

Page 1
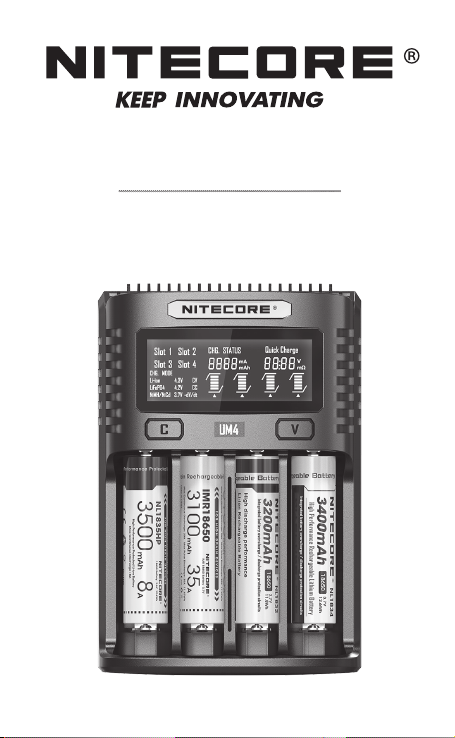
Intelligent USB
UM4
• Automatic and High-Speed Charging
• Real-time Information Display
• Over-Discharged Li-ion Battery Activation
and IMR Battery Restoration
Four-Slot Charger
Page 2
Contents
English
Español
Deutsch
Francais
Русский
日本語
한국어
Italiano
Română
简体中文
IMPORTANT NOTICE CONCERNING WARRANTY
SERVICE
Thank you for purchasing! Before using this charger, please nd your
verication code on the package box, and go to http://charger.nitecore.
com/validation (or scan the QR code beside the verification code to
visit on your mobile phone). Type in your verication code and personal
information as required, and submit the page. After verification,
Nitecore will send you a warranty service email. This email and your
registration email address are essential to your possible warranty
application. Before you complete the warranty service registration, you
cannot enjoy our warranty service for your purchase.
···········································
··········································
·········································
·········································
·········································
10
14
18
·············································
·············································
···········································
·········································
··········································
26
30
34
38
2
6
22
Features
• Intelligent USB Four-Slot Charger
• QC 2.0 input available
• Capable of charging 4 batteries simultaneously and controlling each slot
independently
• Up to 1,500mA charging speed in a single slot
• Compatible with Li-ion and Ni-MH/Ni-Cd batteries with automatic detection
• Automatic detection of battery power level and automatic selection of the
appropriate voltage and charging mode (LiFePO4 and 3.8V Li-ion batteries
excluded)
• Automatic selection between 3 charging modes (CC, CV and -dV/dt)
• Energy-ecient LCD display for real-time charging information
• Capable of manually selecting the charging cut-o voltage and the charging
current
• Automatic detection of large/small capacity batteries and automatic selection
of appropriate charging current
• Automatic termination upon charging completion
• Reverse polarity protection and short circuit protection
• Over-discharged battery activation
• Li-ion battery restoration
• Overtime charging protection
• Automatic detection of battery internal resistance and display of battery health
• Made from durable and re-retardant PC materials
• Optimal heat dissipation design
• Certied by RoHS, CE, FCC and CEC
• Insured worldwide by Ping An Insurance (Group) Company of China, Ltd.
Accessories
USB Charging Cable
Specications
Input: DC 5V/2A 9V/2A
18W (MAX)
Output: 4.35V±1% / 4.2V±1% / 3.7V±1% / 1.48V±1%
QC Mode: 1,500mA*1 (MAX), 1,500mA*2 (MAX), 750mA*4 (MAX)
Compatible with:
IMR/Li-ion/LiFePO4: 10440, 14500, 14650, 16500, 16340(RCR123), 16650,
17350, 17500, 17650, 17670, 17700, 18350, 18490,
18500, 18650, 18700, 20700, 21700, 22500, 22650,
25500, 26500, 26650, 26700
Ni-MH/Ni-Cd: AA, AAA, AAAA, C, D
Dimensions: 159mm×107mm×41mm (6.26”×4.21”×1.61”)
Weight: 232.8g (8.21oz) (Charging cable not included)
Standard Mode: 1,500mA*1 (MAX), 1,000mA*2 (MAX), 500mA*4 (MAX)
-1-
Page 3
(English) UM4 User Manual
Operating Instructions
Connect to power source: connect the UM4 to an external power source (a USB adapter, a computer or other USB
charging devices) via the USB charging cable.
Insert batteries: The UM4 features 4 independently controlled charging slots. Insert batteries of supported types
into each slot according to the polarity marks on the slot. After battery installation, the UM4 begins charging and
presents Battery Health by “Good” or “Poor”, Internal Resistance, Charging Current, Battery Voltage, Charged Volume
and Charging Time on the LCD screen.
Battery Inspection and Error Report: The UM4 has reverse polarity protection and anti-short circuit function. If
there are batteries inserted with polar reversed or short-circuited, the LCD screen of relevant slot will indicate “EE EE”
and the power level display will ash to notify the user of an error.
Smart charging: The UM4 can choose appropriate charging currents based on intelligent detection about battery
types and capacities. Manual charging current selection is also available. The UM4 is compatible with:
1) 3.6V/3.7V Li-ion rechargeable batteries
2) 3.8V Li-ion rechargeable batteries (4.35V±1% when fully charged)
3) 1.2V Ni-MH/Ni-Cd rechargeable batteries
4) 3.2V LiFePO4 batteries
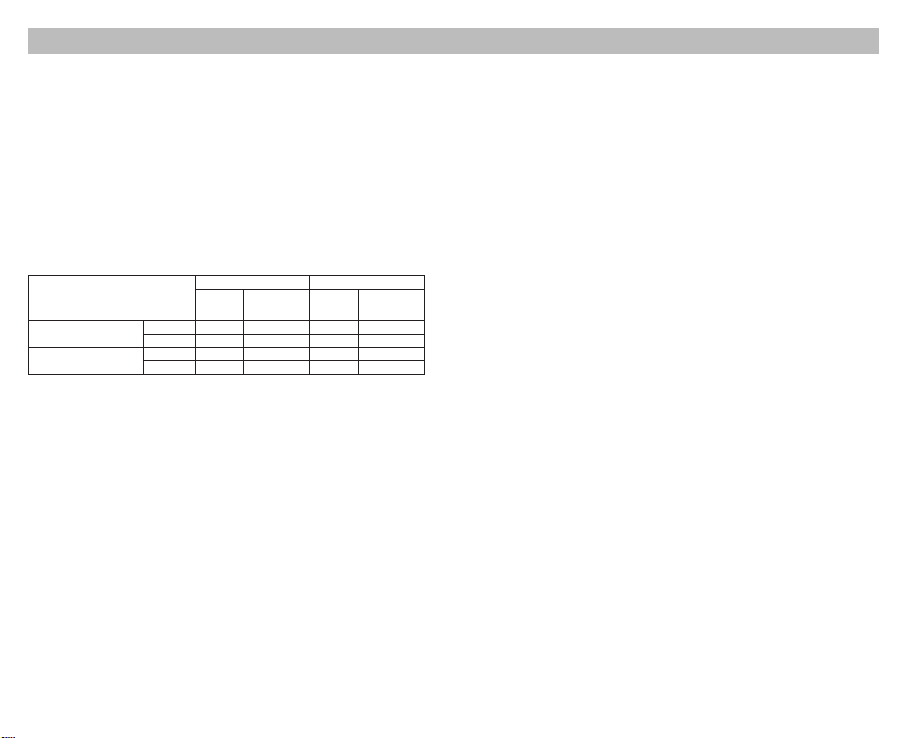
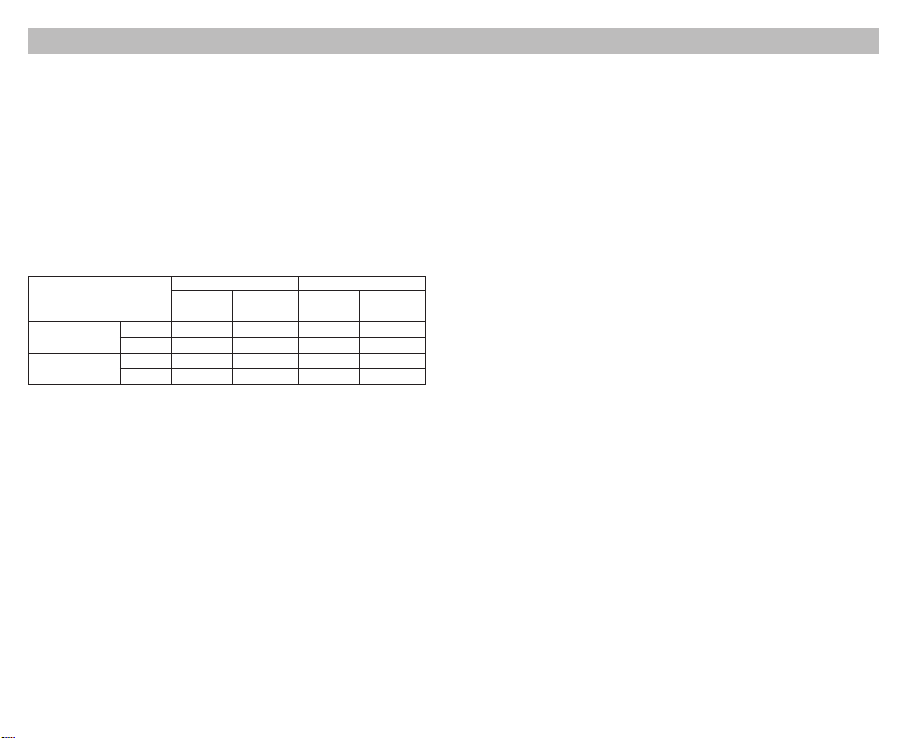
Default Settings
The default settings (not manually congured) for the UM4 are:
Battery Type and Capacity
Li-ion batteries
(4.2V±1% when fully charged)
Ni-MH/Ni-Cd batteries
(1.48V±1% when fully charged)
Note: The UM4 can automatically select charging modes for Ni-MH/Ni-Cd batteries and 3.7V Li-ion batteries. LiFePO4
batteries and 3.8V Li-ion batteries require manual settings on charging cut-o voltages. For the battery whose length
is >60mm (2.4”), the UM4 automatically identies its capacity as >1,200mAh.
Button Operations
During the charging process:
Short press the C button to cycle through the charging status of the 4 slots.
Short press the V button to cycle through Battery Health, Internal Resistance, Charging Current, Battery Voltage,
Charged Volume and Charging time on the LCD screen.
Long press the C button to enter the Charging Setting Mode.
Long press the V button to enter Restoration Mode. (Only eective to over-discharged IMR batteries)
After entering the Charging Setting Mode:
Short press the C button to switch to dierent setting parameters (Charging Current and Cut-O Voltage).
Short press the V button to increase with a 100mA increment each time when setting the Charging Current; or to
switch to dierent battery types and voltage readings when setting the Cut-O Voltage.
Long press the V button to directly access the maximum setting when setting the Charging Current.
Long press the C button to save and exit the Charging Setting Mode.
Note: Perform no action in 10 seconds to exit the Charging Setting Mode without saving and return to the previous
settings.
Charging Voltage Settings
The UM4 is compatible with 3.6V/3.7V Li-ion and Ni-MH/Ni-Cd batteries with automatic detection and adoption of the
suitable charging voltage. For LiFePO4 batteries and 3.8V Li-ion batteries, please follow the steps below for charging
voltage settings:
1. After the battery is inserted and the charging process begins, short press the C button to select the correct slot
and long press the C button to enter Charging Setting Mode.
2. After entering Charging Setting Mode, short press the C button. When the screen shows the ashing text “CHG.
MODE”, short press the V button to select the correct charging voltage (3.7V/4.2V/4.3V).
3. For LiFePO4 batteries, the voltage needs to be set to 3.7V. For 3.8V Li-ion batteries, the voltage needs to be set to
4.3V.
4. When the setting is nalized, long press the C button to save and exit the Charging Setting Mode.
>1,200 mAh 1,000mA 300mA-1,500mA 1,000mA 300mA-1,500mA
<1,200 mAh 500mA 300mA-1,500mA 500mA 300mA-1,500mA
AA/AAA 500mA 300mA-1,500mA 500mA 300mA-1,500mA
C/D 1,000mA 300mA-1,500mA 1,000mA 300mA-1,500mA
Standard Mode QC Mode
Default
Charging
Current
Selectable Range
of Charging
Current
Default
Charging
Current
Selectable Range
of Charging
Current
-2- -3-
Charging Current Settings
Please follow the steps below for charging current settings:
1. After the battery is inserted and the charging process begins, short press the C button to select the correct slot
and long press the C button to enter Charging Setting Mode.
2. After entering Charging Setting Mode, the screen will show the ashing text “CHG. STATUS”. Short press the V
button to increase the charging current with a 100mA increment each time. Long press the V button to directly
access the maximum setting.
3. When the setting is nalized, long press the C button to save and exit the Charging Setting Mode.
Note: When the input power is insucient and a large charging current is set, the charger will automatically adopt
the intelligent current distribution according to the input power.
QC Charging Mode
The UM4 is QC 2.0 input available. When the charger is powered by a QC supportive device or connected to a QC
adapter, the screen will show “Quick Charge” and the single slot max output will achieve 1,500mA.
Automatic Battery Internal Resistance Detection
When the UM4 is on and the battery is installed, it will automatically detect and display the Internal Resistance below
the “CHG. STATUS”. When the Internal Resistance is below 250mΩ, it will show “Good” on the screen. When it is
above 250mΩ, it will show “Poor” on the screen to indicate that the battery should be replaced.
Charged Volume Calculation
During the charging process, the system will automatically calculate and display the Charged Volume below the “CHG.
STATUS”.
Anti-short Circuiting and Reverse Polarity Protection
If there are batteries inserted with polar reversed or short-circuited, the screen will ash to show “EE EE”.
Energy Saving Function
If there is no action to the buttons or batteries in 3 minutes, the screen will automatically go dim to save energy.
Perform any action to light up the screen.
Over-Discharged Li-ion Battery Activation
The UM4 is capable of activating over-discharged Li-ion batteries with a protective circuit. After battery installation,
UM4 will test and activate the battery before charging. When a battery is detected as damaged, the screen will show “EE
EE”.
Over-Discharged IMR Battery Restoration
When an over-discharged IMR battery is inserted, the screen will show “EE EE”. In this case, long press the V button
to enter Restoration Mode. After that, the charging process will continue. The battery should be replaced if it fails to
be restored after several attempts.
NOTE: When attempting to restore an IMR battery, reverse polarity protection is temporarily disabled. Please ensure
batteries are correctly inserted. Failing to do so may result in re or explosion.
Overtime Charging Protection
The UM4 will separately calculate the charging time of each battery. When the charging time exceeds 20 hours in one
slot, it will automatically cease the charging process of this slot and display “END” below the “CHG. STATUS”. This is
to prevent possible overheat or even explosion due to battery quality issue.
Precautions
1. The charger is restricted to charging Li-ion, IMR, LiFePO4, Ni-MH/Ni-Cd rechargeable batteries only. DO NOT use
the charger with other types of batteries as this could result in battery explosion, cracking or leaking, causing
property damage and/or personal injury.
2. Moderate heat from this product is to be expected during the charging process, which is normal.
3. Ambient Temperature of Usage: -10~40℃ (14~104℉); Temperature of Storage: -20~60℃ (-4~140℉)
4. Carefully read all labels on the device to ensure batteries are installed correctly.
5. Please connect this charger to power supplies with the input voltage stated in the specications of the user
manual. If the input voltage is too low or too high, it may lead to malfunctions, or even a re.
6. DO NOT charge batteries if there is any sign of faulty or short circuit.
7. The charger is only to be used by adults above 18 years old. Children under this age must be supervised by an
adult when using the charger.
Page 4
(English) UM4 User Manual
8. DO NOT leave the product unattended while it is connected to a power supply. Unplug the product at any sign of
malfunction.
9. Please make sure the correct program and settings are chosen and set. Incorrect program or setting may damage
the charger, or cause re and explosion.
10. DO NOT attempt to charge primary cells such as Zinc-Carbon, Lithium, CR123A, CR2, or any other unsupported
chemistry due to risk of explosion and re.
11. DO NOT charge a damaged IMR battery as doing so may lead to charger short-circuit or even explosion.
12. DO NOT charge or discharge any battery having evidence of leakage, expansion/swelling, damaged outer wrapper
or case, color-change or distortion.
13. Use the original adapter and cord for power supply. To reduce the risk of damage to the power cord, ALWAYS pull
by the connector rather than the cord. DO NOT operate the charger if it appears damaged in any way.
14. DO NOT expose the device to direct sunlight, heating devices, open ames, or rain and snow environment; avoid
extreme high or extreme low ambient temperatures and sudden temperature changes.
15. Store the device in ventilated areas. DO NOT use the device in moist environment and keep away from any
combustible materials.
16. Avoid any shock or impact to the device.
17. DO NOT place any conductive or metal object in the device to avoid short circuiting and explosions.
18. DO NOT overcharge or over-discharge the batteries. Please recharge the battery as soon as the power runs out.
19. Unplug the device and remove all batteries when it is not in use.
20. DO NOT disassemble or modify the device as doing so will render the product warranty invalid. Please refer to the
warranty section in the manual for complete warranty information.
21. DO NOT misuse in any way! Use for intended purpose and function only.
Disclaimer
This product is globally insured by Ping An Insurance (Group) Company of China, Ltd. NITECORE shall not be
held responsible or liable for any loss, damage or claim of any kind incurred as a result of the failure to obey the
instructions provided in this user manual.
Warranty Details
Our authorized dealers and distributors are responsible for warranty service. Should any problem covered under
warranty occurs, customers can contact their dealers or distributors in regards to their warranty claims, as long as the
product was purchased from an authorized dealer or distributor. NITECORE’s Warranty is provided only for products
purchased from an authorized source. This applies to all NITECORE products. To be qualied for warranty, please refer
to the “IMPORTANT WARRANTY NOTICE” section on top to validate your product.
Any DOA / defective product can be exchanged for a replacement through a local distributor/dealer within the 15
days of purchase. After 15 days, all defective / malfunctioning NITECORE® products can be repaired free of charge
for a period of 12 months (1 year) from the date of purchase. Beyond 12 months (1 year), a limited warranty applies,
covering the cost of labor and maintenance, but not the cost of accessories or replacement parts.
The warranty is nullied if the product(s) is/are:
1. broken down, reconstructed and/or modied by unauthorized parties
2. damaged from wrong operations (i.e. reverse polarity installation, installation of non-rechargeable batteries or
failure to obey the warnings)
3. damaged by batteries leakage.
For the latest information on NITECORE
an email to service@nitecore.com.
※ All images, text and statements specied herein this user manual are for reference purpose only. Should any
discrepancy occur between this manual and information specied on www.nitecore.com, information on our ocial
website shall prevail. SYSMAX Innovations Co., Ltd. reserves the rights to interpret and amend the content of this
document at any time without prior notice.
®
products and services, please contact a local NITECORE® distributor or send
1. Charging Voltage
Lithium-ion (Li-ion) batteries have strict requirement on voltage control. Charging Li-ion batteries with electric voltage
beyond safety standard can lead to battery damage and explosion.
(1) 3.7V Li-ion Batteries / IMR Batteries
3.7V Li-ion batteries are the most common rechargeable Lithium batteries. The skins of these batteries are often
(2) 3.8V Li-ion Batteries
3.8V Li-ion batteries are comparatively rare. It usually has a 3.7V mark on its skin. Normally its seller will inform
(3) 3.2V LiFePO4 Batteries
3.2V LiFePO4 batteries have LiFePO4 and/or 3.2V marks on the skin. Be careful with this type of batteries. Without
2. Charging Current
For all rechargeable Lithium batteries (including Li-ion, IMR and LiFePO4 batteries), we suggest not using current
larger than 1C* for charging. For small capacity batteries, the charging current must be smaller than 1C.
* C=Capacity of a battery. For example, 1C in a 2600mAh rechargeable Lithium battery is 2.6A. 1C in a 3400mAh
rechargeable Lithium battery is 3.4A.
Excessively large charging current will lead to great amount of heat, and consequently battery damage and explosion.
Warning: Our chargers automatically judge and select charging current by the batteries’ length. For some
3. Precautions
(1) DO NOT short circuit the battery in any way.
(2) DO NOT use a 3.7V/3.8V Lithium battery when its voltage is lower than 2.8V, otherwise it can be over-discharged,
(3) We strongly recommend batteries with protective circuit. For batteries without protective circuit (such as IMR
(4) DO NOT discharge a battery with a discharging current larger than its maximum rated current.
4. Long-term Storage
The best storage voltage for 3.7V/3.8V rechargeable Lithium batteries is 3.7V. Voltage too low or too high can damage
your battery during storage. You can discharge a battery to 3.7V, or charge it to 3.7V in a charger before you keep it
in long-term storage.
Safety Instruction for Lithium-ion Batteries
marked with 3.6V/3.7V signs. If our chargers judge that an inserted battery is a Li-ion battery, the battery will be
automatically charged in 4.2V standard charging mode. You do not need extra voltage settings for these types of
batteries.
its buyer that it needs to be charged with 4.35V power. When charging this type of battery, please manually set
the charging voltage to 4.3V, otherwise the charger will charge at 4.2V by default, and cannot provide adequate
charging voltage.
manual setting, our chargers will charge this type of batteries with 4.2V, and will damage or even explode the
battery with excessive charging voltage. You need to manually set the charging voltage to 3.7V for safe charging.
long but small capacity batteries (i.e. 12650, 13650, 14650, 16650), please manually set appropriate
charging current (smaller than 1C).
and/or prone to explosion at next charging.
batteries), please stay alert for over-discharge and short circuit.
Validation code and QR code on package can be veried on NITECORE website.
The charger must be used with NITECORE’s ocial cords. Ocial cords are identied with clearly printed
NITECORE on the plug. During charging, third party cords can cause malfunction, overheat and even re
on the charger. Damages from using unocial cords cannot be covered by ocial warranty.
The charger is restricted to charging Li-ion, IMR, 3.2V LiFePO4, Ni-MH/Ni-Cd rechargeable batteries only.
DO NOT use the charger with other types of batteries as this could result in battery explosion, cracking or
leaking, causing property damage and/or personal injury.
-4- -5-
Page 5
(Español) UM4 Manual de usuario
Instrucciones de operación
Conexión a la fuente de alimentación: Conecte el UM4 a una Fuente de alimentación externa (un adaptador USB,
una computadora o un dispositivo de carga USB) vía el cable de carga USB.
Colocación de baterías: El UM4 tiene 4 bahías de carga controladas de forma independiente. Inserte las baterías
de los tipos soportados en cada bahía de acuerdo con las marcas de polaridad en la bahía. Después de colocar
las baterías, el UM4 comenzará la carga y mostrará el estado de la batería como “Good” o “Poor” (Bueno o malo),
resistencia interna de la batería, corriente de carga, voltaje de la batería, volumen de carga y tiempo de carga en la
pantalla LCD.
Inspección de baterías y reporte de errores: El UM4 tiene protección contra polaridad invertida y contra
cortocircuito. Si hay baterías insertadas con la polaridad invertida o en cortocircuito, la pantalla LCD de la ranura
correspondiente mostrará “EE EE” y el nivel de carga parpadeará para noticar al usuario sobre el error.
Carga inteligente: El UM4 puede elegir la corriente de carga adecuada basado en la detección inteligente de los
tipos y capacidades de las baterías. También está disponible la selección manual de la corriente de carga. El UM4 es
compatible con:
1) Baterías Li-ion 3.6V/3.7V recargables
2) Baterías Li-ion 3.8V recargables (4.35V±1% cuando está completamente cargada)
3) Baterías Ni-MH/Ni-Cd 1.2V recargables
4) Baterías 3.2V LiFePO4
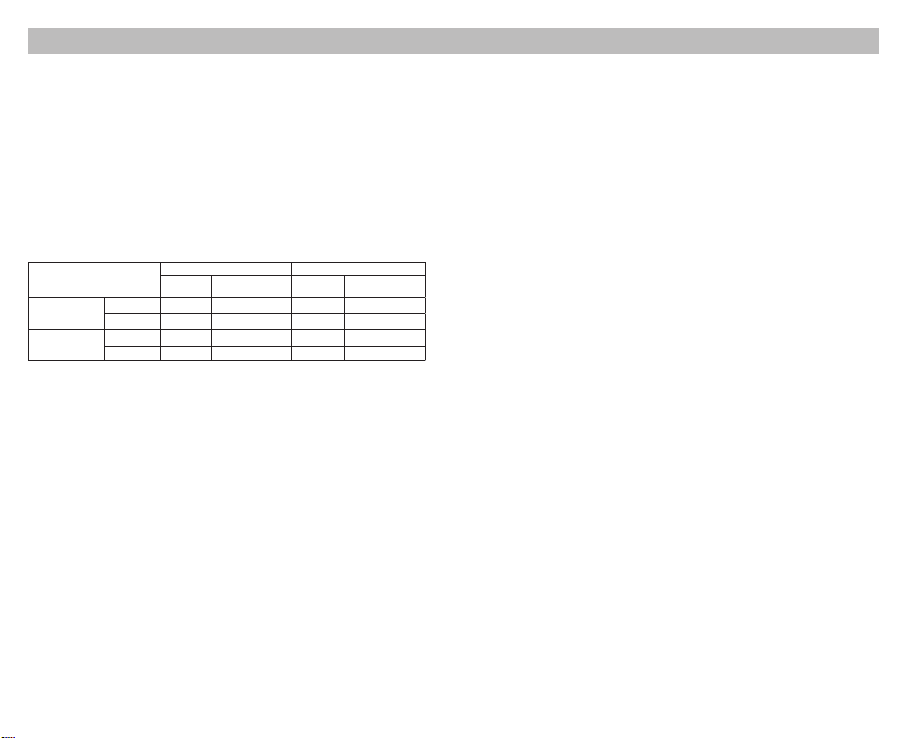
Ajustes predeterminados
Los ajustes predeterminados (no congurados manualmente) para el UM4 son:
Tipo de batería y capacidad
Baterías Li-ion
(4.2V±1% cuando está
completamente cargada)
Baterías Ni-MH/Ni-Cd
(1.48V±1% cuando está
completamente cargada)
Nota: El UM4 puede seleccionar automáticamente el modo de carga para baterías Ni-MH/Ni-Cd y baterías Li-ion
3.7V. Baterías LiFePO4 y Li-ion 3.8V Li-ion requieren ajuste manual en el voltaje de corte de carga. Para baterías cuya
longitud es >60mm (2.4”), el UM4 identica automáticamente su capacidad como >1,200mAh.
Operación de los botones
Durante el proceso de carga:
Presione brevemente el botón C para cambiar entre el estado de carga de las 4 ranuras.
Presione brevemente el botón V para cambiar entre estado de la batería, resistencia interna, corriente de carga,
voltaje de la batería, volumen cargado y tiempo de carga en la pantalla LCD.
Mantenga presionado el botón C para entrar al modo de conguración de carga.
Mantenga presionado el botón V para entrar al modo de restauración (Efectivo sólo para baterías IMR sobre
descargadas)
Después de entrar en el modo de ajuste de carga:
Presione brevemente el botón C para cambiar entre los diferentes parámetros de ajuste (Corriente de carga y Voltaje
de desconexión).
Presione brevemente el botón V para aumentar en 100mA cada vez que ajuste la corriente de carga; o para cambiar
entre distintos tipos de baterías y lecturas de voltaje cuando ajuste el voltaje de desconexión.
Mantenga presionado el botón V para entrar directamente a la conguración máxima cuando ajuste la corriente de
carga.
Mantenga presionado el botón C para guardar y salir del modo de conguración de carga.
Nota: No realice ninguna acción por 10 segundos para salir del modo de conguración de carga sin guardar y
regresar a los ajustes previos.
Conguracióndelvoltajedecarga
El UM4 es compatible con baterías Li-ion y Ni-MH/Ni-Cd de 3.6V/3.7V, detecta automáticamente y adopta el voltaje de
carga adecuado. Para baterías LiFePO4 y baterías Li-ion de 3.8V, por favor siga los pasos a continuación mencionados
para ajustar el voltaje de carga:
1. Después de insertar la batería y comenzar el proceso de carga, presione brevemente el botón C para seleccionar
la bahía correcta y mantenga presionado el botón C para entrar al modo de ajustes de carga.
>1,200 mAh 1,000mA 300mA-1,500mA 1,000mA 300mA-1,500mA
<1,200 mAh 500mA 300mA-1,500mA 500mA 300mA-1,500mA
AA/AAA 500mA 300mA-1,500mA 500mA 300mA-1,500mA
C/D 1,000mA 300mA-1,500mA 1,000mA 300mA-1,500mA
Modo estándar Modo QC
Corriente
de carga
predeterminada
Rango
seleccionable de
corriente de carga
Corriente
de carga
predeterminada
Rango
seleccionable de
corriente de carga
-6- -7-
2. Después de entrar en el modo de ajustes de carga, pulse brevemente el botón C. Cuando la pantalla muestra
el texto intermitente "CHG. MODE", pulse brevemente el botón V para seleccionar el voltaje de carga correcto
(3,7V/4,2V/4,3V).
3. Para las baterías LiFePO4, el voltaje necesita ser ajustado a 3.7V. Para las baterías Li-ion de 3,8 V, el voltaje debe
ajustarse a 4,3 V.
4. Cuando nalice la conguración, mantenga presionado el botón C para guardar y salir del modo de ajustes de
carga.
Conguracióndelacorrientedecarga
Por favor siga los pasos a continuación mencionados para ajustar la corriente de carga:
1. Después de insertar la batería y comenzar el proceso de carga, presione brevemente el botón C para seleccionar
la bahía correcta y mantenga presionado el botón C para entrar al modo de ajustes de carga.
2. Después de entrar en el modo de ajustes de carga, la pantalla mostrará el texto intermitente "CHG. STATUS".
Presione brevemente el botón V para aumentar la corriente de carga en 100 mA cada vez. Mantenga presionado
el botón V para acceder directamente a la conguración máxima.
3. Cuando termine la conguración, mantenga presionado el botón C para guardar y salir del modo de ajustes de
carga.
Nota:
Cuando la potencia de entrada es insuciente y una corriente de carga alta es seleccionada, el cargador
automáticamente adoptará la distribución inteligente de corriente de acuerdo a la potencia de entrada.
Modo de carga QC
El UM4 tiene una entrada QC 2.0 disponible. Cuando el cargador es alimentado por un dispositivo soportado por QC o
conectado a un adaptador QC, la pantalla mostrará “Quick Charge” y la salida máxima de una bahía alcanzará 1,500mA.
Detección automática de la resistencia interna de la batería
Cuando el UM4 está encendido y la batería instalada, detectará automáticamente y mostrará la resistencia interna
debajo de “CHG. STATUS”. Cuando la Resistencia interna es menor a 250mΩ, mostrará “Good” en la pantalla. Cuando
es superior a 250mΩ, mostrará “Poor” en la pantalla para indicar que la batería debe ser reemplazada.
Cálculo del volumen de carga
Durante el proceso de carga, el sistema calculará y mostrará automáticamente el volumen cargado debajo de “CHG.
STATUS”.
Protección anti-cortocircuito y protección contra polaridad
invertida
Si hay baterías insertadas con la polaridad invertida o en cortocircuito, la pantalla parpadeará y mostrará “EE EE”.
Función de ahorro de energía
Si no hay accionamiento de los botones o instalación de baterías en 3 minutos, la pantalla automáticamente se
obscurecerá para ahorrar energía. Realice cualquier acción para encender la pantalla.
Activación de baterías Li-ion sobre descargadas
El UM4 es capaz de activar baterías Li-ion sobre descargadas con circuito de protección. Después de instalar la
batería, el UM4 automáticamente probará y activará la batería antes de cargarla. Cuando detecta que una batería está
dañada, la pantalla mostrará “EE EE”.
Activación de baterías IMR sobre descargadas
Cuando una batería IMR sobre descargada es insertada, la pantalla mostrará “EE EE”. En este caso, mantenga
presionado el botón V para entrar al modo de restauración. Después de esto, el proceso de carga continuará. La
batería deberá ser reemplazada si la restauración falla después de varios intentos.
NOTA: Cuando intente restaurar una batería IMR, la protección contra polaridad invertida estará temporalmente
deshabilitada. Por favor asegúrese que las baterías están correctamente instaladas. De lo contrario podría producirse
un incendio o una explosión.
Protección contra sobretiempo de carga
El UM4 calculará separadamente el tiempo de carga de cada batería. Cuando el tiempo de carga exceda 20 horas en
una bahía, esta automáticamente detendrá el proceso de carga y mostrará “END” debajo de “CHG. STATUS”. Esto es
para evitar un posible sobrecalentamiento o incluso una explosión debido a problemas de calidad de las baterías.
Page 6
(Español) UM4 Manual de usuario
Precauciones
1. El cargador está restringido para cargar sólo baterías recargables Li-ion, IMR, LiFePO4, Ni-MH/Ni-Cd. NO utilice el
cargador con otro tipo de baterías ya que podría provocar una explosión de la batería, rotura o fuga de la batería,
causando daño a la propiedad y/o lesiones personales.
2. Es normal esperar un calentamiento moderado de este producto durante el proceso de carga.
3. Temperatura ambiente de uso: -10~40℃ (14~104℉); Temperatura de almacenamiento: -20~60℃ (-4~140℉)
4. Lea cuidadosamente todas las indicaciones en el dispositivo para asegurar que las baterías están instaladas
correctamente.
5. Por favor conecte el cargador a fuentes de alimentación con el voltaje de entrada especicado en el manual de
usuario. Si el voltaje de entrada es muy bajo o muy alto, puede provocar un mal funcionamiento, o incluso un
incendio.
6. NO cargue las baterías si hay signos de falla o corto circuito.
7. El cargador solo debe ser utilizado por mayores de 18 años. Los menores de edad deben ser supervisados por un
adulto cuando utilicen el cargador.
8. NO deje el producto desatendido cuando está conectado a una fuente de alimentación. Desconecte el product
ante cualquier signo de mal funcionamiento.
9. Por favor asegúrese de seleccionar el programa y conguración correctos. Un programa o una conguración
incorrecta pueden dañar el cargador, o causar un incendio o explosión.
10. NO intente cargar celdas primarias como Zinc-Carbón, Litio, CR123A, CR2, o cualquier otra química no soportada
debido al riesgo de explosión e incendio.
11. NO cargue baterías IMR dañadas, hacerlo puede provocar un corto circuito en el cargador o incluso una explosión,
12. NO cargue o descargue cualquier batería con evidencia de fuga, expansión/hinchazón, daño en la envoltura o
cuerpo, cambio de coloración o distorsión.
13. Utilice el adaptador y cable de alimentación originales. Para reducir el riesgo de daño al cable de alimentación,
SIEMPRE jale del conector en vez de jalar del cable. NO utilice el cargador si aparenta estar dañado en cualquier
forma.
14. NO exponga el dispositivo a la luz directa del sol, dispositivos de calefacción, amas, y ambientes con Lluvia
o nieve; evite temperaturas ambientes extremadamente altas o extremadamente bajas y cambios bruscos de
temperatura.
15. Almacene el dispositivo en áreas bien ventiladas. NO utilice el dispositivo en ambientes húmedos y manténgalo
alejado de materiales combustibles.
16. Evite cualquier golpe o impacto al dispositivo.
17. NO coloque ningún objeto conductor o metálico en el dispositivo para evitar corto circuito o explosiones.
18. NO sobrecargue o sobre descargue las baterías. Por favor recargue las baterías tan pronto como se acabe la
energía.
19. Desconecte el dispositivo y remueva todas las baterías cuando no esté en uso.
20. NO desarme o modique el dispositivo, ya que esto invalidará la garantía. Por favor consulte la sección de garantía
en el manual para información completa de la garantía.
21. ¡NO haga uso indebido de ninguna manera! Utilice sólo para el uso y la función previstos.
Renuncia de responsabilidad
Este producto está mundialmente asegurado por by Ping An Insurance (Group) Company of China, Ltd. NITECORE
no será responsable de ninguna pérdida, daño o reclamación de cualquier tipo incurrida como resultado del
incumplimiento de las instrucciones proporcionadas en este manual de usuario
Detalles de garantía
Nuestros distribuidores autorizados son responsables del servicio de garantía. Si se presenta un problema cubierto
bajo esta garantía, los clientes pueden ponerse en contacto con sus distribuidores respecto a sus reclamaciones de
garantía, siempre y cuando el producto se haya adquirido de un distribuidor autorizado. La garantía de NITECORE
sólo es válida para productos adquiridos de una fuente autorizada. Esto es válido para todos los productos NITECORE.
Para calicar para la garantía, por favor reérase a la sección "IMPORTANTE, AVISO DE GARANTÍA "sección arriba de
validar su producto.
Todo producto DOA / defectuoso puede ser reemplazado por medio de un distribuidor local en los primeros 15 días
después de la compra. Después de 15 días todos los productos NITECORE® defectuosos / con fallas pueden ser
reparados libre de costo durante un periodo de 12 meses (1 año) a partir de la fecha de adquisición. Después de los
12 meses (1 año) aplicará una garantía limitada, que cubre el costo de mano de obra y mantenimiento, más no el
costo de accesorios o recambio de piezas.
La garantía se invalidará si el(los) producto(s) está(n):
1. Roto(s), reconstruido(s) y/o modicado(s) por partes no autorizadas
2. Dañado(s) por mal uso/operación (por ejemplo, instalación con la polaridad invertida, instalación de baterías no
recargables o incumplimiento de las advertencias)
3. Dañados por fuga de baterías.
Para la información más reciente sobre productos y servicios de NITECORE
distribuidor local de NITECORE® o envíe un correo electrónico a service@nitecore.com
-8- -9-
®
favor de ponerse en contacto con un
※ Todas las imágenes, textos y declaraciones que se especican en este manual de usuario sólo sirven para nes de
referencia. En caso de que ocurra cualquier discrepancia entre este manual y la información especicada en www.
nitecore.com, la información en nuestro sitio web ocial prevalecerá. SYSMAX Innovations Co., Ltd. se reserva
el derecho de interpretar y complementar el contenido de este documento en cualquier momento sin previa
noticación.
El código de validación y el código QR en el paquete pueden ser vericados en el sitio web de Nitecore.
Instrucciones de seguridad para baterías de iones de litio
1. Voltaje de carga
Las baterías de iones de litio (Li-ion) tienen requisitos estrictos en el control de voltaje. Cargar baterías Li-ion con
un voltaje eléctrico superior al estándar de seguridad puede provocar daños en la batería y explosión.
(1) Baterías Li-ion 3.7V / Baterías IMR
Las baterías Li-ion 3.7V son las baterías recargables más comunes. Las etiquetas de estas baterías suelen
estar marcadas con marcas de 3.6V/3.7V. Si nuestro cargador juzga que la batería instalada es una batería Liion, la batería automáticamente será carga en modo estándar 4.2V. No necesita hacer ajustes adicionales en
el voltaje para este tipo de baterías.
(2) Baterías Li-ion 3.8V
Las baterías Li-ion 3.8V son relativamente poco comunes. Normalmente tienen una marca de 3.7V en la
etiqueta. Normalmente el vendedor le informará al comprador que necesita ser cargada con una potencia de
4.35V. Cuando cargue este tipo de baterías, por favor seleccione manualmente el voltaje de carga a 4.3V, de
lo contrario el cargador cargará a 4.2V de forma predeterminada, y no proveerá el voltaje de carga adecuado.
(3) Baterías LiFePO4 3.2V
Las baterías LiFePO4 3.2V tienen marcas LiFePO4 y/o 3.2V en la etiqueta. Tenga cuidado con este tipo de
baterías. Sin selección manual, nuestros cargadores cargarán este tipo de baterías con 4.2V, y dañarán o
incluso podrían explotar las baterías por voltaje de carga excesivo. Necesita seleccionar manualmente el
voltaje de carga a 3.7V para una carga segura.
2. Corriente de carga
Para todas las baterías de litio recargables (incluidas las baterías Li-ion, IMR y LiFePO4), recomendamos no usar
corrientes mayores a 1C* para la carga. Para baterías de baja capacidad, la corriente de carga debe ser menor a
1C.
*C=Capacidad de la batería. Por ejemplo, 1C en una batería recargable de litio de 2600mAh es 2.4A. 1C en una
batería de litio recargable de 3400mAh es 3.4A.
Una corriente de carga excesivamente grande provocará una gran cantidad de calor, y consecuentemente daño en
la batería y explosión.
Advertencia: Nuestros cargadores automáticamente juzgan y seleccionan la corriente de carga por el largo de las
baterías. Para algunas baterías largas, pero de baja capacidad (por ejemplo, 12650, 13650, 14650, 16650), por favor
seleccione manualmente la corriente de carga adecuada (menor a 1C).
3. Precauciones
(1) NO provoque un corto circuito en la batería en cualquier forma.
(2) NO utilice una batería de litio 3.7V/3.8V cuando su voltaje sea menor a 2.8V, ya que puede sobre descargarse,
y/o ser propensa a explotar en la siguiente carga.
(3) Recomendamos ampliamente baterías con circuito de protección. En el caso de baterías sin circuito de
protección (como las baterías IMR), por favor esté alerta de no sobre descargarlas y cortocircuito.
(4) NO descargue una batería con una corriente de descarga mayor a su máxima corriente nominal.
4. Almacenamiento a largo plazo
El mejor voltaje de almacenamiento para baterías de litio recargables 3.7V/3.8V es de 3.7V. Voltajes muy bajos o
muy altos pueden dañar la batería durante el almacenamiento. Puede descargar la batería a 3.7V, o cargarla a 3.7V
en un cargador antes de almacenarla por largos periodos de tiempo.
El código de validación y el código QR en el paquete pueden ser vericados en el sitio web de Nitecore.
El cargador debe utilizarse con los cables ociales de NITECORE. Los cables ociales se pueden
identicar con la palabra NITECORE clara mente impresa en el enchufe. Durante la carga, los cables de
terceros pueden causar un mal funcionamiento, calentamiento e incluso fuego en el cargador. Daños
causados por utilizar cables no ociales no serán cubiertos por la garantía ocial. El cargador está
restringido a cargar sólo baterías Li-ion, IMR, 3.2V LiFePO4, Ni-MH/Ni-Cd recargables. NO utilice el
cargador con otros tipos de baterías ya que puede resultar en explosión de las baterías, ruptura o fugas,
causando daño a la propiedad y/o lesiones personales.
Page 7
(Deutsch) UM4 Benutzerhandbuch
Bedienungsanleitung
Anschließen an eine Stromquelle: Schließen Sie das UM4 über das USB-Ladekabel an eine externe Stromquelle
(einen USB-Adapter, einen Computer oder andere USB-Ladegeräte) an.
Einsetzen der Akkus: Das UM4 verfügt über 4 unabhängig voneinander gesteuerte Ladeschächte. Legen Sie die
Akkus der unterstützten Typen entsprechend den Polaritätsmarkierungen in den Ladeschacht ein. Nach dem Einsetzen
der Akkus beginnt das UM4 zu laden und zeigt Ladestrom, Batteriespannung, geladene Kapazität und Ladezeit auf
dem LCD-Display an.
Akkuprüfung und Fehlermeldung: Das UM4 hat einen Verpolungsschutz und eine Kurzschluss-Schutzfunktion.
Wenn Akkus eingelegt werden, deren Polarität verkehrt ist oder Akkus, die kurzgeschlossen sind, zeigt das LCDDisplay des betreenden Ladeschachts "EE EE" an und die Leistungsanzeige blinkt.
Intelligentes Laden: Das UM4 kann anhand intelligenter Erkennung von Akkutypen und Kapazitäten geeignete
Ladeströme auswählen. Die manuelle Ladestromauswahl ist ebenfalls verfügbar. Das UM4 ist kompatibel mit:
1) 3,6V / 3,7V Lithium-Ionen-Akkus
2) 3,8 V Li-Ionen-Akkus (4,35 V ± 1% bei voller Ladung)
3) 1,2 V Ni-MH/Ni-Cd-Akku
4) 3,2V LiFePO4 Batterien
Standard Einstellungen des UM4
Akku Typ und Kapazität
Li-Ionen Akkus
(4,2V ± 1%, wenn
voll geladen)
Ni-MH/Ni-Cd Akkus
(1,48V ± 1%, wenn
voll geladen)
Hinweis: Das UM4 kann automatisch die Lademodi für Ni-MH/Ni-Cd-Akkus und 3,7V Li-Ionen-Akkus auswählen.
LiFePO4-Batterien und 3,8V Li-Ionen-Akkus erfordern manuelle Einstellungen der Ladeschlussspannungen. Bei einem
Akku mit einer Länge von > 60mm erkennt das UM4 automatisch eine Kapazität von > 1200mAh.
Tastenfunktionen
Während des Ladevorgangs
Drücken Sie kurz die C-Taste, um den Ladestatus der 4 Ladeschächte anzuzeigen.
Drücken Sie kurz die V-Taste, um auf dem LCD-Display zwischen Ladestrom, Batteriespannung, Ladekapazität und
Ladezeit zu wechseln.
Drücken Sie lange auf die C-Taste, um in den Modus für die Ladeeinstellung zu gelangen.
Drücken Sie lange die V-Taste, um in den Reaktivierungs-Mode zu gelangen. (Nur wirksam bei tiefentladenen IMRAkkus.)
Nach dem Aufrufen des Lademodus
Drücken Sie kurz die C-Taste, um zu verschiedenen Einstellparametern (Ladestrom und Ladeschlussspannung) zu
wechseln.
Drücken Sie kurz die V-Taste, um jedes Mal um 100 mA zu erhöhen, wenn Sie den Ladestrom einstellen. Wenn Sie die
Ladeschlussspannung einstellen, wechseln Sie so zwischen den Akkutypen und den Spannungswerten.
Halten Sie die Taste V gedrückt, um beim Einstellen des Ladestroms direkt auf die maximale Einstellung zuzugreifen.
Drücken Sie lange auf die C-Taste, um den Ladeeinstellungsmodus zu speichern und zu beenden.
Hinweis: Wenn Sie innerhalb von 10 Sekunden keine Aktion ausführen, wird der Ladeeinstellungsmodus ohne
Speichern verlassen und zu den vorherigen Einstellungen zurückgekehrt.
Ladespannung manuell einstellen
Das UM4 ist kompatibel mit 3,6V / 3,7V Li-Ionen- und Ni-MH-/Ni-Cd-Akkus mit automatischer Erkennung und
Übernahme der passenden Ladespannung. Für LiFePO4-Akkus und 3,8V Li-Ionen-Akkus folgen Sie bitte den
nachstehenden Schritten für die Ladespannungs-Einstellungen:
1. Nachdem der Akku eingelegt ist und der Ladevorgang beginnt, drücken Sie kurz die C-Taste, um den richtigen
Ladeschacht auszuwählen. Drücken Sie lange die C-Taste, um den Ladeeinstellmodus aufzurufen.
2. Drücken Sie nach dem Aufrufen des Ladeeinstellungsmodus kurz die C-Taste. Wenn das Display den blinkenden
Text "CHG. MODE" anzeigt, drücken Sie kurz die Taste V, um die richtige Ladespannung (3,7V / 4,2V / 4,3V)
auszuwählen.
3. Bei LiFePO4-Akkus muss die Spannung auf 3,7V eingestellt werden. Bei 3,8V Li-Ionen-Akkus muss die Spannung
auf 4,3V eingestellt werden.
> 1200 mAh 1000mA 300 mA - 1500 mA 1000 mA 300 mA - 1500 mA
< 1200 mAh 500mA 300 mA - 1500 mA 500 mA 300 mA - 1500 mA
AA/AAA 500mA 300 mA - 1500 mA 500 mA 300 mA - 1500 mA
C/D 1000mA 300 mA - 1500 mA 1000 mA 300 mA - 1500 mA
(NICHT manuell eingestellt/verändert!)
Standard Mode QC Mode
Standard
Ladestrom
Manuelle
Einstellmöglichkeiten
Standard
Ladestrom
Manuelle
Einstellmöglichkeiten
-10- -11-
4. Wenn die Einstellung abgeschlossen ist, drücken Sie lange die C-Taste, um zu speichern und den
Ladeeinstellungsmodus zu beenden.
Ladestrom manuell einstellen
Befolgen Sie bitte die folgenden Schritte, um den Ladestrom einzustellen:
1. Nachdem der Akku eingelegt ist und der Ladevorgang beginnt, drücken Sie kurz die C-Taste, um den richtigen
Ladeschacht auszuwählen. Drücken Sie lange die C-Taste, um den Ladeeinstellmodus aufzurufen.
2. Nach dem Aufrufen des Ladeeinstellmodus wird auf dem Display der blinkende Text "CHG.STATUS" angezeigt.
Drücken Sie kurz die Taste V, um den Ladestrom jedes Mal um 100 mA zu erhöhen. Drücken Sie lange auf die
V-Taste, um direkt auf die maximale Einstellung zuzugreifen.
3. Wenn die Einstellung abgeschlossen ist, drücken Sie lange auf die C-Taste, um den Ladeeinstellungsmodus zu
speichern und zu beenden.
Hinweis: Wenn die Eingangsleistung nicht ausreicht und ein großer Ladestrom eingestellt ist, übernimmt das
Ladegerät automatisch die intelligente Stromverteilung entsprechend der Eingangsleistung.
QC Lademodus
Der UM4 ist QC 2.0 kompatibel. Wenn das Ladegerät an ein QC-unterstützendes Gerät oder an einen QC-Adapter
angeschlossen wird, zeigt das Display "Quick Charge" an und der maximale Ausgang des Einzel-Ladeschacht erreicht
1500 mA.
Automatische Akku-Innenwiderstandserkennung
Wenn das UM4 eingeschaltet und der Akku eingesetzt ist, erkennt es automatisch den internen Widerstand und zeigt
dies unterhalb von "CHG. STATUS" auf dem Display an. Wenn der interne Widerstand unter 250mΩ liegt, wird auf
dem Display "Good" angezeigt. Wenn der Wert über 250mΩ liegt, wird auf dem Bildschirm "Poor" angezeigt, um
anzuzeigen, dass der Akku ersetzt werden muss.
Berechnung der geladenen Kapazität
Während des Ladevorgangs berechnet das System automatisch die geladene Kapazität und zeigt dies auf dem Display
unterhalb von "CHG. STATUS" an.
Anti-Kurzschluss- und Verpolungsschutz
Wenn Akkus eingelegt sind, deren Polarität verkehrt ist oder die kurzgeschlossen sind, blinkt das Display und zeigt "EE
EE" an.
Energiesparfunktion
Wenn die Tasten oder Akkus innerhalb von 3 Minuten nicht aktiviert wurden, wird das Display automatisch dunkel, um
Energie zu sparen. Führen Sie eine Aktion durch, um das Display wieder zu aktivieren.
Tiefentladene Li-Ionen-Akku-Reaktivierung
Das UM4 kann tiefentladene Li-Ionen-Akkus mit Schutzschaltung reaktivieren. Nach dem Einsetzen des Akkus testet und
aktiviert das UM4 den Akku vor dem Laden. Wenn ein Akku als beschädigt erkannt wird, zeigt das Display "EE EE" an.
Tiefentladene IMR-Akku-Reaktivierung
Wenn ein tiefentladener IMR-Akku eingesetzt wurde, zeigt das Display "EE EE" an. In diesem Fall drücken Sie lange
die V-Taste, um in den Reaktivierungsmodus zu gelangen. Danach wird der Ladevorgang fortgesetzt. Der Akku sollte
ersetzt werden, wenn er nach mehreren Versuchen nicht reaktiviert werden kann.
HINWEIS: Beim Versuch einen IMR-Akku wiederherzustellen, ist der Verpolungsschutz vorübergehend deaktiviert.
Bitte stellen Sie sicher, dass die Akkus richtig eingelegt sind. Anderenfalls kann es zu einem Brand oder einer Explosion
kommen.
Zeitgesteuerter Überladeschutz
Das UM4 berechnet separat die Ladezeit jedes Akkus. Wenn die Ladezeit 20 Stunden in einem Ladeschacht
überschreitet, wird automatisch der Ladevorgang dieses Ladeschachts beendet und im Display wird "END" unterhalb
von "CHG.STATUS" angezeigt. Dies dient dazu, eine Überhitzung oder sogar eine Explosion aufgrund von Problemen
mit der Akkuqualität zu verhindern.
Sicherheitshinweise
1. Das UM4 darf nur zum Laden von wiederauadbaren Li-Ionen-, IMR- LiFePO4-, Ni-MH/Ni-Cd-Akkus verwendet
werden. Die Verwendung des UM4 mit anderen Akkutypen kann zur Explosion, zum Bruch oder zum Auslaufen des
Akkus und in Folge dessen zu Sach- und/oder Personenschäden führen.
Page 8

(Deutsch) UM4 Benutzerhandbuch
2. Während des Ladevorgangs entsteht mäßige Wärme am UM4. Dies ist normal.
3. Die Betriebstemperatur des UM4-Laders liegt zwischen -10° C und +40°C, die sichere Lagerungstemperatur liegt
zwischen -20°C und 60°C.
4. Lesen Sie sorgfältig alle Hinweise auf dem Gerät, um sicherzustellen, dass die Akkus korrekt eingesetzt sind.
5. Bitte schließen Sie dieses Ladegerät nur an Netzteile mit den im Benutzerhandbuchs angegebenen
Eingangsspannungen an. Wenn die Eingangsspannung zu niedrig oder zu hoch ist, kann dies zu Fehlfunktionen
oder sogar zu einem Brand führen.
6. Laden Sie die Batterien NICHT, wenn Anzeichen eines Defekts oder eines Kurzschlusses vorliegen.
7. Das Ladegerät darf nur von Erwachsenen über 18 Jahren benutzt werden. Kinder unter diesem Alter müssen von
einem Erwachsenen beaufsichtigt werden, wenn sie das Ladegerät benutzen.
8. Lassen Sie das Ladegerät NICHT unbeaufsichtigt, während es an eine Stromversorgung angeschlossen ist.
Trennen Sie das Ladegerät von der Stromquelle bei Anzeichen von Fehlfunktionen.
9. Bitte stellen Sie sicher, dass das richtige Programm und die korrekten Einstellungen ausgewählt und eingestellt
sind. Falsche Programme oder Einstellungen können das Ladegerät beschädigen oder Feuer und Explosionen
verursachen.
10. Versuchen Sie NICHT, Primärzellen wie Zink-Kohle, Lithium, CR123A, CR2 oder andere nicht unterstützte
Chemikalien aufzuladen, da dies zu Explosions- und Brandgefahr führen kann.
11. Laden Sie einen beschädigten IMR-Akku NICHT auf, da dies zum Kurzschluss oder sogar zur Explosion des
Ladegeräts führen kann.
12. Laden oder entladen Sie KEINE Akkus mit Anzeichen von Lecks, Ausdehnung / Schwellung, beschädigter
Außenhülle, Farbveränderung oder Verzerrung.
13. Verwenden Sie immer den Originaladapter und das Netzkabel zur Stromversorgung. Um das Risiko einer
Beschädigung des Netzkabels zu verringern, ziehen Sie IMMER am Stecker und nicht am Kabel. Betreiben Sie das
Ladegerät NICHT, wenn es in irgendeiner Weise beschädigt ist.
14. Setzen Sie das Gerät NICHT direktem Sonnenlicht, Heizgeräten, oenen Flammen oder Regen und
Schnee aus. Vermeiden Sie extrem hohe oder extrem niedrige Umgebungstemperaturen und plötzliche
Temperaturschwankungen.
15. Lagern Sie das Gerät in belüfteten Bereichen. Verwenden Sie das Gerät NICHT in feuchter Umgebung und halten
Sie es von brennbaren Materialien fern.
16. Vermeiden Sie Stöße oder Schläge auf das Gerät.
17. Legen Sie KEINE leitfähigen oder metallischen Gegenstände in das Gerät, um Kurzschlüsse und Explosionen zu
vermeiden.
18. Überladen oder tiefentladen Sie die Akkus NICHT. Bitte laden Sie den Akku, sobald er entladen ist.
19. Ziehen Sie den Netzstecker aus der Steckdose und entfernen Sie alle Akkus, wenn das Gerät nicht benutzt wird.
20. Zerlegen oder modizieren Sie das Gerät NICHT, da dies die Produktgarantie erlöschen lässt. Bitte beachten Sie
die Garantiebestimmungen in der Bedienungsanleitung für vollständige Garantieinformationen.
21. Missbrauchen Sie das Ladegerät NICHT in irgendeiner Weise! Verwenden Sie es nur für den beabsichtigten Zweck
und die vorgesehene Funktion.
Haftungsausschluss
Dieses Produkt ist weltweit von Ping An Insurance (Group) Company of China, Ltd. versichert. Nitecore haftet
nicht für Verluste, Schäden oder Ansprüche jeglicher Art, die aufgrund der Nichtbeachtung der hier in diesem
Benutzerhandbuch beschriebenen Anweisungen entstanden sind.
Garantiebedingungen
Alle NITECORE® Produkte genießen einen umfassenden Garantieschutz.
Bei einer Fehlfunktion des NITECORE® UM4 Ladegeräts kann das Gerät über einen autorisierten Vertriebshändler/
Händler innerhalb der ersten 15 Tagen nach Erwerb, unter Vorlage des Kaufbelegs, durch den Endverbraucher
getauscht werden. Nach 15 Tagen und bis zum Ablauf von 12 Monaten kann das UM4 zum Zwecke der Reparatur
zu einem autorisierten Vertriebshändler/Händler geschickt werden. Über 12 Monate hinaus deckt die Garantie die
Arbeitskosten, jedoch nicht die Kosten für Zubehör- oder Ersatzteile. Der Garantieanspruch erlischt beim Eintritt
folgender Umstände:
1. Der Artikel wurde durch konstruktive Veränderungen beschädigt oder modiziert.
2. Der Artikel wurde durch unsachgemäßen Gebrauch beschädigt.
3. Der Artikel wurde durch auslaufende Batterien beschädigt.
Für weitere Details der NITECORE
oder senden Sie eine E-Mail an service@nitecore.com
HINWEIS: Die ozielle Website von NITECORE
Allgemeine Hinweise
Altbatterien gehören nicht in den Hausmüll. Sie können gebrauchte Batterien unentgeltlich an unser Versandlager
zurückgeben. Als Verbraucher sind Sie zur Rückgabe von Altbatterien gesetzlich verpichtet.
®
Garantie-Bedingungen kontaktieren Sie bitte einen regionalen Vertrieb/Händler
®
gilt im Falle von geänderten Produktdaten als maßgebend.
1. Ladespannung
Lithium-Ionen (Li-Ionen) Akkus unterliegen strengen Anforderung an die Spannungsregelung. Das Laden von Li-
Ionen-Akkus mit elektrischer Spannung über dem Sicherheitslevel kann zu Akkuschäden und zur Explosion führen.
(1) 3,7V Li-Ionen-Akkus / IMR-Akkus
3,7V Li-Ionen-Akkus sind die häugsten wiederauadbaren Lithium-Akkus. Die Außenseiten dieser Akkus sind
(2) 3,8V Li-Ionen-Akkus
3,8V Li-Ionen-Akkus sind vergleichsweise selten. Sie haben in der Regel eine 3,7V Markierung auf ihrer
(3) 3,2V LiFePO4-Akkus
3,2V LiFePO4 Akkus sind mit LiFePO4 und/oder 3,2V an ihrer Außenseite gekennzeichnet. Seien Sie vorsichtig
2. Ladestrom
Für alle wiederauadbarem Lithium-Akkus (einschließlich Li-Ionen, IMR und LiFePO4-Akkus) empfehlen wir einen
Ladestrom von nicht größer als 1C*. Für kleine Akkukapazitäten sollte der Ladestrom kleiner als 1C sein.
*C = Kapazität des Akkus. Zum Beispiel ist 1C bei einem 2600mAh Lithium-Akku 2,6 A. 1C bei einem 3400mAh
wiederauadbaren Lithium-Akku ist 3,4 A. Ein zu großer Ladestrom wird zu großen Wärmemengen führen und
damit zu Akkuschäden und ggf. zur Explosion.
WARNUNG: Unsere Ladegeräte beurteilen und wählen den Ladestrom automatisch anhand der Länge des Akkus
aus. Bei einigen Akkus mit langer, aber kleiner Kapazität (z. B. 12650, 13650, 14650, 16650) stellen Sie bitte den
entsprechenden Ladestrom manuell ein (kleiner als 1C).
3. Vorsichtsmaßnahmen
(1) Schließen Sie den Akku niemals kurz!
(2) Verwenden Sie keine 3,7V / 3,8V Lithium-Akkus, wenn ihre Spannung niedriger als 2,8V ist, da sie sonst
(3) Wir empfehlen dringend, Akkus mit Schutzschaltung zu verwenden. Bei Akkus ohne Schutzschaltung (wie IMR-
(4) Entladen Sie den Akku nicht stärker als mit dem maximalen Nennstrom.
4. Langzeitlagerung
Die beste Speicherspannung für 3,7V / 3,8V wiederauadbare Lithium-Akkus ist 3,7V. Zu hohe oder zu niedrige
Spannung können den Akku während der Lagerung beschädigen. Entladen Sie den Akku mit einem Ladegerät auf 3,7V
oder laden sie ihn auf 3,7V auf, bevor Sie ihn über einen längeren Zeitraum lagern.
Sicherheitshinweise für Li-Ionen-Akkus
häug mit 3,6V / 3,7V gekennzeichnet. Wenn unsere Ladegeräte entscheiden, dass der eingesetzte Akku ein
Lithium-Ionen-Akku ist, wird der Akku automatisch im 4,2V Standardlademodus geladen. Sie benötigen keine
zusätzlichen Spannungseinstellungen für diesen Akkutyp.
Außenseite. Normalerweise informieren die Verkäufer ihre Kunden, dass sie mit 4,35V geladen werden müssen.
Wenn Sie diesen Akkutyp auaden, stellen Sie bitte die Ladespannung manuell auf 4,35V ein, da sonst das
Ladegerät mit standardmäßigen 4,2V arbeitet, und keine ausreichende Spannung zur Ladung zur Verfügung
stellen kann.
im Umgang mit diesem Akkutyp. Ohne manuelle Einstellungen werden unsere Ladegeräte diesen Akkutyp
standardmäßig mit 4,2V Spannung auaden, was zu Beschädigungen oder sogar zur Explosion führen kann,
da diese Ladespannung für diesen Akkutyp zu hoch ist. Für einen sicheren Ladevorgang müssen Sie die
Ladespannung manuell auf 3,7V einstellen.
tiefentladen sein könnten und damit anfällig für Explosionen bei der nächsten Auadung sind.
Akkus), bitten wir Sie darauf zu achten, den Akku nicht tief zu entladen oder einen Kurzschluss zu verursachen.
Der Validierungscode und der QR-Code des Pakets können auf der NITECORE Website überprüft werden.
Das Ladegerät muss mit den oziellen Kabeln von NITECORE verwendet werden. Ozielle Kabel sind
mit deutlich aufgedrucktem NITECORE am Stecker gekennzeichnet. Während des Ladevorgangs können
Kabel von Drittherstellern zu Fehlfunktionen, Überhitzung und sogar zum Brand des Ladegerätes führen.
Schäden durch die Verwendung inozieller Kabel können nicht durch die ozielle Garantie gedeckt
werden.
Das Ladegerät kann nur Li-Ionen-, IMR-, 3,2V LiFePO4-, Ni-MH / Ni-Cd-Akkus laden. Verwenden Sie das
Ladegerät NICHT mit anderen Akkutypen, da dies zu einer Explosion des Akkus, zu Rissen oder Lecks
führen kann, die Sach- und / oder Personenschäden verursachen können.
-12- -13-
Page 9

(Francais) UM4 Manuel d’Utilisation
Instructions d’opérations
Connecter à une source d’alimentation: connectez l'UM4 à une source d'alimentation externe (un adaptateur
USB, un ordinateur ou d'autres appareils de chargement USB) via le câble de chargement USB. Après l'installation de
la batterie, l'UM4 commence à charger et présente le courant de charge, la tension de la batterie, le volume chargé et
le temps de charge sur l'écran LCD.
Installation des batteries: L'UM4 dispose de 4 emplacements de chargement contrôlés indépendamment. Insérez
des piles de types pris en charge dans chaque logement en respectant les marques de polarité indiquées dans la
fente. Après l'installation de la batterie, l'UM4 commence à charger et présente l'état de la batterie en indiquant
«Good» pour Bon ou «Poor» pour mauvais, la Résistance interne, le Courant de charge, la Tension de la batterie,
Volume chargé et Temps de charge sur l'écran LCD.
Inspection de la batterie et rapport d'erreur: L'UM4 dispose d'une fonction de protection contre l'inversion
de polarité et de court-circuit.. Si des piles sont insérées avec polarité inversée ou court-circuitée, l'écran LCD de
l'emplacement correspondant indiquera «EE EE» et l'achage du niveau de puissance clignotera pour avertir l'utilisateur
d'une erreur.
Charge intelligente: L'UM4 peut choisir des courants de charge appropriés en fonction d'une détection intelligente
des types et des capacités de la batterie. La sélection du courant de charge manuelle est également disponible. UM4
est compatible avec::
1) Batterie rechargeable Li-ion 3.6V/3.7V
2) Batterie rechargeable 3.8V Li-ion (4.35V±1% quand la charge est complète)
3) Batterie rechargeable 1.2V Ni-MH/Ni-Cd
4) Batterie 3.2V LiFePO4
Paramètres par défaut
Les paramètres par défaut (non congurés manuellement) pour UM4 sont:
Type de batterie et Capacité
Batteries Li-ion
(4.2V±1% charge
Batteries Ni-MH/
Ni-Cd (1.48V±1%
charge complète)
Note: L'UM4 peut sélectionner automatiquement les modes de charge pour les batteries Ni-MH / Ni-Cd et les batteries
Li-ion 3,7V. Les batteries LiFePO4 et les batteries Li-ion de 3,8 V nécessitent des réglages manuels pour la tension
de coupure. Pour la batterie dont la longueur est> 60mm (2.4 ”), l'UM4 identie automatiquement sa capacité à>
1.200mAh
Fonctionnement des boutons
Pendant le processus de charge:
Appuyez brièvement sur le bouton C pour faire déler l'état de charge des 4 ports.
Appuyez brièvement sur le bouton V pour parcourir l'état de la batterie, la résistance interne, le courant de charge, la
tension de la batterie, le volume chargé et le temps de charge sur l'écran LCD.
Appuyez longuement sur le bouton C pour accéder au mode de réglage de charge.
Appuyez longuement sur le bouton V pour passer en mode de restauration.. (Seulement ecace pour les batteries
IMR déchargées)
Après être entré dans le mode de réglage de charge:
Appuyez brièvement sur le bouton C pour passer à diérents paramètres de réglage (courant de charge et tension de
coupure).
Appuyez brièvement sur le bouton V pour augmenter de 100 mA à chaque fois que vous voulez régler le courant de
charge; ou pour passer à diérents types de batterie et lectures de tension lors du réglage de la tension de coupure.
Appuyez longuement sur le bouton V pour accéder directement au réglage maximal lors du réglage du courant de
charge.
Appuyez longuement sur le bouton C pour enregistrer et quitter le mode de réglage de charge.
Remarque: N'eectuez aucune action pendant 10 secondes pour quitter le mode de réglage de charge sans
enregistrer et revenir aux paramètres précédents.
Paramètres de tension de charge
Le chargeur UM4 est compatible avec les batteries 3.6V/3.7V Li-ion et Ni-MH/Ni-Cd avec détection automatique et
adoption de la tension de charge appropriée. Pour les batteries LiFePO4 et les batteries Li-ion de 3,8 V, veuillez suivre
les étapes ci-dessous pour les paramètres de tension de charge:
>1,200 mAh 1,000mA 300mA-1,500mA 1,000mA 300mA-1,500mA
complète)
<1,200 mAh 500mA 300mA-1,500mA 500mA 300mA-1,500mA
AA/AAA 500mA 300mA-1,500mA 500mA 300mA-1,500mA
C/D 1,000mA 300mA-1,500mA 1,000mA 300mA-1,500mA
Standard Mode QC Mode
Courant de
charge par défaut
Plage de courant
sélectionnable
-14- -15-
Courant de
charge par défaut
Plage de courant
sélectionnable
1. Une fois la batterie insérée et le processus de charge lancé, appuyez brièvement sur le bouton C pour sélectionner
l'emplacement approprié et appuyez longuement sur le bouton C pour accéder au mode de réglage de charge.
2. Après avoir accédé au mode de réglage de charge, appuyez brièvement sur le bouton C. Lorsque l'écran ache
le texte clignotant “CHG. MODE ”, appuyez brièvement sur le bouton V pour sélectionner la tension de charge
correcte (3.7V/4.2V/4.3V).
3. Pour les batteries LiFePO4, la tension doit être réglée sur 3,7V. Pour les batteries Li-ion de 3,8 V, la tension doit
être réglée à 4,3 V.
4. Lorsque le réglage est nalisé, appuyez longuement sur le bouton C pour enregistrer et quitter le mode de réglage
de charge.
Paramètres de l’état de charge
Veuillez suivre les étapes ci-dessous pour charger les paramètres de l’état de charge:
1. Une fois que la batterie est insérée et que le processus de chargement commence, appuyez brièvement sur
lebouton C pour sélectionner le bon port et appuyez longuement sur le bouton C pour accéder au mode de
réglage de charge.
2. Après avoir accédé au mode de réglage de charge, l'écran ache le texte clignotant «CHG. STATUT". Appuyez
brièvement sur le bouton V pour augmenter le courant de charge avec un incrément de 100 mA à chaque fois.
Appuyez longuement sur le bouton V pour accéder directement au réglage maximum.
3. Lorsque le réglage est terminé, appuyez longuement sur le bouton C pour enregistrer et quitter le mode de
réglage de charge.
Mode de chargement QC
UM4 est une entrée QC 2.0 disponible. Lorsque le chargeur est alimenté par un périphérique compatible QC ou
connecté à un adaptateur de contrôle qualité, l'écran ache «Charge rapide» et la sortie maximale à un seul
emplacement atteint 1,500 mA.
Détection automatique de la résistance interne de la batterie
Lorsque l'UM4 est activé et que la batterie est installée, il détecte et ache automatiquement la résistance interne
sous le «CHG. STATUT". Lorsque la résistance interne est inférieure à 250 mΩ, l'écran ache “Good”. Quand il est
supérieur à 250 mΩ, l'écran ache “Poor” pour indiquer que la batterie doit être remplacée.
Calcul du volume chargé
Pendant le processus de charge, le système calcule et ache automatiquement le volume chargé au-dessous du
«CHG. STATUT".
Protection contre les courts-circuits et les inversions de polarité
Si des piles sont insérées avec polarité inversée ou court-circuitée, l'écran clignote pour acher “EE EE”.
Fonction d'économie d'énergie
S'il n'y a pas d'action sur les boutons ou les piles pendant 3 minutes, l'écran devient automatiquement sombre pour
économiser de l'énergie. Eectuez n'importe quelle action pour allumer l'écran.
Activation de la batterie Li-ion déchargée
L'UM4 est capable d'activer des batteries Li-ion déchargées avec un circuit de protection. Après l'installation de
la batterie, UM4 testera et activera la batterie avant de la charger. Lorsqu'une batterie est détectée comme étant
endommagée, l'écran ache «EE EE».
Restauration de la batterie IMR déchargée
Lorsqu'une batterie IMR déchargée est insérée, l'écran ache «EE EE». Dans ce cas, appuyez longuement sur le
bouton V pour accéder au mode de restauration. Après cela, le processus de chargement se poursuivra. La batterie
doit être remplacée si elle n'est pas restaurée après plusieurs tentatives.
REMARQUE: Lorsque vous essayez de restaurer une batterie IMR, la protection contre l'inversion de polarité est
temporairement désactivée. Veuillez vous assurer que les piles sont correctement insérées au rique de créer un
incendie ou une explosion.
Protection contre dépassement de temps de charge
L'UM4 calculera séparément le temps de charge de chaque batterie. Lorsque le temps de charge dépasse 20 heures
dans un emplacement, le processus de charge de cet emplacement cesse automatiquement et ache un état
complètement chargé “END” sous le “CHG STATUS”. Cela permet d'éviter une surchaue ou même une explosion due
à un problème de qualité de la batterie.
Page 10

(Francais) UM4 Manuel d’Utilisation
Précautions
1. Le chargeur ne peut charger que des batteries rechargeables Li-ion, IMR, LiFePO4, Ni-MH / Ni-Cd. N'UTILISEZ PAS
le chargeur avec d'autres types de piles, car cela pourrait provoquer une explosion de la batterie, des ssures ou
des fuites, des dommages matériels et / ou des blessures.
2. Une chaleur modérée de ce produit est à prévoir pendant le processus de charge, ce qui est normal.
3. Température ambiante d'utilisation: -10 ~ 40 ℃ (14 ~ 104 ℉); Température de stockage: -20 ~ 60 ℃ (-4 ~ 140 ℉)
4. Lisez attentivement toutes les étiquettes sur l'appareil pour vous assurer que les piles sont correctement installées.
5. Veuillez connecter ce chargeur aux blocs d'alimentation avec la tension d'entrée indiquée dans les spécications
du manuel d'utilisation. Si la tension d'entrée est trop basse ou trop élevée, cela peut entraîner des
dysfonctionnements, voire un incendie.
6. NE chargez PAS les batteries en cas de signe de court-circuit ou de défaut.
7. Le chargeur ne doit être utilisé que par des adultes de plus de 18 ans. Les enfants doivent être surveillés par un
adulte lorsqu'ils utilisent le chargeur.
8. NE laissez PAS le produit sans surveillance lorsqu'il est connecté à une source d'alimentation. Débranchez le
produit en cas de dysfonctionnement.
9. Assurez-vous que le programme et les paramètres appropriés sont choisis et dénis. Un programme ou un réglage
incorrect peut endommager le chargeur ou provoquer un incendie et une explosion.
10. NE PAS tenter de charger des cellules primaires telles que le zinc-carbone, le lithium, le CR123A, le CR2 ou tout
autre produit chimique non supporté en raison du risque d'explosion et d'incendie.
11. NE chargez PAS une batterie IMR endommagée car cela pourrait provoquer un court-circuit du chargeur ou même
une explosion.
12. NE PAS charger ou décharger une batterie présentant des signes de fuite, d'expansion / gonement, d'enveloppe
extérieure ou de boîtier endommagé, de changement de couleur ou de déformation.
13. Utilisez l’adaptateur et le cordon d’origine pour l’alimentation. Pour ne pas abimer le cordon d'alimentation, tirez
TOUJOURS sur le connecteur plutôt que sur le cordon. NE PAS utiliser le chargeur s’il est endommagé de quelque
manière que ce soit.
14. NE PAS exposer l'appareil à la lumière directe du soleil, à des appareils de chauage, à des ammes ou à un
environnement pluvieux et neigeux; évitez les températures ambiantes extrêmement basses ou hautes ainsi que
les changements soudains de température.
15. Stockez l'appareil dans des zones ventilées. N'utilisez PAS l'appareil dans un environnement humide et éloignez-le
de tout matériau combustible.
16. Évitez tout choc ou impact sur l'appareil.
17. NE PAS placer d'objet conducteur ou métallique dans l'appareil pour éviter les courts-circuits et les explosions.
18. NE PAS surcharger ni décharger les piles. Veuillez recharger la batterie dès qu’elle deviant faible.
19. Débranchez l'appareil et retirez toutes les piles lorsqu'il n'est pas utilisé.
20. NE démontez PAS ou ne modiez pas l'appareil, car cela annulerait la garantie du produit. Veuillez vous reporter à
la section Garantie du manuel pour obtenir des informations complètes sur la garantie.
21. NE PAS utiliser de manière abusive! Utiliser pour le but et la fonction prévus uniquement.
Avertissement
Ce produit est globalement assuré par Ping An Insurance (Group) Company de Chine, Ltd. NITECORE ne peut être
tenu responsable de toute perte, dommage ou réclamation.
Service de Garantie
Les distributeurs ociels sont responsables du service de garantie. En cas de problème couvert par la garantie, le
client peut contacter son distributeur local pour prétendre au service de garantie, tant que son produit a été acheté
chez un distributeur ociel. La garantie NITECORE ne s’applique qu’aux produits achetés chez des revendeurs
ociels. Cela s’applique pour tous les produits NITECORE.
Pour être qualié pour la garantie, veuillez vous reporter à la section «AVIS DE GARANTIE IMPORTANTE» ci-dessus
pour valider votre produit. Un chargeur UM4 défectueux peut être échangé par l’intermédiaire d’un distributeur local
dans les 15 jours suivant l’achat. Après 15 jours, tous les produits NITECORE® défectueux peuvent être envoyés à un
distributeur autorisé pour réparation pendant les 12 mois suivant l’achat. Au-delà de 12 mois, une garantie limitée
s’applique, couvrant les coûts de main d’œuvre et maintenance, mais pas le coût des pièces détachées.
La garantie est annulée si le produit est :
1. démonté, reconstruit et/ou modié dans des conditions non autorisées
2. endommagé suite à un usage inapproprié (tel que inversion de polarité ou charge de piles non rechargeables)
3. endommagé suite à des fuites de batteries.
Pour plus d’informations sur le service de garantie NITECORE
envoyez un mail à service@nitecore.com.
※ Toutes les images et le texte composant ce mode d’emploi sont présentés à titre indicatif. En cas de diérence
entre ce mode d’emploi et les informations diusées sur le site www.nitecore.com, c’est ce dernier qui prévaut.
SYSMAX Innovations Co., Ltd. se réserve le droit d’interpréter et de modier le contenu de ce document à tout
moment et sans avertissement préalable.
®
, contactez votre distributeur régional NITECORE® ou
-16- -17-
Instructions de sécurité pour les batteries Lithium-ion
1. Tension de charge
Les batteries Lithium-ion (Li-ion) doivent respecter des contraintes strictes concernant le contrôle du voltage.
Charger des batteries Li-ion à un voltage supérieur au standard de sécurité peut endommager la batterie ou
causer une explosion.
(1) Batteries 3.7V Li-ion / IMR
Les batteries 3.7V Li-ion sont les batteries Lithium rechargeables les plus courantes. Elles sont souvent
marquées “3,6V/3,7V”. Si le chargeur reconnait une batterie Li-ion insérée, la batterie sera automatiquement
chargée au standard 4,2V. Vous n’avez pas besoin d’un voltage supérieur pour ce type de batterie.
(2) Batteries 3.8V Li-ion
En comparaison, les batteries 3.8V Li-ion sont relativement rares. Elles sont habituellement marquées “3,7V”.
Normalement le vendeur indique à l’acheteur que ce type de batterie doit être chargée à un voltage de 4,35V.
Pour charger ce type de batterie, ajustez manuellement le voltage de charge à 4,3V, sinon le chargeur règlera
le voltage à 4,2V par défaut, ce qui ne sera pas adéquat.
(3) Batteries 3,2V LiFePO4
Les batteries 3,2V LiFePO4 sont marquées “LiFePO4” et/ou “3,2V“. Soyez prudents avec ce type de batterie.
Sans réglage manuel, le chargeur chargerait ce type de batterie à un voltage de 4,2V et endommagerait, voire
ferait exploser, la batterie. Il faut ajuster manuellement le voltage de charge à 3,7V.
2. Courant de charge
Pour toutes les batteries Lithium rechargeables (y compris Li-ion, IMR et LiFePO4 batteries), il est conseillé de ne
pas utiliser de courant supérieur à 1C* pour la charge. Pour les petites capacités, le courant de charge doit être
inférieur à 1C.
*C=Capacité d’une batterie. Par exemple, 1C pour une batterie rechargeable Lithium de 2600mAh correspond à
2.6A. 1C pour une batterie rechargeable Lithium 3400mAh correspond à 3.4A.
Un courant de charge excessif fait chauer les batteries et peut les endommager ou les faire exploser.
Attention : Le chargeur sélectionne automatiquement le courant de charge en fonction de la longueur des batteries.
Pour les batteries longues mais de petites capacités (comme 12650, 13650, 14650, 16650), attention à bien ajuster
manuellement le courant de charge (inférieur à 1C).
3. Précautions
Ne court-circuitez pas les batteries. N’utilisez pas une batterie Lithium 3.7V/3.8V qui est à moins de 2,8V. Elle
pourrait être trop déchargée et risquerait d’exploser à la prochaine charge. Il est fortement recommandé d’utiliser
des batteries avec circuit de protection. Pour les batteries sans circuit de protection (comme les batteries IMR),
soyez vigilants pour ne pas trop décharger les batteries. Ne déchargez pas une batterie avec un courant supérieur
à son courant maximum.
4. Stockage (batterie non utilisée)
Le meilleur voltage pour une batterie Lithium rechargeable 3.7V/3.8V restant inutilisée pendant une longue
période est 3,7V. Des voltages trop bas ou trop hauts peuvent endommager la batterie qui reste non utilisée. Il est
possible de décharger ou de charger une batterie jusqu’à 3,7V avec le chargeur avant de la stocker pendant une
longue période.
Validation code and QR code on package can be veried on NITECORE website.
1. Pendant la charge, un cordon autre peut causer des dysfonctionnements, une surchaue et même un
feu sur le chargeur. Les dommages dus à l’utilisation d’un cordon non ociel ne peuvent être couverts
par la garantie.
2. L’utilisation du nouveau chargeur est restreinte aux batteries rechargeables de type Li-ion, IMR,
LiFePO4 3,2V et Ni-MH/Ni-Cd. N’utilisez jamais le chargeur avec d’autres types de batteries ; cela
pourrait causer des explosions, des fuites et des dommages matériels et/ou personnels.
Page 11

(Русский)UM4Инструкцияпоэксплуатации
Инструкцияпоэксплуатации
Подключениекисточникупитания: подключите зарядное устройство UM4 к внешнему источнику питания
(USB-адаптер, компьютер или другие зарядные USB-устройства) через USB-кабель для зарядки.
Установкааккумуляторов: В зарядном устройстве UM4 имеются 4 независимо контролируемых слота
зарядки. Вставьте аккумуляторы поддерживаемых типов в каждый слот в соответствии с обозначениями
полярности на слоте. После установки аккумулятора зарядное устройство UM4 начинает зарядку и отображает
на ЖК-дисплее состояние аккумулятора - «Хорошее» или «Плохое», а также внутреннее сопротивление,
зарядный ток, напряжение, заряженную емкость и время зарядки.
Проверкааккумулятораиотчетобошибке: Зарядное устройство UM4 имеет функции защиты от
обратной полярности и от короткого замыкания. Если аккумуляторы установлены с обратной полярностью или
закорочены, на ЖК-дисплее соответствующего слота отображается «EE EE», а индикатор уровня емкости будет
мигать, информируя об ошибке.
Интеллектуальнаязарядка:Зарядное устройство UM4 выберет соответствующие зарядные токи на
основании интеллектуального определения типов и емкости аккумуляторов. Также возможен ручной выбор
зарядного тока. Зарядное устройство UM4 совместимо с:
1) Li-ion аккумуляторы 3,6/3,7 В
2) Li-ion аккумуляторы 3,8 В (4,35±1% В при полной зарядке)
3) Ni-MH/Ni-Cd аккумуляторы 1,2 В
4) Аккумуляторы 3,2 В LiFePO4
Установкипоумолчанию
Настройки по умолчанию (не настроенные вручную) для зарядного устройства UM4:
Тип и емкость аккумулятора
Аккумуляторы Li-
ion (4,2±1% В при
полной зарядке)
Аккумуляторы Ni-MH/
Ni-Cd (1,48±1% В при
полной зарядке)
Примечание: Зарядное устройство UM4 может автоматически выбирать режимы зарядки для аккумуляторов
Ni-MH/Ni-Cd и Li-ion 3,7 В. Для аккумуляторов LiFePO4 и Li-ion 3,8 В требуется ручная настройка напряжения
отключения зарядки. Для аккумулятора, длина которого составляет >60 мм (2,4 дюйма), зарядное устройство
UM4 автоматически определяет его емкость как >1200 мАч.
Кнопочноеуправление
Вовремяпроцессазарядки:
Короткое нажатие кнопки C циклически переключает режим зарядки двух слотов.
Короткое нажатие кнопки V циклически переключает отображение на ЖК-экране: состояние батареи,
внутреннее сопротивление, зарядный ток, напряжение аккумулятора, заряженная емкость и время зарядки.
Долгое нажатие кнопки C включает режим настройки зарядки.
Долгое нажатие кнопки V включает режим восстановления. (Только для полностью разряженных
аккумуляторов IMR)
Послевходаврежимнастройкизарядки:
Короткое нажатие кнопки C переключает на другие параметры настройки (зарядный ток и напряжение
отключения).
Каждое короткое нажатие кнопки V увеличивает зарядный ток с шагом 100 мА в режиме настройки тока; или
переключает различные типы аккумуляторов и показания напряжения при настройке напряжения отключения.
Долгое нажатие кнопки V устанавливает максимальную настройку зарядного тока.
Долгое нажатие кнопки C сохраняет настройки и выводит из режима настройки зарядки.
Примечание: При отсутствии каких-либо действий в течение 10 секунд, происходит выход из режима
настройки зарядки без сохранения и возврат к предыдущим настройкам.
Настройкинапряжениязарядки
Зарядное устройство UM4 совместимо с аккумуляторами Li-ion 3,6/3,7 В и Ni-MH/Ni-Cd с автоматическим
определением и установкой подходящего напряжения зарядки. Для аккумуляторов LiFePO4 и Li-ion 3,8 В,
следует выполнить следующие шаги для настройки напряжения зарядки:
1. После того, как аккумулятор вставлен и начался процесс зарядки, коротко нажмите кнопку C, чтобы
выбрать нужный слот, и нажмите и удерживайте кнопку C, чтобы войти в режим настройки зарядки.
2. После входа в режим настройки зарядки, коротко нажмите кнопку C. Когда на экране отобразится
мигающий текст "CHG. MODE", коротко нажмите кнопку V, чтобы выбрать правильное напряжение зарядки
(3,7/4,2/4,3 В).
>1200 мАч 1000 мА 300-1500 мА 1000 мА 300-1500 мА
<1200 мАч 500 мА 300-1500 мА 500 мА 300-1500 мА
AA/AAA 500 мА 300-1500 мА 500 мА 300-1500 мА
C/D 1000 мА 300-1500 мА 1000 мА 300-1500 мА
Стандартный режим Режим быстрой зарядки
Зарядный ток по
умолчанию
Диапазон выбора
зарядного тока
Зарядный ток по
умолчанию
Диапазон выбора
зарядного тока
-18- -19-
3. Для аккумуляторов LiFePO4 напряжение должно быть установлено на 3,7 В. Для аккумуляторов Li-ion 3,8 В
4. Когда настройка завершена, нажмите кнопку C, чтобы сохранить и выйти из режима настройки зарядки.
Настройкизарядноготока
Для настройки зарядного тока выполните следующие действия:
1. После того, как аккумулятор вставлен и начался процесс зарядки, коротко нажмите кнопку C, чтобы
2. После входа в режим настройки зарядки на экране появится мигающий текст “CHG. STATUS”. Каждое
3. Когда настройка завершена, нажмите кнопку C, чтобы сохранить и выйти из режима настройки зарядки.
ПРИМЕЧАНИЕ:
устройство автоматически интеллектуально установит и распределит ток в соответствии со входной мощностью.
Режимбыстройзарядки(QC)
В зарядном устройстве UM4 имеется режим входа QC 2.0. Когда зарядное устройство питается от устройства,
поддерживающего QC, или подключено к адаптеру QC, на экране будет отображаться «Быстрая зарядка», а
максимальный выход на один слот достигает 1500 мА.
Автоматическоеопределениевнутреннегосопротивления
аккумулятора
Когда зарядное устройство UM4 включено и установлен аккумулятор, он автоматически определит и отобразит
внутреннее сопротивление под “CHG. STATUS”. Если внутреннее сопротивление ниже 250 мОм, на экране
отобразится «Хорошее». Если оно выше 250 мОм, на экране отобразится «Плохое», чтобы указать, что
аккумулятор следует заменить.
Расчетзаряженнойемкости
Во время процесса зарядки система автоматически вычисляет и отображает заряженную емкость под “CHG. STATUS”.
Защитаоткороткогозамыканияиобратнойполярности
Если аккумуляторы вставлены с обратной полярностью или закорочены, экран будет мигать, отображая "EE EE".
Функцияэкономииэлектроэнергии
Если в течение 3 минут не будет никаких действий с кнопками или аккумуляторами, экран автоматически
выключится для экономии электроэнергии. Выполните любое действие, чтобы включить экран.
АктивацияполностьюразряженныхLi-ionаккумуляторов
Зарядное устройство UM4 способно активировать полностью разряженные Li-ion аккумуляторы с защитной
схемой. После установки аккумулятора зарядное устройство UM4 перед зарядкой проверит аккумулятор и
активирует его. Если аккумулятор определится как поврежденный, на экране появится надпись "EE EE".
ВосстановлениеполностьюразряженныхаккумуляторовIMR
Если установлен полностью разряженный аккумулятор IMR, на экране появится надпись "EE EE". В этом случае
долгое нажатие кнопки V запустит режим восстановления. После этого будет продолжен процесс зарядки.
Аккумулятор следует заменить, если он не может быть восстановлен после нескольких попыток.
ПРИМЕЧАНИЕ: При попытке активации аккумулятора IMR защита от обратной полярности временно
отключается. Убедитесь, что аккумуляторы вставлены правильно. Несоблюдение этого требования может
привести к пожару или взрыву.
Защитаприпревышениивременизарядки
Зарядное устройство UM4 отдельно рассчитывает время зарядки каждого аккумулятора. Если время зарядки
превышает 20 часов в одном слоте, оно автоматически прекратит процесс зарядки этого слота и отобразит
END под “CHG. STATUS”. Это необходимо для предотвращения возможного перегрева или даже взрыва ввиду
проблем с качеством аккумулятора.
Мерыпредосторожности
1.
напряжение должно быть установлено на 4,3 В.
выбрать нужный слот, и нажмите и удерживайте кнопку C, чтобы войти в режим настройки зарядки.
короткое нажатие кнопки V увеличивает зарядный ток с шагом 100 мА. Долгое нажатие кнопки V
устанавливает максимальную настройку.
Когда входная мощность недостаточна и установлен большой зарядный ток, зарядное
Зарядное устройство предназначено для зарядки только Li-ion, IMR, LiFePO4, Ni-MH/Ni-Cd аккумуляторов.
Ни в коем случае не используйте зарядное устройство с другими типами аккумуляторов, так как это может
привести к взрыву, растрескиванию или протечке электролита, причинению ущерба имуществу и/или травме.
Page 12

(Русский)UM4Инструкцияпоэксплуатации
2. Умеренное нагревание этого изделия во время процесса зарядки является нормальным.
3.
Температура окружающей среды при использовании: -10~40 ℃; Температура хранения: -20~60 ℃ (-4~140 ℉).
4. Внимательно изучите все обозначения на устройстве, чтобы обеспечить правильную установку
аккумуляторов.
5. Подключайте зарядное устройство к источникам питания со входным напряжением, указанным в
технических характеристиках руководства пользователя. Если значение входного напряжения слишком
низкое или слишком высокое, это может привести к выходу из строя или даже к пожару.
6. НЕ заряжайте аккумуляторы, если налицо любые признаки, свидетельствующие о неисправности или
коротком замыкании.
7. Зарядное устройство предназначено для использования лицами, достигшими 18-летнего возраста. Лица, не
достигшие указанного возраста, должны использовать зарядное устройство под присмотром взрослых.
8. НЕ оставляйте устройство без присмотра, когда оно подключено к источнику питания. Отключите
устройство от питания при каких-либо признаках неисправности.
9. Убедитесь, что выбраны и установлены правильная программа и настройки. Неправильная программа или
настройка могут повредить зарядное устройство или вызвать возгорание и взрыв.
10.
НЕ пытайтесь заряжать гальванические элементы, например, цинк-углеродные, литиевые, CR123A, CR2 батареи
или любые другие батареи с не поддерживаемым химическим составом из-за опасности взрыва и пожара.
11. НЕ заряжайте поврежденный аккумулятор IMR, так как это может привести к короткому замыканию или
даже взрыву зарядного устройства.
12. НЕ заряжайте и не разряжайте аккумулятор, в котором имеются признаки протечки, расширения/вздутия,
поврежденной внешней оболочки или корпуса, изменения цвета или искажения.
13. Используйте оригинальный адаптер и шнур для зарядки. Чтобы уменьшить риск повреждения шнура
питания, ВСЕГДА тяните за разъем, а не за шнур. НЕ используйте зарядное устройство, если оно какимлибо образом повреждено.
14. НЕ подвергайте устройство воздействию прямых солнечных лучей, нагревательных приборов, открытого
огня, дождя или снега; избегайте воздействия экстремально высоких или экстремально низких температур
окружающей среды и внезапных изменений температуры.
15. Храните устройство в вентилируемых помещениях. НЕ используйте устройство во влажной среде и не
подвергайте воздействию любых горючих материалов.
16. Не подвергайте устройство ударам или иным видам воздействия.
17. НЕ вставляйте токопроводящий или металлический предмет в устройство во избежание короткого
замыкания и взрывов.
18. НЕ допускайте перезарядки или полной разрядки аккумуляторов. Заряжайте аккумулятор, как только
закончится заряд.
19. Отключайте устройство от сети и вынимайте аккумуляторы в том случае, если оно не используется.
20. НЕ разбирайте устройство и не вносите в него изменения, так как это приведет к аннулированию гарантии.
Для получения более полной информации о гарантии ознакомьтесь с разделом "Гарантия" в руководстве
пользователя.
21. ЗАПРЕЩЕНО использовать устройство не по назначению! Используйте устройство только по назначению и
в соответствии с его функциями.
Оговоркаобограниченииответственности
Настоящее изделие застраховано во всех странах мира компанией Ping An Insurance (Group) Company
of China, Ltd. Компания NITECORE не несет ответственности и не имеет обязательств в связи с любыми
убытками, ущербом или претензиями любого рода, возникающими в результате несоблюдения инструкций,
представленных в настоящем руководстве пользователя.
Гарантийноеобслуживание
Ответственность за гарантийное обслуживание лежит на официальных дилерах и дистрибьюторах. При
возникновении проблем, которые могут быть устранены в рамках гарантии, клиент может предъявить
гарантийные требования своему дилеру или дистрибьютору при условии, что продукт был приобретен у
официального дилера или дистрибьютора. Гарантия компании NITECORE предоставляется только в отношении
той продукции, которая приобретается у официального продавца. Это относится ко всей продукции NITECORE.
Чтобы иметь право на гарантийное обслуживание, ознакомьтесь с разделом «ВАЖНОЕ УВЕДОМЛЕНИЕ О
ГАРАНТИИ», приведенным выше, чтобы убедиться, что ваш продукт подпадает под условия гарантийного
обслуживания.
Любая неработающая/бракованная продукция может быть заменена у местного дистрибьютора/дилера в
течение 15 дней после приобретения. По истечении 15 дней любая продукция NITECORE®, имеющая дефекты/
неполадки, может быть бесплатно отремонтирована в течение 12 месяцев (1 года) с даты приобретения.
По истечении 12 месяцев (1 года) вступает в силу ограниченная гарантия, покрывающая стоимость работ и
технического обслуживания, но не учитывающая стоимость запасных частей и дополнительных принадлежностей.
Гарантия аннулируется, если изделие:
1. Повреждено, либо в конструкцию внесены изменения лицами, не имеющими на то соответствующих
полномочий;
2. Повреждено из-за неправильных действий (например, установки аккумуляторов с обратной полярностью,
установки не перезаряжаемых батарей, несоблюдения инструкций);
-20- -21-
3. Повреждено в результате протечки аккумуляторов.
Для получения оперативной информации по гарантийному обслуживанию продукции NITECORE
местному дистрибьютору либо отправьте сообщение на адрес электронной почты service@nitecore.com.
※ Все изображения, тексты и заявления, содержащиеся в настоящем руководстве, могут быть использованы
Инструкциипобезопасностидлялитий-ионныхаккумуляторов
1. Напряжениезарядки
Литий-ионные (Li-ion) аккумуляторы имеют строгие требования к контролю напряжения. Зарядка Li-
(1) Аккумуляторы 3,7 В Li-ion / IMR
Аккумуляторы Li-ion 3,7 В являются наиболее распространенными литиевыми аккумуляторами. На
(2) Аккумуляторы 3,8 В Li-ion
(3) Аккумуляторы 3,2 В LiFePO4
Аккумуляторы 3,2 В LiFePO4 на корпусе имеют маркировку LiFePO4 и/или 3,2 В. Будьте осторожны
2. Зарядныйток
Для всех литиевых аккумуляторов (включая аккумуляторы Li-ion, IMR и LiFePO4) мы рекомендуем
* C=Емкость аккумулятора, например, 1С для литиевого аккумулятора емкостью 2600 мАч составляет 2,6 А.
Слишком большой зарядный ток приведет к выделению большого количества тепла, а, следовательно, к
Предупреждение:Наши зарядные устройства автоматически определяют и выбирают зарядный ток по длине
аккумуляторов. Для некоторых длинных, но малоемких аккумуляторов (например, 12650, 13650, 14650, 16650),
установите вручную соответствующий зарядный ток (меньше 1С).
3. Мерыпредосторожности
(1) НЕ производите короткое замыкание аккумулятора.
(2) НЕ используйте литиевый аккумулятор 3,7 / 3,8 В, если его напряжение ниже 2,8 В, иначе он может
(3) Мы настоятельно рекомендуем аккумуляторы с защитной цепью. Для аккумуляторов без защитной цепи
(4) НЕ разряжайте аккумулятор разрядным током, превышающим его максимальный номинальный ток.
4. Долгосрочноехранение
Наилучшее напряжение для хранения литиевых аккумуляторов 3,7/3,8 В - 3,7 В. Слишком низкое или слишком
высокое напряжение может повредить аккумулятор во время хранения. Вы можете разрядить аккумулятор до
3,7 В или зарядить его до 3,7 В в зарядном устройстве, прежде чем оставить его на длительное хранение.
®
обратитесь к
только в справочных целях. При расхождении информации, приведенной в настоящем руководстве, с
информацией, размещенной на сайте www.nitecore.com, преимущественную силу имеет информация,
размещенная на нашем официальном сайте. Компания SYSMAX Innovations Co., Ltd. оставляет за
собой право толковать и изменять содержание настоящего документа в любой момент времени без
предварительного уведомления.
ion аккумуляторов электрическим напряжением за пределами нормы безопасности может привести к
повреждению аккумулятора и взрыву.
корпусе этих аккумуляторов часто встречаются обозначения 3,6 / 3,7 В. Если наши зарядные устройства
определяют, что вставлен аккумулятор Li-ion, он будет автоматически заряжаться в режиме зарядки 4,2
В. Вам не нужны дополнительные настройки напряжения для этих типов аккумуляторов.
3,8 В Li-ion аккумуляторы относительно редко встречаются. Обычно на его корпусе имеется маркировка
3,7 В. Обычно его продавец информирует покупателя о том, что он должен быть заряжен напряжением
4,35 В. При зарядке этого типа аккумулятора установите вручную напряжение зарядки 4,3 В, в
противном случае зарядное устройство будет заряжать по умолчанию напряжением 4,2 В и не сможет
обеспечить достаточное напряжение зарядки.
с такими типами аккумуляторов. Без ручной настройки наши зарядные устройства будут заряжать
аккумуляторы этого типа напряжением 4,2 В, и аккумуляторы будут повреждены или даже взорвутся
из-за слишком высокого напряжения зарядки. Для безопасной зарядки вам необходимо вручную
установить напряжение зарядки 3,7 В.
использовать ток, не превышающий 1С* для зарядки. Для аккумуляторов малой емкости зарядный ток
должен быть меньше 1С.
1C для литиевого аккумулятора емкостью 3400 мАч составляет 3,4 А.
повреждению аккумулятора и взрыву.
быть полностью разряжен и/или подвержен взрыву при последующей зарядке.
(например, аккумуляторы IMR) не допускайте полного разряда и короткого замыкания.
Код подтверждения и QR-код на упаковке можно проверить на сайте NITECORE.
Зарядное устройство необходимо использовать с официальными кабелями NITECORE. Официальные
кабели обозначены четко напечатанным NITECORE на вилке. Кабели сторонних производителей во
время зарядки могут вызвать сбои, перегрев и даже воспламенение зарядного устройства.
Повреждения, вызванные использованием неофициальных кабелей, не могут устраняться в рамках
официальной гарантии.
Зарядное устройство предназначено для зарядки только Li-ion, IMR, 3,2 В LiFePO4, Ni-MH/NiCd аккумуляторов. Ни в коем случае не используйте зарядное устройство с другими типами
аккумуляторов, так как это может привести к взрыву, растрескиванию или протечке электролита,
причинению ущерба имуществу и/или травме.
Page 13

(日本語)UM4 説明書
使用方法
電源に接続する :
電デバイスなど )。
バッテリーを入れる:
スロットの極性マークに従って挿入します。 バッテリーを入れると UM4 は充電を開始し、充電電流、バッテ
リー電圧、充電量、および充電時間を LCD に表示します。
バッテリーの点検とエラーレポート :
ーを逆向きに入れたり短絡したバッテリーを入れると、該当スロットの LCD 画面に「EE EE」と表示され、パ
ワーレベルの表示が点滅してエラーを通知します。
スマートチャージ :
電流は手動で設定することもできます。互換性のあるバッテリーは:
1) 3.6V/3.7V リチウムイオン充電池
2) 3.8V リチウムイオン充電池 ( 最大充電時 4.35V±1%)
3) 1.2V ニッケル水素 / ニッカド充電池
4) 3.2V LiFePO4 充電池
初期設定
UM4 の初期設定 ( 手動で設定していない場合) は以下の通りです:
ノート :
します。LiFePO4 充電池および 3.8V リチウムイオン充電池使用時は手動でカットオフ電圧を設定する必要が
あります。長さが >60mm のバッテリーは、その容量を自動的に >1,200mAh と検出します。
操作方法
充電中 :
C ボタンを押と 4 スロットの充電状態の表示を切り替わります。
V ボタンを押すと LCDスクリーンの表示が充電電流、バッテリー電圧、充電電圧、充電時間と切り替わります。
C ボタンを長押しすると設定モードに入ります。
V ボタンを長押しすると復元モードに入ります。 ( 過放電された IMR バッテリーのみ)
設定モード :
C ボタンを押すと設定パラメータが切り替わります(充電電流とカットオフ電圧)。
充電電圧設定時は、V ボタンを押すと充電電流が 100mA ずつ上がります。カットオフ電圧設定時は、異なる
バッテリータイプと電圧値に切り替わります。
充電電圧設定時に V ボタンを長押しすると、最大電流値まで上がります。
C ボタンを長押しすると変更をセーブして設定モードから抜けます。
ノート :
充電電圧の設定
UM4 は、3.6V / 3.7V リチウムイオンおよびニッケル水素 /ニッカド充電池と互換性があり、適切な充電電圧
を自動的に設定します。 LiFePO4 と 3.8V リチウムイオン充電池の場合、電圧設定を充電するには、以下の手
順に従ってください。
1. バッテリーを入れて充電が始まったら、C ボタンを押して該当スロットを選択し、Cボタンを長押しして
2. 設定モードに入ったら C ボタンを押してください。画面に「CHG. MODE」と点滅表示されたら、V ボタ
3. LiFePO4 充電池の場合 , 電圧は 3.7V を選んでください。3.8V リチウムイオン充電池の場合、電圧は 4.3V
4. 設定が終わったら、C ボタンを長押しして設定モードから抜けてください。
付属の USB 充電ケーブルを使って、本体を外部電源につなぐ (USBアダプター、PC、USB 充
UM4には独立して制御される充電スロットが 4 つあります。 互換性のあるバッテリーを、
UM4 は電池の逆入れ防止および短絡防止機能を備えています。バッテリ
本器はバッテリーのタイプと容量を検出することで、最適な充電電流を自動設定します。
バッテリータイプと容量
リチウムイオン充
電池 ( 最大充電時
4.2V±1%)
ニッケル水素 / ニッ
カド充電池 ( 最大充
電時 1.48V±1%)
設定モードに入ってください。
ンを押して充電電圧を選んでください (3.7V/4.2V/4.3V)。
を選んでください。
>1,200 mAh 1,000mA 300mA-1,500mA 1,000mA 300mA-1,500mA
<1,200 mAh 500mA 300mA-1,500mA 500mA 300mA-1,500mA
AA/AAA 500mA 300mA-1,500mA 500mA 300mA-1,500mA
UM4 はニッケル水素 / ニッカド及び3.7V リチウムイオン充電池使用時に自動的に充電モードを選択
10 秒以上操作をしないとセーブせずに設定モードから抜けます。
C/D 1,000mA 300mA-1,500mA 1,000mA 300mA-1,500mA
スタンダードモード QC モード
充電電流
初期値
選択可能な
充電電流値
充電電流
初期値
選択可能な
充電電流値
充電電流の設定
充電電流を設定するには、以下の手順に従ってください。
1. バッテリーを入れて充電が始まったら、C ボタンを押して該当スロットを選択し、Cボタンを長押しして
設定モードに入ってください。
2. 設定モードに入ると、画面に「CHG. STATUS」と点滅表示されます。Vボタンを押して充電電流を
100mA ずつふやしていくか、V ボタンを長押しして最大電流に設定します。
3. 設定が終わったら、C ボタンを長押しして設定モードから抜けてください。
設定された電流に対して入力電力がたりない場合は、入力電力に応じた電流を自動的に配分します。
ノート :
QC充電モード
本器は QC 2.0 に対応しています。QC をサポートする電源やアダプターに接続した場合、画面に「Quick
Charge」と表示され、スロットの最大電流は 1,500mA となります。
バッテリー内部抵抗の自動検出
本器にバッテリーを入れると、内部抵抗を自動的に計測し「CHG. STATUS」に表示します。内部抵抗が
250mΩ以下の場合は「Good」と表示されます。内部抵抗が 250mΩ以上だった場合は「Poor」と表示され
ますので、バッテリーを交換してください。
充電容量の計算
充電中は充電容量を自動的に計算して「CHG. STATUS」に表示します。
電池の短絡・逆入れ防止機能
電池が短絡していたり逆向きに入れたりした場合、画面に「EE EE」と点滅表示します。
省エネ機能
3 分以上操作をしないと画面表示が消えます。何か操作をすると再び点灯します。
過放電されたリチウムイオン充電池の再活性化
本器は過放電された保護回路付きリチウムイオン充電池の再活性化が可能です。電池を入れると、充電する前
に再活性化を試みます。電池がダメージを受けていて使えない場合は画面に「EE EE」と表示されます。
過放電されたIMR充電池の復元
過放電された IMR 充電池を入れると画面に「EE EE」と表示されます。その場合、V ボタンを長押しすると復
元モードに入り、その後充電が継続されます。もし復元に何度か失敗する場合は、バッテリーを交換してくだ
さい。
IMR 充電池の復元を試行しているとき、逆入れ防止機能は一時的に停止されています。発火や破裂の
ノート :
原因となりますので、電極の向きを必ず正しく入れてください。
過充電保護
本器は各バッテリーの充電時間を個別に測定しています。充電時間が 20時間を超えた場合、電池の不備によ
る過熱や破裂を防ぐため、充電を自動的に停止し「CHG. STATUS」に「END」と表示されます。
注意事項
1. 本器はリチウムイオン、 IMR, LiFePO4, ニッケル水素 / ニッカド 充電池専用です。電池の発火や破裂、
怪我の原因になりますので、ほかのタイプの充電池には使用しないでください。
2. 充電中に本体が熱くなりますが異常ではありません。
3. 本充電器の安全な使用環境温度は -10-40° C、安全な保管温度は -20-60° C です。
4. 本体に貼ってあるラベルなどをよく読んで正しくお使いください。
5. 本マニュアル記載の電源電圧につないでお使いください。低すぎたり高すぎたりする電圧は故障や発火の
原因となります。
6. 故障や短絡している可能性があるバッテリーは使用しないでください。
7. 本充電器は18歳以上のかたがご使用ください。18歳未満の方は、保護者の管理下のもとご使用くださ
い。
8. 充電中は充電器から目を離さないでください。異常が発生した場合はコンセントを抜いてください。
9. 正しいセッティングが選ばれているか確認してから充電してください。間違ったセッティングはバッテリ
ーのダメージや破損につながる恐れがあります。
-22- -23-
Page 14

(日本語)UM4 説明書
10. アルカリ電池、マンガン電池、リチウム電池、CR123A、CR2やそのほかの対応していない電池は充電し
ないでください。破裂や発火することがあります。
11. ダメージのある IMR バッテリーを充電しないでください。本体がショートしたりや破裂する恐れがあり
ます。
12. バッテリーに液漏れ、破裂、膨張、皮膜やケースの傷、変色や歪みなどの異常が見られる場合は充電しな
いでください。
13. 付属のアダプターとコードをお使いください。電源コードの損傷を防ぐため、電源を抜くときはコードで
はなくコネクターを持ってください。アダプターやコードに損傷が見られる場合は使用しないでください。
14. 本充電器を直射日光や暖房装置、火気にさらさないでください。また極端に高いもしくは低い 温度環境や、
急激な温度変化は避けてください。
15. 本器は換気の良い場所に保管ください。また湿気の多い場所や火気の近くでは使用しないでください。
16. 本器に振動や衝撃を与えないでください。
17. ショートや爆発の原因になりますので、導電素材や金属素材を充電器に入れないでください
18. バッテリーの過放電や過充電をしないでください。電池が空になったらすぐに充電をしてください。
19. 使用しないときは電池をすべて取り外し、外部電源に接続しないでください。
20. 本器を分解または改造しないでください。された場合は保証が無効となります。詳細については本マニュ
アルの保証部分を参照ください。
21. 本マニュアル記載の目的や機能どおりの使い方をしてください。それ以外の使い方は危険ですのでおやめ
ください。
免責事項
この製品は、中国 Ping An 保険 ( グループ ) 会社によって世界的に保険が適用されます。NITECORE は、本書
に記載されている指示に従わなかった結果により生じたいかなる損失、損害、または主張についても責任を負
いません。
保証詳細
正規代理店 / 販売店が製品保証サービスを提供します。製品を正規の代理店または販売店から購入していて、
保証対象となる問題が発生した場合は、販売店または代理店にご連絡ください。NITECOREの保証は、正規の
供給元から購入した製品に対してのみ提供されます。 これはすべての NITECORE 製品に適用されます。
保証の適用を受けるために、「保証に関する重要なお知らせ」を参照して製品が正規品であるかをご確認くだ
さい。
NITECORE®製品は、すべての初期不良 / 不良品について、購入後 15 日以内であれば現地代理店 /販売店を通
じて交換いたします。 15 日をすぎて不良 / 故障が発生した場合、購入日から12 ヶ月(1 年間)は無料で修理
いたします。 12 ヵ月(1 年)を超えた場合は限定保証が適用され、人件費およびメンテナンス費用はかかりま
せんが、付属品または交換部品の費用はご請求させていただきます。
以下の場合は保証が適用されません。
1. 製品が許可なく分解、再組み立てまたは改造された場合。
2. 正しくない使用方法によって、製品が壊れた場合 ( 電池の逆入れ、充電できない電池の使用や注意事項に
従わないなど )。
3. 電池の液漏れにより製品が壊れた場合。
®
製品およびサービスに関する最新情報については、現地の NITECORE®代理店 / 販売店にお問い合
NITECORE
わせいただくか、もしくは service@nitecore.com までメールでお問い合わせください。
※ 本書に記載されている全ての画像・文章・文は参考資料です。このマニュアルと www.nitecore.comで指
定された情報が異なる場合、 SYSMAX Innovations Co., Ltd. は予告なしにいつでも本書の内容を変更、
修正する権利を留保します。
1. 充電電圧
リチウムイオン充電池には厳密な電圧コントロールが必要です。規格を超える電圧までリチウムイオン充
(1) 3.7V リチウムイオン充電池 / IMR 充電池
3.7V リチウムイオン充電池は最も一般的なリチウムイオン充電池です。このタイプの電池には主に
(2) 3.8V リチウムイオン充電池
3.8V リチウムイオン充電池はあまり普及していません。このタイプの電池は主に 3.7Vの表記がされ
(3) 3.2V LiFePO4 Batteries
3.2V LiFePO4 充電池は LiFePO4 と 3.2V の表記が両方、もしくは片方されています。手動設定しない
2. 充電電流
リチウムイオン、 IMR や LiFePO4 バッテリーを含むすべてのリチウム系バッテリーに対して、充電電流
*C: 電池の容量に対する電流値の割合。例えば、容量が2600mAh のリチウムイオンバッテリーの1C は2.6A
大きすぎる充電電流はバッテリーの過熱や破損、破裂につながることがあります。
注意:
(12650, 13650, 14650, 16650 など ) は適切な充電電流 (1C 以下 ) を手動で設定してください。
3. 注意事項
(1) バッテリーをショートさせないでください。
(2) 3.7V / 3.8V リチウムイオンバッテリーの電圧が2.8V 以下の場合は充電しないでください。過放電され、
(3) 保護回路付き充電池の使用をお勧めします。保護回路がついていない充電池 (IMRバッテリーなど ) を
(4) バッテリーの最大電流以上の電流で放電しないでください。
4. 長期保管
3.7V/3.8V リチウムバッテリーを保管するのに最適な電圧は 3.7V です。高すぎる、あるいは低すぎる電
リチウムイオン充電池を安全に使用するために
電池を充電すると、バッテリの損傷や破裂の恐れがあります。
3.6V または 3.7V の表記がされています。この充電池を本器に入れた場合、自動的に 4.2V 充電モード
が選択されますが、電圧の設定変更を行う必要はありません。
ており、通常パッケージなどに 4.35V で充電するよう記載があります。この充電池を充電するときは、
充電電圧を 4.3V に手動で設定してください。手動設定をしない場合は初期設定の 4.2V で充電される
ため、適切な充電電圧まで充電できません。
と、本器はこのタイプの充電池を 4.2V で充電するため、過充電によるバッテリーの破損や破裂を引き
起こします。必ず充電電圧を手動で 3.7V に設定してください。
1C* 以下での使用をお勧めします。とくに容量の少ないバッテリーでは、必ず 1C 以下でご使用ください。
(2600mA)、容量 3400mA のリチウムイオンバッテリーの 1Cは 3.4A (3400mA) となります。
本器は充電電流をバッテリーの長さから自動的に設定します。長いけれど容量の小さいバッテリー
次回の充電時に破裂する恐れがあります。
使用するときは、過放電や短絡に十分注意してください。
圧での保管は、バッテリーのダメージにつながります。長期保管するときは、電圧が 3.7V になるよう充
電または放電してください。
パッケージ記載の検証コード / QR コードで Nitecoreウェブサイトを確認できます。
本器には Nitecore 純正のコードを使用ください。純正コードのコネクターにはNitecore の表記があ
ります。それ以外のコードの使用は、誤作動、過熱、発火の恐れがあります。純正以外のコードを使
用した場合の故障は、保証対象外となります。
本器はリチウムイオン、 IMR, 3.2V LiFePO4, ニッケル水素 / ニッカド 充電池専用です。電池の発火
や破裂、怪我の原因になりますので、ほかのタイプの充電池には使用しないでください。
-24- -25-
Page 15

( 한국어 )UM4 설명서
사용설명서
전원 연결 : UM4를 USB 충전 케이블을 통해 외부 전원 (USB 어댑터 , 컴퓨터 또는 기타 USB 충전 장치 ) 에 연
결하십시오 .
배터리 삽입 : UM4에는 4 개의 독립적으로 제어되는 충전 슬롯이 있습니다 . 지원되는 유형의 배터리를 슬롯
의 극성 표시에 따라 각 슬롯에 삽입하십시오 . 배터리를 설치 한 후 UM4가 충전을 시작하고 배터리의 상태를
“Good” 또는 “Poor “로 표시하며 , 내부 저항 값, 충전 전류 , 배터리 전압 , 충전 된 양 및 충전 시간을 LCD 화면
에 표시합니다 .
배터리 검사 및 오류 보고 : UM4는 역 극성 보호 및 안티 - 단락 회로 기능을 가지고 있습니다 . 극성이 역전되
거나 단락이 된 배터리가 있는 경우 해당 슬롯의 LCD 화면에 "EE EE" 가 표시되고 전원 레벨 표시가 깜박거리면
서 오류가 있음을 사용자에게 알립니다 .
스마트 충전 : UM4는 배터리 유형 및 용량에 대한 지능형 감지를 기반으로 적절한 충전 전류를 선택할 수 있습
니다 . 수동 충전 전류 선택 기능도 제공됩니다. UM4 는 다음과 호환됩니다 :
1) 3.6V/3.7V 리튬이온 충전지
2) 3.8V 리튬이온 충전지 (4.35V ±1% 완충시 )
3) 1.2V Ni-MH/Ni-Cd 충전지
4) 3.2V LiFePO4 배터리
기본설정
UM4 의 기본 설정 (수동 구성 아님 ) 은 다음과 같습니다 :
배터리 유형 및 용량
리튬이온 배터리
(4.2V ±1% 완충시 )
Ni-MH/Ni-Cd 배터리
(1.48V ±1% 완충시 )
참고 : UM4는 Ni-MH / Ni-Cd 배터리 및 3.7V 리튬 이온 배터리의 충전 모드를 자동으로 선택할 수 있습니다 .
LiFePO4 배터리 및 3.8V 리튬 이온 배터리는 충전 중지 전압에 대한 수동 설정이 필요합니다 . 길이가> 60mm
(2.4 ") 인 배터리의 경우 UM4 는 용량을> 1,200mAh 로 자동 식별합니다 .
버튼조작
충전 중에 :
C 버튼을 짧게 누르면 4 슬롯의 충전 상태를 순환합니다 .
V 버튼을 짧게 누르면 LCD 화면에 배터리의 상태 , 내부 저항 값, 충전 전류 , 배터리 전압 , 충전 된 충전 량 및
충전 시간이 순환됩니다 .
C 버튼을 길게 눌러 충전 설정 모드로 들어갑니다 .
복원 모드로 들어가려면 V 버튼을 길게 누릅니다 . (과방전 된 IMR 배터리에만 효과가 있음 )
충전 설정 모드로 들어간 후에 :
C 버튼을 짧게 눌러서 다른 설정 매개 변수 ( 충전 전류 및 차단 전압) 로 전환하십시오 .
충전 전류를 설정할 때마다 V 버튼을 짧게 누르면 100mA 씩 증가합니다 . Cut-Off( 중단) 전압 설정 시 다른 배
터리 유형 및 전압 판독 값으로 전환 할 수 있습니다 .
충전 전류를 설정할 때 V 버튼을 길게 눌러 최대 설정에 직접 액세스하십시오 .
충전 설정 모드를 저장하고 종료하려면 C 버튼을 길게 누릅니다 .
참고 : 저장하지 않고 충전 설정 모드를 종료하고, 이전 설정으로 돌아가려면 10 초 안에 아무런 작업도 수행하
지 마십시오 .
충전전압설정
UM4 는 3.6V / 3.7V 리튬 이온 및 Ni-MH / Ni-Cd 배터리와 호환되며 자동 감지 및 적절한 충전 전압 채택이 가
능합니다 . LiFePO4 배터리 및 3.8V 리튬 이온 배터리의 경우 아래 단계에 따라 충전 전압 설정을 하십시오.
1. 배터리를 삽입하고 충전 과정이 시작되면 C 버튼을 짧게 눌러 올바른 슬롯을 선택하고 C 버튼을 길게 눌러
충전 설정 모드로 들어갑니다 .
2. 충전 설정 모드로 진입 한 후 C 버튼을 짧게 누릅니다 . 화면에 "CHG. MODE " 텍스트가 깜빡이면 V 버튼을
짧게 눌러 올바른 충전 전압 (3.7V / 4.2V / 4.3V) 을 선택하십시오.
3. LiFePO4 배터리의 경우 전압을 3.7V 로 설정해야 합니다. 3.8V 리튬 이온 배터리의 경우 전압을 4.3V 로 설
정해야 합니다 .
4. 설정이 완료되면 C 버튼을 길게 눌러 저장하고 충전 설정 모드를 종료합니다 .
>1,200 mAh 1,000mA 300mA-1,500mA 1,000mA 300mA-1,500mA
<1,200 mAh 500mA 300mA-1,500mA 500mA 300mA-1,500mA
AA/AAA 500mA 300mA-1,500mA 500mA 300mA-1,500mA
C/D 1,000mA 300mA-1,500mA 1,000mA 300mA-1,500mA
일반 모드 고속충전 모드
기본 충전 전류
선택 가능한 충전
전류 범위
기본 충전 전류
선택 가능한 충전
전류 범위
-26- -27-
충전전류설정
충전 전류 설정을 위해 다음과 같은 단계를 따라 주십시오 /
1. 배터리를 삽입하고 충전 과정이 시작되면 C 버튼을 짧게 눌러 올바른 슬롯을 선택하고 C 버튼을 길게 눌러
충전 설정 모드로 들어갑니다 ..
2. 충전 설정 모드로 들어가면 , 화면에 "CHG. STATUS" 텍스트가 깜빡입니다. V 버튼을 짧게 누르면 매회
100mA 씩 충전 전류를 높입니다 . 최대값에 바로 접근 하려면 V 버튼을 길게 누릅니다.
3. 설정이 완료되면 C 버튼을 길게 눌러 저장하고 충전 설정 모드를 종료합니다 .
참고 : 입력 전원이 불충분하고 큰 충전 전류가 설정되면 충전기는 입력 전원에 따라 지능형 전류 분배를 자동
으로 채택합니다 .
QC충전 ( 고속충전 )모드
UM4 는 QC 2.0 입력이 가능합니다. 충전기가 QC 지지 장치에 의해 전원이 공급되거나 QC 어댑터에 연결되면
화면에 " 빠른 충전" 이 표시되고 단일 슬롯 최대 출력은 1,500mA 가됩니다 .
자동배터리내부저항감지
UM4 가 켜지고 배터리가 설치되면 "CHG, STATUS "아래에 내부 저항이 자동으로 감지되어 표시됩니다 . ". 내
부 저항이 250m Ω보다 낮으면 화면에 "Good"이라고 표시됩니다 . 250m Ω 이상이면 화면에 " Poor "로 표시
되어 배터리를 교체해야 함을 나타냅니다 .
충전량계산
충전 과정에서 시스템은 자동으로 "CHG, STATUS "아래의 충전량을 계산하고 표시합니다 .
안티단락회로및역극성보호
극성이 역전되거나 단락 된 배터리가 있으면 "EE EE" 가 표시 되며 화면이 깜박입니다.
에너지절약기능
3 분 안에 버튼이나 배터리에 아무런 조치가 없으면 자동으로 화면이 어두워져 에너지를 절약합니다 . 아무키나
눌러 화면을 밝힐 수 있습니다 .
과방전된리튬이온배터리활성화
UM4 는 보호 회로가 있는 과방전 된 리튬 이온 배터리를 활성화 할 수 있습니다. 배터리를 설치 한 후 UM4 는
충전하기 전에 배터리를 테스트하고 활성화합니다 . 배터리가 손상된 것으로 감지되면 화면에 "EE EE"가 표시
됩니다 .
과방전된IMR배터리복원
과방전된 IMR 배터리가 삽입되면 화면에 "EE EE" 가 표시됩니다. 이 경우 V 버튼을 길게 눌러 복원 모드로 들어
갑니다 . 그 후에, 충전 과정은 계속됩니다 . 여러 번 시도한 후에도 배터리가 복원되지 않으면 배터리를 교체해
야 합니다 .
참고 : IMR 배터리를 복원하려고 시도하면 역 극성 보호가 일시적으로 비활성화됩니다. 배터리가 올바르게 삽
입되었는지 확인하십시오 . 그렇게 하지 않으면 화재나 폭발을 초래할 수 있습니다.
과충전보호
UM4 는 각 배터리의 충전 시간을 별도로 계산합니다. 충전 시간이 한 슬롯에서 20 시간을 초과하면 이 슬롯의
충전 프로세스가 자동으로 중단되고 완전히 충전 된 상태가 표시됩니다 . 이것은 배터리 품질 문제로 인한 과열
또는 폭발을 방지하기 위한 것입니다 .
예방조치
1. 충전기는 Li-ion, IMR, LiFePO4, Ni-MH / Ni-Cd 충전 용 배터리만 충전 할 수 있습니다 . 다른 종류의 배터리
와 함께 충전기를 사용하지 마십시오 . 배터리 폭발, 균열 또는 누출로 인해 재산 피해가 발생하거나 부상을
입을 수 있습니다 .
2. 이 제품의 충전 과정에서 발생한 것으로 예상되는 적당한 발열은 정상입니다 .
3. 사용시 주위 온도 : -10 ~ 40 ℃ (14 ~ 104 ℉); 보관 온도 : -20 ~ 60 ℃ (-4 ~ 140 ℉ )
4. 장치의 모든 라벨을 주의 깊게 읽어 배터리가 올바르게 설치되었는지 확인하십시오 .
5. 이 충전기를 사용 설명서의 사양에 명시된 입력 전압의 전원 공급 장치에 연결하십시오 . 입력 전압이 너무
낮거나 높으면 오작동이나 화재를 유발할 수 있습니다 .
Page 16
( 한국어 )UM4 설명서
6. 결함이나 단락의 징후가 있는 경우 배터리를 충전하지 마십시오 .
7. 충전기는 18 세 이상의 성인 만 사용할 수 있습니다 . 이 연령대 이하의 어린이는 충전기를 사용할 때 성인
이 감독해야 합니다 .
8. 전원 공급 장치에 연결된 상태에서 제품을 방치하지 마십시오 . 제품 고장의 징후가 있으면 제품의 플러그
를 뽑으십시오 .
9. 올바른 프로그램과 설정이 선택되고 설정되었는지 확인하십시오 . 잘못된 프로그램이나 설정은 충전기를
손상 시키거나 화재 및 폭발을 일으킬 수 있습니다 .
10. 폭발이나 화재의 위험이 있으므로 Zinc-Carbon, Lithium, CR123A, CR2 또는 기타 지원되지 않는 화학 물질
과 같은 1 차 전지를 충전하지 마십시오 .
11. 손상된 IMR 배터리를 충전하지 마십시오 . 충전기가 단락되거나 폭발 할 수 있습니다 .
12. 누액 , 팽창 / 팽창 , 외 포장재 또는 케이스 손상, 색상 변화 또는 왜곡의 증거가 있는 배터리는 충전하거나
방전하지 마십시오 .
13. 전원 공급 장치에는 원래 어댑터와 코드를 사용하십시오 . 전원 코드 손상 위험을 줄이려면 항상 코드가 아
닌 커넥터를 잡으십시오 . 충전기가 손상된 것으로 보이는 경우 충전기를 작동하지 마십시오.
14. 장치를 직사광선 , 난방 장치 , 화염, 비 , 눈이 오는 장소에 노출시키지 마십시오 . 주위의 온도가 극도로 높
아지거나 낮아지는 등의 급격한 온도 변화는 피하십시오 ..
15. 통풍이 잘되는 곳에 장치를 보관하십시오 . 습기 찬 환경에서 장치를 사용하지 말고 가연성 물질로부터 격
리 시키십시오 .
16. 장치에 충격이나 영향을주지 마십시오 .
17. 누전이나 폭발을 방지하기 위해 장치에 전도성 물질이나 금속 물체를 두지 마십시오 .
18. 배터리를 과충전 또는 과방 전하지 마십시오 . 전원이 다되면 바로 충전하십시오 .
19. 사용하지 않을 때는 장치의 플러그를 뽑고 모든 배터리를 제거하십시오 .
20. 장치를 분해하거나 개조하지 마십시오 . 만약 그럴 시에는 제품 보증이 무효가 됩니다 . 완전한 보증 정보는
설명서의 보증 절을 참조하십시오 .
21. 어떤 식으로 든 오용하지 마십시오 ! 의도한 목적 및 기능에만 사용하십시오 .
면책사항
이 제품은 Ping An Insurance (Group) Company of China, Ltd. 에서 전 세계적으로 보험이 적용됩니다.
NITECORE 는이 문서에 제공된 사용자 설명서 지침을 준수하지 않아 발생한 손실, 손해 또는 클레임에 대해 책
임을 지지 않습니다 .
품질보증
공인 대리점 및 유통 업체는 보증 서비스를 담당합니다 . 보증 범위에 해당하는 문제가 발생하면 고객은 공
인 판매자 또는 유통 업체로부터 제품을 구입 한 경우 보증 요청과 관련하여 해당 딜러 또는 유통 업체에 연
락 할 수 있습니다 . NITECORE의 보증은 승인 된 출처에서 구입 한 제품에 대해서만 제공됩니다 . 이것은 모든
NITECORE 제품에 적용됩니다 .
품질 보증을 받으려면 제품의 유효성을 확인하기 위해서 " 중요 보증 통지" 섹션을 참조하십시오 .
모든 초도불량 / 결함이 있는 제품은 구매 후 15 일 이내에 현지 대리점 / 판매 업체를 통해 교체 할 수 있습니
다 . 15 일 후에 결함이 있거나 고장난 NITECORE® 제품은 구입일로 부터 12 개월 (1 년) 동안 무료로 수리 할
수 있습니다 . 12 개월 (1 년) 을 초과하여 제한 보증이 적용되며 , 노동 및 유지 보수 비용은 포함되지만 액세서
리 또는 교체 부품 비용은 포함되지 않습니다 .
제품이 다음과 같은 경우 보증이 무효화됩니다 .
1. 승인되지 않은 자에 의한 분해 , 재조립 및 / 또는 변경
2. 잘못된 작동으로 인한 손상 ( 즉, 역 극성 설치 , 일회용 배터리 설치 또는 경고에 따르지 않음 )
3. 배터리 누액에 의한 손상 .
®
제품 및 서비스에 대한 최신 정보는 현지 NITECORE® 대리점에 문의하거나 service@nitecore.com
NITECORE
으로 이메일을 보내십시오 .
※ 본 사용 설명서에 기재된 모든 이미지 , 텍스트 및 설명은 참고 용입니다 . 이 설명서와 www.nitecore.com
에 명시된 정보간에 불일치가 발생하면 공식 웹 사이트의 정보가 우선합니다 . SYSMAX Innovations Co.,
Ltd. 는 사전 통지없이 언제든지이 문서의 내용을 해석하고 수정할 수있는 권리를 보유합니다.
1. 충전 전압
리튬 이온 (Li-ion) 배터리에는 전압 제어에 대한 엄격한 요구 사항이 있습니다 . 안전 표준을 초과하는 전압
으로 리튬 이온 배터리를 충전하면 배터리가 손상되고 폭발 할 수 있습니다 .
(1) 3.7V 리튬 이온 배터리 / IMR 배터리
3.7V 리튬 이온 배터리가 가장 일반적인 충전용 리튬 배터리입니다 . 이 배터리의 겉에는 종종 3.6V /
3.7V 신호가 표시됩니다 . 충전기가 삽입 된 배터리가 리튬 이온 배터리라고 판단하면 배터리는 4.2V 표
준 충전 모드로 자동 충전됩니다 . 이러한 유형의 배터리에는 여분의 전압 설정이 필요하지 않습니다.
(2) 3.8V 리튬 이온 배터리
3.8V 리튬 이온 배터리는 비교적 드뭅니다 . 보통 겉에 3.7V 표시가 있습니다 . 일반적으로 판매자는 구
매자에게 충전시 4.35V 의 충전 전력이 필요함을 알려야합니다. 이러한 유형의 배터리를 충전 할 때 수
동으로 충전 전압을 4.3V 로 설정하십시오. 그렇지 않으면 충전기가 기본적으로 4.2V 로 충전되고 적절
한 충전 전압을 제공 할 수 없습니다 .
(3) 3.2V LiFePO4 배터리
3.2V LiFePO4 배터리에는 LiFePO4 및 / 또는 3.2V 표시가 있습니다 . 이러한 유형의 배터리에는 주의하
십시오 . 수동 설정을 하지 않으면 충전기가 4.2V로 이 유형의 배터리를 충전하며 과도한 충전 전압으로
배터리를 손상 시키거나 폭발시킬 수 있습니다 . 안전한 충전을 위해 수동으로 충전 전압을 3.7V로 설정
해야 합니다 .
2. 충전 전류
모든 충전식 리튬 배터리 (Li-ion, IMR 및 LiFePO4 배터리 포함 ) 의 경우 충전에 1C * 이상의 전류를 사용하
지 않는 것이 좋습니다 . 소용량 배터리의 경우 충전 전류가 1C보다 작아야합니다 .
* C = 배터리 용량 . 예를 들어 , 2600mAh 재충전 용 리튬 배터리의 1C 는 2.6A입니다 . 3400mAh 충전식
리튬 배터리의 1C 는 3.4A입니다 .
지나치게 큰 충전 전류는 많은 양의 열을 발생시켜 결과적으로 배터리 손상과 폭발을 일으킵니다 .
경고 : 충전기는 배터리의 길이에 따라 충전 전류를 자동으로 판단하고 선택합니다. 길고 용량이 작은 일부 배
터리 ( 예 : 12650, 13650, 14650, 16650)의 경우 적절한 충전 전류 (1C 미만 ) 를 수동으로 설정하십시오 .
3. 주의 사항
(1) 어떤 식 으로든 배터리를 단락시키지 마십시오 .
(2) 전압이 2.8V 보다 낮을 때는 3.7V / 3.8V 리튬 배터리를 사용하지 마십시오 . 그렇지 않으면 과방 전 및 /
또는 다음 충전 시 폭발 위험이 있습니다 .
(3) 보호 회로가 있는 배터리를 사용하는 것을 강력하게 추천합니다 . 보호 회로가 없는 배터리 ( 예: IMR 배
터리 )의 경우 과방 전 및 누전에 주의하십시오 .
(4) 최대 정격 전류보다 큰 방전 전류로 배터리를 방전시키지 마십시오 .
4. 장기 보관
3.7V / 3.8V 충전 용 리튬 배터리의 최고 저장 전압은 3.7V 입니다 . 전압이 너무 낮거나 너무 높으면 보관
중에 배터리가 손상 될 수 있습니다 . 배터리를 3.7V로 방전하거나 장기간 보관하기 전에 충전기에서 3.7V
로 충전 할 수 있습니다 .
패키지의 유효성 검사 코드 및 QR 코드는 NITECORE 웹 사이트에서 확인할 수 있습니다 .
충전기는 NITECORE 공식 코드와 함께 사용해야합니다 . 공식 코드는 플러그에 NITECORE가 명확하게
인쇄되어 있습니다 . 충전 중에 타사 코드는 오작동, 과열 및 충전기의 화재를 유발할 수 있습니다 . 비
공식 코드 사용으로 인한 손해는 공식 보증의 적용을받을 수 없습니다 .
충전기는 Li-ion, IMR, 3.2V LiFePO4, Ni-MH / Ni-Cd 충전지만 충전 할 수 있습니다 . 다른 종류의 배터
리와 함께 충전기를 사용하지 마십시오 . 배터리가 폭발하거나 갈라 지거나 누출되어 재산 피해가 발생
하거나 부상을 입을 수 있습니다 .
리튬이온배터리에대한안전지침
-28- -29-
Page 17

(Italiano) UM4 Manuale d’istruzioni
Istruzioni d’uso
Connessione ad una fonte di alimentazione: collegare l’UM4 ad una fonte esterna di alimentazione (un
adattatore USB, una presa USB di un PC o qualsiasi altra forma di alimentazione con presa USB) utilizzando il cavo di
ricarica fornito.
Inserimento delle batterie: L’UM4 ore 4 slot di ricarica controllati indipendentemente. Inserite la batteria
compatibile nello slot di ricarica rispettando le polarità indicate. Dopo aver inserito la batteria l’UM4 comincerà il
processo di carica presentando in sequenza sul display LCD I dati sulla corrente di carica utilizzata, il voltaggio della
batteria, la percentuale di carica ed il tempo di ricarica trascorso.
Ispezione delle batterie e visualizzazione di errori: L’UM4 ha una protezione integrata contro l’inversione di
polarità e contro I cortocircuiti delle batterie inserite. Nel caso si incontrassero simili problematiche, il display LCD
indicherà la scritta “EE EE” lampeggiando, per avvisare l’utente dell’errore.
Carica intelligente: L’UM4 sceglie in modo automatico ed intelligente la corrente di carica appropriata da applicare
in base alla tipologia di batteria inserita ed alla loro capacità. E’ eventualmente disponibile una selezione manuale
della corrente di carica in base alle esigenze dell’utente. L’UM4 è compatibile con:
1) Batterie Ricaricabili Li-ion da 3.6V/3.7V
2) Batterie Ricaricabili Li-ion da 3.8V (4.35V±1% a piena carica)
3) Batterie Ricaricabili Ni-MH/Ni-Cd da 1.2V
4) Batterie Ricaricabili LiFePO4 da 3.2V
ImpostazioniPredenite
Le impostazioni predenite del caricabatterie (non congurato manualmente) sono le seguenti:
Tipologia della Batteria
Batterie Li-ion
(4.2V±1% a carica completa)
Batterie Ni-MH/Ni-Cd
(1.48V±1% a carica completa)
Nota: L’UM4 può selezionare automaticamente la modalità di carica per le batterie Ni-MH/Ni-Cd e per le Li-ion da 3.7V.
Le batterie LiFePO4 e le Li-ion da 3.8V richiedono impostazioni manuali. Per le batterie con lunghezza sica supere a
60mm, la capacità viene automaticamente riconosciuta come superiore a 1200mAh.
Utilizzo dei Pulsanti
Durante il processo di carica:
Premere brevemente il pulsante C per passare ciclicamente tra gli status di carica dei quattro slot.
Premere brevemente il pulsante V per passare ciclicamente tra la corrente di carica, il voltaggio della batteria, la
percentuale di carica ed il tempo di ricarica visualizzati sullo schermo LCD.
Premere a lungo il pulsante C per entrare nella selezione manuale di carica.
Premere a lungo il pulsante V per entrare nella modalità di ripristino delle batterie (operativo unicamente su batterie
IMR sovra scaricate)
Una volta entrati nella selezione manuale di carica:
Premere brevemente il pulsante C per passare tra I vari parametri (corrente di carica, voltaggio di cut-o)
Premere brevemente il pulsante V per aumentare di 100mA a pressione la corrente di carica o per passare in rassegna
I tipi di batteria o il voltaggio di cut-o
Premere a lungo il pulsante V per selezionare immediatamente la massima velocità di carica in fase di selezione della
corrente di carica.
Premere a lungo il pulsante C per salvare le impostazioni ed uscire dalla selezione manuale di carica.
Nota: Non eettuando scelte per oltre 10 secondi, si uscirà dalla selezione manuale di carica senza salvare le
modiche.
Impostazione del voltaggio di carica
L’UM4 riesce ad identicare automaticamente le batterie Li-ion da 3.6V/3.7V e le batterie Ni-MH/Ni-Cd adottando
di conseguenza un voltaggio di carica adeguato. Per le LiFePO4 e per le Li-ion da 3.8V vanno impostati invece dei
settaggi manuali nel seguente modo:
1. Prima che la batteria venga inserita e prima che il processo di carica cominci, premete rapidamente il pulsante
C per selezionare il corretto slot in cui inserete la batteria; successivamente premete a lungo il pulsante C per
entrare nella modalità di selezione di carica.
2. Una volta fatto, premete rapidamente il tasto C e quando il display LCD mostrerà la scritta “CHG. MODE”, premete
rapidamente il pulsante V per selezionare il corretto voltaggio di carica (3.7V/4.2V/4.3V).
3. Per le batterie LiFePO4 il voltaggio deve essere impostato a 3.7V; per le batterie Li-ion da 3.8V il voltaggio deve
essere impostato a 4.3V.
>1,200 mAh 1,000mA 300mA-1,500mA 1,000mA 300mA-1,500mA
<1,200 mAh 500mA 300mA-1,500mA 500mA 300mA-1,500mA
AA/AAA 500mA 300mA-1,500mA 500mA 300mA-1,500mA
C/D 1,000mA 300mA-1,500mA 1,000mA 300mA-1,500mA
Standard Mode QuickCharge Mode
Corrente
standard di
carica
Range selezionabile
della corrente di
carica applicata
Corrente
standard di
carica
Range selezionabile
della corrente di
carica applicata
-30- -31-
4. Una volta ultimate le scelte, premete a lungo il pulsante C per salvare le impostazioni ed uscire dalla modalità di
selezione di carica.
Impostazioni della corrente di carica
Per impostare la corrente di carica rispettate I seguenti passaggi:
1. Prima che la batteria venga inserita e prima che il processo di carica cominci, premete rapidamente il pulsante
C per selezionare il corretto slot in cui inserete la batteria; successivamente premete a lungo il pulsante C per
entrare nella modalità di selezione di carica.
2. Una volta fatto, il display LCD mostrerà la scritta “CHG. STATUS”. Premete rapidamente il pulsante V per
aumentare la corrente di carica di 100mA ad ogni successiva pressione. Premete a lungo il pulsante V per
accedere immediatamente alla massima corrente di carica impostabile.
3. Una volta ultimate le scelte, premete a lungo il pulsante C per salvare le impostazioni ed uscire dalla modalità di
selezione di carica.
Nota:
Se l’alimentazione elettrica al caricabatterie è modesta ed è stata impostata una corrente di carica elevata, il
caricabatterie adotterà automaticamente una distribuzione ottimale dell’energia a sua disposizione.
QuickCharge Mode
L’UM4 è compatibile con sistemi QuickCharge 2.0; nel caso la fonte di alimentazione sia connessa ad un alimentatore
QuickCharge 2.0 lo schermo LCD indicherà la scritta “Quick Charge” e l’output massimo per singolo slot diventerà di
1,500mA.
Riconoscimento automatico di batterie dotate di resistenze interne
Quando l’UM4 è acceso ed almeno una batteria è inserita, controllerà automaticamente che quest’ultima sia dotata di
una resistenza interna e lo segnalerà sul display in fase di congurazione nel menù “CHG. STATUS”. Se la resistenza
interna è inferiore a 250mΩ, verrà indicata la scritta “Good” sul display per informare del buono stato della batteria.
Se la resistenza interna è superiore a 250mΩ, verrà indicata la scritta “Poor”sul display, per indicare all’utente che è
giunto il momento di rimpiazzarla.
Calcolo del volume caricato
Durante il processo di carica, il sistema calcolerà automaticamente il volume caricato e lo mostrerà nel menù “CHG.
STATUS”.
Protezione anti cortocircuito ed inversione di polarità
Nel caso vengano inserite batterie on poli invertiti o cortocircuitate, la schermo LCD lampeggerà mostrando la scritta “EE
EE”.
Funzione di risparmio energetico
Nel caso non vengano eettuate azioni sulle batterie o sui pulsanti del caricabatterie in 3 minuti, lo schermo entrerà in
modalità risparmio energetico. Eettuando operazioni o inserendo batterie, lo schermo tornerà alla normalità.
Attivazione di batterie Li-ion sovra scaricate
L’UM4 è in grado di attivare batterie Li-io sovra scaricate e dotate di circuito di protezione. Dopo aver inserito la
batteria, l’UM4 la testerà e la attiverà prima di procedere alla ricarica. Nel caso la batteria fosse identicata come
danneggiata e non attivabile, lo schermo mostrerà la scritta “EE EE”.
Ripristino di batterie IMR sovra scaricate
Nel caso venga inserita una batteria IMR sovra scaricata, il sistema indicherà la scritta “EE EE”. In questo caso, potete
tentare il ripristino premendo a lungo il pulsante V entrando nel Restoration Mode. Fatto questo, il processo di carica
comincerà normalmente. Suggeriamo di dismettere batterie IMR che ciclicamente presentino questa problemativa o
che falliscano il ripristino.
ATTENZIONE: Ripristinando una batteria IMR, la protezione contro l’inversione di polarità è temporaneamente
disattivata. Fate pertanto attenzione in fase di inserimento batterie per evitare danni a cose e a persone.
Protezione contro la carica ad oltranza
L’UM4 calcola indipendentemente il tempo di carica di ogni singola batteria inserita. Nel caso il tempo di carica superi
le 20 ore continuative in un unico slot, questo verrà interrotto ed il display segnalerà la scritta “END” sotto il menu “CHG.
STATUS”. Questo per prevenire possibili surriscaldamenti, o danni a cose o a persone.
Page 18

(Italiano) UM4 Manuale d’istruzioni
Precauzioni
1. Il caricatore è limitato all’uso di batterie ricaricabili di tipo Li-ion, IMR, LiFePO4, Ni-MH/Ni-Cd. NON utilizzare con
altre tipologie di batterie per evitare esplosioni o danni a cose o a persone.
2. In fase di carica il caricatore produce un minimo di riscaldamento e dissipa calore, non allarmatevi, è del tutto
normale.
3. Temperatura d’uso ambientale: -10~40℃ (14~104℉); Temperatura di stoccaggio: -20~60℃ (-4~140℉)
4. Controllate con cura le indicazioni sul caricatore in fase di installazione delle batterie.
5. Allacciate il caricatore a fonti energetiche con voltaggi adeguati, indicati in questo manuale d’uso. In caso di
voltaggi bassi o elevati si incorre in rischi di malfunzionamenti o incendi.
6. NON caricare batterie visivamente danneggiate o cortocircuitate.
7. Il caricatore è pensato per essere utilizzato unicamente da adulti; persone di minore età devono utilizzarlo sotto
stretta supervisione.
8. NON lasciare il caricatore incustodito quando è alimentato da una fonte di corrente. Staccare dall’alimentazione ai
primi segni di malfunzionamento.
9. Nel caso di settaggi manuali, assicuratevi di aver selezionato i programmi corretti. Settaggi errati possono
danneggiare il caricatore, causare incendi o esplosioni.
10. NON ricaricate batterie primarie (non ricaricabili) alo ZincoCarbone, Litio, CR123A, CR2 ets. Per evitare rischi di
incendi o esplosioni.
11. NON caricate batterie IMR danneggiate per evitare cortocircuiti ed esplosioni.
12. NON caricate o scaricate nessun tipo di batteria che mostri segni di perdite di liquidi, che mostrino rigonamenti o
con parti esterne strappate o danneggiate.
13. Usate i cavi dati in dotazione con il caricabatterie per alimentarlo, questo per ridurre i rischi di utilizzare cavi
di basso livello qualitativo. Connettete e sconnettete i cavi solo operando tramite I vari connettori, non tirate o
strattonate i cavi. NON utilizzate il caricatore se vi dovesse apparire in qualche modo danneggiato.
14. NON esporre a raggi solari diretti, fonti di calore, amme vive, liquidi, pioggia o neve. Evitate ambienti con cambi
repentini di temperature o con temperature troppo alte o troppo basse.
15. Usare il caricatore in aree ventilate, NON usare in ambienti umidi e tenetelo a debita distanza da materiali volatili e
combustibili.
16. Evitate qualsiasi tipo di urto o di impatto al caricatore.
17. NON inserite nessun tipo di metallo conduttivo nel caricabatterie, questo porta a cortocircuiti e ad esplosioni.
18. NON sovraccaricare o sovra scaricare le batterie. Ricaricate le batterie appena esauriscono la loro carica.
19. Scollegate il caricatore e rimuovete tutte le batterie inserite quando non in uso.
20. NON smontare o modicare in nessun modo il caricatore. Facendolo invaliderete qualsiasi forma di garanzia.
21. NON utilizzate in modo improprio. Utilizzatelo solo per le funzioni a cui è principalmente preposto.
Assicurazione
Questo prodotto è assicurato a livello globale da Ping An Insurance (Group) Company of China, Ltd. NITECORE non è
responsabile in alcun modo di danni o perdite di alcun tipo nel caso l’utente non abbia rispettato correttamente tutte
le indicazioni presenti in questo manuale.
Garanzia
La qualità di tutti i prodotti NITECORE® è garantita. I prodotti difettosi o non funzionanti possono essere restituiti per
la sostituzione tramite i negozianti ed il distributore uciale entro 15 giorni dall'acquisto. Trascorsi i 15 giorni, tutti i
prodotti NITECORE® difettosi o non funzionanti saranno riparati gratuitamente per un periodo di 12 mesi dalla data
di acquisto. Dopo i 12 mesi, si applica una garanzia limitata, che copre il costo di interventi e manutenzione, ma non
quello di accessori e ricambi. La garanzia decade in tutte le seguenti circostanze:
1. Il prodotto è stato smontato, rimontato e/o modicato da personale non autorizzato.
2. Il prodotto è danneggiato in seguito a uso improprio.
Per informazioni aggiornate sui prodotti e i servizi NITECORE
NITECORE® o inviare un'email a service@nitecore.com
※ Tutte le immagini, i testi e le dichiarazioni riportate nel presente manuale sono da intendersi a mero titolo di
consultazione. Dovesse esserci qualsiasi dierenza fra questo manuale e le informazioni presenti su www.nitecore.
com, prevalgono quelle riportate sul sito uciale. SYSMAX Innovations Co., Ltd. si riserva il diritto di interpretare e
modicare il contenuto di questo documento in qualsiasi momento e senza preavviso.
®
, per cortesia contattare il distributore nazionale
Istruzioni di sicurezza sulle batterie agli ioni di Litio
1. Voltaggio di carica
Le batterie agli ioni di Litio (Li-ion) hanno indicazioni restrittive in fase di utilizzo del voltaggio di carica. Caricare
batterie Li-ion usando voltaggi elettrici oltre gli standard di sicurezza può condurre a danni delle batterie, incendi o
esplosioni.
(1) Batterie 3.7V Li-ion/IMR
Le batterie Li-ion da 3.7V sono le più comuni reperibili sul mercato. Spesso marcate esternamente con voltaggi
di 3.6/3.7V. Nel caso il caricatore identichi la batteria inserita come una Li-ion, verrà normalmente applicata
una corrente di carica standard di 4.2V. Non avete necessità di impostare voltaggi dierenti per queste
batterie.
(2) Batterie 3.8V Li-ion
Le batterie Li-ion da 3.8V sono decisamente rare e solitamente sono marcate esternamente come 3.7V.
Normalmente i produttori indicano di utilizzare correnti di carica di 4.35V. Quando rircaricate queto tipo di
batterie impostate manualmente il voltaggio a 4.3V in modo da fornire un voltaggio adeguato in fase di carica.
(3) Batterie LiFePO4 3.2V
Le batterie LiFePO4 sono esternamente marcate come LiFePO4 e/o 3.2V. Prestate grande attenziobe con
questo tipo di batterie. Nel caso non impostiate manualmente I voltaggi, il caricatore potrebbe caricarle ad
un voltaggio errato di 4.2V danneggiandole o portandole all’esplosione. Dovete obbligatoriamente settare
manualmente il voltaggio di carica su 3.7V in modo da minimizzare qualsiasi possibilità di rischi.
2. Corrente di carica
Suggeriamo di non utilizzare correnti di carica superiori a 1C* per qualsiasi batteria ricaricabile al litio (Li-ion, IMR
e LiFePO4). Su batterie a bassa capacità, la corrente di carica deve essere inferiore a 1C.
* 1C indica la capacità nominale della batteria. Per esempio, 1C di una 2600mAh equivale a 2.6A; 1C di una
3400mAh equivale a 3.4A.
Una corrente di carica eccessivamente ampia condurrà ad una grande generazione di calore con conseguente
danneggiamento delle batterie e a possibili esplosioni.
Attenzione: I nostri caricatori applicano in modo automatico la giusta corrente di carica basandosi sulla lunghezza
delle batterie inserite. Per batterie lunghe, ma con capacità bassa (es. 12650, 13650, 14650, 16650), applicate
manualmente una corretta corrente di carica, inferiore a 1C.
3. Precauzioni
(1) NON cortocircuitare in nessun modo le batterie.
(2) NON utilizzare batterie al Litio da 3.7V/3.8V quando il loro voltaggio rale è inferiore a 2.8V in modo da evitare
che si possano sovra scaricare e danneggiarsi in fase di successiva ricarica.
(3) Raccomandiamo fortemente di utilizzare unicamente batterie dotate di circuiti protettivi. Per batterie prive di
circuiti, come le IMR, prestate grande attenzione alla sovra scarica e ai cortocircuiti.
(4) NON scaricate una batteria utilizzando una corrente di scarica superiore alla sua corrente nominale.
4. Conservare le batterie a lungo termine
Il miglior voltaggio per conservare a lungo termine batterie ricaricabili al litio da 3.7V/3.8V è di 3.7V. Voltaggi
troppo alti o troppo bassi possono danneggiare la batteria. Consigliao di caricare o scaricare le batterie al voltaggio
di 3.7V. prima di conservarle o di stoccarle a lungo.
Validation code e QR code sull’imballo originale del prodotto devono essere
Il caricatore deve essere utilizzato con i cavi originali NITECORE dati in dotazione. Sono
identicabili chiaramente dal logo NITECORE sullo spinotto. Durante la carica, cavi di terze parti
possono generare malfunzionamenti, surriscaldarsi o addirittura incendiarsi. Danni causati da cavi
non ufciali non sono coperti da garanzia.
Il caricatore deve essere utilizzato esclusivamente con batterie ricaricabili Li-ion, IMR, 3.2V LiFePO4, Ni-MH/
Ni-Cd. NON utilizzare altri tipi di batterie per evitare esplosioni o danni a cose o a persone.
registrati sul sito internet ucialer di NITECORE.
-32- -33-
Page 19

(Română)UM4Manualdeutilizare
Instrucțiunideoperare
Conectarealasursădecurent: conectați UM4 la o sursă externă de curent (adaptor USB, computer sau alte
aparaturi de încărcare USB) prin intermediul cablului de încărcare USB.
Introducerea acumulatorilor : UM4 are patruă canale de încărcare care se controlează în mod independent.
Introduceți acumulatorii din tipurile compatibile în ecare canal respectând polaritatea marcată pe ecare canal de
încărcare. După instalarea acumulatorului, UM4 începe încărcarea și prezintă sănătarea bateriei prin “Good” sau “Poor”,
rezistența internă, curentul de încărcare, voltajul acumulatorului, volumul încărcat și timpul de încărcare pe ecranul
LCD.
Inspecțiabateriilorșiraportareaerorilor: UM4 are protecție împotriva polarității inversate și funcție de protecție
împotriva scurtcircuitării. Dacă acumulatorii sunt introduși cu polaritatea inversată sau scurtcircuitați, ecranul LCD
al canalului de încărcare aferent indică “EE EE” și așajul nivelului de putere clipește pentru a notica utilizatorul de
existenta unei erori.
Încărcareinteligentă: UM4 poate alege curentul adecvat de încărcare pe baza detectării inteligente a tipurilor și
capacității acumulatorilor. Este disponibilă și selectarea manuală a curentului. UM4 este compatibil cu:
1) Acumulatori Li-Ion 3,6V/ 3.7V
2) Acumulatori Li-Ion 3,8V (4.35V±1% când sunt complet încărcați)
3) Acumulatori 1,2V Ni-MH/ Ni-Cd
4) Acumulatori 3.2V LiFePO4
Setăriimplicite
Setările implicite (necongurate manual) pentru UM4 sunt:
Tipul și capacitatea acumulatorului
Acumulatori Li-ion
(4.2V±1% complet încărcați)
Acumulatori Ni-MH/Ni-Cd
(1.48V±1% complet încărcați)
Notă:UM4 poate selecta automat modurile de încărcare pentru acumulatorii Ni-MH/Ni-Cd și 3.7V Li-ion. Acumulatorii
LiFePO4 și 3.8V Li-Ion necesită reglarea manuală a voltajelor de întrerupere a încărcării. Pentru acumulatorii cu
lungime >60mm, UM4 identică automat capacitatea >1.200mAh.
Utilizarea butoanelor
Întimpulîncărcării
Apăsați scurt butonul C pentru a trece prin statusul încărcării celor patru canale.
Apăsați scurt butonul V pentru a trece prin sănătatea bateriei prin “Good” sau “Poor”, rezistența internă curentul de
încărcare, voltajul bateriei, volumul încărcat și timpul de încărcare pe ecranul LCD.
Volumul încărcat și timpul de încărcare pe ecranul LCD.
Apăsați lung butonul C pentru a intra în modul pentru reglarea încărcării (Charging Setting).
Apăsați lung butonul V pentru a intra în modul de restaurare (Restoration Mode) – are efect doar în cazul
acumulatorilor supra-descărcați IMR.
Dupăceintrațiînmoduldereglareaîncărcării(ChargingSetting).
Apăsați scurt butonul C pentru a schimba parametrii setărilor (curent de încărcare și voltaj de oprire).
Apăsați scurt butonul V pentru a crește cu 100mA de ecare dată când setați curentul de încărcare (Charging
Current); sau schimbați la alte tipuri de baterii și voltaje când setați voltajul de oprire (Cut-O Voltage).
Apăsați lung butonul V pentru a accesa direct setarea maximă când reglați curentul de încărcare (Charging Current).
Apăsați lung butonul C pentru a salva și a ieși din modul de setare pentru încărcare.
Notă: Nu executați nicio acțiune timp de 10 secunde pentru a ieși din modul de setare pentru încărcare fără să salvați
și să vă întoarceți la setările anterioare.
Setărilevoltajuluideîncărcare
UM4 este compatibil cu acumulatori 3.6V/ 3.7V Li-ion și Ni-MH/Ni- cu detectare automată și adoptarea voltajului de
încărcare potrivit. Pentru acumulatorii LiFePO4 și 3.8V Li-ion, vă rugăm să urmați pașii de mai jos pentru setările
voltajului de încărcare:
1. După ce acumulatorul este introdus și încărcarea începe, apăsați scurt butonul C pentru a selecta canalul de
încărcare corect și apăsați lung butonul C pentru a intra în modul pentru setarea încărcării.
2. După ce ați intrat în modul pentru setarea încărcării, apăsați scurt butonul C. Când ecranul arată clipind textul “CHG.
MODE”, apăsați scurt butonul V pentru a selecta voltajul de încărcare corect (3.7V/ 4.2V/ 4.3V).
>1,200 mAh 1.000mA 300mA-1.500mA 1.000mA 300mA-1.500mA
<1,200 mAh 500mA 300mA-1.500mA 500mA 300mA-1.500mA
AA/AAA 500mA 300mA-1.500mA 500mA 300mA-1.500mA
C/D 1.000 mA 300mA-1.500mA 1.000mA 300mA-1.500mA
Mod standard Mod QC
Implicit
Intervalul de
Încărcare
selecție a curentului
Curent
de încărcare
Implicit
Încărcare
Curent
Intervalul de
selecție a curentului
de încărcare
3. Pentru acumulatorii LiFePO4, voltajul trebuie setat la 3.7V. Pentru acumulatorii 3.8V Li-ion, voltajul trebuie setat la
4.3V.
4. Când setarea este nalizată, apăsați lung butonul C pentru a salva și a ieși din modul de setare a încărcării.
Setărilecurentuluideîncărcare
Vă rugăm să urmați pașii de mai jos pentru setările curentului de încărcare:
1. După ce acumulatorul este introdus și procesul de încărcare începe, apăsați scurt butonul C pentru a selecta
canalul de încărcare corect și apăsați lung butonul C pentru a intra în modul pentru setarea încărcării (Charging
Setting Mode).
2. După ce intrați în modul pentru setarea încărcării, ecranul arată clipind textul “CHG. STATUS”. Apăsați lung butonul
V pentru a crește curentul de încărcare cu o valoare de 100mA de ecare dată. Apăsați lung butonul V pentru a
accesa direct setarea maximă.
3. Când setarea este nalizată, apăsați lung butonul C pentru a salva și a ieși din modul de setare a încărcării.
Notă:
Când puterea de input este insucientă și este setat un curent de încărcare mare, încărcătorul adoptă automat
distribuirea inteligentă a curentului în funcție de puterea de input.
•
În cazul în care curentul de încărcare este același în ambele canale de încărcare, slotul 1 va avea prioritate în fața
slotului 2. Când slotul 1 intră în modul CV cu curent scăzut, slotul 2 își ajustează automat curentul de încărcare
pentru a atinge puterea maximă.
În cazul în care curentul de încărcare este setat diferit în cele două canale de încărcare, slotul setat pentru un
•
curent de încărcare mai mare are prioritate în fața celuilalt pentru a obține puterea maximă.
ModuldeîncărcareQC
UM4 are disponibil QC 2.0. Când îl conectați la un aparat care suportă QC sau este conectat la un adaptor QC, displayul așează “Quick Charge” și puterea maximă a unicului slot atinge 1.500 mA.
Detectareaautomatăarezistențeiinterneabateriei
Când UM4 este pornit și acumulatorul este introdus, acesta detectează automat și așează rezistența internă sub “CHG.
STATUS”. Când rezistența internă este sub 250mΩ, așează pe ecran “Good”. Când este peste 250mΩ, așează “Poor”
indicând astfel că acumulatorul trebuie înlocuit.
Calculareavolumuluiîncărcat
În timpul procesului de încărcare, sistemul calculează automat și așează volumul încărcat sub “CHG. STATUS”.
Protecțieîmpotrivascurtcircuităriișiapolaritățiiinversate
Dacă acumulatorii sunt introduși cu polaritatea inversată sau sunt scurtcircuitați, ecranul clipește arătând “EE EE”.
Funcțiadesalvareaenergiei
Dacă timp de 3 minute nu se constată vreo acțiune asupra butoanelor sau acumulatorilor, ecranul se stinge automat
pentru a economisi energie. Orice acțiune îl repornește.
ActivareaacumulatorilorLi-Ionsupra-descărcați
UM4 activează acumulatorii Li-Ion supradescărcați, cu circuit de protecție. După introducerea acumulatorului, înaintea
încărcării, UM4 îl testează și activează. Dacă acumulatorul este detectat ca ind deteriorat, ecranul arată “EE EE”.
RestaurareaacumulatorilorIMRsupra-descărcați
Când este introdus un acumulator supra-descărcat IMR, ecranul arată “EE EE”. În acest caz, apăsați lung V pentru a
intra în modul de restaurare. După aceea, procesul de încărcare continuă. Acumulatorul trebuie înlocuit dacă nu este
recuperat după mai multe încercări.
NOTĂ: Când încercați să recuperați un acumulator IMR, protecția împotriva polarității inversate este temporar
dezactivată. Asigurați-vă că acumulatorii sunt introduși corect, în caz contrar pot lua foc sau exploda.
Protecțiaîmpotrivaîncărcăriiîndelungate
UM4 calculează separat timpul de încărcare pentru ecare acumulator. Când timpul de încărcare depășește 20 de
ore într-un slot, oprește automat încărcarea în acest slot și END sub “CHG. STATUS”. Această caracteristică previne
posibila supra-încălzire și chiar explozia determinate de problemele puse de calitatea acumulatorului.
-34- -35-
Page 20

(Română)UM4Manualdeutilizare
Atenție
1. Acest încărcător alimentează doar acumualtori Li-ion, IMR, LiFePO4, Ni-MH/Ni-Cd. NU folosiți încărcătorul cu alte
tipuri de acumulatori deoarece pot rezulta: explozia bateriei, crăpări sau scurgeri, cauzând pagube materiale și/
sau vătămări corporale.
2. În timpul procesului de încărcare se produce căldură moderată, ceea ce este un lucru normal
3. Temperatura de operare: -10~40℃ (14~104℉); Temperatura de depozitare: -20~60℃ (-4~140℉)
4. Citiți cu atenție toate etichetele de pe dispozitiv pentru a vă asigura că acumulatorii sunt introduși corect.
5. Vă rugăm să conectați încărcătorul la surse de curent cu tensiunea de intrare specicată în acest manual de
utilizare. Dacă tensiunea de intrare este prea scăzută sau prea ridicată, pot apărea defecțiuni și se poate produce
chiar foc.
6. NU încărcați acumulatori dacă există indicii de defecțiune sau scurtcircuitare.
7. Încărcătorul poate folosit doar de persoane peste 18 ani. Copiii sub această vârstă trebuie supravegheați de un
adult când folosesc încărcătorul.
8. NU lăsați produsul nesupravegheat cât timp este conectat la o sursă de curent. Deconectați produsul la orice semn
de defecțiune.
9. Asigurați-vă că ați ales programul și setările corecte. Programul sau setările incorecte pot deteriora încărcătorul, să
cauzeze foc sau explozie.
10. NU încercați să încărcați baterii nereîncărcabile precum Zinc-Carbon, Litiu, CR123A, CR2 sau altă chimie care nu
este suportată din cauza risculului de a lua foc.
11. NU încărcați un acumulator IMR deteriorat întrucât acest lucru poate cauza scurtcircuitarea încărcătorului sau
explozie.
12. NU încărcați sau descărcați acumulatori cu urme de scurgeri, expansiune/ umare, ambalaj sau carcasă exterioară
deteriorată, schimbare de culoare sau distorsiune.
13. Utilizați adaptorul și cablul original. Pemtru a reduce riscul deteriorării cablului, ÎNTOTDEAUNA să trageți de
conector, nu de cablu. NU-L utilizați dacă încăcătorul pare să e deteriorat în vreun fel.
14. NU expuneți aparatul direct la soare, aparate de încălzit, acără deschisă, mediu cu ploae sau ninsoare; evitați
temperaturile extreme de ridicate sau de scăzute și schimbările bruște de temperatură.
15. Depozitați aparatul în spații ventilate. NU utilizați aparatul în medii umede și păstrați-l departe de orice material
combustibil.
16. Evitați orice șoc sau impact asupra dispozitivului.
17. NU introduceți conductori sau obiecte metalice în dispozitiv pentru a evita scurtcircuitările și exploziile.
18. NU supraîncărcați sau supradescărcați acumulatorii. Vă rugăm să reîncărcați acumulatorul imediat ce nu mai are
putere.
19. Deconectați aparatul și îndepărtați acumulatorii când acesta este nefolosit.
20. NU dezasamblați sau modicați aparatul, întrucât garanția produsului devine invalidă. Vă rugăm să consultați
secțiunea de garanție pentru informații complete referitoare la aceasta.
21. NU abuzați! Utilizați aparatul doar în scopul și funcția pentru care a fost proiectat
Exonerarederăspundere
Acest produs este asigurat la nivel global de Ping An Insurance (Group) Company of China, Ltd. NITECORE nu
este responsabilă sau răspunzătoare pentru pierderile, deteriorările sau pretențiile de orice fel apărute ca urmare a
nerespectării instrucțiunilor furnizate în acest manual de utilizare.
Garanție
Dealerii și distribuitorii NITECORE autorizați sunt responsabili pentru oferirea de service în perioada de garanție. În
cazul în care apare o problemă acoperită de garanție, clienții pot contacta dealerii sau distribuitorii doar dacă produsul
a fost achiziționat de la un distribuitor autorizat sau distribuitor. Garanția NITECORE este oferită numai pentru
produsele achiziționate de la o sursă autorizată! Acest lucru se aplică tuturor produselor NITECORE.
Pentru a vă calica pentru garanție, vă rugăm să consultați secțiunea “NOTĂ IMPORTANTĂ PENTRU GARANȚIE” de
mai sus pentru validarea produsului.
Orice produs cu defecte poate înlocuit printr-un distribuitor în 15 zile de la cumpărare. După cele 15 zile, toate
produsele NITECORE® defecte sau cu defecțiuni pot reparate gratuit pentru o perioadă de 12 luni (1 an) de la
data achiziționării. După cele 12 luni (1 an), se aplică o garanție limitată, care acoperă costul forței de muncă și de
întreținere, dar nu și costul de accesorii sau piese de schimb.
Garanția este anulată daca produsul (produsele) este/ sunt:
1. sparte, reconstituite și/ sau modicate de către persoane neautorizate.
2. deteriorate din cauza manipulării greșite (de exemplu: polaritate inversată, introducerea de baterii care nu sunt
reîncărcabile).
3. deteriorate din cauza scurgerii acumulatorului.
Pentru cele mai recente informații privind produsele și serviciile NITECORE
NITECORE® local sau să trimiteți un e-mail la service@nitecore.com.
※ Toate imaginile, textele și declarațiile specicate în acest manual de utilizare au titlu de prezentare. În cazul în care
apar discrepanțe între manualul de față și informațiile specicate pe www.nitecore.com, prevalează cele de pe
website-ul ocial. SYSMAX Innovations Co., Ltd. își rezervă dreptul de a interpreta și de a modicconținutul acestui
document, în orice moment, fără noticare prealabilă.
®
, vă rugăm să contactați un distribuitor
-36- -37-
InstrucțiunidesiguranțăpentruacumulatoriLi-Ion
1. Tensiunedeîncărcare
Acumulatorii Li-Ion au cerințe stricte privind controlul tensiunii. Încărcarea bateriilor Li-ion cu tensiune electrică
peste standardul de siguranță poate duce la deteriorarea și explozia bateriilor
(1) Acumulatori 3.7V Li-ion / IMR
Acumulatorii 3.7V Li-ion sunt cei mai comuni acumulatori Litiu. Pe învelișul acestora este trecut adeseori 3.6V
/ 3.7V. Dacă încărcătoarele noastre consideră că un acumulator introdus este Li-ion, acesta este încărcat
automat în modul de încărcare standard de 4.2V. Nu aveți nevoie de setări suplimentare de tensiune pentru
aceste tipuri de acumulatori.
(2) Acumulatori 3.8V Li-ion Batteries
Acumulatorii Li-ion de 3.8V sunt relativ rari și, de obicei, pe învelișul lor apare 3.7V. În mod normal, vânzătorul
informează cumpărătorul că trebuie încărcați cu o putere de 4,35 V. Când încărcați acest tip de acumulator,
setați manual tensiunea de încărcare la 4.3V, în caz contrar încărcătorul încarcă la 4.2V în mod implicit și nu
poate furniza tensiunea de încărcare adecvată.
(3) Acumulatori 3.2V LiFePO4
Acumulatorii 3.2V LiFePO4 au notat pe învelișul lor LiFePO4 și/ sau 3.2V. Aveți grijă cu acest tip de
acumulatori. Fără o setare manuală, încărcătoarele noastre încarcă acest tip de baterii cu 4.2V și deteriorează
sau acumulatorul poate chiar să explodeze din cauza tensiunii excesive de încărcare. Pentru o încărcare sigură,
trebuie să setați manual tensiunea de încărcare la 3,7 V.
2. Curentdeîncărcare
Pentru toți acumulatorii litiu (inclusiv acumulatorii Li-ion, IMR și LiFePO4), sugerăm să nu folosiți curent mai mare
de 1C * pentru încărcare. Pentru acumulatorii cu capacitate mică, curentul de încărcare trebuie să e mai mic de
1C.
* C = Capacitatea unui acumulator. De exemplu, 1C într-un acumulator Litiu de 2600mAh este de 2.6A. 1C într-un
acumulator Litiu de 3400mAh este de 3,4A.
Curentul de încărcare excesiv de mare duce la o cantitate mare de căldură și, în consecință, la deteriorarea și
explozia bateriei.
Avertizare: Încărcătoarele noastre apreciază automat și selectează curentul de încărcare după lungimea
acumulatorilor. Pentru unii acumulatori lungi, dar de capacitate mică (de ex. 12650, 13650, 14650, 16650), vă rugăm
să setați manual curentul de încărcare corespunzător (mai mic de 1C).
3. Precauții
(1) NU scurtcircuitați acumulatorul în niciun fel.
(2) NU utilizați un acumulator litiu de 3.7V / 3.8V atunci când tensiunea acestuia este mai mică de 2.8V, în caz
contrar poate supraîncărcat și/ sau predispusă la explozie la încărcarea ulterioară.
(3) Vă recomandăm acumulatorii cu circuit de protecție. Pentru cei fără circuit de protecție (cum ar acumulatorii
IMR), vă rugăm să ți atenți la supraîncărcare și la scurtcircuitare.
(4) NU descărcați acumulatorul cu un curent de descărcare mai mare decât curentul nominal maxim.
4. Depozitarea pe termen lung
Cea mai bună tensiune de stocare pentru acumulatorii cu litiu de 3.7V / 3.8V este 3.7V. Tensiunea prea mică sau
prea ridicată pot deteriora acumulatorul în timpul stocării. Puteți descărca acumulatorul la 3.7V sau să îl puteți
încărca într-un încărcător la 3.7V înainte de a-l depozita pe termen lung.
Codul de validare și codul QR de pe pachet pot vericate pe site-ul NITECORE.
Încărcătorul trebuie utilizat cu cablurile ociale NITECORE. Cablurile ociale sunt identicate cu numele
NITECORE imprimat clar pe ștecher. În timpul încărcării, cablurile de terță parte pot cauza funcționarea
defectuoasă, supraîncălzirea și chiar aprinderea încărcătorului. Deteriorările cauzate de utilizarea cablurilor
neociale nu pot acoperite de garanția ocială.
Încărcătorul este limitat la încărcarea acumulatorilor Li-ion, IMR, 3.2V LiFePO4, Ni-MH / Ni-Cd. NU utilizați
încărcătorul cu alte tipuri de acumulatori, deoarece acest lucru poate duce la explozia, crăparea sau
scurgerea acumulatorilor, cauzând pagube materiale și / sau vătămări corporale.
Page 21

(简体中文)UM4 使用说明书
使用说明
将 USB 充电线一端连接UM4 充电器,并把另一端接上USB充电设备(USB适配器、电脑或其他
接通电源:
USB 充电器设备)即可进行充电。
本充电器共有 4 个充电槽,每个充电槽均可独立控制,用户可在各个充电槽中按照充电器上所标识的
放入电池:
正负极方向正确放入不同种类的充电电池。
当电池放入 UM4,并进入充电状态后,显示屏会显示电池健康状态(以 Good,Poor两个等级显示,Good 表
示电池状态健康,Poor 表示电池状态不健康)、电池内阻、充电电流、电池电压、已充电量及充电时间。
电池检测与报错:
量格整体闪烁提示。
智能充电:
兼容下面四大类型电池:
1) 3.6V/3.7V 锂离子充电电池
2) 3.8V 锂离子充电电池(充满为 4.35V±1%)
3) 1.2V 镍氢 /镍镉充电电池
4) 3.2V 磷酸铁锂电池。
默认充电参数
在不对充电器进行设置时,默认充电参数为:
(充满电为 4.2V±1%)
(充满电为1.48V±1%)
注:
电池和 3.8V锂离子电池,需要用户手动设置截止充电电压。大于60mm 长的电池自动识别为大于 1200mAh电池。
功能键使用方法
当电池处于正常充电状态时:
短按“C”键: 可切换显示 4个槽的充电状态;
短按“V”键: 可切换显示电池健康状态、电池内阻、充电电流、电池电压、已充电量、充电时间参数;
长按“C”键: 进入充电设置模式;
长按“V”键: 进入过放锂电池修复模式(本功能只对过放锂电池生效)。
当电池进入设置模式后:
短按“C”键: 可切换至当前电池所需设置的参数(充电电流和截止电压);
短按“V”键: 在设置电流时,每次短按“V”键,充电电流值递加 100mA;
在设置电压时,每次短按“V”键,可切换不同电池类型及截止电压;
长按“V”键: 在设置电流时,可快速设置充电电流至最大值;
长按“C”键: 保存设置并退出设置模式。
注:
前所使用的参数。
充电电压设置方法
本充电器可自动识别 3.6V/3.7V 锂离子充电电池和镍氢 /镍镉充电电池,当放入电池后,即可自动选择合适的充
电电压进行充电。如需对磷酸铁锂电池或 3.8V 锂离子充电电池充电时,请按以下步骤设置充电电压:
1. 放入电池并进入正常充电后,短按“C”键,选择相应的槽;再长按“C”键,进入充电设置模式;
2. 进入设置模式后,短按“C”键,当显示屏“CHG. MODE”字样下方信息闪烁显示时,可通过短按“V”键
3. 磷酸铁锂电池需手动设置电压为 3.7V,3.8V 锂离子充电电池需手动设置电压为 4.3V;
4. 设置成功后长按“C”键,即可保存设置并退出设置模式。
充电电流设置方法
请按以下步骤设置充电电流:
1. 放入电池并进入正常充电后,短按“C”键,选择相应的槽;再长按“C”键,进入充电设置模式;
UM4 带防反接和短路保护功能。若电池故障或短路不可充时,屏幕显示“EE EE”,且该槽电
UM4 可智能识别当前电池类型以及容量大小选择合适的充电电流,并提供手动选择充电电流功能。
电池类型与容量
>1200 mAh 1000mA 300mA-1500mA 1000mA 300mA-1500mA
锂电池
<1200 mAh 500mA 300mA-1500mA 500mA 300mA-1500mA
镍氢 / 镍镉电池
当装入镍氢 / 镍镉充电电池以及3.7V 锂离子电池时,充电器会自动选择合适的充电方式进行充电。磷酸铁锂
参数设置后,如没有长按“C”键保存。在无按键操作的 10秒后,充电器会自动退出设置模式,并恢复设置
选择充电电压模式(3.7V/4.2V/4.3V);
AA/AAA 500mA 300mA-1500mA 500mA 300mA-1500mA
C/D 1000mA 300mA-1500mA 1000mA 300mA-1500mA
标准充电模式 快充充电模式
默认充电电流 充电电流可选范围 默认充电电流 充电电流可选范围
-38- -39-
2. 进入设置模式后,显示屏“CHG. STATUS”字样下方信息会闪烁显示,此时每次短按“V”键,充电电流值
以 100mA 递增,长按“V”键可快速增加至最大电流值;
3. 设置成功后长按“C”键,即可保存设置并退出设置模式。
当输入功率不足时,若设置了大电流充电,充电器会根据输入功率自动进行智能电流分配。
注:
快充充电功能
本充电器支持 QC 2.0 快充输入。当检测到所连接的供电设备(或适配器)支持 QC快充时,显示屏右上方会显
示“Quick Charge”字样。此时单槽最大充电电流可达 1500mA。
自动检测电池内阻功能
充电器接通电源后放入电池,会自动检测电池的内阻值并在“CHG. STATUS”显示出来,当内阻小于 250mΩ,
显示“Good”;当内阻大于 250mΩ,则显示“Poor”,表明电池健康状态低下,建议用户更换电池
检测已充入电量功能
在充电过程中,UM4 会自动计算已经充入电池的电量,并在“CHG. STATUS”实时显示出来。
电池防反接与防短路保护功能
当装入电池反接或短路时,显示屏会闪烁显示“EE EE”字样提示。
节能省电功能
若超出 3 分钟没有按键或电池操作,LCD 屏幕亮度会自动变暗以节能省电;当有按键或电池操作,显示屏会再次
亮起。
电池保护板激活功能
充电器对带电池保护电路的过放锂电池具有激活功能。当放入电池后,UM4 将对电池进行检测和自动激活。充电
器无法激活的电池将会被认为是已损坏的电池,显示屏会显示“EE EE”字样提示用户。
锂电池修复功能
当放入过放的 IMR 锂电池时,显示屏会显示“EE EE”字样提示。此时长按“V”键,即可进入修复模式,修复完
成后会自动进入正常的充电模式。如经过多次修复都无法充电,建议更换有问题的电池。
当使用 IMR 电池修复功能时,防反接保护功能暂时失效。要注意保证电池安装正确,否则可能引起电池起火
注:
甚至爆炸。
充电超时保护功能
UM4 将会对每一槽的电池充电时间进行独立计算,当充电时间超过20 小时,充电器会强行关断该槽充电功能,
“CHG. STATUS”下会显示“END”字样提示。有效防止由于电池质量问题引起的发热爆炸现象。
注意事项
1. 本充电器仅限于对锂电池、IMR、磷酸铁锂或镍氢 /镍镉充电电池进行充电,若对其他电池充电可能会导致
爆炸、电池破裂或漏液、人身伤害或财产损坏。
2. 充电器在电池充电过程中可能会发热,视为正常现象。
3. 使用环境:温度 -10-40℃(14~104 ℉),储藏温度:-20-60℃(-4~140 ℉)。
4. 请根据充电器上所标识的电极标志装入电池,充电时确保电池正确放置。
5. 请按照参数所述的输入电压连接使用本产品,输入电压过高或过低,会令充电器不能正常工作,甚至会引起
火灾。
6. 当电池出现故障或短路时,禁止充电。
7. 本充电器适用人群为 18 岁以上成年人,孩童必须在成人的监督下使用。
8. 当充电器开始工作时,不可无人看管。若发现有任何故障,请立即停止使用。
9. 必须选择正确的程序以及设定。不正确的充电程序或者设置可能会导致充电器损坏甚至爆炸。
10. 禁止使用本充电器对一次性电池充电,如 Zinc-Carbon(碳锌电池)、一次性锂金属电池、CR123A 电池、
CR2 电池,以及其它不支持充电材料的电池,否则可能引起火灾或爆炸风险。
11. 请勿对残缺的 IMR电池充电,否则可能造成充电器短路而引起爆炸。
12. 若电池有漏液、膨胀、外皮破损、异色或变形等情况,禁止进行充放电。
13. 请连接原装充电线使用本产品。为降低损坏充电线的风险,拔出充电线时应捏住连接头拔出,不可捏住充电
线。若充电线有损坏的迹象,应停止使用。
14. 禁止将充电器暴露于明火或置于暴晒、雨雪环境中。避免在过高温、低温或温度骤变环境中使用。
15. 请置於通风处使用,切勿让充电器处在潮湿的环境中使用或置放。操作区域内不可放置易燃易爆物质。
16. 避免机械振动以及冲击,防止损坏充电器。
Page 22

(简体中文)UM4 使用说明书
17. 请勿将导电材料或金属物体放入充电器内部,避免导致充电器发生短路爆炸的意外。
18. 请勿过充、过放电池,电池电量用光后请尽快充电。
19. 不使用充电器时,应将电池移除,并拔除充电线。
20. 切勿擅自拆卸、组装或改装充电器,可能会导致保修服务失效,详情请查看保固条款。
21. 不可将充电器作为他用!仅可将充电器用于指定用途。
免责声明
本产品由中国平安保险(集团)股份有限公司全球承保。对未按照本产品说明书正确指导操作发生任何事故或意外,
而导致第三方损失或索赔,本公司不承担任何责任。
保固服务
NITECORE® 产品拥有售后保固服务。在购买本产品的15 天内,如果有任何质量问题均可向经销商要求免费更换。
在购买本产品的 12 个月内享受免费保固服务。在超过12 个月免费保固期后,本产品享有终身有限度保固服务,
如需要更换重要部件则需收取成本费用。
本保固规则不适用于以下情况:
1. 人为破坏,拆解,改装本产品。
2. 错误操作导致产品损坏(如装反电池、放入不可充电池或违反警示操作等)。
3. 电池漏液导致产品损坏。
如对奈特科尔产品有任何疑问,欢迎联系当地的代理商或发邮件到 4008869828@nitecore.cn
※ 本说明书的所有图片、陈述及文字信息仅供参考,请以官网 www.nitecore.cn 实际信息为准。广州希脉创新
科技有限公司拥有对说明书内容的最终解释权和修改权。
附注:
一、充电电压:
锂充电电池对充电电压有严格的要求,充电电压超过标准范围将有可能导致电池损坏甚至发生爆炸的危险。
(1) 3.7V 锂离子 /IMR 电池
3.7V 锂离子充电电池是最常见的锂充电电池,通常会在电池外皮上会有 3.6V / 3.7V 的字样。我们的充电器
当检测到放入的电池是锂电池时会自动按照 4.2V 的标准充电模式进行充电,所以对于这种电池,您不需要
对充电电压进行任何设置。
(2) 3.8V 锂离子电池
3.8V 锂离子电池是比较少见的锂充电电池。跟3.7V 电池一样,通常在电池外皮上也是标注着 3.7V 的字样,
通常电池经销商会在销售时告知此款电池需要用 4.35V 充电。在对此种电池进行充电时,请手动设置充电电
压到 4.3V,否则充电器将自动按照 4.2V 标准程序进行充电,无法达到最大充电容量。
(3) 3.2V 磷酸铁锂电池
3.2V 磷酸铁锂电池的电池皮上会有 LiFePO4 字样或者标注的电压为3.2V。对这种电池充电必须格外小心,
因为在不作任何设置的情况下,我们的充电器会自动按照 4.2V 充电程序对这种电池进行充电,会导致过度
充电而损坏电池甚至引发爆炸危险。请手动设置充电器充电电压到 3.7V 为此种电池进行安全充电。
二、充电电流:
对于所有锂充电电池(Li-ion, IMR, LiFePO4), 我们不建议使用超过1C * 电流进行充电。在对小容量电池
进行充电时请注意设置充电电流小于 1C。
*C =电 池表 示 的容 量数 值。例 如,2600mAh 的锂 充电 电池,1C=2.6A,3400mAh 的 锂充 电电 池
1C=3.4A。 过大的充电电流会引起电池在充电过程中严重发热,可能导致损坏电池甚至引发爆炸的风险。
特别注意:本充电器是根据电池长度进行充电电流自动选择的。对某些较长但容量比较低的电池进行充
电时(例如 12650, 13650, 14650, 16650 等),请手动设置合适的充电电流(小于 1C)。
三、使用锂电池注意事项
1. 请勿对锂电池进行短路。
2. 对于 3.7V / 3.8V 锂电池,请不要使用低于 2.8V 电压充电,否则将会导致过度放电损坏锂电池或者引起再次
充电时爆炸的风险。
3. 我们强烈建议使用带有保护板的电池,对于部分不带保护板的电池,例如 IMR 电池,请格外注意不要短路
及过度放电。
4. 请勿使用超过电池额定最大放电电流进行放电。
四、长期储存
3.7V 及 3.8V 的锂充电电池最佳储存电压为3.7V,过高或者过低的电压将有可能在长期储存的过程中损坏锂电池。
您可以把电池放电至 3.7V 或使用充电器的 3.7V 充电程序把电池充电到3.7V 以便长期储存。
使用本充电器充电时必须使用标配的线材,在充电过程中使用非原装正版的线材可能会导致充电器不正
常工作,甚至会产生过热和烧毁等问题。由非原装正版线材所引致的问题将不能获得官方的保固服务。
本充电器仅限于对锂离子、IMR、3.2V 磷酸铁锂、镍氢 / 镍镉充电电池进行充电,若对其它类型的电池
进行充电可能会导致爆炸、电池破裂或漏液、造成人身伤害或财产损坏。
锂充电电池安全使用指南
包装附带防伪标签,支持网站验证或扫描二维码验明真伪。
-40- -41-
Page 23

Thanks for purchasing NITECORE!
SYSMAX Innovations Co., Ltd.
TEL: +86-20-83862000 FAX: +86-20-83882723
E-mail: info@nitecore.com Web: www.nitecore.com
Address: Rm 2601-06, Central Tower, No.5 Xiancun Road,
Tianhe District, Guangzhou, 510623, Guangdong, China
Manufacturer: SYSMAX Power Technology, LLC
Pleasendusonfacebook:NITECOREvapeworldwide
Made in China
UM1610418
 Loading...