

Page 1
CW20 User Manual
⚠ IMPORTANT
Thanks for purchasing NITECORE!
Please read this manual carefully before using the product
and follow the instructions.
This manual contains important safety information and
operating instructions. Please keep it for future reference.
In case of updates, please refer to the latest version
available on the ocial website.
IMPORTANT NOTICE CONCERNING
WARRANTY SERVICE
Thank you for purchasing! Before using this product,
please nd your verication code on the package box, and go
to https://photo.nitecore.com/Server/validation (or scan the QR
code beside the verication code to visit on your mobile phone).
Type in your verication code and personal information as
required, and submit the page. After verication, NITECORE will
send you a warranty service email for a free warranty extension
of 6 months. This email and your registration email address are
essential to your possible warranty application.
SYSMAX Innovations Co., Ltd.
TEL: +86-20-83862000
FAX: +86-20-83882723
E-mail: [email protected]
Web: www.nitecore.com
Address: Unit 6355, 5/F, No.1021 Gaopu Road, Tianhe District,
Guangzhou, 510653, Guangdong, China
Thanks for purchasing NITECORE!
Please find us on facebook: nitecoreimage
Made in China
CW14032024
1. This product is intended for use by adults aged 18 and over.
Please keep this product out of the reach of children.
2. Only use the product for its intended purposes. Using the
product in any other way could potentially lead to risks and
hazards.
3. Ambient Temperature of Usage: -10~40°C (14~104°F);
Temperature of Storage: -20~60°C (-4~140°F)
4. DO NOT cover the air inlet and outlet when using the product.
5. DO NOT put your hands or any foreign objects into the fan
to avoid accidents or damage to the product.
6. Please keep the product clean to prevent insects or foreign
objects from entering the product and potentially causing
malfunction.
7. DO NOT leave hair or fabric near the fan to avoid accidents.
8. Stop using the product immediately if any signs of malfunction
are observed.
9. DO NOT place the product near the re to avoid accidents
and damage to the product.
10. Please store the product in cool and dry places.
11. Please use the product in a standard manner to avoid
accidents in the event of product failure.
12. When the product is placed in an enclosed environment such
as a backpack or storage bag, or when it is left unused for
an extended period, please activate the Lockout Mode to
avoid accidental activation.
13. DO NOT disassemble, modify or repair the product as doing
so will render the product warranty invalid. Please refer to
the warranty section in the manual for complete warranty
information.
⚠ Battery Safety
Improper use of devices with built-in Li-ion batteries may result
in severe battery damage or safety hazards such as combustion
or explosion. DO NOT use the device if it is damaged. DO NOT
disassemble, puncture, cut, crush, or incinerate the device.
If any leakage or abnormal odor is noticed, stop using the
device immediately. Dispose of the device in accordance with
applicable local laws and regulations.
Technical Specications
Input 5V⎓1A / 9V⎓2A
Rated Power 100W (MAX)
Battery Capacity 26.64Wh
Rotational Speed 98,000 RPM (MAX)
Wind Speed 15 km/h – 150 km/h (9.3 mph – 93.2 mph)
Runtime
Dimensions
Weight 321g / 11.32 oz (Accessories Not Included)
Accessories
150 km/h: approx. 20min
15 km/h: approx. 15h 30min
115.2mm x 38.2mm x 67.2mm /
4.54" x 1.50" x 2.65"
(Accessories Not Included)
Flat Nozzle, Round Nozzle, Lanyard,
USB-C Charging Cable, Storage Case
Features ⚠ Warnings
• Wind speed adjuster for stepless control, with a max wind
speed of 150 km/h (93.2 mph)
• Unidirectional air intake to prevent secondary damage to the
object surface
• Power indicators to indicate the remaining battery power
• Built-in intelligent Li-ion battery charging system with a
USB-C charging port
• An expansion interface available at the bottom
• Constructed from aero grade aluminum alloy with HA III
military grade hard-anodized nish
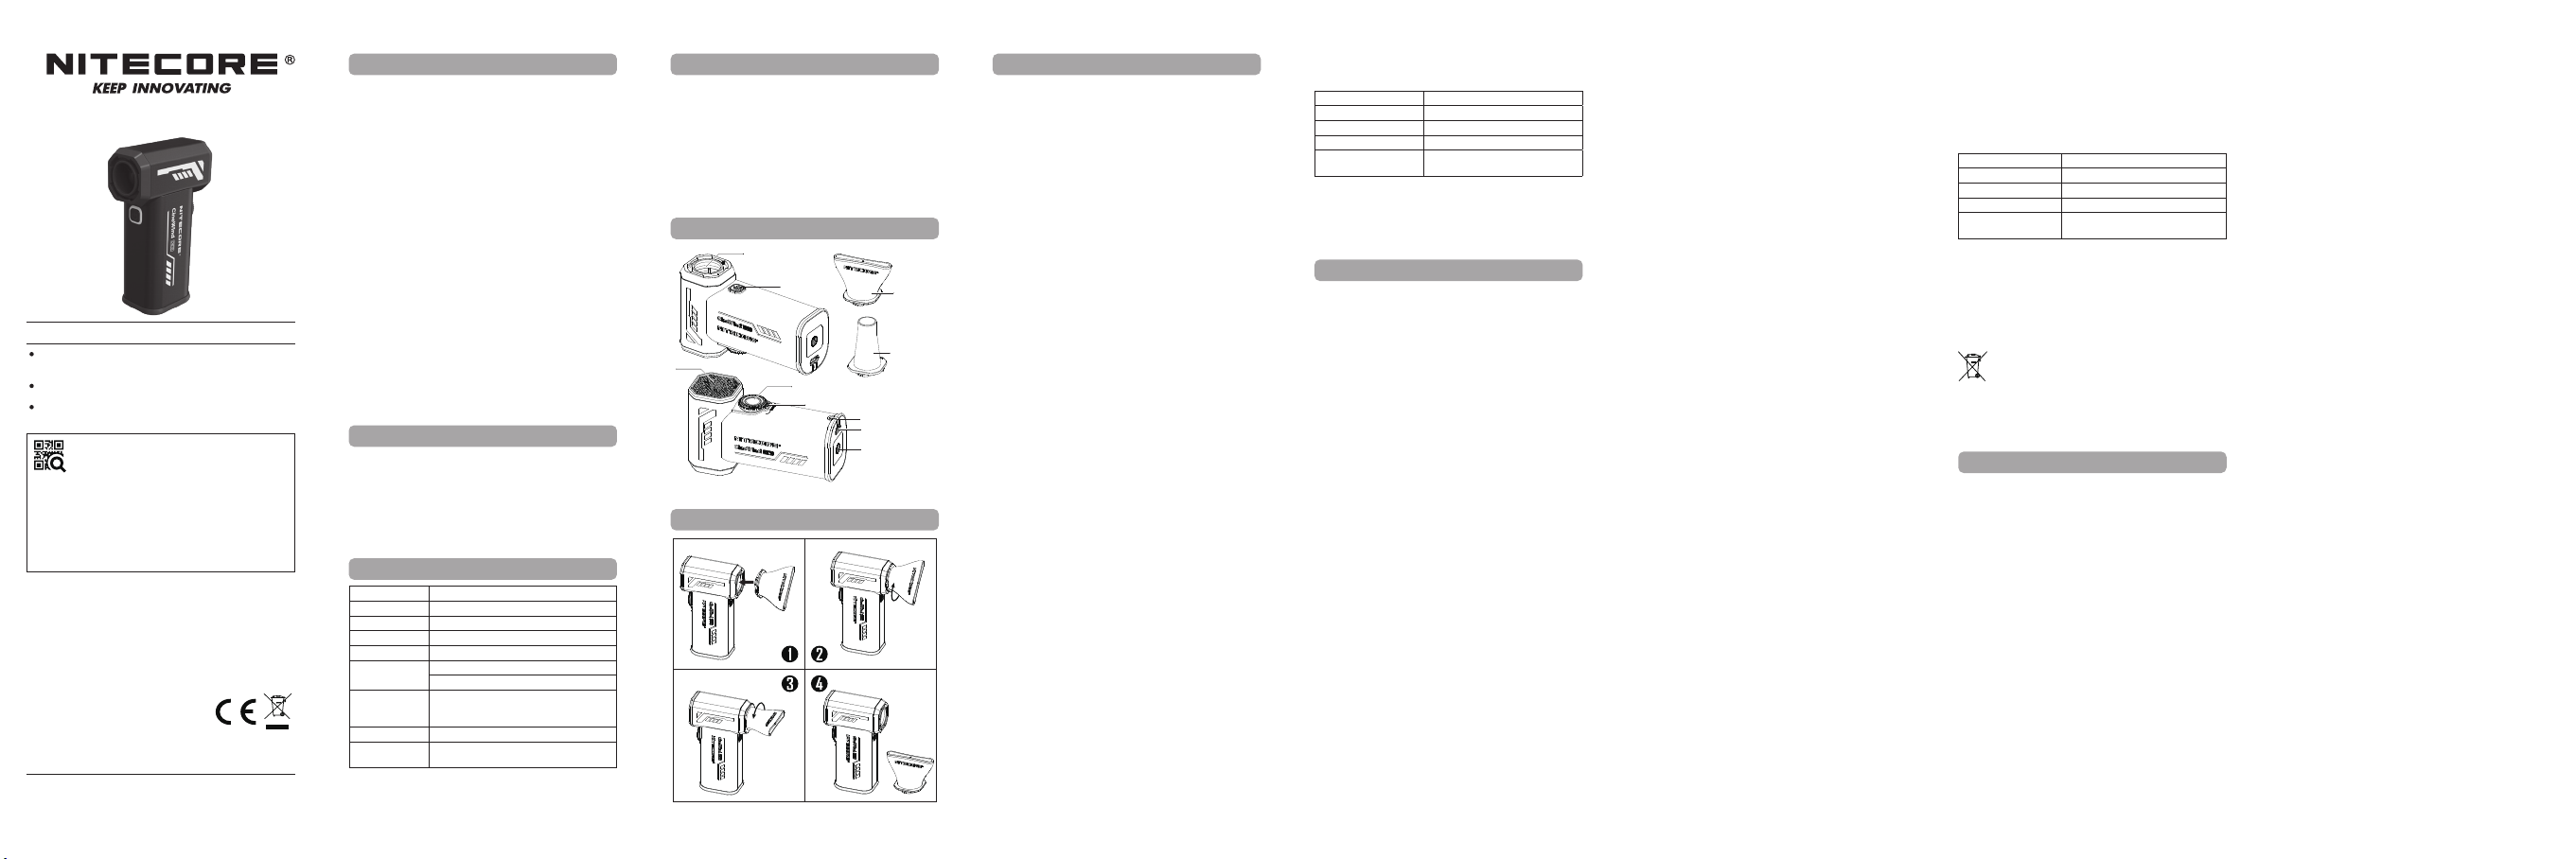
Product Overview
Air Outlet
Power Button
Air Inlet
Wind Speed Adjuster
Power Indicators
Flat Nozzle
Round Nozzle
Lanyard Hole
USB-C Charging Cable
1/4" Screw Hole
Using the Nozzle
(English)
Charging Function
The CW20 is equipped with an intelligent Li-ion battery
charging system. Please charge the product before the rst use.
Use the USB-C cable to connect an external power supply to
the charging port to begin the charging process.
• During the charging process, the blue power indicators will
gradually transition from ashing to a steady light to display
the battery level.
• Once the battery is fully charged, the product will automatically
stop charging and the blue power indicators will become steadily
turned on.
• The charging time in Standard Mode is approx. 7h (5V/1A).
The charging time in QC Mode is approx. 2h 30min (9V/2A).
• The CW20 is available during the charging process.
Note: The CW20 will be automatically unlocked when charged
in the Lockout Mode.
Using the Nozzle
Installing the Nozzle:
Align the nozzle and the air outlet in place (Figure 1). Rotate
the nozzle in the direction indicated by the arrow until it is tight
and secure (Figure 2).
Detaching the Nozzle:
Rotate the nozzle in the direction indicated by the arrow to
remove it (Figures 3 & 4).
Continuous Blowing Mode
• On: When the CW20 is o, double press the Power Button
to turn it on. The power indicators will be on to indicate the
remaining battery power.
• O: When the CW20 is on, short press the Power Button to
turn it o and the power indicators will go o.
Fast Blowing Mode
When the CW20 is o, press and hold the Power Button to turn
it on. Release to turn it o.
Wind Speed Adjustment
The CW20 features stepless wind speed control. Rotate the
Wind Speed Adjuster to select the desired wind speed.
• When the CW20 is on, rotate the Wind Speed Adjuster
clockwise to increase the wind speed until it reaches its
maximum.
• When the CW20 is on, rotate the Wind Speed Adjuster
counterclockwise to decrease the wind speed until it
reaches its minimum.
Lockout / Unlock
• Lockout: When the CW20 is o, short press and then
quickly long press the Power Button until 4 power indicators
light up one by one followed by rapid ashing to indicate
the lockout status. In the Lockout Mode, the CW20 is
unavailable. Pressing and holding the Power Button will turn
on the 4 power indicators; release to turn them o.
• Unlock: In the Lockout Mode, short press and then quickly
long press the Power Button until 4 power indicators go o
one by one. Release to turn on Continuous Blowing Mode to
indicate the unlock status.
Power Indication
When the power is o, short press the Power Button and the
power indicators will glow to indicate the remaining battery power.
Note: The fan will experience reduced wind speed or become
unable to adjust the wind speed due to low power. In such
cases, please recharge the product as soon as possible.
Status of Indicators Remaining Power
4 Constant-on 75%-100%
3 Constant-on 50-75%
2 Constant-on 25-50%
1 Constant-on
Expansion Interface
The CW20 is equipped with an expansion interface located at
the bottom, allowing for the installation of various photography
accessories.
0%-25% (Please recharge the
product as soon as possible)
(Deutsch)
⚠ Warnungen:
1. Dieses Produkt ist für den Gebrauch durch Erwachsene ab
18 Jahren bestimmt. Bitte bewahren Sie dieses Produkt
außerhalb der Reichweite von Kindern auf.
2. Verwenden Sie das Produkt nur für den vorgesehenen
Zweck. Jede andere Verwendung des Produkts kann zu
Risiken und Gefahren führen.
3. Umgebungstemperatur bei der Verwendung: -10 ~ 40°C;
Lagertemperatur: -20 ~ 60°C
4. Decken Sie den Lufteinlass und -auslass NICHT ab, wenn
Sie das Produkt verwenden.
5. Stecken Sie NICHT Ihre Hände oder Fremdkörper in den
Ventilator, um Unfälle oder Schäden am Produkt zu vermeiden.
6. Bitte halten Sie das Gerät sauber, um zu verhindern, dass
Insekten oder Fremdkörper in das Gerät eindringen und
möglicherweise Fehlfunktionen verursachen.
7. Lassen Sie KEINE Haare oder Stoe in der Nähe des Gebläses, um Unfälle zu vermeiden.
8. Stellen Sie den Betrieb des Geräts sofort ein, wenn Sie Anzeichen einer Fehlfunktion feststellen.
9. Stellen Sie das Gerät NICHT in der Nähe des Feuers auf, um
Unfälle und Schäden am Gerät zu vermeiden.
10. Bitte lagern Sie das Gerät an einem kühlen und trockenen Ort.
11. Bitte verwenden Sie das Produkt in einer normalen Weise,
um Unfälle im Falle eines Produktausfalls zu vermeiden.
12. Wenn das Produkt in einer geschlossenen Umgebung, wie
z. B. einem Rucksack oder einer Aufbewahrungstasche, aufbewahrt wird, oder wenn es über einen längeren Zeitraum
nicht benutzt wird, aktivieren Sie bitte den Sperr-Mode, um
eine versehentliche Aktivierung zu vermeiden.
13. Zerlegen, modizieren oder reparieren Sie das Produkt
NICHT, da dadurch die Produktgarantie erlischt. Vollständige
Informationen zur Garantie nden Sie im Abschnitt "Garantiebedingungen" in dieser Bedienungsanleitung.
⚠ Batteriesicherheit
Die unsachgemäße Verwendung von Geräten mit eingebauten
Li-Ionen-Akkus kann zu schweren Akkuschäden oder
Sicherheitsrisiken wie Verbrennung oder Explosion führen.
Verwenden Sie das Gerät NICHT, wenn es beschädigt ist.
Zerlegen, durchstechen, zerschneiden, zerquetschen oder
verbrennen Sie das Gerät NICHT. Wenn Sie ein Leck oder einen
ungewöhnlichen Geruch feststellen, stellen Sie die Verwendung
des Geräts sofort ein. Entsorgen Sie das Gerät in Übereinstimmung
mit den geltenden örtlichen Gesetzen und Vorschriften.
Ladefunktion
Das CW20 ist mit einem intelligenten Li-Ionen-Akku-Ladesystem
ausgestattet. Bitte laden Sie das Produkt vor dem ersten
Gebrauch auf. Verwenden Sie das USB-C-Kabel, um ein
externes Netzteil an den Ladeanschluss anzuschließen und den
Ladevorgang zu starten.
• Während des Ladevorgangs gehen die blauen LEDs allmählich
von Blinken zu Dauerlicht über, um den Ladestand anzuzeigen.
• Sobald der Akku vollständig aufgeladen ist, beendet das
Produkt automatisch den Ladevorgang und die blauen LEDs
leuchten dauerhaft.
• Die Ladezeit im Standardmodus beträgt ca. 7 Stunden (5V/1A).
Die Ladezeit im QC-Modus beträgt ca. 2h 30min (9V/2A).
• Das CW20 ist während des Ladevorgangs nutzbar.
Hinweis: Das CW20 wird automatisch entriegelt, wenn es im
Lockout-Mode geladen wird.
Verwendung der Düsen
Installation der Düse:
Richten Sie die Düse und den Luftauslass an ihrem Platz aus
( ❶ ). Drehen Sie die Düse in Pfeilrichtung, bis sie fest und
sicher sitzt ( ❷ ).
Abnehmen der Düse:
Drehen Sie die Düse in die durch den Pfeil angezeigte Richtung,
um sie zu entfernen ( ❸ und ❹ ).
Kontinuierlicher Blas-Mode
• Ein: Wenn das CW20 ausgeschaltet ist, schalten Sie es durch
doppeltes Drücken der EIN-/AUS-Taste ein. Die Stromanzeige
leuchtet, um die verbleibende Akkuleistung anzuzeigen.
• Aus: Wenn das CW20 eingeschaltet ist, drücken Sie kurz auf
die EIN-/AUS-Taste, um es auszuschalten, und die Betriebsanzeigen erlöschen.
Hochgeschwindigkeits-Blas-Mode
Wenn das CW20 ausgeschaltet ist, halten Sie die EIN-/AUSTaste gedrückt, um es einzuschalten. Lassen Sie sie los, um es
auszuschalten.
Einstellung der Luftgeschwindigkeit
Das CW20 verfügt über eine stufenlose
Luftgeschwindigkeitsregelung. Drehen Sie den
Luftgeschwindigkeitsregler, um die gewünschte
Luftgeschwindigkeit einzustellen.
• Wenn das CW20 eingeschaltet ist, drehen Sie den Luftgeschwindigkeitsregler im Uhrzeigersinn, um die Luftgeschwindigkeit zu erhöhen, bis sie ihren Höchstwert erreicht.
• Wenn das CW20 eingeschaltet ist, drehen Sie den Luftgeschwindigkeitsregler gegen den Uhrzeigersinn, um die Windgeschwindigkeit zu verringern, bis sie ihr Minimum erreicht.
Sperr-Mode / Entsperren
• Sperren: Wenn das CW20 ausgeschaltet ist, drücken Sie
erst kurz und dann lange auf die EIN-/AUS-Taste, bis die
4 Betriebs-LEDs nacheinander aueuchten und anschließend schnell blinken, um den Sperr-Mode anzuzeigen. Im
Sperr-Mode ist das CW20 nicht verfügbar. Wenn Sie die EIN-/
AUS-Taste gedrückt halten, leuchten die 4 Betriebs-LEDs auf.
Lassen Sie sie los, um sie auszuschalten.
• Entsperren: Drücken Sie im Sperr-Mode erst kurz und dann
lange auf die EIN-/AUS-Taste, bis die 4 Betriebs-LEDs nacheinander erlöschen. Loslassen, um den kontinuierlichen BlasMode einzuschalten, der den Entsperrungsstatus anzeigt.
Anzeige der verbleibenden Energie
Wenn das Gerät ausgeschaltet ist, drücken Sie kurz die
EIN-/AUS-Taste und die Betriebs-LEDs leuchten auf, um die
verbleibende Akkuleistung anzuzeigen.
Hinweis: Wenn das Gebläse nur eine geringere
Luftgeschwindigkeit hat oder die Luftgeschwindigkeit nicht mehr
eingestellt werden kann ist ggf. der Strom zu schwach. In solchen
Fällen laden Sie das Gerät bitte so schnell wie möglich auf.
Status der LEDs Verbleibende Energie
4 konstant an 75% - 100%
3 konstant an 50% - 75 %
2 konstant an 25% - 50 %
1 konstant an
Erweiterungsschnittstelle
Das CW20 ist mit einer Erweiterungsschnittstelle an der
Unterseite ausgestattet, die die Installation von verschiedenem
Fotozubehör ermöglicht.
0% - 25% (Bitte laden Sie das Gerät
so schnell wie möglich auf)
Entsorgung von Elektro- und
Elektronikgeräten
Die durchgestrichene Mülltonne bedeutet, dass Sie
gesetzlich verpichtet sind, diese Geräte einer vom
unsortierten Siedlungsabfall getrennten Erfassung
zuzuführen. Die Entsorgung über die Restmülltonne oder die gelbe
Tonne ist untersagt. Enthalten die Produkte Batterien oder Akkus,
die nicht fest verbaut sind, müssen diese vor der Entsorgung
entnommen und getrennt als Batterie entsorgt werden.
(Francais)
Avertissement :
1. Ce produit est destiné à être utilisé par des adultes âgés de
18 ans et plus. Tenez-le hors de portée des enfants.
2. N'utilisez le produit qu'aux ns pour lesquelles il a été
conçu. Toute autre utilisation du produit peut entraîner des
risques et des dangers.
3. Température ambiante d'utilisation : -10~40°C (14~104°F) ;
Température de stockage : -20~60°C (-4~140°F)
4. NE PAS couvrir l'entrée et la sortie d'air lors de l'utilisation
du produit.
5. NE METTEZ PAS vos mains ou des objets étrangers dans le
ventilateur an d'éviter tout accident ou dommage au produit.
6. Veillez à ce que l'appareil reste propre an d'éviter que des
insectes ou des objets étrangers ne pénètrent dans l'appareil
et ne provoquent des dysfonctionnements.
7. Ne laissez pas de cheveux ou de tissus à proximité du
ventilateur pour éviter les accidents.
8. Cessez immédiatement d'utiliser le produit si vous observez
des signes de dysfonctionnement.
9. NE PAS placer le produit près du feu pour éviter les accidents
et les dommages au produit.
10. Conservez le produit dans un endroit frais et sec.
11. Veuillez utiliser le produit de manière standard an d'éviter
tout accident en cas de défaillance du produit.
12. Lorsque le produit est placé dans un environnement fermé tel
qu'un sac à dos ou un sac de transport, ou lorsqu'il n'est pas
utilisé pendant une période prolongée, veuillez activer le mode
de verrouillage an d'éviter toute activation accidentelle.
13. NE PAS démonter, modier ou réparer le produit car cela
rendrait la garantie du produit invalide. Veuillez vous référer
à la section garantie du manuel pour des informations
complètes sur la garantie.
Sécurité de la batterie :
L'utilisation incorrecte d'appareils équipés de batteries Li-ion
intégrées peut endommager gravement la batterie ou entraîner
des risques de sécurité tels que la combustion ou l'explosion.
N'utilisez PAS l'appareil s'il est endommagé. NE PAS démonter,
percer, couper, écraser ou incinérer l'appareil. En cas de fuite ou
d'odeur anormale, cessez immédiatement d'utiliser l'appareil.
Mettez l'appareil au recyclage conformément aux lois et
réglementations locales en vigueur.
Fonction de charge :
Le CW20 est équipé d'un système intelligent de chargement
de la batterie Li-ion. Veuillez charger le produit avant la
première utilisation. Utilisez le câble USB-C pour connecter
une alimentation externe au port de charge an de
commencer le processus de charge.
• Pendant le processus de chargement, les indicateurs d'alimentation bleus passent progressivement d'une lumière clignotante
à une lumière xe pour indiquer le niveau de la batterie.
• Une fois la batterie entièrement chargée, le produit s'arrête
automatiquement et les indicateurs d'alimentation bleus
s'allument en continu.
• Le temps de charge en mode standard est d'environ 7 heures
(5V/1A). Le temps de charge en mode QC est d'environ 2h
30min (9V/2A).
• Le CW20 est disponible pendant le processus de charge.
Remarque : le CW20 est automatiquement déverrouillé
lorsqu'il est chargé en mode verrouillage.
Utilisation de la buse :
Installation de la buse :
Alignez la buse et la sortie d'air en place (gure 1). Tournez la
buse dans le sens indiqué par la èche jusqu'à ce qu'elle soit
bien xée (gure 2).
Démontage de la buse :
Tourner la buse dans le sens indiqué par la èche pour la retirer
(gures 3 et 4).
Mode de soufflage continu :
• Marche : Lorsque le CW20 est éteint, appuyez deux fois
sur le bouton d'alimentation pour le mettre en marche. Les
voyants d'alimentation s'allument pour indiquer la charge
restante de la batterie.
• Arrêt : Lorsque le CW20 est allumé, appuyez brièvement
sur le bouton d'alimentation pour l'éteindre et les indicateurs
d'alimentation s'éteindront.
Mode de soufflage rapide :
Lorsque le CW20 est éteint, appuyez sur le bouton
d'alimentation et maintenez-le enfoncé pour l'allumer. Relâchez
le bouton pour l'éteindre.
Réglage de la vitesse de ventilation :
Le CW20 dispose d'un contrôle progressif de la vitesse de
ventilation. Tournez le bouton de réglage de la vitesse de
ventilation pour sélectionner la vitesse souhaitée.
Page 2
• Lorsque le CW20 est en marche, tournez le bouton de
réglage de la vitesse de ventilation dans le sens des aiguilles
d'une montre pour augmenter la vitesse du soue jusqu'à ce
qu'elle atteigne son maximum.
• Lorsque le CW20 est en marche, tournez le bouton de
réglage de la vitesse de ventilation dans le sens inverse des
aiguilles d'une montre pour diminuer la vitesse du soue
jusqu'à ce qu'elle atteigne son minimum.
Verrouillage / Déverrouillage :
• Verrouillage : Lorsque le CW20 est éteint, appuyez
brièvement puis rapidement sur le bouton d'alimentation
jusqu'à ce que les 4 indicateurs d'alimentation s'allument
l'un après l'autre, puis clignotent rapidement pour indiquer
l'état de verrouillage. En mode verrouillage, le CW20
est indisponible. Appuyez sur le bouton d'alimentation
et maintenez-le enfoncé pour allumer les 4 indicateurs
d'alimentation ; relâchez le bouton pour les éteindre.
• Déverrouillage : En mode verrouillage, appuyez
brièvement puis rapidement sur le bouton d'alimentation
jusqu'à ce que les 4 indicateurs d'alimentation s'éteignent
l'un après l'autre. Relâchez le bouton pour activer le mode de
ventilsation continu an d'indiquer l'état de déverrouillage.
Indication de l’alimentation :
Lorsque l'appareil est éteint, appuyez brièvement sur le bouton
d'alimentation et les indicateurs d'alimentation s'allument pour
indiquer la charge restante de la batterie.
Remarque : Le ventilateur peut avoir une vitesse de
ventilation réduite ou être incapable de régler la vitesse en
raison d'une faible puissance. Dans ce cas, veuillez recharger le
produit dès que possible.
Statut des indicateurs Puissance restante
4 Constants 75%-100%
3 Constants 50-75%
2 Constants 25-50%
1 Constant
Interface d’extension :
Le CW20 est équipé d'une interface d'extension située en bas,
permettant l'installation de divers accessoires de photographie.
0%-25%
(Rechargez la batterie rapidement)
( 한국어 )
⚠ 주의사항
1. 이제품은18 세이상성인용입니다 .어린이의손이닿지않
는곳에보관하십시오 .
2. 본제품은용도에맞게사용하십시오 .제품을부적절하게사
용할경우위험이발생할수있습니다 .
3. 사용주변온도 :-10~40° C(14~104° F),보관온도 :-20~60°
C(-4~140° F)
4. 제품사용중에는절대공기흡입구를가리지마십시오 .
5. 절대공기흡입구 ,배출구또는충전포트에이물질을넣지
마십시오 .
6. 벌레나이물질이유입되어오작동을일으킬우려가있으므
로제품을청결하게유지해주십시오 .
7. 절대머리카락이나천을팬근처에두지마십시오 .말려들어
위험할수있습니다 .
8. 오작동의징후가관찰되면즉시제품사용을중지하십시오 .
9. 사고및제품손상의원인이될수있으므로절대제품을불
꽃이나화염근처에두지마십시오 .
10.제품을서늘하고건조한곳에보관하십시오 .
11.제품고장사고가발생하지않도록정상적인방법으로제품
을사용해주십시오 .
12.제품을백팩이나밀폐된곳또는인화성환경에장기간사용
하지않고방치할경우실수로활성화되지않도록잠금모드
를활성화해주시기바랍니다 .
13.절대제품을분해 ,개조또는수리하지마십시오 .제품보증
이무효가될수있으므로자세한내용은설명서의보증약
관을참조하십시오 .
⚠ 배터리 안전
배터리를부적절하게사용하면제품이손상되거나연소또는
폭발과같은안전위험이발생할수있습니다 .겉포장이손상되
었거나방전전류가제품과맞지않는경우배터리를사용하지
마십시오 .배터리를분해 ,천공 ,절단 ,분쇄 ,소각또는단락
시키지마십시오 .누출 ,이상냄새또는변형이감지되면즉시
사용을중지하고안전하게처리하십시오 .해당지역법률및규
정에따라장치 / 배터리를폐기하십시오 .
충전 기능
CW20 에는스마트리튬배터리충전시스템이내장되어있으므
로처음사용하기전에제품을충전해주시기바랍니다 .USB-C
케이블을사용하여외부전원을충전포트에연결하고충전을
시작하십시오 .
• 정상충전상태일때파란색전원표시등이점멸에서안정적
인표시등으로점차전환되어배터리레벨을표시합니다 .
• 배터리가완전히충전되면제품이자동으로충전을중지하
고파란색전원표시등이켜진상태가됩니다 .
• 스탠다드모드의충전시간은약7 시간(5V/1A),QC 모드의
충전시간은약2 시간30 분입니다 .(9V/2A)
• CW20 은충전중에도사용할수있습니다 .
참고 :잠금모드에서CW20 을충전하면자동으로잠금이해제
됩니다 .
노즐 사용
노즐 설치 :
노즐과공기배출구를그림과같이맞춥니다( 그림 1).노즐이
단단히고정될때까지화살표로표시된방향으로돌립니다( 그
림 2).
노즐 분리 :
화살표로표시된방향으로노즐을돌려제거합니다( 그림 3및4).
연속 송풍 모드
• On: CW20 이꺼진상태에서전원버튼을두번눌러켜십시
오 .전원표시등이들어오면서배터리잔량을나타냅니다 .
• Off: CW20 이켜진상태에서전원버튼을짧게누르면전원
이꺼지면서전원표시등도꺼집니다 .
고속 송풍 모드
CW20 이꺼진상태에서전원버튼을길게누르고있으면켜지
고떼면꺼집니다 .
풍속 조정
CW20 은단계가없는풍속조절기능을갖추고있습니다 .풍속
조정기를돌려원하는풍속을선택합니다 .
• CW20 이켜진상태에서풍속조정기를시계방향으로회전
시키면풍속이최대풍속까지점차증가합니다 .
• CW20 이켜진상태에서풍속조정기를시계반대방향으로
회전시키면풍속이최저풍속까지점차감소합니다 .
잠금 / 잠금 해제
• 잠금:CW20 이꺼진상태에서짧게누른후이어서신속히
길게누르면전원표시등4 개가하나씩켜지고빠르게깜박
이면서잠금상태가됩니다 .잠금모드에서는CW20 을사용
할수없습니다 .전원버튼을길게누르고있으면전원표시
등4 개가켜지고 ,손을떼면꺼집니다 .
• 잠금모드에서짧게누른다음이어서신속히길게누르면
전원표시등4 개가하나씩꺼지고빠르게깜박이면서잠금
이해제됩니다 .손을떼면연속송풍모드가켜져잠금해제
상태를나타냅니다 .
전력 표시
전원이꺼진상태에서전원버튼을짧게누르면배터리잔량을
나타내는전원표시등이켜집니다 .
참고 : 전력이부족하면팬은풍속이감속하거나풍속을조절할
수없게됩니다 .그런경우에는최대한빨리제품을충전해주
시기바랍니다 .
표시등 상태 잔여 전력
4개상시on 75%-100%
3개상시 -on 50-75%
2개상시 -on 25-50%
1개상시 -on
확장 인터페이스
CW20 의하단에는확장인터페이스가장착되어있어다양한사
진액세서리를설치할수있습니다 .
( 가능한한빨리제품을충전해주세요 )
0%-25%
(Italiano)
⚠ Avvertenze
1. Questo prodotto è destinato all'uso da parte di adulti di
età pari o superiore a 18 anni. Si prega di tenere questo
prodotto fuori dalla portata dei bambini.
2. Utilizzare il prodotto solo per gli scopi previsti. L'utilizzo del
prodotto in qualsiasi altro modo potrebbe comportare rischi
e pericoli.
3. Temperatura ambiente di utilizzo: -10~40°C (14~104°F);
Temperatura di stoccaggio: -20~60°C (-4~140°F)
4. NON coprire l'ingresso e l'uscita dell'aria durante l'utilizzo
del prodotto.
5. NON mettere le mani o oggetti estranei nella ventola per
evitare incidenti o danni al prodotto.
6. Mantenere il prodotto pulito per evitare che insetti o
oggetti estranei penetrino nel prodotto e possano causare
malfunzionamenti.
7. NON lasciare capelli o tessuti vicino al ventilatore per
evitare incidenti.
8. Smettere immediatamente di utilizzare il prodotto se si
osservano segni di malfunzionamento.
9. NON posizionare il prodotto vicino al fuoco per evitare incidenti
e danni al prodotto.
10. Conservare il prodotto in luoghi freschi e asciutti.
11. Utilizzare il prodotto in modo standard per evitare incidenti
in caso di guasto del prodotto.
12. Quando il prodotto viene collocato in un ambiente chiuso
come uno zaino o una borsa, o quando viene lasciato
inutilizzato per un periodo prolungato, attivare la modalità
di blocco per evitare l'attivazione accidentale.
13. NON smontare, modicare o riparare il prodotto poiché ciò
invaliderebbe la garanzia del prodotto. Fare riferimento alla
sezione garanzia nel manuale per informazioni complete sulla
garanzia.
⚠ Sicurezza della batteria
L'uso improprio dei dispositivi con batterie agli ioni di litio
integrate può causare gravi danni alla batteria o rischi per la
sicurezza come combustione o esplosione. NON utilizzare il
dispositivo se è danneggiato. NON smontare, forare, tagliare,
schiacciare o incenerire il dispositivo. Se si notano perdite
o odori anomali, interrompere immediatamente l'utilizzo del
dispositivo. Smaltire il dispositivo in conformità con le leggi e i
regolamenti locali applicabili.
Funzione di ricarica
Il CW20 è dotato di un sistema di ricarica intelligente della
batteria agli ioni di litio. Si prega di caricare il prodotto prima
del primo utilizzo. Utilizzare il cavo USB-C per collegare un
alimentatore esterno alla porta di ricarica per iniziare il processo
di ricarica.
• Durante il processo di ricarica, gli indicatori di alimentazione
blu passeranno gradualmente da lampeggianti a luce ssa
per visualizzare il livello della batteria.
• Una volta che la batteria è completamente carica, il prodotto
interromperà automaticamente la ricarica e gli indicatori di
alimentazione blu si accenderanno stabilmente.
• Il tempo di ricarica in modalità standard è di ca. 7 ore (5 V/1
A). Il tempo di ricarica in modalità QC è di ca. 2 ore e 30
minuti (9 V/2 A).
• Il CW20 è disponibile durante il processo di ricarica.
Nota: il CW20 verrà sbloccato automaticamente quando viene
caricato in modalità di blocco.
Utilizzo dell'ugello
Installazione dell'ugello:
Allineare l'ugello e l'uscita dell'aria in posizione (Figura 1).
Ruotare l'ugello nella direzione indicata dalla freccia nché non
è stretto e sicuro (Figura 2).
Staccare l'ugello:
Ruotare l'ugello nella direzione indicata dalla freccia per
rimuoverlo (gure 3 e 4).
Modalità di soffiaggio continuo
• On: Quando il CW20 è spento, premere due volte il pulsante
di accensione per accenderlo. Gli indicatori di alimentazione
si accenderanno per indicare la carica rimanente della
batteria.
• Spento: quando il CW20 è acceso, premere brevemente
il pulsante di accensione per spegnerlo e gli indicatori di
accensione si spegneranno.
Modalità di soffiaggio veloce
Quando il CW20 è spento, tenere premuto il pulsante di
accensione per accenderlo. Rilascia per spegnerlo.
Regolazione della velocità del vento
Il CW20 è dotato di controllo continuo della velocità del vento.
Ruotare il regolatore della velocità del vento per selezionare la
velocità del vento desiderata.
• Quando il CW20 è acceso, ruotare il regolatore della velocità
del vento in senso orario per aumentare la velocità del vento
no a raggiungere il suo massimo.
• Quando il CW20 è acceso, ruotare il regolatore della velocità
del vento in senso antiorario per diminuire la velocità del
vento nché non raggiunge il minimo.
Blocco/Sblocco
• Blocco: quando il CW20 è spento, premere brevemente e
poi premere rapidamente e a lungo il pulsante di accensione
no a quando 4 indicatori di accensione si accendono uno
per uno seguiti da un rapido lampeggio per indicare lo stato
di blocco. Nella modalità di blocco, il CW20 non è disponibile.
Premendo e tenendo premuto il pulsante di accensione si
accenderanno i 4 indicatori di accensione; rilasciare per
spegnerli.
• Sblocco: nella modalità di blocco, premere brevemente e
poi premere rapidamente e a lungo il pulsante di accensione
nché i 4 indicatori di accensione non si spengono uno per
uno. Rilasciare per attivare la modalità di soaggio continuo
per indicare lo stato di sblocco.
Indicazione di potenza
Quando l'alimentazione è spenta, premere brevemente il
pulsante di accensione e gli indicatori di alimentazione si
illumineranno per indicare la carica rimanente della batteria.
Nota: la ventola subirà una riduzione della velocità del vento
o non sarà in grado di regolare la velocità del vento a causa
della bassa potenza. In questi casi, ricaricare il prodotto il prima
possibile.
Stato degli indicatori Potenza rimanente
4 Acceso costantemente 75%-100%
3 Acceso costantemente 50-75%
2 Acceso costantemente 25-50%
1 Acceso costantemente
Interfaccia di espansione
Il CW20 è dotato di un'interfaccia di espansione situata nella
parte inferiore, che consente l'installazione di vari accessori
fotograci.
0%-25% (Ricaricare il prodotto il
prima possibile)
( 简体中文 )
⚠ 警告
1. 本品适用人群为 18 岁以上成年人,请将本品放置在儿童接触
不到的地方。
2. 本品适用于特定用途,若将其挪作他用,可能会导致危险。
3. 使用环境温度:-10℃~ 40℃,储藏温度:-20℃~ 60℃。
4. 请勿在本品运行时遮挡进风口和出风口。
5. 请勿将手或异物插入风机内,否则可能发生意外或导致本品
损坏。
6. 请保持风机的清洁,避免因为虫子或异物进入,导致风机不
能正常运转。
7. 请勿将头发或织物靠近风机,以免被卷入造成危险。
8. 若发现本品有任何故障,请立即停止使用。
9. 请勿将本品靠近火源,以免发生意外。
10.请将本品存放在阴凉干燥的地方。
11.请使用正常方式使用本品,以免本品故障时,发生意外。
12.若把本品放置在背包、收纳袋等密闭环境,或需长时间储存时,
请设置锁定模式以防止误触开启。
13.切勿擅自拆卸、组装或改装本品,可能会导致保修服务失效,
详情请查看保固条款。
⚠ 电池安全
不恰当使用内置锂电池的设备,可能会损坏电池或引发燃烧、爆
炸等危险。若本品损坏,请勿使用。请勿拆卸、刺穿、切割、挤压、
焚烧本品。如果发现有任何泄漏或异味,应立即停止使用本品并
将其安全处理。请根据适用的当地法律和法规处置设备 / 电池。
充电
本品自带智能锂电池充电系统,初次使用前,请先进行充电。将
USB-C 充电线一端连接至风机充电接口,另一端连接电源即可进
行充电。
•
当处于正常充电状态时,蓝色电量指示灯会慢闪提示。
•
当充满电时,将自动停止充电,且蓝色电量指示灯长亮提示。
•
普通充电时间约 7 小时(5V/1A);快速充电时间约 2 小时
30 分(9V/2A)。
•
充电时可正常使用吹风功能。
注:在锁定状态下进行充电,风机将会自动解锁。
使用吹嘴
安装吹嘴:
请如图①所示把吹嘴对齐风机出气口凹槽合上后,按照图②箭头
所示方向转动直至吹嘴不再松动脱落即安装成功。
拆卸吹嘴:
请把风机上的吹嘴如图③箭头所示方向转动,即可如图④取下吹
嘴。
连续吹风功能
•
开 启:关闭状态下,短按2 下开关按键,风机开启连续吹风功能。
电量指示灯亮起提示电池剩余电量。
•
关闭:开启状态下,短按 1 下开关按键,风机关闭。电量指
示灯熄灭。
快速吹风功能
关闭状态下,长按开关按键,风机开启快速吹风功能,松手风机
关闭。
调节风速
本品风速可无极调节,用户可根据实际使用情况旋转风速转盘至
适合的风速。
•
开启状态下,顺时针转动风速转盘,风速将逐渐增大直至最
高风速。
•
开启状态下,逆时针转动风速转盘,风速将逐渐降低直至最
低风速。
锁定 / 解锁
•
锁定:风机关闭状态下,短按 1 下后快速长按开关按键,直
到 4 颗电量指示灯依次点亮后快速闪烁提示提示风机进入锁
定状态。锁定后无法使用气吹功能,长按开关按键,4 颗电量
指示灯点亮以作提示,松手即熄灭。
•
解锁 :锁定状态下,短按 1 下后快速长按开关按键,直到 4 颗
电量指示灯依次熄灭后松手,风机开启连续吹风功能,提示
风机解锁成功。
电量提示
风机关闭状态下,短按开关按键,电量指示灯亮起提示电池剩余
电量。
注:当电池电量不足,风机会出现风速变小或者无法调风的情况。
此时,应尽快对风机进行充电。
指示灯 剩余电量
4 颗亮起 75%-100%
3 颗亮起 50%-75%
2 颗亮起 25%-50%
1 颗亮起 0%-25%,请及时进行充电
拓展接口
本品底部配备拓展接口,可安装摄影配件使用。
售后服务的重要提示
感谢您购买本产品!在使用本产品之前,请持包装盒上防伪码登
录 https://photo.nitecore.cn/Server/validation或 刮开 防伪 贴
纸的二维码,用手机扫描前往验证页面,按页面提示填写防伪码
及个人信息等资料。成功通过正品验证后,您将收到奈特科尔发
来的保固凭证邮件,产品可获得额外 6 个月的免费保固期。请紧
记您的注册邮箱及保存售后服务邮件,此资料为该产品享受保固
服务的重要凭证。
保固
NITECORE®产品拥有售后保固服务。在购买本产品的 15 天内,
如果有任何质量问题均可向经销商要求免费更换。在购买本产品
的 12 个月内享受免费保固服务。在超过 12 个月免费保固期后,
本产品享有终身有限度保固服务,如需要更换重要部件则需收取
成本费用。依照“售后服务的重要提示”完成正品验证后,产品
可获得额外 6 个月的免费保固期。
本保固规则不适用于以下情况:
1. 人为破坏,拆解,改装本产品。
2. 错误操作导致产品损坏。
如对奈特科尔产品有任何疑问,欢迎联系当地的代理商或发邮件
到 [email protected]
※本说明书的所有图片、陈述及文字信息仅供参考,请以官网
www.nitecore.cn 实际信息为准。广州希脉创新科技有限公
司拥有对说明书内容的最终解释权和修改权。
Warranty Details
Our authorized dealers and distributors are responsible for
warranty service. Should any problem covered under warranty
occur, customers can contact their dealers or distributors in
regards to their warranty claims, as long as the product was
purchased from an authorized dealer or distributor NITECORES
Warranty is provided only for products purchased from an
authorized source. This applies to all NITECORE products. Any
DOA / defective product can be exchanged for a replacement
through a local distributor/dealer within 15 days of purchase.
After that, all defective / malfunctioning NITECORE® products can
be repaired free of charge within 12 months (1 year) from the
date of purchase. Beyond 12 months (1 year), a limited warranty
applies, covering the cost of labor and maintenance, but not the
cost of accessories or replacement parts. For an optional free
warranty extension of 6 months, please refer to the "IMPORTANT
WARRANTY NOTICE" section on top to validate your product.
The warranty will be nullied if
1. the product(s) is/are broken down, reconstructed and/or
modied by unauthorized parties;
2. the product(s) is/are damaged due to improper use.
For the latest information on NITECORE® products and services,
please contact a local NITECORE® distributor or send an email
to [email protected].
※ All images, texts and statements specied herein this
user manual are for reference purposes only. Should any
discrepancy occur between this manual and information
specied on www.nitecore.com, Sysmax Innovations Co.,
Ltd. reserves the rights to interpret and amend the content
of this document at any time without prior notice.
Thanks for purchasing NITECORE!
Worldwide Warranty Service
Model number Date of purchase
—————————— ———————————
Serial number Store Stamp
—————————— ———————————
This is the certicate of authenticity of this item and we
conrm that it has been subjected to the most exacting
quality controls by SYSMAX Innovations Co., Ltd.
NOTE:
Please ensure this warranty card is fully completed by the
distributor or retailer after purchasing the product. Should
the product fail to operate correctly during the warranty
period, it may be returned with the completed warranty
card and original sales receipt to the retailer or local
distributor for replacement or repair.
Customer Service Email: [email protected]
 Loading...