

Page 1
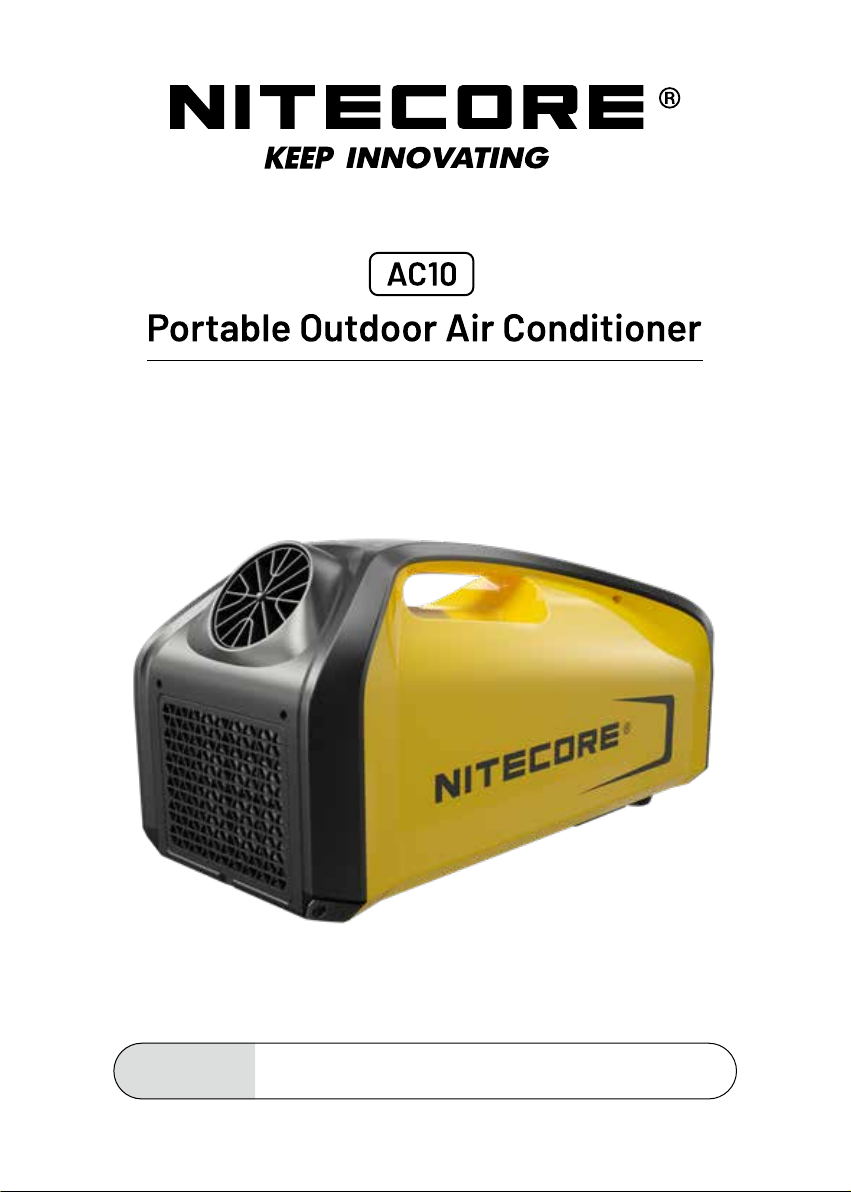
User Manual
Caution
Please place the AC10 at for more than 30 minutes before the
rst usage, or after long distance or bumpy transportation.
Page 2

Contents
English
Francais
Español
Русский
简体中文
·······································································
·····································································
······································································
·····································································
·······································································
2
6
10
14
18
Features
• Applicable to lower the outlet air temperature with a dual hose system in 10
minutes
• 3 adjustable cooling speed
• Equipped with the real-time display to monitor temperatures directly
• Constructed from lightweight ABS and PC materials
• Installation free, breaking loose from the space
Technical Specications
Rated Voltage 24V DC
Rated Current 12.5A
Cooling Power 2550 BTU
Refrigerant R134A
IP Rating IPX4
Sound Level ≤50 dB
Operation Temperature 3-42°C
Dimensions 583mm × 314mm × 260mm / 23.0" × 12.4" × 10.2"
Weight 10kg (22 lbs)
Page 3
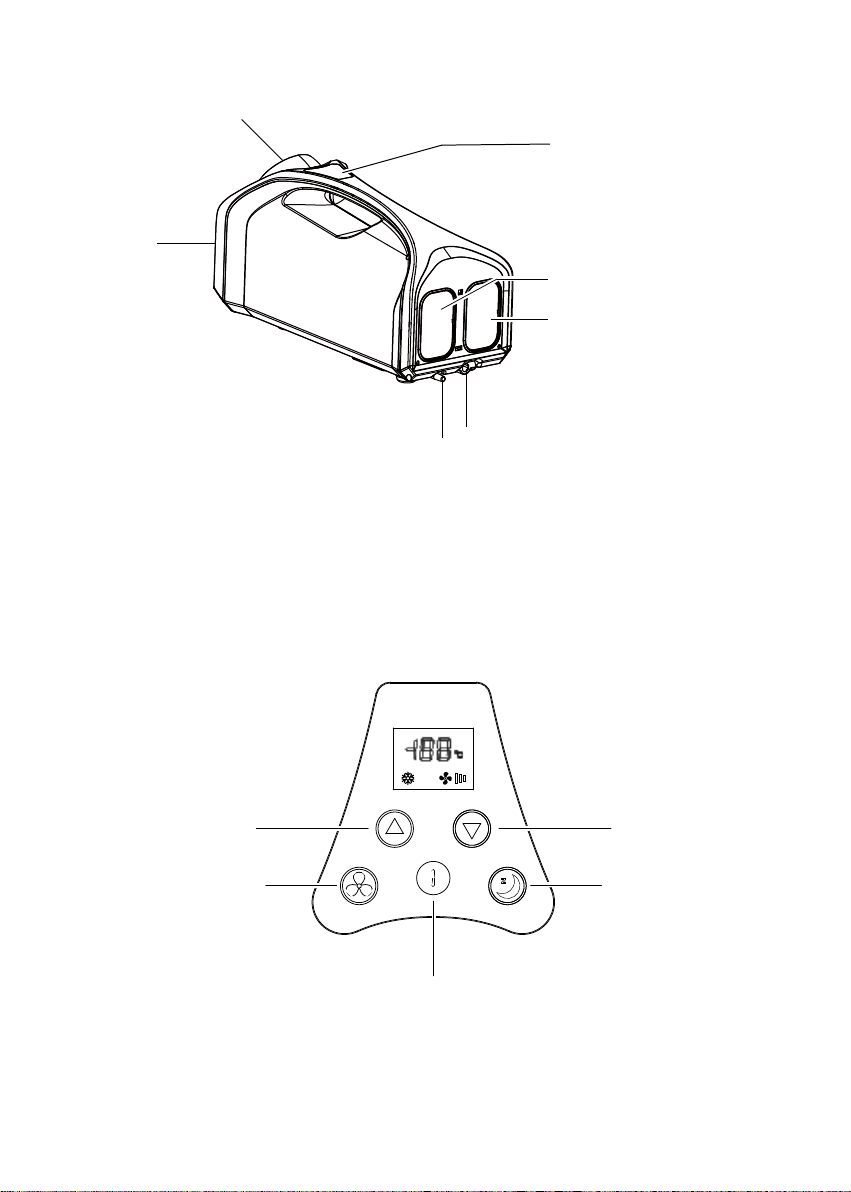
②
①
⑥
③
④
⑤
⑦
① Cooling Air Outlet
② Evaporator Inlet
③ Operation Panel
④ Condenser Air Inlet
⑨
⑪
⑧ Power Button
⑨ "+" Temperature Button
⑩ "-" Temperature Button
⑤ Hot Air Outlet
⑥ Drain
⑦ Power Input
⑩
⑫
⑧
⑪ Wind Speed Button
⑫ Sleep Mode Button
1
Page 4
(English) User Manual
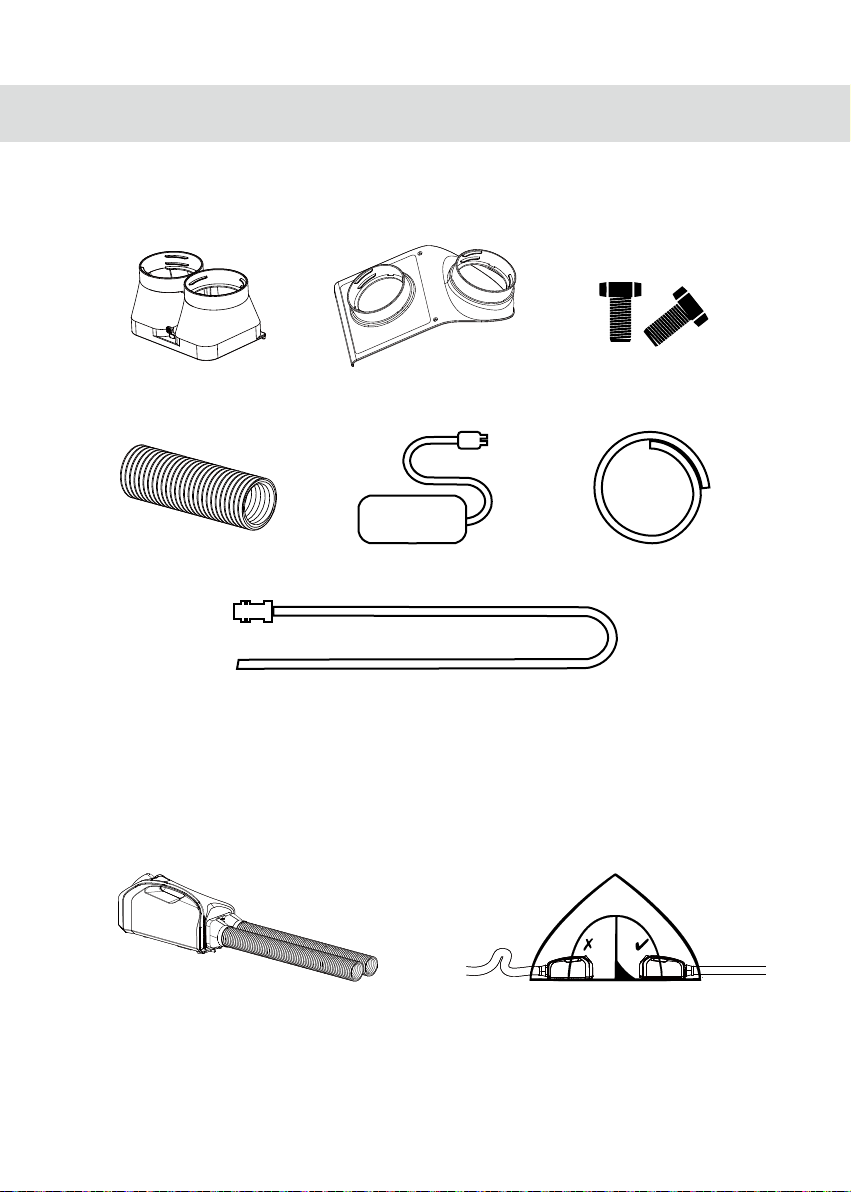
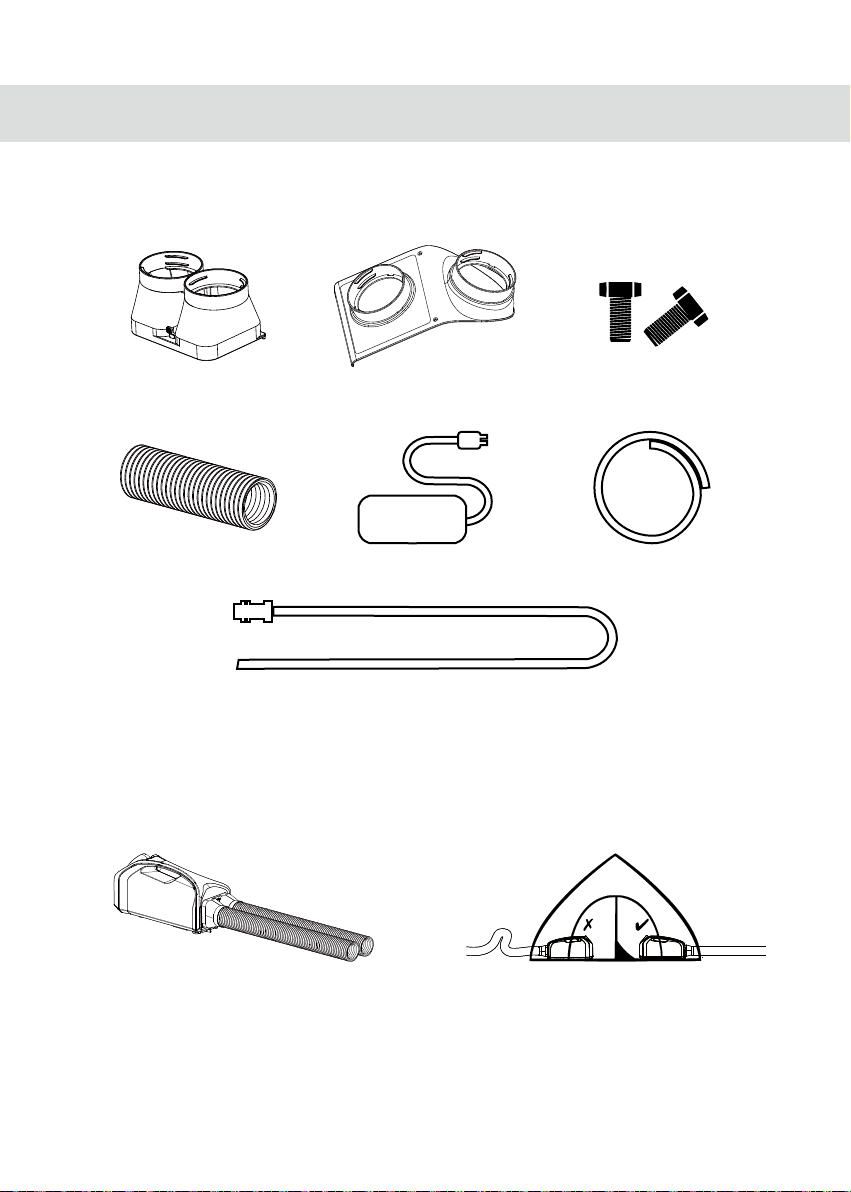
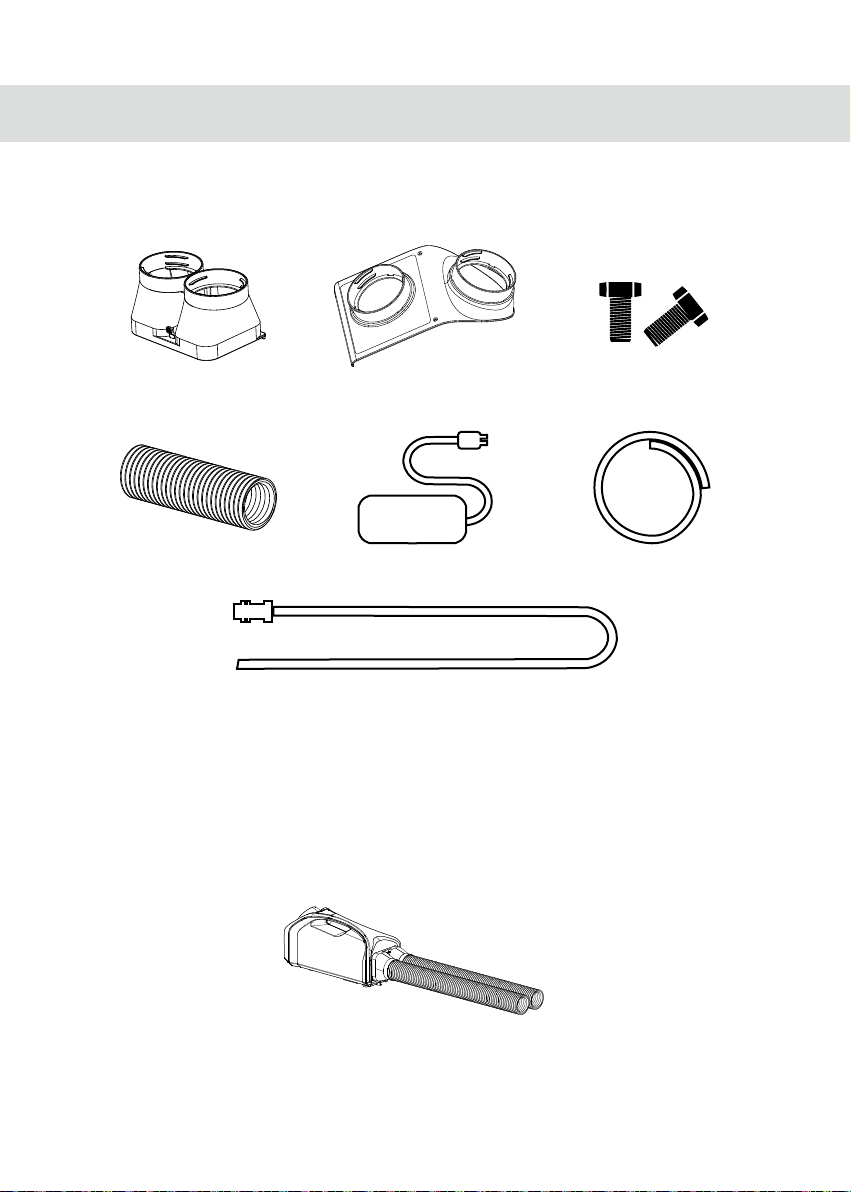
Accessories
Hot Air Hose Connection
× 1
Hose × 2 Power Adapter × 1 Drain Pipe × 1
Cooling Air Hose Connection
× 1
2m Aerial Power Cord × 1
Mounting Screw (M4*12)
Installation
There are 3 ways to install the product:
1. When the product is placed in the tent, exhaust the hot air out of that.
× 2
Pic 1
a. As Pic 1 illustrated, connect 2 hoses with
the threaded end of the Hot Air Hose
Connection.
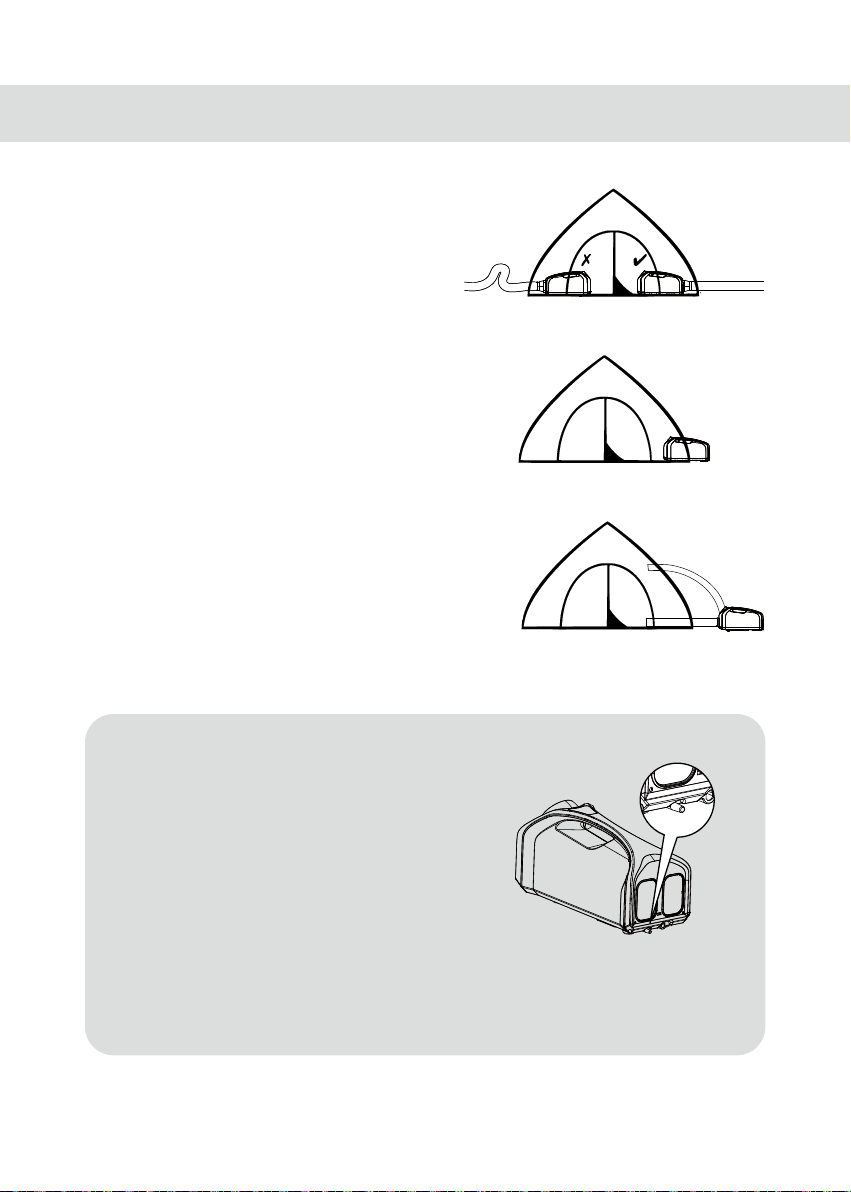
2
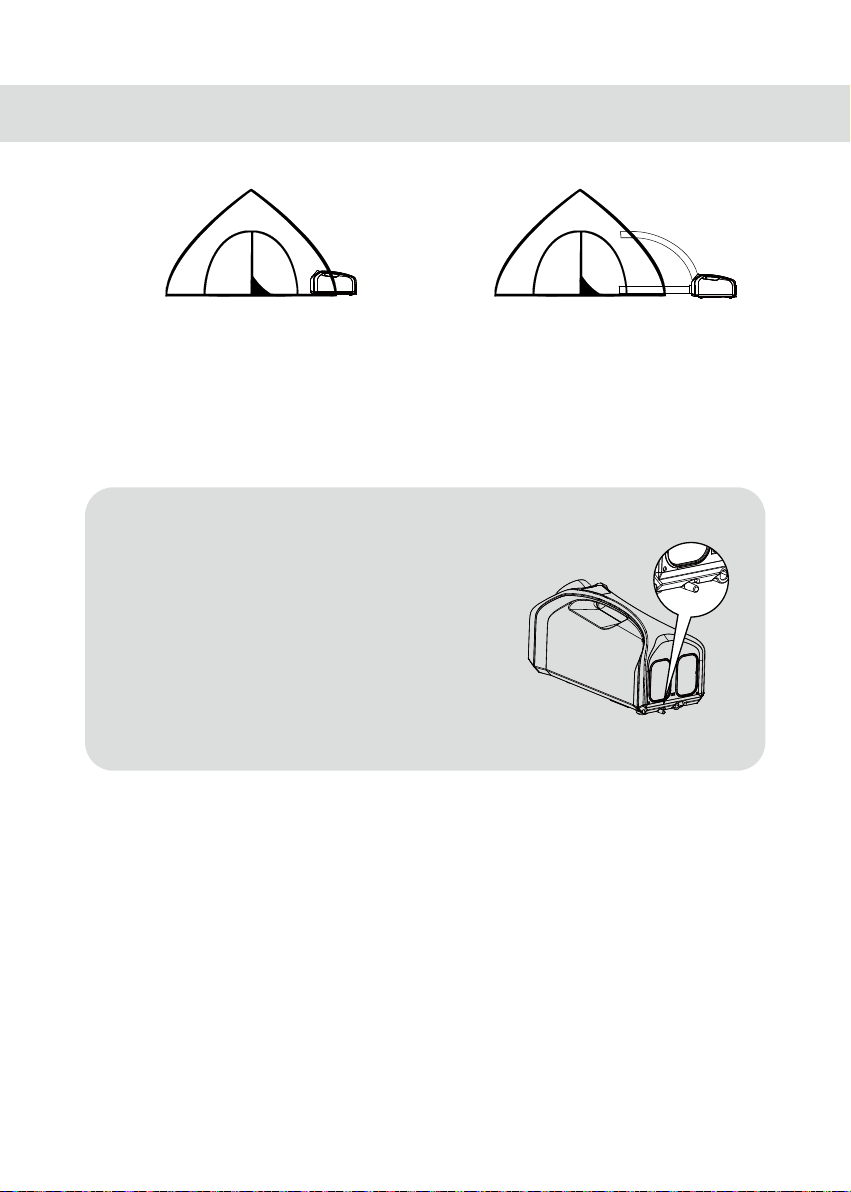
Pic 2
b. As Pic 2 shown, connect the Hot Air Hose
Connection with the end of the product
and extend the hoses outside the tent.
Note: DO NOT bend the hose in use to
avoid aecting the heat dissipation.
Page 5
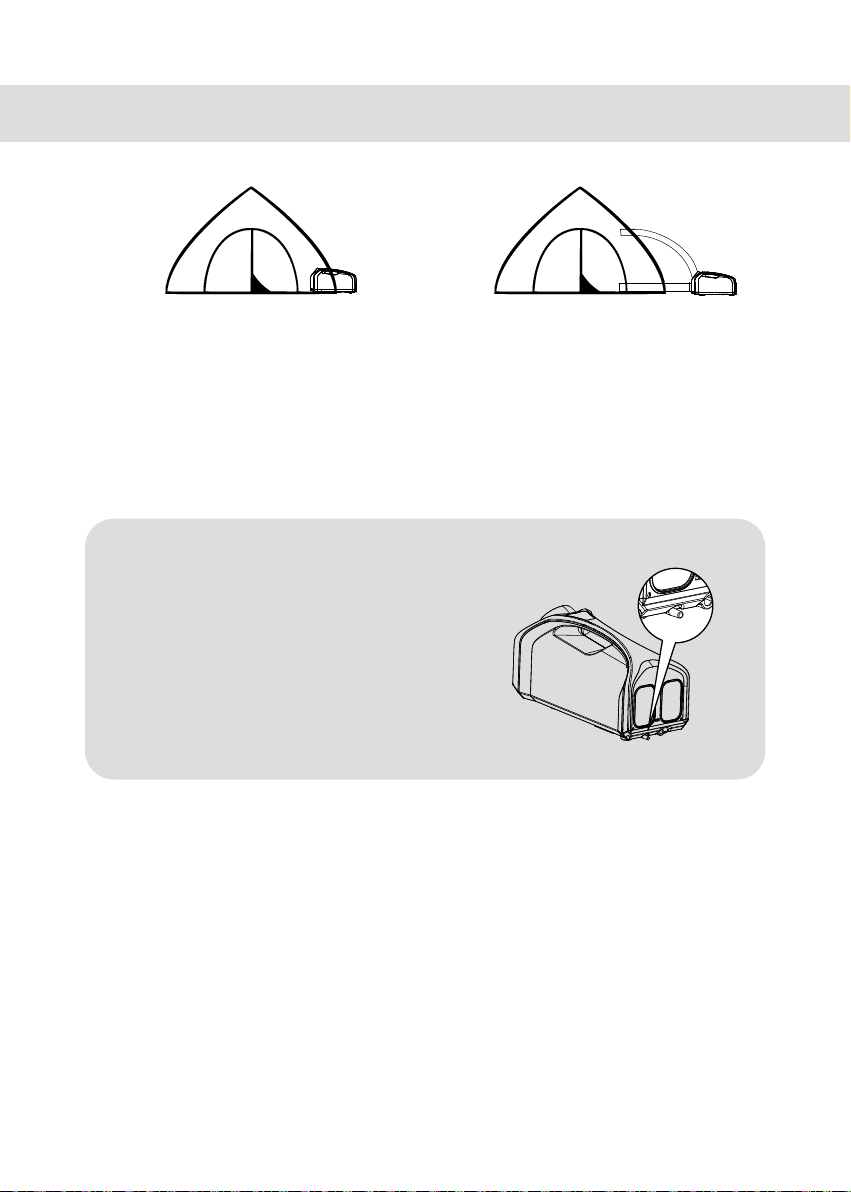
Pic 3
2. When the Cooling Air Outlet is placed in
the tent, place the Condenser Air Inlet
and the Hot Air Outlet outside as Pic 3
illustrated.
Drain Pipe Installation:
Connect the Drain Pipe with the Drain and place the
other end outside to avoid bending and clogging.
Note: Place the product in a at and ventilated area
and make sure there is no obstruction around it at
least 50cm (20"). Keep the Drain Pipe in a straight
line and DO NOT extend the hose or exchange
dierent hoses, or the product may be damaged.
Pic 4
3. When the product is placed outside the
tent, the cooling air should be blown into
that as Pic 4 shown.
Screw the Cooling Air Connection to the
front end of the product and connect
two hoses with the threaded end of the
Cooling Air Hose Connection. Then the
cooling air should be blown into the tent.
Power Connection
Use the Power Adapter to connect an external power supply (e.g. an AC power supply or
power station) to the Power Input. The real-time display will ash to inform the user after the
connection is completed.
Operating Instructions
On / O
On: When the product is o, short press the Power Button to turn it on.
O: When the product is on, long press the Power Button for 3 seconds to turn it o.
3
Page 6

Temperature Adjustment
Short press "+" Temperature Button / "-" Temperature Button to control the temperature from
16°C to 30℃. If there is no operation in adjustment, the product will automatically exit the
setting status after the real-time display ashes for 5 seconds.
Wind Speed Adjustment
Short press the Wind Speed Button to cycle through the following levels: LOW – MID - HIGH.
Mode Selection
• Long press the Sleep Mode Button for 3 seconds to switch between the Cooling Mode and
Sleep Mode.
• The Snowake Icon will be turned on if the product accesses the Cooling Mode. This mode
is ideal for daily use.
The Snowake Icon will be turned o if the product accesses the Sleep Mode. Once the
Sleep Mode is on, only the built-in fan runs continuously with minimal noise, suitable for
sleeping.
• When the product is reactivated, it will automatically access its previous mode
Maintenance
Cleaning Guidance:
• Please wipe the exterior of the product with a moistened cloth. If the dirt cannot be wiped
up, clean it with a mild detergent followed by wiping again with a clean cloth.
• The air lters of the Evaporator Inlet and Condenser Air Inlet are detachable. Rinse them
with water and reinstall them after fully dry.
Plastic Parts Maintenance:
• Please operate the product properly to avoid the oil stain and deforming. DO NOT expose
the product to the sun and it is recommended to use it in the shade.
• DO NOT directly rinse the product with water to avoid degradation of the electrical insulation
performance of the internal circuit and rust of the internal parts. The following items are
prohibited to clean the product, avoiding damage to the coating and plastic parts: hot water,
brush, gasoline, alcohol and soap.
Warnings
1. The product is only to be used by adults above 18 years old. Children under this age must
be supervised by an adult when using the product.
2. Please place the product in ventilated areas. DO NOT use the product in a moist
environment.
3. DO NOT touch the plug or other parts with wet hands.
4. DO NOT operate the product if the power cord or plug is damaged.
5. DO NOT operate the product that has been hit, damaged, placed outside for a long time or
dropped into the water.
6. DO NOT expose the product to open ames or extremely high ambient temperatures.
4
Page 7

7. DO NOT cover the Hot Air Outlet and Cooling Air Outlet when the product is working.
8. Please unplug the product when it is in maintenance or left unused.
9. It is recommended to use with NITECORE power stations or others with safety certication.
10. DO NOT disassemble or modify the product without authorization, as this will cause the
warranty to be nullied. Please check the Warranty Service for details.
Warranty Service
All NITECORE® products are warranted for quality. Any DOA / defective product can be
exchanged for a replacement through a local distributor/_dealer within 15 days of purchase.
After that, all defective / malfunctioning NITECORE® products can be repaired free of charge
within 12 months from the date of purchase. Beyond 12 months, the charge for accessories,
replacement parts and delivery shall be at your own expenses.
The warranty will be nullied if
1. the product(s) is/are broken down, reconstructed and/or modied by unauthorized parties.
2. the product(s) is/are damaged due to improper use.
For the latest information on NITECORE® products and services, please contact a local
NITECORE® distributor or send an email to [email protected]
※ The trademarks and product images specied herein this user manual are for reference
purposes only. The copyright belongs to their lawful holders.
※ All images, texts and statements specied herein this user manual are for reference
purposes only. Should any discrepancy occur between this manual and information specied
on www.nitecore.com, Sysmax Innovations Co., Ltd. reserves the rights to interpret and
amend the content of this document at any time without prior notice.
5
Page 8
(Francais) Manuel d’Utilisation
Accessoires
Raccord de tuyau d’air chaud
× 1
Tuyau × 2 Adaptateur secteur × 1 Tuyau d’évacuation × 1
Raccord de tuyau d’air de
refroidissement × 1
Cordon d’alimentation de 2m × 1
Vis de montage (M4*12)
Installation
Il existe 3 façons d’installer le produit:
1. Lorsque le produit est placé dans la tente, évacuez l’air chaud de celle-ci.
× 2
l’illustration 1
a. Comme le montre l’illustration 1,
connectez 2 tuyaux à l’extrémité letée
du raccord de tuyau d’air chaud.
6
l’illustration 2
b. Comme le montre l’illustration 2,
connectez le raccord de tuyau d’air chaud
à l’extrémité du produit et étendez les
tuyaux à l’extérieur de la tente.
Remarque : NE PAS plier le tuyau utilisé
pour éviter d’aecter la dissipation de
chaleur.
Page 9
l’illustration 3
2. Lorsque la sortie d’air de refroidissement
est placée dans la tente, mettez l’entrée
d’air du condenseur et la sortie d’air
chaud à l’extérieur, comme en témoigne
l’illustration 3.
l’illustration 4
3. Lorsque le produit est placé à l’extérieur
de la tente, l’air de refroidissement doit y
être soué, comme le montre l’illustration
4.
Intallation du tuyau d’évacuation :
Connectez le tuyau d’évacuation avec le drain et
placez l’autre extrémité à l’extérieur pour éviter la
exion et le colmatage.
Remarque : Placez le produit dans un endroit plat et
ventilé et assurez-vous qu’il n’y a aucune obstruction
autour de lui d’au moins 50cm. Gardez le tuyau
d’évacuation en ligne droite et NE PAS étendre le
tuyau ou intervertir diérents tuyaux, sinon le produit
pourrait être endommagé.
Connexion d’alimentation
Utilisez l’adaptateur secteur pour connecter un bloc d’alimentation externe (par exemple, une
alimentation CA ou une centrale électrique) à l’entrée d’alimentation. L’achage en temps réel
clignote pour informer l’utilisateur une fois la connexion terminée.
Mode d’emploi
ON / OFF
ON : lorsque le produit est éteint, appuyez brièvement sur le bouton d’alimentation pour l’allumer.
OFF : lorsque le produit est allumé, appuyez longuement sur le bouton d’alimentation pendant
3 secondes pour l’éteindre.
7
Page 10

Réglage de la température
Appuyez brièvement sur le bouton de température « + » / bouton de température « - » pour
contrôler la température de 16°C à 30°C. S’il n’y a pas d’opération de réglage, le produit
quittera automatiquement l’état des paramètres après que l’achage en temps réel clignote
pendant 5 secondes.
Réglage de la vitesse de l’air
Appuyez brièvement sur le bouton de vitesse de l’air pour parcourir les niveaux suivants :
FAIBLE – MOYEN - HAUT.
Sélection du mode
• Appuyez longuement sur le bouton de mode veille pendant 3 secondes pour basculer entre
le mode refroidissement et le mode veille.
• L’icône Flocon de neige sera activée si le produit accède au mode de refroidissement. Ce
mode est idéal pour une utilisation quotidienne.
L’icône Flocon de neige sera désactivée si le produit accède au mode veille. Une fois le mode
veille activé, seul le ventilateur intégré fonctionne en continu avec un bruit minimal, adapté
au sommeil.
• Lorsque le produit est réactivé, il accède automatiquement à son mode précédent.
Entretien
Conseils de nettoyage :
• Veuillez nettoyer/essuyer l’extérieur du produit avec un chion humidié. Si la saleté ne
peut pas être essuyée, nettoyez-la avec un détergent doux, puis essuyez à nouveau avec un
chion propre.
• Les ltres à air de l’entrée de l’évaporateur et de l’entrée d’air du condenseur sont
détachables. Rincez-les à l’eau et réinstallez-les après séchage complet
Entretien des pièces en plastique :
• Veuillez utiliser le produit correctement pour éviter la tache d’huile et la déformation. NE PAS
exposer le produit au soleil et il est recommandé de l’utiliser à l’ombre.
• NE PAS rincer directement le produit à l’eau pour éviter la dégradation des performances
d’isolation électrique du circuit interne et la rouille des pièces internes. Les articles suivants
sont interdits pour nettoyer le produit, en évitant d’endommager le revêtement et les pièces
en plastique : eau chaude, brosse, essence, alcool et savon.
Avertissements
1. Le produit ne doit être utilisé que par les adultes de plus de 18 ans. Les enfants de moins de
cet âge doivent être surveillés par un adulte lors de l’utilisation du produit.
2. Veuillez placer le produit dans des endroits ventilés. NE PAS utiliser le produit dans un
environnement humide.
3. NE TOUCHEZ PAS la prise ou d’autres parties avec les mains mouillées.
4. NE PAS utiliser le produit si le cordon d’alimentation ou la prise est endommagé.
8
Page 11

5. NE PAS utiliser le produit qui s’il a été frappé, endommagé, placé à l’extérieur pendant une
longue période ou tombé dans l’eau.
6. N’EXPOSEZ PAS le produit à des ammes nues ou à des températures ambiantes
extrêmement élevées.
7. NE COUVREZ PAS la sortie d’air chaud et la sortie d’air de refroidissement lorsque le produit
fonctionne.
8. Veuillez débrancher le produit lorsqu’il est en maintenance ou laissé inutilisé.
9. Il est recommandé de l’utiliser avec les centrales NITECORE ou des powers stations avec
une certication de sécurité.
10. NE PAS démonter ou modier le produit sans autorisation, car cela entraînerait l’annulation
de la garantie. Veuillez consulter le service de garantie pour plus de détails.
Service de garantie
Tous les produits NITECORE® sont garantis pour la qualité. Tout produit défectueux peut être
échangé/remplacé par l’intermédiaire d’un distributeur / revendeur local dans les 15 jours
suivant l’achat. Après cela, tous les produits NITECORE® défectueux peuvent être réparés
gratuitement, dans les 12 mois suivant la date d’achat. Au-delà de 12 mois, les frais pour les
accessoires, les pièces de rechange et la livraison sont à vos frais.
La garantie sera annulée si :
1. le(s) produit(s) est(sont) décomposé(s), reconstruit(s) et/ou modié(s) par des parties non
autorisées.
2. le(s) produit(s) est/sont endommagé(s) en raison d’une mauvaise utilisation.
Pour obtenir les dernières informations sur les produits et services NITECORE®, veuillez
contacter un distributeur NITECORE® local ou envoyer un e-mail à [email protected]
※ Les marques de commerce et les images de produits spéciées dans ce manuel d’utilisation
sont à titre de référence uniquement. Le droit d’auteur appartient à leurs détenteurs
légitimes.
※ Toutes les images, textes et déclarations spéciés dans ce manuel d’utilisation sont à titre de
référence uniquement. En cas de divergence entre ce manuel et les informations spéciées
sur www.nitecore.com, Sysmax Innovations Co., Ltd. se réserve le droit d’interpréter et de
modier le contenu de ce document à tout moment sans préavis.
9
Page 12
(Español) MANUAL DE USUARIO
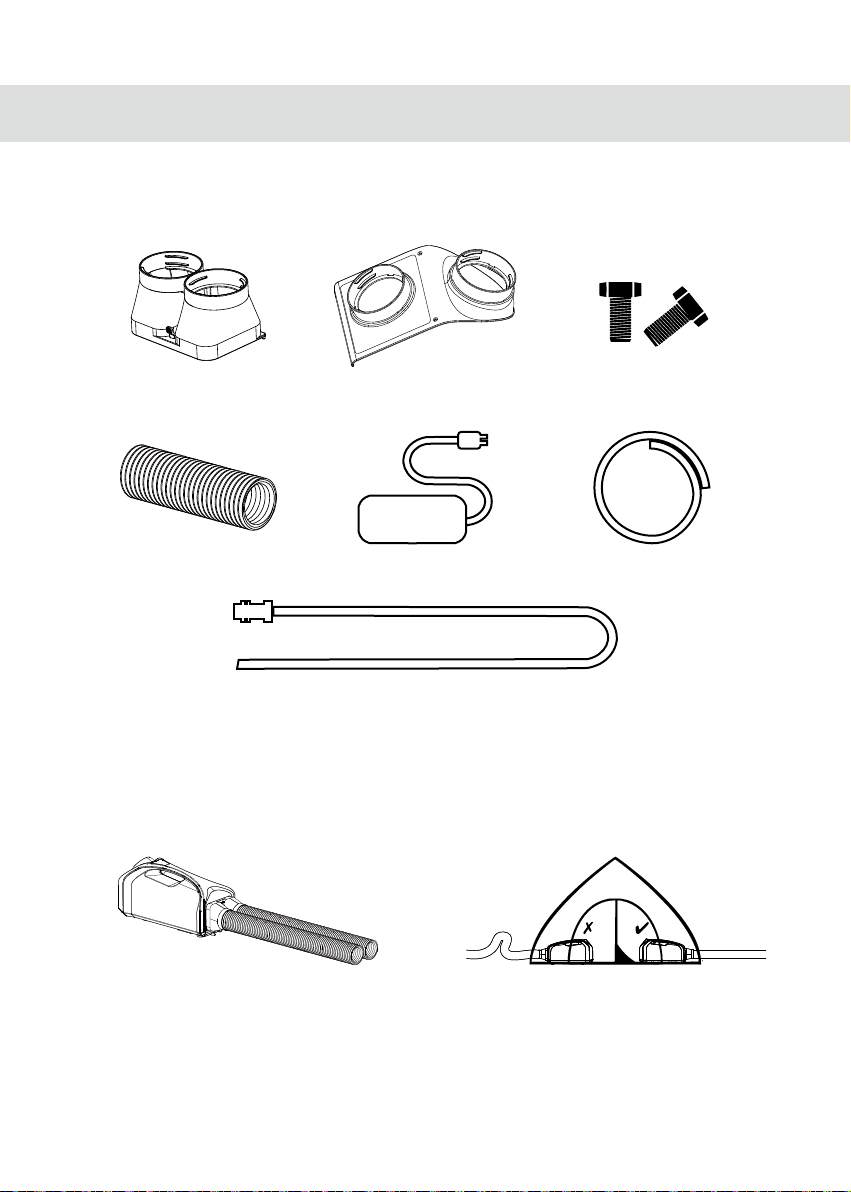
Accesorios
Conexión de manguera de aire
caliente × 1
Manguera × 2 Adaptador de corriente × 1 Tubo de drenaje × 1
Conexión de la manguera de
aire de refrigeración × 1
Cable de alimentación aéreo de 2m × 1
Tornillo de montaje (M4*12)
× 2
Instalación
Hay 3 maneras de instalar el producto:
1. Cuando el producto está colocado en la tienda, extraiga el aire caliente de la misma.
Figura 1
a. Como se ilustra en la imagen 1, conecte 2
mangueras con el extremo roscado de la
conexión de la manguera de aire caliente.
10
Figura 2
b. Como se muestra en la imagen 2, conecte
la conexión de la manguera de aire
caliente con el extremo del producto y
extienda las mangueras fuera de la tienda.
Nota: NO doblar la manguera en uso para
no afectar la disipación de calor.
Page 13
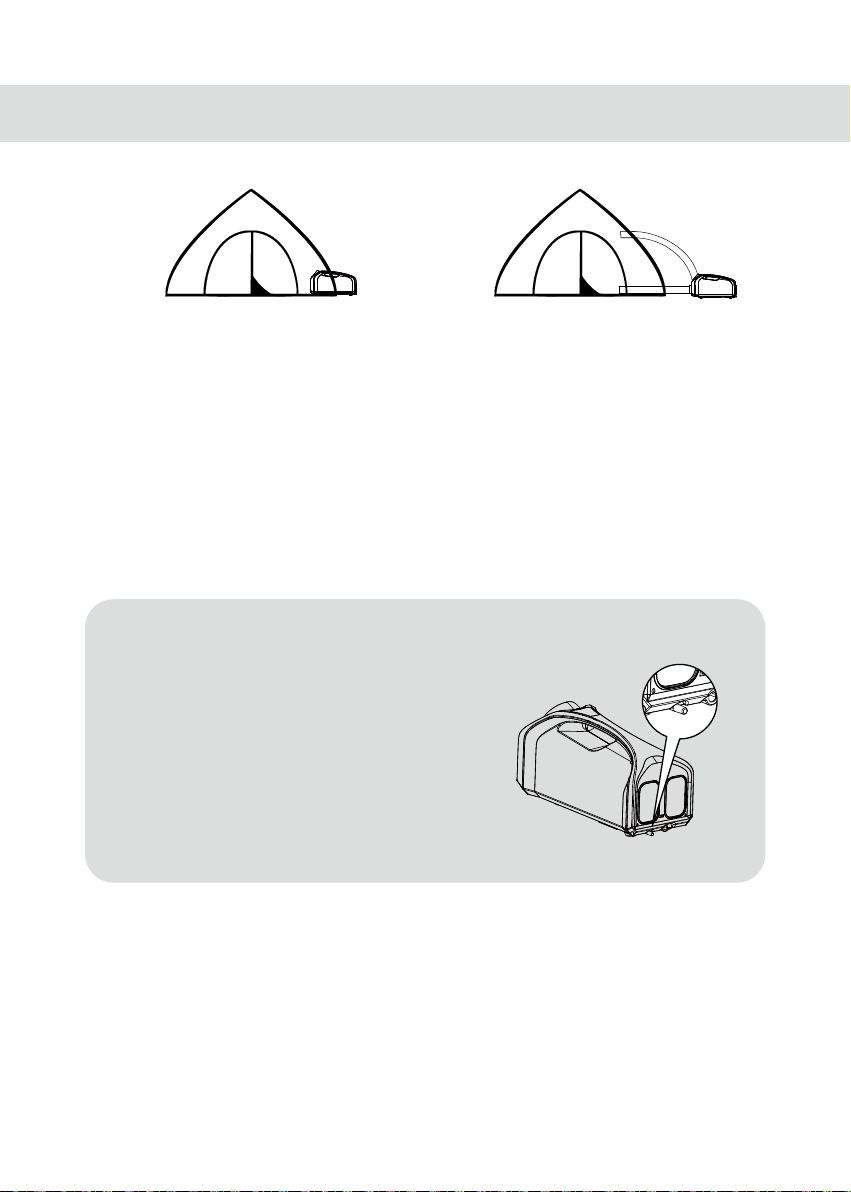
Figura 3
2. Cuando la salida de aire de refrigeración
está colocada en la tienda, coloque la
entrada de aire del condensador y la
salida de aire caliente en el exterior, como
se ilustra en la gura 3.
Instalación del Tubo de Desagüe:
Conecte el Tubo de Desagüe con el Desagüe y
coloque el otro extremo en el exterior para evitar
que se doble y se obstruya.
Notas: Coloque el producto en un área plana y
ventilada y asegúrese de que no haya ninguna
obstrucción a su alrededor de al menos 50cm (20").
Mantenga el Tubo de Drenaje en línea recta y NO
extienda la manguera o intercambie diferentes
mangueras, o el producto podría dañarse.
Figura 4
3. Cuando el producto está colocado fuera
de la tienda, el aire de refrigeración debe
ser soplado en ella, como se muestra en
la Figura 4.
Atornille la conexión de aire de
refrigeración en el extremo delantero del
producto y conecte dos mangueras con
el extremo roscado de la conexión de
la manguera de aire de refrigeración. A
continuación, el aire de refrigeración debe
ser soplado en la tienda.
Conexión a la red eléctrica:
Utilice el adaptador de corriente para conectar una fuente de alimentación externa (por ejemplo,
una fuente de alimentación de CA o una central eléctrica) a la entrada de alimentación. La
pantalla en tiempo real parpadeará para informar al usuario una vez completada la conexión.
11
Page 14

Instrucciones de uso
Encendido / Apagado
• Encendido: Cuando el producto está apagado, pulse brevemente el botón de encendido para
encenderlo.
• Apagado: Cuando el producto está encendido, pulse prolongadamente el botón de
encendido durante 3 segundos para apagarlo.
Ajuste de la temperatura
Pulse brevemente el botón de temperatura "+" / "-" para controlar la temperatura de 16°C a
30℃. Si no hay ninguna operación de ajuste, el producto saldrá automáticamente del estado de
ajuste después de que la pantalla en tiempo real parpadee durante 5 segundos.
Ajuste de la velocidad del viento
Pulse brevemente el botón de velocidad del viento para pasar por los siguientes niveles: BAJO MEDIO - ALTO.
Selección de modo
• Mantenga pulsado el botón de modo de reposo durante 3 segundos para cambiar entre el
modo de refrigeración y el modo de reposo.
• El icono del copo de nieve se encenderá si el producto accede al modo de refrigeración. Este
modo es ideal para el uso diario.
El icono del copo de nieve se apagará si el producto accede al modo de reposo. Una vez que
el modo de reposo está activado, sólo el ventilador incorporado funciona continuamente con
un ruido mínimo, adecuado para dormir.
• Al reactivar el producto, éste accederá automáticamente a su modo anterior.
Mantenimiento
Guía de limpieza:
• Limpie el exterior del producto con un paño húmedo. Si la suciedad no puede limpiarse,
límpiela con un detergente suave y vuelva a pasar un paño limpio.
• Los ltros de aire de la entrada del evaporador y de la entrada de aire del condensador son
desmontables. Aclárelos con agua y vuelva a instalarlos una vez que estén completamente
secos.
Mantenimiento de las piezas de plástico:
• Por favor, utilice el producto correctamente para evitar que se manche de aceite y se
deforme. NO exponga el producto al sol y se recomienda utilizarlo a la sombra.
• NO aclare el producto directamente con agua para evitar la degradación del rendimiento
del aislamiento eléctrico del circuito interno y la oxidación de las piezas internas. Se prohíbe
limpiar el producto evitando dañar el revestimiento y las piezas de plástico: agua caliente,
cepillo, gasolina, alcohol y jabón.
12
Page 15

Advertencias:
• El producto sólo debe ser utilizado por adultos mayores de 18 años. Los niños menores de
esta edad deben ser supervisados por un adulto cuando utilicen el producto.
• Coloque el producto en lugares ventilados. NO utilice el producto en un entorno húmedo.
• NO toque el enchufe u otras partes con las manos mojadas.
• NO utilice el producto si el cable de alimentación o el enchufe están dañados.
• NO utilice el producto si se ha golpeado, dañado, colocado en el exterior durante mucho
tiempo o si se ha caído al agua.
• NO exponga el producto a llamas abiertas o a temperaturas ambientales extremadamente
altas.
• NO cubra la salida de aire caliente y la salida de aire frío cuando el producto esté
funcionando.
• Desenchufe el producto cuando esté en mantenimiento o no lo utilice.
• Se recomienda utilizar con centrales NITECORE u otras con certicación de seguridad.
• NO desmonte ni modique el producto sin autorización, ya que la garantía quedará anulada.
Por favor, consulte el Servicio de Garantía para más detalles.
Servicio de garantía:
Todos los productos NITECORE® tienen garantía de calidad. Cualquier producto DOA /
defectuoso puede ser cambiado por un reemplazo a través de un distribuidor local / distribuidor
dentro de los 15 días de la compra. Después de eso, todos los productos NITECORE®
defectuosos / que funcionen mal pueden ser reparados gratuitamente en un plazo de 12 meses
a partir de la fecha de compra. Más allá de los 12 meses, los gastos de los accesorios, las piezas
de repuesto y la entrega correrán a cargo del usuario.
La garantía quedará anulada si
• El producto(s) se estropea(n), se reconstruye(n) y/o se modica(n) por personas no
autorizadas.
• El producto(s) está(n) dañado(s) debido a un uso inadecuado.
Para obtener la información más reciente sobre los productos y servicios de NITECORE®,
póngase en contacto con un distribuidor local de NITECORE® o envíe un correo electrónico a
[email protected]
※ Las marcas comerciales y las imágenes de los productos especicadas en este manual de
usuario son sólo para nes de referencia. Los derechos de autor pertenecen a sus legítimos
propietarios.
Todas las imágenes, textos y declaraciones especicadas en este manual del usuario son sólo
para nes de referencia. Si se produce alguna discrepancia entre este manual y la información
especicada en www.nitecore.com, Sysmax Innovations Co., Ltd. se reserva el derecho de
interpretar y modicar el contenido de este documento en cualquier momento sin previo aviso.
13
Page 16
(Русский) инструкции
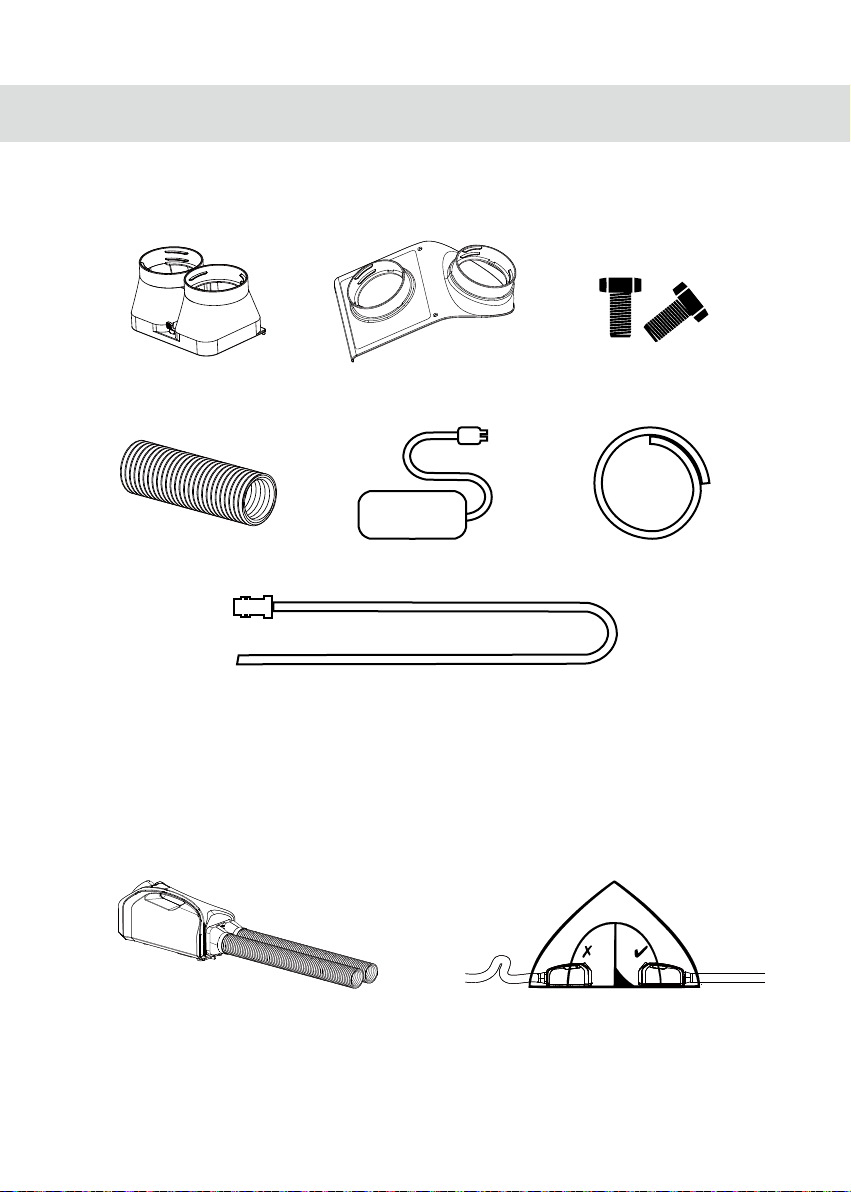
Комплектующие
Крепление для шланга
горячего воздуха × 1
Шланг × 2 Адаптер питания × 1 Дренажная трубка × 1
Крепление для шланга
охлажденного воздуха × 1
Двухметровый антенный кабель × 1
Крепежный винт (M4*12)
× 2
Сборка
Есть три способа установки устройства:
1. После помещения устройства в палатку необходимо выпустить из нее горячий воздух
a. Соедините два шланга с резьбой крепления, предназначенного для шланга горячего
воздуха, так, как показано на иллюстрации 1.
14
Иллюстр 1
Page 17
b. Подсоедините крепление для шланга
горячего воздуха к устройству и вытяните
шланги за пределы палатки так, как показано
на иллюстрации 2.
Примечание: НЕ допускайте сгибания
шланга во время использования, чтобы не
помешать процессу выведения тепла.
2. Поместите устройство в палатке так, как показано
на иллюстрации 3, чтобы выход охлажденного
воздуха приходился на внутреннюю часть палатки,
а воздухозаборник конденсатора и выход горячего
воздуха находились снаружи нее.
3. При помещении устройства снаружи палатки
необходимо чтобы охлажденный воздух попадал
внутрь нее (см. на иллюстрацию 4).
Соедините крепление для шланга охлажденного
воздуха к передней части устройства, а к резьбовому
концу крепления подсоедините два шланга. Теперь
охлажденный воздух должен попадать в палатку.
Установка дренажной трубки:
прикрепите дренажную трубку к дренажному
отверстию устройства и поместите другой конец
этой трубки снаружи во избежание ее изгибов и
засорения.
Иллюстр 2
Иллюстр 3
Иллюстр 4
Примечание: Поместите устройство на ровную
поверхность и в вентилируемое пространство,
также убедитесь, что на расстоянии как минимум
50 см (20 дюймов) вокруг него нет никаких
мешающих объектов. Следите за тем, чтобы дренажная трубка была не согнута,
не пытайтесь растянуть шланг или менять его на другие шланги, в противном
случае устройство может быть повреждено.
15
Page 18

Подключение к источнику питания
Используйте адаптер питания для подключения входа питания ко внешнему источнику
питания (например, блоку питания переменного тока или электростанции). После
подключения дисплей в режиме реального времени начнет мигать, таким образом
информируя пользователя.
Инструкция по эксплуатации
Вкл / выкл
Вкл.: когда устройство выключено, ненадолго зажмите и отпустите кнопку питания,
чтобы его включить.
Выкл.: когда устройство включено, нажмите и удерживайте кнопку питания в течение 3
секунд, чтобы его выключить.
Регулирование температуры
Ненадолго зажмите и отпустите кнопку увеличения температуры «+» / кнопку уменьшения
температуры «-», чтобы контролировать температуру в диапазоне от 16 ° C до 30 ℃. Если
не совершать никаких действий, продукт автоматически выйдет из состояния настройки
после того, как дисплей проработает в течение 5 секунд.
Регулирование скорости потока воздуха
Ненадолго зажимайте и отпускайте кнопку скорости потока воздуха, чтобы переключаться
между тремя доступными уровнями: НИЗКИЙ – СРЕДНИЙ – ВЫСОКИЙ
Выбор режима
• Нажимайте и удерживайте кнопку режима сна в течение 3 секунд, чтобы
переключаться между режимом охлаждения и режимом сна.
• Значок снежинки загорится, если продукт перейдет в режим охлаждения. Этот режим
отлично подходит для ежедневного пользования.
Значок снежинки перестанет гореть, если устройство перейдет в режим сна. При
включенном режиме сна постоянно работает только встроенный вентилятор с
минимальным уровнем шума, режим хорошо подходит для сна.
• При повторном включении устройства оно автоматически переходит в тот режим,
который был установлен в последний раз.
Обслуживание
Руководство по чистке:
• Протрите изделие снаружи влажной тканью. Если грязь не удается удалить, очистите
ее мягким моющим средством, а затем снова протрите чистой тканью.
• Воздушные фильтры на входе испарителя и конденсатора являются съемными.
Промойте их водой и установите на место после полного высыхания.
Обслуживание пластиковых деталей:
• Пожалуйста, используйте продукт правильно, чтобы избежать масляных пятен
и деформации. НЕ подвергайте продукт воздействию солнца, рекомендуется
использовать его в тени.
• НЕ промывайте изделие водой, чтобы избежать ухудшения состояния электрической
изоляции внутренней цепи и ржавчины внутренних частей. Запрещается чистить
изделие во избежание повреждения покрытия и пластиковых частей следующими
средствами: горячая вода, щетка, бензин, спирт и мыло.
16
Page 19

1Предостережения
1. Продукт предназначен к использованию только людьми старше 18 лет. Те, кто младше
этого возраста, должен находиться под присмотром взрослых во время пользования
устройством.
2. Пожалуйста, размещайте продукт в проветриваемых помещениях. НЕ используйте
изделие во влажной среде.
3. НЕ прикасайтесь к вилке или другим деталям мокрыми руками.
4. НЕ используйте устройство, если шнур питания или вилка повреждены.
5. ЗАПРЕЩАЕТСЯ эксплуатировать изделие, которое подвергалось ударам, повреждению,
хранению на открытом воздухе в течение длительного времени или падению в воду.
6. НЕ подвергайте изделие воздействию открытого огня или чрезвычайно высокой
температуры окружающей среды.
7. НИЧЕМ НЕ закрывайте выпускное отверстие для горячего воздуха и выпускное
отверстие для охлажденного воздуха, когда устройство работает.
8. Отключайте изделие от сети, если оно обслуживается или не используется.
9. Рекомендуется использовать с электростанциями NITECORE или другими, но при
наличии сертификации безопасности.
10. НЕ разбирайте и не модифицируйте устройство без разрешения, так как это приведет
к аннулированию гарантии. Пожалуйста, проверьте ваше гарантийное обслуживание
для получения более подробной информации.
Гарантийное обслуживание
На всю продукцию NITECORE® распространяется гарантия. Любой дефектный /
неисправный продукт можно обменять на новый у местного дистрибьютора / дилера
в течение 15 дней с момента покупки. После этого всю дефектную / неисправную
продукцию NITECORE® можно отремонтировать бесплатно в течение 12 месяцев с даты
покупки. По истечении 12 месяцев плата за комплектующие, запасные части и доставку
осуществляется за ваш счет.
Гарантия аннулируется, если
1. продукт(ы) сломан(ы), реконструирован(ы) и / или модифицирован(ы)
неуполномоченными лицами,
2. продукт(ы) поврежден(ы) из-за неправильного использования.
Для получения последней информации о продукции и услугах NITECORE® свяжитесь
с местным дистрибьютором NITECORE® или отправьте электронное письмо по адресу
[email protected]
※ Товарные знаки и изображения продуктов, указанные в данном руководстве
пользователя, предназначены только для справочных целей. Авторские права
принадлежат их законным владельцам.
※ Все изображения, тексты и заявления, указанные в данном руководстве пользователя,
предназначены только для справочных целей. В случае возникновения каких-либо
несоответствий между данным руководством и информацией, указанной на сайте
www.nitecore.com, компания Sysmax Innovations Co., Ltd. оставляет за собой право
интерпретировать и изменять содержание этого документа в любое время без
предварительного уведомления.
17
Page 20
简体中文 使用说明书
配件
热风接管组件 × 1 冷风接管组件 × 1 安装螺钉(M4*12) × 2
导风管 × 2 适配器 × 1 排水管 × 1
2 米航空插电源线 × 1
安装
本产品设有以下三种安装方式:
1. 当产品置于帐篷内时,热风需往外排出。
图1
a. 将两根导风管旋入热风接管组件有螺
纹的一端,如图 1。
18
图2
b. 将热风接管组件卡在空调尾端,风管
伸到帐篷外面,如图 2。
注意:在使用的过程中,请勿折叠排
风管,否则影响空调散热。
Page 21
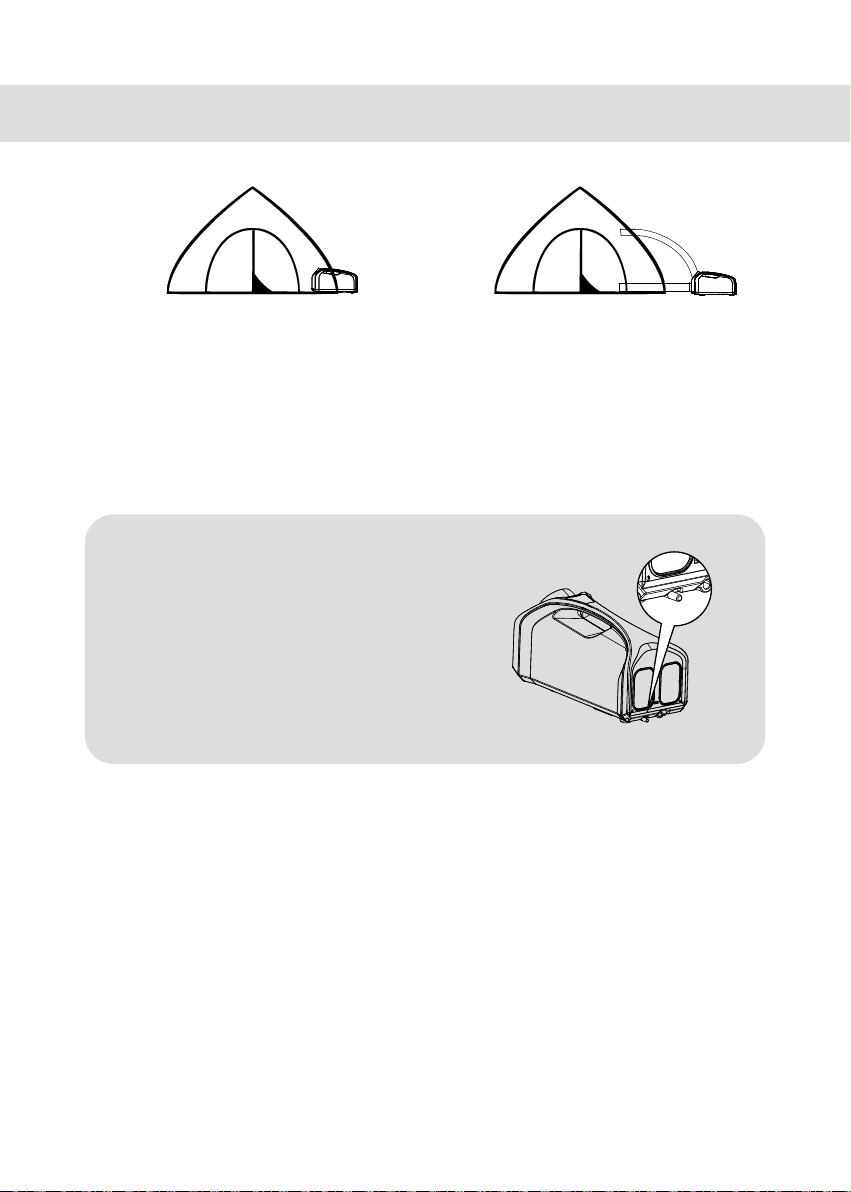
图3
2. 当产品冷风出风端置于帐篷内时,冷
凝器进风端和热风出风端需放在帐篷
外,如图 3。
安装排水管:
将排水管插入空调后面左下方凸出的排水
孔,水管应往外引出,避免弯折和堵塞。
注意 : 产品需放置在一个平坦、干燥的地方,
产品周围至少有 50 厘米的空间,软管尽量
保持直线状态。不要使用扩展或交换不同
的软管,否则可能导致故障。
连接电源
图4
3. 当产品置于帐篷外时,需将冷风引入
帐篷内如图 4。
用螺丝将冷风接管组件固定在空调前
端,两根导风管从螺纹端拧入。两根
导风管另一端伸入帐篷内,把冷风引
入帐篷内。
将电源适配器插入机器后部的电源插座中,另一端接上电源(交流电源或户外电源等),
显示屏将会闪烁提示已成功连接。
空调操作
开启 / 关闭
开启:在关闭状态下,短按电源键即可开启空调。
关闭:在开启状态下,长按电源键 3 秒即可关闭空调。
19
Page 22

温度调节
每次短按“温度加”按键或者“温度减”按键,空调温度可在“16° C ~ 30° C”之间调
节。停止操作后 5 秒闪烁停止,自动退出设置状态。
风速调节
每次短按“风速调节”按键,即按“低风档 - 中风档 - 高风档”顺序循环切换。
模式切换
• 长按“睡眠模式”按键 3 秒,即可在“制冷模式 - 睡眠模式”之间切换。
• 屏幕上雪花图标点亮表示进入制冷模式,适合日常使用。屏幕上雪花图标熄灭表示
进入睡眠模式,此时空调只会进行送风,适合睡眠使用。
• 关闭电源后重新开启时,空调会自动进入之前的使用模式。
日常维护
清洁方法:
• 平时可使用温湿抹布擦拭产品外表面,若污垢无法轻易擦拭,可用中性洗涤剂擦拭,
并使用干净的抹布擦净。
• 蒸发器进风口防尘网和冷凝器进风口防尘网可以拆下,使用清水冲洗干净,晾干后
装入相应位置。
塑料件的保养:
• 妥善保护产品,使用时尽量避免油渍弄脏和变形,避免长时间置于太阳底下曝晒。
• 严禁用水直接清洗本产品,以免内部电路电气绝缘性降低和生锈,以下东西禁止用
于清洁:热水、刷子、汽油、酒精、香皂等,以免损伤涂面层、塑料件。
注意事项
1. 本品适用人群为 18 岁以上成年人,儿童必须在成人的监督下使用。
2. 本产品只适用于干燥的环境,请勿在潮湿的环境中使用。
3. 请勿湿手触摸插头或电器的任何部位。
4. 如电源线或插头损坏,请勿继续使用。
5. 如果设备在受到重击后不能正常工作、损坏、长时间置于室外或落入水中,请勿继
续使用。
6. 请勿将本品暴露于明火或过高温度环境下。
7. 空调运行时,请勿遮挡住空气出口和冷却出口。
8. 当空调在维护或长时间不使用时,请拔下插头。
9. 建议使用 NITECORE 电源或其他有安全认证的电源产品。
10. 切勿擅自拆卸、组装或改装本品,可能会导致保修服务失效,详情请查看保固条款。
20
Page 23

保固服务
NITECORE® 产品拥有售后保固服务。在购买本产品的 15 天内,如果有任何质量问题
均可向经销商要求免费更换。在购买本产品的 12 个月内享受免费保固服务。在超过
12 个月免费保固期后,厂家将收取相应的材料费以及快递费。
本保固规则不适用于以下情况:
1. 人为破坏,拆解,改装本产品。
2. 错误操作导致产品损坏。
如对奈特科尔产品有任何疑问,欢迎联系当地的代理商或发邮件到 4008869828@
nitecore.cn
※ 本说明书中出现的商标及其产品图片版权属于其合法持有人,此处仅作展示所用。
※ 本说明书的所有图片、陈述及文字信息仅供参考,请以官网 www.nitecore.cn 实
际信息为准。广州希脉创新科技有限公司拥有对说明书内容的最终解释权和修改权。
Page 24

SYSMAX Innovations Co., Ltd.
TEL: +86-20-83862000
FAX: +86-20-83882723
E-mail: [email protected]
Web: www.nitecore.com
Address: Unit 6355, 5/F, No. 1021 Gaopu Road, Tianhe District,
Guangzhou, 510653, Guangdong, China
Thanks for purchasing NITECORE!
Please nd us on facebook: nitecorecharger
Made in China
AC05181022
 Loading...