

Page 1

Complete portable
high-output wash light system
with wireless foot pedal control
Page 2
TABLE OF CONTENTS
SAFETY / GENERAL INSTRUCTIONS
INTRODUCTION
Features
Specications
OVERVIEW
Front view
Rear view
Footswitch
DIMENSIONS
CONTROL MENU OVERVIEW
Control Panel
Function Menu
UFI OPERATION
DMX FUNCTION CHART
15-channel mode
3-channel mode
OPERATING MODE PRIORITY RANK
STAND-ALONE OPERATION
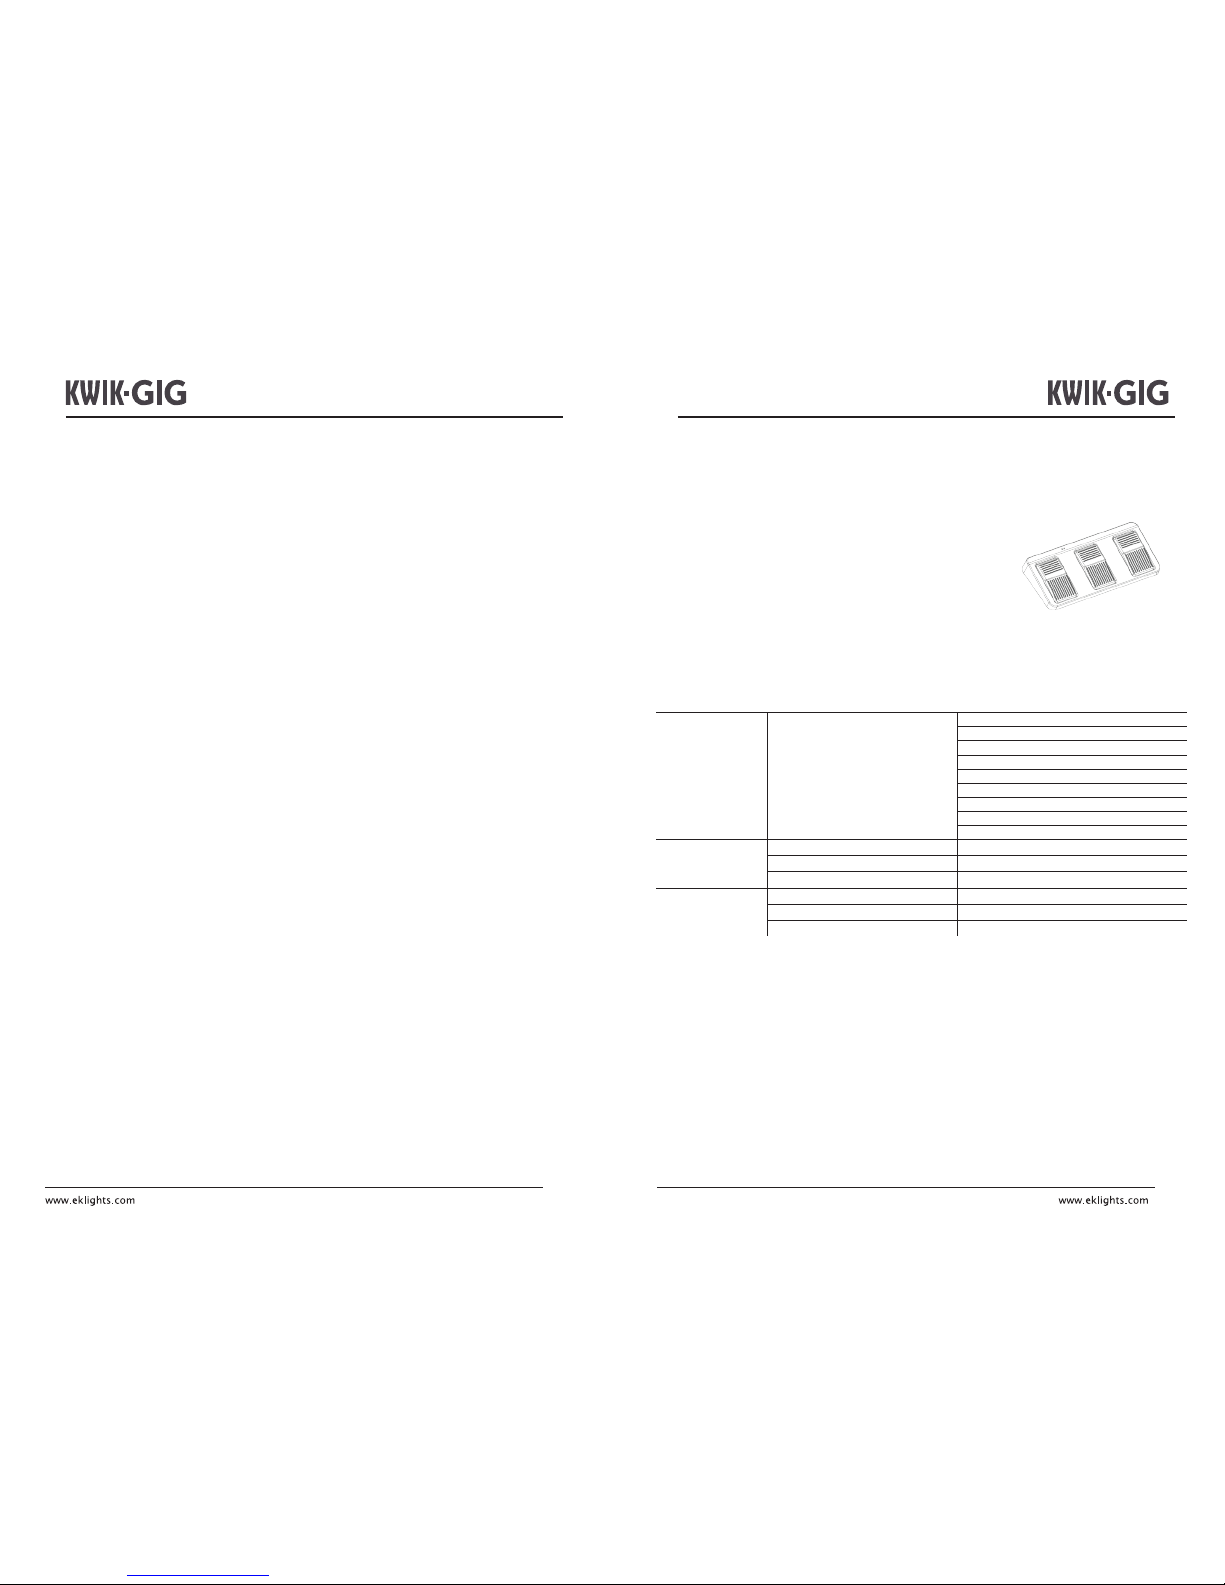
WIRELESS FOOTSWITCH OPERATION
INFRARED (IR6) REMOTE CONTROL OPERATION
MASTER/SLAVE OPERATION (via DMX cable)
MASTER/SLAVE OPERATION (via UFI wi-)
CONTROLLING OTHER NITEC UFI-COMPATIBLE MODELS
MAINTENANCE
- KWIK-GIG
- Gig bag
- Footswitch (wireless)
- Tripod stand (and bag)
- L-Brackets (for optional oor mounting)
- Power cord
- User Manual
- Warranty Card
PACKING CONTENT
2
19
Page 3
18
3
Page 4
INTRODUCTION
KWIK-GIG is a complete portable high-output wash light system.
FEATURES
- Complete portable high-output wash light system
- Wireless footswitch included for convenient cable-free pedal control
- Four adjustable heads project light wherever it's wanted
- Tripod stand included for quick setup
- Custom carrying bag included for easy portability
- L-Brackets included for oor mounting option
- Master-slave mode for linking multiple Kwik-Gig units
- Built-in sound-active and auto (stand-alone) programs
- DMX In and Out connections
- Power In and Out connections for linking mutliple units
- Additional light xtures (not included) can be mounted easily to the top bar
- USB port for optional UFI wi- transceiver for wireless DMX control
- Infrared sensor for optional IR6 remote control
SPECIFICATIONS
Light Source: 28 x 3W Tri-color LED
Beam Angle: 18°
Field Angle: 30°
Colors: RGB color mixing
Output: 305 LUX @ 5 meters (each head)
Strobe: 0 - 30 Hz
PWM Frequency: 600 Hz, icker-free for camera
Dimming: 0-100% dimming
Control Modes: DMX, Master/Slave, Auto, Sound-Active, Footswitch,
Koala wireless DMX (with optional UFI transceiver),
IR (with optional IR6 controller)
DMX Channels: 3 / 15
Built-in Programs: Yes
Menu: 4- digit LED display
Mains: 100 - 240 VAC, 50/60 Hz (auto-ranging)
Power: 69W
Power Linking: Up to 8 units
Power connections: IEC power In/Out
Data connections: 3-pin XLR In/Out for DMX
Housing: Aluminum
Finish: Matte Black
IP Rating: IP20
Dimensions: 1050 x 50 x 270 mm
Weight: 13KG (complete set)
4
17
Page 5
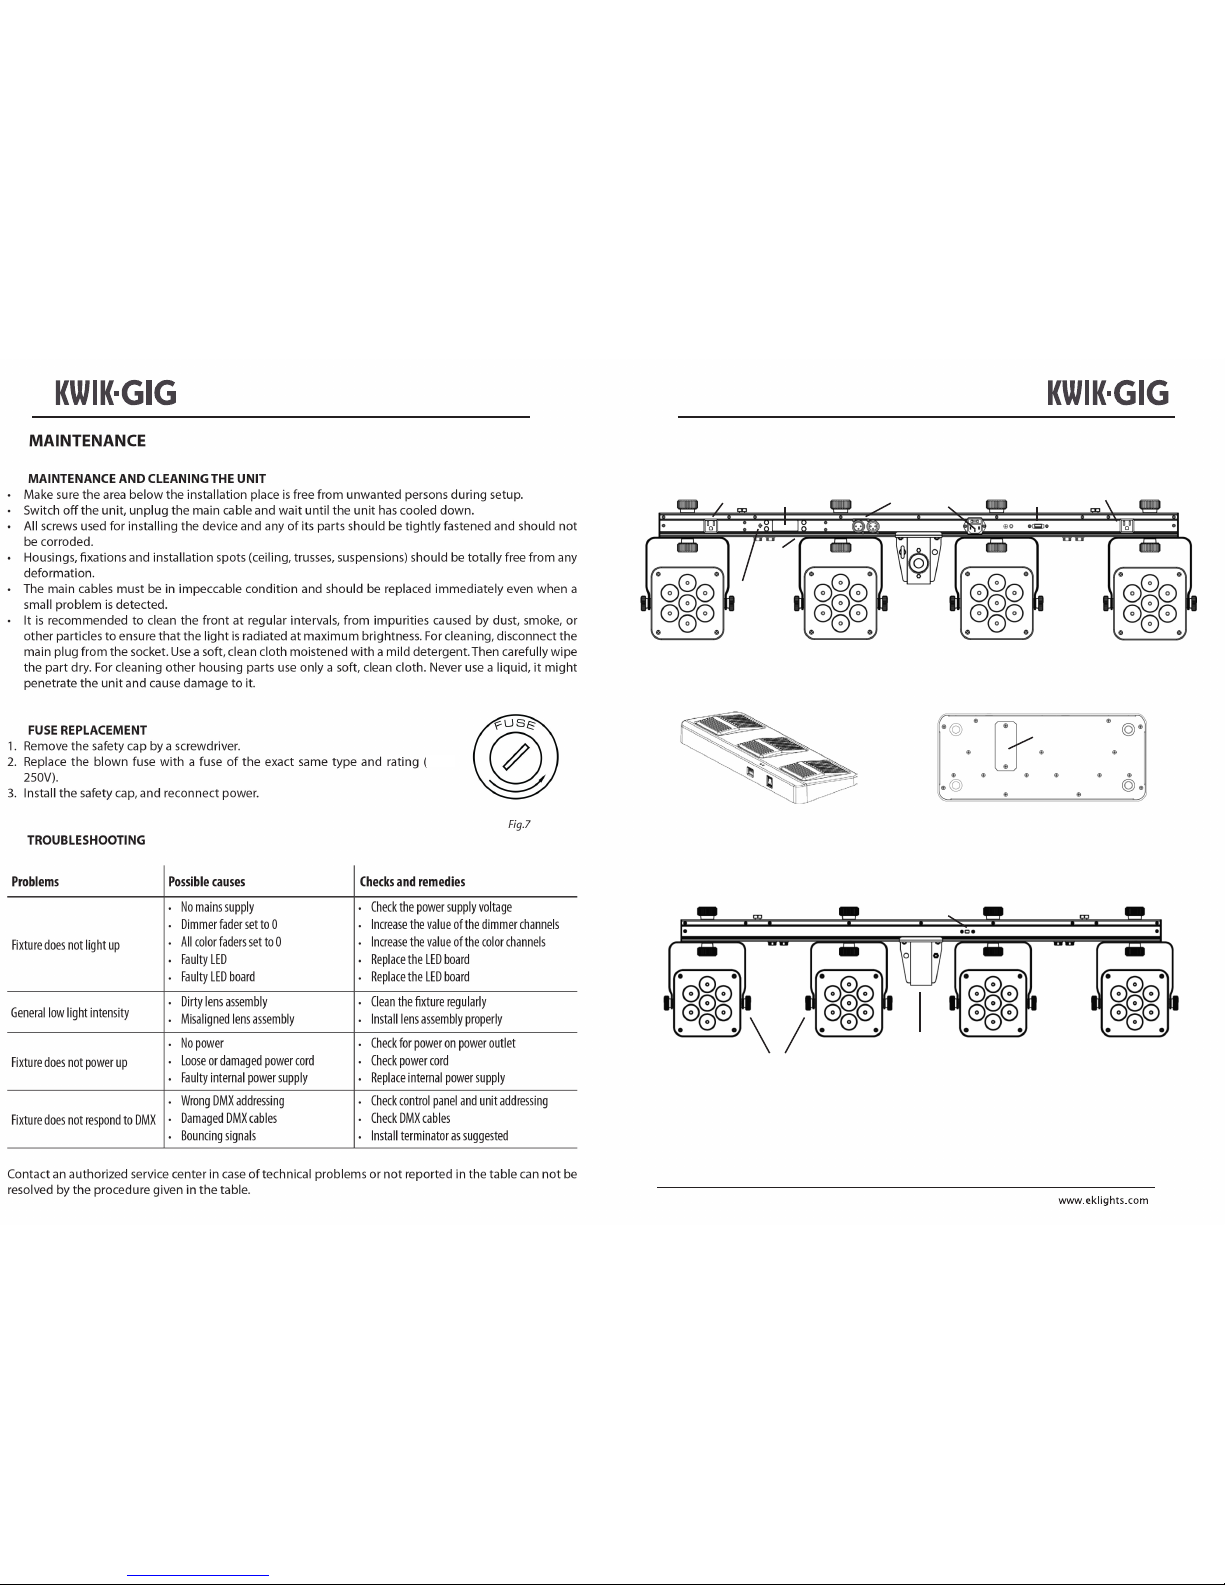
OVERVIEW
Power Out
Microphone
Display
Mounting
Knob
DMX
In/Out
Power In UFI Port
Power Out
Menu
Buttons
Footswitch
DIP switches
Power switch
Battery
Rear View
Clamp
mounting
bolt
Clamp
mounting
bolt
Tripod collar
IR sensor
Adjustment knobs
5
16
T2A-
Page 6
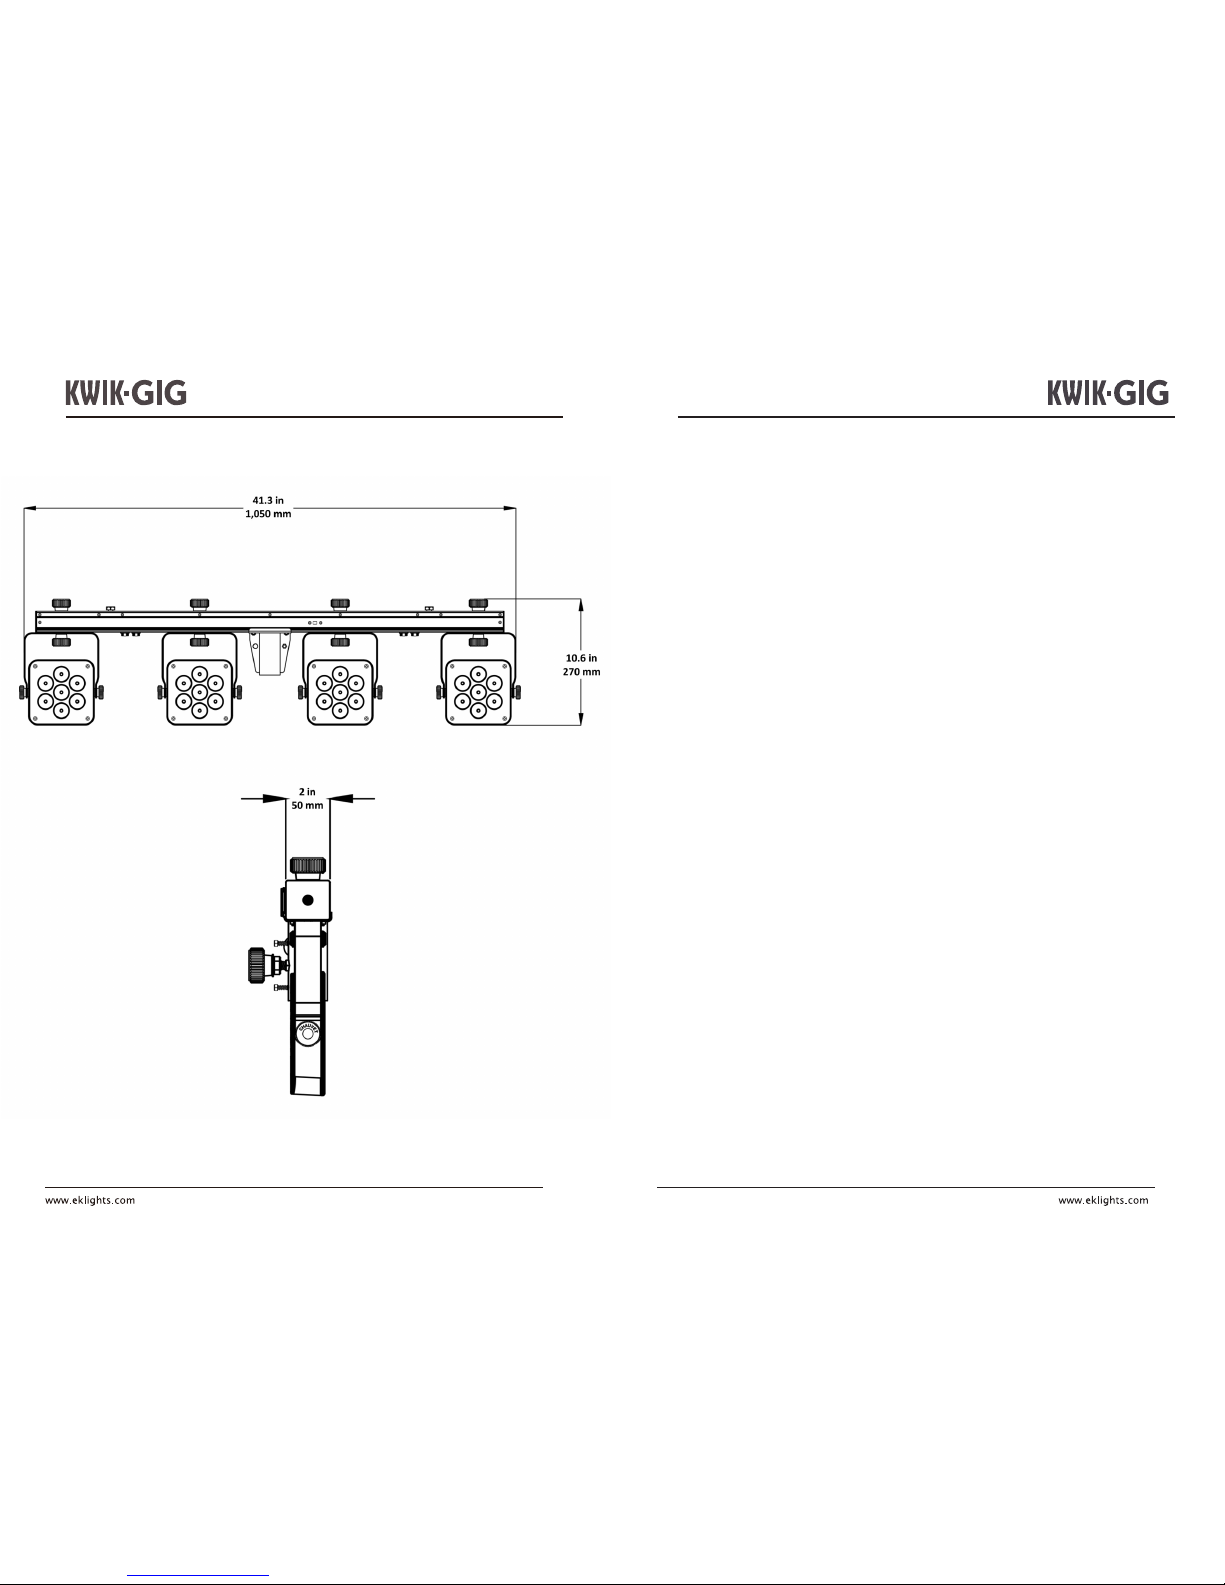
DIMENSIONS
6
CONTROLLING OTHER NITEC UFI-COMPATIBLE MODELS
WITH THE KWIK-GIG
The KWIK-GIG can be congured to control any NITEC model that is UFI-compatible. The
control signal can be transmiited over DMX cable (wired) or by UFI wi- transceivers
(wireless). Setup for both methods described below.
Note: Slave units should be congured before conguring master unit
WIRED CONNECTION OF NITEC MODELS TO KWIK-GIG MASTER UNIT
Slave units:
Set all slave units to 3-channel mode
Set DMX addresses to match the KWIK-GIG head that will control the slave unit
- Slave units controlled by Head 1, set to address 1
- Slave units controlled by Head 2, set to address 7
- Slave units controlled by Head 3, set to address 13
- Slave units controlled by Head 4, set to address 19
Connect all slave units in DMX cable daisy chain
Connect rst slave unit to the KWIK-GIG DMX Out
KWIK-GIG Master unit:
Set to Auto mode or enable footswitch control
Link rst slave unit to the KWIK-GIG’s DMX Out connector
WIRELESS CONNECTION OF NITEC MODELS TO KWIK-GIG MASTER UNIT
Slave units:
Set all slave units to 3-channel mode
Set DMX addresses to match the KWIK-GIG head that will control the slave unit
- Slave units controlled by Head 1, set to address 1
- Slave units controlled by Head 2, set to address 7
- Slave units controlled by Head 3, set to address 13
- Slave units controlled by Head 4, set to address 19
Set UFI transceivers to preferred receiving channel (1-16)
Attach one UFI to the USB port of each NITEC model
KWIK-GIG Master unit:
Set to Auto mode or enable footswitch control
Set UFI to chosen transmitting channel (1-16)
Attach UFI to the KWIK-GIG's USB port
15
Page 7
MASTER/SLAVE OPERATION (via UFI wi- transceiver)
KWIK-GIG units can operate in Master/Slave mode wirelessly using the optional UFI wi-
transceiver. The master UFI-enabled unit can be operated in stand-alone mode or by the
wireless footswitch, with the UFI set to transmit. The slave units should all be set to slave
mode, with the UFI set to receive.
Note: Slave units should be congured before conguring master unit
Note: All units should be set to same DMX address, mode and UFI channel
Setup as below:
SLAVE UNITS:
Press MENU button until 3-CH or 15CH is displayed
Press ENTER
Set DMX address to d 1
Set UFI to preferred receiving channel (1-16)
Attach UFI to the KWIK-GIG's USB port
MASTER UNIT:
Press MENU button until DMX mode is displayed that matches slave conguration
Press ENTER
Set DMX address to d 1
Set to Auto or Sound-Active mode
Set UFI to chosen transmitting channel (1-16)
Attach UFI to the KWIK-GIG's USB port
14
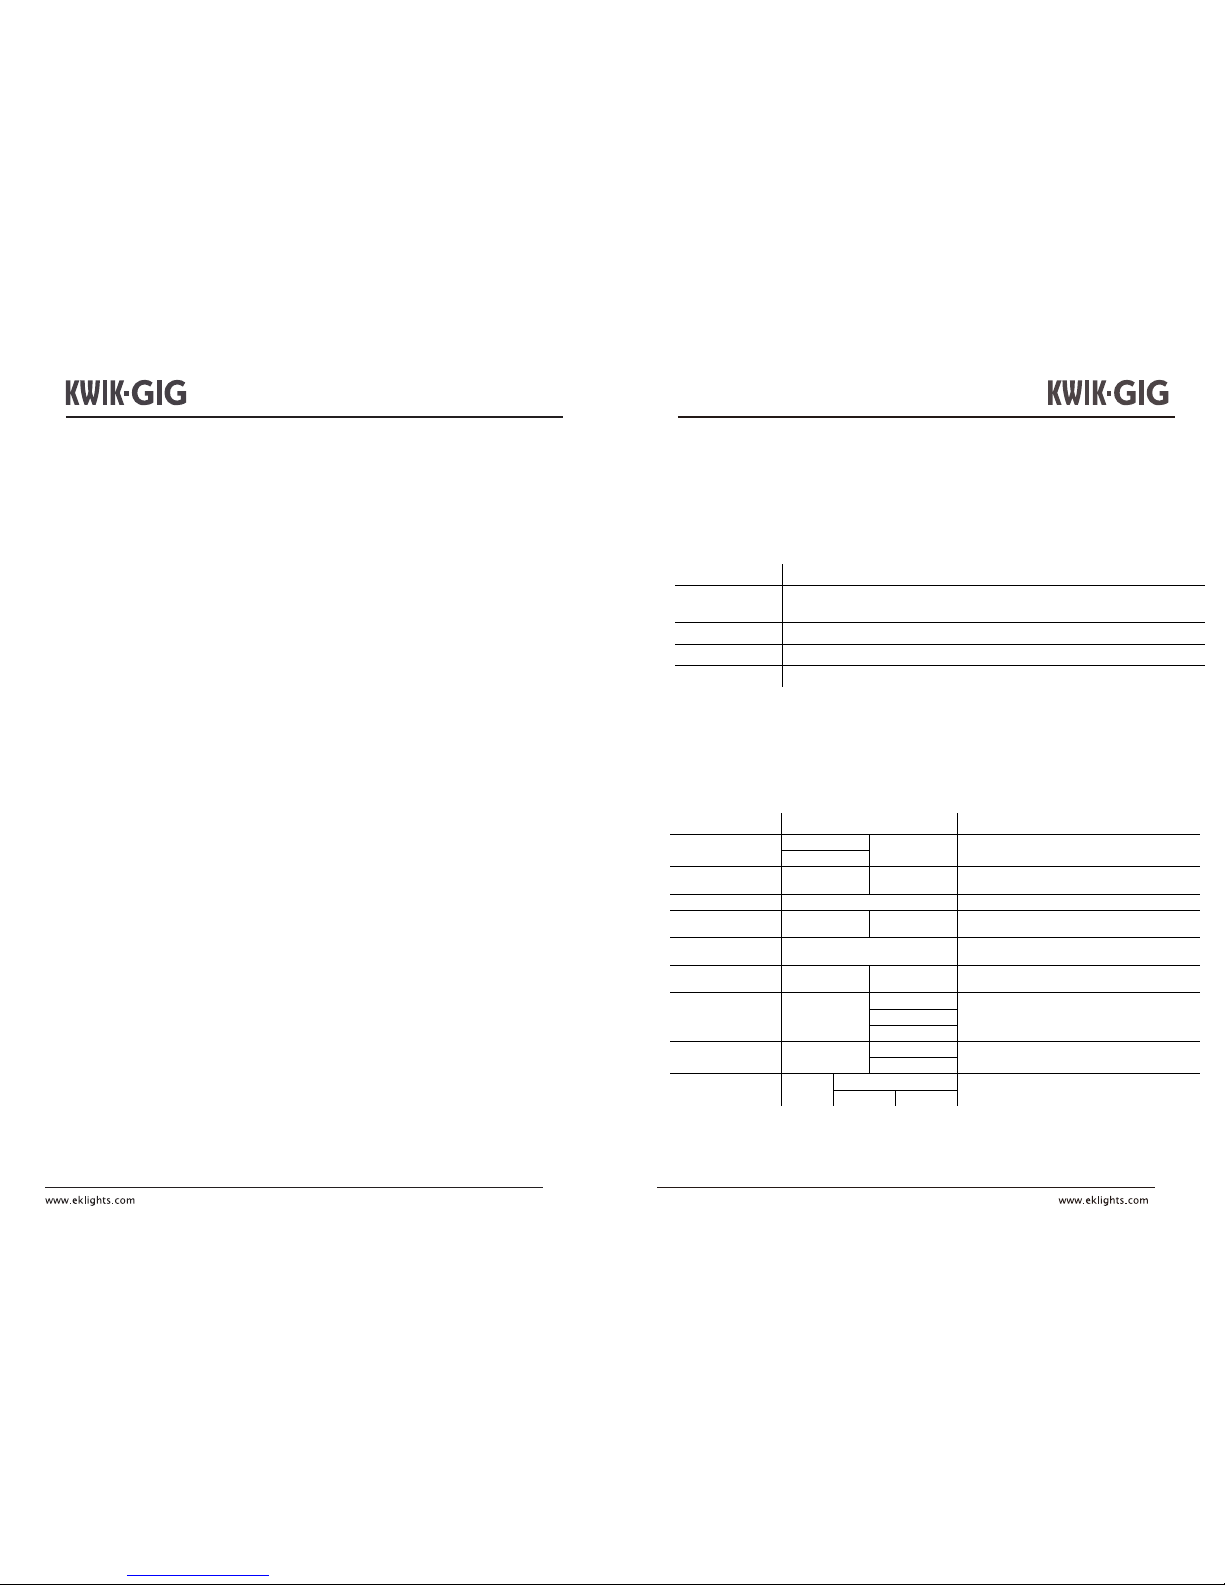
BUTTON FUNCTION
Menu
Selects operating mode or exits submenus
Up
Scrolls up through option lists or selects higher value
Down
Scrolls down through option lists or selects lower value
Enter
Activates displayed menu option or selected value
MODE OPTIONS / VALUES DESCRIPTION
DMX Mode
3-CH
d 1–d512
Sets DMX starting address
15CH
Preset Colors C-- C 1–C 7
Selects preset colors (red, green,
blue, cyan, magenta, yellow, or white.)
Auto Program
Auto
Turns on Auto mode
Speed S-- S 1–S100
Sets the speed of auto programs (fast to slow)
Sound-Active Snd
Sets auto programs to sound-active mode
Sound Sensitivity SenS u 1–u100
Adjusts internal mic sensitivity in Sound mode
RGB Color Mixing U--
r 0–r100
Adjust red, green, and blue color levels
g 0–g100
b 0–b100
Infrared Mode Ser
ON
On/O setting for infrared mode for IR6 remote
OFF
Wireless Foot
Controller
rF
OFF
On/O setting for wireless foot control
Sets channel for wireless foot control
ON
rF1–16
CONTROL MENU OVERVIEW
CONTROL PANEL
FUNCTION MENU
7
Page 8
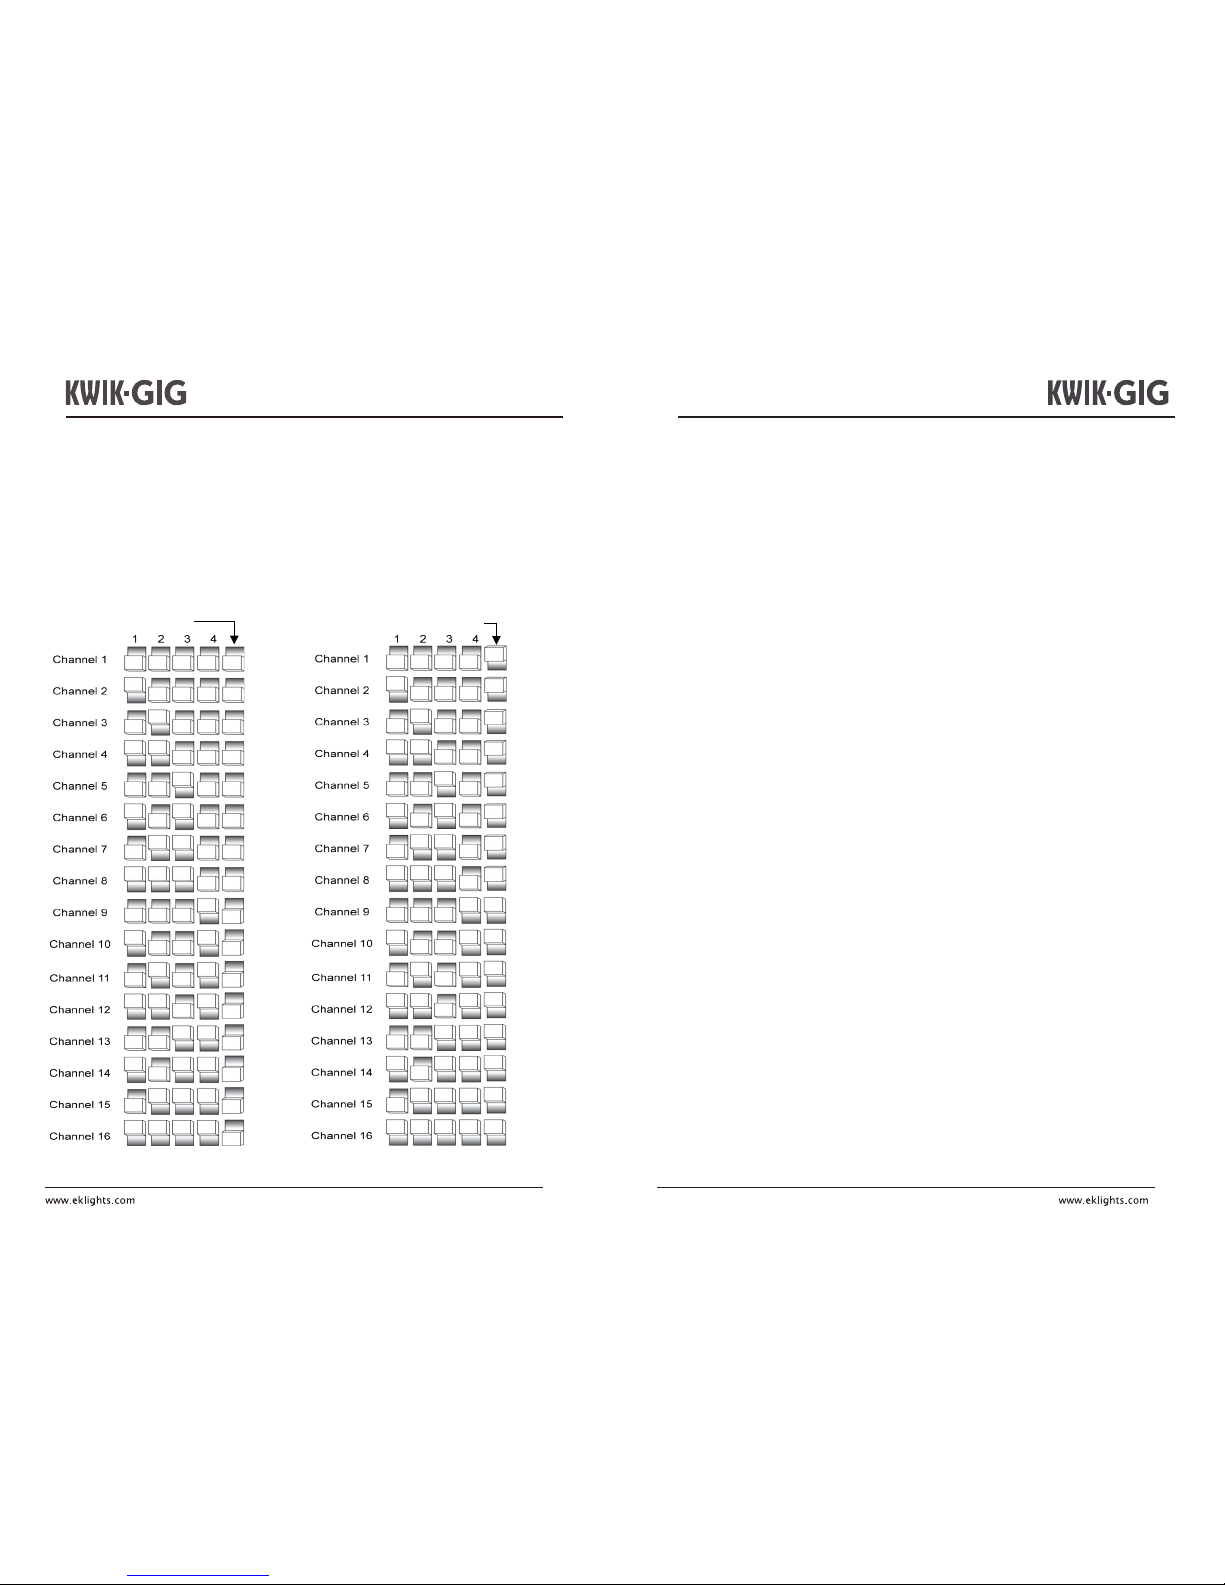
RECEIVING
TRANSMITTING
To enable wireless DMX operation via the optional UFI wi- transceiver:
1) Set the KWIK-GIG starting DMX address
2) Set the UFI sending/receiving channel
3) Attach the UFI to the KWIK-GIG USB port
4) Use Dipswitch 5 to select UFI send or receive mode.
UFI OPERATION
8
MASTER/SLAVE OPERATION (via DMX cable)
When multiple KWIG-GIG units are used together, Master/Slave mode enables the
assignment of one master unit and multiple slave units. The master unit can be operated
in stand-alone mode or by the wireless footswitch. The slave units should all be set to slave
mode.
Note: Slave units should be congured and connected before linking to master unit
Setup as below:
SLAVE UNITS:
Press MENU button until 3-CH or 15CH is displayed
Press ENTER
Set DMX address to d 1
Connect DMX cable from master unit to DMX In connector
Link following slave units in similar cable conguration
MASTER UNIT:
Set to Auto or Sound-Active mode
Link to slave units, beginning from the master DMX Out connector
13
Page 9
INFRARED (IR6) REMOTE CONTROL OPERATION
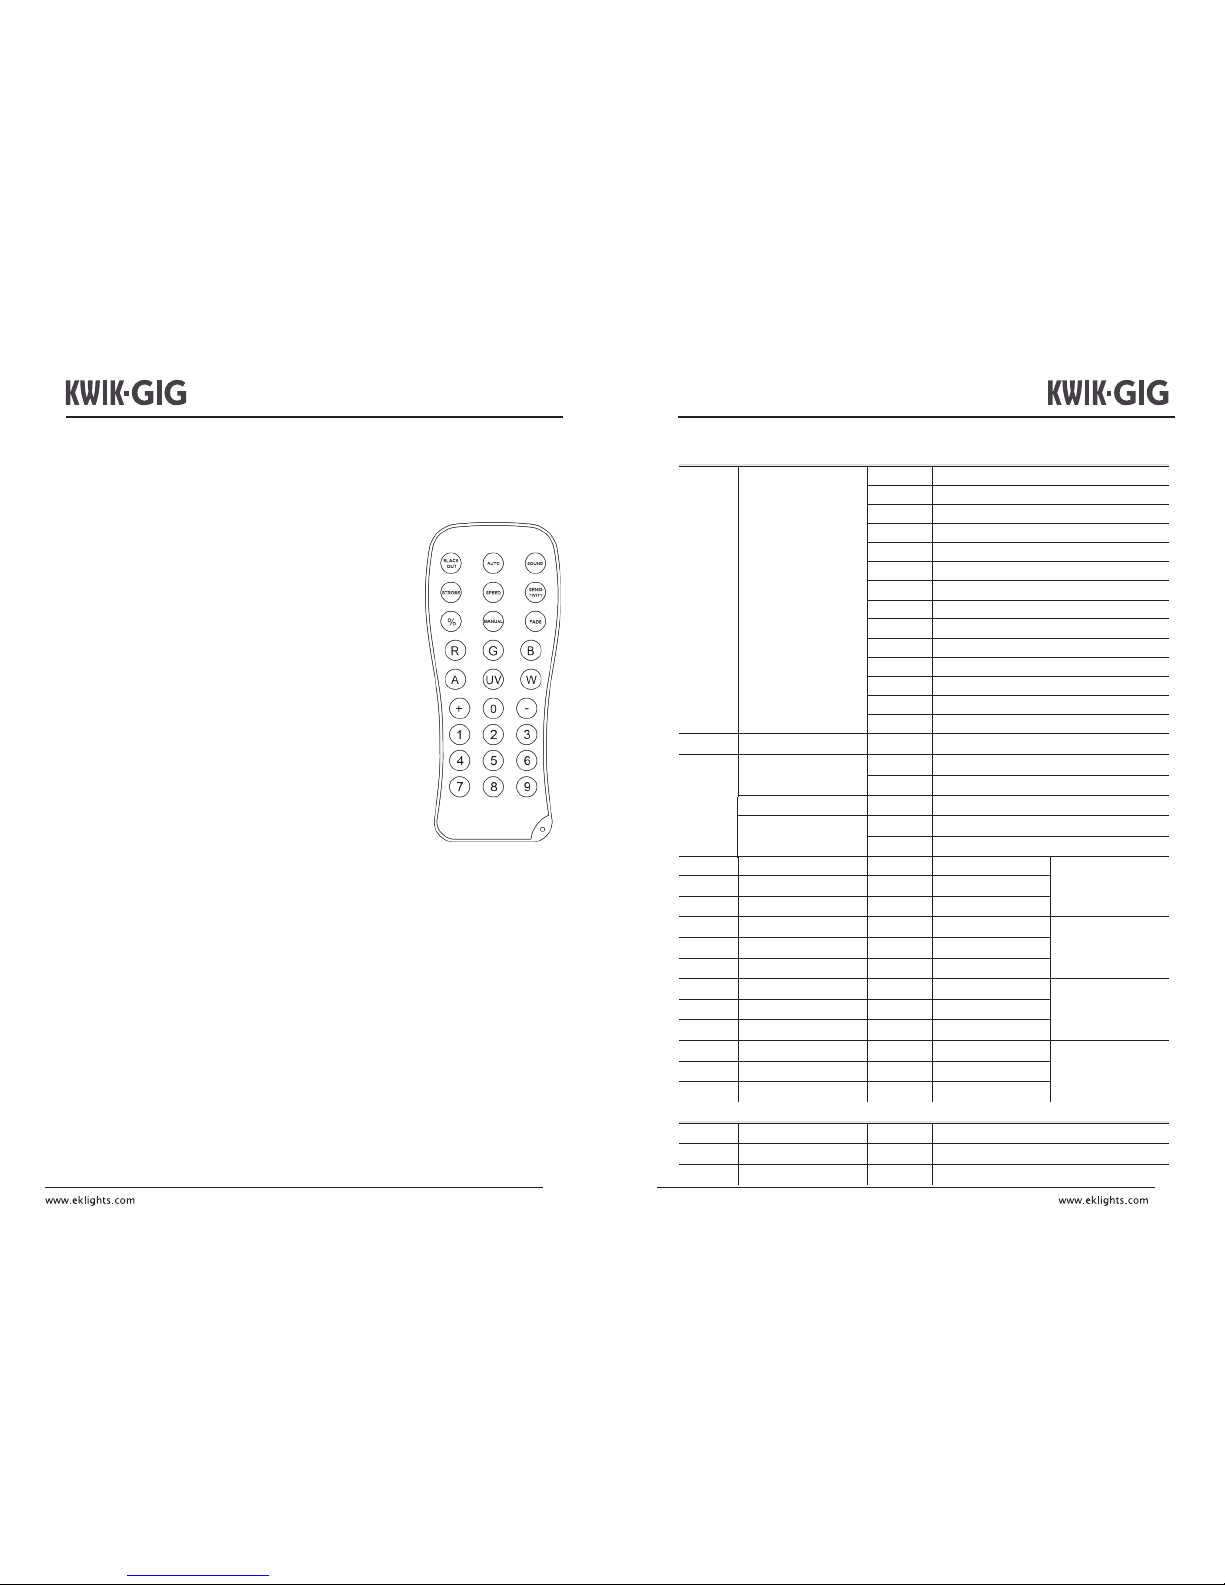
The IR6 infrared controller enables remote control of the KWIK-GIG.
To pair the IR6 to the KWIK-GIG, follow these steps:
1. Press MENU button until Ser is displayed
2. Press ENTER
3. Press UP or DOWN to turn infrared operation ON or OFF
4. Press ENTER
IR6 BUTTON FUNCTIONS
AUTO : Run auto programs
FADE : Fade auto programs
SPEED : Enable speed adjustment of auto programs
+ / - : Increase / decrease speed of auto programs
SOUND : Activate sound-active mode
SENSITIVITY : Enable sound sensitivity adjustment
+ / - : Increase / decrease sound sensitivity
MANUAL : Enable static color selection
0-9 : Select static colors
R : Select red
G : Select green
B : Select blue
+ / - : Increase / decrease output of each color
% : Enable adjustment of total light output level
+ / - : Increase / decrease total light output
STROBE : Enable adjustment of strobe rate
+ / - : Increase / decrease strobe rate
STROBE : Press again to turn o strobe
BLACKOUT : Turn o all light output
BLACKOUT : Press again to exit blackout mode
Note: : If IR6 remote is not responding, press BLACKOUT to conrm
that blackout mode was not mistakenly activated
12
1
Control Mode
000 - 009
RGB Color Mixing
010 - 029
Auto Program 1
030 - 049 Auto Program 2
050 - 069
Auto Program 3
070 - 089
Auto Program 4
090 - 109 Auto Program 5
110 - 129 Auto Program 6
130 - 149 Auto Program 7
150 - 169
Auto Program 8
170 - 189
Auto Program 9
190 - 209
Auto Program 10
210 - 229
Auto Program 11
230 - 249 Auto Program 12
250 - 255 Sound -Active mode
2
Dimmer
000 - 255 Dimmer 0 – 100%
Strobe
000 - 009 No Function
4
Red
000 - 255 0 –100%
RGB Color Mixing
(Head 1)
5
Green
000 - 255 0 –100%
6
Blue
000 - 255 0 –100%
7
Red
000 - 255 0 –100%
RGB Color Mixing
(Head 2)
8
Green
000 - 255 0 –100%
9
Blue
000 - 255 0 –100%
10
Red
000 - 255 0 –100%
RGB Color Mixing
(Head 3)
11
Green
000 - 255 0 –100%
12
Blue
000 - 255 0 –100%
13
Red
000 - 255 0 –100%
RGB Color Mixing
(Head 4)
14
Green
000 - 255 0 –100%
15
Blue
000 - 255 0 –100%
1
Red
000 - 255 0 –100%
2
Green
000 - 255 0 –100%
3
Blue
000 - 255 0 –100%
DMX FUNCTION CHART
Channel
Function
Value
Percent/Setting
15-CHANNEL MODE
3-CHANNEL MODE
9
010 - 255 Speed (slow -> fast)
3
Auto Speed 000 - 255 Auto Speed (slow -> fast)
Sound Sensitivity
000 - 010 Sound Sensitivity OFF
011 - 255 Adjust Sensitivity
Page 10
STAND-ALONE OPERATION
PRESET COLOR MODE
Press MENU button until C-- is displayed
Press ENTER
Press UP or DOWN to select C1 - C7
Press ENTER
AUTO PROGRAM MODE
Press MENU button until Auto is displayed
Press ENTER
SELECTING PROGRAM SPEED
Press MENU button until S-- is displayed
Press ENTER
Press UP or DOWN to select speed
Press ENTER
SOUND-ACTIVE MODE
Press MENU button until Snd is displayed
Press ENTER
ADJUSTING SOUND SENSIVITY
Press MENU button until Sens is displayed
Press ENTER
Press UP or DOWN to adjust mic sensitivity
Press ENTER
RGB COLOR MIXING MODE
Press MENU button until U-- is displayed
Press ENTER to scroll to each color setting for red, green, and blue
Press UP or DOWN to adjust RGB output (r---, g---, b---)
OPERATING MODE PRIORITY RANK
Higher priority control modes override lower priority modes
1. UFI
2. DMX (wired)
3. Infrared (IR6 remote)
4. Manual (onboard menu)
10
WIRELESS FOOTSWITCH OPERATION
Foot pedals allow instant activation of preset colors, auto programs and sound-active
mode. The footswitch has a maximum range of 15 meters.
To pair the footswitch to the KWIK-GIG, follow these steps:
1. Power on the KWIK-GIG
2. Power on the footswitch
3. Press MENU button until rF is displayed
4. Press ENTER
5. Press MENU button until Auto is displayed
6. Press ENTER
7. Set DIP switches on the footswitch to match the rF setting
8. Follow below table for pedal functions
Pedal Action Functions
1
(Static Colors)
Tap pedal to initialize,
then tap again to select
colors and auto programs
White
Red
Green
Blue
Yellow
Magenta
Cyan
Auto Mode (instant)
Auto Mode (fade)
2
(Sound-Active/Strobe)
Tap pedal
Enter Sound Mode
Hold pedal
Strobe Mode
Tap pedal again
Strobe O
3
(Blackout)
Tap pedal
Black out Fixtures
Hold pedal
Fade to Blackout
Tap again / Hold again
Turn o Blackout / Fade from Blackout
11
 Loading...