

Nissei WS-1300 Instruction Manual

WRIST TYPE
DIGITAL BLOOD PRESSURE MONITOR
INSTRUCTIONS
ENGLISH
page 9
WS-1300
Manufacturer:
NIHON SEIMITSU SOKKI CO., LTD. 2508-13 Nakago Shibukawa Gunma 377-0293 Japan
EC-Representative:
Nissei Healthcare (UK) Ltd. Henfield, BN5 9SJ UK
web site http://www.nisseihealthcare.com
BEDIENUNGSANLEITUNG
DEUTSCH
Seite 20
INSTRUCTIONS
FRENCH
page 32
ISTRUZIONI
ITALIANO
pagina 44
INSTRUCCIONES
ESPANÕL
página 56
INSTRUKCJA OBSŁUGI
JĘZYK POLSKI
str 68
PICTORIALS
ABBILDUNGEN
IMAGES
ILLUSTRAZIONI
FIGURAS
ILUSTRACJE
Fig.1
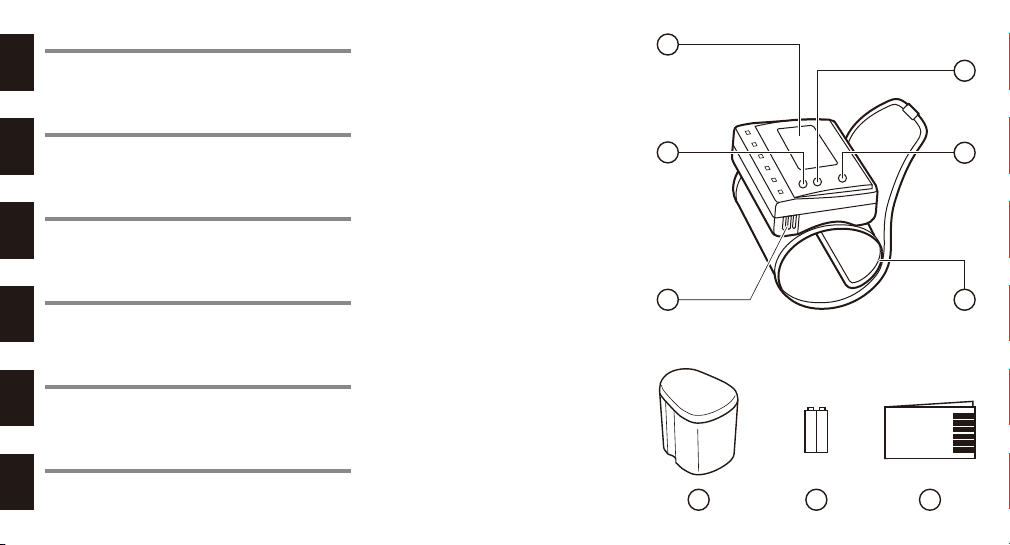
PARTS NAMES AND PRODUCT
COMPONENTS
TEILEBEZEICHNUNGEN UND
PRODUKTKOMPONENTEN
NOMENCLATURE ET
COMPOSANTS DE L’APPAREIL
DENOMINAZIONE DELLE PARTI E
COMPONENTI
NOMBRE DE LAS PIEZAS Y
COMPONENTES DEL PRODCUTO
CZĘŚCI SKŁADOWE
CIŚNIENIOMIERZA
1
4
3
5
2
6
-2-
7
8
9
1
DISPLAY
3
MEMORY M1 BUTTON
4
MEMORY M2 BUTTON
5
BATTERY COVER
6
WRIST CUFF
7
CARRYING CASE
8
2 LR03 (AAA) ALKALINE BATTERIES
9
INSTRUCTION MANUAL
2
POWER BUTTON
1
AFFICHAGE
2
BOUTON DE DÉMARRAGE
3
BOUTON MÉMOIRE M1
4
BOUTON MÉMOIRE M2
5
COUVERCLE LOGEMENT DES PILES
6
BRACELET POUR POIGNET
8
BATTERIES ALCALINES 2 X LR03 (AAA)
9
MANUEL D’INSTRUCTIONS
7
BOÎTIER
1
PANTALLA
3
BOTÓN DE MEMORIA M1
4
BOTÓN DE MEMORIA M2
5
CUBIERTA DE PILA
6
PUÑO DE MUÑECA
7
CAJA DE TRANSPORTE
8
2 PILAS ALCALINAS TAMAÑO LR03(AAA)
9
MANUAL DE INSTRUCCIONES
2
BOTÓN POWER
1
ANZEIGE
3
SPEICHERTASTE M1
4
SPEICHERTASTE M2
5
BATTERIEFACHDECKEL
6
HANDGELENKMANSCHETTE
7
TRAGETASCHE
8
2 X LR03 (AAA) SÄUREBATTERIEN
9
BEDIENUNGSANLEITUNG
2
POWER-TASTE
1
VISUALIZZAZIONI
3
TASTO DI MEMORIA M1
4
TASTO DI MEMORIA M2
5
COPERCHIO DEL VANO DELLE BATTERIE
6
FASCIA DA POLSO
7
CUSTODIA DI TRASPORTO
8
2 X BATTERIE ALCALINE LR03 (AAA)
9
MANUALE D’USO
-3-
2
TASTO POWER
1
WYŚWIETLACZ
3
PRZYCISK PAMIĘCI M1
4
PRZYCISK PAMIĘCI M2
5
PRZYKRYWKA POJEMNIKA BATERII
6
MANKIET NA NADGARSTEK
7
PUDEŁKO NA APARAT
8
2 BATERIE ALKALICZNE LR03 (AAA)
9
INSTRUKCJA OBSŁUGI
2
PRZYCISK POWER

Fig.2
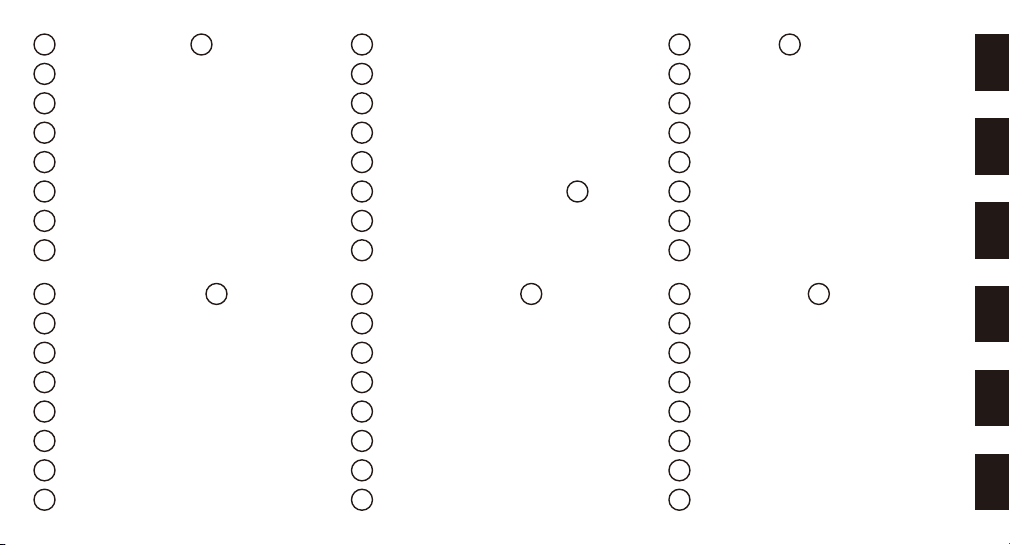
INSTALLING BATTERIES AND
SETTING THE CLOCK
page 12
EINSETZEN VON BATTERIEN
UND EINSTELLEN DER UHR
Seite 23
MISE EN PLACE DES PILES
ET RÉGLAGE DE L’HORLOGE
page 36
INSTALLAZION DELLE
BATTERIE E REGOLAZION
DELL'OROLOGIO
pagina 47
AINSTALACION DE PILAS Y
AJUSTE DEL RELOJ
página 59
WKŁADANIE BATERII I
USTAWIANIE ZEGARA
str. 71
1. 4.
5. 7. 8.6.
MONTH
MONAT
MOIS
MESE
MES
MIESIĄC
CLOCK DISPLAY
UHRANZEIGE
AFFICHAGE DE L’HORLOGE DISPLAY
DELL'OROLOGIO
INDICACION DEL RELOJ
WYŚWIETLANIE ZEGARA
2. 3.
LR03
LR03
DAY
TAG
JOUR
GIORNO
DIA
DZIEŃ
-4-
increase
steigern
augmente
aumentare
aumenta
zwiększanie
HOUR
STUNDE
HEURE
ORA
HORAS
GODZINA
decrease
senken
diminue
diminuire
disminuye
zmniejszanie
YEAR
JAHR
ANNEE
ANNO
AÑO
ROK
MINUTE
MINUTEN
MINUTE
MINUTO
MINUTOS
MINUTY
confirm
bestätigen
confirme
confermare
confirme
potwierdzenie
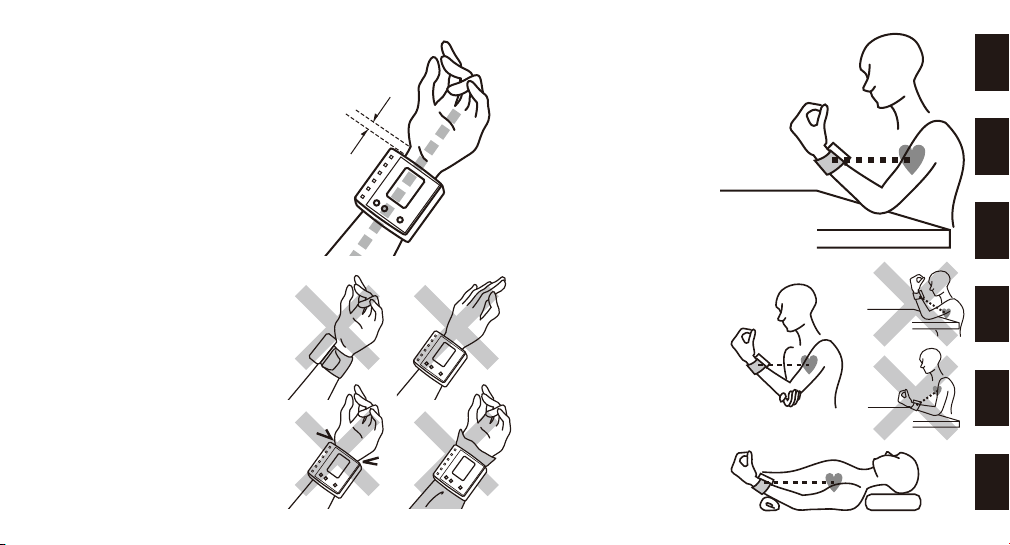
Fig.3
WRAPPING THE CUFF
AROUND YOUR WRIST
page 13
ANLEGEN DER MANSCHETTE
AN DAS HANDGELENK
Seite 24
MISE EN PLACE DU
BRACELET SUR LE POIGNET
page 37
AVVOLGIMENTO DELLA
FASCIA AL POLSO
pagina 49
ENROLLADO DEL PUÑO
ALREDEDOR DE LA MUÑECA
página 60
ZAKŁADANIE MANKIETU NA
NADGARSTEK
str. 72
5mm ~ 10mm
-5-
Fig.4
CORRECT
MEASURING
POSTURE
page 14
RICHTIGE HALTUNG
BEIM MESSEN
Seite 25
POSITION CORRECTE
POUR LA MESURE
page 37
POSIZIONE
CORRETTA DI
MISURAZIONE
pagina 49
OSTURA CORRECTA
DE MEDICIÓN
página 61
WŁAŚCIWA POZYCJA
W TRAKCIE POMIARU
str. 73
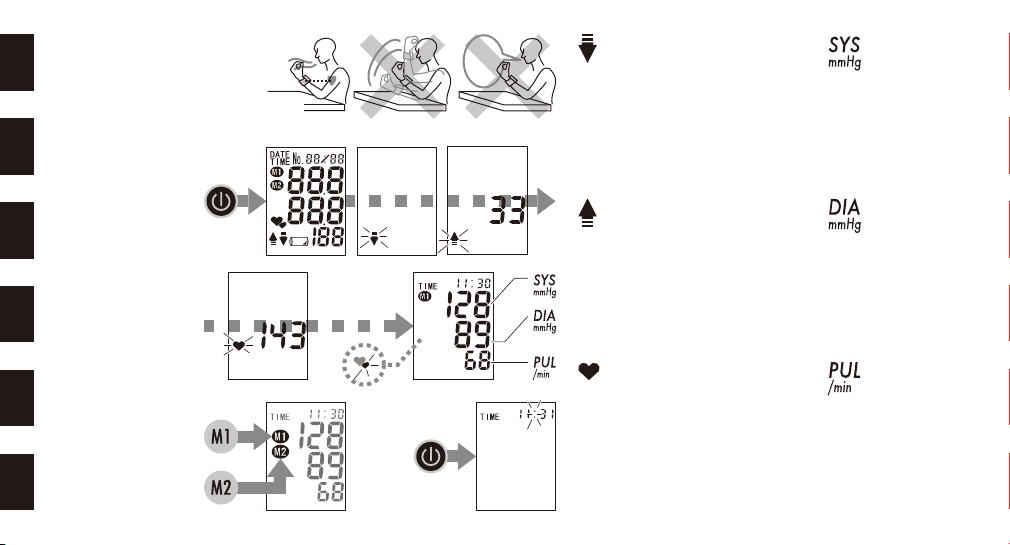
Fig.5
MEASURING
METHOD
page 14
MESSVERFAHREN
Seite 25
MÉTHODE DE
MESURE
page 38
METODO DI
MISURAZIONE
pagina 50
METODO DE
MEDICION
página 61
METODA
POMIAROWA
str. 73
relax...
entspannen...
relaxer...
rilassarsi...
relájese...
odpocznij...
1.
2. 3.
-6-
DEFLATION MARK
DEFLATIONSMARKE
MARQUE DE DÉGONFLEMENT
SIMBOLO DI SGONFIAMENTO
MARCA DE DESINFLADO
SYMBOL SPUSTU POWIETRZA
INFLATION MARK
AUFBLASMARKE
MARQUE DE GONFLEMENT
SIMBOLO DI GONGIAMENTO
MARCA DE INFLADO
SYMBOL POMPOWANIA
PULSE RATE MARK
PULSRATENMARKE
MARQUE DU POULS
SIMBOLO DEL BATTITO
CARDIACO
MARCA DE RAPIDEZ DEL PULSO
SYMBOL PULSU
SYSTOLIC
SYSTOLISCH
SYSTOLIQUE
SISTOLICA
SISTÓLICO
SYSTOLICZNE
DIASTOLIC
DIASTOLISCH
DIASTOLIQUE
DIASTOLICA
DIASTÓLICO
DIASTOLICZNE
PULSE
PULS
POULS
BATTITO
PULSO
PULS
IRREGULAR PULSE
RHYTHM
UNREGELMÄSSIGER
PULSRHYTHMUS
RYTHME IRRÉGULIER DU
POULS
ARITMIA CARDIACA
RITMO DE PULSO
IRREGULAR
NIEREGULARNY RYTM
PULSU
MEMORY BANK NUMBER
SPEICHERBANKNUMMER
NUMÉRO BANQUE DE
MÉMOIRE
NUMERO DI BANCHI DI
MEMORIA
NUMERO DE BANCO DE
MEMORIA
NUMER BANKU
PAMIĘCI
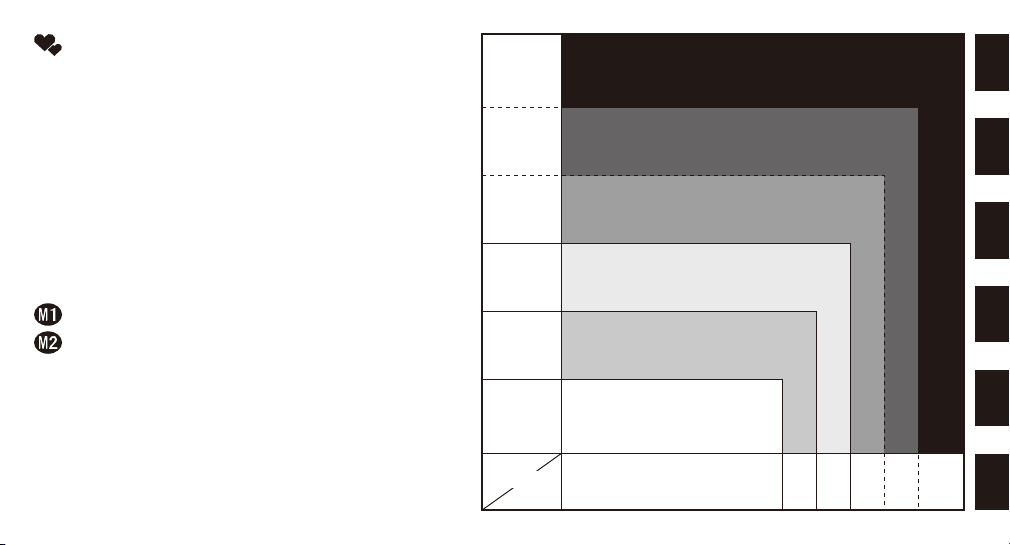
BLOOD PRESSURE
CLASSIFICATION BY WHO
(1999)
BLUTDRUCKKLASSIFIKATION – WHO
(1999)
CLASSIFICATION PRESSION
ARTÉRIELLE – OMS (1999)
CLASSIFICAZIONE DELLA
PRESSIONE SANGUIGNA –
WHO (1999)
CLASIFICACIÓN DE PRESIÓN
ARTERIAL: OMS (1999)
KLASYFIKACJA CIŚNIENIA
KRWI WEDŁUG WHO
(ŚWIATOWEJ
ORGANIZACJI ZDROWIA),
1999 R.
180~
160~179
140~159
130~139
120~129
~120
SYS
mmHg
DIA
-7-
severe schwer
hypertension
Hypertonie
hypertension
ipertensione
hipertensión
nadciśnienie tętnicze
high normal hoch normal
normale élevée superiore al normale
normal elevada
normal normal
normale normale
normal
optimal optimal
optimale ottimale
optima
~
80
grave grave
grave
moderate mittelschwer
modérée moderata
media
mild leicht
faible lieve
baja
poważne
umiarkowane
łagodne
wysokie normalne
normalne
optymalne
80
85
~
84
89
~
90
99
100
~
109
110
~
~
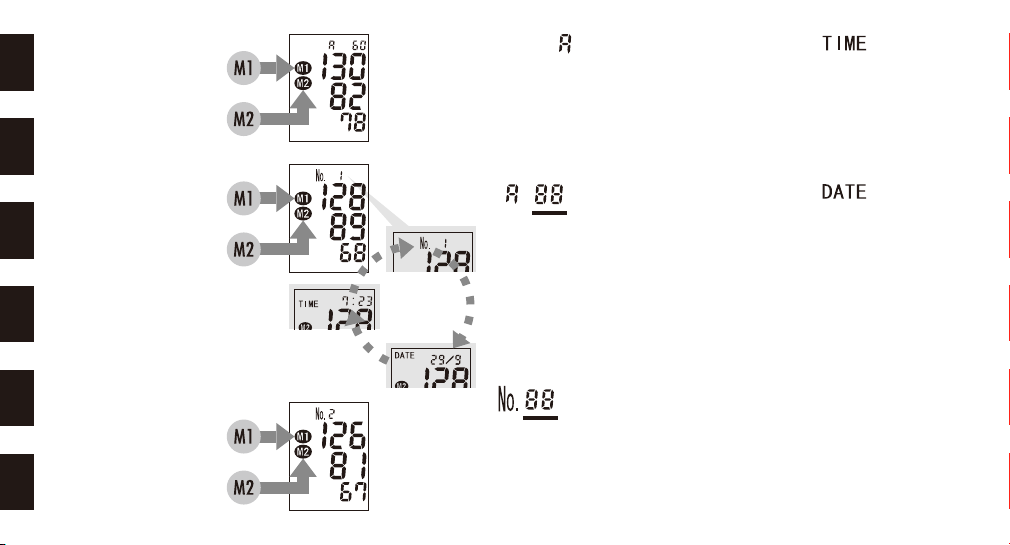
Fig.6
MEMORY FUNCTION
page 16
SPEICHERFUNKTION
Seite 27
FONCTION DE
MÉMOIRE
page 39
FUNZIONE DI
MEMORIA
pagina 51
FUNCION DE
MEMORIA
página 63
FUNKCJE PAMIĘCI
str. 75
1.
2.
AVERAGE
DURCHSCHNITT
MOYENNE
MEDIA
PROMEDIO
ŚREDNIA
NUMBER OF STORED DATA
ANZAHL DER GESPEICHERTEN
DATEN
NUMÉRO DES DONNÉES
MÉMORISÉES
NUMERO DI DATI MEMORIZZATI
NUMERO DE DATOS MEMORIZADOS
ILOŚĆ ZACHOWANYCH POMIARÓW
3.
MEMORY DATA NUMBER
SPEICHERDATENNUMMER
NUMÉRO DES DONNÉES DE MÉMOIRE
NUMERO DI DATI IN MEMORIA
NUMERO DE DATO DE MEMORIA
TIME
ZEIT
HEURE
ORA
TIEMPO
GODZINA
DATE
day/month
DATUM
Tag/Monat
DATE
jour/mois
DATA
giorno/mese
FECHA
día/mes
DATA
dzień/miesiąc
NUMER BANKU PAMIĘCI
-8-

CONTENTS
PICTORIALS ................................ 2
BASIC PRODUCT INFORMATION .................. 9
PRECAUTIONS FOR USE ...................... 11
TIPS ON TAKING YOUR BLOOD PRESSURE .......... 11
INSTALLING BATTERIES AND SETTING THE CLOCK .... 12
WRAPPING THE CUFF AROUND YOUR WRIST ........ 13
BASIC PRODUCT INFORMATION
This manual is intended to assist the user in the safe and efficient
operation of the Model WS-1300 Wrist Type Digital Blood Pressure
Monitor. The product must be used in accordance with the
procedures contained in this manual and must not be used for
purposes other than those described herein. It is important to read
and understand the entire manual. In particular, please read
carefully and become familiar with the section entitled “TIPS ON
TAKING YOUR BLOOD PRESSURE”.
The user is cautioned that the system may fail to yield specified
measurement accuracy if operated or stored in temperature or
humidity conditions outside the limits stated in the specifications
CORRECT MEASURING POSTURE ................ 14
MEASURING METHOD ........................ 14
MEMORY FUNCTION ......................... 16
ERROR DISPLAYS AND TROUBLESHOOTING ......... 17
CARE AND MAINTENANCE ..................... 18
TECHNICAL DESCRIPTION ..................... 19
section of this manual.
INDICATIONS FOR USE
The WS-1300 system is intended for the non invasive measurement
of systolic and diastolic blood pressure and determination of pulse
rate in adult, i.e., age 15 and above. The product is recommended
for use by people with labile (unstable) blood pressure or known
hypertension in a home care environment as an adjunct to medical
management. The cuff will accommodate a wrist circumference
range of approximately 125 to 215 millimeters. Pressure is
measured over a range of 0 to 300 mmHg and pulse rate over a
range of 40 to 160 beats/minute.
-9-

BASIC PRODUCT INFORMATION
METHOD OF MEASUREMENT
This product employs the oscillometric method for measurement of
blood pressure and pulse rate. The entire system, including the
cuff, is a single wrist-mounted unit. The cuff is wrapped around the
wrist and automatically pressurized. Circuits within the cuff sense
the small oscillations in pressure against the cuff produced by the
expansion and contraction of the arteries in the wrist in response
to each heart beat. The amplitude of each pressure waves is
measured, converted to millimeters of mercury, and displayed on
the LCD as a digital value. Responding to heart beats, the
electromagnetic deflation control valve maintains the constant
deflation rate irrespective of differences in wrist size. A memory
circuit stores the 60 most recent measurements for comparison.
SPECIFICATIONS
Model : WS-1300
Operating Principle : Oscillometric method
Indicator : 12 digit Liquid Crystal Display
Pressure Indication Range : 0 to 300 mmHg (cuff pressure)
Measuring Range : 50 to 250 mmHg (systolic)
: 40 to 180 mmHg (diastolic)
: 40 to 160 pulses/min (pulse rate)
Accuracy : ±3 mmHg (cuff pressure)
: ±5 % of reading (pulse rate)
Inflation : Automatic (air pump)
Deflation : Automatic (electric control valve)
Exhaust : Automatic quick exhaust valve
Power Supply : 2 AAA alkaline (LR03) dry cells
Memory : 60 measurements x 2 and averages
Applied Pressure : 190 mmHg (fixed)
Operating Environment : +10˚C to+40˚C, 85% relative humidity
or below
Storage Environment : -5˚C to+50˚C, 85% relative humidity or
below
Cuff : Pre-formed type cuff
Wrist circumference : Approx. 125 to 215 mm
Main Unit : Size ; 70(W) x 70(H) x 29.9(D) mm
: Weight ; Approx. 110 g., without
batteries
Key to symbols : Type BF equipment
: Important ; Read operating
instructions
Classification : Internally powered equipment
Specifications are subject to change without prior notice due to
improvements in performance and quality.
This device complies with EMC (IEC60601-1-2, EN60601-1),
EN1060-1 and EN1060-3.
-10-

PRECAUTIONS FOR USE
Do not use this instrument without consultation with your
doctor if you are under dialysis therapy or on anticoagulants,
antiplatelets or steroids. Use of this instrument under such
conditions could cause internal bleeding.
For specific information on your blood pressure, contact
your physician. Never make any judgment on your own
TIPS ON TAKING YOUR BLOOD PRESSURE
Blood pressure is the force exerted by the heart in pumping the blood
through the arteries and the resistance by the veins to this flow.
Blood pressure varies all the time, influenced by mental and
physical factors and is never constant.
In general, blood pressure is highest during the working hours and
gradually decreases during the afternoon and evening hours. It is
low during sleep and increases at a relatively fast rate after arising
from bed.
Causes for Changes in Blood Pressure
• Body movement • Conversation • Mental Tension • Nervousness
• Emotions • Eating • Drinking Alcohol • Smoking
• Recent Urination or Bowel Movement • Temperature
• Changes in the surroundings such as movement or noise, etc.
regarding measurement results.
Use of this device in areas near portable phones, microwave
ovens or other devices with strong electromagnetic field
may cause malfunctions.
Blood pressure measured at home tends to be lower than
when measured in a hospital, clinic or doctor's office.
This is because you are tense at the hospital and relaxed at home.
It is important to know your stable normal blood pressure at home.
Blood pressure at the wrist may be different from that at the
upper arm.
As the thickness of the blood vessels differs depending on
measuring position, blood pressure value measured at the wrist
may be slightly different from that measured at the upper arm. In
most cases, the difference for a healthy person will be within about
±10mmHg for the systolic and the diastolic blood pressure. Caution
is required for the following persons: persons with hypertension,
diabetes, liver trouble, hardened arteries, peripheral hindrance of
-11-

TIPS ON TAKING YOUR BLOOD PRESSURE
circulation, etc., as there may be a difference between the values
measured at the wrist and those measured at the upper arm.
Let a qualified physician interpret your blood pressure readings.
Depending on your age, weight and general condition, blood
pressure can be slightly different. Consult with your doctor on
determining what blood pressure is normal for you.
Before taking blood pressure, rest for approximately five
minutes and take your blood pressure while relaxed in a
quiet environment.
Measure blood pressure using the correct posture and do
not move nor speak during measurement.
Avoid exercise, eating, drinking alcohol, smoking and
other activities that affect your blood pressure right
before a measurement.
Take your blood pressure at the same time every day.
The ambient temperature should be approximately 20˚C
when you take your blood pressure.
INSTALLING BATTERIES AND SETTING THE CLOCK
1. Remove the battery cover in the arrow direction, lightly pressing
its sides.
2. Install two AAA alkaline dry cells in the battery compartment,
giving attention to their polarity.
The cells can be easily installed by pushing them while pressing
their (-) end against the spring.
3. Replace the battery cover.
Do not force the battery cover into position.
4. Year flashes on the display.
Clock can be set only after the batteries are reinstalled.
Setting the clock correctly ensures storage of the
measurement with the correct date and time.
Use memory M1 button to increase the flashing year and
memory M2 button to decrease the year. Press POWER BUTTON
to confirm and move to next step.
5. Month flashes. Adjust with M1 and M2 buttons and press POWER
-12-
Fig.2 page 4
INSTALLING BATTERIES AND SETTING THE CLOCK
BUTTON to confirm.
6. Day flashes. Adjust with M1 and M2 buttons and press POWER
BUTTON to confirm.
7. Hour flashes. Adjust with M1 and M2 buttons and press POWER
BUTTON to confirm.
The clock operates in 24-hour mode.
8. Minute flashes. Adjust with M1 and M2 buttons and press
POWER BUTTON to confirm.
The clock is set and the unit is turned off.
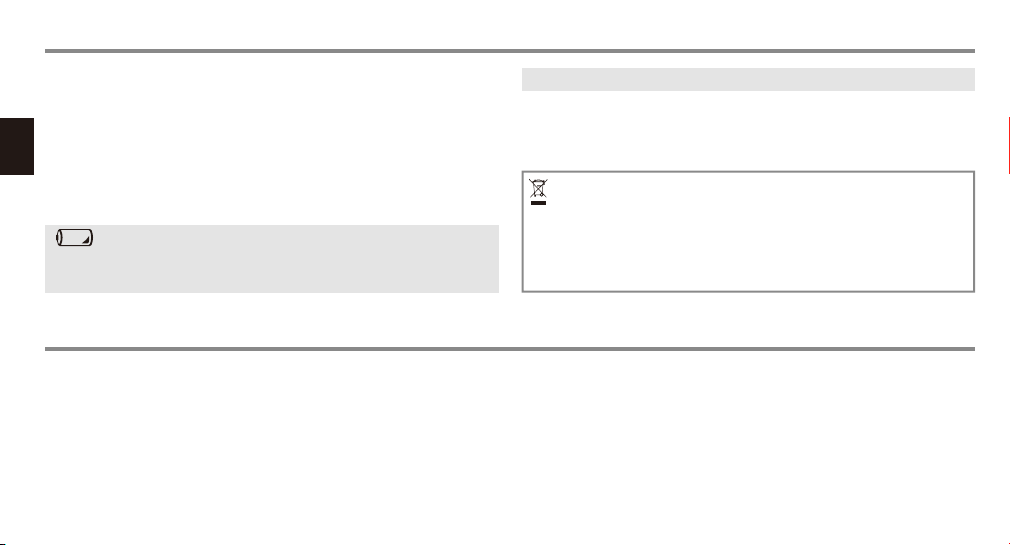
BATTERY REPLACEMENT INDICATION
Replace all the batteries when the battery replacement indication
WRAPPING THE CUFF AROUND YOUR WRIST
1. With the palm of your left hand up, put the cuff on your wrist so
that the display screen is on the same side as your palm. If it is
impossible to put the cuff on your left wrist, use your right wrist
for measurement.
2. Adjust the cuff, with your palm up, until its top edge is positioned
5 to 10 mm from the bottom of your palm. Place the unit at the
appears on the display or nothing is displayed when POWER
BUTTON is depressed.
About 300 measurements can be made after installation of new
AAA alkaline dry cells. The enclosed batteries are for monitoring,
and their life may be shorter than that of commercial batteries.
The used electrical and electronic products are not
household waste. Follow your national/local recycling rules
to dispose of them properly. In the EU countries, please
refer to waste management symbol(s) marked on the
package or the instrument.
Do not use rechargeable batterires.
Fig.3 page 5
center of your wrist.
3. Fasten the cuff around your wrist so that there is no space
between the cuff and your wrist. The cuff should fit snugly. Press
the surface of the cuff to make sure the hook and loop attaches
securely. Position the cuff directly against the skin. Take care
that your clothing is not caught beneath the cuff.
-13-

CORRECT MEASURING POSTURE
1. Sit on a chair.
2. Lightly open your left hand, with your palm up, and put your
elbow on a table or stand.
3. Adjust the cuff to the same height as your heart with a
comfortable support such as a folded towel etc.
WHEN THERE IS NO TABLE AVAILABLE
Sit on chair. Adjust the cuff to the same height as your heart by
lightly applying your left arm to your breast. Lightly support your
arm by your right hand during measurement, but do not touch the
cuff.
Fig.4 page 5
TAKING A MEASUREMENT IN BED
Lie on your back. Adjust the cuff to the same height as your heart
with a comfortable support such as a folded towel etc.
Measured data may vary slightly depending on the
posture during measurement.
Measurements should always be taken using the same
wrist in the same position.
If the cuff is lower (higher) than the heart, the measured
reading tends to become larger (smaller).
MEASURING METHOD
Breathe deeply and relax!
Make sure the cuff is wrapped correctly and it is at the
same height as your heart.
Do not move, chat or strain your arm or hand during
measurement.
1. Press POWER BUTTON.
The cuff is automatically inflated to the applied pressure.
Fig.5 page 6
TO STOP MEASUREMENT
Press POWER BUTTON and the unit stops inflation,
discharges air rapidly, and then turns off.
Pressure (displayed value) starts to decrease and pulse is
indicated by heart mark.
When the measurement is complete, air is automatically released
from the cuff.
-14-
MEASURING METHOD
Upper and lower blood pressures and pulse rate are
displayed.
Heart mark flashes when pulse rhythm detected during
measurement was irregular.
2. Press either one of memory buttons, M1 or M2, and the
result is stored in the selected bank.
The selected memory bank number is shown on the display.
The result is stored in the bank selected when the unit is
turned off. When a measurement resulted in an error, it will
not be stored.
3. Press POWER BUTTON to turn off the power.
If you forget to turn off the unit, it will automatically turn off after
3 minutes.
Do not execute repeated measurements. This will cause
engorgement of the wrist and correct values will not be
obtained. Let your wrist rest for at least 5 minutes.
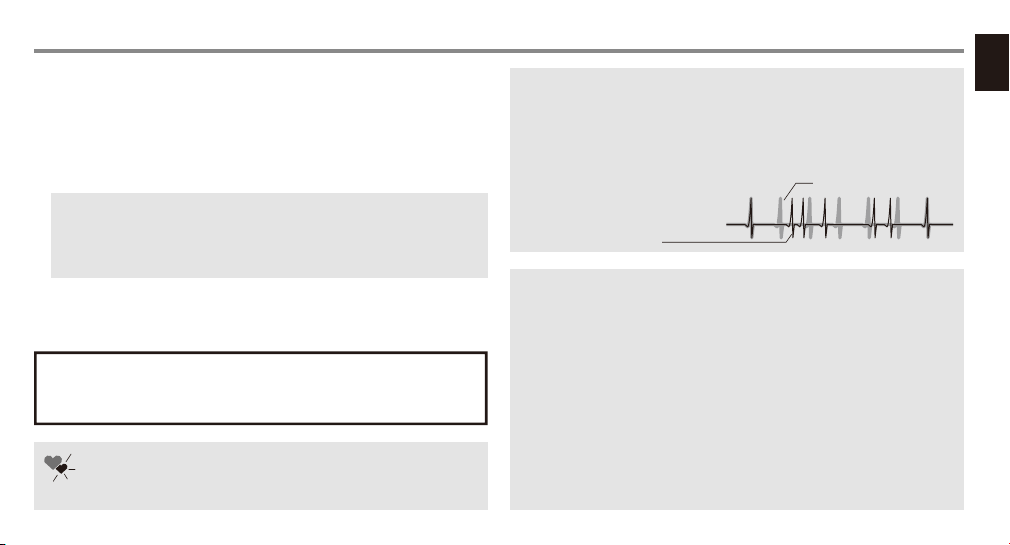
IRREGULAR PULSE RHYTHM INDICATION
Heart mark flashing in measurement result display
indicates irregular pulse rhythm.
Irregular pulse rhythm can be a result of body movement during
measurement or can be because of arrhythmias. Although
frequent appearance of the indication under quiet measurements
may suggest arrhythmias, do not make any judgment on your
own before consulting with your doctor.
regular pulse rhythm
An example of irregular
pulse rhythm compared to
regular pulse rhythm
AUTOMATIC REPRESSURIZATION
If the pressure applied is judged insufficient in the early phase of
measurement or if movement of the hand or wrist occurs during
measurement, the unit will inflate again to a level about 40
mmHg higher. Automatic Repressurization is repeated until a
measurement is made. However, this does not indicate a problem.
To manually control pressurization, hold down POWER BUTTON
immediately after the start of inflation and release it when the
pressure reaches the level 50 mmHg higher than the expected
maximum systolic pressure. If the pressure value has exceeded
190 mmHg, the inflation will stop when the key is released.
Pressure can be increased to approximately 300 mmHg.
-15-

MEMORY FUNCTION
Measured result is stored in either M1 or M2. Each of two memory
banks can hold up to 60 results and their average. When the
number of measurements exceeds 60, the oldest data will be
deleted to record new data. You may decide which bank to store
your measurement results to avoid data mixture with someone
else's, or may use two banks to save data measured in the
morning and evening separately.
RECALLING STORED DATA
1. Press memory M1 button or memory M2 button to see
stored data.
The average of the stored result in the selected bank is
displayed.
The latest result stored is displayed when there is only a
single result and the clock display remains when there are no
results stored.
The memory data is displayed for approximately 30 seconds.
Approximately 30 seconds after memory button is released, the
apparatus will turn off.
2. Press memory button to move to next data.
The memory data number 1 is the latest among the stored data
in the selected memory bank.
Fig.6 page 8
The indication at the top of the display alternately changes from
memory data number to date and to time.
Heart mark flashes when pulse rhythm detected during
measurement was irregular.
3. Every depression of memory button switches among the
memory data.
Readings are recalled from the latest reading to the oldest.
DELETING STORED DATA
1. Show the individual result to be erased or the
average of a memory bank to clear all the memory
bank data.
2. Press and hold down either one of memory buttons:
M1 button to erase specified data in memory bank M1,
and M2 button to erase specified data in memory bank
M2.
The displayed data starts flashing.
3. Hold down the button until nothing but the memory
bank number is displayed.
-16-
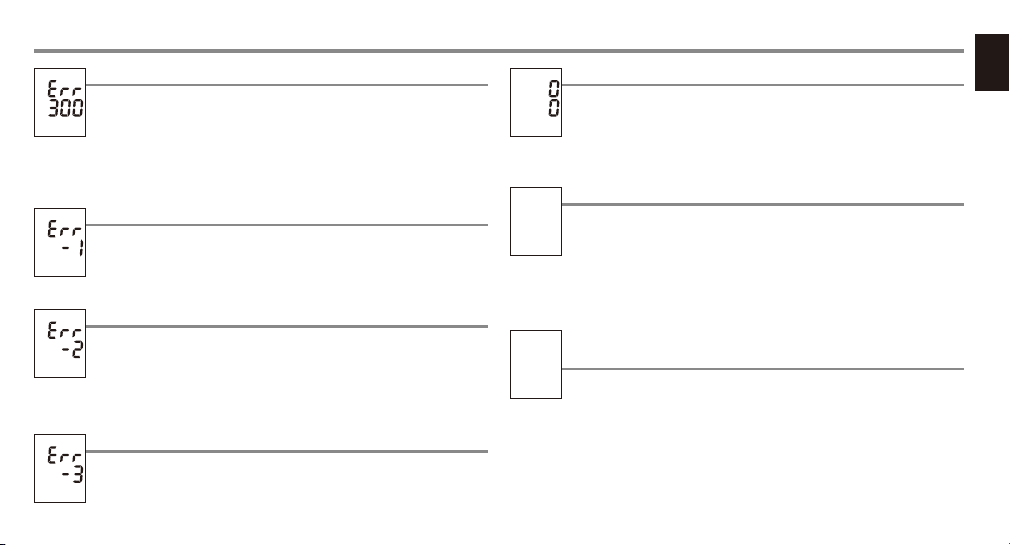
ERROR DISPLAYS AND TROUBLESHOOTING
OVER-PRESSURIZATION
The pressurization was not enough to make a
measurement even though the cuff was inflated to the
maximum value because of wrist movement or talking
during measurement. Do not move during
measurement.
MEASUREMENT ERROR
Measurement could not be made because of moving or
talking during measurement. Remain still and quiet
during measurement.
INFLATION ERROR
The cuff is not properly applied. Properly apply the
cuff.
If Err-2 appears after re-trying to apply the cuff properly,
assume the cuff is damaged. Contact your dealer.
DEFLATION ERROR
Movement or talking was detected during measurement.
Turn off the power and make another measurement
while being quiet and still.
-17-
IMPROPER OPERATION
POWER BUTTON was accidentally pressed during battery
replacement. Press POWER BUTTON once to turn off
the power and press it again to start a
measurement.
No display when POWER BUTTON is pressed.
Batteries are not correctly inserted. Reinsert the
batteries in the correct position.
Battery terminals are not clean. Clean with a dry cloth.
Batteries are exhausted. Replace all batteries with new
ones.
The reading is extremely low (or high). Blood pressure is
different each time.
???
Blood pressure readings constantly vary with time of
measurement and both mental and physical conditions.
See TIPS ON TAKING YOUR BLOOD PRESSURE.
Measurement is not taken with correct posture or the cuff
is wrapped incorrectly. Reconfirm the measurement
procedures.
The reading was effected from moving or talking. Remain
ERROR DISPLAYS AND TROUBLESHOOTING
still and quiet during measurement.
Measurement was taken right after exercise or other
activities influencing the reading. Measure again after
resting for more than 5 minutes. See TIPS ON
TAKING YOUR BLOOD PRESSURE.
CARE AND MAINTENANCES
Because the unit includes precision parts, care should be taken to
avoid extreme temperature variations, humidity, shock, dust, and
direct sunlight. Do not drop or strike the unit. Make sure not to
expose the unit to moisture. This unit is not water resistant.
Clean the body with a cloth moistened with water and a mild
detergent, and then wipe dry. Do not use gasoline, paint thinner, or
other strong solvents. Since the cuff may absorb perspiration and
other fluids, inspect it for stain and discoloration after each use.
When cleaning the cuff, use a synthetic detergent and gently rub
the surface.
When storing the unit, do not place heavy objects on it. When the
unit has been stored at a temperature below the freezing point,
keep it for at least 1 hour in a warm place before using it.
If you cannot get correct measurement with the methods above,
stop using the unit and contact your dealer. Do not tamper with the
internal mechanism. If the unit malfunctions, please return it to the
dealer or an authorized service representative for service
according to the warranty.
Remove the batteries if the instrument is to be stored for an
extended period of time. Keep the batteries out of reach of
children.
We suggest that you have your monitor checked every 2 years.
This operation may only be performed by the manufacturer or by
firms authorized by the manufacturer.
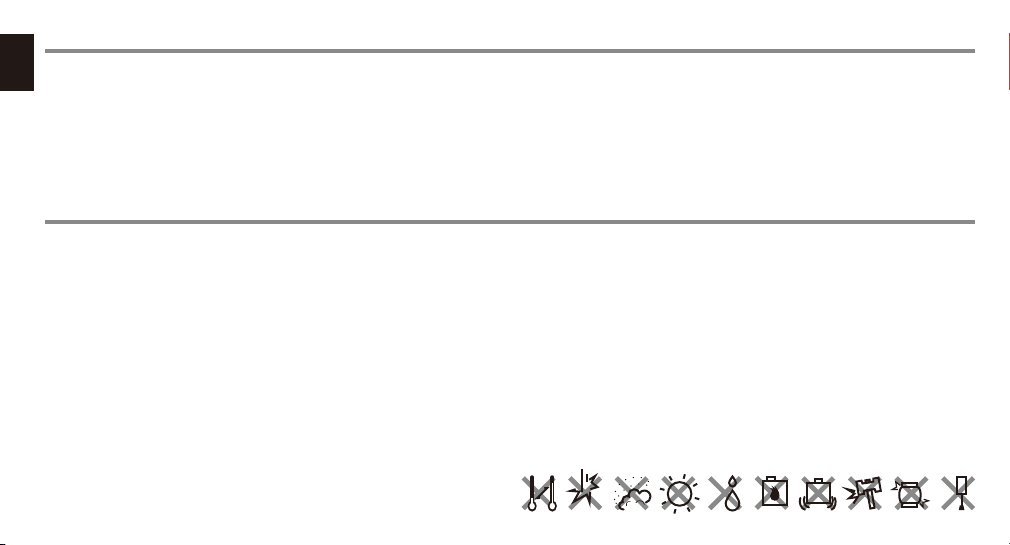
Do not inflate the cuff (start a measurement) when it has not been
wrapped around your wrist. Do not try to stretch or twist the cuff,
and do not bring it into contact with sharp or pointed objects.
Do not disassemble or modify the unit.
-18-
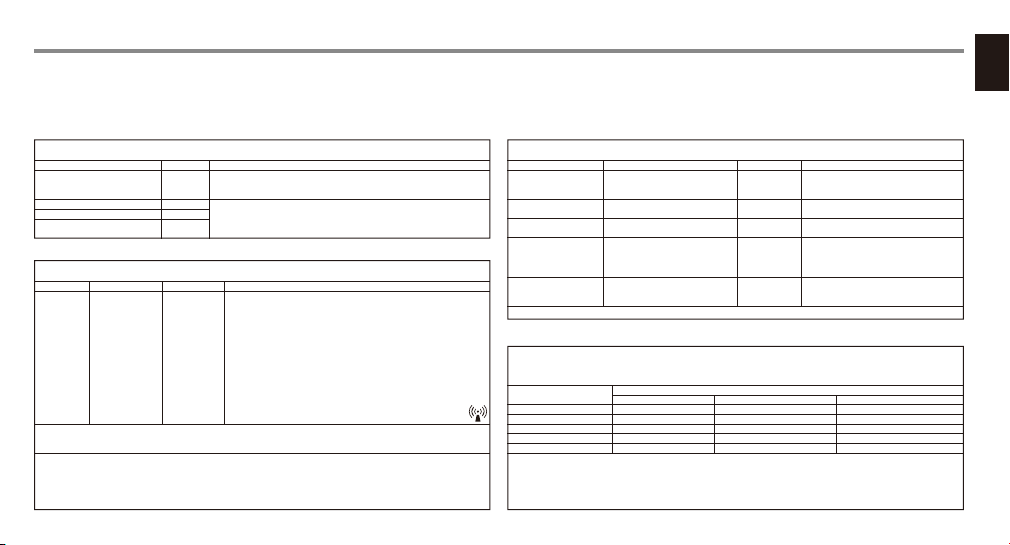
TECHNICAL DESCRIPTION
WS-1300 complies with the EMC, electromagnetic compatibility, standard, IEC60601-1-2. Refer to the tables below for specific information regarding compliance to the standard.
WS-1300, as a medical electrical equipment, needs special precautions regarding EMC and needs to be installed and put into service according to the EMC information provided below.
Portable and mobile RF communications equipments can affect the device.
The use of accessories other than those specified in this manual may result in increased emissions or decreased immunity of the device.
WS-1300 should not be used adjacent to or stacked with other equipment.
WS-1300 is intended for use in the electromagnetic environment specified below. The customer or the user of WS-1300 should
assure that it is used in such an environment.
Emissions test
RF emissions CISPR 11
RF emissions CISPR 11
Harmonic emissions IEC 61000-3-2
Voltage fluctuations / flicker
emissions IEC 61000-3-3
WS-1300 is intended for use in the electromagnetic environment specified below. The customer or the user of WS-1300 should
assure that it is used in such an environment.
Immunity test
Conducted RF
IEC 61000-4-6
Radiated RF
IEC 61000-4-3
NOTE1 At 80 MHz and 800 MHz, the higher frequency range applies.
NOTE2 These guidelines may not apply in all situations. Electromagnetic propagation is affected by absorption and reflection
a
Field strength from fixed transmitters, such as base stations for radio (cellular/cordless) telephones and land mobile radios, amateur
radio, AM and FM radios broadcast and TV broadcast cannot be predicted theoretically with accuracy. To assess the electromagnetic
environment due to fixed RF transmitters, an electromagnetic site survey should be considered. If the measured field strength in the
location in which WS-1300 is used exceeds the applicable RF compliance level above, WS-1300 should be observed to verify normal
operation. If abnormal performance is observed, additional measures may be necessary, such as reorienting or relocating WS-1300.
b
Over the frequency range 150 kHz to 80 MHz, field strengths should be less than [V1] V/m.
Table 201 - Guidance and manufacturer’s declaration - electromagnetic emissions -
Compliance
Electromagnetic environment - guidance
Group 1
WS-1300 uses RF energy only for its internal function. Therefore, its RF
emissions are very low and are not likely to cause any interference in nearby
electronic equipment.
Class B
WS-1300 is suitable for use in all establishments, including domestic
establishments and those directly connected to the public low-voltage power
N/A
supply network that supplies buildings used for domestic purposes.
N/A
Table 204 - Guidance and manufacturer’s declaration - electromagnetic immunity -
IEC 60601 test level
3 Vrms
150 kHz to 80 MHz
3 V/m
80 MHz to 2,5 GHz
Compliance level
N/A
3 V/m
Electromagnetic environment - guidance
Portable and mobile RF communications equipment should be used no closer
to any part of WS-1300, including cables, than the recommended separation
distance calculated from the equation applicable to the frequency of the transmitter.
Recommended separation distance
N/A
d=1.2√P, 80 MHz to 800 MHz d=1.2√P, 800 MHz to 2,5 GHz
Where P is the maximum output power rating of the transmitter in watts
(W) according to the transmitter manufacturer and d is the recommended
separation distance in metres (m).
Field strengths from fixed RF transmitters, as determined by an electromagnetic
a
site survey,
should be less than the compliance level in each frequency range.
Interference may occur in the vicinity of equipment marked with the
following symbol:
from structures, objects and people.
WS-1300 is intended for use in the electromagnetic environment specified below. The customer or the user of WS-1300 should
assure that it is used in such an environment.
Immunity test
Electrostatic discharge
(ESD) IEC 61000-4-2
Electrical fast transient/
burst IEC 61000-4-4
Surge IEC 61000-4-5
Voltage dips, short
interruptions and voltage
variations on power supply
input lines IEC 61000-4-11
Power frequency (50/60
Hz) magnetic field IEC
61000-4-8
NOTE U
Table 206 - Recommended separation distances between portable and mobile RF communications equipment and WS-1300 -
WS-1300 is intended for use in an electromagnetic environment in which radiated RF disturbances are controlled. The customer
or the user of WS-1300 can help prevent electromagnetic interference by maintaining a minimum distance between portable
and mobile RF communications equipment (transmitters) and WS-1300 as recommended below, according to the maximum
output power of the communications equipment.
Rated maximum output
b
power of transmitter, W
For transmitters rated at a maximum output power not listed above, the recommended separation distance d in metres (m) can
be estimated using the equation applicable to the frequency of the transmitter, where P is the maximum output power rating of
the transmitter in watts (W) according to the transmitter manufacturer.
NOTE1 At 80 MHz and 800 MHz, the separation distance for the higher frequency range applies.
NOTE2 These guidelines may not apply in all situations. Electromagnetic propagation is affected by absorption and reflection
-19-
Table 202 - Guidance and manufacturer’s declaration - electromagnetic immunity -
IEC 60601 test level
±6 kV contact
±8 kV air
±2 kV for power supply lines
±1 kV for input/ output lines
±1 kV differential mode
±2 kV common mode
<5% U
(>95% dip in UT) for 0,5 cycle
T
40% U
(60% dip in UT) for 5 cycles
T
70% U
(30% dip in UT) for 25 cycles
T
<5% U
(>95% dip in UT) for 5 sec
T
3 A/m
is the a.c. mains voltage prior to application of the test level.
T
Separation distance according to frequency of transmitter m
0,01
100
0,1
1
10
150 kHz to 80 MHz, N/A
N/A
N/A
N/A
N/A
N/A
from structures, objects and people.
Compliance level
N/A
N/A
N/A
N/A
3 A/m
80 MHz to 800 MHz, d=1.2√P
Electromagnetic environment - guidance
Floors should be wood, concrete or ceramic
tile. If floors are covered with synthetic material,
the relative humidity should be at least 30 %.
N/A
N/A
N/A
Power frequency magnetic fields should be at
levels characteristic of a typical location in a
typical commercial or hospital environment.
0,12
0,38
1,2
3,8
12
800 MHz to 2,5 GHz, d=1.2√P
0,23
0,73
2,3
7,3
23

INHALT
ABBILDUNGEN .............................. 2
GRUNDLEGENDE PRODUKTINFORMATION .......... 20
VORSICHTSMASSREGELN ZUR VERWENDUNG ....... 22
TIPPS ZUR BLUTDRUCKMESSUNG ................ 22
EINSETZEN VON BATTERIEN UND EINSTELLEN DER UHR .. 23
ANLEGEN DER MANSCHETTE AN DAS HANDGELENK ... 24
GRUNDLEGENDE PRODUKTINFORMATION
Dieses Handbuch möchte dem Anwender dabei helfen, den
Automatischen Digitalen Blutdruckmonitor für das Handgelenk
Modell WS-1300 sicher und wirkungsvoll zu handhaben. Das
Produkt ist in Übereinstimmung mit den in diesem Handbuch
enthaltenen Verfahren zu verwenden und darf nicht zu sonstigen,
hier nicht beschriebenen Zwecken verwendet werden. Lesen Sie
insbesondere das Kapitel "TIPPS ZUR BLUTDRUCKMESSUNG"
sorgfältig durch und machen Sie sich mit dessen Inhalt vertraut.
Der Anwender wird darauf hingewiesen, dass das System unter
Umständen keine Messgenauigkeit erzielt, falls es bei Temperaturen
oder Luftfeuchtigkeit betrieben oder gelagert wird, die außerhalb des in
RICHTIGE HALTUNG BEIM MESSEN ................ 14
MESSVERFAHREN ........................ 14
SPEICHERFUNKTION ......................... 16
FEHLERANZEIGEN UND STÖRUNGSSUCHE ......... 17
PFLEGE UND WARTUNG ..................... 18
TECHNISCHE BESCHREIBUNB ................... 19
den Spezifikationen dieses Handbuchs beschriebenen Bereichs liegen.
GEBRAUCHSANWEISUNG
Das System WS-1300 dient der nicht-invasiven Messung des
systolischen und diastolischen Blutdrucks sowie der Bestimmung
der Herzfrequenz bei erwachsenen Patienten, d.h. bei Personen
von mindestens 15 Jahren. Das Produkt wird zur häuslichen
Anwendung von Patienten mit labilem Blutdruck oder bekannter
Hypertonie empfohlen, und zwar als Ergänzung zur Betreuung durch
den Hausarzt. Die Manschette deckt einen Handgelenkumfang in
einem Bereich von ca. 125 bis 215 Millimeter ab. Der Druck wird in
einem Bereich von 0 bis 300 mmHg gemessen, die Herzfrequenz
-20-

GRUNDLEGENDE PRODUKTINFORMATION
in einem Bereich zwischen 40 und 160 Schlägen pro Minute.
MESSMETHODE
Bei diesem Produkt wird die oszillometrische Methode zur Messung
von Blutdruck und Herzfrequenz angewendet. Das gesamte System,
einschließlich der Manschette, ist ein an einem einzigen Handgelenk
angebrachtes Gerät. Die Manschette wird um das Handgelenk
gewickelt und automatisch unter Druck gesetzt. Stromkreise
innerhalb der Manschette spüren die geringen Schwingungen des
Drucks gegen die Manschette, die durch Ausdehnung und
Zusammenziehen der Arterien im Handgelenk als Reaktion auf
jeden Herzschlag entstehen. Die Amplitude jeder Druckwelle wird
gemessen, in Millimeter/Quecksilber umgewandelt und auf dem LCD
als digitaler Wert angegeben. Als Reaktion auf Herzschläge hält das
elektromagnetische Auslass-Steuerungsventil die gleichbleibende
Auslassgeschwindigkeit unabhängig von irgendwelchen Unterschieden
bei der Größe des Handgelenks aufrecht. Eine Speichereinheit
speichert die 60 letzten Messungen zum Vergleich.
SPEZIFIKATIONEN
Modell : WS-1300
Betriebsprinzip : Oszillometrische Methode
Anzeiger : 12 stellige Flüssigkristall-Anzeige
Bereich der Druckanzeige : 0 bis 300 mmHg (Manschettendruck)
Messbereich : 50 bis 250 mmHg (systolisch)
: 40 bis 180 mmHg (diastolisch)
: 40 bis 160 Pulsschläge/Min. (Pulsfrequenz)
Genauigkeit : ±3 mmHg (Manschettendruck)
: ±5% der Anzeige (Pulsfrequenz)
Aufpumpen : automatisch (Luftpumpe)
Abpumpen : automatisch (elektrisches Steuerungsventil)
Auslass : automatisches schnelles Auslassventril
Stromzufuhr : 2 pos. x AAA Säure (LR03) Trockenzellen
Speicher : 60 Messungen + Durchschnittswert x 2
Angewandter Druck : 190 mmHg (fest)
Betriebumgebung : +10˚C bis +40˚C, 85 % oder weniger
Lagerbedingungen : -5˚C bis +50˚C, 85 % oder weniger
Manschette : Vorgeformter Manschettentyp
Umfang des Handgelenks : ca. 125 bis 215 mm
Hauptgehäuse : Größe ; 70(W) x 70(H) x 29.9(D) mm
: Gewicht ; ca. 110 g, ohne Batterien
Erklärung der Symbole : Ausstattung Typ BF
: Wichtig; Lesen Sie die Bedienungsanleitung.
Klassifikation : Innerlich Angeschaltete Ausrüstung
Spezifikationen können sich ohne vorherigen Hinweis aufgrund von
Leistungs-und Qualitätsverbesserungen ändern.
Dieses Gerät entspricht den EMC-Bestimmungen (IEC60601-1-2,
EN60601-1), EN1060-1 und EN1060-3.
-21-

VORSICHTSMASSREGELN ZUR VERWENDUNG
Verwenden Sie dieses Gerät nicht ohne vorher Ihren Arzt zu
konsultieren, wenn Sie an einer Dialyse-Therapie teilnehmen
oder gerinnungshemmende, anti-blutplättchbildende oder
Steroid-Medikamente einnehmen. Der Einsatz des Geräts
unter diesen Bedingungen kann innere Blutungen hervorrufen.
Wenn Sie spezielle Informationen über Ihren Blutdruck
TIPPS ZUR BLUTDRUCKMESSUNG
Bei der Blutdruckmessung wird die Kraft, mit der das Herz das Blut
durch die Arterien pumpt und der dem Blutfluß entgegenwirkende
Widerstand der Venen gemessen.
Der Blutdruck wechselt aufgrund mentaler und körperlicher
Faktoren ständig und ist nie konstant.
Im allgemeinen ist der Blutdruck tagsüber während der normalen
Arbeitszeit am höchsten und fällt im Verlauf des Nachmittags und
Abends. Im Schlaf ist der Blutdruck niedrig und steigt nach dem
Erheben vom Bett relativ schnell an.
Gründe für Veränderungen des Blutdrucks
• Körperbewegung • Unterhaltung • Mentale Spannung • Gefühle
• Mahlzeiten • Alkoholgenuss • Rauchen • Kürzliche Urination
oder Stuhlgang • Temperatur • Änderungen in der Umgebung
wie Bewegungen oder Geräusche usw.
wünschen, fragen Sie Ihren Arzt. Ziehen Sie niemals
irgendwelche eigenen Schlüsse aufgrund Ihrer Messergebnisse.
Die Anwendung dieses Gerätes in der Nähe von tragbaren
Telefonen, Mikrowellengeräten oder sonstiger Geräte mit
starken elektromagnetischen Feldern kann zu
Fehlfunktionen führen.
Der zu Hause gemessene Blutdruck ist tendenziell niedriger
als der im Krankenhaus oder in der Arztpraxis gemessene
Blutdruck.
Das liegt daran, dass Sie im Krankenhaus angespannt, zu Hause
aber entspannt sind. Es ist wichtig, dass Sie Ihren stabilen
normalen Blutdruck zu Hause kennen.
Der Blutdruck am Handgelenk kann sich von dem am
Oberarm unterscheiden.
Da die Messposition und die Dicke der Blutgefäße unterschiedlich
sind, können sich die am Handgelenk gemessenen Blutdruckwerte
geringfügig von den am Oberarm gemessenen unterscheiden. In
den meisten Fällen liegt die Differenz bei einem gesunden Menschen
in einem Bereich von ca. +10 mmHg für den systolischen und den
diastolischen Blutdruck. Bei folgenden Personen ist Vorsicht
-22-

TIPPS ZUR BLUTDRUCKMESSUNG
geboten: Personen mit Hypertonie, Diabetes, Leberproblemen,
verhärteten Arterien, peripheren Durchblutungsstörungen usw.; hier
kann ein Unterschied zwischen den am Handgelenk und den am
Oberarm gemessenen Werten vorliegen.
Lassen Sie Ihre Blutdruckwerte von einem Arzt auswerten.
Der Blutdruck kann sich in Abhängigkeit von Ihrem Alter, Gewicht
und Allgemeinzustand geringfügig unterscheiden. Ziehen Sie niemals
irgendwelche eigenen Schlüsse aufgrund Ihrer Messergebnisse.
Vorher etwa fünf Minuten ruhen und dann in ruhiger und
entspannter Umgebung den Blutdruck messen.
Den Blutdruck bei korrekter Körperhaltung messen und
während der Messung nicht sprechen und nicht bewegen.
Vermeiden Sie vor der Messung des Blutdrucks körperliche
Anstrengung, Essen, Alkoholkonsum, Rauchen und
sonstige Aktivitäten, die den Blutdruckwert beeinflussen.
Messen Sie täglich zur gleichen Uhrzeit.
Die Außentemperatur sollte während der Blutdruckmessung
etwa 20 °C betragen.
EINSETZEN VON BATTERIEN UND EINSTELLEN DER UHR
1. Entfernen Sie die Batterieabdeckung in Pfeilrichtung, während
Sie leicht auf die Seiten drücken.
2. Legen Sie zwei AAA Säurebatterien in das Batteriefach ein und
beachten Sie dabei die Polarität der Batterien. Die Zellen können
problemlos unter Druckanwendung eingelegt werden, indem das
(-)-Ende der Batterie gegen die Feder gedrückt wird.
3. Batterieabdeckung wieder anbringen.
Drücken Sie die Batterie nicht gewaltsam ein.
4. Die Jahresanzeige blinkt im Display.
Die Uhr kann erst nach dem Einsetzen der Batterien eingestellt
werden. Stellen Sie die Uhrzeit richtig ein, damit Messergebnisse
mit richtigen Datums- und Zeitangaben gespeichert werden.
Verwenden Sie die Speichertaste M1 zum Höherstellen der
blinkenden Jahresanzeige und die Speichertaste M2 zum
Niedrigerstellen. Drücken Sie die POWER-Taste zur Bestätigung,
und gehen Sie zum nächsten Schritt weiter.
5. Die Monatsanzeige blinkt. Stellen Sie mit den Tasten M1 und M2
ein, und drücken Sie die POWER-Taste zur Bestätigung.
-23-
Fig.2 Seite 4
EINSETZEN VON BATTERIEN UND EINSTELLEN DER UHR
6. Die Tagesanzeige blinkt. Stellen Sie mit den Tasten M1 und M2
ein, und drücken Sie die POWER-Taste zur Bestätigung.
7. Die Stundenanzeige blinkt. Stellen Sie mit den Tasten M1 und M2
ein, und drücken Sie die POWER-Taste zur Bestätigung.
Die Uhr arbeitet im 24-Stunden-Modus.
8. Die Minutenanzeige blinkt. Stellen Sie mit den Tasten M1 und M2
ein, und drücken Sie die POWER-Taste zur Bestätigung.
Die Uhrzeit ist eingestellt, und das Gerät ist ausgeschaltet.
SYMBOL: BATTERIEWECHSEL
Ersetzen Sie alle Batterien, wenn die Batterie-Ersetzen-Anzeige
im Display erscheint oder keine Anzeige erscheint, auch wenn
die POWER-Taste gedrückt wird.
Nach Einlegen neuer AAA Säure-Trockenzellen können etwa 300
Messungen durchgeführt werden. Die beigefügten Batterien sind für
Aufzeichnungszwecke gedacht, und Ihre Haltbarkeit ist unter
Umständen kürzer als die handelsüblicher Batterien.
Die gebrauchten elektrischen und elektronischen Produkte
sind nicht Haushaltsmüll. Befolgen Sie alle gültigen nationalen/
örtlichen Recycling-Vorschriften zur richtigen Entsorgung. In
den Ländern der EU beachten Sie die Symbole für die
Entsorgungsregelung, die auf der Verpackung oder am Gerät
selber angebracht sind.
ANLEGEN DER MANSCHETTE AN DAS HANDGELENK
1. Legen Sie die Manschette an linken Handgelenk an, so dass Ihre
Handfläche nach oben zeigt und sich das Hauptgehäuse des
Geräts auf der selben Seite wie Ihre Handfläche befindet. Falls es
nicht möglich ist, die Manschette am linken Handgelenk
anzulegen, verwenden Sie das rechte Handgelenk zur Messung.
2. Passen Sie die Manschette bei nach oben zeigender Handfläche
an, bis sich das Ende der Manschette 5 bis10 mm vom
untersten Teil Ihrer Handfläche befindet. Setzen Sie den
Blutdruckmonitor auf die Mitte des Handgelenks.
3. Befestigen Sie die Manschette an Ihrem Handgelenk, so dass kein
Zwischenraum zwischen Manschette und Handgelenk verbleibt.
Die Manschette muss fest sitzen. Drücken Sie auf die Oberfläche
der Manschette um sicherzustellen, dass diese fest angelegt ist.
Legen Sie die Manschette neben der Haut an. Achten Sie darauf,
dass Ihre Kleidung nicht in die Manschette eingeklemmt wird.
-24-
Fig.3 Seite 5
 Loading...