

Page 1

QUICK REFERENCE GUIDE
2 012 cube
Page 2

13
01
03 04
02
05
14
06
08
10
1211
01
LOW TIRE PRESSURE WARNING LIGHT
HEADLIG HT AND TURN SIGNAL C ONTROL
02
INSTRU MENT BRIG HTNESS CONTROL*
03
TWIN TRI P ODOMETER / TRI P COMPUTER
04
WINDSHIELD WIPER / WASHER SWITCH
05
*See your Owner’s Manual for information.
09
STEERI NG WHEEL SWITCHES FOR
06
AUDIO / BLU ETOOTH
07
CRUISE CONTROL
OUTSIDE MIRROR CONTROL SWITCH
08
STEERING WHEEL TILT ADJUSTMENT*
09
®
07
VEHIC LE DYNAMIC CONTROL (VDC)
10
OFF SWITCH*
FUEL-FI LLER DOOR RELEASE
11
HOOD RE LEASE*
12
AUDIO AND NAVIGATION SYSTEM
13
15
16
17
FRONT PASSENG ER AIR BAG
14
STATUS LIGHT*
15
PUSH BUTTON IGNITION SWITCH
AUTOMATIC CLIMATE CONTROLS
16
POWER OUTLET*
17
Page 3

NEW SYSTEM FEATURES
Navigation System (if so equipped) ................................2
ESSENTIAL INFORMATION
Loose Fuel Cap . . . . . . . . . . . . . . . . . . . . . . . . . . . . . . . . . . . . . . . . . . . . . . . . 3
Tire Pressure Monitoring System (TPMS)...........................3
TABLE OF CONTENTS
FIRST DRIVE FEATURES
NISSAN Intelligent Key
®
System (if so equipped) ....................4
Opening the Back Door .........................................5
Front Seat Adjustments..........................................5
Rear Seat Adjustments ..........................................5
Outside Mirror Control Switch ....................................6
Starting/Stopping the Engine ....................................6
Headlight Control Switch ........................................7
Windshield Wiper/Washer Switch.................................8
Automatic Climate Controls (if so equipped) ........................9
FM/AM/XM
USB/iPod
®
Satellite Radio with CD Player (if so equipped) .........11
®
Interface (if so equipped) .............................12
Cruise Control (if so equipped) ..................................12
Fuel-Filler Door................................................13
SYSTEM GUIDE
Trip Computer. ................................................14
Bluetooth
®
Hands-free Phone System (if so equipped)...............14
• A cellular telephone should not be used for any purpose while
driving so full attention may be given to vehicle operation.
• Always wear your seat belt.
• Supplemental air bags do not replace proper seat belt usage.
• Children 12 and under should always ride in the rear seat
properly secured in child restraints or seat belts according to
their age and weight.
• Do not drink and drive.
For more information, refer to the “Safety –– Seats, seat belts and
supplemental restraint system (section 1)”, the “Heater, air conditioner,
audio and phone systems (section 4)” and the “Starting and driving
(section 5)” of your Owner’s Manual.
Additional information about your vehicle is also available in your
Owner’s Manual, Navigation System Owner’s Manual
and at www.nissanusa.com.
To view detailed
instructional videos, go to
www.nissanownersinfo.mobi/2012/cube
or snap this barcode with an
appropriate barcode reader.
Page 4
new system features
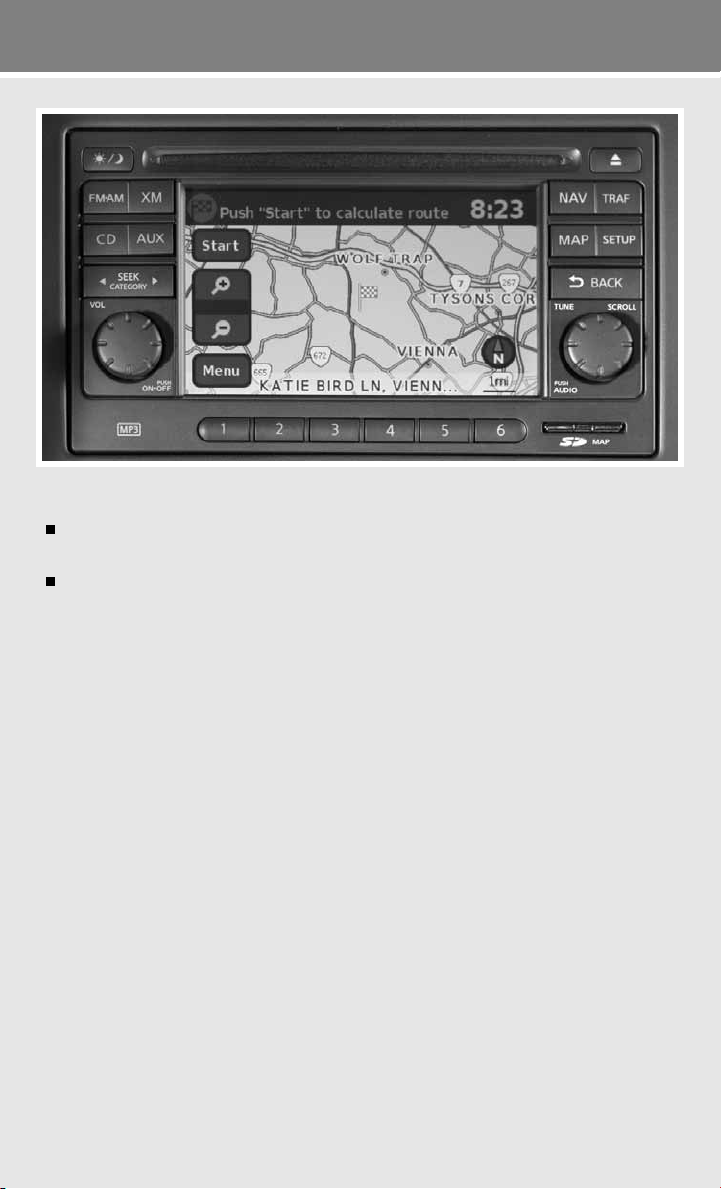
NAVIGATION SYSTEM (if so equipped)
Your Navigation System can calculate a route from the current location to a preferred destination.
The real-time map display and turn-by-turn voice guidance will lead you along the route.
The Navigation System will continually update your vehicle’s position. If you have deviated
from the original route, it will recalculate the route from your current location.
For more information, refer to your Navigation System Owner’s Manual.
2
To view detailed instructional videos regarding these and other features,
please go to www.nissanownersinfo.mobi.
Page 5
essential information
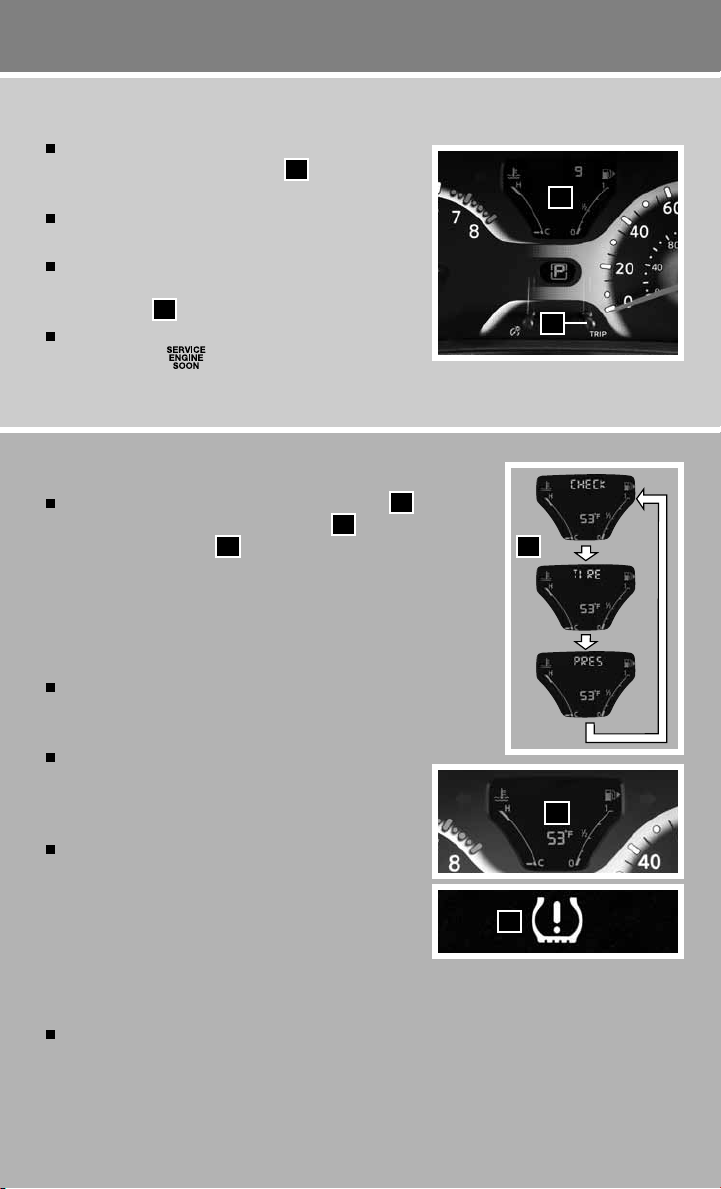
LOOSE FUEL CAP
A LOOSE FUEL CAP warning message will appear
in the twin trip odometer display
filler cap is not tightened correctly.
To tighten, turn the cap clockwise until a single click
is heard.
The warning message will disappear when the vehicle
detects the fuel-filler cap is properly tightened and the
reset button
02
is pressed.
If the cap is not properly tightened, the Malfunction
Indicator Light
For more information, refer to the “Instruments and controls (section 2)” and the “Pre-driving checks and adjustments
(section 3)” of your Owner’s Manual.
may also illuminate.
TIRE PRESSURE MONITORING SYSTEM (TPMS)
A CHECK… TIRE… PRES… warning message
as scrolling text in the twin trip odometer
pressure warning light
are low on pressure and air is needed.
• The tire pressures should be checked when the tires are cold.
The tires are considered cold after the vehicle has been parked
for 3 hours or more or driven less than 1 mile (1.6km) at
moderate speeds.
After tire pressures are adjusted, drive the vehicle at speeds
above 16 MPH (25km/h). The CHECK TIRE PRES warning
message and low tire pressure warning light will disappear.
When the low tire pressure warning light flashes
for approximately 1 minute and then remains on, the
TPMS is not functioning properly. Have the system
checked by a NISSAN dealer.
Tire pressure rises and falls depending on the heat
caused by the vehicle’s operation and the outside
temperature. Low outside temperature can lower the
temperature of the air inside the tire, which can cause
a lower tire inflation pressure. This may cause the low
tire pressure warning light to illuminate. If the warning
light illuminates in low ambient temperature, check the tire pressure in your tires.
• Check the tire pressures (including the spare tire) often and always prior to long distance trips.
The Tire and Loading Information label contains valuable information. Please refer to section 9,
“Technical and consumer information”, in your Owner’s Manual for the location of the Tire and
Loading Information label.
For more information, refer to the “Instruments and controls (section 2)”, the “Starting and driving (section 5)” and the
“Maintenance and do-it-yourself (section 8)” of your Owner’s Manual.
To view detailed instructional videos regarding these and other features,
will illuminate when one or more tires
03
please go to www.nissanownersinfo.mobi.
when the fuel-
01
01
02
and the low tire
will appear
01
02
01
02
03
3
Page 6
first drive features
NISSAN INTELLIGENT KEY® SYSTEM (if so equipped)
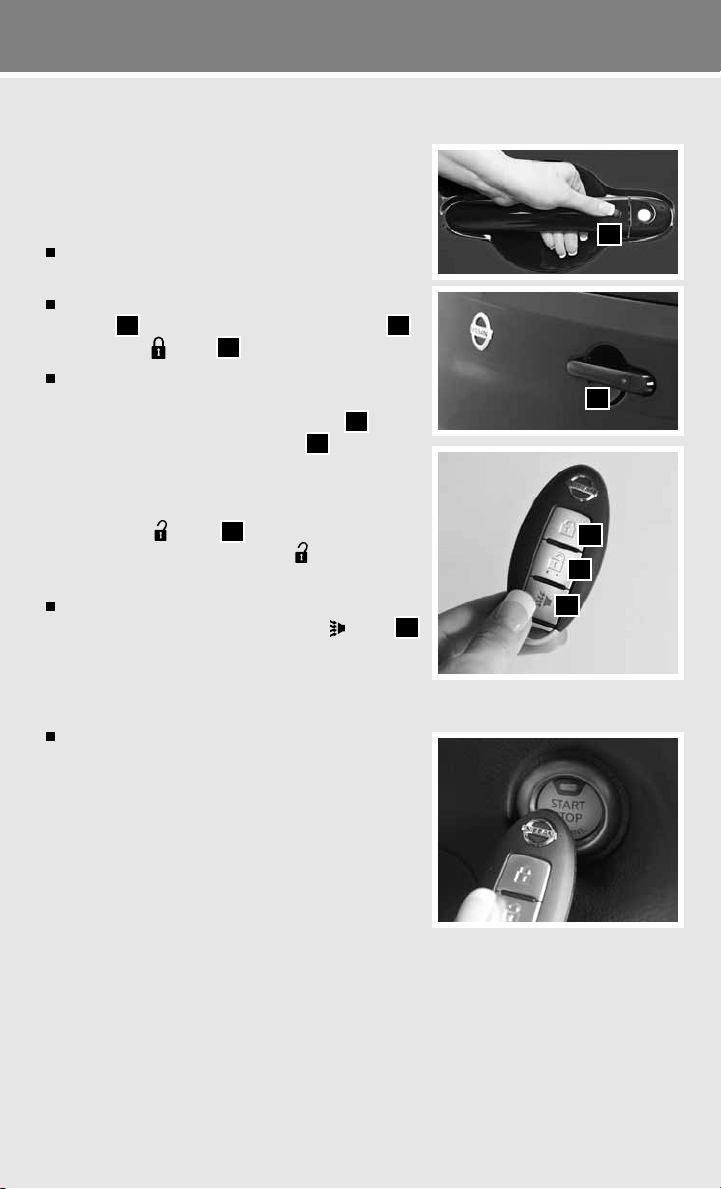
The NISSAN Intelligent Key® System allows you to lock or
unlock the vehicle, open the back door and start the engine.
NOTE: It is important to make sure the Intelligent Key is
with you (that is, in your pocket or purse).
The operating range of the Intelligent Key is within
31.5 in (80 cm) from each request switch.
To lock the vehicle, push either door handle request
switch
01
or press the
, push the back door request switch
button
on the keyfob.
03
02
,
To unlock the vehicle, perform one of the following
procedures:
• Push either door handle request switch
or the back door request switch
02
once
01
once; the
corresponding door will unlock. Push the request
switch again within 1 minute; all other doors
will unlock, or
• Press the
the driver’s side door. Press the
button
on the keyfob to unlock
04
button again;
all other doors will unlock.
The Intelligent Key can also be used to activate the
panic alarm by pressing and holding the
for more than 1 second. Once activated, the panic
button
05
alarm and headlights will stay on for 25 seconds.
INTELLIGENT KEY BATTERY DISCHARGE
If the battery of the Intelligent Key is discharged, or
environmental conditions interfere with the Intelligent
Key operation, start the engine according to the
following procedure:
1. Move the shift lever to the P (PARK) position.
2. Firmly apply the foot brake.
3. Touch the ignition switch with the Intelligent Key
and a chime will sound.
4. Within 10 seconds after the chime sounds, push the ignition switch while depressing the
brake pedal and the engine will start.
For more information, refer to the “Pre-driving checks and adjustments (section 3)”, the “Starting and driving (section 5)”
and the “Maintenance and do-it yourself (section 8)” of your Owner’s Manual.
01
02
03
04
05
4
To view detailed instructional videos regarding these and other features,
please go to www.nissanownersinfo.mobi.
Page 7
OPENING THE BACK DOOR
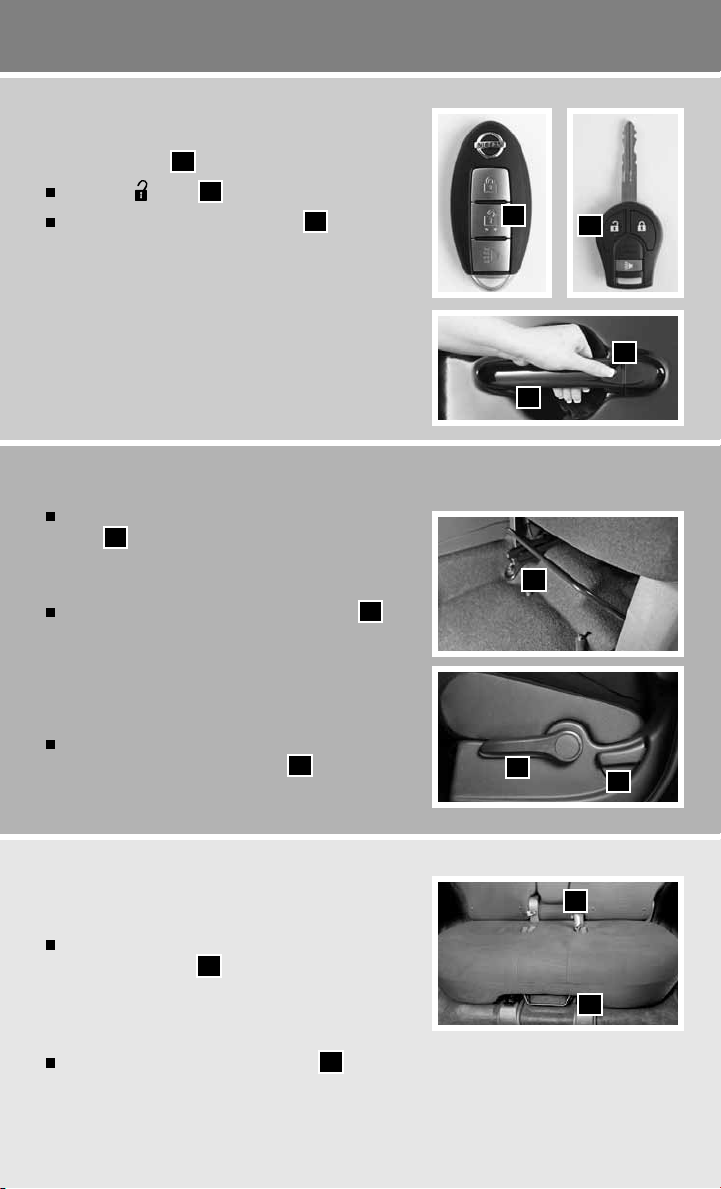
Use one of the following methods to unlock the back door
then pull the handle
Press the
Push the back door request switch
01
button
to open:
on the keyfob twice.
02
while carrying
03
the NISSAN Intelligent Key® with you (if so equipped).
For more information, refer to the “Pre-driving checks and adjustments
(section 3)” of your Owner’s Manual.
FRONT SEAT ADJUSTMENTS
To slide the seat forward or backward, pull up on the
lever
or backward. Release the lever to lock the seat
in position.
To recline the seatback, pull up on the lever
lean back. To bring the seatback forward, pull the lever
up and lean your body forward. Release the lever to
lock the seatback in position.
01
under the front of the seat and slide forward
02
and
02
01
02
03
01
SEAT LIFTER (driver’s seat only)
To adjust the seat height, pull up or push down
repeatedly on the adjusting lever
For more information, refer to the “Safety — Seats, seat belts and
supplemental restraint system (section 1)” of your Owner’s Manual.
03
.
03
REAR SEAT ADJUSTMENTS
ADJUSTING THE REAR BENCH SEAT
To slide the rear bench seat forward or backward,
pull up on the lever
and slide forward or backward. The seat will slide in
3 fixed positions. Release the lever to lock the seat
in position.
To recline the seatback, pull the strap
the strap and lean forward. Release the strap to lock the seatback in position.
01
under the front of the seat
and lean back. To bring the seatback forward, pull
02
To view detailed instructional videos regarding these and other features,
please go to www.nissanownersinfo.mobi.
02
02
01
5
Page 8
first drive features
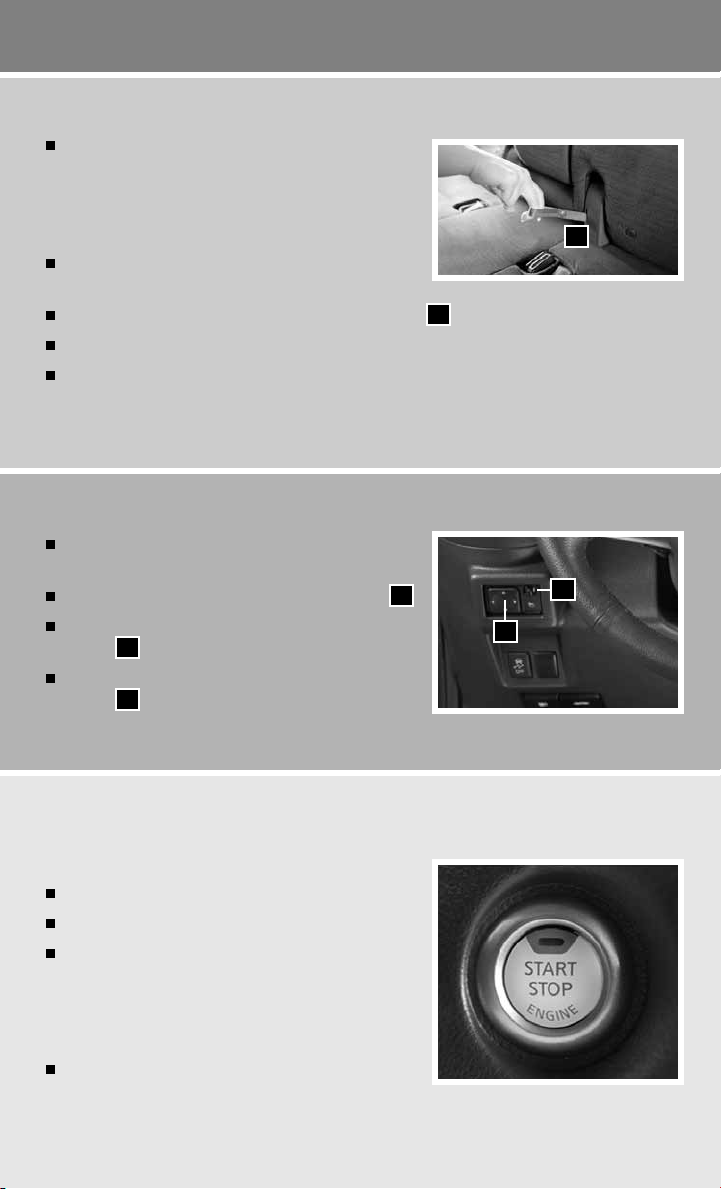
FOLDING DOWN THE REAR BENCH SEAT
To fold the seats flat, secure the seat belts on
the seat belt hooks on the side wall. Release the
connector tongue of the rear center seat belt from
the buckle, then store the connector and seat belt
tongues on the seat belt hook.
Before folding down the seatback, tuck the seat belt
buckles into the seat cushion pockets.
Fold the seatback down by pulling the adjusting strap
To raise the seatback, lift up each seatback and push it to the upright position until it is latched.
After raising the seatback, pull the seat belt buckles out of the seat cushion pockets until they
are fully extended before using the seat belts.
For more information, refer to the “Safety — Seats, seat belts and supplemental restraint system (section 1)” of your
Owner’s Manual.
01
.
OUTSIDE MIRROR CONTROL SWITCH
The outside mirror control switch is located on the
left side of the instrument panel.
To select the left or right mirror, move the switch
Adjust each mirror to the desired position using the
switch
To prevent accidentally moving the mirror, move this
switch
For more information, refer to the “Pre-driving checks and adjustments (section 3)” of your Owner’s Manual.
.
02
to the center “neutral” position.
01
01
.
02
01
01
STARTING/STOPPING THE ENGINE
CONTINUOUSLY VARIABLE TRANSMISSION
(NISSAN Intelligent Key® models only - if so equipped)
Depress the brake pedal.
Move the shift lever to P (PARK).
Push the ignition switch to start the engine.
NOTE: It is important to make sure the Intelligent Key is
with you (that is, in your pocket or purse).
TURNING THE ENGINE OFF
Move the shift lever to the P (PARK) position, apply
the parking brake and push the ignition switch.
6
To view detailed instructional videos regarding these and other features,
please go to www.nissanownersinfo.mobi.
Page 9
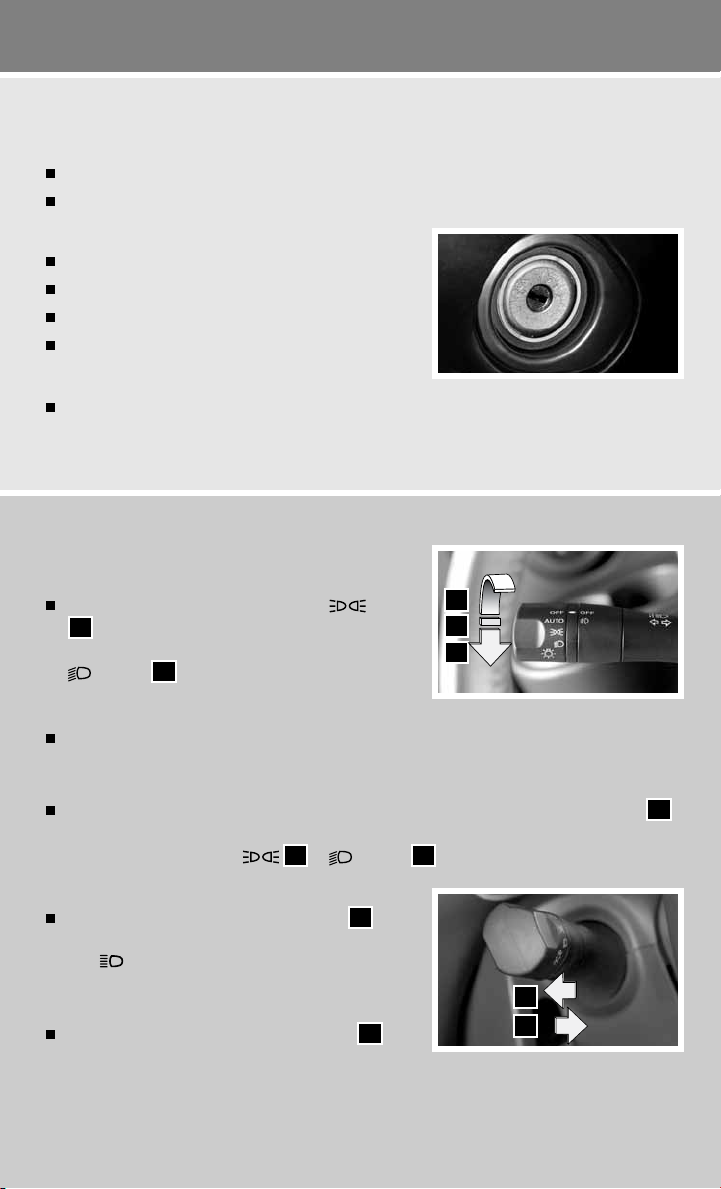
PUSH BUTTON EMERGENCY ENGINE SHUT OFF
To shut off the engine in an emergency situation while driving, perform one of the following procedures:
Rapidly push the push button ignition switch 3 consecutive times in less than 1.5 seconds, or
Push and hold the push button ignition switch for more than 2 seconds.
MANUAL TRANSMISSION (if so equipped)
Depress the brake pedal.
Move the shift lever to N (Neutral).
Depress the clutch pedal to the floor.
Turn the ignition switch to start the engine.
TURNING THE ENGINE OFF
Apply the foot brake and place the vehicle in first gear, then apply the parking brake and turn
the ignition switch to OFF.
For more information, refer to the “Starting and driving (section 5)” of your Owner’s Manual.
HEADLIGHT CONTROL SWITCH
HEADLIGHT CONTROL
Turn the headlight control switch to the
01
to turn on the front parking, side marker, tail, license
position
plate and instrument panel lights. Turn the switch to the
position
to turn on the headlights.
02
AUTOLIGHT SYSTEM (if so equipped)
The autolight system will automatically turn the headlights on when it is dark and off when it is
light. The system will keep the headlights on for a period of time after you turn the ignition off
and all doors are closed.
To activate the autolight system, turn the headlight control switch to the AUTO position
then push the ignition switch to ON. To deactivate the autolight system, turn the headlight
control switch to the OFF,
01
or
position
HIGH BEAM SELECT
Push the headlight control switch forward
04
to
select the high beam function. The blue indicator
light illuminates in the instrument panel. Pull the
headlight switch back to the original position to select
the low beam. The blue indicator light goes off.
Pull and release the headlight control switch
05
to
flash the headlight high beams on and off.
02
03
01
02
03
.
04
05
To view detailed instructional videos regarding these and other features,
please go to www.nissanownersinfo.mobi.
7
Page 10
first drive features
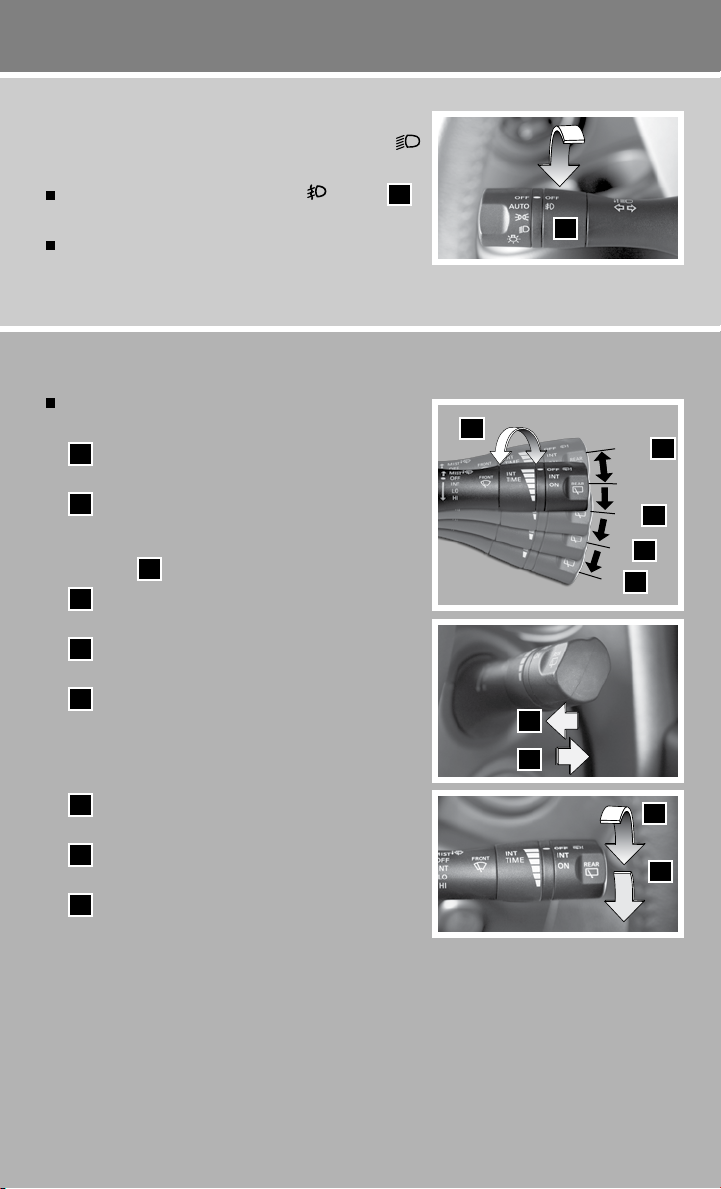
FOG LIGHT SWITCH (if so equipped)
NOTE: The headlights must be on and the low beams
selected for the fog lights to operate.
Turn the switch (inside collar) to the position
to turn the fog lights on.
Turn the switch (inside collar) to the OFF position to
turn the fog lights off.
For more information, refer to the “Instruments and controls (section 2)” of your Owner’s Manual.
WINDSHIELD WIPER/WASHER SWITCH
Move the lever to the following positions to operate
the windshield wipers:
01 Mist (MIST) - One sweep operation of the
front wipers.
02 Intermittent (INT) - Front wipers operate
intermittently. The intermittent operation speed
can be adjusted by twisting the time control
ring
04 Low (LO) - Front wipers operate at a continuous
low-speed.
05 High (HI) - Front wipers operate at a continuous
high-speed.
06 Pull the lever toward you to activate the front
washer. The front wipers will operate several
times.
REAR WINDSHIELD WIPER AND WASHER
07 Intermittent (INT) - Rear wiper operates
intermittently.
08 Low (ON) - Rear wiper operates at a continuous
low-speed.
09 Push the lever forward to activate the rear washer.
The rear wiper will operate several times.
For more information, refer to the “Instruments and controls (section 2)” of your Owner’s Manual.
03
.
06
03
06
09
06
MIST
01
OFF
INT
02
LO
04
HI
05
07
INT
08
ON
8
To view detailed instructional videos regarding these and other features,
please go to www.nissanownersinfo.mobi.
Page 11
05
06
10
03
04
09 08
02
07
01
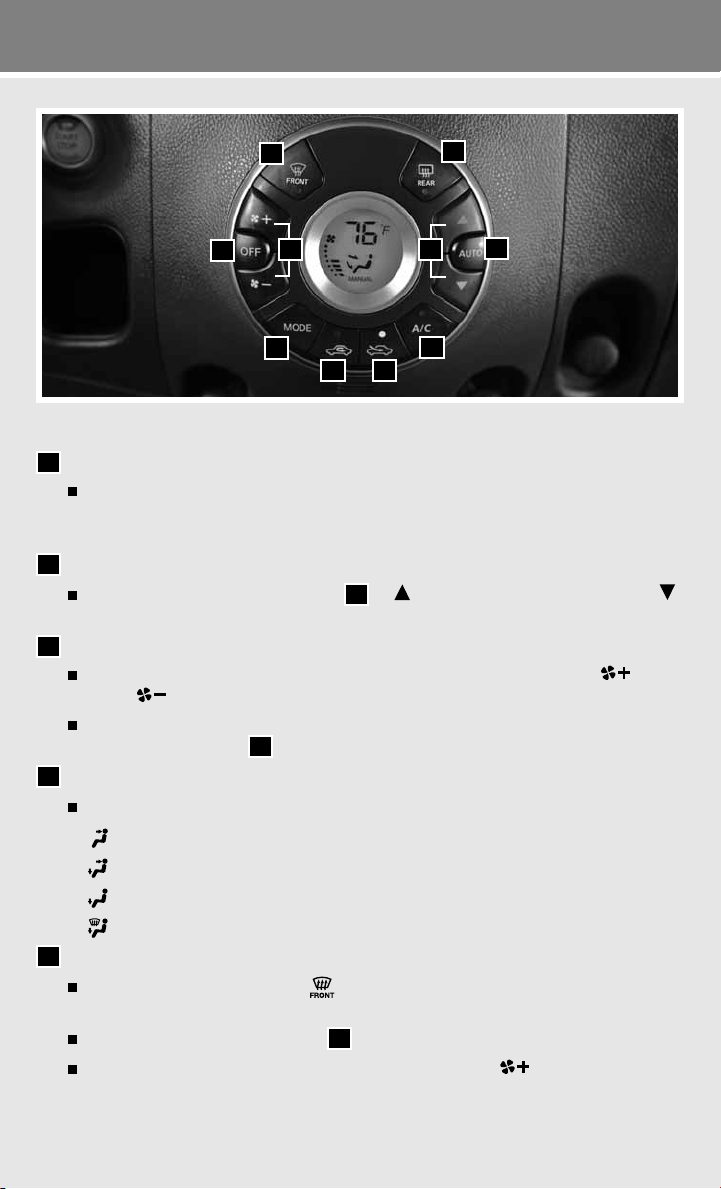
AUTOMATIC CLIMATE CONTROLS (if so equipped)
01
AUTO BUTTON
The auto mode may be used year-round. Press the AUTO button and the system will
automatically control the inside temperature (automatic cooling and/or dehumidified
heating), air flow distribution and fan speed.
02
TEMPERATURE CONTROL BUTTONS
Press the temperature control buttons
to decrease the temperature.
03
FAN SPEED CONTROL BUTTONS
Press the fan speed control buttons to manually adjust the fan speed faster or
slower .
Using the fan speed control buttons will disable the auto mode; to resume auto mode,
press the AUTO button
04
MODE BUTTON
01
.
Press the MODE button to cycle through the following air flow outlets:
Air flows from the center and side vents.
Air flows from the center, side and foot vents.
Air flows mainly from the foot vents.
Air flows from the defroster and foot vents.
05
DEFROSTING/DEFOGGI NG FRONT AN D SI DE WI NDOWS
Press the defroster control button
on when the defroster mode is selected. This feature removes humidity from the air.
Use the temperature control buttons
To set the defroster on high, press the fan speed control button to increase the fan
speed to the maximum setting.
up to increase the temperature or down
02
to turn the system on. The A/C automatically turns
to set the desired temperature.
02
To view detailed instructional videos regarding these and other features,
please go to www.nissanownersinfo.mobi.
9
Page 12
first drive features
06
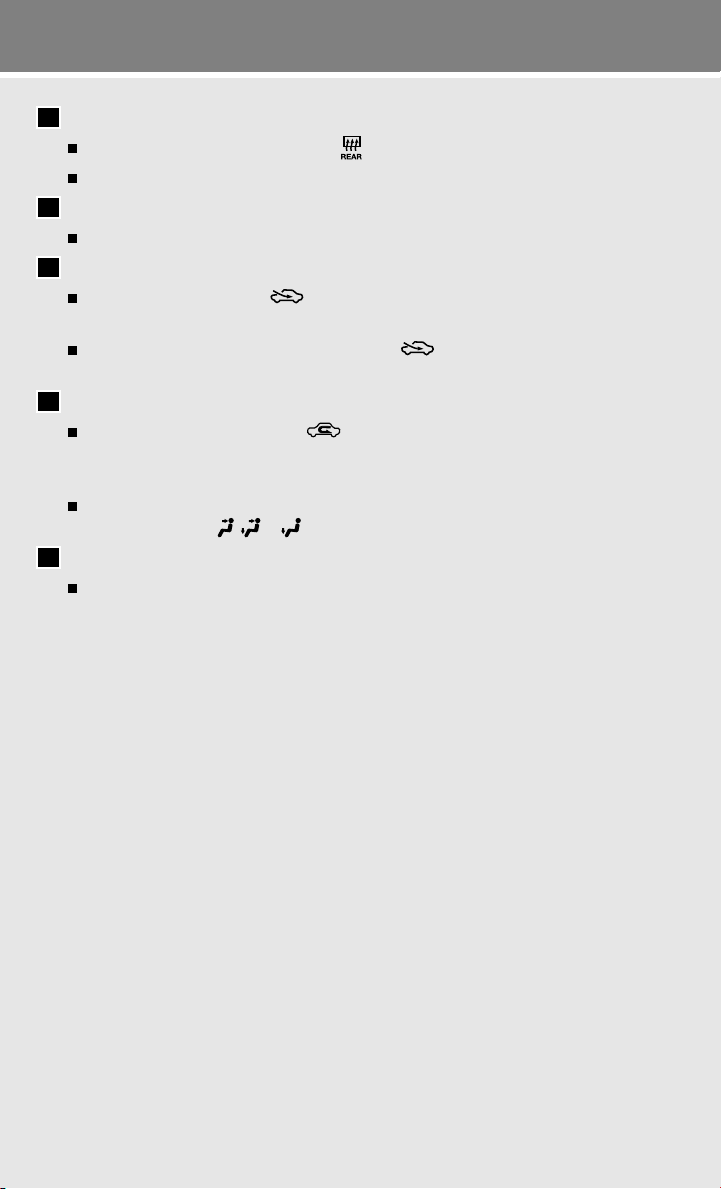
DEFROSTING REAR WINDOW AND OUTSIDE HEATED MIRRORS (if so equipped)
Push the rear window defroster switch
This function automatically turns off after approximately 15 minutes.
07
A/C BUTTON
Press the A/C button to manually turn the A/C on or off.
08
OUTSIDE AIR CIRCULATION BUTTON
Press the outside air button to draw fresh air into the vehicle; the indicator light on
the button will illuminate.
Press and hold the outside air circulation button for more than 1.5 seconds to set
automatic outside air circulation mode.
09
AIR RECIRCULATION BUTTON
Press the air recirculation button to recirculate air inside the vehicle; the indicator
light on the button will illuminate. This system is used to avoid outside odors and helps to
adjust the inside vehicle temperature more effectively.
The air recirculation mode can only be selected if the air flow mode control is in the
following positions: , or .
10
OFF BUTTON
Press the OFF button to turn the climate control system off.
For more information, refer to the “Instruments and controls (section 2)” and the “Heater, air conditioner, audio and
phone systems (section 4)” of your Owner’s Manual.
to turn the system on or off.
10
To view detailed instructional videos regarding these and other features,
please go to www.nissanownersinfo.mobi.
Page 13
05
06
03
01 02
04
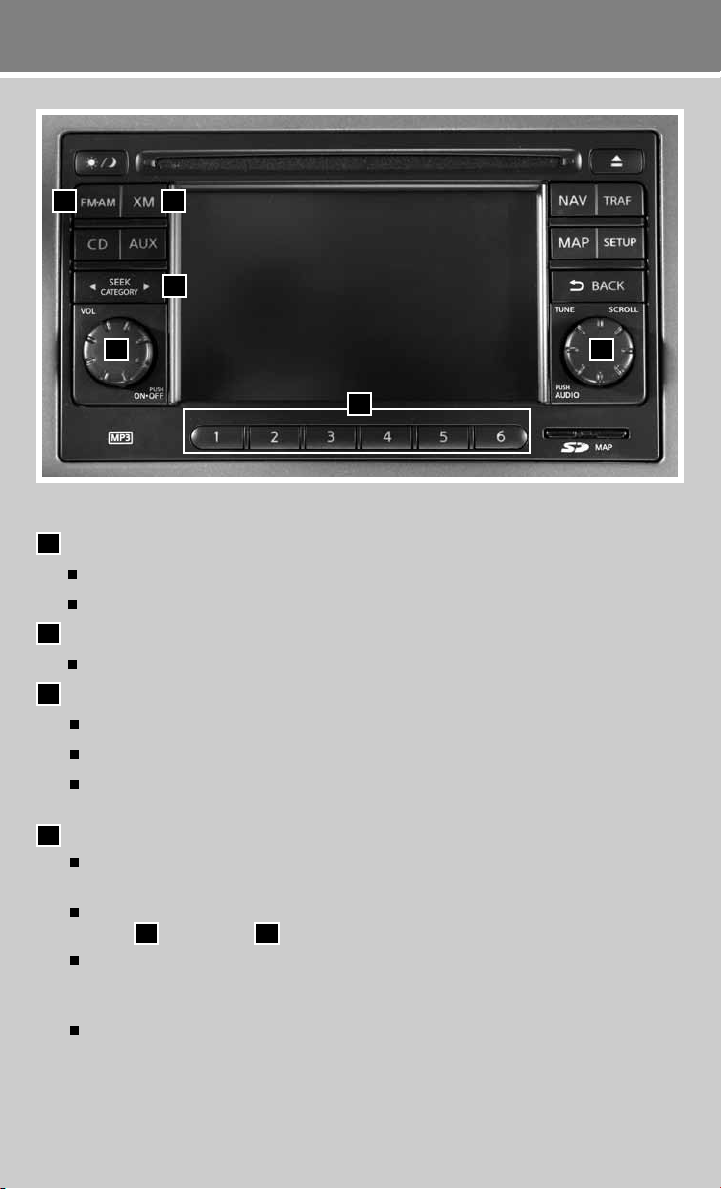
FM/AM/XM®* SATELLITE RADIO WITH CD PLAYER (if so equipped)
01
VOL/ON•OFF CONTROL KNOB
Press the VOL/ON•OFF control knob to turn the system on or off.
Turn the VOL/ON•OFF control knob to the right or left to increase or decrease the volume.
02
TUNE/SCROLL/AUDIO KNOB
To manually tune the radio, turn the TUNE/SCROLL/AUDIO knob left or right.
03
SEEK/CATEGORY BUTTONS
To scan through each broadcasting station, press the SEEK/CATEGORY buttons.
To skip from one track to another on a CD, press the SEEK/CATEGORY buttons.
When the SEEK/CATEGORY buttons are pressed and held while a CD is playing, the CD
will rewind or fast forward. When the button is released, the CD will play at normal speed.
04
STATION SELECT BUTTONS
Twelve stations can be set for the FM band, six for the AM band and eighteen for XM®
satellite radio.
To store a station in a preset, you must first select a radio band by pressing the FM•AM
button 05 or XM button
06
, then tune to the desired AM, FM or XM satellite radio station.
Then press and hold the desired station select button (1-6) until a beep is heard and the
sound is briefly muted. The channel indicator will appear on the display and the sound will
resume. Programming is now complete.
To retrieve a previously set station, select the radio band where the preset was stored
then press the corresponding station select button (1-6).
*XM® Satellite Radio is only available on vehicles equipped with optional XM® satellite subscription service.
For more information, refer to the “Heater, air conditioner, audio and phone systems (section 4)” of your Owner’s Manual.
To view detailed instructional videos regarding these and other features,
please go to www.nissanownersinfo.mobi.
11
Page 14
first drive features
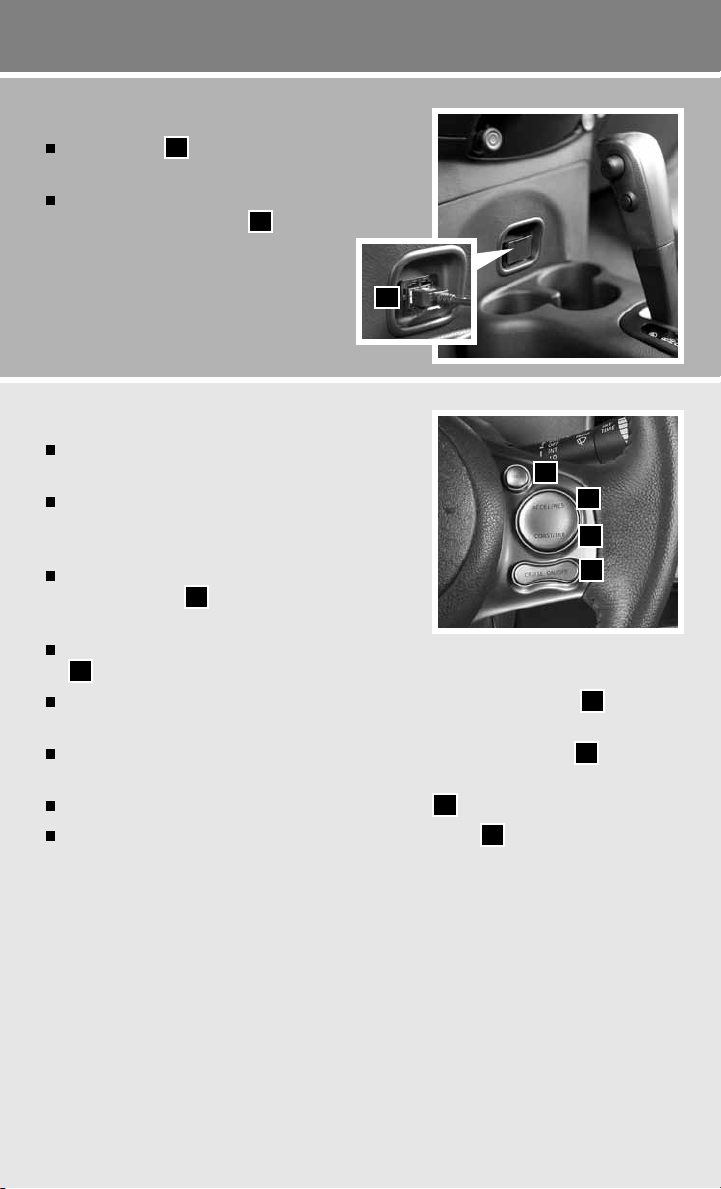
USB/IPOD® INTERFACE (if so equipped)
The USB jack
in front of the shift lever.
When a compatible USB memory device or iPod® is
plugged into the USB jack
files stored on the device can be played
through the vehicle’s audio system.
For more information, refer to the “Heater, air
conditioner, audio and phone systems (section 4)”
of your Owner’s Manual.
CRUISE CONTROL (if so equipped)
The cruise control system enables you to set a constant
cruising speed once the vehicle has reached 25 mph.
The system will automatically maintain the set speed
until you tap the brake pedal, accelerate, cancel or
turn the system off.
To activate the cruise control, push the CRUISE
ON/OFF switch
in the instrument panel will illuminate.
To set cruising speed, accelerate the vehicle to the desired speed, push the COAST/SET switch
02
To reset at a faster cruising speed, push and hold the ACCEL/RES switch
vehicle attains the desired speed, release the switch.
To reset at a slower cruising speed, push and hold the COAST/SET switch
the switch when the vehicle slows to the desired speed.
To cancel the preset speed, push the CANCEL switch
To turn off cruise control, push the CRUI SE ON/OFF switch
light in the instrument panel will turn off.
For more information, refer to the “Starting and driving (section 5)” of your Owner’s Manual.
and release. Take your foot off the accelerator pedal. Your vehicle will maintain the set speed.
is located on the instrument panel
01
, compatible audio
01
. The CRUISE indicator light
01
01
04
03
02
01
. When the
03
. Release
02
04
.
. The CRUISE indicator
01
12
To view detailed instructional videos regarding these and other features,
please go to www.nissanownersinfo.mobi.
Page 15
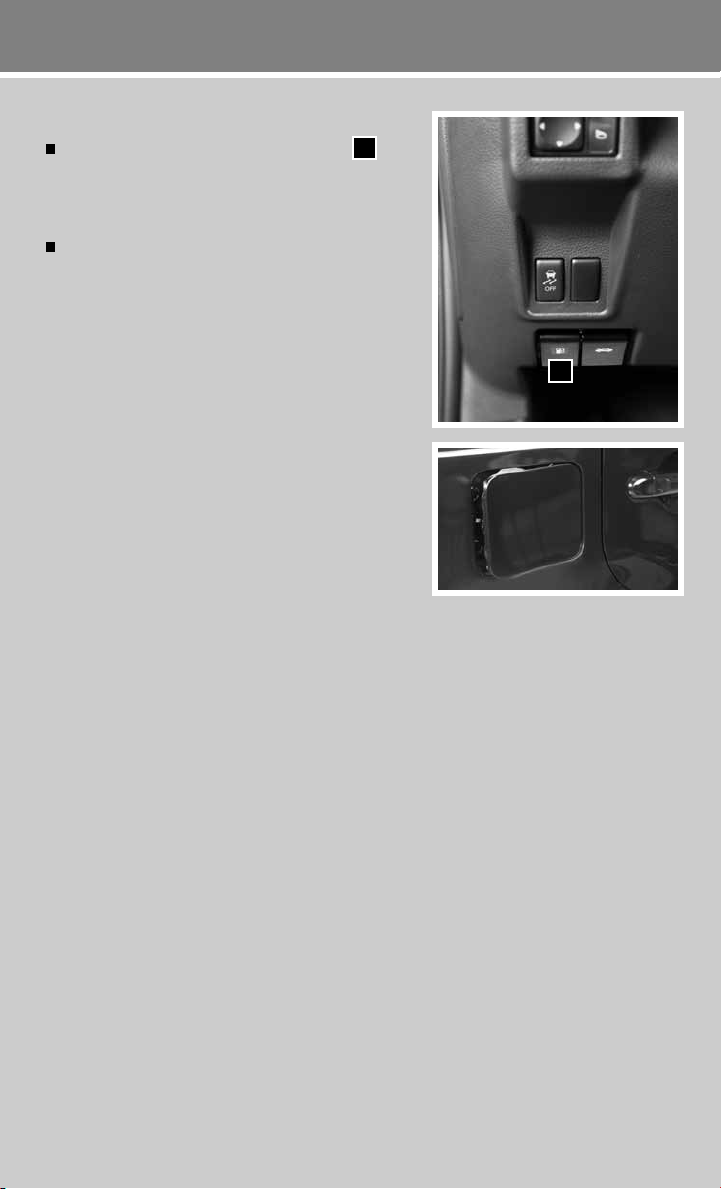
FUEL-FILLER DOOR
To open the fuel-filler door, pull the release
located on the driver’s side instrument panel.
The fuel-filler door is located on the right, rear side of
the vehicle.
For more information, refer to the “Pre-driving checks and adjustments
(section 3)” of your Owner’s Manual.
01
01
To view detailed instructional videos regarding these and other features,
please go to www.nissanownersinfo.mobi.
13
Page 16
system guide
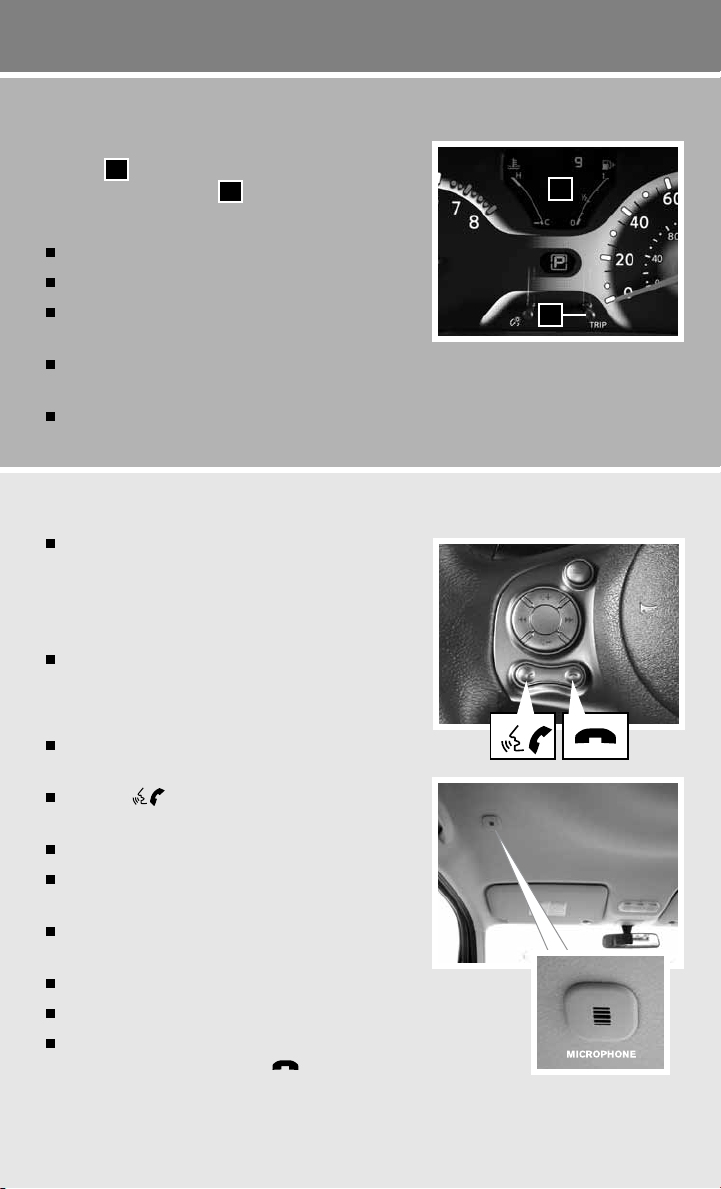
TRIP COMPUTER
With the ignition switch in the ON position, trip
computer
trip computer mode switch
The following modes can be selected in the display:
Trip A – measures the distance of one specific trip.
Trip B – measures the distance of a second specific trip.
Current Fuel Consumption – displays the current fuel
consumption.
Distance to Empty (dte) – displays the estimated distance to empty (dte) the vehicle can be
driven before refueling.
Average Fuel Consumption – displays the average fuel consumption since the last reset.
For more information, refer to the “Instruments and controls (section 2)” of your Owner’s Manual.
BLUETOOTH® HANDS-FREE PHONE SYSTEM (if so equipped)
With an overhead microphone and sound
transmitted through the audio system speakers,
the Bluetooth® Hands-free Phone System utilizes
Bluetooth wireless technology and voice recognition
to provide hands-free cellular phone communication.
A cellular telephone should not be used while driving
so full attention may be given to vehicle operation.*
SYSTEM OPERATING TIPS
Close all windows. Surrounding noises may interfere
with system operation and performance.
Press the
voice recognition.
Wait for the tone before speaking.
Begin speaking a command within 5 seconds of the
tone.
Speak in a clear and natural voice without pausing
between words.
Look straight ahead and avoid speaking too loudly or too softly.
To go back to the previous command, say “Go back” or “Correction.”
To cancel a voice recognition session, simply wait 5 seconds, say
“Cancel” or “Quit,” or press the button for 5 seconds.
modes can be selected by pressing the
01
button on the steering wheel to activate
on the instrument panel.
02
01
02
*Some jurisdictions prohibit the use of cellular telephones while driving.
14
To view detailed instructional videos regarding these and other features,
please go to www.nissanownersinfo.mobi.
Page 17

To interrupt the system voice and give a command quickly, press the
button.
When speaking Phonebook names, please be aware some phones require the last name to be
spoken before the first name. For example, “Michael Smith” may be spoken as “Smith Michael”.
To increase or decrease the volume of the voice prompts, push the volume control switches
or
on the steering wheel or turn the VOL/ON•OFF control knob on the audio
system while the system is responding.
If the Voice Recognition system does not recognize your voice commands, train the system
using the Speaker Adaptation Mode. See your Owner’s Manual for detailed information.
Some commands are not available while the vehicle is in motion.
The “Help” command can be used to hear a list of available commands at any time.
Please refer to the cellular phone manufacturer’s Owner’s Manual for detailed information
regarding your Bluetooth phone.
For recommended phones and detailed instructions, please visit
www.nissanusa.com/bluetooth.
CONNECTING PROCEDURE
NOTE: The vehicle must be stationary when connecting the phone.
1. Press the
button on the steering wheel. The system announces the available commands.
2. Say: “Connect phone”. The system acknowledges the command and announces the next set
of available commands.
3. Say: “Add phone”. The system acknowledges the command and asks you to initiate
connecting from the phone handset.
4. Initiate connecting from the phone:
The connecting procedure varies according to each cellular phone model. For detailed
connecting instructions and compatible phones, please visit
www.nissanusa.com/bluetooth.
When prompted for a Passkey code, enter “1234” from the handset. (The Passkey code is
assigned by NISSAN and cannot be changed.)
5. Say a name for the phone when the system asks you to provide one. You can give the phone
a name of your choice.
PHONEBOOK SETUP
Depending on your cell phone, the system may automatically download your cell phone’s
entire phonebook to the vehicle’s Bluetooth system.
If the phonebook does not download automatically, 40 entries can be individually downloaded.
To manually download entries:
1. Push the
2. After the tone, say “Phonebook”.
button on the steering wheel.
To view detailed instructional videos regarding these and other features,
please go to www.nissanownersinfo.mobi.
15
Page 18

system guide
3. After the next tone, say “Transfer Entry”. The system acknowledges the command and
asks you to initiate the transfer from the phone handset. The new contact phone number
will be transferred from the cellular phone to the vehicle.
The transfer procedure varies according to each cellular phone. See your cellular phone’s
owner’s manual for details. You can also visit www.nissanusa.com/bluetooth for
instructions on transferring phone numbers from NISSAN recommended cellular phones.
4. The system repeats the number and prompts you for the next command. When you have
finished entering numbers or transferring an entry, choose “Store.”
5. The system confirms the name, location and number.
MAKING A CALL
1. Press the
2. Say: “Call”. The system acknowledges the command and announces the next set of
available commands.
3. Say: “Phone Number”. The system acknowledges the command and announces the next
set of available commands.
4. Say the number you wish to call starting with the area code in single digit format.
5. When you have finished speaking the phone number, the system repeats it back and
announces the available commands.
6. Say: “Dial”. The system acknowledges the command and makes the call.
RECEIVING/ENDING A CALL
When you receive a phone call, a ring tone sounds through the audio system.
To accept the call, press the
To hang up the phone at the end of a call or to disconnect during call placement, press
the button.
For more information, refer to the “Heater, air conditioner, audio and phone systems (section 4)” of your Owner’s Manual.
button. A tone will sound.
button. To reject the call, press the button.
16
To view detailed instructional videos regarding these and other features,
please go to www.nissanownersinfo.mobi.
Page 19

memo
Page 20
This Quick Reference Guide is intended to provide an overview of some of the unique features of your new vehicle. See your
Owner’s Manual, which contains important safety warnings and information about the operation and maintenance of your vehicle, for
complete details. Nissan North America, Inc. reserves the right to make changes, at anytime, without prior notice, in prices, colors,
materials, equipment, specifications, and models and to discontinue models or equipment. Due to continuous product development
and other pre- and post-production factors, actual vehicle, materials and specifications may vary. Some vehicles are shown with
optional equipment. See the actual vehicle for complete accuracy. Specifications, options and accessories may differ in Hawaii, U.S.
territories and other countries. For additional information on availability, options or accessories, see your NISSAN dealer or contact
Nissan North America, Inc.
go to www.nissanownersinfo.mobi/2012/cube
or snap this barcode with an appropriate barcode reader.
Nissan, the Nissan Brand Symbol, Z and
Nissan model names are Nissan trademarks.
© 2011 Nissan North America, Inc.
QR2E 0Z12U0
Printing: November 2011 (05)
To view detailed instructional videos,
 Loading...