

Page 1

QUICK REFERENCE GUIDE
2011 cube
Page 2
13
01
03 04
02
05
14
06
08
10
1211
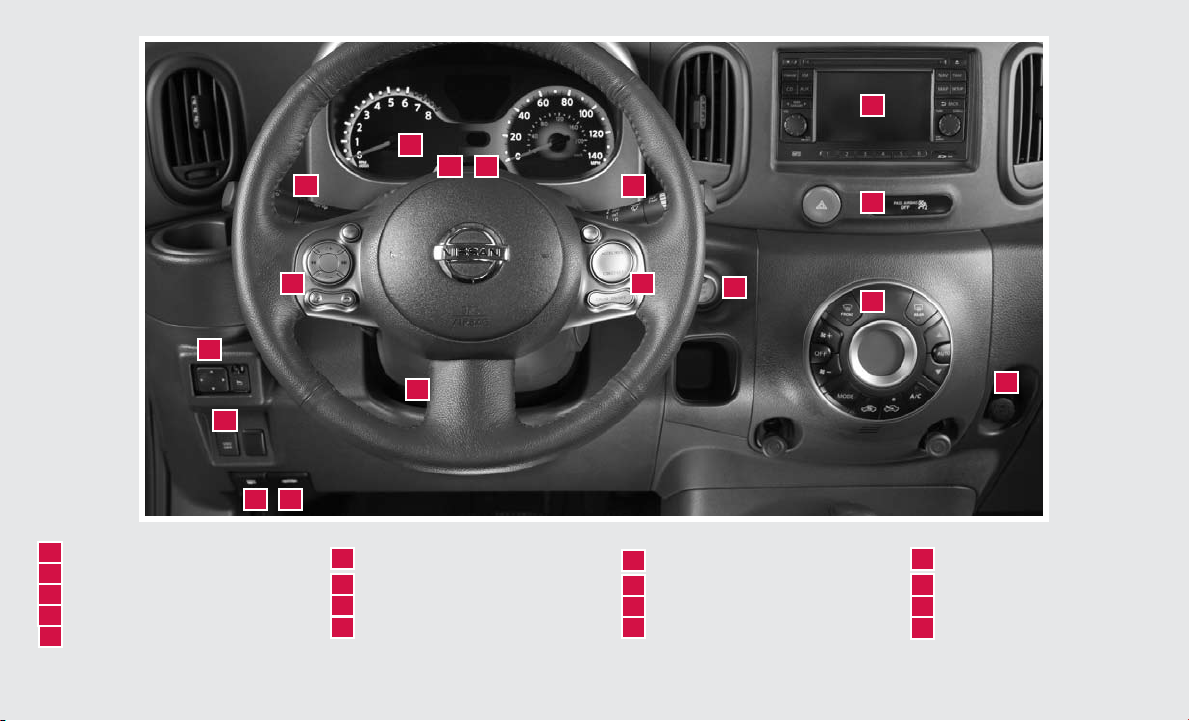
01
LOW TIRE PRESS URE WARN ING LIGHT
HEADLIG HT AND TUR N SIGNAL C ONTROL
02
INSTRU MENT B RIG HTNESS CONTROL*
03
TWIN TRI P ODOM ETER / TRI P COMPUTER*
04
WIND SHIELD WIP ER / WASHER SWITCH
05
06
07
08
09
*See your Owner’s Manual for more information.
09
STEERI NG WHE EL SWITCHES FOR
AUDIO / BLU ETOOTH
CRUI SE CONTROL
OUTSIDE M IRROR CONTROL SWITCH
STEERI NG WHE EL TILT ADJUSTMENT*
®
07
VEHIC LE DYNAMIC CONTROL (VDC)
10
OFF SWITCH*
FUEL-FI LLER DOOR RELEASE
11
HOOD RE LEASE*
12
AUDIO AND NAVIGATION SYSTEM
13
15
16
17
FRONT PASSENG ER AIR BAG
14
STATUS LIGHT*
15
PUSH BUTTON IG NITION SWITCH
AUTOMATIC CLIMATE CONTROLS
16
POWER OUTLET*
17
Page 3
TABLE OF CONTENTS
NEW SYSTEM FEATURES
Navigation System (if so equipped) ................................2
ESSENTIAL INFOR MATION
Loose Fuel Cap . . . . . . . . . . . . . . . . . . . . . . . . . . . . . . . . . . . . . . . . . . . . . . . . 3
Tire Pressure Monitoring System (TPMS)...........................3
FIRST DRIVE FEATURES
NISSAN Intelligent Key™ System (if so equipped)....................4
Seat Adjustments ..............................................4
Outside Mirror Control Switch ....................................4
Starting/Stopping the Engine.....................................5
Headlight Control Switch ........................................5
Windshield Wiper Switch ........................................6
Automatic Climate Controls (if so equipped) ........................6
FM/AM/XM
®
Radio with CD Player (if so equipped) ..................7
Parking Brake..................................................7
Opening the Back Door .........................................8
Fuel-Filler Door.................................................8
SYSTEM GUIDE
Cruise Control (if so equipped) ...................................9
Bluetooth
®
Hands-free Phone System (if so equipped)................9
• Always wear your seat belt.
• Supplemental air bags do not replace proper seat belt usage.
• Children 12 and under should always ride in the rear seat properly secured
in child restraints or seat belts according to their age and weight.
• Do not drink and drive.
For more information, refer to the “Safety –– Seats, seat belts and
supplemental restraint system (section 1)” of your Owner’s Manual.
Additional information about your vehicle is also available in your Owner’s
Manual, Navigation System Owner’s Manual, Electronic Quick Reference
Guide (EQRG) and at www.nissanusa.com.
This easy-to-use Quick Reference Guide is intended to help you more fully
appreciate some of the unique features and functions of your new vehicle.
However, it is not intended to replace your Owner’s Manual. The Owner’s
Manual contains more detailed information to help you better understand
the important safety warnings, features, operation and maintenance of your
vehicle. All information, specifications, photographs and illustrations in this
publication are those in effect at the time of printing. NISSAN reserves the
right to change specifications or design without notice and without obligation.
Page 4
new system features
NAVIGATION SYSTEM (if so equipped)
Your Navigation System can calculate a route from the current location to a preferred destination.
The real-time map display and turn-by-turn voice guidance will lead you along the route.
The Navigation System will continually update your vehicle’s position. If you have deviated
from the original route, it will recalculate the route from your current location.
For more information, refer to your Navigation System Owner’s Manual.
2
Page 5

essential information
LOOSE FUEL CAP
A LOOSE FUEL CAP warning message will display
in the twin trip odometer/trip computer display
when the fuel-filler cap is not tightened correctly.
The warning message will disappear when the vehicle
detects the fuel-filler cap is properly tightened and the
reset button
If the cap is not properly tightened, the Malfunction
Indicator Light
For more information, refer to the “Instruments and controls (section 2)”
and the “Pre-driving checks and adjustments (section 3)” of your
Owner’s Manual.
02
is pressed.
may illuminate.
TIRE PRESSURE MONITORING SYSTEM (TPMS)
The TPMS monitors tire pressure. If the TPMS is not
functioning properly, the low tire pressure warning light
will flash for approximately 1 minute and the light will
remain on after 1 minute. Have the system checked by
a NISSAN dealer.
If the low tire pressure warning light illuminates but
does not blink, check the tire pressure in all four tires.
Adjust the tire pressure to the recommended COLD
tire pressure shown on the Tire and Loading Information
label located in the driver’s door opening.
After tire pressures are adjusted, the vehicle will need to be driven at speeds above 16 MPH
(25km/h) to turn off the low tire pressure warning light.
Tire pressure rises and falls depending on the heat caused by the vehicle’s operation and the
outside temperature. Low outside temperature can lower the temperature of the air inside the
tire, which can cause a lower tire inflation pressure. This may cause the low tire pressure
warning light to illuminate. If the warning light illuminates in low ambient temperature, check
the tire pressure in all four tires.
For more information, refer to the “Instruments and controls (section 2)” and the “Starting and driving (section 5)” of your
Owner’s Manual.
01
01
02
3
Page 6

first drive features
NISSAN INTELLIGENT KEY™ SYSTEM (if so equipped)
The NISSAN Intelligent Key™ System allows you to lock or
unlock your vehicle, open your back door and start the engine.
To lock or unlock a door, push any door handle request
switch
Push any door handle request switch
minute of unlocking the door and all other doors will
unlock.
NOTE: It is important to make sure the Intelligent Key is
with you (that is, in your pocket or purse).
For more information, refer to the “Pre-driving checks and adjustments
(section 3)” of your Owner’s Manual.
SEAT ADJUSTMENTS
Pull up on the lever
slide forward or backward. Release the lever to lock
the seat in position.
Pull up on the lever
your seatback forward or backward. Release the lever
when you have found a comfortable angle and the seat
belt fits properly.
01
once.
01
under the front of the seat and
01
on the side of the seat to adjust
02
within one
01
01
SEAT LIFTER (driver’s seat)
Pull up or push down on the adjusting lever
repeatedly to adjust the seat height.
For more information, refer to the “Safety –– Seats, seat belts and
supplemental restraint system (section 1)” of your Owner’s Manual.
03
OUTSIDE MIRROR CONTROL SWITCH
The outside mirror control switch is located on the
left side of the instrument panel.
Move the switch
Adjust each mirror to the desired position using the
switch
For more information, refer to the “Pre-driving checks and adjustments
(section 3)” of your Owner’s Manual.
4
02
.
to select the left or right mirror.
01
03
02
02
01
Page 7

STARTING/STOPPING THE ENGINE
CONTINUOUSLY VARIABLE TRANSMISSION
(NISSAN Intelligent Key™ models only - if so equipped)
Depress the brake pedal.
Move the shift lever to P (PARK).
Push the ignition switch to start the engine.
NOTE: It is important to make sure the NISSAN Key is
with you (that is, in your pocket or purse).
TURNING THE ENGINE OFF
Move the shift lever to the P (PARK) position, apply
the parking brake and push the ignition switch.
PUSH BUTTON EMERGE NCY ENG INE SHUT OFF
To shut off the engine in an emergency situation while driving, perform one of the following procedures:
Rapidly push the push button ignition switch 3 consecutive times, or
Push and hold the push button ignition switch for more than 2 seconds.
MANUAL TRANSMISSION (if so equipped)
Depress the brake pedal.
Move the shift lever to N (Neutral).
Depress the clutch pedal to the floor.
Turn the ignition switch to start the engine.
TURNING THE ENGINE OFF
Apply the foot brake and place the vehicle in first gear, then apply the parking brake and turn
the ignition switch to OFF.
For more information, refer to the “Starting and driving (section 5)” of your Owner’s Manual.
HEADLIGHT CONTROL SWITCH
Turn the headlight control switch
position to turn on the front parking, side marker, tail,
license plate and instrument panel lights.
Turn the switch
to the position to turn on
01
the headlights.
FOG LIGHT OPERATION (if so equipped)
The headlights must be on and the low beams selected for the fog lights to operate.
Turn the switch (inside collar)
Turn the switch (inside collar)
For more information, refer to the “Instruments and controls (section 2)” of your Owner’s Manual.
to the
01
to the
02
to the OFF position to turn off the fog lights.
02
01
position to turn on the fog lights.
02
5
Page 8

first drive features
WINDSHIELD WIPER SWITCH
Move the lever to the following positions to operate the
windshield wipers:
01 Intermittent (INT) - Front wipers operate
intermittently.
02 Low (LO) - Front wipers operate at a continuous
low-speed.
03 High (HI) - Front wipers operate at a continuous
high-speed.
04 Rear Wiper (REAR) – Twist the end of the
lever to operate the first (INT) or second (ON) speed settings for the rear wiper.
For more information, refer to the “Instruments and controls (section 2)” of your Owner’s Manual.
04
01
02
03
04
03 02
05
01
AUTOMATIC CLIMATE CONTROLS (if so equipped)
01
AUTO BUTTON
Press the AUTO button to turn the system on and the fan speed, air flow distribution and
temperature will be automatically maintained.
02
TEMPERATURE CONTROL BUTTONS
Press the temperature control buttons up for warmer air or down for cooler air.
03
FAN SPEED CONTROL BUTTONS
Press the fan speed control buttons to manually adjust the fan speed up or down .
04
DEFROSTING /D EFOGGI NG FRONT AN D SI DE WI NDOWS
Press the front defroster button
05
DEFROSTING R EAR WIN DOW AND OUTS ID E MI RRORS (if so equipped)
Push the rear window defroster switch
For more information, refer to the “Instruments and controls (section 2)” and the “Heater, air conditioner, audio and
phone systems (section 4)” of your Owner’s Manual.
6
to turn the system on or off.
to turn the system on or off.
Page 9

01 02
01
02
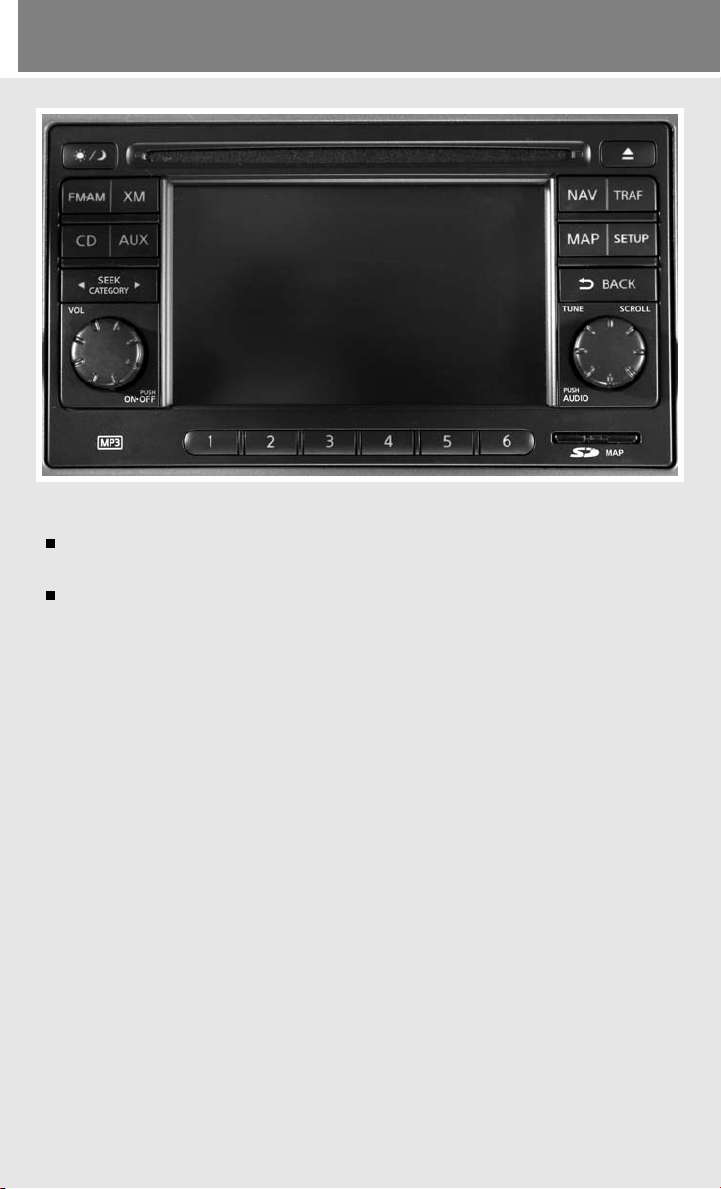
FM/AM/XM®* RADIO WITH CD PLAYER (if so equipped)
01
VOL/ON•OFF CONTROL KNOB
Press the VOL/ON•OFF control knob to turn the system on or off.
Turn the VOL/ON•OFF control knob to the right or left to increase or decrease the volume.
02
TUNE/SCROLL/AUDIO KNOB
To manually tune the radio, turn the TUNE/SCROLL/AUDIO knob left or right.
*XM® Satellite Radio is only available on vehicles equipped with optional XM® satellite subscription service.
For more information, refer to the “Heater, air conditioner, audio and phone systems (section 4)” of your Owner’s Manual.
PARKING BRAKE
To apply, pull the parking brake lever
To release, firmly press the foot brake while slightly
pulling up on the parking brake lever. Press the
button
For more information, refer to the “Starting and driving (section 5)” of your
Owner’s Manual.
and lower the lever completely.
02
01
up.
01
02
7
Page 10

first drive features
OPENING THE BACK DOOR
Use one of the following methods to unlock the back door then pull the handle
Press the
Push the back door request switch
the NISSAN Intelligent Key™ with you (if so equipped).
For more information, refer to the “Pre-driving checks and adjustments
(section 3)” of your Owner’s Manual.
FUEL-FILLER DOOR
To open the fuel-filler door, pull the release
button on the keyfob twice.
while carrying
02
01
01
.
01
to open:
02
The fuel-filler door is located on the right, rear side of
the vehicle.
For more information, refer to the “Pre-driving checks and adjustments
(section 3)” of your Owner’s Manual.
8
01
Page 11

system guide
CRUISE CONTROL (if so equipped)
The cruise control system enables you to set a
constant cruising speed.
The system will automatically maintain the set speed
until you tap the brake pedal, accelerate, cancel or
turn the system off.
For more information, refer to the “Starting and driving (section 5)”
of your Owner’s Manual.
BLUETOOTH® HANDS-FREE PHONE SYSTEM (if so equipped)
With an overhead microphone and sound
transmitted through the audio system speakers,
the Bluetooth® Hands-free Phone System utilizes
Bluetooth wireless technology and voice recognition
to provide hands-free cellular phone communication.
For more information, refer to the “Heater, air conditioner, audio and
phone systems (section 4)” of your Owner’s Manual or visit
www.nissanusa.com/bluetooth.
9
Page 12

Nissan, the Nissan Brand Symbol, “SHIFT_” tagline,
Z and Nissan model names are Nissan trademarks.
© 2010 Nissan North America, Inc.
QR1E 0Z12U0
Printing: October 2010 (04)
 Loading...