

Nishika N8000 Operating Instructions
I
10
12
11
Dear
www.orphancameras.com
Nishika
Since
the
man
has
sought
dimension"
Nishika
most
photography
of
N8000
revolutionary
to
3-dimensional
for
special
Nishika
tem,
lifelike
with
simple
Please
structions
are
designed
sible results
glasses
N8000
you
get
snapshots
depth
and
the naked
This
owner's
3-dimensional
take
few
a
and
suggestions
to help
frorn your
camera.
Sincerely,
NISHIKA
A
DIVISION
OF
Owner,
beginning
to
life
35mm
date.
photography
camera
realism
eye.
manual
OPTICAL
NISHIKA
of
capture
pictures.
in
camera
breakthrough
You
can
or viewers.
and
with
you
will
photography
minutes
to read
it
you
obtain
revolutionary
CORPORATION
photography,
the
elusive
your
"third
new
represents
in
3-D
now
enjoy
without
processing
With
the need
the
sys-
remarkably
experience
you
show
can
how
be.
the in-
contains,
the
which
best
new
pos3-D
SYSTEMS
the
SECTION
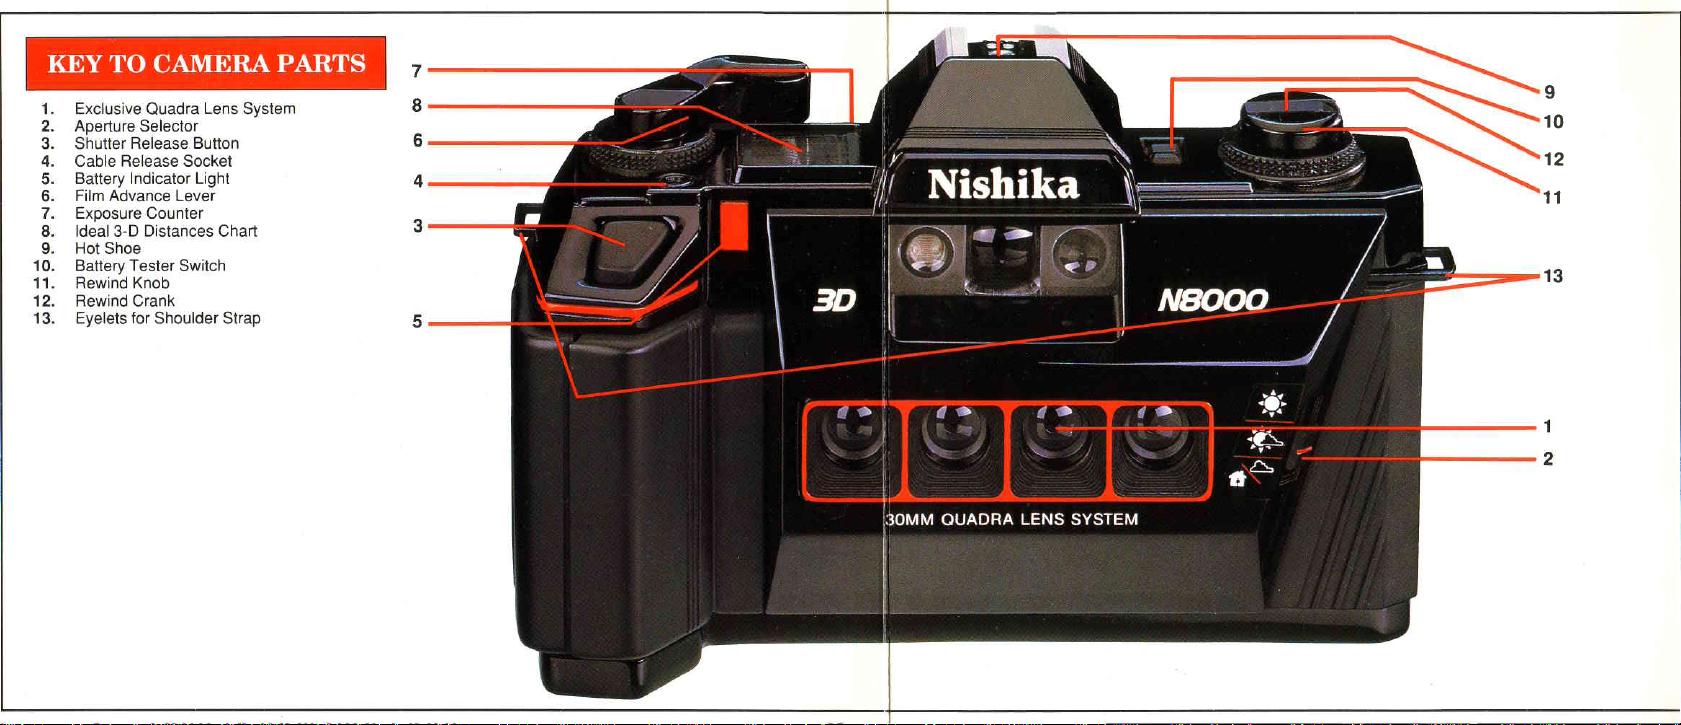
KEY
TO
CAMERA
HOW
TO
USE
CAMERA
INSTALLING
LOADING
USING
REWINDING
CARE
GUIDELINES
TROUBLE.SHOOTI
SPECIFICATIONS
WARRANTY
CUSTOMER
TIPS
PARTS
THEIR
CHECKING
AND
ADVANCING
YOUR
UNLOADING
AND
CAMERA,
AND
THE
ON TAKING
3-D PHOTOS
PARTS
THIS
AND
FUNCTIONS
AND
THE
CAMERA
AND
STORAGE
PHOTOGRAPHS
NEGATIVES
FOR
TAKING
BEST
3-D PHOTOS
NG
SERVICE
THE
(SUMMARY)
. . Inside
MANUAL
BATTERIES
THE
FILM
THE
FILM
OF YOUR
G U I DE
BEST
Front
&
.
.
Outside
Back
Flap
Open
booklet
pages.
you
manual
ence
the
to
Keep
read through
in
to the
instructions.
front
the
reveal the
these
the
will
way
this
parts
of
flaps of
back
and
Key to Camera
pages
opened
manual.
provide a handy
the camera
Using
mentioned
this
Parts
out as
your
refer-
in
1. Exclusive
heart of
The
camera
sional
design,
ment
ured
high-index
and
optical
provide
as
four
manual
to-edge
2.
of the
termining
camera.
as
able
opening
selector
appropriate
comprised
positioned
lenses
in
thousandths
lenses are
increase
112
5
precision
Aperture
The aperture
f-stops,
lighting.
contrast,
quality
and
optimal
feet to
lenses
focusing
sharpness
lens diaphragm
arnount
the
range
The
enables
The size
is controlled
and
up
brightness
Quadra
Nishika
the
patented
its
is
four 30mm
of
of
coated
resolution.
depth
far away
as
eliminate
ensure
and
images.
of
Selector
selector
of
of settings,
you
by
down
SYstem
Lens
35mm
Quadra
two-ele-
accuracy
an
to
These
inch.
an
reduce
to
have exceptional
and
Prefocused
from as
field
of
infinity,
as
the
maximum
controls
opening,
to
of
to
symbol.
thereby
light entering
also
utilize
best
lens diaphragm
the
moving
correspond
the
3-dimen-
Lens
meas-
flare
to
close
the
for
need
edge-
size
the
de-
the
known
avail-
aperture
with the

3. Shutter Release Button
www.orphancameras.com
This
conveniently located
gers
the shutter.
4.
ard cable
units
include
5.
teries
operate. lt is
to
tester
6.
ces the
film
7. Exposure
number
8.
on top of the camera for
provides
distances
ground
Release
Cable
The
cable
releases
for
self-portraits
photographer.
the
Socket
release
as
Battery Indicator
This red
have
indicator
sufficient
activated
(#1
switch
Film
The film
film, rolling
take-up
0).
Advance
advance lever
the exposed film
(#1
spool
Lever
Counter
The
exposure
of times
ldeal
3-D
This helpful
counter indicates
film has
the
Distances
chart,
information
position
to
and background
socket
well
as time delay
group
and
Light
lights
charge
by the
8).
Chart
conveniently located
quick
regarding
foreground,
the
your
of
button trig-
accepts
shots that
your
if
up
for
the
camera
battery
smoothly
onto the
the
been
advanced.
reference,
the
optimum
mid-
composition
stand-
bat-
advan-
maximize
to
the 3-dimensional
photographs.
Hot
9.
units such
which
and ease
Shoe
The
hot
as the
provides
of operation
shoe
accepts electronic flash
Nishika
performance
high
under
tions.
10.
Battery
This
The
cuit.
when
the camera
11.
Rewind
The
1)
when
release
Tester
Switch
switch
activates the
battery indicator light
the
batteries
to
operate.
have
Knob
rewind
knob
serves
in
used
button,
conjunction with
rewind
to
sufficient
the film
during unloading;2) when
the camera
12. Rewind
ing
of
13. Eyelets
camera
the shoulder
This
the
Two
body
back.
Crank
folds
crank
rewind
knob.
for
Shoulder
metal
sturdy
allow the easy
strap.
for
out
eyelets
effect
Twin Light
lighting
low-light
battery test
(#5)
lights
charge
purposes:
two
the
smoothly
pulled
up, to open
convenient
Strap
into
built
attachment
your
of
3010,
condi-
cir-
up
for
rewind
turn-
the
of
Viewfinder
14.
viewfinder
The
subject
of the
composition
Rewind
15.
The
sprocket
the
mechanism,
rewind the
underside
before
button
this
film. Once
the
locked
vance
Film
16.
The
camera
the
alignment.
17. Camera
The camera
vents
is
It
opened
wind
back
of
rewind
wheel
thereby
film.
the
of
rewinding
be
in
the
(#6)
lever
Pressure
film
back
unwanted
by simply
(#1
knob
securely
provides
facilitates
and
photographs.
Release
used
rewind
pressure
Back
1),
shut.
Button
release button
from the
making
This
button,
era,
cam
film.
the
ONLY
pushed,
the
position
is
operated.
Plate
plate
holds the
when closed,
back,
exposure
pulling
closed
and
viewing
direct
framing and
the
disengages
film advance
possible
it
located
must be
lt
when
of the
pushed
is important
rewinding
remains
button
the
until
inside of
the
on
precise
in
film
film
on
up
clicking
by
on
film
Pre-
to
the
to
the
in
that
ad-
light.
re-
the
18. Film
as
tridge.
anchoring
19.
tions
measure
onto
20.
ing
and
pher.
21.
teries.
22.
into the
the
rewind
wind
Take-Up Spool
film
The
it is
being
lt has
the
Advance
Film
These sprockets
engage
that
the
take-up
the
Tripod
This screw
the
group
top
Mount
camera
shots
Battery
The
camera
Rewind
The shaft
film chamber
the
of
knob and
mechanism.
take-up
advanced
four toothed
amount
Ghamber
Shaft
spool
from
slots
Sprockets
are
film
the
of
spool.
mount
a
include
that
powered
is
rewind
the
and
shaft
the
tooth-like
perforations
film
is
designed
tripod
securely
function
to
film onto
onto
of
film cartridge,
film
receives
sPool.
being
knob extends
enabling
the
its
original
for securely
for self-portraits
the
bY two
car-
projec-
to
advanced
mount-
for
photogra-
AA
bat-
engages
the
re-
a
as
23. Film
www.orphancameras.com
roll
Ghamber
The film
of 35mm
chamber
ISO/ASA 100
24, Thumbwheel
The
toothed
advance the
loading film into
film
the camera.
accepts
color
thumbwheel
take-up
spool
any standard
print
film.
you
allows
(#1
8)
to
when
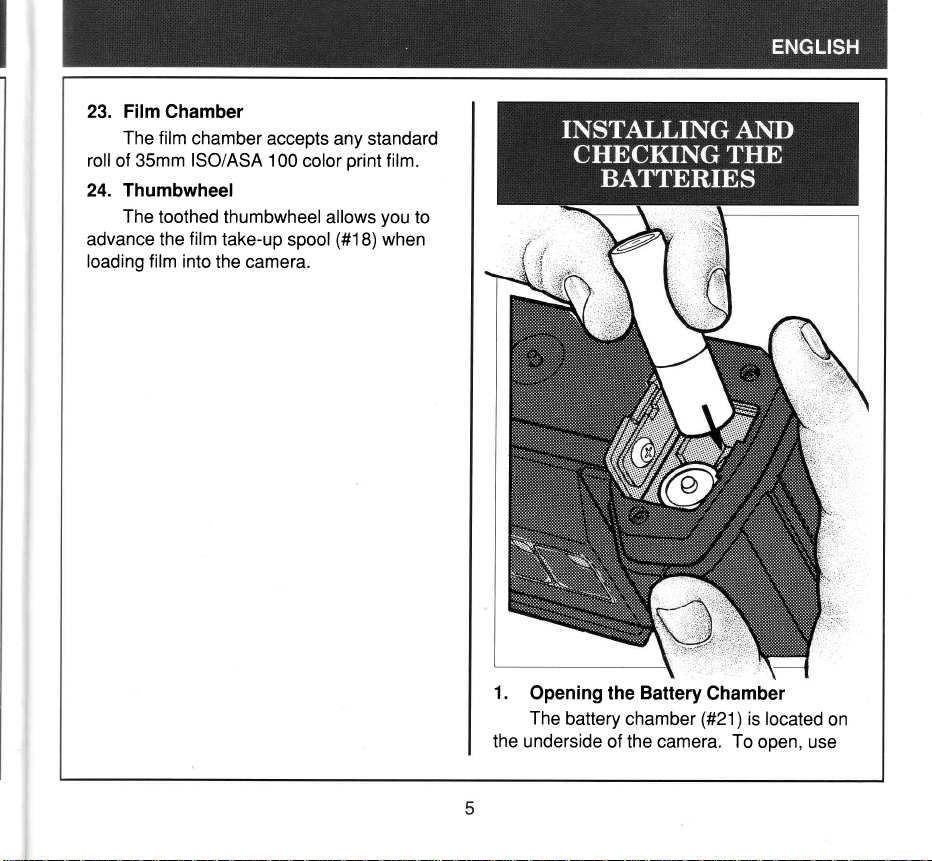
1.
Opening
The
the underside
the
battery
of the camera. To
Battery
chamber
Chamber
(#21
is located
)
open,
on
use
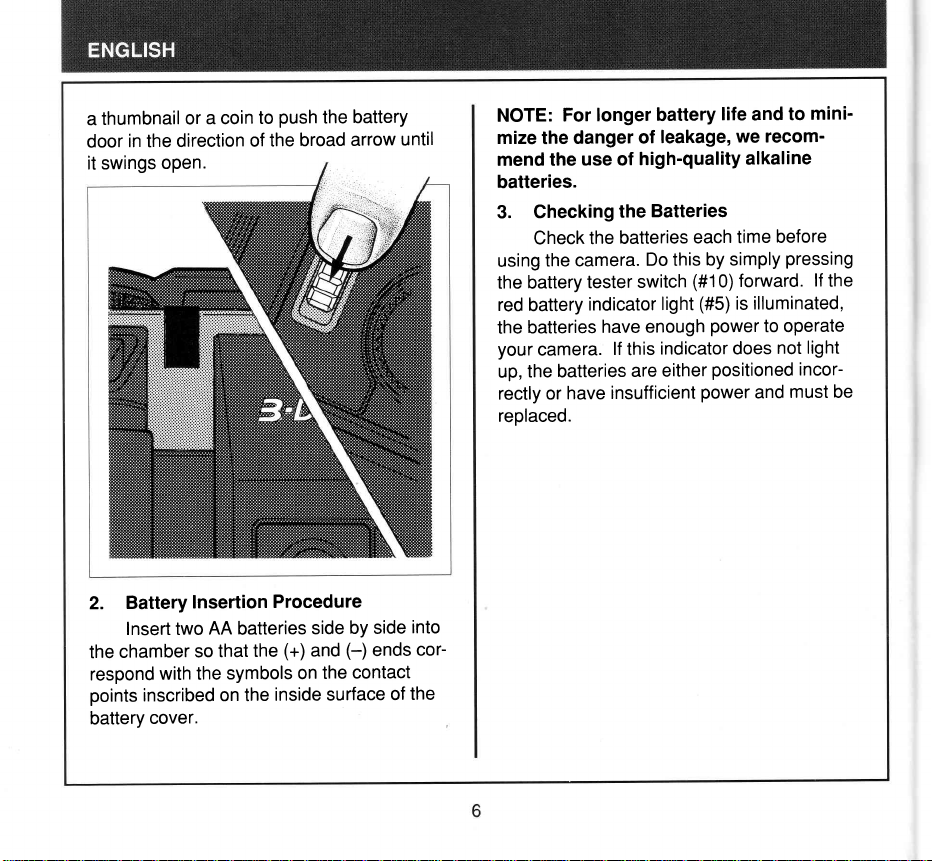
thumbnail
a
in
the
door
it swings
a coin
or
direction
open.
to
of
push
the
the
broad
battery
arrow
until
NOTE:
mize
mend the
batteries.
3.
using
the
red
the
your
up,
rectly or
replaced.
For
the
Ghecking
Check
the camera.
battery
battery
batteries
camera.
the batteries
have
longer battery
leakage,
danger
of
high-quality
use of
Batteries
the
batteries
the
Do this
switch
tester
indicator
light
have enough
indicator
lf
this
either
are
insufficient
life
and
we
alkaline
time
each
by simply
(#1
forward.
0)
(#5)
illuminated,
is
power
does
positioned
power
and
mini-
to
recom-
before
pressing
lf
the
to operate
light
not
incor-
must be
Battery
2.
Insert two
chamber
the
respond
points
inscribed
cover.
battery
Insertion
AA
so
with the
Procedure
batteries
the
that
symbols
inside surface
on the
(+)
on
side
and
the
by side
(-)
ends
contact
of
into
cor-
the
1.
www.orphancameras.com
Use 35mm
ISO/ASA 100
film.
Two
NOTE:
i
mensional
3-d
No.
on
35mm
photog
of exposures No.
film
cartridge
frames
raph.
color
produce
of 3-D
prints
print
one
126
24
36
The Nishika
quires a group
negative images
frames)
to
photograph.
pictures
produced
Nishika
2.
stated
from
camera.
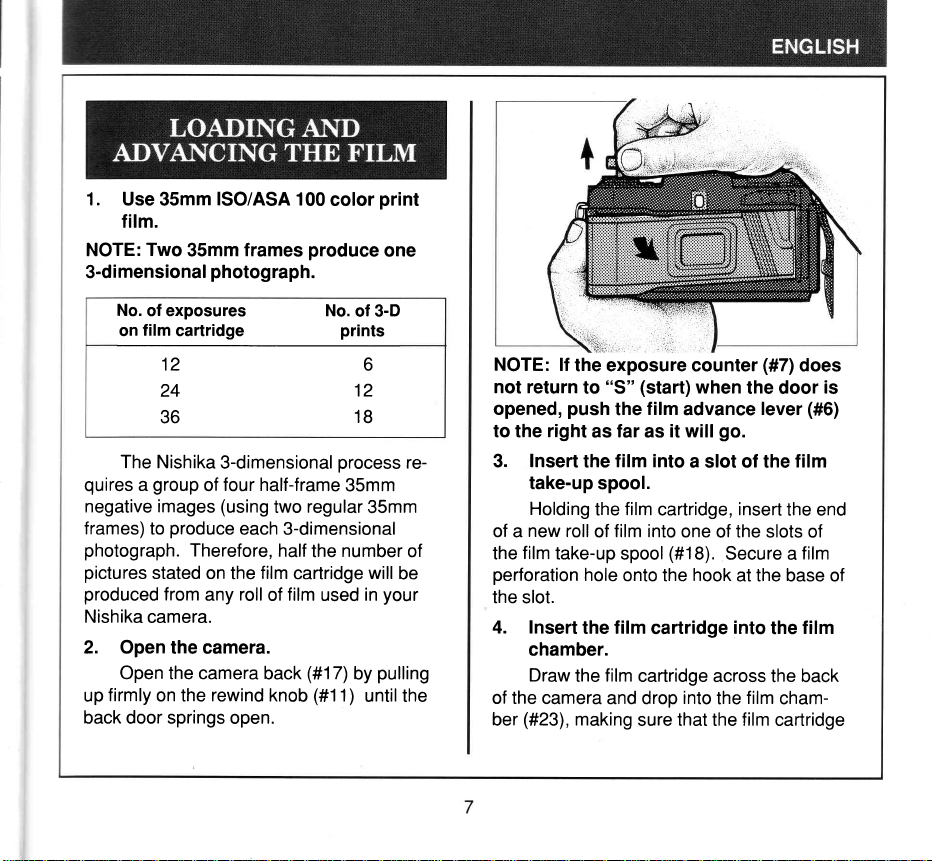
Open the camera.
Open the camera
firmly
up
on the
back door springs
3-dimensional
four half-frame
of
(using
produce
each 3-dimensional
Therefore,
on the
roll
any
rewind
open.
two
half
film
cartridge
film
of
back
knob
12
18
process
35mm
regular
number
the
used
(#1
7)
by
(#1
1)
re-
35mm
of
will
be
your
in
pulling
until the
NOTE:
lf
the exposure counter
not return
opened,
to the
3.
push
right
Insert
take-up
Holding
new
of a
the
roll
film
take-up spool
perforation
the
slot.
4.
Insert
the
chamber.
Draw
the
the
of
camera and drop
(#23),
ber
making
"S"
to
as
the
spool.
the
of
hole
film
film into
film
the
far
film into
onto
(start)
when
film
advance
it will
as
a slot of the
film
cartridge,
one of the slots of
(#1
8). Secure
hook
the
cartridge
cartridge
into
sure that the
(#7)
does
the door
lever
is
(#6)
go.
film
insert
the end
film
a
at the base of
into
the
film
across the back
film
the
film
cartridge
cham-
 Loading...