

Page 1
Contents
Contents
Operating the Printer Safely .......................................................................................1
Part Names and Descriptions.....................................................................................3
Front of the Printer ..................................................................................................3
Rear of the Printer ..................................................................................................4
Front Cover.............................................................................................................5
Operation Panel ......................................................................................................6
Basic Card Printing Methods .....................................................................................8
Turning On and Off the Printer................................................................................8
Loading Cards ........................................................................................................9
Loading Cards into the Card Case................................................................ 9
Manually Loading Cards One by One ......................................................... 10
Printing..................................................................................................................11
Removing Cards ...................................................................................................12
Changing the Ink Ribbon Cartridge ......................................................................13
When a Change is Necessary ..................................................................... 13
Changing the Cartridge ............................................................................... 13
Normal Mode and User Mode ...................................................................................15
Normal Mode and User Mode...............................................................................15
Normal Mode ............................................................................................... 15
User Mode ................................................................................................... 15
Switching to User Mode........................................................................................16
Basic User Mode Operations ................................................................................17
Moving to the Next Menu (Switching to Menus on the Same Level) ........... 17
Moving to a Sub-menu (Switching to Menus on a Lower Level).................. 17
Returning to the Main Menu (Switching to Menus on a Higher Level) ........ 18
Switching to Normal Mode (Exiting User Mode).......................................... 18
Getting the Most Out of Your Printer .......................................................................19
Reprinting a Card that Has Just Been Printed......................................................19
Counting the Number of Cards that Are Printed...................................................20
Displaying the Total Number of Sides that Are Printed .........................................20
Switching the Card Ejection Slot...........................................................................21
Checking the Ink Ribbon Remaining in the Ink Ribbon Cartridge.........................22
Checking the Ink Ribbon Cartridge that is Currently Installed ..............................23
Adjusting the Print Quality ....................................................................................24
Adjusting the Color ...................................................................................... 24
Adjusting the Edges of Images.................................................................... 26
Turning the Error Alarm On or Off.........................................................................27
PR-C101_C101M_E.book Page 2 Monday, August 27, 2007 11:16 AM
Page 2

Full Color Card Printer PR-C101/C101M
Setting the Printer to Reprint a Card if an Error Occurs .......................................28
Checking the Program Information and Serial Number........................................29
Changing the Magnetic Encoder's Settings (PR-C101M Only) ............................30
Returning Settings to the Default..........................................................................30
Preventing Theft and Unauthorized Usage...........................................................31
Preventing Theft of the Printer (Security Cable Slot).................................... 31
How to Store Cards (Removing the Card Case).......................................... 31
Cleaning .....................................................................................................................32
Before Cleaning ....................................................................................................32
Cleaning with a Cleaning Card .............................................................................32
Cleaning the Cleaning Roller ................................................................................34
Cleaning the Feeding Roller .................................................................................35
Troubleshooting.........................................................................................................36
When an Error Message Appears... .....................................................................36
Clearing an Error.......................................................................................... 36
How to Clear an Error................................................................................... 36
When a Card is Jammed... ...................................................................................39
When Cards are Not Printed Correctly..................................................................40
Other Troubles ......................................................................................................41
When These Solutions Don't Work... ....................................................................41
Appendix ....................................................................................................................42
Consumables........................................................................................................42
Ink Ribbon Cartridges.................................................................................. 42
Cards ........................................................................................................... 43
Cleaning Cards............................................................................................ 43
Updating the Printer's Software ............................................................................43
Menu Route Map (User Mode) .............................................................................44
Main Specifications...............................................................................................46
Opening the Printer Driver Settings Screen..........................................................47
Opening the Setting Screen (From the Start Menu)..................................... 47
Opening the Setting Screen (From the Application).................................... 47
Changing the Settings or Confirming the Status from the Setting Screen... 47
PR-C101_C101M_E.book Page 3 Monday, August 27, 2007 11:16 AM
Page 3
Operating the Printer Safely
1
Operating the Printer Safely
The following precautions must be observed to assure safe operation of the printer.
Also, do not do anything that is not described in this manual. Doing so may cause an
unexpected accident.
Failure to observe the following items while using the printer may cause a fire,
electric shock or other unexpected accident.
Installation location Do not install the printer in a damp or dusty location
Do not install the printer flammable or explosive materials or near a heater, stove
or other device that produces heat.
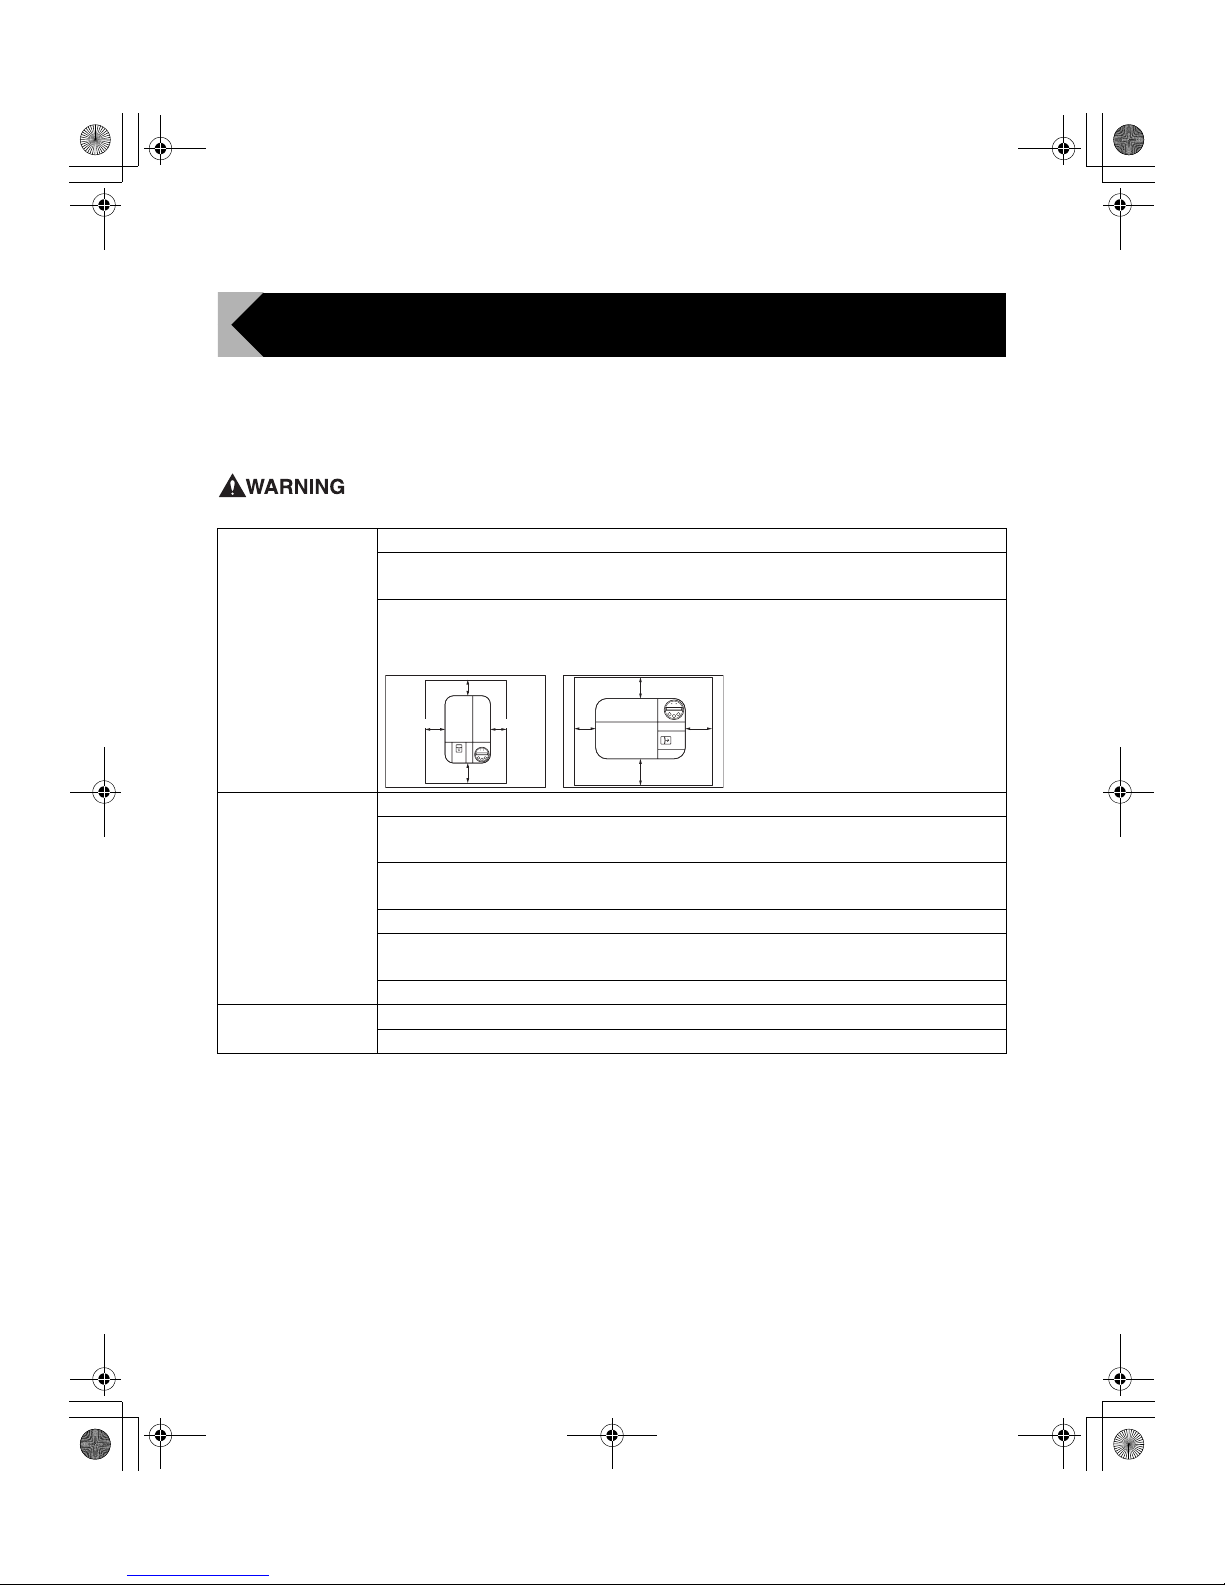
Place the printer away from any walls, as shown in the diagram below, to maintain
air flow. Also, maintain at least 4" (10 cm) of open space above the printer.
Blocking the vents may cause the printer to overheat and catch on fire.
Power supply Use a dedicated power cable and do not use an extension cord with multiple outlets.
Be sure to remove any dust from the plug and outlet.
Humidity produces a micro-current on the surface causing overheating or a fire.
Do not damage or modify the Power Cable. Also, do not place heavy objects on it,
pull it, or bend it excessively.
Do not plug in or unplug the Power Cable if your hands are wet.
Be sure to turn off the power and unplug the plug from the outlet before moving the
printer.
Pull on the plug, not the cable, when unplugging it from an outlet.
Handling Do not use flammable sprays near the printer.
Do not touch anything inside the printer unless specified in this manual.
4"(10cm)
6"(15cm)
4"(10cm)6"(15cm)
4"(10cm)
6"(15cm)
4"(10cm) 6"(15cm)
The left diagram shows the value of
minimum air flow space from any walls
when the Card Stacker is not attached.
If you attach the Card Stacker, the *
value increases to 6" (15 cm).
PR-C101_C101M_E.book Page 1 Monday, August 27, 2007 11:16 AM
Page 4
Full Color Card Printer PR-C101/C101M
2
Failure to observe the following items while using the printer may cause injury
or a malfunction.
z The cooling fan is always running to cool the inside of the printer. This is not
a malfunction.
z Contact your reseller if there is a current leak.
z The printer may cause static, flickering or interrupt reception of televisions
or radios if they are too close to the printer.
Regarding copyrights
Using portraits (photos or images) or copyrighted material (illustrations or
logos) without the permission of their owners is prohibited by law.
Do not use copyrighted images without permission or for illegal activities.
Under the following conditions images on cards may deteriorate or cards may
warp after printing.
z The surface of the card is in contact for an extended period of time with a
vinyl card folder or synthetic leather or other material that contains plasticizer.
z The surface of the card is exposed to direct sunlight for an extended period
of time.
z The card is repeatedly rubbed against a hard object.
z The faces of two cards are in contact for an extended period of time.
z The card is kept for an extended period of time in a very hot location such as
a car parked in the sun.
If a card with a magnetic strip is placed near a magnetic source, the data on the
strip may be corrupted.
Installation location Do not install the printer on a wobbly table, on a slant, or anyplace where there is
excessive vibration.
Do not install the printer in a location susceptible to rapid fluctuations in temperature.
Do not install the printer in a location exposed to direct sunlight.
Power supply Do not use an under-rated extension cord (The rated voltage varies according to
the area of purchase).
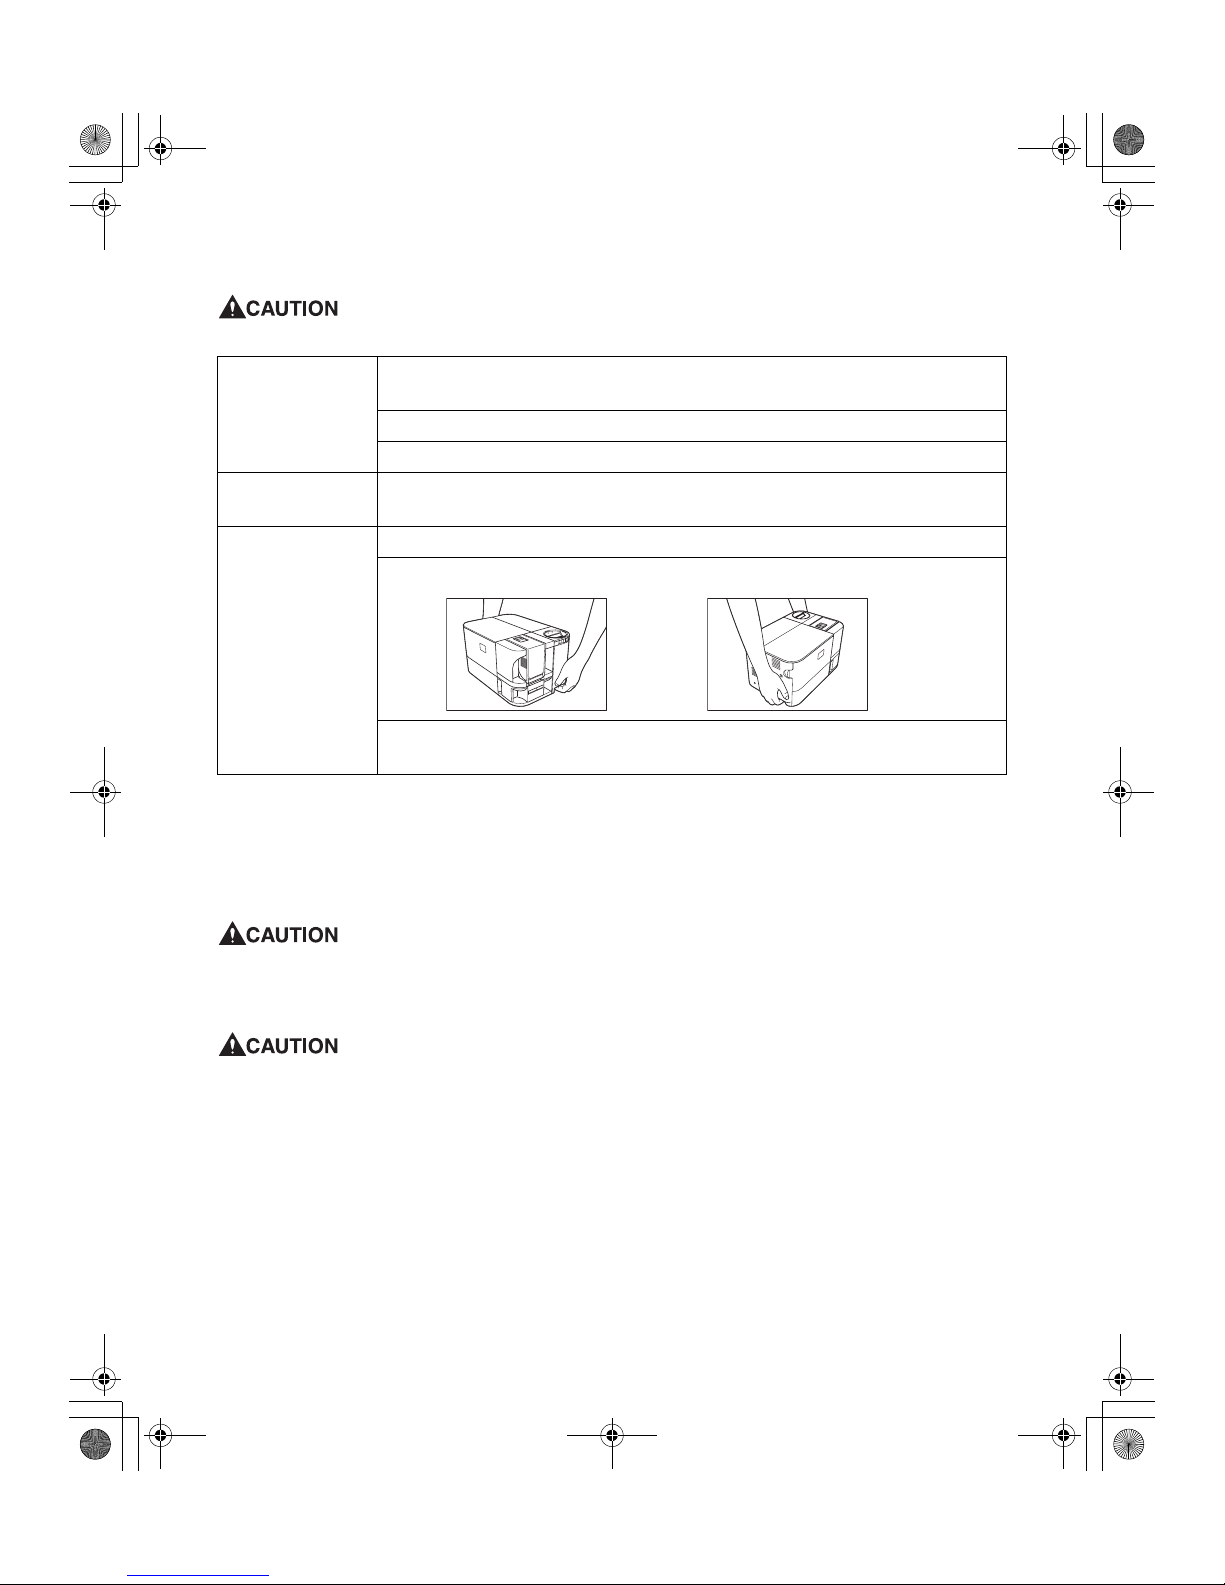
Handling Do not place heavy items on the printer and do not lean on the printer.
If you move the printer, carry it as shown below.
While the printer is operating, do not turn off the power, unplug the power cable, or
look inside the printer.
PR-C101_C101M_E.book Page 2 Monday, August 27, 2007 11:16 AM
Page 5
Part Names and Descriptions
3
Part Names and Descriptions
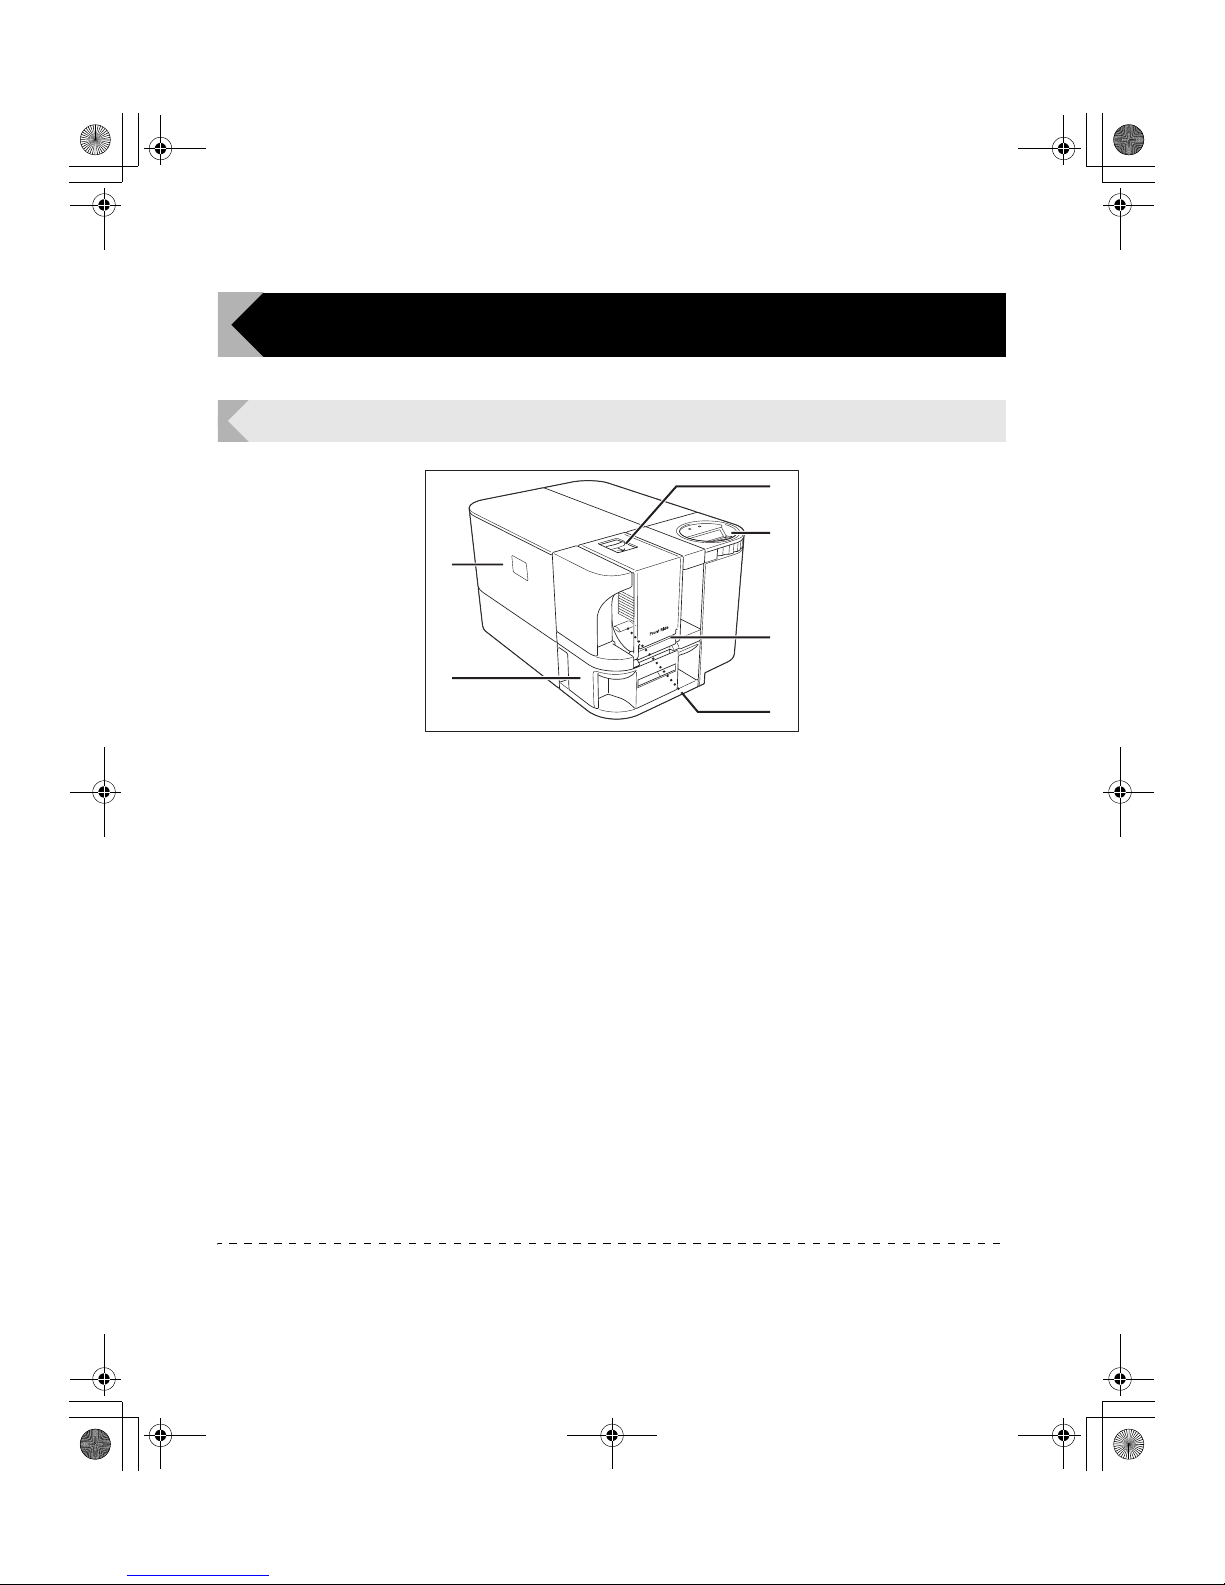
Front of the Printer
*1 When using CR-80 cards (size: 3.375" x 2.125" (86 mm x 54 mm), thickness: 0.03" (0.76 mm)).
a Card Case
Up to 100*1 cards can be loaded at one time.
→See "Loading Cards" on page 9 for instructions on
loading the Card Case.
→See "Cards" on page 43 for details about which
cards you can use.
b Operation Panel
Includes the keys, the LCD Panel, and indicator
for operating the printer.
→See "Operation Panel" on page 6 for part names
and descriptions.
→See "Normal Mode and User Mode" on page 15 for
information about basic operations.
c Card Feeding Slot
You can load cards manually, one by one.
→See "Manually Loading Cards One by One" on
page 10 for instructions on loading manually.
→See "Cards" on page 43 for details about which
cards you can use.
d Feeding Roller
Pulls loaded cards into the printer.
→See "Cleaning the Feeding Roller" on page 35 for
cleaning instructions.
e Card Ejection Slot 1
Ejects correctly printed cards and cards with
errors.
It has a maximum capacity of 30
*1
cards.
You can select between Card Ejection Slot 1
and 2 for card ejection.
→See "Switching the Card Ejection Slot" on page 21
for information about switching the card ejection slot.
f Front Cover
Open this cover to change the Ink Ribbon
Cartridge and clean the roller.
→See "Front Cover" on page 5 for information about
the names of parts inside the cover and their
descriptions.
→See "Changing the Ink Ribbon Cartridge" on
page 13 for details about changing the Ink Ribbon
Cartridge.
→See "Cleaning" on page 32 for cleaning instructions.
a
f
e
b
c
d
PR-C101_C101M_E.book Page 3 Monday, August 27, 2007 11:16 AM
Page 6
Full Color Card Printer PR-C101/C101M
4
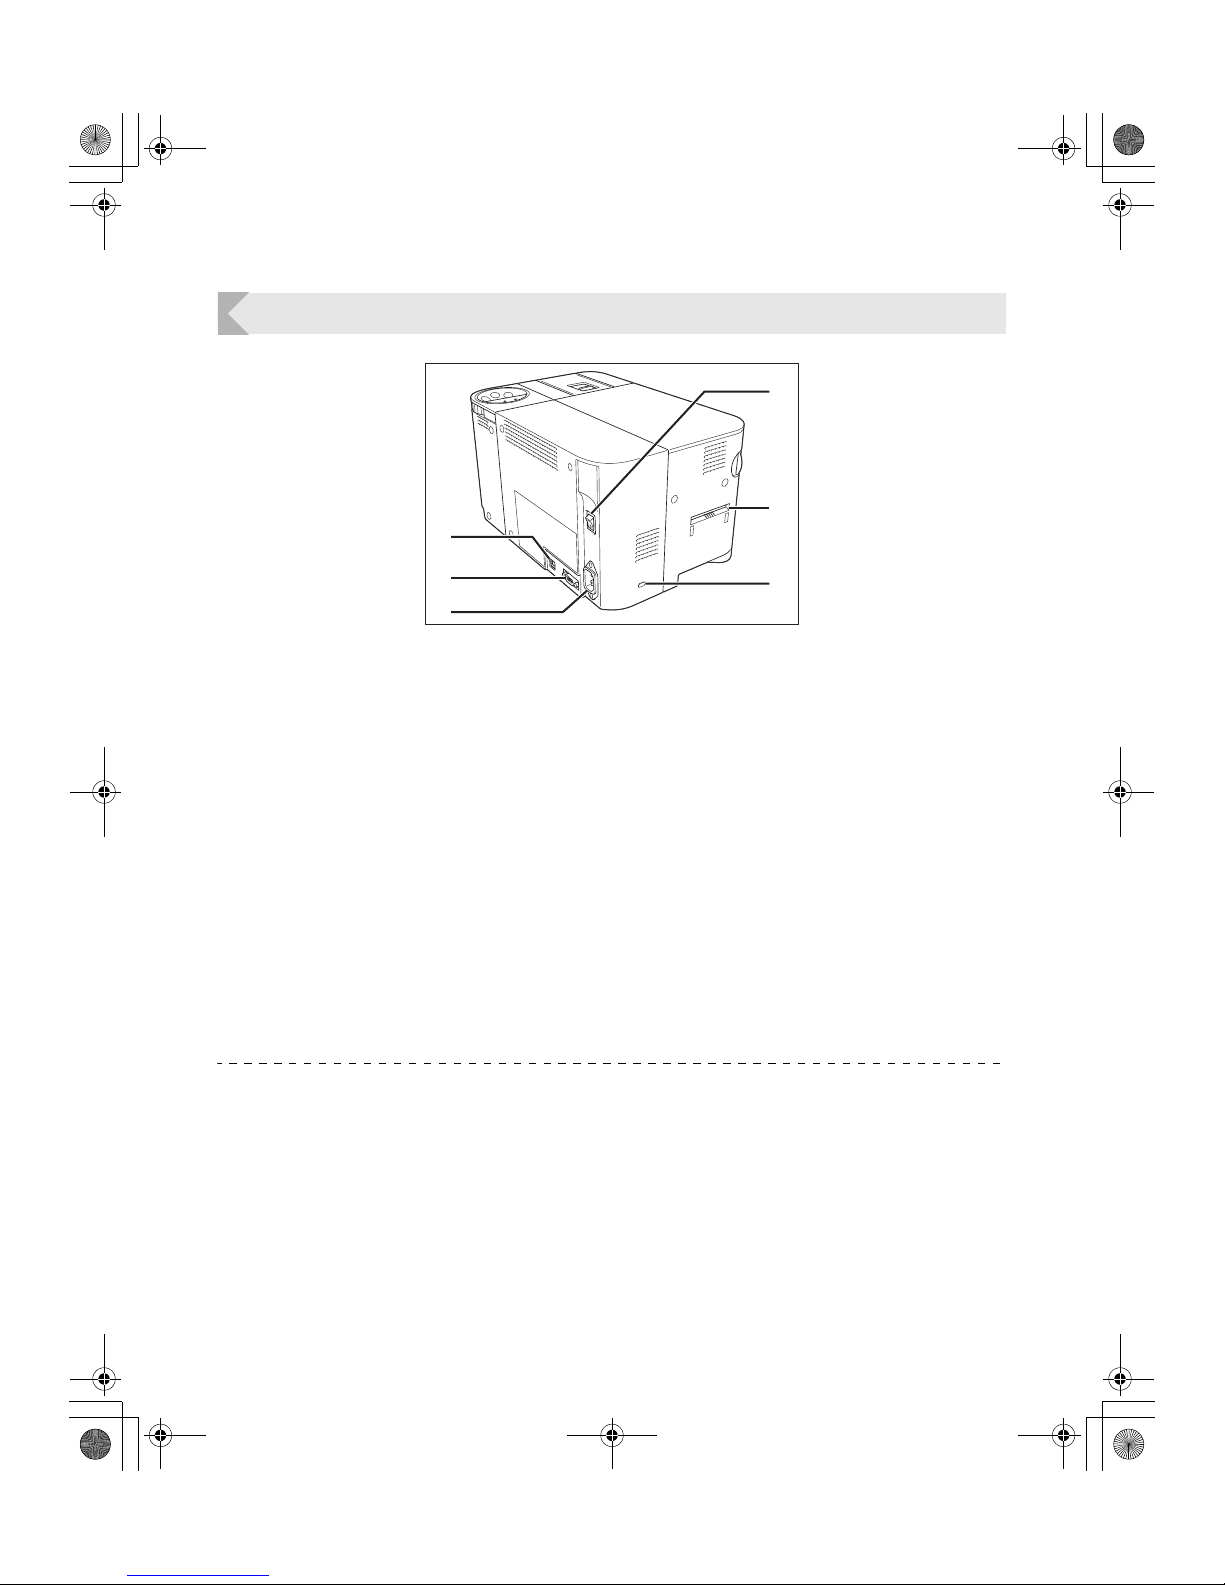
Rear of the Printer
*1 When using CR-80 cards (size: 3.375" x 2.125" (86 mm x 54 mm), thickness: 0.03" (0.76 mm)).
a Power Switch
Turns the power on and off.
→See "Turning On and Off the Printer" on page 8 for
instructions on turning the power on and off.
b Card Ejection Slot 2
Ejects correctly printed cards and cards with
errors.
A maximum of 50
*1
cards can be stacked by
attaching the provided Card Stacker.
You can select between Card Ejection Slot 1
and 2 for card ejection.
→See "Switching the Card Ejection Slot" on page 21
for information about switching the card ejection slot.
c Security Cable Slot
Use the Security Cable Slot to prevent theft of
the printer.
→See "Preventing Theft of the Printer (Security Cable
Slot)" on page 31 for instructions on using the Security
Cable Slot.
d Power Cable Port
Used to connect the provided Power Cable.
→See the "Easy Setup Guide" for instructions on
connecting the cable.
e Port for Enhancing Function
Used for enhancing a function.
f USB Port
Used for connecting to a computer with the
provided USB cable.
→See the "Easy Setup Guide" for instructions on
connecting the cable.
a
f
e
b
c
d
PR-C101_C101M_E.book Page 4 Monday, August 27, 2007 11:16 AM
Page 7
Part Names and Descriptions
5
Front Cover
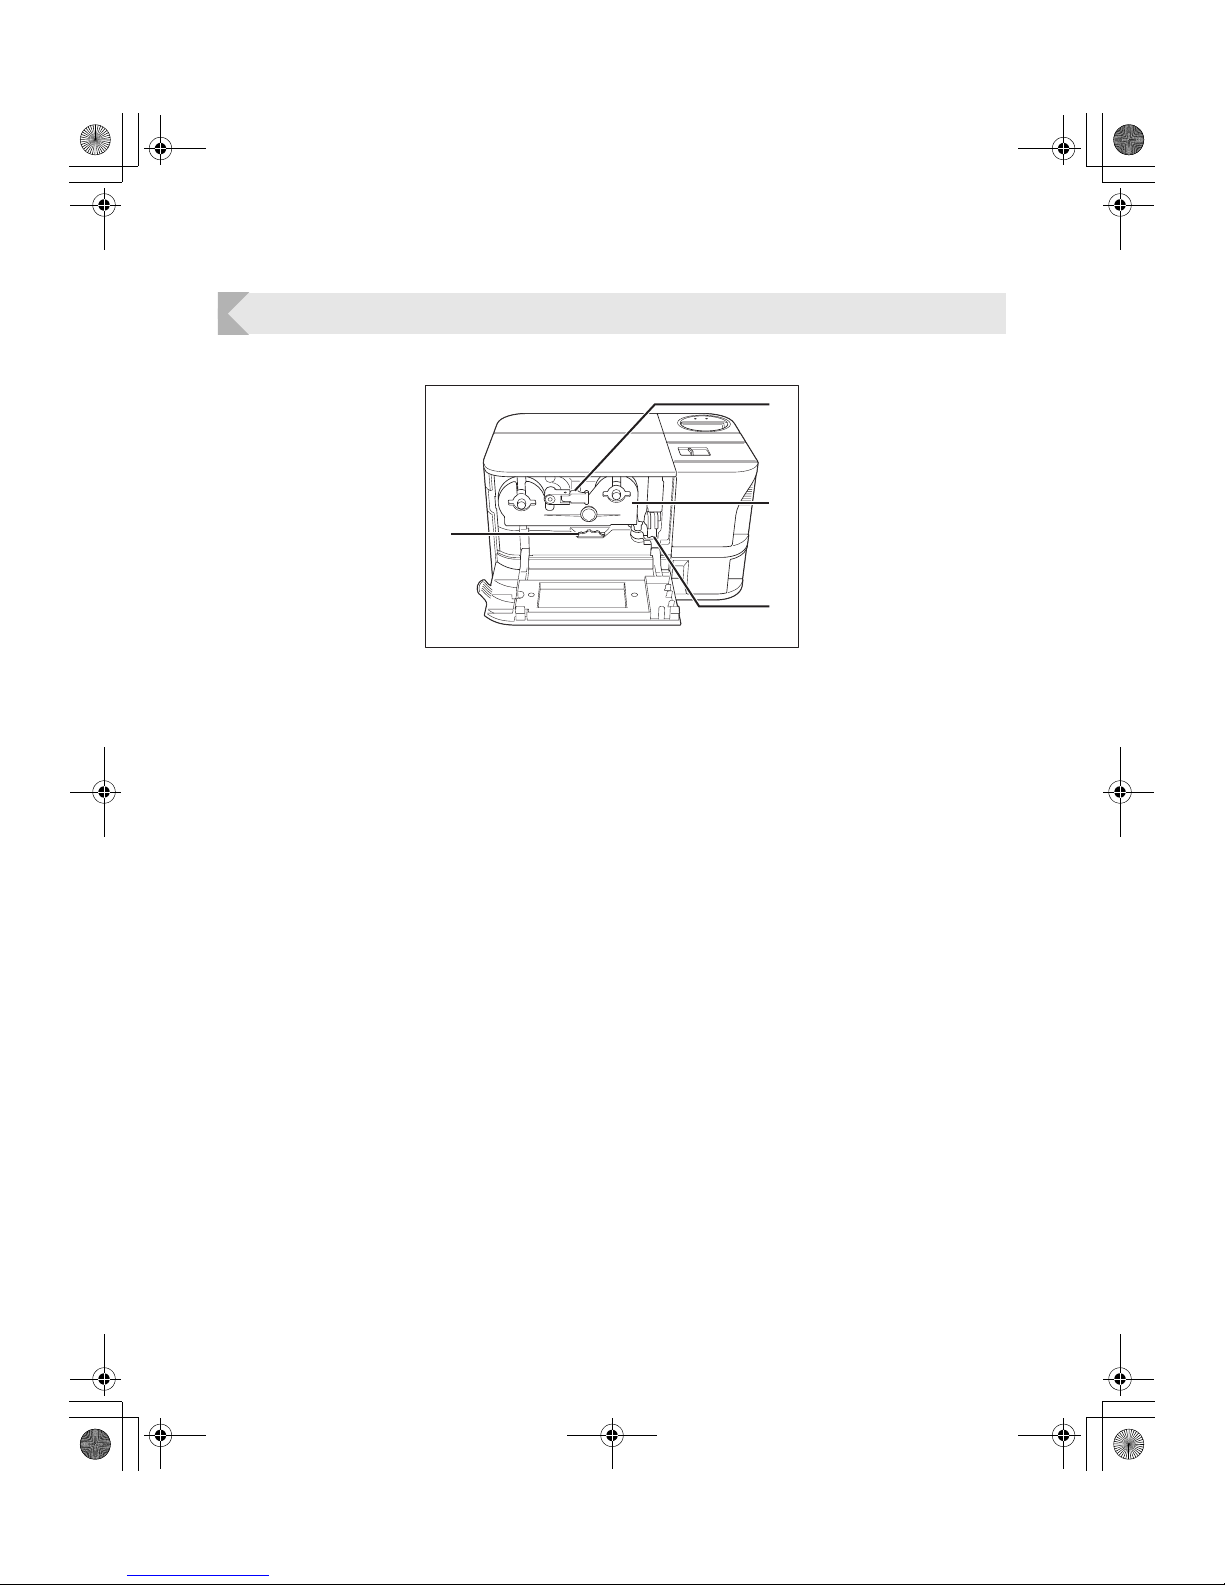
Interior of the Front Cover
a Ink Ribbon Cartridge Securing Lever
Used when loading the Ink Ribbon Cartridge
into the printer.
→See "Changing the Ink Ribbon Cartridge" on
page 13 for details about changing the Ink Ribbon
Cartridge.
b Ink Ribbon Cartridge
This cartridge contains the ink ribbon.
→See "Changing the Ink Ribbon Cartridge" on
page 13 for details about changing the Ink Ribbon
Cartridge.
→See "Ink Ribbon Cartridges" on page 42 for details
about which Ink Ribbon Cartridges you can use.
c Cleaning Roller
Removes dirt and other foreign matter stuck to
the cards.
→See "Cleaning the Cleaning Roller" on page 34 for
cleaning instructions.
d Ejection Dial
Rotating the dial to the left ejects cards jammed
in the printer from Card Ejection Slot 2.
→See "When a Card is Jammed..." on page 39 for
instructions on how to eject jammed cards.
a
b
c
d
PR-C101_C101M_E.book Page 5 Monday, August 27, 2007 11:16 AM
Page 8
Full Color Card Printer PR-C101/C101M
6
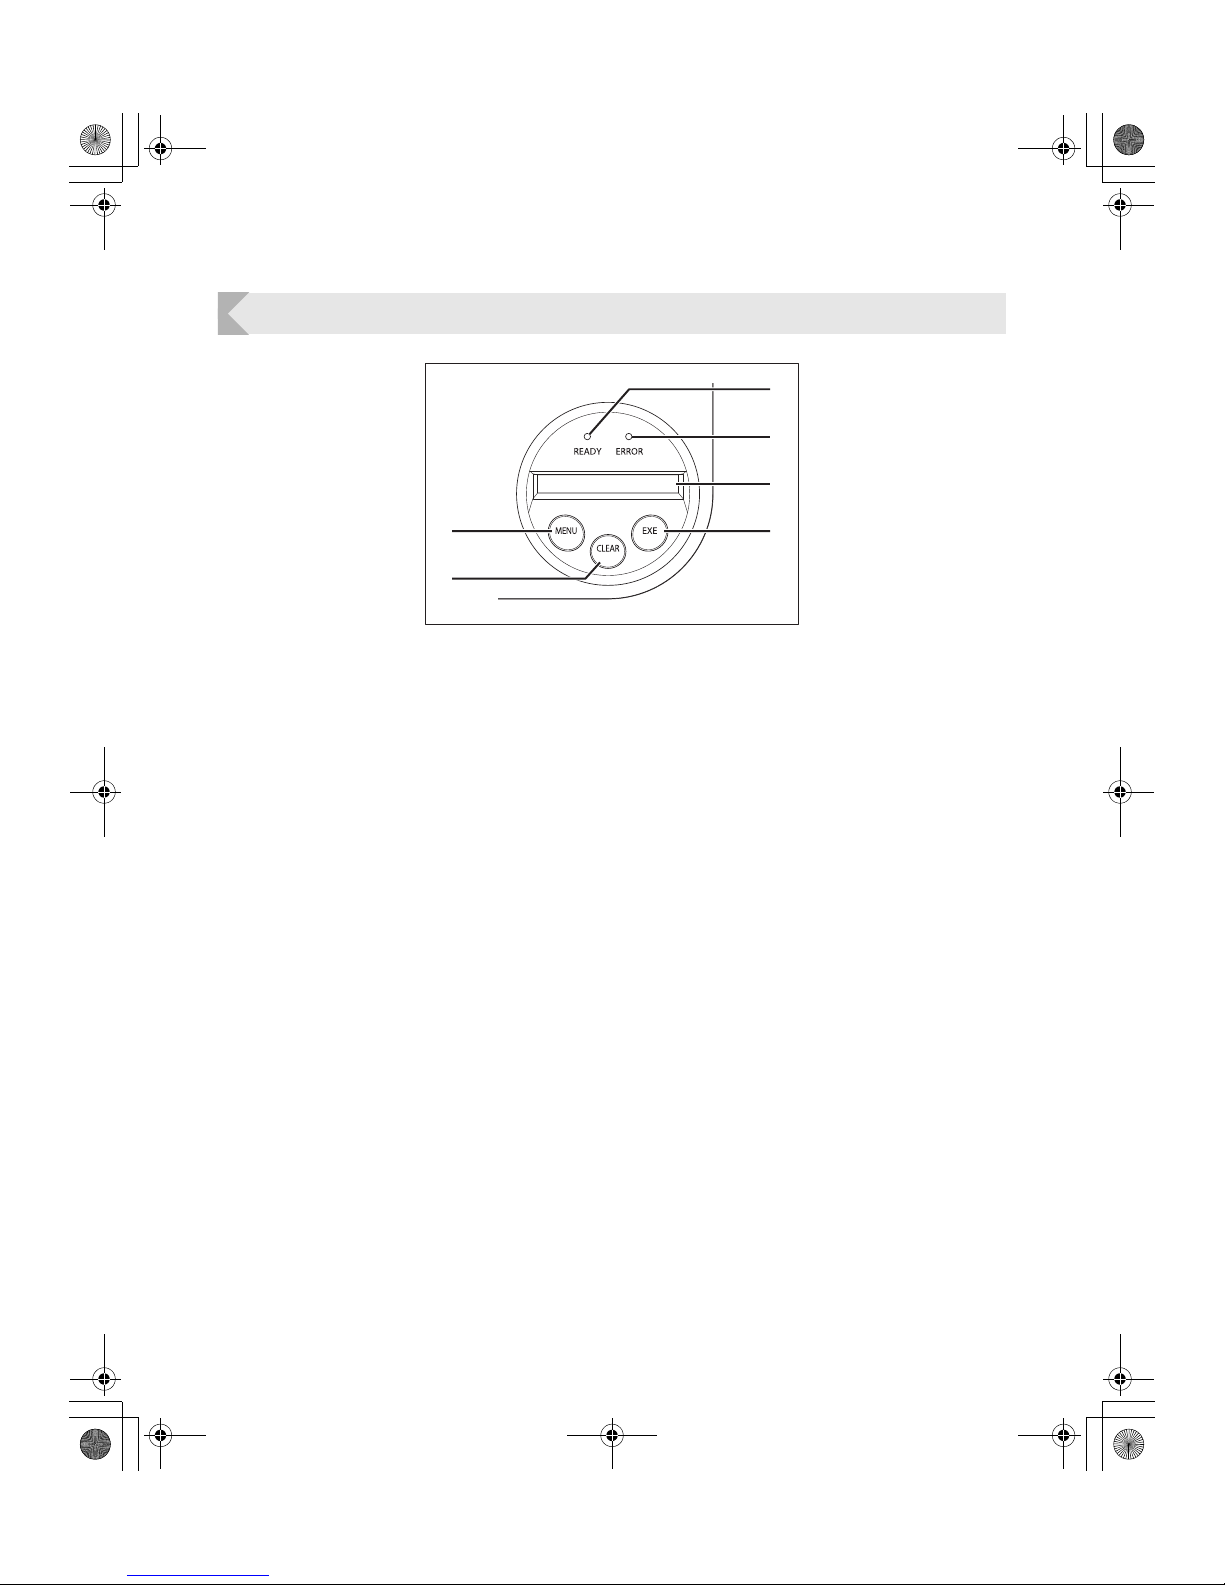
Operation Panel
a READY Indicator (Blue Indicator)
This indicator is constantly lit, blinks (fast or
slow) or is not lit depending on the status of the
printer.
b ERROR Indicator (Red Indicator)
Lights when an error occurs.
→See "Troubleshooting" on page 36 when an error
occurs.
c LCD Panel
Displays the printer's status.
Also displays messages related to the printer's
status in Normal Mode, settable menus in User
Mode, and displays the information about
errors that occur.
→See "Normal Mode and User Mode" on page 15 for
details about Normal Mode and User Mode.
→See "Troubleshooting" on page 36 when an error
occurs.
d EXE Key
Used to reprint the last card printed when the
READY Indicator is lit.
In User Mode, it opens the display menu and
increases setting values.
→See "Reprinting a Card that Has Just Been Printed"
on page 19 for details on reprinting a card.
→See "Basic User Mode Operations" on page 17 for
details on changing the User Mode settings.
e CLEAR Key
Used to clear errors.
In User Mode, it decreases the setting values.
→See "Troubleshooting" on page 36 when an error
occurs.
→See "Basic User Mode Operations" on page 17 for
details on changing the User Mode settings.
f Menu Key
Switches between Normal Mode and User
Mode. In User Mode, it is used to switch
between menus.
→See "Normal Mode and User Mode" on page 15 for
details about Normal Mode and User Mode.
a
f
e
b
c
d
PR-C101_C101M_E.book Page 6 Monday, August 27, 2007 11:16 AM
Page 9
Part Names and Descriptions
7
Note
z You can check the status of the printer by looking at the READY Indicator or ERROR
Indicator.
• READY Indicator is lit ... Ready for printing.
• READY Indicator is blinking (fast) ... Receiving print data from the computer.
• READY Indicator is blinking (slow) ... Printer is in use.
• READY Indicator is not lit ... An error has occurred.
• ERROR Indicator is lit ... An error has occurred.
• ERROR Indicator is blinking ... The amount of ink ribbon remaining comes
near to an end.
PR-C101_C101M_E.book Page 7 Monday, August 27, 2007 11:16 AM
Page 10
Full Color Card Printer PR-C101/C101M
8
Basic Card Printing Methods
This section explains the basic flow of operations, from turning on the power through
printing a card.
Turning On and Off the Printer
Turn on the printer before starting to print.
Before turning on the power, make sure the following preparations are complete:
• The Ink Ribbon Cartridge is loaded
• The Card Case is loaded
• The cards are loaded
• The Front Cover is closed
• The printer is connected to the computer
• The printer driver is installed
z If the preparations above have not been performed, follow the instructions in
the "Easy Setup Guide".
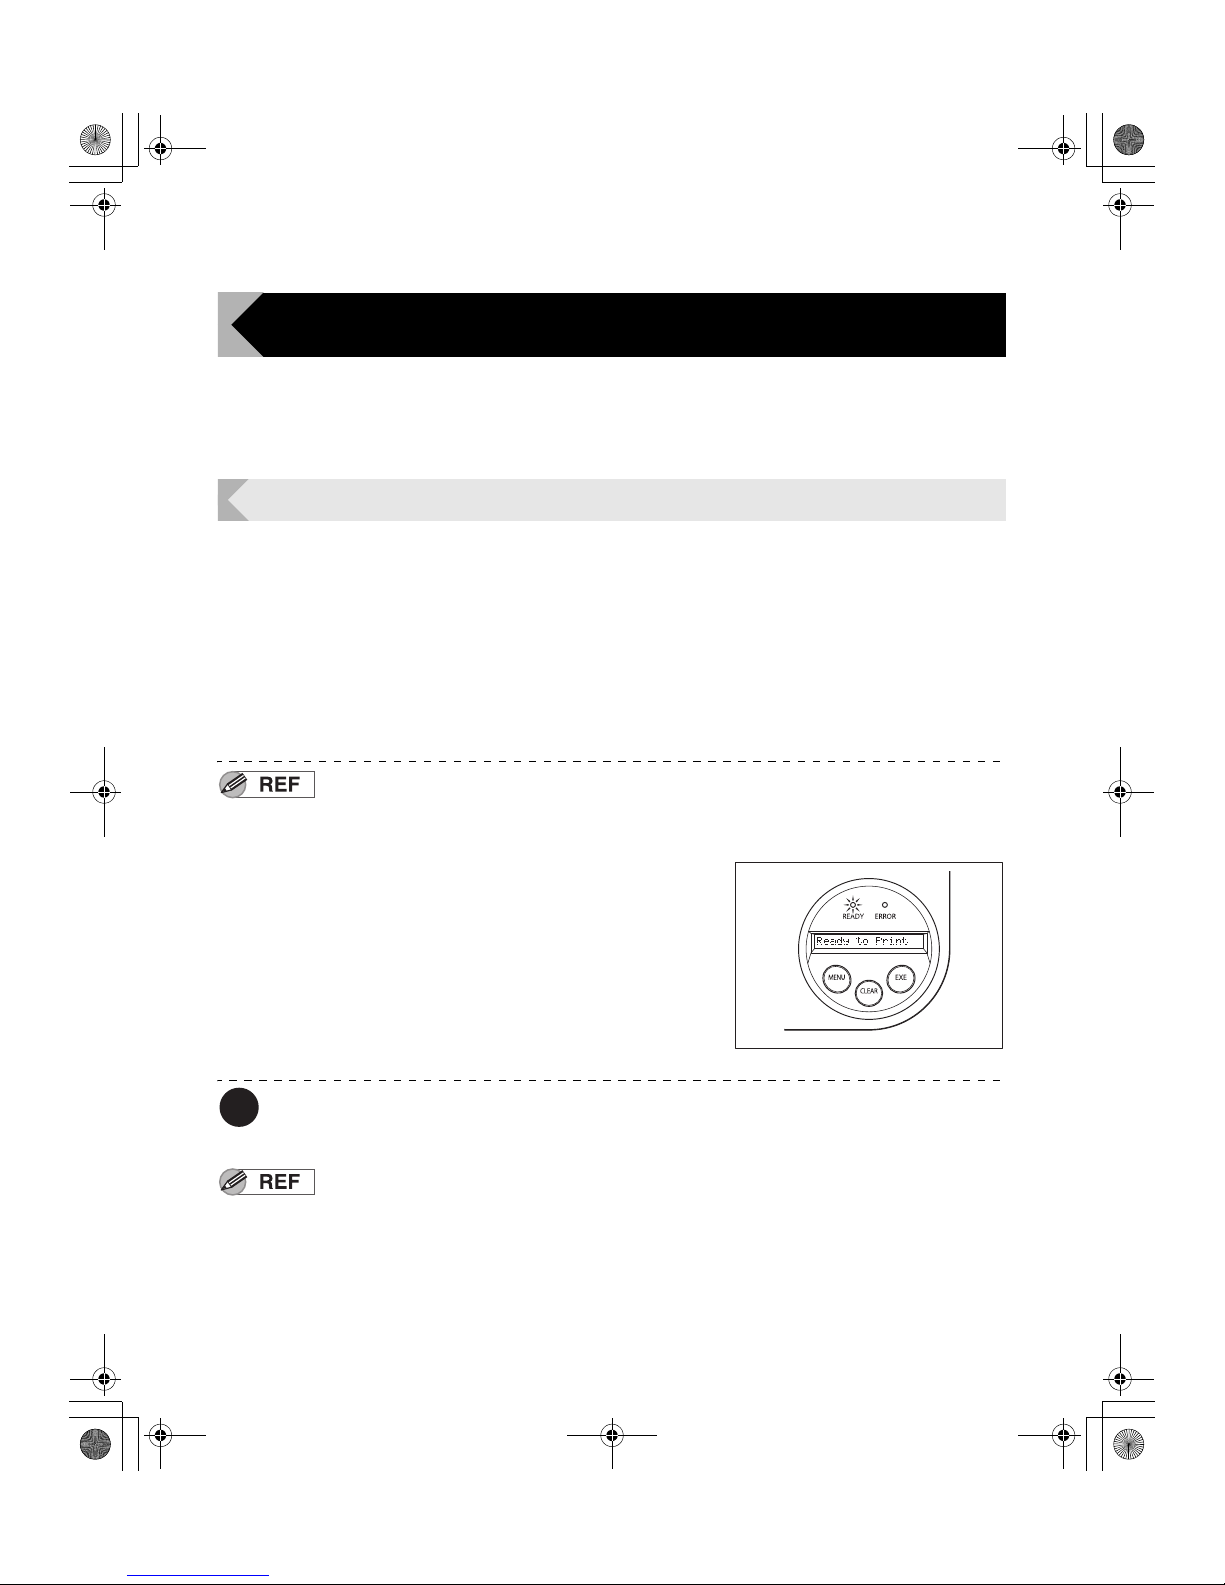
1 Press the Power Switch to turn on the
power.
• Press "–" on the Power Switch behind of the printer for
turning on the power.
• After [Initializing..] appears on the LCD Panel, the
operating indicator turns blue and [Ready to Print]
appears.
• Press "O" on the Power Switch for turning off the
power.
Note
z If a card is still in the printer when the power is turned off, it is ejected from Card
Ejection Slot 1 (default setting).
z If the ERROR Indicator turns red, refer to "Troubleshooting" on page 36.
PR-C101_C101M_E.book Page 8 Monday, August 27, 2007 11:16 AM
Page 11
Basic Card Printing Methods
9
Loading Cards
Cards can be loaded in the Card Case and the Card Feeding Slot.
The Card Case can be loaded with a large quantity of cards, making it useful for mass printing.
Use the Card Feeding Slot to manually load cards when you want to print only 1 particular card
or to print many types of cards.
z Use cards recommended by your reseller.
→See "Cards" on page 43 for details about which cards you can use.
z Do not use the following cards:
• Cards previously printed with this card printer or any other one.
• Wet cards
• Cards mixed with glass, metallic or other foreign objects
• Embossed cards
• Cards coated with oil or other foreign matter
• Cracked, chipped, bent or otherwise damaged cards
• Transparent cards
• Abnormally shaped cards
Loading Cards into the Card Case
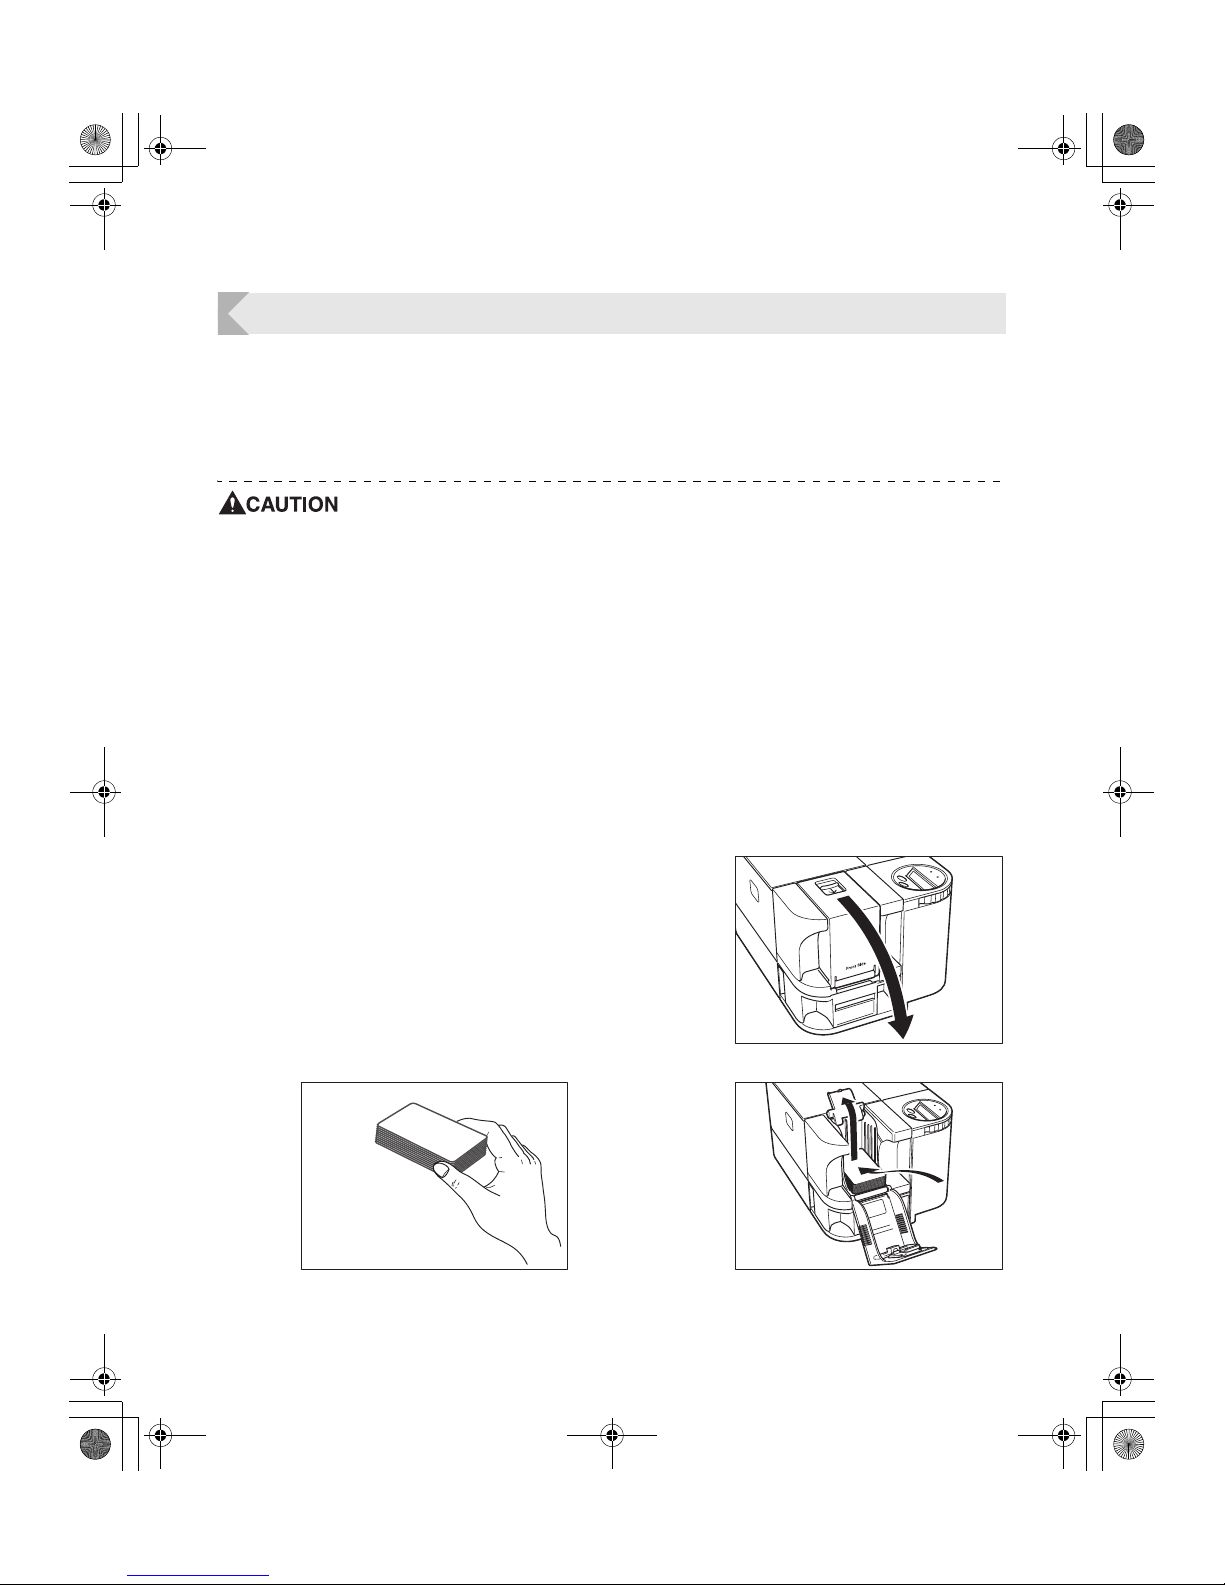
1 Open the Card Case cover.
• While pulling the lock lever, open the cover towards
you.
2 Lift up the weight and load the cards.
• Load the Card Case so the cards are printing side up.
• When loading the cards, be sure to pinch the edge of
them. Never touch the printing side.
3 Lower the weight and close the cover.
PR-C101_C101M_E.book Page 9 Monday, August 27, 2007 11:16 AM
Page 12
Full Color Card Printer PR-C101/C101M
10
Note
z The Card Case can be removed from the printer, allowing you to load cards into the
Card Case before reattaching it.
z In order to prevent unauthorized printing, we recommend storing loaded Card Cases
separately from the printer.
→See "How to Store Cards (Removing the Card Case)" on page 31 for information on the how to remove
the Card Case.
Manually Loading Cards One by One
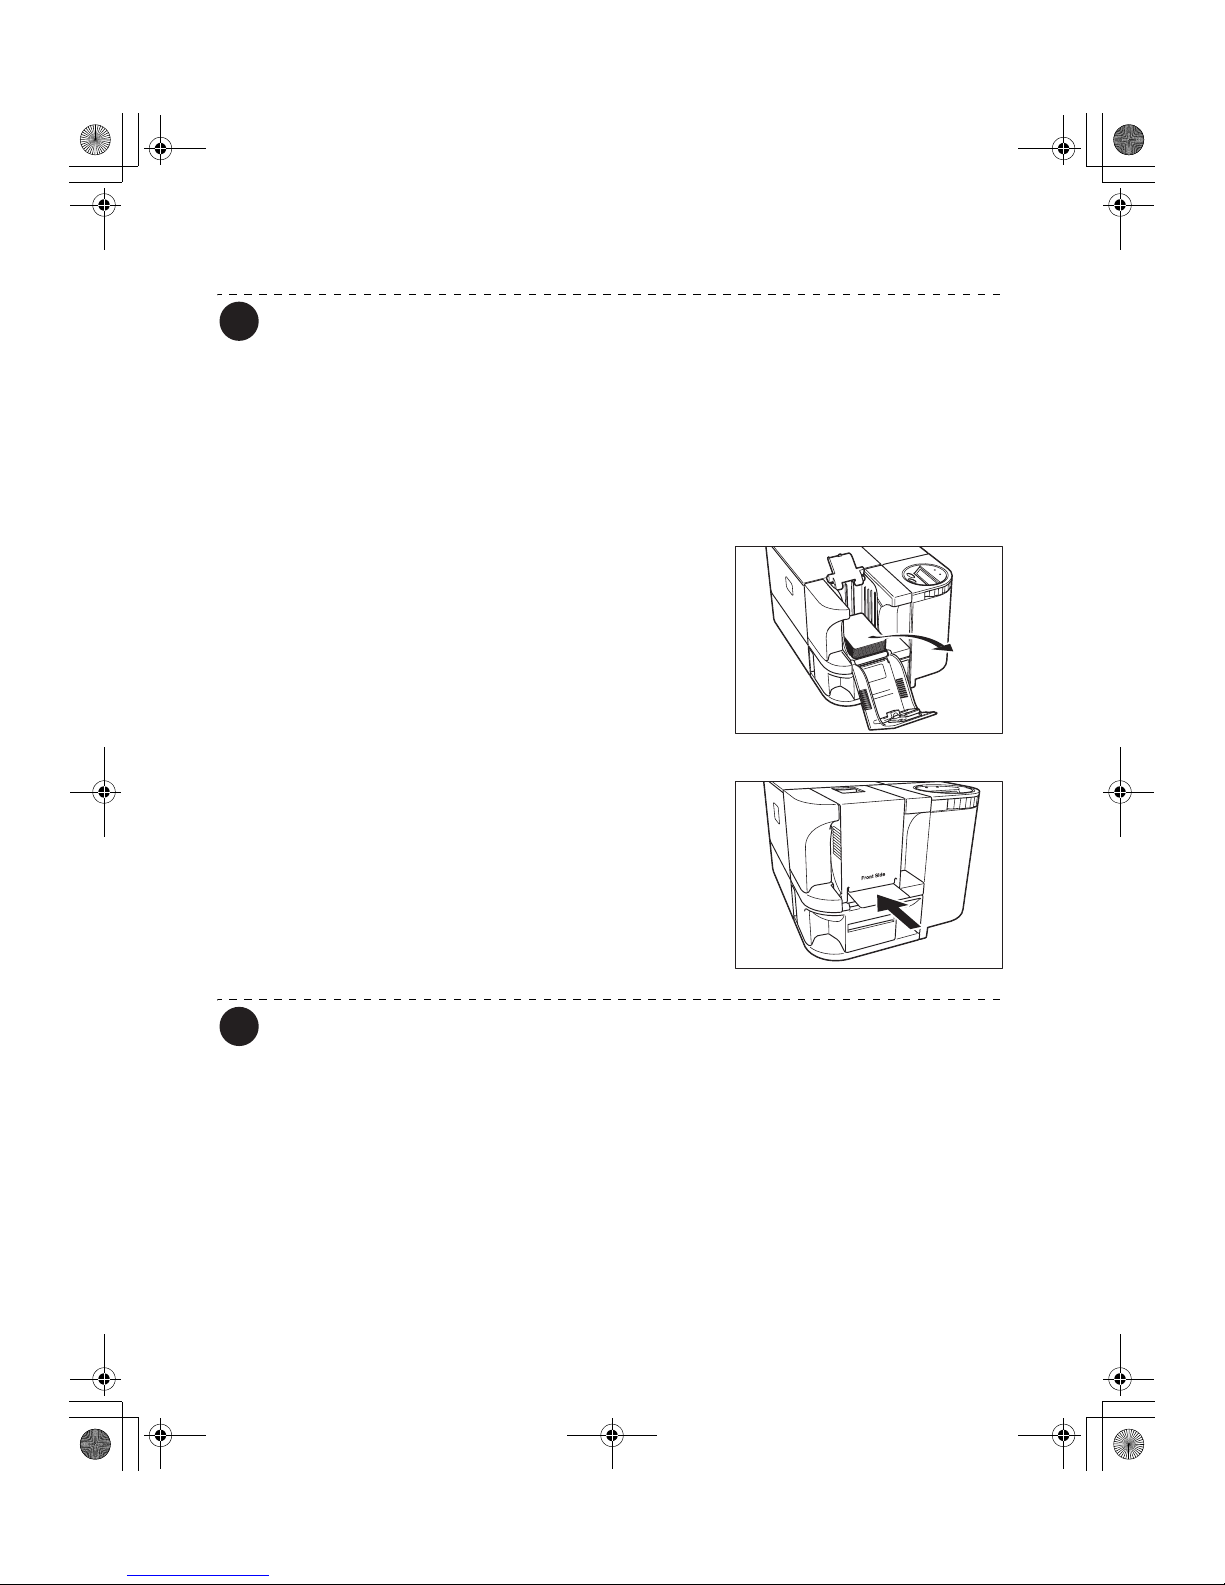
1 Remove the cards from the Card Case.
• [Card Empty] appears on the LCD Panel.
2 Insert cards and press the CLEAR Key.
• Insert cards with the printing side up into the Card
Feeding Slot and press the CLEAR Key.
• [Ready to Print] appears on the LCD Panel.
Note
z Printing occurs on the top side of the card.
Load the cards for printing so that after printing the printed side faces the Operation
Panel.
z The bottom side of the card is for writing data to the magnetic strip.
Load the cards for writing data to the magnetic strip so that the magnetic strip faces
the bottom side of the Operation Panel. (PR-C101M only)
z When printing begins the bottom card is pulled into the printer.
PR-C101_C101M_E.book Page 10 Monday, August 27, 2007 11:16 AM
Page 13
Basic Card Printing Methods
11
Printing
z Command/menu names and the order of the procedure may differ
depending on your application software. For more information on
operations, refer to the instruction manual for your application software.
z Also, for more information about printer driver operations, refer to the driver
help files.
z The explanations in this manual are based on screens that appear when
using Windows Vista.
1 Turn on the printer and load the cards.
• →See "Loading Cards" on page 9 for information on
how to load the cards correctly.
2 Launch your application software to
create a document.
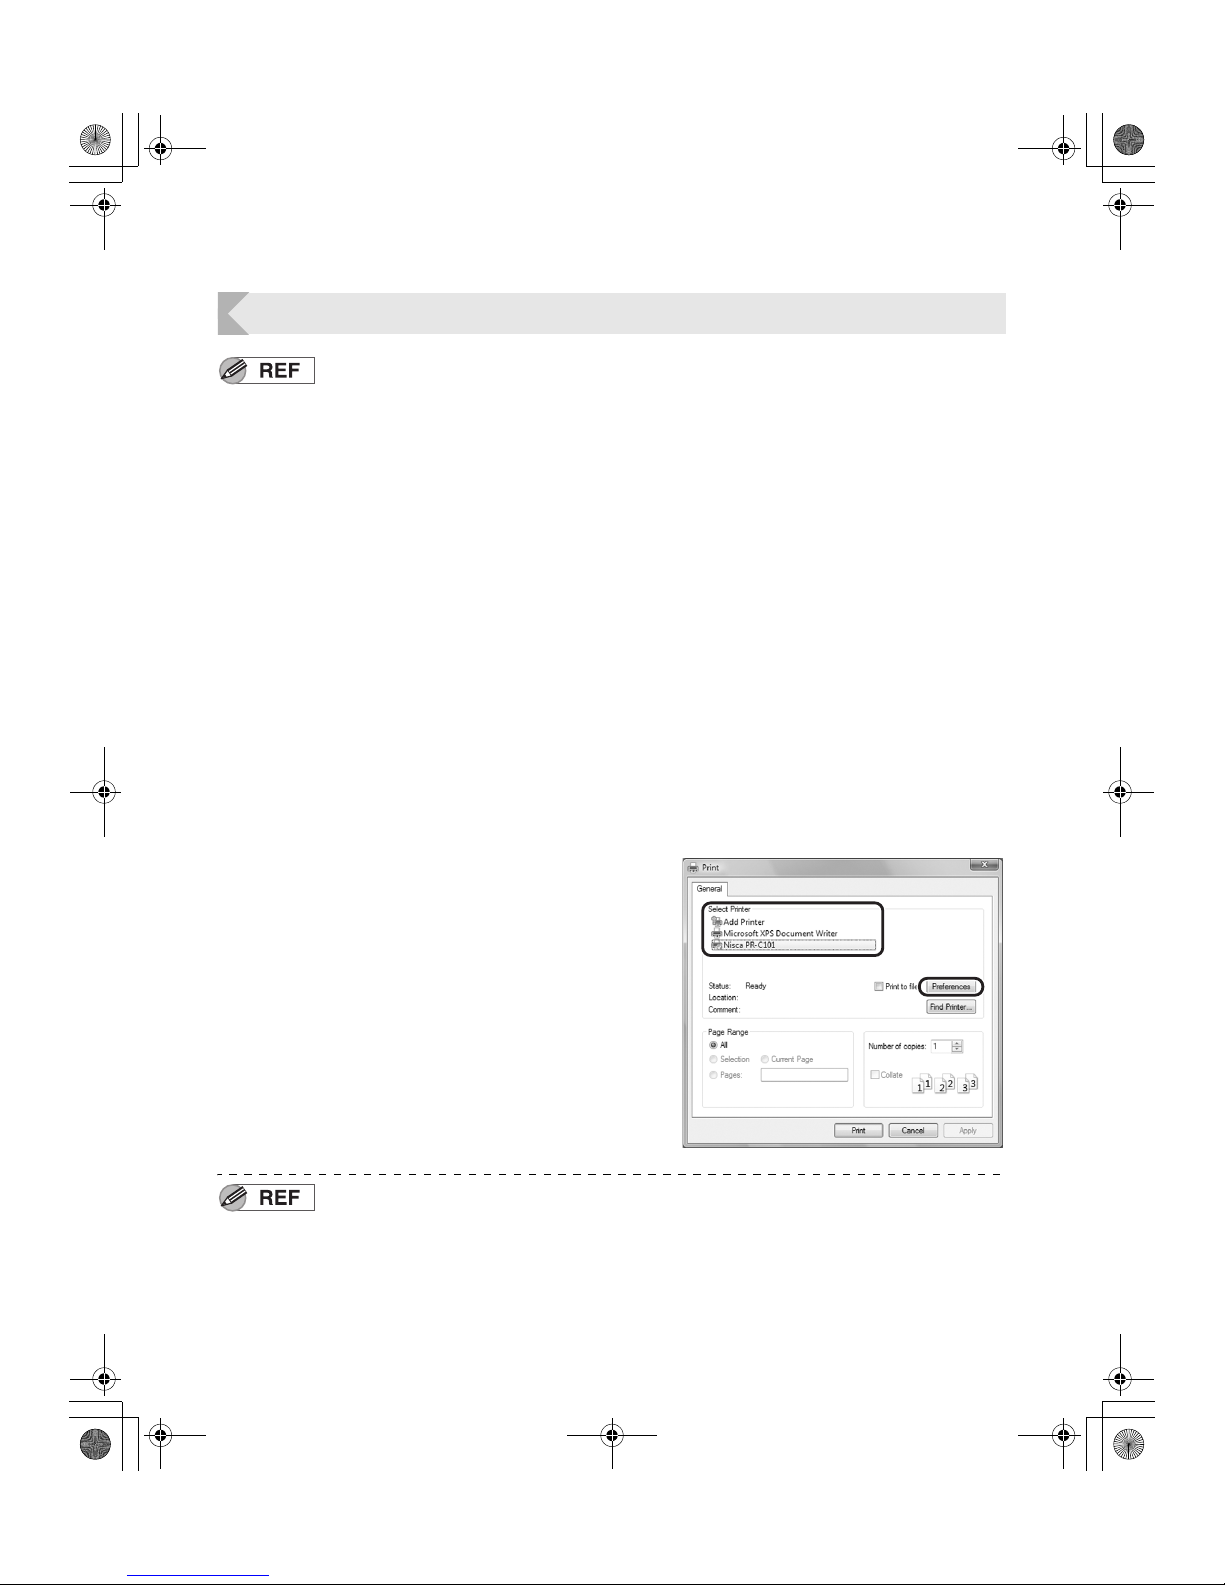
3 From the [File] menu of your
application software, select [Print].
• Open the printer driver settings screen.
4 Specify various settings for printing if
necessary.
• Select [Nisca PR-C101] if it is not already selected.
• Click [Preferences] (or [Properties]), and set the card
size and the number of cards to be printed.
• Click [OK] when setup is complete.
z For more information about how to change the settings of the printer driver,
refer to the driver help files.
PR-C101_C101M_E.book Page 11 Monday, August 27, 2007 11:16 AM
Page 14
Full Color Card Printer PR-C101/C101M
12
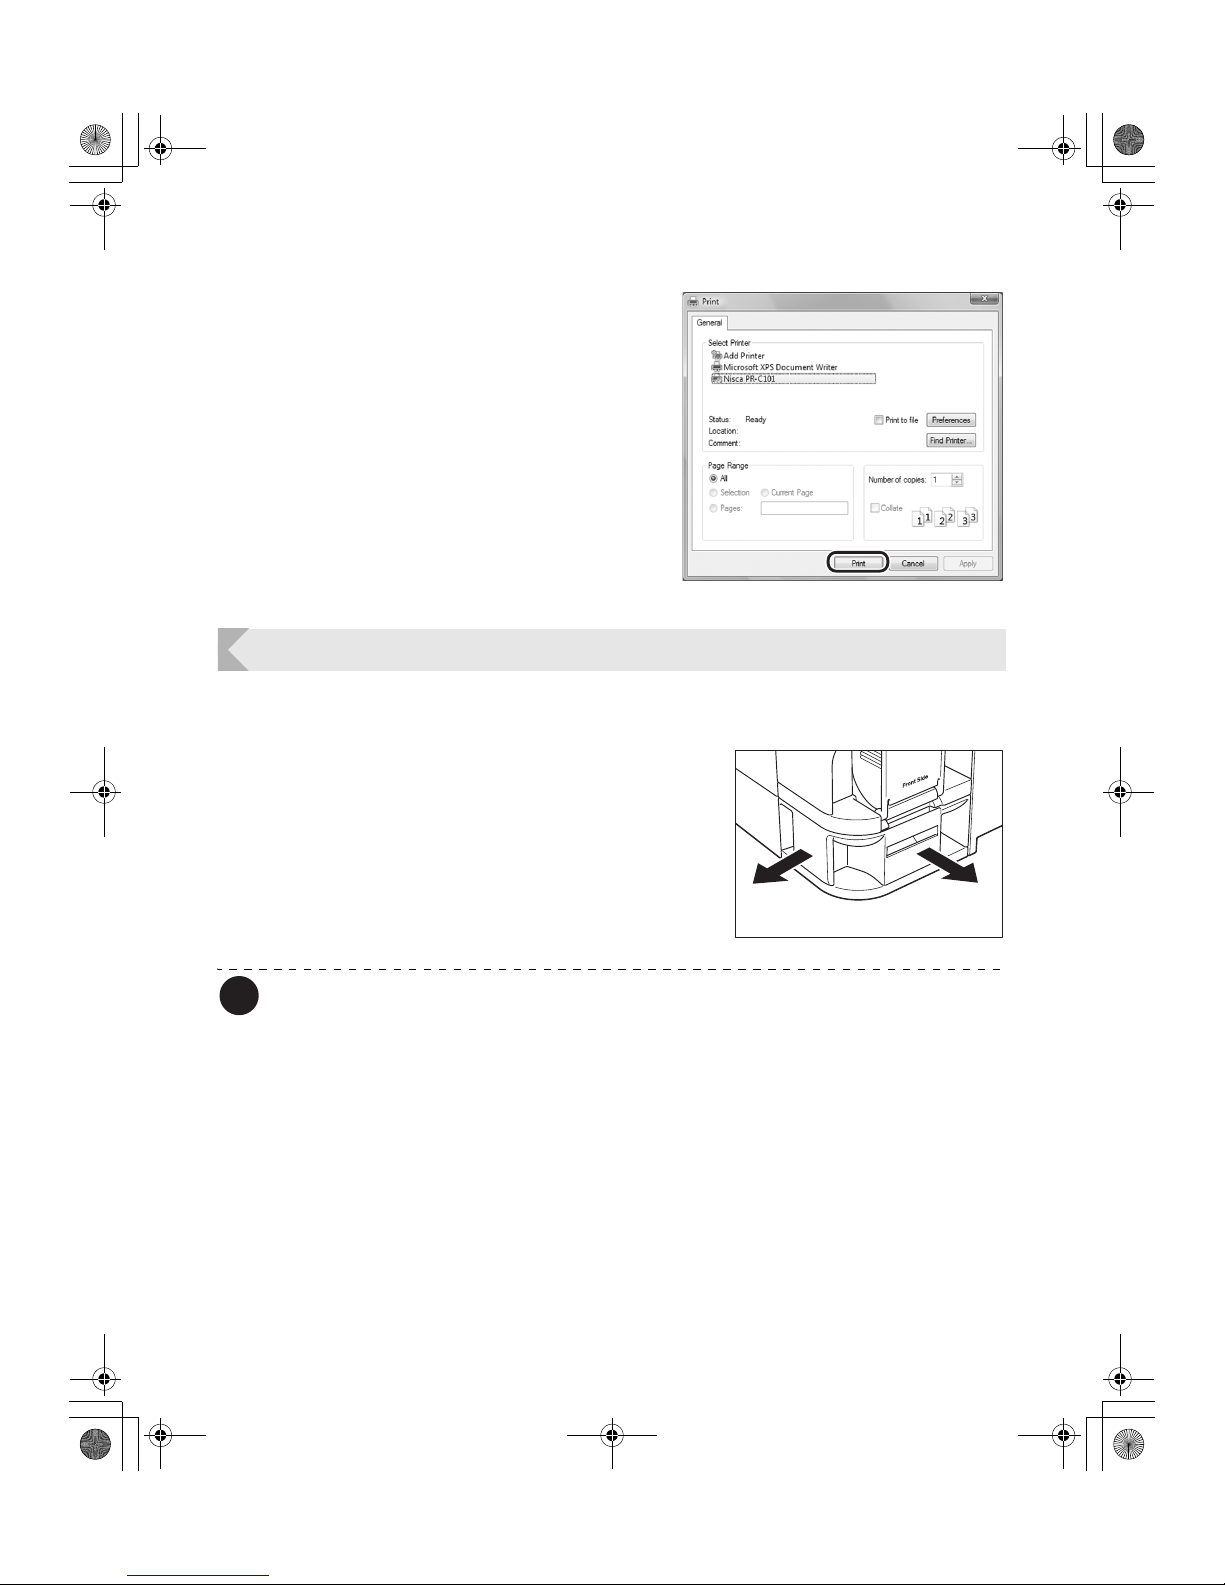
5 Click [Print].
• Printing starts.
• Cards are pulled into the printer and the READY
Indicator blinks.
[Now Printing..] appears on the LCD Panel.
Removing Cards
The factory default is for printed cards to be ejected from Card Ejection Slot 1.
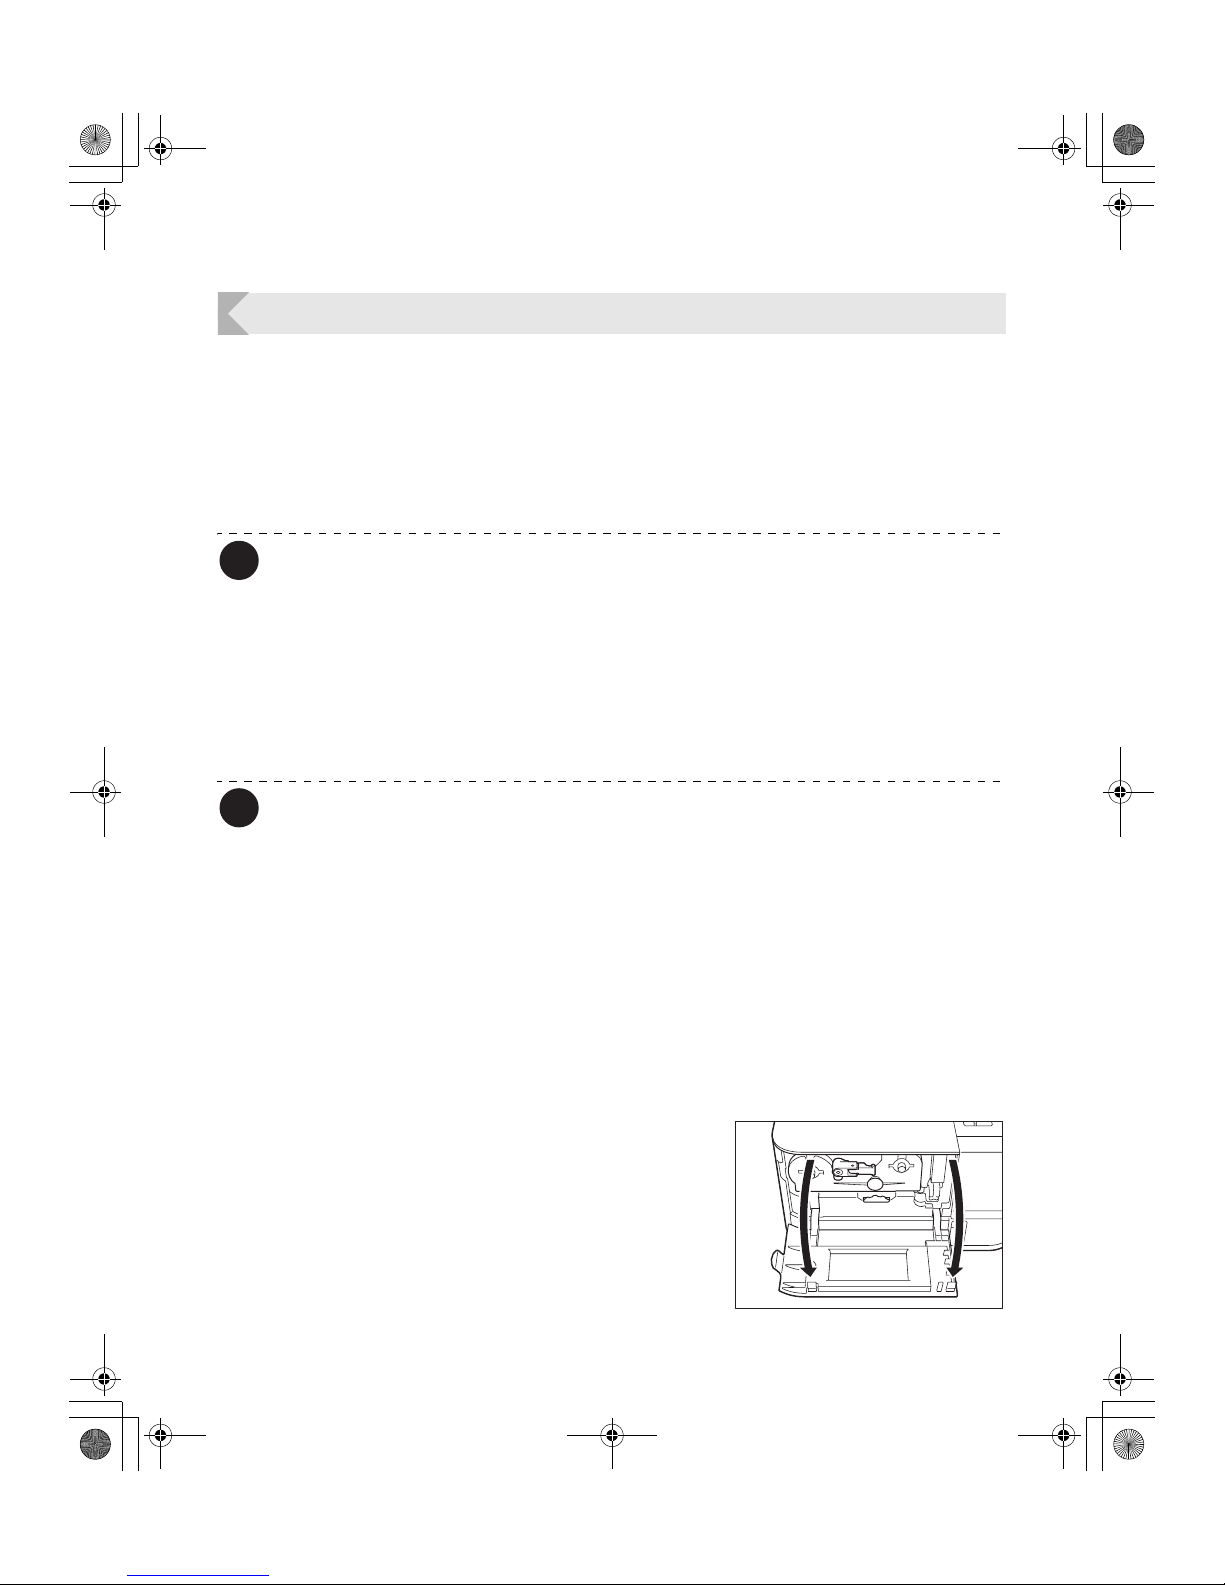
1 Pull out Card Ejection Slot 1 Tray.
• The Card Ejection Slot 1 tray can be pulled out in two
directions. (See the illustration to the right)
Note
z The Card Ejection Slot 1 tray has a maximum capacity of approximately 30 cards.
If the cards printed exceed the maximum capacity of the tray, it will ejected from the
slit of the tray.
Before the tray filled to capacity, making it empty is recommended.
z The factory default is for both correctly printed cards and cards with errors to be
ejected from Card Ejection Slot 1.
You can easily sort cards with errors by attaching a Card Stacker and setting cards
with errors to be ejected to Card Ejection Slot 2.
→See "Switching the Card Ejection Slot" on page 21 for information about switching the card ejection slot
and attaching the Card Stacker.
PR-C101_C101M_E.book Page 12 Monday, August 27, 2007 11:16 AM
Page 15
Basic Card Printing Methods
13
Changing the Ink Ribbon Cartridge
Change the Ink Ribbon Cartridge when the ink ribbon runs out.
You can use the following Ink Ribbon Cartridges:
• PR50025UC (Overcoating Color Ink Ribbon: YMCKO)
• PR5002KOC (Overcoating Black Ink Ribbon: KO)
• PR5002KC (Black Ink Ribbon: K)
→See "Ink Ribbon Cartridges" on page 42 for details about Ink Ribbon Cartridges.
Note
z You can check the amount of ink ribbon remaining. If the amount of ink ribbon
remaining comes near to an end, the ERROR indicator blinks.
→See "Checking the Ink Ribbon Remaining in the Ink Ribbon Cartridge" on page 22 for instructions on how
to check the amount of ink ribbon remaining.
When a Change is Necessary
The Ink Ribbon Cartridge must be changed when the [Rbn End] error message appears on
the LCD Panel.
Note
z The number of printable sides with the Ink Ribbon Cartridge may decrease under the
following conditions:
→See "Consumables" on page 42 for details about the number of printable sides with an Ink Ribbon
Cartridge.
• When the Ink Ribbon Cartridge is removed during printing
• When an error occurs during printing
• Performing operations not listed in this manual
z Use the Ink Ribbon Cartridge as soon as possible after purchase.
Changing the Cartridge
Use the following procedure if it is necessary to change the ink cartridge.
1 Open the Front Cover.
PR-C101_C101M_E.book Page 13 Monday, August 27, 2007 11:16 AM
Page 16
Full Color Card Printer PR-C101/C101M
14
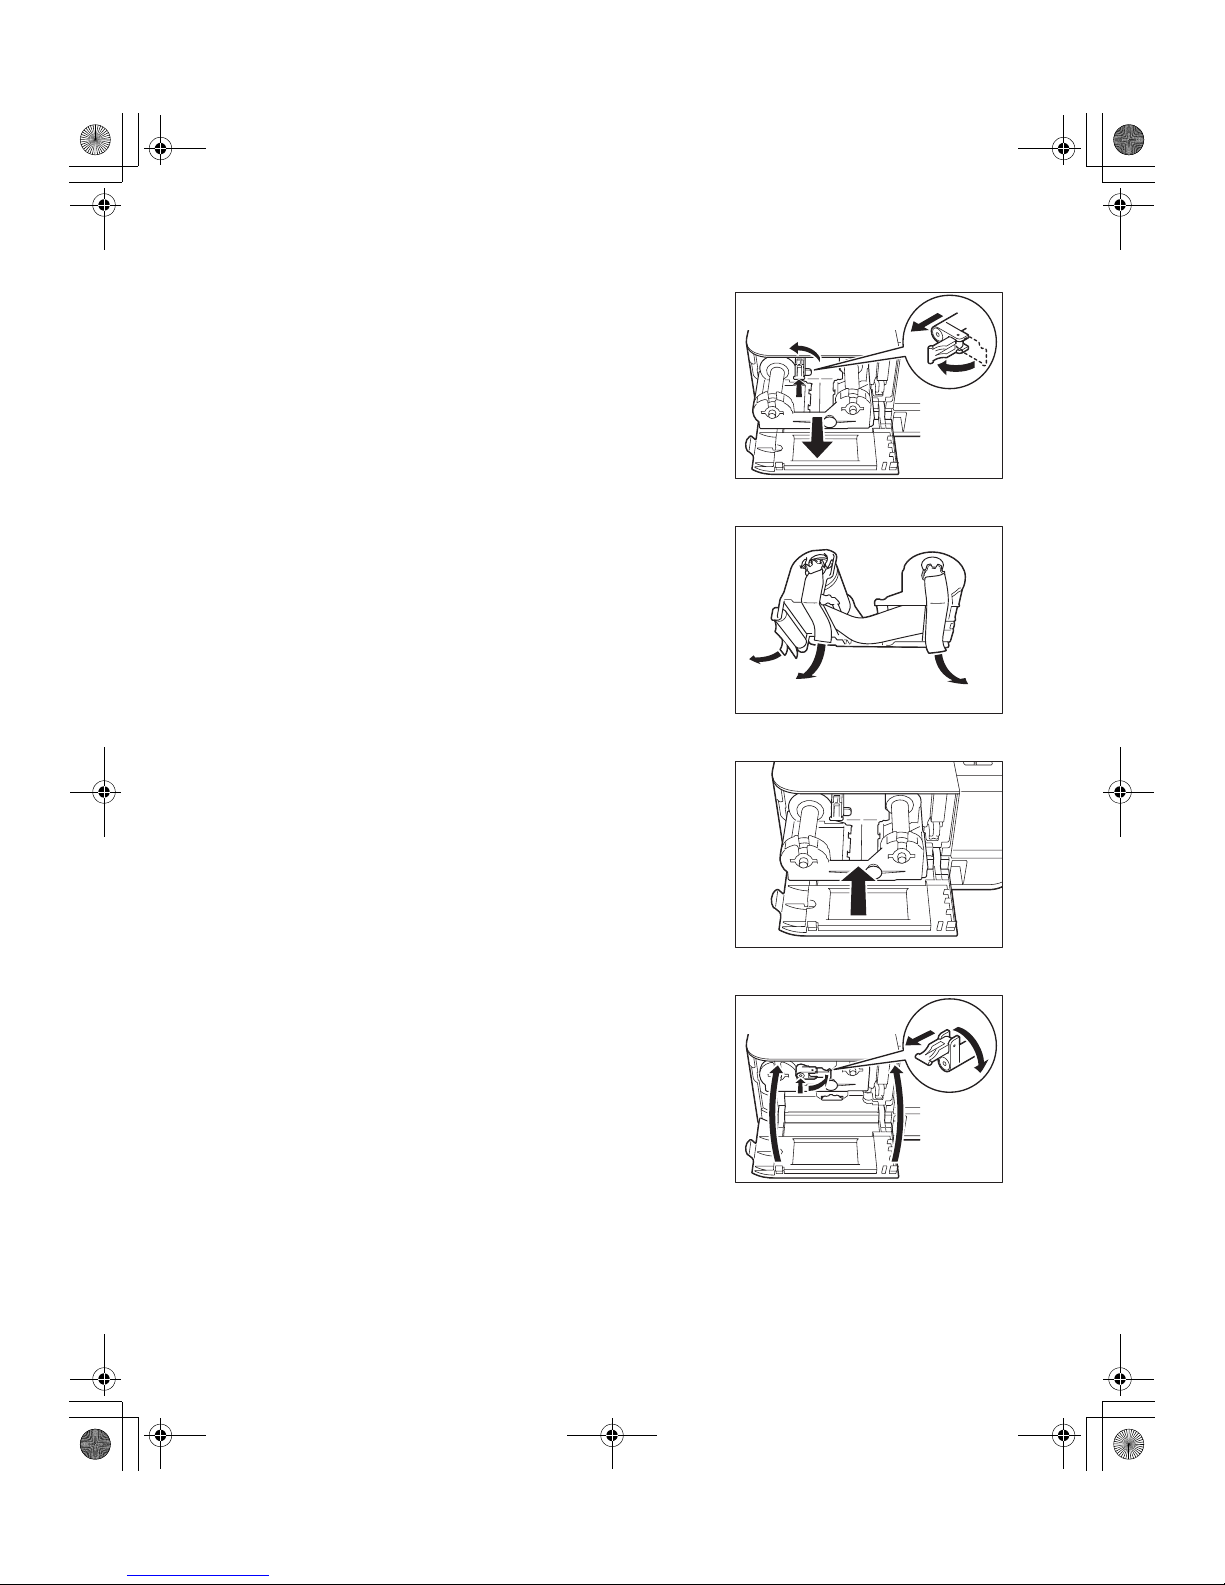
2 Lift the Ink Ribbon Cartridge Securing
Lever and remove the used Ink Ribbon
Cartridge.
• Raise the lever's handle and after pulling it towards
you, rotate the lever to the left.
• After pressing the lever in, remove the Ink Ribbon
Cartridge.
3 Remove the Cleaning Tape Protector
and the fixing tape from the new Ink
Ribbon Cartridge.
• Remove the new Ink Ribbon Cartridge from the box
and the bag, and then remove the Cleaning Tape
Protector from the Cleaning Assist Roller and the Ink
Ribbon Fixing Tape.
4 Load the new Ink Ribbon Cartridge.
• Fully insert the Ink Ribbon Cartridge.
• Do not insert the cartridge to the printer with ink ribbon
slacked.
5 Lower the Ink Ribbon Cartridge
Securing Lever and close the Front
Cover.
• Pull the lever towards you and rotate it to the right.
With the lever lowered, press it in and fold in the
handle.
6 Press the CLEAR Key.
• Press the CLEAR Key if [Push CLEAR Key] appears
on the screen and then [Ready to Print] appears.
• Clear an error first if the error message appears on the
screen and then press the CLEAR Key.
→See "When an Error Message Appears..." on
page 36.
PR-C101_C101M_E.book Page 14 Monday, August 27, 2007 11:16 AM
Page 17
Normal Mode and User Mode
15
Normal Mode and User Mode
You can switch the printer from Normal Mode to User Mode while it is operating.
This section provides an outline of both modes, explains how to change modes and
explains the basic operations of the User Mode.
Normal Mode and User Mode
Normal Mode
Normal Mode is used for printing cards.
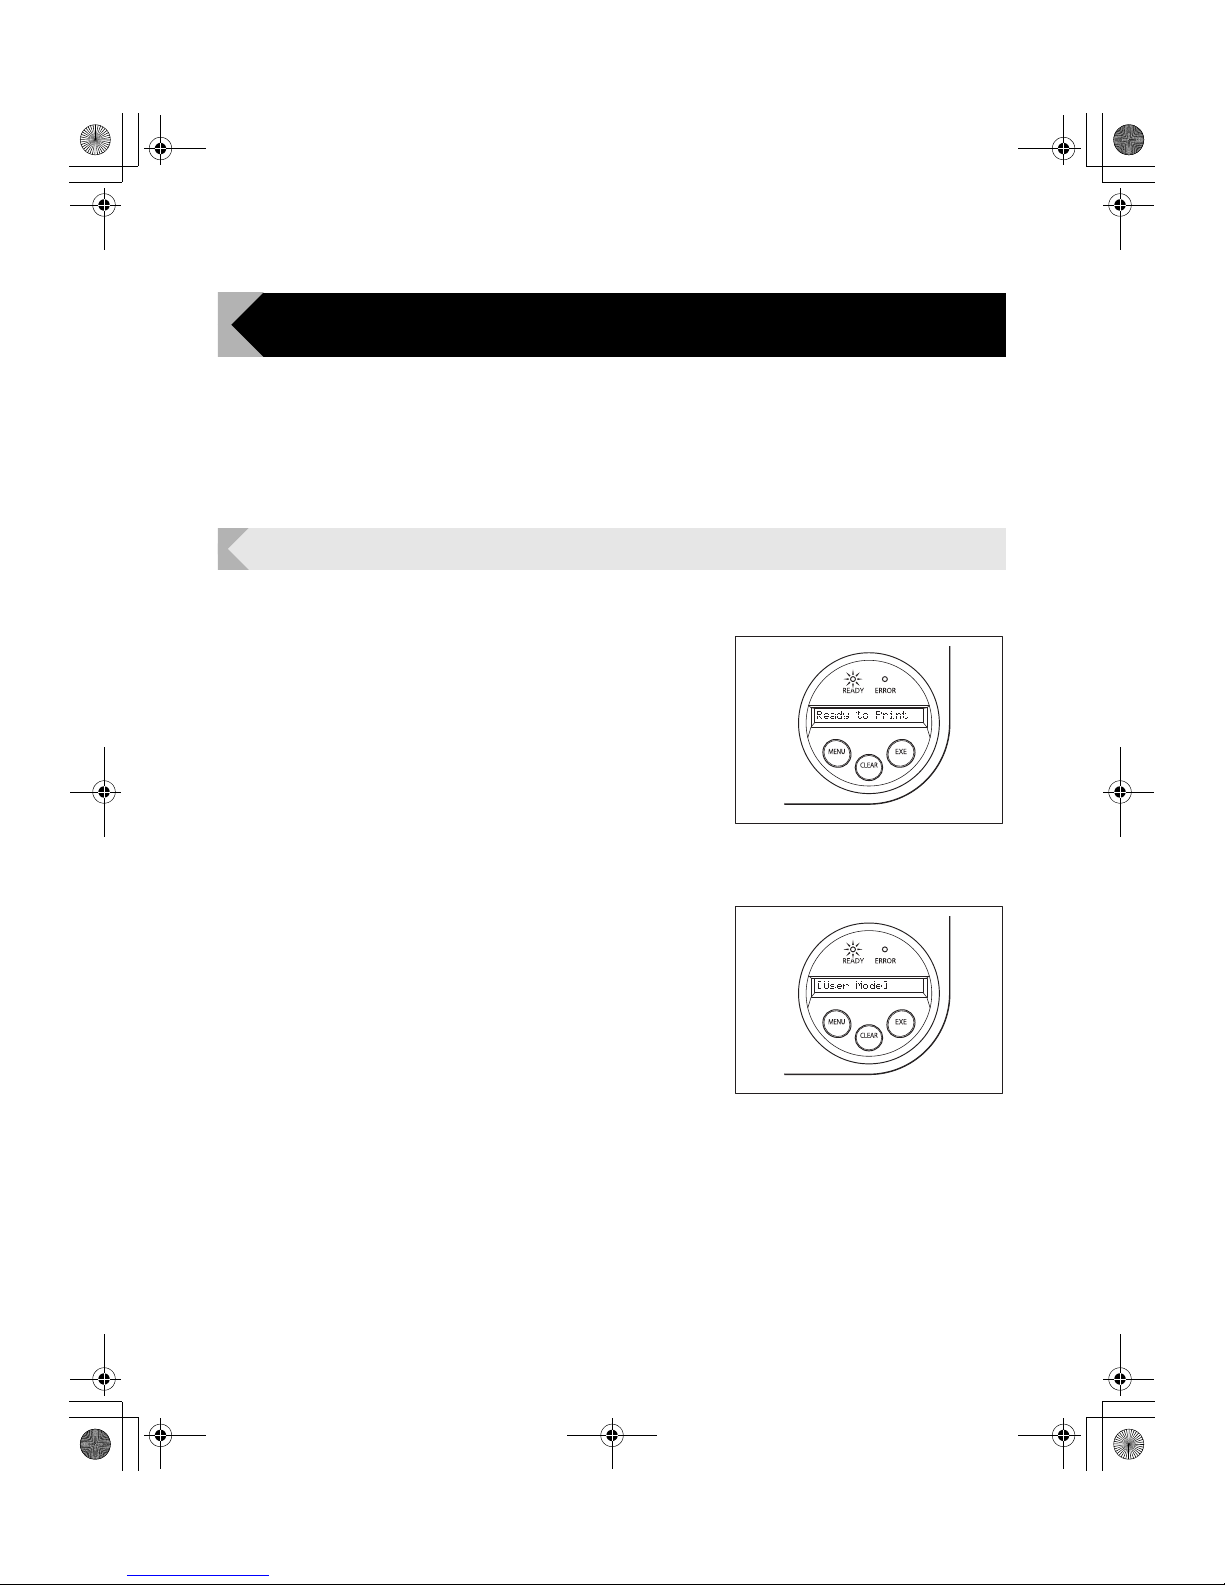
When the power is turned on the printer starts in
Normal Mode.
The printer's status, such as [Ready to Print] or
[Card Empty], appears on the LCD Panel.
User Mode
User Mode is used to set operations and check
the status of the printer.
To switch to the User Mode from the Normal
Mode, hold down the Menu Key for more than
three seconds and then press the EXE Key.
→See "Switching to User Mode" on page 16 for details on
how to switch modes.
A list of menus, such as [Card Count] and [Color
Adjust] are displayed on the LCD Panel.
PR-C101_C101M_E.book Page 15 Monday, August 27, 2007 11:16 AM
Page 18
Full Color Card Printer PR-C101/C101M
16
Switching to User Mode
This section explains how to switch from Normal Mode to User Mode.
→See "Switching to Normal Mode (Exiting User Mode)" on page 18 for how to switch from User Mode to Normal Mode.
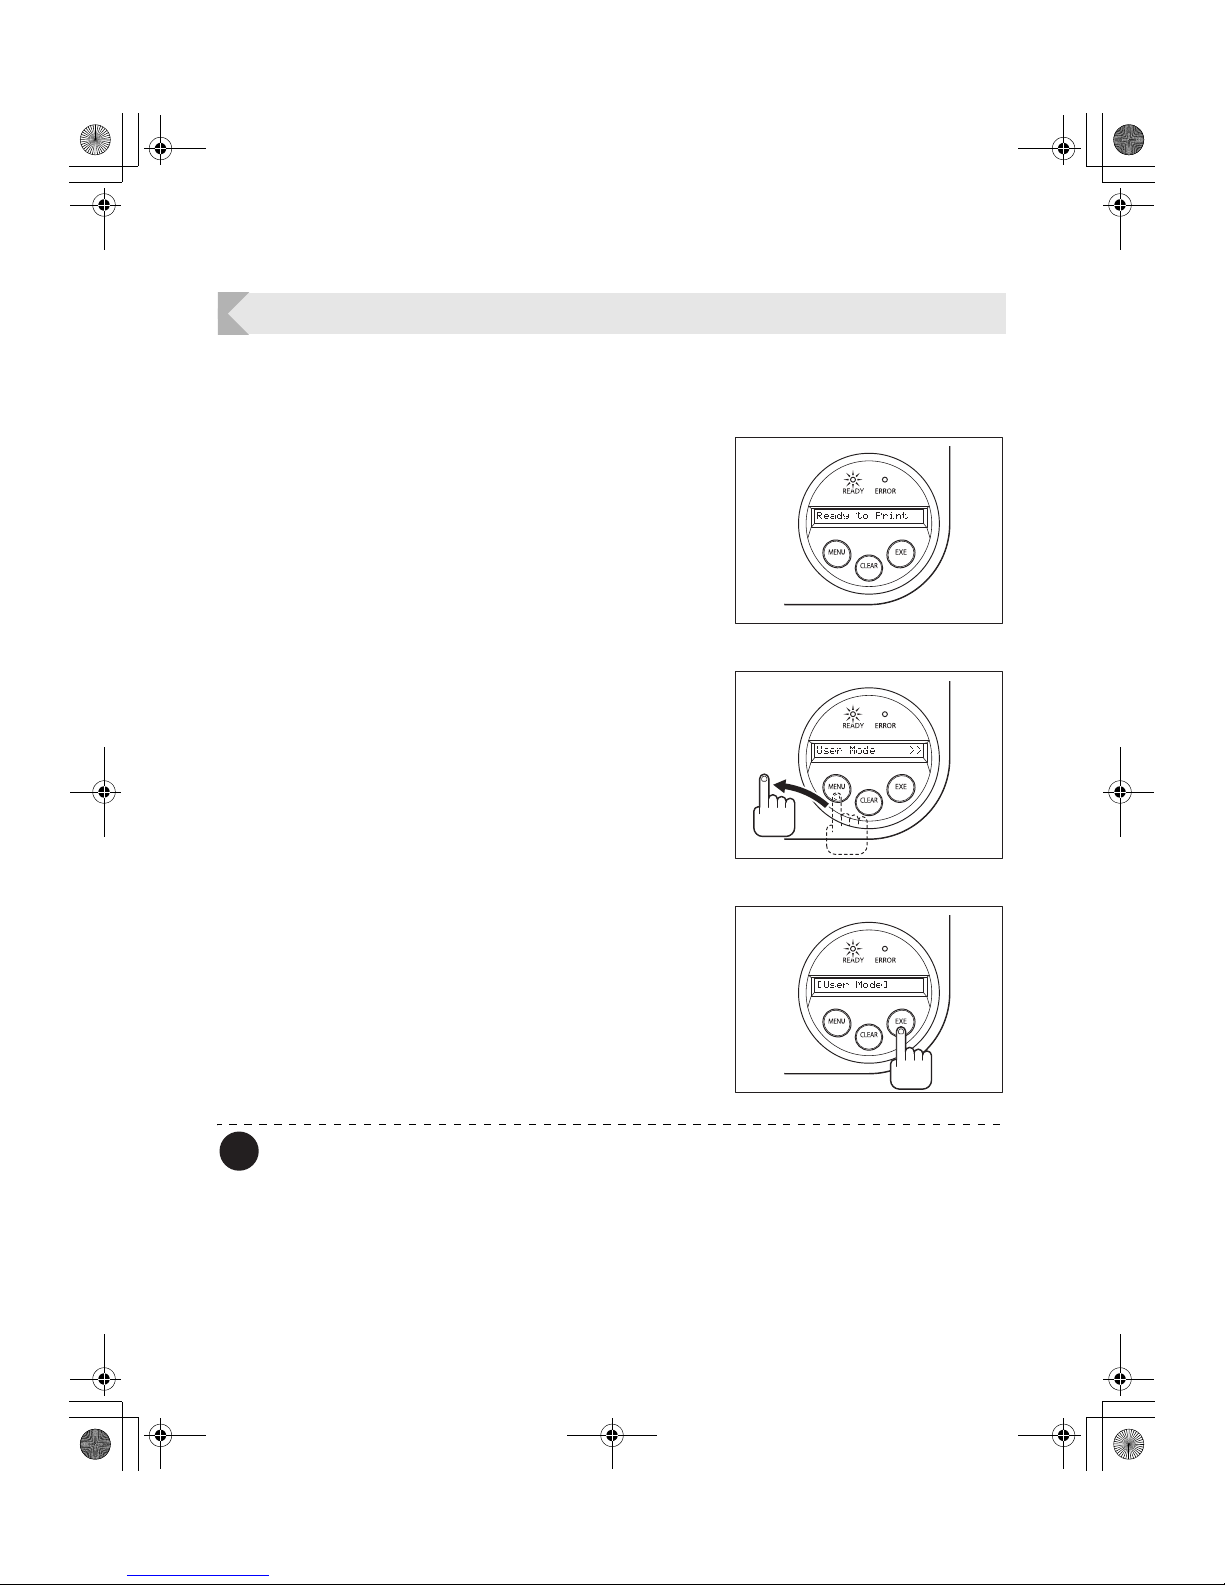
1 Press the Power Switch to turn on the
power.
• When the power starts in the printer turns on in
Normal Mode and [Ready to Print] appears on the
LCD Panel.
2 Press the Menu Key for more than three
seconds and then release it.
• While you are holding down the Menu Key [Input
Commands] appears on the LCD Panel.
• When [User Mode] appears on the LCD Panel after
three seconds, release the key.
[User Mode >>] appears on the LCD Panel.
3 Press the EXE Key.
• [[User Mode]] appears on the LCD Panel and the
printer enters the User Mode.
Note
z You can use the procedure above to enter the User Mode even when a printer error
occurs.
z You can return to Normal Mode by pressing the CLEAR Key while [User Mode >>] is
displayed.
PR-C101_C101M_E.book Page 16 Monday, August 27, 2007 11:16 AM
Page 19
Normal Mode and User Mode
17
Basic User Mode Operations
The User Mode has multiple menus in a hierarchical tree organized according to function.
This section explains how to switch menus in the User Mode hierarchy tree and how to switch
from User Mode to Normal Mode.
→See "Menu Route Map (User Mode)" on page 44 for details about the menu tree configuration.
→See "Getting the Most Out of Your Printer" on page 19 for details on the functions of each menu.
Note
z Look at the "Menu Route Map (User Mode)" on page 44 while reading this section.
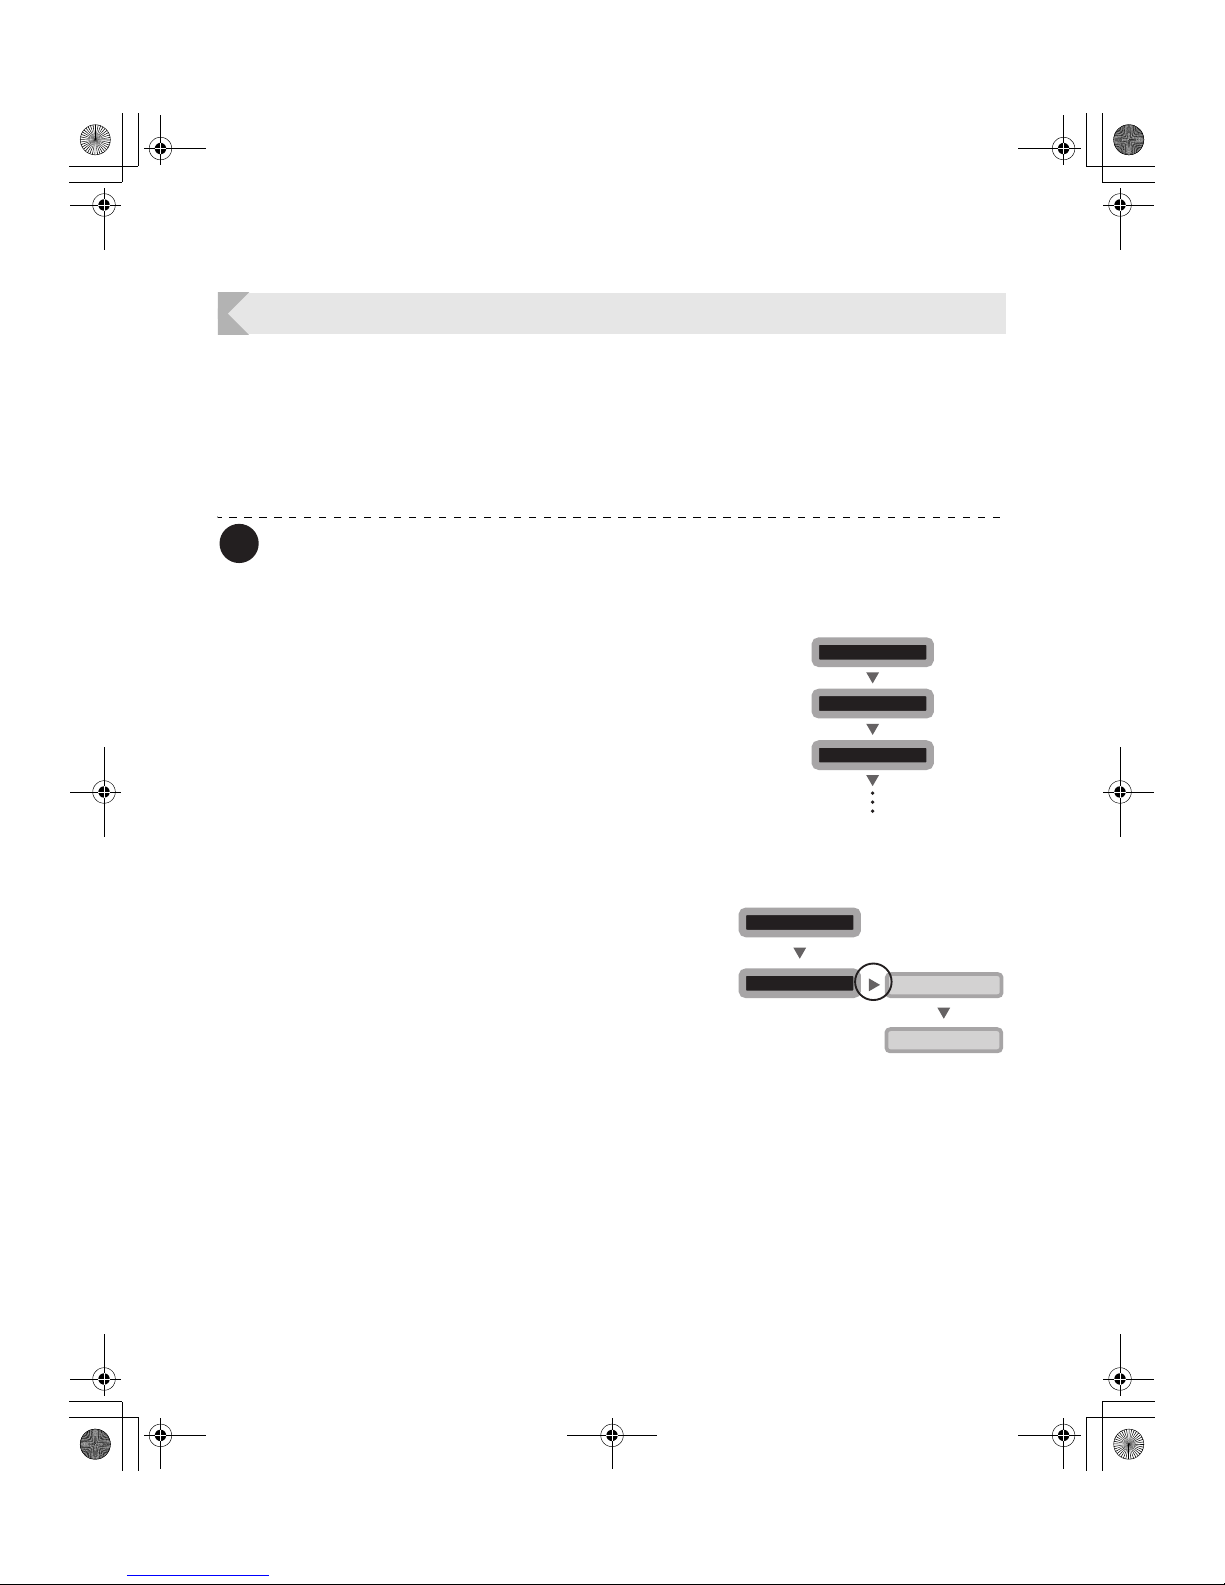
Moving to the Next Menu (Switching to Menus on the Same Level)
You can move to the next menu from any menu in
the User Mode by pressing the Menu Key.
Moving to a Sub-menu (Switching to Menus on a Lower Level)
You can move to available sub-menus by
pressing the EXE Key ([>>] on a menu's right
indicates a sub-menu).
Card Count 0000
[User Mode]
MENU
MENU
Total Cnt 0000**
MENU
Image Setup >>
EXE
[Image Setup]
MENU
Color Adjust >>
Cleaning >>
MENU
PR-C101_C101M_E.book Page 17 Monday, August 27, 2007 11:16 AM
Page 20
Full Color Card Printer PR-C101/C101M
18
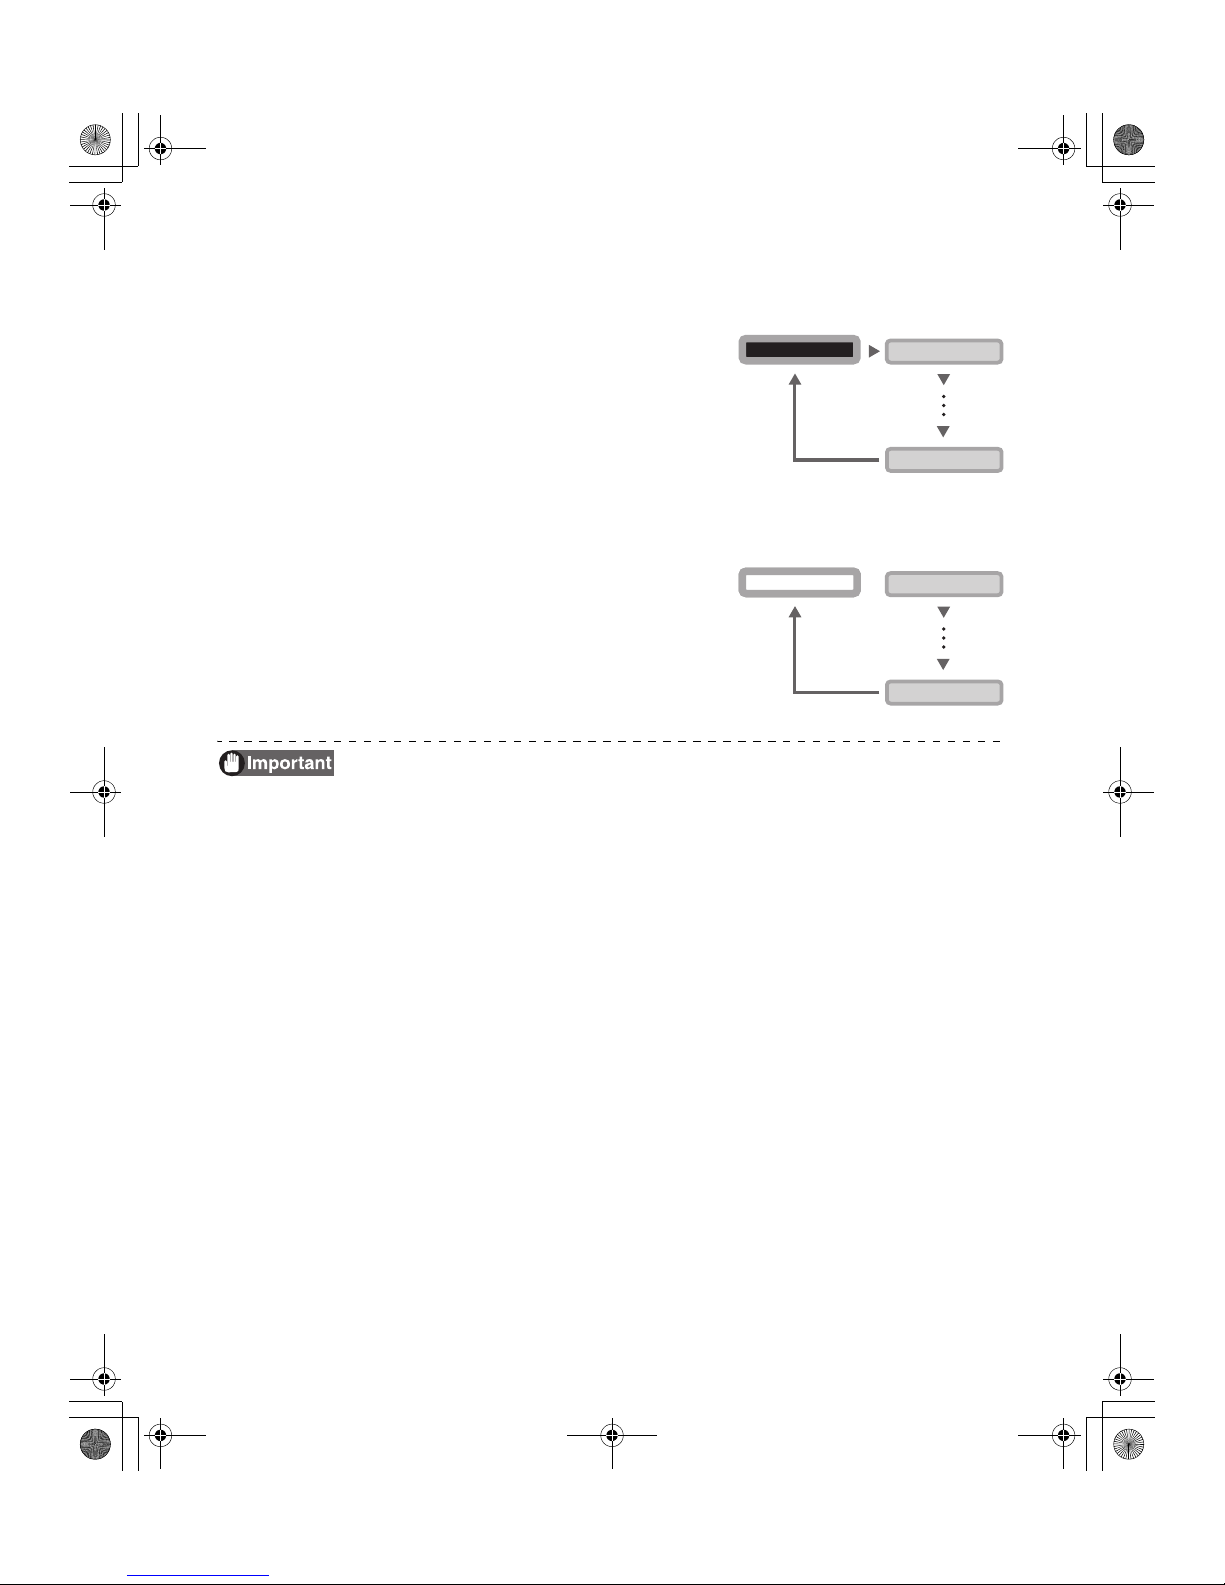
Returning to the Main Menu (Switching to Menus on a Higher Level)
Each sub-menu has a [Parent Menu <<] menu
for moving to a higher level.
Press the Menu Key several times to switch to the
[Parent Menu <<] menu and then press the EXE
Key to return to the main menu.
Switching to Normal Mode (Exiting User Mode)
Each level has a [Normal Mode <<<] menu for
exiting User Mode.
Press the Menu Key several times to switch to the
[Normal Mode <<<] menu and then press the
EXE Key to return to the Normal Mode.
z After changing the printer's setting on a menu, press the Menu Key to switch
to the next menu.
If you turn off the power without switching to the next menu, the changes will
not be saved.
(Changes to the settings are saved when you switch to the next menu.)
Image Setup >>
EXE
[Image Setup]
MENU
Parent Menu <<
EXE
MENU
Ready to Print Ready to Print
[Image Setup]
MENU
Normal Mode <<<
EXE
MENU
PR-C101_C101M_E.book Page 18 Monday, August 27, 2007 11:16 AM
Page 21
Getting the Most Out of Your Printer
19
Getting the Most Out of Your Printer
This section explains how to check the printer's status and change the printer's
settings.
Reprinting a Card that Has Just Been Printed
You can change the printer's settings so that just by pressing the EXE Key you can reprint a
card with the same contents as the previous card.
Note
z You can also change the setting by using the printer driver. (→See "Opening the
Printer Driver Settings Screen" on page 47.)
1 Switch from Normal Mode to User
Mode.
→See "Switching to User Mode" on page 16 for details on
how to switch to User Mode.
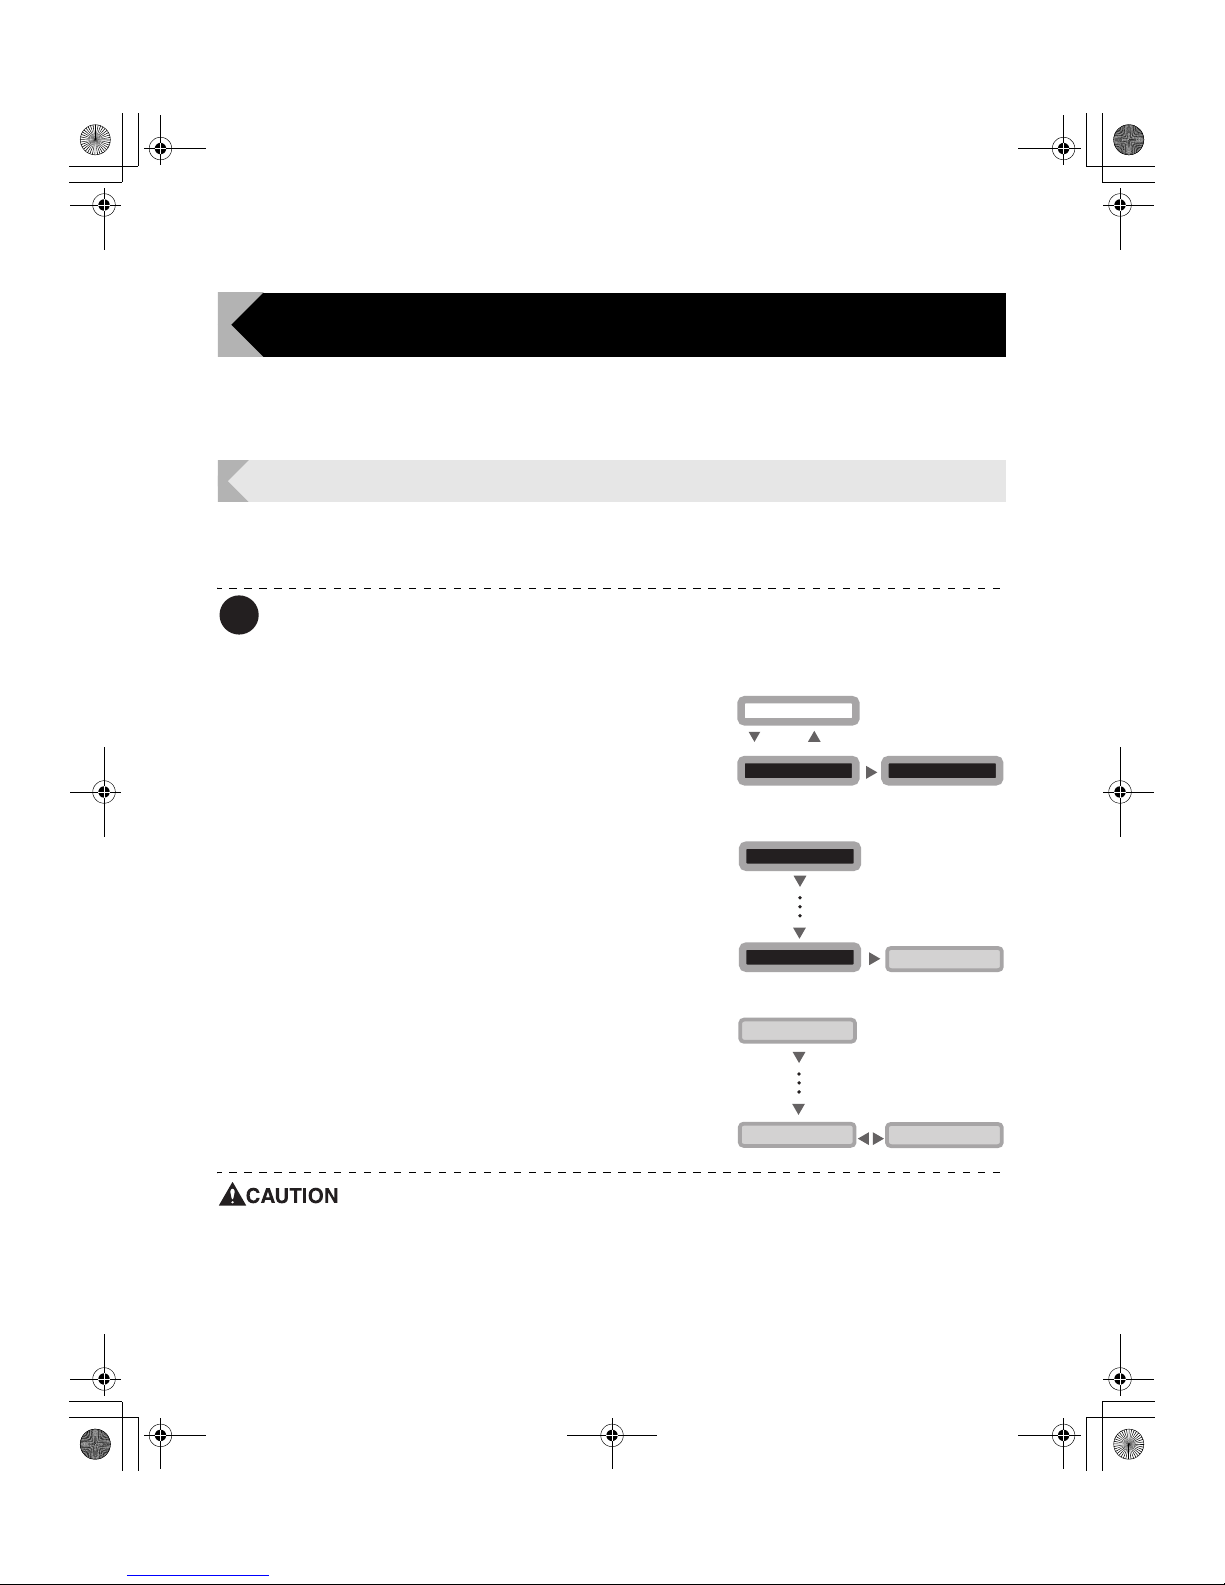
2 Press the Menu Key until [Printer
Setup >>] appears, and then press the
EXE Key.
3 Press the Menu Key until [EXE Print]
appears, and then press the EXE Key.
• Pressing the EXE Key switches between [ON] and
[OFF].
• Set it to [ON] to enable reprinting by pressing the EXE
Key, or [OFF] to disable it.
z The factory default setting is [OFF].
z Reprinting with the EXE Key cannot be used while successively printing
cards that have different content, such as when printing employee IDs for
several people.
z After turning off the power, reprinting a card with the same contents as the
previous card is disabled.
User Mode >>
MENU
Ready to Print
CLEAR
(3 Sec.)
EXE
[User Mode]
Printer Setup >>
EXE
[Printer Setup]
[User Mode]
MENU
MENU
EXE Print ON
MENU
MENU
[Printer Setup]
EXE Print OFF
EXE
PR-C101_C101M_E.book Page 19 Monday, August 27, 2007 11:16 AM
Page 22
Full Color Card Printer PR-C101/C101M
20
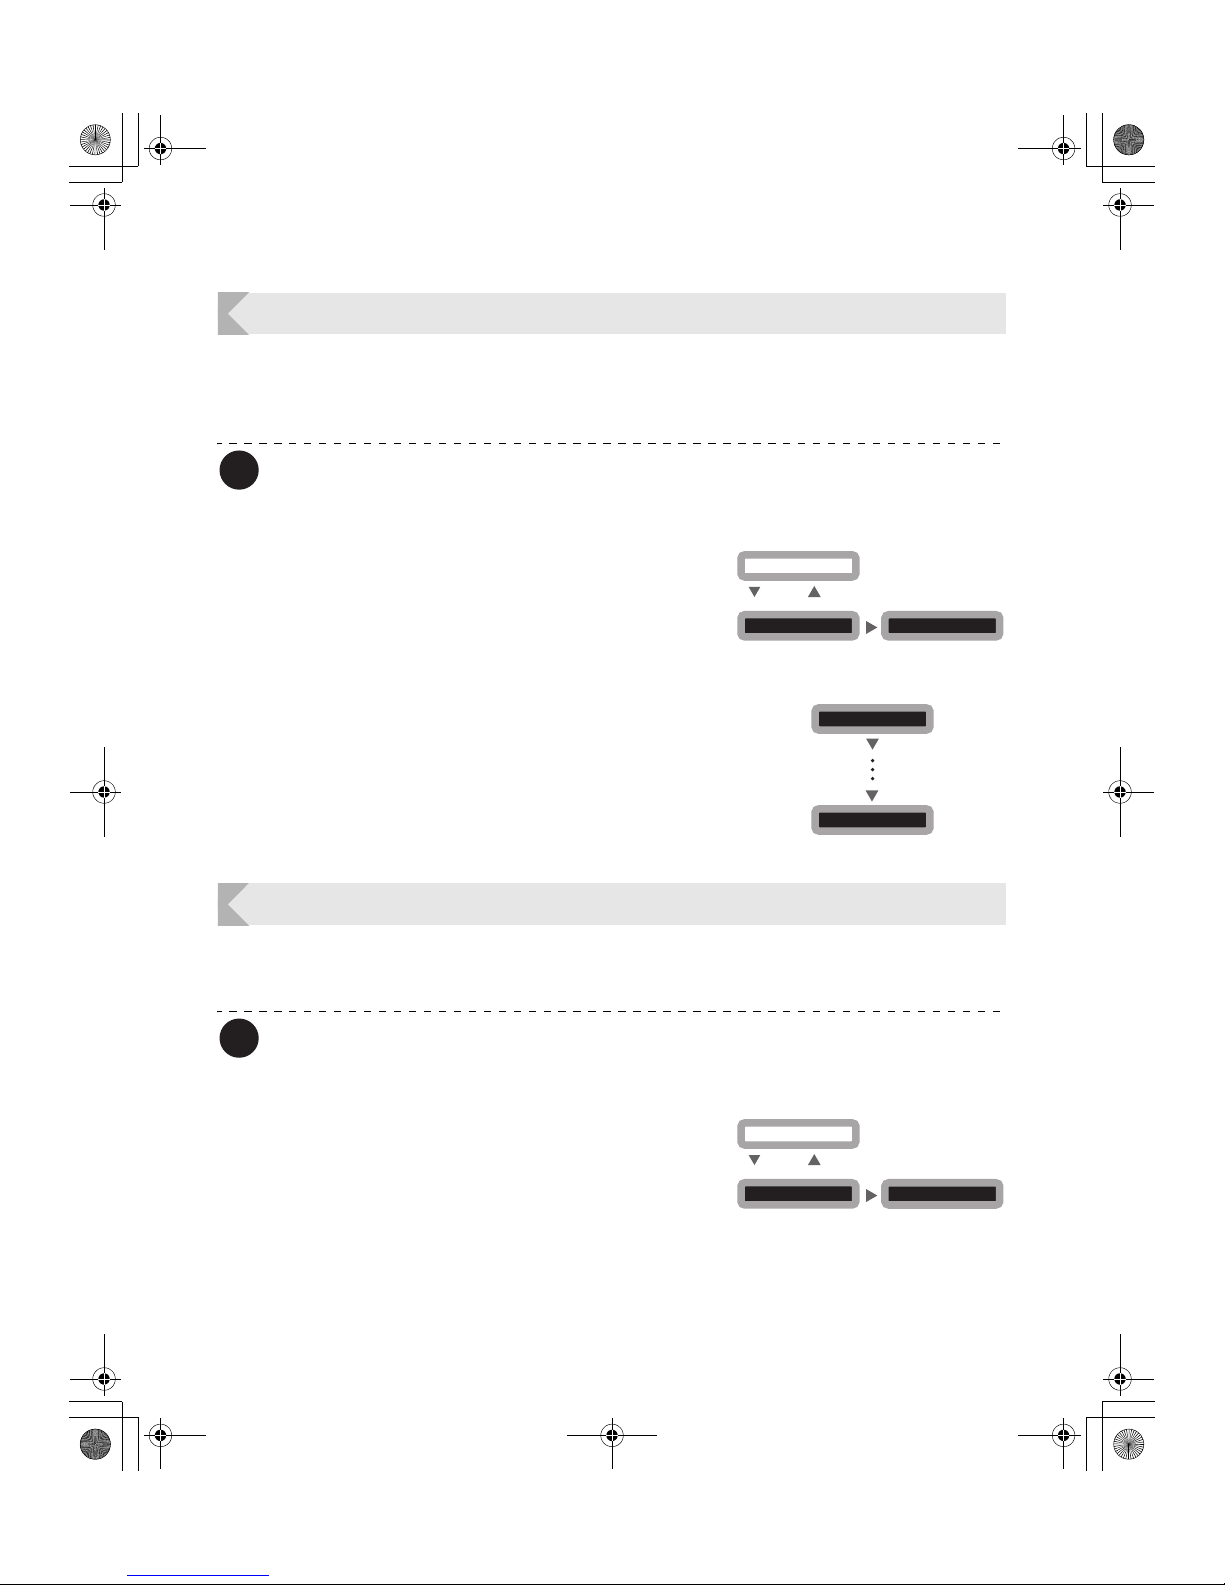
Counting the Number of Cards that Are Printed
You can count the number of cards that are printed.
You can also count the number of cards that have been printed in a specified period of time by
resetting the count with the CLEAR Key.
Note
z You can also count the number of cards printed by using the printer driver. (→See
"Opening the Printer Driver Settings Screen" on page 47.)
1 Switch from Normal Mode to User
Mode.
→See "Switching to User Mode" on page 16 for details on
how to switch to User Mode.
2 Press the MENU Key until [Card Count]
appears.
• The number of cards that are printed appears.
• Pressing the CLEAR Key returns the count to [0].
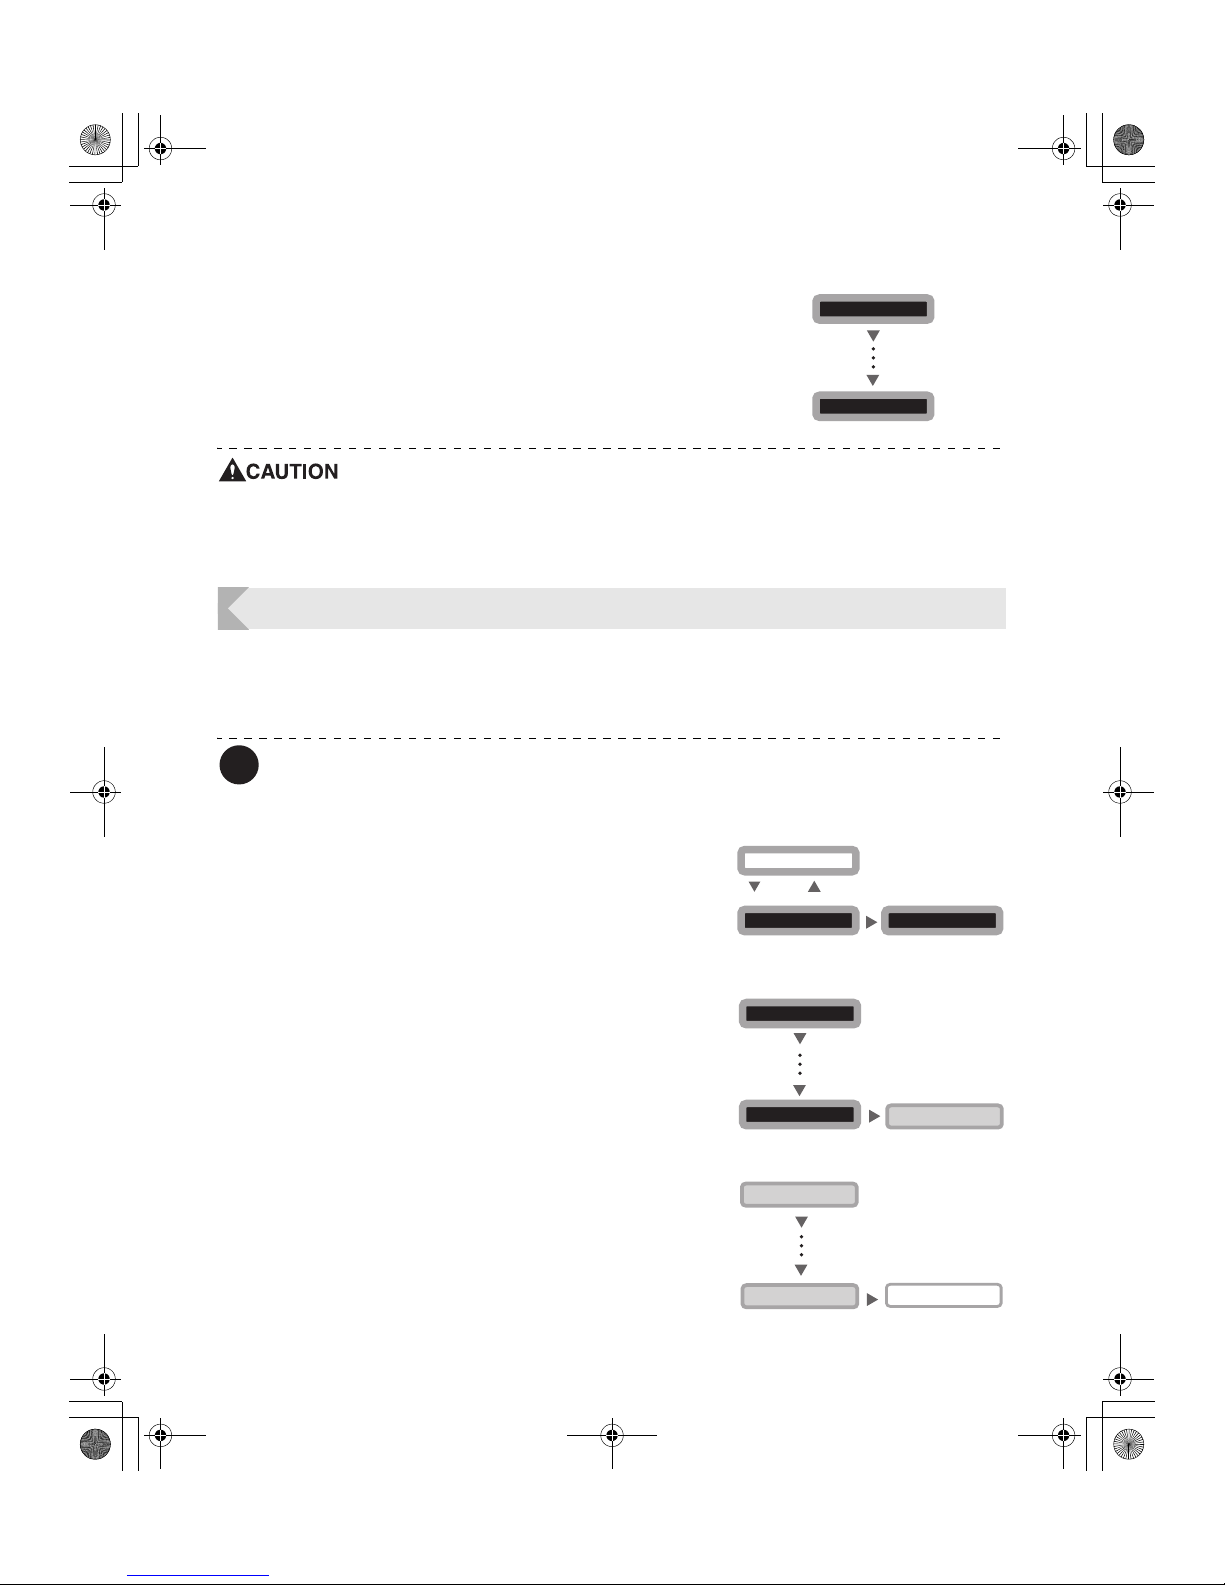
Displaying the Total Number of Sides that Are Printed
You can display the total number of sides (each card has two sides) that are printed. This can
be used as a guideline for doing maintenance.
Note
z You can also display the status on the printer driver. (→See "Opening the Printer
Driver Settings Screen" on page 47.)
1 Switch from Normal Mode to User
Mode.
→See "Switching to User Mode" on page 16 for details on
how to switch to User Mode.
User Mode >>
MENU
Ready to Print
CLEAR
(3 Sec.)
EXE
[User Mode]
Card Count 0000
[User Mode]
MENU
MENU
User Mode >>
MENU
Ready to Print
CLEAR
(3 Sec.)
EXE
[User Mode]
PR-C101_C101M_E.book Page 20 Monday, August 27, 2007 11:16 AM
Page 23
Getting the Most Out of Your Printer
21
2 Press the MENU Key until [Total Cnt]
appears.
• The total number of sides is displayed.
z The count cannot be reset.
z The count display shows several cards have been printed when the printer
is shipped from the factory because the count increases during the
production process.
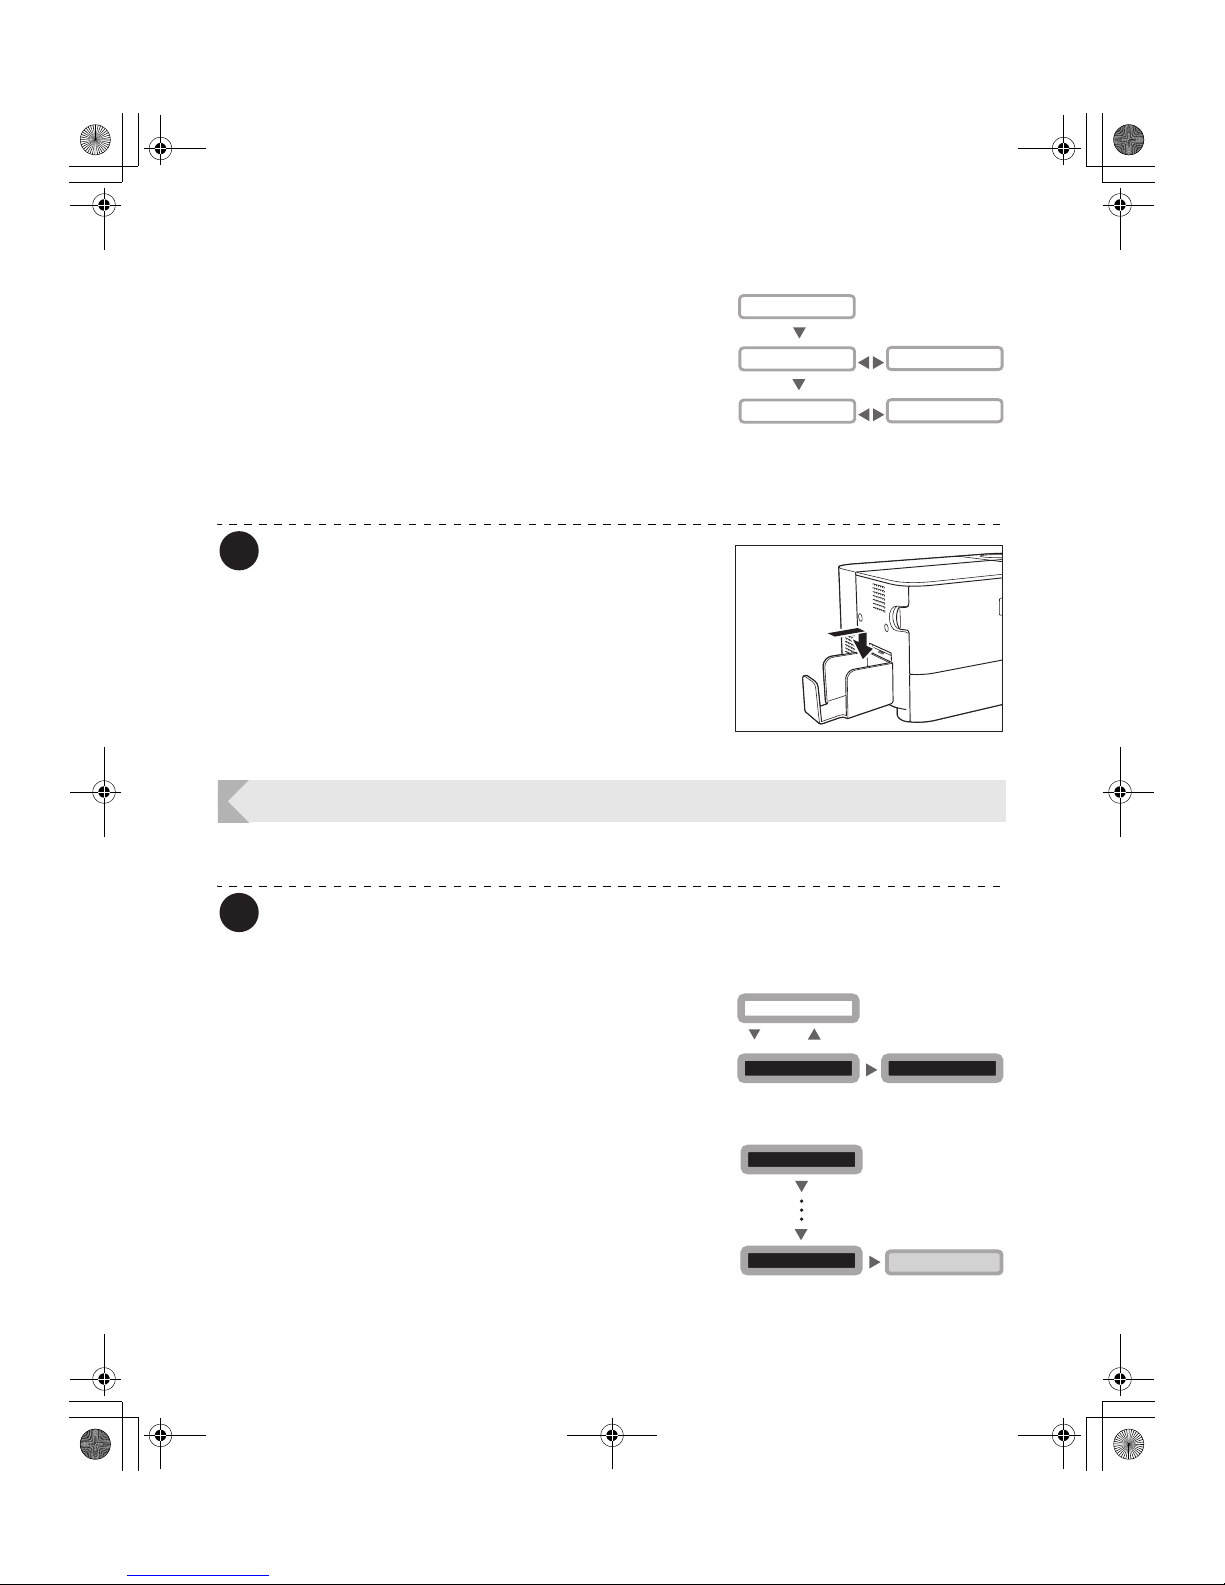
Switching the Card Ejection Slot
You can switch the slot from which printed cards are output to slot 1 or slot 2.
The factory default is set so both correctly printed cards and cards with errors are output from
Card Ejection Slot 1.
Note
z You can also change the setting by using the printer driver. (→See "Opening the
Printer Driver Settings Screen" on page 47.)
1 Switch from Normal Mode to User
Mode.
→See "Switching to User Mode" on page 16 for details on
how to switch to User Mode.
2 Press the Menu Key until [Printer
Setup >>] appears, and then press the
EXE Key.
3 Press the Menu Key until [Card Exit >>]
appears, and then press the EXE Key.
Total Cnt 0000**
[User Mode]
MENU
MENU
User Mode >>
MENU
Ready to Print
CLEAR
(3 Sec.)
EXE
[User Mode]
Printer Setup >>
EXE
[Printer Setup]
[User Mode]
MENU
MENU
EXE
Card Exit >>
MENU
MENU
[Printer Setup]
[Card Exit]
PR-C101_C101M_E.book Page 21 Monday, August 27, 2007 11:16 AM
Page 24
Full Color Card Printer PR-C101/C101M
22
4 Use the Menu Key to switch between
[NORMAL] and [Error], and then
change the setting with the EXE Key.
• Select where to output normal cards on the [Normal]
menu, and where to output abnormal cards on the
[Error] menu.
• Pressing the EXE Key switches between [EXIT-1] and
[EXIT-2].
• Set it to [EXIT-1] to output cards from Card Ejection
Slot 1, or [EXIT-2] to do from Card Ejection Slot 2.
Note
z Attach the Card Stacker to Card Ejection
Slot 2 when Card Ejection Slot 2 is
selected.
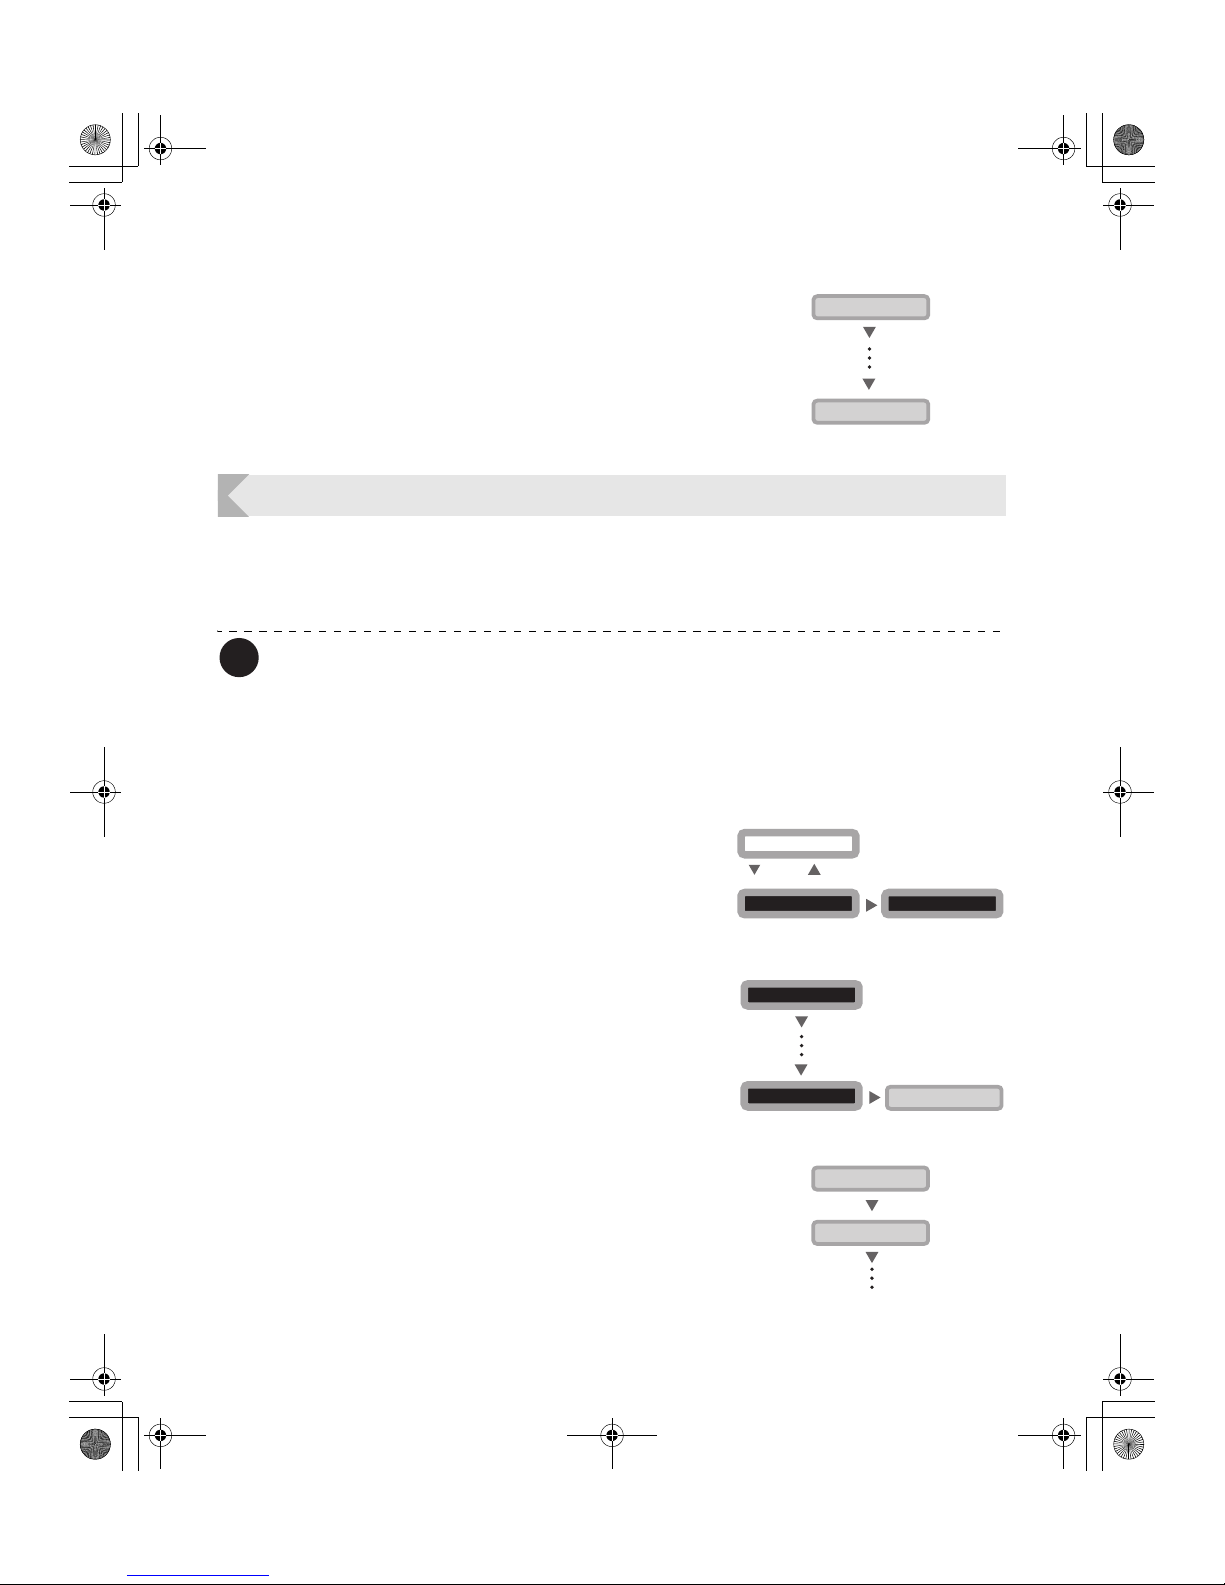
Checking the Ink Ribbon Remaining in the Ink Ribbon Cartridge
You can check the amount of ink ribbon that is remaining in the Ink Ribbon Cartridge.
Note
z You can also display the status on the printer driver. (→See "Opening the Printer
Driver Settings Screen" on page 47.)
1 Switch from Normal Mode to User
Mode.
→See "Switching to User Mode" on page 16 for details on
how to switch to User Mode.
2 Press the Menu Key until [Ribbon
Info. >>] appears, and then press the
EXE Key.
MENU
MENU
EXE
[Card Exit]
Normal EXIT-1
Error EXIT-1
EXE
Normal EXIT-2
Error EXIT-2
User Mode >>
MENU
Ready to Print
CLEAR
(3 Sec.)
EXE
[User Mode]
Ribbon Info. >>
EXE
[Ribbon Info.]
[User Mode]
MENU
MENU
PR-C101_C101M_E.book Page 22 Monday, August 27, 2007 11:16 AM
Page 25
Getting the Most Out of Your Printer
23
3 Press the Menu Key until
[Remainder(%)] appears.
• The amount of ink ribbon in the Ink Ribbon Cartridge
is shown as a percent.
Checking the Ink Ribbon Cartridge that is Currently Installed
You can check the type and lot number of the Ink Ribbon Cartridge that is currently installed.
→See "Changing the Ink Ribbon Cartridge" on page 13 for how to change the Ink Ribbon Cartridge.
→See "Ink Ribbon Cartridges" on page 42 for details about which Ink Ribbon Cartridges you can use.
Note
z You can also display the status on the printer driver. (→See "Opening the Printer
Driver Settings Screen" on page 47.)
z You can confirm the following information.
• Type of Ink Ribbon Cartridge (display is [Type])
• Lot number of Ink Ribbon Cartridge (display is [Lot])
• Serial number of Ink Ribbon Cartridge (display is [Serial])
1 Switch from Normal Mode to User
Mode.
→See "Switching to User Mode" on page 16 for details on
how to switch to User Mode.
2 Press the Menu Key until [Ribbon
Info. >>] appears, and then press the
EXE Key.
3 Press the Menu Key to display the
information you want to check.
• Pressing the Menu Key switches between [Type], [Lot],
and [Serial].
MENU
MENU
[Ribbon Info.]
Remainder(%) 100
User Mode >>
MENU
Ready to Print
CLEAR
(3 Sec.)
EXE
[User Mode]
Ribbon Info. >>
EXE
[Ribbon Info.]
[User Mode]
MENU
MENU
MENU
MENU
[Ribbon Info.]
Type **********
PR-C101_C101M_E.book Page 23 Monday, August 27, 2007 11:16 AM
Page 26
Full Color Card Printer PR-C101/C101M
24
Adjusting the Print Quality
You can adjust the print quality by adjusting the speed or making colors darker or lighter.
Note
z You can also change the setting by using the printer driver. (→See "Opening the
Printer Driver Settings Screen" on page 47.)
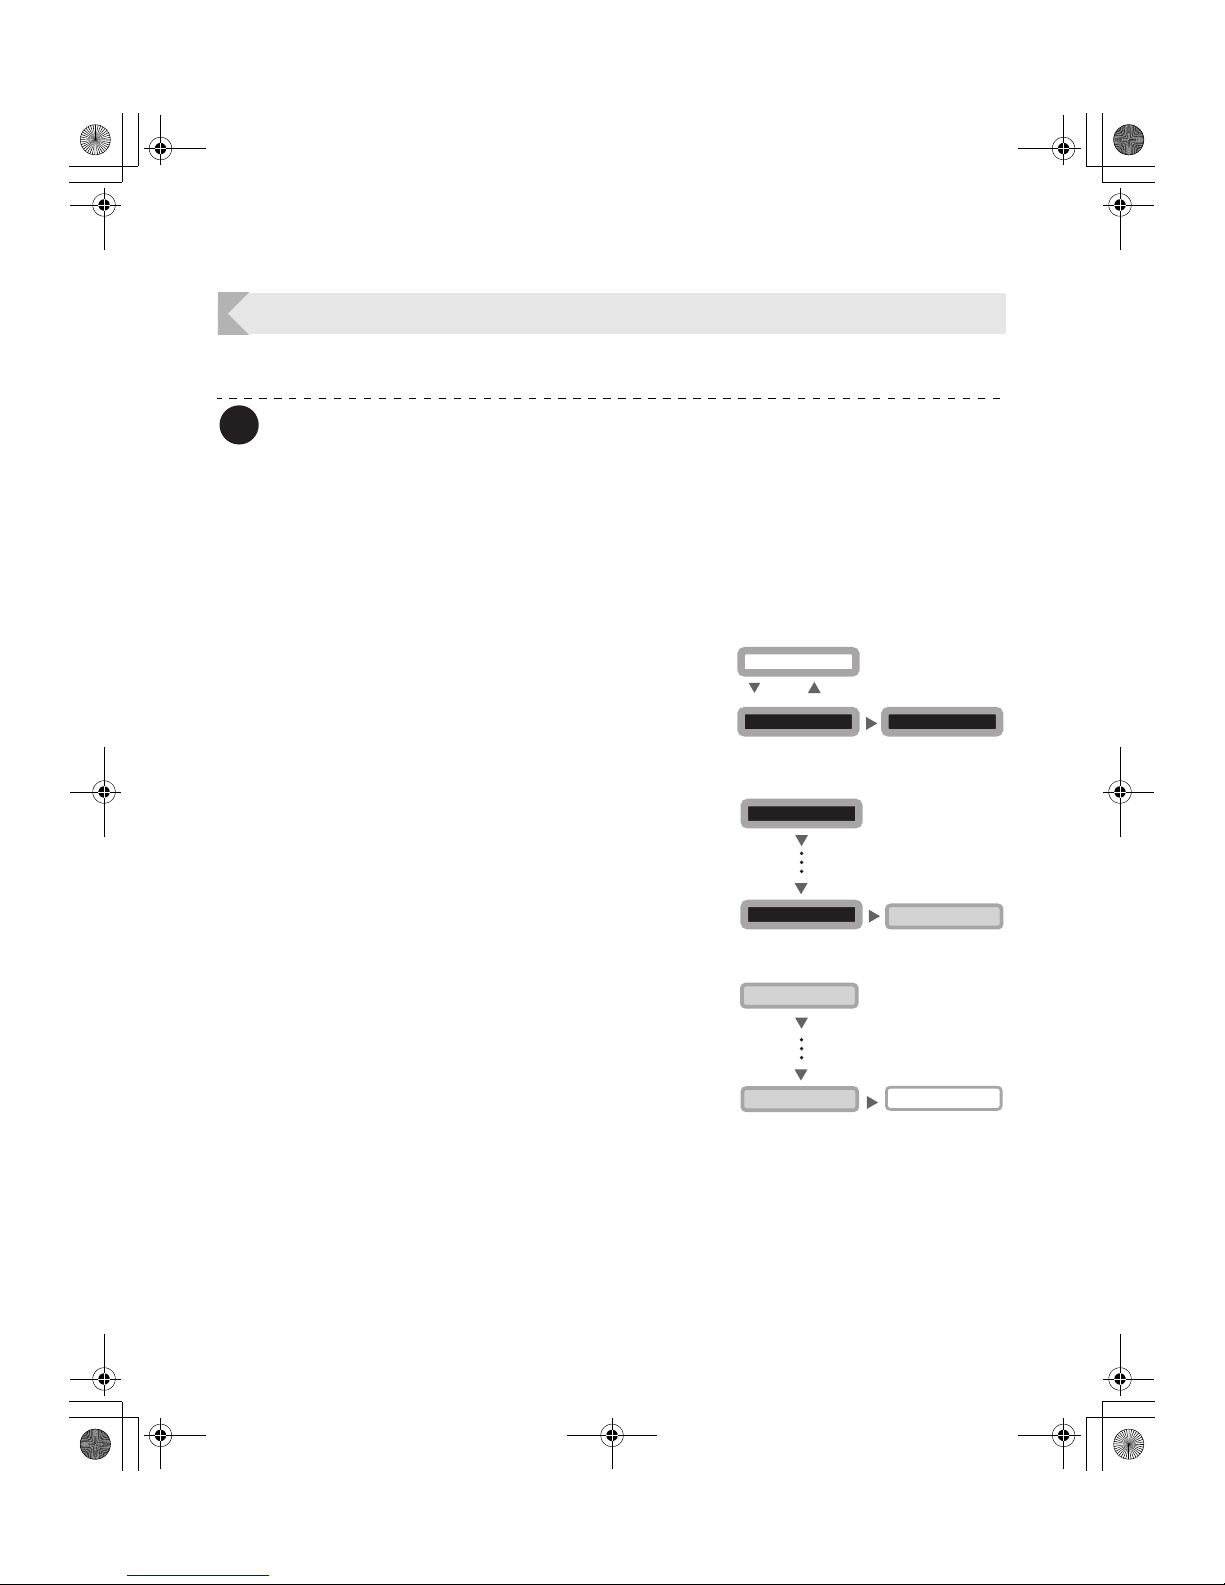
Adjusting the Color
You can adjust tones of yellow, magenta, cyan, and black.
The tones of yellow, magenta, and cyan images are adjustable and you can change the
width of black text.
1 Switch from Normal Mode to User
Mode.
→See "Switching to User Mode" on page 16 for details on
how to switch to User Mode.
2 Press the Menu Key until [Image
Setup >>] appears, and then press the
EXE Key.
3 Press the Menu Key until [Color
Adjust >>] appears, and then press the
EXE Key.
User Mode >>
MENU
Ready to Print
CLEAR
(3 Sec.)
EXE
[User Mode]
Image Setup >>
EXE
[Image Setup]
[User Mode]
MENU
MENU
EXE
Color Adjust >>
MENU
MENU
[Image Setup]
[Color Adjust]
PR-C101_C101M_E.book Page 24 Monday, August 27, 2007 11:16 AM
Page 27
Getting the Most Out of Your Printer
25
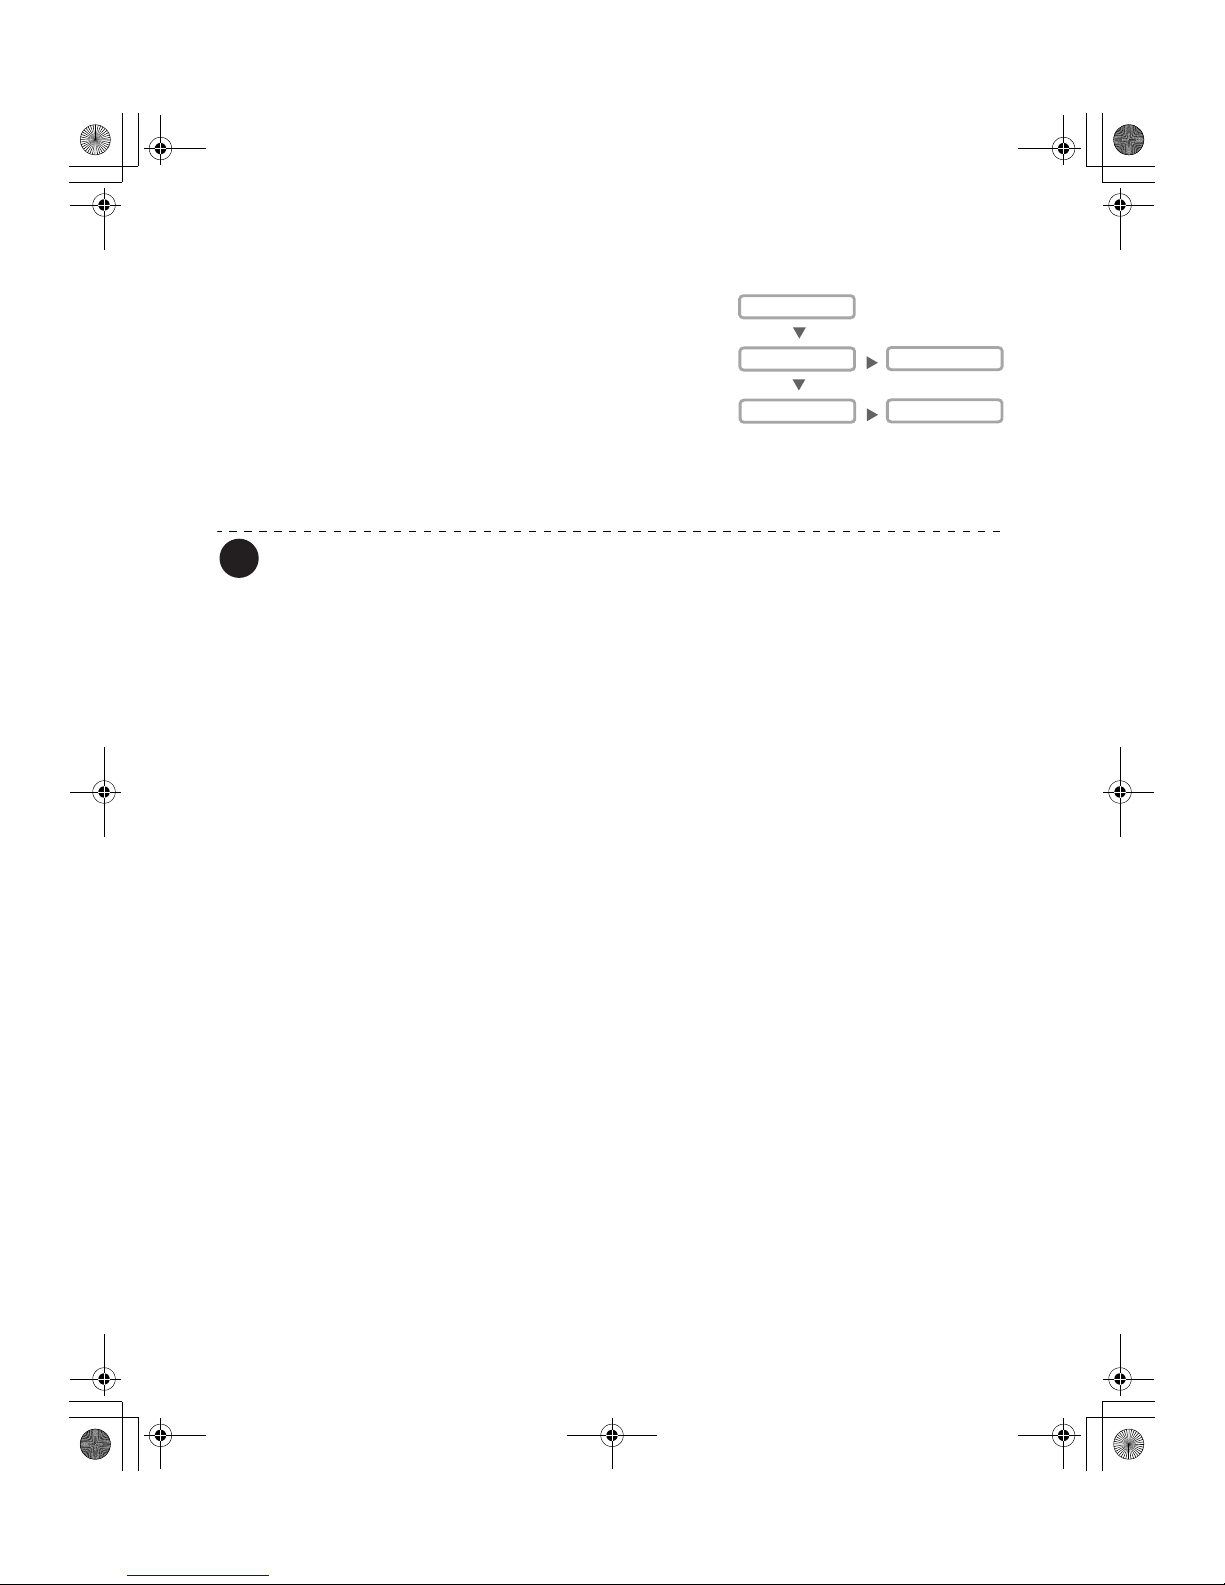
4 Select the color to adjust using the
Menu Key, and then press either the
EXE Key or the CLEAR Key to change
the settings.
• Pressing the Menu Key switches between [Yellow],
[Magenta], [Cyan], and [Black].
• Pressing the EXE Key darkens the color, by changing
the value to 0, 1, 2, or 3.
• Pressing the CLEAR Key lightens the color by
changing the value to 0, -1, -2, or -3.
Note
z The factory default setting for all colors is "0".
MENU
MENU
CLEAR
[Color Adjust]
Yellow 0
Magenta 0
EXE
Yellow 1
Magenta -1
PR-C101_C101M_E.book Page 25 Monday, August 27, 2007 11:16 AM
Page 28
Full Color Card Printer PR-C101/C101M
26
Adjusting the Edges of Images
You can adjust facial contours or the definition of edges of images.
1 Switch from Normal Mode to User
Mode.
→See "Switching to User Mode" on page 16 for details on
how to switch to User Mode.
2 Press the Menu Key until [Image
Setup >>] appears, and then press the
EXE Key.
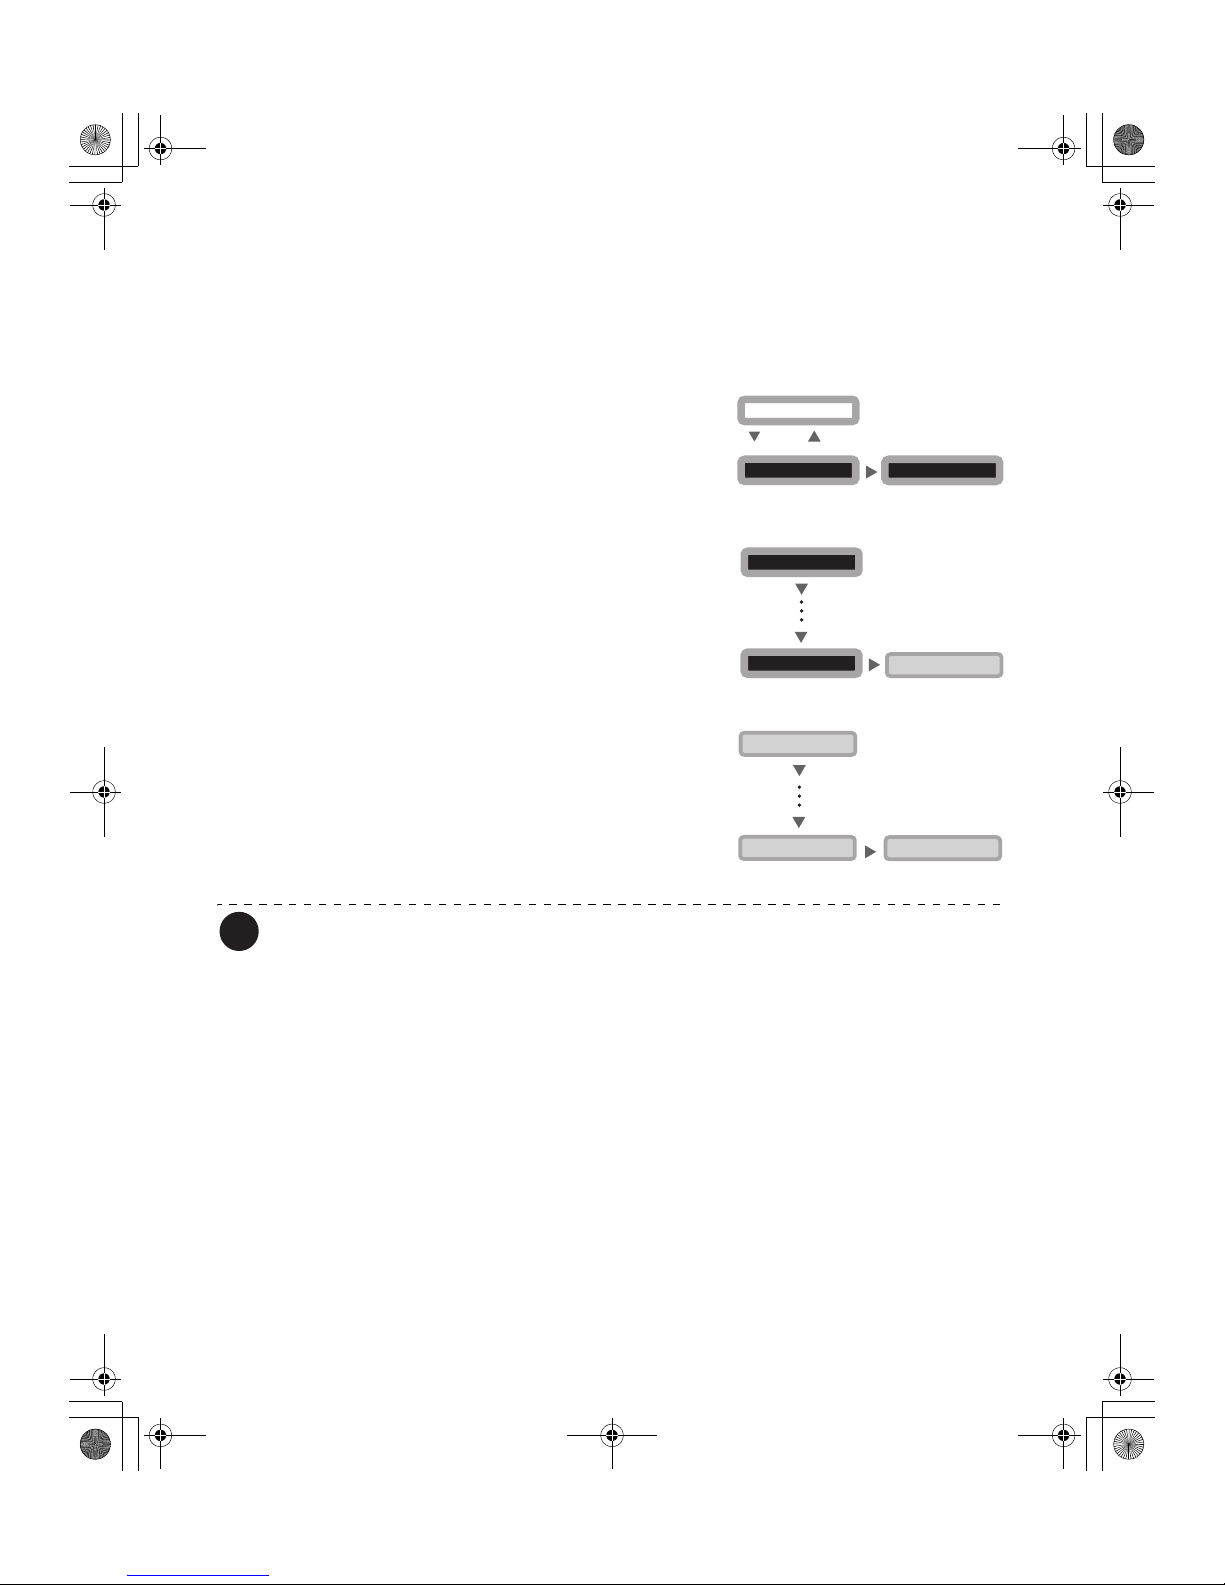
3 Press the Menu Key until [Sharpness]
appears, and then press the EXE Key or
the CLEAR Key to change the settings.
• Pressing the EXE Key darkens outlines by changing
the value to 0, 1, or 2.
• Pressing the CLEAR Key lightens outlines by
changing the value to 0, -1, or -2.
Note
z The factory default setting is [0].
User Mode >>
MENU
Ready to Print
CLEAR
(3 Sec.)
EXE
[User Mode]
Image Setup >>
EXE
[Image Setup]
[User Mode]
MENU
MENU
Sharpness 1
MENU
MENU
[Image Setup]
Sharpness 0
EXE
PR-C101_C101M_E.book Page 26 Monday, August 27, 2007 11:16 AM
Page 29
Getting the Most Out of Your Printer
27
Turning the Error Alarm On or Off
The initial setting is for the buzzer to sound when an error occurs.
You can set the buzzer so that it does not sound.
Note
z You can also change the setting by using the printer driver. (→See "Opening the
Printer Driver Settings Screen" on page 47.)
1 Switch from Normal Mode to User
Mode.
→See "Switching to User Mode" on page 16 for details on
how to switch to User Mode.
2 Press the Menu Key until [Printer
Setup >>] appears, and then press the
EXE Key.
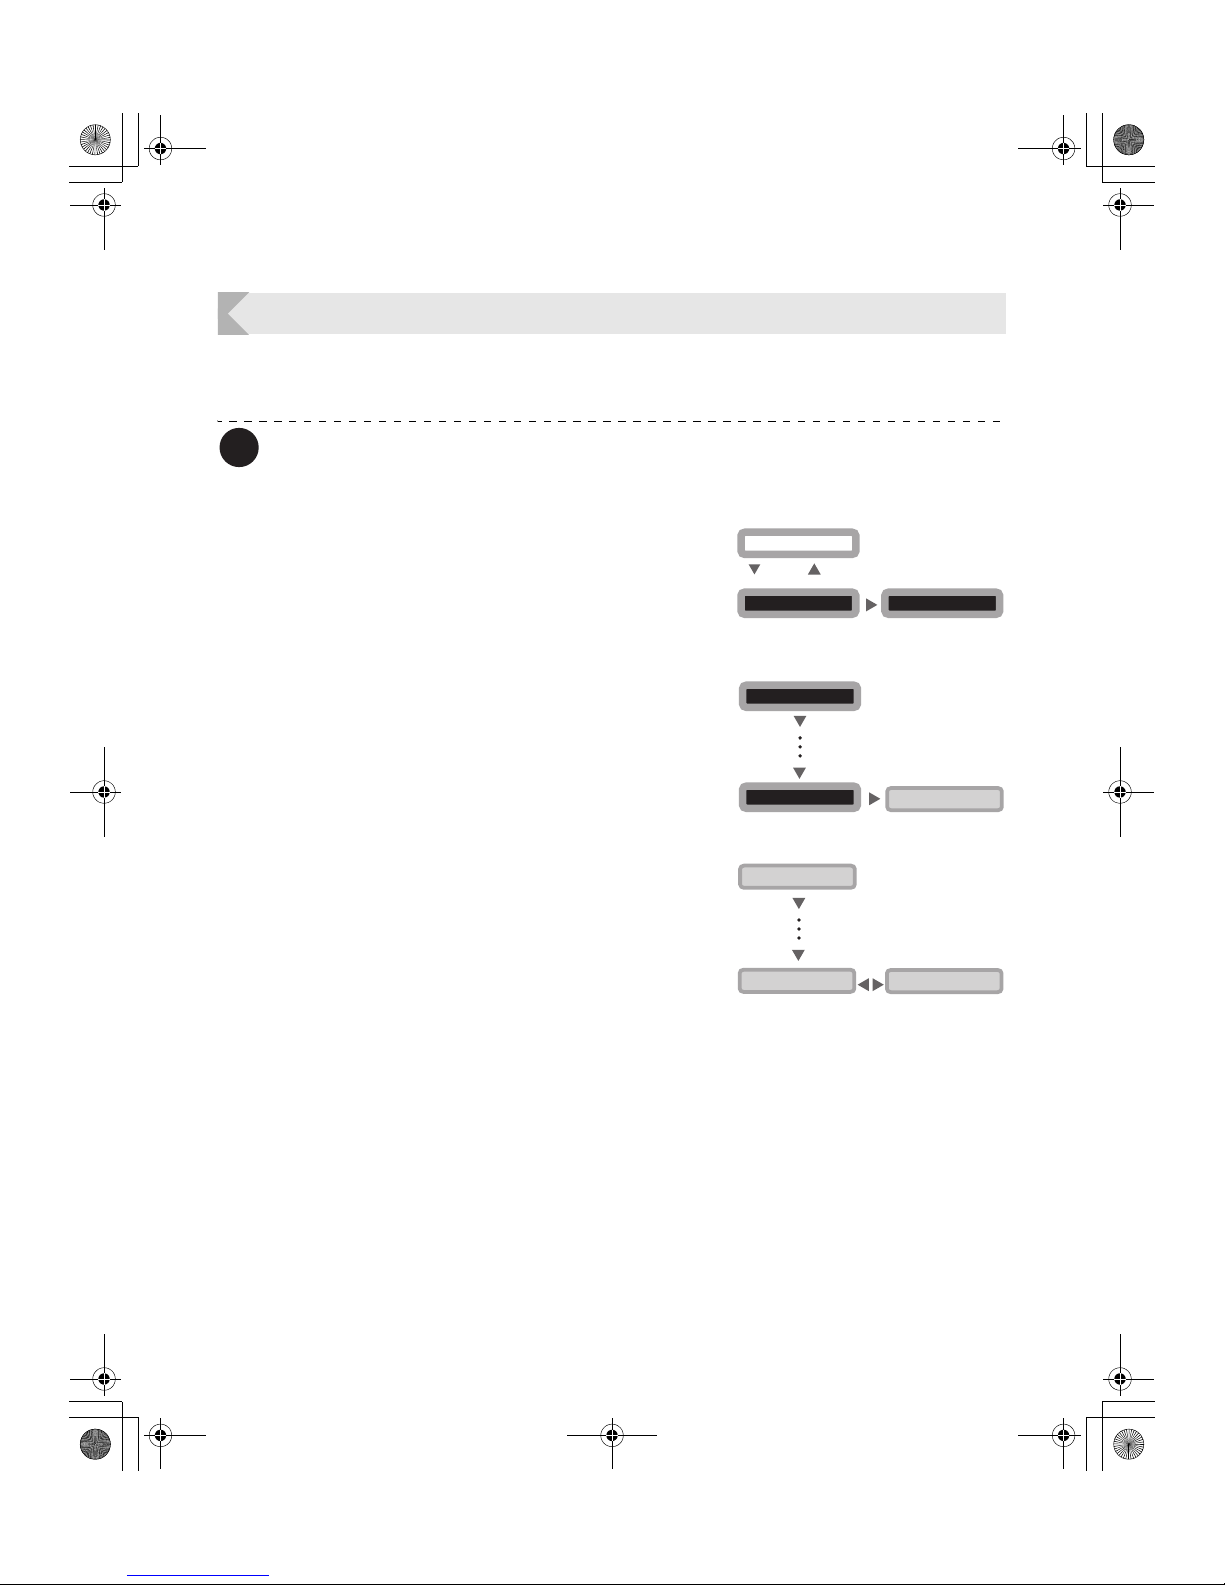
3 Press the Menu Key until [Buzzer]
appears, and then press the EXE Key to
change the settings.
• Pressing the EXE Key switches between [ON] and
[OFF].
• Set it to [ON] to sound the buzzer or [OFF] to turn the
buzzer off.
User Mode >>
MENU
Ready to Print
CLEAR
(3 Sec.)
EXE
[User Mode]
Printer Setup >>
EXE
[Printer Setup]
[User Mode]
MENU
MENU
Buzzer OFF
MENU
MENU
[Printer Setup]
Buzzer ON
EXE
PR-C101_C101M_E.book Page 27 Monday, August 27, 2007 11:16 AM
Page 30
Full Color Card Printer PR-C101/C101M
28
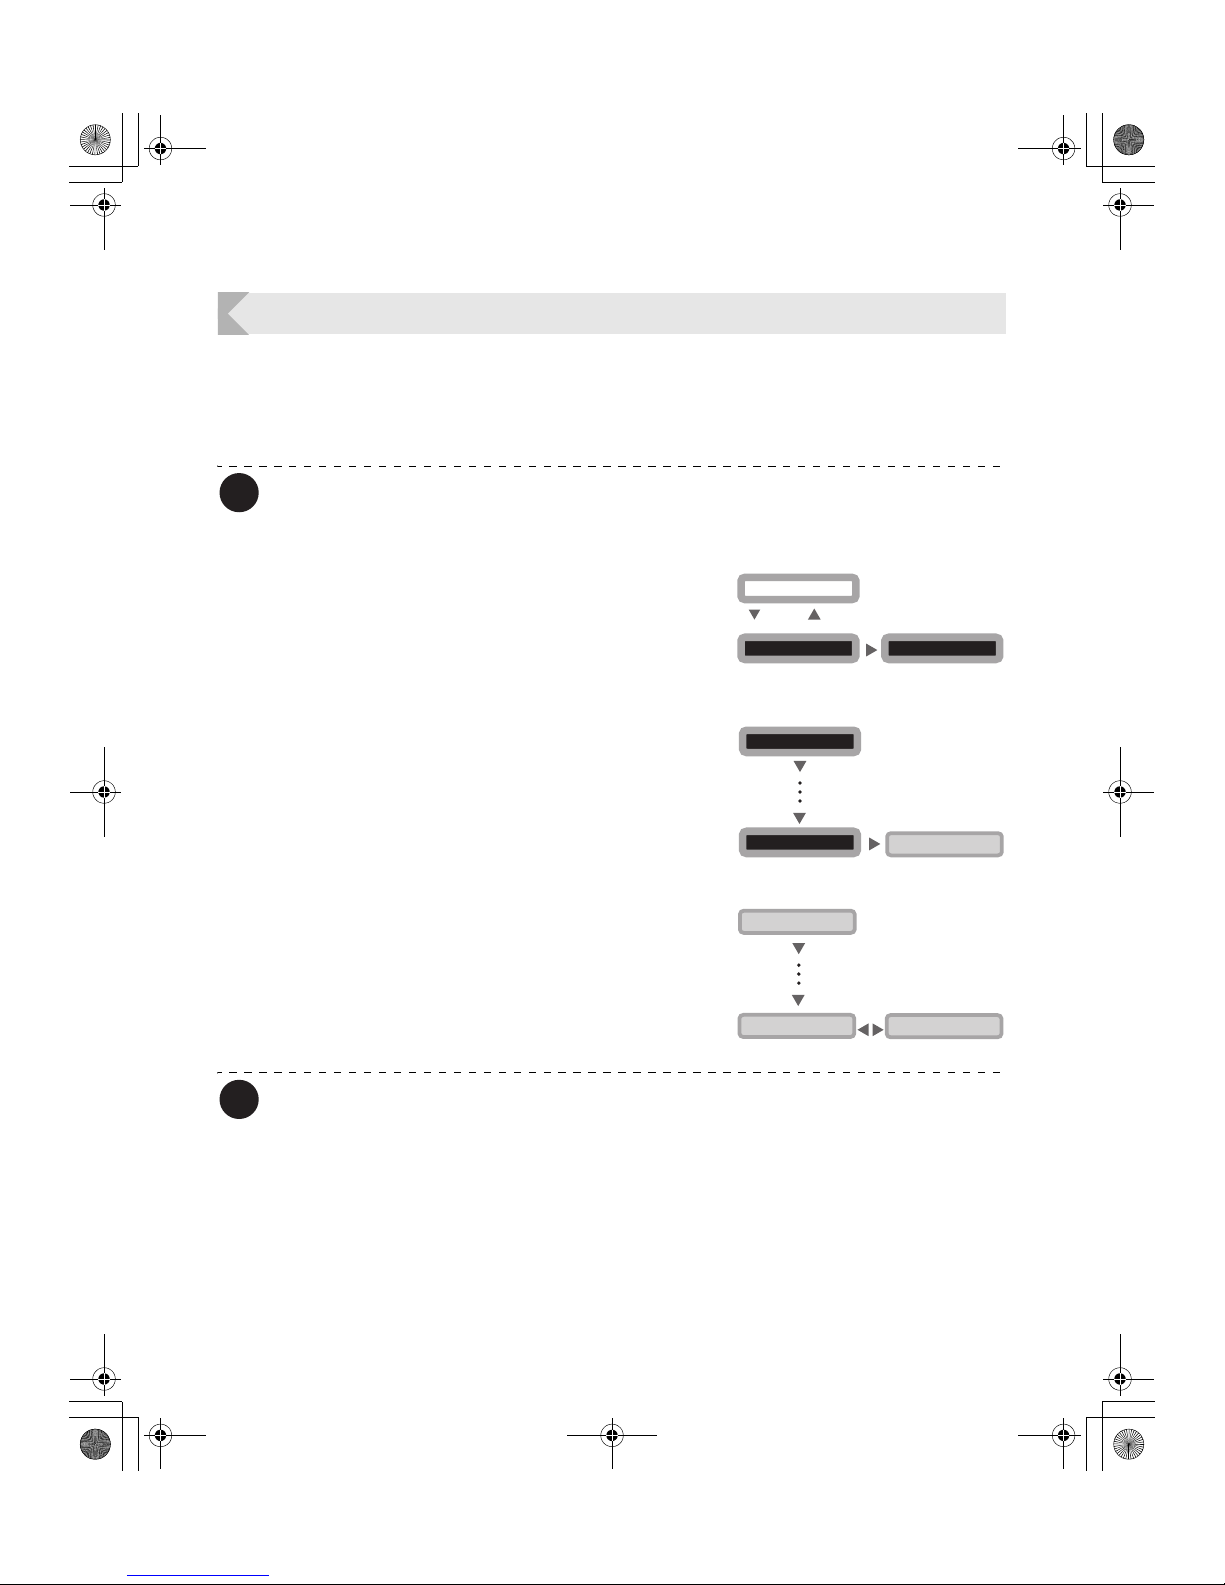
Setting the Printer to Reprint a Card if an Error Occurs
You can change the settings so that cards being printed when an error occurs are automatically
reprinted after the error is fixed.
This is useful to prevent omissions due to errors when printing cards in a series, such as
employee IDs.
Note
z You can also change the setting by using the printer driver. (→See "Opening the
Printer Driver Settings Screen" on page 47.)
1 Switch from Normal Mode to User
Mode.
→See "Switching to User Mode" on page 16 for details on
how to switch to User Mode.
2 Press the Menu Key until [Printer
Setup >>] appears, and then press the
EXE Key.
3 Press the Menu Key until [Retry Print]
appears, and then press the EXE Key.
• Pressing the EXE Key switches between [ON] and
[OFF].
• Set to [ON] to reprint cards after an error or set it to
[OFF] to not reprint the cards.
Note
z The factory default setting is [OFF].
z If the printer is restarted to fix the error, the card that was being printed during the
error is not automatically reprinted.
User Mode >>
MENU
Ready to Print
CLEAR
(3 Sec.)
EXE
[User Mode]
Printer Setup >>
EXE
[Printer Setup]
[User Mode]
MENU
MENU
Retry Print ON
MENU
MENU
[Printer Setup]
Retry Print OFF
EXE
PR-C101_C101M_E.book Page 28 Monday, August 27, 2007 11:16 AM
Page 31
Getting the Most Out of Your Printer
29
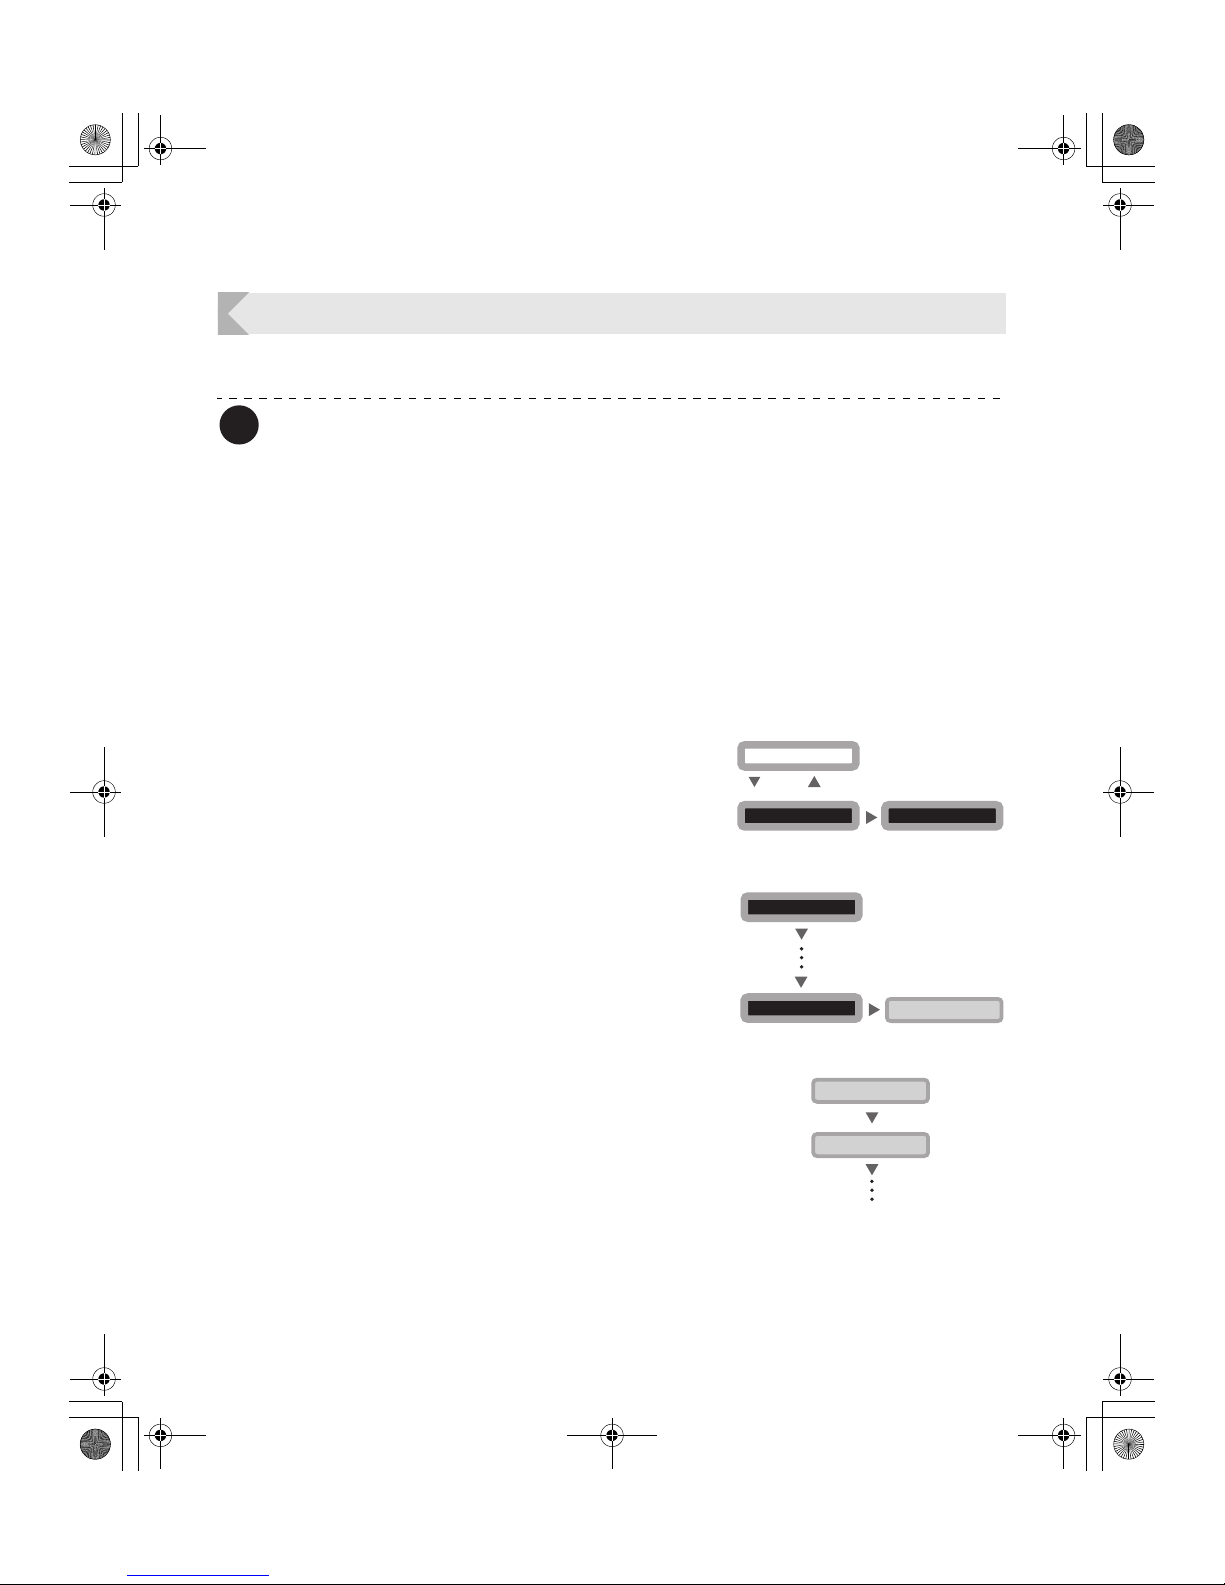
Checking the Program Information and Serial Number
You can check the version of the program and the printer's serial number.
Note
z You can also display the status on the printer driver. (→See "Opening the Printer
Driver Settings Screen" on page 47.)
z You can confirm the following information.
• Version of the base program (display is [Base Ver..])
• Version of the main program (display is [Main Ver..])
The version of the program that starts when the power is turned on.
You can download a file to update the program.
→See "Updating the Printer's Software" on page 43 for updating instructions.
• Printer's serial number (display is [Serial])
• Thermal head's number (display is [Head])
• Version of the magnetic encoder (screen display [Encoder]) (PR-C101M only)
Magnetic encoder standard information (ISO/JIS2) and version information.
1 Switch from Normal Mode to User
Mode.
→See "Switching to User Mode" on page 16 for details on
how to switch to User Mode.
2 Press the Menu Key until [Printer
Info. >>] appears, and then press the
EXE Key.
3 Press the Menu Key to display the
information to check.
• Pressing the Menu Key switches between [Base Ver.],
[Main Ver.], [Serial], [Head], and [Encoder].
User Mode >>
MENU
Ready to Print
CLEAR
(3 Sec.)
EXE
[User Mode]
Printer Info. >>
EXE
[Printer Info.]
[User Mode]
MENU
MENU
MENU
MENU
[Printer Info.]
Base Ver. *.**
PR-C101_C101M_E.book Page 29 Monday, August 27, 2007 11:16 AM
Page 32
Full Color Card Printer PR-C101/C101M
30
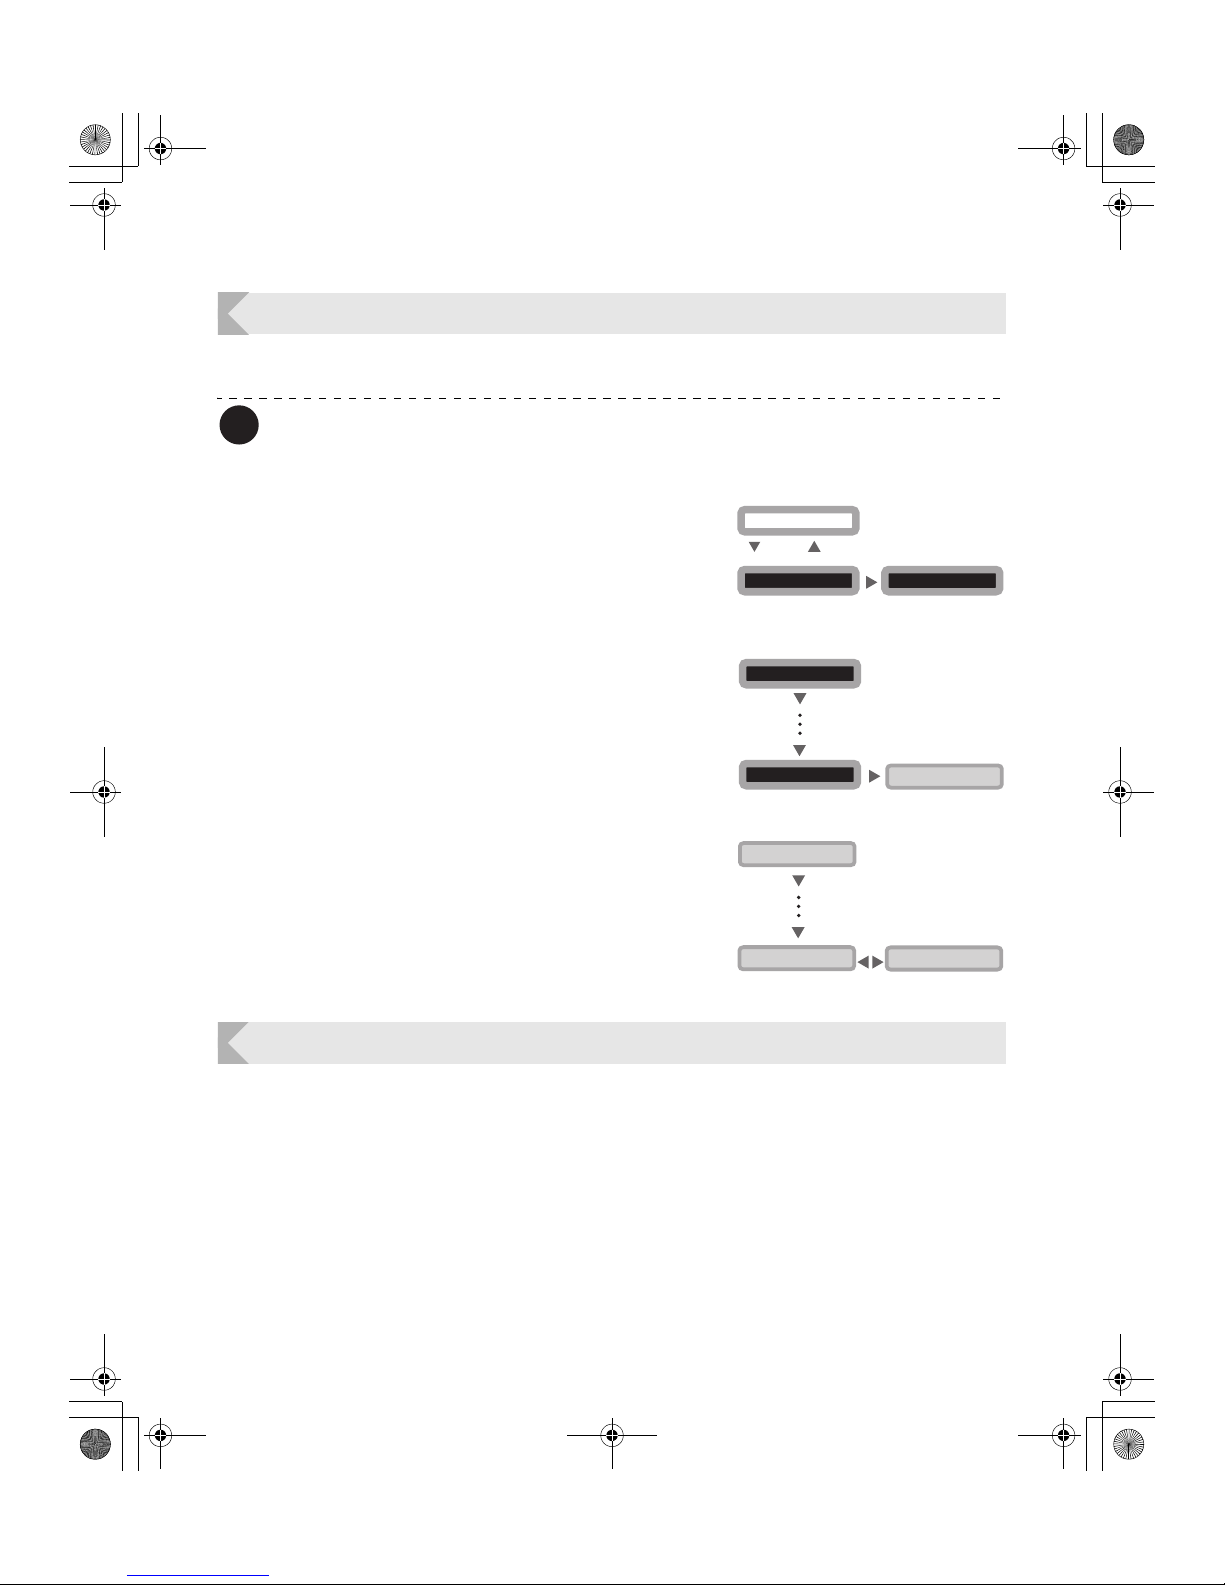
Changing the Magnetic Encoder's Settings (PR-C101M Only)
You can switch the coercivity (Hi-Co or Lo-Co) when writing magnetic data.
Note
z You can also change the setting by using the printer driver. (→See "Opening the
Printer Driver Settings Screen" on page 47.)
1 Switch from Normal Mode to User
Mode.
→See "Switching to User Mode" on page 16 for details on
how to switch to User Mode.
2 Press the Menu Key until [Printer
Setup >>] appears, and then press the
EXE Key.
3 Press the Menu Key until [Encode
Type] appears, and then press the EXE
Key.
• Pressing the EXE Key switches between [LOCO] and
[HICO].
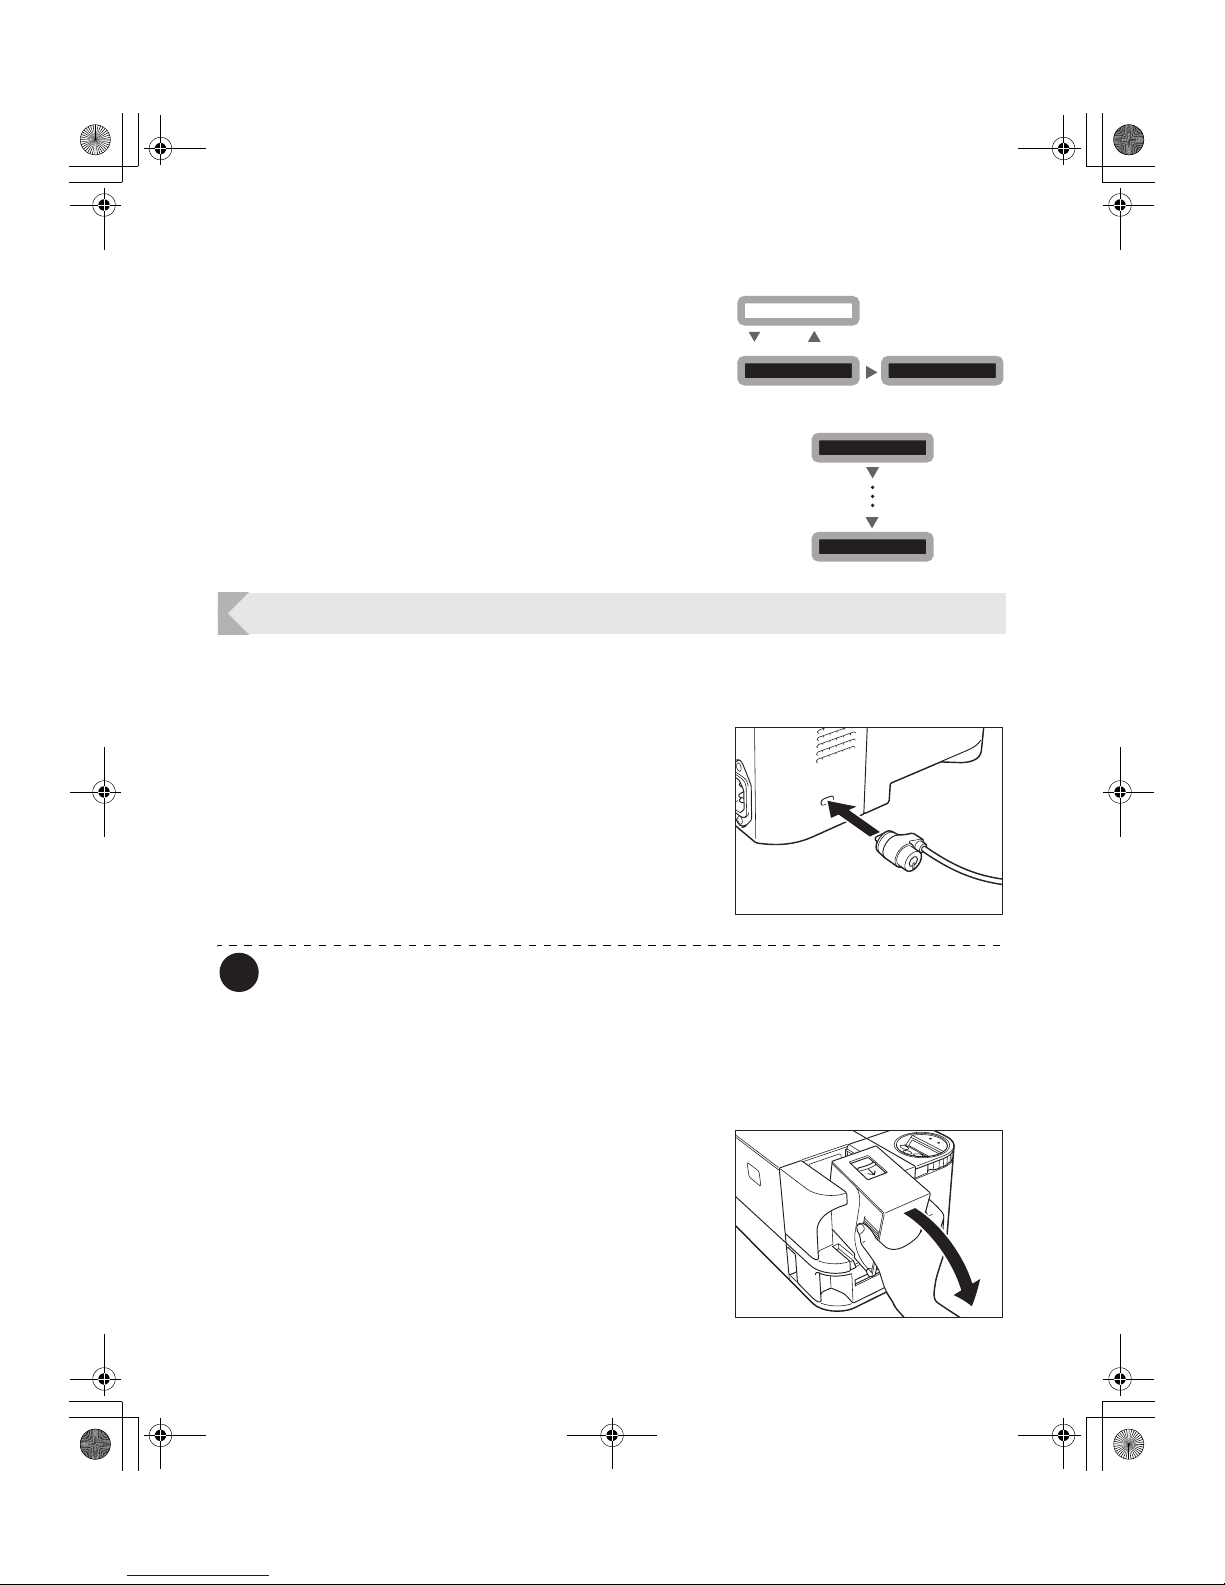
Returning Settings to the Default
You can restore changed settings to their initial factory default settings.
The following settings can be returned to their initial settings.
• [Card Count] value (the [Total Count] value cannot be initialized).
• Settings on the sub menus in [Printer Setup].
• Settings on the sub menus in [Image Setup].
User Mode >>
MENU
Ready to Print
CLEAR
(3 Sec.)
EXE
[User Mode]
Printer Setup >>
EXE
[Printer Setup]
[User Mode]
MENU
MENU
Encode Type HICO
MENU
MENU
[Printer Setup]
Encode Type LOCO
EXE
PR-C101_C101M_E.book Page 30 Monday, August 27, 2007 11:16 AM
Page 33
Getting the Most Out of Your Printer
31
1 Switch from Normal Mode to User
Mode.
→See "Switching to User Mode" on page 16 for details on
how to switch to User Mode.
2 Press the Menu Key until [Setup
Reset[C+E]] appears, and then press
the EXE Key and the CLEAR Key at the
same time.
Preventing Theft and Unauthorized Usage
Preventing Theft of the Printer (Security Cable Slot)
You can prevent theft of the printer by locking it with a wire cable.
Use a wire cable that fits the Security Cable Slot
(0.12" x 0.28" (3.00 mm x 7.00 mm)) to lock up
the printer.
Note
z Use a commercial security cable.
How to Store Cards (Removing the Card Case)
You can prevent unauthorized use of the cards by removing the Card Case and locking it in
a safe or other secure location.
1 Pull the Card Case as indicated by
arrow in the illustration.
• Grip the Card Case by the embossing on its sides and
pull it forward and down.
• When you hear a click remove the Card Case.
User Mode >>
MENU
Ready to Print
CLEAR
(3 Sec.)
EXE
[User Mode]
Setup Reset[C+E]
[User Mode]
MENU
MENU
PR-C101_C101M_E.book Page 31 Monday, August 27, 2007 11:16 AM
Page 34
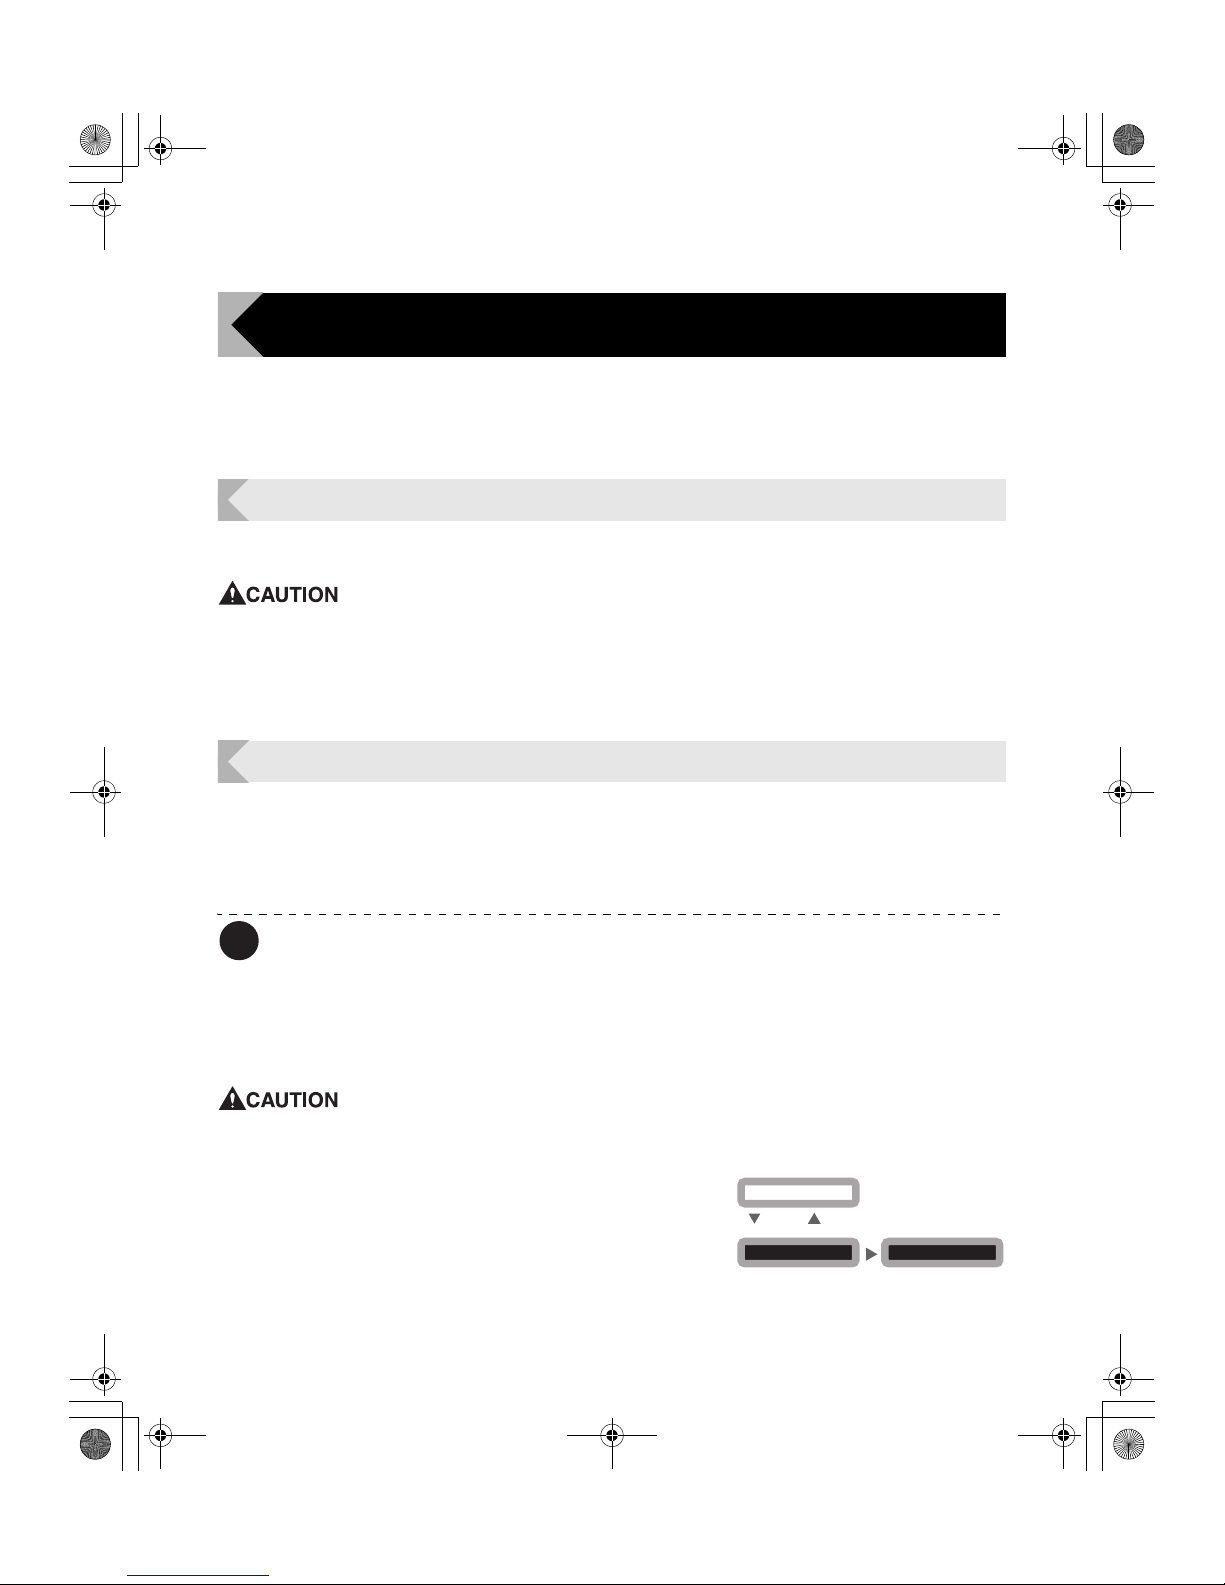
Full Color Card Printer PR-C101/C101M
32
Cleaning
The rollers need to be cleaned to maintain good print quality.
This section explains which rollers need to be cleaned and how to clean them.
Before Cleaning
Note the following cautions when cleaning the rollers.
z Do not clean the rollers near an open flame.
z Remove any cards that are inside the printer.
z After cleaning the rollers, do not use the printer until the rollers get dry (for at
least five minutes).
z Do not touch the rollers with your bare hands.
Cleaning with a Cleaning Card
Use the Cleaning Card (provided) to clean the Card Transport Roller if cards do not feed
smoothly.
We recommend cleaning the rollers after printing about 1,000 cards.
→See "Cleaning Cards" on page 43 for details about which Cleaning Cards you can use.
Note
z The [Card Count] and [Total Count] functions make it easy to keep track of how many
cards are printed.
→See "Counting the Number of Cards that Are Printed" on page 20 for details about the [Card Count]
function.
→See "Displaying the Total Number of Sides that Are Printed" on page 20 for details about the [Total Count]
function.
z Cleaning Cards can only be used once and cannot be reused. Use a new
Cleaning Card every time you clean the rollers.
1 Turn on the power and switch from
Normal Mode to User Mode.
→See "Switching to User Mode" on page 16 for details on
how to switch to User Mode.
User Mode >>
MENU
Ready to Print
CLEAR
(3 Sec.)
EXE
[User Mode]
PR-C101_C101M_E.book Page 32 Monday, August 27, 2007 11:16 AM
Page 35
Cleaning
33
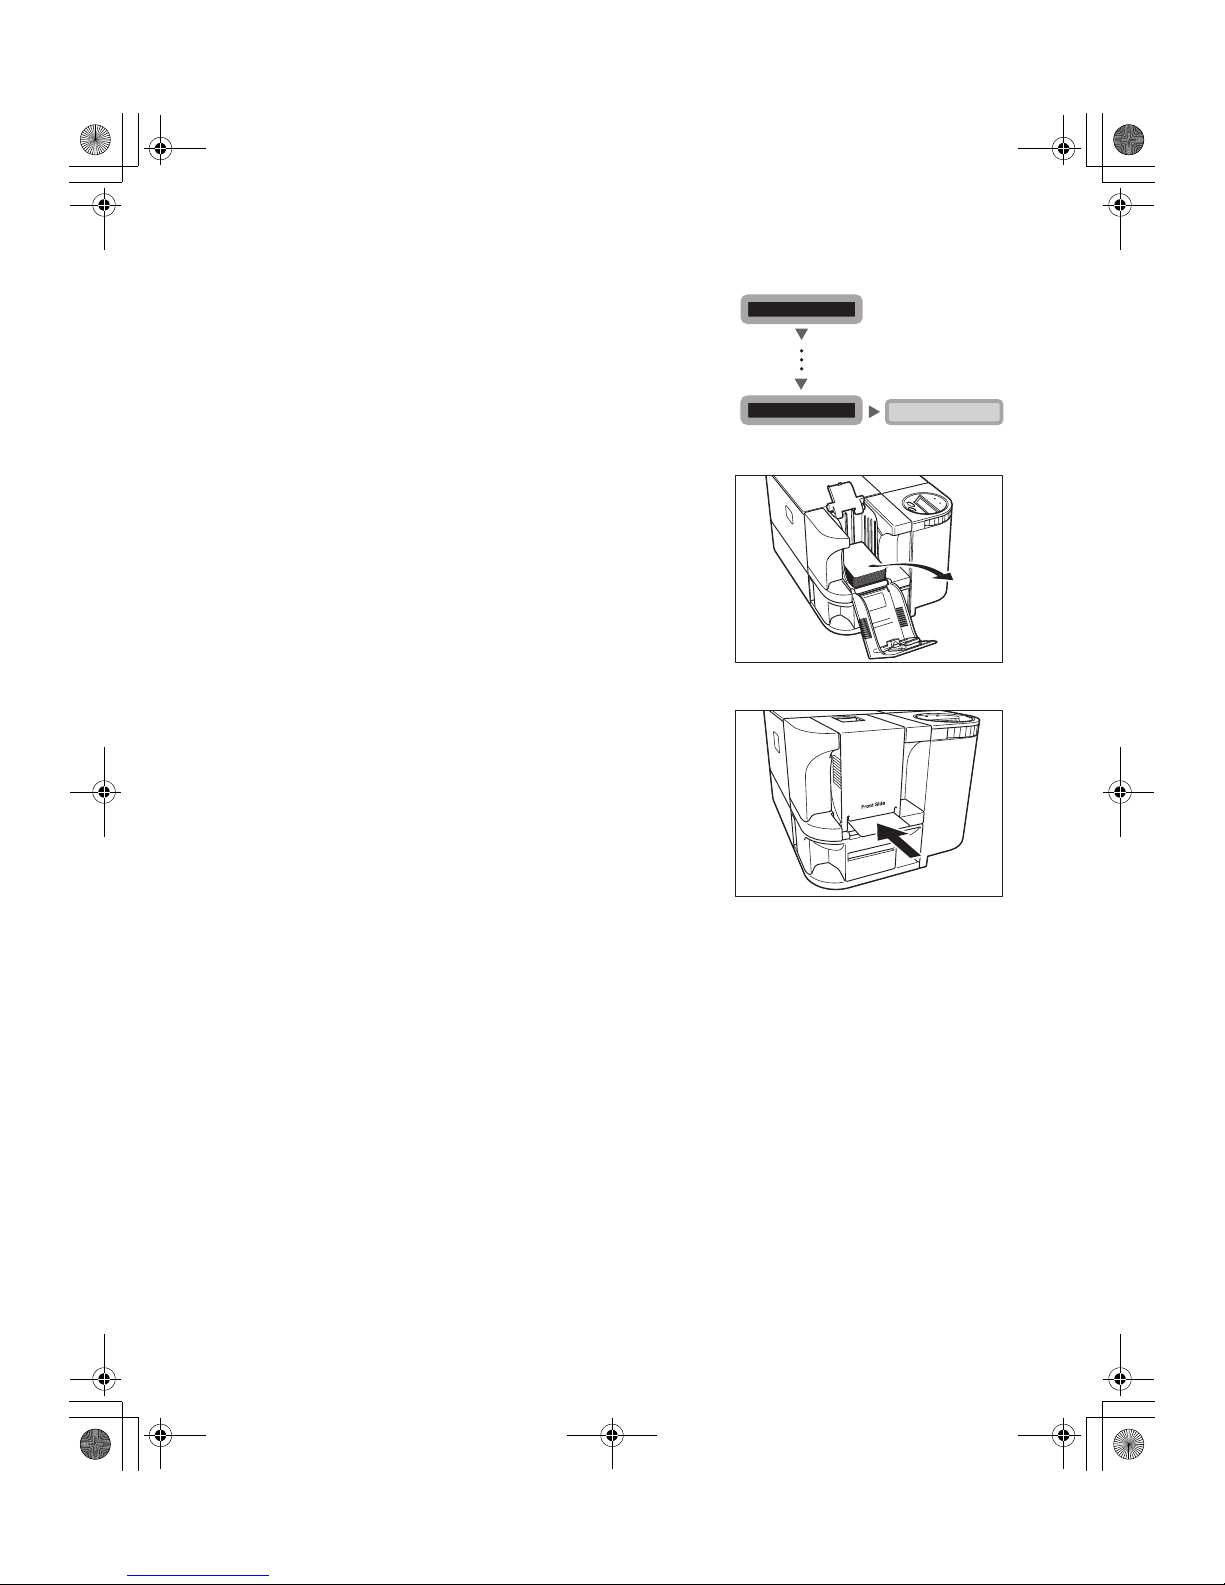
2 Press the Menu Key until [Cleaning >>]
appears and then press the EXE Key.
3 Remove the cards from the Card Case
and then press the EXE Key.
• If cards are loaded, [Remove Cards] appears.
• When the cards have been removed, [Push EXE
(NEXT)] appears.
4 [Set Cleaning Crd] appears when the
Cleaning Card is loaded.
• Remove the protection sheet from the sticky surface of
the Cleaning Card, and then load it with the sticky
surface face down.
• When the Cleaning Card is loaded, [Push EXE (Start)]
appears.
5 Press the EXE Key.
• The Cleaning Card is pulled into the printer and
cleaning starts.
• The Cleaning Card comes out of the Card Ejection
Slot 1 when cleaning is completed.
Cleaning >>
EXE
Remove Cards
[User Mode]
MENU
MENU
PR-C101_C101M_E.book Page 33 Monday, August 27, 2007 11:16 AM
Page 36
Full Color Card Printer PR-C101/C101M
34
Cleaning the Cleaning Roller
Clean the Cleaning Roller if cards are printed with missing colors or if there are foreign objects
on them.
z Be sure to turn off the printer before cleaning the rollers.
z Read the cautions in "Before Cleaning" on page 32.
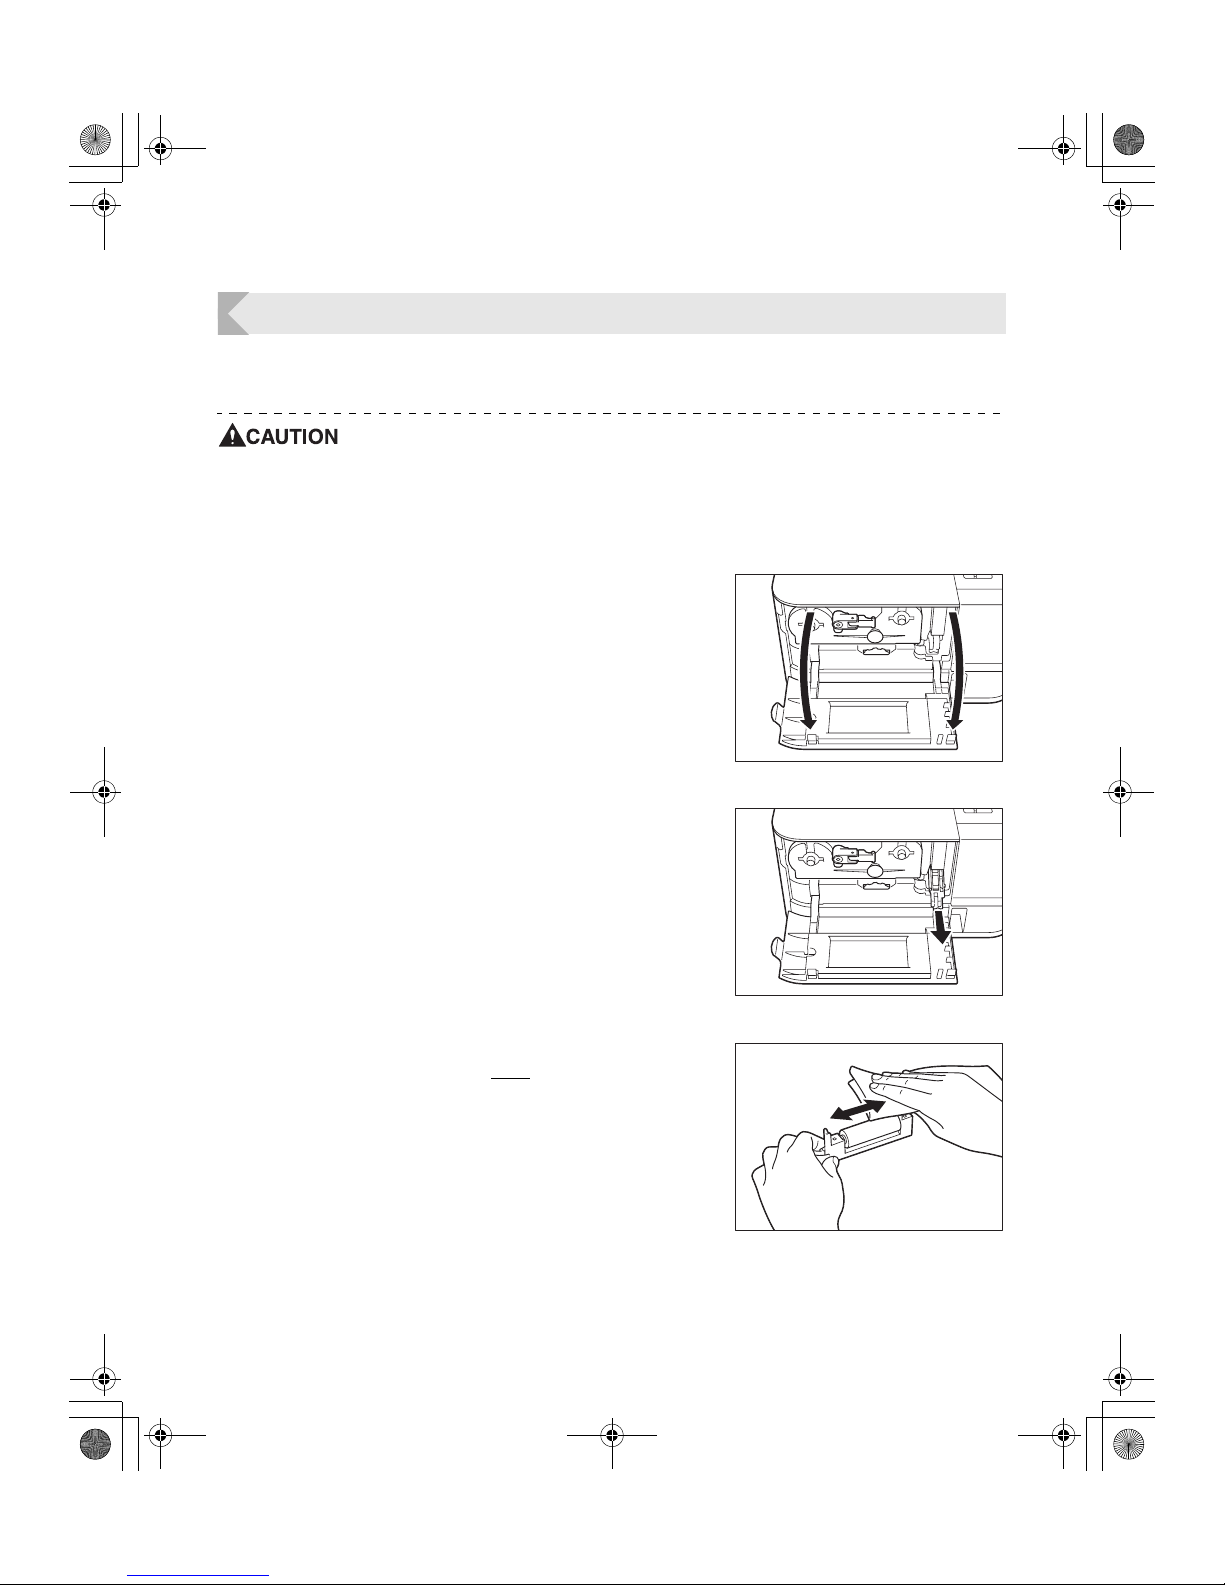
1 Turn off the power.
2 Open the Front Cover.
• Open the Front Cover towards you.
3 Remove the Cleaning Roller.
• To remove the Cleaning Roller, pinch the grip located
on the right side of the Ink Ribbon Cartridge, and pull it
out.
4 Wipe the roller clean.
• Use a soft cloth imbued with water to wipe the roller
clean.
PR-C101_C101M_E.book Page 34 Monday, August 27, 2007 11:16 AM
Page 37
Cleaning
35
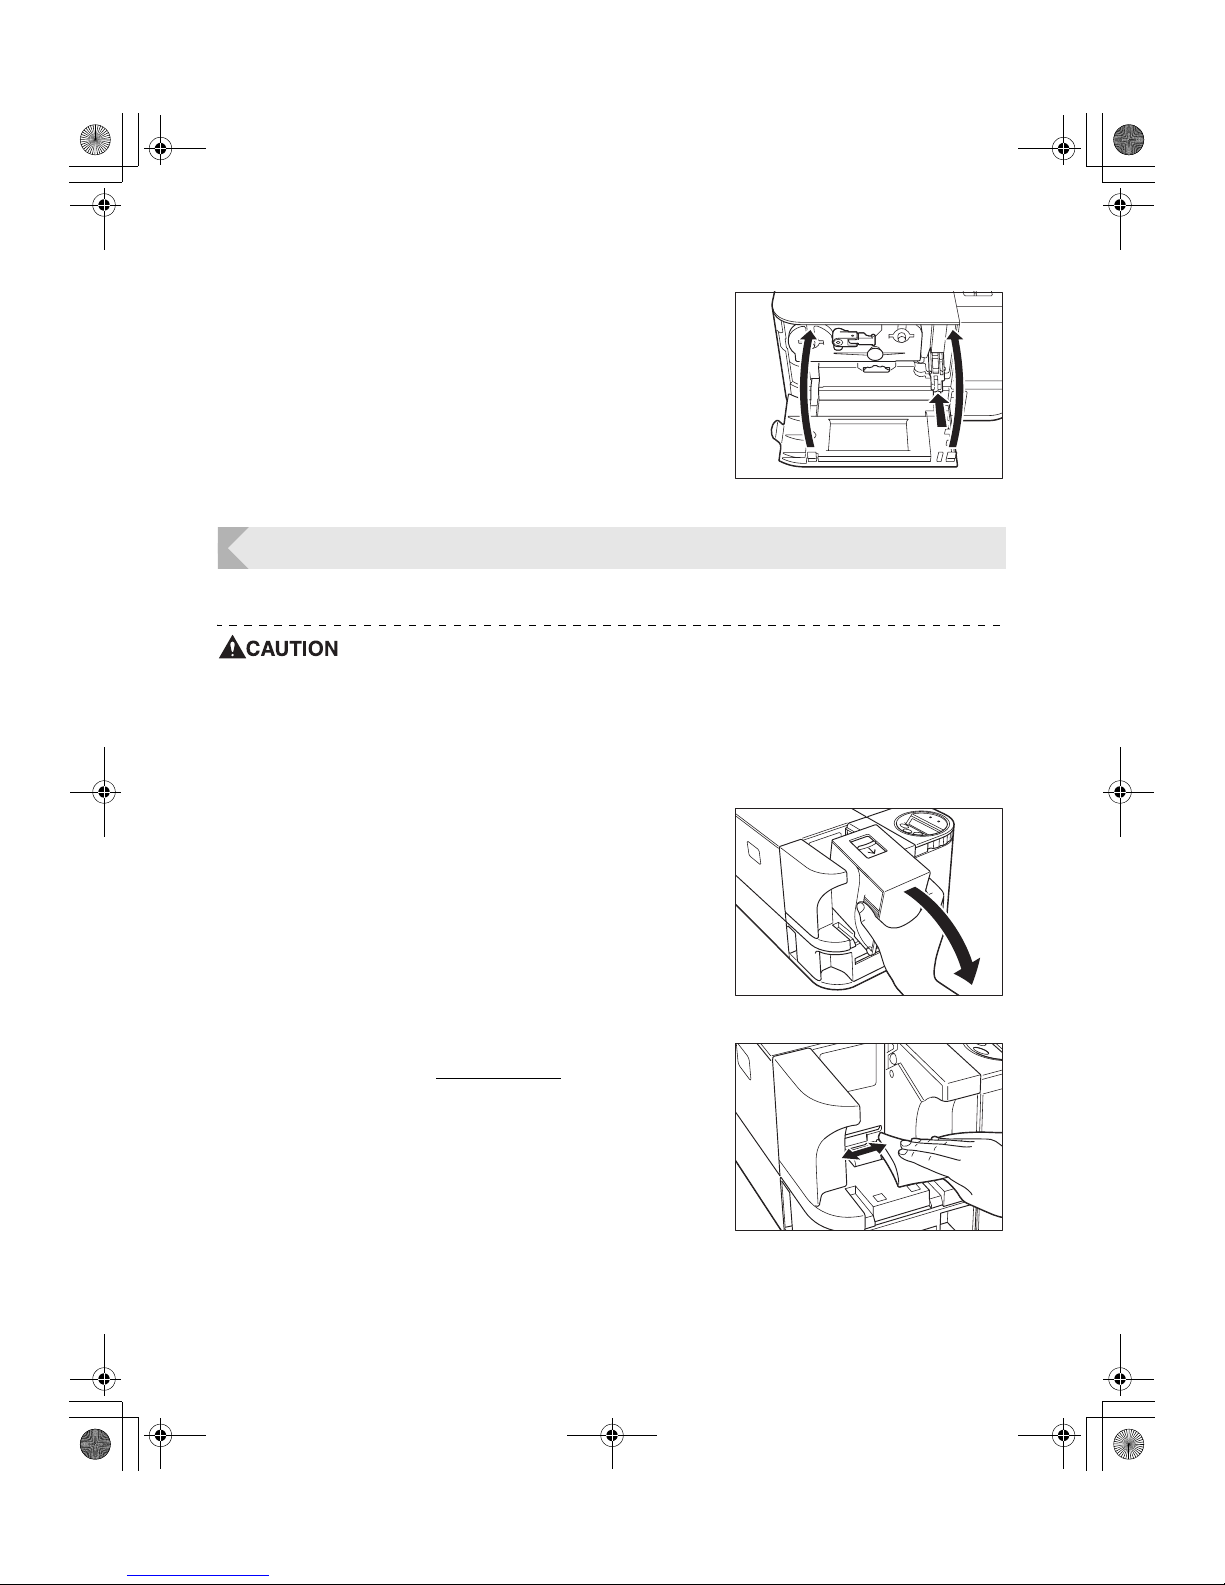
5 Insert the Cleaning Roller and close the
Front Cover.
• Line up the slide with the rail on the printer and insert it
all the way.
Cleaning the Feeding Roller
Clean the Feeding Roller under the Card Case if cards do not feed smoothly into the printer.
z Be sure to turn off the printer before cleaning the rollers.
z Read the cautions in "Before Cleaning" on page 32.
z Do not use any solvents other than very pure alcohol.
1 Turn off the power.
2 Remove the Card Case.
• Grip the Card Case by the ridges on its side and pull it
as indicated by arrow in the illustration.
3 Wipe the roller clean.
• Use a soft cloth and very pure alcohol to wipe the
roller clean.
• Turn the roller as you wipe it to clean it in the direction
of an arrow.
PR-C101_C101M_E.book Page 35 Monday, August 27, 2007 11:16 AM
Page 38
Full Color Card Printer PR-C101/C101M
36
Troubleshooting
This section explains what to do when an error message appears, a card is jammed, or
there is a problem with the printed side of a card.
When an Error Message Appears...
The ERROR Indicator is lit and a description of the error appears on the LCD Panel when an
error occurs.
Clearing an Error
Follow the instructions below to clear an error.
After clearing an error, [Ready to Print] appears when the CLEAR Key is pressed and the
printer is returned to normal status.
Note
z When two errors occur, only the first error message is displayed.
Pressing the CLEAR Key after clearing the first error displays the next error. Continue
to clear errors until [Ready to Print] appears.
How to Clear an Error
Resolve error messages that appear on the LCD Panel according to the instructions below.
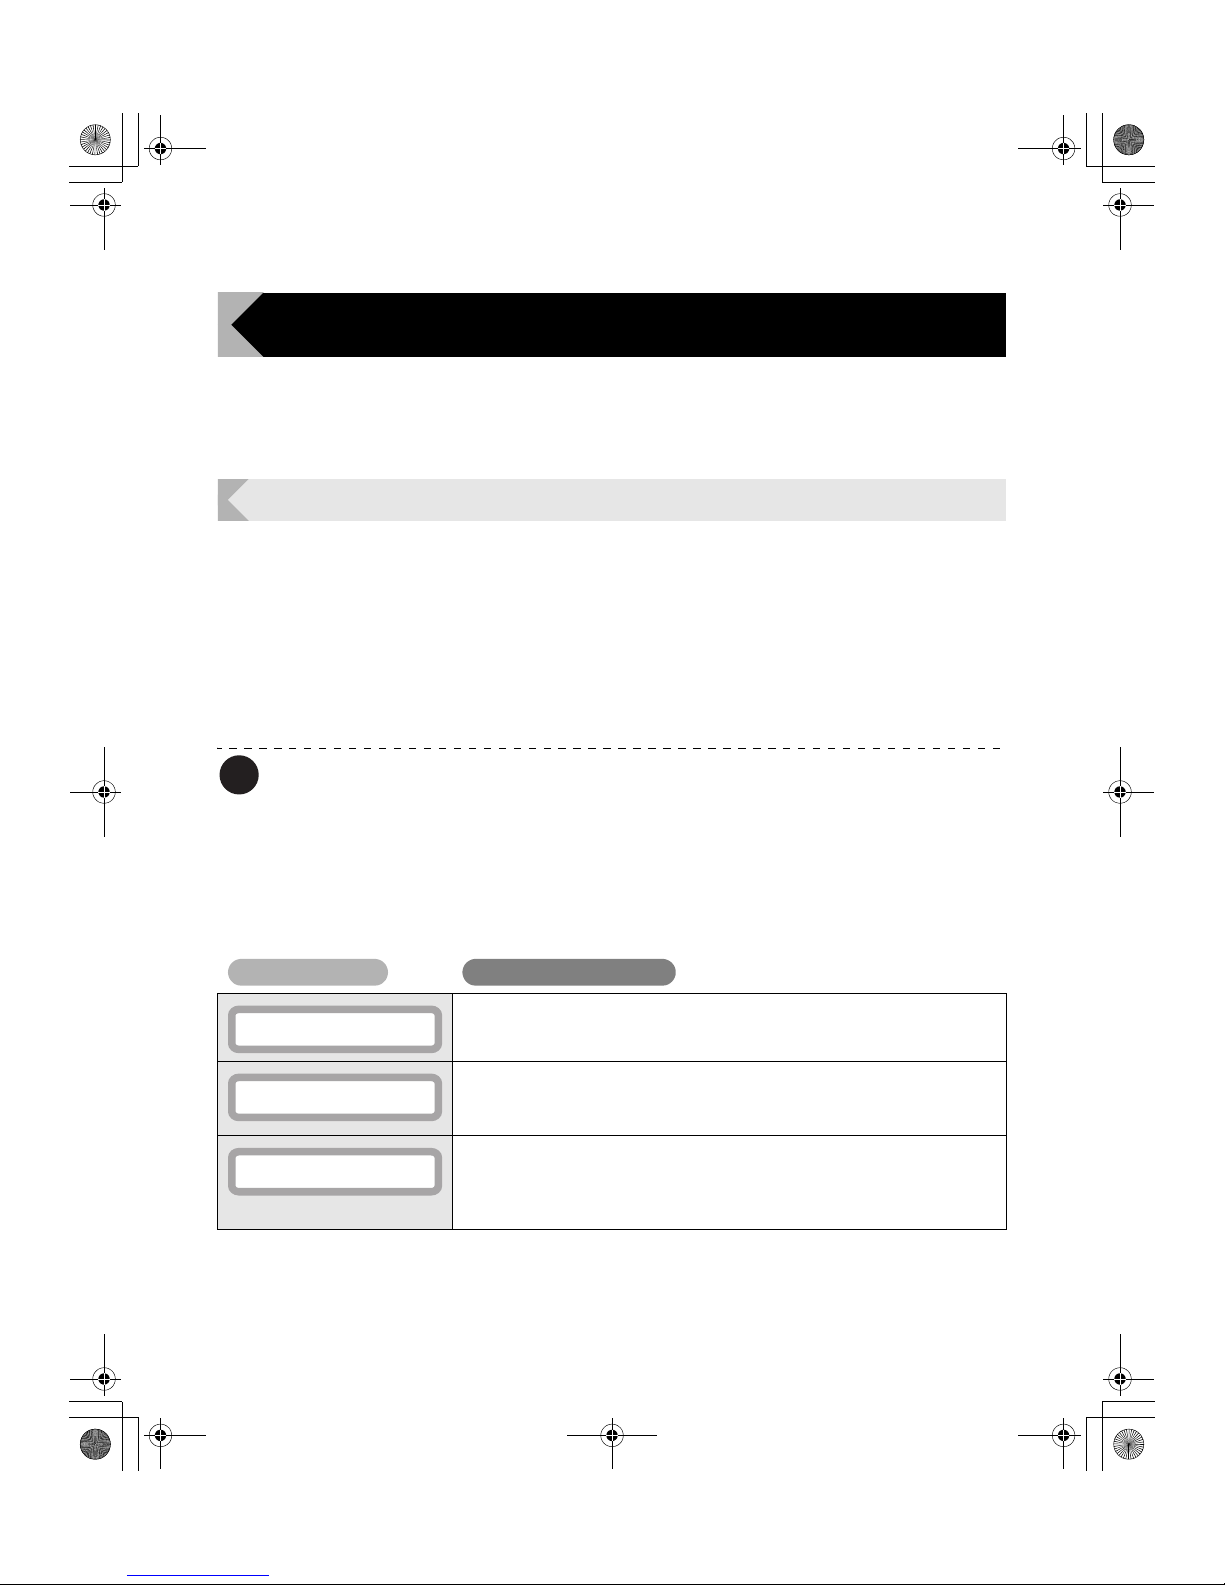
Error message Cause and solution
The Front Cover is opening.
⇒Make sure the Front Cover is closed.
There are no more cards.
⇒Load cards into the printer.
→See "Loading Cards" on page 9 for instructions on loading cards.
The ink ribbon has been used up.
⇒Change the Ink Ribbon Cartridge.
→See "Changing the Ink Ribbon Cartridge" on page 13 for details about
changing the Ink Ribbon Cartridge.
Cover Open XX-XX
Card Empty XX-XX
Rbn End XX-XX
PR-C101_C101M_E.book Page 36 Monday, August 27, 2007 11:16 AM
Page 39
Troubleshooting
37
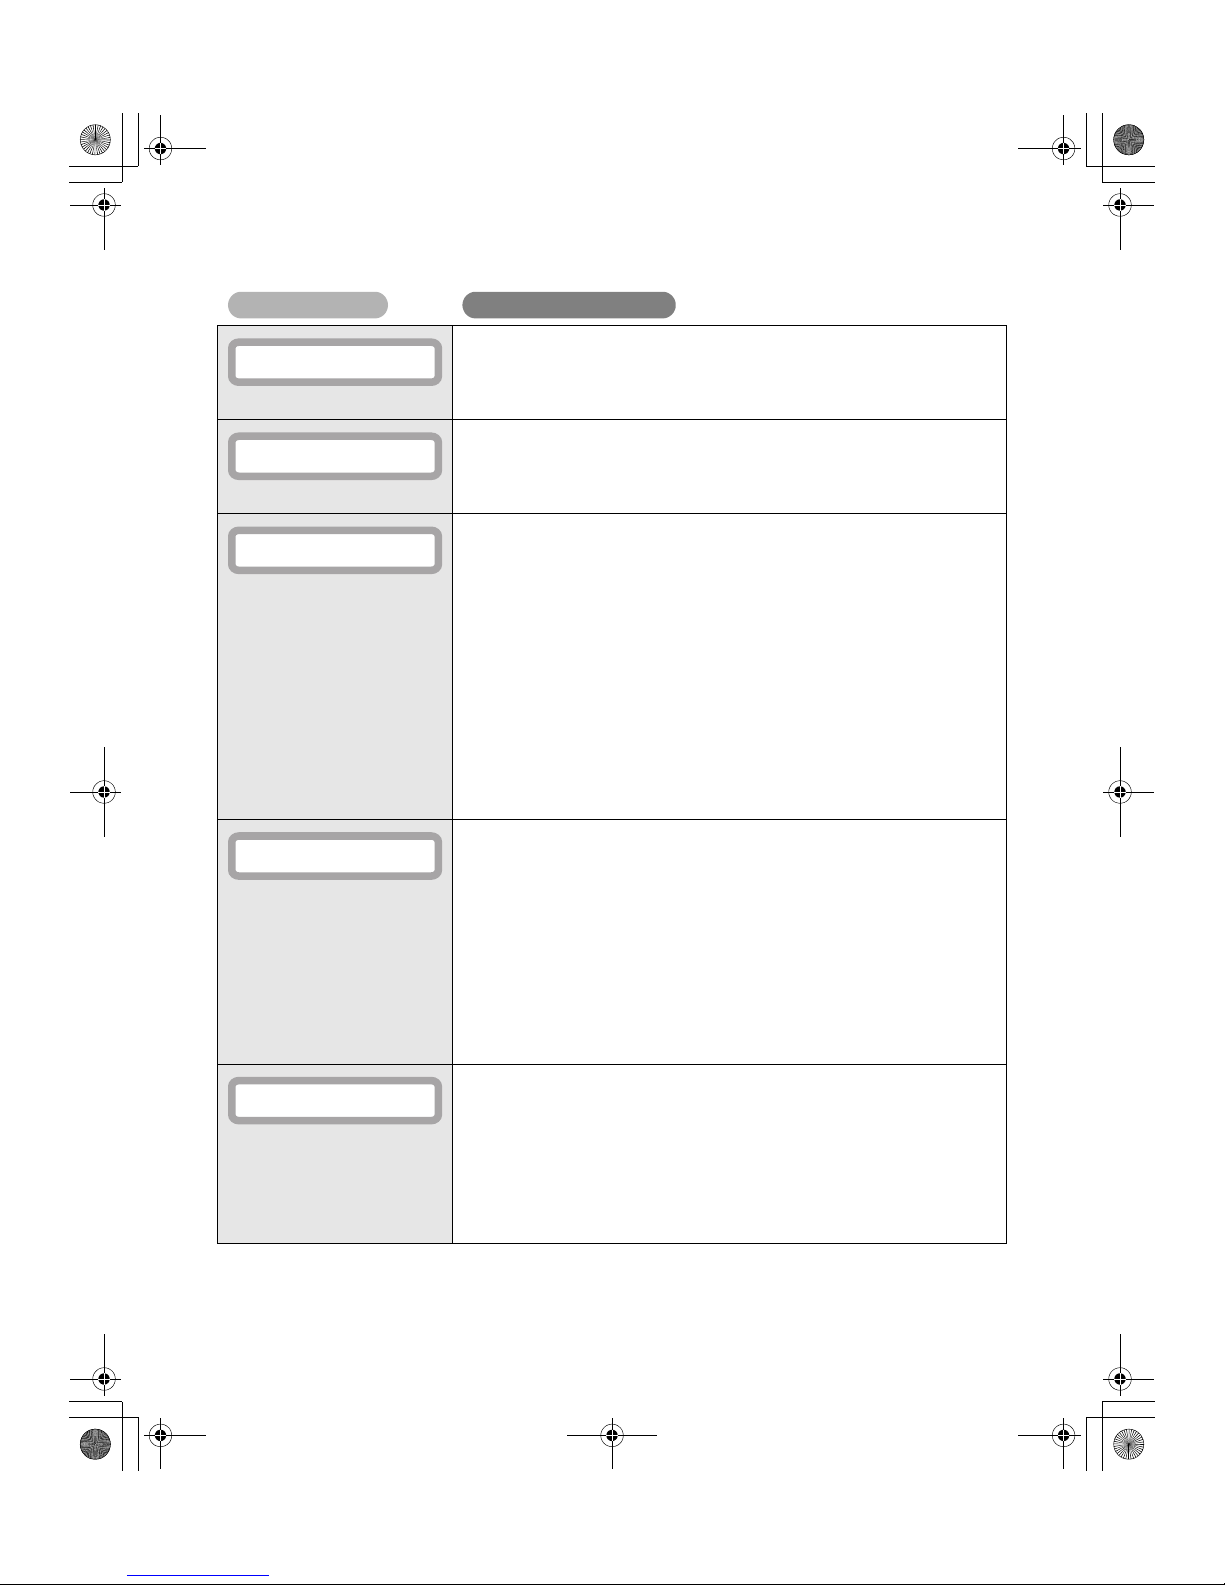
Ink ribbon position control has failed.
⇒Reload the Ink Ribbon Cartridge.
→See "Changing the Ink Ribbon Cartridge" on page 13 for details about
changing the Ink Ribbon Cartridge.
The ink ribbon could not be wound correctly.
⇒Reload the Ink Ribbon Cartridge.
→See "Changing the Ink Ribbon Cartridge" on page 13 for details about
changing the Ink Ribbon Cartridge.
Cards cannot be fed into printer.
⇒Press the CLEAR Key.
Frequent occurrences of this error may mean the following:
Is the Card Case loaded correctly?
⇒Correctly load the Card Case.
⇒Check that the Card Case weight is lowered.
→See "Loading Cards" on page 9 for instructions on loading cards.
Is the Feeding Roller dirty?
⇒Clean the Feeding Roller located below the Card Case.
→See "Cleaning the Feeding Roller" on page 35 for instructions on cleaning the
Feeding Roller.
There was a card jam.
⇒Press the CLEAR Key.
Frequent card jams could mean the following:
Is the Card Transport Roller dirty?
⇒Clean the Card Transport Roller.
⇒If the Card Transport Roller is excessively dirty, continue cleaning
using a new Cleaning Card.
→See "Cleaning with a Cleaning Card" on page 32 for instructions on cleaning
the Card Transport Roller.
Writing to the magnetic strip failed.
⇒Press the CLEAR Key.
Failure when writing to the magnetic strip may mean the following:
Is the card set in the correct direction?
⇒Check the loading direction of the cards.
→See "Loading Cards" on page 9 for instructions on loading cards.
Error message Cause and solution
Rbn Type XX-XX
Rbn Wind XX-XX
Feed Miss XX-XX
Card Jam. XX-XX
MG Write XX-XX
PR-C101_C101M_E.book Page 37 Monday, August 27, 2007 11:16 AM
Page 40
Full Color Card Printer PR-C101/C101M
38
After clearing the errors above, pressing the CLEAR Key clears the errors and [Ready to
Print] is displayed.
If the following messages appear, resolve the problem according to the instructions below.
Are there any scratches or dirt on the card's magnetic strip?
⇒Use undamaged cards.
Is the magnetic characteristics of the card matches the version of
the magnetic encoder and the setting of the magnetic encoder?
⇒Check the version of the magnetic encoder.
→See "Checking the Program Information and Serial Number" on page 29 for
instructions on how to check the version of the magnetic encoder.
⇒Change the settings of the magnetic encoder.
→See "Changing the Magnetic Encoder's Settings (PR-C101M Only)" on
page 30 for information about changing the settings of the magnetic encoder.
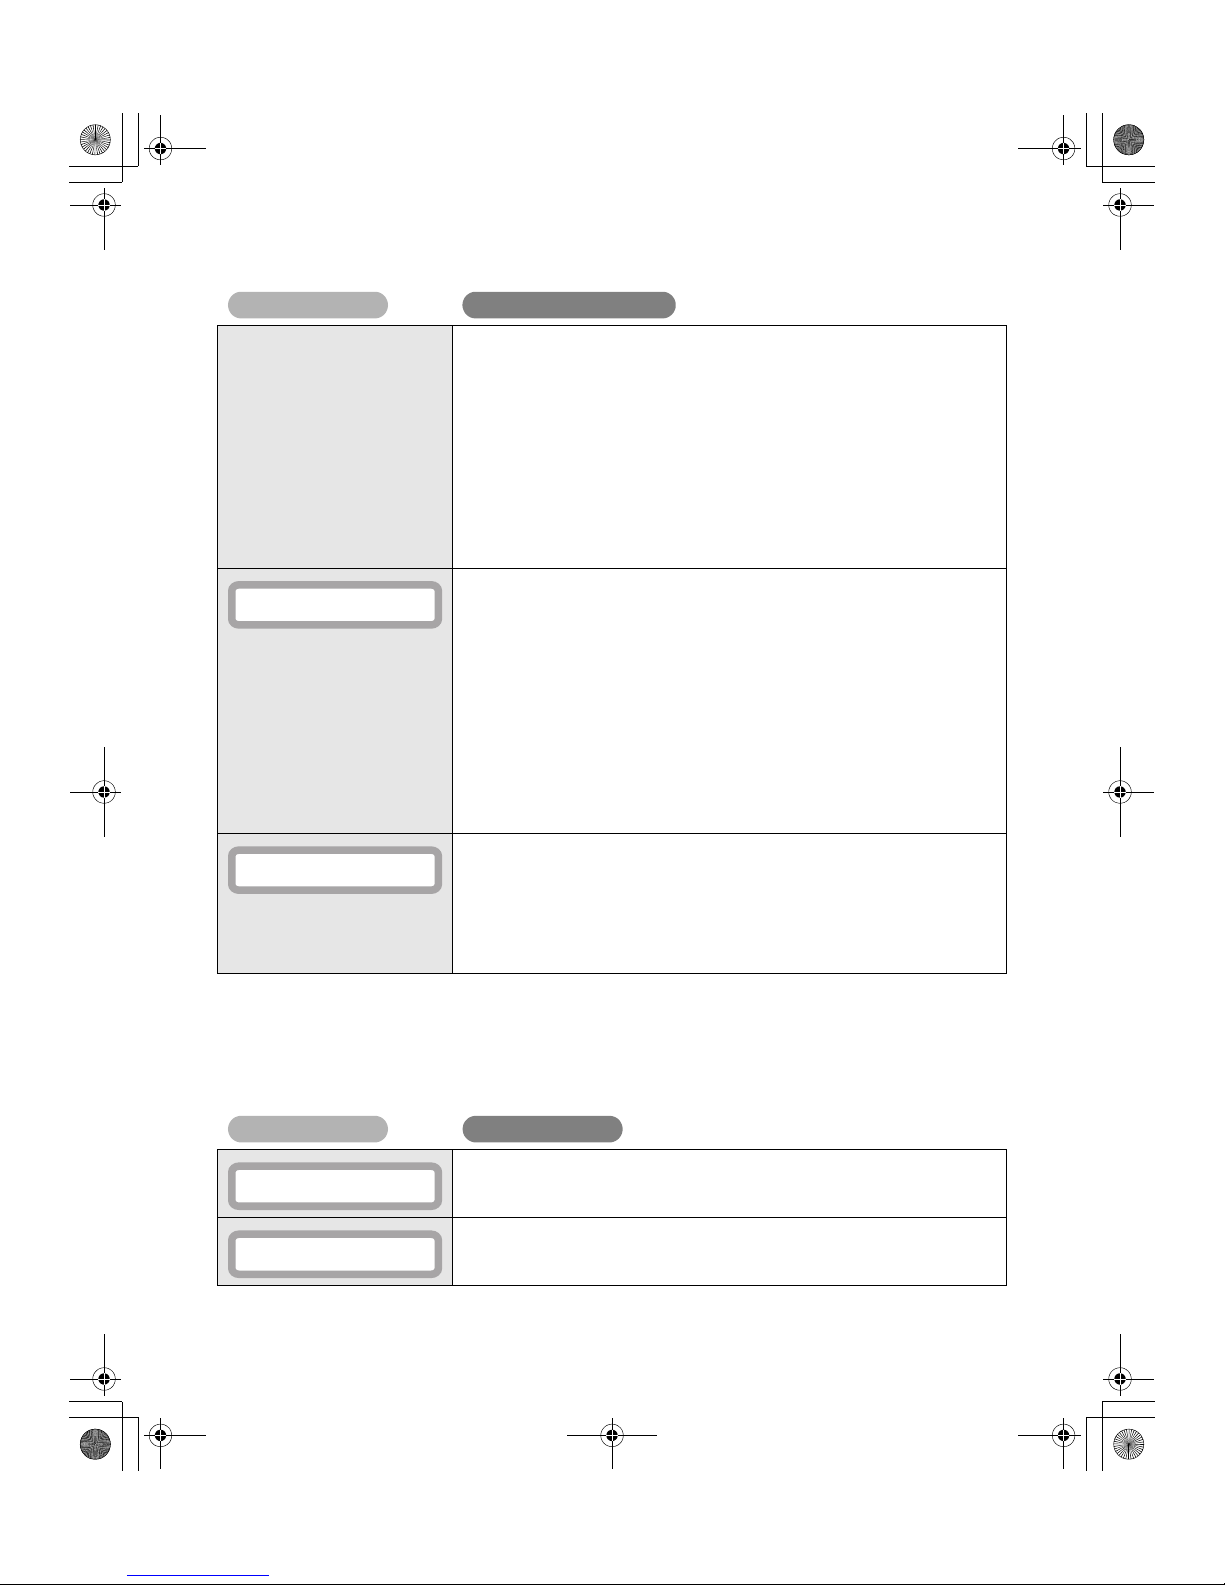
Reading of the magnetic data failed.
⇒Press the CLEAR Key.
Failure when reading the magnetic data may mean the following:
Is the card set in the correct direction?
⇒Check the loading direction of the cards.
→See "Loading Cards" on page 9 for instructions on loading cards.
Are there any scratches or dirt on the card's magnetic strip?
⇒If there are any dirt on the card, remove them.
⇒You cannot use the card with the scratches on the magnetic strip.
An error occurred that requires repairs.
The cause of the error differs depending on the error code.
⇒Turn off and on the power or hold down the CLEAR Key for 3 seconds
to reset the printer.
Repairs are necessary if the error reoccurs.
Message Solution
Press the CLEAR Key.
Correctly close the cover.
Error message Cause and solution
MG Read XX-XX
Service C. XX-XX
Push CLEAR key.
Cover Open
PR-C101_C101M_E.book Page 38 Monday, August 27, 2007 11:16 AM
Page 41
Troubleshooting
39
When a Card is Jammed...
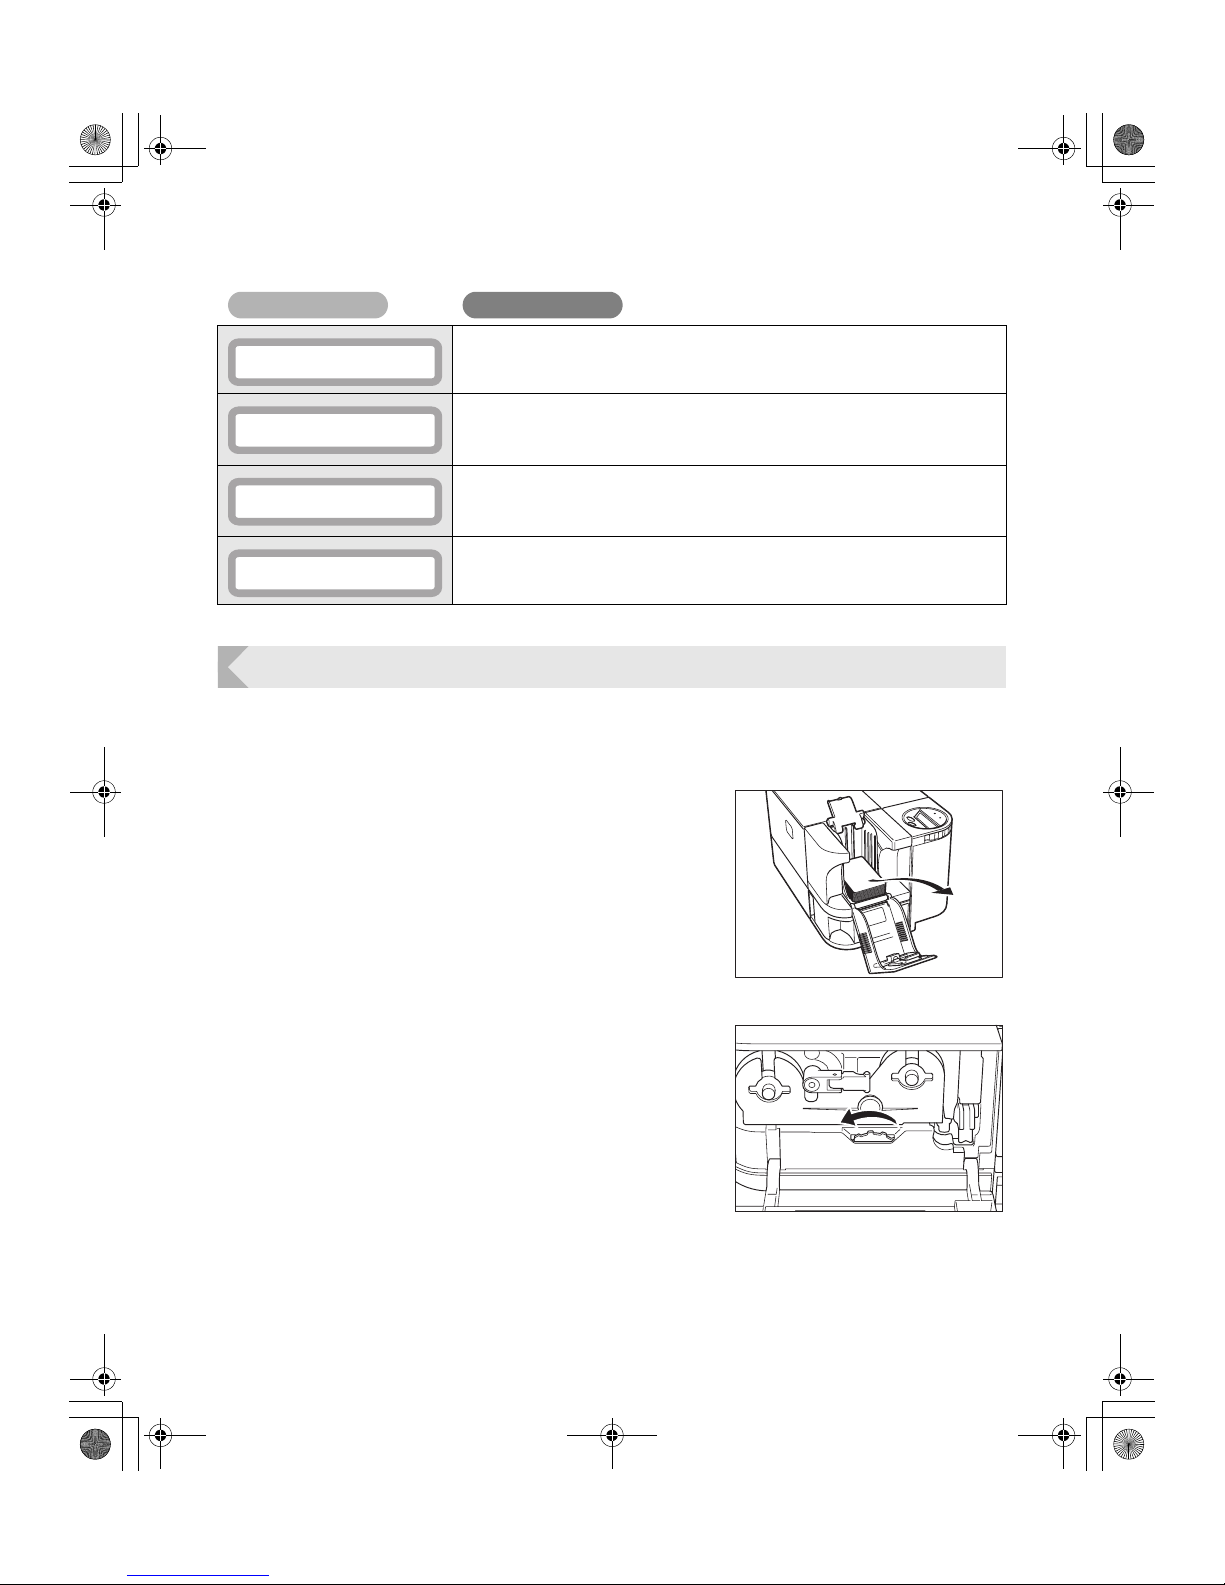
Use the following procedure to remove cards jammed during printing or when the jammed card
is unable to remove despite of CLEAR Key is pressed.
1 Remove cards from the Card Case.
• If the card on the bottom is partially fed into the
machine, slowly pull it out by hand.
• The Card Case cannot be removed.
2 Open the Front Cover, and then rotate
the Ejection Dial to the left.
• Jammed cards are ejected from Card Ejection Slot 2.
Load cards into the printer.
→See "Loading Cards" on page 9 for instructions on loading cards.
Remove the cards by rotating the Ejection Dial.
→See "When a Card is Jammed..." on page 39 for instructions on how to remove
cards.
Change to a normal Ink Ribbon Cartridge.
→See "Changing the Ink Ribbon Cartridge" on page 13 for details about
changing the Ink Ribbon Cartridge.
Turn off and on the power.
Repairs are necessary if the error reoccurs.
Message Solution
Card Empty
Remove Card
Check Ink Ribbon
Cannot Recover
PR-C101_C101M_E.book Page 39 Monday, August 27, 2007 11:16 AM
Page 42
Full Color Card Printer PR-C101/C101M
40
When Cards are Not Printed Correctly...
If missing or incorrect colors are printed on a card or cards are incorrectly printed, resolve the
problem according to the following instructions.
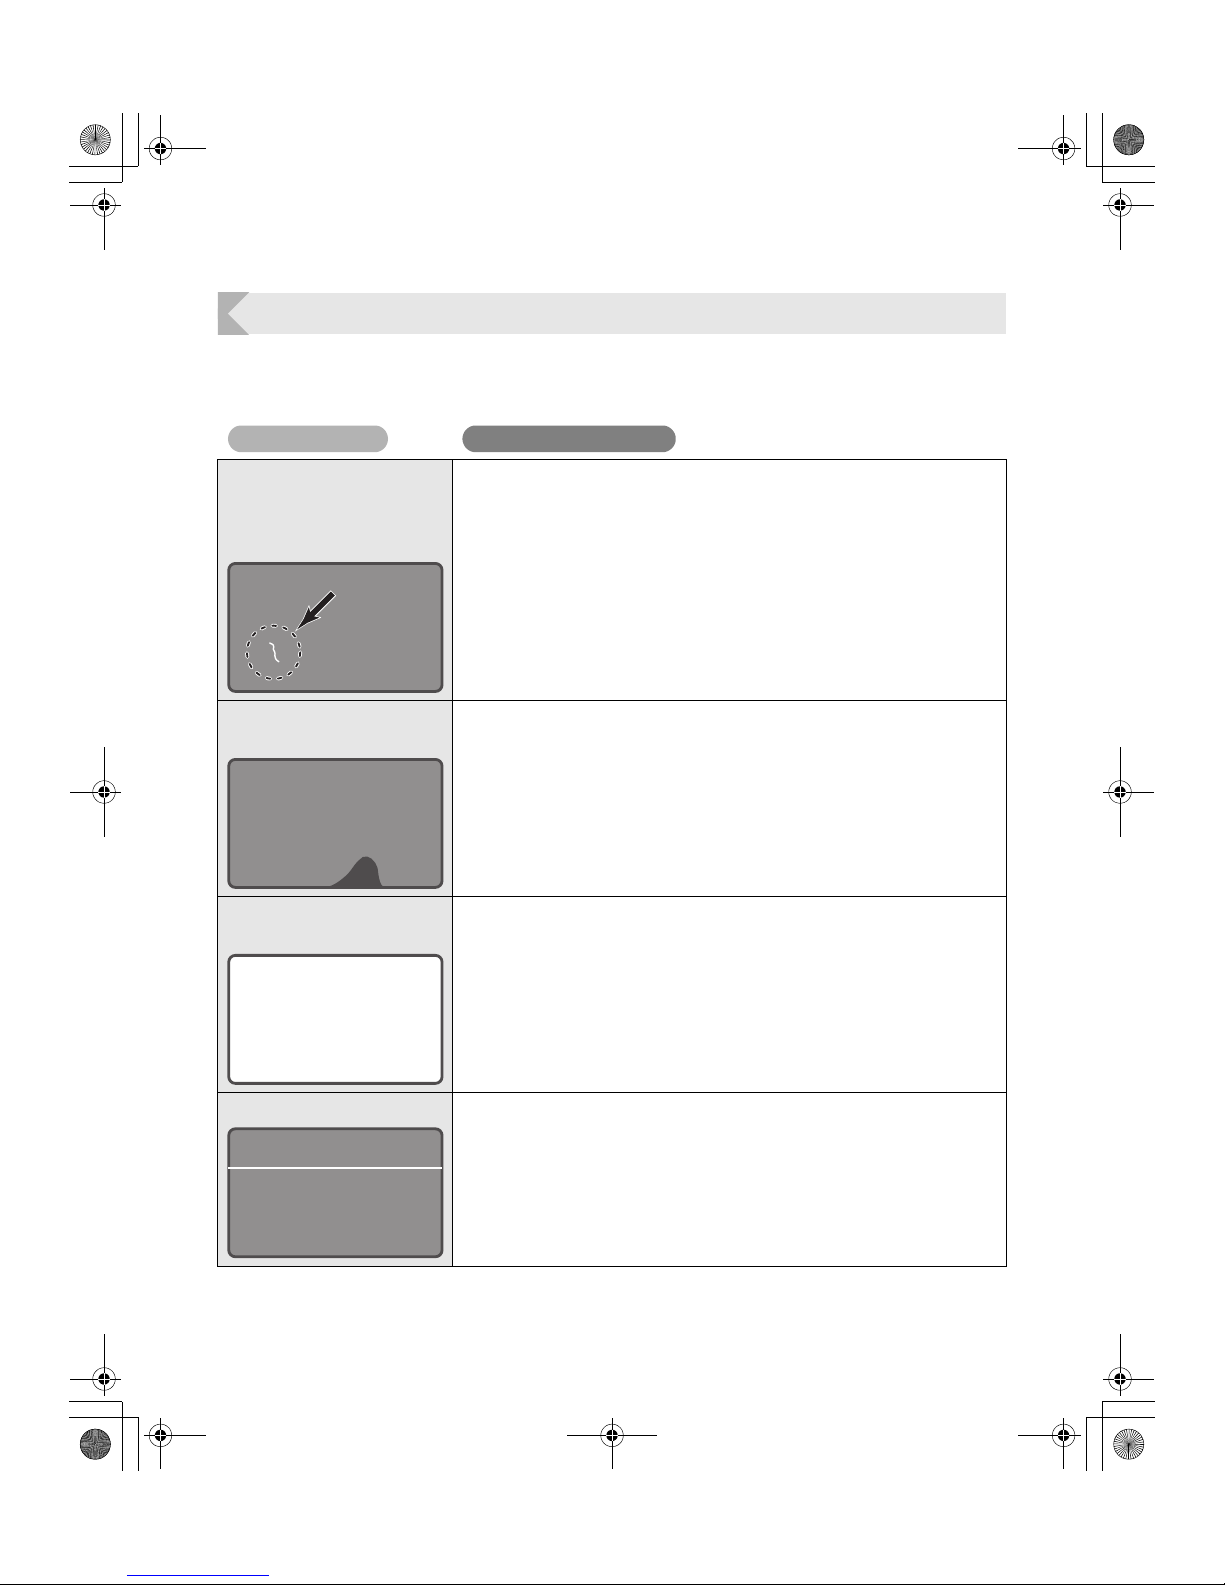
Problem Cause and solution
There are missing or
incorrect colors in certain
sections.
Dirt is present.
Is there dirt on the card surface?
⇒Do not use dirty cards.
⇒Avoid using the printer in locations with excessive dust or dirt.
⇒Clean the Cleaning Roller.
→See "Cleaning the Cleaning Roller" on page 34 for instructions on cleaning the
Cleaning Roller.
There are incorrect colors
within an indefinite range.
Is there oil content attached on the card surface?
⇒Do not touch the printing side of the card.
Are you using incompatible cards?
⇒Use only recommended cards.
→See "Cards" on page 43 for details about which cards you can use.
White cards (unprinted
cards) are output.
Only color image data was received with the Overcoating Black Ink
Ribbon or Black Ink Ribbon loaded.
⇒Use the Overcoating Color Ink Ribbon when printing in color.
→See "Changing the Ink Ribbon Cartridge" on page 13 for details about
changing the Ink Ribbon Cartridge.
Fine lines are not printed. Contact your reseller.
PR-C101_C101M_E.book Page 40 Monday, August 27, 2007 11:16 AM
Page 43
Troubleshooting
41
Other Troubles
When These Solutions Don't Work...
Contact your reseller if errors appear which are not included in this manual or when an error
cannot be cleared.
Note
z When contacting your reseller, provide them with the content of the message and the
error code (XX-XX) that appears on the right side of the LCD Panel.
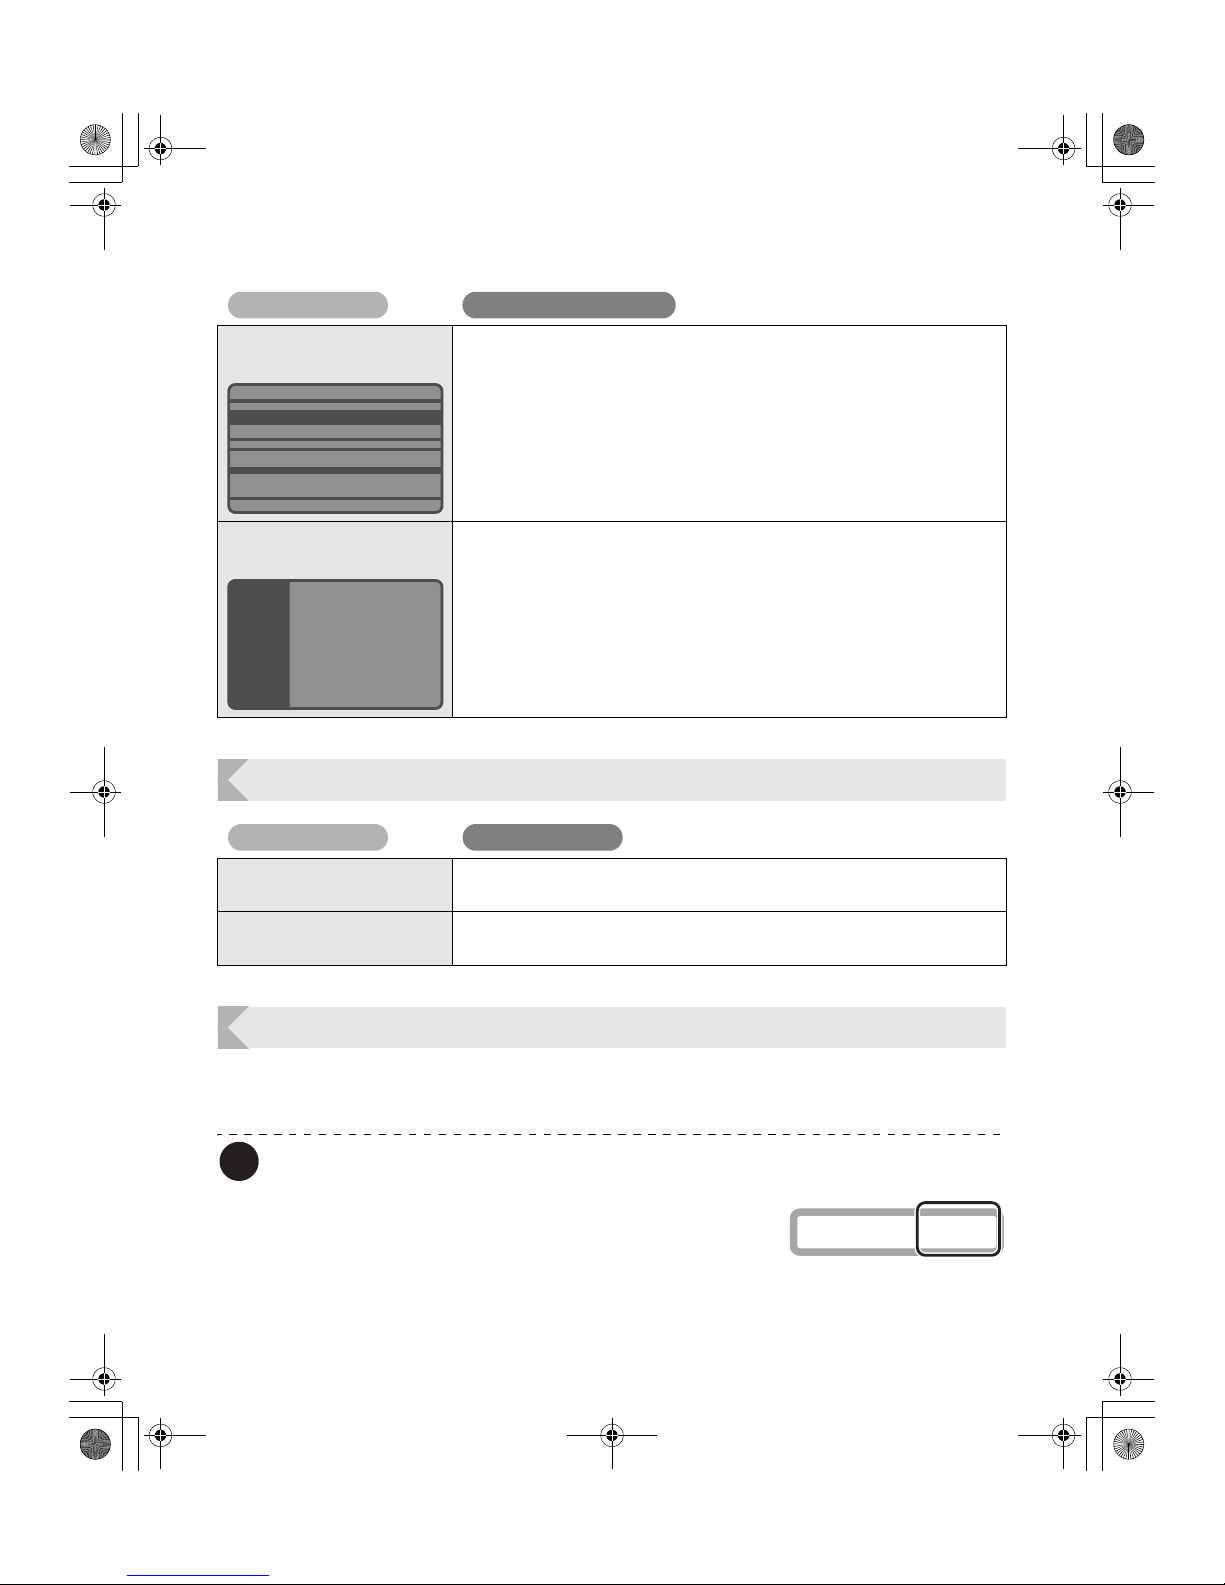
There is a surface
irregularity.
Contact your reseller.
The image suddenly changes
colors during printing.
Contact your reseller.
Problem Solution
The power cannot be turned
on.
Make sure the power cable is connected.
Data cannot be sent to the
printer.
Make sure the USB cable is connected.
Problem Cause and solution
Cover Open XX-XX
PR-C101_C101M_E.book Page 41 Monday, August 27, 2007 11:16 AM
Page 44
Full Color Card Printer PR-C101/C101M
42
Appendix
Consumables
Ink Ribbon Cartridges
The following three types of Ink Ribbon Cartridges can be used with the printer.
z Do not use Ink Ribbon Cartridges other than those listed above. Doing so
may cause a malfunction.
z Touching the ink ribbon directly may cause uneven print density.
z When changing the Ink Ribbon Cartridge, do not drop and make a big
impact.
Note
z The number of printable sides may decrease under the following conditions.
• Changing the Ink Ribbon Cartridge during use
• When an error occurs during printing
• Performing operations not listed in this manual
z Use Ink Ribbon Cartridges as soon as possible after purchase.
z When you store Ink Ribbon Cartridges, do not keep it in a location subject to direct
sunlight, high temperature, high humidity, and dust.
Name Type Model Number of printable sides
Overcoating Color Ink Ribbon YMCKO PR50025UC 250 sides
Overcoating Black Ink Ribbon KO PR5002KOC 500 sides
Black Ink Ribbon K PR5002KC 1000 sides
PR-C101_C101M_E.book Page 42 Monday, August 27, 2007 11:16 AM
Page 45
Appendix
43
Cards
Use only cards that conform to the CR-80 standard.
Size: 3.375" x 2.125" (86 mm x 54 mm) Thickness: 0.03" (0.76 mm)
Material: PVC.PET (Coating PVC or ink absorbing layer on printing side)
z Use only cards that conform to the CR-80 standard. Otherwise cards may
not be printed properly.
z Do not use the following cards:
• Cards previously printed with this card printer or any other one.
• Wet cards
• Cards mixed with glass, metallic or other foreign objects
• Embossed cards
• Cards coated with oil or other foreign matter
• Cracked, chipped, bent or otherwise damaged cards
• Transparent cards
• Abnormally shaped cards
Cleaning Cards
Use the Nisca PR5500K574 Cleaning Card.
z Do not use Cleaning Cards other than those listed above. Doing so may
cause a malfunction.
Updating the Printer's Software
You can update the printer's software by downloading the printer's firmware program (main
program) and the printer driver from the Nisca Web page.
For more information, visit Nisca's homepage at the address listed below.
http://www.nisca.co.jp/
PR-C101_C101M_E.book Page 43 Monday, August 27, 2007 11:16 AM
Page 46
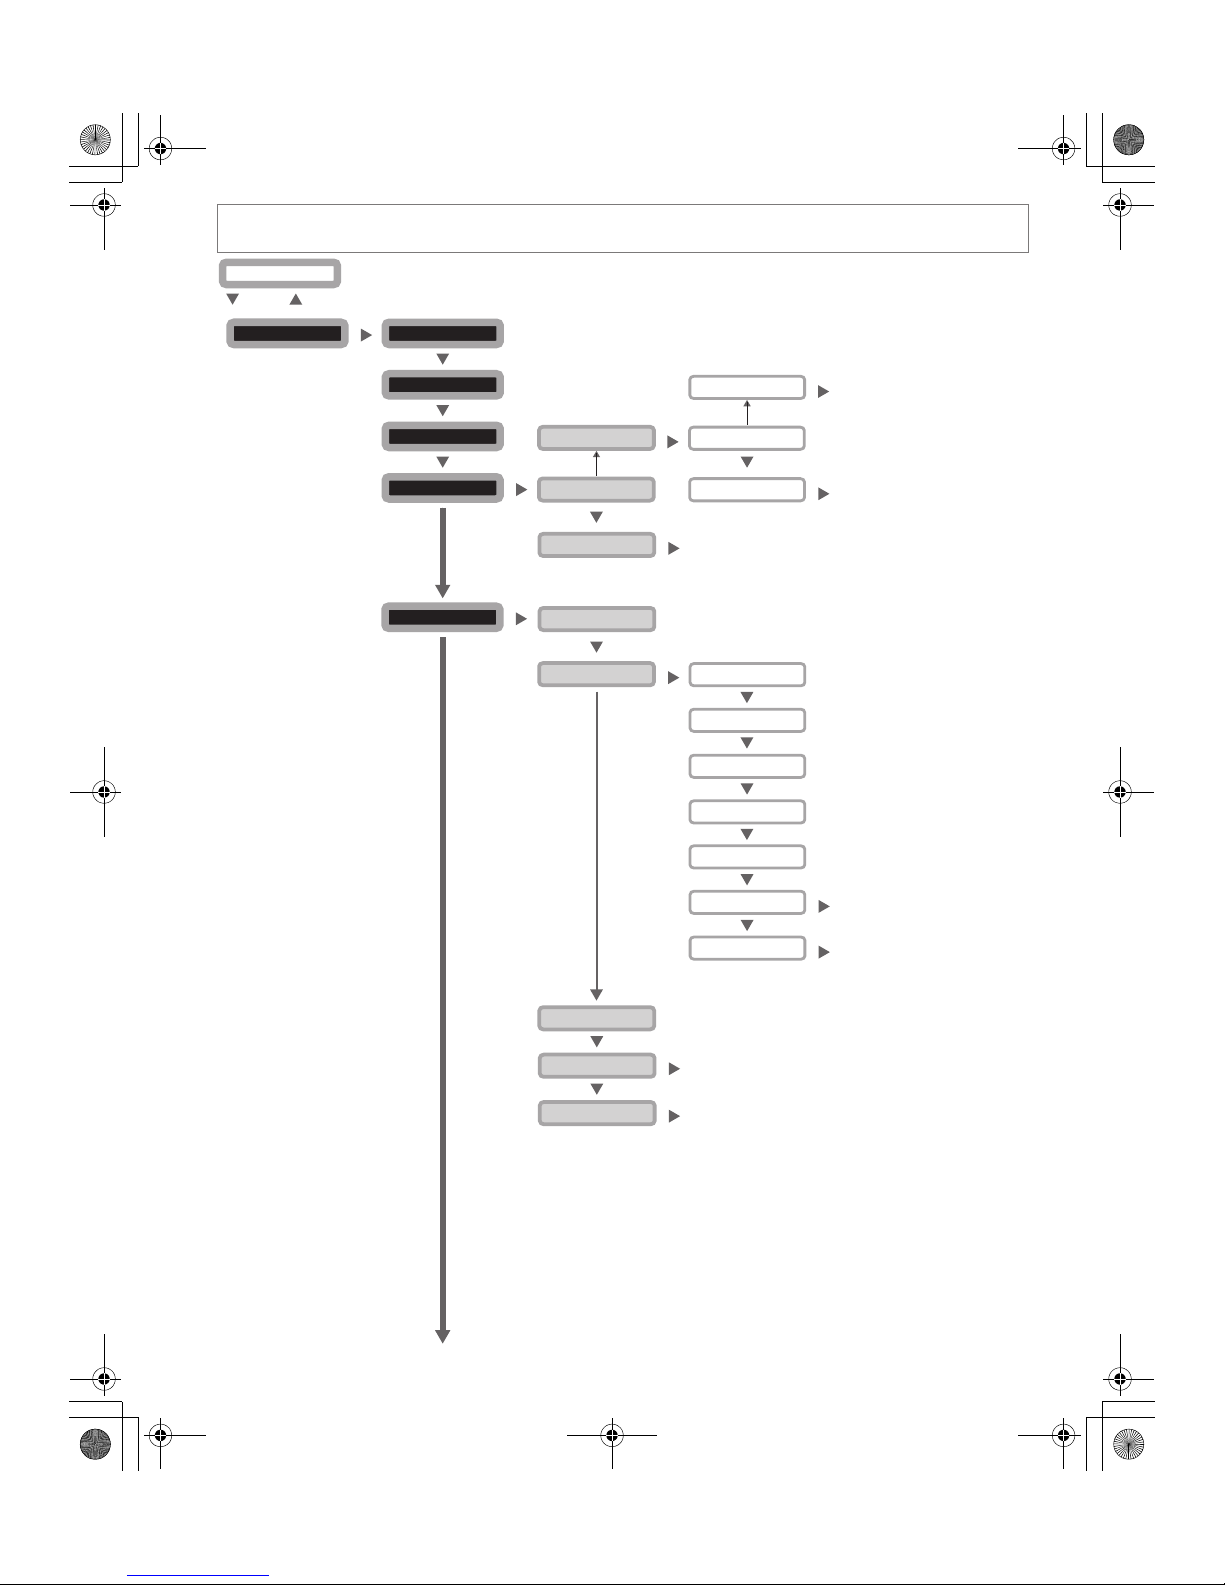
User Mode >>
MENU
Ready to Print
Normal Mode
CLEAR
(3 Sec.)
EXE
Card Count 0000
[User Mode]
MENU
MENU
Total Cnt 0000**
MENU
Cleaning >>
EXE
Remove Cards
Push EXE (Next)
MENU
Normal Mode <<<
EXE
EXE
Set Cleaning Crd
Normal Mode <<<
MENU
EXE
Return to Normal Mode
Push EXE (Start)
EXE
Start Cleaning
Image Setup >>
EXE
[Image Setup]
MENU
Color Adjust >>
EXE
[Color Adjust]
MENU
Yellow 0
MENU
Magenta 0
MENU
Cyan 0
MENU
Black 0
MENU
Normal Mode <<<
EXE
MENU
Parent Menu <<
EXE
MENU
MENU
MENU
Sharpness 0
MENU
Normal Mode <<<
EXE
MENU
Parent Menu <<
EXE
Return to Normal Mode
Return to Normal Mode
Return to Normal Mode
Return to Higher Level
Return to Higher Level
Menu Route Map (User Mode)
PR-C101_C101M_E.book Page 44 Monday, August 27, 2007 11:16 AM
Page 47
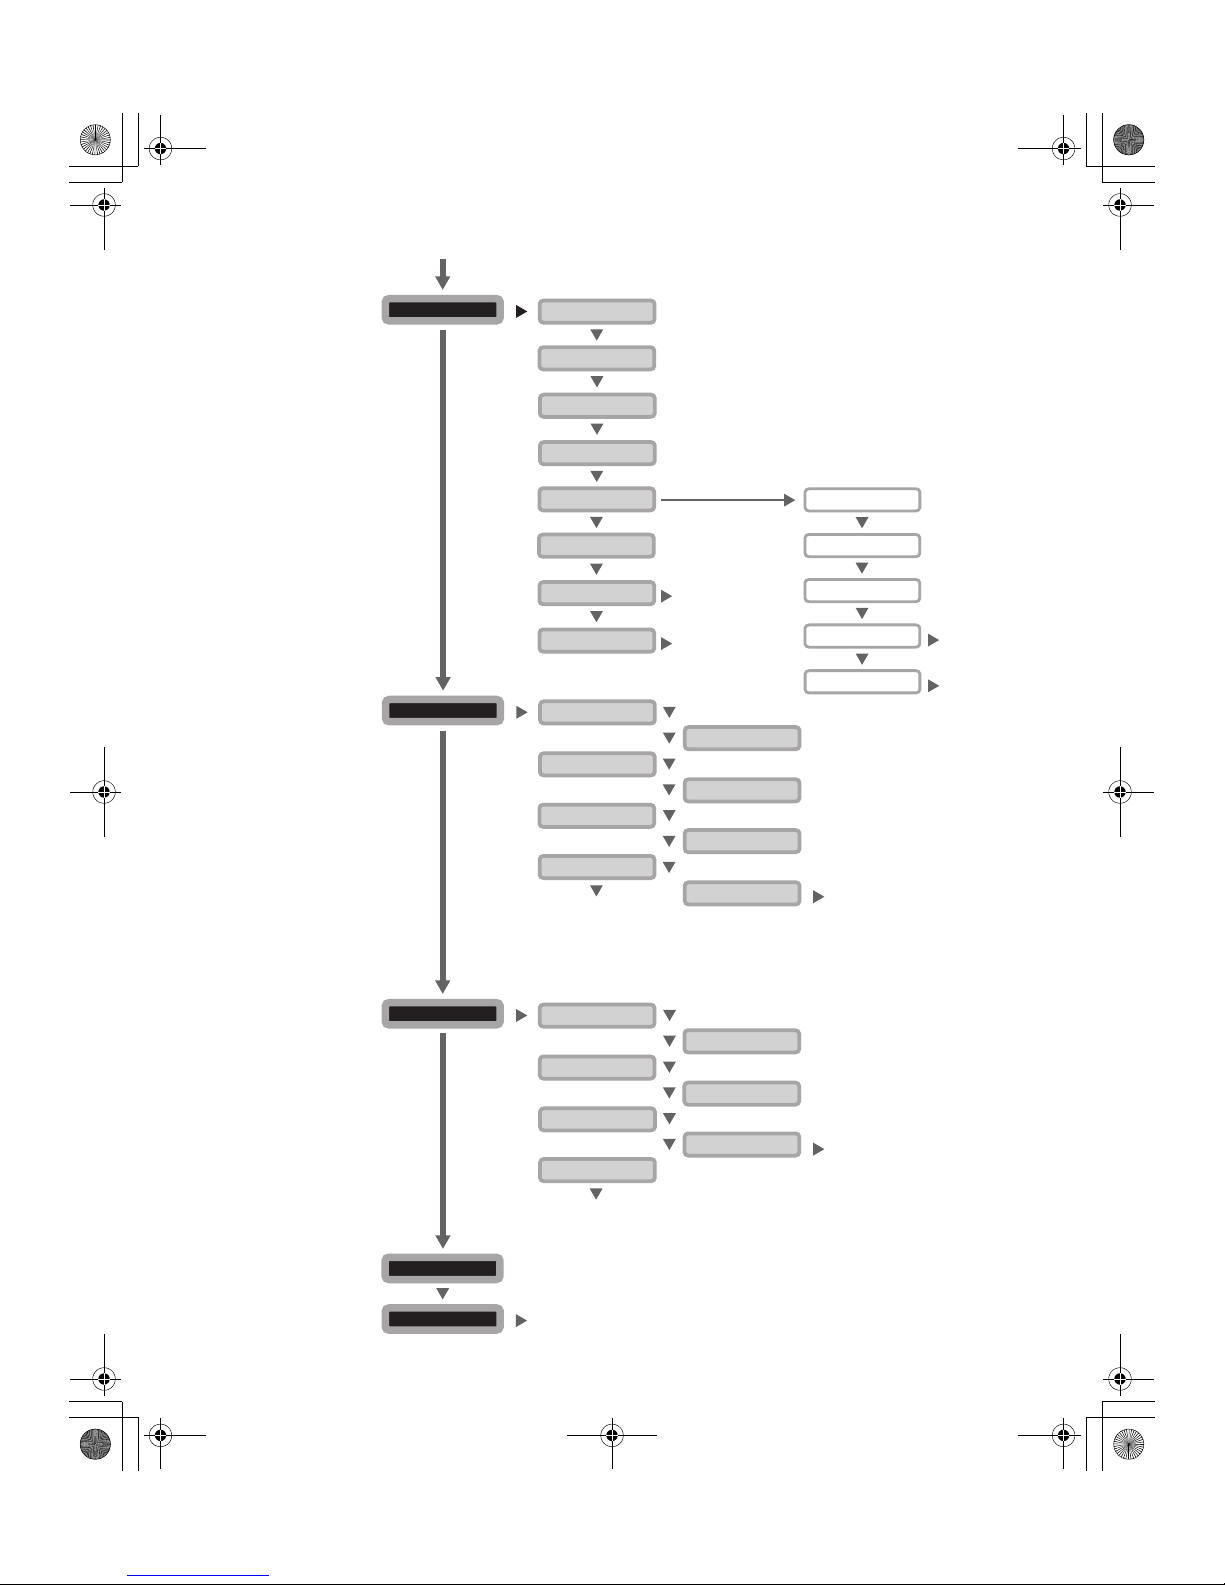
MENU
Printer Setup >>
EXE
[Printer Setup]
MENU
Card Exit >>
EXE
[Card Exit]
MENU
Normal EXIT-1
MENU
Error EXIT-1
MENU
Normal Mode <<<
EXE
MENU
Parent Menu <<
EXE
Buzzer ON
MENU
EXE Print OFF
MENU
Retry Print OFF
MENU
Encode Type LOCO
MENU
Normal Mode <<<
EXE
MENU
Parent Menu <<
EXE
MENU
Printer Info. >>
EXE
[Printer Info.]
Head ******
Base Ver. *.**
Main Ver. *.**
Serial ********
Encoder
Normal Mode <<<
EXE
Parent Menu <<
EXE
MENU
Ribbon Info. >>
EXE
Type **********
Lot ************
Serial ********
Remainder(%) 100
Normal Mode <<<
EXE
Parent Menu <<
EXE
Setup Reset[C+E]
Normal Mode <<<
[Ribbon Info.]
MENU
MENU
MENU
EXE
MENU
MENU
MENU
MENU
MENU
MENU
MENU
MENU
MENU
MENU
MENU
MENU
MENU
Return to Normal Mode
Return to Normal Mode
Return to Normal Mode
Return to Normal Mode
Return to Normal Mode
Return to Higher Level
Return to Higher Level
Return to Higher Level
Return to Higher Level
PR-C101_C101M_E.book Page 45 Monday, August 27, 2007 11:16 AM
Page 48
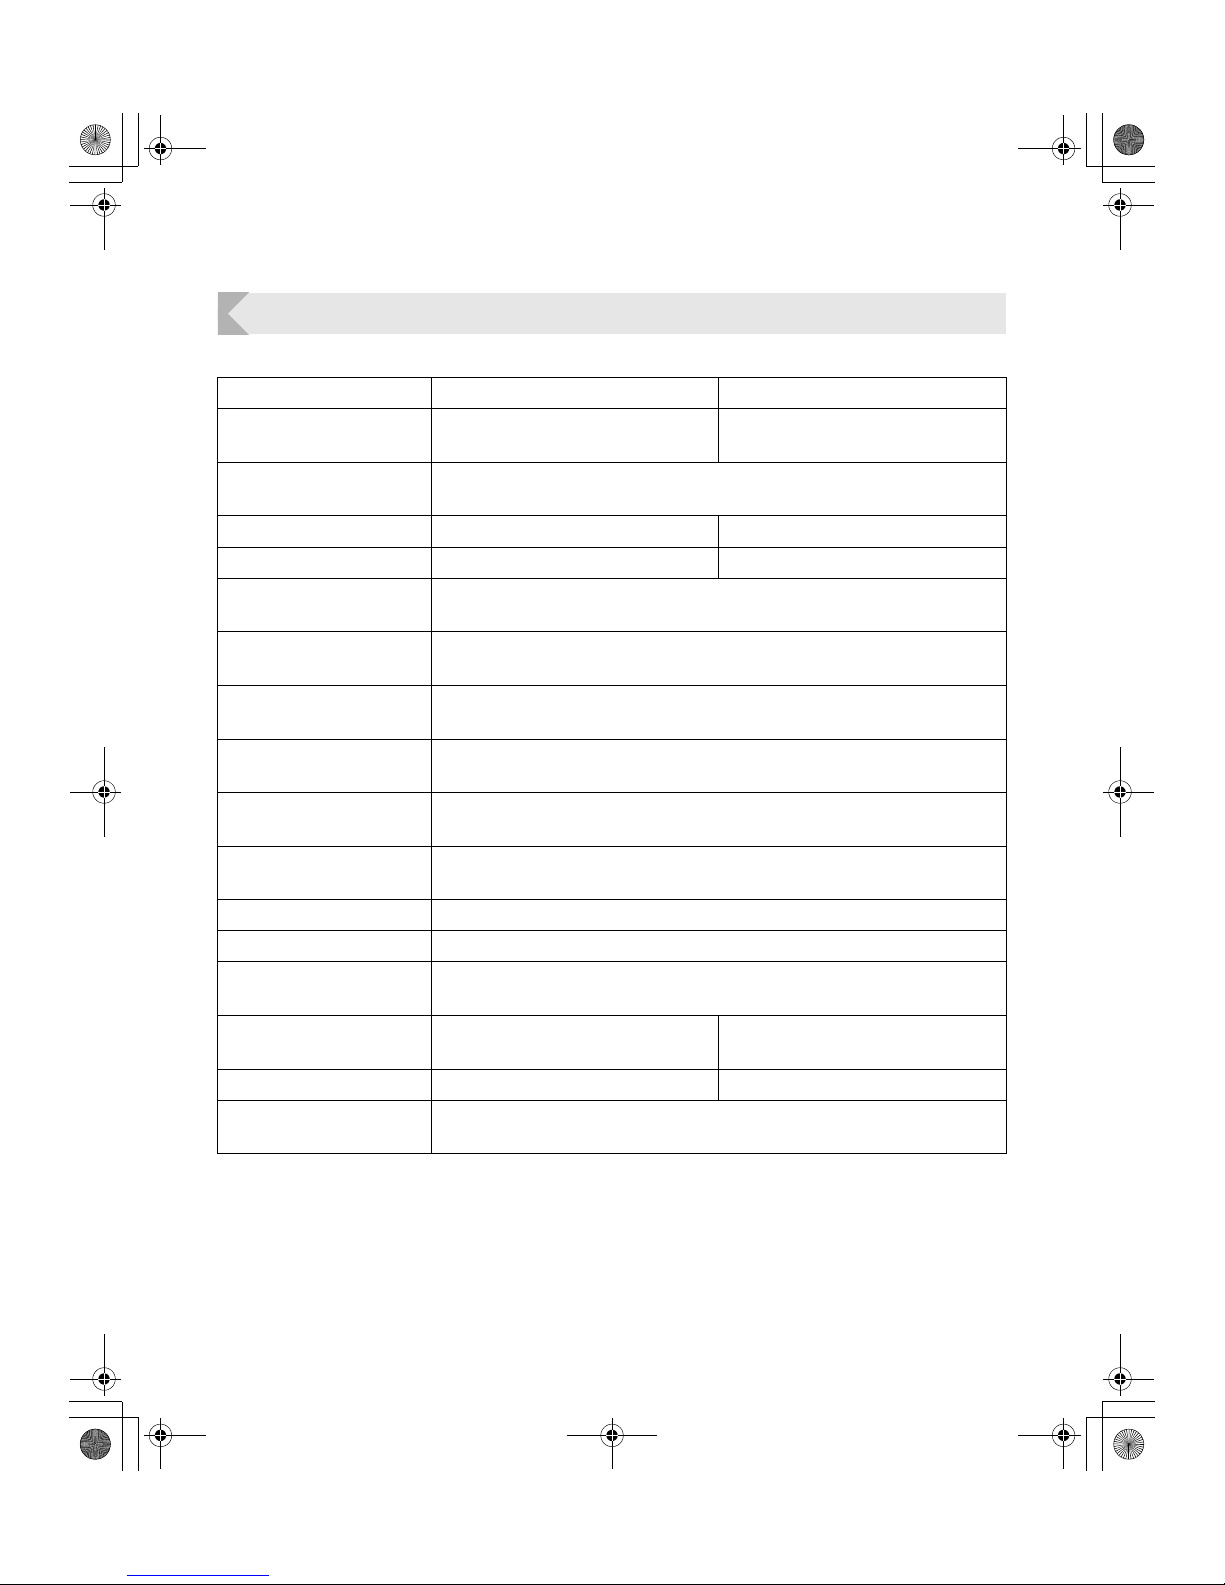
Full Color Card Printer PR-C101/C101M
46
Main Specifications
PR-C101 PR-C101M
Function Full color print (1 side) Full color print (1 side)
Magnetic encode
Print media PVC card
Size and thickness according to CR-80
Magnetic Specifications — Comply with ISO7811
Print quality 300 dpi
Print tones Input tones: RGB, 256 tones/color
Output tones: YMC, 256 tones/color controlled
Print area 3.46" x 2.16" (86.5 mm x 54 mm)
Except for a 0.008" (0.2 mm) margin on the front edge.
Print time Approx. 25 seconds/card using 5 colors over the entire side (Factory default
settings)
Transfer ribbon Overcoating Color Ink Ribbon/Overcoating Black Ink Ribbon/Black Ink
Ribbon
Feed method Automatic feed from the Card Case (100 card auto feed)
Manual feed
Interface USB 2.0
RS-232C (Port for Enhancing Function)
Power source AC 100/120, 220/240V, 50/60 Hz
Power consumption Less than 120 W
Operating noise While operating: Less than 50 dB
While waiting: Less than 45 dB
Dimensions 7.2" (H) x 13.16" (W) x 8.88" (D)
(180 mm x 329 mm x 222 mm)
7.2" (H) x 15.2" (W) x 8.88" (D)
(180 mm x 380 mm x 222 mm)
Weight 14.3 lb (6.5 kg) 17.6 lb (8 kg)
Operating environment Temperature: 50 to 95°F/10 to 35°C
Humidity: 35 to 85% RH (without condensation)
PR-C101_C101M_E.book Page 46 Monday, August 27, 2007 11:16 AM
 Loading...