

Page 1
USER GUIDE
Evolis Card Printer © 2013. All rights reserved. November 2013.
Ref. KU-AVA1-041-ENG Rev. A0
Page 2
Copyright
Evolis Card Printer © November 2013. All rights reserved.
Copyright notice
Users must observe the copyright regulations applicable in their country. This manual must not be photocopied, translated, reproduced
or transmitted, in whole or in part, for any reason and by any electronic or mechanical means whatsoever without the express written
consent of the Evolis Card Printer company.
All the information contained in this document is subject to change without prior notice.
Evolis Card Printer cannot be held liable for any errors that may be found in this manual, or for any loss or damage arising accidentally or
as a result of dissemination or use of this manual.
Trademarks
is a trademark of Evolis Card Printer. All other trademarks belong to their respective holders.
Warranty
Refer to the warranty notice supplied with your printer for warranty terms and conditions and limitations.
Environmental information – recycling of end-of-life products
The manufacture of the equipment that you have purchased required the extraction and use of natural resources. It may contain
materials that are hazardous to health and the environment.
To prevent the dispersal of such materials into our environment and reduce the pressure on our natural resources, we recommend that
you use existing collection systems. These systems will appropriately re-use or recycle most of the materials in your end-of-life equipment.
The crossed-out dustbin symbol on your device is a reminder to use these systems.
If you need further information on collection, re-use and recycling systems, contact your local or regional waste management body.
Do not hesitate to contact us to find out more by visiting our website at www.evolis.com or by emailing the following address:
2
Page 3

About your new printer
Thank you for choosing an Evolis printer.
Using your new printer, you will be able to create a wide variety of high-quality cards and badges which can be printed in various
thicknesses, colours and styles. This printer uses consumables and accessories available from Evolis. For further details, visit our website at
www.evolis.com.
Warranty registration
Please register on line at www.evolis.com to receive our special offers and general information.
Once on the website, click on Drivers and Support and fill in all the fields, giving in particular the model and serial number found on
your printer.
Getting started
The purpose of this user guide is to guide you, step by step, through your printer and how it works. Take some time to read it in order to
better understand your printer and its features, and to save time during installation and use.
As with all Evolis products, a great deal of care has been taken over this manual. Should you find an error, however, please let us know
by emailing us at [email protected].
Contents
The bookmarks found top left of your screen can be used to navigate between the various sections in this user guide.
Icons
The following icons are used in this manual to highlight important information:
Information providing further details or depth about certain points in the main text.
Indicates that failing to take the recommended action is liable to damage your printer.
This symbol indicates that a video showing the procedure is available on the www.evolis.com website.
3
Page 4

Getting started
1
1-1 Unpacking
Your printer is supplied with several accessories that we ask you to look at closely.
This list may vary depending on your location.
The printer is shipped in special packaging designed to prevent any damage in transit. If you notice any visible damage, do not hesitate
to contact the shipper and immediately inform your Evolis reseller, who will tell you the procedure to follow.
Evolis takes great care over the quality of its packaging and we ask that you keep this packaging somewhere clean and dry.
You will be asked for the full original packaging (outer box, inner wedges and protective bags) in the event that
the printer is returned. If the printer is returned without its original packaging and components are damaged in
transit, these components will no longer be covered by the warranty. You will be charged for new packaging
for shipping the printer back to you.
Accessories supplied with your printer:
l Mains power cable.
l USB cable.
l Installation and documentation CD-ROM.
Starter cleaning kit.
l
l Warranty leaflet.
l Card output hopper.
l
Declaration of conformity
If any of these components is missing, please contact your Evolis reseller.
Use only the USB cable supplied with your Evolis printer.
4
Page 5

1
1.2 Operating the printer safely
The following precautions must be observed to assure safe operation of the printer. Also, do not do anything that is not described in this
manual. Doing so may cause an unexpected accident.
ä
Installing location
Do not install the printer
l
in a damp or dusty location
l
on an unstable table, on a slant, or any place where there is excessive vibration.
l
in a location susceptible to rapid fluctuations in temperature.
l
in a location exposed to direct sunlight.
l
near flammable or explosive materials or heater, stove or other device that produces heat
Place the printer away from walls to maintain air flow. Also, maintain at least 30 cm of open space above the printer and at least 15
cm on each side on the printer.
Blocking the vents may cause the printer to overheat and catch fire.
ä
Power supply
l Use a dedicated power cable and do not use an extension cord with multiple outlets.
l Be sure to remove any dust from the plug and outlet. Humidity produces a micro-current on the surface causing overheating or fire.
l Do not damage or modify the Power Cable. Also, do not place heavy objects, pull, or bend excessively.
l Do not plug in or unplug the Power Cable if your hands are wet.
l Ensure a ground wire is connected. When connecting the ground wire, note the following cautions
l
Recommended connections for ground wires.
Outlet ground terminal
Ground terminals installed as type A, B, or C
A copper rod 65 cm or longer buried in the ground.
l
Not permitted for ground wires
Gas piping (risk of fire or explosion.)
Water pipes or taps (water pipes that include plastic piping cannot act as a ground. However, if a water pipe is
configured to act as a ground, then connection of a ground wire is permitted.)
Telephone line ground wires or lightning conductors (danger of high current flow in the event of a lightening strike.)
l Be sure to turn off the power and unplug the plug from the outlet before moving the printer.
l Pull on the plug, not the cable, when unplugging it from an outlet.
l Do not use an under-rated extension cord.
5
Page 6
1
ä
Handling
Do not use flammable sprays near the printer.
Do not touch anything inside the printer unless specified in this manual.
Do not place heavy items on the printer and do not lean on the printer.
While the printer is operating do not turn off the printer, unplung the power cable, or look inside the printer.
The cooling fan is always running for cooling the inside of the printer. This is not a malfunction.
The printer may cause static, flickering or interrupt reception or televisions or radios if they are too close to the
printer.
The lower part of the Top Cover (under the card feeder), the printer internal heat roller section, and
the thermal head section get very hot. Ensure you do not touch these three locations.
ä
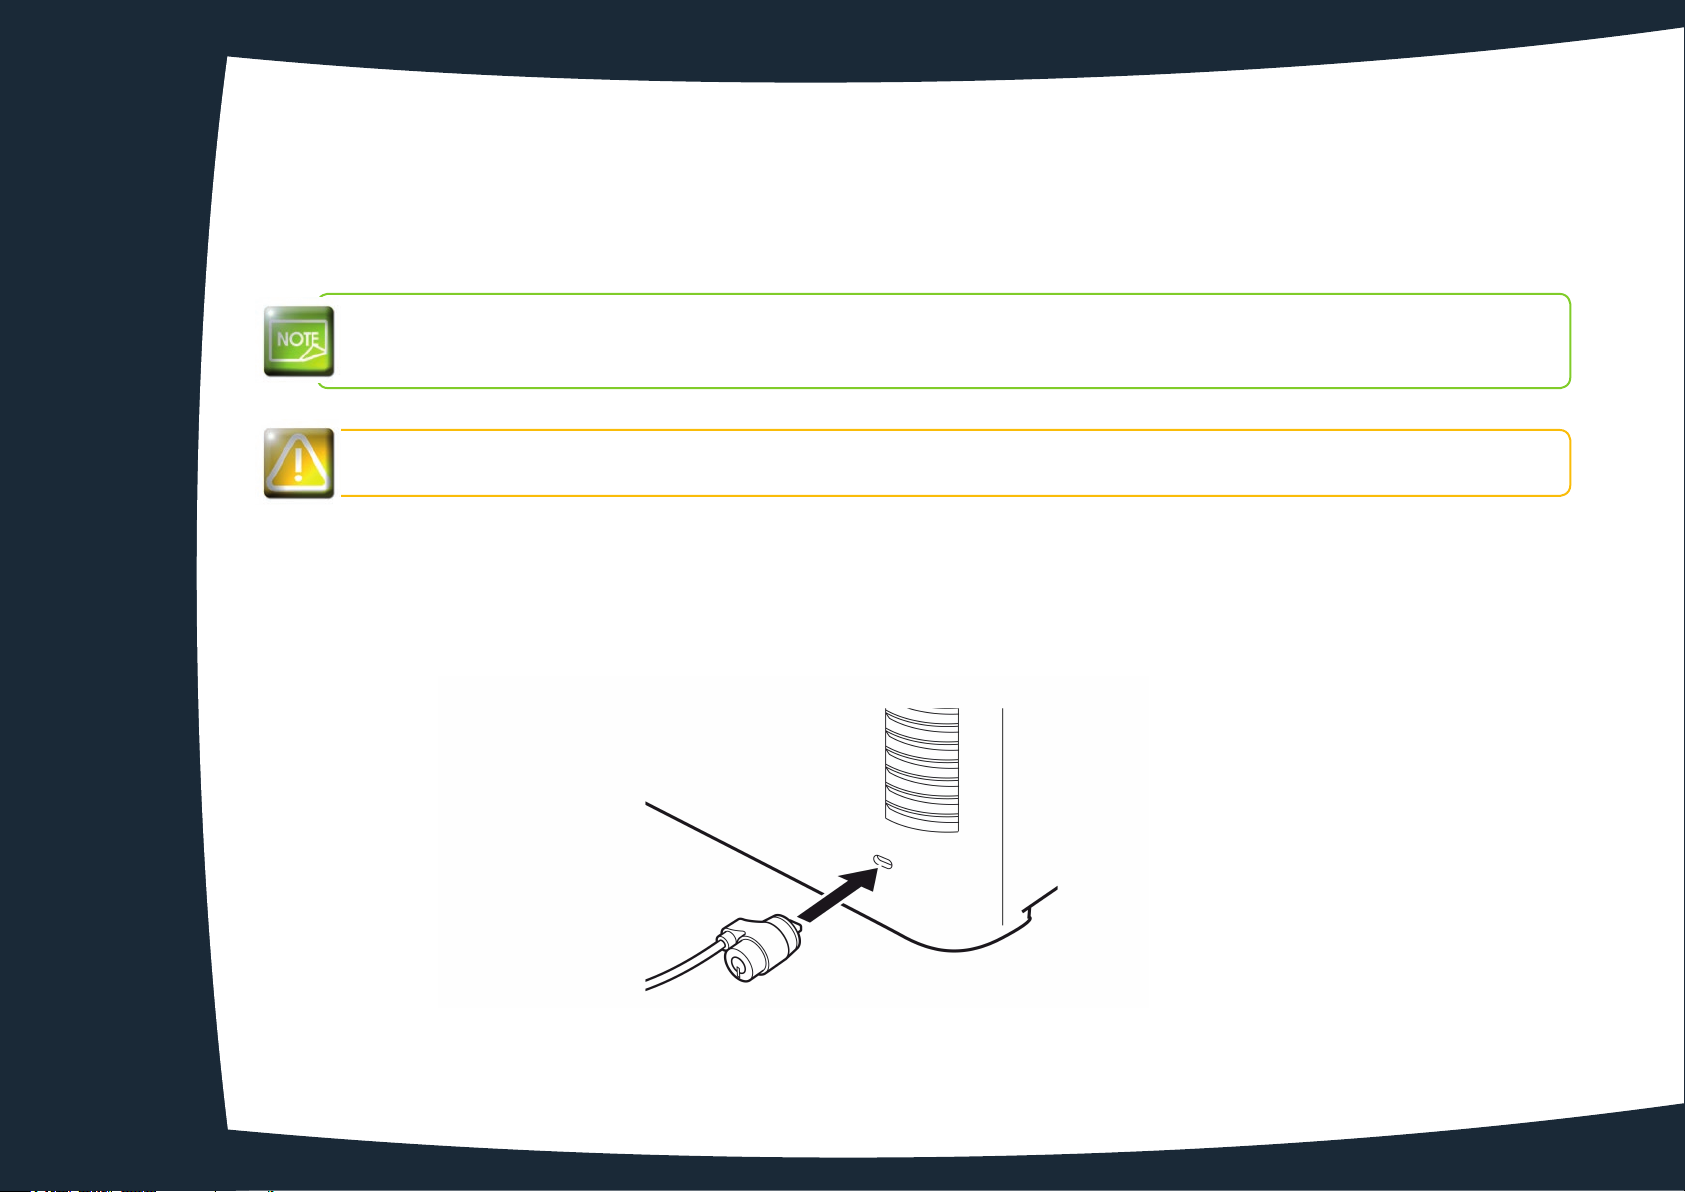
Security cable
You can prevent theft of the printer by locking it with a wire cable.
Use a wire cable that fits the Security cable Slot (0.12"x0.28" (3.00mm x 7.00mm)) to lock up the printer.
6
Page 7
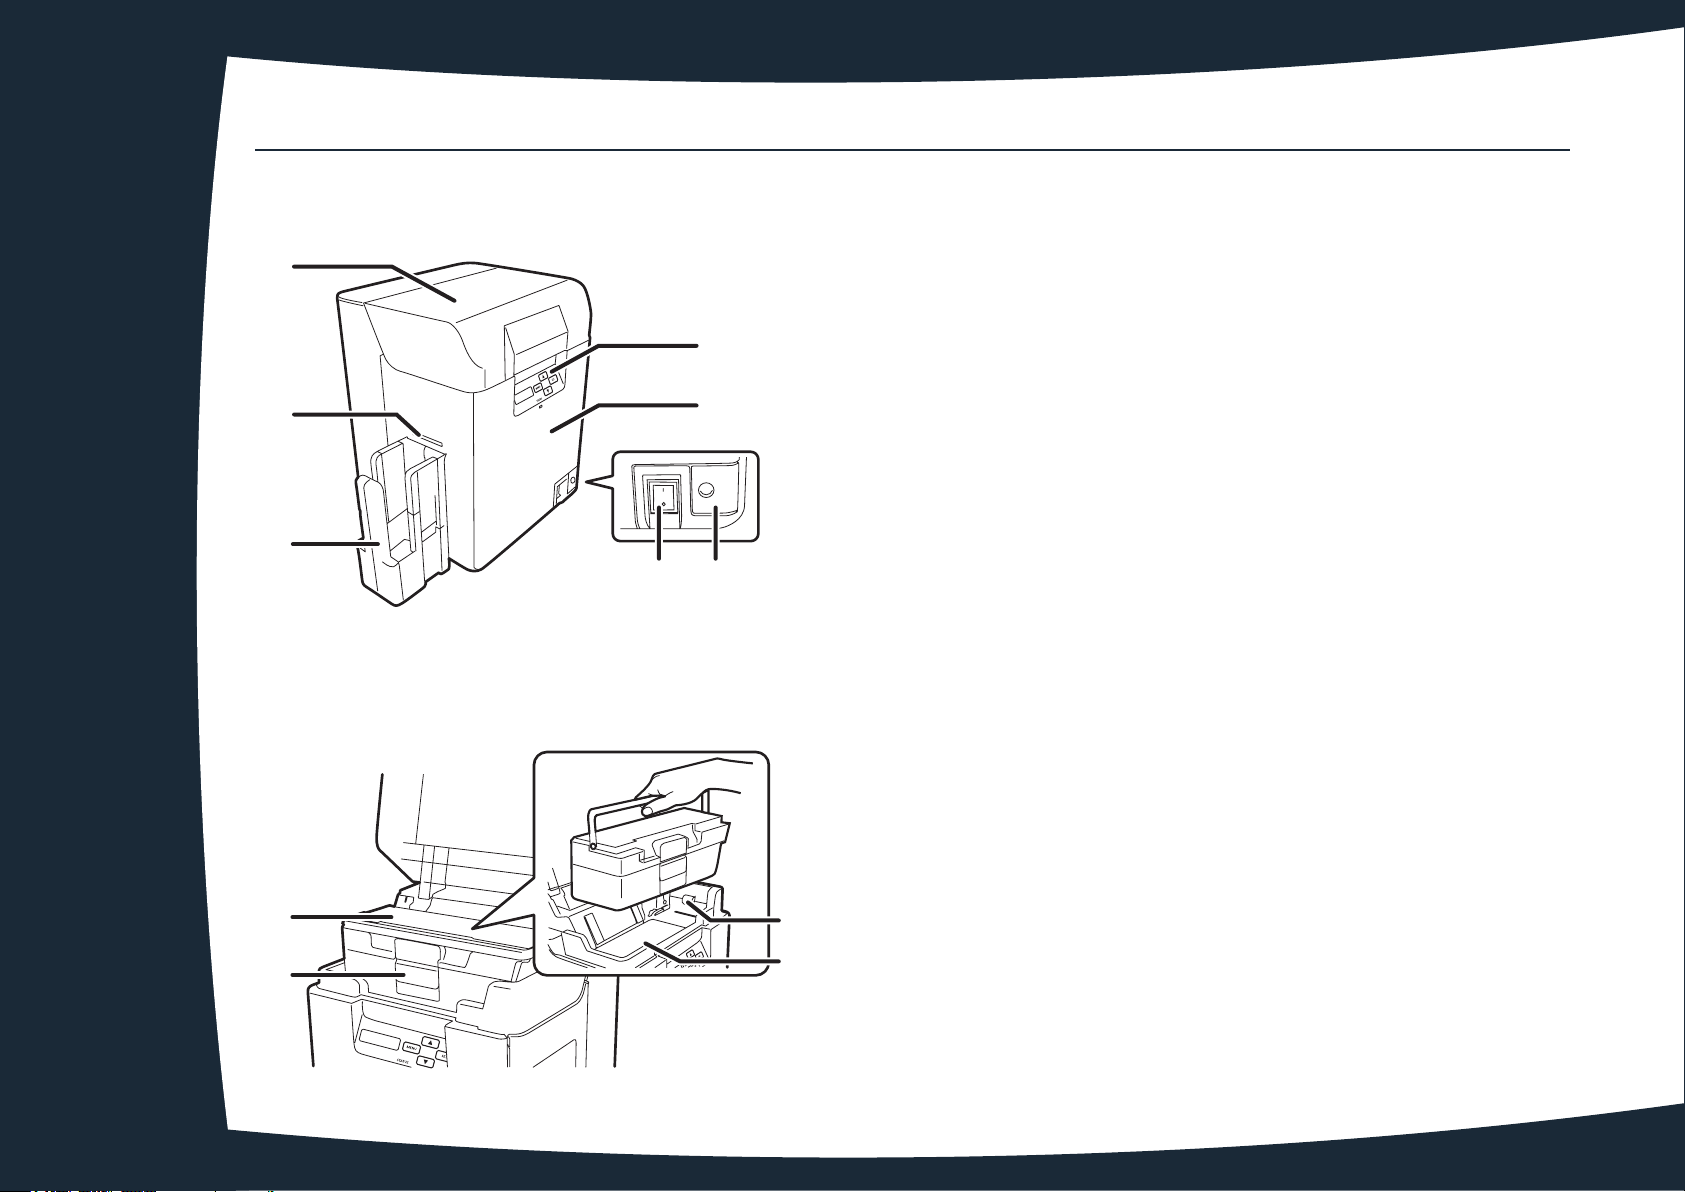
1-2 Description of the printer and its functions
1
1-2a FRONT SIDE OF THE PRINTER
a
g
f
1-2b INSIDE OF THE TOP COVER
b
c
de
1 - Top cover
2 - Control Panel
3 - Front cover
4 - Cover opening button
5 - On-off switch
6 - Card output hopper
7 - Card ejection slot
1 - Card feeder
2 - Feeding roller
3 - Top cover
4 - Card feeder lock
a
d
b
c
7
Page 8
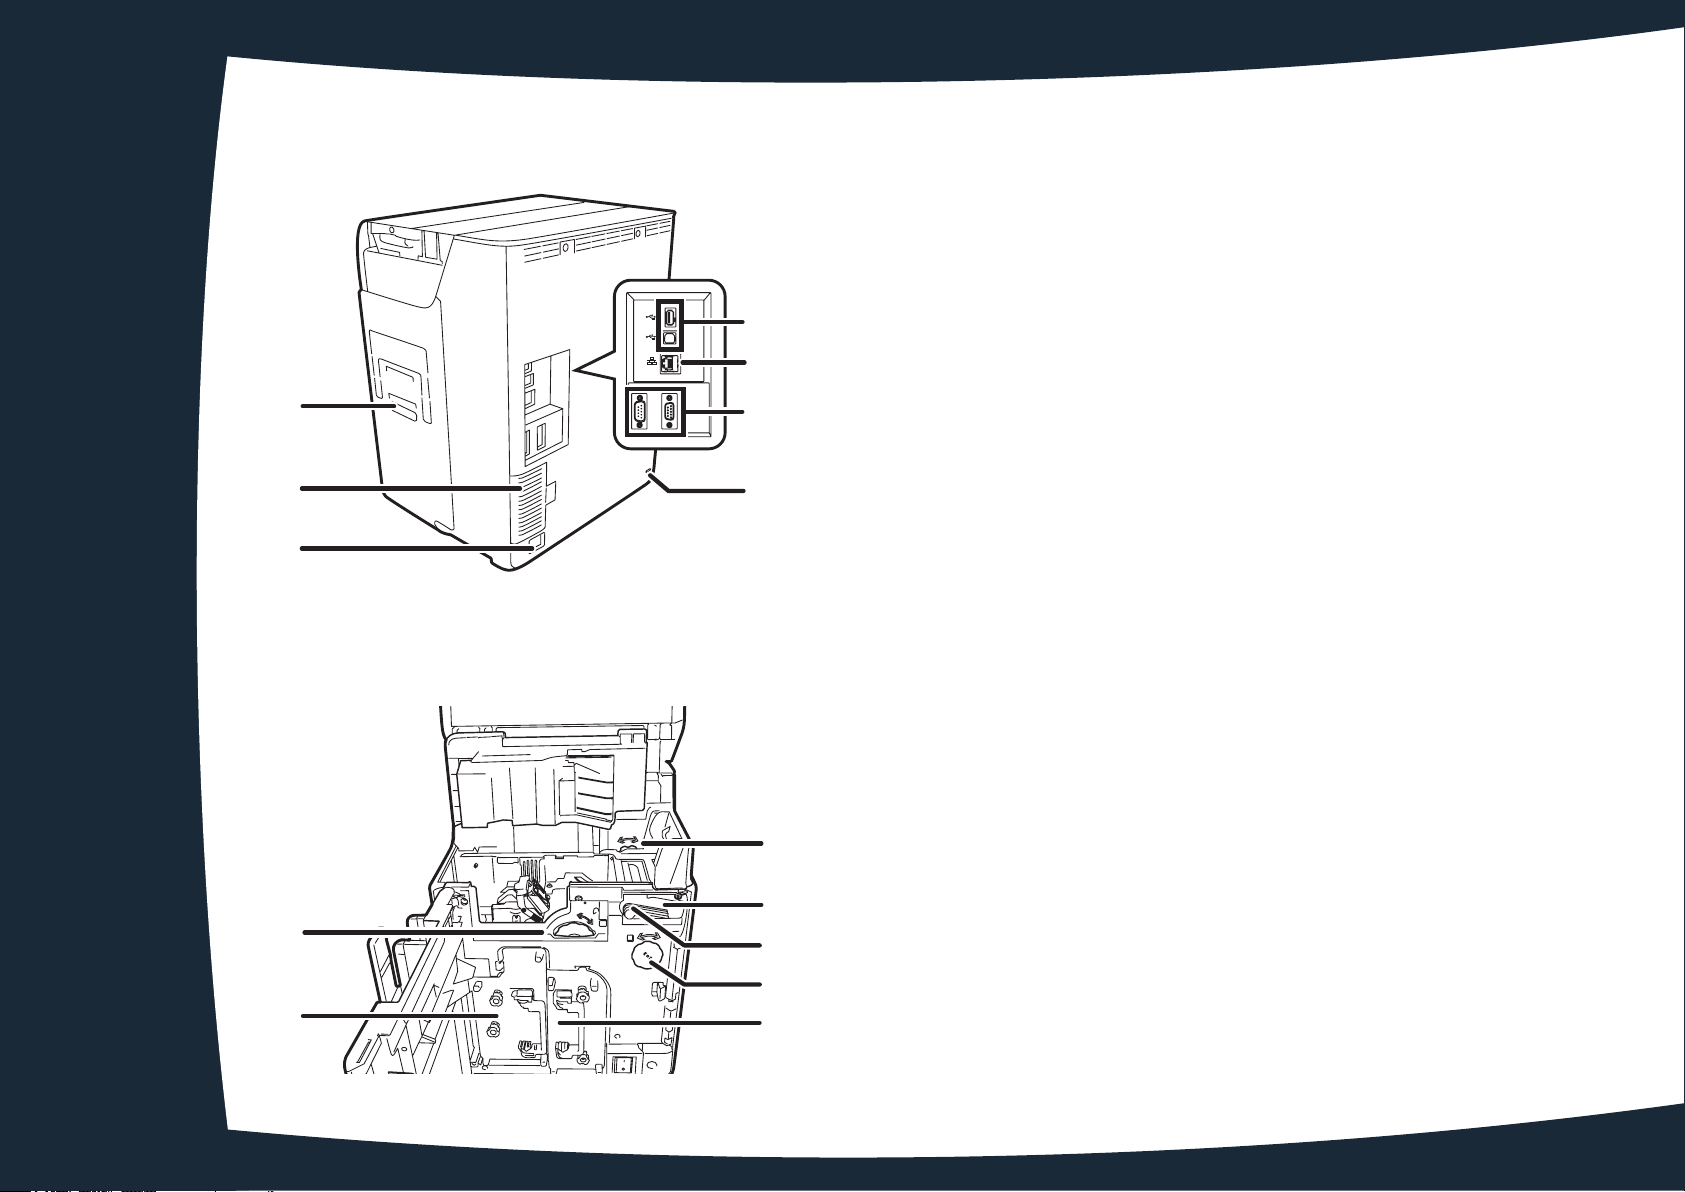
1-2c REAR SIDE OF THE PRINTER
1
a
g
f
1-2d FRON T COVER
a
(OPTION)
(PC)
(10/100)
RS-232C(PC) RS-232C(OPTION)
b
c
d
e
b
c
d
1 - Reject slot
2 - Peripheral USB socket
3 - Ethernet socket (Lan cable port)
4 - Port for enhancing function
5 - Security cable slot
6 - Power cable socket
7 - Filter
1 - Card feeding wheel
2 - Reverse feeding wheel
3 - Cleaning roller
4 - Cleaning tape cassette
5 - Reverse wheel
6 - Ink ribbon cassette
7 - Clear ReTransfer film cassette
g
e
f
8
Page 9
1-3 Installation
1
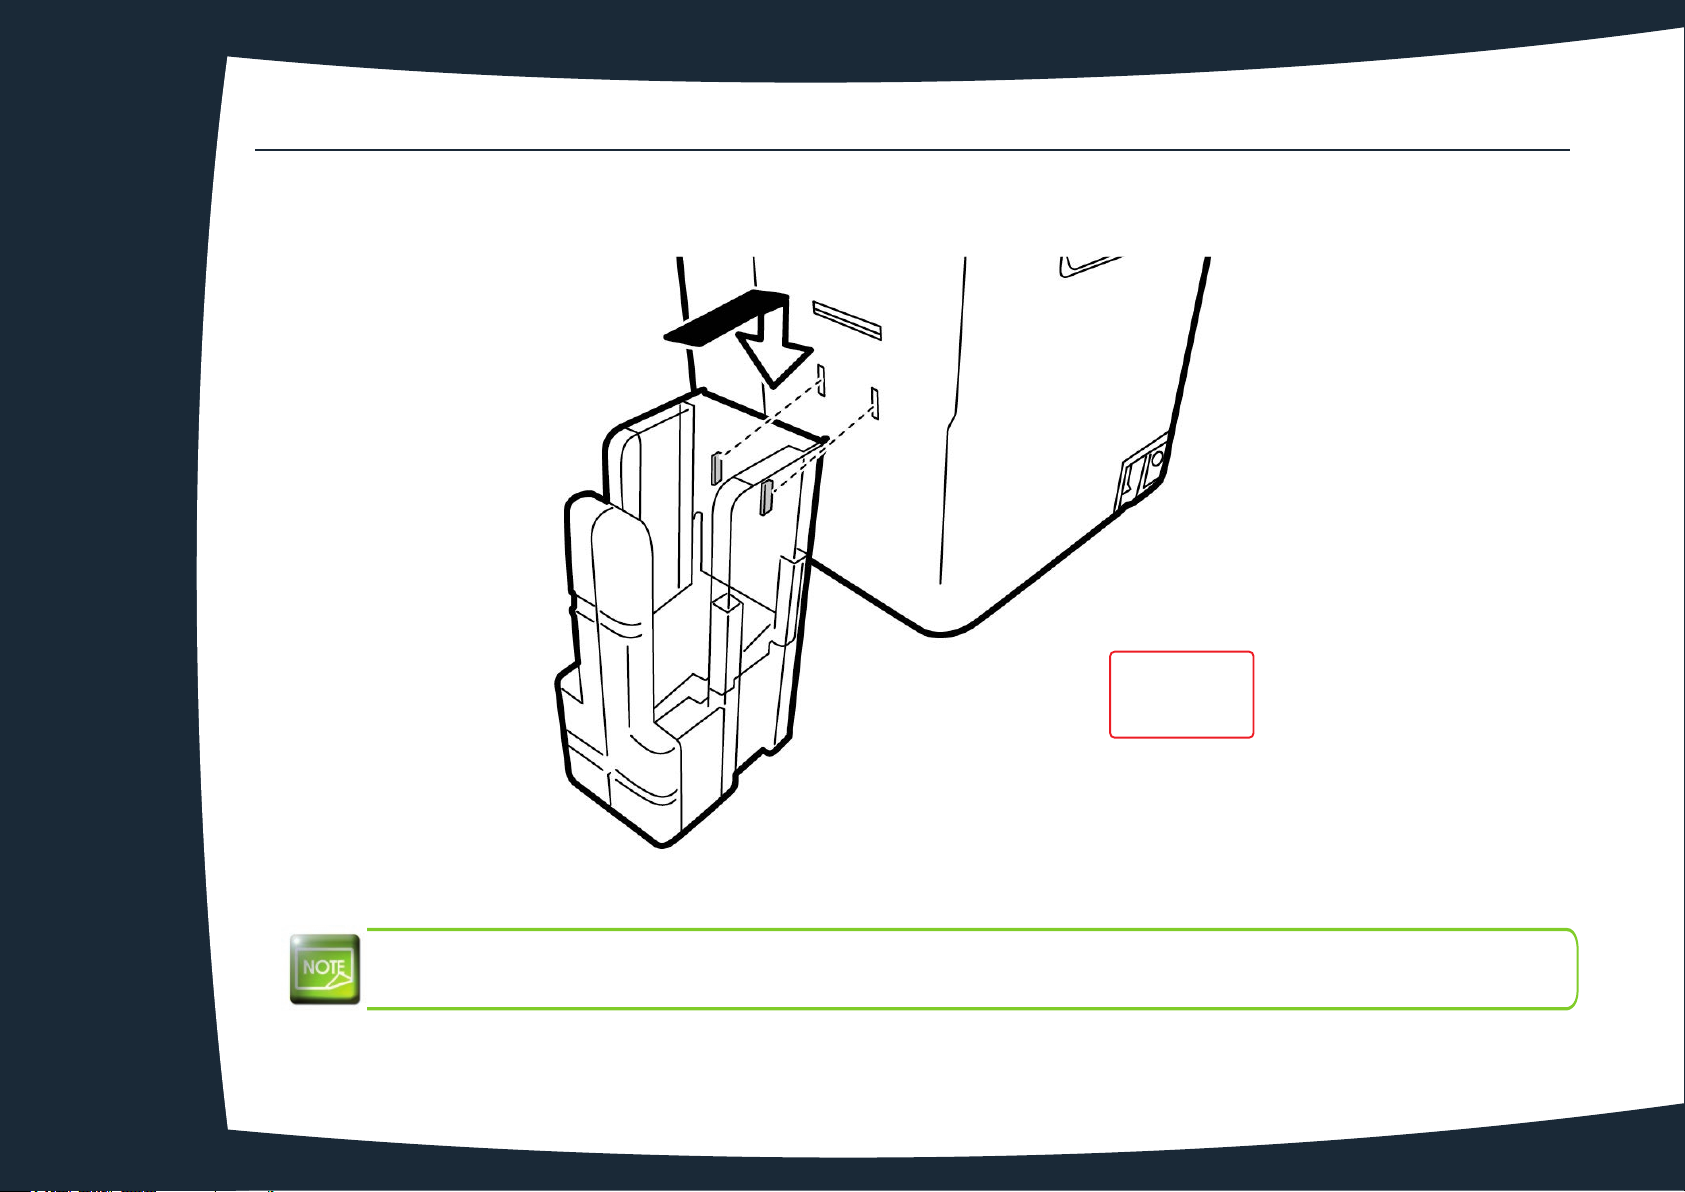
1-3a CONNECTING THE OUTPUT HOPPER
250
max
Insert the hooks of the provided Card output hopper to the holes by the Card Ejection Slot.
The output hopper is delivered with the printer.
Plug it before using the printer.
9
Page 10

1
1-3. CONNECTING THE PRINTER
ä
Connection to the power supply
The printer must be connected to a properly protected and earthed electrical installation.
FI: Laite on liitettävä suojamaadoitus koskettimilla varustettuun pistorasiaan.
NO: Apparatet må tilkoples jordet stikkontakt.
SE: Apparaten skall anslutas till jordat uttag.
This is a Class B device. This equipment are intended for a use un residential environments but may alose be
used in a non residential environments.
The residential environment is an environment where the use of broadcast radio and television receivers may
be expected within a distance of 10 meters from where this product is used.
Connect the power cable to the power supply unit, then plug the power cable connector into the printer.
Ê
Next, plug the end of the power cable into an earthed power socket.
Ë
Power up the printer by switching it
Ì
[Initializing] appears on the LCD, the operating indicator turns blue and [Ready to print] appears.. Should this not be
Í
the feeder, then either installation has not been carried out correctly or the printer is not working properly. Check
the installation.
ON.
Before attempting any maintenance, always ensure that the power switch is in the OFF position and that the
power cable is unplugged. For your personal safety, ensure that both the switch and cable remain easy to
access, especially in the event of an emergency.
To save energy, the heater will automatically turns off after 1 hour of inactivity. For more information please
see section 4-6.
ä
Connecting the USB cable
Under no circumstances should you connect the USB data cable before installation of the printer driver is
complete
Refer to the section on printer driver installation for further details, and follow the instructions carefully.
10
Page 11
1
1-3c RIBBONS AND FILMS
Evolis original ribbons optimise your printer’s operation and avoid causing damage to it. The use of ribbons from other suppliers is liable to
damage your printer and voids the manufacturer’s warranty for the printer.
For optimum print quality, Evolis recommends that the printer is cleaned every time the ribbons and films are changed. See the
Servicing and Maintenance section of this manual.
Ensure that the appropriate ink ribbon type is selected in the print driver.
The
l Ink ribbons intended for the printing module, identifiable from their purple cores.
l Clear ReTransfer films intended for the Retransfer module, identifiable from their charcoal cores.
printer accepts two types of ribbon:
For optimum printing and Retransfer quality, Evolis recommends that the printer is fully cleaned every time
the ribbons are changed.
with the mandatory cleaning cycles in order to keep the equipment in full working condition (see the
Maintenance section). Validity of the manufacturer’s warranty is dependent on adherence to cleaning
cycles.
This is left to the judgement of users, who will nonetheless take care to comply
11
Page 12
ä
Fitting the ink ribbon
1
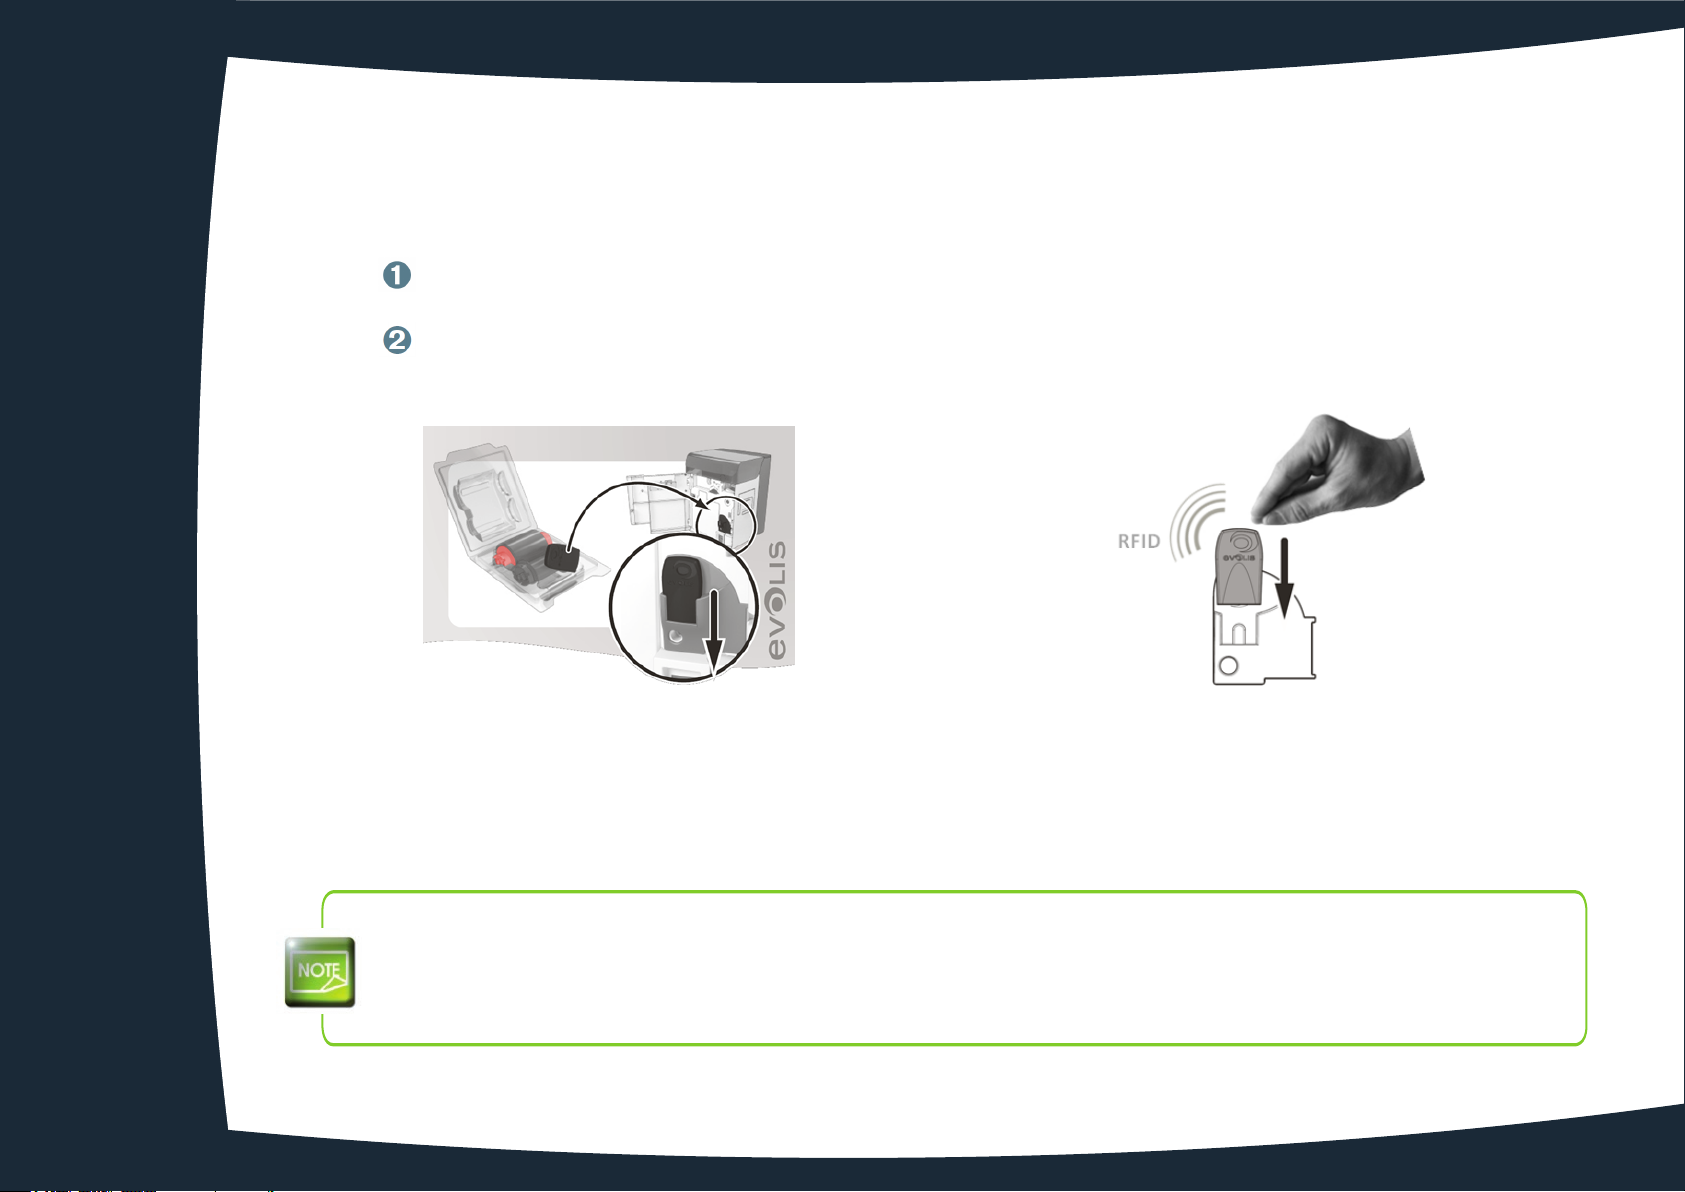
Before fitting the ink ribbon you have to know about the Evolis electronic key which is delivered with every color ribbon.
You will have to install the ribbon first and then install the key inside the printer as demonstrated below:
The electronic key is equipped with a RFID tag which communicates with an electronic board inside the
printer. Without this key, the printer will not print.
Ê Ë
When installing the electronic key, the Avansia printer instantly identifies the type of ribbon without user intervention. The process is
automated from end to end.
With this recognition system you will know exactly how much of the ribbon capacity is remaining, as this
information is readily available from the Printer Driver on the PC.
Similarly, when the ribbon is nearing its end, an alert is displayed on-screen. This helps in estimating the
subsequent print jobs possible, and you can ensure not running out of ribbon during the card personalization
process.
12
Page 13
1
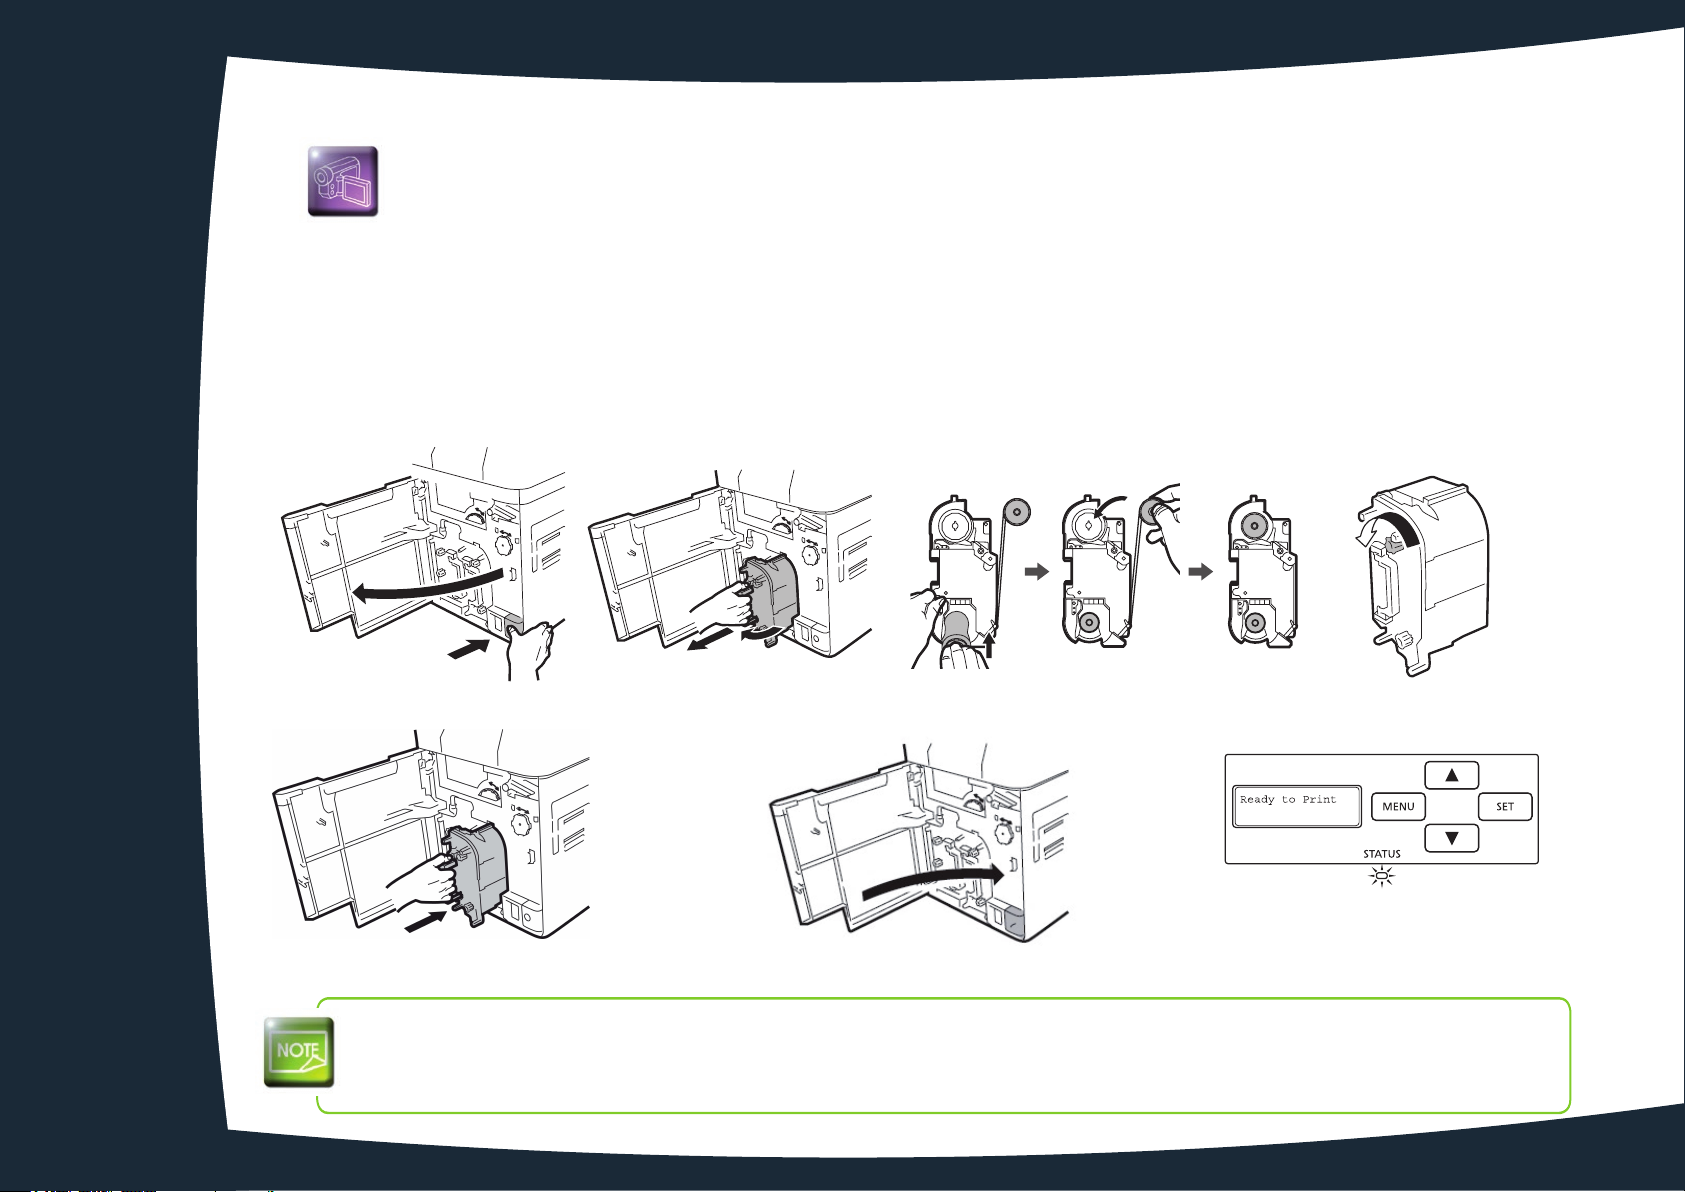
To fit an ink ribbon in the printing module, please proceed as follows:
Open the front cover.
Ê
Remove the ink ribbon cassette.
Ë
Load new ink ribbon in the cassette. Insert the spool spingle into the feed site (yellow) holder. Unwind and load into the
Ì
shalf as shown. Finally, insert the spool spindle into the winding side holder, inserting the bottom first.
Take up the ink ribbon slack. Turn the wheel as shown and take up the ribbon slack.
Í
Insert the ink ribbon cassette until a «click» is heard.
Î
Drop the Evolis electronic key in his container like shown page 11.
Ï
Close the front cover.
Ð
Press the SET Key, when [Push SET Key] appears on the LCD.
Ñ
a
b
Ê Ë
Î
When placing the
If the ribbon is cut, carefully cut the ribbon with scissors. Use cellophane tape to join the ribbon. Then go back to
the step .
Í
ribbon down, prevent contamination adhering by placing it with the handle of the bottom.
ink
13
Ð
Ì
Ñ
Í
Page 14
1
ä
Clear Retransfer film
The Retransfer unit includes parts heated to high temperatures. Be careful not to put your fingers inside the
module. Follow the safety instructions.
Appropriate configuration of the print driver should be carried out before fitting clear Retransfer film.
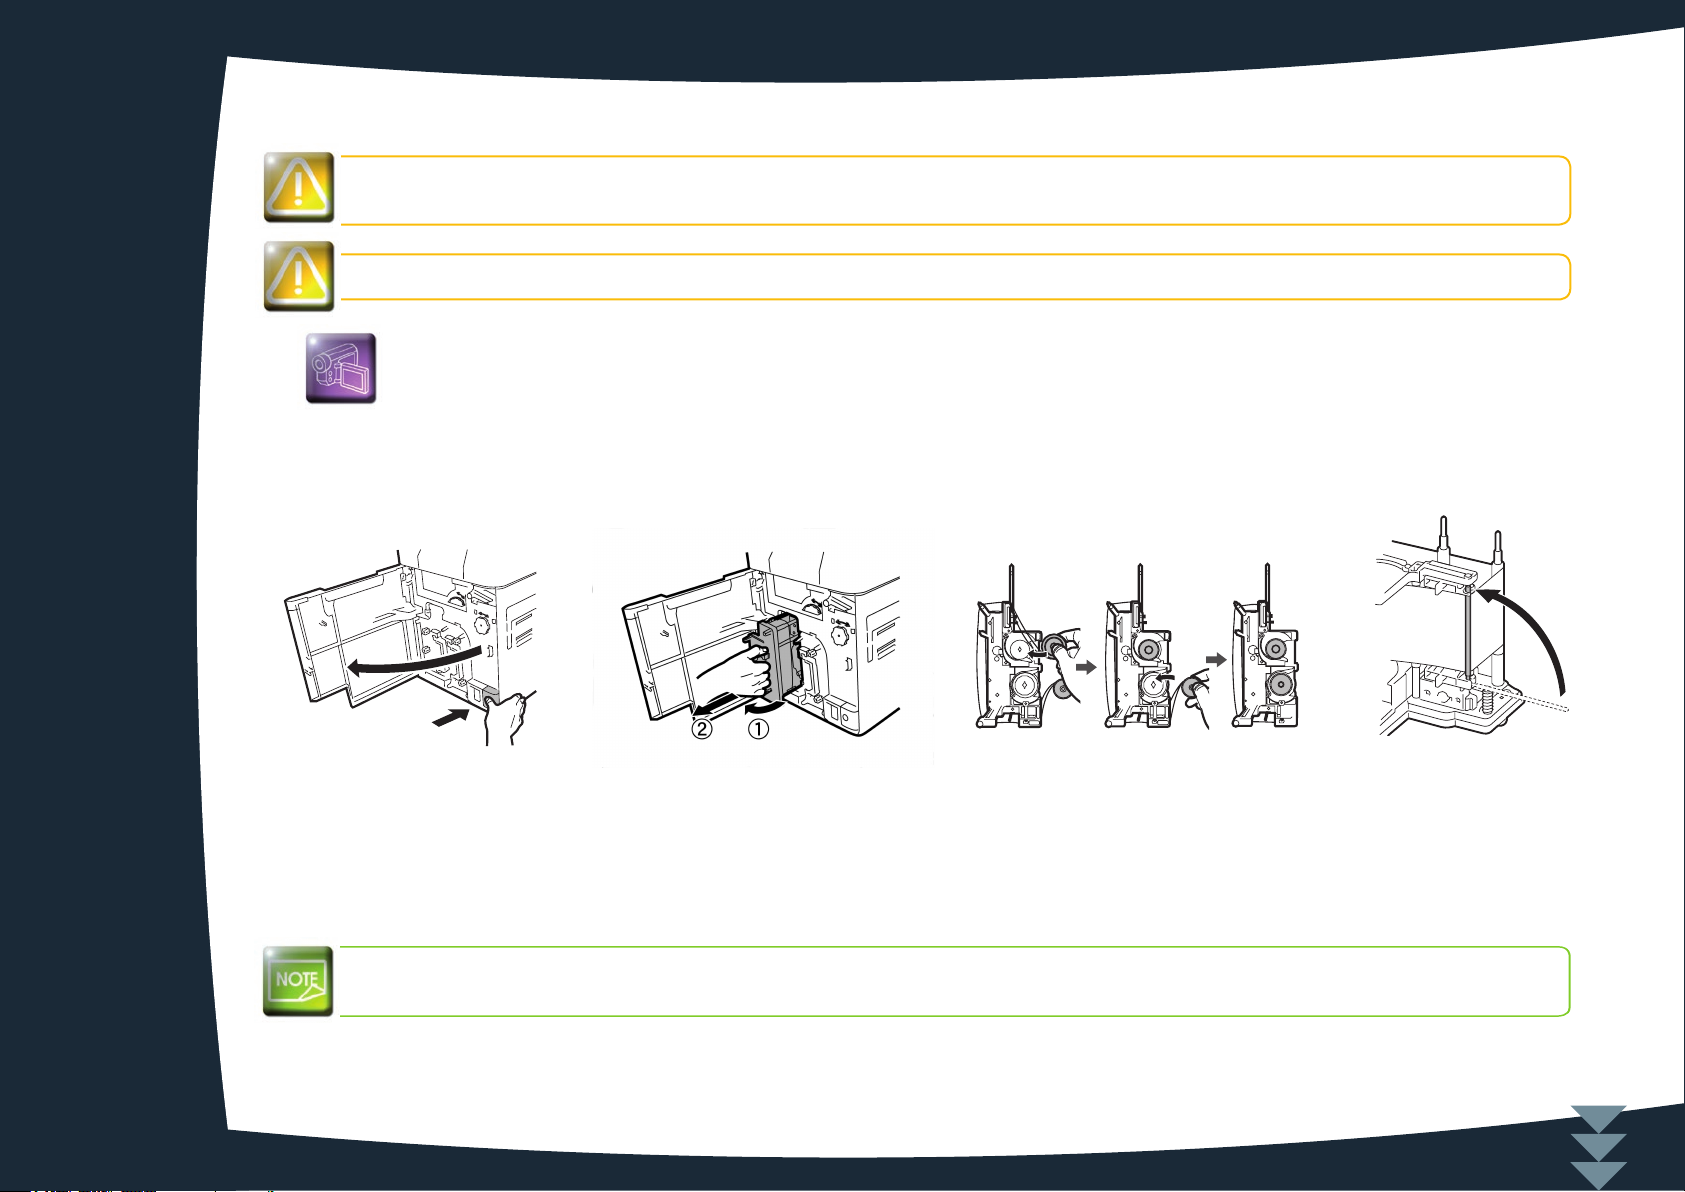
Open the printer cover.
Ê
Remove the film cassette.
Ë
Load clear Retransfer film in the cassette. Insert the spool spindle into the feed side (blue) holder. Unwind and load
Ì
onto the shaft
Attach the pin on top of the clear Retransfer film cassette.
Í
as shown. Finally insert the spool spindle into the winding side holder, inserting the bottom first.
Ê Ë ÍÌ
The clear Retransfert film is delivered within a blister with an adhesive cleaning roller which has to be installed
each time you change the film.
14
Page 15
1
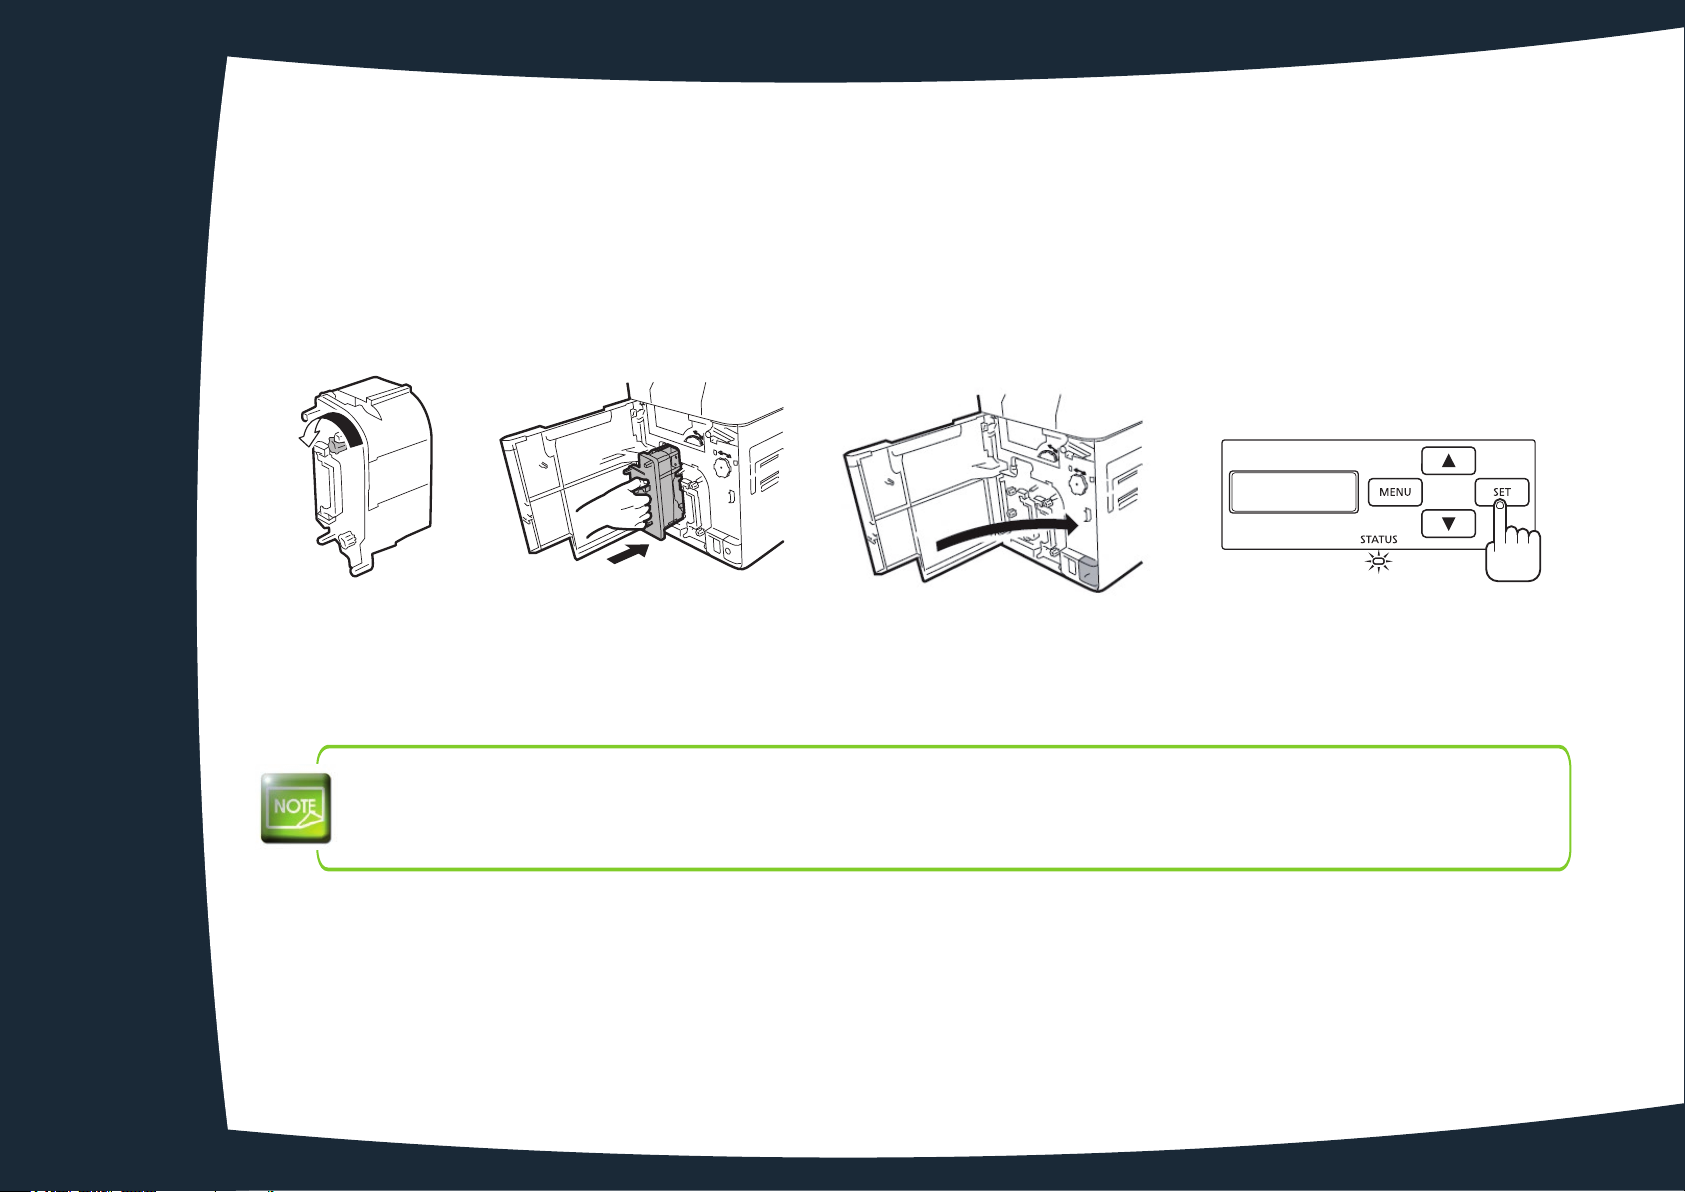
Take up the clear Retransfer film slack. Turn the wheel at right and take up
Î
the
film slack.
Insert the clear Retransfer film cassette into the printer until a click is heard.
Ï
Close the front cover.
Ð
Press the SET key when [Push SET Key ]appears on the LCD.
Ñ
Push SET key
Î Ï Ð
When placing the clear Retransfer film down, prevent contamination adhering by placing it with the handle of
the bottom.
If the film is cut, carefully trim the cut section with scissors. Use cellophane tape to join the film. Then go back
to step .
Î
Ñ
15
Page 16
1-3c CARDS
1
For optimum quality, the cards used must be ISO 7810 certified.
Use only the card types recommended by Evolis.
Do not touch the printable surface of the cards in order to preserve print quality.
Keep your cards protected from dust.
Do not use cards previously printed with this or any other card printer.
Do not use transparent cards, wet cards, cards mixed with glass, metallic or other foreign objects.
Do not use cards coated with oil or other foreign matter.
Do not use cards that have been damaged, folded, embossed or dropped on the floor
The
the ISO 7810 standard. There are several types:
l Blank cards
l Magnetic strip cards
l Contact smartcards
l Contactless smartcards
l Magnetic strip smartcards
printer accepts PVC, PET, PET-G, Sheet(PVC), PC, ABS cards between 0.76 mm and 1 mm thick. For optimum quality, the cards
used must meet
Card
(Front
Surface)
The Retransfer process requires cards to be heated to high temperatures, and they may become slightly warped under the effect of
the heat and the stress exerted by the film as it cools.
Evolis recommends the use of cards specially designed for Retransfer purposes.
For more information, please contact your Evolis reseller who will advise on your choices.
Be extremely careful to ensure that magnetic strip cards and contact smartcards are properly positioned in
the card feeder.
The encoding option will fail if cards are not inserted in the right direction.
16
Page 17
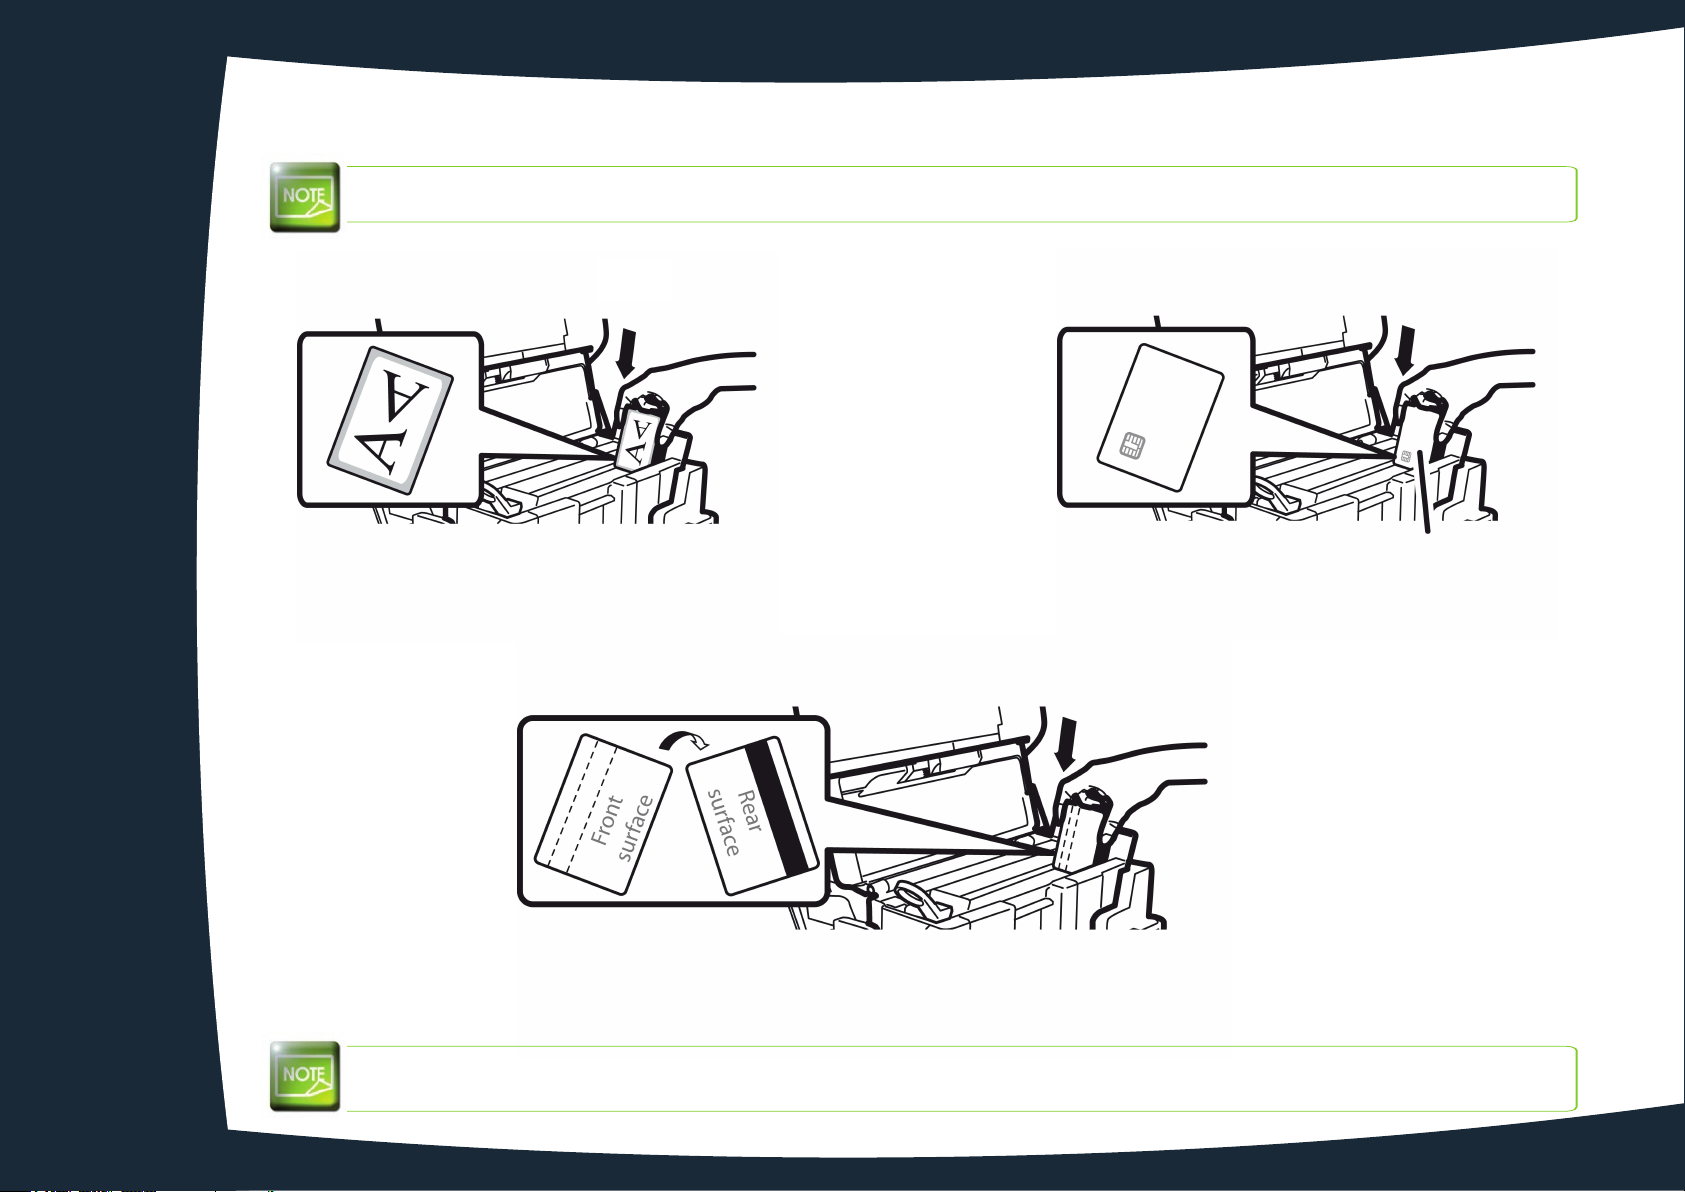
ä
Cards orientation
1
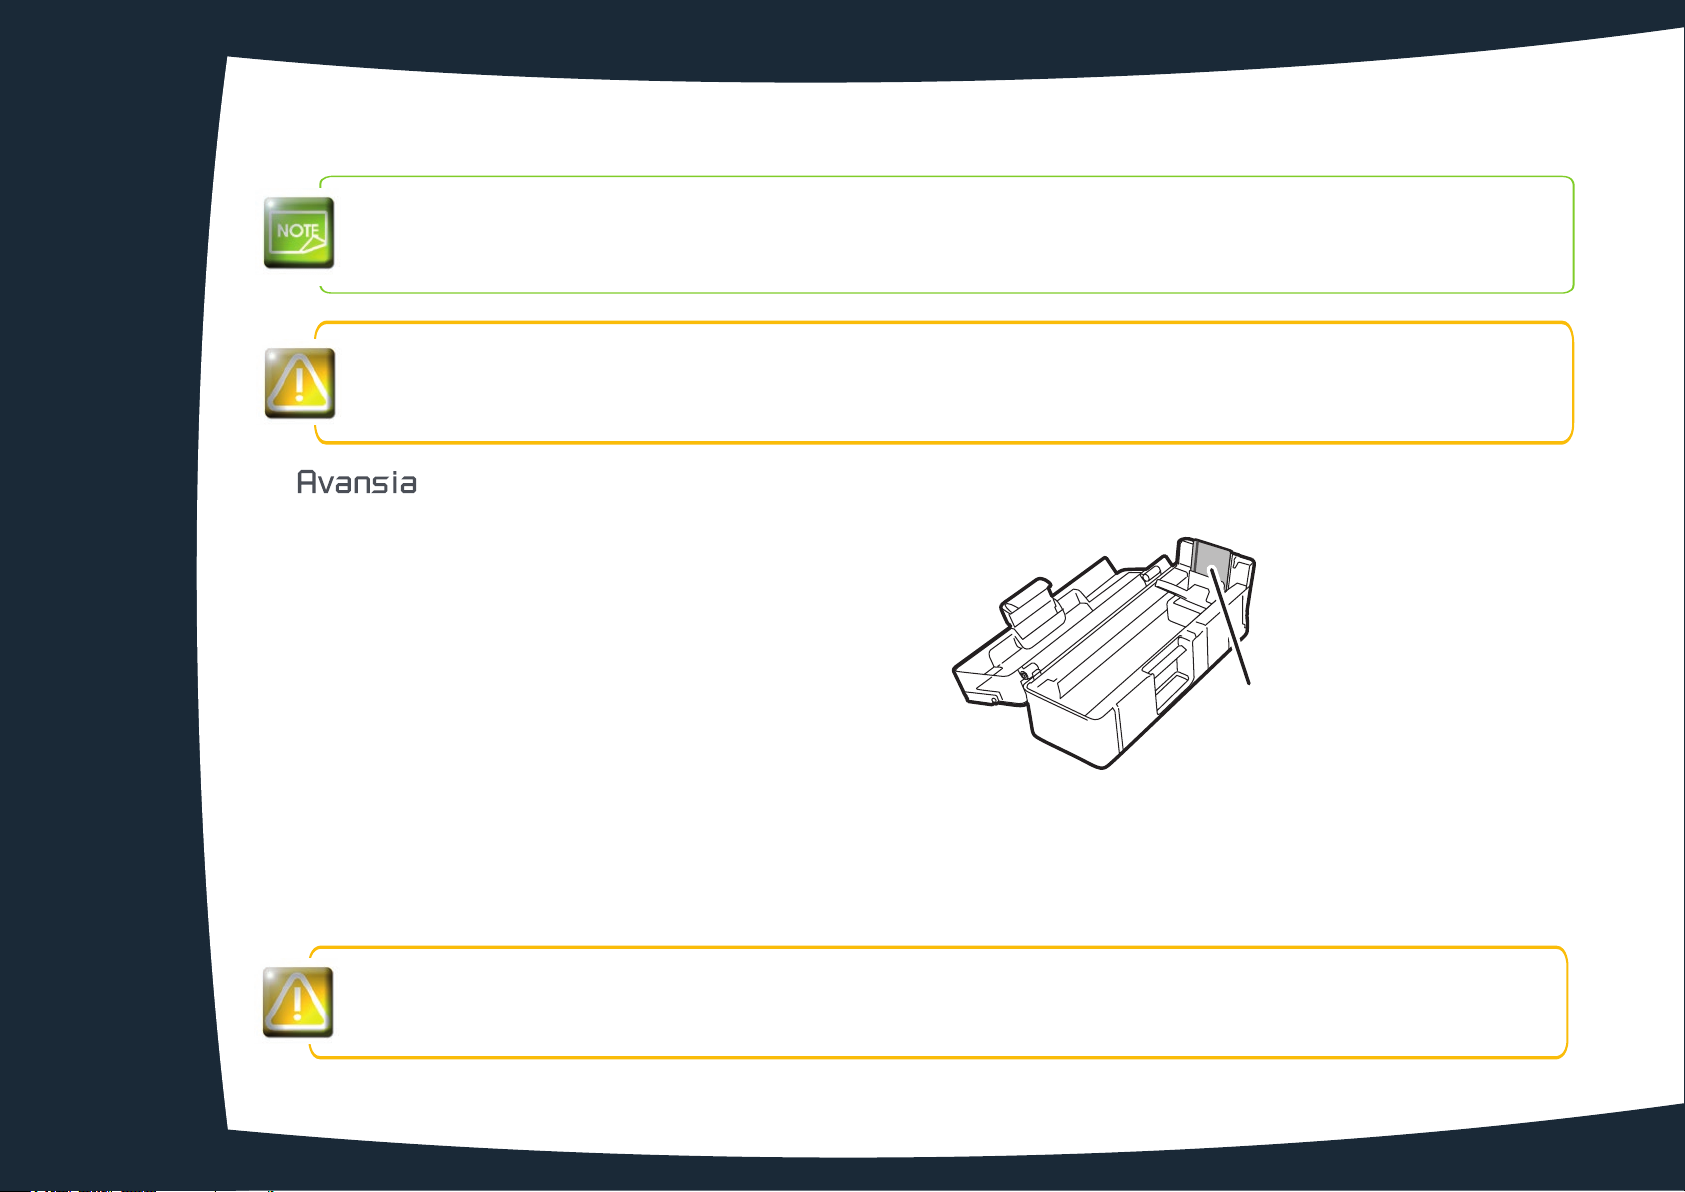
The printing side of the card is the surface on the front side of the card feeder (see pictures
l
l
Pre printed cards
Front side of the card feeder
ront surface)
(F
Ê
l
Magnetic strips cards (Front surface + Rear surface)
Contact smartcards
Front side of the card feeder
Ë
Ë
Ê
(Front surface)
Ì
)
Front side of the card feeder
Ì
The magnetic strips of the magnetic cards need to be facing the back side of the card feeder to be encoded
(see picture )
Ì
17
Page 18
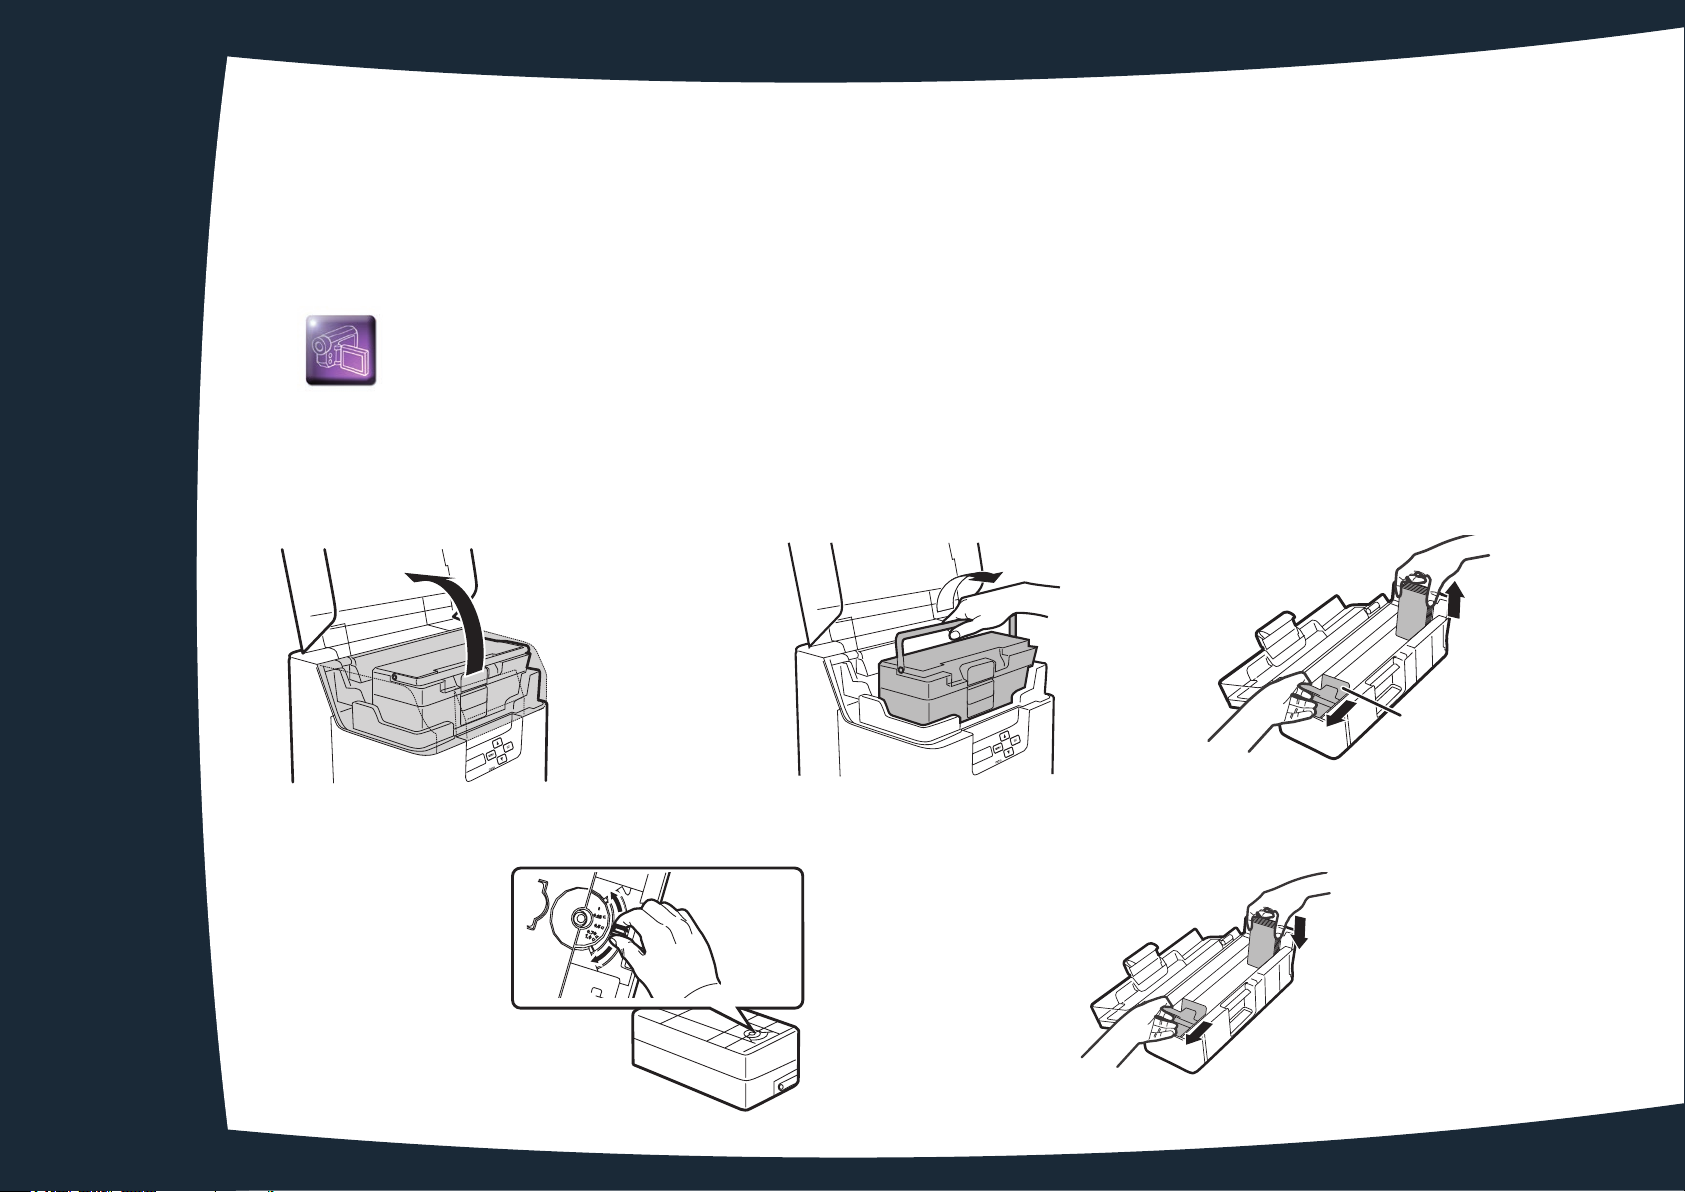
ä
Adjusting card thickness
1
The printer is equipped with a manual card thickness adjustment mechanism which can be reached either through the card input feeder
or through the inside of the printing module when the print head bracket is open. The printer accepts cards between 0.76 mm (30mil)
and 1 mm (40mil) thick. The factory setting for card thickness is 0.76 mm.
Adjusting card thickness please proceed as follows:
Open the printer cover.
Ê
Remove the card feeder from the printer as shown.
Ë
Open the cards feeder and remove the cards.
Ì
Return the feeder and adjust the thickness of the cards used by moving the lever from right to left to the desired card
Í
thickness
Put the feeder back into the feeder and put back the feeder into the printer.
Î
Close the top cover of the printer.
Ï
Card Retainer
Ê
Í
Align
wheel with
Marks
18
Ë
Ì
Î
Page 19
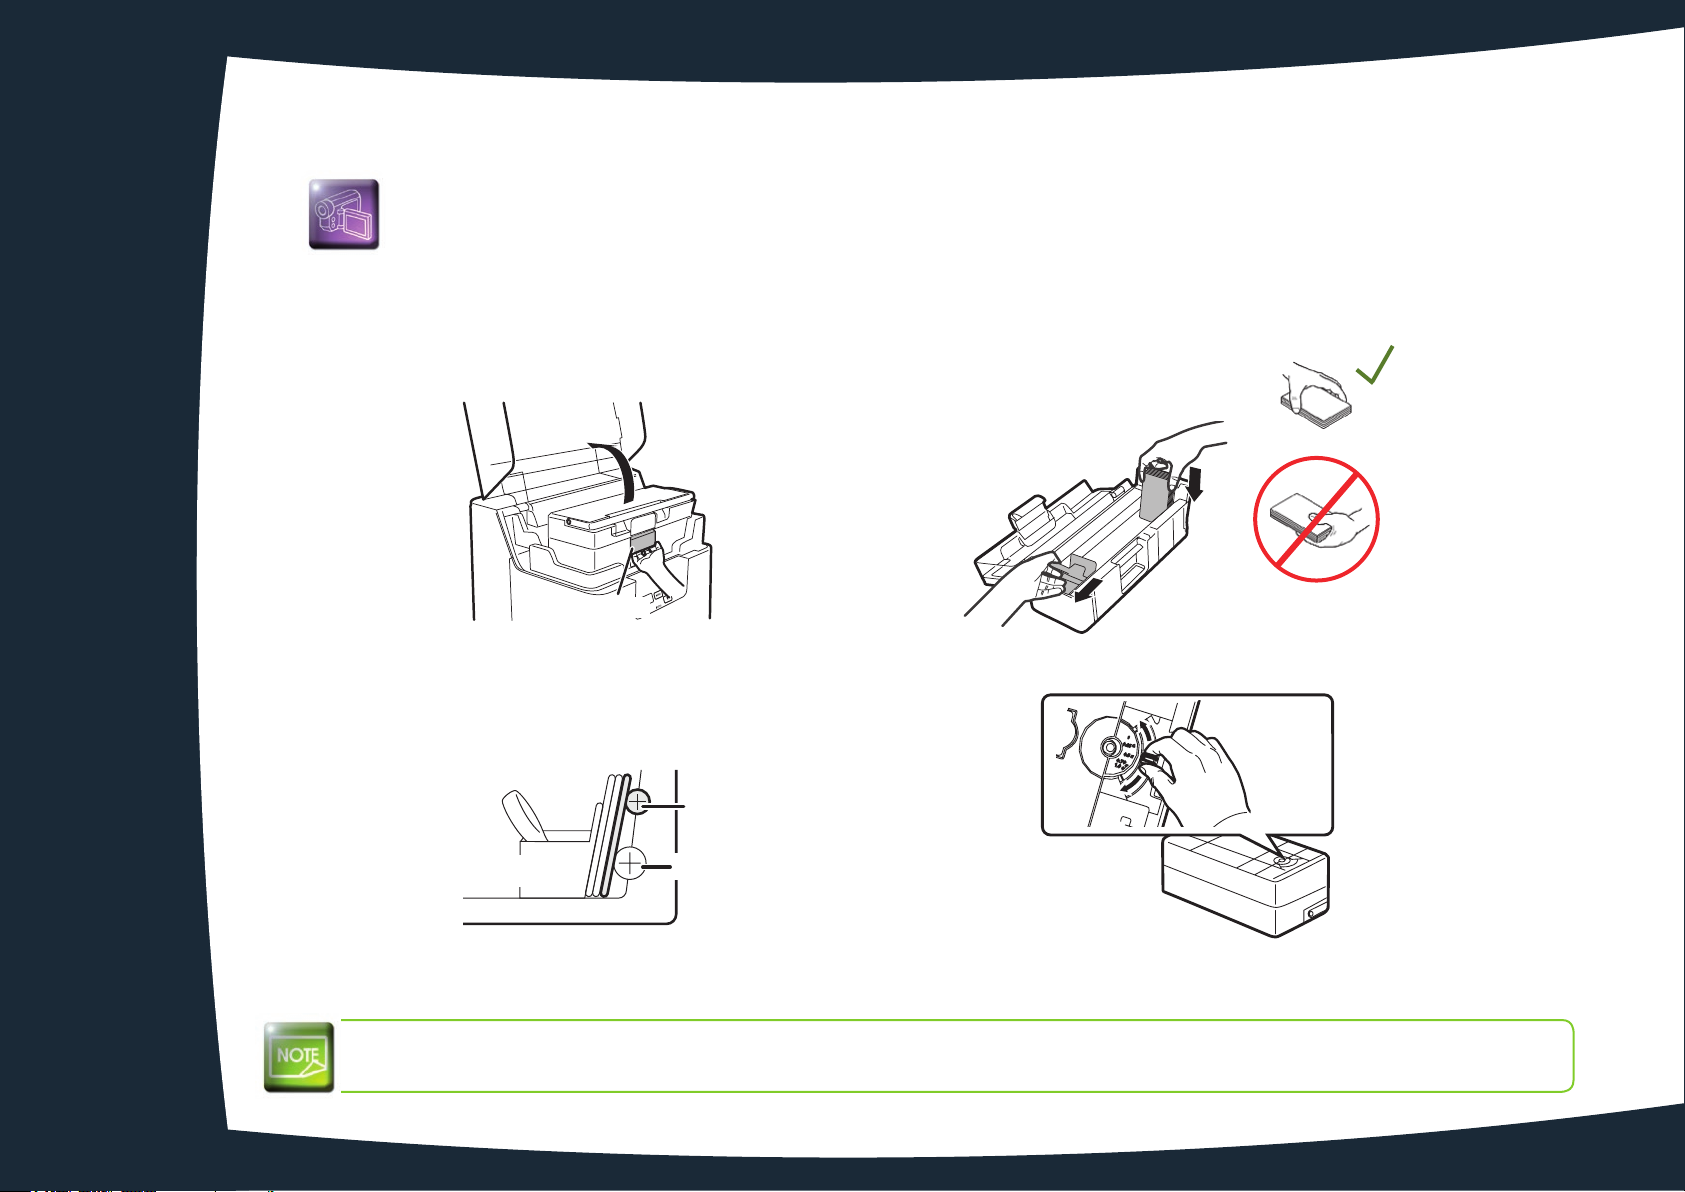
1
ä
Loading the cards
Open the top cover and open the card feeder as shown.
Ê
Hold the card retainer lever with your fingers and pull it right out.
Ë
Insert the cards in the feeder as indicated, with the side to be printed facing to the left.
Ì
Adjust the gauge setting to match the thickness of your cards (see section 1.3.c page 17 for more
Í
Return the card retainer.
Î
Close the top cover.
Ï
Lock Lever
information).
Ê
Card feeder
Roller
Card Retainer
Rubber
Ì
Load cards in order to start from the right side of the card feeding when printing starts the right-most card is
pulled into the printer. You can load card manually, one by one.
19
Ë
Align
wheel with
Marks
Í
Page 20
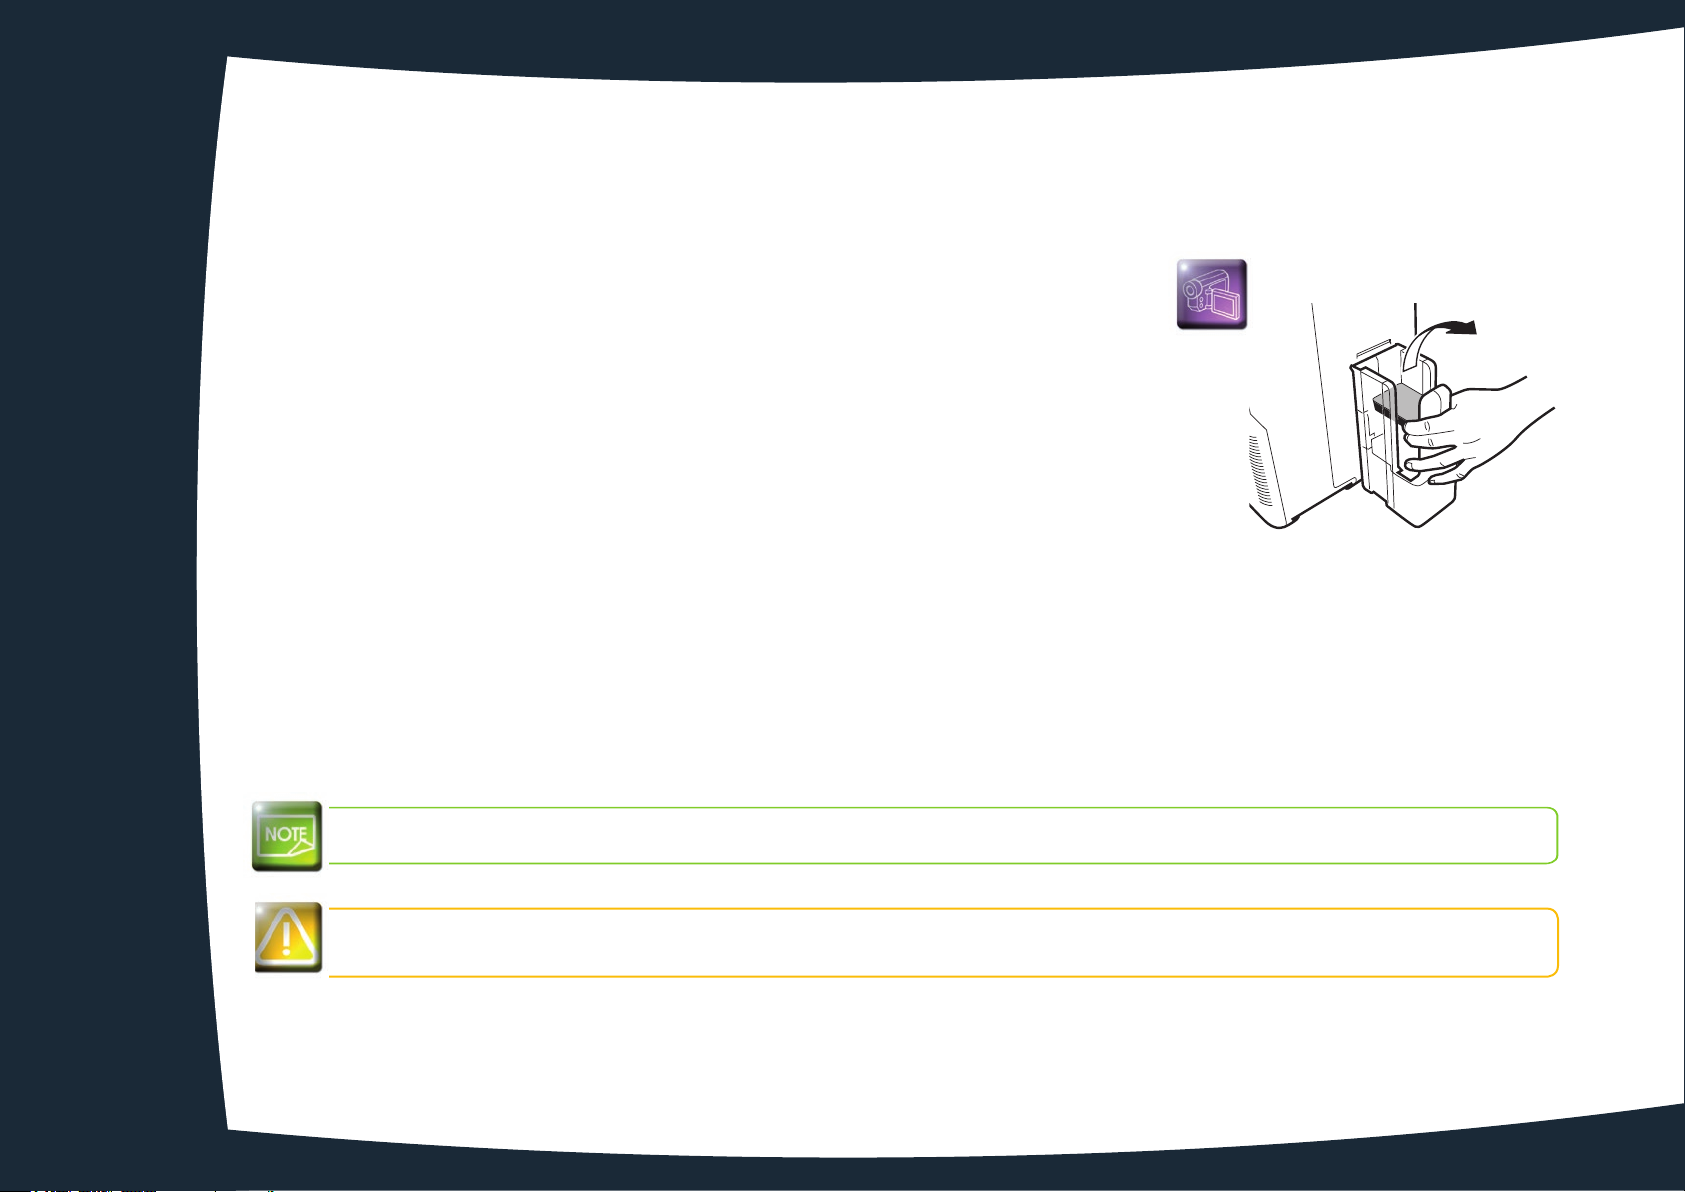
ä
Removing printed cards
1
Once the print and/or encoding cycle is complete, cards are delivered by default into the output hopper found on the left of the device.
The hopper has a maximum capacity of approximately 250 cards.
Users can select from three methods to collect cards from the output hopper:
l Front side of card visible – First card at bottom of stack
l Rear side of card visible – First card at top of stack
l Cards ejected in their position on exit from the retransfer area
to do so, please follows the instructions below:
Switch from Normal Mode to User mode (page 41 section 4.1b)
Ê
Press the t Key until [Card Setup] is displayed, then press the SET Key.
Ë
Press the (fleche vers le bas) Key until [Eject Face] is diplayed, then press the SET Key.
Ì
Change the settings by using the t/s Keys, then press the SET Key.
Í
NOT SPECIFY: The rear surface of cards to output cannot be set. Depending on the details of printing, th eorientation that will print the
most quickly is automatically selected. The front face of the card faces down for single-sided printing, and faces up for double-sided
printing.
UP: The card is output with its front surface upwards.
DOWN: The card is output with its front surface downwards.
The factory default setting is [NOT SPECIFY]
The method is set via the Properties menu in the print driver.
Please see the Print driver Properties section for more information.
20
Page 21

ä
Optimizing transfer conditions
1
In order to optimize the transfer quality you can change the Retransfer settings according to your card type.
Thanks to the LCD Panel or the printer driver you can select the card type, then the transfer speed and the transfer temperature.
Switch from Normal Mode to User Mode.
Ê
Press the Key until [Card Setup] is displayed. Press the SET Key.
Ë
Confirm that [Card Type] appears. Presse the SET Key.
Ì
Change the settings by using the t/s Keys:
Í
PVC (0.76mm)
PET (0.76mm)
PET-G (0.76mm)
Sheet (PET)
If [CARD 1-3] is selected, use the t/s Keys and the SET Key to select the transfer speed and transfer temperature:
- left value: transfer speed.
The higher the value you set, the higher the transfer speed is fast.
- Right value: transfer temperature.
The higher the value you set, the higher the transfer temperature is hot.
The factory default setting is [PVC (0.76mm)].
The factory default transfer speed for [CARD 1-3] is set to [35mm/s].
21
Page 22

ä
Reject hopper management
1
Your printer is equipped with a reject hopper, the purpose of which is to separate correctly customised cards from incorrect
cards.
Incorrect cards are automatically stored in reject slot at the right of the printer.
The reject slot needs to be emptied regularly to avoid halting jobs in progress. This operation is carried out in two stages:
Removal of the cards
Ê
Resetting the rejected card counter to zero (so that the printer knows how full the reject hopper is)
Ë
To empty the hopper and reset the counter, please proceed as follows:
Open the printer cover.
Ê
Open the reject hopper by tilting the flap forwards, and remove the cards found.
Ë
Close the reject hopper flap.
Ì
Close the printer cover.
Í
Press any key on the control panel to enter the menu.
Î
Select the CONFIG option and confirm with OK, then scroll down to select REJECT HOPPER and confirm with OK.
Ï
Select the Reset option and confirm with OK.
Ð
Exit the menu.
Evolis advises you to empty the reject hopper regularly, such as whenever the ribbon is changed or during
routine maintenance.
You can also change the settings by using the printer driver.
22
Page 23
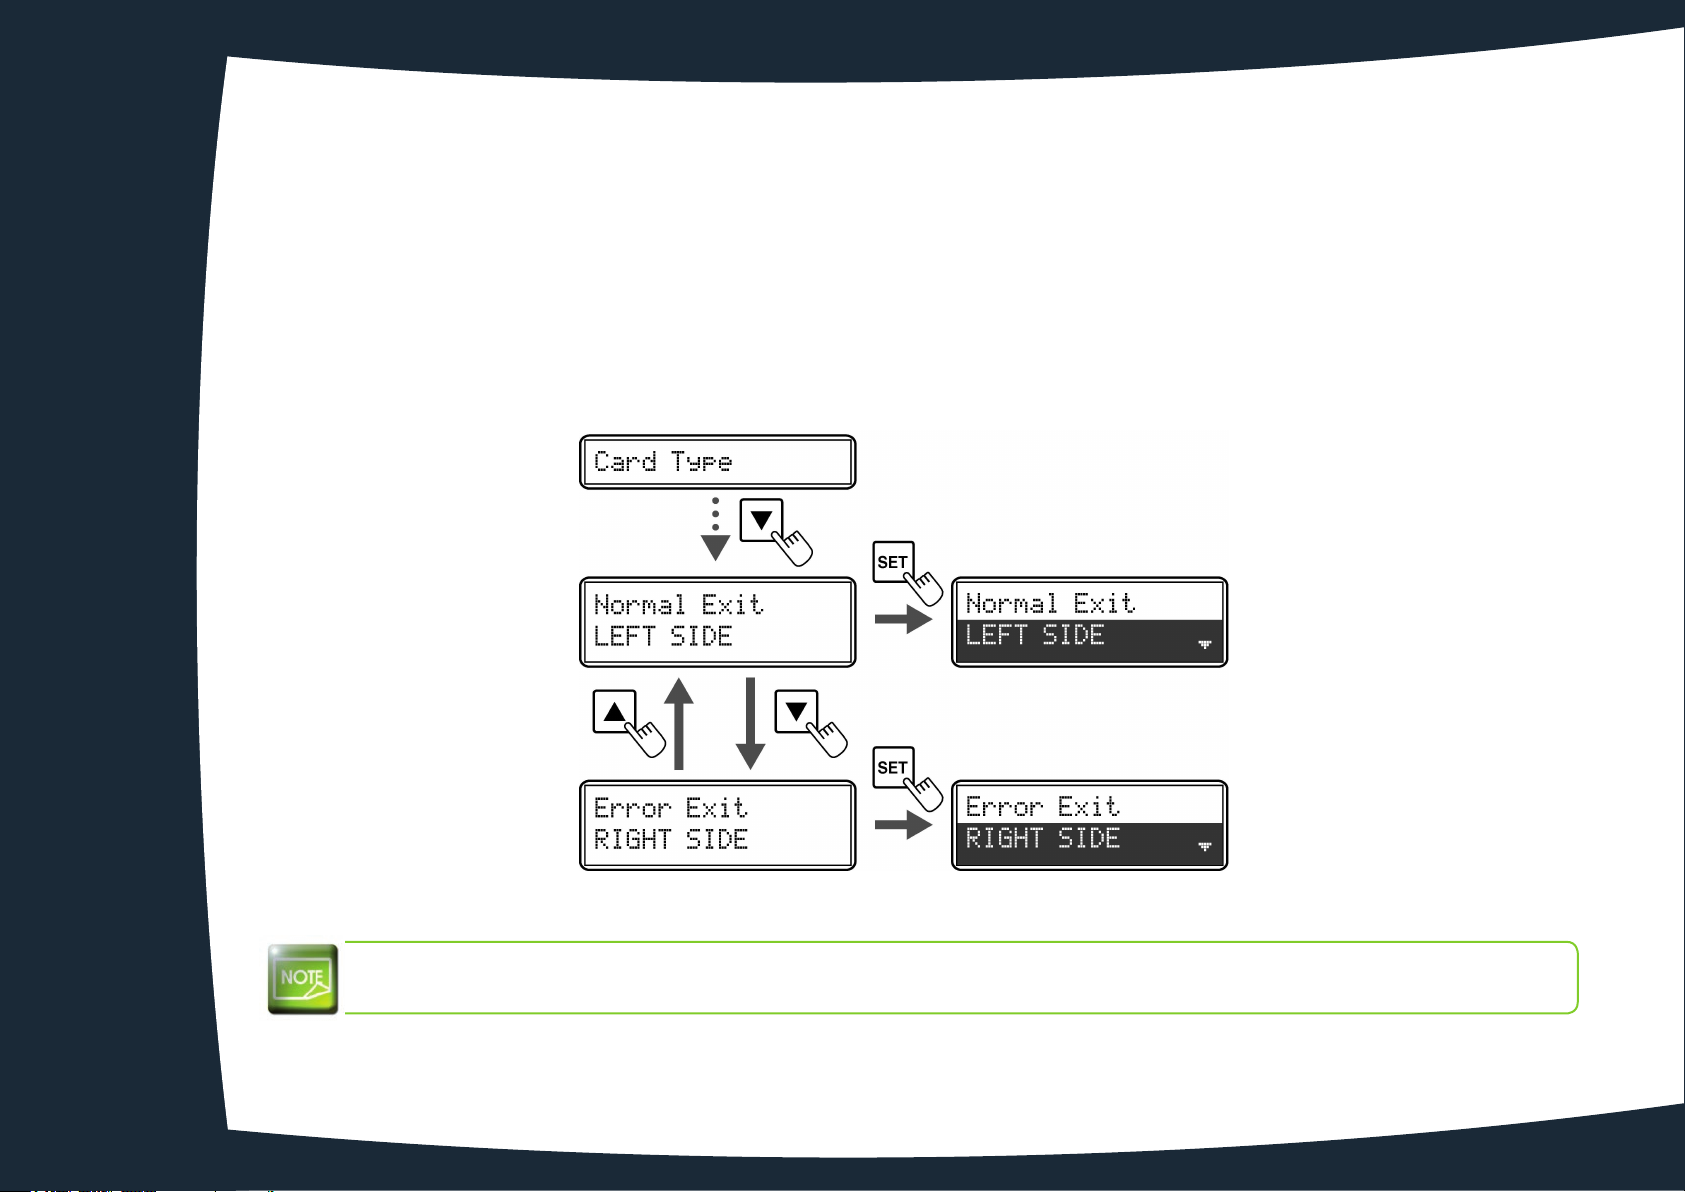
It is possible to switch the rejection slot. To do so, please follows the instructions below:
1
Switch from Normal Mode to User mode (page 41 section 4.1b)
Ê
Press the t
Ë
After using the (fleche haut)/(fleche bas) Keys to switch between [Normal Exit]/
Ì
[Error Exit], press the SET Key.
Change the settings by using the t/
Í
the SET Key.
Key until [Card Setup] is displayed, then press the SET Key.
s Keys, [LEFT SIDE] or [RIGHT SIDE], then press
The factory default is set so that correctly printed cards are output from the card ejection slot (Left), and cards
with errors are output from card ejection slot (Right).
23
Page 24
2
Printing
The information about the procedures described in this section refers to a Windows 7 environment.
2-1 Installing the print driver
Configuration of the printer and its driver is a very important step and requires very special care. In fact, inappropriate settings are a
factor having a negative impact on the quality of card customisation. It is therefore essential to proceed in stages, changing settings
only when you are completely sure. Evolis offers the option to revert to the factory settings at any time if the adjustments made do not
give the expected results.
Your printer is delivered with a CD containing the print drivers for Windows.
To install a print driver, insert the CD into your computer and select the print driver menu. A program will guide you through the entire
installation process.
Do not connect your USB cable to your computer until prompted to do so by the installation program.
For the connection procedure, see the section on Connecting the Printer.
Follow the installation procedure scrupulously. Some versions of Windows and Macintosh require the user to
have administrator rights to install the driver.
24
Page 25
2
2-2 Managing the print settings
Before using your printer, it is essential to check and/or change the default print driver settings:
l Ribbon type
l Card type
l Card finish or treatment
l …
You will find more detailed information about the cards recommended by Evolis in the ‘Evolis Genuine Product’
list of consumables.
Pay attention to the settings defined under the print driver Properties and do not hesitate to contact your Evolis
reseller for any advice and assistance needed before making any changes.
These print settings are accessible:
l From the Start button found bottom-left on the Windows task bar, select Printers and faxes.
l Select your printer and double click.
l From the Printer menu, select Properties.
l The first properties configuration screen for the equipment then appears.
l The main tabs used to define the settings are “Graphics” and “Tools”.
25
Page 26
2
ä
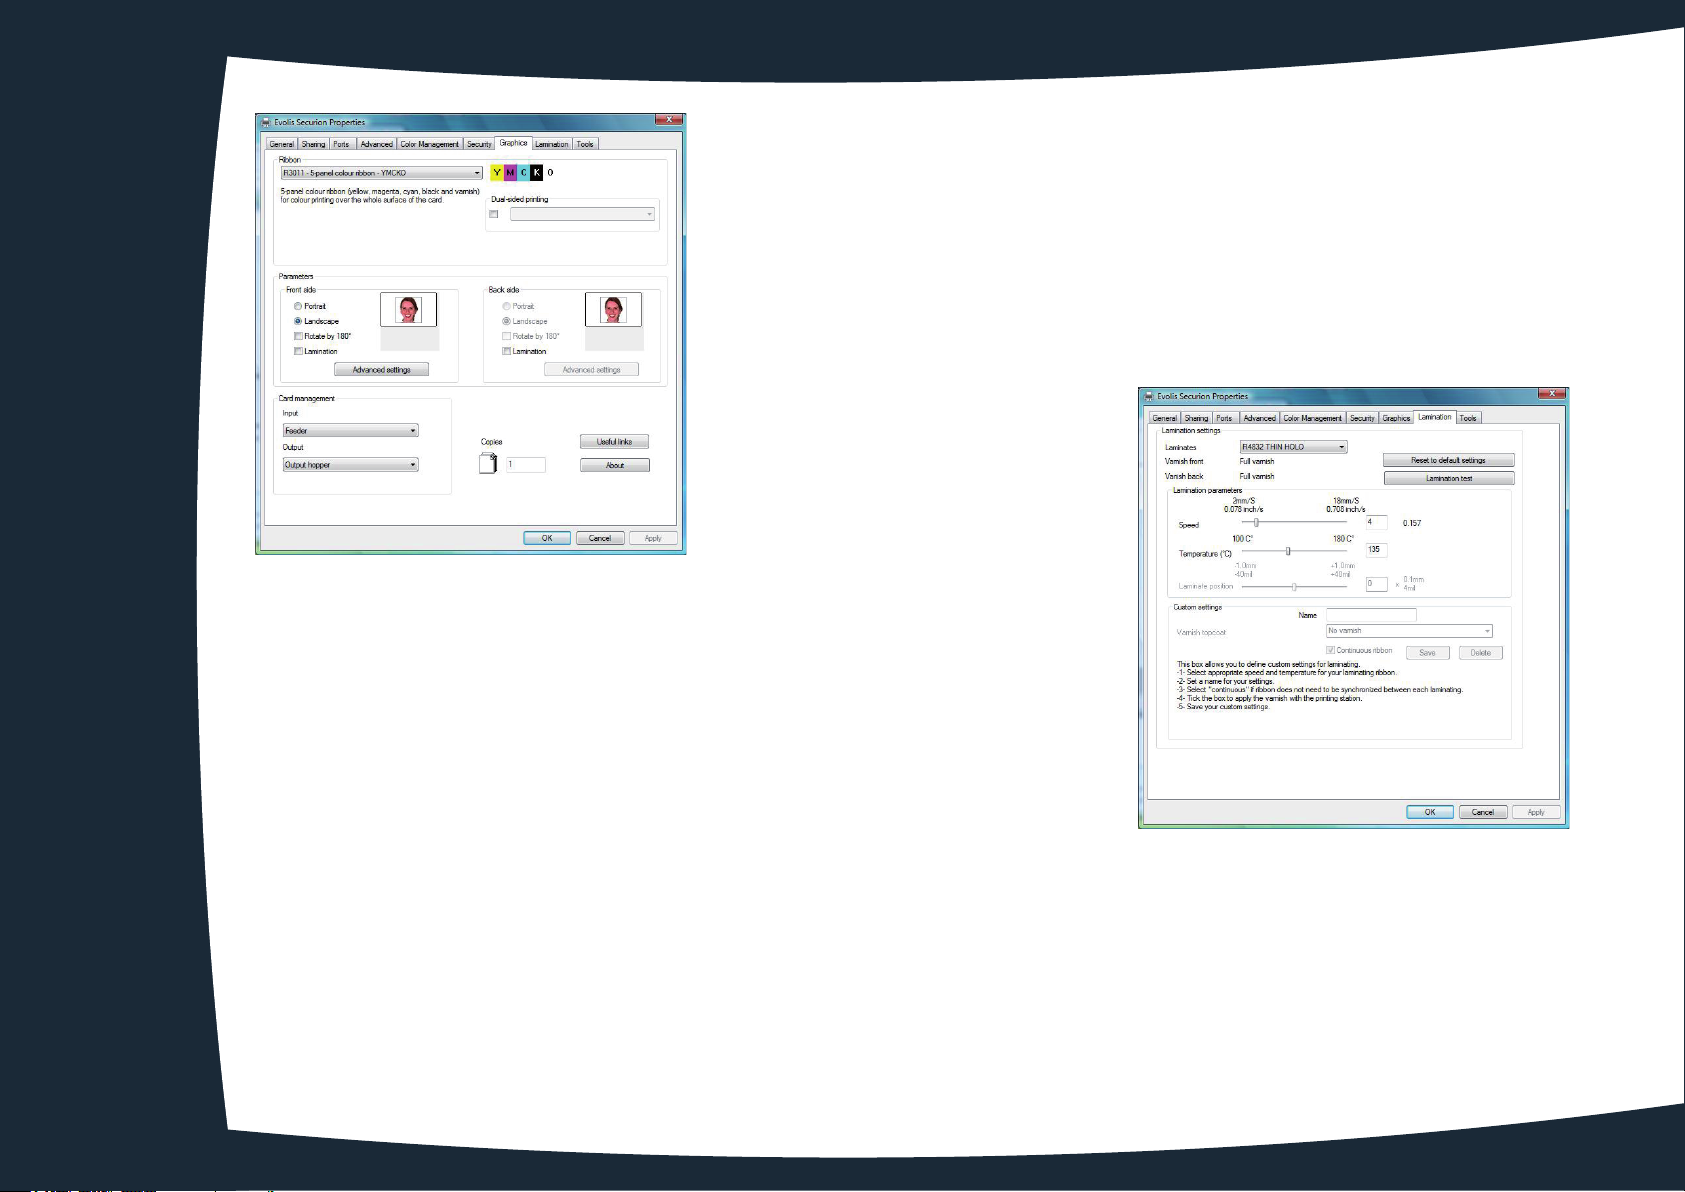
“Graphics” tab
l The ribbon type
l Front/back printing
l Card collection method
l Card orientation, portrait or landscape
l Number of copies
ä
“Retransfer” tab
l
Selection of film type
l Changing Retransfer settings
l Customised configuration
26
Page 27
2
ä
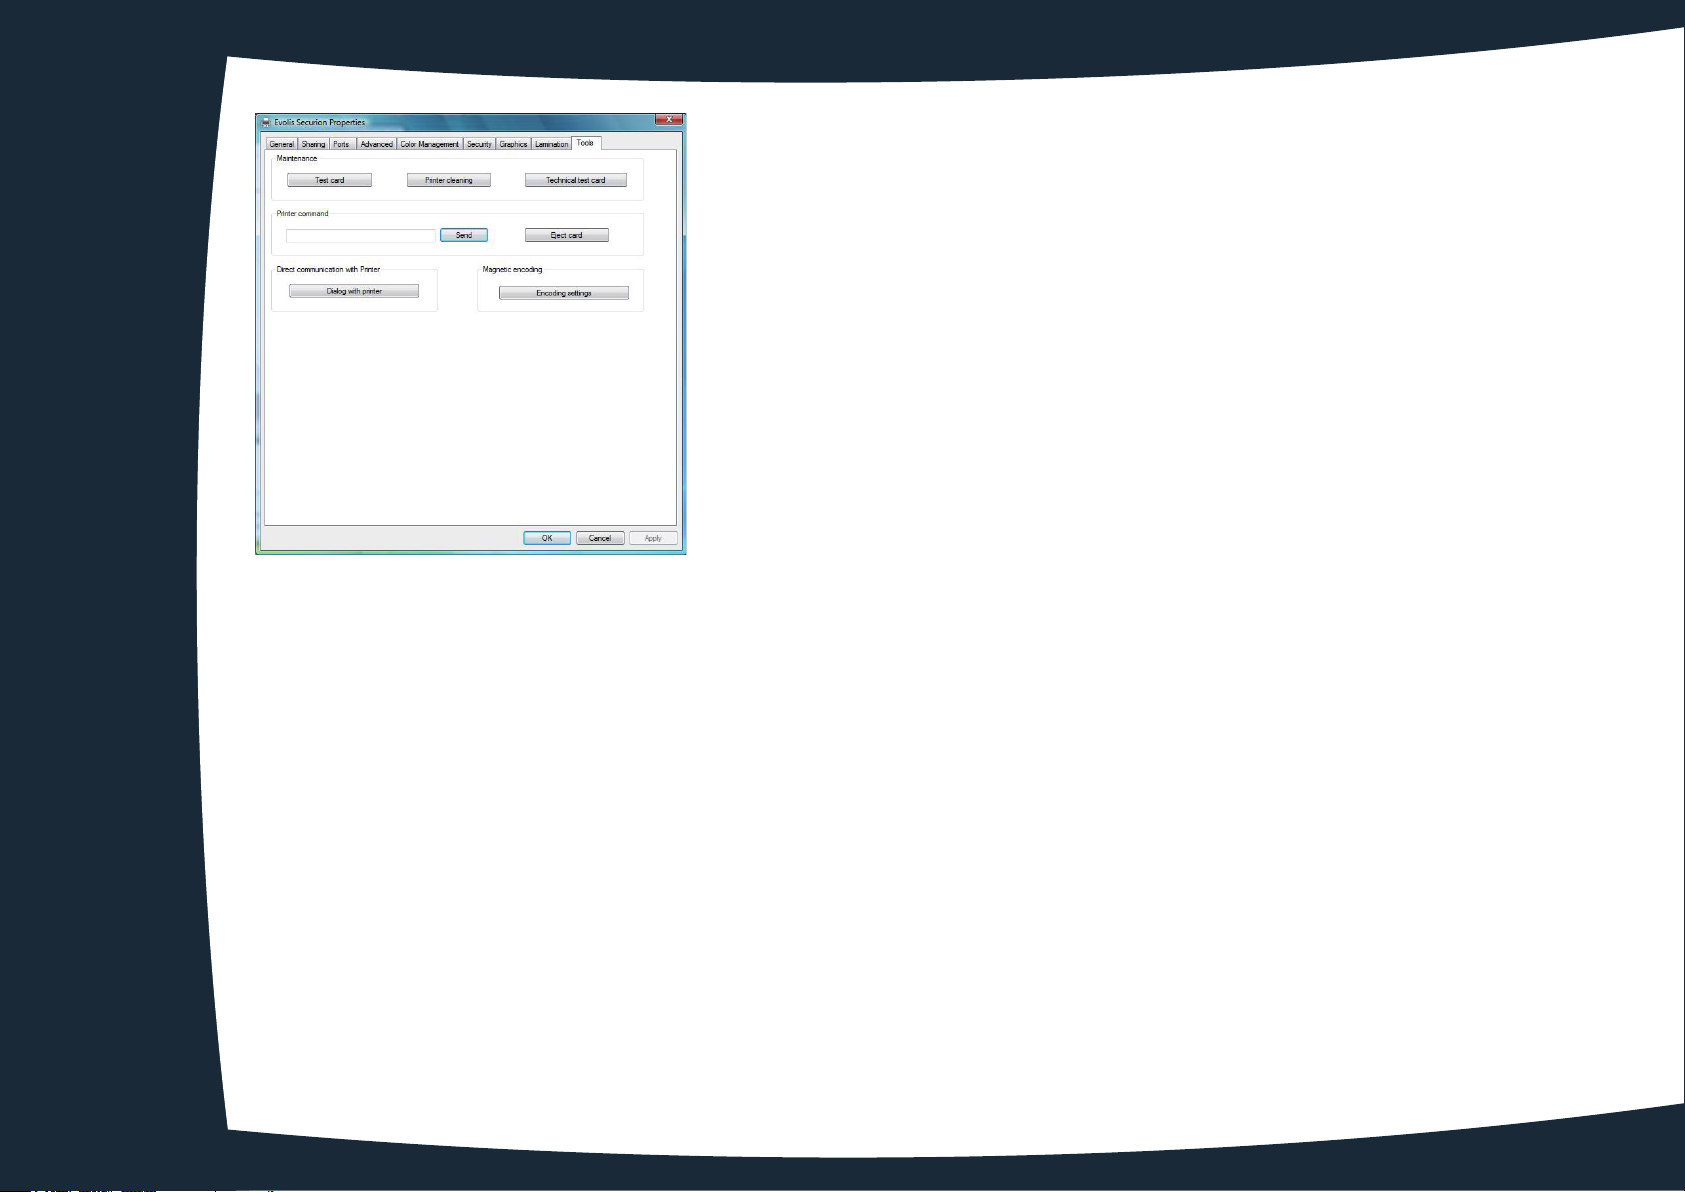
“Tools” tab
l Setting and testing magnetic encoding options
l Test card printing
l Cleaning the printer
l Dialogue interface with the printer
27
Page 28
2
2-3 Printing a card
A large number of Windows applications allow documents to be printed (for example the tools in Microsoft’s Office suite, i.e. MSWord, MS-Access, Ms-Excel, MS-PowerPoint).
To gain familiarity with the layout of a card and configuring its formatting and printing, we suggest the following example.
ä
In Microsoft® Word
After having set the Evolis printer as the default:
l Start the MS-Word application
Click on Page Setup
l
The Paper tab has a
l
In the Margins tab, set all margins to ‘0’, then in the Orientation section, select Landscape.
l
l Close the window by clicking OK.
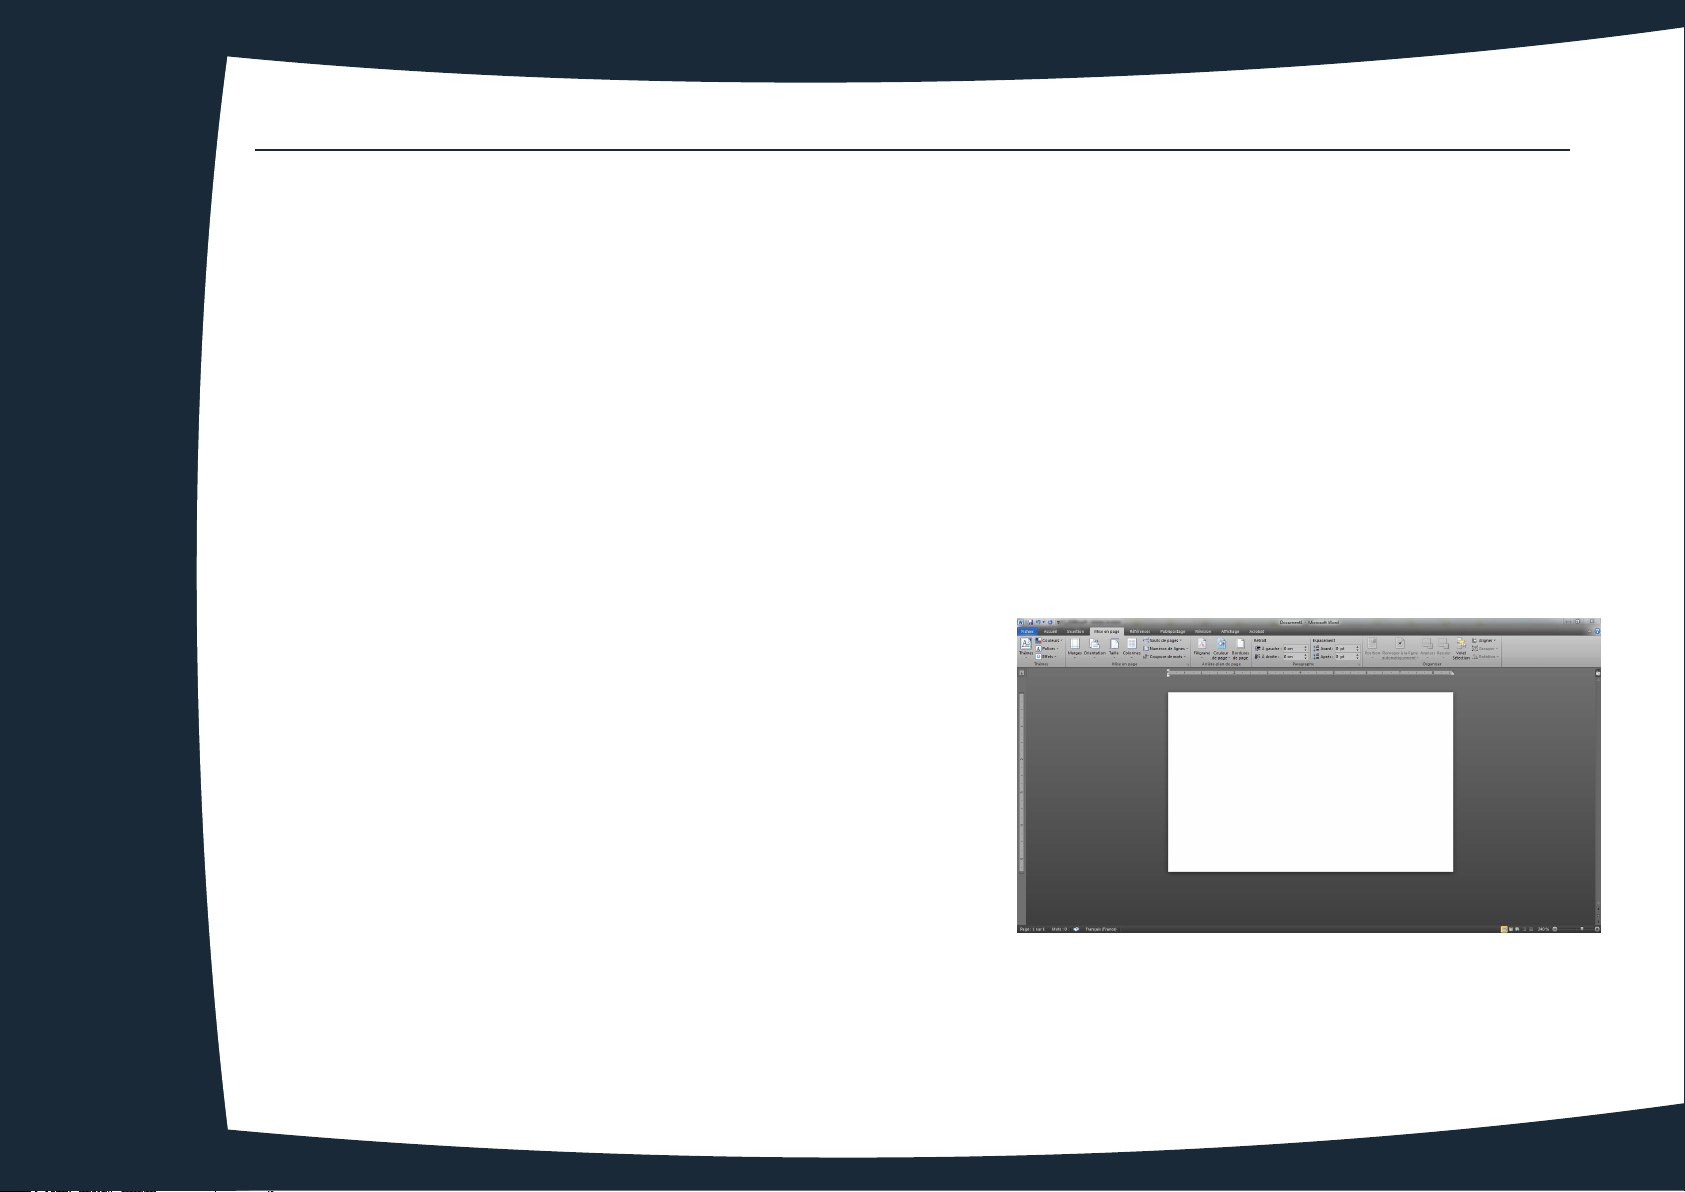
Your Word window should now look like this:
You are ready to customise your card by adding the various items that go
to make up a card:
in the menu bar
Paper Size option, select CR80 Card
l Logo and Illustration
l Identification photo
l Fixed and variable text
l Bar code, etc.
Once ready, click on File and then on Print.
28
Page 29
2
2-4 Connecting to a network (Ethernet)
All Evolis printers have the benefit of a TCP/IP network connection mechanism. This feature is available as standard or as an
option, depending on the model in the range.
Out of the box, the printer comes configured in DHCP mode (Dynamic Host Configuration Protocol), which means that its IP address is
supplied by the network. In addition to these basic settings, the network administrator has the option of configuring the printer
differently in order to comply with the constraints imposed by the corporate LAN:
l Printer connected in a subnet, in DHCP
l Printer connected within a subnet with fixed IP address, with WINS resolution
l Printer connected within a subnet with fixed IP address, without WINS resolution
The printer may be identified on the network in two ways:
l By its hostname (NETBIOS)
l By its IP address.
The user-definable settings are:
l The printer’s IP address
l Subnet mask
l Gateway
l WINS server.
Changing the printer’s basic settings, without prior knowledge of the layout of the LAN in question or without
genuine technical knowledge may result in a malfunction of the printer, and may even extend to a more
widespread failure of all or part of the LAN. Contact your System and Network Administrator before connecting
to or changing the settings for your local area network.
For further details, refer to the ‘Configuration of Evolis printers on a TCP/IP (Ethernet) LAN’ manual.
29
Page 30

2
ä
Changing network connection settings
Switch from Normal Mode to User Mode
Ê
Press the Key until [Interface Setup] is displayed. Press the SET Key
Ë
Select the settings to change by using the / Keys. Press the SET Key to confirm.
Ì
Settings Menu Details
Printer ID Set the individual printer ID
DHCP Set the DHCP function ON/OFF
IP Address
Subnet Mask
Default Gateway
MAC Address Display the MAC address.
IPsec Set the IPsec function ON/OFF
Timout(s)
Password
Change the settings by using t/s Keys. Press the SET Key.
Í
For numerical values, use the t/s Keys to change each digit. Press the SET Key to confirm.
Turn off and on the printer to enable the settings.
Î
Set the IP addres (only when the DHCP function is OFF).
Set the subnet mask (only when the DHCP function is OFF).
Display the default gateway (only when the DHCP function is OFF).
Set the session timeout (seconds).
Set the password ON/OFF for settings TCP/IP using the printer driver.
If the password is on, set the password.
You can also change the settings by using the printer driver.
30
Page 31
Maintenance
3
3-1 General warranty information
Your Evolis printer has been designed to give you long service and needs only minimal regular maintenance. Please comply with the
instructions given below to ensure that it runs satisfactorily.
Keep your warranty cover!
The manufacturer’s warranty is subject to strict adherence to the routine servicing and maintenance instructions,
and in particular the printer cleaning cycles.
Any failure to follow the maintenance and servicing procedures described in this section voids the print head warranty.
Evolis declines any liability where there has been a failure to carry out required maintenance on the printer.
The print head is a wearing part and an extremely sensitive printer component. Its useful life can be seriously curtailed by the presence of
dust, liquids or solids in the printer’s immediate environment, on the print head or on the cards. Users must take all necessary precautions
to insert only clean cards, free of dust deposits or foreign bodies, into the machine.
The frequency and quality of cleaning are decisive factors enabling users to extend the print head’s useful life and to ensure excellent
print quality. Particular care must therefore be taken with cleaning. Users must comply with the servicing and maintenance instructions
as fully described in this section.
Evolis provides replacement parts and consumables that you can refer to within this user guide or by visiting the website at
www.evolis.com.
In addition, the use of Evolis brand ribbons (Evolis Genuine Ribbons) also ensures that your equipment operates properly. Use of ribbons
not approved by Evolis may as a consequence affect the quality and reliability of print jobs, produce low quality printed output and
even affect the printer’s operation. The manufacturer’s warranty does not cover physical damage or quality problems caused by using
non-Evolis approved ribbons.
31
Page 32
3-2 Routine printer cleaning
3
The print head warranty is directly linked to routine cleaning of your printer.
If you do not carry out this cleaning at the required times, the print head warranty will cease to be valid.
Recommended cleaning cycle: whenever the ribbon is changed
Servicing accessory: cleaning card
Remove any cards that are inside the printer. Do not touch the roller with your hands.
Cleaning cards can only be used once.
32
Page 33
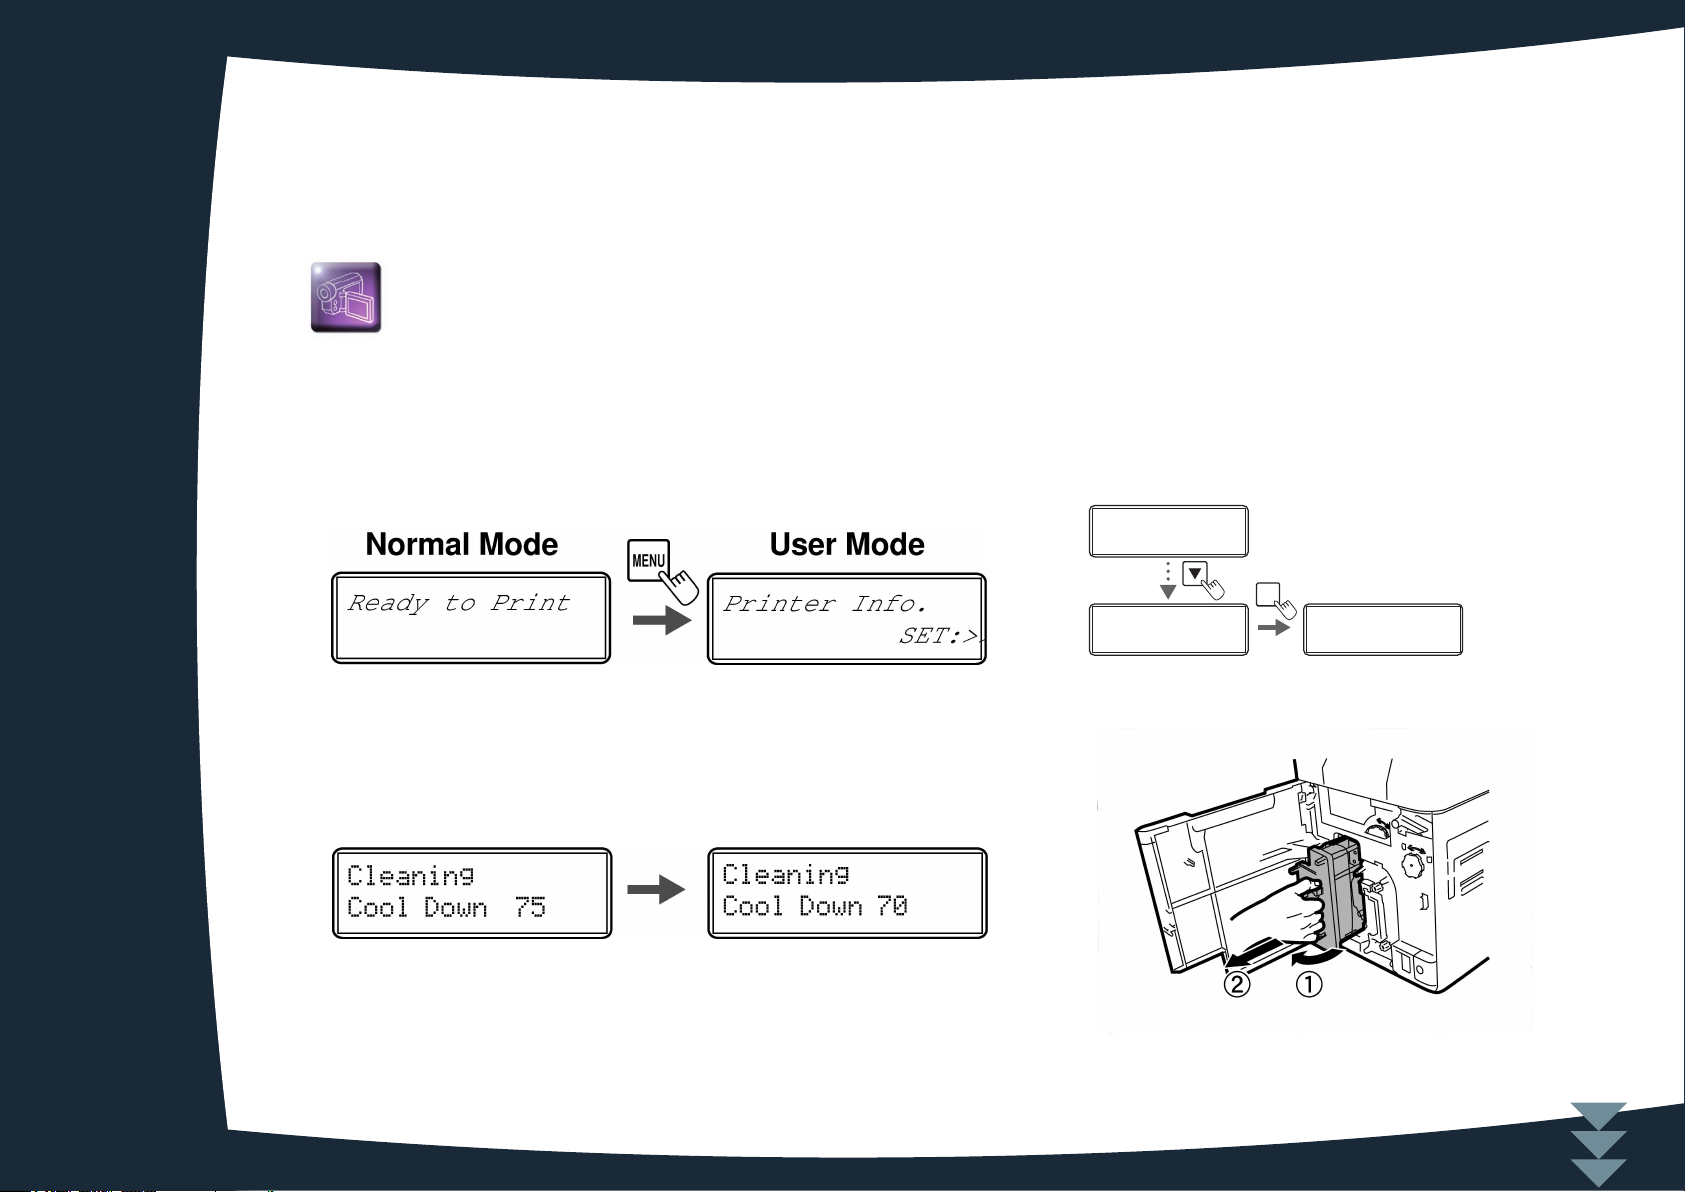
Follow the procedure below:
3
Cleaning the roller is recommended after printing 1000 cards.
Switch from Normal Mode to User mode (page 41 section 4.1b)
Ê
Press the tKey until [Cleaning] is displayed, then press the SET Key.
Ë
Then [Cool down...] is diplayed, wait until the figure drops to 70 or lower. The figure indicates the temperature of the
Ì
heat roller.
Í When [Remove Film] is displayed, open the front cover.
Remove the clear Retransfer film and close the front
Î
Ê Ë
cover.
Printer Info.
Printer Info.
Cleaning
Cleaning
SET:>>
SET:>>
SET:>>
SET:>>
SET
Cleaning
Cleaning
Remove Cards
Remove Cards
Ì
Î
33
Page 34
3
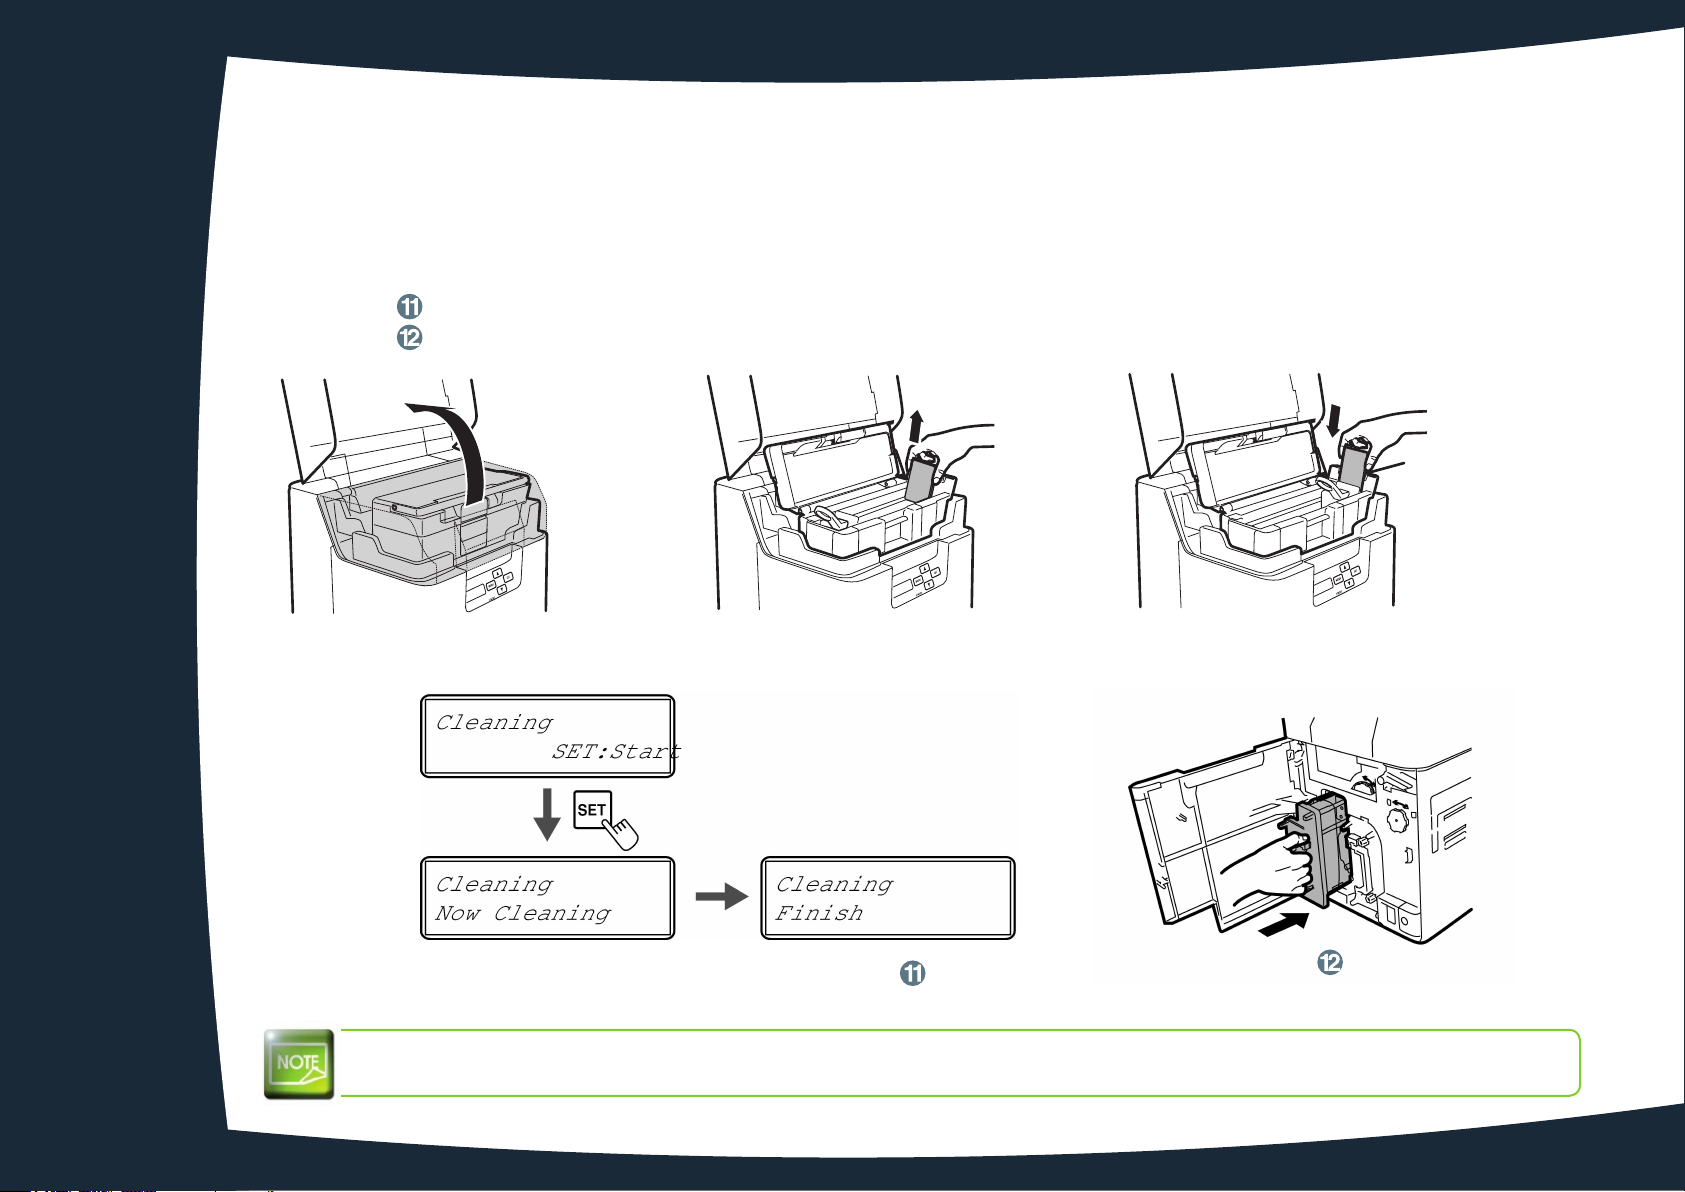
When [Remove cards] is diplayed, open the top cover.
Ï
Open the cards feeder and remove the cards from the cassette.
Ð
When [Set Cleaning Crd] is displayed, load the cleaning card in the feeding slot. Align the adhesive side of the cleaning
Ñ
card to the right.
Close the cards feeder and the top cover.
Ò
When [SET:Start] is displayed, press the SET Key. The cleaning starts automatically.
Ó
When [Finish] is diplayed, cleaning is completed and the cleaning card is ejected into the cards ejection slot.
Put the film back in the Retransfer module. Your printer is once again ready to use.
Ï Ð Ñ
Ó
Wait for at least 5 minutes after cleaning before using your printer.
34
Page 35
3
3-3 Servicing the cleaning roller(s)
In addition to routine printer cleaning, we suggest that you clean the cleaning roller(s) when cards are printed with missing colors or if
there are foreign objects on them.
The cleaning roller(s) remove(s) any dust or particles from the cards before printing.
Recommended cleaning cycle: whenever the ribbon is changed
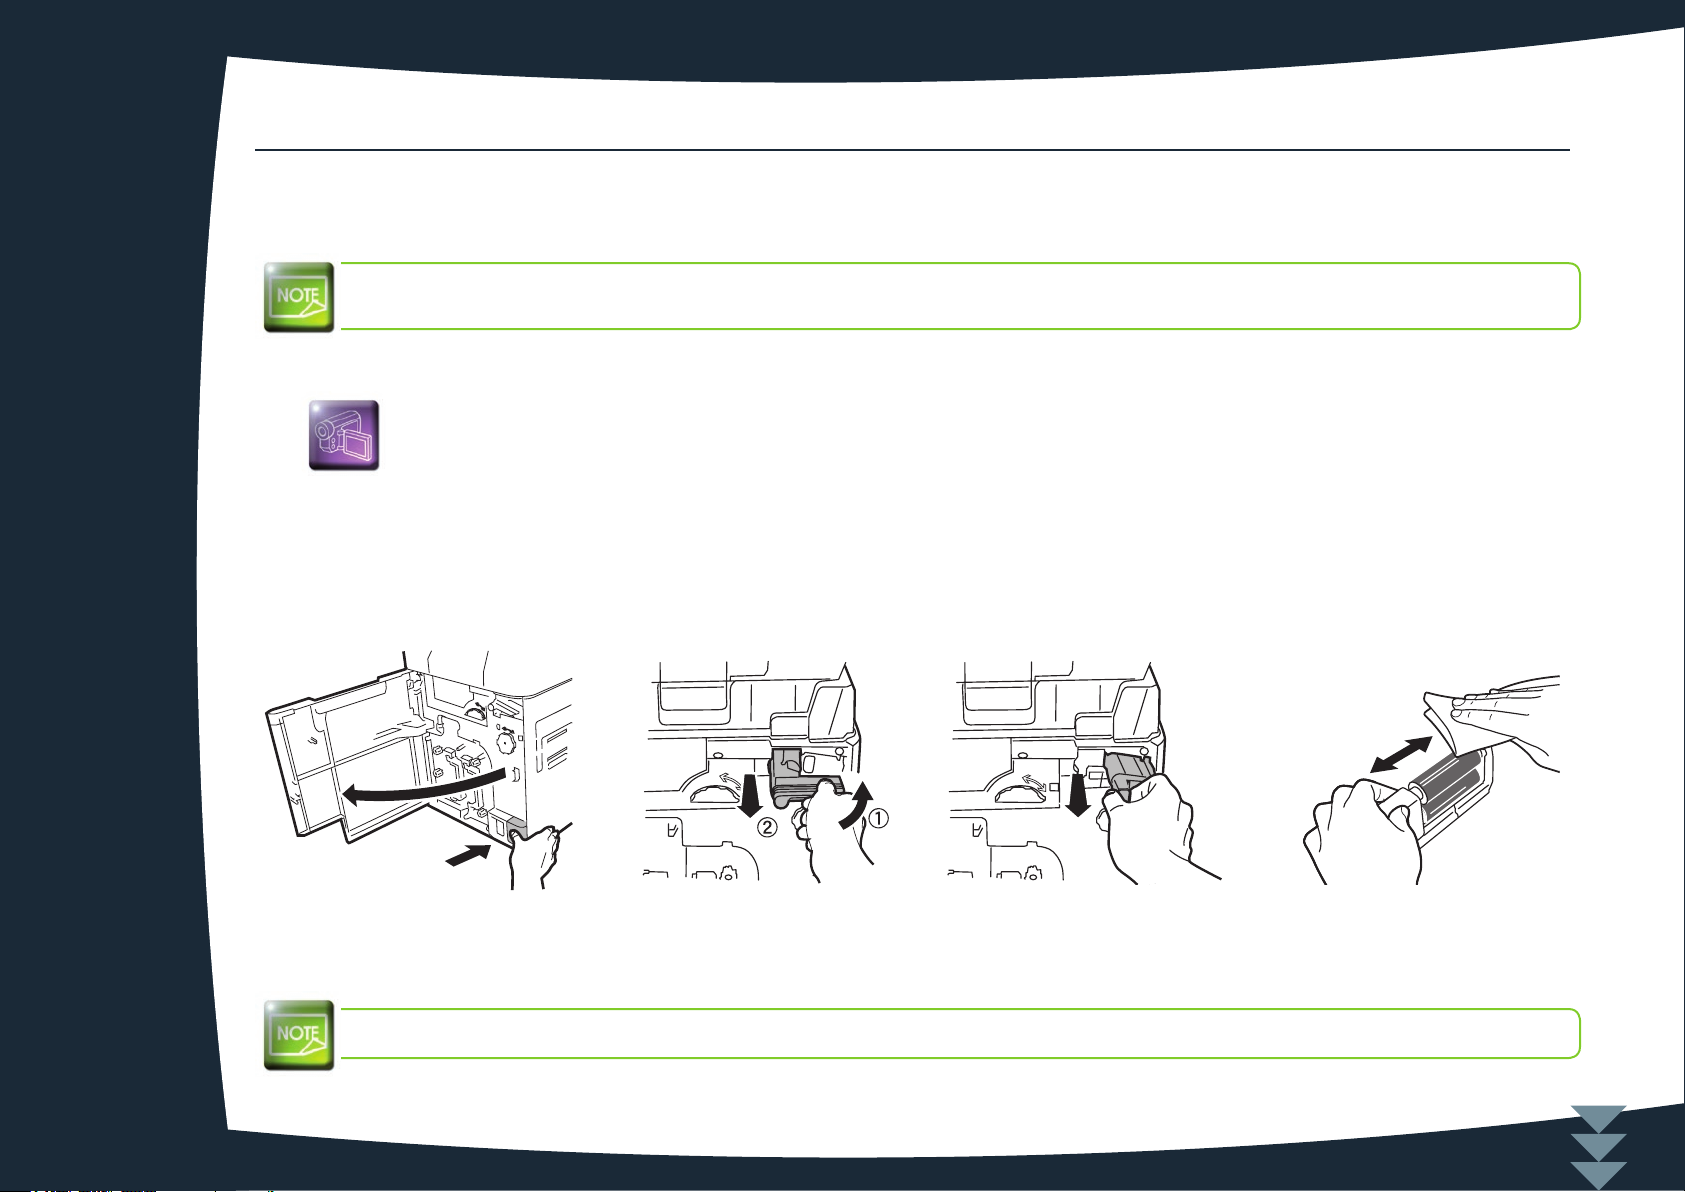
Follow the procedure below:
Turn off the power.
Ê
Open the front cover
Ë
Remove the cleaning tape cassette (blue part), hold the cleaning tape cassette handle,
Ì
Remove the cleaning roller (black part).
Í
Wipe the rollers clean with an Evolis' wipe.
Î
Load first the cleaning roller (black part) and then the cleaning tape cassette (blue part).
Ï
Close the front cover. Your printer is once again ready to use.
Ð
lift it and pull.
Ì Í ÎË
Wait for at least 5 minutes after cleaning before using your printer.
35
Page 36
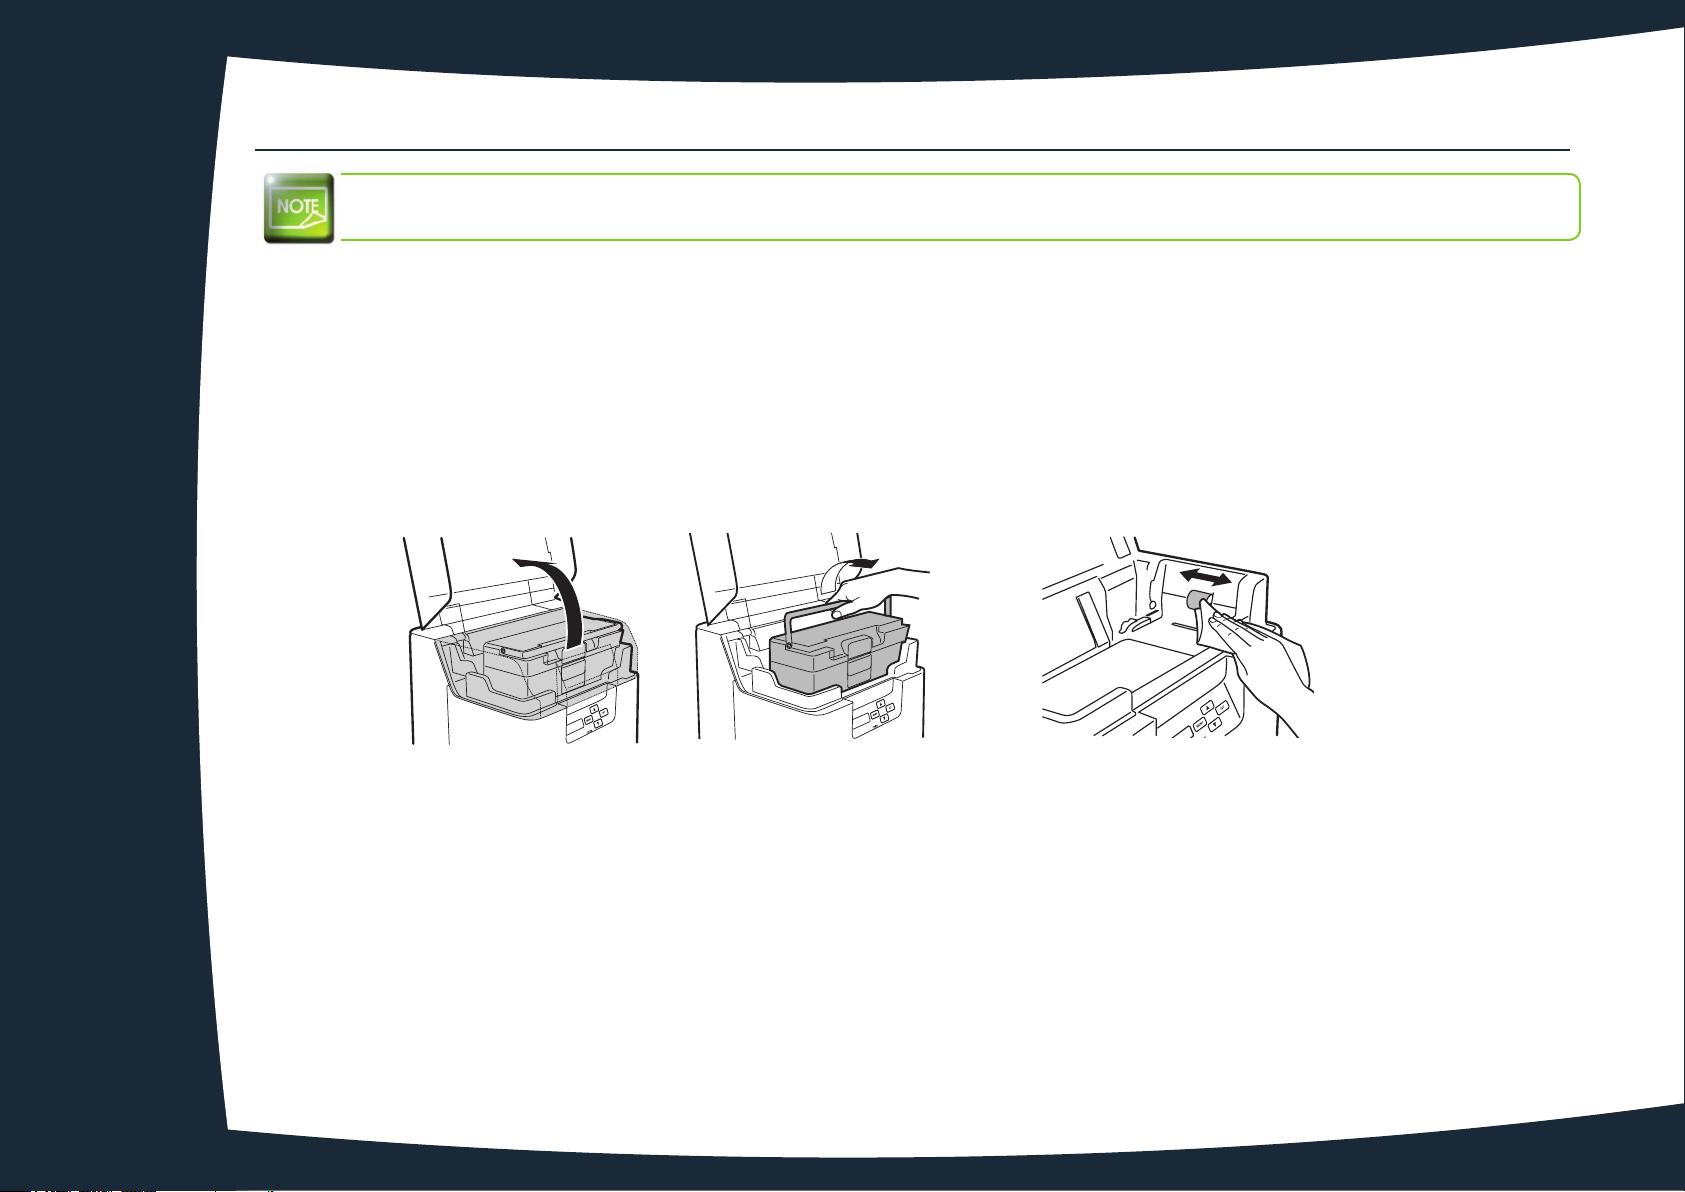
3-4 Servicing the feeding roller
3
Recommended cleaning cycle: If cards do not feed smoothly into the printer
Turn off the printer.
Ê
Open the top cover and remove the card feeder.
Ë
Clean the roller clean with an Evolis' wipe as shown.
Ì
Turn the roller as you wipe it
to
clean it
in the direction of the arrow.
Î Close the top cover. Your printer is once again ready to use.
Load the card feeder.
Í
36
ÌË
Page 37
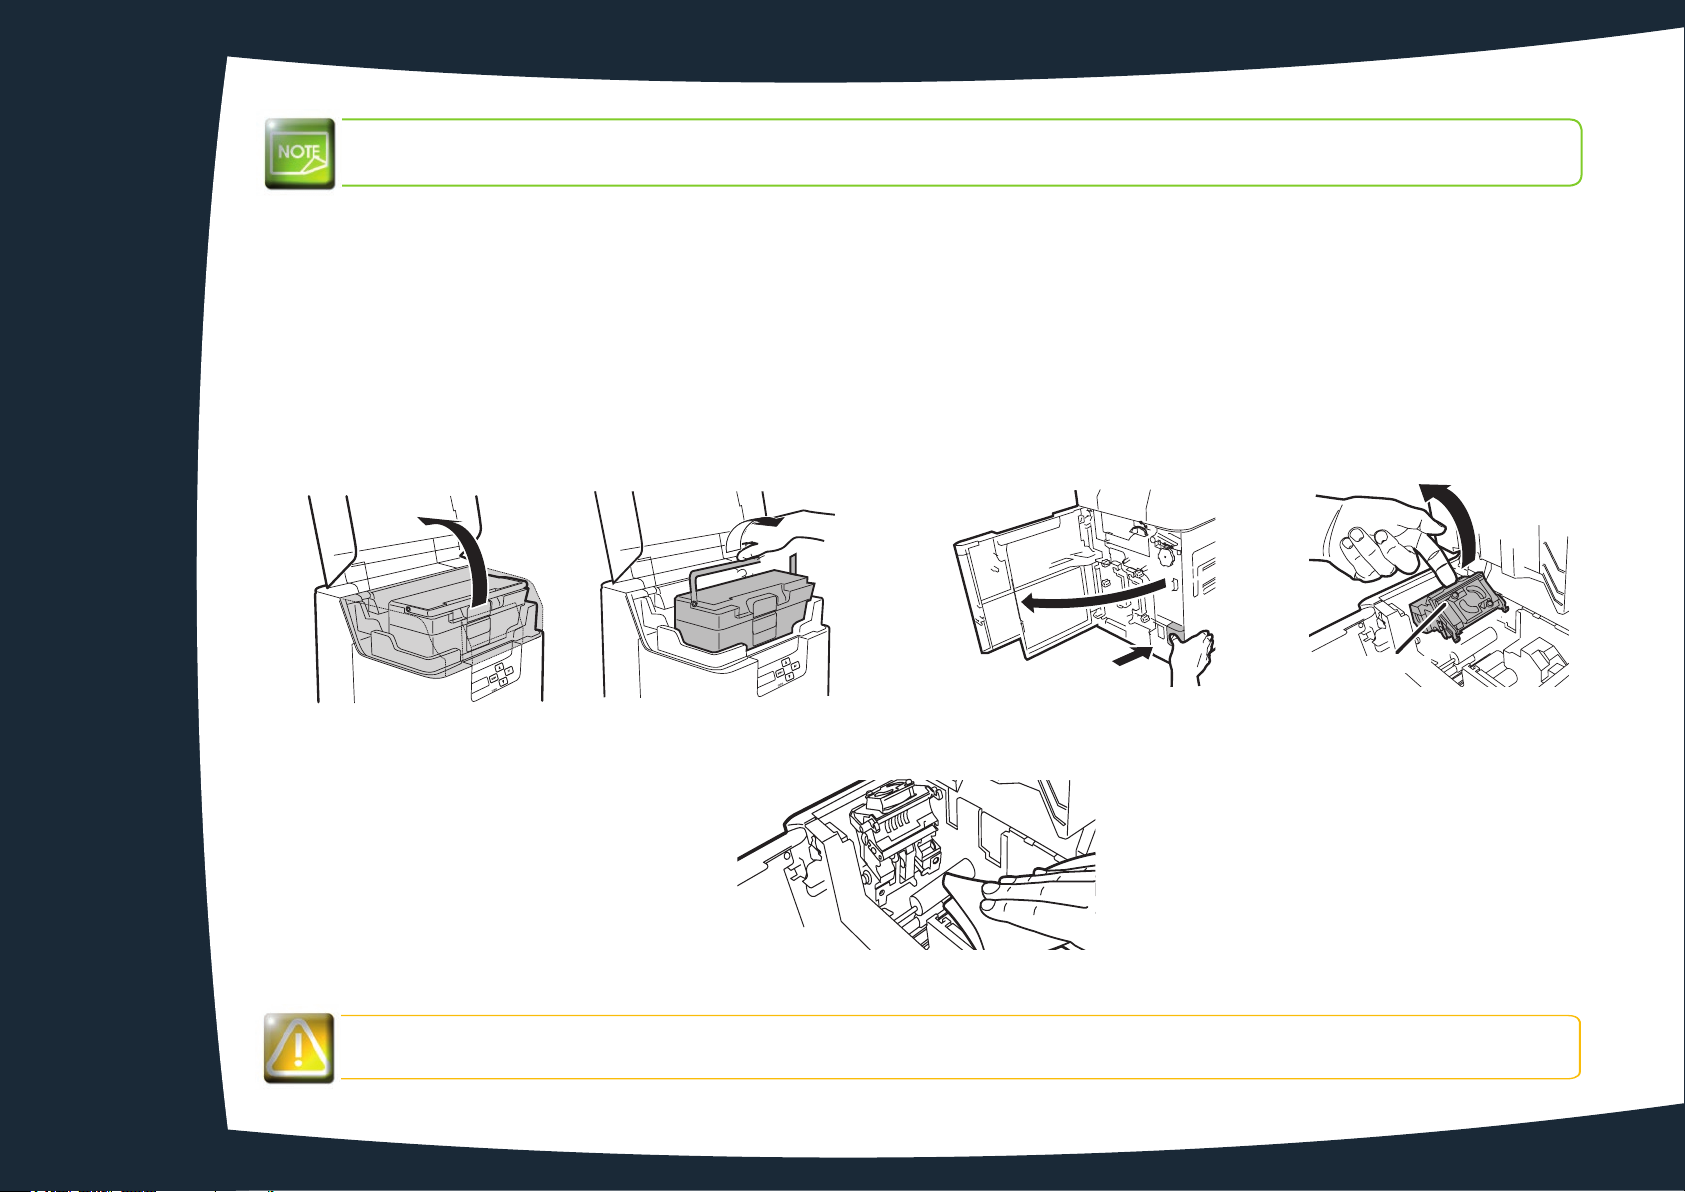
3
Recommended cleaning cycle: if the printing is out of adjustment
Turn off the printer.
Ê
Open the top cover and remove the card feeder.
Ë
Open the front cover and the top cover.
Ì
Lift the decurl section
Í
Wipe the roller clean with an Evolis' wipe fully moistened with water.
Î
Return the decurl section to it original position. Close the top cover and front cover.
Ï
Decurl Section
Ë
Ì
Î
Be careful the decurl section rollers can be troublesome to clean, don't hurt your fingers.
Besides the heat roller is hot so please exercise care when cleaning.
37
Í
Page 38
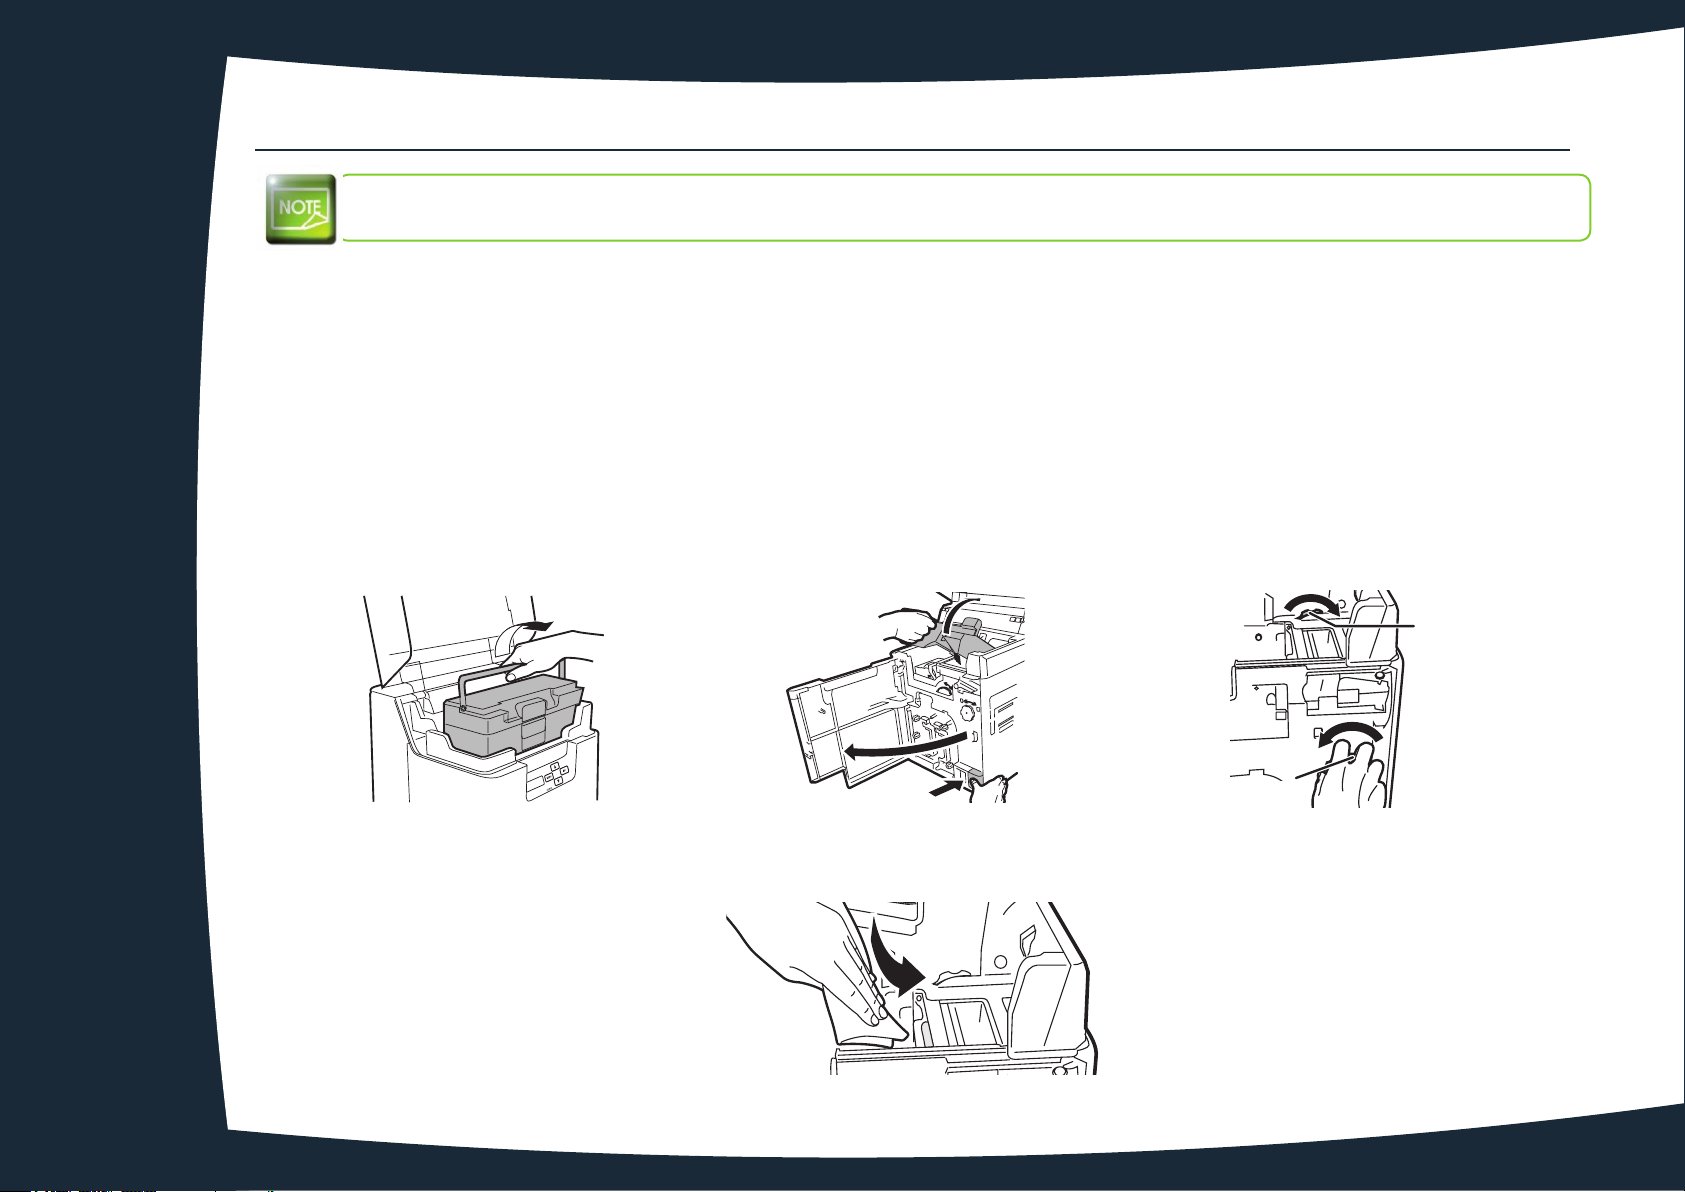
3-5 Servicing the reverse roller
3
Recommended cleaning cycle: monthly
Turn off the printer.
Ê
Open the top cover and remove card feeder.
Ë
Open the front cover and the top cover.
Ì
Rotate the reverse wheel.
Í
Locate the reverse section roller as shown.
Î
Wipe the roller clean with an Evolis' wipe fully moistened with water.
Ï
Rotate the reverse leading wheel and fully clean the roller.
Ð
Return the decurl section to it original position. Close the front cover.
Ñ
Return the card feeder and close the top cover. Your printer is once again ready to
Ò
use.
Reverse Feeding
wheel
Ë Ì
Ï
38
Reverse
wheel
Í
Page 39
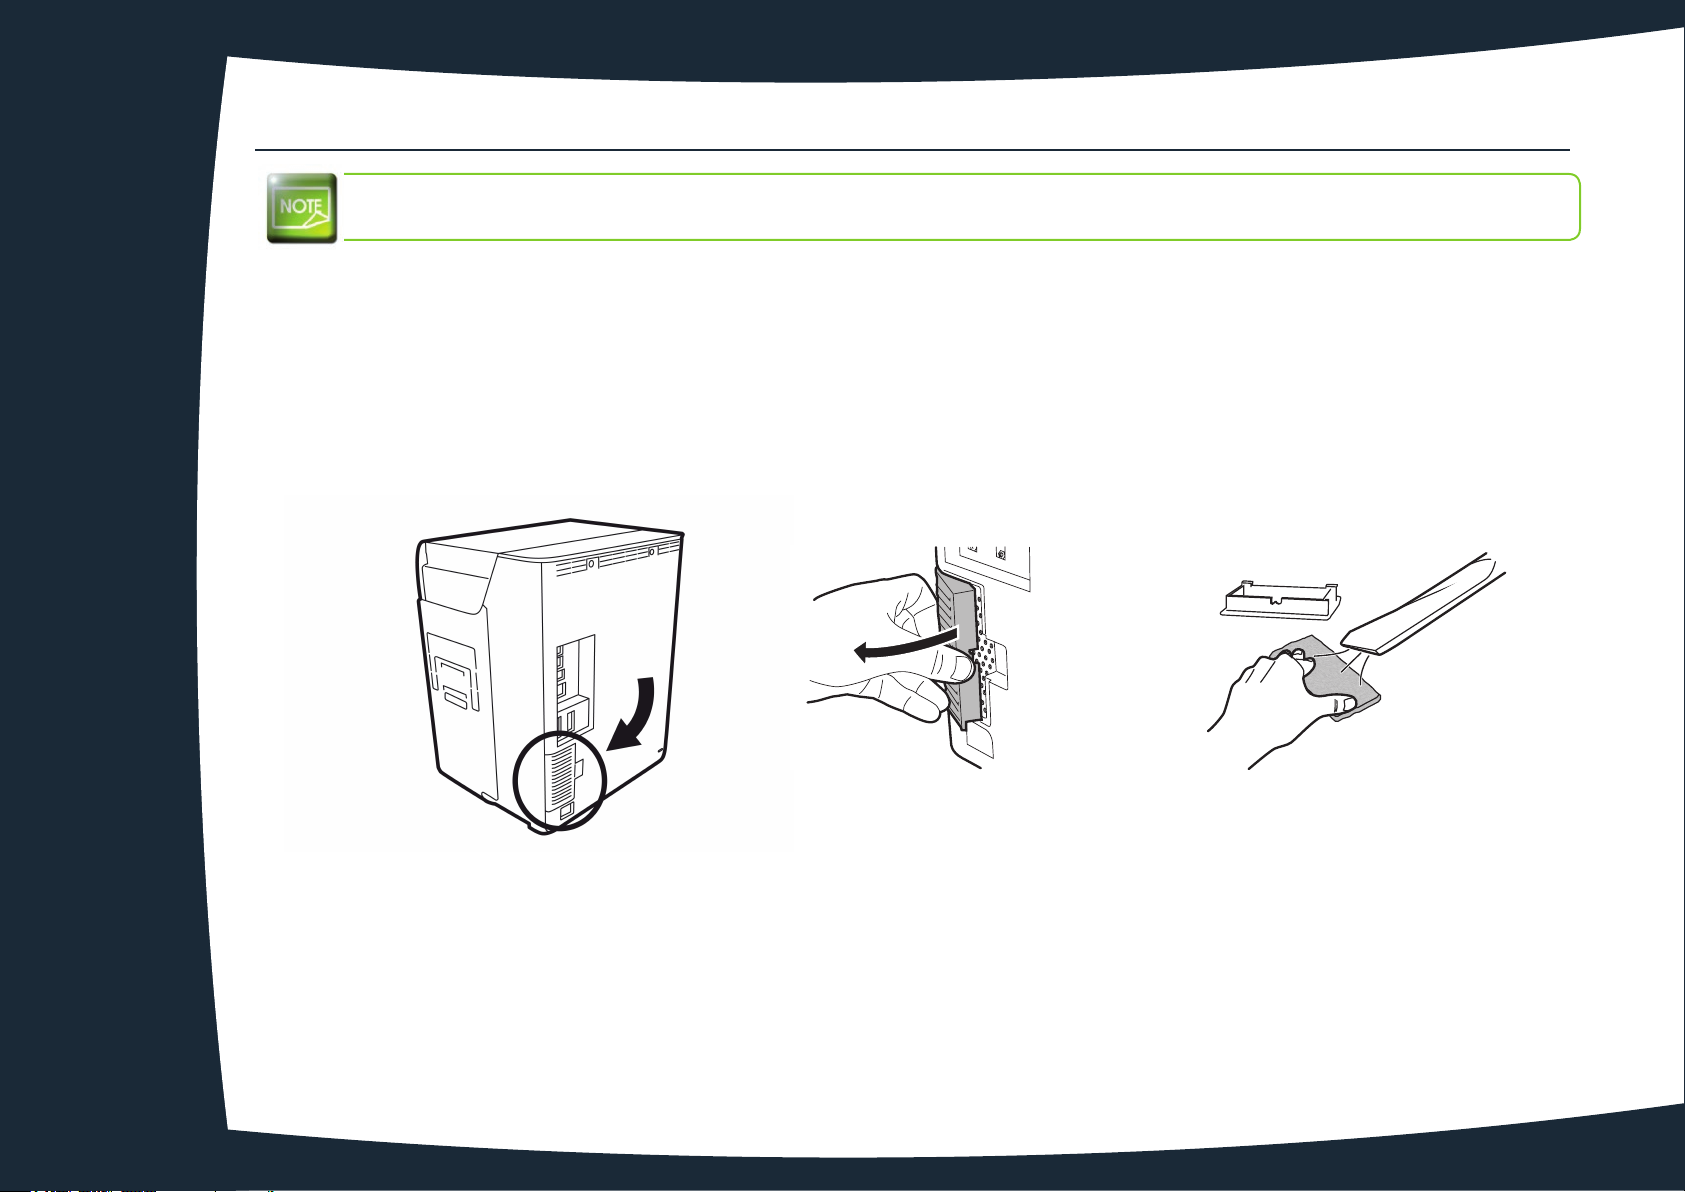
3-6 Servicing the lter cleaning
3
Recommended cleaning cycle: monthly
Turn off the printer.
Ê
Remove the filter cover on the rear of the printer.
Ë
Remove the filter from the filter cover.
Ì
Use a vacuum cleaner to clean the filter.
Í
Î
Hold the filter down with your fingers in order that it is not sucked into the vaacuum cleaner
Put the filter back.
Ï
39
Ë
Í
Î
Page 40
3
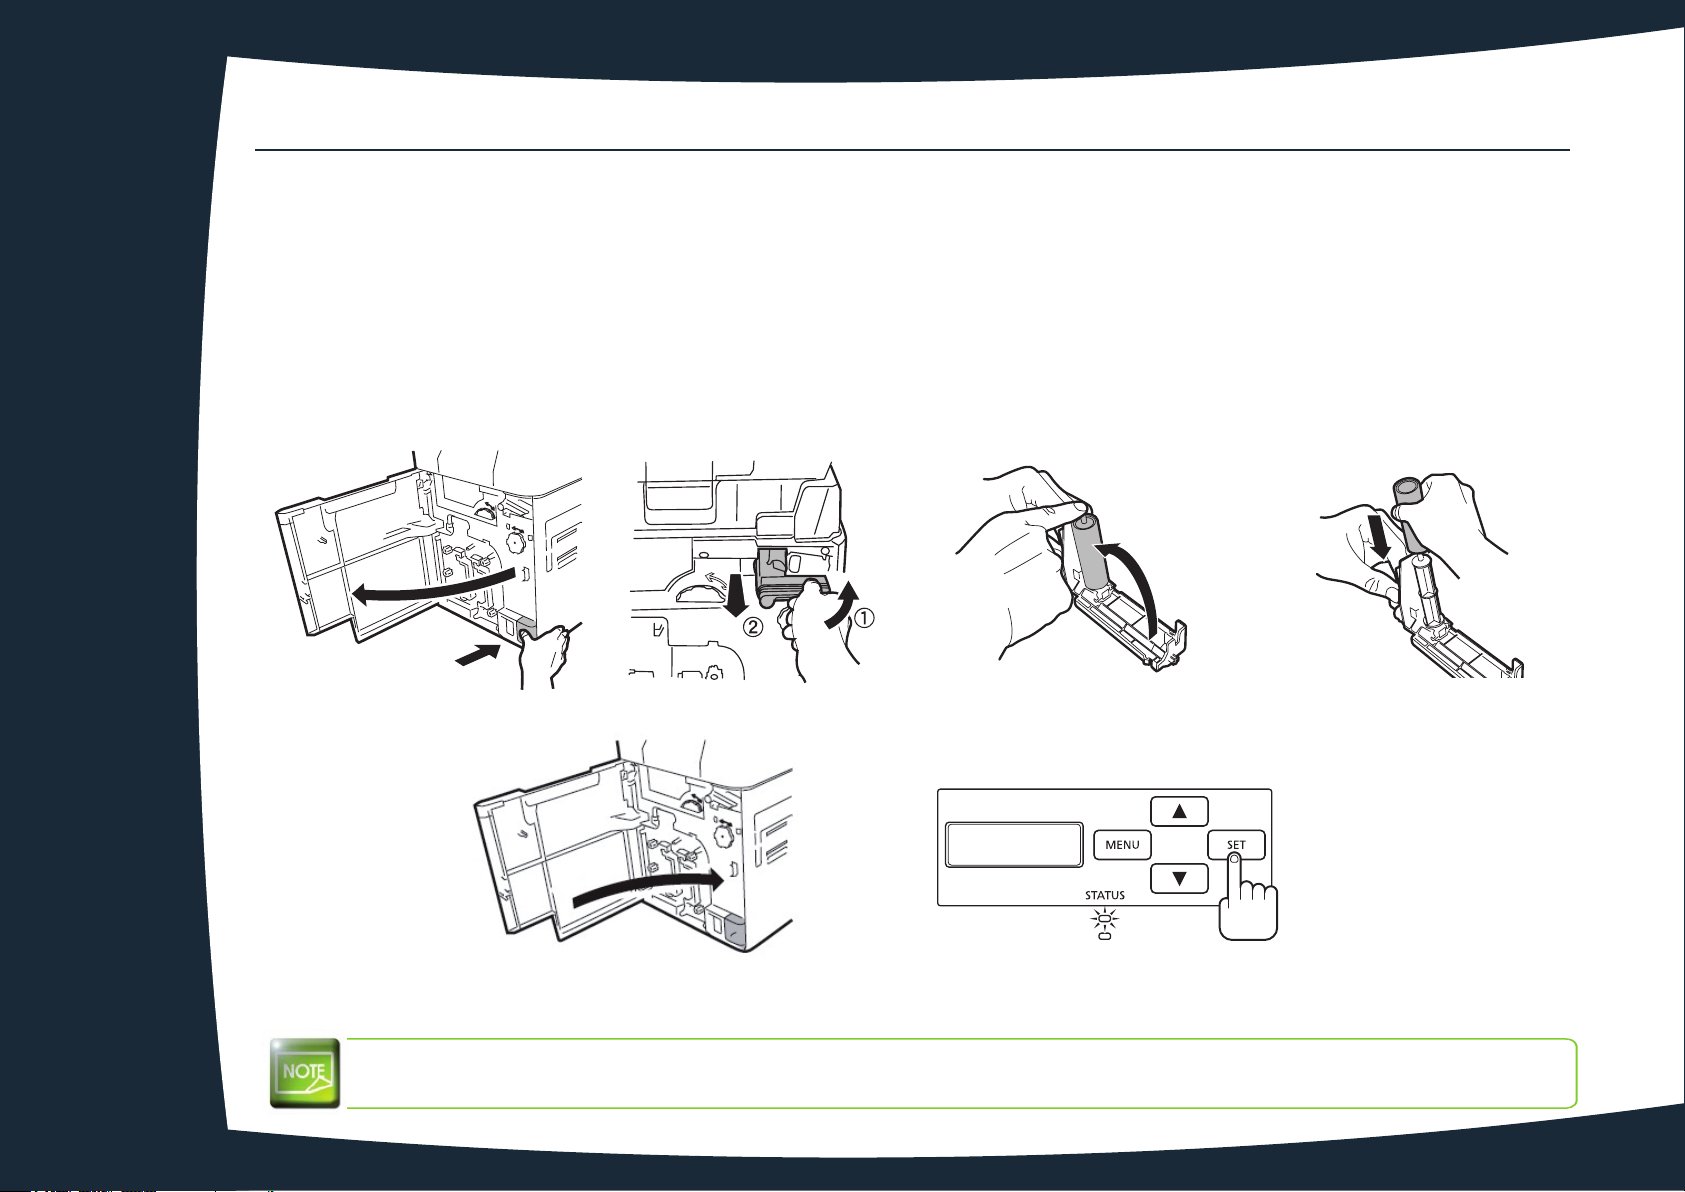
3-7 Cleaning tape replacement
Open the front cover.
Ê
Remove the cleaning tape cassette.
Ë
Lift up the tape spindle.
Ì
Remove the used cleaning tape.
Í
Insert the new tape and return the tape spindle.
Î
Insert the cleaning tape cassette.
Ï
Close the front cover.
Ð
When [Push SET key] appears on the screen, press the SET Key.
Ñ
Ê Ì Í ÎË
Push SET key
Ð
The adhesive cleaning roller is delivered with each clear Retransfert film, which has to be installed each time
you change the film.
40
Ñ
Page 41
Fe
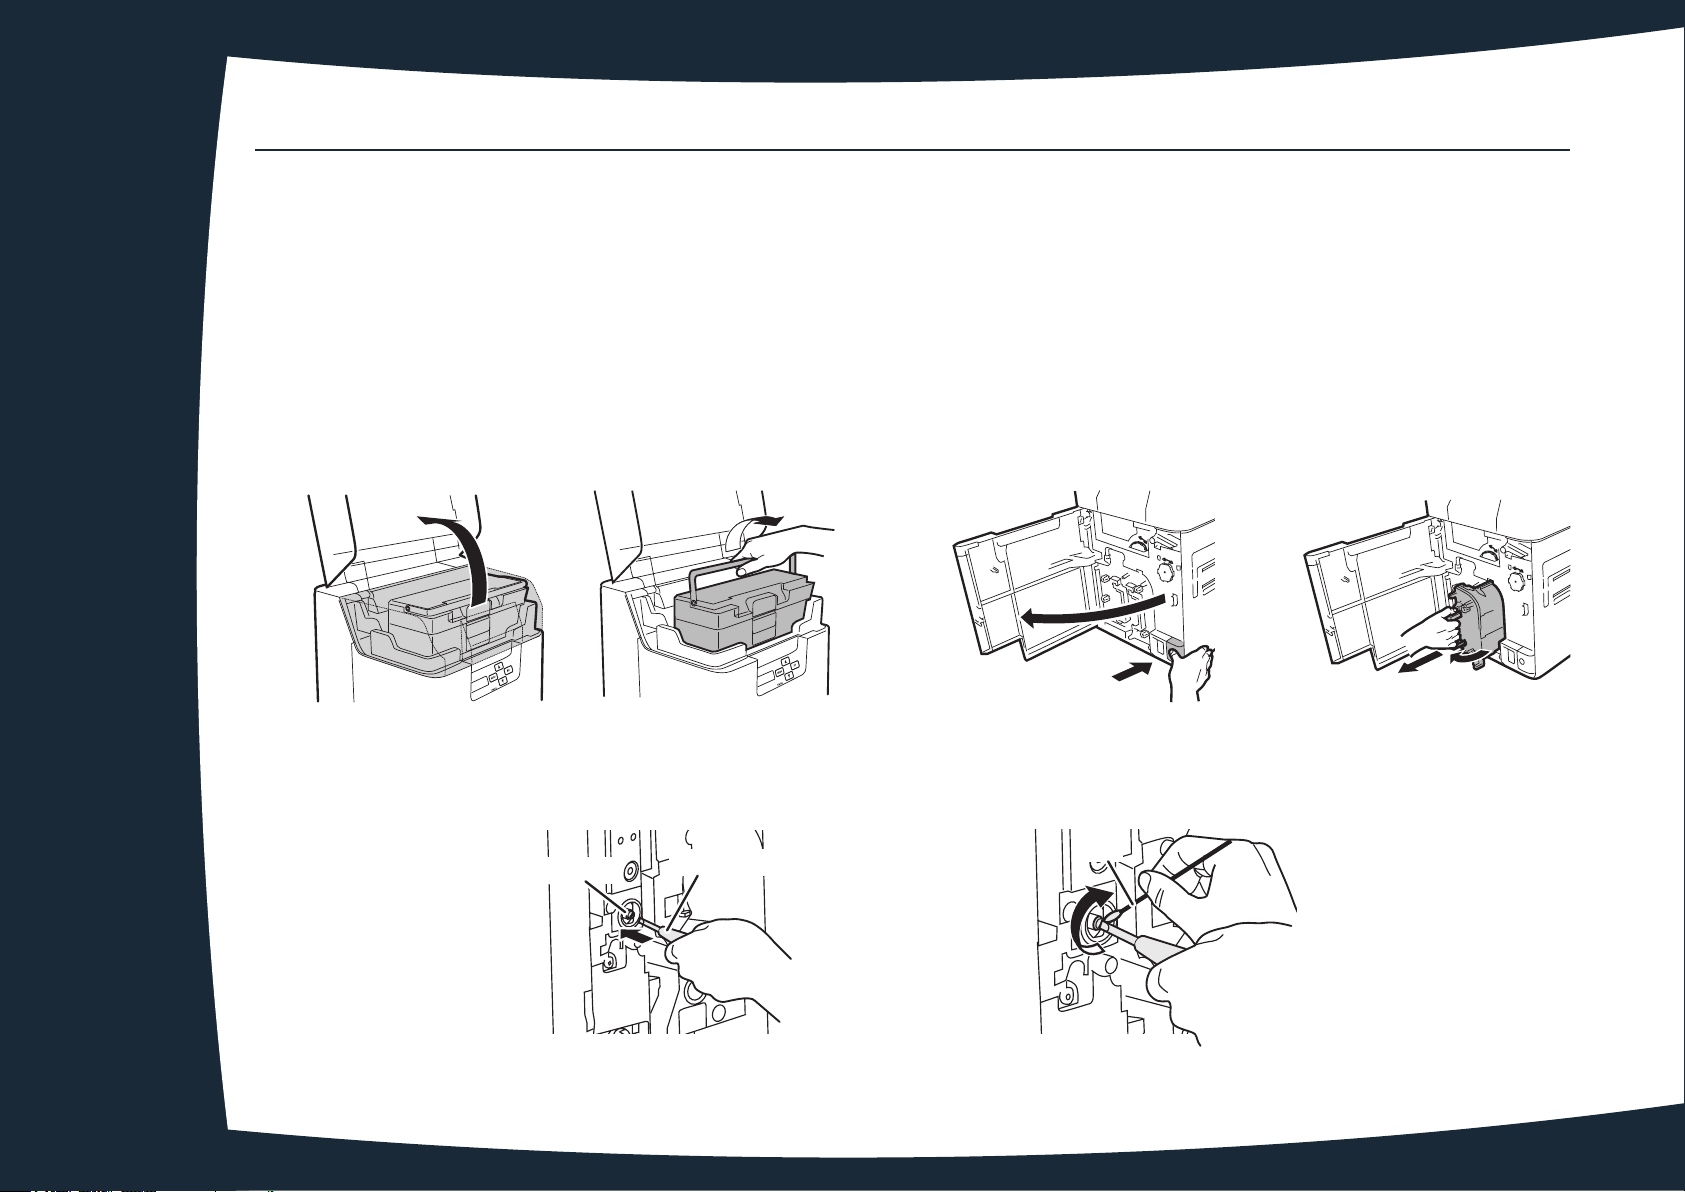
3-8 Primary transfer fedding roller cleaning
3
Turn off the power.
Ê
Open the top cover and remove the card feeder.
Ë
Open the front cover.
Ì
Remove the ink ribbon cassette and the clear Retransfer film.
Í
Insert a flat screwdriver into the groove on the end of the feeding roller.
Î
Turn the screwdriver, and wipe the feeding roller inside the printer using an Evolis cotton swab fully
Ï
moistened
Return the ink ribbon cassette and the clear Retransfer film cassette to their
Ð
Close the front cover.
Ñ
with water.
original
positions.
Ì
b
a
ÍË
eding Roller
Cotton
Flat Screwdriver
Swab
Î Ï
41
 Loading...