

Page 1

Professional Monitoring
Blood Glucose System
(using TRUE METRIX® PRO Test Strips with GDH-FAD Enzyme)
Comprehensive Resource Guide
for Healthcare Professionals
(Policies, Processes, and Procedures)
Information in this guide is specific
for healthcare professionals using the
TRUE METRIX® PRO Professional
Monitoring Blood Glucose System*
in a multiple-patient clinical setting.
© 2015 Nipro Diagnostics, Inc. TRUE METRIX, TRUEmanager and the Nipro Diagnostics logo are trademarks of Nipro Diagnostics, Inc. MKT0523 Rev. 2
*TRUE METRIX is intended for self-monitoring blood glucose only and not for multiple patient use. Only TRUE METRIX PRO is intended for multiple-patient use.
For assistance please call:
Customer Care 1-800-803-6025
www.niprodiagnostics.com
Page 2
Table of Contents
Introduction ........................................ 1-5
• Introduction
• Intended Use Statement
• Safety
• System Specifications
• CLIA Requirements
System Components ..........................6-11
• System Components
• Meter Key Features
• Meter Design
• Meter Display Screen
• Test Strip Design
• Control Solution
Clinical Information .........................12-15
• Performance Characteristics
• Limitations of Use
• Interference Testing
Meter Setup &
Quality Control Testing ....................16-22
• Meter Setup
• Quality Control Testing
• Quality Control Testing Data Form
Blood Glucose Testing .....................23-24
• Blood Glucose Testing
Diabetes Data Management
Capabilities ......................................25-28
• Memory
• Diabetes Management Software
System Maintenance ........................29-33
• Troubleshooting
• Troubleshooting Display Messages
• Battery Replacement
• Cleaning and Disinfection
• System Storage
Training Program .............................34-42
• Training Program
• Training Checklist
• Training Post Test
References ............................................43
Appendix
• Appendix A – Clinical Studies
• Appendix B – Product Labeling
• Appendix C – Safety Data Sheets
• Appendix D – Forms
• Appendix E – Proficiency Testing Information
TRUE METRIX® PRO System Comprehensive Resource Guide (GDH-FAD Enzyme) Table of Contents
Page 3

Introduction
Page 4

Introduction
The purpose of this document is to provide you with
specific manufacturer’s information on using the
TRUE METRIX® PRO System in a multiple-patient,
clinical use setting. The information includes
manufacturer’s processes and procedures for:
• Understanding system intended use, safety
information and testing method.
• Reviewing System components and key
design features.
• Examining clinical white papers on proven product
performance.
• Reviewing limitations of use including physiological
and pharmacological interfering substances.
• Performing the blood glucose testing process
using various specimens.
• Reviewing processes for Quality Control
Testing, product maintenance, system operating
temperature and storage ranges.
• Selecting diabetes data management options for
data retrieval and management.
• Training program for your staff focused on safe use
of the product in a clinical setting.
Most clinical sites already have clearly defined
policies and procedures that address bedside blood
glucose testing, safety, quality control, clinical
evaluations and other processes. This document
is intended to be an adjunct to already established
policies and procedures within a facility and not as a
replacement for the policies and procedures.
TRUE METRIX® PRO System Comprehensive Resource Guide (GDH-FAD Enzyme) Introduction 1
Page 5
Intended Use Statement
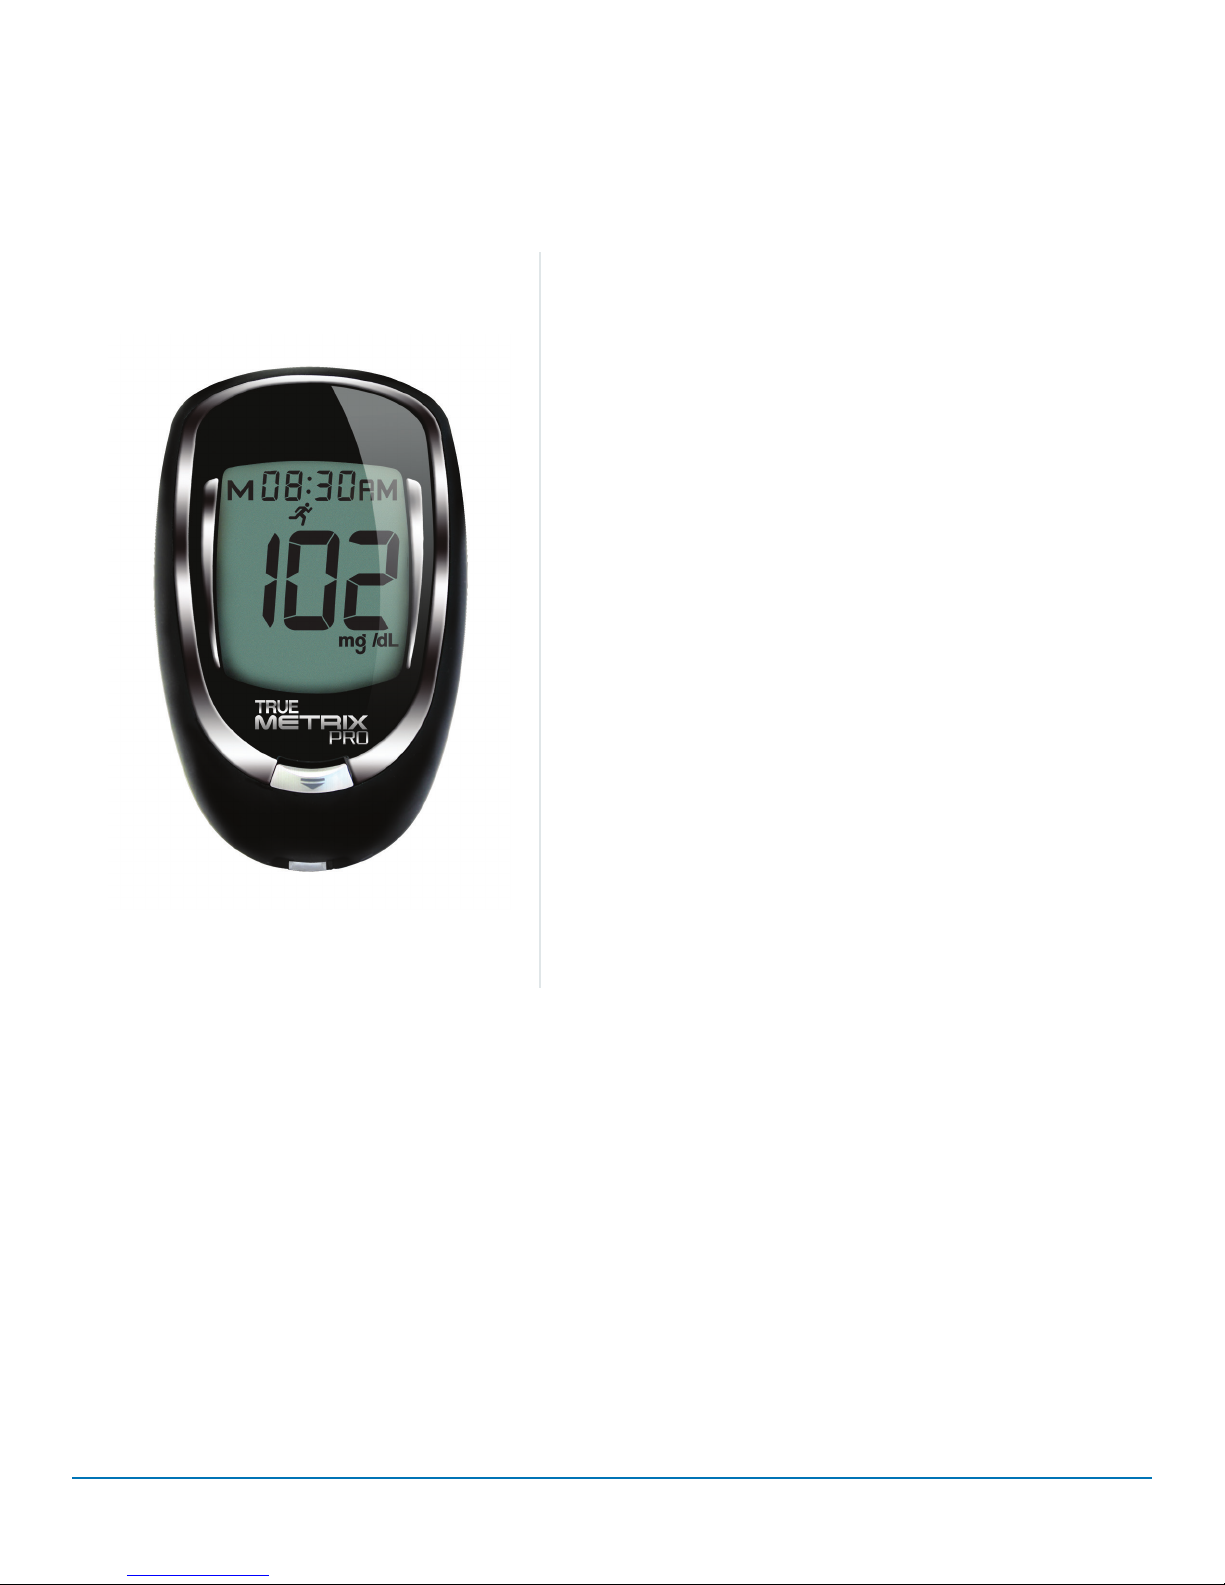
The TRUE METRIX® PRO Blood Glucose
Monitoring System is intended for the
quantitative determination of glucose
in human whole blood taken from the
fingertip or forearm (capillary) or from
the vein (venous). The system is not to be
used for neonates. The system is intended
for multiple-patient use in professional
healthcare settings.
TRUE METRIX® PRO System Comprehensive Resource Guide (GDH-FAD Enzyme) Intended Use Statement 2
Page 6

Safety
Healthcare professionals should adhere to standard
precautions and disinfection procedures when
handling or using this device. ALL parts of the
TRUE METRIX® PRO Blood Glucose Monitoring
System are considered potentially infectious and
capable of transmitting blood-borne pathogens.
Only use auto-disabling, single-use lancing devices
with this product.
• NEVER re-use test strips. NEVER wipe test
strips with water, alcohol, or any cleaner.
• DO NOT attempt to remove blood or control
solution sample from test strips or clean
test strips and re-use. Reuse of test strips
will cause inaccurate results.
• NEVER add a second drop of sample to the
test strip. Adding more sample gives an
error message.
A point-of-care blood testing device, such as a
blood glucose meter, should be used only on one
patient and not shared. If dedicating one blood
glucose meter to a single patient is not possible,
the meter must be properly cleaned and disinfected
after every use following the guidelines found in
System Maintenance and Cleaning and Disinfection
sections of this Resource Guide.
Clean and disinfect the meter after each use to
prevent the transmission of blood-borne pathogens.
Healthcare professionals should wear gloves when
cleaning and disinfecting the meter. Wash hands
after taking off gloves. Contact with blood presents
a potential infection risk. A new pair of gloves
should be worn before testing each patient.
Note: Clean to remove blood or soil from the surface of
your meter and disinfect. Disinfecting removes
most but not all possible infectious agents
(bacteria or virus) from the meter, including
blood-borne pathogens.
1,2
To Clean and Disinfect the Meter
1. Wash hands thoroughly with soap and water. Wear
a clean pair of gloves.
2. Make sure meter is off and a test strip is not
inserted. With ONLY PDI Super Sani Cloth Wipes
(or any disinfectant product with EPA* reg.
no. 9480-4), rub the entire outside of the meter using
3 circular wiping motions with moderate pressure on
the front, back, left side, right side, top and bottom
of the meter. Repeat as needed until all surfaces are
visibly clean. Discard used wipes. (*Environmental
Protection Agency.)
3. Using fresh wipes, make sure that all outside
surfaces of the meter remain wet for 2 minutes.
Make sure no liquids to enter the Test Port or any
other opening in the meter.
Super Sani-Cloths may be purchased at the
following places:
• Amazon.com
• Officedepot.com or visit your local Office Depot
store for other options
• Walmart.com
4. Let meter air dry thoroughly before using to test.
5. Verify that the system is working properly by
performing an Automatic Self-Test.
Note: Other disinfectants have not been tested. The
effect of other disinfectants used interchangeably
has not been tested with the meter. Use of
disinfectants other than Super Sani Cloth Wipes
may damage meter.
Note: Super Sani Cloth Wipes have been tested on
the meter for a total of 10,950 cleaning and
disinfecting cycles, which is equal to cleaning
and disinfecting the meter 10 times per day for
a 3 year period. The use life of the meter is 3
years.
EMC Safety Information
This meter meets the electromagnetic immunity
requirements as per ISO 15197 Annex A3. It meets
the electromagnetic emissions requirements as
per EN 61326 series. Interference from the meter
to other electronically driven equipment is not
anticipated. The electromagnetic environment
should be evaluated prior to operation of the device.
Do not use the meter in a very dry environment,
especially one in which synthetic materials are
present. Do not use the meter close to sources of
strong electromagnetic radiation, as these may
interfere with the proper operation.
TRUE METRIX® PRO System Comprehensive Resource Guide (GDH-FAD Enzyme) Safety 3
Page 7

System Specifications
Meter Specifications
Result Range: 20-600 mg/dL
Sample Size: Minimum 0.5 microliter (0.5 μL)
Sample Type: Fresh capillary whole blood from the
finger or forearm, venous whole blood collected
in sodium heparin blood collection tubes only, or
control solution
Test Time: Results in as little as 4 seconds
Result Value: Plasma equivalent values
Assay Method: Amperometric
Reference Method: Yellow Springs Instrument
Glucose oxidase reagent
Power Supply: One 3V lithium battery #CR2032
(non-rechargeable).
Battery Life: Approximately 1,000 tests or 1 year
Automatic Shut-Off: After two minutes of non-use
Weight: 1.66 ounces
Chemical Composition
TRUE METRIX® PRO Test Strips: Glucose
dehydrogenase-Flavin adenine dinucleotide
(GDH-FAD) (Aspergillus sp.), mediators, buffers
and stabilizers.
TRUE METRIX® Control Solution: Water, d-glucose,
buffers, viscosity enhancing agent, salts, dye
and preservatives.
Note: Material Safety Data Sheets can be found in
the Appendix.
Size: 3.44" x 2.16" x 0.69"
Memory Size: 500 glucose and control results
Operating Conditions
System Operating Range (meter & test strips):
Relative Humidity: 10-90% (Non-condensing)
Temperature: 41°F-104°F
Hematocrit: 20-70%
Altitude: Up to and including 10,200 feet
Note: Use within specified environmental
conditions only.
TRUE METRIX® PRO System Comprehensive Resource Guide (GDH-FAD Enzyme) System Specifications 4
Page 8

CLIA Requirements
Self-testing and point-of-care testing of blood
glucose has been classified by the Clinical
Laboratory Improvement Amendments (CLIA) as a
waived test. CLIA requires all entities that perform
even one test, including waived tests, [on materials
derived for the human body for the purpose of
providing information for the diagnosis, prevention
or treatment of any disease or impairment of, or the
assessment of the health of, human beings] to meet
certain Federal requirements. If an entity performs
tests for these purposes, it is considered under CLIA
to be a laboratory and must register with the CLIA
program.
Waived laboratories must meet the following
requirements:
• Complete the Clinical Laboratory Improvement
Amendments of 1988 (CLIA) Application for
Certification. Form CMS-116. The form and
instructions on completing and mailing the form
are found on http://www.cms.hhs.gov/CLIA/06
How_to_Apply_for_a_CLIA_Certificate_Including_
Foreign_Laboratories.asp#TopOfPage.
• Pay applicable certificate fees biennially.
• Follow manufacturer’s test instructions, including
instructions for Quality Control, maintenance, and
storage instructions.
Upon approval of Form CMS-116, a Certificate of
Waiver is forwarded to the laboratory.
For more information on the CLIA program, see
http://www.cms.hhs.gov/CLIA/.
For a comprehensive look at waived testing, see
http://www.cdc.gov/mmwr/preview/mmwrhtml/
rr541a1.htm.
TRUE METRIX® PRO System Comprehensive Resource Guide (GDH-FAD Enzyme) CLIA Requirements 5
Page 9

System Components
Page 10
System Components
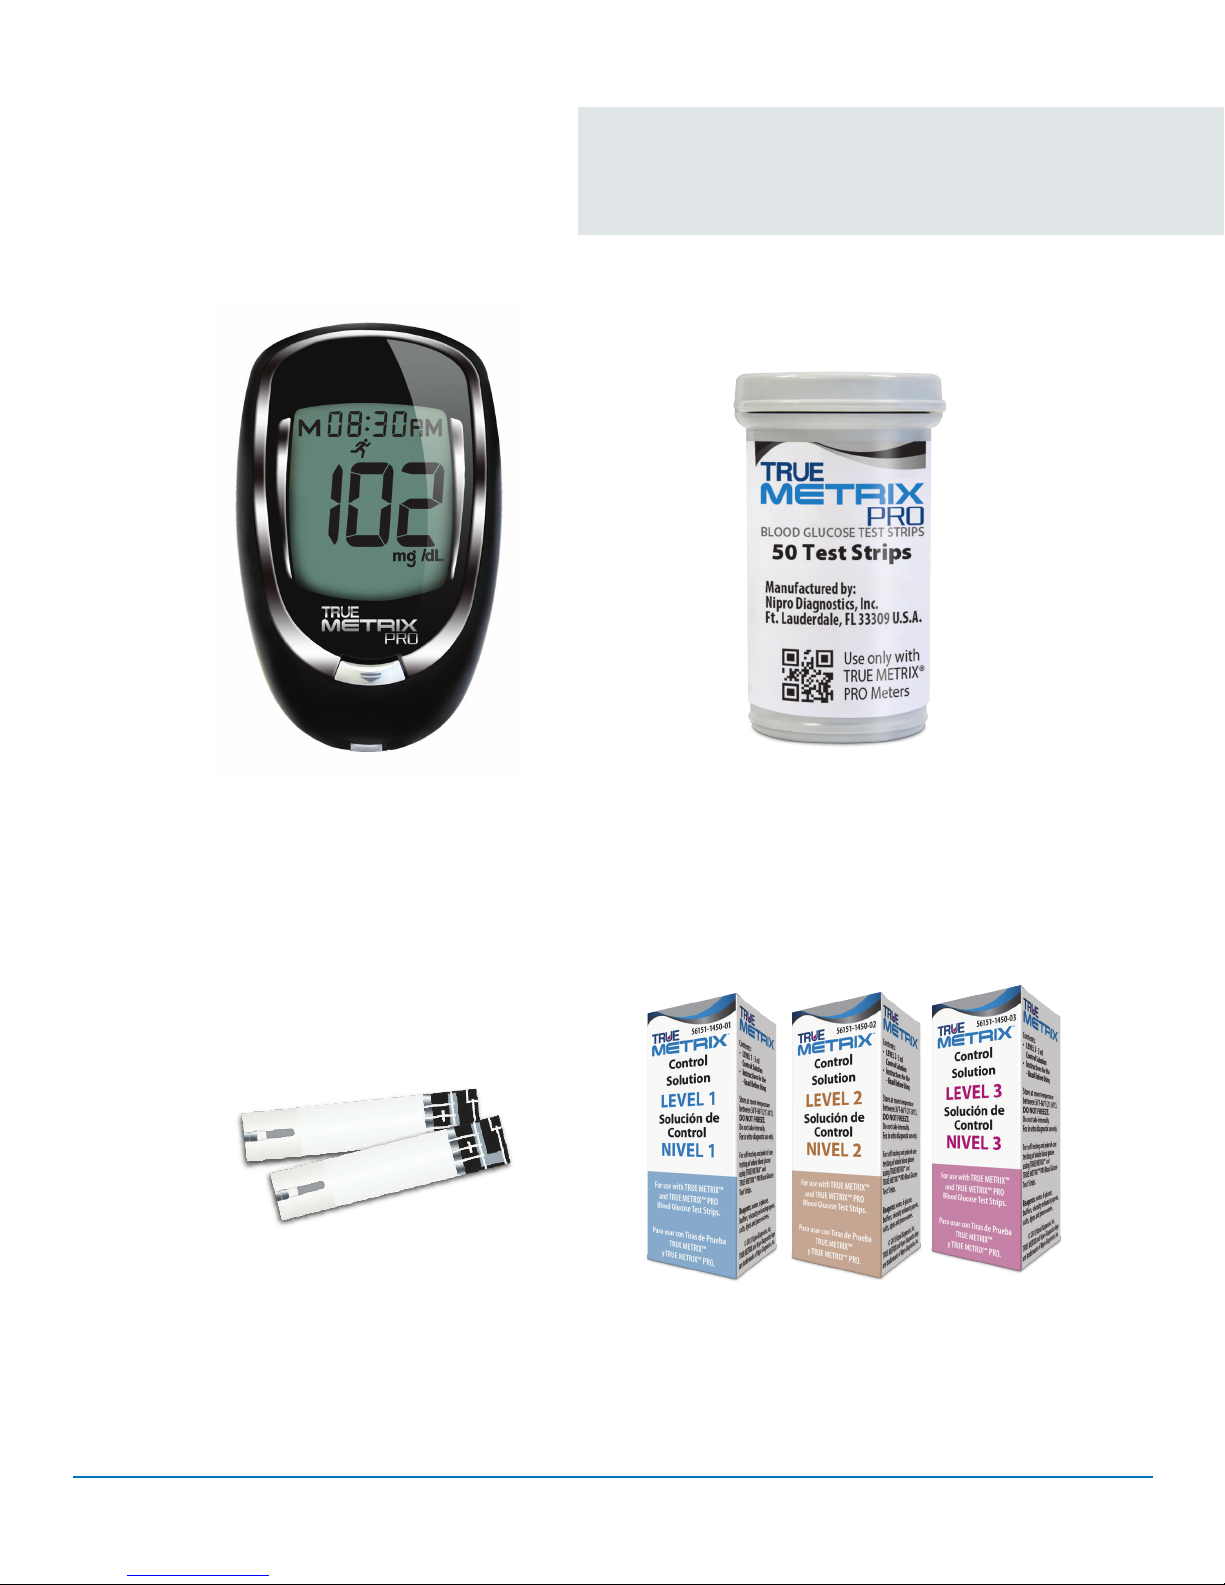
Meter
Test Strips
Test Strip Vial
Control Solution
TRUE METRIX® PRO System Comprehensive Resource Guide (GDH-FAD Enzyme) System Components 6
Page 11
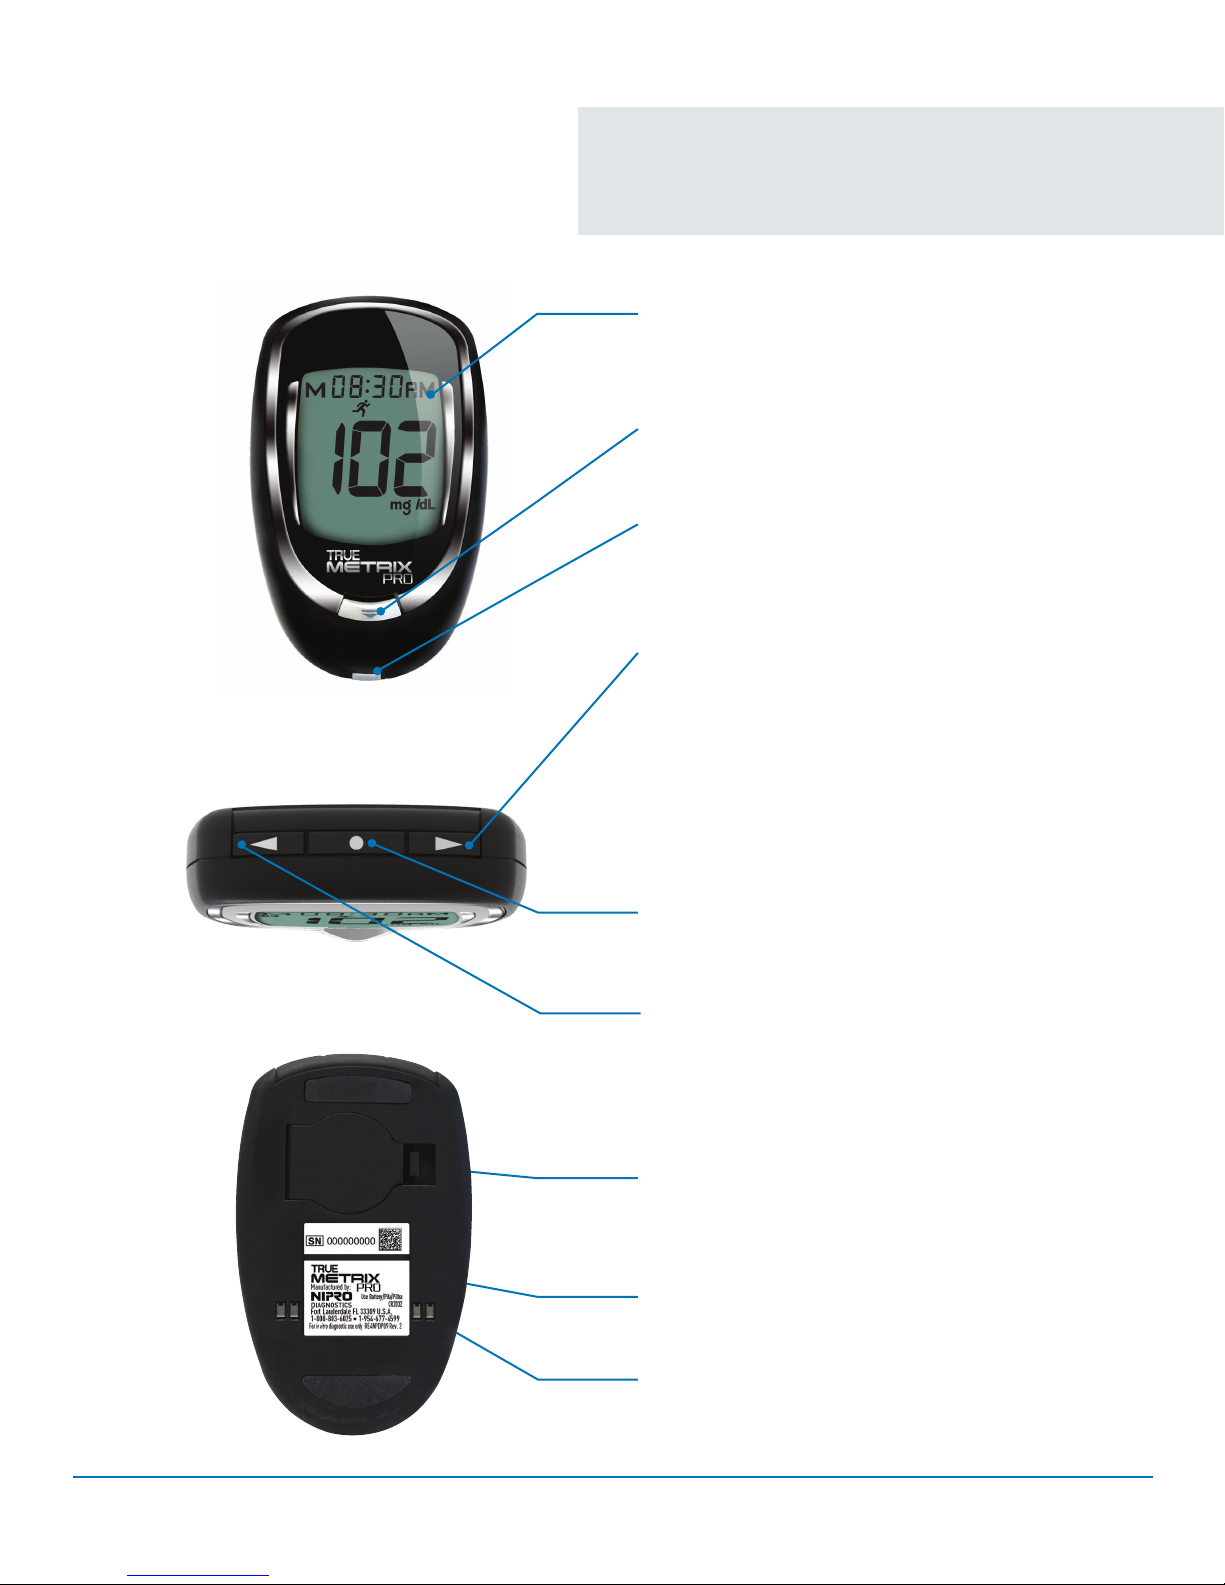
Front of Meter
Top of Meter
Meter Key Features
Display Screen
Shows test results, messages,
user prompts, information
Strip Release Button
Releases test strip after testing for disposal
Test Port
Insert TRUE METRIX® PRO Test Strip here,
contact blocks facing up
▼
“ ” Button
Increase numbers in Meter Set Up; add ALT
Symbol; move forward by date/time when viewing
results and Averages in Memory; scroll through
Event Tags to mark results (if feature on); turn on
Event Tags, Ketone Test Alert and Test Reminders
during Meter Set Up
Back of Meter
“ • ” Button
Turn meter on to view Average values, to view
results in Memory, to access Meter Set Up, and
turn on Event Tags in Meter Memory
▼
“ ” Button
Decrease numbers in Meter Set Up; remove
ALT symbol; move backward by date/time when
viewing results and Averages in Memory
Battery Door
Use one non-rechargeable 3V lithium battery
(#CR2032), positive (“+”) side up
Meter Label
Contains serial number of meter
Data Contacts
Connects meter with computer via docking
station for data upload
TRUE METRIX® PRO System Comprehensive Resource Guide (GDH-FAD Enzyme) Meter Key Features 7
Page 12
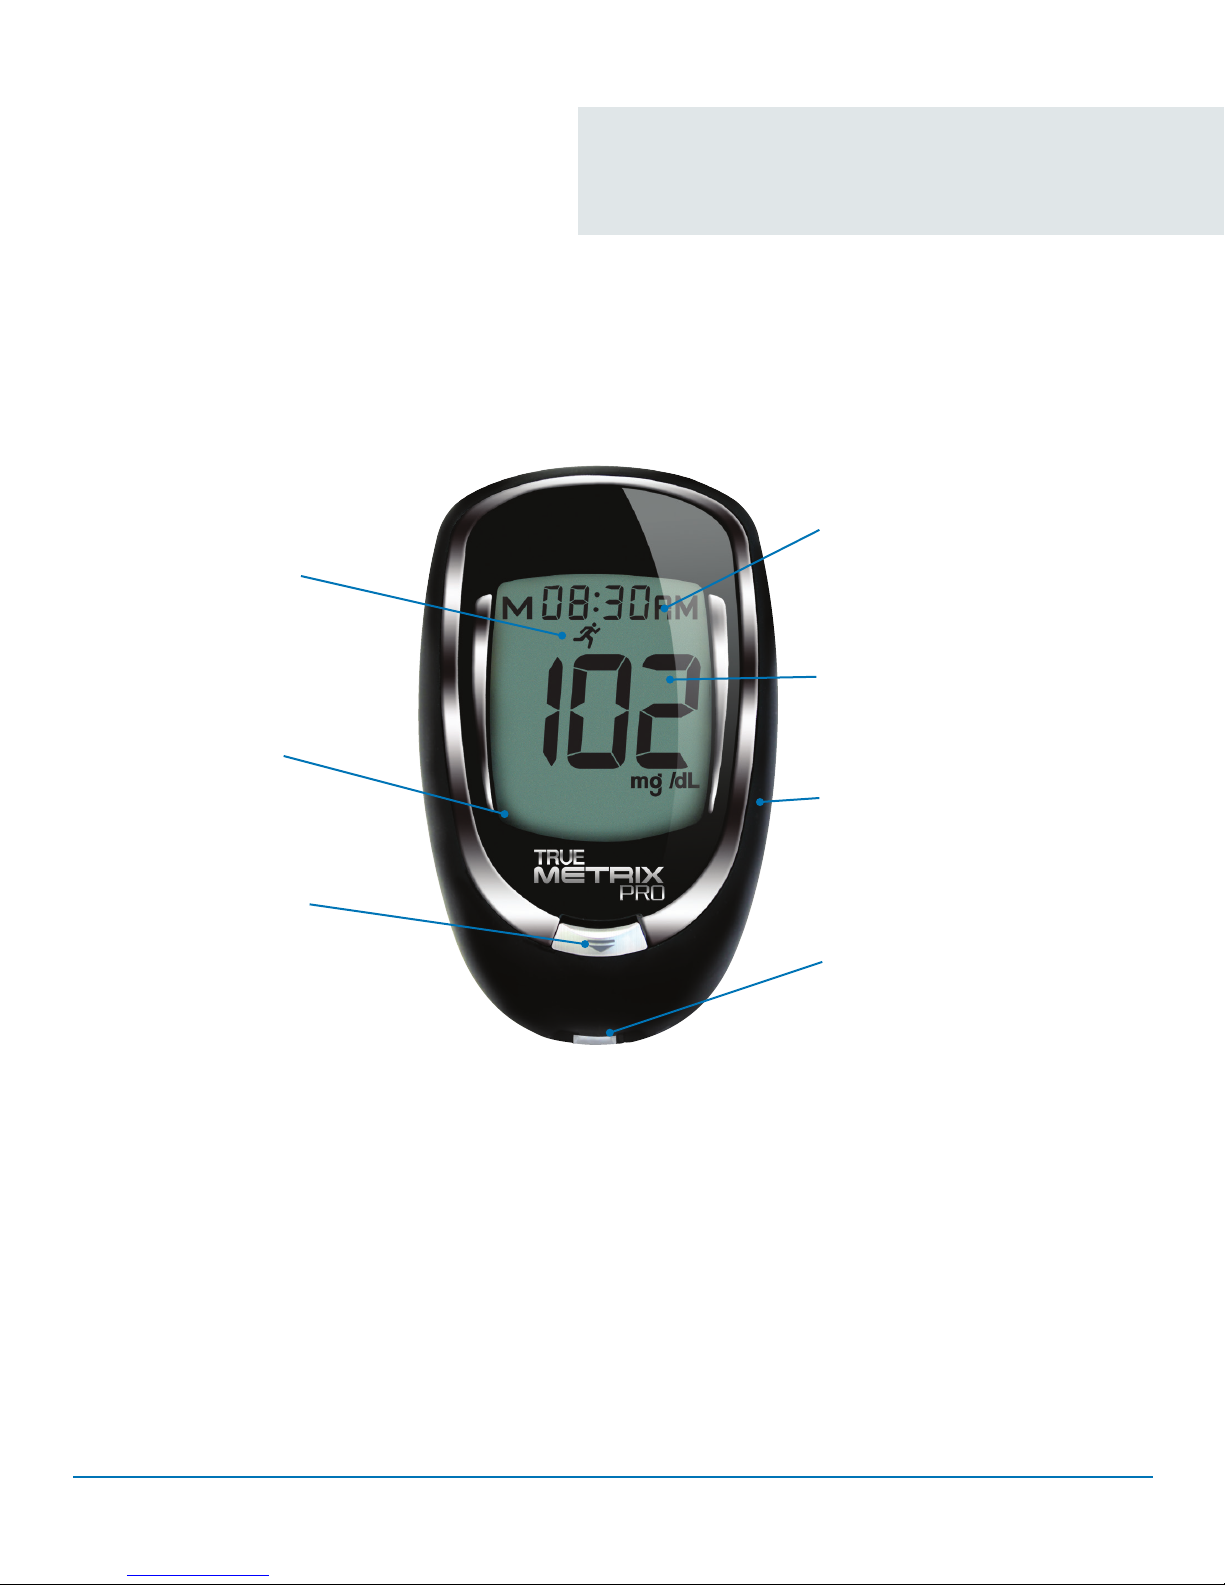
Event Tagging
helps identify trends
associated with
blood glucose results
High quality bezel
for exclusive look;
scratch resistant
Strip Release Button
safely releases test strip
without user coming in
contact with contaminated
test strip
Meter Design
Alternating time/date
for convenient
tracking and trending
of data
Large display
and digits for easy legibility
Elegant black
soft touch surround
material/coating for
easy grip of meter
Test strip guide
for easy test strip insertion
TRUE METRIX® PRO System Comprehensive Resource Guide (GDH-FAD Enzyme) Meter Design 8
Page 13
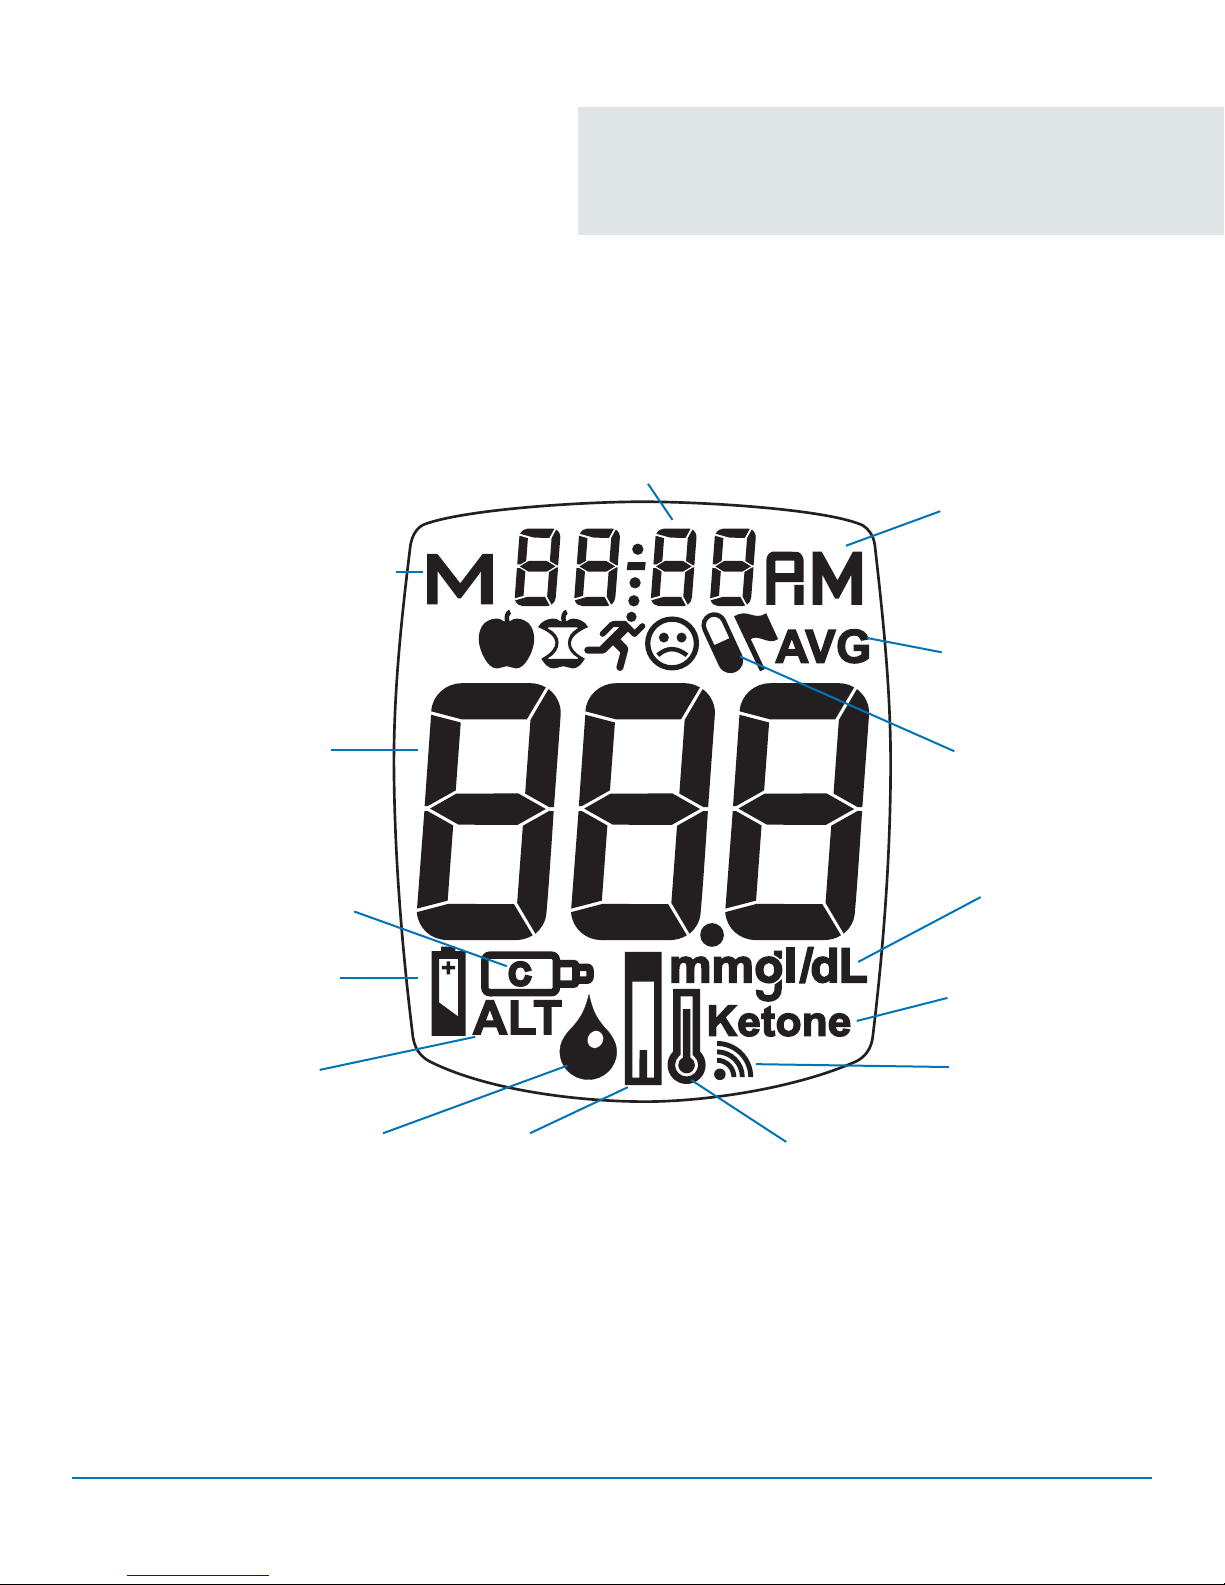
Result is from Memory
Meter Display Screen
Full Display Screen
Time, Date
Time is AM/PM
Result is from
7-, 14-, or 30-
Day Average
Test Result
Control Symbol
Battery Symbol
Alternate Site (ALT)
Symbol
Drop Symbol – Apply blood or
Event Tag Symbols
Units of Measure
(factory set;
cannot be
changed by user)
Ketone Test Alert
Symbol
Test Reminder
Symbol
Temperature Symbol
control solution
TRUE METRIX® PRO System Comprehensive Resource Guide (GDH-FAD Enzyme) Meter Display Screen 9
Page 14
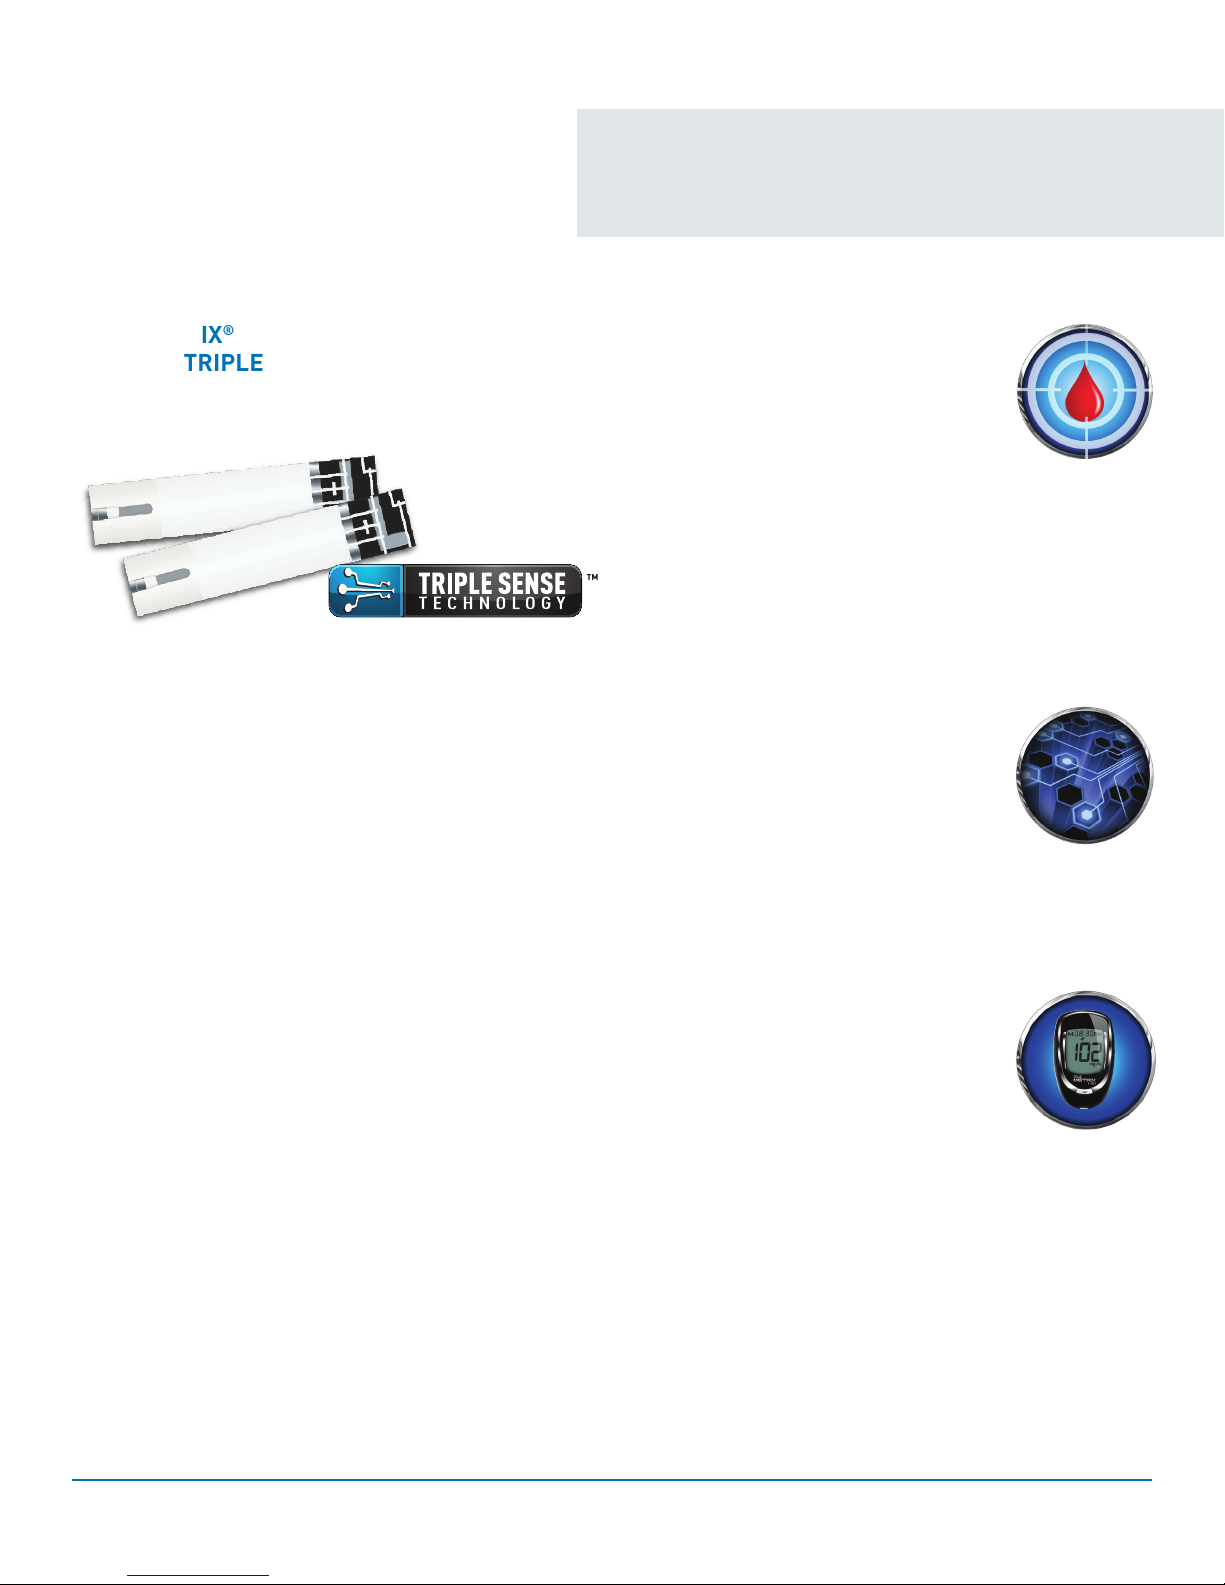
Test Strip Design
TRUE METRIX® PRO Test Strips –
Featuring TRIPLE SENSE TECHNOLOGY
No Coding Technology eliminates the need for coding
of the meter.
• Code is assigned during manufacturing process
• Code is printed onto contacts on end of test strip
• Meter reads code on insertion
Advanced technologies – the meter, a complex
algorithm, chemistry and electrodes – on the test
strip work together as part of the TRUE METRIX®
PRO system to produce accurate results.
Featuring TRIPLE SENSE TECHNOLOGY™, the
system provides proven accuracy and confidence in
results.
™
DETECT
Sample Environment
• An electrode pair on the test
strip detects hematocrit
• An internal unit in the meter
detects temperature
Sample Size
• System triggers proper fill
detection eliminating errors
due to improper sample size
Control
• Detects control solution and automatically identifies
results in memory for accurate data trending
ANALYZE
Environmental and
Physiological Factors
• Every system analyzes the testing
environment for hematocrit and
temperature, which could impact
or influence the accuracy of results
• Testing outside of specified operating temperature
range is marked by an error code – eliminating
incorrect results
CORRECT
Hematocrit/Temperature
Variables
• Employs a Proprietary
Dynamic Adaptive
Algorithm, which incorporates:
TRUE METRIX® PRO System Comprehensive Resource Guide (GDH-FAD Enzyme) Test Strip Design 10
– Active hematocrit correction
– Temperature compensation
• Combined, this algorithm corrects results based
on the testing environment
• Ensures proven accuracy and confidence in results
Page 15
Control Solution
Control Solution/Solución de Control
Level/Nivel 1 3 mL
Manufactured for/Fabricado para:
Control Solution/Solución de Control
Level/Nivel 1 3 mL
K 7461(50%)
1.953 x 1.109
R5NPD01 Rev. 3
Manufactured for/Fabricado para:
Fort Lauderdale FL 33309 USA
For in vitro diagnostic use only.
Store at temperature between 36-86°F (2-30°C).
DO NOT FREEZE.
Control Solution/Solución de Control
Level/Nivel 2 3 mL
Manufactured for/Fabricado para:
No coating areaNo coating areaNo coating area
K 729(50)%
1.953 x 1.109
Control Solution/Solución de Control
Level/Nivel 1 3 mL
K 7461(50%)
1.953 x 1.109
R5NPD01 Rev. 3
Manufactured for/Fabricado para:
Fort Lauderdale FL 33309 USA
For in vitro diagnostic use only.
Store at temperature between 36-86°F (2-30°C).
DO NOT FREEZE.
Control Solution/Solución de Control
Level/Nivel 2 3 mL
R5NPD02 Rev. 3
Manufactured for/Fabricado para:
Fort Lauderdale FL 33309 USA
For in vitro diagnostic use only.
Store at temperature between 36-86°F (2-30°C).
DO NOT FREEZE.
Control Solution/Solución de Control
Level/Nivel 3 3 mL
Manufactured for/Fabricado para:
No coating areaNo coating areaNo coating area
What Is Control Solution?
Control solution is a red liquid containing a known
amount of glucose.
Test Principle:
Use control solution instead of blood to make sure
your system is working.
Storage and Handling:
Control solution must be stored upright, tightly
sealed, at 36°F-86°F, room temperature.
DO NOT REFRIGERATE OR FREEZE
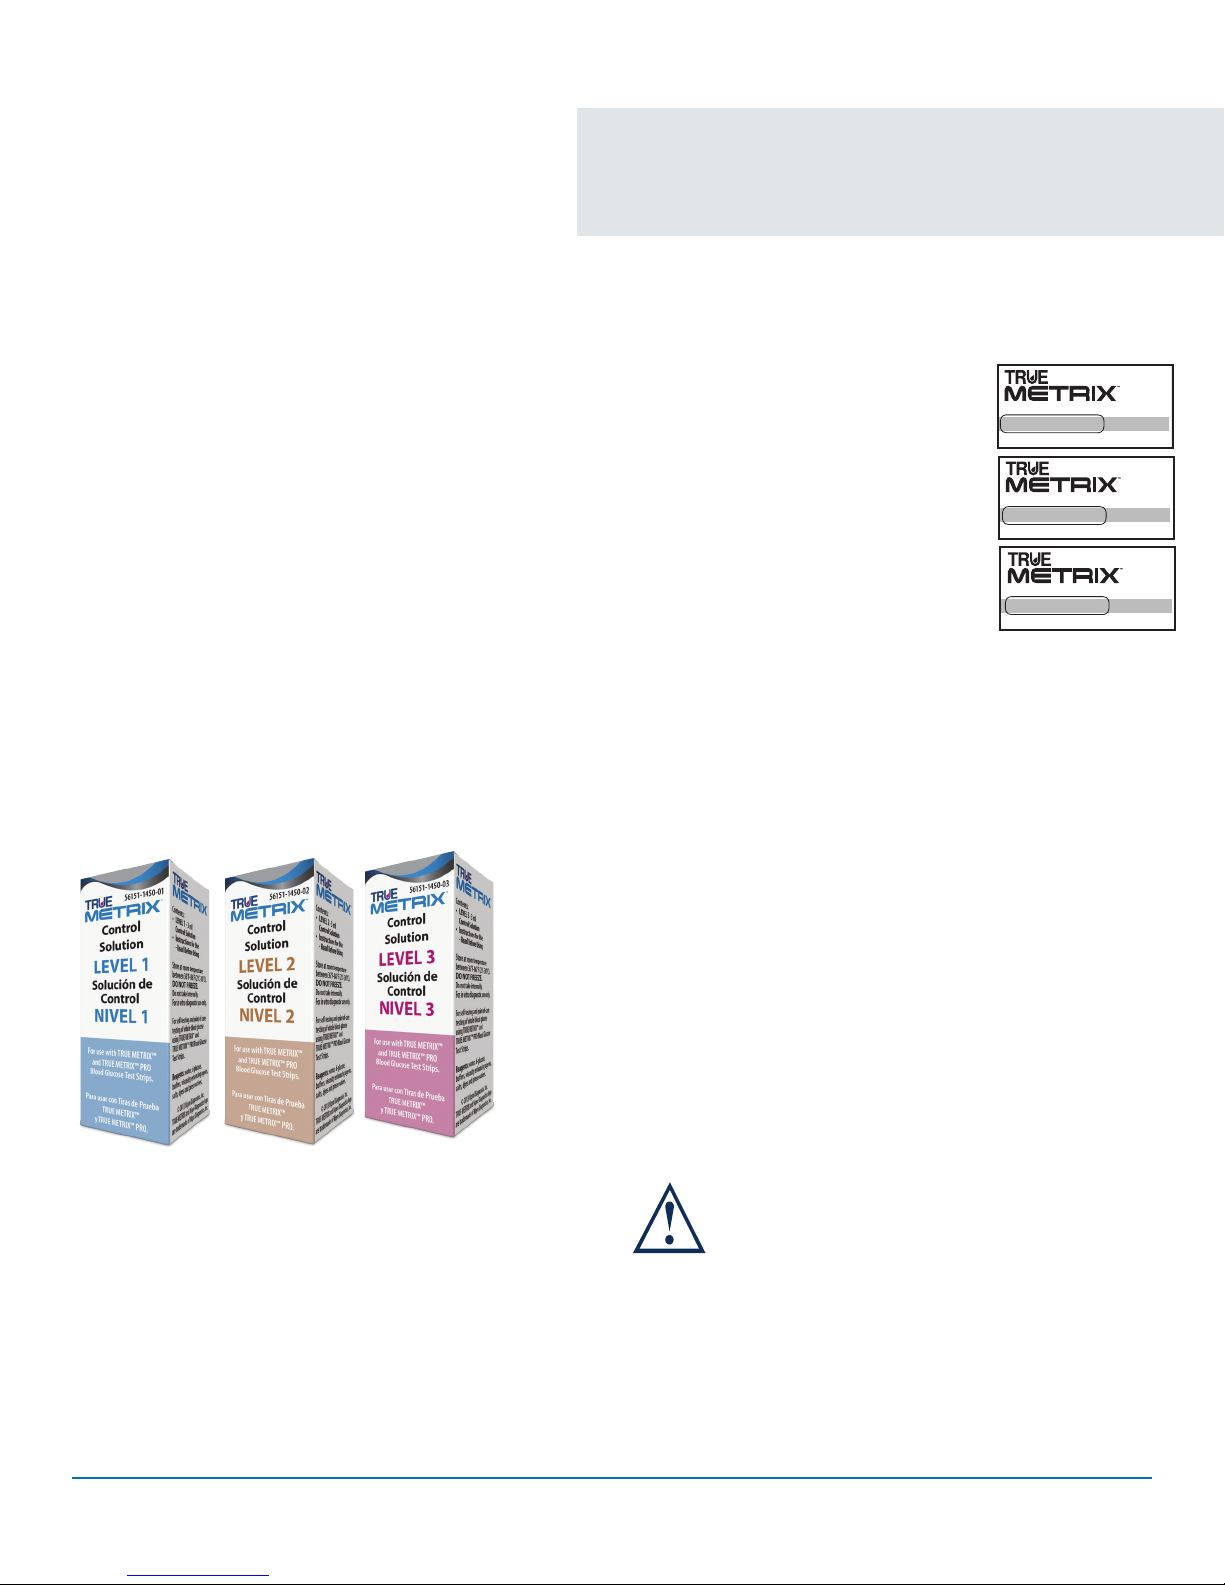
3 Levels of Control Solution
Control Test
Use ONLY TRUE METRIX® Control
Solution to check the performance of
the system. It is important to perform
control tests with more than one level
of control solution to assure that the
system is working properly and testing
technique is good. Three levels of
TRUE METRIX® Control Solution
(Levels 1-3) are available. Call
1-800-803-6025 for assistance in
obtaining different levels of
control solution.
Control Test(s) should be performed:
• Before using the system for the
first time.
• For practice to ensure that testing technique
is good.
• When opening a new vial of test strips.
• If results seem unusually high or low based on the
patient’s condition.
• If test strip vial has been left open or exposed to
extreme heat, cold or humidity.
• Use ONLY TRUE METRIX® Control Solution to
perform Control Tests.
TRUE METRIX® PRO System Comprehensive Resource Guide (GDH-FAD Enzyme) Control Solution 11
• Whenever a check on the performance of the
system is needed.
• If meter damage is suspected (meter was dropped,
crushed, wet, etc.).
Ranges printed on the test strip vial label
are for Control Test results only and are
not to be used for management of patient’s
blood glucose. DO NOT drink control
solution.
Page 16

Clinical Information
Page 17

Introduction
Performance Characteristics4
for Healthcare Professionals
The International Organization for Standardization (ISO)
develops standards in response to an identified need
in the community that will eventually be suitable for
implementation on as broad a basis as possible. ISO
developed the standard for blood glucose monitoring
performance – 15197:2003 – based on a consensus of
professionals around the world.3 It is recognized as the
standard in many countries.
Standard Reference Results ISO Bias Limit Criteria for Accuracy
Less than 75 mg/dL
Greater than or equal to 75 mg/dL
± 15 mg/dL from laboratory
reference result
± 20% from laboratory
reference result
95% of all results
Clinical data obtained by healthcare professionals on
the TRUE METRIX® PRO Blood Glucose Monitoring
System exceeded the minimum accuracy criteria for
ISO 15197:2003.
Accuracy:
TRUE METRIX® PRO accuracy was assessed against the
Yellow Springs Instrument. Studies were conducted at 3
clinical sites by healthcare professionals;
100% of healthcare professionals (HCP) TRUE METRIX®
PRO fingertip values fell within 15 mg/dL of the YSI
results at glucose level <75 mg/dL and within 20% at
glucose levels ≥ 75 mg/dL.
Fingertip Capillary Blood ≥ 75 mg/dL (HCP finger vs. YSI)
±5% 122 / 266 = 45.9%
±10% 220 / 266 = 82.7%
±15% 260 / 266 = 97.7%
±20% 266 / 266 = 100%
100% of TRUE METRIX® PRO forearm values fell within
15 mg/dL of the YSI results at glucose levels <75 mg/dL
and within 20% at glucose levels ≥ 75 mg/dL
Forearm Capillary Blood < 75 mg/dL
(HCP forearm vs. HCP finger)
±5 mg/dL 2/4 = 50%
±10 mg/dL 3/4 = 75%
±15 mg/dL 4/4 = 100%
Forearm Capillary Blood ≥ 75 mg/dL
(HCP forearm vs. HCP finger)
±5% 24/96 = 25%
±10% 58/96 = 60.4%
±15% 88/96 = 91.7%
±20% 96/96 = 100%
Fingertip Capillary Blood < 75 mg/dL (HCP finger vs. YSI)
±5 mg/dL 26/34 = 76.5%
±10 mg/dL 32/34 = 94.1%
±15 mg/dL 34/34 = 100%
TRUE METRIX® PRO System Comprehensive Resource Guide (GDH-FAD Enzyme) Performance Characteristics 12
Page 18

Performance Characteristics4
for Healthcare Professionals cont.
The TRUE METRIX® PRO System was also tested by
healthcare professionals at a research center. The data
was compared to parallel results obtained on a Yellow
Springs Instrument (YSI). The table below shows how
often TRUE METRIX® PRO Blood Glucose System venous
values obtained by healthcare professionals achieve the
accuracy goals.
Venous samples drawn into sodium heparin anticoagulant tubes.
Venous Blood < 75 mg/dL
Within ±5 mg/dL 5/6 = 83.3%
Within ±10 mg/dL 6/6 = 100%
Within ±15 mg/dL 6/6 = 100%
Venous Blood ≥ 75 mg/dL
Within ±5% 20/106 = 18.9%
Within ±10% 60/106 = 56.6%
Within ±15% 101/106 = 95.3%
Within ± 20% 106/106 = 100%
Precision (Repeatability):
Precision describes the variation between results.
Precision results were performed in a laboratory.
Blood (Within Lot): N=100
Mean (mg/dL) 44 89 150 199 329
SD (mg/dL) 1.8 3.6 4.9 7.3 9.6
CV% 4.1 4.0 3.3 3.7 2.9
Control Solution: N=100
Mean (mg/dL) 33 105 306
SD (mg/dL) 1.6 3.8 10.3
CV% 4.8 3.6 3.4
TRUE METRIX® PRO System Comprehensive Resource Guide (GDH-FAD Enzyme) Performance Characteristics 13
Page 19

Limitations of Use
• Please read all product Instructions for Use
carefully before referencing or using this guide.
• Use only TRUE METRIX® PRO Blood Glucose Test
Strips and TRUE METRIX® Control Solution with
the TRUE METRIX® PRO Meter.
• Do not leave test strips or control solution where
the storage temperature printed on vial label may
be exceeded.
• Perform control tests before performing a blood
glucose test for the first time (See the Quality
Control Testing section of this Resource Guide).
• Perform control tests with more than one level of
control solution. Three levels of TRUE METRIX®
Control Solution are available for control tests.
Contact place of purchase or call for assistance to
obtain control procedure/policy.
• TRUE METRIX® PRO is an in vitro (outside the
body) quantitative system that is used for multiplepatient use testing of human whole blood only.
• The most accurate results are obtained using
fresh, capillary whole blood from the fingertip or
forearm. Venous whole blood drawn using only
sodium heparin tubes may be used. Mix well before
use.
• Do not use venous whole blood collected in sodium
fluoride (grey top) vacutainer tubes for testing, as
this may cause false low results.
• Capillary blood from the forearm may be used.
Check with the doctor or healthcare professional
to see if forearm testing may be used for glucose
testing on the patient. Results from the forearm
are not always the same as results from the
fingertip. Use fingertip instead of forearm:
5
- Within 2 hours of eating, exercise, or
taking insulin;
- If the patient’s blood glucose may be rising or
falling rapidly or their results often fluctuate;
- If the patient is ill or under stress;
- If the glucose result may be low or high;
- If symptoms of low or high glucose levels are
not evident.
• Alternate site (forearm) testing should not be used
to calibrate continuous glucose monitors (CGMs).
• Alternate site (forearm) testing should not be used
for insulin dose calculations.
• Do not use for the diagnosis of or screening for
diabetes mellitus or for measuring blood glucose
in newborns.
• When comparing results between TRUE METRIX®
PRO and a laboratory system, TRUE METRIX®
PRO blood tests should be performed within 30
minutes of laboratory test. If a patient has recently
eaten, fingerstick results from the TRUE METRIX®
PRO System can be up to 70 mg/dL higher than
venous laboratory results.5 Diabetes experts have
suggested that glucose meters should agree within
15 mg/dL of a laboratory system when the glucose
concentration is less than 75 mg/dL, and within
20% of a laboratory system when the glucose
concentration is 75 mg/dL or higher.
3
• The device has not been validated for use in the
critically ill. Capillary blood glucose levels in
critically ill patients with reduced peripheral blood
flow may not reflect the true physiological state.
Reduced peripheral blood flow may result from the
following conditions (for example):
7
- shock,
- severe hypotension,
- severe dehydration,
- hyperglycemia with hyperosmolarity, with or
without ketosis.
• Testing at altitudes up to and including 10,200 feet
will not affect accurate results.
• Hematocrit levels between 20% and 70% will not
affect accurate results.
4
4
• Do not use the TRUE METRIX® PRO System
during a xylose absorption test. This may falsely
raise glucose results. Please check with patients
doctor before using the TRUE METRIX® PRO
System.
• Do not use the TRUE METRIX® PRO System if
blood concentrations of ascorbic acid are
> 2 mg/dL
• Do not use the TRUE METRIX® PRO System if blood
concentrations of uric acid > 5 mg/dL
TRUE METRIX® PRO System Comprehensive Resource Guide (GDH-FAD Enzyme) Limitations of Use 14
Page 20

Interference Testing
Interference testing was performed using the concentrations recommended by Clinical and Laboratory Standards
Institute (CLSI) procedure EP7-A2; Interference Testing in Clinical Chemistry; Approved Guideline—Second Edition.8
Potential interferents were added to whole blood samples at 10 to 50-fold concentrations depending on solubility
characteristics. Where no recommendation was given, the potential interferents were added at concentrations higher than
normal or therapeutic ranges. Blood samples containing each of the potential interferents were tested concurrently with
control blood samples containing no added potential interferents. All blood samples originated from normal healthy donors.
The highlighted interferents below are listed as interferents in the Owner’s Booklet and Test Strip Instructions For Use.
Potential Interferent Normal/Therapeutic
Concentrations
Acetaminophen 2.0 mg/dL 30 mg/dL -------
Acetone 2.0 mg/dL 20 mg/dL -------
Ascorbic Acid 1.5 mg/dL 6.0 mg/dL 2 mg/dL
Bilirubin 1.0 mg/dL 15 mg/dL -------
Caffeine 1.25 mg/dL 6.0 mg/dL -------
Cholesterol 150 mg/dL 250 mg/dL -------
Creatinine 1.5 mg/dL 5.0 mg/dL -------
Dopamine 0.03 mg/dL 0.1 mg/dL -------
EDTA 0.1 mg/dL 360 mg/dL -------
Ethanol 150 mg/dL 400 mg/dL -------
Fluoride, Sodium 0.05 mg/dL 429 mg/dL 108 mg/dL
Galactose 5.0 mg/dL 15 mg/dL -------
Gentistic acid 0.4 mg/dL 1.8 mg/dL -------
Glipizide 0.1 mg/dL 0.2 mg/dL -------
Glutathione 0.15 mg/dL 10 mg/dL -------
Hemoglobin 150 mg/dL 1400 mg/dL -------
Heparin, Lithium 0.675 U/mL 31.7 U/mL -------
Heparin, Sodium 0.675 U/mL 31.7 U/mL -------
Ibuprofen 4 mg/dL 50 mg/dL -------
Icodextrin ------- 20 mg/dL -------
L-Dopa 1.3 mg/dL 4.0 mg/dL -------
Maltose 125 mg/dL 250 mg/dL -------
Maltotetraose 30 mg/dL 70 mg/dL -------
Maltotriose 90 mg/dL 180 mg/dL -------
Metformin 0.4 mg/dL 4.0 mg/dL -------
Methyl-Dopa 0.42 mg/dL 1.5 mg/dL -------
Naproxen Sodium 7.5 mg/dL 50 mg/dL -------
PAM 1.0 mg/dL 21 mg/dL -------
Salicylic acid 2.0 mg/dL 70 mg/dL -------
Tetracycline 0.35 mg/dL 1.5 mg/dL -------
Tolazamide 2.5 mg/dL 5.0 mg/dL -------
Tolbutamide 8.1 mg/dL 64 mg/dL -------
Triglyceride 150 mg/dL 1000 mg/dL -------
Uric acid 3 mg/dL 9.0 mg/dL 5 mg/dL
Xylose 5.0 mg/dL 58 mg/dL 7 mg/dL
High/Toxic
Concentrations
Concentrations Determined That Will
Affect Meter Glucose Results
TRUE METRIX® PRO System Comprehensive Resource Guide (GDH-FAD Enzyme) Interference Testing 15
Page 21

Meter Setup &
Quality Control Testing
Page 22
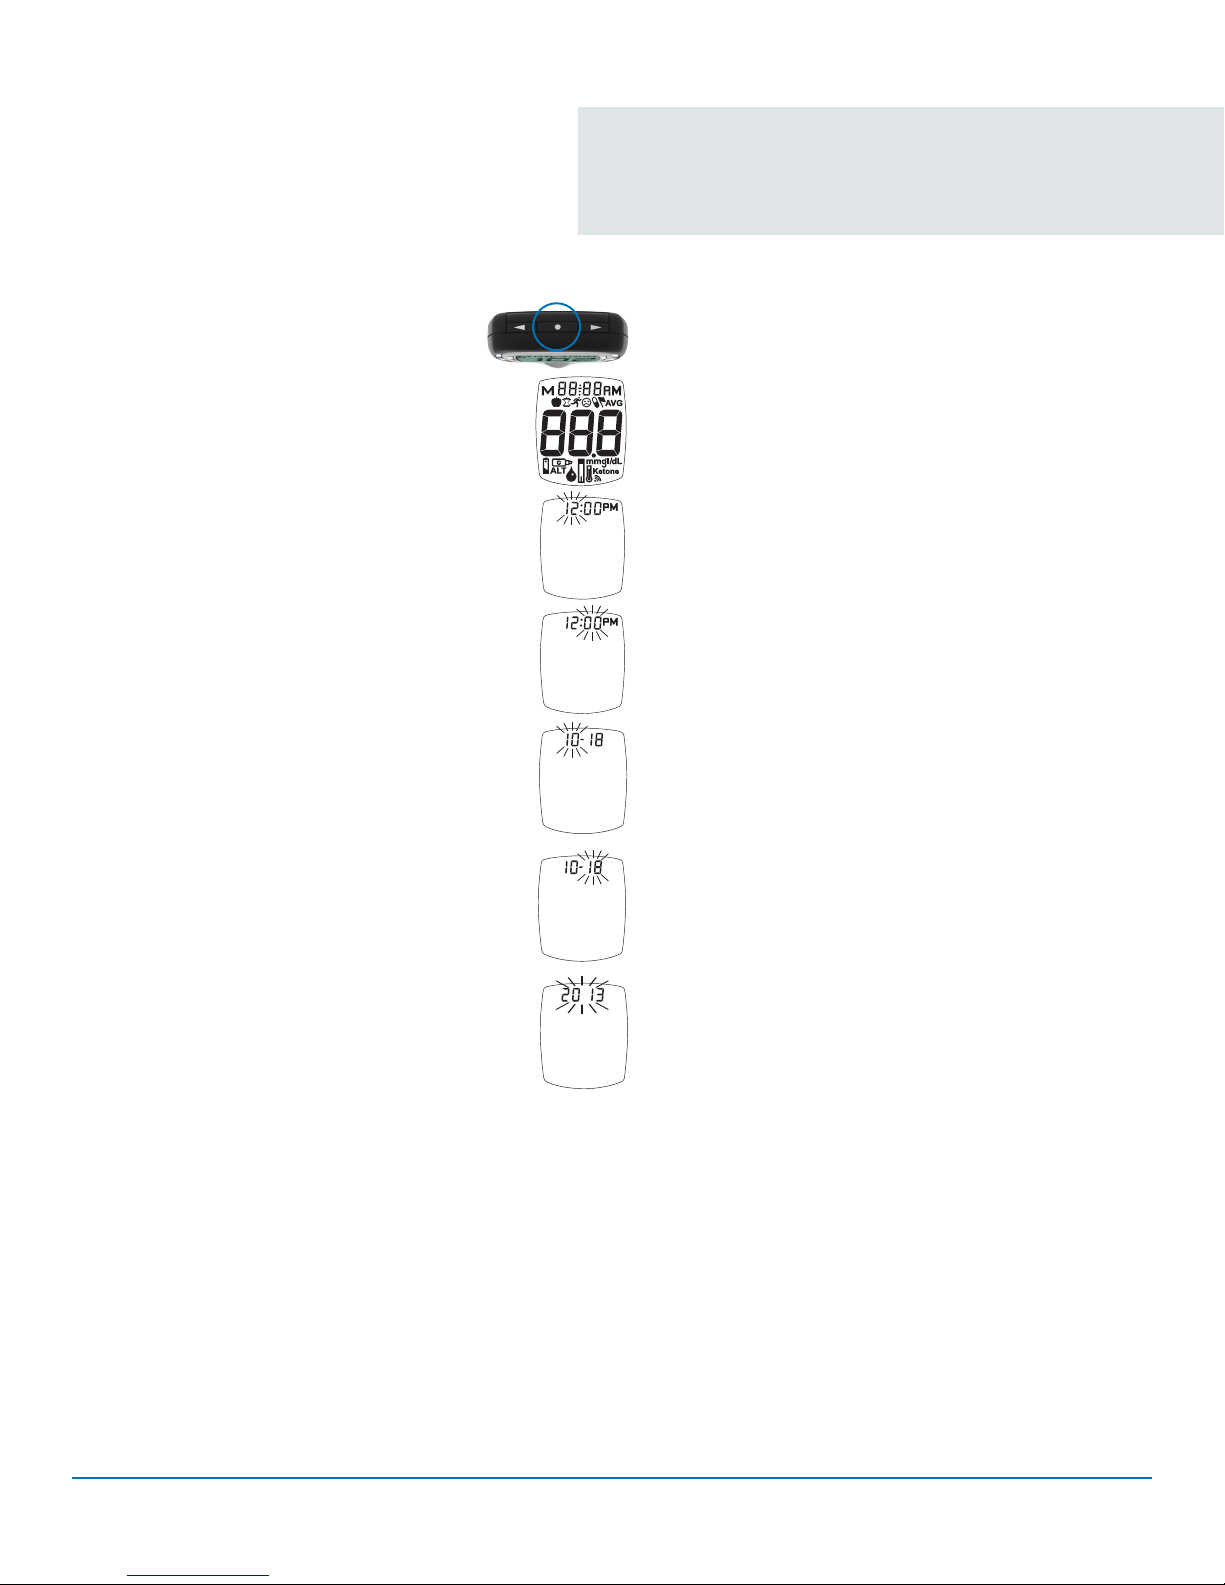
Meter Setup is to be used if changes need
to be made to the time and date, Event Tags,
Ketone Test Alert, or if settings need to be
reset because of battery change.
Meter Setup
1. Press and hold “•” Button until the full display is
shown and a tone sounds (around 10 seconds).
Release “•” Button. Meter goes into Set Up.
Note: Setting up the time, date, Event Tags,
Ketone Test Alert and Test Reminders
may not be suitable for a multiplepatient use of the system. Check with
the facility procedures and policies
before performing Set Up.
Note: If the meter turns off at any time during
Set Up, go back to Step #1 under Meter
Set Up and begin again.
Set Up of Time and Date
2. The hour flashes. To change, press “ ” or “ ”
Button on top of the meter to select the hour. Like
many alarm clocks, to set “AM” or “PM”, scroll
through the hours until “AM” or “PM” appears in
the Display. Press “ • ” Button to set.
3. The minutes flash. To change, press “ ” or “ ”
Button to select the minutes. Press “ • ” Button
to set.
4. The month (number) flashes. To change, press
“ ” or “ ” Button to select the month. Press “ • ”
Button to set.
5. The day (number) flashes. To change, press “ ”
or “ ” Button to select the day. Press “ • ” Button
to set.
6. The year flashes. To change, press “ ” or “ ”
Button to select the year. Press “ • ” Button to set.
▼
▼
▼
▼
▼
▼
▼
▼
▼
▼
TRUE METRIX® PRO System Comprehensive Resource Guide (GDH-FAD Enzyme) Meter Setup 16
Note: Meter beeps every time a setting is confirmed
(“ • ” Button is pressed).
Page 23
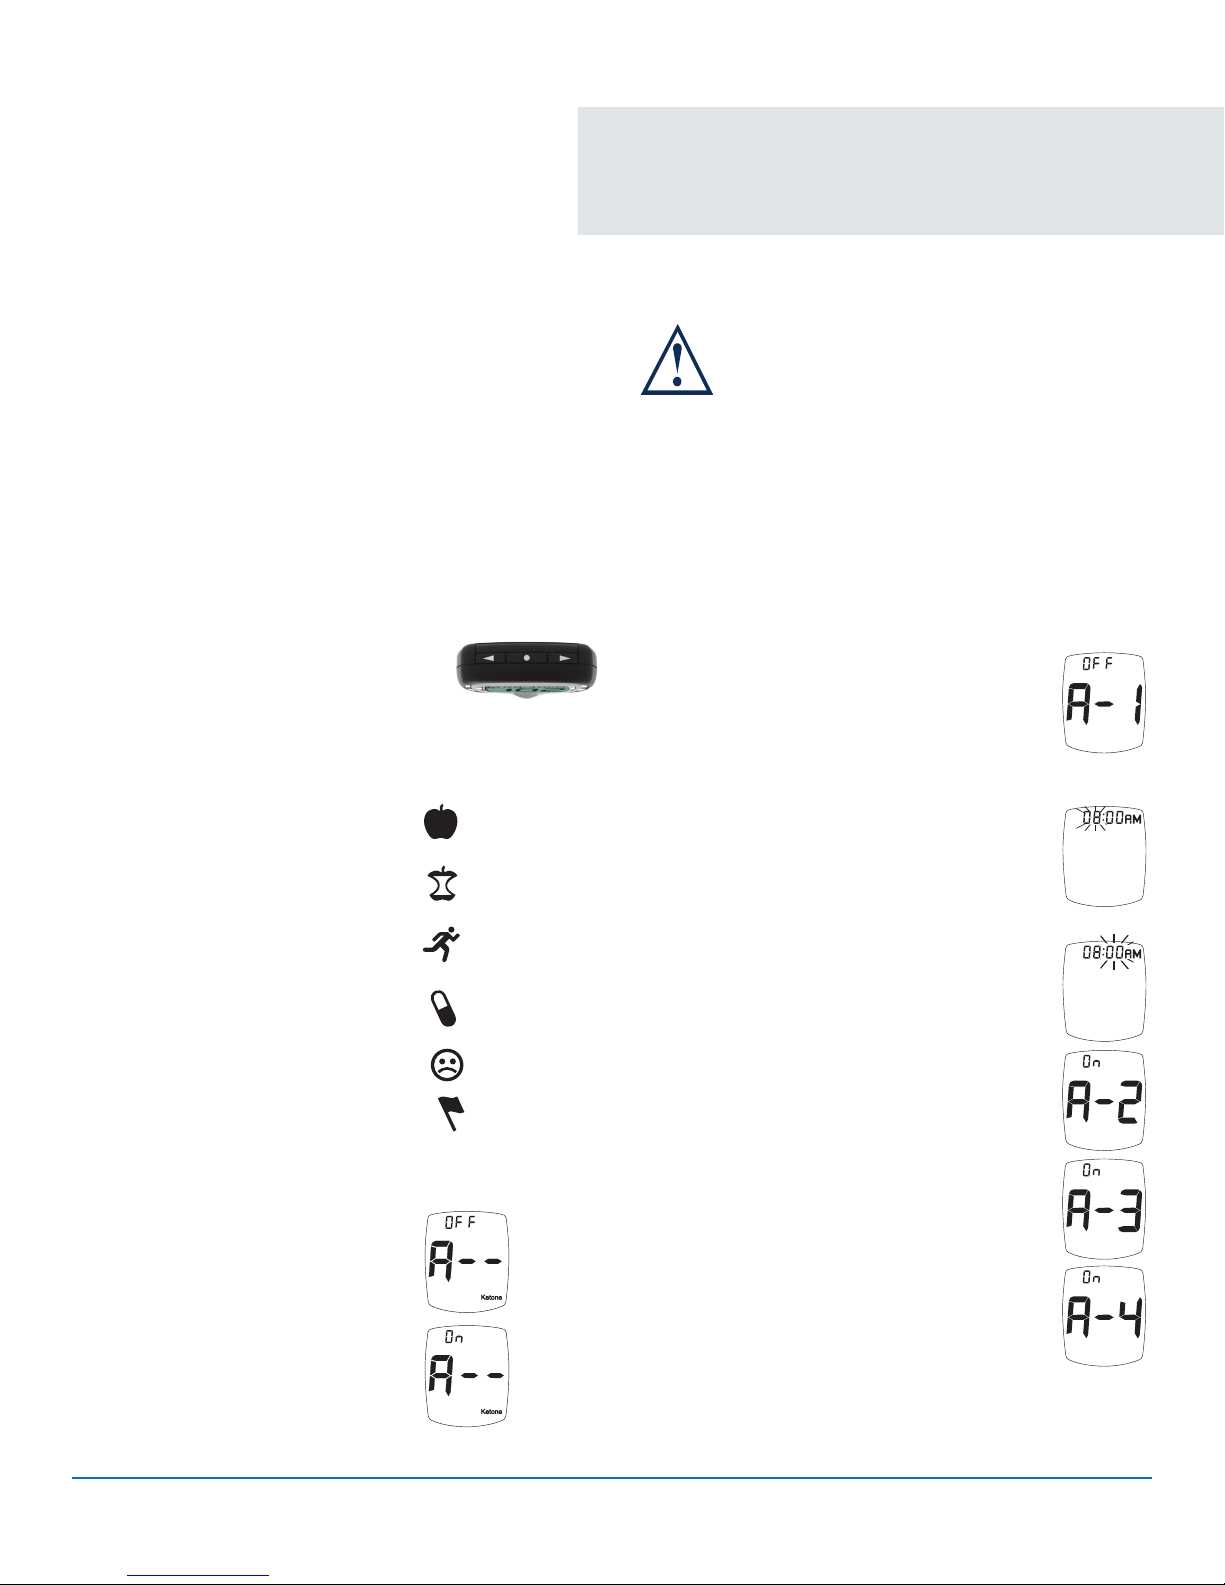
Meter Setup cont.
Set Event Tags, Ketone Alert and
Test Reminders
Meter comes with Event Tags, Ketone Test
Alert and all Test Reminders turned off.
Note: If the meter turned off at any time
during Set Up, go back to Step #1 under
Meter Set Up and begin again.
Event Tags
Event Tags are used to mark a test result
that was taken during a specific event.
1. After setting the year, press “ ” or “ ”
Button to turn Event Tags on or off.
Press “ • ” Button to set. The meter
goes to set Ketone Test Alert.
Event Tags may be used after each blood
glucose result. Event Tags are as follows:
Before meal –test was taken just
before a meal,
After meal – test was taken 2 hours
after the start of a meal,
Exercise – test was taken during or
after exercise,
Medications – medication taken may
have affected test result,
▼
▼
When a Ketone Test Alert is shown in
the meter display, it does not mean
that ketones have been detected
in the patient’s blood. Perform a
ketone test per the treatment plan,
as prescribed by their Doctor or
Diabetes Healthcare Professional.
Test Reminder
Up to four Test Reminders per day may
be set. Reminder sounds at set time for
10 seconds. Meter comes with all Test
Reminders off. To set the Test Reminders:
1. After pressing “ • ” Button to set Ketone
Test Alert, Display shows first Reminder
setting (A-1). To turn Reminder on, press
“ ” Button. Press “ ” Button to turn
▼
Reminder back to off. Press “ • ” Button to
set. Meter goes to next Test Reminder.
2. When “on” is chosen, press “ • ” Button.
The hour flashes. Press “ ” or “ ” Button
to set the hour. To set AM/PM, scroll (press
“ ” or “ ” Button) until “AM” or “PM” is
next to correct time. Press “ • ” Button
to set.
3. The minutes flash. Press “ ” or “ ”
Button to set the minutes. Press “ • ”
Button to set. Meter goes to the next
Test Reminder.
▼
▼
▼
▼
▼
▼
▼
Test Reminder
Sick – test was taken when sick,
Other – any other reason that the test
is unique or different in some way
(example: stress, drinking alcohol).
Ketone Test Alert
When a blood glucose result is over
240 mg/dL, the Ketone Test Alert is a
reminder to check the patient’s ketones
per the treatment plan prescribed by
the doctor or diabetes healthcare
professional.
2. Press “ ” or “ ” Button to turn
Alert on or off. Press “ • ” Button
to set. Meter goes to set
Test Reminder.
TRUE METRIX® PRO System Comprehensive Resource Guide (GDH-FAD Enzyme) Meter Setup 17
▼
▼
4. Turn Reminders on and repeat setting the
time for next 3 Reminders (if needed).
Exit Setup
Press and hold “ • ” Button until meter turns
off. Meter also turns off after 2 minutes of
non use. Set-up choices are saved.
Note: If Test Reminders are set, the Alert
Symbol appears in all Displays. If battery
dies or is replaced, Ketone Test Alert and
Test Reminders may have to be reset.
Page 24
Quality Control Testing
Quality Control Testing is used to detect errors that
may occur due to test system errors, product defects,
adverse environmental conditions and variance in
operator performance. Ongoing Quality Control Testing
is also used to detect any performance issues of the
system over time. Facility Quality Control Testing Policy
and Procedure should adhere to the manufacturer’s
instructions for use and regulatory guidelines.
TRUE METRIX® PRO is a no-coding system, which means
the meter does not have to be coded to each lot of test
strips. To assure accurate and reliable results, TRUE
METRIX® PRO offers two kinds of Quality Control Tests.
These tests ensure that the TRUE METRIX® PRO System
is working properly and the user’s testing technique
is good.
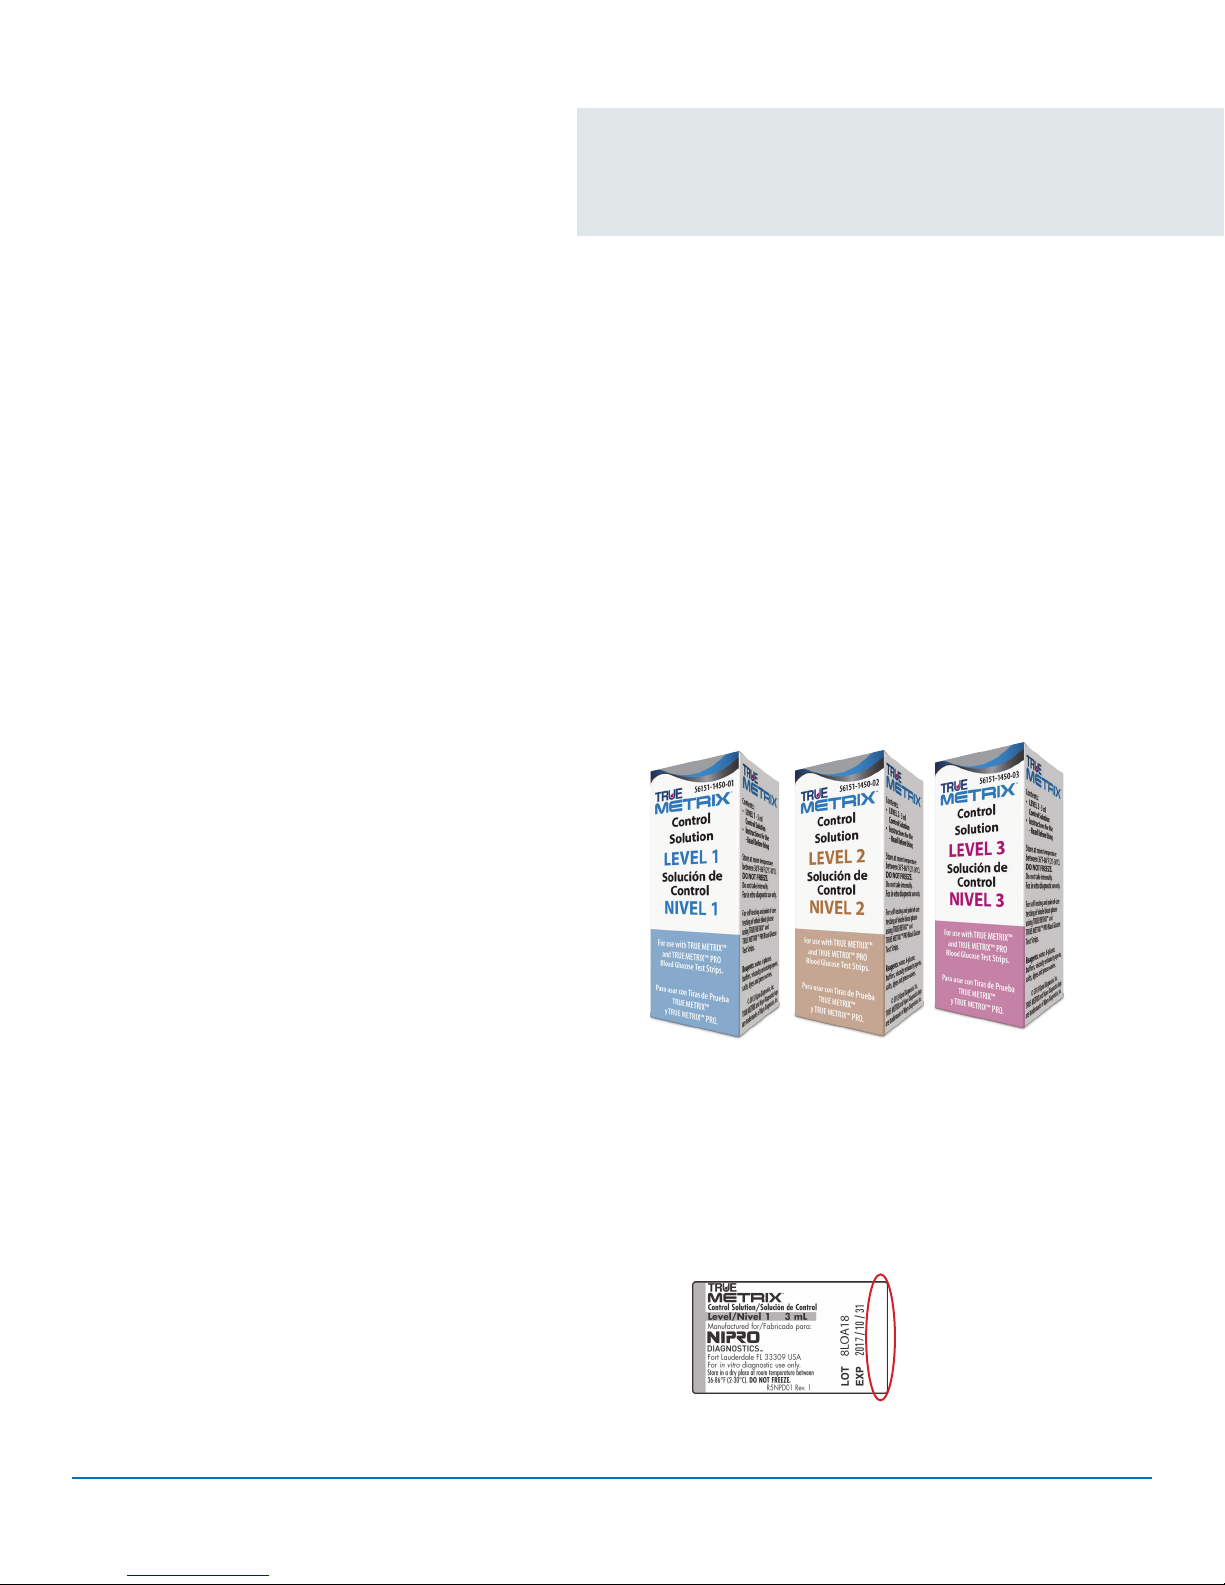
3 Levels of Control Solution
TRUE METRIX® PRO System Comprehensive Resource Guide (GDH-FAD Enzyme) Quality Control Testing 18
• Use ONLY TRUE METRIX® Control Solution to
perform Control Tests.
• Write date opened on control solution
label. Discard if either 3 months after first
opening or after the date printed next to
the EXP on the bottle label has passed,
whichever comes first.
May 30, 2017
• Control Test ranges are printed on the
TRUE METRIX® PRO Test Strip vial label.
Page 25
Quality Control Testing cont.
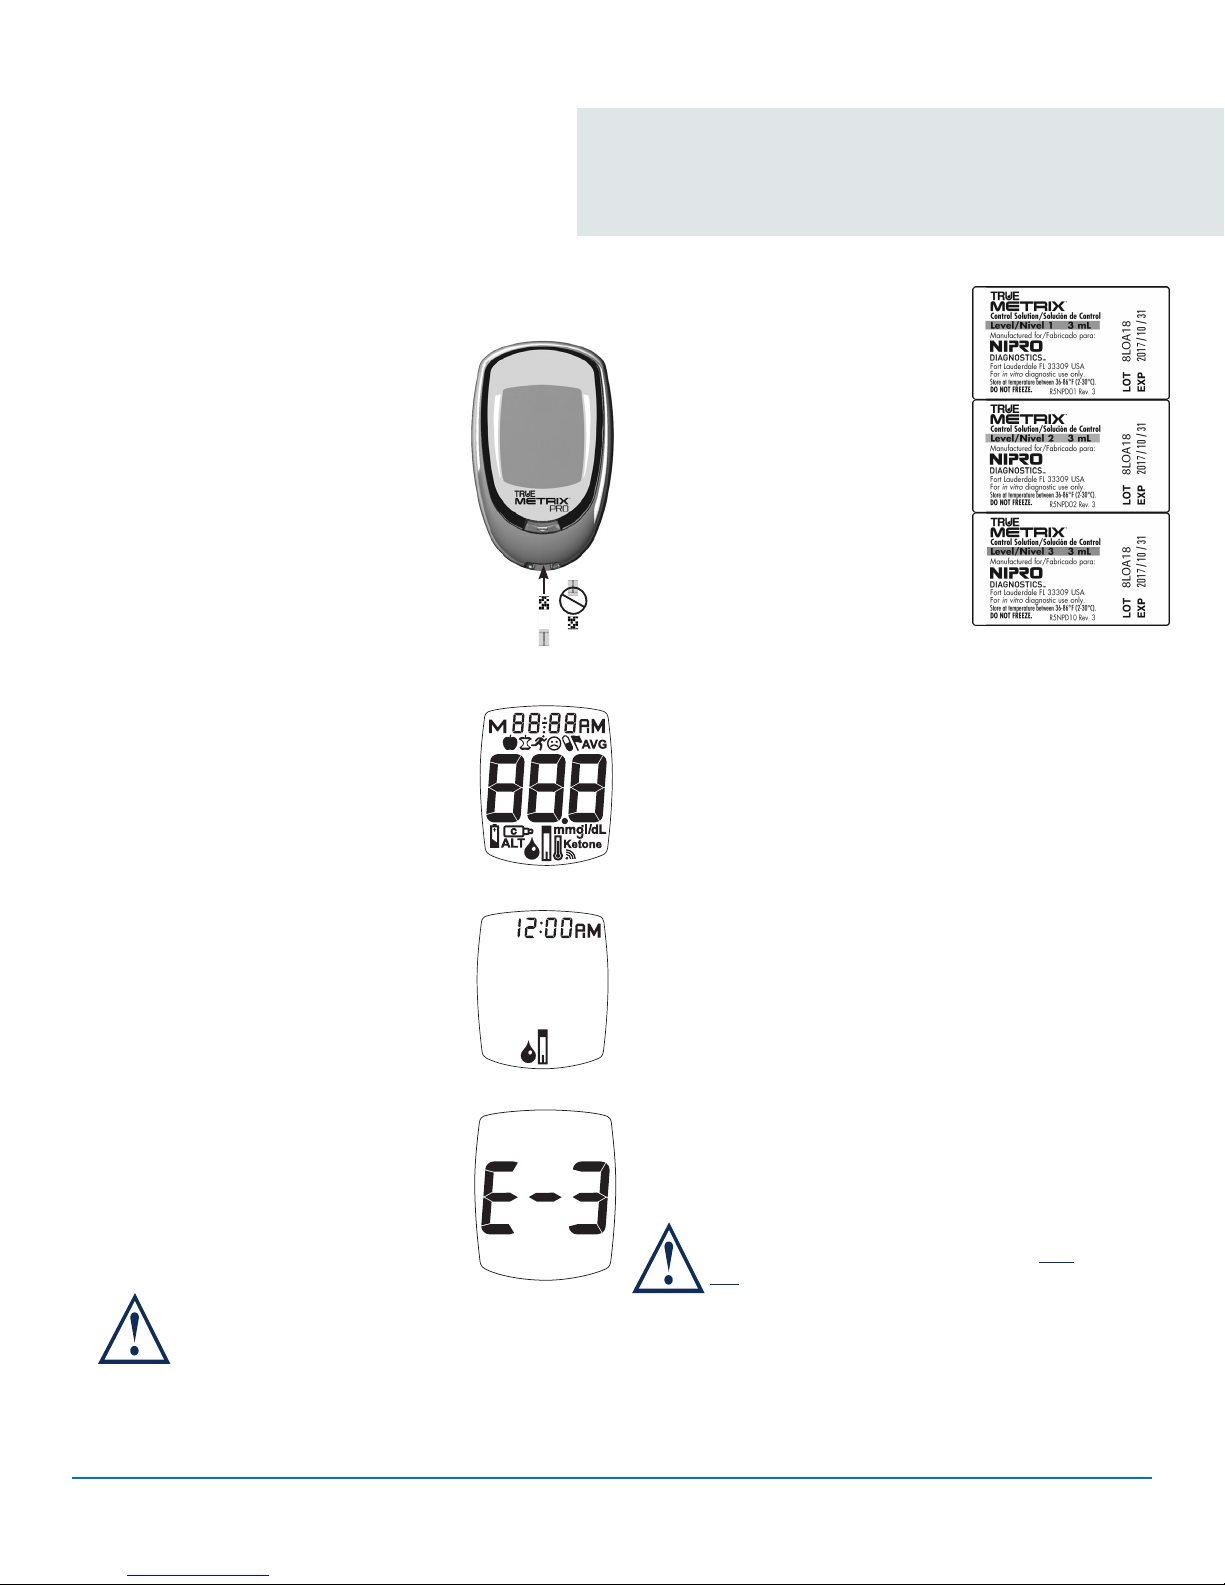
Automatic Self-Test
An Automatic Self-Test is performed
by the meter each time a test strip is
inserted correctly into the Test Port.
Insert a test strip into Test Port. The
meter is working properly if:
~ the full Display appears, then
~ the time appears in the upper
part of the Display, and then,
~ the Drop Symbol begins to blink.
If an error message appears in the
Display, the meter will not perform a
test. See Troubleshooting or call for
assistance.
If any segments are missing
in the Display when meter is
first turned on, do not use the
meter for testing.
Contact Blocks
Face Up
Full Display
Drop Symbol
Error Message
Control Test
Use ONLY TRUE METRIX® Control
Solution to check the performance
of the system. It is important to
perform Control Tests with more
than one level of control solution
to assure that the system is
working properly and testing
technique is good. Three levels of
TRUE METRIX® Control Solution
(Levels 1-3) containing known
amounts of glucose are available.
Control Test(s) should be performed:
• Before using the system for the first time.
• For practice to ensure that testing technique
is good.
• When opening a new vial of test strips.
• If results seem unusually high or low based on
the patient’s condition.
• If strip vial has been left open or exposed to
extreme heat, cold or humidity.
• Whenever a check on the performance of the
system is needed.
• If meter damage is suspected (meter dropped,
crushed, wet, etc.).
Ranges printed on the test strip vial label
are for Control Test results only and are
not to be used for management of patients’
blood glucose. DO NOT drink control
solution.
May 30, 2017May 30, 2017 May 30, 2017
TRUE METRIX® PRO System Comprehensive Resource Guide (GDH-FAD Enzyme) Quality Control Testing 19
Page 26
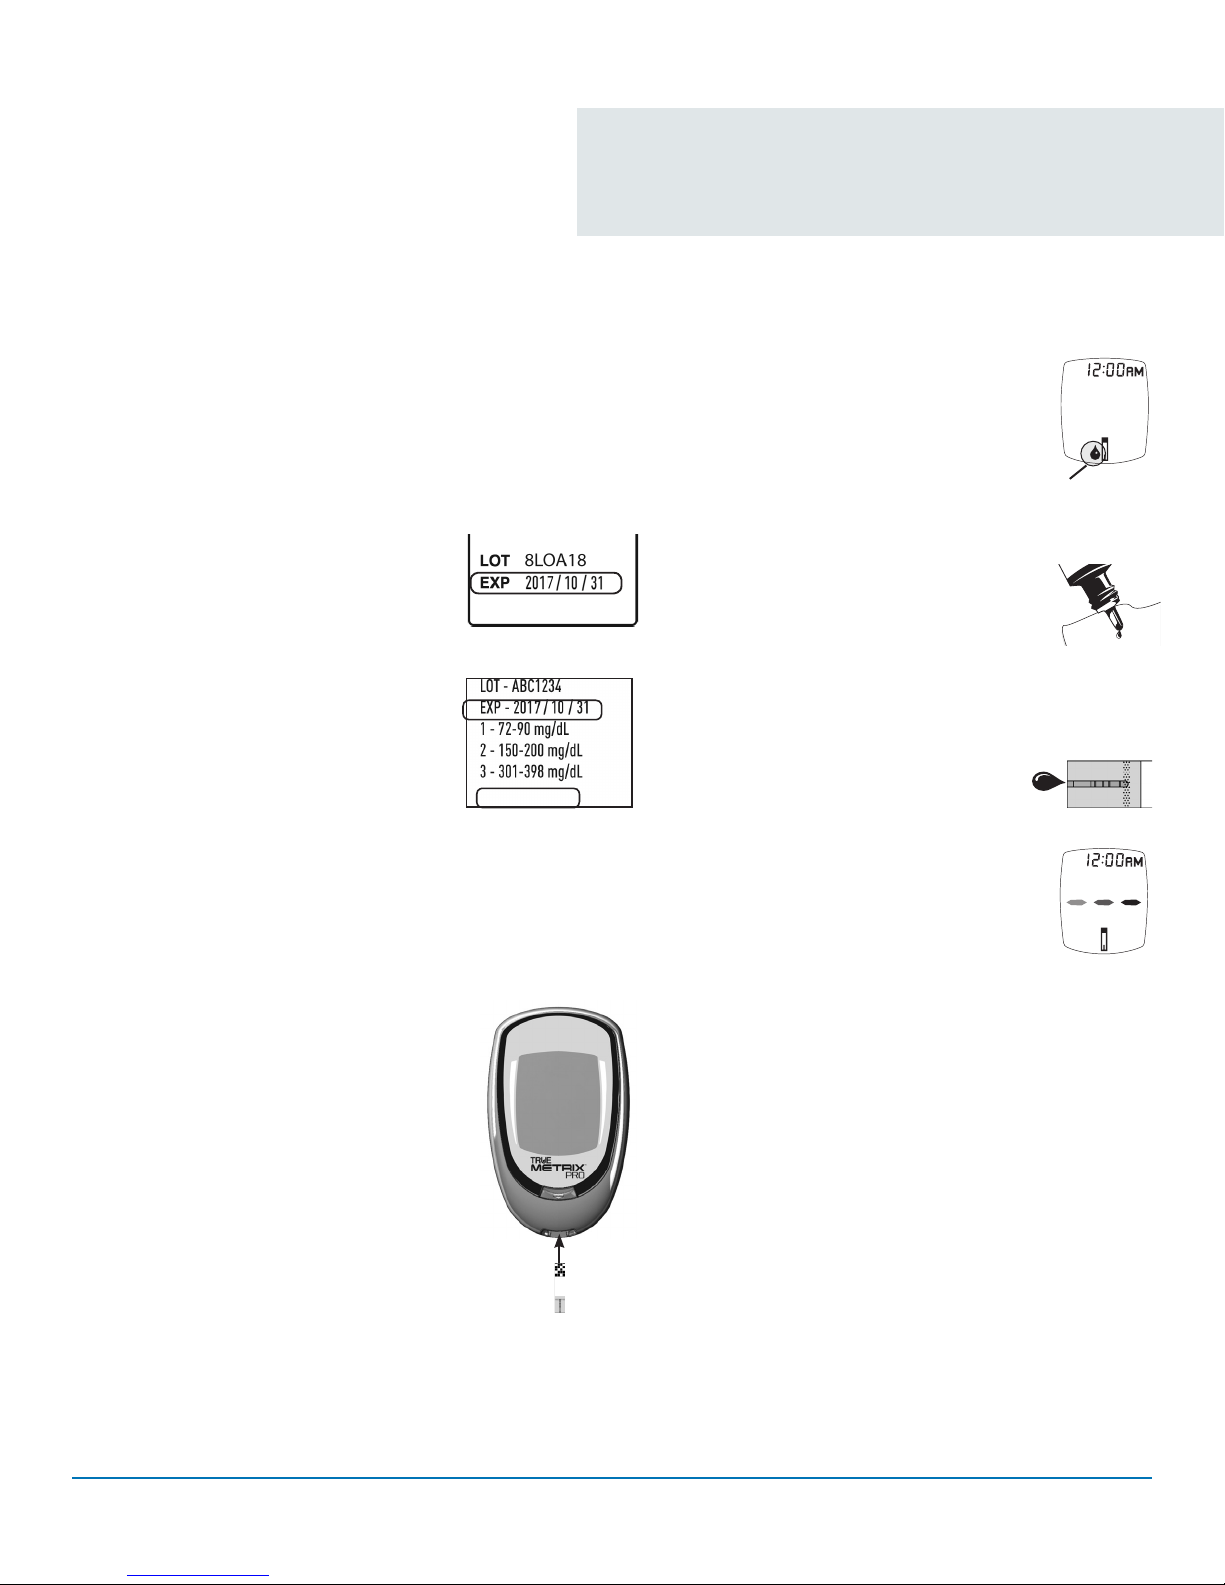
How to Perform a Control Test
Use the Quality Control Record Form located
in the Appendix D, or the form provided by your
facility, to record Control Test results.
Quality Control Testing cont.
6. Wait until Drop Symbol appears in
Display. Keep test strip in meter until
testing is finished.
1. Allow control solution, vial of test strips
and meter to adjust to room temperature .
2. Check dates on control solution
label and test strip vial label.
• Write date first opened on
control solution bottle.
• Do not use control solution if 3
months past written opened date
or after EXP date printed on
control solution bottle label,
whichever comes first.
• Do not use test strips 4 months
past written opened date or
after EXP date printed on test strip
vial label, whichever comes first.
• Discard out-of-date products and
use new products.
3. Gently swirl or invert control solution
to mix. DO NOT SHAKE!
4. Remove one test strip from vial. Close
test strip vial immediately. Use test
strip quickly after removal from vial.
5. Insert test strip into Test Port. Meter
turns on.
May 30, 2017
Note: If test strip is removed before testing
is finished, an error message appears.
Release and discard old test strip.
Drop Symbol
Use new test strip for testing.
7. With cap removed, turn control
solution bottle upside down. Gently
squeeze one drop of control solution
onto a clean tissue. Wipe off bottle tip
with the tissue.
8. Gently squeeze a drop of control solution onto
a small piece of unused aluminum foil or clear
plastic wrap. Dispose after use.
9. With test strip still in meter, touch
edge of Sample Tip to top of control
solution. Allow drop to be drawn
into test strip. Remove test strip
from drop when meter beeps.
10. Dashes appear across the Display
to show meter is testing.
Note: If meter does not beep or begin testing
soon after drawing up sample, release
and discard test strip. Repeat test with
new test strip. If problem persists, see
the Troubleshooting section of this
Resource Guide.
Meter
Testing
Note: If test strip has been out of the vial
too long before testing, an error
message appears upon insertion
of the test strip into the meter.
Release and discard old test strip.
Use new test strip for testing.
TRUE METRIX® PRO System Comprehensive Resource Guide (GDH-FAD Enzyme) Quality Control Testing 20
Contact Blocks
Face Up
Page 27
Control Bottle
Label
Quality Control Testing cont.
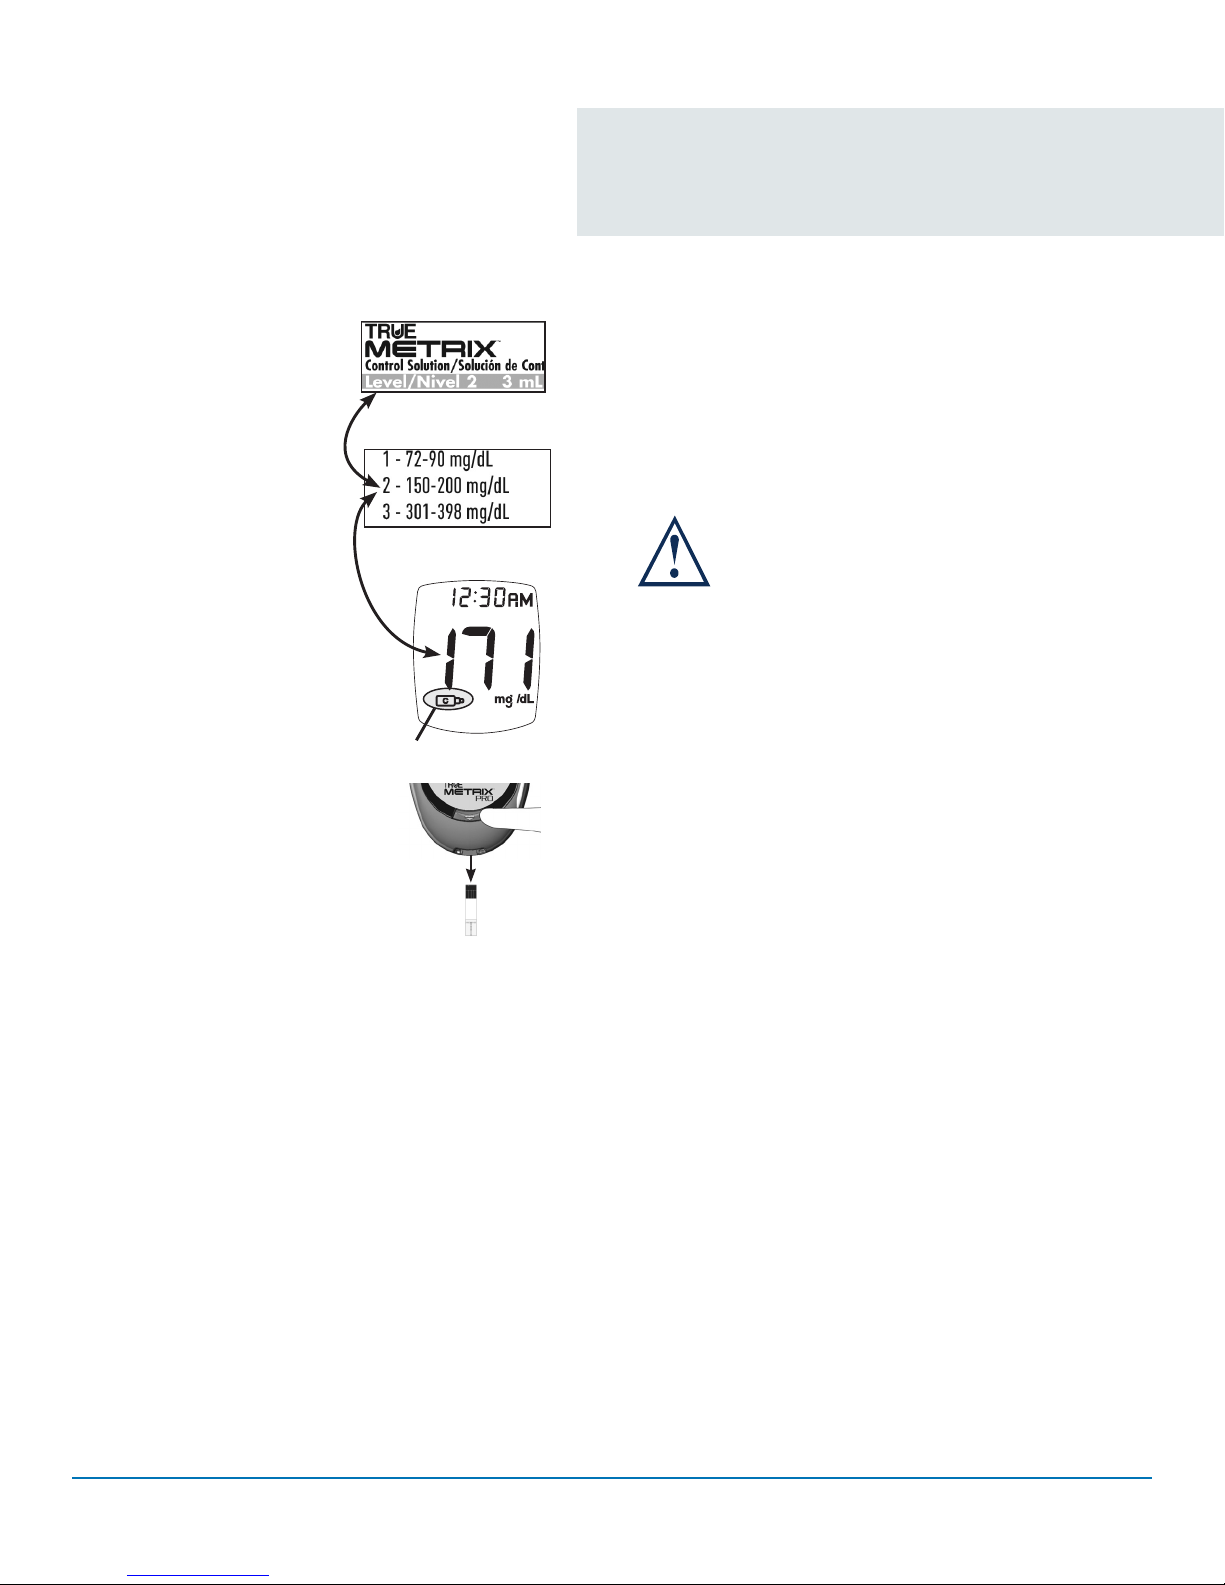
11. Compare result to Control Test range printed on
test strip vial label for level of control solution
you are using. If result is in range, system can
be used for testing blood. If result does not fall
within range, repeat test using a new test strip.
Note: Control Test result shows the Control Symbol in
the Display.
Test Strip
Vial Label
Control Symbol
If Control Test result is outside range,
test again. If result is still outside range,
the system should not be used for testing
blood. Call for assistance.
12. After result is shown, Strip Release Button
flashes. Hold meter with test strip pointing
down. Press Strip Release Button to release and
discard test strip in appropriate container. Meter
turns off.
Note: Removing test strip before result displays
cancels the test. An error message appears
and the result is not stored in Memory. Retest
with a new test strip and do not remove before
result is displayed.
TRUE METRIX® PRO System Comprehensive Resource Guide (GDH-FAD Enzyme) Quality Control Testing 21
Page 28
*
Sample
Initials
Result
on
Range
Printed
Acceptable
Date
Opened
PRO
®
TRUE
EXP
On
Range
Acceptable
Date
Opened
EXP
METRIX
on
Printed
PRO
®
TRUE
On
METRIX
Control Solution - Level __________
of
test
vial
label
strips
either 3 months
Discard bottle if
Control Solution
bottle label, write
date bottle opened.
of
test
vial
label
strips
either 3 months
Discard bottle if
Control Solution
bottle label, write
date bottle opened.
used.
being
printed on the
after EXP date
bottle label has
after opening or
being
after opening or
passed, whichever
used.
printed on the
after EXP date
bottle label has
passed, whichever
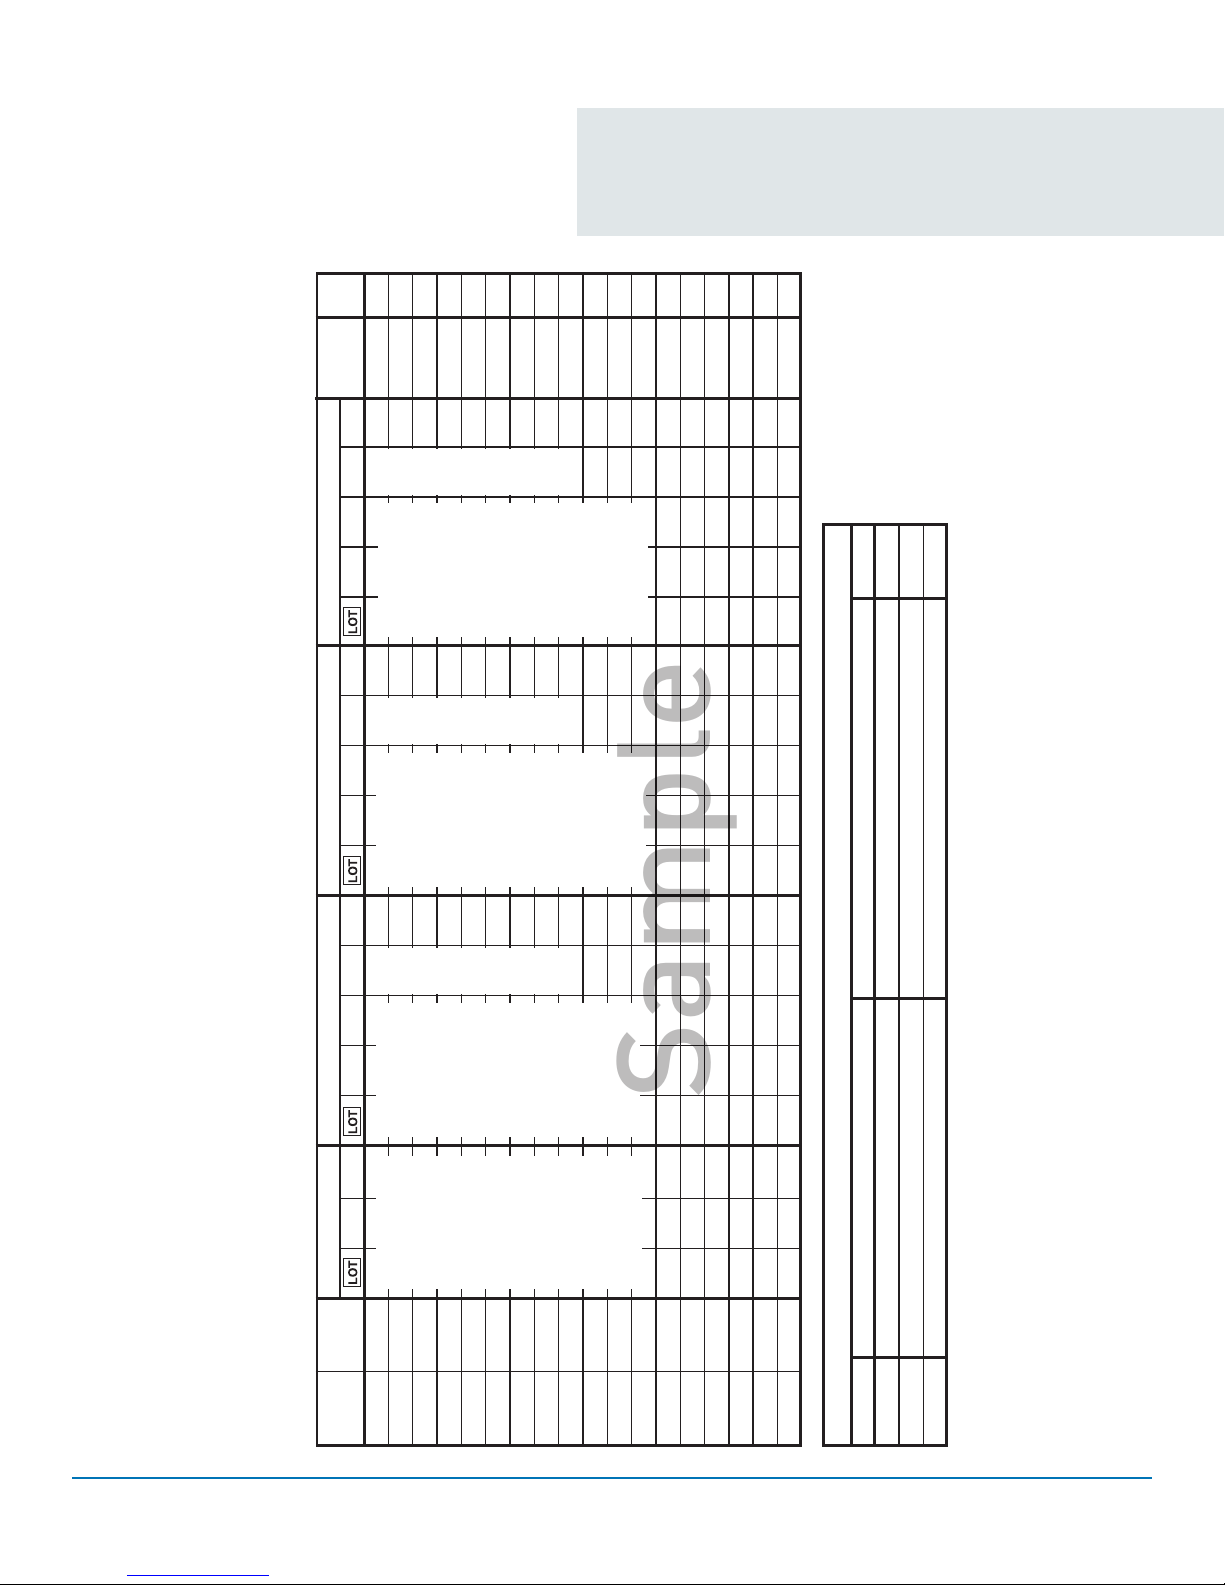
Quality Control Testing
Data Form (located in Appendix)
Initials
comes first.
comes first.
*Note any problems in Troubleshooting section below.
Result Result
on
Range
Acceptable
Date
Opened
EXP
Control Solution - Level __________
(see number on Meter label below the bar code)
Date
Opened
QUALITY CONTROL TESTING DATA FORM
EXP
Test Strips Control Solution - Level __________
Date Time
Meter Serial Number _________________
vial
Printed
PRO
®
TRUE
On
METRIX
Control Solution
PRO
®
On TRUE
METRIX
Test Strip vial label,
of
test
label
bottle label, write
date bottle opened.
write date vial
opened. Discard
used.
strips
being
after EXP date
either 3 months
Discard bottle if
after opening or
opening or
vial if either
4 months after
EXP date printed
comes first.
printed on the
bottle label has
passed, whichever
comes first.
passed, whichever
on the vial label has
Action
Date Problem
*TROUBLESHOOTING
TRUE METRIX® PRO System Comprehensive Resource Guide (GDH-FAD Enzyme) Quality Control Testing Data Form 22
Page 29

Blood Glucose Testing
Page 30
Blood Glucose Testing
Type of Blood Sample Information
Fresh, capillary whole blood from the fingertip or forearm is the recommended sample to be used for testing blood
glucose. Capillary forearm sampling must not be used when the blood glucose levels are rapidly changing (see Obtaining
a Capillary Forearm Blood Sample below). Venous blood samples may also be used for testing on the TRUE METRIX® PRO
Blood Glucose Monitoring System. If using venous blood for testing, careful consideration must be taken when collecting
and handling the venous sample (see Obtaining a Venous Blood Sample below). Follow the facility policy and procedure
for obtaining samples for testing blood glucose levels. Always wear clean gloves prior to testing to decrease risk of direct
contact with blood.
• Never use arterial or neonatal blood samples.
• Never use clotted blood, plasma or serum as a sample for testing on the meter.
How to Perform a Blood Glucose Test
The TRUE METRIX® PRO is a no-coding system, which means the meter does not have to be coded to each lot of test strips.
Use test strips quickly after removal from test strip vial. Test strips that have been left out of the vial too long will give an
error message. If error message displays, release and discard the old test strip and test with a new test strip.
1. To obtain a blood sample for blood glucose testing refer to your facility approved methods and our recommendations
listed in the table below. Follow the facility’s established policy and procedure for handling blood and biohazard safety
(contaminated biological materials and sharps).
Note: A new pair of gloves should be worn before obtaining a blood sample. Contact with blood presents an infection risk.
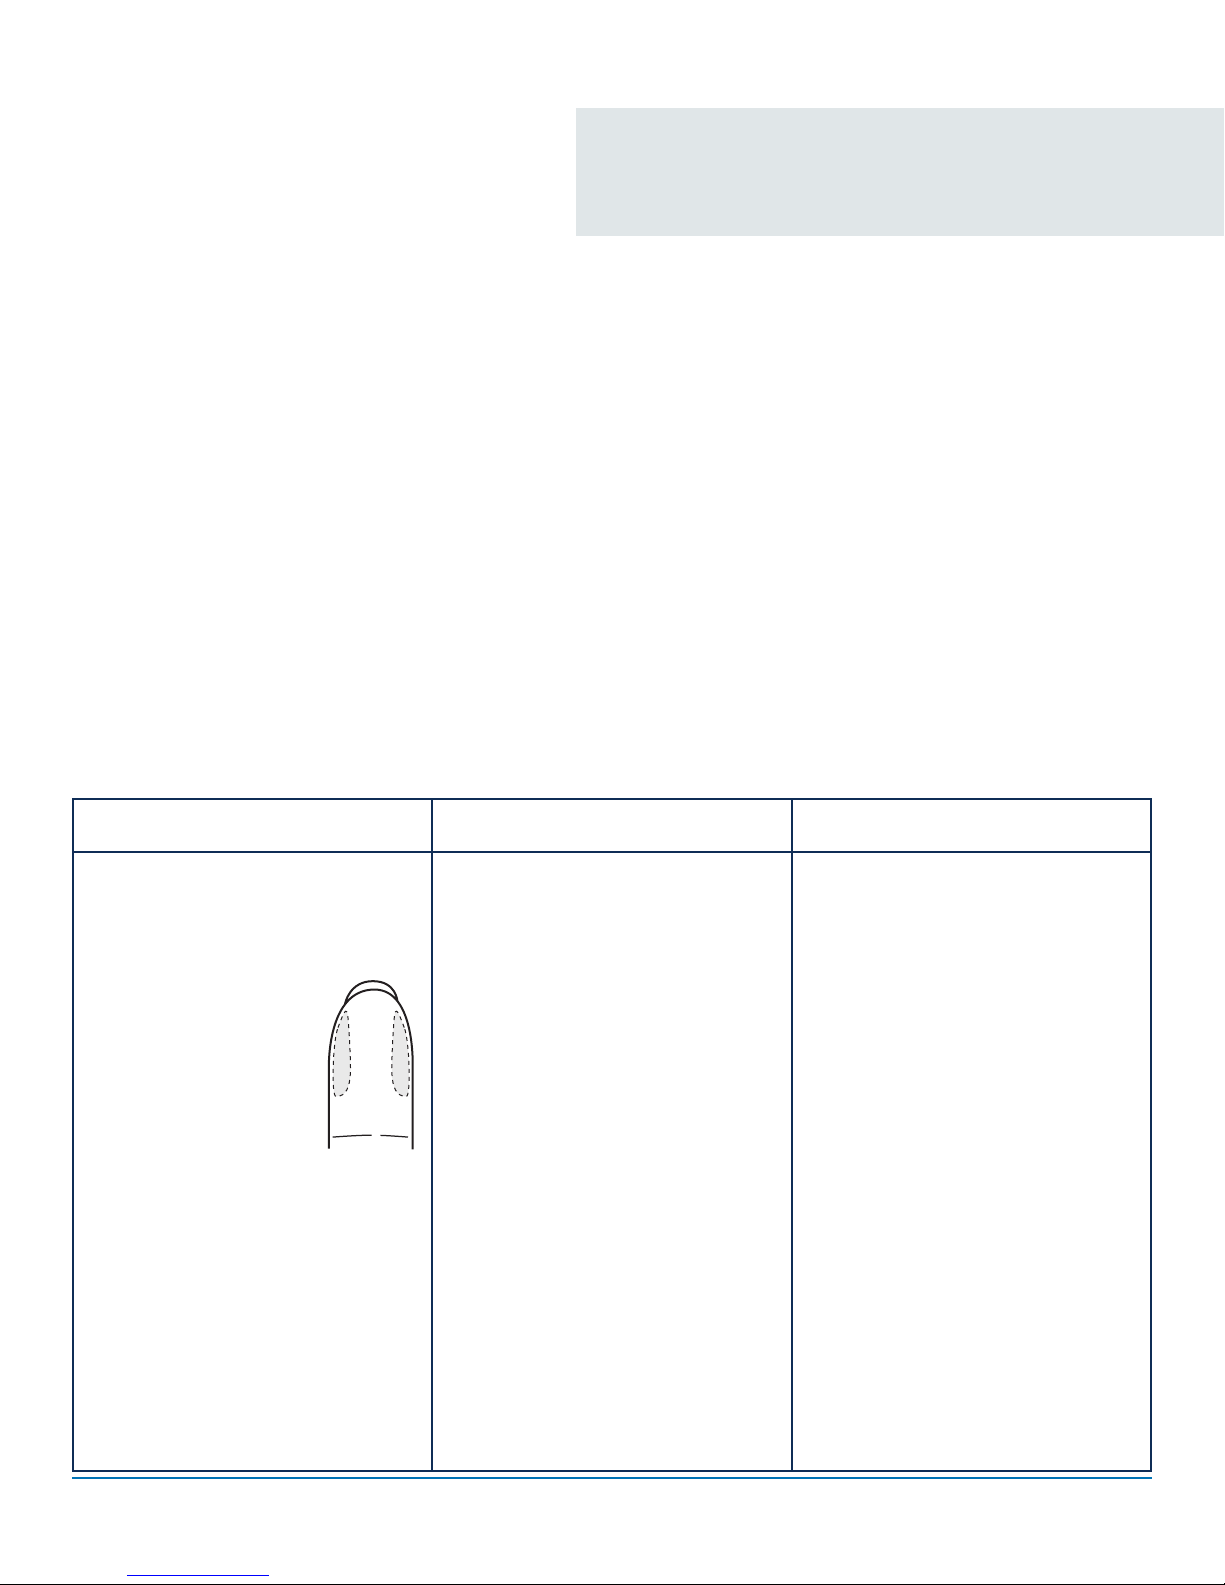
Obtaining a Capillary Fingertip
Blood Sample
1. Wash hands and put on a new pair of
gloves.
2. Select subject’s fingertip. Clean area with
soap and warm water, rinse or use an
approved disinfectant to clean the area.
Dry thoroughly.
Note: Do not squeeze the fingertip
for the blood sample.
This will damage the
surrounding tissues and
the fluid can dilute the
blood sample.
3. To help blood drop form,
lower the hand to a level
below the heart and gently massage the
finger from palm to fingertip.
4. Lance subject’s fingertip.
5. Allow the blood drop to form before
attempting to apply the test strip.
6. Discard all biohazard materials into
appropriate container.
7. Wash hands after taking off gloves.
Obtaining a Capillary Forearm
Blood Sample
Note: Results from the forearm are not
always the same as results from the fingertip. Use fingertip instead of forearm:
• Within 2 hours of eating, exercise, or
taking insulin.
• If the subject’s blood glucose may be
rising or falling rapidly or their results
often fluctuate.
• If the subject is ill or under stress.
• If the glucose result may be low or high.
• If symptoms of low or high glucose levels
may not be evident.
1. Wash hands and put on a new pair of
gloves.
2. Select subject’s forearm area. Clean area
with soap and warm water, rinse or use an
approved disinfectant to clean the area. Dry
thoroughly.
3. Rub area vigorously or apply a warm, dry
compress to increase blood flow.
4. Lance subject’s forearm.
5. Allow the blood drop to form before
attempting to apply the test strip.
6. Discard all biohazard materials into
appropriate container.
7. Wash hands after taking off gloves.
5
Obtaining a Venous
Blood Sample
Note: Do not collect venous specimens from
the arm that has an active intravenous
infusion site. Do not collect samples from
an indwelling line that has an intravenous
infusion.
1. Clean site for venipuncture with soap, water
or cleansing agent. Dry thoroughly.
2. Always collect sample into test tubes
containing only sodium heparin.
Note: Do not use, serum, clotted blood, or
plasma for testing on meter.
3. If using venous blood for testing on a
laboratory device, it must be used within
30 minutes of laboratory test. Mix well
before use.
Note: Do not use sodium fluoride blood collec-
tion tubes. This may cause a false low
glucose results.
9
TRUE METRIX® PRO System Comprehensive Resource Guide (GDH-FAD Enzyme) Blood Glucose Testing 23
Page 31
Blood Glucose Testing cont.
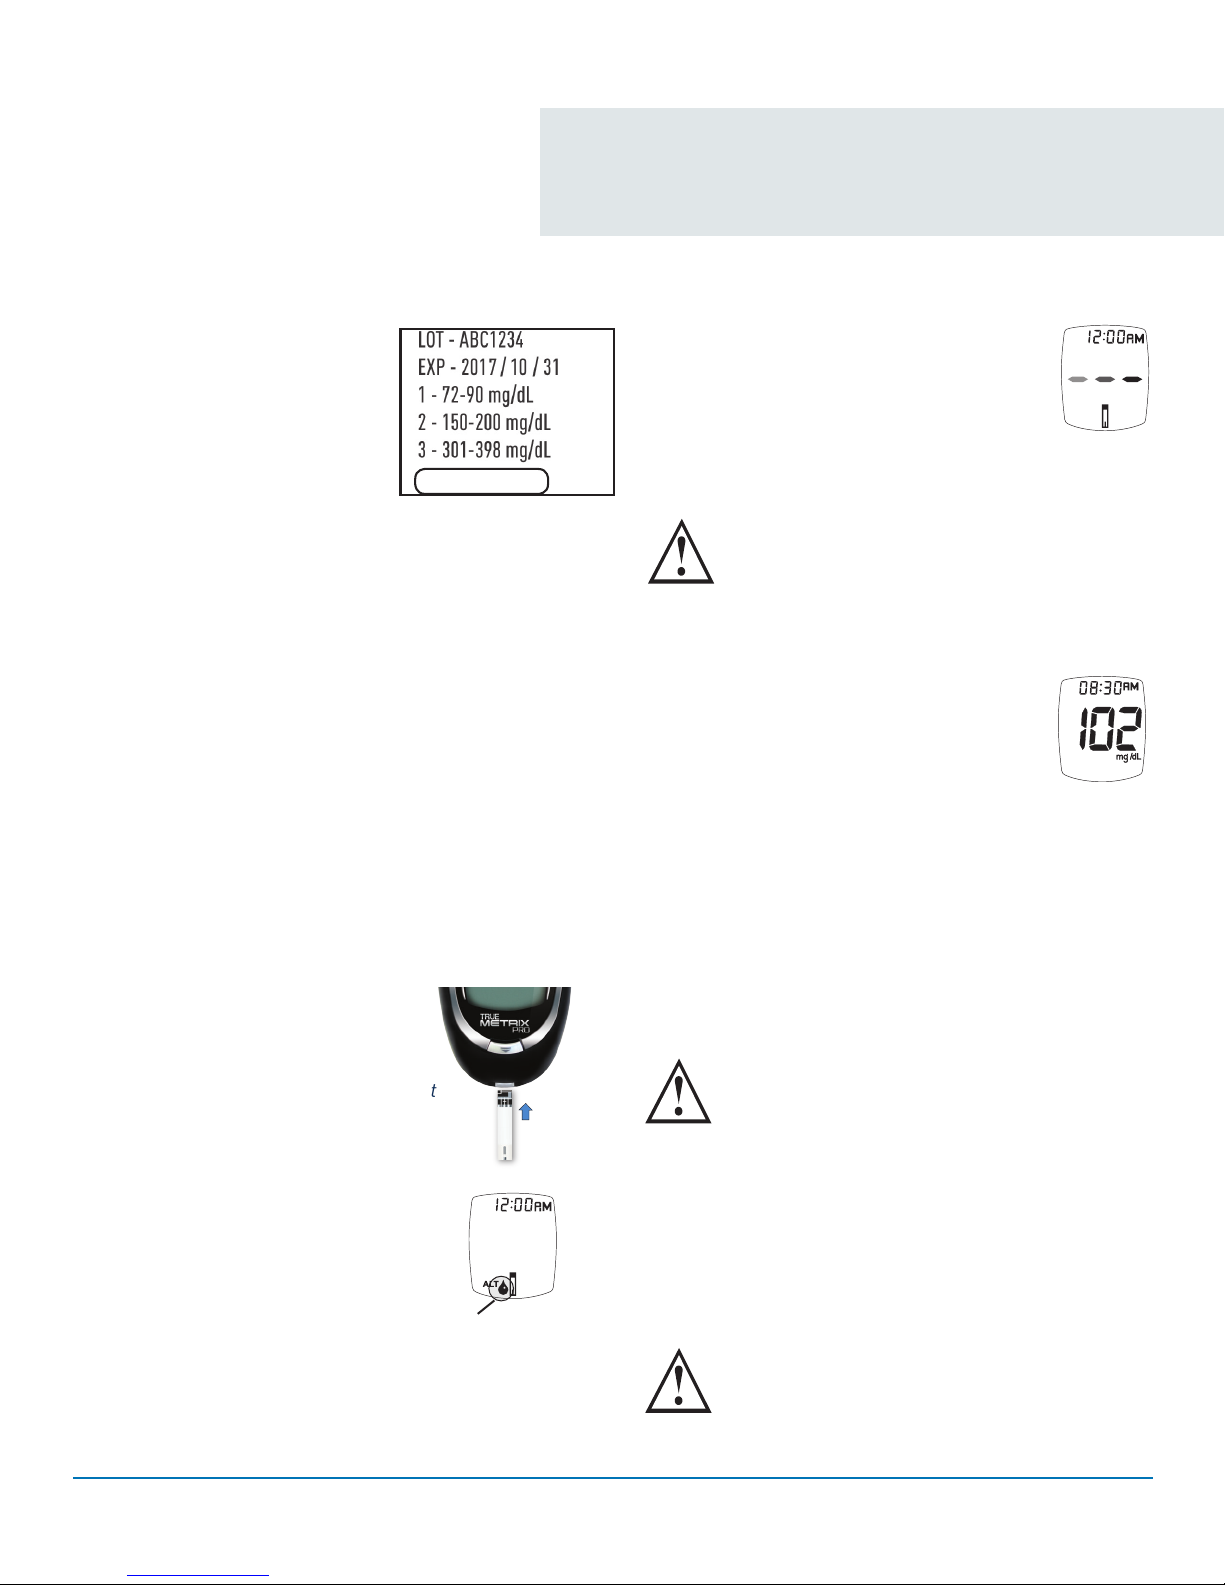
2. Check dates on test strip vial
being used. Do not use test
strips 4 months past written
opened date or after date printed
on test strip vial label, whichever
comes first.
May 30, 2017
3. Remove one test strip from vial.
Close vial immediately. Use test
strips quickly after removal from vial.
Note: Test strips that have been left out of the vial too
long before use will give an error message. If
error message displays, release and discard the
old test strip and test with a new test strip.
4. With meter off, insert test strip Contact End (blocks
facing up) into Test Port. Meter turns on. Keep test
strip in meter until testing is finished.
To mark test as alternate site (forearm) result,
press “ ” Button. ALT Symbol appears in Display.
Press “ ” Button to remove ALT Symbol.
▼
▼
7. With test strip still in meter, touch Sample
Tip of test strip to top of blood drop from
sample obtained in Step 1 and allow blood
to be drawn into test strip. Remove Sample
Tip from blood drop immediately after the
meter beeps and dashes appear across
meter Display.
Note: If meter does not beep and show dashes
in the Display soon after touching the sample
to the Sample Tip, release and discard the
test strip. Repeat the test with a new test
strip and a new sample. If problem persists,
see the Troubleshooting section of this
Resource Guide.
8. After the test is finished, result is
displayed. The Strip Release Button
flashes. Record result as required by
your facility.
9. Hold the meter with the test strip
pointing down. Press the Strip Release
Button to release and discard the test
strip into the appropriate container.
Meter turns off. Result is stored in
Memory with date and time.
Meter Testing
10. Discard all biohazard materials into
Note: Removing the test strip before
the result is displayed cancels
the test. An error message
appears and result is not stored
in memory. Retest with a new test
strip and do not remove the
test strip from the meter before
the result is displayed.
5. Wait until the Drop Symbol appears in
the Display.
6. Obtain the blood sample. Allow drop
to form (refer to step one).
TRUE METRIX® PRO System Comprehensive Resource Guide (GDH-FAD Enzyme) Blood Glucose Testing 24
Drop Symbol
appropriate container. Wash hands
after taking off gloves.
Used test strips and lancets are considered
biohazardous. Dispose used test strips and
lancets in approved biohazard container.
11. Record the result as required by your facility.
Note: If blood glucose test result is greater than 240
mg/dL and the Ketone Test Alert is turned on, the
Ketone Test Alert Symbol appears in the Display
with the result. Test ketones per the treatment
plan. The Ketone Test Alert may be turned on or
off during Setup.
When a Ketone Test Alert Symbol appears,
it does not mean that ketones have been
detected in patient’s blood. The Ketone Test
Alert is a reminder to perform a ketone test
as prescribed in the treatment plan.
Page 32

Diabetes Data
Management Capabilities
Page 33
Memory
Note: The use of Memory features (Averages,
test results) may not be suitable for
multiple-patient use of the system.
Check with the facility procedures/
policy before use.
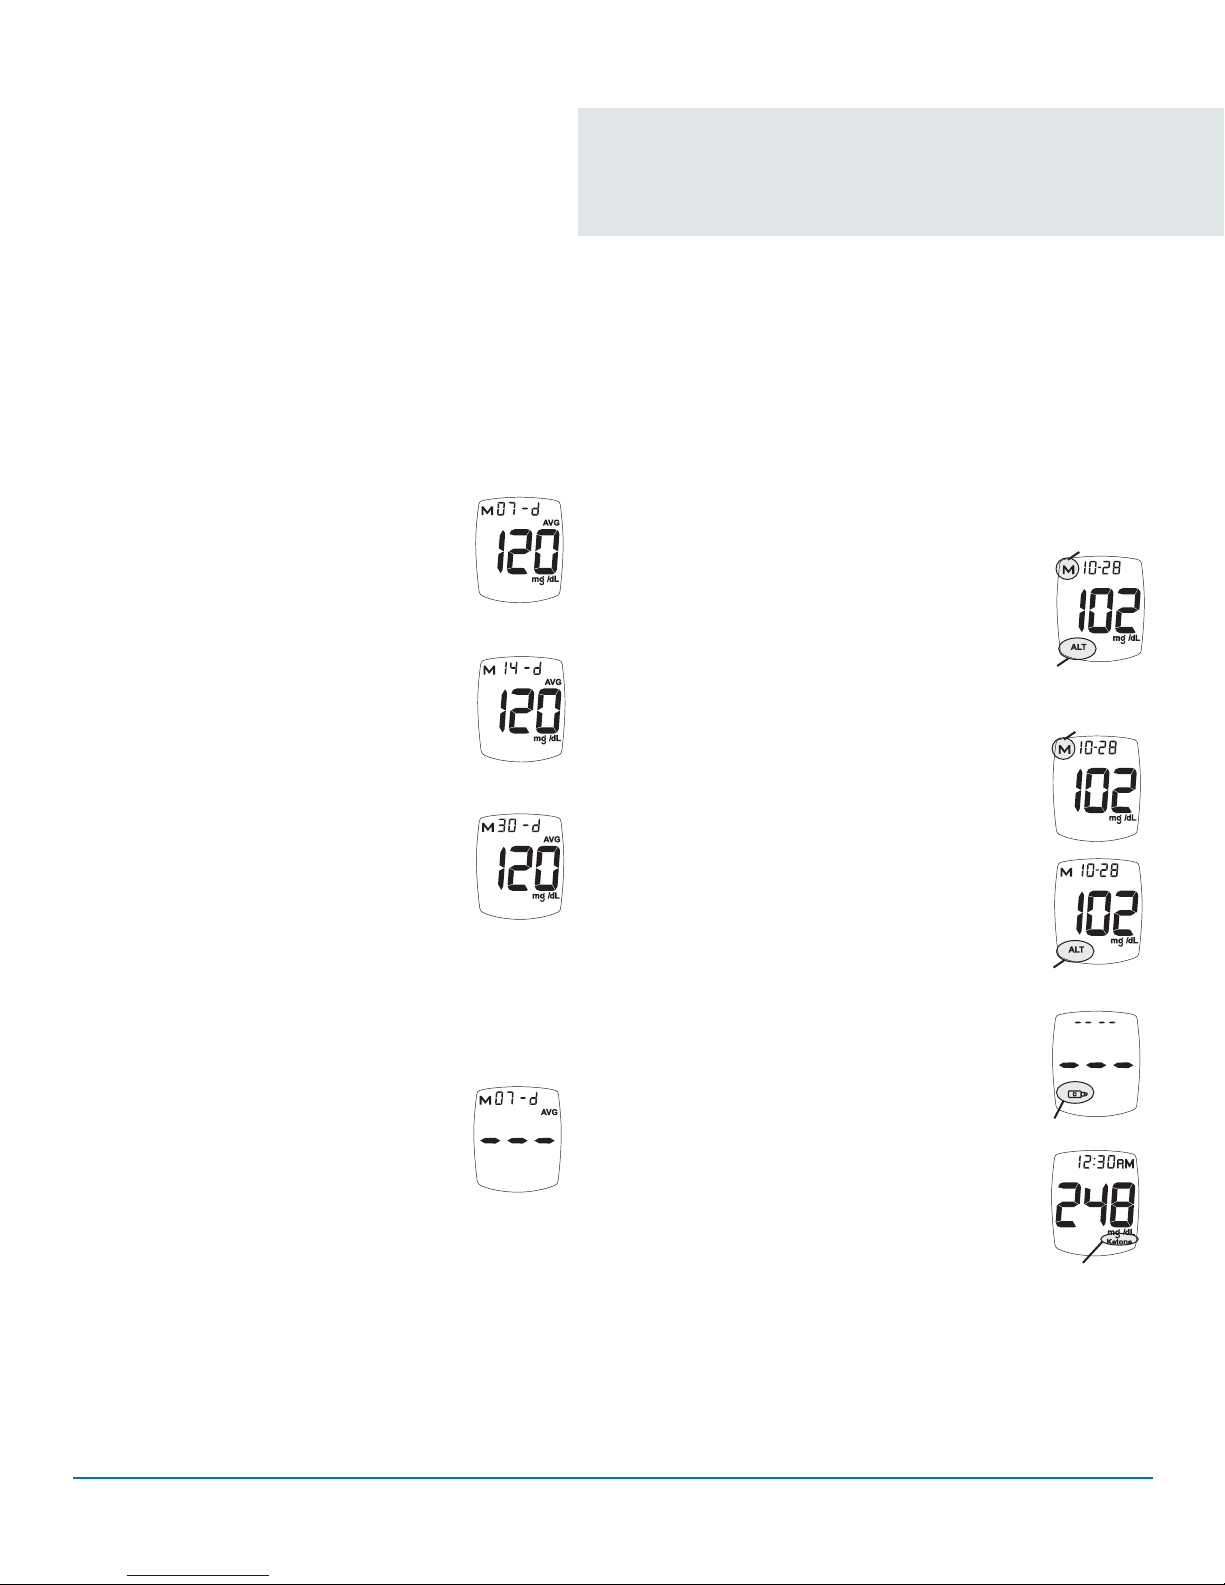
View Averages (7-, 14-, and 30-Day)
The Averages feature allows viewing of the
average of all blood glucose results within
a 7-, 14-, and 30-day period. Control Test
results are not included in the Averages.
1. Start with meter off. Press and release
“•” Button. Display scrolls through 7-,
14-, and 30-day Average values.
2. Meter turns off after 2 minutes if no
buttons are pressed.
Note: If a Control Test is performed outside
the recommended testing temperature
(See the Quality Control Testing
section of this Resource Guide), the
control solution may read as a blood
test and be included in the Averages.
Note: If there are no Average values, three
dashes are displayed for 7-, 14-, and
30-day Averages.
7-Day Average
14-Day Average
30-Day Average
View Results
Memory stores 500 results. When the Memory is full, the
oldest result is replaced with the newest result.
1. Press and release “•” Button. Meter displays
7-, 14-, and 30-day Averages.
Memory Symbol
2. Press and release “•” Button again to
view most recent Control Test result in
Memory. If there are no results in Memory,
dashes appear with the Memory Symbol.
Alternate Site
Symbol
3. Press “ ” Button and release to
▼
advance to the most recent blood test.
Press “ ” Button to scroll forward
▼
▼
through blood results or “ ” Button
to scroll backwards through results.
• Test results marked as alternate site
display ALT Symbol.
• Control Test results display the
Control Symbol. If no Control Test
has been done Display shows dashes
and the Control Symbol.
Memory Symbol
Alternate Site
Symbol
Control Symbol
TRUE METRIX® PRO System Comprehensive Resource Guide (GDH-FAD Enzyme) Memory 25
No Average
• Test results above 240 mg/dL
display Ketone Test Alert Symbol,
when Ketone Test Alert is turned
on during meter Set Up.
Ketone Test
Alert Symbol
Page 34
TRUEmanager® Diabetes
Management Software
TRUEmanager® Diabetes Management Software
provides an easy way for patients with diabetes and
healthcare providers to understand and manage blood
glucose results. Results can be downloaded from the
TRUE METRIX® PRO Meter or results can be manually
entered into the program.
TRUEmanager® Diabetes Management Software gives
you the tools to help your patients achieve target blood
glucose levels. The design makes it easy and convenient
to quickly identify glucose results that are out of target
range, so you can consult with your patients to help
them understand how various lifestyle and behavior
choices may be affecting their blood glucose levels.
With this information and your expertise, patients are
empowered to make better choices in daily
self-management.
Diabetes
Management Software
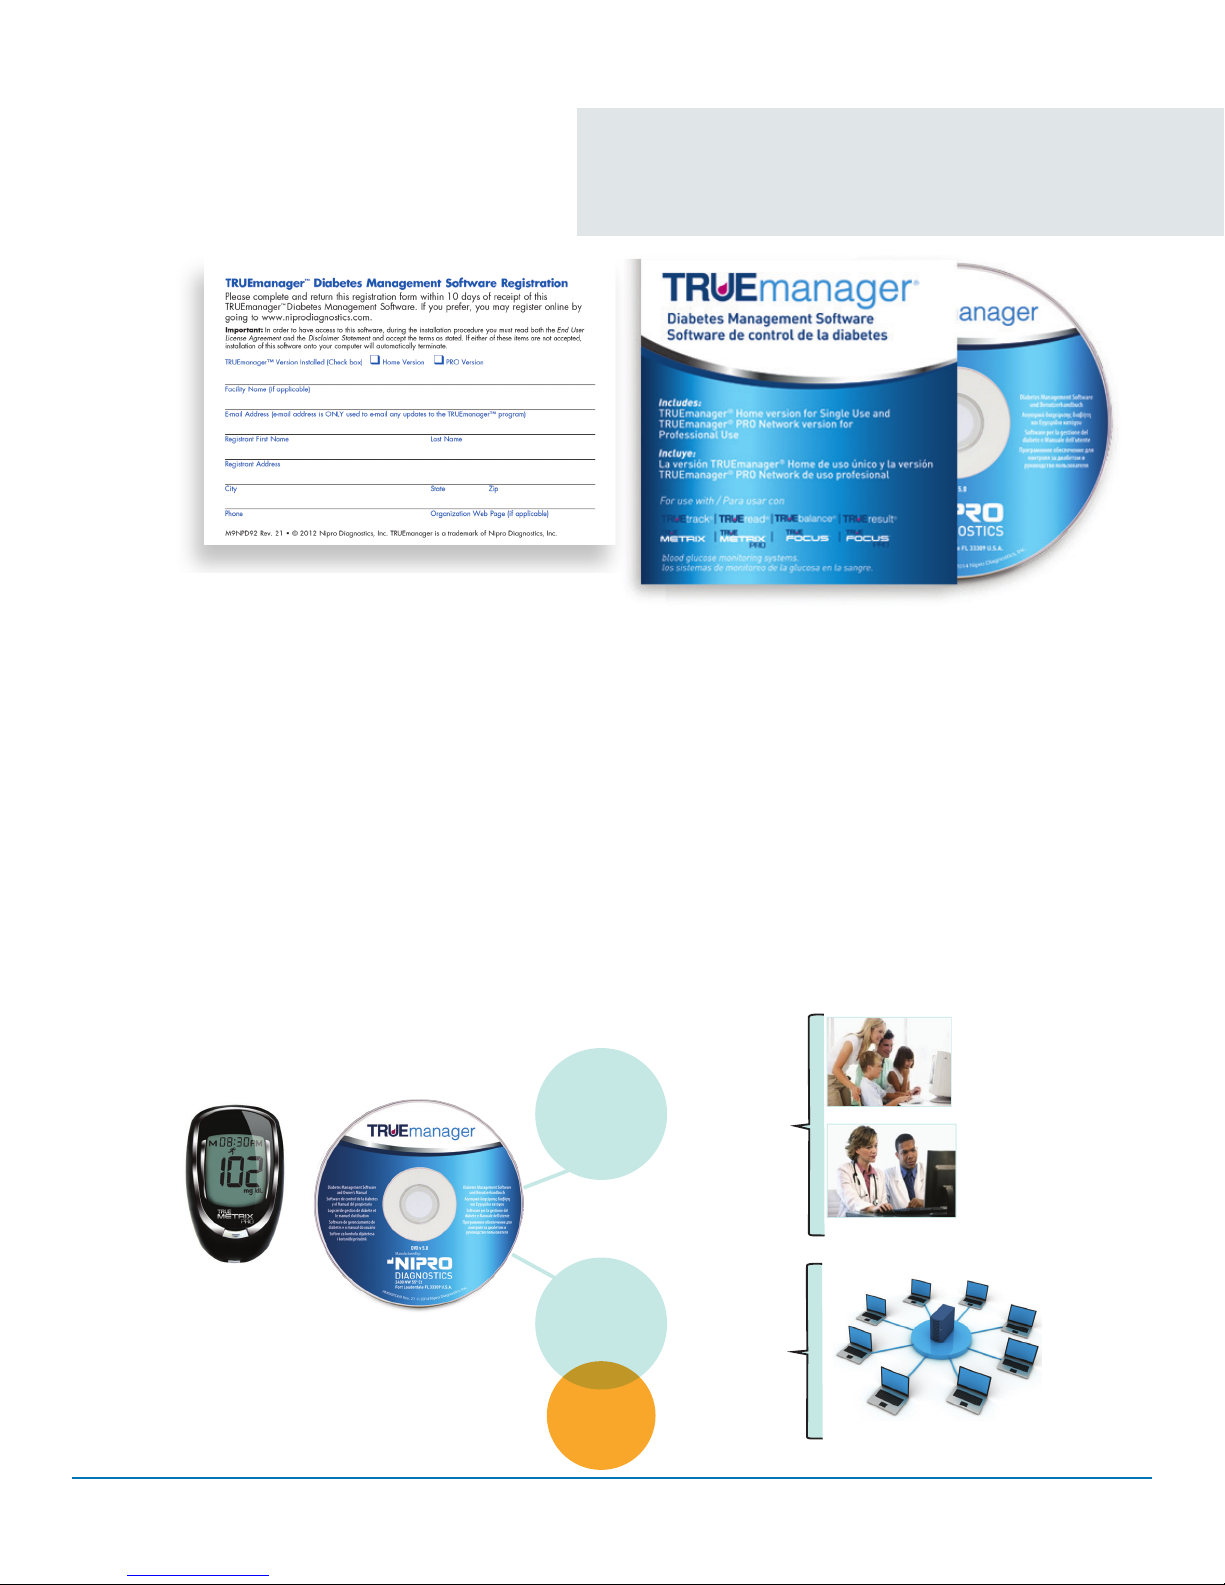
TRUEmanager® Diabetes Management Software (DMS)
is a stand-alone software program for a single user or
multiple user/multiple patient setting.
• The single user (Home) version is installed from the
TRUEmanager® DVD onto a single Windows-based
personal computer (PC). It can hold an unlimited
number of individual patient records and meter results.
• The multiple user version (TRUEmanager® PRO
Diabetes Management Software) easily installs from a
TRUEmanager® DVD to a network server and offers a
separate Health Level 7 (HL7) interoperability module
for data exchange with electronic medical records or
other data management systems.
Nipro Meter
TRUE METRIX® PRO System Comprehensive Resource Guide (GDH-FAD Enzyme) Diabetes Management Software 26
Home
Version
PRO
Version
HL7
• Single PC
• Multiple
• PC
• PC
• PC
Patient
Clinic with no server
Server
Multiple PC
Page 35

Diabetes
Management Software cont.
TRUEmanager® Diabetes Management Software lets
you establish and maintain valuable testing records that
include demographics, health insurance information,
medications, testing regimen recommendations, and
results history. It is an all-in-one, easy-to-access diabetes
data management system.
TRUEmanager® Diabetes Management Software offers
nine comprehensive reports two additional administrative
reports are available in the PRO version. Each report
interprets test results from varied, valuable perspectives
and packages them in easy-to-view, printable reports for
evaluation and discussion.
Comprehensive reports include:
• Summary Report
• Glucose Trend Report
• Logbook Report
• Extended Logbook Report
• Conformance Report
• Modal Day Report
• Modal Week Report
• Clinical Indicators Patient Report
• Clinical Indicators Population Report
Administrative reports available in the PRO version include:
• Login Audit Report
• Patient Audit Report
TRUEmanager® PRO Diabetes Management Software is
available in the following languages that are all available
on one DVD (language preference is chosen during
installation process):
• English
• Spanish
• French
• Portuguese
• Croatian
• German
• Greek
• Italian
• Russian
• Serbian
HL7 Interface Overview
• The HL7 interoperability module is installed after
TRUEmanager® PRO Diabetes Management Software
and provides the ability to send information stored in the
program to an Electronic Medical Record system using
HL7 standard language.
• TRUEmanager® PRO is compatible with Windows 2003 or
2008 Server operating systems.
• An administrative application is included and allows for
configuration of HL7 messages and other administrative
functionality.
TRUEmanager® PRO Minimum Hardware and
Software Requirements
Client
• DVD-ROM
• IBM Compatible PC with one of the following operating
systems installed:
- Windows XP 32/64bit (Service Pack 3 or later)
- Windows Vista (Service Pack 2 or later)
- Windows 7 32/64bit
- Windows 8.1 32/64 bit
• 1GB of memory or greater
• 2GB free disk space or greater
• 1 free USB 2.0/3.0 port
• Pentium 4 Processor minimum 2GHz or greater (unless
using a multi-core processor)
• Graphics card that supports 1024 x 768 or higher
• Docking station and USB Cable
• Acrobat Reader
• Optional color printer for printing reports
TRUE METRIX® PRO System Comprehensive Resource Guide (GDH-FAD Enzyme) Diabetes Management Software 27
Page 36

Diabetes
Management Software cont.
Server
• IBM Compatible PC with one of the following operating
systems installed:
- Windows 2003 Server (Service Pack 2 or later)
- Windows 2008 Server (Service Pack 2 or later)
• Pentium 4 Processor minimum 2GHz or faster (unless using
a multi-core processor)
• 2GB Memory or greater
• 10GB free disk space or more
• Graphics card that supports 1024 x 768 or higher
• Minimum Structured Query Language (SQL) Server 2005
2008 or 2012 Express Edition (Standard or Enterprise
Edition recommended for larger facilities)
TRUEmanager® Home Version Minimum Hardware
and Software
Requirements
• Pentium IV or higher
• Microsoft Windows operating system XP Professional with
Service Pack 3 (SP3), Vista (Service Pack 2 [SP2] or later),
Windows 7 (Service Pack 1 [SP1] or later) or Windows 8.1
• USB port
• DVD-ROM drive
• Docking Station and USB cable
TRUE METRIX® PRO System Comprehensive Resource Guide (GDH-FAD Enzyme) Diabetes Management Software 28
Page 37

System Maintenance
Page 38

Troubleshooting
Troubleshooting
The following is a brief guide for Troubleshooting the
most common errors when using TRUE METRIX® PRO.
If any problems arise that cannot be resolved by using
the guide or the Display Messages, please call for
assistance.
1. After inserting test strip into Test Port, meter
does not turn on.
Test strip is inserted upside down or backwards.
- Remove test strip. Re-insert test strip correctly.
Test strip not fully inserted.
- Remove test strip. Re-insert test strip fully
into meter.
Test strip error.
- Remove test strip. Repeat with new test strip.
Dead or no battery.
- Replace battery.
Battery in backwards.
2. After applying the sample to the test strip,
test does not start/meter does not begin testing.
Sample drop too small.
- Repeat test with a new test strip and a larger
sample drop.
Sample applied after two minute automatic shut-off
of meter.
- Repeat test with a new test strip and apply sample
within 2 minutes of inserting test strip.
Problem with test strip.
- Repeat test with a new test strip.
Problem with meter.
- Call for assistance.
- Check placement of battery. Battery positive (“+”)
side must face up.
Meter error.
- Call for assistance.
TRUE METRIX® PRO System Comprehensive Resource Guide (GDH-FAD Enzyme) Troubleshooting 29
Page 39
Troubleshooting
Display Messages
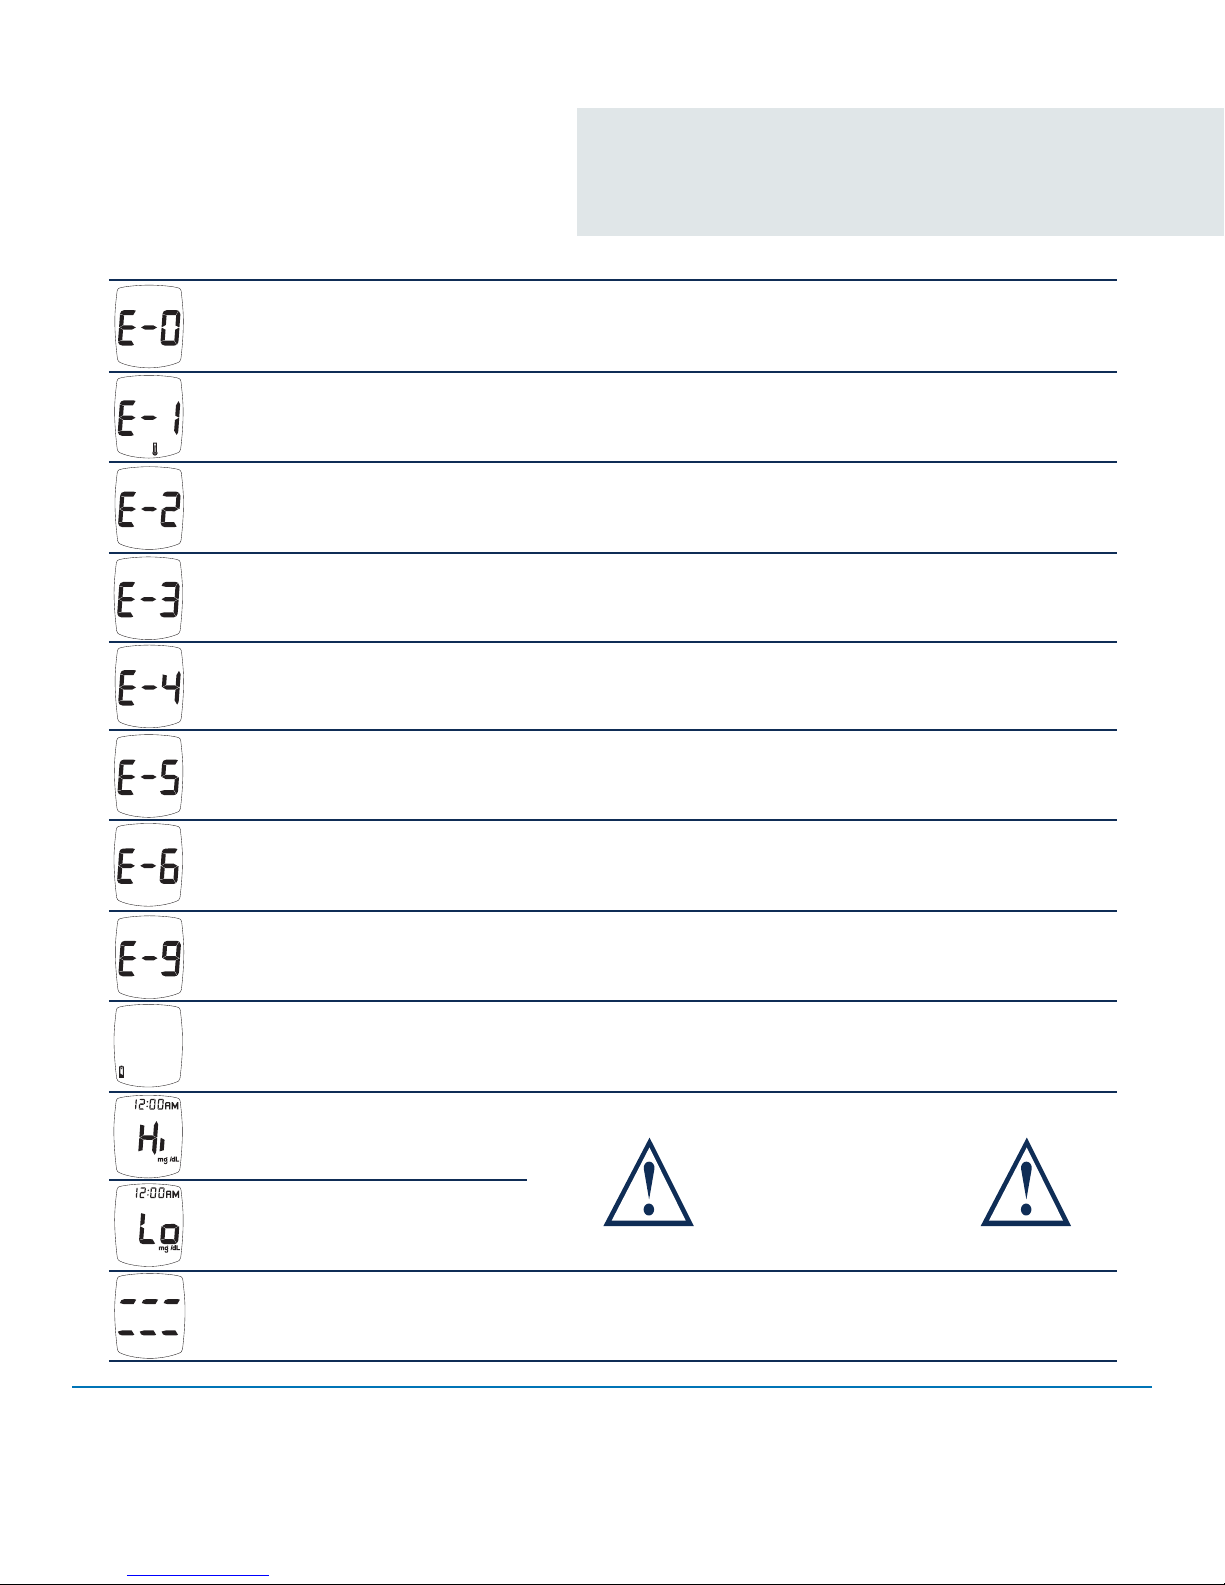
Display Reason Action
Repeat with new test strip, using capillary whole blood from
Invalid Hematocrit
Temperature Error
Too Cold/Too Hot
Sample Not Detected or Using
Wrong Test Strip
Used Test Strip, Test Strip
outside of vial too long, Sample
on top of Test Strip.
Meter Error
Test Strip Error, Very high
blood glucose result - higher
than 600mg/dL
the finger or forearm or venous whole blood collected with
sodium heparin blood collection tube. If error persists, call for
assistance.
Move meter and test strips to area between 41°F-104°F;
wait 10 minutes for System to reach room temperature
before testing.
Retest with new TRUE METRIX® PRO Test Strip and larger
sample.
Repeat with new test strip. Make sure sample is touched to
edge of test strip (not top). If error persists, call for assistance.
Call for assistance.
Retest with new Test Strip. If error persists, call for assistance.
If you have symptoms such as fatigue, excess urination, thirst,
or blurry vision follow your healthcare professional’s advice for
high blood glucose.
Display Messages
Test Strip Removed During Test
Communication Error
Low or Dead Battery
WARNING!! Out of Range - High
Results > 600 mg/dL
Out of Range - Low Results
< 20 mg/dL
Broken Display
If error message still appears, any other error message appears, or troubleshooting does not solve the problem, call for assistance.
Retest with new test strip. Make sure result is displayed before
removing test strip.
Call for assistance.
Low: About 50 tests can be done before battery dies.
Dead: Battery Symbol appears and beeps before
meter turns off.
WARNING!!
Retest with new test strip.
If result is still “Hi” (High)
or “Lo” (Low) contact
Doctor immediately.
Do not use meter for testing. Call 1-800-803-6025.
TRUE METRIX® PRO System Comprehensive Resource Guide (GDH-FAD Enzyme) Troubleshooting Display Messages 30
Page 40
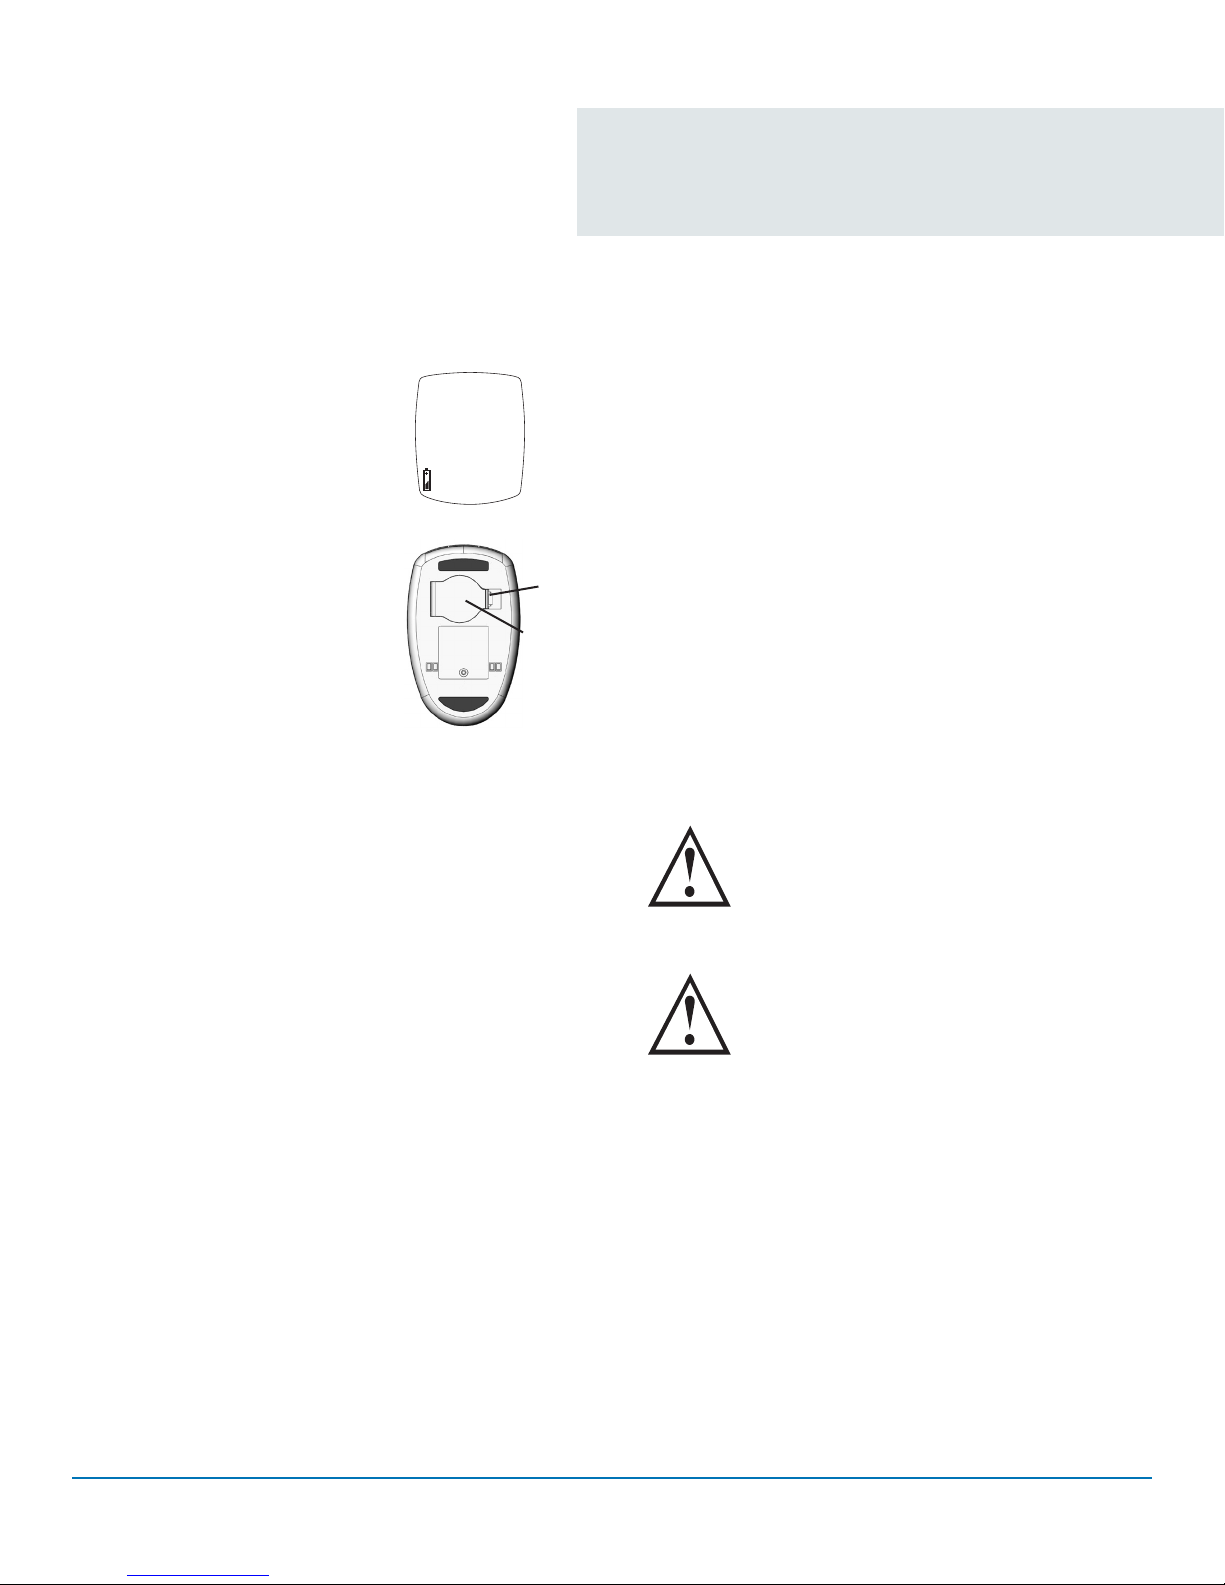
Low
Tab
Battery
Door
Battery Replacement
Battery Replacement
A low battery displays Battery Symbol while continuing to
function. A dead battery displays Battery Symbol, beeps,
and then turns off. To replace battery:
1. Lift tab on Battery Door.
2. Turn meter over, while holding meter in one hand with
Battery Door facing down, tap gently on the palm of
your other hand to loosen and remove battery.
3. Discard the old battery in an appropriate container.
4. Insert new battery with positive (“+”) side facing up.
Close Battery Door.
5. Press “ • ” Button to turn meter on and check time,
date, and Testing Alerts and Reminders (see Meter Set
Up). If meter does not turn on, check that battery was
installed properly. If not, remove and reinsert battery
and turn meter on by pressing “ • ” Button. Call for
assistance if problem persists.
Battery might explode if mishandled or
incorrectly replaced. Do not dispose of
battery in fire. Do not take apart or attempt
to recharge battery. Dispose according to
local regulations.
Battery is not rechargeable. If you have a
cable or a cradle for downloading results
to a computer, DO NOT plug the USB cable
end into an electrical outlet. Trying to
recharge the battery or power the meter by
plugging into an electrical outlet will cause
meter to catch on fire or melt.
TRUE METRIX® PRO System Comprehensive Resource Guide (GDH-FAD Enzyme) Battery Replacement 31
Page 41
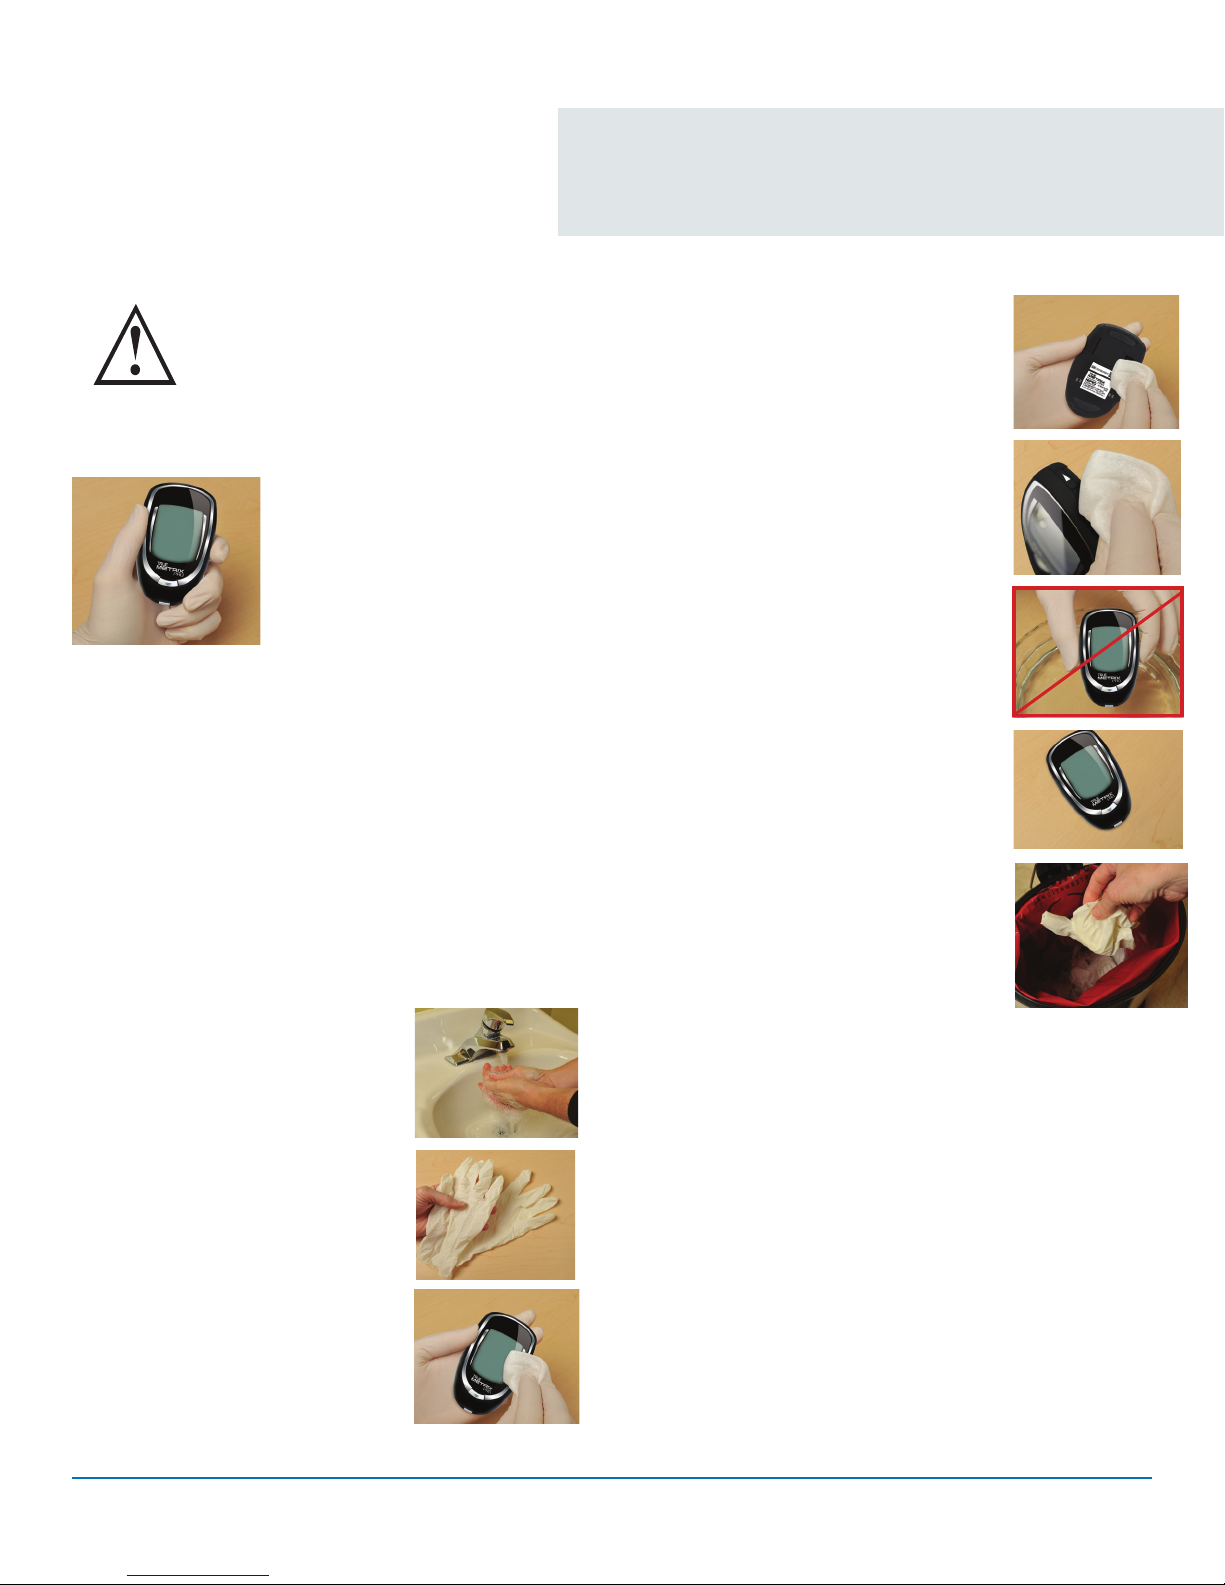
Cleaning and Disinfection
If system is to be used on multiple
patients, cleaning and disinfection of the
meter should be done between patients.
Healthcare professionals should wear gloves when
cleaning the meter. Wash hands after taking off gloves
as contact with blood presents a risk of infection.
Cleaning removes blood and soil from the meter.
Disinfecting removes most, but not all possible
infectious agents (bacteria or virus) from the meter,
including blood-borne pathogens.
• Clean and disinfect immediately after getting
any blood on the meter or if meter is dirty.
• Meter should be cleaned and disinfected
between patients.
• Clean and disinfect the meter before allowing
anyone else to handle them.
• Do not clean the meter during a test.
To Clean and Disinfect the Meter:
1. Wash hands thoroughly with
soap and water. Wear a clean
pair of gloves.
2. Make sure meter is off and a
test strip is not inserted. With
ONLY PDI Super Sani Cloth Wipes
(or any disinfectant product with
the EPA* reg. no. 9480-4), rub the
entire outside of the meter using
3 circular wiping motions with
moderate pressure on the front,
back, left side, right side, top and
bottom of the meter. Repeat as
needed until all surfaces are visibly
clean. Discard used wipes.
(*Environmental Protection
Agency.)
Using fresh wipes, make sure that
all outside surfaces of the meter
remain wet for 2 minutes.
NEVER put meter in liquids or allow
any liquids to enter the test port.
3. Let meter air dry thoroughly
before using to test.
4. Verify that the system is working
properly by performing an
Automatic Self-Test.
5. Properly dispose of gloves and wipes
after cleaning. Wash hands after
removing gloves.
Note: Other disinfectants have not been
tested. The effect of other
disinfectants used interchangeably
has not been tested with the meter.
Use of disinfectants other than
Super Sani Cloth Wipes
may damage meter.
Note: Super Sani Cloth Wipes have been
tested on the meter for a total of
10,950 cleaning and disinfecting
cycles, which is equal to cleaning
and disinfecting the meter 10
times per day for a 3 year period.
The use life of the meter is 3 years.
Stop using the meter and Call
Customer Care for assistance at
1-800-803-6025 if:
• Meter display appears cloudy or any display segments
are missing,
• Markings on meter, including back meter label, are
coming off or are missing,
• Buttons are hard to push on the meter or do not work,
• Unable to insert test strip into Test Port,
• Automatic Self-Test gives an error message.
TRUE METRIX® PRO System Comprehensive Resource Guide (GDH-FAD Enzyme) Cleaning and Disinfection 32
Page 42

System Storage
TRUE METRIX® PRO System
• Store the system (meter, control solution,
test strips) in carrying case to protect from
liquids, dust and dirt.
• Do not keep meter in an area where it may
be crushed (i.e. back pocket, drawer,
bottom of bag, etc.).
• Store the system in a dry place
at temperatures between, 40°F-86°F.
DO NOT FREEZE.
• Allow System to sit at room
temperature for 10 minutes
before testing
TRUE METRIX® PRO Test Strips
• Store test strips in original vial only. Do not
transfer old test strips into new vial or
store test strips outside of vial.
• Write the date first opened on test strip
vial. Discard unused test strips from vial
if either 4 months after first opening or
after date printed next to EXP on vial label
has passed, whichever comes first. Use of
test strips past expiration dates may give
incorrect results. Discard out of date test
strips and use new test strips.
• Close test strip vial immediately
after removing one test strip.
• Store in a dry place at temperatures
between, 40°F – 86°F. DO NOT FREEZE.
• Do not reuse test strips.
• Do not bend, cut or alter test strips in any
way.
TRUE METRIX® Control Solution
• Write the date first opened on control
solution bottle label. Discard if either 3
months after first opening or after date
printed next to EXP on vial label has passed,
whichever comes first.
• After use, wipe bottle tip using a clean, dry
cloth and recap tightly.
• Store at temperatures between, 36°F-86°F.
DO NOT FREEZE.
TRUE METRIX® PRO System Comprehensive Resource Guide (GDH-FAD Enzyme) System Storage 33
Page 43

Training Program
Page 44

TRUE METRIX® PRO Professional Blood
Glucose Monitoring System
Training Certification Program
Trained and competent testing personnel are
essential to good quality testing and patient care.
Waived testing sites are subject to a high rate of
personnel turnover. Personnel should be trained
and competent in each test they will perform before
reporting patient results. In addition, training should
include aspects of safety (including Infection Control
Policies) and Quality Control. The Risk Management
and Chief Medical Officer, and other persons
responsible for overseeing testing should ensure
that testing personnel receive adequate training and
are competent to perform the procedures for which
they are responsible.
11
Training Program
4. Submit completed Post Test to:
LTC Training Certification
Attn.: Customer Care Manager
2400 NW 55th Ct.
Fort Lauderdale, FL 33309
Nipro Diagnostics, Inc. will return a Trainer’s Certificate
upon satisfactory completion of the Post Test (100%
score required). Upon receiving the Trainer’s Certificate,
Certified Trainers are qualified to train appropriate
personnel at their facility to be Approved Testers.
Training Checklists and Certificates must be filed in the
employee’s file at the facility.
Certificate Information
Nipro Diagnostics, Inc. provides a training certificate
for the use of the TRUE METRIX® PRO Professional
Monitoring Blood Glucose System for point-of-care
multiple patient facilities. The Training Certificate
provides a record that the person listed on the
Certificate has been trained correctly in the use of
the TRUE METRIX® PRO System and understands all
procedures and limitations concerning the
TRUE METRIX® PRO System.
Certified Trainer
Certified Trainers are personnel from the facility
who have received a Trainer’s Certificate from Nipro
Diagnostics, Inc. To obtain a Trainer’s Certificate, the
person must:
1. Watch and understand the TRUE METRIX®
PRO How To Use Video (available online
at http://www.niprodiagnostics.com/our_
products/bgm_true_metrix.aspx).
2. Read and be familiar with the entire
Comprehensive Resource Guide and all
product Instructions for Use (Test Strip,
Control Solution, Owner’s Booklet).
3. Complete the Training Checklist and
Post Test included in this Comprehensive
Resource Guide.
• CERTIFIED TRAINERS MUST BE RE-CERTIFIED EVERY
12 MONTHS.
Approved Testers
Approved Testers must be trained by Certified Trainers
before they perform Control Tests or blood glucose
testing using the TRUE METRIX® PRO System. To
become an Approved Tester:
1. Watch the TRUE METRIX® PRO How To Use
Video (available online at
http://www.niprodiagnostics.com/our_products/
bgm_true_metrix.aspx).
2. Successfully complete the Training Checklist
under the instruction of a Certified Trainer.
3. Demonstrate the proper technique for testing
with the TRUE METRIX® PRO System using the
appropriate blood and Control samples.
4. Identify the facility’s Quality Control Policy and
Procedures, including documentation of Quality
Control.
Upon the person’s satisfactory completion of the above,
the Certified Trainer documents the training, signs the
Training Checklist and files the completed Checklist in
the employee’s file at the facility.
• APPROVED TESTERS MUST BE RE-TRAINED EVERY 12
MONTHS BY A CERTIFIED TRAINER.
TRUE METRIX® PRO System Comprehensive Resource Guide (GDH-FAD Enzyme) Training Program 34
Page 45

TRUE METRIX® PRO Blood Glucose System
Training Program Information
Training Program cont.
The training program provided in this section of this
Resource Guide is recommended to supplement
already established facility policies and procedures.
It is recommended that facility personnel be
trained on the TRUE METRIX® PRO Blood Glucose
Monitoring System prior to performing quality
control testing and testing blood samples collected
from patients for the first time.
This training program includes the following
documents to assist in the setup of a training session
for facility personnel
• Product Training Agenda (example)
• Materials Checklist
• Training Checklist
During the training of facility personnel on the
TRUE METRIX® PRO Blood Glucose Monitoring System,
we also recommend including a review of the following
established facility specific policies and procedures:
• Collection of capillary fingertip, capillary forearm,
and venous blood samples
• Quality control testing and documentation
• Blood glucose testing and interpreting patient
glucose values
• Medical Device Cleaning and Disinfection Guidelines
• Handling blood and biohazard safety (contaminated
biological materials and sharps)
TRUE METRIX® PRO System Comprehensive Resource Guide (GDH-FAD Enzyme) Training Program 35
Page 46
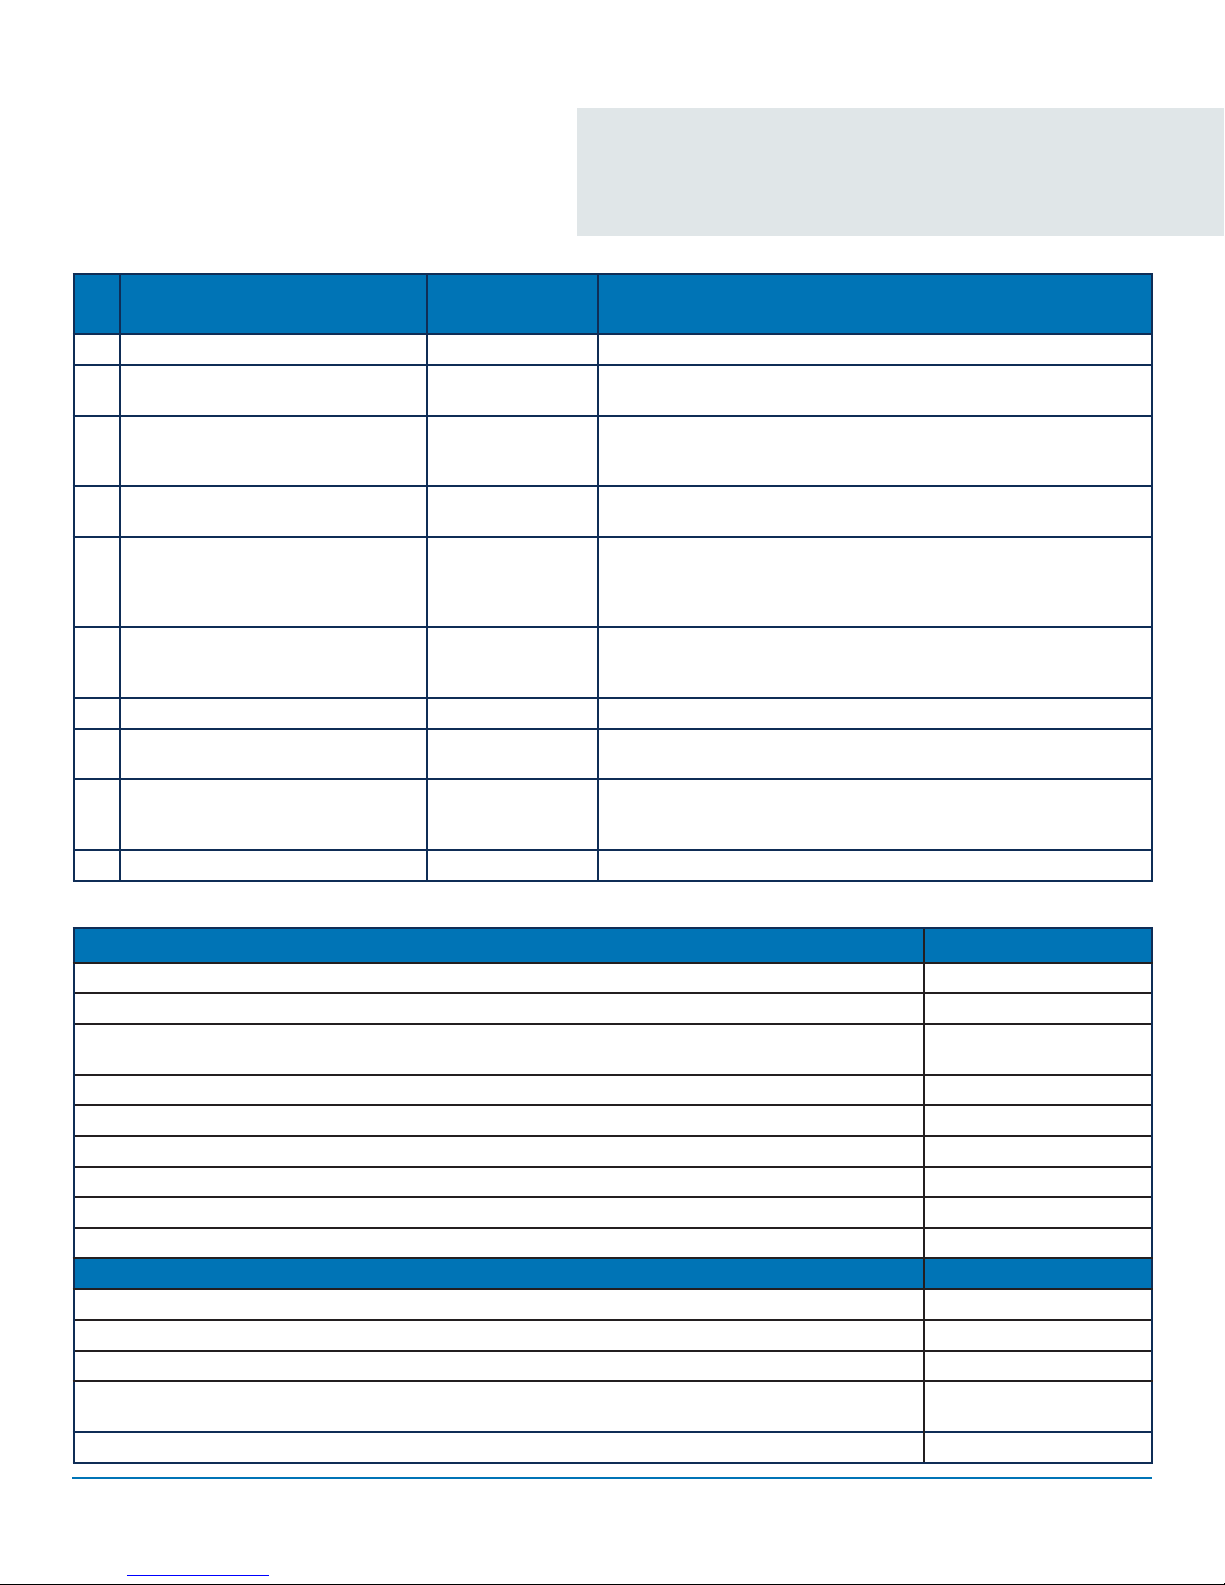
Product Training Agenda (example)
Training Program cont.
Training Topic Estimated Time
Source of Information
to Complete
1. Purpose of Training Overview 5 minutes Technical Overview located in Appendix E of this Resource Guide
2. Overview of System
Components
3. Performing Quality Control Testing 10 minutes Technical Overview located in the Appendix E of this Resource Guide,
4. Documenting and Reviewing Quality
Control Results
5. Sample Collection 10 minutes Owner Booklet/Test Strip Instructions for Use located in Appendix
6. Performing Blood
Glucose Testing
7. Interpreting Blood Glucose Results 5 minutes Facility Policy and Procedure
8. Interpreting Meter Display
Messages/Troubleshooting
9. System Maintenance/Storage 5 minutes Technical Overview located in Appendix E of this Resource Guide,
Total Time to Complete All Sections 55-75 minutes
5-10 minutes Technical Overview located in Appendix E of this Resource Guide and
the System Components section of this Resource Guide
Quality Control Testing section of this Resource Guide, and Facility
Policy and Procedure on quality control
5 minutes Meter Setup and Quality Control Testing section of this Resource
Guide, and Facility Policy and Procedure on quality control
B of this Resource Guide, Blood Glucose Testing section of this
Resource Guide, and Facility Policy and Procedure for collection and
handling of blood samples
5-20 minutes Technical Overview located in Appendix E of this Resource Guide,
Blood Glucose Testing section of this Resource Guide, and Facility
Policy and Procedure for blood glucose monitoring
5 minutes Technical Overview located in Appendix E of this Resource Guide and
the System Maintenance section of this Resource Guide
System Maintenance section of this Resource Guide, and Facility
Policy and Procedure on Medical Device Cleaning and Disinfection
Materials Checklist
Materials for Blood Glucose/Control Testing Available
TRUE METRIX® PRO system(s)-we recommend one meter for every 2 participants
TRUE METRIX® PRO test strips 1 vial (25 or 50 count) shared between every 1-2 participants
TRUE METRIX® Control Solution (Level 1, Level 2, and Level 3 – one bottle of each level) can be shared
between every 2 participants
Auto disabling, single use lancets
Gauze or tissue for performing blood or control testing
Personal Protective Equipment (PPE) gloves, etc.
Biohazard container
Alcohol wipes
Cleaning and disinfecting supplies if desired
Other Training Materials
TRUE METRIX® PRO Owners Booklet
TRUE METRIX® PRO Test Strips Instructions for Use
Copies of Checklist, Post-test and Answer Key (for all participants)
Copies of Quality Control Testing Data Form (located in Appendix D of this Resource Guide or the form
provided by your facility)
Facility Policy and Procedure for blood glucose testing and interpreting glucose results
TRUE METRIX® PRO System Comprehensive Resource Guide (GDH-FAD Enzyme) Training Program 36
Page 47

Training Checklist
TRUE METRIX® PRO Blood Glucose System Training Checklist (Please print)
Name ______________________________________________________ Date ____/____/____
Title __________________________________________________________________________
Facility _______________________________________________________________________
1. The Facility Personnel has completed the following:
____ Read the Owner’s Booklet
____ Read the Test Strip Instructions for Use
____ Read the Control Solution Instructions for Use
____ Read the sections in the Comprehensive Resource Guide located prior to the Training
Program section
2. The Facility Personnel understands the following:
____ Use of the TRUE METRIX® PRO System in a clinical setting
____ System specifications
____ Limitations and critical safety information, including that the TRUE METRIX® PRO System
must not be used for certain patients (neonate)
3. Familiarization with the components of the system.
a. Meter
____ Location of serial number for the meter
____ Review of meter buttons and functions
b. Test Strips
____ Identifies lot number
____ Writes open date on test strip vial label
____ Understands the use by dates, both printed and written
____ Reviews proper handling of test strips including recapping of the test strip vial
immediately after removing test strip
____ Demonstrates proper insertion of the test strip into the meter
c. Control Solution
____ Identifies lot number
____ Writes open date on control solution bottle label
____ Understands the use by dates, both printed and written
____ Identifies control test level
____ Identifies control test ranges
TRUE METRIX® PRO System Comprehensive Resource Guide (GDH-FAD Enzyme) Training Checklist 37
Page 48

Training Checklist cont.
Name ___________________________________________________
4. Quality Control Tests
____ Understands manufacturer’s instructions for quality control testing
____ Understands the purpose of the automatic self-check of the meter upon insertion of
test strip into Test Port
____ Understands the purpose of control tests, the frequency of testing, and the number
of control solution levels to be tested
____ Understands the testing temperature range and what may result if testing temperature
is out of range
____ Identifies correct (unopened vs. opened) use by dates on the control solution bottle
____ Identifies the correct control test range for the control solution level and understands the
troubleshooting if the control test result is not within the acceptable range
____ Demonstrates the procedure using the control solution
____ Records the control test result on the TRUE METRIX® PRO Quality Control Testing Data Form
5. Blood Collection
____
____ Understands when fingertip should be used instead of forearm
____ Demonstrates the ability to obtain a sufficient amount of blood for testing from both
____
____
6. Demonstration of Blood Glucose Testing
____ Demonstrates proper blood glucose testing procedure for the TRUE METRIX® PRO System
____ Understands the proper blood application to the Sample Tip and the significance of the
7. Patient Blood Glucose Test Results
____ Demonstrates the proper documentation of test results
____ Understands that use of Memory, Averages, and Ketone Test Reminder features may not be
____ Proper disposal of biohazardous materials (contaminated biological materials and sharps)
Understands the proper technique of capillary blood collection for both fingertip and
forearm samples
a fingertip and forearm
Understands facility’s procedure on obtaining blood samples
Understands the importance of the use of the recommended type of blood collection tube
for collecting a venous blood sample for the testing on the
Monitoring System
symbols in the Display
appropriate for multiple-patient facilities
per facility policy and procedures
TRUE METRIX® PRO
Blood Glucose
8. Care, Cleaning and Disinfection, Storage of System
____
____
____ Demonstrates battery replacement
____ Understands proper storage of meter, test strips, and control solution
TRUE METRIX® PRO System Comprehensive Resource Guide (GDH-FAD Enzyme) Training Checklist 38
Understands recommended procedures for cleaning and disinfecting the
PRO
Meter
Understands facility policy and procedure for Medical Device Cleaning and Disinfection
TRUE METRIX®
Page 49

Training Post Test
TRUE METRIX® PRO Blood Glucose System Training Written Test (Please print)
Name __________________________________________________ Date _____/_____/_____
Title _______________________________________________________________________
Facility Name _______________________________________________________________
Address____________________________________________________________________
Phone/Fax _________________________________________________________________
True or False
1. It is recommended that healthcare personnel complete the training program prior to using the
TRUE METRIX® PRO Blood Glucose Monitoring System for the first time in a facility.
__________True __________False
2. The TRUE METRIX® PRO System can be used on neonates.
__________True __________False
3. Quality Control Testing should be performed per your facility’s policies and procedures.
__________True __________False
4. Any control solution can be used with the TRUE METRIX® PRO System.
__________True __________False
5. Capillary blood testing of critically ill patients with reduced peripheral blood flow (for example:
shock, severe hypotension, severe dehydration, hyperglycemia with hyperosmolarity, with or
without ketosis) should be tested with the TRUE METRIX® PRO System.
__________True __________False
6. If the meter becomes soiled, wipe it off with PDI Super Sani Cloth Wipes.
__________True __________False
7. The battery should be replaced with an AAA alkaline battery.
__________True __________False
TRUE METRIX® PRO System Comprehensive Resource Guide (GDH-FAD Enzyme) Training Post Test 39
Page 50

Training Post Test cont.
TRUE METRIX® PRO Blood Glucose System Training Written Test (Please print)
Name __________________________________________________
Multiple Choice (choose only one answer for each question)
1. Training on the use of the TRUE METRIX® PRO System consists of reviewing the following:
a) The Comprehensive Resource Guide
b) The Owner’s Booklet
c) Test Strip Instructions for Use
d) Control solution Instructions for Use
e) All of the above
2. If a point-of-care blood glucose test is ordered on a patient, the healthcare professional performing
the test must:
a) Identify treatment(s) patient may be on or starting
b) Identify drug therapy(ies) patient may be on or starting
c) Identify and use appropriate point-of-care blood glucose testing system
d) All of the above
3. The TRUE METRIX® PRO System utilizes the following enzyme to test for glucose:
a) Glucose oxidase (GO)
b) GDH-FAD
c) GDH-NAD
d) GEH-PDQ
4. The following sample(s) is/are appropriate for testing on the TRUE METRIX® PRO System:
a) Capillary whole blood from fingertip or forearm
b) Venous whole blood collected in a Sodium Fluoride tube
c) Plasma
d) Urine
e) Venous whole blood collected using ONLY a sodium heparin tube.
f) a and c
g) b and d
h) a and e
5. The following recommended Quality Control Tests are performed on the TRUE METRIX® PRO:
a) One level of control solution and a patient sample
b) One level of control solution
c) A low level of control solution and a high level of control solution
d) Meter automatic self-test and a minimum of 2 levels of control solution
TRUE METRIX® PRO System Comprehensive Resource Guide (GDH-FAD Enzyme) Training Post Test 40
Page 51

Training Post Test cont.
TRUE METRIX® PRO Blood Glucose System Certified Training Written Test (Please print)
Name __________________________________________________
6. The Control solution use by date (expiration date) is:
a) One week after opening
b) 120 days after opening
c) 3 months after opening
d) The date pre-printed on the bottle next to the EXP
e) c and d
7. If the Control Test result is out of range, it may be because:
a) The control solution has expired
b) The test strip has expired or the vial was left open for too long
c) The cap was left off the control solution bottle
d) The open date written on the control solution bottle or test strip vial has passed
e) All of the above
8. Forearm testing may not be appropriate in the following situations:
a) Within 2 hours of exercise
b) If the patient’s glucose result often fluctuates
c) If the patient is under stress
d) All of the above
9. TRUE METRIX® PRO Test Strips use by date (expiration date) is:
a) The date pre-printed on the bottle next to the EXP
b) 12 months
c) 6 months
d) 4 months
e) a and d
10. If after inserting the test strip into the Test Port, the meter does not turn on, the reason
could be:
a) The test strip was inserted upside down
b) The test strip was not fully inserted
c) The battery is dead
d) All of the above
TRUE METRIX® PRO System Comprehensive Resource Guide (GDH-FAD Enzyme) Training Post Test 41
Page 52

Training Post Test
Answer Key
TRUE METRIX® PRO Blood Glucose System Training Written Test Answer Key
True or False
Q 1. True
Q 2. False
Q 3. True
Q 4. False
Q 5. False
Q 6. True
Q 7. False
Multiple Choice
Q 1. e) All of the above
Q 2. d) All of the above
Q 3. b) GDH-FAD
Q 4. h) a and e
Q 5. d) Meter automatic self-test and a minimum of 3 levels of control solution
Q 6. e) c and d
Q 7. e) All of the above
Q 8. d) All of the above
Q 9. e) a and d
Q 10. d) All of the above
TRUE METRIX® PRO System Comprehensive Resource Guide (GDH-FAD Enzyme) Training Post Test 42
Page 53

References
Page 54

References
1. FDA Public Health Notification: Use of Fingerstick
Devices on More than One Person Poses Risk
for Transmitting Blood Borne Pathogens: Initial
Communication Update 11/29/2010 [Electronic
Version]. Retrieved February 22, 2012 from
http://www.fda.gov/MedicalDevices/Safety/
AlertsandNotices/ucm224025.htm.
2. CDC Clinical Reminder: Use of Fingerstick
Devices on More Than One Person Poses Risk for
Transmitting Bloodborne Pathogens [Electronic
Version]. Retrieved February 22, 2012 from
http://www.cdc.gov/injectionsafety/FingerstickDevicesBGM.html.
3. International Organization for Standardization.
In vitro diagnostic test systems. Requirements
for blood-glucose monitoring system for selftesting in managing diabetes mellitus. Reference
number ISO 15197:2003 (E). Geneva: International
Organization for Standardization; 2003.
4. Data on file.
5. U.S. Food and Drug Administration.
Blood Glucose Meters, Getting the Most
Out of Your Meter. [Electronic Version].
Retrieved July 6, 2009: www.fda.gov/
MedicalDevices/Safety/ AlertsandNotices/
TipsandArticlesonDeviceSafety/ucm109371.htm.
6. Larsson-Cohn U: Difference between capillary
and venous blood glucose during oral glucose
tolerance tests. Scand J Clin Lab Invest 36:805-
808, 1976.
7. Atkin, S.H., et. al. Fingerstick Glucose
Determination in Shock. Annals of Internal
Medicine, 114:1020-1024 (1991).
8. Clinical and Laboratory Standards Institute.
Interference Testing in Clinical Chemistry;
Approved Guideline—Second Edition. CLSI
document EP7-A2 [ISBN 1-56238-584-4]. Clinical
and Laboratory Standards Institute, 940 West
Valley Road, Suite 1400, Wayne, Pennsylvania
19087-1898 USA, 2005.
9. CLSI POCT12-A3 Point of Care blood glucose
testing in acute and chronic care facilities;
Approved Guideline – Third Edition,
January 2013.
10. International Organization for Standardization.
In vitro diagnostic test systems. Requirements
for blood-glucose monitoring system for self
testing in managing diabetes mellitus.
Reference number ISO 15197:2013 (E).
Geneva: International Organization for
Standardization; 2013.
11. Good Laboratory Practices for Waived Testing
sites. [Electronic Version]. Retrieved July 14,
2008: www.cdc.gov/mmwr/preview/mmwrhtml/
rr5413a1.htm.
TRUE METRIX® PRO System Comprehensive Resource Guide (GDH-FAD Enzyme) References 43
Page 55

Appendix A
Clinical Studies
Note: Available for download at
www.niprodiagnostics.com
Page 56

Appendix B
Product Labeling
Note: Your Distributor will provide
copies of product labeling.
(Owner’s Booklet, Test Strip
Instructions for Use and Control
Solution Instructions for Use)
Page 57

Appendix C
Safety Data Sheets
Page 58

Test Strip –
Safety Data Sheet
Section 1: Product Information
Product Name: TRUE METRIX® PRO Blood Glucose
Test Strips
Section 2: Composition / Information on Ingredients
Vial: Silica Gel, polypropylene, polyethylene
Test strips: Glucose dehydrogenase-Flavin adenine
dinucleotide (GDH-FAD) (Aspergillus, sp.), mediators,
buffers and stabilizers
Test strip Box and Package Insert: Paper
Section 3: Hazard Identification
No significant immediate hazards for emergency response
are known.
Section 4: Emergency First Aid Procedures
Eye: No first aid required.
Skin: No first aid required for contact with skin.
Ingestion: No first aid required from ingestion.
Inhalation: No first aid required.
Section 5: Fire and Explosion Hazard Data
Flash Point (Method Used): Vial - > 232°C (450°F)
(estimated), test strips - N/A
Flammable Limits: N/A
General Hazard: Solid material may burn at or above
the flashpoint. If thermally decomposed, flammable/
toxic gases may be released. Toxic gases will form upon
combustion. Hazardous combustion products may include
and are not limited to: carbon monoxide, carbon dioxide.
Special Fire Fighting Procedures: Use water spray to cool
fire exposed surfaces and to protect personnel. Isolate
“fuel” supply to fire. Extinguish the fire by cooling with
water spray. Respiratory and eye protection required for
fire fighting personnel.
Unusual Fire and Explosion Hazards: None determined.
Section 6: Spill or Leak Procedures
Steps to be taken in case material is released or spilled:
Contain material to prevent contamination of soil, surface
water and ground water. May be slipping hazard.
Section 7: Handling and Storage
Store at temperatures and conditions as indicated on the
product label.
Section 8: Personal Protection
Ventilation: Use general room ventilation.
Respiratory Equipment: None
Protective Gloves: None
Eye Protection: None
Other Protective Equipment/Clothing: None
Section 9: Physical Data
Appearance and odor: Vial - vial with desiccant liner,
test strips - Plastic strip with reaction area.
pH: N/A
Specific Gravity: N/A
Boiling Point: N/A
Melting Point: N/A
Vapor Pressure: N/A
Evaporation Rate: N/A
Solubility in Water: N/A
Section 10: Reactivity Data
Stability: Stable if at storage temperature and original
vial closed.
Conditions to Avoid: Product can oxidize and decompose
at elevated temperatures. Avoid putting water inside of
vial, exothermic reaction will occur. Temperatures above
149°C (300°F) may cause product degradation and
self combustion.
Substances to Avoid: Avoid contact with strong acids and
oxidizing materials.
Hazardous Decomposition Products: Flammable
hydrocarbons.
Hazardous Polymerization: Will not occur.
Section 11: Toxicological Information
Chronic Effects of Overexposure: None currently known.
Carcinogen or Suspected Carcinogen: None of the
compounds present are listed as a carcinogen or
suspected carcinogen.
Medical Conditions Aggravated by Exposure: None
currently known.
Acute Toxicity Values: Not applicable.
Section 12: Ecological Information
Ecological effects of this product have not been
determined.
Section 13: Disposal
Primary Container Type: Vial with 50 test strips.
Waste Disposal Method: Each disposal facility must
determine proper disposal methods to comply with local,
state, and federal environmental regulations.
TRUE METRIX® PRO System Comprehensive Resource Guide (GDH-FAD Enzyme) Test Strip Safety
Data Sheet
Page 59

Control Solution –
Safety Data Sheet
Section 1: Product Information
Product Name: TRUE METRIX® Control Solution –
Levels 1, 2, and 3
Section 2: Composition / Information on Ingredients
Bottle: Polypropylene, polyethylene
Control Solution: Water, d-glucose, buffers, viscosity
enhancing agents, salts, dyes, and preservatives.
Control Solution Box and Package Insert: Paper
Section 3: Hazard Identification
No significant immediate hazards for emergency response
are known.
Section 4: Emergency First Aid Procedures
Eye: Flush with copious amounts of water.
Skin: Flush with water.
Ingestion: Contact physician.
Inhalation: Contact physician.
Section 5: Fire and Explosion Hazard Data
Flash Point (Method Used): Bottle - N/A,
control solution - N/A
Flammable Limits: N/A
General Hazard: N/A
Special Fire Fighting Procedures: N/A
Unusual Fire and Explosion Hazards: None determined.
Section 6 : Spill or Leak Procedures
Steps to be taken in case material is released or spilled:
Contain material to prevent contamination of soil, surface
water and ground water. May be slipping hazard.
Section 7 : Handling and Storage
Store at temperatures and conditions as indicated on the
product label. Keep bottle tightly closed when not in use.
Section 8 : Personal Protection
Ventilation: Use general room ventilation.
Respiratory Equipment: None.
Protective Gloves: None
Eye Protection: None
Other Protective Equipment/Clothing: None
Section 9 : Physical Data
Appearance and odor: Bottle - plastic bottle with cap,
control solution - Red liquid.
pH: N/A
Specific Gravity: N/A
Boiling Point: N/A
Melting Point: N/A
Vapor Pressure: N/A
Evaporation Rate: N/A
Solubility in Water: N/A
Section 10 : Reactivity Data
Stability: Stable at storage temperature. Keep bottle
closed when not in use.
Conditions to Avoid: N/A
Substances to Avoid: Avoid contact with strong acids and
oxidizing materials.
Hazardous Decomposition Products: Flammable
hydrocarbons.
Hazardous Polymerization: Will not occur.
Section 11 : Toxicological Information
Chronic Effects of Overexposure: None currently known.
Carcinogen or Suspected Carcinogen: None of the
compounds present greater than 0.1% are listed as a
carcinogen or suspected carcinogen.
Medical Conditions Aggravated by Exposure: None
currently known.
Acute Toxicity Values: Not applicable.
Section 12 : Ecological Information
Ecological effects of this product have not been
determined.
Section 13 : Disposal
Primary Container Type: Bottle with 3 mL
control solution.
Waste Disposal Method: Each disposal facility must
determine proper disposal methods to comply with local,
state, and federal environmental regulations.
TRUE METRIX® PRO System Comprehensive Resource Guide (GDH-FAD Enzyme) Control Solution Safety
Data Sheet
Page 60

Appendix D
Forms
Page 61
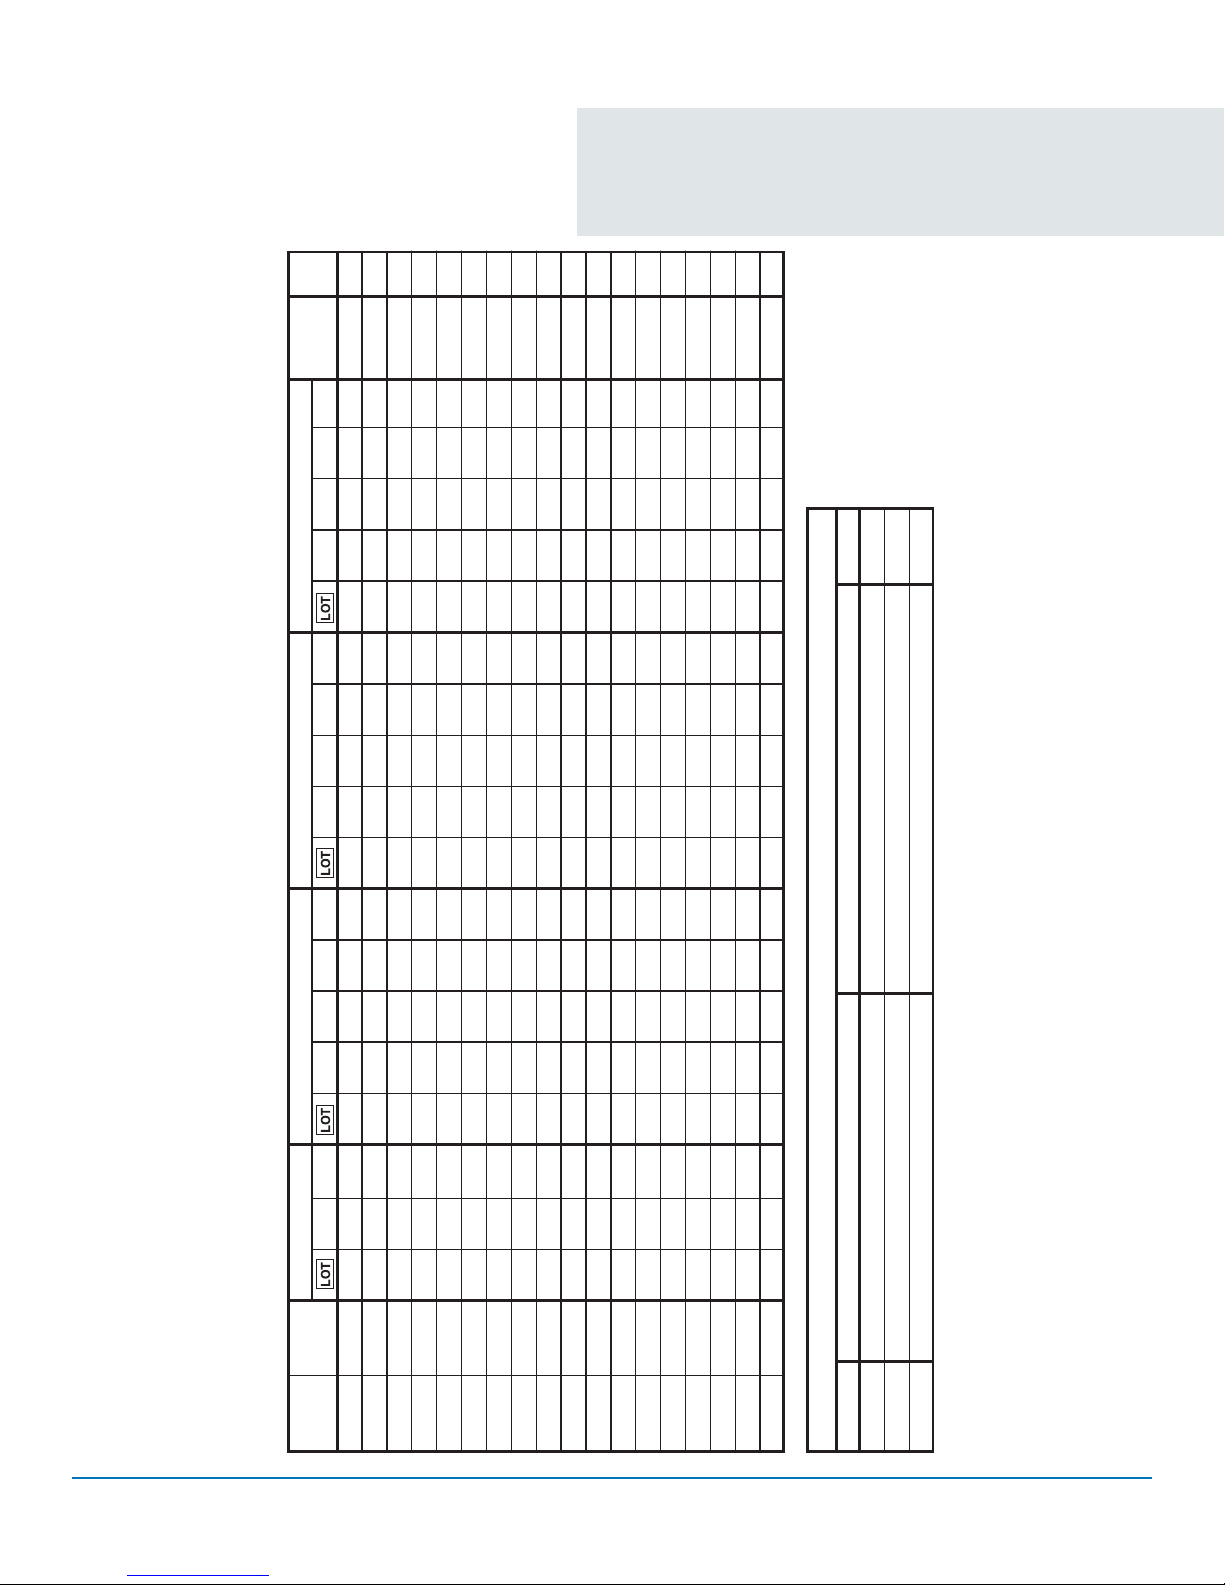
*
Initials
Result
Range
Acceptable
Date
Opened
Quality Control
Testing Data Form
EXP
Control Solution - Level __________
Range
Acceptable
Date
Opened
EXP
*Note any problems in Troubleshooting section below.
Result Result
Range
Acceptable
Date
Opened
EXP
(see number on Meter label below the bar code)
Control Solution - Level __________
Initials
Action
QUALITY CONTROL TESTING DATA FORM
Date
Opened
EXP
Test Strips Control Solution - Level __________
Date Time
Meter Serial Number _________________
TRUE METRIX® PRO System Comprehensive Resource Guide (GDH-FAD Enzyme) Quality Control Testing Data Form
Date Problem
*TROUBLESHOOTING
Page 62

Appendix E
Proficiency Testing
Information
Page 63

TRUE METRIX® PRO Professional Blood
Glucose Monitoring System
Proficiency Testing Information
The objective of proficiency testing is to qualitatively
determine the skill of the user of a specific product
and the accuracy of the results obtained using
the product. Participating laboratories receive
specimens from a distributor, test the specimens
and report the results back to the distributor. The
results of all participants are summarized in a
report that is sent to the participating laboratories.
The report contains an evaluation of the individual
laboratory performance as well as a comparison to
a summary of results from other participating labs.
It is important to be aware that proficiency samples
are not fresh blood and may behave differently on
different glucose test systems. The accuracy of the
result from a proficiency sample is not an indicator
of the accuracy of your system when tested with
fresh whole blood obtained from a patient. The
proficiency testing only serves to show how your
results compare to other TRUE METRIX® PRO
System users. If your proficiency sample results are
not within acceptable limits of other TRUE METRIX®
PRO users’ results, then you should investigate
possible sources of testing error such as expiration
date and storage conditions for the test strips.
Always perform quality control testing per your
facility’s procedures and policies to make sure your
system is working properly. The Owner’s Booklet or
Comprehensive Resource Guide assists you with this
process.
Proficiency Testing
Information
Resources to learn about and obtain proficiency
samples:
• College of American Pathology (CAP) www.cap.org
• American Association of Bioanalysts www.aab.org
The TRUE METRIX® PRO System is optimized to
give accurate results with fresh, capillary whole
blood and venous whole blood samples. Venous
whole blood samples must be tested immediately
or preserved in a vacutainer tube containing sodium
heparin blood only (green top). This preserves the
sample for approximately 30 minutes. Refer to the
TRUE METRIX® PRO Owners Booklet and TRUE
METRIX® PRO Test Strip Instructions for Use for
further information.
TRUE METRIX® PRO System Comprehensive Resource Guide (GDH-FAD Enzyme)
 Loading...