

Nintendo NEW 3DS xl OPERATIONS Manual
OPERATIONS MANUAL
FRANÇAIS Pg. 67 • ESPAÑOL Pg. 133
This product is a precision electronic device that can be damaged by direct physical impact or contact with dust
or other foreign material. A protective carrying case (sold separately) may help prevent damage to your
New Nintendo 3DS™ XL system.
Please carefully read this Operations Manual before setup or use of the New Nintendo 3DS XL system. If, after reading all of the
instructions, you still have questions, please visit our customer service area at support.nintendo.com or call 1-800-255-3700. Also,
built-in instruction manuals are available for many software applications from the HOME Menu (page 22).
A NOTE ABOUT COMPATIBILITY: The New Nintendo 3DS XL system is only compatible with Nintendo 3DS, Nintendo DSi™, and Nintendo
DS™ software. Nintendo 3DS Game Cards are only compatible with the New Nintendo 3DS XL, Nintendo 3DS, Nintendo 3DS XL, and
Nintendo 2DS systems (hereafter referred to as the Nintendo 3DS family of systems). Some accessories may not be compatible with
this system.
Your system includes:
• New Nintendo 3DS XL system
• New Nintendo 3DS XL stylus (inserted into the system’s stylus holder, page 14)
• microSDHC card (inserted into the system’s microSD card slot, page 52)
• AR Cards
• Operations Manual
NOTE: The AC adapter is sold separately or can be ordered from the Nintendo website at store.nintendo.com
(USA/Canada only). This system is compatible with the Nintendo 3DS AC adapter (WAP-002). If you already own
other models in the Nintendo 3DS family of systems, or the Nintendo DSi or Nintendo DSi XL systems, you can use
the AC adapter included with those systems.
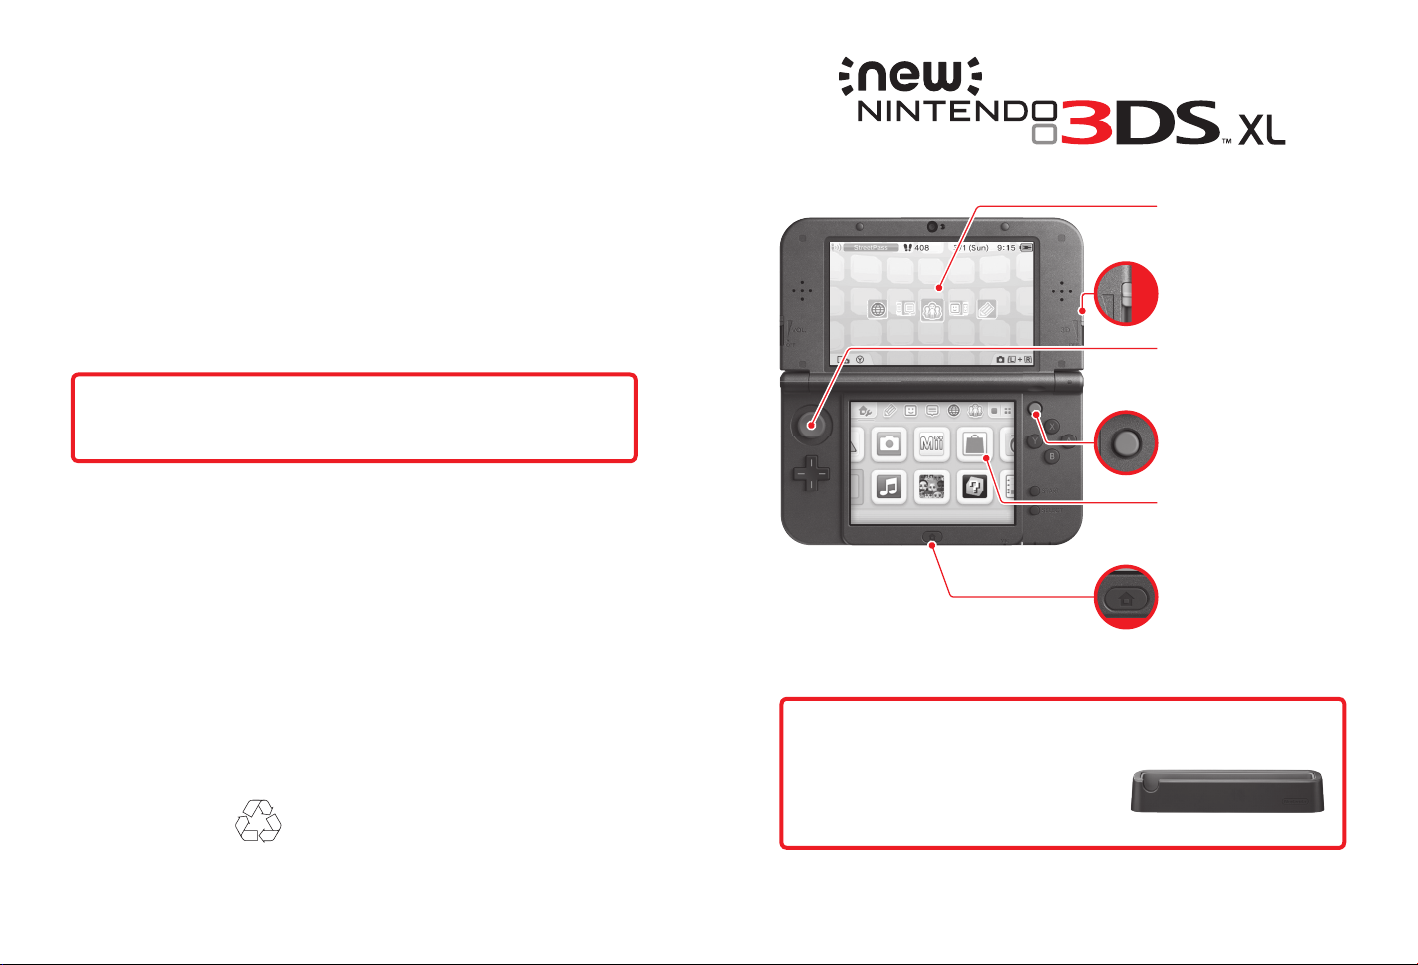
3D Screen
Super-stable 3D for optimal
images (page 20).
3D Depth Slider
Adjusts the depth of 3D images (page 21).
Circle Pad
Allows precise 360˚control for software
that includes this feature (page 13).
C Stick
Allows pressure-sensitive, intuitive control
for software that includes this feature
(page 13).
Touch Screen
A touch-sensitive display screen controlled
by the stylus (page 13).
HOME Button
Allows you to access the HOME
Menu (page 22).
Product recycling information:
Visit recycle.nintendo.com
Elements of the New Nintendo 3DS XL system and related network services are patented or patent pending, both in the United States and internationally.
Trademarks are property of their respective owners. Nintendo 3DS is a trademark of Nintendo. © 2015 Nintendo
Patent: patents.nintendo.com
Keeping your system charged using the New Nintendo 3DS XL charging cradle
(sold separately).
When not in use, you can keep the system in the charging cradle so it
stays fully charged. This accessory may be ordered through Nintendo’s
website at store.nintendo.com (USA/Canada only) or by calling
Customer Service at 1-800-255-3700.
1
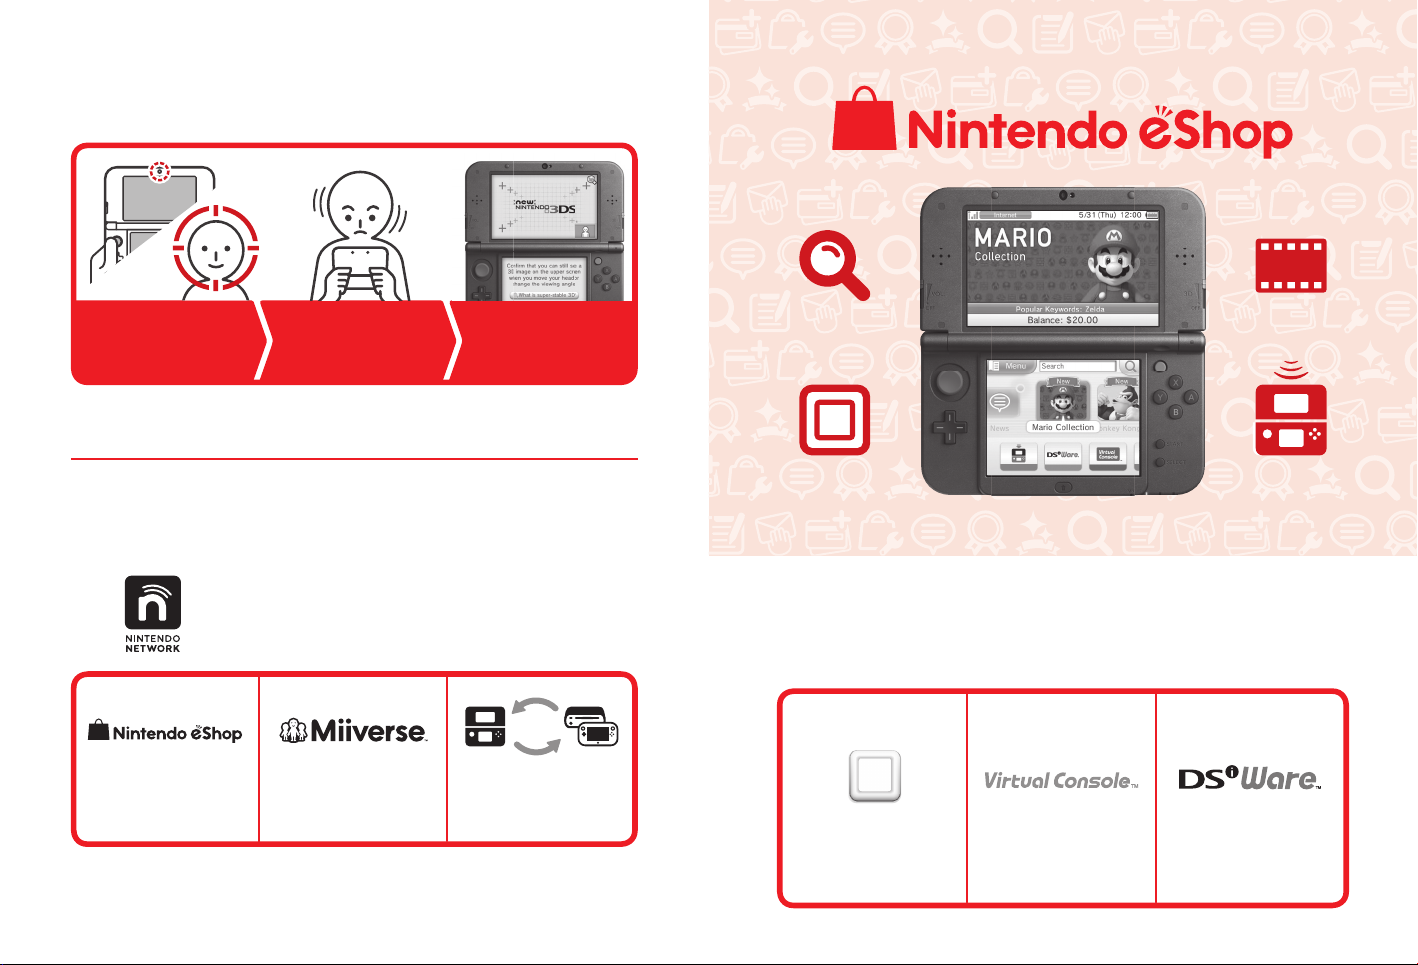
An optimal 3D viewing experience with
Super-Stable 3D
Explore new software
Using facial recognition with
the inner camera...
Super-Stable 3D uses the inner camera to track your face and provide you with an optimal 3D image even when your body or head
moves while using the New Nintendo 3DS system (page 20).
Even if your face or the screen
moves during play...
The 3D images will always be
optimized for where your face is.
Even better network services with a
Nintendo Network ID
Register a Nintendo Network ID to enjoy the services listed below. (A Nintendo Network ID
is an ID required to use Nintendo’s network services. See page 32 for more information.)
Download free or demo software
from Nintendo eShop
Communication in Miiverse
Combine Nintendo eShop balances
from the Wii U and the New
Nintendo 3DS XL systems.
Find software Watch videos
Download software Download demo
You can connect to Nintendo eShop through the Internet and view information and videos about software, or purchase and
download software to play on your system.
NOTE: A broadband wireless network connection is required to connect to the Internet. See page 34 for more information on
setting up a connection.
software
A Nintendo Network ID
is required.
Downloadable software
Nintendo 3DS Downloadable
Software
Some Nintendo 3DS software is
available exclusively through Nintendo
eShop. You can also download certain
Game Card-based titles rather than
purchasing the Game Card.
Virtual Console titles
You can download games originally
released on platforms prior to
Nintendo DS, such as Game Boy™ and
Game Boy™ Color.
Nintendo DSiWare
You can download Nintendo
DSiWare–games originally released for
the Nintendo DSi system.
32
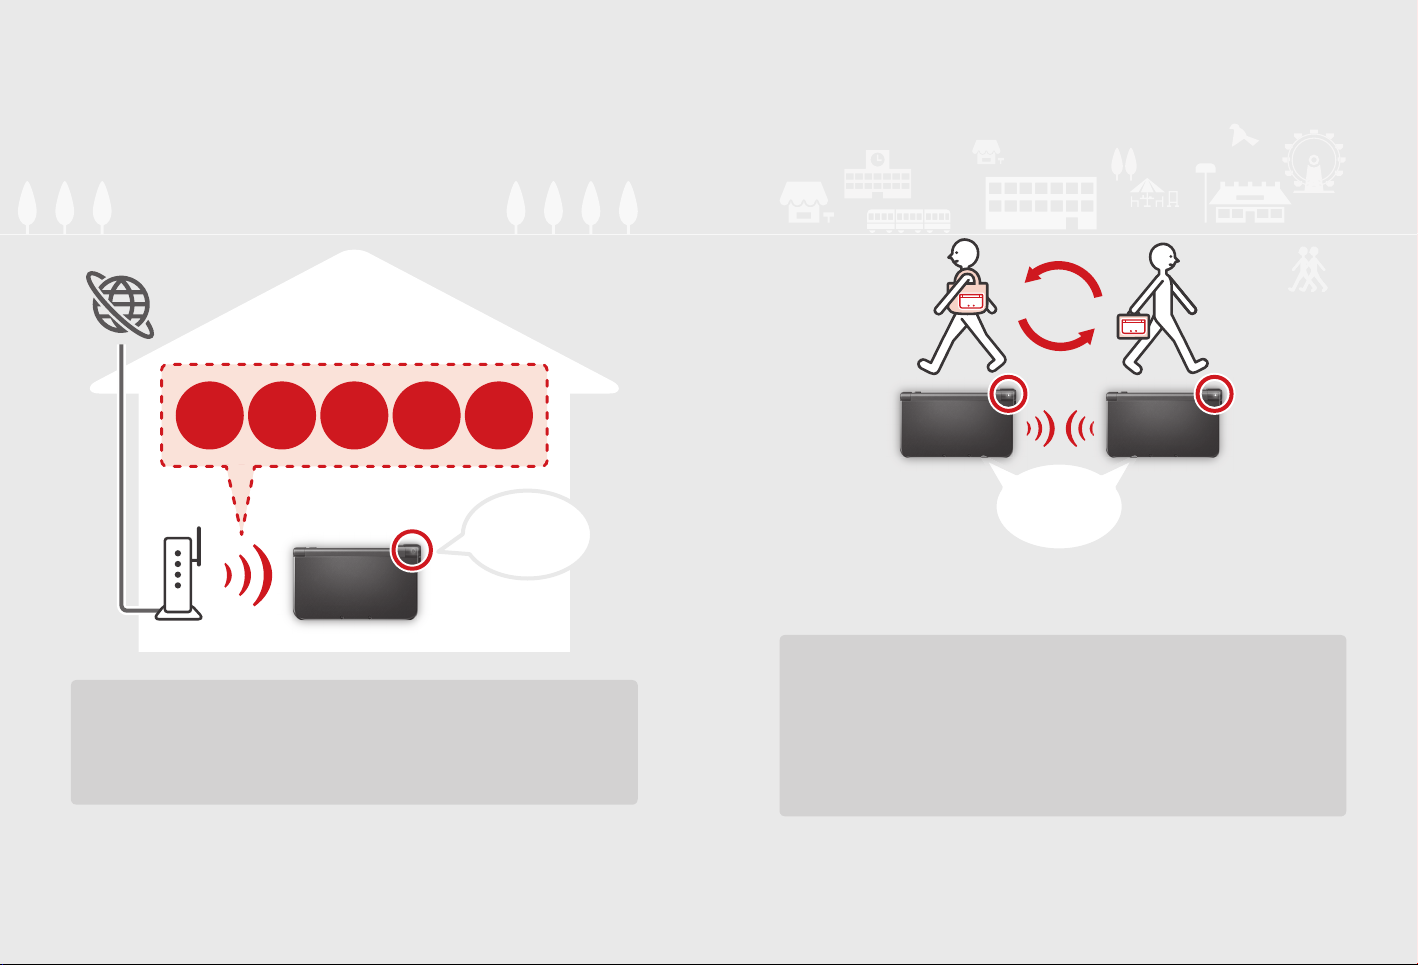
Receive data on your system Automatically talk to other systems
SpotPass
™
StreetPass
™
The SpotPass feature allows the New Nintendo 3DS XL system to automatically communicate with a nearby wireless LAN access point, enabling it to connect to the Internet and
transmit a variety of data. The system can also do this while playing a game or in Sleep
Mode (power is on, but the system is closed).
Internet
Free software
To connect to a wireless LAN access point, you will need to congure the Internet settings for your system (page 34) .
• SpotPass may not be available depending on the play environment or the software you are using. SpotPass is also not
available during local communication (page 22), or when playing Nintendo DS or Nintendo DSi software.
• The Notication LED may not light for some types of data.
• You will need a Nintendo Network ID (page 32) to download demo games or other free content from Nintendo eShop.
3D image
content
Notications
System
Updates
NOTE: Data received via SpotPass is
saved on the microSD card.
Other
Information
The LED ashes
blue to notify you of
inbound content.
The StreetPass feature allows your system to automatically search for and communicate
with other systems in the Nintendo 3DS family and to exchange information with them
as you walk by.
The LED ashes
green to notify you
of inbound content.
If the system is in Sleep Mode (turned on but closed) or certain other modes, and you pass someone who
has enabled StreetPass for the same software, you will exchange game data with them. (If you don’t want
to allow data exchange, you can disable wireless communication.)
StreetPass settings for Nintendo 3DS software are saved on the system. The data you transmit with StreetPass varies depending
on the software using this feature. Each software program has its own StreetPass settings.
• Up to 12 Nintendo 3DS software titles can use StreetPass simultaneously.
• Some Nintendo DS and Nintendo DSi software have a similar feature called tag mode. (The name for this mode may vary
depending on the game you are playing.) Tag mode is only active when the system is in Sleep Mode while the software and
tag mode feature are in use. When tag mode is in use, the StreetPass feature will not work for Nintendo 3DS software.
• If you turn the power o or disable wireless communication, the system cannot communicate (page 26).
• StreetPass may not be available depending on the play environment or the software you are using. StreetPass does not work
if you are connected to the Internet or are using local communication (page 22).
NOTE: A message will appear in
your notication list (page 27).
4 5
Table of Contents
System features 1
Health and Safety Information 7
Usage Guidelines 9
Basic Operations
System Components 12
Charging the Battery Pack 15
Power On/O and Basic Conguration 16
Sleep Mode and turning the system o 16
Conguring System Settings for the rst time 16
Using the keyboard 18
Power LED status 19
Battery endurance 19
Viewing and adjusting the 3D Image 20
To view the best-quality 3D images 20
Adjusting the depth of the 3D images 21
Using Software
HOME Menu 22
HOME Menu electronic manual 23
Software icons 23
Starting a software application 25
Electronic manuals for software applications 26
HOME Menu Settings 26
Icons for HOME Menu features 27
Using Game Cards 28
Starting a game 28
Using Downloaded Software 30
Starting downloaded software 30
System Conguration
System Settings 31
Nintendo Network ID Settings 32
Linking a Nintendo Network ID 33
Internet Settings 34
Internet connection requirements 34
Congure your Internet settings 35
Setup using Search for Access Point 36
Setup using Wi-Fi Protected Setup 37
Setup using AOSS 38
Parental Controls 39
Content or features that can be limited 39
Conguring Parental Controls 40
Data Management 41
Other Settings 42
System Transfer 43
System Update 51
Format System Memory 51
Consumer Information
Replacing the microSD Card or
Battery Pack 52
microSD Card Capacity 55
Troubleshooting 56
Warranty and Service Information 64
Regulations for Equipment Use 64
Legal Notices 65
Health and Safety Information and Usage
Guidelines
Important Safety Information – Read the following warnings before setup or use of the New Nintendo 3DS XL
system.
Also be sure to read the Health and Safety Information application by selecting on the HOME
Menu.
If this product will be used by young children, this manual should be read and explained to them by an
adult. Failing to do so may cause injury. Please carefully review the instruction booklet for the game you are
playing for additional health and safety information.
Throughout this manual, you will see this symbol followed by WARNING or CAUTION, or you may see the term IMPORTANT.
These terms have dierent levels of meaning as outlined below. Please read and understand these terms and the information that
appears after them before using your New Nintendo 3DS XL system:
WARNING
CAUTION
IMPORTANT:
Health and Safety Information
Viewing of 3D images by children 6 and under may cause vision damage.
Use the Parental Control feature to restrict the display of 3D images for children 6 and under. See the Parental Controls section in this
manual for more information.
• Some people (about 1 in 4000) may have seizures or blackouts triggered by light ashes or patterns, and this may occur while
they are watching TV or playing video games, even if they have never had a seizure before.
• Anyone who has had a seizure, loss of awareness, or other symptom linked to an epileptic condition should consult a doctor
before playing a video game.
• Parents should watch their children play video games. Stop playing and consult a doctor if you or your child has any of the
following symptoms:
Convulsions Eye or muscle twitching Loss of awareness
Altered vision Involuntary movements Disorientation
To reduce the likelihood of a seizure when playing video games:
1. Sit or stand as far from the screen as possible.
2. Play video games on the smallest available television screen.
3. Do not play if you are tired or need sleep.
4. Play in a well-lit room.
5. Take a 10 to 15 minute break every hour.
Warns you about incorrect use of the system that could result in serious personal injury.
Cautions you about incorrect use of the system that could result in personal injury or damage to the
system, components, games, or accessories.
Informs you about incorrect use of the system that could result in damage to the system, components,
games, or accessories.
WARNING - 3D FEATURE ONLY FOR CHILDREN 7 AND OVER
WARNING - SEIZURES
Health and Safety Information
76
WARNING - EYESTRAIN AND MOTION SICKNESS
Playing video games can result in eyestrain after a sustained period of time, and perhaps sooner if using the 3D feature. Playing video
games can also result in motion sickness in some players. Follow these instructions to help avoid eyestrain, dizziness, or nausea:
Health and Safety Information
• Avoid excessive play. It is recommended that parents monitor their children for appropriate play.
• Take a 10 to 15 minute break every hour, or every half hour when using the 3D feature, even if you don’t think you need it.
Each person is dierent, so take more frequent and longer breaks if you feel discomfort.
• If your eyes become tired or sore while playing, or if you feel dizzy or nauseated, stop and rest for several hours before
playing again.
• If you continue to have any of the above symptoms, stop playing and see a doctor.
WARNING - REPETITIVE MOTION INJURIES
Playing video games can make your muscles, joints or skin hurt. Follow these instructions to avoid problems such as tendinitis, carpal
tunnel syndrome or skin irritation:
• Avoid excessive play. Parents should monitor their children for appropriate play.
• Take a 10 to 15 minute break every hour, even if you don’t think you need it.
• When using the stylus, you do not need to grip it tightly or press it hard against the screen. Doing so may cause fatigue
or discomfort.
• If your hands, wrists or arms become tired or sore while playing, or if you feel symptoms such as tingling, numbness, burning or
stiness, stop and rest for several hours before playing again.
• If you continue to have any of the above symptoms or other discomfort during or after play, stop playing and see a doctor.
WARNING - BATTERY LEAKAGE
The New Nintendo 3DS XL system contains a rechargeable lithium ion battery pack. Leakage of ingredients contained within the
battery pack, or the combustion products of the ingredients, can cause personal injury as well as damage to your New Nintendo 3DS
XL system. If battery leakage occurs, avoid contact with skin. If contact occurs, immediately wash thoroughly with soap and water. If
liquid leaking from a battery pack comes into contact with your eyes, immediately ush thoroughly with water and see a doctor.
To avoid battery leakage:
• Do not expose battery to excessive physical shock, vibration, or liquids.
• Do not disassemble, attempt to repair, or deform the battery.
• Do not dispose of battery pack in a re.
• Do not touch the terminals of the battery or cause a short between the terminals with a metal object.
• Do not peel or damage the battery label.
WARNING - RADIO FREQUENCY INTERFERENCE
The New Nintendo 3DS XL system can emit radio waves that can aect the operation of nearby electronics, including cardiac pacemakers.
• Do not operate the New Nintendo 3DS XL system within 9 inches of a pacemaker while using the wireless feature.
• If you have a pacemaker or other implanted medical device, do not use the wireless feature of the New Nintendo 3DS XL system
without rst consulting your doctor or the manufacturer of your medical device.
• Observe and follow all regulations and rules regarding use of wireless devices in locations such as hospitals, airports, and on
board aircraft. Operation in those locations may interfere with or cause malfunctions of equipment, with resulting injuries to
persons or damage to property.
IMPORTANT: The New Nintendo 3DS XL system allows you to disable wireless communication. To turn o all wireless
communication, go to HOME Menu settings (page 26). Make sure the wireless LED is o.
HARDWARE PRECAUTIONS AND MAINTENANCE
1. Do not disassemble or try to repair the New Nintendo 3DS XL system, components, or accessories. Doing so voids your warranty.
2. Only insert or remove Game Cards while the system is turned o or while the HOME Menu is displayed. Insert the Game Card
completely until it clicks into place, without forcing either the Game Card or the New Nintendo 3DS XL system.
3. Do not store the system in a humid place, on the oor, or in any location where it may contact moisture, dirt, dust, lint, or
any other foreign material.
4. Do not drop, hit, or otherwise abuse the system, components, or accessories. Doing so may damage the LCD screens or other
precision components of the system. Do not use damaged components, accessories, Game Cards, or SD Cards with your system.
5. Make sure all connections to the system are made carefully and inserted into the correct locations only. Hold plugs straight
when inserting them into sockets.
6. When disconnecting any plugs from the system or wall outlet, rst turn the system o. Then carefully pull by the plug itself
rather than by the cord. Do not step on, sharply pull, or bend any wires or cables.
7. Do not expose the system, Game Cards, or any of the components or accessories to extreme heat or cold. The liquid crystal displays (LCD) may become slower or may not work when the temperature is low. The LCD will deteriorate at a high temperature.
Take care not to expose the system to direct sunlight for extended periods of time.
8. The LCD screens may be damaged by sharp objects or pressure. Take care to protect the displays from scratches or stains.
9. Connect ONLY accessories designed and licensed for use with the system to any external connectors.
10. Do not spill liquids on the system, Game Cards, or other components or accessories. If the system comes into contact with
liquids, wipe clean with a soft, slightly damp cloth (use water only). Remove the battery cover and battery. If liquid came
into contact with the battery, do not reuse it. Call Nintendo Customer Service at 1-800-255-3700 for further instructions on
battery replacement and possible service for your system.
11. Do not rapidly turn the power switch ON and OFF, as this may shorten the life of the battery and cause Game Cards to lose
your stored game information.
12. To avoid dirt or dust from getting into the system, always leave a Game Card loaded (with the power o), when not in use.
13. When using an AC adapter, make sure you are using the correct model appropriate for your system. Always unplug the AC
adapter from the wall outlet when not in use.
14. Do not use the AC adapter if the cable or plug is damaged.
15. The AC adapter is intended to be correctly oriented in a vertical or oor mounted position.
GAME CARD PRECAUTIONS AND MAINTENANCE
1. Avoid touching the connectors with your ngers. Do not blow on them or allow them to get wet or dirty. Doing so may
damage the Game Card and/or the system.
2. The Game Card is a high-precision electronic device. Do not store it in places that are very hot or cold. Do not hit, drop, or
otherwise abuse it. Do not attempt to take it apart.
3. Do not clean with benzene, paint thinner, alcohol or any other solvent.
4. Always check the Game Card edge connector for foreign material before inserting the Game Card into the system.
Usage Guidelines
NOTE: This product does not contain latex. This product complies with applicable laws barring the use of toxic materials such as lead, mercury, cadmium,
hexavalent chromium, PBB, or PBDE in consumer products.
98

IMPORTANT BATTERY GUIDELINES
1. Do not remove the battery pack from the system unless it needs to be replaced.
Usage Guidelines
2. Do not use any battery other than the Nintendo 3DS XL rechargeable battery pack, Model No. SPR-003. A replacement
battery may be ordered through Nintendo’s website at store.nintendo.com (USA/Canada only) or by calling Customer
Service at 1-800-255-3700. See page 52 for more information on replacing the battery.
3. When recharging the battery, use ONLY AC adapter Model No. WAP-002(USA) (sold separately).
4. When disposing of the battery, follow appropriate local guidelines and regulations. For information on battery disposal
contact your local solid waste authority. See page 52 for more information on recycling the battery.
5. If liquid comes into contact with the battery, do not reuse it. Call Nintendo Customer Service at 1-800-255-3700 for further
instructions on battery replacement and possible service for your system.
IMPORTANT STYLUS AND SCREEN GUIDELINES
1. Use the stylus ONLY on the Touch Screen (lower screen).
2. Use only enough pressure to operate the game. Excessive pressure may damage the Touch Screen.
3. Do not use the stylus if it is broken.
4. Use only a Nintendo licensed stylus on the Touch Screen.
5. Replace the stylus in the stylus holder when not in use.
6. If you use a screen protector on your system, use only a Nintendo licensed screen protector.
CLEANING THE TOUCH SCREEN AND 3D SCREEN
IMPORTANT: If the Touch Screen becomes dirty or contaminated with foreign material, do not continue to use your
system. It may not work properly and can become more damaged. Follow the cleaning procedures below. If it still
does not work after cleaning, visit support.nintendo.com for information on repair services.
If the screens on your system have visible smudges, ngerprints, or other foreign material on them, you can clean them by using a
soft clean cloth, such as a lens or eyeglass cleaning cloth.
1. Slightly dampen the cloth with water ONLY and wipe o the screens to loosen any dirt or foreign material.
2. Using a dry cloth, wipe the screens to dry them and nish the cleaning process. If needed, repeat the process.
1110
11
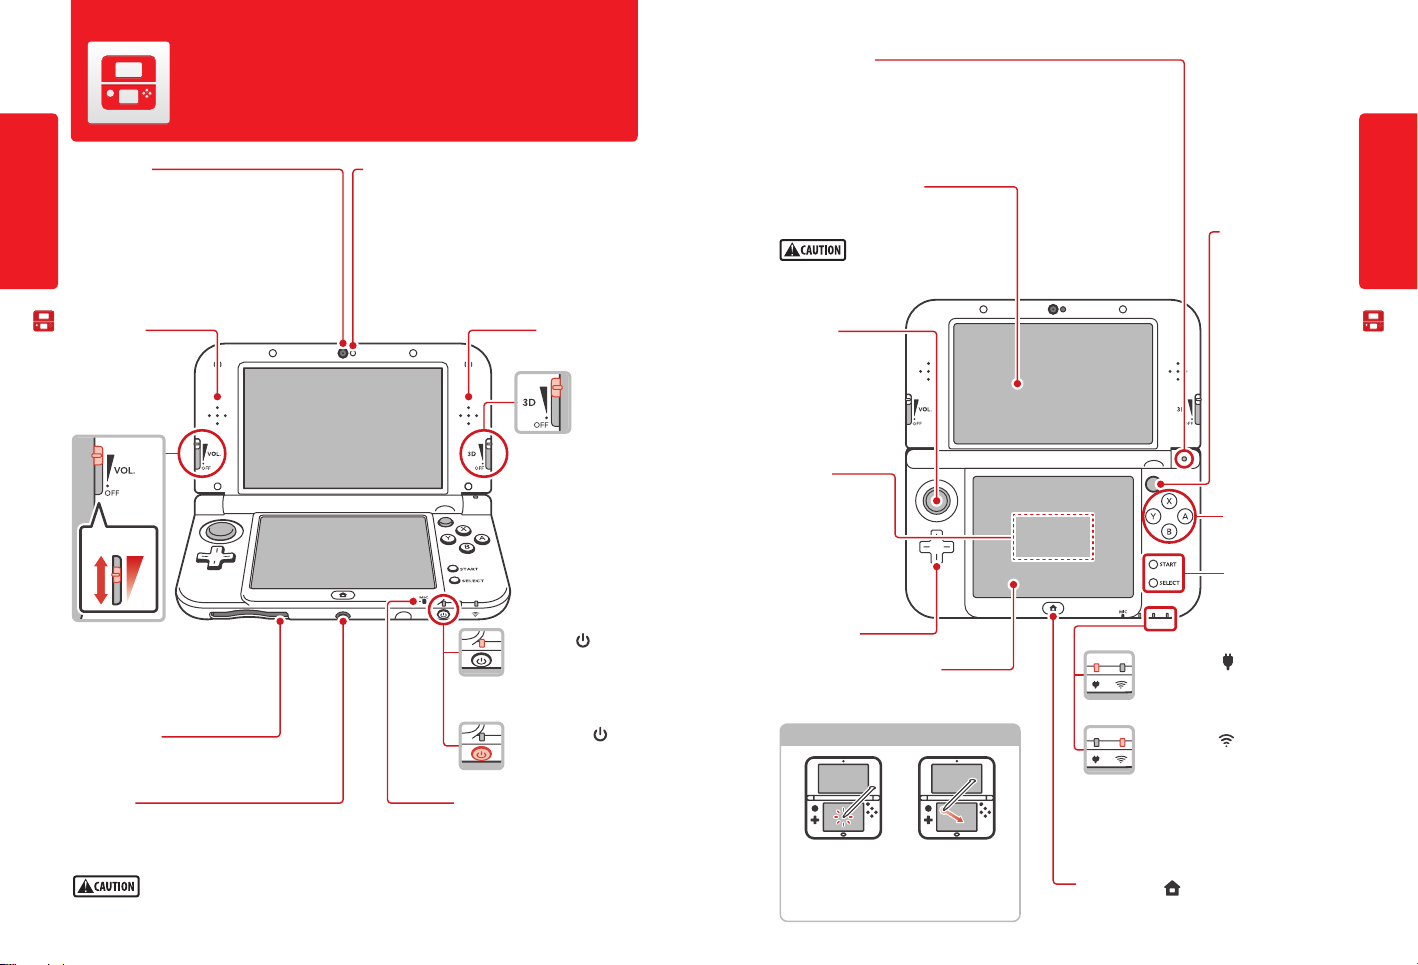
System Components
Basic Operations
Inner camera
Used by games or other applications that include
camera features or super-stable 3D (page 20).
NOTE: Avoid getting the camera lens dirty. If it
becomes dirty, wipe gently with a soft cloth, being
careful not to damage the lens.
System Components
Volume
+
–
Volume control
Slide to adjust the volume.
NOTE: The camera shutter sound always plays
at a xed volume and is not aected by the
volume control.
Game Card slot
For loading Nintendo 3DS Game Cards. Also compatible with
Nintendo DS and Nintendo DSi Game Cards (page 28).
Audio jack
For connection of stereo headphones (sold separately). If headphones are connected, no sound will play through the speakers. (This system is not compatible
with the Nintendo DS Headset.)
When using headphones, set the volume at a safe level. Setting
the volume too high may harm your hearing or damage the headphones.
Infrared LED
Illuminates your face to allow super-stable 3D
to work in darker environments (page 20).
Right speakerLeft speaker
3D Depth Slider
Adjusts the depth of the 3D
image from zero to maximum.
Power LED ( )
Lights when the power is
turned on (page 19).
Power Button ( )
(page 16)
Microphone
Used by games and applications that
include microphone features.
Notication LED
Indicates the status of the system.
Blue – You have received SpotPass data; blinks for about ve seconds (page 4).
Green – You have received StreetPass data; blinks for about ve seconds (page 5).
Orange – A friend has come online; blinks for about ve seconds (page 27).
Red – Battery power is low; blinks continuously when very low (page 19).
3D Screen (Upper screen)
Capable of displaying 3D content for games that
include this feature (page 20).
When opening or closing
the system, keep your ngers away from the
hinge to avoid pinching them.
Circle Pad
For game-play control that
supports this feature. See
the instructions for the
game you are playing for
specic control information.
NFC area
Built-in near-eld
communication
(NFC) feature enables
compatible software
to read or write to an
amiibo™ gure or other
supported device.
+
Control Pad
Touch Screen (Lower screen)
Touch-sensitive screen. This screen should only be
operated with a Nintendo licensed stylus.
Using the Touch Screen
o, and blinks while data is being sent or received or when
the system is in Sleep Mode (dimly).
NOTE: Wireless communication and the NFC feature can be
The lower LCD screen, or Touch Screen, is touch-sensitive. For games that include this game control feature,
operate the screen by using the included stylus.
Lightly touch or slide the stylus across the Touch
Screen as shown.
turned on or o from HOME Menu settings (page 26).
HOME Button ( )
Displays the HOME Menu during a game (page 22).
C Stick
For game-play control
that supports this feature,
including Right Circle Pad
functions of the Nintendo
3DS Circle Pad Pro accessory.
See the instructions for the
game you are playing for
specic control information.
A/B/X/Y Buttons
START/SELECT
Recharge LED ( )
Lights when the battery is being charged
(page 15).
Wireless LED (
Lights when wireless communication is turned
on, turns o when communication is turned
)
Basic Operations
System Components
1312
Wrist strap attachment
2
Basic Operations
For attachment of a licensed wrist strap
(sold separately).
System Components
R Button
ZR Button
Battery cover
Remove cover to replace the battery or
microSD card (page 52).
NOTE: Do not remove the cover unless you
need to replace the battery or microSD
card or check battery installation.
Stylus holder
Always replace the stylus into the stylus holder after use.
NOTE: To prevent damage to your system, do not insert
anything other than a New Nintendo
3DS XL licensed stylus into the stylus holder.
Outer cameras
Used by games or other applications that include camera
features. Two cameras allow you to take 3D photographs.
NOTE: Avoid getting the camera lenses dirty. If they
become dirty, wipe gently with a soft cloth, being careful
not to damage the lenses.
Infrared transceiver
Sends and receives information when using
infrared communication.
L Button
ZL Button
Cradle connectors
Allows connection to the New
Nintendo 3DS XL charging cradle
(sold separately, see page 1).
AC adapter connector
Allows connection of the
Nintendo 3DS AC adapter
(sold separately), for
recharging the battery or
operation using household
current (page 15).
Charging the Battery Pack
Charge the battery pack before using the system for the rst time or if you have not
used it for a long period of time.
WARNING
IMPORTANT: The Nintendo 3DS AC adapter (sold separately), Model No. WAP-002(USA), is for use only with the
Nintendo 3DS family of systems and the Nintendo DSi and Nintendo DSi XL systems. It is not compatible with
any other Nintendo system. Do not use the AC adapter with voltage transformers, dimmer switches, or any other
equipment. It is only for use in a standard 120-volt AC wall outlet.
DC plug (logo side faces up)
Insert the DC plug from the AC adapter into the AC adapter connector on the back of the New Nintendo 3DS XL. Be sure to
1
insert it straight into the connector.
IMPORTANT: Be sure the DC connector plug is facing in the correct direction before inserting into the
connector to avoid damaging either the plug or connector.
Swing the prongs out of the AC adapter and insert into a standard 120-volt AC wall outlet. The recharge LED will light,
indicating the system is charging. When fully charged, the recharge LED will go out. When charging is complete, remove
the AC adapter from the wall outlet and fold the prongs back into the housing.
Charging information
• Battery recharge time is approximately 3 1/2 hours, depending on remaining charge when you start and whether or
not you are using your system during recharging.
• If you play a game while recharging, the recharge LED may not always turn o once charging has completed.
• Optimal charging temperature is between 40º and 95º Fahrenheit (5-35º Celsius). Temperatures above or below this
may decrease the life of the battery and adversely aect the ability of the battery to charge.
• The battery pack can be recharged approximately 500 times, after which battery life may be 70% of a new battery.
• Battery packs become worn with repeated charge/discharge cycles. If usage time gets very short, replace the battery
pack (page 52).
NOTE: Due to the properties of lithium-ion batteries, they can permanently lose their charge when not in use for an
extended period of time. Be sure to charge lithium-ion batteries at least once every six months.
Do not use the Nintendo 3DS AC adapter or charging cradle during a lightning storm.
There may be a risk of electric shock from lightning.
AC plug
1
2
Recharge LED lights up.
It will turn o when the battery
is fully charged.
Basic Operations
Charging the Battery Pack
1514
1
Power On/O and Basic Conguration
3
5
6
7
8
Basic Operations
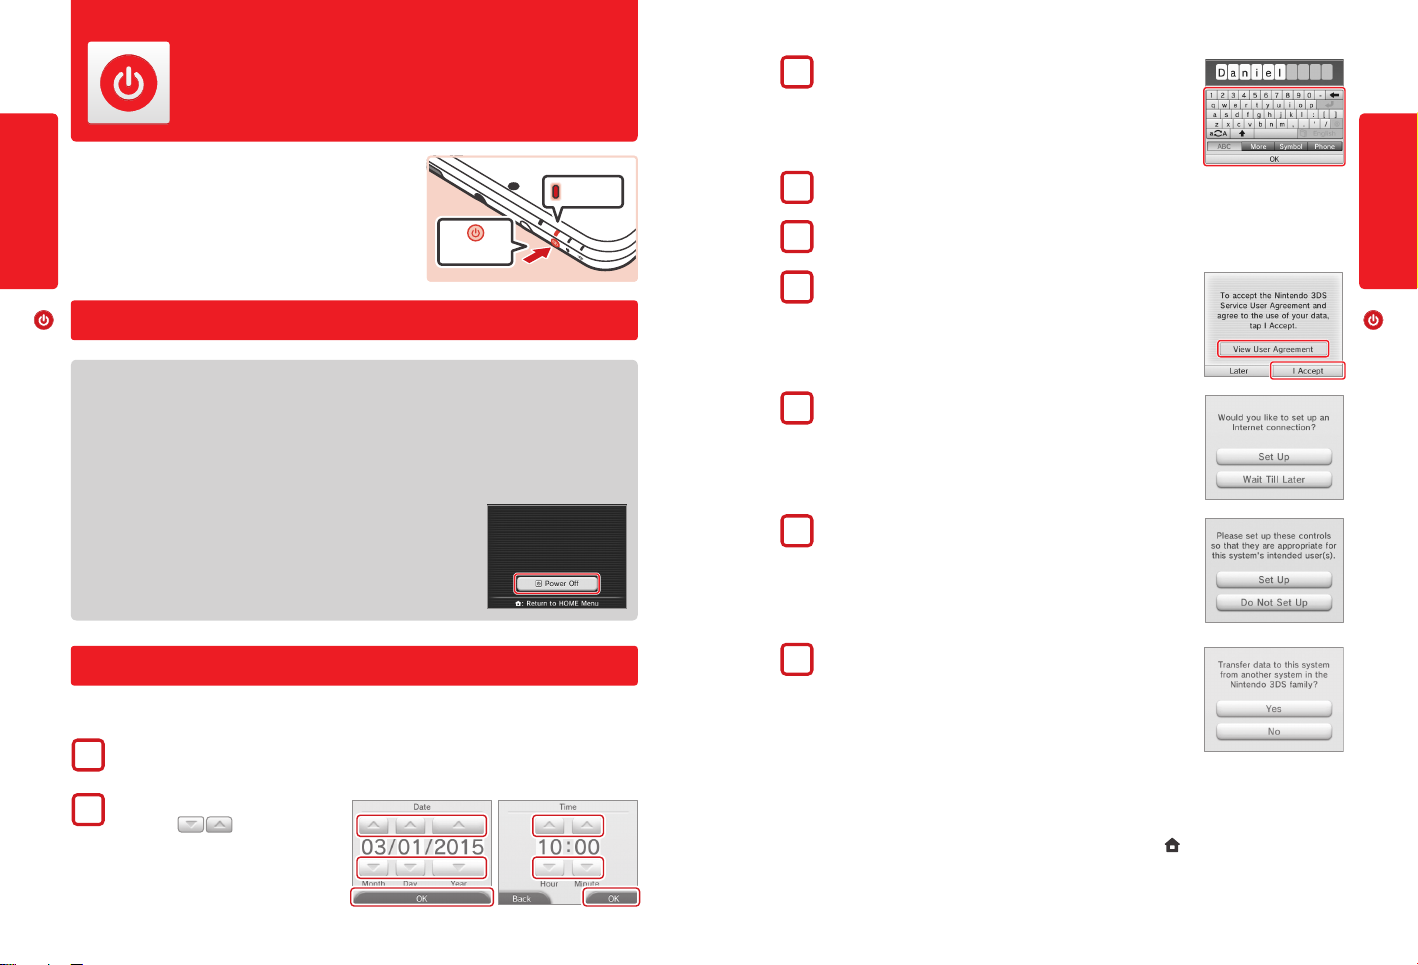
Press the POWER Button to turn the system on. The Power LED will light up and
after a few seconds the HOME Menu will appear.
The rst time you turn the system on, you will need to select a
language and then congure the System Settings.
For more information on the Power LED and battery life, see page 19.
Sleep Mode and turning the system off
Power On/Off and Basic Configuration
Power Button
Power LED
Use the keyboard to enter a nickname or user name (page 18). You can
enter up to 10 characters.
Remember that other people using systems in the Nintendo 3DS family will
see your nickname when interacting with them, so do not use your real name
or otherwise share any personal information in your nickname.
Set your birthday.
4
Set the country and state or province where you live.
Read the Nintendo 3DS Service User Agreement, and after reading, tap I Accept.
To continue without agreeing, tap Later. If you tap Later, you cannot connect to the
Internet until you agree to the Nintendo 3DS Service User Agreement.
Basic Operations
Power On/Off and Basic Configuration
Putting the system into Sleep Mode
Closing the s
ystem while it is turned on will suspend your game and put the system into Sleep Mode. Sleep Mode will reduce
power consumption while still using features such as StreetPass and SpotPass (see pages 4 and 5 for more information on
these features).
Depending on the software you are using, closing the system may not place it in Sleep Mode. (For example, when listening to
music with Nintendo 3DS Sound.)
Turning the system o
To turn the system o, either press the POWER Button to display the Power menu and tap
Power O, or press and hold the POWER Button until the power LED turns o.
Configuring System Settings for the first time
First select a language. Then you will need to congure the basic system settings. Using the stylus on the lower screen, follow the
on-screen instructions. If a child will be using the system, an adult should assist with these settings.
Conrm that you are holding the system in the best way to view 3D images by following the on-screen instructions. See
page 20 for more information on viewing 3D images.
Set the date and time.
2
Tap the arrows to adjust the
settings, then tap OK to conrm and move to
the next option.
Congure the Internet Settings.
If you connect to the Internet, you can use SpotPass and other features to enjoy more
ways of playing and interacting. See page 34 for more information on setting up an
Internet connection. To congure these settings later, tap Wait Till Later.
Congure the Parental Controls.
Parental Controls allow you to restrict the use or download of games and some features
by children, such as 3D image display, use of the Internet browser, and communications
with other users (page 39).
Please congure Parental Controls before the system is used by children.
Would you like to do a System Transfer?
9
If you own another product in the Nintendo 3DS family of systems and would like to
use data from that system on your New Nintendo 3DS XL system, you should perform
a System Transfer (page 43) before playing any software. System Transfer will move
various data, including save data for built-in software, your Nintendo eShop balance,
and account information for downloaded software, from your old system to your new
system.
NOTE: System Transfer will overwrite any data on the SD card in the destination system, so you will be unable to use any
downloaded software or its save data that was saved on the SD card before the System Transfer.
You have now completed the basic system conguration. Press the HOME ( ) Button to display the HOME
Menu (page 22).
1716
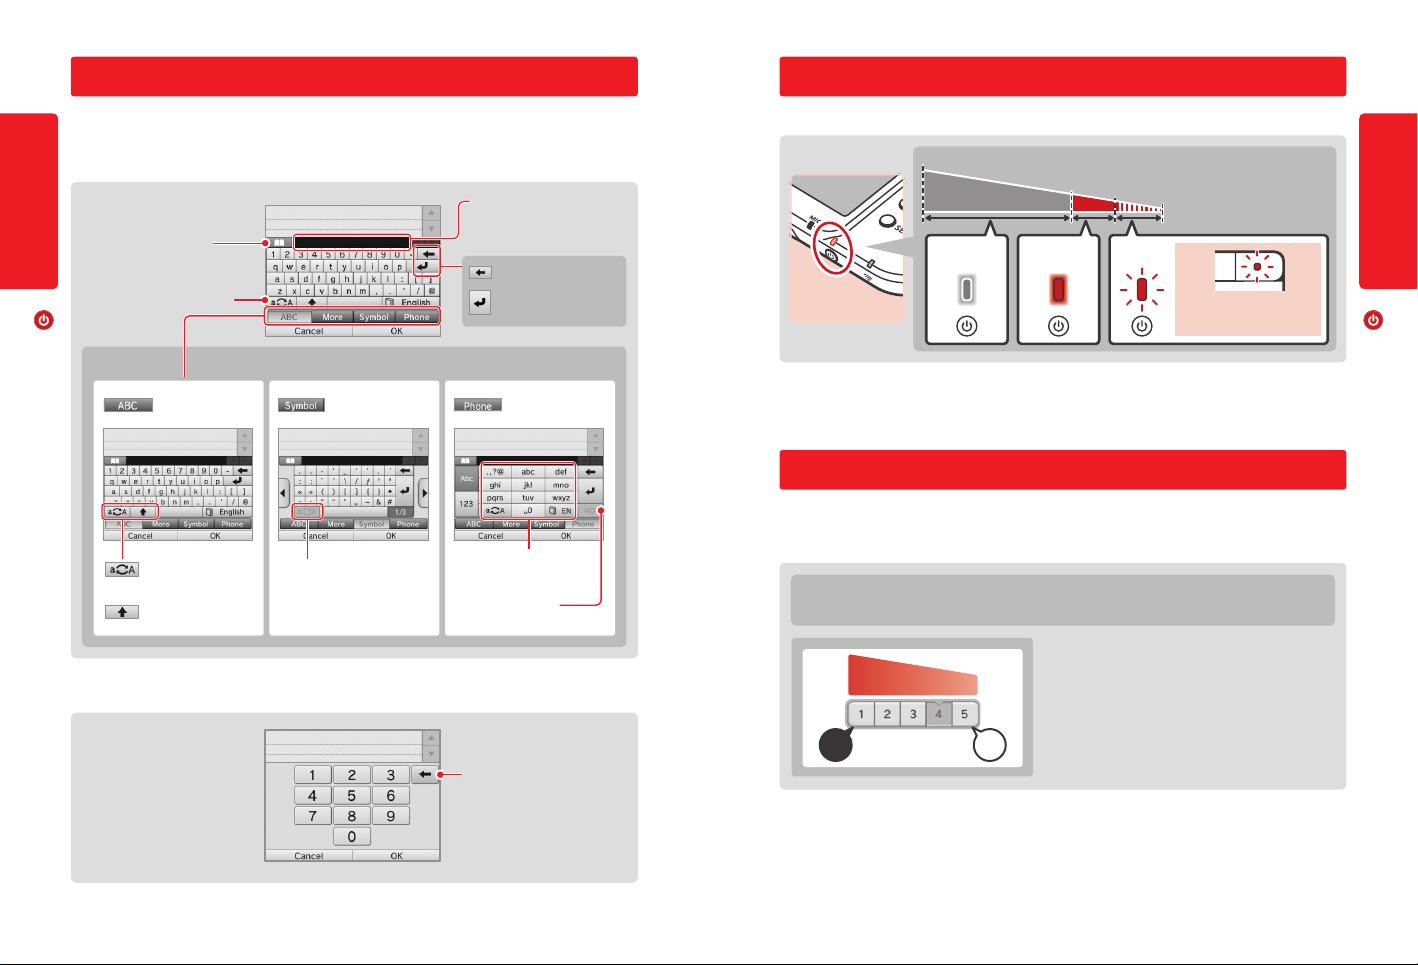
Using the keyboard
Power LED status
A keyboard will display when you are required to enter characters. There are two types of keyboards: a standard alphanumeric
keyboard and a ten-key keyboard.
Basic Operations
Alphanumeric keyboard
Predicted word eld
Predicted word
feature ON/OFF
Switch the next character
between upper and lower case.
Tap the character you want to select.
Delete last character
Return
Power On/Off and Basic Configuration
Switch input method
English
Switch between upper
and lower case
Uppercase only
Special characters or
symbols
Switch between upper and
lower case
Cell phone-style
Each tap changes which character
you would use from each key
Move to next character
Ten-key keyboard
Delete last character
The power LED lights when the system is on. The color and status of the LED changes depending on the remaining battery charge.
Full charge
Steady blue
light
NOTE: If you run out of remaining battery life while playing a game, you must replay the game from your last saved
location. If the power LED turns red, save your game and charge the system.
If you put the system into Sleep Mode (page 16) while the power LED is a steady blue light, the LED will slowly brighten and darken.
Steady red
light
Low
Very low
Blinking red
light
The Notication LED also
blinks red
Battery endurance
The battery endurance times are estimates. They will vary depending on factors such as the software being played, the amount of
data received by wireless communication, and the ambient temperature. Using the camera features may also reduce the battery
endurance times shown below.
Approximate play times:
Nintendo 3DS software • 3.5–7 hours Nintendo DS software • 7–12 hours
Battery endurance time
Dim Bright
Screen brightness
ShorterLonger
The screen brightness setting aects the battery endurance time.
Keeping brightness at lower settings can prolong battery life. If you
tap power-saving mode ON, screen brightness and color gradation
will automatically adjusted to match the displayed images, and
battery consumption will be limited even further (page 26).
Basic Operations
Power On/Off and Basic Configuration
• If you put the system in Sleep Mode when not using it, you can reduce power consumption while still being able to send and
receive information from StreetPass and SpotPass via the wireless communication features. If the system is fully charged and put
into Sleep Mode, the system’s battery endurance time in Sleep Mode is roughly 3 days.
• The power LED slowly brightens and darkens while the system is in Sleep Mode. NOTE: Depending on the software you are using,
sometimes pushing the Sleep switch will not cause the system to enter Sleep Mode. In these cases the power LED will remain
steadily lit. (For example, when listening to music with Nintendo 3DS Sound.)
1918
 Loading...