

Page 1
Operations Manual
Thank you for purchasing this system. Please read this Operations Manual before use, paying careful attention
to the Health and Safety Information section on
supervise the use of this product by children.
Note:
See p. 2 for a complete list of items included with the system.
•
In this manual, the term “Nintendo 3DS system” refers to all systems in the Nintendo 3DS™ family, which includes
•
New Nintendo 3DS™, New Nintendo 3DS XL, New Nintendo 2DS™ XL, Nintendo 3DS, Nintendo 3DS XL and
Nintendo 2DS™.
p. 9, and follow all the instructions carefully. Adults should
Preparations Using Software Adjusting System Settings Troubleshooting
Nintendo may change product specications and update the manual from time to time. The latest version of the manual is available at
http://docs.nintendo-europe.com. (This service may not be available in some countries.)
Page 2
T his seal is your assurance that Nintendo has reviewed this
product and that it has met our standards for excellence in
workmanship, reliability and entertainment value. Always look
for this seal when buying games and accessories to ensure
complete compatibility with your Nintendo Product.
Thank you for selecting the New Nintendo 2DS XL system.
Set Contents
New Nintendo 2DS XL system (JAN-001) x 1
Nintendo 3DS AC adapter (WAP-002(UKV)/WAP-002(EUR)) x 1
[0612/UKV/HW]
New Nintendo 2DS XL stylus (JAN-004)
Note: The stylus is located in the stylus holder on the underside of the system ( p. 13).
microSDHC memory card
Note:
The microSDHC memory card is inserted in the microSD card slot ( p. 13). The microSDHC card is a
•
third-party accessory not manufactured by Nintendo.
The capacity of the microSDHC card is stated on the box.
•
AR Cards
Note: These are used in conjunction with the built-in application, AR Games: Augmented Reality ( p. 21).
x 1
x 1
x 6
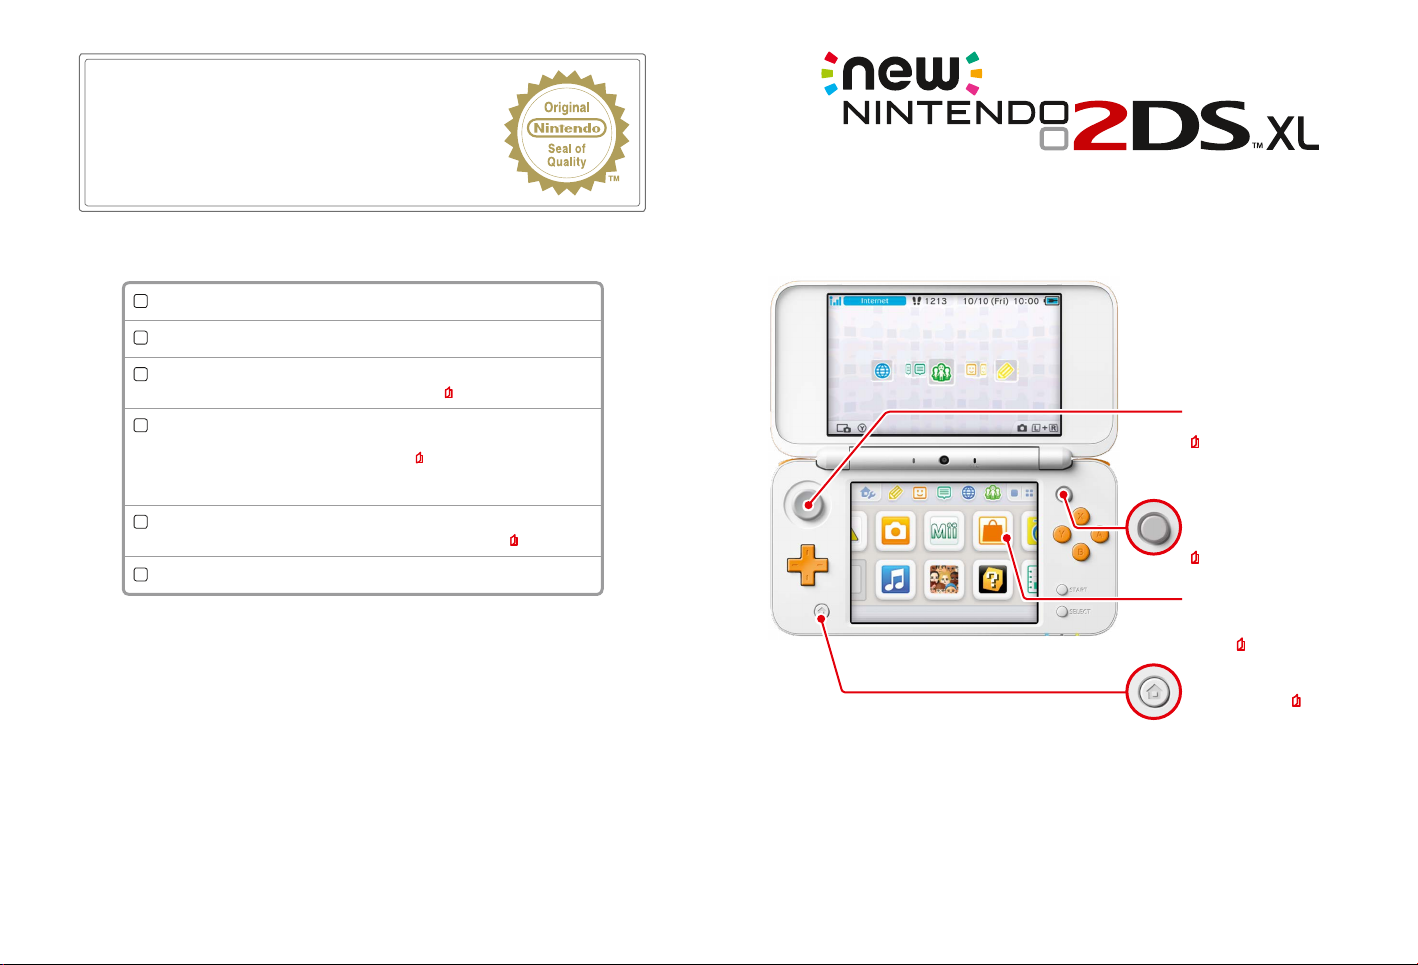
Circle Pad
Allows for precision movement
(
p. 12)
C Stick
Reacts to the pressure you place on it,
allowing for easy, precise movement
(
p. 12)
Operations Manual x 1
Touch Screen
Touch-sensitive screen that allows
you to control software by touching
and sliding (
p. 12)
HOME Button
Displays the HOME Menu ( p. 19)
2 3
Page 3
Enjoy online services with a…
Nintendo Network ID
A Nintendo Network™ ID allows you to enjoy various features
of Nintendo Network.
Find the latest software!
Download free software and
demos from Nintendo eShop.
We hope you enjoy using these services by creating a Nintendo Network ID ( p. 31).
Communicate with other users
around the world in Miiverse™.
You can use your Nintendo eShop
funds on both your
New Nintendo 2DS XL system and
a Wii U™ console.
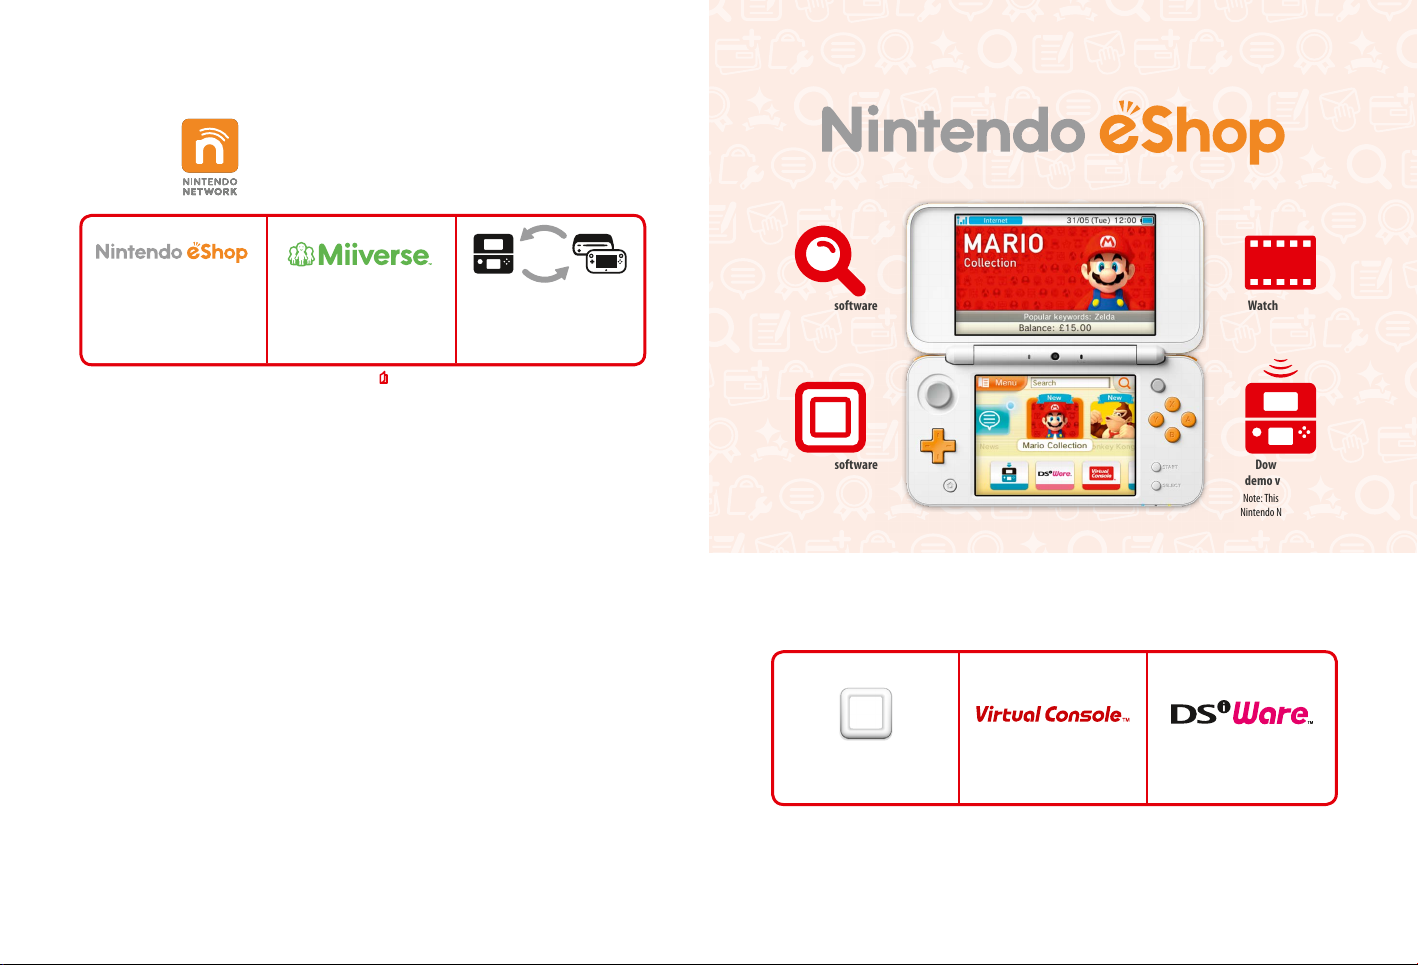
Search for software Watch videos
Download software Download
Connect to the internet and access Nintendo eShop to view the latest information and videos about dierent
kinds of software, purchase downloadable software and try out software demos.
demo versions
Note: This requires a
Nintendo Network ID.
What you can buy
Downloadable software Virtual Console™ Nintendo DSiWare™
You can buy new software exclusive to
Nintendo eShop, or download versions of
card-based software.
You can buy the games you loved on
platforms like NES™, Game Boy™ and
Game Boy™ Color.
You can buy software originally released on
Nintendo DSi™, known as Nintendo DSiWare.
4 5
Page 4
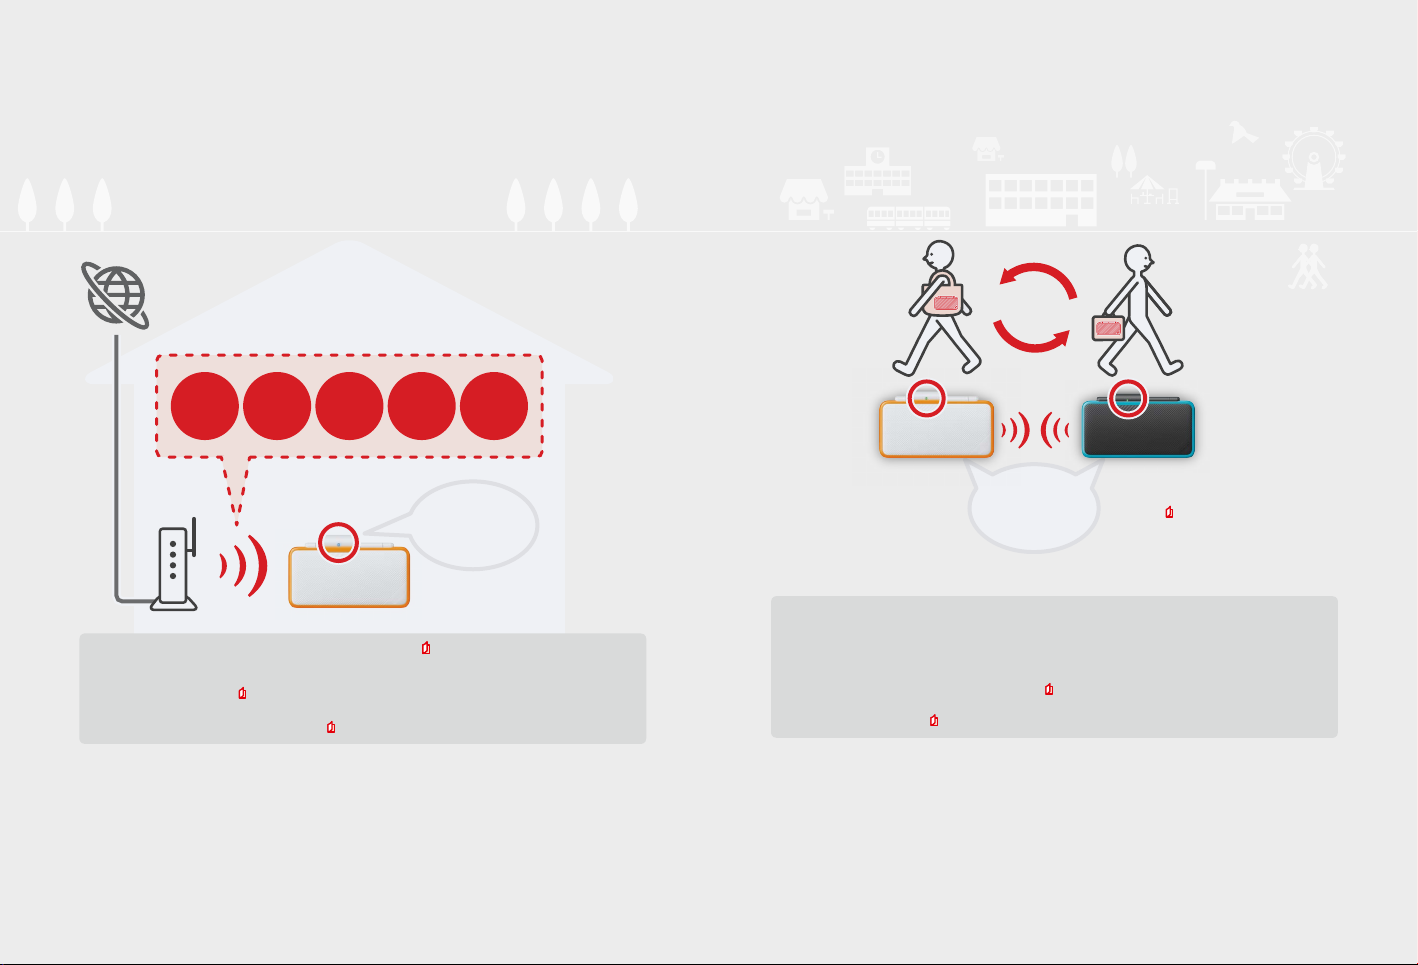
Receive updates and information
SpotPass™
Your system will automatically search for wireless access points, connect to the internet and exchange data at various times, including while in
Sleep Mode (when the system is closed but the power is on).
Internet
Communicate automatically with other Nintendo systems
StreetPass™
Your system automatically searches for and exchanges data with other Nintendo 3DS systems when you carry it around, such as when you're
out walking or when you travel by train.
Free
software
You must congure Internet Settings to be able to connect to wireless access points ( p. 33).
Note:
SpotPass functionality may not be available if an active software title is using certain features or functionality. SpotPass functionality is not available
•
during local wireless communication (
Depending on the type of data received, the notication LED may not light up.
•
A Nintendo Network ID is required to download free software ( p. 31).
•
Image
content
p. 19) or while playing Nintendo DS/Nintendo DSi software.
Notications
System
updates
Flashes blue when
receiving notications
Note: Data received via SpotPass is
saved to the microSD card.
Other
information
Flashes green
when data is being
transferred.
Data will automatically be exchanged if you walk past someone who has the same software title registered with
StreetPass while the system is in Sleep Mode (closed while the power is on), as well as at other times.
Your StreetPass settings are saved on the system.
Note:
A maximum of 12 software titles can use StreetPass at any one time.
•
Contact Mode settings for Nintendo DS / Nintendo DSi software titles are not saved and must be congured while playing compatible titles. Further-
•
more, it is not possible to exchange StreetPass data for Nintendo 3DS software titles while Nintendo DS / Nintendo DSi software titles are in use.
Data cannot be transmitted if the power or wireless functions are o ( p.23).
•
StreetPass functionality may not be available if an active software title is using certain features or functionality. StreetPass functionality is not available
•
during local wireless communication (
p. 19) or when connected to the internet.
Note: A notication is added to your
Notications list (
p. 24).
6 7
Page 5
Contents
Set Contents 2
•
Health and Safety Information 9
•
Preparations
Component Names and Functions 11
Recharging
Turning the Power On and O 15
Using Software
Downloadable Software
14
Conguring the System for the First Time 15
Using the Keyboards 17
Power LED 18
Battery Life 18
HOME Menu 19
HOME Menu Electronic Manual 20
Software Icons 20
Opening Software 22
Software Electronic Manuals 22
HOME Menu Settings 23
HOME Menu Application Icons 24
Card-Based Software 26
Using Game Cards 27
29
Opening Software 29
Adjusting System Settings
System Settings 30
Nintendo Network ID Settings 31
Creating or Linking a Nintendo Network ID 32
Internet Settings 33
Required Items for Internet Connection 33
Connecting to the Internet 34
Parental Controls 38
Options That Can Be Restricted 38
Conguring Parental Controls 39
Data Management 40
Other Settings 41
System Transfer 42
System Update 47
Format System Memory 48
Troubleshooting
Replacing the microSD Card 49
If Your microSD Card is Full… 50
Troubleshooting 51
Technical Specications 57
•
Contact Information 58
•
Health and Safety Information
Please read and observe the health and safety information. Failure to do so could result in injury or damage.
Adults should supervise the use of this product by children.
WARNING – SEIZURES
Some people (about 1 in 4000) may have seizures or blackouts triggered by light ashes or patterns, and this may occur while they
are watching TV or playing video games, even if they have never had a seizure before. Anyone who has ever experienced seizures,
loss of awareness or any other symptom linked to an epileptic condition should consult a doctor before playing video games.
Stop playing and consult a doctor if you have any unusual symptoms, such as: convulsions, eye or muscle twitching, loss of awareness,
altered vision, involuntary movements, or disorientation.
To reduce the likelihood of a seizure when playing video games:
• Do not play if you are tired or need sleep.
• Play in a well-lit room.
• Take a break of 10 to 15 minutes every hour.
WARNING – EYE STRAIN, MOTION SICKNESS AND REPETITIVE MOTION INJURIES
Avoid excessively long play sessions.
Take a break of 10 to 15 minutes every hour, even if you don’t think you need it.
Stop playing if you experience any of these symptoms:
• If your eyes become tired or sore, or if you feel dizzy, nauseated or tired;
• If your hands, wrists, or arms become tired or sore, or if you feel tingling, numbness, burning or stiness or other discomfort.
If any of these symptoms persist, consult a doctor.
WARNING – BATTERY
Stop using if the battery is leaking.
If battery uid comes into contact with your eyes, immediately rinse your eyes with plenty of water and consult a doctor. If any uid
leaks on your hands, wash them thoroughly with water. Carefully wipe the uid from the exterior of the device with a cloth.
This product contains a lithium-ion battery. Do not replace the battery yourself. The battery must be removed and replaced by a qualied
professional. Please contact Nintendo Customer Support for more information.
WARNING – ELECTRICAL SAFETY
Use only the AC adapter (WAP-002) to charge the system.
Connect the AC adapter to the correct voltage (AC 220-240V).
Do not use voltage transformers or plugs that deliver reduced amounts of electricity.
The AC adapter should be plugged into a nearby, easily accessible socket.
The AC adapter is for indoor use only.
If you hear a strange noise, see smoke or smell something strange, unplug the AC adapter from the socket and contact
Nintendo Customer Support.
Do not expose devices to excessive force, re, microwaves, high temperatures or direct sunlight.
Do not pull on cables and do not twist them too tightly.
Do not let devices come into contact with liquid and do not use them with wet or oily hands.
If liquid gets inside, stop using and contact Nintendo Customer Support.
Do not touch device connectors with your ngers or metal objects.
Do not touch the AC adapter or connected devices while charging during a thunderstorm.
Use only compatible accessories that have been approved for use in your country.
Do not disassemble or try to repair devices. If devices are damaged, stop using them and contact Nintendo Customer Support.
Do not touch damaged areas. Avoid contact with any leaking uid.
Health and Safety Information
98
Page 6
WARNING – GENERAL
Keep this system, its accessories and packaging materials away from young children.
Small parts such as Game Cards, microSD cards and packaging items may be swallowed. The cables can coil around the neck.
Do not use this system within 25 centimetres (10 inches) of a cardiac pacemaker while using wireless communication.
If you have a pacemaker or other implanted medical device, rst consult a doctor.
Wireless communication may not be allowed in certain places such as aeroplanes or hospitals.
Please follow respective regulations.
Do not use excessive volume for headphones.
This may damage your hearing. Keep the volume at a level at which you can hear your surroundings.
Consult a doctor if you experience symptoms such as buzzing in your ears.
CAREFUL USAGE
Do not place the system in humid areas or areas where the temperature can suddenly change. If condensation forms, turn the power
Health and Safety Information
o and wait until the water droplets have evaporated.
If devices become dirty, wipe them with a soft, dry cloth.
Avoid using thinner, benzene or alcohol.
Be aware of your surroundings while playing.
Make sure to charge the built-in battery at least once every six months.
If the battery is not used for an extended period of time, it may become impossible to charge it.
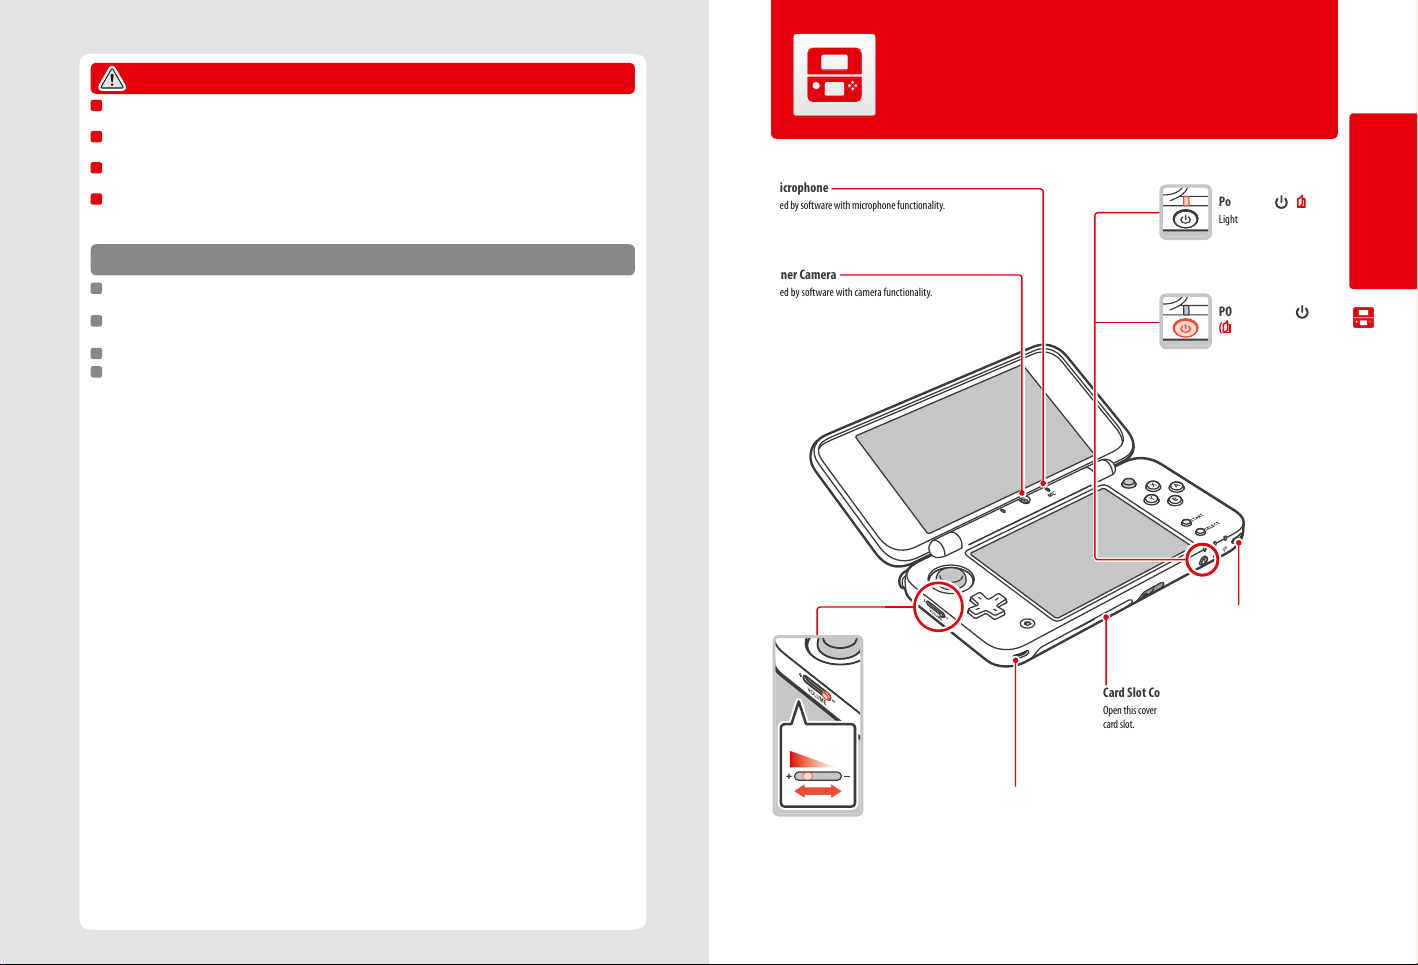
Component Names and Functions
The functions of these components are explained in this Operations Manual.
Microphone
Used by software with microphone functionality.
Inner Camera
Used by software with camera functionality.
Power LED ( ) ( p. 18)
Lights up when the power is on.
POWER Button ( )
p. 15)
(
Speaker (R)
Preparations
Component Names and Functions
10
Volume
Volume Control
Slide to adjust the volume.
Note: The camera's shutter sound will always be
played at a xed volume, regardless of the current
volume setting.
Speaker (L)
Card Slot Cover
Open this cover to access the Game Card slot and the microSD
card slot.
11
Page 7
Notication LED
Noties you of the status of the system by ashing
and changing colour.
Received SpotPass notication
•
(ashes blue for ve seconds) (
Received StreetPass communication
•
(ashes green for ve seconds) (
Friend has come online
•
(ashes orange for ve seconds) (
Battery power is low (ashes red) ( p.18)
•
Preparations
Circle Pad
Used by software that supports
Circle Pad input.
Note: If the Circle Pad is not working
properly, please refer to
NFC (Near-Field
Communication) Area
Touch an amiibo™ accessory or other
Component Names and Functions
NFC-compatible object to this area
to read or write data while using the
appropriate software.
p. 52.
Control Pad
HOME Button (
Displays the HOME Menu ( p. 19).
)
Touch Screen Controls
p. 6)
p. 7)
p. 24)
LCD Screen
C Stick
Allows control of C Stick-compatible
software, and can be used instead
of the Nintendo 3DS Circle Pad Pro
for software compatible with that
accessory.
Software compatible with the
Circle Pad Pro will have the following icon on its packaging:
Circle Pad Pro
Control Buttons
(A, B, X and Y Buttons)
START
SELECT
Recharge LED (
Lights up orange while the battery is recharging.
) ( p. 14)
Wireless LED ( )
Lights up yellow when wireless communication
or NFC is enabled, and remains o when wireless
communication is disabled. Flashes yellow when
data is being sent or received.
Note:
When in Sleep Mode, the wireless LED will
•
light or ash more dimly.
Wireless communication and NFC can be
•
activated/deactivated from the HOME Menu
Settings (
p. 23).
Outer Cameras
Used by software with camera functionality. These two
cameras allow 3D photographs/videos to be taken.
Note: 3D images cannot be viewed on New Nintendo 2DS XL.
AC Adapter Connector
p. 14)
(
Allows connection of the Nintendo 3DS AC
adapter (WAP-002(UKV)/WAP-002(EUR)).
Infrared Transceiver
Sends and receives signals for software
with infrared functionality.
R Button L Button
ZR Button ZL Button
Stylus Holder
Used to store the stylus.
Note: Do not attempt to place
anything into the stylus holder
other than the stylus that came
with this system.
Audio Jack
For connection of commercially available stereo headphones. When
connected, no sound will be played through the speakers.
Note: Please use accessories that are compatible.
Game Card Slot ( p. 27)
For loading Nintendo 3DS Game Cards, Nintendo DS Game Cards,
Nintendo DSi Game Cards and Nintendo DSi enhanced Game
Cards.
microSD Card Slot
Note: A microSD card will already be
inserted.
Preparations
Component Names and Functions
Touch
Gently pressing the Touch
Screen with the stylus is called
"touching" (or "tapping").
12 13
Slide
Tracing over the Touch Screen
with the stylus held gently
against it is called "sliding".
LCD Screen (Touch Screen)
Touch sensitive screen that enables tactile interaction. For software
that supports this control feature, use the included stylus.
Page 8
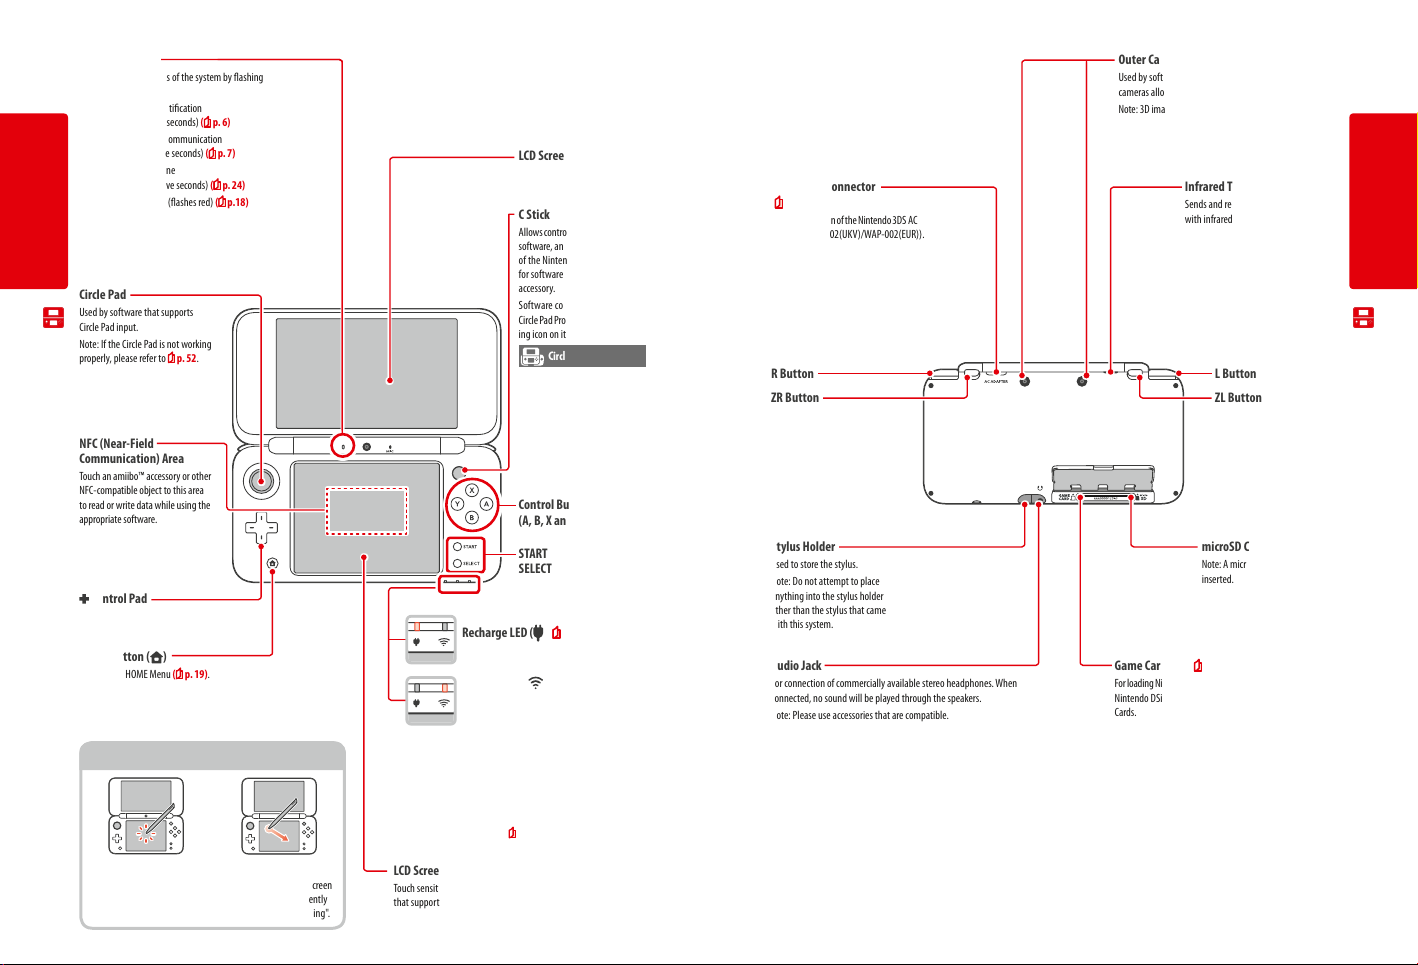
Recharging
You must charge the battery before you use your system for the rst time.
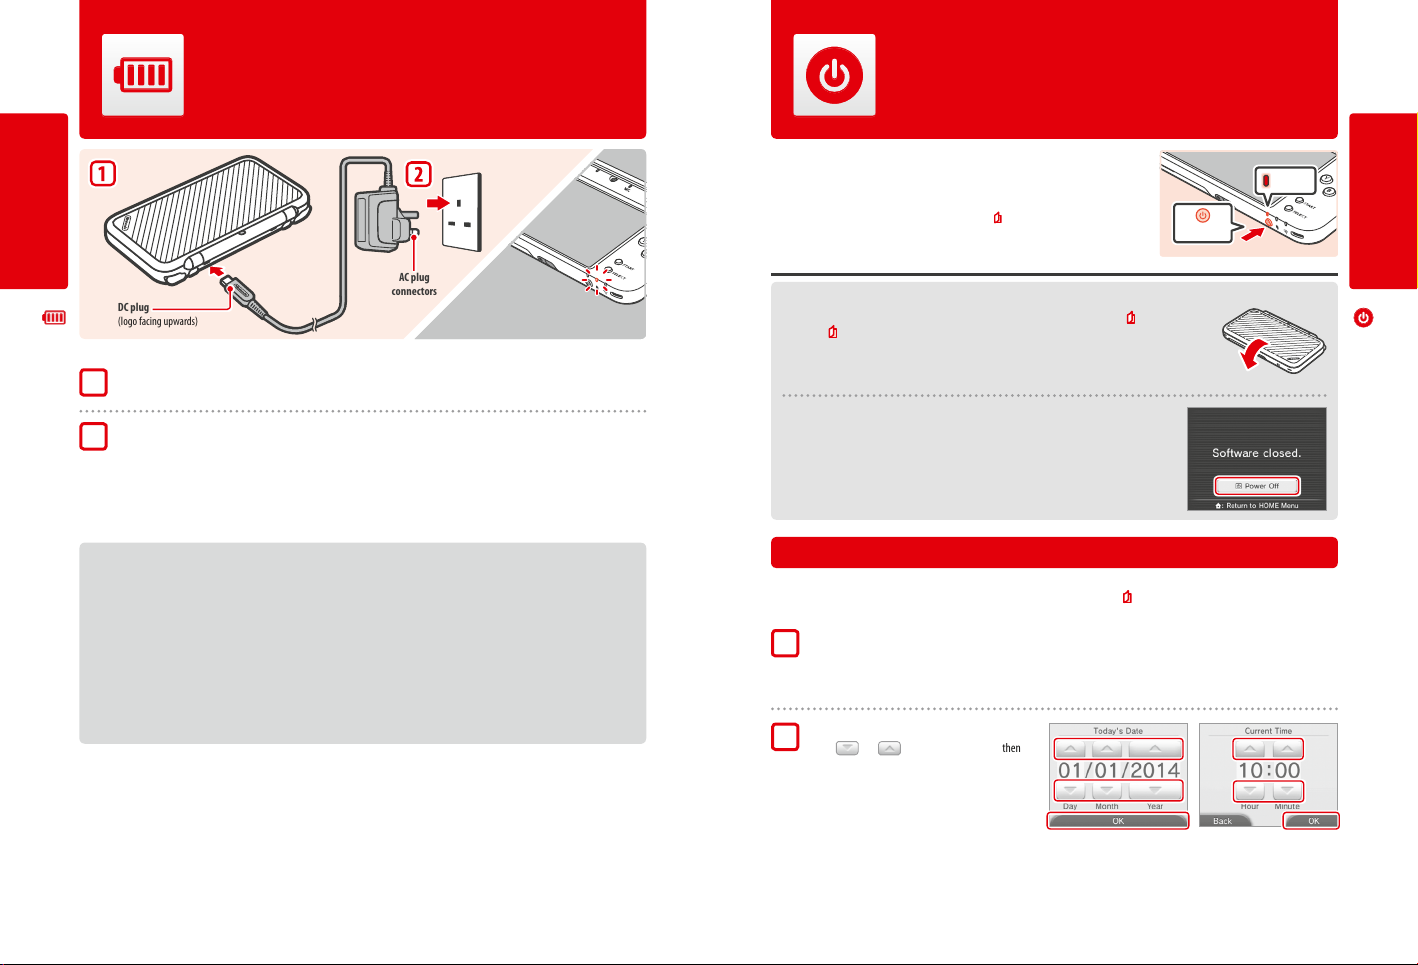
Turning the Power On and O
The POWER Button is used to turn the system both on and o. You must congure
the System Settings the rst time the power is turned on.
Preparations
AC plug
DC plug
(logo facing upwards)
Note: The illustration above shows the UK version of the AC adapter.
Connect the DC connector plug to the system
1
Recharging
Note: Be sure the DC connector plug is the right way up before inserting it into the system.
Insert the AC adapter plug into a standard 220 – 240V AC plug socket
2
The recharge LED will light up when charging begins, and turn o when charging is nished. When charging has nished, remove the
AC adapter plug from the plug socket and remove the DC connector plug from the system.
Note:
If you play a game while the system is recharging, the recharge LED may not always turn o once charging has completed.
•
This is not a malfunction.
To detach the system from the AC adapter, hold the system and the DC connector plug, not the cable, while you remove it.
•
connectors
Recharge LED lit
(The LED will go out when
charging is complete.)
About charging
The system takes approximately 3 hours 30 minutes to fully recharge when o. Charging time may vary if the system is being used while charging,
•
or depending on the level of charge remaining in the battery.
Charge the system in an environment of 5 – 35°C. Attempting to charge the battery while the ambient temperature is outside this range may degrade
•
the battery and prevent it from charging. If the ambient temperature is low, the battery may not charge completely.
Battery life decreases slightly over time as the battery is continually used and recharged. After 500 recharges, battery life may be reduced to 70% of
•
the battery life at the time of purchase.
Make sure to charge the battery at least once every six months. Lithium-ion batteries can slowly lose their charge over time if they have not been
•
used for a while. If the system is not used for an extended period of time, the battery may become overdischarged and may be impossible to charge
when connecting the AC adapter.
If you feel the usage time has noticeably reduced, it may be time to replace the battery. Please contact Nintendo Customer Support for more
•
information.
Turn the system on by pressing the POWER Button. The power LED will light up when the
system has been turned on.
Note:
It may take several seconds for the HOME Menu to display after the power is turned on.
•
For information about the power LED and battery life, see p. 18.
•
Power on
Lit
Sleep Mode and Turning the Power O
Sleep Mode
Close your system during play to suspend software and activate Sleep Mode. SpotPass ( p. 6) and
StreetPass (
p. 7) remain active when the system is in Sleep Mode, but power consumption is greatly
reduced.
Note: Some software cannot enter Sleep Mode while in use or while carrying out specic tasks. For example,
Nintendo 3DS Sound cannot enter Sleep Mode during playback.
Close system
Turning the power o
Press the POWER Button to display the POWER Menu. From here, touch POWER OFF to turn the
power o. Alternatively, pressing and holding the POWER Button has the same eect.
Conguring the System for the First Time
You must congure the system after turning it on for the rst time. If this system is to be used by children, an adult should make sure to perform
these steps. The following steps should be performed with the stylus on the Touch Screen (
Set the system language
1
Touch the language you would like to use, then touch OK.
Note: When the system is rst used, messages about it and its features will be displayed on the screen. Read each message, then
touch OK to proceed.
Set the date and time
2
Touch and to set the date and time, then
touch OK.
p. 12).
Preparations
Turning the Power On and O
14 15
Page 9
Enter a user name
3
Note:
For information on keyboard usage, see p. 17.
•
Names can be a maximum of 10 characters.
•
The name you choose will be visible on other Nintendo 3DS and Nintendo DS systems via
•
wireless communication, so do not include words or phrases that others may nd oensive.
The use of inappropriate language may result in the display of your name being restricted
on other Nintendo 3DS systems.
Enter your date of birth
4
Preparations
Select your country of residence, then your region
5
Accept the Nintendo 3DS Service User Agreement
6
and Privacy Policy
After reading the information, touch I ACCEPT. If you would rather accept these terms
later, touch LATER.
Congure your internet settings ( p. 33)
Turning the Power On and O
7
Connecting to the internet allows various types of data to be exchanged via SpotPass and
wireless play to be used with supported software titles. To set this later, touch SET LATER.
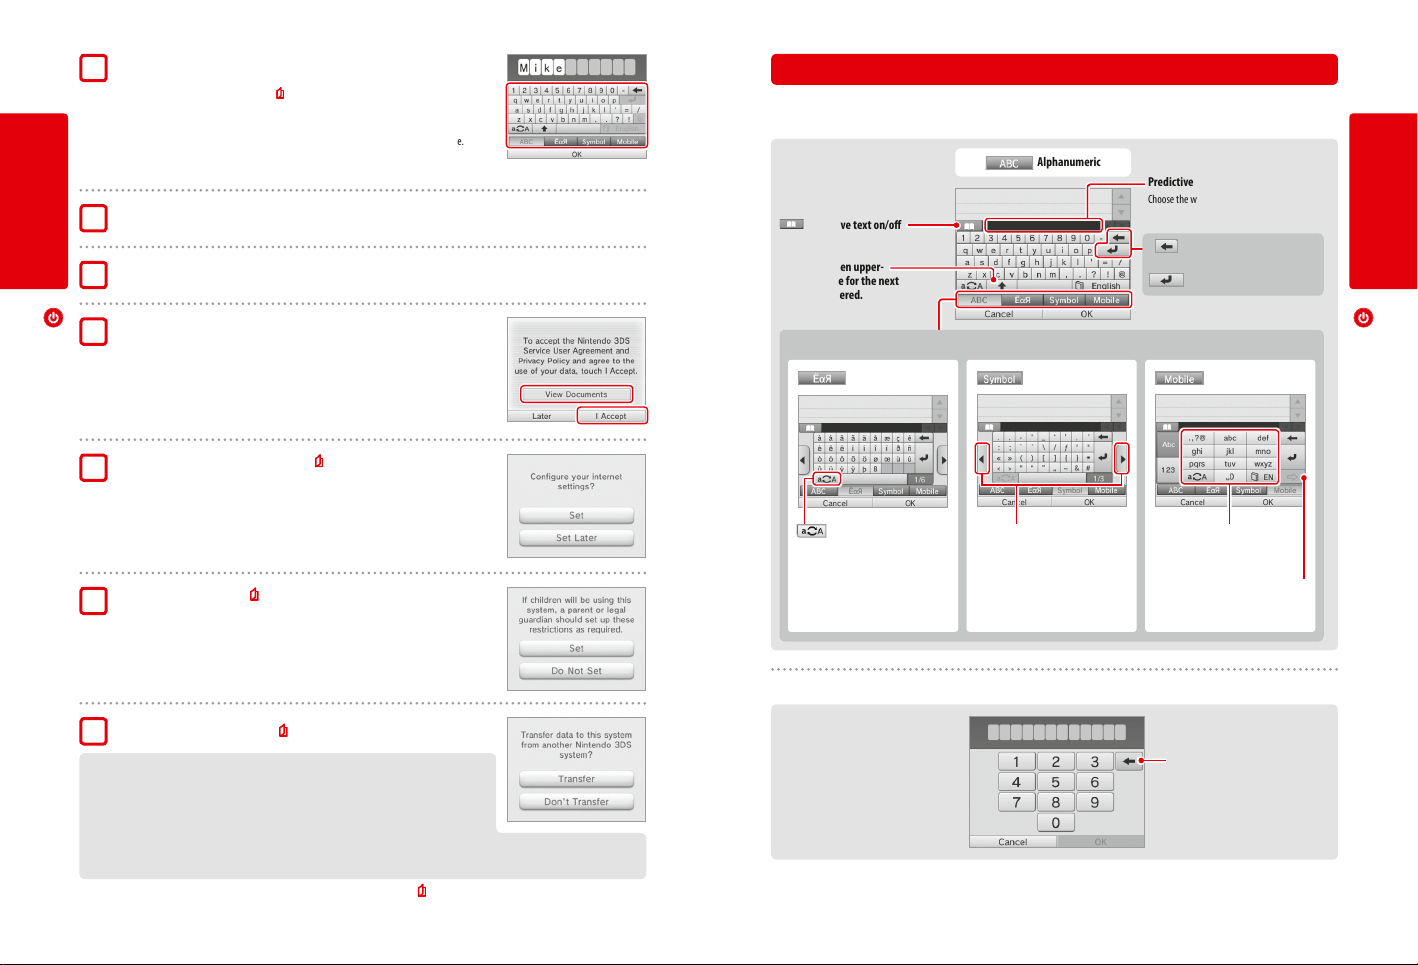
Using the Keyboards
A keyboard will be displayed on the Touch Screen when you are required to input characters. Touch a character to enter it.
Standard
Predictive text on/o
Switch between upper-
and lower case for the next
character entered.
Switch between input modes
Special characters
Alphanumeric
Symbols
Predictive text
Choose the word you want from a list.
Delete the character to the
left of the cursor.
Move to the next line.
Mobile phone
Preparations
Turning the Power On and O
Show additional characters. Cycle through the characters
assigned to each button by
pressing it repeatedly.
Conrm character input and
move to the next space.
Next character
Set Parental Controls ( p. 38)
8
Set up Parental Controls to limit children’s access to certain content and functionality, such as
browsing the internet and interacting with other users.
If the system is to be used by children, parents and guardians should congure Parental Controls
settings as required.
Switch between upper- and
lowercase characters.
Numeric Keyboard
Perform a system transfer ( p. 42)
9
If you own another Nintendo 3DS system and want to transfer data to your new system, please
bear in mind the following:
Congure the initial settings as shown above for the new system before performing the system
•
transfer.
Do not play on the new system before starting the process, as any existing save data for down-
•
loadable and built-in software on the new system will become unusable.
Do not create or link a Nintendo Network ID to the new system before the transfer, otherwise you will be unable to transfer data.
•
Your system is now ready to be used. Press the HOME Button to enter the HOME Menu (
p. 19) and begin using your system.
Delete the last number entered.
16 17
Page 10
Power LED
The power LED lights up blue when the system is turned on, turns red when the battery charge is low and ashes red when the battery is starting
to run out.
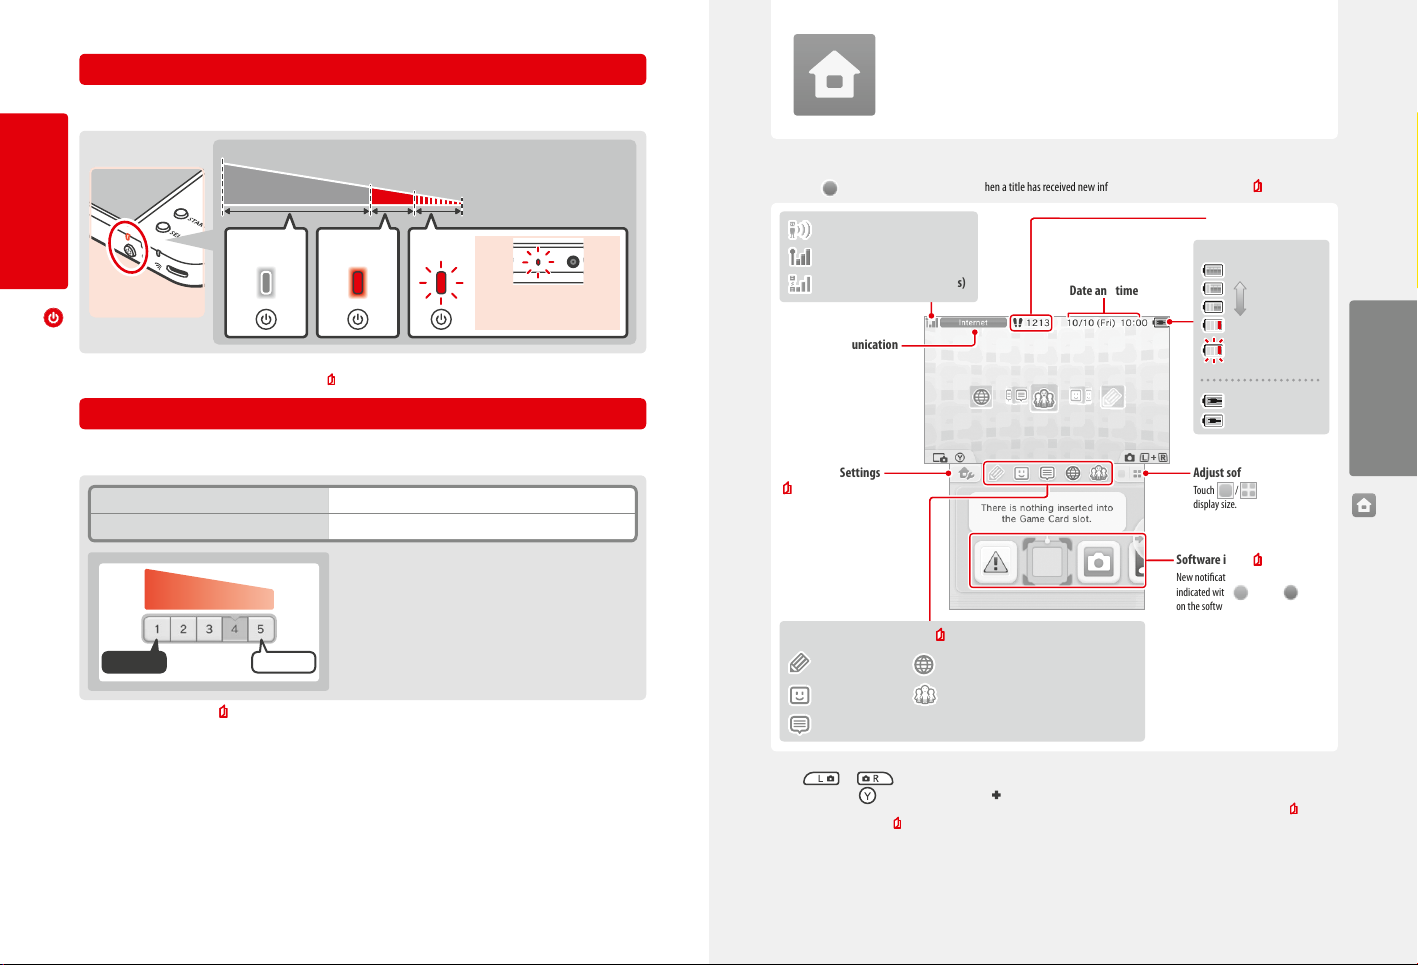
HOME Menu
The HOME Menu is displayed when you turn on the power.
High
Low
Remaining battery charge
Preparations
Solid Blue Solid Red Flashes Red
Note: If the power LED is red, save your game quickly and recharge. If the battery charge runs out before you save, you may lose unsaved data. If the LED
is blue and slowly brightens and dims, the system is in Sleep Mode (
p. 15), which will conserve battery power.
Almost empty
The notication LED
will also ash.
Battery Life
Battery life will vary depending on a number of factors, such as the software being used, the quantity of wireless data sent and received and the
ambient temperature. As such, these times should only be taken as rough estimates.
Turning the Power On and O
Playing Nintendo 3DS software approx. 3.5 – 6.5 hours
Playing Nintendo DS software approx. 5 – 9 hours
Longer ShorterBattery life
The battery life will change depending on the brightness of the LCD screens.
Dark Light
Leaving the system in Sleep Mode ( p. 15) greatly reduces power consumption while leaving wireless communication such as SpotPass and
StreetPass active. If the battery is fully charged, the system can remain in Sleep Mode for 3 days.
Note: The power LED slowly pulses when the system is in Sleep Mode. Some software titles do not allow the system to enter Sleep Mode while in use.
Closing the system while using such software will result in the power LED remaining solidly lit. For example, Nintendo 3DS Sound cannot enter Sleep Mode
during playback.
Screen
brightness
Software titles can be launched from the HOME Menu by touching the icon that corresponds to the title you want to play. The HOME Menu also
shows the time and date, current wireless communication mode and the number of steps you’ve taken that day.
Look out for
on a software icon to instantly tell when a title has received new information or an update via SpotPass ( p. 6).
StreetPass
Signal strength (internet)
Signal strength (local wireless)
Wireless communication
mode
HOME Menu Settings
p. 23)
(
Date and time
Play Coins / Today’s steps
Battery charge
Full
Low
Almost empty
(ashing)
Recharging (ashing)
Recharging complete
Adjust software icon display
Touch /
display size.
to adjust the icon
Software icons ( p. 20)
New notications for software titles are
HOME Menu application icons (
Game Notes
Friend list
p. 24)
Internet browser
Miiverse
indicated with
on the software icon.
(green) / (blue)
Notications
Note:
Press and at the same time to activate the cameras and take photos, or read QR Code patterns.
•
While holding down , press up, down or right on the Control Pad to take a screenshot of the HOME Menu. Pressing up captures the upper screen,
•
and pressing down captures the Touch Screen, while pressing right captures both screens. You can view screenshots in Nintendo 3DS Camera (
(While software is suspended (
Content displayed on the upper screen diers according to the software being used. The display moves in various ways when the microphone picks up
•
noise.
p. 22), only a screenshot of the Touch Screen can be captured.)
p. 21).
Using Software
HOME Menu
18
19
Page 11

HOME Menu Electronic Manual
in the top-left corner of the screen, and then select
Touch
HOME MENU ELECTRONIC MANUAL to display a detailed manual on
how to use the HOME Menu.
Viewing Manuals
Choose an item from the contents
1
Slide up and down to scroll through the contents of
the manual and touch the page you want to view.
Note: Press the Y Button to change the language of the
manual.
View the page
2
Slide up and down to scroll through the contents of
Using Software
the page. Slide left and right to switch pages.
Close manual Change the font size
Software Icons
Free software received via SpotPass and software downloaded via Nintendo eShop are added as icons on the HOME Menu.
HOME Menu
Scrolling the Screen / Moving Software Icons
Scrolling the Screen
Touch an icon, then slide the stylus to the left or right to scroll
through the available software icons.
Moving Software Icons
To move an icon, touch and hold the stylus over the icon until it
detaches, then drag it to where you want to place it and release
the stylus.
Software Icon Types
Card software icons
Nintendo 3DS
Game Card
Nintendo DS / Nintendo DSi
Game Card
The software title’s icon appears after a Game Card
is inserted into the Game Card slot.
Built-in application icons
For information on how to use these software titles, please see their respective electronic manuals ( p. 22).
Health and Safety Information ( p. 9)
Read important health and safet y information for your
system.
Nintendo 3DS Camera
Take 3D photos and videos using this application.
Note: 3D images cannot be viewed on New Nintendo 2DS XL.
Nintendo 3DS Sound
Listen to music and record sounds.
Mii Maker
Make yourself and other people into Mii characters!
StreetPass Mii Plaza
Mii characters you meet through StreetPass ( p. 7)
will appear here.
Nintendo eShop ( p. 5)
View information and videos about various software,
and download new software.
AR Games: Augmented Reality
Use the AR Cards together with the outer cameras to
create believable augmented reality games.
Face Raiders
A shooting game that turns your face, or the faces of
your friends, into the enemies!
Activity Log
Record the number of steps you take while carrying
your system and the length of time you spend using
software.
Download Play
Download demos and play multiplayer games!
System Settings ( p. 30)
Adjust the system settings.
Using Software
HOME Menu
Others
Touch Slide
Gift icon
This icon appears when a new application is added to the HOME Menu. Touch a gift icon to unwrap it.
Note: The icon will ash if the application has not yet nished downloading. Place the system into Sleep Mode ( p. 15) within range of a
compatible internet access point to complete the download.
Any software or video content that is pre-installed on the microSD card will also be displayed on the HOME Menu.
•
20 21
Page 12

Change Theme
Change the design of the HOME Menu by selecting from various themes, or visit the Theme Shop to add
more themes.
Save / Load Layout
Save the layouts for themes and software icons on the HOME Menu, and swap between them.
Screen Brightness
Choose between ve levels of brightness.
Power-Saving Mode
Automatically adjusts the brightness of the screen depending on what is being displayed in order to conserve
battery power. Disabling it ensures that you can maintain a constant brightness level, but results in shorter
continuous play time. This function is turned o by default.
Wireless
Communication / NFC
Activate/deactivate wireless communication and NFC.
Nintendo 3DS
Image Share
Open the internet browser and access Nintendo 3DS Image Share to post screenshots of the HOME Menu to
social networking sites like Twitter and Facebook. Further explanation can be found within Nintendo 3DS
Image Share.
amiibo Settings
Congure amiibo settings. For more information on amiibo, please refer to amiibo.nintendo.eu
Nintendo eShop
Launch Nintendo eShop ( p. 5).
System Settings
Open the System Settings ( p. 30).
HOME Menu
Electronic Manual
Display the HOME Menu electronic manual.
Opening Software
Touch the software icon, then touch OPEN.
HOME Menu Settings
Touch on the HOME Menu to congure the following settings, or to view the HOME Menu
electronic manual.
Closing / Suspending software
Press the HOME Button during game play to suspend a software title and display the
HOME Menu. Touch RESUME or press the HOME Button again to resume play, or touch
CLOSE on the HOME Menu to close the software.
Note:
See p. 24 for details on actions you can perform while software is suspended.
•
Other software titles can be launched, but you must close the suspended title to do this.
•
Using Software
Save before closing software
Any unsaved data will be lost if you close a software title without saving.
Do not remove suspended software or turn o the power
HOME Menu
Do not remove suspended Game Card software, microSD card, or turn the power o while in this state. Doing so can cause data corruption
or loss.
22 23
Software Electronic Manuals
If a software title includes an electronic manual, the MANUAL option will be displayed when the
software icon is selected. Touch this to view the manual. The manual can also be viewed while
the software title is suspended.
Note: Controls for viewing a software manual are the same as for the HOME Menu electronic manual
(
p. 20).
Using Software
HOME Menu
Page 13

HOME Menu Application Icons
Game Notes
Write down notes on games whenever you want.
Friend List
Play and communicate with registered friends via the internet, wherever they may be.
Note: The friend data stored by your Nintendo Network ID is dierent to the friend data stored on this
system. Making changes to this friend list will not aect the friend data attached to your Nintendo
Network ID (
p. 31).
Notications
Receive notications from Nintendo or from software titles via StreetPass and SpotPass.
Internet Browser
View web pages on the internet.
Miiverse
Miiverse is an online service where people from across the world meet up using their
Mii characters. Using Miiverse, you can share your experiences playing games or thoughts
on a topic you're interested in with people from all over the world.
Note: A Nintendo Network ID is required to post or comment to Miiverse ( p. 31).
Touch the icons displayed on the HOME Menu on the upper part of the Touch Screen
Note:
Refer to each application’s electronic manual for more details ( p. 22).
•
The Miiverse manual can be viewed within Miiverse after launching the software.
•
Using Software
to use the functions below.
When suspended…
When a software title is suspended, you can adjust HOME Menu Settings and also access Game Notes, the friend list, Notications,
the internet browser, Miiverse, camera mode and software manuals.
Press the HOME Button to suspend the software and open the HOME Menu to access these features.
Note:
Depending on the state of the software (wireless communication or outer cameras in use, etc.), the HOME Menu may not be displayed, or certain
•
HOME Menu
functions may not be accessible. Some software titles do not make use of certain HOME Menu functions.
Nintendo DS / Nintendo DSi software titles cannot be suspended.
•
Points to note regarding the friend list
Do not share your friend code with people you do not know
The friend list is a system intended for use by you and people you know. Posting your friend code on online forums or sharing it with people
you do not know can result in you receiving unwanted data or status messages containing language that you may nd oensive. Do not
share your friend code with people you do not know.
Parental Controls ( p. 38)
You can restrict the use of the friend list by setting Parental Controls.
Protecting children from harmful websites
You can use the Parental Controls settings ( p. 38) to restrict use of the browser in order to prevent children from accessing harmful or
inappropriate websites.
Points to note regarding Miiverse
In Miiverse your posts, comments, and prole comments may be seen by many people. Do not share any personally identifying information or
make posts that may be inappropriate or oensive to others. For more information, see the Miiverse guide (https://miiverse.nintendo.net/guide/).
Parental Controls ( p. 38)
You can restrict the use of Miiverse by setting Parental Controls.
Using Software
HOME Menu
24 25
Page 14

Card-Based Software
How to use Game Cards with your Nintendo system.
Note: If the system language is set to Dutch, Portuguese or Russian, non-Nintendo 3DS titles will default to English.
In some cases, this may be adjustable within the software.
Nintendo 3DS, Nintendo DS, Nintendo DSi and Nintendo DSi enhanced software can be used on this system.
Nintendo 3DS Game Card Nintendo DS / Nintendo DSi Game Card
Using Game Cards
Insert a Game Card into the Game Card slot
1
Game Card
(label facing upwards)
The label on the card and the
bottom of the system should both
face in the same direction.
Note:
All software (including Nintendo 3DS software) will be displayed in 2D only.
•
SpotPass, StreetPass and the HOME Menu cannot be used while Nintendo DS / Nintendo DSi software is in use.
•
Only Nintendo 3DS and Nintendo DSi software titles matching the region of the system will work. Software titles from dierent regions may not function.
•
Nintendo 3DS software titles cannot be used with Nintendo DS, Nintendo DS Lite, Nintendo DSi or Nintendo DSi XL systems.
•
Pan European Game Information (PEGI) age rating system [1113/UKV]
Using Software
Age rating categories
Titles rated 3 are
suitable for ages 3
and older
Content descriptors
Content descriptors are shown on the game packaging where applicable. These icons indicate the main reasons for a game’s age rating.
Card-Based Software
The ’Online’ logo indicates that a game allows the player to have access to online game play with other players.
The PEGI system was established to help parents and guardians make informed decisions when buying computer and video games.
It replaced a number of national age rating systems with a single system now used throughout most of Europe. For further information
about PEGI visit http://www.pegi.info.
Note: The PEGI rating does not indicate difficulty of a game; it provides information about the age suitability of a game based on its content.
Titles rated 7 are
suitable for ages 7
and older
Titles rated 12 are
suitable for ages 12
and older
Titles rated 16 are
suitable for ages 16
and older
Titles rated 18 are
suitable for ages 18
and older
Note:
If you have trouble inserting the Game Card, remove it and check that it is facing the right direction with the label facing away from the
•
system. Forcing the card in when it is facing the wrong direction could lead to damage.
Only inser t or remove Game Cards while the HOME Menu is displayed or the power is o. (If you have suspended a software title, make
•
sure you have closed it before removing its Game Card.)
Push the Game Card in, then remove it
Click
Touch the Game Card icon, then touch OPEN
2
Nintendo DS / Nintendo DSi titles are displayed in an expanded format by default.
To load the software at its original resolution, hold down either START or SELECT,
then touch OPEN to launch the software. Keep START or SELECT held down until
the software has started.
For further information, refer to the instruction manual for the software you are using
3
Using Software
Card-Based Software
26 27
Page 15

Closing software
Press the HOME Button to bring up the HOME Menu, then touch CLOSE to end a software title. (Any unsaved data will be lost if you close a software title without saving.)
Touch RESUME to return to the point where the software title was suspended.
•
To close Nintendo DS / Nintendo DSi software titles, rst save your data, then
•
press the HOME Button and touch OK.
Note: If you press the POWER Button, the software title will close and the POWER Menu
will be displayed (
p. 15).
Game Card system updates
Some Game Cards contain system update data. Such Game Cards will display a message if a system
update is required in order to use the Game Card. Follow the instruc tions to update your system
(
p. 47).
Using Software
Incompatible software and accessories
Charging cradle and Circle Pad Pro accessories are not compatible with this system.
In addition to these products, it is not possible to use any accessories that would connect to the Nintendo DS or Nintendo DS Lite systems
via the Game Boy Advance™ Game Pak slot or anything that functions in conjunction with a Game Boy Advance Game Pak. For more details,
visit support.nintendo.com.
Card-Based Software
Downloadable Software
Enjoy free software downloaded via SpotPass or software purchased via Nintendo eShop.
With the exception of Nintendo DSiWare ( p. 5), downloaded software is saved to a microSD card. The corresponding icons are displayed in
the HOME Menu.
You can get new software by…
Receiving free software via SpotPass ( p. 6).
•
Purchasing software via Nintendo eShop ( p. 5).
•
Precautions for downloadable software
Because some software is transmitted automatically via SpotPass ( p. 6), it is advised that you keep a microSD card inserted at
•
all times.
Up to 40 Nintendo DSiWare titles can be stored in the system memory and up to 300 downloadable software titles can be stored on
•
a microSD card.
Downloadable software (including its save data) can only be used on the system it was originally downloaded to. Software that you
•
save on a microSD card cannot be used with any other system.
A linked Nintendo Network ID is required to download free or demo software ( p. 31).
•
Demo versions of software may have limitations such as a time limit or number of uses. If you exceed this limit and try to open the
•
software, a message will be displayed. Follow the instructions to delete the software or open Nintendo eShop.
If the system language is set to Dutch, Portuguese or Russian, Nintendo DSiWare titles will default to English. In some cases, this may
•
be adjustable within the software.
Only Nintendo 3DS software and Nintendo DSiWare matching the region of the system will work. Software titles from dierent regions
•
may not function.
Opening Software
Touch the Game Card icon, then touch OPEN
1
Nintendo DSiWare titles are displayed in an expanded format by default. To load
the software at its original resolution, hold down either START or SELECT when
launching the software. Keep START or SELECT held down until the software has
started.
Using Software
Downloadable Software
For further instructions, refer to the instruction manual for the software you are using
2
How to view the electronic manual ( p. 22)
•
About software ratings ( p. 26)
•
How to close a software title ( p. 28)
•
28 29
Page 16

System Settings
Congure your internet settings, Parental Controls and other basic system settings here.
Nintendo Network ID Settings
Create or link a Nintendo Network ID and congure your user information.
Touch the System Settings icon on the HOME Menu to open the System Settings.
For detailed information, consult the
electronic manual.
NINTENDO NETWORK ID
SETTINGS
INTERNET SETTINGS
PARENTAL CONTROLS
DATA MANAGEMENT
OTHER SETTINGS
Adjusting System Settings
System Settings
Adjust your Nintendo Network ID prole, delete your ID or link an existing ID to your system ( p. 31).
CONNECTION SETTINGS
SPOTPASS
NINTENDO DS
CONNECTIONS
OTHER INFORMATION
Restrict features such as online interaction, StreetPass, use of the internet browser and Nintendo 3DS Shopping
Service (
p. 38).
Manage data such as Nintendo 3DS download software, Nintendo DSiWare and StreetPass data. You can
also clear your blocked-user settings (
Manage your prole information, date and time settings, and more ( p. 41).
Congure your internet connection settings (
Change your automatic software download and sending of system information
settings.
Congure internet settings for Nintendo DS software.
Review the Nintendo 3DS Service User Agreement and Privacy Policy, or check
the system’s MAC address.
p. 40).
p. 33).
A Nintendo Network ID allows you to enjoy various features of Nintendo Network.
Download free software and
demos from Nintendo eShop
An internet connection ( p. 33) and an email address are required to create a Nintendo Network ID and link it to your system.
•
Adults should create or link a Nintendo Network ID for their children.
•
p. 5).
(
Communicate with other
users around the world in
Miiverse (
p. 24).
Use your Nintendo eShop
funds on both your system and
a Wii U console.
If you own another Nintendo 3DS system and want to transfer data to your new system…
Congure the initial settings for the new system and then perform the system transfer ( p. 42). Do not create or link a Nintendo Network ID
to the new system before the transfer.
Caution
If you link a new Nintendo Network ID to this system, you will be unable to transfer data from another
Nintendo 3DS system.
Points to note regarding Nintendo Network IDs
You will need to sign in with your ID each time you use
•
Nintendo eShop.
Once you have created or linked a Nintendo Network ID, your
•
system’s Nintendo eShop account activity and funds will be
merged with those of your Nintendo Network ID.
NintendoMario123
Only one ID can be linked per system.
•
1
You cannot link a Nintendo Network ID to multiple
•
Nintendo 3DS systems.
NintendoMario123
Note: You can, however, transfer all of your data to another system
which has not been linked to a Nintendo Network ID using System
Transfer (
p. 42).
NintendoMario123
You cannot merge two Nintendo Network IDs.
•
NintendoMario123 NintendoLuigi12 3
You cannot perform system transfers to a system that is
•
already linked to a Nintendo Network ID.
NintendoMario123 NintendoLuigi12 3
Friend data stored by your Nintendo Network ID and friend
•
data stored on this system are kept separately. Friend data
stored by your Nintendo Network ID can only be deleted or
changed using a Wii U console, and will only be needed in
software that requires you to sign in with your ID.
Adjusting System Settings
Nintendo Network ID Settings
30 31
Page 17

Creating or Linking a Nintendo Network ID
There are two methods:
Create a new Nintendo Network ID.
•
Use an ID already linked to a Wii U console.
•
If you own a Wii U console…
You can link the existing ID from your Wii U console to
this system. Doing so allows you to share your existing
Nintendo eShop funds between devices, and to post to
Miiverse as the same user.
Please be aware that if you create a new Nintendo Network ID on your system, you will not be able to combine or share Nintendo eShop
funds linked to the existing Nintendo Network ID on your Wii U console.
Recommended for owners of
Wii U
Nintendo Network ID
on Wii U
Link
Nintendo eShop funds can be shared!
New Nintendo 2DS XL
Internet Settings
Connect your system to the internet to open up even more options, such as purchasing software in
Nintendo eShop or communicating with players around the world.
Required Items for Internet Connection
A wireless connection is required to connect your system to the internet. A computer is needed to congure the settings on your wireless access
point (router).
Internet
Broadband internet connection
(ADSL, cable or bre optic)
Broadband
internet connection
Modem
and/or router
Wireless
communication
Cannot combine
Nintendo Network ID on
New Nintendo 2DS XL
Newly created ID
Touch NINTENDO NETWORK ID SETTINGS in the System Settings ( p. 30) to begin.
Select LINK AN EXISTING ID or CREATE A NEW ID
1
If you create a new ID on your system, you will not be able to merge it
Adjusting System Settings
Nintendo Network ID Settings
with an existing ID in use on a Wii U console. You will need to select LINK
AN EXISTING ID if you would like to use the same ID across both devices.
Follow the on-screen instructions
2
There are certain services which require you to sign in with your Nintendo Network ID in order to use them. If you forget your pass-
word, select I FORGOT or I FORGOT MY PASSWORD, then follow the on-screen instructions.
Nintendo Network ID
on Wii U
ID linked to Wii U
Nintendo eShop funds cannot be shared!
Please be aware that is it not possible to combine two
existing Nintendo Network IDs.
Wireless access points
Note:
It is easiest to connect to wireless access points which support AOSS™ or Wi-Fi Protected Setup™.
•
Use an access point which supports the 802.11b and/or 802.11g standards. Access points which only
•
support 802.11a are incompatible.
Activating and deactivating wireless communication
To activate or deactivate wireless communication and near-eld communication (NFC), touch in the upper-left corner of the Touch Screen
while on the HOME Menu to open the HOME Menu Settings, then touch ON or OFF under Wireless Communication/NFC.
Adjusting System Settings
Internet Settings
32 33
Page 18

Connecting to the Internet
Once you have everything you need to connect to the internet, you can start conguring the settings on your system.
Note: In order to connect to the internet when using a Nintendo DS Game Card, you must congure Nintendo DS Connections.
Touch CONNECTION SETTINGS
1
Touch NEW CONNECTION
2
Connecting using AOSS
If your access point supports AOSS, you can set up a connection quickly and easily. Refer to the instruction manual for your access point in addition
to this manual.
Note: Using AOSS may cause your access point settings to change. If your computer is connected to the access point without using AOSS, it may
no longer be able to connect after using AOSS. Establishing a connection using an access point found through a search will not change any of
the access point’s settings (
Touch AOSS
1
Note: If you are using the tutorial and you have selected , star t from step 2.
Steps for the access point
2
p. 37).
Find your ideal settings with the tutorial
Touch TUTORIAL to receive help with the connection setup process. Follow the instructions
on-screen and select options to congure the right settings for your connection.
For AOSS guidance, see p. 35.
•
For Wi-Fi Protected Setup guidance, see p. 36.
•
For guidance on searching for and conguring access points, see p. 37.
•
Press and hold the AOSS button on the access point until the
AOSS light ashes twice in succession.
Note: If you have tried and failed several times to set up a connection using AOSS, wait approximately
5 minutes before trying again.
Once the setup complete screen appears, touch OK to begin a connection test
3
If the test is successful, setup is complete.
•
Failure to establish a connection can sometimes occur after AOSS setup is complete. If this happens, please wait a short while
•
before trying to reconnect.
AOSS button
Adjusting System Settings
Setting up a connection without the tutorial
If you would rather set up your connection without assistance, touch MANUAL SETUP instead,
then select from the options displayed to congure your connection.
Adjusting System Settings
For AOSS guidance, see p. 35.
•
For Wi-Fi Protected Setup guidance, see p. 36.
•
For guidance on searching for and conguring access points, see p. 37.
•
Internet Settings
Internet Settings
34 35
Page 19

Connecting using Wi-Fi Protected Setup
You can set up a connection quickly and easily using Wi-Fi Protected Setup. Refer to the instruction manual of your access point for further
information.
Note: If your access point is set to use WEP security encryption, you will be unable to connect your Nintendo system using Wi-Fi Protected Setup.
Touch
1
Note: If you are using the tutorial and you have selected , start from step 2.
Searching for and connecting to an access point
You can use this method to search for and connect to an access point if your access point does not support AOSS or Wi-Fi Protected Setup. You
should also consult the instruction manual that came with your access point.
Note: If your access point is set to use WPA2™-PSK (TKIP) securit y encryption, your system will not be able to connect to the access point.
Touch SEARCH FOR ACCESS POINT
1
Note: If you are using the tutorial and have selected DON’T KNOW / NONE OF THESE or
OTHER, start from step
2
.
Touch the connection method supported
2
by your access point
Steps for the access point
3
Note: It may take around 2 minutes to complete setup.
For Push-Button Connection
Press and hold the Wi-Fi Protected Setup button on the access point until the LED blinks.
For PIN Connection
A PIN will be displayed on the Touch Screen. Enter the code into the access point
Adjusting System Settings
settings, then touch NEXT.
Note: After conguring the access point, touch NEXT on your system’s Touch Screen.
Once the setup complete screen appears, touch OK to begin a connection test
4
Internet Settings
If the test is successful, setup is complete.
•
Failure to establish a connection can sometimes occur after Wi-Fi Protected Setup is complete. If this happens, please wait a short
•
while before trying to reconnect.
Wi-Fi Protected
Setup button
Select an access point
2
Touch the name of the access point you want to connect to (its SSID, ESSID or network name).
•
If you do not know this name, please consult the settings of the access point you are using.
Enter the security key and touch OK
3
This step only applies if the access point is secured. If you do not know the security key, please consult the settings of the access
•
point you are using.
The characters for the key you entered will be hidden by asterisks (*).
•
Note: A security key is the password set for your access point and is required to enable your system to make an internet connection. It may also
be called an encryption key or network password.
Touch OK to save your settings
4
Touch OK to perform a connection test
5
If the test is successful, setup is complete.
•
If connection fails and an error appears, follow the instructions given in the error message.
•
Security types
Access point security types are shown in the table below:
Encryption Method
Security Strength Weaker Stronger
WEP
WPA™-PSK
(TKIP)
WPA2-PSK
(TKIP)
WPA-PSK
(AES)
WPA2-PSK
(AES)
Adjusting System Settings
Internet Settings
36 37
Page 20

Parental Controls
SOFTWARE RATING
Restricts the use of Nintendo 3DS and Nintendo DSi software based on software rating systems ( p. 26).
Note: Nintendo 3DS software received via Download Play is also restricted, but this setting cannot restrict Nintendo DS
software or software received via DS Download Play.
INTERNET BROWSER
Restricts use of the internet browser and prevents the viewing of web pages.
NINTENDO 3DS
SHOPPING SERVICES
Prevents the purchase of goods and services, and the use of credit cards with Nintendo 3DS shopping services.
MIIVERSE
Restricts users from viewing or posting content on Miiverse.
SHARING IMAGES /
AUDIO / VIDEO /
LONG TEXT DATA
Restricts the transfer of data that could be used to carry personal information, such as photos, images,
sounds, videos and long messages.
Note: This setting cannot restrict Nintendo DS software or Miiverse.
ONLINE INTERACTION
Restricts communication with other Nintendo 3DS systems over the internet.
Note: This setting cannot restrict Nintendo DS software or Miiverse.
STREETPASS
Restricts communication with other Nintendo 3DS systems using StreetPass.
Note: This setting cannot restrict Nintendo DS / Nintendo DSi software.
FRIEND REGISTRATION
Restricts the registration of new friends.
DS DOWNLOAD PLAY
Restricts the use of DS Download Play.
VIEWING DISTRIBUTED
VIDEOS
Restricts viewing of distributed videos to those suitable for all ages. This setting does not apply to gamerelated videos found on Nintendo eShop, which can be restricted using the separate Software Rating setting.
Note: For some distributed video playback software, this setting may also restrict the use of the software itself.
Use this option to restrict children from playing games, making purchases or using certain system
functions (such as the internet browser).
Options That Can Be Restricted
The following options can be restricted. Please congure these options as necessary
when allowing children to use the New Nintendo 2DS XL system.
Note: Setting Parental Controls restrictions for any of the options below will also restrict
part of the Nintendo Network ID Settings, Internet Settings, Region Settings, microSD
Management, Outer Cameras, System Transfer and Format System Memory functions. You
will have to enter the Parental Controls PIN in order to use these functions.
Adjusting System Settings
Parental Controls
38 39
Note: If this system is used by several children, we suggest setting up Parental Controls for the youngest child.
Conguring Parental Controls
Touch PARENTAL CONTROLS to begin the conguration ( p. 30).
Follow the instructions on the screen
1
Information about Parental Controls will appear on the screen. Follow the instructions to proceed with conguration.
Enter a four-digit PIN, then touch OK
2
To ensure the information entered is correct, you will be asked to enter your PIN twice.
Note: Your PIN is required to change Parental Controls settings as well as remove them temporarily.
Be careful not to forget it.
Select a secret question, then enter an answer of at least four
3
characters
If you wish to create your own secret question, select (CREATE YOUR OWN SECRET QUESTION)
and enter a question and answer. Each should be at least four characters in length.
Note:
You must answer the secret question if you forget the PIN. Be careful not to forget your answer.
•
See p. 17 for details on using the keyboard.
•
Register an email address
4
If you forget your PIN and the answer to your secret question later, a master key to reset your
PIN can be sent to the email address you have registered.
Please use an email address that only parents or guardians can access, to prevent children from
seeing the master key that is sent.
Touch the setting you want to adjust and follow
5
the instructions on-screen
If you are setting up Parental Controls for the rst time, restrictions will initially be in place for
all options.
Touch DONE to nish conguring Parental Controls settings.
Changing the Parental Controls settings later
To change your restriction settings later on, select PARENTAL CONTROLS
from the System Settings, then select CHANGE.
Note: If you have forgotten your PIN or secret question answer, touch
I FORGOT on the PIN entry screen (
p. 55).
Adjusting System Settings
Parental Controls
Page 21

PROFILE
Set your user name, date of birth, region and Nintendo DS prole.
Note:
•
Your prole is dierent to the user information for your Nintendo Network ID. Changing your prole here will not
change any information connected to your ID.
•
Your Nintendo DS prole includes a colour and message that are used in some Nintendo DS and Nintendo DSi
software. (Characters that are not supported by Nintendo DS or Nintendo DSi software will be displayed as ‘?’.)
DATE & TIME
Change the date and time.
TOUCH SCREEN
Calibrate the Touch Screen when it is not working properly.
ABOUT THIS SYSTEM
View the dierences between New Nintendo 2DS XL and New Nintendo 3DS.
SOUND
Change the speaker sound output settings.
MIC TEST
Check that the microphone is working correctly. If the icon on the lower screen changes colour when you
speak or gently blow into the microphone, the microphone is functional.
OUTER CAMERAS
Calibrate the outer cameras.
CIRCLE PAD
Calibrate the Circle Pad when controls do not seem to operate properly or when in-game movement seems
to occur even when not using the Circle Pad.
SYSTEM TRANSFER
Transfer data between systems ( p. 42).
LANGUAGE
Change the language of the system.
SYSTEM UPDATE
Update the system software ( p. 47).
FORMAT SYSTEM
MEMORY
Format the system to erase data stored in the system memory, such as photographs, software and save data
(
p. 48).
Data Management
Nintendo 3DS
Data Management
SOFTWARE
Check or delete Nintendo 3DS download software or Virtual
Console software.
Note:
•
You can store up to 300 Nintendo 3DS titles on a microSD card.
•
When deleting software, you can create a backup of its save data.
EXTRA DATA
Check or delete extra data (e.g. data received via SpotPass)
on your system.
ADD-ON CONTENT
Check or delete add-on content (including software update
data) downloaded for compatible Nintendo 3DS software.
SAVE DATA BACKUP
Create or delete backups of Nintendo 3DS download software
or Virtual Console software, and restore save data from your
backups. Once a backup has been created, its save data can be
restored at any time.
Nintendo DSiWare
Data Management
Check Nintendo DSiWare saved to the system memory or a microSD card. You can also
copy Nintendo DSiWare between the system memory and a microSD card or delete it.
Note: You can store up to 40 Nintendo DSiWare titles in the system memory.
microSD MANAGEMENT
Use a PC to read and write data from and to the microSD card while it is inserted in the
system.
Note: Your Nintendo system and your PC must both be connected to the same wireless network
access point.
STREETPASS MANAGEMENT
View a list of software that supports StreetPass. You can also deactivate StreetPass for
any software title.
RESET BLOCKED-USER SETTINGS
Resetting blocked-user settings will remove all previously applied restrictions and allow
the receipt of data from all users.
Check or organise software, data and settings saved to the system memory or the microSD card.
Other Settings
Change your user information and congure various other settings.
You can manage downloaded software, check or congure software using StreetPass
functionality and reset the blocked-user settings. Select DATA MANAGEMENT from System
Settings, then select the corresponding option.
Adjusting System Settings
Data Management
40 41
Note:
You can store over 300 pieces of extra data/add-on content on a microSD card, but only the rst 300 will be shown in Data Management.
•
Nintendo DSiWare cannot be launched from a microSD card. Copy it to the system memory before playing.
•
If you copy a software title to a location where the same software title is already saved, the existing software will be overwritten by the one you are
•
copying. Be careful when copying software in order to avoid overwriting save data.
Deleted software and add-on content can be redownloaded free of charge from Nintendo eShop. (Please be aware that it is not possible to redownload
•
content if distribution of that content has been suspended or terminated.)
Touch
at the sides of the screen to change pages.
/
Adjusting System Settings
Other Settings
Page 22

Transferable Data
Nintendo DS Software
Settings
Transfers Internet Settings (Nintendo DS Connections) and Nintendo Wi-Fi
Connection ID.
Pre-installed Application
Save Data
Transfers data such as the friend list, Nintendo 3DS Camera photos, Nintendo 3DS
Sound recordings and Mii Maker Mii characters from the pre-installed applications
on the source system.
Nintendo DSiWare Transfers Nintendo DSiWare (and its save data) stored on the system memory.
Nintendo Network ID
Transfers your Nintendo Network ID information.
Note: A Nintendo Network ID that was previously linked to the source system can only
be linked again to the target system.
Nintendo eShop Account
Activity / Funds
Transfers your Nintendo eShop account activity and funds to the target system.
This will be merged with that of the target system.
Note: Some account activity may not be transferable. You will be given the chance to
review any untransferable data on screen before the transfer.
Usage Licences
for SD Card Data
Transfers usage licences for data stored on the SD card (e.g. downloadable software
and its save data, add-on content, etc.). For more information on transferring data
on an SD card, see
p. 44.
System Transfer
You can transfer data to your new system from any one of the following:
A Nintendo DSi or Nintendo DSi XL system
•
A Nintendo 3DS, Nintendo 3DS XL or Nintendo 2DS system
•
Another New Nintendo 2DS XL, New Nintendo 3DS or New Nintendo 3DS XL system
•
Online Step-by-step System Transfer Guide
There is a convenient online step-by-step transfer guide that you can follow while performing a system transfer at
systemtransfer.nintendo.co.uk
You will need to be connected to the internet to transfer data. The systems will also connect to each other via local wireless. It is recommended
•
that both systems be placed close together in an area with stable internet access (
To prevent the systems from running out of power during the transfer, ensure that the battery on each system is well charged, or plug
•
in the AC adapter before starting the transfer. If the battery charge is too low, you will not be able to transfer data.
Note: Closing the system at this time will not activate Sleep Mode. Additionally, please do not turn the power o while data transfer is taking place.
p. 33).
Transferring from systems in the Nintendo 3DS family
Transfer save data for built-in applications, Nintendo eShop funds/account activity etc. from a Nintendo 3DS, Nintendo 3DS XL, Nintendo 2DS,
New Nintendo 3DS, New Nintendo 3DS XL or New Nintendo 2DS XL system.
Transfer Transfer
Source system
(Nintendo 3DS,
Nintendo 3DS XL or
Nintendo 2DS)
Note:
Data is transferred all together. You cannot choose individual software or items to transfer.
•
You cannot transfer data from a New Nintendo 2DS XL system to a Nintendo 3DS, Nintendo 3DS XL or Nintendo 2DS system.
•
Target system
(New Nintendo 2DS XL)
Source system
(New Nintendo 3DS,
New Nintendo 3DS XL or
New Nintendo 2DS XL)
Target system
(New Nintendo 2DS XL)
Adjusting System Settings
Adjusting System Settings
Other Settings
42 43
Precautions when transferring a Nintendo Network ID
You will not be able to perform the system transfer if you already have a Nintendo Network ID linked to the target system. In this case, you
will need to rst remove the link to the ID by formatting the system (
You cannot merge multiple IDs, so you cannot access software purchased with dierent IDs.
•
Once you remove a Nintendo Network ID from a system, you cannot link it to any other system. You can only link it again to the system it
•
was removed from.
Note: You can only have one Nintendo Network ID linked to the system at a time. If you remove a Nintendo Network ID and then link another ID to
the system, you will need to format the system memory before you can link the rst ID again.
p. 48).
Other Settings
Page 23

Transferring SD card data
The method for transferring data on an SD card will dier depending on the systems you are using.
Transferring between New Nintendo 3DS, New Nintendo 3DS XL or New Nintendo 2DS XL
systems
Source system
New Nintendo 3DS,
New Nintendo 3DS XL or
New Nintendo 2DS XL
Transfer
Target system
New Nintendo 3DS,
New Nintendo 3DS XL or
New Nintendo 2DS XL
Wireless Transfer (Limited Data)
Use this method when the microSD card in the target system does not have
enough free space available. All data except Nintendo 3DS download soft-
ware will be transferred to the microSD card. After performing the transfer, any purchased downloadable software can be
redownloaded at no extra cost from Nintendo eShop.
Save data will be restored once you start the software after redownloading it.
•
Except Nintendo 3DS
software
Copy via PC
With this method, data on an SD card will not be transferred automatically
to the microSD card in the target system. Once the system transfer has
been completed, use a computer to copy all the data from the SD card to the microSD card. After the data has been copied, insert
the microSD card in the target system.
If you have been using a microSD card with an SD card adapter in the source system, there's no need to use a computer to copy
•
the data. Simply insert the microSD card into the target system once the system transfer is complete.
Take the microSD card from the source system and insert it in the target system.
The data on the source system's microSD card will only be usable on the target system. After performing the system transfer, insert the
microSD card from the source system into the target system. If you use the target system without inserting the microSD card, you may
not have access to save data for certain software titles.
Transferring from a Nintendo 3DS, Nintendo 3DS XL or Nintendo 2DS system
Source system
Nintendo 3DS, Nintendo 3DS XL
or Nintendo 2DS
Transfer
Target system
New Nintendo 2DS XL
Copying data to the microSD card
When copying data from an SD card to a microSD card,
use the SD card slot on your PC or a commercially available
microSD card reader/writer and copy all the data on
the SD card to the microSD card. (You should copy the
"Nintendo 3DS" folder in its entirety.)
Copy data to an empty microSD card. If the microSD card
•
already contains data, delete it before copying the data
from the SD card over. (If the data on the target microSD
card is important to you, make a copy of it elsewhere, for
example, on your PC.)
Copy the "Nintendo 3DS" folder to the top level of the microSD card. (In other words, do not place it within another folder.)
•
The "Nintendo 3DS" folder contains data for downloadable software and associated save data. It does not contain photo data.
•
Do not attempt to adjust the data, move or delete the les, or change any le names within the "Nintendo 3DS" folder.
•
Please also read and take note of the copying precautions on p. 50.
•
"Nintendo 3DS" folder
PC
microSD card
Adjusting System Settings
If you've used multiple SD cards with the source system…
Adjusting System Settings
The SD card from the source Nintendo 3DS, Nintendo 3DS XL or Nintendo 2DS system cannot be inserted in the microSD card slot of a
New Nintendo 2DS XL system. However, the three following methods are available for transferring the data on an SD card.
Wireless Transfer (All Data)
It is possible to transfer all the data from the SD card in a Nintendo 3DS,
Nintendo 3DS XL or Nintendo 2DS system onto the microSD card in a New Nintendo 2DS XL
system via wireless communication.
The transfer may take some time if there is a large amount of data to transfer.
•
Other Settings
If there is not enough free space available on the target system's microSD card, you will not be able to perform the transfer.
•
Cancel the transfer and remove any unwanted photos, videos, recordings or software. Alternatively, you can insert a microSD
card with more free space available into the target system or use the "Wireless Transfer (Limited Data)" method to transfer data.
All
You can only transfer the data from one SD card when using the "Wireless Transfer (All Data)" or "Wireless Transfer (Limited Data)"
methods. Data from other SD cards should be copied to dierent microSD cards after the transfer, using the "Copy via PC" method.
Other Settings
44 45
Page 24

Precautions for Transferring
After transferring data, all data on the source system will be deleted.
System memory data deleted System memory data overwritten
Source system Target system
Note: With the exception of Nintendo DSiWare, the data in the target system’s system memory (e.g. pre-installed application save data) will be
deleted and overwritten with the data from the source system. If you have data such as photos and recordings, copy these to a microSD card rst.
System Update
Update the HOME Menu and applications with new applications and functions.
You must be connected to the internet to perform system updates. Congure your internet connection settings before using system update
(
p. 33). (When performing a system update from a Game Card, an internet connection is not necessary.)
Note:
System updates cannot be carried out if the battery charge is running low.
•
Check the Nintendo website for a summary of update details.
•
REGARDING SYSTEM UPDATES
IMPORTANT: After the system is updated, any existing or future unauthorised technical modication of the hardware or software of your system, or use
of an unauthorised device in connection with your system, may render it permanently unplayable. Content deriving from the unauthorised modication
of the hardware or software of your system may be removed. Failure to accept the update may render games unplayable.
Download Software Precautions
Data stored on the target system’s microSD card, such as Nintendo 3DS download software and its save data, will not be usable after
•
the transfer. The software can be re-downloaded from Nintendo eShop.
Nintendo DSiWare and its save data on the target system’s microSD card should be moved to the target system’s system memory
•
before the transfer. It will then remain usable after the transfer.
If the same download software has been downloaded on both systems, its data on the target system’s Account Activity will be deleted
•
and replaced with the data from the source system. Also, the old save data on the target system will no longer be usable.
Nintendo eShop Funds Precautions
If the total Nintendo eShop funds of the source and target systems exceed the maximum allowed, the system transfer will not proceed.
Transferring
From Nintendo 3DS family
Transferring from a Nintendo 3DS, Nintendo 3DS XL, Nintendo 2DS, New Nintendo 3DS,
New Nintendo 3DS XL or New Nintendo 2DS XL system
Source & Target systems
1
Touch TRANSFER FROM A NINTENDO 3DS SYSTEM
Adjusting System Settings
Read the warning message about transferring data, then touch I AGREE.
Source system
2
Touch SEND FROM THIS SYSTEM
Target system
Touch RECEIVE FROM A NINTENDO 3DS SYSTEM
Other Settings
Follow the on-screen instructions to proceed.
Transferring from systems in the Nintendo 3DS family using "Wireless Transfer (Limited Data)"
If you have used the "Wireless Transfer (Limited Data)" method to transfer data, you can check that the save data has been trans ferred by using the
Save Data Management option. Save data can also be deleted by using this option.
REGARDING AUTOMATIC SYSTEM UPDATES
From time to time, the system will carry out automatic updates, such as updates to a list which prevents the use of words that may cause users discomfort,
and/or updates to an internal database of wireless access points which allow you to access online services provided by Nintendo.
No prior notice for these or other such minor automatic updates will be displayed on the screen. For other system updates, a notice will be displayed
on the screen, and you will need to select I ACCEPT to install such updates.
Adjusting System Settings
Other Settings
46 47
Page 25

Format System Memory
Select this option to delete all data saved to the system, and return it to factory settings.
Note:
If you have linked a Nintendo Network ID to your system, you will need an internet connection to format the system memory.
•
The system version will remain at the current version even if you format the system memory.
•
If you opt to format your system, the following data will
be deleted and cannot be recovered:
Content saved in the system memory such as friend list, notication and step data
•
Application save data
•
All photos saved to the system memory
•
Changes made to the System Settings
•
Software saved to the system (see rst note below) and its save data
•
Data saved to the microSD card (see second note below)
•
– Downloadable software (see rst note below) and its save data
– Add-on content (see rst note below)
– Extra data
– Save data backups
The link to a Nintendo Network ID (see third note below)
Note:
Software can be redownloaded from Nintendo eShop at no extra cost. Please note that there are certain cases where software may be temporarily
•
or permanently withdrawn from Nintendo eShop. Should this happen, you will no longer be able to redownload that software. If your system is
linked to a Nintendo Network ID, you will need to use this same ID to redownload software (
If a microSD card that contains software or save data is not inserted when the formatting occurs, the data on that microSD card will not be deleted
•
but it will become unusable.
Formatting your system will not delete your Nintendo Network ID. You will be able to link the same ID to your system again by selecting LINK AN
•
EXISTING ID in Nintendo Network ID Settings.
•
p. 32).
When Disposing of or Giving Away Your System
When you format the system memory, photos and recordings on the microSD card and your Nintendo eShop Account Activity and funds will not be
deleted. When giving your system to another person permanently, please use a computer to delete data on the microSD card and, if your system is not
linked to a Nintendo Network ID, ensure you delete your Account Activity in Nintendo eShop before formatting your system.
If your system is linked to a Nintendo Network ID…
Adjusting System Settings
After linking a Nintendo Network ID to your system, you will not be able to link it to any other system even after formatting. You will need to use
System Transfer (
p. 42) to link your ID to another system instead of formatting.
Replacing the microSD Card
Note:
If the system is used by a young child, a parent or legal guardian should replace the microSD card for them.
•
Always turn the power o before replacing the microSD card.
•
Replacing the microSD Card
Open the card slot cover
1
Push the card in, then remove it
2
Note: Removing the microSD card without pushing
it in rst may lead to damage to the microSD card slot.
Insert new microSD card
3
Note: Do not touch the microSD card terminals
or get them dirty.
microSD Cards
The microSD card stores data such as downloadable software and its save data, extra data and add-on content, photos and videos. This
system supports microSD cards up to 2 GB in size and microSDHC cards with sizes ranging from 4 GB to 32 GB.
Note:
With the exception of Nintendo DSiWare ( p. 5), all downloaded software is stored on the microSD card.
•
Downloaded software (including its save data) cannot be moved or copied individually between microSD cards.
•
See p. 50 on what to do once a microSD card is full.
•
Push Remove
Click
Label-side up
Click
Replacing the microSD Card
48
Troubleshooting
Other Settings
49
Page 26

If Your microSD Card is Full…
Troubleshooting
To free up space on a full microSD card, delete photo, video or sound les you no longer need via Data Management in the System Settings
(
p. 40). Alternatively, transfer all of the data from your current microSD card to one with a larger capacity. You can save software to another
microSD card, but cannot later combine the contents of multiple microSD cards.
In order to transfer data, you will need a computer with a microSD card slot, or a commercially available microSD card reader/writer, and
should transfer the entire "Nintendo 3DS" folder to the target microSD card.
PC
"Nintendo 3DS" folder Target microSD card (larger capacity)
Note:
Always copy the folder to the root of the microSD card.
•
Downloadable software (including save data) is stored inside the "Nintendo 3DS" folder. Photo data is not stored in this folder. Do not modify,
•
move, delete or change the names of les in this folder.
Precautions for Copying Software
Always copy the entire "Nintendo 3DS" folder.
If updated data is saved on the new microSD card, you may not be able to use the same software with the original microSD card.
You should only use one microSD card with a software title at a time; the same software cannot be copied to multiple microSD cards
for use as backups of your progress. Ensure that you only use the new microSD card.
You cannot copy data using the following methods
Downloadable software saved on multiple microSD cards cannot be consolidated onto a single microSD card.
Copying new data over existing data will render the target data unusable.
If Your microSD Card is Full…
If the contents of the "Nintendo 3DS" folder are modied or if individual les are
copied from one "Nintendo 3DS" folder to another, they will be rendered unusable.
The entire "Nintendo 3DS" folder must be copied without any modication in order
to use the data.
Troubleshooting
Before contacting Nintendo Customer Support, please use this section of the manual to determine the cause of the problem.
Note:
You can also check the Troubleshooting section of the HOME Menu electronic manual ( p. 20).
•
If the problem involves a game or accessory, please also refer to the corresponding manual/documentation.
•
Problem Solution
Are you using a Nintendo 3DS AC adapter?
•
Use the Nintendo 3DS AC adapter (WAP-002(UKV)/WAP-002(EUR)).
I can’t recharge the battery /
The recharge LED is not lit
The system will not turn on
The system is hot
I charged the battery, but
I can’t play for long periods of
time / It takes a long time to
charge the battery
There is no video or audio output
There are black or bright dots
on the LCD screens that do not
go away / There are dark or light
patches on the LCD screens
The brightness diers between
LCD screens
The Nintendo DSi Power Supply is also compatible (
Is the AC adapter rmly inserted into the system and a plug socket?
•
Unplug the AC adapter and wait approximately 30 seconds before plugging it in again. Make
sure the AC adapter is securely connected to both the system and the plug socket (
Is the battery being recharged in a location with an ambient temperature between
•
5 – 35°C?
Recharge the battery in a location with an ambient temperature between 5 – 35°C. You may
not be able to recharge the battery in a location outside of this temperature range.
Is the recharge LED lit?
•
If the recharge LED is blinking, there is a chance that the battery is not connected properly. If
you experience this, contact Nintendo Customer Support (
Has the system been charged?
•
Recharge the system ( p. 14).
Is the battery being charged in an area with a high temperature, or being
•
charged for extended periods of time?
Doing so can lead to the system temperature rising sharply. Charge the battery in a location
with an ambient temperature between 5 – 35°C. Touching the system while it is hot may
cause burns.
Are you playing a game or recharging the battery in a location with an ambient
•
temperature less than 5°C?
In environments with a temperature less than 5°C, you will not be able to play games for long
periods of time, and the battery will take longer than usual to recharge.
Battery Life
•
Repeated charging will decrease battery life, reducing the length of time you can use the
system. If usage time is noticeably reduced, it may be time to replace the battery. Please
contact Nintendo Customer Support for more information (
Has the Game Card been correctly inser ted?
•
Insert the Game Card gently but rmly until it clicks into place.
Is the system in Sleep Mode?
•
If the system is in this state, exit Sleep Mode. Some software can enter Sleep Mode even
without the system being closed.
Small numbers of stuck or dead pixels are a characteristic of LCD screens. These are normal
and should not be considered as a defect. The upper screen and Touch Screen have dierent
specications, so their colour displays and levels of brightness may dier.
The technical specications of the upper and lower screens are dierent, which means their
brightness levels can also be dierent. This is normal and should not be considered as a defect.
p. 2).
p. 58).
p. 58).
p. 14).
Troubleshooting
50 51
Page 27

Problem Solution
Problem Solution
The screen hue changes suddenly /
The brightness changes and it becomes dicult to see bright colours
The Circle Pad doesn’t
work properly
The Touch Screen doesn’t
work properly
Troubleshooting
Is power-saving mode on?
•
Power-saving mode changes the brightness and colour gradient automatically according to
the content being displayed, to extend the battery charges for longer periods of time. This
can lead to pale colours whitening and other colours changing. To maintain xed colour and
brightness level, turn power-saving mode o (
Does Circle Pad input match what you see on screen?
•
In rare cases, the Circle Pad’s input may stop working properly after long periods of use or
being used forcefully. If the in-game movements do not match the Circle Pad input, use the
CIRCLE PAD option in System Settings to calibrate the input (
Note: If movements are being input despite the Circle Pad not being used, and you are unable to use
the buttons or Touch Screen, turn the system o, then start it again on the Circle Pad calibration screen
by pressing the POWER Button while pressing and holding L Button + R Button + Y Button.
Does the Touch Screen input match what you see on screen?
•
If the in-game movements do not match the Touch Screen input, use the TOUCH SCREEN
option in System Settings to calibrate the input (
Note: If you are unable to use the Touch Screen to perform this procedure, turn the system o, then
start it again on the Touch Screen calibration screen by pressing the POWER Button while pressing
and holding L Button + R Button + X Button.
Have you attached a commercially available protective sheet to the Touch Screen?
•
If you have applied a commercially available protective sheet to the Touch Screen, refer to its
instruction manual and be sure it has been applied correctly before attempting to calibrate
the Touch Screen.
Not aligned Trapped air or dirt
p. 23).
p. 41).
p. 41).
The C Stick doesn’t work properly
The screen goes completely black
and the system won’t respond /
The system freezes up
No sound from the speakers
No audio from headphones
I can’t use the microphone /
My voice isn’t recognised
My steps aren’t being counted
My microSD card is not
responding
Is the software compatible with the C Stick?
•
The C Stick is only usable in software titles or sections of software titles that support it, or in
place of the Right Circle Pad for software that supports the Nintendo 3DS Circle Pad Pro (
Does the C Stick input match what you see on screen?
•
If you move the C Stick while the system is turning on, movements may be input despite the
C Stick not being used. If this happens, close the system and enter Sleep Mode. When you
open the system and exit Sleep Mode, the C Stick will automatically recalibrate.
If the screen stays black when you turn the system on or when you exit Sleep Mode (reopen
the system after closing it while the power is on), or the screen suddenly goes black during
gameplay and the system stops responding, turn the system o by holding the POWER Button
down until the Power LED goes out, then press the POWER Button again to turn the system
back on.
Are headphones connected?
•
If headphones are attached to the system, no sound will come through the speakers.
Note: The camera's shutter sound will always be played at a xed volume, regardless of the current
setting of the volume control and even if headphones are connected.
Is the plug of the headphones rmly inserted?
•
Make sure the plug of the headphones is securely plugged into the audio jack.
Does this software title or section of it use the microphone?
•
The microphone is only usable in software titles or sections of software titles that support it.
Is the microphone working properly?
•
Select MIC TEST in System Settings to conrm that the microphone is functioning properly
(
p. 41).
Are voices other than your own, such as those of family and friends, recognised
•
correctly?
There are individual dierences in speech recognition rates. Some voices are more dicult to
recognise than others.
Is a headset with microphone attached?
•
Try removing the headset with microphone and using the system microphone instead.
Is the system open?
•
Your steps will only be counted while the system is closed and in Sleep Mode.
Is the system in a loosely-hanging bag?
•
There may be cases where the system cannot correctly count your steps. If it is put in a loosely-
hanging bag while walking, step data may not be counted accurately. If you want to put the
system in a bag while carrying it around, use a tight-tting bag such as a belt pouch.
Note:
Depending on the conditions, the step count might be higher or lower than the number of actual
•
steps taken.
Do not put the system into your back pocket. Subjecting the system and LCD screens to excessive
•
force, for example by sitting on them, can damage them and lead to injury or malfunction.
Has the microSD card been correctly inser ted into the system?
•
Turn the power o and insert the microSD card gently but rmly until it clicks into place in
the microSD card slot on the back of the system (
Are the microSD card terminals dirty?
•
Softly wipe the terminals with dry cotton to avoid damaging the microSD card.
p. 49).
p. 12).
Troubleshooting
52 53
Page 28

Problem Solution
Problem Solution
Even though a Game Card has
been inserted, the icon for the
software title does not appear
and the HOME Menu displays:
"There is nothing inserted into
the Game Card slot."
This message appears while
playing Nintendo DS /
Nintendo DSi software:
"An error has occurred. Press and
hold the POWER Button to turn
the system o. Please refer to the
Operations Manual for details."
I am having diculty using
wireless communications
(communications are interrupted
and the game cannot be played
smoothly)
I can’t nd a wireless
network access point
I can’t connect to the internet
Is the Game Card inserted properly?
•
Remove the Game Card and properly reinsert it until it clicks into place. If this doesn’t work,
try reinserting it a few more times (
Are you using a software title from a dierent region?
•
Only Nintendo 3DS and Nintendo DSi software titles matching the region of the system will
work. Software titles from dierent regions may not function.
Turn o the power, then turn it back on and try again, carrying out the same procedure
as before. If the error message still appears, there may be a fault with your system. Please
contact Nintendo Customer Support for assistance (
Is one of the following signal strength icons ( or
•
Signal strength appears to be poor. Move closer to the other player(s), and remove obstructions
between the systems.
Is your access point using WEP security encryption?
•
Your system is unable to use Wi-Fi Protected Setup to connect to access points that use WEP
security.
Is your access point using WPA2-PSK (TKIP) security encryption ( p. 37)?
•
Your system is unable to search for access points that use WPA2-PSK (TKIP) security.
Does an error code appear?
•
An error message and error code will appear if the internet connection settings are incorrect
or if the connection test fails. Follow the instructions given in the on-screen error message.
For error codes that appear when setting up Nintendo DS Connections or when playing
Nintendo DS or Nintendo DSi software, please read the following.
p. 27).
p. 58).
) shown on screen?
For error codes that appear when playing Nintendo DSi software
The internet connection congured for your system may not be correct. Select CONNECTION
TEST from Internet Settings to start the connection test, then follow the instructions given
in the error message.
I can’t disable Parental Controls
Did you enter the correct PIN?
•
Enter the correct PIN ( p. 39).
Did you enter the correct answer to your secret question?
•
Enter the correct answer to your secret question ( p. 39).
If you have forgotten your PIN
or secret question answer…
If you have forgotten your PIN
Touch FORGOT PIN on the rst screen that appears after
touching PARENTAL CONTROLS in System Settings, or
touch I FORGOT on the PIN entry screen. Enter the answer
to your secret question.
If you have forgotten your secret question answer
1
Touch I FORGOT on the secret answer entry screen.
If you have registered an email address, touch OK on
2
the screen for obtaining a master key. A master key
will then be sent to the registered email address.
Note:
An internet connection is required to receive
•
a master key.
If you are blocking emails using a spam lter or domain
•
ltering, ensure that your email account can accept emails
from the "@nintendo.net" domain.
If you have not registered an email address…
An enquiry number will be displayed. Please contact Nintendo Customer Support
by phone or email (
on your system. You will be given a master key.
Touch OK on the previous screen, then enter the
3
master key.
Note: Once you’ve entered the master key, your email
address will be deleted from the system. Please register
your email address again after setting a new PIN.
p. 58) with the enquiry number and the date currently set
Troubleshooting
Troubleshooting
54 55
Page 29

New Nintendo 2DS XL
Model Number
JAN-001
LCD Screens
(Screen Size / Resolution)
Upper Screen: widescreen LCD
4.88 inches (106.2mm wide x 63.72mm high)
400x240 pixels
Can display 16.7 million colours
Lower Screen: Touch-screen LCD
4.18 inches (84.96mm wide x 63.72mm high)
320x240 pixels
Can display 16.7 million colours
AC Adapter Nintendo 3DS AC adapter (WAP-002(UKV)/WAP-002(EUR))
Dimensions 86.4mm high x 159mm wide x 20.8mm thick (when closed)
Weight Approx. 260g (including battery, stylus and microSD card)
Operating frequency
band(s)
Wi-Fi: 2412-2472MHz
NFC: 13.56MHz
Communication Standard IEEE802.11b/g
Maximum radiofrequency power /
Maximum eld strength
Wi-Fi: 9dBm
NFC: -12dBμA/m
Recommended
Communication Distance
Within 30m
Note: The maximum distance at which communication is possible may be reduced depending on the surroundings.
Camera Feature
Lens: Fixed focal length
Image sensor: CMOS
Eective pixels: About 300,000
Clock Feature Max. Daily Variation of ± 4 seconds (when used within the "Usable Environment" below)
Speakers Stereo (supports pseudo-surround)
Input / Output Terminals Game Card slot, microSD card slot, AC adapter connector, audio jack (stereo output)
Sensors Motion sensor, gyro sensor
Other Features
Infrared communication (recommended communication: within 20cm)
Note: The maximum distance at which communication is possible may be reduced depending on the surroundings.
Near-eld communication (NFC)
Maximum Power
Consumption
Approx. 4.1W (when charging)
Usable Environment
Temperature: 5 – 35°C
Humidity: 20 – 80%
Charge Time Approx. 3.5 hours
Battery Life
Please see
p. 18.
Battery
Battery Type: Lithium ion
Battery Capacity: 5Wh
Stylus
Model Number: JAN-004
Material: Plastic (ABS/PE)
Length: Approx. 69mm
Problem Solution
It may have entered Sleep Mode as the
result of an external magnetic eld. Move
your system away from magnetic objects,
My system suddenly
enters Sleep Mode
Troubleshooting
56
Nintendo 3DS Sound does not
display audio les and folders
I can’t play back audio les using
Nintendo 3DS Sound
If you need further help…
If your system still does not operate correctly after trying these troubleshooting steps or the ones listed in the HOME Menu electronic manual
(
p. 20), please visit the Nintendo Support website: support.nintendo.com
Disposal of this Product
Do not dispose of this product in household waste.
For details see http://docs.nintendo-europe.com
Warranty Information
To find out how to receive warranty information, see support.nintendo.com
including other Nintendo 3DS systems.
Note: Stacking this system on top of other
Nintendo 3DS systems may also result in the
system entering Sleep Mode.
Does the microSD card contain saved audio les that can be played
•
using Nintendo 3DS Sound?
Nintendo 3DS Sound can play AAC les with a le extension of .m4a, .mp4 and .3gp, or
MP3 les with a le extension of .mp3. Other audio les, such as copy-protected ones,
cannot be played back.
Are the audio les saved to the "Private" folder found in the "Nintendo 3DS"
•
folder on the microSD card?
Audio les saved to the "Private" folder found in the "Nintendo 3DS" folder will not be
displayed in Nintendo 3DS Sound. Files should be saved to a dierent folder.
Are the audio les in a format that can be played by Nintendo 3DS Sound?
•
Nintendo 3DS Sound can play audio les which meet the following requirements:
File format: AAC (.m4a, .mp4 or .3gp), MP3 (.mp3)
•
Bit rate: 16 – 320 kbps
•
Sampling rate: 32 kHz – 48 kHz
•
Are the audio les protected by DRM (Digital Rights Management)?
•
DRM-protected audio les cannot be played using Nintendo 3DS Sound.
Technical Specications
Note: These specications may be changed without prior notice.
57
Page 30

Nintendo Customer Support (UK and Ireland) [180416/UKV]
Nintendo Customer Support
customer-support@nintendo.co.uk
www.nintendoservicecentre.co.uk (for support and repairs)
www.nintendo.co.uk (for general enquiries)
PO Box 4678, Windsor, SL4 9DZ
United Kingdom
(UK: Calls charged at the national rate. • Ireland: Calls charged at the international rate of the service provider.)
Nintendo Customer Support (South Africa) [180416/RSA]
(+44) 0345 60 50 247
Nintendo Customer Support
support@nintendo.co.za
www.nintendo.co.za
The iStore Building, No.1 Sandton Drive
Sandton, 2146
South Africa
(+27) 011 390 7002
(Calls are charged at the local rate to the caller.)
© 2017 Nintendo Co., Ltd.
Trademarks are property of their respective owners.
Nintendo 2DS and Nintendo 3DS are trademarks of Nintendo.
microSDHC Logo is a trademark of SD-3C, LLC.
Powered by Devicescape Software. Portions of this products are
© 2003 – 2010 Devicescape Software, Inc. All rights reserved.
Copyright © 2003 – 2010, Jouni Malinen <j@w1.> and contributors
All Rights Reserved.
WPA Supplicant licensed pursuant to BSD License.
Redistribution and use in source and binary forms, with or without modication, are permitted provided that the following conditions are met:
1. Redistributions of source code must retain the above copyright notice,
this list of conditions and the following disclaimer.
2. Redistributions in binary form must reproduce the above copyright notice,
this list of conditions and the following disclaimer in the documentation
and / or other materials provided with the distribution.
3. Neither the name(s) of the above-listed copyright holder(s) nor the
names of its contributors may be used to endorse or promote products
derived from this software without specic prior written permission.
THIS SOFTWARE IS PROVIDED BY THE COPYRIGHT HOLDERS AND CONTRIBUTORS
"AS IS" AND ANY EXPRESS OR IMPLIED WARRANTIES, INCLUDING, BUT NOT
LIMITED TO, THE IMPLIED WARRANTIES OF MERCHANTABILITY AND FITNESS
FOR A PARTICULAR PURPOSE ARE DISCLAIMED. IN NO EVENT SHALL THE
COPYRIGHT OWNER OR CONTRIBUTORS BE LIABLE FOR ANY DIRECT, INDIRECT,
INCIDENTAL, SPECIAL, EXEMPLARY, OR CONSEQUENTIAL DAMAGES (INCLUDING,
BUT NOT LIMITED TO, PROCUREMENT OF SUBSTITUTE GOODS OR SERVICES;
LOSS OF USE, DATA, OR PROFITS; OR BUSINESS INTERRUPTION) HOWEVER
CAUSED AND ON ANY THEORY OF LIABILITY, WHETHER IN CONTRACT, STRICT
LIABILITY, OR TORT (INCLUDING NEGLIGENCE OR OTHERWISE) ARISING IN
ANY WAY OUT OF THE USE OF THIS SOFTWARE, EVEN IF ADVISED OF THE
POSSIBILITY OF SUCH DAMAGE.
This product includes software developed by the OpenSSL Project for use in
the OpenSSL Toolkit. (http://www.openssl.org/).
Copyright © 1998 – 2007 The OpenSSL Project. All rights reserved.
Redistribution and use in source and binary forms, with or without modication, are permitted provided that the following conditions are met:
1. Redistributions of source code must retain the above copyright notice,
this list of conditions and the following disclaimer.
2. Redistributions in binary form must reproduce the above copyright notice,
this list of conditions and the following disclaimer in the documentation
and /or other materials provided with the distribution.
3. All advertising materials mentioning features or use of this software
must display the following acknowledgment:
"This product includes software developed by the OpenSSL Project for
use in the OpenSSL Toolkit. (http://www.openssl.org/)"
4. The names "OpenSSL Toolkit" and "OpenSSL Project" must not be used
to endorse or promote products derived from this software without prior
written permission. For written permission, please contact
openssl-core@openssl.org.
5. Products derived from this software may not be called "OpenSSL" nor
may "OpenSSL" appear in their names without prior written permission
of the OpenSSL Project.
6. Redistributions of any form whatsoever must retain the following
acknowledgment:
"This product includes software developed by the OpenSSL Project for
use in the OpenSSL Toolkit (http://www.openssl.org/)"
THIS SOFTWARE IS PROVIDED BY THE OpenSSL PROJECT "AS IS" AND ANY
EXPRESS OR IMPLIED WARRANTIES, INCLUDING, BUT NOT LIMITED TO, THE
IMPLIED WARRANTIES OF MERCHANTABILITY AND FITNESS FOR A PARTICULAR
PURPOSE ARE DISCLAIMED. IN NO EVENT SHALL THE OpenSSL PROJECT OR
ITS CONTRIBUTORS BE LIABLE FOR ANY DIRECT, INDIRECT, INCIDENTAL, SPECIAL,
EXEMPLARY, OR CONSEQUENTIAL DAMAGES (INCLUDING, BUT NOT LIMITED
TO, PROCUREMENT OF SUBSTITUTE GOODS OR SERVICES; LOSS OF USE, DATA,
OR PROFITS; OR BUSINESS INTERRUPTION) HOWEVER CAUSED AND ON ANY
THEORY OF LIABILITY, WHETHER IN CONTRACT, STRICT LIABILITY, OR TORT
(INCLUDING NEGLIGENCE OR OTHERWISE) ARISING IN ANY WAY OUT OF THE
USE OF THIS SOFTWARE, EVEN IF ADVISED OF THE POSSIBILITY OF SUCH
DAMAGE.
This product includes cryptographic software written by Eric Young.
Copyright © 1995 – 1998 Eric Young (eay@cr yptsoft.com).
All rights reserved.
This package is an SSL implementation written by Eric Young
(eay@cryptsoft.com).
The implementation was written so as to conform with Netscapes SSL.
This library is free for commercial and non-commercial use as long as the
following conditions are aheared to. The following conditions apply to all
code found in this distribution, be it the RC4, RSA, lhash, DES, etc., code;
not just the SSL code. The SSL documentation included with this distribution
is covered by the same copyright terms except that the holder is Tim Hudson
(tjh@cryptsoft.com).
Copyright remains Eric Young’s, and as such any Copyright notices in the
code are not to be removed. If this package is used in a product, Eric Young
should be given attribution as the author of the parts of the library used.
This can be in the form of a textual message at program startup or in
documentation (online or textual) provided with the package.
Redistribution and use in source and binary forms, with or without modication, are permitted provided that the following conditions are met:
1. Redistributions of source code must retain the copyright notice, this
list of conditions and the following disclaimer.
2. Redistributions in binary form must reproduce the above copyright
notice, this list of conditions and the following disclaimer in the documentation and / or other materials provided with the distribution.
3. All advertising materials mentioning features or use of this software
must display the following acknowledgement:
"This product includes cryptographic software written by Eric Young
(eay@cryptsoft.com)"
The word ‘cr yptographic’ can be left out if the rouines from the library
being used are not cryptographic related :-).
4. If you include any Windows specic code (or a derivative thereof)
from the apps directory (application code) you must include an
acknowledgement: "This product includes software written by
Tim Hudson (tjh@cryptsoft.com)"
58 59
Page 31

THIS SOFTWARE IS PROVIDED BY ERIC YOUNG "AS IS" AND ANY EXPRESS OR
IMPLIED WARRANTIES, INCLUDING, BUT NOT LIMITED TO, THE IMPLIED
WARRANTIES OF MERCHANTABILIT Y AND FITNESS FOR A PARTICULAR
PURPOSE ARE DISCLAIMED. IN NO EVENT SHALL THE AUTHOR OR CONTRIBUTORS BE LIABLE FOR ANY DIRECT, INDIRECT, INCIDENTAL, SPECIAL,
EXEMPLARY, OR CONSEQUENTIAL DAMAGES (INCLUDING, B UT NOT LIMITED
TO, PROCUREMENT OF SUBSTITUTE GOODS OR SERVICES; LOSS OF USE,
DATA, OR PROFITS; OR BUSINESS INTERRUPTION) HOWEVER CAUSED AND
ON ANY THEORY OF LIABILITY, WHETHER IN CONTRACT, STRICT LIABILITY,
OR TORT (INCLUDING NEGLIGENCE OR OTHERWISE) ARISING IN ANY WAY
OUT OF THE USE OF THIS SOFTWARE, EVEN IF ADVISED OF THE POSSIBILITY
OF SUCH DAMAGE.
Manufacturer: Nintendo Co., Ltd., Kyoto 601-8501, Japan
Importer in the EU: Nintendo of Europe GmbH, Herriotstrasse 4, 60528 Frankfurt, Germany
The licence and distribution terms for any publically available version or
derivative of this code cannot be changed. i.e. this code cannot simply be
copied and put under another distribution licence [including the GNU Public
Licence.]
and AOSS™ are the trademarks of BUFFALO INC.
Wi-Fi Protected Access® (WPA and WPA2) and the Wi-Fi Protected Setup
logo are registered trademarks of the Wi-Fi Alliance.
The Wi-Fi Protected Setup™ Logo is a certication mark of Wi-Fi Alliance®.
Notes
AC ADAPTER (WAP-002(UKV)) INCLUDED IS SUITABLE FOR USE IN THE UK, IRELAND
AND MALTA.
AC ADAPTER (WAP-002(EUR)) INCLUDED IS SUITABLE FOR USE IN THE EEA (EXCEPT FOR
THE UK, IRELAND AND MALTA), SWITZERLAND AND RUSSIA.
DO NOT USE IT IN COUNTRIES WHERE VOLTAGE REQUIREMENTS ARE DIFFERENT.
For explanation of the symbols and markings used on this product, see http://docs.nintendo-europe.com
DECLARATION OF CONFORMITY
Hereby, Nintendo declares that the radio equipment type (New Nintendo 2DS XL) is in compliance with Directive 2014/53/EU. The full text of the
EU declaration of conformity is available at the following internet address: http://docs.nintendo-europe.com/
60 61
Pat. pend.
Page 32

Notes
Notes
62 63
Page 33

For more information about New Nintendo 2DS XL,
please visit the Nintendo Support website.
support.nintendo.com
[0617-UKV-L]
Nintendo of Europe GmbH
Herriotstrasse 4
60528 Frankfurt am Main
Germany
MAA-JAN-S-UKV-WWW0
 Loading...