

Page 1
P.O. Box 957, Redmond, WA 98073-0957 U.S.A.
Nintendo of America Inc.
www.nintendo.com
57099A
PRINTED IN USA
INSTRUCTION BOOKLET
Page 2
PLEASE CAREFULLY READ THE SEPARATE HEALTH AND SAFETY
PRECAUTIONS BOOKLET INCLUDED WITH THIS PRODUCT BEFORE
USING YOUR NINTENDO® HARDWARE SYSTEM, GAME CARD OR
ACCESSORY. THIS BOOKLET CONTAINS IMPORTANT HEALTH AND
SAFETY INFORMATION.
IMPORTANT SAFETY INFORMATION: READ THE FOLLOWING
WARNINGS BEFORE YOU OR YOUR CHILD PLAY VIDEO GAMES.
WARNING - Seizures
• Some people (about 1 in 4000) may have seizures or blackouts triggered by light flashes or patterns,
such as while watching TV or playing video games, even if they have never had a seizure before.
• Anyone who has had a seizure, loss of awareness, or other symptom linked to an epileptic condition
should consult a doctor before playing a video game.
• Parents should watch when their children play video games. Stop playing and consult a doctor if you or
your child have any of the following symptoms:
Convulsions Eye or muscle twitching Loss of awareness
Altered vision Involuntary movements Disorientation
• To reduce the likelihood of a seizure when playing video games:
1. Sit or stand as far from the screen as possible.
2. Play video games on the smallest available television screen.
3. Do not play if you are tired or need sleep.
4. Play in a well-lit room.
5. Take a 10 to 15 minute break every hour.
WARNING - Radio Frequency Interference
The Nintendo DS can emit radio waves that can affect the operation of nearby electronics, including
cardiac pacemakers.
• Do not operate the Nintendo DS within 9 inches of a pacemaker while using the wireless feature.
• If you have a pacemaker or other implanted medical device, do not use the wireless feature of the
Nintendo DS without first consulting your doctor or the manufacturer of your medical device.
• Observe and follow all regulations and rules regarding use of wireless devices in locations such as
hospitals, airports, and on board aircraft. Operation in those locations may interfere with or cause
malfunctions of equipment, with resulting injuries to persons or damage to property.
WARNING - Repetitive Motion Injuries and Eyestrain
Playing video games can make your muscles, joints, skin or eyes hurt after a few hours. Follow these
instructions to avoid problems such as tendinitis, carpal tunnel syndrome, skin irritation or eyestrain:
• Avoid excessive play. It is recommended that parents monitor their children for appropriate play.
• Take a 10 to 15 minute break every hour, even if you don't think you need it.
• When using the stylus, you do not need to grip it tightly or press it hard against the screen. Doing so
may cause fatigue or discomfort.
• If your hands, wrists, arms or eyes become tired or sore while playing, stop and rest them for several
hours before playing again.
•
If you continue to have sore hands, wrists, arms or eyes during or after play, stop playing and see a doctor.
WARNING - Battery Leakage
The Nintendo DS contains a rechargeable lithium ion battery pack. Leakage of ingredients contained within the
battery pack, or the combustion products of the ingredients, can cause personal injury as well as damage to your
Nintendo DS.
If battery leakage occurs, avoid contact with skin. If contact occurs, immediately wash thoroughly with soap and
water. If liquid leaking from a battery pack comes into contact with your eyes, immediately flush thoroughly with
water and see a doctor.
To avoid battery leakage:
• Do not expose battery to excessive physical shock, vibration, or liquids.
• Do not disassemble, attempt to repair or deform the battery.
• Do not dispose of battery pack in a fire.
• Do not touch the terminals of the battery, or cause a short between the terminals with a metal object.
• Do not peel or damage the battery label.
Page 3
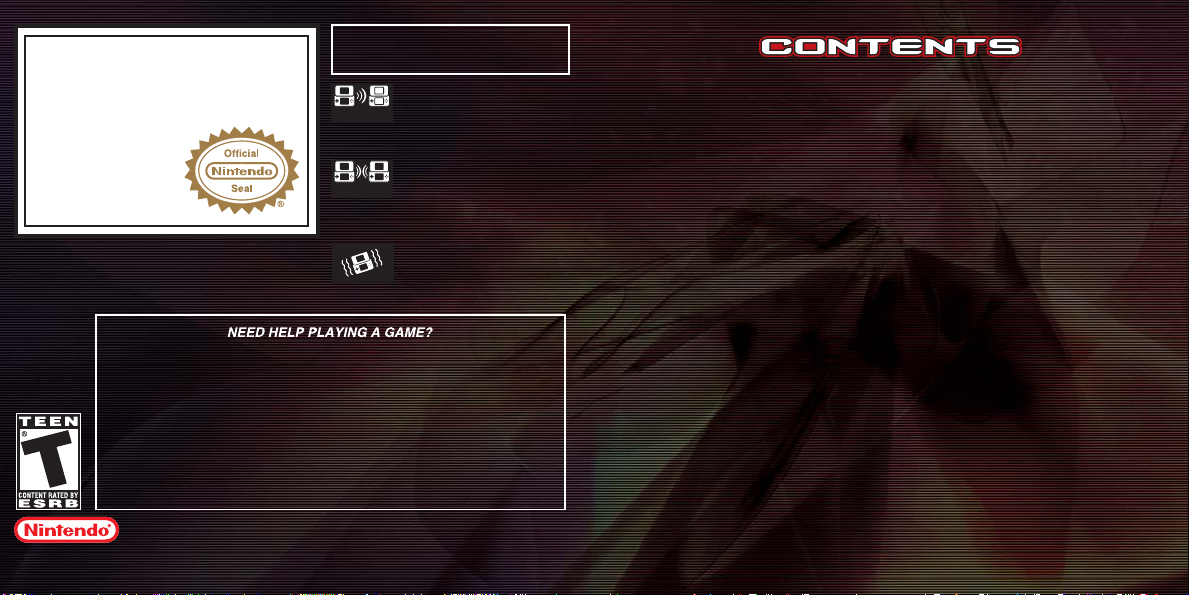
THIS GAME CARD WILL WORK
The official seal is your assurance
that this product is licensed or
manufactured by Nintendo. Always
look for this seal when buying
video game systems,
accessories, games
and related
products.
Nintendo does not license the sale or use of products
without the Official Nintendo Seal.
Nintendo's game pages, at www.nintendo.com/games, feature
walkthroughs, frequently-asked questions, and codes for many of our
games. If your answer isn't there, check out our forums where you can
If you don't have access to the web-site, recorded tips for many titles are
available on Nintendo's Power Line at
distance call, so please ask permission from whoever pays the phone bill.
© 2004-2006 NINTENDO. DEVELOPED BY NINTENDO SOFTWARE TECHNOLOGY CORP. ALL RIGHTS, INCLUDING THE
COPYRIGHTS OF GAME, SCENARIO, MUSIC AND PROGRAM, RESERVED BY NINTENDO. TM, ® AND THE NINTENDO
DS LOGO ARE TRADEMARKS OF NINTENDO. © 2006 NINTENDO. ALL RIGHTS RESERVED.
exchange tips with other gamers online.
For more information about our forums, visit
www.nintendo.com/community.
ONLY WITH THE NINTENDO DS
VIDEO GAME SYSTEM.
Wireless DS
Single-Card
Download Play
2-4
THIS GAME ALLOWS WIRELESS MULTIPLAYER
GAMES DOWNLOADED FROM ONE GAME CARD.
Wireless DS
Multi-Card
Play
2-4
THIS GAME ALLOWS WIRELESS MULTIPLAYER
GAMES WITH EACH DS SYSTEM CONTAINING
A SEPARATE GAME CARD.
Rumble Pak
Compatible
(sold separately)
THIS GAME IS COMPATIBLE WITH
THE RUMBLE PAK ACCESSORY.
(425) 885-7529
. This may be a long-
TM
06
STORY
08
CONTROLS
11
GETTING STARTED
14
ADVENTURE MODE
14
How to Advance in the Game
20
The Default Screen
22
Basic Actions
26
Weapon Actions
30
Morph Ball Actions
32
MULTIPLAYER MODE
32
Single-Card Play
34
Multi-Card Play
36
Nintendo Wi-Fi Connection
46
Playing a Multiplayer Game
52
HUNTERS
55
DS DOWNLOAD PLAY
57
RUMBLE PAK
58
CREDITS
63
WARRANTY AND SERVICE
INFORMATION
Page 4

The Galactic Federation has heeded this strange, suspicious communication as well and has
called for the help of Samus Aran.
In the distant reaches of space, beyond the territories controlled by the Galactic
Federation, is the Tetra Galaxy, once home to a mighty race known as the Alimbics.
An advanced civilization, peaceful, prosperous, and powerful, the Alimbics maintained
stability over the region forcefully but judiciously. They reigned over a vast region
known as the Alimbic Cluster.
One day, perhaps thousands of years ago, perhaps tens of thousands, they simply
disappeared, leaving behind artifacts scattered across the Alimbic Cluster, all protected
by a lethal arsenal of the Alimbics’ most advanced weaponry.
Today, for the first time in centuries, the long-dormant Alimbic Cluster has begun to stir,
delivering strange tidings. A telepathic communiqué, originating within the Cluster, has
been transmitted into the brains of some of the most exceptional beings in our galaxy.
The message is translated into a thousand different languages on a thousand different
worlds, but the message is always the same: “The secret to ultimate power lies in the
Alimbic Cluster.”
This message has intrigued and enticed some of the most formidable bounty hunters in
the galaxy, inspiring them to make the long journey to the Alimbic Cluster. Each of these
great warriors has his own motivation. Some desire power--for themselves, their planet,
or their people--while others simply desire to hunt and to kill, to prove themselves the
best bounty hunter in the galaxy. Now, it’s a race against time to see which bounty hunter
will triumph and who will discover the secret behind this promise of “ultimate power.”
06 07
Her mission: to discover the truth about this mysterious message, to protect against a
potential threat, and to keep the ultimate power of the Alimbics from falling into the
wrong hands.
Samus Aran
One of the best bounty hunters in the
galaxy. Her Power Suit has the ability to
transform her into a Morph Ball.
Morph Ball
Page 5
Control Modes
You can select either Stylus Mode or Dual Mode to
play the game. Both modes support right- and lefthanded controls. You can change the control mode by
Using the Nintendo DS
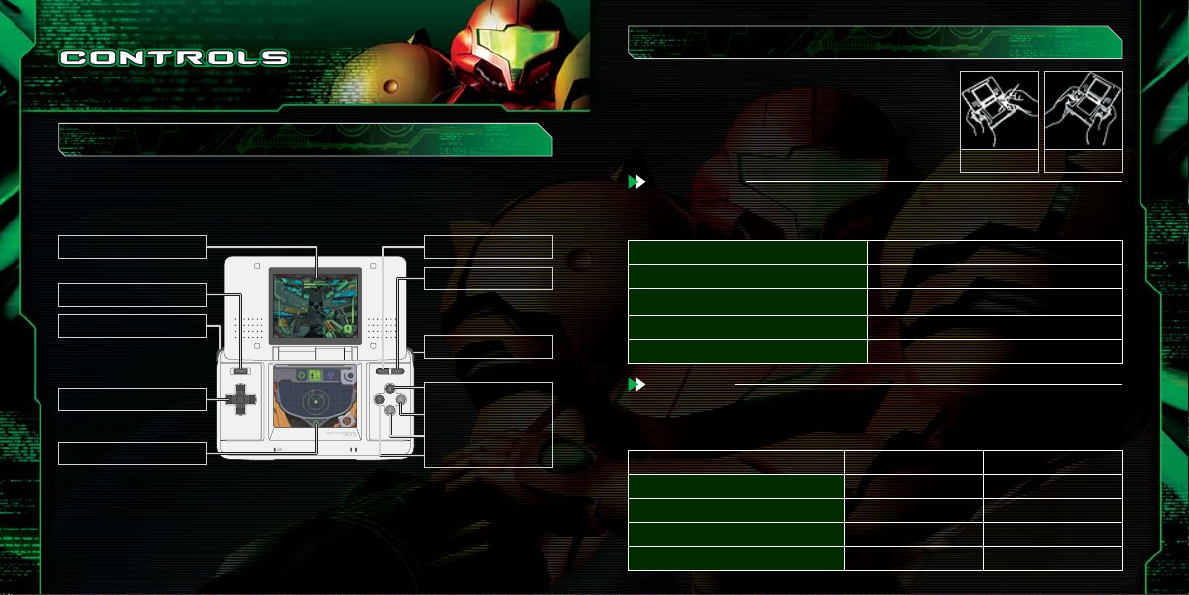
Metroid Prime Hunters uses two control modes. In this manual, the controls for the
Stylus Mode are explained using the configuration for right-handed players.
Top Screen
Power
L Button
Attack (Hold down for a
Charge Attack) / Bomb
+Control Pad
Move
Touch Screen
Select/Confirm in the menu
Control Samus
(see pages 22-24 for additional information)
If you close your Nintendo DS during a game, it will go into Sleep Mode to save
battery life. Open the DS again to resume the game.
08 09
SELECT
START
Pause Menu (During
Adventure Mode)
R Button
Boost
X Button
A Button
B Button
Y Button
Jump
selecting CONTROLS under OPTIONS (page 13).
See pages 22-24 for additional control information.
Dual ModeStylus Mode
Stylus Mode
Buttons control the Attack and Move commands. The stylus handles all other controls.
Left-handed Stylus Mode
A, B, X, or Y Buttons
+Control Pad
L Button
R Button
Touch Screen
Move
Jump
Boost
Attack/Bomb
Control Samus (see pages 22-24)
Dual Mode
In addition to Attack and Move commands, the A, B, X, and Y Buttons control the
character’s viewpoint (look up/down), direction, and jump commands.
Dual Mode Controls
+Control Pad
A, B, X, or Y Buttons
R Button
L Button
Right-handed Left-handed
Move
Viewpoint (change direction)
Jump/Boost
Attack/Bomb
Viewpoint (change direction)
Move
Attack/Bomb
Jump/Boost
Page 6

How to Use the Touch Screen
Perform actions in-game by moving the stylus across the Touch Screen. On the menu
screen or in the Gunship (page 18), commands are selected in the following manner:
Selecting a Mode
To choose the game mode, select the Menu icon on the
Touch Screen. If you select an icon with the +Control
Pad, the icon will highlight, with the explanation
displayed on the Top Screen. Tap on the icon to confirm
your selection.
Selecting Various Menu Icons and Items
Tap on the icon or text to make your selection.
Scrolling/Switching Selection
Scroll through the text and switch selections by touching the icons below.
Screenshots surrounded by a blue frame are on the Top Screen, and screenshots
surrounded by a red frame are on the Touch Screen.
10 11
Starting the Game
Make sure the Nintendo DS is turned off before you begin. Insert the Metroid
Prime Hunters Game Card into your Nintendo DS and press Power on the
Nintendo DS system. Touch the Metroid Prime Hunters panel to begin the game. If
you would like to use the Rumble Pak, insert the Rumble Pak into the Game Boy
Advance Game Pak slot before turning the power on.
When you turn on the Nintendo DS, the screen on the
right will be displayed. After reading the message,
tap on the Touch Screen to continue.
Touch "Metroid Prime Hunters" on the DS Menu
Screen to begin the game.
*If you set your DS to Auto-Start mode, this step is
not necessary. Please see the Nintendo DS hardware
manual for details.
Once the title screen is displayed, follow the
instructions on page 12.
®
Page 7
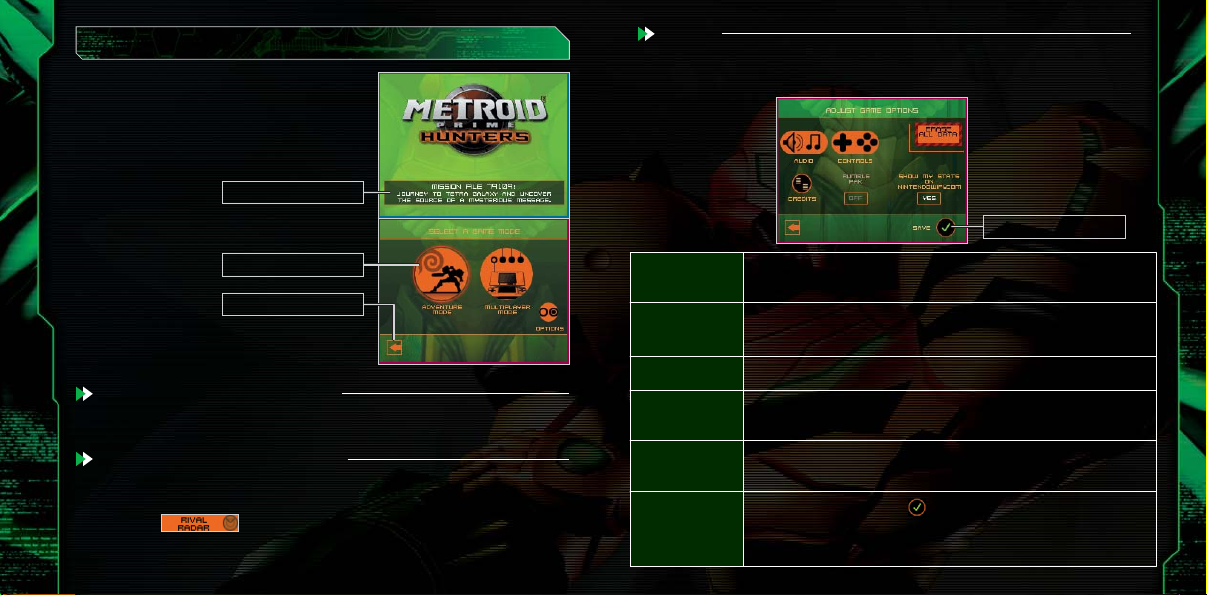
Main Menu
On the title screen, tap the Touch Screen to view
the main menu. Select a game mode or the
Options icon by tapping once.
Menu Window
Options
Change in-game settings here. After you have made your selections, tap on the
checkmark icon to save your preferences.
Save Icon
Mode Icon
Return Icon
Tap on this icon to return to the
previous page.
Adventure Mode (Pages 14-31)
Control Samus Aran in this single-player adventure.
Multiplayer Mode (Pages 32-51)
Up to four players can play multiplayer by using Multi-Card Play, DS Download, or
Wi-Fi communication.
By tapping on , you can exchange your Hunter License automatically
with other nearby players who have also activated this feature (page 44).
AUDIO
CONTROLS
CREDITS
RUMBLE PAK
SHOW MY STATS ON
NINTENDOWIFI.COM
ERASE ALL DATA
Choose between Stereo, Surround, or Headphone sound. Volume levels for
sound effects and background music, and mic sensitivity can be adjusted here.
Set the in-game controls (page 9) and the sensitivity of the Stylus here. You
can also invert the up/down perspective controls by turning LOOK INVERT on.
Look at the people responsible for Metroid Prime Hunters.
If you have a DS Rumble Pak inserted in your DS, you can turn the Rumble
Feature on or off.
Decide whether or not you would like your online game statistics and
Hunter’s License (page 42) to be viewable at www.NintendoWiFi.com.
After selecting this option, tap on the confirmation screen to erase all
saved data and records (see page 19 for saving).
Any data you erase is gone forever, so please be careful.
12 13
Page 8

-How to advance in the game-
What is Adventure Mode?
This story mode places you in the action as you battle enemies and solve puzzles as
the main character, Samus Aran. Visit various planets and space stations within the
Alimbic Cluster and gather all the Octoliths to acquire the ultimate power within.
Select the
destination
Explore
Acquire
Octoliths
Use the Tetra Galaxy Scan screen (page 16) to select a planet or
space station.
After selecting a planet or space station, use all the abilities at
your disposal (pages 22-31) to find an Octolith.
Once you have obtained an Octolith, return to Samus's Gunship
to continue on to your next destination.
About Octoliths
Like Samus, six other bounty hunters are exploring the Tetra galaxy
seeking out the Octoliths. If one of these Hunters defeats you in
battle, you may lose any Octoliths you’re carrying. If this happens,
you must battle that Hunter again to reclaim your Octoliths.
Starting Adventure Mode
Select Adventure Mode from the main menu to begin.
Select a File
When playing for the first time, select one of the
three files (A, B, or C) available. Your game will be
saved to the file you select.
After selecting a file, you can delete or copy the data
to another file. Note that once you delete saved
data, it is gone forever (see page 19 for information
on saving).
View Unlocked Cinematics.
Game Over
If your remaining energy hits zero, the game ends. Select Continue to resume from
the last checkpoint.
Select a Destination
From the Tetra Galaxy Scan screen, select a planet or a space station to explore
(page 16).
14 15
Page 9

Tetra Galaxy Scan Screen
On the Top Screen, you can view the Tetra Galaxy
from inside your Gunship. The Tetra Galaxy map
appears on the Touch Screen. Select the location you
want to visit here.
1
Change Ordinate Axis
Slide the stylus up and down on the Ordinate Axis or use
the +Control Pad to change the vertical line.
2
Change Abscissa Axis
Slide the stylus right and left on the Abscissa Axis or use the
+Control Pad to change the horizontal line.
3
Destination Name
After selecting a destination, its name will appear on the
Top Screen.
4
Land Shi p
Tap Land Ship to land at the selected destination.
5
Opposing Hunter at this destination
If your opponent has an Octolith, this will also be displayed.
Selecting a Destination
Using the stylus, adjust the Ordinate and Abscissa Axes
to select a planet or space station. Once LAND SHIP is
displayed, touch the icon to visit the destination.
3
5
1
4
2
About the Tetra Galaxy
There are two planets and two space stations within the Alimbic Cluster in the
Tetra Galaxy.
Celestial Archives
This space station was badly damaged by an unkown
object and is currently in very unstable condition.
Alinos (The Volcanic Ruin)
This planet’s ultra-high temperature once provided
power for an Alinos city. In the ruins, visible
reminders of their civilization can still be seen.
Vesper Defense Outpost
This small base once operated as a refueling station.
It has been abandoned for a long time. A toxic fuel
leak has frozen over the station.
Arcterra (The Ice Cave)
This planet is located at the farthest reaches of the
Tetra Galaxy. Arcterra is a barren and frozen world
with caves and underground catacombs.
16 17
Page 10
Inside the Gunship
When you visit a space station or planet you have
already been to, or when Samus goes back inside her
ship, this screen will appear. Inside the Gunship, your
energy and ammo will automatically be replenished.
Current Status
This screen displays your current number of Energy Tanks (page 21),
Sub-weapon selection (pages 26-27), and current location.
Gunship Screen Menu
WEAPON SELECT
OPTIONS
SAVE GAME
LOGBOOK
EXIT SHIP
LAUNCH SHIP
View all currently available Sub-weapons.
Change the game's control scheme (page 9).
Save your game progress.
View previous logbook entries.
Exit the Gunship and resume exploration.
Stop exploring and return to the Tetra Galaxy Scan screen.
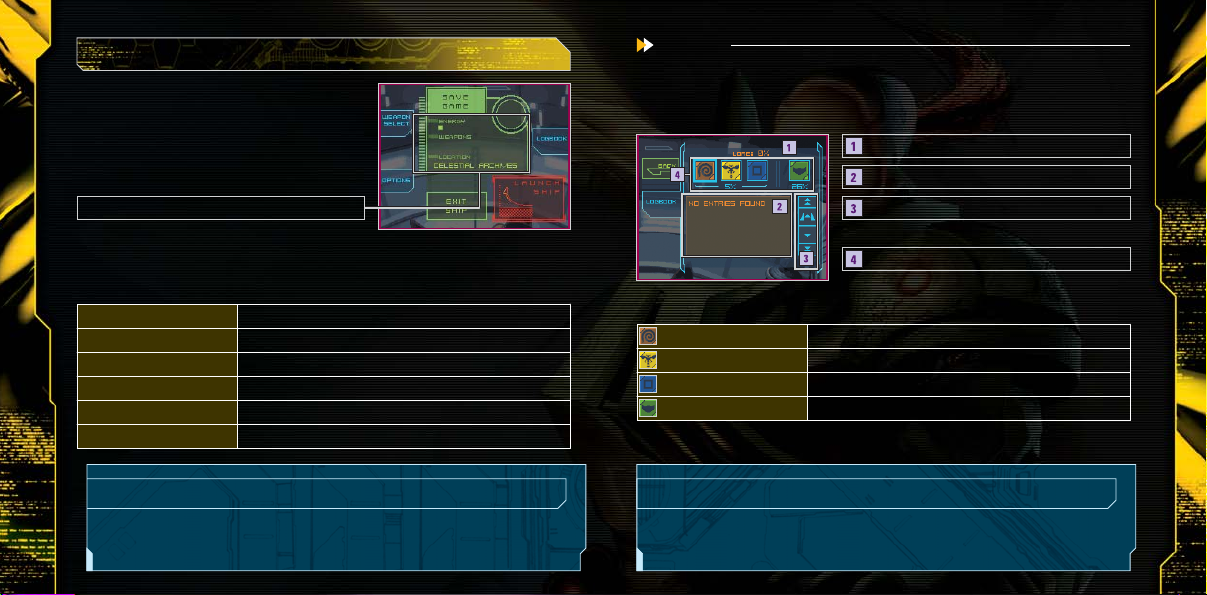
Logbook
With the Logbook, you can check the information you scanned with the Scan Visor (page
24) and Samus’s equipment status. Tap on the Category icon, then select the item you
want to view.
Category and Scanning Percentage
Data List
Scroll Icon
Scroll through th e data list with the up and dow n arrows.
Category Icon
The number below the category indicates the scanning
How to read the Category Icons
LOREE
BIOFORM
OBJECT
EQUIPMENT
percentage average.
Review messages left by the Alimbics.
Data about enemies you have scanned.
Information about various mechanisms and objects.
Information about Samus’s equipment.
Portals and Returning to the Gunship
If you activate a Portal while exploring, you can use it to return to a location near the
Gunship. This comes in handy when you want to save your progress.
Saving Data
Select SAVE GAME on the Gunship screen to save your Adventure Mode game
progress. Your Options settings will be saved at the same time.
18 19
Page 11

8
Sub-weapon Icon
Check the currently equipped Sub-weapon (pages
27-28). Tap on this icon to switch to the Sub-weapon.
9
Sub-weapon Change Icon
Touch and hold the stylus here to view and change
all available Sub-weapons (pages 26-27).
10
Remaining Energy
Samus’s current energy level. If the Energy Gauge
reaches zero, the game is over.
Energy Gauge
11
When Samus receives damage, the Energy Gauge
of each tank drops.
Energy Tank
12
Find new Energy Tanks for extra energy in the
battles ahead.
-Default Screen-
Main Screen
The main screen displays Samus’s point of view. Please see page 30 for how to view
the screen while Samus is in Morph Ball form.
10
11
1
4 5
3
2
8
9
7
6
12
Sight
1
Aim your shots using the sight’s targeting reticle.
2
Remaining Ammo
Check how much ammo remains in the currently
equipped weapon.
Visor Icon
3
Touch here to switch between Combat and Scan
Visors (page 24).
4
Beam Icon
Touch here to switch your weapon to the Power Beam
(page 27).
Missile Icon
5
Tap here to switch your weapon to the Missile. The
top number indicates remaining ammo, and the
bottom number indicates maximum ammo.
Morph Ball Icon
6
Tap here to transform into the Morph Ball
(pages 30-31).
7
Radar
The icon indicates Samus's location. Nearby enemies
are indicated with or marks on the radar.
20 21
Page 12

Jumping
-Basic Actions-
Moving the Character
Move Samus in the desired direction by pressing on the +Control Pad.
If you are using the left-handed Stylus Mode (page 9), use the X Button to move forward,
the B Button to move backward, the Y Button to strafe left, and the A button to strafe right.
+Contro l Pad
Quickly double-tap the Touch Screen to jump.
Combine this move with the +Control Pad to jump
in various directions.
In right-handed Dual Mode, use the R Button to jump.
Use the L Button in left-handed Dual mode.
Switch to Morph Ball (Tap on the Alt-Form Icon)
Changing the Viewpoint/Direction Change
Sliding the stylus moves
your point of view in any
direction.
In right-handed Dual Mode (page 9), the X Button and the B Button look up and down,
and the Y Button and the A Button turn you left and right. In left-handed Dual Mode,
press up and down on the +Control Pad to look up and down, and press left and right on
the +Control Pad to turn left and right.
Tap on the Alt-Form icon to transform Samus into the
spherical Morph Ball. Tap the same icon again to return
her to bipedal form (page 30-31).
Alt-Form Icon
Normal
Morph Ball
22 23
Page 13

Switching Visor Types
Touch and hold the Visor icon to change the Top
Screen to the Scan Visor view. Tap the icon again
to switch back to the Combat Visor.
While using the Scan Visor, you cannot
use weapons.
Using the Scan Visor
When the Scan cursor appears on the screen, hold the L Button to scan an object.
Once scanning is complete, information on the object will be displayed on the Touch
Screen. Tap OK when you have finished reading. If there is any important
information, that information will be entered into the Logbook (page 19). Certain
Viewing the Map
Press START to display your current location in
the 3-D map on the Top Screen. Use the stylus to
manipulate the 3-D map.
Door/Entrance/Exit
Samus’s Location
Samus's location is displayed in red.
Symbols on the Map
Review various features, including door types,
compatible weapons, etc.
START
Press START to return to the default screen.
mechanisms found in the game can be activated by scanning them.
Sight Window
Scan various organisms and
objects that appear in this
window.
QUIT Icon
Touch here to abort the game and return to the
title screen. Your progress will not be saved.
Opening Locked Doors
Scan Cursor
This cursor indicates an object
you can scan.
When using left-handed controls (page 9), press the R Button to scan.
24 25
Locked doors can be opened by shooting them with the
appropriate weapon. Scan the door with the Scan Visor to
determine which weapon to use.
Page 14

Switching Sub-weapon Types
Samus can use up to six types of Sub-weapons, as well
-Weapon Actions-
Charge Attack
Press the L Button to fire a weapon. Some weapons
can be charged for more powerful attacks. To charge
your weapon, hold down the L Button and then
release to fire a devastating Charge Attack. Except for
the Power Beam, Charge Attacks consume more ammo
than regular attacks.
L Button
as the Power Beam and Missile. Touch and hold the
Sub-weapon Switch icon to see the list of Subweapons, then slide the stylus to the desired weapon.
Lift the stylus from the screen to replace the current
Sub-weapon with the Sub-weapon you chose.
Weapon Types
You can earn up to six different Sub-Weapons as you progress through the game.
Power Beam
Switching the weapon of choice
Tap on the Beam icon to switch your weapon to the Power Beam. Tap on the
Missile icon to switch to the Missile, and tap on the Sub-weapon icon to switch to
the Sub-weapon.
Power Beam Icon
Missile Icon
26 27
Sub-weapon Icon
Sub-weapon
Switch Icon
Power Beam has a limited offensive capability, but it has excellent rapid-fire ability.
Missile
The Missile is more powerful than the Power Beam, and is capable of Charge Attacks.
Samus’s Missiles have homing capability; its Charge Attack enhances the homing
feature.
Battlehammer
The Battlehammer is a heavy-duty mortar-type weapon with moderate firing
speed. The Battlehammer has no Charge Attack, but the rapid-fire attack
more than makes up for it.
Sub-weapon
Page 15

Judicator
The Judicator shoots energy that has been super-cooled to temperatures
approaching absolute zero. If the beam hits hard ground, it will bounce around
the environment. Normal attacks shoot a single shot while the Charge Attack
shoots three shots simultaneously.
Volt Driver
Sub-weapon
Sub-weapon
About Items
Some items can be found by defeating enemies,
and some are hidden in various locations in the
world. Draw Energy Balls, Missiles, and Universal
Ammo packs toward you by charging your weapon
(page 26).
The Volt Driver shoots high-velocity, rapid-fire energy blasts with a very high hit
probability. This weapon’s Charge Attack launches an aerobomb that moves
slowly toward its target. If the aerobomb strikes the target, it causes tremendous
damage.
Magmaul
Sub-weapon
The Magmaul shoots projectiles of superheated magma. When charged, its
projectiles become wider and explode on impact.
Shock Coil
Sub-weapon
The Shock Coil fires charged blasts of high-density neutrinos in concentrated
bursts, sending multiple concussive waves toward its target. This weapon possesses
no Charge Attack. Press and hold the L Button to fire the beam continuously.
Imperialist
Sub-weapon
The Imperialist is ideal for sniping. It fires a thin, powerful laser over long
distances. Press the R Button to turn on the zoom feature, which increases the hit
probability and power.
Use the L Button while using the left-handed control mode (page 9). You can zoom in if you
28 29
double-tap the Sub-weapon icon (page 21) or with the SELECT Button if using Dual Mode controls.
Energy Ball (S: Red, M: Blue:, L: Yellow)
Restores Samus’s energy.
(S: 30, M:60, L:100)
UA/Universal Ammo (S, L)
Restores ammo for the
Sub-weapon. (S: 10, L: 25)
Missile Expansion
Max Missile number
increases by 10.
Sub-Weapon
Samus earns a new
Sub-weapon.
Missile (S, L)
Restores ammo for the
Missile. (S: 5, L:10)
Energy Tank
Samus gains an extra
energy tank.
UA Expansion
Max ammo for the Subweapon increases by 30.
Octolith
A mystery item that holds
the key to ultimate power.
Page 16

-Morph Ball Actions-
Morph Ball Screen
By tapping on the Alt-Form Icon, Samus transforms herself into the Morph Ball and
the viewpoint will switch to a third person view. If you tap on the icon again, Samus
will return to her normal form.
Move
Press the +Control Pad or slide the stylus on the Touch Screen to move the
Morph Ball in any direction.
Boost Ball
Quickly slide the stylus in any direction on the Touch
Screen to activate the Boost in that direction. This
allows the Morph Ball to move at a higher speed for
a short time. You can also boost by charging the R
Button (L Button in left-handed control modes).
BOOST Icon
While boosting, the Boost icon
will blink.
Bombs
Up to three Bombs can be
deployed at once.
Bomb
Press the L Button to release a bomb. If you place
the Morph Ball on top of the Bomb before it
explodes, the impact of that explosion will propel
the Morph Ball into the air.
Alt-Form Icon
30 31
Page 17

Select Your Hunter
Double-tap on the Hunter you wish to use for the
-Single-Card Play -
battle. Wait for the other players to select their
Hunters. In Single-Card play, Samus is the only
selectable character.
Hosting a Game
To host a Single-Card game with up to four players, select Single-Card Play from the
Multiplayer Mode. In this mode, the player with the game card will be the host and
set the game rules. Everyone else will be guest players.
Please read DS Download Play on page 55 before you play.
Start the Battle
When everyone has made their selection, you
can start the game. If you are playing a team
battle, divide players into teams by touching the
color bar. Tap on START GAME to begin the battle.
Select an Arena
Select the Arena and the settings you would like
to use for the game (pages 48-49). Only the
“Battle” game mode is available with Single-Card
Play. When you have finished choosing your
settings, touch the in the lower right corner.
When You're the Guest
If you are a guest player, you can select only Samus as your Hunter. Once the
download is completed, wait for the host player to start the game.
• The downloaded game will be deleted once you turn off the power.
For Players With the Game Card
If you are a guest player and you have a copy of Metroid Prime Hunters, you can join
a multiplayer game following the steps on (pages 34-35). You can select any of the
32 33
available Hunters. Your game results will be saved to your Hunter’s License (page 42).
Page 18

-Multi-Card Play -
To play a multiplayer game, each player must have a Nintendo DS and a Metroid Prime
Hunters Game Card.
Select Your Hunter
All Players
Tap twice on the Hunter you would like to play. If you don’t have enough players to join
the game, the host can add a BOT (computer-controlled character) to play against. Tap
on the and select the characters to add to your battle.
• The host player can also play this mode with all-BOT players for additional
hunting practice.
Creating/Joining a Game
The player who selects the CREATE GAME option
hosts the game and determines the game criteria.
The other players must select the host’s name in
the JOIN GAME box to enter the hosted game.
Select Game Mode
Host Only
Add Bot
Change BOT Difficulty
Change the difficulty of the Bot
by tapping on the icon.
One = easy
Two = normal
Three = hard
The host selects a game mode from the seven
modes available (pages 48-49).
Select the Stage
Host Only
The host selects the Arena and game rules used for the game (pages 48-49). After the
selections have been made, touch the checkmark in the lower-right corner of the screen.
Start the Battle
Once all players are ready (including BOTs), the host can start the game. If playing
with teams, first divide the players into teams by touching on the colored bar above
or below the Hunter. Tap on START GAME to start.
Host Only
34 35
Page 19

Wi-Fi Menu
-Nintendo Wi-Fi Connection-
Nintendo Wi-Fi Connection allows multiple Metroid Prime Hunters owners to play
together over the internet—even when separated by long distances.
To play Nintendo DS games over the internet, you must first set up the Nintendo Wi-Fi
•
Connection (Nintendo WFC) on your Nintendo DS system. Please see the separate Nintendo Wi-Fi
Connection instruction booklet included with this game for directions on setting up your
Nintendo DS.
To complete the Nintendo WFC setup, you will also need access to a PC that has a wireless
•
network device installed (such as a wireless router) and an active broadband or DSL internet
account.
If you do not have a wireless network device installed on your PC, you can order a Nintendo Wi-
•
Fi USB Connector (sold separately) directly from Nintendo. See the separate Nintendo WFC
instruction booklet for more information.
Nintendo Wi-Fi Connection game play uses more battery power than other game play. You may
•
prefer to use the AC Adapter to prevent running out of power when using the Nintendo Wi-Fi
Connection.
You can also play Nintendo WFC compatible games at selected internet hotspots without
•
additional setup.
The Terms of Use Agreement which governs Nintendo Wi-Fi Connection game play is available in
•
the Nintendo Wi-Fi Connection instruction booklet or online at www.nintendowifi.com/terms.
Please note that the DS system will shut down and must be restarted when making any Nintendo Wi-Fi Connection changes.
For additional information on the Nintendo WFC, setting up your Nintendo DS, or a list of
available internet hotspots, visit www.nintendowifi.com (USA, Canada and Latin America) or
36 37
call 1-800-895-1672 (USA/Canada only).
After selecting Multiplayer Mode from the Main Menu, tap on NINTENDO WFC to
view the Nintendo Wi-Fi Connection screen.
For the best experience, use the same Nintendo DS and Metroid Prime Hunters
Game Card together as a set. Please read the separate Nintendo Wi-Fi Connection
booklet for details.
FIND A GAME
(pages 38-39)
FRIENDS AND RIVALS
(pages 40-41)
CONFIGURE WI-FI
EDIT FRIENDS AND RIVALS
(pages 42-45)
Connect to Nintendo WFC and battle with users all
over the world.
Connect to Nintendo WFC, and battle against your
Friends and Rivals.
Set up your DS hardware and game card for
Nintendo Wi-Fi Connection.
Review your FRIENDS and RIVALS roster and
register new Friends.
Connection Problems?
If you cannot connect to Nintendo Wi-Fi
Connection even when you select FIND A GAME or
FRIENDS AND RIVALS, an error message and error
code will be displayed.
Please read the separate Nintendo Wi-Fi Connection booklet for more details.
Page 20

Find Game
Use the FIND A GAME option to connect to Nintendo Wi-Fi Connection and play
against gamers from all over the world (page 48).
You cannot edit the Point Goal, Time Limit, or Team Play settings in a FIND GAME
battle. Also, only Battle Mode is available.
Set the Criteria
Select a specific region and opponent ranking to
search for opponents. After you have selected your
criteria, select SEARCH FOR GAME. After players
meeting your criteria have been found, the game will
advance to the Hunter selection screen.
Select the Hunter
Tap on the Hunter you want to play, then tap again to confirm your selection.
Select the Stage
Each player helps choose which stage to play. Make
your selection and tap on to confirm. Once
everyone has made a selection, the Arena will be
decided by majority vote. If multiple choices receive
the same number of votes, the Arena will be selected
randomly from the choices.
Once the Arena is selected, the battle will start automatically.
Register your opponent in the RIVALS roster
Criteria
REGION
OPPONENT RANK
To find an opponent from anywhere in the world, select
WORLDWIDE. If you want to limit the search to North
America, select LOCAL REGION.
Use MATCH MY RANK to find opponents similar to
your skill level.
Any players that you play against through "FIND
GAME" may be added to your RIVALS roster from
the Results screen. Tap on the player’s ADD RIVAL
icon, then select either QUIT or PLAY AGAIN. If that
player also tapped on the ADD RIVAL icon, then
each of you will be registered to your opponent’s
RIVALS roster.
If the other player didn’t tap on your ADD RIVAL icon, then that player will not
be added to your RIVALS roster.
ADD RIVAL
38 39
Page 21

Friends and Rivals
You can only play with the players you registered as FRIENDS or RIVALS. When you
tap on the CREATE GAME icon, you can create a game as the host. You cannot choose
FRIENDS or RIVALS if you do not register them.
Available Games
The host’s name will be
displayed. Tap on the name to
join in.
Create Game
Select Game Conditions
Host Only
The host player has the ability to restrict players who can join the game. If you don’t
want rivals to join the game, select NO on RIVALS. If you don’t want your friends to
join, select NO on FRIENDS.
Game Mode and Stage Set up
Host Only
Select the game mode you would like to play from the seven available game modes
(pages 48-49). Then, choose the Arena and game conditions you would like to use
(pages 48-49).
Online Info
Number of the FRIENDS and
RIVALS players currently online.
View
Tap to switch to the FRIENDS
and RIVALS screen. This will
show those FRIENDS and
RIVALS currently online.
Choose a Hunter
Tap on the Hunter you want to use for the battle, then tap again to confirm.
Wait for the other players to select their Hunters.
Start the Battle
Once you have at least two players in the game, the
host can close the invitation and start the battle. If
you want to play a team battle, divide players into
separate teams. Tap on START GAME to begin.
Send a Message to a Friend/Voice Chat
Send a message
If players are on your FRIENDS roster, the icon on the left will be
displayed after all players have selected their Hunter. If you tap on this
icon, the keyboard (page 45) will be displayed and friends can exchange
messages before beginning a game.
• These messages will be shown to everyone on your FRIENDS roster.
Voice Chat
If the icon on the left is displayed on the screen, press the X Button to
chat with other FRIENDS using Voice Chat. As with sending a message,
you can only chat with people on your FRIENDS roster.
To protect your privacy, do not give out personal information such as last name, phone number, birth
date, age, e-mail or home address when communicating with others.
All Players
Host Only
40 41
Page 22

Edit Friends and Rivals
On the Edit screen, you can review other players’ information and add to or edit
your FRIENDS and RIVALS rosters. The FRIENDS and RIVALS rosters are displayed on
the Touch Screen.
1
3
2
4
5
6
8
7
Player Name and Rank1Your Name
A player's ranking is decided by
previous battle’s results. This
ranking indicates the player’s
skill level (with five stars being
the highest ranking). The color of
the frame around the player’s
name indicates the player's
region (North American version:
Blue, Japanese version: Red,
European version: Green).
2
Ranking Points and Next Round
Displays current RANK POINTS and how many
points are needed to reach NEXT RANK.
3
Player Information
Switch the display by pressing the L or R Button.
4
FRIENDS Roster
5
RIVALS Roster
6
7
Add FRIENDS (page 44)
8
Delete Player (page 45)
Data Lock Switch
You can register up to 60 players on your FRIENDS
and RIVALS rosters. If you register more than 60
players, the oldest player’s data will be deleted. If
you want to make sure a player will not be deleted,
tap the icon on the left of the player’s name to lock
Lock
Status
that player's data. You can lock up to 57 players.
FRIENDS and RIVALS
FRIENDS
Players can play FRIENDS AND RIVALS battles (pages 40-41) as well as
exchange messages (page 41) with other friends.
How to register
a FRIEND
RIVALS
1. Play Multi-Card Play (pages 34-35).
2. Input a FRIEND CODE to register that player (page 44).
Unlock
Status
Battle rivals in the FRIENDS AND RIVALS mode.
About the Hunter License
The Hunter License is your own personal game profile. Various information is
stored here, including your favorite weapon and game mode, number of wins,
42 43
and total hours played.
How to register
a RIVAL
1. Register the player after a completed FIND GAME battle (page 38).
2. Register the player after a completed FRIENDS AND RIVALS battle.
3. Exchange information using the RIVAL RADAR feature (page 44).
Page 23

Registering a FRIEND
1
Select ADD FRIEND in order to register a friend.
Enter your friend’s FRIEND CODE on the screen
displayed on the right, then tap on to confirm.
Delete a name from the roster
Select the player you want to delete from the roster,
then tap on DELETE PLAYER to delete the data. On
the confirmation screen, tap the icon.
When this is complete, enter your friend’s name.
A FRIEND CODE is the 12-digit code automatically
assigned to you when you first connect to Nintendo
Wi-Fi Connection.
Decide when you would like to meet up with your
2
friend online, then connect to Nintendo Wi-Fi
Connection. Registration will automatically take
place. If you connect to Nintendo Wi-Fi Connection
at different times, only the person who was
connected later will be registered. The first person
must connect again to be registered.
Use RIVAL RADAR to add RIVALS
Select RIVAL RADAR from the Multiplayer Menu,
then tap on the icon to start communication.
If you come near someone who has set his/her
DS on RIVAL RADAR, you can exchange your
Your Personal FRIEND CODE
Give your personal FRIEND
CODE to your friend when you
want to register him/her on
your FRIENDS roster.
How to use the Keyboard
The keyboard screen will be displayed when you
send a message (page 41) or when registering a
friend’s name on the FRIENDS roster. Use the
Touch Screen keyboard to enter text.
Special Keys
CANCEL
SHIFT/CAPS
SPACE
SEND/CONFIRM
BACKSPACE
Tap on the icon to return to the previous page.
Switch font types.
Put a space between text.
Tap on the icon to send a message to your friend.
Tap on the icon to backspace.
Hunter License (page 42) with up to three
players at a time, and register those players on your RIVALS roster.
44 45
Page 24

Multiplayer Basic Rules
-Playing a Multiplayer Game-
Battle other players to complete the selected objectives. Watch your Energy Gauge:
once the gauge goes down to zero, you’re defeated. Press the L Button (or, if you’re
left-handed, press the R Button) to respawn your character in a different spot.
Multiplayer Screen
Depending on the Hunter you choose, the Multiplayer Mode display screen will be
different. However, the basics will be the same as the Adventure Mode (pages 20-
21). Hold START to check the current score.
The game does not pause while you are viewing the current score.
The screenshot on the right is the Multiplayer
Mode display screen for Samus.
Objective Completion Gauge
Energy Gauge
When your character receives damage, the gauge
will be reduced. If the Energy Gauge reaches zero,
your character is defeated. Your Energy Gauge can
reach a maximum of 199 energy units.
RANK
Displays your current game ranking.
Remaining Time
46 47
Action Controls
Basic controls are the same as in Adventure
Mode. Although you cannot switch visors or view
the world map, all other commands are available
(pages 22-29). Other characters can use AltForms by touching the Alt-Form icon. Each
character has its own unique movement and
attack methods, so try them all!
The Results Screen
When time expires or the game requirements are
met, the battle ends. Each player’s rank appears
on the Results screen. Select PLAY AGAIN to start
the next game or QUIT to exit Multiplayer mode.
Screen Switch Icon
Tap this icon or use the L and R Button to
review the details of your battle results.
Page 25

Setting Game Criteria
There are seven different multiplayer game
modes. Each mode has different objectives.
Detailed rules can be modified in the Arena
Setting screen. Please see pages 32-35 for more
information.
Advanced Settings
PRIME HUNTER
CAPTURE
The first player to make a Kill becomes the powerful “Prime
Hunter.” The remaining players must then defeat this player to
take the title. Compete against each other unti Time Goal is met, or
Time Limit has expired. If the Time Limit expires, the player who
held the title longest is the winner.
Attack enemy territory and steal their Octoliths, then bring them
back to your own territory. The team who receives the specified
number of points first wins. You can set the number of Octoliths
required to win, the Time Limit, and Auto Reset, which returns the
Octolith to base when the carrying Hunter is defeated.
Game Types
BATTLE
Compete to see how many other Hunters you can defeat. You can
set the Point Goal needed to win the game, the Time Limit, and
Team Play. (Choosing this will divide players into two teams.)
NODES
Fight over the Nodes placed in the stage. When you stand on an
uncontested node for ten seconds, you capture it. You get points for
nodes under your control.
Battle against other players–the last one standing is the winner.
SURVIVAL
BOUNTY
DEFENDER
You can set Lives (the number of times you can respawn your
Hunter) and Team Play.
Pick up the Octolith and take it to a specified location to earn
points. The first player to deliver the specified number of Octoliths
to the goal wins. You can set the number of Octoliths required to
win, the Time Limit, Team Play, and Auto Reset, which returns the
Octolith to base when the carrying Hunter is defeated.
Attempt to secure a designated area. You will earn time while you
are the only Hunter to occupy it.
Advanced Settings
Tap on ADVANCED SETTINGS on the Arena Settings screen to modify detailed
rule options.
Show Hunters on Radar
Damage Level
Friendly Fire
Available Weapons
If you turn this option off, enemies will not be displayed on the radar.
Adjust the damage level you give and receive.
You can receive damage from your teammate as well as enemy players (Team Play Mode).
Choose between Default or Affinity weapons.
48 49
Page 26

Hunters & Affinity Weapons
Samus and the other six Hunters all have
unique and different abilities and AltForms. Using each Hunters' Affinity
Weapon strengthens that Hunter’s
weapon power and weapon effects.
Weavel
Weapon: Battlehammer
When the Battlehammer strikes
its target it explodes, causing
additional damage.
Kanden
Weapon: Volt Driver
When a charged Volt Driver
strikes its target, the target’s
vision is temporarily distorted.
Sylux
Weapon: Shock Coil
The Shock Coil drains the target’s
energy.
Samus Aran
Weapon: Missile
The Missile can track enemy
movements. The charge attack
increases the Missile’s
effectiveness.
Noxus
Weapon: Judicator
If Noxus uses the charge attack
with the Judicator, its shots
freeze the target.
Spire
Weapon: Magmaul
The Magmaul’s charge attack
has a larger explosion that
burns its target.
Trace
Weapon: Imperialist
While using this weapon, Trace’s
body will be invisible as long as
he remains stationary.
Items
Find the items placed across each stage and use
them to your advantage. The items you can find
differ depending on the game mode and rules
you select.
Energy Balls (M: Blue, L: Yellow)
Restores energy level.
(M:60, L: 100)
UA/Universal Ammo (S, L)
Restores Sub-weapon ammo.
Number restored depends
on weapon.
Double Damage
Doubles attack power for a
limited time.
Deathalt
Changes character to Alt-Form to
quickly destroy its enemies by
touching them.
Missile (S, L)
Affinity Weapon
Cloak
Octolith
Restores Missile ammo.
(S: 5, L: 10)
Earn the Hunter’s preferred
Affinity weapon.
Turns your character invisible for a
limited time.
Take this back to the goal or base
to earn points.
50 51
Page 27

Alt-Form: Triskelion
SYLUX
Sylux is a resourceful tracker, and a deadly
sharpshooter who harbors an intense hatred for the
Galactic Federation and for Samus Aran for assisting the
Galactic Federation in the past.
Alt-Form: Lockjaw
TRACE
Trace is a Kriken, one of the most hated
and feared races in the galaxy. His
quest for ultimate power consumes him,
and his every thought is bent toward
bringing supremacy to the Krikens and
honor to himself.
WEAVEL
This cybernetic warrior is part of a Space Pirate special
unit. Badly injured in a past battle with Samus Aran,
Weavel’s body has been reconstructed and fused with a
Power Suit. The rebuilt Weavel has become a
formidable and ferocious warrior.
Alt-Form: Halfturret
52 53
KANDEN
A lab experiment gone awry, Kanden
was created to be the ultimate soldier,
immortal and relentless. He is a ferocious,
deadly and dangerously unpredictable
Hunter. To prove himself as the finest
bounty hunter of them all, he now seeks
to attain the ultimate power.
Alt-Form: Stinglarva
Page 28

NOXUS
Noxus is a member of the Vhozon, a proud and
reclusive race. He is determined to get the
ultimate power first to prevent it from falling
into the hands of lawbreakers or the unworthy.
Alt-Form: Vhoscythe
SPIRE
Spire is the sole remaining member of the
Diamonts, an ancient silicon-based lifeform. He hopes that finding the Alimbics’
source of ultimate power and solving the
mystery of their lost race will help him solve
the mystery of his own.
54 55
Alt- Form: Dialanche
This section explains how to establish a link for DS Download Play.
What you need:
Nintendo DS systems 1 per player
Metroid Prime Hunters Game Cards 1
What to Do (For the Parent Unit)
Make sure that all DS systems are turned off, then insert a Metroid
1.
Prime Hunters Game Card into your unit.
Turn on the power for all systems. The DS Menu Screen will appear.
2.
Touch the “Metroid Prime Hunters” panel.
3.
Follow the instructions on page 32.
4.
Steps - All systems excluding P1
Turn on the power of all the systems.
1.
The DS menu screen will appear.
Touch the “DS Download Play” panel.
2.
The Game List Screen will appear.
Touch the “Metroid Prime Hunters” panel. The Download
3.
Confirmation Screen will appear.
When the correct software appears, touch “Yes.”
4.
The parent unit will then start the download process.
Next, follow the instructions on page 32.
5.
Game Selection Screen
Game List Screen
Page 29

Take note of the following guidelines for DS Download Play.
The icon on the DS and game menu screens shows that there is a wireless function associated
with an activity. Choose menus with this icon to engage in wireless activities. Please do not choose
this option in places where wireless transmission is forbidden, such as airplanes or hospitals.
The icon that appears when you are connected to a wireless signal indicates the strength of the
signal. The stronger the signal, the smoother your wireless play will be.
This game is compatible with the Nintendo DS Rumble Pak (sold separately). The Rumble Pak
includes built-in features that rumble while you play, providing realistic feedback. Please read the
following before you play the game with Rumble Pak enabled.
• Make sure the Nintendo DS is turned off.
• Insert the Rumble Pak into Slot-2 on the front of the Nintendo DS (the label
should face toward the bottom) just like loading a Game Boy Advance Game Pak.
• Make sure to turn the power off before removing the Rumble Pak.
Troubleshooting
Within 30 ft.
Signal Bars
0123
Weak
Strong
Within 30 ft.
The power light will blink when wireless functionality is active.
To make the most of your wireless experience, remember the following:
Keep all DS consoles within 30 feet of each other, or at least close enough that you see two or
•
more bars of signal strength.
•
Please arrange the DS consoles so they face each other. Make sure there are no people or other
obstructions between the DS consoles.
Play may sometimes be affected by devices that cause interference, such as GBA Wireless
•
Adapters, Wavebirds, WLAN, microwaves, or cordless appliances. If this occurs, move away from
the interference-causing device or turn it off.
56 57
• Nintendo DS Rumble Pak is making a sound
- When the Rumble Feature is on, the Rumble Pak will make sounds during game play.
• Does not rumble
- Make sure the Rumble Feature is turned on in the game (select Options in the main menu).
- Make sure the edge connector of the Rumble Pak and the Nintendo DS system (Slot-2) are not dirty.
• Does not stop rumbling
- Make sure the edge connector of the Rumble Pak and the Nintendo DS system (Slot-2) are not dirty.
If the Rumble Pak still does not work properly after following these troubleshooting measures,
please call Nintendo customer service.
Page 30

Nintendo Software Technology Corporation
Game Director
Masamichi Abe
Single-Player Game Design/Story
Richard Vorodi
Wi-Fi Game Design/Project Coordination
Wing S. Cho
Project Coordination
Hiroto Alexander
Technical Programming Lead
Colin Reed
Programming Lead/
Multiplayer Game Design
Jonathan Johnson
AI Programming
David Devaty
Enemy Programming
Max Szlagor
Audio Programming
Rory Johnston
58 59
Network/Multiplayer Programming
Cory O'Regan
Jonathan Bryant
Additional Programming
Scott Bassett
Tools Department Lead
Satoru Hosogai
World Editor Tool
Alexander Van Berg
Menu Tool
Clark Morse
Corey Ross
Art Director/Multiplayer Game Design
Michael Harrington
Special Effects
Edward Barkley
Environment Lead
Alain Schneuwly
Environment Art/Multiplayer Game Design
Chris Donovan
Environment Art
Chris Miller
Katie Clark
Environment/Game Objects
Edward Sherman
Character Modeling/Animation Lead
David Lee Phemister
Character Modeling/Animation
Oscar Nebres
Mark Trono
UI Design/Art
Nicholas Trahan
Promotional Art
Kunitake Aoki
In-Game Camera Sequences
Dwight Hwang
Sound Design/Music/Voice
Lawrence Schwedler
James Phillipsen
Producers
Shigeki Yamashiro
Robert Champagne
Special Thanks
Andrew Jones
John Layman
Darren Lamb
Bryan Meagher
Mike Keough
Jared Carew
Nintendo Company, Ltd.
Executive Producer
Satoru Iwata
Producer
Kensuke Tanabe
Coordination
Akiya Sakamoto
Special Thanks
Retro Studios
Super Mario Club
PolyAssets United Inc.
Page 31

Nintendo Of America
Senior Product Specialist
Jeff Gilbert
Vice President, Engineering
Yoshinobu Mantani
Director Product Testing
Shuji Hashimoto
Product Testing Sr. Manager
Rob Crombie
Product Testing Manager
Kyle Hudson
Product Testing Supervisors
Eric Bush
Sean Egan
Bilingual Product Tester
Mika Kurosawa
Text Editing
Nate Bihldorff
Teresa Lillygren
Product Testers
Michael Chipman Robert Jahn
Joel D. Simon Pat Wells
60 61
Senior Project Coordinator
Robert Johnson
Project Coordinator
Jim Holdeman
Communications Coordinator
Tomoko Mikami
Special Thanks
Mike Fukuda
Tom Prata
Jeff Miller
Brett Gow
Darren Smith
NOA Wi-Fi Team
NOE Wi-Fi Team
Nintendo Of Europe
Coordination
Andy Fey
Noriko Netley
Testing Coordinator
Alessio Danieli
Page 32

Important Legal Information
REV–D
Copying of any video game for any Nintendo system is illegal and is strictly prohibited by domestic
and international intellectual property laws. “Back-up” or “archival” copies are not authorized and
are not necessary to protect your software. Violators will be prosecuted.
This video game is not designed for use with any unauthorized copying device or any unlicensed
accessory. Use of any such device will invalidate your Nintendo product warranty. Nintendo (and/or
any Nintendo licensee or distributor) is not responsible for any damage or loss caused by the use of
any such device. If use of such device causes your game to stop operating, disconnect the device
carefully to avoid damage and resume normal game play.
If your game ceases to operate and you have no device attached to it, please contact Nintendo
Customer Service (see below).
The contents of this notice do not interfere with your statutory rights.
This booklet and other printed materials accompanying this game are protected by domestic and
international intellectual property laws.
For further information or assistance, please contact:
Nintendo Consumer Service
www.nintendo.com
or call 1-800-255-3700
(U.S. and Canada)
Warranty & Service Information
You may need only simple instructions to correct a problem with your product. Try our website at www.nintendo.com or call
our Consumer Assistance Hotline at 1-800-255-3700, rather than going to your retailer. Hours of operation are 6 a.m. to 7 p.m.,
Pacific Time, Monday - Sunday (times subject to change). If the problem cannot be solved with the troubleshooting information available online or
over the telephone, you will be offered express factory service through Nintendo. Please do not send any products to Nintendo without contacting
us first.
HARDWARE WARRANTY
Nintendo of America Inc. ("Nintendo") warrants to the original purchaser that the hardware product shall be free from defects in material and
workmanship for twelve (12) months from the date of purchase. If a defect covered by this warranty occurs during this warranty period, Nintendo
will repair or replace the defective hardware product or component, free of charge. The original purchaser is entitled to this warranty only if the date
of purchase is registered at point of sale or the consumer can demonstrate, to Nintendo's satisfaction, that the product was purchased within the last
12 months.
GAME & ACCESSORY WARRANTY
Nintendo warrants to the original purchaser that the product (games and accessories) shall be free from defects in material and workmanship for a
period of three (3) months from the date of purchase. If a defect covered by this warranty occurs during this three (3) month warranty period,
Nintendo will repair or replace the defective product, free of charge.
SERVICE AFTER EXPIRATION OF WARRANTY
Please try our website at www.nintendo.com or call the Consumer Assistance Hotline at 1-800-255-3700 for troubleshooting information and repair or
replacement options and pricing. In some instances, it may be necessary for you to ship the complete product, FREIGHT PREPAID AND INSURED FOR
LOSS OR DAMAGE, to Nintendo. Please do not send any products to Nintendo without contacting us first.
WARRANTY LIMITATIONS
THIS WARRANTY SHALL NOT APPLY IF THIS PRODUCT: (a) IS USED WITH PRODUCTS NOT SOLD OR LICENSED BY NINTENDO (INCLUDING, BUT NOT
LIMITED TO, NON-LICENSED GAME ENHANCEMENT AND COPIER DEVICES, ADAPTERS, AND POWER SUPPLIES); (b) IS USED FOR COMMERCIAL PURPOSES
(INCLUDING RENTAL); (c) IS MODIFIED OR TAMPERED WITH; (d) IS DAMAGED BY NEGLIGENCE, ACCIDENT, UNREASONABLE USE, OR BY OTHER CAUSES
UNRELATED TO DEFECTIVE MATERIALS OR WORKMANSHIP; OR (e) HAS HAD THE SERIAL NUMBER ALTERED, DEFACED OR REMOVED.
ANY APPLICABLE IMPLIED WARRANTIES, INCLUDING WARRANTIES OF MERCHANTABILITY AND FITNESS FOR A PARTICULAR PURPOSE, ARE
HEREBY LIMITED IN DURATION TO THE WARRANTY PERIODS DESCRIBED ABOVE (12 MONTHS OR 3 MONTHS, AS APPLICABLE). IN NO EVENT SHALL
NINTENDO BE LIABLE FOR CONSEQUENTIAL OR INCIDENTAL DAMAGES RESULTING FROM THE BREACH OF ANY IMPLIED OR EXPRESS WARRANTIES.
SOME STATES DO NOT ALLOW LIMITATIONS ON HOW LONG AN IMPLIED WARRANTY LASTS OR EXCLUSION OF CONSEQUENTIAL OR INCIDENTAL
DAMAGES, SO THE ABOVE LIMITATIONS MAY NOT APPLY TO YOU.
This warranty gives you specific legal rights. You may also have other rights which vary from state to state or province to province.
Nintendo's address is: Nintendo of America Inc., P.O. Box 957, Redmond, WA 98073-0957 U.S.A.
This warranty is only valid in the United States and Canada.
REV–P
 Loading...