

Page 1
®
BL205
OWNER’S GUIDE
Euro-Pro Operating LLC
US: Newton, MA 02459
CAN: Ville St-Laurent, QC H4S 1A7
1-877-646-5288
www.ninjakitchen.com
Copyright © 2011 Euro-Pro Operating LLC
Printed in China
Illustrations may differ from actual product.
BL205.E.110812.1
Pulse™
www.ninjakitchen.com
®
HELP
LINE
1 877 646-5288
BL205_30_IB_ENG_110812_1.indd 1-1 11-08-12 1:51 PM
Page 2

2
TOLL FREE: 1-877- 646- 5288
www .ninja kitche n.com
3
21. DO NOT overfill.
22. DO NOT operate the appliance
empty.
23. CAUTION: When mixing pizza
dough or any heavy mix such as
bread dough or pastry dough,
mix for up to 1 minute, then let the
appliance rest for approximately
1 minute before mixing again
to prevent overheating of the
appliance.
24. If the appliance overheats, a
thermal switch will become
activated and shut of f the motor.
To reset, unplug the appliance and
let it cool down for approximately
30 minutes before using again.
25. THIS PROD UCT IS INTE NDED FOR
HOUSEH OLD USE ON LY. Do not
use this appliance for anything
other than its intended use. Do not
use outdoors.
26. The maximum rating is based on
the Cookie Paddle (40 oz. bowl)
that drives the greatest power and
other recommended attachments
may draw less power or current.
27. Keep the pour spout closed whe n
blending to prevent splashing.
WARNING: Extension cords are
not recommended for use with this
product.
SAVE THESE
INSTRUCTIONS
IMPORTANT SAFETY INSTRUCTIONS
For Household Use Only
WHEN USING ELECTRICAL
APPLIANCES, BASIC SAFETY
PRECAUTIONS SHOULD ALWAYS
BE FOLLOWED, INCLUDING THE
FOLLOWING:
READ ALL INSTRUCTIONS
BEFORE USING YOUR NINJA®
KITCHEN SYSTEM PULSE™ .
POLARIZED PLUG
WARNING: To reduce the risk of
electric shock, this appliance has a
polarized plug (one blade is wider
than the other). This plug will fit into
a polarized outlet only one way. If
the plug does not fit fully into the
outlet, reverse the plug. If it still
does not fit, contact a qualified
electrician to install the proper
outlet. DO NOT modif y the plug in
any way.
9. Keep hands, hair, clothing, as well
as utensils out of container while
processing to reduce the risk of
severe injury to persons or damage
to the appliance. A scraper may be
used but only when the appliance is
not running.
10. CAUTION : Blade assembly is sharp,
handle with care. When handling
the blade assembly, always hold by
the shaft or collar.
11. Avoid contact with moving parts.
12. DO NOT attem pt to sharpe n
blades.
13. DO NOT use the appliance if blade
assembly is bent or damaged.
14. To reduce risk of injury, never
place the blade assembly on the
base without the pitcher or bowl
properly attached.
15. DO NOT operate this appliance
on or near any hot sur faces (such
as gas or electric burner or in a
heated oven).
16. The use of attachments or
accessories including canning
jars, not recommended by the
manufacturer may result in fire,
electric shock or personal injury.
17. DO NOT remove the container from
the motor base while the appliance
is in operation.
18. To reduce the risk of injury, NEVER
operate the appliance without
the lid in place; DO NOT tr y to
defeat the interlock m echanism;
make sure that the attachment is
properly installed before operating
the appliance.
19. DO NOT expose containers to
extreme temperature changes.
20. DO NOT blend hot liquids .
WARNING:
TO REDUCE THE RISK OF FIRE, ELECTR IC
SHOCK OR INJURY:
1. To protect against electrical shock ,
do not submerge the appliance or
allow the power cord to come into
contact with water or any other
liquid.
2. DO NOT allow young children to
operate the appliance or use as a
toy. Close supervision is necessary
when any appliance is used by or
near children .
3. Never leave an appliance
unattended when in use.
4. Remove the power cord from the
electrical outlet when not in use,
before assembling or disassembling
parts and before cleaning. To
unplug, grasp the plug and pull from
the electrical outlet. Never pull from
the power cord.
5. DO NOT abuse the power cord.
Never carry the appliance by the
power cord or yank it to disconnect
from electrical outlet; instead grasp
the plug and pull to disconnect.
6. DO NOT operate any appliance with
a damaged cord or plug, or after th e
appliance malfunctions, has been
dropped or damaged in any manner.
Return the appliance to EURO-PRO
Operating LLC for examination,
repair or adjustment.
7. DO NOT let the power cord hang
over the edge of table or counter or
touch hot surfaces such as the stove.
8. Always use appliance on a dry, level
surface.
BL205_30_IB_ENG_110812_1.indd 2-3 11-08-12 1:51 PM
Page 3
4
TOLL FREE: 1-877- 646- 5288
www .ninja kitche n.com
5
Contents
THIS BOOK COVE RS MODE L NUMB ERS:
BL205 3 0
TECHNIC AL SPECIF ICATIONS
Voltage: 120V., 60Hz.
Power: 700 Wat ts
Bowl Capac ity: 40 oun ces (5 cups)
Single Ser ving Cup C apacity: 1 6 ounces . (2 cups)
Getting to Know Your Ninja® Kitchen System Pulse™ .........6
Assembling the Ninja
®
Kitchen System Pulse™ ..................... 8
Assembly and Use for the Single Serve Cup ............................ 9
Assembly and Use for the 40-oz Bowl ... ................................... 10
Suggested Uses ...................................................................................11
Care & Maintenance ........................................................................... 12
Troubleshooting Guide .....................................................................13
Replacement Parts ............................................................................. 13
Recipes .................................................................................................... 14
Warranty & Registration ...................................................................19
Thank you for
purchasing
the Ninja
®
Kitchen
System
Pulse™.
BL205_30_IB_ENG_110812_1.indd 4-5 11-08-12 1:51 PM
Page 4

6
TOLL FREE: 1-877- 646- 5288
www .ninja kitche n.com
7
NOTE: Atta chment s are not
interch angeab le.
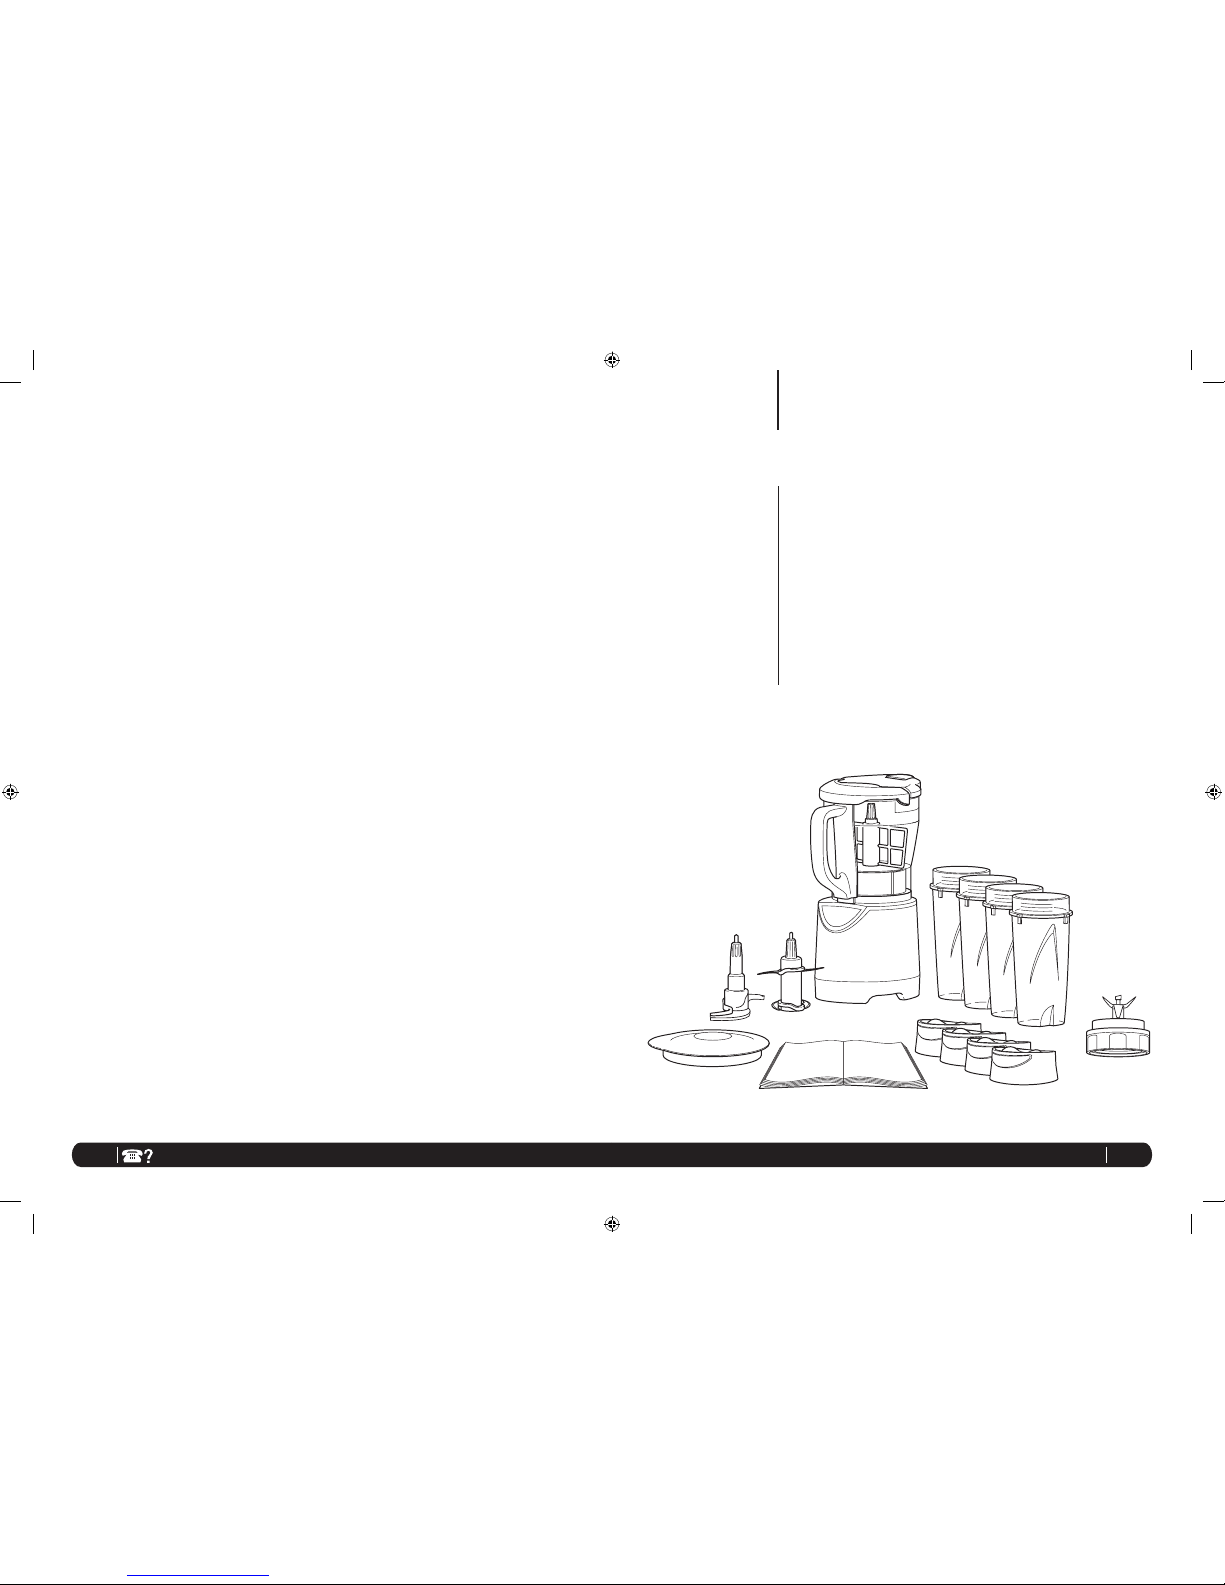
Getting To Know Your Ninja® Kitchen System Pulse
™
a
e
f
b
c
i
k
g
h
d
j
l
The Ninja® Kitche n System Pu lse™ is a high powere d innovative tool with a co mpact
design and o utstand ing perfo rmance. It is p erfect f or ice crushin g, choppi ng, blend ing,
kneading a nd complete ju icing. The N inja
®
Kitche n System Pu lse™ also featu res a unique
capabilit y to knead do ugh for cooki es, bread s, pizza and m ore! Blen d and go with the
convenient sin gle serve cup, c reate delicio us drinks to get yo u out the door ! Best result s
are achieved whe n you Pulse.
FEATURES:
• Ninja
®
Blade Technology
• 40 oz. Bowl and Sin gle Serve Drink Cu p - BPA Free
• Cord storage
• Pu lse Power: Co ntrolled ble nding, proc essing, jui cing, and k neading by usi ng short
pulses. I n short inter vals, pre ss down on the top of th e single ser ve drink cup or th e
handle of the 4 0-oz. bowl li d and pulse to the p erfect c onsistency.
• Si ngle Ser ve Blendi ng: Fill, bl end, and g o! Blend rig ht in the single s erve drink c up and
twist on the to -go lid for a he althy, convenient sna ck with little cle an up.
• Do ugh Mixin g: Mix and kn ead pizza do ugh, cooki e dough, br ead dough a nd more!
For best resul ts, be sure to ca refully rea d all the instru ctions cont ained in the m anual
before using th is applian ce.
g Single Ser ve Drink Cup (x4)
h 40- oz. Bowl
i Drive Gear
j Single Se rve Blade
k Motor B ase
l Power Cord (not shown)
m Recipe boo k (not shown)
a 40 -oz. Bowl Storage L id
b 40-oz. Bowl Li d with Locking Ha ndle
c To-Go S ingle Ser ve Lids (x4)
d Cookie Padd le (40-oz. bowl)
e Dough B lade (40-oz. bowl)
f 4-Blade As sembly (40-oz. bowl )
BL205_30_IB_ENG_110812_1.indd 6-7 11-08-12 1:51 PM
Page 5

8
TOLL FREE: 1-877- 646- 5288
www .ninja kitche n.com
9
Assembling the Ninja® Kitchen System Pulse™
BEFORE F IRST USE
1 Re move all packagi ng material an d labels
from the appl iance.
2 Wash the li ds, bowl, sin gle serve cu ps
and attach ments in wa rm, soapy water
with a soft cloth . Use caut ion when
washing t he blade a ssembl ies as the
blades a re very sha rp.
3 Rins e and dry th oroughly.
4 The bowl, sin gle serve cup s, lids and
attachm ents are all dis hwasher safe .
It is recomme nded that the l ids and
attachm ents be place d on the top rack .
Ensure that the at tachme nts are removed
from the conta iners befo re placing in th e
dishwasher.
5 Wipe th e motor base cle an with a damp
cloth.
IMPORTANT: Make sure that the m otor
base is plugg ed in for use.
1 Pla ce the motor base o n a clean, d ry,
level surfac e such as a counter o r table
top.
2 Add in gredients to th e single ser ve cup.
3 Plac e the single se rve blade onto th e cup
and screw it tightly u ntil you have a good
seal. (Fig . 1)
4 Turn the single ser ve cup upside down
and place it on to the motor base, a ligning
the tabs on the c up with the motor ba se.
Turn to the left, the uni t is ready for use .
(Fig. 2)
5 Press d own on the top of the cu p in short
intervals to ac tivate. (Fig. 3 )
PLEASE KE EP THESE IMPORTANT
SAFEGUARDS IN MIND WHE N
USING THE A PPLIANCE :
IMPORTANT: Always place the
attachment in the 40 -oz. bowl
before adding a ny ingredient s.
IMPORTANT: Attachment s are not
interchang eable.
CAUTION: Blad es are sharp! U se
extreme cau tion when han dling
the blade as semblies . Always hold
them by the shaf t.
IMPORTANT: When mixing doug h.
Mix dough fo r up to 1 minute, the n
let applian ce rest for 1 minu te
before mixing a gain.
IMPORTANT: Never run the
appliance e mpty.
CAUTION: Never at tempt to remove
the contain er while the ap pliance is
still runnin g.
WARNIN G: Never leave the
appliance u nattende d while in use.
Fig. 1
Fig. 2
Assembly and Use for the Single Serve Cup
Fig. 3
Fig. 4
Fig. 5
ASSEMBLY PULSE REMOVAL
For best resul ts, use sho rt “PUL SES”... Pra ctice makes pe rfect! !
6 When you h ave reached your de sired
consistenc y, stop the applian ce by
removing your ha nd from the sin gle
serve cup. Th en turn the sin gle serve cu p
to the right (Fig . 4) and pull straig ht up
to remove. (Fig. 5)
NOTE: Do not over fill! To avoid spilling ,
do not add ing redients p ast the “Ma x” fill
line.
7 Turn the cup up right and rem ove the
single ser ve blade by twisti ng the blade
assembly to th e left.
8 Place th e To-Go drinki ng lid onto the
single ser ve drink cup, tw ist to seal and
enjoy!
9 Make sure th at the motor base i s
unplugge d when not in us e.
BL205_30_IB_ENG_110812_1.indd 8-9 11-08-12 1:51 PM
Page 6

10
TOLL FREE: 1-877- 646- 5288
www .ninja kitche n.com
11
FUNCTION CONTAINER ATTACHMENT TYPE OF FOOD
Mincing
Single Ser ve
40-oz. B owl
Blade As sembly
Onion
Garlic
Herbs
Kneadin g* 40-oz. B owl Dough B lade
Bread Dou gh
Pizza Dough
Dough Mixin g* 40-oz. Bowl Cookie Pad dle
Cookie Do ugh
Dessert B ars
Biscuits
Scones
Batters
Blendin g
Single Ser ve
40-oz. B owl
Blade As sembly
Smoothies
Milkshake s
Frozen Drinks
Dips
Spreads
Grating
Single Ser ve
40-oz. B owl
Blade As sembly
Cheese
Bread Crum bs
Chopping 40-oz. B owl Blade Ass embly
Salsa
Vegetables
Egg Salad
Ice Crushin g
Single Ser ve
40-oz. B owl
Blade As sembly
Ice
Slushies
Snow Cones
Complete
Juicing
Single Ser ve
40-oz. B owl
Blade As sembly Fruit & Veg etable Drin ks
Suggested Uses
bowl aligning t he arrow ( ) located o n
the lid with the arrow (
) located on th e
bowl’s handl e. (Fig. 3)
7 Pus h down on the “P ULSE” on t he handle
to start the a ppliance. ( Fig. 4)
NOTE: Pulse in gredient s for even
chopping by pr essing down in sh ort
intervals .
IMPORTANT: When using the d ough
blade or coo kie paddle h old the
appliance to s ecure the app liance to the
counter or tab le top.
8 Whe n you have reached you r desired
consistenc y, stop pressing the li d handle
and wait for the at tachme nt to stop
turning.
9 To remove the lid, pull th e lid handle u p
to a 90° angle . Turn the bowl clockwi se
to lift off th e base. (Fig . 5, Fig. 6)
CAUTION: N ever insert yo ur hands in th e
pitcher as the b lades are sha rp. Always
use a spatula to dis lodge food th at has
stuck to the side s of the pitcher.
10 Make sure th at the unit is un plugged
when not in use .
IMPORTANT: Make sure that the mo tor
base is plugg ed in for use.
1 Pla ce the motor base o n a clean, d ry,
level surfac e such as a counter o r table
top.
2 Alig n and lower the bowl o nto the motor
base. (Fig . 1) Handle sh ould be alig ned
slightly to the lef t of the “LOC K” symbol
on the motor bas e.
3 Rotate th e containe r to the left as fa r as
it will go to lock in pl ace. (Fig. 1)
4 Holding th e desired att achment by th e
shaft, pl ace it onto the drive ge ar inside
the containe r. Ensure that the atta chment
is seated prope rly and is sta nding
upright. (F ig. 2)
NOTE: The bla de will fit loose ly on the
drive gear.
5 Add the i ngredient s to the bowl, maki ng
sure that they do no t exceed the highe st
measured m arking line o n the side of the
bowl.
6 Holdin g the lid by the han dle in the
upright posi tion, place it o n top of the
Assembly and Use for the 40-oz. Bowl
Fig. 4
Fig. 5
Fig. 6
Fig. 2
Fig. 1
Shaft
Fig. 3
Or
ASSEMBLY PULSE REMOVAL
*IMPORTANT: When mixing pizza dough or any heavy mix
such as bread dough or pastry dough, mix for up to 1 min ute,
then let the appliance rest for approximately 1 minute before
mixing again to prevent overheating of the appliance
.
It’s best to ad d the liquid in gredients fi rst and the n the dry ing redients .
BL205_30_IB_ENG_110812_1.indd 10-11 11-08-12 1:51 PM
Page 7

12
TOLL FREE: 1-877- 646- 5288
www .ninja kitche n.com
13
HOW TO STORE
1 Store th e Ninja
®
Kitche n System Pu lse™.
upright with the 4 0-oz bowl on th e
motor base, 4 -Blade a ssembly in side and
lid on the bowl. S ecure the power co rd
underne ath the base by wrap ping the
cord around th e cord wrap. Do no t place
anything on top . Store the single s erve
cups and the re st of the attac hments
along side th e applianc e where they
will not be dam aged and won ’t cause a
hazard.
RESET TING THE M OTOR THER MOSTAT
The Ninja
®
Kitche n System Pu lse™ features
a unique safe ty system whic h prevents
damage to the u nit’s motor an d drive
system shoul d you inadverte ntly overload
your applia nce. If the app liance is bei ng
overloaded , the motor will stop . To reset the
appliance , follow the reset ting proced ure
below:
1 Un plug the app liance from th e electric al
outlet.
2 Rem ove and empty the c ontainer a nd
ensure that no f ood is jammi ng the
cutting bla des or attac hments .
3 Allow th e applian ce to cool for
approximately 3 0 minutes.
4 Re-inst all the contai ner onto the bas e
and re-pl ug the applia nce into the
electric al outlet.
5 Proce ed to use the appl iance as
before makin g sure not to exceed the
recommen ded maximu m capacitie s.
HOW TO CLEAN
CAUTION: Make sure th at the motor
base is unpl ugged from th e power
source before i nserting o r removing any
attachm ent and before c leaning .
CAUTION: DO NOT imm erse the motor
base into water or a ny other liquid .
1 Se parate/remove all pa rts from ea ch
other.
2 Cle an the motor base a nd gear sh aft with
a damp cloth an d wipe dry.
3 Plac e the bowl and sin gle serve cup s
in the dishwash er. Place the lids an d
attachm ents on the top ra ck. Use ca ution
when han dling th e blade as semblie s as
the blad es are very s harp.
NOTE: You may also wash th e containe rs
by filling ¾ of the cont ainer with war m
water and a drop of di sh washing
detergent, p lacing the cor respondi ng
lid on the conta iner and pu lsing a few
times. On ce clean, re move the containe r
from the motor ba se. Rinse the c ontainer,
attachm ent and lid un der runnin g water.
Allow all the pa rts to dry be fore storing.
Please cal l customer se rvice if any
servicin g needs to be pe rformed o n the
appliance a t 1-877-6 46-528 8.
Care & Maintenance
PROBLEMS POSSIBLE REASONS & SOLUTIONS
Motor Doesn’t Start or
Attachment Doesn’t
Rotate.
• Make sure th e container i s securely ali gned and lo cked,
(40-oz bowl) on the motor b ase.
• For the sing le serve cup, m ake sure that the t abs are
seated in the slo ts and turne d to the left.
• Make sure th e lid is securel y on the contain er
(40-oz bowl) in the corre ct position wi th the arrows
aligned .
• Check th at the plug is se curely inser ted into the
electric al outlet.
• Check th e fuse or circu it breaker in your e lectrica l box.
• The u nit could be ove rloaded . Unplug an d wait
approximate ly 30 minutes b efore using ag ain.
• The u nit could be ove rheated. U nplug the u nit and wait 30
minutes to reset .
Food is Unevenly
Chopped.
• Either you a re chopping too m uch food at on ce, or you
are not pulsin g properly. Remove so me of the food
items.
Food is Too Finely
Chopped or Too Watery.
• The food h as been over pro cessed. Pu lse ingredi ents
for best resul ts. Press d own on the single s erve cup or
40-oz. lid h andle in sh ort interv als.
You Cannot Achieve
Snow From Ice Cubes.
• For best re sults use ice st raight from th e freezer. Try
using shor t pulses ins tead of one lon g one.
Single serve cup is
leaking.
• Make sure th at the single se rve blade set i s tightly
screwed on to the cup b efore blendi ng. Turn the lid
tightly clock wise.
Unit doesn’t turn on.
• Make sure th e unit is plugg ed in.
• Rotate and p ress down on the si ngle serve cu p or the
“pulse” ha ndle on the 40 -oz. lid to turn th e unit on.
Unit doesn’t turn off.
• Releas e your hand fro m the single se rve cup or the
“pulse” ha ndle on the 40 -oz. lid to turn th e unit off.
Doesn’t mix well.
• Pulse ing redients fo r best result s. Press down o n the
cup in shor t intervals fo r even blending a nd choppi ng.
For frozen ingredi ents, pu lse in short i ntervals of 2-5
seconds an d repeat.
Troubleshooting Guide
Replacement Parts
ORDER ING REP LACEME NT PARTS
To order additional p arts an d attachme nts, ple ase visit our web site:
www.ninja kitchen. com or feel fre e to contact cus tomer ser vice: 1-87 7-646-5 288.
BL205_30_IB_ENG_110812_1.indd 12-13 11-08-12 1:51 PM
Page 8

14
TOLL FREE: 1-877- 646- 5288
www .ninja kitche n.com
15
Fire Roasted Tomato Salsa with Tortilla Chips
I ngredi ents:
1 4.5 oz. Can Fire- Roasted Tomatoes , With Juice
1
/2 Small Red On ion, Pee led, Rough ly Cut
4 Cloves Garlic Pe eled
1
/2 tsp. Salt
1
/4 tsp. Black Pepper
1
/4 tsp. Ground Cumin
1
/4 Cup Cilantro L eaves
2 tbsp. Fresh Lime Juic e
6 oz. Baked Tortilla Chi ps
D irecti ons:
P lace all ingre dients in th e 40 oz. blende r jar and puls e until fairly sm ooth. Taste
and adjus t seasoning s, if desire d. Serve rig ht away with chips or refr igerate for
up to 2 days. Makes a bout 1
1
/2 cups.
4 0 oz. Bowl
Bowl Lid
RecipesRecipes
Breakfast Smoothie
Ingredi ents:
1
/2 Banana
2 Frozen Strawberries
1
/4 Cup Bluebe rries
1 Cup Orange Ju ice
3 Ice Cub es
Direct ions:
Add the ingred ients, in th e order listed a bove, into the sing le serve cup.
Screw on the sing le serve cup b lade lid, sc rewing the lid on tig htly.
Place the sing le serve cup on to th e motor base (see ass embly instr uctions).
Push down on the to p of the single se rve cup to begin b lending . Run until smoo th.
Serve imm ediately. Serve s 1.
Single Ser ve Cup
Smoked Salmon Spread
I ngredi ents:
8 oz. Low Fat Cream Chees e, At Room Temperature
1
/4 Cup Low Fat Sour Cream
1
/4 Cup Low Fat Greek Yogurt
1 tbsp. Fresh Lemon Ju ice
2 tsp. Fresh Dill, Plu s More For Gar nish
2 tsp. Chives (Or Green O nions) Plus More For G arnish
1
/2 tsp. Salt
1
/4 tsp. Freshl y Ground Bl ack Pepper
8 oz. Smoked Sa lmon, Rou ghly Chopp ed Thinly Sli ced Rye Bread
Rounds
D irecti ons:
P lace the cream c heese, so ur cream, yog urt, lem on juice, dill , chives, sal t, pepper,
and half of the s moked salmo n in the 40 oz. blen der jar.
P ulse until smo oth.
P lace the sprea d in a servin g dish and mix in th e remainin g salmon. G arnish with
dill and chives , if desired . Serve right away wit h rye bread rou nds or chill unti l
serving . Serves 8 .
4 0 oz. Bowl
Bowl Lid
Quick Orangsicle
I ngredi ents:
B lende r Jar
1/2 Cup Fresh Orange Juice
1
/2 Cup Fresh Red G rapefruit , Peeled, S egmented
1 Cup Fresh Oran ge, Peele d, Segme nted
1 Cup Low Fat Plain Yogurt
1 tsp. Powdered Sugar
10 To 12 Ice Cubes
S ingle Se rve
1 C up Vanilla Frozen Yogurt
1
/4 Cup Orange Ju ice
1
/2 Cup Fresh Oran ge, Peele d, Segme nted
D irecti ons:
P lace all the ing redients i n blender ja r or single se rve cup and Pu lse until smoot h.
Serve right away - bl ender ser ves 4.
40 oz. Bowl
Single Ser ve cup
BL205_30_IB_ENG_110812_1.indd 14-15 11-08-12 1:51 PM
Page 9

16
TOLL FREE: 1-877- 646- 5288
www .ninja kitche n.com
17
English Toffee Cookies
I ngredi ents:
1 C up Butter, soften ed
1
/2 Cup Dark Brow n Sugar, packed
1
/2 Cup Su gar
1 tsp. Vanill a Extrac t
1 Egg Yolk
2 Cups Cake Flour
Pinch Salt
10 ounces Milk Ch ocolate Can dy Bar, melted
1
/2 Cup Alm onds, ch opped
D irecti ons:
P lace the butte r, sugars, vani lla extract a nd egg yolk in the b owl and pulse/ blend
for 5 seconds f or initial mixin g. Use a spatul a to clean the sid es of the bowl and
pulse/ble nd for an add itional 5 seco nds until smo oth and creamy. Add 1/2 cu p of
flour and sa lt, pulse/ blend for 15 s econds. Ad d the remaini ng flour and p ulse for
15 seconds . Clean the s ides of the bowl an d pulse for an a dditional 1 0 seconds
until smooth .
S poon the coo kie dough o nto a baking she et that has bee n coated with cook ing
spray. Allow a 2-inch ma rgin, as the d ough will spre ad. Lightly sp read the
chocolate over the d ough and sp rinkle the nu ts over all. Ba ke at 350°F for 1 5 to
20 minutes. C ool slightly a nd cut into small sq uares. Co ol on a wire rack .
4 0 oz. Bowl
Dough Pad dle
Bowl Lid
Recipes - cont’d
Easy Pizza Dough
Ingredi ents:
1/4 oz. Pkg. Dry Active Yeast
1 tsp. Salt
1 tbsp. Sugar
2
/3 Cup Water, warmed to 1 10-115° F
1
/4 Cup Canola O il (substitute olive oil)
2 Cups All -Purpos e Flour
Direct ions:
Place the yeast , salt, suga r and water in the b owl. Pulse for 1 0 seconds . Add the oil
and flour an d blend until t he dough is sm ooth and no lu mps remain . Transfer the
dough to a lightly- oiled bowl an d cover. Let rise for about 1 h our.
Add sauce and to ppings as pre ferred and b ake at 425°F for 25 -30 minutes , or
until the crus t is lightly browne d and the toppin gs and chee se are hot.
Makes 1 pizza cr ust.
40 oz. Bowl
Dough Bla de
Bowl Lid
Notes Or Your Favorite Recipes
BL205_30_IB_ENG_110812_1.indd 16-17 11-08-12 1:51 PM
Page 10

18
TOLL FREE: 1-877- 646- 5288
www .ninja kitche n.com
19
Notes Or Your Favorite Recipes
Product Registration
Please visit www.ninjakitchen.com or call 1-877-646-5288 to register your new Ninja® product
within ten (10) days of purchase. You will be asked to provide the store name, date of purchase
and model number along with your name and address.
The registration will enable us to contact you in the unlikely event of a product safety
notification. By registering you acknowledge to have read and understood the instructions for
use, and warnings set forth in the accompanying instructions.
ONE (1) YEAR LIMITED WARRANTY
EURO-PRO Operating LLC warrants this product to be free from material defects and
workmanship for a period of one (1) year from the date of purchase when utilized for normal
household use, subject to the following conditions, exclusions and exceptions.
The liability of EURO-PRO Operating LLC is limited solely to the cost of the repair or replacement
of the unit at our option. This Limited Warranty does not cover normal wear of parts and does
not apply to any unit that has been tampered with or used for commercial purposes. This Limited
Warranty does not cover damage caused by misuse, abuse, negligent handling or damage due
to faulty packaging or mishandling in transit. This Limited Warranty does not cover damage or
defects caused by or resulting from damages from shipping or repairs, service or alteration to
the product or any of its parts, which have been performed by a repair person not authorized by
EURO-PRO Operating LLC.
If your appliance fails to operate properly while in use under normal household conditions within
the Limited Warranty period, you may return the complete appliance and accessories with proof
of purchase and date, freight prepaid. For Customer Service support, call 1-877-646-5288 or visit
our website www.ninjakitchen.com.
If the appliance is found by EURO-PRO Operating LLC to be defective, in EURO-PRO Operating
LLC’s sole discretion, we will repair or replace it free of charge. Proof of purchase date and a check
made payable to EURO-PRO Operating LLC in the amount of $19.95 to cover the cost of return
shipping and handling must be included.*
This Limited Warranty is extended to the original purchaser of the unit and excludes all other
legal, implied and/or conventional warranties. The responsibility of EURO-PRO Operating LLC if
any, is limited to the specific obligations expressly assumed by it under the terms of this Limited
Warranty. In no event is EURO-PRO Operating LLC liable for incidental or consequential damages
to anyone of any nature whatsoever. Some states do not permit the exclusion or limitation of
incidental or consequential damages, so the above may not apply to you.
This Limited Warranty gives you specific legal rights, and you may also have other rights which
vary from state to state or from province to province.
*IMPORTANT: Carefully pack item to avoid damage in shipping. Be sure to include proof of
purchase date and to attach tag to item before packing with your name, complete address and
phone number with a note giving purchase information, model number and what you believe
is the problem with the item. We recommend you insure the package (as damage in shipping
is not covered by your Limited Warranty). Mark the outside of your package “ATTENTION
CUSTOMER SERVICE”. We are constantly striving to improve our products, therefore the
specifications contained herein are subject to change without notice.
BL205_30_IB_ENG_110812_1.indd 18-19 11-08-12 1:51 PM
 Loading...