

Page 1

Professional Blender
OWNER’S GUIDE
Page 2

IMPORTANT SAFETY INSTRUCTIONS
SAVE THESE INSTRUCTIONS
For Household Use Only
WHEN USING ELECTRICAL
APPLIANCES, BASIC SAFETY
PRECAUTIONS SHOULD ALWAYS
BE FOLLOWED, INCLUDING THE
FOLLOWING:
READ ALL INSTRUCTIONS
BEFORE USING YOUR NINJA
™
PROFESSIONAL BLENDING SYSTEM.
POLARIZED PLUG
WARNING: To reduce the risk of
electric shock, this appliance has a
polarized plug (one blade is wider
than the other). This plug will fit into
a polarized outlet only one way. If the
plug does not fit fully into the outlet,
reverse the plug. If it still does not
fit, contact a qualified electrician to
install the proper outlet. DO NOT
modify the plug in any way.
1
1
1
1
1
1
2
2
2
2
2
2
2
2
2
1. To protect against electrical shock, do not
submerge the blender or allow the power
cord to come into contact with water or
any other liquid.
2. Close supervision is necessary when any
appliance is used by or near children.
3. Never leave an appliance unattended
when in use.
4. Turn the appliance Off and remove the
power cord from the electrical outlet
when not in use, before assembling or
disassembling parts and before cleaning.
To unplug, grasp the plug and pull from
the electrical outlet. Never pull from the
power cord.
5. DO NOT abuse the power cord. Never
carry the appliance by the power cord
or yank it to disconnect from electrical
outlet; instead grasp the plug and pull to
disconnect.
6. DO NOT operate any appliance with
a damaged cord or plug, or after the
appliance malfunctions, has been
dropped or damaged in any manner.
Return the appliance to EURO-PRO
Operating LLC for examination, repair or
adjustment.
7. DO NOT let the power cord hang over
the edge of table or counter or touch hot
surfaces such as the stove.
8. Always use appliance of a dry, level
surface.
9. Keep hands, hair, clothing, as well as
utensils out of container while blending to
reduce the risk of severe injury to persons
or damage to the appliance. A scraper
may be used but only when the blender is
not running.
10. CAUTION: Blade assembly is sharp,
handle with care. When handling the
blade assembly, always hold by the shaft.
11. Avoid contact with moving parts.
12. DO NOT attempt to sharpen blades.
13. DO NOT use the appliance if blade
assembly is bent or damaged.
Page 3

NOTE: This unit has a short power supply
cord to reduce the risk resulting from
becoming entangled in or tripping over
a long cord. An extension cord may be
used if you are careful in its use:
1. The electrical rating of the extension
cord should be at least as great as the
electrical rating of the appliance.
2. An extension cord with the power cord
must be arranged so that it will not drape
over the countertop or tabletop where
they can be pulled on by children or
tripped over accidentally.
14. To reduce risk of injury, never place the
blade assembly on base without pitcher
properly attached.
15. DO NOT operate this appliance on or near
any hot surfaces (such as gas or electric
burner or in a heated oven).
16. The use of attachments or accessories
not recommended by the manufacturer
may result in fire, electric shock or
personal injury.
17. DO NOT remove the pitcher from the
motor base while the blender is in
operation.
18. To reduce the risk of injury, NEVER
operate the appliance without the lid in
place; DO NOT try to defeat the interlock
mechanism; make sure that the cutting
blades are properly installed before
operating the appliance.
19. DO NOT expose pitcher to extreme
temperature changes.
20. Exercise extreme caution when blending
hot liquids.
21. CAUTION: Do not process food or liquid
that is hotter than 180°F / 82°C. Allow
very hot ingredients to cool before
processing.
22. DO NOT overfill.
23. Extreme caution must be used when
moving an appliance containing hot food,
water or other liquids.
24. When processing hot liquids, open the
pouring spout cap.
25. DO NOT operate the appliance empty.
26. Always allow the appliance to cool before
taking off parts and before cleaning.
27. If the appliance overheats, a thermal
switch will become activated and shut off
the motor. To reset, unplug the appliance
and let it cool down for approximately 10
minutes before using again.
28. THIS PRODUCT IS INTENDED FOR
HOUSEHOLD USE ONLY. Do not use
this appliance for anything other than its
intended use. Do not use outdoors.
Page 4

T
Pr
TECHNICAL SPECIFICATIONS
Voltage: 120V., 60Hz.
Power: 1000 Watts
Pitcher Capacity: 2.15 L (72 ounces) (9 cups)
Page 5
Contents
Thank you for
purchasing
the Ninja
™
Professional
Blender.
Getting Started .................................................................................... 6
Using the Ninja
™
Professional Blender......................................... 8
Care & Maintenance ........................................................................... 11
Hints ......................................................................................................... 11
Replacement Parts ............................................................................. 11
Blending Chart ..................................................................................... 12
Troubleshooting Guide ..................................................................... 12
Recipes .................................................................................................... 13
Warranty ................................................................................................. 16
Registration ........................................................................................... 17
Page 6

Th
ic
fav
sur
ap
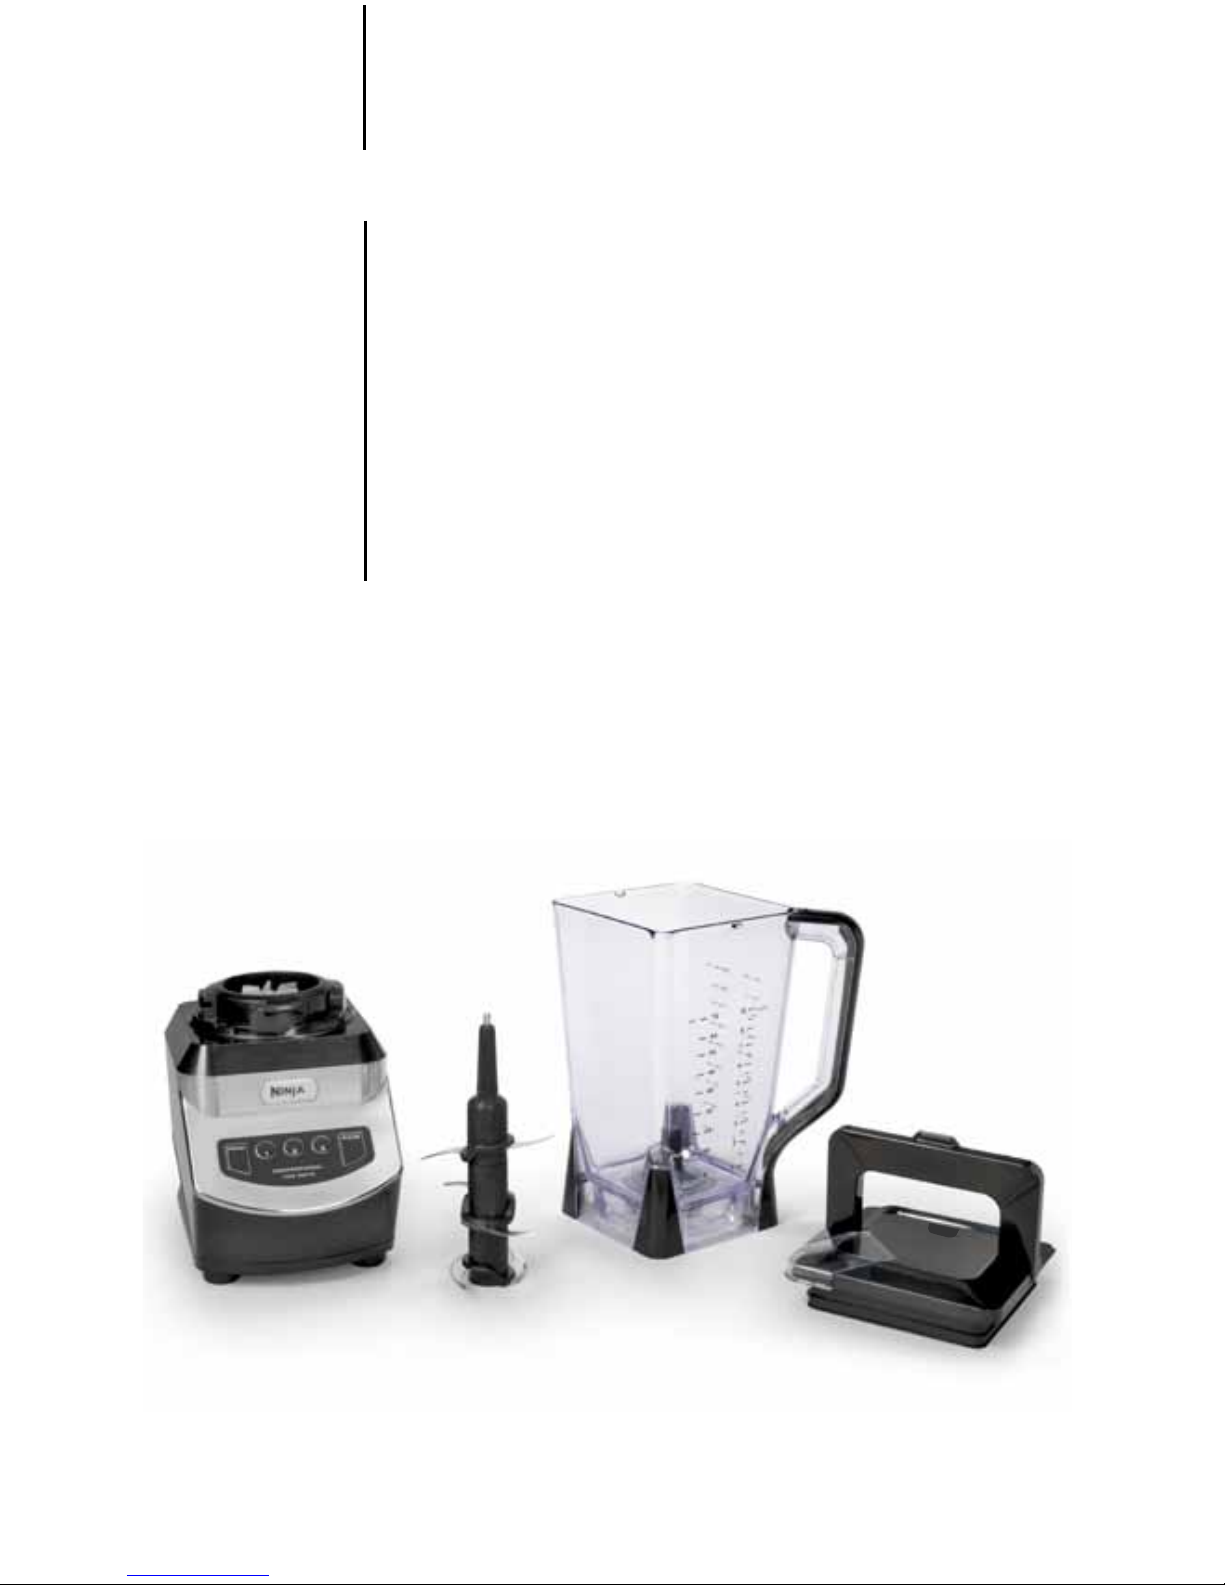
Getting Started
g Motor Base
h Control Panel
i Non Slip Bottom
j Power Cord (not shown)
k Cord Storage (in back) (not shown)
a Lid with Locking Handle
b Locking Handle Release Button
c Pouring Spout with Cap
d Pitcher
e Ninja
™
6-Blade
f Gear Shaft
a
d
e
f
b
c
g
h
i
FE
• Eas
• Pat
• Ext
• Eas
• Cor
• No
Page 7

The Ninja™ Professional Blender is a high powered kitchen tool that is perfect for
ice crushing, blending, pureeing and controlled processing. Create all of your
favorite recipes fast and easy with just one touch of a button. For best results, be
sure to carefully read all the instructions contained in the manual before using this
appliance.
FEATURES:
• Easy lock lid with built-in pour spout
• Patented Ninja™ Blade technology
• Extra Large 72 oz. pitcher
• Easy to clean electronic control panel
• Cord storage
• Non Slip Bottom
Page 8

Using the Ninja™ Professional Blender
BEFORE FIRST USE
1 Remove all packaging material and
labels from the appliance.
2 Wash the lid, pitcher and blade
assembly in warm, soapy water with a
soft cloth. Use caution when washing
the blade assembly as the blades are
very sharp.
3 Rinse and dry thoroughly.
4 The pitcher, lid and blade assembly are
all dishwasher safe. It is recommended
that the lid and blade assembly go on
the top rack. Ensure that the blade
assembly is removed from the pitcher
before placing in the dishwasher.
5 The motor base can be wiped clean
with a damp cloth.
HOW TO ASSEMBLE
CAUTION: Make sure that the motor
base is unplugged from the power
source.
1 Place the motor base on a clean, dry,
level surface.
2 Lower the pitcher onto the motor base.
(Fig. 1)
3 Rotate the pitcher to the left as far
as it will go. As the pitcher rotates, it
will lower and the safety tabs on the
bottom of the pitcher will slide under
the safety tabs on the top of the motor
base. The pitcher can be placed on the
motor base two ways; the handle can
be on the front right corner or the front
left corner. (Fig. 2)
4 Holding the blade assembly by the
shaft, place it onto the gear shaft inside
the pitcher. (Fig. 3) Ensure that the
blade assembly fits snuggly around the
gear shaft and that the blade shaft is
standing straight.
CAUTION: Blades are sharp! Use
extreme caution when handling the
blades. Always hold them by the shaft.
1
2
3
Fig. 1 Fig. 2
Page 9

Shaft
,
se.
t
r
or
he
nt
ide
he
ft.
HOW TO USE
IMPORTANT: DO NOT attempt to
operate the appliance without the lid
on.
1 Place pitcher on motor base and insert
the blade assembly.
2 Add the ingredients to the pitcher.
Make sure your total of ingredients
don't go higher than the highest
measured marking line on the side of
the pitcher.
IMPORTANT: Never add ingredients
into the pitcher before placing the
blades in first.
3 Place the lid onto the pitcher with the
locking handle in the upright position
and the pouring spout on the corner
opposite the pitcher handle. Align
the arrows (
) located on the lid and
pitcher handle. Press the lid down into
the pitcher. Press the locking handle
down so that the latches on the lid fit
under the tabs on the pitcher. (Fig. 4)
NOTE: If you need to add additional
ingredients while the blender is
processing, open the pouring spout
cap and pour the ingredients in
through the opening.
4 Plug the power cord into the electrical
outlet and press on the power button.
NOTE: As a safety feature, the power
button will blink quickly and the motor
will not work if the pitcher and lid are
not secured in place When the pitcher
and lid are installed properly, the power
button will blink slowly, indicating that
the blender is ready for use.
5 Select the speed according to your
blending requirements:
• Use the speed 1 button for
processing and mixing.
• Use the speed 2 button for blending
and ice crushing.
• Use the speed 3 button for pureeing
and liquifying.
• Use the pulse button for controlled
chopping and processing.
*
See Blending Chart.
Locking
Handle
Fig. 3 Fig. 4
Page 10

10 Unplug the appliance after use.
IMPORTANT: Never run the appliance
empty.
CAUTION: Use extreme caution when
processing hot foods or liquids to avoid
accidental scalding or burns. Do not
process food or liquid that is hotter
than 180°F/82°C. Allow very hot
ingredients to cool before processing.
When processing hot foods or liquids,
always open the pouring spout cap to
vent the steam. Keep hands and other
exposed skin away from the opening to
prevent possible burns or scalding.
WARNING: Secure the blender while
in use by pressing down on the lid with
one hand.
WARNING: Never leave the blender
unattended while in use.
6 Press the same speed button a second
time to stop the blades or press a
different button to change the speed.
7 If the ingredients stick to the side of
the pitcher, stop the appliance by
pressing the power button and wait
for the blades to stop turning. Then
remove the lid by pressing the release
button, lifting the handle up and pulling
straight up. (Fig. 5) Use a spatula to
dislodge the pieces, replace the lid and
continue processing.
8 To remove the pitcher, press the power
button to turn the appliance off. Wait
for the blades to stop moving before
removing. (Fig. 6)
CAUTION: Never remove the pitcher
while the blender is still running.
9 Depending on the consistency of the
contents, open the pouring spout cap
and use the spout to empty liquid
contents. For thicker consistencies,
remove the lid and blade assembly
carefully (by its shaft), then empty
contents of the pitcher.
Using the Ninja
™
Professional Blender - cont'd
Fig. 5 Fig. 6
Page 11

HOW TO CLEAN
CAUTION: Make sure that the motor
base is unplugged from the power
source before inserting or removing
any attachment and before cleaning.
CAUTION: DO NOT immerse the motor
base into water or any other liquid.
Clean with a damp sponge or cloth and
wipe dry.
1 The pitcher, lid and blade assembly are
all dishwasher safe. It is recommended
that the lid and blade assembly be
placed on the top rack.
2 You may also wash the blender by
filling ¾ of the pitcher with warm water
and a drop of dish washing detergent,
placing the lid on the pitcher and
pressing the pulse button a few times.
Once clean, remove the pitcher from
the motor base. Rinse the pitcher,
blade assembly and lid under running
water. Allow all the parts to dry before
storing.
Use extreme caution when handling
the blade assembly as blades are very
sharp.
HOW TO STORE
1 Store the Ninja
™
Professional Blender
upright with the pitcher, blade
assembly and cover on the motor base.
Do not place anything on top.
2 Tuck power cord in cord storage
compartment in the back of the unit.
Care & Maintenance
ww w. nin jak itche n.com
11
Hints
• Make sure that all foods are cut to even
size pieces to achieve even results.
• When using many ingredients, always
place the liquid ingredients first in the
pitcher and then the solids.
• When making graham cookie crumbs,
break large cookies into smaller pieces
and pulse a few times until desired
consistency is reached.
• To make a lumpy gravy smooth, add
mixture to pitcher and blend at Speed
2 for a minute or two.
Page 12

BUTTON FUNCTION USE
POWER
On/Off Always turn appliance Off when not in use.
1
Processing
& Mixing
Use to mix thin batters, gravies and marinades,
scramble eggs, puree cooked foods and uncooked
fruits and chop vegetables for dips and salsa.
2
Blending
& Ice
Crushing
Use to grate hard cheeses, cream soups, beat dips,
grind nuts, thorough chopping, blend sauces and
spreads. Blend mixed drinks, powdered drinks or
milk shakes. Crush ice cubes for snow cones, chilled
beverages or frozen slushes.
3
Pureeing &
Liquifying
Use to mix smoothies, frappes, liquify thick mixtures
and blend whole fruits and vegetables.
PULSE
Controlled
Processing
& Bursts of
Power
Use to control chopping and processing.
Blending Chart
PROBLEMS POSSIBLE REASONS & SOLUTIONS
Motor Doesn’t Start
or Blades Don’t
Rotate.
Make sure the pitcher is securely placed on motor
base.
Make sure the lid is securely on pitcher in the correct
position (align arrows).
The blender is turned off. Press the power button to
turn on.
Check that the plug is securely inserted into the
electrical outlet.
Check the fuse or circuit breaker.
The unit has overheated. Unplug and wait
approximately 10 minutes before using again.
Food is Unevenly
Chopped.
Either you are chopping too much food at one
time, or the pieces are not of even size and
processing smaller amounts per batch.
Food is Chopped Too
Fine or is Too
Watery.
The food has been over processed. Use pulse
button for controlled processing..
Food Collects On
Lid or On the Sides of
the Pitcher.
The mixture is to thick. Add more liquid.
You Cannot Achieve
Snow From Solid Ice
Do not use ice that has been sitting out or has
started to melt. Use ice straight from the freezer.
Troubleshooting Guide
R
I
f
I
3
i
Page 13

Sparkling Raspberry Lemon Spritzer
Ingredients:
1 Pint Raspberries (Fresh or Frozen and Thawed)
1 Cup Lemonade
3 Tbsp. Honey
8 Cups Sparkling Water
4 Mint Leaves
Directions:
Place the raspberries, lemonade and honey in the pitcher and blend on Speed 3
for one minute. Pour the juice blend into 4 tall glasses. Top with sparkling water
and stir well to combine. Add ice cubes and milt leaves for garnish. Serves 4
A Blue Tornado
Ingredients:
1 Shot Blue Curacao
1 Shot Premium Vodka
3/4 Cup Pineapple Juice
1 1/2 Cups Ice Cubes
1 tsp. Powdered Sugar
Small Pineapple Wedge for Garnish
Directions:
Place the curacao, vodka, juice and ice cubes in the pitcher and blend on Speed
3 for 30 seconds or until smooth. Make a slice in the pineapple wedge. Press the
wedge onto the rim of a tall glass and slide it all around the rim to moisten the
glass. Then press the rim into a dish of powdered sugar. Pour the Blue Tornado
into the glass and garnish with the pineapple wedge. Serves 1.
Page 14

Recipes - cont'd
Mocha Freeze
Ingredients:
1/3 Cup Instant Cocoa Mix
2 Tbsp. Instant Coffee
1/4 Cup Sugar
1/4 Cup Hot Water
1 Quart Lowfat Milk (Partially Frozen)
Directions:
In a small bowl, mix together the cocoa mix, coffee and sugar. Add the hot water
and stir to blend well. Pour the mixture into the pitcher and add the milk and
pieces of iced milk. Blend on Speed 3 for 30 seconds or until very smooth. Pour
into 4 glasses and serve immediately. Serves 4.
Gazpacho in a Glass
Ingredients:
6 oz. Spicy Tomato Juice
1 tsp. Lemon Juice
1 Small Roma Tomato (Quartered)
1-inch Piece Onion (Peeled)
1-inch Piece Green Bell Pepper (Seeded)
Dash Tabasco® Sauce
Celery Stick for Garnish
Directions:
Pour the tomato and lemon juices into the pitcher. Add the tomato, onion and
green pepper. Add the Tabasco sauce to taste. Blend on Speed 2 for 1 minute
or until very smooth. Strain, if desired, and pour into a tall glass. Garnish with a
celery stick. Serves 1.
Page 15

Chocolate Chip Milk Shake
Ingredients:
2 Cups Ice Cream
2 Tbsp. Chocolate Chips
3 Tbsp. Cream
Directions:
Add the ice cream, chocolate chips and cream to the pitcher and blend on Speed
3 for 10 seconds. Serve.
Peanut Butter
Ingredients:
3 Tbsp. Oil
1 Cup Peanuts (Unsalted)
2 Pinches Salt
Directions:
Pour the peanuts and oil into the pitcher. Add salt and blend on Speed 2 for 20
seconds.
Salsa Dip
Ingredients:
5 Whole Roma Tomatoes
3 Whole Sprigs of Cilantro
1/2 Medium White Onion (Quartered)
Directions:
Fill pitcher evenly with all ingredients and blend on Speed 1 for 6 seconds.
Page 16

PRÉCAUTIONS IMPORTANTES
Lorsque vous utilisez votre ASPIRATEUR VERTICAL SANS SAC CONVERTIBLE, des
précautions de sécurité de base doivent être observées, incluant ce qui suit :
CONSERVEZ CES INSTRUCTIONS
Pour Usage Domestique Seulement
1. Lire toutes les instructions avant d’utiliser
votre ASPIRATEUR VERTICAL SANS
SAC CONVERTIBLE.
2. Utiliser l’appareil uniquement pour un
usage domestique.
3. Pour éviter les chocs électriques, ne pas
immerger aucune partie de l’appareil dans
l’eau ou d’autres liquides.
4. Ne jamais tirer sur le cordon pour
débrancher de la prise, empoigner plutôt la
fiche et tirer pour débrancher.
5. Ne pas laisser le cordon toucher à des
surfaces chaudes.
6. Ne pas passer l’aspirateur sur le cordon.
7. Ne pas faire fonctionner l’appareil avec un
cordon ou une fiche endommagés, ou si
l’appareil ou toute autre partie a été
échappée ou endommagée. Pour éviter
tout risque de choc électrique ne pas
défaire ou essayer de réparer l’Aspirateur
vertical sans sac convertible. Retourner
l’unité à EURO-PRO Operating LLC ( voir
garantie) pour examen ou réparation. Un
réassemblage ou une réparation incorrecte
peut causer un risque de choc ou de
blessures lorsque l’Aspirateur vertical
sans sac convertible est utilisé.
8. Une surveillance attentive est nécessaire
pour toute utilisation d’un appareil par ou
près des enfants. Ne pas laisser l’appareil
sans surveillance lorsque branché.
9. Éloigner les cheveux, les vêtements
amples, les doigts et toute partie du corps
des ouvertures et des pièces amovibles.
10. Ne pas se servir de l’appareil pour nettoyer
des liquides inflammables ou combustibles
tels que l’essence, ou ne pas l’utiliser dans
des endroits où ces produits peuvent être
présents.
11. Ne pas se servir de l’appareil pour
ramasser quelque chose qui brûle ou qui
fume comme des cigarettes, des allumettes
ou de la cendre encore chaude.
12. Faire très attention lorsque vous nettoyez
des escaliers.
13. Ne pas utiliser l’aspirateur sans le filtre du
bac de poussière en place.
14. Cet appareil est conçu uniquement pour
être utilisé à l'intérieur. Suivre toutes les
instructions dans ce manuel.
ATTENTION: Pour réduire les risques de décharge électrique, cet appareil est équipé d’une
prise polarisée (l’une des fiches est plus longue que l’autre). Cette prise entrera dans une prise
polarisée d’une seule façon. Si la prise ne s’adapte pas parfaitement à la prise d'alimentation,
tournez la prise. Si elle ne s’adapte toujours pas, contactez un électricien qualifié pour installer
la bonne prise. N’essayez pas de modifier la prise, d’aucune façon.
30 DAYS LIMITED WARRANTY
EURO-PRO Operating LLC warrants this product to be free from be defects in material and
workmanship for a period of 30 days from the date of the original purchase, when utilized for
normal household use, subject to the following conditions, exclusions and exceptions.
If you
r appliance fails to operate properly while in use under normal household conditions within
the warranty period, return the complete appliance and accessories, freight prepaid to:
EURO-PRO Operating LLC, 500 Middle Country Road, Saint James, NY 11780
Call: 1 (888) 298-5358 or visit our website: www.prcind.com/support
If the appliance is found by EURO-PRO Operating LLC to be defective in material or
workmanship, EURO-PRO Operating LLC will repair or replace it free of charge. Proof of
purchase date and $
.95 to cover the cost of return shipping and handling must be included.*
Non-durable parts including, without limitation, filters, brushes and electrical parts which normally
require replacement are specifically excluded from warranty.
The liability of EURO-P
RO Operating LLC is limited solely to the cost of the repair or
replacement of the unit at our option. This warranty does not cover normal wear of parts and
does not apply to any unit that has been tampered with or used for commercial purposes. This
limited warranty does not cover damage caused by misuse, abuse, negligent handling or
damage due to faulty packaging or mishandling in transit. This warranty does not cover damage
or defects caused by or resulting from damages from shipping or repairs, service or alterations to
the product or any of its parts, which have been pe rformed by a repair person not authorized by
EURO-PRO Operating LLC.
This warranty is extended to the original purchaser of the unit and excludes all other legal and/or
conventional warranties. The responsibility of EURO-PRO Operating LLC if any, is limited to the
specific obligations expressly assumed by it under the terms of the limited warranty. In no event
is EURO-PRO Operating LL C liable for incidental or consequential damages of any nature
whatsoever. Some states/provinces do not permit the exclusion or limitation of incidental or
consequential damages, so the above may not apply to you
.
This warranty gives you specific legal rights, and you may also have other rights which vary from
state to state or province to province.
*Important: Carefully pack item to avoid damage in shipping. Be sure to include proof
of purchase date and to attach tag to item before packing with your name, complete
address and phone number with a note giving purchase information, model number and
what you believe is t he problem with item. We recommend you insure the package (as
damage in shipping is not covered b y your warranty). Mark the outside of your package
“ATTENTION CUSTOMER SERVICE”. We are constantly striving to improve our products,
therefore the specifications contained herein are subject to change without notice.
 Loading...