

Page 1

Juicing 101
Use the freshest and ripest fruits and vegetables, and wash them prior to juicing.
Always turn the juicer on before adding ingredients to the feed chute.
Add ingredients gradually, making sure each has been fully processed and
has moved through the feed chute chamber before adding more.
PEEL VS. NO PEEL
Please make sure to read the enclosed Ninja® Owner’s Guide prior to using your unit.
QUICK START
NeverClog
COLD PRESS JUICER
™
GUIDE
REMOVE SKINS AND RINDS
from ingredients such as citrus fruits,
melons, pineapples, dragon fruit, mangoes,
pomegranates, beets, ginger, papayas,
and root vegetables.
For best results, cut ingredients in 5cm pieces.
REMOVE STEMS
from apples (no need to remove
the core or seeds). Remove stems
from herbs, if desired.
REMINDER
500g of produce will yield approximately 240ml of juice.*
DO NOT PROCESS
INGREDIENTS
that do not contain
juice, such as bananas or
avocados.
*Yield may vary depending on produce a nd seasonality.
Ingredients such as grapes
and berries will require
ample quantity due to low
product yield.
SAVE PULP FOR RECIPES
for other recipes such as quick bread instead
USE THE PULP
of throwing it away.
PREP
THE PEEL OR SKIN CAN REMAIN ON
for ingredients such as apples, pears,
peaches, plums, cucumbers,
and carrots.
REMOVE LARGE PITS AND SEEDS
from ingredients such as mangoes,
plums, peaches, cherries, papayas,
lemons, melons, and peppers.
DO NOT PROCESS FROZEN
fruits and vegetables or ice.
REFER TO THE INSPIRATION GUIDE
for more ideas.
NeverClog
™
COLD PRESS JUICER
For questions or to register your product,
visit us online at ninjakitchen.com.au | ninjakitchen.co.nz
@NinjaKitchenAU | @NinjaKitchenNZ
NEVERCLOG and NINJA NEVE RCLOG are tradem arks of S harkN inja Op eratin g LLC.
NINJA is a registered trademar k of SharkNinja O perating LLC.
© 2024 Sha rkNin ja Operating LLC .
JC151ANZ_QSG_NevClog_MP_Mv4
What’s in the Box
A
B
C
D
A
Motor Base
B
Tamper
C
Fo od Tr ay
D
Feed Chute Chamber
NOTE: The feed chute chamber (D), auger (E), orange filter (G), and pulp spout (H) are preassembled.
Before first use, disassemble and clean all parts, then follow the assembly instructions.
E
Auger
F
Black Filter
(less pulp)
G
Orange Filter
(lots of pulp)
E
F
G
H
Pulp Spout
I
Pulp Container
J
Juice Jug
H
Using the Control Panel
START/STOP
Press once to start continuous
running up to 12 minutes;
press again to stop.
REVERSE
If the feed chute chamber becomes blocked or ingredients
are not processing, press and hold REVERSE. There will be
a beep and a brief pause, then the auger will rotate in the
opposite direction. Release REVERSE to stop. Repeat as
needed. Press START/STOP to resume normal operation.
I
J
Page 2
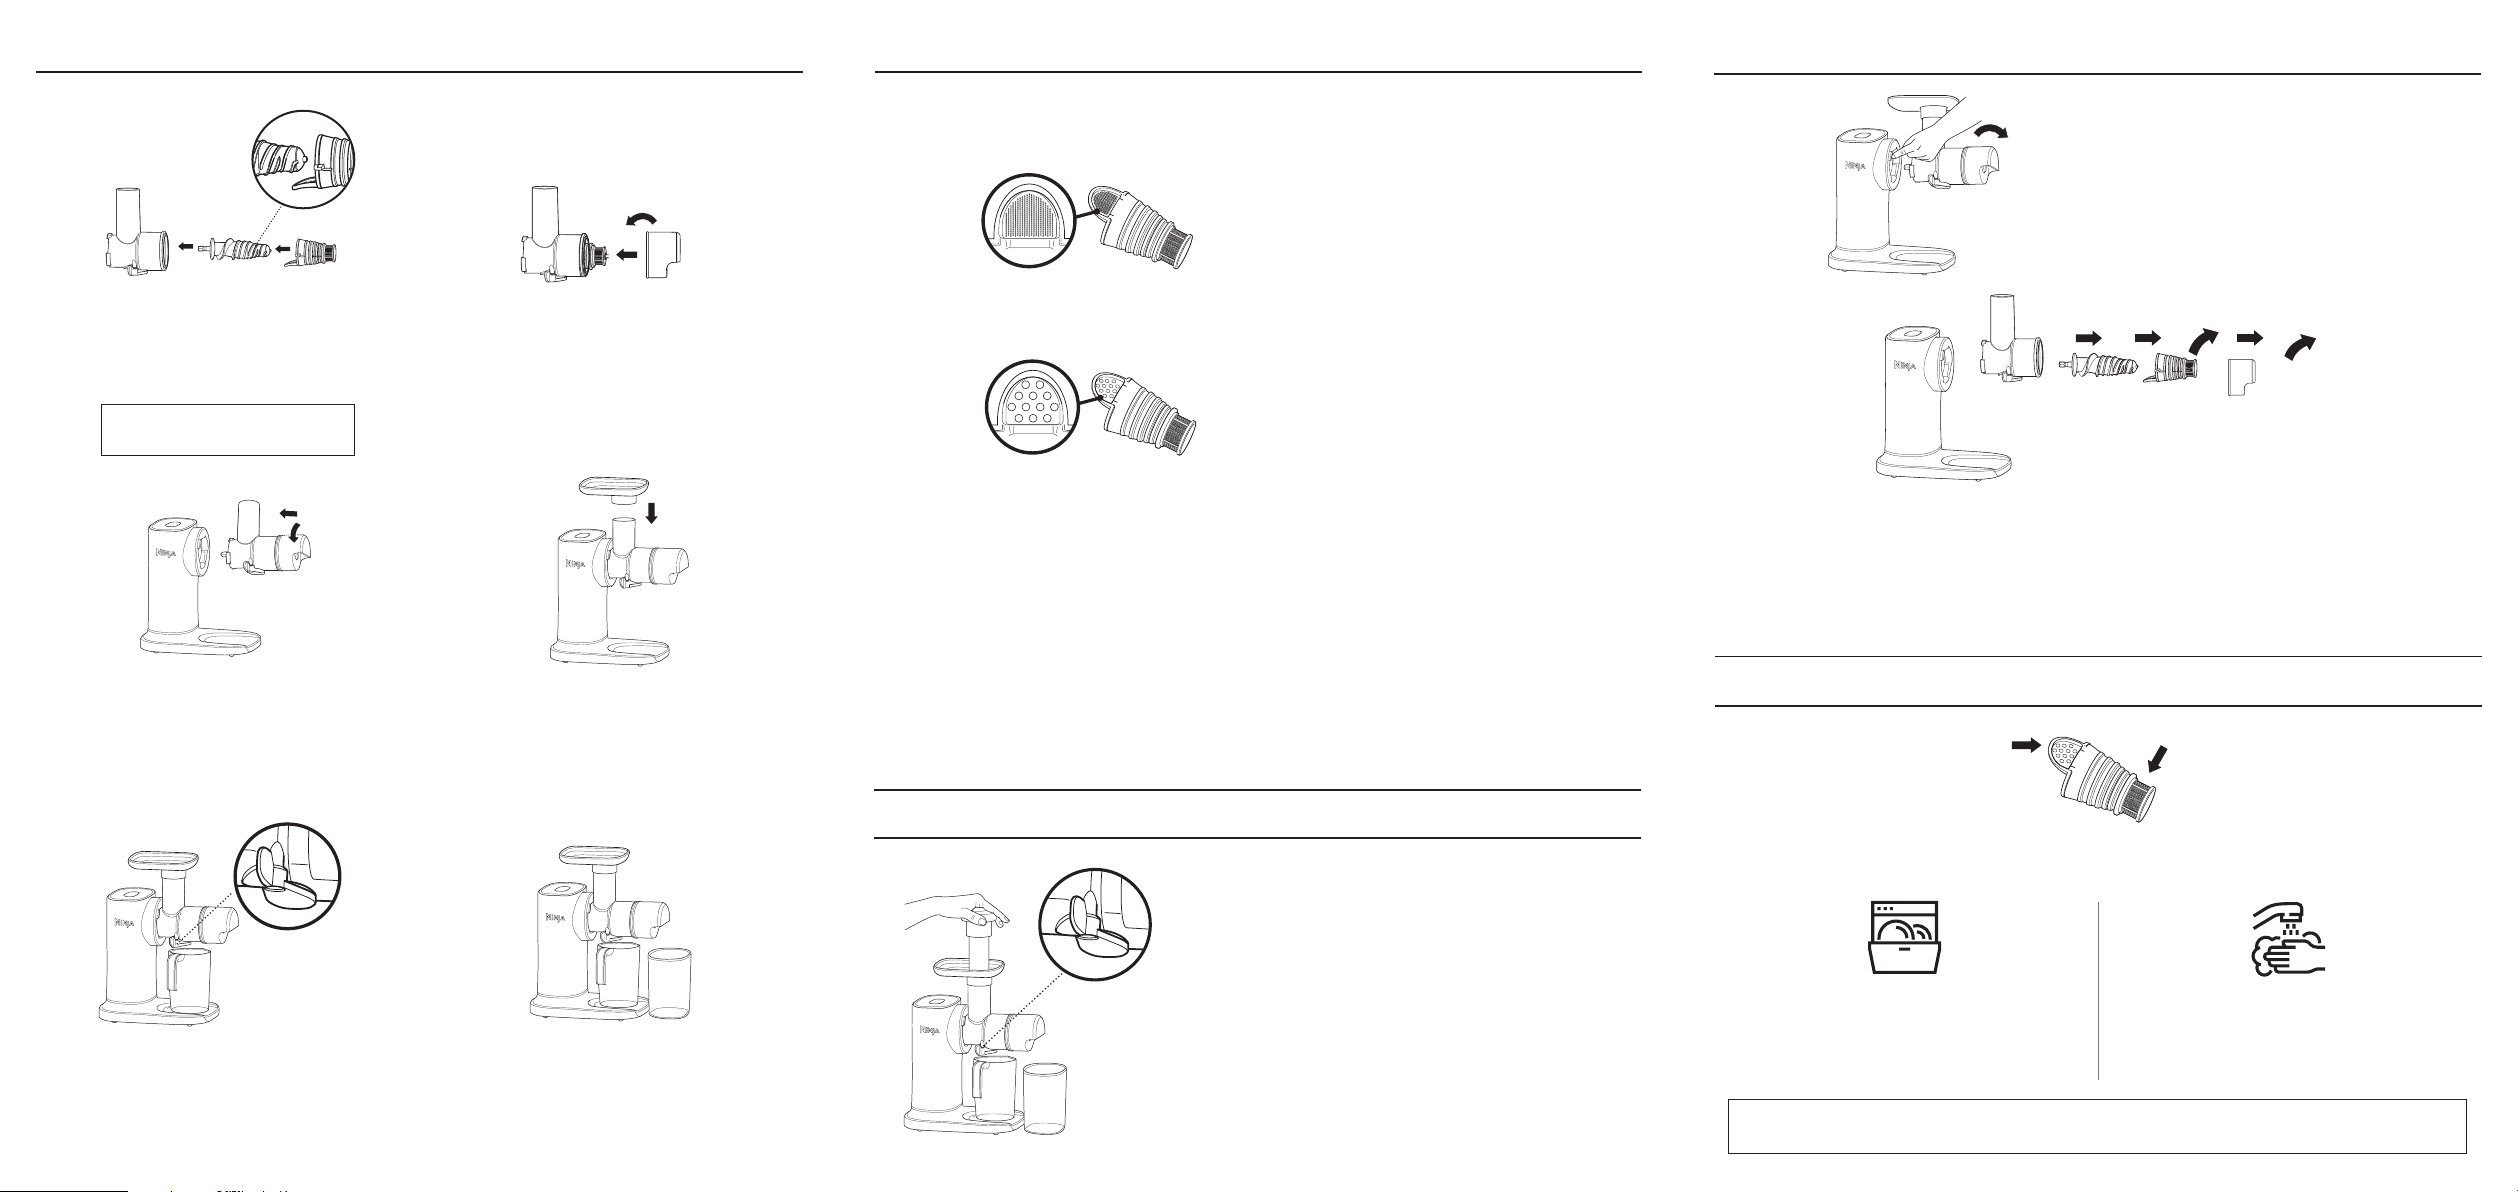
Assembly
Using the Filters for Pulp Control
Disassembly
Align th e metal p ortio n
of the filter with the
bottom o f the auger.
1.
Insert the auger into the feed chute
chamber, then attach the desired
filter onto the auger. The filter will
sit loosely around the auger.
NOTE: See next page for choosing
a filter for pulp control.
2.
Attach the pulp spout to the feed
chute chamber by installing at an
angle on top of the filter, then turning
anticlockwise to lock in place.
Control the amount of pulp by choosing the appropriate filter.
LESS PULP
Use the black filter with the finest
mesh for juice with less pulp.
LOTS OF PULP
Use the orange filter with the largest
mesh for juice with lots of pulp.
For best results, we recommend using the
Orange (Lots of Pulp) filter when processing soft fibrous
fruits like pears, berries, seeded melons, and pineapple.
Depending on the seasonality of ingredients, you may experience
lower juice and pulp yield when using the Black (Less Pulp) filte r.
If this occurs, try using the Orange (Lots of Pulp) filter.
1.
Press and hold the RELEASE
button while turning the feed
chute chamber clockwise to
remove it from the motor base.
2.
Remove the pulp spout from the feed chute chamber by turning it clockwise.
Remove the filter and auger by gently pulling them out of the feed chute chamber.
3.
Unplug the unit when finished. If moving the unit,
grab from the bottom of the base.
3.
Install the assembled feed
chute chamber on the
motor base at an angle,
then turn anticlockwise
until it clicks into place.
Make sure the
anti-dri p lever
is open b efore
juicing.
5.
Place the juice jug under
the anti-drip lever on the
feed chute chamber.
4.
Install the food tray
on the top of the feed
chute chamber.
6.
Place the pulp container
under the pulp spout.
Using the Juicer
1. Make sure the anti-drip lever is open before juicing.
2. Press START/STOP, then gradually add
ingredients to the feed chute. For best results,
allow juicer to process each ingredient before
adding more. Use the tamper to push ingredients
down into feed chute as needed. When done,
press START/STOP to stop the unit.
3. Close the anti-drip lever so juice won’t drip onto
the motor base. Remove juice jug from unit, stir
juice, and serve.
Cleaning
If there is pulp buildup on the metal portion of the filter, use a
cleaning utensil or toothpick to remove the excess before washing.
Dishwasher
All parts except the motor base are
top-rack dishwasher safe and should NOT
be cleaned with a heated dry cycle.
IMPORTANT: DO NOT attempt to clean the unit by adding water to the feed chute while it’s attached
to the motor base.
Hand-Washing
Wash parts in warm, soapy water.
 Loading...