

Page 1
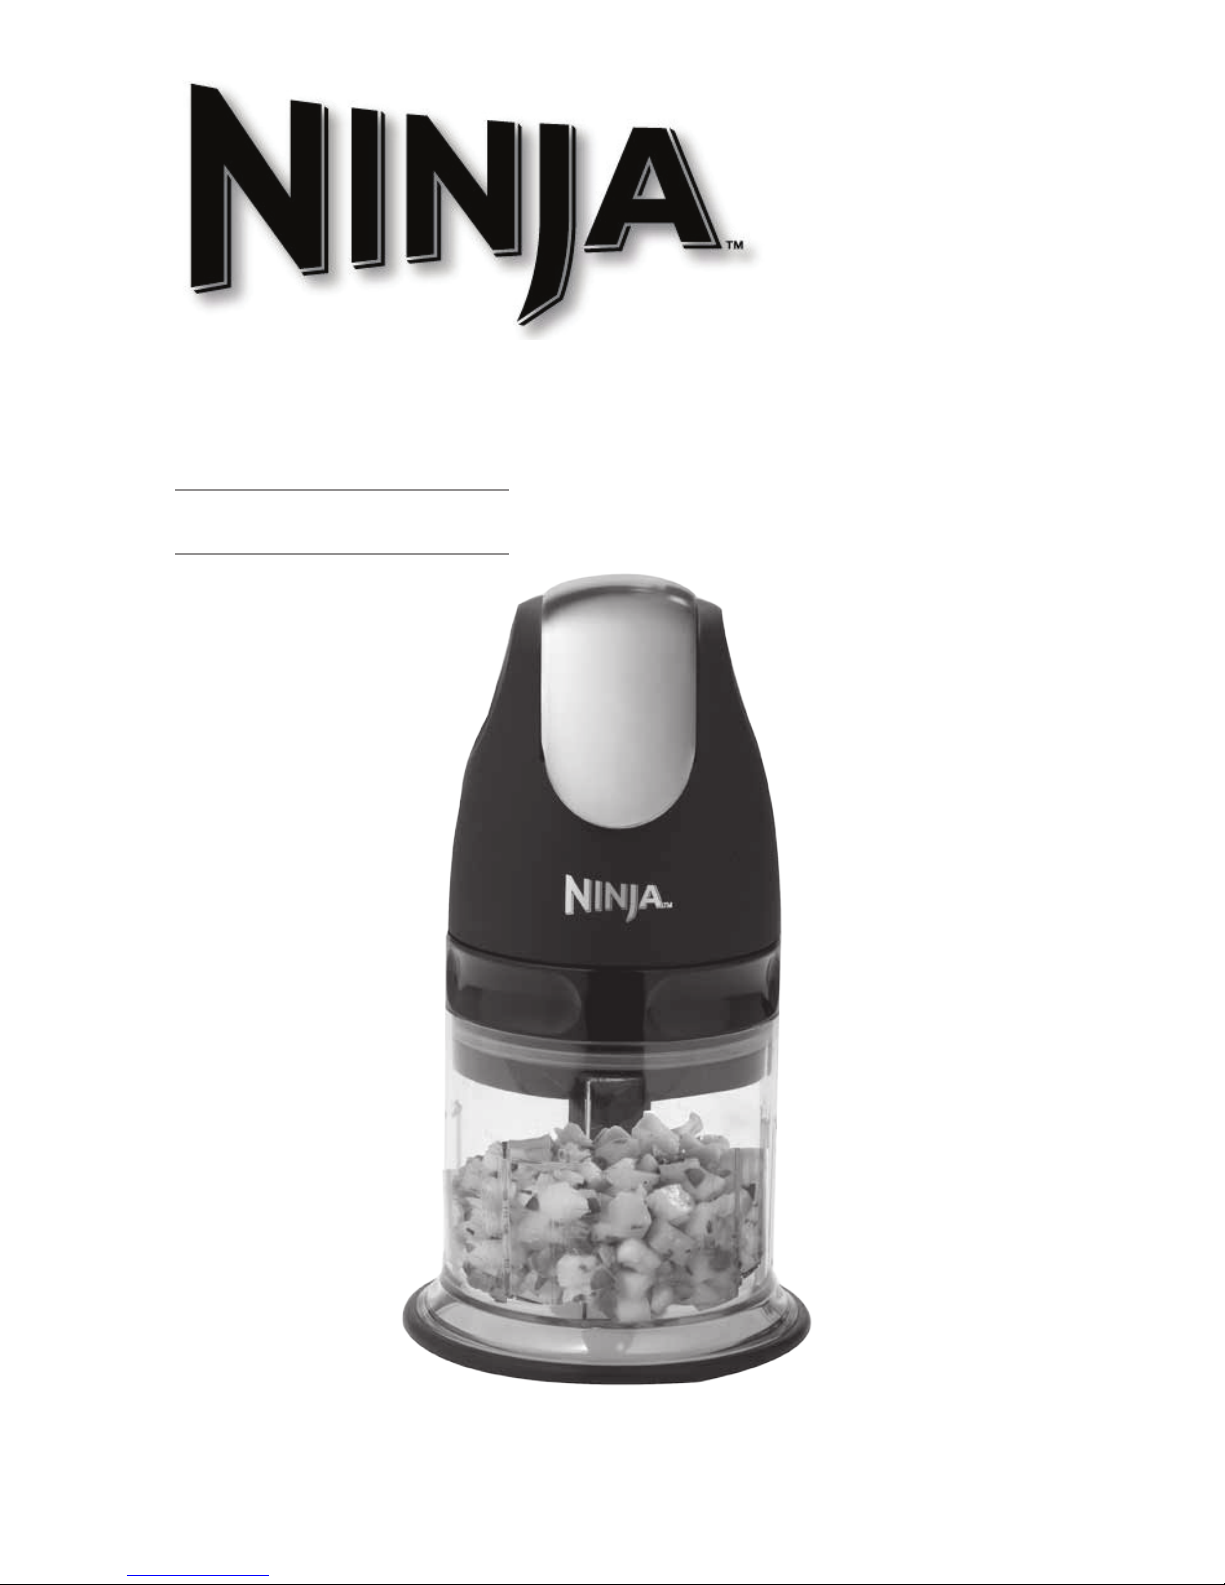
Master Prep™ Chopper
OWNER’S GUIDE
QB600W
Page 2
TOL L FR EE : 1 -8 00 -798 -7398 www .n inj aki tchen .co m
NOTE: This unit has a short power
supply cord to reduce the risk
resulting from becoming entangled
in or tripping over a long cord. An
extension cord may be used if you
are careful in its use:
1. The electrical rating of the
extension cord should be at least
as great as the electrical rating of
the appliance.
2. An extension cord with the power
cord must be arranged so that it
will not drape over the countertop
or tabletop where they can be
pulled on by children or tripped
over accidentally.
SAVE THESE
INSTRUCTIONS
IMPORTANT SAFETY INSTRUCTIONS
For Household Use Only
Engl ish
WHEN USING ELECTRICAL
APPLIANCES, BASIC SAFETY
PRECAUTIONS SHOULD ALWAYS
BE FOLLOWED, INCLUDING THE
FOLLOWING:
READ ALL INSTRUCTIONS
BEFORE USING YOUR NINJA™
MASTER PREP™ PROFESSIONAL.
POLARIZED PLUG
WARNING: To reduce the risk of
electric shock, this appliance has
a polarized plug (one blade is
wider than the other). This plug
will fit into a polarized outlet only
one way. If the plug does not fit
fully into the outlet, reverse the
plug. If it still does not fit, contact
a qualified electrician to install the
proper outlet. DO NOT modify
the plug in any way.
13. DO NOT expose jars to extreme
temperature changes.
14. DO NOT use jars if they are
cracked or chipped.
15. DO NOT use the appliance if
chopping blades are bent or
damaged.
16. Avoid contact with moving parts
at all times. Keep hands, hair,
clothing as well as spatulas and
other utensils away from pitcher
or chopping container during
operation to prevent risk of
personal injury and/or damage to
the appliance.
17. Exercise extreme caution when
blending hot liquids.
18. Immediately release the On/Off
pulse button on the motor head
in the event that the appliance
malfunctions during use.
19. To reduce the risk of injury, NEV ER
operate the appliance without the
splash guard in place; DO NOT try
to defeat the interlock mechanism;
make sure that the cutting blades
are properly assembled before
operating the appliance.
20.DO NOT use outdoors.
21. DO NOT use appliance for other
than intended use.
22.D O NOT operate the appliance for
more than 15 seconds.
23.DO N OT operate the appliance
empty.
24.If the appliance overheats, a
thermal switch will become
activated and shut off the motor.
To reset, unplug the appliance and
let it cool down for approximately
10 minutes before using again.
1. Close supervision is necessary
when any appliance is used by or
near children.
2. To protect against electric shock,
DO NOT immerse cord, plug or any
part of the main unit in water or
any other liquids.
3. DO NOT let cord hang over edge
of table or counter, or touch hot
surfaces.
4. DO NOT operate any appliance
with a damaged cord or plug, or
after the appliance malfunctions,
has been dropped or damaged
in any manner. Return the
appliance to EURO-PRO Operating
LLC for examination, repair or
adjustment.
5. Unplug appliance from outlet when
not in use and before cleaning.
6. DO NOT place on or near a hot gas
or electric burner.
7. The use of accessory attachments,
including canning jars not
recommended by EURO-PRO
Operating LLC may cause fire,
electrical shock or risk of personal
injury.
8. Extreme caution must be used
when moving an appliance
containing hot food, water or other
liquids.
9. Use this appliance on a stable work
surface away from water.
10. DO N OT remove the motor head
before the chopping blades have
stopped turning.
11. CAUTION! Chopping blades are
sharp, handle with care. When
handling the chopping blades,
always hold by the plastic shaft.
12. DO NOT attempt to sharpen
blades.
2 3
Page 3
TOL L FR EE : 1 -8 00 -798 -7398 www .n inj aki tchen .co m
5
Contents
Thank you for
purchasing
the Ninja™
Master Prep™
Chopper.
Engl ish
Getting Started ...................................................................... 6
Cleaning and Maintenance ................................................ 10
Troubleshooting Guide .......................................................10
Warranty ...................................................................................11
Registration .............................................................................13
TECHNICAL SPECIFICATIONS
Voltage: 120V., 60Hz.
Power: 400 Watts
Bowl Capacity: 0.47 L (16 ounces) (2 cups)
4
Page 4

www .n inj aki tchen .co m
6 7
Engl ish
The Ninja™ Master Prep™ Chopper is an indisp ensable kitchen tool that is perfect for
blending, chopping, mixing or pureei ng when pre paring your favorite recipes. For
best result s, be sure to c arefully re ad all the instructio ns contain ed in the manual
before using this applia nce.
TOL L FR EE : 1 -8 00 -798 -7398
Getting Started
400 Wat t Power Head
The 400 watt power h ead operates on 120V., 60Hz. electrical power. NEV ER allow
the power head to become wet when plugged into an electrical outlet .
WARNING: The power head should never be imme rsed in water o r any other liq uid.
CAUTION: Make sure that the power head is unplug ged from the electrical outlet a nd
that the b lades have stopped turning before at taching or removing any accessor y.
CAUTION: Blades are sha rp! Use ext reme ca ution when han dling the blades.
Always ho ld them by t he shaft. Do not attem pt to sha rpen bl ades.
IMPOR TANT: Never run the appliance e mpty.
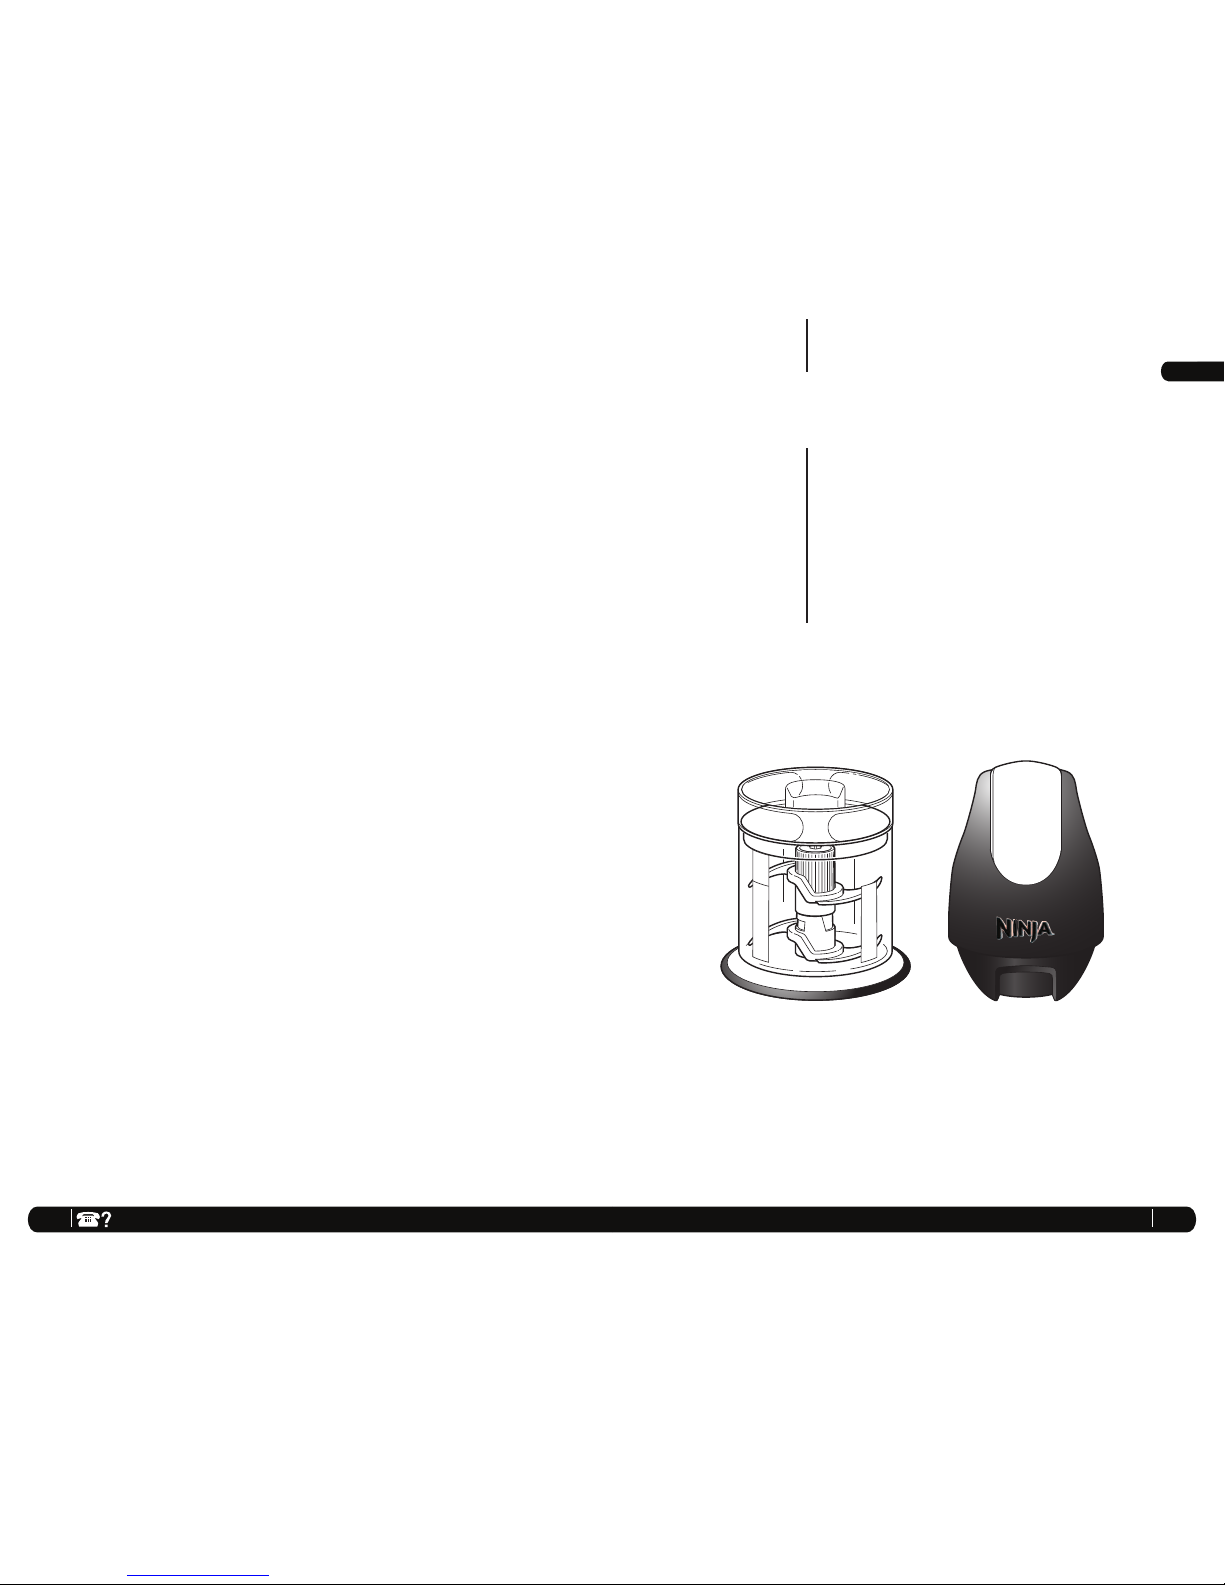
a Bowl Sp lash Gua rd
b Upper Blade (bowl)
c Lower Blade (bowl)
d* Master Prep™ Chopper Bowl
e Spindle Pin
f Non-Slip Base Gasket (bowl)
g On/Off Pulse Button
h Power Head
b
a
g
e
h
c
f
*d
Page 5

www .n inj aki tchen .co m
8 9
Using the Master Prep™ Chopper
TOL L FR EE : 1 -8 00 -798 -7398
Shaft
11 Make sure that th e blades have
stopped completely before removing
the power head.
12 If the ingredients stick to th e side of
the Master Prep™ Chopper bowl, stop
the appliance, remove the p ower head
and the splash guard. Use a spatula to
dislodge the pieces and then replace
the splash guard and the power head .
Continue processing .
13 Remove the blade assembly by its shaft
before you empty the contents of the
Master Prep™ Chopper bowl.
HIN TS & TIPS FO R USING YOU R NINJA™
MASTER PREP™ CHOPPER
l The cho pping bl ades can be used for
choppin g meat, fis h, vegeta bles, cheese
etc.
l For mincing, chopping and pureei ng,
increase the length of pulses.
l For coar se chopp ing, use s hort, q uick
pulses an d monitor fo od texture.
l Pre- cut large r pieces to ma ke them fit
into the Master Prep
™
Chopper. When
choppin g hard food s (e.g. meat, ch eese)
cut into 1-in ch cubes .
l To crush ice into snow, start by using
short pu lses to brea k up large ch unks.
Continue u ntil snow is ac hieved.
Engl ish
CAUTION: Blades are sharp! Use
extreme caution when handling the
blades. Always hold them by the shaft.
IM PORTANT: Never run the a ppliance
empty.
1 Place the Master Prep™ Chopper bowl
on a clean, dry, level surf ace.
2 Holding the lower blade by the shaft,
place it over the spindle pin inside the
Master Prep™ Chopper. (fig. 1)
3 C arefully inser t the upper blade over
the lower blade rotating it until it locks
onto the lower blade. (fig. 2)
IM PORTANT: Always assemble the
blades inside the container.
WARNING: DO NOT try to place the
blades onto the power head and then
into the Master Prep™ Chopper bowl.
4 Place the food that you want to process
into the Master Prep™ Chopper bowl.
IM PORTANT: Never add ingredient s
into the Master Prep™ Chopper bowl
before placing the blade assembly in
first.
NOTE: DO NOT add more than 2 cups
dry or 1 cup liquid ingredients a s this
will strain the motor and may cause
overflow.
5 Place the splash guard on the bowl.
(fig. 3)
6 Place the power head on top of the
splash guard making sure that it is
securely in place. (fig . 4) DO NOT
attempt to ope rate the appliance
without the safety splash guard in
place.
7 To start the applia nce, plug the power
cord into the electrical o utlet, securely
hold power he ad while operating
and press on the on/off pulse button
located on th e top of the power head.
(fig. 5)
8 Hold the Master Prep™ Chopper bowl
firmly while d epressing the on/off pulse
button to ensu re the unit stays in place.
NOTE: DO NOT operate the appliance
continuously for more than 15 seconds
at a time. Be careful not to over
process. For coarsely choppe d foods,
use repeated short pulsing action until
the desired consistenc y is reache d.
9 To stop the appliance, remove your
fingers from the on/off pulse button .
10 In ord er to obtain a better quality of
chopping, operate th e appliance by
using the “pulse” method.
2
1
5
3
4
Page 6

www .n inj aki tchen .co m
10 11
Engl ish
Cleaning and Maintenance
Model
QB600W
TOL L FR EE : 1 -8 00 -798 -7398
CAUTION: Make sure that the p ower head is unplugged from power so urce before
inserting or removing a ny attachment and before cleaning.
DO NOT imm erse the power head into water or any other liquid. Clean with a damp
sponge or cloth and wipe dry.
The Master Prep™ Chopper, Master Prep™ Splash guard and cho pping bla des are all
dishwasher safe. It is recommended to place the storage lids and the cho pping
blades on th e top rack. U se extreme c aution whe n handling the chopping blades as
they are very sh arp.
Clean the Ninja™ Master Prep™ Chopper and all par ts before first use an d immediately
after each use.
To purchase replacement parts, please visit our website: www.ninjakitchen.com
or contact customer service: 1-800-798-7398.
ONE (1) YEAR LIMITED WARRANTY
EURO-PRO Operating LLC warrants this product to be free from material defects
and workmanship for a period of one (1) year from the date of purchase when
utilized for normal household use, subject to the following conditions, exclusions
and exceptions.
The liability of EURO-PRO Operating LLC is limited solely to the cost of the repair
or replacement of the unit at our option. This Limited Warranty does not cover
normal wear of parts and does not apply to any unit that has been tampered with
or used for commercial purposes. This Limited Warranty does not cover damage
caused by misuse, abuse, negligent handling or damage due to faulty packaging
or mishandling in transit. This Limited Warranty does not cover damage or defects
caused by or resulting from damages from shipping or repairs, service or alteration
to the product or any of its parts, which have been performed by a repair person
not authorized by EURO-PRO Operating LLC.
If your appliance fails to operate properly while in use under normal household
conditions within the Limited Warranty period, you may return the complete
appliance and accessories with proof of purchase and date, freight prepaid.
For Customer Service support, call 1-800-798-7398 or visit our website
www.ninjakitchen.com.
If the appliance is found by EURO-PRO Operating LLC to be defective, in EURO-
PRO Operating LLC’s sole discretion, we will repair or replace it free of charge.
Proof of purchase date and cheque made payable to EURO-PRO Operating LLC
in the amount of $14.95 to cover the cost of return shipping and handling must be
included.*
This Limited Warranty is extended to the original purchaser of the unit and excludes
all other legal, implied and/or conventional warranties. The responsibility of
EURO-PRO Operating LLC if any, is limited to the specific obligations expressly
assumed by it under the terms of this Limited Warranty. In no event is EURO-
PRO Operating LLC liable for incidental or consequential damages to anyone of
any nature whatsoever. Some states do not permit the exclusion or limitation of
incidental or consequential damages, so the above may not apply to you.
This Limited Warranty gives you specific legal rights, and you may also have other
rights which vary from state to state or from province to province.
*IMPORTANT: Carefully pack item to avoid damage in shipping. Be sure to
include proof of purchase date and to attach tag to item before packing with
your name, complete address and phone number with a note giving purchase
information, model number and what you believe is the problem with the item.
We recommend you insure the package (as damage in shipping is not covered
by your Limited Warranty). Mark the outside of your package “ATTENTION
CUSTOMER SERVICE”. We are constantly striving to improve our products,
therefore the specifications contained herein are subject to change without
notice.
PROBLEMS POSSIBLE REASONS & SOLUTIONS
Motor Doesn’t Start
or Blades Don’t
Rotate.
Check that the bottom of m otor head i s clean an d
there is no fo od blocking conne ction when placin g
on contain ers.
There is too much food in th e contain er.
The unit ha s overheated . Unplu g and wait
approximately 10 minutes before us ing again.
Make sure the s plash gu ard is securely on container.
Make sure the power head is se curely pla ced on
splash guard.
Check that th e plug is securely inserted into the
electrical outlet.
Check fuse or breaker. Replace fuse/reset
breaker.
Food is Unevenly
Chopped.
Either you are ch opping too m uch food at one
time, or the pieces are not small enough. Try
cutting the food into smaller pieces of even size
and processing smaller amounts per batch .
Food is Chopped Too
Fine or is Too
Watery.
The food has been over processed. Use brief
pulses or process for shorter time . Let blades
stop completely between pulses.
Food Collects On
Splash Guard/Safety
Cover or Master Prep™
Chopper Bowl.
You may be processing too m uch food . Turn the
machine of f. When the b lades stop rotating,
remove the power he ad and the splash gua rd.
Remove some of the food being processed.
You Cannot Achieve
Snow From Solid
Ice.
Do not use ice that has been sitting out o r has
started to melt. Be sure to use short pulses in
the beginning to break up large pieces.
Troubleshooting Guide
Page 7

Notes
12
www .n inj aki tchen .co m
13
QB600W 30
OWNERSHIP REGISTRATION CARD
FOR CANADIAN CONSUMERS ONLY
Please fill out and mail the product registration card within ten (10)
days of purchase. The registration will enable us to contact you in the
unlikely event of a product safety notification. By returning this card
you acknowledge to have read and understood the instructions for
use, and warnings set forth in the accompanying instructions.
Mail to the following address:
• EURO-PRO Operating LLC
4400 Bois Franc, St.Laurent, Québec, Canada H4S 1A7
Owner’s Name:
Address:
City: Province: Postal Code:
Date Purchased:
Name of Store:
Appliance Model:
| |
TOL L FR EE : 1 -8 00 -798 -7398
Page 8

U.S.: EURO-PRO Operating LLC
Newton, MA 02459
CANADA: EURO-PRO Operating LLC
4400 Bois Franc
Ville St. Laurent, Québec H4S 1A7
1-800-798-7398
www.ninjakitchen.com
COPYRIGHT © EURO-PRO OPERATING LLC 2010
PRINTED IN CHINA REV. 100811
Illustrations may differ with actual product.
 Loading...