

Page 1

NINJA LPRV2 LOW PRESSURE REGULATOR MADE IN USA
P
Page | 1
P
NINJA LPRV2 LOW PRESSURE REGULATOR MADE IN USA
REASSEMBLY: Reference gure 2
1. Reinsert LPRV2 piston # 9 pin- side rst. Be certain the pin enters the center hole (Figure 3: X)
2. Reinsert LPRV2 Main Spring #10, roughly center the spring on the piston.
3. Verify the LPRV2 Adjuster is fully threaded into the LPRV2 Cap, fully turned counterclockwise.
4. Thread, clockwise, the LPRV2 Cap onto the LPRV2 Body NO GAP BETWEEN LPRV2 BODY AND
LPRV2 CAP.
5. Reinstall the LPRV2 Maintenance Access Locking set screw #12, DO NOT OVER TIGHTEN!
6. Re-chronograph using the quick start guide in this manual.
REVISION JANUARY 2018
age | 5
START UP GUIDE FOR OPTIMAL PERFORMANCE
-MAXIMUM INPUT PRESSURE OF 500PSI
-SET REFERENCE GAUGE TO 80PSI
-FIRE ROUNDS OVER CHRONOGRAPH
(Pressure may drop)
-INCREASE PRESSURE UNTIL STABLE AND DESIRED
VELOCITY IS ACHIEVED
-ONCE VELOCITY IS STABLE AT DESIRED LEVEL, INSTALL
TOURNAMENT LOCK ZIP TIE IF REQUIRED BY FIELD.
Proudly made in USA
WARNING: THIS IS NOT A TOY IMPROPER USE CAN RESULT IN INJURY OR DEATH DO NOT USE THE LPR
PRIOR TO READING THIS MANUAL IN ITS ENTIRETY
The Ninja LPRV2 is a low pressure regulator for Air soft markers.
Construcon: Aluminum.
Inlet Pressure: Max 500 PSI
Adjustment Range: 0 -160 PSI
Reseng Relief Valve: 140-150 PSI, NOT SERVICEABLE DO NOT REMOVE OR TAMPER WITH.
Lubon: Any Silicone based, NON-PETROLEUM LUBRICANT.
Adjustment: 3/16” Allen wrench
Tournament legal: Can be l
Pressure Gauge: 0-160 PSI
Piston: 015-90 red urethane oring for ease of maintenance.
Break In Period: 1000-3000 Cycles
Maintenance kit included (Quany (2) of #7 red oring 015 )
The Ninja LPRV2 is designed to be used with a standard regulated paintball air source.
Paintball air source is available in 3000 and 4500 psi boles. The paintball tank must have a
regulator, which regulates the air source the Max regulator output is 500 psi. Ninja oers a full
line of air systems, visit www.ninj
Figure 1.
C E
F
B A
Features:
A. Pressure adjustment.
B. Tournament Lock zip e holes.
C. Maintenance only access lock set screw.
D. Pressure Relief Valve assembly.
E. Low Pressu
F. Low Pressure Quick Disconnect.
re Reference Gauge.
ocked out with zip
apaintball.com
D
age | 1
If you have any queons or require help please call our 877-NINJA-USA (646-5287) for assistance.
186 Virginia Rd, Crystal, Lake, IL 60014 Ph: 877-NINJA-USA (646-5287)
If you have any queons or require help please call our 877-NINJA-USA (646-5287) for assistance.
186 Virginia Rd, Crystal, Lake, IL 60014 Ph: 877-NINJA-USA (646-5287)
877-NINJA-USA (646-5287) for assistance.
186 Virginia Rd, Crystal, Lake, IL 60014 Ph: 877-NINJA-USA (646-5287)
Page 2
NINJA LPRV2 LOW PRESSURE REGULATOR MADE IN USA
Page |
Page |
Page | 4
Page |
NINJA LPRV2 LOW PRESSURE REGULATOR MADE IN USA
NINJA LPRV2 LOW PRESSURE REGULATOR MADE IN USA
Quick start guide:
Verify Adjuster (Figure 1: A.) is at the maximum, turning counter clockwise until it stops, using a
3/16 Allen (hex) key.
Completely attach the regulated air source with a verified output pressure of 500 psi.
The pressure gauge is for reference only. The velocity should be set following the engine
manufacturers specifications utilizing a chronograph designed for airsoft use.
Rotating the adjuster CLOCKWISE will INCREASE the output pressure.
Rotating the adjuster COUNTER CLOCKWISE will DECREASE the output pressure.
In General, increasing the output pressure will increase the velocity of the airsoft engine.
o Using small 5° Clockwise adjustments (right hand) to increase velocity and verify using a
chronograph.
o Small Counter Clockwise adjustments to reduce velocity must be followed by several
clearing shots.
o If the air pressure is increased beyond the factory Resetting Pressure Relief Valve
(Figure 1: D.) set point (140-150psi), the Resetting Pressure Relief Valve will begin to
vent. Quickly turn the adjuster at least one full turn Counter Clockwise to decrease the
pressure output and the Resetting Pressure Relief Valve will reset.
Due to the Ninja LPRV2 design, the air source tank and regulator should turn easily, unthread
from the Ninja LPR smoothly and de-gas with a small vent of air after unthreading two full turns
and before three full turns are completed.
The cylinder valve can fly off with enough force to kill of the valve unscrews from the cylinder. LOOK
at valve when removing cylinder.
STOP if the valve starts to unscrew from the cylinder. Screw it back on and contact the manufacturer
for Instructions to repair.
WARNING: THIS IS NOT A TOY IMPROPER USE CAN RESULT IN INJURY OR DEATH DO NOT USE THE LPR
PRIOR TO READING THIS MANUAL IN ITS ENTIRETY
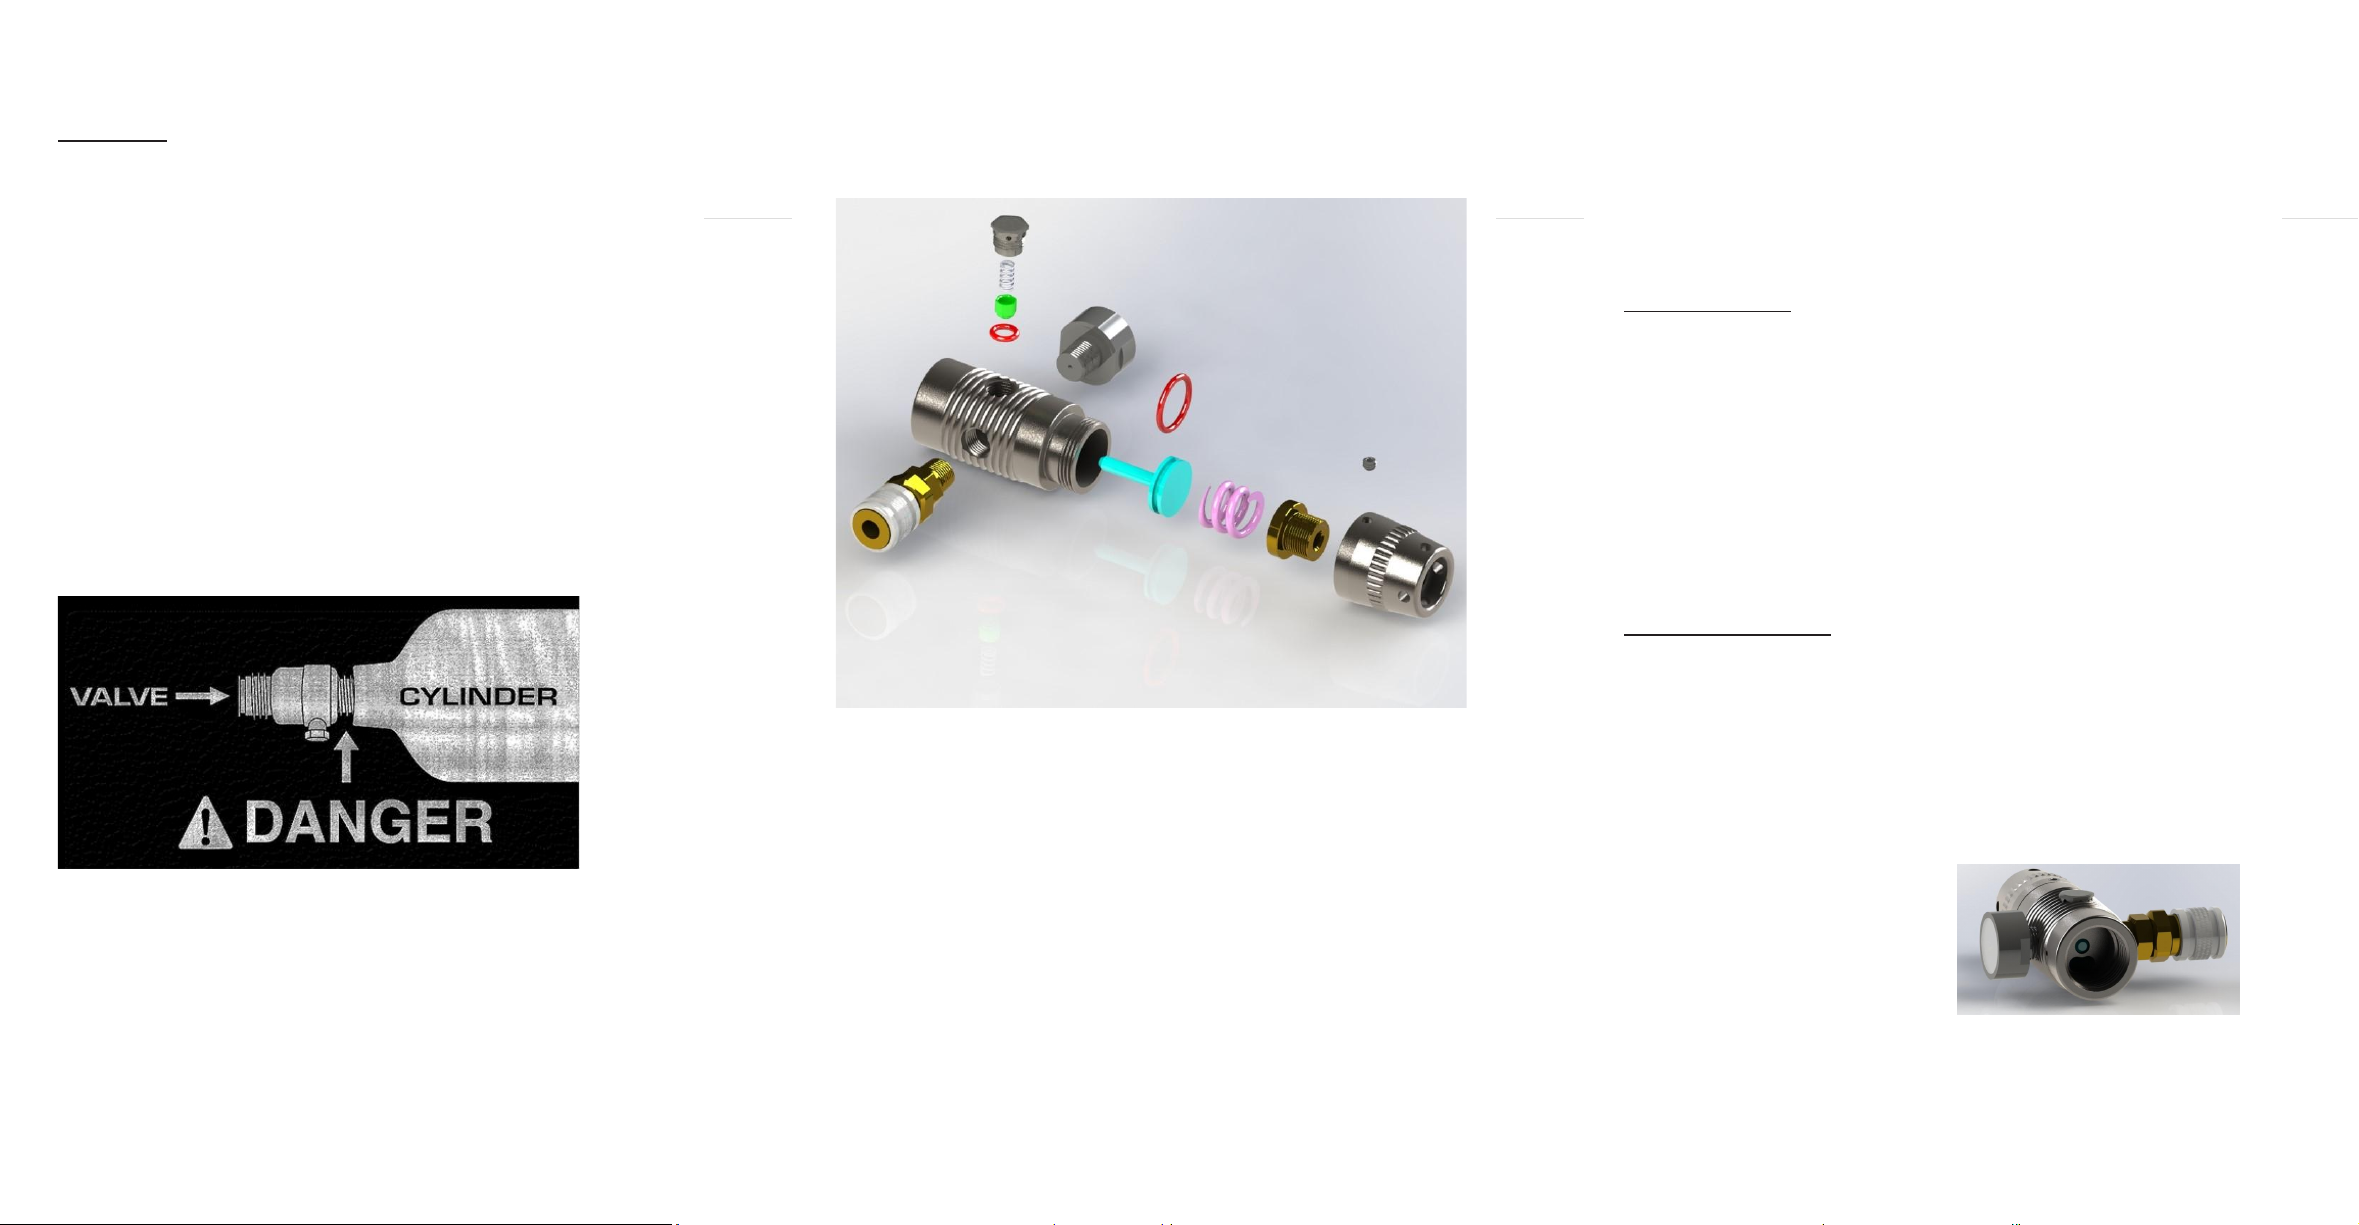
NOTE: COMPONENT COLOR FOR ILLUSTRATION PURPOSES ONLY ACTUAL PRODUCT COLOR MAY VARY
2
Figure 2.
1
2
3
4 5
6 7
12
9
8
10
11
13
1. LPRV2 Pressure Relief Housing
2. LPRV2 Pressure Relief Spring
3. LPRV2 Pressure Relief Piston
4. LPRV2 Pressure Relief Piston 009-70 Buna Oring
5. LPRV2 Low Pressure Gauge
6. LPRV2 body
7. LPRV2 Piston Oring 015 – 90 Red urethane
8. Low Pressure Fosters Quick Disconnect
9. LPRV2 Piston
10. LPRV2 Main Spring
11. LPRV2 Adjuster
12. LPRV2 Maintenance Access Locking set screw
13. LPRV2 Cap
3
WARNING NEVER OPERATE OR ADJUST THE LPRV2 WITH THE MAINTENANCE SET SCREW #12 LOOSE
OR REMOVED.
NEVER ATTACH AN AIR SOURCE WITH THE LPR CAP #13 NOT FULLY INSTALLED WITH THE
MAINTENANCE SCREW #12 FIRMLY INSTALLED. IF THE LPR CAP IS LOOSE OR REMOVED THE LPRV2
PISTON IS UNDER PRESSURE AND CAN TRAVEL AT VELOCITIES, WHICH MAY CAUSE PERSONAL INJURY
TO THE USER OR BYSTANDERS.
MAINTENANCE & SERVICE:
Maintaining the Ninja LPRV2 for optimum performance requires occasional Piston Oring #7
replacement.
Replacing and silicone greasing oring #7 will solve a number of common air pressure regulation issues:
1. Inconsistent pressure output.
2. Slow loss of pressure while under pressure but not using the regulated air.
3. Slow recharging of set pressure.
4. Leaking from LPRV2 cap #13, LPR adjuster #11, LPR Maintenance set screw #12.
WARNING THE LPRV2 RESETTING PRESSURE RELIEF #1-4 IS NOT USER
SERVICABLE. DO NOT REMOVE OR TAMPER WITH THE LPR PRESSURE RELIEF
DISASSEMBLY: Reference figure 2
1. Remove Air Source.
2. Using a 3/16” Allen (hex) key rotate the LPRV2 Adjuster #11 fully Counter Clockwise.
3. Using a 5/64” Allen (hex) key remove the LPRV2 Maintenance Access Locking set screw #12 by
rotating Counter Clockwise using a flat, non-ball end of the Allen.
4. Rotate LPRV2 cap #13 Counter Clockwise to remove LPR cap and Adjuster.
5. Remove LPRV2 Main Spring #10
6. Remove LPRV2 Piston #9 by light pressing an Allen key through the center hole on the Air Source
Attachment side (Figure 3: X)
7. Remove and replace oring #7, lightly lube the oring with silicone grease.
Figure 3
x
4
If you have any questions or require help please call our 877-NINJA-USA (646-5287) for assistance.
186 Virginia Rd, Crystal, Lake, IL 60014 Ph: 877-NINJA-USA (646-5287)
If you have any questions or require help please call our 877-NINJA-USA (646-5287) for assistance.
186 Virginia Rd, Crystal, Lake, IL 60014 Ph: 877-NINJA-USA (646-5287)
If you have any questions or require help please call our 877-NINJA-USA (646-5287) for assistance.
186 Virginia Rd, Crystal, Lake, IL 60014 Ph: 877-NINJA-USA (646-5287)
 Loading...