

Page 1
User Manual
A
D
B
C
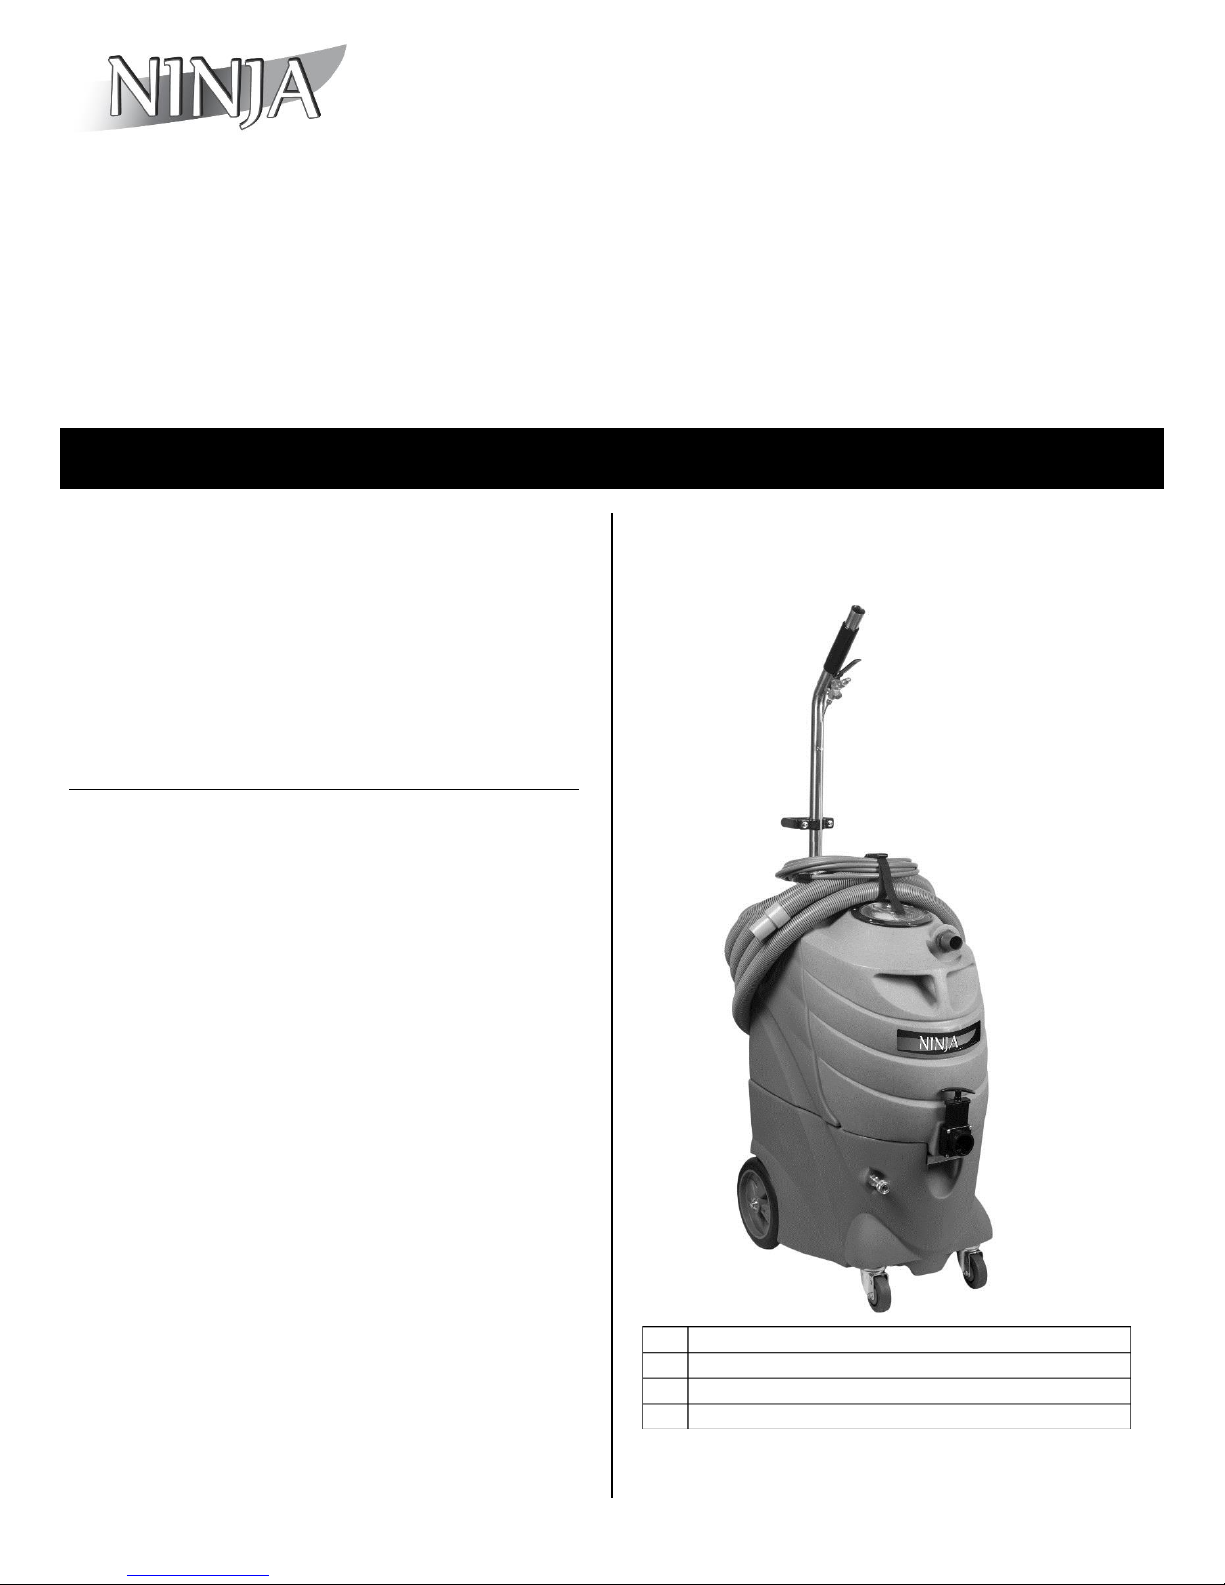
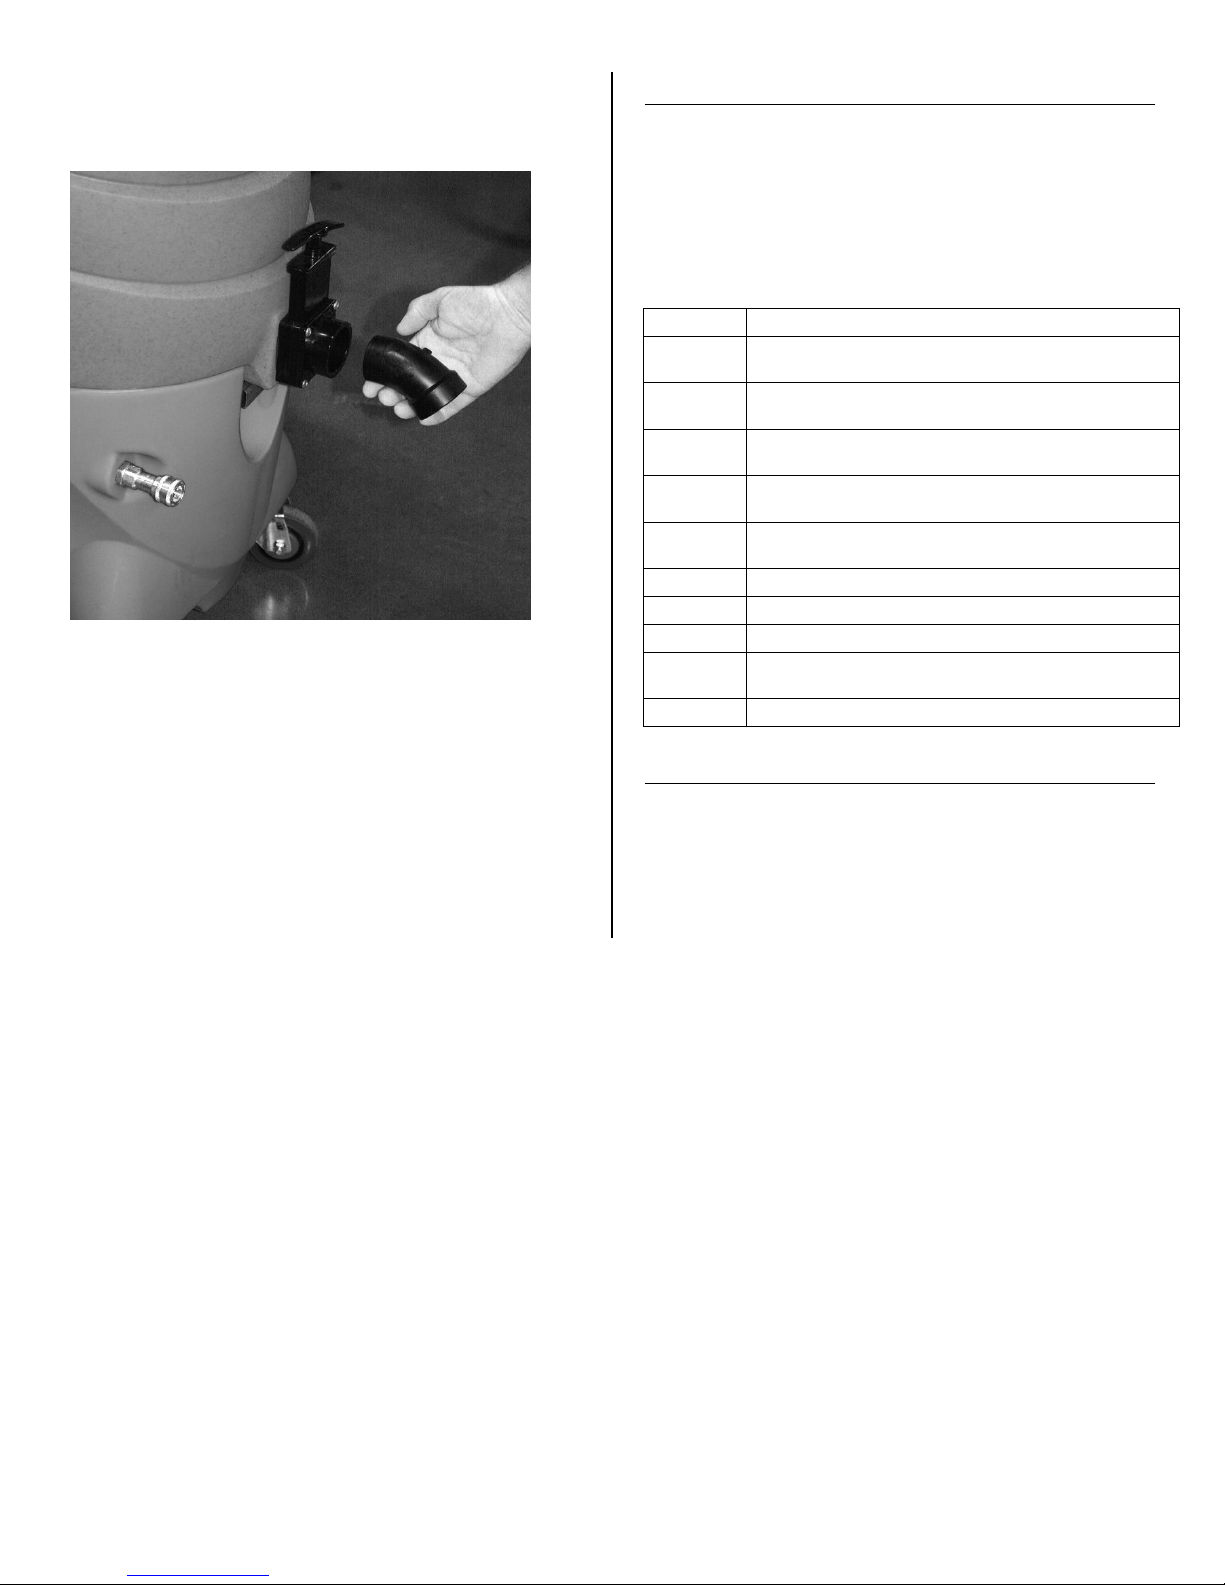
FIG. 1: Front View
A
Recovery tank cover
B
Vacuum hose attachment
C
Recovery tank gravity drain and gate-type valve
D
Solution hose quick-connect
B
Ninja Portable Extractor
Model 1200MS
15180 Josh Wilson Road
Burlington, WA 98233
800-932-3030 www.LegendBrandsCleaning.com
Ninja Portable Extractors provide deep, rapid cleaning of carpets, upholstery and hard surfaces.
Lightweight, easy to use, and adjustable for a wide range of carpet types and soiling conditions,
the Ninja Extractors produce cleaner, drier carpets and surfaces.
Patents: http://www.LBpatents.com
REA D A N D S A V E T H E S E I N S T R U C T I O N S
Intended Use
Ninja Portable Extractors are intended for
professional use only and are designed to clean
carpets and upholstery in an indoor environment.
They are not constructed for any other use. Use only
commercially available floor cleaning chemicals and
recommended accessories intended for your
specific model. Do not us this machine other than
described in this manual.
Shown with optional Wand and Vacuum Hose
Kit (48-103).
Notice: Risk of injury
Do not leave appliance when plugged in. Unplug
cord from outlet when not in use or servicing
machine.
Do not use outdoors. This machine is for indoor use
only.
Do not allow to be used as a toy. Close attention is
necessary when used near children.
Use only as described in this manual. Use only
manufacturer’s recommended accessory tools.
Operators shall be adequately instructed on the use
of this machine.
This machine is not intended for use by persons,
including children, with reduced physical, sensory
or mental capabilities, or lack of experience and
knowledge.
Do not use with damaged cord or plug. If appliance
is not working as it should, has been dropped,
damaged, left outdoors, or dropped in water, return
it to a service center for repair.
Do not pull or carry by cord, use cord as a handle,
close a door on cord, or pull cord around sharp
edges or corners. Do not run appliance over cord.
Keep cord away from heated surfaces.
Do not pull cord to unplug. To unplug, grasp the
plug, not the cord.
07-02233A MANUAL - 1200MS 115V PORTABLE 1 Ninja
Page 2
A
D
B
G
C
F
H
E
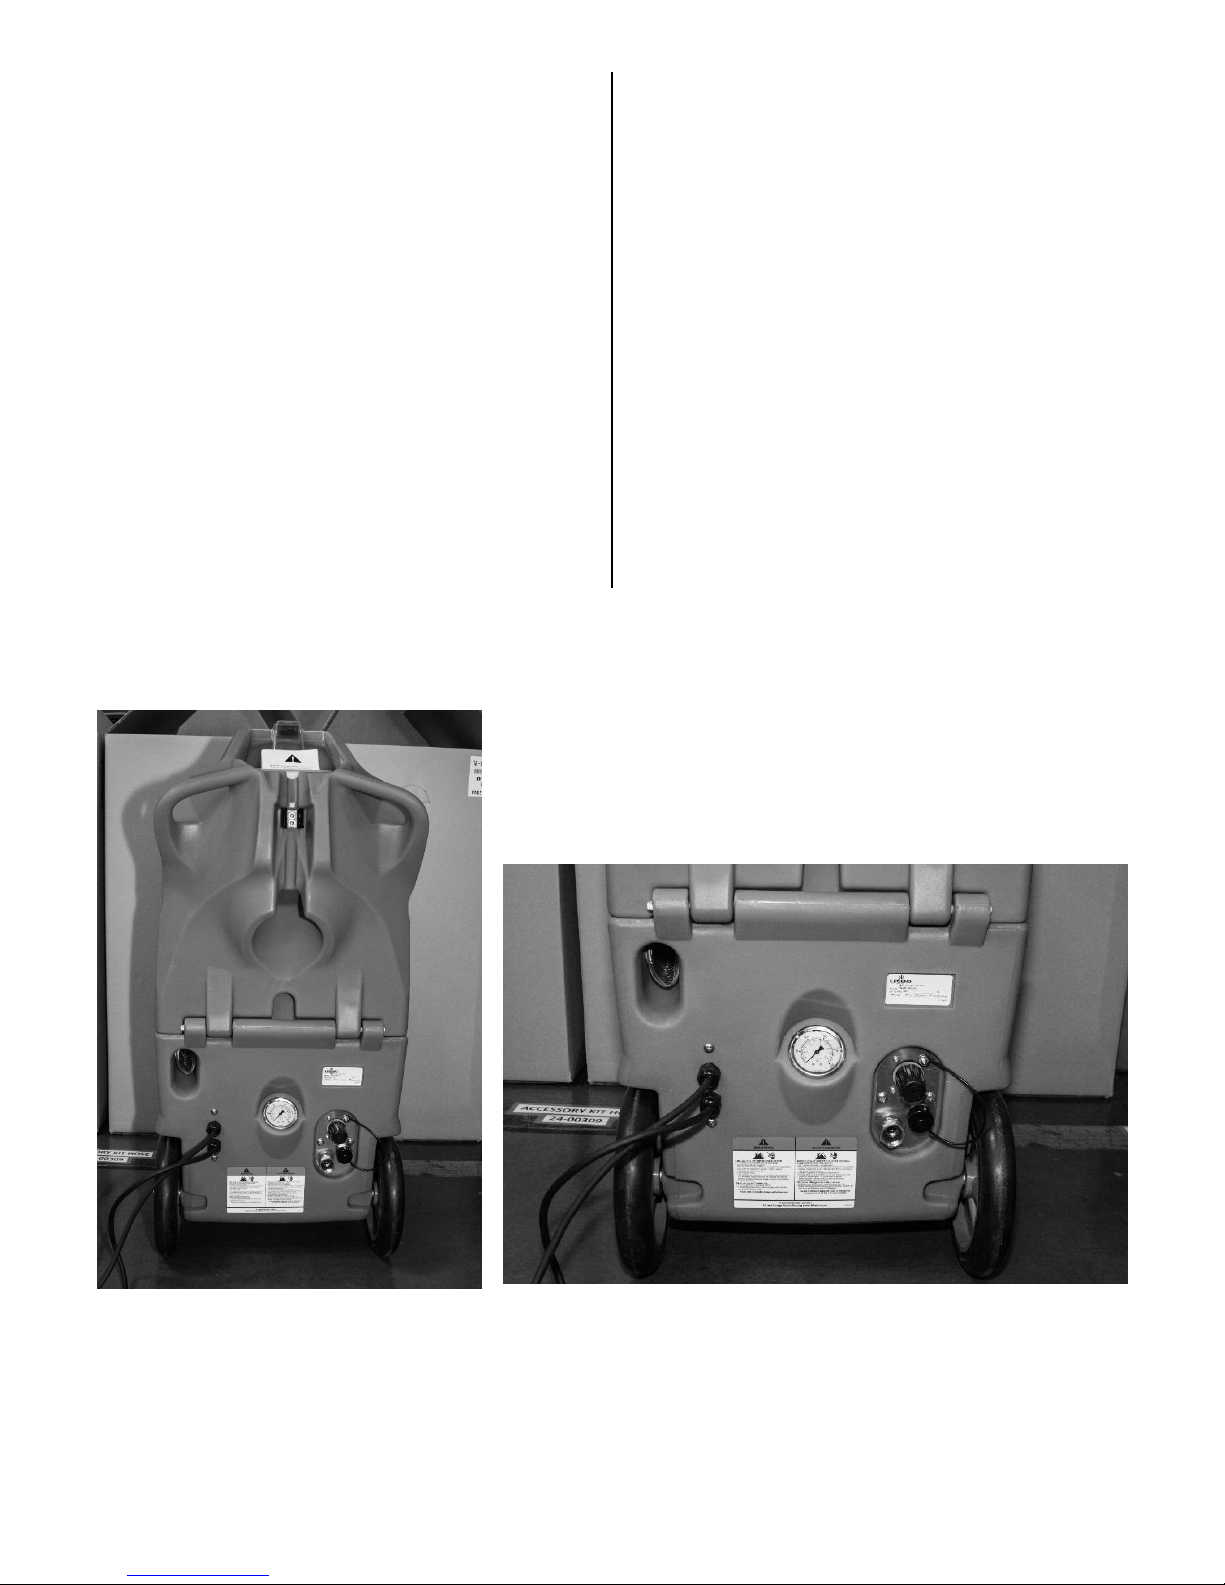
FIG. 2: Rear View
(Fig 2 detail)
A
I
J
A
Solution tank with clear hinged cover
F
Safety notifications label
B
Wand retention clip
G
Pressure gauge
C
Vacuum exhaust. Keep clear.
H
Pressure regulator
D
Product label and serial number
I
Auto-pumpout coupling. Keep capped when not in use.
E
Dual cords
J
Auto-fill coupling
Do not handle plug or appliance with wet hands.
Do not put any object into openings. Do not use with
any opening blocked; keep free of dust, lint, hair and
anything that may reduce airflow.
Do not use without ball float screen in place.
Turn off all controls before unplugging.
Do not use to pick up flammable or combustible
liquids, such as gasoline, or use in areas where they
may be present.
Immediately unplug power cord from outlet if
machine leaks solution/foam or if machine tips over
while operating.
Release water pressure at accessory tool spray
nozzle before disconnecting solution hose.
Always stop machine on a level surface.
Use extra care when cleaning on stairs. Do not
wheel machine up or down stairs.
Connect to a properly grounded outlet only.
Do not pick up any type of hazardous dust or toxic
materials.
Do not pick up anything that is burning or smoking,
such as cigarettes, matches, or hot ashes.
Do not point spray at yourself or in the direction of
others
Do not use this machine for dry vacuuming.
Do not operate machine in standing water.
Extension cords must be 12/3 gauge and no longer
than 40 feet. Replace cord if ground plug becomes
damaged.
Do not use additional extension cords with machine.
Do not use machine if not in proper operating
condition.
Do not modify machine from its original design.
Get assistance when lifting machine.
07-02233A MANUAL - 1200MS 115V PORTABLE 2 Ninja
Page 3

All repairs must be performed by a qualified service
person. Only parts approved by Legend Brands
should be used.
Cautions: Risk of property damage
CAUTION: Protect from freezing. Freezing may
damage internal components and will void warranty.
CAUTION: Do not use with water with over 3 grains
per gallon (51 miligrams per liter) of hardness. Use
with hard water could result in the formation of
mineral deposits inside pumps and fittings. Damage
caused by mineral deposits will void warranty.
CAUTION: Use only to extract moisture. Do not
immerse end of vacuum hose in liquid.
configuration as the plugs. No adaptor should be used
with this appliance. If the appliance must be reconnected
for use on a different type of electric circuit, the
reconnection should be made by qualified service
personnel.
CONTROLS
ON THE CONTROL PANEL (Fig. 3)
Includes rocker-type switches control blower, solution
pump, and pumpout (on select models).
ON THE BACK PANEL (Fig. 2H)
Pressure regulator. Select models. Turn clockwise to
increase solution pressure; turn counterclockwise to
decrease solution pressure.
OPERATING INSTRUCTIONS
CAUTION: Do not use as a dry vacuum. Dust
particles will damage the vacuum motors. Damage
caused by dry vacuuming will void the warranty.
CAUTION: To prevent the growth of mold and
mildew inside the tanks, always drain waste tank
completely and empty solution tank after use.
WARRANTY
Visit www.LegendBrandsCleaning.com to register your
purchase. Registration allows us to better assist you with
using, maintaining or servicing your equipment, as well
as to contact you in case we have important safety
information concerning your product.
The warranty is valid from the date of purchase for one
year. This will cover parts and labor at an authorized
Ninja or Sapphire Scientific distributor. The warranty is
only valid to the original purchaser and proof of purchase
is required. Modifying this unit or not maintaining the
machine as outlined in this manual will void the warranty.
See the full Limited Warranty document for details.
GROUNDING INSTRUCTIONS
This appliance must be grounded. If it should
malfunction or break down, grounding provides a path of
least resistance for electric current to reduce the risk of
electric shock. This appliance is equipped with cords
having equipment-grounding conductors and grounding
plugs. The plugs must be inserted into an appropriate
outlet that is properly installed and grounded in
accordance with all local codes and ordinances.
WARNING! Improper connection of the equipmentgrounding conductor can result in a risk of electric
shock. Check with a qualified electrician or service
person if you are in doubt as to whether the outlets
are properly grounded. Do not modify the plugs
provided with the appliance – if the plugs do not fit
the outlets, have proper outlets installed by a
qualified electrician.
This equipment is for use on a circuit or circuits having a
nominal rating no more than 120V and is factoryequipped with a specific electric cord and plug to permit
connection to a proper electric circuit. Make sure that the
appliance is connected to outlets having the same
07-02233A MANUAL - 1200MS 115V PORTABLE 3 Ninja
IMPORTANT: Make sure to control foaming in the
vacuum system. Excessive foam can allow moisture,
carpet fiber and other debris to be drawn through the
vacuum cutoff valve and cause damage to the vacuum
motors. Damage caused by moisture or debris will void
the product warranty. To help reduce foaming, use a
low-foam detergent. Foaming may also occur because of
residues left from previous cleanings. If this happens,
use a defoamer additive. Follow defoamer manufacturer
instructions for proper application.
NOTICE: The 1200MS model may contain
residual anti-freeze from the factory. Flush
pressure system with fresh water prior to first use.
WARNING: DO NOT drain used antifreeze on the
ground or into storm drains. Dispose of antifreeze
only in an approved location. Observe all relevant
laws when disposing anti-freeze.
1. Pre-mix cleaning solution with hot water in a
separate container. Pour mixed solution into the
solution tank of the machine or apply solution
directly to the cleaning surface as directed by
chemical manufacturer.
2. Connect vacuum and solution hoses to machine and
attach to extraction wand or hand tool.
3. Drain waste tank when full using gravity drain and
diverter (Fig. 7), or use the automatic pumpout
feature described below.
4. For auto-fill operation, attach fresh water supply to
freshwater inlet (Fig. 2J) and turn on water supply at
faucet. Tank will begin filling and automatically shut
off when full.
5. If auto-pumpout operation is desired, attach a
regular garden hose to auto-pumpout coupling (Fig.
2H), and place other end in suitable drain or large
container.
6. Insert both plugs into separate 3-pin grounded
circuits. Keep cords clear of your cleaning path. The
1200MS unit has two cords and each cord should be
plugged into separate 3-pin grounded circuits. The
separate circuit indicator light will glow green (Fig.
2F) when the cords are properly connected.
Page 4

A
D
B
G
C
F
FIG. 3: Control Panel
E
Power ON/OFF
Solution pressure pump ON/OFF
Auto pumpout ON/OFF
FIG. 4: Solution inlet filter cleaning
Remove
open top.
Unscrew
Rinse cap
7. Turn on VAC.
8. Turn on solution pump.
9. If using the auto-pumpout feature, press the autopumpout switch (Fig. 3) to the On position.
10. Begin cleaning. Refer to industry-approved
procedures.
11. Solution pressure may be adjusted with the pressure
regulator knob (Fig. 2H). Monitor the pressure gauge
to ensure pressure is adequate.
12. If not using the auto-pumpout feature, use the
gravity drain with diverter in place to empty waste
when tank is full (Fig. 7).
turned off immediately to prevent damage to the
vacuum motor.
13. When cleaning is completed, rinse solution tank with
clear water to ensure no detergents or rinse agents
remain in the tank.
14. Empty and rinse the waste tank thoroughly. This will
help to prevent the formation of damaging deposits
and reduce the growth of odor-causing bacteria. Use
gravity drain to drain waste tank when full. Attach
diverter to direct flow downward (Fig. 7).
15. Turn on vacuum motor and allow it to run for 15
minutes to help remove any moisture from the
vacuum motors and help ensure long vacuum life.
MAINTENANCE
WARNING: Unplug machine before servicing.
Possibility of electrical shock.
WARNING: Interior components may be hot
after operation. Let unit cool completely
before servicing.
DAILY OR AFTER EACH USE
Clean the solution inlet filter (Fig. 4) Loosen tank
attachment screw (Fig. 1) and open unit. Remove filter
cover and strainer screen (Fig. 4). Rinse strainer screen
clean in warm water. Replace strainer and retighten filter
cover.
Clean vacuum ball float valve (Fig. 5). Empty recovery
tank, then open recovery tank lid. Grasp valve assembly
and pull gently toward the front of the unit, taking care
not to distort the strainer screen. Rinse assembly clean
and make sure float ball moves freely inside assembly.
Clean recovery tank strainer (Fig. 6, pumpout models
only). Remove strainer by gently rotating it and lifting
upward. Rinse filter clean with water and reinstall.
Reinstall strainer and vacuum ball float valve assembly
securely.
CAUTION: When the recovery tank reaches capacity,
an automatic float valve blocks vacuum intake (Fig.
5) and the vacuum motors will make a high pitched
noise. When this occurs, the machine should be
nut with
9/16 in.
wrench
and lift
07-02233A MANUAL - 1200MS 115V PORTABLE 4 Ninja
AS NEEDED
Lubricate pressure regulator O-ring (if equipped).
Access O-ring by unscrewing and removing pressure
regulator knob (Fig. 2H). Lubricate with a suitable O-ring
lubricant.
inline filter
cap assembly
and remove.
and filter
assembly
clean and
reinstall.
Page 5
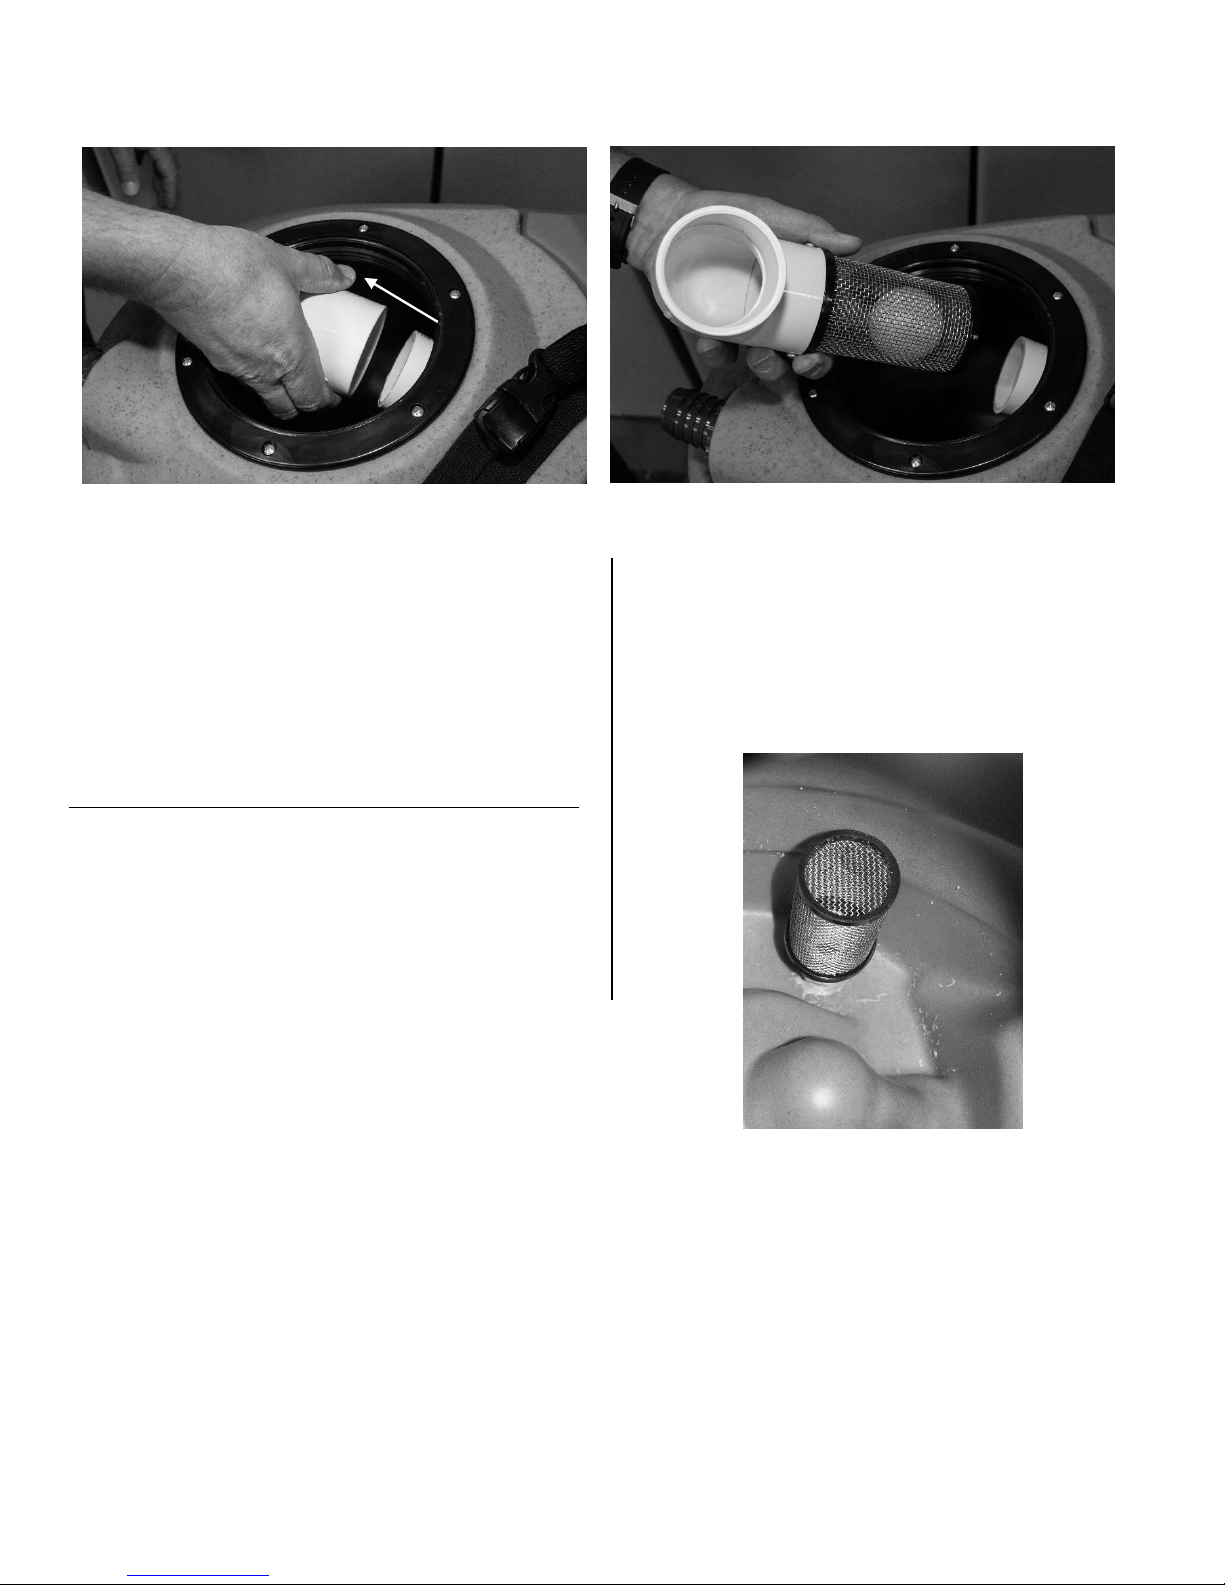
FIG. 6: Recovery tank strainer
Slide filter upward to remove. Rinse
filter clean with water and reinstall.
FIG. 5: Vacuum cutoff valve cleaning
Slide filter off and lift out to remove.
Slide filter tube back into place. Rotate assembly
to a 45° angle toward outside wall of tank.
Lubricate the solution line quick-connect coupling
(Fig. 1D) with a small amount of rust-inhibiting oil such
as LPS-3 or WD-40.
To maintain appearance, wipe interior and exterior
surfaces with a damp cloth. For deep cleaning and a
lasting, protective shine, use an automotive vinyl
cleaner/protectant product.
MAINTENANCE
IMPORTANT! Pump crankcase oil must be changed
after an initial 50-hour break-in period. Thereafter, oil
must be changed every 3 months or at 500 hour
intervals thereafter. Replace only with General Pump Oil
SAE 30W. Order part no. 13-030/24-00490.
To change the oil, see "Changing the 1200MS Pressure
Pump Oil" below.
07-02233A MANUAL - 1200MS 115V PORTABLE 5 Ninja
Page 6
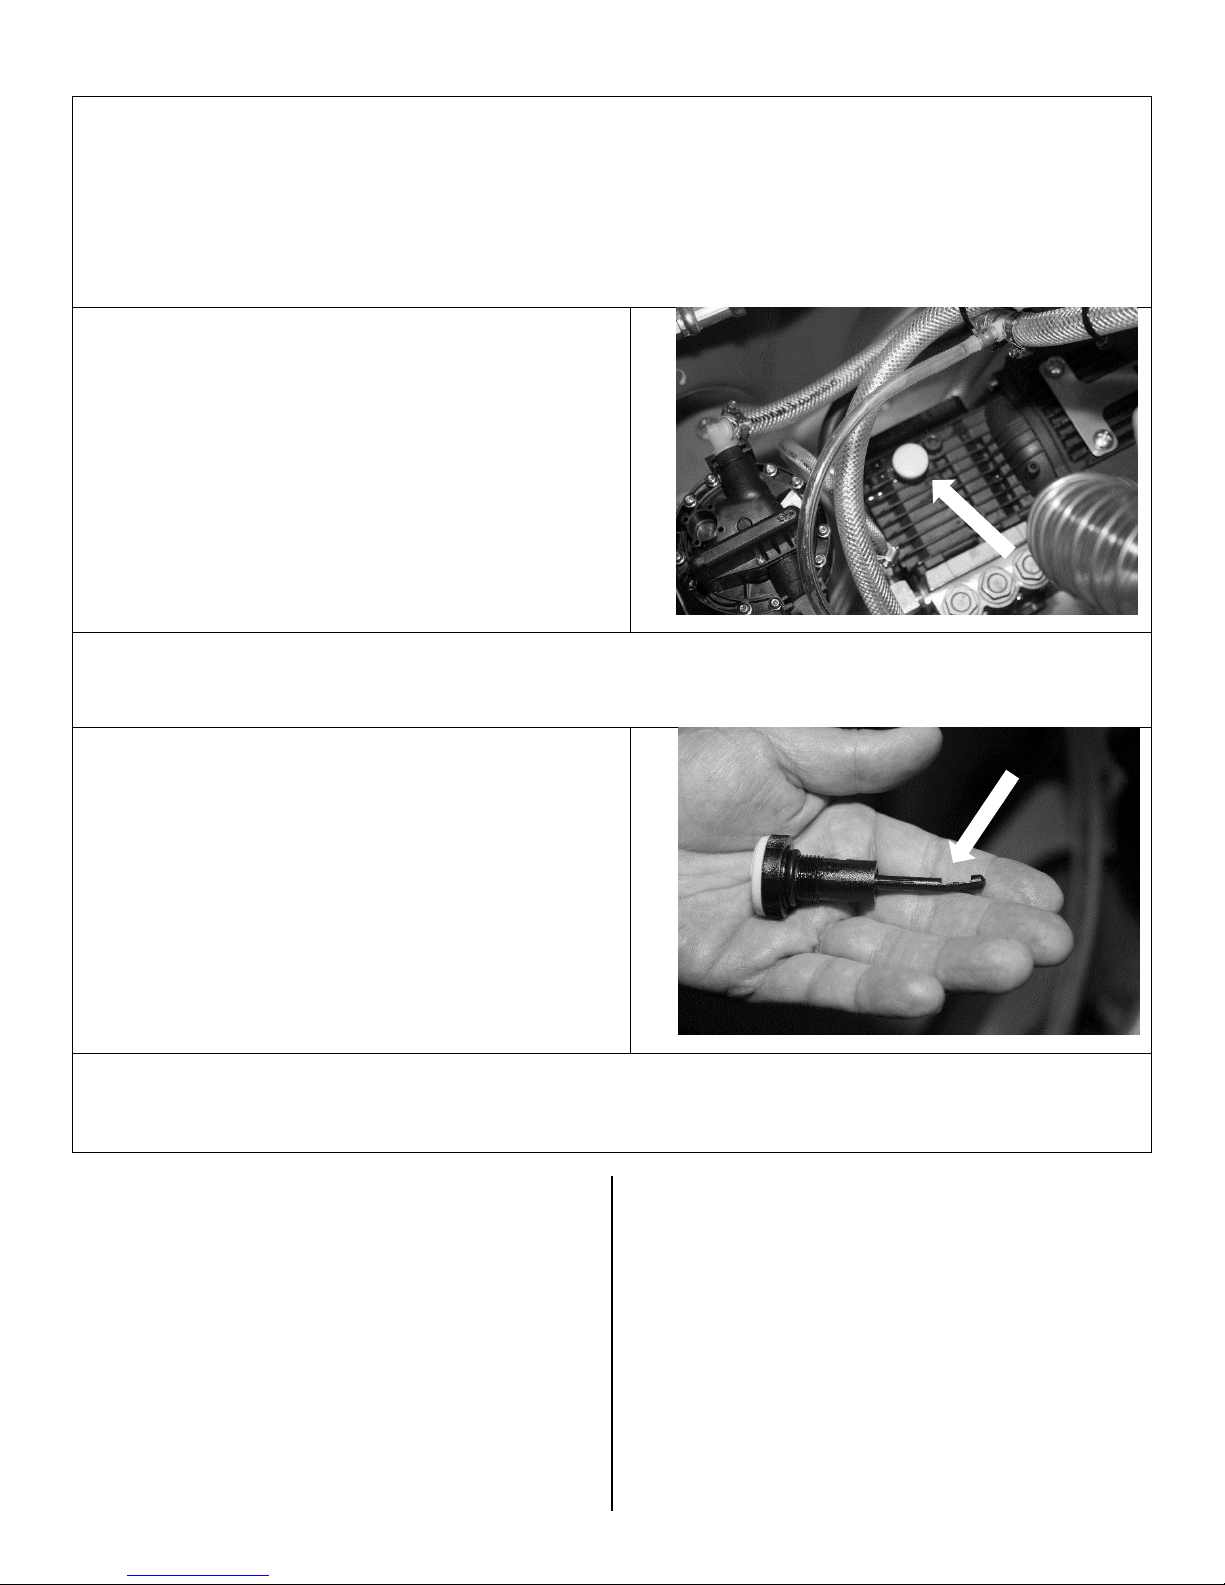
CHANGING THE 1200MS PRESSURE PUMP OIL
Tools required:
Manual transfer pump
Clean cloths
Suitable oil waste/recycling container
Verify both tanks are empty. Use a cloth to wipe out any residual moisture. Place clean cardboard or a pad behind unit
to protect handle. Remove retaining nut, hinge open unit and rest on pad.
Remove oil fill cap on pressure pump
Insert suction tube of transfer pump into oil fill hole. Pump out oil to a suitable waste / recycling receptacle.
Insert suction tube of transfer pump into bottle of fresh oil and pump approximately 8 oz. of oil into pressure pump.
After placing approximately 8 oz. of oil into the pump, check
the oil level with the dipstick. Level should be within the
notched area on the dipstick. If necessary, add oil and
recheck with the dipstick until oil is at the correct level.
When filling is complete, reinstall install oil cap, close unit and reinstall retaining nut. Dispose of used oil appropriately.
The 1200MS is now ready for use.
07-02233A MANUAL - 1200MS 115V PORTABLE 6 Ninja
Page 7
Model
Ninja 1200MS Portable Extractor (
Vacuum
motor
6.6 Ametek producing 659 peak air watts
Power
Circuit 1 12.5A
Circuit 2 13.0A
Capacity
Solution tank 12 gal. | 37.9 l
Recovery tank: 10 gal. | 37.9 l
Construction
Rotomolded polyethylene housing and handle; 10 in. semipneumatic wheels.
Closed water
lift
137 in. | 348 cm
Power cord
Two stub cords and two 14/3 25 ft. ext. cords
Drain valve
Gate type
Float shut-off
Ball type
Dimensions
(H × L × W)
41.5 × 30.25 × 19.75 in. | 105.4 × 76.8 × 50.2 cm
Safety
ETL listed
FIG. 7: Gravity drain diverter
OPTIONS (PURCHASED SEPARATELY)
Wand and Vacuum Hose Kit (48-103): Wand, 25 ft. ¼
in. solution hose and 25 ft. 1½ in. vacuum hose
HOSS 700 Rotary Cleaning Tool (67-025). Use with
HOSS 700 Adaptor Kit (48-117).
Upholstery Pro (67-019-P)
SPECIFICATIONS
CONTACT
Ninja
15180 Josh Wilson Road
Burlington, WA 98233
800-932-3030 www.LegendBrandsCleaning.com
07-02233A MANUAL - 1200MS 115V PORTABLE 7 Ninja
Page 8

A
D
C
B
FIG. 1: Vista frontal
A
Tapa del tanque de recuperación
B
Conexión de la manguera de aspirado
C
Drenaje tanque recuperación y válvula compuerta
D
Conexión rápida de la manguera de solución
Manual de Uso
Ninja Extractores Portátile
Modelo 1200MS
15180 Josh Wilson Road
Burlington, WA 98233
800-932-3030 www.LegendBrandsCleaning.com
Los Extractores Portátiles Ninja premiten una rápida y profunda limpieza de alfombras, tapicería
y superficies duras. Ligeros, fáciles de usar, y ajustables para una amplia gama de tipos de
alfombras y condiciones suciedad, los Extractores Ninja dejan más limpias y secas las
alfombras y las superficies secas.
Patentes: http://www.LBpatents.com
LEA Y C O N S E R V E E S T A S I N S T R U C C I O N E S
Uso previsto
Los Extractores Portátiles Ninja están diseñados
para uso profesional solamente y están diseñados
para limpiar alfombras y tapicerías en un ambiente
interior. No se construyen para ningún otro uso.
Utilice sólo productos químicos de limpieza para
pisos disponibles comercialmente y accesorios
recomendados para su modelo específico. No utilice
esta máquina que no sea la descrita en este manual.
Aviso: Riesgo de lesiones
No descuide la unidad cuando esté enchufada.
Desenchúfela cuando no esté en uso o cuando se la
esté reparando.
No usar en exteriores. La máquina está diseñada
sólo para uso interior.
No permita que se la utilice como juguete. Es
necesario prestar adecuada atención cuando se la
usa en cercanía de niños.
Usar sólo de la manera descrita en este manual.
Utilice sólo los accesorios recomendados por el
fabricante.
Quienes operen esta máquina deberán estar
adecuadamente instruidos en su uso.
Esta máquina no está pensada para que la utilicen
personas con capacidades físicas, sensoriales o
mentales limitadas, o con falta de experiencia o
conocimiento, incluyendo niños.
No utilizar en caso de que el enchufe o el cable se
encuentren dañados. Si la unidad no funciona como
debería, si se ha caído, dañado, si ha quedado en el
exterior o si le cayó agua encima, llévela a un centro
de servicio para su reparación.
No acarrearla tironeando de su cable, no use el
cable como manija, no cierre una puerta sobre el
cable ni lo tironee sobre bordes o esquinas agudos.
No haga funcionar la máquina sobre el cable.
Mantenga el cable alejado de superficies calientes.
07-02233A MANUAL - 1200MS 115V PORTABLE 8 Ninja
Page 9

No desenchufar tirando del cable. Para hacerlo,
tome del enchufe, no del cable.
No tomar el enchufe ni la unidad con las manos
mojadas.
No colocar ningún objeto en las aberturas. No usar
en caso de que alguna de las mismas se halle
obstruida; mantener libre de polvillo, pelusas,
cabello o cualquier elemento que reduzca el flujo de
aire.
No utilizar sin la pantalla flotadora esférica en su
lugar.
Apague todos los controles antes de desenchufar.
No usar para absorber líquidos inflamables, tales
como gasolina, ni utilizar en sectores donde los
mismos puedan hallarse presentes.
No usar para absorber ningún tipo de polvillo
peligroso o materiales tóxicos.
No extraer nada que se esté quemando o emanando
humo, como podrían ser cigarrillos, fósforos o
cenizas calientes.
No apuntar el aspersor sobre usted mismo o hacia
otras personas.
No usar esta unidad para un aspirado en seco.
No utilizar la máquina sobre agua estancada.
En caso de que la unidad gotee alguna espuma o
solución o si la misma se da vuelta cuando se la
estaba usando, desenchufe de inmediato del
tomacorriente.
Libere la presión de agua en la herramienta de
boquilla de aspersión antes de desconectar la
manguera de la solución.
Detener la máquina sólo en superficies niveladas.
Tenga especial cuidado cuando se estén limpiando
escaleras. No gire la máquina hacia arriba o hacia
abajo de los escalones.
Conectar únicamente en tomacorrientes con
adecuada puesta a tierra.
Los cables prolongadores deben ser de un calibre
12/3 y de una extensión que no supere los 40 pies.
Reemplace el cable si se daña el enchufe de puesta
a tierra.
No utilizar con la unidad cables prolongadores
adicionales.
No utilizar la unidad si no se halla en adecuadas
condiciones operativas.
No alterar el diseño original de la máquina.
Pida ayuda para levantar la máquina.
Toda reparación deberá ser realizada por personal
calificado. Sólo se deben usar piexas aprobadas por
Legend Brand.
Riesgo de daños a la propiedad
PRECAUCIÓN: Proteger contra el congelamiento. Puede
dañar componentes internos y anular la garantía.
PRECAUCIÓN: No usar con agua con dureza mayor a 3
granos por galón (51 mg por litro). El uso con agua dura
puede generar formación de depósitos minerales en el
interior de las bombas y accesorios. Los daños por el
depósito de minerales anulan la garantía.
PRECAUCIÓN: Utilice únicamente para extraer
humedad. No sumergir en líquido el extremo de la
manguera de aspirado.
PRECAUCIÓN: No utilizar como aspiradora en seco.
Las partículas de polvo pueden dañar los motores de
aspirado. Los daños causados por aspirado en seco
anularán la garantía.
PRECAUCIÓN: Para evitar la formación de moho y
hongos en el interior de los tanques, siempre después
de cada uso vacíe por completo el tanque de residuos y
el depósito de la solución.
GARANTÍA
Visite www.LegendBrandsCleaning.com para registrar su
compra. El registro nos permite ofrecerle ayuda en lo que
hace al uso, mantenimiento o reparación de su equipo, y
contactarle en caso de que tengamos información de
seguridad importante con respecto a su producto. La
garantía tendrá validez de un año a partir de la fecha de
compra. Cubrirá repuestos y mano de obra en un
distribuidor autorizado Ninja o Sapphire Scientific. Sólo
es válida en beneficio del comprador original y se
requerirá el comprobante de compra. La modificación
de la unidad o su falta de mantenimiento según lo
indicado en este manual harán perder la cobertura de
esta garantía. Por mayor información, consulte el
documento completo de Garantía Limitada.
INSTRUCCIONES DE PUESTA A TIERRA
Este aparato debe estar conectado a tierra. Si llegara a
fallar o a estropearse, la conexión a tierra brinda a la
corriente eléctrica una vía de menor resistencia para
reducir el riesgo de descarga. Este aparato está equipado
con cables que disponen de conductores de conexión a
tierra, además de enchufes con puesta a tierra. Los
enchufes deben ser insertados en tomacorrientes
apropiados que esté instalado y conectado a tierra
cumpliendo todos los códigos y ordenanzas locales.
¡ADVERTENCIA! La conexión incorrecta del conductor
de puesta a tierra del equipo puede derivar en riesgo
de descarga eléctrica. Si tiene dudas en relación a la
puesta a tierra de los tomacorrientes, consulte con un
electricista o personal de servicio técnico calificado.
No modifique los enchufes suministrados con el
aparato; si no se ajustan a los tomacorrientes, haga
que un electricista autorizado instale unos adecuados.
07-02233A MANUAL - 1200MS 115V PORTABLE 9 Ninja
Page 10

A
B
FIG. 2: Vista Trasera
A
Tanque de solución con la tapa quitada
F
Luz indicadora de doble circuito
B
Clip de retención de la vara
G
Manómetro
C
Salida de la aspiradora. No obstruir.
H
Regulador de presión
D
Etiqueta y número de serie del producto
I
Acoplamiento de la bomba automática de salida. Mantener
tapado cuando no esté en uso.
E
Cables dobles
J
Acoplamiento para el auto-llenado
(Fig. 2 detalle)
A
D
C
E
F
H
I
J
Este equipo es para uso en un circuito o circuitos con un
valor nominal de potencia no superior a 120 V, y viene de
fábrica equipado con un cable eléctrico y enchufe
específicos para permitir su conexión a un circuito eléctrico
adecuado. Asegúrese de que el aparato sea conectado a
tomacorrientes con la misma configuración que los
enchufes. No se debe utilizar adaptador con este equipo.
Si el aparato debe ser reconectado para ser usado en un
circuito eléctrico diferente, tal reconexión deberá ser
realizada por personal cualificado.
CONTROLES
EN EL PANEL DE CONTROL (Fig. 3)
Incluye ventilador de control con interruptores
basculantes, bomba de solución, y bomba de
salida (en algunos modelos).
EN EL PANEL POSTERIOR (Fig. 2H)
Regulador de presión. Algunos modelos. Gire a la
derecha para aumentar la presión de la solución; y a la
izquierda para disminuirla.
INSTRUCCIONES DE USO
IMPORTANTE: Controle la formación de espuma en el
sistema de aspirado. Una espuma excesiva puede permitir
que la humedad, las fibras de la alfombra y otros desechos
ingresen a través de la válvula de corte de la aspiradora,
causando daños en los motores de aspirado. Los daños
provocados por humedad o suciedad anularán la garantía del
producto. Para reducir la formación de espuma, use un
detergente de baja espuma. La formación de espuma
también puede darse debido a los residuos de limpiezas
anteriores. En tal caso, utilice un aditivo antiespumante. Siga
las instrucciones del fabricante para su adecuada aplicación.
AVISO: El modelo 1200ms puede contener
anticongelante residual de fábrica. Enjuague el sistema
de presión agua fresca de su primer uso.
ADVERTENCIA: NO vaciar el anticongelante usado en el
suelo o en desagües pluviales. Desechar el
anticongelante sólo en un lugar aprobado. Cumpla todas
las leyes pertinentes cuando se deshaga anticongelante.
1. En un recipiente aparte, prepare la mezcla de la
solución de limpieza con agua caliente. Vierta este
preparado en el depósito de solución de la máquina
o aplique la solución directamente sobre la
07-02233A MANUAL - 1200MS 115V PORTABLE 10 Ninja
Page 11

FIG. 4: Limpieza del filtro de entrada de la solución
Desenrosque
tapa del filtro
Enjuague
la tapa y el
colocar.
Quite la
abierta.
D
B
C
Fig. 3 Panel de Control
superficie a limpiar, según indicaciones del
fabricante del químico.
2. Conecte las mangueras de aspirado y de solución, y la
vara de extracción o a la herramienta de mano.
3. Drene el tanque de desechos cuando esté completo
utilizando el drenaje por gravedad y el desviador (Fig.
7), o bien utilice la función de bomba de salida
automática que se describe a continuación.
4. Para la operación de auto-llenado, conecte el
suministro de agua limpia a la entrada de agua (Fig.
2J) y abra el grifo. El tanque comenzará a llenarse y se
apagará automáticamente cuando esté completo.
5. Si desea el bombeo automático de salida,
conecte una manguera de jardín al acoplamiento de
la bomba (Fig. 2H) y coloque el otro extremo en el
drenaje adecuado o en recipiente grande.
6. Inserte los dos enchufes en circuitos separados.
Mantenga los cables fuera de su trayectoria de limpieza.
La unidad 1200MS tiene dos cables, y cada uno de
ellos debe estar conectado a circuitos independientes
con puesta a tierra. Se encenderá la luz verde
indicadora de circuitos separado (Fig. 2F) cuando los
cables están conectados correctamente.
7. Encienda la Aspiradora.
8. Encienda la bomba de solución.
9. Si se utiliza la Bomba de salida automática, mueva
su interruptor (Fig. 3) a la posición de encendido.
10. Comience la limpieza. Consulte los procedimientos
aprobados por la industria.
11. La presión de la solución puede ser ajustada desde
la perilla reguladora de presión (Fig. 2H). Controle el
medidor de presión para asegurarse de que la
presión es la adecuada.
12. Si no utiliza la bomba automática de salida, utilice el
drenaje por gravedad con el desviador para vaciar
los residuos cuando el tanque esté lleno (Fig 7).
PRECAUCIÓN: Cuando el tanque de recuperación
complete su capacidad, una válvula flotadora
automática bloqueará la entrada de la aspiradora
(Fig. 5) y sus motores generarán un ruido agudo.
Cuando esto ocurre, se debe apagar la máquina
inmediatamente para evitar daños en el motor de
aspiración.
Encendido / Apagado ON/OFF
Bomba de presión de solución ON/OFF
Bomba automática de salida ON/OFF
13. Cuando se haya completado la limpieza, enjuague
con agua el tanque de solución para asegurarse de
que no queden detergentes ni agentes de enjuague.
14. Vacíe y enjuague por completo el depósito de residuos.
Esto ayudará a prevenir la formación de depósitos
dañinos y reducir el crecimiento de bacterias del mal
olor. Utilice el drenaje por gravedad para vaciar el
tanque de residuos cuando esté lleno. Conecte el
desviador para dirigir el flujo hacia abajo (Fig. 7).
tuerca con
una llave de
9/16 pulg y
levante la
parte
07-02233A MANUAL - 1200MS 115V PORTABLE 11 Ninja
superior
y quite el
montaje de la
de entrada.
montaje
del filtro y
vuelva a
Page 12

FIG. 6: Colador del tanque
de recuperación
Deslice el filtro hacia arriba hasta sacarlo.
Enjuague el filtro con agua y vuelva a instalar.
Fig. 5: Limpieza de la válvula de corte de la
Deslice el filtro hasta sacarlo y levántelo.
Deslice el tubo del filtro otra vez hacia su lugar. Rote el
a instalar.
montaje 45° hacia la pared exterior del tanque y vuelva
15. Encienda el motor de aspiración y hágalo funcionar
15 minutos para ayudar a eliminar la humedad y
asegurar una larga vida de la aspiradora.
MANTENIMIENTO
PRECAUCIÓN: Desenchufe la máquina
antes del mantenimiento. Posibilidad de
descarga eléctrica.
PRECAUCIÓN: Las piezas interiores
pueden estar calientes después del uso.
Deje que la unidad se enfríe antes del
mantenimiento.
DIARIAMENTE O DESPUÉS DE CADA USO
Limpie el filtro de entrada de la solución (Fig. 4)
Afloje el tornillo de fijación del depósito (Fig. 1) y abra la
unidad. Retire la tapa del filtro y la malla (Fig. 4).
Enjuague la malla de filtro en agua tibia. Vuelva a
colocar el filtro y ajuste la tapa.
Limpie la válvula flotante de la aspiradora (Fig. 5).
Vacíe el tanque de recuperación y luego abra la tapa del
mismo. Sujete el conjunto de la válvula y tire
suavemente hacia la parte frontal de la unidad, con
cuidado de no deformar la pantalla del filtro. Enjuague el
conjunto y asegúrese de que el flotador se mueve
libremente dentro del mismo.
SEGÚN SEA NECESARIO
Lubrique el O-ring regulador de presión (si tiene).
Acceda a la junta O-ring desenroscando y quitando la
perilla del regulador de presión (Fig. 2H). Lubrique con
un lubricante para O-ring.
Lubrique la línea de solución de acoplamiento de
conexión rápida (Fig. 1D) con una pequeña cantidad
de aceite inhibidor anticorrosion, como LPS-3 o WD-40.
Limpiar el filtro del tanque de recuperación (Fig. 6,
sólo para modelos con bomba de salida). Quite el flitro
girándolo con suavidad y levantándolo. Enjuague con
agua limpia y vuelva a colocar.
Vuelva a instalar el filtro y el conjunto del flotante de la
aspiradora de forma segura.
07-02233A MANUAL - 1200MS 115V PORTABLE 12 Ninja
Para mantener la buena apariencia, limpie las superficies
interiores y exteriores con un paño húmedo. Para lograr
Page 13

CAMBIO DE ACEITE DE LA BOMBA DE PRESIÓN DE LA 1200MS
Herramientas necesarias:
Bomba de transferencia manual
Paños limpios
Recipiente adecuado para desechar/reciclar aceite
Verifique que ambos tanques estén vacíos. Utilice un paño para limpiar cualquier humedad residual. Coloque un cartón
limpio o una plancha debajo de la unidad para proteger la manija. Retire la tuerca de retención, abra la unidad por su
articulación y apóyela sobre la plancha.
Quite la tapa del tanque de aceite de la bomba de presión
Inserte el tubo de succión de la bomba de transferencia dentro del orificio de llenado de aceite. Extraiga el aceite hacia
un adecuado recipiente de desecho/reciclaje.
Inserte el tubo de succión de la bomba de transferencia dentro de una botella de aceite limpio y bombee
aproximadamente 8 oz. de aceite hacia la bomba de presión.
Tras colocar aproximadamente 8 oz. de aceite en la bomba,
verifique su nivel mediante la varilla medidora. El nivel
debería encontrarse dentro de la muesca. De ser necesario,
añada más aceite y vuelva a verificar con la varilla, hasta
que se encuentre en el nivel correcto.
Cuando se haya completado el llenado, vuelva a colocar la tapa del aceite, cierre la unidad y enrosque la tuerca de
retención. Disponga adecuadamente del aceite usado.
Ahora la 1200MS está lista para su uso.
limpieza profunda y brillo duradero, utilice limpiador/protector
de vinilo de los que se usan para automóviles.
MANTENIMIENTO
¡IMPORTANTE! El aceite del cárter de la bomba
debe ser cambiado después las primeras 50 horas
de uso. A partir de entonces, el cambio de aceite se
hará cada 3 meses o 500 horas de uso. Reemplazar
con Aceite General de Bombas SAE 30W. Solicite
repuesto Nº 13-030/24-00490.
Para cambiar el aceite, consulte "Cambiar el aceite de la
bomba de presión del 1200MS" más abajo.
07-02233A MANUAL - 1200MS 115V PORTABLE 13 Ninja
Page 14

Modelo
1200MS 115V Portátil
Motor de la
aspiradora
6.6 Ametek que produce 659 vatios de aire
Potencia
Circuito 1 12.5A
Circuito 2 13.0A
Capacidad
Tanque de solución de 12 gal. | 37,9 l
Tanque de recuperación: 10 gal. | 37,9 l
Fabricación
Carcasa y mango de polietileno rotomoldeado; Ruedas
semi-neumáticas de 10 pulg.
Elevador
hidráulico
137 pulg | 348 cm.
Cable de
alimentación
Dos cables de derivación y dos cables prolongadores de
14/3 de 25 pies.
Válvula de
drenaje
Tipo compuerta
Flotador para
corte
De tipo esférico
Dimensiones
(Alto × Largo
× Ancho)
41,5 × 30,25 × 19,75 pulg | 105,4 × 76,8 × 50,2 cm
Seguridad
Listada ETL
FIG. 7: Desviadora de drenaje
por gravedad
OPCIONES (SE ADQUIERE POR SEPARADO)
Vara y kit de la manguera de aspirado (48-103). Vara,
manguera de solución de ¼'' por 25 pies ; y manguera
de aspiradora de 1½ por 25 pies.
HOSS-700 Rotary Cleaning Tool (67-025). Usar con el
Kit Adaptador HOSS 700 (48-117).
Upholstery Pro (67-019-P)
ESPECIFICACIONES
CONTACTO
Ninja
15180 Josh Wilson Road
Burlington, WA 98233
800-932-3030 www.LegendBrandsCleaning.com
07-02233A MANUAL - 1200MS 115V PORTABLE 14 Ninja
Page 15

FIG. 1: Vue de face
A
Couvercle du réservoir de récupération
B
Fixation du tuyau d'aspiration
C
Drain de vidange par gravité du réservoir de
récupération et robinet à guillotine
D
Raccord rapide du tuyau pour le mélange nettoyant
Manuel de l’utilisateur
Ninja Extracteurs Portable
Modèle 1200MS
15180 Josh Wilson Road
Burlington, WA 98233
800-932-3030 www.LegendBrandsCleaning.com
Les extracteurs portables Ninja permettent un nettoyage rapide et en profondeur des
moquettes, des tissus d'ameublement et des surfaces dures. Légers, faciles à utiliser et
réglables pour une large gamme de types de moquette et de degrés de salissure, les extracteurs
Ninja contribuent à des surfaces et des moquettes plus propres et plus sèches.
Licences: http://www.LBpatents.com
LISEZ ET CONSERVEZ CES INSTRUCTIONS
Utilisation prévue
Les extracteurs portables Ninja sont destinés à un
usage professionnel uniquement et sont conçus
pour nettoyer les tapis et les tapisserie
d'ameublement dans un environnement intérieur. Ils
ne sont pas construits pour une autre utilisation.
N'utilisez que des produits chimiques de nettoyage
de sol disponibles dans le commerce et les
accessoires recommandés destinés à votre modèle
spécifique. N'utilisez pas cette machine autrement
que décrit dans ce manuel.
Note: Risque de blessure
Ne pas s’éloigner de l’appareil lorsqu’il est branché.
Débrancher le cordon d’alimentation de la prise
électrique lorsque l’appareil n’est pas en service ou
lors de son entretien.
Ne pas utiliser à l’extérieur. Cet appareil n’est conçu
que pour un usage à l’intérieur.
Ne pas permettre qu’il soit utilisé comme un jouet.
Une attention particulière est de rigueur lorsqu’il est
utilisé à proximité d’enfants.
N’utiliser que comme décrit dans ce guide. N’utiliser
que les accessoires recommandés par le fabricant.
Les opérateurs devront recevoir des instructions
appropriées pour l’utilisation de cet appareil.
Cet appareil n’est pas conçu pour être utilisé par des
personnes, y compris des enfants, avec des
capacités physiques, sensorielles ou mentales
réduites, ou manquant d’expérience et de
connaissance.
Ne pas utiliser si le câble d’alimentation ou la prise
sont endommagés. Si l’appareil ne fonctionne pas
comme il devrait, s’il est tombé, est endommagé, a
été laissé à l’extérieur ou a été accidentellement
immergé, le renvoyer au centre de services pour
réparation.
07-02233A MANUAL - 1200MS 115V PORTABLE 15 Ninja
Page 16

Ne pas le tirer ou le porter en se servant du câble
d’alimentation comme d’une poignée, ne par
refermer une porte sur le câble d’alimentation ou
tirer celui-ci en contact avec des surfaces acérées
ou des coins. Ne pas faire rouler l’appareil sur le
câble. Tenir le câble éloigné des surfaces chaudes.
Ne pas utiliser l’appareil si les bonnes conditions de
fonctionnement ne sont pas réunies.
Ne pas apporter de modification à la conception
initiale de l’appareil.
Se faire aider pour soulever l’appareil.
Ne pas tirer sur le câble pour débrancher l’appareil.
Pour débrancher, prendre la prise en main, pas le
câble.
Ne pas manipuler la prise ou l’appareil avec les
mains mouillées.
Toutes les réparations doivent être exécutées par un
technicien qualifié. Seulement les pièces de
rechange approuvées par Legend Brands doivent
être utilisées.
Mises en garde : Risque de dégâts
N’insérer aucun objet dans les ouvertures. Ne pas
utiliser si les ouvertures sont obstruées, les
maintenir exemptes de poussière, peluches,
cheveux ou de tout ce qui peut réduire le flux d’air.
Ne pas utiliser si l’écran du flotteur n’est pas en
place.
Éteindre toutes les commandes avant de
débrancher.
Ne pas utiliser pour aspirer des liquides
inflammables ou combustibles, tels que de
l’essence, ou utiliser dans des zones où ceux-ci
peuvent être présents.
Ne pas aspirer tout type de poussières dangereuses
ou de matières toxiques.
Ne pas aspirer ce qui brûle ou fume, comme des
cigarettes, des allumettes ou des cendres chaudes.
Ne pas diriger le pulvérisateur vers vous ou vers les
autres.
Ne pas utiliser l’appareil pour l’aspiration à sec.
Ne pas faire fonctionner l’appareil dans de l’eau
stagnante.
Immédiatement débrancher le cordon d’alimentation
de la prise si de la solution ou de la mousse
s’échappent de l’appareil ou si celui-ci bascule
pendant son fonctionnement.
Relâcher la pression de l’eau au niveau de l’embout
pulvérisateur de l’outil accessoire avant de
débrancher le tuyau de solution.
Toujours arrêter l’appareil sur une surface plane.
Être particulièrement prudent lors du nettoyage des
escaliers. Ne pas monter ou descendre les escaliers
en faisant rouler l’appareil.
Ne brancher qu’à une prise correctement mise à la
terre.
Les rallonges électriques doivent être de calibre 12/3
et ne doit pas mesurer plus de 40 pieds (12 mètres).
Remplacer le câble si la prise de mise à la terre est
endommagée.
Ne pas utiliser de rallonge électrique supplémentaire
avec l’appareil.
07-02233A MANUAL - 1200MS 115V PORTABLE 16 Ninja
matériels
ATTENTION : Protégez de l'exposition au gel. Le gel
peut endommager les composants internes ce qui
annulerait la garantie.
ATTENTION : Ne pas utiliser avec une eau
présentant un degré de dureté de plus de 51
milligrammes par litre (3 grains par gallon).
L'utilisation avec de l'eau dure peut provoquer la
formation de dépôts minéraux à l'intérieur des
pompes et des accessoires. Les dégâts provoqués
par des dépôts minéraux annuleraient la garantie.
ATTENTION : Utiliser seulement pour extraire
l'humidité. Ne pas plonger l'extrémité du tuyau
d'aspiration dans le liquide.
ATTENTION : Ne pas utiliser comme un aspirateur à
sec. Les particules de poussière peuvent
endommager les moteurs d'aspiration. Les dégâts
dus à une aspiration à sec annuleraient la garantie.
ATTENTION : Pour éviter le développement des
moisissures dans les réservoirs, vidangez toujours
entièrement le réservoir d'eaux usées et videz le
réservoir de mélange nettoyant après utilisation.
GARANTIE
Allez sur www.LegendBrandsCleaning.com pour
enregistrer votre achat. Votre enregistrement nous
permet de mieux vous aider pour l'utilisation,
l'entretien et la révision de votre équipement et il
nous permet aussi de vous contacter dans
l'éventualité où nous aurions d'importantes
informations de sécurité concernant votre produit.
La garantie est valide à partir de la date d’achat
pendant une période d’un an. Cette garantie couvre
les pièces et la main d’œuvre pour un distributeur
VersaClena ou Sapphire Scientific agréé. La garantie
est seulement valide pour l’acheteur original et une
preuve d’achat est obligatoire. Une modification de
l’appareil ou l’absence d’entretien conformément à
ce manuel annulerait la garantie. Se reporter au
document complet de la Garantie limitée pour plus
de détails.
Page 17

A
FIG. 2 : Vue arrière
(Fig 2 Détail)
A
A
Réservoir de mélange nettoyant avec
couvercle articulé transparent
F
Voyant lumineux du double circuit
B
Clip de maintien du tube
H
Régulateur de pression
C
Évacuation de vide.
I
Raccord de vidange automatique. À maintenir obturé par
un bouchon hors utilisation.
D
Étiquette du produit et numéro de série
J
Raccord de remplissage automatique
E
Double câble
F
H
I
J
D
B
C
E
A
INSTRUCTIONS DE MISE À LA TERRE
Cet appareil doit être mis à la terre. En cas de
dysfonctionnement ou de panne, la mise à la terre
fournira au courant électrique une résistance moindre
pour réduire le risque d’électrocution. Cet appareil est
équipé de câbles d'alimentation munis de conducteurs et
de fiches d'alimentation électrique pour la mise à la
terre. Les fiches doivent être branchées dans une prise
appropriée correctement installée et mise à la terre
conformément à tous les codes et règlements locaux.
ATTENTION ! Un branchement incorrect du
conducteur de mise à la terre de l'équipement peut
provoquer un risque d’électrocution. Si vous n'êtes
pas sûr que les prises soient correctement reliées à
la terre, vérifiez avec un électricien qualifié ou un
agent de service. Ne modifiez pas les fiches fournies
avec l'appareil - si les fiches ne correspondent pas
aux prises, faites installer les bonnes prises par un
électricien qualifié.
Cet équipement est prévu pour une utilisation sur un ou
des circuits avec une tension nominale n'excédant pas
120V et est équipé en usine d'un câble et d'une prise
électrique permettant le branchement à un circuit
électrique approprié. Assurez-vous que l'appareil est
branché à des prises avec la même configuration que
les fiches. Ne pas utiliser d'adaptateur avec cet appareil.
Si le raccordement électrique de l'appareil doit être refait
pour être utilisé sur un autre type de circuit électrique,
cela doit être fait par du personnel qualifié.
COMMANDES
SUR LE PANNEAU DE COMMANDE (Fig. 3) Inclut
interrupteurs à bascule du ventilateur, pompe du
mélange nettoyant et pompe de vidange (sur une
sélection de modèles).
SUR LE PANNEAU ARRIÈRE (Fig. 2H)
Régulateur de pression. Sélection de modèles.
Tournez dans le sens des aiguilles d'une montre pour
augmenter la pression du mélange nettoyant et dans le
sens inverse des aiguilles d'une montre pour la
diminuer.
Ne pas obstruer.
07-02233A MANUAL - 1200MS 115V PORTABLE 17 Ninja
Page 18

A
D
B
C
F
E
FIG. 3: Control Panel
Encendido / Apagado ON/OFF
Bomba de presión de solución ON/OFF
Bomba automática de salida ON/OFF
FIG. 4: Filtre d'entrée de solution de nettoyage
Retirer
Dévissez
Rincer
l'ensemble de
remplacer.
MODE D’EMPLOI
IMPORTANT : Veillez à contrôler la mousse dans le
système d'aspiration. Un excès de mousse peut
permettre à l'humidité, aux fibres de la moquette et aux
autres débris d'être aspirés dans la vanne d'arrêt
d'aspiration et provoquer ainsi des dégâts sur les
moteurs d'aspiration. Les dégâts provoqués par
l'humidité ou des débris annuleraient la garantie du
produit. Pour aider à réduire la mousse, utilisez un
détergent peu moussant. La mousse peut également
être produite par les résidus laissés lors des nettoyages
précédents. Dans ce cas, utilisez un additif anti-mousse.
Suivez les instructions du fabricant d'anti-mousse pour
une bonne utilisation.
AVIS: Le modèle 1200ms peut contenir forme
l'usine anti-gel résiduel. Système de
pression Rincer à l'eau fraîche avant la
première utilisation.
ATTENTION: NE PAS vidanger l'antigel utilisé sur le
sol ou dans les égouts pluviaux. Jeter l'antigel
uniquement dans un endroit approuvé. Observer
toutes les lois pertinentes quand disposant anti-gel.
1. Mélangez d'abord le produit de nettoyage avec de
l'eau chaude dans un récipient à part. Versez le
mélange dans le réservoir de solution de l'appareil
ou appliquez-le directement sur la surface de
nettoyage selon les instructions du fabricant..
2. Branchez les tuyaux d'aspiration et de mélange
nettoyant à l'appareil et fixez au tube d'extraction ou
à l'outil main.
3. Vidangez le réservoir d'eaux usées lorsqu'il est plein
en utilisant le drain par gravité et le tube
d'évacuation (Fig. 7) ou utilisez la fonctionnalité de
vidange automatique décrite ci-dessous.
4. Pour l'opération de remplissage automatique, fixez
le tuyau d'alimentation en eau douce à l'arrivée
d'eau douce (Fig. 2J) et ouvrez le robinet
d'alimentation en eau. Le réservoir commencera à
se remplir et se fermera automatiquement lorsque
plein.
5. Si vous désirez une vidange automatique, fixez un
tuyau d'arrosage ordinaire au raccord de vidange
l'écrou avec
une clé à
9/16 po et
ouvrir le
dessus
07-02233A MANUAL - 1200MS 115V PORTABLE 18 Ninja
ouvert.
l'assemblage
du couvercle
du filtre et le
retirer.
couvercle et
Page 19

FIG. 5: Nettoyage de la vanne d’arrêt d’aspiration
Faire glisser le filtre vers l’extérieur pour le
retirer.
Faire glisser le tube pour le remettre en place.
réservoir. Réinstaller.
Tourner l’ensemble à 45° vers la paroi externe du
automatique (Fig. 2H) et placez l'autre extrémité
dans un siphon adapté ou dans un grand récipient.
6. Insérez les deux fiches dans les circuits à 3 pôles
mis à la terre distincts. Maintenez les câbles hors de
votre circuit de nettoyage. Le modèle 1200MS est
doté de deux câbles et chaque câble doit être
branché dans un circuit à 3 pôles mis à la terre
distinct. Chaque voyant vert de circuit s'allumera
(Fig. 2F) lorsque les câbles seront correctement
branchés
7. Mettez la VAC en marche
8. Mettez la pompe de mélange nettoyant en marche).
9. Si vous utilisez la fonctionnalité de vidange
automatique, appuyez sur l'interrupteur de vidange
automatique (Fig. 3).
10. Commencez le nettoyage. Référez-vous aux
procédures approuvées par l'industrie.
11. La pression de la solution de nettoyage peut être
réglée avec le bouton du régulateur de pression
(Fig. 2H). Surveillez la jauge de pression pour vous
assurer que la pression est adaptée.
12. Si vous n'utilisez pas la fonctionnalité de vidange
automatique, utilisez le drain par gravité avec le tube
d’évacuation en place pour vider les eaux usées
lorsque le réservoir est plein (Fig. 7).
ATTENTION : Lorsque le réservoir de récupération
atteint sa capacité, une vanne à flotteur automatique
bloque l'arrivée d'aspiration (Fig. 5) et les moteurs
d'aspiration émettent un sifflement. Dès que ceci se
produit, l'appareil doit être éteint pour éviter tout
dégât sur le moteur d'aspiration.
13. Lorsque le nettoyage est terminé, rincez le réservoir
de solution à l'eau claire pour vous assurer qu'aucun
détergent ou agent de rinçage ne reste dans le
réservoir.
14. Videz le réservoir de récupération et rincez-le
soigneusement. Cela aidera à éviter la formation de
dépôts préjudiciables et à réduire la prolifération de
bactéries responsables des mauvaises odeurs.
07-02233A MANUAL - 1200MS 115V PORTABLE 19 Ninja
15. Mettez en marche le moteur d'aspiration et laissez-le
ENTRETIEN
ATTENTION : Débranchez l'appareil avant son
entretien. Risque d'électrocution.
Utilisez le drain par gravité pour vidanger lorsque le
réservoir d'eaux usées est plein. Fixez le tube
d'évacuation pour diriger le flux vers le bas (Fig. 7).
tourner pendant 15 minutes pour aider à enlever
toute l'humidité des moteurs d'aspiration et assurer à
l'aspiration une durée de vie étendue.
Page 20

FIG. 6: Crépine du réservoir
de récupération
Faites glisser le filtre vers le haut
réinstallez
ATTENTION : Les éléments intérieurs peuvent être
chauds après l'utilisation. Laissez entièrement
refroidir l'appareil avant l'entretien.
QUOTIDIENNEMENT OU APRÈS CHAQUE
UTILISATION
Nettoyez le filtre d'aspiration de la solution
nettoyante (Fig. 4) Desserrez les vis de fixation du
réservoir (Fig. 1) et ouvrez l'ensemble. Retirez le
couvercle du filtre et la protection du filtre (Fig. 4).
Rincez la protection du filtre dans de l'eau tiède.
Replacez le filtre et revissez le couvercle du filtre.
Nettoyez la valve à flotteur de l'aspiration et le filtre
(Fig. 5). Videz le réservoir de récupération, puis ouvrez
le couvercle du réservoir de récupération. Attrapez
l'ensemble de la valve et tirez-le délicatement vers le
bas en prenant soin de ne pas tordre la protection du
filtre et tirez-le doucement vers l'avant de l'appareil de
ne pas tordre la protection du filtre. Rincez l'ensemble et
assurez-vous que les flotteurs bougent librement dans
l'ensemble. Replacez solidement.
Nettoyer le préfiltre du mélange nettoyant à
l'intérieur du réservoir (modèle avec vidange
seulement) Fig. 6. Allez à l'intérieur du réservoir de
mélange nettoyant et dévissez le préfiltre. Rincez à l'eau
tiède. Replacez.
SI BESOIN
Graissez le joint torique du régulateur de pression
(si l'appareil en est équipé). Accédez au joint torique
en dévissant le bouton du régulateur de pression et en
l'enlevant (Fig. 2H). Graissez avec un lubrifiant adapté
aux joints toriques.
Graissez le raccord rapide du tuyau de mélange
nettoyant (Fig. 1D) avec une petite quantité d'huile
inhibitrice de corrosion telle que LPS-3 ou WD-40.
Pour entretenir l’aspect, essuyez les surfaces
extérieures et intérieures avec un chiffon humide. Pour
un nettoyage approfondi et un fini lustré durable et
protecteur, utilisez un nettoyant pour vinyle
automobile/produit protecteur.
ENTRETIEN
IMPORTANT ! L’huile de la pompe refoulante doit
être vidangée et changée après une période initiale
de rodage de 50 heures. Par la suite, l’huile doit être
remplacée tous les 3 mois ou les 500 heures
d’utilisation. Remplacer seulement avec de l’huile
générale. Commander la pièce no 13-030/24-00490
Pour changer l’huile, se référer à “Changer l’huile de la
pompe de pression 1200MS”, ci-dessous.
07-02233A MANUAL - 1200MS 115V PORTABLE 20 Ninja
pour l’enlever. Rincez à l’eau et
Page 21

CHANGER L’HUILE DE LA POMPE DE PRESSION 1200MS
Outils nécessaires
Pompe de transfert manuel
Chiffons propres
Récipient adéquat pour l’huile usée/recyclage
Vérifiez que les deux réservoirs sont vides. Eliminez toute trace d’humidité résiduelle avec un chiffon. Placez un carton
propre ou une protection derrière l’appareil pour protéger la poignée. Retirez l’écrou de retenue, dégagez l’ensemble et
posez-le sur la protection.
Retirez le bouchon de remplissage sur la pompe de
pression
Insérez le tube d’aspiration de la pompe de transfert dans l’orifice de remplissage. Vidangez l’huile dans un récipient
adéquat.
Insérez le tube d’aspiration de la pompe de transfert dans un contenant d’huile neuve et extrayez environ 8 oz. d’huile
dans la pompe de pression.
Après avoir injecté environ 8 oz d’huile dans la pompe,
vérifiez le niveau d’huile avec la jauge. Le niveau doit se
situer à hauteur de l’encoche sur la jauge. Si nécessaire,
ajoutez de l’huile et vérifiez de nouveau avec la jauge
jusqu’à ce que le niveau soit correct.
Lorsque le remplissage est terminé, replacez le bouchon de remplissage, fermez l’ensemble et replacez l’écrou de
retenue. Mettez au rebut l’huile usée de manière appropriée. Le 1200MS est maintenant prêt pour utilisation.
07-02233A MANUAL - 1200MS 115V PORTABLE 21 Ninja
Page 22

Modèle
Ninja 1200MS 115V portatif
Moteur
d'aspiration
Ametek 6.6 produisant 659 watts d'air
Puissance
Circuit 1 12.5A
Circuit 2 13.0A
Contenance
Mélange nettoyant de récupération de 37,9 litres | 12
gallons
Réservoir de récupération : 37,9 litres. | 10 gallons
Construction
Boîtier et poignée en polyéthylène rotomoulé, roues
semi-pneumatiques de 25 cm de diamètre.
Colonne
d'eau fermée
348 cm | 137 pouces
Câble
d'alimentation
Deux câbles et deux rallonges de 7,50m 14/3
Valve de
vidange
À guillotine
Coupure par
flotteur
En forme de ballons
Dimensions
(H × L × L)
41.5 × 30.25 × 19.75 pouces | 105.4 × 76.8 × 50.2 cm
Sécurité
Listé ETL
FIG. 7: Dériveur de drainage
par gravité
OPTIONS (À ACHETER SÉPARÉMENT)
Kit de tube et tuyau d'aspiration. Tuyau pour le mélange nettoyant d'environ 7,50 m, tuyau d'aspiration d'environ 7,50
m (48-103).
Outil de nettoyage rotatif HOSS-700 (67-025). Utiliser avec un kit adaptateur HOSS 700 (48-117)
Pro des tissus d'ameublement (67-019P)
CARACTÉRISTIQUES
CONTACT
Ninja
15180 Josh Wilson Road
Burlington, WA 98233
www.LegendBrandsCleaning.com
07-02233A MANUAL - 1200MS 115V PORTABLE 22 Ninja
 Loading...