

Page 1
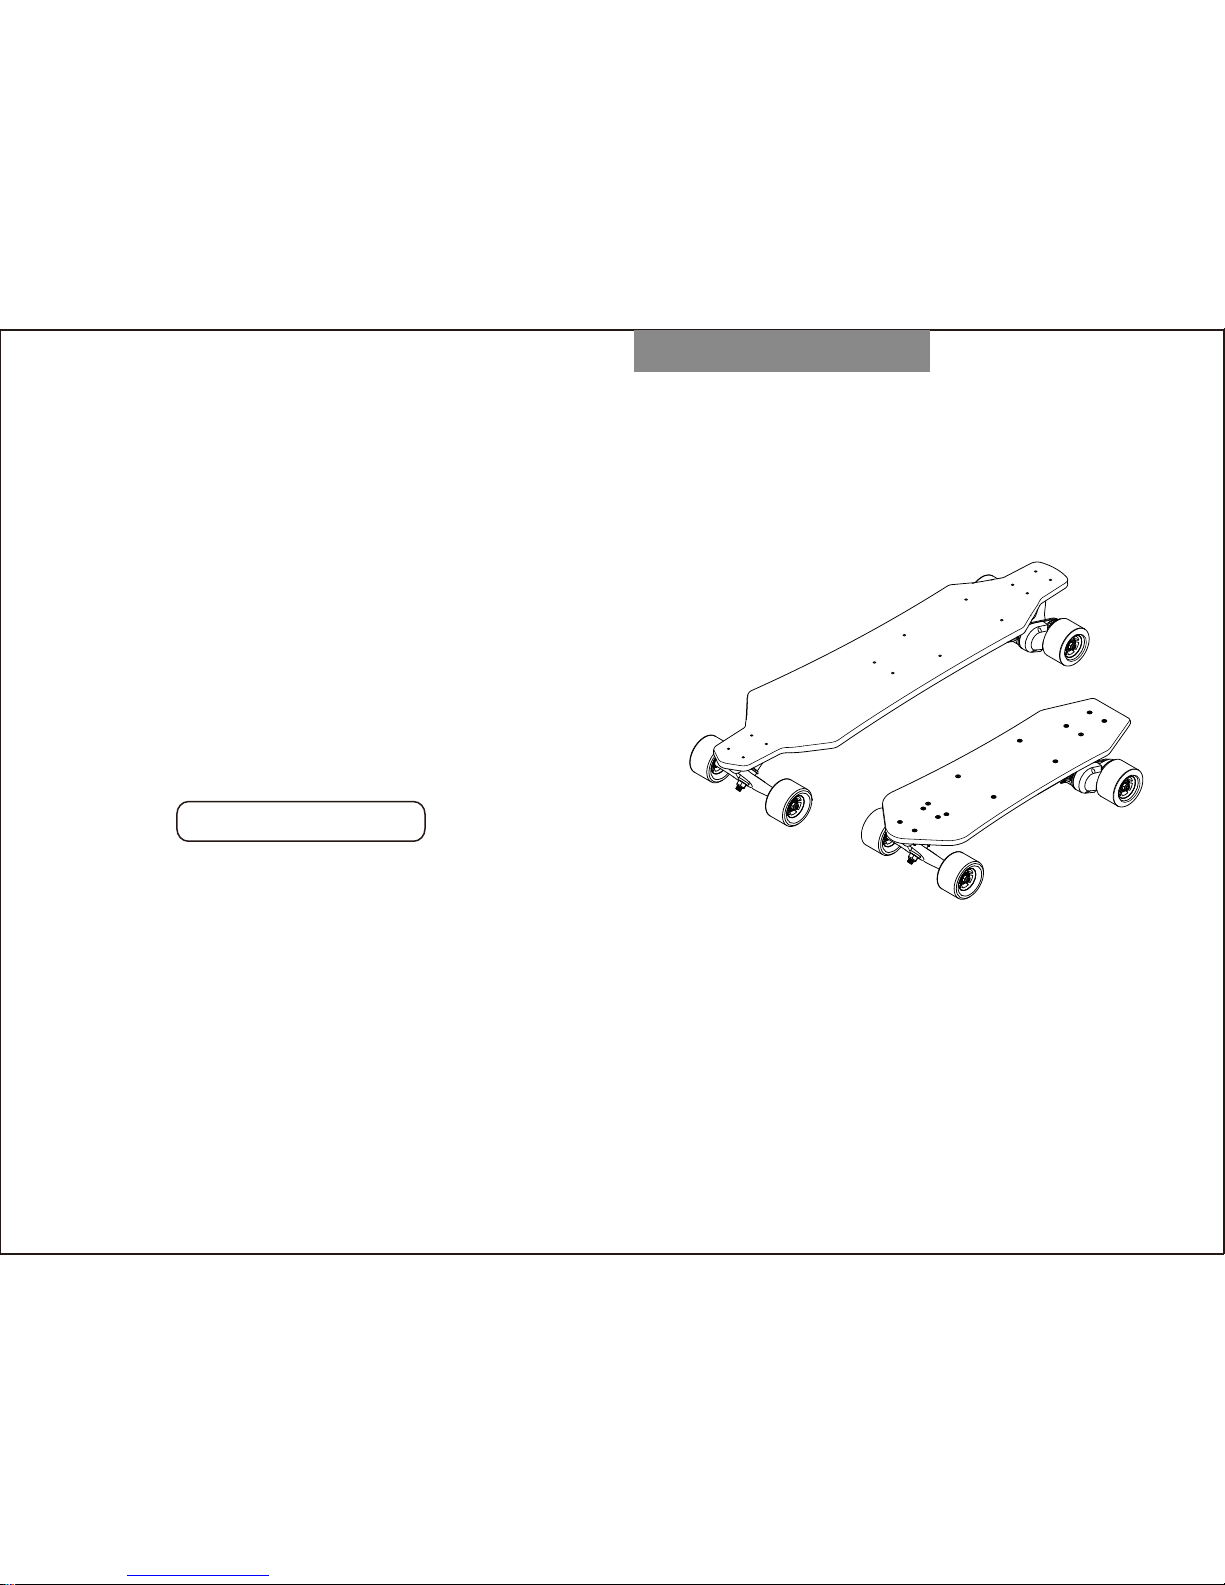
Making the world a greener place through designing
an incredibly innovative Electric Skateboard.
ROUTINE MAINTENANCE
●
Regularly inspecting your board for damage and checking
that it is running properly.
●
Before riding make sure all screws are tight.
●
Do not clean the board with harsh abrasives or chemicals;
using a semi-damp cloth to wipe off dust and dirt from belts,
bearings and wheels.
●
Turn off the board and remote controller when not in use.
●
Keep your board battery fully charged when not in use.
●
Recharge the battery every 3 month.
●
Do not leave the board charging unattended.
●
Disconnect the battery from charger once it is fully charged.
●
Do not modify the electrical controls or wiring.
THIS USER GUIDE IS SUBJECT TO
CHANGE WITH FUTURE REVISIONS.
USER GUIDE
PLEASE READ THROUGH THIS USER
GUIDE BEFORE USING THE BOARD.
Electric Skateboard
M/N:SK-B2
Page 2

WARNING........................................................
SPECIFICATION..............................................
REMOTE CONTROL GLOSSARY...................
GET READY ..............………...........................
RIDING BASICS…...........................................
POWER ON/OFF THE REMOTE / BOARD.....
GETTING STARTED........................................
HOW TO USE THE REMOTE..........................
CHARGE THE REMOTE / BOARD..................
POWER TRUCK DIAGRAM.............................
BOARD DIAGRAM...........................................
TROUBLE SHOOTING...................................
WARRANTY......................................................
1
CONTENTS
2
3
5
6
7
8
9
10
11
12
13
14
15
Page 3
2
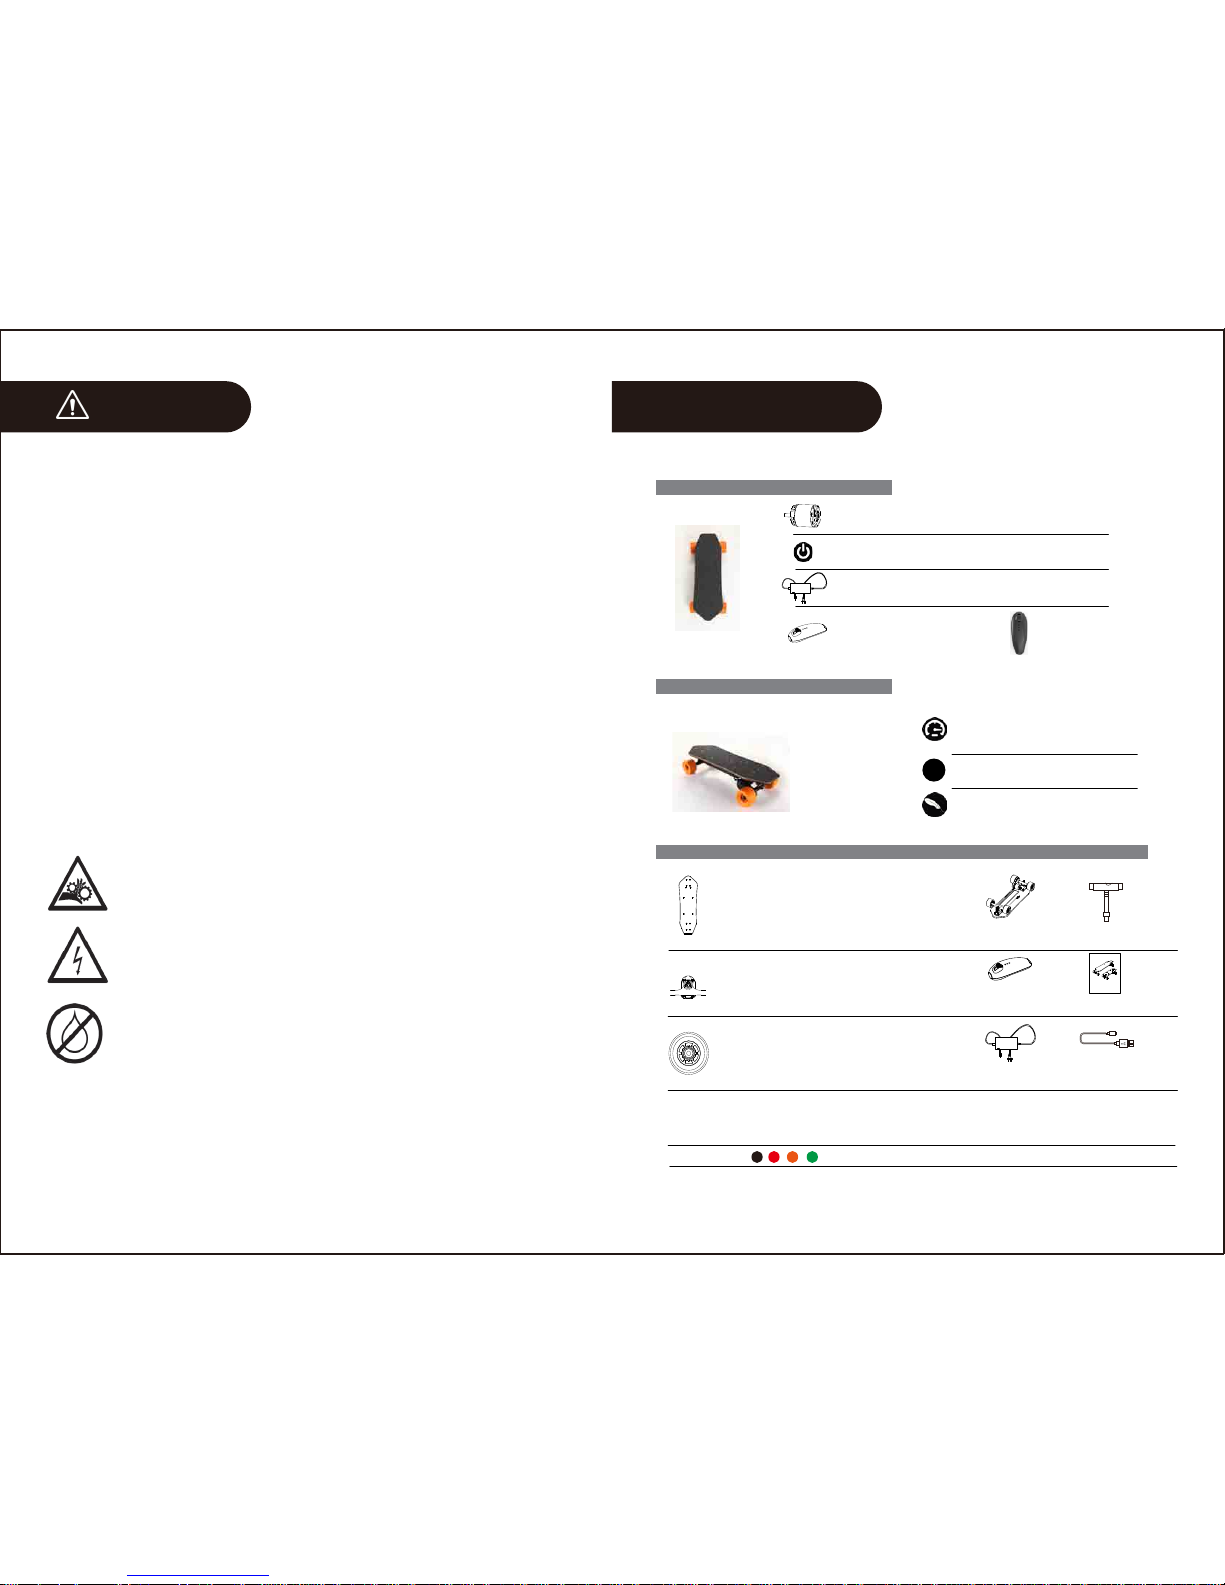
WARNING
SPECIFICATION
RISK OF SERIOUS INJURY
Whenever you ride a board, you are risk of serious injury from
loss of control, collision, and falls. To ride safely, you must read
and follow all warnings and instructions in the user guide.
WARNING: PINCH POINTS!
Keep fingers, hair, and clothing away from belts,
motors , wheels, and all moving parts
WARNING: RISK OF ELECTRIC SHOCK!
Do not open or tamper with electronics
housings, which also voids the warranty.
WARNING: AVOID WATER!
Your board is not water proof. Electronics,
bearings, and other components can be damaged.
Water damage is not covered under the warranty.
Please ride responsibly and respect those around you, both for
your safety and to help promote new sport and mode of
transportation.
WARNING: Do not ride board in environments, on inclines, or at
speeds where you would not be safely in control of an unpowered
longboard. In the event of wireless interference or battery fault,
you may need to rely on skating techniques like footbraking or
sliding to stop.
Always wear a helmet when riding. Avoid water, wet surfaces,
slippery/uneven surfaces, steep hills, traffic, cracks,tracks, gravel,
rocks, or any obstacles that could cause a loss of traction and
cause a fall. Avoid night riding, areas with poor visibility, and small
spaces.
3
Motor: Patented Motor
1200W DC brushless motor with Hall Sensor
Working Voltage: 21.6V
Rider Weight Limit: 120KG
Cruise Distance: 4.4Ah 20KM
8.8Ah 35KM
Deck: 24’’ 3 layers of bamboo & 1 layer of fiberglass;
7-ply Canadian Maple
Grip:OS780 corundum grip tape
Truck:7’’ Aluminum Alloy, gravity casting trucks
Raiser Pad:6mm PU Raiser pads.
Hardware:1.25’’ high quality carbon hardware, electroplated rust-proof
all hardware compatible with standard skateboard tools
Wheel color choice:
Wheels:83x52mm,Polyurethane(PU) wheels
Hardness:88A
Bearing:ABEC-7 super smooth bearing
Board Weight:4.4Ah:5KG / 8.8Ah:5.5KG
Three riding modes:
Thrill mode with high speed 32KM/H
Fun mode with low speed 16KM/H
Cruise mode
Charging time: 4.4Ah 2.5 hours /8.8Ah 4hours
Charger: 25.2V, 2A. 100-240V AC, 50/60HZ
Remote Contorl: 2.4 GHz radio control
Controller standby time: 1 month
Charging time: 2 hours
Battery:4.4Ah/8.8Ah Lithium Battery
Battery: 18650 Lithium Battery 24V 4.4AH/8.8AH
Battery Case: ABS Case
ELECTRONIC PARTS
PERFORMANCE
SKATEBOARD PARTS
Deck Thickness: 13MM
USER GUIDE
ELECTRIC SKATEBOARD
PLEASE READ THROUGH THIS USER
GUIDE BEFORE USING THE BOARD.
Performance varies
per certain road situation
and rider’s weight.
WHOLE SET INCLUDE:
Board complete
Controller
Charger Controller Cable
Tools
User Guide
Page 4
4
SPECIFICATION
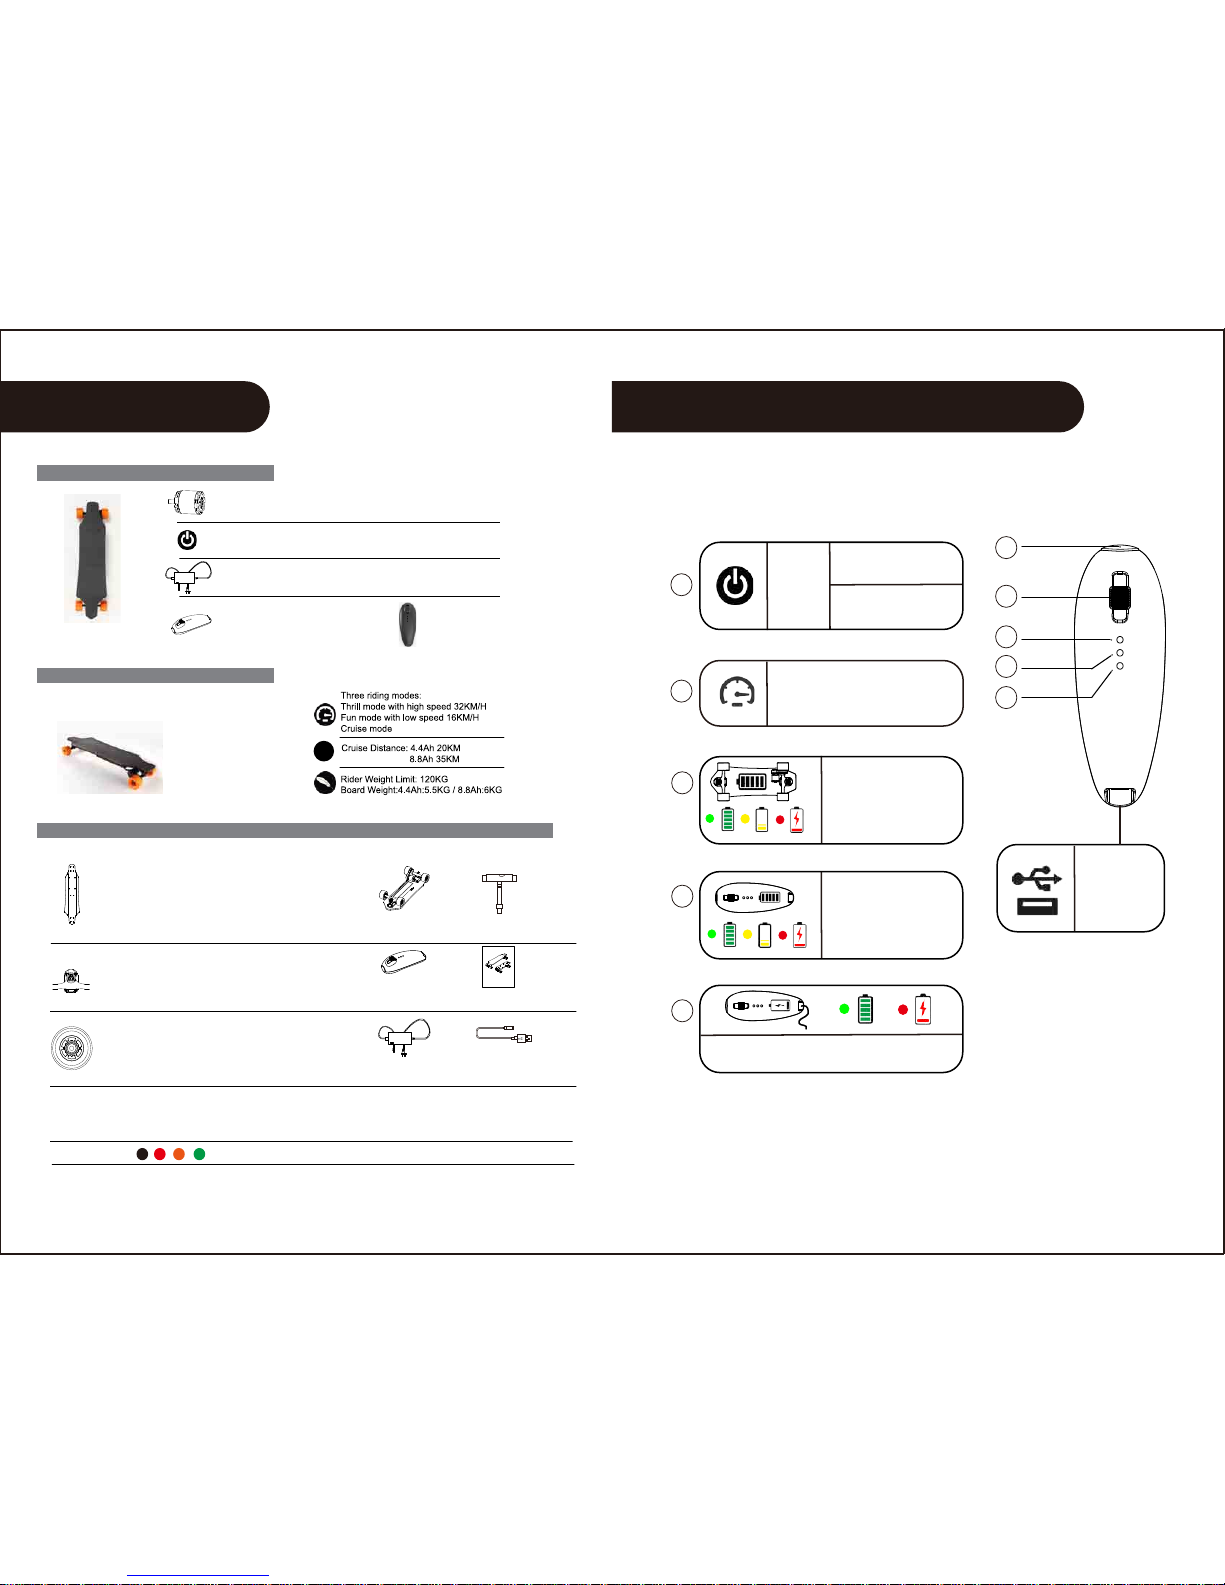
REMOTE CONTROL GLOSSARY
1
2
3
5
4
1
2
ON/OFF
MODE
CHANGE
Press
Joystick:
Control the speed / brake
3s
~
5s
Board Battery Indicator:
(Green light ≥70%,
yellow light ≥30%,
red light need to be charged)
Remote Control Battery
Indicator: (Green light ≥70%,
yellow light ≥30%,
red light need to be charged)
Remote Control Charging Indicator:
(Red light means charging, green light means full)
Remote Control
Charging Port
3
5
4
5
Motor: Patented Motor
1200W DC brushless motor with Hall Sensor
Working Voltage: 21.6V
Grip:OS780 corundum grip tape
Truck:7’’ Aluminum Alloy, gravity casting trucks
Raiser Pad:6mm PU Raiser pads.
Hardware:1.25’’ high quality carbon hardware, electroplated rust-proof
all hardware compatible with standard skateboard tools
Wheel color choice:
Wheels:83x52mm,Polyurethane(PU) wheels
Hardness:88A
Bearing:ABEC-7 super smooth bearing
Charging time: 4.4Ah 2.5 hours /8.8Ah 4hours
Charger: 25.2V, 2A. 100-240V AC, 50/60HZ
Remote Contorl: 2.4 GHz radio control
Controller standby time: 1 month
Charging time: 2 hours
Battery:4.4Ah/8.8Ah Lithium Battery
ELECTRONIC PARTS
PERFORMANCE
SKATEBOARD PARTS
USER GUIDE
ELECTRIC SKATEBOARD
PLEASE READ THROUGH THIS USER
GUIDE BEFORE USING THE BOARD.
Performance varies
per certain road situation
and rider’s weight.
WHOLE SET INCLUDE:
Board complete
Controller
Charger Controller Cable
Tools
User Guide
Deck: 36’’ 4 layers of bamboo material & 2 layers of fiberglass;
7-ply Canadian Maple
Battery: 18650 Lithium Battery 24V 4.4AH/8.8AH
Battery Case: ABS Case
Deck Thickness: 14MM
Page 5
GET READY
6
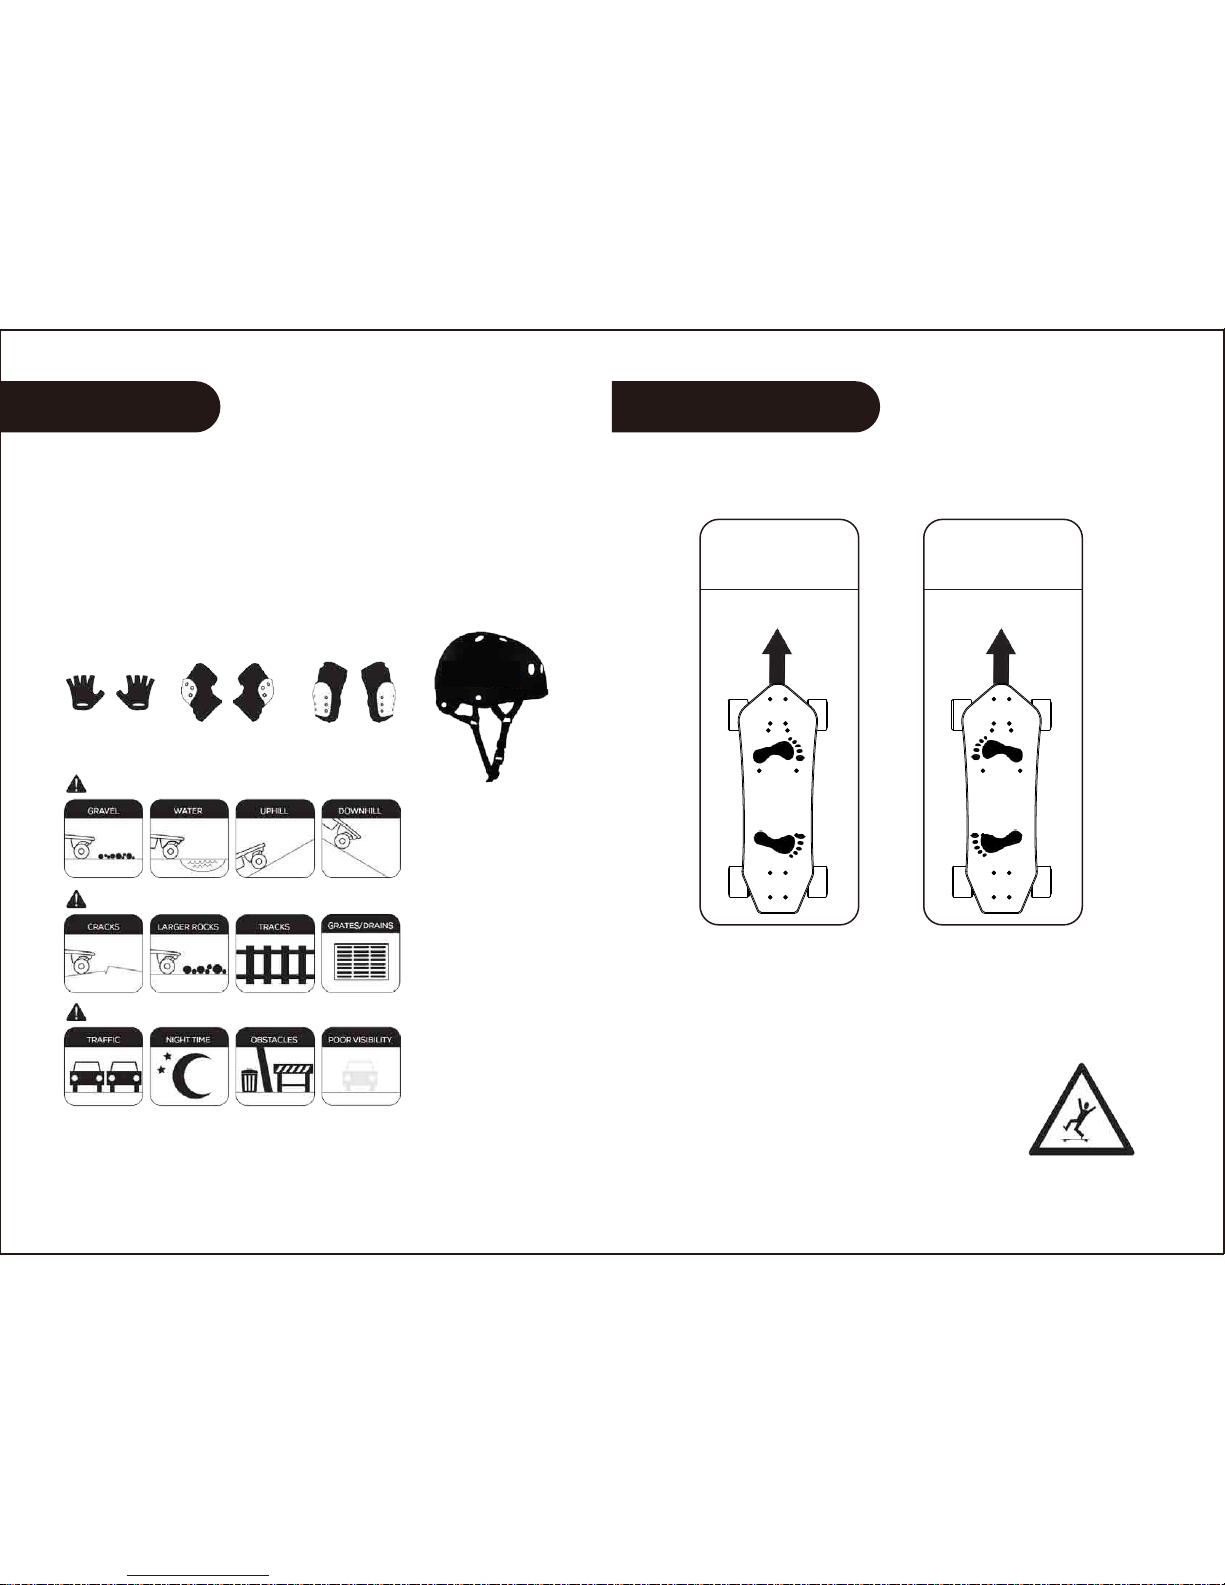
RIDING BASICS
Keep a wide stance on the board.
Our board has a lot of power.
Follow these tips to ensure a safe riding experience:
●Move the Joystick in small increments.
●Keep a wide stance on the board.
●Keep a low center of gravity.
●Lean forward when accelerating.
●Lean backwards when braking.
STANCE:
REGULARLY
FOOTED
GOOFY
FOOTED
7
L
R
R
L
AVOID THESE THINGS THAT CAN CAUSE SLIPPING:
Find an open, flat area with
clean pavement for your first ride.
Read the warning at the beginning of this user guide.
OTHER PROTECTIVE EQUIPMENT IS HIGHLY RECOMMENDED
AVOID THESE THINGS THAT CAN CAUSE TRIPPING:
AVOID THESE THINGS THAT CAN CAUSE COLLISONS:
Page 6
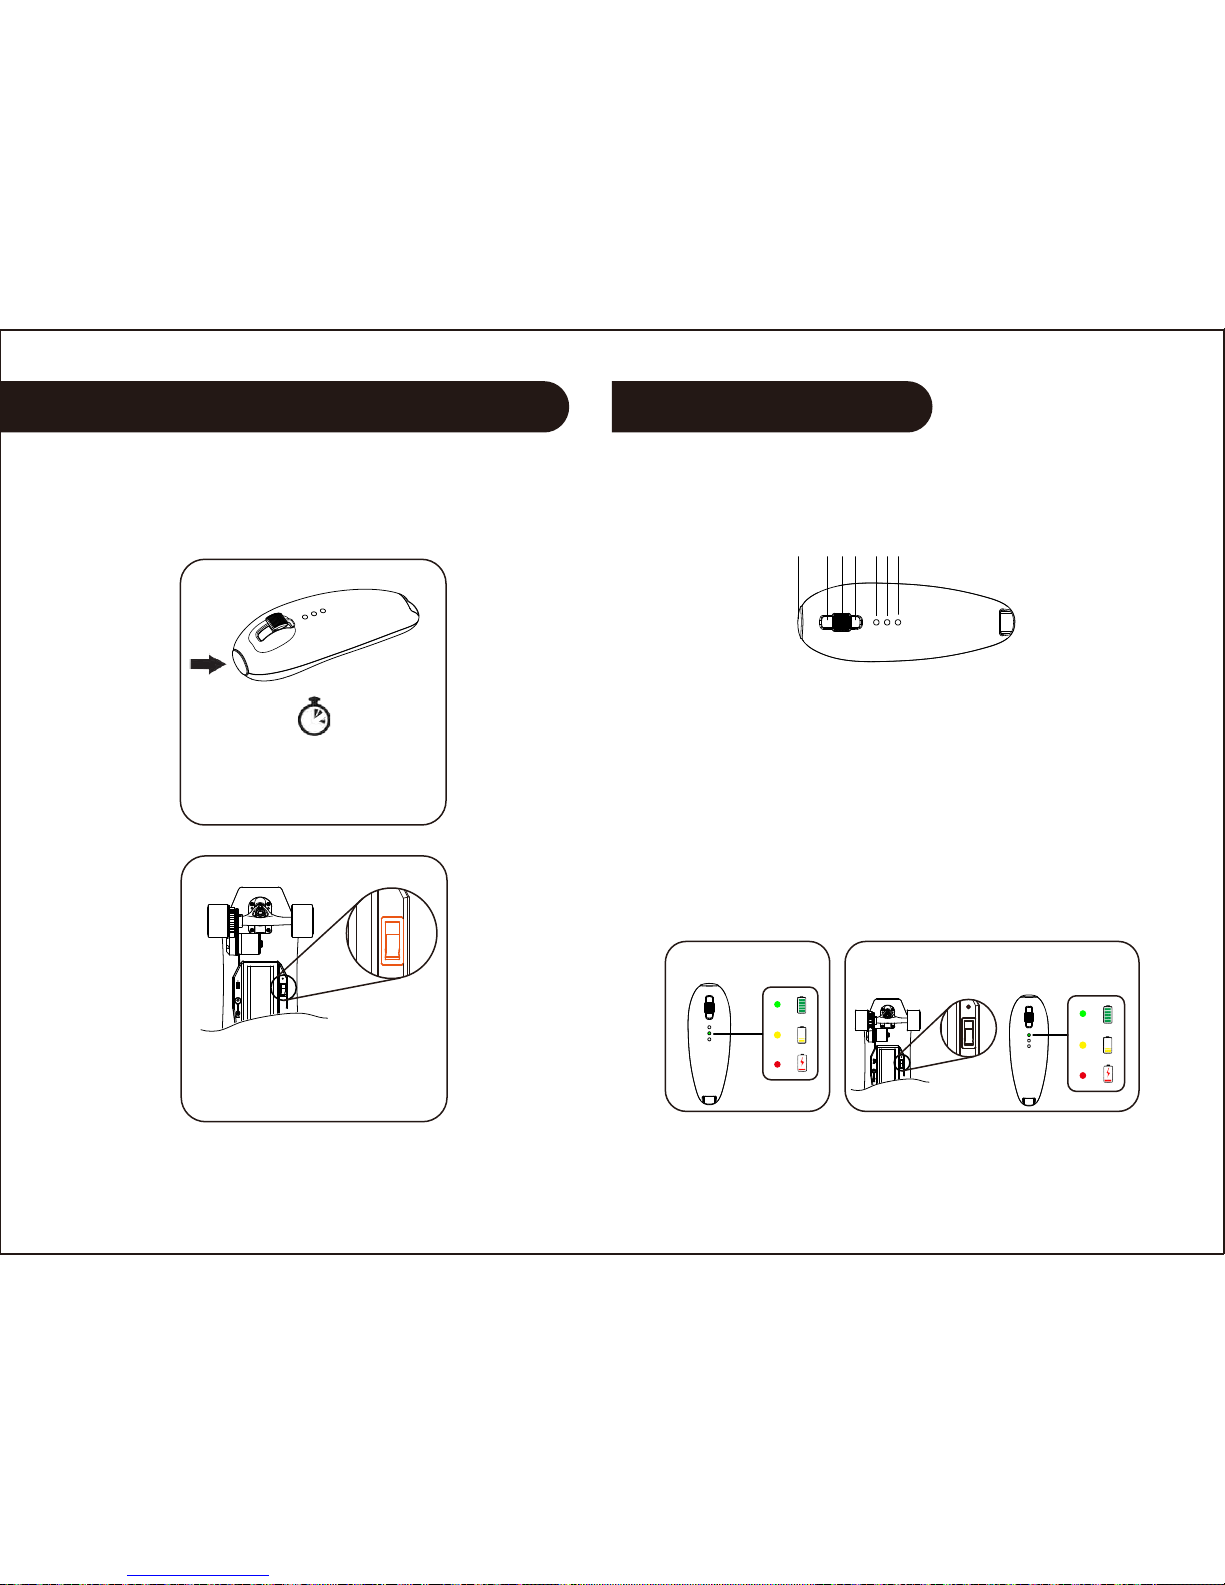
POWER ON/OFF THE REMOTE / BOARD
8
Press the Switch-Button
GETTING STARTED
Check the remote life Check the battery life
9
3~5 s
Press the Power Button
for 3~5 seconds
The remote control has been paired / synchronized before shipment.
If it is not working with the skateboard, pair / synchronize it as under-below:
Press down to B first, meanwhile press 1(power) for 3-5 seconds untill indicator
light 2,3,4 flash. It will enter into pairing / synchronizing mode. Then turn on the
power of skateboard.The board is paired / synchronized when the indicator lights
stop flash. If the indicator lights don't flash, check that the board is powered on.
NOTE: The pairing / synchronizing mode is indicated by the indicator icon by
flashing when the remote is pairing / synchronizing with the board.
A C B 21 3 4
PAIRING / SYNCHRONIZING THE REMOTE
WITH THE BOARD
BOARD DEFAULTS TO LOW SPEED MODE WHEN RE-PAIRED / SYNCHRONIZED
Page 7
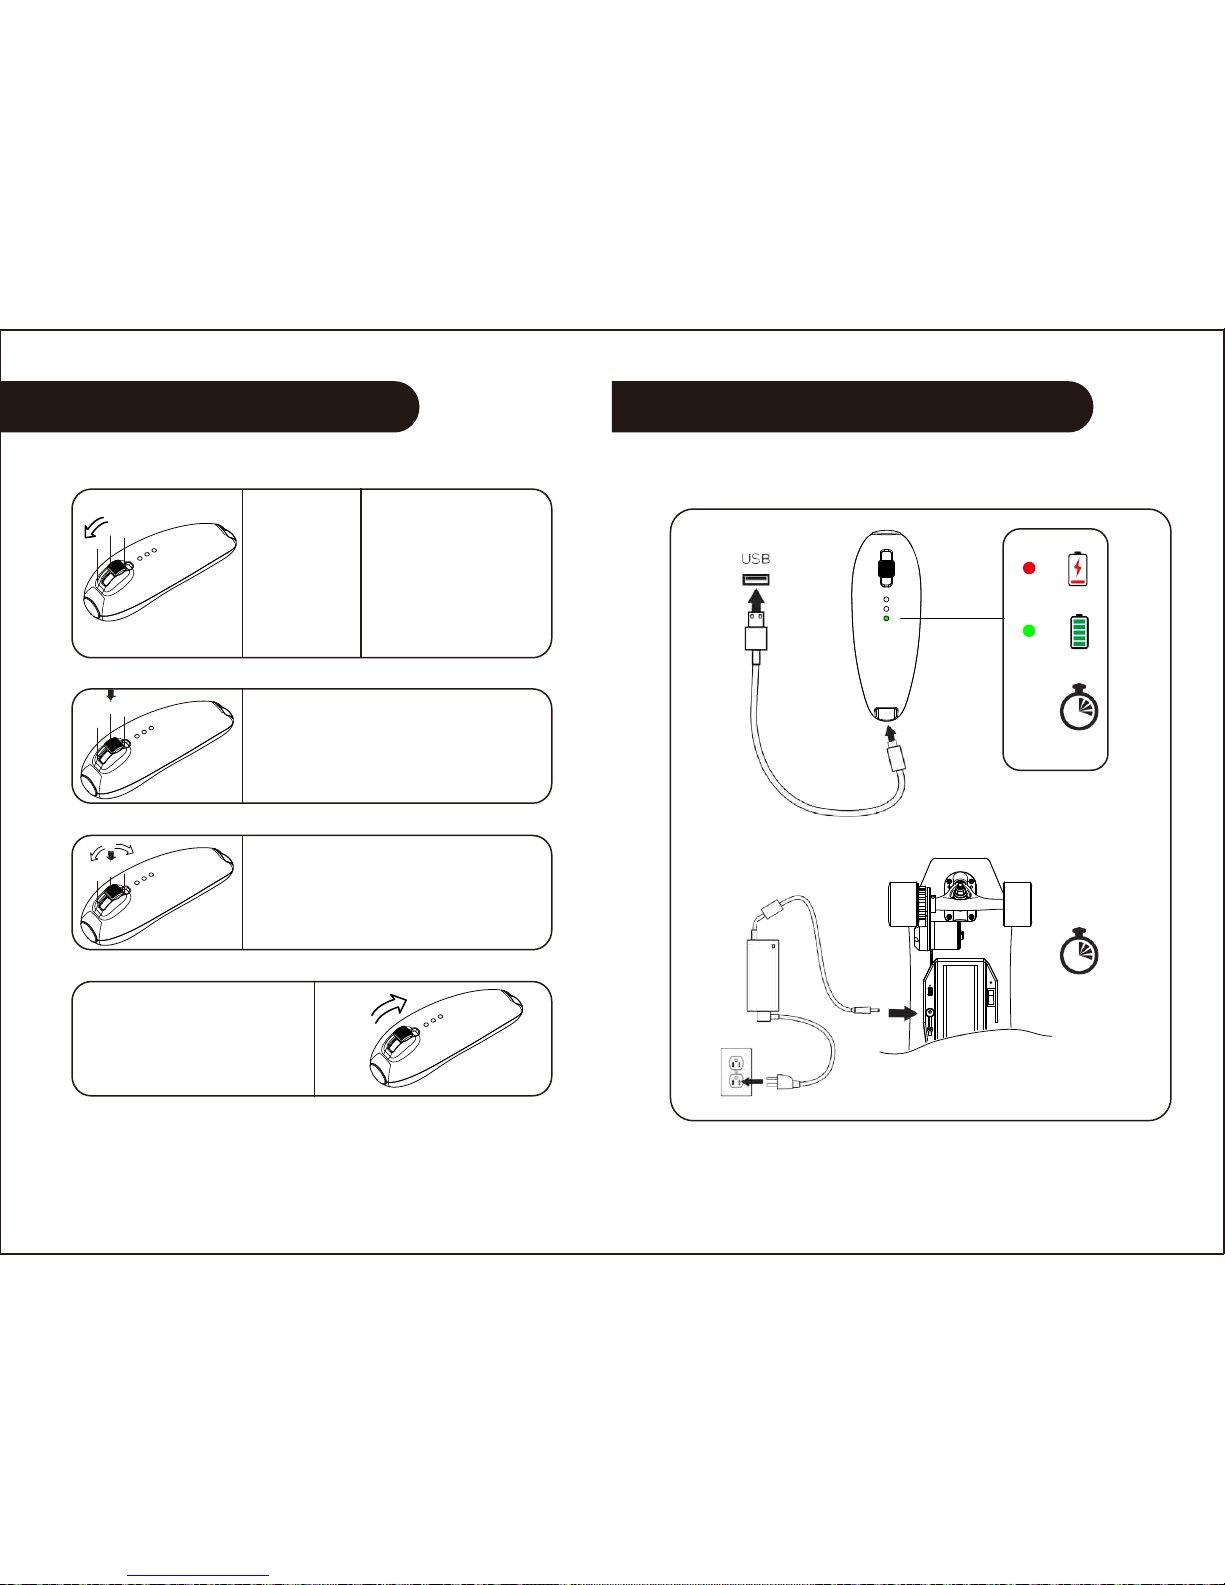
HOW TO USE THE REMOTE
BRAKE
10
CHARGE THE REMOTE / BOARD
1.5h
2.5h~5h
11
Power on
first, push
forward the
joystick slowly.
Power off first, push
forward the joystick
to the end and press
power button at the
meantime untill
indicator flash.
SAFETY LOCK
If you need stop for a short time, press
down the joystick when at rest; press
down again to unlock.
CRUISE MODE
Press down the joystick when riding,
push the joystick backward to release
the cruise mode.
HIGH SPEED
SLOW SPEED
Please do not brake suddenly
when it is in high speed.Please
slow down the speed with brake
slowly or brake intermittently.
A
C
B
A
C
B
A
C
B
Page 8
12
13
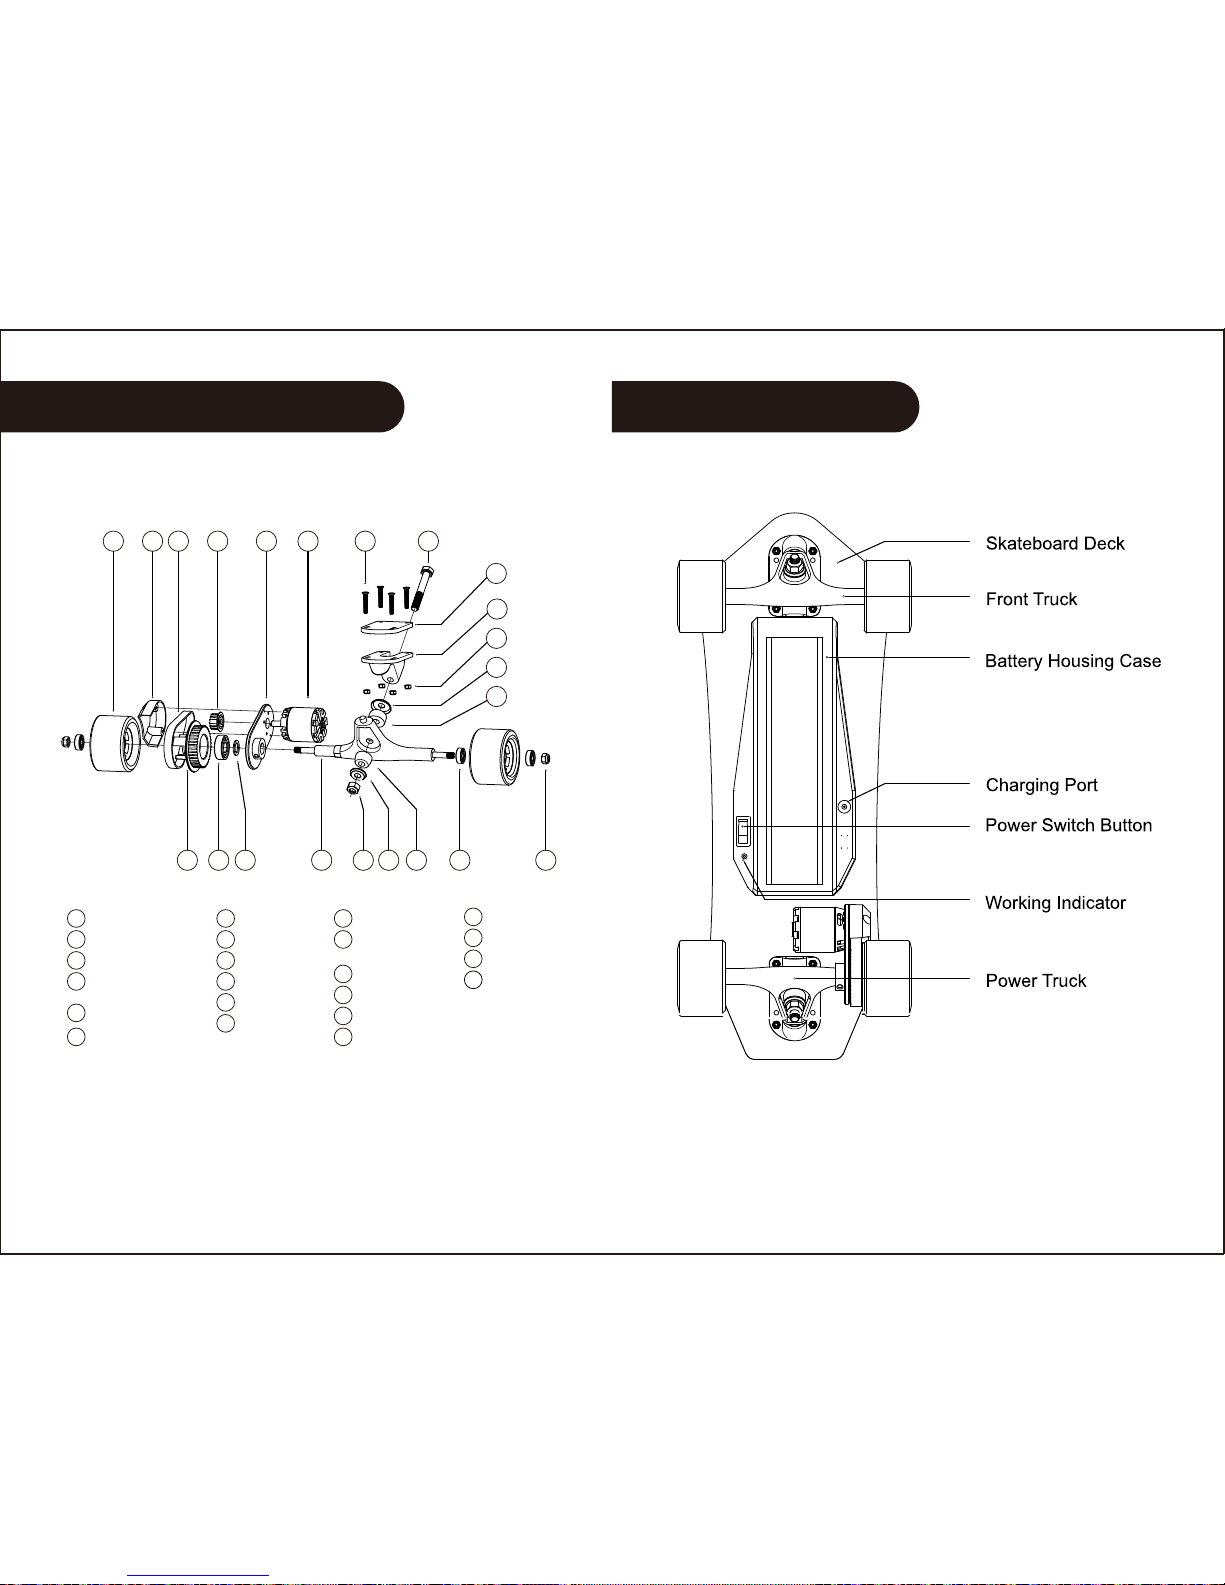
BOARD DIAGRAM
POWER TRUCK DIAGRAM
21 3
9
10
4 5 6 7 8
11
12
13
14 15 16 17 18 19 20 21 22
Power Wheel
1
Protection Case
2
3
Small Synchronous
Wheel
4
Motor Mounts
5
Brushless Motor
With Hall Sensor
6
Fixed Screw
7
Truck Screw
8
Rubber Pat
9
Truck Mount
Nut
Washers Ring
Washers
Big Synchronous
Wheel
Bearing
Shim
Power Truck
Truck Nut
Washers Ring
Washer
10
11
12
13
14
15
16
17
18
19
20
Bearing
Nut
21
22
Drive Belt
Page 9
14
15
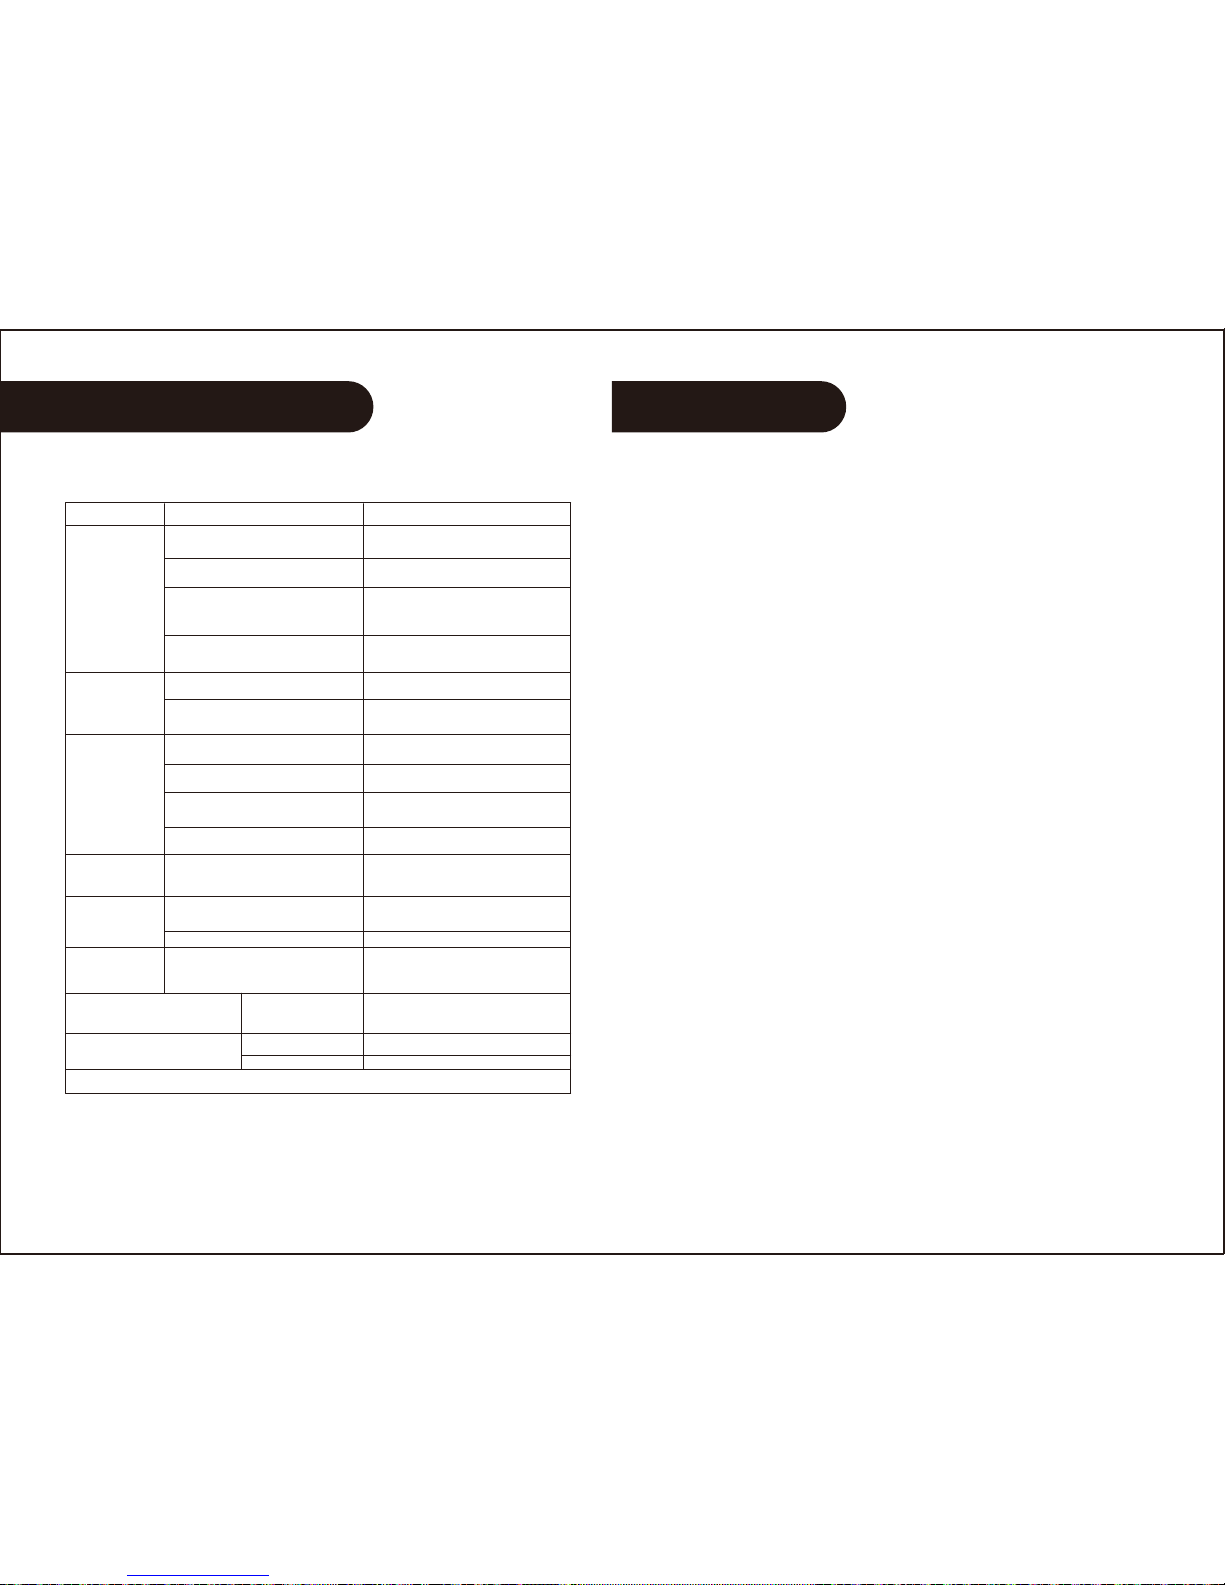
TROUBLE SHOOTING
ISSUE
DIAGNOSE RESOLUTION
STRONG VIBRATION AND NOISE
The belt is either too
loose or over tightened
Adjust the belt
Bearing damage Replace the bearing
MY BOARD
DOESN'T
START
MY BOARD IS
MOVING AT
LOW SPEED
MY BOARD
STOPS
AUTOMATICALLY
MY BOARD
STOPS
SUDDENLY
MY BOARD
DOESN'T
CHARGE
MY CONTROLLER
DOES'T CHARGE
THE BATTERY OF SKATEBOARD CANNOT BE
CHARGED ANYMORE, BUT THE INDICATOR
KEEPS GREEN WHEN CHARGING.
5.1 Check if the USB cable is well
connected to the controller and the
charge port and if the board is powered on.
The battery is damaged
and need to be replaced
with new one.
Or the linking wires come off inside the battery
case. Please check the liking wire.
For more unlikely occurrence of a fault please contact with the dealer to get support for diagnose or any technical advice.
If the connection is good and the controller is
charging, the controller's light will turn on.
1.1 Check if the board is activated ON.
1.2 Check if the controller is powered ON.
1.3 If both the board and controller are
powered ON.
1.4 If the board and controller are paired/
synchronized and the controller's failed
to make the board work.
It means the board's or controller's battery
is low and need to be recharged.
It means the board and controller are not paired/
synchronized.Turn off the board and remote
control, then turn them on separately, waiting 10-15
seconds then pairing/synchronizing them again.
Turning ON the board. When turning on the
board its status indicator light should come on.
Turning ON the controller. When turning ON the
controller, its indicator light should come on.
2.1 Check if the board is in Cruise mode.
2.2 If during your ride the cruiser's speed
going down gradually, followed by a stop
feeling.
3.1 If during your ride the board stops
and the board's indicator light is off,
3.2 If during your ride the board stops
and the controller's indicator light is off,
It means the controller's battery is running
out and needs to be recharged.
3.3 If during your ride the board stops
and both the board system and controller
are still working,
Check the synchronizing belt if there is dirt
stuck between belt and gear.
3.4 If the board stops during your ride
up a inclination
It means that the board is over loaded and
should not be used on the inclination.
The motor is overheated
4.1 Check if the charge cable is connected
to the board and if the charger is connected
to a standard A/C power source.
The charger has overheated
Replace the charger
If the connection is good and the board is
charging, the charger's battery status indicator
will turn red. When fully charged it till turn green.
Turn off the power and allow the motor to
cool down.
It means the board's battery is running out
and needs to be recharged.
It means the board's battery is low
and needs to be recharged.
If so, switch the controller's speed mode
to LOW-SPEED / HIGH-SPEED mode.
WARRANTY
●We offer a 6 months fault warranty, we must ascertain whether
the board has gone faulty due to a quality issue/genuine fault with
the product or misuse (damage caused by neglect) we may ask
for a photo or video of said fault. Once this is ascertained we will
send you out spares to repair the product yourself; we will send
spares that are very easily fitted by yourself. We can assist you
if necessary.
●Please be aware that upon the purchase of our board in the
unlikely occurrence of a fault you will need to repair the board
yourself with the support from our engineer (we will send parts
and diagnose).
●All parts within warranty are delivered 100% free of charge and
any technical advice is given to fit said parts.
●We do not pay for shipping or duty in any circumstances, unless
it is to deliver parts within warranty.
Page 10

16
WARRANTY
●Product neglect is not covered under our warranty, we will rest
assured do what we can to get you back up and running but parts
and shipping will be at your own cost.
●Riding on bumpy surfaces. This can cause component damage.
Liquid damage. The board is splash resistant, not water proof.
●Dropping the remote. The remote is not designed to be dropped, if
you damage the remote please place an order through our website
and we'll assist with you the re-sync procedure.
●For your own safety please wear appropriate safety gear whilst
riding, please follow the laws in your country/state. Please do not
ride in heavy traffic or leave braking until the last minute. We do
not take any responsibility for dangerous or reckless riding.
PRODUCT NEGLECT
●Some common causes for board failure causing a fault: Riding
down steep hills and braking. This causes the motor to burn out.
Page 11

FCC Warning:
This equipment has been tested and found to comply with the limits for a Class B
digital device, pursuant to part 15 of the FCC Rules. These limits are designed to
provide reasonable protection against harmful interference in a residential installation.
This equipment generates, uses and can radiate radio frequency energy and, if not
installed and used in accordance with the instructions, may cause harmful interference
to radio communications. However, there is no guarantee that interference will not
occur in a particular installation. If this equipment does cause harmful interference to
radio or television reception, which can be determined by turning the equipment off
and on, the user is encouraged to try to correct the interference by one or more of the
following measures:
• Reorient or relocate the receiving antenna.
• Increase the separation between the equipment and receiver.
• Connect the equipment into an outlet on a circuit different from that to which the
receiver is connected.
• Consult the dealer or an experienced radio/TV technician for help.
Caution: Any changes or modifications to this device not explicitly approved by
manufacturer could void your authority to operate this equipment.
This device complies with part 15 of the FCC Rules. Operation is subject to the
following two conditions: (1) This device may not cause harmful interference, and (2)
this device must accept any interference received, including interference that may
cause undesired operation.
 Loading...