

Page 1
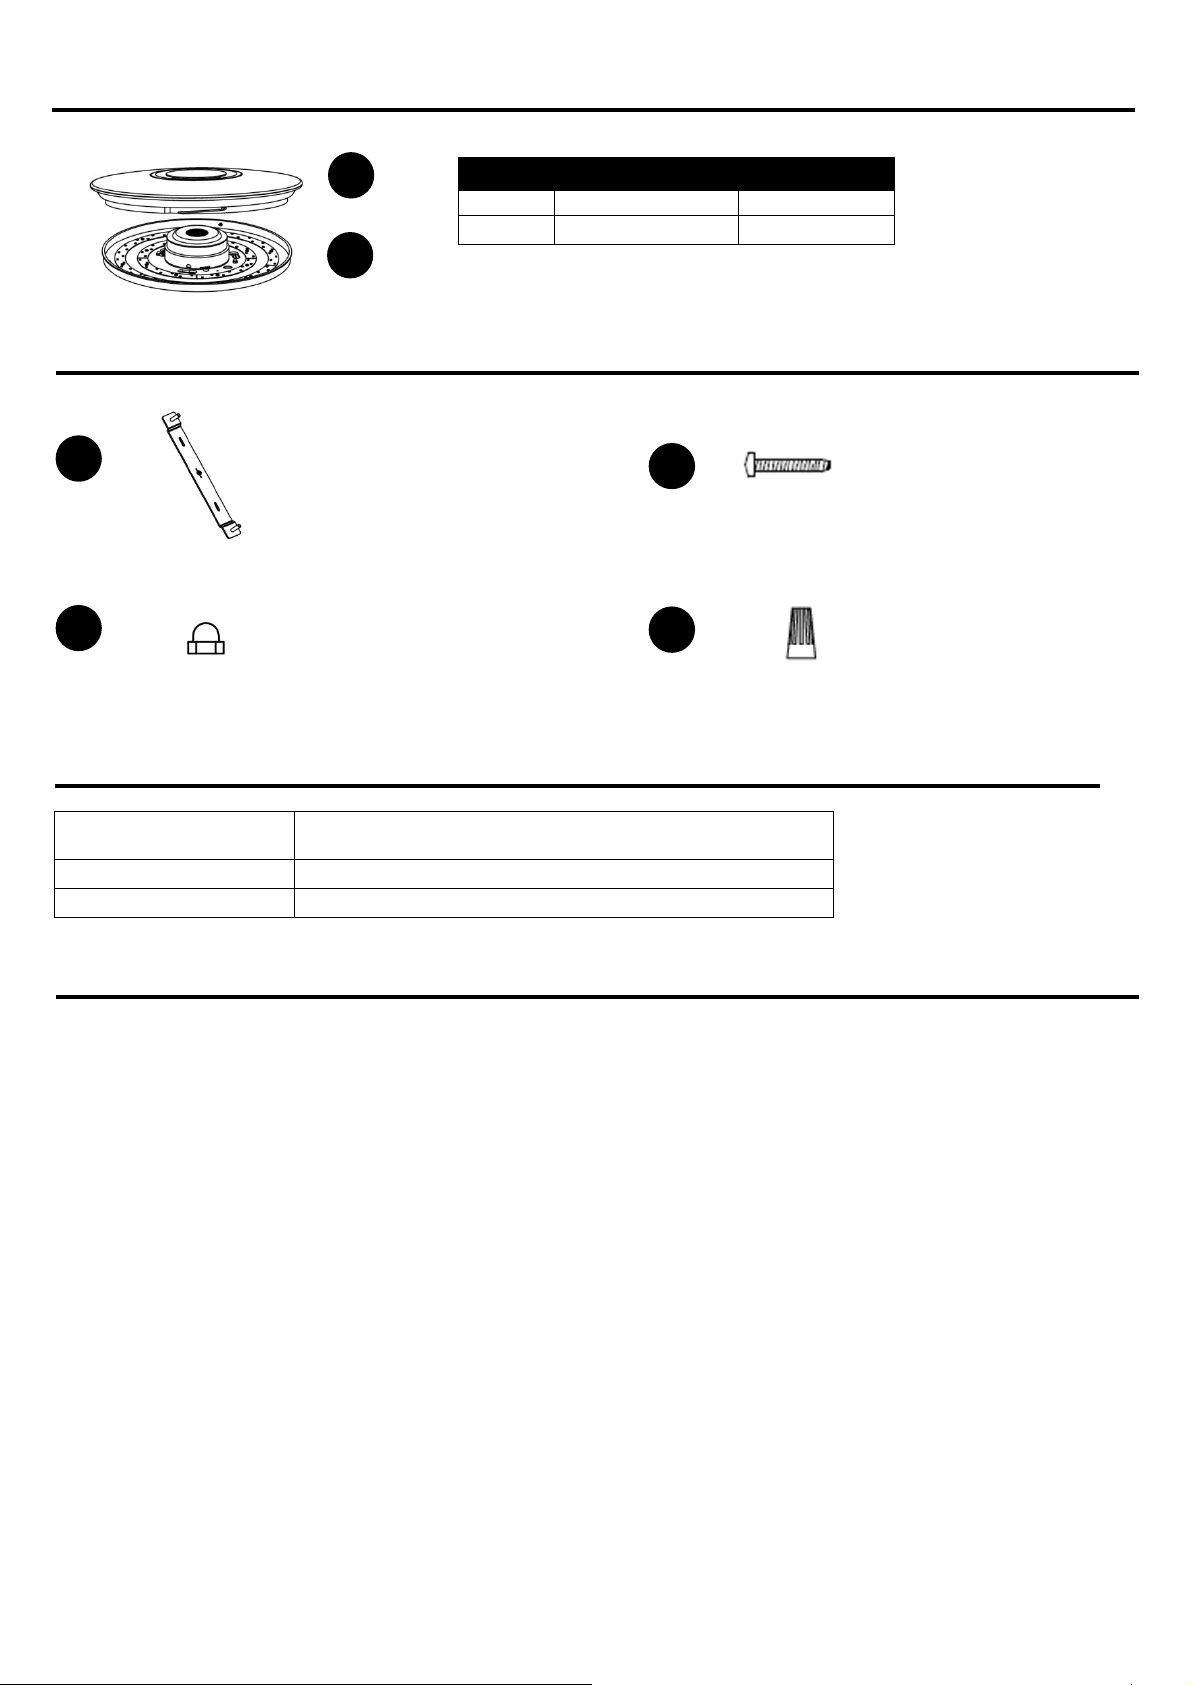
PACKAGE CONTENTS
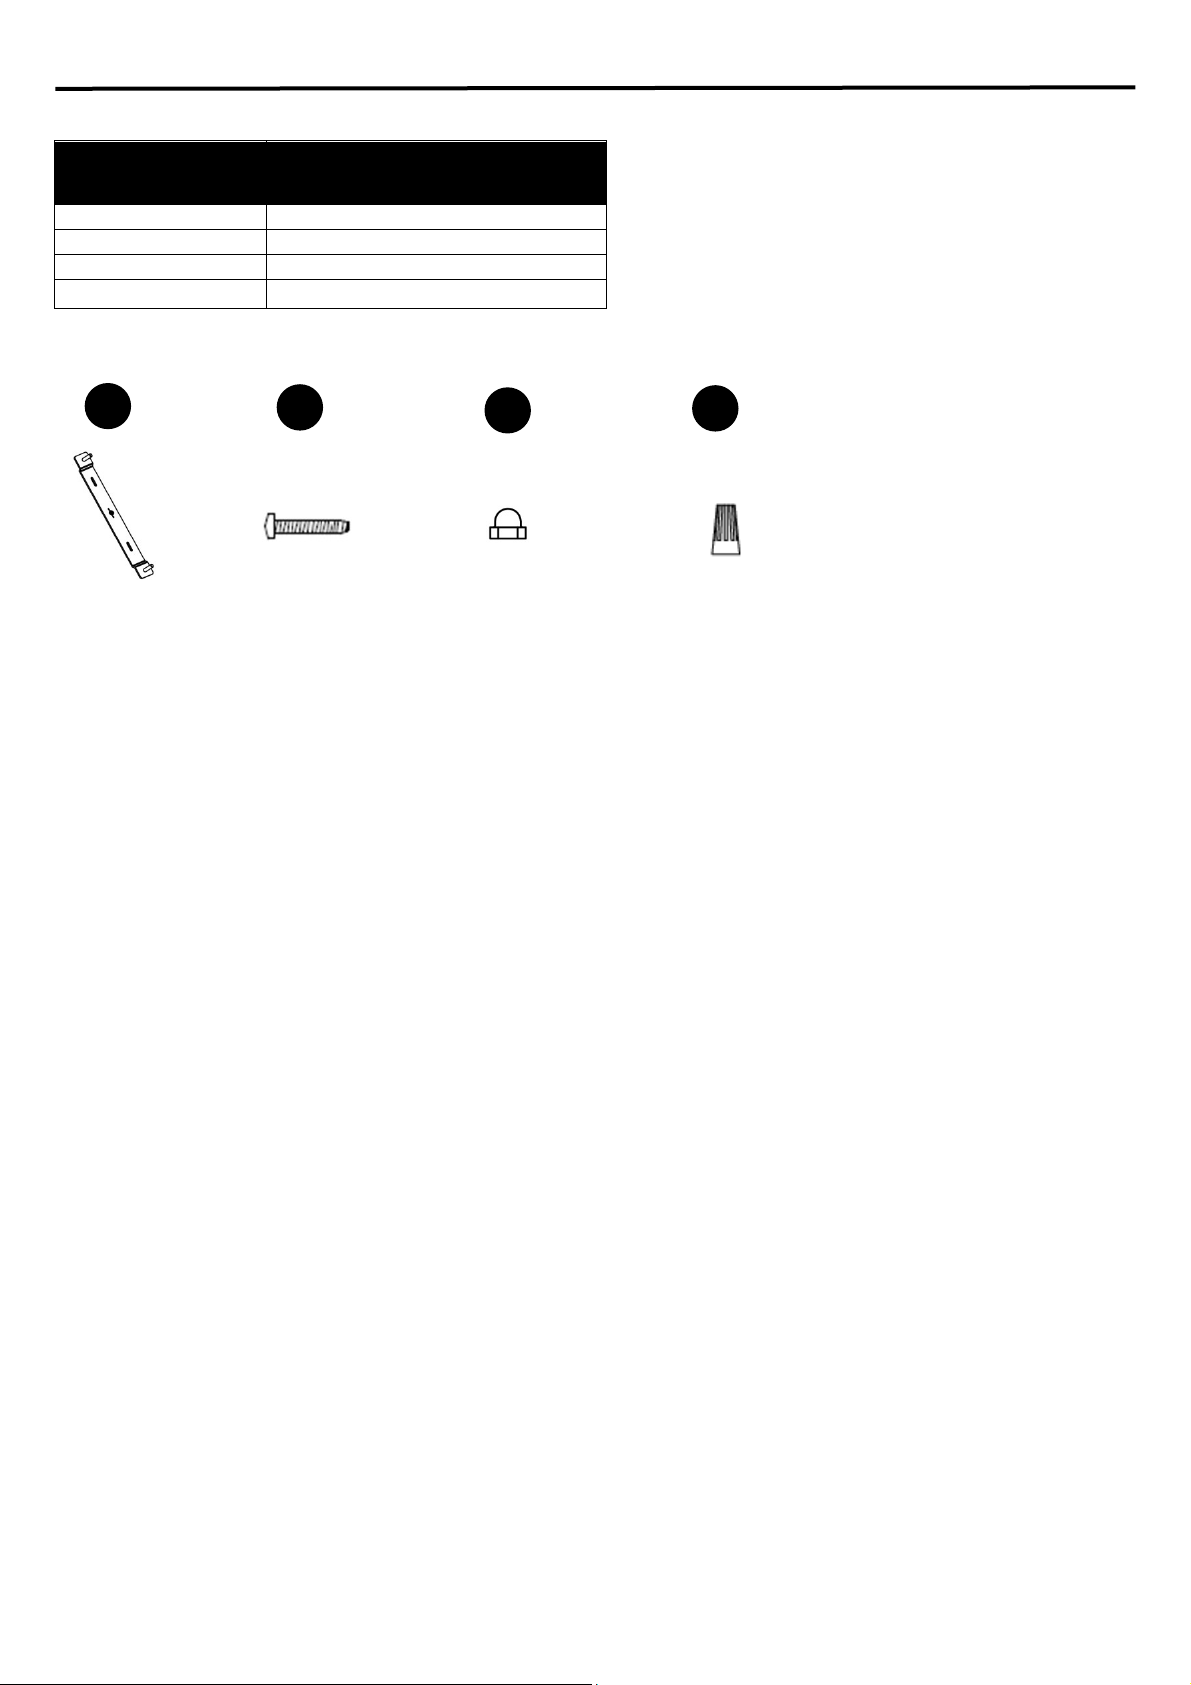
HARDWARE CONTENTS
Note:Not shown to size
AA
x1
CC
x 2
Mounting Bracket
Fixed Nut
Parameter:
Model.: 3702
A
B
PART DISCRIPTION QUANTITY
A Diffuser 1
B Fixture pan 1
BB
x2
DD
x2
Mounting Screw
Wire Nut
Rated voltage AC 120V,60Hz
Rated power LED 24W
SAFETY INFORMATION
Please read and understand this entire manual before attempting to assemble, operate or install the product.
● Do not attempt to install this product while it is plugged in.
● For INDOOR USE ONLY.
● The distance of the Bluetooth speaker connection should be less than 16.4 ft.
● This lamp can not dimming.
Warning: Any changes or modifications to this unit not expressly approved by the party responsible for compliance could
void the user's authority to operate the equipment.
WARNING
● Consult a qualified electrician if you are not certain about the installation process. Always install
wiring connections in accordance with local code, ordinances and the National Electric Code.
●Changes or modifications to this unit not expressly approved by the part responsible for compliance could void the user’s
authority to operate the equipment.
1
Page 2

Caution:
This device complies with Part 15 of the FCC. Operation is subject to the following two conditions: (1) this device may not
cause harmful interference, and (2) this device must accept any interference received, including interference that may
cause undesired operation.
Changes or modifications not expressly approved by the party
responsible for compliance could void the user's authority to operate the
equipment.
This equipment has been tested and found to comply with the limits for
a Class B digital device, pursuant to part 15 of the FCC Rules. These
limits are designed to provide reasonable protection against harmful
interference in a residential installation. This equipment generates
uses and can radiate radio frequency energy and, if not installed and
used in accordance with the instructions, may cause harmful interference
to radio communications. However, there is no guarantee that interference
will not occur in a particular installation. If this equipment does cause
harmful interference to radio or television reception, which can be
determined by turning the equipment off and on, the user is encouraged
to try to correct the interference by one or more of the following
measures:
—Reorient or relocate the receiving antenna.
—Increase the separation between the equipment and receiver.
—Connect the equipment into an outlet on a circuit different from that
to which the receiver is connected.
—Consult the dealer or an experienced radio/TV technician for help.
MPE Reminding
To satisfy FCC RF exposure requirements, a separation distance of 20 cm or more should be maintained between the
antenna of this device and persons during device operation.
To ensure compliance, operations at closer than this distance is not recommended.
PREPARATION
Before beginning to assemble or install lighting fixture, make sure all parts are present. Compare parts with package
contents list and hardware contents list. If any part is missing or damaged, do not attempt to assemble, install or operate
the fixture.
● Estimated Assembly Time: 20 - 40 minutes (Installation time will vary depending on skill level and existing wiring
conditions.)
●Tools Required for Assembly (not included): Phillips screwdriver, flatheadscrewdriver.
● Helpful Items (not included): step ladder.
● NOTE: This fixture must be installed on the ceiling.
2
Page 3
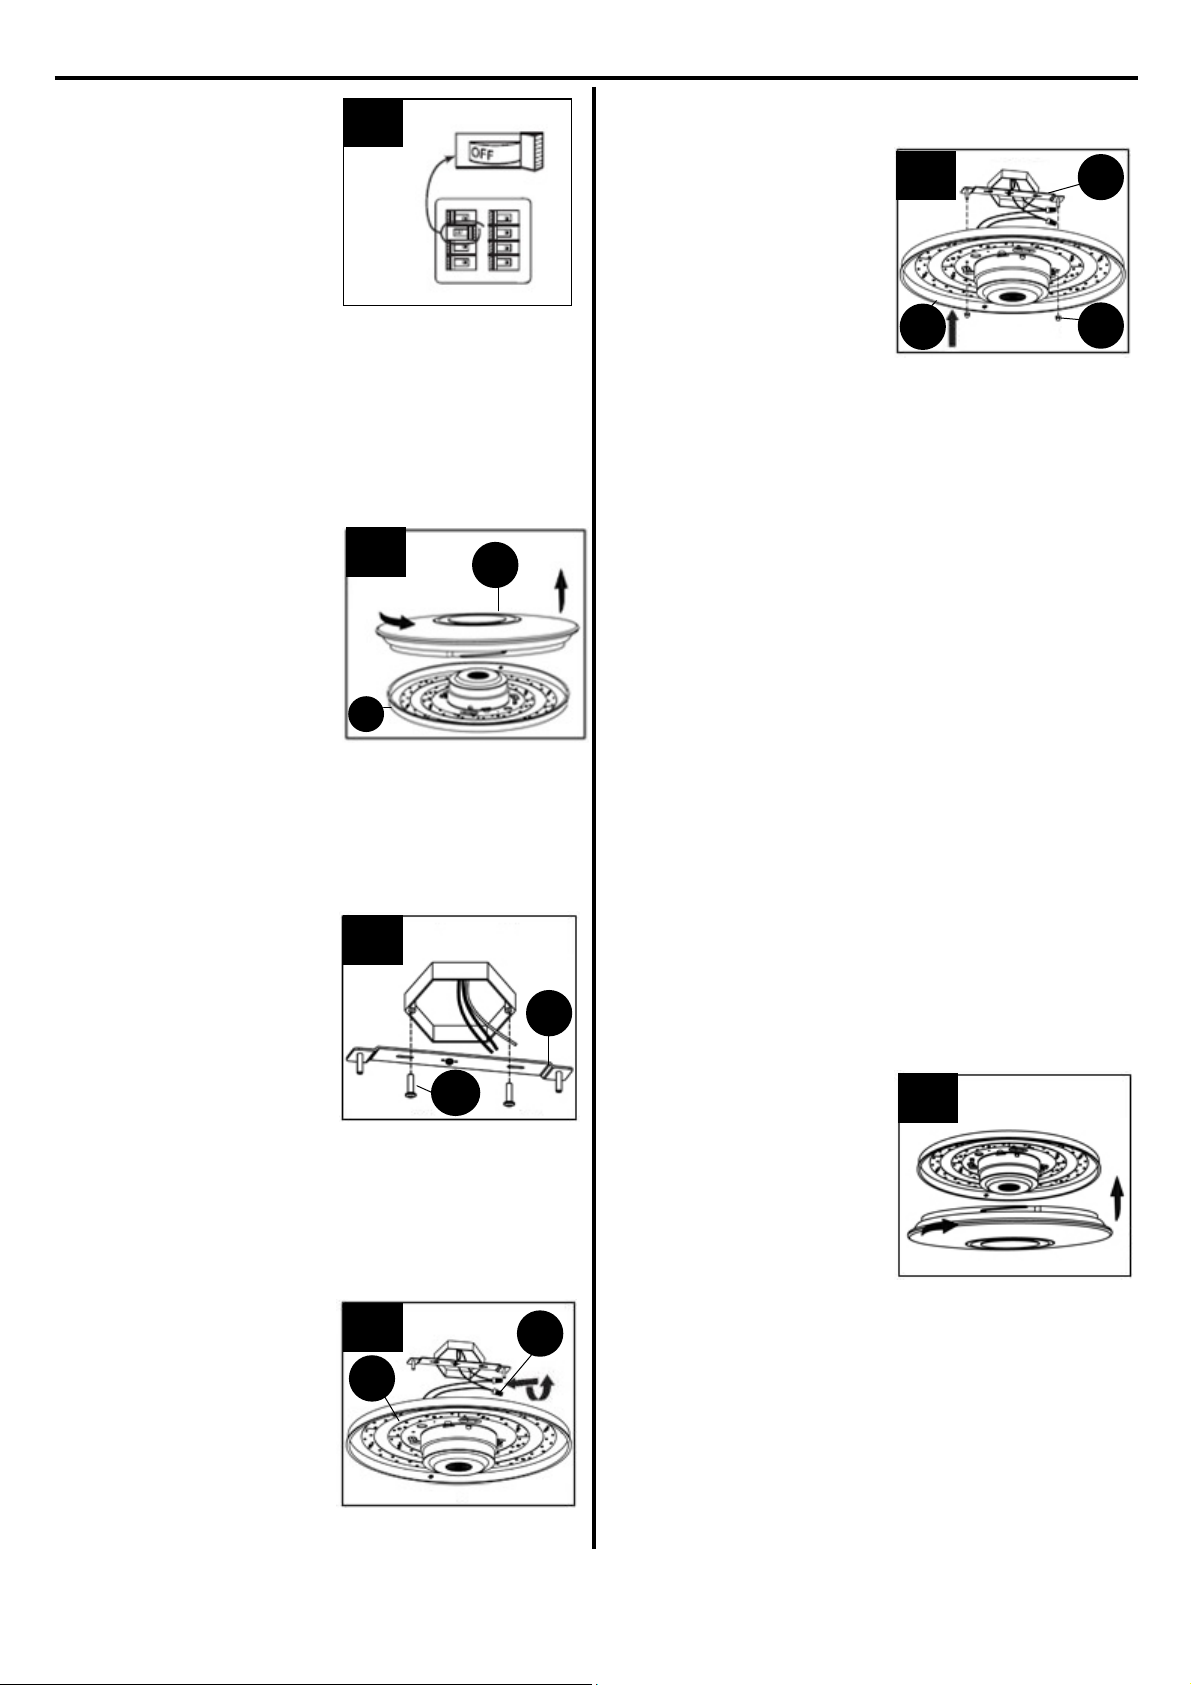
INSTALLATION INSTRUCTIONS
1. Turn OFF power to work
area at main circuit
breaker or fuse box.
WARNING: Do not rely on
wall switch alone to turn
off power.
2. Detach the preassembled
diffuser (A) from the
fixture pan (B) by turning
the
diffusercounterclockwise.
3. Attach mounting
bracket(AA) to outlet box
(not included) with the two
mounting screws (BB).
4. Connect ground wire on
the mounting
bracket.Connect white
wire from
the outlet box to the white
wire from the fixture pan
(B) and the black wire
from the outlet box to the
black wire from the fixture
pan (B). Secure connections with wire nuts (DD), then
cover wire nuts (DD) with electrical tape (not included).
Carefully tuck wires back into outlet box.
1
2
A
3
AA
BB
5. Attach the fixture pan (B)
to mounting bracket (AA)
by using fixed nut(CC).
6. Carefully turn the diffuser
clockwise until it locks
into place.
B
5
AA
CC
6
4
B
DD
3
Page 4
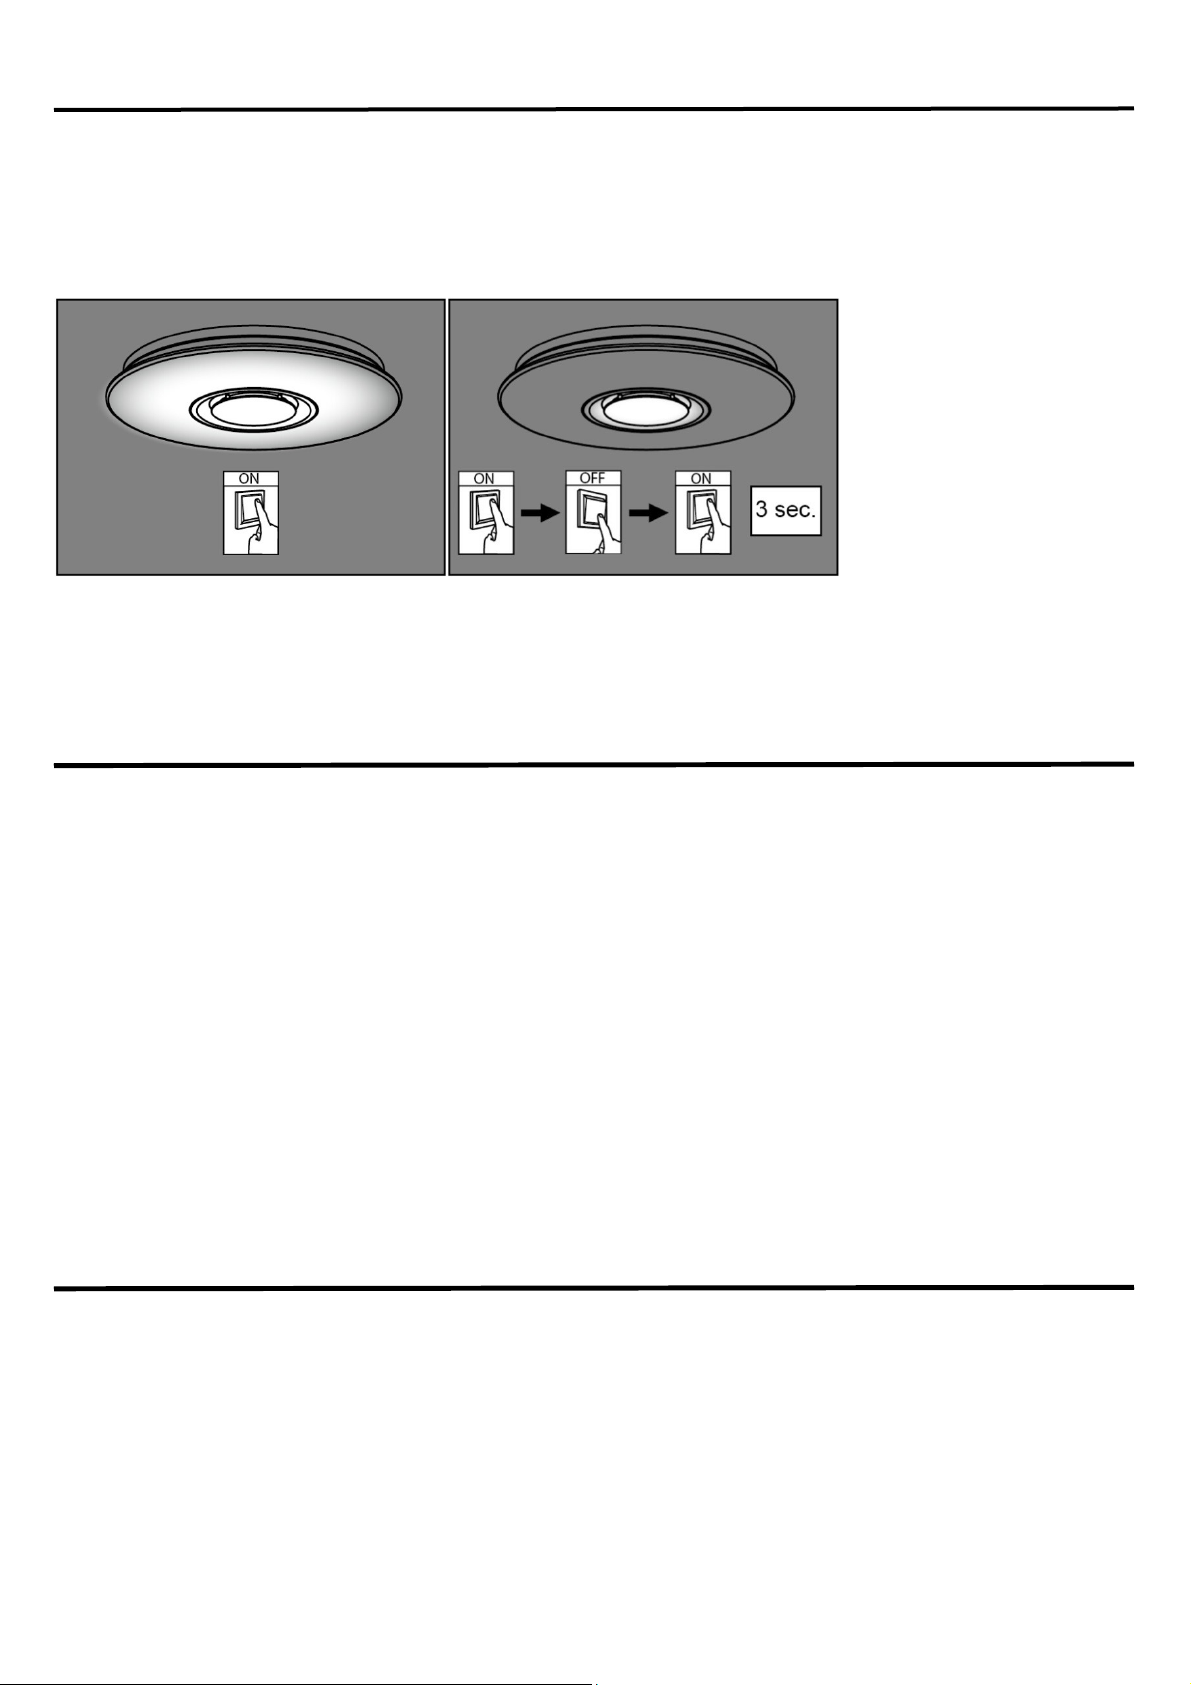
DEBUGGING INSTRUCTION
1. The lamphas 2 modes: the full bright mode and the night light mode.
2. The full bright mode: turn ON the switch.
3. The night light mode: turn ON-OFF-ON in 3 seconds.
4. The Bluetooth speaker is always on standby in two modes.
BLUETOOTH SPEAKER INSTRUCTION
Please open the Bluetooth speaker in the following steps:
1. Turn on the switch.
2. Turn on the Bluetooth on the device, then click the search for available devices.
3. Select the "3702 speaker" in the list of available devices, thenconnect.
4. After a successful connection, you can use the Bluetooth speaker to play music orradio on your device.
5. After playing, open the Bluetooth settings on yourdevice, select "3702 speaker" in the devices list, select disconnect.
NOTE: One Bluetooth speaker can only connect one device.
CARE AND MAINTENANCE
CAUTION:
●Turn OFF all power to circuit at main circuit breaker or fuse box. DO NOT rely on wall switch alone to turn off power.
● Clean surfaces with a mild, non-abrasive cleaner.
● Total fixture wattage: 24watts; do not attempt to replace the LEDs.
4
Page 5
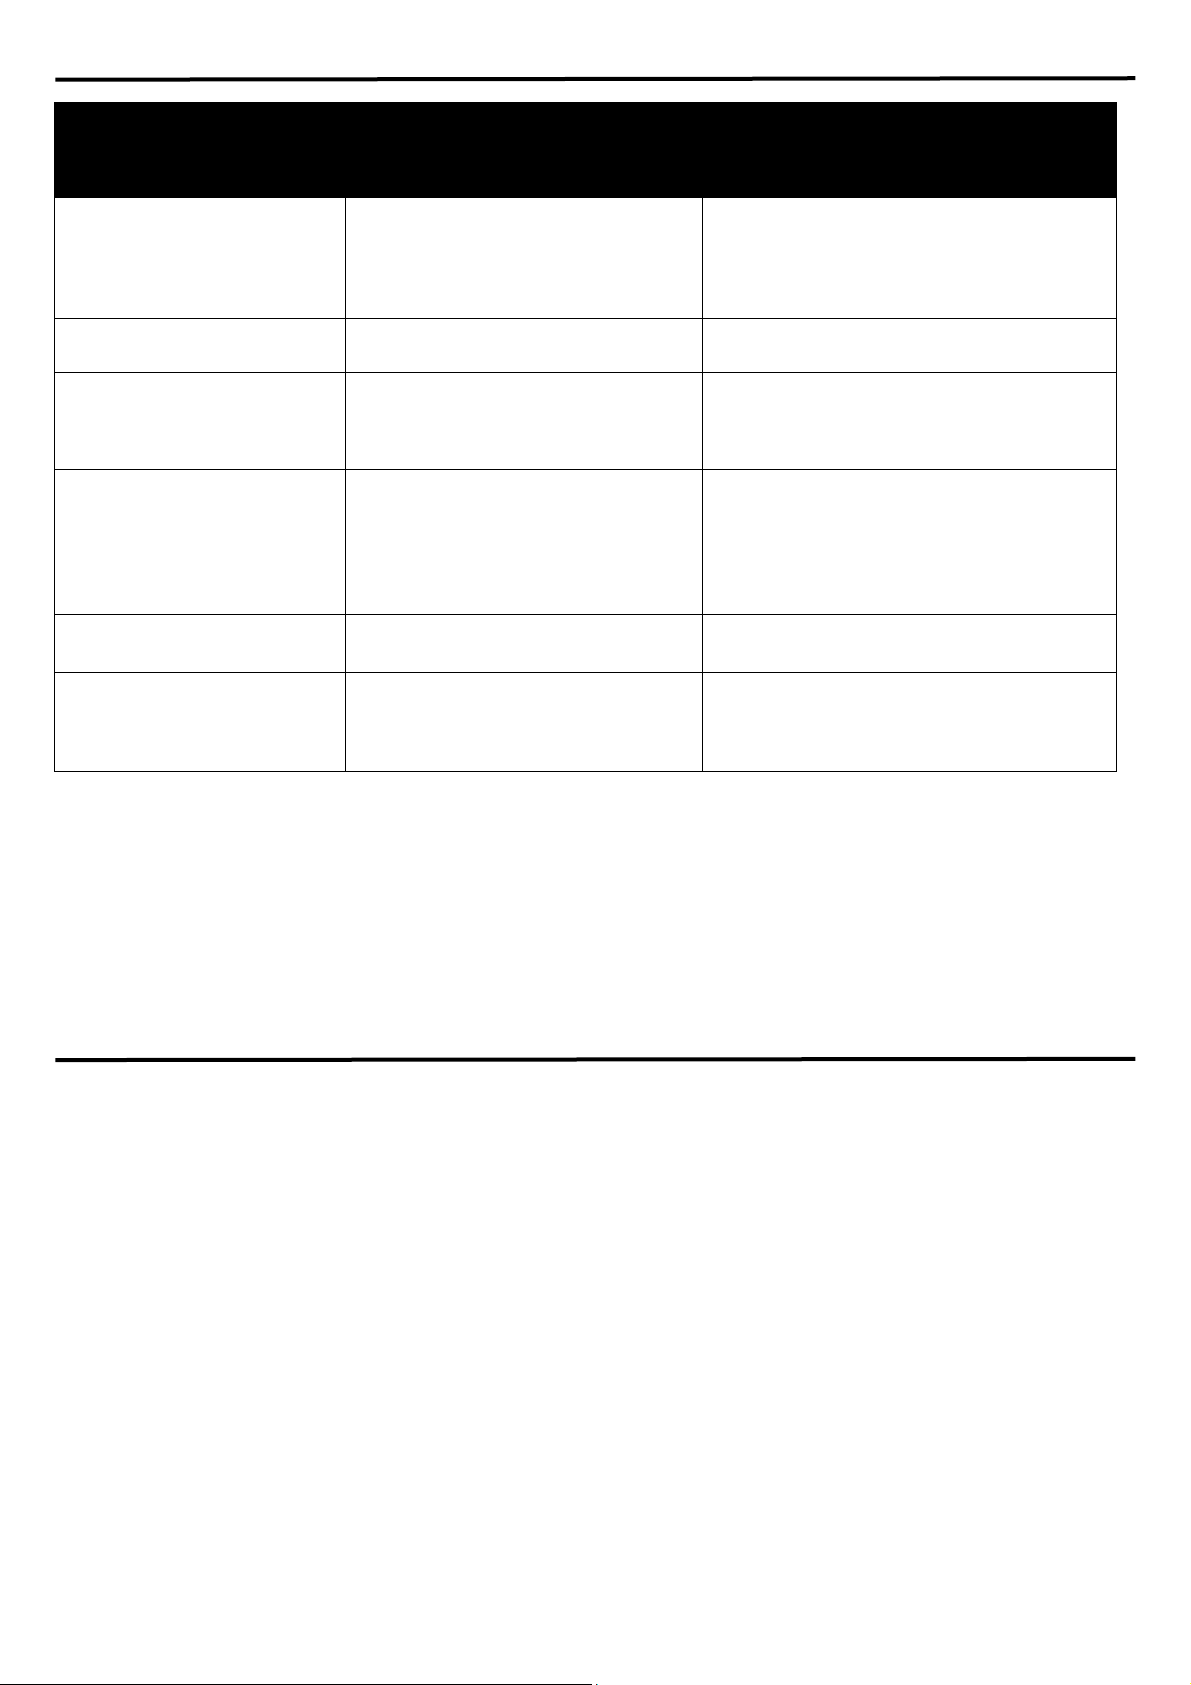
TROUBLESHOOTING
PROBLEM
PROBLÈME
PROBLEMA
Light will not
come ON.
Turn on the light is the
nightlight mode.
Can not into the night light
mode.
Can not connect to the
Bluetooth speaker.
There is no sound after
connecting.
The speaker has a obvious
distortion when playing, and
the lamp has a obvious
vibration.
POSSIBLE CAUSE
CAUSE POSSIBLE
CAUSA POSIBLE
1. No power to light.
2. There may be a poor connection
between the light and supply
wires inside the junction box.
1. There may be connection
problem in the switch.
1. Method error.
1. The Bluetooth speaker is
connecting with other phone.
2. The Bluetooth feature of the
device is broken.
3. The device is too far from the
light.
1. The device’s volume is too small 1. Turn up the volume of the device.
1. The lamp is not installed well. 1. Check every part of the lamp is fixed.
CORRECTIVE ACTION
MESURE CORRECTIVE
ACCIÓN CORRECTIVA
1. Check that the circuit/fuse is on and the
wall switch is in on position.
2. Check supply wire connections.
1. Check the switch.
1. After turning on the switch in the first
time, turn off and then turn on the switch
in three seconds.
1. Disconnect with other device.
2. Check the device’s Bluetooth.
3. Get closer.
5-YEAR LIMITED WARRANTY
If this product fails due to a defect in materials or workmanship within five (5) years from the date of purchase, return it
along with proof of date of purchase and it will be replaced with the same or comparable model free of charge.
This warranty is void if damage or defect has resulted from accident, abuse, misuse or faulty repair.
This warranty gives you specific legal rights and you may have other rights that vary from state to state.
IN NO EVENT WILL LIABILITY EXTEND TO ANY CONSEQUENTIAL, SPECIAL, INCIDENTAL OR INDIRECT DAMAGES
OF ANY KIND ARISING OUT OF THE USE OR MISUSE OF THIS PRODUCT. SOME STATES DO NOT ALLOW THE
EXCLUSION OR LIMITATION OF INCIDENTAL OR CONSEQUENTIAL DAMAGES SO THE ABOVE EXCLUSION OR
LIMITATION MAY NOT APPLY TO YOU
5
Page 6
REPLACEMENT PARTS LIST
BB
PART
AA Mounting Bracket
BB Mounting Screw
CC Fixed Nut
DD Wire Nut
AA
DESCRIPTION
CC
DD
6
 Loading...