

Page 1

Nine Eagles
TM
www.NineEagle.com
SOLO and FREE SPIRIT MICRO
Instruction Manual
Nothing Flies Like Nine EaglesNothing Flies Like Nine Eagles
NE R/ C 210A Co- axial Helicopter
210A 08. 12.29
Page 2

CONTENTS
Anyone No Experience can Fly Easy Necessary!
2.4GHz 4CH Fly in Ultra-Small Space!
Latest and Unique Ultra-Micro 0.95Oz(27g) Heli in the world!
Feature:
1. Perfect airframe design and best electronic
component offer credible durability.
2.THREE UNIQUE INVENTION PATENT in the world:
A. Charge directly on the transmitter
B. Easy installation of battery
C. Allow Mode 1 to Mode 2 only by antenna
1
www. NineEagle. com
INTRODUCTION
FREE SPIRIT MICRO and SOLO are the latest 4 CH ultra
mini-helicopters. Their excellent control function offering
first-time pilots the ability to control them easily. FREE
SPIRIT MICRO and SOLO adopt coaxial, counter-rotating
rotor head design and latest 2.4GHz technology, making the
helicopters unsurpassed stability and easy to flight and the
dimension of the whole helicopter is only:
8.39 (213mm)x7.40 (188mm), weight only: 0.95Oz(27g),
making these two kind of helicopters can easy fly indoor
anywhere. Just as drawing room, bedroom and even office.
FREE SPIRIT MICRO and SOLO come out 100% factory-
made and assembled, flight-tested and ready to fly right out
of the box, you can enjoy the flight without assembly or
setup required .including in the box is the Free spirit micro
/solo airframe, Li-Po Battery, Four( 4) AA battery, 2.4GHz
transmitter which offers freedom from frequency restrictions
and allows the FREE SPIRIT MICRO and SOLO to be flown
indoors or a suitable area, anytime.
Though our products: FREE SPIRIT MICRO and SOLO
possess stable flight function from the factory, we strongly
suggest reading through this manual completely and check
the battery and the charger function, then control
helicopters.
Page 3

2
www. NineEagle. com
INTRODUCTION
FREE SPIRIT MICRO and SOLO are the latest 4 CH ultra
mini-helicopters. Their excellent control function offering
first-time pilots the ability to control them easily. FREE
SPIRIT MICRO and SOLO adopt coaxial, counter-rotating
rotor head design and latest 2.4GHz technology, making the
helicopters unsurpassed stability and easy to flight and the
dimension of the whole helicopter is only:
11 11
8.39 (213mm)x7.40 (188mm), weight only: 0.95Oz(27g),
making these two kind of helicopters can easy fly indoor
anywhere. Just as drawing room, bedroom and even office.
FREE SPIRIT MICRO and SOLO come out 100% factorymade and assembled, flight-tested and ready to fly right out
of the box, you can enjoy the flight without assembly or
setup required .including in the box is the Free spirit micro
/solo airframe, Li-Po Battery, Four( 4) AA battery, 2.4GHz
transmitter which offers freedom from frequency restrictions
and allows the FREE SPIRIT MICRO and SOLO to be flown
indoors or a suitable area, anytime.
Though our products: FREE SPIRIT MICRO and SOLO
possess stable flight function from the factory, we strongly
suggest reading through this manual completely and check
the battery and the charger function, then control
helicopters.
Page 4

3
www. NineEagle. com
1..slide the li-po battery into
the slot on the helicopter
Misoperation
2.turn on the transmitter .
Start process:
Right operation
2 slide the li-po battery into
the slot on the helicopter ..
1 turn on the transmitter ..
1.turn off the transmitter
2.take out the li-po from
helicopter
Shut down process:
Misoperation
Warning
Warning: Failure to comply with any of the instruction of this
manual to mis-operation ,it could lead to unnecessary injury .
Switch the mode process:
1.Keep the li-po in the
helicopter
1.Take out the li-po from
helicopter
1.turn off the transmitter
Page 5

Warning: Failure to comply with any of the instruction of this
manual to mis-operation ,it could lead to unnecessary injury .
Switch the mode process:
1.Keep the li-po in the
helicopter
1.Take out the li-po from
helicopter
2.Switch the mode
4
www. NineEagle. com
Right operation
1.turn off the transmitter
2.take out the li-po from
helicopter
2.Switch the mode
Right operation
Misoperation
Page 6

An R/C helicopter is not a toy! If misused, it can cause serious
bodily harm and damage to property. Fly indoors or a suitable
area, in open areas following all instructions and as recommended
in this manual. Keep loose items that can get entangled in the rotor
blades away from the main and tail blades, including loose clothing,
or other objects such as pencils and screwdrivers. Ensure that
yours and other prople' s hands,and face are kept away from
the rotating parts.
Note on Lithium Polymer Batteries
Lithium Polymer batteries are significantly more
volatile than alkaline or NiCd/NiMH batteries used in
R/C applications. All manufacturer's instructions and
warnings must be followed closely. Mishandling of LiPo
batteries can result in fire. Always follow the
manufacturer's instructions when disposing of Lithium
Polymer batteries.
Instructions for Disposal of WEEE
by Users in the European Union
This product must not be disposed of with other waste.
Instead, it is the user's responsibility to dispose of their
waste equipment by handing it over to a designated
collections point for the recycling of waste electrical and
electronic equipment. The separate collection and
recycling of your waste equipment at the time of disposal
will help to conserve natural resources and ensure that it is
recycled in a manner that protects human health and the
environment. For more information about where you can
drop off your waste equipment for recycling, please contact
your local city office, your household waste disposal
service or where you purchased the product.
5
www. NineEagle. com
Additional Safety Precautions
and Warnings
As the user of this product, you are solely responsible for operating
it in a manner that does not endanger yourself and others or result in
damage to the product or the property of others.
This model is controlled by a radio signal that is subject to
interference from many sources outside your control. This
interference can cause momentary loss of control so it is advisable
to always keep a safe distance in all directions around your model,
as this margin will help to avoid collisions or injury.
Page 7

Additional Safety Precautions
and Warnings
As the user of this product, you are solely responsible for operating
it in a manner that does not endanger yourself and others or result in
damage to the product or the property of others.
This model is controlled by a radio signal that is subject to
interference from many sources outside your control. This
interference can cause momentary loss of control so it is advisable
to always keep a safe distance in all directions around your model,
as this margin will help to avoid collisions or injury.
Never operate your model with low transmitter batteries.
Always operate your model in an open area away from cars,
traffic, or people.
Avoid operating your model in the street where injury or damage
can occur.
Never operate the model out into the street or populated areas
for any reason.
Carefully follow the directions and warnings for this and any
optional support equipment (chargers, rechargeable battery
packs, etc.) which you use.
Keep all chemicals, small parts and anything electrical out of the
reach of children.
Moisture causes damage to electronics. Avoid water exposure to
all equipment not specifically designed and protected for this
purpose.
Never lick or place any portion of your model in your mouth as it
could cause serious injury or even death.
6
www. NineEagle. com
Page 8

FCC INFORMATION
USA
Denmark
Germany
Spain
Canada
France
Italy
Sweden
Belgium
Finland
Netherlands
UK
This device complies with part 15 of the FCC rules. Operation is
subject to the following two conditions:
(1) This device may not cause harmful interference, and (2) this device
must accept any interference received, including interference that may
cause undesired operation.
NOTE: This equipment has been tested and found to comply
with the limits for a Class B digital device, pursuant to part 15
of the FCC rules. These limits are designed to provide
reasonable protection against harmful interference in a
residential installation. This equipment generates, uses and can
radiate radio frequency energy and, if not installed and used in
accordance with the instructions, may cause harmful
interference to radio communication. However, there is no
guarantee that interference will not occur in a particular
installation. If this equipment does cause harmful interference
to radio or television reception, which can be determined by
turning the equipment off and on, the user is encouraged to try
to correct the interference by one or more of the following
measures:
1) Reorient or relocate the receiving antenna.
2) Increase the separation between the equipment and receiver.
3) Connect the equipment into an outlet on a circuit different
from that to which the receiver is connected.
4) Consult the dealer or an experienced radio/ TV technician for
help.
The associated requlatory agencies of the following countries
recognize the noted certifications for this product as authorized for sale
and use:
7
www. NineEagle. com
Additional Equipment
No additional equipment is required to complete your helicopter.
Flight Preparation
Please note this checklist is not intended to be a replacement for
the content included in this instruction manual. Althought it can be
used as a quick start guide, we strongly suggest reading through
this manual completely before proceeding.
1.Check whether the whole package complete
2. Install four(4) AA batteries into the transmitter
3. Use the transmitter to charge the helicopter
4. Put the Li-Po battery into frame
5. Test the function of transmitter
6. Familiar yourself with the function of transmitter
7. Choosing a suitable area for Flying
PRODUCT LIST
Page 9

Additional Equipment
No additional equipment is required to complete your helicopter.
Flight Preparation
Please note this checklist is not intended to be a replacement for
the content included in this instruction manual. Althought it can be
used as a quick start guide, we strongly suggest reading through
this manual completely before proceeding.
1.Check whether the whole package complete
2. Install four(4) AA batteries into the transmitter
3. Use the transmitter to charge the helicopter
4. Put the Li-Po battery into frame
5. Test the function of transmitter
6. Familiar yourself with the function of transmitter
7. Choosing a suitable area for Flying
8
www. NineEagle. com
PRODUCT LIST
Description
FREE SPIRIT MICRO/SOLO Air frame
2.4GHz TRANSMITTER
Li-Po Battery
AA Battery
Screwdriver
QTY
1
1
1
4
1
Page 10

Li-Po Batter y Warning
and Guidelines
If you do not agree with these conditions, return your
complete FREE SPIRIT MICRO/SOLO model in new, unused
condition to the place of purchase immediately.
You must charge the included 3.7V 110mAh LiPo battery in a safe
area away from flammable materials.
Never charge the battery unattended. When charging the battery
you should always remain in constant observation to monitor the
charging process and react to potential problems that may occur.
After flight, the battery must be cooled to ambient temperature
before charging.
You MUST use the included 3.7V DC LiPo Charger ONLY.
Failure to do so may result in a fire causing personal injury
and/or property damage. DO NOT use a NiCd or NiMH charger.
9
www. NineEagle. com
Operation Method
Please note this checklist is not intended to be a replacement for
the content included in this instruction manual. Althought it can be
used as a quick start guide, we strongly suggest reading through
this manual completely before proceeding.
Always turn the transmitter on first
Plug the flight battery into the lead from the 5-in-1 control unit
Allow the 5-in-1 control unit to initialize and arm properly
Fly the model
Land the model
Unplug the flight battery from the 5-in-1 control unit
Always turn the transmitter off last
Page 11

LiPo cells should not be discharged to below 3V each under
load. In the case of the 1S LiPo battery used for the FREE
SPIRIT MICRO/SOLO, you will not want to allow the battery to
fall to below 3V during flight.
The FREE SPIRIT MICRO/SOLO's 5-in-1 control unit features a
soft low voltage cutoff (LVC) that occurs when the battery
reaches 3V under load. When the soft cutoff occurs, the ESCs of
the 5-in-1 unit will reduce power to the motors (regardless of
the power level you have set with the throttle stick) in order to
prevent the voltage of the battery from dropping below 3V. This
reduction in power usually requires that you land the model
immediately, at which point you should power down the model
and unplug the flight battery.
And while it is possible to power the model up and to fly again
after the soft LVC occurs, this is NOT recommended as
continued discharging to the soft LVC will cause permanent
damage to the LiPo battery that results in lost power and
duration when using the battery for subsequent fights, or
failure of the battery entirely. Continued attempts to further
discharge the battery may also result in loss of control while
the motors are running as the voltage of the battery may drop
below the minimum operating voltage of the receiver and other
electronics.
10
www. NineEagle. com
If at any time during the charge or discharge process the
battery begins to balloon or swell, discontinue charging or
discharging immediately. Quickly and safely disconnect the
battery, then place it in a safe, open area away from flammable
materials to observe it for 30-45 minutes. Continuing to charge
or discharge a battery that has begun to balloon or swell can
result in a fire. A battery that has ballooned or swollen even a
small amount must be removed from service completely.
Store the battery at room temperature in a dry area for best results.
When transporting or temporarily storing the battery, the
temperature range should be from degrees Fahrenheit. Do not
store the battery or model in a car or direct sunlight whenever
possible. If stored in a hot car, the battery can be damaged or even
catch fire.
Do not over-discharge the LiPo flight battery. Discharging the
battery too low can cause damage to the battery resulting in
0-7°
Page 12

Note: When the battery power/voltage is getting low you
will typically find that significant rudder trim and/or
rudder stick adjustments are needed to prevent the
helicopter from spinning. This usually occurs before soft
LVC, and indicates a good time to stop flying.
If you have any fur ther questions or concer ns re garding the
handling, char ging and/or use of the included Li-Po battery
pack,please contact TEL:0086-21-52919366, EMAIL:
SALES@NINEEAGLE.COM
Also, it is not recommended that you fly to the soft LVC every
time you fly. Instead, you should be aware of the power level of
the battery/helicopter throughout the flight, and if at any time
the helicopter begins to require more throttle than typical to
maintain hover or flight, you should land the helicopter
immediately. Routinely discharging the battery to the soft LVC
can still cause permanent damage to the battery.
11
www. NineEagle. com
Batter y Charging
A.Ensure the transmitter contain batteries with enough power
B.Take off the battery cover
of the transmitter.
C.Slide the li-po battery into the
slot on the transmitter until you
make the connection successfully
.the indicative led light on the
charger will solid red.
Installing the Transmitter Batter y
1.Take off the transmitter cover
2.Install four(4) AA batteries in the transmitter
3.Turn on the power , check if there is any content on LCD
Installing Li-Po Batter y
to the Helicopter
Slide the li-po battery into the battery slot on frame of helicopter
(usually with the label on the battery facing outward) .however, be
sure to check for proper alignment and polarity before proceeding to
the next step.
D.when the battery is fully charged the Led light will go out entirely
E.You must take out the li-po when it finishes the charge process.
Page 13

Installing the Transmitter Batter y
1.Take off the transmitter cover
2.Install four(4) AA batteries in the transmitter
3.Turn on the power , check if there is any content on LCD
Installing Li-Po Batter y
to the Helicopter
Slide the li-po battery into the battery slot on frame of helicopter
(usually with the label on the battery facing outward) .however, be
sure to check for proper alignment and polarity before proceeding to
the next step.
D.when the battery is fully charged the Led light will go out entirely
E.You must take out the li-po when it finishes the charge process.
12
www. NineEagle. com
Page 14

Transmitter Control Identification
When the transmitter is MODE1:
Direction joy stick
(Starter or advanced
changing button)
Throttle trim
Throttle joy stick
(Matching button)
Rudder
Aileron trim
Throttle reading
Transmitter power reading
Elevator
Direction trim show
Starter or advanced changing s how
Aileron button show
Throttle trim show
Elavator
13
www. NineEagle. com
When the transmitter is MODE2:
Transmitter power reading
Page 15

When the transmitter is MODE2:
Direction joy stick
(Starter or advanced
changing button)
Throttle joy stick
(Matching button)
Throttle trim
Aileron trim
Throttle reading
Transmitter power reading
Rudder
Starter or advanced changing s how
Aileron button show
Throttle trim show
Elevator
Rudder
Elevator
14
www. NineEagle. com
Page 16
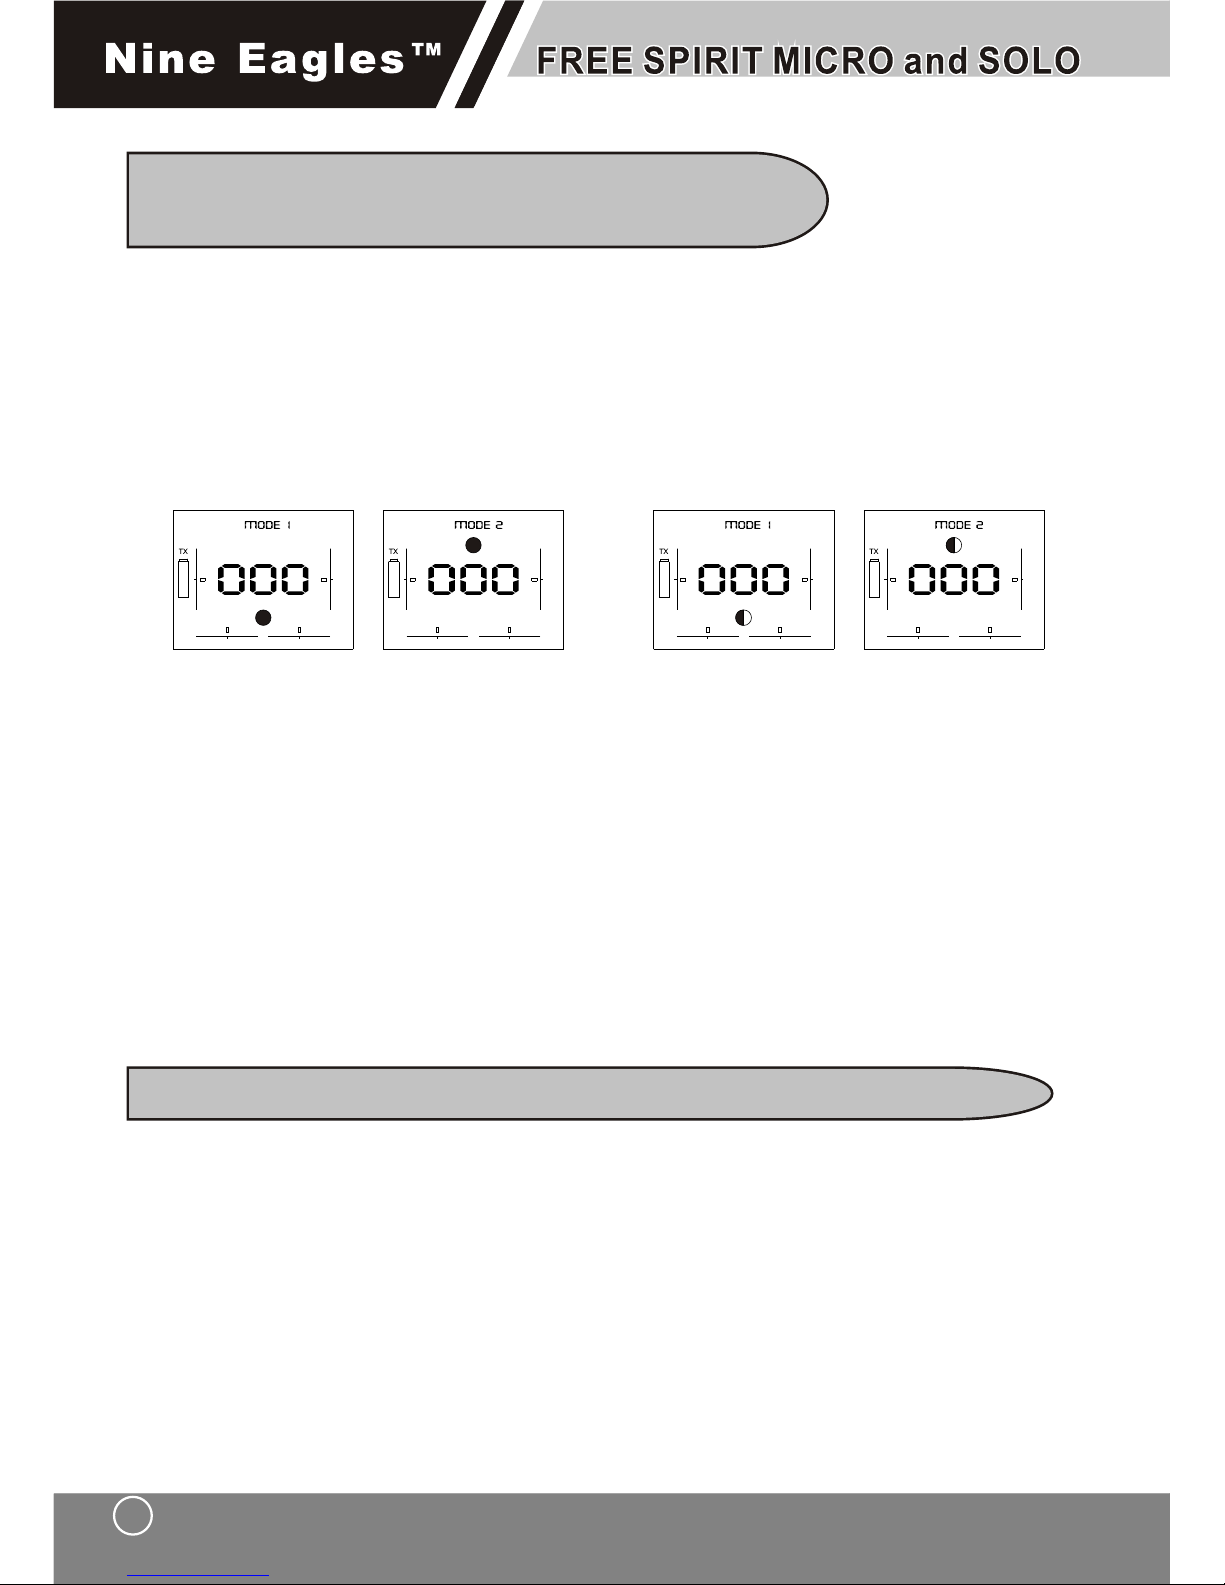
Set up the Primar y and
Advanced Control Switch
We have set up the primary and advanced control model to meet
the different fans requirement.
1.Turn on the transmitter, check the present model of transmitter. if
the mode is advanced the illustration as left, if the mode is primary
the illustration as right.
Advanced mode
Primary mode
2.Press the button to switch the mode of the primary and advanced.
Note: This throttle curve in the low rate mode is also different
than it is in the high rate mode. This makes it much smoother
and easier to control the throttle when in the low rate mode.
The advanced mode is suitable for the experienced pilot .We
suggest you choose the primary mode when you first flight the
helicopter.
Transmitter Mode Switch Function
In order to meet the different customer requirement, we use the
transmitter with the mode switch function .it can switch between the
lift and right hand.
Please go ahead the following process to switch the mode from
Mode2 to Mode1:
1.Turn off the transmitter.
1
www. NineEagle. com
1
www. NineEagle. com
15
www. NineEagle. com
2.Take off the fixed nut on the antenna
and clip.
3.Reverse the antenna 90 degree ,
circumrotate the antenna shaft 180
degree,then make the antenna to cling
another side of transmitter .
4.Re-install the nut and the fix clip on
the antenna.
5.Turn on the transmitter then be the mode1 operation.
Control Test
Although the FREE SPIRIT MICRO and SOLO are test flown at the
factory, we still suggest you inspect the productive quality when you
open the box to ensure none of the any parts were damaged during
shipping and handling .
1.Turn on the transmitter.
2.Slide the li-po into the slot of helicopter ( usually the copper
spring facing inward), to prevent reverse polarity connection
.however ,please be sure to check for proper alignment and polarity
before proceeding to the next step.
Page 17

2.Take off the fixed nut on the antenna
and clip.
3.Reverse the antenna 90 degree ,
circumrotate the antenna shaft 180
degree,then make the antenna to cling
another side of transmitter .
4.Re-install the nut and the fix clip on
the antenna.
5.Turn on the transmitter then be the mode1 operation.
Control Test
Although the FREE SPIRIT MICRO and SOLO are test flown at the
factory, we still suggest you inspect the productive quality when you
open the box to ensure none of the any parts were damaged during
shipping and handling .
1.Turn on the transmitter.
2.Slide the li-po into the slot of helicopter ( usually the copper
spring facing inward), to prevent reverse polarity connection
.however ,please be sure to check for proper alignment and polarity
before proceeding to the next step.
16
www. NineEagle. com
Page 18

3.Move the elevator stick on the transmitter forward and aft to check
elevator pitch control. When the stick is pushed forward, the righthand servo (when viewing the helicopter from behind) should pull
the swashplate downward.
MOD E 2
MOD E 1
4.With the stick pulled back, the right-hand servo should push the
swashplate upward.
MOD E 2
MOD E 1
5.Move the aileron stick left and right to check aileron roll control.
When the stick is pushed to the left, the left-hand servo (when
viewing the helicopter from behind) should pull the swashplate
downward.
MOD E 2
MOD E 1
1
www. NineEagle. com
1
www. NineEagle. com
17
www. NineEagle. com
6.With the aileron stick pushed right, the left-hand servo should
push the swashplate upward.
5-in-1 control unit description,
ar ming and motor control test
The unique 5-in-1 Control Unit installed on your FREE SPIRIT
MICRO/SOLO is a lightweight combination of main motor
electronic speed controls, mixer, gyro, servos and GFSK compatible
receiver. The 5-in-1 unit is also equipped with two status indicator
LEDS.
Page 19

www.NineEagle.com
6.With the aileron stick pushed right, the left-hand servo should
push the swashplate upward.
MOD E 2
MOD E 1
5-in-1 control unit description,
ar ming and motor control test
The unique 5-in-1 Control Unit installed on your FREE SPIRIT
MICRO/SOLO is a lightweight combination of main motor
electronic speed controls, mixer, gyro, servos and GFSK compatible
receiver. The 5-in-1 unit is also equipped with two status indicator
LEDS.
18
www. NineEagle. com
Page 20

The following checklist contains the steps you must follow to
ensure proper arming and operation of the 5-in-1 unit, as well as
proper motor response:
Each time before you fly you should ALWAYS turn the
transmitter on before connecting the flight battery to the 5in-1 unit. Never connect the flight battery to the 5-in-1 unit
before powerin the transmitter on first. After each flight, be
sure that you always disconnect the flight battery from the
5-in-1 unit before powering the transmitter off.
Note:We have set the code for you before the helicopters
leave factory. It is not necessary to adjust it again in the
future, unless the transmitter can not control the helicopter.
Turn on the transmitter and slide the li-po into the helicopter, If
the indicative led light flashes Please set up the throttle to zero
graduation ,then the led light become solid red,thenmove the
throttle stick slightly on the transmitter forwarder and after to
make the blade circumrotate.Push the throttle at any direction
and the blade swing against it; push any button of trim and the
scale of LCD variety against it .then the helicopter is good.
Note: If you find any abnormal situation when you check your
helicopter, Please do as below:
A.Reinstall the battery of transmitter.
B.Reinstall the Li-Po battery of the helicopter, and check if the
battery installed reverse.
C.Rebind for the helicopter.
If your helicopter still can not work after do as above said, please
call the Nine Eagle Support Team at : 0086-21-52919366 OR
EMAIL: SALES@NINEEAGLE.COM
1
www. NineEagle. com
1
www. NineEagle. com
19
www. NineEagle. com
With the rotor blades spinning at a low level of power, move the
rudder stick all the way to the right. This should cause the speed of
the upper main rotor blade to increase, and the speed of the lower
main rotor blade to decrease.
Next, move the rudder stick all the way to the left. This should
cause the speed of the lower main rotor blade to increase and the
speed of the upper main rotor blade to decrease. If both rotor
blades are not responding properly to rudder input, simply swap
the locations of their motor plugs on the 5-in-1 unit.
After confirming that both rotor blades are rotating in the correct
directions, and are responding properly to rudder inputs, your FREE
SPIRIT MICRO/SOLO is ready for flight. However, please be sure to
review the following sections of the manual BEFORE proceeding
with the first flight.
Page 21

Once you have placed the helicopter in a safe area, free of
obstructions, and are clear of the rotor blades, you can safely
begin to power up the model to check for proper operation of the
motors.
Advance the throttle stick upward slowly, just until both rotor
blades begin to spin. DO NOT attempt the fly the helicopter at
this time. Note the direction that each of the rotor blades spins.
When viewed from the top, the upper main rotor blades should
spin counter clockwise and the lower main rotor blades should
spin clockwise. If either set of rotor blades is operating in the
wrong direction, disconnect the battery and reverse the polarity
of the corresponding motor's input power leads.
After confirming that the direction of rotation for both rotor
blades is correct, it is best to confirm that both rotor blades
respond properly to rudder control inputs.
With the rotor blades spinning at a low level of power, move the
rudder stick all the way to the right. This should cause the speed of
the upper main rotor blade to increase, and the speed of the lower
main rotor blade to decrease.
Next, move the rudder stick all the way to the left. This should
cause the speed of the lower main rotor blade to increase and the
speed of the upper main rotor blade to decrease. If both rotor
blades are not responding properly to rudder input, simply swap
the locations of their motor plugs on the 5-in-1 unit.
After confirming that both rotor blades are rotating in the correct
directions, and are responding properly to rudder inputs, your FREE
SPIRIT MICRO/SOLO is ready for flight. However, please be sure to
review the following sections of the manual BEFORE proceeding
with the first flight.
20
www. NineEagle. com
 Loading...