

Page 1

UHR70-1700
Instructions for use
Kullanim Talimatlari
Instructions for Use
3/2006 revised 9/2016 REV B
Form no. 56041655
A-Türkçe
B-English
Model:
56422001
Page 2

A-2 / TÜRKÇE
ùÇùNDEKùLER
Sayfa
Giriú ...................................................................................................... A-2
Yedek Parça ve Servis ......................................................................... A-2
Ta nÕtma LevhasÕ ................................................................................... A-2
Makinenin Paketten ÇÕkarÕlmasÕ ........................................................... A-2
Önemli Güvenlik TalimatlarÕ .................................................................. A-3
Makinenizi TanÕyÕn ....................................................................... A-4 – A-5
Makinenin KullanÖma HazÖrlanmasÖ
Bataryalar ............................................................................................. A-6
Parlatma YastÕ÷ÕnÕn TakÕlmasÕ .............................................................. A-7
Toz Toplama TorbasÕnÕn TakÕlmasÕ ........................................................A-8
Makinenin ÇalÖûtÖrÖlmasÖ
Her KullanÕmdan Önce ......................................................................... A-9
ParlatÕlacak Zeminin PlanlanmasÕ ........................................................ A-9
Makinenin ÇalÕútÕrÕlmasÕ ....................................................................... A-9
BakÖm
KullanÕm SonrasÕ ................................................................................ A-10
BakÕm Çizelgesi ..................................................................................A-10
Makinenin Ya÷lanmasÕ .......................................................................A-10
Direksiyon Zinciri Gerginli÷i ................................................................ A-10
Elektromanyetik Fren .......................................................................... A-10
BataryalarÕn ù
Genel Sorun Giderme
Hata EkranÕ ......................................................................................... A-12
Girdap øúaretleri .................................................................................. A-12
Zemindeki Daireler .............................................................................A-12
Zemin Parlatma øúleminin DurmasÕ .................................................... A-12
Makinenin ÇalÕúÕrken Titremesi ..........................................................A-12
Makinenin ÇalÕúmamasÕ ..................................................................... A-12
Teknik Özellikler .................................................................................. A-13
arj Edilmesi .................................................................. A-11
GIRIú
Bu kÕlavuz, NilÀ sk A/S UHR 70-1700 cihazÕnÕzdan en iyi verimi almanÕzda size yardÕmcÕ olacaktÕr. Makineyi çalÕútÕrmadan önce kÕlavuzu baútan
sona okuyunuz.
Not: Parantez içinde verilen koyu numaralar, A-4- A-5 arasÖ sayfalarda gösterilen bir bileûeni belirtmektedir.
Bu ürün sadece ticari amaçlarla kullanÕma yöneliktir.
YEDEK PARÇA VE SERVùS
Gerekli onarÕmlar, Nil¿ sk A/S orijinal de÷iútirme parçalarÕ ve aksesuarlarÕ kullanÕlmak suretiyle Nil¿ sk A/S servis personeli tarafÕndan
gerçekleútirilmelidir.
OnarÕm parçalarÕ veya servis için Nil¿ sk A/S ‘i arayÕnÕz. Makinenizle ilgili iúlem yaptÕrmak için Modelini ve Seri NumarasÕnÕ belirtiniz.
DE÷ùúùKLùKLER
Temizlik makinesinde, kapasiteyi ve güvenli çalÕútÕrmayÕ etkileyen de÷iúiklikler ve eklemeler, Nil¿ sk A/S úirketinden önceden yazÕlÕ onay almaksÕzÕn
müúteri veya kullanÕcÕ tarafÕndan gerçekleútirilemez. øzinsiz de÷iúiklikler makine garantisini geçersiz kÕlar ve ortaya çÕkan kazalardan müúteri
sorumlu olur.
TANITMA LEVHASI
Makinenizin Model ve Seri NumarasÕ, makine üzerinde bulunan TanÕtma LevhasÕnda gösterilir. Bu bilgiler, makinenin onarÕm parçalarÕnÕ sipariú
ederken gereklidir. Gelecekte gerekti÷inde kullanmak üzere makinenizin Model ve Seri NumarasÕnÕ yazmak üzere aúa÷Õdaki boú alanlarÕ kullanÕnÕz.
MODEL ________________________________________________
SERø NUMARASI ________________________________________
PAKETTEN ÇIKARMA
Makineyi teslim aldÕ÷ÕnÕzda, hasar olup olmadÕ÷ÕnÕ kontrol etmek için nakliye ambalajÕnÕ ve makineyi dikkatlice inceleyiniz. Hasar belirgin ise,
denetlenmesi için nakliye kartonunu (uygun hallerde) saklayÕnÕz. Tespit edilen navlun hasarÕnÕ bildirmek üzere derhal Nil¿ sk A/S Müúteri Hizmetleri
DepartmanÕ ile irtibata geçiniz. Makineyi paletten indirmek için makine ile birlikte verilen paket çözme talimatlarÕna bakÕnÕz.
A-2 - FORM NO. 56041655 - UHR 70-1700
revised 3/13
Page 3

TÜRKÇE / A-3
ÖNEMLù EMNùYET TALùMATLARI
Bu makine konutlardaki normal temizlik iúlerinden ziyade sadece oteller, okullar, hastaneler, fabrikalar, dükkanlar ve o¿ sler gibi ticari
kullanÕma uygundur.
Kullanmadan önce bütün talimatlarÕ okuyunuz.
UYARI!
YangÕn, elektrik çarpmasÕ veya kiúisel yaralanma riskini azaltmak için:
• Makineyi sadece bu kÕlavuzda açÕklanan úekilde kullanÕnÕz. Sadece imalatçÕ tarafÕndan tavsiye edilen parçalarÕ kullanÕnÕz.
• Bu makine sadece uygun e÷itim almÕú ve yetkili kiúilerce kullanÕlÕr.
• Bu makine sadece kuru kullanÕma uygundur ve Õslak koúullarda kullanÕlamaz veya dÕú mekanda saklanamaz.
• Oyuncak olarak kullanÕlmasÕna izin vermeyiniz. Çocuklar tarafÕndan ya da çocuklarÕn yakÕnÕnda kullanÕldÕ÷Õnda gerekli dikkat
gösterilmelidir.
• KÕvÕlcÕm, alev ve sigara gibi maddeleri bataryalardan uzak tutun. PatlayÕcÕ gazlar normal kullanÕm sÕrasÕnda boúaltÕlmaktadÕr.
• BataryalarÕn úarj edilmesi son derece patlayÕcÕ hidrojen gazÕ üretmektedir. Sadece açÕk alevlerden uzak iyi havalandÕrÕlmÕú
yerlerde úarj edin. BataryalarÕ úarj ederken sigara içmeyin.
• Elektrikli parçalarÕn yakÕnÕnda çalÕúÕrken üzerinizdeki her türlü takÕlarÕ çÕkarÕn.
• Elektrikli parçalarÕ çÕkarmadan önce kontak anahtarÕnÕ kapatÕn (O) ve bataryalarÕn ba÷lantÕsÕnÕ kesin.
• Makineyi destekleyen emniyet bloklarÕ veya sehpalarÕ olmadan makine altÕnda asla çalÕúmayÕn.
• YanÕcÕ temizlik maddelerini etrafa yaymayÕn, makineyi bu maddeler üzerinde veya yakÕnÕnda ya da yanÕcÕ sÕvÕlarÕn bulundu÷u
alanlarda çalÕútÕrmayÕn.
• Bu makineyi basÕnçlÕ yÕkayÕcÕ ile temizlemeyin.
• Bu makine kamu yollarÕ veya caddelerinde kullanÕm için onaylÕ de÷ildir.
• Makine a÷ÕzlarÕna herhangi bir cisim koymayÕn. Herhangi bir a÷Õz tÕkalÕ durumda iken kullanmayÕn; toz, tüy, saç ve hava akÕmÕnÕ
azaltacak cisimleri temizleyin.
• E÷im oranÕ makine üzerinde belirtilenden yüksek olan yüzeylerde kullanmayÕn.
• Bu makineyi kullanÕrken, özellikle çocuklar olmak üzere üçüncü taraÀ arÕn tehlikeye girmemesine dikkat edin.
• Herhangi bir servis iúlevi yerine getirmeden önce, söz konusu iúleve ait tüm talimatlarÕ dikkatlice okuyun.
• ølk önce kontak anahtarÕnÕ kapatmadan (O) ve anahtarÕ çÕkarmadan makinenin yanÕndan ayrÕlmayÕn. Böyle bir durumda park
freni otomatik olarak etkin duruma gelir.
• FÕrçalarÕ de÷iútirmeden ve herhangi bir eriúim panelini açmadan önce kontak anahtarÕnÕ kapatÕn (O) ve anahtarÕ çÕkarÕn.
• Saç, takÕ veya bol giysilerin hareketleri parçalara takÕlmasÕnÕ engellemek için önlem alÕn.
• Toz torbasÕ ve/veya ¿ ltreler yerinde olmadan kullanmayÕn.
• YastÕk karterine dayanmayÕn.
• Bu makine sa÷lÕ÷a zararlÕ tozlarÕ toplamak için uygun de÷ildir.
• Makine hurdaya çÕkarÕlmadan önce makineden bataryalar çÕkarÕlmalÕdÕr. BataryalarÕn imha iúlemi, yerel çevre düzenlemelerine
uygun olarak güvenli bir úekilde yapÕlmalÕdÕr.
• Bütün kapÕlar ve kapaklar makineyi kullanmadan önce kÕlavuzda belirtilen úekilde yerleútirilmelidir.
• Batarya úarj cihazÕ hakkÕnda ilave uyarÕlarÕ ö÷renmek için batarya úarj cihazÕ OEM ürün kÕlavuzuna bakÕnÕz.
• Bu makine düúük ¿ ziksel, duyusal veya zihni kapasitede, bilgisiz ve deneyimsiz kiúilerce (çocuklar dahil) kullanÕlmamalÕdÕr.
• Rampa üzerinde ve e÷imli yerlerde, ani durma hareketinden kaçÕnÕn. Ani ve keskin dönüúlerden kaçÕnÕn. Yokuú aúa÷Õ düúük
hÕzda gidin.
• Makineyi yüklerken, sürerken, kaldÕrÕrken veya desteklerken makinenin Brüt Makine A÷ÕrlÕ÷Õna (BMA) dikkat edin.
revised 3/13
BU TALùMATLARI SAKLAYIN
FORM NO. 56041655 - UHR 70-1700 - A-3
Page 4

A-4 / TÜRKÇE
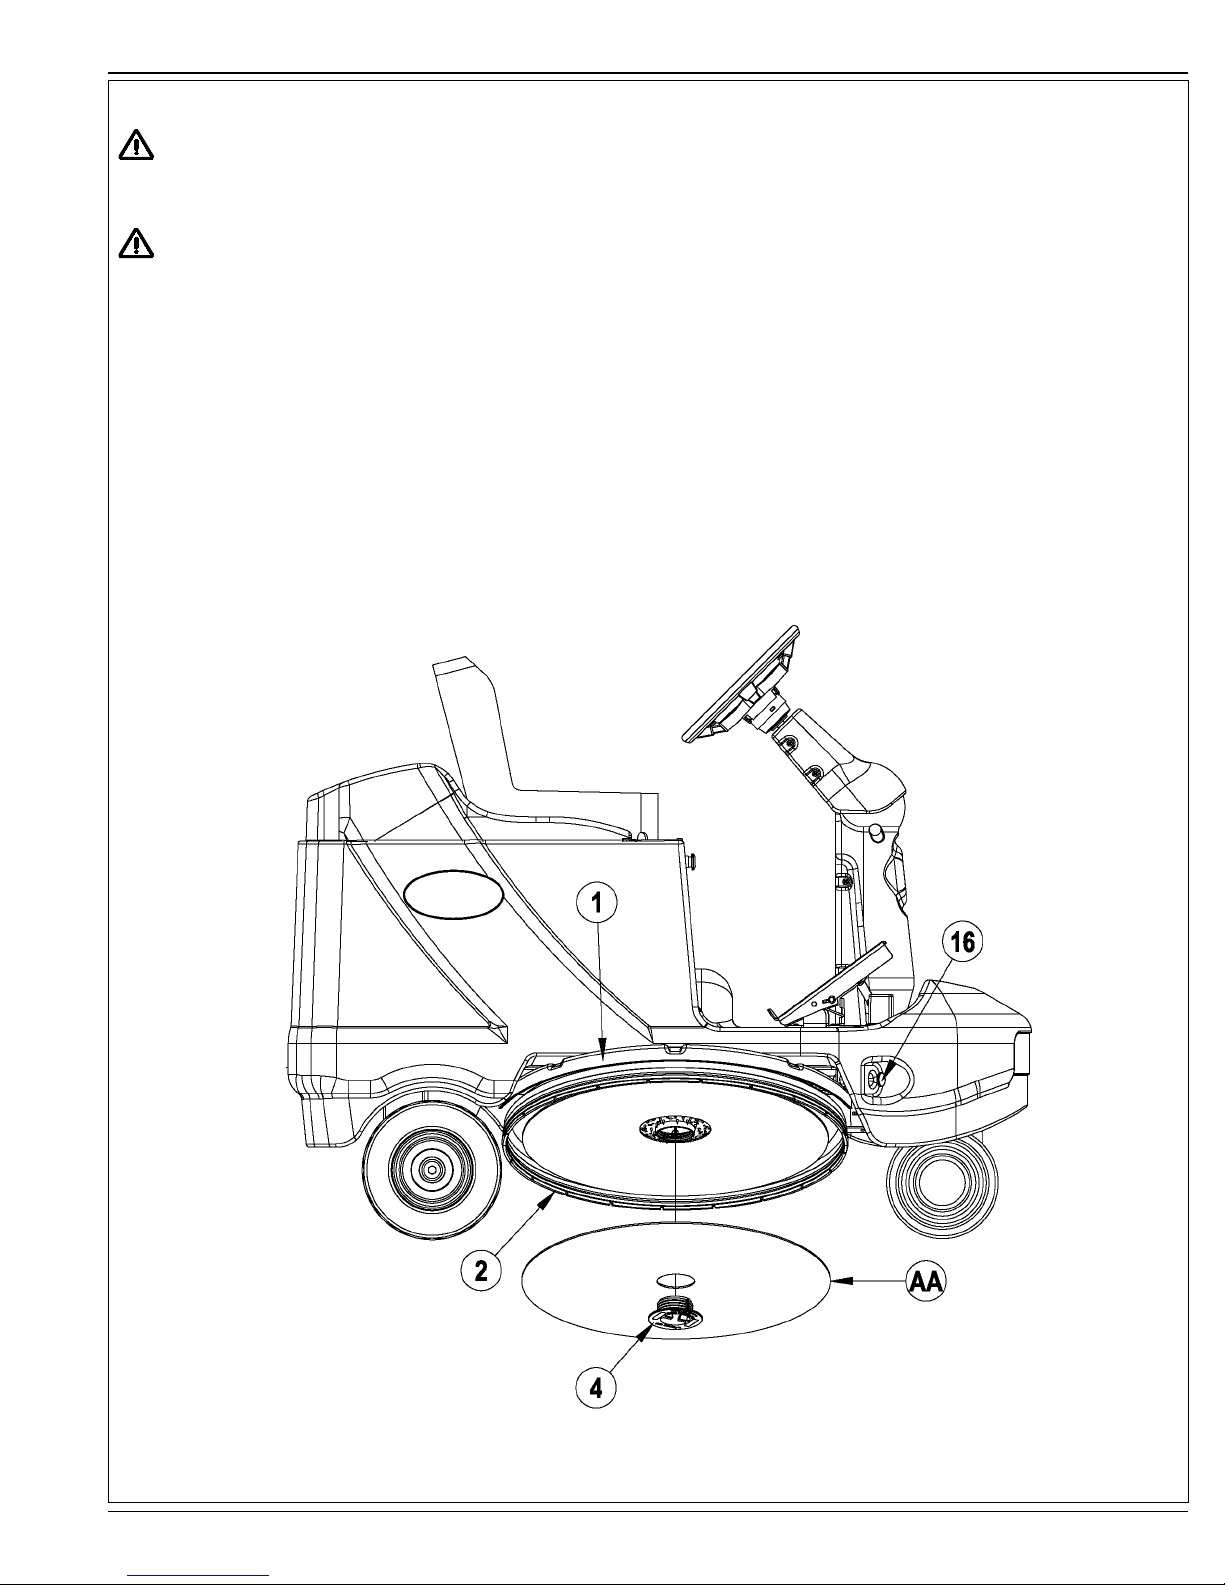
MAKINENIZI TANIYIN
Bu kÕlavuzu okurken, parantez içinde koyu harÀ e yazÕlmÕú bir numara veya harf göreceksiniz- örnek: (2). Bu numaralar, aksi belirtilmedikçe,
bu sayfalarda gösterilen bir bileúene atÕf yapmaktadÕr. Metinde bahsedilen bir bileúenin yerini tam olarak belirlemek için gerekli oldu÷unda bu
sayfalara bakÕnÕz. NOT: Takip eden 2 sayfada gösterilen her bir bileúene ait ayrÕntÕlÕ açÕklamalar için servis el kitabÕna bakÕnÕz.
1 YastÖk Tahrik Güvertesi
2 Toz Kontrol Örtüsü
3 Parlatma YastÖøÖ
4 YastÖk Tutucu
5 Toz Toplama TorbasÖ
6 Makine BaølantÖ ParçasÖ
7 Batarya Konektör TakÖmÖ
8 ùLERù/GERù Sürme PedalÖ
9 Direksiyon Eøim AyarÖ
10 Acil Durum Güç Kapama
11 Direksiyon
12 Operatör Koltuøu W/Emniyet AnahtarÖ
13 Batarya Bölmesi KapaøÖ
14 Sürme / Yönlendirme Tekerleøi
15 Devre Kesiciler
40 Amp (Tekerlek Tahriki)
5 Amp (Kontrol Devresi)
16 Güverte MandalÖ
17 Kontrol Paneli
18 Yedek Toz TorbasÖ Deposu
19 Fener (ùsteøe baølÖ)
20 Far (ùsteøe baølÖ)
21 Aktif Toz Kontrolü (ùsteøe baølÖ)
22 Yerleûik úarj CihazÖ (ùsteøe baølÖ)
23 úarj CihazÖ Fiû
i
A-4 - FORM NO. 56041655 - UHR 70-1700
Page 5

MAKINENIZI TANIYIN
A Ana Kontak AnahtarÖ
B Batarya Durumu Göstergesi
C Saat Ölçer / Hata EkranÖ
D YastÖk Tahrik Göstergesi IûÖøÖ
E YastÖk Tahriki Yükseltme / Alçaltma AnahtarÖ
F Korna Gösterge IûÖøÖ
G Korna AnahtarÖ
TÜRKÇE / A-5
FORM NO. 56041655 - UHR 70-1700 - A-5
Page 6

A-6 / TÜRKÇE
BATARYALAR
Makineniz bataryalar takÖlÖ olarak gelirse, aûaøÖdaki iûlemleri yapÖnÖz:
x BataryalarÕn makineye ba÷lÕ olup olmadÕ÷ÕnÕ kontrol edin (7).
x Kontak AnahtarÕnÕ (A) AÇIK konuma getirin ve Batarya Göstergesini (B) kontrol edin. Yeúil ÕúÕk AÇIK konumda ise, bataryalar kullanÕma hazÕrdÕr. Yeúil ÕúÕk
KAPALI konumda ise, bataryalar kullanÕmdan önce doldurulmalÕdÕr. “BataryalarÕn ùarj Edilmesi” bölümüne bakÕnÕz.
Makineniz bataryalar takÖlÖ olmadan gelirse, aûaøÖdaki iûlemleri yapÖnÖz:
x Tavsiye edilen bataryalar konusunda Yetkili Nil¿ sk A/S satÕcÕsÕna dan
x Aúa÷Õdaki talimatlarÕ takip ederek bataryalarÕ takÕn.
x Makinenize üç adet 12 voltluk batarya TAKMAYIN. Bu durum makinenin dengesini etkiler.
ÕúÕn.
UYARI!
Bataryalarla ilgili iúlem yaparken son derece dikkatli olunuz. Bataryalar içindeki sülfürik asit, deri veya gözlerle temas etmesi halinde
a÷Õr yaralanmaya yol açabilir. PatlayÕcÕ hidrojen gazÕ, batarya kapsüllerinde bulunan açÕklÕklar yoluyla dÕúarÕya boúaltÕlmaktadÕr. Bu
gaz, herhangi bir elektrik arkÕ, kÕvÕlcÕm veya alev yoluyla tutuúabilir. Herhangi bir kurúun asitli bataryayÕ, mühürlü konteyner veya
mahfaza içine takmayÕnÕz. AúÕrÕ úarjdan kaynaklanan hidrojen gazÕnÕn çÕkÕúÕna izin verilmelidir.
BataryalarÖn BakÖm ùûlemleri...
* Bütün ziynet eúyalarÕnÕzÕ çÕkarÕn
* Sigara içmeyin
* Emniyet gözlükleri, lastik eldivenler ve bir lastik önlük takÕn.
* øyi havalandÕrÕlmÕú alanda çalÕúÕn.
* Aletlerin aynÕ anda birden fazla batarya kutup baúÕna temas etmesine izin vermeyin
* BataryalarÕ de÷iútirirken kÕvÕlcÕm çÕkmasÕnÕ önlemek için HER ZAMAN negatif (toprak) kabloyu önce sökün.
* BataryalarÕ takarken HER ZAMAN negatif kabloyu en son ba÷layÕn.
DùKKAT!
BataryalarÕn uygun úekilde takÕlmamasÕ ve ba÷lanmamasÕ halinde bu makinedeki elektrikli bileúenler a÷Õr biçimde hasar görebilir.
Bataryalar, Nil¿ sk A/S, bir yetkili elektrikçi veya batarya imalatçÕsÕ tarafÕndan takÕlmalÕdÕr.
1 BataryalarÕ sevkÕyat sandÕ÷Õndan çÕkarÕn ve herhangi bir çatlak veya baúka hasar olup olmadÕ÷ÕnÕ dikkatlice kontrol edin. Belirgin bir hasar varsa, hasarÕ
bildirmek için teslimatÕ yapan nakliye úirketi veya batarya imalatçÕsÕ ile irtibata geçin.
2 Ana Kontak AnahtarÕnÕ (A) KAPALI konuma getirin ve anahtarÕ çÕkarÕn.
3 Batarya Bölmesi Kapa÷ÕnÕ açÕn ve destekleyin (13). Batarya kablolarÕnÕ batarya bölmesinden çÕkarÕn.
4 Makineniz fabrikadan altÕ adet 6 voltluk batarya monte edilecek úekilde yeterli batarya kablosu ile birlikte gelmektedir. BataryalarÕ dikkatlice batarya bölmesine
do÷ru kaldÕrÕn ve úEKùL 1’de gösterildi÷i úekilde düzenleyin. BataryalarÕ mümkün oldu÷unca makinenin arka tarafÕna yakÕn olacak úekilde monte edin.
5 Batarya kablolarÕnÕ gösterildi
6 Her bir batarya kutup baúÕndaki somunu kutup baúÕ dönmez duruma gelene kadar dikkatlice sÕkÕn. Kutup baúlarÕnÕ aúÕrÕ sÕkmayÕn, aksi halde gelecekte bakÕm
amacÕyla çÕkarÕlmasÕ çok zor olacaktÕr.
7 Kutup baúlarÕnÕ, üzerine püskürtmeli batarya kutup baúÕ kaplamasÕ ile kaplayÕn (ço÷u oto parçalarÕ ma÷azalarÕnda mevcuttur).
8 Her bir kutup baúÕnÕn üzerine siyah kauçuk pabuçlardan koyun ve Batarya Konektör TakÕmÕnÕ ba÷layÕn (7).
BataryalarÕ veya úarj cihazÕnÕ de÷iútirirken, do÷ru batarya, úarj cihazÕ ve makine ayarlarÕ için yerel yetkili servis merkezi ile iletiúim
kurarak bataryanÕn hasar görmesini önleyin.
úEKIL 1
÷i úekilde takÕn. KablolarÕ batarya kapsüllerinin bakÕm için kolayca çÕkarÕlabilece÷i úekilde yerleútirin.
415 Ah, 20 Hr. Rate
A-6 - FORM NO. 56041655 - UHR 70-1700
revised 3/13
Page 7
TÜRKÇE / A-7
PARLATMA YASTI÷ININ TAKILMASI
UYARI!
Makinenin bakÕm iúlemleri sÕrasÕnda, Acil Durum Güç Kapama (10) kolunu yukarÕya do÷ru çekerek makinenin Batarya TakÕmÕ
Ba÷lantÕsÕnÕ (7) kesin.
DùKKAT!
FÕrçalarÕ de÷iútirmeden ve herhangi bir eriúim panelini açmadan önce kontak anahtarÕnÕ kapatÕn (O) ve anahtarÕ çÕkarÕn.
1 Bkz. úekil 2. Ya stÕk Tahrik Güvertesinin sa÷ tarafÕndan (1) kavrayarak gösterildi÷i úekilde mandallanana (16) kadar yukarÕya do÷ru kaldÕrÕn.
2 Elinizi Toz Kontrol Örtüsünün (2) altÕna koyun ve YastÕk Tutucuyu (4) esnek yastÕk tutucu takÕmÕndan çÕkarÕn. NOT: Tutucuyu sÕkÕca kavrayÕn
ve tutucuyu Sol Vida Diúi kullandÕ÷Õndan dolayÕ saat yönünde (sa÷ tarafa do÷ru) çevirin.
3 27 inç (68 cm) çapÕnda bir Parlatma YastÕ÷Õ (AA) kullanÕn. YastÕklar ve parçalarÕn seçimi konusunda bulundu÷unuz yerdeki Nil¿ sk A/S
Distribütörüne baúvurun.
4 Plastik YastÕk Tutucuyu (4) Ya stÕ
yerleútirin. NOT: Önemli !!! MandalÕn tÕklama sesini duyana kadar tutucuyu içeriye do÷ru çevirin; böylece yastÕk malzemesinin uygun biçimde
sÕkÕútÕrÕlmasÕ ve tutucunun zemine çarpmayacak úekilde yukarÕ çekilmesi yoluyla yastÕ÷Õn gerekli úekilde gerginleútirilmesi sa÷lanÕr.
÷Õn (AA) merkezine do÷ru takÕn. Daha sonra tutucuyu saat yönünün tersine (sola do÷ru) çevirerek yeniden
úEKIL 2
FORM NO. 56041655 - UHR 70-1700 - A-7
Page 8

A-8 / TÜRKÇE
TOZ TOPLAMA TORBASININ TAKILMASI
The UHR 70-1700, PN 56391185 nolu toz toplama torbasÕnÕ kullanmaktadÕr (6’lÕ paketler halinde satÕlÕr).
Bkz. úekil 3. Toz Toplama TorbasÕnÕ (5) açÕn ve Mukavva Tutucunun (AA) üzerine do÷ru tutarak makinenin sol tarafÕnda bulunan YastÕk Tahrik
Güvertesi (1) üzerinde yer alan Toplama Borusuna (BB) geçirin.
NOT: Toz Toplama TorbasÖ (5) veya isteøe baølÖ PN56422083 nolu Aktif Toz Kontrol Kiti (21) takÖlÖ olmadan UHR70-1700 cihazÖnÖ
çalÖûtÖrmayÖn. Aksi halde parlatma tozu havaya savrulacaktÕr. Aktif Toz Kontrol Kiti (21), Ana Kontak AnahtarÕnÕn (A) AÇIK konumda oldu÷u, YastÕk
Tahrik Güvertesinin (1) aúa÷Õda oldu÷u ve øLERø/GERø Sürme PedalÕnÕn (8)
Fazla olan Toz Toplama TorbalarÕ, úekilde gösterildi÷i gibi Yedek Toz TorbasÕ Deposunda (18) saklanabilir. TorbalarÕ tutturmak için Lastik KayÕúÕ
(CC) úekilde görüldü÷ü gibi takÕn.
boúta oldu÷u durumlarda çalÕúÕr.
úEKIL 3
18
5
AA
CC
BB
A-8 - FORM NO. 56041655 - UHR 70-1700
revised 8/13
Page 9

TÜRKÇE / A-9
HER KULLANIMDAN ÖNCE
1 Operatör kumanda cihazlarÕ ve bunlarÕn iúlevlerini tam olarak anladÕ÷ÕnÕzdan emin olun.
2 Ana Kontak AnahtarÕnÕ (A) AÇIK (I) konuma getirin ve Batarya Durum Göstergesini (B) kontrol edin. KÕrmÕzÕ ÕúÕk yanmasÕ halinde, makineyi
kullanmadan önce bataryayÕ yeniden doldurun.
3 Yeni veya temiz bir yata÷Õn takÕlÕp takÕlmadÕ÷ÕnÕ kontrol edin.
4 Toz Toplama TorbasÕnÕn (5) takÕlÕ olup olmadÕ÷ÕnÕ kontrol edin.
PARLATILACAK ZEMININ PLANLANMASI
1 Zeminin çizilmesini ve parlatma performansÕnÕn kötü olmasÕnÕ engellemek için, zemini önceden süpürün veya zeminde bulunan çöpleri
kaldÕrÕn.
2 Minimum durma veya baúlama olacak úekilde uzun sürüú alanlarÕ belirleyin.
3 Direklere çarpmaktan ya da makinenin kenarlarÕnÕ sürtmekten kaçÕnÕn.
MAKINENIN ÇALIúTIRILMASI
NOT: Parantez içinde verilen koyu numaralar veya harÀ er, A-4 - A-5 arasÕ sayfalarda gösterilen bir bileúeni belirtmektedir.
KÕlavuzun MAKøNENøN KULLANIMA HAZIRLANMASI ve HER KULLANIMDAN ÖNCE bölümlerinde verilen talimatlarÕ uygulayÕn.
1 Makine üzerine oturduktan sonra Direksiyon E÷im AyarÕ (9) yoluyla Direksiyonu (11) rahat bir kullanma pozisyonuna ayarlayÕn.
2 Ana Kontak AnahtarÕnÕ (A) AÇIK (I) konuma getirin. Böylece Batarya Durum Göstergesi IúÕ÷Õ/IúÕklarÕ (B) ve Saat Ölçer / Hata EkranÕ (C)
görüntülenecektir.
3 Makineyi çalÕúma yapÕlacak alana götürmek için, øleri hareket etmek üzere øLERø/GERø Sürme PedalÕnÕn (8) ön tarafÕna ve Geriye gitmek
üzere pedalÕn arka tarafÕna yatay basÕnç uygulayÕn. NOT: Ön tahrik tekerle÷inde bir yerleúik elektromanyetik fren sistemi vard
GERø Sürme PedalÕnÕn (8) boúta oldu÷u ya da Ana Kontak AnahtarÕnÕn (A) KAPALI konumda oldu÷u durumlarda etkin hale gelmektedir.
Manuel olarak geçersiz kÕlma talimatlarÕ için ELEKTROMANYETøK FREN bölümüne bakÕnÕz.
4 ÇalÕúma yapÕlacak alana gelindi÷inde, yastÕk basÕncÕ, Ana Kontak AnahtarÕ (A) kapalÕ konuma getirilerek ayarlanabilir. Ana Kontak AnahtarÕnÕ
(A) açarken YastÕk Tahriki Yükseltme / Alçaltma AnahtarÕna (E) basÕlÕ tutun. Ekranda (C) “Ayarla” (‘Adjust’) sözcü÷ü göründü÷ündeYastÕk
Tahriki Yükseltme / Alçaltma AnahtarÕ serbest bÕrakÕlabilir. Serbest bÕrakÕldÕ÷Õnda, ekranda “1”, “2” ya da “3” sayÕ
Bunlar yastÕk basÕnç ayarlarÕdÕr ve “3” en yüksek yastÕk basÕnç ayarÕdÕr. YastÕk basÕncÕnÕ de÷iútirmek için, YastÕk Tahriki Yükseltme / Alçaltma
AnahtarÕna (E) basarak 1, 2 ve 3 arasÕnda geçiú yapabilirsiniz. Parlatmak istedi÷iniz ayarÕ seçtikten sonra, bu ayarÕ belle÷e almak için Ana
Kontak AnahtarÕnÕ (A) kapalÕ konuma getirin. Bu ayar, yukarÕda açÕklanan prosedür kullanÕlarak de÷iútirilmesine kadar kontrol panelinin
belle÷inde kalacaktÕr.
5 ÇalÕúma yapÕlacak alana geldi÷inizde, makineyi øLERø veya GERø hareket ettirmek için makinenin øLERø/GERø Sürme PedalÕna (8) basÕn.
Yas tÕk Tahrik Güvertesi (1) indirilmeden önce makine mutlaka hareket etmiú olmalÕdÕr.
6 Makineyi hareket ettirdikten sonra, YastÕk Tahriki Yükseltme / Alçaltma AnahtarÕna (E) basarak YastÕk Tahrik Güvertesini (1) indirin. Kontrol
panelinde bulunan YastÕk Tahrik Göstergesi IúÕ÷Õ (D) aúa÷Õ inerken sarÕ yanacak ve tam indi÷inde yeúil yanacak ve yastÕk dönmeye
baúlayacaktÕr. YastÕk Tahriki Yükseltme / Alçaltma AnahtarÕna (E) basarak YastÕk Tahrik Güvertesini (1) yükseltebilirsiniz. YastÕk Tahrik
Göstergesi IúÕ÷Õ (D) yukarÕ çÕkarken kÕrmÕzÕ yanacak ve tam yükseldikten sonra KAPALI konuma gelecektir. NOT: Operatörün aya÷Õ Sürme
PedalÕndan kaldÕrÕldÕ÷Õnda, pedal otomatik olarak boú
Göstergesi IúÕ÷Õ (D) sarÕ olarak yanacaktÕr). Makineyi durdurmadan önce YastÕk Tahrik Güvertesini yükseltin. YastÕk aúa÷Õda ve çalÕúÕyorken
makinenin durdurulmasÕ halinde zemin zarar görebilir.
7 Düz çizgileri takip ederek parlatmaya baúlayÕn ve her geçiúin 2-3 inç (5-7 cm) içerisine denk gelecek úekilde ayarlayÕn. Zeminin durumuna
göre makine hÕzÕnÕ ayarlayÕn (zemin fazla çizik ise, düzgün parlatma için daha yavaú bir hÕzda sürün). TakÕlÕ olmasÕ halinde, Aktif Toz Kontrol
Kiti (21), Ana Kontak AnahtarÕnÕn (A) AÇIK konumda oldu÷u, YastÕk Tahrik Güvertesinin (1) aúa÷Õda oldu÷u ve øLERø/GERø Sürme PedalÕnÕn
(8) boúta oldu÷u durumlarda çalÕúÕr.
a geçer ve yastÕk motoru yaklaúÕk bir saniye sonra kapanacaktÕr (YastÕk Tahrik
larÕ görüntülenecektir.
Õr ve øLERø/
DùKKAT!
Yas tÕk aúa÷Õda ve çalÕúÕyorken makinenin durdurulmasÕ halinde zemin zarar görebilir.
8 Parlatma iúlemi sÕrasÕnda makineyi durdurarak, yastÕ÷Õ kaldÕrmak ve yastÕ÷Õn zemin cilasÕ ve kirle dolu olup olmadÕ÷ÕnÕ kontrol etmek gerekli
olabilir. Böyle bir durumda, temiz tarafÕ gelecek úekilde yastÕ÷Õ ters çevirin veya temiz bir yastÕk takÕn.
ÖNEMLù NOT: Ünitenin bir acil durumda hÖzla kapatÖlmasÖ gerekli olduøunda, Acil Durum Güç Kapama (10) kolunu itiniz.
FORM NO. 56041655 - UHR 70-1700 - A-9
Page 10

A-10 / TÜRKÇE
KULLANIM SONRASI
1 Ya stÕk Tahrik Güvertesini (1) kaldÕrÕn ve makineyi bir servis alanÕna götürün.
2 Ana Kontak AnahtarÕnÕ (A) KAPALI (O) konuma getirin ve anahtarÕ çÕkarÕn.
3 Parlatma yastÕ÷ÕnÕ çÕkarÕn, yastÕ÷Õ ÕlÕk su ile yÕkayarak kurumasÕ için bir yere asÕn. NOT: Tekrar kullanmadan önce yastÕ÷Õn tam olarak
kurumasÕnÕ sa÷layÕn.
4 Toz Toplama TorbasÕnÕ (5) kontrol edin ve yarÕdan fazla dolu veya zarar görmüú ise yeni bir torba ile de÷iútirin.
5 BakÕm çizelgesini kontrol edin ve gerekli bakÕm iúlemlerini gerçekleútirin.
6 Nemli bir bezle makineyi silin ve sonra temiz ve kuru bir yerde muhafaza edin.
BAKIM ÇIZELGESI
BAKIM KALEMù Günlük HaftalÖk AylÖk YÖllÖk
BataryalarÕn ùarj Edilmesi X
Parlatma YastÕklarÕnÕn Kontrolü/Temizlenmesi/De÷iútirilmesi X
Toz Toplama TorbasÕnÕn Kontrolü/De÷iútirilmesi X
Batarya Su Seviyesinin Kontrolü X
YastÕk Örtüsü Etekli÷inin Kontrolü/De÷iútirilmesi X
Direksiyon Zinciri Gerginli÷i X
Ya÷lama X
YastÕk tahrik motorundan tüm toz ve kalÕntÕlarÕ temizleyin. X
YastÕk/Tekerlek Tahriki/Aktüatör MotorlarÕndaki
Karbon FÕrçasÕ AúÕnmalarÕnÕn Kontrolü X
NOT: Bu kÕlavuzda bahsedilen tüm bakÕm kalemleri ile ilgili daha fazla ayrÕntÕ için Servis El KitabÕna bakÕnÕz.
MAKùNENùN YA÷LANMASI
Periyodik olarak ya÷lanmasÕ gereken yerler:
1 – Direksiyon Mili Kardan MafsalÕ (ya÷ deli÷i veya portu)
DIREKSIYON ZINCIRI GERGINLI÷I
Ayda bir kontrol edin ve gerekirse ayarlama yapÕn (ayrÕntÕlÕ talimatlar için servis el kitabÕna bakÕn).
ELEKTROMANYETIK FREN
Bkz. úekil 4. Tahrik/Direksiyon TakÕmÕnda (14) bir yerleúik elektromanyetik fren sistemi vardÕr
ve øLERø/GERø Sürme PedalÕnÕn (8) boúta oldu÷u ya da Ana Kontak AnahtarÕnÕn (A) KAPALI
konumda oldu÷u durumlarda etkin hale gelmektedir. Bu fren, úekilde görüldü÷ü gibi Yün Ya÷ÕltÕsÕ
(Yolk) (AA) arkasÕna orta veya büyük bir tornavida sokarak gerekli hallerde manuel olarak geçersiz
kÕlÕnabilir. Bu iúlem sadece üniteyi itmeniz veya çekmeniz gerekli oldu÷unda yapÕlmalÕdÕr.
úEKIL 4
A-10 - FORM NO. 56041655 - UHR 70-1700
revised 8/13
Page 11

TÜRKÇE / A-11
BATARYALARIN úARJ EDILMESI
Makinenin 1 saat veya daha uzun süre kullanÕldÕ÷Õ ya da Batarya Durum Göstergesi IúÕklarÕnÕn (B) kÕrmÕzÕ yandÕ÷Õ zamanlarda bataryalarÕ úarj
edin.
BataryalarÖ úarj Etmek için...
1 ÖNEMLù!: Uygun havalandÕrma sa÷lamak için Batarya Bölmesi Kapa÷ÕnÕ (13) açÕn.
2 Batarya Konnektör TakÕmÕnÕ (7) çÕkarÕn ve batarya úarj cihazÕnÕ bataryalara ba÷lÕ ¿ úe takÕn.
4 Batarya úarj cihazÕ üzerindeki talimatlarÕ uygulayÕn.
5 BataryalarÕ úarj ettikten sonra, tüm batarya hücrelerindeki sÕ
getirmek için, gerekli ise, damÕtÕk su ilave edin.
vÕ seviyesini kontrol edin. SÕvÕ seviyesini doldurma tüplerinin altÕna kadar
UYARI!
BataryalarÕ úarj etmeden doldurmayÕn.
BataryalarÕ iyi havalandÕrÕlmÕú alanda úarj edin.
Bataryalar üzerinde çalÕúÕrken sigara içmeyin.
BataryalarÖn BakÖm ùûlemleri...
* Bütün takÕlarÕnÕzÕ çÕkarÕn
* Sigara içmeyin
* Emniyet gözlükleri, lastik eldivenler ve bir lastik önlük takÕn.
* øyi havalandÕrÕlmÕú alanda çalÕúÕn.
* Aletlerin aynÕ anda birden fazla batarya kutup baúÕna temas etmesine izin vermeyin
* BataryalarÕ de÷iútirirken kÕvÕlcÕm çÕkmasÕnÕ önlemek için HER ZAMAN negatif (toprak) kabloyu önce sökün.
* BataryalarÕ takarken HER ZAMAN negatif kabloyu en son ba÷layÕn.
DùKKAT!
Zemin yüzeylerine zarar gelmesini önlemek için, úarj iúleminden sonra bataryalarÕn üzerinden kalan su ve asidi temizleyin.
BATARYA SU SEVIYESININ KONTROL EDILMESI
BataryalarÕn su seviyesini en az haftada bir kontrol edin.
BataryalarÕ úarj ettikten sonra, hava kapaklarÕnÕ çÕkarÕn ve her batarya hücresindeki su seviyesini kontrol edin. Her batarya hücresini seviye
göstergesine kadar (ya da ayÕrÕcÕlarÕn üzerinde 10 mm seviyesine kadar) doldurmak için bir batarya doldurma kabÕ (ço÷u oto parçalarÕ
ma÷azasÕnda mevcuttur) içinde damÕtÕk veya demineralize su kullanÕn. BataryalarÕ aúÕrÕ DOLDURMAYIN!
DùKKAT!
BataryalarÕn aúÕrÕ doldurulmasÕ halinde asit zemine dökülebilir.
Hava baúlÕklarÕnÕ sÕkÕn. BataryalarÕn üst taraÀ arÕnÕ karbonat ve sudan oluúan bir çözelti (2 yemek kaúÕ÷Õ karbonat ve 1 litre su) ile yÕkayÕn.
Servis Notu: Batarya bölmesinin alt tarafÕnda bir boúaltma tapasÕ vardÕr.
FORM NO. 56041655 - UHR 70-1700 - A-11
Page 12

A-12 / TÜRKÇE
GENEL SORUN GùDERME
OPERATÖR GÖSTERGE PANELù DURUM IúIKLARI:
Saat Ölçer / Hata EkranÖ (C): E÷er Saat Ölçer / Hata EkranÕnda (C) bir hata kodu görüntülenirse, bir sistem hatasÕ ortaya çÕkmÕú demektir, hata
ekranÕnda “Err” yazÕsÕ olacak ve iki rakamlÕ kod(lar) görüntülenecektir. Hata kodu açÕklamalarÕ ve düzeltici iúlemler için Servis El KitabÕna bakÕnÕz.
GùRDAP ùúARETLERù
• Zemin temiz de÷ildir.
• ParlatÕlacak alan iyi süpürülmemiútir- yastÕk veya fÕrçada çöp vardÕr.
• Bu iú için uygun olmayan yastÕk.
• Makinenin çok hÕzlÕ hareket ettirilmesi.
ZEMùNDEKù DAùRELER
• YastÕk çalÕúÕrken makinenin sabit durmasÕ.
ZEMùN PARLATMA ùúLEMùNùN DURMASI
• Uygun olmayan yastÕk … çok güçlü.
• Makinenin çok hÕzlÕ hareket ettirilmesi.
MAKùNENùN ÇALIúIRKEN TùTREMESù
• Kusurlu yastÕk … bir tarafÕ di÷erine göre daha yo÷un.
• YastÕk, yastÕk tutucu kÕllarÕna tam olarak “oturmamÕútÕr”
• YastÕk tutucu dengesiz - de÷iútirin.
MAKùNENùN ÇALIúMAMASI
• Acil Durum Güç Kapama (10) kolunu kontrol edin.
• Operatör koltu÷u emniyet anahtarÕnÕ (12) kontrol edin
• Hem ana hem de hÕz kontrol birimlerindeki hata kodlarÕnÕ kontrol edin (servis el kitabÖna bakÖnÖz)
• Ayak PedalÕ HatasÕ: Operatörün, Ana Kontak AnahtarÕnÕ açmadan (A) øLERø / GERø Tahrik PedalÕnÕ (8) etkin hale getirmesinden
kaynaklanmÕútÕr. Temizlemek için: Kontak anahtarÕnÕ kapatÕn, ekran kapanana kadar bekleyin ve kontak anahtarÕnÕ tekrar açÕn.
A-12 - FORM NO. 56041655 - UHR 70-1700
Page 13

TEKNùK ÖZELLùKLER (ünite üzerinde monte ve test edilen)
Model UHR 70-1700
Model No. 56422001
Voltaj, Bataryalar V 36V
Batarya Kapasitesi Ah 415
Koruma Derecesi IPX3
Ses gücü seviyesi
(IEC 60335-2-72: 2002 Amend. 1:2005, ISO 11201)
Maksimum Tekerlek Zemini Yükleme (Sa÷ Arka) N/mm
Maksimum Tekerlek Zemini Yükleme (Sol Arka) N/mm
Maksimum Tekerlek Zemini Yükleme (orta ön) N/mm2 / psi .88 / 128
Brüt A÷ÕrlÕk lbs. / kg 1,379 / 625
El Kontrollerindeki Titreúimler (ISO 5349-1) m/s
Koltuktaki Titreúimler (EN 1032) m/s
TÕrmanma Yetene÷i
TaúÕma 12.3% (70)
Temizleme 12.3% (7
dB(A)/20Pa 69
2
/ psi .50 / 72
2
/ psi .72 / 105
2
2
1.27 m/s
0.19 m/s
TÜRKÇE / A-13
2
2
0
)
revised 5/09
FORM NO. 56041655 - UHR 70-1700 - A-13
Page 14

B-2 / ENGLISH
TABLE OF CONTENTS
Page
Introduction ........................................................................................... B-3
Parts and Service ................................................................................. B-3
Nameplate ............................................................................................ B-3
Uncrating the Machine .......................................................................... B-3
Important Safety Instructions ................................................................ B-4
Importantes consignes de sécurité ....................................................... B-5
Know Your Machine .....................................................................B-6 – B-7
Preparing the Machine for Use
Batteries ............................................................................................... B-8
Installation of the Burnishing Pad ......................................................... B-9
Installation of the Dust Collection Bag ................................................ B-10
Operating the Machine
Before Each use ................................................................................. B-11
Plan Your Floor Burnishing ................................................................. B-11
Operating The Machine ...................................................................... B-11
Maintenance
After Use .............................................................................................B-12
Maintenance Schedule ....................................................................... B-12
Lubricating the Machine .....................................................................B-12
Steering Chain Tension ...................................................................... B-12
Electromagnetic Brake .......................................................................B-12
Charging the Batteries ........................................................................ B-13
General Machine Troubleshooting
Error Display ....................................................................................... B-14
Swirl Marks ......................................................................................... B-14
Circles on the Floor ............................................................................B-14
Floor Finish Removed ........................................................................B-14
Machine Wobbles During Operation ................................................... B-14
Machine Does Not Run ......................................................................B-14
Technical Speci¿ cations .....................................................................B-15
INTRODUCTION
This manual will help you get the most from your Nilfi sk S/A UHR70-1700. Read it thoroughly before operating the machine.
Note: Bold numbers in parentheses indicate an item illustrated on pages B-6 – B-7.
This product is intended for commercial use only.
PARTS AND SERVICE
Repairs, when required, should be performed by Nil¿ sk S/A service personnel using Nil¿ sk S/A original replacement parts and accessories.
Call Nil¿ sk S/A for repair parts or service. Please specify the Model and Serial Number when discussing your machine.
MODIFICATIONS
Modi¿ cations and additions to the cleaning machine which affect capacity and safe operation shall not be performed by the customer or user
without prior written approval from Nil¿ sk S/A. Unapproved modi¿ cations will void the machine warranty and make the customer liable for any
resulting accidents.
NAME PLATE
The Model and Serial Number of your machine are shown on the Nameplate on the machine. This information is needed when ordering repair
parts for the machine. Use the space below to note the Model and Serial Number of your machine for future reference.
MODEL ________________________________________________
SERIAL NUMBER ________________________________________
UNCRATING
When the machine is delivered, carefully inspect the shipping packaging and the machine for damage. If damage is evident, save the shipping
carton (if applicable) so that it can be inspected. Contact the Nil¿ sk S/A Customer Service Department immediately to ¿ le a freight damage claim.
Refer to the unpacking instruction sheet included with the machine to remove the machine from the pallet.
B-2 - FORM NO. 56041655 - UHR 70-1700
revised 3/13
Page 15

ENGLISH / B-3
IMPORTANT SAFETY INSTRUCTIONS
This machine is only suitable for commercial use, for example in hotels, schools, hospitals, factories, shops and of¿ ces other than
normal residential housekeeping purposes.
Read all instructions before using.
WARNING!
To reduce risk of ¿ re, electric shock, or injury:
• Use only as described in this manual. Use only manufacturer’s recommended attachments.
• This machine shall be used only by properly trained and authorized persons.
• This machine is for dry use only and shall not be used or stored outdoors in wet conditions.
• Do not allow to be used as a toy. Close attention is necessary when used by or near children.
• Keep sparks, À ame and smoking materials away from batteries. Explosive gases are vented during normal operation.
• Charging the batteries produces highly explosive hydrogen gas. Charge batteries only in well-ventilated areas, away from open
À ame. Do not smoke while charging the batteries.
• Remove all jewelry when working near electrical components.
• Turn the key switch off (O) and disconnect the batteries before servicing electrical components.
• Never work under a machine without safety blocks or stands to support the machine.
• Do not dispense À ammable cleaning agents, operate the machine on or near these agents, or operate in areas where À ammable
liquids exist.
• Do not clean this machine with a pressure washer.
• This machine is not approved for use on public paths or roads.
• Do not put any object into openings. Do not use with any opening blocked; keep free of dust, lint, hair, and anything that may
reduce air À ow.
• Do not use on surfaces having a gradient exceeding that marked on the machine.
• When operating this machine, ensure that third parties, particularly children, are not endangered.
• Before performing any service function, carefully read all instructions pertaining to that function.
• Do not leave the machine unattended without ¿ rst turning the key switch off (O) and removing the key. The parking brake is
automatically activated at this time.
• Turn the key switch off (O) and remove the key, before changing the brushes, and before opening any access panels.
• Take precautions to prevent hair, jewelry, or loose clothing from becoming caught in moving parts.
• Do not use without dust bag and / or ¿ lters in place.
• Do not stand on the pad housing.
• This machine is not suitable for picking up health endangering dust.
• The batteries must be removed from the machine before the machine is scrapped. The disposal of the batteries should be
safely done in accordance with your local environmental regulations.
• All doors and covers are to be positioned as indicated in the instruction manual before using the machine.
• Refer to the battery charger OEM product manual for additional speci¿ c battery charger warnings.
• This machine is not intended for use by persons (including children) with reduced physical, sensory or mental capabilities, or
lack of experience and knowledge.
• While on ramps or inclines, avoid sudden stops. Avoid abrupt sharp turns. Use low speed down ramps.
• Observe the Gross Vehicle Weight, GVW, of the machine when loading, driving, lifting or supporting the machine.
revised 3/13
SAVE THESE INSTRUCTIONS
FORM NO. 56041655 - UHR 70-1700 - B-3
Page 16

B-4 / ENGLISH
KNOW YOUR MACHINE
As you read this manual, you will occasionally run across a bold number or letter in parentheses - example: (2). These numbers refer to an item
shown on these pages unless otherwise noted. Refer back to these pages whenever necessary to pinpoint the location of an item mentioned in
the text. NOTE: Refer to the service manual for detailed explanations of each item illustrated on the next 2 pages.
1 Pad Drive Deck
2 Dust Control Shroud
3 Burnishing Pad
4 Pad Retainer
5 Dust Collection Bag
6 Machine Tie Down
7 Battery Connector Assembly
8 FWD/REV Drive Pedal
9 Tilt Steering Wheel Adjuster
10 Emergency Power Disconnect
11 Steering Wheel
12 Operator’s Seat W/Safety Switch
13 Battery Compartment Cover
14 Drive / Steer Wheel
15 Circuit Breakers
40 Amp (Wheel Drive)
5 Amp (Control Circuit)
16 Deck Latch
17 Control Panel
18 Spare Dust Bag Storage
19 Beacon (Optional)
20 Headlight (Optional)
21 Active Dust Control (Optional)
22 Onboard Charger (Optional)
23 Charger Plug
B-4 - FORM NO. 56041655 - UHR 70-1700
Page 17

KNOW YOUR MACHINE
A Master Key Switch
B Battery Condition Indicator
C Hour Meter / Error Display
D Pad Drive Indicator Light
E Pad Drive Raise / Lower Switch
F Horn Indicator Light
G Horn Switch
ENGLISH / B-5
FORM NO. 56041655 - UHR 70-1700 - B-5
Page 18

B-6 / ENGLISH
BATTERIES
If your machine shipped with batteries installed do the following:
x Check that the batteries are connected to the machine (7).
x Turn ON the Key Switch (A) and check the Battery Indicator (B). If the green light is ON, the batteries are ready for use. If the green light is OFF, the
batteries should be charged before use. See the “Charging The Batteries” section.
If your machine shipped without batteries installed do the following:
x Consult your Authorized Nil¿ sk S/A dealer for recommended batteries.
x Install the batteries by following the instructions below.
x DO NOT install three 12 volt batteries in your machine. This affects the stability of the machine.
WARNING!
Use extreme caution when working with batteries. Sulfuric acid in batteries can cause severe injury if allowed to contact the skin
or eyes. Explosive hydrogen gas is vented from the batteries through openings in the battery caps. This gas can be ignited by
any electrical arc, spark or À ame. Do not install any lead-acid battery in a sealed container or enclosure. Hydrogen gas from
overcharging must be allowed to escape.
When Servicing Batteries...
* Remove all jewelry
* Do not smoke
* Wear safety glasses, rubber gloves and a rubber apron
* Work in a well-ventilated area
* Do not allow tools to touch more than one battery terminal at a time
* ALWAYS disconnect the negative (ground) cable ¿ rst when replacing batteries to prevent sparks.
* ALWAYS connect the negative cable last when installing batteries.
CAUTION!
Electrical components in this machine can be severely damaged if the batteries are not installed and connected properly. Nil¿ sk S/A,
a quali¿ ed electrician, or the battery manufacturer should install batteries.
1 Remove the batteries from their shipping crate and carefully inspect them for cracks or other damage. If damage is evident, contact the carrier that delivered
them or the battery manufacturer to ¿ le a damage claim.
2 Turn the Master Key Switch (A) OFF and remove the key.
3 Open and prop the Battery Compartment Cover (13). Remove the battery cables from inside the battery compartment.
4 Your machine comes from the factory with enough battery cables to install six 6 volt batteries. Carefully lift the batteries into the battery compartment and
arrange them exactly as shown in FIGURE 1. Secure the batteries as close to the back of the machine as possible.
5 Install the battery cables as shown. Position the cables so the battery caps can be easily removed for battery service.
6 Carefully tighten the nut in each battery terminal until the terminal will
not turn. Do not over-tighten the terminals, or they will be very dif¿ cult to
remove for future service.
7 Coat the terminals with spray-on battery terminal coating (available at most
auto parts stores).
8 Put one of the black rubber boots over each of the terminals and connect
the Battery Connector Assembly (7).
When changing batteries or the charger, please contact your
local authorized service center for correct battery, charger and
machine settings to prevent battery damage.
FIGURE 1
B-6 - FORM NO. 56041655 - UHR 70-1700
415 Ah, 20 Hr. Rate
revised 3/13
Page 19

ENGLISH / B-7
INSTALLATION OF THE BURNISHING PAD
WARNING!
Disconnect the machines Battery Pack Connection (7) by pulling up on the Emergency Power Disconnect (10) handle, when ever
servicing the machine.
CAUTION!
Turn the key switch off (O) and remove the key, before changing the brushes, and before opening any access panels.
1 See Figure 2. Grab hold of the right side of the Pad Drive Deck (1) and lift up until it Latches (16) in place as shown.
2 Place your hand underneath the Dust Control Shroud (2) and remove the Pad Retainer (4) from the À exible pad holder assembly. NOTE:
Grip the retainer ¿ rmly and turn clockwise (to the right) as the retainer uses a Left Hand thread.
3 Select a 27 inch (68 cm) Dia. Burnishing Pad (AA). See your local Nil¿ sk S/A Distributor for a complete selection of pads and accessories.
4 Insert the plastic Pad Retainer (4) into the center of the Pad (AA). Then reinstall by turning the retainer counter-clockwise (to the left).
NOTE: Important !!! Turn the retainer in until you hear a clicking ratchet sound, this insures proper tightening of the pad by properly
compressing the pad material and drawing up the retainer so it will not strike the À oor.
FIGURE 2
FORM NO. 56041655 - UHR 70-1700 - B-7
Page 20

B-8 / ENGLISH
INSTALLATION OF THE DUST COLLECTION BAG
The UHR70-1700 uses dust collection bag PN 56391185 (sold 6 to a Package).
See Figure 3. Unfold the Dust Collection Bag (5) and while holding onto the Card Board Retainer (AA) insert it over the Collection Tube (BB)
found on the top of the Pad Drive Deck (1) on the left side of the machine.
NOTE: Never operate the UHR70-1700 without a Dust Collection Bag (5) or the optional Active Dust Control Kit (21) PN56422083
installed. Failure to do so will allow the burnishing dust to become airborne. The Active Dust Control Kit (21) is running whenever the Master Key
Switch (A) is ON, the Pad Drive Deck (1) is down and the FWD/REV Drive Pedal (8) is off the neutral position.
Extra Dust Collection Bags can be stored in the Spare Dust Bag Storage (18) box as shown. Install the Rubber Strap (CC) as shown to secure the
bags.
FIGURE 3
18
5
AA
CC
BB
B-8 - FORM NO. 56041655 - UHR 70-1700
revised 8/13
Page 21

ENGLISH / B-9
BEFORE EACH USE:
1 Be sure you understand the operator controls and their function.
2 Turn the Master Key Switch (A) ON (l) and check the Battery Condition Indicator (B). If the red light comes on, recharge the battery pack
before using the machine
3 Check that a new or clean pad has been installed.
4 Check that a Dust Collection Bag (5) is installed.
PLAN YOUR FLOOR BURNISHING:
1 Pre-sweep or scrub À oor area of debris to prevent scratching and poor burnishing performance.
2 Arrange long runs with a minimum of stopping or starting.
3 Avoid bumping into posts or scraping the side of the machine.
OPERATING THE MACHINE
NOTE: Bold numbers or letters in parentheses indicate an item shown on pages B-6 – B-7.
Follow the instructions in PREPARING THE MACHINE FOR USE and the BEFORE EACH USE section of the manual.
1 While seated on the machine adjust the Steering Wheel (11) using the Tilt Steering Wheel Adjuster (9), to a comfortable operating position.
2 Turn the Master Key Switch (A) ON (l). This will display the Battery Condition Indicator Light(s) (B) and Hour Meter / Error Display (C).
3 To transport the machine to the work area, apply even pressure on the front of the FWD/REV Drive Pedal (8) to go Forward or the rear of the
pedal for Reverse. NOTE: The front drive wheel has a built in electromagnetic brake that engages whenever the FWD/REV Drive Pedal (8)
is in the neutral position or when the Master Key Switch (A) is turned OFF. See the ELECTROMAGNETIC BRAKE section for manual override instructions.
4 Once at the work area, the pad pressure can be adjusted by turning the Master Key Switch (A) off. Hold down the Pad Drive Raise / Lower
Switch (E) while turning on the Master Key Switch (A). The word “Adjust” will scroll on the Display (C) and the Pad Drive Raise/Lower Switch
can be released. Once released, the display will read either “1”, “2”, or “3”. These are the pad pressure settings with “3” being the highest
pad pressure setting. To change pad pressure, press the Pad Drive Raise / Lower Switch (E) to increment between 1, 2, and 3. Once you
have selected the setting that you want to burnish with turn the Master Key Switch (A) off to store the setting in the memory. This setting will
remain in the control panel’s memory until it is changed again using the above procedure.
5 When at the work area press the machine’s FWD/REV Drive Pedal (8) to move the machine in either FWD or REV drive. The machine
should always be moving before lowering the Pad Drive Deck (1).
6 Once the machine is moving, lower the Pad Drive Deck (1) by pressing the Pad Drive Raise / Lower Switch (E). The Pad Drive Indicator
Light (D) on the control panel will light yellow when going down and then turns green to con¿ rm the lowered position and the pad begins
to turn. To raise the Pad Drive Deck (1) press the Pad Drive Raise / Lower Switch (E). The Pad Drive Indicator Light (D) will be red when
coming up and then turns OFF to con¿ rm the raised position. NOTE: When the operator’s foot is removed from the Drive Pedal, the pedal
automatically returns to neutral and the pad motor will shut off after about 1 second (the Pad Drive Indicator Light (D) will light yellow). Raise
the Pad Drive Deck before stopping the machine. The À oor may be damaged if the machine is stopped with the pad down and running.
7 Begin burnishing making long straight line passes, overlap each pass 2-3 inches (5-7 cm). Adjust your machine speed according to the
condition of the À oor (if the À
installed will be running whenever the Master Key Switch (A) is ON, the Pad Drive Deck (1) is down and the FWD/REV Drive Pedal (8) is off
the neutral position.
oor is heavily scuffed, drive at a slower rate to ensure proper burnishing). The Active Dust Control Kit (21) if
CAUTION!
The À oor may be damaged if travel of the machine is stopped with the pad down and running.
8 It may become necessary when burnishing to stop the machine, raise the pad and check to see if the pad is loaded up with À oor ¿ nish and
dirt. If it is, turn the pad over to expose the clean side, or install a clean pad.
IMPORTANT NOTE: In the event a fast emergency shutdown of the unit is required push the Emergency Power Disconnect (10).
FORM NO. 56041655 - UHR 70-1700 - B-9
Page 22

B-10 / ENGLISH
AFTER USE
1 Raise the Pad Drive Deck (1), then drive the machine to a service area.
2 Turn the Master Key Switch (A) OFF (O) and remove the key.
3 Remove the burnishing pad, rinse the pad with warm water and hang it up to dry. NOTE: Allow pad to dry completely before using again.
4 Check the Dust Collection Bag (5) if over half full or damaged remove and replace with a new bag.
5 Check the maintenance schedule and perform any required maintenance.
6 Wipe the machine with a damp cloth, then store the machine in a clean, dry place.
MAINTENANCE SCHEDULE
MAINTENANCE ITEM Daily Weekly Monthly Yearly
Charge Batteries X
Check/Clean/Replace Burnishing Pad X
Check/Replace Dust Collection Bag X
Check Battery Water Level(s) X
Check/Replace Pad Shroud Skirt X
Steering Chain Tension X
Lubrication X
Clean all dust and debris from the pad drive motor X
Check Carbon Brush Wear On Pad/Wheel Drive/ Actuator Motors X
NOTE: Refer to the Service Manual for more detail on all maintenance items mentioned in this manual.
LUBRICATING THE MACHINE
Locations requiring periodic oiling are:
Qty 1 - Steering Wheel Shaft Universal Joint (oil hole or port)
STEERING CHAIN TENSION
Inspect once a month and make adjustments if needed (refer to the service manual for detailed instructions).
ELECTROMAGNETIC BRAKE
See Figure 4. The Drive / Steer Wheel Assembly (14) has a built in electromagnetic brake that
is engaged whenever the Master Key Switch (A) is OFF or the FWD / REV Drive Pedal (8) is in
the neutral position. This brake can be manually over ridden if necessary by inserting a medium
to large screwdriver behind the Yoke (AA) as shown. This should only be done in the event you
need to push or pull the unit.
FIGURE 4
B-10 - FORM NO. 56041655 - UHR 70-1700
revised 8/13
Page 23

ENGLISH / B-11
CHARGING THE BATTERIES
Charge the batteries each time the machine is used for 1 hour or longer, or whenever the Battery Condition Indicator Lights (B) light up red.
To Charge the Batteries...
1 IMPORTANT!: Open the Battery Compartment Cover (13) to provide proper ventilation.
2 Disconnect the Battery Connector Assembly (7) and plug the battery charger into the plug connected to the batteries.
4 Follow the instructions on the battery charger.
5 Check the À uid level in all battery cells after charging the batteries. Add distilled water, if necessary, to bring the À uid level up to the bottom of
the ¿ ller tubes.
WARNING!
Do not ¿ ll the batteries before charging.
Charge batteries in a well-ventilated area.
Do not smoke while servicing the batteries.
When Servicing Batteries...
* Remove all jewelry
* Do not smoke
* Wear safety glasses, rubber gloves and a rubber apron
* Work in a well-ventilated area
* Do not allow tools to touch more than one battery terminal at a time
* ALWAYS disconnect the negative (ground) cable ¿ rst when replacing batteries to prevent sparks.
* ALWAYS connect the negative cable last when installing batteries.
CAUTION!
To avoid damage to À oor surfaces, wipe water and acid from the top of the batteries after charging.
CHECKING THE BATTERY WATER LEVEL
Check the water level of the batteries at least once a week.
After charging the batteries, remove the vent caps and check the water level in each battery cell. Use distilled or demineralized water in a battery
¿ lling dispenser (available at most auto parts stores) to ¿ ll each cell to the level indicator (or to 10 mm over the top of the separators). DO NOT
over-¿ ll the batteries!
CAUTION!
Acid can spill onto the À oor if the batteries are over¿ lled.
Tighten the vent caps. Wash the tops of the batteries with a solution of baking soda and water (2 tablespoons of baking soda to 1 liter of water).
Service Note: There is a drain plug in the bottom of the battery compartment.
FORM NO. 56041655 - UHR 70-1700 - B-11
Page 24

B-12 / ENGLISH
GENERAL MACHINE TROUBLESHOOTING
OPERATOR DISPLAY PANEL STATUS LIGHTS:
Hour Meter / Error Display (C): If an error code is displayed on the Hour Meter / Error Display (C) a system error has occurred, the error display
will read “Err” followed by a two digit code(s). Reference the Service Manual for fault code descriptions and corrective action.
SWIRL MARKS
• Floor not clean.
• Area not properly swept - debris in pad or brush.
• Improper pad for the job.
• Moving the machine too fast.
CIRCLES ON THE FLOOR
• Machine standing still while the pad is running.
FLOOR FINISH REMOVED
• Improper pad...too aggressive.
• Moving the machine too slowly.
MACHINE WOBBLES DURING OPERATION
• Defective pad... one side is more dense than the other.
• Pad not “seated” properly into pad holder bristles.
• Padholder out of balance - replace.
MACHINE DOES NOT RUN
• Check Emergency Power Disconnect (10)
• Check operator seat safety switch (12)
• Check for error fault codes in both the main and speed controllers (see service manual)
• Foot Pedal Fault: Caused by the operator activating the FWD / REV Drive Pedal (8) before turning on
the Master Key Switch (A). To Clear: Turn the key switch off, wait until display is off, then turn key switch back on.
B-12 - FORM NO. 56041655 - UHR 70-1700
Page 25

TECHNICAL SPECIFICATIONS (as installed and tested on the unit)
Model UHR 70-1700
Model No. 56422001
Voltage, Batteries V 36V
Battery Capacity Ah 415
Protection Grade IPX3
Sound Power Level
(IEC 60335-2-72: 2002 Amend. 1:2005, ISO 3744)
Maximum Wheel Floor Loading (Right Rear)
Maximum Wheel Floor Loading (Left Rear) N/mm
Maximum Wheel Floor Loading (Center Front) N/mm2 / psi .88 / 128
Gross Weight lbs. / kg 1,379 / 625
Vibrations at the Hand Controls (ISO 5349-1) m/s
Vibrations at the Seat (EN 1032) m/s
Gradeability
Transport 12.3% (70)
Cleaning 12.3% (7
dB(A)/20Pa 69
N/mm2 / psi .50 / 72
2
/ psi .72 / 105
2
2
1.27 m/s
0.19 m/s
ENGLISH / B-13
2
2
0
)
FORM NO. 56041655 - UHR 70-1700 - B-13
Page 26

Page 27

Page 28

Page 29

Page 30

Exemplary list for Scrubber Dryers
RoHS
㒊௳ྡ⛠
杔
(Pb)
䓝㰈
䓝☐
ᗏ䚀
䓝⫸惵ẞ
弗䭉
⍹≐㛢
䓝㸸乧
ᇶ䟨暞ẞ
᥍ไჾ
⢬䎮炾㰉㯜
ๅᏊ㸭㈓ⷂ
ᮏ⾲᱁౫ᤣSJ/T 11364 ⓗ妫⮁份∝˛
O㸸⾲♧富㛰⮚䉐崏✏富惏ờ㈧㛰✮崏㜷㖀Ḕ䙫␒憶✮✏GB/T 26572 妫⮁䙫昷憶奨㰩Ọ˛
X㸸⾲♧富㛰⮚䉐崏凚⯸✏富惏ờ䙫㞷✮崏㜷㖀Ḕ䙫␒憶嵬⇡GB/T 26572 妫⮁䙫昷憶奨㰩˛
Xoo o X X
XoX o o o
Xoo o o o
XoX o X X
Xoo X X o
Xoo o X X
XoX X o o
ooo X o o
Xoo o o o
ooo o X X
ooo o X X
ợ
(Hg)
柘
(Cd)
භ௴杻
(Cr (VI))
᭷ᐖ≀德
ከ⁏勣啾(PBB) ከ⁏Ɽ搩(PBDE)
NAMEPLATE
The Model Number (also known as Part Number) and Serial Number of your machine are shown on the Nameplate, located on the machine.
Date of Manufacture “Date Code” is marked on the nameplate. Date Code: A16, means January 2016.
This information is needed when ordering repair parts for the machine. Use the space below to note the Part Number and Serial Number of your
machine for future reference.
PART NO. ______________________________________________
SERIAL NO. ____________________________________________
Page 31

EU Overensstemmelseserklæring DK
Déclaration CE de conformité B, F
Polermaskine
Polisseuse
Maskinen er fremstillet i overensstemmelse med følgende direktiver:
Cette machine a été fabriquée conformément aux directives suivantes:
Maskindirektiv: 98/37/EØF
Réglementation machine: 98/37/CEE
EMC-direktiv: 89/336/EØF 92/31/EØF 93/68/EØF 98/13/EOF
RéglementationCEM: 89/336/CEE 92/31/CEE 93/68/CEE 98/13/CEE
Lavspændingsdirektiv: 73/23/EØF 93/68/EØF
Harmoniserede standarder: EN 60 335-2-72
Règlement basse tension: 73/23/CEE 93/68/CEE
Normes harmonisées: EN 60 335-2-72
EU Överensstämmelseförsäkran S, FIN
EG-conformiteitsverklaring NL, B
Polermaskine
Ultra high speed vloeronderhoudmachine
Maskinen är tillverkad i överensstämmelse med följande direktiver:
Deze machine is vervaardigd overeenkomstig de volgende richtlijnen:
Maskindirektiv: 98/37/EEG
Machine richtlijn: 98/37/EEC
EMC-direktiv: 89/336/EEG 92/31/EEG 93/68/EEG 98/13/EEG
EMC-richtlijn: 89/336/EEC 92/31/EEC 93/68/EEC 98/13/EEC
Lågspänningsdirektiv: 73/23/EEG 93/68/EEG
Harmoniserade standarder: EN 60 335-2-72
Laagspanning richtlijn: 73/23/EEC 93/68/EEC
Geharmoniseerde normen: EN 60 335-2-72
EU Declaration of Conformity GB, IRL
Declaración de conformidad de la CEE E
Floor burnishing machine
Abrillantadora de suelos
This machine was manufactured in conformity with the following directives and standards:
Esta máquina ha sido fabricada en conformidad a las siguientes normativas:
Machine Directive: 98/37/EEC
Normativa de la máquina: 98/37/CEE
EMC-directive: 89/336/EEC 92/31/EEC 93/68/EEC 98/13/EEC
Normativa EMC: 89/336/CEE 92/31/CEE 93/68/CEE 98/13/CEE
Low voltage directive: 73/23/EEC 93/68/EEC
Harmonized standards: EN 60 335-2-72
Normativa sobre baja tensión: 73/23/CEE 93/68/CEE
Normas armonizadas: EN 60 335-2-72
Dichiarazione di conformità - CEE I
EU Declaração de conformidade da CE P
Macchina Lucidatrice
Polidora
È prodotto in conformità alle disposizioni contenute nelle Direttive del Consiglio dei Ministri:
Esta máquina foi fabricada em conformidae com as seguintes directrizes:
M-direttiva: 98/37/EEC
Directriz de maquinaria: 98/37/CEE
EMC-direttiva: 89/336/EEC 92/31/EEC 93/68/EEC 98/13/EEC
Directriz EMC: 89/336/CEE 92/31/EEC 93/68/CEE 98/13/CEE
LV-direttiva: 73/23/EEC 93/68/EEC
Norme armonizzate: EN 60 335-2-72
Directriz de baixa voltagem: 73/23/CEE 93/68/CEE
Normas harmonizadas: EN 60 335-2-72
EG – Konformitätserklärung D, A
EU:n yhdenmukaisuudesta direktiiveihin FIN
Poliermaschine
Lattian kiillotuskone
Diese Maschine wurde gemä den folgenden Richtlinien hergestellt:
On valmistettu noudattaen yhteisön määräämiä direktiivejä:
Maschinerichtlinie: 98/37/EWG
M-direktiivi: 98/37/CEE
EMV-Richtlinie: 89/336/EWG 92/31/EWG 93/68/EWG 98/13/EWG
EMC-direktiivi: 89/336/CEE 92/31/CEE 93/68/CEE 98/13/CEE
Niederspannungsrichtlinie: 73/23/EWG 93/68/EWG
Harmonisierte normen: EN 60 335-2-72
LV-direktiivi: 73/23/CEE 93/68/CEE
Yhdenmukaistetut standardit: EN 60 335-2-72
ó EU GR
EL vastavusdeklaratsioon ET
Põrandapoleerimismasin tolmuimeja
Käesolev masin on valmistatud kooskõlas järgmiste direktiivide ja standarditega:
98/37/EEC
Masinadirektiiv: 98/37/EEC
EMC: 89/336/EEC 92/31/EEC 93/68/EEC 98/13/EEC
Elektromagnetilise sobivuse direktiiv: 89/336/EEC 92/31/EEC 93/68/EEC 98/13/EEC
EECEEC
Madalpinge direktiiv: 73/23/EEC 93/68/EEC
EN 60 335-2-72
Ühtlustatud standardid: EN 60 335-2-72
ES atbilstības deklarācija LV
Pareiškimas apie atitikimą ES direktyvoms LT
Grīdas spodrināšanas mašīna
Grindų poliravimo mašina
Šī mašīna izgatavota atbilstoši šādām direktīvām un standartiem:
Šis įrenginys pagamintas laikantis tokių direktyvų bei standartų:
Mašīnu direktīva: 98/37/EEC
Įrengimų direktyva: 98/37/EEC
Elektromagnētiskās savietojamības (EMC) direktīva: 89/336/EEC 92/31/EEC 93/68/EEC
98/13/EEC
EMC direktyva: 89/336/EEC 92/31/EEC 93/68/EEC 98/13/EEC
Zemsprieguma direktīva: 73/23/EEC 93/68/EEC
Saskaņotie standarti: EN 60 335-2-72
Žemos įtampos įrengimų direktyva: 73/23/EEC 93/68/EEC
Harmonizuoti standartai: EN 60 335-2-72
Deklaracija EU o skladnosti SL
Prehlásenie o súlade EÚ SK
Stroj za poliranje tal
Zariadenie na leštenie povrchov
Ta stroj je izdelan v skladu z naslednjimi smernicami in standardi:
Toto zariadenie bolo vyrobené v súlade s nasledujúcimi direktívami a normami:
Smernica o strojih: 98/37/EEC
Direktíva o zariadeniach: 98/37/EEC
Smernica o elektromagnetni združljivosti (EMC): 89/336/EEC 92/31/EEC 93/68/EEC
98/13/EEC
Direktíva EMC: 89/336/EEC 92/31/EEC 93/68/EEC 98/13/EEC
Smernica o nizki napetosti: 73/23/EEC 93/68/EEC
Harmonizirani standardi: EN 60 335-2-72
Direktíva o nízkom napätí: 73/23/EEC 93/68/EEC
Súvisiace normy: EN 60 335-2-72
EU Prohlášení o shodě CS
Deklaracja zgodności z normami UE PL
Stroj pro leštění podlah
Polerka podłogowa
Tento stroj byl vyroben ve shodě s následujícími směrnicemi a normami:
Niniejsze urządzenie zostało wyprodukowane w zgodzie z następującymi dyrektywami i
normami UE:
Směrnice o strojním zařízení: 98/37/EEC
Dyrektywa dotycząca maszyn: 98/37/EEC
Směrnice o elektromagnetické kompatibilitě: 89/336/EEC 92/31/EEC 93/68/EEC 98/13/EEC
Dyrektywa: kompatybilność elektromagnetyczna 89/336/EEC 92/31/EEC 93/68/EEC
98/13/EEC
Směrnice o nízkém napětí: 73/23/EEC 93/68/EEC
Harmonizované normy: EN 60 335-2-72
Dyrektywa: urządzenia elektromagnetyczne niskonapięciowe 73/23/EEC 93/68/EEC
Zharmonizowane normy: EN 60 335-2-72
EU megfelelőségi nyilatkozat HU
Декларация изготовителя о соответствии директивам ЕС
Padlófényező-/padlókefélő-gép
Машина для полировки полов
Ez a gép az alábbi irányelvekkel és szabványokkal összhangban készült:
Данная машина разработана в соответствии со следующими инструкциями и
стандартами:
Gépészeti irányelvek 98/37/EEC
Инструкция по разработке машин: 98/37/EEC
EMC-irányelvek 89/336/EEC 92/31/EEC 93/68/EEC 98/13/EEC
Инструкция EMC: 89/336/EEC 92/31/EEC 93/68/EEC 98/13/EEC
Kisfeszültségű irányelvek: 73/23/EEC 93/68/EEC
Harmonizált szabványok: EN 60 335-2-72
Инструкция по использованию низких напряжений: 73/23/EEC 93/68/EEC
Согласованные стандарты: EN 60 335-2-72
TYPE: UHR 70-1700
3.01.2006
Larry Doerr, Vice President Operations
Nilfisk, Inc. Nilfisk A/S
9435 Winnetka Ave North Kornmarksvej 1
Minneapolis, MN 55445 USA DK-2605 Brøndby, Denmark
©Nilfisk Incorporated, 4/04
.pas
Page 32

Nilfi sk A/S
Kornmarksvej 1 · DK-2605 Brøndby · Denmark
Tel.: +45 43 23 81 00 · Fax: +45 43 43 77 00
mail.com@nilfi sk.com
www.nilfi sk.com
 Loading...