

Nilfisk-Advance MH 4M-140/560 X, MH 4M-170/890, MH 4M-165/820 X, MH 4M-180/860 L, MH 4M-180/860 X Instructions For Use Manual
...Page 1

MH 4M -
Instructions for use
107140469 F (03. 2015)
Page 2

Page 3

Contents
1 Safety instructions ...........................................................................................................................2
2 Description ........................................................................................................................................2
2.1 Purpose ...................................................................................................................................2
2.2 Operating elements .................................................................................................................2
3 Before starting the cleaner ..............................................................................................................3
3.1 Setting up the cleaner .............................................................................................................3
3.2 Set the brake ...........................................................................................................................3
3.3 Install Crank handle for high pressure hose reel1) ................................................................... 4
3.4 Fit clamp for high-pressure jet tube1) ......................................................................................4
3.5 Fill up detergent tank
3.6 Fill up tank for Nilfisk AntiStone1) ............................................................................................. 4
3.7 Antiscale ..................................................................................................................................5
3.8 Fill up fuel tank ........................................................................................................................5
3.9 Connecting the high pressure hose.........................................................................................5
3.10 Connecting the water supply ...................................................................................................6
3.11 Electrical connection ...............................................................................................................6
3.12 Antifreeze - before first use .....................................................................................................6
4 Control / Operation ...........................................................................................................................7
4.1 Connections ............................................................................................................................7
4.2 Switching on the cleaner .........................................................................................................7
4.3 Pressure regulation (Tornado Lance)1) .................................................................................... 8
4.4 Pressure regulation (VarioPress Gun)1) ................................................................................... 8
4.5 Using cleaning agents1) ........................................................................................................... 8
1)
............................................................................................................. 4
5 Applications and methods ..............................................................................................................8
5.1 Techniques ..............................................................................................................................8
5.2 Some typical cleaning tasks ....................................................................................................9
6 After using the cleaner .................................................................................................................. 11
6.1 Switching off the cleaner .......................................................................................................11
6.2 Disconnecting supply lines .................................................................................................... 11
6.3 Rolling up the electrical cord and storing accessories ..........................................................11
6.4 Storing the cleaner (below 0°C (32°F)) ................................................................................. 11
7 Maintenance ....................................................................................................................................12
7.1 Maintenance plan ..................................................................................................................12
7.2 Maintenance work ................................................................................................................. 12
8 Troubleshooting .............................................................................................................................14
8.1 Indications on Display ...........................................................................................................14
8.2 Other Faults ...........................................................................................................................15
9 Further information ........................................................................................................................15
9.1 Recycling the cleaner ............................................................................................................15
9.2 Guarantee .............................................................................................................................16
9.3 EU Declaration of Conformity ................................................................................................16
9.4 Technical Data .......................................................................................................................17
1)
Options / model variants
Original instructions
1
Page 4

1 Safety instructions
High Pressure Washer SAFETY INSTRUCTIONS
107141898 D (09-2015)
2 Description
2.1 Purpose This high-pressure cleaner has
been designed for professional
use. It can be used for cleaning
agricultural and construction
equipment, stables, vehicles,
rusty surfaces, etc.
The cleaner has not been approved for cleaning surfaces
which comes into contact with
food.
2.2 Operating elements 1 Spray lance
2 Spray lance storage
3 Control panel
4 Pressure gauge
5 Tank fi ller for fuel
See fold-out page at front of these
operating instructions.
6 Receptacle for service
crane and lifting ring
7 Top cover release
8 Crank handle for
High pressure hose
reel (MH 4M..X)
9 High pressure hose
connection for machines
without hose reel
10 Main switch with
temperature controller
1)
Chapter 5 describes the use of
the high-pressure cleaner for
various cleaning jobs.
Always use the cleaner as described in these operating instructions. Any other use may
damage the cleaner or the surface to be cleaned or may result
in severe injury to persons.
11 Detergent metering knob1)
12 Power ON
13 Pump oil low
1)
14 Service interval due/expired
15 Nilfi sk AntiStone low
16 Fuel low
1)
1)
17 Castor with parking brake
18 Supply water connection
19 Tank fi ller for anti-freeze
20 Tank fi ller for Nilfi sk
AntiStone
21 Canister for detergent
22 High pressure hose
reel (MH 4M..X)
23 Cable hook
24 Grip for top cover
1)
2
Options / model variants
Original instructions
Page 5

3 Before starting the cleaner
3.1 Setting up the cleaner Every fuel-burning appliance,
such as pressure washers, depends upon a proper mix of fuel
and air (by weight) for proper
combustion. Therefore some
adjustment of the air regulation
to the burner may be necessary
to take account of altitude and
the resulting air pressure. This
is true whether your fuel is ‘Natural gas’, Propane or Diesel.
Your Nilfisk hot water pressure
washer was thoroughly tested
and adjusted for optimum per-
3.2 Set the brake 1. Before using the cleaner for
formance before it left our factory. The factory is located at approximately 120m (390 ft) above
sea level, and the combustion
settings are optimal for that elevation.
If your location is higher than
1200m (3900 ft) above sea level, your burner may require readjustment for proper performance and best fuel economy.
Contact your Dealer or Nilfisk
for assistance.
the first time, check it carefully to detect any faults or
damage.
2. Run the machine only when
it is in perfect condition.
3. Set the brake.
4. The slope of which the high
pressure cleaner is placed
must not exceed more than
10° in any direction.
1)
Options / model variants
Original instructions
3
Page 6

3.3 Install Crank handle
for high pressure hose
1)
reel
STOP
1. Pull cap of crank in arrow direction.
2. Align tabs on crank with slot
in axle.
3. Put crank on axle of high
pressure hose reel.
4. Fix crank by pushing the cap.
3.4 Fit clamp for highpressure jet tube1)
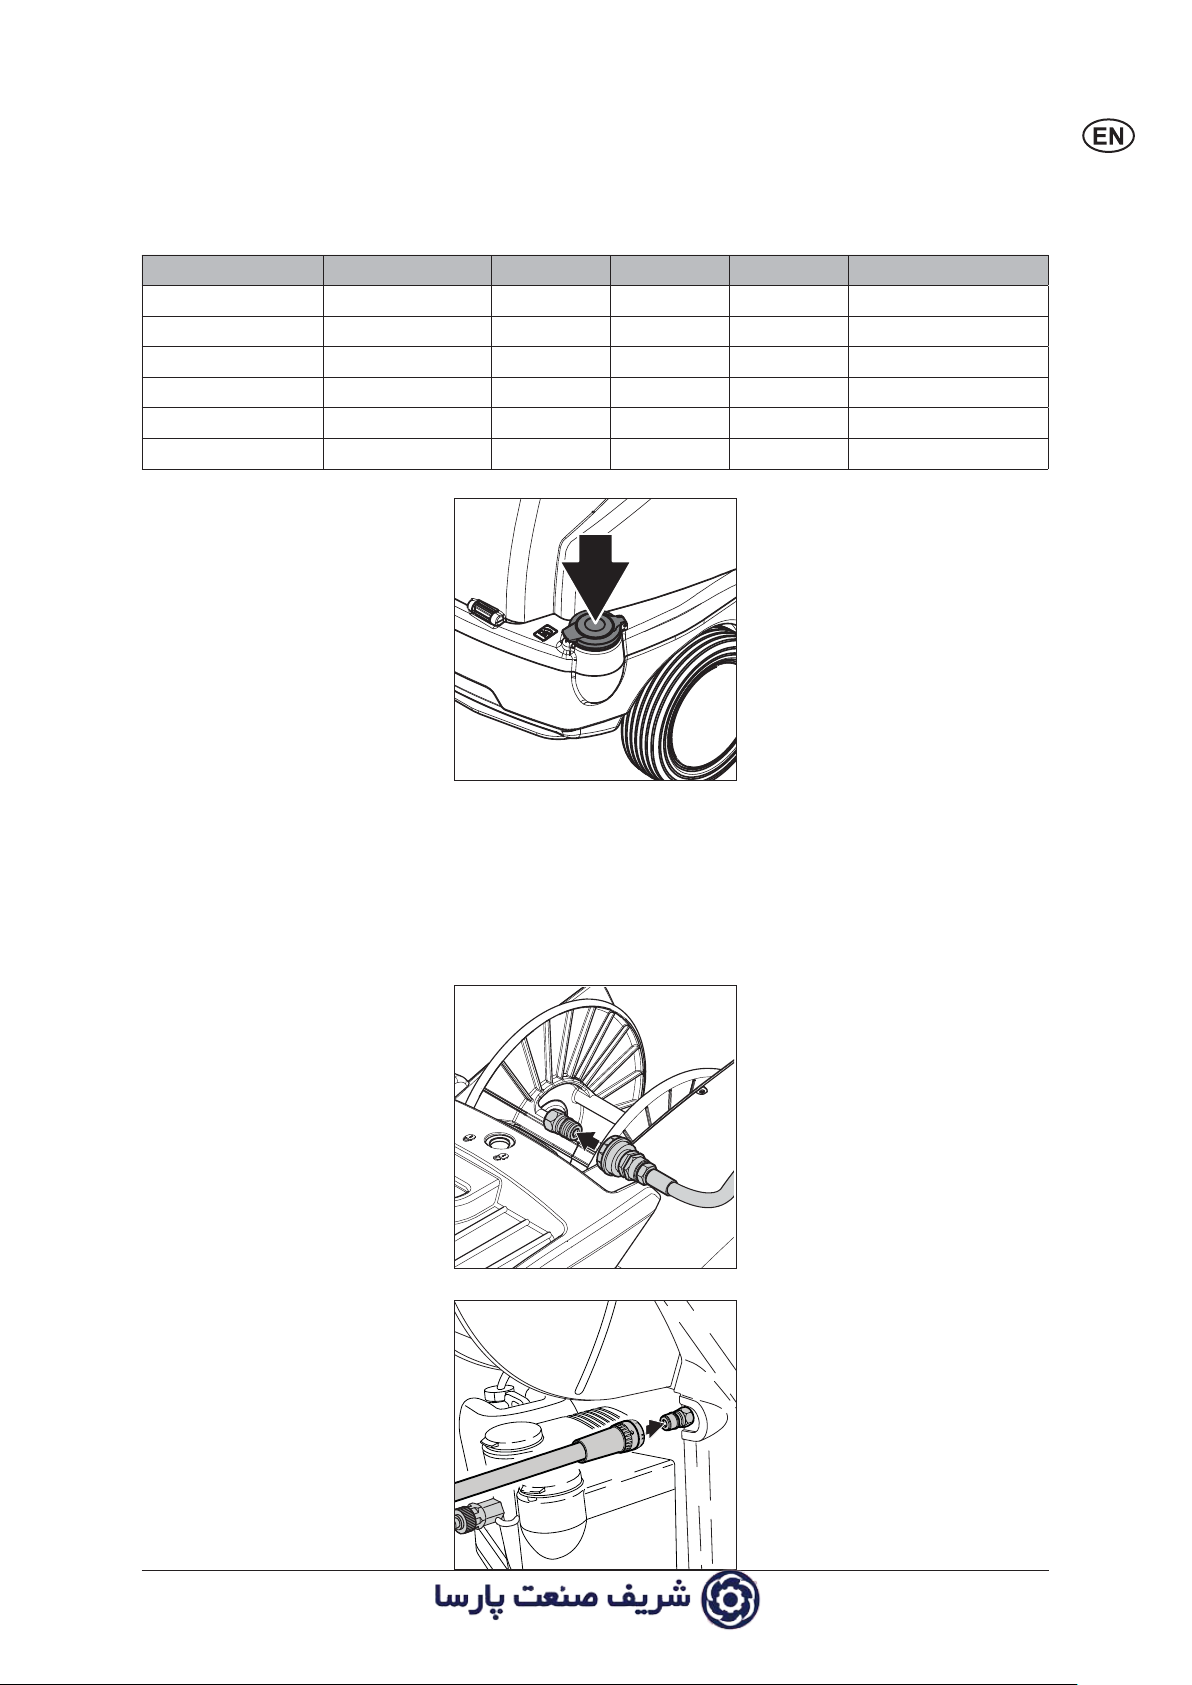
3.5 Fill up detergent tank
ø
1. Insert clamp into the
holder on the sliding
guard:
High-pressure jet
lance1)
clamp
Ø
1.
2.
1)
1. Fill up detergent tank with
prediluted detergent.
Capacity see chapter 9.4 Technical Data
3.6 Fill up tank for Nilfisk
AntiStone
1)
4
1. Fill up Nilfisk Anti-Stone/water softener reservoir with the
sample bottle1) provided. Nilfisk Anti-Stone prevents any
deposits of scale and acts at
the same time as a corrosion
inhibitor.
For compatibility reasons, use
only the tested „Nilfisk AntiStone“. Order the refill pack in
good time (Order no. 8466, 6 x
1 l).
1)
Options / model variants
Original instructions
Page 7
3.7 Antiscale
The Nilfisk Antiscale dosing system is set by the factory.
To adjust the water hardness we
recommend that the inlet water
Use the schematic to find the
right dosage of No Scale/anti
stone and water, and add the
mixture to the antiscale tank.
is tested accordingly.
Machine flow L/h Pump size ml/h ˚dH ˚f ˚e Dosage
800 35 0-12 0-21,5 0 - 15 1:1 = 17ml/h
800 35 12-30 21,5 - 53,7 15 - 37,5 Pure = 35ml/h
900 35 0-12 0-21,5 0 - 15 1:1 = 17ml/h
900 35 12-30 21,5 - 53,7 15 - 37,5 Pure = 35ml/h
1000 35 0-12 0-21,5 0 - 15 1:1 = 17ml/h
1000 35 12-30 21,5 - 53,7 15 - 37,5 Pure = 35ml/h
3.8 Fill up fuel tank
NOTE!
At temperatures below 8° C, the fuel
oil begins to solidify (paraffin precipitation). This can lead to difficulties
in starting the burner. Before the
winter period either add a solidification point / flow improver (available
from the fuel oil trade) to the fuel or
use winter diesel fuel.
3.9 Connecting the high
pressure hose
3.9.1 Machines with high
pressure hose reel
With the machine cold:
1. Fill fuel tank from a clean container with a fresh fuel, heating oil, DIN 51603-1 (without
bio diesel) or Diesel EN 590
(Diesel with a bio diesel content up to 7%).
Diesel according to EN 590
(up to 7% bio diesel) can be
used with the following restrictions: Maximum storage
time in high pressure cleaner
diesel tank: 1 month. Diesel
stored externally for more
than 6 months is not allowed
to be fi lled into Nilfi sk high
pressure cleaners. Diesel
EN 590 is not recommended
for use in HPW's at an ambient temperature below 0°C.
Diesel EN 590 from an open
container must not be used.
1. Put the quick connector of
the high pressure hose onto
the nipple on the axle.
3.9.2 Machines without high
pressure hose reel
1)
Options / model variants
Original instructions
1. Put the quick connector of
the high pressure hose onto
the nipple on the cleaner.
5
Page 8

3.10 Connecting the water
supply
NOTE!
See chapter 9.4 Technical Data for
required quantity of water and water
pressure.
1. Rinse the water supply hose
briefly in order to prevent
sand an other dirt particles
entering into the machine.
2. Connect water supply hose
to the machine.
3. Open water tap.
In order to comply with national
regulations and those of the water
supply companies, it must be
ensured that water cannot fl ow
back if the pressure in the water
mains falls below atmospheric
pressure.
3.11 Electrical connection
In the case of poor water quality
(sand, etc.), we recommend that a
fine water filter is fitted in the water
inlet.
230 00
220 0
Before connecting devices with
voltage changeover1): Check that
the pre-selected voltage on the
machine corresponds with the
voltage of the electrical instal-
We recommend the use of a textilereinforced water hose with a nominal diameter of min. 3/4" (19 mm).
lation. Otherwise the electrical
devices of the machine can be
destroyed.
CAUTION!
When using cable reels:
1. Due to the risk of overheating and fire, always unwind
the power supply cord fully.
The cleaner may only be connected to a correctly installed
electrical installation.
1. Observe safety instructions in
chapter 1.
2. Put the plug into the electrical
socket.
3.12 Antifreeze - before first
use
6
The machine is protected with
anti-freeze from the factory.
Catch the liquid discharging at
first (approx. 5 l) for re-use in a
container.
1)
Options / model variants
Original instructions
Page 9

4 Control / Operation
A
C
B
4.1 Connections
4.1.1 Connecting the spray
lance to the spray gun
NOTE!
Always remove any dirt from the
nipple before connecting the spray
lance to the spray gun.
4.2 Switching on the
cleaner
4.2.1 Cold water operation /
Hot water operation (up
to 100°C)
OFF
140
284
A
20
68
100
212
1. Pull the blue quick-release
grip (A) of the spray gun
backwards.
2. Insert the nipple of the spray
lance (B) into the quickrelease connection and release it.
3. Pull the spray lance (or other
accessory) forwards to check
that it is securely attached to
the spray gun.
1. Move main switch into posi-
°C
°F
40
104
B
tion ‘Cold Water’ (A).
The control electronics system performs a self-test, all the
80
60
140
LEDs light up once.
The motor starts.
lights up.
2. Move main switch into position ‘Hot Water’ (B) and select the temperature.
IMPORTANT!
In the case of appliances with a
hose reel:
In hot water mode, unwind the
high-pressure hose fully from the
hose reel, as otherwise the hose
reel may become warped due to
the effects of the heat.
4.2.2 Steam operation (over
100°C (212°F))
Beware of hot water and
steam discharge up to
150°C when operating in
steam stage.
1)
3. Unlock the spray gun and actuate it.
The burner switches on.
In case of interruptions in work:
Also be sure to insert the safety
catch even during short interruptions in work (see Fig. in section
6.1)
1. Open cover.
2. Turn the twist grip on the
safety control block com plete ly to the left (anti clock wise
direction).
3. Turn the main switch into position ‘Hot Water’.
4. Select temperature (over
100°C).
For special applications: replace
the standard nozzle with the
steam spray nozzle (accessory).
1)
Options / model variants
Original instructions
7
Page 10

4.3 Pressure regulation
(Tornado Lance)
1)
1. Turn the twist grip on the
spray unit:
– High pressure =
clockwise (+) for high pres-
sure
– Low pressure =
anticlockwise (–) for low pres-
sure.
4.4 Pressure regulation
(VarioPress Gun)
For safety reasons, never tie back
or wedge open the trigger of the
spray gun in open position during
operation. The trigger must be
free to close when released, thus
interrupting the fl ow of the water.
1)
4.5 Using cleaning agents
1. Turn the twist grip on the
spray unit:
Water volume
(–) (+)
min. max.
1)
1. Set the desired concentration of cleansing agent at the
cleansing agent dosing facil-
0
ity.
2. Spray the object to be cleaned.
3. Allow the cleaning agent to
work, depending on the degree of soiling. Then rinse off
with the high pressure spray
jet.
For special applications (e.g. disinfection) the exact detergent concentration has to be determined by
measuring cup. For water throughput of the machine see chapter 9.4
technical data.
CAUTION!
Never allow cleaning agent to dry
on the surface to be cleaned. The
surface may be damaged.
5 Applications and methods
5.1 Techniques
8
Effi cient high pressure cleaning is achieved by following a few
guidelines, combined with your own personal experience of specifi c
cleaning tasks. Accessories and detergents, when correctly chosen,
can increase the effi ciency of your pressure washer. Here is some
basic information about cleaning.
1)
Options / model variants
Original instructions
Page 11

5.1.1 Soaking
Encrusted or thick layers of dirt can be loosened or softened up by
a period of soaking. This is for example an ideal method within agriculture – for example, within pig sties. The ideal soaking method
can be achieved via use of foam or simple alkaline detergent. Let
the product lie on the dirty surfaces for around 30 minutes before
pressure washing. The result will be a much quicker high pressure
cleaning process.
5.1.2 Detergent and Foam
Foam or detergent should be applied onto dry surfaces so that the
chemical product is in direct contact with the dirt. Detergents are
applied from bottom to top, for example on a car bodywork, in order
to avoid “super clean” areas, where the detergent collects in higher
concentration and streams downwards. Let the detergent work for
several minutes before rinsing before rinsing but never let it dry on
the surface being cleaned.
5.1.3 Temperature Detergents are more effective at higher temperatures. Greases, oils
and fats can be broken down more easily at higher temperatures
also. Proteins can be cleaned at temperatures of around 60°C. Oils,
traffi c fi lm around 70°C, and grease can be cleaned at 80°C - 90° C.
5.1.4 Mechanical Effect In order to break down tough layers of dirt, additional mechanical
effect may be required. Special lances and rotary or wash brushes
offer this supplementary effect that cuts through dirt.
5.1.5 High Water Flow or
High Pressure
High pressure is not always the best solution and high pressure may
damage surfaces. The cleaning effect also depends upon water
fl ow. Pressure levels of around 100 bar may be suffi cient for vehicle
cleaning (in association with hot water). Higher fl ow levels give the
possibility to rinse and fl ush away large amounts of dirt easily.
5.2 Some typical cleaning tasks
5.2.1 Agriculture
Task Accessories Method
Stables
Pig Pens, Sties
Cleaning of walls,
floors and equipment
Disinfectant
Chemical Foam Injectors
Foam lance
Powerspeed lance
Floor Cleaner
Detergents
Universal
Alkafoam
1. Soaking – apply foam to all surfaces (bottom to top)
and wait for approx. 30 minutes.
2. Remove the dirt from surfaces with the high pressure
lance or chosen accessory. Again, clean from bottom
to top on vertical surfaces.
3. To fl ush away large quantities of dirt, change to low
pressure mode and use the higher fl ow to push away
the dirt.
4. Use recommended disinfectant products and methods
to ensure hygiene. Apply DES 3000 disinfectant once
Disinfectant
the surfaces are perfectly clean.
DES 3000
Machinery
Tractors
ploughs etc.
Detergent injection
Powerspeed lances
Curved lances and underchassis washers
Brushes
1. Apply detergent to vehicle or equipment surfaces in
order to soften up dirt and grime. Apply from bottom
to top.
2. Proceed with cleaning using the high pressure lance.
Clean again from bottom to top. Use accessories to
clean in diffi cult to reach places.
3. Clean fragile areas such as motors, rubber at lower
pressure levels to avoid damage.
1)
Options / model variants
Original instructions
9
Page 12

5.2.2 Vehicle
Task Accessories Method
Vehicle bodywork Standard lance
Detergent injection
Curved lances and underchassis washers
brushes
1. Apply detergent to vehicle or equipment surfaces in
order to soften up dirt and grime. Apply from bottom
to top. In cases of particularly dirty vehicles, pre-spray
with a product such as Allosil in order to remove traces
of insects etc, then rinse at low pressure and apply
normal car cleaning detergent. Let detergents settle
Detergents
Active Shampoo
Active Foam
Sapphire
Super Plus
Active Wax
Allosil
RimTop
for 5 minutes before cleaning off. Metallic surfaces
can be cleaned using RimTop.
2. Proceed with cleaning using the high pressure lance.
Clean again from bottom to top. Use accessories to
clean in diffi cult to reach places. Use brushes in order
to add a mechanical cleaning effect. Short lances can
help for cleaning of motors and wheel arches. Curved
lances or undercarriage washers can be valuable for
the cleaning of car underchassis and wheel arches.
3. Clean fragile areas such as motors, rubber at lower
pressure levels to avoid damage.
4. Apply a liquid wax using the pressure washer in order
to protect the bodywork from pollution.
5.2.3 Buildings and Equipment
Task Accessories Method
General surfaces
Metallic equipment
Foam injectors Standard lance
Curved lances
Tank cleaning
head
1. Apply thick foam over the surfaces to be cleaned.
Apply on dry surfaces. Apply from top to bottom on
vertical surfaces. Let the foam act for up to 30 minutes
for the optimal effect.
2. Proceed with cleaning using the high pressure lance.
Use applicable accessories. Use high pressure to
Detergents
Intensive
J25 Multi
Combi Active
Alkafoam
Disinfectant
DES 3000
dislodge large amounts of incrusted dirt or grime.
Use lower pressure and high water volume in order
to rapidly fl ush away loose dirt and rinse surfaces.
3. Apply DES 3000 disinfectant once the surfaces are
perfectly clean.
Areas covered by amounts of loose dirt, such as animal
remains in slaughterhouses, can be removed by using
high water fl ow to fl ush away the dirt to evacuation pits
or drains.
Tank cleaning heads can be used to clean barrels, vats,
mixing tanks etc. Cleaning heads may be hydraulically or
electrically powered and give the possibility for automatic
cleaning without a constant user.
Rusted or damages surfaces prior
to treatment
Wet Sandblasting
equipment
1. Connect the sandblasting lance to the pressure
washer and place the suction tube in the sand.
2. Always wear protective equipment during sandblasting.
3. Spray the surfaces to be treated with the mix of water
and sand. Rust, paint etc will be stripped off.
These are merely several examples of cleaning tasks that can be solved by a pressure washer in association with accessories and detergents. Each cleaning task is different. Please consult your local dealer
or Nilfi sk representative in order to discuss the best solution for your own cleaning tasks.
1)
10
Options / model variants
Original instructions
Page 13

6 After using the cleaner
6.1 Switching off the
cleaner
6.2 Disconnecting supply
lines
6.3 Rolling up the electrical
cord and storing
accessories
1. Close water tap.
2. Squeeze the spray gun handle until the cleaner is depressurised.
3. Lock the safety catch on the
spray gun.
1. Turn the main switch to position „OFF“.
2. Close water tap.
3. Squeeze the spray gun handle until the cleaner is depressurised.
4. Lock the safety catch on the
spray gun.
4. Switch off the cleaner.
5. Remove the water hose from
the cleaner.
6. Pull out the plug from the
electrical socket.
Risk of tripping!
To prevent accidents, always
carefully roll up the electrical
cord.
1. Wind up the cord
2. Wind up the high pressure
hose.
3. Place the spray lance into
the spray lance storage.
6.4 Storing the cleaner
(below 0°C (32°F))
A
A
1)
Options / model variants
Original instructions
Store the cleaner in a dry room
without danger of frost or protect
as below:
1. Remove the water inlet hose
from the cleaner.
2. Remove the spray lance.
3. Switch on the cleaner with
the main switch in position
"Cold Water".
4. Operate the spray gun.
5. Gradually pour antifreeze
(approx. 5 litres) into the water tank (A).
6. During suction operate the
spray gun two or three times.
7. The machine is protected
against frost when antifreeze
solution emerges from the
spray gun.
8. Lock the safety catch on the
spray gun.
9. Switch off the cleaner.
10. To avoid any risks, store
the cleaner temporarily in a
heated room before using it
again.
11. When the machine is put into
service again, the antifreeze
solution can be collected and
stored for future use.
11
Page 14

7 Maintenance
7.1 Maintenance plan
7.2.1 Water fi lters
Weekly
After the fi rst 50
operating hours
Every six
months or
500 operating
hours
As
required
7.2.2 Fuel fi lter
7.2.3 Checking the pump oil quality
7.2.4 Changing the pump oil
7.2.5 Emptying the fuel oil tank
7.2.6 Flame Sensor
7.2 Maintenance work
7.2.1 Water filters
7.2.2 Maintenance of fuel
filter
A water fi lter is fi tted on the water
inlet to prevent large particles of
dirt from entering into the pump.
1. Unscrew quick coupling.
2. Remove fi lter with tool and
clean it.
1. Open hose clips
2. Replace fuel fi lter
3. Close hose clips
4. Dispose the cleaning solution/damaged filter in accordancewith the disposalregulations.
12
1)
Options / model variants
Original instructions
Page 15

7.2.3 Checking the pump oil
quality
1. Check colour of pump oil.
If the oil has a grey or white
shade, change the oil (see
chapter 7.2.4)
2. Top up cold pump with fresh
oil if necessary.
Oil type see chapter 9.4
Technical Data.
7.2.4 Changing the pump oil 1. Unscrew the oil drain plug
(A) on the pump housing and
dispose of the old oil in accordance with the disposal
regulations.
2. Check the drain plug gasket
and screw in the plug again.
3. Fill with oil and close the oil
filler plug.
Oil grade and capacity see
chapter ‘9.4 Technical Data’.
7.2.5 Flame sensor
1)
1. Remove the sensor and
clean with a soft cloth.
2. Ensure that the sensor is
correctly seated when installing again - the symbols must
face upwards.
1)
Options / model variants
Original instructions
13
Page 16

8 Troubleshooting
8.1 Indications on Display
Indication lights Cause Remedy
>>Constant light
- The appliance is ready for
operation
When switching on, all the
LEDs light up once before the
motor is switched on
Flashing light
- Flow sensor fault
- Water tap closed or water
shortage
- Detergent tank empty
- Pressure regulation on
the safety control block or
VarioPress-lance
water volume
- Machine scaled
> Constant light
- Fuel shortage
> Flashing light
- Nilfi sk AntiStone shortage
>>Constant light
- Service interval has expired
Flashing light
- Service interval due in 20
hours
> Constant light
- Pump oil low
1)
set to low
>
Contact Nilfi sk Service
Cold water operation possible
>
Required volume fl ow and pres-
sure see chapter 9.4 Technical
Data
>
Top up detergent tank or set detergent metering to “OFF“
>
Turn the twist grip on safety control block or VarioPress lance
higher water volume (see chapter
4.4)
Contact Nilfi sk Service
>
>>Top up fuel
Cold water operation is possible
> Top up Nilfi sk AntiStone
>>Contact Nilfi sk Service
Contact Nilfi sk Service
> Top up pump oil
1)
to
14
> Flashing light (simultaneously)
- Leakage or inadmissible op-
erating condition by short-time
operation
- Spray gun leaking
- High pressure hose, coupling
or line system leaking
- Detergent tank empty
- Water inlet fi lter dirty
- High-pressure pump drawing
in air
>
After three times of short-time operation the manchine switches off.
Reset: Turn main switch to position “OFF“, then start again. Keep
spray gun pressed for longer than
3 seconds. If a leak occurs causing the machine to start and stop
briefl y 3 times, then the machine
will switch off.
>
Check Spray gun
>
Replace high pressure hose,
retighten screw fi ttings
>
Top up detergent tank or set detergent metering to “OFF“
>
Clean fi lter (see chapter 7.2.1)
>
Repair leaks
Continued
1)
Options / model variants
Original instructions
Page 17

>>Flashing light (alternately)
- Motor overheated
>>• Turn main switch in position
“OFF“, let the machine cool
down
• Remove/disconnect extension cable
• Possible phase failure; have
electrical connection checked
slow
- Machine overheated
> Flashing light
- Flame sensor sooted
- Ignition or fuel system failure>>
rapid
Contact Nilfi sk Service
Clean fl ame sensor (see chapter
7.2.5)
Contact Nilfi sk Service
Cold water operation possible
8.2 Other Faults
Fault Cause Remedy
not ON
Pressure too low > High pressure nozzle worn out • Replace nozzle
Machine is running with
pulsating pressure and
makes knocking noise
No detergents drawn in > Detergent tank empty • Top up detergent tank
Burner soots > fuel contamination
> Plug not connected to the
electrical plug socket
> Pressure regulation set to low
pressure or VarioPress-lance
set to low water volume.
> Pump has drawn in air as the
detergent tank is empty
> Dirt in detergent tank • Clean detergent tank
> Suction valve at cleaning
agent inlet soiled
• Put the plug into the electrical
socket.
• Check fuse (see chapter 9.4 Technical Data)
• Turn the twist grip on safety control
1)
block clockwise (+) or set VarioPress-lance
(see chapter 4.4)
• Close detergent valve. Remove
lance from gun. Operate spray gun
and let machine run until air in pump
is gone and the machine is running
normally/calm again.
• Remove suction valve and clean or
replace
Contact Nilfi sk Service
1)
to higher water volume
> Burner sooted or adjustment
incorrect
9 Further information
9.1 Recycling the cleaner Make the old cleaner unusable im-
mediately.
1. Unplug the cleaner and cut the
power cord.
Do not discard of electrical appliances with household waste.
As specified in European Directive
1)
Options / model variants
Original instructions
2012/19/EU on old electrical
and electronic appliances, used
electrical goods must be collected separately and recycled
ecologically. Contact your local
authorities or your nearest deal-
er for further information.
15
Page 18

9.2 Guarantee Our general conditions of
business are applicable with
regard to the guarantee.
Unauthorised modifications
to the appliance, the use of
incorrect accessories, spare
parts and cleaning chemicals in
addition to using the appliance
in a way other than for the
intended purpose exempt the
manufacturer from any liability
for the resulting damage.
US only:
This warranty is in effect from
the first day of purchase by the
end user.
- Machines being misused.
- Machines being repaired or
tampered with by unauthorized person(s).
- The use of parts other than
Nilfisk Cleaning Systems,
Inc. original spare parts and/
or accessories.
The burner coil on all Nilfisk
Cleaning Systems, Inc. hot
water/steam cleaners is under
warranty for two (2) years
against defects, and the high
pressure hose is covered for an
initial 30 days, under the same
conditions described above.
9.3 EU Declaration of
Conformity
Each machine will have one
(1) year coverage, from date
of purchase by the end user,
covering parts found defective
due to faulty components,
materials and/or bad
workmanship. Not included in
this warranty coverage are parts
Nilfisk Cleaning Systems, Inc.
will cover labor by an authorized
Nilfisk CSI Dealer for a 12-month
period after the date of purchase
of the machine by the end user.
No other costs, other than laid
out in this warranty program, will
be covered by the warranty.
found defective due to:
- Normal wear and tear (such
as seals, valves, pistons,
bearings, etc.)
- Machine working under ab-
Dated, End-User proof of
purchase must be submitted
with any claim for Warranty
Service.
normal conditions.
We,
Nilfi sk A/S
Kornmarksvej 1,
DK-2605 Broendby
DENMARK
Hereby declare, that the
Product: HPW - Professional - Mobile
Description: 230V 1~, 400V 3~,
50/60Hz, IPX5
Type: MH 4M*
Hadsund 04-03-2015
Anton Sørensen
Senior Vice President – Global R&D
16
Are in compliance with the following
standards:
EN 60335-1:2012
EN 60335-2-79:2012
EN 55014-1:2006+A1:2009+A2:2011
EN 55014-2:1997+A1:2001+A2:2008
EN 61000-3-2:2014
EN 61000-3-11:2000
EN 50581:2012
Following the provisions of:
Machinery Directive 2006/42/EC
EMC Directive 2004/108/EC
RoHS Directive 2011/65/EC
Noise Emission Directive 2000/14/EC
– Conformity assessment procedure according to Annex V.
- Measured noise level [dB]: 75-80
- Guaranteed noise level [dB]: 91-94
1)
Options / model variants
Original instructions
Page 19

9.4 Technical Data
MH 4M Descr.
Voltage 200 V / 3~ / 50Hz
4M-
140/560 X
4M-
165/820 X
4M-
180/860 L
4M-
180/860 X
4M-
170/890
JP
4M-
170/890
4M-190/960
4M-190/960 X
4M-190/960
4M-190/960 X
4M-200/1010
4M-200/1010 X
4M-
200/1010
Voltage 200 V / 3~ / 60Hz JP
Voltage 220 V / 1~ / 60Hz
Voltage 230 V / 1~ / 50Hz EU
Voltage 230 V / 1~ / 60Hz
Voltage 240 V / 1~ / 50Hz
Voltage 400 V / 3~ / 50Hz EU EU EU EU / AU EU
Voltage 400/230 V / 3~ / 50Hz NO
Voltage 220/440 V / 3~ / 60Hz EXPT
Fuse
Power rating
Power consumption
Type of protection
Working pressure
Permissible pressure P
Volume fl ow (max)
Volume fl ow Q
IEC
High pressure nozzle
Temperature t
, hotwater °C 90 90 90 90 90 90 90 90 90 90
max
max
A 16 16 16 16 20 20 16 25 / 16 16 15 / 25
kW 3.1 4.7 5.2 5.2 4.8 4.7 6 / 6.1 6.2 / 6 6.5 / 6.7 6.4 / 6.3
A 15.1 9.2 9.7 9.7 18.9 16.8 13 / 13.1 22.5 / 12.4 12.5 / 12.7
12.4 /
22.5
IP X5 IP X5 IP X5 IP X5 IP X5 IP X5 IP X5 IP X5 IP X5 IP X5
bar
(Mpa)
bar
(Mpa)
135
165 (16.5) 180 (18) 180 (18)
(13.5)
210 250 250 250 250 250 250 250 250 250
170
(17)
170
(17)
190
(19)
190
(19)
200
(20)
200
(20)
l/h 565 820 860 860 890 890 960 960 1010 1010
l/h 525 760 800 800 830 830 900 900 960 960
0340 0450 0450 0450 0500 0500 0500 0500 0500 0550
Temperature t
Max. water inlet temperature
Max. water inlet pressure
Dimensions l x w x h
, steam °C 150 150 150 150 150 150 150 150 150 150
max
°C 40 40 40 40 40 40 40 40 40 40
bar
10(1) 10(1) 10(1) 10(1) 10(1) 10(1) 10(1) 10(1) 10(1) 10(1)
(Mpa)
mm
1053 x
687 x
760
1053 x 687
x 760
1053 x
687 x
760
1053 x
687 x
760
1053 x
687 x
760
1053 x
687 x
760
1053 x 687
x 760
1053 x 687
x 760
1053 x 687
x 760
1053 x
687 x
760
Weight kg 136 136 125 136 136 136 136 / 141 136 / 141 136 / 141 136 / 141
Calculated sound pressure at
a distance of 1 m EN 60704-1
+/- K
*
L
pA
pA
Sound power level L
including KwA = 1,5dB *
wA MAX
Vibration ISO 5349
dB(A)
dB(A) 94 94 94 94 91 91 91 91 92 92
m/s²
80
+/- 1,580+/- 1,580+/- 1,580+/- 1,575+/- 1,575+/- 1,576+/- 1,5
76
+/- 1,5
77
+/- 1,5
77
+/- 1,5
≤ 2,5 ≤ 2,5 ≤ 2,5 ≤ 2,5 ≤ 2,5 ≤ 2,5 ≤ 2,5 ≤ 2,5 ≤ 2,5 ≤ 2,5
Recoil forces N 18.2 30.1 33.3 33.3 36 37 38 38 42 42
Heating capacity
Fuel tank
Detergent tank A / B
kW 48 61 51 61 66 66 66 66 66 66
l15 15 15 151515 15 15 15 15
l10 10 10 101010 10 10 10 10
Oil quantity l1 1 1 111 1 1 1 1
Oil type
* Noise emission acc. to EN 60335-2-79 ZAA.2.7
1)
Options / model variants
Original instructions
BP Energol
GR-XP 220
17
Page 20

HEAD QUARTER
DENMARK
Nilfi sk A/S
Kornmarksvej 1
DK-2605 Brøndby
Tel.: (+45) 4323 8100
www.nilfi sk.com
SALES COMPANIES
ARGENTINA
Nilfi sk srl.
Edifi cio Central Park
Herrera 1855, 6th fl oor/604
Ciudad de Buenos Aires
Tel.: (+54) 11 6091 1571
www.nilfi sk.com.ar
AUSTRALIA
Nilfi sk Pty Ltd
Unit 1/13 Bessemer Street
Blacktown NSW 2148
Tel.: (+61) 2 98348100
www.nilfi sk.com.au
AUSTRIA
Nilfi sk GmbH
Metzgerstrasse 68
5101 Bergheim bei Salzburg
Tel.: (+43) 662 456 400 90
www.nilfi sk.at
BELGIUM
Nilfi sk n.v-s.a.
Riverside Business Park
Boulevard Internationalelaan 55
Bâtiment C3/C4 Gebouw
Bruxelles 1070
Tel.: (+32) 14 67 60 50
www.nilfi sk.be
BRAZIL
Nilfi sk do Brasil
Av. Eng. Luis Carlos Berrini, 550
40 Andar, Sala 03
SP - 04571-000 Sao Paulo
Tel.: (+11) 3959-0300 / 3945-4744
www.nilfi sk.com.br
CANADA
Nilfi sk Canada Company
240 Superior Boulevard
Mississauga, Ontario L5T 2L2
Tel.: (+1) 800-668-8400
www.nilfi sk.ca
CHILE
Nilfi sk S.A. (Comercial KCS Ltda)
Salar de Llamara 822
8320000 Santiago
Tel.: (+56) 2684 5000
www.nilfi sk.cl
CHINA
Nilfi sk
4189 Yindu Road
Xinzhuang Industrial Park
201108 Shanghai
Tel.: (+86) 21 3323 2000
www.nilfi sk.cn
CZECH REPUBLIC
Nilfi sk s.r.o.
VGP Park Horní Počernice
Do Čertous 1/2658
193 00 Praha 9
Tel.: (+420) 244 090 912
www.nilfi sk.cz
DENMARK
Nilfi sk Danmark A/S
Industrivej 1
Hadsund, DK-9560
Tel.: 72 18 21 20
www.nilfi sk.dk
FINLAND
Nilfi sk Oy Ab
Koskelontie 23 E
02920 Espoo
Tel.: (+358) 207 890 600
www.nilfi sk.fi
FRANCE
Nilfi sk SAS
26 Avenue de la Baltique
Villebon sur Yvette
91978 Courtabouef Cedex
Tel.: (+33) 169 59 87 00
www.nilfi sk.fr
GERMANY
Nilfi sk GmbH
Guido-Oberdorfer-Straße 2-10
89287 Bellenberg
Tel.: (+49) (0)7306/72-444
www.nilfi sk.de
GREECE
Nilfi sk A.E.
Αναπαύσεως 29
Κορωπί Τ.Κ. 194 00
Tel.: (30) 210 9119 600
www.nilfi sk.gr
HOLLAND
Nilfi sk B.V.
Versterkerstraat 5
1322 AN Almere
Tel.: (+31) 036 5460760
www.nilfi sk.nl
HONG KONG
Nilfi sk Ltd.
2001 HK Worsted Mills
Industrial Building
31-39, Wo Tong Tsui St.
Kwai Chung, N.T.
Tel.: (+852) 2427 5951
www.nilfi sk.com
HUNGARY
Nilfi sk Kft.
II. Rákóczi Ferenc út 10
2310 Szigetszentmiklós-Lakihegy
Tel.: (+36) 24 475 550
www.nilfi sk.hu
INDIA
Nilfi sk India Limited
Pramukh Plaza, ‘B’ Wing, 4th fl oor, Unit
No. 403
Cardinal Gracious Road, Chakala
Andheri (East) Mumbai 400 099
Tel.: (+91) 22 6118 8188
www.nilfi sk.in
IRELAND
Nilfi sk
1 Stokes Place
St. Stephen’s Green
Dublin 2
Tel.: (+35) 3 12 94 38 38
www.nilfi sk.ie
ITALY
Nilfi sk SpA
Strada Comunale della Braglia, 18
26862 Guardamiglio (LO)
Tel.: (+39) (0) 377 414021
www.nilfi sk.it
JAPAN
Nilfi sk Inc.
1-6-6 Kita-shinyokohama, Kouhoku-ku
Yokohama, 223-0059
Tel.: (+81) 45548 2571
www.nilfi sk.com
MALAYSIA
Nilfi sk Sdn Bhd
Sd 33, Jalan KIP 10
Taman Perindustrian KIP
Sri Damansara
52200 Kuala Lumpur
Tel.: (60) 3603 627 43 120
www.nilfi sk.com
MEXICO
Nilfi sk de Mexico, S. de R.L. de C.V.
Pirineos #515 Int.
60-70 Microparque
Industrial WSantiago
76120 Queretaro
Tel.: (+52) (442) 427 77 00
www.nilfi sk.com
NEW ZEALAND
Nilfi sk Limited
Danish House
6 Rockridge Avenue
Penrose, Auckland 1061
Tel.: (+64) 9526 3890
www.nilfi sk.com.au
NORWAY
Nilfi sk AS
Bjørnerudveien 24
1266 Oslo
Tel.: (+47) 22 75 17 80
www.nilfi sk.no
PERU
Nilfi sk S.A.C.
Calle Boulevard 162, Of. 703, Lima 33Perú
Lima
Tel.: (511) 435-6840
www.nilfi sk.com
POLAND
Nilfi sk Sp. Z.O.O.
Millenium Logistic Park
ul. 3 Maja 8, Bud. B4
05-800 Pruszków
Tel.: (+48) 22 738 3750
www.nilfi sk.pl
PORTUGAL
Nilfi sk Lda.
Sintra Business Park
Zona Industrial Da Abrunheira
Edifi cio 1, 1° A
P2710-089 Sintra
Tel.: (+351) 21 911 2670
www.nilfi sk.pt
RUSSIA
Nilfi sk LLC
Vyatskaya str. 27, bld. 7/1st
127015 Moscow
Tel.: (+7) 495 783 9602
www.nilfi sk.ru
SINGAPORE
Den-Sin
22 Tuas Avenue 2
639453 Singapore
Tel.: (+65) 6268 1006
www.densin.com
SLOVAKIA
Nilfi sk s.r.o.
Bancíkovej 1/A
SK-821 03 Bratislava
Tel.: (+421) 910 222 928
www.nilfi sk.sk
SOUTH AFRICA
WAP South Africa
12 Newton Street
Spartan 1630
Tel.: (+27) 11 975 7060
www.wap.com.za
SOUTH KOREA
Nilfi sk Korea
3F Duksoo B/D, 317-15
Sungsoo-Dong 2Ga
Sungdong-Gu, Seoul
Tel.: (+82) 2497 8636
www.nilfi sk.co.kr
SPAIN
Nilfi sk S.A.
Torre d’Ara,
Passeig del Rengle, 5 Plta. 10
08302 Mataró
Tel.: (34) 93 741 2400
www.nilfi sk.es
SWEDEN
Nilfi sk AB
Taljegårdsgatan 4
431 53 Mölndal
Tel.: (+46) 31 706 73 00
www.nilfi sk.se
SWITZERLAND
Nilfi sk AG
Ringstrasse 19
Kircheberg/Industri Stelz
9500 Wil
Tel.: (+41) 71 92 38 444
www.nilfi sk.ch
TAIWAN
Nilfi sk Ltd
Taiwan Branch (H.K)
No. 5, Wan Fang Road
Taipei
Tel.: (+88) 6227 00 22 68
www.nilfi sk.tw
THAILAND
Nilfi sk Co. Ltd.
89 Soi Chokechai-Ruammitr
Viphavadee-Rangsit Road
Ladyao, Jatuchak, Bangkok 10900
Tel.: (+66) 2275 5630
www.nilfi sk.co.th
a
TURKEY
Nilfi sk A.S.
Serifali Mh. Bayraktar Bulv. Sehit Sk. No:7
Ümraniye, 34775 Istanbul
Tel.: +90 216 466 94 94
www.nilfi sk.com.tr
UNITED ARAB EMIRATES
Nilfi sk Middle East Branch
SAIF-Zone
P.O. Box 122298
Sharjah
Tel.: (+971) (0) 655-78813
www.nilfi sk.com
UNITED KINGDOM
Nilfi sk Ltd.
Nilfi sk House, Bowerbank Way
Gilwilly Industrial Estate, Penrith
Cumbria CA11 9BQ
Tel: (+44) (0) 1768 868995
www.nilfi sk.co.uk
UNITED STATES
Nilfi sk Inc.
14600 21st Avenue North
Plymouth, MN-55447
Tel.: (+1) 800-989-2235
www.nilfi sk.com
VIETNAM
Nilfi sk Vietnam
No. 51 Doc Ngu Str.
P. Vinh Phúc, Q.Ba Dinh
Hanoi
Tel.: (+84) 761 5642
www.nilfi sk.com
 Loading...