

Page 1

9/06 revised 6/11
FORM NO. 56041671
A-English
B-Türkçe
Instructions for Use
Original Instructions
Kullanim Talimatlari
Models: 56265002 (230V), 56265007 (100V J)
AX 410
INSTRUCTIONS FOR USE
Page 2

A-2 / TÜRKÇE
İÇERIKLER TABLOSU
Giriş ................................................................................................ A-3
Parçalar ve servis .......................................................................... A-3
İsim plakası .................................................................................... A-3
Makinenin kasadan çıkarılması ..................................................... A-3
Güvenlik önlemleri ......................................................................... A-4
Topraklama Talimatları ................................................................... A-5
Makinenizin Tanıtımı ................................................................A-6-A-7
Makinenin kullanım için hazırlanması
Solüsyon deposunun doldurulması ............................................... A-8
Kullanımdan önce .......................................................................... A-8
Halının ön spreylenmesi ................................................................ A-8
Temizleme Planı ............................................................................ A-8
Çalıştırma
Makinenin Çalıştırılması ................................................................ A-9
Aksesuarların kullanılması ............................................................. A-9
Sert zemin takımları ....................................................................... A-9
Kullanımdan sonra
Makineyi kullandıktan sonra ........................................................ A-10
Bakım
Bakım Programı ........................................................................... A-10
Vakum pabucu bakımı ................................................................. A-10
Sprey nozulu bakımı .....................................................................A-11
Güç kordonu bakımı .....................................................................A-11
Elektrikli fırçanın basıncının ayarlanması ......................................A-11
Elektrikli fırça bakımı ....................................................................A-11
Fırçanın çıkarılması ......................................................................A-11
Sorun giderme ............................................................................. A-12
Teknik özellikler ........................................................................... A-12
A-2 - FORM NO. 56041671 - AX 410
Page 3

TÜRKÇE / A-3
GİRİŞ
Bu el kitabı Nilfi sk halı temizleme makinenizden en iyi şekilde yararlanmanız amacıyla hazırlanmıştır. Makineyi çalıştırmadan önce bu el kitabını
dikkatle okuyun.
Bu ürün sadece ticari kullanım amacıyla tasarlanmıştır.
PARÇALAR VE SERVİS
Gerektiği zaman tamirler , fabrikada eğitilen servis personelini çalıştıran ve Nilfi sk –Adnvance’in orijinal yedek parçalarını ve aksesuarlarını sağlayan
yetkili Nilfi sk Servis Merkezi tarafından yapılmalıdır.
Parçaların tamiri ve servis için aşağıda belirtilen NILFISK –ADVANCE SATICISINI arayın. Lütfen makinenizin Model ve Seri numarasını belirtin.
İSİM PLAKASI
Makinenizin Model numarası ve Seri numarası , makine üstündeki isim plakasında yer almaktadır. Bu bilgi , makine için yedek parça siparişi verirken
gerekli olacaktır. Aşağıdaki boşluğa, ileride bakmak için makinenizin model numarasını ve seri numarasını yazın.
MODEL NUMARASI ______________________________________________
SERİ NUMARASI ________________________________________________
MAKİNENİN KASADAN ÇIKARILMASI
Makine teslim edildiğinde, nakliye kartonunu ve makineyi hasar bakımından dikkatle inceleyin. Eğer bir hasar varsa, incelenmek üzere nakliye kartonunu
saklayın. Navlun hasar bildirisinde bulunmak için hemen Nilfi sk Müşteri Hizmetleri Bölümü ‘nü arayın.
revised 12/08
FORM NO. 56041671 - AX 410 - A-3
Page 4

A-4 / TÜRKÇE
ÖNEMLİ GÜVENLİK ÖNLEMLERİ
Bu makine sadece ticari kullanım içindir, örneğin normal ev kullanımı amacı dışında otellerde, okullarda, hastanelerde, dükkanlarda ve
ofi slerde kullanılır.
Elektrikli bir cihazı kullanırken şu aşağıdakiler dahil gerekli güvenlik önlemleri alınmalıdır.
Bu makineyi kullanmadan önce talimatları dikkatle okuyun.
UYARI!
Yangın, elektrik çarpması veya yaralanma riskini azaltmak için;
* Makineyi fi şi takılı olarak tek başına bırakmayın. Kullanılmadığında veya servisten önce fi şi prizden çekin.
* Elektrik çarpmasından kaçınmak için yağmurda bırakmayın. Kapalı alanlarda saklayın.
* Makinenin bir oyuncak gibi kullanılmasına izin vermeyin. Çocukların yanında kullanırken çok dikkat edilmelidir.
* Sadece bu el kitabında tanımlandığı gibi kullanın ve imalatçının tavsiyelerine uyun.
* Hasarlı kordonu veya fi şi kullanmayın. Eğer makine uygun çalışmıyorsa veya düşürülmüşse, hasar görmüşse , dışarıda bırakılmışsa,
suya düşürülmüşse, servis merkezine veya satıcısına başvurun.
* Kordonu çekmeyin, kordonu sap veya taşıyıcı olarak kullanmayın, kordonun üstüne kapıyı kapatmayın veya kordonu keskin
kenarların etrafından veya köşelerden çekmeyin. Kordonun üstünde herhangi bir cihazı çalıştırmayın. Kordonu, ısınmış yüzeylerden
uzak tutun.
* Fişi kordonundan çekerek prizden çekmeyin. Fişi prizden çekmek için kordonu değil fi şi tutarak çekin.
* Cihazı veya fi şini ıslak ellerle tutmayın.
* Açıklıklara herhangi bir obje koymayın veya açıklıklar herhangi bir şekilde bloke olmuşken kullanmayın. Açıklıklardaki tozları, saçları,
kılları ve hava akışını azaltabilecek diğer şeyleri temizleyin.
* Giysileri, saçı, parmakları ve vücudun diğer sıkışabilecek parçalarını açıklıklardan ve hareket eden parçalardan uzak tutun.
* Sigara, kibrit veya sıcak kül gibi yanan veya tüten herhangi bir şeyi veya tehlikeli tozları toplamayın.
* Fişi prizden çekmeden önce tüm kontrolleri kapatın.
* Merdivenlerde temizlik yaparken ekstra dikkat gösterin
* Gaz gibi alev alıcı veya yanıcı sıvıları toplamayın veya bu tip maddelerin olduğu yerlerde makineyi kullanmayın.
* Eğer egzozdan köpük veya sıvı gelirse hemen gücü kapatın. Sorun devam ederse Nilfi sk’e başvurun.
* Sprey nozulundan püskürtülen sıvı , sıcaklığı, basıncı veya kimyasal içeriği nedeniyle tehlikeli olabilir.
* Sadece makineyle temin edilen veya talimat el kitabında tanımlanan fırçaları kullanın. Başka fırçaların kullanılması güvenliğe zarar
verebilir.
A-4 - FORM NO. 56041671 - AX 410
BU TALİMATLARI SAKLAYIN
revised 12/08
Page 5

TÜRKÇE / A-5
TOPRAKLAMA TALİMATLARI
Bu cihaz topraklanmalıdır. Makine bozulduğunda, temin edilen topraklama elektrik çarpması riskini azaltmak için yeterli direnci sağlar. Bu makine , ekipman topraklama
iletkenine ve topraklama fi şine sahip bir kordonla temin edilir. Fiş, uygun bir şekilde takılmış olan ve lokal yönetmeliklere göre topraklanmış olan uygun bir prize
takılmalıdır.
TEHLİKE!
Ekipman topraklama iletkeninin uygun olmayan şekilde bağlanması , elektrik çarpması riskine yol açabilir. Prizin uygun şekilde topraklanmış
olup olmadığı konusundaki şüphenizi gidermek için yetkili bir elektrikçiye veya servis personeline başvurun. Makineyle temin edilen fi şi
değiştirmeyin- eğer bu prize uymuyorsa, yetkili bir elektrikçiye uygun bir priz taktırın.
Eğer topraklama pimi hasarlıysa veya kırılmışsa fi şi değiştirin.
Kordondaki yeşil (veya yeşil/ sarı) tel topraklama telidir. Fişi değiştirirken tel sadece topraklama pimine takılmalıdır. Bu makineye bağlı olan uzatma kordonları 12 gauge
olmalıdır, üç çatal dişli fi şi ve prizi olan üç telli kordon. 50 feet (15m) ‘den daha uzun uzatma kordonu kullanmayın.
FORM NO. 56041671 - AX 410 - A-5
Page 6
A-6 / TÜRKÇE
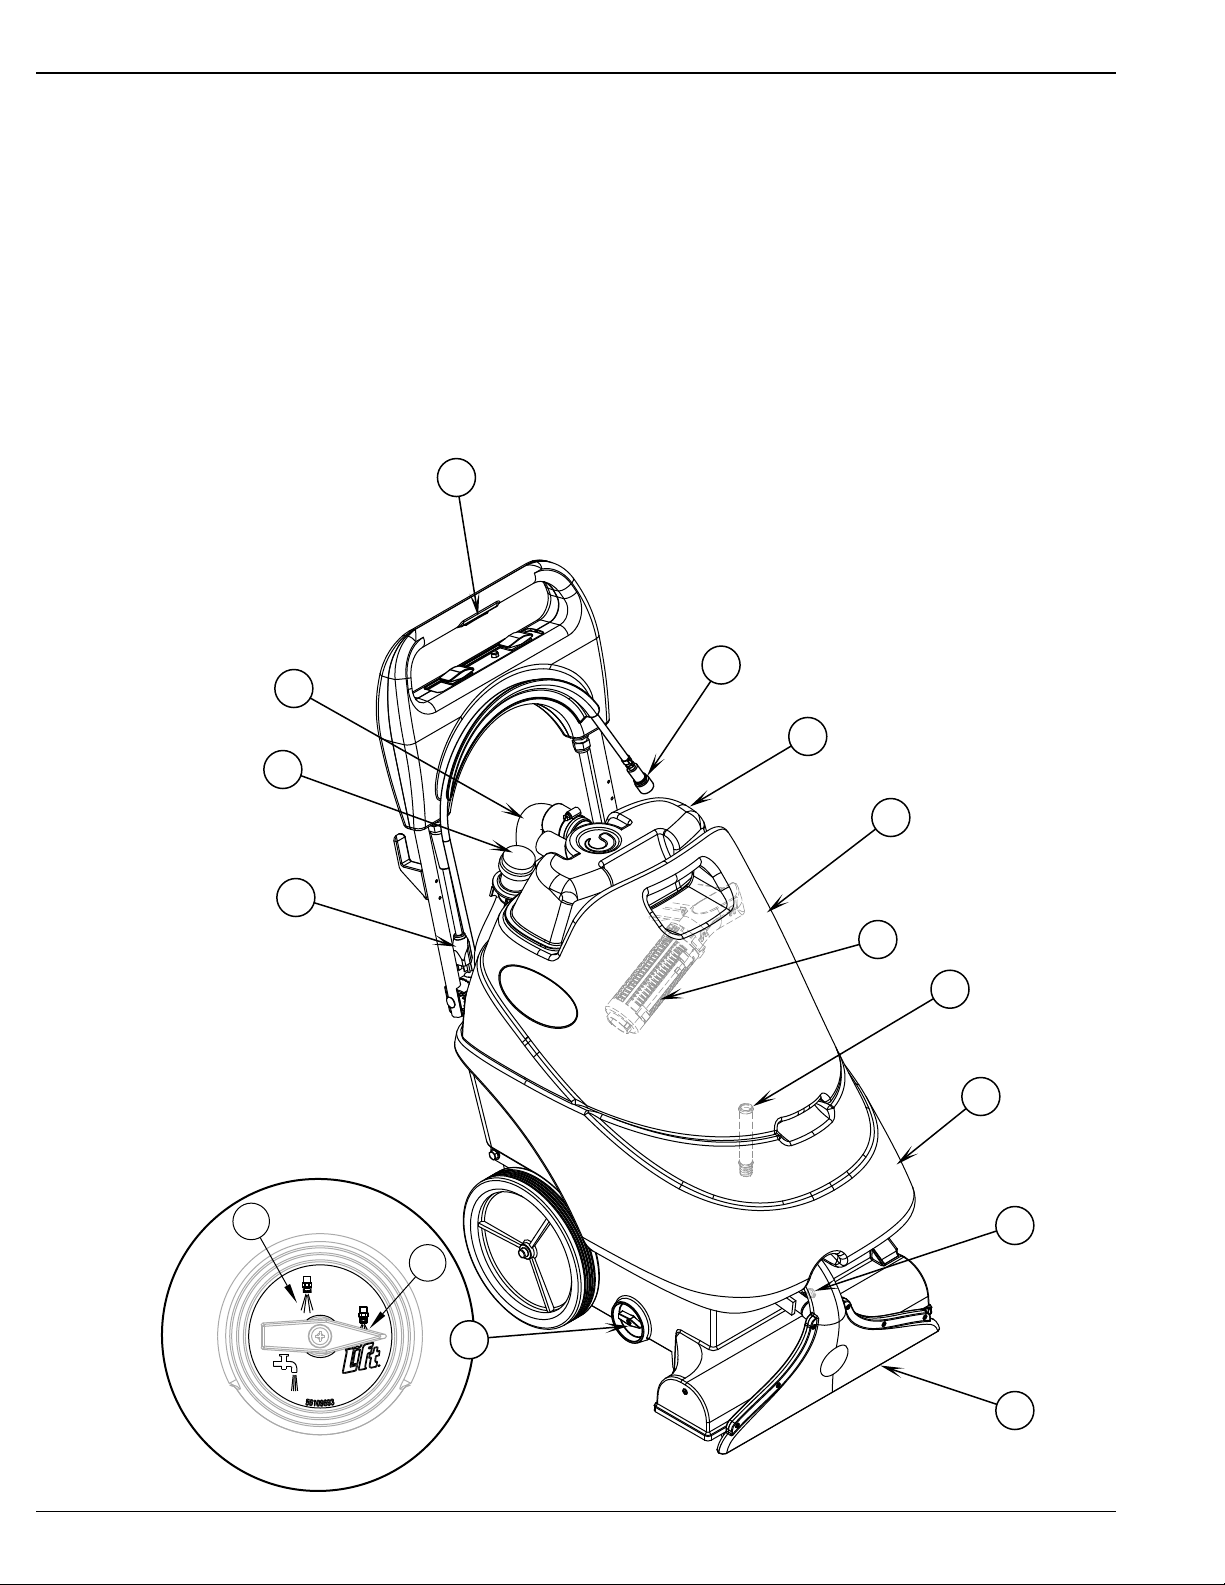
MAKİNENİZİN TANITIMI
1 Solüsyon düğmesi
2 Aksesuar Solüsyon hortumu
3 Kirli su hortumu
4 Kirli su haznesi kubbe kapağı
5 Kirli su haznesi
6 Solüsyon deposu (Temiz su haznesi)
7 Vakum pabucu için pim bırakması
8 Vakum pabucu
9 Nozul seçme tokmağı
9A Bakım modu
9B Onarım modu
11 Domuz kuyruğu kordonu
12 Kirli su haznesi boşaltma hortumu
13 Solüsyon eleği
14 Otomatik duba kapaması
1
9B
2
3
4
12
5
11
14
13
6
7
A-6 - FORM NO. 56041671 - AX 410
9A
9
8
revised 12/10
Page 7
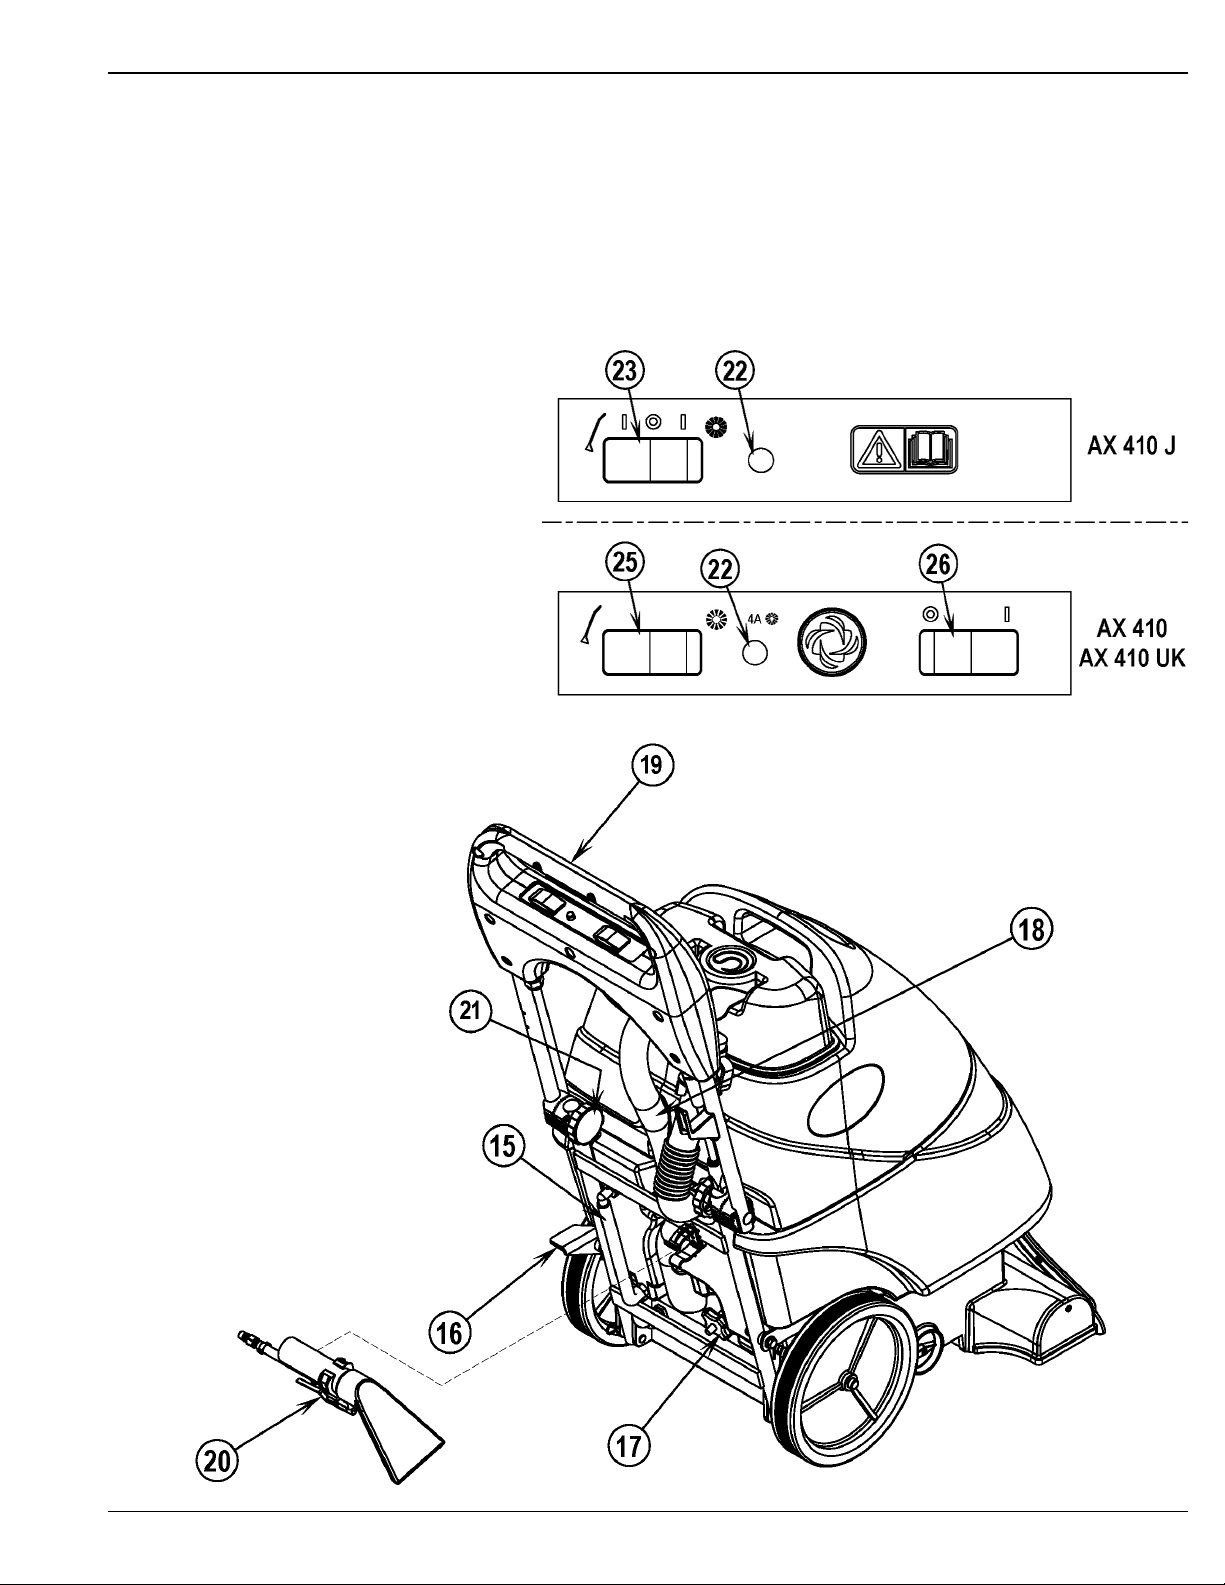
MAKİNENİZİN TANIMI (DEVAMI)
15 Solüsyon boşaltma hortumu/seviye göstergesi
16 Sap bırakma pedalı
17 Fırça basıncı kontrol tokmağı
18 Toplama hortumu bağlantısı
19 Sap tertibatı
20 Sap aleti tertibatı
21 Sap açısı ayarlama tokmakları
22 Fırça motoru devre kesicisi
23 Güç & Çıkarma/ aksesuar düğmesi
25 Çıkarma/ aksesuar düğmesi
26 Güç düğmesi
TÜRKÇE / A-7
revised 12/08
FORM NO. 56041671 - AX 410 - A-7
Page 8
A-8 / TÜRKÇE
MAKİNENİN KULLANIM İÇİN HAZIRLANMASI
SOLÜSYON DEPOSUNUN DOLDURULMASI
1 Güç düğmesini OFF’a (O) getirin ve makineyi fi şten çekin.
2 Kirli su hortumunu çıkarın. Kirli su haznesini makineden kaldırın ve bir yana koyun.
3 Kimyasal kabın üstündeki talimatları okuyun. Daha sonra , makinenizin solüsyon deposunun su kapasitesi ile (için 8 galon/30 litre) karıştırmak için
uygun kimyasal miktarını hesaplayın.
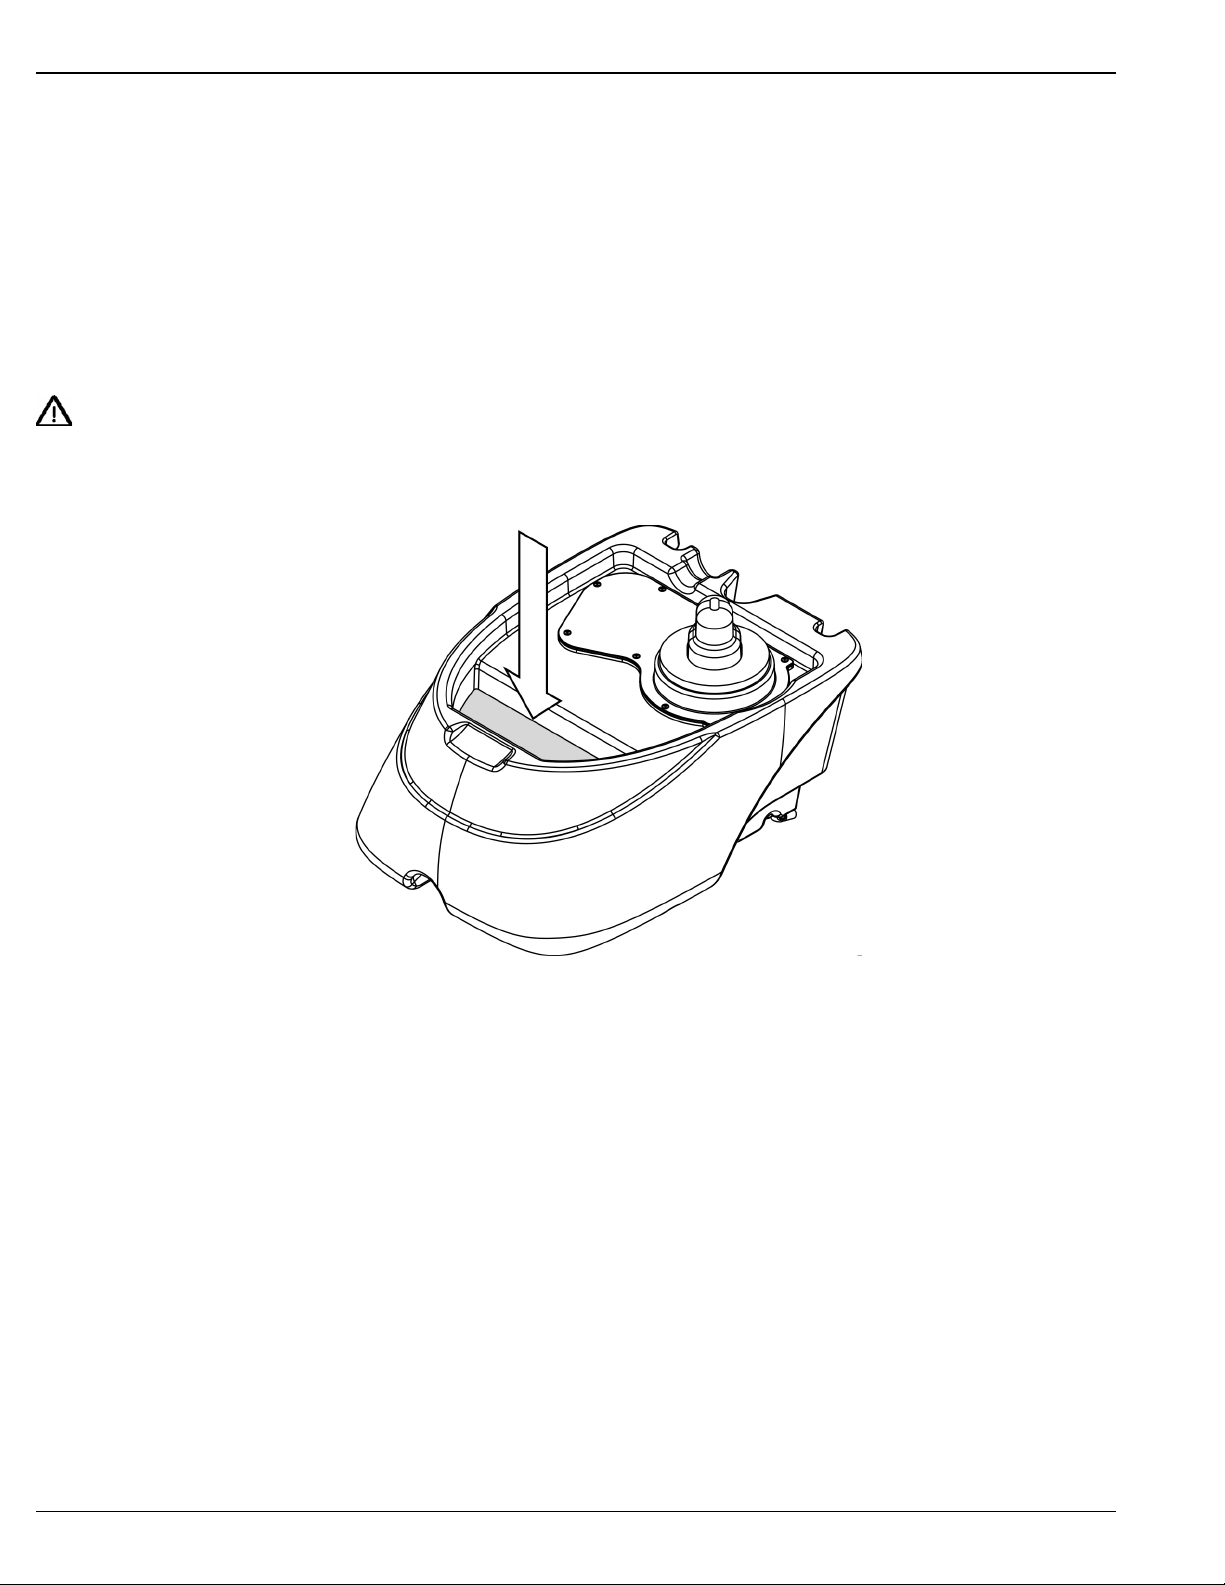
4 Kimyasalı solüsyon deposuna (6) dökün ve depoyu sıcak suyla doldurun (maksimum sıcaklık 54°C/130°F). NOT: Solüsyon deposunu fazla
doldurmayın. Maksimum dolum seviyesi, solüsyonun depo açıklığı üstündeki kenarın alt kısmına ulaşma seviyesidir. Şekil 4’e bakın.
5 Kirli su haznesini makineye geri yerleştirin. NOT: Kirli su haznesinin solüsyon deposuna uygun şekilde oturmasını sağlayın.
DİKKAT!
Halı için üretilmiş olan düşük köpüklü, sıvı deterjanlar kullanın.
ŞEKIL 4
AX 410’U KALLINMADAN ÖNCE
AX 410’u kullanmadan önce temizlenecek olan halıyı iyice vakumlayın.
HALININ ÖN SPREYLENMESİ
Temizlemeden önce lekelere ve çok geçilen yerlere sprey sıkın. Elle tutulan şişe sprey veya basınçlı “Hudson” tipi sprey kullanın. Spreyi, kimyasal
imalatçının talimatlarına göre karıştırın.
TEMİZLEME PLANI
Temizleme işlemine başlamadan önce, temizlenecek alanı inceleyin ve planınızı yapın. Temizlenecek yeri bölümlere ayırın. Her 2 inch (5cm) geçişin
üstünden tekrar geçin.
A-8 - FORM NO. 56041671 - AX 410
revised 12/08
Page 9

TÜRKÇE / A-9
MAKİNENİN ÇALIŞTIRILMASI
1 Bu el kitabındaki Makinenin Kullanım için hazırlanması bölümündeki talimatları okuyun.
2 Kolu, çalışma konumuna indirmek için Kol Bırakma Pedalına (16) basın.
3 Sap yükseklik ayarlama tokmaklarını (21) gevşetin ve sap yüksekliğini operatör için en rahat pozisyona getirin. İstenen yükseklik elde edildiğinde
tokmakları yeniden sıkıştırın.
4 Eğer iki sprey nozulu takılmışsa nozul seçme tokmağını (9) “bakım” (9A) veya “onarım” (9B) moduna ayarlayın.
Bakım modu (9A): sık yapılan yüzey temizliği için tavsiye edilen düşük solüsyon akışı
Onarım modu (9B): daha az sık yapılan yüzey temizli
5 Makinenin fi şini uygun bir prize takın. Vakum motorunu, solüsyon pompasını ve fırça motorunu çalıştırmak için,
Çıkarma/Aksesuar düğmesi (25) üstünde çıkarma pozisyonunu seçin ( fırça sembolü) ve sonra güç düğmesini (26)
ON (I) pozisyonuna getirin.
6 Fırça basıncını ayarlayın. Fırça basıncını azaltmak için fırça basınç kontrol tokmağını (17) saat yönünün aksine çevirin
ve basıncı arttırmak için saat yönünde çevirin.
7 Solüsyonu dağıtmak için solüsyon düğmesine (1) sürekli bastırın. Solüsyon düğmesi (1) bırakıldığında solüsyon akışı
duracaktır.
8 Temizliğe makineyi düz çizgide çekerek ve her 2 inch (5 cm) geçişin üstünden tekrar geçerek başlayın. Halıdan solüsyonun tamamen çıkarılmasını
sağlamak için dönüşlerden önce solüsyon/fırça motor düğmesini (1) bırakın.
9 Kirli su haznesi kubbe kapağı görüş kapısına (4) giren sıvıyı izleyin. Eğer Kirli su haznesinde çok fazla köpük varsa, Kirli su haznesine köpük
giderici kimyasal ekleyin.
ği için tavsiye edilen yüksek solüsyon akışı
9B
9A
DİKKAT!
Sıvı veya köpük vakum motoruna girmeden önce kirli su haznesini boşaltın.
Eğer kirli su haznesine giren sıvı yoksa veya çok az varsa, Solüsyon boşaltma hortumu/ Seviye göstergesini (15) kontrol edin ; solüsyon deposu
boş olabilir. Solüsyon deposunu, su ve uygun miktarda temizleme kimyasalı ile doldurun. Solüsyon deposunu her doldurmak gerektiğinde kirli su
haznesini boşaltın.
10 Kirli su haznesinde, kirli su haznesi dolu olduğunda vakum sistemini bloke etmek için otomatik duba kapatması (14) bulunur. Vakum motorunun
sesindeki ani bir değişiklikte duba kapanır. Duba kapandığında, Kirli su haznesi boşaltılmalıdır. Makine solüsyonu dağıtmaya devam edebilir
ancak duba kapalı olduğunda suyu toplamayacaktır.
11 Operatör temizlemeyi durdurmak isterse veya kirli su haznesi doluysa, Solüsyon/Fırça motor düğmesini (1) bırakın. Sonra güç düğmesini OFF (O)
‘a getirin ve fi şi prizden çekin.
12 Makineyi belirtilen atık su “ATMA YERİNE “ götürün ve kirli su haznesini boşaltın. Boşaltmak için, kirli su haznesi boşaltma hortumunu (12) arka
saklama askısından çekin, sonra fi şi çekin. (Suyun ani kontrolsüz akışını önlemek için hortum ucunu depodaki su seviyesinin üstünde tutun.)
Solüsyon deposunu yeniden doldurun ve temizliğe devam edin.
AKSESUARLARIN KULLANILMASI
Aksesuarları kullanmak için , kirli su hortumu bağlantısındaki (18) kirli su hortumunu (3) sökün. Aksesuarın çözelti hortumunu, makinenin Aksesuar
Çözelti Hortumuna (2) takın. Aksesuarları kullanırken, Çıkarma/aksesuar düğmesini (23 veya 25) aksesuar pozisyonuna getirin ( çubuk sembolü)
AX 410 ile kullanılabilecek aksesuarlar için Nilfi sk Satıcısına danışın.
SERT ZEMİN TAKIMLARI
Vakum pabucu, sert zeminlerde kullanılmak üzere
çıkarılıp seçmeli lastik Süpürge takımıyla (A)
değiştirilebilir. Şekil 5’e bakın. Vakum pabucu ,
pim çıkarması (7) çekilerek ve vakum pabucu (8)
kaydırılarak çıkarılabilir. Sonra kirli su hortumunu (B)
vakum pabucundan sökün ve lastik süpürge takımını
takın. Lastik süpürge takımını , vakum pabucu için
kullanılan aynı montaj yerine takın. Pim çıkarmasını
çekin ve lastik süpürge takımını yerine kaydırın.
ŞEKIL 5
revised 12/10
FORM NO. 56041671 - AX 410 - A-9
Page 10

A-10 / TÜRKÇE
MAKİNEYİ KULLANDIKTAN SONRA
1 Güç düğmesini OFF (O)’a getirin. Güç kordonunu (10) prizden çekin. Kordonu sarın ve kordon kancasına asın.
2 Solüsyon deposunu boşaltmak için, solüsyon boşaltma hortumunu (15) çekin. Hortumu belirtilen atık su “ATMA YERİNE “ yöneltin. Depoyu temiz
suyla çalkalayın. Solüsyon hortumlarını kontrol edin; hasarlıysa değiştirin.
3 Kirli su haznesini boşaltmak için, boşaltma hortumunu (12) askısından alın. Hortumu belirtilen “ATIK ATMA YERİNE” yöneltin ve fi şi çıkarın (ani
ve kontrolsüz atık su çıkışını önlemek için hortumun ucunu depodaki su seviyesinin üstünde tutun ). Depoyu temiz suyla çalkalayın, boşaltma ve
kirli su hortumlarını kontrol edin ve hasarlı olanları değiştirin.
4 Fırçayı çıkarın, ılık suyla çalkalayın ve hal
5 Kirli su hortumunu (3) Kirli su haznesi kubbe kapağından (4) çıkarın ve kirleri kirli su hortumundan ve vakum pabucundan çıkarmak için ılık suyla
yıkayın.
6 Makineyi nemli bir bezle silin. Aşındırıcı kimyasallar veya solventler kullanmayın.
7 Saklamadan önce gerekli bakımı yapın.
BAKIM PROGRAMI
Bakım yapılacak parça Günlük Haftalık Aylık
Elektrikli fırçayı kontrol edin/temizleyin X
Depoları ve hortumları kontrol edin/temizleyin X
Vakum kapama dubasını kontrol edin ve temizleyin X
Vakum pabucunu temizleyin X
“Bakım” Sprey nozulunu temizleyin X
Solüsyon eleğini kontrol edin ve temizleyin X
*Karbon fırçalarını kontrol edin X
*Nilfi sk servis teknisyeninden vakum motoru karbon fırçalarını yılda bir kez veya her 300 çalışma saatinden sonra kontrol etmesini isteyin. Fırça motoru karbon fırçaları
her 500 saatte bir veya yılda bir kez kontrol edilmelidir.
ı tüyü , kıl gibi kirleri çıkarın.
ÖNEMLİ!
Karbon fırçalarının bakımının yapılmamasından kaynaklanan motor hasarı , garanti altında değildir. Sınırlı Garanti bildirisine bakın.
8 Makineyi temiz, kuru bir yerde depo kubbe kapağı açık olarak saklayın. Donmadan uzak tutun.
9 Makineyi saklama pozisyonunda bırakın. Bu fırçanın ömrünü uzatacak ve fırçanın performansını koruyacaktır.
Sap bırakma pedalını (16) kaldırın ve sonra makineyi saklama pozisyonuna getirmek için sap tertibatını (19) ittirin.
VAKUM PABUCU BAKIMI
Vakum pabucunu günlük olarak kontrol edin. Herhangi bir saç, kıl gibi kirleri çıkarın. Şekil 6’ya bakın. Vakum pabucu, pim bırakması (7) çekilerek ve
vakum pabucu (8) kaydırılarak çıkarılabilir. Sonra Kirli su hortumunu pabuçtan sökün.
ŞEKIL 6
A-10 - FORM NO. 56041671 - AX 410
revised 12/08
Page 11

TÜRKÇE / A-11
SPREY NOZULU BAKIMI
Sprey nozulunu (C) haftada bir kez çıkarın. Şekil 7’e bakın. Kimyasal artıkları çıkarmak için nozulu
bir gece sirkeye yatırın.
SOLÜSYON ELEĞİ BAKIMI
Haftada bir kez (veya gerekirse daha sık) solüsyon eleğini (13) temizleyin. Solüsyon ve toplama depolarını boşaltın. Kirli su haznesini makineden
kaldırın ve bir kenara koyun. Solüsyon deposunun içini çalkalayın ve solüsyon fi tresini çıkarmak için vidasını gevşetin.
GÜÇ KORDONU BAKIMI
Haftada bir kez (veya gerekirse daha sık) , çatlak veya hasar gören izolasyon, kordonda veya fi şte açıkta duran teller ve hasarlı veya eksik toprak pimi
bakımından güç kordonunu kontrol edin. Eğer kordon veya fi ş hasarlıysa, hemen değiştirilmelidir.
FIRÇA BASINCININ AYARLANMASI
Fırça basıncını azaltmak için Fırça basınç kontrol tokmağını (19) saat yönünün aksine çevirin ve basıncı arttırmak için saat yönünde çevirin.
ELEKTRİKLİ FIRÇA BAKIMI
Fırçayı her gün kontrol edin. Herhangi bir kıl, tüy gibi kirleri çıkarın. Makine kullanılmadığında, saklama pozisyonunda saklanmalıdır .Bu fırçanın
ömrünü uzatacak ve fırçanın performansını koruyacaktır.
FIRÇANIN ÇIKARILMASI
DİKKAT!
Fırçaları değiştirmeden önce güç düğmesini OFF (O)’a getirin ve fi şi prizden çekin.
1 Solüsyon deposunu boşaltın. Kirli su haznesini makineden kaldırın , boşaltın ve depoyu bir kenara koyun.
2 Sap tertibatını (19) saklama pozisyonuna getirin ve makineyi geriye yatırın.
3 Şekil 7’ye bakın. Sürme parçası (D) pimlerin yere paralel olduğu yerine oturana kadar fırçayı ittirin.
4 Fırça tutma mandalıyla (E) ucundan fırçayı kavrayın ve düz çekin.
5 Sürme parçasının ucuna yeni fırçayı takın ve fırçayı tutma mandalına kilitlenene kadar ittirin.
ŞEKIL 7
revised 12/08
FORM NO. 56041671 - AX 410 - A-11
Page 12

A-12 / TÜRKÇE
SORUN GİDERME
Eğer aşağıda listelenen olası nedenler sorunun bir kaynağı değilse, o zaman bu belirtiler çok daha ciddi demektir. Hemen Nilfi sk Servis Merkezine
başvurun.
DEVRE KESİCİNİN ARIZALANMASI
Devre kesici (20) ,kontrol paneli üzerinde bulunur ve elektrik devresini ve fırça motorunu fazla yüklü şartlara bağlı hasardan korur. Eğer devre kesicide
arıza olursa nedenini belirlemeye çalışın.
Fırça devre kesicisi (5 Amp) Olası nedenler şöyle olabilir:
1 Fırça sürmesinin etrafında pislik toplanmış olabilir (pisliği çıkarın)
2 Fırça ayarı çok düşüktür (uyku fırça ayarını yapın)
3 Elektrik kısa devresi (Nilfi sk Servis Merkezine veya yetkili bir elektrikçiye makinenizi kontrol ettirin)
Sorun giderildiğinde, devre kesiciyi kurmak için düğmeye basın. Eğer düğme basılmazsa, 5 dakika bekleyin ve yeniden deneyin. Eğer devre kesici
tekrar tekrar arıza yapıyorsa, Nilfi sk Servis Merkezini arayın.
ZAYIF SU TOPLAMASI
Olası nedenler;
1 Kirli su haznesi dolu (Kirli su haznesini boşaltın)
2 Kirli su haznesi boşaltma hortumu açıktır (boşaltma hortumu kapağını kapatın veya değiştirin)
3 Kirli su hortumu vakum pabucuna bağlı değildir (hortumu vakum pabucuna bağlayın)
4 Kirli su hortumu dolaşmış veya hasarlı (hortumu değiştirin)
5 Kirli su haznesi kapağı contası sızıntı yapıyor (contayı değiştirin)
6 Vakum pabucuna veya Kirli su hortumuna pislik sıkışmıştır (vakum pabucunu ve Kirli su hortumunu temizleyin)
UYGUN OLMAYAN SOLÜSYON AKIŞI
Olası nedenleri:
1 Solüsyon deposu boş olabilir (solüsyon deposunu doldurun)
2 Solüsyon hatları veya eleği tıkanmış olabilir (hatları ve eleği yıkayın)
3 Nozul seçici, bakım ile onarım arasındaki bir pozisyona gelmiştir (tokmağı ya tamamen sağa ya da sola çevirin)
TEKNİK ÖZELLİKLER (üniteye takildiği ve test edildiği şekilde)
Model AX 410 AX 410 J
Model No. 56265002 56265007
Voltaj/ frekans V/Hz 220-240 / 50-60 100 / 50-60
Oranlı akım Amp 7 13.3
Koruma sınıfı (elektrik)
Koruma derecesi IP34 -Ses basınç seviyesi (IEC 60704-2-1) 74.3dB LpA, 3dB KpA 74.3dB LpA, 3dB KpA
Toplam ağırlık lbs/kg 166 / 75.29 166 / 75.29
El kontrollerinde titreşim (ISO 5349-1) m/s
Solüsyon deposu kapasitesi 8 gal (30l) 8 gal (30l)
Kirli su haznesi kapasitesi 6 gal (23l) 6 gal (23l)
2
0.72m/s2 0.72m/s
2
A-12 - FORM NO. 56041671 - AX 410
revised 12/10
Page 13

Page 14

B-ii / ENGLISH
TABLE OF CONTENTS
Page
Introduction ................................................................................... B-1
Parts and Service ........................................................................... B-1
Nameplate ...................................................................................... B-1
Uncrating the Machine .................................................................... B-1
Cautions and Warnings .................................................................. B-2
Grounding Instructions ................................................................... B-3
Know Your Machine.............................................................B-4 – B-5
Preparing the Machine for Use
Filling the Solution Tank .................................................................. B-6
Before Using ................................................................................... B-6
Pre-Spraying the Carpet ................................................................. B-6
Plan for Cleaning ............................................................................ B-6
Operation
Operating the Machine ................................................................... B-7
Using Attachments .......................................................................... B-7
Hard Floor Kits ................................................................................ B-7
After Use
After Using the Machine ................................................................. B-8
Maintenance
Maintenance Schedule ................................................................... B-8
Vacuum Shoe Maintenance ............................................................ B-8
Spray Nozzle Maintenance ............................................................. B-9
Power Cord Maintenance ............................................................... B-9
Adjusting the Brush Pressure ......................................................... B-9
Power Brush Maintenance ............................................................. B-9
Removing the Brush ....................................................................... B-9
Troubleshooting ............................................................................ B-10
Technical Specifi cations ............................................................... B-10
B-ii - FORM NO. 56041671 - AX 410
Page 15

ENGLISH / B-1
INTRODUCTION
This manual will help you get the most from your Nilfi sk carpet extractor. Read it thoroughly before operating the machine.
This product is intended for commercial use only.
PARTS AND SERVICE
Repairs, when required, should be performed by your Authorized Nilfi sk Service Center, who employs factory trained service personnel, and maintains
an inventory of Nilfi sk original replacement parts and accessories.
Call the NILFISK DEALER named below for repairs or service. Please specify the Model and Serial Number when discussing your machine.
(Dealer, affi x service sticker here.)
NAMEPLATE
The Model Number and Serial Number of your machine are shown on the Nameplate, located on the rear base of the machine. This information is
needed when ordering repair parts for the machine. Use the space below to note the Model Number and Serial Number of your machine for future
reference.
MODEL _______________________________________________________________________
SERIAL NUMBER _______________________________________________________________
UNCRATING THE MACHINE
When the machine is delivered, carefully inspect the shipping carton and the machine for damage. If damage is evident, save the shipping carton so
that it can be inspected. Contact the Nilfi sk Customer Service Department immediately to fi le a freight damage claim.
revised 12/08
FORM NO. 56041671 - AX 410 - B-1
Page 16

B-2 / ENGLISH
IMPORTANT SAFETY INSTRUCTIONS
This machine is only suitable for commercial use, for example in hotels, schools, hospitals, shops and offi ces other than normal residential
housekeeping purposes.
When using an electrical appliance, basic precautions should always be followed, including the following:
Read all instructions before using this appliance.
WARNING!
To reduce the risk of fi re, electric shock, or injury:
• Do not leave the appliance when it is plugged in. Unplug the unit from the outlet when not in use and before servicing.
• To avoid electric shock, do not expose to rain. Store indoors.
• Do not allow to be used as a toy. Close attention is necessary when used near children.
• Use only as described in this manual. Use only the manufacturer’s recommended attachments.
• Do not use with damaged cord or plug. If the appliance is not working as it should be, has been dropped, damaged, left outdoors or
dropped into water, return it to a service center.
• Do not pull or carry by the cord, use the cord as a handle, close a door on the cord, or pull the cord around sharp edges or corners.
Do not run the appliance over the cord. Keep the cord away from heated surfaces.
• Do not unplug by pulling on the cord. To unplug, grasp the plug, not the cord.
• Do not handle the plug, cord or appliance with wet hands.
• Do not put any object into openings. Do not use with any opening blocked; keep free of dust, lint, hair, and anything that may reduce
air fl ow.
• Keep loose clothing, hair, fi ngers, and all parts of body away from openings and moving parts.
• Do not pick up anything that is burning or smoking, such as cigarettes, matches, or hot ashes, or any health endangering dusts.
• Turn off all controls before unplugging.
• Use extra care when cleaning on stairs.
• Do not use to pick up fl ammable or combustible liquids such as petrol or use in areas where they may be present.
• If foam or liquid comes out with the vacuum exhaust, switch power off immediately. Verify that there are no foreign objects obstructing
the fl oat ball from moving freely. Contact Nilfi sk if the problem persists.
• Liquid ejected at the spray nozzle could be dangerous as a result of its temperature, pressure or chemical content.
• Only use the brushes provided with the appliance or those specifi ed in the instruction manual. The use of other brushes may impair
safety.
B-2 - FORM NO. 56041671 - AX 410
SAVE THESE INSTRUCTIONS
revised 12/08
Page 17

ENGLISH / B-3
GROUNDING INSTRUCTIONS
This appliance must be grounded. If it should electrically malfunction, grounding provides a path of least resistance for electric current to reduce the
risk of electric shock. This appliance is equipped with a cord having an equipment-grounding conductor and grounding plug. The plug must be plugged
into an appropriate outlet that is properly installed and grounded in accordance with all local codes and ordinances.
DANGER!
Improper connection of the equipment-grounding conductor can result in a risk of electric shock. Check with a qualifi ed electrician or
service person if you are in doubt as to whether the outlet is properly grounded. Do not modify the plug provided with the appliance. If it
will not fi t the outlet, have a proper outlet installed by a qualifi ed electrician.
Replace the plug if the grounding pin is damaged or broken.
The Green (or Green/Yellow) wire in the cord is the grounding wire. When replacing a plug, this wire must be attached to the grounding pin only.
Extension cords connected to this machine should be 12 gauge, three-wire cords with three-prong plugs and outlets. DO NOT use extension cords
more than 50 feet (15 m) long.
revised 12/08
FORM NO. 56041671 - AX 410 - B-3
Page 18

B-4 / ENGLISH
KNOW YOUR MACHINE
1 Solution Switch
2 Accessory Solution Hose
3 Recovery Hose
4 Recovery Tank Dome Lid
5 Recovery Tank
6 Solution Tank
7 Pin Release for vacuum shoe
8 Vacuum Shoe
9 Nozzle Selector Knob
9A Maintenance Mode
9B Restoration Mode
11 Pigtail Cord
12 Recovery Tank Drain Hose
13 Solution Screen
14 Automatic Float Shut-Off
1
9B
2
3
4
12
5
11
14
13
6
7
B-4 - FORM NO. 56041671 - AX 410
9A
9
8
revised 12/10
Page 19

KNOW YOUR MACHINE (CONTINUED)
15 Solution Drain Hose / Level Indicator
16 Handle Release Pedal
17 Brush Pressure Control Knob
18 Recovery Hose Connection
19 Handle Assembly
20 Hand Tool Assembly
21 Handle Angle Adjustment Knobs
22 Brush Motor Circuit Breaker
23 Power & Extract / Accessory Switch
25 Extract / Accessory Switch (only AX410)
26 Power Switch (only AX410)
27 PAT Test Connection (Portable Appliance Test)
(all models except AX410)
ENGLISH / B-5
23
25
22
22
AX 410 J
27
4A
26
AX 410
AX 410 UK
revised 12/10
FORM NO. 56041671 - AX 410 - B-5
Page 20

B-6 / ENGLISH
PREPARING THE MACHINE FOR USE
FILLING THE SOLUTION TANK
1 Turn the power switch to off (O) and then unplug the machine.
2 Remove the recovery hose. Lift the recovery tank from the machine and set it off to the side.
3 Read the dilution instructions on the chemical container. Then calculate the proper amount of chemical to mix with your machine’s solution tank
capacity of water; 8 gallons (30 liters).
4 Pour the chemical into the solution tank and fi ll the tank with hot water (maximum temperature 54°C/130°F). NOTE: Do not overfi ll the solution
tank. The maximum fi ll point is when the solution level reaches the bottom of the lip on the tank opening. See Figure 4.
5 Put the Recovery Tank back on the machine. NOTE: Make sure the Recovery Tank is properly seated on the Solution Tank.
CAUTION!
Use low-sudsing, liquid detergents designed for carpet extraction.
FIGURE 4
BEFORE USING THE AX 410
Thoroughly vacuum the carpet to be cleaned before using the AX 410 automatic extractor.
PRE-SPRAYING THE CARPET
Pre-spray spots and heavy traffi c areas before extracting. Use a hand-held bottle sprayer or a pressurized “Hudson” type sprayer. Mix the pre-spray
according to the chemical manufacturer’s directions.
PLAN FOR CLEANING
Before you begin extracting, look at the area to be cleaned and plan your work. Divide the space into sections. Overlap each pass 2 inches (5 cm).
B-6 - FORM NO. 56041671 - AX 410
revised 12/08
Page 21

ENGLISH / B-7
OPERATING THE MACHINE
1 Follow the instructions in the Preparing the Machine for Use section of this manual.
2 Press the Handle Release Pedal (16) to lower the handle into the operating position.
3 Loosen the Handle Height Adjustment Knobs (21) and adjust the handle height to the most comfortable position for the operator. Re-tighten the
knobs once the desired height is reached.
4 Adjust the Nozzle Selector Knob (9) to either “maintenance” (9A) or “restoration” (9B) mode.
Maintenance Mode (9A): Lower solution fl ow, recommended for frequent surface cleaning.
Restoration Mode (9B): Higher solution fl ow, recommended for less frequent deep cleaning.
5 Plug the machine into a properly grounded outlet. To start the vacuum motor, solution pump and brush motor…
Select the extract position (brush symbol) on the Extract/Accessory Switch (25), then turn the Power Switch (26) to
the On (I) position.
6 Adjust the brush pressure. Turn the Brush Pressure Control Knob (17) counter-clockwise to decrease the brush
pressure and clockwise to increase the brush pressure. The machine should assist, but not propel itself (on carpet)
when the brush is properly adjusted.
7 Continually hold the Solution Switch (1) to dispense solution. Once the Solution Switch (1) is released the solution fl ow will stop.
8 Begin cleaning by pulling the machine along in a straight line and overlap each pass by 2 inches (5 cm). Release the Solution Switch (1) prior to
turns to ensure complete extraction of solution from carpet.
9 Watch the fl uid entering the Recovery Tank Dome Lid (4). If there is a large amount of suds in the recovery tank, add a defoamer chemical to the
recovery tank.
9B
9A
CAUTION!
Empty the recovery tank before the fl uid or foam enters the vacuum motor.
If there is little or no fl uid entering the recovery tank, check the Solution Drain Hose / Level Indicator (15), the solution tank may be empty. Refi ll
the solution tank with water and the proper ratio of cleaning chemical.
10 The recovery tank has an Automatic Float Shut-Off (14) to block the vacuum system when the recovery tank is full. You can tell when the fl oat
closes by the sudden change in the sound of the vacuum motor. When the fl oat closes, the recovery tank must be emptied. The machine can
continue to dispense solution, but will not pick up water with the fl oat closed.
11 When the operator wants to stop cleaning or the recovery tank is full, release the Solution Switch (1). Then turn the power switch Off (O) and
unplug the machine.
12 Push the machine to a designated waste water “DISPOSAL SITE” and empty the recovery tank. To empty, pull the Recovery Tank Drain Hose
(12) from its rear storage hanger, then remove the plug (hold the end of the hose above the water level in the tank to avoid sudden, uncontrolled
fl ow of waste water). Refi ll the solution tank and continue cleaning.
USING ATTACHMENTS
To use accessory tools, disconnect the recovery hose at the Recovery Hose Connection (18). Attach the accessory’s recovery hose to the machine’s
Recovery Hose (3). Attach the accessory’s solution hose to the machine’s Accessory Solution Hose (2). When using accessory tools place the Extract/
Accessory Switch (23 or 25) in the accessory position (wand symbol).
See your Nilfi sk Distributor for accessories that may be used with the AX 410.
HARD FLOOR KITS
The vacuum shoe can be removed and replaced
with an optional Squeegee Tool (A) for use on hard
fl oors. See Figure 5. The vacuum shoe can be
removed by pulling on the Pin Release (7) and
sliding the Vacuum Shoe (8) off. Then disconnect
the Recovery Hose (B) from the vacuum shoe and
connect to the squeegee tool. Attach the squeegee
tool to the machine at the same mounting location
used for the vacuum shoe, simply pull the pin
release and slide the squeegee tool into place.
FIGURE 5
revised 12/10
FORM NO. 56041671 - AX 410 - B-7
Page 22

B-8 / ENGLISH
AFTER USING THE MACHINE
1 Turn the Power Switch OFF (O). Unplug the Power Cord (10). Coil the cord and hang it from the cord hook.
2 To empty the solution tank, pull the Solution Drain Hose (15) off the elbow. Direct the hose to a designated waste water “DISPOSAL SITE”. Rinse
the tank with clean water. Inspect the solution hoses; replace if kinked or damaged.
3 To empty the recovery tank, take the Recovery Drain Hose (12) off its hanger. Direct the hose to a designated waste water “DISPOSAL SITE” and
remove the plug (hold the end of the hose above the water level in the tank to avoid sudden, uncontrolled fl ow of waste water). Rinse the tank
with clean water. Inspect the recovery and drain hoses; replace if kinked or damaged.
4 Remove the brush, rinse with warm water and remove any built-up string, hair or carpet fi bers.
5 Disconnect the Recovery Hose (3) from the Recovery Tank Dome Lid (4) and fl ush with warm water to wash any debris out of the Recovery Hose
and Vacuum Shoe.
6 Wipe the machine with a damp cloth. Do not use abrasive chemicals or solvents.
7 Perform any required maintenance before storage.
MAINTENANCE SCHEDULE
MAINTENANCE ITEM Daily Weekly Yearly
Check / Clean Power Brush •
Check / Clean Tanks & Hoses •
Check / Clean Vacuum Shut-Off Float •
Clean Vacuum Shoe •
Clean “Maintenance” Spray Nozzle •
Inspect & Clean Solution Screen •
*Check Carbon Brushes •
* Have a Nilfi sk service technician check the vacuum motor carbon brushes once a year or after 300 operating hours. The brush motor carbon brushes
check every 500 hours or once a year.
IMPORTANT!
Motor damage resulting from failure to service the carbon brushes is not covered under warranty. See the Limited Warranty Statement.
8 Store the machine indoors in a clean, dry place with the tank dome lid open. Keep from freezing.
9 Place the machine in the storage position. This will prevent the brush from taking a set which will increase the brush life and maintain the
performance of the brush.
Lift up on the Handle Release Pedal (16) then push the Handle Assembly (19A) forward to place the machine in the storage position.
VACUUM SHOE MAINTENANCE
Check the vacuum shoe daily. Remove any built-up string, hair or carpet fi bers. See Figure 6. The vacuum shoe can be removed by pulling on the
Pin Release (7) and sliding the Vacuum Shoe (8) off. Then disconnect the recovery hose from the shoe.
FIGURE 6
7
B-8 - FORM NO. 56041671 - AX 410
8
revised 12/08
Page 23

ENGLISH / B-9
SPRAY NOZZLE MAINTENANCE
Remove the Maintenance Spray Nozzle (C) once a week. See Figure 7. Soak the nozzle overnight in vinegar to remove chemical deposits.
SOLUTION SCREEN MAINTENANCE
Once a week (or more often if necessary), clean the Solution Screen (13). Drain the solution and recovery tanks. Lift the recovery tank from the
machine and set it off to the side. Reach inside the solution tank and unthread the solution fi lter to remove.
POWER CORD MAINTENANCE
Once a week (or more often if necessary), check the power cord for cracked or damaged insulation, exposed wires in the cord or plug, and damaged
or missing ground pin. Repair or replace damaged cord or plug immediately.
ADJUSTING THE BRUSH PRESSURE
Simply turn the Brush Pressure Adjustment Knob (19) clockwise to increase brush pressure and counter-clockwise to decrease the brush pressure.
POWER BRUSH MAINTENANCE
Check the brush daily. Remove any built-up string, hair or carpet fi bers. When the machine is not in use it should be placed in the storage position.
This will prevent the brush from taking a set which will increase the brush life and maintain the performance of the brush.
REMOVING THE BRUSH
CAUTION!
Turn the power switch off (O) and unplug the machine, before changing the brushes.
1 Empty both the recovery and solution tanks. Lift the recovery tank from the machine and set it off to the side.
2 Place the Handle Assembly (19) into the storage position and tip the machine over onto its back.
3 See Figure 7. Rotate the brush until the Drive Lug (D) is in a position where the fi ns on the drive lug are parallel to the fl oor.
4 Grab the brush at the end with the Brush Retainer Clip (E) and pull straight out.
5 Install a new brush at the drive lug end fi rst then push in the other brush end in until it snaps into the retainer clip.
FIGURE 7
FORM NO. 56041671 - AX 410 - B-9
Page 24

B-10 / ENGLISH
TROUBLESHOOTING
If the possible causes listed below are not the source of trouble, it is a symptom of something more serious. Contact your Nilfi sk Service Center
immediately for service.
TRIPPING THE CIRCUIT BREAKER
The Circuit Breaker (20) is located on the Control Panel; it protects the electrical circuit and brush motor from damage due to overload conditions. If
the circuit breaker is tripped try to determine the cause.
Brush Circuit Breaker (5 Amp) Possible cause may be:
1 Debris wrapped around the brush drive (remove debris)
2 Brush setting too low (adjust to proper brush setting)
3 Electrical short circuit (have your Nilfi sk Service Center or qualifi ed electrician check the machine)
Once the problem has been corrected, push the button in to reset the circuit breaker. If the button does not stay in, wait 5 minutes and try again. If the
circuit breaker trips repeatedly, call your Nilfi sk Service Center for service.
POOR WATER PICKUP
Possible causes may be:
1 Recovery Tank Full (empty recovery tank)
2 Open recovery tank drain hose (secure drain hose cap or replace)
3 Recovery hose not connected at vacuum shoe (connect hose to vacuum shoe)
4 Recovery hose is kinked or damaged (replace the hose)
5 Recovery tank cover gasket leak (replace gasket)
6 Debris caught in vacuum shoe or recovery hose (clean vacuum shoe and recovery hose)
INADEQUATE SOLUTION FLOW
Possible causes may be:
1 Solution tank empty (fi ll solution tank)
2 Solution lines or screen clogged (fl ush lines and screen)
3 Nozzle selector is turned to a position between maintenance and restoration (turn knob to full left or full right)
TECHNICAL SPECIFICATIONS (as installed and tested on the unit)
Model AX 410 AX 410 J
Model No. 56265002 56265007
Voltage/frequency V/Hz 220-240 / 50-60 100 / 50-60
Rated Current Amp 7 13.3
Protection Class (electrical)
Protection Grade IP34 -Sound Pressure Level (IEC 60704-2-1) 74.3dB LpA, 3dB KpA 74.3dB LpA, 3dB KpA
Total Weight lbs/kg 166 / 75.29 166 / 75.29
Vibrations at the Hand Controls (ISO 5349-1) m/s2 0.72m/s2 0.72m/s
Solution Tank Capacity 8 gal (30l) 8 gal (30l)
Recovery Tank Capacity 6 gal (23l) 6 gal (23l)
2
B-10 - FORM NO. 56041671 - AX 410
revised 12/10
Page 25

Page 26

Page 27

2010
Overenstemmelseserklaering Declaration de conformit é Samsvarserklaering
Declaration of conformi ty Verklaring van overeenstemming Vaatimustenmukaisuusvakuutus
Konformitätserklärung Dichiarazione di conformità Atitikties deklaracija
Declaración de conformidad Vastavussertifikaat Osvědčení o shodě
Atbilstības deklarācija Deklaracja zgodności Certifikát súladu
Megfelelősségi nyilatkozat Försäkran om överensstämmelse
Certifikat o ustreznost i
Modell/ Modèle/ Model/ Malli/ Modelo/ Μοντέλο/ Modelo/ Modelis/Модель: AX 410
Typ e/ Tyyppi/ Tipo/ Τύπος/ Tüüp/ Tipas/ Tips/ Typ/ Típus/ Тип/ Tip: Carpet Cleaner - Part No: 56265002
Year of Affixing CE marking: 2010
Brand: Nilfisk
D Der Unterzeichner bestätigt hiermit dass die oben erwähnten Modelle gemäß den folgenden Richtlinien und Normen hergestellt
wurden.
GB The undersigned certify that the above mentioned model is produced in accordance with the following directives and standards.
DK Undertegnede attesterer herved, at ovennævnte model er produceret i overensstemmelse med følgende direktiver og st andarder.
N Undertegnede attesterer att ovennevnte modell är produsert I overensstemmelse med fölgende direktiv og s tandarder.
E El abajo f i rmante certifica que los modelos arriba mencionados han si do produc i dos de acuerdo con las siguientes dir e ctivas y
estandares.
I Il sottoscri tto dichiara che i modelli s opra menzionati sono prodotti in accordo c on l e seguenti direttive e standard.
EST Allakirjutanu k i nni tab, et ülalnimetatud m udel on valmistatud kooskõlas j ärgmiste direktiivide ja normidega.
LV Ar šo tiek apliecināts, ka augstākminētais modelis ir izgatavots atbilstoši šādām direktīvām un standartiem.
CZ Níže podepsaný stvrzuje, že výše uvedený model byl vyroben v souladu s následujícími směrnicemi a normami.
SLO Spodaj podpisani potrjujem, da je zgoraj omenjeni model i zdelan v s kladu z naslednjimi smerni cami in standardi.
F Je soussigné certif i e que l es modèles ci-dessus s ont fabriqués conformément aux direct i ves et normes suivantes.
NL Ondergetekende verzekert dat de bovengenoemde modellen geproduceerd zijn in overeenstemming met de volgende richtl i j nen
en standaards.
FIN Allekirjoittaia vak uut taa että yllämainittu m al l i on tuotettu seuraavien direktiivien ja standardien mukaan.
S Underteck nad i nt ygar at t ovannämnda modell är producerad i överensstämmelse med föl j ande di rek tiv och standarder.
GR Ο κάτωθι υπογεγραμμένος πιστοποιεί ότι η παραγωγή του προαναφερθέντος μοντέλου γίνεται σύμφωνα με τις ακόλουθες οδηγίες
και πρότυπα.
P A present e assinatura serve para declarar que os modelos supramencionados são produtos em conformidade com as seguintes
directivas e normas.
LT Toliau pateiktu dokumentu patvirtinama, kad minėtas modelis yra pagamintas laikantis nurodytų direktyvų bei standartų.
PL Niżej podpisany zaświadcza, że wymieniony powyżej model produkowany jest zgodnie z następującymi dyrektywami I normami.
H Alulírottak igazoljuk, hogy a fent említett modellt a következő irányelvek és szabványok alapján hoztuk létre.
SK Dolu podpísaný osvedčuje, že hore uvedený model sa vyrába v súlade s nasledujúcimi smernicami a normami.
EC Low Voltage Directive 2006/95/EC EN 60335-1, EN 60335-2-68
EC Machinery Direct i ve 06/42/EC
EC EMC Directive 2004/108/EC EN 61000-3-2, -3, EN 55014-1,-2
This product is declared on o u r sole responsibility.
12.10.2010
Don Legatt, Engineering Director
Manufacturer : Importer:
Nilfisk-Advance, Inc. Nilfisk-Advan ce A/S
14600 21st Avenue North Sognevej 25
Plymouth, MN 55447 USA DK-2605 Brøndby, Denmark
©Nilfisk-Advance Incorporated, 2010
.pas
Page 28

Nilfi sk-Advance A/S
Sognevej 25 • DK-2605 Brøndby • Denmark
Tel: +45 43 23 81 00 • Fax: +45 43 43 77 00
www.nilfi sk-advance.com
 Loading...