

Page 1
™
Aquamatic Selectric
OPERATOR MANUAL
Advance MODELS 56263501, 56263510
revised 10/00 Form Number 56041258
Page 2

TABLE OF CONTENTS
_____________________________________________________________________________________________________________________________________________________________________________________________________________________________________________________________________________________________________________________________________
Page
Introduction................................................................................... 2
Parts and Service.......................................................................................2
Nameplate.................................................................................................. 2
Uncrating the Machine ...............................................................................2
Know Your Machine ..................................................................... 3
Important Safety Instructions........................................................ 4
Importantes Mesures de Sécurité................................................. 5
Grounding Instructions ................................................................. 6
Preparing the Machine for Use..................................................... 7
Filling the Solution Tank............................................................................. 7
Pre-Spraying the Carpet ............................................................................7
Plan for Cleaning .......................................................................................7
Operating the Machine ................................................................. 8
Using Attachments .....................................................................................8
After Using the Machine ............................................................... 9
Maintenance Schedule ..............................................................................9
Maintenance ............................................................................... 10
Maintenance Note ....................................................................................10
Power Brush Maintenance .......................................................................10
Pick-Up Tool Maintenance .......................................................................10
Spray Nozzle Maintenance ......................................................................10
Lubricating the Machine ...........................................................................10
Cleaning the Vacuum Exhaust Filters ......................................................11
Servicing the Vacuum Motor ....................................................................11
Servicing the Wheel Drive Motor .............................................................11
Adjusting the Brush Height ......................................................................11
Changing the Brush .................................................................................12
Troubleshooting.......................................................................... 13
Wheel Drive Circuit Breaker..................................................................... 13
Brush Drive Circuit Breaker .....................................................................13
Vacuum Motor Circuit Breaker .................................................................13
FORM NO. 56041258 / Aquamatic Selectric™ - 1
Page 3

INTRODUCTION
_____________________________________________________________________________________________________________________________________________________________________________________________________________________________________________________________________________________________________________________________________
This manual will help you get the most from your Advance Selectric™. Read it thoroughly before operating the machine.
Note: Bold numbers in parentheses indicate an item illustrated on page 3.
This product is intended for commercial use only.
_____________________________________________________________________________________________________________________________________________________________________________________________________________________________________________________________________________________________________________________________________
PARTS AND SERVICE
Repairs, when required, should be performed by your Authorized Advance Service Center, who employs factory trained
service personnel, and maintains an inventory of Advance original replacement parts and accessories.
Call the ADVANCE DEALER named below for repair parts or service. Please specify the Model and Serial number when
discussing your machine.
(Dealer, affix service sticker here.)
_____________________________________________________________________________________________________________________________________________________________________________________________________________________________________________________________________________________________________________________________________
NAME PLATE
The Model and Serial Number of your machine are shown on the Nameplate on the right side of the machine. This
information is needed when ordering repair parts for the machine. Use the space below to note the Model and Serial
Number of your machine for future reference.
MODEL _____________________________________
SERIAL NUMBER _____________________________
_____________________________________________________________________________________________________________________________________________________________________________________________________________________________________________________________________________________________________________________________________
UNCRATING THE MACHINE
When the machine is delivered, carefully inspect the shipping carton and the machine for damage. If damage is evident,
save the shipping carton so that it can be inspected by the trucking company that delivered it. Contact the trucking
company immediately to file a freight damage claim.
2 - FORM NO. 56041258 / Aquamatic Selectric
™
Page 4
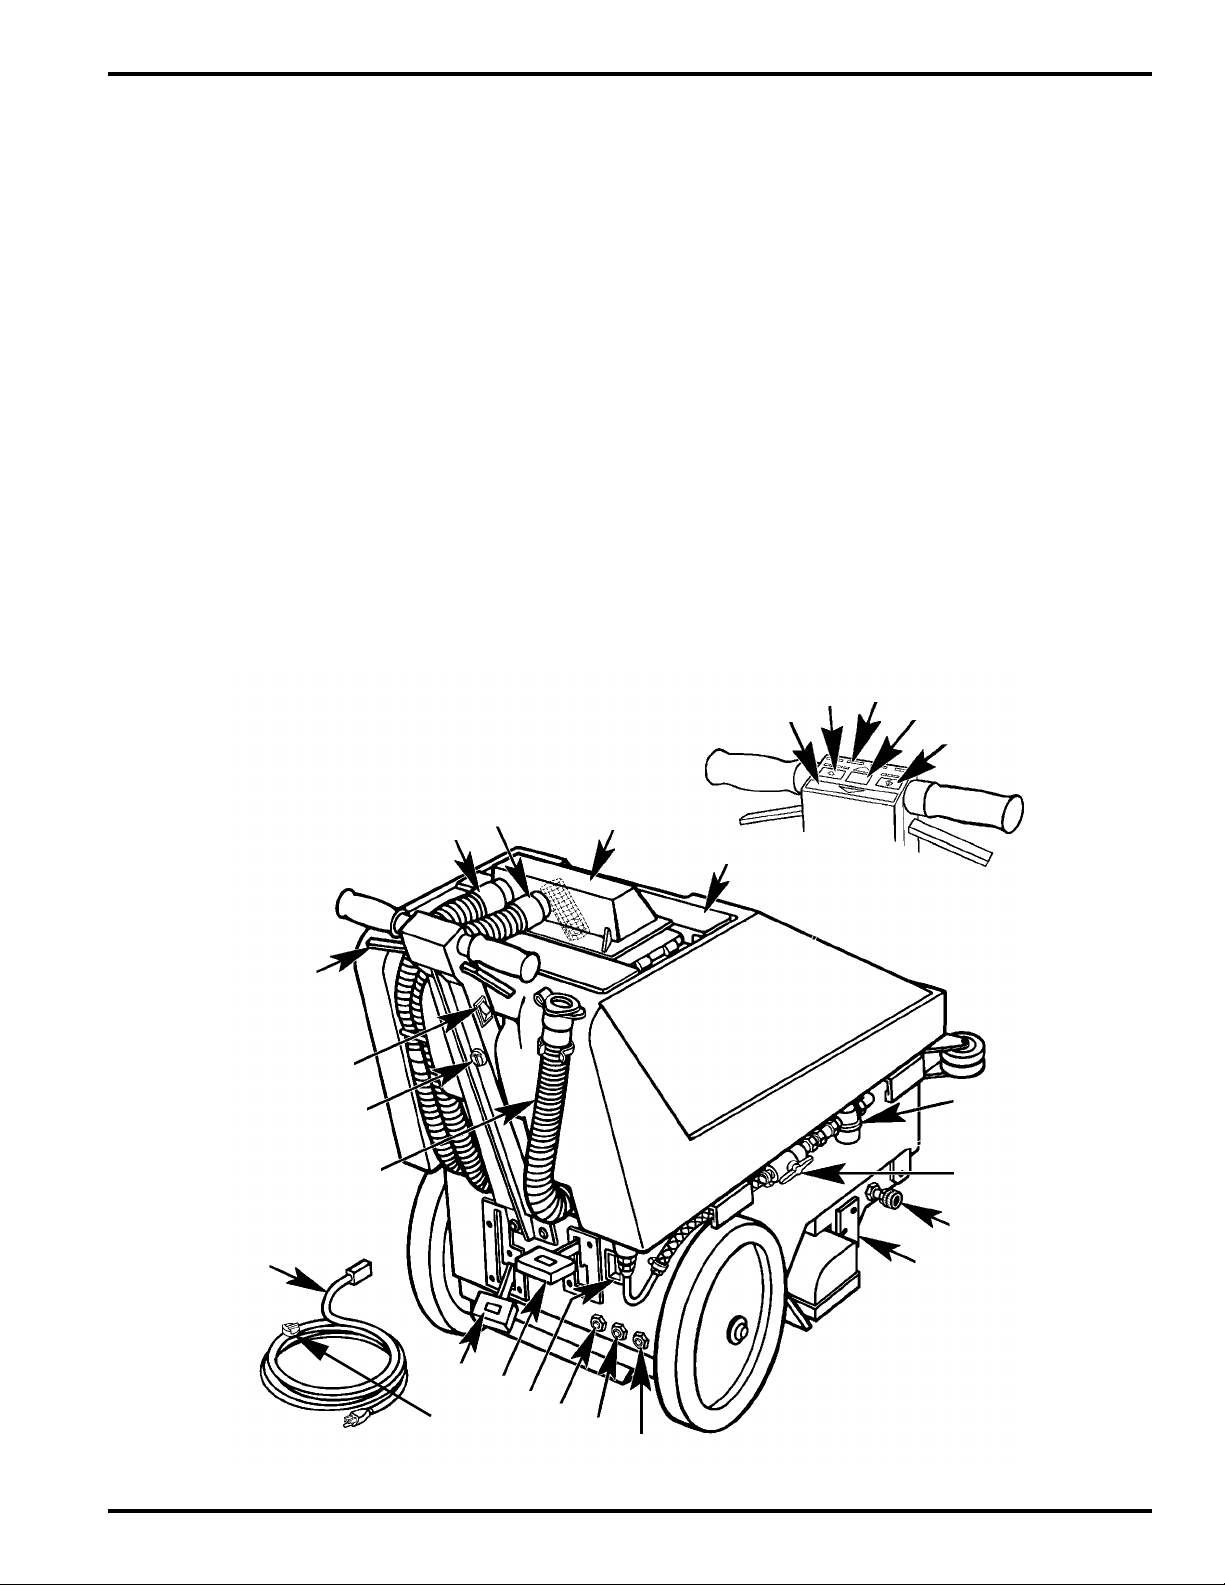
KNOW YOUR MACHINE
_____________________________________________________________________________________________________________________________________________________________________________________________________________________________________________________________________________________________________________________________________
As you read this manual, you will occasionally run across a bold number in parentheses - example: (2). These numbers
refer to an item on this page. Refer back to this page whenever necessary to pinpoint the location of an item mentioned
in the text.
1 Reverse Button
2 Decrease Speed Button
3 Speed Indicator Lights
4 Solution Button
5 Increase Speed Button
6 Upper Recovery Hose
7 Vacuum Hose
8 Recovery Tank Cover with automatic float shut-off
9 Solution Fill Cover
10 Main Switch
11 Solution Filter
12 Drive Lever
7
6
13 Solution Valve Lever
14 Accessory Connection
15 Brush Height Adjustment
16 Brush Drive Circuit Breaker (6 Amp)
17 Wheel Drive Circuit Breaker (2 Amp)
18 Vacuum Motor Circuit Breaker (13 Amp)
19 Power Cord Connection
20 Drive Pedal
21 Brush Pedal
22 Power Cord
23 Recovery Tank Drain Hose
24 Plug Lug (A and B mating halves)
3
2
1
4
5
8
9
22
12
10
24B
23
21
24A
20
19
18
17
11
13
14
15
16
FORM NO. 56041258 / Aquamatic Selectric™ - 3
Page 5

IMPORTANT SAFETY INSTRUCTIONS
When using an electrical appliance, basic precautions should always be followed, including the following:
Read all instructions before using.
WARNING!
To reduce risk of fire, electric shock, or injury:
1 Do not leave the appliance when it is plugged in. Unplug the unit from the outlet when not in use and before servicing.
2 To avoid electric shock, do not expose to rain. Store indoors.
3 Do not allow to be used as a toy. Close attention is necessary when used by or near children.
4 Use only as described in this manual. Use only manufacturer’s recommended attachments.
5 Do not use with damaged cord or plug. If the appliance is not working as it should, has been dropped, damaged, left
outdoors, or dropped into water, return it to a service center.
6 Do not pull or carry by cord, use cord as a handle, close a door on cord, or pull cord around sharp edges or corners.
Do not run appliance over cord. Keep cord away from heated surfaces.
7 Do not unplug by pulling on cord. To unplug, grasp the plug, not the cord.
8 Do not handle plug or appliance with wet hands.
9 Do not put any object into openings. Do not use with any opening blocked; keep free of dust, lint, hair, and anything
that may reduce air flow.
10 Keep hair, loose clothing, fingers, and all parts of body away from openings and moving parts.
11 Do not pick up anything that is burning or smoking, such as cigarettes, matches, or hot ashes.
12 Turn off all controls before unplugging.
13 Use extra care when cleaning on stairs.
14 Do not use to pick up flammable or combustible liquids such as gasoline or use in areas where they may be present.
15 Connect to a properly grounded outlet only. See Grounding Instructions.
SAVE THESE INSTRUCTIONS
4 - FORM NO. 56041258 / Aquamatic Selectric
™
Page 6

IMPORTANTES MESURES DE SÉCURITÉ
______________________________________________________________________________________________
L’utilisation d’un appareil électrique demande certaines précautions:
LIRE TOUTES LES INSTRUCTIONS AVANT DE FAIRE FONCTIONNER (CET APPAREIL)
AVERTISSEMENT:
Pour réduire les risques d’incendie, de choc électrique ou de blessure:
1 Ne pas laisser l’appareil sans surveillance lorsqu’il est branché. Débrancher lorsque l’appareil n’est pas utilisé et avant
l’entretien.
2 Pour réduire les risques de choc électrique, utiliser à l’intérieur seulement.
3 Ne pas permettre aux enfants de jouer avec l’appareil. Une attention particulière est nécessaire lorsque l’appareil
est utilisé par des enfants ou à proximité de ces derniers.
4 N’utiliser que conformément à cette notice avec les accessoires recommandés par le fabricant.
5 Ne pas utiliser si le cordon ou la fiche est endommagé. Retourner l’appareil à un atelier de réparation s’il ne fonctionne
pas bien, s’il est tombé ou s’il a été endommagé, oublié à l’extérieur ou immergé.
6 Ne pas tirer soulever ou traîner l’appareil par le cordon. Ne pas utiliser le cordon comme une poignée, le coincer dans
l’embrasure d’une porte ou l’appuyer contre des arêtes vives ou des coins. Ne pas faire rouler l’appareil sur le cordon.
Garder le cordon à l’écart des surfaces chaudes.
7 Ne pas débrancher en tirant sur le cordon. Tirer plutôt la fiche.
8 Ne pas toucher la fiche ou l’appareil lorsque vos mains sont humides.
9 N’insérer aucun objet dans les ouvertures. Ne pas utiliser l’appareil lorsqu’une ouverture est bloquée. S’assurer que
de la poussière, de la peluche, des cheveux ou d’autres matières ne réduisent pas le débit d’air.
10 Maintenir les cheveux, les vêtements amples, les doigts et toutes les parties du corps à l’écart des ouvertures et des
pièces mobiles.
11 Ne pas aspirer de matières en combustion ou qui dégagent de la fumée, comme des cigarettes, des allumettes ou
des cendres chaudes.
12 Mettre toutes les commandes à la position ARRÊT avant de débrancher l’appareil.
13 User de prudence lors du nettoyage des escaliers.
14 Ne pas aspirer des liquides inflammables or combustibles, comme de l’essence, et ne pas faire fonctionner dans des
endroits ou peuvent se trouver de tels liquides.
15 Ne brancher qu’à une prise de courant avec mise à la terre. Voir les instructions visant la mise à la terre.
CONSERVER CES INSTRUCTIONS
FORM NO. 56041258 / Aquamatic Selectric™ - 5
Page 7

GROUNDING INSTRUCTIONS
This appliance must be grounded. If it should electrically malfunction, grounding provides a path of least resistance for
electric current to reduce the risk of electric shock. This appliance is equipped with a cord having an equipmentgrounding conductor and grounding plug. The plug must be plugged into an appropriate outlet that is properly installed
and grounded in accordance with all local codes and ordinances.
DANGER!
Improper connection of the equipment-grounding conductor can result in a risk of electric shock. Check with a qualified
electrician or service person if you are in doubt as to whether the outlet is properly grounded. Do not modify the plug
provided with the appliance. If it will not fit the outlet, have a proper outlet installed by a qualified electrician.
This appliance is for use on a nominal 120-volt circuit, and has a grounding plug that looks like the plug illustrated in Figure
1. A temporary adapter illustrated in Figure 2 may be used to connect this plug to a 2-pole receptacle as shown in Figure
2 if a properly grounded outlet is not available. The temporary adapter should be used only until a properly grounded
outlet (Figure 1) can be installed by a qualified electrician. The green-colored rigid ear, tab, or the like extending from
the adapter must be connected to a permanent ground such as a properly grounded outlet box cover. Whenever the
adapter is used, it must be held in place by a metal screw.
Note: In Canada, the use of a temporary adapter is not permitted by the Canadian Electrical Code.
Grounding
Pin
Grounded
Outlet
Figure 1
Grounded
Outlet Box
Adapter
Tab for
Grounding
Screw
Adapter
Metal
Screw
Grounded
Outlet Box
Figure 2
6 - FORM NO. 56041258 / Aquamatic Selectric
™
Page 8

PREPARING THE MACHINE FOR USE
_____________________________________________________________________________________________________________________________________________________________________________________________________________________________________________________________________________________________________________________________________
BEFORE USING THE SELECTRIC
1 Thoroughly vacuum the carpet to be cleaned before using the Selectric automatic extractor.
_____________________________________________________________________________________________________________________________________________________________________________________________________________________________________________________________________________________________________________________________________
FILLING THE SOLUTION TANK
1 Lift the front Solution Fill Cover (9) off the machine.
2 Read the dilution instructions on the chemical container. Then figure the proper amount of chemical to mix with 25
gallons (94.5 liters) of water. For best results, use the Advance CarpeTeam™ Extraction Cleaner chemical specially
formulated for use with Advance carpet extractors.
3 Pour the chemical in the solution tank and fill the tank with warm water to 2 inches below the inside edge of the opening.
4 Put the Solution Fill Cover back on the machine.
CAUTION!
Use only low-sudsing, liquid detergents designed for carpet extraction.
_____________________________________________________________________________________________________________________________________________________________________________________________________________________________________________________________________________________________________________________________________
PRE-SPRAYING THE CARPET
Pre-spray spots and heavy traffic areas before extracting. Use a hand-held bottle sprayer or a pressurized “Hudson”
type sprayer. Mix the pre-spray according to the chemical manufacturer’s directions. For best results, use the Advance
CarpeTeam™ Pre-Spray chemical specially formulated for use with Advance carpet extractors.
_____________________________________________________________________________________________________________________________________________________________________________________________________________________________________________________________________________________________________________________________________
PLAN FOR CLEANING
Before you begin extracting, look at the area to be cleaned and plan your work. Divide the space into sections. Overlap
each pass 2 inches (5 cm).
FORM NO. 56041258 / Aquamatic Selectric™ - 7
Page 9

OPERATING THE MACHINE
_____________________________________________________________________________________________________________________________________________________________________________________________________________________________________________________________________________________________________________________________________
1 Follow the instructions in the Preparing the Machine for Use section of this manual.
2 Slide the Plug Lug halves (24A & 24B) together. Connect the Power Cord (22) to the machine at the Power Cord
Connection (19), then plug the Power Cord into a properly grounded outlet.
3 Make sure the Solution Fill Cover (9) and the Recovery Tank Cover (8) are firmly in place and the Solution Valve Lever
(13) is in the ON position.
4 Turn the Main Switch (25) ON. The Solution Button (4) will light up to indicate that the solution is ON.
5 Put the Brush Pedal (21) UP to lower the brush to the floor.
6 Step DOWN on the Drive Pedal (20) and push the pedal to the right to engage the drive motor.
7 Pull and hold the Drive Levers (26) UP to propel the machine. To adjust the travel speed, press the Increase Speed
Button (5) or the Decrease Speed Button (2). To move backward, hold down the Reverse Button (1) while pulling the
Drive Levers; release the Reverse Button to move forward again.
Note: There will be a slight pause between direction changes.
8 Solution is dispensed only while moving forward and automatically shuts off in reverse. Press the Solution Button
(4) to stop solution flow; the light will turn off.
9 Watch the fluid entering the recovery tank cover (8). If there is a large amount of suds in the recovery tank, add a
defoamer chemical to the recovery tank.
CAUTION!
Empty the recovery tank before the fluid or foam enters the Vacuum Hose (7) on the right side of the recovery tank
cover.
If there is little or no fluid entering the recovery tank, look to the clear solution hose on the right side of the machine.
If there is no fluid running through the solution hose, the solution tank may be empty. Refill the solution tank with water
and the proper ratio of cleaning chemical.
10 The recovery tank has an automatic float shut-off to block the vacuum system when the recovery tank is full. You can
tell when the float closes by the sudden change in the sound of the vacuum motor. When the float closes, the recovery
tank must be emptied. The machine will not pick up water with the float closed.
_____________________________________________________________________________________________________________________________________________________________________________________________________________________________________________________________________________________________________________________________________
USING ATTACHMENTS
To use accessory tools, attach the accessory recovery hose to the left port of the recovery tank cover. Attach the
accessory solution hose to the Accessory Connection (14). Connect the other ends of the hoses to the accessory tool.
When using accessory tools, step DOWN on the Brush Pedal (18) to raise the brush.
See your Advance Distributor for accessories that may be used with the Selectric including:
• 56249360 Liquidator
• 56204223 Drag Tool SS 4 Ft
• 56204224 Hand Tool SS
• 56249318 Scrub & Vac Hose 15 Ft
• 56801000 Aqua Kit (Includes PN 56800385, 56800390 & 56249318)
• 56800390 Drag Tool (Plastic)
• 56800385 Hand Tool (Plastic)
8 - FORM NO. 56041258 / Aquamatic Selectric
™
revised 10/00
Page 10

AFTER USING THE MACHINE
_____________________________________________________________________________________________________________________________________________________________________________________________________________________________________________________________________________________________________________________________________
1 Turn the Main Switch (25) OFF.
2 Step DOWN and lock the Brush Pedal (21) to raise the brush.
3 Put the Drive Pedal (20) UP to disengage the drive belt.
4 Unplug the Power Cord (22) from the power outlet and from the machine.
5 Unhook the Recovery Tank Drain Hose (23), direct the hose to a “DESIGNATED” waste water disposal site. Remove
the hose plug to empty the recovery tank and rinse it with clean water.
6 Separate the upper section of the Recovery Hose (6) at the back of the machine, then remove the Solution Fill Cover
(9) and place the recovery hose into the bottom of the solution tank. Turn on the Main Switch (25) and vacuum the
unused solution into the recovery tank. Unhook the Recovery Drain Hose (23), direct the hose to a “DESIGNATED”
waste water disposal site. Remove the plug to empty and rinse with clean water.
7 Unscrew the Solution Filter (11) cover and clean the screen.
8 Wipe the machine with a damp cloth. Do not use abrasive chemicals or solvents.
9 Perform any required maintenance before storage.
_____________________________________________________________________________________________________________________________________________________________________________________________________________________________________________________________________________________________________________________________________
MAINTENANCE SCHEDULE
MAINTENANCE ITEM WEEKLY MONTHLY YEARLY
Clean and Check Power Brush •
Clean Pick-Up Tool •
Clean Spray Nozzle •
Lubricate the Machine •
Clean the Vacuum Exhaust Filter •
*Service the Vacuum Motor •
Service the Wheel Drive Motor •
*Have the carbon brushes in the vacuum motor checked once a year or after every 500 hours by a qualified Advance
service person.
10 Store the machine in a clean, dry place with the tank covers open.
FORM NO. 56041258 / Aquamatic Selectric™ - 9
Page 11

MAINTENANCE
_____________________________________________________________________________________________________________________________________________________________________________________________________________________________________________________________________________________________________________________________________
WARNING!
Unplug the power cord before attempting any service or maintenance work to the machine.
_____________________________________________________________________________________________________________________________________________________________________________________________________________________________________________________________________________________________________________________________________
MAINTENANCE NOTE
With the tanks empty and the power cord unplugged, tip the machine forward onto its nose for access to the Power Brush,
Pick-Up Tool, and Spray Nozzle.
_____________________________________________________________________________________________________________________________________________________________________________________________________________________________________________________________________________________________________________________________________
POWER BRUSH MAINTENANCE
Check the brush once a week. Remove any built-up string, hair or carpet fibers. Check the bristle length. Change the
brush when the brush bristles are worn to 1/4 inch (6 mm).
_____________________________________________________________________________________________________________________________________________________________________________________________________________________________________________________________________________________________________________________________________
PICK-UP TOOL MAINTENANCE
Check the pick-up tool once a week. Remove any built-up string, hair or carpet fibers.
_____________________________________________________________________________________________________________________________________________________________________________________________________________________________________________________________________________________________________________________________________
SPRAY NOZZLE MAINTENANCE
Remove the spray nozzle once a week. It is located under the machine just in front of the brush. Soak the nozzle
overnight in a vinegar and water solution to remove chemical deposits.
_____________________________________________________________________________________________________________________________________________________________________________________________________________________________________________________________________________________________________________________________________
LUBRICATING THE MACHINE
Once a month (or every 30 hours), lubricate all pivot points on the pick-up tool. For best results, use a spray silicone
lubricant.
Once a month, pump grease into the grease fitting on the caster wheel until it seeps out around the bearing. Wipe off
the excess grease to avoid staining carpet.
10 - FORM NO. 56041258 / Aquamatic Selectric
™
Page 12

MAINTENANCE
_____________________________________________________________________________________________________________________________________________________________________________________________________________________________________________________________________________________________________________________________________
CLEANING THE VACUUM EXHAUST FILTERS
Clean the vacuum exhaust filters once a month. Remove the filter holder from the bottom of the machine and vacuum
to remove any dust or debris that may block air flow. For extremely dirty filters, wash with warm, soapy water and rinse
thoroughly with clean water. Allow the filter to dry completely before installing back on the machine.
_____________________________________________________________________________________________________________________________________________________________________________________________________________________________________________________________________________________________________________________________________
SERVICING THE VACUUM MOTOR
Have the carbon brushes in the vacuum motor checked once a year or after every 500 hours by a qualified Advance
service person.
IMPORTANT!
Motor damage resulting from failure to service carbon brushes is not covered under warranty. See the Limited Warranty
statement.
_____________________________________________________________________________________________________________________________________________________________________________________________________________________________________________________________________________________________________________________________________
SERVICING THE WHEEL DRIVE MOTOR
Have the carbon brushes in the wheel drive motor checked every 450 hours by a qualified Advance service person.
IMPORTANT!
Motor damage resulting from failure to service carbon brushes is not covered under warranty. See the Limited Warranty
statement.
_____________________________________________________________________________________________________________________________________________________________________________________________________________________________________________________________________________________________________________________________________
ADJUSTING THE BRUSH HEIGHT
There is an Adjustment Plate (15) on each side of the machine, just in front of the brush. To adjust the Brush Height,
loosen the two Plate Screws on the side of the Adjustment Plates. Raise the plates to lower the brush; Lower the plates
to raise the brush. Use a wrench to turn the Adjustment Screws to the desired position, then tighten the Plate Screws.
FRONT
Adjustment Screw
Plate Screws
Adjustment Plate
FORM NO. 56041258 / Aquamatic Selectric™ - 11
Adjusting the Brush Height
Page 13

MAINTENANCE
_____________________________________________________________________________________________________________________________________________________________________________________________________________________________________________________________________________________________________________________________________
CHANGING THE BRUSH
Change the brush when the brush bristles are worn to 1/4 inch (6 mm).
1 Remove the Belt Guard from the left side of the machine.
2 Loosen the brush drive motor mount and slip the Belt off the motor pulley.
3 Tip the machine on its nose. Then pry the Belt Cover off the Brush Housing.
4 Pull the pulley end of the brush out of the Brush Housing.
5 Inspect the Belt for wear or damage, replace if necessary.
6 Place the Belt around the pulley on the new brush. Install the brush in the Brush Housing so that number 1 is visible
on both bearing blocks.
7 Place the Belt over the motor pulley and tighten the motor mount.
8 Install the Belt Cover and Belt Guard.
Number 1
on Bearing Blocks
Brush Housing
Belt Cover
Changing the Brush
Belt
12 - FORM NO. 56041258 / Aquamatic Selectric
™
Page 14

TROUBLESHOOTING
_____________________________________________________________________________________________________________________________________________________________________________________________________________________________________________________________________________________________________________________________________
2 AMP WHEEL DRIVE CIRCUIT BREAKER
When the Wheel Drive Circuit Breaker (17) trips, check to see if there is debris wrapped around the wheel axle. Remove
the debris from the axle. Have the wheel drive motor checked for worn out brushes; repair or replace the motor if
necessary. Push the button to reset the circuit breaker.
If the circuit breaker trips repeatedly, call your local Advance Distributor for service.
_____________________________________________________________________________________________________________________________________________________________________________________________________________________________________________________________________________________________________________________________________
6 AMP BRUSH DRIVE CIRCUIT BREAKER
When the Brush Drive Circuit Breaker (16) trips, check to see if the brush height is set too low or if there is debris wrapped
around the brush. Adjust the brush height or remove the debris from the brush. Push the button to reset the circuit
breaker.
If the circuit breaker trips repeatedly, call your local Advance Distributor for service.
_____________________________________________________________________________________________________________________________________________________________________________________________________________________________________________________________________________________________________________________________________
13 AMP VACUUM MOTOR CIRCUIT BREAKER
When the Vacuum Motor Circuit Breaker (18) trips, check the exhaust filter and clean or replace if necessary. Have the
vacuum motor checked for worn out bearings and/or brushes or bearing failure. Repair or replace the motor if necessary.
Push the button to reset the circuit breaker.
If the circuit breaker trips repeatedly, call your local Advance Distributor for service.
FORM NO. 56041258 / Aquamatic Selectric™ - 13
Page 15

Nilfisk-Advance, Inc.
14600 21st Avenue North
Plymouth, MN, 55447-3408
www.nilfisk-advance.com
Phone: 800-989-2235
Fax: 800-989-6566
©2000 Nilfisk-Advance, Inc.,
Plymouth, MN 55447-3408
Printed in the U.S.A.
 Loading...