

Page 1
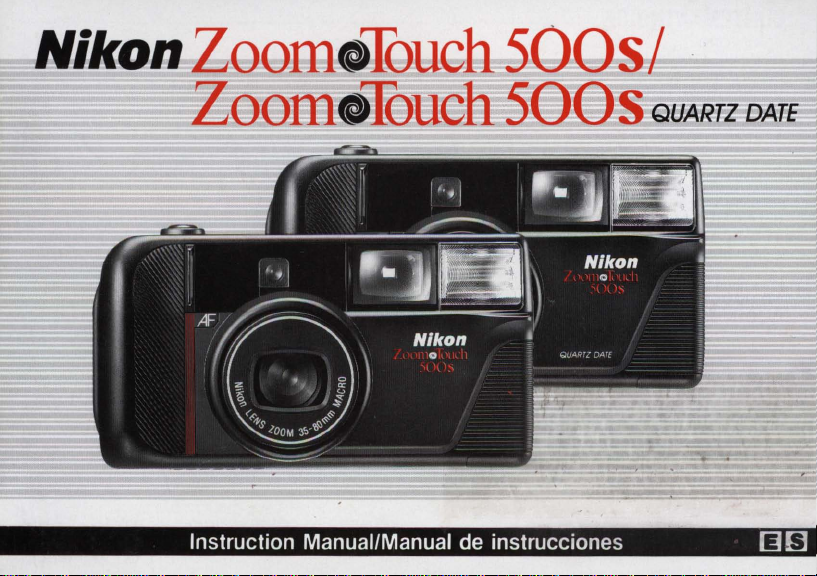
Nikon
Zoom
oT
ouch
500s/
~·
~
~~~
Loom
Instruction Manual/Manual de instrucciones
o
T
ouch
5Q
~
s
QUARTZ
DATE
[J[)
Page 2
CONTENTSIINDICE
FOREWORD . .
NOMENCLATURE . .
INSTALLING BATTERY .
CHECKING BATTERY .
LOADING FILM .
SHOOTING .
ADVANCED SMART FLASH
Automatic Flash Shooting Range
............
.................
---------------
..
. .
.......
. . .
. . .
......
. . . .
Flash Cancellation .
Fill-Flash Operation .
HOW TO USE FOCUS LOCK ... . . ..... ..
SELF-TIMER .
CONTINUOUS SHOOTING!
CONTINUOUS ZOOM SHOOTING
...........
.
...... ..... . . .
Continuous Shooting
Continuous Zoom Shooting
STEP
ZOOM
IMAGE SIZE SELECTOR BUTTON .
EXPOSURE COMPENSATION
CAMERA CARE TIPS
ABOUT BATTERIES .
ATTACH NECKSTRAP
ACCESSORIES .
IMPRINTING
(Zoom
SHOOTING COMBINATION CHART .
SPECIFICATIONS .
SHOOTING
DATA
· Touch
.........
........
500s
QUARTZ
...............
. . .
. .
...
DATE
.
only) .
.
2
PREFACIO
3
4-8
NOMENCLATURA . . . . . . . . . . . . . . . . . . . . . .
INSTALACION
9
10-11
.
12-15
16-22
23-28
....
27-28
.
29-30
31-33
34-37
35-36
38-39
40-41
42-43
46-49
51-55
COMPROBACION DE
DE LAS
CARGA DE
TOMA
25
FLASH INTELIGENTE DE AVANZADA .
26
Gama
CancelaciOn del flash ... . . . . . . . . . . . . . . . . . .
Flash de relleno 27 -28
UTILIZACION DEL BLOQUEO
DE ENFOQUE . . . . .
DISPARADOR AUTOMATICO
DISPARO CONTINUO/DISPARO CON
34
CONTINUO . . . . . . . . . . . . . . . . . .
Disparo continuo . . . .
37
Disparo con zoom continuo . . . . 35-36
DISPARO CON
BOTON DE SELECCION DE
44
DIMENSIONES DE
45
COMPENSACION DE
45
CONSEJOS PARA EL CUI
DE
ACE RCA DE LAS PILAS . . . . . . . . . . . . . . . . .
50
FIJACION DE LA CORREA .
ACCESORIOS . . . . . . . . . . . . . . . .
IMPRESION DE DATOS
(S610 con la
Zoom·Touch
CUADRO DE COMBINACIONES DE TOMAS
ESPECIFICACIONES
...............
DE
PI
LAS
LA
PELICULA
DE
FOTOGRAFIAS
LAS PILAS .
LA
. . 10-
..
CARGA
.....
. . 12-15
.........
.
de disparo de flash automatico . . . . . . . . .
..
. .
........
ZOOM
ZOOM
POR PASOS . . . . . . . . .
LA
LA
CAMARA ...
IMAGEN . .
LA
EXPOSICION . . . . . 40-41
DADO
........
50
Os
QUARTZ DATE) . .
...
....
. . . . . . . . .
...........
..
.
....
..
. . . 3
4-8
11
16
-22
23
-28
..
25
..
26
29
-30
31-33
34-37
..
34
37
38-39
42-43
44
45
..
45
46-49
50
51
-55
9
Page 3
-------
Thank you for purchasing the Nikon Zoom -Touch
Zoom-Touch
Although the Zoom-Touch SODs/Zoom -Touch
QUARTZ
this instruction manual thoroughly before you begin_
FOREWORD/
SODs
QUARTZ
DATE
is extremely easy to use, be sure to read
PREFACIO
DATE.
500s/
SODs
Gracias
Zoom-Touch
Aunque esta camara es extraord inariamente facil
manejar, slrvase leer detenidamente este manual
instrucciones antes de comenzar a usarla_
'For instructions on
por
comprar
SODs
data imprint functions, see
la Nikon Zoom -Touch
QUARTZ
the
Zoom-Touch
DATE.
SODs
IMPRINTING
500s/
QUARTZ
DATA
on
46-49_
'Para las instrucciones relacionadas con l
impresion de datos de
yea
la
secclon IMPRESION DE DATOS
la
Zoom-Touch
as
funciones de
SODs
QUARTZ
en
las paginas
46-49_
de
de
DATE
pages
DATE,
's
3
Page 4
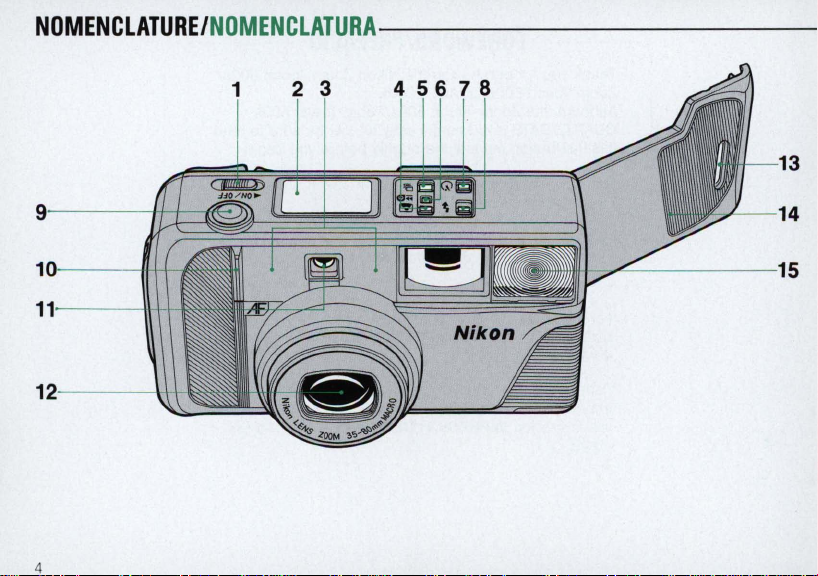
NOMENClATURE/
11
- -
-1
1
4
NOMENClATURA
------------
1---:7
""--
----
13
14
15
Page 5
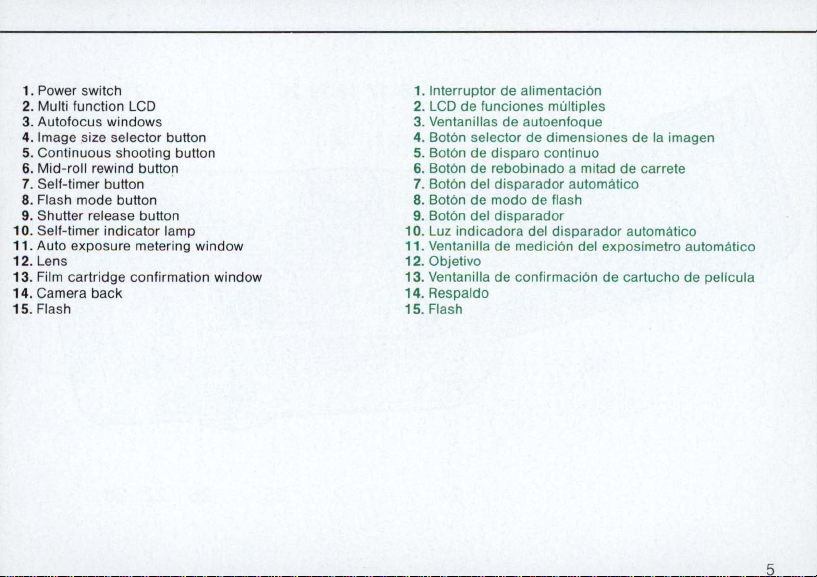
1. Power switch 1. Interruptor de alimentaci6n
2. Multi function LCD 2.
3.
Autofocus windows 3. Ventanillas de autoenfoque
4. Image size selector button 4. Bot6n selector de dimensiones de la imagen
5. Continuous shooting button
6. Mid-roll rewind button 6. Bot6n de rebobinado a mitad de carrete
7. Self-timer button .
8. Flash mode button
9. Shutter
10. Self-timer indicator lamp
11. Auto exposure metering window
12. Lens
13
14
15
re
lease button 9. Bot6n del
. Film cartridge confirmatio n window
. Camera back 14. Respaldo
. Flash 15. Flash
LCD
de funciones multiples
5.
Bot6n de disparo continuo
7.
Bot6n del
8.
Bot6n de modo de flash
10
. Luz indicadora del
11. Ventanilla de medici6n del exposimetro automatico
12
. Objetivo
13
. Ventanilla de confirmaci6n de cartucho de pellcula
disparador
disparador
disparador
automatico
automatico
5
Page 6
24
6
25
26 27 28
Page 7
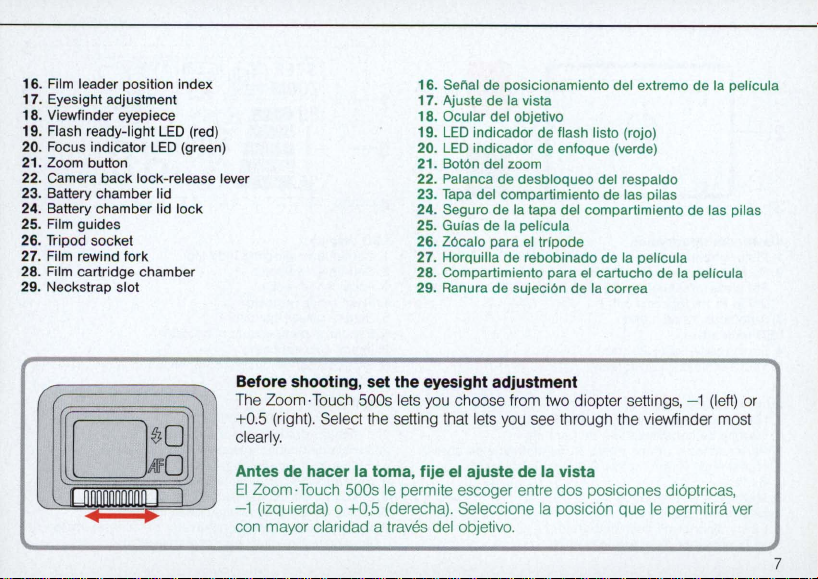
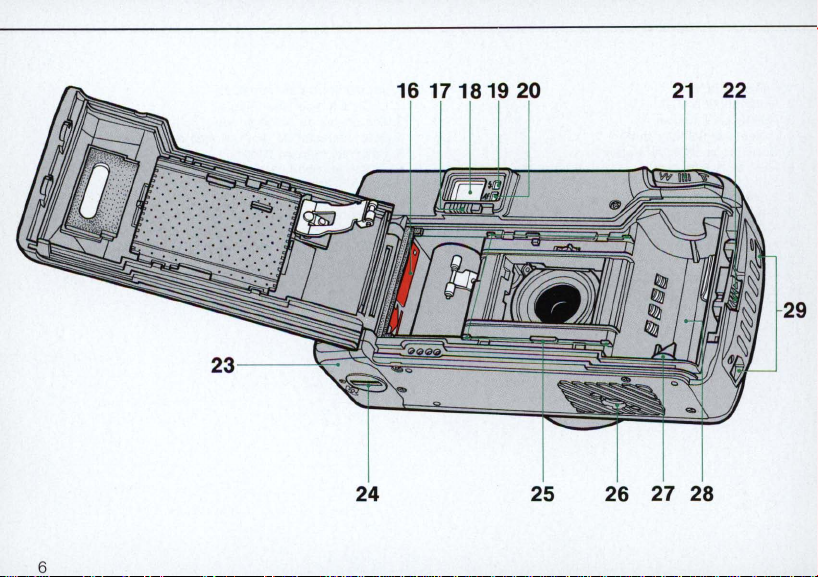
16. Film leader position index 16.
17
. Eyesight adjustment
18
. Viewfinder eyepiece 18. Ocular del objeti
19. Flash ready-light
20. Focus indicator
21. loom
22. Camera back lock-release lever 22. Palanca de desbloqueo del respaldo
23. Battery chamber lid
24. Battery chamber lid lock
25
26. Tripod socket
27. Film rewind fork
28. Film cartridge chamber
29. Neckstrap slot
button
. Film guides
LED
LED
(red)
(green)
SeMI
17
19. LED
20. LED
21
23.
24. Seguro de
25. Gufas de la peifcula
26.
27. Horquiifa de rebobinado de
28. Compartimiento para
29. Ranura de sujec
de posicionamiento del extremo de
. Ajuste de la vista
indicador de flash listo (rajo)
indicador de enfoque (verde)
. Bo
tOn
del zoom
Tap
a del compartimiento de las pilas
lOcalo
vo
la
tapa del compartimiento de las pilas
para
el
trfpode
el
cartucho de la pelicula
iOn
de
la
la
correa
peifcula
Before shooting, set the eyesight adjustment
The Zoom·Touch 500s lets you choose from two diopter setting
+0.5 (right
rl
y.
clea
Select the sett
ing that lets you see through the viewfinder most
).
Antes de hacer la toma, fije el ajuste de la vista
EI
unnnnnnnnru
J
Zoom·Touch 500s Ie permite escoger entre dos posiciones dioptricas,
- 1 (izquierda)
0 +0,5 (derecha).
Se
leccione la posicion que Ie permitira
co n mayor claridad a traves del objetivo.
la
pelicula
s,
- 1
(left)
or
ver
7
Page 8
4
5
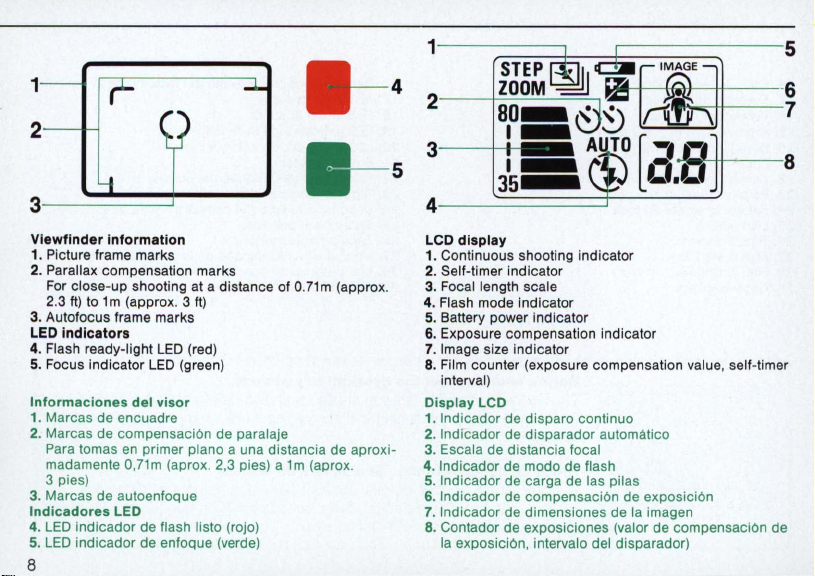
Viewfinder
1. Picture frame marks
2.
Parallax compensation marks
For close-up shooting at a distance of 0.
2.3
3.
Autofocus frame marks
LEO
4. Flash ready-light
5.
Focus indicator
Informaciones
1. Marcas de encuadre
2.
Marcas de compensaci6n de paralaje
Para tomas
madamente O,
3 pies)
3. Marcas de autoenfoque
Indicadores
4.
LED
5.
LED
Information
It)
to
1 m (approx. 3 It)
indicators
indicador de fiash listo (rojo)
indicador de enfoque (verde)
LED
(red)
LED
(green)
del
visor
en
primer plano a una distancia de aproxi-
71m
(aprox . 2,3 pies) a
LEO
8
1m
71
(aprox.
m (approx.
LCD
display
1. Continuous shooting indicator
2.
Self-timer indicator
3. Focal length scale
4.
Flash mode indicator
5. Battery power indicator
6. Exposure compensation indicator
7. Image size indicator
8. Film counter (exposure compensation value, self-timer
interval)
Display LCD
1. Indicador de disparo continuo
2.
Indicador de disparador automatico
3.
Escala de distancia focal
4. Indicador de modo de flash
5. Indicador de carga de las pilas
6.
Indicador de compensaci6n de exposici6n
7.
Indicador de dimensiones de
8.
Contador de exposiciones (valor de compensaci6n de
la
exposici6n, intervalo del disparador)
la
imagen
Page 9
INSTALLING
BATTERY/
INSTALACION
1 2
~
DE
LAS
PILAS
-------
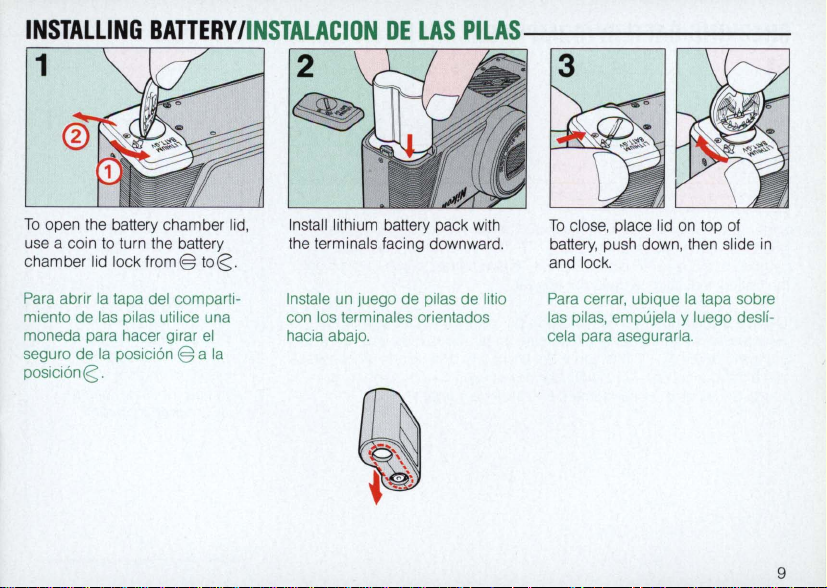
To
open the battery chamber lid,
use a coin to turn the battery
chamber lid lock
Para
abrir
miento de las pilas utilice una
moneda para hacer girar
seguro de
posici6n€;.
from@
la
tapa del comparti-
la
posici6n @ a
to€;.
el
la
Install lithium battery pack with
the terminals facing downward.
un
Instale
con los terminales orientados
hacia abajo.
juego de pilas de litio
To
close, place l
battery, push down, then slide
and lock.
Para
cerrar, ubique
las
pi
las,
cela para asegurarla.
id
on top of
la
empujela y luego deslf-
tapa sobre
in
9
Page 10
CHECKING
80
i
J5
Slide power switch
ope ns to wideangle position, a
lenglh scale appear in the
the battery indicator
Deslice
del objetivo
los indicadores
en
ran
carga de las pilas es suficiente para utilizar la camara.
10
BATTERY/
COMPROBACION
U
AUTO
[ EJ
-~
to
turn camera
c::» does not appear.
el
interruptor de alimentacion para activar
se
abrira automaticamente
E , '\' (indicador del flash) y
el
panel
LCD.
Si
el
on.
The lens cover automatically
nd
E ,
'\'
LCD
indicador de las pilas
(flash indicat
panel. When battery power
en
la
la
posicion de gran angular y
la
distancia focal aparece-
CA
DE
LA
CARGA
or)
, and focal
is
sufficienl,
camara.
no aparece, la
La
tapa
DE
LA
PILAS
e
To
turn camera off, slide
power swi tch again. (
panel turns o
e
Para
desactivar
camara, deslice
rruptor de alimentacion
nuevamente hasta
posicion original.
indicaciones del panel
LCD
desapareceran).
----
ff.
)
la
el
LCD
inte-
su
(Las
Page 11
...
1;
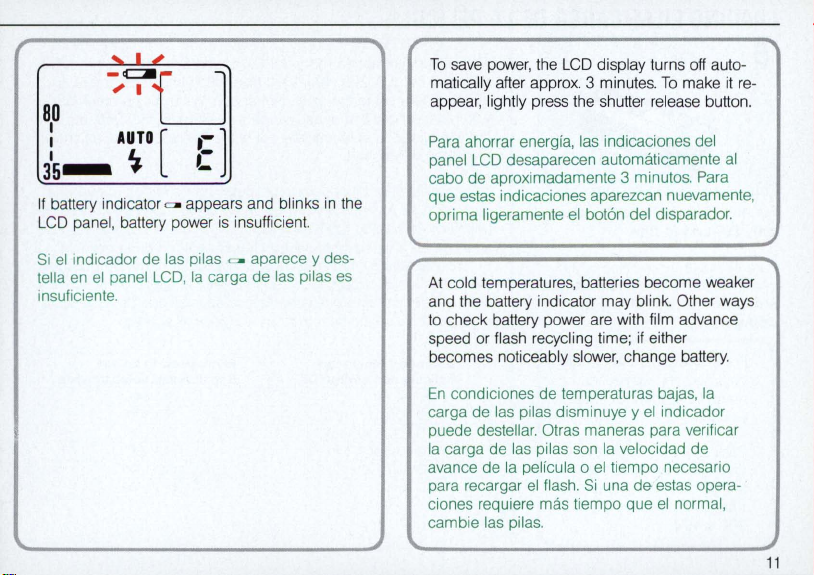
If
battery indicator c:.o appears and blinks
LCD
panel, battery power
Si
el
indicador de las pilas
telia
en
el
panel
LCD,
is
insufficient.
c:.o
aparece y des-
la carga de las pilas
insuficiente.
To save power, the
matically after approx. 3 minutes.
LCD
display turns off auto-
To
make
it
re-
appear, lightly press the shutter release button.
Para ahorrar energia, las indicaciones del
LCD
panel
desaparecen automaticamente
al
cabo de aproximadamente 3 minutos. Para
in
the
es
que estas indicaciones aparezcan nuevamente,
el
oprima ligeramente
bot6n del disparador.
At cold temperatures, batteries become weaker
and the battery indicator may blink. Other ways
to check battery power are with film advance
speed or flash recycling time;
if
either
becomes noticeably slower, change battery.
En
condiciones de temperaturas bajas,
carga de las pilas disminuye y
el
indicador
la
puede destellar. Otras maneras para verificar
la carga de las pilas son la velocidad de
la
avance de
para recargar
pelicula 0
el
ciones requiere mas tiempo que
flash.
el
tiempo necesario
Si
una
de
estas opera-
el
normal,
cambie las pilas.
11
Page 12
LOADING
FILM/
CARGA
DE
LA
PELICULA
----------
5
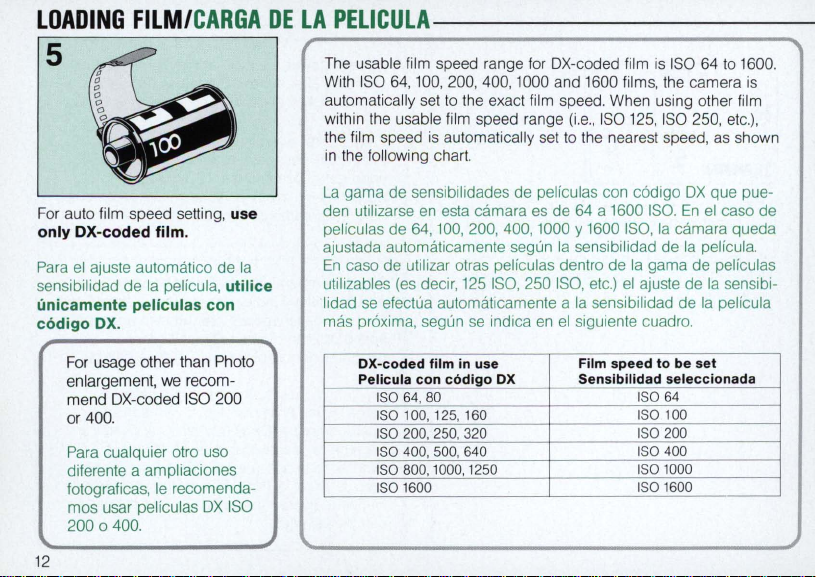
For auto film speed sett
only OX-coded film.
Para
el
ajuste automatico de
sensibilidad de la pelicula, utilice
unicamente peliculas con
OX.
c6digo
For usage other than
enlargement, we recommend OX-coded ISO 2
or 400.
Para cualquier otro uso
diferente a ampliaciones
fotograficas,
mos usar peliculas
2000400.
12
ing, use
Ie
recomenda-
OX
Ph
la
oto
00
ISO
The usable film speed range for OX-coded film is I
With
ISO
64,
100,
ut
omatically set
a
within the usable film speed range
the film speed is automatically set
in the
fol
lowing chart.
La
gama de sensibilidades de peliculas con c6digo
den utilizarse en esta camara es
peliculas de 64,
ajustada automaticamente segun la sensibilidad de
En
caso de utilizar otras peliculas dentro
utilizables (es decir, 125
lidad se efectua automaticamente a
mas pr6xima, segun se indica en
OX
-coded film
Pelicula con c6digo
ISO 64, 80
ISO 100, 125, 160
ISO 200, 250, 320
ISO 400, 500, 640
ISO 800. 1000, 1250
ISO
200, 400, 1000 and 1600 films, the camera is
to th
1600
e exact film speed. When using other film
100,
200, 400, 1000 Y 1600
ISO,
in
use Film speed to be set
OX
(i.e.,
ISO 125, I
to
the nearest speed, as shown
de
64 a 1600
250
ISO,
la
el
siguiente cuadro.
Sensibilidad seleccionada
ISO.
ISO,
de
la gama
etc.)
el
ajuste de la sensibi-
sensibilidad
ISO
ISO 100
ISO 200
ISO 400
ISO 1000
ISO 1600
SO
la
64
SO
64
to
1600.
250, et
c.),
OX
que pue-
En
el
caso de
camara queda
la
pelicula.
de
peliculas
de
la pelicula
Page 13
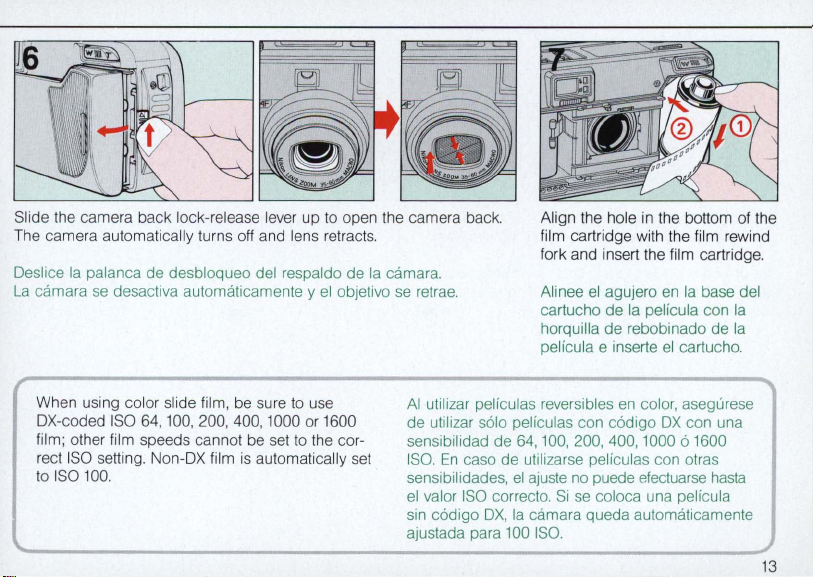
Slide the camera back lock-release lever up to open the camera back.
Th
e camera automatically turns off and lens retract
Oeslice
la
La
palanca de desbloqueo del respaldo de
camara
se
desactiva automalicamente y
sli
When using color
OX-coded ISO
fi
lm; other film speeds canno t be set to the cor-
SO
setting. Non-OX film is automatically set
rect I
to ISO
100.
de film, be sure
64, 100, 200,
400
, 1000
to
or
el
use
objetivo
1600
s.
la
camara.
se
retrae.
AI
utilizar peliculas reversibles
de utilizar
s610
sensibilidad de
ISO.
En
caso de ulilizarse peliculas con otras
sensibilidades,
el
valor
ISO
sin c6digo
OX,
ajustada para
Align the hole in the bottom of the
film cartridge with the film rewind
fork and insert
Alinee
th
e film cartrid
el
agujero en la base del
cartucho de la pelicula con la
horquilla de rebobinado de la
pelicula e inserte
peliculas con c6digo
64, 100, 200, 400, 1000 6 1600
el
ajuste no puede efectuarse
cor recto.
Si
se
la
camara queda automaticamente
100
ISO
coloca una pelicula
.
el
en
color, asegurese
OX
ge.
cartucho.
con una
hasta
13
Page 14

Pull film leader across
film leader position index.
Tire del extremo de
la
seiial de posiclonamiento
hasta
del extremo de la pelicula.
Avoid loading/unloading film
EVlte
cargar 0 descargar
lugar expuesto a
to
la
pelicula
la
luz solar directa.
14
the
red
la
pelicula
in
Check to make sure film
no film slack.
la
Verifique que
que este tensa.
direct sunlight.
en
un
peicula quede ubicada
is
located between the film guides and there
en.tre
las guias de
la
pelicula y
is
Page 15
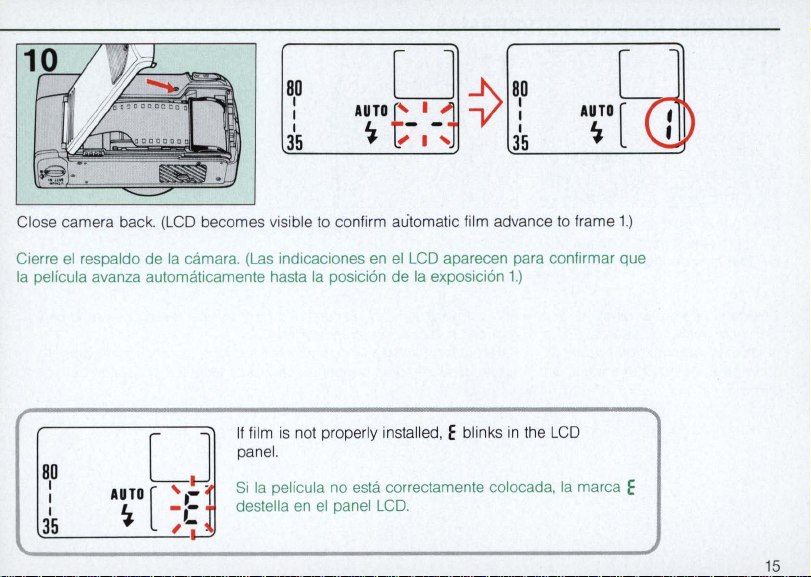
Close camera back. (
Cierre
el
la
respaldo de la camara.
pelicula avanza automaticamente hasta la posicion de la exposicion
80
I
I
I
35
AUTO
L -
...
LCD
becomes visible
LJ
[ '
--
l
,-
~
~
to
confirm automatic film advance
(Las
indicaciones en
If
film
is
not properly installed, E blinks
panel.
Si
la
pelicula no esta correctamente colocada, la marca E
destella
en
el
panel
el
LCD.
LCD
aparecen para confirmar que
in
1.)
the
to
LCD
frame
1.)
15
Page 16
SHOOTINGITOMA
DE
FOTOGRAFIAS
12
------------
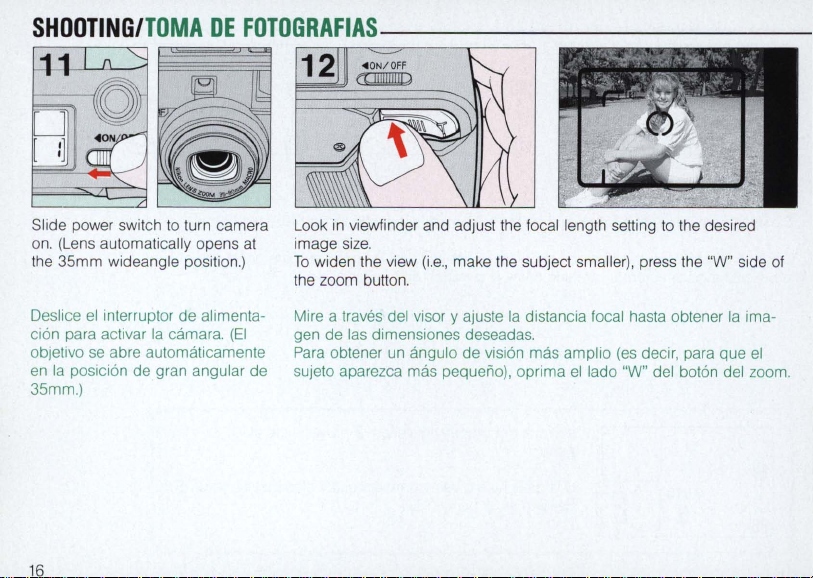
Slide power switch to turn camera
on. (Lens automatically opens
the 35mm wideangle position.)
el
Deslice
cion para activar
objetivo
en
35mm.)
16
interruptor de alimenta-
la
se
la posicion de gran angular de
camara.
abre automaticamente
at
(EI
Look
in
viewfinder and adjust the focal length setting
size.
image
To
widen the view
the zoom button.
Mire a traves del visor y ajuste
gen de las dimensiones deseadas.
Para obtener
sujeto aparezca mas pequeno), oprima
(i.e.,
make the subject smaller), press the "W" side
la
distancia focal hasta obtener la ima-
un
angulo de vision mas amplio
to
the desired
(es
el
decir, para que
lado "W" del boton del zoom.
of
el
Page 17
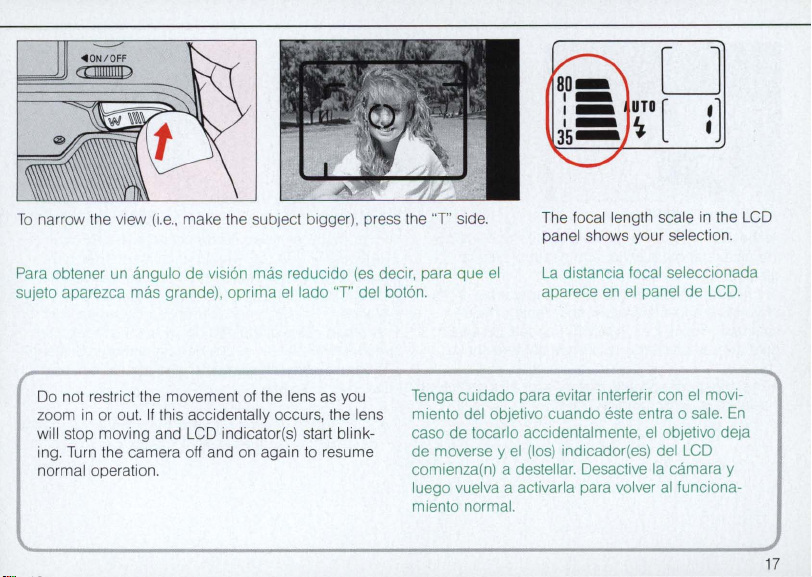
To narrow the view
Para obtener
(i.e.,
make the subject bigger
un
angulo de vision mas reducido
sujeto aparezca mas grande), oprima
),
press the "
(es
el
lado "T" del boton.
decir, para que
T"
sid
Th
e.
e focal leng
panel shows your s
el
La
distancia focal seleccionada
aparece
en
th
el
panel de
scale in the LCD
electi
on.
LCD.
Do not restrict the movement of the lens as you
or out.
If
th
is
zoom in
wi
ll
stop moving and LCD ind icator(s) sta
in
g. Turn the
ma
nor
camera o
l operation.
accidentally occur
ff and
on again to resume
s, the lens
rt blin
Tenga cuidado para evitar Interferir con
miento del objetivo cuando este entra
caso de tocarlo accidental mente,
k-
de moverse y
el
(los)
indicador(es) del
comienza(n) a destellar. Desactive la camara y
luego vuelva a activarla para volver
miento normal.
el
movi-
0 sale.
el
objetivo deja
LCD
al
funciona-
En
17
Page 18

WIDE
At
the 35mm local length setting (aperture the picture angle
greater.
At
the 80mm focal length setting (aperture -
the picture angle
shallower. Focus lock
hold the camera lirmly
.
The
minimum shooting distance for
settings
18
is
is
wider and depth
is
sharper and depth of field
is
recommended. Be sure
to
prevent camera shake.
O.71rn
(approx. 2.3
tt
).
01
lield
all
local length
1/3.5),
is
1/7.8)
is
En
el
caso del ajuste de distancia local a 35mrn
(abertura -
am plio y
,
En
el
(abertura reducido y la profundldad de campo
to
recomienda utilizar
la camara lirmemente para evitar que
tomar
La
•
de distancia local
1/3,5),
la
caso del ajuste de distancia local a 80mm
la
lotografia.
distancia minima de toma para todos los ajustes
el
prolundidad de campo
117,8),
el
TELE
angulo de
angulo de la Imagen
el
bloqueo de enloque. Sostenga
es
de
la
0,71m
(aprox. 2,3 pies).
imagen
es
mayor.
es
se
es
mas
es
mas
menor.
mueva
Se
al
Page 19

Look
in
viewfinder and position
autofocus frame marks on the
su
bje
main
ct.
Lightly press shutter
button.
re
lease
Confirm green focus indicator
LED
lights up.
Mire a traves del visor y ubique
los marcos de autoenfoque en
sujeto principal.
Oprima ligeramente
el
disparador.
el
boton del
Verifique que
LED
cador
de color verde.
se
encienda
el
indi-
19
Page 20

If
subject
is
green focus indicator
blinks. Remove finger from
shutter release button,
move farther from subject,
then lightly press button
again and confirm green
light
Si
el
cerca,
enfoque verde destella.
Retire
del disparador, alejese del
sujeto y vuelva a oprimir
ligeramenle
disparador para verificar
que
no destelle.
too near, the
is
not blinking.
sujeto esta demasiado
el
indicador
el
dedo del boton
el
boton del
el
indicador
LED
20
LED
LED
de
verde
Depress shutter release button to
take the picture.
Presione
para tomar
el
boton del disparador
la
fotografia.
The built-in flash fires auto-
matically when light
insufficient.
ADVANCED
- See
FLASH on pages 23-28.
EI
flash incorporado se
dispara automaticamente
la
iluminacion
Vea
la seccion FLASH
-
INTELIGENTE DE
AVANZADA
23-28.
SMART
es
insuflciente.
en
la pagina
is
si
Page 21

80
I
AUTO
I
I
35
At
the end of the roll, lens retracts, lens cover closes, and film automatically starts rewinding. The frame counter counts backwards until rewinding
stops. Check
LCD
indicators turn off
AI
lIegar
rebobmado de
en
orden descendente hasta flnalizar
matlcamente. Venfique que
damente 8 segundos). Luego todos los Indlcadores desaparecen del panel para mdicar
que
el
LCD
panel to confirm frame counter E blinks (for approx. 8 sec.), then all
to
indicate rewinding
al
final del carrete,
la
pelicula comlenza automatlcamente .
rebobmado de la pelicula esta completo.
el
obJetlvo
la
mdlcaclon E destelie en
is
se
retrae,
el
reboblnado de
complete.
la
is
cublerta del mlsmo
EI
contador de exposlclones cuenta
la
pelicula,
el
panel
~
complete, then automatically
se
cierra y
el
el
cual
se
LCD
detlene auto-
(durante aproxlma-
AUTO
L -
*'
U
[ '
.-
,-
, -
21
~
oj
Page 22

To
rewind film before you
reach the end of
push mid-roll rewind button
using a pointed objec
Para rebobinar la pelicula
antes de Ilegar
mlsma, oprima
reboblnado a mitad de
carrete con
punta.
al
el
un
objeto en
th
fin
boton de
22
e roll,
t.
de
If
you leave the Zoom·Touch
500s/Zoom· Touch 500s
QUARTZ
power switch on, the lens
will automatically retract to
35mm focal leng
a
Open camera back and remove
film cartridge.
el
respaldo de
Abra
el
saque
la
carrete de
la
camara y
la
pelicula.
Si
alimentacion de la
Zoom· Touch 500s/
Zoom-Touch 500s QUARTZ
DATE
objetivo
distancia focal de 35mm
cabo de aproximadamente
3 minutos.
DATE
with the
ft
er approx. 3 minutes.
se
deja
en la posicion
se
th sett
el
interruptor de
ret
rae hasta la
ON,
ing
el
al
Page 23

ADVANCED
SMART
FLASH/
FLASH
INTELIGENTE
DE
AVANZADA
-----
r
-
()
I
If
existing light
circumstances, lightly pressing the shutter release button causes the
LED
to light up. To take the picture, depress the shutter release button.
81
la
lIuminaclon eXlstente no
para automatlcamente.
que
el
Para tomar
is
insufficient for normal shooting, the flash fires automatically. Under such
En
flash esta preparado
la
fotografia, slmplemente opnma
estas Clrcunstanclas,
se
es
suflclente para tomar fotografias normales,
enclende
el
Sl
Indlcador
se
opnme Ilgeramente
el
boton del dlsparador.
LED
de color
red
flash ready-light
el
flash
ro)o
el
baton del dlsparador.
que Indica
se
dls-
23
Page 24

Using the flash causes battery volt-
age to drop for a short time. When
is
battery
th
flash shooting may cause the
battery indicator to start blinking.
EI
de las
tos.
muy
rojo I'luede comenzar a destellar
se
dlsparador Inmedlatamente despues
de tomar una
very weak, lightly pressing
e shutter release button right a
uso del flash hace que
pl
las caiga por un
Cuando
oprime ligeramente
la
baJa,
carga de las pilas
el
Indicador LCD de color
fo
tografia con flash.
la
os
mom en-
el
boton del
24
fter
LCD
tension
es
si
If
flash
is
not suffi
LED
light
case, remove your finger from the shutter release
and wait a few seconds.
SI
el flash no esta suflclentemente cargado,
LED
de flash IIsto destella y
queda bloqueado.
boton del disparador y espere unos segundos.
ciently charged, the
blinks and shutter release button locks.
el
En este caso, retire el dedo del
red
flash ready-
el
boton del disparador
Indlcador
In
this
button
Page 25

Automatic Flash Shooting Range/Gama de disparo automatico de flash
Unit· m
(tt)
80mm setting
0.71-2 (2.3-6.6)
0.71-5 (23-16.4)
0.71-1
es
avi
ng a speed
11
within
r
-
()
I
Before taking a flas
check
to
ensure subject is within
proper flash shooting range
the film speed
focus indica tor
subject is too close
beyond the flash shooting
h pictur
in
use. The green
LED
blin
ks
or
if
it is
e,
for
if the
range.
Film Speed (ISO)
Sensibilidad
la
pelicula (ISO)
de
64 0.71-3 (2.3-9.8)
100
200
400
1000
1600
Automatic Flash Shooting Range
Gama de disparo automatico de flash
35mm setting
Ajuste a 35mm Ajuste a 80mm
0.71-4 (2.3-131) 0.71-3.5 (2.3-11.5)
0.71-6 (2.3-19.7)
0.71-8.5 (2.3-27.9) 0.71-7 (2.3-23)
0.71-13 (2.3-42.7) 0.71-
0.71
-17 (2.3-55.8)
The chart shown above indicates the flash shooting range for color print
fi
films. For slide
one third. Overexposure may occur
(approx.
1000 or high
lm, reduce the maximum shooting distance by about
if
3.3
ft)
of the subject usin
you take pictur
g slide film h
er.
Unidad ' m (pie)
(2.3-36.1)
4 (2.3-45.9)
1m
of ISO
Antes de tomar una fotografia
el
con flash, verifique que
este dentro de
flash
de
EI
LED
la
segun la pelicula utilizada.
indicador de enfoque de
color verde destella
esta demasiado cerca
sujeto
gam a de disparo
si
el
sujeto
0 fuera de
la gama de alcance del flash.
Este
cuadro indica las gamas de dlsparo para fotografias para peliculas
en
color de negativo. Para peliculas reverslbles, reduzca
un
toma aproximadamente
si
sobreexpuestas
3,3
pies) utilizando peliculas de 1000
se
tercio. Pueden producirse fotografias
toman con
el
sujeto a menos de un metro (aprox.
ISO
0 mas.
la
dlstancla de
25
Page 26

Flash Canceliation/Cancelacion del flash
~
~
[g
~
To shoot witho
1.
Pr
ess flas
2. Fully depr
Para
tomar fotografias
rado de esta camara:
1. Opnma una
aparezca
2. Opnma
26
W
!<tD
~
~
ut
flash
h mode button once, then confirm
ess
shutter release button to
vez
el
en
el
panel
el
boton del dlsparador a fondo para tomar
80
3:5
--®J
In
light conditions where camera would automatically
Sin
flash
en
boton de modo del flash y verlflque que
LCD
.
U
:]
fla
sh cancellation mark ~ in
take
the pic
ture.
condiciones que normal mente actlvan
la
marca de cancelaclon
la
fotografia.
fire the flas
LCD
panel.
el
flash Incorpo-
h:
~
.
Page 27

Fill-Flash Operation/Flash de relleno
r-------------------
~
When shooting a dark subject against a bright background
the
built-in flash automatically fires
To
cancel fill-flash, press the flash mode button and confirm flash cancellation mark
to
brighten the subject with fill-in lighting .
(i.e.
, against a bright window),
appears. See previous section.
AI
tomar fotograffas de sujetos contra fondos brillantes (por ejemplo, contra una ventana),
el
flash incorporado de esta camara
luz de relleno que ilumina adecuadamente
Para
que
cancelar
la
el
flash de relleno, oprima una
marca de cancelacion aparezca
se
dispara automaticamente para proporcionar una
el
sujeto.
vez
en
el boton de modo del flash y verifique
el
panel
LCD.
Vea
la
seccion anterior.
27
Page 28

To
select fill-flash intentionally:
Press flash mode button twice, then confirm flash indicator
LCD
panel. Next, lightly press shutter release button and confirm flash
~
in
the
ready-light comes on, then depress the shutter release button to take the
picture.
Para actlvar
Opnma una
del flash
boton del disparador y verifique que
Indica que
la
fotografia normal mente, oprimiendo a fondo
el
flash de relleno a voluntad:
vez
el
~
boton de modo del flash y veriflque que
aparezca en
el
flash esta preparado
el
panel
LCD.
el
Oprima luego ligeramente
el
indicador
se
encienda. Proceda luego a tomar
LED
de color rojo que
el
boton del disparador.
indicador
el
28
If
subject
is
too small to
fully cover the autofocus
frame marks, the camera
may not detect whether fillin
flash
is
necessary; be
sure autofocus frame marks
cover the entire subject.
Si
el
sujeto
es
demasiado
pequeno para cubrir las
marcas de autoenfoque,
probable que
detecte
activar
la
la
necesidad de
el
flash de relleno.
es
camara no
Verifique que las marcas
de autoenfoque cubran
el
sujeto.
todo
Page 29

HOW
TO
USE
FOCUS
To
compose a picture with a subject outside the
autofocus frame marks, use the focus
1. Center autofocus frame marks on the subject.
2. Lightly press shutter release button and confirm
focus indicator lights up.
Para
componer una fotografia con
fuera de las marcas de autoenfoque,
cion de bloqueo de enfoque.
1. Centre las marcas de autoenfoque sobre
2. Oprima ligeramente
verifique que
encienda.
el
indicador de enfoque
LOCK/
el
boton del disparador y
UTILIZACION
lock
el
sujeto ubicado
uti
lice
se
la
el
fun-
sujeto.
DEL
BLOOUEO
3. Without taking finger off
scene.
4.
Fully depress
3. Sin retirar
vuelva a componer
4. Oprima a fondo
tomar
el
la
fotografia.
DE
shu
tter
release button.
dedo del boton del disparador,
el
el
boton del disparador para
ENFOOUE
the
button, recompo
encuadre.
---
se
29
Page 30

With the following subject
focus lock.
1. Subjects too sma
s,
focus on another object the same distance from the camera and use
ll
to
fully cover the autofocus frame marks.
2. Subjects behind glass.
3. Glossy, light-reflecting surfaces, such as cars or water.
4. Very bright light sources.
Cuando quiera tomar fotografias de alguno de los siguientes sujetos, enfoque en otro sujeto que
encuentre a
la
misma distancia que
el
primero y
uti
lice la funci6n de bloqueo de enfoque.
1. Sujetos demasiado pequenos para cubrir por completo las marcas de autoenfoque.
2. Sujetos ubicados detras de cristales.
3. Superficies brillantes que reflejan la
4. Fuentes de
IUl
muy intensa.
IUl,
tales como vehfculos 0 agua.
30
se
Page 31

SELF-TIMER/
DISPARADOR
AUTOMATICO
----------
1. Press
2.
3.
1. Opnma una
2. Centre las marcas de
3. Opnma
sel
the
Center the autofocus frame marks on the subjec
Depress the shutt
The self-timer indicator l
ed, the shutter
released, the indicato r lamp starts blinking.
el
exposiclon.
enciende y
rara.
Indicadora comlenza a destellar.
f-timer button once and confirm self
LCD
panel.
er
release button to lock the focus and exposure.
amp
is
released. Three seconds before the shutter
ve
z
el
Indlcador ~ aparezca en
el
Tres
segundos antes de que
boton del dlsparador automatlco y venflque que
boton del dlsparador para bloquear el enfoque y la
La
lam para Indlcadora del disparador automatlco
al
cabo del Intervalo seleccionado
turns on and a
el
au
panel
toenfoque sobre
se
LCD.
libere
-timer indicator ~ in
t.
fter
the interval select-
el
sUJeto
.
el
obturador
el
obturador,
la
is
se
se
IIbe-
lam para
To
cancel the self-timer, press selftimer button a second time and
confirm self-timer indicator disappears, or slide power
camera off.
Para cancelar
matico, oprima nuevamente
boton del dlsparador automatico
y venflque que
correspondlente desaparezca del
LCD
panel
camara utllizando
de alimentaclon.
, 0 bien desactive la
swi
tch
el
dlsparador auto-
el
Indlcador
el
Interruptor
to
turn
el
31
Page 32

,',
810
-~-
1."":'
.
~. [ ~
t
~~~=~=~=~=~~~=======
The Zoom·Touch 500s/Zoom ·Touch 500s QUARTZ
To
select the duration:
(1)
Hold self-timer button for about
section of
(2)
To select another duration, hold the self-timer button
To
side
To
counter section and
La Zoom·Touch 500s/Zoom·Touch 500s QUARTZ
automatlco.
(1)
Mantenga
que
panel
(2)
Para selecclonar otra duraclon del dlsparador automatlco, mantenga opnmldo
tlCO
Para hacer aumentar
dos. Para hacer
numeros camblan
Para
La
en
th
e LCD panel. This indicates self-timer will last
increase the duration, press tele side of zoom button a few seconds; to decrease the duration, press the wide
of the button. Numbers change
confirm the duration you
opnmldo
la
marca ~ comlence a destellar y
LCD.
y opnma uno
conflrmar
duraclon aparece en
el
panel LCD.
~
el
Esto indica que
de
los lados del boton del zoom.
la
dlsmlnw
en
la
duraclon del dlsparador automatlco selecclonada, opnma Ilgeramente
five
seconds and confirm ~ starts blinking and "10" appears
in
have
or
~::;
boton del dlSparador automallco durante aproxlmadamente Cinco segundos y venflque
la
duraclon del dlsparador automatlco, opnma
la
duraclon del dlsparador automatlco, opnma
los slgulentes pasos: 5-10-15-20-25-30
la
secclon del contador de exposlclones y las marcas
the following increments: 5-10-15-20-25-30
set,
lightly press the shutter
starts blinking
duraclon del dlsparador automatlco
in
el
numero "10" apareza
~
--
=~
~
DATE
lets you select the desired duration for self-timer shooting.
10
sec.
in,
and press either side of the zoom button.
the LCD panel.
DATE
Ie
perm lie selecclonar
32
BID
~
35-
(5
sec
rel
ease button. The duration appears
la
duraclon deseada del dlsparador
en
la
secclon del con tad or de exposlclones del
es
de
10
segundos.
el
el
lado "T" del zoom durante unos segun-
el
(5
segundos a 30 segundos).
lado "W" del boton del zoom. Los
~
to
bot on del dlsparador automa-
el
boton del dlsparador.
0 ' l' comlenzan a destellar
~I,
-'
''(
in
in
frame counter
30 sec
).
In
~
[='
~
L Lf
the frame
_-']
Page 33

To
take two consecutive self-timer pictures, press the
self-timer button twice, then confirm two consecutive
self-timer indicators
After the first shot, the film automatically advances,
and after approx. 5
taken.
For
using the same instructions as
timer shooting.
the first shot, select your desired duration
~~
appear in the
sec.,
the second exposure
for
LCD
single self-
panel.
is
Para
tomar dos fotografias consecutlvas con
dlsparador auto matico, oprlma dos veces
del dlsparador automatlco y verlflque
cadores de dlsparador automatlco continuo " aparezcan en
tom
de aproxlmadamente 5 segundos
segunda fotografia. Para
puede selecclonar
matico segun las Instrucclones dadas sobre
del dlsparador automatlco para una fotografia.
el
panel
LCD.
a,
la
pelicula avanza automatlcamente y
Despues de
la
prlmera fotografia,
la
duraclon del dlsparador auto-
se
el
qUE'
dos mdl-
la
prlmera
tom a la
el
boton
a,
cabo
Ud
el
usa
The self-timer will not operate until the flash
fully recharged.
is
EI
dlsparador automatlco no funclona mlentras
flash no este completamente cargado.
el
33
Page 34

CONTINUOUS
DlSPARO
The Zoom·Touch SOOs/Zoom·Touch
DATE
offers two different types of continuous shoot-
in
g - continuous shoo ting and continuous zoom
shooting.
La
Zoom· Touch SODs/Zoom· Touch
DATE
ofrece dos tipos diferentes
- disparo continuo y disparo con zoom continuo,
SHOOTING/CONTINUOUS
CONTINUO/DiSPARO
de
CON
SODs
QUARTZ
SODs
QUARTZ
disparo continuo
ZOOM
ZOOM
SHOOTING/----
CONTINUO
Continuous Shooting/Oisparo continuo
80
3:5_
CiJ
--
U
[ :]
Continuous shooting, wi
operation, operates o
fl
ash) photography. Be sure the flash mode
indicator shows
EI
disparo continuo, con 0
solo para fotografias con suficlente Ilumlnacion
(es declr, que no requleran utllizar
Veriflque que
aparezca
en
el
el
th
or with
nl
y in available light (non-
CiJ
in the LCD pan
Sin
Indlcador de
panel
LCD.
out zoom
el.
zoom, funciona
el
flash).
modo
de flash
34
CiJ
1. Press conti nuous shooting button on
2. Confirm continuous shooting indicator appea rs
in the
LCD
panel.
vez
el
1. Opnma una
2. Venflque que
aparezca
en
boton de dlsparo continu
ellndicador
el
panel
de dlsparo continuo [C
LCD,
ce.
o,
l~
ll
-
Page 35

Continuous
Zoom
Shooting/
Oisparo con zoom continuo
3. Depress shutt
and keep depressed
as you wish
ing pictures.
3. Oprima
y mantengalo opflmldo
liempo necesaflo para contlnuar tomando fotografias
consecutlvas.
er release button,
to
continue shoot-
el
boton del dlsparador
as
long
el
g
~
d
Iw
J..e
g
~
~
~
1. Press continuous shooting button twice.
2. Confirm
3. Depress shutler release button and hold down to take pictures
1. Opflma dos veces
2. Verlflque que
el
en las poslclones correspondlentes a los a)ustes de
en
3. Opflma
necesaflo para contlnuar tomando fotografias a tres dlstanclas focales diferentes (3Smm-SOmm-80mm).
I~
~ (continuous zoom indicator) and focal length scale bars
at
the
appear
three different focal length settings (3Smm-SOmm-80mm).
panel
el
3S,
ellndlcador
LCD
y las barras Indlcadoras de dlstancla focal aparezcan
panel
LCD.
el
boton del dlsparador y mantengalo opflmldo
zoo.~
80-
1
1-
1
35-
SO
and 80mm settings
el
boton de dlsparo continuo.
de dlsparo continuo zoom
U
1)[
: ]
in
the
LCD
3S, SO
panel.
1::':
[ aparezca en
y 80mm
el
tlempo
at
3S
Page 36

35mm
50mm
• By starting continuous zoom operation with the focal length
you can also take pictures in reverse sequence - 80mm-SOmm-
If
3Smm.
the lens
you activate the process, the lens automatically resets
is
at
a focal length other than 3Smm
or
80mm when
to
3Smm and
begins from there .
•
AI
comenzar la operacion de dlsparo con zoom continuo a
cia focal de 80mm,
el
vas en
orden contrario - 80mm-SOmm-3Smm.
en una distancia focal que no sea la de 3Smm
se
activa este proceso,
Ud
. puede asimismo tomar fotografias consecutl-
el
objetivo retorna automallcamente a 3Smm a
Si
el
objetlvo esta
0 la de 80mm cuando
partir del punto de inicio de la secuencla.
36
at
la
80mm
80mm,
distan-
Page 37

STEP
ZOOM
Step zoom shooting lets you conven
out in 5 fixed steps, by pressing the zoom butt
move to the next st
1. Press con
confi
rm
La
funci6n de disparo con zoom por pasos continuo
Ie
permite utilizar
el
boton del zoom para activar
do
1. Oprima tres veces
nuo y verifique que
panel
LCD.
SHOOTING/
ep.
ti
nuous shooting button three times and
:~~
~
in the
LCD
el
zoom
el
interruptor de disparo conti-
el
indicador
DISPARO
iently zoom
pane
l.
en
5 pasos fijos, oprimien-
el
proximo paso.
l~~~
aparezca en
CON
in
or
on
to
el
ZOOM
POR
PASOS
2.
Wi
th
each press of the zoom button, either T
focal length scale changes to the next setting and
lens moves
take any number
focal length settings.
is
setting
Th
tinuous shooting button one more time
camera
off.
2. Cada
vez
sea en
tancia focal cambia
liendole tomar cualquier numero de fotografias
cualquiera de los
del objetivo.
Este
mente
la
que
el
lado T 0 en
ajuste queda cancelado
el
boton de dlsparo continuo 0
camara utilizando
------
to
the next fixed position,
of
pictures
at
any
of five
is cancelled when you press the con-
se
oprime
el
boton del zoom,
el
lado W del mlsmo,
al
sigulente paso
CinCO
ajustes de distancla focal
al
opflmir nueva-
el
Interruptor de alimentaclOn.
to
let
you
fixed
or
turn
fllO,
perml-
al
desactlvar
or
W,
the
ya
la
dls-
en
37
Page 38

IMAGE
DE
The image size selector button
lets you select from the following
image sizes - full-body, half-body,
or head-and-shoulder
Zoom·Touch
SODs
out automatica
pictures at the indicated size.
EI
siones
seleccionar cualquiera de las
siguientes dimensiones: cuerpo
completo, tronco
objetivo
Zoom·Touch
se mueve hacia adentro 0 hacia
afuera automaticamente para
tomar las fotografias
dimensiones indicadas.
LA
IMAGEN
QUARTZ
boton
de
de
de
SIZE
SELECTOR
s.
SOOs
DATE
ll
seleccion de dimen-
la imagen
la Zoom·Touch
SODs
The
/Zoom·Touch
zooms in or
y to let you take
Ie
permite
0 bien retrato.
QUARTZ
de
las
SOOs/
DATE
38
BUTTON/
1. Select desired image size:
EI
2.
1. Seleccione las dimensiones de
2. Oprima
BOTON
P.!:.,ess
image size selector button once
[J
appears
Pre
ss
a second time
Pres
s a third time to set
panel.
Pre
ss
a fourth time
Depress shutter release button
Oprima una vez
para seleccionar
cera en
Oprima una seguQ9a
la
tronco:
Para seleccionar
el
irJdicadar
Para desactivar esta funcion, oprima nuevamente
LJ
aparecera
DE
SELECCION
in
LCD panel. _
to
set to half-body;
to
head-and-shaulders;
to
turn the function off; U appears
el
boton de seleccion de dimensiones de
el
el
panel
marca ~ aparecera
el
boton del disparadar para tomar la fotografia.
modo de cuerpo completo: la marca
LCD.
vez
el
boton para seleccionar
el
modo
el
panel
de retrata: oprima
LCD.
51
aparecera en
en
DE
DIMENSIONES
to
set
image size to full-body;
[EJ
appears
to
take picture.
la
imagen a fotografiar:
en
el
panel
LCD.
el
panel
el
LCD.
in the
appears
in
Cl.J
el
modo
boton.
LCD
LCD
la
imagen
de
La
in
apare-
marca
m:J
boton una tercera
el
panel.
LCD
panel.
vez:
Page 39

eThe Zoom·Touch SOOs/Zoom·Touch
DATE'
s ability to convey the selected image size
th
depends on
image size wi
se
lected siz
to
viewfinder image size at the moment you take
your picture.
e
La
capacidad
SODs
QUARTZ
segun las dimensiones seleccionadas de esta
manera depende
sujeto.
todo caso seran pr6ximas a las seleccionadas y
correspond en en todo caso a
ves del visor en
e subject's distance and
ll
always be as close as possible
e,
and wi
ll
always correspond
de
la Zoom· Touch SODs/Zoom · Touch
DATE
para tomar las fotografias
de
Las
dimensiones reales de
la distancia y del tamalio del
el
momento
SODs
size.
la
fotografia en
la
imagen vista a tra-
de
tomar
la
fotografia.
QUARTZ
Actual
to
39
Page 40

EXPOSURE
Using flash mode and zoom buttons,
pensate exposure within the range of ±2EV.*
Utilizando los botones del flash y del zoom,
ible efectuar compensaciones dentro de
±2EV.*
EV
*The
the film speed
*EI
rango de compensacion
sibilidad de
siguiente cuadra:
COMPENSATION/
compensation range varies according
in
use.
Refer
to
the following chart:
la
pelicula
en
EV
usa.
COMPENSACION
you
can com-
la
varia segun
Refierase
40
es
pos-
gam a de
to
la
sen-
al
DE
LA
EXPOSICION!
Press
and hold the flash mode button for about
seconds until
appear
Oprima
oprimido
dos hasta que ellndlcador
aparezca
OX-coded film
Pelicula
en uso
~
and
the
EV
in
the
LCD
panel.
el
baton de modo del flash mantengalo
durante aproxlmadamente CinCO segun-
en
el
panel
in
use
de
c6digo
64
100-400
1000
1600
compensation amount
~
de
LCD
.
EV
OX
compensation range
Rango de compensaci6n
----
compensaclon
EV
-2.0-+
1.0EV
-2.0-+2.0EV
-1.5-+2.0EV
-1
.Q-+2.0EV
five
EV
Page 41

To
increase compensation, while continui
hold the flash mode button,
the zoom button; numbers change in the following
sequence:
To
~
0.0 -
decrease compensation, while continuing to
p"
hold the flash mode button,
the zoom button; numbers change
sequence:
Para
~
aumentar
0.0
-~ 0.5 -~ 1.0
la
compensacion, manteniendo
press the T side of
0.5
- p"
1.0
press the W side of
oprimido el boton de modo del flash ,
lado T del boton del zoom: los numeros cambian
la
siguiente secuencia:
p" 1 ,5
- p"
reducir
2,0.
la
Para
~
0,0 -p"
compensacion, manteniendo opri-
mido el boton de modo del flash,
W del boton del zoom: los numeros cambian en
siguiente secuencia:
~
1,5-
~
2,0.
~
0,0
-~ 0,5
- p"
1.5 -p"
in
the following
-~ 1.5
oprima
0,5
- p"
oprima
-~ 1,0
ng
to
-~ 2.0.
1,0-
el
lado
-
2.0.
el
en
la
When you remove your finger from the flash
mode button after setting the compensation
amount, the compensation value indicator
disappears and
After shooting, be sure to reset the compensation value to
value remains set unless the camera back
opened.)
AI retirar el dedo del boton de modo del flash
despues de haber ajustado la cantidad de
compensacion,
compensacion desaparece y en
aparece
Una vez efectuada la toma, no deje de volver
a ajustar el valor de compensacion
(una
vez
permanecera asi aun cuando
posterior de la camara).
i!
que
i!
appears
00.
(Once
set,
the compensation
el
indicador del valor de la
.
se
ha hecho
el
in
the LCD panel.
el
panel
en
ajuste,
el
valor
se
abra la parte
is
LCD
00
41
Page 42

CAMERA
CARE
TlPS/
CONSEJOS
PARA
EL
CUiDADO
DE
LA
CAMARA
---
1. Do not leave camera in an
excessively hot place; store
somewhere cool and
1. Nunca deje la camara en luga-
res
excesivamente calidos.
Guardela en un lugar fresco y
seco.
• When not using camera, turn the power switch
off. Do not store camera in case with the power
switch on, as
button and drain the battery.
dry.
it
may depress shutter release
2. Clean all lens surfaces, in
ing the
a soft, clean cloth.
2.
Li
mpie las superficies de todas
las lentes, incluyendo la ventanilla de autoenfoque, con
pano suave y limpio.
42
aut%cus
• Cuando no utilice
cl
ud-
window, with
un
mentacion. Nunca debe guardarse la camara
en la funda con la alimentacion activada,
que
el
disparador puede activarse y las pilas
pueden descargarse.
3. Avoid taking pictures
3. Evite tomar fotografias bajo
fter usi
rain. A
lake, wipe gently with a soft
cloth.
Iluvia. Despues de utilizar la
camara cerca del mar
lago, lim piela cuidadosamente
un
pano suave .
con
la
camara, desactive la ali-
in
ng near the sea
0 de
ya
the
or
la
un
Page 43

4. Battery power weakens
teries and keep camera warm. Sudden extreme temperature cha nge s
se
may cau
4.
La
carga de las pilas disminuye
nuevas y mantenga
repentin
les a
internal condensa tion that could damage the camera.
os
y extremos pueden causar condensaci6n interna, las cua-
su
vez
pueden dariar la camara.
in extremely cold temperatures; use new bat-
en
la
camara caliente. Cam bios de temperatura
temperaturas bajas. Utilice pilas
5.
If
camera malfunctions, take
an authorized Nikon dealer
service center.
5.
En
caso de que esta camara
faile, Ileveia a
Nikon a
de servlclos de
un
ut
oflzado 0 a
conceSlonafiO
la
marca.
un
to
or
centro
43
Page 44

ABOUT
BATTERIES/
ACERCA
DE
LAS
PILAS
---------
1. Keep batteries out
reach. If swallowed, call a
doctor immediately.
1. Conserve las pilas fuera del
alcance de los nifios.
gan una, avise inmediatamente
en
contacto con
of
un
medico.
children's
Si
se
44
2. Never throw used batteries into
ire.
a f
2. No tire nunca
tra-
gastadas.
al
fuego las pilas
3. Never short-circuit, disassemble, heat or attempt
charge batteries.
3. Nunca cortocirculte, desarme,
caliente
pilas.
ni
trate de recargar las
to
Page 45

ATTACH
NECKSTRAP/
FIJACION
DE
LA
CORREA
--------
1
ACCESSORIES/
Camera case (optional)
Estuche para
ACCESORIOS
la
camara (opcional)
4
~
Slide neckstrap through neckstrap slot, and adjust length
Pase
la
correa par las ranuras de sujeclon y ajuste
la misma segun
se
indica en estas Ilustraciones,
--------------
la
longltud de
as
shown,
45
Page 46

IMPRINTING
IMPRESION
Month/Day/Year
Mes/dia/aiio
Day/Month/Year
Dia/mes/aiio
Year/Month/Day
Aiio/mes/dia
Day/Hour/Minute
Dia/hora/m
No
imprint
Cancelacion
DATA
DE
inu
tos
display
de
registro
[------]
46
(Zoom·Touch
DATOS
(Solo
Month
Indicador
LCD
imprint
Pantalla
impresion
Year
indicator
Indicador
MODE
button
Pu
sh
to select
avaifab
le
BolOn
de
(MODE)
Oprima
para
cinco
indicaciones
When
Cuando
la
pila de litio.
indicator
de
mes
data
de
LCD
de
de
aiio
one
displays
modadidad
seleccionar
LCD
el
contenido de
5008
QUARTZ
can
la
Zoom·Touch
de
datos
(
01 the live
.
.
becomes faint and difficult
MODE) SELECT
una
de
la
pantalla
•
DATE
only)/------
5008
QUARTZ
Indicador
ADJUST
•
•
Oprima
para
seleccionar
to
read,
rep
lace lithium battery.
se
haga impreciso y dificil de
DATE)
Data
de
Time indicator
Seiial indicadora
Boton
Oprima
Push
10 sel
ect dala
Baton
de
los
leer,
imprint indicator
impresion
de
de
(dos
puntos)
ADJUST
Pu
sh
10
adju
de
ajuste
(ADJUST)
para
lijar
los
SELECT
to
be adju
seleccion
(SELECT)
datos a ser
ajustados
cambie
datos
colon
hora
button
st
data
datos
button
sted.
.
.
.
Page 47

Setting date and
time/
Fijaci6n
de
datos y de hora
a b c
~
SELECT
ADJUST
For
example, to set March 30,
Month/DaylYear display.
other than Day/Hour/Minute. With Day/Hour/Minute
display, only time can be
Push
SELECT
button so year section starts blinking
it
indicating that
button to set the year
(c)
day
To
leave adjust mode, push S
the day display
and data imprint indicator - appears wi
blinking
can be adjusted. Push ADJUST
in
the same manner
is
blinking. The newly adjusted data
(d).
1991,
(To
set.)
(a)
. Set the month
choose
set date, choose display
as
for the year.
ELE
CT button while
(b)
th
and the
out
d
de
el
modo
dia
boton
(c)
-------,
el
dia, elija otra
la
hora
que la seccion
de la misma
SELECT
Los
mientras
nuevos datos
la
el
su
-------,
Por
ejempl
o,
pantalia de mes/dia/ano (para fijar
pantalia que no sea
Con la pantalla de dialhoralminuto, solo
puede ser fijada).
Oprima
del ano comience a desteliar indicando que puede
ser ajustado. Oprima
ano
(a).
manera que para
Para salir de la modalidad de ajuste y confirmar
imagen corregida, oprima
la imagen de dia este desteliando.
ajustados y el indicador de impresion de datos aparecen sin desteliar
para fijar 30 de marzo, 1991, elija
la
pantalia de dialhora/minuto.
el
boton
SELECT
el
Fije
el
mes
boton ADJUST para fijar
(b) y el
el
ano.
(d).
47
Page 48

For Day/Hour/Minute
To
display:
mode, push
button while the time indicator colon
Para
dia/hora/minuto:
dejar
oprima
mientras
indicador de tiempo esta
desreliando.
leave adjust
SELECT
is
blinking.
la
pantalla
el
modo de ajuste,
el
boton
SELECT
el
signo del
Para
48
Imprint
Select your desired display and depress the shutter release button to
take picture with imprinted data.
make sure data imprint indicator - blinks for approx. 2 sec. immediately after taking the picture.
Seleccione
tomar la fotografia con los datos impresos. Para verificar que los datos
esten impresos, revise para asegurar que
datos - destelie por aprox. 2 seg., inmediatamente luego de tomar
la fotografia.
data/
lmpresi6n de datos
su
pantalia deseada y oprima
To
confirm data
Imprinted
data
Datos
Impresos
is
imprinted, check to
el
boton del disparador para
el
indicador de impresion de
Page 49

Replacing lithium battery for data imprint function/
de
Reemplazo
a.
Remove the screw that secures the lid of the data
back battery chamber.
a.
Saque
el
partimiento de pilas
de datos.
tornillo que asegura la tapa del com-
la pila de litio para la funci6n de impresi6n de datos
b. Remove used battery.
b. Retire la pila gastada.
en
el
respaldo para impresion
c. Insert new battery.
c.
Inserte una pila nueva.
d. Replace the data back battery chamber lid.
d.
Recoloque la tapa del compartimiento de pilas.
49
Page 50

SHOOTING
CUADRO
Flash
operation
COMBINATION
DE
CHART/-----------
COMBINACIONES
Single Single frame Step
frame shooting zoom
shooting
0 0 0
with zoom
DE
TOMAS
Single frame advance
shooting
Image-size
selector
0
Continuous frame advance
Continuous
shooting
with zoom
f.)
Continuous
shooting
without zoom
~
Self-timer
0:
Possible
X:
Not p
ossible
Operacion
del flash
Disparador
auto
matico
0: Uso posible
so
Imposib
X : U
50
0
(1)
:
Flash cancellation only
Toma de
una sola
exposicion
0 0 0
0
le
f.) : S610 con flash ca
X
Avance de una exposicion
Toma de
una sola exposiciones
exposicion con zoom
con zoom
X X
porpasos
ncelado
X
Toma de
0
Selector de
dimensiones
de
la
imagen
0
0
X X
Avance de exposiciones
continuo
Toma de Toma de
exposiciones
consecutivas consecutivas
con zoom
.,
X X
exposiciones
sin
zoom
~
Page 51

SPECIFICATIONS/
Type of Camera 35mm compact camera with
Picture Format 24mm x 36mm (standard
Lens 35mm
Lens Cover Opens or closes automatically
Shooting Distance 0.
Film Speed Setting Automatically set to ISO 64,
Shutter Programmed electronic shut-
Viewfinder Reverse Galilean Albada-type
Eyesight
Adjustment
ESPECIFICACIONES
1/3.5
Nikon zoom 35mm
BOmm
f/7.B lens; features in-
clude autofocus, auto exposure, auto flash, auto flash exposure, auto shutter lock, auto
film loading, auto film speed
setting, auto film advance, auto
film rewind, auto film rewind
stop and auto ready lens cover
35mm format)
1/3
.5
~
9 elements
with power switch
71m
100,200,400,1000,1600
OX-coded film; non OX-coded
films are automatica
ISO
100
ter; also serves
blades
bright-frame viewfinder;
0.44X
tomatically
motor; frame coverage
or more
-1/+0
BOmm
in
7 groups
(approx. 2.3
~
0.9X
magnification au-
se
lected and set by
.5 diopter
as
se
~
1/7.B,
fl.) ~ infinity
with
ll
y set to
diaphragm
is
BO%
lectable
------------
Zoom Operation
Focusing
Auto Exposure
Range
Film Loading
Film Advance
Film Advance Approx.
Speed in Continuous shooting
Film Rewinding
Frame Counter
Single-frame shooting, with or
without zoom; continuous
shooting without zoom;
continuous zoom shooting
(automatic consecutive shooting in three steps); step zoom
shooting (selectable 5-step
zooming); image size selection
for full-body, half-body or head
and shoulders
Active infrared autofocus sys-
(0.71m
4 ~ EV
6.2 ~ EV
(at ISO
O.B*
is
[approx. 2.3fl.] ~
16
at 35mm setting
16
at
BOmm
100)
at
approx. 0.6
frames per sec.
reached; approx.
ll
y when film
tem
lightly pressing shutter release
button locks focus
EV
EV
setting
Film automatically advances to
first frame when camera back
is
closed
Automatic,
per frame
Automatic rewinding when end
of film roll
17
sec.* per 24-exposure roll;
stops automatica
is
rewound; mid-roll rewind
button
Additive type; automatically
resets when camera back
00);
sec.*
is
51
Page 52

Self-Timer
Built-in Flash
LCD Panel
Battery Life
Power Source
52
opened; counts back while
film is rewinding
Activa
ted
timer button and shutter release button; locks focus and
exposure; 10-sec. delay with
indicator lamp ; two-shot selftimer and timer interval control
(from 5 to 30 sec.) possible;
cancellable
Fires at user selec
matically
sufficient for normal shooting;
ready-light; shutter locks
flash is not charged; recycling
time approx. 3 sec.'; flash
guide number (ISO 100) of
GN41(ft.) or GN12.5(meters) at
35mm
GN14(meters) at
Film counter; battery power indicator; continuous shooting
indicator; flash
self-timer indicator; continuous
zoom indicator; step zoom in-
dicator; image size indicator;
exposure compensation indicator; focal length scale
Approx.
sure film
Lithium battery pack (Duracell
DL223A 6V or Panasonic
CR-P26V)
by depressing self-
ti
if
setting,
30'
w/50%
on or auto-
existing light
to
GN46(ft.) or
BOmm
mode
rolls of 24-expo-
flash
is
in-
if
setting
indicator;
Dimensions Approx. 136.Bmm(W) x
Weight Approx. 3709 (Zoom·Touch
For data
(Zoom'
Data Imprint Year/Month/Day, Day
Functions
back
Touch 5005 QUARTZ DATE)
Power Source One lithium (CR2025) battery
'Wi
th fresh battery pack
(20°C [68°
Specifications and design are subject to change without
notice.
F])
.
73mm(H) x 57.Bmm(D)
(Zoom·Touch 500s)
Approx. 5.4 x 2.9 x 2.3
Approx. 136.Bmm(W) x
73mm(H) x 61.3mm(D)
(Zoom·Touch 500s QUARTZ
DATE)
Approx. 5.4 x 2.9 x 2.4 in.
50
Os
without battery)
Approx. 13 oz.
3BOg
Approx.
500s QUARTZ
batteries)
Approx. 13.4
(Zoom·Touch
DATE
oz.
function
Year,
Month/Day/Year, Day/
/M
inute or no imprint, as
Hour
selected; 24-hr. built-in clock
with timing accuracy to within
±90
sec. a month at normal
temperatures
at
standard room temperature
in.
without
/Month/
Page 53

Tipo de camara
Formato del
encuadre
Objetivo
Tapa del objetivo
Distancia de toma
Ajuste
de
la
sensibilidad
18
pelicula
de
Camara compacta de 35mm
con objetivo Nikon zoom de
113,5
35mm
con autoenfoque, exposicion
automatica, flash automatico,
exposicion automatica con
flash, bloqueo del disparador
automatico, car9a automatica
de la pelfcula,
tico de la sensibilidad de la
pelicula, avance automatico de
la
pelicula, rebobinado automatico de la pelfcula, detencion automatica de rebobinado
de la pelicula y tapa de objetivo de apertura automatica
24mm
estandar de 35mm)
35mm
9 elementos
Se
abre y
camente con
alimentacion
0,71m
2,3 pies) a infinito
Ajuste automatico a 64,
200, 400, 1000 y 1600
el
caso de peliculas con
codigo
zarse peliculas sin codigo
el
ajuste
camente a 100 ISO
- 80mm
x 36mm (formato
113,5
-
se
(aproximadamente
DX.
En
se
efectua automati-
117,8;
aJuste
automa-
80mm
117,8,
en
7 grupos
cierra automati-
el
interruptor de
100,
ISO
caso de utili-
en
DX,
Obturador
Visor
Ajuste
de
Funcionamiento
la vista
del zoom
Enfoque
Obturador electronico programado: funciona asimismo
como diafragma
Visor luminoso galileico invertido de tipo Aldaba; aumento
de 0,44X a 0,9X seleccionado
automaticamente y ajustado
por motor; aproximadamente
0 mas de cubrimiento del
80%
marco
Seleccion dioptnca
Toma de exposiciones simples, con
exposiciones continuas sin
zoom; toma de exposiciones
continuas con zoom (toma de
exposiciones consecutivas
automaticas en tres pasos);
toma de expositiones con
zoom por pasos (funcionamiento en 5 pasos de zoom
seleccionables); seleccion de
dimensiones de la imagen
para tomas de cuerpo completo, tronco y retrato
Sistema de autoenfoque activo
con rayos infrarrojos
[aproximadamente 2,3 pies] a
00);
mir ligeramente
disparador
0 sin zoom; toma de
enfoque bloqueado
-1/+0,5
(0,71m
el
boton del
al
opri-
53
Page 54

Rango de
exposici6n
automatica
Carga de
la pelicula
Avance de
la pelicula
Velocidad de
tracci6n de la
pelicula en
disparo continuo
Rebobinado de Rebobinado automatico
la pelicula lIegar
Contador de
exposiciones
Disparador
automatico
EV
4 -
EV
16
con
35mm
EV
6,2 -EV
80mm
La
pelicula
mente
hasta
al
siclon
la
Avance
segundos· por exposicion
Aprox.
segundo
madamente
un
el
maticamente una
tado;
mitad
Tipo
tomaticamente
paldo
gresiva durante
de
Activado oprimiendo
del
boton
de
indicadora; dlsparador automatico
cerrar
camara
automatico a
0,8
al
final
rollo de
rebobinado
boton para rebobinado a
de
carrete
aditivo,
de
la
la
pelicula
disparador automatico y
del
10
segundos
para
ajuste
16
con
ajuste de
avanza
automatica-
la
primera expoel
respaldo de
fotogramas· por
del
rollo.
17
segundos·
24
exposiciones;
se
detiene auto-
vez
vuelve a cero
al
abrir
camara; cuenta
el
rebobinado
disparador; demora
con
dos tomas conse-
54
de
0,6
al
Aproxi-
para
com
ple-
au-
el
res-
el
boton
lampara
cutivas y control
del
disparador automatico
5 a
30
segundos), ambas fun-
Flash incorporado
Panel LCD Contador de exposiciones;
re-
el
clones posibles y anulables
Se
dispara
seleccionado
podiente por
automaticamente
cion
eXlstente
para
toma
males;
flash
bloqueado
cargado; tiempo de recarga:
aproximadamente 3
numero
(100
GN12,5
35mm a
(metros)
Indicador de carga de
pilas; indicador de disparo
continuo; Indicador de modo
de
dor automatico; indicador de
zoom
zoom
dimensiones
Indicador
de exposicion; escala
distancia
de
lam
para
listo;
el
si
de
ISO)
de
(metros)
GN46
con
flash;
indicador de dispara-
continuo; indicador de
por
pasos;
de
focal
del
intervalo
en
caso
de
el
el
no
fotografias
disparador queda
el
guia de
GN41
ajuste
ser
modo corres-
usuario 0 bien
si
la
ilumlna-
es
suficiente
indlcadora de
flash
(pies) a GN14
nor-
no
esta
seg.*;
flash
(pies)
de
a
80mm
con ajuste de
las
indicador de
de
la
Imagen;
compensacion
de
(de
Page 55

Duraci6n de
las pilas
Fuente de
alimentaci6n
Dimensiones
Peso
Aproximadamenle
de pelicula de 24 exposiciones con 50% de uso del flash
Juego de pilas de lilio
(Duracell
Panasonic CR-P2
Aprox. 136,8mm(AN) x
73mm(AL) x 57,
(Zoom·Touch 500s)
Aprox.
Aprox. 136,8mm(AN) x
73mm(AL) x 61,3mm(PR)
(Zoom·Touch 500s QUARTZ
DATE)
Aprox. 5,4 x 2,9 x 2,4 pulgadas
aprox. 370 gramos
(Zoom· Touch 500s sin pila)
Aprox.
Aprox. 380 gramos
(Zoom·Touch 500s QUARTZ
DATE
Aprox.
DL
5,4
13
onzas
sin pilas)
13,4
223A
x 2,9 x
onzas
30'
6V
6V)
8mm
2,3
roilos
0 bien
(PR)
pulgadas
Para
el
fechador
(Zoom· Touch 5005 QUARTZ DATE)
Funciones de Ario/mes/dia dia/mes/aflo
impresi6n mes/dialaflo:
de datos 0 sin impresion alguna, selec-
Fuente de
alimentaci6n
'Con juego de pilas
(20
°C
[68°F])
especificaci
lo
aVIso
.
Las
sin
prev
cionable. Reloj de 24 horas incorporado con una precision
±90
de
lemperaluras norm ales
Una pila de lilio (CR2025)
nuevo
a temperatura ambiente normal
ones y el
.
diseiio
dia/hora/min~lo
segundos por mes a
estan
sujetos a cam bios
55
Page 56

No rep
roduct
or
device
This
(2) this
Th
is equipm
of
the
be
the
an
receiver
in
determined by
the
ion
part
reviews), may
from
complies
is
subject
device
device
ent h
with
FCC
to
equipment
electrical
whole
articles or
au
thorization
This
Operation
(1)
And
received, including interf
undesired operation
'
comply with t
accordance
15
interference
can
off, use
utilize
by
in
any
form
(except f
NIKON CORPORATION
may
must
.
as bee
he
limi
the
Rules. If
rad
io
outlet
.'
of
or brief
be
made without
with
part
15
the
following two
cause har
accept
erence
that
n tested a
for a Class
this
equipment does
television
turning
the
in
another
different
of
mful
any
B d
reception
equipment
location
to
not
ts
specifications set forth
or
this
manual,
quotation
the
FCC
Rules
con
dit
interference
interference
may
cause
nd found
to
igita
l d
evice
in Part
cause
which
on
and/or
from
that
used
in
written
.
ions
and
in
critical
.
:
.
in
Nikon
Oueda prohibida
este
lolleto
en
articulo 0
(salvo
de
breves
la
autorlzaclon
la
reproduccion
en
revlstas
escrlta
10
que
especlalizadasll
de
NIKON
total
0 parcial
se
reflere
a cltas
CORPORATION.
Sin
NIKON CORPORATION
FUJI
BLDG
.,
2-3,
81
-3-3214-
MARUNOUCHI
5311
-5856
CHIYODA-KU, TOKYO
PHON
E:
FA
X:
81-3-3201
100, JAPAN
3-CHOME
TELEX: NI
KON
,
J22601
NIKON CORPORATION
FUJI
BLDG"
2-3,
CHIYODA-KU,
TEL:
FAX
Print
ed
in Japan / Impreso
81-3-3214-5311
:
81-3-3201-5856
MARUNOUCHI
TOKIO
100,
TELEX:
en
Jap6n 9&081-B011 (S275)
JAPON
3-CHOME,.
•
NIKON
J22601
 Loading...