

Page 1

Network Guide
• Read this manual thoroughly before using the camera.
• After reading this manual, keep it in a readily accessible
place for future reference.
En
Page 2

Choose from 3 different manuals.
For information on wireless connections, read:
For a guide to basic shooting and playback, read:
The Network Guide (this manual)
Learn how to use Wi-Fi or Bluetooth to connect the
camera to a computer or a smart device such as
smartphone or tablet.
Also included is information on such topics as the tasks that can be
accomplished using a WT-7 wireless transmitter.
•
•
The User’s Manual (included)
Master basic camera operations as well as features
specific to this camera.
• Table of Contents
• Getting to Know the Camera
• First Steps
• Basic Photography and Playback
• Basic Settings
• Shooting Controls
• The i Button
• Troubleshooting
ii
Page 3

The Reference Manual (pdf)
For a guide to all aspects of camera operation, read:
In addition to the material covered in the User’s
Manual supplied with the camera, the Reference
Manual details the options available in the camera
menus and covers such topics as connecting the
camera to other devices.
Among the topics covered in the Reference Manual are:
• Basic shooting and playback
operations
• Advanced shooting options
• The camera menus
• Connecting to computers, printers,
and HDMI devices
• Flash photography using optional
flash units
The Reference Manual (pdf) is available from the Nikon Download Center.
nikon download center Z 7
Z7:
https://downloadcenter.nikonimglib.com/en/products/492/Z_7.html
Z6:
https://downloadcenter.nikonimglib.com/en/products/493/Z_6.html
The Reference Manual can also be viewed online in html format.
nikon online manual Z 7
https://onlinemanual.nikonimglib.com/z7_z6/en/
Z 6
Z 6
iii
Page 4

About This Guide
This guide is chiefly devoted to describing how to connect to a wireless local
area network (LAN) using the camera’s built-in Wi-Fi and how to use network
features once connected. Be sure to read this guide and the camera manual
thoroughly and to keep them where they will be read by all those who use
the product. Should damage to this guide render it illegible, a replacement
copy (pdf ) can be downloaded from the Nikon Download Center.
Symbols and Conventions
To make it easier to find the information you need, the following symbols and
conventions are used:
This icon marks notes; information that should be read before using
D
this product.
This icon marks tips, additional information you may find helpful
A
when using this product.
This icon marks references to other sections in this manual.
0
Menu items, options, and messages displayed in the camera monitor are
shown in bold.
Throughout this manual, smartphones and tablets are referred to as “smart
devices”, and the XQD memory cards used by the camera as “memory cards”.
Camera Settings
The explanations in this manual assume that default settings are used.
Illustrations
The appearance and content of the software and operating system dialogs,
messages, and displays shown in this guide may vary with the operating
system used. For information on basic computer operations, see the
documentation provided with the computer or operating system.
iv
Page 5
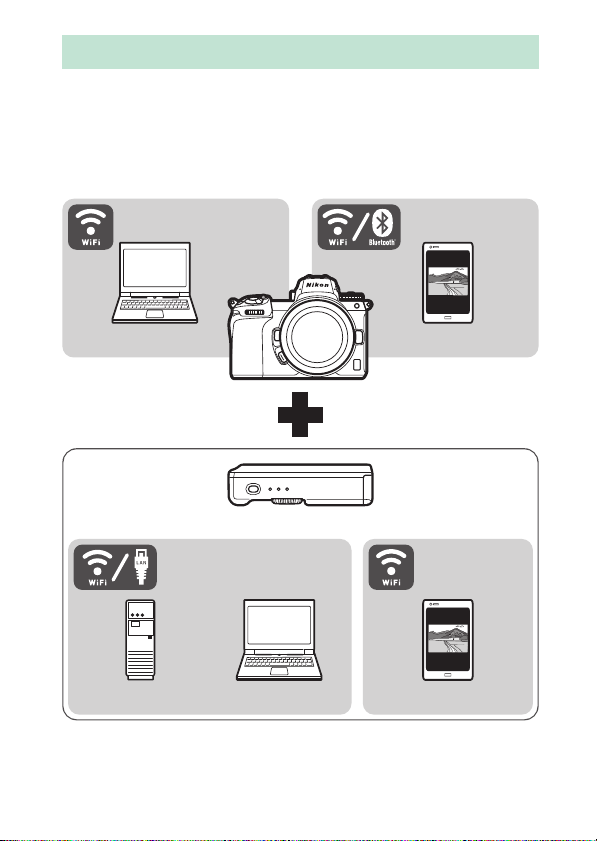
Camera and Network System Chart
Computer Smart Device
Smart Deviceftp Server Computer
WT-7 Wireless Transmitter (Available Separately)
The types of network connection available with the camera and
optional accessories are shown below. The focus of this guide is
on connecting to computers; for information on connecting to
networks using a WT-7 wireless transmitter, see the manual
supplied with the WT-7.
v
Page 6
What Networks Can Do for You
The camera supports network connections to computers,
smartphones, tablets, and other devices. Once connected, you
can upload pictures or control the camera remotely.
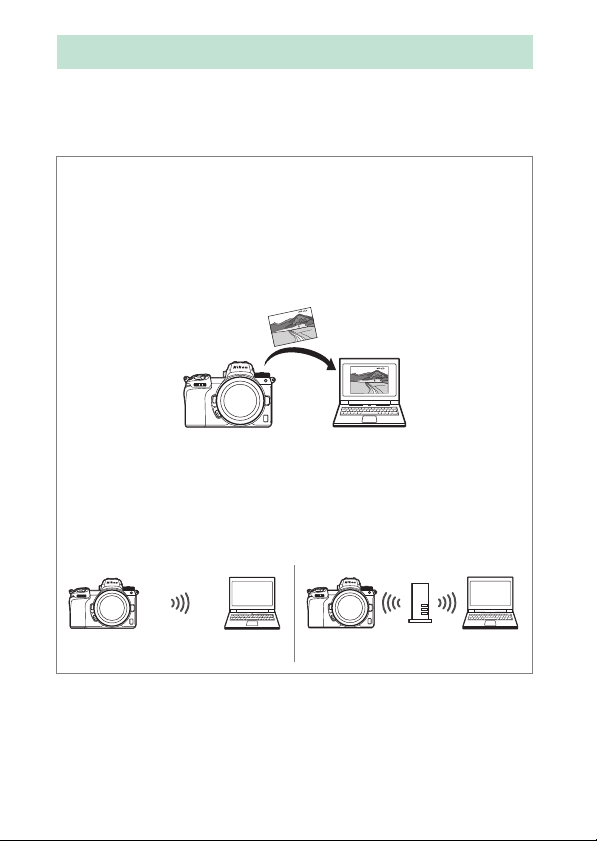
Want to upload pictures to a computer?
…then connect via Wi-Fi (0 1)
Using the camera’s built-in wireless LAN (Wi-Fi), you
can connect to computers to upload photos and
movies.
Connecting to a Computer
The camera can connect either:
• by direct wireless link (access-point mode, 0 3), or
• via a wireless router on an existing network, including home
networks (infrastructure mode, 0 7).
Access-point mode Infrastructure mode
vi
Page 7

Want to download pictures to or
control the camera from a smart device?
…then connect using the SnapBridge app (0 18)
Install the SnapBridge app on your smartphone or
tablet (smart device) and connect to the camera via
Bluetooth or Wi-Fi.
Want to upload pictures to a computer or ftp server,
control the camera from a computer, or
control the camera from a web browser?
…then connect using the WT-7 (0 37)
Connecting to a network using the optional WT-7
wireless transmitter gives access to a variety of
features.
vii
Page 8

Notices
• No part of this guide may be
reproduced, transmitted,
transcribed, stored in a retrieval
system, or translated into any
language in any form, by any means,
without Nikon’s prior written
permission.
• Nikon reserves the right to change
the appearance and specifications
of the hardware and software
described in this guide at any time
and without prior notice.
• Nikon will not be held liable for any
damages resulting from the use of
this product.
• While every effort has been made to
ensure that the information in this
guide is accurate and complete, we
would appreciate it were you to
bring any errors or omissions to the
attention of the Nikon
representative in your area (address
provided separately).
viii
Page 9

Notice Concerning Prohibition of Copying or Reproduction
Note that simply being in possession of material that has been digitally
copied or reproduced by means of a scanner, digital camera, or other device
may be punishable by law.
• Items prohibited by law from being copied
or reproduced
Do not copy or reproduce paper
money, coins, securities,
government bonds, or local
government bonds, even if such
copies or reproductions are
stamped “Sample.”
The copying or reproduction of
paper money, coins, or securities
which are circulated in a foreign
country is prohibited.
Unless the prior permission of the
government has been obtained, the
copying or reproduction of unused
postage stamps or post cards issued
by the government is prohibited.
The copying or reproduction of
stamps issued by the government
and of certified documents
stipulated by law is prohibited.
• Cautions on certain copies and
reproductions
The government has issued cautions
on copies or reproductions of
securities issued by private
companies (shares, bills, checks, gift
certificates, etc.), commuter passes,
or coupon tickets, except when a
minimum of necessary copies are to
be provided for business use by a
company. Also, do not copy or
reproduce passports issued by the
government, licenses issued by
public agencies and private groups,
ID cards, and tickets, such as passes
and meal coupons.
• Comply with copyright notices
Under copyright law, photographs
or recordings of copyrighted works
made with the camera cannot be
used without the permission of the
copyright holder. Exceptions apply
to personal use, but note that even
personal use may be restricted in
the case of photographs or
recordings of exhibits or live
performances.
ix
Page 10

Table of Contents
About This Guide.......................................................................... iv
Camera and Network System Chart .......................................... v
What Networks Can Do for You................................................. vi
Notices.......................................................................................... viii
Connecting to Computers via Wi-Fi 1
What Wi-Fi Can Do for You .......................................................... 1
The Wireless Transmitter Utility ................................................. 1
Infrastructure and Access-Point Modes.................................... 2
Access-Point Mode.................................................................................2
Infrastructure Mode...............................................................................2
Connecting in Access-Point Mode ............................................. 3
Connecting in Infrastructure Mode ........................................... 7
Uploading Pictures ..................................................................... 14
Selecting Pictures for Upload.......................................................... 14
Uploading Photos as They Are Taken .......................................... 15
The Transfer Icon ................................................................................. 16
The “Connect to PC” Status Display.............................................. 16
Disconnecting and Reconnecting............................................ 17
Disconnecting....................................................................................... 17
Reconnecting........................................................................................ 17
Connecting to Smart Devices 18
The SnapBridge App...................................................................18
What SnapBridge Can Do for You ............................................ 18
Wireless Connections ................................................................. 19
Connecting via Wi-Fi (Wi-Fi Mode)................................................ 20
Connecting via Bluetooth................................................................. 26
x
Page 11

Connecting to Networks Using the WT-7 37
What the WT-7 Can Do for You................................................. 38
Connecting Using the WT-7 ......................................................39
Menu Guide 40
Connect to Smart Device ........................................................... 40
Pairing (Bluetooth).............................................................................. 40
Select to Send (Bluetooth)................................................................ 41
Wi-Fi Connection .................................................................................42
Send While Off...................................................................................... 42
Connect to PC .............................................................................. 43
Wi-Fi Connection .................................................................................43
Network Settings .................................................................................44
Options.................................................................................................... 45
MAC Address......................................................................................... 45
Wireless Transmitter (WT-7)......................................................46
Wireless Transmitter........................................................................... 46
Troubleshooting 47
Appendix 48
Index 49
xi
Page 12

D Life-Long Learning
As part of Nikon’s “Life-Long Learning” commitment to ongoing
product support and education, continually-updated information is
available online at the following sites:
• For users in the U.S.A.: https://www.nikonusa.com/
• For users in Europe and Africa: https://www.europe-nikon.com/support/
• For users in Asia, Oceania, and the Middle East: https://www.nikon-asia.com/
Visit these sites to keep up-to-date with the latest product information,
tips, answers to frequently-asked questions (FAQs), and general advice
on digital imaging and photography. Additional information may be
available from the Nikon representative in your area. See the following
URL for contact information: https://imaging.nikon.com/
D Background Knowledge
This guide assumes basic knowledge of wireless local area networks
(LANs). For more information on installing, configuring, and using the
devices in a network, contact the manufacturer or network
administrator. Information on configuring computers for connection
to wireless networks may be found in the online help for the Wireless
Transmitter Utility.
xii
Page 13

Connecting to Computers via Wi-Fi
This chapter describes how to connect to a computer using the
camera’s built-in Wi-Fi.
What Wi-Fi Can Do for You
Connect via Wi-Fi to upload
selected pictures to a computer.
The Wireless Transmitter Utility
After configuring the camera for connection, you will need to
pair it with the computer using the Wireless Transmitter Utility
before you will be able to upload or download images via Wi-Fi.
Once the devices are paired, you will be able to connect to the
computer from the camera.
The Wireless Transmitter Utility is a computer application
available for download from the Nikon Download Center:
https://downloadcenter.nikonimglib.com
Be sure to download the latest version after reading the release
notes and system requirements.
1Connecting to Computers via Wi-Fi
Page 14
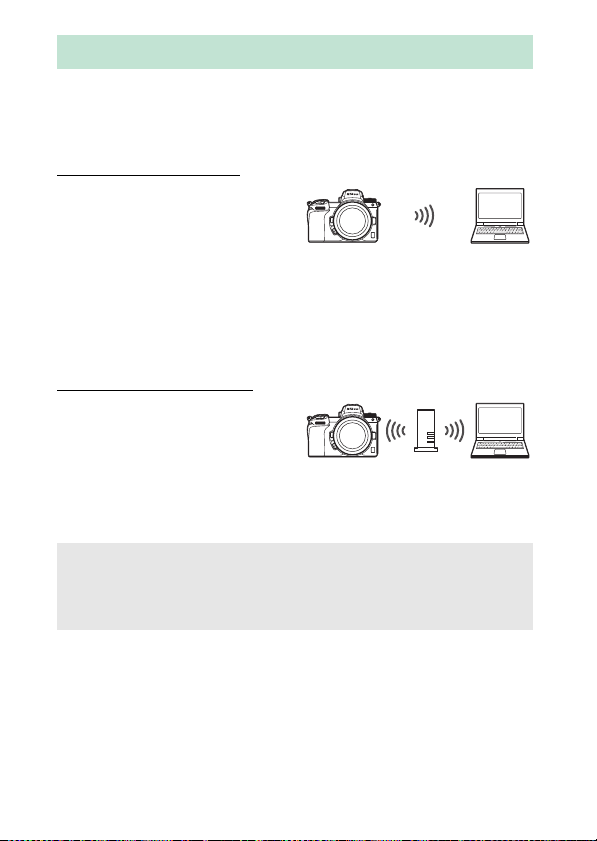
Infrastructure and Access-Point Modes
Access-point mode (0 3)
Infrastructure mode (0 7)
The camera can connect either via a wireless router on an
existing network (infrastructure mode) or by direct wireless link
(access-point mode).
Access-Point Mode
The camera and computer
connect via direct wireless link,
with the camera acting as a
wireless LAN access point and
without the need for
complicated adjustments to settings. Choose this option when
working outdoors or in other situations in which the computer is
not already connected to a wireless network.
Infrastructure Mode
The camera connects to a
computer on an existing
network (including home
networks) via a wireless router.
The computer can still connect
to the Internet while connected to the camera.
D Infrastructure Mode
This guide assumes you are connecting via an existing wireless
network. Connection to computers beyond the local area network is
not supported.
2 Connecting to Computers via Wi-Fi
Page 15
Connecting in Access-Point Mode
Follow the steps below to create a direct wireless link to a
computer in access-point mode.
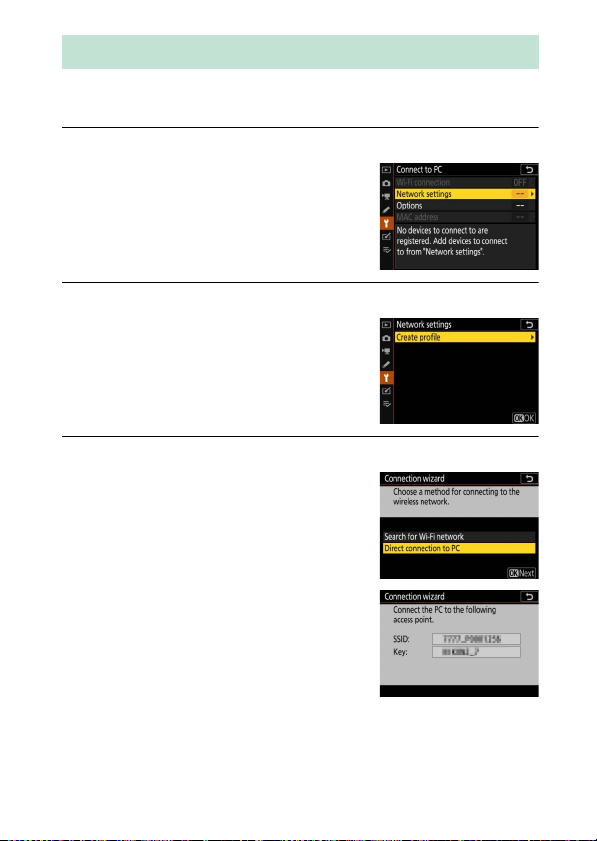
1 Display network settings.
Select Connect to PC in the camera
setup menu, then highlight Network
settings and press 2.
2 Select Create profile.
Highlight Create profile and press J.
3 Select Direct connection to PC.
Highlight Direct connection to PC
and press J.
The camera SSID and encryption key
will be displayed.
3Connecting to Computers via Wi-Fi
Page 16
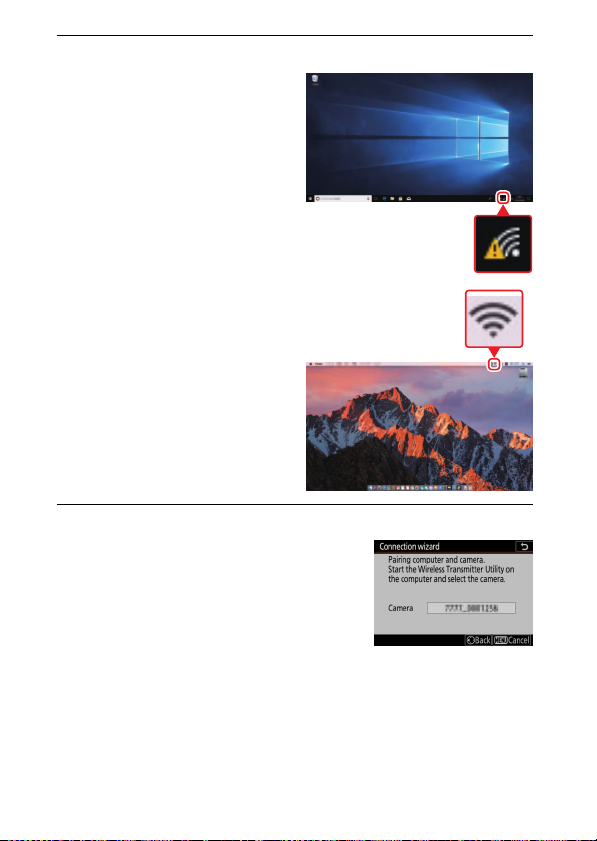
4 Connect from the computer.
Windows: Click the wireless
LAN icon in the taskbar and
select the SSID displayed by
the camera in Step 3. When
prompted to enter the
network security key, enter
the encryption key displayed
by the camera in Step 3.
macOS/OS X: Click the wireless
LAN icon in the menu bar
and select the SSID
displayed by the camera in
Step 3. When prompted to
supply a password, enter the
encryption key displayed by
the camera in Step 3.
5 Launch the Wireless Transmitter Utility.
When prompted, launch the Wireless
Transmitter Utility on the computer.
4 Connecting to Computers via Wi-Fi
Page 17
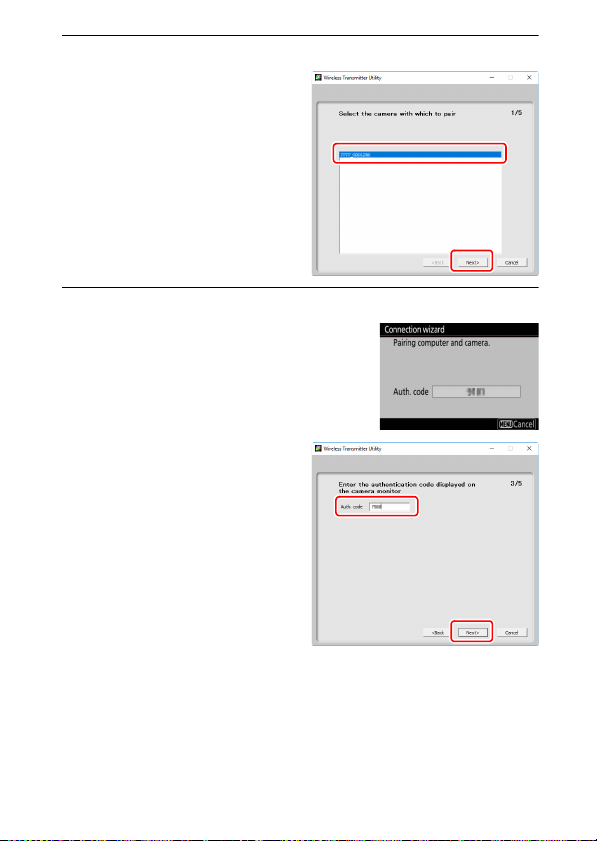
6 Select the camera.
In the Wireless Transmitter
Utility, select the camera
name displayed in Step 5
and click Next.
7 Enter the authentication code.
The camera will display an
authentication code.
Enter the authentication
code in the dialog displayed
by the Wireless Transmitter
Utility and click Next.
5Connecting to Computers via Wi-Fi
Page 18
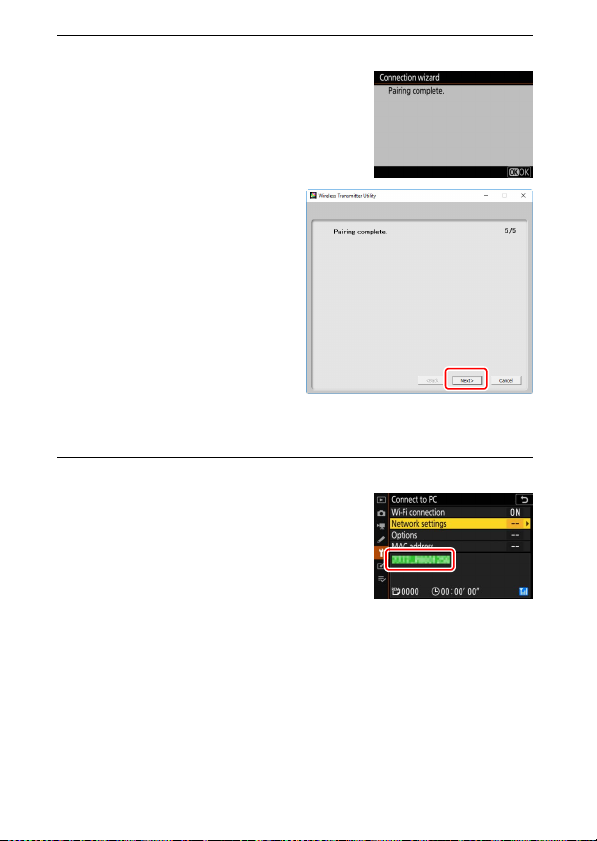
8 Complete the pairing process.
When the camera displays a message
stating that pairing is complete, press
J.
In the Wireless Transmitter
Utility, click Next. The
application will close
automatically.
A connection will now be established between the camera
and computer.
9 Check the connection.
When a connection is established, the
network SSID will be displayed in
green in the camera Connect to PC
menu.
Now that a wireless connection has been established, you can
upload images to the computer as described in“Uploading
Pictures” (0 14).
6 Connecting to Computers via Wi-Fi
Page 19

Connecting in Infrastructure Mode
Follow the steps below to connect to a computer on an existing
network in infrastructure mode.
1 Display network settings.
Select Connect to PC in the camera
setup menu, then highlight Network
settings and press 2.
2 Select Create profile.
Highlight Create profile and press J.
7Connecting to Computers via Wi-Fi
Page 20

3 Search for existing networks.
Highlight Search for Wi-Fi network
and press J. The camera will search
for networks currently active in the
vicinity and list them by name (SSID).
D “Easy Connect”
To connect without entering an SSID or
encryption key, press X in Step 3, then
press J and choose from the following
options:
• Push-button WPS: For routers that support
push-button WPS. Press the camera J
button to connect.
• PIN-entry WPS: The camera will display a PIN; to connect, use a
computer to enter the PIN into the router (for more information,
see the documentation provided with the router).
After connecting, proceed to Step 6.
8 Connecting to Computers via Wi-Fi
Page 21

4 Choose a network.
Highlight a network SSID and press J
(if the desired network is not
displayed, press X to search again).
Encrypted networks are indicated by a
h icon; if the selected network is
encrypted, you will be prompted to
enter the encryption key as described in Step 5. If the
network is not encrypted, proceed to Step 6.
D Hidden SSIDs
Networks with hidden SSIDs are
indicated by blank entries in the network
list. If you highlight a blank entry and
press J, you will be prompted to provide
the network name; press J, enter a
name, and then press X. Press X again to
proceed to Step 5.
9Connecting to Computers via Wi-Fi
Page 22

5 Enter the encryption key.
When prompted to enter the
encryption key for the wireless router,
press J…
…and enter the key as described
below. For information on the
encryption key, see the
documentation for the wireless
router. Press X when entry is
complete.
Press X again to initiate the
connection. The message at right will
be displayed for a few seconds when
the connection is established.
D Text Ent ry
A keyboard is displayed when text entry is required. Tap letters on the
screen (to cycle through the upper- and lower-case and symbol
keyboards, tap the keyboard selection button) or use the multi selector
to highlight characters and press J to ins er t th em a t th e c urr ent cur sor
position.
Tex t di spla y ar ea
Keyboard area Keyboard selection
10 Connecting to Computers via Wi-Fi
Page 23

6 Obtain or select an IP address.
Highlight one of the following options
and press J.
• Obtain automatically: Select this option
if the network is configured to
supply the IP address automatically.
• Enter manually : When prompted, enter
an IP address by rotating the main command dial to
highlight segments, pressing 4 and 2 to change and
pressing J to accept. Press X to exit to the “IP address
configuration complete” dialog when entry is complete.
Pressing X again displays the sub-net mask, which you can
edit by pressing 1 and 3, pressing J to exit when entry is
complete.
Confirm the IP address and press J to proceed.
7 Launch the Wireless Transmitter Utility.
When prompted, launch the Wireless
Transmitter Utility on the computer.
11Connecting to Computers via Wi-Fi
Page 24

8 Select the camera.
In the Wireless Transmitter
Utility, select the camera
name displayed in Step 7
and click Next.
9 Enter the authentication code.
The camera will display an
authentication code.
Enter the authentication
code in the dialog displayed
by the Wireless Transmitter
Utility and click Next.
12 Connecting to Computers via Wi-Fi
Page 25

10
Complete the pairing process.
When the camera displays a message
stating that pairing is complete, press
J.
In the Wireless Transmitter
Utility, click Next. The
application will close
automatically.
A connection will now be established between the camera
and computer.
11
Check the connection.
When a connection is established, the
network SSID will be displayed in
green in the camera Connect to PC
menu.
Now that a wireless connection has been established, you can
upload images to the computer as described in “Uploading
Pictures” (0 14).
13Connecting to Computers via Wi-Fi
Page 26

Uploading Pictures
You can select pictures for upload in the camera playback
display or upload pictures as they are taken.
D Destination Folders
By default, images are uploaded to the following folders:
• Windows: \Users\(user name)\Pictures\Wireless Transmitter Utility
• Mac: /Users/(user name)/Pictures/Wireless Transmitter Utility
The destination folder can be selected using the Wireless Transmitter
Utility. For more information, see the utility’s online help.
Selecting Pictures for Upload
Follow the steps below to select pictures for upload.
1 Start playback.
Press the K button on the camera and select full-frame or
thumbnail playback.
2 Press the i button.
Select a picture and press the i
button to display the playback i
menu.
14 Connecting to Computers via Wi-Fi
Page 27

3 Choose Select to send/deselect (PC).
Highlight Select to send/deselect
(PC) and press J. A white transfer
icon will appear on the picture. If the
camera is currently connected to a
network, upload will begin
immediately; otherwise, upload will
begin when a connection is established. The transfer icon
turns green during upload.
D Deselecting Pictures
To remove transfer marking from the current picture, highlight Select
to send/deselect (PC) and press J. To remove transfer marking from
all pictures, select Connect to PC>Options> Deselect all? in the
setup menu.
Uploading Photos as They Are Taken
To upload new photos as they are taken,
select On for Connect to PC> Options>
Auto send. Upload begins only after the
photo has been recorded to the memory
card; be sure a memory card is inserted in
the camera. Movies and photographs
taken in movie mode are not uploaded automatically when
recording is complete but must instead be uploaded from the
playback display.
15Connecting to Computers via Wi-Fi
Page 28

The Transfer Icon
Status: The status of the connection to the
host. The host name is displayed in green
when a connection is established. While files
are being transferred, the status display
shows “Now sending” preceded by the name
of the file being sent. Any errors that occur
during transfer are also displayed here.
Signal strength: Wireless signal strength.
Pictures/time remaining: The estimated time
required to send the remaining pictures.
Upload status is indicated by the transfer
icon.
• Y (white): Send. The picture has been
selected for upload but upload has not
yet begun.
• X (green): Sending. Upload in progress.
• Y (blue): Sent. Upload complete.
The “Connect to PC” Status Display
The Connect to PC display shows the following information:
D Loss of Signal
Wireless transmission may be interrupted if the signal is lost, but can
be resumed by turning the camera off and then on again.
16 Connecting to Computers via Wi-Fi
Page 29

Disconnecting and Reconnecting
The camera’s link to an existing network can be suspended or
resumed as described below.
Disconnecting
You can disconnect by turning the camera off, selecting Disable
for Connect to PC> Wi-Fi connection in the setup menu, or
selecting Wi-Fi connection> Close Wi-Fi connection in the i
menu for shooting mode. The connection to the computer will
also end if you use Wi-Fi to connect to a smart device.
D Access-Point Mode
An error will occur if the computer’s wireless connection is disabled
before the camera’s. Disable camera Wi-Fi first.
Reconnecting
To reconnect to an existing network, either:
• select Enable for Connect to PC> Wi-Fi connection in the
setup menu, or
• choose Wi-Fi connection> Establish
Wi-Fi connection with PC in the i
menu for shooting mode.
D Access-Point Mode
Enable camera Wi-Fi before connecting.
D Multiple Network Profiles
If the camera has profiles for more than one network, it will reconnect
to the last network used. Other networks can be selected using the
Connect to PC> Network settings option in the setup menu.
17Connecting to Computers via Wi-Fi
Page 30

Connecting to Smart Devices
To connect to the camera from a smartphone or tablet (below,
“smart device”), download the SnapBridge app.
The SnapBridge App
Use the SnapBridge app for wireless connections
between the camera and smart devices.
The SnapBridge app is available free
of charge from the Apple App Store®
and on Google Play™. Visit the Nikon
website for the latest SnapBridge
news.
What SnapBridge Can Do for You
Using the SnapBridge app, you can:
• Download pictures from the camera
Download existing pictures or download new pictures as they
are taken.
• Control the camera remotely (remote photography)
Control the camera and take pictures from the smart device.
For details, see the SnapBridge app online help:
https://nikonimglib.com/snbr/onlinehelp/en/index.html
18 Connecting to Smart Devices
Page 31

Wireless Connections
Using the SnapBridge app, you can connect via Wi-Fi (0 20) or
Bluetooth (0 26). Connecting via Bluetooth allows you to set
the camera clock and update location data using information
provided by the smart device.
Wi-Fi Bluetooth
19Connecting to Smart Devices
Page 32

Connecting via Wi-Fi (Wi-Fi Mode)
Follow the steps below to connect to the camera via Wi-Fi.
D Before Connecting
Before connecting, enable Wi-Fi on the smart device (for details, see
the documentation provided with the device), check that there is
space available on the camera memory card, and ensure that the
batteries in the camera and smart device are fully charged to prevent
the devices turning off unexpectedly.
1 Smart device: Launch the SnapBridge app.
If this is the first time you have launched
the app, tap Connect to camera and
proceed to Step 2.
20 Connecting to Smart Devices
Page 33

If you have launched the app before, open the tab and tap
> Wi-Fi mode before proceeding to Step 3.
2 Smart device: Choose the camera and connection type.
When prompted to choose the camera type, tap mirrorless
camera and then tap Wi-Fi connection.
21Connecting to Smart Devices
Page 34

3 Camera: Turn the camera on.
The smart device will instruct you to
ready the camera. Turn the camera on.
Do NOT tap Next until you have
completed Step 4.
4 Camera: Enable Wi-Fi.
Select Connect to smart device >
Wi-Fi connection in the setup menu,
then highlight Establish Wi-Fi
connection and press J.
The camera SSID and password will be
displayed.
D Enabling Wi-Fi
You can also enable Wi-Fi by selecting
Wi-Fi connection> Establish Wi-Fi
conn. with smart device in the i menu
for shooting mode.
22 Connecting to Smart Devices
Page 35

5 Smart device: Tap Next.
Tap Next on ce you hav e en able d Wi -Fi
on the camera as described in the
preceeding step.
6 Smart device: Tap View options.
After reading the instructions
displayed by the smart device, tap
View options.
• Android devices: Wi-Fi settings will be
displayed.
• iOS devices: The “Settings” app will
launch. Tap < Settings to open the
“Settings” app. Next, scroll up and
tap Wi-Fi, which you’ll find near the
top of the settings list.
23Connecting to Smart Devices
Page 36

7 Smart device: Enter the camera SSID and password.
Enter the SSID and password displayed by the camera in
Step4.
Android device
(actual displays
may differ)
iOS device
(actual displays
may differ)
You will not be required to enter the password when next you
connect to the camera.
24 Connecting to Smart Devices
Page 37

8 Smart device: Return to the SnapBridge app.
After a Wi-Fi connection is
established, Wi-Fi mode options will
be displayed. See online help for
information on using the SnapBridge
app.
D Ending Wi-Fi Connections
To end the Wi-Fi connection, tap . When
the icon changes to , tap and select
Exit Wi-Fi mode.
25Connecting to Smart Devices
Page 38

Connecting via Bluetooth
For information on pairing the camera and smart device when
connecting for the first time, see “Connecting for the First Time:
Pairing”, below. For information on connecting once pairing is
complete, see “Connecting to a Paired Device” (0 36).
❚❚ Connecting for the First Time: Pairing
Before connecting via Bluetooth for the first time, you will need
to pair the camera and smart device as described below. See
“Android”, below, if you are using an Android device, or “iOS”
(0 31) for information on pairing with iOS devices.
D Before Pairing
Before beginning pairing, enable Bluetooth on the smart device (for
details, see the documentation provided with the device), check that
there is space available on the camera memory card, and ensure that
the batteries in the camera and smart device are fully charged to
prevent the devices turning off unexpectedly.
Android
Follow the steps below to pair the camera with an Android
device.
1 Camera: Ready the camera.
Select Connect to smart device>
Pairing (Bluetooth) in the setup
menu, then highlight Start pairing
and press J…
…to display the camera name.
26 Connecting to Smart Devices
Page 39

2 Android device: Launch the SnapBridge app.
If this is the first time you have launched
the app, tap Connect to camera and
proceed to Step 3.
If you have launched the app before,
open the tab and tap Connect to
camera.
27Connecting to Smart Devices
Page 40

3 Android device: Choose the camera.
Tap the camera name.
4 Camera/Android device: Check the authentication code.
Confirm that the camera and Android device display the
same authentication code (circled in the illustration).
28 Connecting to Smart Devices
Page 41

5 Camera/Android device: Initiate pairing.
Camera: Press J.
Android device: Tap the button indicated
in the illustration (the label may differ
depending on the version of Android
you are using).
D Pairing E rror
If you wait too long between pressing the button on the camera
and tapping the button on the Android device, pairing will fail and
an error will be displayed.
• Camera: Press J and return to Step 1.
• Android device: Tap OK and return to Step 2.
29Connecting to Smart Devices
Page 42

6 Camera/Android device: Follow the on-screen instructions.
Camera: Press J. The camera will
display a message stating that the
devices are connected.
Android device: Pairing is complete. Tap OK to exit to the tab.
D Pairing for the First Time
The first time you pair the Android device with a camera after
installing the SnapBridge app, you will be prompted to select auto
link (auto upload and auto clock and location synchronization)
options. This prompt will not appear again, but auto link settings
can be accessed at any time using Auto link in the tab.
Pairing is now complete. The next time you use the SnapBridge
app, you can connect as described in “Connecting to a Paired
Device” (0 36).
D Ending Bluetooth Connections
To end the connection to the smart device, select Disable for Connect
to smart device > Pairing (Bluetooth) > Bluetooth connection in
the camera setup menu.
30 Connecting to Smart Devices
Page 43

iOS
Follow the steps below to pair the camera with an iOS device. For
information on Android devices, see “Android” (0 26).
1 Camera: Ready the camera.
Select Connect to smart device>
Pairing (Bluetooth) in the setup
menu, then highlight Start pairing
and press J…
…to display the camera name.
2 iOS device: Launch the SnapBridge app.
If this is the first time you have launched
the app, tap Connect to camera and
proceed to Step 3.
31Connecting to Smart Devices
Page 44

If you have launched the app before,
open the tab and tap Connect to
camera.
3 iOS device: Choose the camera.
Tap the camera name.
32 Connecting to Smart Devices
Page 45

4 iOS device: Read the instructions.
Read the pairing instructions carefully
and tap Understood.
5 iOS device: Select an accessory.
When prompted to select an
accessory, tap the camera name
again.
33Connecting to Smart Devices
Page 46

6 Camera/iOS device: Initiate pairing.
Camera: Press J.
iOS device: Tap the button indicated in
the illustration (the label may differ
depending on the version of iOS you
are using).
D Pairing Error
If you wait too long between pressing the button on the camera
and tapping the button on the iOS device, pairing will fail and an
error will be displayed.
• Camera: Press J and return to Step 1.
• iOS device: Dismiss the SnapBridge app and check that it is not
running in the background, then open the iOS “Settings” app and
request iOS to “forget” the camera as shown in the illustration
before returning to Step 1.
34 Connecting to Smart Devices
Page 47

7 Camera/iOS device: Follow the on-screen instructions.
Camera: Press J. The camera will
display a message stating that the
devices are connected.
iOS device: Pairing is complete. Tap OK to exit to the tab.
D Pairing for the First Time
The first time you pair the iOS device with a camera after installing
the SnapBridge app, you will be prompted to select auto link (auto
upload and auto clock and location synchronization) options. This
prompt will not appear again, but auto link settings can be
accessed at any time using Auto link in the tab.
Pairing is now complete. The next time you use the SnapBridge
app, you can connect as described in “Connecting to a Paired
Device” (0 36).
D Ending Bluetooth Connections
To end the connection to the smart device, select Disable for Connect
to smart device > Pairing (Bluetooth) > Bluetooth connection in
the camera setup menu.
35Connecting to Smart Devices
Page 48

❚❚ Connecting to a Paired Device
Connecting to a smart device that has already been paired with
the camera is quick and easy.
1 Camera: Enable Bluetooth.
In the setup menu, select Connect to
smart device> Pairing
(Bluetooth)> Bluetooth
connection, then highlight Enable
and press J.
2 Smart device: Launch the SnapBridge app.
A Bluetooth connection will be
established automatically.
36 Connecting to Smart Devices
Page 49

Connecting to Networks Using the WT-7
When attached to the camera, the optional WT-7 wireless
transmitter can be used to connect to computers, ftp servers, or
other devices over Ethernet or wireless networks.
D Before Connecting the WT-7
Before connecting the WT-7, confirm that the firmware for the camera
and WT-7 have been updated to the latest versions. For more
information, visit the Nikon website for your region (0 xii).
37Connecting to Networks Using the WT-7
Page 50

What the WT-7 Can Do for You
Using the WT-7, you can:
• Upload existing photos and movies to an ftp server or computer
Not only can you copy
pictures to computers (image
transfer mode), you can also
upload them to ftp servers (f tp
upload mode). Pictures can be
uploaded as they are taken.
• Control the camera and take pictures remotely from a computer
Installing Camera Control Pro2
(available separately) on a
network computer gives you
complete control over camera
settings and lets you take
pictures remotely and save
them directly to the computer
hard disk (camera control
mode).
• Control the camera and take pictures remotely from a web browser
Using a web browser, you can
control the camera from
network computers and smart
devices for remote control
that requires no dedicated
app or computer software
(http server mode).
38 Connecting to Networks Using the WT-7
Page 51

Connecting Using the WT-7
Connect the WT-7 using the USB cable supplied with the
camera.
Turn the transmitter on and select
Wireless transmitter (WT-7)> Wireless
transmitter> Use in the camera setup
menu.
A Menu Options for the WT-7
All menu options for the WT-7 can be found in the setup menu under
Wireless transmitter (WT-7). For more information, see the manual
provided with the WT-7.
See the manual provided with the WT-7 for more information.
39Connecting to Networks Using the WT-7
Page 52

Menu Guide
Read this section for information on the
menu items used when the camera is
connected to a network. All the items
listed are to be found in the setup menu.
Connect to Smart Device
Connect to smartphones or tablets
(smart devices) via Bluetooth or Wi-Fi.
Pairing (Bluetooth)
Pair with or connect to smart devices using Bluetooth.
Option Description
Start pairing Pair the camera with a smart device (0 26).
Paire d devices
Bluetooth connection Select Enable to enable Bluetooth.
List paired smart devices or switch from one
device to another.
40 Menu Guide
Page 53

Select to Send (Bluetooth)
Select pictures for upload to a smart device or choose whether
to mark pictures for upload as they are taken. Upload begins
immediately when a connection is established.
Option Description
If On is selected, photos will be marked for
upload to a smart device as they are taken (this
Auto select to send
Manual select to send Mark selected pictures for upload.
Deselect all Remove transfer marking from all images.
does not apply to photos taken in movie mode,
which must be selected for upload manually).
Regardless of the option selected with the
camera, photos are uploaded in JPEG format at
size of 2 megapixels.
41Menu Guide
Page 54

Wi-Fi Connection
Connect to smart devices via Wi-Fi.
❚❚ Establish Wi-Fi Connection
Initiate a Wi-Fi connection to a smart device. To connect, select
the camera SSID on the smart device and enter the password
(0 20). Once a connection is established, this option will change
to Close Wi-Fi connection, which can be used to end the
connection when desired.
❚❚ Wi-Fi Connection Settings
Access the following Wi-Fi settings:
• SSID: Set the camera SSID.
• Authentication/encryption: Choose OPEN or WPA2-PSK-AES.
• Pa ssword: Set the camera password.
• Channel: Select Auto to have the camera choose the channel
automatically, or select Manual and choose the channel
manually.
• Current settings: View current Wi-Fi settings.
• Reset connection settings: Select Ye s to reset Wi-Fi settings to
default values.
Send While Off
If On is selected, upload of images to smart devices connected
via Bluetooth will continue even when the camera is off.
42 Menu Guide
Page 55

Connect to PC
Connect to computers via Wi-Fi.
Wi-Fi Connection
Select Enable to connect using the settings currently selected
for Network settings.
43Menu Guide
Page 56

Network Settings
Select Create profile to create a new network profile (0 3, 7). If
more than one profile already exists, you can press J to select a
profile from a list. To edit an existing profile, highlight it and
press 2. The following options will be displayed:
• General: The profile name and password. Select Profile name to
rename the profile (by default, the profile name is the same as
the network SSID). To require that a password be entered
before the profile can be changed select On for Password
protection (to change the password, highlight On and press
2).
• Wi reless: Adjust settings for connection to a network via a router
(infrastructure mode) or for direct wireless connection to the
camera (access-point mode).
- Infrastructure mode: Enter the network SSID and password and
choose the type of authentication/encryption used on the
network (OPEN or WPA2-PSK-AES). The channel is selected
automatically.
- Access-point mode: Enter the SSID and choose a channel (select
Auto for automatic channel selection or Manual to choose
the channel manually) and authentication/encryption type
(OPEN or WPA2-PSK-AES) used for connection to the
camera. If WPA2-PSK-AES is selected for Authentication/
encryption, you can also set the camera password.
• TC P/IP: If Enable is selected for Obtain automatically, the IP
address and sub-net mask for infrastructure mode connections
will be acquired via a DHCP server or automatic IP addressing.
Select Disable manually to enter the IP address (Address) and
sub-net mask (Mask). Note that an IP address is required for
infrastructure mode connections.
44 Menu Guide
Page 57

Options
Adjust upload settings.
❚❚ Auto Send
Select On to upload new photos as they are taken. Upload
begins only after the photo has been recorded to the memory
card; be sure a memory card is inserted in the camera. Movies
and photos taken in movie mode are not uploaded
automatically when recording is complete but must instead be
uploaded from the playback display (0 14).
❚❚ Delete After Send
Select Ye s to delete photographs from the camera memory card
automatically once upload is complete (files marked for transfer
before this option is selected are not deleted). Deletion may be
suspended during some camera operations.
❚❚ Send File As
When uploading NEF+JPEG images, choose whether to upload
both the NEF (RAW) and JPEG files or only the JPEG copy.
❚❚ Deselect All?
Select Ye s to remove transfer marking from all images. Upload of
images with a “sending” icon will immediately be terminated.
MAC Address
Display the camera MAC address.
45Menu Guide
Page 58

Wireless Transmitter (WT-7)
Adjust settings for connection using an
optional WT-7 wireless transmitter. These
settings take effect when the WT-7 is
connected and turned on, in which case
the options selected for Connect to
smart device and Connect to PC are
automatically disabled. Information on the Wireless
transmitter option can be found below; for information on
Choose hardware, Network settings, and Options, see the
manual provided with the WT-7.
Wireless Transmitter
Select Use to enable WT-7 when it is connected to the camera.
46 Menu Guide
Page 59

Troubleshooting
Solutions to some common issues are listed below.
Troubleshooting information for the SnapBridge app can be
found in the app’s online help, which can be viewed at:
https://nikonimglib.com/snbr/onlinehelp/en/index.html
For information on the WT-7, see the manual provided with the
transmitter. For information on the Wireless Transmitter Utility
or Camera Control Pro 2, see the online help for the application
in question.
Problem Solution 0
The camera displays a
TCP/IP error.
The camera displays a
“no memory card” error.
Upload is interrupted
and fails to resume.
The connection is
unreliable.
Connect to smart
device and Connect to
PC are grayed out and
unavailable.
Check settings for the host computer or
wireless router and adjust camera
settings appropriately.
Confirm that the memory card is
correctly inserted.
Upload will resume if the camera is
turned off and then on again.
If Auto is selected for Channel, choose
Manual and select the channel
manually.
If the camera is connected to a
computer in infrastructure mode, check
that the router is set to a channel
between 1 and 8.
These options are not available while
the WT-7 is in use. Turn the WT-7 off.
44
15
14
42
44
46
47Troubleshooting
Page 60

Appendix
Apple Public Source License
This product includes Apple mDNS source code that is subject to the
terms of the Apple Public Source License located at URL
https://developer.apple.com/opensource/.
This file contains Original Code and/or Modifications of Original Code as
defined in and that are subject to the Apple Public Source License
Version 2.0 (the ‘License’). You may not use this file except in compliance
with the License. Please obtain a copy of the License at
https://opensource.apple.com/apsl and read it before using this file.
The Original Code and all software distributed under the License are
distributed on an ‘
OR IMPLIED, AND APPLE HEREBY DISCLAIMS ALL SUCH WARRANTIES, INCLUDING
WITHOUT LIMITATION, ANY WARRANTIES OF MERCHANTABILITY, FITNESS FOR A
PARTICULAR PURPOS E, QUIET ENJOYMENT OR NON-INFRINGEMENT. Please see the
License for the specific language governing rights and limitations under
the License.
AS IS’ basis, WITHOUT WARRANTY OF ANY KIND, EITHER EXPRESS
48 Appendix
Page 61

Index
A
Access-point mode...........................2, 3
Android...................................................26
Authentication/encryption..............42
Auto send........................................15, 45
B
Bluetooth ........................................26, 40
C
Camera Control Pro 2 ........................38
Connect to computers ........................ 1
Connect to PC.......................................43
Connect to smart devices.................18
D
Deselecting pictures ..........................15
Direct connection to PC...................... 3
Disconnecting and reconnecting..17
E
Easy connect...........................................8
Errors........................................................47
Establish Wi-Fi connection...............42
F
FTP server...............................................37
I
Infrastructure mode.........................2, 7
iOS.............................................................31
IP address........................................11, 44
M
MAC address .........................................45
N
Network settings........................ 3, 7, 44
O
Options................................................... 45
P
Pairing.............................................. 36, 40
PIN-entry WPS.........................................8
Push-button WPS...................................8
R
Remote photography........................ 18
S
Search for Wi-Fi network.....................8
Select to send (Bluetooth)............... 41
Selecting pictures for upload......... 14
Send while off ......................................42
SnapBridge............................................18
SSID................................................. 3, 8, 42
W
Wi-Fi.....................................................1, 42
Wi-Fi connection.......................... 42, 43
Wi-Fi mode............................................ 20
Wireless Transmitter (WT-7)..... 37, 46
Wireless Transmitter Utility................1
WT-7.........................................................37
49Index
Page 62

No reproduction in any form of this manual, in whole or in part (except
for brief quotation in critical articles or reviews), may be made without
written authorization from NIKON CORPORATION.
SB8K01(11)
6MOA2711-01
 Loading...