

Page 1
Nikon
F80
F80D
F80S
INSTRUCTION MANUAL
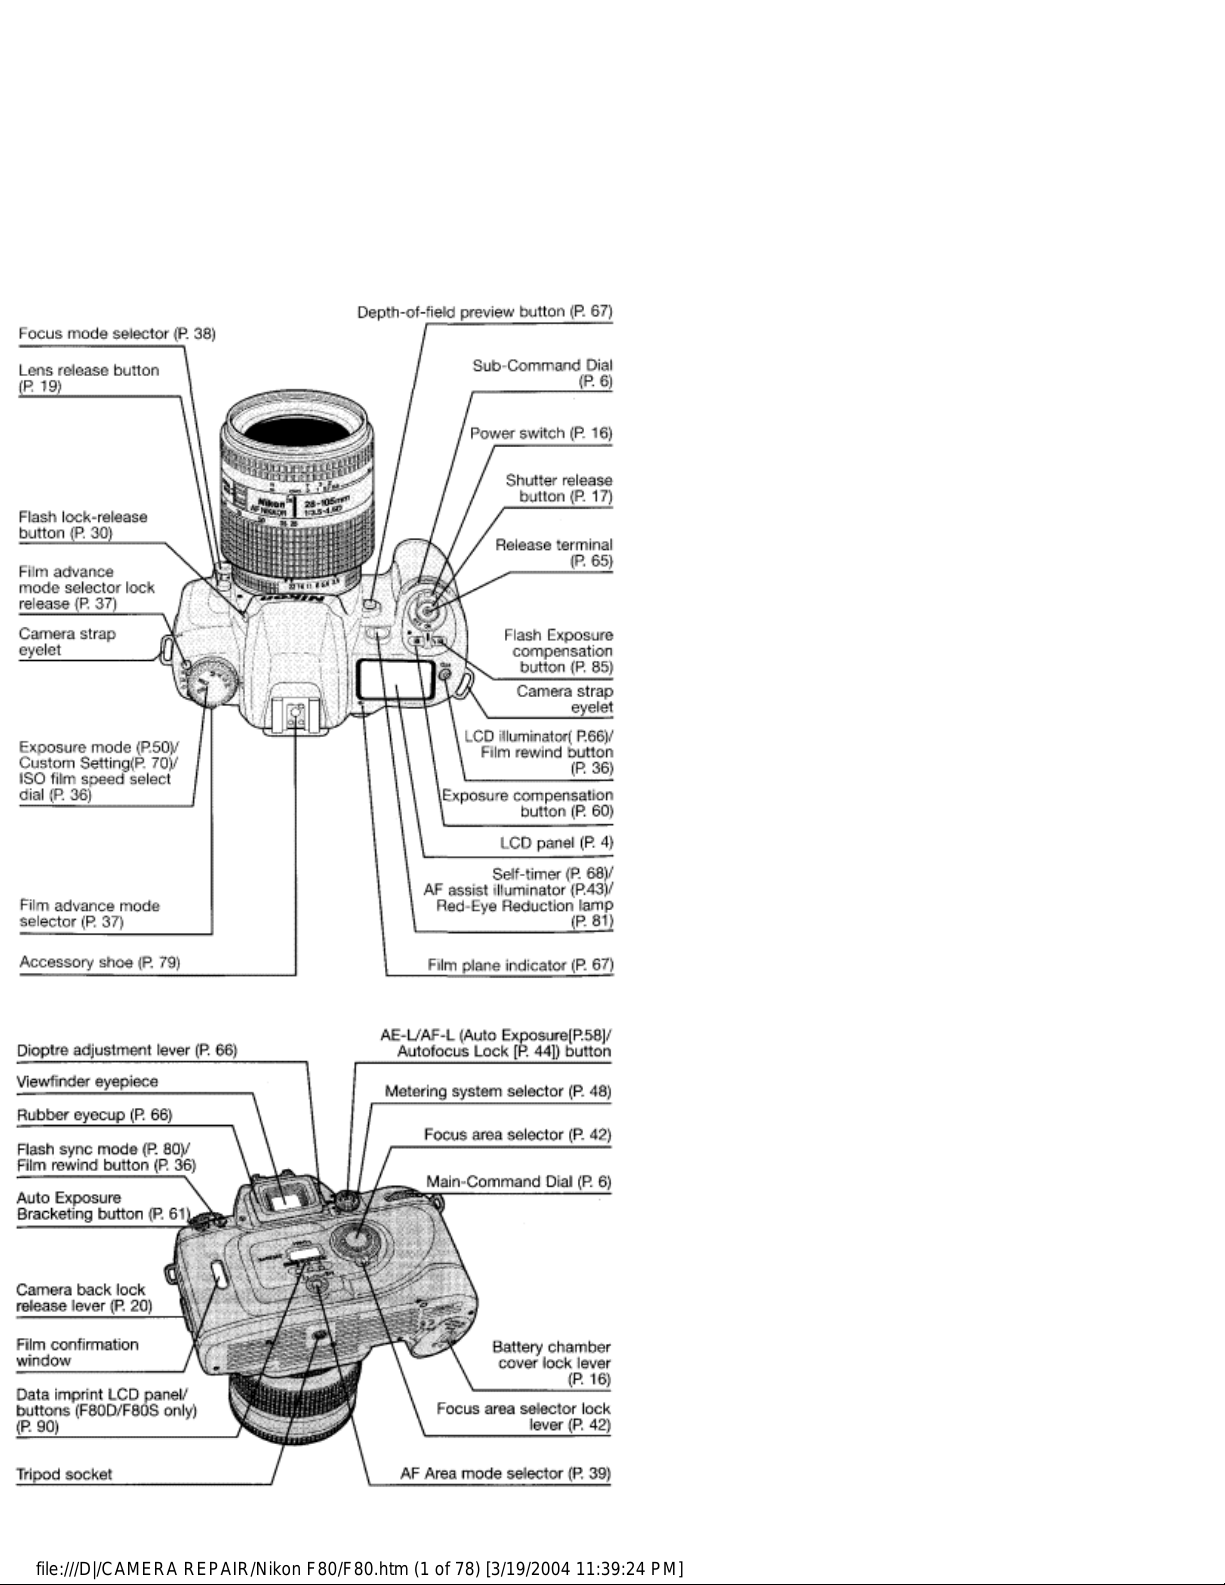
Nomenclature
Nikon
Distributed by WWW.LENSINC.NET
file:///D|/CAMERA REPAIR/Nikon F80/F80.htm (1 of 78) [3/19/2004 11:39:24 PM]
Page 2
* Illustration shown is the F80D. The camera backs of the F80 and F80S differ from
the F80D. For the F80S's camera back, see page 90.
Supplied accessories
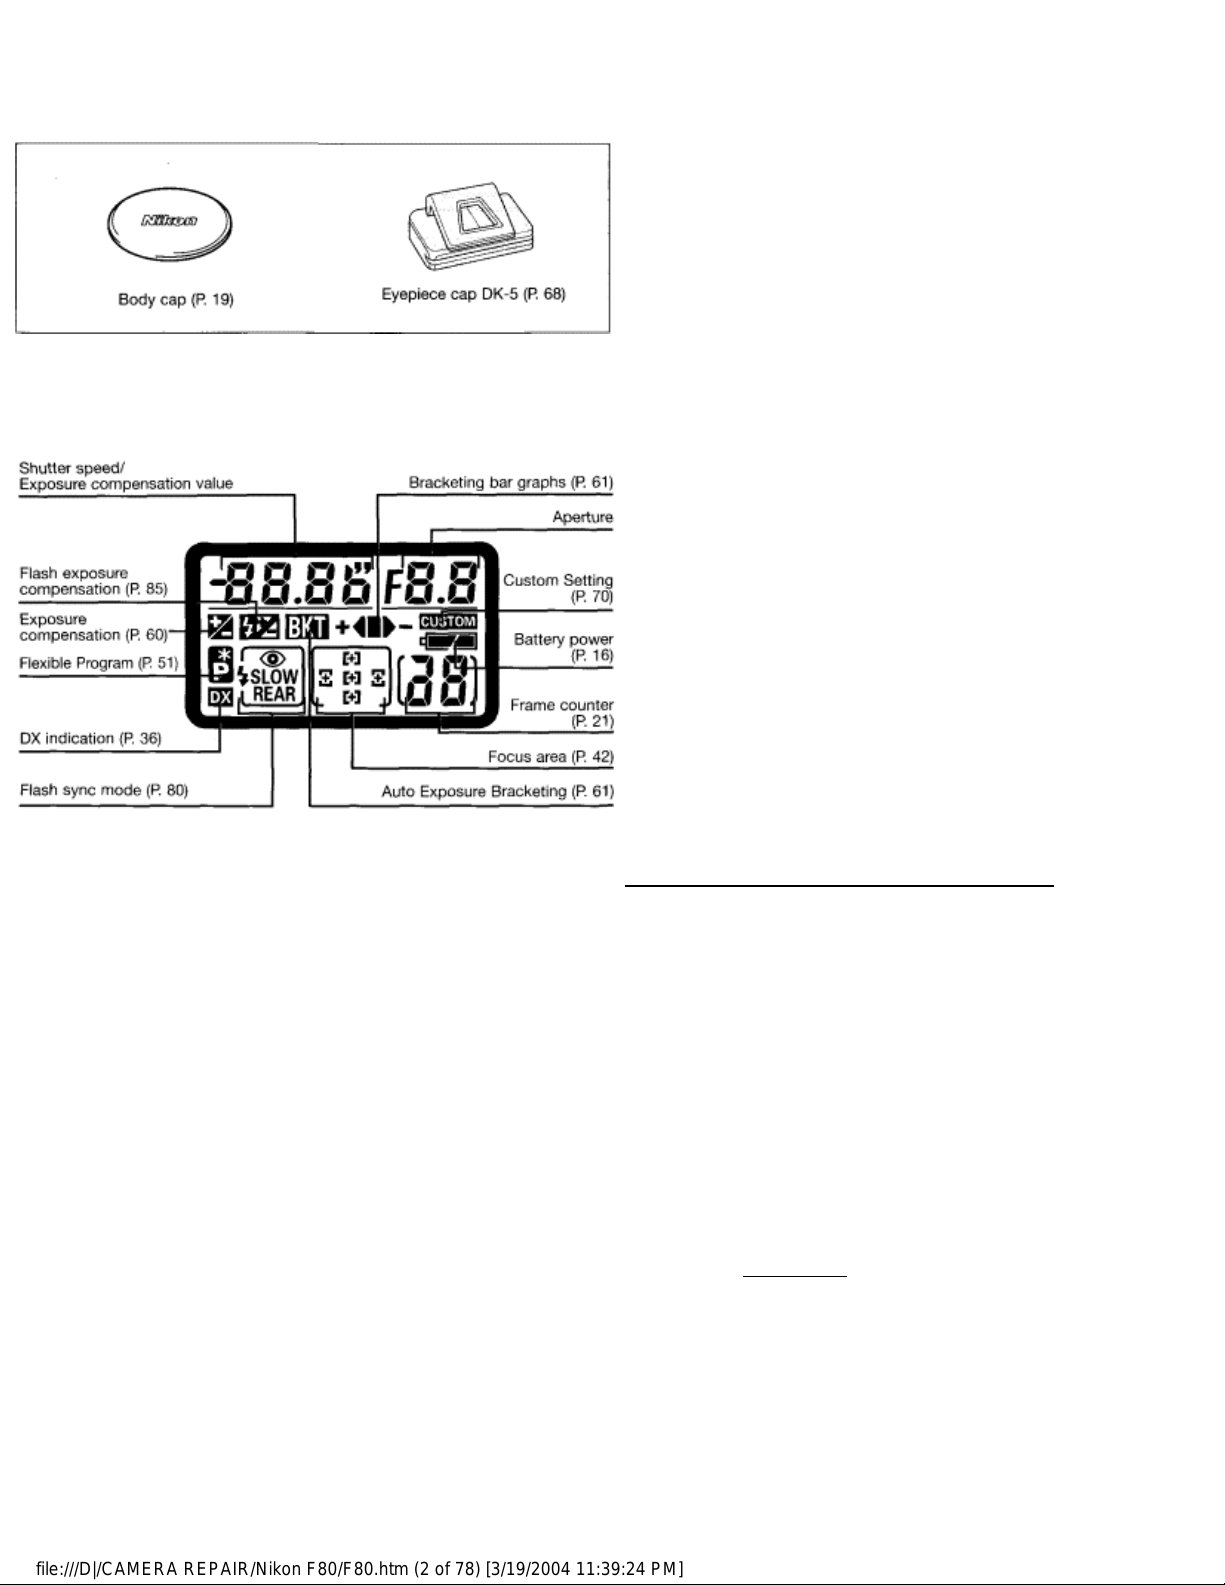
LCD Panel/Viewfinder Display
• LCD panel
* The illustrations are fully labelled for your reference.
About Nikon Advanced Focusing Screen Display_______________
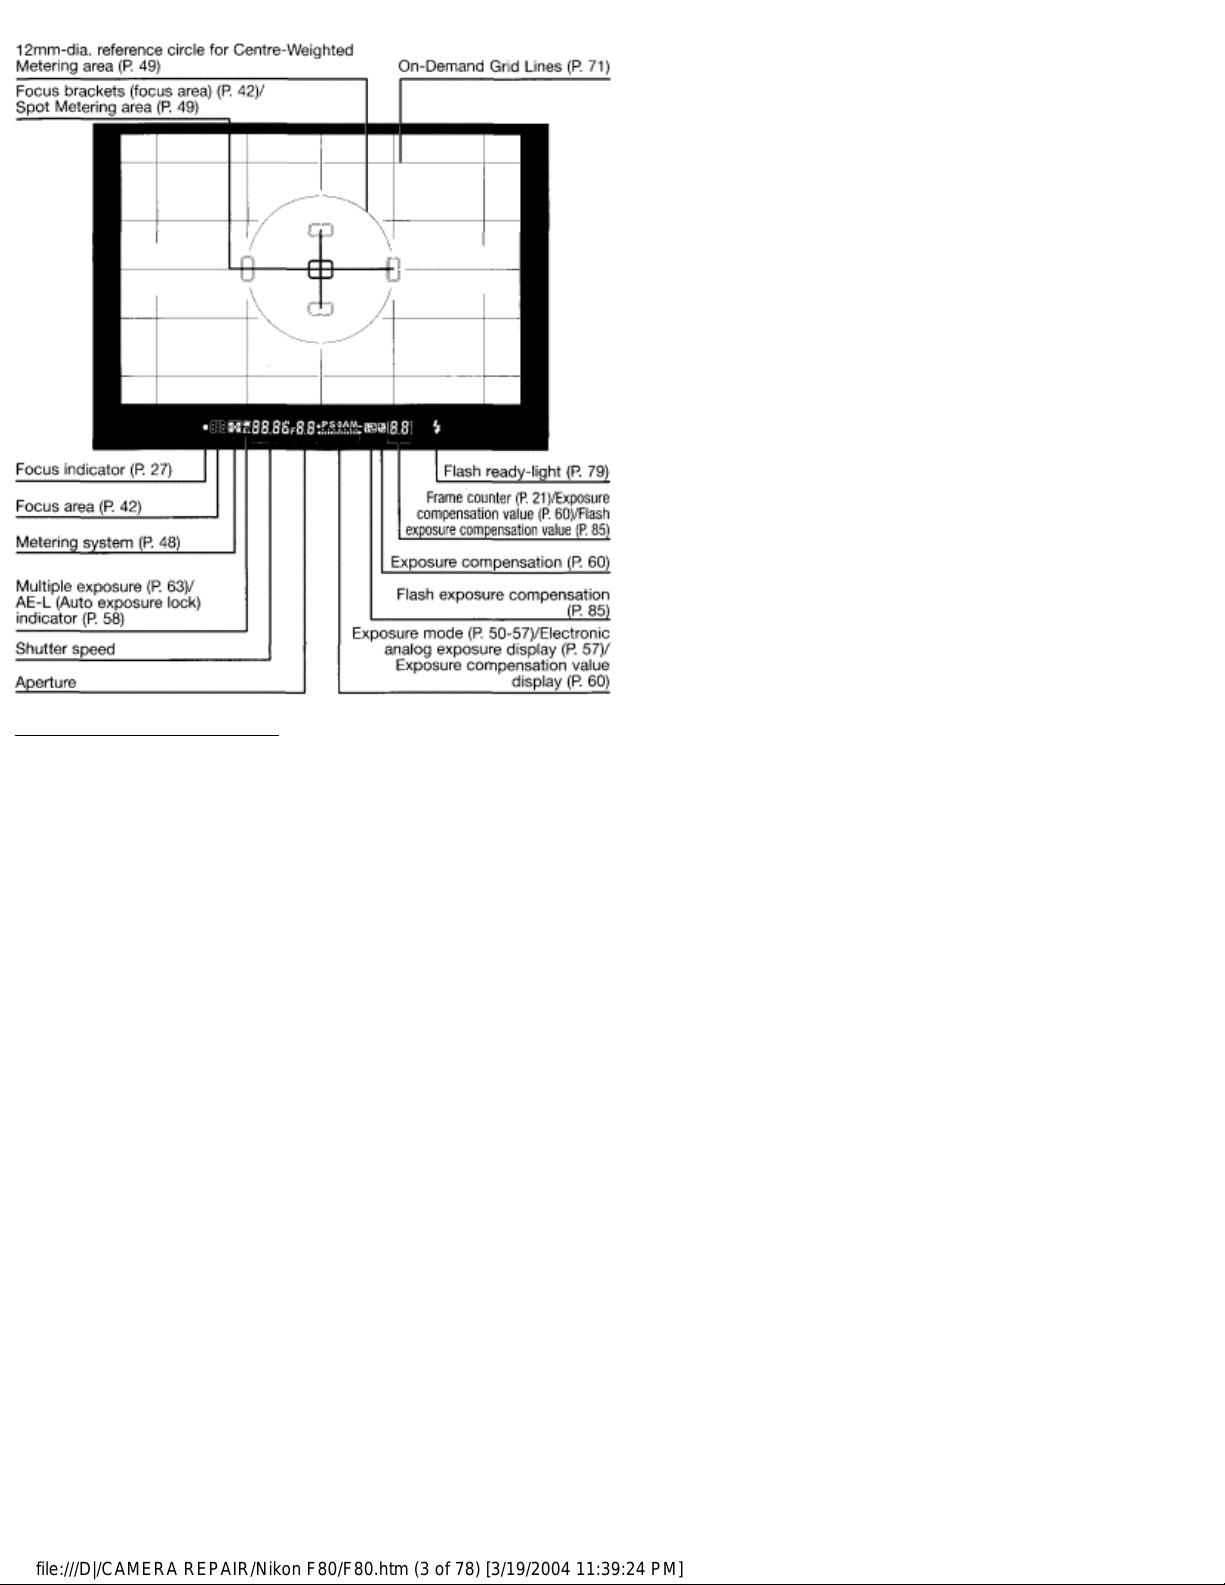
The new Nikon Advanced Focusing Screen Display of the F80/F80D/F80S employs the
convenient Vari-Brite Focus Area display system; it enables clear display of the focus
brackets at the selected focus area in the viewfinder for easy identification. When the finder
image is bright, the focus brackets are displayed in black and when the finder image is
dark, the focus brackets are momentarily illuminated in red. The selected focus area can be
identified easily in both bright and dark conditions with this function (page 72).
Also, the new Nikon Advanced Focusing Screen Display allows the superimposition of OnDemand Grid Lines. The grid lines can be displayed by using Custom Setting Menu #4
(page 71). These grids assist you in composing the frame, in taking landscape pictures or in
shifting/tilting PC-Nikkor lenses.
* Due to characteristics of the LCD used in the Vari-Brite Focus Area display system, a thin line
outside the selected focus area may also be displayed or the entire viewfinder may be
illuminated in red under certain conditions. These are not malfunctions.
About LCD___________________________________
The LCD panel and viewfinder displays tend to turn darker at high temperatures and slower
response time at low temperatures. On the other hand, the LCD in the Nikon Advanced
Focusing Screen Display tends to turn lighter at high temperatures and darker with slower
response time at low temperatures. In either case, when the temperature returns to normal,
the displays also return to normal.
• Viewfinder Display
Nikon
Distributed by WWW.LENSINC.NET
file:///D|/CAMERA REPAIR/Nikon F80/F80.htm (2 of 78) [3/19/2004 11:39:24 PM]
Page 3
CAUTION: About viewfinder_________________________
The viewfinder will be dark without battery power but brightens after installation
of fresh batteries. This is not a malfunction.
Command Dials
•The F80/F80D/F80S's Main- and Sub-Command Dials are used alone
or in combination with other buttons to select/set various functions or
modes.
See "Basic Operation" on pages 15 to 31 if you want to start shooting
immediately with F80/F80D/F80S's basic mode.
Nikon
Distributed by WWW.LENSINC.NET
file:///D|/CAMERA REPAIR/Nikon F80/F80.htm (3 of 78) [3/19/2004 11:39:24 PM]
Page 4
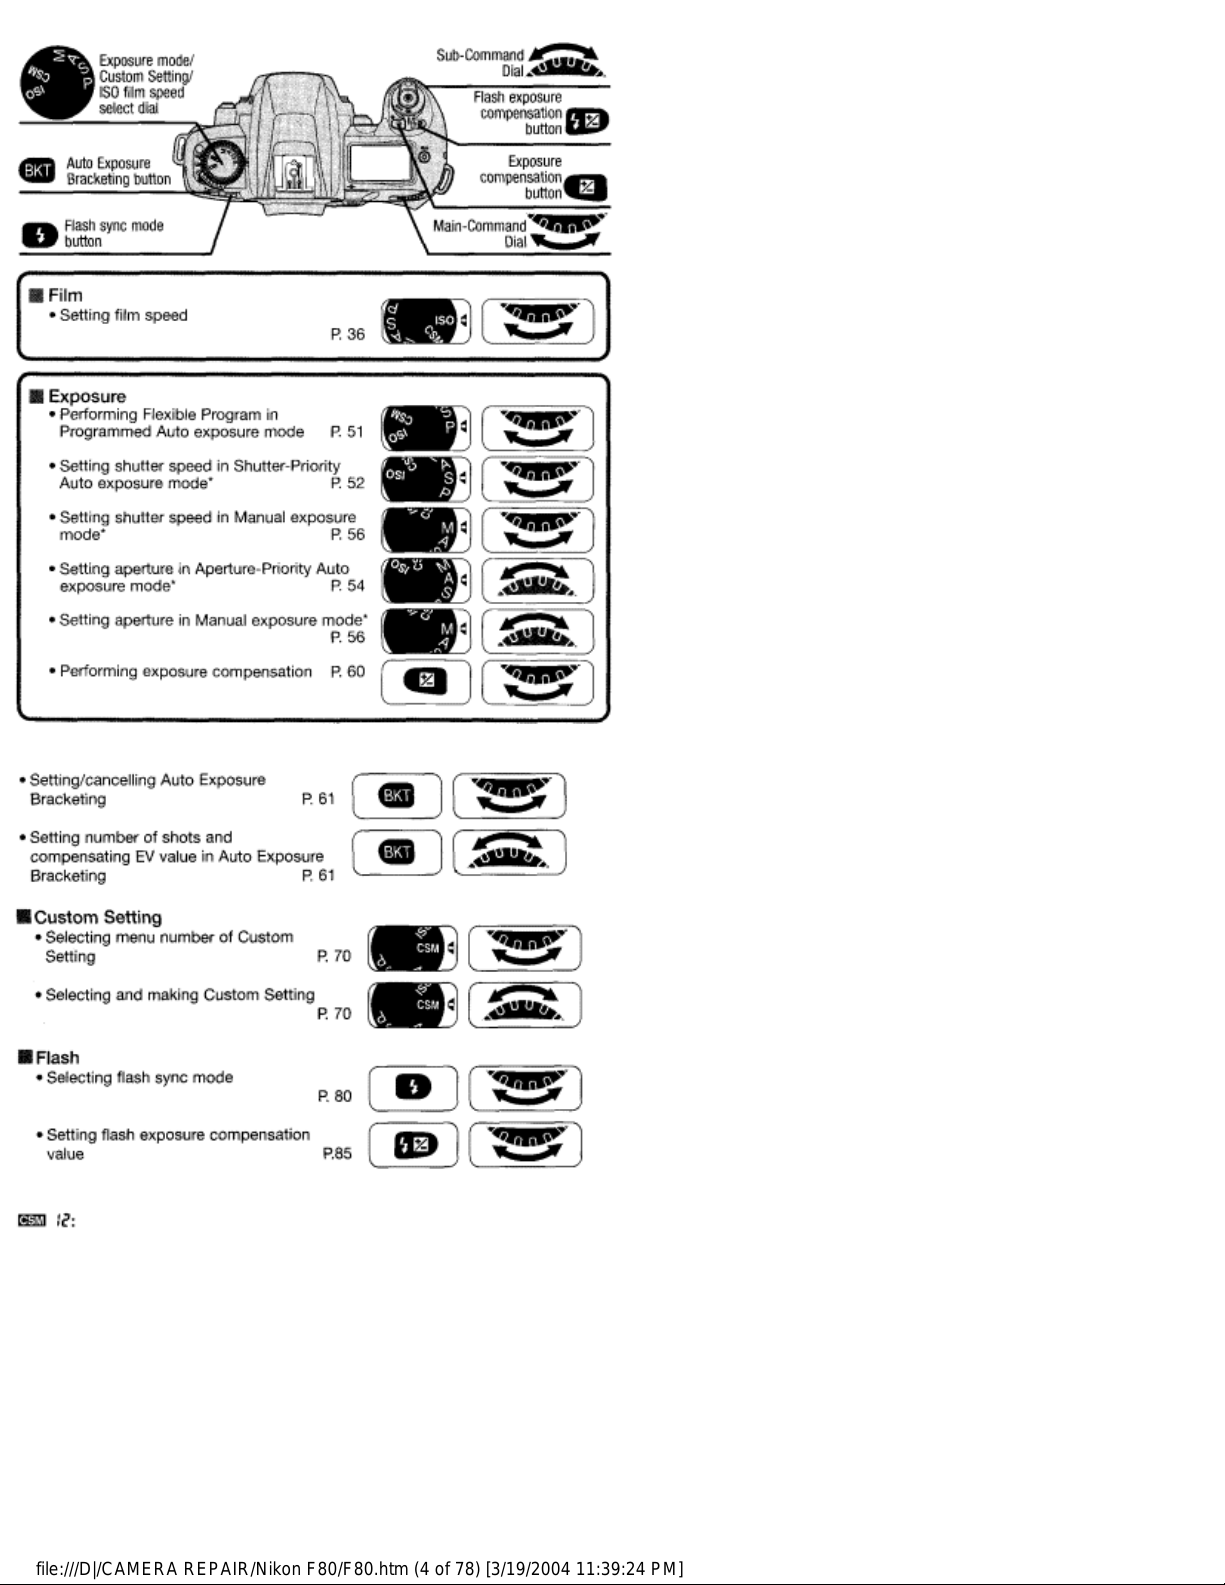
Shutter speed can be set to change with the Sub-Command Dial (in
Shutter-Priority Auto or Manual exposure mode) and aperture with the
Main-Command Dial (in Aperture-Priority Auto or Manual exposure
mode) (page 74).
Introduction
•Thank you for purchasing the Nikon F80/F80D/F80S—a camera that is
sure to make photography a bigger part of your life.
Nikon
Distributed by WWW.LENSINC.NET
file:///D|/CAMERA REPAIR/Nikon F80/F80.htm (4 of 78) [3/19/2004 11:39:24 PM]
Page 5
Get to know your F80/F80D/F80S camera, and be sure to read this
manual thoroughly before using it. We recommend that you keep this
manual handy.
Main features of the F80/F80D/F80S:
• SLR camera with built-in Speedlight makes taking pictures easy
and enjoyable, even for the most inexperienced beginner.
• The Dynamic AF, which utilises five-area autofocusing, enables
sharp focus on irregularly moving subjects (page 39).
• The Vari-Brite Focus Area display system clearly displays focus
brackets at selected focus area in the viewfinder (page 4).
• Nikon's exclusive 10-segment 3D Matrix Metering provides correct
exposure in various shooting situations (page 48).
• Custom Setting enables you to choose customised combinations
of various functions/modes (page 70).
Take trial shots_______________________________
Take trial shots before shooting at important occasions like weddings
or graduations.
Have Nikon spot-check your camera regularly________________
Nikon recommends that you have your camera serviced by an
authorised dealer or service centre at least once every two years.
Using your camera correctly
The Nikon F80/F80D/F80S's performance has been optimised for use
with Nikon brand accessories. Accessories made by other
manufacturers may not meet Nikon's criteria for specifications, and
nonconforming accessories could damage the F80/F80D/F80S's
components. Nikon cannot guarantee the F80/F80D/F80S's
performance when it is used with other than Nikon brand accessories.
Contents
The "Basic Operation" section introduces battery, lens, film, focusing,
metering, exposure and shooting in basic steps easy enough even for SLR
camera beginners to take pictures.
"Detailed Operation" explains each function, from lens to exposure functions,
in detail, in approximately the same order as the steps in the "Basic Operation"
section. After becoming familiar with basic shooting, refer to the detailed
explanation of each operation/function and start using advanced shooting
techniques.
"Flash Photography" introduces flash photography using the F80/F80D/F80S's
built-in Speedlight or an optional Speedlight in darkness and flash-shooting
situations in bright conditions
Nikon
Distributed by WWW.LENSINC.NET
file:///D|/CAMERA REPAIR/Nikon F80/F80.htm (5 of 78) [3/19/2004 11:39:24 PM]
Page 6

R RATION.......................,.........,.........,..,.............................,„2-13
Nomenclature...................................................................................................2-3
LCD Panel/Viewfinder Display..........................................................................4-5
Command Dials................................................................................................6-7
Introduction ......................................................................................................8-9
About This Manual .......................................................................................12-13
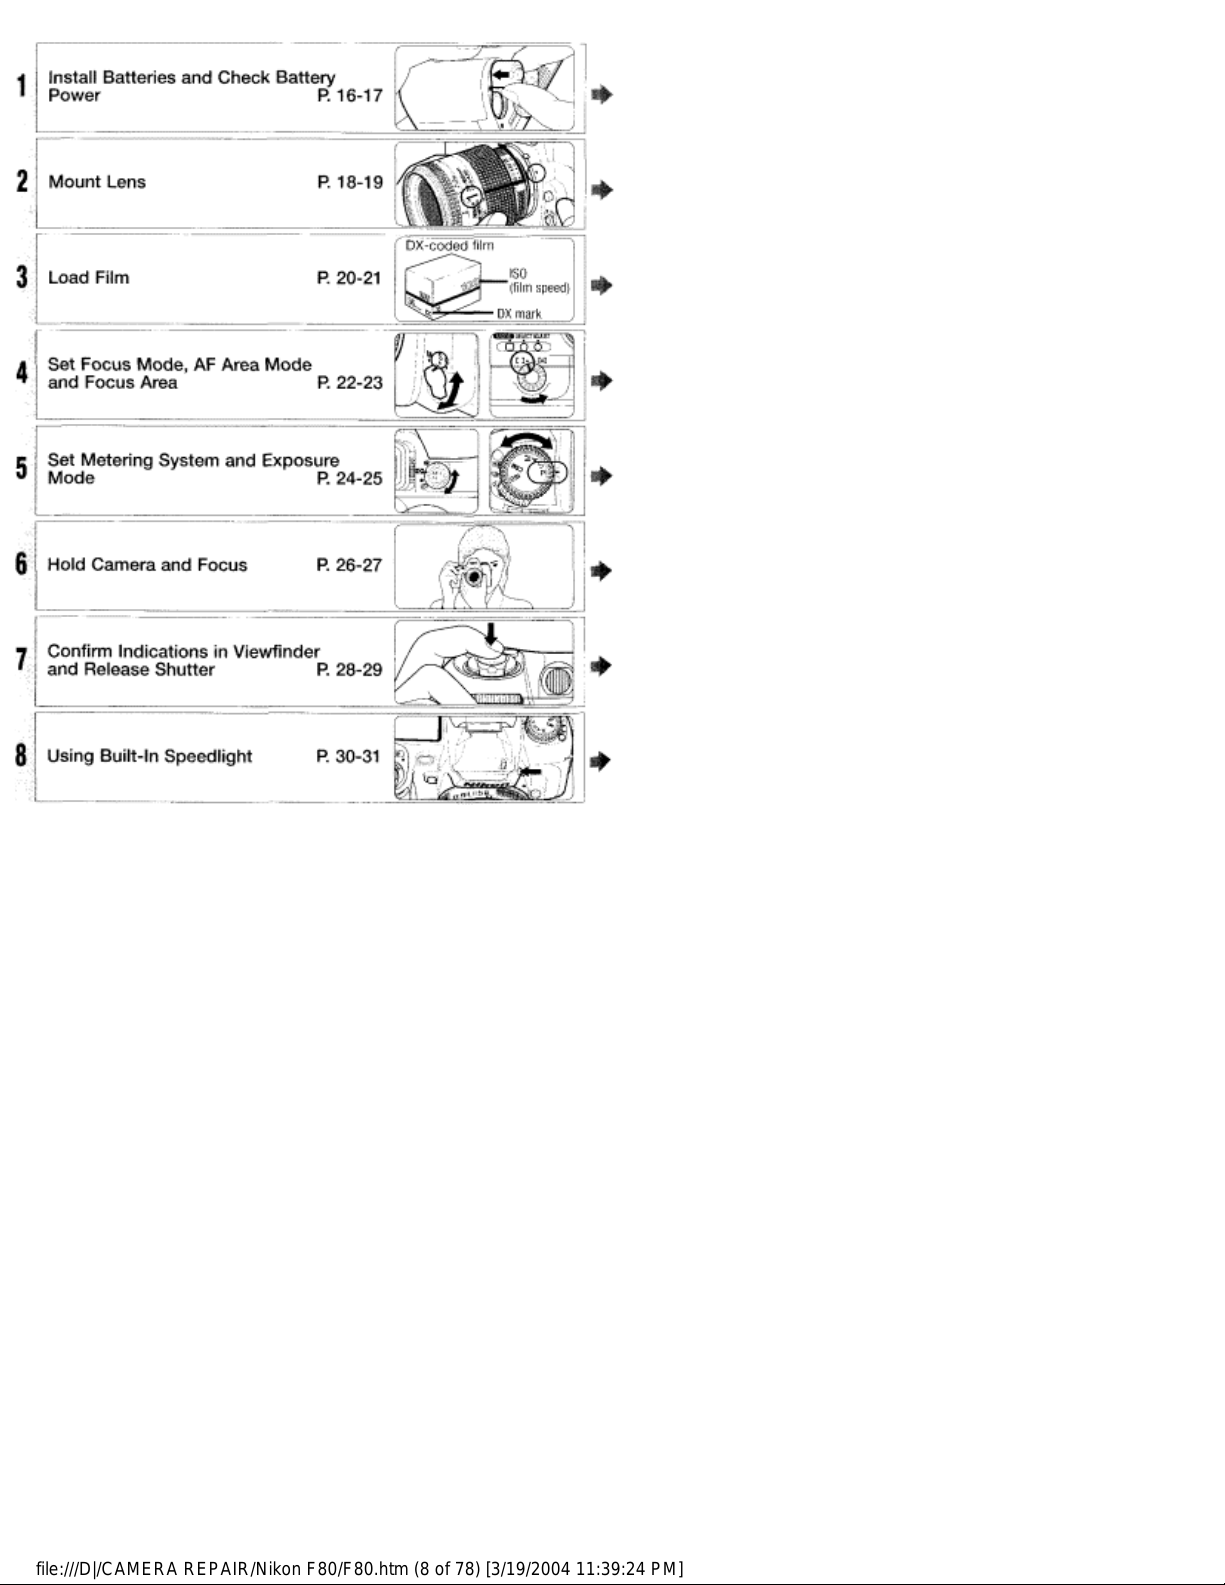
BASIC OPERATION......................................................................15-31
1. Install Batteries and Check Battery Power..............................................16-17
2. Mount Lens...............................................................................................18-19
3.Load Film..................................................................................................20-21
4. Set Focus Mode, AF Area Mode and Focus Area ...................................22-23
5. Set Metering System and Exposure Mode..............................................24-25
6. Hold Camera and Focus ..........................................................................26-27
7. Confirm Indications in Viewfinder and Release Shutter...........................28-29
8. Using Built-in Speedlight..........................................................................30-31
About Metering System and Exposure..............................................................32
DETAILED OPERATION...............................................................33-68
Lens Compatibility........................................................................................34-35
Film (film speed, mid-roll rewind, film advance mode, etc.)........................36-37
Autofocus (Single Servo AF, Continuous Servo AF)..........................................38
AF Area Mode ..............................................................................................39-41
Focus Area.........................................................................................................42
AF-Assist Illuminator..........................................................................................43
Focus Lock (Single Servo AF, Continuous Servo AF) ..................................44-45
Situations Where Autofocus May Not Work As Expected ................................46
Manual Focus ....................................................................................................47
Exposure Metering System (Matrix, Centre-Weighted, Spot)......................48-49
Shooting in Each Exposure Mode................................................................50-57
Programmed Auto Exposure Mode (Flexible Program, Program Chart)..50-51
Shutter-Priority Auto Exposure Mode .....................................................52-53
Aperture-Priority Auto Exposure Mode ...................................................54-55
Manual Exposure Mode ..........................................................................56-57
Auto Exposure Lock.....................................................................................58-59
Exposure Compensation ...................................................................................60
Auto Exposure Bracketing ...........................................................................61-62
Multiple Exposure.........................................................................................63-64
Long Time Exposure..........................................................................................65
Dioptre Adjustment/LCD Illuminator..................................................................66
Nikon
Distributed by WWW.LENSINC.NET
file:///D|/CAMERA REPAIR/Nikon F80/F80.htm (6 of 78) [3/19/2004 11:39:24 PM]
Page 7

Depth-of-Field Preview/Film Plane Indicator.....................................................67
Self-Timer Operation .........................................................................................68
CUSTOM SETTING.......................................................................69-76
Menu/Features of Custom Setting...............................................................70-75
Two-Button Reset..............................................................................................76
FLASH PHOTOGRAPHY............................................................. 77-87
About Flash Photography..................................................................................78
Accessory Shoe/Ready-Light............................................................................79
Flash Sync Mode Features ..........................................................................80-81
Using the Built-in Speedlight .......................................................................82-83
Usable Lenses with Built-in Speedlight.............................................................84
Flash Exposure Compensation..........................................................................85
Usable Optional Speedlights........................................................................86-87
About Depth of Field and Focus Tracking.........................................................88
DATABACK...................................................................................89-94
Adjusting Date and Time and Imprinting Data.............................................90-93
Imprinting Shooting Data (F80S only)................................................................94
MISCELLANEOUS ......................................................................95-113
Optional Accessories ...................................................................................96-97
Camera Care................................................................................................98-99
Notes on Batteries...........................................................................................100
Troubleshooting........................................................................................101-103
Specifications...........................................................................................104-109
Index.........................................................................................................110-111
Custom Setting Menu ..............................................................................112-113
About This Manual
BASIC OPERATION P. 15-31
Nikon
Distributed by WWW.LENSINC.NET
file:///D|/CAMERA REPAIR/Nikon F80/F80.htm (7 of 78) [3/19/2004 11:39:24 PM]
Page 8
Detailed Operation and Notes on Batteries P. 33-94,100
Notes on Batteries.... ..... . .............................. . ..... ............... ..P. 100
Lens Compatibility ........ ........... .................................. .......... . .................P. 34-35
Film...............................................................................................................P. 36-37
Autofocus (P. 38), AF Area Mode (P. 39-41), Focus Area (P. 42),
AF-Assist Illuminator (P.43), Focus Lock (P. 44-45),
Situations Where Autofocus May Not Work As Expected (P. 46),
Manual Focus (P. 47)
Exposure Metering System (P. 48-49), Shooting in Each Exposure Mode (P. 50-57),
Auto Exposure Lock (P. 58-59), Exposure Compensation (P. 60),
Auto Exposure Bracketing (P. 61 -62), Multiple Exposure (P. 63-64),
Long Time Exposure (P. 65)
Dioptre Adjustment/LCD Illuminator................................................................P. 66
Depth-of- Field Preview/Film Plane Indicator..................................................P. 67
Self-Timer Operation ............................................................................... .P. 66
Custom Setting............................................................................................. .69-75
Two-Button Reset............................................................................................P. 76
Data Back..................................................................................................P. 89-94
Flash Photography (About Flash Photography/Accessory Shoe/
Ready-Light/Flash Sync Mode Features/Using the Built-In Speedlight/
Nikon
Distributed by WWW.LENSINC.NET
file:///D|/CAMERA REPAIR/Nikon F80/F80.htm (8 of 78) [3/19/2004 11:39:24 PM]
Page 9
Usable Lenses with Built-In Speedlight/Flash Exposure Compensation/
Usable Optional Speedlights)....................................................................P. 77-87
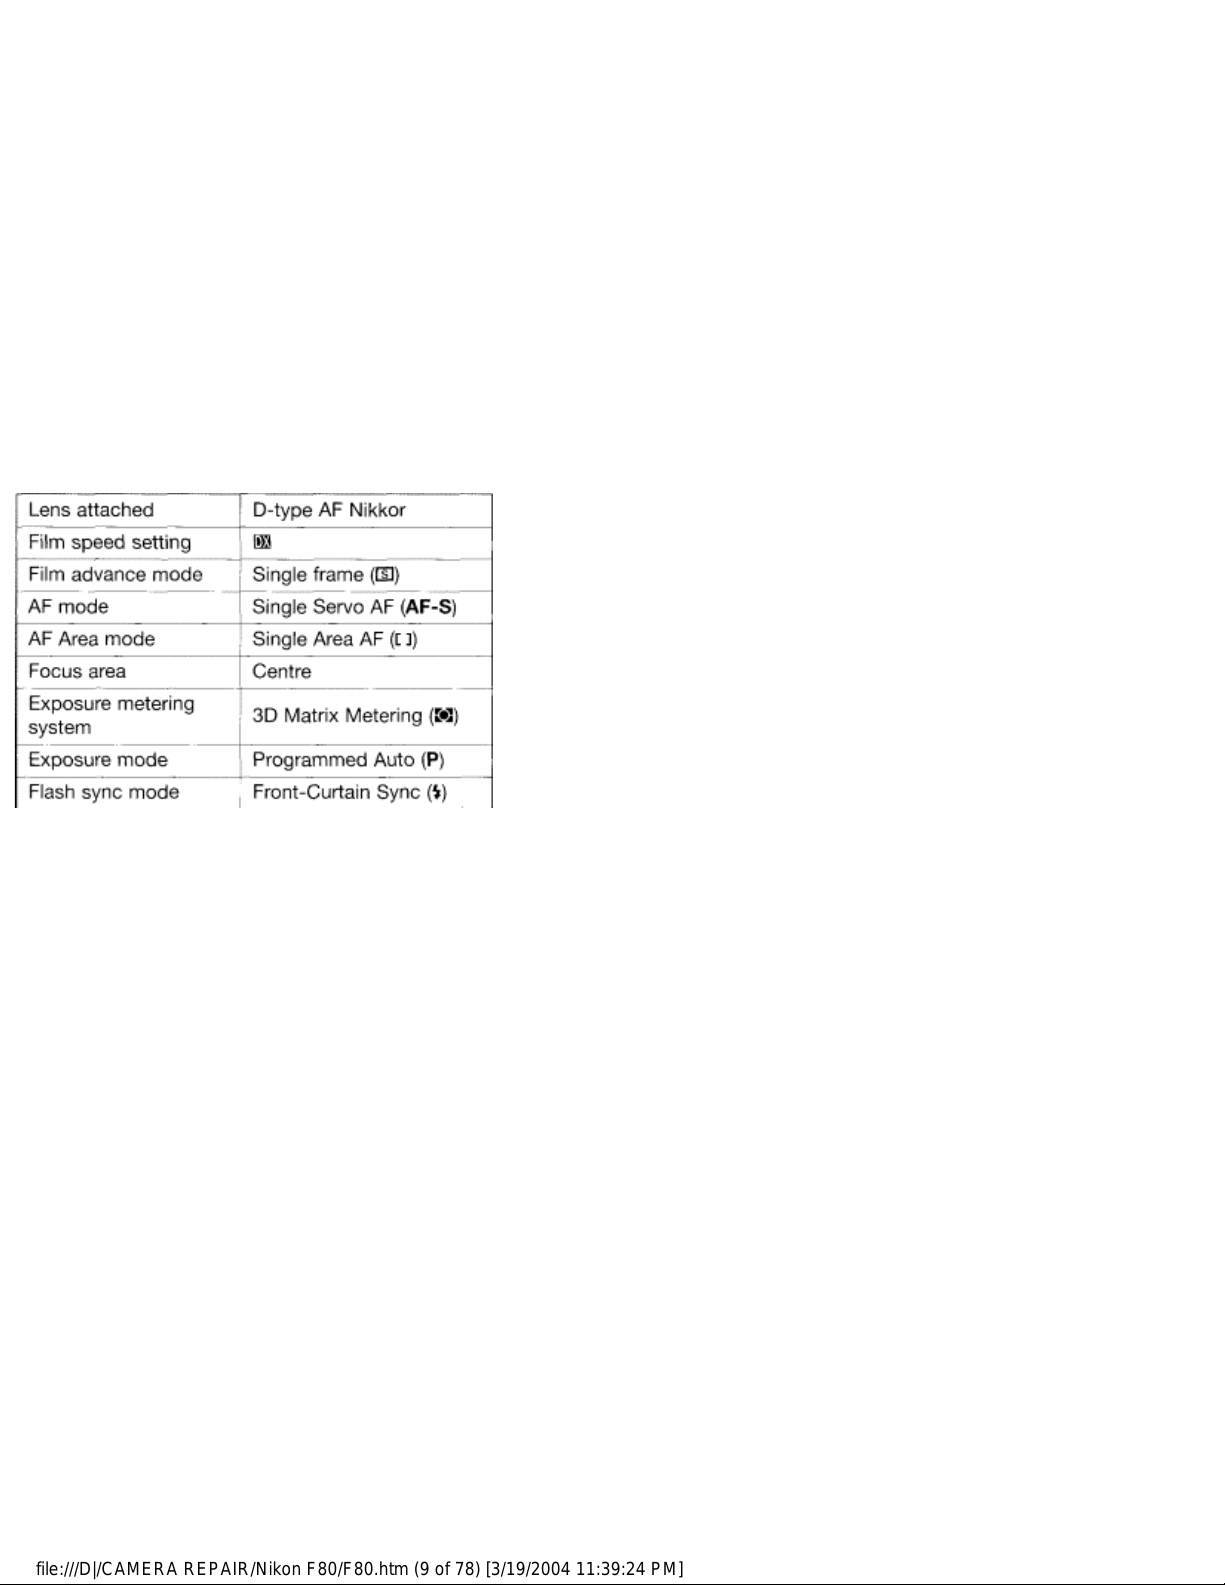
BASIC OPERATION
This section features the settings for most
common picture-taking situations when
using Programmed Auto exposure mode.
The shooting modes explained in this
section cover most of your shooting
situations.
Shooting modes/functions explained in this section
are as follows:
Install Batteries and Check Battery Power
Nikon
Distributed by WWW.LENSINC.NET
file:///D|/CAMERA REPAIR/Nikon F80/F80.htm (9 of 78) [3/19/2004 11:39:24 PM]
Page 10
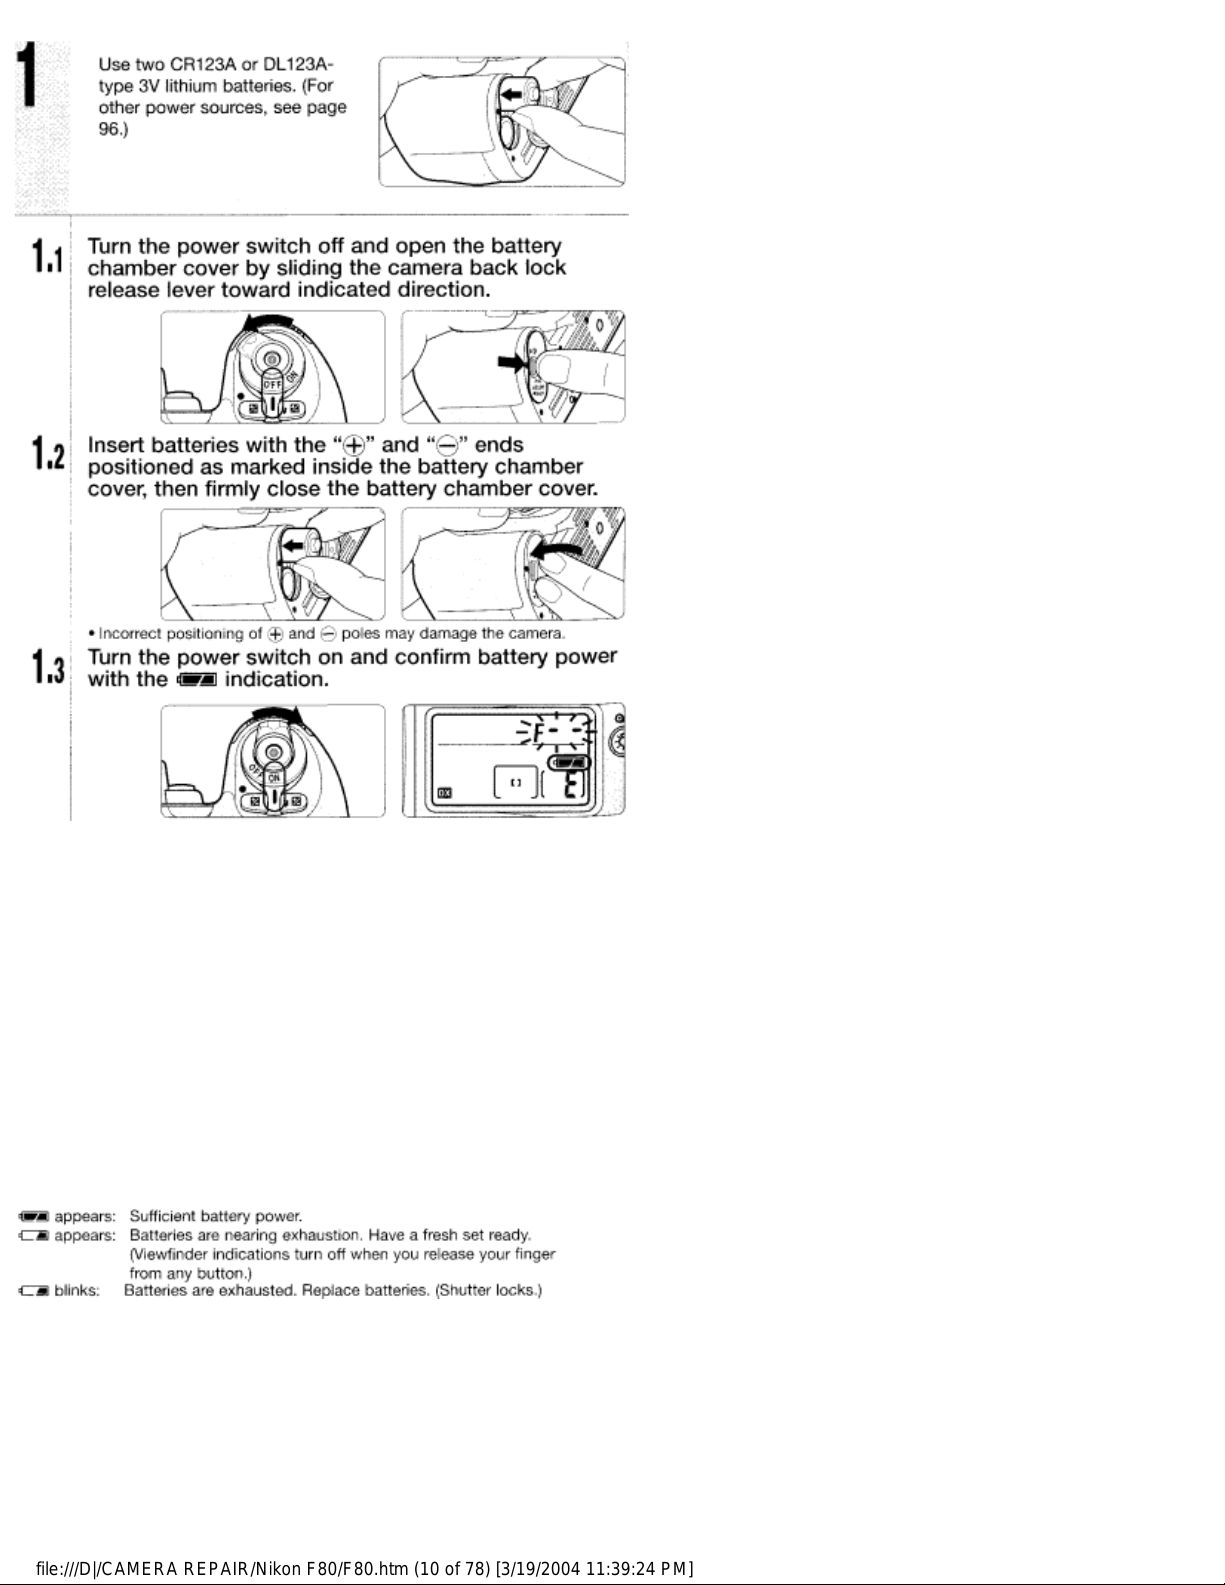
Check points
Keep the batteries out of children's reach. If swallowed, contact a
doctor immediately. (For "Notes on Batteries", see page 100.)
When replacing batteries, be sure to turn the power switch off and
replace both batteries at the same time. Always use fresh batteries of
the same brand.
We recommend that you take spare batteries with you, especially when
travelling.
For the number of film rolls that can be shot with fresh batteries, see
page 108.
• Shutter speed and aperture indications in the LCD panel automatically
turn off 6 sec. after the power switch is turned on and the camera
remains unused. (All indications in the viewfinder turn off.)
• For F80D/F80S only: Batteries in the camera body also power the Quartz
Date. After installing batteries for the first time, set the date and time
(page 90).
1.4 Lightly press the shutter release button to activate
Nikon
Distributed by WWW.LENSINC.NET
file:///D|/CAMERA REPAIR/Nikon F80/F80.htm (10 of 78) [3/19/2004 11:39:24 PM]
Page 11
the exposure meter.
• Lightly pressing the shutter release button reactivates the exposure meter
and indications in the LCD panel and viewfinder for approx. 6 sec.
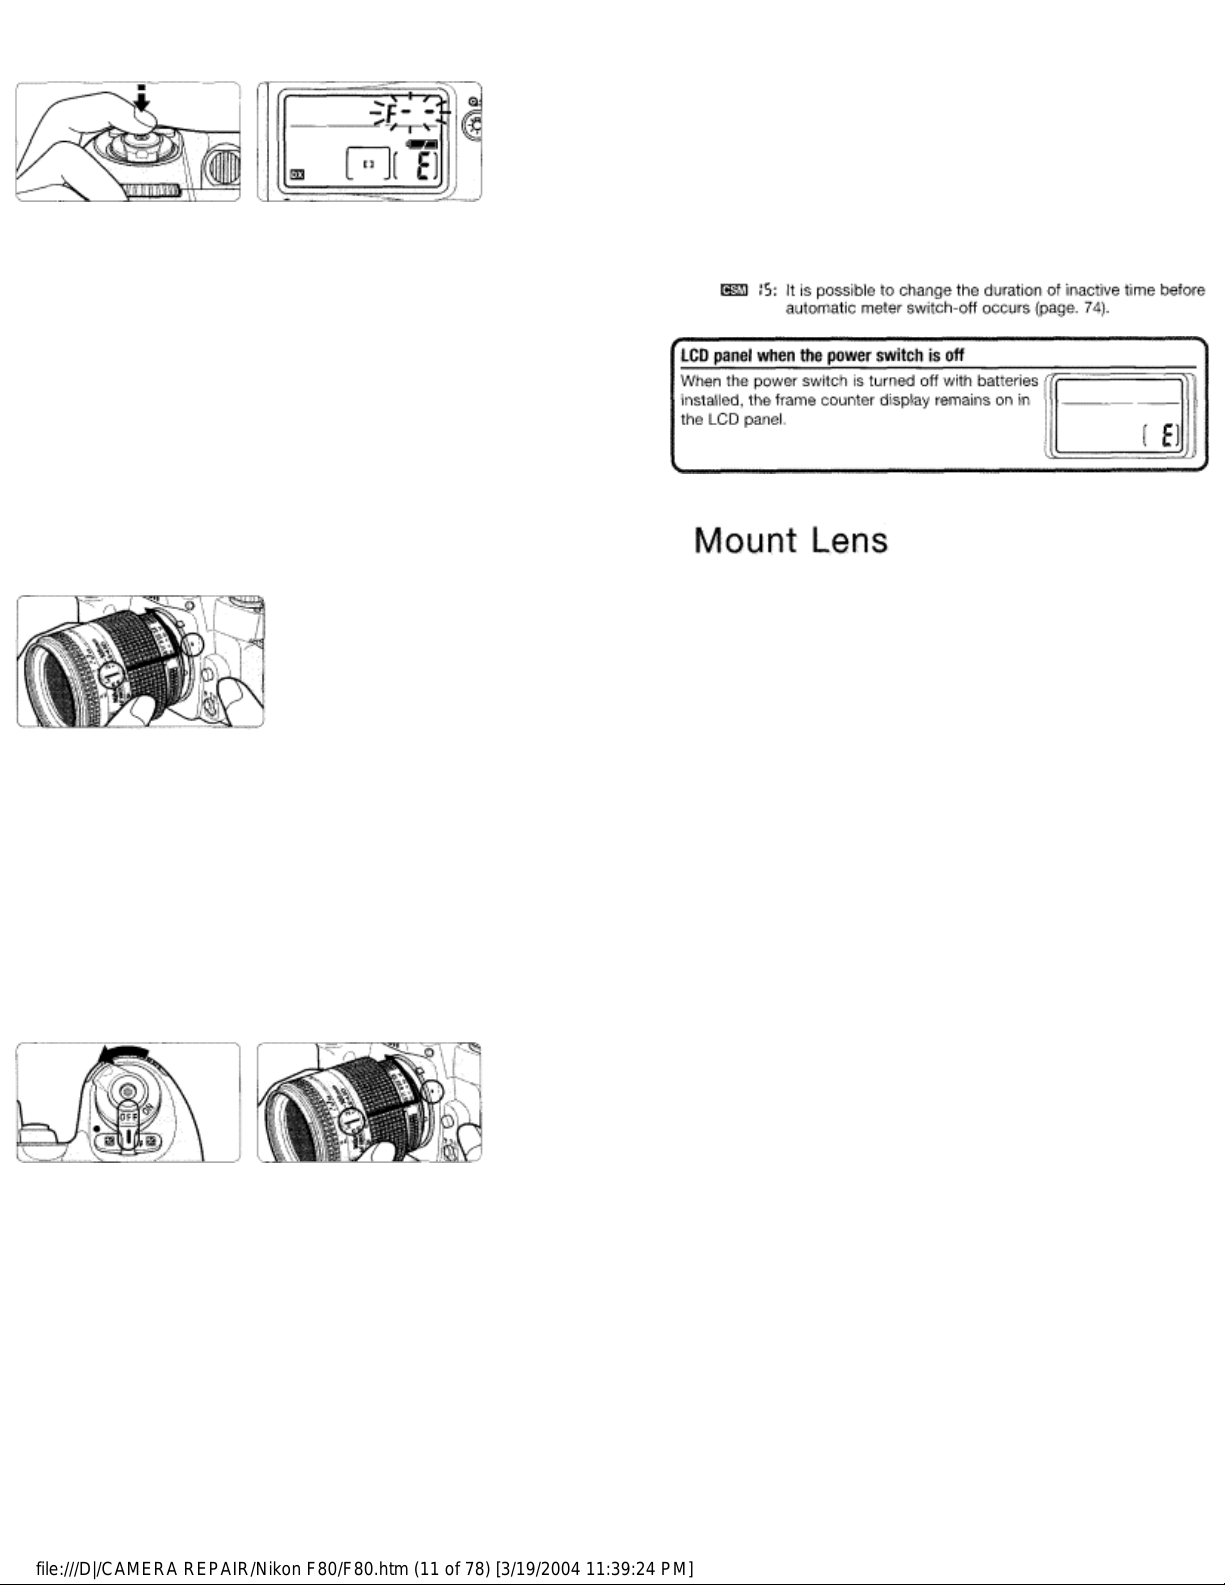
2 Turn the power switch off,
mount the lens to the camera
body and set the lens aperture
to its minimum setting (largest
f-number).
2
.1 Turn the power switch off and mount the lens to the
camera body.
• Position lens in the camera's bayonet mount so that the mounting
indexes on lens and camera body are aligned, then twist lens
counterclockwise until it locks into place. (Be sure not to touch the lens
release button.)
• When the lens is not attached or when a non-CPU Nikkor lens is attached
and the power switch is turned on, f- - blinks in the LCD panel and
viewfinder, and the shutter cannot be released. See page 34 for a nonCPU lens.
2.2 Set the lens aperture to its minimum and lock.
Nikon
Distributed by WWW.LENSINC.NET
file:///D|/CAMERA REPAIR/Nikon F80/F80.htm (11 of 78) [3/19/2004 11:39:24 PM]
Page 12
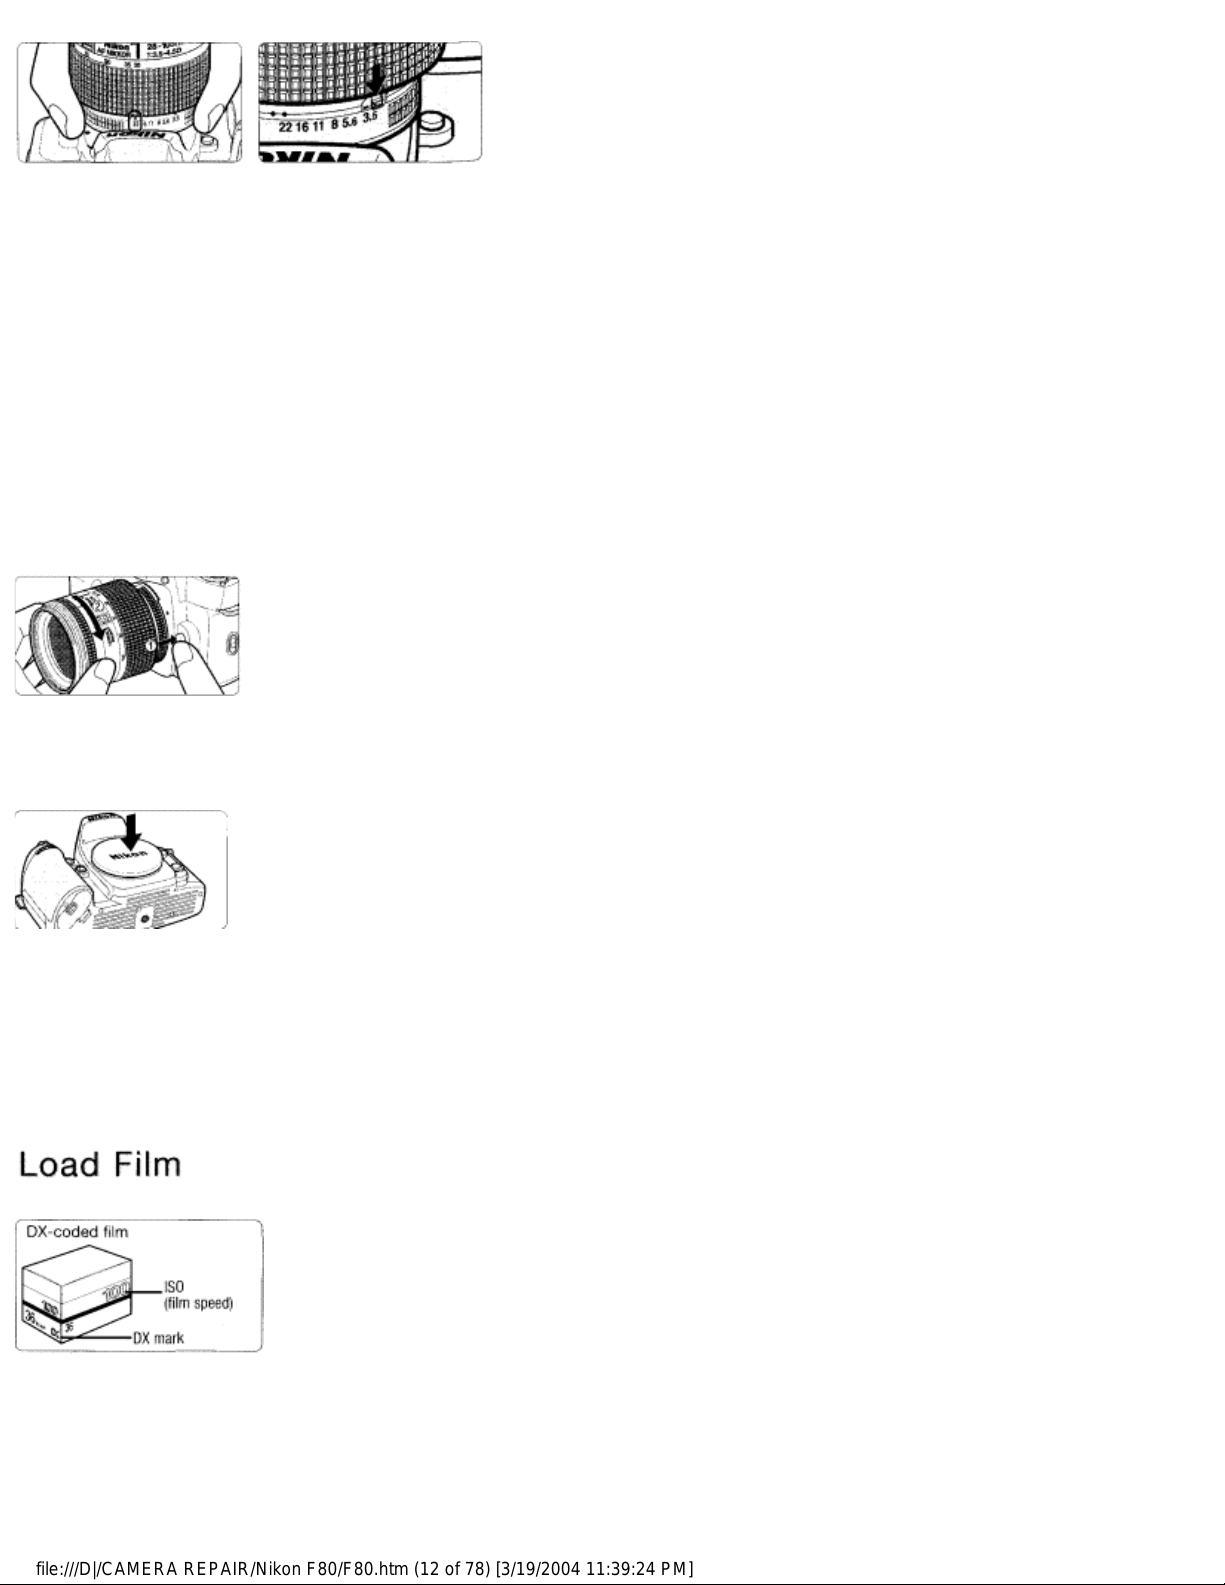
• When the lens is not set to its minimum aperture setting (largest fnumber) and the power switch is turned on, FEE blinks in the LCD panel
and viewfinder and the shutter cannot be released.
Checkpoints
Use a D-type AF Nikkor lens to utilise all of this camera's functions.
(See page 34 for Lens Compatibility.)
Make sure to turn the power switch off when attaching/detaching the
lens.
When attaching the lens, take care not to press the lens release button.
Avoid direct sunlight when attaching/detaching the lens.
2.3 Detaching the lens.
• Push and hold the lens release button, then turn the lens clockwise.
When camera is left unattended without lens
When you leave the camera unattended
without a lens attached, be sure to attach
the supplied body cap (page 3), or
optional body cap BF-1A. (BF-1 body cap
cannot be used.)
3 Turn the power switch on and
load DX-coded film. With DXcoded film, film speed will be set
automatically (ISO 25-5000).
Nikon
Distributed by WWW.LENSINC.NET
file:///D|/CAMERA REPAIR/Nikon F80/F80.htm (12 of 78) [3/19/2004 11:39:24 PM]
Page 13
When the camera is turned on,
film is loaded and the camera
back is closed, the film
automatically advances to the
first frame.
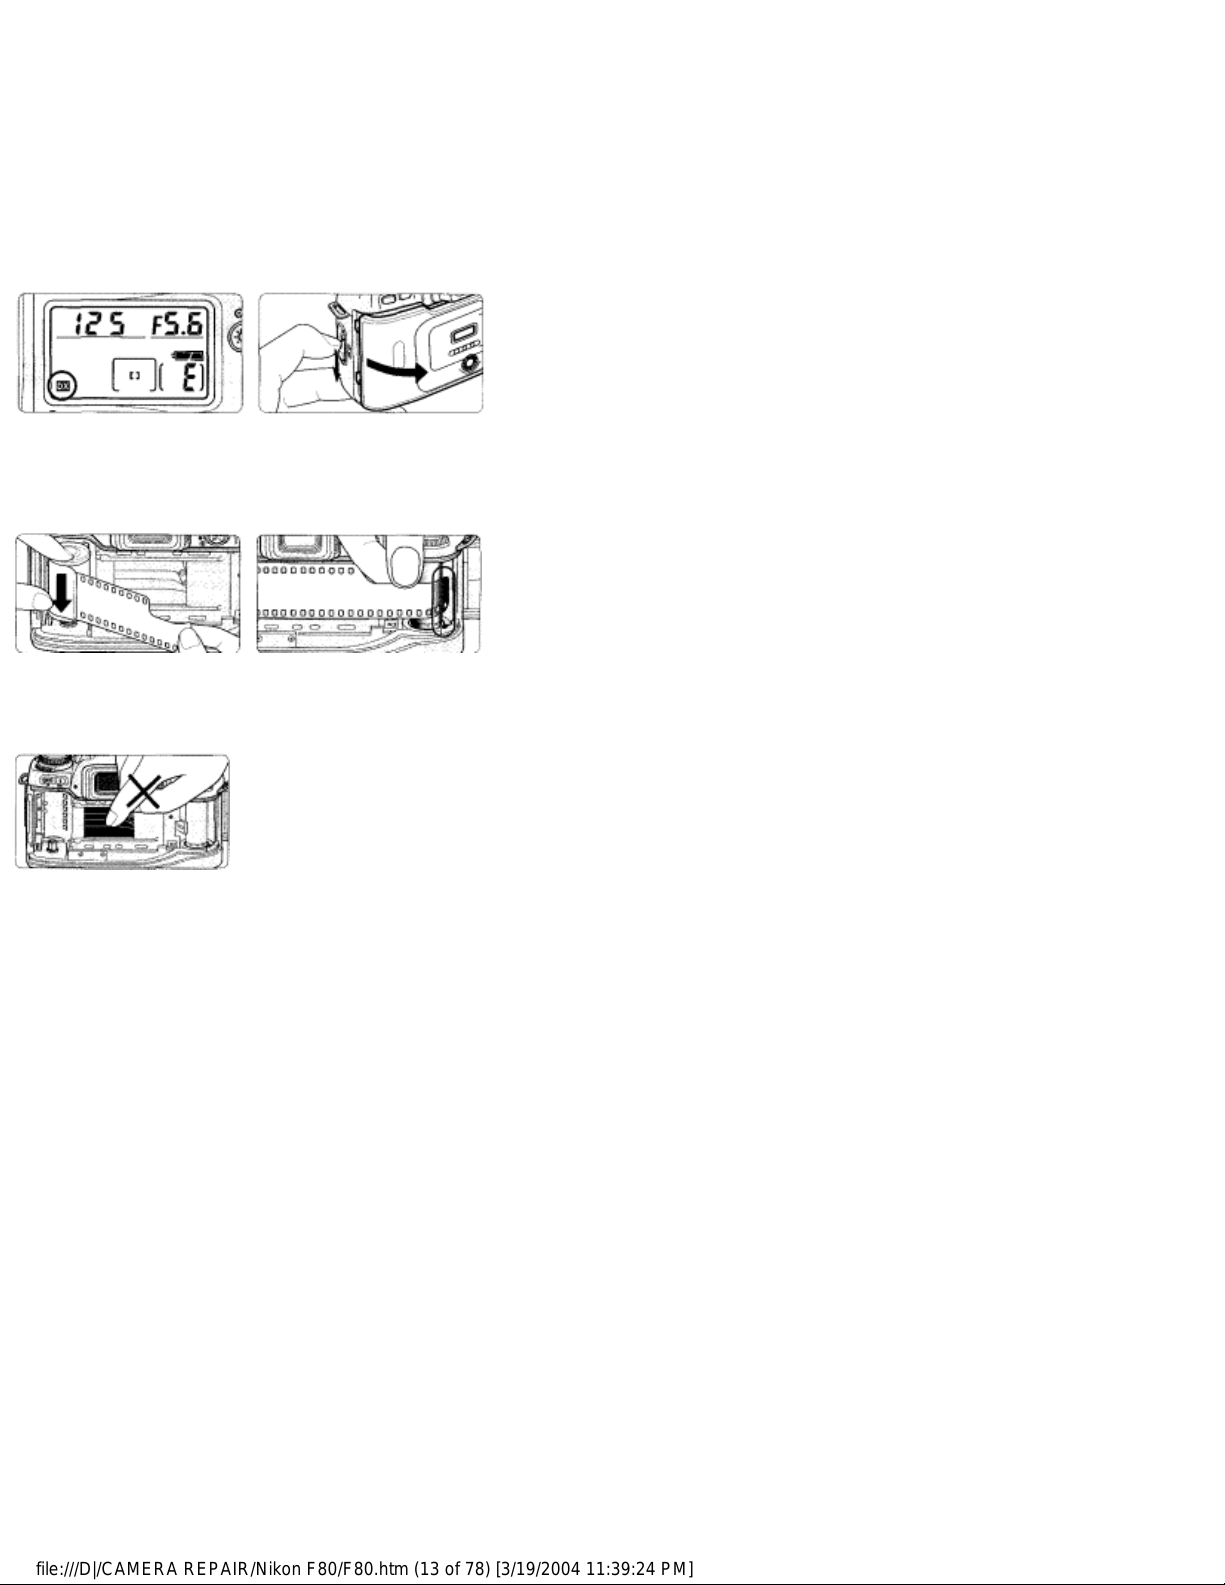
3.1 Turn the power switch on, confirm that the film
speed setting is set to DX, then open the camera
back by sliding the camera back lock release lever.
• If the film speed setting is not set to DX, see page 36.
3.2 Insert film from the bottom side and pull film leader
out to red index mark.
• Do not insert the film leader beyond the red index mark.
NOTE: Loading/removing film
Shutter curtains are very thin. Do not
touch the shutter curtains with your finger
or the film leader.
Check points
To change film speed with DX-coded film or select film advance mode,
see pages 36-37.
Shutter curtains are very thin. Do not touch the shutter curtains with
your finger or the film leader.
Avoid direct sunlight when changing film outdoors.
3.3 Hold the film cartridge and ensure film is properly
positioned with no slack, then gently close the
camera back until the camera back snaps closed.
Film automatically advances to the first frame.
Nikon
Distributed by WWW.LENSINC.NET
file:///D|/CAMERA REPAIR/Nikon F80/F80.htm (13 of 78) [3/19/2004 11:39:24 PM]
Page 14
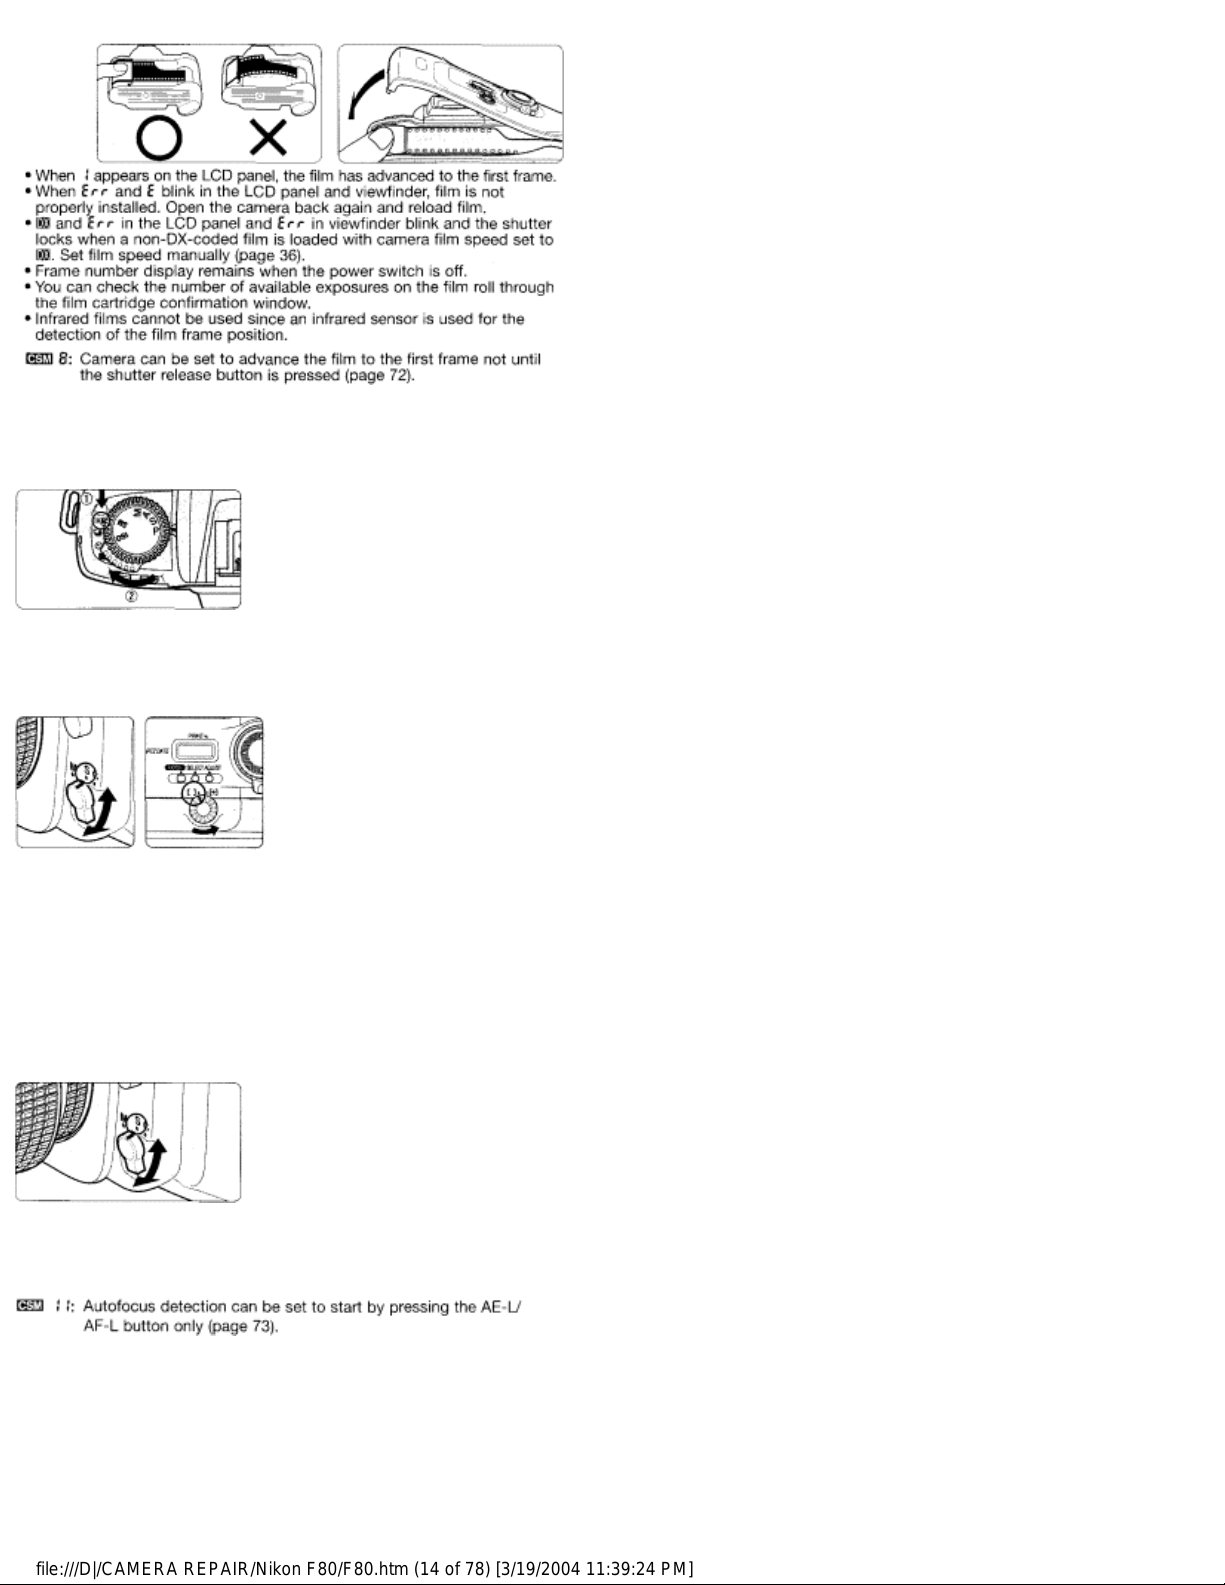
3.5 Set the film advance mode selector to S (singleframe shooting) while pressing the film advance
mode selector lock release.
Set Focus Mode, AF Area Mode and Focus Area
4 Set the focus mode to S (Single
Servo AF), AF Area mode to [ ]
(Single Area AF) and focus area
to centre.
4.1 Set the focus mode selector to S (Single Servo AF).
• Make sure to turn the focus mode selector until it clicks into position.
• To focus, lightly press the shutter release button (page 27).
4.2 Set the AF Area mode selector to [ ] (Single Area AF).
Nikon
Distributed by WWW.LENSINC.NET
file:///D|/CAMERA REPAIR/Nikon F80/F80.htm (14 of 78) [3/19/2004 11:39:24 PM]
Page 15
• Set the AF Area mode selector firmly.
Check points
Do not attempt to rotate the lens focus ring manually while the focus
mode is set to S or C.
With the focus mode set at S (Single Servo AF), the shutter cannot be
released when the subject is out of focus.
See pages 38-42 for details regarding focus mode, AF Area mode and
focus area.
See page 46 for situations where autofocus may not work as expected.
4.3 Rotate the focus area selector lock lever and select
centre focus area with the focus area selector.
• Pressing the focus area selector up/down/right/left shifts the focus area
toward the desired direction. Press the focus area selector while the
exposure metre is on (page 42).
• Selected focus area is indicated in the LCD panel and viewfinder (page
42).
4.4 Rotate the focus area selector lock lever to lock
focus area.
• When the focus area is locked, pressing the focus area selector does not
change the focus area.
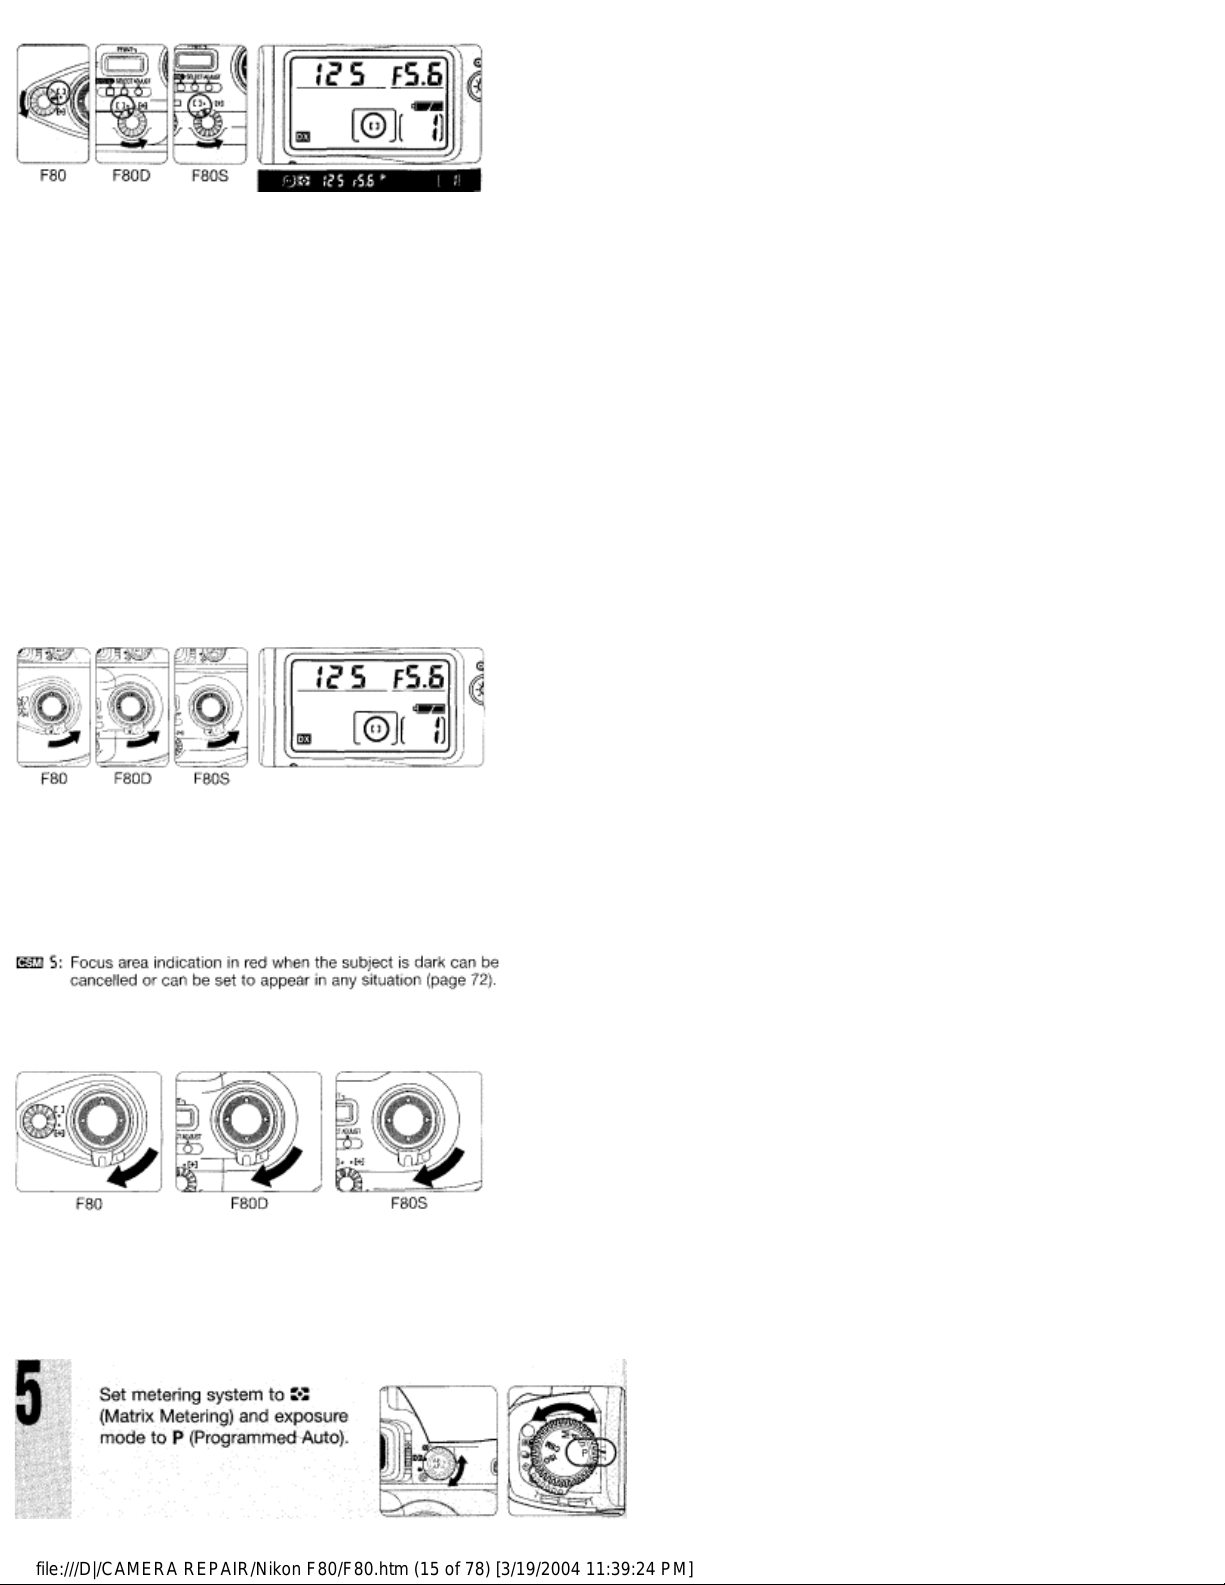
Set Metering System and Exposure Mode
Nikon
Distributed by WWW.LENSINC.NET
file:///D|/CAMERA REPAIR/Nikon F80/F80.htm (15 of 78) [3/19/2004 11:39:24 PM]
Page 16
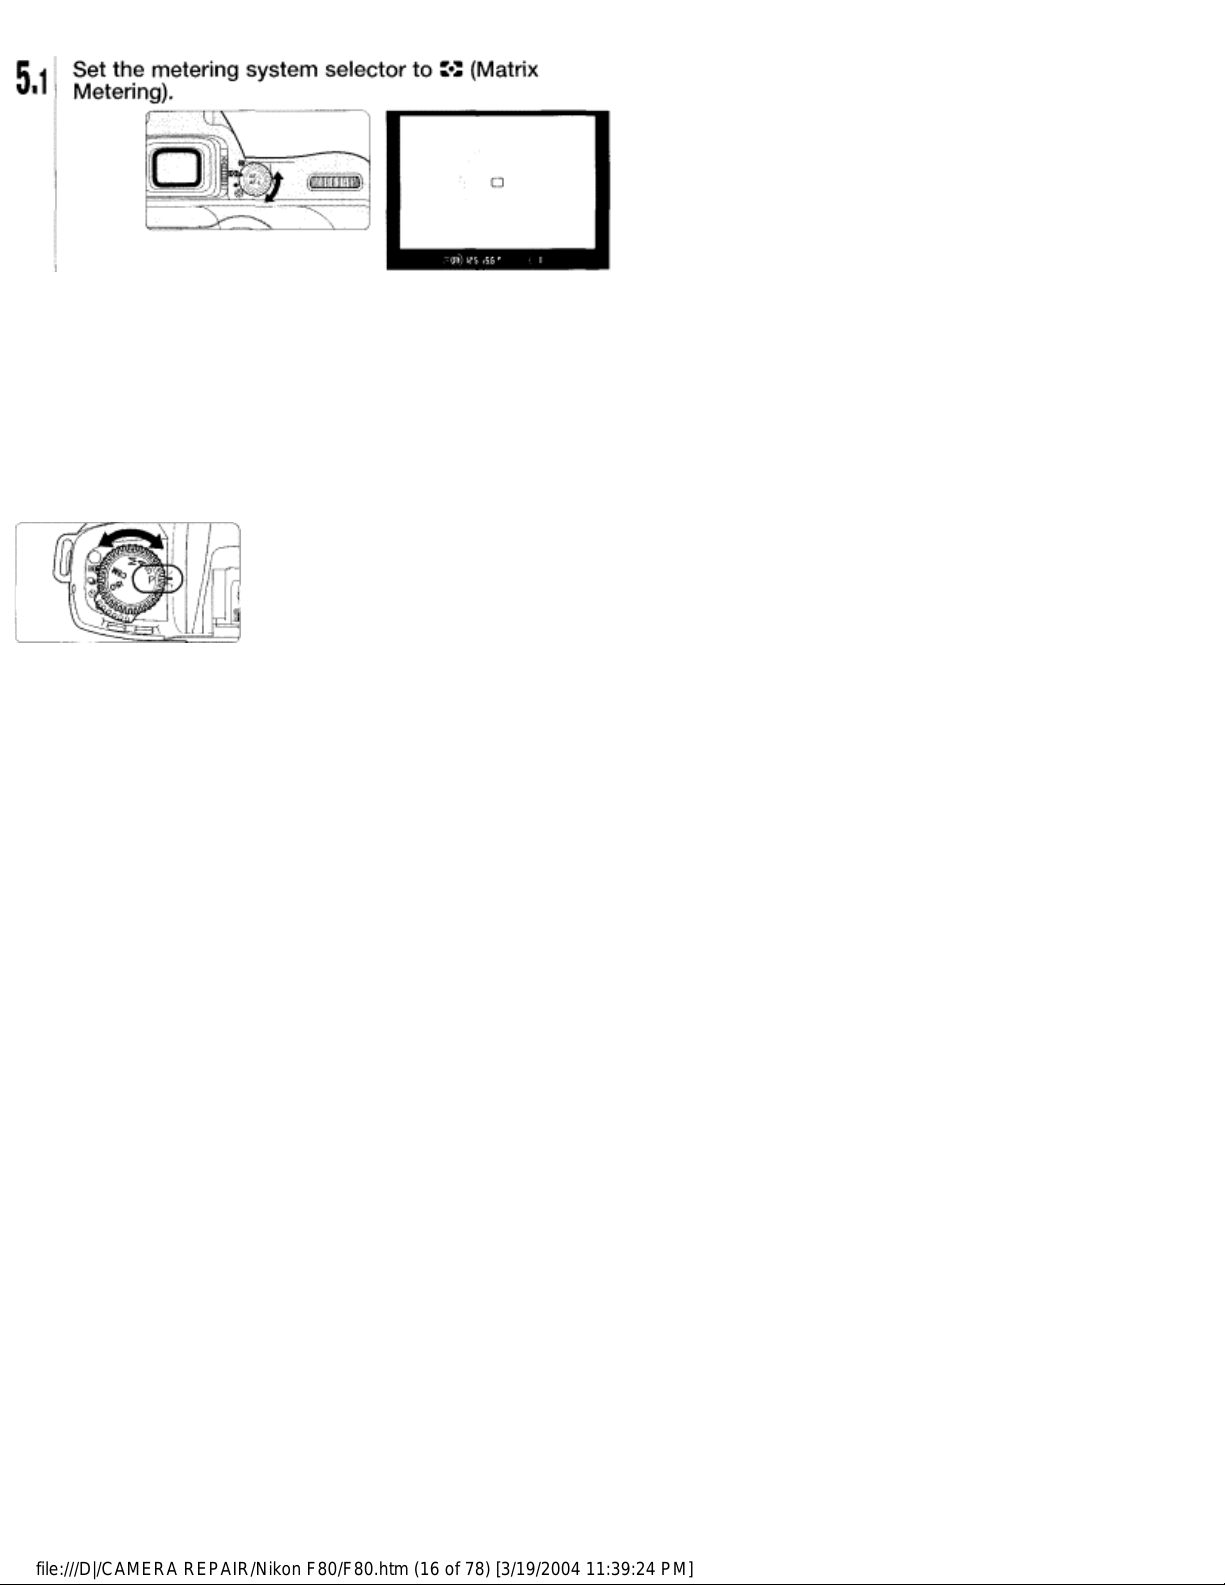
• Matrix Metering indication ED appears in the viewfinder.
• The frame is divided into 10 segments in Matrix Metering, and data from
each segment is used to determine correct exposure. Use of a D-type
Nikkor lens automatically activates 3D Matrix Metering (page 48), which
accounts for scene brightness and contrast, as well as subject distance
(Distance Information) in order to determine exposure accurately.
5.2 Set the exposure mode select dial to P (Programmed
Auto).
•When the shutter release button is lightly pressed, shutter speed and
aperture appear in the LCD panel and viewfinder.
Check points
Three metering systems—the F80/F80D/F80S features Matrix, CentreWeighted and Spot Metering (page 48).
Four exposure modes—the F80/F80D/F80S features Programmed
Auto, Shutter-Priority Auto, Aperture-Priority Auto and Manual
exposure modes. Each exposure mode provides a choice of exposure
controls for various shooting situations. See step 5.2 for a summary of
each exposure mode and its reference page for operating instructions
and details.
• Shooting characteristics of exposure modes
Symbol Exposure mode Shooting characteristics
P
Programmed
Auto P. 50
Camera controls shutter speed and
aperture automatically—allowing you to
freely take pictures, concentrating only on
the shutter release opportunity. In addition,
other settings, such as Flexible Program
(page 51) or exposure compensation (page
60) are possible.
S
Shutter-Priority
Auto P. 52
You set desired shutter speed, and the
camera selects the correct aperture.
"Freeze" the motion of a moving subject
using a fast shutter speed or "blur" the
subject using a slower speed.
Nikon
Distributed by WWW.LENSINC.NET
file:///D|/CAMERA REPAIR/Nikon F80/F80.htm (16 of 78) [3/19/2004 11:39:24 PM]
Page 17
A
Aperture-Priority
Auto P. 54
You set the desired aperture, and the
camera selects the correct shutter speed.
Lets you determine depth of the in-focus
area (page 88), so you can choose whether
near or far subjects are in sharp focus, or
whether foreground or background is to be
blurred.
M
Manual P. 56 Shutter speed and aperture are set
manually. Suitable for situations where it is
difficult to attain the desired effect using
other exposure modes. Also, use Manual
exposure mode when using a non-CPU
Nikkor lens. (Camera's exposure meter
cannot be used.)
Hold Camera and Focus
6 Lightly pressing the shutter
release button automatically
focuses the camera on the
subject and when the subject is
in focus, causes • to appear in
the viewfinder.
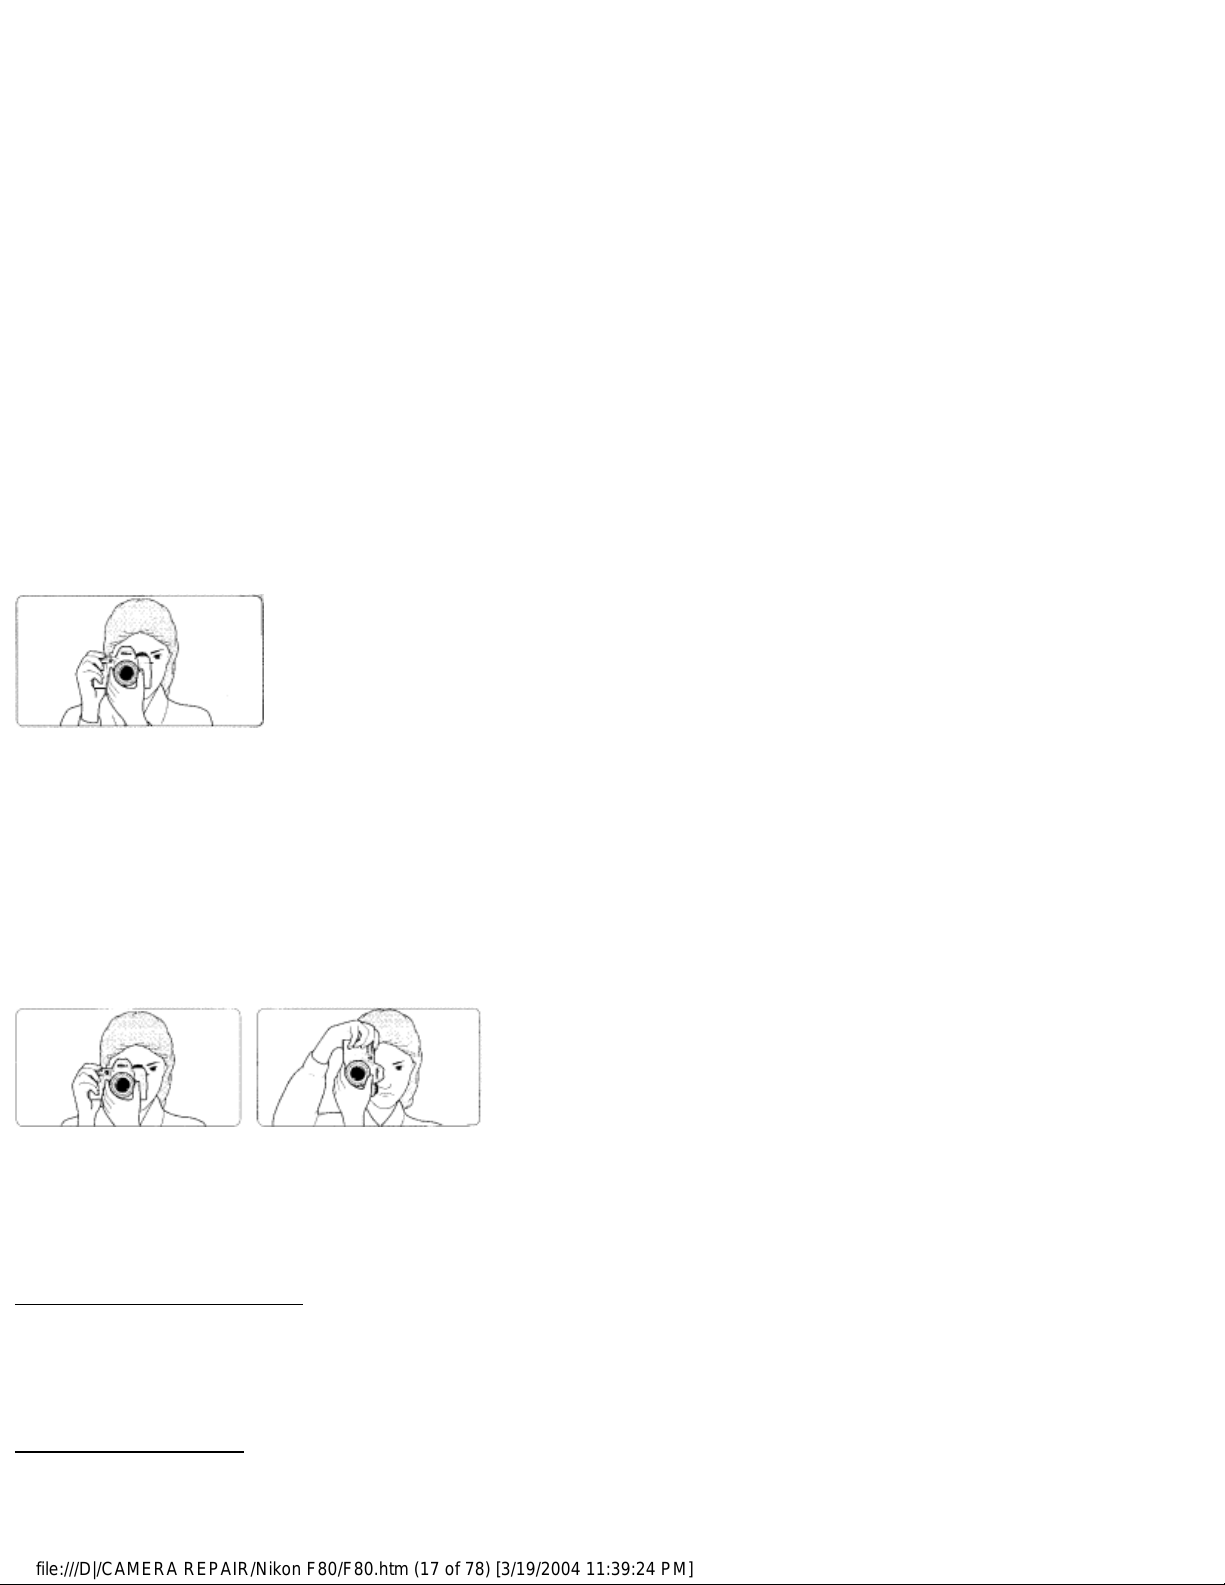
6.1 Hold the camera properly.
• Keep your elbow propped against your body for support.
• Stand with one foot forward a half step and keep your upper body still.
• Grasp the camera handgrip with your right hand and use your left hand to
cradle the camera (or lens).
Camera shake and shutter speed___________________
Preventing camera shake is crucial when taking photographs. In
general, you should set the shutter speed faster than 1/60 sec. Use of a
tripod or Speedlight (pages 30, 78) is recommended for shooting at
shutter speeds slower than 1/60 sec.
NOTE: Composing frame______________________
This camera's viewfinder frame shows approximately 92% of the image
actually exposed on the film frame. Therefore, the actual exposed frame
Nikon
Distributed by WWW.LENSINC.NET
file:///D|/CAMERA REPAIR/Nikon F80/F80.htm (17 of 78) [3/19/2004 11:39:24 PM]
Page 18
is somewhat larger than the image you see through the viewfinder. Note
that the edges of a negative film are partially cropped by most labs.
Check points
Dioptre adjustment (page 66) enables you to see more clearly through
the viewfinder.
To take a picture of a subject outside the focus area, shift the focus
area by using the focus area selector (page 42) or use focus lock (page
44).
F80D/F80S only: You can imprint date and/or time (page 90) or
shooting data (F80S only) on your photos/negatives (page 94).
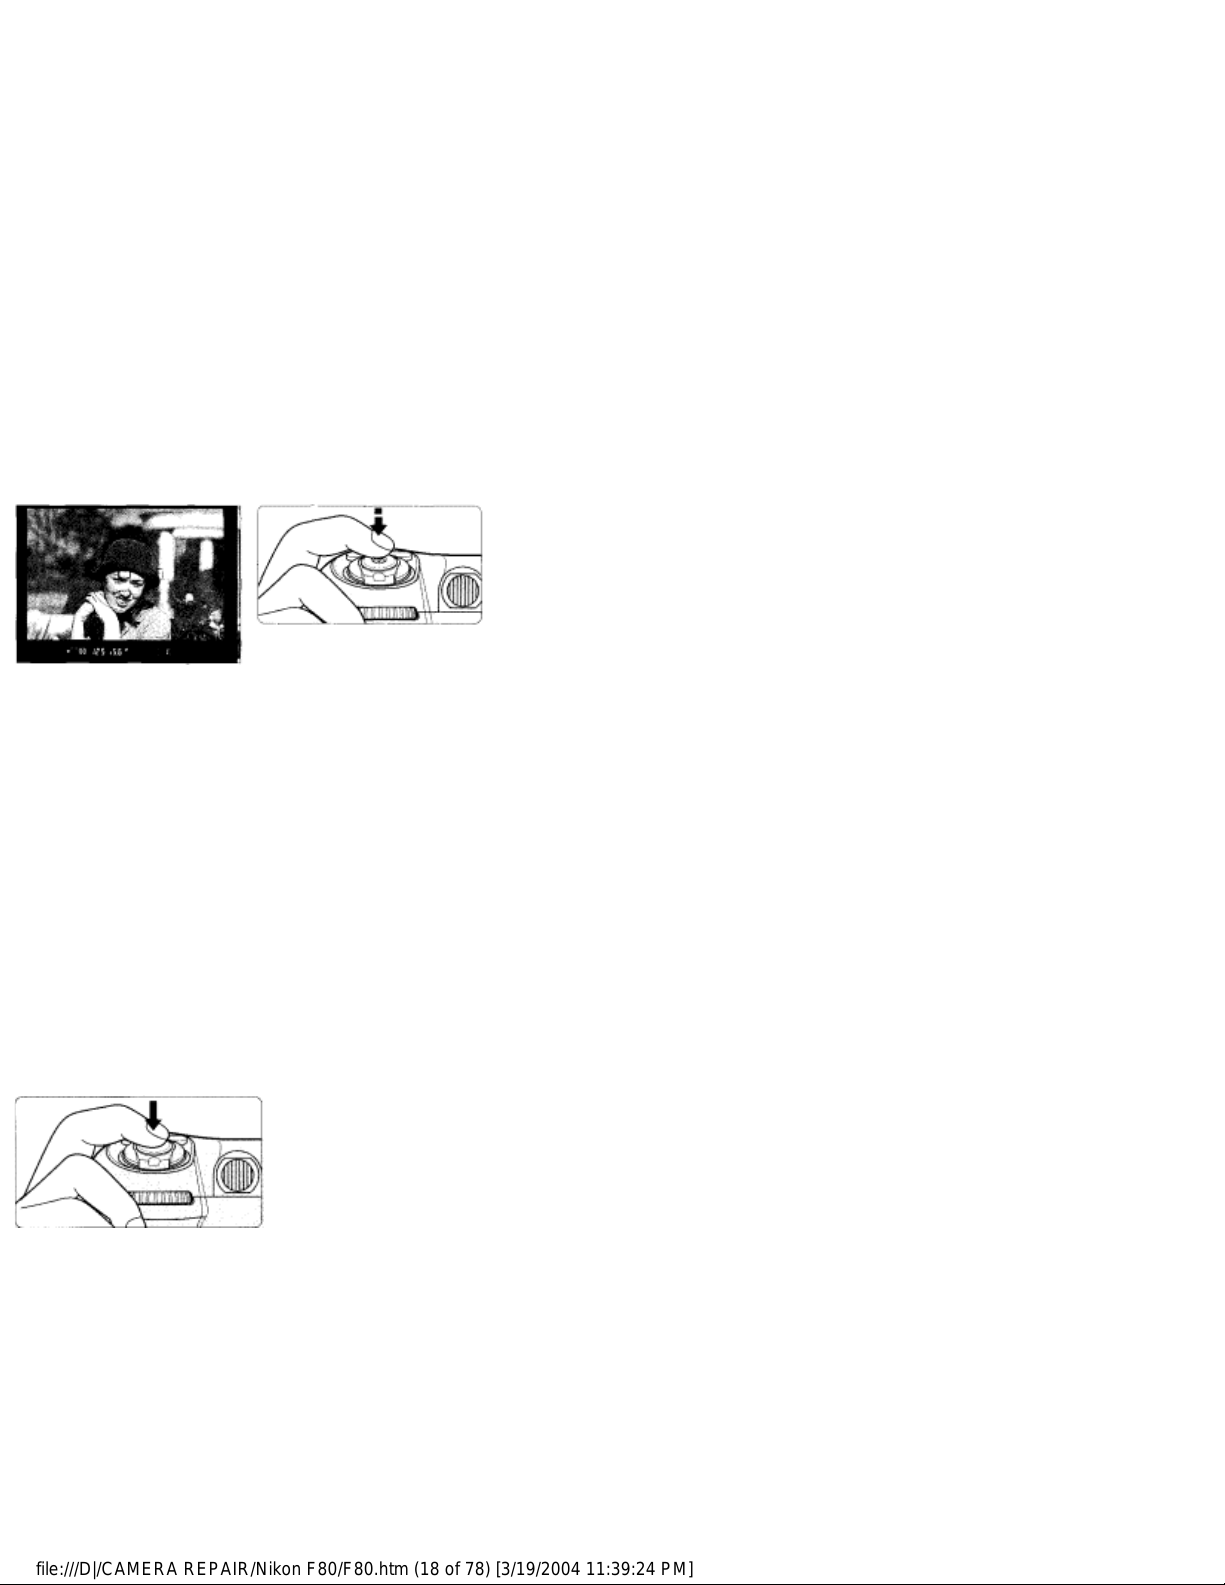
6.2 Compose frame and focus by lightly pressing the
shutter release button.
• Centre the focus brackets on your subject and lightly press the shutter
release button. The camera focuses automatically and focus indicator
appears or blinks as follows.
• appears: Subject is in focus.
• blinks: Unable to focus using autofocus.
• With dark subjects, the camera's AF-Assist Illuminator (page 43) is
automatically activated to guide autofocus.
• To take a picture of a subject outside the focus area, shift the focus area
by using the focus area selector (page 42) or use focus lock (page 44).
• In situations where autofocus may not work as expected, see page 46.
Confirm Indications in Viewfinder and Release Shutter
7 Confirm that • (in-focus
indicator) appears in the
viewfinder, then slowly, fully
depress the shutter release
button. Camera automatically
tracks subject that has been
moving (page 88).
7.1 Confirm indications in the viewfinder while lightly
Nikon
Distributed by WWW.LENSINC.NET
file:///D|/CAMERA REPAIR/Nikon F80/F80.htm (18 of 78) [3/19/2004 11:39:24 PM]
Page 19
pressing the shutter release button. (Shutter speed
and aperture are shown in 1/2 steps.)
• When the subject is dark or the shutter speed is slower than 1/60 sec.,
use the built-in Speedlight to avoid picture blur (page 30).
• If any warning indications appear in the LCD panel or viewfinder, see
page 101.
7.2 Confirm that focus indicator • appears and slowly
depress the shutter release button.
• After shutter is released, the film automatically advances to the next
frame and the next shot can be taken.
Check points
Focus, shutter speed and aperture can be confirmed in the
viewfinder. If any other warning indications appear, see page 101.
When you reach the end of the film roll, the film starts to rewind
automatically.
For mid-roll rewind, see page 36.
For self-timer operation, see page 68.
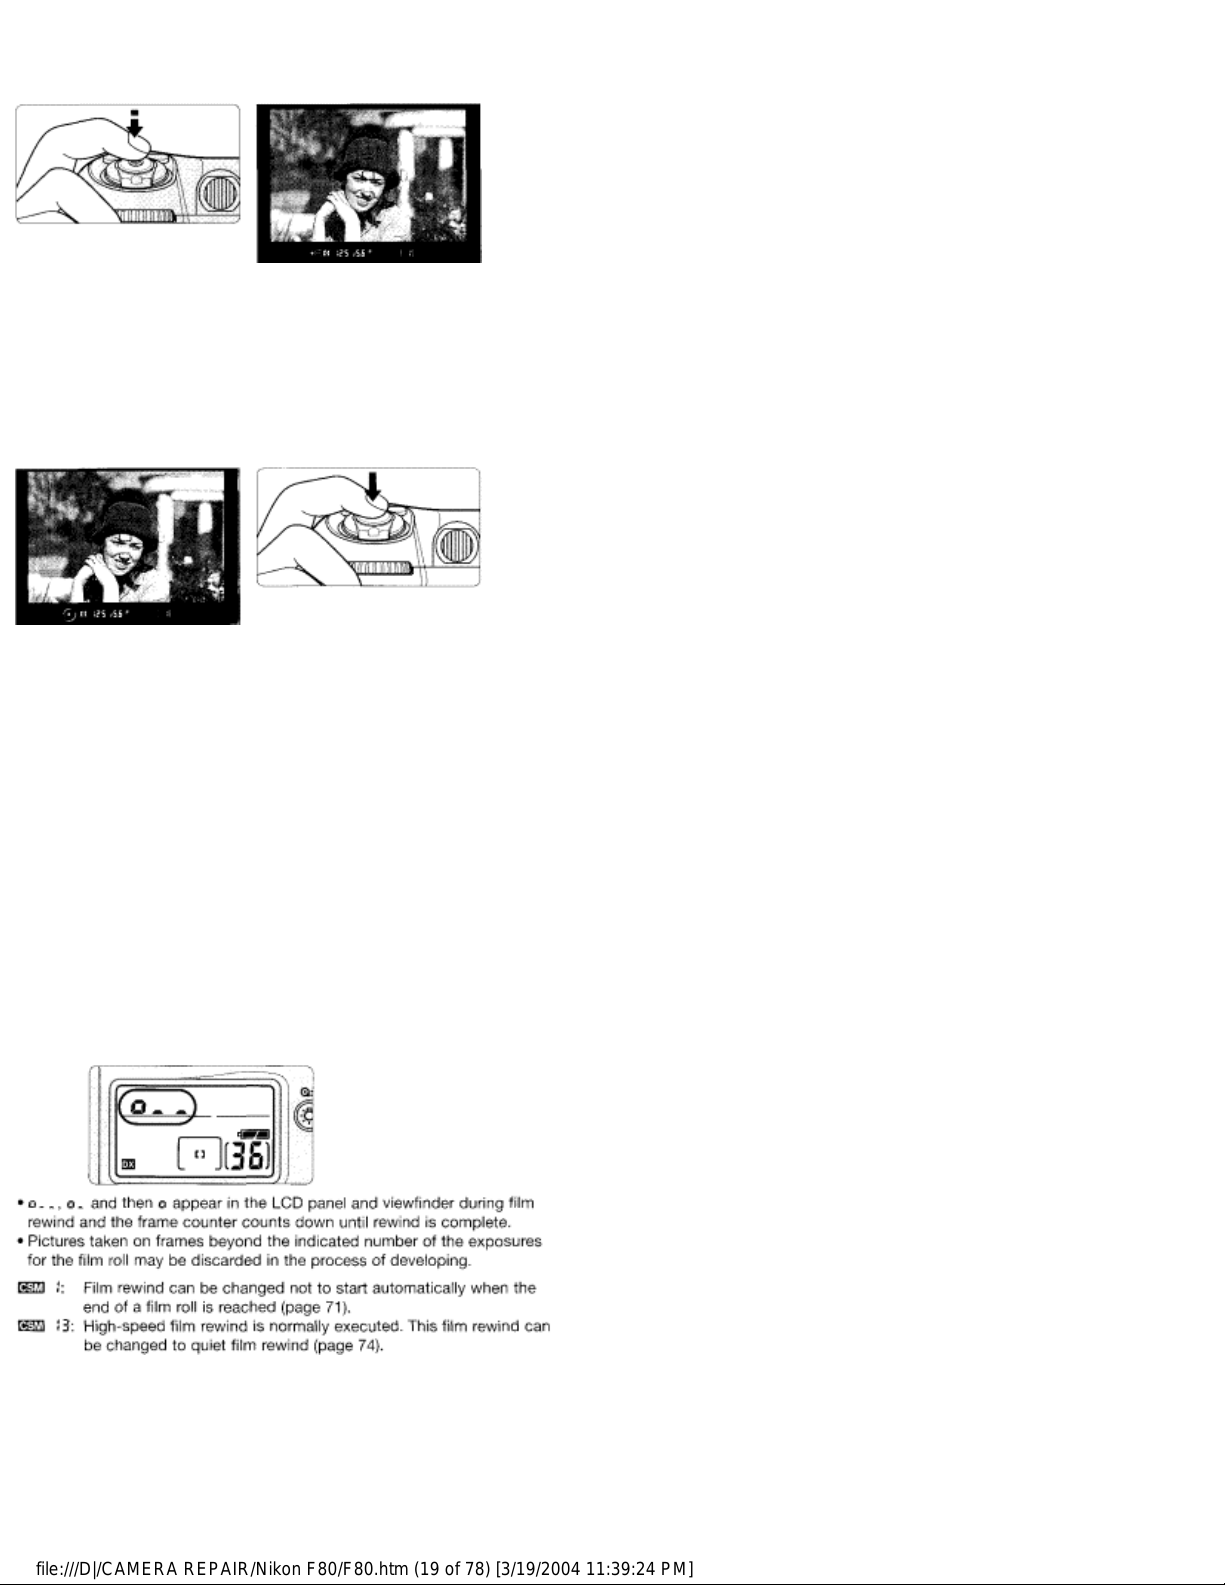
7.3 Film starts to rewind automatically when film reaches
the end of the roll.
7.4 Confirm that film is completely rewound, then
remove film cartridge.
Nikon
Distributed by WWW.LENSINC.NET
file:///D|/CAMERA REPAIR/Nikon F80/F80.htm (19 of 78) [3/19/2004 11:39:24 PM]
Page 20

• Film is completely rewound when the frame counter shows blinking "£" in
the LCD panel and viewfinder. (E appears without blinking when the
exposure meter is off.) Open the camera back away from sunlight and
remove the film cartridge by tilting it to one side.
8 Using Built-in Speedlight
When the subject is dark or the
shutter speed is slower than
1/60 sec., use the built-in
Speedlight to avoid picture blur.
Speedlight photography is also
suitable for shooting backlit
subjects.
8.1 Press the Speedlight lock-release button to release
the Speedlight. The Speedlight starts charging
automatically.
Suitable situations for use of Speedlight_______________
• Shutter speed is slower than 1/60 sec.
• Subject is dark at night or indoors.
• Subject is backlit or when more light is desired on the main subject,
such as the subject's face.
NOTE: Continuous use of built-in Speedlight
After continuous use of the built-in Speedlight, it may stop firing to
protect the firing tube. Wait for a while before using the Speedlight
again.
Check points
Nikon
Distributed by WWW.LENSINC.NET
file:///D|/CAMERA REPAIR/Nikon F80/F80.htm (20 of 78) [3/19/2004 11:39:24 PM]
Page 21
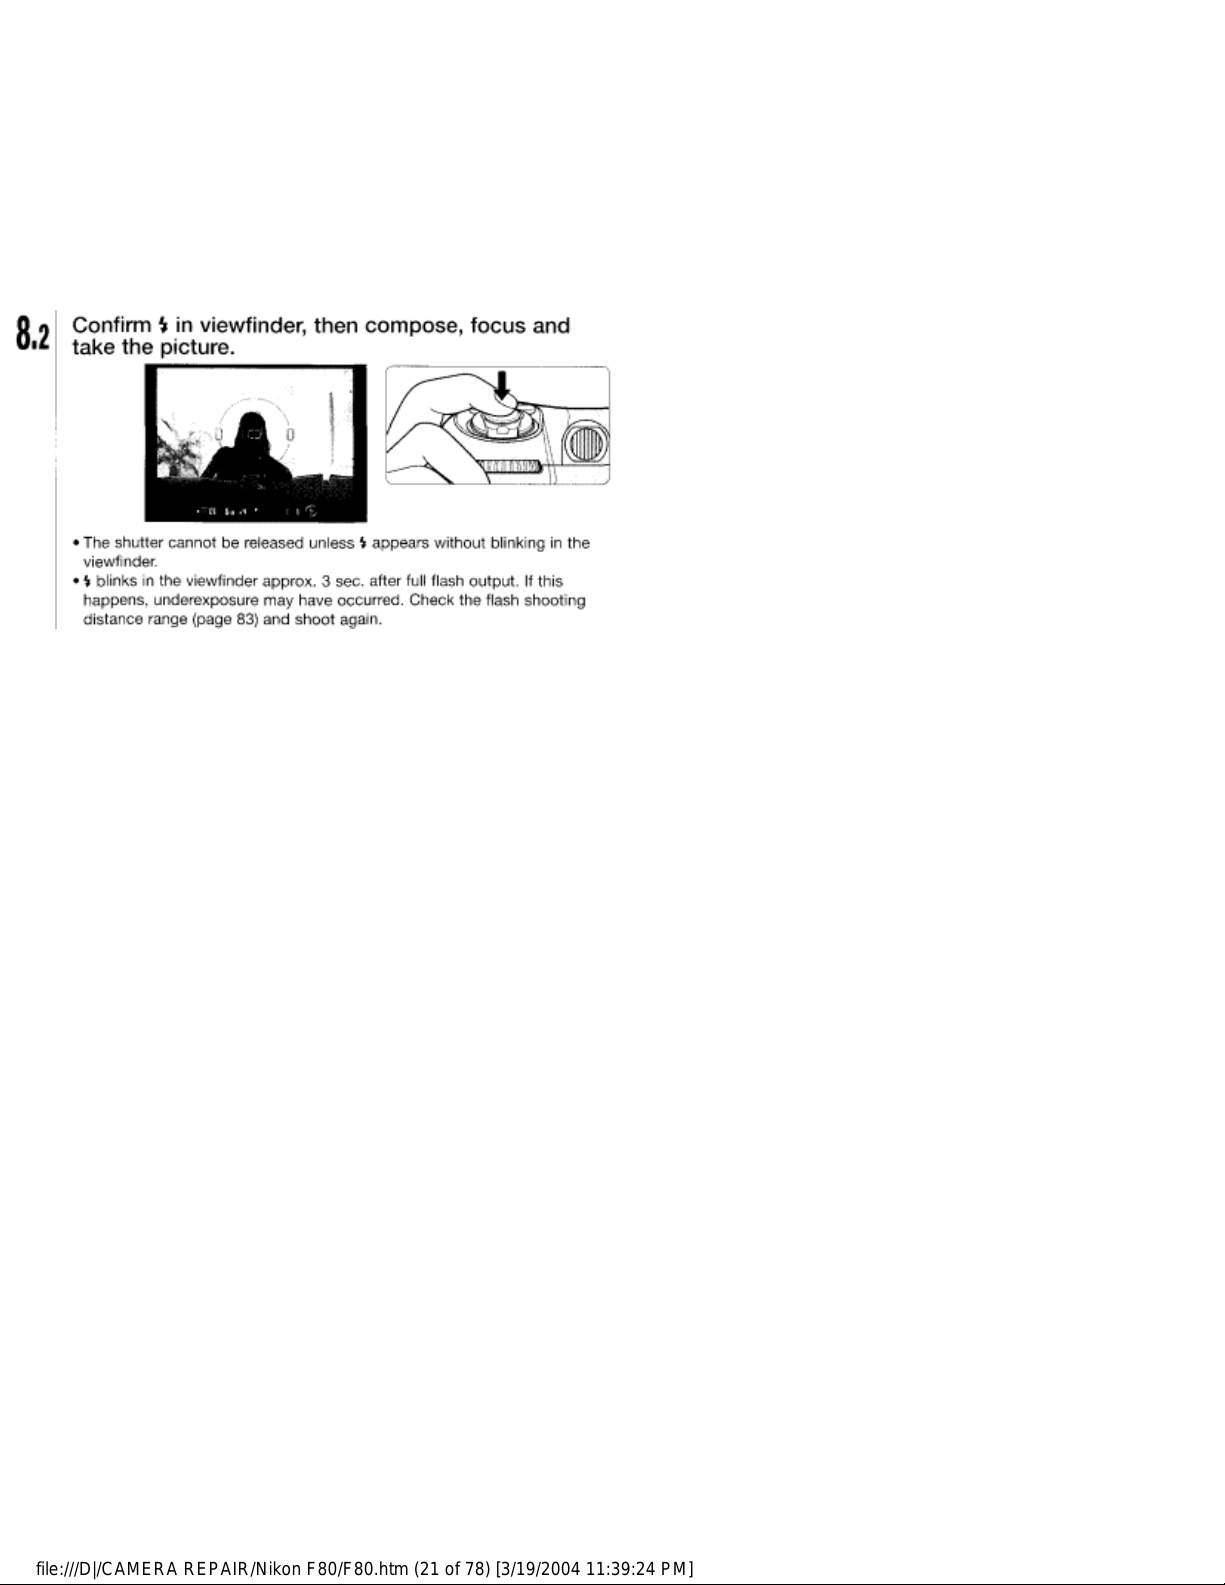
The built-in Speedlight offers an angle of coverage of 28mm tens with
a guide number of 12 (ISO 100, m).
Using a D-type Nikkor lens enables use of 3D Multi-Sensor Balanced
Fill-Flash. (For details, see page 78.)
Be sure to remove (or store) the lens hood before flash shooting.
Some lenses have limitations using the built-in Speedlight and may
cause vignetting. (For details, see page 84.)
• Normal Front-Curtain Sync flash mode is introduced in this section. Flash
with Red-Eye Reduction, which reduces the "red-eye" effect with a
person or animal, and Slow Sync flash, which brings out the background
details, are also available. For details, see page 80.
• With dark subjects, the camera's AF-Assist Illuminator is automatically
activated to guide autofocus. See page 43 for details.
3D Multi-Sensor Balanced Fill-Flash
When a D-type Nikkor lens is attached, it integrates Distance
Information from the lens with other exposure control information,
automatically compensating the flash output level so that flash output
and ambient light are balanced (page 78).
About Metering System and Exposure
Metering systems and exposure are important factors for taking
pictures. Knowing the characteristics of each factor helps you
widen your photographic expression.
•Metering System
As the proper combination of shutter speed and aperture for correct
exposure is determined according to subject brightness and film
sensitivity, measuring subject brightness is very important.
In general, brightness inside the viewfinder is not uniform. The
F80/F80D/F80S provides three metering systems: Matrix Metering,
Centre-Weighted Metering and Spot Metering. With Matrix Metering,
scene brightness data is detected by the 10-segment Matrix sensor. With
Centre-Weighted Metering, most of the meter's sensitivity is
concentrated on the 12mm-diameter centre circle in the viewfinder. Spot
Metering sensitivity is concentrated in a small, selected focus area from
five available focus areas. Using D-type Nikkor lenses, the F80/F80D/
F80S camera performs 3D Matrix Metering by adding distance
information to determine correct exposure. See page 48.
Exposure
Nikon
Distributed by WWW.LENSINC.NET
file:///D|/CAMERA REPAIR/Nikon F80/F80.htm (21 of 78) [3/19/2004 11:39:24 PM]
Page 22
Light from the subject passes through the lens and exposes the film.
Shutter speed and aperture control how much light reaches the film. The
combination of shutter speed and aperture appropriate for subject
brightness and film sensitivity results in correct exposure—a result
provided by the F80/F80D/F80S's four exposure modes: Programmed
Auto (page 50), Shutter-Priority Auto (page 52), Aperture-Priority Auto
(page 54) and Manual (page 56) exposure modes.
When a highly reflective or very low reflective object is within a frame,
correct exposure may not be obtained. In such situations, exposure
compensation is required. The F80/F80D/F80S offers auto exposure lock
(page 58), exposure compensation (page 60) or Auto Exposure
Bracketing function (page 61) allowing a photographer greater control of
exposure than that afforded by Auto exposure modes.
DETAILED
OPERATION
This section features detailed descriptions
of all camera functions—including lens, film,
focus, exposure and other functions.
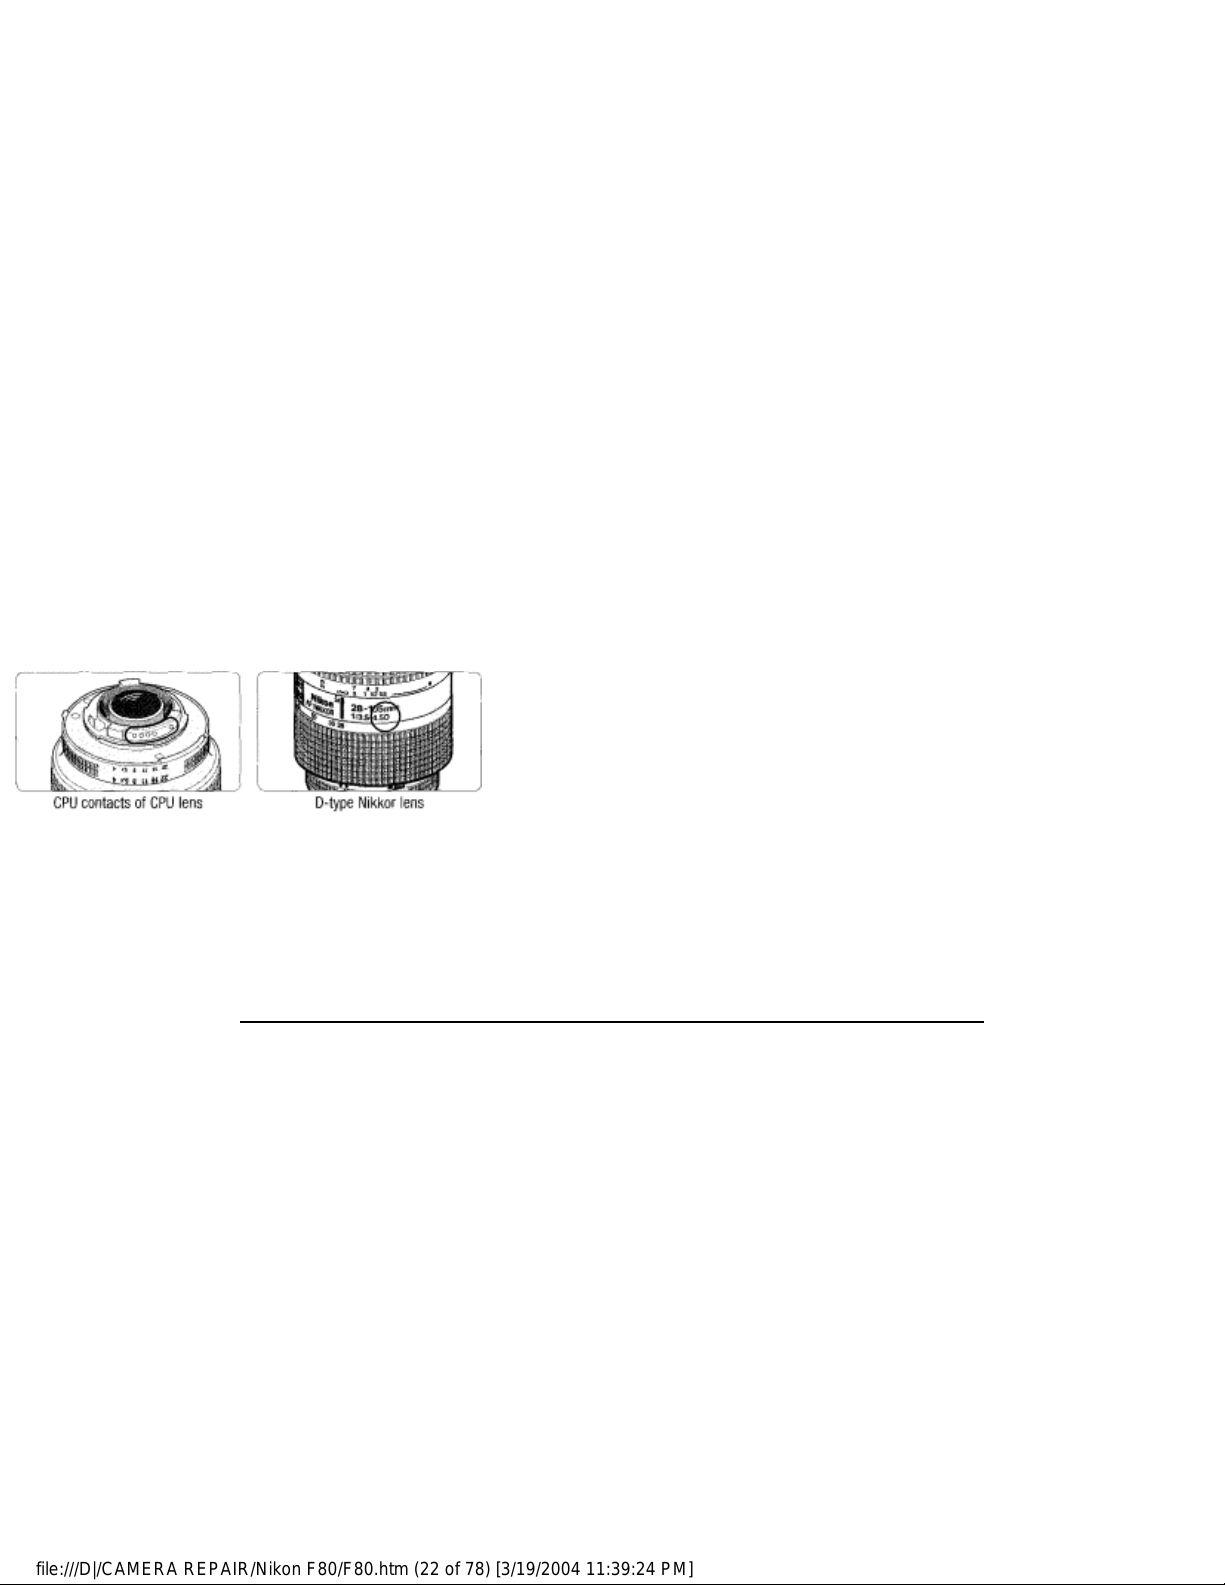
Lens Compatibility
• Use a CPU lens (except IX-Nikkor) with this camera. D-type AF lenses give
you access to all available functions.
When a non-CPU lens is attached
Set exposure mode to Manual with a non-CPU lens. (When other modes are
selected, shutter cannot be released.) The camera's exposure meter cannot
be used and the aperture cannot be set using the Sub-Command Dial when
using non-CPU lenses, f- - appears in place of the aperture indication in the
LCD panel and viewfinder; set/confirm aperture using the lens aperture ring.
CAUTION: Nikkor lenses/accessories that cannot be attached to the F80/F80D/F80S
The following Nikkor lenses/accessories cannot be attached to the
F80/F80D/F80S (otherwise camera body or lens may be damaged):
• TC-16A Teleconverter
• Non-AI lenses
• 400mm f/4.5, 600mm f/5.6, 800mm f/8 and 1200mm f/11 with Focusing
Unit AU-1
• Fisheye 6mm f/5.6, 8mm f/8 and OP 10mm f/5.6
•Old type 21 mm f/4
• K2 ring
• ED 180-600mm f/8 (No. 174041 -174180)
•ED 360-1200mm f/11 (No. 174031-174127)
• 200-600mm f/9.5 (No. 280001-300490)
• 80mm f/2.8, 200mm f/3.5 and TC-16 Teleconverter for F3AF
Nikon
Distributed by WWW.LENSINC.NET
file:///D|/CAMERA REPAIR/Nikon F80/F80.htm (22 of 78) [3/19/2004 11:39:24 PM]
Page 23
• PC 28mm f/4 (No. 180900 or smaller)
• PC 35mm f/2.8 (No. 851001-906200)
• Old type PC 35mm f/3.5
• Old type Reflex 1000mm f/6.3
• Reflex 1000mm f/11 (No. 142361-143000)
• Reflex 2000mm f/11 (No. 200111 -200310)
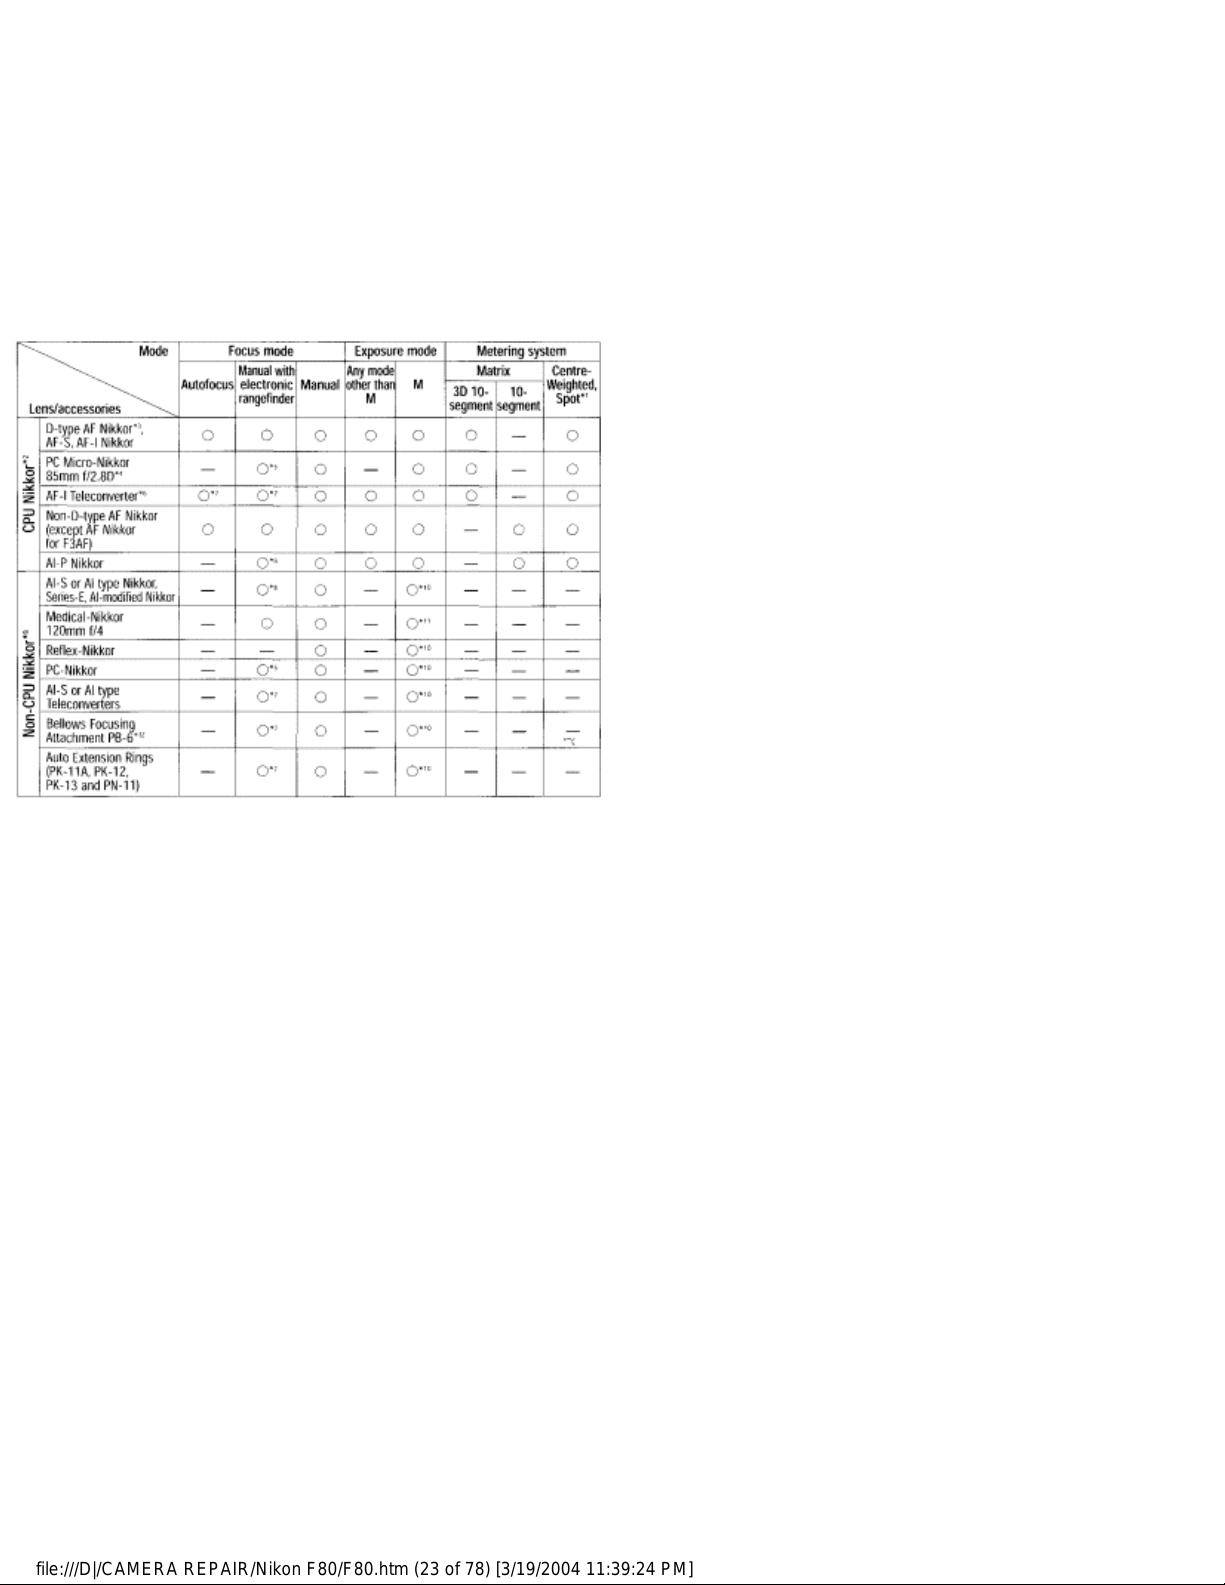
•Types of CPU lenses and other usable lenses/accessories
"1 Spot Metering area can be shifted with focus area selector (page 49) with CPU Nikkor lens.
•2 IX-Nikkor lenses cannot be attached.
'3 This camera is compatible with the Vibration Reduction function of the VR Nikkor lens.
"4 The camera's exposure metering and flash control system do not work properly when shifting and/or tilting the
lens, or when using an aperture other than the maximum aperture.
'5 Without shifting and/or tilting the lens.
"6 Compatible with AF-S and AF-I Nikkor except AF-S 17-35mm f/2.80 IF-ED and AF-S 28-70mm f/2.80 IF-ED.
"7 With maximum effective aperture of f/5.6 or faster.
'8 With maximum aperture of f/5.6 or faster.
"9 Some lenses/accessories cannot he attached. (See page 34.)
•10 With exposure mode set to Manual. The exposure meter cannot be used.
'11 With exposure mode set to Manual and shutter speed set to 1/125 sec. or slower but the exposure meter can-
not be used.
"12 Attach the PB-6 vertically. (PB-6 can be set to horizontal position after attaching.)
• AS-15 must be attached in combination with Medical-Nikkor 200mm f/5.6 for the lens to fire flash.
• Reprocopy Outfit PF-4 can be attached in combination with Camera Holder PA-4.
• Do not attach the following accessories to the lens, as they might damage the parts such as the lens' CPU
contacts: Auto Extension Ring PK-1, PK-11, Auto Ring BR-4 and K1 Ring.
Film
•Setting and confirming film speed
Set the exposure mode/ISO film speed select dial to ISO
Nikon
Distributed by WWW.LENSINC.NET
file:///D|/CAMERA REPAIR/Nikon F80/F80.htm (23 of 78) [3/19/2004 11:39:24 PM]
Page 24
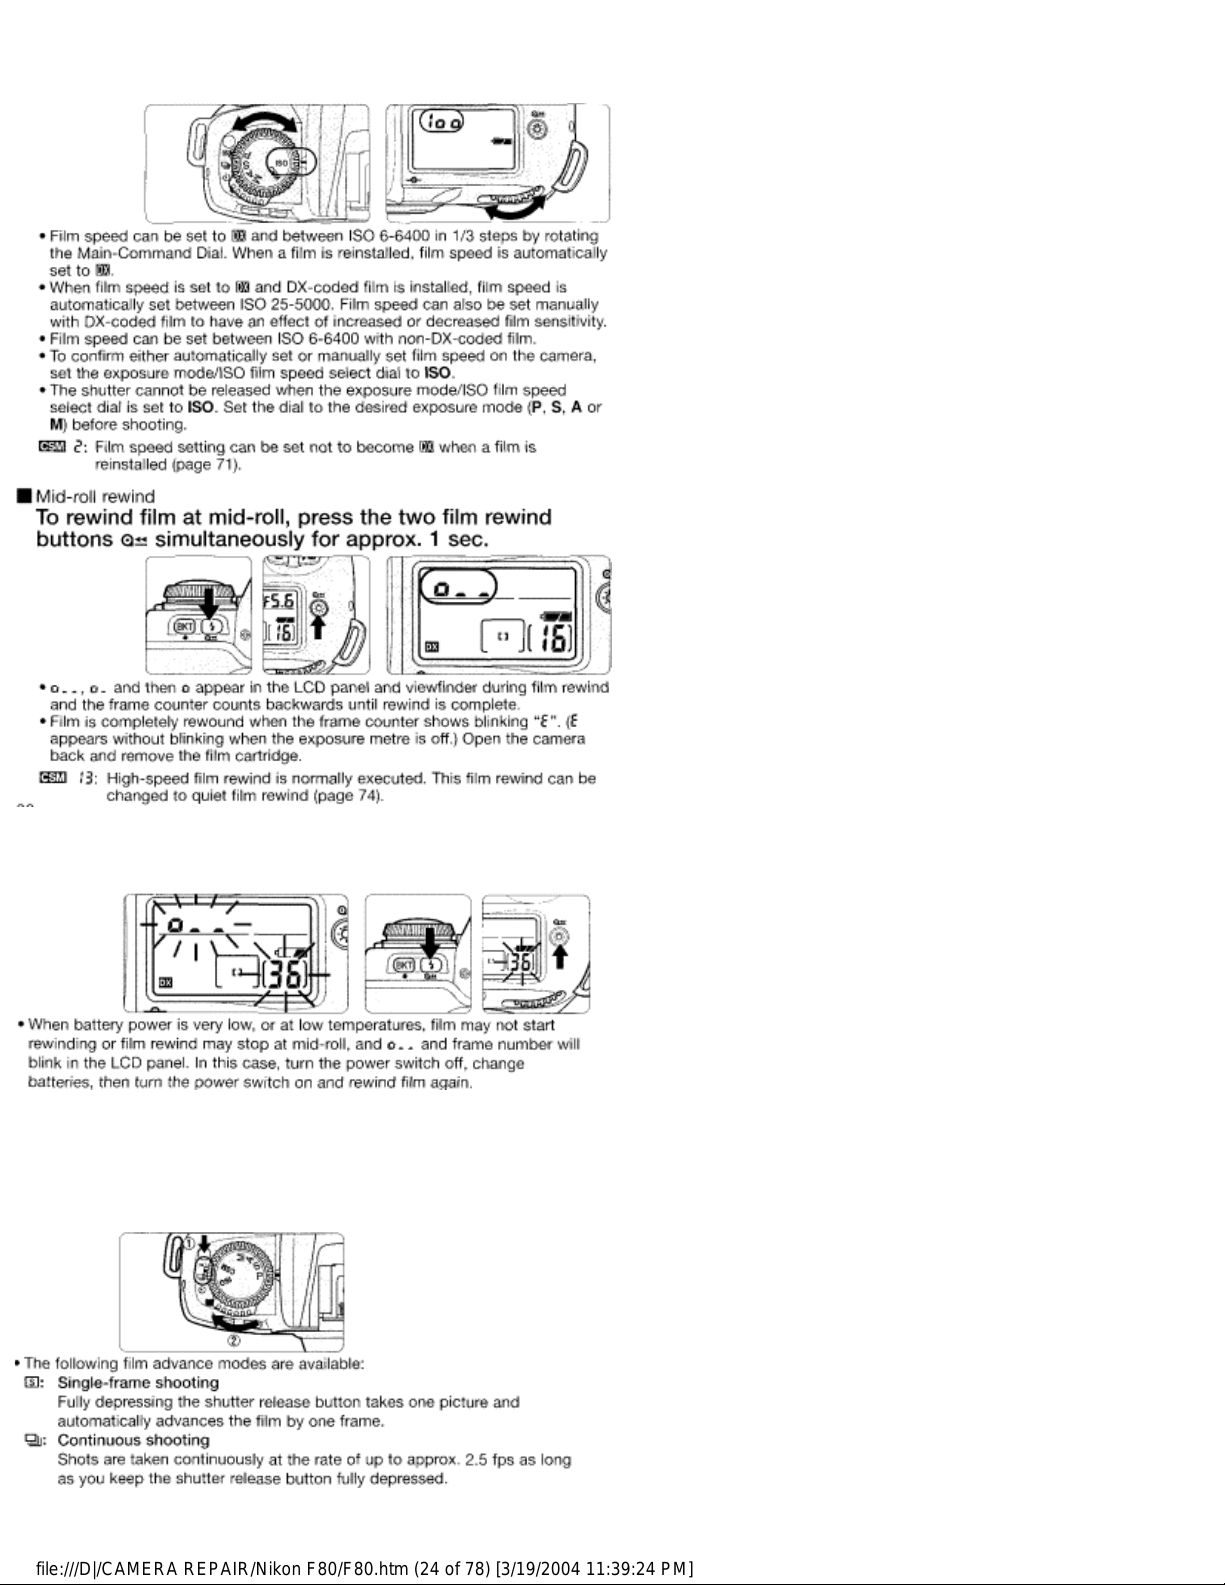
and rotate the Main-Command Dial to set film speed in
use.
• If film does not start to rewind or film rewind stops at mid-roll
• Film advance mode
Rotate the film advance mode selector while pressing
the film advance mode selector lock release to select
film advance mode.
Nikon
Distributed by WWW.LENSINC.NET
file:///D|/CAMERA REPAIR/Nikon F80/F80.htm (24 of 78) [3/19/2004 11:39:24 PM]
Page 25

Film advance speed is tested using camera settings of focus mode M, exposure
mode M, shutter speed 1/125 sec. or faster, aperture other than maximum, at
normal temperature of 20°C (68°F), with fresh batteries, for the 1st to 36th frames
of a film.
Autofocus
• Focus mode selector
• Set focus mode selector to S (Single Servo AF with Focus-Priority) or !
(Continuous Servo AF with Release-Priority). Camera focuses automatically on
the subject when the shutter release button is lightly pressed.
S: Single Servo AF with Focus-Priority
The shutter can only be released when in focus indicator • appears in the
viewfinder (Focus-Priority). Once focused on a subject, keeping the shutter
release button lightly pressed locks focus (Focus Lock, page 44). With a
subject that has been moving, the camera continuously focuses on a
subject as long as the shutter release button is kept lightly pressed (Focus
Tracking, page 88) and focus locks when the subject stops moving.
C: Continuous Servo AF with Release-Priority
Since the priority is on shutter release, you can release the shutter
regardless of the focus status (Release-Priority). Focus is not locked when
• appears in the viewfinder and the camera continues to focus on a
subject until shutter release. With a moving subject, the camera
continuously focuses on a subject as long as the shutter release button is
kept lightly pressed (Focus Tracking, page 88).
AF Area Mode
•Autofocus operation lets you select Single Area AF that uses one focus
area selected or Dynamic AF that also utilises the other four focus areas.
Rotate AF Area mode selector to select AF Area mode.
Nikon
Distributed by WWW.LENSINC.NET
file:///D|/CAMERA REPAIR/Nikon F80/F80.htm (25 of 78) [3/19/2004 11:39:24 PM]
Page 26

If the focus mode is set to Single Servo AF in Dynamic AF, the camera is
automatically set to Dynamic AF Mode with Closest Subject Priority in initial
setting.
AF Area Mode—continued
• The Closest Subject Priority AF operation is possible in the Dynamic AF, where
the camera automatically selects the focus area with the closest subject.
Focus is always achieved at any of the five focus areas so you can avoid outof-focus pictures.
• In Dynamic AF Mode with Closest Subject Priority, focus area indication does
not appear in the LCD panel and viewfinder and focus area cannot be
selected.
• When the telephoto lens is attached or the subject is very dark, the closest
subject may not be selected. In this case, use Single Area AF.
• Autofocus modes
The following focusing operations can be executed with combinations of the focus
mode and AF Area mode.
Nikon
Distributed by WWW.LENSINC.NET
file:///D|/CAMERA REPAIR/Nikon F80/F80.htm (26 of 78) [3/19/2004 11:39:24 PM]
Page 27

Dynamic AF Mode with Closest Subject Priority can be selected in either focus
mode, in Single Servo AF or Continuous Servo AF.
When the AF Area Mode is set to Dynamic AF Mode, the following settings are
selected in combination with the given focus mode.
Focusing operation
Suitable shooting situation
Focus is obtained only at the selected focus
area and focus is locked (as long
as the shutter release button is lightly
pressed) once focus is achieved.
General shooting such as a
stationary subject.
Dynamic AF Mode with Closest Subject
Priority automatically maintains focus
on the subject located closest to any of five
focus areas and focus is locked
once focus is achieved. If the subject moves
from the selected focus area
before focus lock, camera automatically
focuses on the subject determining the
data from the other focus areas.
Snapshot where you let the
camera's autofocus
operation determine the
focusing,
Focus is obtained at the selected focus area
and focusing is locked (as long
as the shutter release button is lightly
pressed) once it is achieved. If the
subject moves from the selected focus area
before focus lock, camera
automatically focuses on the subject
determining the data from the other
focus areas.
General shooting including
a moving subject
where you want to expand
the range of a regular
snapshot.
Nikon
Distributed by WWW.LENSINC.NET
file:///D|/CAMERA REPAIR/Nikon F80/F80.htm (27 of 78) [3/19/2004 11:39:24 PM]
Page 28

Focus is obtained only at the selected focus
area. Focus is not locked and
focusing continues until the shutter is
released.
Subject moving straight
toward or away from the
camera such as a racing car
or track athlete to
follow a subject with one
focus area,
Focus is obtained at the selected focus area.
Focus is not locked. If the subject
moves from the selected focus area, camera
automatically focuses on the
subject determining the data from the other
focus areas.
Irregularly moving subject
such as a player in a
football game where subject
is difficult to follow
in one focus area.
Dynamic AF Mode with Closest Subject
Priority automatically maintains focus
on the subject located closest to any of five
focus areas. Focus is not locked. If
the subject moves from the selected focus
area, camera automatically focuses
on the subject determining the data from the
other focus areas.
Snapshot of a moving
subject where you let the
camera's autofocus
operation determine the
focusing.
Focus Area
•This camera's five focus areas cover a wide frame area, and you can
select among them, depending on the subject's position in the frame or
your desired composition. They reliably provide sharp focus without
use of focus lock (page 44).
1 Rotate the AF Area mode selector to select Single
Area AF [ ] or Dynamic AF [+].
2 Rotate the focus area selector lock lever to release
the lock, then select desired focus area with the focus
area selector.
• Lightly press the shutter release button and press the focus area selector
up/down/right/left to change the focus area toward the corresponding
direction. Selected focus area is indicated (momentarily in red when the
subject is dark, page 4) in the viewfinder. Selected focus area is also indicated
in the LCD panel.
Nikon
Distributed by WWW.LENSINC.NET
file:///D|/CAMERA REPAIR/Nikon F80/F80.htm (28 of 78) [3/19/2004 11:39:24 PM]
Page 29

• Selected focus area can be locked by rotating the focus area selector lock
lever to lock position.
AF-Assist Illuminator
•When the subject is dark and the shutter release button is pressed
lightly, the camera's AF-Assist Illuminator automatically turns on and
enables autofocus operation in a dark environment.
• AF-Assist Illuminator automatically turns on in the following situations:
Focus mode is Single Servo AF, AF Nikkor lens is used, subject is dark and
centre focus area is selected or Dynamic AF Mode with Closest Subject Priority
is activated.
• Focal length of the usable AF Nikkor lens is 24-200mm and the distance range
of the AF-Assist Illuminator is approx. 0.5-3m.
NOTE: Continuous use of the AF-Assist Illuminator_____________
When the AF-Assist Illuminator is used continuously, illumination is limited
temporarily to protect the firing tube. The illumination restarts after a few
moments. Also, when the AF-Assist Illuminator is used repeatedly in a short
period of time, be careful not to touch the AF-Assist Illuminator lamp because
it may have become hot.
Optional Speedlight and AF-Assist Illuminator_______________
When an optional Speedlight is attached and the condition for the AF-Assist
Illumination is met, the AF-Assist Illuminator of the optional Speedlight SB-28/
28DX, SB-27, SB-26, SB-25 and SB-24 automatically turns on. With other
optional Speedlights, camera's Illuminator turns on.
• Autofocus using the camera's AF-Assist Illuminator cannot be performed due
to vignetting with following lenses at shooting distance within 1m:
AF Micro 200mm f/4 IF-ED, AF-S 17-35mm f/2.8 IF-ED (24mm or longer
focal length), AF 20-35mm f/2.8 IF, AF 24-120mm f/3.5-5.6 IF, AF-S 2870mm f/2.8 IF-ED, AF 35-70mm f/2.8, AF Micro 70-180mm f/4.5-5.6 ED
• Autofocus using the camera's AF-Assist Illuminator cannot be performed due
to vignetting with AF-S 80-200mm f/2.8 IF-ED, AF 80-200mm f/2.8 ED and AF
VR 80-400mm f/4.5-5.6 ED.
Focus Lock
• Focus lock is useful in autofocus shooting when you want to capture a
subject that's framed outside of the F80/F80D/F80S's five focus areas,
and in situations where autofocus may not work as expected (page 46).
Focus lock is operated differently in Single Servo AF or Continuous
Servo AF.
1 Position the focus area on the subject and lightly
Nikon
Distributed by WWW.LENSINC.NET
file:///D|/CAMERA REPAIR/Nikon F80/F80.htm (29 of 78) [3/19/2004 11:39:25 PM]
Page 30

press the shutter release button.
• • appears when the subject is in focus.
2 Confirm focus indicator • and lock focus.
In Single Servo AF;
Focus is locked as long as the shutter release button is kept lightly
pressed.
3 While keeping the focus locked, recompose and
shoot.
Situations Where Autofocus May Not Work As Expected!
•Autofocus may not work as expected in the following situations. In
such situations, focus manually using the clear matte field (page 47) or
focus on a different subject located at the same distance, use focus
lock (page 44) then recompose.
Nikon
Distributed by WWW.LENSINC.NET
file:///D|/CAMERA REPAIR/Nikon F80/F80.htm (30 of 78) [3/19/2004 11:39:25 PM]
Page 31

Low-contrast scenes
For example, where the subject is wearing clothing
the same colour as a wall or other background.
Scenes with subjects within the focus
brackets located at different distances from
the camera
For example, when shooting an animal in a cage or
a person in a forest.
Patterned subject or scene
For example, building windows.
Scenes with pronounced differences in
brightness within the focus brackets
For example, when the sun is in the background
and the main subject is in shadow.
Manual Focus
• Focus can be set manually when the focus mode selector is set to M.
Nikon
Distributed by WWW.LENSINC.NET
file:///D|/CAMERA REPAIR/Nikon F80/F80.htm (31 of 78) [3/19/2004 11:39:25 PM]
Page 32

• Set the focus mode selector to M. Look through the viewfinder and rotate the
lens focusing ring until a sharp image appears on the clear matte field in the
viewfinder. The shutter can be released whether or not the subject is in focus.
Use Manual focus in situations where autofocus may not work as expected
(page 46) or a lens other than an AF Nikkor lens (page 35) is attached.
• Manual focus using Electronic Rangefinder
• Set the focus mode selector to M. The focus can be confirmed with •
indication in the viewfinder. The Electronic Rangefinder works with most
Nikkor lenses (including AF Nikkors when operated manually) having a
maximum aperture of f/5.6 or faster.
• Lightly press the shutter release button and while the meter is on, rotate the
lens focusing ring until • appears in the viewfinder. The shutter can be
released anytime. The Electronic Rangefinder can be activated with any of five
focus brackets selected as the focus area (page 42).
Exposure Metering System
•Three choices of metering system are available to suit the lighting for
your subject.
Rotate the metering system selector to select the
desired metering system.
• When a metering system is selected, it is indicated in the viewfinder.
• Metering systems cannot be used when a non-CPU Nikkor lens is attached.
• Metering systems and characteristics of each are as follows:
Matrix Metering provides correct exposure control using a 10-segment
Matrix Sensor. With D-type Nikkor lenses, 10-segment 3D Matrix
Metering automatically activates, applying scene brightness, scene
Nikon
Distributed by WWW.LENSINC.NET
file:///D|/CAMERA REPAIR/Nikon F80/F80.htm (32 of 78) [3/19/2004 11:39:25 PM]
Page 33

contrast and subject distance information to ensure even more accurate
exposure control. Centre-Weighted or Spot Metering is recommended for
the Auto Exposure Lock function (page 58) or exposure compensation
(page 60).
Centre-Weighted Metering places special emphasis on brightness within
the 12mm-diameter circle in the viewfinder, so it is useful for basing
exposure on a specific area of the scene.
Nearly 100% of the meter's sensitivity is concentrated on the 4mm-dia.
area (approx. 1 % of entire frame) within the selected focus area of the
viewfinder. Use Spot Metering when you want to base the exposure on a
very small area within the frame, such as with a backlit subject or highcontrast scenes.
• When Spot Metering is selected, shifting focus area also shifts Spot
Metering area to a corresponding position.
• Spot Metering area stays at centre (does not shift) as long as Dynamic AF
Mode with Closest Subject Priority (page 40) is activated.
Shooting in Each Exposure Mode
• P: Programmed Auto
The camera automatically controls
exposure according to the exposure
combination in the program chart for
exposure that is correct for any shooting
situation. Suited for situations such as
when taking a snapshot, where you want
to concentrate only on the shutter release
opportunity. For more complex shooting,
use Flexible Program, exposure
Nikon
Distributed by WWW.LENSINC.NET
file:///D|/CAMERA REPAIR/Nikon F80/F80.htm (33 of 78) [3/19/2004 11:39:25 PM]
Page 34

compensation (page 60) or auto exposure bracketing (page 61).
• Programmed Auto can only be selected when using a CPU Nikkor
lens (page 34).
1 Rotate the exposure mode select dial to select P.
NOTE: Minimum aperture with CPU Nikkor lens_____________
Always set the aperture ring of a CPU Nikkor lens to its minimum (largest
f-number).
• When the lens is not set to its minimum aperture setting, fEE blinks in the
LCD panel and viewfinder and the shutter locks.
• When a non-CPU lens is attached, F- - blinks in the LCD panel and
viewfinder, and the shutter cannot be released. In this case, set the
exposure mode to Manual (page 56) and set/confirm aperture with the lens
aperture ring. Camera's exposure meter cannot be used. See "Lens
Compatibility" on page 34 for details.
2 Compose picture, focus and shoot.
• When the subject is too dark or bright, one of the following warning
indications will appear in the viewfinder or LCD panel.
• HI: Use ND filtre.
• Lo: Use Speedlight.
Program chart
The program chart shows exposure control in Programmed Auto exposure
mode.
—— With ISO 100, lens with maximum aperture of f/1.4 and
minimum aperture of f/16 (e.g. AF 50mm f/1.4D).
Nikon
Distributed by WWW.LENSINC.NET
file:///D|/CAMERA REPAIR/Nikon F80/F80.htm (34 of 78) [3/19/2004 11:39:25 PM]
Page 35

•There are limitations for minimum and maximum EV depending on the film
speed.
• In Matrix Metering, any EV above 161/3 is controlled to EV 16V3 when using
ISO 100 film.
Shooting in Each Exposure Mode—continued
•S: Shutter-Priority Auto
Enables you to manually set your desired
shutter speed (30-1/4000 sec.); the
camera automatically selects the proper
aperture to provide correct exposure. With
high shutter speeds, you can freeze the
motion of a fast-moving subject; with
slower speeds, you can create a blurry,
motion effect.
•Shutter-Priority Auto can only be selected with CPU Nikkor lens (page
34).
1 Rotate the exposure mode select dial to select S.
NOTE: Minimum aperture with CPU Nikkor lens_____________
Always set the aperture ring of a CPU Nikkor lens to its minimum (largest
f-number).
• When the lens is not set to its minimum aperture setting, FEE blinks in the
LCD panel and viewfinder, and shutter locks.
• When a non-CPU Nikkor lens is attached, f- - blinks in the LCD panel and
viewfinder, and the shutter cannot be released. In this case, set the
exposure mode to Manual (page 56) and set/confirm aperture with the lens
Nikon
Distributed by WWW.LENSINC.NET
file:///D|/CAMERA REPAIR/Nikon F80/F80.htm (35 of 78) [3/19/2004 11:39:25 PM]
Page 36

aperture ring. Camera's exposure meter cannot be used. See "Lens
Compatibility" on page 34 for details.
• If bulb is selected in Manual exposure mode and the exposure mode is
changed to Shutter-Priority Auto without cancelling bulb, bulb blinks and
the shutter locks. To shoot in Shutter-Priority Auto exposure mode, select
shutter speed other than bulb by rotating the Main-Command Dial.
2
Set the shutter speed (30-1/4000 sec.) by rotating the
Main-Command Dial.
3 Compose picture, focus and shoot.
• When the subject is too dark or bright, one of the following warning
indications will appear in the LCD panel or viewfinder. (Electronic analog
exposure display will also indicate the amount of under- or overexposure.)
• HI: Select higher shutter speed. If the warning indication still remains
on, use ND filtre.
• Lo: Select a slower shutter speed. If the warning indication still remains
on, use the Speedlight.
Shooting in Each Exposure Mode—continued
•A: Aperture-Priority Auto
Enables you to set the desired aperture
manually. The camera automatically
selects a shutter speed suitable for correct
exposure. By varying the aperture, and
thus controlling the depth of field (page
88), you can sharpen the background and
foreground, or blur the background. In
flash photography, varying the aperture
changes the flash shooting distance (page 83).
•Aperture-Priority Auto can only be selected with CPU Nikkor lens
(page 34).
1 Rotate the exposure mode select dial to select A.
Nikon
Distributed by WWW.LENSINC.NET
file:///D|/CAMERA REPAIR/Nikon F80/F80.htm (36 of 78) [3/19/2004 11:39:25 PM]
Page 37

NOTE: Minimum aperture with CPU Nikkor lens____________
Always set the aperture ring of a CPU Nikkor lens to its minimum (largest
f-number).
• When the lens is not set to its minimum aperture setting, FEE blinks in the
LCD panel and viewfinder, and the shutter locks.
• When a non-CPU Nikkor lens is attached, f- - blinks in the LCD panel and
viewfinder, and the shutter cannot be released. In this case, set the
exposure mode to Manual (page 56) and set/confirm aperture with the lens
aperture ring. Camera's exposure meter cannot be used. See "Lens
Compatibility" on page 34 for details.
2 Set the aperture by rotating the Sub-Command Dial.
3 Compose picture, focus and shoot.
• When the subject is too dark or too bright, one of the following warnings
will appear in the LCD panel or viewfinder. (Electronic analog exposure
display will also indicate the amount of under- or overexposure.)
• HI: Select smaller aperture (larger f-number). If the warning indication
persists, use an ND filtre.
• L o: Select larger aperture (smaller f-number). If the warning indication
persists, use the Speedlight.
Shooting in Each Exposure Mode—continued
•M: Manual
Enables you to set both shutter speed and
aperture manually. With electronic analog
exposure display in the viewfinder, you can
produce various creative effects by
adjusting the exposure. Long Time
Exposure (Bulb) can be set in Manual
exposure mode.
Nikon
Distributed by WWW.LENSINC.NET
file:///D|/CAMERA REPAIR/Nikon F80/F80.htm (37 of 78) [3/19/2004 11:39:25 PM]
Page 38

1 Rotate the exposure mode select dial to select M.
NOTE: Minimum aperture with CPU Nikkor lens_____________
Always set the aperture ring of a CPU Nikkor lens to its minimum (largest
f-number).
• When the lens is not set to its minimum aperture setting, fEE blinks in the
LCD panel and viewfinder, and the shutter cannot be released.
• When a non-CPU Nikkor lens is attached, F- - appears in the LCD panel
and viewfinder. Set/confirm aperture with the lens aperture ring. Camera's
exposure meter cannot be used. See "Lens Compatibility" on page 34 for
details.
2
Set the shutter speed and aperture and confirm by
looking at the electronic analog exposure display in
the viewfinder.
• Set the shutter speed by rotating the Main-Command Dial and the aperture
by rotating the Sub-Command Dial. These functions can be set
independently.
• Long Time exposure (Bulb) can be set by setting the shutter speed to bulb
(page 65).
• When the shutter speed is set to 1/125 sec., the shutter can be released
with the camera back open.
Electronic analog exposure display_________________
The electronic analog display in the viewfinder indicates the difference
between the selected exposure (shutter speed and aperture) and the
correct exposure. Not available with Long Time Exposure.
The electronic analog exposure display blinks when the subject
brightness is beyond the camera's exposure range.
The following examples show electronic analog exposure display
indications:
3 Compose picture, focus and shoot.
Nikon
Distributed by WWW.LENSINC.NET
file:///D|/CAMERA REPAIR/Nikon F80/F80.htm (38 of 78) [3/19/2004 11:39:25 PM]
Page 39

Auto Exposure Lock
1 Rotate the metering system selector to select CentreWeighted or Spot Metering.
• Matrix Metering is not recommended since the effect of the Auto Exposure
Lock cannot be effectively attained.
• Area of exposure in Spot Metering:
1. When the focus area and metering area are linked in Spot Metering
(page 49), exposure is locked at selected focus area.
2. When Dynamic AF Mode with Closest Subject Priority (page 40) is
selected in Spot Metering, exposure is locked at centre focus area (page
49).
•When the Centre-Weighted Metering is selected, exposure at 12mmdiameter circle is locked.
• In Single Servo AF or Continuous Servo AF, focus is also locked
simultaneously (page 44). Make sure to confirm focus indicator • appears
in the viewfinder.
Nikon
Distributed by WWW.LENSINC.NET
file:///D|/CAMERA REPAIR/Nikon F80/F80.htm (39 of 78) [3/19/2004 11:39:25 PM]
Page 40

1. Flexible Program (page 51) in Programmed Auto Exposure mode
2. Shutter speed adjustment in Shutter-Priority Auto Exposure mode
3. Aperture adjustment in Aperture-Priority Auto Exposure mode
In any of these three situations, controlled shutter speed and/or aperture
will be displayed after change.
• Rotating the metering system selector to another setting does not change
the metering system during Auto Exposure Lock operation. (The metering
system changes as soon as the Auto Exposure Lock is cancelled.)
Exposure Compensation
•To modify exposure control (i.e. from the ISO standard), use the exposure
compensation function. This can be useful when intentionally achieving
under- or overexposure. Use Centre-Weighted or Spot Metering.
Exposure compensation can be performed in any exposure mode.
• Electronic analog exposure display indicates the exposure compensation
value and 0 blinks.
• Normally, you should compensate exposure to the + side when the
background is brighter than your main subject, or to the - side when the
background is darker.
• See page 85 for flash exposure compensation where only the flash output
level is compensated.
Auto Exposure Bracketing
Auto Exposure Bracketing allow you to shoot in selected compensated
EV value (maximum of ±2 ev) shifting from the automatically set proper
Nikon
Distributed by WWW.LENSINC.NET
file:///D|/CAMERA REPAIR/Nikon F80/F80.htm (40 of 78) [3/19/2004 11:39:25 PM]
Page 41

exposure (or selected exposure in Manual exposure mode) for a selected number
of shots (two or three) each time the shutter is released. For example, this
is useful in selecting one shot out of several shots with Bracketed
exposures after processing the film, when the subject has pronounced
contrast in shooting with colour slide film and where the latitude of the
proper exposure is minimal. Auto Exposure Bracketing can be
performed in any exposure mode.
• Shutter speed and aperture in Programmed Auto, aperture in ShutterPriority Auto and shutter speed in Aperture-Priority Auto and Manual
exposure mode differ.
• In any of the exposure modes, Flash Exposure Bracketing and Auto
Exposure Bracketing are simultaneously performed when a Speedlight is
used.
• See the table on the next page for the combinations of the number of shots
and compensated EV value.
Auto Exposure Bracketing—continued
3 Compose picture, focus and shoot.
• Compensated shutter speed and aperture values are displayed during
shooting.
Nikon
Distributed by WWW.LENSINC.NET
file:///D|/CAMERA REPAIR/Nikon F80/F80.htm (41 of 78) [3/19/2004 11:39:25 PM]
Page 42

• If the end of the film roll is reached during Bracketing, the remaining shots
can be taken after new film has been loaded. Also, if you turn the power
switch off during Bracketing, the remaining shots can be taken after the
power is turned back on.
• Bracketing is performed with one frame at a time when the self-timer (page
68) is set.
Multiple Exposure
Multiple exposure consists of two or more exposures of one or more
subjects in the same frame. Multiple exposure can be performed in any
of the available exposure modes.
Standard compensation value in Multiple exposure
Exposure compensation is
necessary depending on the
number of exposures in
Multiple exposure since
more than one image is
exposed in the same frame.
Number of
exposures
Compensation
value
Two
-1.0 EV
Three
-1.5 EV
Nikon
Distributed by WWW.LENSINC.NET
file:///D|/CAMERA REPAIR/Nikon F80/F80.htm (42 of 78) [3/19/2004 11:39:25 PM]
Page 43

Four
-2.0 EV
Eight or Nine
-3.0 EV
• Test shooting is recommended since the compensation actually required
varies depending on the shooting situation.
• When the background is completely dark and subjects do not overlap, no
compensation is necessary for each shot.
• In some cases, frames may shift slightly in multiple exposure. In particular,
film advance becomes unstable at the beginning and near the end of a film
roll so multiple exposure is not recommended.
Multiple Exposure—continued
3 Compose picture, confirm focus indicator • and
shoot.
• The first shot is taken when the shutter release button is fully depressed.
The film does not advance and multiple exposures can be taken from the
second shutter release.
Long Time Exposure
•This function is useful for shooting nighttime scenes or stars, which
require extended exposure of more than 30 sec. The shutter will be
open as long as the shutter release button is kept fully depressed. (Use
of a tripod is recommended.)
1 Rotate the exposure mode select dial to select M
(Manual exposure).
• Use of a tripod is recommended to avoid camera shake. Using the optional
cable release (page 97) attached to the release terminal instead of pressing
the shutter release button with your finger also reduces camera shake.
• Use the LCD illuminator (page 66) to view the LCD panel in the dark.
2 Rotate the Main-Command Dial to select buLb and
rotate the Sub-Command Dial to set the aperture.
Nikon
Distributed by WWW.LENSINC.NET
file:///D|/CAMERA REPAIR/Nikon F80/F80.htm (43 of 78) [3/19/2004 11:39:25 PM]
Page 44

• If buLb is selected in Manual exposure mode and the exposure mode is
changed to Shutter-Priority Auto without cancelling buLb, bulb blinks and
the shutter locks (page 52).
• Continuous exposure of approx. 6 hours is possible with a fresh set of
lithium batteries. Note that continuous exposure time is reduced when
shooting at low temperatures.
3 Compose picture, focus and shoot.
• The shutter will be open as long as the shutter release button is kept fully
depressed.
Dioptre Adjustment/LCD llluminator
•The finder dioptre enables near- or far-sighted photographers to adjust
the eyepiece dioptre to suit their vision.
• Remove the rubber eyecup and slide the dioptre adjustment lever while
looking through the viewfinder until the focus brackets or other displays in the
viewfinder appear sharp. Attach the rubber eyecup again after adjustment.
• The adjustable range of the finder dioptre is -1.8 DP to +0.8 DP. Nine optional
eyepiece correction lenses provide a viewfinder dioptre range of -5 to +3 DP
(P. 96).
NOTE: Using the dioptre adjustment lever_________________
Since the dioptre adjustment lever is located next to the viewfinder, be
careful not to poke yourself in the eye with your finger or fingernail while
sliding the lever.
• Displays in the LCD panel can be confirmed in the dark with the LCD
illuminator.
Depth-of-Field Preview/Film Plane Indicator
• Depress the depth-of-field preview button to confirm the depth of field
through the viewfinder (see page 88).
Nikon
Distributed by WWW.LENSINC.NET
file:///D|/CAMERA REPAIR/Nikon F80/F80.htm (44 of 78) [3/19/2004 11:39:25 PM]
Page 45

• Pressing the depth-of-field button stops the lens down to the aperture
controlled in Programmed Auto or Shutter-Priority Auto exposure mode, and
down to the aperture selected in Aperture-Priority Auto or Manual exposure
mode. By looking through the viewfinder, the approximate depth of field with
the given aperture can be confirmed.
•The film plane indicator shows the position of the film plane inside the
camera body.
•The film plane indicator shows the standard line of the shooting distance and
indicates the position of the film plane inside the camera body. Use this
indicator when actually measuring camera-to-subject distance, e.g. in closeup photography.
•The exact distance from the lens mounting flange to the film plane is 46.5mm.
Self-Timer Operation
•You can use the self-timer when you want to be in the photograph. Use
a tripod or place the camera on a stable surface before using the selftimer.
• Self-timer shooting cannot be performed unless the camera's shutter can
be released (i.e. when subject cannot be brought into focus with autofocus
in Single Servo AF).
• To shoot in an exposure mode other than Manual, cover the eyepiece with
the supplied eyepiece cap DK-5 (page 3) or with your hand before pressing
the shutter release button to prevent interference and achieve correct
exposure from stray light.
• Do not stand in front of the lens when setting the self-timer in autofocus
mode.
2 Compose picture, focus by lightly pressing the shutter
release button and fully depress the shutter release
button.
• Once the self-timer is activated, the shutter will release in 10 seconds. The
Nikon
Distributed by WWW.LENSINC.NET
file:///D|/CAMERA REPAIR/Nikon F80/F80.htm (45 of 78) [3/19/2004 11:39:25 PM]
Page 46

self-timer indicator LED will blink for 8 sec. and then illuminate for 2 sec.
before the shutter is released.
CUSTOM SETTING
Using the Custom Setting feature, you can
create a combination of functions that is
different from the initial factory settings. The
functions listed in this section can be
selected with the F80/F80D/F80S.
Menu/Features of Custom Setting
• Creating Custom Setting
1 Set the exposure mode/Custom Setting select dial to
CSM and select a menu number by rotating the Main-
Command Dial.
• 19 menus (1 to 19) are available with the F80S and 18 menus (1 to 18) are
available with the F80/F80D.
2 Select the desired option number by rotating the SubCommand Dial.
• When the desired option number is displayed in the LCD panel, CUSTOM
appears in the LCD panel. Rotate the exposure mode/Custom Setting
select dial to set desired exposure mode and picture can be taken with
desired settings.
• The shutter cannot be released when the exposure mode/Custom Setting
select dial is set to CSM. Set the dial to the desired exposure mode before
shooting.
• Cancelling Custom Setting
Set the exposure mode/Custom Setting select dial to
CSM and perform Two-Button Reset (page 76).
• All the Custom Settings are cancelled and reset to their initial factory settings.
• Each Custom Setting can be cancelled and reset to initial setting by selecting
the number of "initial setting" (e.g. 0 with Custom Setting menu number 1) at
step 2 above.
Menu number and Custom Setting options
Nikon
Distributed by WWW.LENSINC.NET
file:///D|/CAMERA REPAIR/Nikon F80/F80.htm (46 of 78) [3/19/2004 11:39:25 PM]
Page 47

* Refer also to the Custom Setting Menu table at the end of this instruction manual.
1. Automatic film rewind at the end of film roll (page 29)
Options: 0: Activated (initial setting)
1: Disabled
At initial setting, film rewind is automatically started when the end of the film
roll is reached. However, the camera can be set not to rewind film at the end
of the film roll but instead film rewind is started by pressing the two film
rewind buttons for more than 1 sec.
2. Reset to DX film speed setting for new film (page 36)
Options: 0: Activated (initial setting)
1: Disabled
3. Bracketing order (page 62)
Options: 0: Metered value, under, over (initial setting)
1: Under, metered value, over
Bracketing is normally performed in the order of the initial setting (page 62).
However, this Bracketing order can be changed to be performed from
negative compensation to positive compensation.
4. On-Demand Grid Lines superimposition display (page 5)
Options: 0: Not displayed (initial setting)
1: Displayed
At initial setting, On-Demand Grid Lines (page 5) are not displayed in the
viewfinder. However, they can be set to be displayed.
Menu/Features of Custom Setting—continued
5. Illumination for superimposition (page 4)
Options: 0: Automatically illuminated for low light (initial setting)
1: Cancelled
2: Always illuminated
At initial setting, selected focus area (focus brackets) in the viewfinder are
temporarily illuminated in red depending on the subject brightness for easy
identification. However, they can be set not to be illuminated or always
illuminated no matter the subject brightness.
6. Focus area selection (page 42)
Options: 0: Normal selection (initial setting)
1: Enables successive rotation of focus area selection
At initial setting, the focus area can be selected by pressing the focus area
selector in the desired direction. However, it can be set to be changed
continuously in the same direction. For example, when the top of the focus
area selector is pressed, focus area continues to change from top, bottom,
middle and so on. With this option, focus area can be switched to the opposite
position without pressing the opposite position on the focus area selector.
7. Auto Exposure Lock when shutter release button is lightly pressed
(page 58)
Nikon
Distributed by WWW.LENSINC.NET
file:///D|/CAMERA REPAIR/Nikon F80/F80.htm (47 of 78) [3/19/2004 11:39:25 PM]
Page 48

Options: 0: Disabled (initial setting)
1: Activated
8. Auto film loading when camera back is closed (page 21)
Options: 0: Enabled (initial setting)
1: Disabled
At initial setting, film advances to the first frame when the camera back is
closed after it is loaded. However, film advance can be set not to start until
the camera back is closed and the shutter release button is fully depressed.
9. Closest-subject-priority Dynamic AF in Single Servo AF (page 40)
Options: 0: Enabled (initial setting)
1: Disabled
At initial setting, Dynamic AF Mode with Closest Subject Priority (page 40) is
activated when Dynamic AF mode is selected in Single Servo AF. However,
Dynamic AF Mode with Closest Subject Priority can be set to be disabled in
Single Servo AF.
10.Closest-subject-priority Dynamic AF in Continuous Servo AF
(page 40)
Options: 0: Disabled (initial setting)
1: Enabled
At initial setting, selecting Dynamic AF in Continuous Servo AF does not
activate Dynamic AF Mode with Closest Subject Priority (page 40). However,
Dynamic AF Mode with Closest Subject Priority can be set to be activated in
Continuous Servo AF.
11. AE-L/AF-L button (page 44/58)
Options 0: AE/AF simultaneous lock (initial setting)
1: Auto Exposure lock only
2: Autofocus lock only
3: Auto Exposure lock (remains locked until button is pressed
again)
4: AF operation only starts by pressing AE-L/AF-L button
Menu/Features of Custom Setting—continued
12.Command Dial functions (pages 50-57)
Options: 0: Main-Command Dial for shutter speed; Sub-Command Dial for
aperture setting (initial setting)
1: Main-Command Dial for aperture; Sub-Command Dial for
shutter speed setting
Nikon
Distributed by WWW.LENSINC.NET
file:///D|/CAMERA REPAIR/Nikon F80/F80.htm (48 of 78) [3/19/2004 11:39:25 PM]
Page 49

Unlike the initial Command Dial functions, the Sub-Command Dial can be set
to select shutter speed (in Shutter-Priority Auto or Manual exposure mode)
and the Main-Command Dial to select aperture (in Aperture-Priority Auto or
Manual exposure mode).
13.Film rewind (pages 21)
Options: 0: High-speed film rewind (initial setting)
1: Quiet film rewind
Film rewind can be set to perform more silently as opposed to initial high-
speed film rewind setting. Film rewind speed of the high-speed film rewind is
approx. 15 sec. and quiet film rewind is approx. 23 sec. per 36-exposure film
roll with fresh batteries.
14.Multiple exposure (page 63)
Options: 0: Single shutter release operation (initial setting)
1: Continuous shutter release operation
At initial setting, the shutter is released once each time the shutter release
button is fully depressed in multiple exposure (single frame shooting).
However, it can be changed to continuous shooting where the shutter can be
continuously released as long as the shutter release button is fully
depressed.
15. Time delay for auto metre-switch-off (page 17)
Options 4 : 4 sec.
6 : 6 sec. (initial setting)
8 : 8 sec.
16 : 16 sec.
At initial setting, the exposure metre automatically turns off 6 sec. after
turning the power switch on or lightly pressing the shutter release button.
However, it can be changed to 4 sec., 8 sec. or 16 sec. (Note that the usable
number of film rolls per batteries decreases with the longer delay time for
auto metre-switch-off.)
16.Self-timer duration (page 68)
Options 2 : 2 sec. 10 : 10 sec. (initial setting)
5 : 5 sec. 20 : 20 sec.
At initial setting, the shutter is released 10 sec. after the shutter release
button is fully depressed in self-timer operation. However, this can be
changed to 2, 5, or 20 sec.
17.LCD illuminates by pressing any function button (page 66)
Options 0: Disabled (initial setting)
1: Activated
At initial setting, pressing the " " button activates the LCD illuminator.
However, it can be set to be activated with a press of any button.
18.AF-Assist Illuminator activation (page 43)
Options 0: Activated (initial setting)
1: Disabled
When the condition for the AF-Assist Illumination is met (page 43) and the
shutter release button is pressed lightly, the AF-Assist Illuminator of the
camera automatically turns on and enables autofocus operation in a dark
environment. However, it can be changed not to turn on (autofocus may
Nikon
Distributed by WWW.LENSINC.NET
file:///D|/CAMERA REPAIR/Nikon F80/F80.htm (49 of 78) [3/19/2004 11:39:25 PM]
Page 50

become impossible).
19. ISO film speed setting for data imprint between frames (F80S only,
page 94)
Options 0: Automatically (initial setting) 3: ISO 100
1: Under ISO 25 4: ISO 125-200
2: ISO 32-80 5: Over ISO 250
At initial setting, the F80S automatically sets the film speed of the loaded
film when imprinting shooting data between film frames. However, it can be
changed to be set manually. Note that Custom Setting Menu 19 can only be
selected when the shooting data imprint between film frames is set on the
camera.
• Set the Custom Setting option to / (automatic setting) or at an option of
the ISO value of the film in use to imprint shooting data at regular exposure
level.
To increase the imprint exposure level, select an option number of lower
ISO number than the film in use. To decrease it, select a higher ISO
number.
Two-Button Reset
•Two-Button Reset lets you instantly reset specified settings to their
original initial settings.
• The LCD turns off momentarily and the following functions are reset to their
original settings with exposure mode/Custom Setting select dial set at
either P, S, A or M:
Function
Condition
Focus area
Centre
Flexible Program
Cancelled
Exposure
compensation
Cancelled
Auto Exposure Lock Cancelled
Auto Exposure/Flash
Exposure Bracketing
Cancelled
Flash Sync mode
Front-curtain sync
Nikon
Distributed by WWW.LENSINC.NET
file:///D|/CAMERA REPAIR/Nikon F80/F80.htm (50 of 78) [3/19/2004 11:39:25 PM]
Page 51

Flash exposure
compensation
Cancelled
•Cancelling Custom Setting
• Set the exposure mode/Custom Setting select dial to CSM and perform TwoButton Reset. The LCD turns off momentarily and then CUSTOM disappears from
the LCD panel. All the Custom Settings are cancelled and reset to their initial
factory settings (pages 71-75).
FLASH
PHOTOGRAPHY
You can enjoy the excitement of the Nikon
F80/F80D/F80S's advanced flash
technology by using the built-in Speedlight
or an optional AF Speedlight such as the
SB-28, SB-27 or SB-26. With the
F80/F80D/F80S system you'll discover the
benefits of flash for more picture-taking
situations than ever. Make fill-flash a
standard part of your photography. Brighten
dull scenes and erase harsh shadows for
beautiful portraits. With the F80/F80D/F80S
system's automatic operation, you can take flash pictures like never before.
About Flash Photography
•Built-in Speedlight
This camera is equipped with a built-in Speedlight that provides an angle of
coverage for a 28mm lens with a guide number of 12 (IS0100, m). TTL Auto
Flash modes such as 3D Multi-Sensor Balanced Fill-Flash and Multi-Sensor
Balanced Fill-Flash are available and ensure proper exposure of the main
subject and background, while providing adequate flash output to create
natural-looking flash photography. In addition to shooting in dim light, the flash
can be used in daylight to reduce shadows on the main subject or to put
catchlights in your subject's eyes. Five flash sync modes—Front-Curtain Sync
(Normal Sync), Slow Sync, Rear-Curtain Sync, Red-Eye Reduction and Red-Eye
Reduction with Slow Sync—are available with this camera.
• See below for the TTL Flash modes, page 82 for using the built-in Speedlight
and page 80 for the flash sync modes.
•The following TTL Auto Flash modes are available depending on the
type of lens used.
Lens
TTL Auto Flash mode
D-type Nikkor lens
3D Multi-Sensor Balanced Fill-Flash
(with Distance Information and Monitor
Pre-Flash)
Other CPU Nikkor lens
(except AF Nikkor for
F3AF)
Multi-Sensor Balanced Fill-Flash
(with Monitor Pre-Flash)*
Non-CPU Nikkor lens Standard TTL
Nikon
Distributed by WWW.LENSINC.NET
file:///D|/CAMERA REPAIR/Nikon F80/F80.htm (51 of 78) [3/19/2004 11:39:25 PM]
Page 52

" Only with built-in Speedlight or optional Speedlight SB-28/28DX, SB-27,
SB-26 or SB-25.
3D Multi-Sensor Balanced Fill-Flash
3D Multi-Sensor Balanced Fill-Flash can be performed with a combination of
the F80/F80D/F80S camera and D-type Nikkor lens. In this flash mode, just
after you press the shutter release button and before the shutter is activated,
the built-in Speedlight will fire a series of imperceptible pre-flashes that are
detected by the F80/F80D/F80S's five-segment TTL Multi Sensor, then
analysed for brightness and contrast. Furthermore, it integrates Distance
Information from the lens with other exposure control information, automatically
compensating the flash output level so that flash output and ambient light are
balanced.
3D Multi-Sensor Balanced Fill-Flash enables flash photography in very difficult
situations, such as a scene that includes an object with extremely high reflectivity
or a subject against an "infinite" background (empty sky, clouds, etc.).
• Set the camera's exposure mode to any mode other than Manual and
metering system to other than Spot.
Accessory Shoe/Ready-Light
Multi-Sensor Balanced Fill-Flash
Multi-Sensor Balanced Fill-Flash, without the Distance Information added to
the 3D Multi-Sensor Balanced Fill-Flash, can be performed with a combination
of the F80/F80D/F80S camera and CPU Nikkor lens other than D-type.
• Set the camera's exposure mode to any mode other than Manual and
metering system to other than Spot.
3D Multi-Sensor Balanced Fill-Flash together with Multi-Sensor Balanced Fill-Flash is called Automatic Balanced Fill-Flash with TTL
Multi-Sensor
Standard TTL Flash
Standard TTL Flash can be performed with non-CPU Nikkor lens. (Can only be
used with exposure mode set to Manual) With CPU Nikkor lens, Standard TTL
Flash is automatically set when the camera is set to Manual exposure mode or
Spot metering. In Standard TTL Flash, automatic flash output level
compensation is not available. This means that. even though the main subject
is correctly exposed, the background may not be. Standard TTL Flash is useful
when you want to highlight the main subject or perform flash exposure
compensation.
• Monitor Pre-Flash is cancelled in Standard TTL Flash.
• Accessory shoe
•An optional Speedlight, i.e. SB-28/28DX, SB-27, SB-26, SB-25, SB-24, SB-23
or SB-22s can be attached directly to the accessory shoe of the F80/F80D/
F80S without a cord. This accessory shoe is equipped with a safety-lock which
prevents accidental drop when a Speedlight with a safety-lock pin (i.e. SB-28/
28DX, SB-27, SB-26, SB-25 or SB-22s) is attached.
Nikon
Distributed by WWW.LENSINC.NET
file:///D|/CAMERA REPAIR/Nikon F80/F80.htm (52 of 78) [3/19/2004 11:39:25 PM]
Page 53

•Ready-light
• If the ready-light blinks approx. 3 sec. after full flash output, underexposure
may have occurred (when the Speedlight is set to TTL or non-TTL Auto Flash
mode). Check the focus distance, aperture or flash shooting distance range
and shoot again.
Flash Sync Mode Features
Set the flash sync mode to Front-Curtain
Sync for normal flash photography. The
camera's shutter speed is automatically set
to 1/60 to 1/125 sec. for flash photography
in Programmed Auto or Aperture-Priority
Auto exposure mode.(With an optional
Speedlight SB-26, SB-25 and SB-24, set
the Speedlight's sync mode selector to
NORMAL.)
Normally, the camera's shutter speed is
automatically set to 1/60 to 1/125 sec. for
flash photography in Programmed Auto or
Aperture-Priority Auto exposure mode.
Nikon
Distributed by WWW.LENSINC.NET
file:///D|/CAMERA REPAIR/Nikon F80/F80.htm (53 of 78) [3/19/2004 11:39:25 PM]
Page 54

However, for shooting nighttime scenes,
Slow Sync uses a slower shutter speed
(down to 30 sec.) to bring out background
details using all of the available light.
The Speedlight fires at the end of the
exposure, turning available light into a stream
of light that follows the flash-illuminated
moving subject. When Rear-Curtain Sync is
set in Programmed Auto or Aperture-Priority
Auto exposure mode, Slow Sync is
automatically set. (With an optional
Speedlight SB-26, 25 and 24, set the
Speedlight's sync mode selector to REAR.)
The Red-Eye Reduction lamp lights for
approx. 1 sec. before the flash fires in order
to reduce the red-eye effect in photos of
people or animals. (With an optional
Speedlight SB-28/28DX, SB-27 or SB-26,
the Red-Eye Reduction lamp of the
Speedlight lights.)
Red-Eye Reduction and Slow Sync mode are simultaneously set. Set the
exposure mode to Programmed Auto or Aperture-Priority Auto. (With an
optional Speedlight SB-28/28DX, SB-27 or SB-26, the Red-Eye Reduction
lamp of the Speedlight lights.)
NOTE: Flash Sync Modes_________________________
• When Red-Eye Reduction or Red-Eye Reduction with Slow Sync is
selected, the Red-Eye Reduction lamp lights for approx. 1 sec. before the
flash fires. Do not move the camera or let the subject move until the shutter
is released. (Red-Eye Reduction is not recommended in shooting situations
where shutter release is your top priority.)
• With some lenses, light from the Red-Eye Reduction lamp may not reach
the subject's eyes. In some cases, red-eye effect may not be reduced
Nikon
Distributed by WWW.LENSINC.NET
file:///D|/CAMERA REPAIR/Nikon F80/F80.htm (54 of 78) [3/19/2004 11:39:25 PM]
Page 55

effectively due to the location of subject.
• With Slow Sync and Red-Eye Reduction with Slow Sync, keep the camera
steady to prevent picture blur since the shutter speed is slow. Use of a
tripod is recommended.
• Rear-Curtain Sync cannot be used with a studio flash system since the
correct synchronisation cannot be obtained.
Using the Built-in Speedlight
•Operation described in this section applies when the built-in Speedlight
and D-type AF Nikkor are attached.
1Set the metering system.
• Set the metering system to Matrix or Centre-Weighted Metering.
3 Set exposure mode and confirm shutter speed and
aperture.
• Note that Automatic Balanced Fill-Flash with TTL Multi Sensor is executed
with the exposure mode set to Programmed Auto, Shutter-Priority Auto or
Aperture-Priority Auto, and Standard TTL with the Manual.
• Available shutter speed and aperture in each exposure mode
Exposure mode
Available shutter
speed
Available
aperture
Page
Programmed Auto Automatically set
(1/125-1/60 sec.)
Automatically
set
50
52
Shutter-Priority
Auto
1/125-30 sec.*1
Aperture-Priority
Auto
Automatically set
(1/125-1/60 sec.)
Desired
setting*2
54
56
Manual
1/125-30 sec.*1, bulb
*1 Shutter speed shifts automatically to 1/125 sec. when the shutter speed is set to faster than
1/125 sec. and the flash is fired (or attached optional Speedlight is turned on). In this case,
125 appears in the viewfinder and the selected shutter speed display blinks in the LCD
panel.
Nikon
Distributed by WWW.LENSINC.NET
file:///D|/CAMERA REPAIR/Nikon F80/F80.htm (55 of 78) [3/19/2004 11:39:25 PM]
Page 56

*2 Flash shooting distance range depends on the ISO film speed of the film in use and
aperture selected. In Aperture-Priority Auto or Manual exposure mode, set the aperture
according to the flash shooting distance range table on page 83.
•Flash shooting distance range for built-in Speedlight
Flash shooting distance changes according to the film speed in use and
aperture setting.
ISO Film speed 25 50 100 200 400 800 Flash shooting
distance range*
(m)
Guide number 6 8.5 12 17 24 34
Aperture value — — 1.4 2 2.8 4 2-8.5
— 1.4 2 2.8 4 5.6 1.4-6
1.4 2 2.8 4 5.6 8 1-4.2
2 2.8 4 5.6 8 11 0.7-3
2.8 4 5.6 8 11 16 0.6-2.1
4 5.6 8 11 16 22 0.6-1.5
5.6 8 11 16 22 32 0.6-1.1
8 11 16 22 32 — 0.6-0.8
* The table shows the flash shooting distance range for print films. The flash shooting distance
range of color slide film is approx. 2/3 that of print film with the same ISO film speed rating.
• The maximum flash shooting distance can also be calculated by dividing the
guide number by the aperture value selected.
Example: When f/2.8 is selected with ISO 100 film using the camera's built-in
Speedlight, the maximum flash shooting distance will be;
12/2.8 = approx. 4.2m
Usable Lenses with Built-in Speedlight
Nikon
Distributed by WWW.LENSINC.NET
file:///D|/CAMERA REPAIR/Nikon F80/F80.htm (56 of 78) [3/19/2004 11:39:25 PM]
Page 57

• Usable lenses with built-in Speedlight
• 28mm to 300mm CPU lenses can be used with the built-in Speedlight.
• Make sure to remove the lens hood.
• The built-in Speedlight cannot be used with zoom lenses set to Macro in
wideangle.
• Vignetting occurs at the edges of the frame resulting in underexposure with the
following zoom lenses, which have limitations in usable focal length or shooting
distance:
Lens
Limitations
AF-S 17-35mmf/2.8
ED
35mm focal length at 1.5m or longer shooting
distance.
AF 20-35mm f/2.8 28mm focal length at 2m or longer shooting
distance or 35mm
focal length at 0.7m or longer shooting distance
AF 24-120mm
f/3.5-5.6
28mm or longer focal length; and at 28mm, at
0.8m or longer
shooting distance
AF-S 28-70mm
f/2.8 ED
50mm or longer focal length; and at 50mm, at
0.8m or longer
shooting distance
AF 28-85mm
f/3.5-4.5
28mm or longer focal length; and at 28mm, at
2m or longer
shooting distance
AF 35-70mm f/2.8 35mm or longer focal length; and at 35mm, at
0.8m or longer
shooting distance.
AF Micro
70-180mm
f/4.5-5.6 ED
70mm or longer focal length; and at 70mm, at
0.7m or longer
shooting distance
* 28mm to 200mm non-CPU Nikkor lenses (AI-S, Al, Al-modified Nikkor) and
Series-E lenses except 200mm f/2 lens can be used with the built-in
Speedlight. However following lenses have limitations in usable focal length or
shooting distance:
•AI-S/AI 25-50mm f/4 (40mm or longer focal length; and at 40mm, at 0.8m or
longer shooting distance)
• AI-S 28-85mm f/3.5-4.5 (35mm or longer focal length)
• Al 35-70mm f/3.5 (35mm or longer focal length; and at 35mm, at 1 mm or
longer shooting distance)
• Al 28-45mm f/4.5 (28mm or longer focal length; and at 28mm, at 1m or longer
shooting distance)
•Al-modified 50-300mm f/4.5 (200mm or longer focal length)
Nikon
Distributed by WWW.LENSINC.NET
file:///D|/CAMERA REPAIR/Nikon F80/F80.htm (57 of 78) [3/19/2004 11:39:25 PM]
Page 58

•AI-S"AI 50-300mm f/4.5 (135mm or longer focal length)
• Al 80-200mm f/2.8 (105mm or longer focal length)
• Al-modified 80-250mm f/4 (135mm or longer focal length)
Exposure Compensation
Flash exposure compensation lets you intentionally change the correct
exposure computed by the Speedlight and the camera. For example,
you can highlight the main subject by increasing the flash output or
prevent the main subject from becoming too bright by decreasing the
flash output.
2 Release the built-in Speedlight by pressing the flash
lock-release button, and set the flash sync mode and
exposure mode.
Usable Optional Speedlights
Nikon
Distributed by WWW.LENSINC.NET
file:///D|/CAMERA REPAIR/Nikon F80/F80.htm (58 of 78) [3/19/2004 11:39:25 PM]
Page 59

*1 Standard TTL is performed with Spot Metering. Selecting Spot Metering or Manual exposure mode
automatically changes the TTL Auto Flash mode to Standard TTL with Speedlights other than SB-28/
28DX, 27, 26, 25 and 24 that are equipped with TTL Auto Flash.
*2 Wireless Slave Flash can be performed with the SB-26. Shutter speed is automatically controlled
to slower than 1/90 sec. when the Wireless Slave Flash selector is set to 0.
*3 With the SB-21 B, autofocus can only be used when an AF Micro-Nikkor (60mm, 105mm, 200mm
and 70-180mm) is attached.
*4 TTL Auto Flash is possible with TTL Remote Cord SC-23.
In A or M flash mode, attach SU-2 to SC-13 with SB-11 and SB-14, or attach SU-3 to SC-13 with
SB-140.
SC-11 or SC-15 can also be used; however, the ready-light does not appear in the viewfinder and
the shutter speed does not change automatically.
*5 Ultraviolet photography can be performed only when SB-140 is set to M. (Infrared photography
cannot be performed.)
Notes on using the optional Speedlight
• See your Speedlight manual for details. If the camera groups are defined in the
manual of the Speedlight with TTL Auto Flash, see the section for camera group I.
• Flash sync speed is 1/125 sec. or slower when using an optional Speedlight.
• Available film speeds for TTL Auto Flash are ISO 25 to ISO 1000.
• With the SB-26, 25 or 24, flash sync mode set on the Speedlight overrides the
setting on the camera body.
• When Red-Eye Reduction or Red-Eye Reduction with Slow Sync is set on a
camera attached with the SB-28/28DX, 27 or 26, the Red-Eye Reduction lamp
of the Speedlight lights up.
• Even when the optional Speedlight with the AF-Assist Illuminator is attached,
AF-Assist Illuminator does not emit light unless the conditions for AF-Assist
Illumination are met (page 43).
Nikon
Distributed by WWW.LENSINC.NET
file:///D|/CAMERA REPAIR/Nikon F80/F80.htm (59 of 78) [3/19/2004 11:39:25 PM]
Page 60

• With SK-6 and SB-24 are attached, AF-Assist Illuminators of the camera body
and the Speedlight do not emit light.
• In Programmed Auto exposure mode, the camera automatically controls the
maximum available aperture as follows in relation to the film speed:
ISO film speed
25 50 100 200 400 800 1000
Maximum
available
aperture
Built-in Speedlight 2 2.4 2.8 3.3 4 4.8 —
Optional
Speedlight
2.8 3.3 4 4.8 5.6 6.7 6.7
* When film speed increases by one step, the maximum available aperture is
stopped down by 1/2 f/stop. If you are using a lens with a maximum
aperture smaller than that listed above, the automatically controlled aperture
range is from the lens' maximum to minimum aperture.
• Use the optional Accessory Shoe Adaptor AS-15 to use the sync terminal
• FEE in the LCD panel and P in the viewfinder blink and the shutter cannot be
released when the exposure mode is set to P and attached Speedlight is not
set to TTL Auto Flash. Set the Speedlight flash mode to TTL, or set the
camera's exposure mode to S, A or M.
NOTE: Flash attachments made by manufacturers other than Nikon_____
Use only Nikon Speedlights. Other units may damage the camera's electrical
circuit due to incompatible voltage requirements (not compatible with 250V
or higher), electric contact alignment or switch phase.
About Depth of Field and Focus Tracking
This camera is equipped with autofocus where focusing is
automatically executed by the camera. Basics of the relationship
between focus and depth of field and Focus Tracking are
explained in this section.
Depth of field
When focusing, depth of field should be considered. Depth of field is the
zone of sharpest focus in front of and behind the subject on which the
lens is focused. It varies according to shooting distance, focal length and,
above all, aperture. Smaller apertures (larger f-numbers) will produce a
deeper depth of field where the background and foreground become
sharper: larger apertures (smaller f-numbers) will produce a shallower
depth of field where the background becomes blurred. Similarly, shorter
shooting distance or longer focal length will produce a shallower depth of
field, and longer shooting distance or shorter focal length will produce a
deeper depth of field. Note that depth of field tends to be shallower in
front of and deeper behind the subject in focus.
•Focus Tracking
When the focus mode selector is set to Single Servo AF (S) or Continuous
Servo AF (C) and the shutter release button is lightly pressed or AE-L/AFL button (when AF start in CSM 11 is selected) is kept pressed, the
camera automatically switches to Focus Tracking when a moving subject
is detected. Focus Tracking enables the camera to analyse the speed of
Nikon
Distributed by WWW.LENSINC.NET
file:///D|/CAMERA REPAIR/Nikon F80/F80.htm (60 of 78) [3/19/2004 11:39:25 PM]
Page 61

the moving subject according to the focus data detected, and to obtain
correct focus by anticipating the subject's position—and driving the lens
to that position—at the exact moment of exposure.
In Single Servo AF, Focus Tracking is activated with a subject that has
been moving in advance to the focus detection, and focus is locked when
the subject stops moving and • appears in the viewfinder. In Continuous
Servo AF, camera continues to track subject (even with a subject which
started moving in the middle of the focus detection) and focus is not
locked.
DATA BACK
Imprint the date and/or time on photographs
with the data back of the Nikon F80D or
F80S, and also shooting data between
frames (F80S only).
Adjusting Date and Time and Imprinting Data
•The F80D and F80S allow you to imprint Year/Month/Day,
Day/Hour/Minute (24-hour clock), Month/Day/Year or Day/Month/Year
on your picture (in any exposure mode).
•Adjusting date and time (Example: year 2000, April 21, 15:30; shows
the operation with F80D; same operation with F80S)
1 Push MODE button to select one of the date displays.
• Each time you push the MODE button the display changes as follows:
• To set date choose display other than Day/Hour/Minute. With
Day/Hour/Minute display, only time can be set.
2 Push SELECT button so year section starts blinking.
Nikon
Distributed by WWW.LENSINC.NET
file:///D|/CAMERA REPAIR/Nikon F80/F80.htm (61 of 78) [3/19/2004 11:39:25 PM]
Page 62

• Each time you push the SELECT button the blinking section moves in the
order of year, month and day. ' indicates the year section (last two digits)
and m indicates the month section, (< is not imprinted on the picture.)
3 Push ADJUST button to set the year to "00".
• Each time you push the ADJUST button the year section changes as
follows (between 1998 to 2049):
• To change the numerical indication rapidly, hold the ADJUST button down
for more than 1 sec.
4 Set the month and day following steps 2 and 3. When
the setting is complete, push the SELECT button so
the newly adjusted date display appears without
blinking.
• Push the SELECT button until the date display stops blinking. When the
data imprint indicator — appears in the data imprint LCD panel,
date setting is complete.
Adjusting Date and Time and Imprinting Data-continued
5 Push MODE button to select Day/Hour/Minute
display.
6 Push SELECT button so hour section starts blinking.
• Each time you push the SELECT button, the blinking section moves in the
order of hour, minute and : (colon).
7 Push ADJUST button to set the hour to "15".
Nikon
Distributed by WWW.LENSINC.NET
file:///D|/CAMERA REPAIR/Nikon F80/F80.htm (62 of 78) [3/19/2004 11:39:25 PM]
Page 63

8 Set the minute following steps 6 and 7. When the
setting is complete, push the SELECT button twice so
the newly adjusted time display appears without
blinking.
• Pushing the SELECT button once makes : blink and pushing it a second
time makes — appear. When — appears, the setting is complete.
• To set time to the precise second, push the SELECT button once at the
step 8 so : indication blinks. When the actual time coincides with the time
you have set, push the ADJUST button. The clock starts from 00 sec.
(Seconds are not displayed in the LCD panel.)
Example: To set the clock to 13:00:00:
Set the clock to 13:00. Push the SELECT button so : indication blinks.
When the time becomes exactly 13:00:00, push the ADJUST button to start
the clock at exactly 13:00:00.
• Batteries in the camera body also power the Quartz Date. Set the date and
time after installing batteries for the first time. When changing batteries,
date and time remain in the Quartz Date memory up to approx. 15 minutes
without batteries. If the date and time data are lost, reset them.
• Imprinting date/time
Push MODE button to select date/time display and fully
depress the shutter release button to take a picture with
the imprinted date/time.
• The data displayed on the data imprint LCD will be imprinted on the
picture. Select - - - - - - (no imprint) to cancel data imprint. Compatible
film speeds for data imprinting are IS032-3200.
• Data imprint indicator - blinks for approx. two to three sec. immediately
after the shutter is released (when a film is loaded).
Nikon
Distributed by WWW.LENSINC.NET
file:///D|/CAMERA REPAIR/Nikon F80/F80.htm (63 of 78) [3/19/2004 11:39:25 PM]
Page 64

Imprinting Shooting Data (F80S only)
•With the F80S, you can imprint shutter speed, aperture and selected
exposure compensation values between film frames (in any exposure
mode).
• When a picture is taken, three shooting data—shutter speed, aperture and
selected exposure compensation value—are imprinted between film frames.
• Compatible film speeds for shooting data imprinting are IS025-3200.
• To fit into a slide mount, edges of the film and the imprinted shooting data may
be cut off in processing.
• When shooting data imprint is selected, film advance speed may slow down
even when the film advance mode is set to continuous shooting. The film
advance speed varies with film sensitivity and temperature; it becomes slower
with slower film sensitivity and at lower temperatures.
• Liquid crystal illumination is used in imprinting shooting data. Due to slow
response characteristics of the liquid crystal, previous data may be imprinted
or data imprint may overlap. This tends to occur at lower temperatures. Make
sure to release the shutter after shooting data has changed especially with
continuous shooting. Also, correct data imprint may not be executed when the
brightness, shutter speed or aperture of each frame vary
* Custom Setting Menu 19 can only be selected when the shooting data imprint
between film frames is set on the camera.
MISCELLANEOUS
The Nikon F80/F80D/F80S is a high-
performance, precision instrument, designed
to deliver superior pictures. You'll want to
take good care of your camera to ensure the
best possible performance. Take time to
review this section thoroughly, as doing so
will add to your picture-taking pleasure.
We've also included information about
optional accessories and a detailed section
with technical specifications. Please read
these areas carefully.
Optional Accessories
•A variety of optional accessories, including power source and
Speedlight are available for the F80/F80D/F80S.
Battery Pack MB-16
• With the Battery Pack MB-16, four 1.5V AA-type alkaline-manganese, lithium.
NiCd or Ni-MH batteries can be used to power the F80/F80D/F80S,
Nikon
Distributed by WWW.LENSINC.NET
file:///D|/CAMERA REPAIR/Nikon F80/F80.htm (64 of 78) [3/19/2004 11:39:25 PM]
Page 65

Eyepiece correction lenses
• Eyepiece correction lenses enable near- or far-sighted photographers to adjust
the eyepiece dioptre to suit their vision, and can be attached easily by
inserting onto the viewfinder eyepiece. Nine optional eyepiece correction
lenses provide viewfinder dioptre settings of -5, -4, -3. -2. , +0.5, +1. +2 and
+3 DP (combined dioptre with setting on camera body). We recommend that
you actually look through the viewfinder with various correction lenses
attached before making a purchase, since viewfinder dioptre differs from one
person to another. Use the optional eyepiece correction lens when you need
eyepiece correction over -1.8 to +0.8 DP that can be adjusted using the
F80/F80D/F80S's dioptre adjustment lever.
Lenses
• A wide variety of lenses — 16mm to 600mm wideangle, telephoto, zoom.
Micro or DC (Defocus image Control) — is available for the F80/F80D/F80S.
Filtres
• Nikon filtres can be divided into three types: screw-in, drop-in and rearinterchange. With the F80/F80D/F80S, the filtre factor need not be considered
except for the R60 filtre. Compensate exposure +1 EV when using the R60.
Note that when special filtres available from manufacturers other than Nikon
are used, autofocus or the electronic rangefinder may not operate properly.
• Use circular-polarising filtre C-PL instead of polarising filtre Polar. The linear
polarising filtre cannot be used with the F80/F80D/F80S.
• Use NC filtre when using the filtre to protect the lens.
• Moire may occur when shooting a subject against bright light or if a bright light
source is in the frame. In this case, remove the filtre before shooting.
Cable release AR-3
. When the Cable Release AR-3 is attached to the release terminal of the F80/
F80D/F80S, camera shake can be reduced when shooting with slow shutter
speed such as in night scene photography, astronomical photography or
close-up photography.
Speedlight SB-28/SB-27
• Speedlight SB-28/SB-27 normally uses four AA-type alkaline-manganese
batteries with a guide number of 36 (SB-28) and 30 (SB-27) (manual flash, 35mm
zoom-head position, ISO 100, m, 20°C). Optional external power source
SD-7 and SD-8A or Power Bracket SK-6 (SB-28 only) can also be used.
. 3D Multi-Sensor Balanced Fill-Flash, which enables natural-looking overall
exposures and a better balance between ambient light and the fill-flash (even
when a highly reflective object is located within the frame or the background is
non-reflective), is compatible with the SB-28/SB-27. Also, the AF Assist
Illuminator enables autofocus operation in a dark environment.
• Automatic power zoom continuously changes the zoom-head position
according to the lens' focal length. Also, a variety of flashes, including Slow
Sync, Rear-Curtain Sync, non-TTL Auto Flash or manual flash are compatible
with the SB-28/SB-27. With SB-28, Repeating Flash is also available.
Wireless Slave Flash Controller SU-4 (with SG-2)
•TTL multi-flash, where a Speedlight to which Wireless Slave Flash Controller
SU-4 (with SG-2) is attached is fired simultaneously with the Speedlight attached
to the F80/F80D/F80S, can also be used. Use the Diffuser SG-2 supplied with
the SU-4. The Diffuser SG-1 cannot be used. If the SG-1 is supplied with your
SU-4, contact an authorised Nikon dealer or service centre.
Nikon
Distributed by WWW.LENSINC.NET
file:///D|/CAMERA REPAIR/Nikon F80/F80.htm (65 of 78) [3/19/2004 11:39:25 PM]
Page 66

Soft case (CF-59/CF-60)
• Two camera cases, CF-59 (for standard lens) and CF-60 (for telephoto lens) are
available for this camera.
CF-59: Camera body fits inside case with AF 28-200mm f/3.5-5.6D IF or
smaller lens attached.
CF-60: Camera body fits inside case with AF 75-240mm f/4.5-5.6D or smaller
lens attached.
Neckstraps/Handstrap AH-4
• Braid-type AN-4B (black) and AN-4Y (yellow), wide braid-type neckstrap
AN-6Y (yellow) and AN-6W (burgundy) neckstraps are available.
• Handstrap -4 helps you to hold the camera firmly and easily, and shoot in
quick-motion.
Camera Care
•Cleaning camera body___________________________
Use a blower brush to remove dirt and dust from the camera body and clean it
with a soft, clean cloth. After using the camera near seawater, wipe the camera
body with a soft, clean cloth slightly moistened with pure water to remove salt,
and then dry it with a dry cloth. NEVER use organic solvents like thinner or
benzene. They may damage the camera.
•Cleaning mirror and lens__________________________
Use a blower brush to remove dirt and dust from the mirror or lens. To remove
fingerprints or smudges from the lens' surface, use a soft, clean cotton cloth or
lens tissue moistened with ethanol (alcohol) or lens cleaner.
• Do not subject the camera or lens to strong vibration or shock____
Do not drop the camera body and lens or hit them against a hard surface as this
may damage their precision mechanism.
• Do not touch the shutter curtains_____________________
The shutter is made of very thin curtains. Do not hold, poke, or blow strongly with
a blower brush. Doing so may scratch, deform or tear the shutter curtains.
•Avoid strong electric or magnetic fields__________________
The camera may not function properly in strong electric or magnetic fields such
as near a transmitter tower. Avoid using the camera in such locations.
• Store the camera in a cool, dry place__________________
Store the camera in a cool, dry place to prevent mold and mildew.
Keep it away from naphthalene or camphor (moth repellent), electrical appliances
that generate magnetic fields or an excessively hot place such as inside a vehicle
during the summer or near a heater.
•Avoid extreme temperature change___________________
An extreme temperature change can cause condensation inside the camera body.
When taking the camera to a very hot place from a very cold place or vice versa,
place it inside an airtight container such as a plastic bag and leave it inside a
while to expose the camera gradually to the temperature change.
•Avoid water or moisture___________________________
Keep the camera away from water or moisture. When using the camera near
water, guard against splashes, especially salt water spray.
Nikon
Distributed by WWW.LENSINC.NET
file:///D|/CAMERA REPAIR/Nikon F80/F80.htm (66 of 78) [3/19/2004 11:39:25 PM]
Page 67

. Remove the batteries and store the camera with a desiccant_____
IIf you do not intend to use the camera for a long time, remove the batteries to
protect the camera from battery leakage.
• In a humid environment, store the camera inside a plastic bag with a desiccant
to keep out dust, moisture and salt. Note, however, that storing leather cases in
vinyl bags may cause the leather to deteriorate. Keep the batteries in a cool, dry
place away from heat or humidity.
• Change the desiccant occasionally since it does not absorb moisture effectively
after a while.
• Leaving the camera unused for a long period of time may cause mold to grow
and result in malfunction. Turn the power on and release the shutter a few times
once per month.
•To maintain the built-in Speedlight in peak condition, fire it a few times every
month. This will enable you to use the flash for many years.
Notes on Batteries
«Use two CR123A or DL123A lithium batteries______________
Use two CR123A or DL123A lithium batteries.
• Change the batteries well before the end of their life and prepare spare batteries
before important photographic occasions.
•Turn the camera power off when changing batteries___________
Turn the camera power off before changing batteries and insert the batteries with
(+) and (-) ends positioned correctly.
• Stains on the battery poles may cause lack of contact. Wipe the batteries well
with a dry cloth before installing.
• Use fresh batteries at low temperatures__________________
Battery power diminishes at extremely low temperatures and the camera may not
function properly with old batteries. Use a fresh set of batteries at low
temperatures, keep spare batteries warm, and use them alternately.
• Film advance speed lowers and number of usable film rolls becomes less at low
temperatures. However, battery power may recover when the temperature
returns to normal.
• Do not throw batteries into a fire or short circuit batteries_______
Do not throw batteries into a fire. Do not short, disassemble, heat or charge
batteries.
Troubleshooting
Nikon
Distributed by WWW.LENSINC.NET
file:///D|/CAMERA REPAIR/Nikon F80/F80.htm (67 of 78) [3/19/2004 11:39:25 PM]
Page 68

Troubleshooting—continued
Nikon
Distributed by WWW.LENSINC.NET
file:///D|/CAMERA REPAIR/Nikon F80/F80.htm (68 of 78) [3/19/2004 11:39:25 PM]
Page 69

In certain cases, due to static electricity or poorly loaded batteries, the
F80/F80D/F80S's microcomputer may turn the camera off, even with fresh,
properly installed batteries. For the same reason, the film may not advance
properly. In each of these cases, to resume operation, simply turn the power off,
then turn it on again. Or, remove and reinstall the batteries.
Specifications
Nikon
Distributed by WWW.LENSINC.NET
file:///D|/CAMERA REPAIR/Nikon F80/F80.htm (69 of 78) [3/19/2004 11:39:25 PM]
Page 70

Type of camera Integral-motor autofocus 35mm single-lens reflex
with electronically
controlled focal-plane shutter and built-in Speedlight
Exposure modes P: Programmed Auto (Flexible Program possible)
S: Shutter-Priority Auto
A: Aperture-Priority Auto
M: Manual
Picture format 24 x 36mm (standard 35mm film format)
Lens mount
Nikon F mount (with AF coupling, AF contacts)
Lens
• D-type AF Nikkor: All functions possible
• PC Micro-Nikkor 85mm f/2.8D: All functions
except autofocus and
exposure modes other than Manual possible without
shifting and/or
tilting the lens
• AF Nikkor other than D-type (except AF Nikkor for
F3AF): All
functions except 3D Matrix Metering possible
• AI-P Nikkor: All functions except 3D Matrix
Metering and autofocus
possible
• IX-Nikkor: Cannot be used
• Non-CPU: Usable in Manual exposure mode
(exposure meter
cannot be used)
Electronic Rangefinder usable with lens with
maximum aperture of
f/5.6 or faster
Viewfinder
Fixed eye-level pentaprism, built-in dioptre
adjustment (-1.8 to +0.8
DP)
Eyepoint
17mm (at-1.0 DP)
Focusing screen Clear Matte Screen II with focus brackets and
On-Demand Grid Lines
able to display
Viewfinder
frame
coverage
Approx. 92%
Finder
magnification
Approx. 0.75x with 50mm lens set to infinity (at -1.0
DP)
Dioptre
adjustment
-1.8 DP to+0.8 DP
Nikon
Distributed by WWW.LENSINC.NET
file:///D|/CAMERA REPAIR/Nikon F80/F80.htm (70 of 78) [3/19/2004 11:39:25 PM]
Page 71

Viewfinder
information
Focus indications, metering system, AE lock, shutter
speed, aperture,
exposure mode, electronic analog exposure
display/exposure
compensation display, exposure compensation, frame
counter/
exposure compensation value, ready-light, multiple
exposure, focus
area, flash exposure compensation,
five sets of focus brackets (area)/Spot Metering area,
12mmo
reference circle for Centre-Weighted metering,
On-Demand Grid Lines
able to display
Reflex mirror Automatic, instant-return type
Specifications—continued
Shutter
Electronically controlled vertical-travel focal-plane
shutter
Release terminal Available on the shutter release button
Shutter speeds • In P, A: 30 to 1/4000 sec.
• In S: 30 to 1/4000 sec. (in 1/2 steps)
• In M: 30 to 1/4000 sec. (in 1/2 steps), bulb
Nikon
Distributed by WWW.LENSINC.NET
file:///D|/CAMERA REPAIR/Nikon F80/F80.htm (71 of 78) [3/19/2004 11:39:25 PM]
Page 72

Sync contact
X-contact only; flash synchronisation up to 1/125
sec.
Built-in
Speedlight
Activated by pressing Speedlight lock-release button,
guide number:
12 (at ISO 100, m); flash coverage: 28mm or longer
lens; film speed
range: ISO 25 to ISO 800
Flash control Controlled by five-segment TTL Multi Sensor
• Automatic Balanced Fill-Flash with TTL Multi
Sensor: 3D MultiSensor Balanced Fill-Flash compatible with built-in
Speedlight,
SB-28/28DX, 27, 26, 25 and D-type Nikkor lens;
Multi-Sensor Balanced Fill-Flash with built-in
Speedlight or
Speedlight such as SB-29, 28/28DX, 27, 26, 25, 24,
23, 22s, 22, 20
and AF Nikkor other than D-type or Ai-P Nikkor
lens (except for AF
Nikkor for F3AF)
• Standard TTL: With built-in Speedlight, SB-29,
28/28DX, 27, 26, 25,
24, 23, 22s, 22, 20 and non-CPU Nikkor lens; or with
built-in
Speedlight, SB-29, 28/28DX, 27, 26, 25, 24, 23, 22s,
22, 20 and
exposure mode set to Manual or metering system to
Spot
Flash sync mode Front-Curtain Sync (normal sync), Red-Eye
Reduction, Red-Eye
Reduction with Slow Sync, Slow Sync, Rear-Curtain
Sync
Ready-light
Lights up when flash fully charged with built-in
Speedlight, SB-28/
28DX, SB-27, SB-26, SB-23, etc.; blinks (3 sec. after
flash) for full
output warning
Accessory shoe Standard ISO-type hot-shoe contact (sync contact,
ready-light
contact, TTL auto flash contact, monitor contact,
GND), safety lock
provided
Self-timer
Electronically controlled; timer duration: 10 sec.
Depth-of-field
preview button
Stop-down lens aperture by pressing depth-of-field
button
Film loading Film automatically advances to first frame when
camera back is
closed (shutter and reflection mirror not activated)
Nikon
Distributed by WWW.LENSINC.NET
file:///D|/CAMERA REPAIR/Nikon F80/F80.htm (72 of 78) [3/19/2004 11:39:25 PM]
Page 73

Specifications—continued
Nikon
Distributed by WWW.LENSINC.NET
file:///D|/CAMERA REPAIR/Nikon F80/F80.htm (73 of 78) [3/19/2004 11:39:25 PM]
Page 74

All specifications apply when fresh batteries are used at normal temperature (20°C).
Specifications and design are subject to change without notice.
AFArea mode..........................22, 39-41
AF-Assist Illuminator...27, 31, 43, 83, 87
Aperture-Priority Auto exposure
mode....................................25, 54-55
Auto Exposure Bracketing.............61-62
Auto Exposure Lock ......................58-59
Autofocus................................22, 38, 46
Automatic Balanced Fill-Flash
with TTL Multi Sensor..........78-79, 86
!
Centre-Weighted Metering......32, 35, 49
Continuous shooting ...........................37
Continuous Servo AF.........38, 40-41, 88
CPU Nikkor lens.....34-35, 78-79, 84, 86
Custom Setting ..............69-75, 112-113
D
Nikon
Distributed by WWW.LENSINC.NET
file:///D|/CAMERA REPAIR/Nikon F80/F80.htm (74 of 78) [3/19/2004 11:39:25 PM]
Page 75

Depth of field.................................67, 88
Dioptre adjustment..............................66
Distance information ...............32, 48, 78
D-type Nikkor lens ............32, 34, 78, 86
DX-coded film ...............................20, 36
Dynamic AF mode ...................39-41, 42
Dynamic AF Mode with Closest
Subject Priority.....................39-41, 42
E
Exposure compensation .....................60
Exposure meter...................................17
Exposure metering
system............................32, 35, 48-49
Exposure mode..................24, 35, 50-57
F
Film advance mode.......................21, 37
Flash exposure compensation............85
Flash shooting distance range............83
Flash sync mode............................80-81
Flexible Program .................................51
Focus brackets (area) .....4, 5, 23, 27, 42
Focus Lock..............................44-45, 46
Focus mode............................22, 35, 38
Focus Tracking..............................38, 88
Front-Curtain Sync........................30, 80
L
lcd illuminator....................................66
Long Time Exposure (Bulb).................65
M
Manual exposure mode...........25, 56-57
Manual focus.................................46, 47
Manual focus with electronic
rangefinder ......................................47
Matrix Metering.................24, 32, 35, 48
Maximum aperture......54, 56, 83, 87, 88
Minimum aperture..............18, 50-56, 88
Monitor Pre-Flash................................78
Nikon
Distributed by WWW.LENSINC.NET
file:///D|/CAMERA REPAIR/Nikon F80/F80.htm (75 of 78) [3/19/2004 11:39:25 PM]
Page 76

Multiple exposure ..........................63-64
Multi-Sensor Balanced
Fill-Flash.........................31, 78-79, 86
P
Programmed Auto exposure
mode............................... 24-25, 50-51
R
Ready-light.................. 30, 79, 82-83, 85
Rear-Curtain Sync.........................81, 86
Red-Eye Reduction.......................81, 86
Red-Eye Reduction with
SIow Sync..................................81, 86
s
Self-timer.............................................68
Shutter-Priority Auto exposure
mode....................................25, 52-53
Single Area AF mode...............22, 39-42
Single-frame shooting...................21, 37
Single Servo AF...........22, 38, 40-41, 88
Slow Sync flash...................................80
Spot Metering .........................32, 35, 49
Standard TTL flash ........................78-79
Sync shutter speed .............................82
"
3D Multi-Sensor Balanced
Fill-Flash.........................31, 78-79, 86
3D 10-Segment Matrix
Metering ..............................32, 35, 48
Two-Button Reset................................76
Custom Setting Menu
Function
Options
1 Automatic film rewind at the end
of film
roll
0: Activated (initial setting)
1: Disabled
Nikon
Distributed by WWW.LENSINC.NET
file:///D|/CAMERA REPAIR/Nikon F80/F80.htm (76 of 78) [3/19/2004 11:39:25 PM]
Page 77

2 Reset to DX film speed setting
for new
film
0: Activated (initial setting)
1: Disabled
3 Bracketing order
0: Metered value, under, over
(initial
setting)
1: Under, metered value, over
4 On-Demand Grid Lines
superimposition
display
0: Not displayed (initial setting)
1: Displayed
5 Illumination for superimposition 0: Automatically illuminated for
low light
(initial setting)
1: Cancelled
2: Always illuminated
6 Focus area selection
0: Normal selection (initial
setting)
1: Enables successive rotation
of focus
area selection
7 Auto Exposure Lock when
shutter release
button is lightly pressed
0: Disabled (initial setting)
1: Activated
8 Auto film loading when camera
back is
closed
0: Enabled (initial setting)
1: Disabled
9 Closest-subject-priority Dynamic
AF in
Single Servo AF
0: Enabled (initial setting)
1: Disabled
10 Closest-subject-priority Dynamic
AF in
Continuous Servo AF
0: Disabled (initial setting)
1: Enabled
11 AE-L/AF-L button
0: AE/AF simultaneous lock
(initial setting)
1: Auto Exposure lock only
2: Autofocus lock only
3: Auto Exposure lock (remains
locked
until button is pressed again)
4: AF operation only starts by
pressing AEL/AF-L button
Nikon
Distributed by WWW.LENSINC.NET
file:///D|/CAMERA REPAIR/Nikon F80/F80.htm (77 of 78) [3/19/2004 11:39:25 PM]
Page 78

Function
Options
12 Command Dial functions
0: Main-Command Dial for
shutter speed;
Sub-Command Dial for aperture
setting
(initial setting)
1: Main-Command Dial for
aperture; Subcommand Dial for shutter speed
setting
13 Film rewind
0: High-speed film rewind
(initial setting)
1: Quiet film rewind
14 Multiple exposure
0: Single shutter release
operation (initial
setting)
1: Continuous shutter release
operation
15 Time delay for auto
meter-switch-off
4 : 4 sec.
6 : 6 sec. (initial setting)
8 : 8 sec.
12: 16 sec.
11 Self-timer duration
2 : 2 sec.
5 : 5 sec.
10: 10 sec. (initial setting)
20: 20 sec.
17 LCD illuminates by pressing any
function
button
0: Disabled (initial setting)
1: Activated
18 AF-Assist Illuminator activation 0: Activated (initial setting)
1: Disabled
19 ISO film speed setting for data
imprint
between frames
0 : Automatically (initial
setting)
1 : Under ISO 25
2 : ISO 32-80
3 : ISO 100
4 : ISO 125-200
5 : Over ISO 250
To create Custom Setting: Set the exposure mode/Custom Setting dial to CSM.
Rotate the Main-Command Dial to select menu number and rotate the Subcommand Dial to select desired option number. See pages 70-75 for details.
Nikon
Distributed by WWW.LENSINC.NET
file:///D|/CAMERA REPAIR/Nikon F80/F80.htm (78 of 78) [3/19/2004 11:39:25 PM]
 Loading...