

Page 1
SHORTCUT
Nikon
TO
GREAT
PICTURES
5
5
•••••
•••••••
I:::::
•••
••
••
•••••
..
.;-:..
•••
• •
••••••
••••
••••
••
••
•••••• • •••••
••
.c:
•
••
• •
.:::.
••••
•••••
INSTRUCTION MANUAL
•
•••
•••••
•••••
•••••
•••
•• • ••••
••
•••
•
•
•••
•
•••••
..
,
...
••
•
•
••••• •
••
.
•
•
•
••
•••
••••
• ••••
••••••
(E
• •
••
•
•••
•
•
•••••••
• •••••••
• •••••••
• •••••••
•
••••••
•••••
•••••
••••
IlII
••
••
•
•
•
•
• •
•
••
•
••
Page 2

FOREWORD
Thank you for purchasing the Nikon
that you will enjoy using this camera and that it will make photography
a bigger part
manual, the Nikon
MODE-SHORTCUT
etable guide that explains the easiest way
2
of
your life.
In
addition
F501F50D
TO GREAT PICTURES, a concise, pock-
F501F50D
to
this comprehensive instruction
comes with SHOOTING IN SIMPLE
camera. We are sure
to
use the
F501F50D.
Page 3
CONTENTS
FOREWORD
GETIING
BEFORE SHOOTING
MOUNTING
INSTALLING
LOADING
SETIING
.............................
TO
KNOW
YOUR
LENS
.......................................................
BATIERY .........
FILM
........................................................ 1
CAMERA
TO
AUTOFOCUS
....
.................................
CAMERA
.........................
.......
............................
.......
.....
........
MODE
........
..................
SHOOTING IN ADVANCED MODE
AVAILABLE
PROGRAM
OPERATION
EXPOSURE
OPERATION
RESET
OPTIONAL FUNCTIONS
MEMORY
AF
MODE
ISO
EXPOSURE
OTHER CONTROLS
SELF-TIMER
LONG
TO
SHOOT
EXPOSURE
SELECTION
IN
PROGRAMMED
MODE
IN
OTHER
FUNCTION
SETIING
SELECTION
CONFIRMATION/SETIING
COMPENSATION
MODES
.............................
GUIDE ....
AUTO
................................................
EXPOSURE
...
.....................
FUNCTION
.............................................
............................... 32-
.....................................
..................................
...................................
TIME
EXPOSURE
AN
OPERATION
OFF-CENTRE
............................................
AT
"TIME"
SUBJECT
........................
MODES
.............
................................
..
......
..................
SETIING
...............
........................
.....
....
.........
.
....
..
4-5
6-12
7-8
0-11
12
13-30
14-15
16-18
19-25
26-29
30
31-37
33
.....
34
35
36-37
38-49
39
40
.41
2
USING
AE-L
9
BUTION
CASES
WHERE
ACCEPTABLE
MANUAL
IMPRINTING
FOCUS
......
...
.....................................
AUTO
FOCUS
................
.........................................................
DATEITIME
............................................
(for
FLASH PHOTOGRAPHY ..................
USING
BUILT-IN
SPEEDLIGHT
MISCELLANEOUS
LENSES
CAMERA
NOTES
ON
SPECiFiCATIONS
ABOUT
F50/F50o
LCD
PANELIVIEWFINDER
FLASH
..................................
COMPATIBILITY
......................................
....................................................
CARE
TIPS
...............................................
BATIERIES
................................................
....................................................
METERING
INDICATIONS
IS
NOT
F50D
only)
..............
SYSTEM
42-43
................
...
.....................
.......
.........................
..................
.....
.....
......
46-49
...
50-56
...
51-55
57-71
58-59
60-61
63-66
68-70
44
.45
56
62
67
3
Page 4
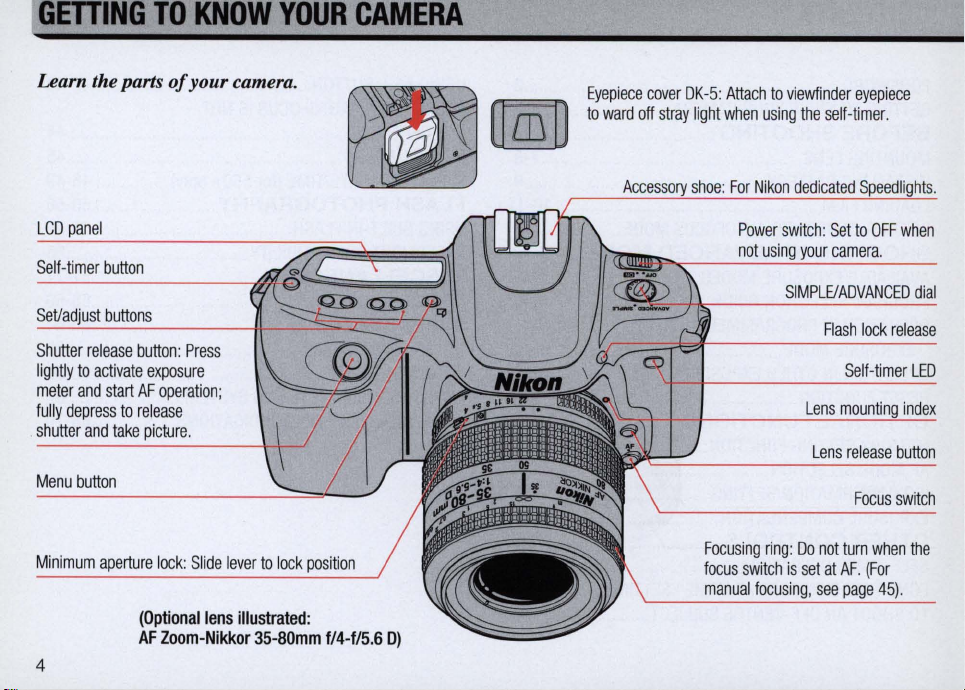
Learn the parts
LCD
panel
Self-timer
Set/adjust
Shutter
lightly
meter
fully
shutter
Menu
button
buttons
release
to
activate
and
start
depress
and
take
button
button: Press
exposure
AF
to
release
picture
of
your
operation
.
camera.
;
~
-
If
.
~
uillJJ
Eyepiece
cover
DK-5: Attach
to
ward
off
stray
light
Ar.r.IP.~Sflrv
~--
~==~
shoe: For
~~~~----~~--
when
to
viewfinder
using
Nikon
dedicated
SIMPLE/ADVANCED
the
self-timer.
r
camera
Flash
Lens
Lens
eyepiece
C:;nppr11i11ht~
lock
Self-timer
release
Focus
.
dial
release
LED
index
button
switch
Minimum
4
aperture
(Optional
AF
lock: Slide
Zoom-Nikkor
lever
lens
illustrated:
to
lock
position
35-80mm
f/4-f/5.6
0)
Focusing
focus
switch
manual
focusing, see
ring:
is
Do
set
not
at
turn
AF.
page
when
(For
45)
the
.
Page 5
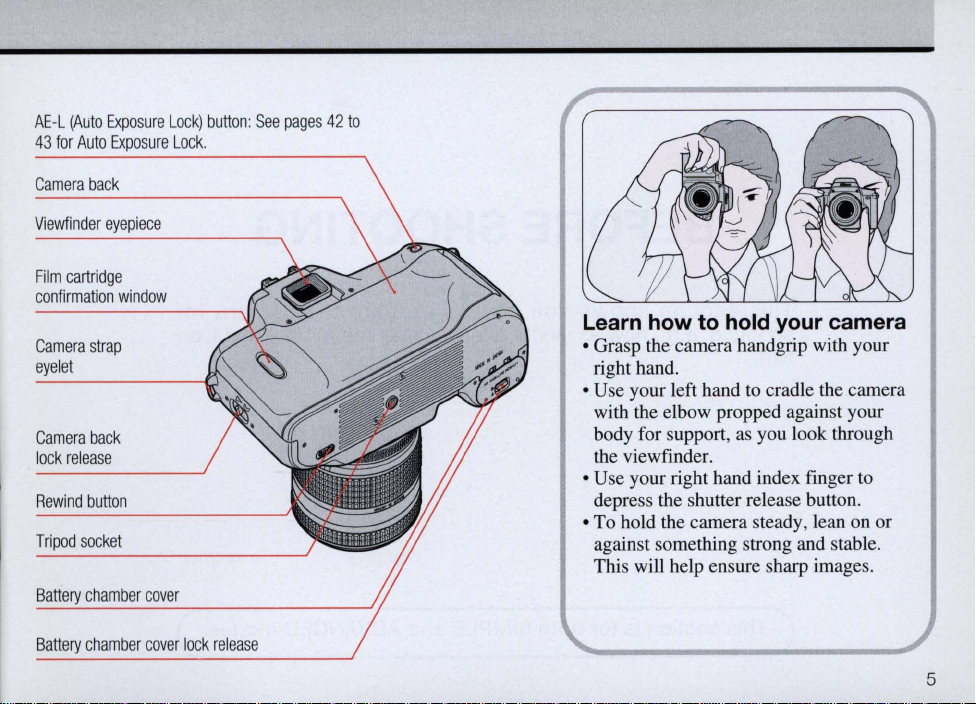
AE
-L (Au
43
for
Auto
Camera
to
Exposure
Exposure
back
Lock) button: See
Lock
.
pages
42
to
Viewfinder
Film
confirmation
Camera
eyelet
Camera
lock
Rewind
Tripod
Battery
Battery
eyepiece
cartridge
strap
back
release
button
socket
chamber cover
chamber
window
cover
lock
release
Learn how to hold your camera
• Grasp the camera handgrip with your
right hand.
• Use your left hand to cradle the camera
with the elbow propped against your
body for support,
the viewfinder.
• Use your right hand index finger to
depress the shutter release button.
• To hold the camera steady, lean on or
against something strong and stable.
This will help ensure sharp images.
as
you look through
5
Page 6
BEFORE SHOOTING
This
section
shooting, e.g., how to mount a lens, install the battery and load
film.
This section is
6
shows
for
you
how
to
prepare
both SIMPLE and ADVANCED modes.
the
camera
for
Page 7

MOUNTING
Remove the camera body cap
and the front and rear lens
1
caps.
LENS
Position the lens in the
2
camera's bayonet mount so
the mounting indices on the lens
and the camera body are aligned.
Twist the lens counterclockwise
until it locks into place.
, I I /
I .:,,-1
__
-
~
-
Err,~
71-'
With a non-CPU lens
When the camera
powered on with a nonCPU len
the LCD panel and E
blinks inside viewfinder.
For using a non-CPU lens,
see page 58.
s,
Err and
is
m blink
~ ~
in
Usable Lenses
Use CPU lenses (AF Nikkor lenses and AF-S/AF-I/
AI-P lenses). Other Nikon and Nikkor lenses (nonCPU lenses) can be mounted, but you have
an external exposure meter, and the only usable
exposure mode is Manual. (See page
• AF-SIAF-IIAI-P lenses are for manual focus only.
58)
to
use
.
When mounting
• Avoid direct sunlight.
• Make sure
not
• Do
the
touch the lens release button.
lens-
camera's power is off.
7
Page 8
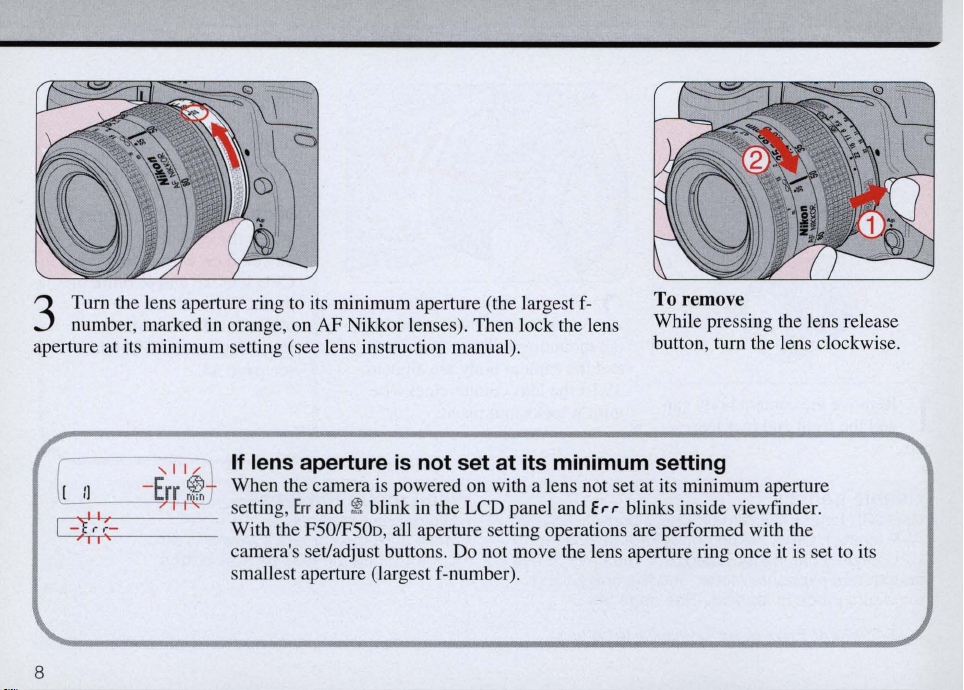
Turn the lens aperture ring to its minimum aperture (the largest
3
number, marked in orange,
aperture at its minimum setting (see lens instruction manual).
on
AF Nikkor lenses). Then lock the lens
f-
To remove
While pressing the lens release
button, turn the lens clockwise.
If lens aperture
When the camera is powered on with a lens not set at its minimum aperture
setting,
With the
camera's set/adjust buttons. Do not move the lens aperture ring once it
smallest aperture (largest f-number).
8
Err
and ~ blink in the LCD panel and
F501F50D,
is
not set
all aperture setting operations are performed with the
at
its minimum setting
E,.,.
blinks inside viewfinder.
is
set
to
its
Page 9

INSTALLING
BATTERY
...
Make sure the camera's power
1
is
off, then slide the lock
release on the battery chamber
cover
to
open the chamber.
- Use 6V lithium battery pack (2CR5 or DL245 type).
-See
page 62 for "NOTES ON BATTERIES".
Insert a 6V lithium pack with
2
"+"
and "-" ends positioned
shown on the inside
Close the cover by pushing until it
clicks .
of
the cover.
Switch the power ON. Check
as
the LCD panel
3
frame counter shows "E" or the
frame number appears and
battery mark
If
~
blinks: Battery
exhaustion. Have a fresh one
ready.
If
Err
and = blink: Battery
ex
hausted. Switch power OFF and
replace battery with fresh one.
If
no
indication appears on the
LCD panel: Battery
exhausted or improperly installed.
Change the battery.
to
(~
or = ) appears.
is
is
J
see
if
the
no
nearing
is
almost
completely
9
Page 10
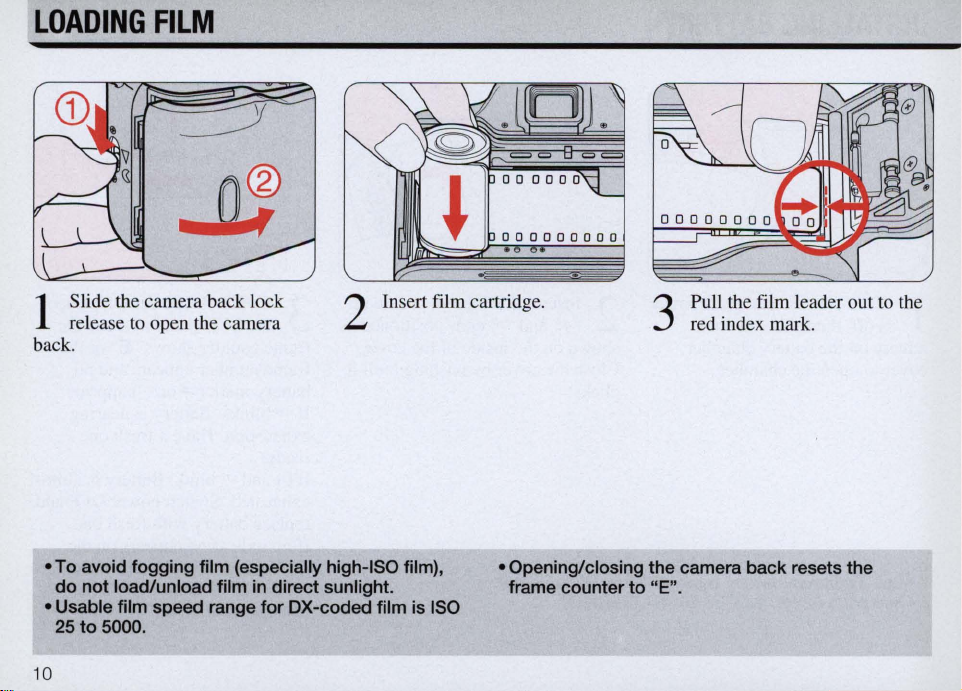
LOADING
FILM
000000000
Slide the camera back lock
1
release to open the camera
back.
•
To
avoid fogging film (especially high-ISO film),
do
not load/unload film
• Usable film speed range for OX-coded film
25
to 5000.
10
in
direct sunlight.
2 Insert film cartridge.
is
ISO
Pull the film leader out to the
red index mark.
3
• Opening/closing the camera back resets the
frame counter to
"E".
Page 11
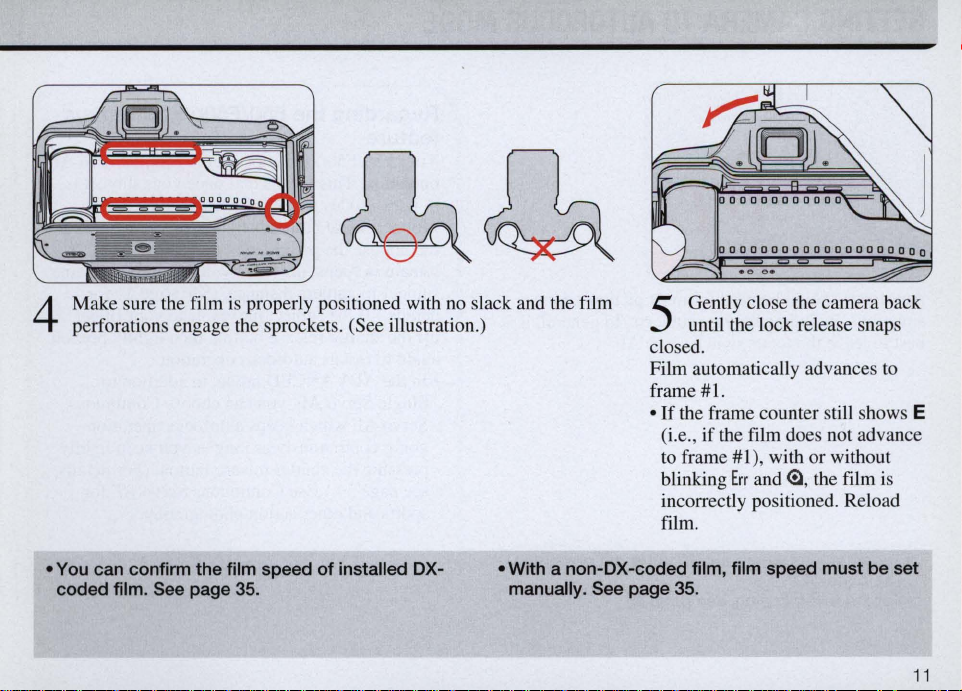
Make sure the film
4
perforations engage the sprocket
is
properly positioned with no slack and the film
s.
(See illustration.)
Gently close the camera back
until the lock release snaps
5
close
d.
Film automatically advances to
frame
#l.
•
If
the frame counter still shows E
(i.e., if the film does not advance
to frame
blinking
incorrectly positioned. Reload
film.
#1
), with or without
Err
and
e, the film is
• You can confinn the film speed
coded film. See page 35.
of
installed OX-
• With a non-OX-coded film, film speed must be set
manually. See page 35.
11
Page 12
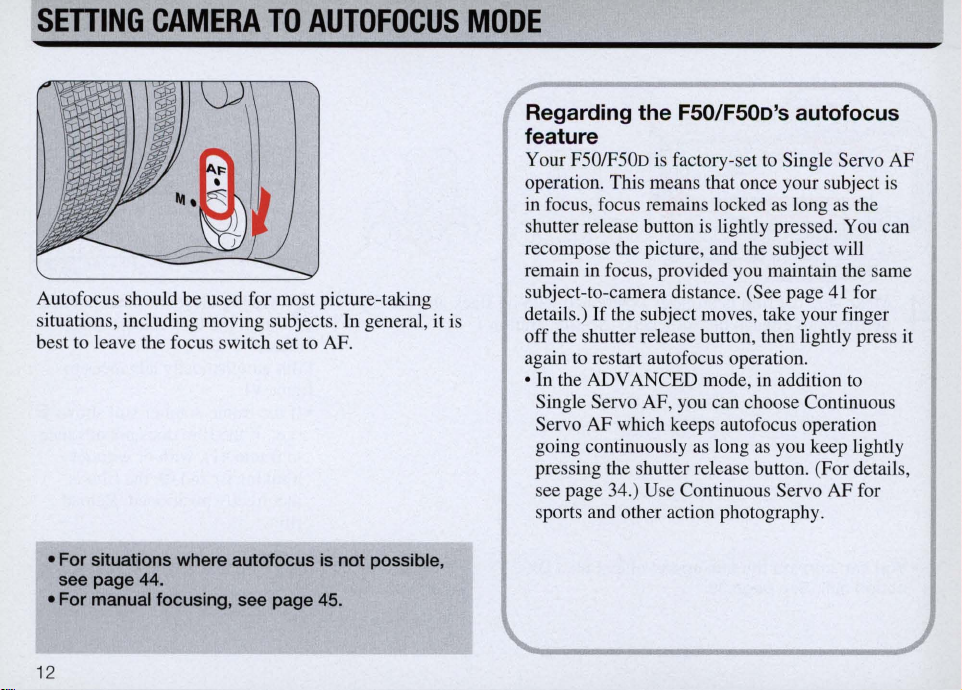
SETTING
CAMERA
TO
AUTO
FOCUS
MODE
Autofocus should be used for most picture-taking
situations, including moving subjects. In general , it is
to
best to leave the focus switch set
• For situations where autofocus is not possible,
see page 44.
• For manual focusing, see page 45.
12
AF.
Regarding
the
FSO/FSOo's autofocus
feature
Your F501F50o
operation. This means that once your subject
in
focus, focus remains locked
shutter release button
recompose the picture, and the subject will
remain
in
subject-to-camera distance. (See page
details.)
off the shutter release button, then lightly press it
again to restart autofocus operation .
• In the ADV ANCED mode,
If
Single Servo AF, you can choose Continuous
Servo AF which keeps autofocus operation
going continuously
pressing the shutter release button. (For detai l
see page 34.) Use Continuous Servo AF for
sports and other action photography.
is
factory-set
is
focus, provided you maintain the same
the subject moves, take your finger
as
to
Single Servo AF
is
as
long
as
the
lightly pressed. You can
41
for
in
long
addition
as
you keep lightly
to
s,
Page 13
SHOOTING IN
ADVANCED
This section shows you how to set your desired Program or exposure
mode.
C,
______
T_h_is_s_e_c_t_io_n_i_s_fo_r_A_D_v,_A_N_C
MODE
__
E_D_m
__
o
d_e
__
O_n_IY_.
____
~)
13
Page 14
AVAILABLE
EXPOSURE
MODES
In the Advanced Operation Mode, you can select any
modes-Programmed
Priority Auto (A)and Manual
Programmed Auto Exposure
In
addition to the four Programs in SIMPLE
General-Purpose 0, Landscape a,
Close-Up
ADV ANCED mode: Sport
Scene
The
chooses the combination
for a correct exposure.
For features and sample pictures
pages
«'-four
m and Motion Effect
FSOJFSOD
16
camera's microcomputer automatically
to
18.
Auto
(P),
Shutter-Priority Auto
(M).
Mode
mode-
Portrait!l
more Programs are available
~, Silhouette~,
~.
of
shutter speed and aperture
of
each Program, see
and
Night
in
of
four exposure
(S)
, Aperture-
Shutter-Priority Auto Exposure Mode
You manually set the shutter speed and the camera
sets the matching lens aperture. To freeze action, use a
high shutter speed; to create motion effects, choose a
low shutter speed. For more information on ShutterPriority Auto, see pages 26
to
29.
14
Page 15
Aperture-Priority Auto Exposure
Mode
You manually set the aperture and the camera sets the
appropriate shutter speed. Smaller apertures make the
background and foreground sharper (recommended for
landscape pictures) while larger apertures tend to blur
the background (recommended for portraits).
For more information on Aperture-Priority Auto , see
pages 26 to 29.
Metering System
The Programmed, Aperture-Priority and ShutterPriority Auto Exposure modes employ either 3D
Matrix Metering or Advanced Matrix Metering,
depending
on
lens type
in
use.
Manual Exposure
Mode
You select both the shutter speed and aperture. This
mode lets you experiment with and produce different
creative effects (e.g., intentional blur, intentional
under- or overexposure). For more information on
Manual Exposure Mode , see pages 26 to 29.
In
Manual exposure mode, Centre-Weighted
metering
system, see page 67.
is
used. For details about this metering
15
Page 16
PROGRAM
SELECTION
GUIDE
/
1
. ...
/
..
. '
,,;;,
!Jr
' . \
',
't-f!
:
'.
~'\
.\
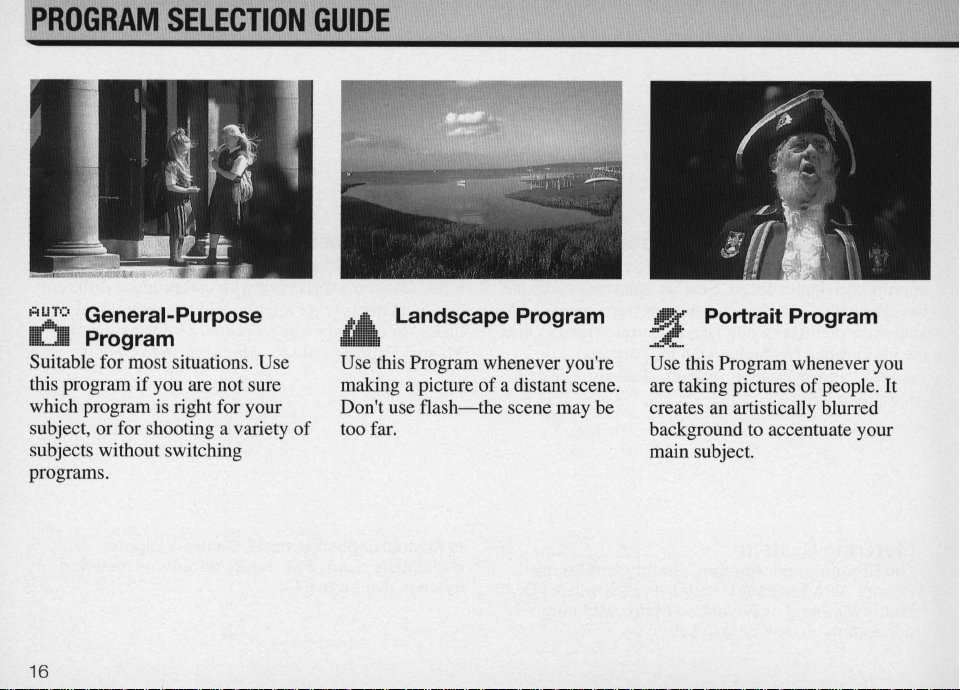
AUto:' General-Purpose
o Program
Suitable for most situations. Use
this program
which program
subject, or for shooting a variety
subjects without switching
program
16
if
you are not sure
s.
is
right for your
""
Landscape Program
Use this Program whenever you're
making a picture
Don't use
of
too far.
of
flash-the
a distant scene.
scene may be
-9'
Portrait Program
..........
Use this Program whenever you
are taking pictures
creates an artistically blurred
background
main subject.
of
people.
to
accentuate your
It
Page 17
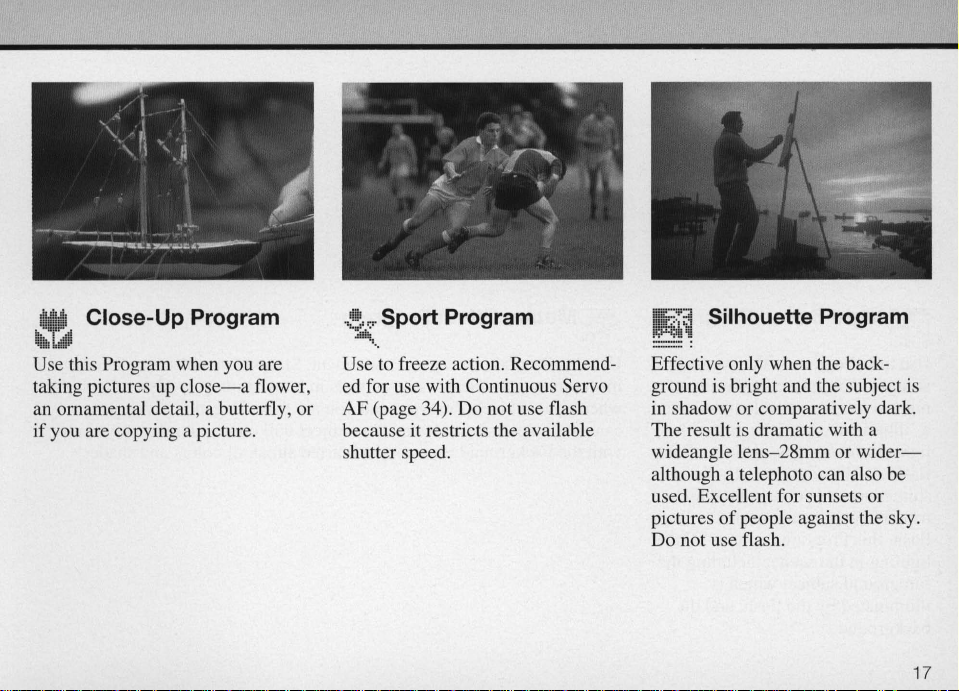
Close-Up Program
Use this Program when you are
taking pictures
an
ornamental detail, a butterfly, or
if you are copying a picture.
up
c1ose-a
flower,
...
!.'7
Sport Program
:iHI!t.
"
Use to freeze action. Recommended for use with Continuous Servo
AF (page 34). Do not use flash
because it
shutter speed.
re
stricts the available
N~
Silhouette Program
Effective only when the back-
ground is bright and the subject is
in
shadow or comparatively dark.
The result is dramatic with a
wideangle lens-28mm or
although a telephoto can also be
used. Excellent for sunsets or
pictures
Do not use flash.
of
people against the sky.
wider-
17
Page 18
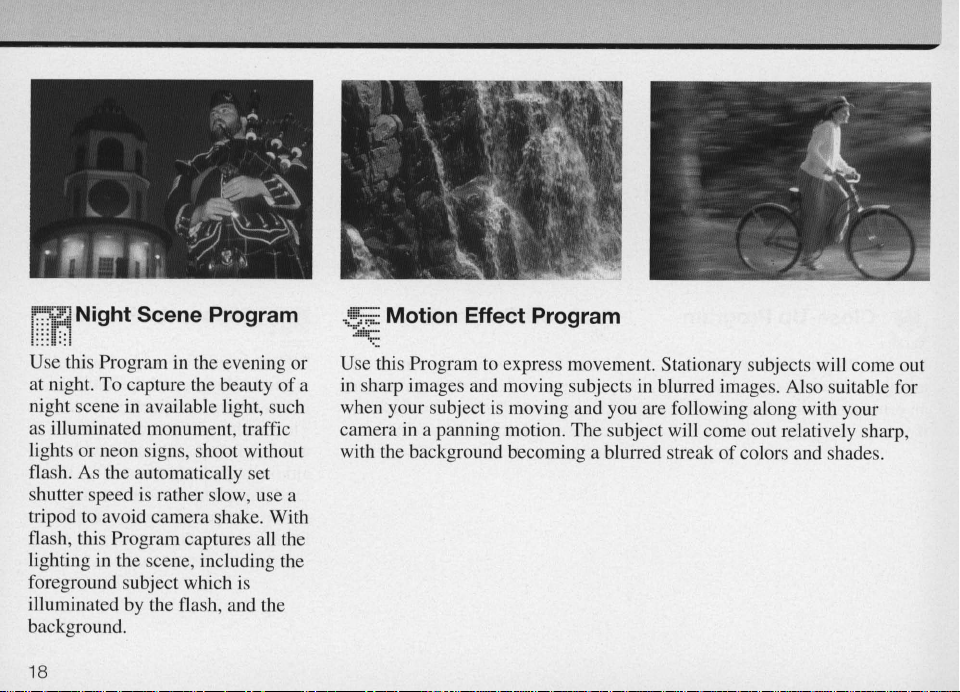
Night Scene Program
Use this Program
at night.
To
night scene in available light, such
as illuminated monument, traffic
lights
or
neon signs, shoot without
flash. As the automatica
shutter speed
tripod to avoid camera shake. With
flash , this Program captures a
li
ghting
in
foreground subject which
illuminated by the flash , and the
background.
18
in
the evening or
capture the beauty
is
rather slow, use a
ll
y set
of
ll
the
the scene, including the
is
-,~
Motion Effect Program
.dH!i~
Use this Program to express movement. Stationary subjects will come out
in
a
sharp images and moving subjects
when your subject
camera
in
a panning motion.
is
moving and you are following along with your
The
with the background becoming a blurred streak
in
blurred images. Also suitable for
subject will
come
out relatively sharp,
of
colors and shades.
Page 19
OPERATION
IN
PROGRAMMED
AUTO
EXPOSURE
CD
Cb
l 1
MODE
®
o u Q
00
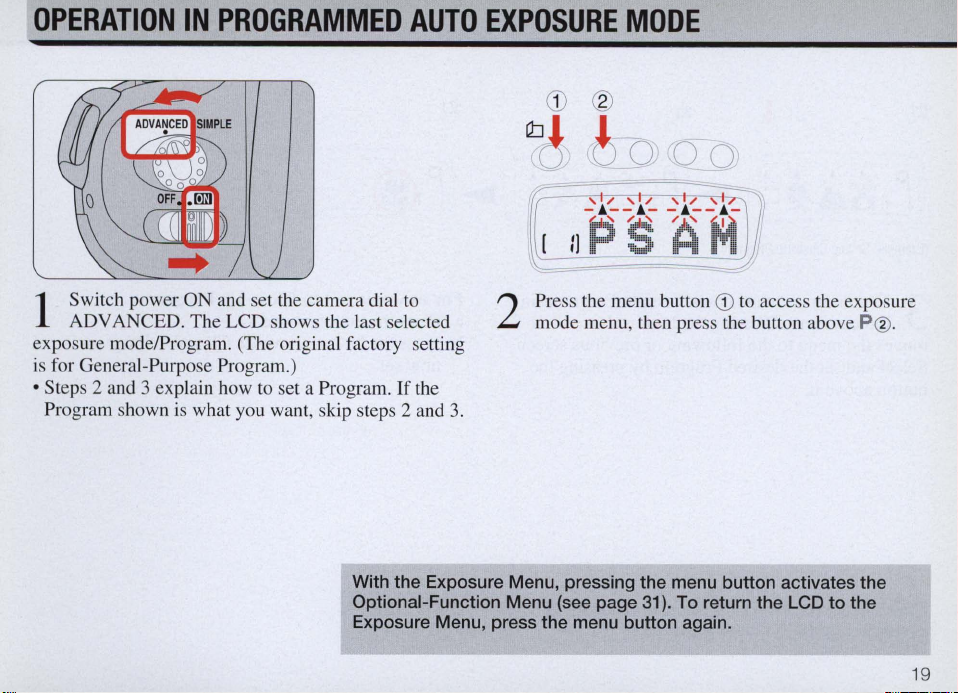
Switch power ON and set the camera dial to
ADVANCED. The LCD shows the last se lected
1
exposure modeiProgram. (The ori
is
for General-Purpose Program.)
• Steps 2 and 3 explain how to set a Program.
Program shown
is
what you want , skip steps 2 and 3.
gi
nal factory setting
With the Exposure Menu, pressing the menu button activates the
Optional-Function Menu (see page 31). To return the LCD to the
Exposure Menu, press the menu button again.
If
the
Press the menu button
mode menu, then press the button above P@.
2
CD
to access the exposure
19
Page 20
Cb
~
~
<Q)
QDQ])
@
]
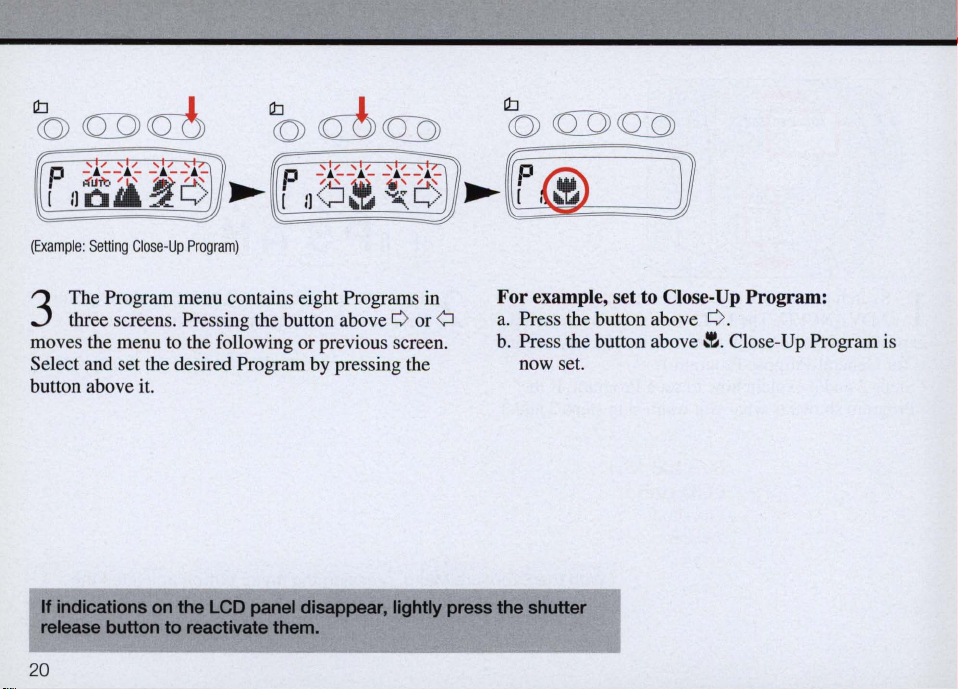
(Example:
3
moves the menu to the following or previous screen.
Select and set the desired Program by pressing the
button above
20
Setting
Clo
se-
Up
Program)
The Program menu contains eight Programs
three screens. Pressing the button above 0 or Q
it.
If
indications
release
button
on
the
to
reactivate
LCD
panel
them.
disappear,
in
lightly
For example, set to Close-Up Program:
a. Press the button above O.
b.
press
Press the button
now set.
the
shutter
above~.
Close-Up Program is
Page 21
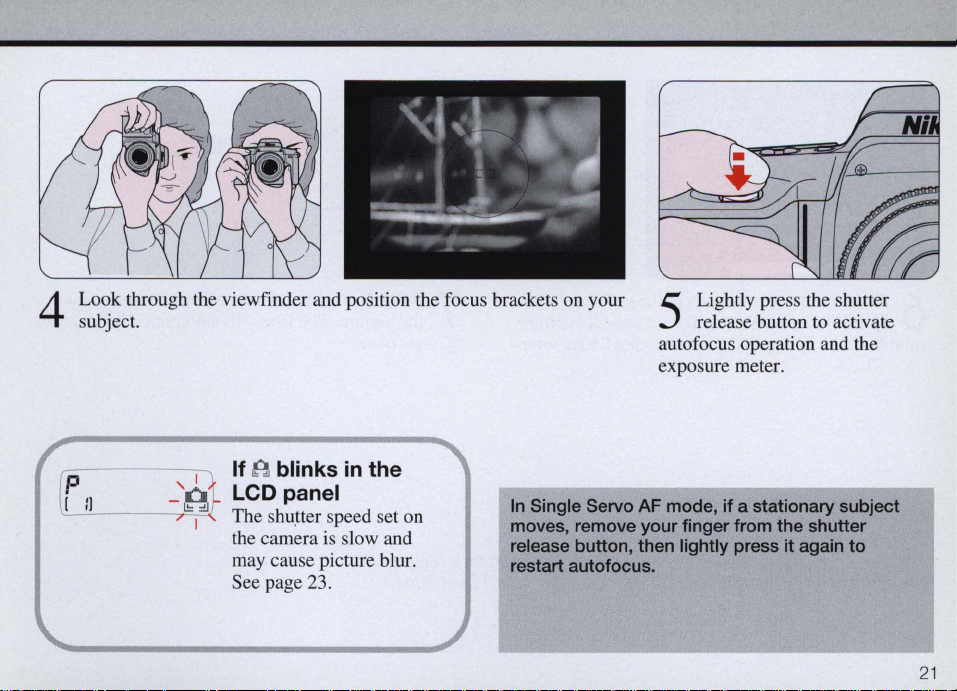
Look through the viewfinder and position the focus brackets on your
subject.
4
Lightly press the shutter
5
release button
autofocus operation and the
exposure meter.
to
activate
p
[
If A blinks
II
LCD panel
The
shu~ter
the camera is slow and
may cause picture blur.
See page 23.
in
the
speed set on
In
Single
moves,
release
restart
Servo
AF
remove
button,
autofocus.
your
then
mode,
finger
lightly
if
a stationary subject
from
the shutter
press
it
again
to
21
Page 22
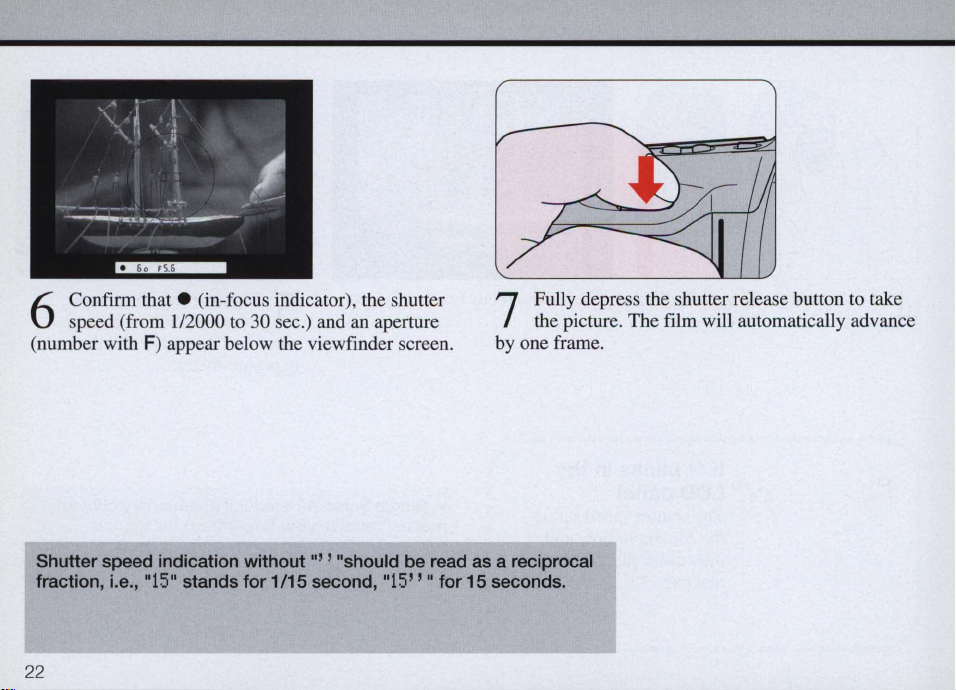
Confirm
6
speed (from
(number with F) appear below the viewfinder screen.
that.
(in-focus indicator), the shutter
112000
to 30 sec.) and
an
aperture
Fully depress the shutter release button to take
7
the picture. The film will automatically advance
by one frame.
Shutter speed
fraction,
22
Le.,
indication
"15"
stands
without
for
1/15
,,' , "should
second,
"15""
be
read
as a reciprocal
for
15
seconds.
Page 23
1·~~:l~
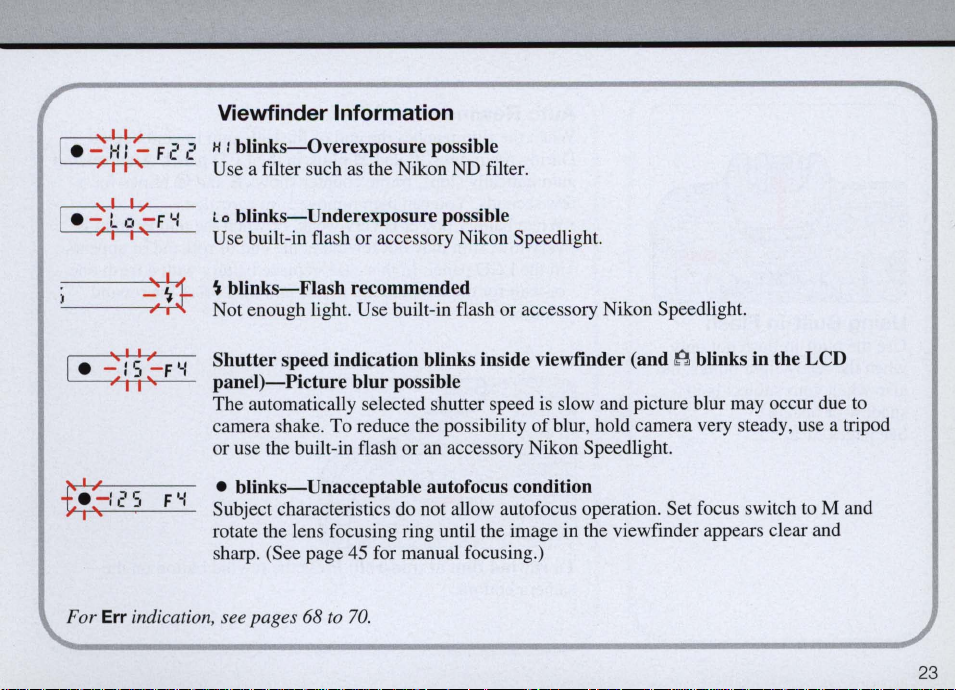
Viewfinder Information
H : blinks-Overexposure possible
F22
Use a filter such as the Nikon ND filter.
I.~
~ ~~
For Err indication, see pages 68
l Q blinks-Underexposure possible
F'-:
Use built-in flash or accessory Nikon Speedlight.
~
blinks-Flash
Not enough light. Use built-in flash or accessory Nikon Speedlight.
Shutter speed indication blinks inside viewfinder (and
panel)
-Picture
The automatically selected shutter speed
camera shake. To reduce the possibility
or use the built-in flash or
• blinks-Unacceptable autofocus condition
Subject characteristics do not allow autofocus operation. Set focus switch
rotate the lens focusing ring until the image in the viewfinder appears clear and
sharp. (See page 45 for manual focusing.)
recommended
blur possible
to
70.
is
slow and picture blur may occur due to
of
blur, hold camera very steady, use a tripod
an
accessory Nikon Speedlight.
A blinks
in
the LCD
to
M and
23
Page 24

Using Built-In Flash
Use the built-in flash not only
when the ready-light blinks, but
also when your subject is
shadow or backlit.
See pages
24
51
to 55.
in
Auto Rewind
When the film reaches the end
ta
During rewinding,
automatically stops, frame counter shows E and
few seconds. You can then remove film cartridge.
• When battery power is very weak, or when the temperature is
very low, film may not rewind at the end
in
the LCD panel.
or wait for the temperature to rise and then press the rewind
button.
To rewind film at mid-roll: Press the rewind button on the
camera bottom.
and ~ blink in the LCD panel. After rewind
In
this case, replace battery with a fresh one,
of
the roll, auto rewind begins.
ta
blinks for a
of
roll and
Err
appears
Page 25

(
......
)
To
change a combination of shutter speed/aperture
In the General-Purpose Program, you can change the combination
shutter speed/aperture
the button above
f-number); press the button above
smaller aperture (larger f-number). Pressing and holding the button
down changes the shutter speed/aperture combination rapidly. p
appears
indicating the change
• The original shutter speed/aperture combination for General-
in
the LCD panel
Purpose Program
automatically switches off, when you turn the camera power off,
when you switch
by
pressing the button above
'"
for faster shutter speed/wider aperture (smaller
'"
for slower shutter speed/
and
··
••
appears inside the viewfinder,
in
shutter speed/aperture.
is
recalled when the LCD indication
to
SIMPLE mode or when you use flash.
'"
or .A. Press
:+:
of
25
Page 26

OPERATION
IN
OTHER
EXPOSURE
MODES
~
ab
-I.~~I.~ ~
IJPSAt'i
Q1)
.. --, -
Switch camera on and set the dial
1
selected exposure modeiProgram. (The original factory setting is for General-
Purpose Program.)
• Step 2 explains how
want, skip step
.Press the menu button
2
mode, press the button above the desired indication.
• With the Exposure Mode Menu, pressing the menu button activates the Optional-
Function Menu (see page 31). To return the LCD to the Exposure Mode Menu, press
the menu button again.
To adjust the shutter speed and/or aperture, press the button above
3
(down) indication.
Look through the viewfinder and position the focus brackets ( [ ] ) on the main
4
subject. Lightly press the shutter release button to activate autofocus operation and
the exposure meter. Confirm that the in-focus indicator . appears in the viewfinder.
26
2.
to
set an exposure mode.
to
activate the Exposure Mode Menu. To set the exposure
to
ADVANCED. The LCD shows the previously
If
the present exposure mode
'"
is
(up) or
what you
'"
Page 27

To
change
hold
the
To
change
the
button
To
change
rapidly,
shutter
button
aperture
down
shutter
hold
speed
down
.
rapidly, ho
.
speed/aperture
the
button
rapidly
down
Shutter-Priority Auto
,
Aperture-Priority Auto
ld
.
Your
selected
set
screen
Your
shutter speed
screen
Your
shown, along
the
+.
~.-
~
. ~
.-
+.
~
.;
For
shutter
aperture
are
.
selected
aperture
are shown
.
selected
shutter
with
viewfinder indication
Correct
Overexposure
Underexposure
"T
H1E
"-setting, see
speed
shown
below
and
speed
the
exposure
exposure
and
the
the
automatically
below
the
and
.
page 40.
the
automatically
viewfinder
set
viewfinder
aperture
are
indicator, below
27
Page 28

Using Built-In Flash
Use the built-in flash not only when the readylight blinks, but also when your subject is
shadow or backlit.
See pages
51
to 55.
in
Fully depress the shutter release button
5
picture. The film automatically advances by one
frame.
- Shutter speed indication without
read as a reciprocal fraction, i.e.,
1/15 second,
-In
Single Servo
moves, remove your finger from the shutter
release button, then lightly press
restart autofocus.
"15"
AF
H
for
15 seconds.
mode,
if
,,'
, "should be
"15"
a stationary subject
it
again
28
to
take a
stands
to
for
Auto
Rewind
When the film reaches the end
rewind begins. During rewinding,
in
the LCD panel. After rewind automatically
stops, frame counter shows E and e blinks for a
few seconds. You can then remove film
cartridge.
• When battery power is very weak, or when the
temperature is very low , fIlm may not rewind at
the end
this case, replace battery with a fresh one, or
wait for the temperature to rise and then press
the rewind button.
To
button at the bottom
of
roll;
rewind film
Err
appears in the LCD panel.
at
mid-roll: Press the rewind
of
the camera.
of
the roll, auto
e and
~
blink
In
Page 29

[ •
~
~!
~
F5
Viewfinder
H :
blinks-Overexposure
faster shutter speed. Or, use a filter such
.0
information
possible*: Select smaller aperture (larger f-number) and/or
as the Nikon ND filte
r.
[. : 2 5
.-
[
.~~ q~
F 5.0
For Err indica
**For Aperture-Priority Au
~~ o
~
lo
blinks-Underexposure
-......_---
*For Shutter-Priority Auto a
=-:=-
'-'- and/or a slower shutter speed. Or, u
F5.0
Speedligh
~
blinks-Flash
accessory Nikon Spee
Shutter
possible**: Automatically selected shutter speed is low a
to camera shake or subject movemen
very stead
Selecting a wider aperture (smaller f-numb er) results
blinks-Unacceptable
•
Your s
focus ma
ti
on, see pages
possible*: Select a wider aperture (smaller f-number)
se the built-
t.
recommendation: Not enough lig
dJight.
speed indication blinks (and A blinks in the
t.
To reduce the possibility
y, use
a tripod or use the built-
autofocus condition
ubj
ect is inappropriate for autofocus operation. Set the focus switch to M and
nuall
y.
(See page 45.)
68
to
70.
nd
Aperture-Priority Auto exposure modes.
to
exposure mode.
in flas
h or an accesso
ht.
in
flash or an accesso
in
ry
Nikon
Use the built-in flas
LCD
panel)-Picture
nd
picture blur m
of
blur, ho
ry
Nikon Spee
a faster shutter speed .
h or an
ay
ld
blur
occ
ur due
camera
dJight.
29
Page 30

RESET
FUNCTION
co
To
Program (when Memory Function
set)*
Press and hold the menu button for at least two
seconds.
* With the Memory Function set, pressing and holding
the menu button
memorised exposure mode/Program. (See pages 32
to
30
OOCQo
T
~
P
AUTI)
•
:l
~
I
return to the General-Purpose
for
at least two seconds recalls the
33.)
~)
lj
is
not
?
To
original factory setting
Simultaneously press the menu and self-timer buttons
for two seconds. This will activate the General-
Purpose Program and cancel Optional Functions.
cOOcQ~
1:1
,-
AUT':l
•
I
tl
~
reset the camera's mode to the
__
O
T
~
))
~
!J
Page 31

OPTIONAL FUNCTIONS
The Advanced Operation Mode also offers four Optional Functions:
I18J
Memory Setting (pages 32 to
When Memory is set, you can easily set the desired exposure
Program by pressing the menu button for at least two seconds.
AF
AF
Mode Selection (page
You
can switch the AF mode from Single Servo Autofocus
Autofocus.
ISO
ISO Confirmation/Setting (page
With OX-coded film, you can confirm
can manually set the
~
Exposure Compensation (pages 36 to
You
can compensate exposure from -5EV to +5EV
In
SIMPLE mode, the Optional Functions you have set will
C,
______
ISO
film speed number.
T_h_i_s_s_e_c_tio_n
33)
34)
35)
ISO
film speed. With non-OX-coded film, you
37)
__
is_f_o_r_A_D_V_A_N_C
in
__
E_D_m
to
112
steps.
be
ignored.
__
o_d_e_O_n_IY_"
______
mode
Continuous Servo
)
or
desired
31
Page 32

MEMORY
SETTING
FUNCTION
With the Exposure Mode
menu, press the menu button
1
to activate the Optional-Function
Menu. Pre ss the button above
Co
®
W
-
f~
The symbol for the selected
3
exposure mode or Program is
displayed. Press the button above
the symbol to have it memorised.
32
Q0
-
~
Blinking
2
setting mode
above the corresponding symbol. (In the example shown above, ShutterPriority Auto exposure mode
.
ClJ
cD
(
r
Memory is set.
4
mode/Program that was set before you activated the OptionalFunction Menu. (Example illustration shows General-Purpose Program
To recall the memorised exposure mode or Program, press the menu
button for at least two seconds.
r1BJ
((ill)
~
ll
'
appears above the frame counter, indicating that Memory
is
activated. To select exposure mode, press the button
is
selected.)
Q0
r1BJ
stops blinking and the LCD shows the exposure
.)
Page 33

To
clear memory
While memory
Menu. Press the button above
frame counter
•
Pressing
above the
Exposure
is
di
the
frame
Mode
set,
appears.
menu
counter
Menu.
rtEl
appears
button
in
rtEl.
(@
while
returns
~
place
of
is
replaced with
IB
is
blinking
the
LCD
Q]
CO>
QOcaD
F -.- .--.- .-
[-nUtDA
l18J
in
the Optional-Function
to
the
110
and
'F
•
fSb~
18
above the
Releasing
the
exposure
the shutter
frame
counter activates the
mode
or
Program.
while
IB
is
blinking
previously
above
set
33
Page 34

AF
MODE
Single Servo AF and
Cont
inuous Servo AF
The default AF setting
Servo AF.
mode, once the subject
you can lock focus by keeping the
shutter release button lightly
pressed, but be sure to maintain the
same subject-to-camera distance.
In
the Continuous Servo AF mode,
autofocus
you continuously lightly press the
shutter release button, even
focus distance changes because
either you or your subject moves.
In either AF mode, the shutter
cannot be released when the
subject
is
SELECTION
is
In
the Single Servo AF
is
is
maintained
out
of
focus.
as
Single
in
focus,
long
if
the
as
With the Exposure Mode
Menu, press the menu button
1
to activate the Optional-Function
Menu . Press the button above
AF
Mod
e Selection can be performed regardless of the focus switch
on
(A
positi
or M).
AF.
r-
[ o
AF
For Continuous Servo AF ,
2
press the button above
Single Servo AF , press the button
S.
above
The LCD shows the last selected
exposure modelProgram.
C for
34
Page 35

ISO
CONFIRMATION/SETTING
ItJ
<Q)
cO
OeQ])
~
r-
- A-
i
:J
fSo~
To
confirm ISO film speed for OX-coded
film:
Usable film speed range
to 5000.
With the Exposure Mode Menu, pre ss the menu button
to
activate the Optional-F unction Menu. Press the
IS
button above
of
the loaded DX-coded mm.
To retu
rn
press the button above
With a OX-coded film, film speed
set on the camera body; you cannot adjust.
O. The LCD shows the ISO film speed
to
the last selected exposu
of DX-coded film is ISO 25
re
modelProgram,
IS
O.
is
automatically
400
Pre
ss
to
adjust
Co
® ®
e~
~;:-===::::~~
To
manually set ISO film speed for non-
OX-coded film:
When using non-DX-coded film, manually set the ISO
film speed number. Usable film speed range is ISO
to 6400.
If you have installed non-DX-coded film and closed
the camera back, the ISO setting screen
automatically activated on the LCD panel. Adjust the
film speed by pre
T (down) indication. To change film speed rapidl
hold tbe button down. To complete the setting, press
the button above
exposure mode/Program .
• Until setting is completed, the sbutter remains
locked, a
•
If
you want to recall the ISO setting screen after
completing the setting, activate the OptionalFunction Menu and press the button above
ss
IS
nd
the menu button is deactivated.
--
Press
to
complete
setting
is
ing the button above the . (u
O.
The LCD shows the last selected
ISO.
p)
6
or
y,
35
Page 36

EXPOSURE
By compensating the exposure, you can vary the
exposure results to create different versions
same picture or put creative emphasis on a specific
part
of
the picture.
You can compensate exposure from -5
in
1/2
steps.
COMPENSATION
of
the
EV
to
+ 5 EV
Without
compensation
(overexposed)
36
With
compensation
(correctly
exposed)
Page 37

Press
~
6"Q
~~;;~~
;_~=:
F
II
~
~
CC2D
~:;~
+0.5
~
1]
Press
setting
to
to
adjust
comp
lete
With the Exposure Mode
Menu, press the menu button
1
to
activate the Optional-Function
Menu. Press the button above the
m indication.
Adjust the compensation value by pressing the button above the.A.
T (down) indication. + value
(up) or
2
for underexpo sure. To change the value rapidly, hold the button down.
To complete the setting, press the button above
last selected exposure modelProgram.
Program,
indicating that the exposure has been compensated .
•
If
setting, press the menu button. The LCD panel will return to the
Exposure Mode Menu.
After shooting with compensated exposure, make sure to reset the
compensation value to
m appears in the LCD panel and
you want to cancel the exposure compensation before completing the
±O.O.
is
for overexposure; - value
m . The LCD shows the
Wh
en you set exposure mode or
in
side the viewfinder,
is
37
Page 38

OTHER CONTROLS
38
This section shows you various photographic
off-centre subject, what you should do when autofocus is impossible, how
to
operate
exposure.
This section
the
camera's
is
for both SIMPLE and ADVANCED modes.
self-timer,
techniques-how
and
how
to
perform a long
to shoot
time
an
Page 39

SELF-TIMER
OPERATION
Set desired exposure mode or
Program, then press the self-
1
~
timer button.
LCD panel.
• To cancel self-timer and make
di
sappear, press the menu button.
In
Programmed Auto, Shutter-Priority Auto or
Aperture-Priority Auto exposure mode, attach the
eyepiece cover DK-5 (provided) to the viewfinder
appears in the
~
Look through the viewfinder, lightly press the shutter release button,
and confirm focus and exposure.
2
Fully depress the shutter release button
The self-timer LED starts blinking and
3
blink
s.
The shutter wi
seco
nd
s, then stops blinking
After the shot, self-timer operation
To cancel self-timer operation before shooting : Turn the camera's
power off.
to
start self-timer operation.
~
in
the LCD panel also
ll
release after
to
eyepiece before setting self-timer. The DK-5
prevents stray light from entering the viewfinder
and affecting exposure.
10
seconds. The LED
tell you
to
get ready.
is
automatically deactivated.
bUnks
for eight
39
Page 40

LONG
In
can set shutter speed to
leave the shutter open
desired.
When performing long time
exposure, you must use a tripod to
avoid camera shake which may
cause picture blur.
TIME
the Manual Exposure mode, you
EXPOSURE
"TIME" to
as
long
as
AT
IITIMEII
,...
i I
I-
II
TI
SETTING
"f"
ME
FS.E.
"f
F5.s
(ADVANCED
..
1
M
mode
only)
40
Set exposure mode
"30' ,
")
1
of
the shutter speed indication and the exposure indicator disappears.
Fully depress the shutter release button then remove your finger to
start exposure. The shutter
2
remove your finger from the shutter release button. During exposure, the
self-timer LED blinks.
After the desired duration, lightly press the shutter release button
3
complete exposure.
for 30 seconds. Inside the viewfinder, "- -" appears in place
to
Manual and shutter speed to "TIME" (next
is
released about 0.5 sec. after you
to
to
Page 41

TO
SHOOT
In the following procedure, you can take an in-focus picture with an
off-centre, stationary subject. However, when shooting a moving
subject, always position the viewfinder focus brackets on the
subject.
AN
OFF-CENTRE
SUBJECT
Position focus brackets on the
ubj
ect and ljghtly press the
s
1
shutter release button to activate
autofocus operation.
• The above
(original
Continuous
(see
page
procedure
factory
Servo
34),
lightly
setting
AF
pressing
is
for
).
If
mode
Single
you
have
in
Optional
the
Confirm
indicator) appears
2
viewfinder. Focus remains locked
as
long
release button lightly pressed.
Servo
AF
set
Functions
shutter
that. (in-focus
as
you keep the shutter
mode
release
button
•
To
(Automatic
to
in
the
will
maintain
43.)
Willie keeping the shutter
3
release button lightly pressed,
recompose the picture, then fully
depress the
not
lock
subject
Exposure
the
exposure,
focus.
Lock)
sh
utter release button.
use
the
button.
(See
AE-L
pages
42
41
Page 42

USING
AE-L
BUTTON
When your subject
an extremely bright background, your subject may
come out too dark (underexposed)
with a background that is too dark, the subject may be
washed out (overexposed).
correctly expose your subject
mode, use the AE-L (Auto Exposure Lock) button.
Compose your subject so that the circle
viewfinder
1
is
off-centre or very small against
in
the picture. Or,
In
such situations,
in
the auto exposure
is
fully covered
by
the subject.
in
to
the
Lightly press the shutter release button
2
autofocus operation and the exposure meter.
Confirm . (in-focus indicator) and exposure.
to
activate
42
Page 43

3 Press the AE-L button and hold
In
Single
Servo
AF
mode,
if
picture could change subject-to-camera distance,
refocus
by
briefly
removing
it.
recomposing
your
finger
from
the
the
While keeping the AE-L button pressed,
4
recompose the picture , then
shutter release button.
shutter
(while
release
holding
button
the
AE-L
and
button).
fully depress the
lightly
pressing
it
again
43
Page 44

CASES
Autofocus operation depends on general lighting, subject contrast and
detail, and other technical points.
is not possible, • blinks inside the viewfinder.
• Very
Focus manually (page 45). Or for
autofocus, focus on another,
brighter subject located at the same
distance, recompose with the
shutter release button lightly
pressed, then shoot.
You can also use the built-in flash,
or
an
WHERE
dark
subject
accessory Nikon Speed light.
AUTO
FOCUS
IS
NOT
ACCEPTABLE
In
those rare situations where autofocus
• Low-contrast subject
Focus manually (page 45). Or for
autofocus, focus on another subject
at the same distance but with more
contrast, recompose with the
shutter release button lightly
pressed, then shoot.
When the focus brackets are
positioned
subjects/scenes, ignore
focus.
manually:
• Scenes with subjects
located
distances
•
Bright
shiny surface, such as
silver
• Strongly backlit subjects
When
•
polarizing filter,
special filter, e.g., a softfocus filter. (Circular
polarizing filters can
used for autofocus.)
on
the following
in-
indication and focus
at
different
subjects with a
or
aluminum
·using a
linear
or
a
be
44
Page 45

MANUAL
FOCUS
Set focus switch to M.
1
If
your AF Nikkor lens has an
A-M switch, set it to M.
For
maximum
zoom
lens.
focal length
length
setting
focusing
it
is
best
setting.
and
to
Focusing
then
accuracy
focus
at
at
zooming
when
the
the
up
Look through the viewfinder and rotate the lens focus ring until the
2
subject appears sharp.
using
lens'
longest
shortest
to
the
a
focal
longest
focal length
imprecision
pictures.
setting
in
focusing
will
magnify
and
could
any
slight
result
in
unsharp
45
Page 46

SETTING
DATEITIME
(for
F50 0 only)
You can imprint d
Day/HourlMinute, Mo nthlDay/Year, or
DaylMonthlYear-Dn your picture.
Year/Month/Day
Day/Hour/Minute
1
------
No imprint display
Month/DaylYear
Day/MonthlYear
ate
/time-YearlMonthlDay,
1
MODE button : Push
select one
ava
il
able disp lays.
of
the five
.IUI].]=-
to
When
the
camera
back.
rPRINT
SELECT ADJUST
• • •
LCD
becomes
(See
page
faint,
49.)
replace
Month indicator
Year indicator
Data imprint indicator
Time indicator
Date/time
ADJUST button: Push
to adjust date/time .
SELECT button : Push to select
date/
ti
me to be ad·usted.
lithium
battery
installed
in
co
the
lon
46
Page 47

ED
SELECT
• • •
g
~
ADJUST
g
Set
year
.
-t9
:r-
-:
:1
Set
month
.
Set day
1
'9
.
l
-3-
:
: :}
Setting has
completed.
been
ED
Setting date and time
For example, to set March 15, 1994, choose
YearlMonthlDay display. (To set date, choose display
other than Day/Hour/Minute. With Day/HourlMinute
display , only time can be set.)
Push SELECT button so year section starts blinking
indicating that it can be adjusted. Push ADJUST
button to set the year. To change numerical indication
SELECT
o©
To set time to precise second:
Advance the
time (i.e.,
13:00).
if
Then
ADJUST
a
time
actual
push
one
minute
time
is
SELECT
12:59,
button
,
-t9~
and
ahead of
set
the time
so
:1
-
-:
actual
to
time indicator
, ,
[
'9'-:
-3-
::*
rapidly, hold the ADJUST button down. Set the month
and day
setting, push SELECT button while the day display is
blinking. The newly adjusted date and the imprint
indicator - appears without blinking.
To set time, select Day/HourlMinute display and set
the hour and the minute.
colon
with
the
in
the same manner
starts
the
time
second
to
blinking.
you
set,
00.
When
push
as
for year. To complete
actual
time
ADJUST
[
'9Y
coincides
button
-3
~
to
reset
47
Page 48

"
-II' ~ -,
;,-,
;,
'jj=
,]
r PRINT
Imprinted DatelTime
4M.,.,.
SELECT
ADJUST
• • •
g
gg
Imprinting date/time
Select your desired display
confirm date and time are correctly set. Then fully depress
the shutter release button
date/time. To confirm whether date/time is imprinted, check
to
make sure the imprint indicator - blinks for approx. 2
sec., immediately after taking the picture.
Imprinting
bright
48
date/time
colours
such
by
pushing MODE button and
to
take picture with imprinted
may
be
as
white
difficult
or
to
reddish col
read
against
ours.
Year/Month
DaylHour/Minute
/Day
Page 49

Replacing lithium
battery for imprinting
function
3.
Remove used battery.
1.
Make sure that film
loaded, open the camera back.
4. Insert new battery with "+"
terminal facing upward.
is
not
2.
Loosen the silver screw on the
inside
of
the camera back.
Remove the battery chamber
cover.
5. Replace the battery chamber
cover and tighten the screw.
49
Page 50

FLASH PHOTOGRAPHY
50
The thunderbolt symbol
flash
to
take
a picture,
activate the F50/F50D'S built-in flash and use it. But remember that
you can also use flash
This feature, which works with the F50/F50D'S built-in flash or any
dedicated Nikon Speed light,
operates
Shutter-Priority
automatically assuring a correct and well-balanced exposure of both
the main subject and the background.
Centre-Weighted Fill-Flash, which uses Centre-Weighted metering to
expose the background, applies.
This section
in
all
the Programmed exposure modes, as well as
is
(~)
inside viewfinder will blink if you need
for
example, in dim light. You can then
in
bright light to fill
is
or
Aperture-Priority
called Matrix Balanced Fill-Flash. It
in
shadows with extra light.
Auto
exposure
In
the Manual exposure mode,
modes,
for both SIMPLE and ADVANCED modes.
in
the
Page 51

USING
BUILT-IN
FLASH
Notes on using built-in flash
• Do not touch the flash when it is firing;
normal operation can cause it
• Never fire the flash more than 20
consecutive times at intervals
or shorter. This may impair flash
performance. After each continuous
firing, let the flash rest at least 10
minutes before firing again.
When you continuously fire the flash,
the camera's handgrip may become hot;
this
is
normal. Continuous firing will
result
in
a longer interval before the
ready-light comes on because it takes
longer for the flash to recharge
automatically.
to
heat up.
of
5 sec.
I- Ie'S
When subject brightness is insufficient, the ready-light
~
1
the shutter release button
Press the flash lock-release to release and activate the builtin flash.
You can use the built-in flash anytime, regard-less
ambient lightin
can use the built-in flash to illuminate your subject and fill in
shadows.
•
When
Speedlight
the built-in
•
For
FS.b
blinks inside the viewfinder when you lightly press
to
activate the exposure meter.
of
g.
the
usable
For example,
built-in
will
not
flash
in
lenses,
flash
fire.
the locked-down
see
if
is
activated,
When
page
55.
your subject
an
using
accessory
a Speedlight,
position
is
backlit, you
keep
.
51
Page 52

I-
:25
F5.6
Flash shooting distance range
ISO film speed
25 50 100 200 400
2
- - -
2.B
BOO
Flash shooting
distance range
4
2.B
- 9.2m
Make sure the s
2
distance range and confIrm that the ready-light
(~
) is on. Fully depress the shutter release button
take a shot with flash.
After shootin
for a few seconds after shooting, the light might have
been insufficient. ConfIrm shooting distance and,
necessary, move closer
aperture.
52
g,
ubj
ect is within the flash shooting
check the ready-light again.
to
the s
ubj
ect or select a wider
If
it blinks
to
if
- -
2
-
Q)
2 2.B 4 5.6
...
:::J
1:
Q)
a.
2.B
4 5.6
5.6
B
4 5.6 B
B
11
«
2
2.B
B
11
16
2.B
4 5.6
11
16
22
5.6
4
B 1.4 - 4.6m
B
11
11
16 0
22
16
22
32
32
- 0.6 - O.
2 - 6.5m
1.0 - 3.3m
.7
- 2.3m
0.6 - 1.6m
0.6 - 1.
2m
Bm
Page 53

Guide for flash shooting distance range
in
SIMPLE mode (at ISO 100)
For outdoor subjects
on
sunny day
For outdoor subjects
cloudy day or
in
on
shadows
For indoor subjects
Use the listed range only
having maximum aperture
slower lenses, the maximum shooting distance will
be reduced.
•
The
wider
the
you
select,
distance,
larger
the
shooting
aperture
the
farther
whereas
f-number),
distance.
the
as
a guide for a lens
of
f12. 8 or
(the
smaller
the
maximum
smaller
the
the
shorter
-1.6m
0.6
0.7 - 2.3m
0.7 - 4.6 m
faster. With
the
f-number)
shooting
aperture
the
maximum
(the
Using guide number to estimate the
maximum shooting distance
You can also estimate the maximum shooting distance
by
guide number
Guide number
full
L
ens aperture
Guide
number
25
6.5 9.2
•
With a slower
automatically
shooting
of
for
50
shutter
selected,
distance
built-in flash.
= Maximum shooting distance
each
ISO
setting
ISO
film speed
100 200 400 800
13
18.4 26 36.8
speed, a smaller
resulting
range.
(m)
aperture
in a shorter
is
53
Page 54

• In Shutter-Priority Auto or Manual exposure
mode,
if
you set the shutter speed at
or faster,
111
ac
• In Aperture-Prio
shutter speed is f
shootin
th
e ca mera automatically shifts to
25 sec. as soon as the built-
ti
vated .
ri
ty Auto exposure mode, the
ix
ed at
g.
111
25 sec. fo r flash
111
in flash is
SB-28, SB-27, SB-26, SB-25 or SB-24 users
The automatic adjustment functions for film
speed, aperture a
be used with the
nd
zoom-head pos
F50/F50o camera.
iti
on cannot
54
80 ec.
Page 55

Usable AF Nikkor Lenses with Built-In Flash
• Usable non-zoom lenses
3S
to 300mm AF Nikkor lens (except
200mm f/4D IF-ED, AF 300mm
f12.8D IF-ED
and
AF-S 300mm
AF
Micro
fI2.S,
AF-I 300mm
fI2.8D IF-ED)
• Usable zoom lenses
AF 24-S0mm f/3 .3-4.SD*1
AF
24-120mm f/3.
AF 28-70mm
AF 28-70mm f/3.
AF
28-80mm f/3.S-S.6D* I
AF 28-8Smm f/
S-S.6D
f/3.S-4.S
S-4.SD
3.S-4.S*3
*1
* I
IF
*2
AF 3S-70mrn f/2.8*4
3S-70mm
AF
f12
.8D*4
* 1 Focal leng th 35mm or longer.
*2 Shooting
70mm) or within
*3
Focal length 35mm
*4 Focal leng
*5 Shooting within I. 7m/5.6
(at J05mm or 135mm) causes vignettin
*6
Fo
•
Do
vignetting.
atfocallength
th
cal length
not
use a lens
35mm, within
O.6m!2
.0 ft. (at 120mm) causes vignetting.
or
50mm or longer.
JOOmm
longer.
ft.
at a focal length shorter than 85mm
or longer.
hood;
it
At 35mm
could
1m/
3.3
ft.
(at 50mm), within
, shooting within 2m/6.6
g.
cause
slight
AF
3S-70mm f/3.3-4.S
AF
3S-80mm f/4-S.6D
AF
3S-10Smm f/3.S-4.S
AF 3S-10Smm
AF
3S-13Smm
f/3.
f/3.
S-4.SD
S-4.5
AF Micro 70-1S0mm f/4.
AF 70-210mm f/4
AF 70-21Omm
AF
70-21Omm f/
AF
7S-300rnm f/4.
AF
80-200mm fI2.S ED
AF
80-200mm f/
AF 80-200mm f/4.
O.8mJ2.6
ft.
causes vignetting.
or
within O. 8
With
zoom
•
range
f/
4-S
4-S
S-S.6
2.SD
S-S
ft.
(at
mJ2
. 6
ft.
lenses,
(indicated by
.6
.6D
ED
.6D
do
the
IF
IF
*3
S-S
*6
*6
*6
not
orange
.6D ED*5
shoot
within
line
on
the
the
macro
lens).
55
Page 56

I
SPEED
LIGHT
COMPATIBILITY
88
-28,
88
88
88-140, 88-14
88-11 (with 8U -
88
88-16A*2
*1
*2
•
56
88-27,88-26,88-25
-24, 88-23, 88-22,
-20,
88-168
-21A
*2,
Although
possible
Weighted
Fill-Flash
the
F50lF50D
The
58-168,
instruction
58-21A
difference
is
the
manual.)
and
58-218
camera, use
between
type
Nikon 8peedlight
88-218
,
2)
with
58-218,
Matrix
are
not
recommended
the
58-218
58-21A
and
of
controller
attached,
are
not
available
,
*1,
8alanced
for
at
manual
58-218,
(For
in
EU
TIL
auto flash
Other flash mode
TIL
auto flash
Other flash mode
TIL
auto flash
Other flash mode
Fill-Flash
and
close-up
photography, With
flash
exposure
or
between 58-16A
details,
see
5peedlight
countries,
Centre-
mode,
and
Camera exposure mode
P S A M
Yes
Yes
Yes
Yes
No No
Yes Yes
No No Yes Yes
No No No No
No
No
Yes Yes
Yes
Yes
Yes Yes
Connection
Direct
Direct
Via 8C-23
Via 8Cwith
ViaA8-6
13
A8-15
c::J : Matrix 8alanced Fill-Flash
c::J : Centre-Weighted Fill-Flash
Controlled aperture
accessory Nikon Speedlight (at ISO 100)
For outdoor subjects
For
outdoor subjects
or
in
shadows
For
indoor subjects
in
SIMPLE mode with an
on sunny
on
cloudy
day f/8
day
or sync cord
f/5,6
f/4
Page 57

MISCELLANEOUS
This section is
for
both SIMPLE and ADVANCED modes.
57
Page 58

LENSES
The Nikon F501F50o
is
designed for autofocus photography with AF
Nikkor lenses (except AF-Nikkor lenses made specifica lly for the
Nikon F3AF camera). To take full advantage
of
the F501F50o
camera's features, you should use AF Nikkor lenses.
However, the lenses listed on right can be used under the following
conditions:
When an AF-S, AF-I
• Set the focus switch to M and focus
or
AI-P Nikkor lens
is
used:
by
rotating the lens focusing
ring*.
When mountable non-CPU Nikkor lenses are used:
• Use
an
external exposure meter.
to
• Set exposure mode
Manual. (In other exposure modes, shutter
locked.)
• Shutter speed indication appears on the LCD panel and inside the
viewfinder. Set hutter speed by pre ing the set/adjust button.
The f-numb
er
of
the aperture set will not be visible
in
the LCD panel
and inside the viewfinder. Set the aperture by rotating the lens
aperture ring.
• Adjust focus by rotating the lens focusing ring until the subject
appears sharp inside the viewfinder. *
* Unless your subject
can confirm the in-focus indicator. Centre the focus brackets on the subject,
and rotate the focusing ring while lightly
Wh
en the subject
is
not acceptable
is
infocus, the in-focus
for
autofocus operation (page 44), you
pr
essing the shutter release button.
indicator.
appears.
Mountable
• AF Nikkor lenses
• AF-S Nikkor lenses
• AF
-I
•
AI
-P Nikkor lenses
• AI-type
Nikkor lenses except Fisheye
f
/5.6
180-600mm
smaller),
300490 or sma
f/
is
11
• Nikon Series E lenses
• Reflex Nikkor lenses
500mm
1
OOOmm f/11
smaller/
2000mm f/11
larger)
• Medical-Nikkor
available
• Teleconverters (except nonmountable TC-16/TC-16A)
Use
of
the camera.
Nikkor
lenses
Nikkor lenses
(A
I-S,
AI
and AI-modified)
and Fisheye OP 1
Omm
fl8 (No. 174166 or
200-600mm
(No. 174087 or smaller)
ll
er),
f/9.5 (No.
360-
1200mm
fl8
(No. 142360 or
No
. 143001 or larger)
(No. 200311 or
120mm
in
EU
countries)
other
lenses may damage
f/4 (not
6mm
f/5.6,
58
Page 59

Nikkor lens compatibility
Lenses
AF Nikkor (exce
AF-Nikkor
AF-S Nikkor/AF-1 Nikkor/AI-P Nikkor
or AI-S
AI-
IReflex NikkorlSeries E ' 1
Nikkor)
Medical-Nikkor 120mm
Teleconverters
(except
Bellows Focusing Attachm ent PB-6
K ring set
Auto Extension Rings
11A
(PK-
pt
AF-S Nikkor/AF-1 Nikkorl
for F3AF)
type
Nikkor (including AI-modified
f/4 (
not available
TC-16/TC-16A)
(K1
, K3, K4 and
, 12, 13 and PN-11)
KS)
o Compatible
X Incompatible
' 1 Some
'2
lenses
Seepage
Manual focus
with
58.
lenses
within
these
types/series cannot be attached.
with
in-focus indicator confirmation is
that
have
a maximum aperture
in
EU
countries)
of
fl5.
6 or
Focusing Exposure mode
Autofocus
0
X
X
X
X
X
available
faste
r.
Manual
0
0
'2
'2
0
0
0
'3
0
'3
'3
Manual
focus
with
lenses
or
faster.
*4
Camera's exposure meter
P S A M
0
0
X X
X X X
X X X
X X X
with
in-focus indicator confirmation is
that
have
a maximum effective aperture
does
0
0 0
0 0
not
work.
X
See
page
0
0
'4
0
'4
0
'4
0
'4
available
of
f/5.
6
58.
59
Page 60

CAMERA
1.
Do not touch the
camera's reflex mirror
or focusing screen.
Remove dust with a
blower brush.
5.
Clean glass surfaces, such
eyepiece, with a blower brush; do not use lens tissue,
silicon type eyeglass tissue, etc. To remove dirt and
smudges, use soft cotton moistened with denatured
alcohol and wipe surfaces in a spiral motion from
centre
CARE
to
periphery. Do not leave traces.
TIPS
2.
Do not touch the
shutter curtains.
as
the lens or the
3.
Do not touch the DX
contacts. Keep them
clean with a blower
brush.
Cautio
n!
A spray gun-type blower may damage the
optical glass
if
ED glass
avoid damage, hold the blower upright with its
nozzle more than 30cm from the lens surface,
and keep the nozzle moving so the stream
is not concentrated in one spot.
if
used
is
used for the front lens element. To
4. Clean the viewfinder
eyepiece with a soft,
clean cloth. Do not use
alcohol.
to
clean the lens, especially
of
air
60
Page 61

6.Do
not lubricate the
camera.
10.
If
the camera malfunctions, take it immediately
to
authorised Nikon
dealer or service
centre.
an
7.Do not leave the
camera
in
an
excessively hot place.
8. Keep the camera away
from water or moisture . When using the
camera near water,
guard against splashes,
especially salt water
spray.
11
. Store the camera
naphthalene or camphor (moth repellent).
in
a cool, dry place away from
In
humid environment, store the camera inside a vinyl
bag with a desiccant
to
keep out dust, moisture and
salt. Note, however, that storing leather cases
vinyl bags may cause the leather
to
deteriorate.
9. Make sure not
to
drop
or bump the camera
body/lens against a
hard surface. Strong
shock may cause
malfunction.
12.
To maintain the built-in
a
flash condens
er
in
peak
condition, thereby
in
enabling you
flash for many years,
to
use the
fire the flash a few
times every month.
61
Page 62

NOTES
1. Keep batteries out
children's reach.
someone accidentally
swallows a battery, call
a doctor immediately.
5. When replacing a
battery, be sure
a fresh battery.
ON
BATTERIES
If
to
of
use
2.
Do not disassemble,
short circuit or heat
batteries. Do not
charge batteries.
6.
Do not throw used
batteries into fire.
3.
If
you do not intend
use the camera for a
long time, remove the
battery.
7.
If
the battery chamber is contaminated
leakage, take the camera to
dealer.
to
4. Battery power
an
diminishes at
extremely low
temperatures-make
sure the battery you
buy is fresh, and wrap
the camera body
something warm.
authorised Nikon
by
in
battery
62
Page 63

SPECIFICATIONS
Type of camera
Picture format
Lens mount
Lens
Operation mode
Focus modes
Autofocus mode
Autofocus
Integral-motor autofocus 35mm
single-lens reflex
ED
only
35mm
200mm
in
24mm x 36mm (standard
film format)
Nikon F mount
AF Nikkor lenses (except AFNikkor
SOmm
IF
f/3.5
16!fC-16A)
TC-
Nikkor lenses (with limitation)
available
SIMPLE and ADVANCED
Autofocus and manual
Single Servo
Servo AF*
* Continuous Servo is possible
ADVANCED
TIL
phase detection system using
fl2.S,
, and autofocus converter
, and non-AF
AF
and Continuous
mode
detection system Nikon advanced AM200 autofocus
Autofocus
detection range
Autofocus lock
Focus tracking
module
Approx .
100)
Possible,
once a stationary subject
focus as long as the shutter
release button is
Automatically activated with a
moving subject
EV
-1
to
EV
19 (at ISO
in
Single Servo AF mode,
is
li
ghtly pressed
in
Exposure modes
Programmed
Auto exposure
control
Flexible Program
Shutter-Priority
Auto exposure
control
Aperture-Priority
Auto exposure
control
Manual exposure
control
Programmed Auto
mode; Programmed Auto, ShutterPriority Auto, Aperture-Priority Auto
and Manual
Both shutter speed and aperture
are set;
Purpose Program, Landscape
Program, Portrait Program and
Close-Up Program are ava
ADVANCED mode, GeneralPurpose Program, Landscape
Program, Portrait Program, CloseUp Program, Sport Program,
Silhouette Program, Night-Scene
Program, and Motion Effect
Program are available
Possible with General-Purpose
Program
when flash is off
Aperture automatically selected to
Shutter speed automatically
selected to match manually set
aperture
Both aperture and shutter speed
are set manua
in
SIMPLE mode, General-
in
match manually set shutter speed
in
SIMPLE
in
ADVANCED mode
il
able;
ADVANCED mode
ll
y
in
63
Page 64

Shutter speedl
aperture
adjustment
Auto exposure
lock
Exposure Possible
compensation within
Pressing the adjust button
changes shutter speed or
aperture
the adjust button rapidly changes
shutter speed or aperture
step
Available by pressing the AE-L
button while the exposure meter
on
in
1/2 step; holding down
in
ADVANCED mode
±5
EV
range
in
1/2 steps
in
one
Exposure metering Matrix Metering (for Programmed
Auto, Shutter-Priority Auto, and
Aperture-Priority Auto exposure
modes) ; Centre-Weighted
Metering for Manual exposure
mode
Exposure metering
EV
1 to
EV
20 at ISO 100 with
range f/1 .4 lens
Exposure meter Activated by lightly pressing shut-
switch ter release button; when the LCD
panel shows the Exposure Mode
menu, Program menu, OptionalFunction menu, or Optional
Function settings, stays on for
approx. 60 sec.; when the LCD
panel shows the Program/
exposure mode, stays on for
Shutter
Shutter release
Shutter
is
Viewfinder
Eyepoint
Focusing screen
Viewfinder
information
Viewfinder
illuminator
speeds
approx. 8 sec. with the built-in
flash off or 15 sec. with the built -in
flash on
Electronically contro
travel focal
Electromagnetic
1/2000 sec. to 30 sec
magnetica
setting
mode)
Fixed eye-level pentaprism type;
0.78x magnification with 50mm
lens set at infinity; approx. 90%
frame coverage
Approx. 18mm
Fixed Nikon advanced B-type
BriteView screen with central focus
brackets for autofocus operation
In-focus/ AF-impossible indication,
correct exposure indicator, shutter
speed, aperture, exposure
information and exposure
compensation indicatior are shown
in
LCD readout; also shows flash
recommended-/ready-light
Automatically activates when
exposure meter
-p
ll
y controlled Time
is
provided (for ADVANCED
ll
is
on
ed vertical-
.;
lane shutter
electro-
64
Page 65

Film speed range
Film speed setting Auto for DX-coded f
Film loading
Frame counter
ISO
25 to 5000 for DX-coded
films; ISO 6
coded
setting for non-OX-coded f
ADVANCED mode)
Film
frame one when camera back
closed
Accumulati
during film rewind); displayed on
the LCD panel
to
6400 for non-DX-
fi
lms (for ADVANCED mode)
automatically advances to
ve
il
ms; manual
il
ms (for
type (counts down
Film advance Film automat ically advances one
frame at approx. 1 sec. when
shutter
is released; film advance
Film rewind
Self-timer
Reflex mirror
Camera back
Accessory shoe
stops automatically at end
roll
Automatic by built-in
of film roll; manual mid-ro
possible by pressing rewind button
Electronically controlled; 10sec.timer duration
Automatic, instant-return type
Hi
nged back; unchangeable
Standard ISO-type with hot-shoe
contact, ready- light contact,
monitor contact,
TI
of fil
motor
at end
ll
rewind
L flash contact
is
m
Built-in TTL flash
Flash synchro-
nisation speed
Automatic
Balanced
Fill-Flash
Flash ready -light
Power source
Guide number: 13 meters (at ISO
100, 20'C
35mm or longer lens
);
angle
of
coverage:
1/1 25 sec. or slower
TIL
in
Manual
flash or
Fill
re;
blinks
-Flash
Possible with built-in
Nikon dedicated Speed lights such
as SB-28, SB-27, SB-26, SB-25,
SB-24, SB-23, SB-22, SB-20, and
SB-16B; Matrix Balanced
in
Auto exposure modes; CentreWeighted Fi
exposure mode
Without flash: Blinks when using
flash is recommended
With flash:
flash or Nikon dedicated
Speed light
after flash shooting to warn of
insufficient light for correct
exposure
6V
li
0L245
ll
-Flash
Li
ghts up when built-in
is
ready to fi
thium battery pack (2CR5 or
type)
65
Page 66

Number
of
24-exposure
(36-exposure)
film
rolls
per
fresh
battery>
at 20'C
Without flash
With flash for half
of all
exposures
• For autofocus operation with
f/5.6
0 lens covering the full range from infinity to the closest
and
distance
or
faster shutter speed
back
100
(80)
20
(15)
AF
Zoom Nikkor
to Infinity before each shot,
at
-1
O'C
40
(30)
13
(10)
35-80mm
at
1/125
f/4-
sec.,
Dimensions F50: Approx. 149 x 96 x 70mm
(WxHxD) F50o: Approx. 149 x
96 x 71
mm
Weight (without F50: Approx. 580g
battery inside F50o: Approx. 590g (
in
cluding
camera body) battery for date/time imprint
function)
Optional viewing Rubber Eyecup DK-9
accessory
For Date/Time imprinting function (F50D only)
Imprint functions
Year/Month/D
ay,
Day/Hour/
Minute, No imprint, Month/Day/
Year and Day/MonthlYear are
e;
selectabl
24-hour built-in clock
with timing acc uracy within
seconds a month at normal
temperature
Power source
Battery life
With fresh battery
SpeCifications
and
One 3V lithium
Approx. three years'
• May vary depending on extent
imprint use
at
normal temperature (20"
design are subject to change without notice.
(C
R2025) battery
and
film speed
C).
in
±90
of
use .
data
66
Page 67

ABOUT
THE
F50/F50D
METERING
SYSTEM
The Nikon F501F50D has two types
metering
Weighted Metering.
Matrix Metering
With D-type
set a Program, or Shutter-Priority Auto or Aperture-Priority Auto
exposure mode , 3D Matrix Metering automatically activates. Even
extremely comp lex lighting situations, the six-segment Matrix Meter
analyzes sce ne brightness and contrast, automatically adjusting
everything to ensure correct exposure.
built in the D-type AF Nikkor lens sends the information about camerato-subject distance, enabling the camera's microcomputer to perform more
precise exposure analysis.
If
Matrix Metering
camera-to-subject distance, correct exposure is assured.
systems-Matrix
AF
Nikkor lenses including AF-S/AF-J Nikkor: When you
non-D-type AF Nikkor lens or Al-P Nikkor lens
is
activated; although there
Metering and Centre-
of
exposure
In
addition, the microcomputer
is
used, Advanced
is
no information about
in
o
Centre-Weighted Metering
When you set Manual exposure
mode, the camera automatically
switches to Centre-Weighted
Metering. Centre-Weighted
Metering places special emphasis
on brightness within the 12mmdiameter central area
viewfinder, and useful to base
exposure on a specific area
scene.
of
the
of
the
67
Page 68

LCD
PANEUVIEWFINDER
INDICATIONS
I LCD panel
Blinking Symbol
c::ril!III
Err
CJ
Err
Err
11]]
(PU
Err
(in
P
IS IA
0]]
(F'U
(in
M).
G)
f(,;r,
Err
Err
68
Viewfinder
Blinking Symbol
)
Shutter
Can be released
Locked
.-
.:
,- ,-
.-
.:
,-
,- Locked code
.-
,-
.:
,-
,-
.:
,- ,-
Locked
Locked
Can be released
Locked
Locked or film rewind. Turn the camera's power off, and on
Cause and Remedy
is
Battery
ready.
Battery
and replace battery with new one.
a) Film
b)
Non-OX-coded film or film with unacceptable
set film speed manually.
Lens
attached.
Lens attached has no CPU
lens
Lens
number) setting. Set lens to the smallest aperture.
Camera detects a malfunction during film advance
again.
nearing exhaustion. Have a fresh one
is
just about exhausted. Turn the power off
is
not correctly positioned. Reload film.
Battery
power off and replace battery with new one.
is
exhausted during film rewind. Turn the
is
loaded. Switch
attached
Atta
is
attached.
is
not set to the smallest aperture (largest f-
has
ch
to
ADVANCED mode and
no
CPU;
(see
or
or
page
AF
Nikkor
no
AI-P
lens is
lens.
58);
or no
OX
I
Page 69

I LCD panel
Blinking Symbol Blinking Symbol
Viewfinder
•
Shutter Cause and Remedy
Locked
Autofocus
mode switch
the lens focusing ring.
is
impossible with the subject. Set focus
to
M to focus manually by rotating
I
(in
(in
(in
TI
HI
P IS I
A)
Lo
P IS I
A)
U
I.!:::::!.I
(in
SIMPL mode)
U
I.!:::::!.I
P IA
in
ME
Err
H:
Lo
-,
.-
,-
-'
Shutter
speed
indicator
ADVANCED mode)
,-
,-
C ,-
~
(without flash).
Can be released
Can be released
Can be released
Locked
Can be released
Overexposure may occur.
Underexposure may occur.
Automatically selected shutter speed
and picture blur may occur. Use a tripod to avoid
camera shake, or use built-in TTL flash
Speed light.
"T
IME"
is
set
in
Shutter-Priority Auto exposure
mode. Set another shutter speed,
to
mode
Your subject
or
Manual.
is
too dark. Use the built-in TTL flash
Nikon Speedlight.
is
too slow
or
Nikon
or
set exposure
69
Page 70

I
LCD
Blinking Symbol Blinking
panel
Viewfinder
(after flash
Symbol
~
shooting)
Locked
Shutter
Cause
and
Remedy
Light might be insufficient. Confirm shooting
distance and, if necessary, move closer to the
subject or select a wider aperture.
I
Err
TTL
•
(
in P IS)
About LCD
• The camera
the
highest
normal
reliable operation. After
deteriorate
fade.
charge
or
service
use,
You
by
can
uses a Liquid
quality
should
and
display
have
contacting
facility.
70
,-
C ,-
which,
provide
this
information
the
LCD
an
,-
Crystal
under
conditions of
several
period,
replaced at a
authorised
Locked
Display
years
contrast
may
Nikon
(LCD)
of
may
start
nominal
dealer
to
of
Speed light attached
Speedlight's flash mode to
Priority Auto or Manual exposure mode.
•
At
temperatures between
response
normal
•
As
as
These
time
when
the temperature
the temperature drops, the
the temperature
changes
slows
do
not
is
not set at
down;
rises,
affect
TIL
freezing,
it
goes
rises.
the
LCD
LCD
normal
TIL.
Set the
. Or, use Aperture-
the
LCD's
back
to
turns
reddish;
turns
bluish.
use.
Page 71

In certain cases, due
to
static electricity
or
poorly
loaded batteries, the camera's microcomputer
tum
may
the camera off, even with fresh properly
installed battery. For the same reason, film may
not advanced properly. In each
resume operation, simply
then
tum
ON
again,
or
remove battery and install
tum
of
these cases,
the power
OFF,
it again.
to
"This digital apparatus does not exceed the
(Class
B)
limits for radio noise emissions from
digital apparatus set out in the Radio Interference
Regulations
the Canadian Department
of
of
Communications. "
Nikon cannot be held responsible
malfunction resulting from the use
for
of
other than as specified in this manual.
any
the camera
71
Page 72

..
No reproduction
in
whole or
quotation
be made without written authorisation from
NIKON CORPORATION.
in
any form
in
part (except for brief
in
critical articl
es
of
this manual,
or reviews), may
NIKON CORPORATION
FUJI BLDG., 2-
PHONE: 81-3-3214-53
3,
MARUNOUCHI 3-CHOME, CHIYODA-KU, TOKYO 100-833
11
TELEX: NIKON J22601
,
Nikon
f
FAX:
81-3-3201-5856
1,
JAPAN
Printed in Japan K8A2001101 (839
•
•••
•
::11
•••
•••
••• •
••• •
••••••
••••••
•••••
••••••
2)
•
Page 73

SHORTCUT
TO
GREAT PICTURES
Nikon
Read this Instruction Sheet to learn
how to use your F50/F50o camera
the SIMPLE mode.
For additional information about how to
Set/adjust buttons:
SIMP
LE
to
set
Shutter release
button
Menu button
F50/F50o
In
mode, press
~r("\r''''rn
SHOOTING
in
IN
SIMPLE
operate your F50/F50o, please also
read the F50/F50o Instruction Manual
booklet, after you have become familiar
with the SIMPLE mode.
MODE
Power switch
SIMPLE!
ADVANCED dial
I
PREPARING
Make sure the power switch
off. Attach the AF Nikkor lens.
1
Turn on the power switch and load film.
Pull the film leader out to the red index
3
THE
CAMERA
is
turned
Insert 6-volt lithium battery pack (2CR5
or Duracell DL245 type).
2
mark and close the camera back.
#1
matically advances to frame
.
Film
auto-
Page 74

I
CAMERA
SETTINGS
Set lens aperture to minimum
(f
setting
the lens ap erture.
I
TAKING A PICTURE-FOR A GENERAL
Confirm the LCD panel shows
viewfinder at the subject you wish to photograph, and lightly press the shutter
th
is
indicator) and 0 (correct exposure indicat
take a picture.
I
TAKING
/22 , f/32 , etc.) and lock
activat
es
the autofocus operation and the light meter operation. Confirm the . (in-focus
LANDSCAPE,
ri,
••
••
•
•••
••••
••
• • ••• • ••
••
••••
••••••
••••••••••••••
••••• • ••••
••••
•••• • •••
•••• • •••
•••• • •••
••••• •
••••••••••••••
Set focus switch to AF position.
SUBJECT
indicating the General Purpose Program. L
or)
appear; full
••• ••
••
•
••
•
• •••
••••
PORTRAIT
y depress the shutter release button to
AND
CLOSE-UP
Set selector dial
PICTURES
ook
through the
re
lease button;
to
SIMP
LE.
To vi
ew
the Program Menu , press the menu
button, then press the button above the
to
select
the
icon
picture in the same manner as taking a
picture with General Purpose Program.
Once selected, each Program remains in
effect until you select another Program.
LANDSCAPE PROGRAM
Co
®
1
:I
~n
PORTRAIT PROGRAM
desired Program . Take a
CQO
,
• • •••
••• • •••••
•••
••• • •••••••
••• • •••••••
••• •
••• • •••••••••
••• • •••••••••
••••••••••••••••
••••••••••••••••
••••••••••••••••
••••••••••••••••
••••••• ••
••••••• • ••
•••••• • ••
•••••• • ••
••••
••
•••• • ••
••••• • ••••
•••• • ••••
•••••
••
••••••
••••
• •••••
•••••••••
•••••
•••
•••••
•••••
••••••
••••
••••
• •••••
••
(b
cQDCQD
[:IIS
]
To select the General
Purpose Program quickly
Just press the menu button
at least
two
seconds.
for
CLOSE-UP PROGRAM
••• ••• • ••
•••••••••••
•••••••••••
•••••••••••
...........
. ......
•• • ••
••• • •••
•••• • ••••
••••• • •••••
•••••• • ••••••
•••••
••••
• • •
•• ••• ••
•••••••••
• ••••••
• •••••
~
~~~~~
Page 75

I
WHILE
YOUIRE
TAKING
PICTURES
Using the Built-In Flash
The flash can
when the
0.6m to 3m when using a
film with ISO 100
AF
Zoom-Nikkor
mm
(/4-(/5.60
~
blinks inside the viewfinder, use the built-
If
lock release button . Lightly press the shutter release button, wait for the
~
to
come on
appears in the viewfinder, then fully depress the shutter release button.
-If ~ blinks after shooting for a few seconds, this means that the light
might be insufficient. Check shooting distance, and if necessary,
move closer to subject and take a picture with flash again.
in
the viewfinder. Confirm
in
flash. Press the flash
the.
(in-focus indicator)
be
subject
lens.
used
is within
and
the
35-80
Viewfinder information
[
~:~: i
c........,
.......-; ....
o
---
~
: -"<-
---
H : blinks-Overexposure [
--
possible ;. i i ;
Use a film with lower ISO, or
use a Nikon Neutral Density
Filter.
lo
blinks-Underexposure
possible
Use the built-in flash.
~H"
~
blinks (without
<..pI
Flash recommendation
This happens when it's dark.
Use the built-in flash.
flash)-
~:~ ::
S"' ......
! ;
.... -___
~
[ ] blinks inside viewfinder and A
blinks
is possible
The light
automatically selected shutter speed
slow. This can cause picture blur due to
camera shake. Hold the camera steady,
or use a tripod. Or, use a built-
• blinks-Unacceptable condition
_
for autofocus
Autofocus requires that the subject
have some contrast or details to focus
upon. Make sure the subject conforms .
You can't focus on the sky, a blank
wall, a very shiny surface, a subject
which has no details or contrast.
r If a stationary
subject starts
move
Remove your finger from
the shutter release
button and lightly press
again to restart
autofocus.
in
the
LCD
panel-Picture blur
is
probably dim and the
in
"""
to
is
flash.
I
WHEN
YOUIVE
TAKEN A COMPLETE
ROLL
To rewind film at mid-roll: Press the
rewind button
on
the camera bottom .
 Loading...