

Page 1

Instruction Manual
E
Page 2

FOREWORD
Thank you for choosing the Nikon F5 for your photography.
Designed with a combination of strong and reliable construction, plus today’s newest and most advanced technology, the
F5 35mm SLR and the Nikon system will provide you with the
opportunity to advance your picture-taking capability.
The Nikon F5 has been designed and built to meet the needs of
demanding professionals, for sports, photojournalism, scientific,
industrial, forensic and nearly every other professional use of
photography, as well as high-quality personal photography.
The F5 features Nikon’s F system bayonet lens mount, and
offers its highest level of performance and features, with D-type
Nikkor lenses. Performance and operation of available features
will vary when used with Nikon lenses other than D-type Nikkor.
Refer to the chart in “LENS” section for details.
The F5 features an all-metal, die-cast chassis, a moisture- and
dust-resistant metal exterior cover, and the world’s first selfdiagnostic, self-adjusting, high-performance shutter — to
provide truly reliable performance.
To design the F5, Nikon invented many new features, surpassing all others previously available. The F5 will provide you with
the most advanced performance for its fast motor drive with
Focus Tracking and Lock-On™, new 1,005-sensor Nikon 3D
Color Matrix Meter, variable Center-Weighted Meter, Spot Meter
selectable with five points, Multi-Sensor Balanced Fill-Flash,
near-silent Cs film advance mode and more. Available options
include the near-silent Nikon AF-S Silent Wave Motor Lens,
Multi-Control Back, and more.
Nikon, the long-standing leader in professional quality photographic equipment, offers the F5’s leading-edge technology to
meet the demanding needs of today’s photography.
Because the F5 includes so many new and innovative features,
you should thoroughly read the instruction material provided.
Experiment, enjoy — your personal experience will provide you
with the ultimate education.
You’ll also want to inquire about unique Nikon accessories
designed for the F5. These include the Multi-Control Back, the
personal computer link system, AF-Nikkor interchangeable
optics, the Nikon close-up system, remote control system and
much more.
We hope that you enjoy using your new Nikon F5, and thank
you again for choosing Nikon.
2
Page 3

Special new features:
• Nikon’s exclusive new cross-ranged, five-area autofocus sensor (Multi-CAM1300) system covers a wider
area than any system before it in both the horizontal
and vertical ranges in the viewfinder.
• Choice of two modes for Nikon’s exclusive five-area
autofocus operation—Dynamic AF for moving subjects,
and fixed Single Area AF.
• Five focus areas are selectable, and the focus bracket
turns from grey to black to indicate the selected focus
area (with standard EC-B type focusing screen).
• Exclusive new powerful motors and CPU enable a highspeed film advance of up to 8 frames per second (fps)
even with automatic Focus Tracking operation.
• Exclusive 3D Color Matrix Metering using a new 1,005pixel RGB sensor to read a scene’s color as well as
brightness and contrast.
• Flexible Center-Weighted Meter enables sensing area
size to be changed (with Custom Setting).
• Spot Metering changes the meter’s sensing area to
correspond to the manually selected focus area.
• Self-diagnostic double-bladed shutter that’s tested to
150,000 cycles, featuring Nikon’s exclusive shutter
monitor.
• AF start button activates AF independently of the shutter release button (with Custom Setting).
• 1/300 High-Speed Flash Sync (with Custom Setting;
1/250 sec. at normal setting).
• Menu of 24 Custom Settings for added versatility.
• Fortified aluminum-alloy die-cast body covered by
durable aluminum housing, titanium viewfinder housing
and easy-to-grip, slip-proof rubber-reinforced surface
finish.
Your Nikon F5 is fully guaranteed against any
manufacturing defects for three full years
from the date of purchase. During this period,
repairs or adjustments will be made free of
charge only upon presentation of the Nikon
Worldwide Service Warranty Card to any of
the Nikon service facilities listed. Contact an
authorized Nikon dealer or service center for
more details.
3
Page 4

NOTES
Have Nikon spot check your camera regularly
Nikon recommends that you have your camera serviced
at an authorized dealer or service center, at least once
every two years.
Using your camera correctly
The F5 camera’s performance has been optimized for
use with Nikon brand accessories. Accessories from
other manufacturers may not meet Nikon’s criteria for
specifications, and nonconforming accessories could
damage the F5’s components. Nikon cannot guarantee
the F5’s performance when it is used with other than
Nikon brand accessories.
4
Page 5

ABOUT THIS MANUAL
Reference tag
Reference tag on the edge of the righthand pages corresponds to the sections
described in “How this instruction manual
is organized”.
Index
Use alphabetically listed index on pages
162 and 163 to check your desired page
number.
Glossary
Refer to alphabetically listed “Glossary”
on pages 155 to 161 to get definitions on
various terms used in this manual.
How this instruction manual is organized
Before You Begin
Preparation
Basic Operation
General Functions
Describes information required before you start using
your camera.
Describes preparation of camera, loading of batteries
and film before taking pictures.
Introduces basic shooting using the most basic
settings.
Explains photography fundamentals with the F5
including film advance mode, focus area, focus
mode, metering system and exposure mode.
P.2
-P.15
P.16
-P.24
P.25
-P.34
P.35
-P.56
Advanced P.57
Operation -P.94
Controls in Detail
Flash Photography
Miscellaneous
Presents advanced F5 applications for obtaining various photographic effects
Describes the F5’s various features in detail, points to
be checked and other pertinent items.
Introduces various flash photography methods using
an optional Nikon Speedlight.
Lists lens, accessories, tips on camera and battery
care, and other miscellaneous information.
P.95
-P.107
P.108
-P.126
P.127
-P.168
5
Page 6

CONTENTS
BEFORE YOU BEGIN.............................................................2-15
FOREWORD..........................................................................2-3
NOTES .....................................................................................4
ABOUT THIS MANUAL .............................................................5
CONTENTS ...........................................................................6-7
NOMENCLATURE ...............................................................8-13
LCD panels........................................................................12
Viewfinder ..........................................................................13
HOW TO OPERATE COMMAND DIALS ............................14-15
PREPARATION...................................................................16-24
MOUNTING LENS .............................................................17-18
Removing lens ...................................................................18
INSTALLING BATTERIES........................................................19
CHECKING BATTERY POWER...............................................20
LOADING FILM..................................................................21-24
BASIC OPERATION ............................................................25-34
RELEASING SHUTTER/COMPOSING THE PICTURE........26-27
BASIC SHOOTING ............................................................28-34
About Two-Button Reset ...................................................34
GENERAL FUNCTIONS........................................................35-56
FILM ADVANCE MODE .....................................................36-37
Single-Frame Shooting ......................................................36
Continuous Shooting .........................................................37
FOCUS AREA....................................................................38-40
Selecting Focus Area....................................................38-39
Selecting AF Area Mode ....................................................40
FOCUS MODE...................................................................41-48
Autofocus.....................................................................41-45
Single Servo AF with Focus-Priority ..........................42-43
Continuous Servo AF with Release-Priority ...............44-45
Manual Focus...............................................................45-48
Manual focus with Electronic Rangefinder.................46-47
Manual focus using clear matte field...............................48
EXPOSURE METERING SYSTEM......................................49-51
3D Color Matrix Metering ...............................................49
Center-Weighted Metering .............................................50
Spot Metering ................................................................50
Setting Metering System....................................................51
EXPOSURE MODE ............................................................52-56
Selecting Exposure Mode.............................................52-55
Setting Exposure Mode .....................................................56
ADVANCED OPERATION.....................................................57-94
SHOOTING IN EACH EXPOSURE MODE ..........................58-67
Operation in Shutter-Priority Auto Exposure Mode........58-60
Operation in Aperture-Priority Auto Exposure Mode......61-63
Operation in Manual Exposure Mode............................64-67
FLEXIBLE PROGRAM........................................................68-69
FOCUS LOCK—To take off-center subjects ......................70-71
AE/AF LOCK .....................................................................72-73
EXPOSURE COMPENSATION...........................................74-81
To Obtain Meter Reading for a Particular Subject in
Manual Exposure Mode............................................75-76
Exposure Compensation Function ................................77-78
Auto Exposure/Flash Exposure Bracketing ...................79-81
6
Page 7

SELF-TIMER......................................................................82-83
LONG TIME EXPOSURE....................................................84-85
MULTIPLE EXPOSURE......................................................86-87
CUSTOM SETTING ...........................................................88-94
To Make a Custom Setting ................................................91
CONTROLS IN DETAIL......................................................95-107
VIEWFINDER DIOPTER—To see clearly through viewfinder ....96
ILLUMINATION SWITCH—To view LCD panels in the dark .....96
USING NON-DX-CODED FILM ...............................................97
FILM REWIND CRANK—To rewind film manually...............97-98
MIRROR LOCKUP LEVER—
To lock reflex mirror in up position......................................99
DEPTH-OF FIELD PREVIEW BUTTON ..................................100
ACCESSORY SHOE .............................................................100
SYNC TERMINAL .................................................................101
REMOTE TERMINAL.............................................................101
OPERATION WITH PERSONAL COMPUTER ................102-103
SELF-DIAGNOSTIC SHUTTER SYSTEM...............................104
CHANGING CAMERA BACK ................................................105
CHANGING VIEWFINDERS...................................................106
CHANGING FOCUSING SCREENS ......................................107
FLASH PHOTOGRAPHY ..................................................108-124
TTL AUTO FLASH—Automatic Balanced Fill-Flash and
Standard TTL Flash ..............................................109-117
Types of TTL Auto Flash ...........................................109-113
Shutter Speed/Aperture for Each Exposure Mode in
TTL Auto Flash .....................................................114-115
Flash shooting distance range in 1/300 TTL
High-Speed Sync.........................................................116
Selecting flash sync mode ...............................................117
TTL Auto Flash Operation .........................................118-119
SLOW SYNC—
To make dark background more visible ....................120-121
REAR-CURTAIN SYNC—
To create a natural-looking stream of light ................122-123
AVAILABLE SPEEDLIGHT AND FLASH FUNCTIONS ....124-125
NOTES ON FLASH PHOTOGRAPHY....................................126
MISCELLANEOUS...........................................................127-168
LENS.............................................................................128-131
ATTACHING NON-AI LENS ..................................................132
OPTIONAL ACCESSORIES ...........................................133-145
SPECIAL FOCUSING SITUATIONS IN AF ......................146-147
TROUBLESHOOTING....................................................148-150
CAMERA CARE TIPS ....................................................151-153
NOTES ON BATTERIES........................................................154
GLOSSARY ...................................................................155-161
INDEX............................................................................162-163
SPECIFICATIONS..........................................................164-168
7
Page 8
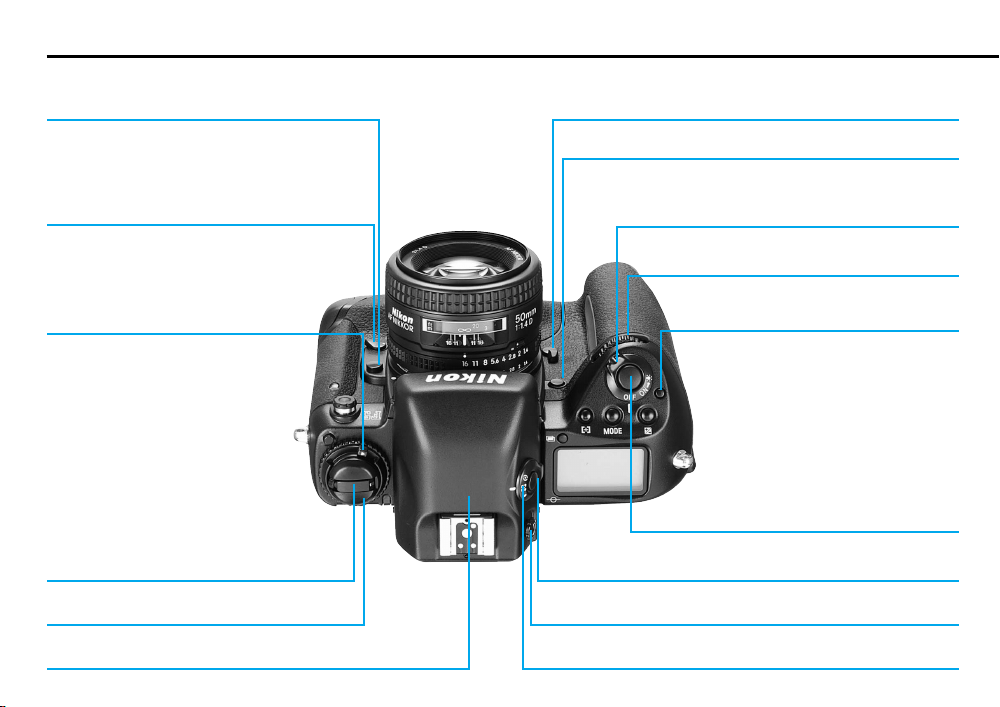
NOMENCLATURE
Lens release button
Focus mode selector:
S for Single Servo AF (pp. 42-43)
C for Continuous Servo AF (pp. 44-45)
M for Manual focus (pp. 45-48)
Camera back lock release: To open
camera back, lift film rewind knob while
sliding camera back lock release.
Film rewind crank
Film rewind knob
8
Mirror lockup lever (p. 99)
Depth-of-field preview button (p. 100)
Power/LCD panel illumination switch: Rotate to
turn camera ON/OFF or illuminate LCD panels. (p. 96)
Sub-Command Dial:
Rotate to set various functions. (p. 15)
Power switch lock release
Shutter release button: To activate
exposure meter and autofocus func-
tion, lightly press; to release shutter,
depress fully; exposure meter automati-
cally switches off after approx. 8 sec.
Metering system selector lock release
Diopter adjustment knob (p. 96)
Metering system selector (p. 51)Multi-Meter Finder DP-30
Page 9
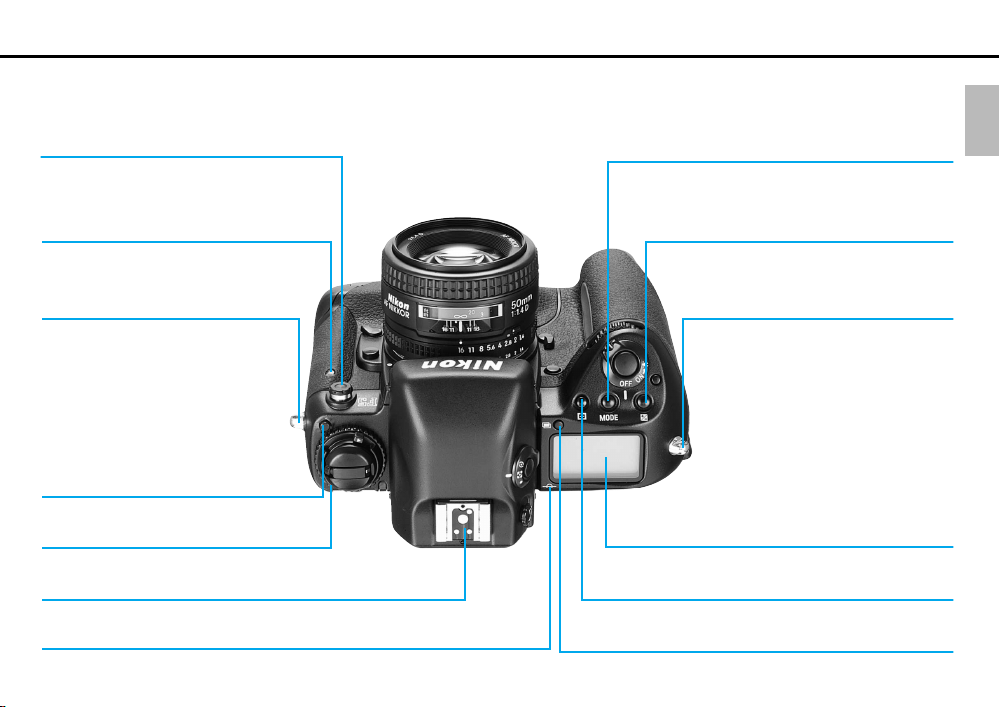
Sync terminal
Exposure mode (MODE) button (p. 56)
Self-timer indicator LED (pp. 82-83)
Camera strap eyelet
Film advance mode selector
lock release
Film advance mode/self-timer selector
(pp. 36, 82)
Accessory shoe: For Nikon dedicated Speedlights.
Film plane indicator: Exact distance from lens mounting flange to film
plane is 46.5mm.
Exposure compensation (=) button
(p. 77)
Camera strap eyelet
Top LCD panel (p. 12)
AF area mode button (˝) (p. 40)
Multiple exposure (Z) button (p. 86)
9
Page 10
Eyepiece shutter lever: Used to prevent stray light
from entering viewfinder.
Finder release button
Viewfinder eyepiece
AE-L/AF-L (Auto Exposure/Autofocus Lock) button:
Locks auto exposure and focus when pressed and held in.
Alert LED
Film rewind lever (2 „) lock release
Film rewind lever (2 „)
Film cartridge confirmation window
Battery holder release knob
Auto Exposure/Flash Exposure
Bracketing (‚) button (p. 79)
Film speed (°) button (p. 21)
Shutter speed/aperture/focus area lock
(—) button (p. 39, 59, 61)
Flash sync mode (±) button (p. 117)
10
AF start (AF-ON) button: Pressing AF
start button starts autofocus operation.
Main-Command Dial:
Rotate to set various functions. (p. 14)
Film rewind button (1 „)
10-pin remote terminal:
For Personal Computer Connecting
Cord MC-33 or MC-34, Remote
Cord MC-30/MC-20, etc.
Focus area selector (p. 38)
Rear LCD panel (p. 12)
Custom Setting Menu (·) button (p. 91)
Page 11

AF start (AF-ON) button for vertical shooting:
Pressing AF start button starts autofocus operation
and switches exposure meter on.
Vertical-shooting shutter release button
Lock lever for vertical-shooting shutter
release button
Camera back
Tripod socket
11
Page 12
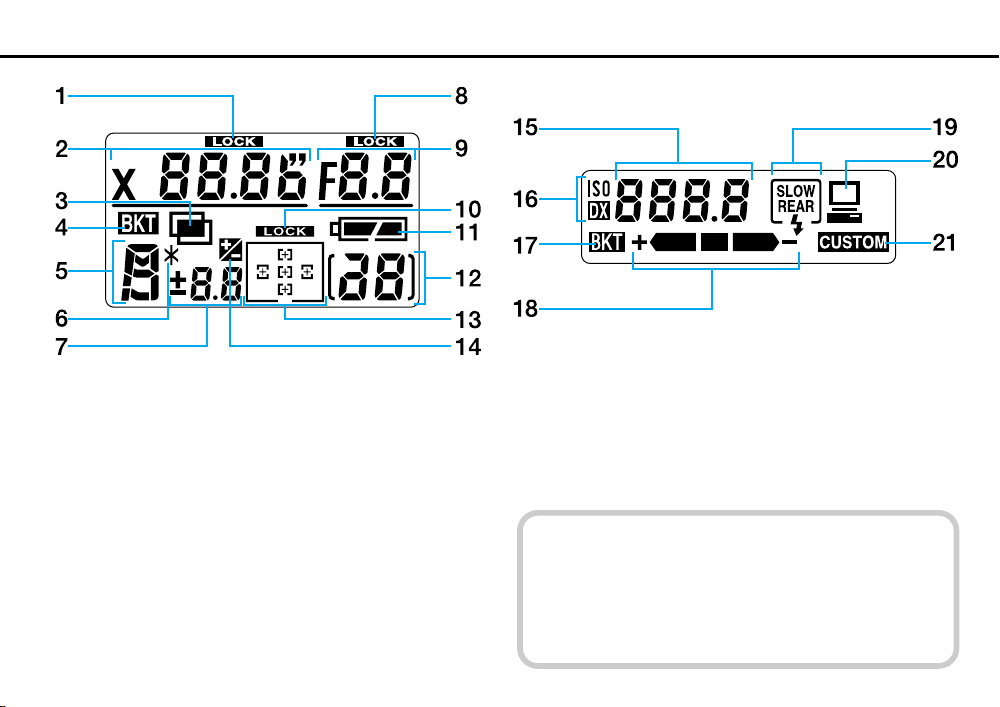
LCD Panels
Top LCD panel indications
1. Shutter speed lock
2. Shutter speed
3. Multiple exposure
4. Auto Exposure/Flash Exposure Bracketing
5. Exposure mode
6. Flexible Program
7. Exposure compensation value
8. Aperture lock
9. Aperture
10. Focus area lock
11. Battery level
12. Frame counter
13. Focus area/AF area mode
14. Exposure compensation
12
Rear LCD panel indications
15. Film speed/Bracketing information/Custom Setting
16. Film speed setting mode
17. Auto Exposure/Flash Exposure Bracketing
18. Bracketing bar graphs
19. Flash sync mode
20. Personal computer connection
21. Custom Setting
• At high temperature (60°C/140°F or above), the entire
display turns black, making it hard to read display information. When the temperature drops, the display can
again be read normally.
• When the temperature drops below freezing, the LCD
response time slows. When the temperature rises, the
display works normally again.
Page 13
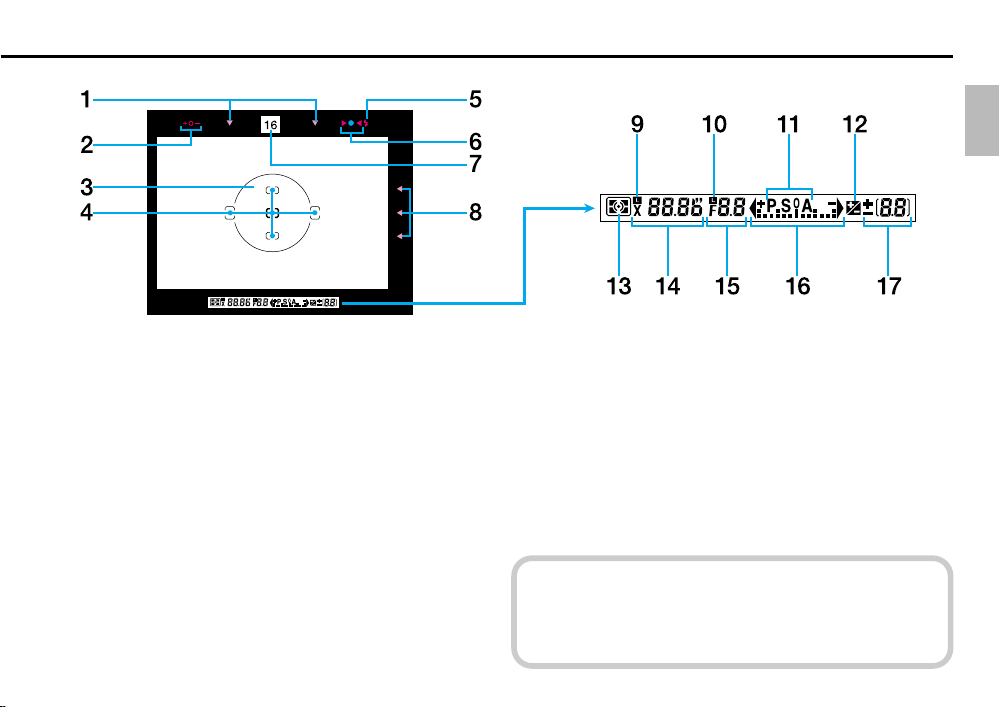
Viewfinder
1. Focus area indicators
2. Exposure level (for Waist-Level Finder DW-30 or 6X High-
Magnification Finder DW-31, in Manual exposure)
3. 12mm-dia. reference circle for Center-Weighted Metering
4. Focus brackets/Spot Metering (4mmø) area
5. Ready-light
6. Focus indicators: / indicates a subject is in focus; blinking
? indicates autofocus is impossible; < and > arrows indicate front and rear focus, respectively
7. Aperture direct-readout
8. Focus area indicators
9. Shutter speed lock indicator
10. Aperture lock indicator
11. Exposure mode
12. Exposure compensation
13. Metering system
14. Shutter speed
15. Aperture
16. Electronic analog exposure display
17. Frame counter/exposure compensation value
Lightly pressing the shutter release button turns on the
exposure meter and switches on the viewfinder illuminator.
13
Page 14
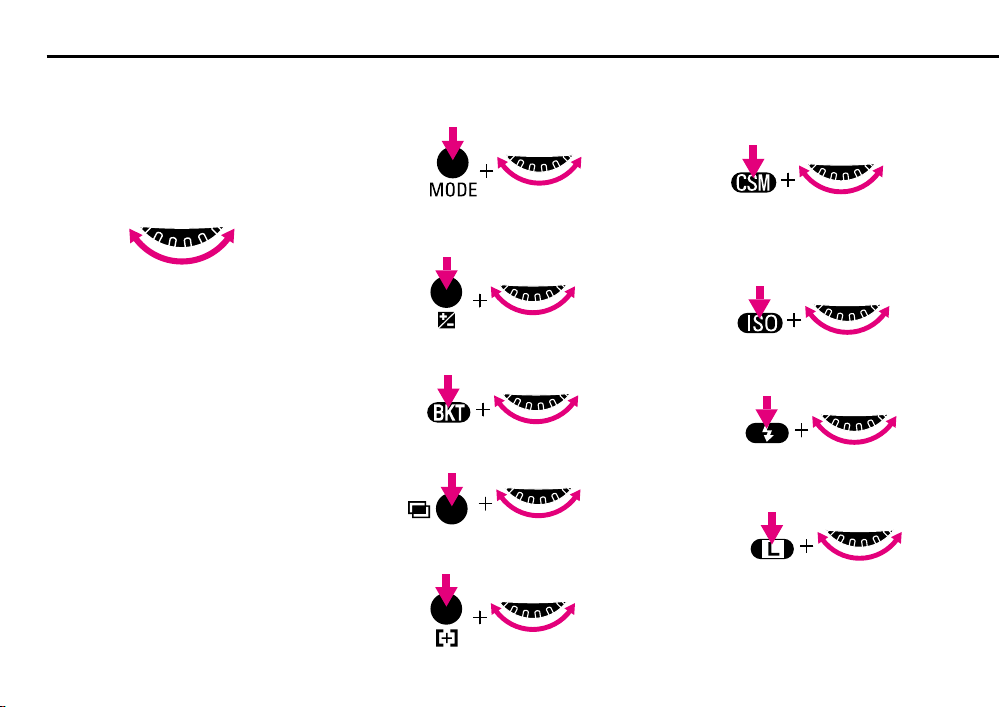
HOW TO OPERATE COMMAND DIALS
The F5’s Main- and Sub-Command Dials
are used alone or in combination with
other buttons to select/set various functions or modes.
Main-Command Dial
Rotating Main-Command Dial by itself:
• Selecting shutter speed in ShutterPriority Auto or Manual exposure mode.
See page 58 or 64.
• Performing Flexible Program in
Programmed Auto exposure mode. See
page 68.
Rotating Main-Command Dial while pressing various buttons:
• Selecting exposure mode. See page 52.
• Performing exposure compensation.
See page 77.
• Setting/canceling Auto Exposure/Flash
Exposure Bracketing. See page 79.
• Setting/canceling multiple exposure.
See pages 86-87.
• Selecting AF area mode. See page 40.
• Selecting Custom Setting menu. See
page 91.
• Selecting auto film speed setting or
manually selecting film speed. See
pages 21 and 97.
• Selecting flash sync mode. See page
117.
• Locking shutter speed. See page 59.
14
Page 15

Sub-Command Dial
Rotating Sub-Command Dial by itself:
• Selecting aperture in Aperture-Priority
Auto or Manual exposure mode. See
pages 61 or 64-66.
* Aperture can also be set on the lens’
aperture ring (except for G-type Nikkor
lens). Aperture can only be set on the
lens’ aperture ring with non-CPU lens.
Rotating Sub-Command Dial while
pressing various buttons:
• Setting number of exposure and
compensation value in the Auto
Exposure/Flash Exposure Bracketing.
See pages 79-81.
• Selecting and making a Custom Setting.
See page 91.
• Locking aperture. See page 59.
Focus Area Selector
Pressing one of the focus area selector
arrows changes the focus area in the
corresponding direction. See pages 38-
39.
‚ and · Buttons
Pressing ‚ and · buttons simultaneously for more than two seconds resets
various functions to the initial settings.
See page 34.
15
Page 16

16
PREPARATION
This section shows you how to prepare the camera for shooting—
e.g., how to mount lens, load film. Whether you are a beginner or a
seasoned photographer, you should master this section before
proceeding further.
Page 17
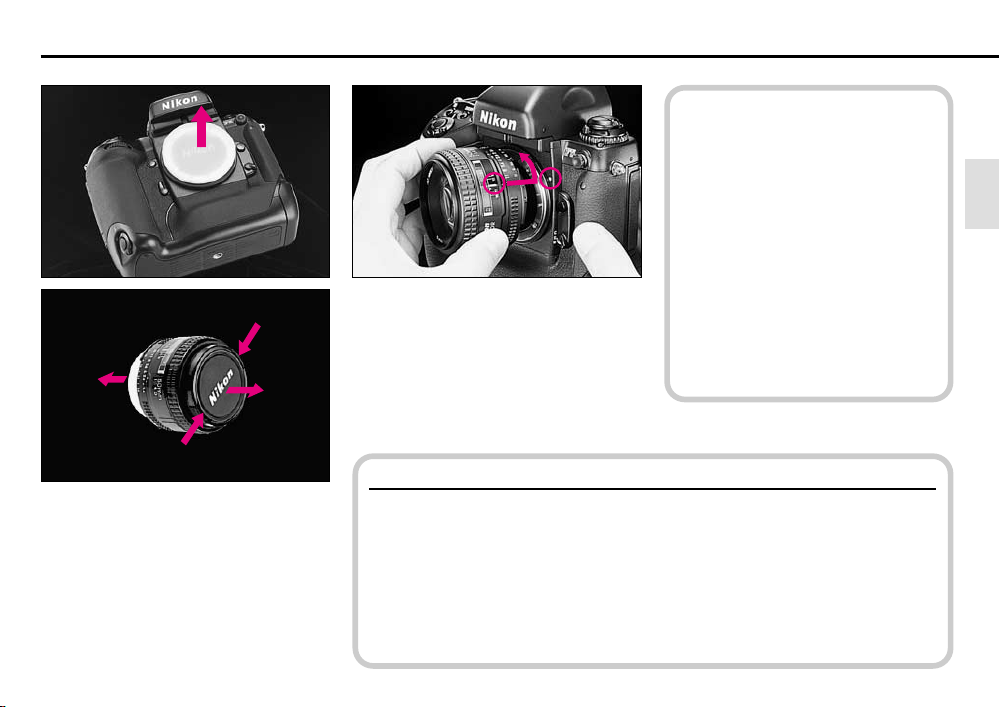
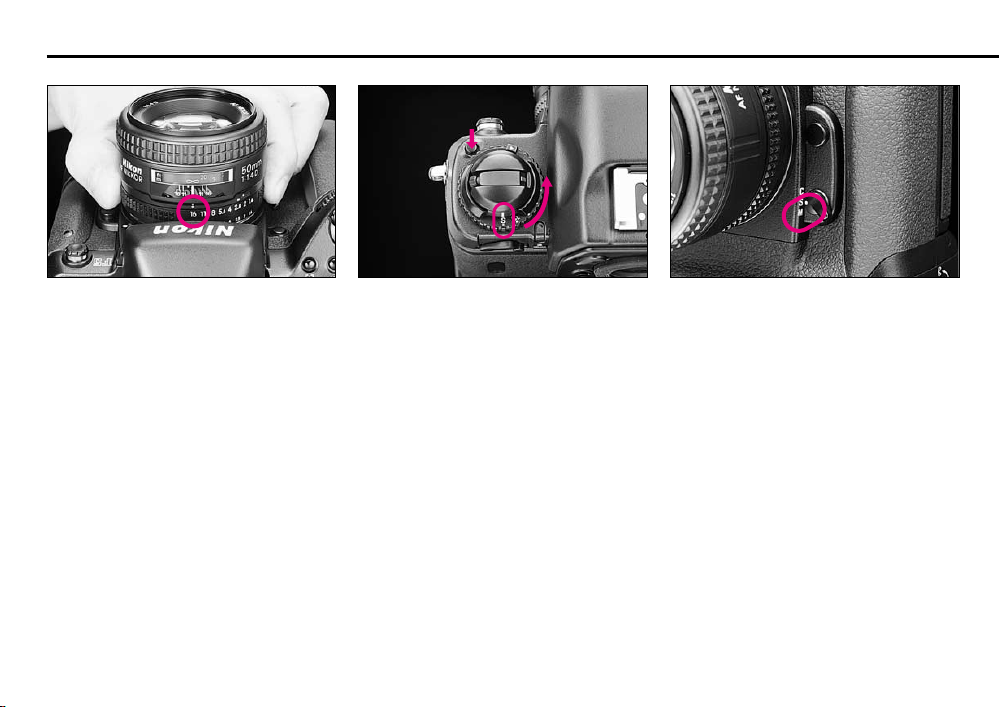
MOUNTING LENS
Remove camera body cap and front
1
and rear lens caps.
• When mounting/removing lens,
make sure that the camera’s
power is turned off and avoid direct
sunlight.
• For Nikon lens compatibility, see
pages 128-131.
• To mount non-AI lens, see page
132.
Some non-AI lens cannot be
Position lens in the camera’s bayo-
2
net mount so that the mounting
indexes on lens and camera body are
aligned. Taking care not to press the lens
release button, twist lens counterclockwise until it locks into place.
G-type Nikkor and other CPU Nikkor lens
• The G-type Nikkor lens has no aperture ring; aperture should be selected from
camera body. Unlike other CPU Nikkor lenses, aperture does not need to be set
to minimum (largest f-number).
• CPU Nikkor lenses other than G-type Nikkor lens have an aperture ring. Set the
lens aperture to its minimum and lock. When the lens is not set to its minimum
aperture setting and the power switch is turned on in Programmed Auto or
Shutter-Priority Auto exposure mode, ƒEE blinks in the LCD panel and
viewfinder.
attached. For more details, see
page 131.
17
Page 18
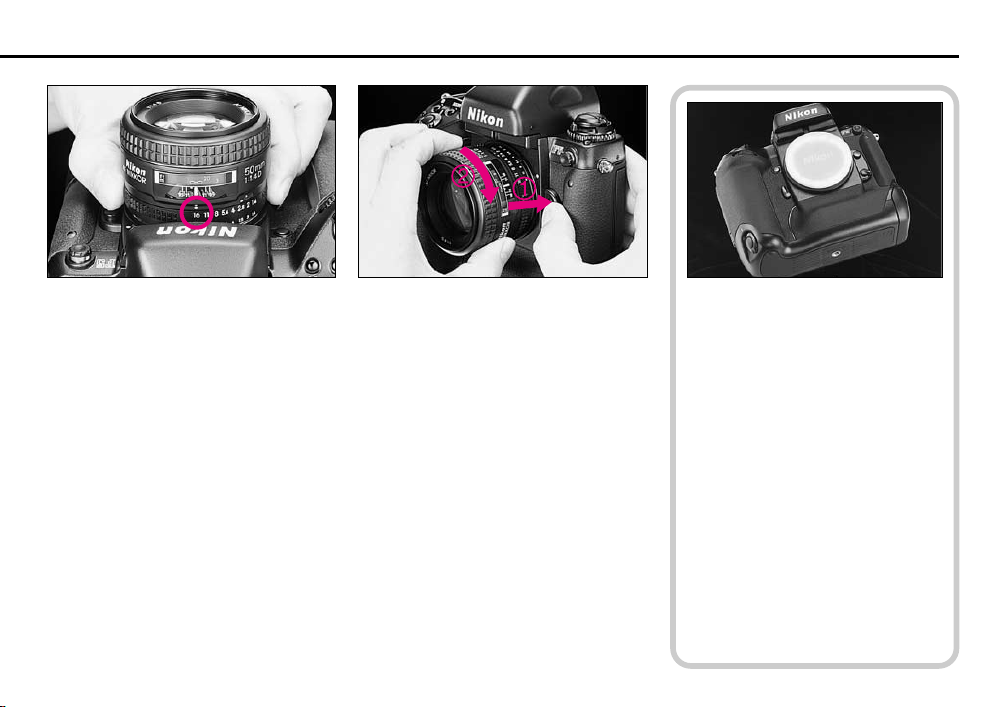
Removing Lens
Minimum aperture:
Set lens to its minimum aperture when
using CPU Nikkor lens other than G-type.
The largest f-number of aperture on the
lens’ aperture index is the lens’ minimum
aperture.
• Aperture setting operations are performed
using the Sub-Command Dial on the
camera body. Do not move the lens’ aperture once it is set to its minimum aperture.
• Aperture can also be set with the lens’
aperture ring in Aperture-Priority Auto or
Manual exposure mode when using CPU
Nikkor lens other than G-type. In this case,
aperture can only be verified through aperture direct-readout.
• When G-type Nikkor lens is attached,
aperture does not need to be set to minimum unlike other CPU Nikkor lenses with
aperture ring.
18
Push and hold lens release button and
turn lens clockwise.
When lens is detached from
camera for a long time
Make sure to attach the supplied
body cap or optional body cap
BF-1A. (BF-1 body cap cannot be
attached to the F5 camera body.)
Page 19
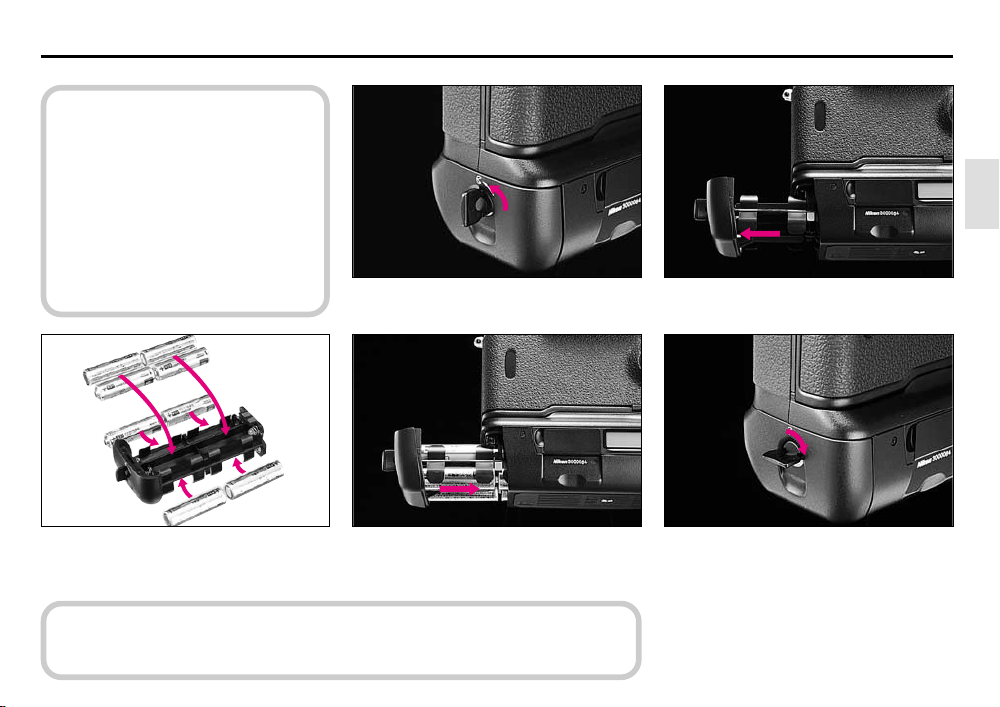
INSTALLING BATTERIES
Before installing batteries:
• Make sure the power switch is set
at OFF position.
• Use AA-type alkaline or lithium
batteries, or optional Ni-MH
Battery Unit MN-30 with the F5.
• When installing/replacing batteries,
always read “NOTES ON BATTERIES”, page 154.
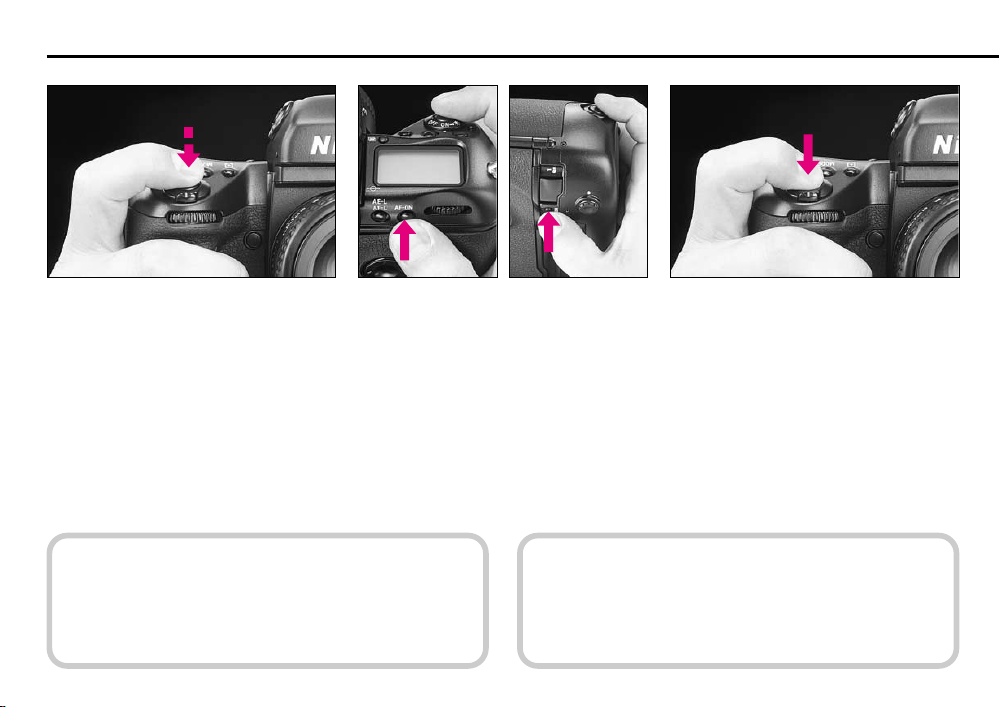
Pull out and turn battery holder
1
release knob as shown. 2
Remove battery holder MS-30.
Install eight AA-type batteries with
3
the “+” and “–” terminals positioned
as shown inside the holder.
CAUTION: When carrying the battery holder MS-30 removed from the camera
body, remove its batteries or install it in a case to avoid possible short-circuit
caused by contacts with other metal objects.
Return battery holder MS-30 to
4
battery chamber. 5
Turn battery holder release knob
clockwise until it stops.
• To install Ni-MH Battery Unit MN-30,
follow steps 1-2 and 4-5.
19
Page 20
CHECKING BATTERY POWER
Rotate power switch to ON position while pressing the lock release, and confirm that
the full battery mark appears in the top LCD panel, indicating sufficient battery power.
The battery mark and exposure indications automatically turn off after 8 sec.
Sufficient battery power.
N
Batteries are nearing exhaustion. Have a
fresh set ready.
M
M
About exposure meter
You can check battery power
anytime by lightly pressing the shutter release button. This also activates
the exposure meter, so that the LCD
panel and viewfinder LCD show
aperture/shutter speed indications,
and autofocus operation starts
(unless camera is set for manual
focusing). The exposure indications
and battery mark stay on for approx.
8 sec. after you take your finger off
the shutter release button, then
automatically turn off.
If M blinks, batteries are almost
exhausted. Rotate power switch to OFF
and replace batteries with a fresh set.
An exhausted battery can temporarily regain normal battery level after a pause.
When the installed batteries are exhausted but the sufficient battery power indication N is shown in the LCD panel, battery level may quickly become low after
shutter release and the camera does not function normally. To resume normal
operation, replace the batteries with new ones.
20
If no indication/mark appears, batteries
are completely exhausted or improperly
installed. Replace.
c
matic switch-off after 4 sec., 16 sec.
or 32 sec. as desired, use Custom
Setting #15. For details, see page
89.
To set the
meter for auto-
Page 21

LOADING FILM
Auto film speed setting with DX-coded
film is explained in this section.
• The usable film speed range for DXcoded film is ISO 25 to 5000.
• For non-DX coded film, see page 97.
• IX240 film cartridge cannot be used with
the F5.
Confirm whether s for DX-coded
1
film is shown on the rear LCD panel.
If not, rotate Main-Command Dial while
pressing the ° button so s appears
on the LCD panel.
When film speed is set manually and
DX-coded film is loaded, the manually set film speed becomes effective.
While sliding camera back lock
2
release, lift the film rewind knob. The
camera back will pop open.
• To avoid fogging of film (especially
high-ISO film), do not load/unload
film in direct sunlight.
• Do not touch the shutter curtains
with your finger or with film leader.
21
Page 22
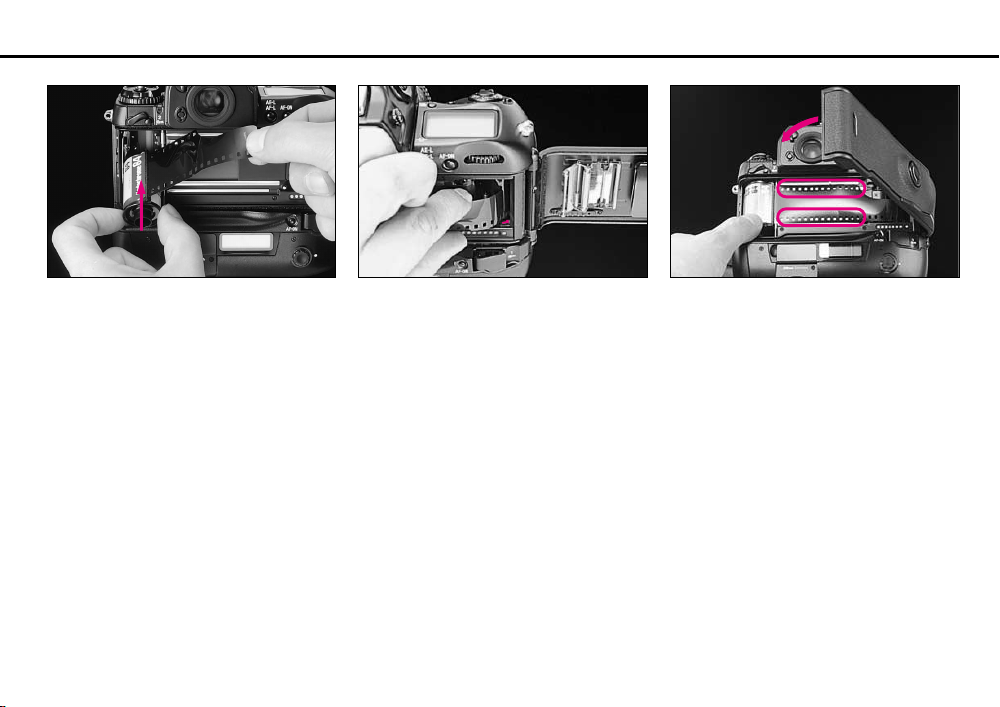
Insert film cartridge.
3
22
Pull film leader across to red film
4
index mark. 5
Check to ensure film is properly
positioned with no slack, then gently
close camera back until it locks.
Page 23
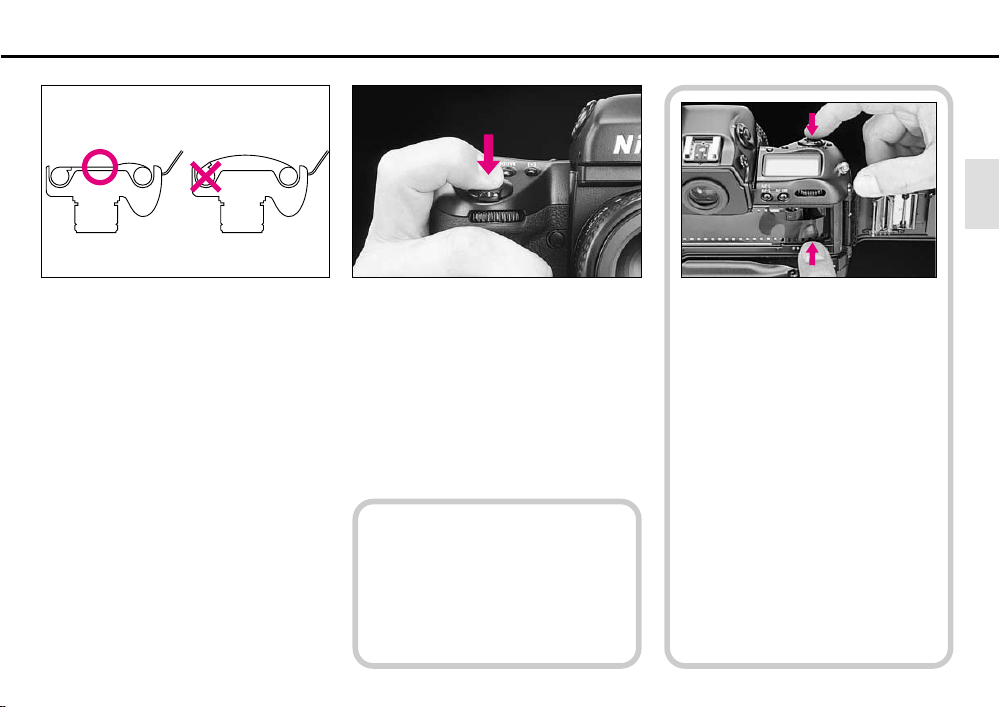
Fully depress shutter release button
6
to advance film to frame #1.
• If non-DX-coded film or film with an
unacceptable DX code is loaded, the
Err in the top and rear LCD panel and
viewfinder, a and s marks in the rear
LCD panel blink and the shutter locks.
Set ISO speed manually (see page 97).
To check if the film is loaded properly before closing the camera back,
hold the film leader with your finger
and fully depress shutter release
button. Film winds up and you can
confirm if the film leader is properly
wound to the film spool.
c
advance the film automatically when
the camera back is closed and the
power is on. For details, see Custom
Setting #8, page 89.
The camera can
be set to
23
Page 24
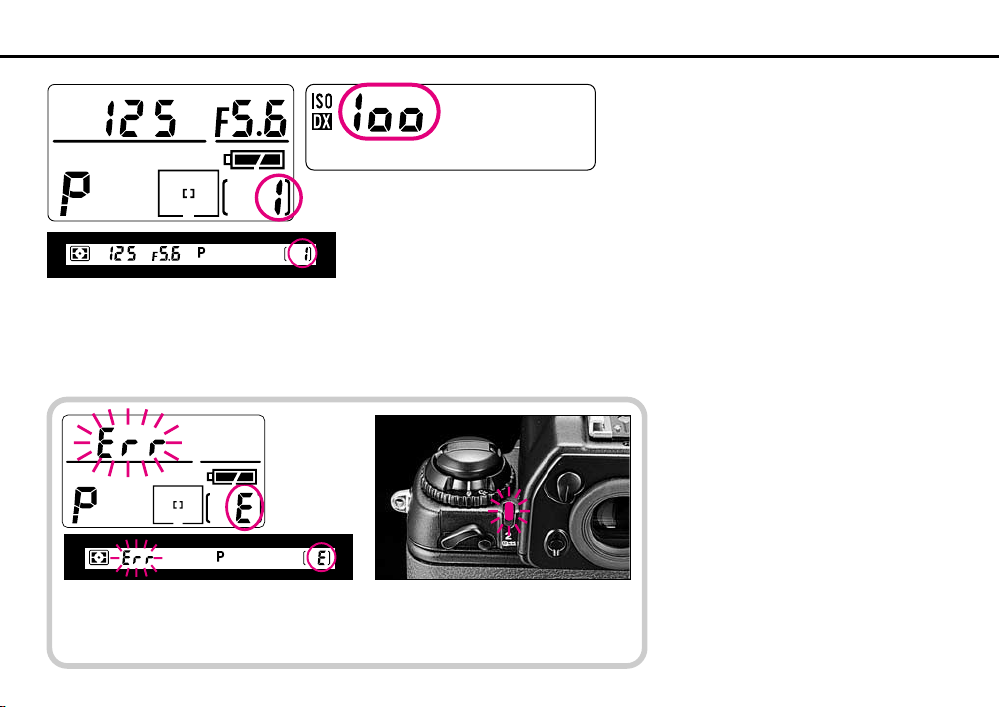
Confirm frame counter shows 1 on
7
the top LCD panel and viewfinder.
The rear LCD panel shows automatically
set film speed.
E appears and Err blinks in the top LCD panel and viewfinder,
and alert LED blinks if film is incorrectly positioned. Open camera
back and reload film properly.
24
Page 25

BASIC OPERATION
This section features the settings for most common picture-taking
situations when using the standard Multi-Meter Finder DP-30 and a
D-type Nikkor lens (including AF-S and AF-I). The shooting modes
explained in this section cover most of your shooting situations.
Shooting modes/functions explained in this section are as follows:
Film advance mode Single frame
AF area mode Single Area AF*
Focus area Center*
AF mode Single Servo Autofocus
Exposure metering 3D Color Matrix Metering
Exposure mode Programmed Auto*
Lens attached D-type Nikkor
* Can be set using the Two-Button Reset. See page 34.
25
Page 26
RELEASING SHUTTER/COMPOSING PICTURE
Lightly pressing shutter release
button
Lightly press shutter release button to
start autofocus operation and switch the
exposure meter on.
Indications inside the viewfinder and LCD
turn on. They remain on for approximately
8 seconds after you take your finger off
the shutter release button, then automatically turn off.
c
desired, use Custom Setting #15. For details, see page 89.
26
To set the meter for automatic switchoff after 4 sec., 16 sec. or 32 sec. as
AF start button
Autofocus can be set not to start when
the shutter release button is lightly
pressed using Custom Setting #4. To
start autofocus in this case, press the AF
start button. To release the shutter, fully
depress shutter release button while
pressing the AF start button.
Also, use AF start button when it is difficult to focus on the subject by lightly
pressing the shutter release button.
Fully depressing shutter release
button
Fully depress the shutter release button to
release shutter.
Depress the shutter release button slowly.
Depressing the shutter release button
abruptly may result in camera shake.
c
Custom Setting #4. For details, see page 88.
To deactivate autofocus when shutter
release button is lightly pressed, use
Page 27
Hold camera properly
Stand with one foot forward a half step to balance your body.
Grasp the camera handgrip with your right hand. Use your left
hand to cradle the camera with your elbow propped against
your body for support, as you look through the viewfinder. Use
your right index finger to press the shutter release button. A
vertical-shooting shutter release button is also provided for
smoother shutter release in vertical-format shooting. To use the
vertical-shooting shutter release button, turn the lock lever for
vertical-shooting shutter release button to • position to release
the lock. At other times, keep the shutter release button locked
by setting the lock to Ò.
Notes
• Do not block the lens with your hair or hand.
• When taking a picture without looking through the
viewfinder, make sure nothing (such as your camera
strap) is between your camera and the subject.
• Do not block the flash or AF-assist illuminator LED during
flash photography.
27
Page 28
BASIC SHOOTING
Make sure that the lens’ aperture is
1
set to its minimum position when
using CPU Nikkor lens other than G-type.
28
Set the film advance mode selector
2
to Í for Single-frame shooting.
Set the focus mode selector to Í for
3
Single Servo AF.
Page 29
Select Single Area AF mode by rotating the Main-Command Dial while pressing
4
the AF area mode (˝) button.
• The selected focus area of the top LCD displays only g.
• Focus bracket also appears in the viewfinder.
While pressing lock release, set the
5
metering system selector to q for
3D Color Matrix Metering.
29
Page 30
Select Programmed Auto exposure mode by rotating the
6
Main-Command Dial while pressing the exposure mode
(MODE) button so ¡ appears in the top LCD panel and P in the
viewfinder.
30
Compose picture.
7
Position the focus brackets on your main subject by pressing
the focus area selector.
• You can change the focus brackets position as long as the
exposure meter is on.
When the exposure meter is off, lightly press the shutter
release button before selecting the focus area.
Slide film images may be partially cropped by the mount.
Also, the edges of negative film are partially cropped by
most labs.
Page 31

Lightly press the shutter release button.
8
If HI appears in the shutter speed position—Overexposure alert: Use Nikon
ND filter.
If Lo appears in the shutter speed position—
Under-exposure alert:
Use accessory Nikon
Speedlight.
Confirm / appears inside the viewfinder and fully depress
9
the shutter release button to take the picture.
The camera automatically advances the film by one frame, and
LCD frame counter increases by one.
Shutter cannot be released when:
? blinks: Focus manually. See page 146.
> appears: Subject is too close. Move away from your
subject. See page 43.
31
Page 32

At the end of the film roll, End blinks in the top LCD
10
panel and viewfinder, the alert LED lights, and the shutter can no longer be released.
Confirm that the film has reached the end of film roll.
• The number of frames on the loaded film roll can be read
through the film cartridge confirmation window.
To rewind film, first open the film rewind button 1 „
11
cover and press the film rewind button 1 „, then turn
the film rewind lever 2 „ while pressing the 2 „ lock release.
This starts film rewinding automatically.
During film rewind, the frame counter counts backward, rewind
knob turns and alert LED blinks.
• To rewind film manually, see page 97.
• You can rewind film before it reaches the end of the roll in the
same manner.
c
using Custom Setting #12. See page 89.
32
Film advance can be set to stop automatically at the 35th or 36th frame
Page 33

• If film rewind does not start, check
battery power. See page 20.
• If film rewind has stopped at midroll, check the battery power. If
battery power is insufficient, turn
the power switch off, replace
batteries with a fresh set, turn
power on, then press 1 „ button
and turn 2 „ lever to restart film
rewind.
• If you accidentally press 1 „
button, lightly press the shutter
release button. The film advances
one frame without exposure and
1 „ button pops up.
Confirm “E” is displayed in the
12
top LCD panel and viewfinder,
and film rewind is complete.
Open camera back and remove
13
film cartridge.
To conserve battery power, turn off
the power switch when you are not
using the camera. Always remove
batteries before storing a camera to
prevent damage due to leaking
batteries.
33
Page 34

About Two-Button Reset
Pressing ‚ and · buttons simultaneously for more than two seconds resets various modes to their initial settings.
Two-Button Reset sets the following modes:
Exposure mode Programmed Auto Page 53
AF area mode Single Area AF Page 40
Focus area Center Page 38
Flash sync mode* Front-curtain sync Page 117
* When using SB-26, SB-25 or SB-24, Speedlight settings will override camera
settings.
Two-Button Reset cancels the following modes:
Flexible Program Canceled
Exposure compensation 0.0
Auto Exposure/Flash Exposure
Bracketing
Multiple Exposure Canceled
Custom Setting Initial setting (except for menu 0, page 88)
Functions on Multi-Control Back MF-28 Canceled, but data remains
Shutter speed lock Canceled
Aperture lock Canceled
Focus area lock Canceled
Canceled
34
Page 35

GENERAL FUNCTIONS
This chapter explains the various modes of the F5 camera’s
operation. Please review it thoroughly.
35
Page 36

FILM ADVANCE MODE
Single-Frame Shooting
There are four automatic film advance modes. To choose a
mode, rotate the film advance mode/self-timer selector while
pressing the film advance mode selector lock release. Set S for
Single-frame shooting, CL for Continuous low-speed shooting,
CH for Continuous high-speed shooting or CS for Continuous
silent-low-speed shooting.
36
With the film advance mode at S, fully depressing the shutter
release button takes one picture and automatically advances
the film by one frame. Film advances immediately after the shutter closes whether you remove your finger from the shutter
release button or keep the button depressed. To take the next
shot, lift your finger from the button, then fully depress it again.
Use Single-frame shooting for stationary subjects or subjects
that do not require several frames of rapid firing.
Page 37

Continuous Shooting
Shots are taken continuously as long as you keep the shutter
release button fully depressed. You have a choice of shooting
speeds: up to approx. 7.4 fps (frames per second) in CH mode,
up to approx. 3 fps in CL mode and approx. 1 fps in CS mode—
with fresh AA-type alkaline or lithium batteries at normal temperature (20°C or 68°F) and a shutter speed of 1/250 sec. or higher
in Manual exposure and Continuous Servo AF modes. With
shutter speeds slower than 1/250 sec., the framing rate
becomes progressively slower in proportion to the shutter
speed in use.
Film advance speed using fully charged optional rechargeable
Ni-MH Battery Unit MN-30 is up to approx. 8 fps in CH mode,
up to approx. 3 fps in CL mode and approx. 1 fps in CS mode.
c
Custom Setting #9, 10. See page 89.
In CH and CL modes, the shooting
speeds can be changed using
37
Page 38

FOCUS AREA
Selecting Focus Area
Top LCD Viewfinder
Five focus areas are available with the F5.
To select your desired focus area, press top, bottom, left or
right on the focus area selector.
Corresponding focus areas appear in the viewfinder and top
LCD panel.
Arrows on top (m) and to the right (>) of the viewfinder also indicate the selected focus area.
Center Left
• When Spot Metering is selected, shifting the focus area also
shifts the Spot Metering area accordingly.
38
Page 39

Right Top Bottom
x
select desired focus area, then press the focus area selector to any position while pressing the — button. x
appears above the focus area indication in top LCD panel.
To release the lock, press the focus area selector while
pressing the — button again so x above the focus
area indication disappears from top LCD panel.
Focus area can be locked using the
lock function. To lock the focus area,
39
Page 40

Selecting AF Area Mode
While pressing AF area mode (˝) button,
rotate the Main-Command Dial to select
Single Area AF or Dynamic AF mode.
Dynamic AF is useful when shooting
moving subjects without changing the
composition, or when it is difficult to
predict the position of subjects at the
moment of exposure.
When Single Area AF mode is
selected, you may designate the focus
area you wish to use, and that choice will
remain unchanged regardless of subject
movement. g (or h) appears in the
selected focus area of the top LCD.
(Example is when center focus area is
selected.) You may alternately choose
any one of the five available focus areas.
In Single Area AF mode, the focused
distance is calculated exclusively by the
sensor in the selected focus area.
Dynamic AFSingle Area AF
When Dynamic AF mode is selected,
g (or h) appears in the selected focus
area and
top LCD, and all five AF sensors are
active. (Example shows center focus area
selection.)
Using Dynamic AF, you will designate the
primary sensor, the one which will be first
to detect a subject, then if the detected
subject moves, the Dynamic AF operation
will automatically shift to the next sensor
which detects the subject, progressively
shifting among the sensors as the subject
moves; Dynamic AF is capable of following and maintaining accurate focus on
moving subjects.
• Viewfinder indication does not change
even though the sensor is shifted in
Dynamic AF mode.
in all five focus areas of the
f
40
Page 41

FOCUS MODE
Autofocus
The Nikon F5 has two autofocus modes, Single Servo AF with
Focus-Priority and Continuous Servo AF with Release-Priority. In
either of these modes—and in any film advance mode—Focus
Tracking automatically activates when the subject starts moving,
provided you are not using Single Servo AF mode and the focus
has already locked, or you are using Continuous Servo AF
mode and are pressing the AE-L/AF-L button.
See page 42 for more details on Single Servo AF with FocusPriority; page 44 for Continuous Servo AF with Release-Priority.
Caution
Do not attempt to turn the lens focusing ring or impede its
rotation when the focus mode selector is set to Single
Servo AF (S) or Continuous Servo AF (C).
c
Continuous Servo AF using Custom Setting #1, 2. See
page 88.
Release-Priority can be given to Single
Servo AF or Focus-Priority to
41
Page 42

Single Servo AF with Focus-Priority
For Single Servo AF, set the focus mode to S.
Lightly press the shutter release button to activate focus adjustment. Because the priority is on correct focus, the shutter
cannot be released until the subject is in focus.
After focus is achieved with a stationary subject, the focus
remains locked for as long as the shutter release button is lightly
pressed. Focus locks with any one of the five focus areas
selected (in Single Area AF mode). If the camera-to-subject
distance changes however, you must refocus by lifting your
finger from the shutter release button momentarily, then lightly
pressing the button again.
42
With a stationary subject: Lightly press shutter release button.
When the subject is in focus, the lens stops moving, the infocus indicator / appears in the viewfinder, and the focus locks.
You can release shutter.
If the subject moves before shutter releases, remove your finger
from the shutter release button, then lightly press it again to reactivate autofocus.
Page 43

With a moving subject: Lightly press shutter release button to
automatically activate Focus Tracking. Confirm / appears in the
viewfinder, then fully depress the shutter release button. (The
shutter release button can in fact be depressed without confirming / indication; as soon as the subject comes into focus, the
shutter will be released.)
Focus Tracking remains activated as long as you keep the shutter release button lightly pressed. If the subject stops and /
appears, focus is locked. If subject moves again, remove your
finger from the shutter release button and lightly press it again to
start autofocus with Focus Tracking.
• Single Servo AF is convenient for off-center subjects. See
pages 70-71.
• After shooting with the film advance mode selector set at
S, you do not have to remove your finger from the shutter
release button to take the next shot. Slightly lift your
finger from the button (while maintaining the button in the
half-depressed position) then fully depress it to release
the shutter again. The focus setting will remain
unchanged from the prior setting. In Single Servo AF with
Focus-Priority mode, the focus remains locked even after
the shutter is released, unless you remove your finger
from the shutter release button.
With the film advance mode set at CL, CH or CS, the
camera refocuses every time the shutter is released.
> Lens is focused at rear of the subject.
< Lens is focused at front of the subject.
? If ? blinks in the viewfinder: Autofocus is not
possible. See page 146.
c
using Custom Setting #23. See page 90.
> and < display in viewfinder in
Autofocus mode can be canceled
43
Page 44

Continuous Servo AF with Release-Priority
Set focus mode to C for Continuous Servo AF.
In Continuous Servo autofocus mode, as you lightly press the
shutter release button, focus detection begins and the lens
continues to focus for as long as you keep the shutter release
button lightly pressed. Since the priority is on shutter release,
you can fully depress the shutter release button regardless of
focus status. Whenever the subject distance changes due to
recomposition or movement of the subject in Continuous Servo
AF mode, the F5 will refocus on the subject at the new distance.
44
Lightly press shutter release button to start autofocus operation.
When the subject is in focus, the camera’s autofocus motor (or
the built-in motor of an AF-S or AF-I Nikkor lens) stops driving
the autofocus lens and / appears in the viewfinder. Unless you
remove your finger from the shutter release button, the motor
will start driving the lens again to obtain an in-focus picture if the
focus distance changes.
Page 45

> Lens is focused at rear of the subject.
< Lens is focused in front of the subject.
? If ? blinks in the viewfinder: Autofocus is not
possible. See page 146.
As focus is not locked in Continuous Servo AF, to take an
off-center subject, use AE-L/AF-L button and recompose
picture. See pages 72-73.
Manual Focus
To focus manually when using Nikon lenses that do not have an
A/M switch, set the camera’s focus mode selector to M. When
using a Nikon lens that has an A/M switch, set the lens’ switch
to M; when using an AF-S or AF-I Nikkor lens, set the switch to
M or M/A; with these lens types it is not necessary to change
the camera’s focus mode selector.
There are two ways of assuring precise manual focus—with the
Electronic Rangefinder or with the viewfinder’s clear matte field.
45
Page 46

Manual focus with Electronic Rangefinder
The Electronic Rangefinder provides you with viewfinder indications that show the focus status while you are focusing. It works
with most Nikon lenses (including AF Nikkor when operated
manually) having a maximum aperture of f/5.6 or faster. (For a
complete list of usable lenses, see Lens Compatibility on pages
128-131).
Look through viewfinder and position the selected focus
1
bracket on main subject. Then lightly press shutter release
button. You may select any one of the focus brackets.
46
Page 47

While lightly pressing shutter release button, rotate lens
2
focusing ring in the direction indicated by the focus-to-left
arrow (>) or focus-to-right arrow (<), until arrow disappears and
in-focus indicator / appears.
If focus-to-left arrow (>) does not disappear when you turn the
focus ring counterclockwise to the limit, subject is closer than
the distance at which the lens is able to focus. Move back from
subject.
For special focusing situations shown on page 146, ?
blinks to indicate that the Electronic Rangefinder does not
work correctly. Focus with clear matte field (p. 48).
Confirm in-focus indicator / appears, then fully depress
3
shutter release button to take the picture.
47
Page 48

Manual focus using clear matte
field
Look through viewfinder and rotate lens focusing ring until
image on clear matte field appears sharp.
48
Page 49

EXPOSURE METERING SYSTEM
The Nikon F5 has three types of exposure metering systems––
3D Color Matrix Metering, Center-Weighted Metering and Spot Metering.
q 3D Color Matrix Metering (with the Multi-Meter Finder DP-30
This system is ideal for quick operation in any exposure mode.
With D- or G-type AF Nikkor lenses including AF-I or AF-S
Nikkor, 3D Color Matrix Metering is automatically activated. 3D
Color Matrix Metering uses various types of data: scene brightness, scene contrast, focused subject’s distance (Distance
Information) and color distribution of the entire frame. Data on
scene brightness, contrast and color distribution are detected
by the camera’s 1,005-pixel Matrix Sensor, while data on the
focused subject’s distance is detected and relayed by your Dor G-type AF Nikkor lens. Information sent by the camera’s
autofocus system indicating whether the main subject is
centered is also considered in the computation. By analyzing
these data, the F5’s built-in microcomputer is able to provide
correct exposure even in extremely complex lighting situations.
If a non-D/G-type lens is used, Matrix Metering is performed.
Although lens’ Distance Information is not given, 1,005-pixel
Matrix Sensor provides the correct exposure in most lighting
situations.
Note that Matrix Metering system can only be used with lenses
having a built-in CPU (such as AF Nikkor and AI-P lenses.)
49
Page 50

w Center-Weighted Metering e Spot Metering
With approximately 75% of the meter’s sensitivity concentrated
on the 12mm-dia. circle within the viewfinder and 25% outside
this circle, this meter becomes useful in situations where you
want to base exposure on a specific area in the scene. In auto
exposure mode, to measure the brightness of the picture’s offcenter portion, use the camera’s AE-L/AF-L button (see pages
72 and 73).
c
sensitivity can be changed to 8mm-dia., 15mm-dia.,
20mm-dia. circle or average on entire viewfinder using
Custom Setting #14. See page 89.
50
In Center-Weighted Metering, the area
that concentrates 75% of the meter’s
Nearly 100% of the meter’s sensitivity is concentrated on the
4mm-dia. area (approx. 1.5% of entire frame) within the
selected focus area of the viewfinder. (6mm-dia. area or approx.
3.3% of entire frame with focusing screens other than EC-B/ECE-type.) Use this meter for highly selective exposure control—
achieving the best results requires experience.
When Spot Metering is selected, shifting focus area also
shifts Spot Metering area to corresponding position (with
EC-B/EC-E focusing screen only).
Page 51

Setting Metering System
3D Color Matrix Metering Center-Weighted Metering Spot Metering
Rotate the metering system selector while pressing the metering system selector lock
release to select your desired symbol—q for 3D Color Matrix Metering, w for CenterWeighted Metering or e for Spot Metering—in the viewfinder.
If you are using a lens without
CPU, or accessories such as
bellows or extension rings
The 1,005-pixel 3D Color Matrix
Metering automatically switches to
Center-Weighted Metering and the
w symbol appears. (If Programmed
Auto or Shutter-Priority Auto is set
on the camera, the exposure mode
also switches automatically to
Aperture-Priority Auto with F-- and
blinking exposure mode indicator in
the top LCD panel, and A appears in
the viewfinder.) In this case, use
Center-Weighted Metering or Spot
Metering.
51
Page 52

EXPOSURE MODE
Light reaching the film is controlled by shutter speed and lens
aperture. The proper combination results in a correct exposure.
Shutter speed and lens aperture settings are based on the ISO
speed set for the film in use and the operation of the camera’s
exposure control system.
The relationship between aperture and shutter speed is as
follows: For example, a shutter speed of 1/500 sec. admits half
the light of 1/250 and double the light of 1/1000 sec. An aperture of f/8 admits half the light of f/5.6 and double the light of
f/11. If the correct exposure for a scene is 1/500 at f/8, then we
can also select 1/250 at f/11 or 1/1000 at f/5.6 and achieve the
same exposure results, and so on.
Selecting Exposure Mode
In selecting the exposure control mode, you can choose
whether you want to set the shutter speed and/or lens aperture
automatically or manually.
The Nikon F5 camera offers four types of exposure modes:
Programmed Auto (¡), Shutter-Priority Auto (™), AperturePriority Auto (£) and Manual (¢) exposure modes.
52
Page 53

Programmed Auto exposure mode
–4
–3
12
13
–2
–1
0
1
2
3
4
5
6
7
8
9
10
11
F1.4
F1
F2
F2.8
F4
F5.6
F8
F11
F16
F22
F32
30" 15"8"4" 2" 1" 2 4 8 15 30 60
125 250 500
1000200040008000
22
21
20
19
18
17
16
15
14
16
1
/3
(¡)
With the F5’s microcomputer choosing
the combination of shutter speed and
aperture automatically, you can concentrate on picture composition without
worrying about exposure.
Note that programmed auto exposure
modes operate only with Nikon lenses
that have a built-in CPU (AF Nikkor and
AI-P Nikkor lenses).
Programmed Auto exposure mode is
used for most common picture-taking
situations.
In Programmed Auto exposure mode,
you can use the Flexible Program function
to temporarily shift an automatically
selected shutter speed/aperture combination and obtain the desired shutter
speed/aperture while retaining the same
or a consistent exposure (see pages 68
and 69).
Program chart
To check shutter speed and aperture values, follow the red line to where it intersects
the diagonal line. This shows the combination of aperture (vertical line) and shutter
speed (horizontal line).
EV
Sec.
——: With 50mm f/1.4
-----: High-brightness limit for 3D Color Matrix Metering
ISO 100
53
Page 54

Shutter-Priority Auto exposure mode (™)
Allows you to manually set your desired shutter speed. To
freeze the action, use a high shutter speed; to create motion
effects, choose a slower shutter speed. The F5’s microcomputer automatically selects the proper aperture to match the
manually set shutter speed to ensure a correct exposure. See
pages 58-59 for Shutter-Priority Auto operation.
Note that Shutter-Priority Auto exposure mode operates only
with Nikon lenses having a built-in CPU (AF Nikkor and AI-P
Nikkor lenses).
Aperture-Priority Auto exposure mode (£)
By varying the aperture, you can control the depth of field.
Smaller apertures make the background and foreground
sharper (recommended for landscape pictures) while larger
apertures tend to blur the background (recommended for
portraits).
Your selected aperture will determine the shutter speed that is
automatically set by the camera’s microcomputer. When using
smaller apertures with correspondingly slower shutter speeds,
remember that, generally, any speed below 1/(focal length in
use) second, requires the use of a tripod to prevent picture blur
due to camera shake. The higher the corresponding shutter
speed to the aperture you set, the easier it is to stop action.
Adjust the selected aperture if the speed is not appropriate for
conditions or the specific effect you want.
For Aperture-Priority Auto operation, see pages 61-63.
Manual exposure mode (¢)
Manual exposure control allows you to make both aperture and
shutter speed settings. For a technically correct exposure,
follow the recommendation of the camera’s light meter, as indicated by the LCD readout. To achieve a specific creative effect
(e.g., intentional blur, intentional under- or over-exposure), disregard the LCD and modify the recommended exposure settings.
For Manual exposure operation, see pages 64-67.
54
Page 55

Pictures taken at different shutter speeds
High shutter speed Large aperture
Pictures taken at different apertures
Slow shutter speed
Small aperture
55
Page 56

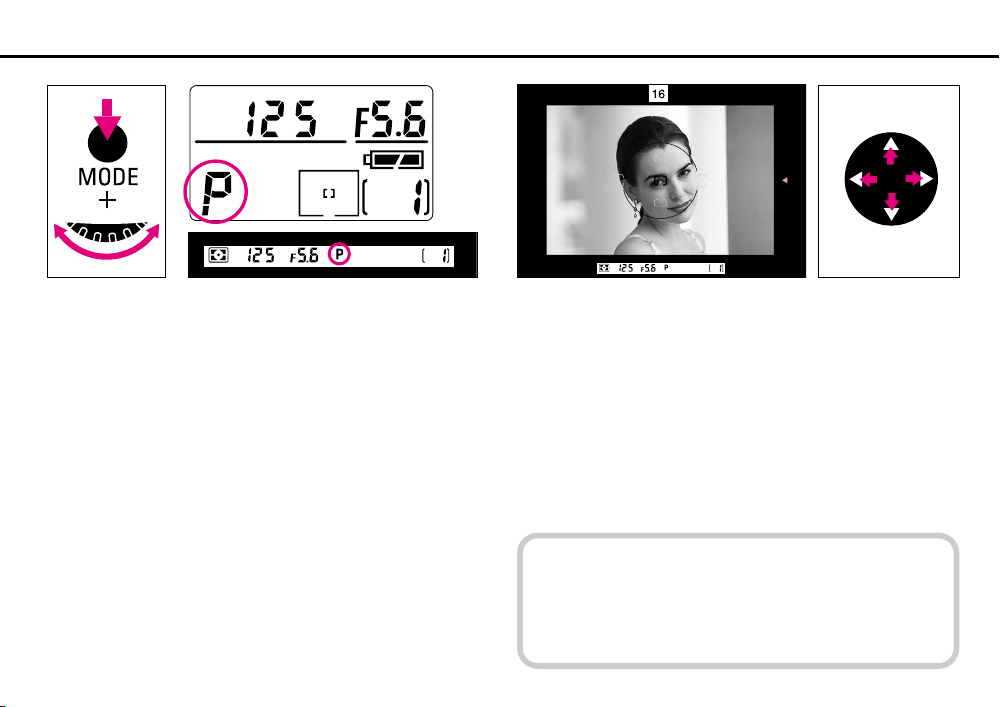
Setting Exposure Mode
While pressing ¨ button, rotate Main-Command Dial. The exposure mode changes
as in the following sequence:
¡ Programmed Auto ™ Shutter-Priority Auto
¢ Manual £ Aperture-Priority Auto
56
For users of lenses that have
no CPU, or accessories such
as bellows attachment or
extension rings
Use Aperture-Priority Auto or Manual
exposure mode. Programmed Auto
or Shutter-Priority Auto exposure
mode automatically shifts to
Aperture-Priority Auto exposure
mode with ƒ-- and the blinking
exposure mode indicator in the top
LCD panel, and A appears in the
viewfinder. (If 3D Color Matrix
Metering is set on the camera,
metering system is also automatically shifted to Center-Weighted.)
Page 57

ADVANCED OPERATION
This chapter explains advanced photographic techniques and
applications.
57
Page 58

SHOOTING IN EACH EXPOSURE MODE
Operation in Shutter-Priority Auto Exposure Mode
While pressing ¨ button, rotate Main-Command Dial
1
until ™ appears in the top LCD panel and S in the
viewfinder.
• When using CPU Nikkor lens other than G-type, make sure to
set lens to its minimum aperture position (largest f-number).
• This operation can be performed only with lenses having
a built-in CPU.
• If meter and LCD readout have turned off, turn on again
by lightly pressing shutter release button.
• If “bulb” is set on the camera, selecting the ShutterPriority Auto mode will cause buLb to blink—a warning
that the “bulb” setting cannot be used in Shutter-Priority
mode.
58
Remove finger from ¨ button, and rotate Main-
2
Command Dial to select desired shutter speed.
Shutter speed indications change in 1/3 steps between 30 sec.
and 1/8000 sec., and flash sync speed of 1/250 sec. (X25o).
c
shutter speed can be changed using Custom Setting #6.
See page 88.
The direction that the Main-Command
Dial is turned to increase/decrease
Page 59

Look inside viewfinder, compose and lightly press shutter
3
release button. Confirm the automatically set aperture
value.
To take the picture, fully depress shutter release button.
4
x
accidental changes of settings. To lock the shutter speed,
rotate the Main-Command Dial while pressing the —
button. x appears in the top LCD panel and Ò in the
viewfinder above the shutter speed indications.
To release the lock, rotate Main-Command Dial while
pressing the — button again, or select another exposure
mode. x and Ò disappear.
• Lock function operates only with lenses having a CPU,
when the lens is set and locked at its minimum aperture.
(With G-type Nikkor lens, aperture does not need to set
to minimum.)
The selected shutter speed can be
locked using the lock function to avoid
59
Page 60

If HI appears in the aperture position—Overexposure
alert: Select a higher shutter speed or use a Nikon ND filter.
If Lo appears in the aperture position—Underexposure
alert: Select a slower shutter speed or use an accessory
Nikon Speedlight.
60
If ƒEE blinks in the aperture position—Lens setting
error alert: CPU Nikkor lens other than G-type is not set to
its smallest aperture setting. Set lens to its smallest aperture, and lock setting.
Page 61

Operation in Aperture-Priority Auto Exposure Mode
While pressing ¨ button, rotate Main-Command Dial
1
until £ appears in the top LCD panel and A in the
viewfinder.
x
dental change of settings. To lock aperture, rotate SubCommand Dial while pressing the — button. x
appears in the top LCD panel and Ò in the viewfinder
above the aperture indications.
To release the lock, rotate Sub-Command Dial while pressing the — button again, or select another exposure
mode. x and Ò disappear.
• Lock function operates only with lenses having a CPU,
when the lens is set and locked at its minimum aperture.
(With G-type Nikkor lens, aperture does not need to set
to minimum.)
The selected aperture can be locked
using the lock function to avoid acci-
Remove finger from ¨ button, and rotate Sub-
2
Command Dial to select desired aperture. (When using
CPU Nikkor lens other than G-type, make sure to set lens to its
minimum aperture position.)
Aperture set is indicated in the top LCD panel and viewfinder.
Aperture indication changes in 1/3 steps between lens’ maximum and minimum apertures. (Available apertures limited to
those of lens in use.)
• Aperture can also be set by rotating the lens aperture ring (except
for G-type Nikkor lens). In this case, ƒ-- blinks in the viewfinder
and top LCD panel, and aperture can be confirmed only through
the aperture direct-readout in the viewfinder.
• To select minimum aperture with the lens aperture ring (with CPU
Nikkor lens other than G-type), make sure to also set aperture to
minimum with Sub-Command Dial; the reason being that when the
lens’ aperture ring is set to its minimum, aperture set with SubCommand Dial will be effective.
• If you regularly set aperture using the lens’ aperture ring with CPU
Nikkor lens other than G-type, it is recommended that you cancel
aperture change by rotating Sub-Command Dial using Custom
Setting #22 (page 90).
61
Page 62

If meter and LCD readout have turned off, turn on again by
lightly pressing shutter release button.
With lenses having no CPU, ƒ-- blinks instead of
aperture value in the LCD panel and viewfinder.
Set the aperture manually with lens’ aperture ring.
With AI-type lenses including AI-modified Nikkor
lenses: Confirm aperture value on lens barrel.
With lenses having fixed aperture, such as ReflexNikkor lenses: Aperture cannot be changed.
With lenses having no auto diaphragm such as PCNikkor lenses: Switch to Manual exposure mode (see
pages 64-67).
Look inside viewfinder, compose and lightly press shutter
3
release button. Confirm automatically set shutter speed.
c
Custom Setting #22. Set aperture by rotating the lens’
aperture ring in this case. See page 90.
62
Aperture can be set not to change by
rotating Sub-Command Dial using
Page 63

To take picture, fully depress shutter release button.
4
If HI appears in the shutter speed position—
Overexposure alert: Select smaller aperture (large f-
number) or use Nikon ND filter.
If Lo appears in the shutter speed position—
Underexposure alert: Select wider aperture (smaller f-
number) or use accessory Nikon Speedlight.
63
Page 64

Operation in Manual Exposure Mode
While pressing ¨ button, rotate Main-Command Dial
1
until ¢ appears in the top LCD panel and electronic analog
exposure display in the viewfinder.
64
Remove finger from ¨ button, set shutter speed by
2
rotating the Main-Command Dial.
Shutter speed can be set in 1/3 steps.
• In Manual exposure mode, you can set shutter speed to buLb
for extended time exposures. For details about buLb setting,
see pages 84-85.
c
30 minutes using Custom Setting #19. See page 90.
Slowest shutter speed can be
changed from 30 sec. to as much as
Page 65

c
Custom Setting #22. Set aperture by rotating the lens’
aperture ring in this case (except for G-type Nikkor lens).
See page 90.
Aperture can be set not to change by
rotating Sub-Command Dial using
Set aperture by rotating the Sub-Command Dial. (Lens’
3
aperture set to its minimum position with CPU Nikkor lens
other than G-type.)
Aperture can be set in 1/3 steps between lens’ maximum and
minimum apertures.
• Aperture can also be set by rotating the lens aperture ring
(except for G-type Nikkor lens). In this case, ƒ-- blinks in the
viewfinder and top LCD panel, and aperture can be confirmed
only through the aperture direct-readout in the viewfinder.
• To select minimum aperture with the lens aperture ring with
CPU Nikkor lens other than G-type, make sure to also set
aperture to minimum with Sub-Command Dial; the reason
being that when the lens’ aperture ring is set to its minimum,
aperture set with Sub-Command Dial will be effective.
• If you regularly set aperture using the lens’ aperture ring with
CPU Nikkor lens other than G-type, it is recommended that
you cancel aperture change by rotating Sub-Command Dial
using Custom Setting #22 (page 90).
x
to avoid accidental changes of settings. To lock the shutter
speed/aperture, rotate the Main-/Sub-Command Dial while
pressing the — button. x appears in the top LCD
panel and Ò in the viewfinder above the shutter
speed/aperture indications.
To release the lock, rotate Main-Command Dial while
pressing the — button again, or select another exposure
mode. x and Ò disappear.
• Lock function operates only with lenses having a CPU,
when the lens is set and locked at its minimum aperture.
(With G-type Nikkor lens, aperture does not need to set
to minimum.)
The selected shutter speed/aperture
can be locked using the lock function
65
Page 66

Look into viewfinder, compose shot and lightly press shut-
4
ter release button.
Adjust aperture and/or shutter speed until the electronic analog
exposure display shows “0” or your desired amount.
Examples
Over +2EV +2EV
66
+1/3EV
–2/3EV Below –2EV
±0EV
Page 67

Fully depress shutter release button
5
to take the picture.
With lenses having no CPU, ƒ-- blinks instead of
aperture value in the LCD panel and viewfinder.
Set aperture manually with the lens’ aperture ring.
With lenses having fixed aperture, such as ReflexNikkor lenses: Aperture cannot be changed; adjust expo-
sure by changing the shutter speed.
With lenses having no auto diaphragm such as PCNikkor lenses: Lens is stopped down when a smaller
aperture (larger f-number) is selected. Focus manually with
the lens set at maximum aperture.
Exposure compensation with AF Micro lens
When an AF Micro lens is attached to the F5 camera body
and exposure is measured with a seperate exposure
meter, compensation is not necessary when selecting
aperture with the Sub-Command Dial.
However, exposure compensation indicated in lens’
manual is required when selecting aperture with lens aperture ring.
67
Page 68

FLEXIBLE PROGRAM
To change the shutter speed/aperture combination in
Programmed Auto exposure mode, use the Flexible Program
function. Flexible Program lets you temporarily change an automatically set shutter speed/aperture combination in 1/3 EV
steps, while maintaining the same or consistent exposure.
Flexible Program function can also be used with any Nikon
Speedlight. Note that selectable shutter speeds are limited to
those below the sync speed of the Speedlight. When performing flash photography, however, you cannot shift to a shutter
speed faster than 1/250 sec. (Changeable to 1/300 sec. with
Custom Setting.)
Make sure Programmed Auto exposure mode (¡) is
1
selected, and lightly press the shutter release button.
Shutter speed and aperture appear in the top LCD and
viewfinder.
68
Page 69

Rotate Main-Command Dial until desired shutter speed or
2
aperture value appears in the viewfinder and top LCD
panel. The Flexible Program indicator (§) appears to indicate
the program has been shifted or changed.
• The shifted program is maintained unless you rotate the MainCommand Dial to the previous shutter speed/aperture.
Flexible Program is canceled when you switch the exposure
mode to another mode, pressing ‚ and · buttons simultaneously to activate Two-Button Reset or turn off the power
switch.
69
Page 70

FOCUS LOCK—To take off-center subjects
In Single Servo AF mode, focus remains locked as long as
the shutter release button is kept lightly pressed. Focus can be
locked from any of the five focus areas selected.
• In Continuous Servo AF mode, lock focus using AE-L/AF-L
button. See page 72.
In this case, both exposure and focus are simultaneously
locked.
Position focus brackets on subject and lightly press shutter
1
release button to start autofocus operation.
With a moving subject, focus cannot be locked.
70
c
ter release button is lightly pressed using Custom Setting
#7. See page 89.
Both exposure and focus can be set
to lock simultaneously when the shut-
Page 71

Confirm in-focus indicator / appears in the viewfinder.
2
Keeping shutter release button lightly pressed, recompose,
3
then fully depress shutter release button to take the
picture.
c
shutter release button is lightly pressed using Custom
Setting #4. In this case, focus can be locked by keeping
the AF start button pressed. See page 88.
Autofocus can be deactivated and
lens does not start focusing when the
Provided a subject is covered by one of the five focus
brackets, you can also shoot an off-center subject by shifting the focus to the relevant focus area without changing
the composition. See page 38.
71
Page 72

AE/AF LOCK
Pressing the AE-L/AF-L button will simultaneously lock both
exposure and focus. This function can be used with both Single
Area AF or Dynamic AF operation, and with all metering systems
used for automatic exposure control functions.
• Using Single Servo AF, when Single Area AF mode and Spot
Metering are selected, correct exposure can be achieved by
choosing a focus area which corresponds to your picture
composition.
• Aperture in Aperture-Priority Auto and shutter speed in
Shutter-Priority Auto can be changed even while pressing the
AE-L/AF-L button.
• You cannot change the metering system while pressing the
AE-L/AF-L button.
• To lock only focus in Single Servo AF, lightly press the shutter
release button and recompose. See pages 70-71.
• Pressing the AE-L/AF-L button locks exposure only in manual
focus mode.
About AE Lock
In the auto exposure mode, when you want to control exposure
based on the brightness of a specific area within the scene, use
AE lock. With the F5, pressing the AE-L/AF-L button locks both
exposure and focus, but it can be changed to lock only exposure (or focus) using the Custom Setting.
Center-Weighted or Spot Metering is recommended when using
AE lock.
Position focus brackets on subject and lightly press shutter
1
release button to start autofocus operation.
c
Custom Setting #21. See page 90.
AE-L/AF-L button can be set to lock camera’s controlled
shutter speed and aperture instead of detected exposure
value using Custom Setting #5. See page 88.
Autofocus can be deactivated and lens does not start
focusing when the shutter release button is lightly pressed
using Custom Setting #4. In this case, focus can be locked
by keeping the AF start button. See page 88.
AE-L/AF-L button can be set to lock
only focus or exposure by using
72
Page 73

Keeping shutter release button lightly pressed, confirm in-
2
focus indicator / appears in viewfinder. Then press and
hold the AE-L/AF-L button to lock focus and exposure—and
continue holding until step #3 is complete.
While holding AE-L/AF-L button in, recompose, then fully
3
depress shutter release button to take picture.
73
Page 74

EXPOSURE COMPENSATION
Exposure compensation is a photographic technique that
enables you to vary the final exposure settings from those
measured by the camera’s light meter. Nikon’s 3D Color Matrix
Metering employs methods of exposure calculation that automatically apply exposure compensation, depending upon scene
brightness, contrast, focused subject’s distance and color distribution of the entire frame. As a result, your subject, whether it is
centered in the viewfinder or not, is given corrected exposure in
most lighting situations.
We do not recommend using any manually or automatically
applied exposure compensation when using 3D Color Matrix
Metering. If you identify an extreme condition under which
Matrix may have some difficulty, such as a severely backlit
scene or one with extremes of contrast, we recommend using
your camera’s other built-in meters, Center-Weighted or Spot.
Ultimately, only you know what the subject or a part of it
requires in terms of exposure measurement. That’s why the F5
camera incorporates three meters plus a variety of exposure
compensation systems. The photographer’s creativity is always
the final deciding and controlling factor. To use the various
exposure compensation functions, please refer to the following:
• Using AE-L/AF-L (Auto Exposure/Autofocus Lock) button
(pages 72-73)
• To obtain meter reading for a particular subject in Manual
exposure mode (pages 75-76)
• Using exposure compensation button (pages 77-78)
• Auto Exposure/Flash Exposure Bracketing (pages 79-81)
Results will vary, depending on conditions, so you will want to
experiment with each method.
74
Page 75

To Obtain Meter Reading for a Particular Subject in Manual Exposure Mode
In Manual exposure mode, if you want to
set an exposure for a specific brightness
value within the scene, switch metering
system to Center-Weighted or Spot and
use the following method.
Center main subject inside viewfinder
1
and/or move in closer until the reference circle for Center-Weighted Metering
or Spot Metering is fully covered by the
subject.
Lightly press shutter release button.
2
75
Page 76

Adjust shutter speed and aperture
3
by rotating the Main- and/or SubCommand Dials until the electronic
analog exposure display shows desired
exposure.
76
Recompose the picture and shoot.
4
• In Single Servo AF mode, if recomposing the picture could change subject-tocamera distance, refocus by briefly
removing your finger from shutter
release button and lightly pressing it.
• Continuous Servo AF is not recommended if the subject becomes offcentered after recomposing.
Page 77

Exposure Compensation Function
To modify exposure control (from the ISO standard), use the
exposure compensation button. Compensation can be applied
from –5EV to +5EV in 1/3 steps. After taking your photographs,
be sure to reset the control to “0” to resume normal operation.
• If Auto Exposure/Flash Exposure Bracketing is also set, exposure compensation will be combined compensation values.
Without compensation
With compensation
Rotate Main-Command Dial while pressing = (Exposure
1
Compensation) button to set desired compensation value.
= and the compensated value will appear in the top LCD panel
and viewfinder.
77
Page 78

Once set, exposure compensation remains fixed until
2
reset.
= and the compensated value remain on in the top LCD panel.
Although the = symbol in the viewfinder stays on to indicate
that exposure compensation is on, the compensation value
disappears from the readout when you remove your finger from
= button. To confirm compensation value in the viewfinder,
press = button again.
78
After shooting, be sure to reset the amount of compensa-
3
tion to “0.0” to resume normal operation.
Page 79

Auto Exposure/Flash Exposure Bracketing
In situations where you might find it difficult to obtain a proper
exposure, Auto Exposure/Flash Exposure Bracketing lets you
shoot the same subject at two or three different exposures, with
a variable exposure compensation degree of 0.3 EV, 0.7 EV or
1 EV.
If you set a compensation degree of 1 EV in a three-step
bracket for example, you will take three pictures, the first shot
having no compensation, the second shot having a –1 EV
compensation and the third shot having a compensation of
+1 EV.
Rotate Main-Command Dial while pressing the ‚ (Auto
1
Exposure/Flash Exposure Bracketing) button to select Auto
Exposure/Flash Exposure Bracketing mode. z appears in the
top and rear LCD panels and = blinks in the top LCD panel and
the viewfinder while the exposure meter is on.
c
Setting #3 to start shooting with negative compensation,
no compensation and positive compensation in that order.
See page 88.
You can perform only Auto Exposure Bracketing or Flash
Exposure Bracketing using Custom Setting #24. See page
90.
In Auto Exposure/Flash Exposure
Bracketing, you can set Custom
79
Page 80

While pressing the ‚ button, rotate Sub-Command Dial
2
to select your desired number of shots and compensation
value from one of the following:
Number Compensated
of shots EV value
Two 0 and +1/3 2F0.3 z @#$
Two 0 and –1/3 2F0.3 z $%^
Two 0 and +2/3 2F0.7 z @#$
Two 0 and –2/3 2F0.7 z $%^
Two 0 and +1 2F1.0 z @#$
Two 0 and –1 2F1.0 z $%^
Three
Three 0, –2/3 and +2/3 3F0.7 z @#$%^
Three 0, –1 and +1 3F1.0 z @#$%^
80
0, –1/3 and +1/3
(default)
Rear LCD panel
3F0.3 z @#$%^
Compose picture, confirm focus and exposure, then fully
3
depress shutter release button.
With the film advance mode at single-frame shooting (S), fully
depress the shutter release button the set number of times to
perform bracketing.
With film advance mode at continuous shooting (CH, CL or CS),
fully depress the shutter release button and hold in until the set
number of shots has been taken and film advance stops automatically.
c
speed, aperture or shutter speed/aperture combination)
within the bracketing operation can be changed using
Custom Setting #17. See page 90.
In Manual exposure mode, various
factors (flash output level, shutter
Page 81

After the set number of shots has been taken, rotate the
4
Main-Command Dial while pressing the ‚ button so z
disappears in the top and rear LCD panels to cancel Auto
Exposure/Flash Exposure Bracketing. The number of shots and
compensation value disappear when you remove your finger
from the ‚ button.
• The set number of shots and compensation value remain
unchanged after Auto Exposure/Flash Exposure Bracketing is
canceled.
• In Auto Exposure/Flash Exposure Bracketing, the shutter
speed and aperture in Programmed Auto, aperture in
Shutter-Priority Auto, shutter speed in Aperture-Priority
Auto and Manual exposure mode are varied. Flash output
level is varied in flash photography with dedicated Nikon
Speedlight.
• If exposure compensation function is also set, Bracketing
will be combined with the exposure compensation
values.
• Bracketing with varying flash output levels can be
performed at the buLb setting.
• If film reaches the end of the roll during shooting, rewind,
load a new roll and fully depress shutter release button to
advance film to frame 1, then fully depress shutter release
button again to resume operation.
• Bracketing is performed with one frame at a time when
the self-timer is set.
• Bracketing settings made on Multi-Control Back MF-28
have priority over settings on the F5 camera body.
• When a prolonged shutter speed (slower than 40 sec.) is
selected with a Custom Setting, shutter speed is not
varied in Bracketing.
• When flash sync speed is selected in Manual exposure
mode, shutter speed is not varied in Bracketing.
• When the Photo Secretary for F5 is used, Bracketing on
the camera body cannot be performed.
Perform Bracketing on the Photo Secretary for F5.
81
Page 82

SELF-TIMER
While pressing the lock release, set
1
the film advance mode/self-timer
selector to V (self-timer) position.
82
With all auto exposure modes, use
the eyepiece shutter before starting
the self-timer to prevent stray light
from entering the viewfinder and
affecting the exposure.
Compose picture, lightly press shut-
2
ter release button, and confirm focus
and exposure.
Page 83

Fully depress shutter release button.
3
Self-timer LED starts blinking and
shutter will be released after 10 sec.
During the final two seconds, the LED
lights up warning you to get ready for the
shot.
• To cancel self-timer operation, turn the
film advance mode selector/self-timer to
another position.
c
changed to any interval from 2 to 60
sec. by using Custom Setting #16.
See page 90.
The self-timer
duration can be
• In Single Servo AF with FocusPriority, self-timer operates only
when the in-focus indicator ˇ
appears in the viewfinder. Once
self-timer starts, shutter will be
released even though subject is
out of focus at the time of shutter
release.
• Selecting buLb automatically sets
the shutter speed to 1/250 sec.
83
Page 84

LONG TIME EXPOSURE
At buLb setting, the shutter stays open as long as the shutter
release button remains depressed.
To avoid camera shake, which may cause picture blur, use a
tripod. Use of remote control accessories, such as Nikon
Remote Cord MC-20 or MC-30, Modulite Remote Control Set
ML-3 is also recommended.
Select ¢ for Manual exposure mode by rotating Main-
1
Command Dial while pressing ¨ button.
c
Custom Setting #19. See page 90.
Alert LED can be set to blink while Long Time Exposure
using Custom Setting #11. See page 89
84
Long Time Exposures from 40 sec. to
30 minutes can also be selected using
Page 85

Remove finger from ¨ button and rotate Main-
2
Command Dial until buLb (for Bulb exposure) appears in
top LCD panel and viewfinder.
Use of new batteries is recommended when performing
Long Time Exposure.
Fully depress shutter release button.
3
Hold shutter release button as long as desired.
To close the shutter, remove finger from shutter release button.
Note that duration of an exposure may depend on the
condition of the batteries inside the F5.
At low temperatures, batteries weaken and continuous
shooting time shortens. We recommend using lithium
batteries or Ni-MH Battery Unit and keeping the camera
body warm in cold conditions.
See page 168 for continuous shooting time of the F5.
85
Page 86

MULTIPLE EXPOSURE
Multiple exposure consists of two or more
exposures of one or more subjects on the
same frame.
86
Activate multiple exposure by rotat-
1
ing the Main-Command Dial while
pressing Z (multiple exposure) button.
Z appears in top LCD panel.
Take first shot by depressing the
2
shutter release button.
Film will not advance to next frame.
Z blinks in top LCD panel.
Page 87

Take next shot.
3
Multiple exposure is canceled auto-
matically and the film advances to the
next frame. Z disappears from the top
LCD panel.
To take more than two shots on the
same frame, rotate Main-Command Dial
while pressing Z button before taking the
second shot (while Z is blinking in top
LCD panel). The shutter can be released
on the same frame as many times as
desired until multiple exposure is
canceled.
To cancel multiple exposure before
taking first shot, rotate Main-Command
Dial while pressing Z button so Z disappears from the top LCD panel.
• Multiple exposure cannot be canceled
after taking the first shot. To avoid
exposure, cover the lens with a lens cap
and take the second shot.
• Note that in multiple exposure
operation, exposure compensation
will be required depending on
subject brightness, background
brightness and number of exposure. You must determine the
necessary exposure compensation
and make adjustment.
• When data imprint is selected on
the MF-28 or MF-27 camera back,
the data is imprinted only at the
first shot.
c
sure mode to remain on after taking
the second shot using Custom
Setting #13. See page 89.
To cancel multiple exposure mode in
this case, rotate the Main-Command
Dial while pressing Z (multiple exposure) button so Z disappears from
the top LCD panel.
You can set
multiple expo-
87
Page 88

CUSTOM SETTING
Using the Custom Setting feature, you can create a combination
of functions that are different from the initial factory settings. The
functions listed below can be selected with the F5.
When the F5 is connected to a personal computer via the
optional Personal Computer Connecting Cord MC-33 or MC-34
and optional Photo Secretary for F5, even more Custom Setting
choices are available in addition to the following. For more about
Phto Secretary for F5, see page 102.
By using Two-Button Reset, selected Custom Setting menu can
be reset to its default setting. See page 34.
0 Selecting Custom Setting: To store a combination of your
Custom Settings, select 0-A or 0-b and make settings #1
to #24. Then, you can easily switch between one combination of your settings (A) and another (B) by selecting 0-A or
0-b. To change settings in (A) or (B), select 0-A or 0-b
first and change settings #1 to #24.
When Two-Button Reset is performed, all the settings in
selected Custom Setting menu 0-A or 0-b are reset to
their default setting. If you wish to keep any of the settings
in 0-A or 0-b do not perform Two-Button Reset.
1 Continuous Servo AF: The F5’s default setting with
Continuous Servo AF is Release-Priority. To set it to FocusPriority instead, simply choose 1-1.
2 Single Servo AF: The F5’s default setting with Single Servo
AF is Focus-Priority. To set it to Release-Priority instead,
simply choose 2-1.
3 Bracketing order: At the default setting in bracketing,
shots are taken in progressive order from no compensation
to negative compensation to positive compensation. To
change the order and take the first shot with negative
compensation, select 3-1.
4 Autofocus activated when shutter release button is
lightly pressed: At the default setting, autofocus is acti-
vated and lens starts focusing when the shutter release
button is lightly pressed. To deactivate autofocus when the
shutter release button is lightly pressed, select 4-1. Use the
AF start button to start autofocus in this case.
5 AE Lock: At the default setting, exposure is locked based
on the conditions detected when the AE-L/AF-L button is
pressed. In this case, shutter speed/aperture combination
can be shifted in Programmed Auto exposure mode, shutter
speed in Shutter-Priority Auto exposure mode and aperture
in Aperture-Priority Auto exposure mode. To lock the shutter speed and aperture, select 5-1.
6 Direction of Command Dial rotation: At the default
setting, turning the Command Dials counterclockwise
increases selected value or selects a certain function. To
change the direction to clockwise, select 6-1.
88
Page 89

7 AE Lock when shutter release button is lightly pressed:
At the default setting, exposure does not lock when the
shutter release button is lightly pressed. To lock exposure
when the shutter release button is lightly pressed, select
7-1 in Custom Setting.
8 Auto film loading when camera back is closed: At the
default setting, loaded film is advanced to frame #1 when
the camera back is closed and the shutter release button is
fully depressed once. By selecting 8-1 in Custom Setting,
film automatically advances to frame #1 when the camera
back is closed after film loading.
9 Film advance speed in CH: To change the film advance
speed to 6 fps from 7.4 fps with AA-type alkaline or lithium
batteries or 8 fps with Ni-MH Battery Unit in (CH)
Continuous High-Speed film advance mode, select CH6.
10 Film advance speed in CL: To change the film advance
speed to 5 fps or 4 fps from 3 fps in (CL) Continuous LowSpeed film advance mode, select CL5 or CL4.
11 Alert LED in buLb exposure: To enable alert LED to blink
during buLb exposure, select 11-1.
12 Auto film stop: At the default setting, film advances until
the end of the film roll is reached. To stop film advance at
frame number 35 or 36, select E35 or E36.
13 Multiple exposure: Multiple exposure mode is automati-
cally canceled when the second shot is taken. To continue
multiple exposure after the second shot, select 13-1.
14 Center-Weighted Metering: 75% of the meter’s sensitivity
is concentrated in the 12mm-dia. circle within the viewfinder
and 25% outside this circle in Center-Weighted Metering.
To change the size of the circle to 8mm, 15mm, 20mm,
average on entire viewfinder or create a custom-size (by
Computer Link) diameter, select C 8, C15, C20, A or PC.
15 Time delay for auto meter-switch-off: Camera’s meter
remains on approximately 8 seconds after the shutter
release button is pressed. To change the delay time to 4
sec., 16 sec. or 32 sec., select L 4, L 16 or L32.
89
Page 90

16 Self-timer duration: At the default setting, shutter is
released 10 sec. after the shutter release button is fully
depressed. To change the delay time to 2 to 60 sec. in one
sec. steps, select L 2, L 3, L 4, ... or L60.
17 Bracketing in manual exposure mode: At the default
setting in Manual Exposure mode, shutter speed shifts with
each shot taken when bracketing is performed. To change
the shifting factor to a shutter speed/aperture combination,
shutter speed, aperture, flash output level, select 11A, 10A,
01A or 00A.
18 Focusing screen compensation: To change the EV level
of the focusing screens C, F, G1-G4 or U to –2.0 to +2.0 in
0.5EV steps, select -2.0, -1.5, -1.0, -0.5, 0, 0.5, 1.0, 1.5
or 2.0. See the instruction manual of the focusing screen for
the required compensation value.
19 Prolonged shutter speed: Long Time Exposures of 40
sec. to 30 minutes can be selected by rotating the MainCommand Dial when the Custom Setting is set to 19-1.
Selectable shutter speeds are: 40 sec., 50 sec., 1 min.,
1.5 min., 2 min., 3 min., 4 min., 5 min., 6 min., 8 min.,
10 min., 13 min., 15 min., 20 min., 25 min. and 30 min.
Shutter speed is not varied when bracketing is performed
and electronic analog display does not appear.
20 TTL flash sync speed: To set the top TTL flash sync speed
at 1/300, 1/250, 1/200, 1/160, 1/125, 1/100, 1/80 or 1/60,
select 3oo, 25o, 2oo, 16o, 125, 1oo, 8o or 6o. 1/300
can be selected only in Shutter-Priority Auto or Manual
exposure mode. (To select 1/300, set 3oo after selecting
flash sync speed of X25o by rotating the Main-Command
Dial. Shutter speed is controlled to 1/250 in Programmed
Auto or Aperture-Priority Auto exposure mode.)
• When 1/300 TTL High-Speed Sync is selected, see page
116 to determine the correct flash shooting distance
range.
21 AE-L/AF-L button: At the default setting, pressing the AE-
L/AF-L button locks both focus and exposure. To change
this to lock exposure or focus only, select AEL or AFL.
22 Aperture setting via Sub-Command Dial: At the default
setting, aperture can be changed by rotating the SubCommand Dial. To disable this function, select 22-1. Set
aperture by rotating the lens’ aperture ring in this case.
23 > and < focus indicators: To stop display of > or <
(focused at rear or in front of the subject) in viewfinder in
Autofocus mode, select 23-1.
24 Auto Exposure/Flash Exposure Bracketing: At the default
setting when bracketing is activated, both Auto Exposure
and Flash Exposure Bracketing are performed. To change
this to perform only Auto Exposure Bracketing or Flash
Exposure Bracketing, select 01E or 10E.
90
Page 91

To Make a Custom Setting
Select Custom Setting mode by
1
rotating Main-Command Dial while
pressing · (Custom Setting Menu)
button.
Keeping · button pressed, rotate Main-Command Dial further to select your
2
desired function number, then rotate Sub-Command Dial to set your desired
option. c appears in the rear LCD panel.
To cancel all Custom Settings, press ‚ and · buttons simultaneously. Custom
Settings except for #0 are canceled to initial factory settings.
To cancel each Custom Setting, select the setting you want to cancel, then select
“0” (default setting).
Refer to the following tables for available functions and options, and to the
Custom Setting’s corresponding LCD panel displays of numbers and symbols.
Note that those numbers with 0 at the end represent the F5’s default settings.
91
Page 92

Number Function Your option LCD panel
0 Selecting Custom Setting
1 Continuous Servo AF
2 Single Servo AF
3 Bracketing order
Autofocus activated when shutter
4
release button is lightly pressed
5 AE Lock
6 Direction of Command Dial rotation
AE Lock when shutter release
7
button is lightly pressed
Auto film loading when camera
8
back is closed
92
Custom setting A 0-A
Custom setting B 0-b
Release-Priority 1-0
Focus-Priority 1-1
Focus-Priority 2-0
Release-Priority 2-1
0, –, + 3-0
–, 0, + 3-1
Activated 4-0
Disabled 4-1
Detected value 5-0
Controlled value 5-1
Default 6-0
Opposite 6-1
Disabled 7-0
Activated 7-1
Disabled 8-0
Enabled (when power is on) 8-1
Page 93

Number Function Your option LCD panel
9 Film advance speed in CH
10 Film advance speed in CL
Alert LED in buLb
11
exposure
12 Auto film stop
13 Multiple exposure
14 Center-Weighted Metering
Time delay for
15
auto meter-switch-off
16 Self-timer duration
Default (8 fps) 9-0
8 fps, 6 fps CH8, CH6
Default (3 fps) 10-0
5 fps, 4 fps, 3 fps CL5, CL4, CL3
Does not blink 11-0
Blinks 11-1
Disabled 12-0
35 frame, 36 frame, Disabled E35, E36, -Canceled after release 13-0
Remains after release 13-1
Default (75% concentration in 12mm dia. area) 14-0
(75% concentration in ) 8mm dia.,12mm dia., C 8, C12,
15mm dia., 20 mm dia., Average, Custom (by PC) C15, C20, A, PC
Default (8 sec.) 15-0
4, 8, 16, 32 sec. L 4, L 8, L16, L32
Default (10 sec.) 16-0
2 to 60 sec. L 2, L 3, L 4 ... L60
93
Page 94

Number Function Your option LCD panel
Bracketing in Manual
17
exposure mode
Focusing screen
18
compensation
19 Prolonged shutter speed
20 TTL flash sync speed
21 AE-L/AF-L button
Aperture setting via
22
Sub-Command Dial
23 > and < focus indicators
Auto Exposure/Flash
24
Exposure Bracketing
94
Default (shifts shutter speed) 17-0
Shifts shutter speed/aperture combination, 11A, 10A,
shutter speed, aperture, flash output level 01A, 00A
0 18-0
–2.0 to +2.0 in 0.5EV steps -2.0, -1.5, -1.0 ... 2.0
Disabled 19-0
Enabled 19-1
Default (1/250) 20-0
1/300, 1/250, 1/200, 1/160, 3oo, 25o, 2oo, 16o,
1/125, 1/100, 1/80, 1/60 125, 1oo, 8o, 6o
Default (Double lock) 21-0
AE Lock, AF Lock, Double lock AEL, AFL, L-L
Enabled 22-0
Disabled 22-1
Displayed 23-0
Not displayed 23-1
Default (Auto Exposure/Flash Exposure Bracketing) 24-0
Auto Exposure Bracketing, Flash Exposure
Bracketing, Auto Exposure/Flash Exposure Bracketing
01E, 10E, 11E
Page 95

CONTROLS IN DETAIL
This chapter explains how to operate the various controls of the F5.
95
Page 96

VIEWFINDER DIOPTER—To see clearly
through viewfinder
ILLUMINATION SWITCH—To view LCD
panels in the dark
With supplied Multi-Meter Finder DP-30, adjusting the finder
diopter enables near- or far-sighted photographers to adjust the
eyepiece diopter within a continuous range of from –3 to +1.
Pull the diopter adjustment knob and rotate it in either direction
until the focused image in 12mm-dia. circle within the viewfinder
appears sharp, then push back to lock.
96
In dim light, rotate Power/LCD panel illumination switch toward
Πto illuminate the top and rear LCD panels. Power/LCD panel
illumination switch automatically returns to ON position, but
LCD panels remain illuminated as long as the camera’s meter is
on.
After shutter is released, the illumination automatically turns off.
Page 97

USING NON-DX CODED FILM
FILM REWIND CRANK—To rewind film
manually
With non-DX coded film, rotate the Main-Command Dial while
pressing the ° (film speed) button to set film’s ISO number in
the rear LCD panel. The usable range for manual film speed
setting is ISO 6 to 6400 in 1/3 steps.
• If DX-coded film is loaded but manual film speed setting is
selected, camera gives priority to the manually set ISO
number.
To rewind film manually, press the film rewind button 1 „,
1
then lift the film rewind crank and turn in the direction of
arrow until the film leader is rewound completely back into the
cartridge.
Turn the film rewind crank a few times more after the tension is
gone.
• Frame counter counts backward when film is rewound manu-
ally with the meter on.
• Do not press the shutter release button until the film leader is
rewound completely back into the cartridge. Doing so may
damage the shutter curtain.
97
Page 98

Open camera back and remove film
2
cartridge.
98
Page 99

MIRROR LOCKUP LEVER—To lock reflex mirror in up position
When using super-telephoto lenses or performing photomicrography, it is necessary to reduce camera vibration to the absolute
minimum. Lock the reflex viewing mirror in the “up” position by
rotating the mirror lockup lever counterclockwise until it stops.
When the reflex mirror is locked in the up position, make
sure not to leave the camera in direct sunlight. The sunlight
may enter through the lens and may damage the shutter
curtain.
With the mirror lock up, you cannot operate the camera in any
Auto Exposure or autofocus mode, even though the viewfinder
LCD may indicate otherwise. Any indication of light in the LCD is
a result of spurious light entering through the viewfinder
eyepiece.
99
Page 100

DEPTH-OF-FIELD PREVIEW BUTTON
ACCESSORY SHOE
In Aperture-Priority Auto or Manual exposure mode, depress the
depth-of-field preview button to stop the lens down to the aperture set with the Sub-Command Dial. In Programmed Auto or
Shutter-Priority Auto exposure mode, the lens will be stopped
down to the automatically set aperture. The viewed image
becomes progressively darker as the aperture gets smaller.
Those portions of the picture that appear in focus when the
button is pressed are within the depth of field.
• During preview with lenses with meter coupler, attaining
correct exposure is not possible, because exposure must be
determined by full-aperture metering.
• Use Metering system other than Spot.
• During preview, aperture cannot be adjusted and autofocus is
not possible.
100
Located at the top of the Multi-Meter Finder DP-30, the ISOtype hot shoe allows direct mounting of a wide range of Nikon
dedicated electronic Speedlights, including SB-50DX, SB-29,
SB-28/28DX, SB-27, SB-26, SB-25, SB-24, SB-23, SB-22s,
SB-22, SB-20, SB-18, SB-16B and SB-15. Other Nikon
Speedlights may be mounted with a compatible Nikon flash unit
coupler.
 Loading...