

Page 1
AF Micro-Nikkor
ED 200mm
f/4 D IF
付属アクセサリー
62mmスプリング式前キャップ
裏ぶたLF-1
ハードケース CL-45
使用説明書
Instruction Manual
Bedienungsanleitung
Manuel d'utilisation
Manual de instrucciones
使用説明書の内容が破損などによって判読できなくなったときは、
当社サービス機関にて新しい使用説明書をお求めください。
No reproduction in any form of this manual,
in whole or in part (except for brief quotation in
critical articles or reviews), may be made without
written authorization from NIKON CORPORATION.
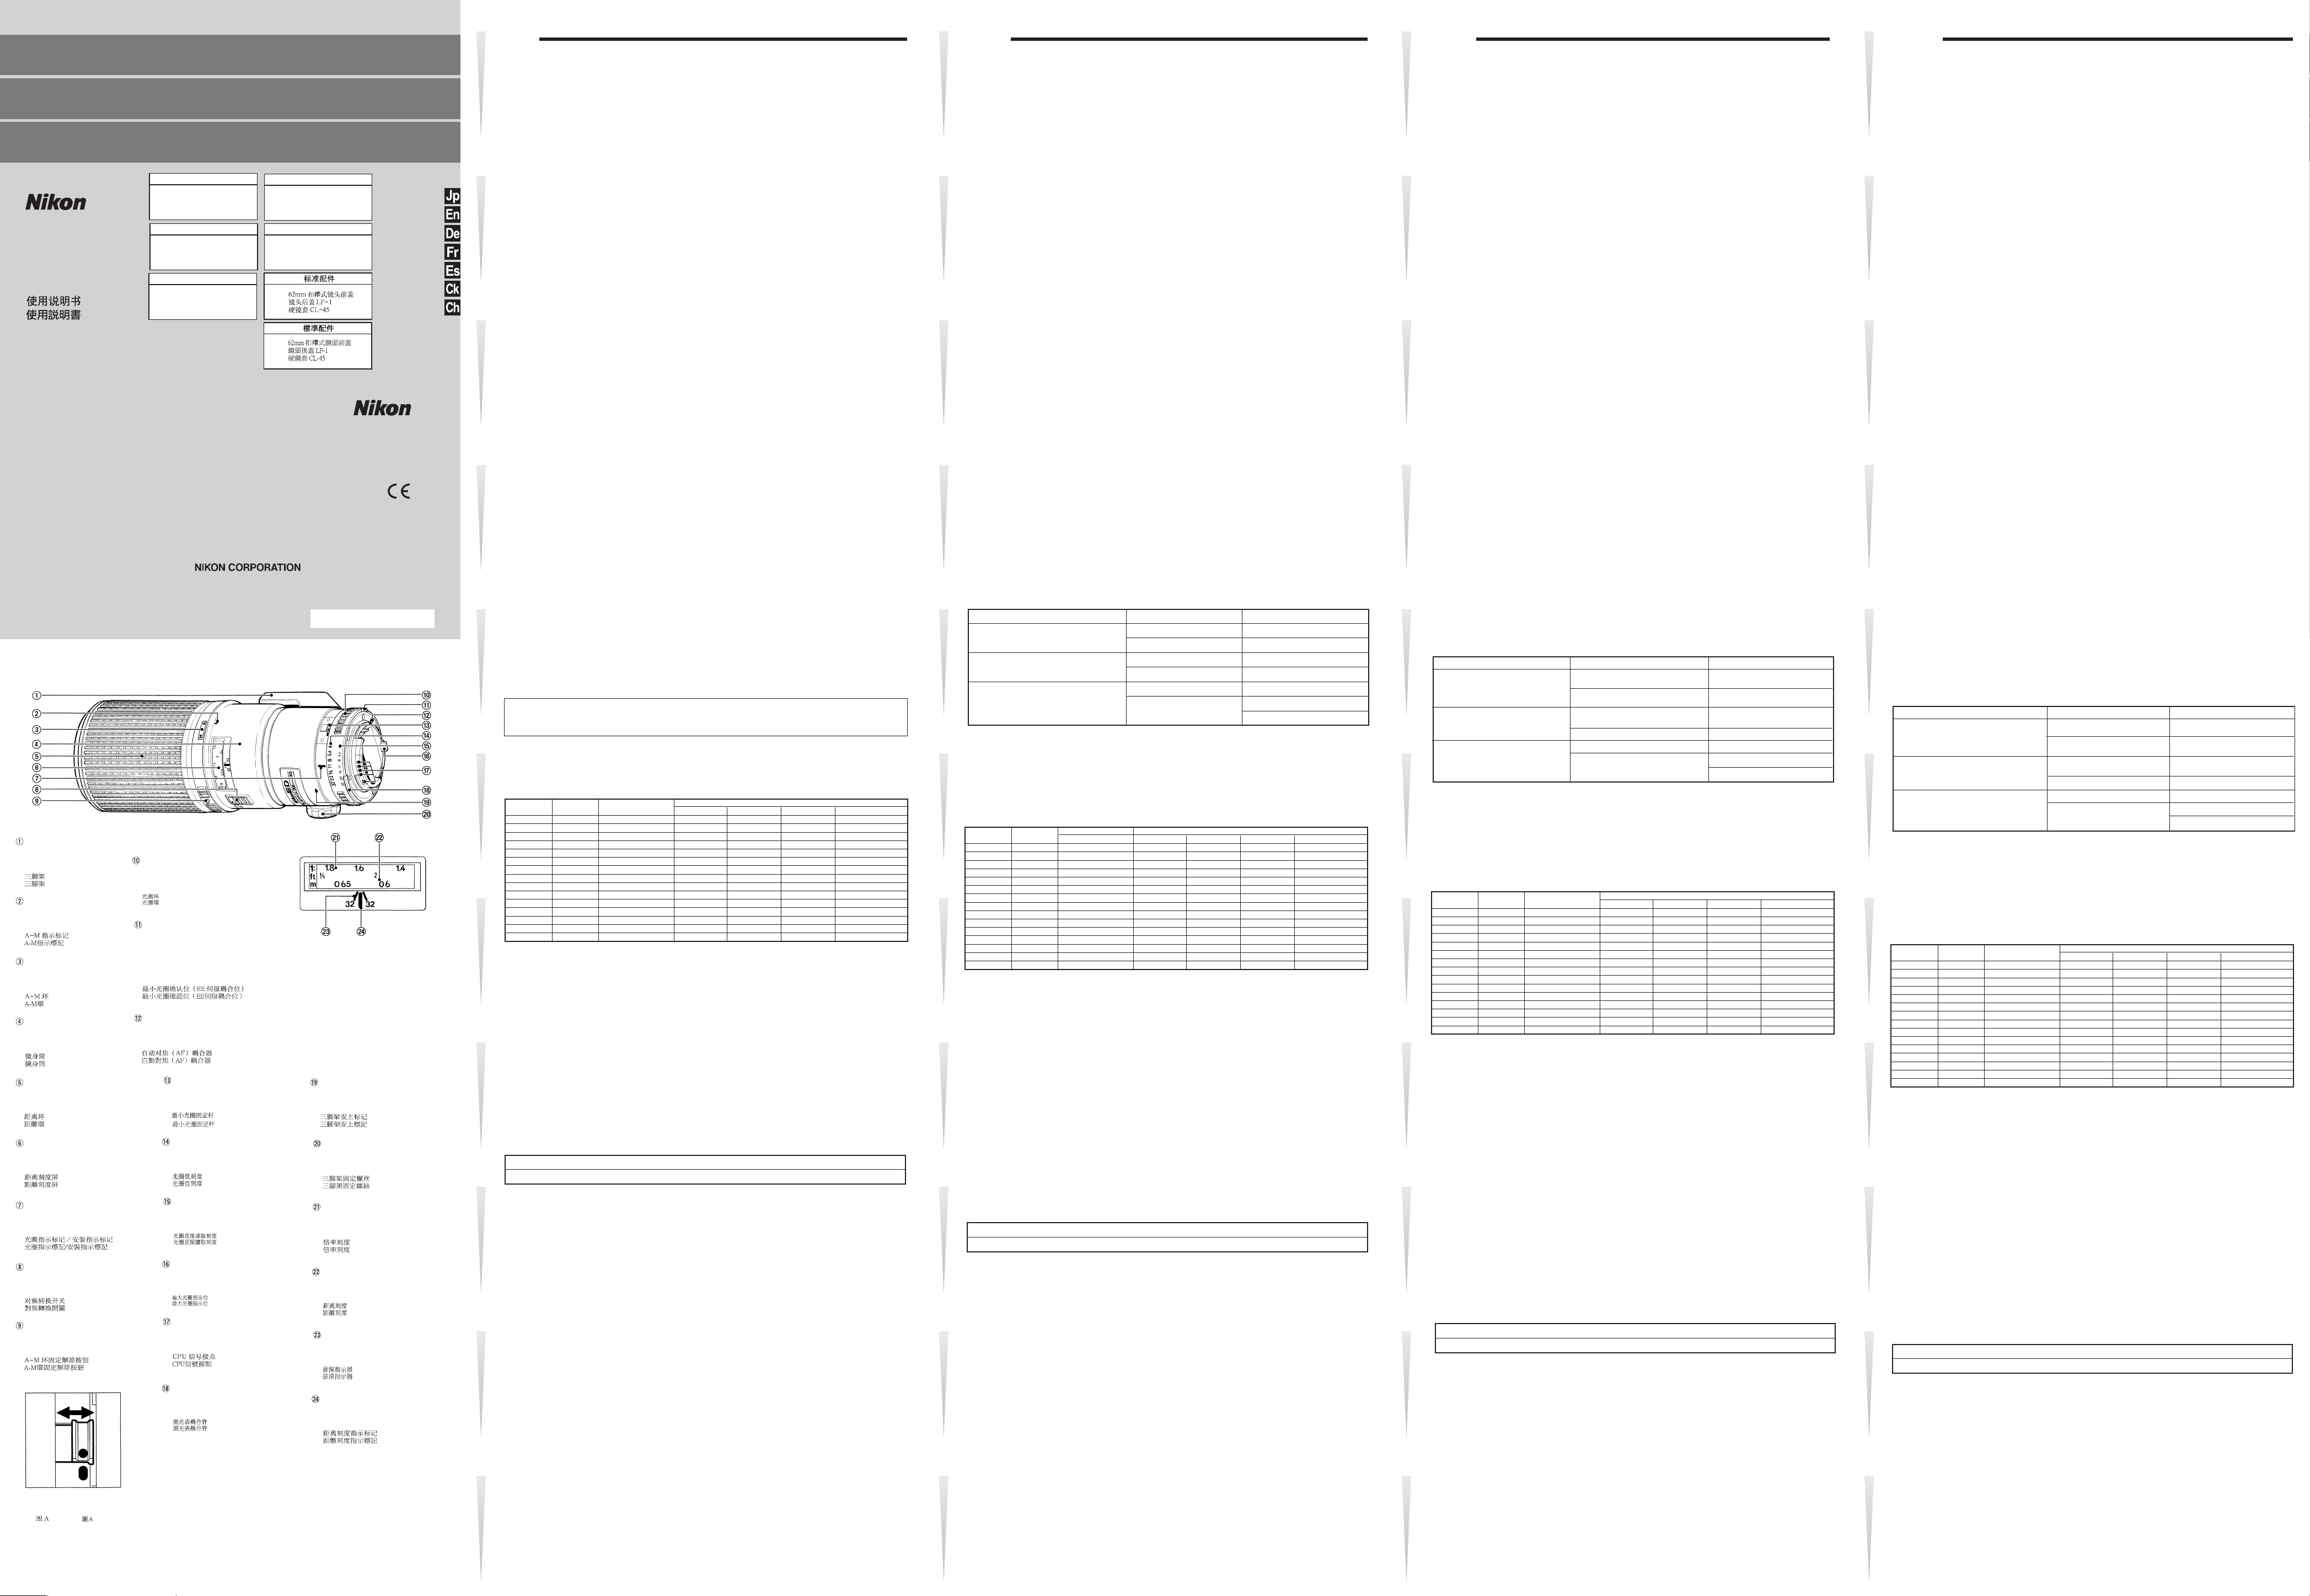
三脚座
Tripodcollar
Stativanschlusses
Collier trépied
Collar del trípode
A-M切換え指標
A-Mindex
A-M-Index
Index A-M
Indice del Selector A-M
A-M切換えリング
A-Mring
A-M-Ring
Bague A-M
Anillo A-M
レンズ鏡筒
Lensbarrel
Objektivtubus
Barillet d'objectif
Tu bo portalentes
フォーカスリング
Focusring
Einstellring
Baguedemiseaupoint
Anillodeenfoque
距離目盛窓
Distancescalewindow
Entfernungsskalenfenster
Fenêtre d'échelle des distances
Ventanilla scala delle distancias
絞り指標・着脱指標*
Apertureindex/Mountingindex*
Blenden/Montage-Index*
Repère d’ouverture.Repère de montage*
Indicador de abertura/montaje*
フォーカス制限切換えスイッチ
Focusinglimitswitch
Fokussier-Begrenzungsschalter
Interrupteurdefindecoursedemiseaupoint
Commutador de límite de enfoque
A-M切換え解除ボタン
A-Mbutton
A-M-Knopf
CommutateurA-M
Botón A-M
イラストA
IIIsut.A
Abb.A
IIsut.A
Fig.A
Standard accessories
62mm snap-on front lens cap
Rear lens cap LF-1
Hard lens case CL-45
Serienmäßiges Zubehör
Aufsteckbarer Frontdeckel
62 mmφ
Hinterer Objektivdeckel LF-1
Fester Öbjectivkocher CL-45
FUJI BLDG., 2-3 MARUNOUCHI 3-CHOME, CHIYODA-KU,
TOKYO 100-8331, JAPAN
絞りリング
Aperture ring
Blendenring
Bague des
ouvertures
Anillo de aberturas
最小絞り信号ガイド(EE連動ガイド)
Mimimum aperture signal post(EE servo
coupling post)
Signalstift für Kleinste Blende(Kupplungsstift
für automatische Blendensteuering)
Borne du signal d’ouverture minimale(Borne
de la servocommande EE)
Borne de señal de abertura minima
(Borne del acoplador EE)
AFカップリング
AFcoupling
AF-Kupplung
CouplageAF
AcoplamientoAF
最小絞りロックレバー
Minimumaperturelocklever
Verriegelungf
Verroudel'ouvertureminimale
Bloqueodeavertureminima
絞り目盛
Aperturescale
Blendenskala
Echelledesouvertures
Escaladeaberturas
ファインダー内直読用絞り目盛
Aperture
-
direct-readoutscale
Skalafür direkte Blendenablesung
Echelle de lecture directe des ouvertures
Escala de lectura directa de la abertura
開放F値連動ガイド
Apertureindexingpost
Anschlag für Blendenkupplung
Borne indicatrice d’ouverture
Pivote indicador de abertura de
CPU信号接点
CPUcontacts
CPU-Kontakte
Contacte CPU
Contactos CPU
露出計連動ガイド
Metercouplingridge
Steuerkurve
Index de couplage photométrique
Protuberancia de acoplamiento al exposímetro
ü
rkleinsteBlende
Bouchon avant à emboîtement
62mm
Bouchon arrière LF-1
Etui rigide CL-45
Tapa frontal a presión de 62mm
Tapa trasera del objetivo LF-1
Estuche duro CL-45
diafragma
Accessoires standards
Accesorios estándar
Printed in Japan ●
三脚座取り付け指標セットマーク
Tripodcollaralignmentindex
PositionierindexdesStativanschlusses
Repè d’alignement du collier trépied
Indiceparaelalineamientodelcollardeltrípode
三脚座止めネジ
Tripodcollarlockscrew
FeststellschraubedesStativanschlusses
Visdeblocageducolliertrépied
Tornilodefijación del collar del trípode
倍率目盛
Reproductionratioscale
Abbildungsmaßstab
Echelledesrapportsdereproduction
Escaladeproporción de reproducción
距離目盛
Distancescale
Entfernungsskala
Echelledesdistances
Escaladedistancias
被写界深度目盛
Depth-of-fieldindicators
Schärfentiefenskala
Echelle de profondeur de champ
Escala de profundidades de campo
距離目盛指標
Distandceindex
Entfernungsindex
Repère des distances
Indicador de distancia
HB7E00050201(70)
8MNJA670
▲
日本語
はじめに
このたびは、ニッコールレンズをお買いあげいただきありがとうございます。
ご使用の前に以下の「安全上のご注意」及び製品の使用説明書をよくお読みのうえ、十分に理解してから正しくお使いください。お読
みになった後は、お使いになる方がいつでも見られる所に必ず保管してください。なお、カメラ本体の使用説明書に記載されている「安
全上のご注意」も併せてお読みください。
「安全上のご注意」
●分解したり修理・改造をしないでください。
●使用しないときは、レンズにキャップをつけるか太陽光の当たらない所に保管してください。
このレンズは、ニコンのAF[オートフォーカス(F3AF用除く)]カメラと組み合わせますと、オートフォーカス撮影が可能です。また、
マニュアル(手動)によるピント合わせも行えます。さらに被写体までの距離情報をカメラボディー側に伝達する機能を備え、3D測光
機能を持ったカメラとの組み合わせ時により的確な露出制御を実現する3D-マルチパターン測光・3D-マルチBL調光を可能とします。こ
のレンズは、等倍撮影が可能で、EDガラスおよび内焦方式を採用し光学性能が優れています。最短撮影距離は約50cm、近接撮影のワー
キングディスタンスは約26cmとなりますので昆虫や小動物の接写に威力を発揮します。
注記
●下記のアクセサリーはCPU信号接点等を損傷しますので、直接このレンズに取り付けないでください。
オート接写リングPK-1・PK-11、K1リング、オートリングBR-4
なお、PK-11のかわりにPK-11Aリングをご使用ください。
なお、上記以外のアクセサリーと、カメラボディとの組み合わせ使用に際しては、必ず各カメラボディの使用説明書も併せてご参照
ください。
●DX-1ファインダー(ニコンF3AF用)と組み合わせてのご使用はできません。
ピント合わせ
このレンズはA-M切換え方式となっております。ニコンAF(オートフォーカス)カメラとの組み合わせでオートフォーカス撮影を行う
場合は、A-M切換え解除ボタンを押しながらA-M切換えリングを回転させ、Aの位置(マニュアルの場合はM)にセットしてからご使用
ください。(なお、F-501カメラをご使用の場合、レンズのA-M切換えリングがMの状態でオートフォーカス撮影を行いますと、カメラ
の故障の原因となりますので必ずAの位置にあることを確認してご使用ください。)
●このレンズにクローズアップレンズを取り付けた場合、マニュアルまたはフォーカスエイドでピント合わせを行ってください。オー
トフォーカス撮影は行えません。
フォーカス制限切換えスイッチの使用
撮影距離が一定の範囲内の場合、この切換えスイッチをFULLからLIMIT側へ切換えることにより、ピント合わせの時間が短縮できます。
(制限範囲の切換えは、0.7m<2
撮影倍率
撮影倍率とは、フィルム面上に写された像の大きさと被写体の実際の大きさとの比率を示したものです。たとえば実際には5cmの長さの
被写体がフィルム面上に1cmに写ったときの撮影倍率は
することもできます。たとえば
合わせます。
被写界深度
被写体の前後のどの範囲が鮮明に写るかという被写界深度の範囲は、レンズ鏡筒の距離指標線の両側の被写界深度目盛によって示され
ます。被写界深度は、この2本の線が示す距離目盛でおおよそ読むことができます。ただし、近距離ではズレが生じるため被写界深度目
盛は使用できません。被写界深度プレビュー(絞り込み)機構を持つカメラボディは、絞り込みによりファインダー内で被写界深度を
確認できます。(裏面の被写界深度表をご覧ください。)
最小絞りロックレバー(図A参照)
プログラム撮影時や、シャッター優先による撮影時は、絞りリングを最小絞り目盛りで固定することができます。ロック方法は、絞り
リングを回転させ、最小絞り目盛(32)を絞り指標(白色)に合わせます。次に最小絞りロックレバーを絞りリングの方向にスライド
させます。このとき最小絞りロックレバーの白色の指標と鏡筒上のオレンジ色の線が合う位置まで確実にスライドさせてください。
ロックの解除は、ロックするときと反対方向に止まるまで最小絞りロックレバーをスライドさせます。
接写、複写撮影
撮影の際は特にカメラブレに注意してください。三脚、ケーブルレリーズ、またはリモートコードを併用することをおすすめします。
接写撮影では、一般に被写界深度が著しく浅くなりますので、奥行きのある被写体の撮影では、絞りを十分絞って、露出時間を長くす
るようにしてください。また、接写時の撮影倍率、被写界面積、撮影距離については、裏面の表をご覧ください。
露出補正
マイクロレンズのように近接撮影可能なレンズは、レンズを繰り出し撮影倍率を増大するとフィルム面上の像の明るさは減少し、有効F
値が変化していきます。カメラのTTL測光による自動露出撮影及びカメラの露出計でのマニュアル撮影を行う場合や、TTL調光によるフ
ラッシュ撮影を行う場合にはレンズを通過した光を測りますので、自動的に補正して撮影されます。
外部露出計による測光時や外部調光スピードライト使用時には、撮影倍率に応じて明るさが減少した分だけ、露出の増加(露出倍数)
を考慮した露出補正が必要です。
有効F値、露出倍数について
レンズのF値は無限遠の被写体の像の明るさを表す値ですが、レンズを繰り出して撮影倍率を増大すれば像の明るさは減少します。
この時の実質的な明るさを有効F値と称し、レンズの明るさが減少した分だけ補正する露出の比を露出倍数といいます。
●表は撮影倍率
絞りはそのままでシャッタースピードを変えて補正したい場合は、シャッタースピードに露出倍数をかけた数値の補正を行なってく
ださい。
露出倍数表
撮影倍率
●本レンズは撮影距離(撮影倍率)によって有効F値が変化しますが、カメラ側の外部表示パネルやファインダー内液晶表示部で表示さ
れる絞り値は露出倍数が自動的に補正された有効F値ですので、外部露出計で測光した絞り値をこれらの表示を使ってセットする場合
には露出倍数を考慮する必要はありません。同様にF-401シリーズの絞りダイヤルで絞り値を設定した場合も露出倍数は内部で自動補
正されますので補正は不要です。ただし、レンズ絞りリング上の絞り値とF5等のファインダー内絞り直読み窓の絞り表示は露出倍数
を考慮しない値なので、これらの絞り値を見ながら絞りをセットする場合は露出倍数補正が必要です。
1
/10以上のときの露出倍数及び絞りを開く量を示したものです。
露出倍数 絞りを開く量
1/10
1/8
1/7
1/6
1/5
1/4
1/3
1/2.5
1/2
1/1.8
1/1.6
1/1.4
1/1.2
1/1.1
1/1
レンズ取り扱い上のご注意
●レンズの清掃は、ホコリを拭う程度にしてください。万一指紋がついたときは、柔らかい清潔な木綿のふきんに無水アルコール(エ
タノール)を少量湿らせ、中心から外側へ渦巻状に、拭きムラ、拭き残りのないように注意して拭いてください。
●シンナーやベンジンなどの有機溶剤は絶対に使用しないでください。
●レンズ表面の汚れや傷を防ぐために、NCフィルターの使用をおすすめします。レンズの保護には、フードも役立ちます。
●レンズをご使用にならないときは、必ず前後にレンズキャップをしておいてください。
●長期間お使いにならないときや保管の際は、カビあるいはサビを防ぐため、高温多湿のところや直射日光のあたるところ、また、ナ
フタリンや樟脳のあるところは避けて風通しのよい場所に保管してください。
●レンズを水に落としたり濡らしたりすると、部品がサビつくなどして故障の原因となりますので注意してください。
●この製品の外観の一部には強化プラスチックを使用していますが、極端に温度が高くなると変形する場合があります。ストーブの前
等、高熱となる場所に置くことは避けてください。
仕様
焦点距離
最大口径比
レンズ 構成
画角
撮影距離目盛
撮影距離情報
倍率目盛
絞り目盛
最小絞りロック
絞り方式
測光方式
マウント
アタッチメントサイズ
三脚座
大きさ
質量(重さ)
1
/4ft>近辺を目安に至近側と∞側に分けられます。)
1
1
/5の倍率で撮影したいときは倍率目盛の5を距離目盛に合わせておき、カメラボディを前後してピントを
1.10
1.12
1.14
1.16
1.19
1.24
1.31
1.37
1.46
1.51
1.57
1.65
1.75
1.82
1.90
約 1/6 絞り
〃 1/6 〃
〃 1/6 〃
〃 1/6 〃
〃 1/3 〃
〃 1/3 〃
〃 1/3 〃
〃 1/2 〃
〃 1/2 〃
〃 2/3 〃
〃 2/3 〃
〃 2/3 〃
〃 5/6 〃
〃 5/6 〃
〃 1 〃
/5倍といいます。倍率目盛(オレンジ色)により、先に倍率を決めてから撮影
カメラの外部表示パネルに表示されるF値(有効F値)
開放F/4のとき
4
4.2
4.2
4.2
4.2
4.2
4.5
4.8
4.8
4.8
5
5
5
5.3
5.3
F/8のとき
8
8
8
8
8
8
11
11
11
11
11
11
11
11
11
F/16のとき
16
16
16
16
16
16
22
22
22
22
22
22
22
22
22
最小絞りF/32のとき
別売りアクセサリー
62mmねじ込み式フィルター、ねじ込み式フードHN-30
:200mm
:1:4
:8群13枚
:12°20ニコンデジタルカメラ(ニコンDXフォーマット)装着時8°
:∞〜0.5m、1
:カメラボディへの撮影距離情報出力可能
:1:10〜1:1(等倍)
:4〜32ファインダー内直読用絞り目盛併記
:ロックレバーによりf/32にロック可能
:自動絞り
:CPU・AI方式のカメラボディでは開放測光、従来方式のカメラボディでは絞り込み測光
:ニコンFマウント
:62mm(P=0.75mm)
:360°回転式
:約76mm(最大径)×193mm(長さ:バヨネット基準面からレンズ先端まで)、全長約202mm
:約1190g
5
/8ft.(併記)
32
32
32
32
32
32
32
45
45
45
45
45
45
45
45
English
Thank you for your kind patronage of Nikon.
Features of the AF Micro-Nikkor ED 200mm f/4 D IF lens are:
•
Closest focus destance of 0.5m (1 5/8 ft.)
•
Distance information used for 3D Matrix Metering or the 3D Multi-Sensor Balanced Fill-Flash will be transmitted instantly
from the lens to the camera body.
Before using your new lens, read the following carefully so you get the most out of your lens now and for years to come.
Important!
•
Be careful not to soil or damage the CPU contacts.
•
Do not attach the following accessories directly to the ens, as they might damage the lens’ CPU contacts:
Auto Extension Ring PK-1, Auto Extension Ring PK-11, K1 Ring, Auto Ring BR-4.
(Use PK-11A instead of PK-11 Ring.)
•
This lens cannot be used with AF finder DX-1 (for the Nikon F3AF).
Focusimg
This lens can be used for both autofocus and manual focus.
To select autofocus, while pressing the A-M ring lock button, turn the A-M ring so that “A” is aligned with the A-M index.
With the Nikon F-501/N2020*, setting to M may cause camera to malfunction.
To select manual, turn the A-M ring so “M” is aligned with the
camera's focus mode selector as desired.
•
When using a close-up attachment lens, autofocusing is not possible; use manual focusing.
The Nikon N2020 is sold exclusively in the U.S.A. and Canadian markets.
*
Presetting focus range
In cases when you want to shoot within a specified distance range, you can reduce focusing time by setting the focus limit
switch from FULL position to LIMIT. (There are two focusing limit zones; approx. 0.7m [21/4 ft.] to infinity for normal shooting,
approx 0.7m [21/4 ft.] to 0.5m [15/8 ft.] for shooting at a close distance.)
Fccusing at a predetermined reproduction ratio
The reproduction ratio is the relation between the size of the image recorded on film and the actual subject size. If for
example, the image on the focusing screen is one-fifth the actual subject size, the reproduction ratio is 1:5.
To photograph at a predetermined reproduction ratio, use the following procedure:
1. Manually turn the focus ring until the desired reproduction scale number is aligned with the distance index.
Aim at the subject, then change your position, moving closer to or farther away from the subject, until the image in the
2.
viewfinder sharpens.
To obtain the appropriate reproduction ratio for each focal distance, see the table on the reverse side of this sheet.
Depth of Field
The depth of field indicator lines are engraved beside the distance index line, At close distances, however, so little is in focus that
it may be more useful to check the depth of field table (
preview button or depth of field preview lever, you can check the depth of field in the viewfinder.
Minimum Aperture Lock
(Illust. A)
For programmed auto or shutter-priority auto exposure shooting, use the minimum aperture lock lever to lock the lens aperture at
f/32.
1. Set the lens to its minimum apreture (f/32).
2. Slide the lock lever in the direction of the aperture ring so the white dot on the lever aligns with the orange dot.
To release the lock, slide the lever in reverse directon.
Notes on Close-up photography and Duplication word
Cmera shake
The AF Micro-Nikkor ED 200mm f/4 D IF provides such exceptionally high image magnification that even the slightest movement
during shooting causes a blurred image. Be sure to mount the camera on a tripod and use a cable release or remote cord to
release the shuttter.
Close working distances
At the high reproduction ratios used in close-up shooting, the depth of field is very shallow. To ensure greater depth of field, stop down
the lens, then carefully position the camera to ensure the most important surface of the subject is in the same zone of sharp focus.
Exposure measurement with close-up attachments
For a lens in normal position, see the following table. For a reverse-position lens, be sure to use stop-down measurement.
Camera Accessory Exposure measurement
F6, F5, F90X/N90s3),F90-Sesies/N903),
F70-Series/N70
F-801s/N8008
Nikkormat FT3, F2 Photomic A, F2 photomic AS(Al)
F-501/N2020, FE2, FA, FM2, FG,
FG-20, EM, F-301/N2000
Non-Al
3)
,F4 series, F801/N80083),
3)
)
S
(CPU•Al
F3 series, FE,FM,EL2,
4)
(Al)
• The F-401s/N4004s3) exposure metering system will not work with PK-11A, PK-12, PK-13 or bellows.
1)For stop-down exposure metering, consult your camera’sinstruction manual.
2)Lens modification required. After
3)The Nikon N90s,
N90, N70, N8008, N8008s and N4004s are sold exclusively in the U.S.A.
mounting modified lens, manually perform maximum aperture indexing.
4)The Nikon N2000 is sold exclusively in the U.S.A. and Canadian markets.
Exposure Compensation
At a close distance (at reproduction ratios 1:10 or greater), the amount of light reaching the film decreases as the lens-to-film
distance increases. When shooting without TTL exposure meteromg (i.e., when performing non-TTL auto flash photography,or
when using a separate exposure meter, etc.) male exposure compensation while referring to the tabe below:
Reproduction ratio
1:10
1:8
1:7
1:6
1:5
1:4
1:3
1:2.5
1:2
1:1.8
1:1.6
1:1.4
1:1.2
1:1.1
1:1
Exposure factor
1.10
1.12
1.14
1.16
1.19
1.24
1.31
1.37
1.46
1.51
1.57
1.65
1.75
1.82
1.90
Amount of exposure
compensation (approx.)
1/6 stop
1/6 stop
1/6 stop
1/6 stop
1/3 stop
1/3 stop
1/3 stop
1/2 stop
1/2 stop
2/3 stop
2/3 stop
2/3 stop
5/6 stop
5/6 stop
1 stop
To compensate exposure without increasing aperture more than one full f/stop, use slower shutter speeds. For
example, for a 1:1.2 reproduction ratio, open the lens by 5/6 stop. Or use a shutter speed one step slower, then stop
the lens down by 1/6 stop.
Lens Care
• Clean lens surface with a blower brush. To remove dirt and smudges, use a soft, clean cotton cloth or lens tissue
moistened with ethanol (alcohol) or lens cleaner. Wipe in a circular motion from center to outer edge, taking care
not to leave traces and not to touch the other lens parts.
• Never use thinner or benzine to clean the lens.
To protect the lens surface from dirt or demage, the use of an NC filter is recommended at all times. The lens
•
hood also helps to protect the lens.
• Keep the lens cap in place whenever the lens is not in use.
• If you will not use the lens for a long time, potect it from rust and mold by storing it in a cool,dry place. Also,do
not store in direct sunlight, and keep it away from naphthalene or camphor.
• Be careful not to get the lens wet or drop it in water. Water on the lens may cause maifunction.
• Reinforced plastic is used on the exterior of the len unit; to avoid damage, take extra care tp never leave the
lens in an excessively hot place.
Important!
When using a separate exposure meter and setting the aperture according to value indicated in the camera’s LCD
panel or in the viewfinder LCD, there is no need to consider the exposure factor. Likewise, when setting aperture
Value with the aperture dial of F-401 series cameras, the exposure compensation is unnecessary. However, when
setting aperture with the aperture ring of the lens or according to value indicated in the viewfinder Aperture Direct
Readout window, make exposure compensation while referring to the table.
62mm screw-in filters, Screw-in lens hood HN-30
Specifications
Focal length: 200mm
Maximumaperture: f/4
Lens construction: 13 elements in 8groups
Picture angle; 12°20' when Nikon Digital Camera Nikon DX format are fixed, it’s 8°
Distance scale: Graduated in meters and feet.inches from 0.5m(1
Distance information: Output into camera body
Reproduction ratio: 1:10 to 1:1 (life size)
Aperture scale: f/4 to f/32 on both standard and aperture-direct-readout scales
Minimum aperture lock: Provided
Diaphragm: Fully automatic
Exposure measurement: Via full-aperture method for Al cameras or cameras with CPU interface system;
viastop-down method for other cameras
Mount: Nikon bayonet mount
Attachment size: 62mm (P=0.75mm)
Tripod mounting: Built-in tripod mounting collar rotatable through 360°
Dimensions: Approx. 76mm(3 inches) dia. x 193mm(7.6 inches) extension from the camera’s lens
mounting flange; overall length is approx. 202mm(8 inches)
Weight: Approx. 1190g(41.9 oz.)
PK-11A, 12, 13/PN-11
PK-2, 3/PN-1/Bellows
PK-11A, 12, 13/PN-11
PK-2,3/PN-1/Bellows
PK-11A, 12, 13/PN-11/Bellows
PK-2,3/PN-1
Optional Accessories
A-M
index. With the Nikon
on the reverse side of this sheet
F value displayed on the shooting display panel of camera (Available F value)
Aperture:F/4
4
4.2
4.2
4.2
4.2
4.2
4.5
4.8
4.8
4.8
5
5
5
5.3
5.3
F/8 F/16 Minimum aperture : F/32
8
8
8
8
8
8
11
11
11
11
11
11
11
11
11
5
/8 ft.) to infinity (∞)
F-501/N2020
, also set the
). If your camera has a depth of field
Full-apertre
1)
Stop-down
Full-apertre
Stop-down
Stop-down
Stop-down
Full-apertre
(or light intensity feedback)
1)
1)
1)
2)
16
16
16
16
16
16
22
22
22
22
22
22
22
22
22
32
32
32
32
32
32
32
45
45
45
45
45
45
45
45
Deutsch
Wir danken lhnen für das Vertrauen, daß Sie Nikon mit dem Kauf dieses Objektivs entgegengebracht haben.
Das AF Micro-Nikkor ED 200 mm f/4 D IF zeichnet sich durch folgende Merkmale aus:
Naheinstellgrenze 0,5 m
•
D-Charakteristik zur Nutzung der 3D-Natrixmessung bzw. des 3D-Multi-Sensor-Aufhellblitzes.
•
Bitte lesen Sie die folgende Beschreibung sorgfältig durch, damit Sie viele Jahre ungetrübte Freude an diesem Objektiv haben.
Wichtig!
Sorgen Sie dafür, daß die AF-Kontakte unter keinen Umständen verschmutzen oder beschädigt werden.
•
Setzen Sie bitte folgendes Zubehör nicht an das Objektiv, da es die AF-Kontakte beschädigen könnte:
•
Die Automatik-Zwischenringe PK-1 und PK-11, die Zwischeniringe K1, den Automatikring BR-4
(Verwenden Sie PK-11A statt PK-11.)
Dieses Objektiv kann nicht mit dem Sucher DX-1(der Nikon F3AF) verwendet werden.
•
Scharfeinstellung
Dieses Objektiv erlaubt sowohl manuelles wie auch automati-sches Fokussieren.
Um Autofokus-Betrieb einzustellen, drehen Sie, während Sie den A-M-Verrigelungsknopf gedrückt halten, den A-M-Ring, bis
das A der A-M-Indexmarkierung gegenübersteht. Bei der Nikon F-501 ist in Stellung M kein einwandfreier Betrieb gewährleistet.
Um Manuell-Betrieb einzustellen, drehen Sie, den A-M-Ring entsprechend in die M-Position. Bei der Nikon F-501 muß der
Fokus-Betriebsartenwahlschalter ebenfalls entsprechend eingestellt werden.
Wenn Sie eine Nahlinse einsetzen, ist Autofokus-Betrieb nicht möglich. Stellen Sie bitte manuell scharf.
•
Voreinstellung des Scharfeinstellbereichs
Wenn Sie innerhalb eines vorher bekannten, begrenzten Entfernungsbereichs fotografieren wollen, können Sie die
Autofokus- Ansprechzeit verkürzen, indem Sie den Fokussier-Begrenzungsschalter entweder aut FULL oder LIMIT stellen.
(Es gibt zwei Scharfeinstellbereiche: ca. 0,7m bis 0,5m für Makro-Aufnahmen.)
Scharfeinstellung auf einen vorgewählten Abbildungsmaßsteb
Als Abbildungsmaßstab bezeichnet man das Verhältnis zwischen der Größe des Aufnahmegegenstandes und der Größe seiner
Abbildung auf dem Film. Wird ein Aufnahmegegenstand z.B. auf der Einstellscheibe im Sucher fünfmal kleiner als in Wirklichkeit
abgebildet, so ist der Abbildungsmaßstab 1:5.
Um Aufnahmen mit einem vorbestimmten Abbildungsmaßstab zu erstellen, gehen Sie wie folgt vor:
1. Stellen Sie den Scharfeinstellring per Hand so ein, daß der gewünschte Abbildungsmaßstab dem Entfernungsindex
gegenübersteht.
2. Richten Sie die Kamera auf lhr Motiv, und bewegen Sie sich anschließend mitsamt der Ausrüstung vom Motiv weg
oder zu ihm
Die Abbildungsmaßstäbe, die sich aus den jeweiligen Entfer-nungseinstellungen ergeben, können Sie der Tabelle auf der
Rückseite dieser Anleitung entnehmen.
Schärfentiefe
Neben dem Entfernungsindex sind Linien zur Anzeige der Schärfentiefe eingraviert. Bei sehr kurzen Aufnahmeabständen ist die
Schärfentiefe allerdings so gering, daß es sich empfiehlt, die Werte der Schärfentiefe-Tabelle (auf der Rückseite dieser Anleitung)
zu entnehmen. Wenn lhre Kamera über einen Abblend-Knopf oder -Hebel verfügt, können Sie die Schärfentiefe im
Sucher kontrollieren.
Verriegelung der kleinsten Blende
Verriegeln Sie mit dem Schieber den Blendenring bei f/32, wenn Sie Programm-oder Blendenautomatik verwenden.
1. Stellen Sie den Blendenring auf den kleinsten Wert (f/32).
2. Drücken Sie den Verriegelungs-Schieber in Richtung des Blendenrings, bis der weiße Punkt auf dem Schieber dem orangen
Punkt gegenübersteht.
Drücken Sie den Schieber in die entgegengesetzte Richtung, um wieder zu entriegeln.
Hinweise für Nahaufnahmen und Duplikationen
Das AF Nicro-Nikkor ED 200 mm f/4 D IF ermöglicht überdurchschnitt-lich große Abbildungsmaßstäbe, so daß selbst geringste
Bewegungen während der Aufnahme unscharfe Aufnahmen verursacher könnten. Die Kamera sollte deshalb auf ein Stativ gesetzt
und mit einem Draht- oder Fernauslöser bedient werden.
Geringe Aufnahmeabstände
Die Schärfentiefe ist bei den großen Abbildungsmaßstäben in der Makro-Fotografie außerordentlich klein. Um eine größere
Schärfentiefe zu erreichen, blenden Sie das Objektiv ab und richten Sie die Kamera sorgfältig so aus, daß die wichtigsten
Motivdetails in einer Schärfenebene liegen.
Belichtungsmessung mit Nahaufnahme-Zubehör
Richten Sie sich nach der folgenden Tabelle, wenn Sie ein mormal angesetztes Objektiv einsetzen. Bei einem in Retrostellung
angesetzten Objektiv muß die Messung in jedem Fall bei der Arbeitsblende erfolgen. (Siehe Tabelle)
Kamera
F6, F5, F90X, F90 Serie, F70 Serie, F4 Serie,
F-801, F-801s (CPU•Al
F3 Serie, FE, FM, EL2, Nikkormat FT3,
F2
F-501, FE2, FA, FM2,
FG, FG-20, EM, F-301(Al)
Nicht-Al
• Das Belichtungs einem Balgengerät.
1)Lesen Sie sich bitte bezüglich der Arbeitsblenden-Messung die Betriebsanleitung Ihrer Kamera.
2)
Dazu muß das. Objektiv auf den Al-Standard umgerüstet werden. Nach dem Ansetzen des Objektivs müssen Sie Per Hand
dem
Belichtungskorrektur
Bei kurzen Aufnahmedistanzen (bei Abbildungsmaßstäben von
1:10 und größer) trifft bei zunehmendem Abstand zwischen Feldlinse und Film entsprechend
Sie nicht mit Innenmessung arbeiten (z.B. Computer-Blitzbetrieb oder Einsatz eines Handbelichtungsmessers) sollten Sie deshalb
zur Vermeidung Von Unterbelichtung die Blende gemäß der untenstehenden Tabelle etwas weiter öffnen.
Abbildungsmaßstab
Um die Belichtungszeit zu korrigieren, ohne die Blende um mehr als einen vollen Wert zu öffnen, können Sie auch
längere Verschlußzeiten einsetzen. Wenn Sie z.B. mit einem Abbildungsmaßstab von 1:1,2 arbeiten, können Sie
eine um
kleinere Blende.
Objektivpflege
•
Reinigen Sie die Linsenoberfläche zunächst mit einem Blasepinsel. Benutzen Sie zur weitergehenden Reiningung
ein mit reinem Alkohol befeuchtetes weiches und sauberes Baunmwolltuch bzw. Linsenreiningungstapier. Wischen
Sie dabei in einer größer werdenden Kreisbewegung von innen nach außen.
Zum Reinigen des Objektivs unter keinen Umständen Verdünner oder Benzin verwenden.
•
•
Die Frontlinse des Objektivs sollte grundsätzlich durch ein Filter NC vor Staub und Beschädigung geschützt
werden. Auch die Gegenlichtblende bewährt sich als Frontlinsenschutz.
•
Bei Nichtbenutzung sollte der vordere Objektivdeckel grundsätzlich aufgesetzt bleiben.
•
Wird das Objektiv ohne Kameragehäuse aufbewahrt, sollten vorderer und hinteret Objektivdeckel aufgesetzt sein.
•
Wenn Sie das Objektiv längere Zeit unbenutzt lassen, bewahren Sie es an einem kühlen, trockenen Ort auf, um
Rost und Schimmelbefall zu vermeiden. Schützen Sie das Objektiv vor direkter Sonneneinstrahlung und vermeidn
Sie die Nähe von Naphtalin und Kampfer.
• Bestimmte Bauteile des Objektivs sind aus verstärkten Kunststoffen gefertigt. Um Schäden zu vermeiden, darf das
Objektiv niemals Plätzen mit extrem hoher Wärme ausgesetzt werden.
Wichtig!
Wenn ein getrennter Belichtungsmesser verwendet und die Blende entsprechend den im LCD-Feld der Kamera oder
im Sucher eingestellt wird, braucht der Belichtungsfaktor nicht berücksichtigt zu werden. Entsprechend ist beim
Einstellen des Blendenwerdes mit dem Blendenring bei Kameras der Serie F401 der Belichtungsausgleich nicht
erforderlich. Wenn aber die Blende mit dem Blendenring am Objektiv oder entsprechend der Direkt-Blendenanzeige
im Sucher eingestellt wird, muß der Belichtungsausgleich entsprechend der Tabelle vorgenommen werden.
Technische Daten
Brennweite: 200mm
Größte Blende: f/4
Optischer Aufbau: 13 Elemente in 8 Gruppen
Bildwinkel; 12°20' Dieser liegt bei fixierten Nikon-Digitalkameras Nikon Dx-format bei 8°
Entfernungsskala:
Abbildungsmaßstab:
Entfernungsskala:
Blendenskala:
Verriegelung der kleinsten Blende:
Blendentyp:
Belichtungsmessung:
Arbeitsblendenmessung bei allen kameras ohne Al-Blendenkupplung
Objektivfassung:
Frontgewinde:
Stativbefestigung:
Abmessungen:
Gewicht:
hin, bis das Bild im Sucher scharf erscheint.
(
)
Bild A
Belichtungsmessung
bei Offenblende
)
bei Arbeitsblende
bei Offenblende(oder rückgekoppelte
Beleuchtungs-stärkeMessung)
bei Arbeitsblende
bei Arbeitsblende
bei Arbeitsblende
bei Offenblende
1
)
1
)
1
)
1
)
2
Photomic
A, F2
Photomic
Meßsystem der
)
Zubehör
PK-11A, 12, 13/PN-11
AS (Al)
PK-2, 3/PN-1/Balgengerät
PK-11A, 12, 13/PN-11
PK-2,3/PN-1/Balgengerät
PK-11A, 12, 13/PN-11/Balgengerät
PK-2,3/PN-1
F-401s funktioniert nicht mit den Automatik-Zwischenringen PK-11A, PK-12, PK-13 oder
weniger Licht aut den Film. Wenn
Belichtungsfaktor
1:10
1:8
1:7
1:6
1:5
1:4
1:3
1:2.5
1:2
1:1.8
1:1.6
1:1.4
1:1.2
1:1.1
1:1
1.10
1.12
1.14
1.16
1.19
1.24
1.31
1.37
1.46
1.51
1.57
1.65
1.75
1.82
1.90
5
/6 Stufe größere Blende einstellen oder eine um 1 Stufe längere Verschlußzeit und eine um 1/6 Stufen
Belichtungskorrektur (ca.)
1/6 blendenstufe
1/6 blendenstufe
1/6 blendenstufe
1/6 blendenstufe
1/3 blendenstufe
1/3 blendenstufe
1/3 blendenstufe
1/2 blendenstufe
1/2 blendenstufe
2/3 blendenstufe
2/3 blendenstufe
2/3 blendenstufe
5/6 blendenstufe
5/6 blendenstufe
1 blendenstufe
Di wert F Konnt aut das Flüssingkristall-Display der Kamerahaltung auf (di verfügbare Wert F)
Blende:F/4
4
4.2
4.2
4.2
4.2
4.2
4.5
4.8
4.8
4.8
5
5
5
5.3
5.3
F/8 F/16 Kleinste Blende : F/32
8
8
8
8
8
8
11
11
11
11
11
11
11
11
11
16
16
16
16
16
16
22
22
22
22
22
22
22
22
22
Sonderzubehör
62-mm-Einschraubfilter, Aufschraubbare Sonnenblende HN-30
ln Meter und Fuß von 0,5m (15/8 ft.) bis unendlich (∞)
von 1:10 bis 1:1 (Originalgröße)
Werden an Kameras übertragen
Von f/4 bis f/32 auf der Standard- und der Skala für die lnnenablesung
Vollautomatisch
Offenblendmessung bei Kameras mit integrierter CPU und/oder Al-Blendenkupplung;
Nikon F-Bajonettanschluß
62 mm; (Steigung=0.75mm)
Eingebauter Einschraubkranz, der um 360° drehbar ist
ca. 76 mm Durchmesser x 193 mm Länge bis zum Flansch; Gesamtlänge ca. 202 mm
ca. 1190g
Vorhanden
32
32
32
32
32
32
32
45
45
45
45
45
45
45
45
Français
Nikon vous remercie d’avoir porté votre choix sur son AF Micro-Nikkor ED 200 mm f/4 D IF, dont les caractéristiques sont les
suivantes:
•
Distance de mise au point minimale de 0,5 m
• Les informations de distance utilisées pour la mesure matricielle 3D ou le dosage auto/ flash ambiance multi-capteur sont
instantanément transmises de l’objectif au boîtier.
Lisez attentivement les paragraphes suivants avant d’ utiliser votre nouvel objectif, les quelques minutes ainsi passées vous
permettront de tirer le meilleur de votre objectif tout de suite et pour des années.
Important!
•
Veiller à ne pas salir ou endommager les contacts CPU.
•
Ne pas fixer les accessoires suivants à un objectif, car ils peuvent endommager les contacts CPU de l’objectif:
Bague d’auto-rallonge PK-1, Bague d’auto-rallonge PK-11, Bague K1, Auto Bague BR-4.
(Utiliser la PK-11A à la place de PK-11.)
•
Cet objectif ne peut pas s’employer à l’intention du Viseur AF de DX-1 fixé à l’appareil F3AF Nikon.
Mise au point
Cet objectif peut être utilisé pour la mise au point manuelle aussi bien qu’automatique.
Pour sélectionner la mise au point automatique, tourner la bague A-M tout en pressant le bouton de verrouillage de la bague
A-M de telle maniére que “A” soit aligné avec l’index A-M. Avec la Nikon F-501/N2020*, s’il était sur “M”, ceci pourrait
entraîner une anomalie de l’appareil.
Pour sélectionner la mise au point manuelle, tourner la bague A-M de telle maniére que “M” soit aligné avec l’index A-M.
Avec la Nikon F-501/N2020, régler également le sélecteur de mode de mise au point de l’appareil comme désiré.
•
Lorsque l’on utilise un objectif accessoire pour prise de vue rapprochée, la mise au point automatique n’est pas possible;
utiliser la mise au point manuelle dans ce cas.
*
La Nikon N2020 est une référence réservée aux marchés américain et canadien.
Prédétermination de l’intervalle de mise au point
Au cas où l’on désire effectuer une prise de vues dans la gamme de distance spécifiée, il est possible de réduire le temps
de
mise au point en réglant l’interrupteru de fin de course de mise au point de la position FULL à celle LIMIT. (ll y a deux zones
de
limi-te de mise au point: environ 0,7 m
des distances de mise au point rapprochée.)
Mise au point à un rapport prédérminé
Le rapprt de reproduction est le rapport entre la dimension de l’image enregistrée sur le film et la dimension réelle du sujet.
Si par exemple l’image de visée représente le cinquiéme du sujet, on dit que le rapport de reproduction est de 1:5
Pour photographier à un rapport de reproduction donné, utiliser la procédure suivante :
1.
Tourner la bague de mise au point jusqu’ à ce que le nombre désiré sur l’échelle de rapport de reproduction soit en face du
repére des sistances.
2.
Viser le sujet, puis changer de place, s’en rapprocher ou s’en éloigner, jusqu’ à ce que l’image dens le viseur soit
parfaitement au point.
Pour obtenir le rapport de reproduntion adapté à chaque distance focale, consulter le tableau de profondeur de champ.
Profondeur de champ
Les repères de profondeur de champ sont gravés à côté des lignes de distance. Lors de prises de vue très rapprochées, la
profondeur de champ est si faible qu’il vant mieux se reporter au tableau de profondeur de champ.
Si votre boîtier comporte le poussoir de contrôle de profondeur de champ, ou le levier de contrôle de profondeur de champ,
vous pouvez tester la profondeur de champ dans le viseur.
Verou de l’ouvertre minimale
Pour une prise de vues automatique programmée ou priorité obturation, utiliser le levier de verrou de l’ouverture minimale pour
verrouiller l’ouverture minimale (f/32).
1. Régler l’objectif sur son ouverture minimale (f/32).
2.
Glisser le levier de verrou vers la direction de la bague des ouvertures de sorte que le point blanc sur le levier fasse face au
point orange.
Pour relâcher le verrou, glisser le levier dans le sens inverse.
Conseils pour la macrophotographie et les travau de duplication
Le bouge
Le AF Micro-Nikkor ED 200 mm f/4 D IF a un tel grossissemet de l’image que le moindre mouvement pendant la prise de vue
donnera un cliché flou. Pour éviter ceci, placer l’appareil photo sur un pied et utiliser un déclencheur souple ou un fil
de commande à distance.
Lesplans très rapprochés
Du fait des grossissements importants rencontrés en macrophotographie, on manque énormément de profondeur de champ. On
peut l’améliorer en diaphragmant, mais on doit placer le boîtier de telle sorte que les plans les plus importants du sujet se
trouvent dans la même zone de metteté.
Mesure de l’exposition avec les accessoires de macrophotographie
Pour un objectif en position normale, consulter le tableau suivant. Pour un objectif en position retournée, être sûr d’utiliser la
méthode avec diaphragme.
Boîtier
F6, F5, F90X, Série F90, Série F70, Série F4,
F-801, F-801s (CPU•Al)
Série F3, FE, FM, EL2, Nikkormat FT-3,
F2 Photomic A, F2 Photomic AS (Al)
F-501/N2020, FE2, FA, FM2, FG, FG-20,
EM, F-301/N2000
Non-Al
3)
(Al)
• Le système de mesure d’exposition du F-401s ne fonctionnera pas avec les PK-11A, PK-12, PK-13 ou soufflets.
1)Pour la mesure
2)
La modification de l’objectif est requise. Une fois le montage de l’objectif modifié, exécuter manuellement l’affichage de
de diaphragme, se référer au mode d’emploi de l’appareil.
l’ouverture maximale.
3) La Nikon N2000 est vendu exclusivement aux Etats-Unis et au Canada.
Compensation de l’exposition
A un plan rapprodhé (à rapports de reproduction égaux ou supérieurs à 1:10), la quantité de lumière atteignant
lorsque la distance de l’ objectif au film augmente. Lors de prise de vue sans posemètre TTL (c’est-à-dire lors d’ exécution d’ une
photographie avec flash automatique sans TTL ou en cas d’ utilisation d’ un flash séparé, etc.) procéder à la compensation de
l’exposition en vous référant au tableau ci-dessous:
Rapport de
reproduction
1:10
1:8
1:7
1:6
1:5
1:4
1:3
1:2.5
1:2
1:1.8
1:1.6
1:1.4
1:1.2
1:1.1
1:1
Pour compenser
de reproduction de 1:1,2, ouvrir l’objectif de
l’objectif de
Facteur
d’exposition
Variateur de la compensation
1.10
1.12
1.14
1.16
1.19
1.24
1.31
1.37
1.46
1.51
1.57
1.65
1.75
1.82
1.90
l’exposition sans ouvrir de plus d’une valeur, utiliser un obturateur plus lent. Par exemple, pour un rapport
1
/6 de valeur.
Soins à apporter à votre objectif
•
Nettoyez la surface de l’objectif avec un pinceau souflant. Pour enlever la saleté et les taches, utilisez un chiffon doux en
coton ou une étoffe de nettoyage pour objectif, légerement imprégné d’alcool éthylique ou de liquide de nettoyage pour
objectif.
Essuyez avec des mouvements circulaires du centre vers l’extérieur, en prenant soin de ne pas laisser de traces et de ne
pas toucher les autres parties de l’objectif.
•
Ne jamais utiliser de diluants ou de benzine pour nettoyer l’objedtif.
•
Laisser un filtre NC monté en permanence constitue une bonne protection de la lentille avant contre la poussière et les chocs.
Le bouchon avant est également une protection efficace de la lentille avant.
•
Bouchez l’avant de votre objectif lorsque vous ne vous servez pas de votre appareil.
•
Lorsque votre objectif n’est pas monté, mettez-lui ses bouchons avant et arrière.
•
Si vous n’utilisez pas l’objectif pendant une longue période de temps, protégez-le contre la rouille et l’humidité en le rangeant
dans un endroit sec et frais. Ne le rangez également pas en plein sloeil et éloignez-le de la naphtaline ou du camphre.
•
Certaines pièces de l’objectif sont en plastique renforcé; pour éviter toute détérioration, ne pas ranger l’objectif dans un
endroit excessivement chaud.
Important!
Si vous utilisez un posemètre indépendant et réglez l’ouverture en fonction de la valeur indiquée sur le panneau LCD de
l’appareil photo ou le LCD du viseur, il n’est pas nécessaire de tenir compte du facteur d’exposition. De même, si vous réglez
l’index d’ouverture avec la molette des ouvertures d’un appareil photo de la série F-401, la compensation de l’exposition n’est
pas nécessaire. Cependant, si vous réglez l’ouverture avec la bague des ouvertures de l’objectif ou en fonction de la valeur
indiquée dans la fenêtre d’indication directe de l’ouverture dans le viseur, compensez l’exposition en vous référant.
Filtres vissants 62 mm, Parasoleil vissant HN-30
Caractéristiques
Longueur focale: 200mm
Ouverture maximum: f/4
Construction optique
Champ angulaire:
Echelle des distances: Graduée en mètres et en pieds/pouces depuis 0.5m(15/8 ft.) à l’infini (∞)
Données relatives à la distance
Rapports de reproduction
Echelle des ouvertures
Verrou de l’overture minimale
Diaphragme
:
Mesure de l’exposition
par la méthode à ouverture réelle avec les autures apareils
Monture: Monture à baïonnette Nikon
Taille des accessories
Fixation du pied
Dimensions:
202mm
Poids: Env. 1190g
: 13
éléments en
12°20'
Avec les paramètres d’usine desappareils numériques Nikon format Nikon DX il s’agit de 8°
:
Figurent pour les appareils
: De1:10 à 1:1
:
f/4 à f/32 sur les deux normes et les échelles de lecture directe d’ouverture
:
Pourvu
Entièrement automatique
:
Par la méthode à pleine ouverture pour appareils Al ou les appareils avec le systéme d’interface CPU;
:
62mm (P=0.75mm)
:
Bague de fixation à rotation de 360°
Env. 76mm diam x 193mm rallonge de la bride de montage d’objectif de l’appareil; longueur hors tout est env.
– ∞ pour prise de vues normale, environ 0,7 m – 0,5 m pour prise de vues à
(Illust. A)
Mesure de l’exposition
Pleine ouverture
Ouverture réelle
Pleine ouverture
(ou contrôle avec contre-mesure)
Ouverture réelle
Ouverture réelle
Ouverture réelle
Pleine ouverture
16
16
16
16
16
16
22
22
22
22
22
22
22
22
22
1)
1)
1)
1)
2)
Ouvreture minimale : F/32
d’exposition (env.)
1/6
de valeur
1/6 de valeur
1/6 de valeur
1/6 de valeur
1/3 de valeur
1/3 de valeur
1/3 de valeur
1/2 de valeur
1/2 de valeur
2/3 de valeur
2/3 de valeur
2/3 de valeur
5/6 de valeur
5/6 de valeur
1 de valeur
Accessoire
PK-11A, 12, 13/PN-11
PK-2, 3/PN-1/Soufflet
PK-11A, 12, 13/PN-11
PK-2,3/PN-1/Soufflet
PK-11A, 12, 13/PN-11/Soufflet
PK-2,3/PN-1
La valeur F apparaît sur l’atticheur de prise de vues de l’appareil photo (valeur F disponible)
Ouverture: F/4
4
4.2
4.2
4.2
4.2
4.2
4.5
4.8
4.8
4.8
5
5
5
5.3
5.3
5
/6 de valeur. Ou bien utiliser une vitesse d’ obturation de 1 valeur et fermer
F/8 F/16
8
8
8
8
8
8
11
11
11
11
11
11
11
11
11
Accessoires en option
8
groups
(grandeur nature)
le
film
32
32
32
32
32
32
32
45
45
45
45
45
45
45
45
diminue
Page 2
Español
Muchas gracias por utilizar los productos Nikon.
Algunas características de los objetivos AF Micro-Nikkor ED 200 mm f/4 D IF son:
•
Distancia de enfoque mínima de 0,5 m (1 5/8 pies)
•
La información de distancia utilizada para la medición matricial 3D o para el flash de ralleno equilibrado multisensor 3D se
transmitirá instantáneamente del objetivo a la cámara.
Antes de utilizar su nuevo objetivo, lea cuidadosamente las siguientes instrucciones, con el fin de obtener el mayor rendimiento
de su nuevo objetivo ahora y durante muchos años más.
¡Importante!
•
Tenga cuidado para no ensuciar ni dañar los contactos CPU.
•
No monte los siguientes accesorios en el objetivo, pues se pueden dañar los contactos CPU del mismo
Anillo Automático de Extensión PK-1, Anillo Automático de Extensión PK-11, Anillo K1, Anillo Automático BR-4.
(Utilice el PK-11A, en lugar del PK-11.)
•
Este objetivo no puede ser utilizado con le Visor AF DX-1 anexo a la cámara F3AF de Nikon.
Enfoque
Estos objetivos pueden ser utilizados tanto para enfoque automático como manual.
Para seleccionar el enfoque automático, al mismo tiempo que oprime el botón de fijación del anillo A-M, gírelo de tal manera
que “A” se alinée con el índice de A-M. En el caso de la Nikon F-501/N2020*, la fijación a M puede causar funcionamiento
inadecuado de la cámara.
Para seleccionar manual,
F-501/N2020, posicione el selector de la modalidad de enfoque de la cámara como lo desee.
•
Cuando utiliza objetivos accesorios para enfoque de aproximación (close-up), no es posible obtener enfoque automático,
entonces utilice el manual.
*
La Nikon N2020 se vende exclusivamente en los mercados de EE.UU. y Canadá.
Preselección de la variación de distancia del enfoque
En casos en que usted desee tomar fotografía a distinto rango de distancia, usted puede reducir el tiempo de enfoque
ajustando el conmutador de límite de enfoque desde la posición FULL a la posición LIMIT. (Existen dos posiciones límites
de enfoque, aproximadamente 0,7 m [2
5
[1
/8 pies] para toma de fotografias cuando enfoque a distancias pequeñas.)
Enfoque a una proporción de reproducción predeterminada
La proporción de reproducción es la relación entre el tamaño de la imagen (gragada en la película) y el tamaño real del sujeto. Si,
por ejemplo, la imagen en la pantalla de enfoque es una quinta parte del tamaño real del sujeto, la proporción de reproducción
será de 1:5.
Al fotografiar en una proporción de reproducción predetermina-da, utilice el siguiente procedimiento:
1. Gire manualmente el anillo de enfoque hasta que el número de escala de reproducción deseado esté alineado con el índice de
distancia.
2. Apunte el sujeto, luego cambie su posición, acérquese o aléjese del sujeto hasta que la imagen en el visor sea clara a y nítida.
Para obtener la proporción de reproducción apropiada para cada distancia focal, vea el cuadro de profundidad de campo.
Profundidad de campo
Las líneas del indicador de profundidad de campo están grabadas al lado de la línea del índice de distancia. A cortas distancias.
sin embargo, queda tan poco dentro del foco que puede ser más útil verificar el cuadro de profundidad de campo. Si su cámara
tiene un botón de examen previo de profundidad de campo o palanca de examen previo de profundidad de campo, usted puede
verificar la profundidad de campo en el visor.
Bloqueo de abertura mínima (llust. A)
Para operación automática programada o con prioridad al obturador, utilice la palance de bloqueo de abertura minima para
bloquear la abertura del objetivo en f/32.
1. Coloque el objetivo a su abertura mínima (f/32).
2. Deslice la palanca de bloqueo en la dirección del anillo de abertura de tal manera que el ponto blanco de la palanca se alinee
con el punto anaranjado.
Para liberar le bloqueo, deslice la palanca en la direcci
Observaciones sobre fotografía de acercamiento y trabajo de duplicación
Movimiento de la cámara
El AF Micro-Nikkor ED 200 mm f/4 D IF proporciona ampliación de imagen tan grande que aún el movimiento más ligero durante
la toma causa una imagen borrosa. Monte la cámara en un tripode y utilice un cable de liberación o un cable de mando a
distancia para liberar el obturador.
Distancias de trabajo cercanas
Con altas proporciones de reproduccióh utilizadas durante tomas de primeros planos, la profundidad de campo es muy baja.
Disminuya la abertura del objetivo para asegurar una profundidad de campo más grande, luego posicione cuidadosamente la
cámara para asegurarse de que la superficie más importante del sujeto está en la misma zona de enfoque nítido.
Medición de exposición con accesorios de acercamiento
Para un objetivo en la posición normal, vea el slguiente cuadro. Para un objetivo en posición invertida asegúrese de utilizar un
método de diafragmado.
Cámera Accesorio Medición de exposición
F6, F5, F90X/N90s3), Serie F90/N903),
Serie F70/N70
F-801s/N8008
Nikkormat FT3,
F-501/N2020, FE2, FA, FM2, FG, FG-20,
EM, F-301/N2000
Sin-Al
3)
, Serie F4,
3)
S
(CPU•Al
F2 Photomic A, F2 photomic AS(Al)
• El sistema de medición de la exposición F-401s/N4004s3)no funcionara con PK-11A, PK-12, PK-13 o con fuelles.
1)Para la medición
2) Se requiere modificación del objetivo. Después de montar el objetivo modificado, realice manualmente el arreglo de la
abertura máxima.
3) Las Nikon N90s, N90, N70, N4004s, N8008 y N8008s se vende exclusivamente en el mercado de EE.UU.
4) La Nikon N2000 se vende exclusivamente en los mercados de EE.UU.y Canadá.
Compensación de la exposición
A distancias cercanas (a tasas de reproducción de 1:10 mayores), la cantidad de luz que llega a la película disminuye a medida
que la distancia del objetivo a la película aumenta Cuando se efectúa tomas sin medición de exposiciíb TTL(es decir, cuando se
efectúa fotografia con flash automático no TTL, o cuando se usa un medidor de exposición separadi, etc.),efectúe la
compensación de exposición refiriéndose a la tabla que se presenta a continuación.
Proporción de
reproducción
1:10
1:8
1:7
1:6
1:5
1:4
1:3
1:2.5
1:2
1:1.8
1:1.6
1:1.4
1:1.2
1:1.1
1:1
Para compensar la exposición sin aumentar la abertura más que un valor f completo, utilice velocidades de obturador
lentas. Por ejemplo, para una proporción de reproducción de 1:1,2, luego abra el objetivo en
posición manor de velocidad de obturador, luego diafragme el objetivo en
Cuidado del objetivo
•
Limpie la superficie del objetivo con un cepillo en pomo. Para eliminar la suciedad y las manchas, utilice un paño de
algodón suave y limpio o un papel para cristales empapado en etanol (alcohol) o limpiador de cristales. Limpie con un
movimiento circular del centro al borde exterior, cuidando de no dejar marcas y de no tocar las otras partes del objetivo.
•
Para limpiar el objetivo, no utilice nunca ni solvente ni bencina.
•
Para proteger la superficie del objetivo de polvo o perjuicio alguno se recomienda el uso de un filtro NC en to do
momento. El parasol tambien ayuda a proteger el objetivo.
•
Dejar la tapa puesta siempre que no se use el objetivo,
•
Si usted no va a usar el objetivo por un período de tiempo prolongado, protéjalo contra la oxidación y el moho
almacenándolo en un lugar fresco y seco. Además, no lo almacene a la luz solar directa, y manténgalo alejado de la
naftalina o alcanfor.
•
Asegúrese de no mojar el objetivo ni dejarlo caer en agua. El agua puede causar mal fincionamiento del objetivo.
•
Se utiliza plástico reforzado en algunas partes de la unidad de objetivo; para evitar daño, tenga cuidado abicional para
nunca dejar el objetivo en un lugar excesivamente caliente.
¡Importante!
Cuando utilice un medidor de exposición separado y ajuste la abertra de acuerdo con el valor indicado en el panel
visualizador de cristal líqido de la cámara o en el visualizador de cristal líquido del visor, no será necesario que tenga en
cuenta el factor de exposición. De igual forma, cuando ajuste el valor de abertura con el dial de abertura de las cámaras
de la serie F-401, no será necesario que realice la compensación la exposicion. Sin embargo, cuando ajustte la bertura
con el anillo de aberturas del objetivo de acuerdo con el valor indicado en la ventanilla de lectura directa de la abertura
del visor, realice la compensación de la exposición refriéndose a la tabla.
Especificaciones
Longitud focal: 200mm
Aberture maxima: f/4
Construcción del objetivo
Angulo fotográfico:
Escala de distancias: Graduada en metros y pies/pulgadas; desde 0.5m(15/8 ft.) hasta infinito (∞)
Datos de distancias
Proporción de reproducción
Escala de aberturas
Bloqueo de abertura mínima
:
Diafragma
Medición de la exposición
CPU; por medio del método de diafragmado para otras cámaras.
Montura: A bayoneta Nikon
Medida de enlazamiento
Montra de trípode
Dimensiones:
largo(total)
Peso: Aprox.
To ta lmente automático
Aprox. 76mm(3pulgadas) x 193mm (7.6 pulgadas) desde la pestaña de montaje; aprox. 202 mm (8 pulgadas)
1190g(41.9 onzas)
gire el anillo A-M de tal manera que “M” quede alineado con el índice A-M. En el caso de la Nikon
1
/4 pies] –– ∞ para toma normal, y aproximadamente 0,7 m [21/4 pies] ––– 0,5 m
ó
n inversa.
Pleine abertura
Diafragmando
Pleine abertura
intensidad luminosa central)
Diafragmando
Diafragmando
Diafragmando
Pleine abertura
1)
(o medición de la
1)
1)
1)
2)
),
4)
(Al)
F-801/N80083),
Serie F3,
FE,FM,EL2,
PK-11A, 12, 13/PN-11
PK-2, 3/PN-1/Fuelles
PK-11A, 12, 13/PN-11
PK-2,3/PN-1/Fuelles
PK-11A, 12, 13/PN-11/Fuelles
PK-2,3/PN-1
de la exposición por detención, consulte el manual de instrucciones de su cámara.
Factor de
exposición
1.10
1.12
1.14
1.16
1.19
1.24
1.31
1.37
1.46
1.51
1.57
1.65
1.75
1.82
1.90
Cantidad de compensación
de exposición (aprox.)
1/6
de abertura
1/6 de abertura
1/6
de abertura
de abertura
1/6
1/3
de abertura
1/3
de abertura
1/3
de abertura
de abertura
1/2
1/2
de abertura
2/3
de abertura
de abertura
2/3
2/3
de abertura
5/6
de abertura
5/6
de abertura
1
de abertura
El valor F aparece sobre el panel indicador de desparo de la cámara (valor F desponible)
Abertura: F/4
4
4.2
4.2
4.2
4.2
4.2
4.5
4.8
4.8
4.8
5
5
5
5.3
5.3
F/8 F/16
8
8
8
8
8
8
11
11
11
11
11
11
11
11
11
1
/6 de abertra.
16
16
16
16
16
16
22
22
22
22
22
22
22
22
22
Abertura minima : F/32
5
/6 de abertura. O utilice una
Accessorios Opcionales
Filtros de rosca de 62 mm, Parasol con rosca de HN-30
: 13
12°20'
Cuando estén fijas cámaras digitales Nikon Digital Camera Formato Nikon DX, es 8°
:
Salida en las cámaras
: 1:10 ––– 1:1
:
f/4 ––– f/32 tanto en la escala normal y la de lectura directa de la abertura
:
Se suministra
:
Por medio del método de plena abertura para cámaras Al o cámaras con el sistema de interface
:
62mm (P=0.75mm)
:
Anillo de montura del trípode incorporado girable hasta 360°
elementos en
8
grupos
(tamaño natural)
32
32
32
32
32
32
32
45
45
45
45
45
45
45
45
■
Depth of Field
Focused
distance
15/8
13/4
17/8
2
21/4
21/2
3
31/2
4
5
6
8
12
20
∞
■
被写界深度表
■
Schärfentiefetabelle
■
Table de prondeur de champ
撮影距離
Eingestellte
Distance de mise au point
Distancia enfocade
4
1’7 1/2”–
1
/2”
1’7
1’9”–
1’9 ”
1
1’10
/2”–
1
/2”
1’10
2’–
2’
2’3”–
2’3”
2’6”–
2’6”
15
2’11
1
/16”
3’
15
/16”–
3’5
1
3’6
/16”
7
/8”–
3’11
1
4’
/8”
13
4’11
3
/16”
5’
5
5’11
/8”–
1
/4”
6’
7
/16”–
7’11
5
8’
/8”
5
11’10
9
/16”
12’1
3
19’8
/4”–
9
/16”
20’5
987’37/16”–
∞
Distanz
/16”–
/16”–
/8”–
Depth of field
5.6 8 11 16 22 32
1
1’7
/2”–
1
/2”
1’7
1’9”–
1’9 ”
1
1’10
/2”–
1
/2”
1’10
2’–
2’
2’3”–
2’3”
15
2’5
/16”–
1
/16”
2’6
15
2’11
/16”–
1
/16”
3’
7
/8”–
3’5
1
3’6
/8”
7
/8”–
3’11
3
4’
/16”
3
4’11
/4”–
1
/4”
5’
1
5’11
/2”–
3
/8”
6’
3
/16”–
7’11
7
8’
/8”
11’10”–
3
/16”
12’3
7
19’6
/8”–
7
/16”
20’7
694’111/16”–
∞
1’7
1’7
1’9”–
1’9 ”
1’10
1’10
2’–
2’
2’2
2’3
2’5
2’6
2’11
3’
3’5
3’6
3’11
4’
4’11
5’
5’11
6’
7’10
8’1
11’9
12’3”
19’ 4
21’10
1
/2”–
1
/2”
1
/2”–
1
/2”
15
/16”–
1
/16”
15
/16”–
1
/16”
15
/16”–
1
/8”
7
/8”–
1
/8”
13
/16”–
1
/4”
5
/8”–
3
/8”
3
/8”–
9
/16”
13
/16”–
1
/8”
3
/16”–
1
/4”–
1
/16”
1’7
1’7
1’9”–
1’9 ”
1’10
1’10
1’11
1
2’
2’2
2’3
2’5
2’6
2’11
1
3’
3’5
3’6
3’11
4’
4’11
5’
5’11
6’
7’10
8’1
11’7
12’4
19’
21’ 1
5
1
1
/16”
15
1
/8”
/16”
9
13
11
5
/2”–
/2”
1
1
/16”
15
1
13
3
/16”
15
/8”–
11
/2”–
/2”
15
/16”–
/16”–
/16”
7
/8”–
/16”–
/16”
11
1
/2”–
1
/8”–
/16”
3
/8”–
/16”
/16”–
1
/4”
/16”–
/16”–
/16”
∞∞
■
Tabla de profundidad de campo
■
■
被写界深度
Schärfentiefe
Profondeur de champ
Profundidad de campo
1’7
1’7
1’9”–
1’9 ”
1’10
1’10
1’11
1
2’
2’2
2’3
2’5
2’6
2’11
3
3’
3’5
3’6
3’11
7
4’
4’11
5’
5’10
6’ 1
7’9
8’2
11’6
12’5
18’ 7
21’ 6
/16”
/16”
/16”
3
1
1
15
1
7
1
11
5
/4”
11
3
1
/2”–
/2”
7
/16”–
9
/16”
15
/16”–
/16”
/8”–
/8”
13
/16”
9
1
3
1
/8”
/16”–
/8”
/4”–
15
7
/16”–
7
/8”
/16”–
/16”–
/16”–
/16”–
/4”–
/4”–
/16”
1’7
1’7
1’8
1’9
1’10
1’10
1’11
2’
2’2
2’3
2’5
2’6
2’11
3’
3’5
3’6
3’11
4’
4’10
5’ 1
5’10
6’ 1
7’8
8’3
11’3
12’8
18’
22’ 2
174’ 77/16”–246’ 97/16”–492’15/16”–∞∞348’ 8”–
1
/2”–
1
/2”
15
/16”–
1
/16”
7
/16”–
9
/16”
15
/16”–
1
/16”
7
/8”–
1
/8”
7
/8”–
1
/8”
3
/4”–
1
/4”
9
/16”–
7
/16”
7
/16”–
5
/8”
15
/16”–
1
/16”
1
/4”–
5
/8”
11
/16”–
3
/8”
13
/16”–
3
/8”
1
/16”–
1
/4”
7
1’7
/16”–
9
/16”
1’7
5
1’8
/16”–
1
/16”
1’9
7
1’10
/16”–
9
/16”
1’10
7
/8”–
1’11
1
/8”
2’
7
2’2
/8”–
1
2’3
/8”
13
/16”–
2’5
3
/16”
2’6
5
2’11
/8”–
3
/8”
3’
7
3’5
/16”–
5
3’6
/8”
3
3’11
/16”–
7
4’
/8”
1
4’10
/2”–
1
/2”
5’ 1
9
/16”–
5’9
5
/16”
6’ 2
11
7’8
/16”–
3
/4”
8’4
3
/8”–
11’
13
/18”
12’11
11
17’ 1
/16”–
11
/16”
23’
3
/4”–
123’ 6
∞
撮影倍率
Vergößerungsbereich
Rapport de reproduction
Proporción de reproducción
Reproduction
ratio
1/1
1/1.2
1/1.3
1/1.5
1/1.9
1/2.3
1/3
1/3.8
1/4.5
1/6
1/7.5
1/10.6
1/16.7
1/29.1
∞
1/
(ft)
(m)
45.6 8 11162232
––
0.500 ––
0.500
0.520 ––
0.520
0.550 ––
0.550
0.599 ––
0.601
0.649 ––
0.651
0.699 ––
0.701
0.799 ––
0.802
0.898 ––
0.902
0.997 ––
1.003
1.195 ––
1.205
1.491 ––
1.510
1.983 ––
2.021
2.959 ––
3.055
3.918 ––
4.100
5.796 ––
6.230
149.985
0.5
0.52
0.55
0.6
0.65
0.7
0.8
0.9
1
1.2
1.5
2
3
4
6
∞
0.500 ––
0.500
0.520 ––
0.520
0.550 ––
0.550
0.600 ––
0.600
0.650 ––
0.650
0.700 ––
0.701
0.799 ––
0.801
0.899 ––
0.901
0.999 ––
1.002
1.198 ––
1.203
1.496 ––
1.505
1.993 ––
2.012
2.983 ––
3.031
3.964 ––
4.054
5.905 ––
6.121
300.926
––
0.500 ––
0.500
0.520 ––
0.520
0.550 ––
0.550
0.600 ––
0.600
0.649 ––
0.651
0.699 ––
0.701
0.799 ––
0.801
0.898 ––
0.902
0.998 ––
1.002
1.197 ––
1.204
1.494 ––
1.507
1.989 ––
2.016
2.973 ––
3.041
3.945 ––
4.073
5.860 ––
6.166
211.813
Photographic Range with Close-up Attachment
Close-up attachment
Close-up attachment lens No.5T
Close-up attachment lens No.6T
PK–series Rings
PN–Ring
Bellows PB-4 or PB-5
Bellows PB-6
Extension Bellows PB-6E
Reprocopy Outfit PF-2,3,4
Reprpduction ratio Subject field
1/3.3–1.4
1/1.7–1.7
1/25–1.5
1/3.8–1.5
1/4.7–1/1.1
1/4.2–1.0
1/4.2–2.2
1/2.7–1.0
––
0.500 ––
0.500
0.520 ––
0.521
0.549 ––
0.551
0.599 ––
0.601
0.648 ––
0.651
0.699 ––
0.701
0.798 ––
0.802
0.897 ––
0.903
0.996 ––
1.005
1.193 ––
1.207
1.487 ––
1.513
1.976 ––
2.029
2.939 ––
3.075
3.881 ––
4.137
5.707 ––
6.319
106.274
0.499 ––
0.501
0.519 ––
0.521
0.549 ––
0.551
0.599 ––
0.601
0.648 ––
0.652
0.698 ––
0.702
0.797 ––
0.803
0.896 ––
0.905
0.994 ––
1.006
1.190 ––
1.210
1.482 ––
1.519
1.965 ––
2.040
2.911 ––
3.103
3.828 ––
4.190
5.580 ––
6.446
75.220
––
Lens in normal position
3.1 x 4.7 – 0.7 x 1.0
1.6 x 2.4 – 0.5 x 0.8
23.6 x 35.5 – 0.64 x 0.95
3.6 x 5.4 – 0.62 x 0.94
4.4 x 6.6 – 1.0 x 1.5
3.9 x 5.9 – 0.91 x 1.36
3.9 x 5.9 – 0.43 x 0.65
2.6 x 3.8 – 0.94 x 1.42
––
0.499 ––
0.501
0.519 ––
0.521
0.549 ––
0.551
0.598 ––
0.602
0.648 ––
0.652
0.697 ––
0.703
0.796 ––
0.805
0.894 ––
0.907
0.991 ––
1.009
1.186 ––
1.215
1.474 ––
1.526
1.949 ––
2.056
2.871 ––
3.143
3.752 ––
4.266
5.401 ––
6.625
53.224
––
0.499 ––
0.501
0.519 ––
0.521
0.548 ––
0.552
0.598 ––
0.602
0.647 ––
0.653
0.696 ––
0.704
0.794 ––
0.806
0.891 ––
0.909
0.988 ––
1.013
1.180 ––
1.221
1.463 ––
1.537
1.927 ––
2.078
2.814 ––
3.200
3.646 ––
4.372
5.147 ––
6.879
37.662
––
∞∞∞∞∞∞∞
1/1.0
1/1.1
1/1.2
1/1.5
1/1.7
1/1.9
1/2.4
1/2.9
1/3.4
1/4.4
1/5.9
1/8.4
1/13.4
1/18.5
1/28.5
1/∞
(in)
Focused distance
35.8–16.9
23.1–15.4
213–20.2
47.8–20.2
54.1–31.5
50.4–31.5
50.4–36.5
33.6–19.5
Use of this lens with both the No. 5T and No. 6T close-up attachments is not recommended, as this combinatin will not produce good
definition in close-up photography. To assure good definition when using either the No.5T or N0.6T lens attachments, stop the lens
down to an aperture of f・5.6 or smaller.
The first values are for the PK-11A ring used alone and the othe ones for the PK-11A–––PK-13, PK-11–––PL-13 or PK-1––––PK-3
rings used together. However, the PK-11 and PK1 rings cannot be attached directly to the lens.
The figures shown here represent the ranges obtained with the subject on the beselate, using the lens without any close-up attachment.
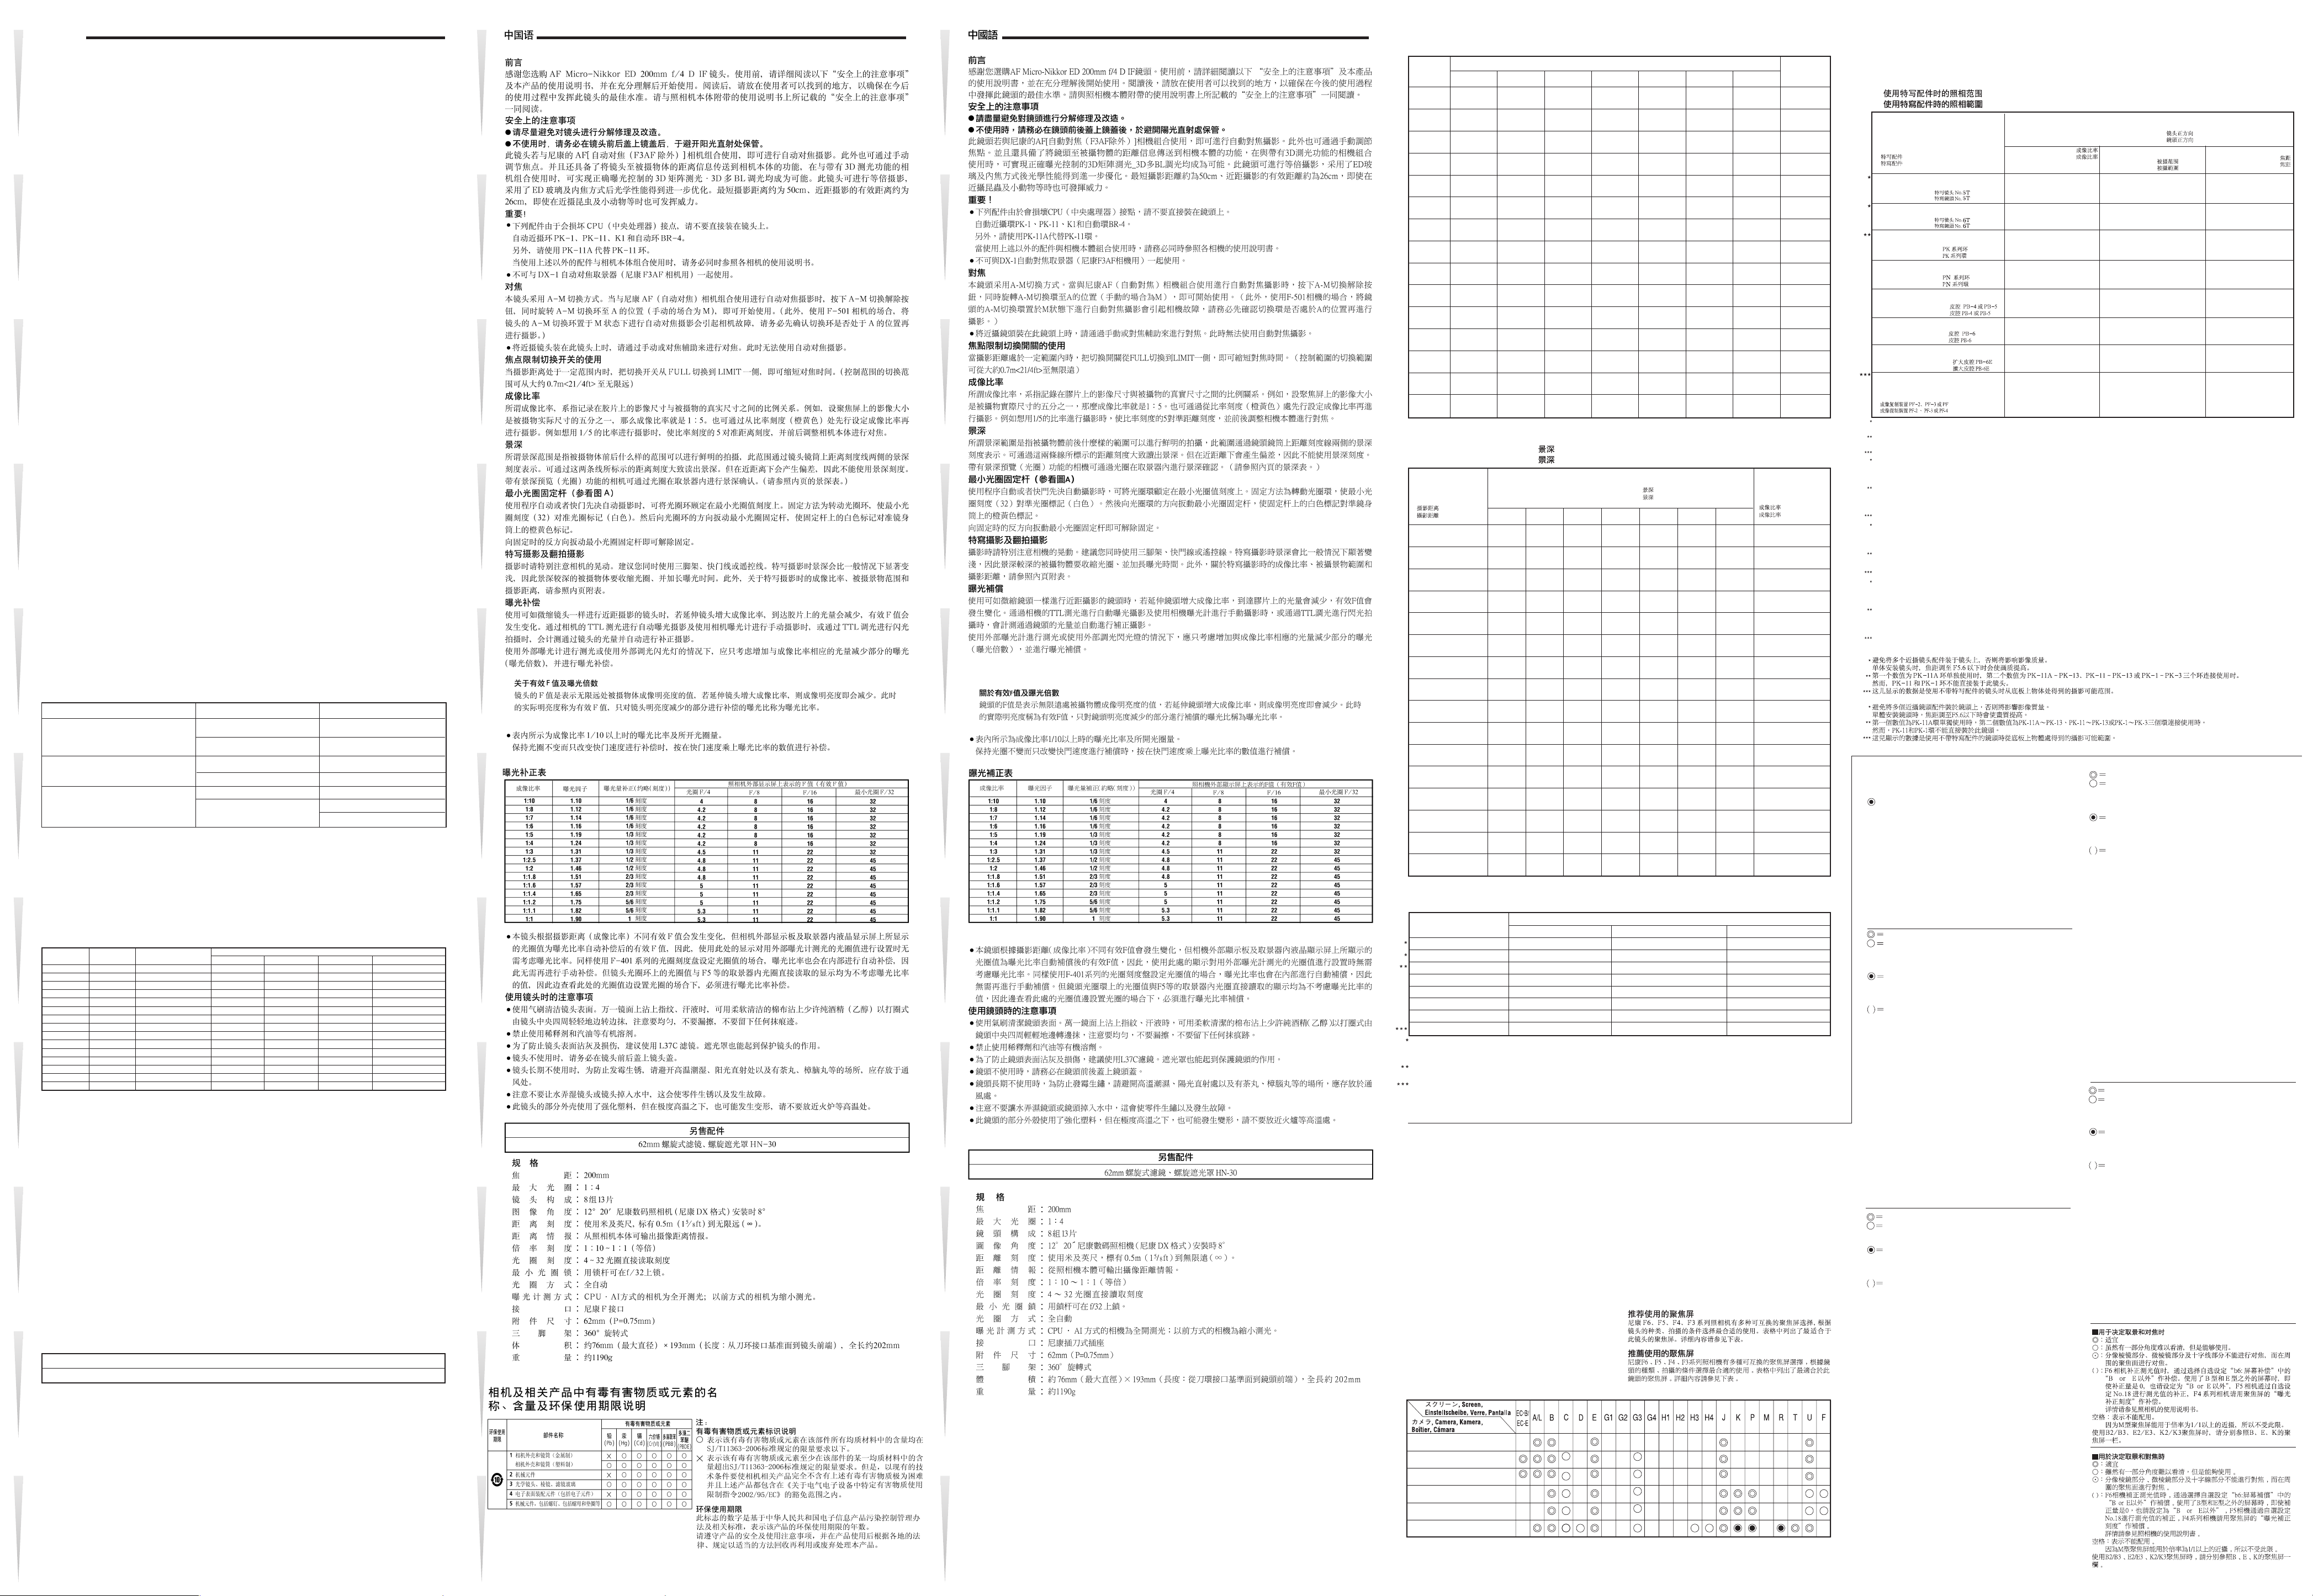
ファインダースクリーンとの組み合わせ
ニコンF6、F5、F4およびF3シリーズカメラボディには多種
類のファインダースクリーンがあり、レンズのタイプや撮影
条件に合わせて最適なものを選ぶことができます。このレン
ズに適したファインダースクリーンは次表のとおりです。(な
お、ご使用に際しては必ず各カメラボディの使用説明書を併
せてご参照ください。)
Recommended Focusing Screens
Various interchangeable focusing screensare availableforNikon
F 6,F 5, F 4 and F 3 series cameras to suit any type of lens or
picture - taking situation . Those Which are recommended for use
with this lens are listed in the table. For details, also refer to the
specific camera's instruction manual.
Verres de visée recommandés
Divers verres de visée interchangeables sont disponibles pour
les appareils Nikon des séries F 6, F 5, F 4 et F 3 pour convenir
à
tout type de situation d'objectif ou de prise de vues . Ceux qui
sont recommandés pour l
'
utilisation avec cat objectif sont inscrits
dans la liste du tableau . Pour plus de détails, se référer aussi au
mode d
'
emploi de l'appareil spécifique.
Pantallas de enfoque recomendadas
Existen varias pantallas de enfoque intercambiables para las
cámaras de la serie F 6, F 5, F 4 y F 3 de Nikon aptes para todo
tipo de objetivo o situación fotográfica. Las pantallas que se
recomiendan con este objetivo aparecen en la lista de la tabla.
Para más detalles, vea asimismo el manual de instrucciones de
la cámera de que se trate .
Empfohlene Einstellscheiben
Für Nikon Kameras der Serien F 6, F 5, F 4 und F 3 stehen
verschiedeneauswechselbareEinstellscheiben zur
Verfügung, um jedem Objektiv und jeder Aufnahmesituation
gerecht zu werden. Die für dieses Objektiv empfohlenen
werden in der Tabelle aufgeführ t. Für weitere Einzelheiten
siehe auch Bedienungsanleitung der Kamera.
F6
F5+DP-30
F5+DA-30
F4+DP-20
F4+DA-20
+
(
)(
0.5
+
0.5
)(
+
0.5
+
(
)
0.5
) (
-
)
(
1.0
+
)
0.5
-
)
(
1
-
(
)
1
-
)
(
1
+
(
)
0.5
F3
■
接写表 このレンズを各種の接写用具に取り付けて使用するときの撮影は次のようになります。
■
Fotografische Bereiche mit dem Nahaufnahme-Zubehör
■
Rapports obtenus en proxiphotographie et photomacrographie
■
Rangos fotográficos con accesorios de asercamiento
■
■
使用器具
Nahaufnahme-Zubehör
Accessoires macro
Accesorio de acercamiento
クローズアップレンズMo.5T
Vorsatzlinse Nr.5T
Bonnette n° 5T
Lente N°5T
クローズアップレンズMo.6T
Vorsatzlinse Nr.6T
Bonnette n° 6T
Lente N°6T
PKリング
Zwischenringe PK
Bagues PK
Anillo de la Serie PK
PNリング
Zwischenringe PN
Bagues PN
Anillo de la Serie PN
ベローズアタッチメント
Balgengerät PB-4 oder PB-5
Soufflet PB-4 ou PB-5
Fuelles PB-4 o PB-5
ベローズアタッチメント
Balgengerät PB-6
Soufflet PB-6
Fuelles PB-6
エクステンションベローズPB-6E
Zusatzbalgen PB-6E
Soufflet additionnel PB-6E
Fuelle de extensión PB-6E
複写装置PF-2、PF-3、PF-4
Reprogerät PF-2, PF-3 oder OF-4
Statif de reproduction PF-2,PF-3 ou PF-4
Unidad de reproducción PF-2,PF-3 o PF-4
クローズ アップレンズNo.5TとNo.6Tを連結してこのレンズに取り付けると画質が劣化しますのでおすすめできません。なお、単体でこのレンズを取り付ける場合
は絞りをF 5 . 6以下に絞り込むと画質が向上します。
PKリング のはじめの 数 値はPK-11Aリング1 個使用のとき、あと の 数 値 は PK-11A〜PK-13リング 、PK-11〜PK-13リングまたはPK-1〜PK-3リングを連 結したとき
のものです 。ただし、PK-11リング および P K - 1リングはこのレンズ に 直接取り付けることはできませんのでご注意ください 。
複写装置PF-2、PF-3、PF-4はレンズ単体で使用したとき、複写台の戴物面上の撮影可能範囲を示します
Grundsätzlich ist der Gebrauch mit einer Vorsatzlinse Nr.5T oder 6T für Nahaufnahmen nicht zu empfehlen, weil bei dieser
Kombination keine gute Bildschärfe zu erwarten ist, es sei denn, daß das Objektv auf Blende 5,6 oder einen noch kleineren Wert
eingestellt wird.
Die ersten Werte in jeder Zeite gelten für die alleinige Verwendung des automatischen Zwischenrings PK-11A, der zweite Wert gilt für
die gemeinsame Verwendung von PK-11A mit PK-13, PK-11 mit PK-13 oder PK-1 mit PK-3. Beachten Sie aber bitte, daß PK-11 und
PK-1 nicht direkt aut das Objektiv gesetzt werden Können.
Diese Ziffern geben die Arbeitsabstände an, die sich ohne Nahzubehör bei Motiven auf der Grundplatte ergeben.
L’ emploi de cet objectif avec un accessoire macro n° 5T et n° 6T n’est pas recommandé parce que cette combinaison ne permettra
pas d’obtenir une bonne définition en macrophotographie. Fermer l’objectif à f/5,6 ou moins pour assurer une bonne définition avec
ces accessoires macro.
Les premières valeurs sont pour la bague PK-11A utilisée seulement et les autres pour les bagues PK-11A–PK-13, PK-11–PK-13ou
PK-1 – PK-3 utilisées ensemble. Toutefois, les bagues PK-11 et PK-1 ne peuvent être directement fixées à l’objectif.
Les chiffres indiqués représentent les rapports obtenus avec le sujet sur le plateau, l’objectif étant utilisé sans accessoire macro.
El uso de este ojetivo no se recomienda con los lentes de acercamiento Nº 5T ni Nº 6T, ya que esta combinación no producirá buena
definición en fotografía de acercamiento. Para asegurar una buena definición al usar los lentes de acercamiento Nº 5T o Nº 6T,
detenga el objetivo en una apertura de f/5,6 o menor.
Los primeros valores son para el caso en que se utilice el anillo PK-11A solo y los otros valores para el caso en que se utilicen los
anillos PK-11A––PK-13, PK-11––PK-13 o PK-1––PK-3 juntos. Sin embargo, no es posible montar los anillos PK-11 y PK-1 en el
objetivo en forma directa.
Les cifras indicadas representan los intervalos obtenidos con los sujetos en la platina de base, sin emplear ningún accesorio de
aproximación en el objetivo.
■構図の決定やピント合わせの目的 には
◎:
好適です。
○:
視野の一部が多少見にくくなりますが 使 用できます 。
:
スプリットプリズ ム 部、マイクロプリズム部および 十字線部では、
ピント合わせができません。周囲のマット面でピントを合わせます。
():
内の数値は中央部重点測光時に必要な露出補正値です。
F6カメラの場合、測光値の補正は、カメラのカスタムメニュー
「b6:スクリーン 補 正 」を「B or E以外」にセットして 行 いま
す。B型およびE型以外を使用する場合は、補正量が0でも、
「B or E以外」にセットしてください 。F5カメラの場 合は、カ
スタムセッティングN o .18の設定で測光値の補正を行います。
F4シリーズカメラの 場 合は、ファインダースクリーン露 出 補
正ダイヤルを回して補正を行います。
詳しくはカメラの使 用説明書をご覧ください 。
空欄:使用不適当です。ただし、Mスクリーンの場合 、撮影倍率1/1
倍以上の接近撮影に用いられるため 、この 限りではありませ ん 。
F6、F5、F4、F3シリーズ 以 外のCPU・AIカメラをご使 用 の 場 合 、K2、
B2、E2スクリー ンは それ ぞれ K 、B、Eスクリーン の 欄をご 覧ください 。
Excellent focusing
Acceptable focusing
Slight Vignetting or moire phenomenon affects
screen image, but film image shows no traces
of this.
Acceptable focusing
Split-image rangefinder, microprism or crosshair area is dim; focus on the surrounding matte
area.
Indicates degree of exposure compensation
needed (Center-Weighted metering only). For
F6 cameras, compensate by selecting “Other
screen” in Custom Setting “b6: Screen comp.”
and setting the EV level to -2.0 to +2.0 in 0.5
EV steps. When using screens other than type
B or E, “Other screen” must be selected even
when the required compensation value is “0”
(no compensatio required). For F5 cameras,
compensate using Custom Setting #18 on the
camera body. For F4-Series cameras,
compensate using the Exposure Compensation
Dial for the focusing screen.
See instruction manual of the camera body for
more details.
Blank box means not applicable.
Since type M screen can be used for both
macrophotography at a 1;1 magnification ratio
and for photomicrography, it has different
applications than other screens.
For the K2, B2 and E2 focusing screens, refer to the
columns on the K, B and E screens, respectively.
For details, also refer to the specific camera's
instruction manual.
Ausgezeichnete Scharfeinstallung
Brauchbare Scharfeinstellung
Leichte Vignettierung oder Moire´ im
Sucherbild, nicht iedoch auf dem Film.
Brauchbare Scharfeinstellung
Schnittbildindikator, Mikroprismenfeld oder,
Fadenkreuzbereich dunkeln ab. Fokussierung
auf Einstellscheiben-Umfeld.
Zeigt den Betrag zusätzlich erforderlicher
Belichtungskorrektur (Nur mittenbetonte
Belichtungsmessung). Bei F6-kameras
korrigieren Sie durch Wahl von “Andere” in der
Individualfunktion “b6: Einstellscheibe” und
Einstellen des LW-Werts im Bereich zwischen -
2,0 und +2,0 in 0,5-LW-Schritten. Bei Gebrauch
von anderen Scheiben als B oder E, ist
“Andere” auch dann zu wählen, wenn der
erforderliche Korrekturwert “0” beträgt (keine
korrektur nötig). Zur Einstellung des
Korrekturwerts am F5 Kameragehäuse dient
die Individualfunktion Nr. 18. Mit den F4-Serien-
Geräten durch den
Belichtung-kompensationsanzeiger für
Visiermattscheiben kompensieren.
Näheres hierzu finden Sie in der
Bedienungsanleitung des Kameragehäuses.
Ein Leerfeld bedeutet unbrauchbar. Da die
Einstellscheibe Typ M fu..r Makrofotografie bei einem
Abbildungsverha..ltnis von 1:1 sowie fu..r
Mikrofotografie verwendet wird, unterscheidet sich
ihre Anwendung von den anderen Einstellscheiben.
Fu..r die Einstellscheiben K2, B2 und E2 siehe die
Spalten fu..r die Scheiben K, B bzw. E. Siehe auch
die Anleitung der jeweiligen Kamera.
PB-4、PB-5
PB-6
撮影倍率
Abbildungs-maßstab
Rapport de reproduction
Relación de reproducción
1/3.3 –– 1.4
1/1.7 –– 1.7
1/25 –– 1.5
1/3.8 –– 1.5
1/4.7 –– 1/1.1
1/4.2 –– 1.0
1/4.2 –– 2.2
1/2.7 –– 1.0
レンズ正方向
Objektive in Normalstellung
Objectif en position normale
Objetivo en la posición normal
被写界面積
Aufnahmefeld
Champ couvert
Campo abarcado
8.0 x 12.0 –– 1.7 x 2.6
4.1 x 6.1 –– 1.4 x 2.1
60.0 x 90.1 –– 1.6 x 2.4
9.1 x 13.7 –– 1.6 x 2.4
11.2 x 16.8 –– 2.6 x 3.9
10.0 x 15.0 –– 2.3 x 3.5
10.0 x 15.0 –– 1.1 x 1.7
6.5 x 9.7 –– 2.4 x 3.6 85.3 –– 50.0
Mise au point excellente
Mise au point passable
Le´ ger vignettage ou effets de moire sur I,image
du berre, mais le film ne pre´ sente aucune trace
de ces phe´ nome`nes.
Mise au point passable
Image coupe´e au te´le´me`tre, zone
microprisme ou en toile d,araigne´e teme. Mise
au point autour de la zone tresse´e.
Indica la cantidad de compensación adicional
necesaria (Solamente medición ponderada
central).
Para cámaras F6, compense seleccionando
“Otra pantalla” en el ajuste personal del usuario
“b6: Compens pantalla” y ajustando el nivel EV
a -2,0 a +2,0 en pasos de 0,5 EV. Cuando se
utilice una pantalla que no sea de tipo B o E,
debe seleccionarse “Otra pantalla” incluso
cuando el valor de compensación requerido
sea “0” (no se requiere compensación). Para la
cámara F5 compense usando el ajuste
personal del usuario No. 18 en el cuerpo de la
cámara. Para las cámaras de la serie F4,
compense usando el dial de compensación de
exposición para las pantallas de entoque.
Para más detalles, consulte el manual de
instrucciones de la cámara.
Les blancs de´signent des verres inutilisables.
Comme le verre de type M est utilise´ pour la macrophotographie a` un rapport d,agrandissement de 1:1
aussi bien que pour laphotomicrographie, son
application est deffe´rente de celle des autres
verres.
Pour les verres de vise´e K2, B2 et E2, se reporter
respectivement aux colonnes des verres K, B, et E.
Pour plus de de´tails, se re´fe´rer au mode d,emploi
de chaque bo^ltier.
Enfoque excelente
Enfoque aceptable
Ligero vi~neteo o feno´ meno de moire´ afecta la
imagen delas pantallas, pero la imagen de la
pell´cula no esafectada por esto.
Enfoque aceptable
Te le´ metro de imagen partida, microprisma o
a´ rea de cruz filar es oscura; enfoque en el
a´ rea mate circundante.
Divers verres de visée interchangeables sont
disponibles pour les appareils Nikon des séries
F6, F5, F4 et F3 pour convenir à tout type de
situation d’objectif ou de prise de vues. Ceux
qui sont recommandés pour l’utilisation avec
cet objectif sont inscrits dans la liste du tableau
(voir le verso). Pour plus de détails, se référer
aussi au mode d’emploi de l’appareil
spécifique.
El cuadro blanco significa inaplicable. Como la
pantalla de tipo M se usa para macrofotografl´a a
una razon de magnidicacion de 1:1 asl´ como para
microfotografl´a, su aplicacio´n es distinta a la de las
dema´s pantallas.
Para las pantallas de enfoque K2, B2 y E2, vea las
columnas de las pantallas K, B y E,
raspectivamente. Para los detalles tambien
rafie´rase al manual de instruccio´n de la ca´mara
especifica.
撮影距離
Eingestellte Entfernung
Distance de mise au point
Distancia de enfoque
91.0 –– 42.8
58.6 –– 39.0
541 –– 51.2
121 –– 51.3
137 –– 80.0
128.1 –– 79.9
128.1 –– 92.8
(cm)
 Loading...