The lens construction is divided into two consisting of Prime Lens composed of 9 elements of 6 groups, and 2X attachment lens that consist of 2 elements of one group
Picture Angle: 120 degrees 30
Distance scales vary starting from 1.6m which is the (white numerals) and 0.35 (1/11X) to 0.8X 2X which is 0.33 orange numeral is 0.26 type conversion sticker that is provided for feet
Scaling: f/Nobody f/32
Diaphragm: It is fully automatic. The guide bridgemaster system will turn eves correct diaphragm when subject distance is set on the focussing ring.
Reproduction ratio: Continously changeable from ( is 1/11X to 1X) (using a prime lens only) 0.8X - 2X to any description with 2X close up attachment lens
Il lusion of Mege K banners: Re production ratios of 1/11X-1X2 can be recorded in the lower right hand corner of the(gilm) non data shooting also possible by leaving the DATA button in the off position
Flash illumination: Through a built-in xenon ringlight flashtube the output is 60W/sec aproximately: circuit works through a silicon controlled rectifier and series circuit giving flash output determined by ASA/ISO ring setting. Flash duration is approximately 1/500 second at ASA/ISO 25.
Ready-light: Provided red LED on top of lens barrel the reproduction ratio printed in the viewfinder is red LED used on a ready-light.
Focusing lamp: Provided a put in front of the lens at the cameras center a 12V lamp that ignites and stays alight for 16 seconds.
after a finger lifts off LAMP button: stop shining any time the ringlight flashes or the power source is off
Attachment size: 49 mm (P = 0.75 mm); 49 mm, 2X close up attachment lens is included
Mount: Nikon bayonet type mount
Power supply: AC Power Unit LA-2 and DC Power Unit LD-2 (both come with a neckstrap)
Dimensions:: 98mm x 150mm in length overall,146mm outside from flange.
-Weight: About 890g. (A prime lens is included)
-Accessories provided: Lens cover LF-1, a Rear lens cover, a 12V lamp, a 4 pin SC-21 power cable, a 2 pin SC-20 sync cable, a 3 pin SC-22 sync cable and a Distance scale conversion sticker.
Optional accessories: Leatherette Competment Case, 3 m Power cord, DC Power unit LD – 2, AC power unit LA – 2.
Frequently Asked Questions
Q: What is the maximum reproduction ratio of Medical Nikkor 120 mm lens?
A: The maximum reproduction ratio is maximum 2X when 2X close up attachment lens is in use.
Q: Is this lens compatible with any Nikon camera?
A: Apart from certain cameras specified in the manual which in the use of all Nikon and Nikkormat cameras with this lens fitted.
Q: By what means does the lens ensure that the exposure is automatic?
A: The lens features an integrated ringlight and a guide number system that automatically adjusts the required flash output and aperture to match the ASA/ISO on film that has been set on the device.
Q: With which power source this lens can work with?
A: This lens can work with an AC Power Unit LA-2 or a DC Power Unit LD-2, thereby enabling the use of the lens indoors or outdoors.
Q: How do I configure the ASA/ISO film speed through the lens?
A: In order to set the ASA/ISO film speed, the locking screw on the ASA/ISO ring has to be loosened and the ring turned so that the number for the film that is needed aligns with it.
Q: What does the DATA button on the lens do?
A: The DATA button facilitates reproduction ratio to be revealed through the viewfinder and recorded on the film at the instance of exposure.
Q: For how long is the focusing lamp on?
A: 16 seconds period is for which the focusing lamp is on especially when the LAMP button is pressed, however manually switching off the power supply can also turn off the lamp.
User Manual
Page 1
Medical-Nikkor
120mm
f/41F
Nikon
INSTRUCTION
MANUAL
Page 2
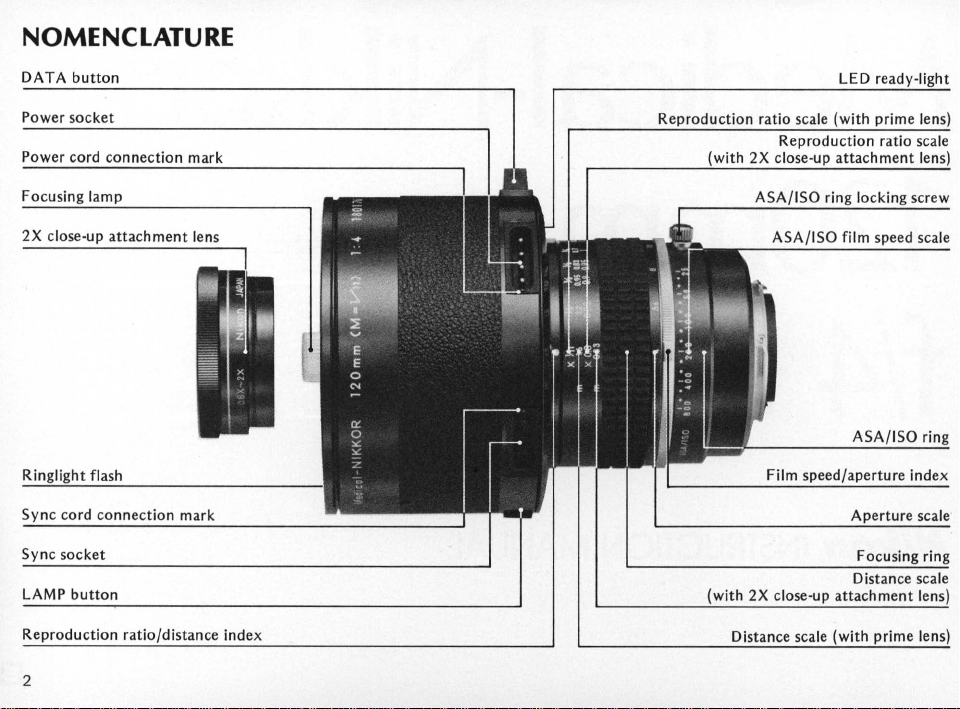
NOMENCLATURE
DATA
button
Power socket
Power cord connection mark
Focusing lamp
R
t flash
Sync cord connection mark
Sync socket
button
LAMP
LED
Film
speed/aperture index
read
re
scale
R
istance index
2
Page 3
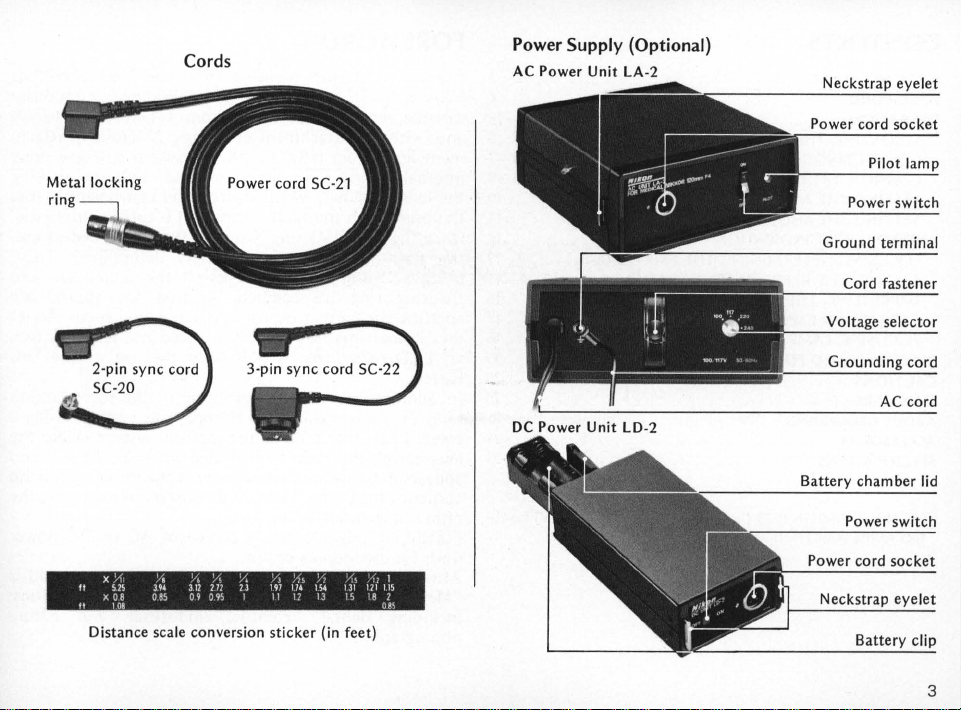
Cords
Power Supply (Optional)
AC
Power
Unit LA-2
Neckstrap
Power
Power
Ground
Cord
cord
socket
Pilot lam
switch
terminal
fastener
selector
eyelet
x
~
/&
/,'
tt
SlS
394
x08
it
08S
108
~
312
272
09
Q9S
Distance scale conversion
~
2 J
1
J
h'
191
1"
'I
12
sticker
IS.
131 111
13
IS
(in feet)
Grounding
Battery
Power
'I,
1
liS
18
]
08~
Power
Neckstrap
AC
chamber
switch
cord
socket
eyelet
cord
cord
lid
3
Page 4
CONTENTS-----------------
NOMENCLATURE ...
FOREWORD
OPERATION
MOUNTING
CONNECTING THE POWER
CONNECTING
SETTING THE ASA/ISO FILM
SETTING THE SHUTTER
READY-LIGHT INDICATION. . . . . . . .
FOCUSING/DETERMINING THE
SETTING THE REPRODUCTION RATIO . . .
Featuring internal focusing (IF), the Medical-Nikkor
4
120mm f/4 I F
variable reproduction ratios from 1/11 X down to 1 X
5
and, with the attachment
ment lens, from
internally, there
10
the
lens
Exposure with the built-in ringlight
11
Once the ASA/ISO ring
12
13
the flash output
using a "guide number system," the diaphragm and
16
focusing ring are coupled,
aperture for correct exposure
18
you know when the flash
an
LED
barrel.
20
In
21
21
addition, automatic imprinting
ratio
in
green
LED
lens
barrel, the ratio
appears
corner
ratio
in
of
is
imprinted on the film.
Finally, this
units for use indoors or out.
Although this complete close-up system
"Medical-Nikkor" lens, it
including dental, scientific, industrial, and nature
photography.
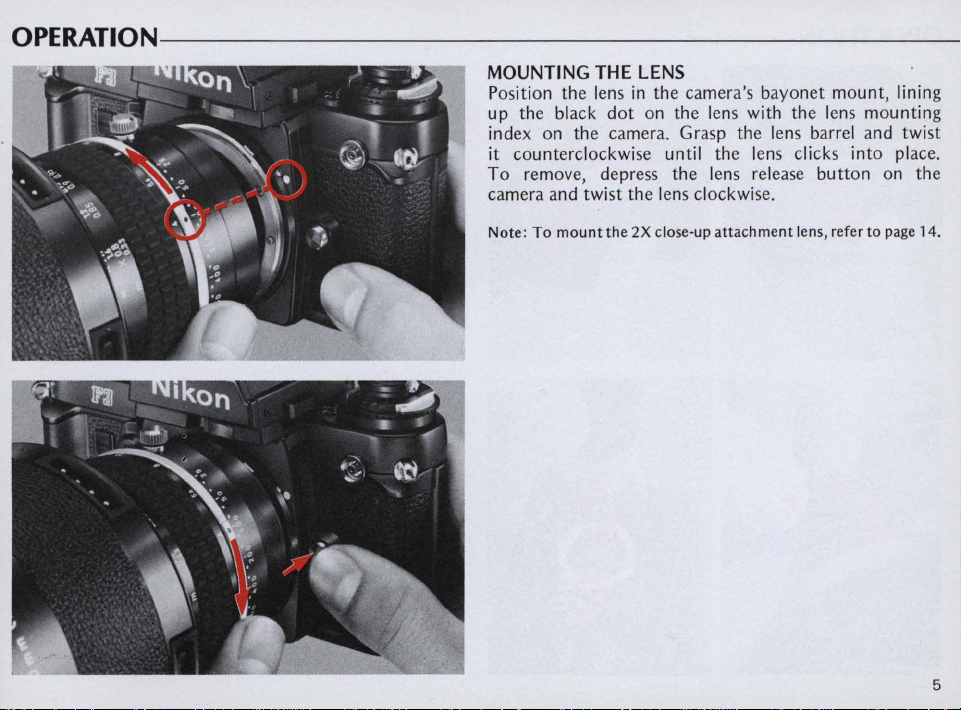
Position the lens
up the black
index on the camera. Grasp the lens barrel and twist
it counterclockwise until the lens clicks into place.
To
remove, depress the lens release button on the
camera and twist the lens clockwise.
Note:
To
mount
in
the camera's bayonet mount, lining
dot
on the lens with the lens mounting
the
2X
close·up
attachment
lens, refer to page 14.
5
Page 6
-OPERATION-continued-----------------------
CONNECTING
The
• DC
This
chamber
clip .
sure
all
To
the
power
the
align
and
place (4) .
To
Caution:
necting
off. Otherwise,
THE
Medical-Nikkor
DC
power
units
, allowing
out.
Power
Unit
LD-2
battery
batteries.
lid (1). Remove
making sure
poles are aligned
Put
that
lid back
eight
connect
power
socket
plug with
the
metallic
push
remove
unit
To
install
lid
in
the
the
that
the
correctly
the
battery
the
contacts
into
place. When replacing
at
once.
the
battery
cord
5C-21 (supplied with
on
the
the T mark
white
dot
dot
near
the
the
plug
the
plug
its metal locking ring
Before
it
connecting
from
the LD-2, make sure
the
ringlight might be damaged.
POWER SUPPLY
120mm
holds
the
direction
f/4
lens
1.5V
accepts
to
the
eight
batteries, first slide
of
the
battery
arrow,
clip. Load
positive and negative
as
shown
clip
back
into
the
go
in
first (2).
unit
to
the
lens, plug
lens barrel by aligning
next
to
on
into
from
and
the
edge
pull
the
other
the
the
the
end
the
socket
DC
unit,
it
out.
that
of
LD-2's
until it clicks
of
power cord SC-21
either
be used
AA-type
inside
chamber,
Then,
batteries,
the
socket
the
power
grasp
the power switch
indoors
penlight
the
battery
and
open
the
batteries
(+
and
the
battery
making
slide
replace
one
end
lens)
into
the
arrow
(3).
plug with
socket,
the
plug
to
or
discon.-
AC
Then
or
or
the
- )
the
of
the
on
,
the
into
by
is
Page 7
•
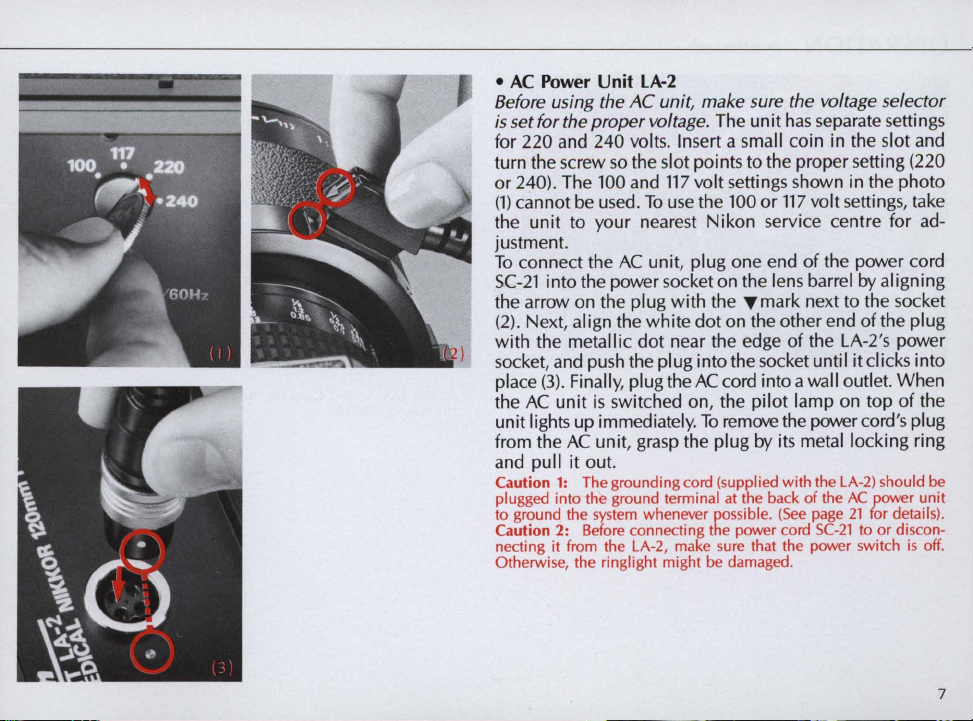
AC
Power
Unit
Before using the
is set for the proper voltage.
LA-2
AC
unit
, make sure the voltage selector
The unit
has
separate settings
for 220 and 240 volts. Insert a small coin in the slot and
turn the screw
or 240). The 100 and
(1)
cannot be
so
the slot points to the proper setting (220
117
used. To
volt settings shown in the photo
use
the 100 or
117
volt settings, take
the unit to your nearest Nikon service centre for adjustment.
To
connect the
SC-21
into the power socket on the lens barrel
the arrow on the pi
(2)
. Next, align the
with
the metallic
AC
unit, plug one end
ug
with
white
dot
the T mark next to the socket
dot
on the other end
near the edge
of
the power cord
by
aligning
of
the plug
of
the LA-2's power
socket, and push the plug into the socket until it clicks into
(3)
place
the
. Finally, plug the
AC
unit
is switched on, the
unit lights up immediately.
from the
and pull
Caution
plugged into the ground terminal
to ground the
Caution 2: Before connecting the power cord
necting
Otherwise, the ringlight might
AC
unit, grasp the plug by its metal locking ring
it
out.
1:
The grounding cord (supplied with the LA-
system
it
from the LA-2, make sure that the power switch
AC
cord into a wall outlet. When
pilot
To
remove the power cord's plug
at
whenever possible.
the back
be damaged.
lamp on top
of
the
page
SC-21
AC
21
(See
of
2)
should
power unit
for details).
to
or
discon-
is
the
be
off.
7
Page 8
-OPERATION-continued-----------------------
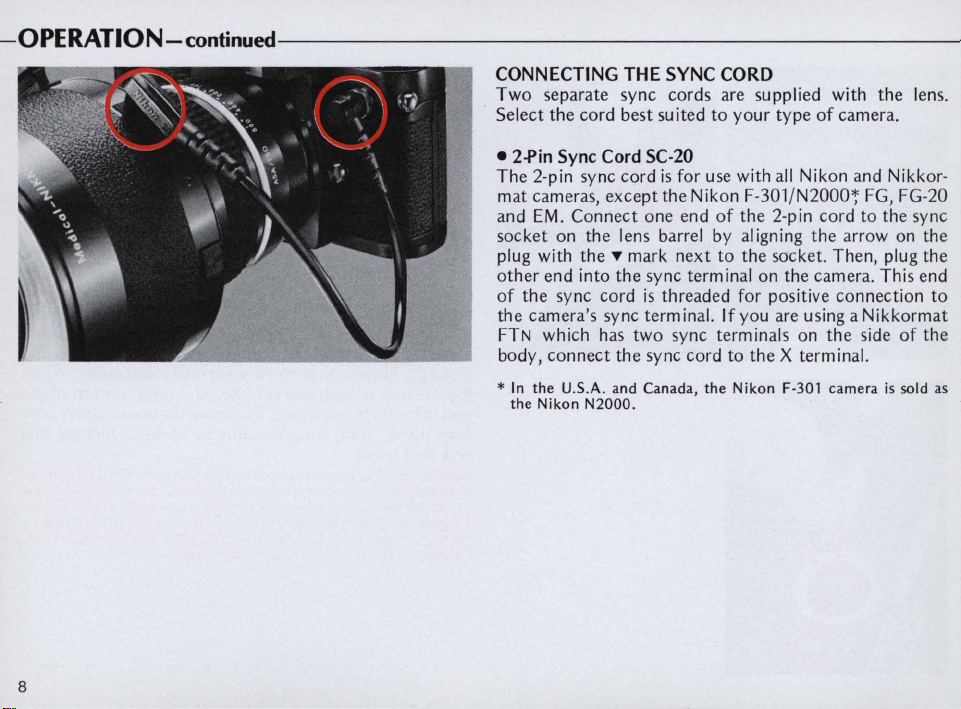
CONNECTING
Two
separate
Select
the
cord
THE SYNC
sync
cords
best
suited
CORD
are supplied with
to
your
type
of
the
camera
lens.
.
• 2-Pin
The
and
socket
plug with
other
of
the
* In the
8
2-pin sync
mat
cameras,
EM.
the
camera
FTN
body,
the
Sync
Connect
on
the
the ~ mark
end
into
sync cord
's sync
which has
connect
U.S.A.
Nikon
N2000.
Cord
SC-20
cord
is
for use with
except
the
Nikon
one
end
lens barrel
next
the
sync
term
is
threaded
term
inal.
two
sync terminals
the
sync
cord
and Canada, the
all
Nikon
and
F-301/N2000
of
the
2-pin
by
aligning the arrow on the
to
the
socket.
inal
on
the
for
positive
If
you
are using a
~
FG, FG-20
cord
to
Then
camera
connection
Nikkormat
, plug
. This end
on the side
to
the
X terminal.
Nikon
F-301 camera
Nikkor-
the
sync
of the
is
sold
the
to
as
Page 9
• 3-Pin Sync Cord SC-22
The 3-pin sync cord can
be
used with
all
Nikon and
Nikkormat cameras having standard ISO-type hot shoe.
When
the
SC-22
is
FE2,
FE,
FM2,
F-301/N2000, FG, FG-20, or
camera's ready-light
used with the Nikon F3-series*,
in
the viewfinder operates,
EM,
so
FA,
the
you
can take pictures without removing your eye from the
viewfinder.
FE2, FE, F-301/N2000,
In
addition, with the Nikon F3-series,
FG,
FG-20, or
EM
FA,
camera set
for automatic operation or at certain manual shutter
speeds, the proper sync speed
in
g on the power supply
f/4
IF
lens
. (For details about automatic switchover to
flash sync speed, refer to your camera's instruction
is
automatically set
for
the
Medical-Nikkor 120mm
by
turn-
manual.)
To
use
the 3-pin sync cord, first plug one end into the
sync socket on the lens barrel
the plug with the
~
mark next to the socket. Then,
the other end into the camera's hot
by
aligning the arrow on
~
hoe
until it stops,
slip
and tighten the attachment screw.
*
Use
of
the Flash
Unit
Coupler AS-4
or AS-7
is
required.
9
Page 10
-OPERATION-continued-----------------------
SETTING THE ASAjlSO FILM
The fl
setting of the ASA/ I
with the ring
ISO
locking screw
until the number corresponding to the ASAjlSO of your
film
film
numbers on the film-speed scale represent intermediate
settings such
have
locking screw to hold the ring
Note
it may be necessary
1
··
1
.-
1
··
1
800 400 200 100 50
··
1
··
1
2~
the
ash
output
ring for the
is
opposite the index mark.
of
the ringlight varies according to the
SO
li
ght flash, you must first adjust the
film
on
the ASAjlSO ring and turn the ring
ring. To get correct exposure
in
use.
To do this, loosen the
It
is
possible to set any
AS
speed from ASA/ISO 25 to 800. Dots between the
SPEED
as
32, 40, etc.
(see
illustration). Once you
lined up the ASA/ISO number, retighten the
in
place.
: When
shooting
ASAjlSO
predominantly light
to
make
ring
to
a higher
exposure
or
lower
or
dark-toned
compensation
setting.
subjects,
by resetting
A/
10
Page 11
SETTING THE SHUTTER
The
shutter
speed setting necessary for proper flash
SPEED
DIAL
synchronization depends on the type
the
film speed
set
on
the
lens ASA/ISO ring and
of
sync cord used,
the
Nikon
or
to
Nikkormat
the table below for the
setting .
camera
you are using. Please refer
appropriate
shutter
speed
• With 2-pin
ASA/ISO
film speed
~
800-100
80--25
• With
ASA/ISO
film speed
~
800-100
80-25
* With
the
power
3-pin
the
Sync
Sync
camera
supply
Cord
F3·Series
(via AS·4
AS-7)
1/80
sec. (X)
or
slower
1/60
sec.
or
slower
Cord
F3·series
(via AS·4
or
AS·7)
All
settings*
1/60
or
slower
set
for
for
the
SC-20
FA, FE2,
FM2 (with
or
1/250
sync
1/250
or
1/125
or
SC-22
FA, FE2 FE
All
settings*
sec.
automatic
Medical-Nikkor
1/125
or
operation
sec.
speed)
sec. 1/125 sec.
slower
sec.
slower
sec .
slower
120mm
or
1/60
or
AUTO,
1/125
or
1/60
or
or
at
certain manual
f/41F
FE
slower
sec.
slower
sec.
slower*
sec.
slower
lens
FM2 (with
/2
00
sec.
1
sync
speed)
1
/200
sec.
(X200)
or
slower
1/ 125 sec.
or
slower
FM2 (with FM2 (with
1/250
sec.
sync
speed)
1/250
sec.
or
slower
1/125
sec.
or
slower
shutter
is
turned
on.
speeds,
1/200
sync
1/200
or
1/125
or
the
sec.
speed)
sec.
(X200)
slower
sec.
slower
proper
F-301 /
All
1/60
or
sync speed
N2000
,
FG
settings* All settings*
sec.
slower
is
automatically
EM
B
set when
11
Page 12
- OPERATION-continued
-----------
-
-----------
READY -LIGHT INDICATION
After the power supply
ready-light, built into the top
as
soon
as
taken, the ready-light goes out,
as
soon
again.
reproduction ratio visible inside the viewfinder serves
as
a ready-light. Thus, you can take pictures with any
Nikon or Nikkormat camera wit h
from the viewfinder.
If the Medical-Nikkor
SC-22 sync cord and the Nikon F3-series (via
AS-7),
EM
or
Cord"), the ready-light inside the camera's viewfinder
operates, too.
the ringlight
as
the ringlight
In
addition, with the
FA,
FE2, FE,
(see the previous section, "Connecting the Sync
is
switched on, a red
of
the lens barrel, lights up
is
ready to fire.
but
is
recycled and ready to fire
OAT
is
used
in
FM2,
F-301jN2000, FG, FG-20,
When
then comes back on
A button on, the
out
removing your eye
conjunction with the
LED
the shot
AS-4
or
is
12
Page 13
FOCUSING/DETERMINING THE EXPOSURE
This lens focuses
lenses do.
important
the
subject
if
you
wish
ratio, first
(e.g.
1/4X)
appears
sharp. This will
predetermined
the
to
the
lens
provide
Because
once
set
in
the
Therefore
to
you,
, if
simply
appears sharp
to
take
set
and
pictures
the
focusing ring
then
move
reproduction
focusing ring
is
focused,
the
correct
same way as
the
reproduction
turn
the
in
the
at a certain
to
in
and
produce
ratio.
is
coupled
the
aperture
exposure
other
Nikon/Nikkor
ratio
focusing ring until
viewfinder.
reproduction
the
desired
out
until
photographs
to
the
is
simultaneously
when
ringlight.
the
ambient
If
illuminate
Note
1: If
and/or
microprism focusing aid,
cannot
be used.
fiel d instead.
Note
2: If
of
you
backing;
the
meter
distance scale conversion
sticker's
top
the
you
light
subject.
are using a
In
this case,
want
to
convert
then
attach
scale.
is
dim, use
(For
details, see page
camera
with a split-image rangefinder
they
focus
the
distance
sticker
provided.
the
sticker
the
focusing lamp
may
on
the
scale
to
the
18.)
become
surrounding
to
First peel
focusing ring
is
less
How
eve r,
setting
the
subject
at
diaphragm ,
using
the
to
dark and
matte
feet,
use
the
off
the
on
a
13
Page 14
- OPERATION-
continued
------------------------
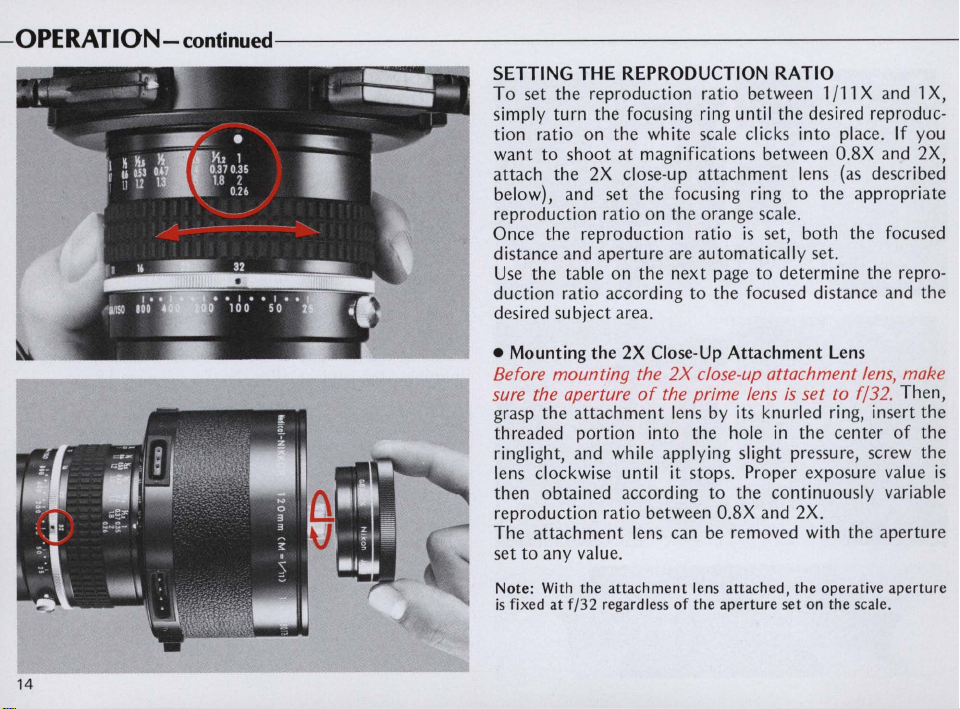
SETTING THE REPRODUCTION RATIO
To
set
the
simply
tion
want
attach
below), and
reproduction
Once
distance
Use
duction
desired
• Mounting
reproduction
turn
the
focusing ring until
ratio
on
the
to
shoot
the
the
the
subject
at
2X
close-up
set
ratio
reproduction
and
aperture
table
on
ratio according to
area .
the
2X
magnifications
the
the
Before mounting the
sure the aperture
grasp
the
attachment
threaded
ringlight, and while
lens clockwise until
then
reproduction
The
set
portion
obtained
attachment
to
any
of
according
ratio between O.8X
lens can be removed with
value.
ratio between 1/11 X and 1
white scale clicks
attachment
focusing ring
on
the orange scale.
ratio
are
automatically set.
next
page
the
Close-Up
2X
close-up attachment
the prime lens
lens by its knurled ring, insert
into
the
app
lying slight pressure, screw
it
stops
to
the
desired reproduc-
into
between
lens (as described
to
is
set,
both
to
determine
focused distance and
Attachment
is
set to
hole
in
the
. Proper
the
exposure value
continuous
and
2X.
place. If
O.8X
the
appropriate
the
Lens
lens,
f132.
center
ly variable
the
and 2X,
focused
the
repro-
make
Then,
of
aperture
X,
you
the
the
the
the
is
14
Note: With the
is
fixed
at
f/32 regardless
attachment
of
lens
the
attached,
aperture
the
operative
set
on the scale.
aperture
Page 15
• Prime
Reproduc-
Note:
+ indicates rear (farther) depth.
- indicates
Focused distance means distance between subject and film surface.
Circle of confusion for the Medical-Nikkor 120mm f/4
Lens
Only
tion ratio distance
1/11X
1/8X
1/6X
1/5X
1/4X
1/3X
1/2.5 X
1/2X
1/1.5X
1/1.2X
1X
Focused m Depth of field
1.6
(5.25)
1.2
(3.94)
0.95
(3.12) - 12.7 - 0.500
0.83
(2.72)
0.7
(2.3) - 8.15 - 0.321
0.6
(1.97)
0.53 +4.99 (+0.196)
(1.74)
0.47
(1.54)
0.4
(1.31 )
0.37
(1.21 )
0.35
(1.15)
front
(nearer) depth.
(ft)
+ 25.4 ! + 1.0001
-24.4
+17.9!+0.7051
-17.3
+
13.2!
+10.8!+0.4
-10.5
+8.45!+0.3331
+6.18 (+0.243)
-5
-4.81
+3.85 !+0.1521
-3.71
+2.74!+0.108)
-2
+2.07!+0.
- 1.99
+1.63!+0.
-1.56
mm
.97
.64
(in.)
- 0.961
-0.681
+0.5201
25
-0.413
(-0.235)
(- 0.189)
-0.146
-0.104)
081
-0.078
064
-0.061
Subject field
mm
264 x 396
(10.40 x 15.59)
192 x 288
(7.56 x 11.34)
144x216
(5.67 x 8.50)
120x180
1
(4.72 x 7.09)
96 x 144
(3.78 x 5.67)
72 x 108
(2.83 x 4.25)
60 x 90
(2.36 x 3.54)
48 x 72
(1.89 x 2.83)
36 x 54
(1.42 x 2.13)
28.8 x 43.2
1
(1.13 x 1.70)
24 x 36
1
(0.94 x 1.42)
(in.)
IF
is
1/20mm.
•
With
2X
Close-Up
Reproduc- Focused m Depth of field
tion ratio distance (ft.)
0.8X
0.85X
0.9X
0.95X
1X
1.1X
1.2X
1.3X
1.5 X
1.8X
2X
Attachment
mm
0.33
(1.08)
0.325
(1.07 )
0.32
(1.05)
0.315
(1.03)
0.31
(1.02)
0.30 + 1.28
(0.98)
0.29
(0.95)
0.285
(0.94)
0.275
(0.90)
0.27
(0.89)
0.26
(0.85) - 0.40
+
2.47!+
- 2.35 - 0.093
+ 2.21 (+0.087)
- 2.11 (- 0.083)
+ 1.95 (+0.077)
- 1.88 (- 0.074)
+ 1.78
- 1.71 (- 0.067
+ 1.55
- 1.50 - 0.059
- 1.23 (- 0.048)
+ 1.10 !+0.0431
- 1.06
+ 0.90
- 0.86 - 0.034
+0.67!+0.
- 0.65 - 0.026
0.521+
+
- 0.50 - 0.020
+0.41 (+0.0161
Lens
(in.)
0.0971
(+
0.0701
i+
0.
(+
0.050)
-0.042
!+
0.0351
0.
(-0.016
061
026
020
Subject field
(1.18 x 1.77)
28.2 x 42.4
(1.11 x 1.67)
(1.05 x 1.57)
25.3 x 37.9
(1.00 x 1.49)
1
(0.94 x 1.42)
21.8 x 32.7
(0.86 x 1.29)
(0.79 x 1.18)
18.5 x 27.7
(0.73 x 1.09)
1
(0.63 x 0.94)
13.3 x 20
1
(0.52 x 0.79)
(0.47 x 0.71)
mm
(in.)
30 x
45
26.7 x 40
24 x 36
20
x 30
16 x 24
12 x 18
15
Page 16
-OPERATION-continued-----------------------
IMPRINTING THE REPRODUCTION RATIO
The
determines whether or not data
viewfinder and imprinted on the film.
When
the down or
ratio set on the
hand corner of the viewfinder
ringlight flash
when the flash
Then, at the instant
the same place on the
attachment lens
O.8X
Press
the up or OFF position.
data
imprinted on the film.
If you shoot with the focusing ring set between clickstops, the reproduction ratio
inside the finder.
button
will
Note:
or
corner
not
OAT
A button on the side
the
OAT
A button
ON
position. I n this case, the reproduction
lens
is
ready to fire. Because the data glows
is
recycled, you can
in
and 2X
is
will
be
the
OAT
A button a second time, and it returns to
not visible inside the viewfinder nor
is
pushed once, it remains
appears
of
in
green
exposure, the data
film
frame.
place, the reproduction ratio between
displayed and imprinted
With
the button
will
In
is
in
not
be
When using
impossible
of
the
show
up if
the OF F position,
imprinted on the film.
to
read if
frame
the
this case, make sure the
so
color
film,
the
the
is
green;
background
imprinted
background
with
black·and-white
is
light in
of
the lens barrel
will
be
displayed
at
the lower right-
image
as
use
it
as
With
the 2X close-up
in
not
be
shown correctly
is
in
soon
as
a ready-light.
imprinted
in
green.
this position,
will
it
OAT
that the incorrect data
data
may be
in
tone
the
.
difficult
lower right-hand
film, it
may
the
in
the
at
be
A
16
Page 17
STOP-DOWN
EXPOSURE
MEASUREMENT
Although the lens has a built-in ringlight for shooting,
you
can
take
stop-down
focused
or
method
set
Medical-Nikkor
aperture, which can be read
pictures
to
get
the
correct
camera's depth-of-field preview
lens down
camera on
to
the taking aperture prior
Automatic
speed manually.
measurement, refer
without
it.
In
this case, use
for exposure measurement. When
to
a particular reproduction ratio,
is
also automatically
off
exposure, you
set
to
a particular
the focusing ring.
must
depress the
button
to
to
or
before adjusting the
(For
details
about
stop-down exposure
to
your
camera's instruction manual.)
stop
using
shutter
the
the
Then,
the
the
Note : If the automatically
below
approx.
1/125
sec., the use
is
era/lens assembly
will
come
out
recommended . Otherwise, the photograph
blurred because
or
manually selected
of
a tripod to
of
camera shake.
shutter
support
speed
the
cam-
is
17
Page 18
FOCUSING LAMP
If the ambient light
is
dim, push the
LAMP
button to
illuminate the subject for focusing. After removi ng
your finger from the button, the lamp stays on for 16
off
seconds, then turns
If
necessary, you can press the button once again. After
automatically to conserve power.
taking a picture using the ringlight, the focusing lamp
immediately goes out. To turn the focusing
before the 16-sec. automatic timing period
lamp
is
up, simply
off
switch off the power supply.
If
the focusing lamp fails to light
button
is
pushed, it needs replacement. First, remove the
up
after the
LAMP
power cord from the lens; then remove the lamp cover
by
unscrewing it counterclockwise. Then,
whil
e applying
pressure, turn the old bulb counterclockwise and replace
it with a
the
new
one.
Align
new
bulb with the notched portion
the protrusions
at
the
of
base
of
the lamp
housing and, while app lying pressure, turn the bulb
clockwise until it
is
fully seated into position. Finally,
replace the lamp cover. For your convenience, a spare
is
provided with the lens.
bulb
Page 19
RECOMMENDED
FOCUSING
SCREENS-------------
Various interchangeable focusing screens are
F3-
and F2-series cameras to
ture-taking situation. Those which are recommended for
use with your lens are listed below. For screens used with
N ikon cameras other than
ight vignetting or moire phenomenon affects the screen
But the
Blank means not usable.
image
on
film
shows
no
trace
of
this.
(e.g.,
Nikon
FA,
FE2,
FM2
and FE), refer to the column
for F3-series cameras. For the
screens, refer to the columns on the K, Ba
respectively. For detail
screen's instruction sheet.
1. Due to the electrical characteristics of the MedicalNikkor's ringlight flash and focusing lamp, this lens
in
an
should not be used
an oxygen-enriched atmosphere) or
to highly combustible materials (i.e.,
bottles). .
2.
To eliminate any possibility
following precautions should
the Medical-Nikkor lens with the
unit.
.
Do
not
attempt to repair the
yourself. Tampering with their internal circuits with
the cover removed can result
Leave
shock.
or send the unit directly to the manufacturer .
•
Be
sure to turn the power switch to the
position before opening the battery compartment to
replace the batteries
the terminals with the switch
can cause
repairs to
an
electric shock.
explosive environment (i.e.,
an
in
the
in
close proximity
high
-pressure
of
electric shock, the
be
observed when using
AC
or
DC
AC
or
DC
power units
in
a dangerous electric
authorized Nikon dealer
DC
power unit. Touching
in
the "ON" position
gas
power
"OFF"
LENS
CARE
• Although you should always keep the lens surfaces
clean, rough cleaning must
a soft, clean cotton cloth moistened with a
to remove grease or fingerprints from the
surfaces.
If
you
sometimes appears on the surface
coated
cotton cloth moistened with alcohol.
Keep
•
in
use
• Attach both the front and rear caps when the
lens
is
---------
use
ether
in
lens.
If
this happens, wipe it
the
lens
cap
in
.
stored separately.
place whenever the
be
avoided.
cleaning the lens, a smudge
Wipe
of
again
lens
a multi-
with a
lc
is
with
ohol
lens
not
20
Page 21
ABOUT
• Before connecting
cord, make sure the LA-2's
nected
• With an
the
To
•
(a plastic tap
cord arou nd
• Never
GROUNDING------
to
a wall
outlet
outlet
having a ground terminal,
ground cord securely
connect
the
connect
ground
cannot
the
tap.
the ground cord
or
disconnecting
AC
.
to
the
cord
to
be used), securely wind the
the
is
not
connect
ground
plug
ground terminal.
a metalic water tap
to
a gas pipe.
con-
ACCESSORIES--------
Compartment
This optional black leatherette
accommodates a Medical-Nikkor
mounted
not), a 2X close-up
unit,
the
You can use
provided
3m
Power
Enables
used up
Case
on a camera
necessary
either
to
carry
the
Cord
the
Medical-Nikkor
to
three meters
for
Medical-Nikkor
compartment
body (motor-drive equipped
attachment
cords
the hand strap
complete
off
lens, an
and
set
120mm
the
power supply.
120mm
120mm
AC
other
small accessories_
or
the shoulder strap
around.
f/4
IF lens
f/4
case easily
f/4
IF lens
or
DC
power
IF
to
or
be
21
Page 22
SPECIFICATIONS---------------------
Focallength
Maximum aperture
Lens construction
Picture angle
Distance scale
Aperture scale
Diaphragm
Reproduction ratio
Data imprinting
Flash illumination
22
120mm (at 1/11
X)
f/4
lens:
Prime
6 groups;
2 elements
9 elements
2X
attachment
in
1 group
in
lens
:
20°30'
Graduated
in
meters from 1.6m to
0.35m for 1/11 X to 1 X (white
numerals) and 0.33m to 0.2
for 0.8X to
when using
2X
(orange numerals)
2X
close-up attach-
6m
ment lens; sticker-type conversion scale for feet also provided
f/4- f/32
Fully automatic; guide number
system automatically sets
appropriate aperture
distance
is
set on focusing ring
as
subject
Continuously variable from 1/11 X
to 1 X (prime
to


 Loading...