

Page 1
Micro-Niklor
105mm
f/4
Nikon INSTRUCTION MANUAL ^l
Page 2

NOMENCLATURE
Reproduction ratio scale (lens only)
Reproduction ratio scale (lens + PN ring) ^M^^M(^^te__,
Micro-Nikkor Lens
Apertu re ring
Focusing ring
Meter coupling shoe
Aperture scale index
Distance scale
Depth-of-field indicators
Distance scale index
Aperture scale
Aperture-direct-readout scale
Meter coupling ridge
2
J*
If
SAW
|f
I
5L.L-.
WtjM
|
1-
•1-
1II
_[t MM
\
| |
Page 3

CONTENTS
Foreword 4
Mounting the lens 5
Focusing 6
Recommended focusing screens 7
Reproduction ratio 7
Focusing at predetermined ratio 8
Depth of field 9
Notes on focusing 9
Determining exposure 10
With built-in TTL metering 10
Without TTL metering 11
Close-up tables 12
Depth-of-field tables 13
Features/specifications 15
3
Page 4
FOREWORD
The Micro-Nikkor 105mm f/4 is a special telephoto lens designed for
close-up photography at high reproduction ratios. It features the same
optical construction as the much-acclaimed Bellows-Nikkor 105mm
f/4,
but with a special focusing helicoid that enables operation from
infinity (°°) to a reproduction ratio of 1 : 2 (half life-size) without the
need for any adapters. The lens offers "automatic maximum aperture
indexing"
pling ridge provided. The ridge and the auto diaphragm function to-
gether to permit full aperture exposure measurement; the lens is also
fitted with a meter coupling shoe to permit the same operation with
Nikon cameras which lack the Al facility. In terms of optical performance,
feature, enabling virtually distortion-free images at all reproduction
ratios.
hances performance by increasing image contrast, while reducing flare
and ghost, for outstanding color reproduction.
When the Micro-Nikkor 1 05mm is used with the special Auto Extension
Ring PN-11 or PN-1, focusing is further extended from 1 : 2 to 1 : 1 for
full life-size reproduction.
To get the best results from your Micro-Nikkor 105mm f/4, read this
instruction manual carefully. Keep the manual handy for reference
until you have thoroughly familiarized yourself with the lens and its
operation.
mistakes.
(Al) with suitably equipped cameras, via the meter
the Micro-Nikkor's excellent flatness of field is a stand-out
The application of Nikon Integrated Coating (NIC) further en-
A few minutes of preparation will help you avoid costly
cou-
Page 5
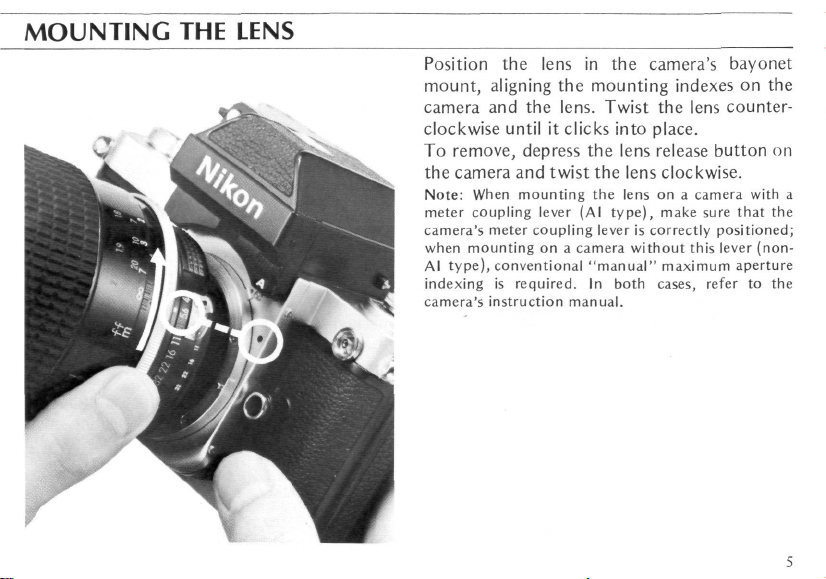
MOUNTING THE LENS
Position the lens in the camera's bayonet
mount, aligning the mounting indexes on the
camera and the lens. Twist the lens counterclockwise until it clicks into place.
To remove, depress the lens release button on
the camera and twist the lens clockwise.
Note:
When mounting the lens on a camera with a
meter coupling lever (Al type), make sure that the
camera's meter coupling lever is correctly positioned;
when mounting on a camera without this lever (non-
Al type), conventional "manual" maximum aperture
indexing is required. In both cases, refer to the
camera's instruction manual.
Page 6

FOCUSING
The fully automatic diaphragm of the MicroNikkor enables focusing with maximum image
brightness throughout the entire focusing range
of the lens. As the image is constantly viewed
at the maximum aperture setting
(i.e.,
f/4),
the depth of field is minimized so that the
image snaps in and out of focus rapidly and
distinctly.
To focus, turn the focusing ring until the image
on the focusing screen appears sharp and crisp.
Via the special focusing helicoid, the Micro-
Nikkor operates continuously from infinity
(°°) to 0.47m (1.55 ft) for a reproduction
ratio of 1:2.
The distance scale on the focusing ring is
marked in both meters (white) and feet
low).
These figures indicate the distance from
(yel-
the subject to the camera's film plane.
Note:
The exact position of the film plane is indicated on all cameras for convenience when measuring.
On Nikon F/F2 cameras, the top edge of the serial
number is the exact position of the plane. On
other Nikon and Nikkormat cameras, the plane is
indicated by the symbol (-Q-)
Page 7

Recommended Focusing Screens
Nineteen different interchangeable focusing
screens are available for F and F2 Nikon
cameras to suit any type of lens or picturetaking situation. Those which are recommended for use with this Micro-Nikkor 105mmf/4
lens are listed below.
c
A/I
(„,„ SS«"
©= Excellent focusing
®= Acceptable focusing
0= Acceptable focusing
• = Not usable
= With these lens-screen combinations the view-
•
F
»
l
•
•
*••
m
The image is brilliant from edge to edge, but the
center area (range-finder, microprism or crosshair) is dim. Focus on the surrounding matte
area.
Slight vignetting (or moire phenomenon, in the
case of the microprism) affects the screen image.
The image on the
of this.
finder can be used only for focusing; exposure
measurement is not possible.
O | E
|
CI [
o
@
film,
G2
G3 j 04 HI H2
o
m
•
however, shows no trace
°]
•"'"•;•
s o «
Wmr
M
K/P
»
•
*
0
®
Reproduction Ratio
The reproduction ratio is the numerical expression of the relationship between the image size
(to be recorded on the film) and the actual size
of the subject. For example, if the image on
the focusing screen is one-fifth the actual size
of the subject, the reproduction ratio is said to
be 1:5, and is indicated on the reproduction
ratio scale of the Micro-Nikkor 105mm f/4 by
the number "5'!
7
Page 8

FOCUSING - continued
Focusing at Predetermined Ratio
Above the distance scale on the focusing ring
are two reproduction ratio scales inscribed in
orange. The inner scale, with figures from 1:10
to 1:2, represents the reproduction ratios obtained when the lens is used alone. The outer
scale figures
(i.e.,
1:2 to 1:1) represent the
ratios possible when the lens and, PN-1 or
PN-11
ring,
are used together. Using either of
these scales, you can photograph at a predetermined ratio without calculating the
distances required. To photograph at a reproduction ratio of 1 : 5, for example, just turn
the focusing ring until the number "5" is
aligned with the distance scale index; then
aim at the subject and adjust your position
(close to, or farther away from, the subject)
until the image appears sharp and crisp on
the focusing screen.
8
Page 9

Depth of Field
Depth of field refers to the zone of acceptable
focus extending in front of and behind the
plane of sharpest focus. As this zone is exceptionally shallow at high reproduction ratios,
previewing is desirable before shooting. To
preview, press the depth-of-field button on
the camera and the lens will close to the
preselected aperture to allow you to see how
much background and foreground is in focus.
Depth of field can also be observed by reading
the color-coded indicators inscribed on the
lens barrel. The pairs of colored lines on either
side of the white distance scale index line
correspond to f/numbers of the same color on
the aperture scale. At close distances, so little
is in focus that the depth-of-field tables on
pages 13 ~ 14 are more useful.
NOTES ON FOCUSING
Camera Shake: Close-up photography poses
several problems not encountered in general
photography. One of these is sensitivity to
vibration—the magnification of the image is so
high that even slight displacement during
shooting results in a blurred image. Therefore,
the use of a tripod is recommended at all
times,
with shutter actuated via cable release.
In this respect, the convenient, 360° rotatable
tripod mounting collar on the PN ring will
prove useful.
Close Working Distances: At high reproduction
ratios encountered during close-up shooting,
depth of field decreases drastically. This
dition can be partially compensated for by
stopping down the lens. But at very close
working distances, an extremely shallow depth
of field is inevitable. Careful placement of the
camera will be necessary to ensure that the
important surfaces of the subject are in the
same zone of sharpness.
con-
9
Page 10

DETERMINING EXPOSURE
Camera
Al
Al
Al
non-AI
*non-AI
non-AI
*With this combination, conventional "manual" maximum aperture
indexing is required.
Close-up attachment
PN-11
PN-1
Bellows, E2 and K rings
and close-up lenses
PN-11
PN-1
Bellows, E2 and K rings
and close-up lenses
10
Exposure measurement
Full aperture
Stop-down
Stop-down
Stop-down
Full aperture
Stop-down
With Built-in TTL Metering
The Micro-Nikkor has a fully automatic diaphragm with settings from f/4 to f/32. The
Micro-Nikkor couples fully to the thru-thelens meter of any F/F2 Nikon Photomic or
other Nikon/Nikkormat cameras for full aperture exposure measurement over the entire
range of aperture settings. Note that when
this lens is used with non-AI cameras,
conventional "manual" maximum aperture indexing is required.
When close-up attachments such as a PN ring
or bellows are used, the exposure measure-
ment method is shown in the table on the left.
When the lens is mounted in the reverse
tion,
the stop-down method should be used.
posi-
See the instruction manual supplied with your
camera or Photomic viewfinder for details.
Caution:
When the stop-down method is used at
small apertures, a finder eyecup should be attached
to the eyepiece to ensure complete exclusion of
stray light.
Page 11

Without TTL Metering
At close ranges (reproduction ratios greater
than
1:10),
the amount of light reaching the
film decreases as the lens-to-film distance increases. When non-TTL measurement is used
for this range, the result is underexposed
photographs unless compensation has been
made for this decrease. (When the MicroNikkor 105mm f/4 lens is used with the Photomic or Nikon/Nikkormat TTL meter it is
not necessary to make compensations, since
the meter is designed to give an accurate
reading of the amount of light reaching the
film.)
The table at right gives the exposure factors
(compensation values) with exposure increase
in f/stops for non-TTL exposure measurement
at reproduction ratios greater than 1:10.
Reproduction
ratio
I I
1/10
1/8
1/6
1/4
1/2
1/1.8
1/1.6
1/1.4
1/1.2
1/1
Exposure
factor
12
1.2
13
1.5
2.1
2.3
21
2.7
3.1
3.6
Exposure
increase
in f/stops
0.2
0.3
0.4
0.6
1.1
1.2
1.3
1-1
1.6
1.9
Insert this table into the memo holder at the back of
your camera for easy reference.
1 1
Page 12

CLOSE-UP TABLES
Photographic Ranges with Other Close-up Attachments
Close-up attachment
E2 Ring
K Ring Set
PN Ring
Bellows PB-4, PB-5
Close-Up Lens No. 0
Close-Up Lens No. 1
Close-Up Lens No. 2
Repro-Copy Outfit
PF-2,
PI--.!
Close-up attachment
;H2Rin
S
K Ring Set
PN Ring
Bellows PB-4, PB-5
Close-Up Lens No. 0
Close-Up Lens No. 1
Close-Up Lens No. 2
Repro-Copy Outfit
PF-2,
PF-3
* The first values are for the K1 ring used alone and the second ones for all five
rings used together.
** The figures shown here represent the ranges obtained with the subject on the
1
2 baseplate, using the lens without any close-up attachment.
Reproduction
1/7.5-1/1.6
1/18.1-1/1.1
1/5.7-1/3.7
1/2.4-1.8
1/13.4-1/1.7
1/6.4-1/1.4
1/3.2-1/1.1
1/6-1/2
Reproduction
1/7.5-1/1.6
1/18.1-1/1.1
1/5.7-1/3.7
1/2.4-1.8
1/13.4-1/1.7
1/6.4-1/1.4
1/3.2-1/1.1
1/6-1/2
Lens in normal position
Subject field
18.0x27.0-
3.8x5.7
43.4 x
65.2-
2.5 x 3-8
I 3.7 x
20.6-
8.8 x 13.3
5.9 x 8.8-
1.4x2.0
32.3x48.4-
4.0 x 6-0
15.4x 23.1
3.4 x 5.2
7.7 x
11.6-
2.7 x 4.0
14.4x21.6-
4.8 x 7.2
Lens in normal position
Subjected
?i:s-
\iVS-1-
u:a-
UttZjs
\i\w-
s:s-
wt-
S5if-
Focused
distance
101-44.1
212-41.9
260-202
50.8-45.3
156-42.9
82.7-39.7
49.1-35.4
85.3-41.9
Focused
distance
39.8-17.4
83.3-16.5
102-79.4
20.0-17.8
61.5-16.9
32.6-15.6
19.3-14.0
33.5 16.5
Reproduction
l/3.8-1.fi
Reproduction
1/3.8-1.6
Lens in reverse position
Subject field
9.2 x
13.8-
1.5x2.2
Lens in reverse position
Subject field
3.6
• 5.1
0.58 x 0.88
Focused
distance
63.9-44.3
Focused
25.1-17.4
Page 13

DEPTH-OF-FIELD TABLES
Focused
distance
0.47
0.50
0.55
0.6
0.7
0.8
1
1.2
1.5
2
3
7
.
4
0.469-0.471
0.499-0.501
0.549-0.552
0.598-0.602
0.697-0.703
0.795-0.805
0.992-1.01
1.19-1.21
1.48-1.52
1.96-2.04
2.91-3.10
6.48-7.62
82.9-°°
5
0.469-0.471
0.499-0.501
0.548-0.552
0.597-0.603
0.696-0.704
0.794-0.806
0.990-1.01
1.18-1.22
1.47-1.53
1.95-2.05
2.88-3.13
6.36-7.79
66.4-°°
8
0.468-0.472
0.498-0.502
0.547-0.553
0.596-0.604
0.694-0.707
0.791-0.810
0.984-1.02
1.17-1.23
1.46-1.54
1.92-2.09
2.82-3.21
6:03-8.36
41.6—•
Depth
of
field
11
0.468-0.472
0.497-0.503
0.546-0.554
0.595-0.606
0.691-0.709
0.787-0.813
0.978-1.02
1.17-1.24
1.44-1.56
1.89-2.12
2.76-3.30
5.73-9.02
30.3-°°
16
0.467-0.473
0.496-0.504
0.544-0.556
0.592-0.608
0.687-0.713
0.782-0.819
0.968-1.03
1.15-1.25
1.42-1.59
1.85-2.18
2.66-3.45
5.30-10.4
20.9-°°
22
0.466-0.474
0.494-0.506
0.542-0.559
0.589-0.612
0.683-0.719
0.775-0.827
0.957-1.05
1.13-1.28
1.39-1.63
1.80-2.26
2.55-3.66
4.87-12.7
15.2-°°
32
0.464-0.477
0.492-0.509
0.538-0.563
0.584-0.617
0.675-0.727
0.765-0.840
0.939-1.07
1.11-1.31
1.35-1.70
1.72-2.40
2.39-4.08
4.28-20.6
10.5-°°
(m)
Reproduction
ratio
1/1.98
1/2.35
1/2.90
1/3.43
1/4.45
1/5.45
1/7.40
1/9.33
1/12.2
1/17.0
1/26.5
1/64.7
l/oo
13
Page 14

DEPTH-OF-FIELD TABLES - continued
Depth
Focused
distance
1.55
1.75
2
2.5
3
4
5
7
10
20
-
14
4
1,6-9/16,'-l'6-5/a"
^'B-•\5tf6•'-^•9••
ril-7/8,'-2'
1/16"
2-5-13/16"-2'6-I/8"
2'11 11/16"—31/4"
3'1 !-7/16"-4'l/2"
4'11-l/8"-5'7/8"
6'10-WT6"-?'1-7/»"
9'8-1/8"-l0'4"
18'8"-21'6"
272'--"
5.6
T6-l/2"-1
'6-5/8"
l'8-7/8"-l'9-l/16"
1'1l-7/8"-2'l/I6"
2'5-3/4"-2'6-3/16"
2'l1-5/8"-3'5/16"
311-1/4"-4'1l/l6"
4'i0-3/4"-5'l-1/4"
6'9-7/16"-7'2-5/8"
9'6-ll/16"-10'6"
18*3"
22'2"
1W--
s
l'6-l/2"-l'6-5/8"
l'8-7/8"~l'9-l/16"
l'il-13/16"-2'l/8"
2,5-5/8"-2'6-5/16"
2'1l-7/l6"-3'!/2"
3"10-15/16"
4*1-1/16"
4lO-1/4"-5'l-13/l6"
6'8-7/16"-7'3-7/8"
9'4-9/16"-10'9"
17'7"-23'3"
136'--
r6-l/2"-T6-11/16"
l'8-l
3/16"- 1 '9-1/8"
1'11-3/4"
2'5-9/16"-2'6-7/16"
21
l-1/4'-31l
3'10-9/16"-4'l-7/16"
4'9-l1/l6"-5'2-l/2"
6"7-3/16"-7'5-7/l
9-2"-ir0"
!6'10"-24'10"
»'4»--
of
11
-2' 3/16"
1/1 6"
6"
field
16
T6-7/16" 1 '6-11/16"
l'8-3/4"-1'9-3/16"
l'H-5/8"-
2'5/16"
2'5-5/16"-2'6-5/8"
2'10-15/16"—3T-1/16'
3,10"-4'2-3/16"
4'8-11/l6"-5'3-3/4"
6'5-l/4"-7'8-3/16"
8'10-1/16"-1!'7"
IS'8"-27'11"
68'6"--
22
!'6-3/8"-l'6-3/4"
1'8-1I/16" - 1*9-1/4"
ri1-l/2"-2'7/l6"
2'5-1/8"-2,6-7/8"
2'10-5/8" -3'1-l/2"
3-9-1/4"
4*3-1/16"
4'7-9/16"-5'5-5/16"
6'3" 7'1
1-3/4"
8*5'11/16"-12'3"
14'6"
-32'9"
50'0 '• —
32
1'6-5/l6"-l'6-I3/16"
1'8-9/16"-r9-7/16"
ril-5/I6"-2'!1/16"
2'4-3/4"-2,7-3/8"
2,l0"-3'2-1/4"
3'8-3/16"-4'4-H/l6"
4'5-13/16"-5'8-l/8"
5'11-S/8"-8'6-3/8"
711-1/4'—13
8"
12'11"
46'7"
347"—
(fii
Reproduction
ratio
1/2.01
1/2.72
1/3.53
1/5.07
1/6.57
1/9.52
1/12.4
1/18.3
1/27.0
1/56.1
1/-
Page 15

FEATURES/SPECIFICATIONS
Focal length: 105mm
Maximum aperture: f/4
Lens construction: 5 elements in 3 groups
Picture angle: 23°20'
Distance scale: Graduated in meters and feet
from 0.47m (1.55 ft) to infinity (°°)
Aperture scale: f/4 ~ f/32
Diaphragm: Fully automatic
Reproduction ratios: Scales provided; 1:10
to 1 : 2 for lens only; 1 : 2 to 1 : 1 for lens plus
PN-1 orPN-11 ring
Exposure measurement: Via full-aperture
method;
Al cameras and meter coupling shoe for nonAl cameras
Lens hood: Slip-out type built into front of
lens
Tripod mounting: Via socket in tripod mount-
ing collar of PN
mit vertical and horizontal format picturetaking;
rotation;
meter coupling ridge provided for
ring;
collar rotatable to per-
click-stops provided at each 90° of
collar locking screw provided
Attachment size: 52mm (P = 0.75)
Mount: Nikon F mount
Dimensions: 74.5mm0 x 104mm long (over-
all);
96mm extention from flange
Weight: 500g
Accessories included: 52mm snap-on front
lens cap; rear lens cap LF-1
Optional accessories: 52mm screw-in filters;
flexible lens pouch No. 55; hard lens case
CL-33A, plastic lens case CP-2; flexible lens
pouch No. 56 (with PN ring attached); hard
lens case CL-35A (with PN ring attached)
15
Page 16

NIPPON KOGAKU K.K
No reproduction in any form of this booklet,
in whole or in part (except for brief quotation in
critical articles or reviews), may be made without
written authorization from the publishers.
Printed in Japan (77.10.C) &-3
 Loading...