Inbuilt focus mechanism: image displacement detecting system type “Through the lens”
Along with AF-Nikkor 80mm f/2.8 and AF-Nikkor 200mm f/3.5 IF-ED it supports usage of other Nikkor lenses with focal ratio greater than f 3.5:1
Shutter speed range: 1/2000 sec, 1/64 sec, 1/8 sec, 1/80 sec, and 8 sec or B (Bulb), T (Time) settings
Metering: has Center weighted metering for the system
For ASA/ISO, range of film speeds catered to is 12-6400.
Exposure compensation: set ranges of either range ±2 stops in 1/3 of a stop.
Viewfinder: For use can be interchanged with view finders that only covers 92 percent of the image diagonal.
35mm film cartridge along with was the only available film type
Film advance lever was manual wind
Contains a type AAA or it can be powered by two silver oxide of 1.55 V prisms.
Jam and E-magno are very specific in their dimensions as they can’t be found anywhere in the manuals
According to the manual the weight of the Nikon F2 is 1.5 kg
Contains a type AAA or it can be powered by two silver oxide of 1.55 V prisms.
Self-timer: Yes, with a delay of 10 seconds.
Accessories: Motor Drive MD-4, dedicated flash units like SB-12, SB-16A, SB-17
Emergency shutter release was always made more safe with the electric release lever and the backup mechanical lever.
Frequently Asked Questions
Q: What kind of lenses can be used with the Nikon F3AF?
A: AF-Nikkor 200mm f/3.5 IF-ED, f/2.8 along with the Nikkor lenses allow for a maximum F stop of f 3.5.
Q: What battery types does the camera require?
A: The camera can use two 1.55V silver-oxide batteries or two type AAA batteries for the viewfinder.
Q: How does the autofocus function?
A: The autofocus function employs a method which determines the position of the lens by analyzing the TTL image which is displaced while focusing the lens mechanically once the shutter release button is slightly pressed.
Q: What is meant by the exposure compensation?
A: Through exposure compensation, a provision is made to modify the shutter speed that was set by the system automatically within a limit of ±2 stops in increments of 1/3 stop due to strange lighting conditions.
Q: Is it possible to adjust the shutter speed manually?
A: Indeed, there is full range of shutter speed control in the Nikon F3AF from 1/2000 sec through 8 sec plus B and T and X.
Q: How does it compare to other cameras using film Nikon F3AF?
A: Nikon F3AF utilizes the same regular 35mm film cassettes.
User Manual
Page 1
Nikon
INSTRUCTION
MANUAL
Page 2
@ Viewfinder eyepiece
®Fi
lm
@ ASAIISO film
@ Film rewind fork
@ Film cartridge chamber
-s
peed index
roller
® Shutter curtains
@ Data back contacts
@ Motor drive coupling
@ Film rewind button
Motor drive positioni
@
@ Camera back
® Memo holder
4
drive
Motor drive electrical contacts
Film
@
Page 3
NOMENCLATURE
ure-direct-readout (ADR) window
button
o Mirror lockup lever
® Self-timer
® Backup mechanical release lever
<V
Anatomical
® Exposure memory lock button
® Viewfinder battery chamber
(with lid)
@I
Shutter speed index
(jJ)
Viewfinder illuminator button
@ Neckstrap eyelet
LED
Viewfinder illuminator
Meter coupling lever
Meter coupli lever release button @
Sync terminal @
Len
s mounting index @
Lens release button @
Len
s
Accessory terminal @
®
3
Page 4
Page 5
@ Focusing ring
Fo
cus lock buttons
® Depth-of-field indicators
scale
® Aperture index
-readout sca
A-M switch index
A-M switch
is
tance sca
D
Di
stance index @
Aperture ring
Meter coupling shoe @
le
Lens AF
contacts
®
I@
le
@
@
®I
@ Exposure compensation sca
®
Exposure index
® Hot
-s
hoe contacts
le
® shoe
Film rewind crank
® Camera back lock lever
@ Film rewind knob
@ Exposure compensation dial locking button
Self-timer lever ®
Shutter speed dial @
Power switch @
Multiple exposure lever
Shutter relea
Fr
ame counter @
Shutter-speed dial locki
Film plane
se
button @
ng
button @
in
dica tor
®
5
Page 6
CONTENTS--------------------~------
NOMENCLATURE
FOREWORD
BASIC
OPERATION .
FOCUS ....
Autofocus
Fo
cus·Aid Operation
Manual Focus . .... ..... ..
Special Situations
EXPOSURE
Setting the Film Speed . ..
Setting the Ap erture
Setting the Shutter Speed
Automatic Exposure Control.
Manual Exposure Control
Relationship Between Shutter Speed
and Aperture .
Depth
of
Exposure Compensation .
Stop-Down Exposure Measurement .......•.........
OTHER
CONTROLS ...
Shutter Release Button
Backup Mechanical Release Lever
Film Advance Lever.
Frame Counter .
Eyepiece Shutter Lever
Self-Timer
Mirror Lockup Lever .
Viewfinder Illuminator
Multiple Exposure Lever.
Memo Holder . .
Film Plane Indicator
Infrared Focusing Index
through-the-Iens autofocus control with either
Nikkor lenses, the
Thus, you
remains
shutter speed is set automatically to match the f/stop
so
The
majority
mum aperture of
focusing using the matte portion
with any lens .
Before actually taking pictures with the F3AF, you should
familiarize yourself with its basic operation
first section. For more detailed explanations
picture-taking situations, refer to the rest
minutes wisely invested now will
warding photographic experiences.
To
is
in
you
never
F3AF also gives
of
insure proper service, make sure the Nikon Warranty Card
enclosed
You
cameras
TTL image displacement detecting system utiliz·
's built into the
can shoot fast-moving action while the subject
sharp focus. And like the regular Nikon F3, the
have
Nikkor and Nikon Series E lenses having a maxi·
in
the camera box.
now own one
on
the market today.
AF
BOmm
f/2.B
to worry about getting the correct exposure.
you
focus-aid operation with the vast
f/3.5 or faster, while regular manual
of
the most advanced,
Finder DX-1, this camera offers
and
the 200mm f/3.5 IF-ED.
of
the screen is possible
of
payoff
later
of
two
AF-
in
use
as
presented
the manual. A few
in
in
and
special
years of re-
the
,
7
Page 8
BASIC
1
Remove
•
46
Use a coin
wise to unscrew
from
to
twist the clip counterclock-
OPERATION------------
the
the
it.
battery
camera
clip
body.
2
Load
the
batteries
•
the
Wipe the battery terminals clean and insert the two 1.55V silver-oxide batteries
supplied with the camera, making sure
that the
manganese batteries or one 3V lithium
battery can also
Caution:
small chifdren. In case a battery
swallowed, call
material in
problem
clip.
+ signs are up.
be
Keep batteries away from infants and
si
s.
used.
a doctor immediately
de the batteries can cause serious
Two
1.5Valkaline-
is
into
accidentally
as
the
3
Reattach
•
clip.
Slip the battery clip back into the camera
body and screw it tightly into
the
battery
place.
8
Page 9
4
Remove
•
chamber
the
lid ®
battery
from
the
finder.
Apply pressure to the battery chamber l
located at the side of the viewfinder to
it
off.
slide
5 Load
•
the
the
batteries
finder's
battery
chamber.
id
Load two AAA-type batteries into the bat-
tery chamber, making sure the positive
and negative
the diagrams inside the holder.
Caution: NiCd batteries should not be used
they might cause an explosion.
(+
and
-)
terminals match
Into
6
Reattach
• While applying pressure
teries with the lid, slide it
into place.
as
the
lid.
on
to
until
the bat-
it
clicks
9
Page 10
-BASIC
7.
Move
• @ to
Turn
the switch clockwise until it clicks
e.
into plac
for ex
shooting.
10
Thi
po
sure metering and autofocus
OPERATION-continued----------
the
power
uncover
s makes the camera ready
the
switch
red
dot.
8 Depress
the
shutter
• release button @
halfway.
This activates the exposure meter and
autofocus functions. Both stay
seconds after you take your finger off the
button, then turn themselves off automatically to conserve battery power.
on
for
16
@
9
Check
•
Look
out a lens mounted
the focus-impossible warning (red
shaped LED) blinks or lights up continuously, while the liquid crystal display
(LCD) shows the shutter speed. These
displays indicate that the batteries have
been properly installed and their power
adequate. If neither the red X nor the
appears , check battery installation
camera body or replace the batteries
the body and check again. If the
does not appear but the
battery installation
the finder's batteries with a fresh set.
Note: If a lens is mounted on the camera, either
X
the red
(two red LED arrows) will light up.
battery
through the viewfinder. With-
or
one
or
both
power.
on
the camera body,
LCD
in
does, check
the finder or replace
of
the focus indicators
in
red
LCD
the
X-
is
in
X
Page 11
10
Mount
• First, make sure that the meter coupling lever .@
locked
in
Then,line up the aperture index
ing index @
wise until
right
on
top.
To
remove:
clockwise until the lens comes off.
Notes
:
1)
Lenses usable with the Nikon
page2G.
2)
Never touch the AF contacts ® inside the camera's lens mounting
flange@orthose@onthelensbayonetmount.
3)
When
changing lenses with film loaded
expose the mirror box to direct sunlight.
the
lens
onto
the
camera.
the
"down"
position. Grasp the lens by its lens barrel.
on
the camera body and twist the lens counterclock·
ft
clicks into place. Confirm that the aperture index
Push
the lens release button @ and turn the lens
~on
the lens with the lens mount·
F3AF.
plus OX·/ Finder, are listed
in
the camera, be careful not to
on
11
Open
the
is
•
While pushing the camera back lock lever
back
36
.
camera
® counterclockwise with your thumb, lift
is
the film rewind knob
back will pop open.
Note: If
you
that the motor drive coupling cover @
turned to the camera's baseplate ; otherwise, the
film might be inadvertently exposed while
shooting.
have used a motor drive, be sure
@ and the camera
is
reo
11
Page 12
-BASIC
12
•
Dr
op the film cartridge into the film cartridge chamber
points towards
pu
sh the rewi
pl
ace.
Notes:
1)
Any 3Smm fifm Cartridge can be used.
2) Handle film
posure to sunlight.
OPERATION-continued----------
Install
cartridge.
the
@ so
th
e tdke
nd
knob back down into
in
the shade to avoid direct ex-
film
th
at the film leader
up
spool
@,
13
Insert
• spool.
Pull
the leader acro
slots in
th
with your finger to engage
a
nd
of the takeup spool and sprocket
e film takeup spool. Advance the takeup spool slightly
the
ss
film
leader
the
camera
and insert it into one of the
the
film's perforations with
@.
in
the
takeup
the
teeth
12
Page 13
14
Wind
the
film
•
film
lever
onto
Wind the film advance lever and depress
the shutter release button until the film
sprockets engage the perforations
edges of the film.
the
39
takeup
to
advance
advance
spool.
on
the
15
Close
•
Make sure that the perforations are perfectly meshed with the sprockets and
fi
that the
rails
@.
Then, close the camera back until
it
snaps shut.
the
camera
back.
lm
is
set between the film guide
16
Take
up
the
• Fold out the film rewind crank @
and rotate it
until
it
stops.
in
the direction of the arrow
Then
film
fold the crank back in.
slack.
13
Page 14
-BASIC
1l
•
To
dispose of the first few frames exposed during film loading ,
continue to alternately advance the film and depre ss the shutter
release button until the counter reaches frame one (the first dot
past 0). While making blank exposures, check that the rewind
knob is rotating, indicating the film has been loaded
and is being advanced. If the knob does not rotate, reload
the film.
Notes:
1)
Wh
en making blank exposures, set the shutter speed dial @ to A or to
11125
sec. or above, and the shutter will
80
or
M 80 displayed by the LCD in the viewfinder.
2) Do not take pictures prior to the first frame,
function until the counter reaches one.
OPERATION-continued----------
Make
blank
counter
exposures
76
reaches
until
frame
be
released at
as
the
one.
the meter does not
frame
correctly
1180
sec. with
18
Set
the
•
ASAIISO
speed.
Lift up the ASA/ISO film speed dial @ and
in
rotate it
dot
in
compensation index
This programs the camera's exposure
meter so that it may provide a proper
exposure for the type of film being used.
Note:
carton and cartridge. Detaits
to
page
either direction until the white
® is opposite the ASAIISO film speed
use. Also make sure that the exposure
® is set to the red
The
film speed is printed
intermediate settings can be found
29.
film
on
on
setting the dial
the film
on
O.
14
Page 15
19
Set
the
•
shutter
dial
72
at
Rotate the shutter speed dial until the A
opposite the shutter speed index @ . The
in
locking mechanism ensures that
builtthe dial cannot be accidentally shifted
from the A (Auto) position during shooting.
To
set the dial to other positions, turn
the dial while depressing the shutterspeed dial lock button
A.
speed
@.
20
is
lenstoA.
Slide the switch
Slide
• on
the
the
AF·Nikkor
as
far as
A·M
it
will
switchrs5
go.
21
Turn
the desired f-number
ture index. The selected f-number appears
in
Use the following suggestions
in
80mm
Note: Depending on your preferenc
of
controlled by your selection
aperture. For more information, refer to page 36.
Set
the
the
'·number
lens.
•
the aperture ring @ on the lens until
the viewfinder for convenient reference.
setting the f/stop
f/2.8
is
as
well
fl2.8"-f/4
Indoors:
Outdoors (c loudy): f
Outdoors (clear): f/8"-f/16
Outdoors (clear at the beach or
mountains):
field
is
opposite the aper-
on
the lens (when the
used):
/4"-f/8
f/16"-f/32
as
the shutter speed can
as
e,
the depth
of
the shooting
on
a guide
in
the
be
15
Page 16
-BASIC
OPERATION-continued----------
22
to cradle the camera, with your fingers wrapped around the lens
and your thumb beside
elbow
finger of your right hand to depress the shutter release button
and your thumb to wind the film advance lever. Wrap
fingers of your right hand around the camera body.
adapt this basic posture
shooting.
against something strong and stable (e.
16
Hold
the
•
camera
As
you
look through the viewfinder, use your left hand
is
propped against your body for support. Use the index
To
hold the camera steady,
steady.
the
focus lock button ®, while your
to
both horizontal
and
it
is
advisable to lean
g.
, a wall).
vertical format
the
You
other
can
on
or
23
compose your photo with the main subject (if possible, a subject's vertical line)
in
assure correct focus and exposure.
While looking through the viewfinder, depre
lea
focus function
shutter speed
neither + 2000 nor -8- appears
the camera gives the correct exposure. If either indication appear
shutter speed is indicated, referring
you
readout (ADR) window.
cate that the image is
page 26.
Depress
•
halfway
focus
displays.
se
button halfway to turn
s.
The
to
match the aperture set
s,
adjust
the
aperture ring
have set
on
the lens
the
shutter
and
check
on
LCD
indicates the automatically selected
is
also shown
When
in
focu
release
both
the exposure meter and auto-
in
the shutter speed display,
on
the lens until a desirable
to
page 32.
both
red
arrows light
s.
If
the
red
button
th~
exposure
ss
the shutter
on
the
len
s.
in
The
the
aperture-direct-
up,
X appears, refer to
As
long
f-number
they indi-
re-
as
17
Page 18
-BASIC
OPERATION-continued----------
25
button all the way down; apply light but
steady pressure with the ball of your
index finger to avoid camera shake which
might result
18
Take
the
• Depress the shutter release
in
picture.
a blurred image.
26
transport the film to the next frame.
Advance
• Stroke the film advance lever to
the
film.
27.
When the film reaches the end of the roll,
the film advance lever will stop working.
Then, turn the camera upside down and
press the film rewind button, so that the
exposed film can be rewound back into
its cartridge .
depressing the button.
Press
button
the
rewind
® .
You
do not have to continue
Page 19
28
turn
you
winding
film leader
into the cartridge.
Rewind
• Lift the film rewind crank
it
in
the direction of the arrow.
feel the tension lessen, continue
one
is
the
film.
or
two more turns until the
rewound completely back
and
When
29
Push
clockwise
to open
film cartridge. Avoid unloading film
direct sunlight.
Remove
•
cartridge.
the camera back lock lever counter-
as
the
camera back.
the
film
you
lift the film rewind crank
Take
out the
30
the
inadvertent battery drain
shutter release button is accidentally
depressed.
in
Turn
•
Turn
camera
the
camera
the power switch off while
is
not
in
use.
Thi
in
off.
s prevents
case
the
19
Page 20
FOCUS------------------------------~
The
Nikon F3AF features a through-the-Iens autofocus system
which takes the guesswork out of focusing : just point the camera
at what
you
want to photograph, depress the shutter release
button @ halfway, and watch the subject literally 3nap into sharp
focus ... automatically.
The
system consists of three parts: the special F3AF camera
body, the
80mm 1/2.8 or the 20
AF
Finder DX-1,
0mm
and
an AF-Nikkor lens, either the
1/3
.5 IF-ED.
The
AF Finder
DX-1
interchangeable and covers approx. 92 % of the image area of
the
actual photograph, meaning that the final photograph will
be
larger than the image seen
is
screen
built into the bottom of the viewfinder and cannot
interchanged. However, when other Nikon
viewfinders are used with
interchangeable focusing screens (refer to page
Nikon's autofocus system
ally quick response, allowing
in
the viewfinder.
the F3AF, you
is
unique
in
you
to keep
The
F3
interchangeable
have a choice of 20
55).
that
it
features exception-
up
with active, fast-
focusing
moving subjects .
The
Nikon F3AF offers
1)
autofocus, 2) focus-aid
inside the finder), or
the focusing screen).
you
three different ways of focusing:
operation (using the focus indicators
3)
manual focus (using the matte portion of
As
shown
in
the following table, however,
only AF-Nikkor lenses are usable for autofocus. With other lenses
having maximum apertures of
focus indicators
as
a guide
1/3
in
focusing
.5
and faster,
as
you
you
can
use
manually rotate
the lens focusing ring (
Note: Because
slides
or
slightly smaller than the image seen
of
regular snapshot-size
the cropping which
occurs in
prints, the actual picture might come out
in
the viewfinder.
the case
of
mounted
Usable Lenses
is
Notes:
1)
be
2)
3)
4)
the
5)
Focusing method
Autofocus
Focus
-ai
d operation Nikkor (including AF-Nikkorl and Nikon Series
Manual focus
Even
with lenses slower than fI3.5, the focus indicators
when the shutter release button
is
however,
Although the following Nikkor lenses have a maximum aperture
or faster, they cannot be used for focus-aid operation: 16mm fI3.5,
20mm fI3.5, 28mm fI3.5, 135mm fI3.5, Micro 55mm fI3.5,
fI3.
5,
PC
35mm
f12
.8 cannot be used
105mm fI3.5-fI4.5 can be used only
When
the Nikon Teleconverter TC-14, 200 or 300
and it makes the lens' effective aperture slower than
camera's autofocus and focus-aid operation cannot be used.
The
following lenses cannot be mounted on the F3AF with the OX-1
Finder: . Nikkor 13mm fI5.6, Reflex-Nikkor 500mm
Nikkor 1000mm
Certain filters cannot be used for autofocusl focus-aid operation. (For
details, please refer to page
autofocus or focus-aid operation is impossiple. (This
warning also lights up momentarily at the start of
autofocus or focus-aid operation,
if
there
is
a big
difference between the actual camera-to-subject
distance and the lens distance selting.)
21
Page 22
-FOCUS-continued-----------------
Autofocus
With the lens
lease button halfway turns
(as well
focus indicator(s) or the focus-impossible warning
finder light
that the main subject (if possible, a subject's vertica l line)
shou
ld
viewfinder. Autofocus continues for
remove your finger from the button.
focus, focusing stops
If
there
distance and setting
lights
If
the subject is closer than the closest distance to which the
lens can focus, either the far-focus arrow
up
continuously. However, when the
continuously, this indicates that the autofocus system does not
A-M
switch ® set
as
the exposure meter}.
up
and the lens begins to focus automatically. Note
be
centered inside the central focusing frame
at
A, depressing the shutter re-
on
the camera's autofocus control
At
the same time, either the
16
sec.
When
and
both
red
is a big
difference between the actual camera-to-subject
on
up
momentarily but disappears
the lens distance scale
arrows light
as
soon
(
<III
red
X blinks or lights up
in
the
even
after
the
subject
up.
®,
as
)
the
focusing begins.
or
the
red
view-
in
you
is
red
X lights
function well with the particular subject or shooting situation
se
the
refer to page
(plea
Notes
:
1)
After taking a picture during autofocus operation, the lens will continue
to
focus for
button.
To
power, slide the A-M switch to
but the red arrow(s) or red
automatically.
in
2)
While shooting fast-moving subjects, one or both
may blink to show that the image is quite close to the in-focus zone;
for ordinary snapshots, taking the shot even in this situation can produce satisfactory results. However,
X
until both red arrows light up continuously.
3)
When
becomes slow or may even stop, even though the red arrow(s) or red X
remain lit. In this
convenience,
manually using the red arrows
stop the lens movement
the batteries
26
for further details).
16
sec. after you remove pressure from the shutter release
in
the viewfinder are nearly exhausted, autofocus
case
, replace the batteries
or
set the A-M switch to M and turn the focusing ring
at
any time to conserve battery
M.
Immediately lens movement stops,
X remain
on
for
16
sec. until switched
of
if
sharp focus is mandatory, wait
in
the finder
as
a guide.
off
the red arrows
at
your earliest
22
Page 23
Focus
lock
The AF-Nikkor lens has two focus lock buttons ®
barrel, one
u
se either of the
on
the side and the other
se
button
s,
on
depending
the
on
on
switch.
the lens
You
can
A-M
your choice of horizontal- or vertical-format shooting. During autofocus operation,
depressing the focus lock button allows you to lock
focus distance setting
as
soon as
To
you
take pictures with the main subject off-center, first ce nter the
main subject within the focusing frame
on
the lens. Autofocus begins once again
release the button.
in
the viewfinder, depress
in
the auto-
the shutter release button halfway and make sure both focus
indicators light up; then depress the focus lock button and, while
holding it
in
, recompose and shoot.
r
-------------------l
I
Notes:
Ii W
it
h the focus lock butlon held down, the in-focus indication
may change
depress the shutler relea
matic
have taken a picture. However, regardless
change, the distance set
depressed the focus lock button.
2) When
subject
to
get the correct exposure. For more information, refer
in
the following two cases: 1) when you once again
se
16
-sec. switch has turned off the indication,
taking pictures
off
-center,
button halfway after the camera's auto-
on
the
ler)s
is
still the same
in
the automatic exposure mode with the main
you
must also depress the memory lock button ®
of
----~
(
~<III
or
2) just after
the focus indication
to
as
when you
page 40.
you
)
23
Page 24
-FOCUS-continued------------------
Focus-Aid
With the AF-Nikkor's
or
Nikon Series E lenses having a maximum aperture
faster (as listed
as
a guide
main subject (if possible, a
focusing frame; then depress the shutter release button halfway will light
to
make the
16
sec. after removing your finger).
(
<III
) lights up, this indicates that
subject, whereas
lens
is
focused
convenient, because they tell you
focusing ring : just turn
image
is
When
subject distance
impossible warning appears.
until
in
there
one
Operation
A-M
switch @ set
on
as
focus, both
of the
page 20), you can
you
rotate the lens focusing ring. First, center the closest focusing distance of
red
arrows light
the
near-focus arrow
in
front of the subject. These
in
the direction of the arrow.
red
is a big
red
arrows light
difference between the actual camera-to-satisfactory results. However, if sharp focus
and
distance set
arrows lights up; then continue
(Using
at
su
bject
's
up
(focus information stays
If
the
lens
in
which direction
up
on
In
this case, turn the focusing
the
M, or with other Nikkor
use
the focus indicators fully counterclockwise, this means the subject
vertical line) within the closer than the closest focu
only
the
far-focus arrow disappear even after
is
focused behind the that
(~)
indicates that the
red
arrows are very
continuously. ordinary snapshots, taking the shot even in this situation can produce
the
lens, the focus-rotate the focusing ring untif both red arrows light up continuously.
Focus
of
1/3.5
to
turn the Note : While shooting fast-moving subjects, one
When
to
turn
Indicators)
ring
or far-focus arrow (
on
for
the
ring
the
until both arrows are lit, indicating sharp focus.
In
case
the
the
particular subject
26
for further details).
may blink to show that the image
24
If
<III
) remains lit after
up
continuously.
the
red
X blinks or lights
focus-aid indication system does not function well with
sing
the
focusing
or
shooting situation (please refer to page
the
ring
has
the
lens.
distance of
up
continuously
ring
is
quite close to the in-focus zone; for
is
If
the subject
the
is
turned, this indicates
or
both
is
mandatory. continue to
only the
been rotated
closer than
is
lens, the
and
does not
of
the red arrows
the
much
red
X
Page 25
Manual
Manual focus is required
batteries
using a lens which cannot provide autofocus or focus-aid operation,
continuously, or 4) when
se
lf.
turn the lens focusing ring until
of the screen inside the viewfinder looks sharp and clear. With
all
other lenses, rotate the focusing ring
Focus
in
the
3)
when the focus-impossible warning blinks or lights
With
an
AF-Nikkor lens, set the
(Using
in
DX-1
the followi
finder are exhausted,
you
simp
the
Matte
ng
cases:
2)
when
ly
want to focus the lens your-
A-M
switch
the
image
in
@l
on
the matte portion
the normal manner.
Portion
1)
when the Note:
you
are shift the fens distance setting by turning the focusing ring.
up
to M; then
of
the
Focusing
With
the
A-M
Screen)
switch on the AF-Nikkor
fens
set at
A,
you cannot
25
Page 26
-FOCUS-continued-----------------
Special Situations
The
F3AF provides autofocus and focus-aid operation
majority
moving sports events, subjects seen through glass, or scenes
containing point light sources, such
or a streetlight at night. However, if the overall subject
tone (e.g. when the illumination level
I
focus-impossible warning blinks or glows continuously
you
tem will not work.
®I
portion of the focusing screen. As
focus or focus -aid operation using another subject, if available,
which
photograph; then, with the focus lock button depressed
autofocus or without changing the distance setting
operation, point the camera at the original subject and take
the picture.
or
cases, including such difficult situations
SO
100), low
that the camera's
to M and focus
in
contrast, or lacks a distinct vertical line,
In
on
is
located at the same distance
as
the flame from a candle
is
less than
TTL
image displacement detecting
this case,
the main subject manually using
you
can set the lens'
an
alternative, perform auto-
as
the one
EV
4 at ASAI
AM
the
you
in
focus-aid
as
is
to
want
in
fast-
dark
inform
sys
switch
matte
the
Dark subject (llIust_ 1)
The
red X blinks to show insufficient scene brightness.
case, focus manually, or perform autofocus/focus-aid operation
on
an
in
the
-
to
on
alternate subject at the same distance which
in
tone.
Low-contrast subject (lliust. 2), small or finely
detailed subject (lliust. 3)
The
red
X lights
up
perform autofocus or focus-aid operation
continuously.
ject at the same distance which
In
this case, focus manually, or
on
has
more contrast ·or
an
Subject with no vertical lines (lliust. 4)
The
red
X glows continuously. In this case, turn the camera vertically and perform autofocus or focus-aid operation, or focus
manually; alternatively, perform autofocus or focus-aid operation using
vertical lines.
an
alternate subject at
the
same distance which
Subject with high reflectivity (lliust. 5), backlit
subject (Illust. 6), or scene with both far and near
subjects (Illust. 7)
In
these cases, both
uously.
If
are lit, use the matte portion of the screen to check focus.
your desired subject
in
the red X appears, focus manually. If both
focus, take the shot.
red
arrows or the
is
out of focus, then focus manually. If it
red
X light
In
this
is
lighter
alternate sub-
is
larger.
has
up
contin-
red
arrows
If
is
26
Page 27
27
Page 28
EXPOSURE------------------------------
To
match the convenience of autofocus, the Nikon
F3AF features aperture-priority auto exposure. All
you
do
is
Light
at
electronically determined to match the aperture
use. The F3AF also lets you select the shutter
speed manually for complete creative control.
BecauSe the fast-reacting
located
@,
an
ing
concentrated
focusing screen, while the remaining 20
buted over the rest of the screen .
rect exposure, center the main subject
There are three factors involved
exposure: film speed, aperture, and shutter speed.
All must
set the camera at A (Auto) and fire away.
is
automatically measured through the lens
full aperture, and the correct shutter speed
in
the camera body below the reflex mirror
you have full metering capabilities even with
interchangeable viewfinder attached. Meter -
is
centerweighted;
in
be
set correctly
the
SPD
metering cell
80
% of its sensitivity
12mm~
center spot of the
to
get the proper exposure.
%
To
get the corin
in
determining
is
in
is
is
is
distri-
the finder.
28
Page 29
Setting
To
program the F3AF to give the correct exposure with a particular film, you must first set the camera to the correct film
speed. The film speed, represented by
numerical rating of the film's sensitivity to a given amount of
light: the higher the number, the greater the sensitivity, and vice
versa . This number
itself.
settings from ASAIISO
of ASAIISO numbers stand for intermediate settings, such as
64,
80
settings.
the
Film
Speed
an
ASAIISO number,
is
printed
on
To
handle all film types, the camera's ASAIISO dial @ has
, etc. The table above gives the speeds for all intermediate
the film carton and the cartridge
12
to 6400.
Two
dots between each pair
is
Note: In certain situations, you can set the ASAIISO dial to a setting
which is different from the recommended film speed. For example, some
photographers rate their color slide film
a
ting to produce intentional underexposure for more color saturation. Or
when shooting in very low light, you can "
white film by doubling or quadrupling the ASAI
it to compensate for the underexposure.
at
a slightly higher
push"
high· speed black-and·
ISO
, then overdeveloping
ASAIISO
set·
29
Page 30
-EXPOSURE-continued---------------
Setting
The second factor
ture . Aperture, or the opening formed by the diaphragm inside
the lens, controls the amount of light allowed to pass through
the lens and strike the film;
page
required to use large apertures (indicated by f-numbers which
are low
apertures are called for
click-stops at whole f
out its entire range. With the exception of a few special lenses,
Nikkor and Nikon Series E lenses enable full-aperture light
measurement regardless of the aperture setting. These lenses
have automatic diaphragms, meaning that the diaphragm stops
down
keep you fully informed, the aperture
window
30
the
Aperture
in
determining exposure
it
36
for more information).
in
numerical value, e.g. f/2.8), while
Is tops but
to
the preset aperture only at the instant of exposure.
CD
inside the camera's viewfinder.
also controls depth of field (see
In
(e
.g., f/16). The aperture ring @ features
is
continuously variable through-
low light,
in
use appears
is
the shooting aper-
you
are generally
in
bright light, small
in
the ADR
To
Setting
Shutter speed, or the length of time the shutter remains open,
also determines the amount of light allowed to strike the film.
The Nikon F3AF offers automatic stepless shutter speed control
over the range from
trol with a choice of
speeds, except
the
Shutter
1/2000 sec. to 8 sec., plus full manual con-
18
settings, including B, T, and
T,
are electromagnetically controlled.
Speed
X.
All shutter
Page 31
The shutter speed dial @ has the following settings:
A (Auto): Provides aperture-priority
trol in
which
camera
exposure.
1/2000"'8
trol
of
white
also a reciprocal, appears
manual shutter speed for proper synchronization with electronic
flash (with the exception
represent actual sh
means 8 sec.
you first select the shooting aperture, then the
sets the corresponding
sec
_:
15
the shutter speed. The numbers engraved on the dial
are
reciprocals, for example 2000
discrete
of
utter
speed
in
automatic
shutt~r
settings give you full manual con-
red and indicates the highest
X). Numbers engraved
s,
for example an orange 8
speed for
means
exposure con-
correct
1/2000 sec. 60,
in
orange
B (Bulb): The shutter remains open as long as the shutter re-
lease button
@ is depressed.
T (Time): At this mechanical setting, the shutter stays open until
is
the dial
long time exposure .
this procedure: turn the power switch
the LCD is not displayed
the backup mechanical release lever
in
X (X-
nization speed for any electronic flash unit.
To
click-stops opposite the index line
A and X settings to prevent accidental shifting
move the dial off a locked setting, push the locking button
you rotate the dial. Intermediate settings should not be used.
rotated to another setting, making it ideal for really
To
avoid unnecessary
in
the finder, then trip the shutter using
battery
@
off
and make certain
®.
sync):
Provides 1/80 sec. speed, the proper synchro-
set the shutter speed dial, rotate it until the desired setting
@;
the dial is locked at the
of
the setting.
drain, follow
To
Q]J
as
31
Page 32
-EXPOSURE-continued--------------
,-
+2000
,
2000
,
:':'00
,
500,
I
With
+
2000
indicates that
for the working aperture
remedy this situation,
If
the correct expos
at
the smallest aperture,
even
(neutral density) filter.
250, :25
one
of these indications displayed, correct exposure will
the
subject is too bright
you
have
use
a smaller aperture.
ure
is
still unobtainable
,
chosen; to
use
an
c,ef
ND
Automatic Exposure Control
Automatic exposure is the most convenient way to shoot with
the Nikon F3AF, because it
the subject without worrying about
the aperture and locking the shutter speed dial
came
ra automatically sets the proper stepless shutter speed
1/200010 8 sec. as soon as the shutter
from
is
depressed halfway.
speed is displayed via LCD
1
/2
and 1/2000
speed, for examp le
and 8 seconds are signified by a - symbo l appearing to the
.uppe r right of the number, for example 8- means 8 sec. To make
SE>C
al
lows you to concentrate fully on
th
e exposure. By presetting
To
keep you fully informed, the shutter
in
. are shown as a reciprocal of the actual
125 means 1/125 sec. Speeds between 1
the viewfinder. Speeds between
@ at A, the
re
lease button @
,
f :,,
-"-'
..
be
obtained.
- 8- indicates the subject
should
use
ex
posure is unobtainable
aperture,
supplementary illumination.
When mak
ter s
an
the display easy to read, intermed
display as a discrete shutt
speed. (For insta nce,
selected shutter speed
LCD stays on for approx.
from
Before shootin
Note:
speed and aperture
pp. 66·69 for more information.
a larger aperture. If the correct
use
an
ing
peed
80
blank exposures with the shut-
dial set at A
will appear until
th
e shutter button.
g,
The
camera
is
too dark
even
electronic flash or other
or
1/125
you
reach
er
1/287 sec. might be the automatically
in
check the exposu re display.
's
effective metering range depends
in
use
at a particular film speed.
,,-
=,
-
1..1-
f
..
and
you
at maximum
sec
. or
above
frame
one
ia
speed which
use, but 250 wi
16
te speeds appear
sec. after
0-
-
I.J
,
.
is
ll
you remove your finger
CI-
..
'_' ,
I
in
the
shutter
se refer
the
closest to the actual
be displayed.) The
on
Plea
to
32
Page 33
'M.5oo
,
~S
+
Ie
M
Use
a larger aperture or slower
shutter speed.
Use
a smaller aperture or faster
shutter speed.
M
M
M
C;;
_
-+~So
Manual
In
the manual exposure mode, you can shoot at any combination
of
flstop and shutter speed from 1/2000
to select your desired shutter speed. Manual exposure
required when stop-down exposure measurement
or when you want to use the
Except at the B,
shown
button
upper right of the number indicates shutter speeds from 1 to 8
sec. Also the letter M appears to the left of the number, indicating the manual exposure mode. Above the
symbols appear:
overexposure, and correct exposure, respectively.
correct exposure, simply turn the shutter speed dial
aperture ring until the - + symbol appears. The
approx.
Exposure
T.
in
the viewfinder immediately after the shutter release
®
is
16
and X settings, the shutter speed you set
depressed halfway.
-,
+, and - + which indicate underexposure,
sec. after you remove your finger from the button.
Control
B,
T,
or X setting.
As
before, the - symbol at the
to
Within ±
8 sec
M,
114
EV.
.,
enabling you
is
is
necessary
the following
To
obtain
@ andlor
LCD
stays
also
on
+
80
M
Intermediate settings
while those
the lens aperture down or open
mediate setting when fine adjustment of the exposure
necessary.
is
When making blank exposures with the shutter speed dial set
between
with M
At
the B or T setting,
At
X,
exposure, because the meter does not function at this setting;
as
F3AF and turned on, the + disappears from the display, leaving
just M 80.
on
11125
80
displayed until the frame counter reaches one.
an
M+
80
soon
as
a dedicated Nikon Speed light
on
the lens aperture ring ~ can be. Therefore, stop
and 1/2000 sec., the shutter fires at 1/80 sec.
appears. However, the + does not mean over-
the shutter speed dial cannot
it
up to the appropriate inter-
an
M - appears
in
the viewfinder.
is
attached to the
be
used
is
33
Page 34
-EXPOSURE-continued---------------
1/2000
Relationship
The
amount of light reaching
combination of
shutter speed of
ting
of 1/250 sec.
aperture setting of
as
much
as
picture-taking situation
at
f/16 will give
The
table above illustrates
speed and aperture. 50mm
34
fiB.
Between
the
shutter speed
1/125 sec. lets
and
only half
f/11
lets
Thus,
if
is
the
same exposure. minimum shutter
111000
2.B
the
in
as
in
twice
the
correct exposure for a particular
1/125
at
the
interrelationship between shutter length of
4
Shutter
film plane
and
the
twice
as
much light
as
much light
f/11, then
11500
1/250
5.6 B
is
determined
lens
much light
as
1/250
1/1
25 1/60
11
Speed
aperture. A fast shutter speeds
as
1/60
as
f/16, half
at
fiB or 1/60 A good
and
by a The
a set-duce a deliberate
sec.
An
16
Aperture
of
field, while large apertures restrict
the
of
field, refer
number
than
best combination will depend
main
subject. (For more detailed information about depth
rule
the
lens,
to
1/250 sec.
to
freeze motion;
blur.
Also,
to
page
36.)
to follow
select a speed
1/50).
lens
and
in
preventing camera shake
speed
in
use. For
For
a 200mm super-telephoto,
so
forth.
on
the results
small apertures give greater depth
which
no
slower
use
the
is
the reciprocal of
example,
than
you
slow speeds
zone
of sharp focus
when
using a normal
1/60 sec. (the closest
is
use
want.
to
select a
the
no
to
Use
pro-
to
focal
less
Page 35
A fast shutter speed freezes
the rider and background.
By
panning the camera, a slow one allows
the background to blur.
35
Page 36
-EXPOSURE-continued---------------
Depth
When
you
tain distance range
final photograph. Objects beyond this range become increasingly out of focus. This "in-focus zone"
field. When this zone of sharpness
said to
be
The
1)
2)
36
of
Field
you
shoot at a certain aperture and focusing distance,
will find that not only the main subject but objects
be
deep; when it
shallow.
following
The
smaller the shooting aperture (i.e. the larger the numerical f-number), the deeper the depth of field ;
aperture, the shallower the depth of field.
The
farther away the subject
depth of field becomes; the closer to the lens, the shallower
the depth of field.
in
front of
and
is
small, the depth of field
is
true of depth of field:
behind it will
is
is
is
from the lens, the deeper the'
known as depth of
large, the depth of field
be
the
in
sharp
is
said to
larger the
a cer-
in
the
3)
The
longer the focal length of a lens, the shallower the depth
of field at each f/stop; the shorter the focal length, the deeper
the depth of field.
4)
There
is
greater depth of field behind the main subject than
in
front of
The
is
set of color-coded lines
f-numbers
with the distance scale
tance between the lines.
Note: Certain Zoom-Nikkor and special-purpose Nikkor lenses do not
have
it.
depth of field at each aperture
® (corresponding to the colors of the
on
the aperture ring) which are used
@ .
The
a depth-of-field scale.
is
range
indicated
is
indicated
on
in
the lens by a
conjunction
by
the dis-
Page 37
Depth-of-field preview button ®
When a lens with
the viewfinder
However, by depressing the depth-of-fie
the lens will
to examine depth of field before shooting. The image
finder darkens according to the selected f-number: the smaller
the aperture (i.e
Components of the picture that appear
is
depressed wi
Note that the button should
Note:
When
do not release the shutter while depressing the preview button; improper
exposure may result.
an
automatic diaphragm
is
viewed with the lens at maximum aperture.
be
stopped down to the aperture set, enabling you
.,
the larger f-number), the darker the image.
ll
be
in
the zone of sharp focus.
be
depressed all the way.
shooting in the automatic exposure mode with an AI lens,
is
used, the image
ld
preview button,
in
the view-
in
focus when the button
in
To
illustrate depth of field, the following photos were taken with
AF
-Nikkor
BOmm
the
only difference
f/2.Blens at a focused distance of 5m; the
is
that they were shot at various apertures. Control of depth of field enables you to create photos having selective focus (where the major subject stands out from the background and/or foreground) or overall sharpness (in which all
in
elements
your picture a character
the picture appear sharp). Depth of field imparts to
all
its own.
37
Page 38
38
Lens set
at
f/2.8 Lens set
at
f/16
Page 39
Suggested Applications for Exposure Compensation
Exposure Compensation
In the vast majority of cases, the F3AF provides the correct
exposure
deviation from the automatic exposure setting. For this purpose,
the F3AF features both
a memory lock button
Exposure compensation dial
This dial adjusts the exposure by increasing or decreasing the
automatically
usually light or dark
pen
Or
expose the shot
on
automatic. However, certain situations require a
an
exposure compensation dial @ and
®.
se
sa
tion must
lected shutter speed. When the scene is
in
tone (e.g., a snow scene), exposure com-
be
made to prevent over- or underexposure.
un-
under normal conditions, you can intentionally over- or under-
to
create special "high-key" or "low-key" effects.
_ + 2 White background, snow scene
-+ 1 White background occupying half of viewing area
-1
"-
spotlighted subject, black background occupying
half of viewing area
-2
black background
To
make exposure compensation, push the locking button ~ as
you
rotate the exposure compensation dial.
one-third stop increments:
stops less
exposure, whereas + 1 and + 2 indicate one a
-1
and
It
-2
is graduated
indicate one and two
nd
stops additional exposure. At ASAIISO 6400, the compensation
extends to only
su
re
to reset the dial to "0."
The
recommended exposure compensation settings for various
-1
; at ASAIISO 12, up to +
1.
After use make
subjects and picture -taking situations are shown above.
Note: Because the LCD shows only discrete shutt
adjustment
be
reflected
of
the
exposure compensation d
in
a change in shutter speed.
ial,
such as +
er
speeds, a slight
113
, may not
in
two
39
Page 40
Memory lock button
Another way of making exposure compensation with the F3AF
on
automatic
there
subject and the background, such
the camera's exposure meter
in
under- or overexposure (Fig. 1).
center the main subject
the subject, depress the memory lock button and hold it
recompose and shoot (Fig.
Note:
button when recomposing with
sharp focus.
is
to
use
is
a substantial difference
In
autofocus operation,
the exposure memory lock button.
in
brightness between the main
as
a strongly backlit subject ,
is
likely to be fooled, resulting
To
in
the
viewfinder or move
2).
you
must also depress the focus lock
the
compensate for this,
subject off-center
in
to
When
close to
in
; then
keep
it
40
@J
- @
in
--
----------1
-
____
I
I
I
I
I
I
I
I
I
I
I
I
.J
Page 41
Stop-Down Exposure
When using a non-AI lens or certain close-up accessories, you
must push the meter coupling lever release button
the meter coupling lever
a lens or attaching an accessory.
the lens does not link with the meter coupling lever on the
camera body. Therefore, you must perform stop-down metering.
The procedure
is
4
as follows:
in
Measurement
the "up" position before mounting
In
this case, the diaphragm
@ and lock
For non·Allenses with automatic diaphragms
On
auto: Push the depth-of-field preview button ® all the way
and hold
Caution:
the mirror 9 may remain
On
button and turn the lens aperture ring
appears
the shot.
it
as you trip the shutter.
If the depth·
of
-field preview button is not depressed all the
in
the " up" position.
manual: Select a shutter speed. Then hold
in
the viewfinder. Release the preview button and take
@ until the - + symbol
in
the preview
way,
For non·Allenses or accessories without automatic
diaphragms
On
in
auto: Stop the lens down manually until the desired shutter
speed appears in the viewfinder. Then take the picture.
On
manual: Adjust the shutter speed or aperture until the - +
sign appears.
For fixed·aperture lenses, photomicrography,
or astrophotography
in
On
auto: No control
On
manual: Adjust the shutter speed dial until the - + appears.
If correct exposure
filter or change the illumination to adjust the exposure.
is
necessary; just take the picture.
is
unobtainable, use
an
NO
(neutral density)
41
Page 42
OTHERCONTROLS-------------------------
Shutter
Depressing the button halfway switches
and autofocus function and activates the viewfinder
LCD
displays for focus/exposure information. Both displays stay
on
for approx.
ton, then turn themselves off automatically
power. Depressing the button
shutter.
Release
16
sec., even after taking your finger off the but-
The
shutter release button
Button
all
75
on
the exposure meter
to
conserve battery
the way down releases the
is
threaded
LED
in
its center to
and
accept a standard cable release for tripping the shutter with the
camera mounted
Notes:
1)
The
shutter cannot be tripped using the shutter release button unless:
a) the camera's power switch @
1M!
is
stroked completely to cock the shutter, and c) the batteries are
in
proper working order.
dead, use the backup mechanical release lever ®, referring to the
next page.
2)
At the B setting, unless you hold the shutter release button down all
way,
the
3)
00
not screw a tripod into the camera
on
a tripod.
is
turned
To
release the shutter when the batteries are
the shutter may close prematurely.
's
tripod socket @ too tightly.
on,
b) the film advance lever
42
Backup
T
his
lever
shutter
pletely exhausted.
to
pull
the shutter.
approx.
At
T.
the power switch
Caution: If you advance the film while holding down
ical release lever, the shutter will fire immediately at the completion
the film advance stroke, thus wasting a frame. Also,
the film completely and then use the lever to trip the shutter, the mirror
® will remain
complete film winding, the shutter will fire, also wasting
Mechanical
is
provided
in
case the camera's batteries become weak or com-
it
down to the ready position.
The
1160
sec. at any setting
T,
push down the backup mechanical release lever with
in
as
an
To
operate the lever, first use your fingernail
shutter operates at a mechanical speed of
@ off.
the "up" position; when the additional stroke
Release
Lever
alternative method of releasing the
Then
push it down
on
the shutter speed dial, except
the
backup mechan·
if
you fail to advance
is
a frame.
(6
to
trip
made to
of
Page 43
Film
Advance
The
film advance lever
@ and
is
film, wind the lever to the right
matically returns to the standoff position the moment
your thumb off it. One complete stroke or a series of shorter
ones advances the film by a single frame and simultaneously
cocks the shutter.
At
to
Note:
roll, this means that the film
erly. In this case, rewind the film immediately and load the film again.
specially contoured to fit the thumb.
the end of the film roll,
wind the lever further; just rewind the film.
If
the lever becomes difficult to operate
Lever
is
coaxial with the shutter release button
the
is
@)
To
all
the way until
lever stops working.
not winding onto the takeup spool
it
stops. It auto-
Do
at
the beginning
advance the
not attempt
you
@pro
of
take
the
Frame
To
counter
numerals appear every 5 frames (0, 5,
between. White marks at 12, 20, 24, and 36 indicate the number
of frames available
shots with the shutter speed dial
fire at
In
addition, the
manually between
fire at
p-
the speed
will fire
Therefore, to speed
sec. or above.
When
matically resets to two frames below zero.
Counter
keep track of the number of exposed frames, the frame
is
graduated from two frames below 0
1/80 sec. until the frame counter reaches the first frame.
LCD
1/80 sec.
the camera back @
In
is
manually set to 1/80 sec. (X) or below, the shutter
at
the speed set with the
Q§)
up
10
, etc.), with dots
on
most film cartridges. When making blank
shows
1/125 and 1/2000 sec., the shutter will still
the finder,
up
film loading, set the dial to A or to 1/125
@ set
to
"A," the shutter will
80
in
the finder. Or, if
an M 80
is
opened, the frame counter auto-
is
LCD
you
displayed. However, if
indicating that speed.
to
40.
Blue
set the dial
43
in
Page 44
-OTHER
CONTROLS-continued----------
•
..,,;r-
-.
•
8
Eyepiece
When it is impossible to keep your eye at the viewfinder (such
as
when utilizing the self-timer),
shutter. This shutter prevents stray light from entering the eye-
piece and adversely affecting the automatic exposure meter
reading and autofocus function . Just push the lever to the left
to close the shutler.
is
painted red.
blind
44
Shutter
As
Lever
a visual reminder that it
@
you
should use the eyepiece
is
in
use, the
Self-Timer
The
F3AF's blinking self-timer provides a to-sec. delay
release.
To
uncover the
autofocus and/or automatic exposure modes, don't forget to
close the eyepiece shutter to prevent stray light from entering
the eyepiece.)
Immediately the
blinking and then speed
the shutter opens to warn
turn the self-timer lever to its original position after
If
you
release button, return the self-timer lever to its original position.
This will prevent the picture from being taken. .
Note:
with the self-ti
operate the self-timer, push the self-timer lever ® to
red
dot (Fig. t). (When using the camera
Then
push the shutter release button.@ (Fig. 2).
red
LED @Ion
want to cancel the self-timer after pushing the shutter
The
B setting on the shutter speed dial @does not function
mer.
the front of the camera will start
up
during the final two seconds before
you
to get ready (Fig. 3). Finally,
use
in
shutter
(Fig.
in
the
re-
4).
as
B
Page 45
Mirror
In
the following situation
in
the "up" position: when
MD
lenses which do not feature through-the-Iens viewi
Lockup
-4
at 6 frames per second or when using certain fisheye
Lever
s,
the F3AF's mirror @ must
you
CD
want
to
operate the Motor Drive
be locked
ng
. Also,
when using super-telephoto lenses or doing photomicrograph
it
becomes necessary
reflex viewing mirror
field preview button
it
stop
s.
until
the
lever clockwise until
Do not
"up"
Caution:
on
automatic.
speed automatically selected by the
the correct exposure. Autofocus operation with the mirror
position
To
re
lease the shutter unless the mirror is completely
or "down" position.
With
the mirror locked
Even
is
also impossible.
to
minimize camera vibration.
in
the
"up" posit
@ a
nd
rotate the lever counterclockwise
return the mirror
ion, pu
to
the "down" posi
it stops.
up,
you
though the LCD continues to show
should not operate the camera
camera, this speed will not produce
sh
in
To
lock the
the depth-of-
tion, rotate
in
you
the shutter
in
the
Viewfinder
A convenie
exposure information
on
the base of the viewfinder just
y,
@.
the camera's exposure meter
soon
Notes:
1)
the
2)
"up"
nt
the illuminator, push
Ple
ase remember that the illuminator only lights
as
you
remove your finger from
If
you
plan
spare set
nator consumes
At low temperatures or with nearly exhausted batterie
illuminator might temporarily lower the voltage, causing
disappear. If the
can release
of
Illuminator
(13
built-in viewfinder illuminator lets
and
the aperture,
even
the red illuminator button @ located
in
front of
the
is
switched on, but turns off
the
button.
to
use
the
fresh batteries for the camera
the
illuminator for extended periods, take along a
a lot of power.
LCD
appears again when
shutter without replacing the batteries.
body,
the
you
see the
in
dim light.
To
LCD
turn
shutter speed dial
up
when
because the illumi-
s,
using the
illuminator
the LCD
is
off,
at
as
to
you
45
Page 46
CONTROLS-continued-----------
Multiple
For
creative and unusual effects,
more than one
or multiple exposures, follow this procedure:
1)
Take
2)
Then
the multiple exposure lever forward (Fig.
advance lever
wi
ll
3)
Now
frame. For more than two shots
peat the same procedure for each additional exposure. When
you
next frame. While making multiple exposures, the frame
counter does not advance.
cannot
Note: If you wish to cancel the multiple exposure selling, first cover the
lens with the lens cap and close the eyepiece shuller; then make
shot and advance the film to the next frame.
46
Exposure
im
age
on
the first shot.
to
recock the shutter without advancing
~
.
spring back
you
are ready
have finished, simply advance
be
cancelled
Immediately the multiple exposure lever
to
its normal position (Fig. 2).
once the lever
Lever
the same frame of film
to
the
take the second shot
on
The
multiple exposure setting
74
F3AF allows you
1),
the same frame, just
the
film normally
is
set
in
the "out
to
. To make double
the
film, push
and stroke the
on the same
" position.
record
re-
to
the
a blank
Memo
As
the roll
the memo holder. While loading the film, insert the film carton
end before c
loaded,
Holder
a reminder of the film type and the number of exposures
in
use
, clip off the
losing the camera back. When
you
must remove the DX-1 finder.
37
end
of the film carton and insert it into
film is already
on
Page 47
Film
Plane
The
film plane indicator (
just behind the shutter speed dial. It indicates the exact position
of the film plane inside the camera. Whenever it becomes
necessary to measure the exact distance between the subject
and. film plane, such
indicator. The distance between the film plane and the lens
mounting flange is exactly
Indicator
-E>-
as
in
macrophotography, use the film plane
)
is
engraved
46.5mm
@
.
in
white
on
the top deck
Infrared
The red dot beside the focusing index
infrared focusing index. When shooting with black-and-white
(but not color) infrared film,
compensate for the fact that infrared light rays focus at a point
slightly
In
infrared photography, use of the
on
focus
focusing ring
and take note of the focused distance. Reset the focusing ring
so that the desired distance
take pictures with the filter attached.
Note: Automatic focusing is impossible
photography.
Focusing
in
front of visible light.
your subject through the viewfinder by rotating the lens
@ without the filter
Index
on
most lenses
it
is
necessary to refocus the lens to
R60
filter
is
required. At first,
in
place. Then look at the lens
is
aligned with the
in
red
dot. Finally
black-and-white infrared
is
the
47
Page 48
FLASHPHOTOGRAPHY---------------------
The Nikon F3AF has been specially designed to make electronic
flash photography easier than ever. When used with
sory Nikon dedicated flash unit, the camera offers fully automatic through-the-Iens (TTL) control of the flash exposure. This
means that while the shutter
photodiode (SPD) reads the light reflected directly off the film
and tells the flash unit to cut itself off when the exposure
is
correct.
To
prevent mistakes, the camera also offers automatic switchover of the shutter speed for proper synchronization. With the
shutter speed dial @ set at A or
speed
is
automatically switched to 1/80 sec . as soon as the
is
turned on.
flash
M 80
on
manual. For creative fill-
speed manually to 1/60 sec. or below and the shutter fires at the
speed set with the speed
For
non-dedicated flash units,
you the proper manual speed of
in
the
LCD
this setting, M 80 appears
When shooting manually with any flash unit,
determine the flash unit's guide number for the film you are
using; then set the aperture to match the shooting distance.
As
a reminder, the
. However, if you use a Nikon dedicated flash unit at
is
1/125
in
in
use displayed
an X se
1/80 sec. At X,
as
soon
as
open, the camera's silicon
sec. or above, the shutter
LCD
shows 80
flash effects , you can set the
in
the viewfinder.
tting
the unit
an
on
auto or
is
provided, giving
M+
80
appears
is
turned on.
it
is
necessary to
acces-
48
Page 49
Accessory Shoe ®
Located at the base of the rewind knob@, the accessory shoe
allows direct mounting of a Nikon dedicated flash unit, such
the 88-12, 88-16A or 88-17.
flash units (having either
foot) to the F3AF
is
required (for details, refer to page 56.)
's
accessory shoe, a Nikon
also accepts accessory cords, such
To
mount other direct-mounting
an
180
- or Nikon F2-type mounting
Flash
The
as
the
8C-12
Unit Coupler
accessory shoe
and
convenient flash photography with Nikon bracket-mounting
units, such
Three electrical contacts @
synchronization of the flash unit, automatic
and
as
the
88-11
and
ready-light indication (via
14.
on
the accessory shoe provide for
an
LED)
TTL
output control,
in
the camera's viewfinder, plus auto switching to the proper synchronization speed
of
1/80sec.
8C-13
as
, for
Caution:
Nikon dedicated electronic flash unit which operates with a low-voltage
curren
damage the camera's circuitry; any damage caused by such use
covered by the Nikon warranty.
For flash photography, it
t.
The
use
of
any other flash which operates at high voltages may
is
recommended that
you
use a
is not
49
Page 50
-FLASH
PHOTOGRAPHY-continued---------
Sync Terminal
16
A separate sync terminal with a protective screw-in cover
provided
tronic flash unit without a hot-shoe contact,
use the camera's sync terminal.
PC
PC
c=J
c=J
cords, plus
cord.
Speedlighl
Flashbulb
Synchronized
Cannot be used
on
the Nikon
FP
M
MF
F3AF.
When
using flashbulbs or
It
it
is
threaded for use with a Nikon screw-in
1/2000
1/1000 1/500 1/250 1/1
accepts
it
is
necessary to
all
standard plug-in
25 1160
an
11
50
elec-
30
is
1/
Th
e F3AF features
flash units to
or slower.
Shuller speed (sec.)
15
118
1/4 1
an
be
synchronized
12
X-sync
contact only, allowing electronic
at
a speed of 1/80 sec.
1 2 4 8
(X)
X (1/80) B
Page 51
Ready-Light
A built-in
portion of the viewfinder outside the picture area.
dedicated flash unit (or a
accessory shoe
flash
never have to remove your
in
output, the ready-light starts blinking for approx. two seconds,
warning you that the light was probably insufficient for correct
exposure.
connected properly or if the ASAIISO
outside the dedicated flash unit's range of ASNISO 25"'400.
For
tion manual.
LED
ready-light
® , the ready-light comes
is
recycled, indicating that the unit
the TTL mode, whenever the flash unit fires
As
an
additional warning,
is
provided
in
the upper right-hand
When
TTL
sensor cord)
eye
from the viewfinder. Moreover,
is
attached to the
on
as
is
ready to fire. So, you
at
it
blinks if the flash
se
tting
on
the camera is
a Nikon
soon
as
its maximum
is
more detailed information, refer to the flash unit's instruc-
the
not
Nlkon
F3AFISpeedlight
Speedlight
SB-17 yes yes
SB-16A
SB-12-
(with
SC
-12)
SB-11114
SB-19** (with AS-4, 7)
SB-
SBSB-1O
SB-7E
SB-6
SB-E** (with AS-4, 7)
*With
**The SB-19, SB-18 and SB-E cannot be mounted on the F3AF unless
(with SC-13)
SC-ll)
(with
18**
(with AS-4, 7)
15
(with
AS-4
,
7)-
(with ASA, 7)
(with AS-3)
(with SC-6)
(with AS-3,
SC-9, SU-l)
the
SB-12
or
cannot be rotated so that it
the Eyelevel Finder
SB-15
DE-2
Combination
Camera's
ready-light
yes yes
yes yes
yes yes TTL, manual
yes
no
yes
yes
yes yes
yes yes
no no auto, manual
no no manual, MD
no no
yes yes
mounted on the Nikon F3AF, the flash head
is
over the AF Finder DX-l .
or High-Eyepoint Finder DE-3
Shutter
speed auto
changeover
yes auto, manual
no auto, manual
yes auto only
yes manual only
Chart
Usable flash
output control
TTL, auto,
manual, MD
TTL, auto,
manual, MD
TTL, manual
auto, manual,
MD
auto, manual
auto, manual,
MD
auto only
is
used.
51
Page 52
ACCESSORIES----------------------------
DE-2
Interchangeable
In
addition to the AF Finder
other interchangeable viewfinders designed for the regular
Nikon
F3.
including the AF-Nikkors, are usable with the F3AF body.
gardle
exposure control because the meter
body rather than the finder. The camera's autofocus control,
however, cannot
The
provides
High-Eyepoint Finder
but allows eyegla
52
With them,
ss
of which finder
an
upright
be
and
ss
Eyelevel Finder DE-2
Viewfinders
DX-1
all
Nikkor and Nikon Series E lenses,
is
attached,
used with viewfinders other than the DX-1.
offers regular eyelevel viewing and
unreversed image
DE-
3 gives
wearers and action photographers alike to
DE-3
, the F3AF camera also accepts
you
still have full automatic
is
built into the camera
in
you
the viewfinder.
the same eyelevel viewing,
Re-
The
DW-3
see the entire frame with the eye
from the eyepiece.
you
want to use the camera at a low angle or upside down over
your head for shooting over crowds.
works well for those situations when
close to the finder, such
you
are wearing a helmet or goggles, or when the camera is
enclosed
cation Finder
work or photomicrography.
When
not enter from the top and cause
in
using the
DA-2
The
Waist-
Level
as
in
fast-breaking sports events, when
waterproof underwater housing.
DW-4
is
for critical high -magnification close-
DA-2
or
DW-3, be
an
DW-4
up
to appro
Finder DW-3
The
Action Finder
you
cannot bring your eye
careful that stray light does
inflated meter reading.
x.
25mm away
is
ideal when
The
6X
DA-
Magnifi-
up
2
Page 53
To
remove the finder, use your thumb and forefinger to slide the
finder release levers
® toward the back of the camera ; then lift
the finder out. Before attaching another viewfinder, a focusing
54).
To
screen must be installed (please refer to page
it
new finder, position
above the camera with the nameplate
attach the
facing toward the front of the camera, and gently push the viewfinder down until it
is
attached securely.
is
fully seated
in
place. Make sure the finder
Do not forget to remove the focusing screen from the body when
DX-1.
you reattach the AF Finder
If not, both the focusing screen
inside the camera body and the one built into the bottom of the
DX
-1
might be damaged.
CaUl/on:
1)
When
handling the F3AF with the
or damage the electrical contacts at the bottom
matching ones inside the camera body at the top
Also do not short· circuit them.
2)
Do
not pick up the camera by the finder only
damage
to
To
3)
glass attached.
4)
When
protective cover (supplied with the camera!
screen from becoming scratched.
the camera.
prevent dirt from getting inside the finder, always keep the eyepiece
storing the
OX
-) separately from
OX
·) removed, be careful not to soil
of
the finder or the
of
the mirror box.
The
force may cause
the
camera body, attach the
to
prevent the built-in finder
53
Page 54
Focusing Screens
When
using a viewfinder other than the standard AF
DX-1,
you have a choice of
as
listed
on
and
out.
the next page.
push the rear ed
insert the front edge (the edge with the slot in the middle)
the pin
To
take out the focusing screen, first remove the
insert your fingernail under the rear
lift
it
54
21
interchangeable focusing screens,
To
install a focusing screen, simply
ge
of
the screen down into place .
edge
fin
of the screen
der, then
Fin
un
Note: For more information on which screens are compatible with which
der
lenses, consult the instruction manual supplied with the len
der
and
s.
Page 55
Focusing
Screen
TYPO
A:
12mmcP
photography
Type
8:
12mm41
reference
Type
C:
photomicrography.
using
parallax
TYpo
D:
for
use
with
Type
E:
Matte/Fresnel
circle. and
TYpo
G:
viewing
and
sponding
Type
H:
area. Pennits
brightness
particular
TYpo
J:
circle
.
Good
Selector
Mane/Fresnel
reference
circle. Rap.ld
.
Mane/Fresnel
circle
Fine-ground
astrophotography
focusing
Overall
fine-ground
long
lenses
etched
horizontal
Clear
Fresnel
focusing
to
specific
focal
Clear
Fresnel
rapid
focusing
In
poor
localleng1h
Mane/Fresnel
for
general
f~ld
wifh
3mm~
flElld
with
.
Good
for
general
matte
field
on
aerial
Images
mane
.
field
with
3mm¢
and
..
r~ld
w~h
extra-bright
In
poor
light.
length
lenses.
field
with
microprism
on
any
light. Available
lenses
.
field
with
photography
Guide
circular
and
accurate
3mm41
fine-ground
photography.
with
4mm4J
and
other
.
liBld. For
specialized
fine-ground
rllcallines. Ideal
12rnm~
Four
models
Depth
of
focusing
part
of
the
In
lour
models
central
mlcroprlsrn
.
split-Image
rangelinder
focusing. Excellent
matte
especially
clear
spot
and
high-magnilication
close-up
matte
spot
,
for
archnectural
mlcroprlsrn
(G1-G4)
are
field
cannot
be
observed
pattern
over
screen
with
optimum
(H1-H4)
focusing
spot
and
lor
general
focusing
spot
and
with
long
lenses
cross
hair. For
appllcat~ns.
photography
and
12mm~
reference
photography
.
focusing
spot
for
available
corre-
.
the
entire
screen
edge-la-edge
corresponding
spot
and t2mm</>
Typo
K:
Combination
of
Image
rangefinder
accurate
Suitable
TYpo
L:
.
to
Same
Best
lor
subjects
Type
M:
use
In
parallax
indMd
uaJ
light.
Su~bIe
applications
Type
P:
etched
horizontal
focusing
lor
general
TYpo
R:
Same
angle
and
lenses
having
Type
T:
and
horizontal
Dotted
lines
area, whereas
Type
U:
12mm¢
longer than
length
lenses, this
spot
focu~ng
for subjects
for
general
photography
as
Type A screen
w~h
Fine-ground
focusing
magnification
for
.
Same
as
Type K but
and
for
subject
photography
as
Type A but
horizontal
maximum
Matte
/Fresnel field
and
indicate
broken
Mane/Fresnel
reference
circle. Utilizes
100mm
screen
Type A and J screens. Mane
surrounded
by
with
.
but
with
horizontal
lines.
Fresnel
field
with S.Smmq,
on
aerial
Image,
of
objects
or
close-ups
.
photom~rography
with
split-image
vertical
lines
horizontal
.
vertical
apertures
nnes
field
image
Is
with
with
lines.
TV
indicate
with
in
not
suitable
as
or
rangefindor
tines
from
split-image
Used
screen
"sa
3mm¢
the
the
with
and
vertical
standard
the
lmm-wide
both
straight
spln-lrnage
plus
tor
measuring
an
aid
vertlcallines
prisms
to
aid
fl3
.5
to
rangefinoor,
when
format
fe
title"
fine-ground
same
matte
viewfinder
because
/Fresnel
micnoprlsrn
lines
and
rangeflnder
clear
spot
millimeter
ob;ects.
and
other
rangefinder
to
composition. Rapid
or
til-defined
of
sloping
proper
composition. 't\brks
1/5.6.
preparing
slides
.
SOlid
oulline shows
area
.
matte
field
as
Is
easier
to
of
light
fall-of!
field
w~h
3rnm~
doughnut.
Rapid
III-defined
line
at a 45"
and
double
cross
scales
for
calculation
Brilliant
Image
hlgh-magn~tlon
line
at a 45°
angle
and
contours. Suitable
surfaces
at a smaller
12mmq,
reference
for
TV
broadcasts
"sa
le
focusing
Type
S,
but
with
see. With
shorter
in
the
comer
spl~
contours
angie
half
In
accura
best
with
circle
action"
spot
lenses
focal-
.
and
dim
and
and
.
.
for
of
te
,
,
55
Page 56
-ACCESSORIES-continued-------------
Electronic Flash
Indispensable for shooting
in
the shadows
electronic flash units which complement your Nikon F3AF per-
fectly. Everything about these Speedlights
have to do
through the lens, ensuring the correct exposure regardless of
the lens
in
in
daylight, Nikon Speedlights are dedicated
is
set the aperture and the flash output
use.
Equipment
in
dim light and at night or for filling
is
automatic-all
is
measured
you
5peedlights 5B·12, 5B·16A and 5B·17
Compact and light, Nikon
directly
on
flash exposure. The
100
features a zoom head with four zoom settings for 28, 35,
85mm lenses with a guide number of
meters) or
bounce flash, it has two flash heads: the main head not only tilts
back 90° but rotates 270°, while the smaller secondary head
faces straight ahead to provide a catch light for the eyes. Similar
in
size and power rating to the SB-12, the
flashtube module for convenient bounce flash.
the camera to provide automatic TTL control of the
and meters) or
52
(ASAIISO
SB-12
, SB-16A and
SB-12
has
41
a guide number of
(ASAIISO
25
25
and feet).
32
and feet) for the 35mm setting. For
(ASAIISO
SB-17
SB-17
mount
25
(ASAIISO
The
SB-16A
50
and
100
and
employs a tilting
F3AF with 58-12
F3AF with
F3AF with S8-16A
58-17
56
Page 57
Speedlights
For those photographers requiring a separate bracket-mounting
unit, Nikon has the
S8-
11
feet), while the S8-14, which requires a separate battery pack,
has
a guide number of
(ASAIISO 25 and feet). For automatic TTL control, these units
be
must
flash heads, the
easily off the ceiling or walls for softer, more flattering lighting
for portraits.
Flash
To
mount other direct mounting flash units on the F3AF's acces-
sory shoe, a Nikon Flash Unit Coupler
coupler
AS
-4 or AS-7
of the AS-7
flash unit.
S8·11
and
14
S8-11
is
36 (ASA/ISO
used with the TTL Sensor Cord SC-12. Featuring tilting
Unit
is
S8-11
Couplers
necessary when mounting the Nikon S8-7, while the
is
for the S8-15, S8-E, or
is
that it lets
and S8-14.
100
and meters) or 60 (ASA/ISO
32
(ASA/ISO
and
AS·3,
you
The
guide number of the
100
and meters) or 52
14
allow
you
to bounce the light
4,
and
7
is
required.
S8-1O.
change film without removing the
A special feature
25
The
and
AS-3
F3AF with 58-11
A5-3
F3AFwith
58-14
57
Page 58
-ACCESSORIES-continued------------
Motor
One
the Motor Drive MD-4.
streamlined unit attaches to the bottom of the camera
onds
6* frames per sec
motor drive
duced
addition to the electromagnetic trigger button (which also turns
on
concentric
check button and
for automatic film rewinding,
which sto
AA-type penlight batteries fit into a quick-release clip housed
the base of the motor drive.
available for
possible firing rate. Once
you'
The Firing Rate Converter MK-1
accessory for a motor-driven
socket of the MD-4
vide three firing
you
focu
use
The
out changing film
• Possible with NiCd baltery pack al 11125 sec. or above with Ihe mirror
locked up.
Drive
of the most exciting accessories for the F3AF camera
and
advances the film either singly or
to
only those necessary for convenient operation.
the
camera's meter when depressed halfway), there are its
SoC
ps
ll
never want to take
to
operate the motor drive
ses
automatically.
in
vertical-format shooting.
Magazine Back MF-4 for shooting up to
MD·4
This
amazingly compact, light, and
in
ond-making
on
the market today. Actual controls have been re-
(Single/Continuous) mode selector, a battery
LED
indicators, two interlocking rewind slides
the motor
use
at
in
cold weather or when
and
rates-1,
It
is
also available
it the fastest regular production
and
a subtractive frame counter
the desired number of frames. Eight
An
optional
you
attach
it
off.
plugs into the remote terminal to pro-
2,
has its
the
is
F3AF.
It
or 3 frames per
on
continuous while the camera
own
handy trigger button for
as
an
sequence
NiCd
battery pack
you
want the fastest
MD-4 to your camera,
available
screws into the tripod
option .
as
second-a
250
frames with-
a special
in
sec-
up
llowing
is
to
In
in
is
.'
0 , I O ·
() III
: :
--,
0
58
Page 59
Data
To
Back
keep track of when photos were taken, the F3AF accepts the
Data Back MFback
@ with no sync cord needed. Three imprinting modes are
possible: year/month/day, day/hour/minute , or picture counting ;
information
then is imprinted
as
a handy clock, a quartz timer with
incorporated.
MF·14
14
which slips
is
displayed clearly
on
the film at the instant of exposure. Serving
on
in place of the regular camera
on
the data back via
an
alarm function
an
LCD
is
and
also
59
Page 60
-ACCESSORIES-continued------------
Close-Up
For
shooting subjects which are located closer than the closest
Equipment
possible focusing distance of the lens, Nikon makes a wide
variety of equipment:
1)
Close-Up Attachment Lenses
Nos.
0,
1,2,
3T. 4T,
5T.
and
6T.
These lenses screw into the front of the lens just like filters
be
to magnify the image. Exposure metering can still
done at
full aperture without compensation .
2)
Auto Extension Rings
PK-11,
PK-12, PK-13.
These fit between the lens and camera body. Used singly or
in
combination, exposure determination
ture with all AI-type lenses. (The
PK-11
is
done at full aper-
cannot
be
attached to
the AF-Nikkor lenses.)
3)
Bellows Focusing Attachment PB-6.
The PB-6 is also attached between the lens and camera body.
is
Exposure
beauty of this accessory
determined by the stop-down method. The
is
that you can change magnifi-
cations continuously by extending the bellows.
4) Micro-Nikkor
55mm
fI2 .
B,
105mm f/4, and 200mm
f/41F.
These specially designed lenses offer continuous focusing
from infinity down to 1/2X lifesize .
nification with
extension ring
PN-11
the
infinity up to
an
AI
Micro-Nikkor lens, the use of
is
required: the
for the 105mm f/4; to obtain magnifications from
1X
with the 200mm f/4 IF, use the Nikon
To
obtain 1/2X to 1 X mag-
PK-13
for the 55mm
an
f/2.B,
auto
and
Teleconverter TC-300. Even with these accessories, exposure
determined at full aperture. Note that
is
depth of field
as much
generally shallow. Thus, you should stop down
as
possible when photographing a subject with great
in
close-up photography,
depth. Since Micro-Nikkor lenses are not compatible with the
F3AF's autofocus and focus-aid functions, focusing must
be
done by manually rotating the focusing ring @ while using the
matte portion of the DX-1's focusing screen . For critical
60
in
focusing
close-up photography, the use of a suitable inter-
changeable focusing screen and accessory viewfinder
recommended .
When using close-up equipment such as a bellows unit or extension ring(s) attilched between the F3AF camera body and
lens, focus-aid operation depends
camera's mounting flange, as shown
For lenses not appearing
in
on
lens extension from the
in
the following table.
this list, focus-aid operation
possible with any close-up equipment attached.
focus-aid operation cannot be performed when a lens
in
the reverse position.
Notes:
1)
The
F3AF's meter coupling lever ® should be pushed up before at-
taching
is
2)
3) Auto Extension Rings
a bellows unit
3,
PN-I,
etc
Before attaching the PB-6 to the
removed from the camera body.
Adapter Ring
.
or
non-AI extension rings, such
F3AF,
the OX·1 Finder should
pK-1
BR
-4 cannot be attached to AF-Nikkor lenses.
and PK-II, Extension Ring
as
is
In
addition,
is
mounted
the PK-I , 2,
be
KI
and Auto
is
im-
first
Page 61
AR-7
Micro-Nikkor
Lenses
Auto Extension
Rings
Close-Up
Attachment
Lenses
61
Page 62
-ACCESSORIES-continued,------------
Duplication work and photomicrography
1)
The
The
F3AF combined with the proper accessory enables
perform duplication work or photomicrography.
In
ized areas of photography, however, focusing should
you
these special-
be
performed manually using the matte portion of the focusing screen
as
autofocus/focus-aid operation
In
addition, exposure compensation
is, in
most cases, impossible.
is
required because these
areas of photography represent unusual contrast situations.
in
Shown
the table
types and proper exposure. S
is
the relationship between specific photo
in
ce this
is
meant to
be
a guide,
practice, you should make further compensation by experimentation until you achieve the proper results.
Method
of
Copy
work
Slide
duplication
Photomicrography
+ : more exposure
Subje
ct
Photographs and
pictures with
ous gradation
Documents and
drawings of high
contrast
Slide
gradation stops
Slide of documents and
drawings photographed
Prepared specimen Stop-down
-:
con
with
continuous
less exposure
tin
u-
exposure
measurement
Full·aperture
or
stop-down
Stop·down letters
Exposure
compensation
Compensation
necessary
Approx.
+t
stops f
or
black letters
on
white background:
approx. -
112
stop for white letters
on
black background.
Appro
x.
+ 1 to + 2
Approx. +1
+2,112 stops for black
on
white back· Nikon Bellows
ground
o to approx.
for white letters
black background
Appro
x.
+ 1 stop
to
in
not
to
+2
to - 1
·1
12
to Nikon
-112
on
exposure compensation values listed below are reference
data obtained when general-purpo
color reversal film or microfilm for duplicat
advisable to take additional shots with
compensation
as
latitude.
2)
To
avoid vibration,
illumination
3)
It
is
on
and off.
advisable to
vibration.
Required
accessories
Micro·Nikkor 55mm
Cable release
Micro·Nikkor 55mm
Sli
de Copying
Adapter PS·6:
Focusing Attachment
PB
stop
·6:
Cable release
Mi
croflex PFX
se
film was used. With
ion
work,
± one-stop exposure
these films have very small exposure
you
can make the exposure by turning the
use
a cable relea
For
high'contrast subjects, u
reflectance
112
.8:
is
recommended. With
compensation is required regardless of whether
the background
112
.8:
When u
se
t the flood lamp 30cm away from its opal plate.
Generally, results come out better with more
exposure
sation
value
the
compensation value by
se
to eliminate camera
Remarks
se
of
gray
card
is
black or white.
sin
g Nikon Slide Copying Adapter PS·6,
in
photomicrography. The compen·
on
the
left
an t8%
in
determining
the
is
only a guide: determine
card,
no
exposure
test shooting.
exposure
it
is
62
Page 63
Anti·Cold
In
cold weather, use the Antiaccepts two
to
the batteries inside the camera body. Simply connect the
DB
-2
to
pocket or coat
metering system will function
Cable
The
screw-type
Battery
AA
-type batteries,
the camera body, then slip the assembly inside your
to
keep it warm. This
Release
AR-3
makes for vibration-free shutter release.
Pack
Cold
even
AR·3
DB·2
Battery Pack
as
an
alternative power supply
assures that the camera 's
in very
DB-2
cold temperatures.
, which
RubberEyecup
Attached to the finder eyepiece ®., this eyecup excludes strong
light and helps prevent eye fatigue.
Eyepiece Correction Lenses
These
are accessory lenses that screw into the viewfinder eyepiece to enable nearpictures without having to wear eyeglasses. Nine models are
available, offering a choice of
-2,
0, + 0.5, + 1, + 2
combined dioptry of the viewfinder
of
the
eyepiece correction lens
and
farsighted photographers to take
tl1e
following diopters:
and
+ 3; the diopters represent the
and
lens,
and
only.
not the dioptry
-5,
-4,
-3,
D8
-2
AR-3
Rubber Eyecup
Eyepiece Correction Lenses
63
Page 64
-ACCESSORIES-continued------------
Filters
Constructed of Nikon's own optical glass, Nikon filters not only
protect the front of the lens, but provide color correction or
allow you to create special effects. As shown
filters are broadly divided into the screwin
type.
Notes:
1)
For lens protection, the L39 and L37C are recommended.
2)
When
shooting a backlit subject
frame, a ghost image
you
should take the picture without a filter.
3)
The
F3AF
's
4)
In
impossible warning to blink.
autofocuslfocus-aid function cannot be used with the
low-light situation
is
likely to result when using a filter. In this case,
s,
the use
of
or
an
if
NO
in
the table, Nikon
in
type and the drop-
there
's
a bright source
filter may cause the focus-
in
ROO
the
.
F«
Both
CoIof
and
BlaCk-and·WhII,FlIm
Ul'lrlYIaIet
Ugh!
SoItflnets
NeulralOenslty
Lens
Hoods
Recommended to prevent extraneous light from striking the
lens, Nikon
snap-o
the lens hood specially designed for
lens hoods can
's
lens hoods come
n,
and collapsible rubber. Every
be
used
in
common by several lense
in
four styles: screw-in, slip-on,
len
s should
it.
Note, however, that some
be
fitted with
s.
64
~~~ ~ r.~~h
)
IncflCales
Increase
~I~~-4--~~~
"'"
in I/stop
.
~~~~
~-4--~--4-~
Page 65
Camera
Two camera cases are available for the Nikon F3AF: The CF-24
Semi-Soft Leather Camera Case houses the camera body with
AF-Nikkor
Camera Case accepts the camera, plus AF-Nikkor 200mm
1/3
.5 IF-ED.
Cases
80mm
1/2
.8 attached; the CF-6 Leatherette Speed
Neckstraps
Available are the leather neckstrap AN-1 (black), webbed nylon
. neckstraps
webbed nylon neckstraps AN-6Y (yellow) and AN-6W (brown) .
Compartment
A wide selection of six types to choose from, ranging lrom a
compact model to a large type which can accommodate large
or bulky camera equipment: FB-8, FB-11A,
and
FB-17
AN
-4Y (yellow) and AN-4B (black), and wider
Cases
.
FB-14, FB-15
, FB-16
CF-24
CF-6
65
Page 66
EVRANGEOFCAMERA---------------------
The
camera 's meter may
range covered by the exposure value (EV) range of the meter,
which varies with the aperture and ASAIISO setting.
The
charts
on
the f/stop, shutter speed and film speed, indicating the usable
functioning shutter speed (for metering purposes) with any film
speed/aperture combination.
Careful attention to the following instructions will assure precise
exposure, automatically, over the complete exposure control
and meter range capabilities of your Nikon F3
pages 68 and 69 show the relationships between
WhatlsEV?
Exposure value (EV)
combinations of shutter speed and aperture that give the
exposure effect when the scene brightness and ASAIISO remain the same.
At
ASAIISO
speed and
is
stopped down by one full f/stop or the shutter speed is one
step faster, the
up
by one full f/stop or the shutter speed
decrea
f/2 represents
sec. at
same, 1/30 sec. at
EV 12.
100
, the combination of a one-second shutter
an
aperture of f/1.4
EV
ses
by one. Using ASAIISO
EV
1/5
.6 represents
be
used only within the shutter speed
AF
.
is
a number representing the available
is
defined
as
EV
1. If the aperture
increases by one ; if the aperture
2, 1 sec. at f/5.6 represents
EV 12. Becau
f/11
and 1/1000 sec. at f/2 both represent
100
is
one step slower,
as
an
example, 1 sec. at
EV
se
the exposure
is
opened
5, while 1/
How
to
Section A of the chart shows the usable
Read
on
the lens' maximum aperture
it
also indicates the usable
stop-down metering. Section D shows
film speed, Section B the aperture settings for various film
speeds, and Section C the shutter speeds to match any film
speed/aperture combination.
In
practice,
low end of the metering range which require a careful check.
The
situations, and it
sa
is
taking situations that you need pay any special attention.
me
Full-aperture metering
Use
100
and the
will find that the F3AF's
If
the lens
f/5.6 indication for ASA/ISO
EV
protruding line intersects with Section C's vertical line for a
shutter speed of 8 sec. (the F3AF's slowest shutter speed).
125
From this point of intersection, follow
the
leads to the Section D
will obtain
you
EV
range of the Nikon F3AF encompasses most lighting
the Nikkor 50mm f/1.4 lens and a film speed of ASAIISO
as
an
example.
EV
value indicated for ASAIISO
is
set at f/5.6, refer to Section B
an
EV
the
EV
Chart
in
EV
range for aperture settings
will find that
is
only under very dim or very bright picture-
By
range of 2. Start again from the f/5.6 indication
it
is
generally the high end and the
referring to the f /1.4 column
EV
range
in
100. Go
's
EV
value for ASAIISO
EV
full-aperture metering , while
the
value for the ASAIISO
100
this case
is
and
diagonally down until the
the
horizontal line that
range depending
in
Section A
in
Section
D,
, and
you
you
1 to 18.
single out the
100
in
66
Page 67
for ASAIISO
protruding line intersects with Section
shutter speed of
this time. Then follow the horizontal line that leads to Section
D's
EV
16
. This means that at
shutter speeds from 8
ran
ge is
range of
The
green area
Section C demonstrates the usable shutter speed range to
match any film speedlaperture combination at ASAIISO
(The minimum aperture of the lens is
Similarly
AF
-Nikkor 80mm f/2.8lens
Two
red lines
ranges of the scene brightness usable with autofocus or focu
aid operation. Therefore, the combinations of shutter speeds
and
apertures indicated
usable.
100
in
Section B, and go down diagonally until the
1/
2000 sec. (the F3AF's fastest shutter speed)
value for ASA/ISO lOa, and
EV
2 to 16, which
EV
1 to
in
Chart
in
an flstop of
to
1/2000 sec
is
EV
18
.
in
Chart 1 encompassed by
2,
the usable range (at ASAIISO
Section C of both charts indicate the EV value
well within
is
shown
in
the areas outside the lines are not
C'
s vertical line for a
you
will get a reading of
1/5
.6 at ASAIISO
.,
the effective metering
the
F3AF
the
heavy lines
1/16.)
in
green.
100
's
metering
100)
EV
and at
100
for the
Stop-down metering
For stop-down metering, Section A indicates the usable
range for various aperture settings. For example, if the
stopped down to f/8 at ASAIISO lOa, refer to the f/8 column
Section A and the
section D, and
23
. Now single out f/8 at ASAIISO
onally down until the protruding line intersects with Section C
vertical line for the shutter speed of 8 sec . From this point of
in
intersection, follow the horizontal line that leads
EV
value for ASAIISO lOa, and
.
3. This means that
speed of 8 sec. give
find out the slowest shutter speed usable, follow the f/8 indication for ASAIISO
intersects the horizontal line
that
careless or rough handling
may damage
following tip
will always work
as the day
it.
Observe the
s,
and the F3AF
as
you
bought
perfectly
it.
in
- Before using the camera,
good
practice to check
thoroughly first.
-
Clean
metallic parts with a
blower brush or with a
cloth.
CARE-----------
it
is
a
-
Do
not force your camera
trols-
they are designed
work with a minimum of pres·
sure.
- Generally, the camera does not
need lubrication.
F3AF
in
top working order,
recommended that
and
shutter
advance lever a few times each
month with or without film load·
ed
in
the camera.
dry,
it
soft
's
con·
To
keep your
it
you
operate the film
trip the
Do
not touch
reflex mirror
to
screen to prevent them from
getting dirty or scratched.
move dust with a blower brush.
-
If
the camera body
to
rain
or mist, wipe moisture
gently with a soft cloth
is
the camera. After
camera near salt water,
care that
you
mOistened
remove possible traces of salt.
with pure water
the
AF
contacts@,
@ or the focusing
Re·
is
exposed
and
dry
using
the
it
with a cloth
take
wipe
to
70
Page 71
-Avoid touching
interi
or
shutter curtains ®
pressure plate @,
-If
the
inside of
accidentally gets wet, its internal
precisi
rusty,
Take
away to
N
ikon
dealer for a checkup,
Work
of this sort may require
repair payment.
the
surface
s,
especially t
the
camera
on
parts may get
the
camera right
the
nearest authorized
camera
and
he
film
body
's
-Clean glass surfaces s
the lens
or
lens
using
you
leave
not
long
time, take out
s,
Without
the
body
high
or camphor.
the
tiss
or
to
using
humidity, naphtha-
® with a blower brush; avoid
using
possible, Gently wipe dirt,
smudges
soft cotton moistened with a
small amount of absolute alcohol,
from center
s
ure
-
When
a
terie
keep
camera away
ature,
line,
uch
finder eyepiece
ue
as
much
fingerprints with
a spiral motion
periphery,
no
cap
from
wiping trace
the
camera for
the
lens
, always
on,
Store
high
temper-
Make
bat-
as
Caution: Use
blower
to
cause possible damage
as
glass
is
by suddenly lowering the tem perature on the lens surface,
avoid damage, hold the blower
upright, keep its nozzle more than
30cm away from the lens surface
s,
and move the nozzle around
-
In
best
the
vinyl
keep
and
clean the lens may
(e
specially when
used for the front lens element),
a
humid
to
store
bag
with a desiccant
away
salt.
of
a spray-gun type
ED
environment,
the
camera
dust,
moisture
to
the
glass
To
so
it
in
that the stream
centrated
is
-Storing leather cases enclosed
in a vinyl
a
to
leather
exercise
in
one spot.
bag
to
due
care,
of
deteriorate,
air
is
not con-
may cause
the
so
71
Page 72
TIPS ON BATTERY
1)
Battery power falls off
this may cause the camera's photometric circuit to cease
operate.
camera body from the cold. Note that battery power will
recovered
2)
When not using the camera for a long period of time, take
batteries out and store them
Should the batteries be left
period of time, insufficient contact may occur due to battery
contamination. Thus, it
the batteries and the contact section
with a soft cloth. If the battery chamber
battery, remove the batteries at once and clean the chamber.
In
this situation, use new batteries and protect the
as
soon
in
extremely cold temperatures and
as
the temperature becomes normal.
in
a cool (below 25°C), dry place.
in
the battery chamber for a long
is
good practice to periodically clean
USE----------
in
the battery chamber
is
stained by a leaking
3)
Never mix new and old batteries or batteries of different
to
makes.
4)
Always check battery power before every shooting session.
be
It is a good idea to have spare batteries
lengthy shooting assignment.
5)
Keep batteries away from infants and small children.
a battery
as
problems.
6)
Never disassemble batteries or dispose of them by bourning.
is
accidentally swallowed, call a doctor immediately
the material inside the batteries can cause serious
on
hand during a
In
case
72
Page 73
ABOUT
1)
At
high temperatures (over approx. 60°C), the whole surface
turns black so that the exposure information cannot
However, this situation will return to normal when the temperature drops.
2)
Avoid storing the camera
in
a car parked
shorteri the
3)
When the temperature goes below freezing, the response
time decreases as the liquid crystal becomes more viscose.
4)
Although the Nikon F3AF employs the highest quality
deteriorates
or seven years. When this happens, please contact your
dealer or the Nikon
ment of this element at a small charge.
THE
in
direct sunlight or inside the trunk.
LC~'s
life by doing
in
contrast and becomes difficult to see after six
LIQUID CRYSTAL DISPLAY
in
excessively hot places, such
so.
se
rvice facility nearest you for replace-
You
be
read.
may
LCD,
(LCD)---
as
it
73
Page 74
SPECIFICATIONS-------------
35mm
Type of camera
Picture format
Len
s mount
Lenses
Focus detecting system
Brightness range
for autofocusl
focus-aid operation
Focus informat ion
display
Focus lock buttons
Exposure control
system
74
single-lens reflex
24mmx36mm
(standard 3
Nikon bayonet mount
Autofocus operation: AF-Nikkor
80mm
IF-ED; focus-aid operation: more
than 30 Nikkor and Nikon Series E
lenses with maximum aperture of
f/3.5 or faster; manual operation:
more than 60 Nikkor and Nikon
Series E lenses available
TTL image displacement detecting
system by SPDs built into AF
Finder
Appro
(at ASAIISO 100)
Visible
LEDs; two red arrows light up to
indicate correct focus
focus -aid operation, right- or lefthand arrow indicates out-
image (too near or too far), red X
glows when autofocus/focus aid is
impossible or subject
focus to great extent
Two
lens barrel; either locks lens
distance setting during autofocus
operation
Aperture-priority automatic
exposure with manual override and
5mm
film format)
f/2.8 and 200mm f/3.5
DX
-1
x.
EV
4"'EV
20
in
the viewfinder via red
in
autofocus/
of
-focus
is
out of
buttons provided on AF-Nikkor
Meteri
ng
range
Shutter
Shutter speeds
Exposure information
display
backup mechanical control ;
through-the-Iens, full aperture
metering via silicon photodiode
(SPD) with centerweighted metering
pattern and meteri
incorporated into camera body ;
meter works with all viewfinders
EV
1 to
EV
f/1.4 lens
ASAII SO
Horizontal-travel, titanium focal plane shutter
Auto: electromagnetically controlled
step less speeds from 8 to 1/2000
sec
magnetically controlled discrete
speeds from 8 to 1/2000 sec., plus
B and X (1/80 sec.); mechanical:
T setting on shutter speed dial and
1/60 sec. when using backup
mechanical release lever
Visible
on
closest to automatically selected
speed
indicated by
indicates underexposure;
manual, M appears with +
indicating over- or underexposure
and ture
aperture-direct-readout (ADR)
window
or
100
.;
manual: quartz/electro-
in
the viewfinder via
auto, discrete shutter speed
is
displayed, overexposure
+ correct exposure ; aper-
in
use also shown through
ng
circuits
18
at ASAIISO
EV 3 to
EV
with f/2.8 lens
+ 2000 and -8-
100
20 at
on
LCD
or-
with
;
Page 75
Shutter release button
Backup mechanical
release lever
Viewfinder
Viewfinder illuminator
Finder terminal
Focusing screen
Film speed range
Exposure
compensation dial
Exposure memory lock
button
Electromagnetically releases
shutter ; initial pressure on shutter
release button switches on meter
and autofocus/focus-aid function
(after power switch
meter and autofocus/focus-aid
function then remain on for
after finger
Trips shutter at
of shutter speed dial setting except
T;
used when batteries are dead
at
Interchangeable eyelevel pentaprism type AF Finder
standard ;
0mm
5
both lenses set at infinity; appro
92 % frame coverage; five other
types available
Illuminates both
f-number
5-pin terminal provided for
accessories
Fi
into the AF Finder OX-l ; with viewfinders other than OX-l,
changeable screens are available
ASAIISO
±2
in
Operates on auto to electronically
lock
O.SX
lens or 1.3X with
xed matte type screen
12
EV
compensation is possible
one-third increments
in
shutter speed
is
turned on),
is
taken off button
1/60 sec. regardless
OX
LCD
and
-l as
SOmm
AOR
is
21
magnification with
to ASAIISO 6400
16
built
inter-
sec.
lens,
x.
Auto flash control
system
Accessory shoe
Sync terminal
Flash synchronization
Flash ready-light
TIL
direct flash control governs
of
output
using camera's
effective ASA/ISO range from
ISO
Special Nikon type located at base
of rewind knob; has hot-shoe
contac.t,' ready-light contact, and
TIL
accepts Nikon S8-12,
S8-17 shoe-mounting electronic flash
unit or TTL connecting cord from
S8-11
output control using camera's
metering cell
Threaded type provided for offcamera or multiple-flash
photography
Speeds
with electronic flash; with Nikon
dedicated flash unit, flash sync
is
when shutter speed dial
or
speeds, shutter fires at the speed set
Visible
up
is
warn of insufficient light output,
improper flash connection, or
improper ASAIISO setting
Nikon dedicated flash unit
SPO
sensor;
ASAI
25 to ASAIISO 400
flash output control contact;
or S8-
14
of
1/S0
automatically set to
S8
-16A or
for
TIL
direct flash
SPO
sec. (X) or slower
1/S0
sec.
is
set at A
1/125 sec. or above; at slower
in
the viewfinder ;
when Nikon dedicated flash unit
completely recycled or blinks to
LED
lights
75
Page 76
-SPECIFICATIONS-continued-----------
Film advance lever Wound
Automatic film advance Possible with optional Motor Drive
Frame counter Additive type, self-resetting; for
Film rewind
Self-timer Quartz-timed
Eyepiece shutter Prevents stray light from entering
Depth-of -field preview Coaxial with mirror lockup lever
button
Reflex mirror Automatic instant-return type with
Multiple exposure lever Disengages frame counter for
Camera back Hinged interchangeable type;
Power switch Switches
in
single stroke or series of Batteries
strokes with 30
and
1400 winding angle
MD-4
blank exposures before frame one,
shutter speed automatically set to
1/80 sec. with shutter speed dial Dimensions
set to A or 1/125 sec. or above
Via
folding crank and rewind button Weight
in
baseplate
exposure;
first 8 sec. then at 8Hz for
viewfinder from the .rear during
self-timer operation
lockup facility ; incorporates
air damper
correct count
memo holder provided
to
uncover
0
stand-off angle
10
sec. delayed
LED
blinks at 2
on
when turned clockwise
red
dot
Hz
la
for
st 2 sec.
Two
1.5V
manganese or zinc-carbon batteries
in
focus-aid operation ; two 1.55V
silver-oxide cells (Eveready
076 or equivalent), two 1.
alkaline-manganese cells, or one
3V
148.5mm(W)x115.5mm(H)x
90.0mm(D) with
Approx. 950g with
(including batteries)
AM-type
the AF Finder
lithium battery for camera body
alkaline-
DX-1
for autofocusl
AF
Finder
AF
Finder
EPX76
5V
DX-1
,
DX-1
76
Page 77
IMPORTANT!------------------------------
The
Nikon F3AF
which performs full-aperture metering with AI-type lenses. The aperture ring of
these lenses has a meter coupling ridge
two holes (see illustration). Almo
AI
type. However, please confirm whether or not your lens
the F3AF.
or book provided with AI-Nikkor lenses
feature. All Nikon Series E lenses
ing
coupl
To
BASIC
stop-down exposure measurement is required with the camera body
coupling
Note:
matic diaphragm and meter coupling s
users. For further information concerning lens modification, please contact your local authorized
shoe.
attach
OPERATION
lever @ locked up (refer
The
Nikon dealer.
is
an AI-type (Automatic Maximum Aperture Indexing) camera
® and a meter coupling shoe
st
all lenses now manufactured
Note that the "AI" or "AI-S" mark
have
an AI-type lens to the camera body, follow the directions provided
modification, at reasonable cost,
section of this instruction manual. If the lens
to
the page 41).
hoe,
on
is
of
is available for the convenience
the cover of the instruction sheet
your assurance that the lens offers the
the
AI
feature but
most non-AI Nikkor lenses having both an auto-
is
by
Nikon are of the
AI
before using
do
not
have
in
a non-AI type,
®l
containing
of
Nikkor lens
it
with
a meter
in
the
's
meter
AI
77
Page 78
(Nikon)
NIPPON KOGAKU K.K.
No reproduction
In
whole or
Critical articles or reViews), may be made without,
written authorIZation Irom the publishers
In
any form of this booklet.
In
part (except lor bllel quotation
In
Printed
in
Jap
an (84.3.
AI &-3
Loading...
+ hidden pages
You need points to download manuals.
1 point = 1 manual.
You can buy points or you can get point for every manual you upload.


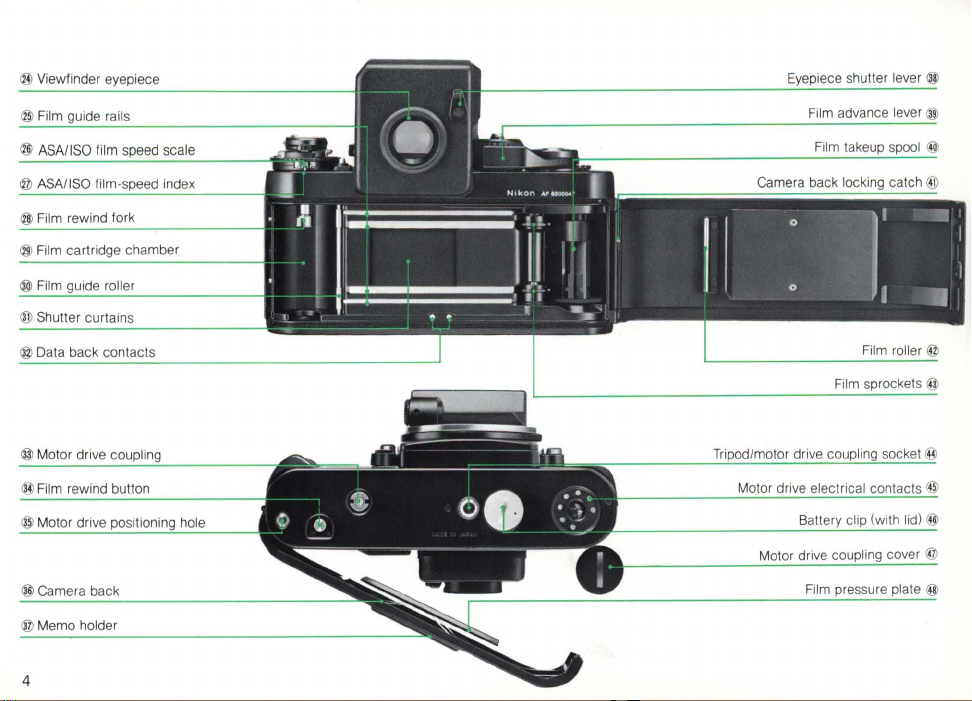
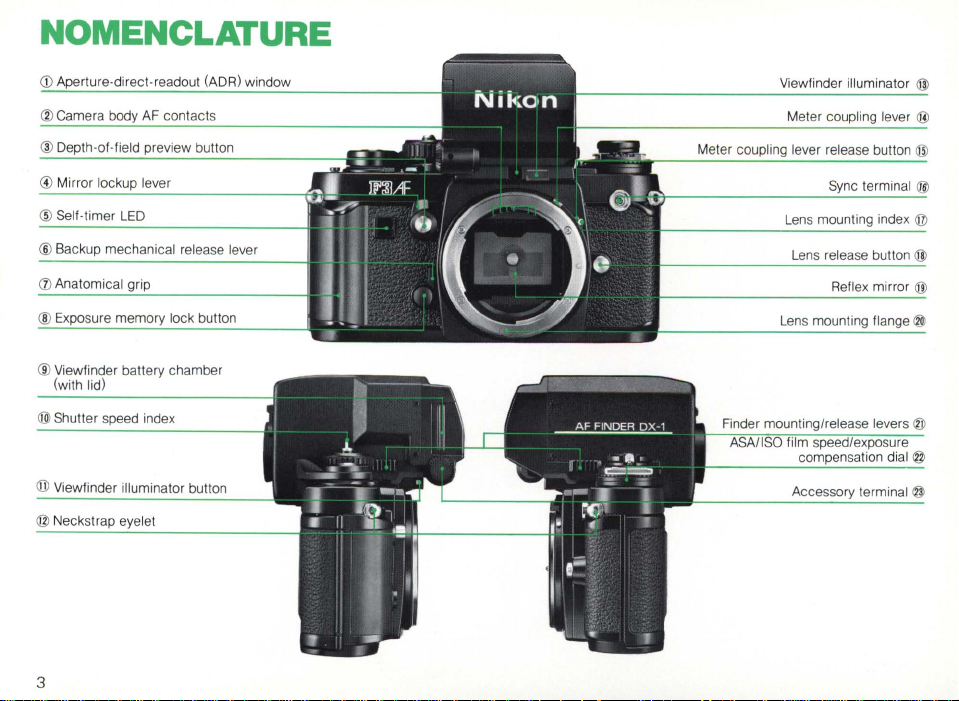

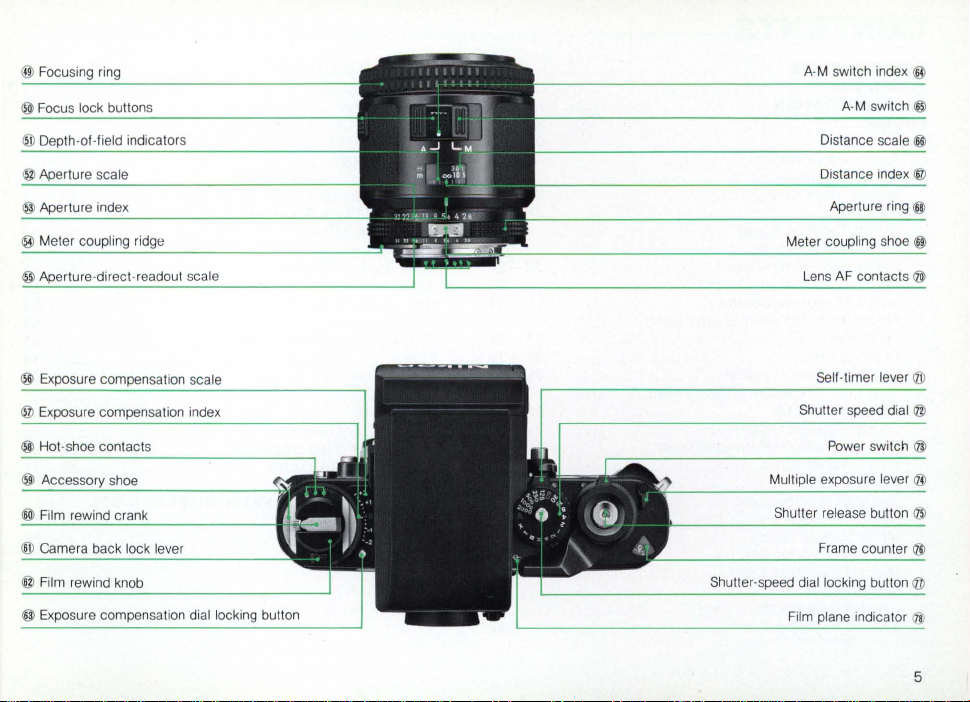

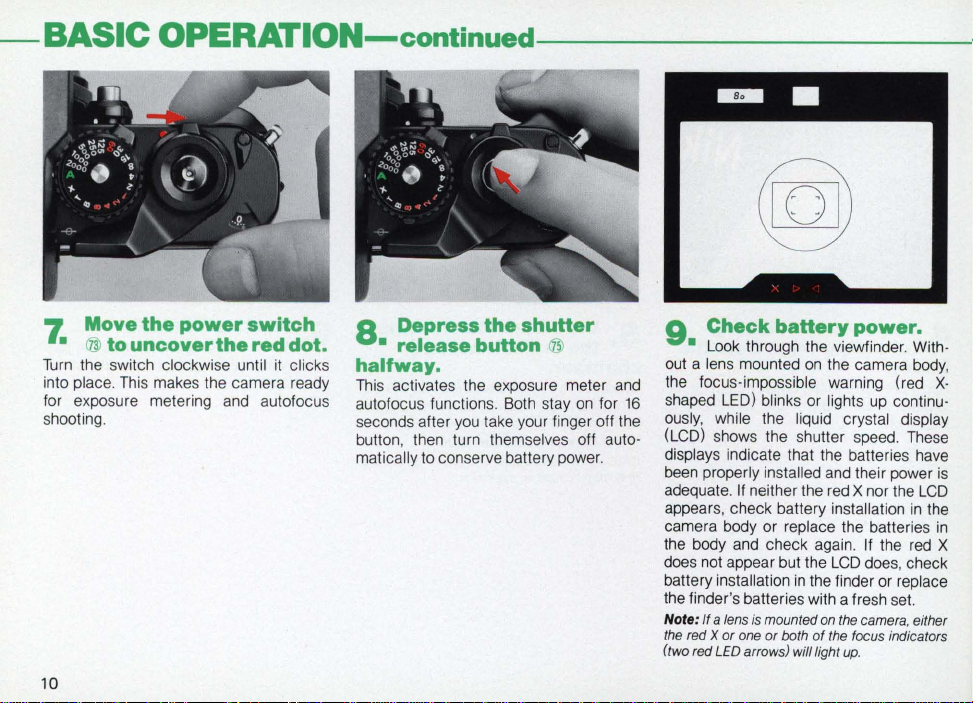


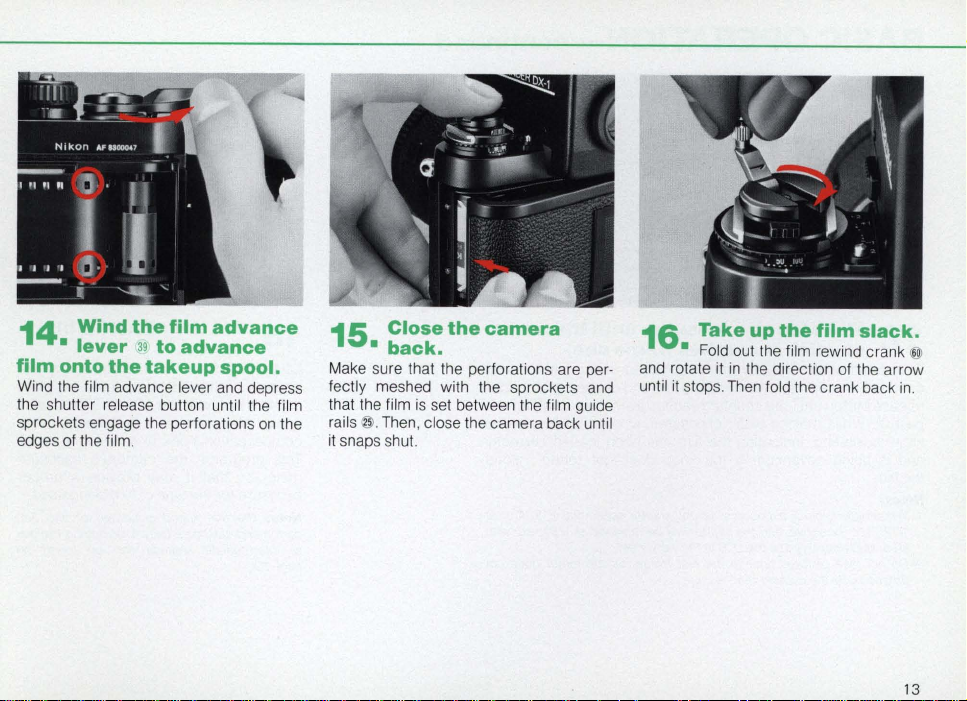
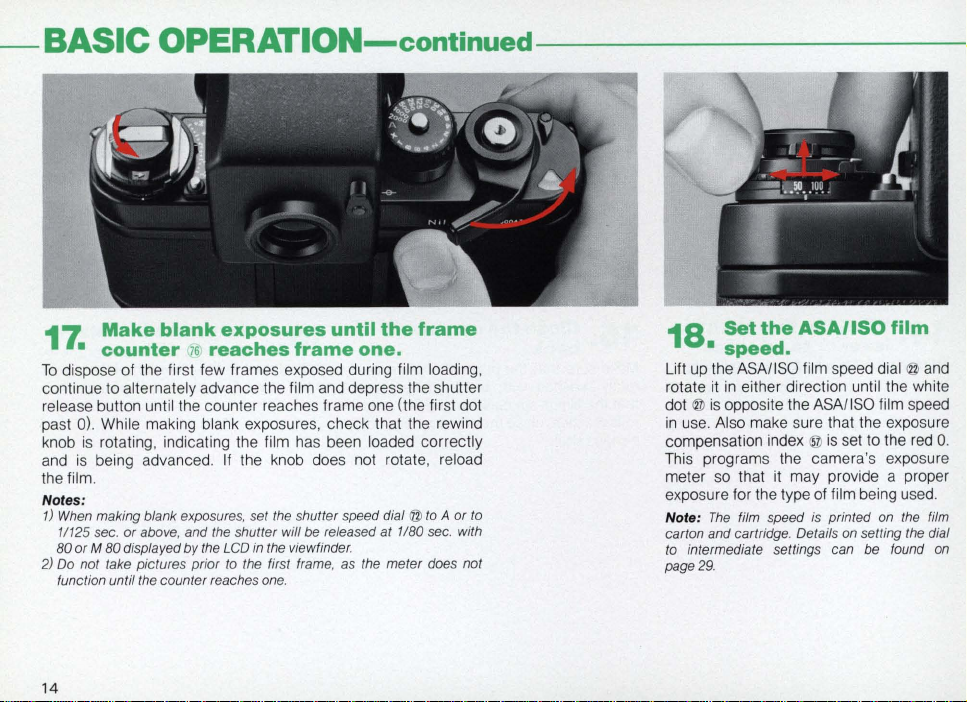
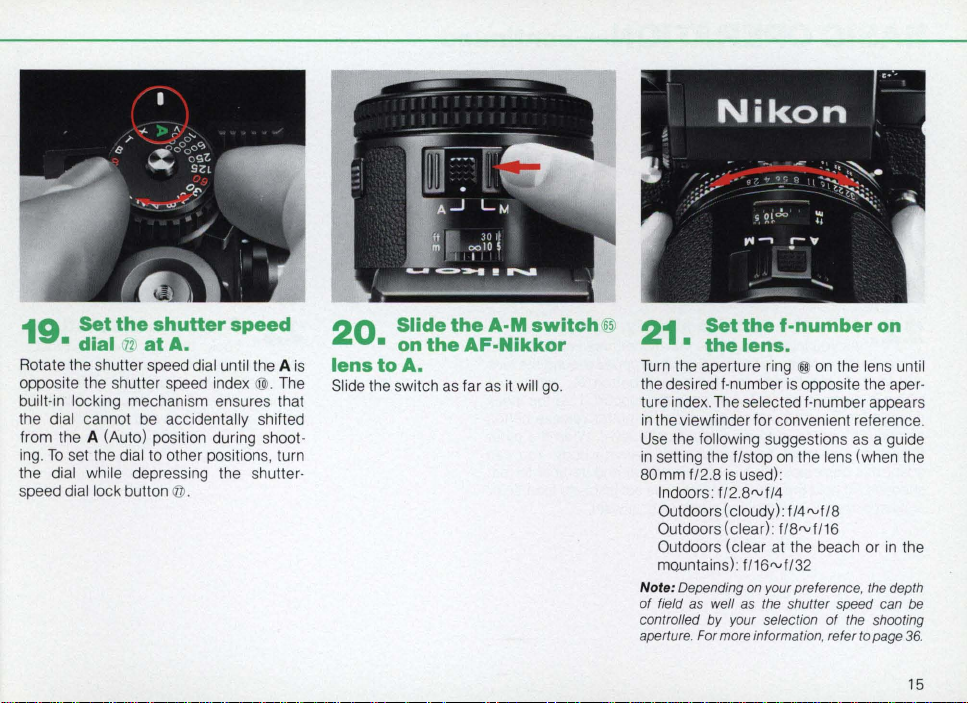
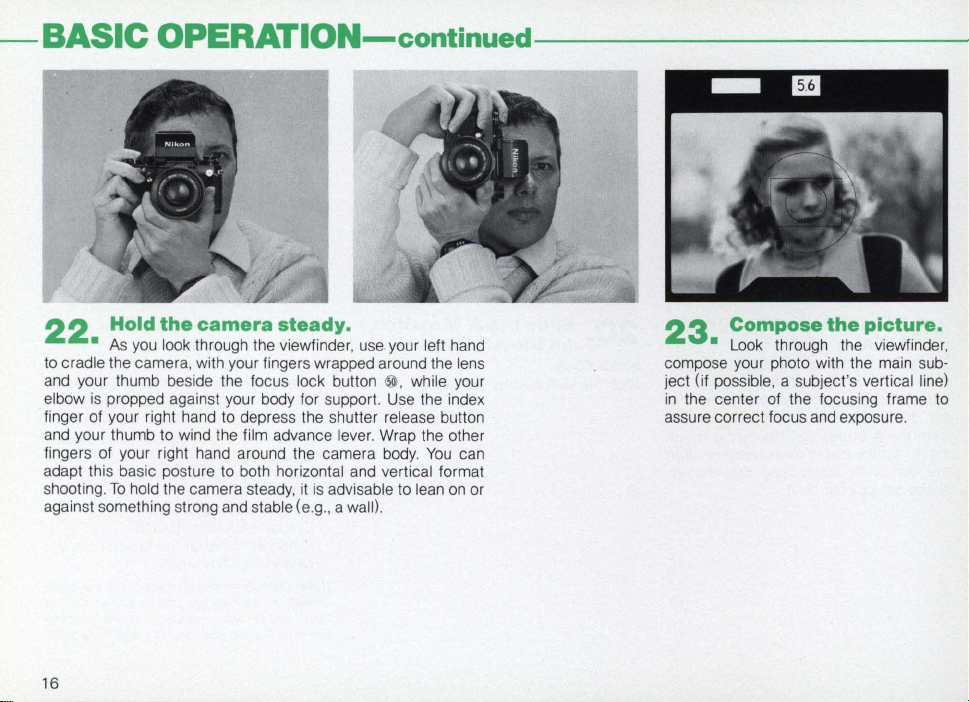
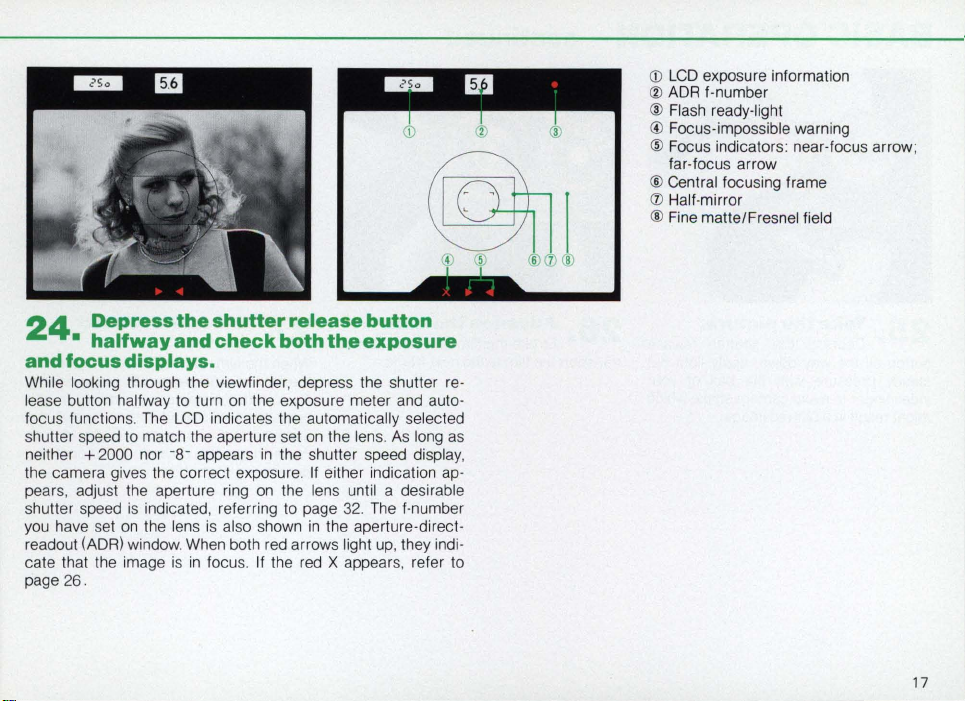
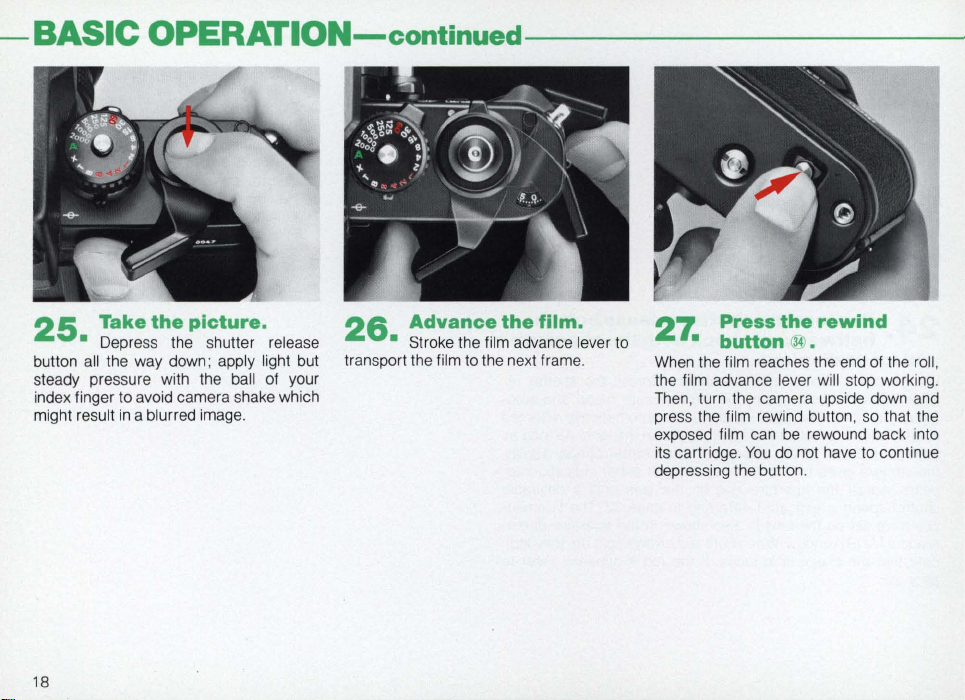

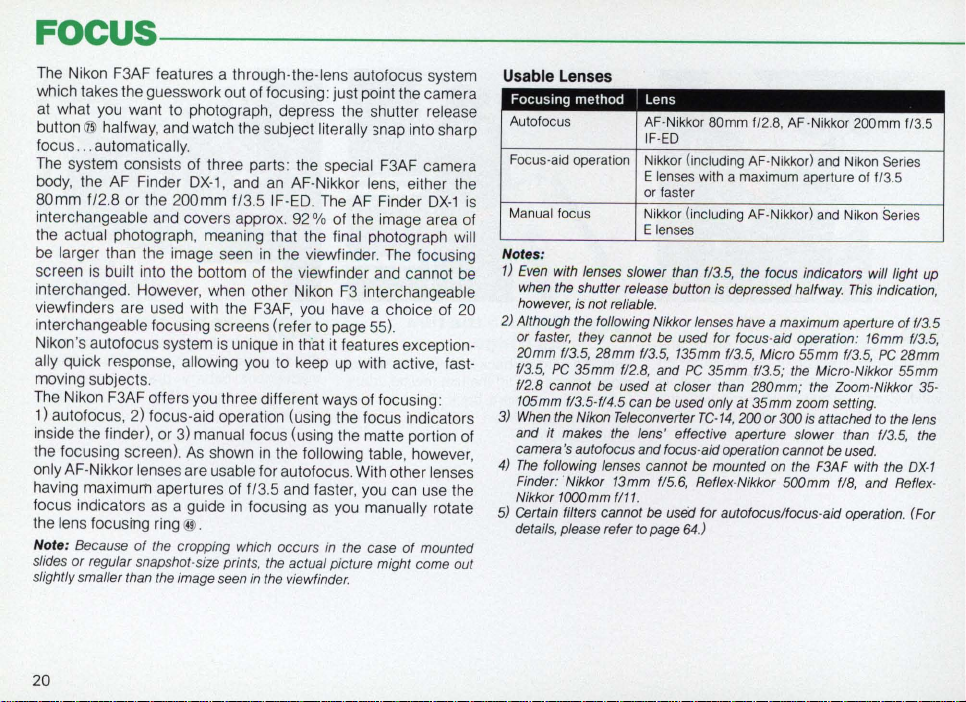
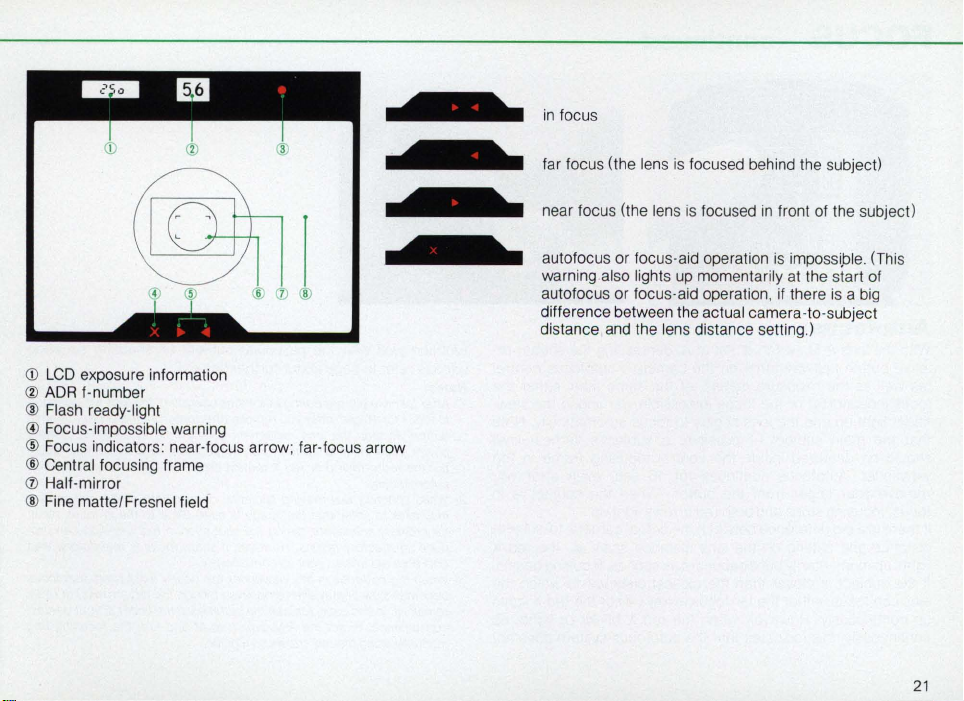
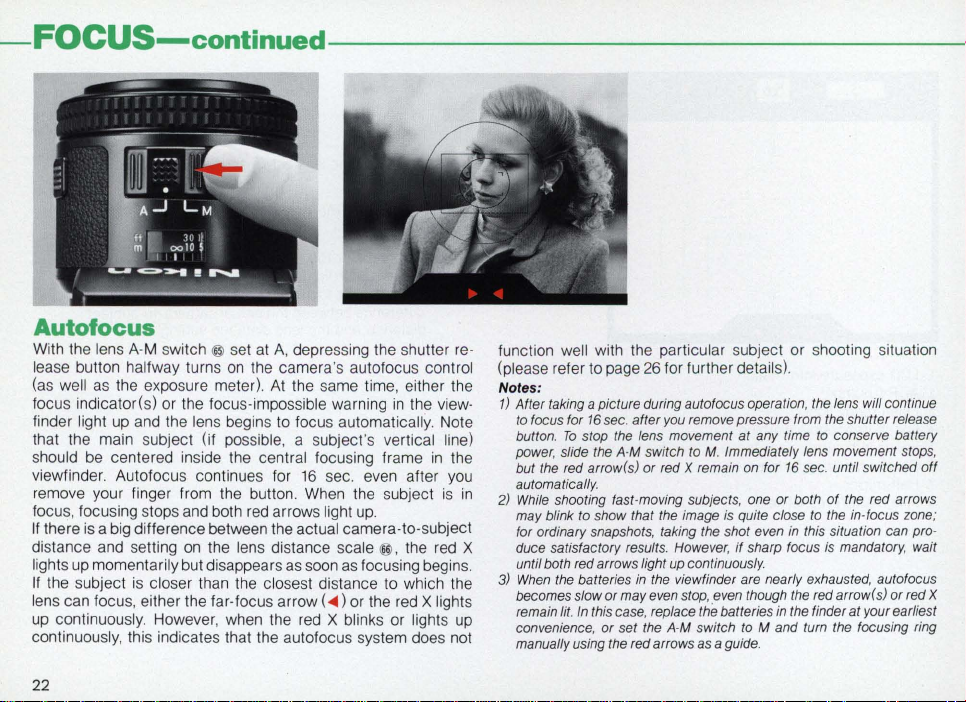
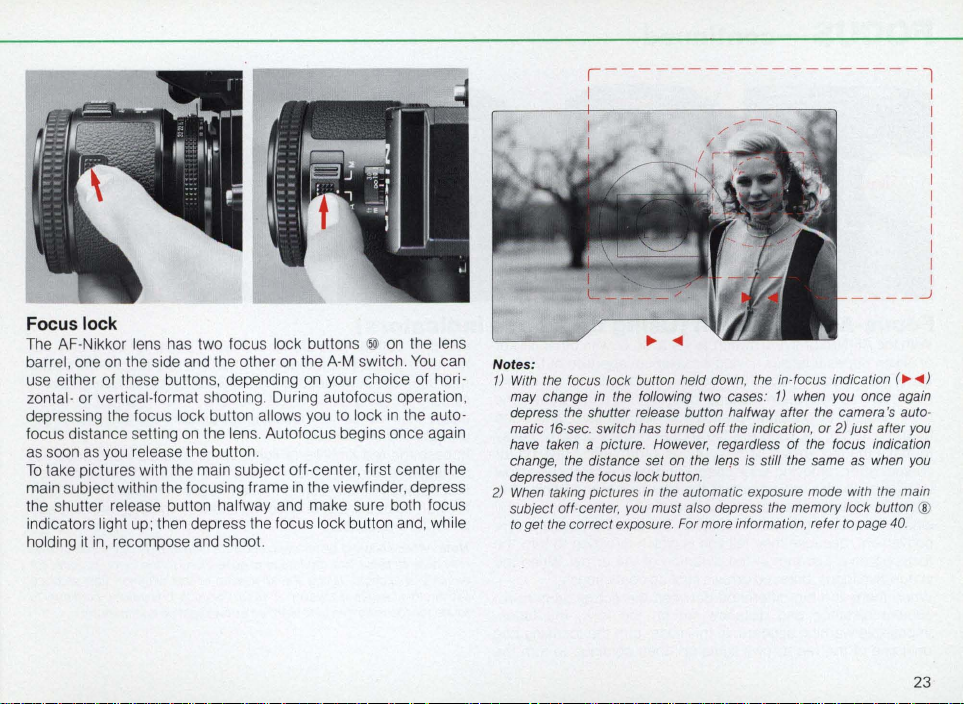
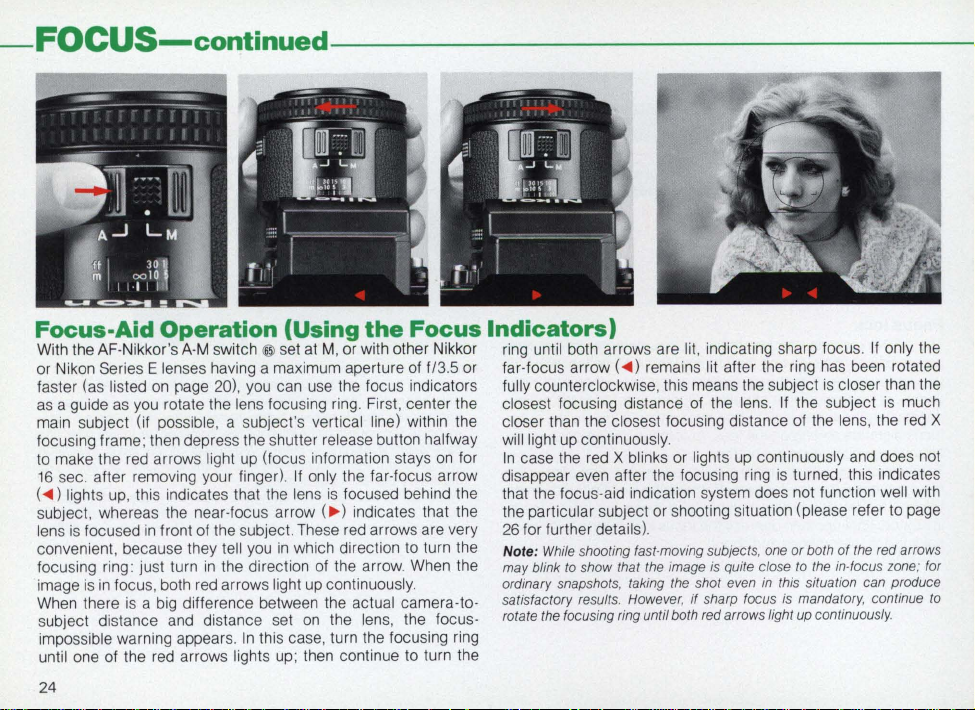


 Loading...