

Nikon f-28G-ED-AF-S-VR-II User Manual [en, de, es, fr, it]
VR
VR
VR
Jp
En
De
Fr
Es
It
Ck
Ch
使用説明書
(P. 2–13)
Instruction Manual
(PP. 14–21)
Bedienungsanleitung
(S. 22–29)
Manuel d'utilisation
(P. 30–37)
Manual de instrucciones (PP. 38–45)
Manuale di istruzioni
(PP. 46–53)
(P. 54–61)
(P. 62–69)
AF-S Zoom-Nikkor
70–200mm
f/2.8 IF-ED
この表示を無視して、誤った取り扱いをすると、人が死亡または重傷を
負う可能性が想定される内容を示しています。
この表示を無視して、誤った取り扱いをすると、人が傷害を負う可能性が
想定される内容および物的損害の発生が想定される内容を示しています。
2
安全上のご注意
ご使用の前に「安全上のご注意」をよくお読みのうえ、正しくお使いください。こ
の「安全上のご注意」は製品を安全に正しく使用していただき、あなたや他の
人々への危害や財産への損害を未然に防止するために、重要な内容を記載してい
ます。お読みになった後は、お使いになる方がいつでも見られる所に必ず保管し
てください。
表示について
表示と意味は次のようになっています。
注意
警告
警告
分解したり修理・改 造 を し ないこと
感電したり、異常動作をしてケガの原因となります。
落下などによって破損し、内部が露出したときは、露出部に手
を触れないこと
感電したり、破損部でケガをする原因となります。
カメラの電池を抜いて、販売店またはニコンサービスセンターに修理を
依頼してください。
接触禁止
すぐに修理依頼を
分解禁止
お守りいただく内容の種類を、次の絵表示で区分し、説明しています。
絵表示の例
△記号は、注意(警告を含む)を促す内容を告げるものです。図の中や近くに
具体的な注意内容(左図の場合は感電注意)が描かれています。
記号は、禁止(してはいけないこと)の行為を告げるものです。図の中や近
くに具体的な禁止内容(左図の場合は分解禁止)が描かれています。
●記号は、行為を強制すること(必ずすること)を告げるものです。図の中や
近くに具体的な強制内容(左図の場合は電池を取り出す)が描かれています。
Jp
警告
熱くなる、煙が出る、こげ臭いなどの異常時は、速やかにカメラ
の電池を取り出すこと
そのまま使用すると火災、やけどの原因となります。電池を取り出す際、
やけどに十分注意してください。電池を抜いて、販売店またはニコン
サービスセンターに修理を依頼してください。
水につけたり水をかけたり、雨にぬらしたりしないこと
発火したり感電の原因となります。
引火・爆発のおそれのある場所では使用しないこと
プロパンガス・ガソリンなど引火性ガスや粉塵の発生する場所で使用
すると、爆発や火災の原因となります。
レンズまたはカメラで直接太陽や強い光を見ないこと
失明や視力障害の原因となります。
3
注意
ぬれた手でさわらないこと
感電の原因になることがあります。
製品は幼児の手の届かないところに置くこと
ケガの原因になることがあります。
使用しないときは、レンズにキャップをつけるか太陽光のあたら
ない所に保管すること
太陽光が焦点を結び、火災の原因になることがあります。
三脚にカメラやレンズを取り付けたまま移動しないこと
転倒したりぶつけたりしてケガの原因になることがあります。
電池を取る
水かけ禁止
使用禁止
見ないこと
感電注意
放置禁止
移動禁止
保管注意
Jp
すぐに修理依頼を
NORMAL
ACTIVE
ON
OFF
M/A
M
FULL
∞2.5m
F
G
A
C
B
D
E
4
H
I
J
5

6
Jp
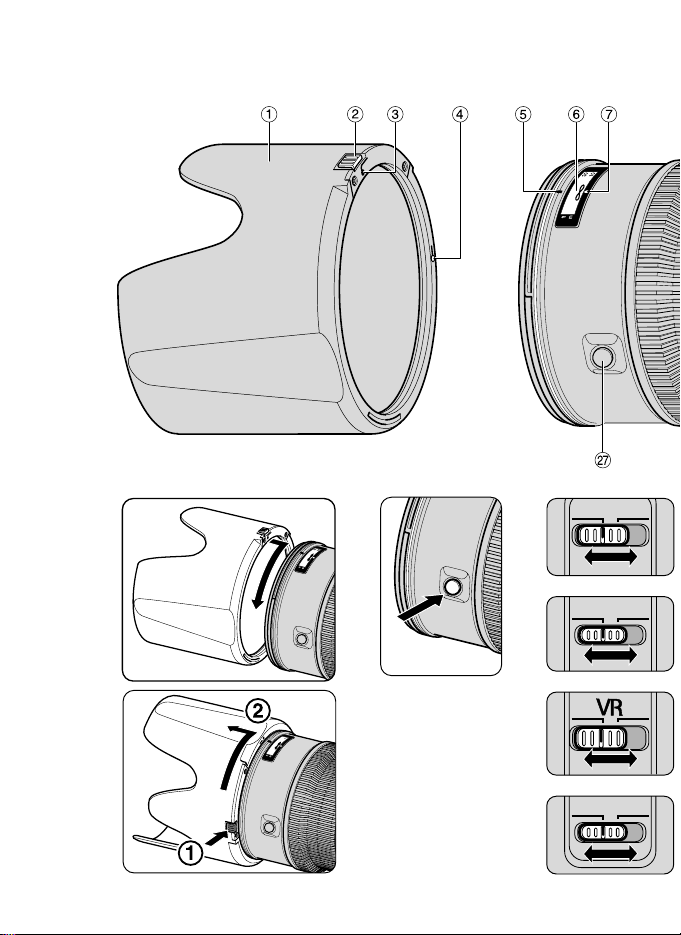
各部の名称
1フード
2フードロック解除ボタン
3フード取り付け指標
4フードセット指標
5フード着脱指標
6距離目盛
7距離目盛基準線
8フォーカスリング
9ズームリング
!焦点距離目盛
"焦点距離目盛基準線
#三脚座リング回転位置指標
$位置指標(90°)
%三脚座リング
&レンズ着脱指標
(レンズマウントゴムリング
)CPU信号接点
~三脚座取り付け脚
+三脚座固定ネジ
,三脚座
-三脚座ロック解除レバー
.三脚座リング止めネジ
/手ブレ補正モード切り換えスイッチ
:手ブレ補正スイッチ
;フォーカス制限 切り換えスイッチ
<フォー カス モード 切り換えスイッチ
=フォー カス ロックボタン
カメラ別の使用可能機能表
使用できる機能には制限・制約がある場合があります。カメラの使用説明書もご確
認ください。
カメラ
手ブレ
オートフォーカス機能
露出モード
補正機能
P*S AM
F6、F5、F100、F80シリーズ、
ニコンU
2、ニコンU、D2シリーズ、
D1シリーズ、D200、D100、
D70シリーズ、D50
プロネア600i、プロネアS **
F4シリーズ、F90Xシリーズ、
F90シリーズ、F70D
ニコンU
S、F60D、F50D、
F-401シリーズ
F-801シリーズ、F-601M
その他***
○:使用可 ×:使用不可
*:P に は AUTO(オート)モード、イメ ージプログラムモードを含みます。
**:M モードの設定はありません。
***:このレンズはF3AFカメラでは使用できません。
○○○○○○
×○○○○○
×○○○××
××○○○○
××○○××
××××××

7
Jp
はじめに
このたびはニッコールレンズをお買い上げいただき、誠にありがとうございます。
このレンズは、手ブレ補正機能および、高速で静かなAF(オートフォーカス)撮
影を可能にするレンズ内超音波モーター(サイレント・ウェーブ・モーター)駆
動方式を採用した高性能なズームレンズです。
特長
●
手ブレ補正機能を使用すると、使わないときと比べ約3段分シャッタースピードを遅くして
撮影できるため、シャッタースピードの選択の範囲が広がり、手持ちの望遠撮影が容易。
●
手ブレを主に補正するNORMALモードと、乗り物に乗っている状態での手ブレを補正
するACTIVEモードの切り換えが可能。
●
手ブレか流し撮りかを自動的に識別し、流し撮り時にも手ブレ補正機能の威力を発揮
(NORMALモード時)。
●
AF(オートフォーカス)撮影およびMF(マニュアルフォーカス)撮影の切り換えが簡単に
できるフォーカスモード切り換えスイッチを装備。
●
AF撮影中にも瞬時にマニュアルフォーカスモードに切り換えることのできる「マニュア
ル優先オートフォーカス」機能、AF撮影時にAF作動を一定の撮影距離範囲に制限できる
フォーカス制限切り換えスイッチ、レンズ側でのピント固定操作ができるフォーカスロッ
クボタンなど、数々の機能を装備。-「ピント合わせの方法」参照
●
被写体までの距離情報をカメラボディ側に伝達する機能を備え、3D測光機能を持った
カメラとの組み合わせ時には、より的確な露出制御を実現。
●
ニコン独自のED(特殊低分散)ガラスによる色収差の補正とともに、良好なボケ味が得
られる円形絞りの採用により優れた光学性能、描写性能を発揮。
●
最短撮影距離1.5m(オートフォーカス時)/1.4m(マニュアルフォーカス時)までの近接
撮影が可能。
●
三脚座は着脱式で、不要な時は取り外しが可能。
注記
●
レンズのCPU信号接点は汚さないようにご注意ください。
●
AF-I/AF-Sテレコンバーターは、TC-14E/TC-14EⅡ/TC-17EⅡ/TC-20E/TC-20EⅡ
が使用可能です。テレコンバーター使用時でも、「手ブレ補正機能」「オートフォーカス」
は使用可能です。
●
ニコンデジタルカメラ(ニコンDXフォーマット)D2シリーズ、D1シリーズ、D200、
D100、D70シリーズ、D50に装着すると、対角線画角は22°50―8°となり、
35mm判で焦点距離約105mm―300mm相当のレンズとなります。
●
レンズマウントゴムリングが破損した場合は、そのまま使用せず修理を依頼してくだ
さい。

8
Jp
レンズの設定モード
カメラ M/A M
マニュアル優先
マニュアルフォーカス撮影
オートフォーカス撮影
(フォーカスエイド可)
マニュアルフォーカス撮影のみ
(フォーカスエイド可)
上記以外の
マニュアルフォーカス撮影のみ
AF(オートフォーカス)
(フォーカスエイド可)
カメラ(F-601、F3AF除く*)
ピント合わせの方法
ご使用のカメラや撮影目的によって、下表のようなピント合わせが選択できます。
C
S
AF
M
M
C
S
AF
F6、F5、F4
シリーズ
、F100、
F90X
シリーズ、
F90
シリーズ
、
F80
シリーズ
、ニコンU2、
F70D、ニコンU、
プロネア600i、プロネアS、
D2シリーズ、D1シリーズ、D200、D100、
D70シリーズ、D50
*
このレンズはF3AFカメラでは使用できません。
■M/A(マニュアル優先オートフォーカス)モードの使い方
1 フォー カス モード切り換えスイッチをM/Aにセットします。(図D)
2 オートフォーカス撮影時、シャッターボタンを半押ししたまま、あるいはAF
作動ボタンを保持したまま、フォーカスリングを手で回転させると、瞬時に
マニュアルフォーカス撮影が行えます。
3 シャッターボタンやAF作動ボタンから指をはなすと、オートフォーカスモー
ドに戻ります。
■
フォー カス制限切り換えスイッチの使い方
(M/Aモード使用可能なカメラのみ)
オートフォーカス撮影時で、撮影距離が常に2.5m以上に限られている場合は、ス
イッチ を∞-2.5mにセットすると、ピント合わせの時間を短縮できます。
・撮影距離が2.5m以内を含む場合はFULLにセットしま す。(図E)
■フォーカスロックボタンの使い方(M/Aモード使用可能なカメラのみ)
オートフォーカス作動中にフォーカスロックボタンを押すと、押している間は
ピントが固定されます。(図C)
・フォーカスロックはカメラ側およびレンズ側の両方から行えます。いずれかのボタンが
押されている間、ピントは固定されます。
手ブレ補正機能
手ブレ補正機能は、次のカメラで使用できます。
35mm一眼レフ:F6、F5、F100、F80シリーズ、ニコンU2、ニコンU
デジタル一眼レフカメラ:D2シリーズ、D1シリーズ、D200、D100、
D70シリーズ、D50
・
上記以外のカメラをご使用の場合には、必ず、手ブレ補正スイッチをOFFにしてください。特に
プロネア600iでは、このスイッチをONにしたままにすると、電池を消耗することがあります。
カメラの
フォーカスモード
9
Jp
■手ブレ補正機能の概念図
■手ブレ補正スイッチの使い方(図F)
ON: シャッターボタンを半押しすると、手ブレを補正します。ファインダー内の画像の
ブレも補正するため、ピント合わせが容易で、フレーミングしやすくなります。
OFF:手ブレを補正しません。
■手ブレ補正モード切り換えスイッチの使い方(図G)
手ブレ補正スイッチをONにし、手ブレ補正モード切り換えスイッチを設定します。
NORMAL:主に、通常の手ブレを補正します。パンニングに対応し、流し撮りも行えます。
ACTIVE: 乗り物に乗っている等、揺れの激しい条件でのブレから通常の手ブレを補正
します。このモードではパンニング自動検出は行いません。
■手ブレ補正使用時のご注意
●
手ブレ補正スイッチONの時は、シャッターボタンを半押し後、ファインダー内画像が
安定してから撮影されることをおすすめします。
●
流し撮りする場合は、必ずNORMALモードにしてください。NORMALモードでは、流し
撮りなどでカメラの向きを大きく変えた場合、変えた方向の手ブレ補正は機能しません。
例えば、流し撮りで横方向にパンニングすると、縦方向の手ブレだけが補正され、流し撮
りが行えます。
振 幅
NORMALモードで対応
パンニング
手ブレ
ACTIVEモードで対応
激しい揺れ
例)乗り物等
での揺れ
周
波
数
大
高
手ブレ補正 NORMALモードまたはACTIVEモードで対応
パンニング(流し撮り)での手ブレ補正 NORMALモードで対応
激しい揺れでの手ブレ補正 ACTIVEモードで対応

10
Jp
●
手ブレ補正の原理上、シャッターレリーズ後にファインダー像がずれることがあります。
●
手ブレ補正中にカメラの電源スイッチをOFFにしないでください。電源スイッチOFFの
状態でレンズを振るとカタカタ音がすることがありますが、故障ではありません。カメ
ラの電源スイッチを再度ONにすれば、音は消えます。
●
手ブレ補正中にレンズを取り外した時、レンズを振るとカタカタ音がすることがありま
すが、故障ではありません。再度、カメラに取り付けシャッターボタンを半押しすれば、
音は消えます。
●
F80シリーズ、ニコンU2、ニコンU、D200、D100、D70シリーズ、D50の内蔵フ
ラッシュ充電中には、手ブレ補正は行いません。
●
三脚を使用するときは、手ブレ補正スイッチをOFFにしてください。ただし、三脚を使っ
ても雲台を固定しないときや、一脚を使用するときには、スイッチを ONに することをお
すすめします。
●
AF作動ボタンのあるカメラでAF作動ボタンをONにしても、手ブレ補正は作動しません。
ズーミングと被写界深度
撮影を行う場合は、ズームリングを回転させ構図を決めてから、ピント合わせ
を行ってください。プレビュー(絞り込み)機構を持つカメラでは、撮影前に被
写界深度を確認することができます。
絞り値の設定
このレンズには絞りリングがありません。絞り値は、カメラ側 で設 定してください。
カメラ内蔵フラッシュ使用時のご注意
以下のカメラの内蔵フラッシュを使用する際は、フラッシュの光がレンズでさえ
ぎられて、写真の一部に影ができる(ケラレ)ことがあります。焦点距離や撮影距
離に気を付けて撮影してください。
カメラ ケラレなく撮影できる焦点距離と撮影距離
ニコンU
2 焦点距離70mm時は撮影距離3m以上
焦点距離80mm以上は制約なし
F70D 焦点距離80mm時は撮影距離1.8m以上
焦点距離105mm以上は制約なし
ニコンU
S、ニコンU、F60D 焦点距離105mm時は撮影距離1.8m以上
焦点距離135mm以上は制約なし
F50D 焦点距離105mm時は撮影距離4m以上
焦点距離135mm以上は制約なし
プロネア600i 焦点距離80mm時は撮影距離2.5m以上
焦点距離105mm以上は制約なし
プロネアS 焦点距離135mm時は撮影距離4m以上
焦点距離200mm時は制約なし
F-401シリーズ 焦点距離135mm以上は制約なし
11
Jp
ファインダースクリーンとの組み合わせ
■構図の決定やピント合わせの目的には
◎: 好適です
○: 視野の一部が多少見にくくなりますが、撮影結果には全く影響がありません。
―: 各 カ メラ に存在しないファインダースクリーンです。
(): 中央部重点測光時の補正値です。F6カメラの場合、測光値の補正は、カメラのカスタム
メニュー「b6:スクリーン補正」を「B orE以外」にセットして行います。B型およびE
型以外を使用する場合は、補正量が0でも、「B or E以外」にセットしてください。F5カ
メラの場合は、カスタムセッティングNo.18の設定で測光値の補正を行います。F4シリ
ーズカメラの場合は、ファインダースクリーン露出補正ダイヤルを回して補正を行いま
す。詳しくはカメラの使用説明書をご覧ください。
空欄: 使用不適当です。ただし、Mスクリーンの場合、撮影倍率1/1倍以上の近接撮影に用いら
れるため、この限りではありません。
・上記以外のカメラでB、Eスクリーンをご使用の場合は、それぞれB、Eスクリーンの欄をご覧く
ださい。
三脚の取り付け、取り外し
三脚は、カメラではなくレンズ側の三脚座に取り付けてください。
■取り付け方
●
1
レンズの三脚座取り付け脚を三脚座に差し込み、2三脚座固定ネジを完全
に締めます。(図H)
●
1
レンズの三脚座リング止めネジを少し緩め、2カメラ位置(縦/横)に応
じてレンズの位置指標と三脚座リング回転位置指標を合わせ、3三脚座リン
グ止めネジを締めて固定します。(図J)
■取り外し方
●
1
三脚座固定ネジを完全に緩め、2三脚座ロック解除レバーを押し下げ、
3
三脚座取り付け脚をスライドさせて取り外します。(図 I)
○
スクリーン
カメラ
F5+DP-30
◎
◎ ―
◎ ―
―
―
―
―
― ◎ ― ◎
― ◎ ― ◎
G1
G2
G3
BCE
EC-B
EC-E
F
JKLMPU
F4+DP-20
F4+DA-20
F5+DA-30
A
◎
◎
◎
◎
◎
◎
◎◎―
―
―
◎◎
○
○
○
(–0.5)
○
(+0.5)
◎
F6
○
○
○
◎
― ― ― ―― ― ―◎ ◎ ◎◎
◎
◎
◎
◎
G4
三脚に取り付けて使用するときは、三脚座固定ネジを必ず完全に締めること。
不意に外れて、ケガの原因になることがあります。
注意

12
Jp
フードHB-29の取り付け、取り外し
■取り付け方
レンズ先端のフード着脱指標とフード取り付け指標()を合わせ、フード後方
から見て左回りにカチッと音がするまで回転させ確実に取り付けます。(図A)
・フード着脱指標とフードセット指標()が合っていることを確認してください。
・フードが正しく取り付けられないと撮影画面にケラレを生じますのでご注意ください。
・フード先端を強くつかむと着脱が困難になります。着脱の際は、フードの根元(取り付け
部分)付近を持って回転させてください。
・収納時はフードを逆向きにレンズに取り付けることができます。
■取り外し方
フードロック解除ボタンを押さえ、そのまま、フード後方から見て右回りに回
転させて取り外します。(図 B)
レンズのお手入れと取り扱い上のご注意
●
レンズ面の清掃は、ホコリを拭う程度にしてください。指紋がついたときは、柔らかい清
潔な木綿の布に無水アルコール(エタノール)または市販のレンズクリーナーを少量湿ら
せ、レンズの中心から外周へ渦巻状に、拭きムラ、拭き残りのないように注意して拭いて
ください。
●
シンナーやベンジンなどの有機溶剤は絶対に使用しないでください。
●
レンズ表面の汚れや傷を防ぐために、L37Cフィルターを常用することをおすすめします。
また、レンズフードも役立ちます。
●
レンズをケースに入れるときは、必ず、レンズキャップを前後に取り付けてください。
●
レンズを長期間使用しないときは、カビやサビを防ぐために、高温多湿のところを避けて
風通しのよい場所に保管してください。また、直射日光のあたるところ、ナフタリンや樟
脳のあるところも避けてください。
●
レンズを水に濡らすと、部品がサビつくなどして故障の原因となりますのでご注意ください。
●
ストーブの前など、高温になるところに置かないでください。極端に温度が高くなると、外観
の一部に使用している強化プラスチックが変形することがあります。
付属アクセサリー
●
77mmスプリング式レンズキャップ LC-77
●
裏ぶた LF-1
●
バヨネットフード HB-29
●
セミソフトケース CL-M2

別売アクセサリー
●
77mmねじ込み式フィルター(円偏光フィルターⅡを含む)
●
AF-Sテレコンバーター(TC-14EⅡ/TC-17EⅡ/TC-20EⅡ)
仕様
型式: ニコンFマウントCPU内蔵Gタイプ、AF-Sズームレンズ
焦点距離: 70mm―200mm
最大口径比: 1:2.8
レンズ構成: 15群21枚(EDガラス5枚)
画角: 34°20―12°20
(ニコンデジタルカメラ[ニコンDXフォーマット]装着時:
22°50―8°)
(IX240カメラ装着時:27°40―9°50)
焦点距離目盛: 70、80、105、135、200mm
撮影距離情報: カメラボディへの撮影距離情報出力可能
ズーミング: ズームリングによる回転式
ピント合わせ: ニコン内焦方式(超音波モータによるオートフォーカス)、マニュア
ルフォーカス可能
手ブレ補正: ボイスコイルモータ(VCM)によるレンズシフト方式
撮影距離目盛: ∞〜1.5m、5ft(併記)
最短撮影距離: 1.5m(ズーム全域、オートフォーカス時)
1.4m(ズーム全域、マニュアルフォーカス時 )
絞り方式: 自動絞り
絞りの範囲: 2.8〜22
測光方式: CPU方式のカメラボディでは開放測光
フォー カス制限
切り換えスイッチ: FULL(∞〜1.5m)と∞-2.5mの2段切り換え
三脚座:
位置指標(90°)付きの360°回転三脚座リング、三脚座のみ着脱可能
アタッチメントサイズ:
77mm(P=0.75mm)
大きさ: 約87mm(最大径)×215mm(長さ:バヨネット基準面からレンズ
先端まで)
質量(重さ): 約1,470g(三脚座取り付け時)
約1,395g(三脚座なし)
13
Jp

14
Nomenclature
1 Lens hood
2 Lens hood lock release button
3 Lens hood attachment index
4 Lens hood setting index
5 Lens hood mounting index
6 Distance scale
7 Distance index line
8 Focus ring
9 Zoom ring
! Focal length scale
" Focal length scale index line
# Tripod collar ring rotating index
$ Position indexes (90˚)
% Tripod collar ring
& Mounting index
( Lens mount rubber gasket
) CPU contacts
~ Tripod collar mounting foot
+ Tripod collar lock screw
, Tripod collar
- Tripod collar lock release lever
. Tripod collar ring fastening screw
/ Vibration reduction mode switch
: Vibration reduction ON/OFF switch
; Focusing limit switch
< Focus mode switch
= Focus lock button
Usable cameras and available functions
There may be some restrictions or limitation for available functions. Refer to your
camera’s instruction manual for details.
Cameras Vibration Autofocus
Exposure mode
reduction
P*
1
SAM
F6, F5, F100, F80-Series/N80-Series*,
F75-Series/N75-Series*,
F65-Series/N65-Series*, D2-Series,
D1-Series, D200, D100, D70-Series, D50
Pronea 600i/6i*, Pronea S*
2
F4-Series, F90X/N90s*,
F90-Series/N90*, F70-Series/N70*
F55-Series/N55-Series*,
F60-Series/N60*,
F50-Series/N50, F-401x/N5005*,
F-401s/N4004s*, F-401/N4004*
F-801s/N8008s*, F-801/N8008*,
F-601M/N6000*
Other Nikon cameras*
3
* Sold exclusively in the USA. ○: Possible ×:Impossible
*
1
P includes AUTO (General-Purpose Program) and Vari-Program System
*
2
Manual (M) is not available
*
3
This lens is not compatible with the F3AF
○
○
○
○○○
×
○
○○○○
×
○○○××
××○○○○
××○○××
××
×
×××
En

15
Introduction
Thank you for purchasing the AF-S VR Zoom-Nikkor 70-200mm f/2.8G IF-ED lens.
This is a high-performance zoom lens featuring special Vibration Reduction (VR) and
high-speed Internal Focusing (IF) mechanisms. It also employs a Silent (S) Wave Motor
to drive the focusing mechanism.
Major features
●
With this lens, you can take pictures at shutter speeds approx. 3 stops slower than you
ordinarily could without using a VR lens, expanding the range of usable shutter speed
options and making telephoto shooting much easier without a tripod.
●
Two vibration reduction modes are available: (1) the NORMAL mode for reducing
camera shake, and. (2) the ACTIVE mode for reducing camera shake when taking
pictures from a moving vehicle.
●
Panning is also possible, as the lens automatically distinguishes panning from camera
shake and vibration reduction works effectively (in the NORMAL mode).
●
Autofocus (A) or manual (M) mode can easily be selected with the focus mode switch.
●
Various functions provided: (1) autofocusing with manual override providing an
instant change from autofocusing to manual focusing, (2) focusing limit switch to limit
AF operation within a certain shooting distance, (3) focus lock button to lock focus on
the lens, etc. (Refer to “Focusing.”).
●
More accurate exposure control is possible when this is mounted on a Nikon camera
having 3D Matrix Metering capability, because subject distance information is
transferred from the lens to the camera body.
●
The use of five ED (extra-low dispersion) lens elements ensures sharp pictures
virtually free of color fringing. Also, by utilizing a 9-blade diaphragm that produces a
nearly circular aperture, out-of-focus images in front of or behind the subject are
rendered as pleasing blurs.
●
Closest focusing distance of 1.5m (4.9 ft.) (AF) and 1.4m (4.6 ft.) (MF) are provided.
●
Detachable tripod collar is provided and can be removed when not needed.
Important!
●
Be careful not to soil or damage the CPU contacts.
●
AF-I/AF-S Teleconverters TC-14E/TC-14EII/TC-17EII/TC-20E/TC-20EII are usable. Even
when a teleconverter is attached, both vibration reduction and autofocus functions work
properly.
●
When mounted on Nikon digital cameras (Nikon DX format) D2-Series, D1-Series,
D200, D100, D70-Series and D50, the lens’ picture angle becomes 22˚50’–8˚ and its
35mm equivalent focal length range is approx. 105–300mm.
●
If the lens mount rubber gasket is damaged, be sure to visit the nearest Nikon
authorized dealer or service center for repair.
En

Lens’ focus mode
Cameras M/A M
Autofocus with manual
Manual focus
priority
(Focus assist is available.)
Manual focus
(Focus assist is available.)
Other Nikon AF cameras
Manual focus
(except the F3AF, F-601/N6006*)
(Focus assist is available.)
16
Focusing
Set your camera’s focus mode selector according to this chart:
C
S
AF
M
M
C
S
AF
F6, F5, F4-Series, F100, F90X/N90s*,
F90-Series/N90
*, F80-Series/
N80-Series
*, F75-Series/
N75-Series
*, F70-Series/N70*,
F65-Series/N65-Series
*,
Pronea 600i/6i
*, Pronea S, D2-Series,
D1-Series, D200, D100, D70-Series, D50
* Sold exclusively in the U.S.A.
Autofocus with manual override (M/A mode)
1 Set the focus mode switch to M/A. (Fig. D)
2 Autofocus is provided, but you can manually override the focus by operating the
separate focus ring while lightly depressing the shutter release button or AF start
(AF-ON) button on the camera body of cameras so equipped.
3 To cancel manual override, remove your finger from the shutter release button or the
AF start button.
To limit the range of autofocus (with M/A mode compatible cameras only)
With AF operation, if the subject is always more than 2.5m (8.2 ft.) away, set the
focusing limit switch to “∞–2.5m” to reduce focusing time. If the subject is 2.5m (8.2 ft.)
or closer, set it to “FULL” (Fig. E).
Focus lock (with M/A mode compatible cameras only)
With autofocus operation, focus is locked while pressing the focus lock button. (Fig. C)
・The AF-Lock function can be engaged on either the camera and lens. Focus is locked while
either of these buttons is pressed.
Vibration reduction mode
The following cameras are usable:
35mm SLR cameras: F6, F5, F100, F80-Series/N80-Series, F75-Series/N75-Series,
F65-Series/N65-Series
Digital SLR cameras: D2-Series, D1-Series, D200, D100, D70-Series, D50
・When using the lens with cameras other than those listed above, set the vibration reduction
mode switch to OFF to cancel the vibration reduction mode. With the Pronea 600i/6i
camera, in particular, battery power may become depleted quickly if this switch is left ON.
Camera’s focus mode
En
17
Basic concept of vibration reduction
Setting the vibration reduction ON/OFF switch (Fig. F)
ON: Vibration is reduced while the shutter release button is lightly pressed and also at
the instant the shutter is released. Because vibration is reduced in the viewfinder,
auto/manual focusing and exact framing of the subject are easier.
OFF: Vibration is not reduced.
Setting the vibration reduction mode switch (Fig. G)
First, set the vibration reduction ON/OFF switch ON, then select the following mode:
NORMAL:The vibration reduction mechanism primarily reduces camera shake, making
smooth panning shots possible.
ACTIVE: The vibration reduction mechanism reduces camera shake when taking
pictures and those from a moving vehicle. In this mode, the lens does not
automatically distinguish panning from camera shake.
En
Strength of vibrations
Set the vibration reduction mode switch to “NORMAL”.
Panning shots
Camera shake
Set the vibration reduction mode switch to “ACTIVE”.
Camera shake
when taking
pictures from a
moving vehicle
Number of vibrations
When taking pictures
When taking panning shots
When taking pictures from
a moving vehicle
Set the vibration reduction mode switch to
either “NORMAL” or “ACTIVE”.
Set the vibration reduction mode switch
to “NORMAL”.
Set the vibration reduction mode switch
to “ACTIVE”.

18
Notes on using vibration reduction
●
Wait until the image in the viewfinder stops vibrating before fully depressing the
shutter release button after you have lightly pressed the shutter release button.
●
When taking panning shots, be sure to set the vibration reduction mode switch to NORMAL.
If you move the camera in a wide arc when panning, vibration in the direction of that
movement is not affected. For example, if you pan the camera horizontally, only
vibration in the vertical direction is reduced, making smooth pans much easier.
●
Due to the characteristics of the vibration reduction mechanism, the image in the
viewfinder may become blurred after releasing the shutter.
●
Do not turn the camera power OFF while the vibration reduction mode is in operation.
Otherwise, the lens may emit a chattering noise if the camera is shaken. This is not a
malfunction. Turn the camera power ON again to correct this.
●
If the lens is removed from the camera while the vibration reduction mode is in
operation, the same thing may happen as stated above. Mount the lens and press the
shutter release button halfway to eliminate the chattering noise.
●
With F80-Series/N80-Series, F75-Series/N75-Series, F65-Series/N65-Series, D200,
D100, D70-Series and D50 cameras, vibration reduction does not work while the flash
is recycling.
●
When the lens is mounted on a tripod, set the vibration reduction ON/OFF switch to
OFF. However, set the switch to ON when using a tripod without securing the tripod
head, or when using a monopod.
●
If you set the AF start (AF-ON) button to ON on the body of cameras so equipped,
vibration reduction does not operate.
Focusing, zooming, and depth of field
First turn the zoom ring until the desired composition is framed in the viewfinder before
focusing. If your camera has a depth of field preview (stop-down) button or lever, depth
of field can be observed while looking through the camera viewfinder.
Setting the aperture
Because this lens does not have an aperture ring, you must set the aperture on the camera.
Taking flash pictures with cameras having built-in flash
When using the following cameras, check the focal length and shooting distance before
taking flash pictures to prevent vignetting since the light emitted from the flash may be
obstructed by the lens barrel.
En
Cameras Usable focal length / Shooting distance
F75-Series/N75-Series* 70mm / 3m (9.8 ft.) or greater
80mm or longer / No restriction
F70-Series/N70* 80mm / 1.8m (5.9 ft.) or greater
105mm or longer / No restriction
F65-Series/N65-Series*, F60-Series/N60*, 105mm / 1.8m (5.9 ft.) or greater
F55-Series/N55-Series* 135mm or longer / No restriction
F50-Series/N50* 105mm / 4m (13.1 ft.) or greater
135mm or longer / No restriction
Pronea 600i/6i* 80mm / 2.5m (8.2 ft.) or greater
105mm or longer / No restriction
Pronea S 135mm / 4m (13.1 ft.) or greater
200mm / No restriction
F-401x/N5005*, F-401s/N4004s*,
135mm or longer / No restriction
F-401/N4004*
19
○
Screen
Camera
F5+DP-30
◎
◎ ―
◎ ―
―
―
―
―
― ◎ ― ◎
― ◎ ― ◎
G1
G2
G3
BCE
EC-B
EC-E
F
JKLMPU
F4+DP-20
F4+DA-20
F5+DA-30
A
◎
◎
◎
◎
◎
◎
◎◎―
――
―
◎◎
○
○
○
(–0.5)
○
(+0.5)
◎
F6
○
○
○
◎
― ― ― ― ― ―◎ ◎ ◎◎
◎
◎
◎
◎
G4
En
Recommended focusing screens
Various interchangeable focusing screens are available for certain Nikon SLR cameras to
suit any picture-taking situation. The ones recommended for use with this lens are:
◎: Excellent focusing
○: Acceptable focusing
Slight vignetting or moiré patterns appear in the viewfinder, but not on the film.
―: Not available.
(): Indicates degree of exposure compensation needed (Center-Weighted metering only). For F6 cameras,
compensate by selecting "Other screen” in Custom Setting “b6: Screen comp.” and setting the EV level to
-2.0 to +2.0 in 0.5 EV steps. When using screens other than type B or E, “Other screen” must be selected
even when the required compensation value is “0” (no compensation required). For F5 cameras,
compensate using Custom Setting #18 on the camera body. For F4-Series cameras, compensate using
the Exposure Compensation Dial for the focusing screen.
See instruction manual of the camera body for more details.
Blank box means not applicable. Since type M screen can be used for both macrophotography at a 1:1
magnification ratio and for photomicrography, it has different applications than other screens.
• When using the B and E focusing screens in cameras other than those listed above, refer to the columns for
the B and E screens.
*Sold exclusively in the U.S.A.

20
Using a tripod
When using a tripod, attach it to the lens’ tripod collar instead of the camera.
CAUTION
When using a tripod, be sure to fully tighten the tripod collar lock screw, otherwise
the lens may fall off the tripod accidentally and cause bodily injury.
Attaching the tripod
• Insert the tripod collar mounting foot 1 into the tripod collar, then fully tighten the
tripod collar lock screw 2. (Fig. H)
• Loosen the tripod collar ring fastening screw 1. Depending on the camera’ s position
(vertical or horizontal) 2, turn the lens to an appropriate position index on the tripod
collar ring by aligning the tripod collar ring rotating index on the lens, then tighten the
screw 3. (Fig. J)
Detaching the tripod
• Fully loosen the tripod collar lock screw 1. While holding down the tripod collar lock
release lever 2, slide the tripod collar mounting foot 3 to detach. (Fig. I)
Using bayonet hood HB-29
Attaching the hood
Align the lens hood attachment index ( ) on the lens hood with the hood mounting
index on the lens, and turn the hood counterclockwise (as viewed from the camera side)
until it click stops. (Fig. A)
・Make sure that the lens hood mounting index aligns with the lens hood setting index ( ).
・If the lens hood is not correctly attached, vignetting can occur.
・To facilitate attachment or removal of the hood, hold it by its base rather than its outer edge.
・To store the lens hood, attach it in the reverse position.
Detaching the hood
While holding down the lens hood lock release button, turn the hood clockwise (as viewed
from the camera side) to detach. (Fig. B)
Lens care
●
Clean the lens surfaces with a blower brush. To remove dirt and smudges, use a soft,
clean cotton cloth or lens tissue moistened with ethanol (alcohol) or lens cleaner.
Wipe in a circular motion from center to outer edge, taking care not to leave traces or
touch other parts of the lens.
●
Never use thinner or benzene to clean the lens as this might damage it, result in a fire,
or cause health problems.
●
To protect the front lens element, an NC filter is recommended at all times. A lens
hood also helps protect the front of the lens.
●
When storing the lens in its lens case, attach both front and rear caps.
En

21
●
When the lens will not be used for a long time, store it in a cool, dry place to prevent
mold. Also store the lens away from direct sunlight or chemicals such as camphor
or naphthalene.
●
Do not get water on the lens or drop it in water as this will cause it to rust
and malfunction.
●
Reinforced plastic is used for certain parts of the lens. To avoid damage, never leave
the lens in an excessively hot place.
Supplied accessories
●
77mm snap-on front lens cap LC-77
●
Rear lens cap LF-1
●
Bayonet hood HB-29
●
Semi-soft case CL-M2
Optional accessories
●
77mm screw-in filters, including circular polarizing filter II
●
AF-S Teleconverters (TC-14EII/TC-17EII/TC-20EII)
Specifications
Type of lens: G-type AF-S Zoom-Nikkor lens having built-in CPU and Nikon bayonet
mount. Special vibration reduction (VR) mechanism incorporated
Focal length: 70 to 200mm
Maximum aperture: f/2.8
Lens construction: 21 elements in 15 groups (including 5 ED lens elements)
Picture angle: 34˚20’–12˚20’ (22˚50’– 8˚ with Nikon digital cameras (Nikon DX
format); 27˚40’– 9˚50’ with IX240 system cameras)
Focal length scale: 70, 80, 105, 135, 200mm
Distance information: Output to camera body
Zooming: Manually via separate zoom ring
Focusing: Nikon Internal Focusing (IF) system (utilizing an internal Silent Wave
Motor); manually via separate focus ring.
Vibration reduction: Lens-shift method using voice coil motors (VCMs)
Shooting distance scale:
Graduated in meters and feet from 1.5m (5 ft.) to infinity (∞)
Closest focusing distance:
1.5m (4.9 ft.) at all zoom settings in AF mode
1.4m (4.6 ft.) at all zoom settings in MF mode
Diaphragm: Fully automatic
Aperture scale: f/2.8–f/22
Exposure measurement:
Via full-aperture method with cameras with CPU interface system
Focusing limit switch: Provided; two ranges available: FULL (∞–1.5m), or ∞–2.5m
Tripod collar: Rotatable through 360˚, lens rotating position index at 90˚,
tripod collar only detachable
Attachment size: 77mm (P = 0.75mm)
Dimensions: Approx. 87mm dia. x 215mm extension from the camera’s lens
mounting flange
Weight: Approx. 1470g (51.9 oz.) with tripod collar; approx. 1395g (49.2 oz.)
for lens only
En

Kameras Vibrationsreduktion Autofokus
Belichtungsfunktion
P*1SAM
F6, F5, F100, F80-Serie,
F75-Serie, F65-Serie, D2-Serie,
D1-Serie, D200, D100, D70-Serie, D50
Pronea 600i, Pronea S*
2
F4-Serie, F90X, F90-Serie,
F70-Serie
F55-Serie, F60-Serie,
F50-Serie, F-401x, F-401s,
F-401
F-801s, F-801, F-601M
Andere Nikon-Kameras*
3
De
22
Nomenklatur
1 Gegenlichtblende
2 Gegenlichtblende-Entriegelungstaste
3 Gegenlichtblende-Anbringindex
4 Gegenlichtblende-Einstellindex
5 Gegenlichtblende-Montageindex
6 Entfernungsskala
7 Entfernungs Indexlinie
8 Entfernungseinstellring
9 Zoomring
! Brennweitenskala
" Brennweitenskala-Indexlinie
# Stativanschlussring-Rotationsindex
$ Positionsindizes (90°)
% Stativanschlussring
& Objektivindex
( Gummiring der Objektivfassung
) CPU-Kontakte
~ Stativanschluss-Montagfuß
+ Feststellschraube des Stativanschlusses
, Stativanschluß
-Stativanschluss-Entriegelungshebel
. Stativanschlussring-
Befestigungsschraube
/
Schalter zur Vibrationsreduktion (VR-Schalter)
:
ON/OFF-Schalter zur Vibrationsreduktion
; Fokussier-Begrenzungsschalter
< Fokussierschalter
= Fokussier-Verriegelungstaste
Verwendbare Kameras und verfügbare Funktionen
Möglicherweise gibt es hinsichtlich der verfügbaren Funktionen Einschränkungen.
Informationen hierzu finden Sie in der Bedienungsanleitung zu Ihrer Kamera.
○○○○○○
×○○○○○
×○○○××
××○○○○
××○○××
××××××
○: Möglich ×:Nicht möglich
*
1
P umfaßt AUTO (General-Purpose Program) und Vari-Program System.
*
2
Manueller Betrieb (M) ist nicht möglich.
*
3
Dieses Objektiv ist nicht mit der F3AF kompatibel.
 Loading...