

Nikon F25B Photomatic, 2SB Photomic Instruction Manual
2
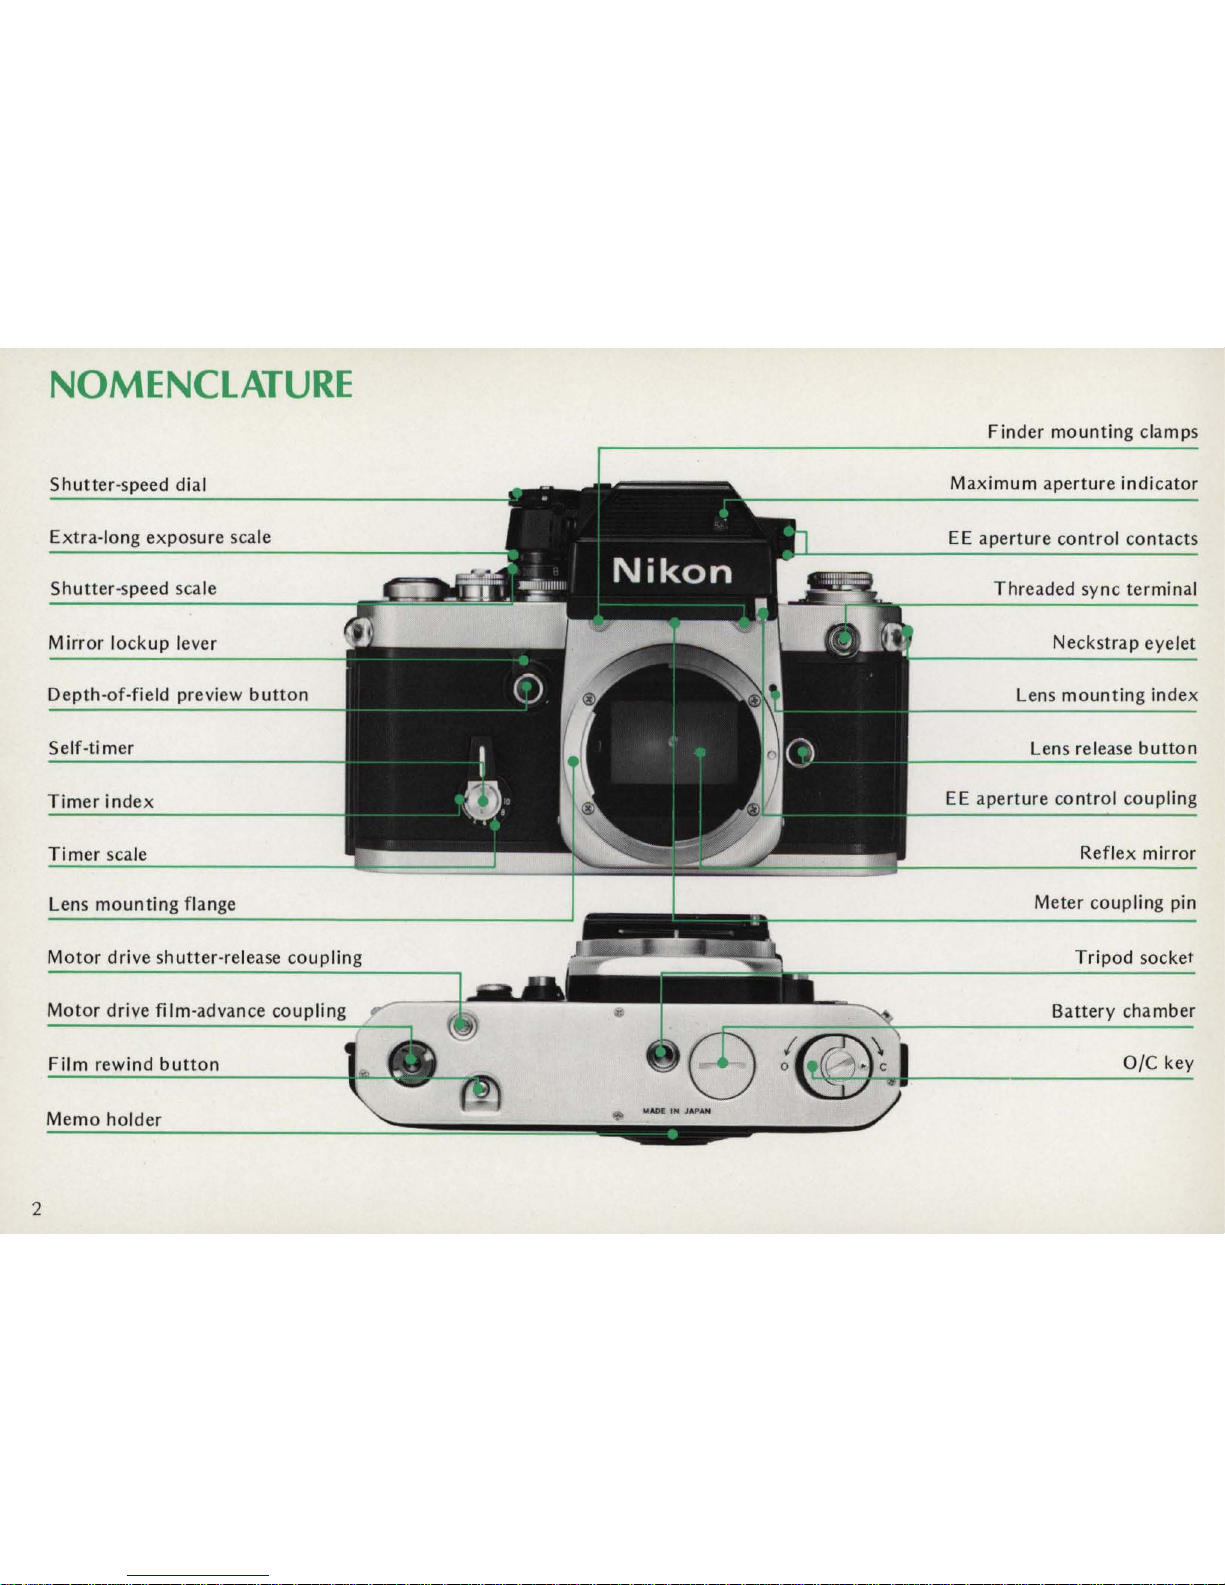
NOMENCLATURE
Shutter-speed dial
Extra-long exposure
scale
Shutter-speed scale
Mirror
lockup
lever
Depth-of-field preview
button
Self-timer
Timer
index
Timer
scale
Lens
mountin
Motor
drive shutter-release coupling
Motor
drive film-advance coupling
Film
rewind
button
Memo
holder
Finder
mounting
clam
ps
Maximum
aperture
indicator
EE
aperture
control
contacts
Threaded sync terminal
Neckstrap eyelet
Lens
mounting
index
Lens release
button
EE
aperture
control
coupling
Reflex
mirror
Meter coupling pin
Tripod
socket
Sa
ttery
cha
mber
o/e key
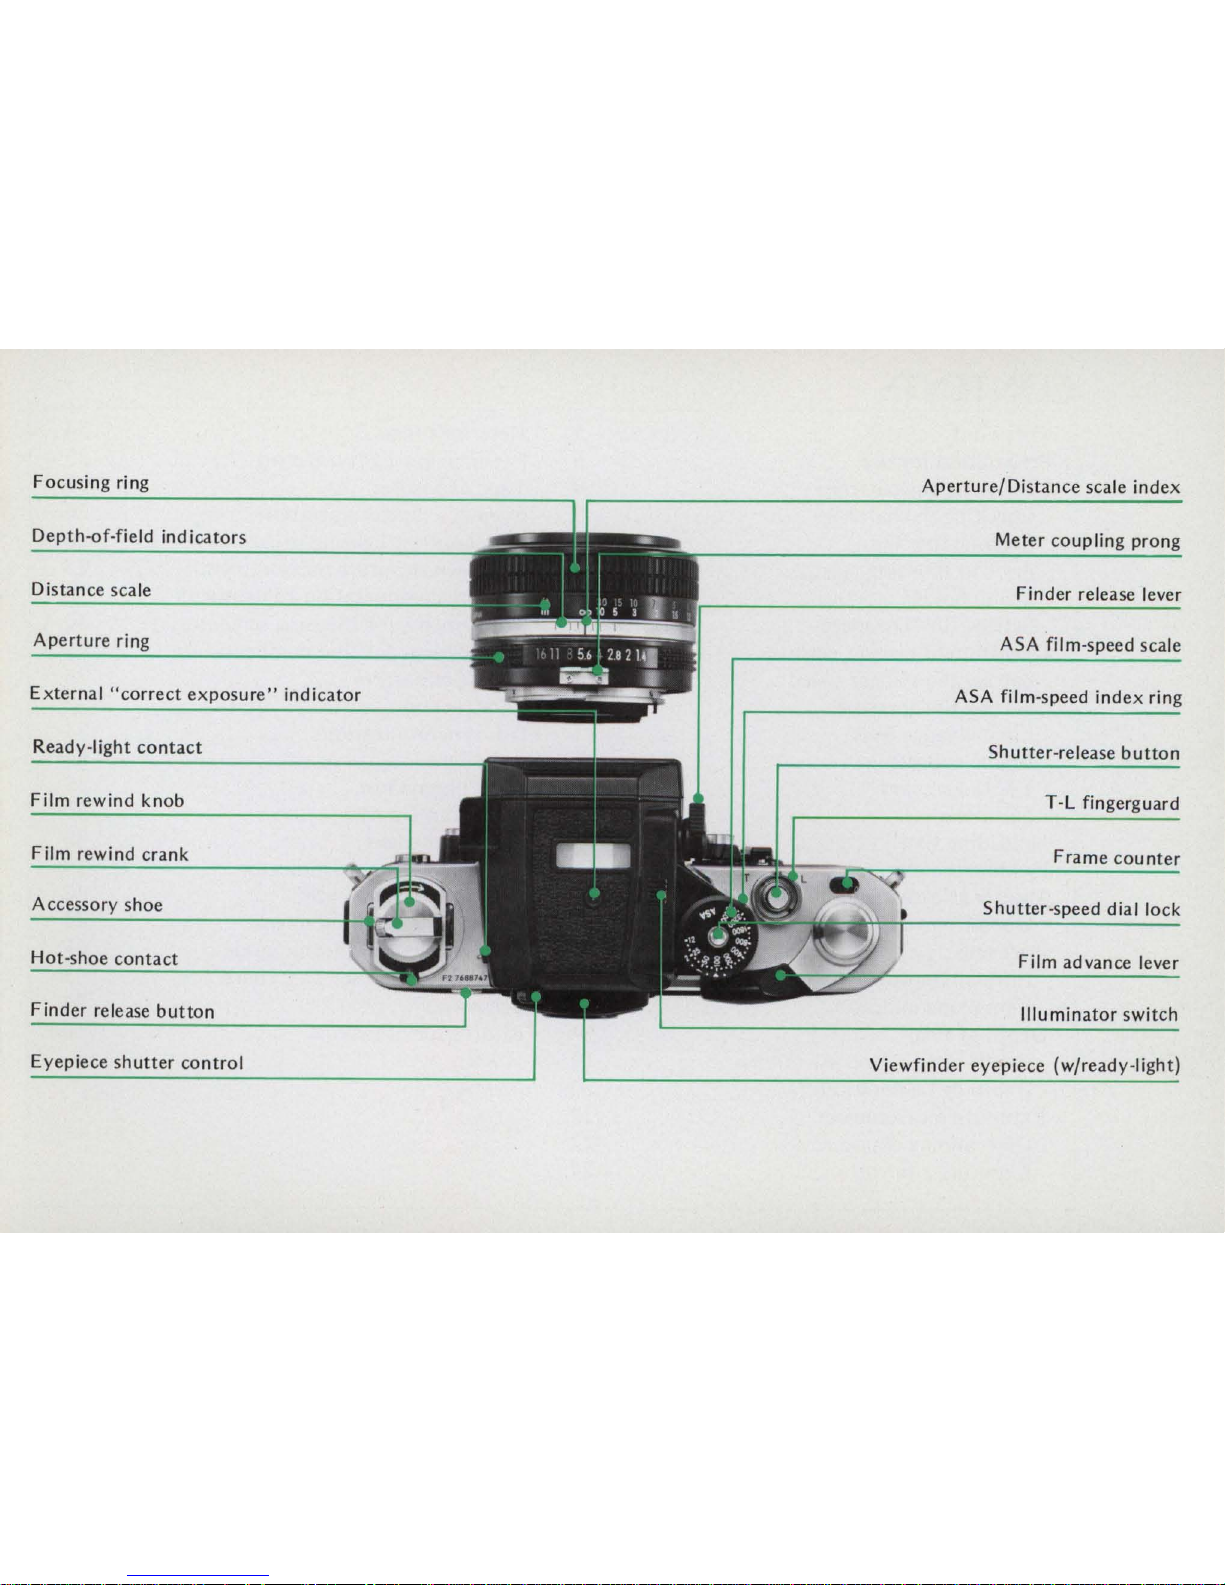
F ocusi ng
ri
ng
Aperture/Distance
scale
index
Depth-of-field
ind
icators
Meter
coupling
prong
Distance
scale
Finder
release lever
Aperture
ring
ASA film-speed
scale
External
"correct
exposure"
indicator
ASA film-speed
index
ring
Ready-light
contact
Shutter-release
button
Film rewind
knob
T-L fingerguard
Film
rewind
crank
Frame
counter
A ccessory
shoe
Shutter-speed
dial lock
Hot-shoe
contact
Film ad vance lever
Finder
release
button
Illuminator
switch
Eyepiece
shutter
control
Viewfinder
eyepiece
(w/ready-light)
4
CONTENTS
Foreword
......
. . . . . . . . . . . . . .
..
5
Preparation
for
use . . . . . . . . . . . . . . . . 6
Installing
the
batteries
......
. .
.....
6
Checking
the
batteries.
. . . . . . . . . .
..
6
Loading
the
film
................
, 7
Prior
to
shooting
.............
.
..
8
Memo holder . . . . . . . . . . . . . . . . . . . 9
Setting
the
film speed . .
.....
. . . .
..
9
Operation
of
camera controls . . . . . . .
..
10
Setting the
shutter
speed
...........
10
Setting
the
aperture
..............
10
Film-advance lever
...............
11
Frame
counter.
. . . . . . . . . . . . . . .
..
11
T-Lfingerguard
...
..
..
..........
12
Self-timer . . . . . . . . . . . . . . . . . . .
..
12
Unloading film . . . . . . . . . . . . . . . . .
..
13
Holding
the
camera . . . . . . . . . . . . . .
..
14
Shutter
release
operation
..
. . . . . . . .
..
15
Operation
via
cable
release.
. . . . . . .
..
15
Focusing.
. . . . . . . . . . . . . . . . . . . .
..
16
I nfrared photography . . . .
...
..
....
18
Film-plane indicator
..............
18
Depth
of
field
...........
.....
...
19
Depth-of-field preview
button
........
19
Depth-of-field indicators .
..........
20
Exposure measurement . . . . . . . . . . .
..
22
Determining exposure
...
..
........
22
Exposure control
....
. . . . . . . . . .
..
24
Metering range . . . . . . . . . . . . . . . . . .
24
Extreme low-light metering
.........
25
Time exposures .
....
..
..
. . . . . .
..
25
Eyepiece shutter operation . . . . . . . .
..
26
High-contrast lighting situations
......
26
Stop-down exposure
measurement.
. . .
..
28
Exposure compensation adjustments
....
30
Adjustments for focusing
screens.
. . .
..
30
Adjustments for film compensation . .
..
32
Multiple exposures . . . . . . . . . . . . . .
..
33
Mirror lockup ......
..
... ,........
33
Flash synchronization . . . . . . . . . . . .
..
34
Ready-light : . . . . . . . . . . . . . . . . . .
..
35
Finder illuminator .
......
........
. 35
Tips
on
camera care .
.......
.......
36
Changing
the
lens . . . . . . . .
.. ..
....
,
38
Maximum aperture indicator . . . . . . .
..
39
Changing
the
viewfinder
............
40
Changing
the
focusing screen . .
......
.
41
Focusing screen selector guide
.......
,
42
Focusing screen selector
chart.
. . . . .
..
43
Accessories . , . . . . . . . . . . . . . . . . .
..
44
Features/specifications .
.......
.....
46
FOREWORD
The
Nikon F2SB
Photomic
camera
offers
the
serious
photographer
the
ultimate
in
quality,
performance,
con-
venience and versatility.
At
the
same time, it
is
engineer-
ed
to
take
the
guesswork
out
of
photography
with
auto-
matic
features
anyone
can learn
to
use
in
minutes.
To
get
the
most
out
of
your
Nikon F2SB
Photomic,
study
the
instructions
carefully
and
practice using
the
controls
before
you
load
any
film
in
the
camera. Keep this
book-
let
handy
for
ready reference until
you
have mastered
its basics, and
follow
the
suggestions for
camera
care
given
on
page 36.
The
few
moments
you
spend familiar-
izing
yourself
with
the
camera
will guarantee
you
the
best
results and increase
your
picture-taking
enjoyment
many
times over.
L-----------------------------------------~
5
6
PREPARATION FOR
USE
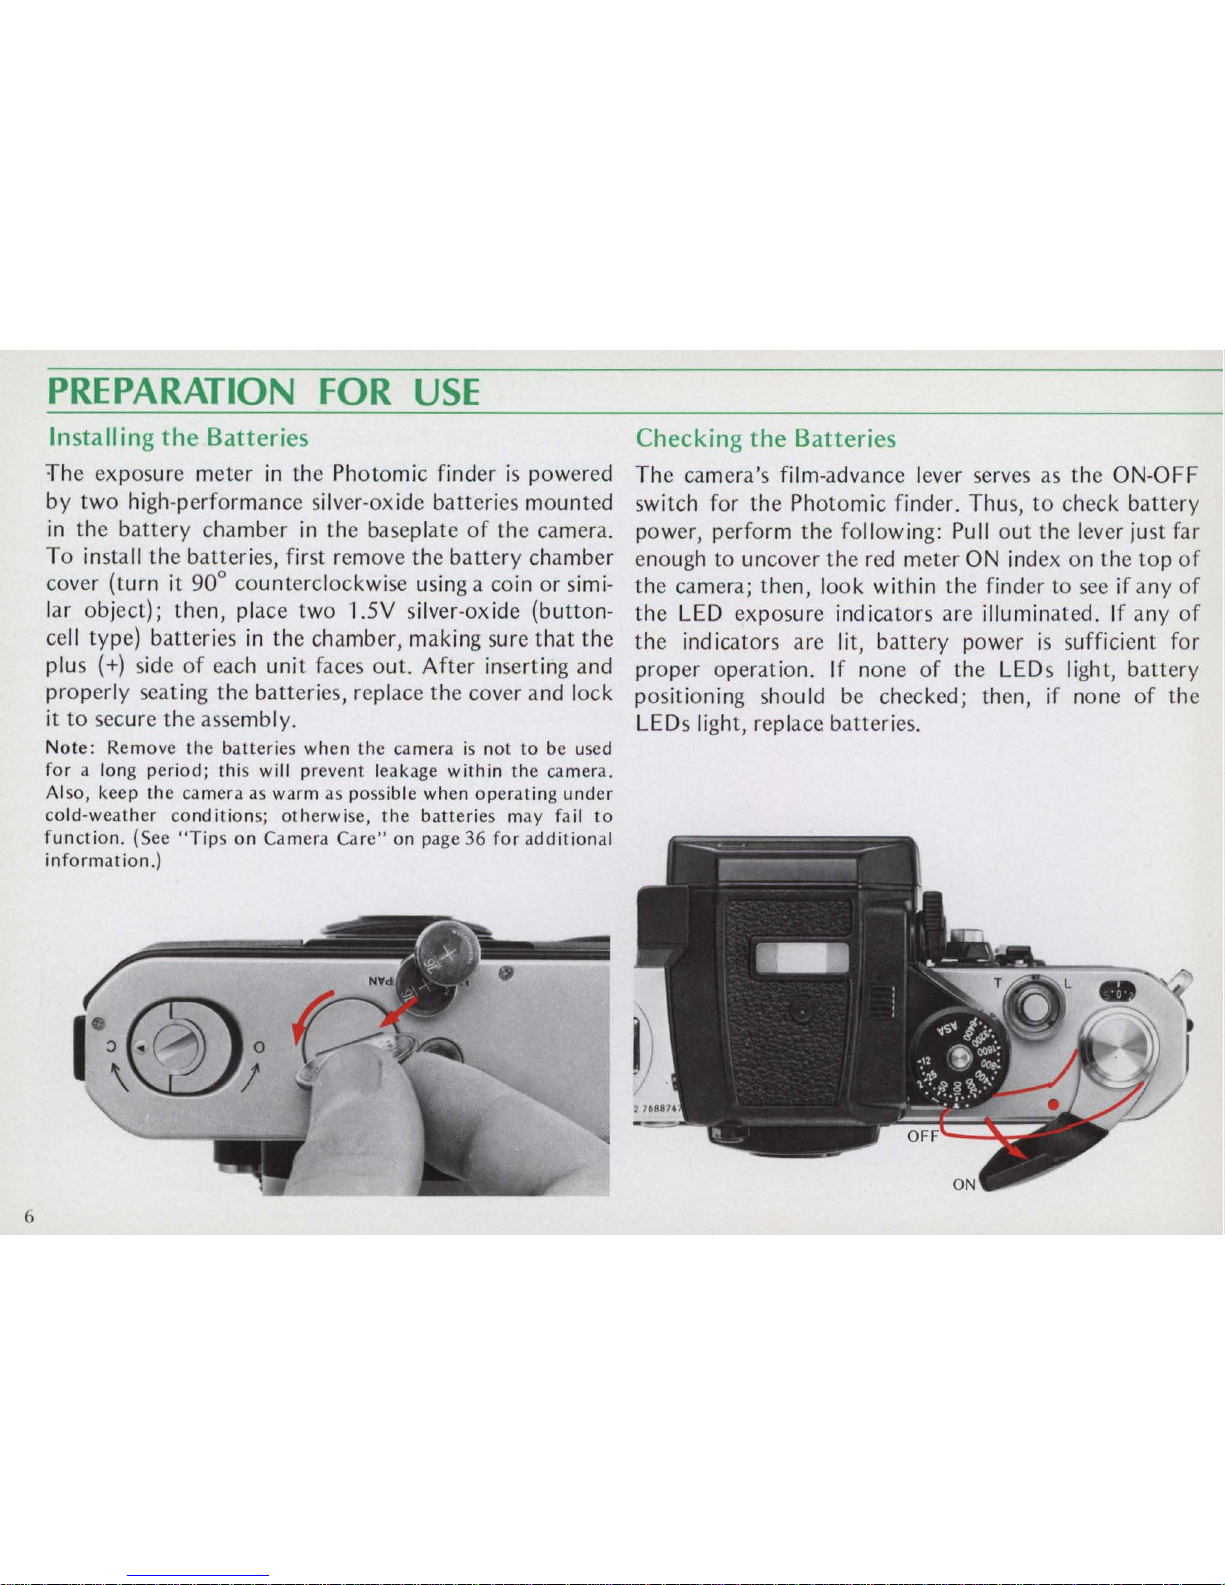
Installing
the
Batteries
Checking
the
Batteries
The exposure meter
in
the Photomic finder
is
powered
by two high-performance silver-oxide batteries mounted
in
the battery chamber
in
the baseplate
of
the camera.
To install the batteries, first remove the battery chamber
cover (turn it 90° counterclockwise using a coin or similar object); then, place two 1.5V silver-ox
ide
(button-
cell
type) batteries
in
the chamber, making sure
that
the
plus
(+)
side
of
each unit faces out. After inserting and
properly seating the batteries, replace the cover and lock
it to secure the assembly.
Note:
Remove
the
batteries
when
the
camera
is
not
to
be used
for
a long
period;
this will
prevent
leakage
within
the
camera.
Also,
keep
the
camera
as
warm
as
possible
when
operating
under
cold-weather
conditions;
otherwise.
the
batteries
may
fail
to
function.
(See
"Tips
on
Camera
Care"
on
page
36
for
additional
information.)
The camera's film-advance lever serves as the ON-OFF
switch for the Photomic finder. Thus,
to
check battery
power, perform the following:
Pullout
the lever just far
enough to uncover the
red
meter
ON
index on the top
of
the camera; then, look within the finder to
see
if any
of
the
LEO
exposure indicators are illuminated.
If
any
of
the
ind
icators are lit, battery power
is
sufficient for
proper operation.
If
none
of
the LEOs light, battery
positioning should
be
checked; then, if none
of
the
LEOs light, replace batteries.
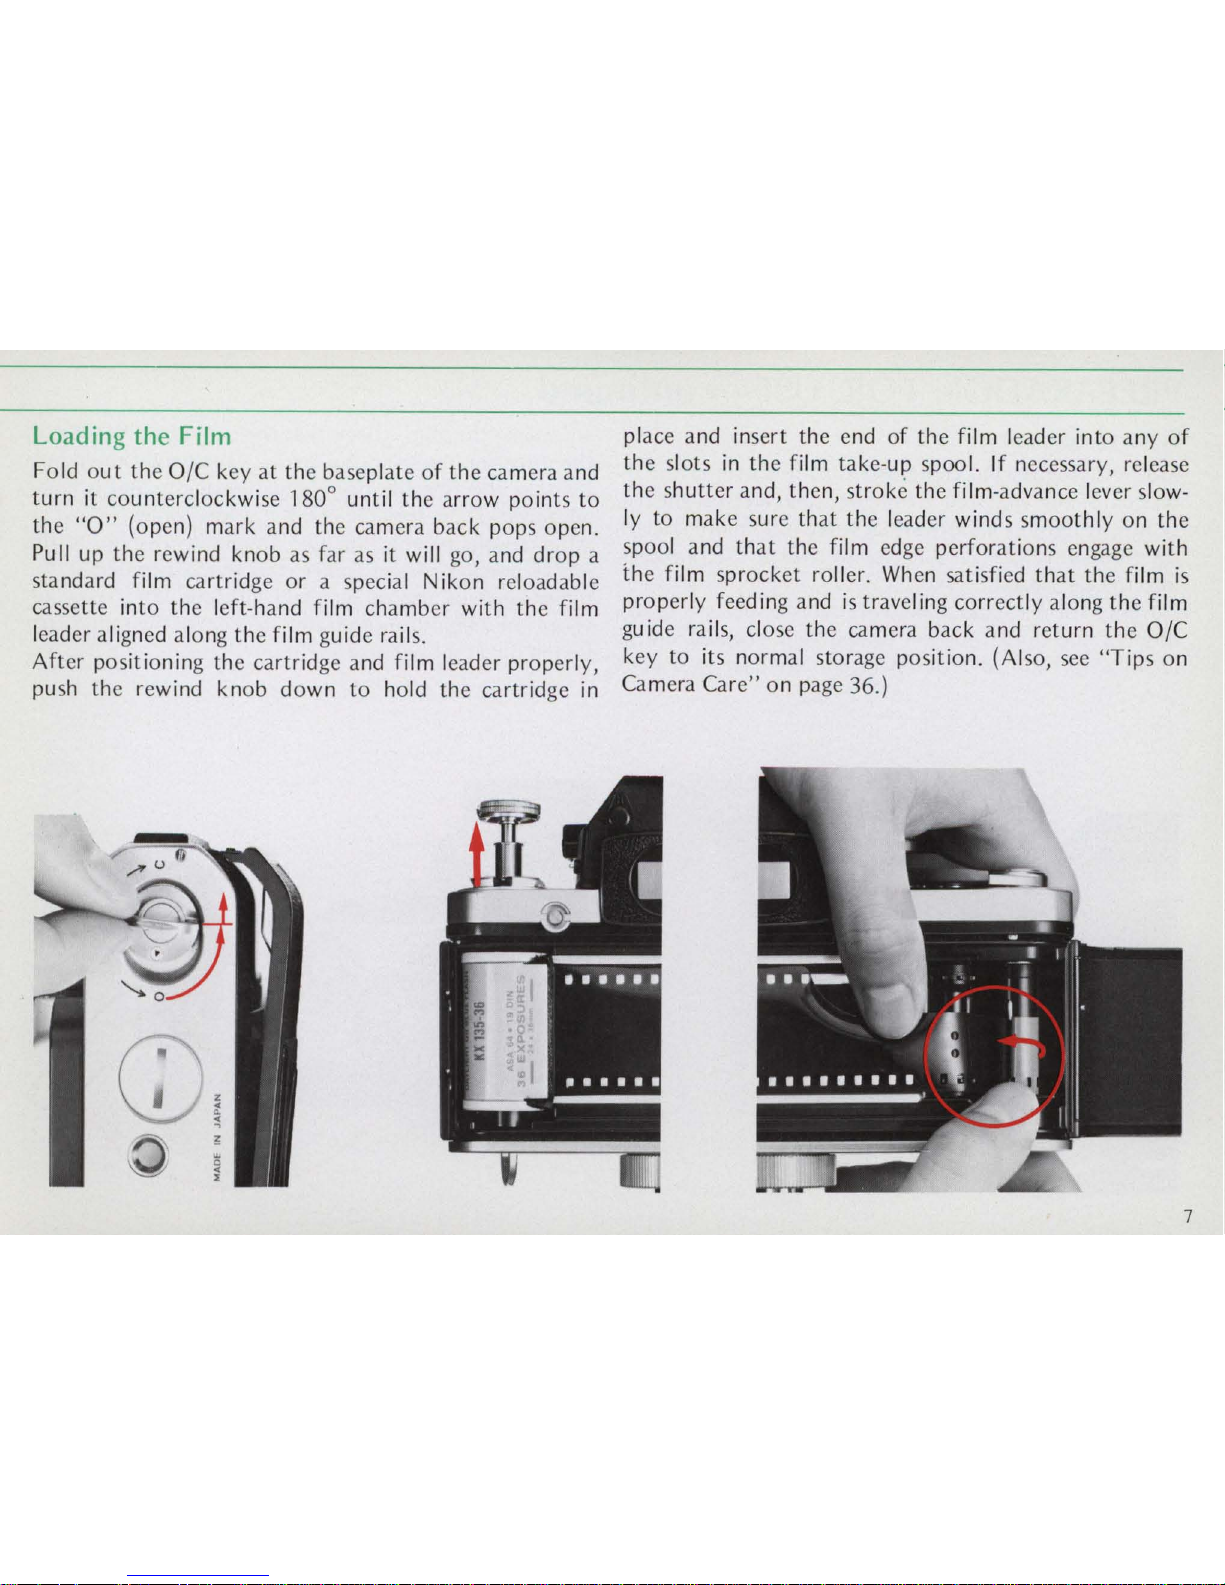
Loading the Film
Fold
out
the OIC key
at
the baseplate
of
the camera a
nd
turn
it
counterclockwise 1800 until the arrow po ints
to
the
"0"
(open) mark and the camera back pops ope
n.
Pull up the rewind knob as far as it
will
go, and drop a
sta
nd
ard f
ilm
cartridge or a special Nikon reloadable
cassette into the left-ha
nd film
chamber with the film
leader align
ed
along the film guide rails.
After positioning the cartridge a
nd film lea
der proper ly,
push the rewind knob down to ho
ld
the cartridge
in
place a
nd
insert the end of the f
ilm
leader into a
ny
of
the slots
in
the f
ilm
take-up spool. If necessar
y,
release
the s
hutt
er and, then, stroke the film-advanc
e l
eve
r slow-
ly to make sure that the l
ea
der winds smoothl y on the
spool and
that
the
film edge
perforat
ion
s engage with
the
fi
lm
sprocket roller.
When
satisfied
that
the
film
is
prope
rly
feeding a
nd
is
traveling correctly along the film
guide ra
ils,
close the camera back a
nd
return the OIC
key to its normal storage position. (Also, see "Tips on
Camera Care" on page 36.)
7
8
PREPARATION
FOR
USE
- continued
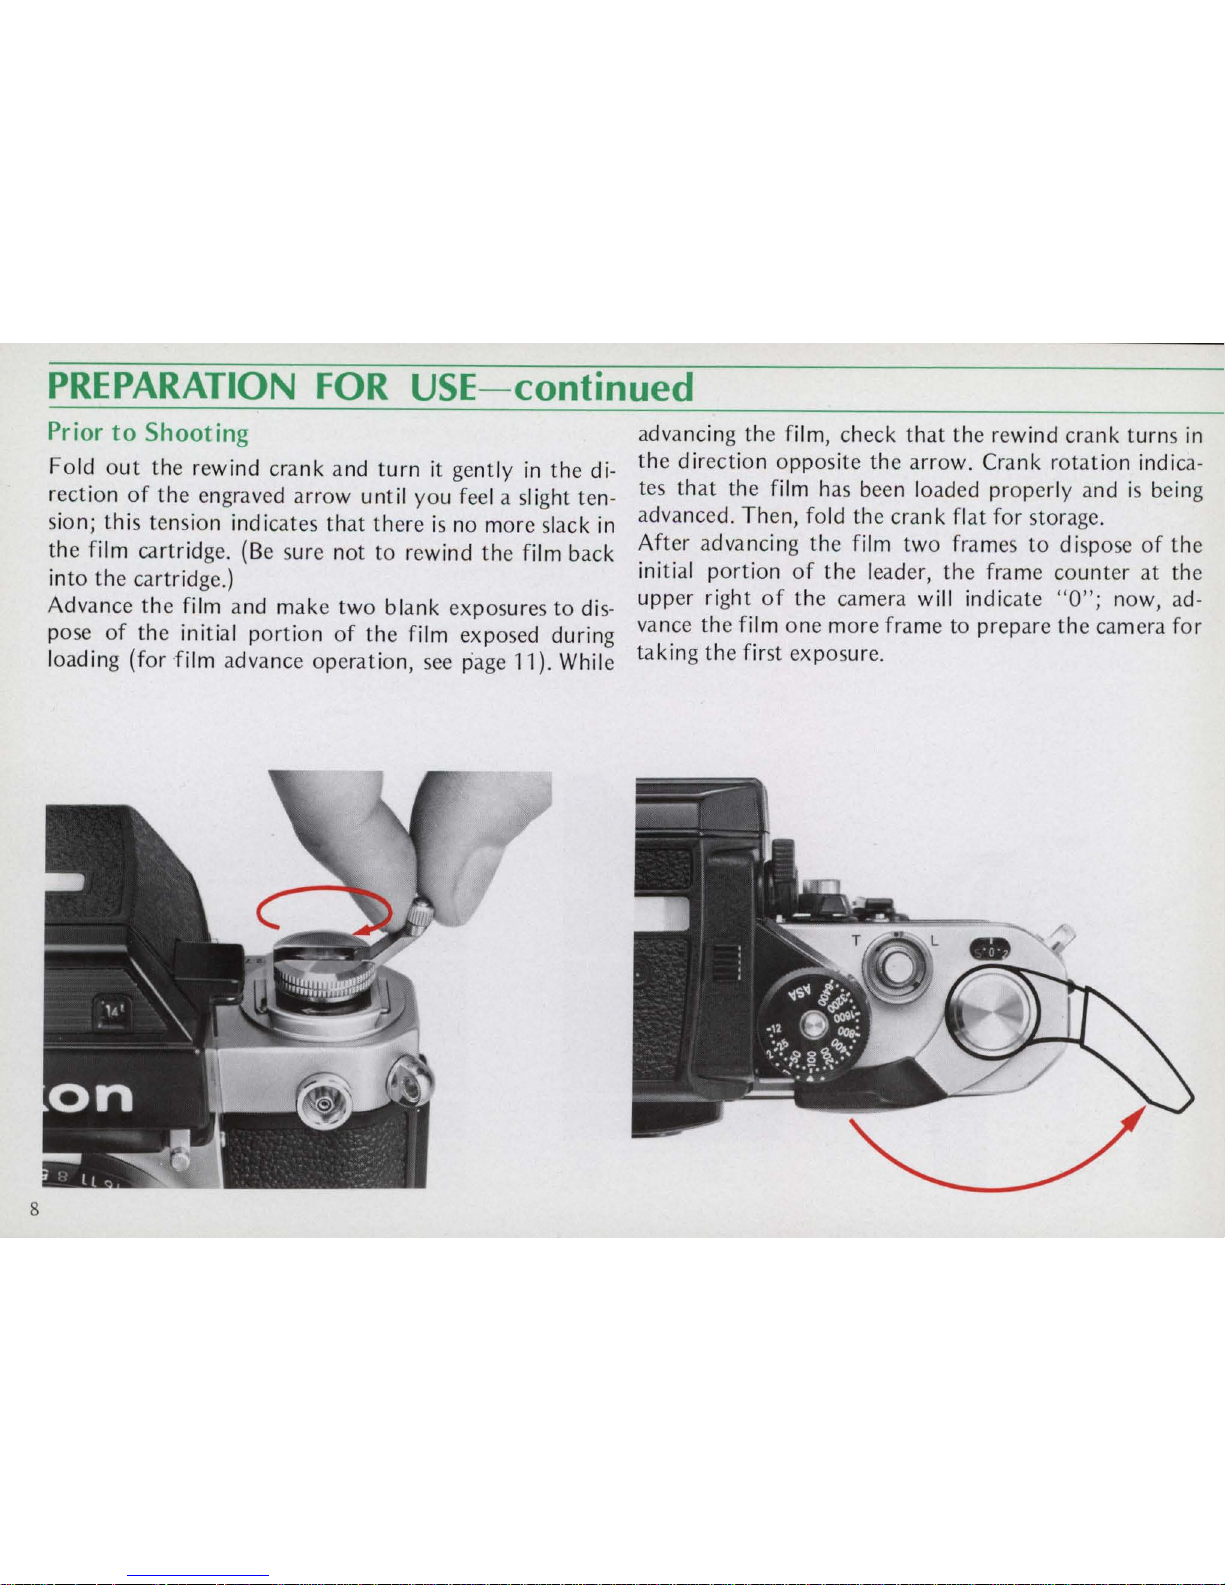
Prior
to
Shooting
Fo
ld out
th e rewind crank a
nd
turn
it
gently
in
the
direction of the engraved arrow until you feel a sl ight tension; this tension indi
cates
that there is no more slack
in
the f
ilm cartridge.
(Be sure not to rewind the f
ilm
back
into the
ca
rtridge
.)
Advan
ce
the f
ilm and
make two blank exposu
res
to dis-
pose.
of
the i.nitial portion of th e f
ilm
exposed during
loa d
In
g (for ·fllm advan
ce
operation,
see
page 11) .
Whil
e
ad
vancin
g the f
ilm
, check that the rewind crank turns
in
the directi
on oppos
ite th e arro
w. Cra
nk
rotation
indi
ca-
t
es
that the film h
as bee
n loaded properly a
nd
is being
ad
vance
d. Then, fo
ld
the crank fl
at for storage.
After advancing th e
film two fram
es
to dispose
of
the
ini
tial portion
of
the leader, the fra me counter at the
upper
right
of
th e camera
will
indicate
"0"·
now ad-
van
ce
the f
il
m one more frame to prepare the
~amer~
for
ta
kin
g the first exposur
e.

Memo Holder
A special holder
is
provided on the camera back for con-
venient storage
of
information pertinent to the photo-
graphy. A piece
of
paper or the end-flap torn from the
film carton can
be
inserted to serve
as
a reminder
of
the
film type, film speed and number
of
exposures.
Setting the Film
Speed
The camera's exposure meter must be adjusted to the
speed
of
the film
in
use
to
ensure correct measurement;
thus, a film-speed scale
(ASA
graduations) and an index
ring are provided on the finder.
To
adjust, lift the milled
ASA
film-speed index ring and turn it until the
red
index
triangle
is
aligned with the
ASA
value for the film
in
use.
The meter
is
sensitive across the
fu
II
range
of
from
ASA
12 to
ASA
6400. The film-speed dial has two dots between each pair of numbers for intermediate settings
such as 64, 80, 125, etc.
9
OPERATION OF CAMERA CONTROLS
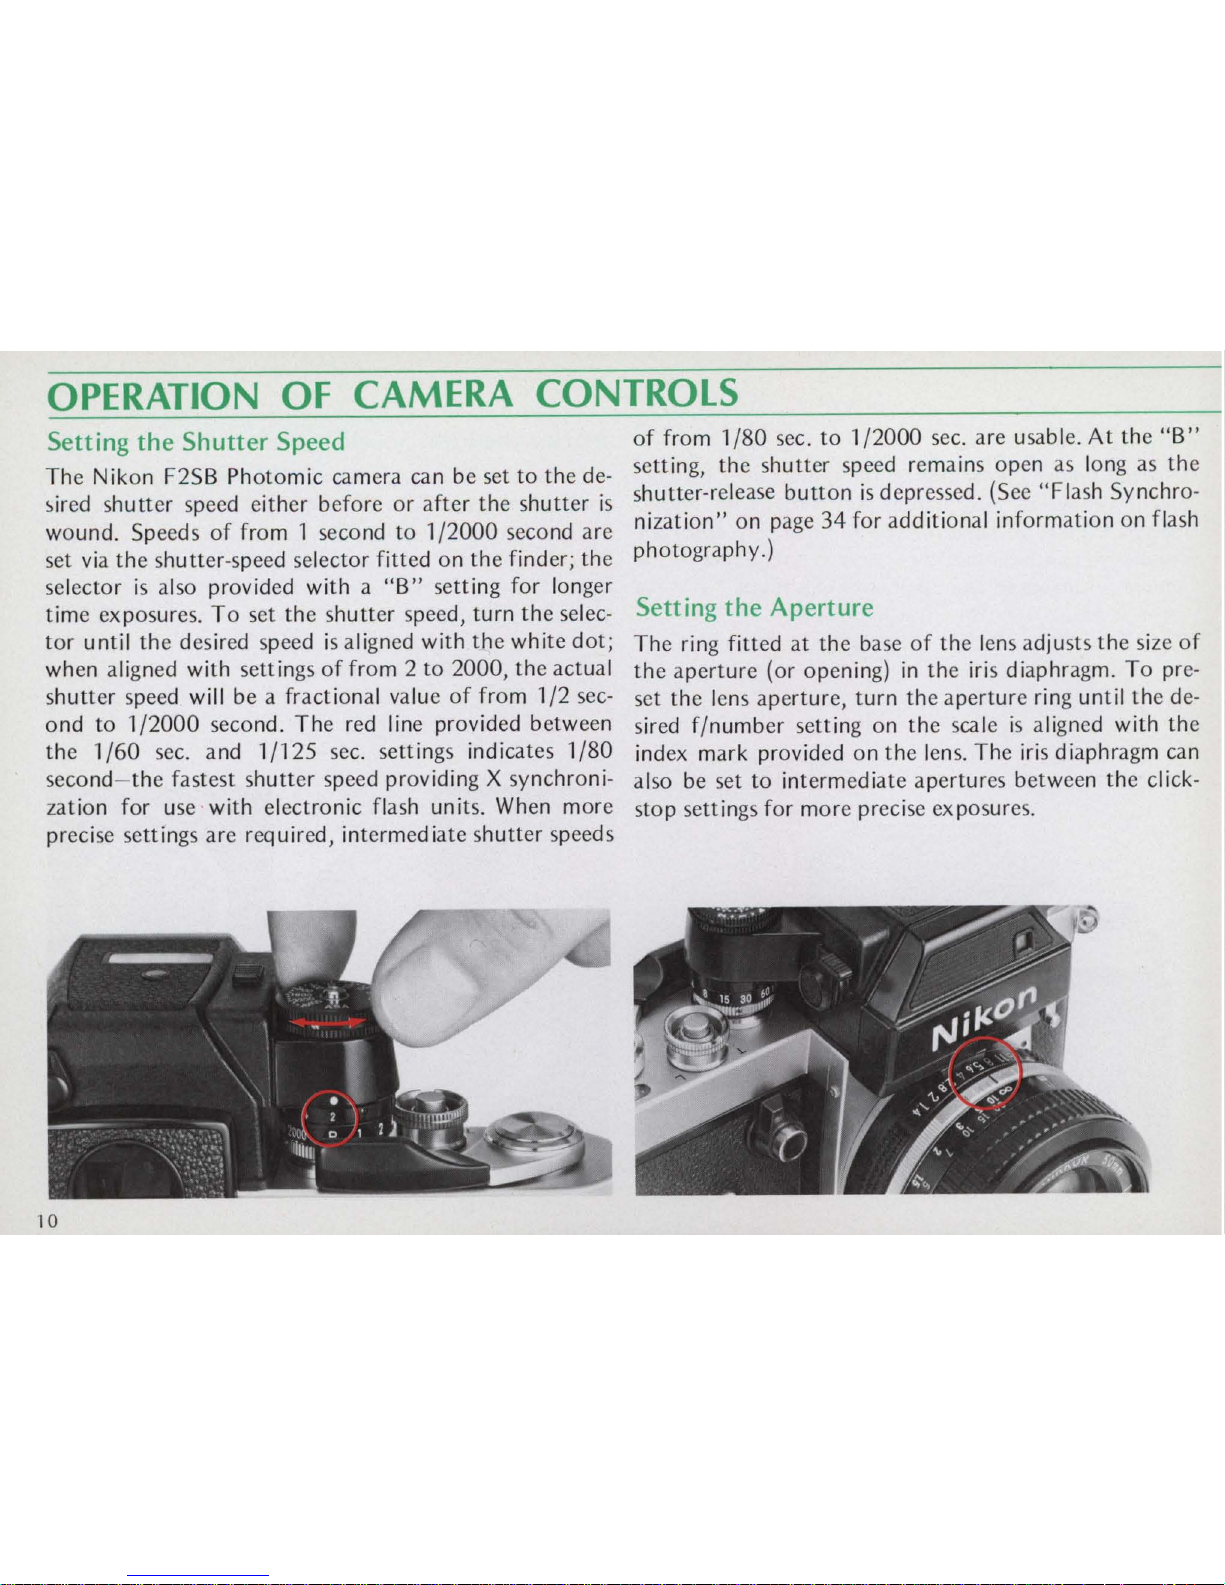
Setting the Shutter Speed
The
Nikon
F2S8 Photom
ic camera can
be
set
to
the
de-
~ired
shutter
speed
either
before
or
after
the
shutter
is
wound.
Speeds
of
from
1 second
to
1/2000
second
are
set via
the shutt
er-speed selector fitt ed
on
the
finder;
the
sel
ector
is
also provided with a
"8"
setting
for
longer
time exposures.
To
set
the
shutte
r speed,
turn
the
selec-
tor
until
the
desired speed
is ali
gned with
the
white
dot;
when aligned with setti ngs
of
from 2
to
2000,
the
actua
l
shutter
speed will
be a fractiona
l value
of
from
1/2
sec-
ond
to
1/2000
second.
The
red line provided
between
the 1 /60
sec. and 1
/125
sec. settings ind icates
1/80
seco nd -
the
fastest
shutte
r speed providing X synchroni-
zation
for use with
electronic
flash units. When
more
precise settings
are
required,
intermediate shutt
er speeds
10
of
from
1/80
sec.
to
1/2000
sec.
are
usable.
At
the
"8"
setting,
the
shutter
speed remains
open
as l
ong
as
the
shutter-release
button
is
depressed. (See
"Flash
Synchro-
nization"
on
page
34
for
additional
information
on
flash
photography.)
Setting the Aperture
The
ring fitted
at
the
base
of
the
lens adjusts
the
size
of
the
aperture
(or opening)
in
the
iris diaphragm.
To
pre-
set
the
lens
aperture,
turn
the
aperture
ring until
the
de-
s
ir
ed
f/number
setting
on
the
scale
is ali
gned with
the
index mark provided
on
the
lens.
The
iris diaphragm can
also be set
to
intermediate
apertures
between
the
click-
stop
settings for
more
precise
ex
posures.
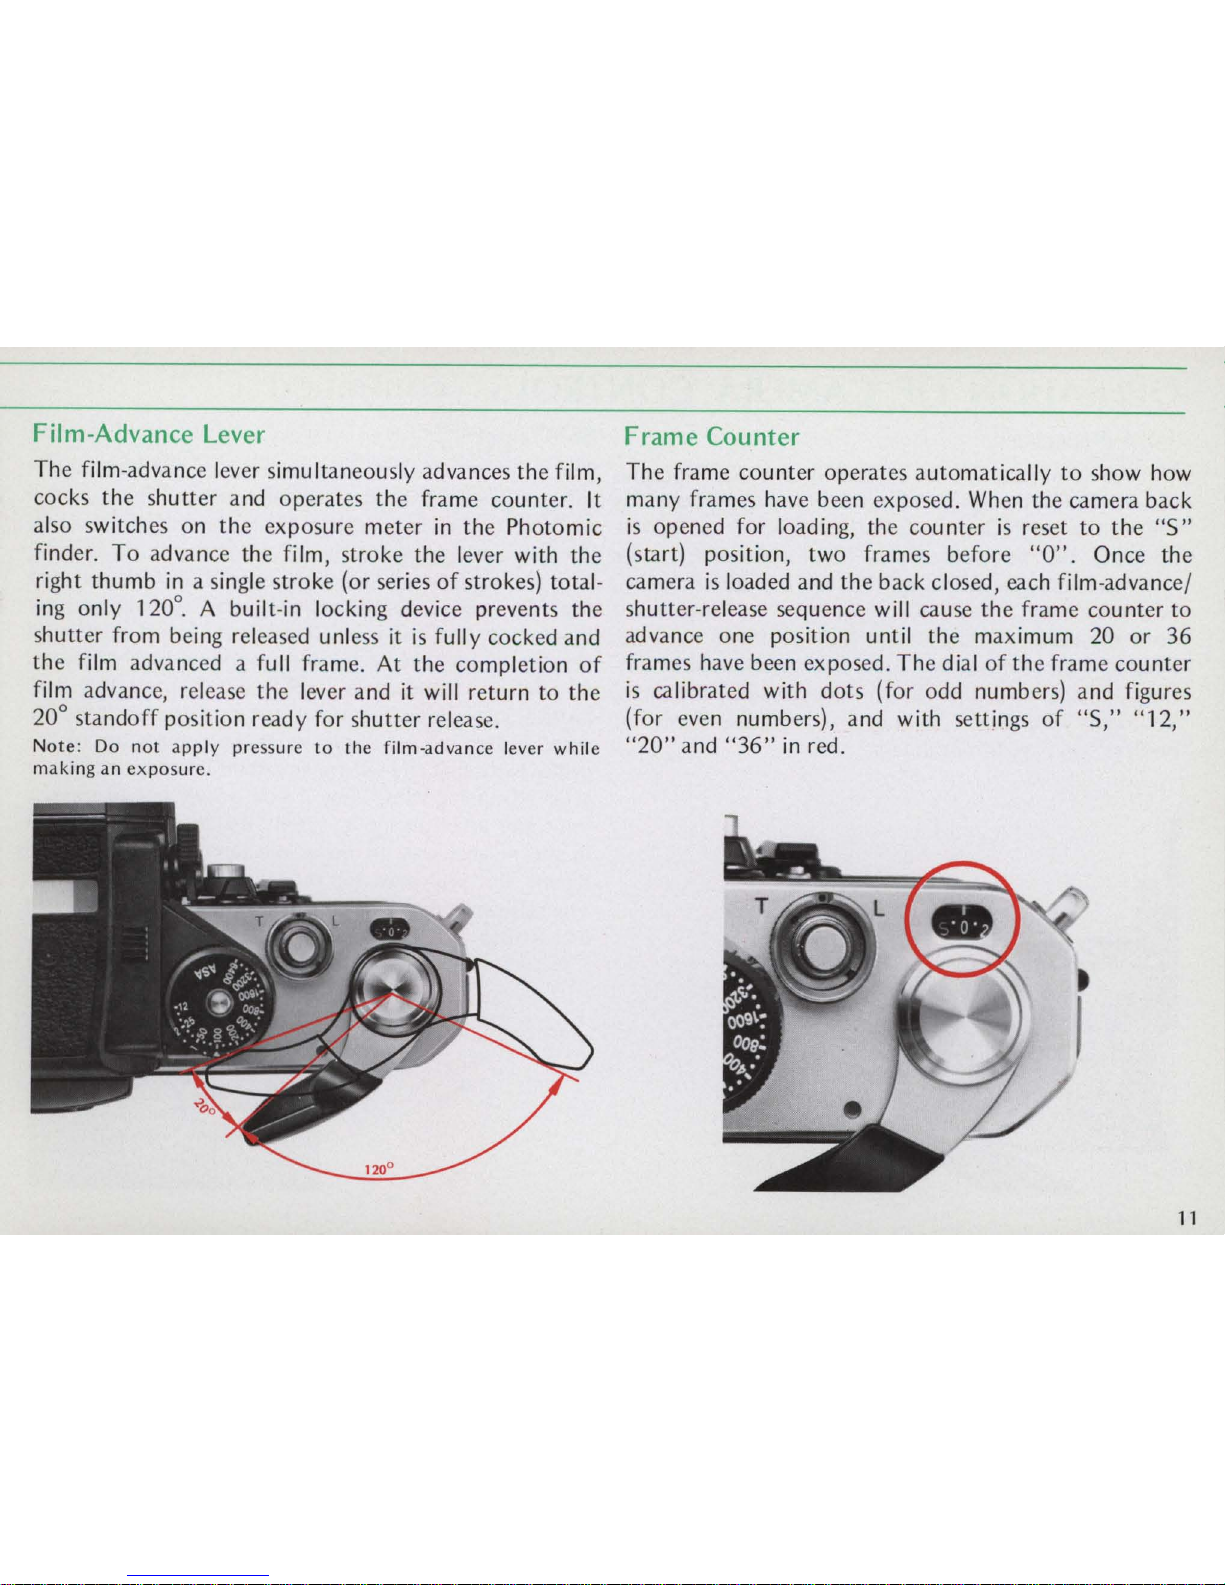
Film-Advance Lever
The
film-advance lever simu ltaneously advances
the
film,
cocks
the
shutter
and
operates
the
frame
counter.
It
also switches
on
the
exposure
meter
in
the
Photomic
finder.
To
advance
the
film,
stroke
the
lever with
the
right
thumb
in
a single
stroke
(or series
of
strokes) total-
ing
only
120
°. A built-in locking device prevents
the
shutter
from being released unless it
is
fully cocked
and
the
film advanced a full frame.
At
the
completion
of
film advance, release
the
lever
and
it will
return
to
the
20°
standoff
position
ready
for
shutter
release.
Note: Do
not
apply
pressure
to
the
film-advance
lever
while
making
an exposure.
Frame Counter
The
frame
counter
operates
automatically
to
show
how
many
frames have been
exposed.
When the camera
back
is
opened
for
loading, the cou nter
is
reset
to
the
"5"
(start) position ,
two
frames
before
"0".
Once
the
camera
is
loaded and
the
back
closed, each film-advance/
shutter-release sequence will cause
the
frame
counter
to
advance
one
position until
the
maximum
20
or
36
frames have been exposed.
The
dial
of
the
frame
counter
is
calibrated with
dots
(for
odd
numbers)
and
figures
(for even numbers), and
with
settings
of
"5,"
"12,"
"20"
and
"36"
in
red.
11
OPERATION OF CAMERA
CONTROLS-continued
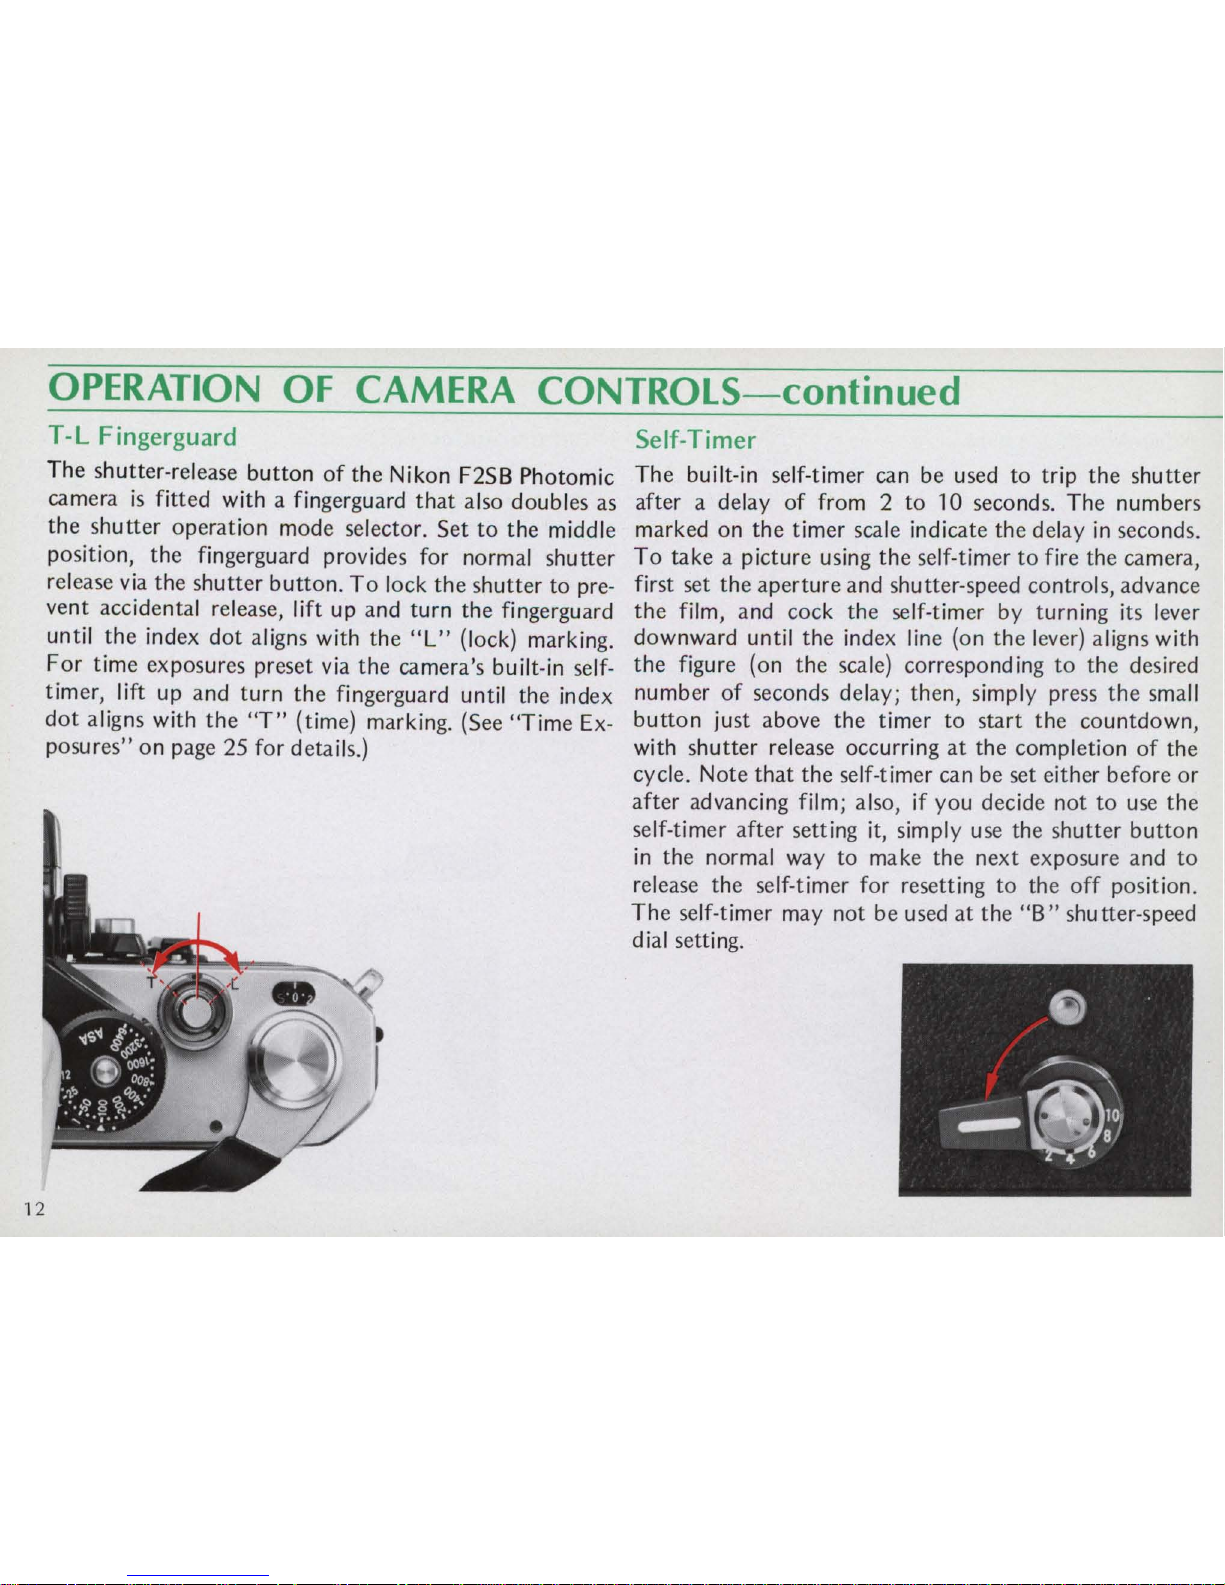
T-L
Fingerguard
The
shutter-release
button
of
the
Nikon F2SB P
hotomic
camera
is
fitted
with a fingerguard
that
also doubles as
the
shutter
operation
mode
selector.
Set
to
the
middle
position,
the
fingerguard provides for normal shu
tter
release via
the
shutter
button.
To
lock
the
shutter
to
pre-
vent
accidental release, lift
up
and
turn
the
fingerguard
until
the
index
dot
aligns with
the
"L"
(lock) marking.
For
time
exposures preset via
the
camera's built-in self-
timer, lift
up
and
turn
the
fingerguard until
the
index
dot
aligns with
the
"T"
(time) marking. (See
"Time
Ex-
posures"
on
page 25
for
details.)
12
Self-Timer
The
built-in self-timer can be used
to
trip
the
shutter
after a delay
of
from 2
to
10
seconds.
The
numbers
marked on
the
timer
scale indicate
the
delay in seconds.
To
take
a picture using
the
self-timer
to
fire
the
camera,
first set
the
aperture
and
shutter-speed controls, advance
the
film, and cock
the
self-timer by turning its lever
downward until
the
index line (on
the
lever) aligns with
the
figure (on
the
scale) corresponding
to
the
desired
number
of
seconds delay;
then,
simply press
the
small
button
just
above
the
timer
to
start
the
countdown,
with
shutter
release occurring
at
the
completion
of
the
cycle.
Note
that
the
self-timer can be set either
before
or
after
advancing film; also, if
you
decide
not
to
use
the
self-timer
after
setting it, simply use
the
shutter
button
in
the
normal way
to
make
the
next
exposure
and
to
release
the
self-timer
for
resetting
to
the
off
position.
The
self-timer may
not
be
used
at
the
"B"
shu tter-speed
dial setting.
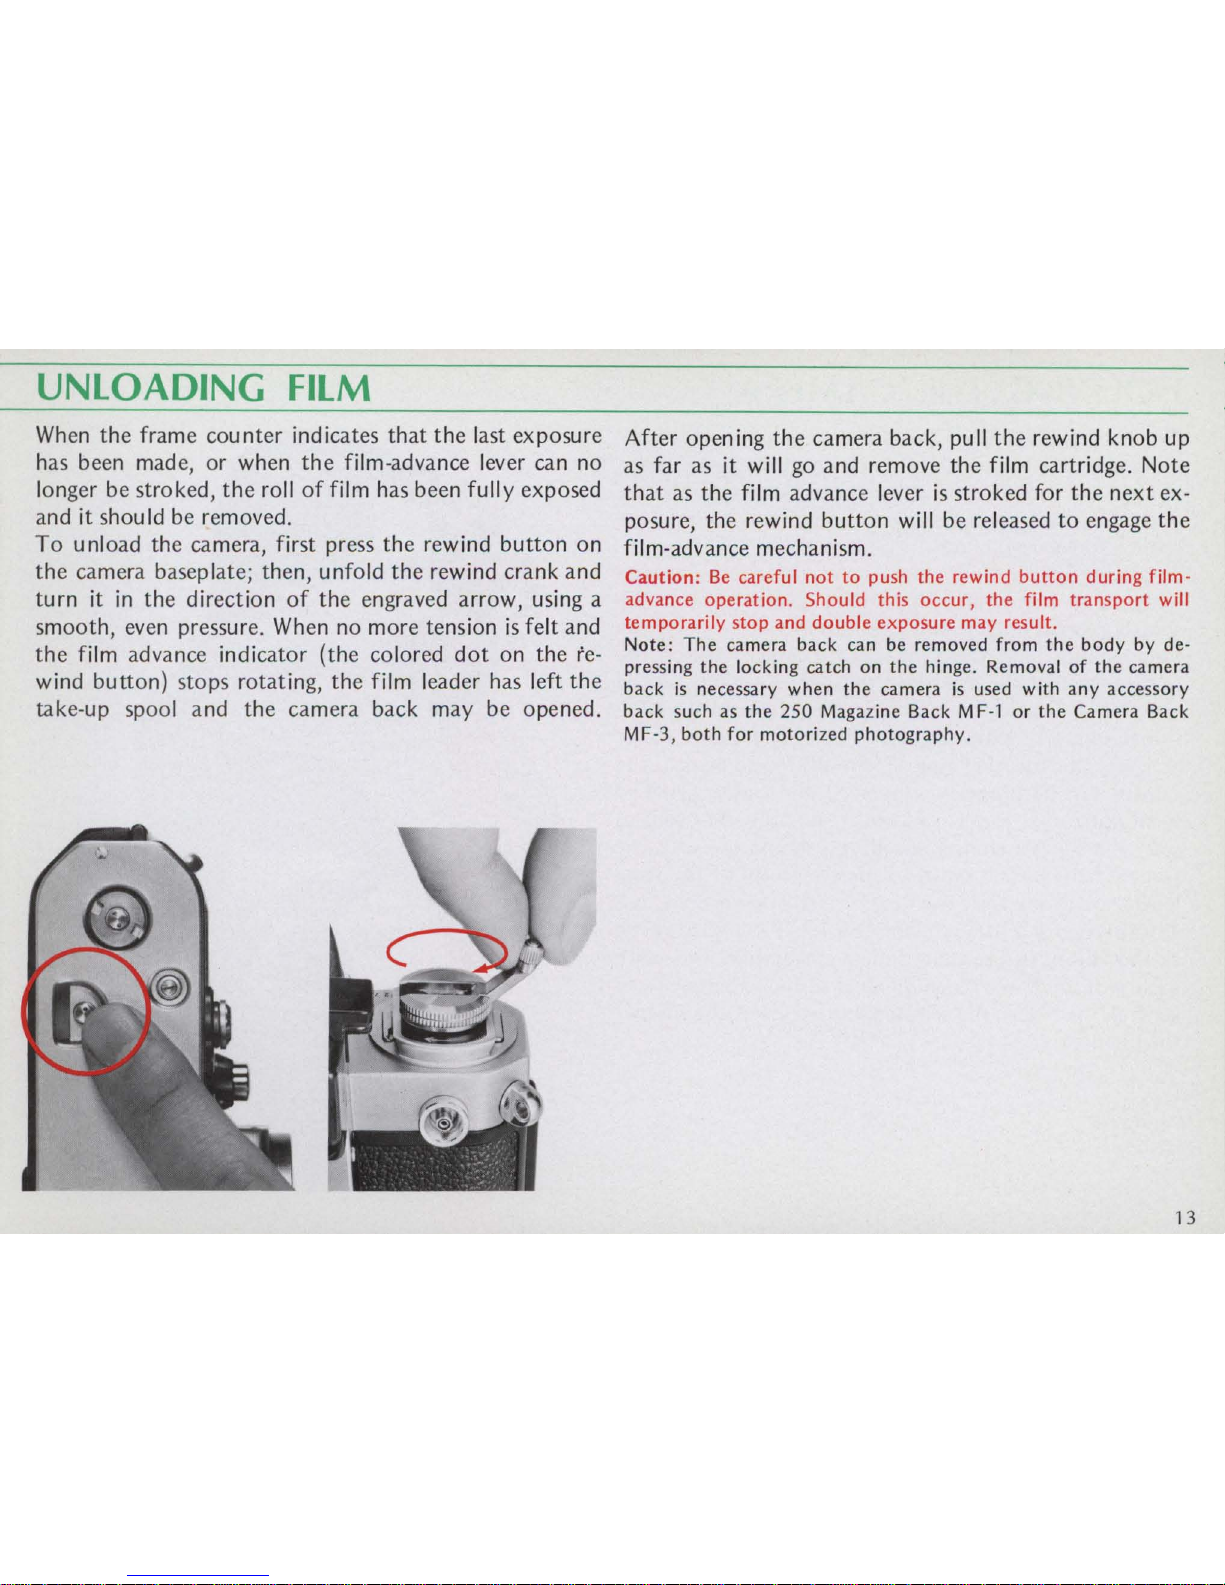
UNLOADING FILM
When
the
frame
counter
indicates
that
the
last
exposure
has been made,
or
when
the
film-advance lever can
no
longer be
stroked,
the
roll
of
film has been fully exposed
and
it
shou
Id
be removed.
To
unload
the
camera, first press
the
rewind
button
on
the
camera baseplate; then, unfold
the
rewind
crank
and
turn
it
in
the
direction
of
the
engraved
arrow,
using a
smooth,
even pressure. When no
more
tension
is
felt
and
the
film advance
indicator
(the
colored
dot
on
the
re-
wind
button)
stops
rotating,
the
film leader has left
the
take-up spool
and
the
camera
back
may
be
opened.
After
open
ing
the
camera
back, pu
II
the
rewind
knob
up
as far as it will go and remove
the
film cartridge.
Note
that
as
the
film advance lever
is
stroked
for
the
next
ex-
posure,
the
rewind
button
will
be
released
to
engage
the
film-advance mechanism.
Caution:
Be
careful
not
to
push
the
rewind
button
during
film-
advance
operation. Should
this
occur,
the
film
transport
will
temporarily
stop
and
double
exposure
may
result.
Note:
The
camera
back
can
be
removed
from
the
body
by de-
pressing
the
locking catch
on
the
hinge. Removal
of
the
camera
back
is
necessary
when
the
camera
is
used with
any
accessory
back
such as
the
250
Magazine Back M F-1
or
the
Camera
Back
MF
-3.
both
for
motorized
photography.
13

HOLDING
THE
CAMERA
Camera shake
is
one
of
the most common causes
of
un-
sharp pictures, especially
at
slow shutter speeds. Learn
to hold the camera correctly and practice steady shutter
squeezing. The photos show the best ways to hold the
camera for sharp pictures.
Wrap
the fingers
of
the right hand around the camera
body
so
that the index finger rests comfortably on the
shutter-release
button
and the thumb fits between the
camera body and the film-advance lever. Position the
camera
so
that the eye looks through the center
of
the
viewfinder. Cradle the camera
in
the left hand for additional support, with the left thumb and index finger
grasping the focusing ring. From this basic stance, the
camera can be properly supported and easily switched
from horizontal to vertical format shooting.
As
a general
rule, the lowest shutter speed you should
use
with the
camera hand-held
is
equal to the reciprocal
of
the focal
length
of
the lens
in
use
(e.g., for a 500mm lens,
use
1/500
sec.; for a 105mm lens,
use
1/125
sec.)
. However,
as
the ability to hold the camera steady may vary with
each individual,
we
recommend that you experiment. In
general, the higher the selected shutter speed, the sharper
the picture.
14
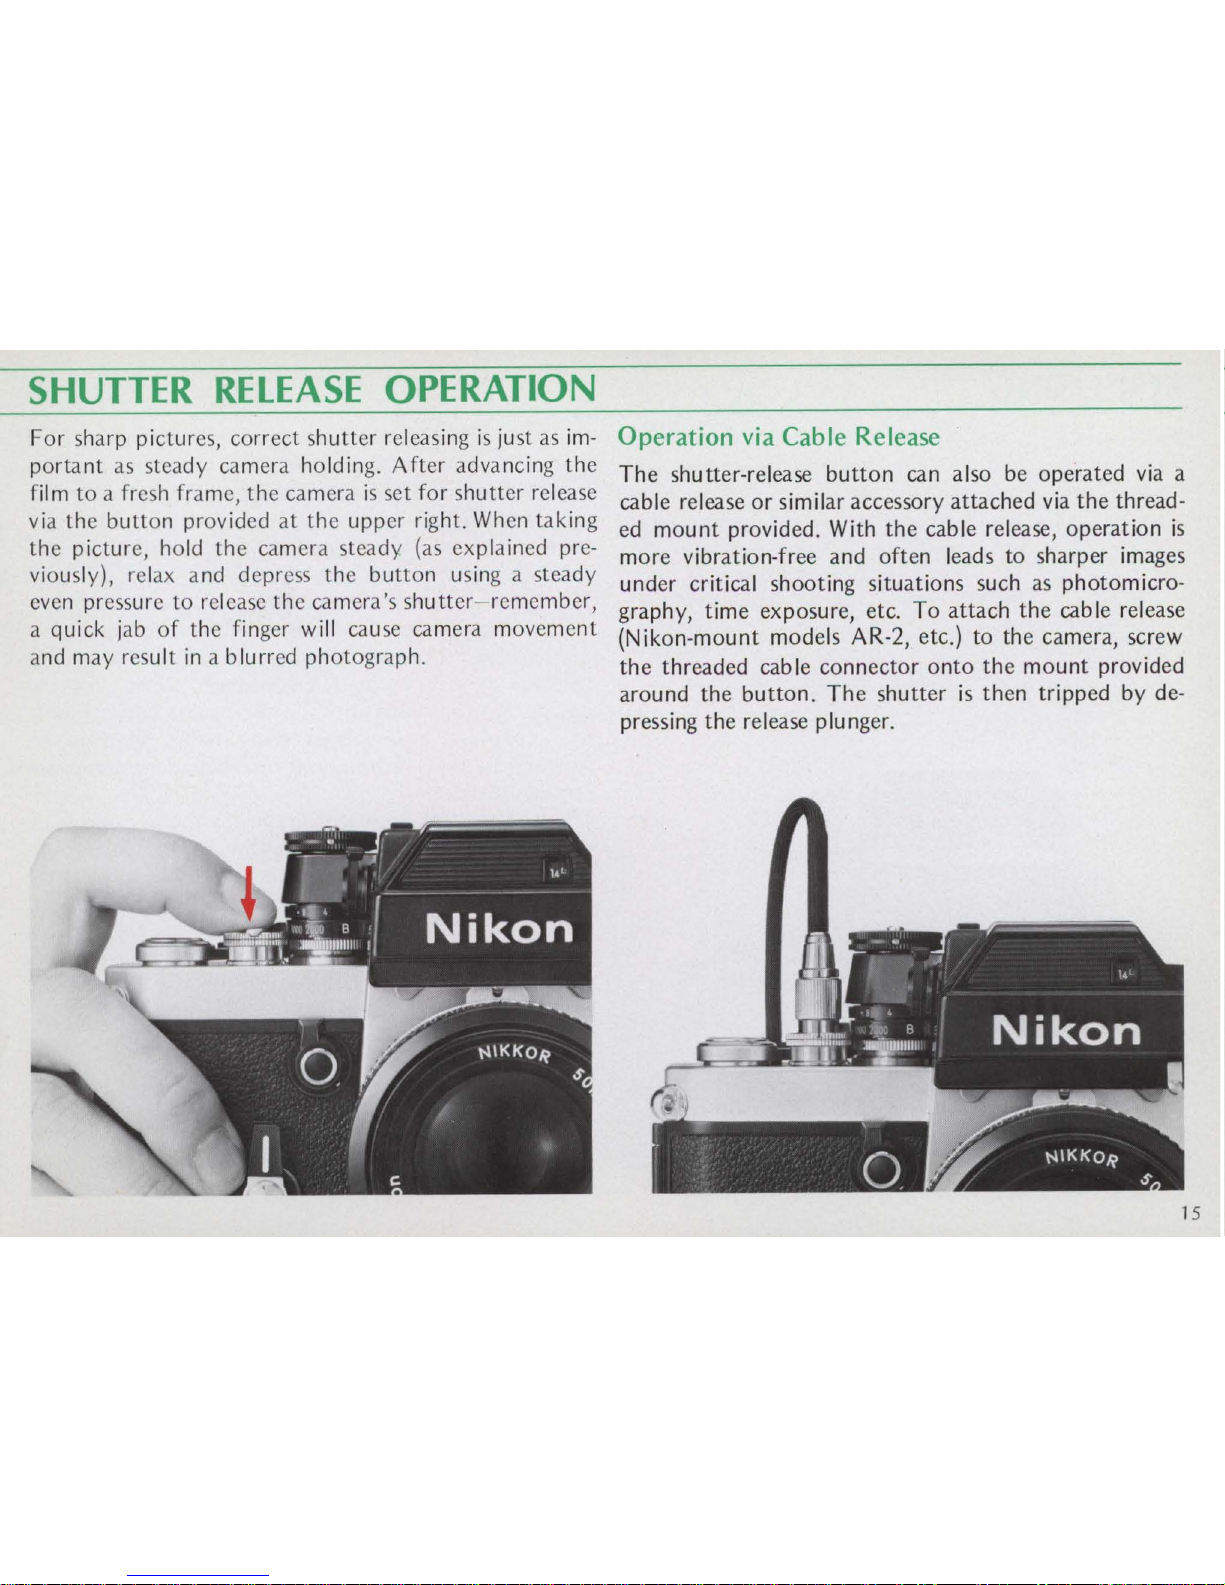
SHUTTER
RELEASE
OPERATION
For sharp
pictures,
correct shutl
er releasing
is
just as im-
portant
as
steady
camera
ho lding.
After
advancing
the
fi
lm
to
a fresh frame,
the
camera
is
set
for
shutter
release
via
the
button
provided
at
the
upper
right. When
taking
the
picture,
hold
the
camera
steady
(as
explained
pre-
viously), relax
and
depress
the
button
using a
steady
even pressure
to
release
the
camera's
shu
tter
- rem
ember,
a quick jab
of
the finger will ca u
se
camera m
oveme
nt
and
may
result
in
a blurred ph ot
ograph.
Operation via Cable Release
The
shutter-release
button
can also be
operated
via a
cable release
or
similar accessory
attached
via
the
thread
-
ed
mount
provided. With
the
cable release,
operation
is
more
vibration-free
and
often
leads
to
sharper images
under
critical
shooting
situations
such as
photomicro
-
graphy,
time
exposure,
etc.
To
attach the cable release
(Nikon-mount
models AR-2, etc.)
to
the
camera,
screw
the
threaded
cab
Ie
connector
onto
the
mount
provided
around
the
button. The
shutter
is
then
tripped
by de-
pressing
the
release plunger.
15
 Loading...