

Specifications and Main Features
- The camera is a 35 mm single-lens reflex which uses a semiautomatische operation.
- The picture which is captured has a measuerment of which are 24 mm x 36 mm, which can also be referred to as the 35 mm film format
- The mount of the lens is Nikkon F mount using a bayonet type of connection
- A standard lens is available as Nikkor which come in 50mm f/1.4 with more than 50 Nikkor lenses available. There are other more options Nikkor 50mm f/2 and 55mm f/1.2
- A horizontal travel is set and depends on the focal plane shutter speed. The horizontal ranges from 1 to 1/2000 or can be considered as ‘B’, the speer is from 2 up to 10 seconds. Intermediate settings are also place between 1/80 to 1/2000 seconds. A shutter self timer or a shutter release button can be used
- A shutter speed of off camera can be set, controlling the flash through a pc terminal, this is provided with a hot shoe contact which has startling controls built in.
- For FP espes people can set in a range of 1/2000 ~ 1/125,or 1/30 ~ 1 for modulated and M bulbs for other 1/30 ~ 1 range and B for MF bulbs, The range is also extended for E flashes 1/80 ~ 1 range further increased for B
- Electric hot switches can be added as contacts to built in parts of the body and serves as safety t for the electric switches
- The type is eye level pentaprism with exposure meter of (calendar mode DP-3). An exchangeable through the lens focusing viewfinder. Shutter speed and aperture setting are displayed at the base of the view screen and a shutter window for the eyepiece is also provided.
- Focusing screen: A matte image employing a standard Nikon type K screen with a 12mm diameter reference circle defines the area of meter center-weighting. Incorporating a microprism ring and a split-image range afinder enhanced the functionality of this screen.
- Reflex mirror: From the term itself, a type that can retract and return to its original position instantaneously. this type also comes inclusive of a lockup lever.
- Exposure metering: Photodiodes are solid state devices that measure light exposure. This system employs two of those sensors and the response obtained is instantaneous. Also the measurement is achieved by averaging the exposure metered through the lens with a center-weighting scheme. To get an appropriate exposure, light emanating from the center LED needs to be adjusted which is under a closed loop control. The other features with this system include shutter speed controls and diaphragms. Two 1.5V silver-oxide batteries are there as energy sources.
- Metering range: The tension applied when making this circuit results in an exposure variance of 2 volts to 17 volts and with use of certain lenses and ASA 100.
- Film speed scale: This setting is adjustable within the range of ASA 12 to 6400.
- Lens diaphragm coupling: There is an automated shutter meter coupling function that enables the use of meters with maximum apertures ranging from f/1.2 to f/32
- Film winding: The rotating angle of this device which is 120° is aimed at improving efficiency when operating on the metering system on 735WR
- Frame counter: Automatically reset to store S while the number of frames that has been exposed is displayed in an additive fashion.
- Film rewinding: Manual use of the film rewind crank plus a built in plate that allows the attachment of the motor
- Depth-of-field view: Provided through a key present on the right side of the camera body
- Section finish : Textured chrome and textured black
- Body only mass : 850g
- Measurement: 152.5mm x 102mm x 66mm
Frequently Asked Questions
- Q: What kind of battery is the Nikon F2SB Photomic powered by?
A: Silver oxide batteries with a voltage rating of 1.5 and quantity rating of 2 only.
- Q: What is the mass of the camera, Nikon F2SB Photomic?
A: The mass of the camera when only the body is considered is 850g.
- Q: Am I restricted to hand a single lenses of Nikon or can I wing other companies?
A: Nikons f mount lenses have been specifically developed to be used with this camera.
- Q: What are the different shutter speeds that one can set with this camera?
A: The shutter can be set to any speed greater than 1 second and when a value of less than 1-sec is set to speed 1/2000/sec. B setting is incorporated for long exposures.
- Q: After I have shot the video how do I rewind it?
A: Rewinding the film cranks manually, so pressing the button on the base plate will initiate the rewinding.
- Q: Can the viewfinder be changed?
A: The viewfinder can be changed as there are several types of such devices.
- Q: The exposure metering system does what function in the camera?
A: It primarily serves the purpose of measuring and recording the amount of light that passes through a camera lens.
User Manual
Page 1
Page 2
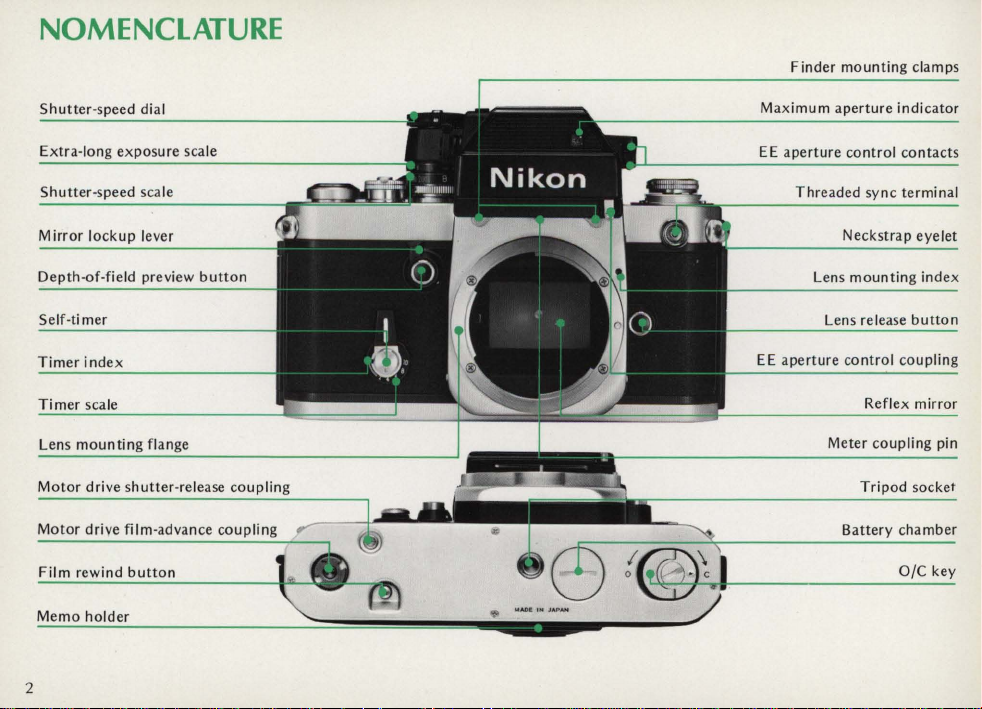
NOMENCLATURE
Finder
mounting
clam
ps
Shutter-speed dial
Extra-long exposure
Shutter-speed scale
Mirror
lockup
lever
Depth-of-field preview
Self-timer
Timer
index
Timer
scale
Lens
mountin
Motor
drive shutter-release coupling
Motor
drive film-advance coupling
Film
rewind
button
Memo
holder
scale
button
Maximum
EE
EE
aperture
aperture
aperture
control
Threaded sync terminal
Neckstrap eyelet
Lens
mounting
Lens release
control
Reflex
Meter coupling pin
Tripod
Sa
ttery
indicator
contacts
index
button
coupling
mirror
socket
cha
mber
o/e key
2
Page 3
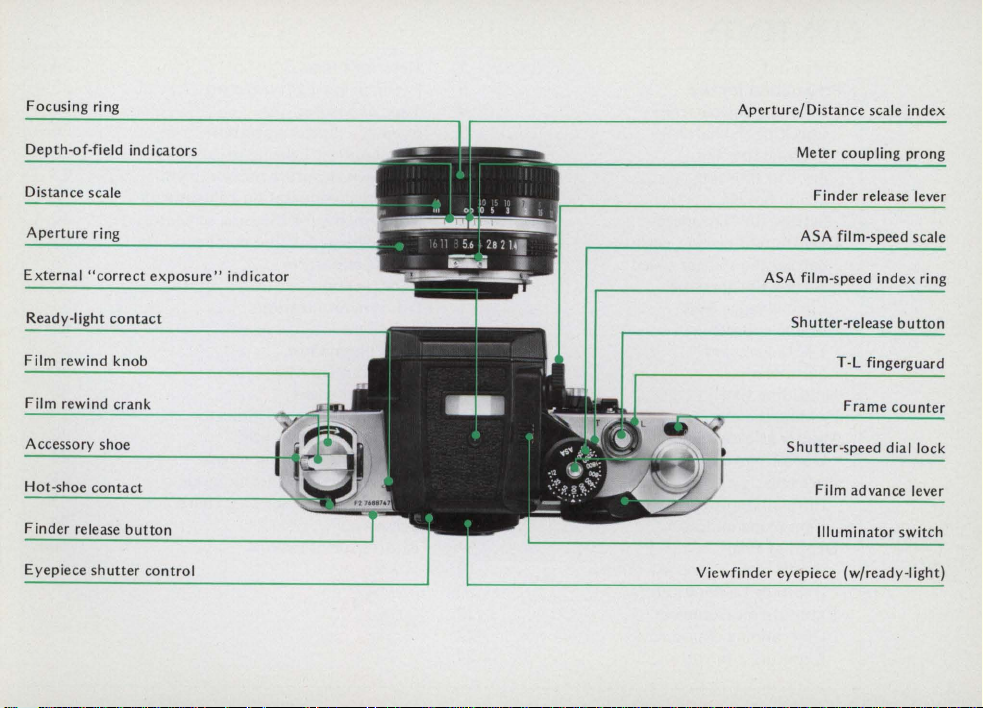
F ocusi ng
ri
ng
Aperture/Distance
scale
index
Depth-of-field
Distance
Aperture
External
scale
ring
"correct
Ready-light
Film rewind
Film
rewind
A ccessory
Hot-shoe
Finder
Eyepiece
shoe
contact
release
shutter
ind
contact
knob
crank
button
icators
exposure"
control
indicator
Viewfinder
Meter
coupling
Finder
ASA film-speed
ASA film-speed
Shutter-release
T-L fingerguard
Frame
Shutter-speed
Film ad vance lever
Illuminator
eyepiece
(w/ready-light)
prong
release lever
scale
index
ring
button
counter
dial lock
switch
Page 4
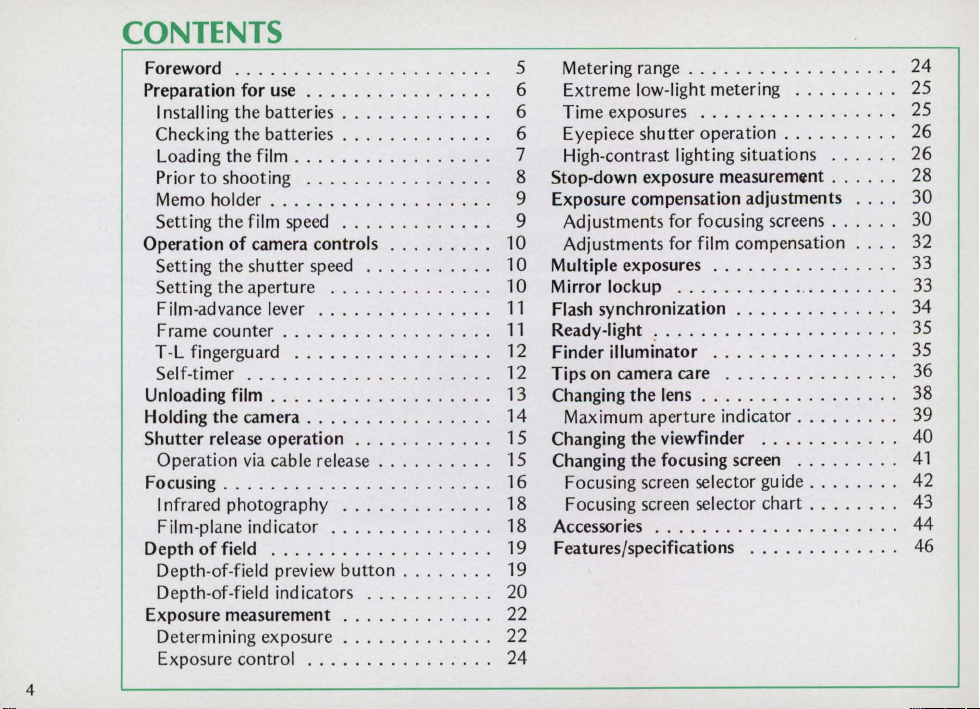
CONTENTS
Foreword
Preparation
Installing
Checking
Loading
Prior
Memo holder . . . . . . . . . . . . . . . . . . . 9
Setting
Operation
Setting the
Setting
Film-advance lever
Frame
T-Lfingerguard
Self-timer . . . . . . . . . . . . . . . . . . .
Unloading film . . . . . . . . . . . . . . . . .
Holding
Shutter
Operation
Focusing.
I nfrared photography . . . .
Film-plane indicator
Depth
Depth-of-field preview
Depth-of-field indicators .
Exposure measurement . . . . . . . . . . .
Determining exposure
Exposure control
4
......
for
the
the
the
to
shooting
the
of
the
counter.
the
camera . . . . . . . . . . . . . .
release
via
. . . . . . . . . . . . . . . . . . . .
of
field ...
. . . . . . . . . . . . . .
use . . . . . . . . . . . . . . . . 6
batteries
batteries.
film
film speed . .
camera controls . . . . . . .
shutter
aperture
operation
cable
......
. . . . . . . . . .
................
.............
.....
speed
...........
..............
...............
. . . . . . . . . . . . . . .
...
..............
..
. . . . . . . .
release.
..............
........
button
..........
...
..
....
. . . . . . . . . .
. .
.....
. . . .
. . . . . . .
...
..
....
.....
........
........
.
...
..
..
, 7
..
..
..
..
..
..
..
..
..
..
..
..
5
Metering range . . . . . . . . . . . . . . . . . .
Extreme low-light metering
Time exposures .
6
Eyepiece shutter operation . . . . . . . .
6
High-contrast lighting situations
8
Stop-down exposure
Exposure compensation adjustments
9
Adjustments for focusing
10
Adjustments for film compensation . .
Multiple exposures . . . . . . . . . . . . . .
10
10
Mirror lockup ......
11
Flash synchronization . . . . . . . . . . . .
Ready-light : . . . . . . . . . . . . . . . . . .
11
12
Finder illuminator .
12
13
14
15
15
16
18
18
19
19
20
22
22
24
on
Tips
Changing
Changing
Changing
Accessories . , . . . . . . . . . . . . . . . . .
Features/specifications .
camera care .
the
Maximum aperture indicator . . . . . . .
the
the
Focusing screen selector guide
Focusing screen selector
....
..
measurement.
screens.
..
......
.......
lens . . . . . . . .
viewfinder
focusing screen . .
............
chart.
.......
.........
..
. . . . . .
......
... ,........
........
.......
.. ..
....... 41
.......
. . . . .
. . .
....
. . .
....
.....
..
..
..
..
..
..
..
..
. 35
,
..
,
..
..
24
25
25
26
26
28
30
30
32
33
33
34
35
36
38
39
40
42
43
44
46
Page 5
FOREWORD
The
Nikon F2SB
photographer
venience and versatility.
to
take
ed
matic
get
the
before
let
handy
the
features
the
most
instructions
you
for
its basics, and
on
given
izing
page 36.
yourself
results and increase
times over.
Photomic
the
ultimate
guesswork
anyone
out
of
carefully
load
any
ready reference until
follow
The
with
the
At
out
can learn
your
Nikon F2SB
and
film
in
the
few
camera
your
picture-taking
camera
in
quality,
the
of
offers
performance,
same time, it
photography
to
use
Photomic,
practice using
the
camera. Keep this
you
suggestions for
moments
you
will guarantee
enjoyment
the
serious
con-
is
engineer-
with
auto-
in
minutes.
To
study
the
controls
book-
have mastered
camera
care
spend familiar-
you
the
best
many
L-----------------------------------------~
5
Page 6
PREPARATION FOR
Installing
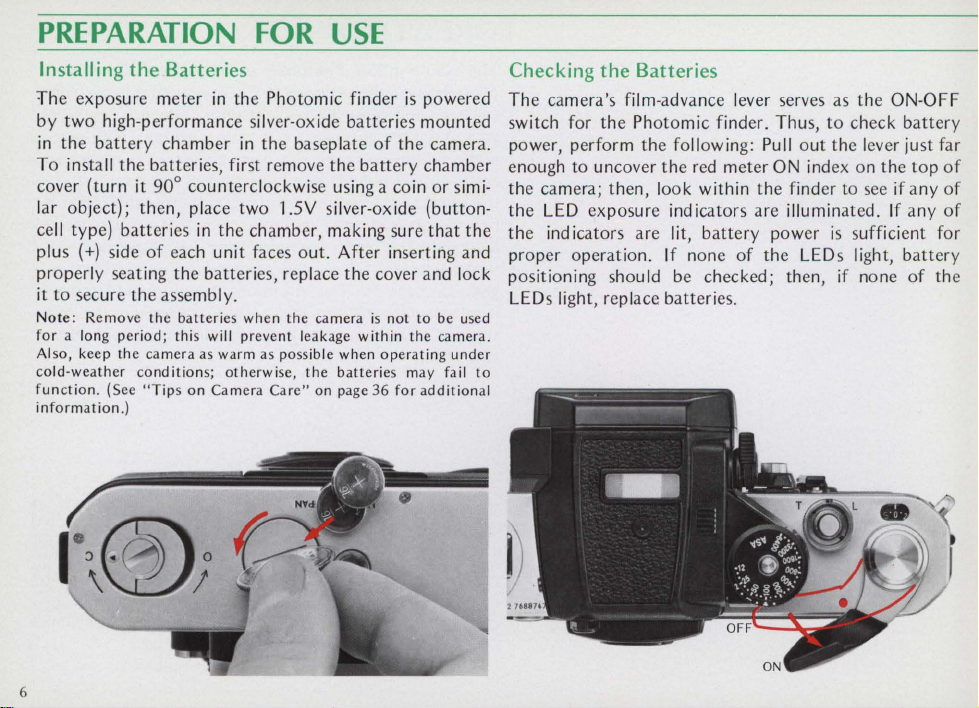
The exposure meter
the
Batteries
in
the Photomic finder
USE
is
powered
by two high-performance silver-oxide batteries mounted
in
the battery chamber
in
the baseplate
of
the camera.
To install the batteries, first remove the battery chamber
cover (turn it 90° counterclockwise using a coin or similar object); then, place two 1.5V silver-ox
cell
type) batteries
plus
(+)
side
in
the chamber, making sure
of
each unit faces out. After inserting and
ide
(button-
that
the
properly seating the batteries, replace the cover and lock
it to secure the assembly.
Note:
Remove
for
a long
Also,
keep
cold-weather
function.
information.)
period;
the
conditions;
(See
the
this will
camera
"Tips
batteries
as
warm
on
Camera
when
prevent
as
possible
otherwise.
Care"
the
leakage
the
camera
when
batteries
on
page
is
not
within
operating
36
to
the
may
for
additional
be used
camera.
under
fail
to
Checking
the
Batteries
The camera's film-advance lever serves as the ON-OFF
switch for the Photomic finder. Thus,
power, perform the following:
enough to uncover the
red
Pullout
meter
the camera; then, look within the finder to
the
LEO
exposure indicators are illuminated.
the
ind
icators are lit, battery power
If
none
of
proper operation.
positioning should
be
the LEOs light, battery
checked; then, if none
to
check battery
the lever just far
ON
index on the top
is
sufficient for
see
if any
If
any
of
of
of
of
the
LEOs light, replace batteries.
6
Page 7
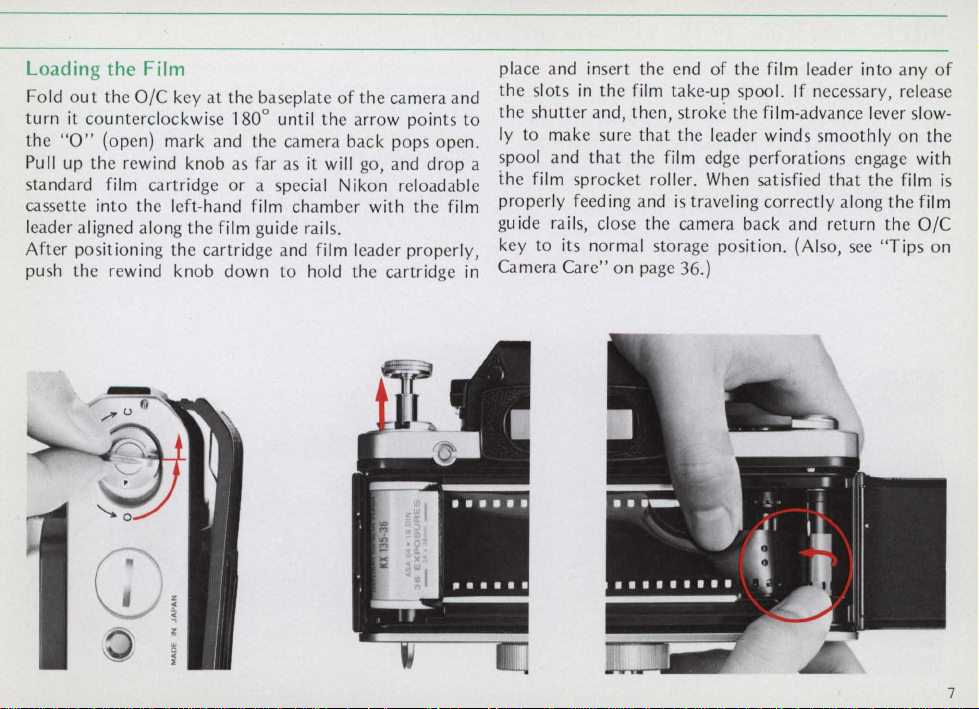
Loading the Film
Fold
out
the OIC key
turn
it
counterclockwise 1800 until the arrow po ints
the
"0"
(open) mark and the camera back pops ope
Pull up the rewind knob as far as it
sta
nd
ard f
ilm
cassette into the left-ha
leader align
ed
along the film guid e rails.
After positioning the cartridge a
push the rewind knob down to ho
at
the baseplate
will
cartridge or a special Nikon reloadable
nd film
chamber with the film
nd film lea
ld
of
the camera a
go, and drop a
der properly,
the cartridge
place a
nd
insert the end of the f
the slots
nd
the s
to
ly to make sure that the l
n.
spool and
the
prope
guide ra
in
the f
hutt
er and, then, stroke the film-advanc
that
fi
lm
sprocket roller.
rly
feeding a
ils,
close the camera back a
ilm
take-up spool. If necessar
the
film edge
When
nd
is
traveling correctly along the film
ilm
leader into a
e l
ea
der winds smoothly on the
perforat
satisfied
nd
ion
s engage with
that
ret urn the OIC
key to its normal storage position. (Also, see "Tips on
Camera Care" on page 36.)
in
y,
eve
the
ny
of
release
r slow-
film
is
7
Page 8
PREPARATION
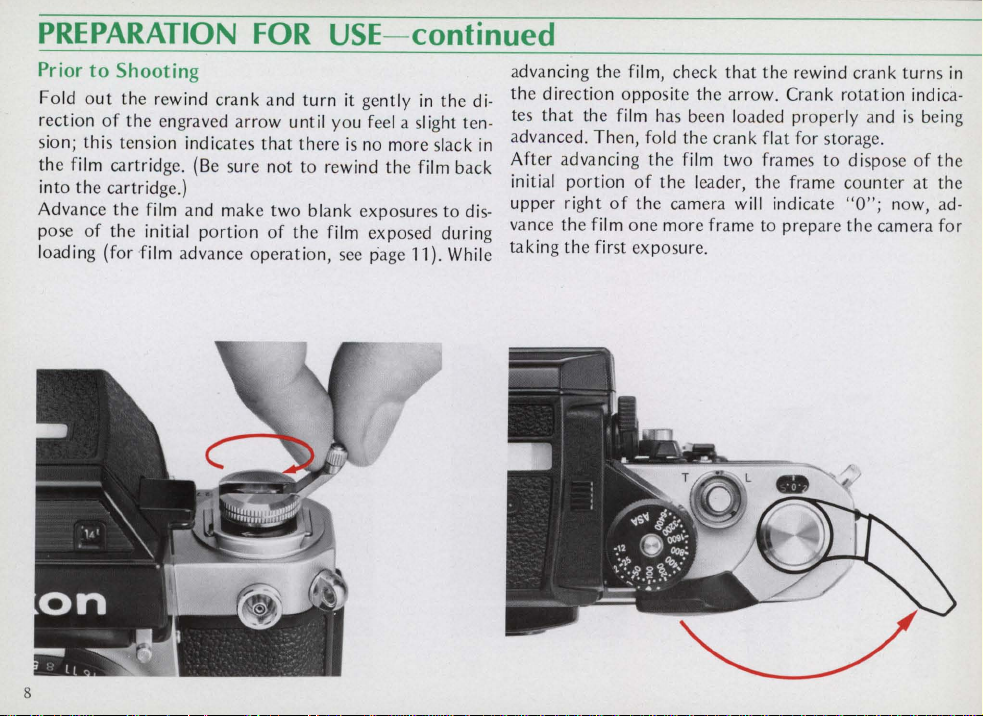
Prior
to
Shooting
Fo
ld out
th e rewind crank a
rection of the engraved arrow until you feel a sl ight tension; this tension indi
the f
ilm cartridge.
ca
rtridge
into th e
Advan
ce
pose.
of
the i.nitial portion of the f
load
In
g (for ·fllm advan
the f
.)
ilm and
FOR
cates
that there is no more slack
(Be sure not to rewind the f
make two blank exposu
ce
operation,
nd
turn
USE
- continued
it
gently
ilm
exposed during
see
page 11) .
in
res
ilm
the
back
to dis-
Whil
di-
ad
vancin
g the f
the directi
t
es
vance
ad
in
After advancing th e
ini
tial portion
upper
van
ta
kin
e
on oppos
that the film h
d. Then, fo
right
ce
the f
g the first exposur
ilm
, check that the rewind crank turns
ite th e arro
as bee
ld
the crank fl
film two fram
of
the leader , the frame counter at the
of
th e camera
il
m one more frame to prepare the
e.
w. Cra
nk
n loaded properly a
at for storage.
es
to di spose
will
indicate
rotation
nd
"0"·
now ad-
~amer~
in
indi
ca-
is being
of
the
for
8
Page 9
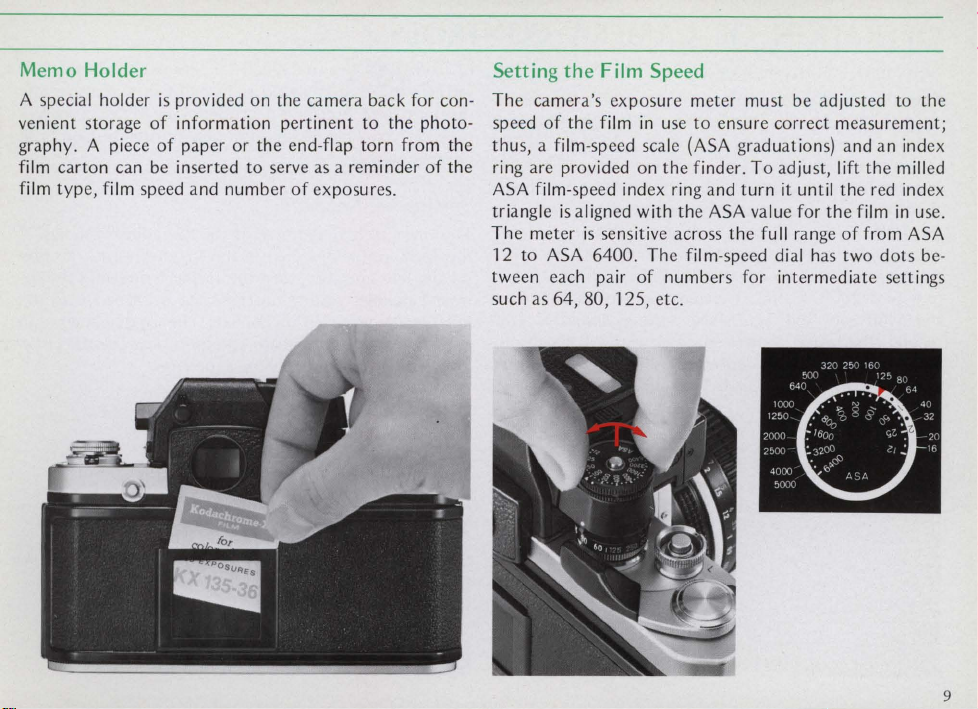
Memo Holder
A special holder
venient storage
graphy. A piece
film carton can
is
provided on the camera back for con-
of
information pertinent to the photo-
of
paper or the end-flap torn from the
be
inserted to serve
film type, film speed and number
as
a reminder
of
exposures.
of
Setting the Film
Speed
The camera's exposure meter must be adjusted to the
speed
of
the film
thus, a film-speed scale
ring are provided on the finder.
the
ASA
film-speed index ring and turn it until the
is
triangle
aligned with the
The meter
12 to
ASA
in
use
to
ensure correct measurement;
(ASA
graduations) and an index
To
adjust, lift the milled
ASA
value for the film
is
sensitive across the
fu
II
range
of
6400. The film-speed dial has two dots between each pair of numbers for intermediate settings
such as 64, 80, 125, etc.
red
from
index
in
use.
ASA
9
Page 10

OPERATION OF CAMERA CONTROLS
of
from
Setting the Shutter Speed
The
Nikon
F2S8 Photom
~ired
shutter
wound.
set via
sel
ector
time exposures.
tor
until
when aligned with settings
shutter
ond
to
the 1 /60
seco nd zation
precise settings
speed
Speeds
the shutt
is
speed will
1/2000
the
for use with
of
er-speed selector f itted
also provided with a
To
the
desired speed
be a fractiona
second.
sec. and 1
fastest
are
ic camera can
either
before
from
1 second
set
the
shutte
is ali
of
The
/125
sec. settings ind icates
shutte
r speed providing X synchroni-
electronic
required,
be
set
or
after
the
to
1/2000
on
the
"8"
setting
r speed,
gned with
from 2
l value
red line provided
flash units. When
intermediate shutt
to
turn
the
2000,
of
from
to
the
shutter
second
finder;
for
longer
the
selec-
white
the
actua
1/2
between
1/80
more
er speeds
setting,
de-
shutter-release
is
nization"
are
photography.)
the
Setting the Aperture
dot;
The
l
the
sec-
set
s
ir
index mark provided
also be set
stop
1/80
the
ring fitted
aperture
the
lens
ed
f/number
settings for
sec.
shutter
button
on
page
at
(or opening)
aperture,
setting
to
intermediate
more
to
1/2000
speed remains
is
depressed. (See
34
for
additional
the
base
of
in
turn
the
on
the
on
the
apertures
precise
sec.
are
open
information
the
lens adjusts
the
iris diaphragm.
aperture
scale
is ali
lens.
The
ex
posures.
usable.
At
the
"8"
as l
ong
as
the
"Flash
Synchro-
on
flash
the
size
To
pre-
ring until
gned with
iris diaphragm can
between
the
the
click-
de-
the
of
10
Page 11
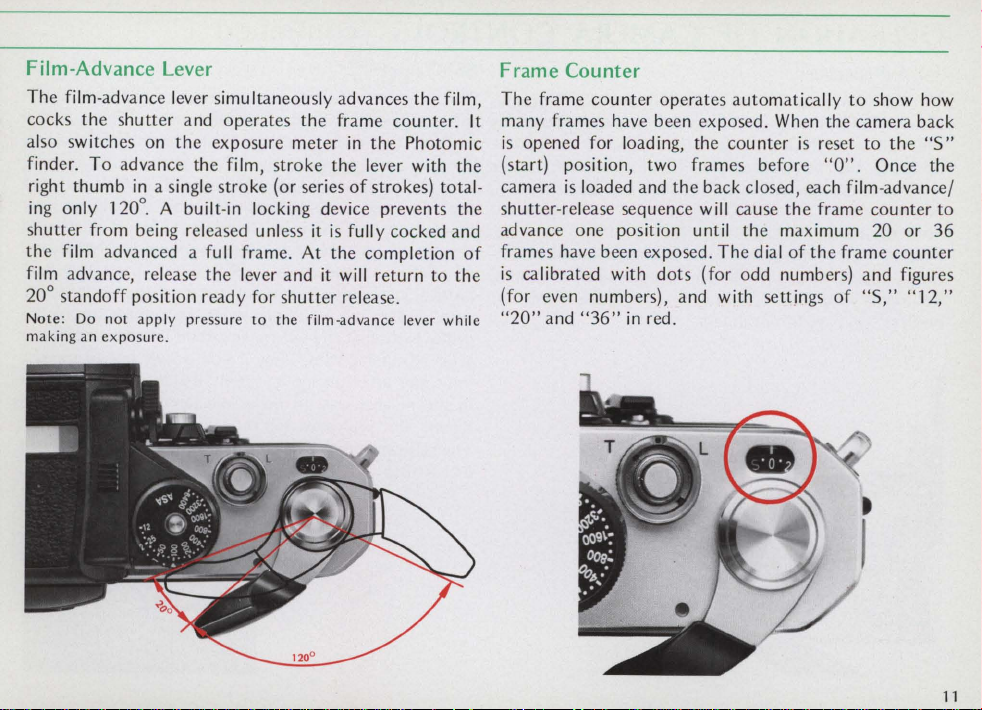
Film-Advance Lever
The
film-advance lever simu ltaneously advances
the
cocks
shutter
also switches
finder.
shutter
the
To
advance
right
thumb
ing
only
120
from being released unless it
film advanced a full frame.
film advance, release
20°
standoff
Note: Do
making
not
an exposure .
and
on
in
a single
the
the
operates
exposure
film,
stroke
the
meter
stroke
(or series
°. A built-in locking device prevents
At
the
lever
and
position
apply
ready
pressure
for
to
shutter
the
film-advance
frame
in
the
the
lever with
of
strokes) total-
is
fully cocked
the
completion
it will
return
release.
the
film,
counter.
Photomic
to
lever
while
Frame Counter
The
frame
counter
many
It
the
the
and
of
the
frames have been
is
opened
for
(start) position ,
camera
is
loaded and
shutter-release sequence will cause
advance
one
frames have been exposed.
is
calibrated with
(for even numbers), and
"20"
and
"36"
operates
loading, the cou nter
two
position until
dots
in
red.
exposed.
frames
the
back
(for
automatically
to
show
When the camera
is
reset
to
before
"0".
Once
closed, each film-advance/
the
frame
counter
the
The
odd
with
maximum
dial
of
numbers)
settings
the
frame
and
of
"5,"
20
how
back
the
"5"
the
or
36
counter
figures
"12,"
to
11
Page 12
OPERATION OF CAMERA
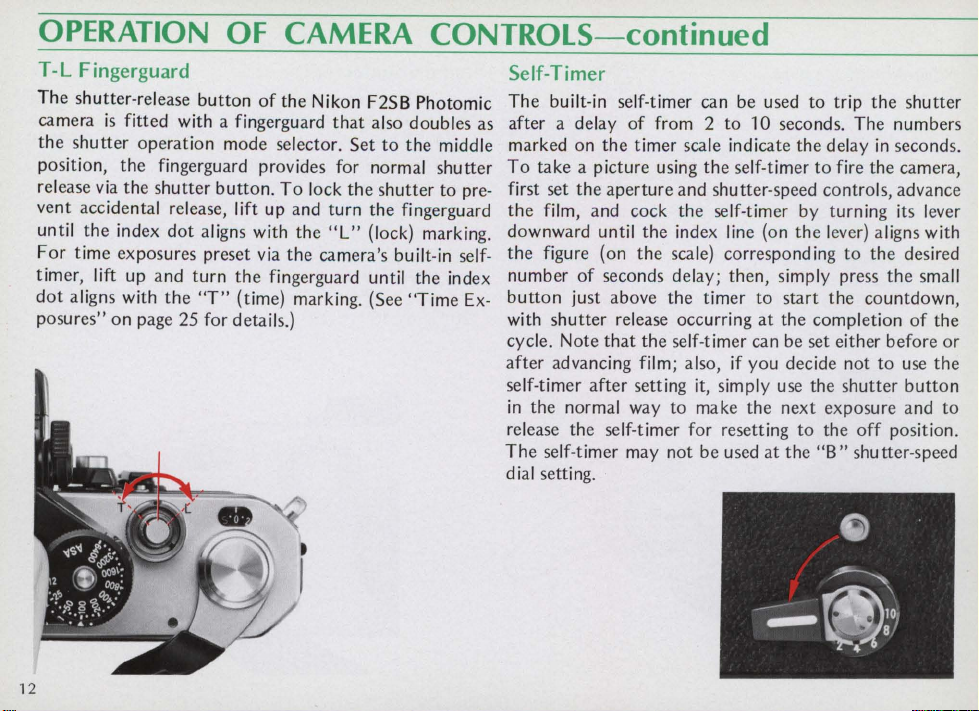
T-L
Fingerguard
The
shutter-release
camera
the
position,
release via
vent
until
For
timer, lift
dot
posures"
is
fitted
shutter
the
the
accidental release, lift
the
index
time
exposures preset via
up
aligns with
on
button
of
the
Nikon F2SB P
with a fingerguard
operation
fingerguard provides for normal shu
shutter
and
page 25
dot
aligns with
turn
the
"T"
for
mode
button.
up
the
fingerguard until
(time) marking. (See
details.)
that
also doubles as
selector.
To
the
Set
to
lock
the
shutter
and
turn
the
the
"L"
(lock) marking.
camera's built-in self-
CONTROLS-continued
Self-Timer
The
hotomic
the
middle
tter
to
pre-
fingerguard
the
index
"Time
Ex-
built-in self-timer can be used
after a delay
marked on
To
take
first set
the
film, and cock
downward until
the
figure (on
number
button
with
shutter
cycle.
Note
after
advancing film; also, if
self-timer
in
the
normal way
release
The
self-timer may
dial setting.
of
from 2
the
timer
a picture using
the
aperture
the
the
scale) corresponding
of
seconds delay;
just
above
the
release occurring
that
the
after
setting it, simply use
to
the
self-timer
not
scale indicate
and
the
index line (on
self-timer can be set either
make
for
the
timer
be
to
trip
the
shutter
to
10
seconds.
self-timer
shutter-speed controls, advance
self-timer by turning its lever
then,
simply press
to
start
at
the
you
decide
the
next
resetting
used
at
the
The
the
delay in seconds.
to
fire
the
the
lever) aligns with
to
the
the
the
countdown,
completion
before
not
to
the
shutter
exposure
to
the
off
position.
"B"
shu tter-speed
numbers
camera,
desired
small
of
the
or
use
the
button
and
to
12
Page 13

UNLOADING FILM
When
the
frame
counter
has been made,
longer be
it
shou
and
To
unload
the
camera baseplate; then, unfold
turn
it
in
smooth,
the
wind
even pressure. When no
film advance
button)
take-up spool
or
stroked,
Id
be removed.
the
camera, first press
the
direction
stops
and
indicates
when
the
roll
of
indicator
rotating,
the
camera
the
film-advance lever can
of
film has been fully exposed
the
(the
the
that
the
last
exposure
the
rewind
the
engraved
more
colored
rewind
arrow,
tension
dot
button
crank
is
felt
on
film leader has left
back
may
be
opened.
no
on
and
using a
and
the
re-
the
After
open
ing
the
camera
back, pu
as far as it will go and remove
that
as
the
film advance lever
the
rewind
posure,
button
will
film-advance mechanism.
Caution:
advance
temporarily
Note:
pressing
back
back
MF
Be
careful
operation. Should
stop
The
camera
the
locking catch
is
necessary
such as
both
the
for
-3.
not
to
and
double
back
can
on
when
the
250
Magazine Back M F-1
motorized
photography.
push
the
this
occur,
exposure
be
removed
the
camera
II
the
rewind
the
film cartridge.
is
stroked
be
rewind
hinge. Removal
is
released
button
the
may
result.
from
used with
or
for
film
the
the
to
transport
the
body
of
any
Camera
knob
next
engage
during
by de-
the
camera
accessory
up
Note
exthe
film-
will
Back
13
Page 14
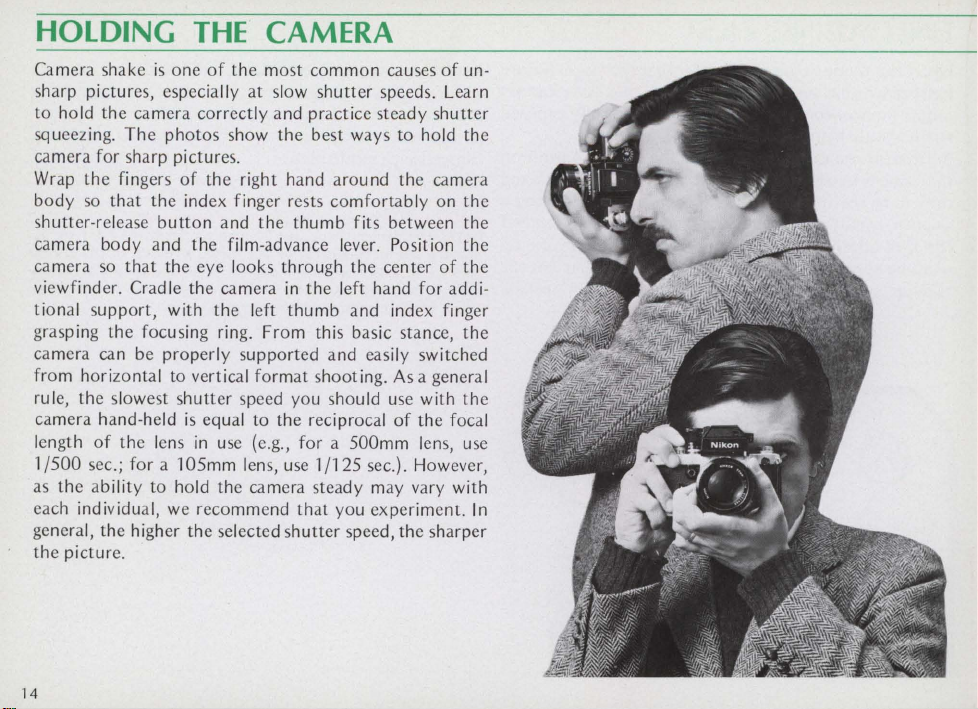
HOLDING
Camera shake
sharp pictures, especially
to hold the camera correctly and practice steady shutter
squeezing. The photos show the best ways to hold the
camera for sharp pictures.
Wrap
the fingers
body
so
that the index finger rests comfortably on the
shutter-release
camera body and the film-advance lever. Position the
camera
viewfinder. Cradle the camera
tional support, with the left thumb and index finger
grasping the focusing ring. From this basic stance, the
camera can be properly supported and easily switched
from horizontal to vertical format shooting.
rule, the lowest shutter speed you should
camera hand-held
length
1/500
as
each individual,
general, the higher the selected shutter speed, the sharper
the picture.
so
that the eye looks through the center
of
the lens
sec.; for a 105mm lens,
the ability to hold the camera steady may vary with
THE
is
one
of
button
is
equal to the reciprocal
in
we
recommend that you experiment. In
CAMERA
of
the most common causes
at
slow shutter speeds. Learn
the right hand around the camera
and the thumb fits between the
in
the left hand for addi-
use
use
(e.g., for a 500mm lens,
use
1/125
sec.)
of
of
As
a general
with the
of
the focal
. However,
un-
the
use
14
Page 15
SHUTTER
RELEASE
OPERATION
For sharp
portant
fi
lm
via
the
viously), relax
even pressure
a quick jab
and
pictures,
as
steady
to
a fresh frame,
the
button
picture,
may
result
correct shutl
camera
the
camera
provided
hold
and
to
release
of
the finger will cau
in
at
the
camera
depress
the
a blurred ph ot
er releasing
ho lding.
is
the
upper
steady
the
camera's
ograph.
After
set
right. When
(as
button
shu
se
camera m
advancing
for
shutter
explained
using a
tter
is
just as im-
- rem
ember,
oveme
the
release
taking
pre-
steady
nt
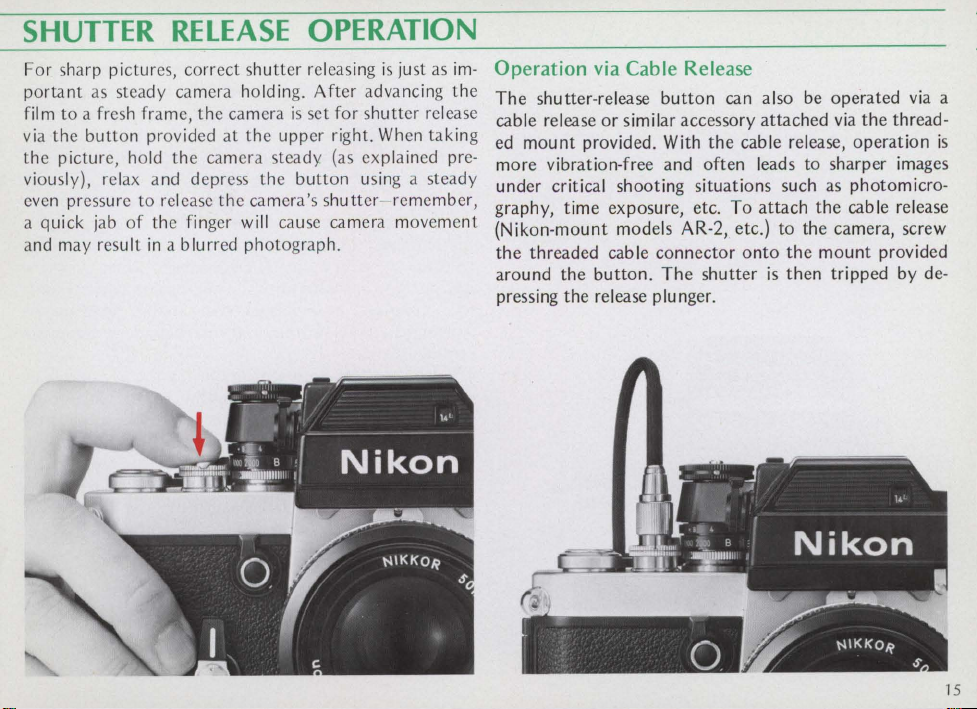
Operation via Cable Release
The
shutter-release
cable release
mount
ed
more
under
graphy,
(Nikon-mount
the
around
pressing
provided. With
vibration-free
critical
time
threaded
the
button. The
the
release plunger.
button
or
similar accessory
and
shooting
exposure,
models AR-2, etc.)
cab
Ie
connector
can also be
the
often
situations
etc.
shutter
cable release,
To
operated
attached
leads
attach the cable release
onto
is
to
sharper images
such as
to
the
camera,
the
mount
then
tripped
via
the
thread
operation
photomicro
provided
screw
by de-
via a
-
is
-
15
Page 16

FOCUSING
Focusing isdone
with an automatic diaphragm. This technique provides
the brightest possib
easy focusing and composing.
field
so
that
tinctly.
The Nikon Type K screen comes with the camera as
standard equipment. To focus, turn the focusing ring on
the lens until the two halves
coincide to form a single, crisp image; when using the
microprism ring, turn until the microprism pattern shifts
to
a sharp and crisp image. You can also focus on the
matte field
central area.
The
lens can also be prefocused using the distance scale
engraved
ply turn the focusing ring until the desired camera-tosubject distance
with the distance scale index on the lens barrel. This
technique
when time does not permit through-the-Iens focusing.
at
full
aperture with Nikkor lenses fitted
Ie
images on the focusing screen for
It
also minimiz
the image snaps
that
surrounds the rangefinder/microprism
in
both meters and feet on the lens barrel. Sim-
(as
measured or estimated)
is
useful for candid shots
in
and
of
the rangefinder image
es
depth
ou t of
of
focus
is
lined
elusive subjects
of
dis-
up
16
Page 17

Ou t
of
focus
In
focus
17
Page 18

FOCUSIN
G-continued
I nfrared Photography
The plane
more distant than its counterpart for visible
of
sharpest focus for infrared light
li
is
ght
slightly
as
seen
through the camera's viewfinder. Thus, for sharpest
focus
in
infrared photography, adjustments must be
made.
To
compensate for this shift
age
sharp
ly
through the viewfinder. Then, turn the focusing ring counterclockwi
aligned with the
barrel. For example,
red
dot (or
in
been focused for infinity
that
when lenses having a focal length
in
focus, first focus the
se
until the point focused
lin
e)
provided on the lens
the picture below, the lens
(00)
infrared shooting. Note
of
50mm or l
im-
has
ess
are used stopped down to f/8 or below, no adjustment
necessary due to the large depth
Note
: Some new
(ED)
glass,
refocusing
instruction
for
manuals
as
well
as
infrared
optics
reflex
photography.
for
details.
using
of
Nikon's
(catadioptric)
Refer
field avai lable.
Extra-low
lenses, do
to
Dispersion
not
individu
require
al
lens
Film-Plane Indicator
Under various precision shooting situations, such as
close-up photography, it
is
often necessary to measure
the film-to-subject distance to ensure the sharpest focus.
The camera's
the figures making
left
of
film
plane
is
indicated by the top edge
up
the serial number at the upper
the camera body. Note that these figures are
46.5mm from the front surface of the camera's lens
mounting flange.
is
is
(mounting flange front surface)
of
18
Page 19

DEPTH OF
Depth
of
field refers
tending
focus. Within this zone, image
everything
Three
focal length
distance,
ture
greater
the
operate
other,
the
use,
over
in
front
may
factors
and
and
the
the
shallower
independently
with
effects
of
the
photographer
the
final picture.
of
depth
anyone
FIELD
to
the
zone
of,
and
behind,
be considered as being
greatly influence
the
lens
the
taking
aperture.
shorter
the
the
the
of
field. Also,
depth
of
or
factor
other.
can exercise wide creative
the
in
use,
focal length
field.
in
conjunction
capable
Thus, by careful selection and
Depth-of-Field Preview Button
As
most
Nikkor lenses
ease
of
focusing, visualization
shooting
depth-of-field preview
The
"preview")
after) shooting. Simply
lens
you
or
depth-of
is
stopped
to
out
of
aperture
-field preview
the
down
see
how
focus.
zone
are
operated
of
may be difficult.
button
of
to
much
often
button
sharpness
by
depressing
the
preselected
background
the
of
acceptable
the
plane
blur
is
negligible
in
sharp focus.
depth
of
the
camer
The
smaller
of
the lens,
the
closer
These
three
with
of
partially cancel ing
at
full
aperture
depth
of
Thus,
the
can
come
lets
you
at
any
time
the
aperture
and
foreground
focus ex-
of
sharpest
and
field :
the
a-to-subject
the
aper-
the
the
subject,
factors
field
button,
can
one
an-
control
for
at
the
camera's
in
handy.
check (or
before
(or
the
to
allow
is
in
19
Page 20

DEPTH OF
FIELD-continued
Depth-of-Field Indicators
Depth
of
field can be read directly from
in
scale
meters
or
feet
with
the
aid
of
depth-of-field indicators engraved on
of
Each pair
colored lines
distance scale index line corresponds
same color on
field
at
a particu lar
su
bject while looking through the viewfinder.
the numbers
of
focus for
clearly depict
photo
to
while
the
extending from
on
the
the
photo
right,
the
aperture
aperture,
the
distance scale
aperture
the
changing
the
at
the
approximately
on
either
side
to
scale.
To
first focus
to
determine
in
use.
The
three
depth
of
field
is
shallow
far right shows a
2.7m (9 ft)
(00).
the
the
color-coded
the
lens barrel.
of
the
fjnumbers
find
the
the
lens on
Then
photos
field; with
at
the
fj4
depth
to
distance
central
of
the
depth
the
check
the
zone
shown
the
setting,
of
field
infinity
of
Lens set
depth
the
rna,in
at
of
fie
subject.
f/4:
ld
centered
Shallow
on
20
Page 21

Lens
at
extended
the mai
f/8
in
n subj
: Depth
front
ect.
of
fie
ld
of/behind
Lens
at
f/16:
is
extended
the
entire
backgrou nd.
foreground
Sharp focus
to
encompass
and
21
Page 22

EXPOSURE
The
exposure
camera's
system
trols.
screen
allows
ject
Th
but
you
area,
finder
coupled
e m
eter
favors
to
and
-
0
-
0
0
+
+
MEASUREMENT
meter
features
to
the
reads
the
make precise readings
results
in
Underexposure"by
Underexposure
Correct
Overex posu re by
Overexposure
of
the
Nikon
a center-weighted
shutter
the
central
more
speed
light over
12mm-diameter
balanced overall ex posures.
exposure
by
F2SB Photomic
and
the
of
the selected sub-
more
by
1/5
1/5
to 1 stop
more
TT
L metering
aperture
entire
focusing
area.
than 1 stop
to 1 stop
than 1 stop
Determining Exposure
The
con-
This
finder has
within the viewfield
correct
metering
posure
low-I ight level
and lens
of
To
Switch ON
to
LED indicators will light, indicating overexposure, correct
I ights, increase the s
until
turns
shutter
dicator lights. When
+ and
of
setting slow
p
described
exposure,
information
operat
determine
the
20°
exposure or
the cent
off;
speed
0,
correct
osure
. Values
aperture
ion
or
three
LED
exposure
("+"
for overexposure, "0" for
and
"- "
for
und
erex
system
is
capab le
s.
Add
settings
for
setting
the
correct
the
meter
standoff
if
- and 0
expos
ly
in
the
position; with this
underexposure.
hutt
er (0) indicator just comes on a nd
the
minus
or
increase the ap
).
ure;
to
get
for
figure o n this page.
of
in fiv
e steps,
itionaliy,
are
the
desired
exposure
by
moving the film
er speed
(- ) indicator
two
LEOs lig
the
exposure
thus
, be sure
only
the
the
five
providing easy-to-read ex-
and
even
the sel
ected
visible for
exposure
with
act
If
the
or
decrease
is
ert
ure until
ht
simul tan
setti ng
to
adjust
correct
settings
of
indicators visible
posur
the
plus
lit, decrease
is
"center"
e);
thus,
the
at
extremely
shu
tter
speed
maximum
.
Nikon F2SB:
-advance lever
ion,
(+)
the
the cent
eous
within l -stop
the
one
of
indicator
aperture
the
er
ly (i.e.,
apert
ease
the
(+)
the
ure
(0) ex-
the
LEOs are
in-
22
Page 23

Page 24

EXPOSURE
MEASUREMENT-continued
Exposure
The
mined
shutter
combinations
change
aperture
For
twice as
only
aperture
half as
the
oJ)eration
speeds
to
see
fill,
acceptable.
The
results desired. Use
or
use slow speeds
blur. Small
large
The
greatly
Control
amount
example, a
half as
then
best comb ination for
apertures
creative selection
of
by a combination
speed. Since
will give
in
the
shutter
setting, will
much
light as a setting
much
setting
much
and
that
enhance
of
as
f/8,
throughout
aperture
if a
correct
1/60
apertures
restrict sharp focus
your
light reaching
of
the
two
the
same exposure. A 1-step
speed,
either
halve
shutter
at
speed
light as a speed
f/11,
twice as much light as
is
passed. This
the
settings. With this
exposure
f/16
or
1/250
your
fast
shutter
to
produce
give greater
of
both
photography.
the
film plane
the
lens
aperture
are interrelated,
or
a 1-stop change
or
double the
of
1/125
of
1/250
of
1/60
feature
available range
in
for a scene
at
f/8
needs will
speeds
to
deliberate and creative
depth
to
the
speeds
and
is
and
different
exposure.
second passes
second,
second;
f/16,
characterizes
of
mind, it's easy
is
1/125
will be equally
depend
freeze
motion,
of
field, while
main subject.
apertures
deter-
the
in
the
and
for
an
and
shutter
at
on
the
will
Metering Range
If
the
center
"correct
even
after
all possible lens-aperture/shutter-speed combinations have been tried,
bright
or
too
dim
situation, several measures m
Switch
more closely
density filter on
the
flash unit)
too,
for bright
lens (with ASA
8 seconds)
lent low-light
f/4
ing (with ASA
EV 20
to
to
a new film (either higher
matches
film plane;
to
that
the
lens
or
dim shooting.
to
performance;
lens proves more usable
(f/22
at
match
the
existing lighting conditions.
exposure"
then
for
the
meter's
the
available light;
the
lens
to
or
use artificial lighting (i.e
increase subject illumination.
in
use can greatly influence suitability
100
film) couples from EV - 2
EV
17
(f/8
at
on
100
film) from EV 1
1/2000).
Thus, choose
LED fails
the
range.
ay
be
decrease
For
example, a
1/2000
the
other
at
bright-light levels, coupl-
to
illuminate,
available light
To
correct
taken, as follows:
or
lower ASA)
mount
a neutral
the
light reaching
.,
an electronic
Remember
50mm
second) for excel-
hand, a
(f/4
at
8 seconds)
the
lens carefully
is
too
this
that
f/1.4
(f/1.4
200mm
,
at
to
24
Page 25

Extreme
The meter built into the
of
speeds
perform the following: Set the lens' aperture
Low-Light Metering
Niko~
F2SB camera
is
capable To make an exposure longer than 10 seconds, set the
Time
Exposures
metering low-light levels requiring slow shutter shutter-speed selector to
of
up to 10 seconds. To meter at
low
-light
levels,
ring
to the ing." Advance the
guard to
"T"
as
described
film
"B"
in
and press the shutter-release
desired aperture setting, and the shutter-speed selector button to open the shutter.
to
"B";
then, depr
lock and turn the selector until the center
indicator (0) illuminates to indicate correct exposure. to close the shutter,
Having set the selector,
ess
and hold the shutter-speed dial remains set to
LED
exposure returning the fingerguard to the normal center position
read
off the number on the
ex
tra-
camera,
as
a blurred
"T,"
the shutter
be
careful not to
image
may
long exposure scale and set the camera's self-timer for
the indicated value; then, set the
T-L
fingerguard to
"T"
and depress the shutter button to make the exposure.
When
performing low-light metering,
entry
of
stray light into the viewfinder by closing the
be
sure to block the
eyepiece shutter or by continuously viewing through the
finder. (Refer to accompanying photos for details.)
and turn the
T-L
finger-
"Extreme Low-Light Meter-
As
long
as
the fingerguard
will
remain open.
move
When
or shake the
result.
25
Page 26

EXPOSURE
Eyepiece
The
shutter
remote
and
the
To
control
LEDs
indicator
atop
using
ture
just
for
correct
In
addition
manned
handy
cal
protection
finder
Shutter
camera's
for special
control,
aperture
entry
of
close
the
60°
are
deactivated
is
the finder.
the
external
ring
and/or
glows;
photography,
to
ensure
shooting
during
Photomic
automated
control
stray
shutter,
clockwise; as the
switched
To
the
once
exposure.
to
its use for low-light
correct
situations
against
daylight shooting.
MEASUREMENT-continued
Operation
finder
is
fitted
with an eyepiece
unmanned
unit) requiring
light
through
simply
and
on
set
LED indicator, simply
shutter-speed selector until
the LED comes
(e.g.,
the
entry
shooting
shooting
the
turn
the
shutter
the
external
for
metering
the
camera
on,
the
eyepiece
exposure
measurement
photomicrography)
of
bright light
with
protection
viewfinder eyepiece.
eyepiece
closes,
"correct
for
the
metering
shutter
situations
motor
the
exposure"
operation
proper
adjust
camera
or
comes
into
against
shutter
internal
exposure
the
the
for un-
in
or
the
High-Contrast Lighting
When
(e.g.,
tween
tant
drive
from
aper-
LED
is
set
criti-
for
view-
in
bright
the
finder reading, and
vent
these shooting cond itions,
be taken
Fortunately,
action
operation
To
compensate
ground,
cusing screen wh
sures
on
be
ture
and
desired
without
when
the
camera slightly
ment
without
underexposed
jects, it may
to
ensure a
Situations
there
are substantial brightness differences be-
the
main
subject
spots
under-
or
overexposure
to
ensure
the
finder's
simplifies
target
that
the
picture
readjusting the camera controls.
shooting
to
eliminate the effects
such
adjustments,
and
more
for an excessively
the
ile
the
main emphasis
chosen subject.
shutter
composition
landscapes, it
compensation,
in
be
necessary
proper
and
or
dark
thus
proper
accurate
main
subject
performing
speed
adjustments,
downward
the
final
reading.
the
spots
the final exposure.
of
some
exposure
center-weighted
making for qu icker camera
final resu Its.
in
metering; th
of
Then,
and
is
during
of
a bright expanse
the
print.
to
move closer
background, unimpor-
can adversely influence
To
pre-
the
main
corrective
of
the
bright
the
center
the
meter
after
completing
recompose
make
often
advisable to aim
exposure
landscape
Also,
for
subject
TTL
or
the
For
to
under
action
must
main subject.
metering
dark
back-
of
the
fo-
is
action
en-
reading will
aper-
to
the
exposure
example,
measure-
of
sky;
may
appear
backlit
the
sub-
subject
26
Page 27

• Metering with a bright area
cause
underexposure
of
the
in
the
center
main subject.
will
----
•
For
correct exposure, first
then,
recompose
-
'!::"~
- f
5.6
--+-0 - =--60 ------_______ ..J
f5.6 + 0 - 60
and
measure
shoot.
the
main subject;
......
- -
---
- ,
I
I
I
I
I
I
I
I
I
I
I
I
I
I
I
I
I
I
I
I
I
27
Page 28

STOP-DOWN
EXPOSURE
MEASUREMENT
With
some Nikkor lenses, full-aperture exposure
surement
automatic diaphragm, or because the lens does not cou-
ple with the finder's meter; with certain accessories,
lens/finder coupling
aperture measurement. However, the camera's Photomic
meter can still
the stop-down method. Before mounting the
accessory) on the camera body, push the meter coupling
pin up into the finder with a coin or similar object; when
set, the number
mum aperture indicator. After setting the finder, mount
the
switch on the meter
the standoff position, and then set the controls for correct exposure
For fixed-aperture lenses, such
simply adjust the shutter-speed selector until the center
LED
speeds can
to 1/2000
meter indicates con tinuous overexposure,
density filter or slower film. If continuous underexposure
film
photography using a telescope or microscope"
is
not possible, either because the lens has
be
"5.6"
lens
or lens/accessory combination on the camera,
as
follows:
indicator comes on. For convenience, shutter
be
set at intermediate settings
sec.
speed range for precise exposures.
is
indicated, suppleme"ntary lighting or a faster
is
necessary. This technique
is
not possible, thus, preventing full-
used
for exposure measurement
will
appear
by
moving the film-advance
in
the finder's maxi-
as
Reflex-N i kkor lenses,
in
the 1/80 sec.
use
a neutral
is
also suitable for
lens
lever
If
mea-
no
too,
via
(or
to
the
28
Page 29

For
automatic
such as the
sup er-tel
the camera
th
e depth-of-f icld preview bu
phr
agm and, while holding the bu
dia
a
dju
st the a perture ring until the center LED indi cator
co
mes o n. Bc su re to release the de
to making the exposure.
prior
For
bellows
the ca mera
th
e lens manually until the center LED indi
on. Preset-type lenses
Zoom-Ni
ephoto
to
units,
to
the desired shu
diaphragm
lenses
kkor 200
with
-600
no
mm
lenses using Nikon foc usi
the desired shu
tto
tter
n
speed; then,
to
stop-dow
pth
extension
in
rings
tte
r spee d; then,
clude PC-Ni
and
kko
coupling
f/9.5
ng
tto
n depressed,
-of-fic
preset lenses,
stop dow
cator comes
r lenses.
prong,
lens and
units, set
depress
n the lens
ld
butt
on
set
n
29
Page 30

EXPOSURE
COMPENSATION
ADJUSTMENTS
Adjustments for Focusing Screens
Light transmission properties vary somewhat with focus-
ing
screen type, thus occasionally requiring exposure
correction to compensate for the combined effects
the lens/screen combination
in
various blocks
note the amount
adjust the camera's finder for the indicated f/stop cor-
rection, lift and turn the
until the
the appropriate mark engraved on the ring.
ample figure shown,
mark to provide the correction required when using the
Type C screen with the Nikon
and the Fisheye-Nikkor 8mm f/2.8
the table.
pensation
ASA
(When
is
of
of
value for the
"0"
required.)
the table on the opposite page
correction necessary
ASA
in use. The numbers listed
ASA
film-speed index ring
film
in
use
100
is
aligned with the
F2SB
Photomic camera
lens, as
is
indicated
in
the table,
in
is
aligned with
indicated
of
de-
f/stops. To
In
the
ex-
-Y:!
in
no
com-
30
Exposure measurement
• = Exposure measurement
via
fu
II-aperture method .
via
stop-down method .
• = Exposure measurement not possible; lens/screen
combination permits only focusing operation.
Blank space indicates lens/screen combination cannot be
used.
Page 31

Fisheye
Widungle
NOfmdl
Telephoto
Zoom
Renex
TeJcpholo
h~=<Ti;
,-----
31
Page 32

EXPOSURE
COMPENSATION
ADJUSTMENTS-continued
Adjustments for Film Compensation
Some exposure correction may
tain types of films are used for copying or photomicrography applications; the
however,
will
depend on the type
cific application. The
corrections
in
f/stops required for various film/shooting
amount
fol
requirements. Compensation
shutter speed or the aperture
also, compensation
is
possible by adjusting the
film-speed index ring. I n the exa
ring is set
this sett
increase
p)
sto
(see
Type
offilm
I~
Panchromatic
film compensation
for
so
that the
in
g is the correct position to achieve a one-stop
red
in exposure (three scale grad ua tions equ al one
as requ
table) using
general
ired when performing photomicrography
ASA
100 Panchromatic film.
Repr
o-co
pying &
use
B&W
color photo
No
necessar
y
Letters or figures
light background
+1
be
necessary when cer-
of
correction requ ired,
of film
and the
lowing table lists the exposure
is
possible by adjusting the
by
the indicated amount;
mpl
e shown, the index
mark is aligned with
slide-copying
letter
on
Y2
stops -
s or figures
on
dark background
Y2
sto
p
ASA
Photo
micro
+1
ASA
·
gra
s
top
spe-
50;
phy
32
Page 33

MULTIPLE EXPOSURES
Intentional multiple exposures for creative effects can be
made with the Nikon F2SB Photomic camera.
mUltiple exposure, perform the following:
itial exposure, depress and hold the rewind button on
the camera's baseplate, and stroke the film-advance lever
to cock the shu tter for the nex t exposure on the same
frame; for each additional exposure on the frame, repeat
At
the same procedure.
posure operation, stroke the film-advance lever once
more to release the rewind button, cover the lens and
make one blank exposure, and then resume normal
operation. Note that during mUltiple exposure operation, the camera's shutter speed can
setting for the desired shooting effect. Also, throughout
the multiple exposure operation, the camera's frame
will
counter
rewind button
advance lever.
remain
is
held depressed while stroking the film -
the completion
at
the same setting
be
To
Make
of
multiple ex-
changed
as
long
take a
the
to
any
as
in-
the
MIRROR LOCKUP
The reflex mirror must
when using either the Fish
OP
Fisheye-Nikkor lOmm f/5.6 lenses, since their rear
clements protrude into the camera body and interFere
with mirror movement. Locking-up the mirror
necessary when shooting with a motor drive unit
top speed sett
hold the depth-oF-field button a
up
lever downward until the white dot
the white index
position until the lever is returned to the normal position.
in
g.
lin
be
lock
eye-N
To lock
e. The mirror
up
the mirror, depress a
ed
in
the up position
ikkor 6mm f/5.6 or the
is
also
at
nd
nd
turn the mirror lock-
is
aligned with
will
remain
in
the up
its
33
Page 34

FLASH
SYNCHRONIZATION
The N ikon F2SB Photom
chronize with most types
shutter speeds and with electronic flash
ic
camera
of
is
designed to syn-
flashbulbs
at
at
almost
speeds
to'
all
/80
second. The table below shows which shutter speeds
may
be
used with different types
Fl
ashbulb
~
r---;;;-
No
2000[i000[S00
l.
I I I
dli
ghl
Synchronized
Spee
MF
special adapters are necessary when using the Nikon
250 125 X(80) 60
1 J
"Cannot be u
F2SB Photomic camera with the Flash Unit
with the Speedlight Unit
lyon
the camera's accessory shoe and they require no
SB-2.
of
flashbulbs.
30
1 15
T8'
4 T 2 1 1
-
tl~'
_+-I
-t
sed
T-+-
BC-7
Both units mount direct-
B
1
or
sync cords. For other flash units with ISO-type hot-shoe
contacts, mounting on the camera
Coupler
AS-' provides
AS-';
again no sync cord
fu
II
connection
is
via
the Flash Unit
is
required,
via
the camera's hot-shoe
as
the
contact.
Caution:
the
than
shutter
1/80
When
will
second.
the
reflex
not
synchronize
mirror
is
with flashbulbs
locked
in
the
up
position,
at
speeds
faster
34
Page 35

READY -LIGHT
The
camera's
for
use with N ikon
provides
graphy, as the
the
from
for
the
grapher
when
on,
while viewing.
struction
Photomic
Speedlight
for
greater ease
photographer
eyepiece
next
know
or
manual supplied with the Speedlight.)
to
exposure;
the
condition
"not
ready"
(For
additional
check if
finder has a ready-light
U nits. This
of
operation
need
the
Speedlight
this
built-in lamp lets
of
the
when off)
information,
unique
during flash
not
remove his eye th
flash (either
at
all times even glow red.
built
in
feature
photo-
unit
is
ready illuminator.
the
photo-
"ready"
see
the
in-
FINDER
When
shooting
ter
speed
viewfinder image)
is
problem,
the
top
this
action,
ILLUMINATOR
and
aperture
the
To
of
the
finder toward
the
under
low-light levels,
indicators (located just below
often
are difficult
Photomic
operate,
shutter
finder
slide
speed
is
the
illuminator switch
the
rear
and
aperture
the
finder's shut-
the
to
read.
To
solve
fitted with a finder
of
the
camera; with
settings will
at
35
Page 36

TIPS
ON
Good
camera
Photomic
F2SB
instrument
Although ruggedly
shock, heat,
will be assured
• Fingerprints
comfortable,
optical
tissue
lens tissue moistened with alcohol
surfaces using
material
flu ids sparingly
chanical
• When interchanging lenses, finders, etc.,
to
the
clean moving
here, a lens brush and blower will
out
ing
shutter
body
vided with
quickly and easily. (Note
to
used
• When
condensation
CAMERA CARE
care
is
primarily common-sense care.
camera as
and it will provide you years
constructed,
water
or
of
the
or
dust
and will generally
performance
or a soft
entry
curtains, as
surfaces using
clean
exposed
lens brush;
cloth,
that
might
to
components.
of
dust
body
the
interior
the
camera; thi? cloth will remove fingerprints, etc.
the
lens surfaces.)
to
may form
you
would
your
misuse. By observing
longest possible service life.
on
lens/prism surfaces will
. Clean lens surfaces
stubborn
paper
towels,
scratch
prevent
or
parts
of
they
the
sudden
the
seepage, and resulting damage
other
contaminants.
frequently
the
camera, however, avoid
are easily damaged. Also, wipe
silicone-impregnated cleaning
that
the
temperature
on
the
lens surfaces.
Treat
your
Nikon
any
other
precision optical
of
trouble-free service.
camera
contribute
smudges should be wiped with
or
lens cleaner. Never clean lens
ordinary
lens surface; also, use cleaning
to
prevent
come
cleaning
may be damaged by
the
following tips, you
make
to a deterioration
often
using a
tissue,
or
your
camera
in
very
cloth
changes
is
It
is
a good idea
the
build-up
handy.
contact
should never be
or
high
After
using
viewing un-
quality
When blow-
lens
any
other
to
me-
susceptible
of
dust;
with
the
the
outer
cloth
pro-
humidity,
in
these
of
to
36
Page 37

situations,
temperature
that
fungus
always
and,
failure
to
on
lens surfaces- a
dry
useless.
•
Should
water,
servicing can be
• Always
case
the
and
• Never
to
tant
your
take
store
when
lens. Do
never
lubricate
an
authorized
shooting
camera
it
to
the
not
not
store
assignment,
guaranteed
in
the
batteries, if necessary)
• Observe normal
formance
(wiping
wise
proper
for
leakage
cool, dry loc
properly
impede
polarity;
an
extended
at all
with
a rough cl
performance);
within
ation)
(do
not
the
details regarding
facturer.
dry
the
then,
out
be
your
camera
use.
And
leave film
camera
any
part
service
for
battery
times.
remove
period;
camera;
to
burn);
battery
camera
store
the
thoroughly
in a cool,
camera
condition
accidently
dealer
immediately
only
at
an
in
an ever-ready case
be sure
in
with
of
the
center.
test
proper
handling
Be
oth
will remove residues
install
batteries
change
maximize
and
that
the
camera
the
shutter
camera.
Prior
your
operation.
procedures
sure to: Clean
batteries
when
weak
store
unused
service life; dispose
keep
out
performance,
dry
may
result
that
will
dropped
for
authorized
the
lens cap
for
a long
or
Lubrication
to
a holiday trip
camera
properly,
not
batteries
batteries
of
the
reach
refer
to
(and slowly)
location.
in
render
on
the
servicing.
Remember
the
growth
your
floor
Thorough
at
room
camera
or
dealer.
or
compartment
is
attached
period
of
time,
self-timer
cocked.
should
or
be
impor-
(including changing
for
maximum
batteries
that
might
periodically
other-
checking
using
the
equ
ipment
promptly
the
to
prevent
properly
of
children.
of
batteries
(in a
original manu-
of
in
to
left
per-
for
For
37
Page 38

CHANGING
To
remove
lease
lens
loose
To
mount
mount
camera are aligned; then, twist the lens counterclockwise
until it clicks
lens, shade
In
order
the
button
and, holding
to
the
right as far as it will go.
and
can be lifted
a lens, position it
so
that
and
the
to
measure exposure
THE
lens from
out
the
mounting
locks into place. While
camera from the sun with
LENS
the
camera, press
the
button
.
in
index
at
fu
depressed, twist
The
the camera's
on
II
aperture
lens will
the
lens and
mounting
your
the
lens re-
the
come
bayonet
the
the
body.
with lenses
having
different
indexed with
in
use. This
ring
all
meter
After
the
follows:
ture
then
automatically fits
finder into
the
maximum apertures,
the
must
locking the lens
all
the
way
the
coupling prong on
to
the
maximum
the
maximum
be done each time a lens
way
in
the
aperture
to
the
minimum
the
opposite direction. Th
coupling pin
aperture
in
setting
place,
of
the
ofthe
aperture
meter
must
be
of
the
lens
is
mounted,
turn
the
lens and adjusts
lens.
as
the
aper-
setting,
is
step
Photomic
38
Page 39

Maximum Aperture Indicator
As
the
lens'
aperture
and
pling
aperture
ample,
cause
"2.8"
indicator
with
numbers
from
"1.2"
position
indexing,
via
a lens
to
when
to
aperture
the
with a maximum
appear
(and
"5.6"
at
the
the
indicator
in
properly
dots
as
ring
is
turned
completion
finder
displays
(see figure below).
the
finder's
coupled.
for
intermediate
depicted.
to
of
lens/finder
the
aperture
maximum
The
scale
the
lens'
of
settings)
maximum
cou-
maximum
For
f/2.8
aperture
is
provided
ex-
will
of
Maximum
Aperture
5·9_4.5
4
e- 3.5
[2:6]-2.5
2
1.4
1.2
Scale
39
Page 40

CHANGING
In
addition
the
camera, six
available.
mount
lever inward
releases
release
finder
To
attach
set
it
and
locks
To
attach a Photomic-type
Photomic
aperture
aperture
camera
into
shutter-speed selector left
the
camera's
turned
aperture
the
Lens"
to
To
one
of
and
the
mounting
button
at
out
of
the
a viewfinder
in position
into
place on
finder included with
ring
of
setting;
and firmly press it
place (see
shutter-speed dial and
in
tandem
ring with
on
page 38.
the
F2SB
other
remove
the
other
rotate
the
camera.
and
the
then,
Photo
(see
the
THE
interchangeable viewfinders are
the
clamps); then , depress
rear
other
press
the
lens (if
gently position
A).
Photo
finder as described in
VIEWFINDER
Photomic
units, press
toward
of
the
than a
camera.
down
Once
or
finder
included with
F2SB
Photomic
the
finder release
the
front
(this action
camera
down
model (including
the
mounted)
in
right until it engages with
B). Lastly, index
body
Photomic-type
firmly until it clicks
camera), first set
to
the
the
finder on
until it clicks
place,
turn
the
two can be
finder
the
finder
and
lift
model,
the
F2SB
maximum
and
locks
the
finder's
the
lens'
"Cha
nging
to
the
the
the
(B)
40
Page 41

CHANGING
Nineteen d ifferen t types
ab
le for use with the Nikon F2SB Photomic camera,
THE
of
FOCUSING
SCREEN
focusing screens are avai l-
each designed to meet specific focusing requ irements.
The N ikon Type K screen comes with the camera as
standard equipment.
To change the focusing screen, first remove the finder
described on the preceding page. Then, turn the camera
body upside-down and press the finder release button a
second t
To
flat s
front
ton and the screen
Caution:
touch
advisable to place a clean ,
to
im
e to release the screen.
mount a screen, simp
id
e facing downward and the
of
the camera. Then, press the finder relea
When changing
the
optical
surfaces. When removing
catch
the
screen
as
ly
place it
will
drop into place.
the
focusing screen, be careful
dry
cloth
free
of
over
the
it
drops
in
position with the
"Nikon"
the
camera
mark to the
the
screen ,
palm
of
.
se
the
not
but-
to
it
hand
as
is
41
Page 42

CHANGING
THE
FOCUSING
SCREEN-continued
Focusing
D
Screen
Selector
Type A. L
Type
A:
split-image rangefinder spot
id
and
photogra phy.
Type
L: Same as
rangefindCI line
with
horilontal
Type B: Matte Fresnel field with
ground matte focusi
general
Type C: Fine-ground matte field
spot and
photography and other high-magnification applica-
tions,
and
Typ
e 0 : Overall fine-ground
cialized
lenses.
Ty
pe
ground
cal lines. Ideal
Ty
pe G:
mm</>
focusing
available
lenses.
Guide
Matte
Fresnel field
accurate
focusing. Excellent for general
Type
A screen
at
a 45° anglc. Bcst for subjects
lines.
ng
photography,
cross
for
close-up
E:
Malle
matte
Clear
microprism
in
corresponding
Depth
spot in the center. Good
especially
hair.
For
parallax focusing on aerial images.
photography
Fresnel field
spot
and
etched
for
architectural
Fresne
l field
focusing
poor
light.
Four
of
field cannOI be
with
3mmq>.circul"r
and
12mm¢circle.
but
with
with
photomicrography I astra-
matte
and
for
with
horizontal
photography.
with
spot
for
models
to
specific
observed.
Rap-
witll split-image
12mm¢
fine-
long
lenses.
4mm¢clear
field. For spe-
use
with
long
12mmrJ>
fine-
and
veni-
extra-bright
viewing
and
(Gl-G4)
focal
length
for
are
12·
Typ
e H: Clear Fresnel field with
pattern over
ing
rapid
focusing
mum
edge-to-edge
ble in
ticular
J:
Ty pe
focusing
photography.
Typ
e K:
Matte
finder
doughnut.
jects
with
tours.
Suitable
Typ
e M:
clear
spot
focusing
cal
culation
or
for
light.
Suitable
other
high-magnification
Type
'
P:
rangefinder
tal
and
Rapid
horizontal
Suitable
Typ
e R:
prisms
horizontal
tion. Works
aperture
on
four
models
focal
length
Matte
Fresnel field
spot
and 1 2mm</>
Combination
Fresnel field
spot
surrounded
Rapid
both
for
Fine
ground
and
double
on
aerial image, plus
of
individual
measuring
for
Same
line
vertical lines
and
accurate
or
vertical
for
general
Same
of
sloping
and
vertical lines
best
of
from
the
any
brightness
(1-1
lenses.
with
and
straight
general
objects.
close-ups,
as
Type K but
at
a 450 ang
photography
as
Type A but
surfaces
with
f/3.5
microprism
entire
screen
part
' -
1-1
of
by 1
accurate
Fresnel
cross
applications.
as
focusing
lines
to
area.
of
the
screen
in
poor
4)
corresponding
with
central
circle.
Good
Type A and J screens.
3mm¢ spli
t-image
mm-wide
focusing
lines
and
ill-defined
photography.
field with 5.5mm</>
hair
for
use in
millimeter
magnification
Brilliant
image
photomicrography
with
le
and
etched
an
aid
to
for
subject with
or
ill-defined
.
with
at a smaller
to
aid
proper
lenses
having
f/5.6
focus-
Permits
with
opti-
light. Availa-
to
par-
microprism
for
gene
range-
microprism
for
subcon-
parallax
scales
for
of
objects
in
dim
and
split-image
horizon-
composition.
con
Lours.
rangefinder
angle
and
composi-
maximum
ral
42
Page 43

Focusing Screen Selec tor Chart
= Excellent
=
Acceptable
The
image is brilliant
edge,
but
micro prism
dim.
Focus
matte
area.
from
the central rangefinder,
or
cross-hair area
on
the
edge
surrounding
to
FiVleye
is
'
Wideans!e
• = Acceptable
Slight vignetting
nomenon
microprism)
image.
But
shows
no
traces
(in
the
the
affects
of
or
moire phe-
case
of
the
the
image on film
th is.
screen
No-nul
• = Acceptable
Incompatible
a
maximum
f/2.8
ficiency and accuracy
rangefinder.
in
the
be slightly
Focus
area.
Caution: The
screen
Special care should be
otect
pr
ve
cessi
with
any
aperture
since this decreases the ef-
The
central
out
on
the
is
made
it
from
pressure.
lens having
larger
of
the
in-focus image
spot
may prove
of
focus
surrounding
rear
surfa
of
acryl resin.
scr
atching
on
ce
taken
than
screen
film.
matte
of
the
or ex-
to
to
Telephoto
Zoom
-""-
PC
~'
Rene
Telephot
~
I
'mm
~
J8m~
.1i"""
8"",,-
1/:
'''"
.
s"""
""'"
""'"-
;1"
E
ffi~
-'="'-"-
-
11
;~~~::jH
:...=
iF1i~-,
/~
~
"mm/
".
;00;;;;;;1
'
"mml/'.
,0'""",
...
o
=~
:
.~
....
.-
. -
.-
. -
r-
t-
r--
...
t-
r-
1-'
r-'
r
.-
J='"
-r-
-I-
t
t--
'-
1-
t
t·
t -
-'-
- I-
t==
-
-
c 0
\-
r--
C- -
-
I---
r--
1-
HI
~
I--
-
t--
-
t--
l-
l-
I--
H2
c--l
I--
I-
-
E Gl
-_
--
.....
-
-
-
G2 G3
...
~
-
..
l-
-
I-
- . -
_.
0_
,=-;
-
'-
-
t-
-
t-_
"'=
- -
...
-
~
-
I-
..
-
.
. -
-
~
I-
G'
I--
f-
t-
r--
-
l-
r-
t·
l=-
r-
I-
t-
t--
r--
H.
H3
\--
r--
-'
t-
1-
...
...
...
r--
.-
r--
t -
f-
t--
t-
r-
-
.-
. -
r-
. -
.~
_.
- -
-
-
-
..
_.
-
-
-
..':I!...
,,--
.-
I-
\--
t-
r'
• •
..
-
..
-
I
...
t-
..
t-
I-
t-
.-
_ .
t
-
0.-
.-
II-
.-
43
Page 44

ACCESSORIES
Lens
Hoods
The use
of
a lens hood
is
recommended at
all
times to
prevent extraneous light from striking the lens surface
and causing flare or ghost, and to protect the lens against
damage. Nikon lens hoods come
ing
on the lens: screw-in, snap-on, slip·in and built-in.
in
four types, depend-
They are calculated precisely for each focal-length
Nikkor lens to provide maximum protection against
stray light.
To attach or remove the snap-on hood, first depress the
spring latch- which
it
in
the direction
directly over a screw-in filter,
lens
at
the same time.
can
be
reversed for storage on the lens, and the lens and
its hood can
be
is
marked with
of
the arrow. The hood
When
not
stored together
an
arrow- and slide
will
so
both can
in
use, the snap-on hood
in
the ever-ready case.
be
used on a
also fit
Filters
Nikon filters are made
polished
so
that both surfaces are optically flat and
of
optical glass, ground and
parallel. Nikkor lenses and Nikon filters are made for
each other. For best results,
lenses. The filters are available
use
Nikon filters on Nikkor
in
both screw-in and
series mounts, depending on the lens.
Except for the R60, no Nikon filter requires exposure
compensation when used with the Nikon F2SB Photo-
mic.
When
using the R60 filter under tungsten light,
increase the exposure
by
the exposure meter.
Note:
If
you
wish
accidental
against
recommended
.
to
leave a filter
damage,
by
one f-stop more than indicated
on
the
lens
to
the
use
of
th e L37
protect
or
L37C
the
filter
lens
is
44
Page 45

Eyepiece Correction
The
nine
permit
focus
without
0,
+0.5,
combined
screw
into
eyepiece
nearsighted
+1,
+2
dioptry
the
correction
and
their
glasses. Available in -
and
+3
of
finder
eyepiece.
Lenses
lenses
farsighted users
diopters,
the
lens
each
and
are
designed
to
2, -3, -4,
representing
the
finder.
view
Simply
Finder Eyecup
to
The
and
finder
- 5,
ing
the
the
When using an
eyecup,
eyecup.
Then
soft
rubber
eyepiece
viewfinder.
it
is
First,
screw
the
finder
eyecup
to
prevent
eyepiece
recommended
fit
the
lens into
assembly
onto
screws
extraneous
correction
to
use
the
the
finder
directly
light
lens
the
Nikkormat
eyecup
eyepiece.
onto
the
from
enter-
with a finder
type
in
advance.
45
Page 46

FEATURES/SPECIFICATIONS
Type
of
camera: 35mm single-lens reflex (SLR)
Picture
Lens
format:
mount:
Lenses available: Nikkor
as standard; more
Shutter:
from 1
to
10
mediate settings possible between 1
second;
Flash synchronization :
speed
switch provided;
for off-camera flash
Synchronization
and
"B"
MF
bulbs;
Accessory shoe : Special Nikon-type built into body;
fitted
with hot-shoe
which turns
Viewfinder: Interchangeable eyelevel pentaprism
with
bu
(model DP-3); selected aperture and
dicated below viewfield; eyepiece
Focusing screen: Matte Fresnel field with central split-
image rangefinder surrounded by microprism ring;
12mm
center-weighting; Nikon
46
24mm x 36mm
Nikon F
mount
than
(35mm film format)
(bayonet
50mm
f/l.4,
type)
f/2
50 Nikkor lenses
or
in
55mm
all
f/l.2
Horizontal-travel focal-plane shutter; speeds
to
1/2000
second and
"B";
speeds
of
from 2
seconds available via built-in self-timer; inter-
/80
and 1 /2000
shutter
is
release via
set; hot-shoe
one
shutter
Automatic
contact
threaded
button
selection
or
self-timer
as
shutter
with built-in safety
PC
terminal provided
operation
range: 1
for FP bulbs;
1/80~
on
contact
/2000~1
1/30
1 sec. and
contact
as flash
/125
sec., 1
/30~1
~1
sec. and
"B"
for electronic flash
"B"
for M and
and electric safety switch
unit
is
mounted
sec.
type
ilt-in through-the-Iens (TTL) exposure
shutter
diameter
shutter
reference circle defines area
Type
K screen
provided
meter
speed
of
meter
in-
of
Reflex mirror: I nstant-return
type;
lockup lever provided
Exposure metering: Through-the-Iens, center-weighted,
full-
aperture
measurement employing
two
silicon
photo-
diodes (SPD) for fast response; exposure correctly set
by adjusting for illumination
emitting diode (LED) indicator;
with
both
diaphragm and
two
powered by
Metering range: EV - 2
f/8
at
1/2000
1.5V silver-oxide batteries
~
second) with 50mm
EV
of
single central light-
meter
shutter
17 (i.e.,
speed controls;
f/l.4at
f/l.4
cross-coupled
8
seconds~
lens
and
ASA
100
Film speed scale: Settings provided for ASA
Lens diaphragm coupling:
for
automatic
f/1.2
to
f/32
to
lenses with maximum
f/5.
6,
meter/diaphragm coupling
Bu
ilt-in
meter
12 ~ 6400
coupling pin
apertures
of
from
of
from
f/1.2
Film winding: Via single-stroke lever with 1200 winding
angle and 20° stand-off angle; lever also serves as
ON/OFF
Frame
ditive type); automatically resets
before
switch
counter
: Shows
"0")
when camera back
number
of
frames exposed (ad-
to "S"
is
opened
meter
(two frames
Film rewinding: Manual via film rewind crank; coupling
provided on baseplate for rewind via
Depth-of-field preview: Via
button
motor
drive
provided on
front
of
camera
Body finish: Satin-chrome and semi-gloss black
Weight: 850g (body only)
Dimensions:
152.5mm
x 1
02mm x 66mm
Page 47

THE
NIKON WARRANTY
The Nikon Worldwide Service Warranty Registration
Card which identifies your F2SB Photomic camera by its·
serial number is your guarantee th
is
a new one. When you return this card to a Nikon
tributor you
Warranty Certificate, which entitles you to a one-year
warranty anywhere throug
the conditions listed
an
Only
a Nikon Warra nty Registration Card. We cannot gu
antee any camera or
dealer without a Warranty Registration Card,
ay
be
m
will
receive your Nikon Worldwide Service
in
the certificate.
authorized Nikon dealer can provide you with
lens so
second-hand equipmen
at
the camera·you buy
hout
the world, subject to
ld
to you
by
an unauthorized
t.
since it
dis-
ar-
47
Page 48

 Loading...