

Nikon F100 instruction Manual

WWW.LENSINC.NET
(En)
INSTRUCTION MANUAL
En
WWW.LENSINC.NET
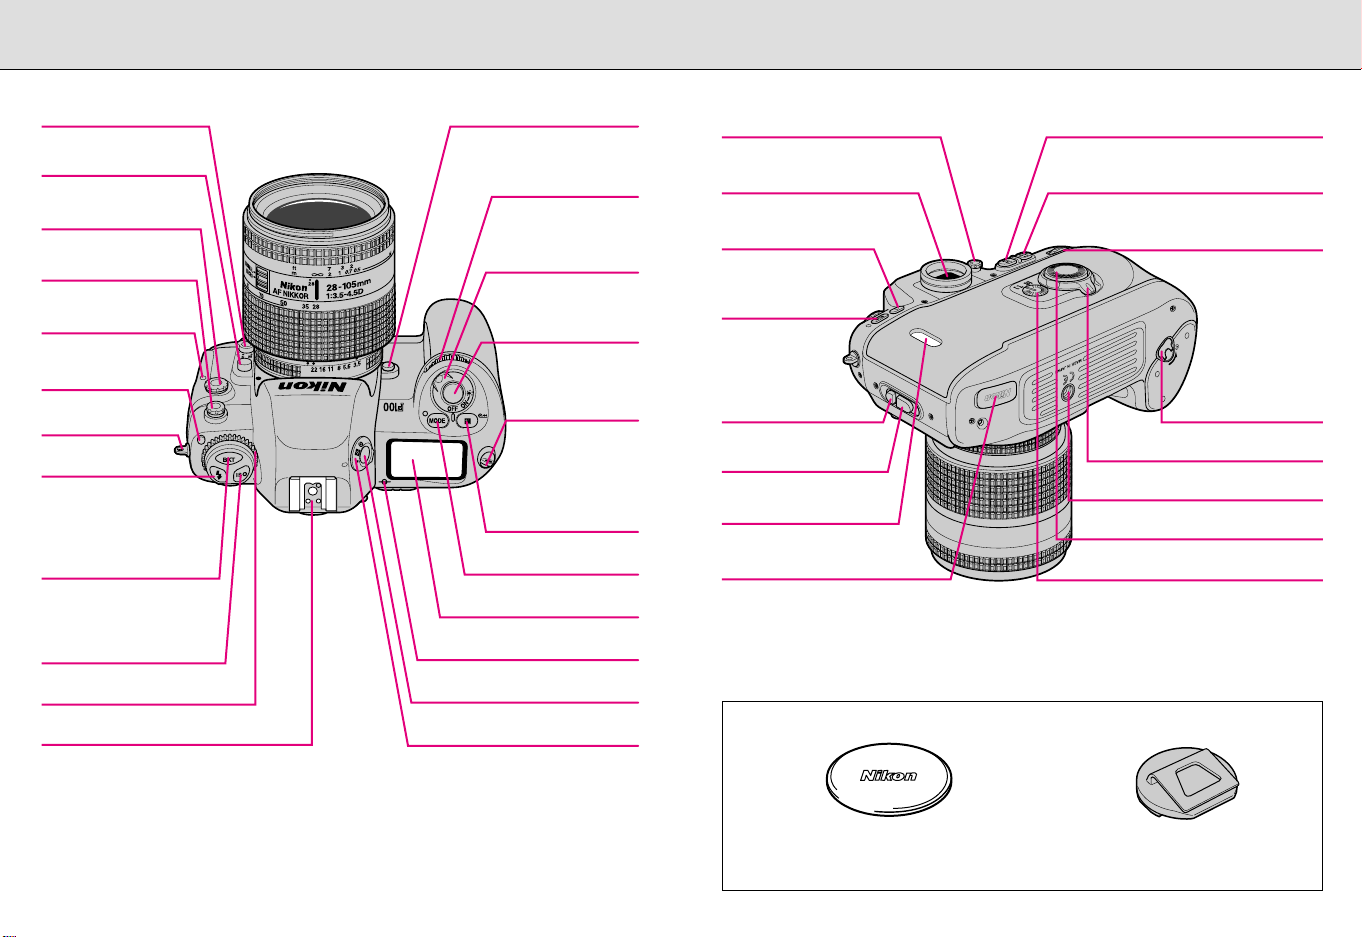
Nomenclature
Focus mode selector PP. 36, 43
Lens release button
P. 1 9
10-pin remote
terminal P. 94
Sync terminal P. 79
Self-timer
indicator LED P. 67
Film advance
mode selector
lock release P. 35
Camera strap
eyelet
Flash sync mode
button P. 80
Film rewind button P. 29
Auto Exposure/Flash
Exposure Bracketing
button P. 57
ISO film speed button
P. 3 4
Film advance mode selector
P. 3 5
Depth-of-field preview button P. 64
Sub-Command Dial
P. 6
Power switch P. 16
Shutter release
button P. 17
Camera strap
eyelet
Exposure
compensation
button P. 56
Film rewind button
P. 2 9
Exposure mode button
PP. 46-53
LCD panel P. 4
Film plane indicator P. 64
Metering system selector lock
release P. 44
Diopter adjustment knob P. 63
Viewfinder eyepiece
Shutter speed/aperture
lock button P. 49/ 51
Custom Setting
button P. 70
Camera back lock
release P. 20
Camera back lock
release lever P. 20
Film confirmation
window
Coupling contacts for
Multi-Power High Speed
Battery Pack MB-15
Supplied accessories
AE-L/AF-L (Auto Exposure/
Autofocus Lock) button PP. 41, 54
AF start (AF-ON) button P. 36
Main-Command Dial P. 6
Battery holder
release knob P. 16
Focus area selector lock lever
P. 3 7
Tripod socket
Focus area selector P. 37
AF area mode selector P. 38
Accessory shoe P. 79
Metering system selector P. 44
Body cap P. 19
Eyepiece cap DK-8 P. 67
32
WWW.LENSINC.NET
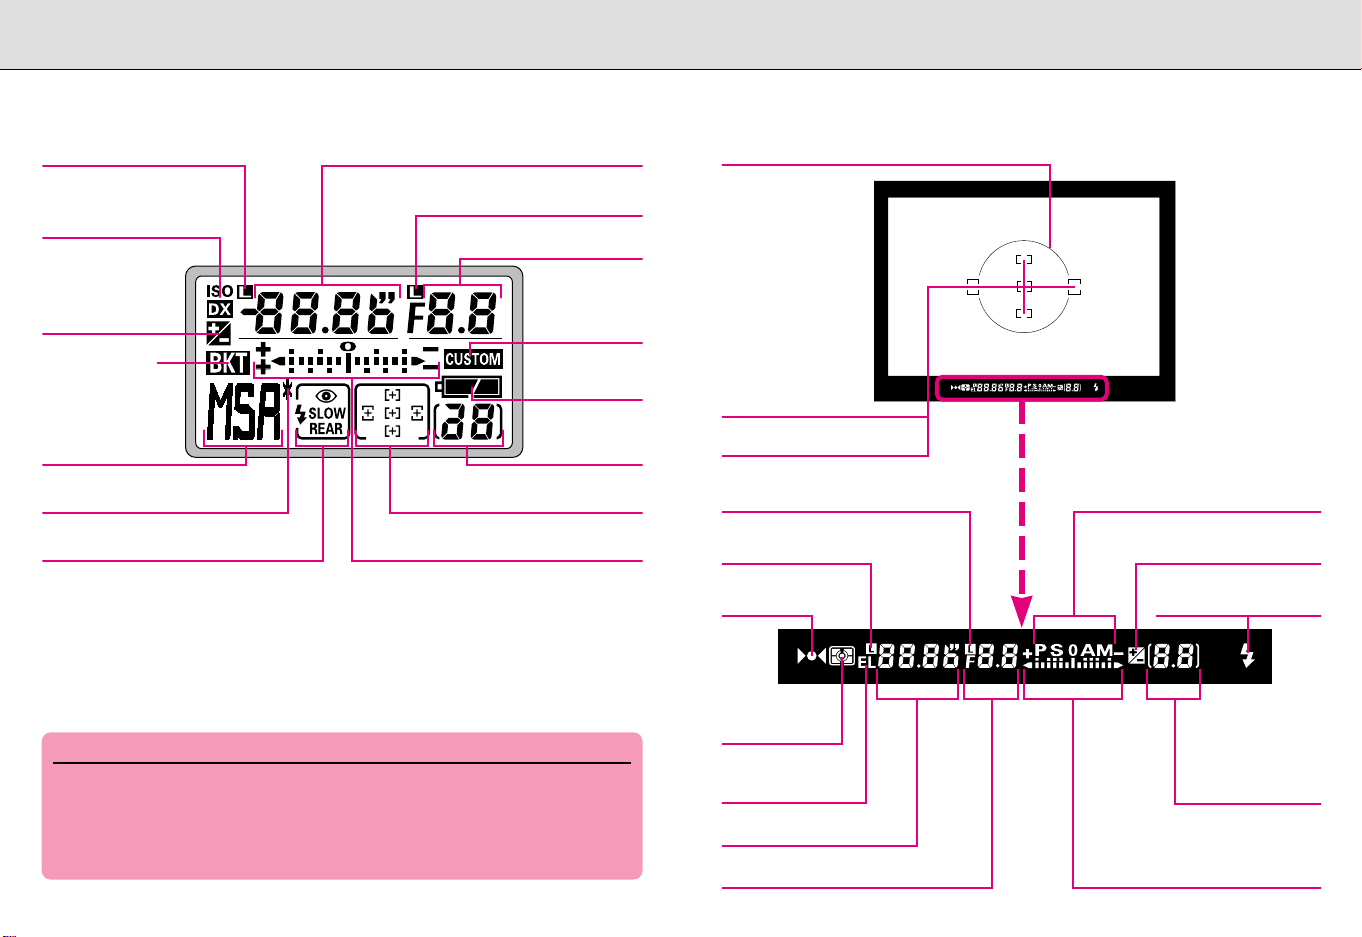
LCD/Viewfinder Displays
• LCD panel
Shutter speed lock P. 49
Film speed/DX indication
P. 3 4
Exposure
compensation P. 56
Auto Exposure/
Flash Exposure
Bracketing P. 57
Exposure mode
PP. 46-53
Flexible Program P. 47
Electronic analog exposure display/Exposure
Flash sync mode P. 80
Shutter speed/Exposure
compensation value
Aperture lock P. 51
Aperture
Custom Setting
P. 7 0
Battery power
P. 1 7
Frame counter
P. 2 1
Focus area P. 37
compensation value display P. 53/56
About LCD illuminator panel
LCD illuminator panel brightness deteriorates over time, and is not a malfunction.
Contact an authorized Nikon dealer or service center to replace the illuminator
panel (at charge).
About LCD
• At high temperatures of 60°C (140°F) or above, the display turns black,
making it impossible to read. It returns to normal when the temperature drops
to 20°C (68°F).
• At temperatures below freezing, the LCD’s response time slows; when the
temperature rises, it returns to normal.
• Viewfinder Display
12mm-dia. reference circle for Center-Weighted Metering area
Focus brackets
(focus area) P. 37
Spot Metering (4mm ø)
area P. 45
Aperture lock indicator P. 51
Shutter speed lock indicator
P. 4 9
Focus indicators
P. 2 7
Metering
system P. 44
AE-L (Auto
exposure lock)
indicator P. 54
Shutter speed
Aperture
Exposure mode P. 46-53
Exposure compensation
Electronic analog exposure
display/Exposure compensation
P. 5 6
Flash ready-light P. 79
Frame counter/
Exposure
compensation
value P. 21/56
value display P. 53/56
54

WWW.LENSINC.NET
Command Dials
• The F100’s Main- and Sub-Command Dials are used alone or in
combination with other buttons to select/set various functions or
modes.
ISO film speed
button
Auto Exposure/
Flash Exposure
Bracketing button
Flash sync
mode button
Custom Setting
button
Shutter
speed/aperture
lock button
Sub-Command
Dial
Exposure
compensation button
Exposure mode
button
MainCommand Dial
• Film
• Setting film speed
P. 3 4
• Exposure
• Selecting exposure mode
• Performing Flexible Program in Programmed Auto
exposure mode P. 47
PP. 46-53
• Locking/unlocking shutter speed*
• Locking/unlocking aperture*
• Performing exposure compensation*
• Setting/canceling Auto Exposure/
Flash Exposure Bracketing P. 57
• Setting number of shots and compensated
EV value in Auto Exposure/Flash Exposure
Bracketing P. 57
1
1
• Custom Setting
• Selecting menu number of Custom
Setting P. 70
• Selecting and making Custom Setting
• Flash
• Selecting flash sync mode
P. 4 9
P. 5 1
2
P. 5 6
P. 7 0
P. 8 0
• Setting shutter speed in Shutter-Priority Auto or
Manual exposure mode*
• Setting aperture in Aperture-Priority Auto or
Manual exposure mode*
1
1
P. 48/52
P. 50/52
*1 · 12: Shutter speed can be set to change with the Sub-Command Dial (in
Shutter-Priority Auto or Manual exposure mode) and aperture with the MainCommand Dial (in Aperture-Priority Auto or Manual exposure mode) (page 73).
*2 · 13: Exposure compensation can be set to be performed using the Main- or
Sub-Command Dial without pressing the exposure compensation button (page 73).
76

WWW.LENSINC.NET
Introduction
• Thank you for purchasing the Nikon F100—a camera that you are sure
to enjoy in making photography a bigger part of your life.
Get to know your F100 camera, and be sure to read this manual
thoroughly before using it. We recommend that you keep this manual
handy.
Main features of the F100:
• Nikon’s exclusive new cross-ranged, five-area Multi-CAM1300
autofocus sensor system achieves superior performance in highspeed continuous shooting, and Dynamic AF, which also utilizes
five-area autofocusing, enables sharp focus on irregularly moving
subjects.
• Nikon’s exclusive 10-segment 3D Matrix Metering provides correct
exposure in various shooting situations.
• Menu of 22 Custom Settings enables you to choose among
customized combinations of various functions/modes and two
Command Dials provide access to more versatile functions.
• F100’s fortified die-cast body and Nikon lenses and accessories
accommodate various photographic situations.
• Take trial shots
Take trial shots before shooting at important occasions like weddings
or graduations.
• Have Nikon spot-check your camera regularly
Nikon recommends that you have your camera serviced by an
authorized dealer or service center at least once every two years.
• Using your camera correctly
The Nikon F100’s performance has been optimized for use with Nikon
brand accessories. Accessories made by other manufacturers may not
meet Nikon’s criteria for specifications, and nonconforming accessories
could damage the F100’s components. Nikon cannot guarantee the
F100’s performance when it is used with other than Nikon brand
accessories.
Note: · 00
· 00 (numbers from 1 to 22): indicates that the function/mode changes
according to Custom Setting menu number.
98

WWW.LENSINC.NET
Contents
The “Basic Operation” section introduces battery, lens, film, focusing, exposure
and shooting in basic steps easy enough even for SLR camera beginners to
take pictures.
“Detailed Operation” explains each function, from lens to exposure functions, in
detail, in approximately the same order as the steps in the “Basic Operation”
section. After becoming familiar with basic shooting, refer to the detailed
explanation of each operation/function, and start using advanced shooting
techniques.
“Flash Photography” introduces flash photography using the optional
Speedlight in darkness, Matrix Balanced Fill-Flash, as well as other flashshooting applications in brightness.
PREPARATION ................................................................................2-13
Nomenclature ...................................................................................................2-3
LCD/Viewfinder Display....................................................................................4-5
Command Dials................................................................................................6-7
Introduction ......................................................................................................8-9
About This Manual .......................................................................................12-13
BASIC OPERATION ......................................................................15-29
1. Install Batteries and Check Battery Power ..............................................16-17
2. Mount Lens...............................................................................................18-19
3. Load Film..................................................................................................20-21
4. Set Focus Mode, Focus Area and AF Area Mode ...................................22-23
5. Set Metering System and Exposure Mode ..............................................24-25
6. Hold Camera and Focus ..........................................................................26-27
7. Confirm Indications in Viewfinder and Release Shutter...........................28-29
About Metering System and Exposure..............................................................30
DETAILED OPERATION ...............................................................31-67
Lens Compatibility........................................................................................32-33
Film (film speed, mid-roll rewind, film advance mode, etc.) ........................34-35
Autofocus (Single Servo AF, Continuous Servo AF, AF start button) ................36
Focus Area.........................................................................................................37
AF Area Mode ..............................................................................................38-39
Focus Lock (Single Servo AF, Continuous Servo AF) ..................................40-41
Situations Where Autofocus May Not Work As Expected ................................42
Manual Focus ....................................................................................................43
Exposure Metering System (Matrix, Center-Weighted, Spot) ......................44-45
Shooting in Each Exposure Mode................................................................46-53
Programmed Auto Exposure Mode (Flexible Program, Program Chart)..46-47
Shutter-Priority Auto Exposure Mode .....................................................48-49
Aperture-Priority Auto Exposure Mode ...................................................50-51
Manual Exposure Mode ..........................................................................52-53
Auto Exposure Lock.....................................................................................54-55
Exposure Compensation ...................................................................................56
Auto Exposure/Flash Exposure Bracketing .................................................57-59
Multiple Exposure.........................................................................................60-61
Long Time Exposure..........................................................................................62
Diopter Adjustment/LCD Illuminator..................................................................63
Depth-of-Field Preview/Film Plane Indicator.....................................................64
Changing Focusing Screens..............................................................................65
Changing Camera Back (Data Back MF-29) .....................................................66
Self-Timer Operation .........................................................................................67
About Depth of Field and Focus Tracking.........................................................68
CUSTOM SETTING.......................................................................69-76
Menu/Features of Custom Setting...............................................................70-75
Two-Button Reset ..............................................................................................76
FLASH PHOTOGRAPHY ............................................................. 77-85
Types of TTL Auto Flash ....................................................................................78
Accessory Shoe/Sync Terminal/Ready-Light ....................................................79
Flash Sync Mode Features ..........................................................................80-81
Usable Optional Speedlights........................................................................82-83
Using the Speedlight....................................................................................84-85
Combinations of AF Functions ..........................................................................86
MISCELLANEOUS ......................................................................87-111
Optional Accessories ...................................................................................88-95
Camera Care ................................................................................................96-97
Notes on Batteries.............................................................................................98
Troubleshooting..........................................................................................99-101
Specifications ...........................................................................................102-107
Index.........................................................................................................108-109
Custom Setting Menu ..............................................................................110-111
1110
WWW.LENSINC.NET
About This Manual
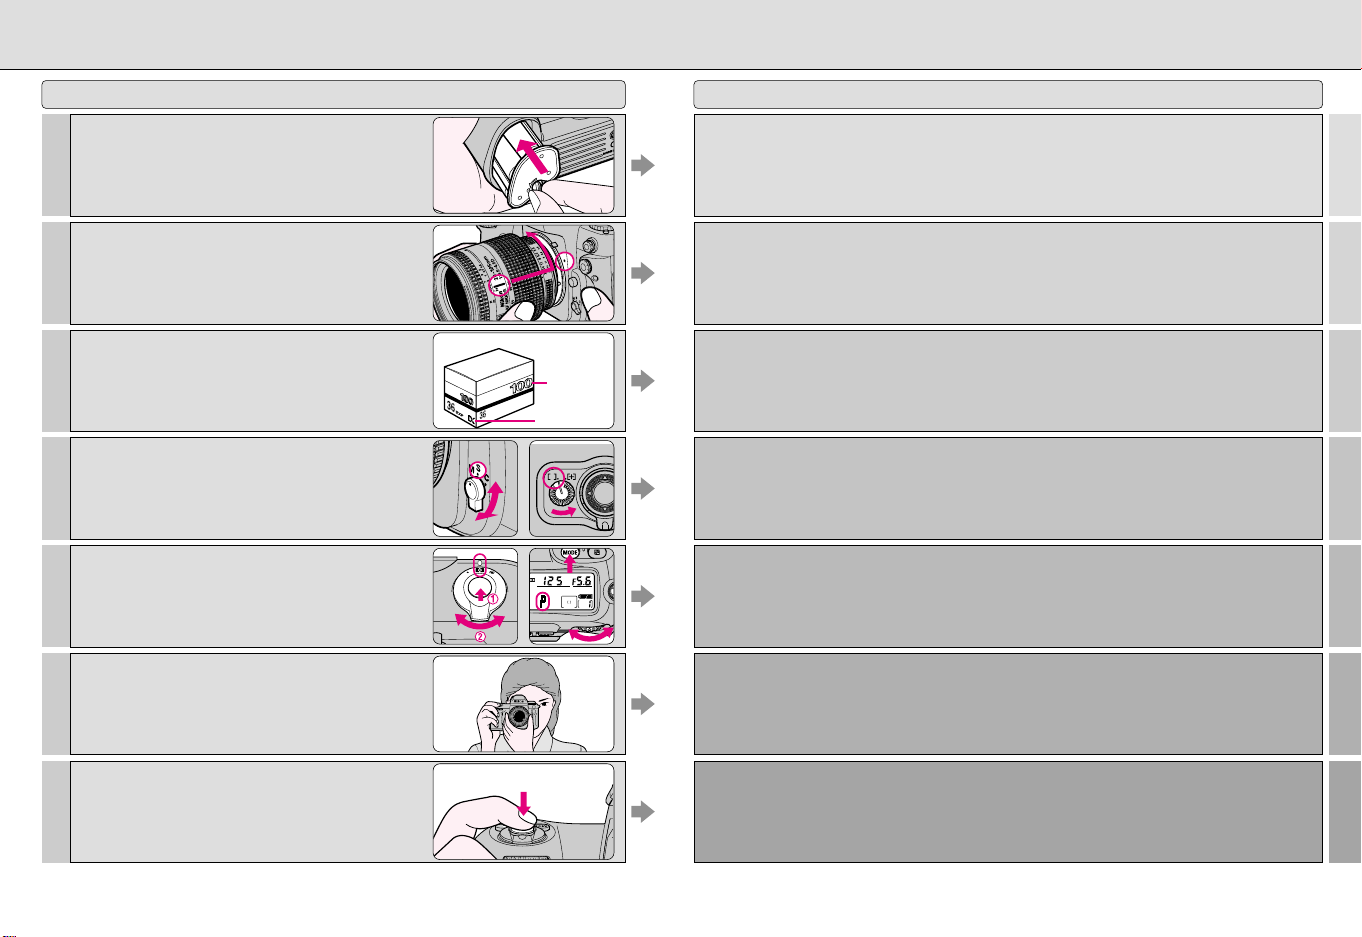
BASIC OPERATION P. 15-29
Install Batteries and Check Battery
1
Power P. 16-17
Mount Lens P. 18-19
2
DX-coded film
Load Film P. 20-21
3
Set Focus Mode, Focus Area and
4
AF Area Mode P. 22-23
Set Metering System and Exposure
5
Mode P. 24-25
ISO
(film speed)
DX mark
Detailed Operation and Notes on Batteries P. 31-67, 88, 94, 98
External power source (P. 88); Notes on Batteries (P. 98)
Lens Compatibility (P. 32-33)—CPU Nikkor lens (P. 32)/Non-CPU lens (P. 33)
Film (P. 34-35)—Set/Confirm film speed (P. 34)/Mid-roll rewind (P. 34)/In case film
does not start rewind or film rewind stops at mid-roll (P. 35)/Film advance mode
(P. 35)
Autofocus (P. 36)—Single Servo AF, Continuous Servo AF, AF start button (P. 36);
Focus Area (P. 37); AF Area Mode (P. 38-39); Focus Lock (P. 40-41)—Single Servo AF
(P. 40)/Continuous Servo AF (P. 41); Situations Where Autofocus May Not Work As
Expected (P. 42); Manual Focus (P. 43)—Manual focus/Manual focus with electronic
rangefinder (P. 43)
Exposure Metering System (P. 44-45)—Matrix (P. 44)/Center-Weighted (P. 44)/Spot (P. 45); Shooting in
Each Exposure Mode (P. 46-53)—P: Programmed Auto Exposure Mode (P. 46-47)/S: Shutter-Priority
Auto Exposure Mode (P. 48-49)/A: Aperture-Priority Auto Exposure Mode (P. 50-51)/M: Manual
Exposure Mode (P. 52-53); Auto Exposure Lock (P. 54-55); Exposure Compensation (P. 56); Auto
Exposure/Flash Exposure Bracketing (P. 57-59); Multiple Exposure (P. 60-61); Long Time Exposure
(P. 62)
Batteries
Lens
Film
Focus
Exposure
Hold Camera and Focus P. 26-27
6
Confirm Indications in Viewfinder
7
and Release Shutter P. 28-29
Diopter Adjustment/LCD Illuminator (P. 63); Depth-of-Field Preview/Film Plane
Indicator (P. 64); Changing Focusing Screens (P. 65); Changing Camera Back (Data
Back MF-29) (P. 66)
Composition
Self-Timer Operation (P. 67); Remote control operation (P. 94)
Shooting
1312

WWW.LENSINC.NET
BASIC OPERATION
This section features the settings for most
common picture-taking situations when
using a D-type AF Nikkor lens (including
AF-S and AF-I). The shooting modes
explained in this section cover most of your
shooting situations.
Shooting modes/functions explained in this section
are as follows:
14
Lens attached D-type AF Nikkor
Film advance mode Single frame
AF mode Single Servo AF
Focus area Center*
AF area mode Single Area AF
Exposure metering 3D Matrix Metering
Exposure mode Programmed Auto*
* Can be set using the Two-Button Reset. See page
76.
15
WWW.LENSINC.NET
1
1.1
1.2
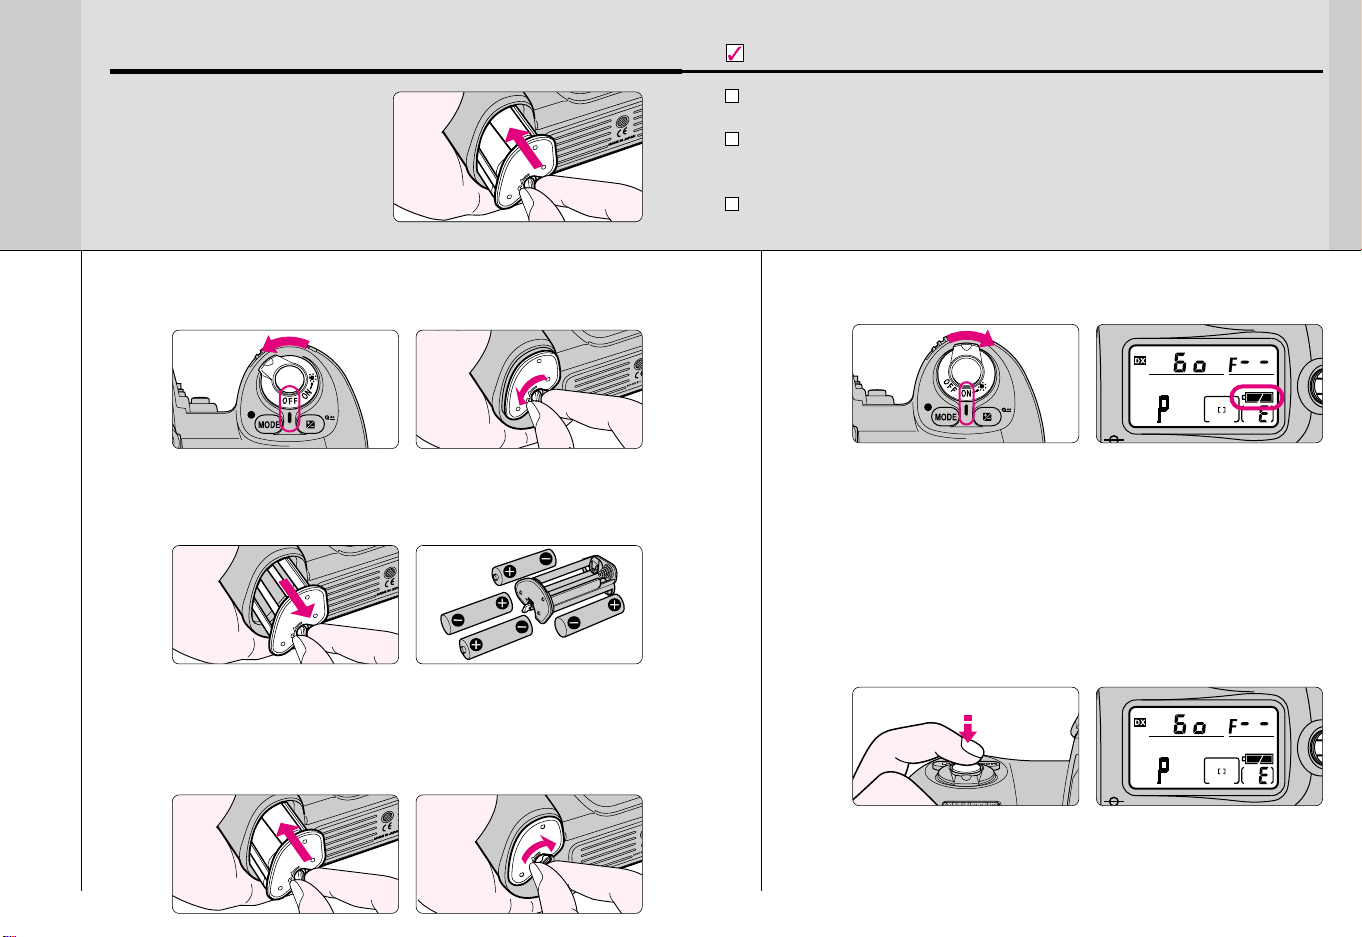
Install Batteries and Check Battery Power
Use four 1.5V AA-type alkalinemanganese or lithium batteries.
(See page 88 for other power
sources.)
Turn the power switch off, and turn the battery
holder release knob toward ◊ to release the lock.
Remove the battery holder and insert batteries with
the “+” and “–” ends positioned as marked on the
battery holder.
Check points
Keep the batteries out of children’s reach. If swallowed, contact a
doctor immediately. (For “Notes on Batteries”, see page 98.)
When replacing batteries, be sure to turn the power switch off and
replace all four batteries at the same time. Always use fresh batteries
of the same brand.
We recommend that you take spare batteries with you, especially when
traveling.
Turn the power switch on and confirm battery power
1.4
with the N indication.
• Battery power
N appears: Sufficient battery power.
M appears: Batteries are nearing exhaustion. Have a fresh set
M blinks: Batteries are exhausted. Replace batteries. (Shutter
• Indications other than exposure mode, battery power, frame counter, focus
area and Custom Setting (when Custom Setting is selected) in the LCD
panel automatically turn off 6 sec. after the power switch is turned on and
the camera remains unused. (All the indications in viewfinder turn off.)
ready.
locks.)
BASIC OPERATION
• Incorrect positioning of + and – poles may damage the camera.
Return battery holder to battery chamber and turn
1.3
the battery holder release knob opposite to ◊ to
lock the holder firmly.
Lightly press the shutter release button to activate
1.5
the exposure meter.
• Lightly pressing the shutter release button reactivates the exposure meter
and indications in the LCD panel and viewfinder for approx. 6 sec.
· 15: It is possible to change the duration of inactive time before
automatic meter switch-off occurs (page. 74).
1716

2
2
ft
m
28
7
0
50
3
5
28
8
5
1
0
5
2
2
WWW.LENSINC.NET
2
2.1
2.2
Mount Lens
Turn the power switch off and
mount the lens to the camera
body.
Check the lens type.
CPU contacts of CPU
lens
Å CPU Nikkor lens other than G-type (Illustration is D-type Nikkor lens),
with aperture ring
Í G-type Nikkor lens, without aperture ring
Turn the power switch off and mount the lens to the
camera body.
Å CPU Nikkor lens
other than G-type
Í G-type Nikkor lens
Check points
Use D- or G-type AF Nikkor lens to utilize all the functions of this
camera. (See page 32 for Lens Compatibility.)
Make sure to turn the power switch off when attaching/detaching the
lens.
When attaching the lens, take care not to press the lens release button.
Avoid direct sunlight when attaching/detaching the lens.
With CPU Nikkor lens with aperture ring (other than G-
2.3
type), set the lens aperture to its minimum and lock.
• When CPU Nikkor lens other than G-type is not set to its minimum aperture setting and
the power switch is turned on, ƒEE blinks in the LCD panel and viewfinder and the
shutter cannot be released.
• With CPU Nikkor lens other than G-type, lock the lens aperture (except in case setting the
aperture with the lens aperture ring) (page 75).
• The G-type Nikkor lens has no aperture ring; aperture should be selected from camera
body. Unlike other CPU Nikkor lens, aperture does not need to be set to minimum.
Detaching the lens.
2.4
BASIC OPERATION
• Position lens in the camera’s bayonet mount so that the mounting
indexes on lens and camera body are aligned, then twist lens
counterclockwise until it locks into place. (Be sure not to touch the lens
release button.)
• When the lens is not attached or when a non-CPU lens (page 32) is
attached and the power switch is turned on, ƒ-- appears in the LCD
panel and viewfinder. (Exposure mode indication ¡ or ™ also blinks in
Programmed Auto or Shutter-Priority Auto exposure mode. Page 46/48.)
• Push and hold the lens release button Å, then turn the lens clockwise Í.
When camera is left unattended without lens
When you leave the camera unattended
without a lens attached, be sure to attach
the supplied body cap (page 3), or optional
body cap BF-1A. (BF-1 body cap cannot be
used.)
1918
WWW.LENSINC.NET
3
3.1
3.2
3.3
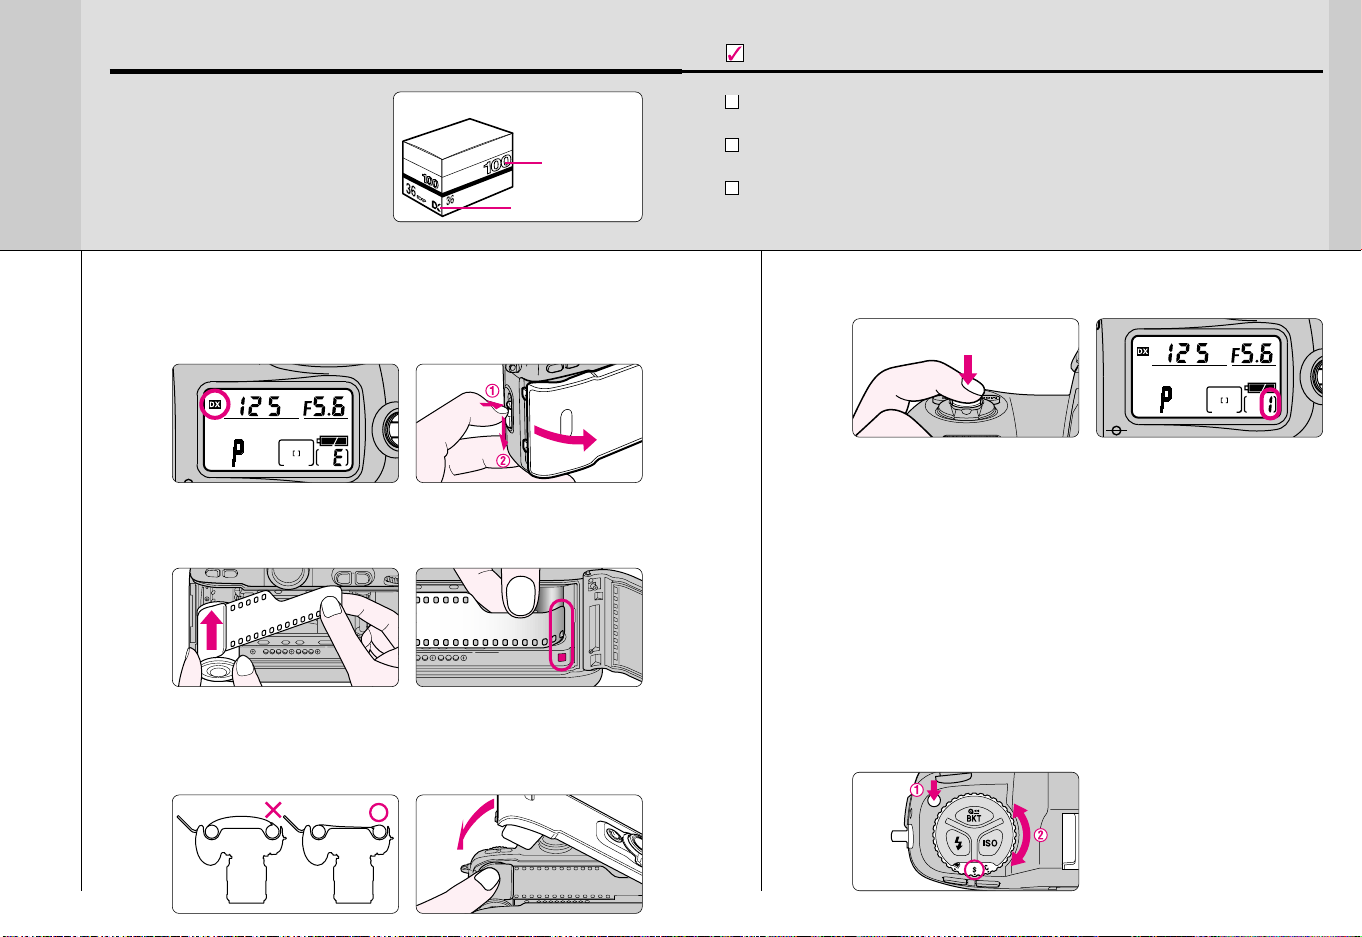
Load Film
Turn the power switch on, set the
camera’s film speed setting to
DX (page 34) and load DX-coded
film. Film speed will be set
automatically (ISO 25-5000).
Close camera back and press
the shutter release button to
advance the film to the first
frame.
Turn the power switch on, confirm that the film
speed setting is set to s, then open the camera
back by sliding the camera back lock release lever
while pressing the camera back lock release.
• See page 34 if the film speed setting is not set to s.
Insert film from the top side and pull film leader out
to red index mark.
• Do not insert the film leader beyond the red index mark.
Hold the film cartridge and ensure film is properly
positioned with no slack, then gently close the
camera back until the camera back snaps closed.
DX-coded film
ISO
(film speed)
DX mark
Check points
See page 34 for changing film speed with DX-coded film or selecting
film advance mode.
Shutter curtains are very thin. Make sure not to touch the shutter
curtains with your finger or film leader.
Avoid direct sunlight when changing film outdoors.
Press the shutter release button. Film automatically
3.4
advances to the first frame.
• When 1 appears on the LCD panel, the film has advanced to the first
frame.
• When Err and E blink in the LCD panel and viewfinder, film is not
properly installed. Open the camera back again and reload film.
• a, s and Err blink and the shutter locks when a non-DX-coded film is
loaded with camera film speed set to s. Set film speed manually (page
34).
• Frame number display remains when the power switch is off.
• You can check the number of available exposures on the film roll through
the film cartridge confirmation window.
· 8: Camera can be set to advance the film automatically to the first
frame after the camera back is closed (page 72).
Set the film advance mode selector to S (single-
3.5
frame shooting) while pressing the film advance
mode selector lock release.
BASIC OPERATION
2120
WWW.LENSINC.NET
4
4.1
4.2
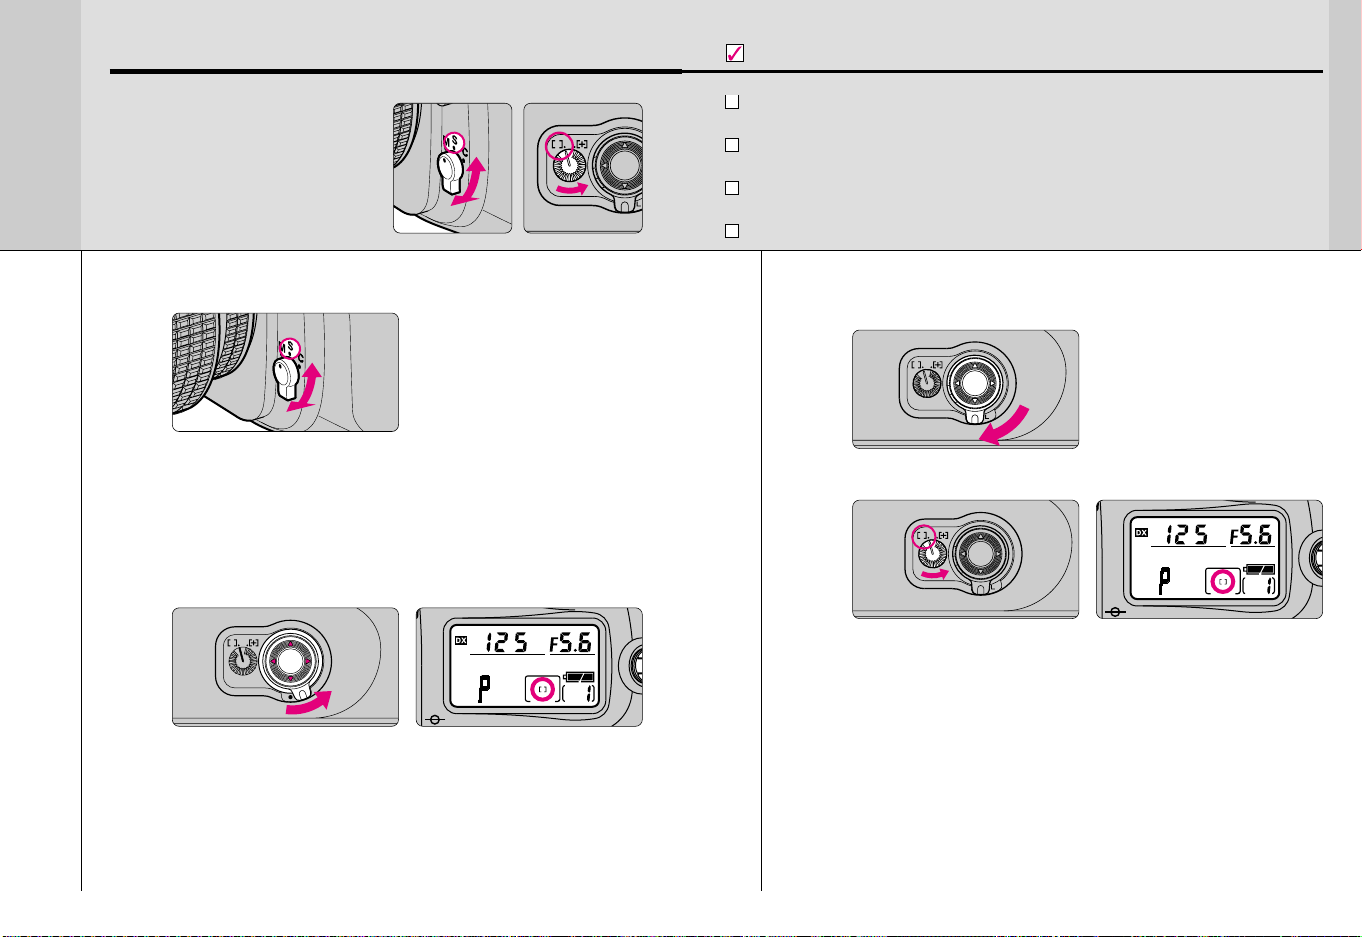
Set Focus Mode, Focus Area and AF Area Mode
Set the focus mode to S (Single
Servo AF), focus area to center
and AF area mode to g (Single
Area AF).
Set the focus mode selector to S (Single Servo AF).
• Make sure to turn the focus mode selector until it clicks into position.
• To focus, lightly press the shutter release button (page 27) or keep
pressing the AF start button (page 36).
· 4: Autofocus detection can be set to start by pressing the AF start
button only (page 71).
Rotate the focus area selector lock release and
select center focus area with the focus area selector.
Check points
Do not attempt to rotate the lens focus ring manually while the focus
mode is set to S or C.
With the focus mode set at S (Single Servo AF), shutter cannot be
released when the subject is out of focus.
See pages 36-43 for details regarding focus mode, focus area and AF
area mode.
See page 42 for situations where autofocus may not work as expected.
Rotate the focus area selector lock release to lock
4.3
focus area.
Set the AF area mode selector to g (Single Area AF).
4.4
BASIC OPERATION
• Pressing the focus area selector up/down/right/left shifts the focus area
toward the desired direction. Press the focus area selector while the
exposure meter is on (page 37).
• Selected focus area is indicated in LCD panel and viewfinder (in red in the
viewfinder) (page 37).
• Set the AF area mode selector firmly.
2322
WWW.LENSINC.NET
5
5.1
5.2
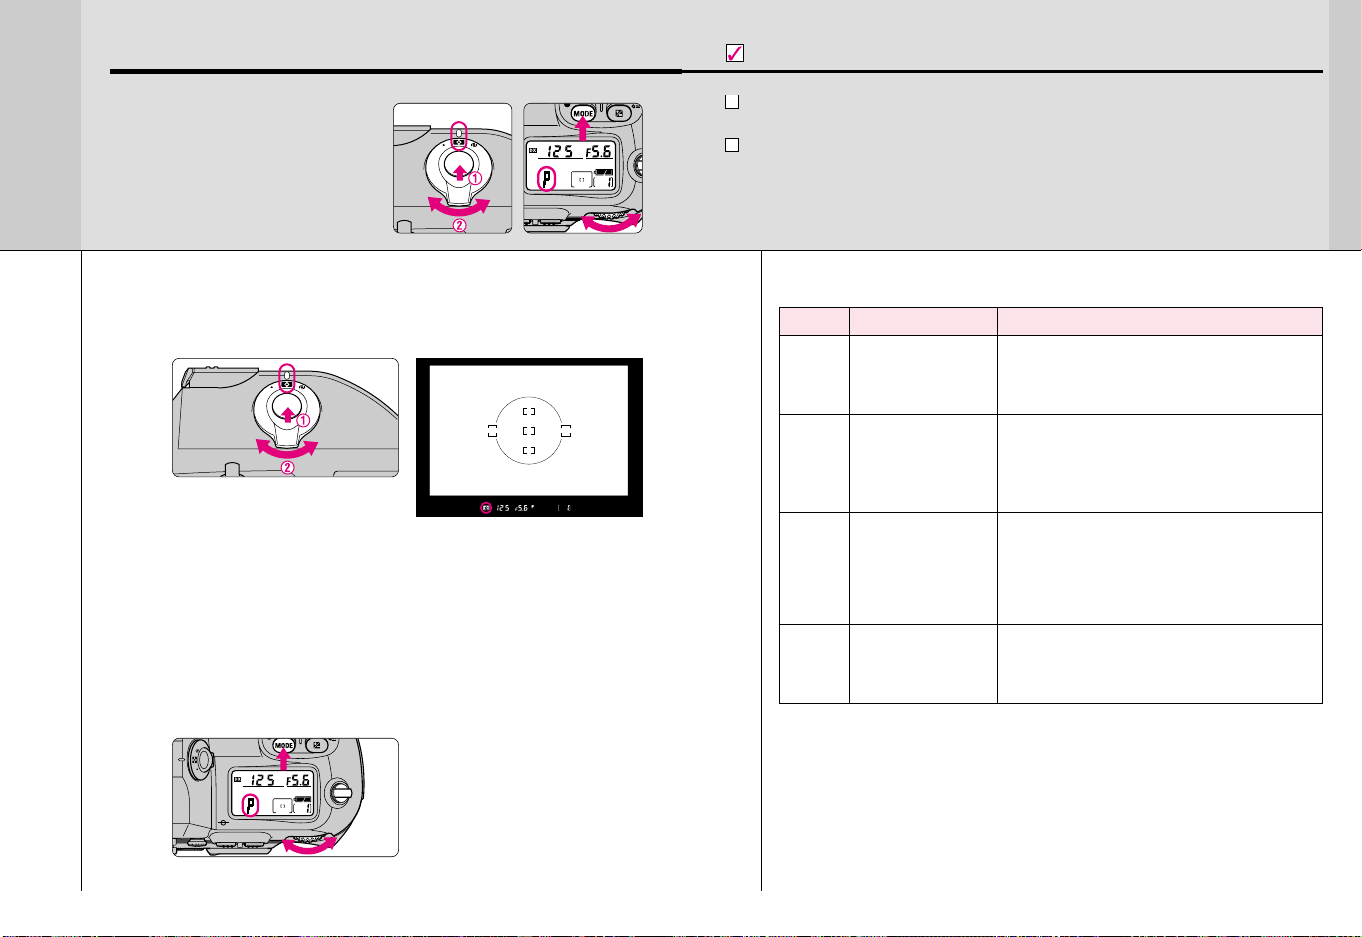
Set Metering System and Exposure Mode
Set metering system to ”
(Matrix Metering) and exposure
mode to ¡ (Programmed Auto).
Set the metering system selector to ” (Matrix
Metering) while pressing the metering system
selector lock release.
• Matrix Metering indication q appears in the viewfinder.
• The frame is divided into 10 segments in Matrix Metering, and data from
each segment is used to determine correct exposure. Use of a D- or Gtype AF lens automatically activates 3D Matrix Metering (page 44), which
accounts for scene brightness and contrast, as well as subject distance
(Distance Information) in order to determine exposure accurately.
Rotate the Main-Command Dial while pressing the
exposure mode button ∆ to set the exposure
mode to ¡ (Programmed Auto).
Check points
Three metering systems—the F100 features Matrix, Center-Weighted
and Spot Metering (page 44).
Four exposure modes—the F100 features Programmed Auto, ShutterPriority Auto, Aperture-Priority Auto and Manual exposure modes. Each
exposure mode provides a choice of exposure controls for various
shooting situations. See step 5.2 for a summary of each exposure
mode and its reference page for operating instructions and details.
• Shooting characteristics of exposure modes
Symbol Exposure mode
Programmed Auto
¡
P. 4 6
Shutter-Priority
™
Auto P. 48
Aperture-Priority
£
Auto P. 50
¢ Manual P. 52
Shooting characteristics
Camera controls exposure automatically,
while allowing you to make other settings,
such as Flexible Program (page 47) or
exposure compensation (page 56).
You set desired shutter speed, and the
camera selects the correct aperture.
“Freeze” the motion of a moving subject
using a fast shutter speed or blur the
subject using a slower speed.
You set the desired aperture, and the
camera selects the correct shutter speed.
Lets you determine depth of the in-focus
area, so you can choose whether near or
far subjects are in sharp focus, or whether
foreground or background is to be blurred.
Shutter speed and aperture are set
manually. Suitable for situations where it is
difficult to attain the desired effect using
other exposure modes.
BASIC OPERATION
• When the shutter release button is lightly pressed, shutter speed and
aperture appear in the LCD panel and viewfinder.
2524
WWW.LENSINC.NET
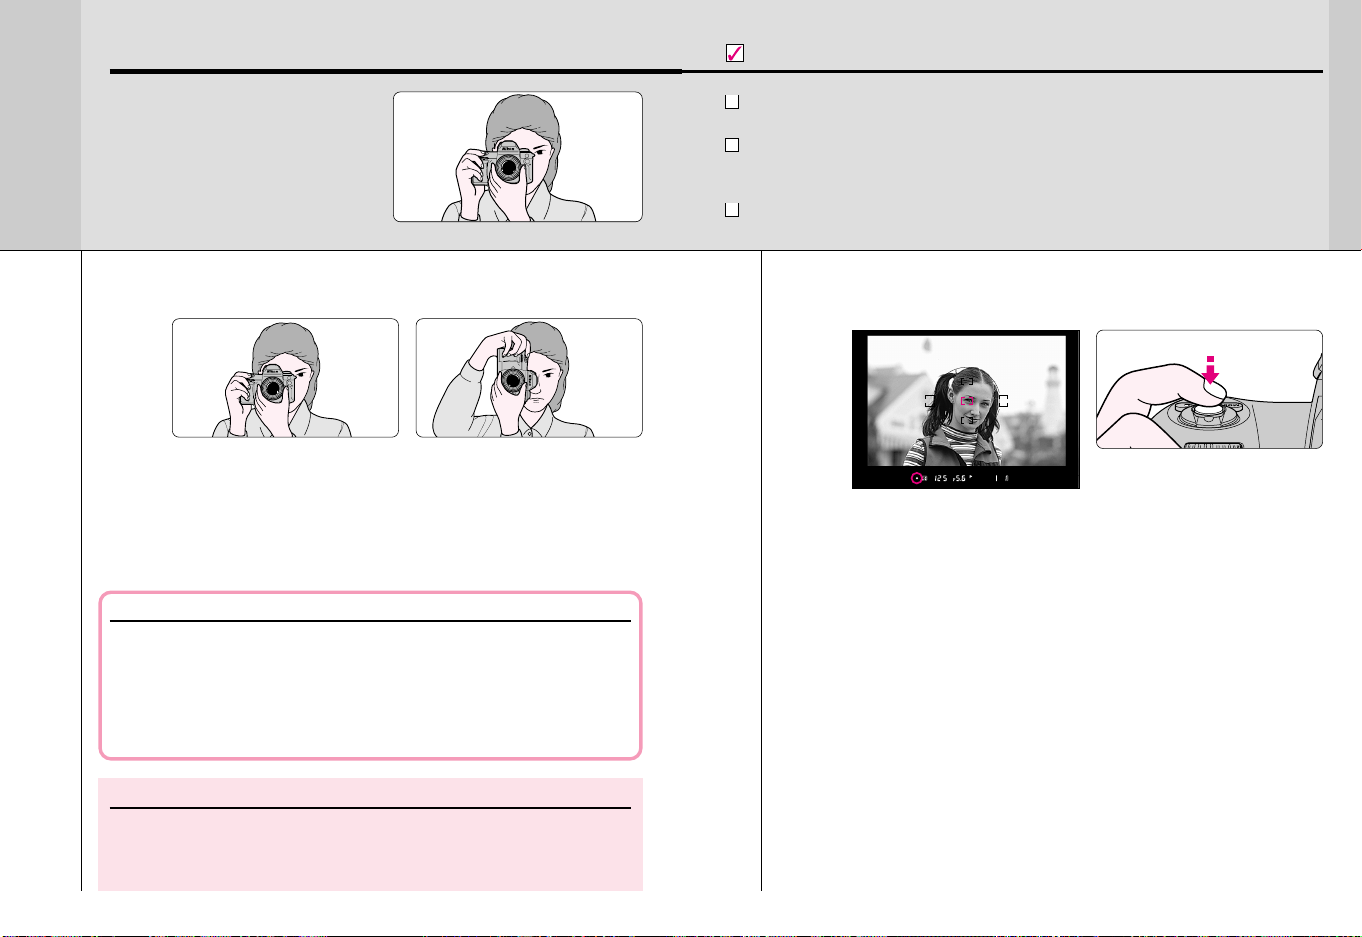
Hold Camera and Focus
Lightly pressing the shutter
6
release button automatically
focuses the camera on the
subject and when the subject is
in focus, causes / to appear in
the viewfinder.
Hold the camera properly.
6.1 6.2
• Keep your elbow propped against your body for support.
• Stand with one foot forward a half step and keep your upper body still.
• Grasp the camera handgrip with your right hand and use your left hand to
cradle the camera (or lens).
• The optional Multi-Power High Speed Battery Pack MB-15 (page 88)
makes available a shutter release button for vertical frame shooting.
Camera shake and shutter speed
Preventing camera shake is crucial when taking photographs. In
general, you should set the shutter speed faster than ‘1/focal length of
your lens’ sec. (Example: when using a 50mm lens, set the shutter
speed faster than 1/50 sec.) Use of a tripod is recommended for
shooting at slower shutter speeds.
Check points
Diopter adjustment (page 63) enables you to see more clearly through
the viewfinder.
To take a picture of a subject outside the focus area, shift the focus
area by using the focus area selector (page 37) or use focus lock (page
40).
The optional Data Back MF-29 lets you imprint date and/or time on
your photos/negatives (page 92).
Compose frame and focus by lightly pressing the
shutter release button.
• Center the focus brackets on your subject and lightly press the shutter
release button. The camera focuses automatically and focus indicator
appears or blinks as follows.
/ appears: Subject is in focus.
< appears: Camera is focused on an area between camera and
subject.
> appears: Camera is focused on an area behind the subject.
? blinks: Unable to focus using autofocus.
• To take a picture of a subject outside the focus area, shift the focus area
by using the focus area selector (page 37) or use focus lock (page 40).
• In situations where autofocus may not work as expected, see page 42.
BASIC OPERATION
NOTE: Composing frame
This camera’s viewfinder frame shows approximately 96% of the image
actually exposed on the film frame. Note that the edges of a negative
film are partially cropped by most labs.
2726
WWW.LENSINC.NET
7
7.1
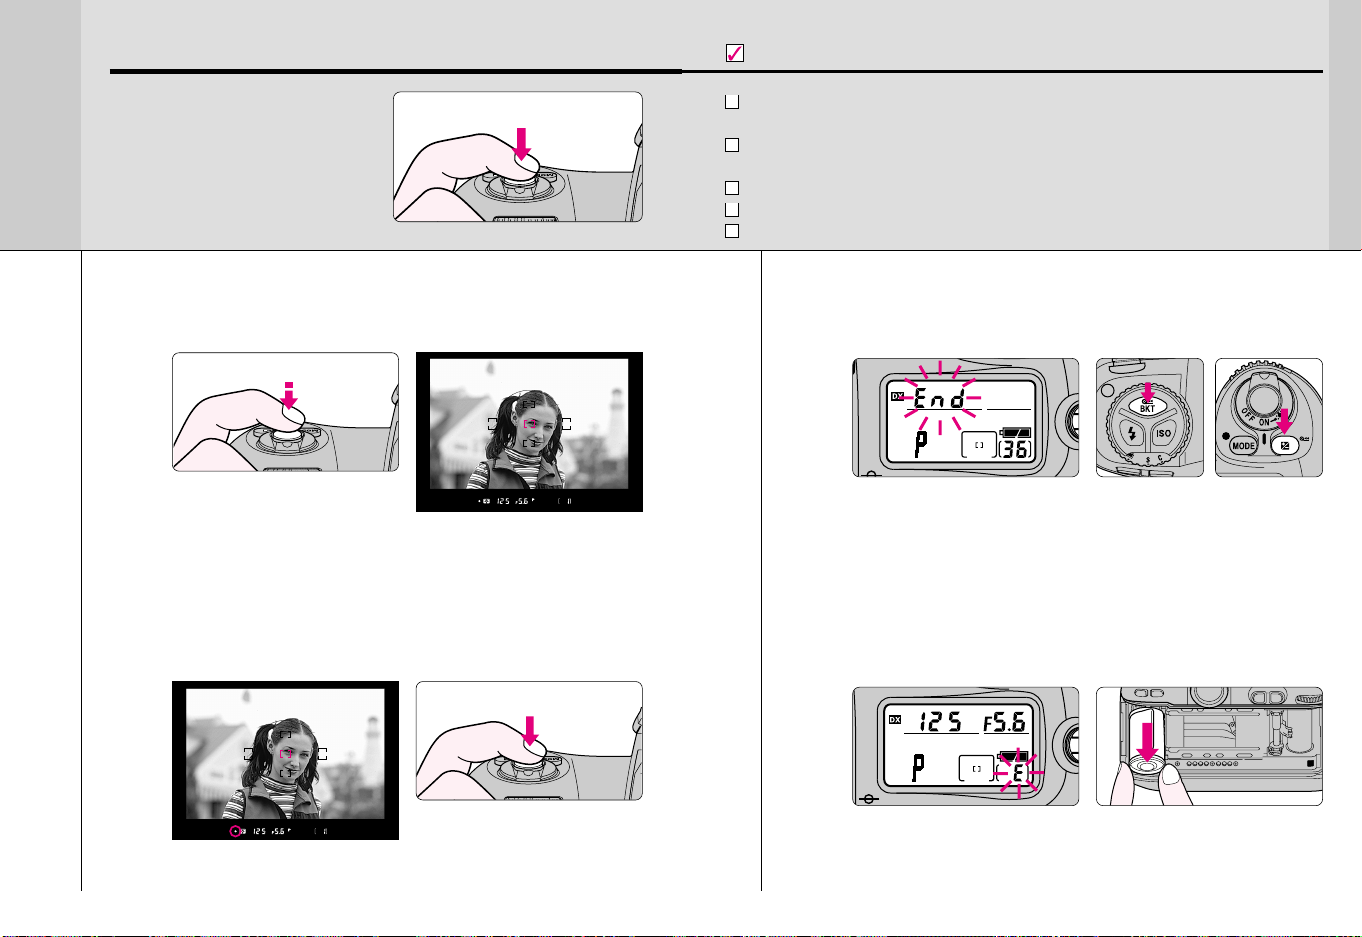
Confirm Indications in Viewfinder and Release Shutter
Confirm that / (in-focus
indicator) appears in the
viewfinder, then slowly, fully
depress the shutter release
button. Camera automatically
tracks subject that has been
moving.
Confirm indications in the viewfinder while lightly
pressing the shutter release button. (Shutter speed
and aperture are shown in 1/3 steps.)
• If any warning indications appear in the LCD panel or viewfinder, see
page 46.
· 2: Shutter speed and aperture can be changed to display settings in
steps of 1/2 or one (page 71).
7.3
Check points
Focus, shutter speed and aperture can be confirmed in the
viewfinder. If any other warning indications appear, see page 46.
When you reach the end of the film roll, End blinks in the LCD panel.
Press the two film rewind buttons „ simultaneously to rewind film.
For mid-roll rewind, see page 34.
For self-timer operation, see page 67.
For remote control operation, see page 94.
When you reach the end of the film roll, End blinks in
the LCD panel. Press the two film rewind buttons „
simultaneously for approx. 1 sec. to rewind film.
• o–– blinks in the LCD panel during film rewind and the frame counter
counts down backwards until rewind is complete.
• Pictures taken on frames beyond the indicated number of the exposures
for the film roll may be discarded in the process of developing.
· 1: Film rewind can be changed to start automatically when the end of
a film roll is reached (page 71).
BASIC OPERATION
Confirm that focus indicator / appears and slowly
7.2
depress the shutter release button.
• After shutter is released, the film automatically advances to the next
frame and the next shot can be taken.
Confirm that film is completely rewound, then
7.4
remove film cartridge.
• Film is completely rewound when the frame counter shows blinking “E”.
(E appears without blinking when the exposure meter is off.) Open the
camera back away from sunlight and remove the film cartridge by tilting it
to one side.
2928

WWW.LENSINC.NET
About Metering System and Exposure
Metering systems and exposure are important factors for taking pictures.
Knowing the characteristics of each factor helps you widen your
photographic expression.
•Metering System
As the proper combination of shutter speed and aperture for correct exposure is
determined according to subject brightness and film sensitivity, measuring
subject brightness is very important.
In general, brightness inside the viewfinder is not uniform. The F100 provides
three metering systems: Matrix Metering, Center-Weighted Metering and Spot
Metering. With Matrix Metering, scene brightness data is detected by the 10segment Matrix sensor. With Center-Weighted Metering, most of the meter’s
sensitivity is concentrated on the 12mm-diameter center circle in the viewfinder.
Spot Metering sensitivity is concentrated in a small, selected focus area from
five available focus areas. Using D- or G-type Nikkor lenses, the F100 camera
performs 3D Matrix Metering by adding distance information to determine
correct exposure. See page 44.
•Exposure
Light from the subject passes through the lens and exposes the film. Shutter
speed and aperture control how much light reaches the film. The combination of
shutter speed and aperture appropriate for subject brightness and film
sensitivity results in correct exposure—a result provided by the F100’s four
exposure modes: Programmed Auto (page 46), Shutter-Priority Auto (page 48),
Aperture-Priority Auto (page 50) and Manual (page 52) exposure modes. Also,
the F100 offers auto exposure lock (page 54), exposure compensation (page 56)
or Auto Exposure/Flash Exposure Bracketing function (page 57) allowing a
photographer greater control of exposure than that afforded by Auto exposure
modes.
DETAILED
OPERATION
This section features detailed descriptions
of all camera functions — including lens,
film, focus, exposure and other functions.
30
31

WWW.LENSINC.NET
Lens Compatibility
• Use a CPU lens (except IX-Nikkor) with this camera. D- or G-type AF
lenses give you access to all available functions.
G-type Nikkor and other CPU Nikkor lens
• The G-type Nikkor lens has no aperture ring; aperture should be selected
from camera body. Unlike other CPU Nikkor lenses, aperture does not need
to be set to minimum (largest f-number).
• CPU Nikkor lenses other than G-type Nikkor lens have an aperture ring. Set
the lens aperture to its minimum and lock. When the lens is not set to its
minimum aperture setting and the power switch is turned on, ƒEE blinks in
the LCD panel and viewfinder and the shutter cannot be released.
When a non-CPU lens is attached
Set exposure mode to £ (Aperture-Priority Auto) or ¢ (Manual) and metering
system to Center-Weighted or Spot with a non-CPU lens. When other modes
are selected, exposure indication (¡ or ™) in the LCD panel blinks, exposure
mode is automatically set to Aperture-Priority Auto and metering system is
set to Center-Weighted w. (A appears in the viewfinder.) With a non-CPU
lens, the aperture cannot be set using the Sub-Command Dial. ƒ-- appears
in place of the aperture indication in the LCD panel and viewfinder;
set/confirm aperture using the lens aperture ring.
CAUTION: Nikkor lenses/accessories that cannot be attached to the F100
The following Nikkor lenses/accessories cannot be attached to the F100
(otherwise camera body or lens may be damaged):
• TC-16A Teleconverter
• Non-AI lenses
• 400mm f/4.5, 600mm f/5.6, 800mm f/8 and 1200mm f/11 with Focusing
Unit AU-1
• Fisheye 6mm f/5.6, 7.5mm f/5.6, 8mm f/8 and OP 10mm f/5.6
• Old type 21mm f/4
• K1, K2 Ring, Auto Extension Ring PK-1, PK-11, Auto Ring BR-2, BR-4
• ED 180-600mm f/8 (No. 174041-174180)
• ED 360-1200mm f/11 (No. 174031-174127)
• 200-600mm f/9.5 (No. 280001-300490)
• 80mm f/2.8, 200mm f/3.5 and TC-16 Teleconverter for F3AF
• PC 28mm f/4 (No. 180900 or smaller)
• PC 35mm f/2.8 (No. 851001-906200)
• Old type PC 35mm f/3.5
• Old type Reflex 1000mm f/6.3
• Reflex 1000mm f/11 (No. 142361-143000)
• Reflex 2000mm f/11 (No. 200111-200310)
32
• Types of CPU lenses and other usable lenses/accessories
Mode Focus mode Exposure mode Metering system
Manual with
Autofocus electronic Manual P A
Lens/accessories
D-type AF Nikkor*3,
G-type AF Nikkor, R R RRRR— R
2
AF-S, AF-I Nikkor
PC Micro 85mm f/2.8D*
AF-S/AF-I Teleconverter*
Non-D/G-type AF Nikkor
(except AF Nikkor RRRRR— RR
CPU Nikkor*
for F3AF)
AI-P Nikkor — R*
AI-S or AI type Nikkor,
Series-E, AI-modified Nikkor
Medical-Nikkor
120mm f/4
10
Reflex-Nikkor ——R — R ——R
PC-Nikkor — R*
AI-S or AI type
Teleconverters
Bellows Focusing
Attachment PB-6*
Non-CPU Nikkor*
Auto Extension Rings
(PK-11A, PK-12, — R*
PK-13 and PN-11)
*1 Spot Metering area can be shifted with focus area selector (page 45) with CPU Nikkor lens.
*2 IX-Nikkor lenses cannot be attached.
*3 This camera is compatible with the Vibration Reduction function of the VR Nikkor lens.
*4 The camera’s exposure metering and flash control system do not work properly when shifting and/or tilting the
lens, or when using an aperture other than the maximum aperture.
*5 Without shifting and/or tilting the lens.
*6 With exposure mode set to Manual.
*7 Compatible with AF-S and AF-I Nikkor except AF-S 17-35mm f/2.8D IF-ED, AF-S 24-85mm f/3.5-4.5G IF-ED
and AF-S 28-70mm f/2.8D IF-ED.
*8 With maximum effective aperture of f/5.6 or faster.
*9 With maximum aperture of f/5.6 or faster.
*10 Some lenses/accessories cannot be attached. (See page 32.)
*11 With exposure mode set to Manual and shutter speed set to 1/125 sec. or slower.
*12 By stop-down metering. In Aperture-Priority Auto exposure mode, exposure is determined by presetting lens aperture.
Exposure must also be determined before shifting; use AE-L/AF-L button before shifting. In Manual exposure mode,
exposure is determined by presetting lens aperture. Exposure must also be determined before shifting.
*13 Exposure compensation is necessary with Ai 28-85mm f/3.5, Ai 35-105mm f/3.5-4.5, Ai 35-135mm f/3.5-4.5
or AF-S 80-200mm f/2.8D lens. See the instruction manual of the teleconverter for details.
*14 Attach the PB-6 vertically. (PB-6 can be set to horizontal position after attaching.)
*15 By stop-down metering. In Aperture-Priority Auto exposure mode, exposure is determined by stopping down
aperture on the bellows. Exposure must also be determined before shooting.
• Reprocopy Outfit PF-4 can be attached in combination with Camera Holder Adapter PA-4.
4
7R*8
14
rangefinder
R*
5
8
9
9
5
8
8
8
— R*
— R*
— RR— R*
— R*
— R*
SM
R — R*6R — R
RRRR— R
RRR— RR
R — R ——R
R — R*
R — R ——R*
R — R*
R — R ——R
Matrix Center-
3D 10- 10-
segment segment
11
———
12
——R
15
——R
Weighted,
Spot*
13
1
Lens
33

WWW.LENSINC.NET
Film
• Setting and confirming film speed
Rotate the Main-Command Dial while pressing the film
speed ° button to set film speed in use.
• Film speed can be set to s and between ISO 6-6400 in 1/3 steps by rotating
the Main-Command Dial.
• When film speed is set to s and DX-coded film is installed, film speed is
automatically set between ISO 25-5000. Film speed can also be set manually
with DX-coded film to have an effect of increased or decreased film sensitivity.
• Film speed can be set between ISO 6-6400 with non-DX-coded film.
• Press the ° button to confirm the film speed set on the camera.
· 5: When film speed is set to s and non-DX-coded film is loaded, a, s
and Err blink in the LCD panel after film is advanced to the first frame. This
warning indication can be changed to appear when the power switch is turned
on (page 71).
• Mid-roll rewind
To rewind film at mid-roll, press the two film rewind
buttons „ simultaneously for approx. 1 sec.
• o–– blinks in the LCD panel during film rewind and the frame counter counts
backwards until rewind is complete.
• Film is completely rewound when the frame counter shows blinking “E”. (E
appears without blinking when the exposure meter is off.) Open the camera
back and remove the film cartridge.
34
• If film does not start to rewind or film rewind stops at mid-roll
• When battery power is very low, or at low temperatures, film may not start
rewinding or film rewind may stop at mid-roll, and o–– and frame number will
blink in the LCD panel. In this case, turn the power switch off, change
batteries, then turn the power switch on and rewind film again.
• Film advance mode
Rotate the film advance mode selector while pressing
the film advance mode selector lock release to select
film advance mode.
• The following film advance modes are available:
S: Single-frame shooting
Fully depressing the shutter release button takes one picture and
automatically advances the film by one frame.
C: Continuous shooting
Shots are taken continuously at the rate of up to approx. 4.5 fps as long
as you keep the shutter release button fully depressed.
Cs: Continuous silent-low-speed shooting
Shots are taken continuously at the rate of up to approx. 3 fps as long as
you keep the shutter release button fully depressed. Film rewind speed
also slows down and there is little rewind noise.
Film advance speed is tested using camera settings of focus mode C, exposure
mode ¢, shutter speed 1/250 sec. or faster, aperture other than maximum, at
normal temperature of 20°C (68°F), with AA-type alkaline-manganese batteries, for
the first to 36th frames of a film.
• When the film advance mode selector is set to Z, multiple exposure can be
performed (page 60). Also, when it is set to V, self-timer operation can be
performed (page 67).
• When the batteries are exhausted, film advance speed slows down since film
advance automatically switches to start after the mirror is all the way down.
(Normally, film advance starts immediately when the mirror starts to go down.)
In this case, battery change is recommended.
Film
35
 Loading...