

Page 1

À 3»j^í J J>.ji
Page 2

Page 3
www.orphancameras.com
Page 4

TABLE OF CONTENTS
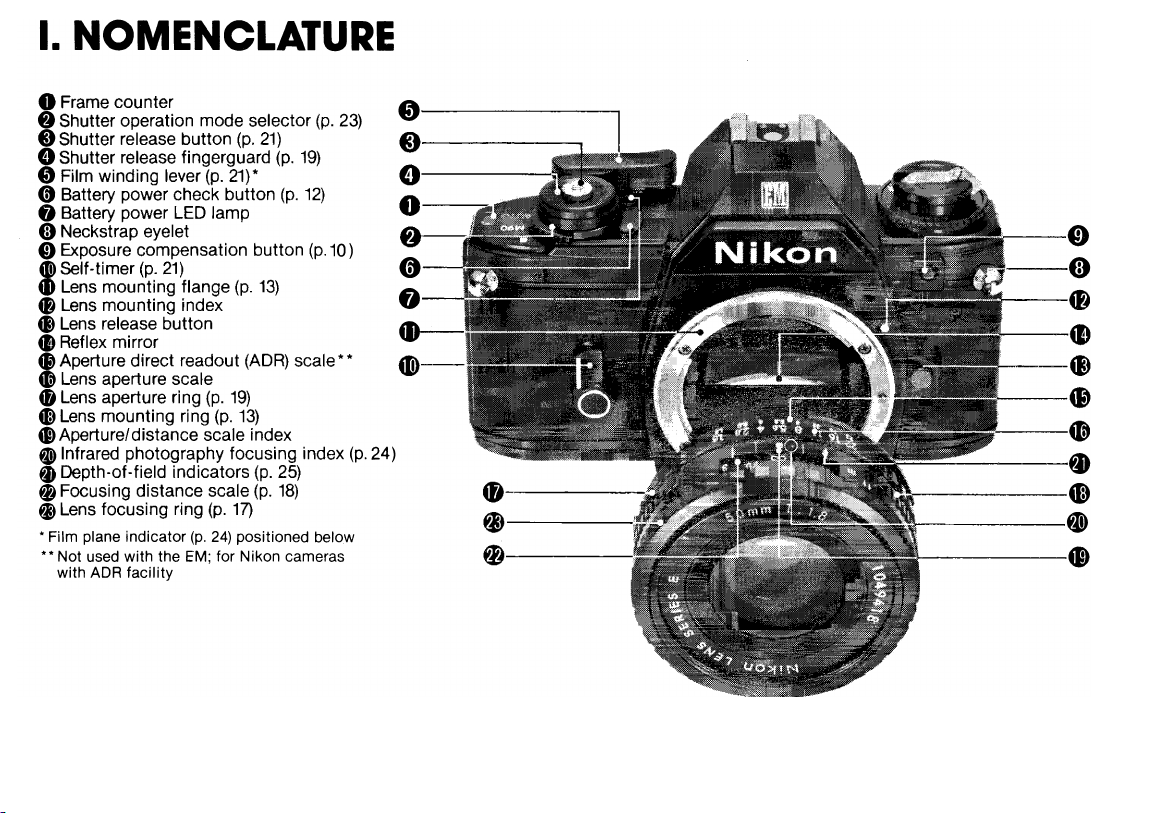
I. NOMENCLATURE
II. BASIC OPERATION............................................................4-9
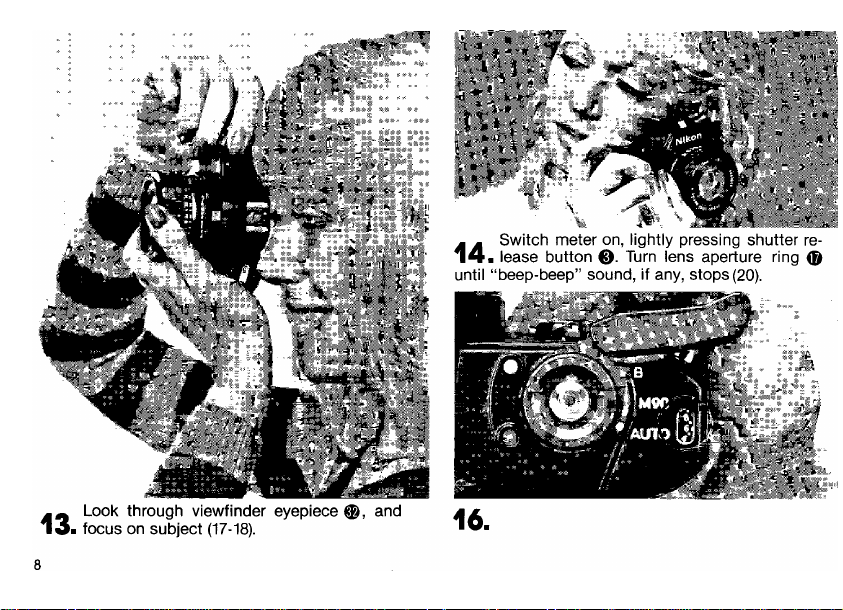
III. HOW TO HOLD THE CAMERA
IV. SETTING UP THE CAMERA BODY AND THE LENS
A. Install the Batteries
B. Mount the Lens...............................................................13
V. PREPARING TO SHOOT AND ACTUAL SHOOTING
A. Load the Film.......................................................... 14—15
B. Set ASA............................................................................16
C. Focus
D. Determine Exposure...............................................19—20
E. Shoot
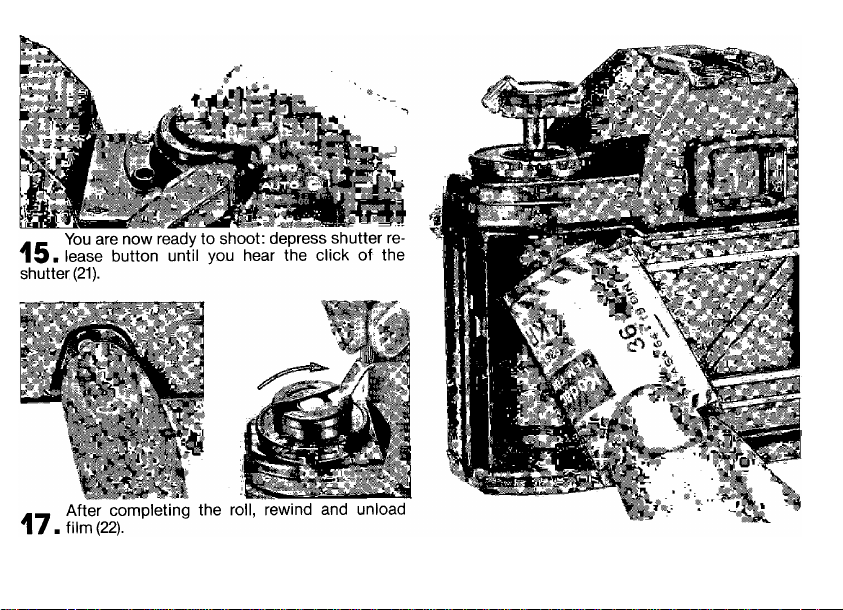
F. Unioad the Film...............................................................22
VI. TECHNICAL DETAILS AND OTHER INFORMATION
A. Exposure Measurement.................................................23
B. Shutter Operation Mode Selection
C. Film Plane Indicator
D. Infrared Photography
E. Depth of Field..................................................................25
VII. SPECIAL ACCESSORIES FOR THE NIKON EM
A. Motorized Shooting with the
Nikon MD-E Motor Drive.........................................26—27
B. Flash Photography with the
Nikon SB-E Speedlight Unit...........................................28
VIII. OTHER EM ACCESSORIES AND USABLE LENSES
A. Other Accessories
B. Nikon and Nikkor Lenses for the Nikon EM
IX. TIPS ON CAMERA CARE
X. SPECIFICATIONS..............................................................32-33
..............................................................
...........................................
.................................................
.........
...............................................................17—18
...............................................................................
.......................................................
.....................................................
..........................................................
......................................................
...............................
www.orphancameras.com
Page No.
11 — 12
.................
3, 34
10
21
23
24
24
29
30
31
II. BASIC OPERATION
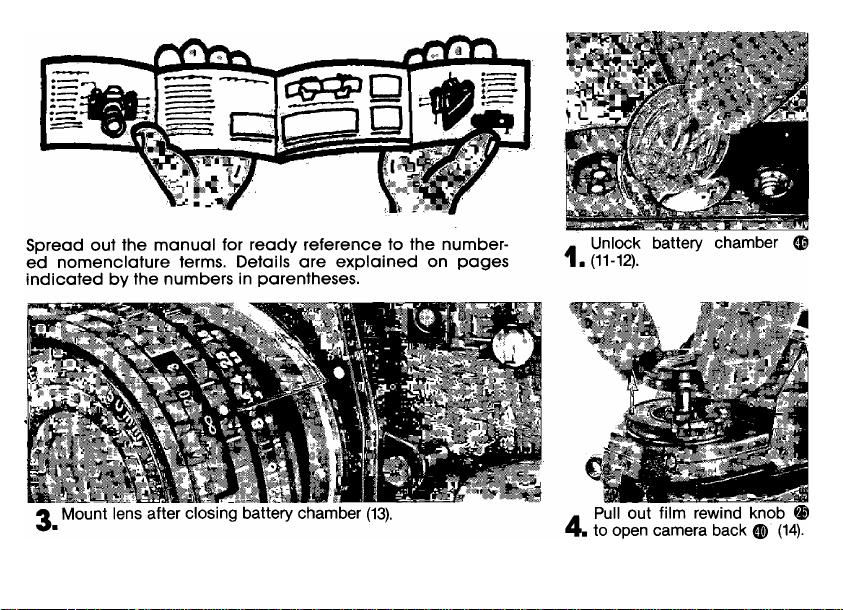
This section provides a concise sum
mary of all the other sections of this
manual. After you have thoroughly
read the rest of the manual, use this
section as a quick reference source.
Insert two batteries into battery clip.
2.
Page 5
www.orphancameras.com
Page 6
Page 7
www.orphancameras.com
Page 8
Advance filnn to the next frame, (p. 21).
www.orphancameras.com
Page 9
www.orphancameras.com
Page 10
» m ^ ■ ■ ■ Ш Ш ¡Ш Ш
III. HOWTO нош П4Е CAMERA
. .. * i; ' ttv
To take good pictures, yoxir
should first 1ШЗГП how to}
handle "your :came|a pr^
perly. Hold fie cbmei^
with both hands, asishowm
In the picture^ cushionirigi
it in the palr^ of your ’l44
hand. For added support,!
prop yp.ur teftliand-elbci^!
against your body. Before
loading the camera wtttf,
film, practice^ 1;П front o| d ^
-mirror Until you have mas;
tered all the controls. ,,
■V '
Page 11
IV. SETTING UP THE CAMERA BODY AND THE LENS
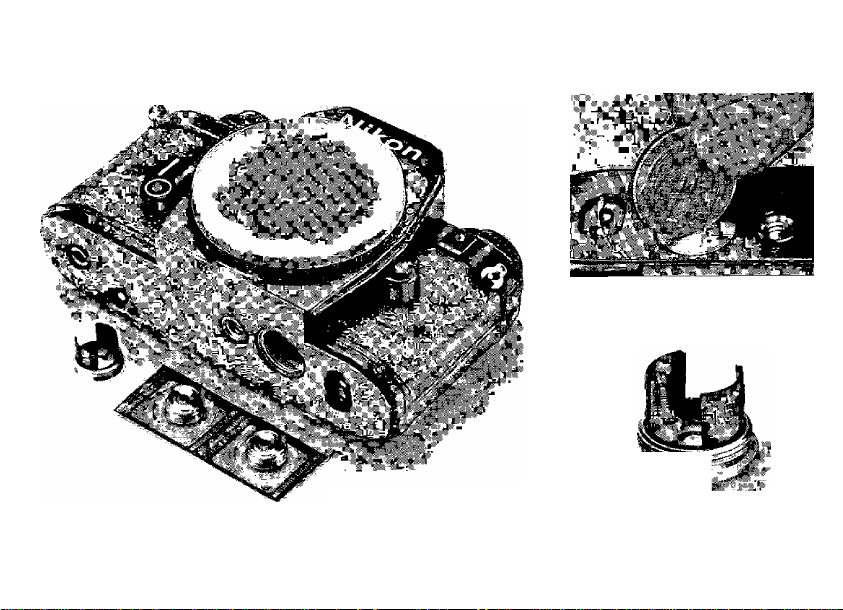
A. Install the Batteries
_ Unlock the battery chamber
j, lid ® with a coin.
II,
Proper batteries: Two 1.5V
silver-oxide type; a pair
comes with your camera.
www.orphancameras.com
I ■■ I
0^ Remove the battery clip
2a which is integral with the lid.
11
Page 12

www.orphancameras.com
Page 13

www.orphancameras.com
13
Page 14

V. PREPARING TO SHOOT AND ACTUAL SHOOTING
A. Load the Film
Proper film: Any commercially
available, color or black-andwhite, 35mm film negative
(prints) or transparency
(slides) in cassettes of 12, 20,
24 or 36 exposures.
14
j. Open the camera back by
j ■ pulling up the film rewind
knob
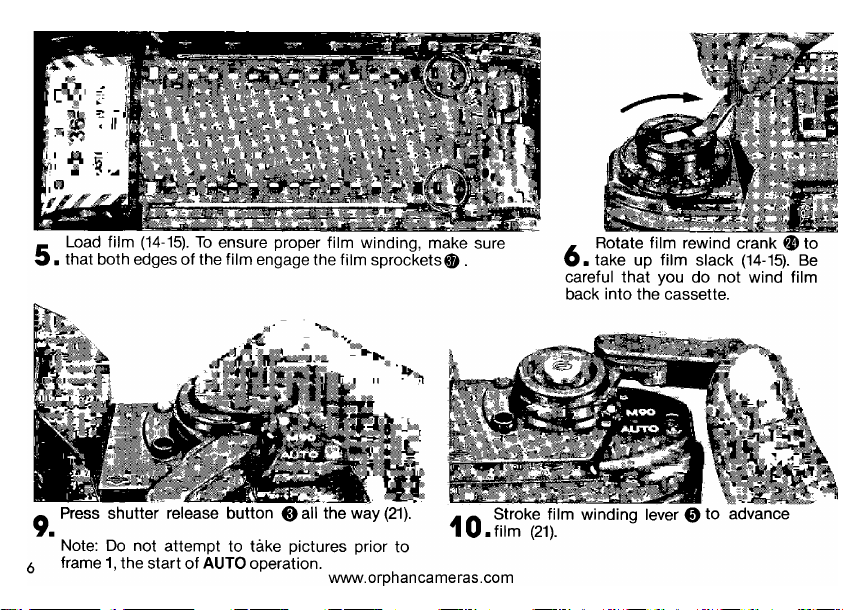
_ After closing the camera
9- back, press the shutter re
lease button 0
www.orphancameras.com
^ Place the cassette in the film
2. cassette chamber®.
To take up film slack, turn the film
6
■ rewind crank ® in the direction of
the engraved arrow, until you feel a slight
resistance. Be careful not to wind the film
back into the cassette.
Page 15

www.orphancameras.com
Page 16

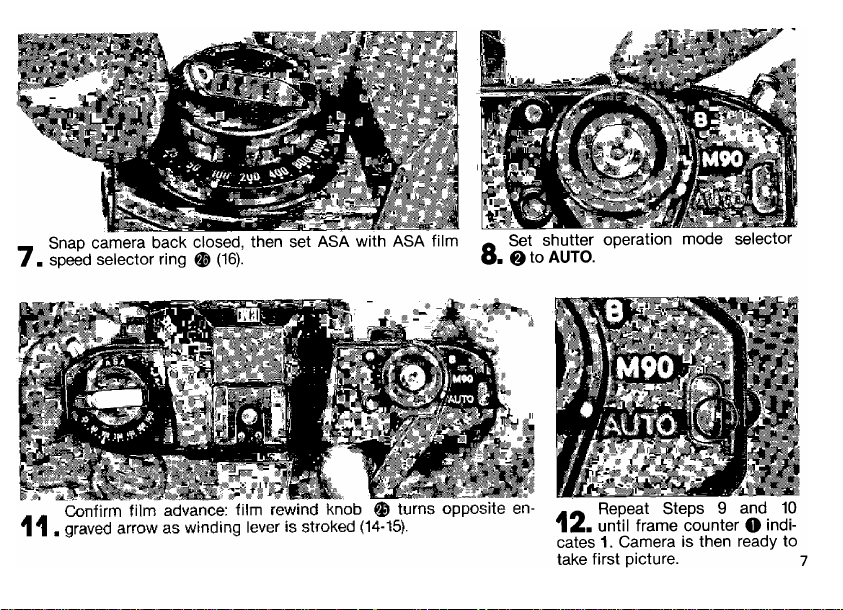
B. Set ASA
- Pull up the ASA film speed
j ■ selector ring
^ Turn it until the ASA film
2a speed setting index ® is
aligned with your film’s ASA
rating.
QA
Q. What is ASA?
A. ASA is a number assigned to your film by the Ameri
can Standards Association. This number indicates the re
lative sensitivity of your film to light. Your camera must
have this information to be able to give your film the
proper exposure.
16
www.orphancameras.com
Note: Don’t forget to reset ASA
when you use film with different
ASA ratings; otherwise, the film
will not be correctly exposed.
QA
Q. What should I do to remember the ASA rating of the
film loaded In the camera?
A. As a reminder, Insert the film carton tab which indi
cates the ASA rating, into the camera back’s memo'
holder®.
Page 17

www.orphancameras.com
м
Page 18

■Ч;:ч.Т
www.orphancameras.com
Page 19

D. Determine Exposure
_ Set the shutter operation
1 ■ mode selector ©to AUTO.
i
2m Select an aperture by turning the lens aperture ring ©. ,
^ Press the shutter release button ® halfway (i.e., cushion your
3- finger with the shutter release fingerguard ©) to switch the
camera’s meter on. The shutter speed indicated by the needle in the
viewfinder will depend on both the selected aperture and scene
brightness.
Note: The meter remains switched on for a brief period even after your finger is
lifted off the shutter release button. 19
www.orphancameras.com
Page 20

Exposure warning signal: Should a “beep-beep” sound be emitted, note the position of the needle in the
shutter speed scale. If it swings past 1/1000sec. and stays within the red zone, overexposure will result. In
this case, reset lens aperture until the sound stops or the needle “drops” from the red zone; despite the
sound, correct exposure is possible. If the needle is around 1/30sec. or below, the sound merely warns
you that camera shake may affect image sharpness because of the slow shutter speed. You either read
just aperture until the sound stops, or, if the needles is below 1/30sec., use a tripod to prevent picture
blur. The meter remains switched on for a brief period even after your finger is lifted off the shutter
release button.
Notes: 1. At approximately 1/1000sec. or 1/30sec., a shrill sound may be emitted; it becomes regular when the
needle goes beyond these points.
2. It is possible you won’t hear the warning sound in noisy shooting situations.
Overexposed (Above 1/1000 sec.)
Q. What shutter speed is best to use?
QA
20
A. The shutter speed shouid be fast enough to pre
vent camera shake, especialiy in hand-held shoot
ing. In dim iight, you may not be able to get a high
speed. As a ruie of thumb, use a tripod if the shutter
speed is siower than a number equal to the focal
length of the lens. For example, with a 50mm lens,
Tripod recommended to prevent Correctly exposed
camera shake (Below 1/30 sec.)
www.orphancameras.com
don’t take hand-held pictures at shutter speeds
slower than 1/50sec., and with a 135mm, try to use
a minimum speed of 1/135sec. Remember, this
presumes your subject is not moving. If it does,
you’ii need faster speeds—in which case you just
open the iens aperture.
Page 21

E. Shoot
- Depress the shutter release
j ■ button © with steady, even
pressure.
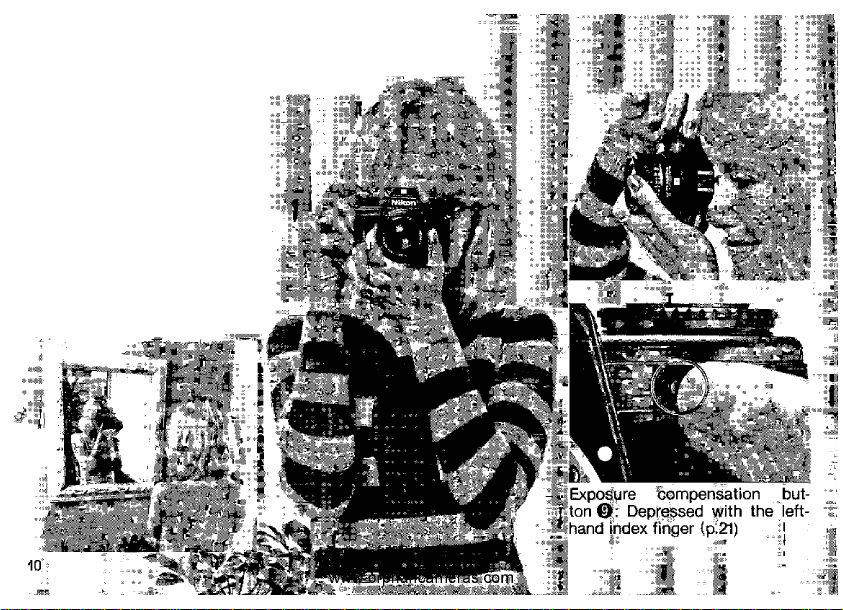
Q. When is the exposure com
pensation button © used?
A. To obtain a correct exposure
lit or backlit. In this case, keep the button depressed as you
depress the shutter release button © the shutter speed
needle “drops” by about 2 steps (i.e., from 1/250 sec. to
approx. 1/60 sec.).
when the main subject is side-
^ Advance the film to the next
2. frame by stroking the film
winding lever
0
www.orphancameras.com
You can move the grooved film
winding lever with your right-
.
that the timer is designed not to cock accidentally and
requires slight pressure when you start to stroke it.
After use, gently nudge the lever back into place since
it always stops just before the starting position.
hand thumb in one sweep or a
series of short strokes.
Self-timer: This provides an ap
prox. 10-sec. exposure delay.
Slide the lever away from the
lens as far as it will go, cover the
finder eyepiece 0 with the palm
of your hand to prevent stray
light from entering, then depress
the shutter release button. Note
21
Page 22

www.orphancameras.com
Page 23

www.orphancameras.com
Page 24

C. Film Plane Indicator
This is mainly used in close-up photography to
determine the exact subject-to-film plane distance.
It is visible when the film winding lever 0 is pulled
out, and positioned precisely on the film plane—
46.5mm from the front surface of the lens mount
ing flange ®.
www.orphancameras.com
D. Infrared Photography
Both Nikon Series E and Nikkor lenses have an
infrared photography focusing index ® for shoot
ing with black-and-white infrared film. The image
is first focused through the viewfinder; then the
lens focusing ring ® is turned until the point
focused is aligned with the infrared index.
Page 25

Lens set at f/8
www.orphancameras.com
Page 26

26
www.orphancameras.com
Page 27

www.orphancameras.com
27
Page 28

28
www.orphancameras.com
Page 29

VIII. OTHER EM ACCESSORIES AND USABLE LENSES Other Accessories
Lens Hoods
The HR-4 and HR-5
Lens Hoods perfectly
complement the Nikon
Series E lenses. They
prevent extraneous light
from striking the lens
surface and causing
flare and ghost in the
.
.
...........
_■
Camera Case
The CF-11 Camera Case is recommended for stor
ing the Nikon EM with a Nikon Series E 50mm
f/1.8 mounted. It has an attractive, durable finish.
Eyepiece Adapter
Simply slide this adapter
onto the EM’S rectangular
viewfinder eyepiece ®, and
you can use various Nikon
such as eyepiece correction lenses, rubber eyecup,
etc., to meet the requirements of various shooting
situations.
viewfinder accessories,
www.orphancameras.com
Compartment Case
The FB-E Compartment Case has
been specially designed to accommo
date the Nikon EM with a Nikon
Series E 50mm f/1.8 lens attached
and other EM accessories such as
Nikon Speedlight SB-E, Nikon Motor
Drive MD-E, Nikon Series E 35mm
f/2.5, 100mm f/2.8 and sundry items.
picture. Also useful for
protecting the lens.
29
Page 30

Nikon and Nikkor Lenses for the Nikon EM
Nikon Series E Lenses
Nikon Series E 50 mm f/1.8
Nikon Series E 35mm f/2.5
Nikon Series E 100mm f/2.8
Nikkor Lenses
(Wideangle)
HI Nikkor 13mm f/5.6
H Nikkor 15mm f/5.6
H Nikkor 18mm f/4
H Nikkor 20mm f/3.5
H Nikkor 24mm f/2
H Nikkor 24mm f/2.8
H Nikkor 28mm f/2
H Nikkor 28mm f/2.8
H Nikkor 28mm f/3.5
H Nikkor 35mm f/1.4
H Nikkor 35mm f/2
H Nikkor 35mm f/2.8
(Normal)
H Nikkor 50mm f/1.2
H Nikkor 50mm f/1.4
H Nikkor 50mm f/1.8
H Nikkor 50mm f/2
(Telephoto)
H Nikkor 85mm f/2
H Nikkor 105mm f/2.5
H Nikkor 135mm f/2
H Nikkor 135mm f/2.8
H Nikkor 135mm f/3.5
H Nikkor 180mm f/2.8
H Nikkor 200mm f/4
0] Nikkor 300mm f/2.8 IF-ED
H Nikkor 300mm f/4,5 IF-ED
30
H Nikkor 300mm f/4.5
H Nikkor 400mm f/3.5 IF-ED
H Nikkor 400mm f/5.6 IF-ED
H NIkkor 400mm f/5.6 ED
H Nikkor 600mm f/5.6 IF-ED
H NIkkor 800mm f/8 IF-ED
H Nikkor 1200mm f/11 IF-ED
(Reflex)
Reflex-Nikkor 500mm f/8
Reflex-Nikkor 1000mm f/11
Reflex-Nikkor 2000mm f/11
(Zoom)
H Zoom-Nikkor 28-45mm f/4.5
H Zoom-Nikkor 35-70mm f/3.5
B Zoom-Nikkor 43-86mm f/3.5
B Zoom-Nikkor 80-200mm f/4.5
B Zoom-Nikkor 50-300mm f/4.5 ED
B Zoom-Nikkor 50-300mm f/4.5
(Fisheye)
B Fisheye-Nikkor 6mm f/2.8
B Fisheye-Nikkor 8mm f/2.8
B Fisheye-Nikkor 16mm f/3.5
(Special)
PC-Nikkor 28mm f/4
PC-NIkkor 35mm f/2.8
B Noct-NIkkor 58mm f/1.2
B MIcro-Nikkor 55mm f/3.5
B MIcro-Nikkor 105mm f/4
B Micro-Nikkor 200mm f/4 IF
(Televonverter) '
Nikon Teleconverter TC-14
Nikon Teleconverter TC-200
Nikon Teleconverter TC-300
www.orphancameras.com
Notes:
1) When using PC-NIkkor lenses, it is
important to note that exposure meter
ing must be performed before the lens
is shifted; should metering be perform
ed after shifting, it may result in er
roneous metering indication. First,
note the shutter speed needle’s posi
tion inside the viewfinder before shift
ing the lens. After shifting the lens,
reset the ASA film speed scale m until
the same shutter speed appears Inside
the viewfinder. For details, refer to the
Instruction manual of the lens.
2) Older Nikkor lenses which have
been modified for Al operation and Al
lenses of other than Nikon manu
facture do not provide full perform
ance with the Nikon EM, when used
with the SB-E.
Nor can most Al-modified 55mm f/1.2 and
28mm f/3.5 lenses be mounted on the
Nikon EM; therefore, to prevent damage,
don't attempt it.
3) If you mount the EM on a tripod
with a large head, contact between
the lens barrel and the head may
make it impossible to operate the
lens. In this case, use Nikon’s special
adapter between the camera body
and the tripod head.
Caution: Auto Nikkor lenses and
lenses of other manufacture which do
not have the Al feature must not be
mounted on the EM. Attempts to
mount such lenses will damage the
camera’s Al indexing mechanism.
Page 31

IX. TIPS ON CAMERA CARE
• Don’t force your camera’s con
trols—they are designed to
work with a minimum of pres
sure.
If you drop the camera acci
dentally, take it to a Nikon
authorized dealer or service
center for immediate servicing.
faces periodically with a blowertype brush or lens tissue mois
tened with an approved photo
lens cleaning liquid.
• Store your camera, lenses, ac
cessories in a cool, dry place.
Remove the batteries when the
camera or accessories are not
to be used for an extended
period.
www.orphancameras.com
interior surfaces, especially the
shutter curtains ® and film
pressure plate 0.
Dispose of used batteries
properly—never throw them
into fire. For battery perform
ance by brand, refer to manu
facturer’s literature.
31
Page 32

X. SPECIFICATIONS
Type of camera 35mm single-lens reflex (SLR),
Picture format
Lens mount
Lenses usable
Shutter
Film advance
Viewfinder
32
aperture-priority automatic
35mm (24mm x 36mm film size)
Nikon bayonet type
Nikon Series E 50 mm f/1.8 as
Standard; other Series E lenses;
Al-type Nikkor lenses and others
(p. 30)
Electronically controlled, verticaltravel, metal focal-plane shutter;
stepless speeds from 1 sec. to 1/
1000 sec. when shutter operation
mode selector is set to AUTO;
1/90 sec. mechanical shutter
speed when set to M90;B setting
also provided for long exposures
Film winding lever provided;
completed stroke of 144° simul
taneously advances film, cocks
shutter and operates frame
counter; choice of one contin
uous stroke or series of shorter
strokes
Fixed eyelevel pentaprism fullaperture viewing type with built-
in TTL exposure meter; shutter
speed scale and exposure nee
dle visible inside; ready-light
lights up when SB-E or SB-10
www.orphancameras.com
Speedlight is in use; center of
scale’s bracket indicates 1/90
sec.; finder coverage approx.
92% of picture field; 0.86X mag
nification with 50 mm lens set at
Focusing screen Fixed-type Nikon “K” screen;
Reflex mirror
Self-timer
Exposure
measurement
Metering range EV 2 to EV 18 (i.e., f/2 at 1 sec. to
Exposure signal “Beep-beep” warning sound ac
infinity (°o)
comprises matte fresnel field
with central split-image range
finder spot surrounded by micro
prism ring and 12mm-dia. refer
ence circle which denotes area
of center-weighted metering
Instant-return, non-lockable type
Lever provided can be set for up
to approx. 10-sec. exposure de
lay; setting cancellable before
shutter release button is pressed
TTL center-weighted exposure
metering at full aperture; meter
incorporates one silicon photo
diode (SPD)
f/16 at 1/1000 sec. at ASA 100
and with 50mm f/1.8 lens)
tivated when shutter release but
ton is pressed to fingerguard
position if matching shutter
Page 33

Exposure
comper\sation
Meter power
source
Meter ON/OFF
switch
Battery power
checker
Film speed
range
Frame counter
Film rewind
speed for lens aperture set is
approx. 1/30sec. and below, or
approx. 1/1000sec. and above
Approx. +2EV when exposure
compensation button is kept de
pressed as shutter release button
is pressed
Two 1.5V silver-oxide batteries
(S-76 type)
Meter switched on when shutter
release button is pressed; stays
switched on for several seconds
after finger is lifted off button
LED lamp lights up to indicate
sufficient power availability
when power check button is
pressed
ASA 25^1600
Shows number of frames ex
posed; automatically resets to
“S” when camera back is open
ed; automatic operation starts
from frame i
Manual; film rewind crank rotat
ed after film rewind button is
depressed
Flash
synchronization
Built-in ISO-type hot-shoe; auto
matic flash sync at 1/90 sec.
with SB-E Speedlight Unit which
activates camera’s ready-light
when flash operation is ready;
ready-light “blinks" to signal in
correct ASA/aperture combi
nation; M90 shutter operation
mode selector setting used with
other electronic flash units, pro
viding flash sync at 1/90sec.;
bulb-type units not usable
Motor drive
coupling
Electrical contact and coupler
built-in for operation with MD-E
Motor Drive
Camera back
Swings open when film rewind
knob is pulled up; memo holder
provided
Body finish
Accessories
provided
Black
Camera body cap, triangular
grommets for neckstrap and two
1.5V silver-oxide batteries
Dimensions
Weight
All specifications are subject to change without notice.
135mm(W)x 86mm (H)x 54mm (D)
460g (body only)
www.orphancameras.com
33
Page 34

Film rewind crank (p. 22)
® Film rewind knob
© ASA film speed selector ring (p. 16)
ASA film speed setting index
m ASA film speed scale
® Flash unit hot-shoe (p. 28)
© Hot-shoe contact
^ Ready-light contact for SB-E/SB-10 Speedlight
Viewfinder eyepiece '
Film cassette chamber (p. 14)
t
Film rewind fork
Film guide rails
S
® Shutter curtains
Film sprockets
# Film takeup spool
® Film pressure plate
(5) Camera back
Memo holder (p. 16)
® Motor drive positioning hole (p. 26)
(D Motor drive coupling
Film rewind button (p. 22)
(J) Tripod/motor drive coupling socket
® Battery chamber lid/battery clip (p. 11)
Motor drive electrical contact
www.orphancameras.com
34
 Loading...