

Nikon AF-S NIKKOR 400mm f/2.8G ED VR, 2171 - Zoom-Nikkor Telephoto Lens, AF-S 400mm f/2.8G ED VR, AF-S NIKKOR 400mm f/2.8 ED VR User Manual
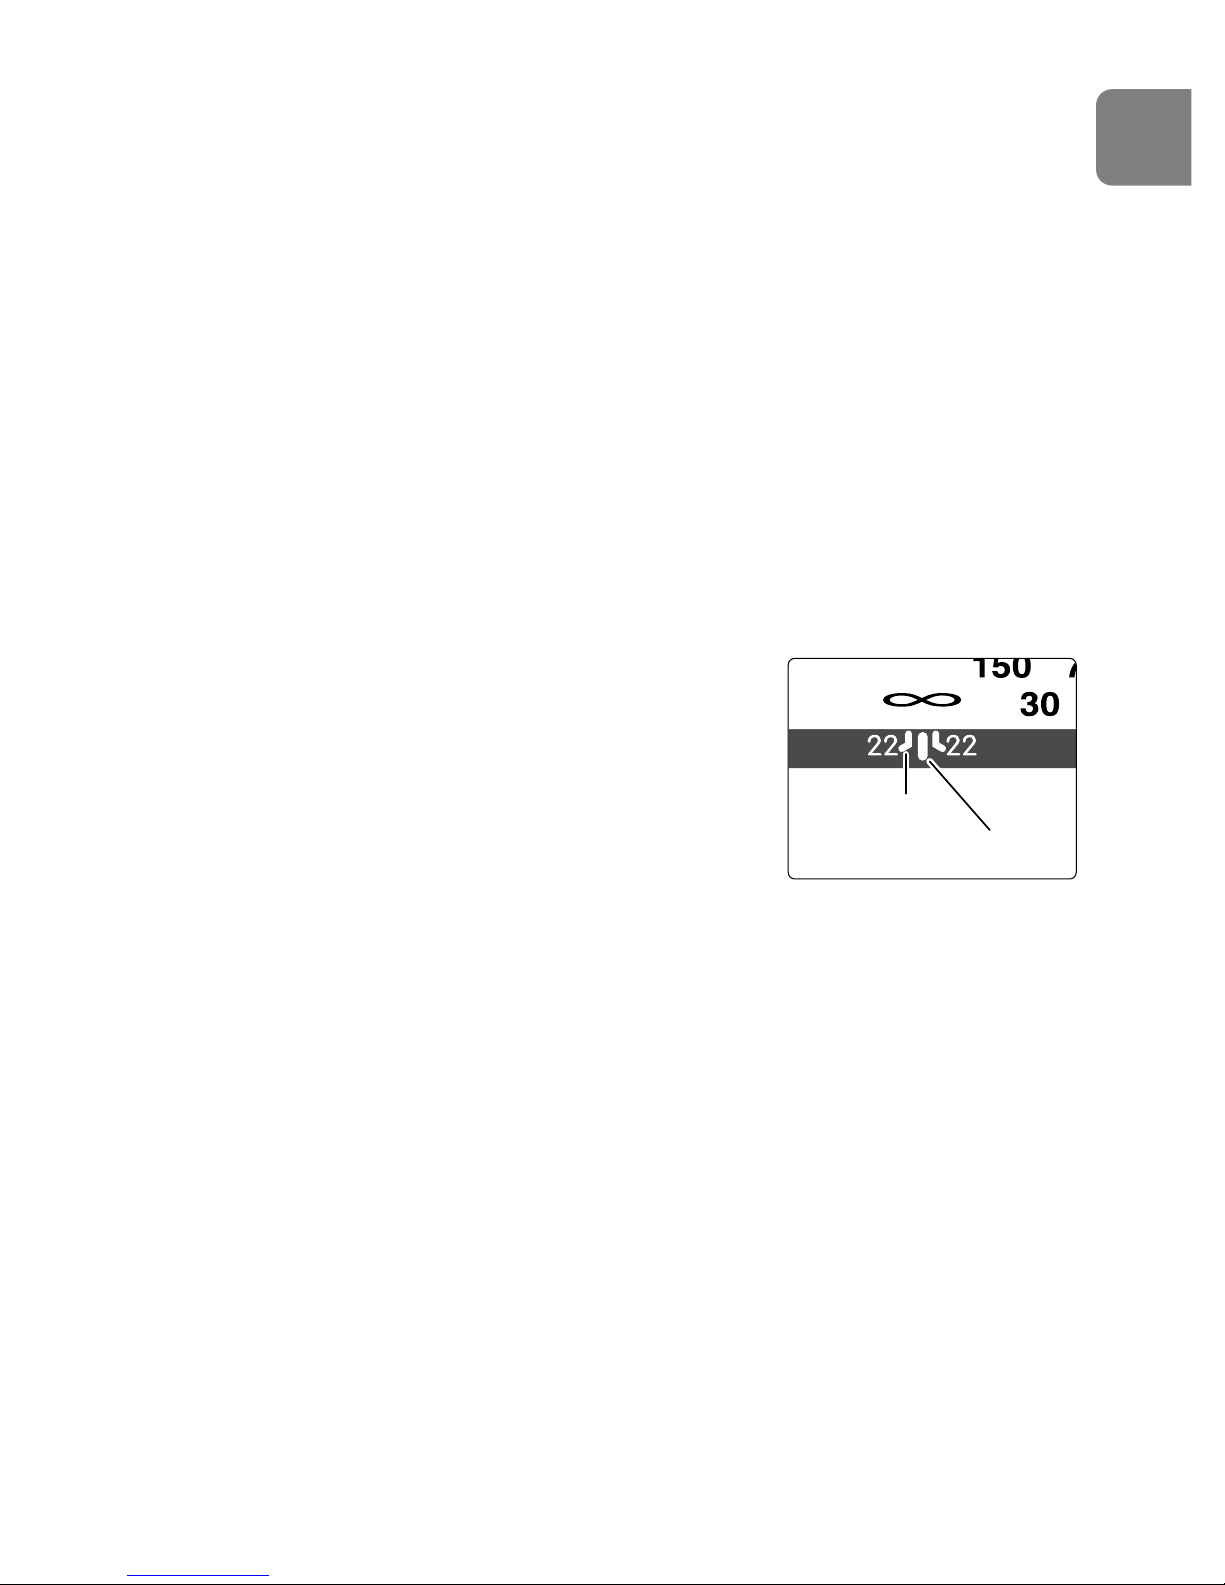
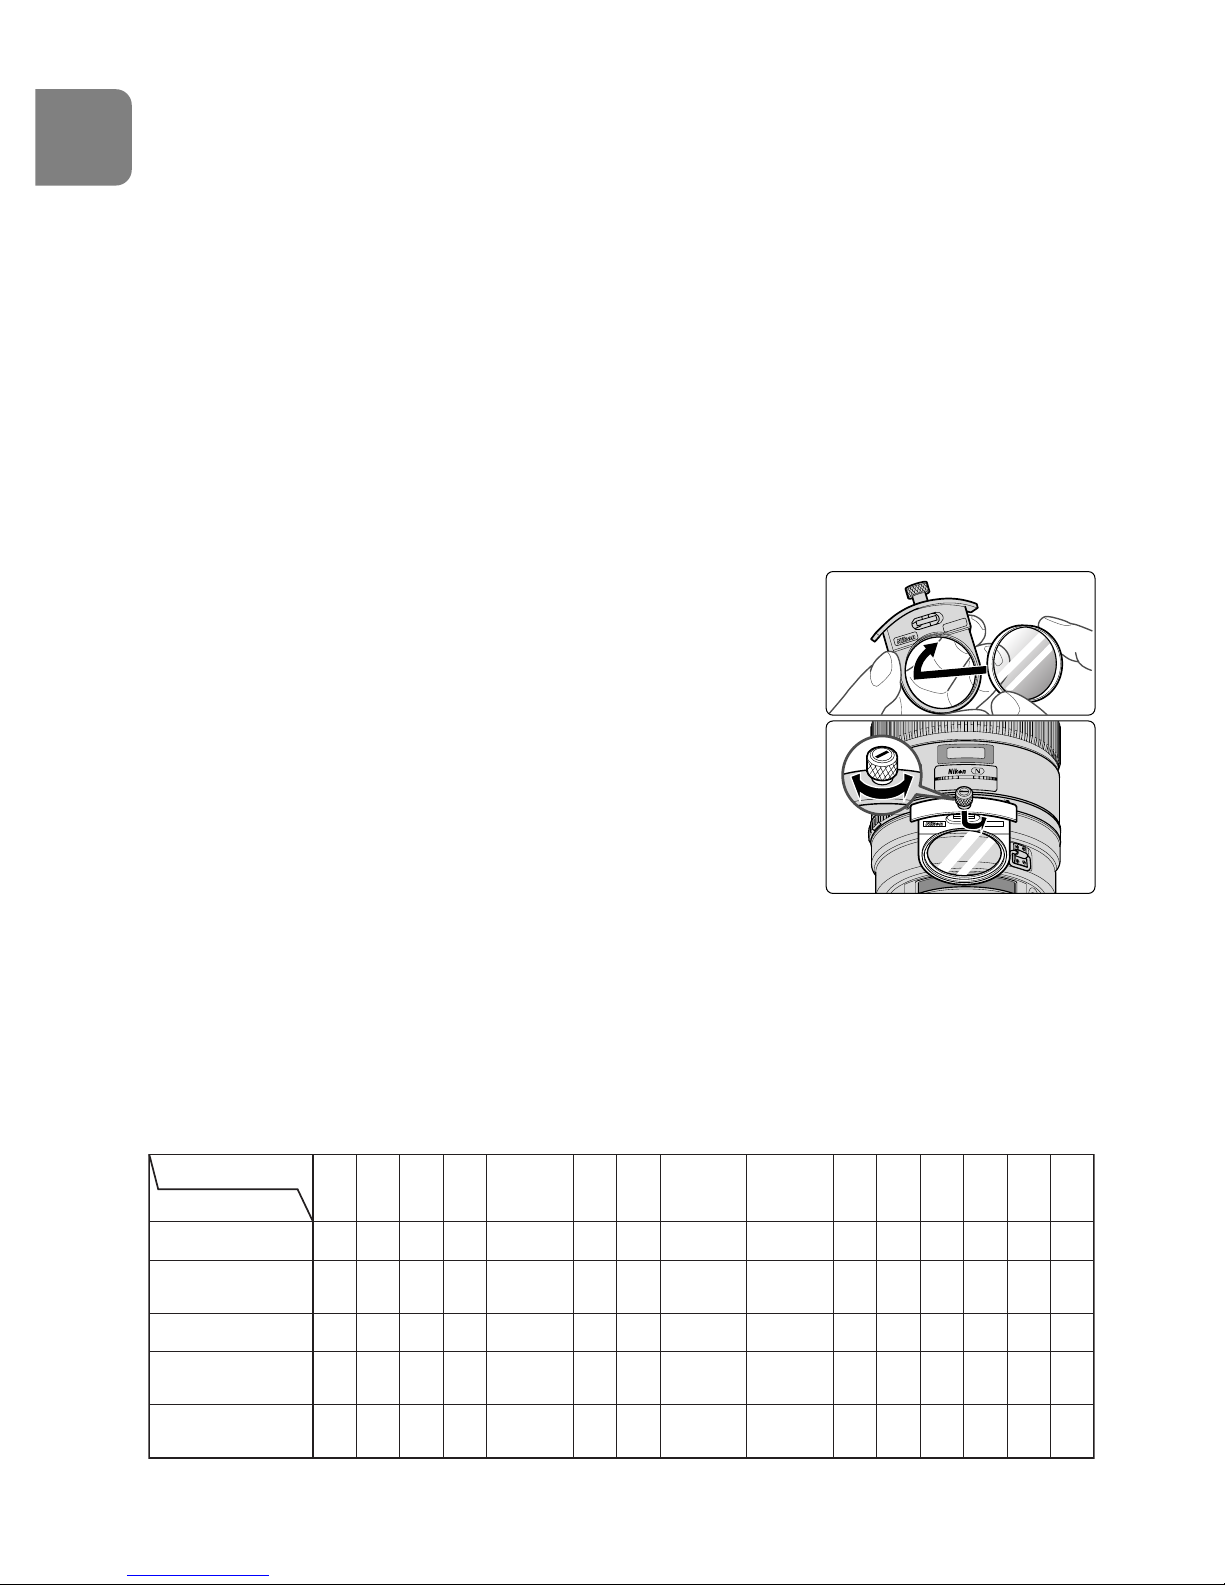
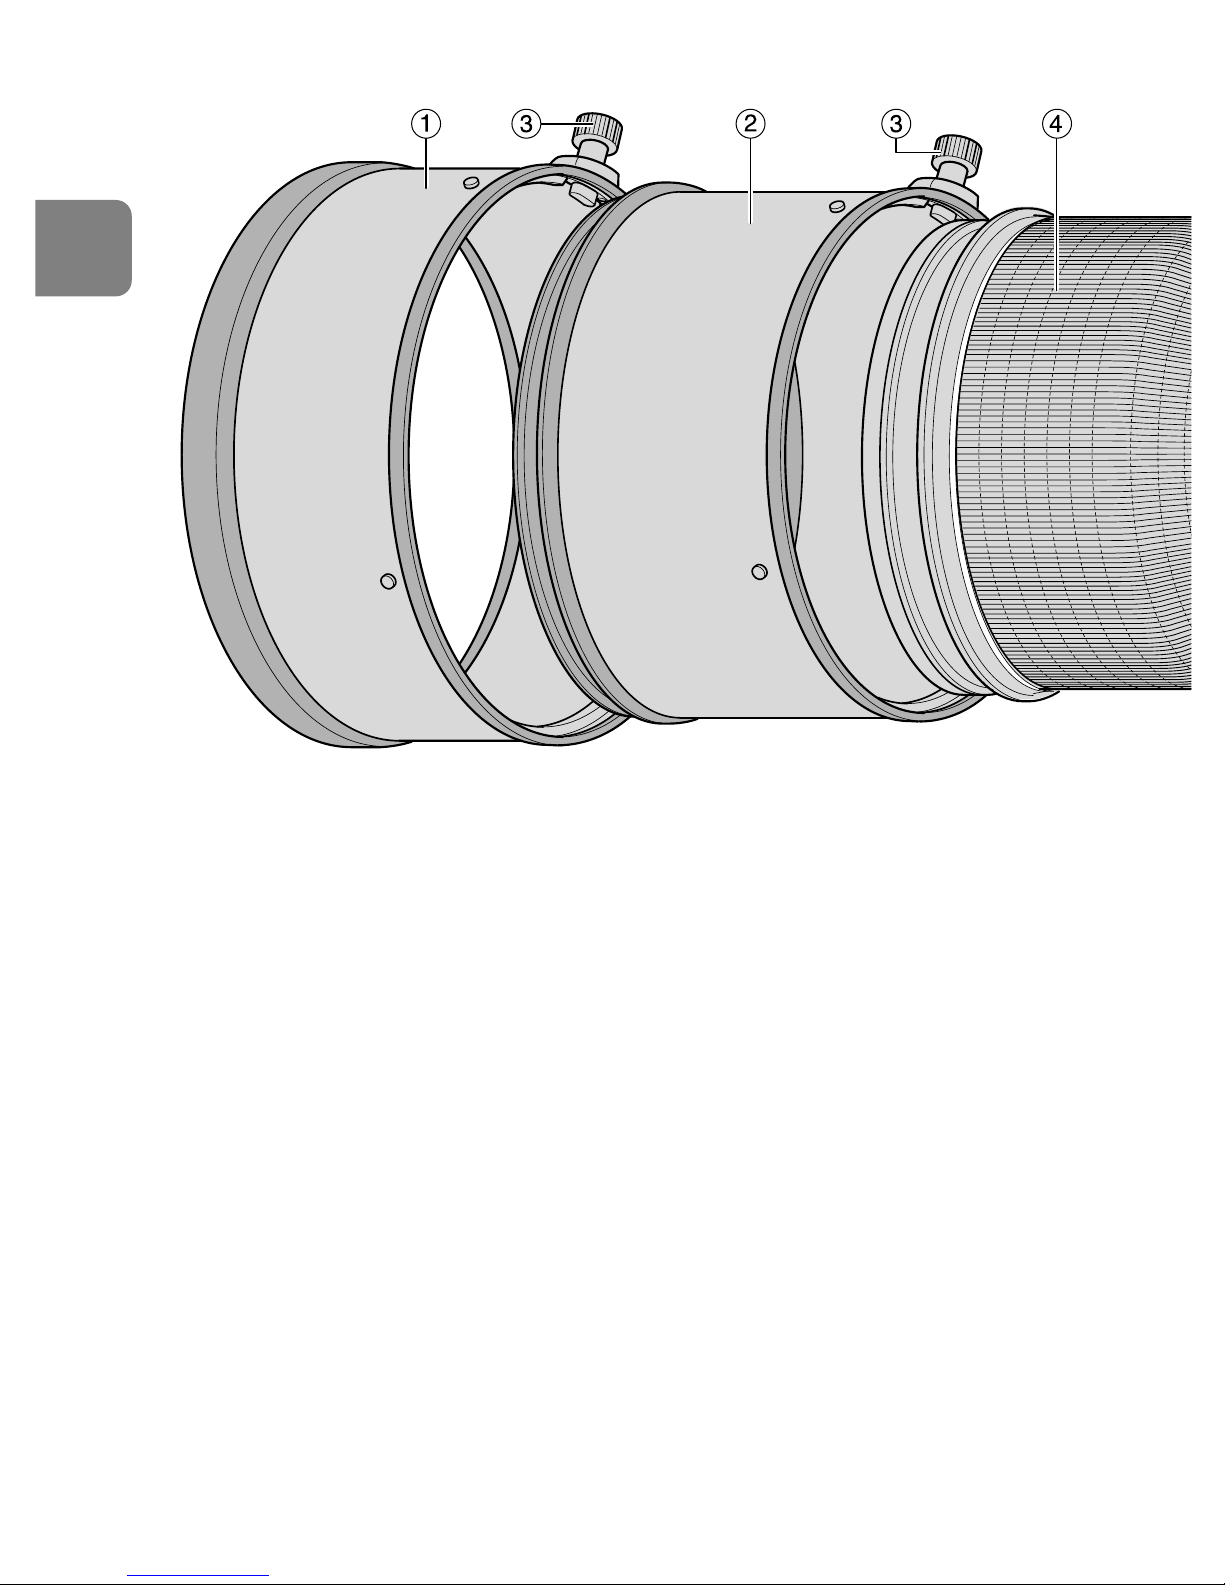
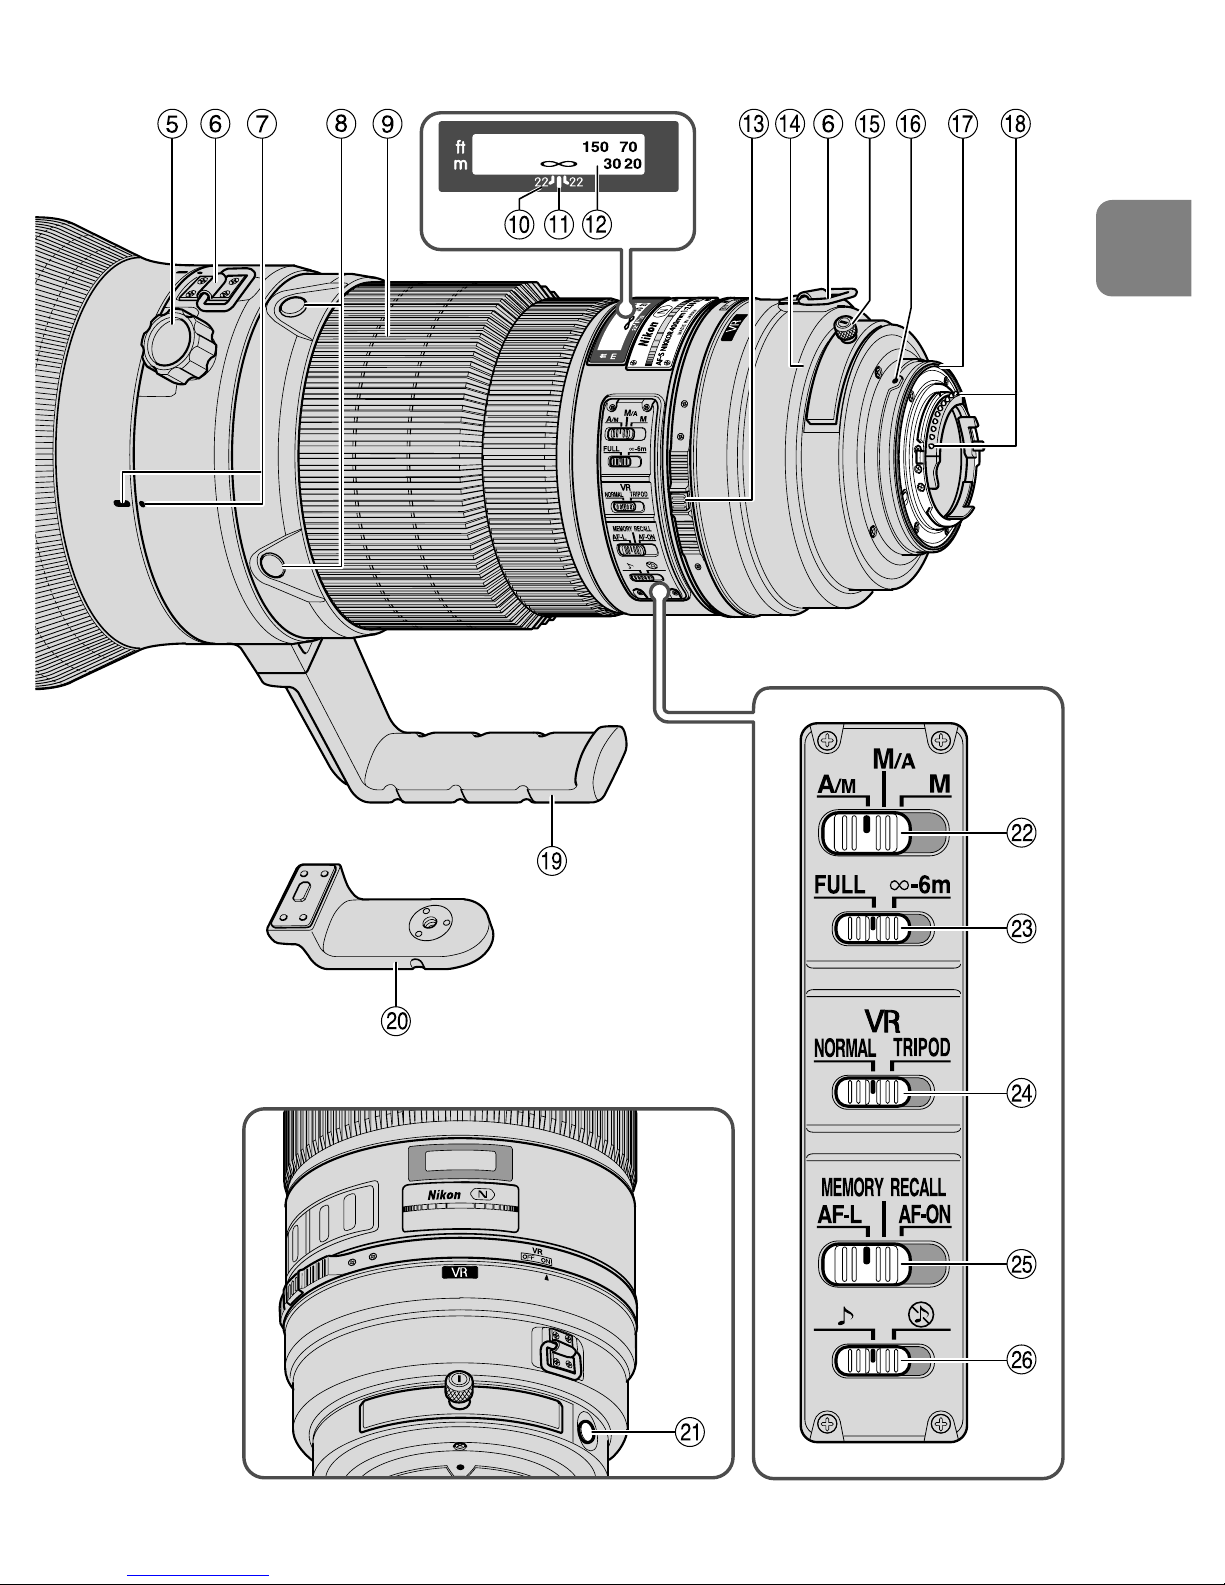
Page 1
使用説明書
(P. 2–15)
User’s Manual
(PP. 16–31)
Benutzerhandbuch
(S. 32–47)
Manuel de l’utilisateur
(P. 48–63)
Manual del Usuario
(PP. 64–79)
Anvädarhandbok
(S. 80–95)
Pyko‚Ó‰ÒÚ‚Ó ÔÓθ˝Ó‚°ÚÂÎfl
(CTP. 96–111)
Gebruikshandleiding
(P. 112–127)
Manuale d’uso
(PP. 128–143)
(P. 144–160)
(P. 161–175)
(P. 176–191)
AF-S NIKKOR
400mm f/2.8
ED VR
Nano Crystal Coat
J
p
En
De
Fr
Es
Se
Ru
Nl
It
Ck
Ch
Kr
Page 2
2
Jp
安全上のご注意
ご使用の前に「安全上のご注意」をよくお読みのうえ、正しくお使いください。この「安
全上のご注意」は製品を安全に正しく使用していただき、あなたや他の人々への危害や財
産への損害を未然に防止するために、重要な内容を記載しています。お読みになった後は、
お使いになる方がいつでも見られる所に必ず保管してください。
表示について
表示と意味は次のようになっています。
この表示を無視して、誤った取り扱いをすると、人が死亡または重
傷を負う可能性が想定される内容を示しています。
この表示を無視して、誤った取り扱いをすると、人が傷害を負う可
能性が想定される内容および物的損害の発生が想定される内容を示
しています。
お守りいただく内容の種類を、次の絵表示で区分し、説明しています。
絵表示の例
△記号は、注意(警告を含む)を促す内容を告げるものです。図の中や近くに具
体的な注意内容(左図の場合は感電注意)が描かれています。
記号は、禁止(してはいけないこと)の行為を告げるものです。図の中や近く
に具体的な禁止内容(左図の場合は分解禁止)が描かれています。
●記号は、行為を強制すること(必ずすること)を告げるものです。図の中や近
くに具体的な強制内容(左図の場合は電池を取り出す)が描かれています。
接触禁止
すぐに修理依頼を
分解禁止
分解したり修理・改造をしないこと
感電したり、異常動作をしてケガの原因となります。
落下などによって破損し、内部が露出したときは、露出部に手を触
れないこと
感電したり、破損部でケガをする原因となります。
カメラの電池を抜いて、販売店またはニコンサービス機関に修理を依頼して
ください。
Page 3
3
Jp
熱くなる、煙が出る、こげ臭いなどの異常時は、速やかにカメラの
電池を取り出すこと
そのまま使用すると火災、やけどの原因となります。電池を取り出す際、や
けどに充分注意してください。電池を抜いて、販売店またはニコンサービス
機関に修理を依頼してください。
水につけたり水をかけたり、雨にぬらしたりしないこと
発火したり感電の原因となります。
引火・爆発のおそれのある場所では使用しないこと
プロパンガス・ガソリンなど引火性ガスや粉塵の発生する場所で使用する
と、爆発や火災の原因となります。
レンズまたはカメラで直接太陽や強い光を見ないこと
失明や視力障害の原因となります。
ぬれた手でさわらないこと
感電の原因になることがあります。
製品は幼児の手の届かないところに置くこと
ケガの原因になることがあります。
逆光撮影では、太陽を画角から充分にずらすこと
太陽光がカメラ内部で焦点を結び、火災の原因になることがあります。画角
から太陽をわずかに外しても火災の原因になることがあります。
使用しないときは、レンズにキャップをつけるか太陽光のあたらな
い所に保管すること
太陽光が焦点を結び、火災の原因になることがあります。
三脚にカメラやレンズを取り付けたまま移動しないこと
転倒したりぶつけたりしてケガの原因になることがあります。
窓を閉め切った自動車の中や直射日光が当たる場所など、異常に温
度が高くなる場所に放置しないこと
内部の部品に悪い影響を与え、火災の原因となることがあります。
水かけ禁止
使用禁止
見ないこと
感電注意
移動禁止
放置禁止
保管注意
保管注意
電池を取る
すぐに修理依頼を
放置禁止
Page 4
4
Jp
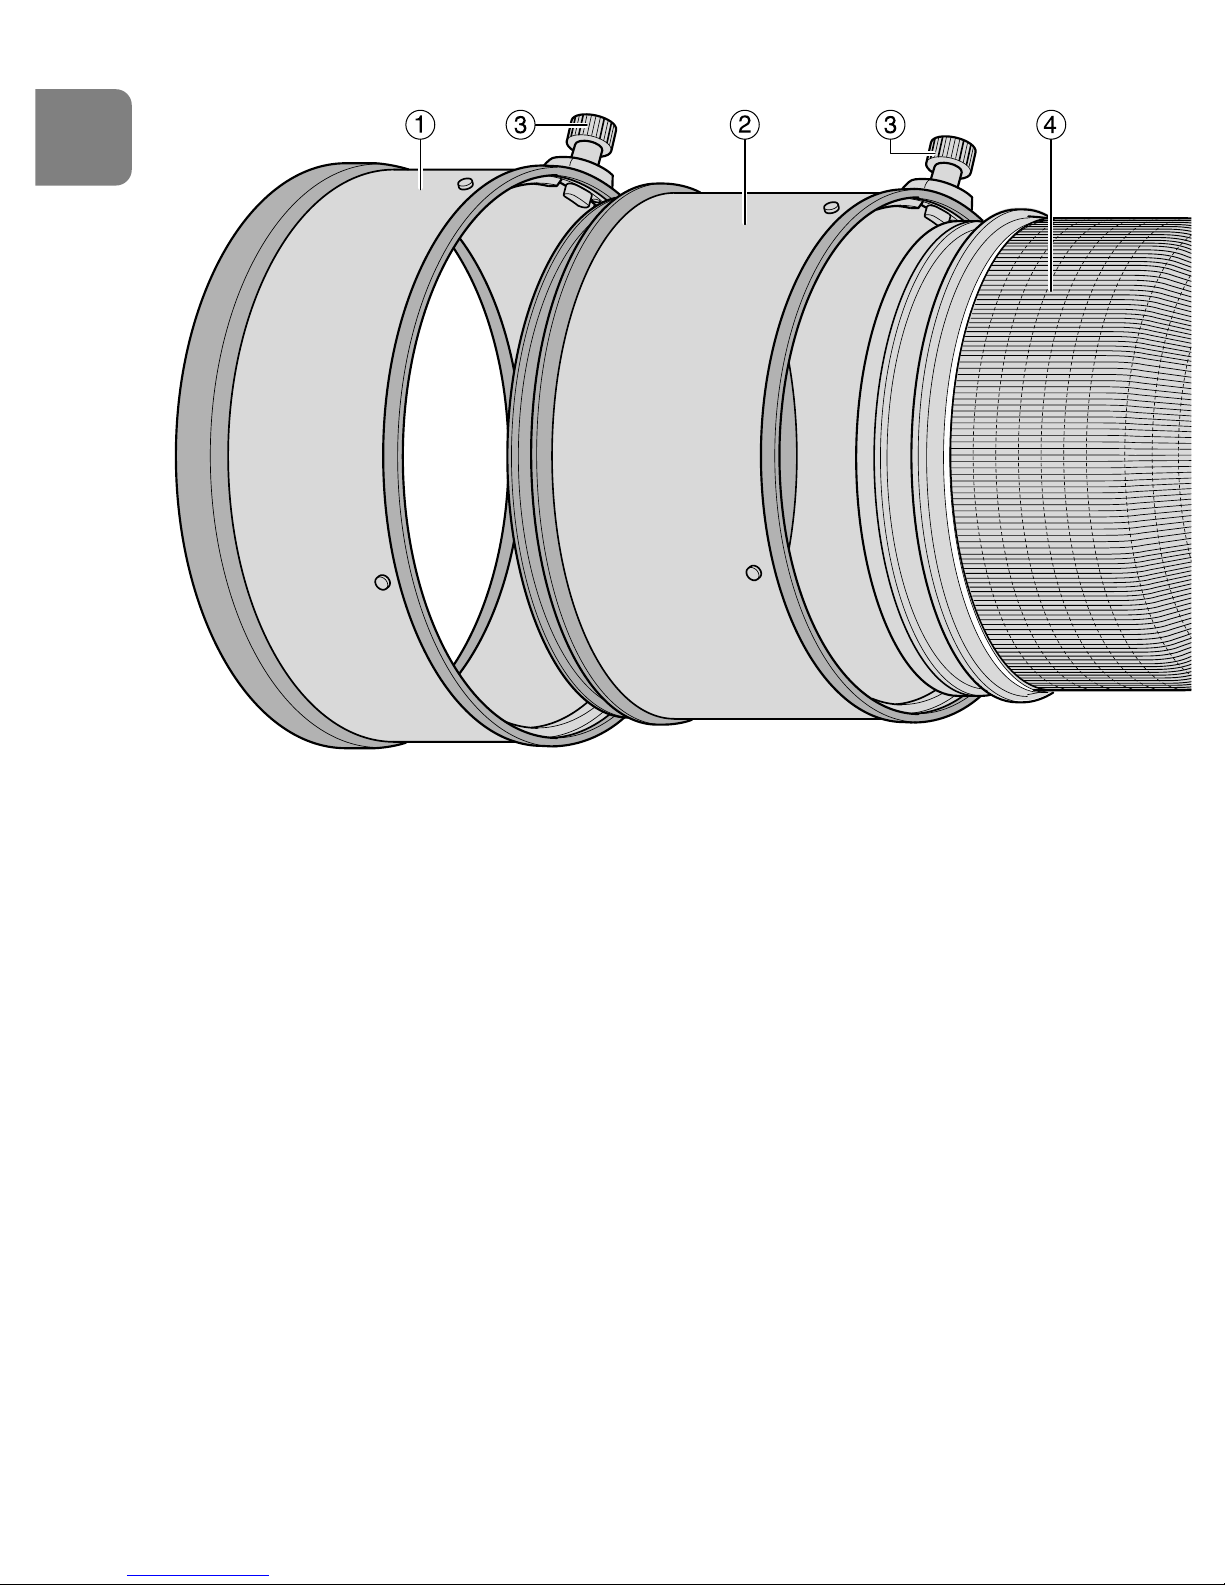
1 かぶせフード HK-33-2(P.12)
2 かぶせフード HK-33-1(P.12)
3 クランプノブ(P.12)
4 すべり止めゴム
5 三脚座止めネジ(P.11)
6 吊り金具
7 レンズ回転位置指標
8 フォーカス作動ボタン(P.9)
(フォーカスロック/メモリーリコール/
オートフォーカス作動)
9 フォーカスリング(P.8)
! 被写界深度目盛(P.11)
" 距離目盛基準線(P.11)
# 距離目盛
$ 手ブレ補正リングスイッチ(P.10)
% 組み込み式フィルターホルダー(P.12)
& 組み込み式フィルターホルダーつまみ
(P.12)
( レンズ着脱指標
) レンズマウントゴムリング(P.8)
~ CPU信号接点(P.8)
+ 組み込み式回転三脚座(P.11)
, 一脚座(交換用)(P.11)
- メモリーセットボタン(P.10)
.
フォーカスモード切り換えスイッチ
(P.8)
/
フォーカス制限切り換えスイッチ
(P.9)
: 手ブレ補正モード切り換えスイッチ
(P.10)
; フォーカス作動設定スイッチ(P.9)
(フォーカスロック/メモリーリコール/
オートフォーカス作動)
< 電子音スイッチ(P.9)
1.各部の名称
Page 5
5
Jp
Page 6

6
Jp
2.使用できる機能
カメラによって、使用できる機能には制限・制約がありますので、カメラの使用説明書
でもご確認ください。
※1:PにはAUTO(オート)モード、イメージプログラムモードを含みます。
※2:Mモードの設定はありません。
※3:フォーカス作動設定スイッチがAF-ONの場合、オートフォーカス動作させるには
シャッターボタン半押し状態で、フォーカス作動ボタンを押します。
※4:シャッターボタン半押し状態で、メモリーセットボタンやフォーカス作動ボタン
を押します。
●
手ブレ補正が使用できないカメラでは、必ず、手ブレ補正リングスイッチをOFFにし
てください。特に、プロネア600iでは、このスイッチをONにしたままにすると、電
池を消耗することがあります。
3.はじめに
このたびはニッコールレンズをお買い上げいただき、誠にありがとうございます。
高精度な手ブレ補正機能をはじめとしたさまざな機能を備え、レンズ内超音波モーター
駆動方式の採用により高速・静粛なオートフォーカス撮影を可能にする高性能な超望遠
レンズです。
■特 長
● フォーカスモードの切り換え(P.8)
A/M(オート優先オートフォーカスモード)またはM/A(マニュアル優先オートフォー
カスモード)にすると、オートフォーカス中にフォーカスリングを回すだけで、マニュ
アルでピントを合わせることができます。
カメラ
手ブレ補正
AF
フォーカス
ロック
露出モード
P
※1
SAM
D3、D2
シリーズ
、D1
シリーズ
、
D300、D200、D100、
D80、D70
シリーズ
、D50、
D40
シリーズ
F6、F5、F100、F80
シリーズ
、
ニコンU2、ニコンU
プロネア
600i、プロネア
S
※2
F4
シリーズ
、F90X
シリーズ
、
F90
シリーズ
、F70D
ニコンUs
、F60D、F50D、
F-401
シリーズ
F-801
シリーズ
、F-601M
F3AF、F-601、F-501、
MFカメラ(F-601Mを除く)
○○ ○○○○
××○×
○○
○
○
△
※3
○○ ○○○○○○
×○ ○○○○○○
×○
※3
○○××
○○
※4
××○○○○
×××× ×○○××
×××× ×××××
○:使用可 △:制限あり ×:使用不可 AF:オートフォーカス
メモリー
リコール
レンズ側
でのAF
機 能
Page 7
7
Jp
M/A:フォーカスリングを回転させると、瞬時にマニュアルフォーカス撮影が行えます。
A/M:フォーカスリングを回転させても、瞬時にはマニュアルフォーカスに切り換わり
ません。オートフォーカスを優先させたい時にご使用ください。
● フォーカス制限の切り換え(P.9)
オートフォーカス撮影時にオートフォーカス作動を一定の撮影距離範囲に制限できるフ
ォーカス制限切り換えスイッチを装備しています。撮影距離が6m以上の場合に、スイ
ッチを∞−6mにすることよりピント合わせの時間が短縮します。
● フォーカスロック/メモリーリコール/オートフォーカス作動(P.9〜10)
レンズ側でフォーカスロックができたり(AF-L)、あらかじめピント位置を記憶させ、
瞬時に呼び出せたり(MEMORY RECALL)、レンズ側でオートフォーカスを作動でき
る(AF-ON)などの機能を装備しています。
● 手ブレの補正
※
【VRⅡ】(P.10〜11)
NORMAL:手持ち撮影や一脚撮影時
の手ブレを補正します。手ブレ補
正機能を使用すると、使わないと
きと比べ約4段分シャッタースピー
ドを遅くできるので、シャッター
スピードの選択範囲が広がり、幅
広い領域で手持ち撮影が可能です。
パンニング(流し撮り)でも手ブ
レを補正します。
TRIPOD:三脚使用時のブレを補正し
ます。三脚撮影時には、TRIPOD
モードの使用をおすすめします。
超望遠レンズでは、三脚を使って
もブレが発生することがあります。TRIPODモードを使用することで、このブレを軽
減することができ、以下の効果が得られます。
・撮影画像のブレ軽減(特にシャッタースピードが1/15〜1秒のとき)
・ファインダー像の安定
※ 当社撮影条件によります。また、手ブレ補正効果は、撮影者や撮影条件によって異な
ります
● 被写体までの距離情報をカメラボディー側に伝達する機能を備え、3Dマルチパター
ン測光機能を持ったカメラとの組み合わせでは、より的確な露出制御を実現します。
● ニコン独自のED(特殊低分散)ガラスによる色収差の補正とともに、良好なボケ味
が得られる円形絞りの採用により優れた光学性能、描写性能を発揮します。
● ナノクリスタルコート(Nano Crystal Coat)を一部のレンズに施したことにより、
強い太陽光が当たるスポーツ撮影から、スポットライトのある室内撮影まで、あらゆ
る条件下で、クリアーで抜けの良い画像を提供します。
パンニング(流し撮り)
(NORMALモード)
手持ちや一脚使用時のブレ
(NORMALモード)
三脚使用時のブレ
(TRIPODモード)
大小
高
低
振 幅
周
波
数
手ブレ補正機能の概念図
Page 8

8
Jp
● 保護ガラスには、平面ガラスではなくメニスカスガラスを採用しています。
● 最短撮影距離2.9m(オートフォーカス時)/2.8m(マニュアルフォーカス時)まで
の近接撮影が可能です。
■ご注意
●
カメラに装着した状態で、カメラだけを持たないでください。カメラ(マウント部分)
破損の恐れがありますので、必ずレンズも持ってください。
●
組み込み式フィルターホルダーは、付属の52mmネジ込み式フィルター等を取り付け、
必ず装着して撮影してください。
●
CPU信号接点は汚さないようにご注意ください。
●
AF-I/AF-Sテレコンバーターは、TC-14E/TC-14EⅡ/TC-17EⅡ/TC-20E/TC20EⅡが使用可能です。
●
ニコンDXフォーマットのニコンデジタル一眼レフカメラ(D2シリーズ、D50など)
に装着すると、対角線画角は4°となり、35mm判で焦点距離約600mm相当のレン
ズとなります。(35mm判での対角線画角は6°10′)
●
レンズマウントゴムリングが破損した場合は、そのまま使用せず販売店またはニコン
サービス機関に修理を依頼してください。
4.フォーカスモードの切り換え
カメラによって、フォーカスモードを選択できます。
■A/M(オート優先オートフォーカスモード)
M/A(マニュアル優先オートフォーカスモード)(P.6参照)
1
フォーカスモード切り換えスイッチ(図1)をA/MまたはM/Aにセ
ットします。
2
オートフォーカスでシャッターボタンを半押し、またはカメラのAF
作動ボタンやレンズのフォーカス作動ボタンを押したままフォーカ
スリングを回すと、マニュアルフォーカスが行えます。
レンズのフォーカスモード
カメラ
MM/AA/M
MF
(フォーカス
エイド可能)
MF
(フォーカスエイド可能:F-601Mは不可)
MF(フォーカスエイド可能)
マニュアル優先
AF
オート優先
AF
AF:オートフォーカス MF:マニュアルフォーカス
D3、D2
シリーズ
、D1
シリーズ
、
D300、D200、D100、
D80、D70
シリーズ
、D50、
D40
シリーズ
、F6、F5、
F4
シリーズ
、F100、F90X
シリーズ
、
F90
シリーズ
、F80
シリーズ
、
F70D、
ニコン
U2、
ニコン
U、
プロネア
600i、
プロネア
S
ニコンUs
、F60D、F50D、
F-801
シリーズ
、F-401
シリーズ
、
F-601M
カメラの
フォーカスモード
AF
(C/S)
AF
(C/S)
MF
MF
図1
Page 9
9
Jp
●
シャッターボタンやカメラのAF作動ボタンまたはレンズのフォーカス作動ボタンから
指を離し、再度オートフォーカス動作(シャッターボタンの半押しなど)をすると、
オートフォーカスに戻ります。
5.フォーカス制限の切り換え
(対応カメラは、P.6参照)
●
撮影距離が常に6m以上の場合には、フォーカス制限切り換えスイッ
チ(図2)を∞−6mにセットします。
●
撮影距離が6m未満を含む場合はFULLにセットします。
●
オートフォーカスで撮影する場合に使える機能です。
6.フォーカスロック/メモリーリコール/オートフォーカス作動
■フォーカス作動設定スイッチ(AF-L/MEMORYRECLL/AF-ON)とフォ
ーカス作動ボタンの関係について
●
フォーカス作動設定スイッチ(図3)の設定により、フォーカス作動
ボタン(図4)の機能が切り換わります。お使いになる機能に合わせ
て、フォーカス作動設定スイッチを設定してください。
●
フォーカス作動ボタンは、ご希望の位置に改造(回転)できます。
詳しくは、ニコンサービス機関へお問い合わせください。
●
フォーカス作動ボタンは、4ヶ所あります。どれか1個を押します。
■フォーカスロック(AF-L)(対応カメラは、P.6参照)
1
フォーカスモード切り換えスイッチ(図1)をA/MまたはM/Aにセットします。
●
オートフォーカスで撮影する場合に使える機能です。
2
フォーカス作動設定スイッチ(図3)をAF-Lにセットします。
3
オートフォーカス中にフォーカス作動ボタン(図4)を押し、フォーカスをロックし
て撮影します。
●
フォーカス作動ボタン押している間、ピントが固定されます。
●
フォーカスロックはカメラでも行えます。
■ メモリーリコール(MEMORYRECALL)
(対応カメラは、P.6参照。オートフォーカス、マニュアルフォーカスとも作動可能です。)
●
電子音スイッチ(図5)を にセットすると、操作の際に音
(ピッ/ピッピー等)で知らせてくれます。鳴らさないときは
にセットします。
●
以下の手順は、電子音をセットした場合の説明です。
図2
図3
フォーカス作動設定スイッチ フォーカス作動ボタンの機能
AF-L フォーカスロック
MEMORYRECALL メモリーリコール
AF-ON レンズ側でのAF作動
図4
図5
Page 10
10
Jp
1
フォーカスモード切り換えスイッチ(図1)をA/M、M/AまたはMFにセットします。
2
被写体にピントを合わせメモリーセットボタン(図6)を押し(ピッ
と鳴ります)、ピント位置を記憶させます。
●
ピント位置の記憶は、フォーカスモードやフォーカス作動設定スイ
ッチ等の設定に関わらず可能です。
●
カメラの電源を切ったり、カメラから取り外してもピント位置を記
憶しています。
ご注意:距離目盛が左右に10回程度振れた時(ピッ、ピーピーピーと鳴ります)には、
正しく設定されていません。もう一度、ピント位置を記憶させてください。
3
フォーカス作動設定スイッチ(図3)をMEMORYRECALLにセットします。
4
フォーカス作動ボタン(図4)を押します。
●
シャッターボタンを半押ししていても、フォーカス作動ボタンを押すと記憶させたピ
ント位置にセットされます。
5
ピピッと鳴り、記憶したピント位置にセットされたら、撮影します。
ご注意:フォーカス作動ボタンは、シャッターが切れるまで押し続けてください。
●
フォーカス作動ボタンから指を離すと、通常のオートフォーカスまたはマニュアルフ
ォーカスに戻ります。
■オートフォーカス作動(AF-ON)
(対応カメラは、P.6参照。)
1
フォーカスモード切り換えスイッチ(図1)をA/MまたはM/Aにセットします。
2
フォーカス作動設定スイッチ(図3)をAF-ONにセットします。
3
フォーカス作動ボタン(図4)を押し、撮影します。
●
フォーカス作動ボタンを押している間はオートフォーカスが作動します。
7.手ブレの補正(対応カメラは、P.6参照)
1
手ブレ補正リングスイッチ(図7)のボタンを押しながら1、
ONにセットします
2
。
2
手ブレ補正モード切り換えスイッチ(図8)をNORMALまた
はTRIPODにセットして、撮影します。
●
シャッターボタンを半押しすると、ファインダー画像のブレも
補正し、ピント合わせが容易になりフレーミングしやすくなり
ます。
ご注意:
●
シャッターボタンを半押し後、ファインダーの画像が安定して
から撮影されることをおすすめします。
●
手ブレ補正の原理上、シャッターレリーズ後にファインダー像
がずれることがあります。
●
カメラのAF作動ボタンまたはフォーカス作動ボタン(図4)を押しても、手ブレ補正
は作動しません。
図7
図8
図6
Page 11
11
Jp
●
三脚撮影時にTRIPODモードを使用した場合、撮影画像のブレ軽減効果やファインダ
ー像の安定が得られますが、ブレ量が小さい撮影条件下で撮影を行った場合は、
TRIPODモードとVRのOFFで効果が逆転する場合があります。その場合は、VRを
OFFでご使用ください。また、三脚を使っても雲台を固定しないときや一脚を使用す
るときなどは、NORMALモードでのご使用をおすすめします。
●
流し撮りする場合は、手ブレ補正モード切り換えスイッチ(図8)を必ずNORMAL
にしてください。
●
流し撮りでカメラの向きを大きく変えた場合、流した方向の手ブレは補正しません。
つまり、横方向にパンニングすると、縦方向の手ブレだけが補正されます。
●
手ブレ補正中にカメラの電源をOFFにしたり、レンズを取り外したりしないでくださ
い。OFFにしたり取り外すと、レンズ内部でカタカタ音がすることがあります。
故障ではありませんので、カメラの電源を再度ONにすれば、音は消えます。
●
F80シリーズ、ニコンU2、ニコンU、D300、D200、D100、D80、D70シリ
ーズ、D50、D40シリーズの内蔵フラッシュ充電中には、手ブレ補正は行いません。
8.被写界深度
●
被写体の前後のピントが合う範囲(被写界深度)は、距
離目盛基準線の両側の被写界深度目盛によって、おおよ
そ判ります。(図9)
●
プレビュー(絞り込み)機構を持つカメラでは、撮影前
に被写界深度を確認できます。
●
詳しい被写界深度は、被写界深度表(P.192)をご覧く
ださい。
9.絞り値の設定
●
絞り値は、カメラ側で設定してください。
10.組み込み式回転三脚座
●
タテ位置で撮影する場合は、三脚座止めネジを緩めて任意の位置まで回転して、ネジ
を締めてください。
●
三脚の形状によっては、カメラのグリップを握った状態でカメラを回転した際、三脚
に手がぶつかることがありますので、ご注意ください。
■一脚座(付属アクセサリー)
●
このレンズは、標準装備の三脚座を使用目的に合わせて一脚座に交換できます。
●
ご自分で交換される場合、ネジの締め付けが不充分ですとネジが緩んで事故や破損な
どの原因になるおそれがありますので充分ご注意ください。
●
一脚座への交換については、ニコンサービス機関に申し付けられることをおすすめし
ます。
被写界深度目盛
距離目盛基準線
図9
Page 12
12
Jp
11.かぶせフード HK-33-1/HK-33-2
二段式のかぶせフードを取り付けることができます。(一段目にHK-33-1、二段目に
HK-33-2)
1
一段目のかぶせフード HK-33-1の側面についているクランプノブを緩め、静かにレ
ンズ先端の上にかぶせ、ななめにかぶさっていないか確認して、クランプノブをしっ
かり締めてください。
2
二段で重ねて使用する時は、二段目のかぶせフード HK-33-2のクランプノブを緩め、
静かにHK-33-1の上にかぶせ、クランプノブをしっかり締めつけ、ご使用ください。
■ご使用後フードをレンズに収納する場合
かぶせフード HK-33-1にかぶせフード HK-33-2を逆向きにかぶせ、HK-33-1がレン
ズの先端に対して逆向きになるようにかぶせ、収納してください。
12.組み込み式フィルターホルダー
●
撮影の際は、フィルターを必ず装着してください(お買い
上げ時は、NCフィルターが装着されています)。
1
付属の52mmネジ込み式フィルターを、Nikon JAPAN
の表示がある面よりねじ込みます。(図10)
2
組み込み式フィルターホルダーつまみを押し込みながら、
つまみの白い指標が組み込み式フィルターホルダーと平行
になるように回し(反時計方向)ます。
●
カメラ側または被写体側のどちらの側に向けて取り付けて
も、撮影に影響はありません。
■組み込み式円偏光フィルター C-PL1L(別売)
●
ガラスなどの非金属面や水面の反射光をカットする場合におすすめします。
●
距離目盛は正常な位置からずれ、最至近がわずかに長くなります。
●
メモリーリコール(P.9)を使用する場合は、ピントを記憶させるときから装着して
ください。
13.ファインダースクリーンとの組み合わせ
スクリーン
カメラ
F5+DP-30
◎
(+0.5)
◎―
◎―
―
―
―
―
―◎―◎
―◎―◎
G1
G2
G4G3BCE
EC-B
EC-E
FJKLMPU
F4+DP-20
F4+DA-20
F5+DA-30
A
◎◎◎
◎
◎
◎◎
◎
◎
◎
◎
◎
◎◎
―
―
◎◎
◎
○
○
○
(+0.5)
○
(–0.5)
○
(–0.5)
◎
◎◎◎
◎
◎
◎
F6
――― ― ―
―
―
―◎◎ ◎◎― ――◎ ◎
◎
◎
◎
図10
Page 13

13
Jp
■構図の決定やピント合わせの目的には
◎:好適です。
○:視野の一部が多少見にくくなりますが、撮影結果には全く影響がありません。
―:各カメラに存在しないファインダースクリーンです。
() :中央部重点測光時の補正値です。F6カメラの場合、測光値の補正は、カメラのカ
スタムメニュー「b6:スクリーン補正」を「BorE以外」にセットして行います。
B型およびE型以外を使用する場合は、補正量が0でも、「BorE以外」にセットし
てください。F5カメラの場合は、カスタムセッティングNo.18の設定で測光値の
補正を行います。F4シリーズカメラの場合は、ファインダースクリーン露出補正
ダイヤルを回して補正を行います。
詳しくはカメラの使用説明書をご覧ください。
空欄:使用不適当です。ただし、Mスクリーンの場合、撮影倍率1/1倍以上の近接撮影
に用いられるため、この限りではありません。
ご注意:
●
F5カメラの場合、マルチパターン測光はEC-B、EC-E、B、E、J、A、Lスクリーン
のみ可能です。
●
上記以外のカメラでB、Eスクリーンをご使用の場合は、それぞれB、Eスクリーンの
欄をご覧ください。
14.レンズのお手入れと取り扱い上のご注意
●
レンズ面の清掃は、ホコリを拭う程度にしてください。指紋がついたときは、柔らか
い清潔な木綿の布に無水アルコール(エタノール)または市販のレンズクリーナーを
少量湿らせ、レンズの中心から外周へ渦巻状に、拭きムラ、拭き残りのないように注
意して拭いてください。
●
シンナーやベンジンなどの有機溶剤は絶対に使用しないでください。
●
ご使用にならない時は、レンズ表面の汚れや傷を防ぐために、レンズキャップを取り
付けてください。
●
レンズをケースに入れるときは、必ず、レンズキャップを前後に取り付けてください。
●
レンズを長期間使用しないときは、カビやサビを防ぐために、高温多湿のところを避
けて風通しのよい場所に保管してください。また、直射日光のあたるところ、ナフタ
リンや樟脳のあるところも避けてください。
●
レンズを水に濡らすと、部品がサビつくなどして故障の原因となりますのでご注意く
ださい。
●
ストーブの前など、高温になるところに置かないでください。極端に温度が高くなる
と、外観の一部に使用している強化プラスチックが変形することがあります。
Page 14

14
Jp
15.付属アクセサリー
●
トランクケース CT-404
●
かぶせ式レンズキャップ
●
裏ぶた LF-1
●
かぶせフード
HK-33
●
組み込み式フィルターホルダー(専用※)●52mmネジ込み式NCフィルター
●
ストラップ LN-1
●
一脚座
※ 専用の付属アクセサリーは、一般販売は行っておりません。破損や紛失の場合には、
ニコンサービス機関へお申し出ください。
16.別売アクセサリー
●
セミソフトケース CL-L2
●
52mmネジ込み式フィルター(円偏光フィルターⅡを除
く)●組み込み式円偏光フィルター C-PL1L
●
AF-Sテレコンバーター TC-14EⅡ/
TC-17EⅡ/TC-20EⅡ
17.仕 様
型 式: ニコンFマウントCPU内蔵Gタイプ、AF-Sレンズ
焦点距離: 400mm
最大口径比: 1:2.8
レンズ構成: 11群14枚(EDガラス3枚、ナノクリスタルコート1面)、他保護
ガラス1枚
画 角: 6°10′ … 35mm判一眼レフカメラ
FXフォーマットのデジタル一眼レフカメラ
4° … DXフォーマットのデジタル一眼レフカメラ
5° … IX240カメラ
撮影距離情報: カメラボディーへの撮影距離情報出力可能
ピント合わせ: IF(ニコン内焦)方式、超音波モーターによるオートフォーカス、
マニュアルフォーカス可能
手ブレ補正: ボイスコイルモーター(VCM)によるレンズシフト方式
撮影距離目盛: ∞〜2.8m、10ft(併記)
最短撮影距離: 2.9m(オートフォーカス時)/2.8m(マニュアルフォーカス時)
絞り羽根枚数: 9枚(円形絞り)
絞り方式: 自動絞り
絞りの範囲: 2.8〜22
測光方式: CPU連動方式のカメラボディーでは開放測光
フォーカス制限
切り換えスイッチ: FULL(∞〜2.9m)と∞−6mの2段切り換え
三脚座: 位置指標(90°)付きの360°組み込み式回転三脚座(一脚座に交
換可能)
Page 15

15
Jp
大きさ: 約159.5mm(最大径)×368.0mm(バヨネットマウント基準面
からレンズ先端まで)
質 量: 約4,620g
●
仕様、外観の一部を、改善のため予告なしに変更することがあります。
Page 16

16
En
Do not disassemble
Touching the internal parts of the camera or lens could result in injury. Repairs
should be performed only by qualified technicians. Should the camera or lens
break open as the result of a fall or other accident, take the product to a Nikon
authorized service representative for inspection after unplugging the product
and/or removing the battery.
Turn off immediately in the event of malfunction
Should you notice smoke or an unusual smell coming from the camera or lens,
remove the battery immediately, taking care to avoid burns. Continued operation
could result in injury. After removing or disconnecting the power source, take the
equipment to a Nikon-authorized service representative for inspection.
Do not use the camera or lens in the presence of flammable gas
If the electronic equipment is operated in the presence of flammable gas, it could
result in an explosion or a fire.
Do not look at the sun through the lens or viewfinder
Viewing the sun or other strong light sources through the lens or viewfinder
could cause permanent visual impairment.
Keep out of reach of children
Particular care should be taken to prevent infants from putting the batteries or
other small parts into their mouths.
Notes on Safety Operations
CAUTION
Page 17

17
En
Observe the following precautions when handling the camera
and lens
• Keep the camera or lens unit dry. Failure to do so could result in a fire or
electric shock.
• Do not handle or touch the unit with wet hands. Failure to do so could result in
electric shock.
• In backlit shooting, keep the sun well out of the frame.
The sunlight could focus into the lens body and cause a fire. When the sun gets
close to the frame, it can also cause a fire.
• When the lens will not be used for a long time, attach both front and rear lens
caps and store the lens away from direct sunlight. Failure to do so could result
in a fire, as the lens might focus sunlight onto an object.
Page 18
18
En
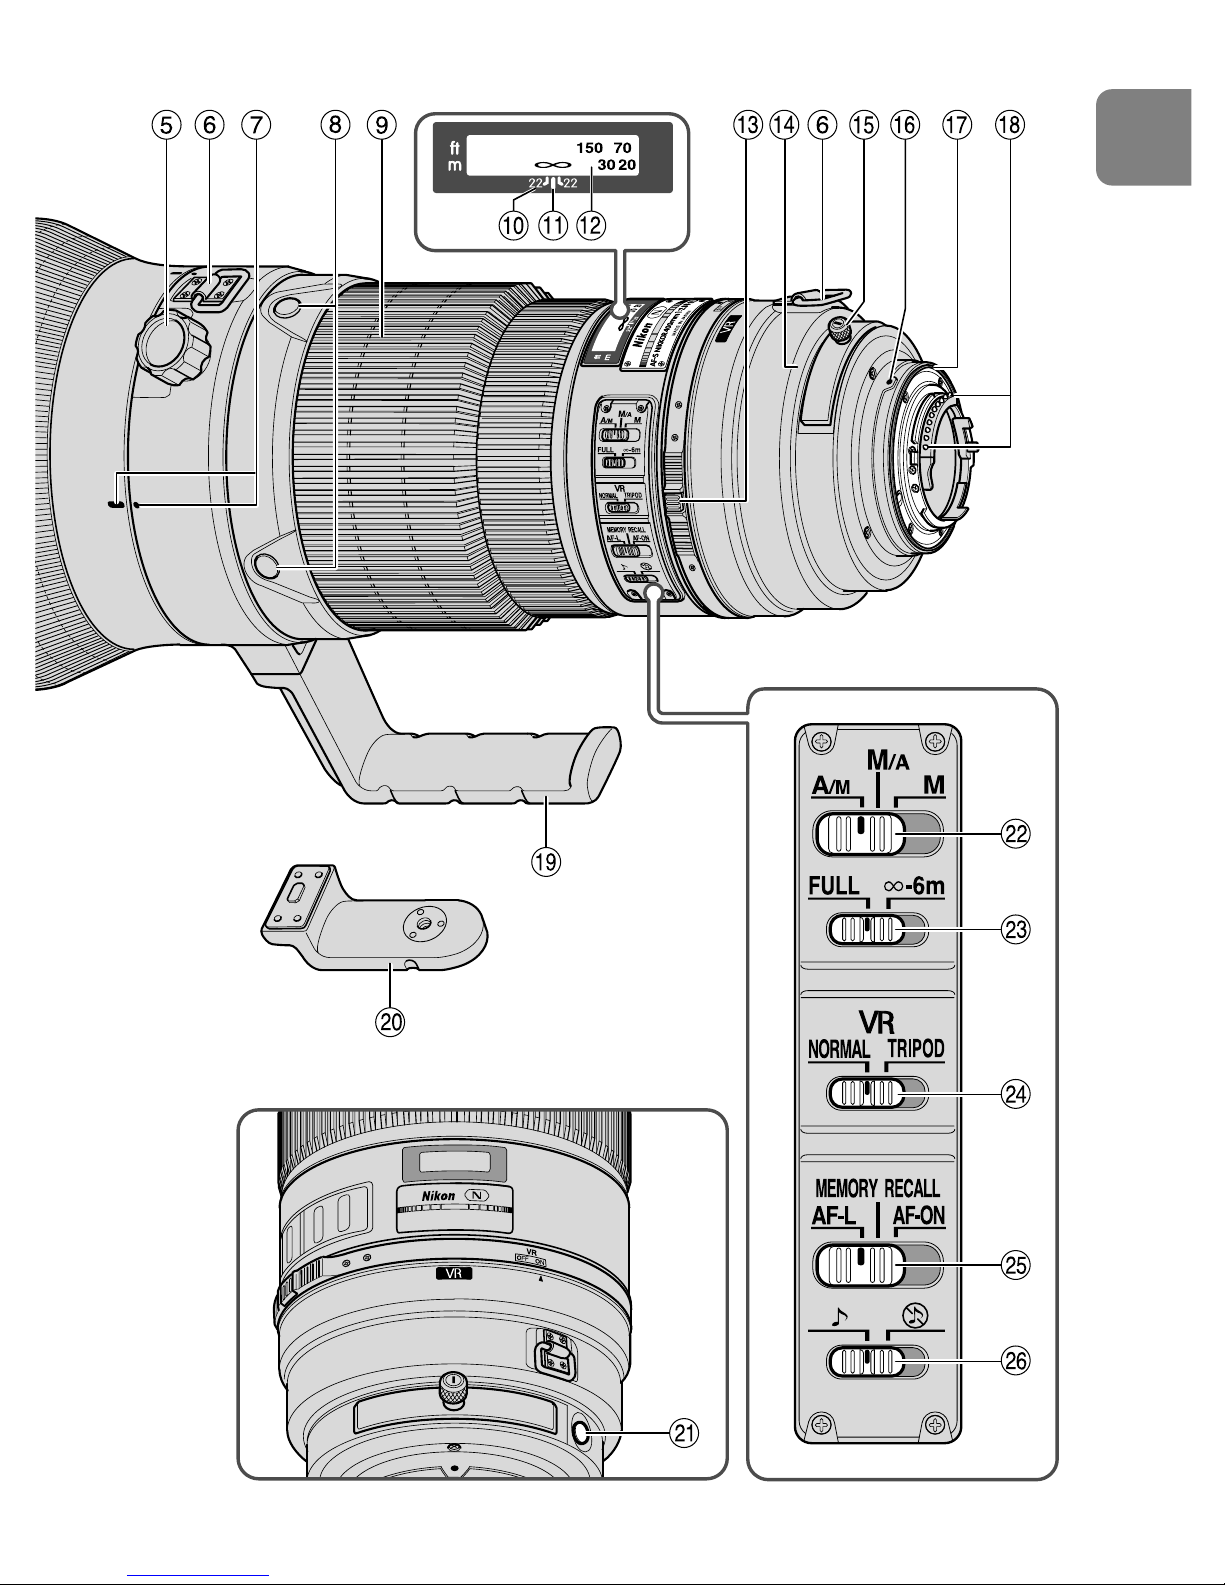
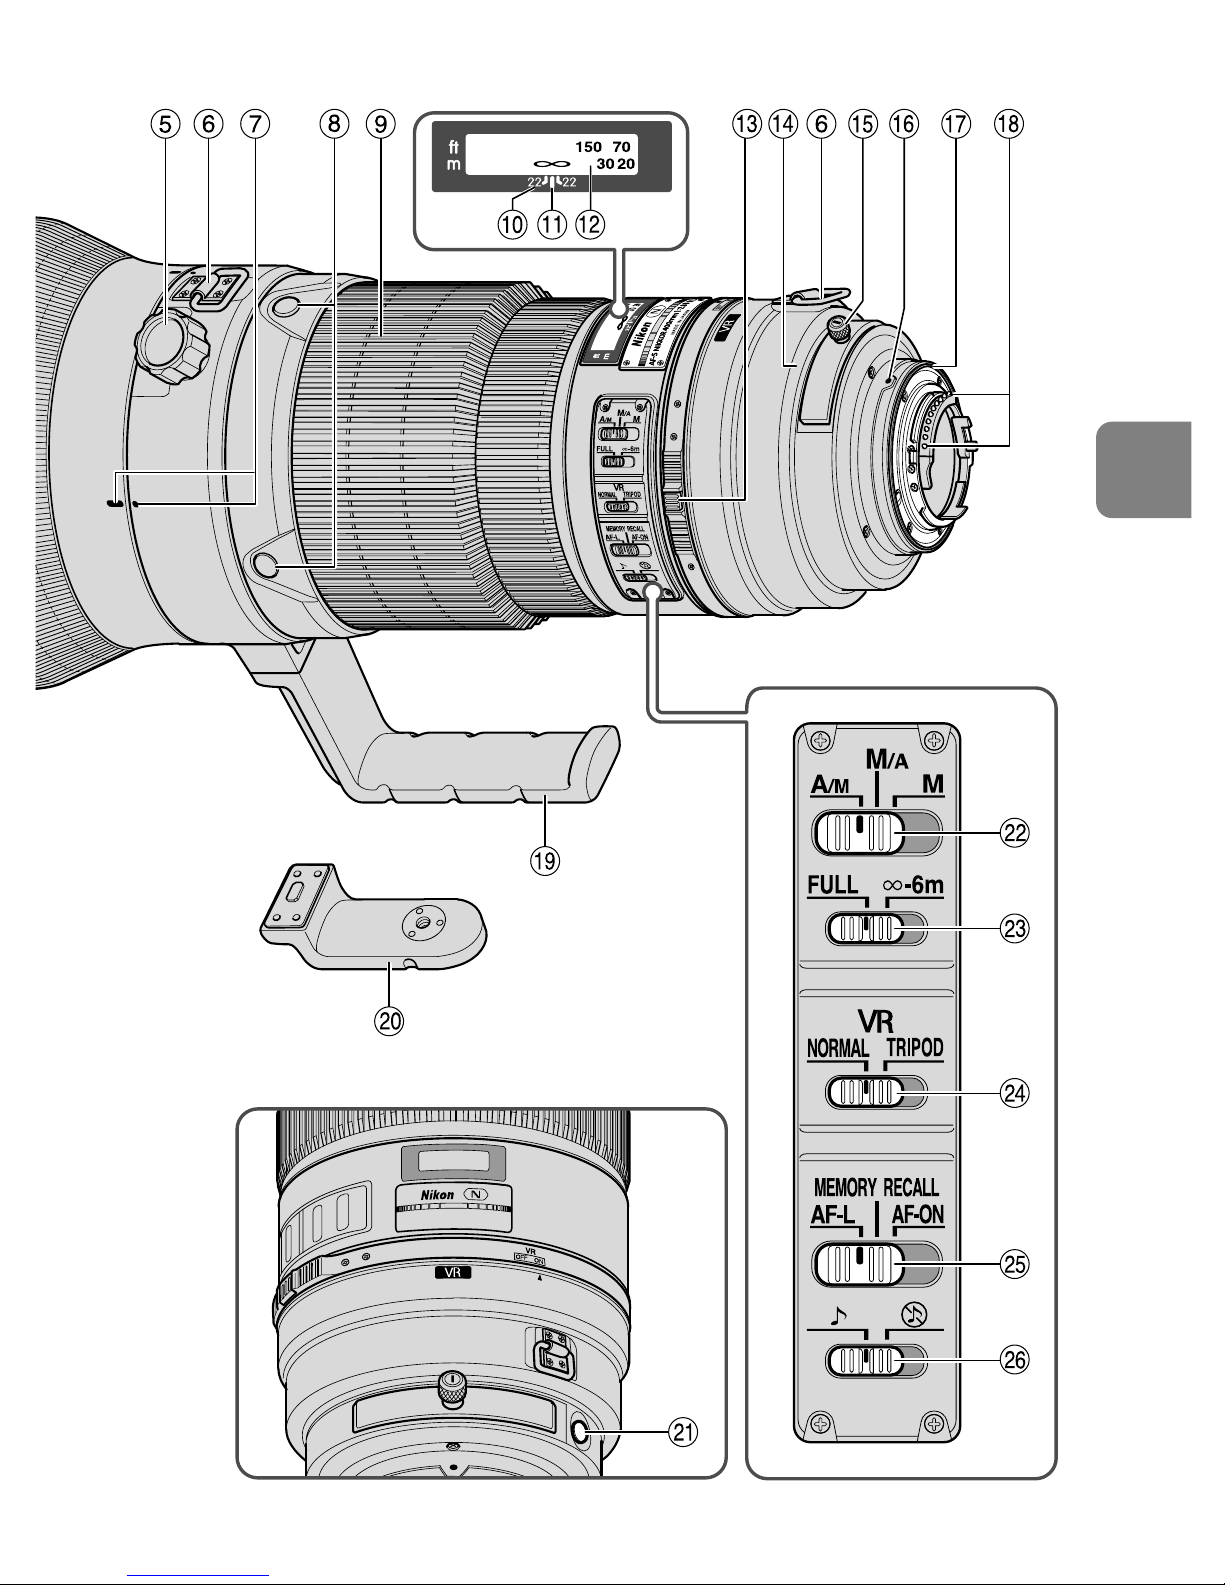
1 Lens hood HK-33-2 (p. 27)
2 Lens hood HK-33-1 (p. 27)
3 Lens hood screw (p. 27)
4 Rubber grip
5 Tripod collar lock screw (p. 27)
6 Strap eyelet
7 Lens rotating position index
8 Focus operation button (Focus
Lock/MEMORY RECALL/AF Start)
(p. 24)
9 Focus ring (p. 23)
! Depth-of-field scale (p. 26)
" Distance index line (p. 26)
# Distance scale
$ Vibration reduction ON/OFF ring
switch (p. 25)
% Slip-in filter holder (p. 27)
& Slip-in filter holder knob (p. 27)
( Mounting index
) Lens mount rubber gasket (p. 22)
~ CPU contacts (p. 22)
+ Built-in rotating tripod collar (p. 27)
, Monopod collar (replaceable)
(p. 27)
- Memory Set button (p. 25)
. Focus mode switch (p. 23)
/ Focusing limit switch (p. 24)
: Vibration reduction mode switch
(p. 25)
; Focus operation selection switch
(AF-L/MEMORY RECALL/AF-ON)
(p. 24)
< Sound monitor switch (p. 24)
1. Nomenclature ( ): Reference page
Page 19
19
En
Page 20

20
En
2. Usable cameras and available functions
There may be some restrictions or limitation for available functions. Refer to your
camera’s instruction manual for details.
* Sold exclusively in the USA. ** Sold exclusively in the USA and Canada.
*1 P includes AUTO (General-Purpose Program) and Vari-Program System
*2 Manual (M) is not available.
*3 When the Focus operation selection switch is set to AF-ON, autofocus begins
as soon as you depress the Focus operation button while lightly depressing
the shutter-release button.
*4 Depress the Memory Set button or Focus operation button while lightly
depressing the shutter-release button.
Cameras
Vibration
reduction
Autofocus
Focus
lock
Exposure
mode
P*1SAM
D3, D2-Series, D1-Series,
D300, D200, D100, D80,
D70-Series, D50,
D40-Series
F6, F5, F100,
F80-Series/N80-Series*,
F75-Series/N75-Series*,
F65-Series/N65-Series*
Pronea 600i/6i*,
Pronea S*
2
F4-Series, F90X/ N90s*,
F90-Series/N90*,
F70-Series/N70*
F60-Series/ N60*,
F55-Series/N55-Series*,
F50-Series/N50*,
F-401x/N5005*,
F-401s/ N4004s*,
F-401/N4004*
F-801s/N8008s*,
F-801/N8008*,
F-601M/N6000*
F3AF, F-601/N6006*,
F-501/N2020**,
Nikon MF cameras
(except F-601M/N6000*)
҂҂҂
*
3
҂
҂
*
3
*
4
҂҂
҂҂҂҂҂
҂҂҂҂҂
҂
҂
҂
҂
҂
҂
҂
҂
Memory
recall
AF start
on the
lens
Function
: Possible : Possible, with limited restrictions ҂: Impossible
Page 21

21
En
• If this lens is used with cameras not compatible with vibration reduction, set
the vibration reduction ON/OFF ring switch to OFF. With the Pronea 600i/6i
camera, in particular, battery power may become quickly depleted if this
switch is left ON.
3. Introduction
Thank you for purchasing the AF-S NIKKOR 400mm f/2.8G ED VR lens. This is a
high performance lens featuring special Vibration Reduction (VR) and high-speed
Internal Focusing (IF) mechanisms. It also employs a Silent (S) Wave Motor to
drive the focusing mechanism. Focus preset is also provided.
Major features
Two AF modes (p. 23)
Autofocus can be overridden by setting the focus mode switch to “A/M” or
“M/A” and manually focusing with the focus ring.
M/A: Autofocus can be overridden by manually focusing with the focus ring.
This mode should be used for fine-focusing.
A/M: Autofocus can be overridden by manually focusing with the focus ring, but
focus ring detection sensitivity is lower than in M/A mode. Use this mode
to avoid canceling the AF setting by unintentionally moving the focus ring.
Limiting the range of autofocus (p. 24)
Focus time can be reduced by setting focusing limits.
For example, if a subject is at least 6 m (19.7 ft.) away, set the focusing limit
switch to ∞ – 6 m.
AF-L/MEMORY RECALL/AF-ON (p. 24)
Focus distances can be locked and saved during autofocus (AF-L) and then
recalled by pushing the
“MEMORY RECALL” button. Autofocus is restarted on
the lens by setting switch to AF-ON.
Vibration reduction* (VR II) (p. 25)
NORMAL: Reduces camera shake during handheld shooting or use of a
monopod. This mode allows pictures to be taken at shutter speeds approx. 4
stops slower than is possible with a non-VR lens, therefore expanding the
range of shutter speed options and making handheld or monopod telephoto
shooting much easier. Panning is also possible.
TRIPOD: Recommended mode to reduce camera shake when using a tripod.
With a super-telephoto lens, camera shake may occur even when the camera
is mounted on a tripod. TRIPOD mode reduces camera shake when shooting
with a tripod, especially with shutter speeds between 1/15 and 1 sec. It also
reduces image shake in the viewfinder.
* Under Nikon measurement conditions. The effects of vibration reduction vary
depending on individual and shooting conditions.
Page 22
22
En
More accurate exposure control is possible when this is mounted on a Nikon
camera having 3D Matrix Metering capability, because subject distance
information is transferred from the lens to the camera body.
The use of three ED (extra-low dispersion) lens elements ensures sharp pictures
virtually free of color fringing. Also, by utilizing a 9-blade diaphragm that
produces a nearly circular aperture, out-of-focus images in front of or behind
the subject are rendered as pleasing blurs.
The Nano Crystal Coat deposited on some of the lens elements ensures that
fine, clear images can be reproduced under any shooting conditions, from the
sunny outdoors to spotlighted interior scenes.
Meniscus glass, unlike existing flat glass, is used for the lens protective glass.
Closest focusing distances of 2.9 m (9.5 ft) (AF) and 2.8 m (9.2 ft) (MF) are
provided.
Important!
• Be careful not to hold the camera body when the lens is attached, as this may
cause damage to the camera. Be sure to hold both the lens and camera when
carrying.
• Be sure to attach a 52mm screw-in filter to the slip-in filter holder.
• Be careful not to soil or damage the CPU contacts.
• AF-I/AF-S Teleconverters TC-14E/TC-14EII/TC-17EII/TC-20E/TC-20EII are usable.
• When mounted on Nikon digital SLR (Nikon DX format) cameras, such as the
D2-Series and D50, the lens’ picture angle becomes 4° and its 35 mm
equivalent focal length is approx. 600 mm. (The lens’ picture angle is 6°10’ at
35 mm focal length.)
• If the lens mount rubber gasket is damaged, be sure to visit the nearest Nikon
authorized dealer or service center for repair.
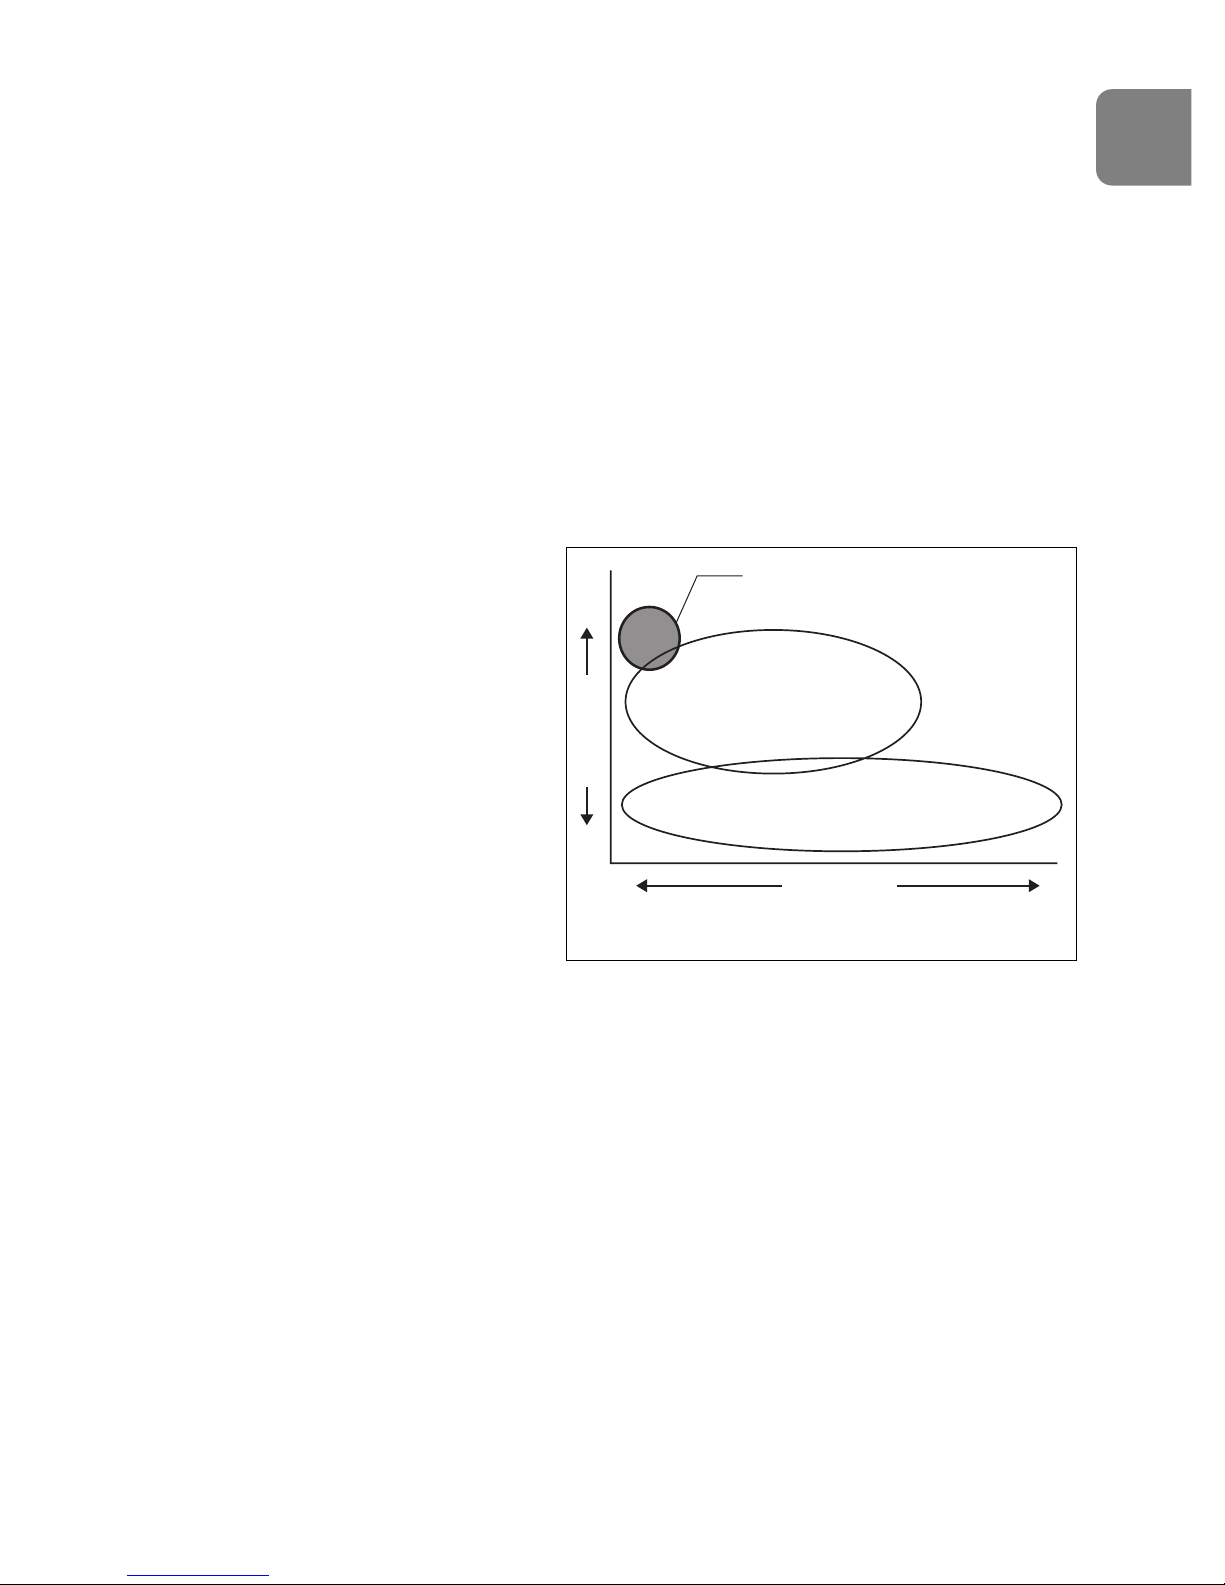
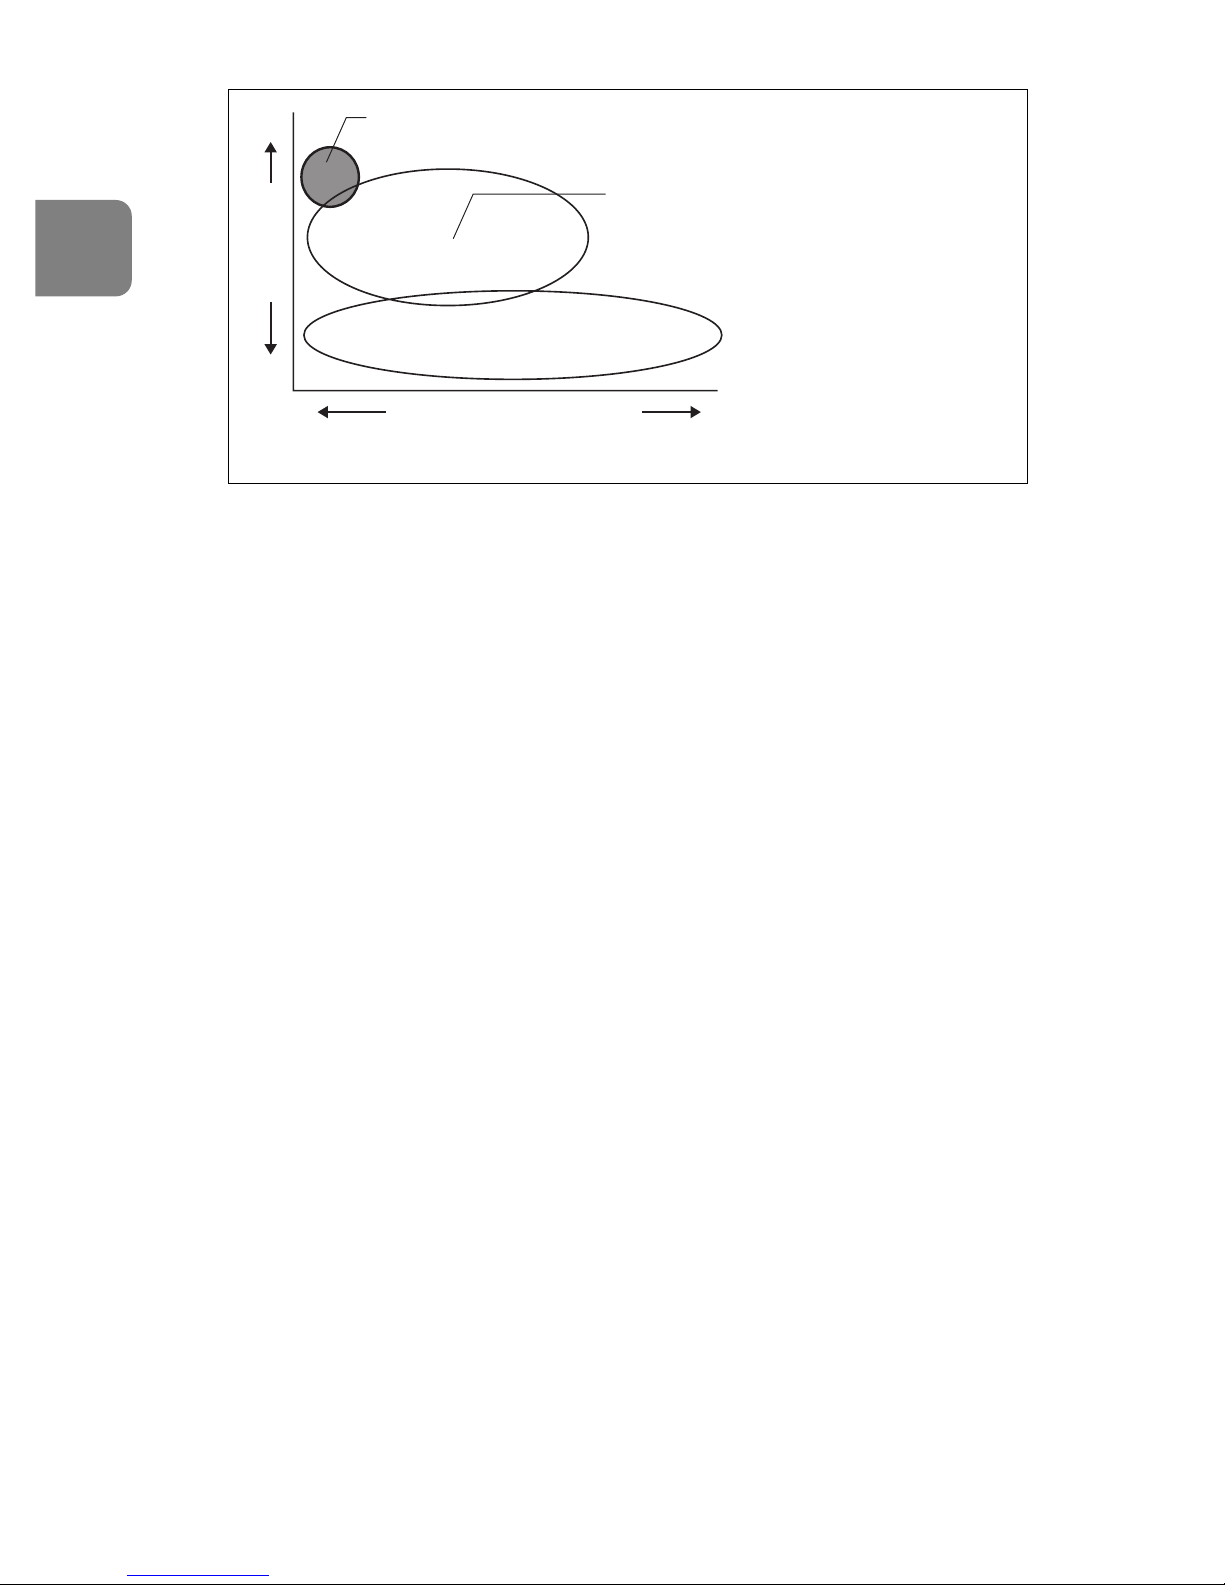
Panning shots
(in NORMAL mode)
Vibration reduction using a tripod
(in TRIPOD mode)
Strength of vibrations
Camera shake during handheld
shooting or when using a monopod
(in NORMAL mode)
Basic concept of vibration reduction
Number of
vibrations
Page 23
23
En
4. Focusing
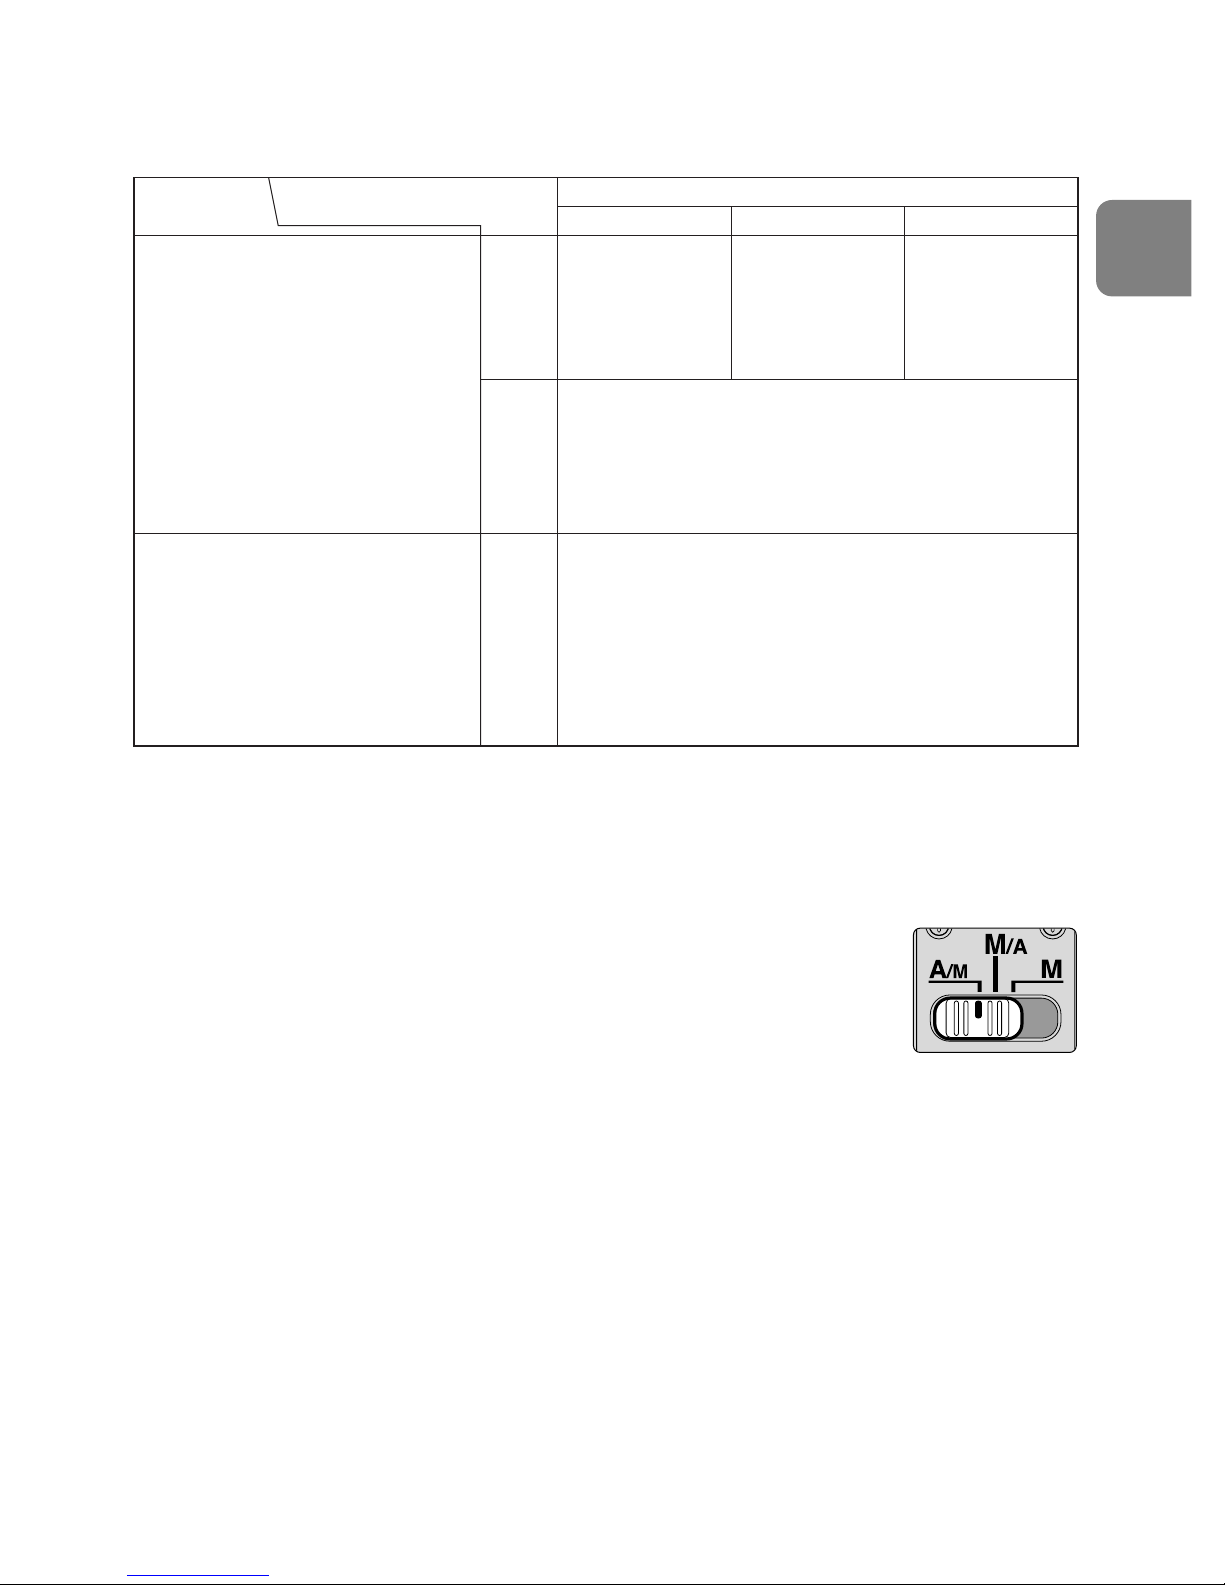
Set your camera’s focus mode selector according to this chart:
Autofocus with manual override (p. 21)
A/M mode: Autofocus with manual override. AF priority
M/A mode: Autofocus with manual override. MF priority
1
Set the focus mode switch to “A/M” or “M/A”. (Fig. 1)
2
You can manually override autofocus by operating the focus
ring while lightly depressing the shutter release button or the
AF start button on the camera or the Focus operation button
on the lens.
• To cancel manual override, remove your finger from the
shutter release button or the AF start button on the camera or
the Focus operation button on the lens, and lightly depress the
shutter release button to return to the autofocus mode.
Lens’ focus mode
Cameras
Camera’s focus mode
MM/AA/M
Manual focus
(Focus assist
is available.)
Manual focus
(Focus assist is available, except with the
F-601M/N6000*.)
Manual focus
(Focus assist is available.)
Autofocus with
manual override
(MF priority)
Autofocus with
manual override
(AF priority)
AF
(C/S)
AF
(C/S)
MF
MF
D3, D2-Series, D1-Series, D300,
D200, D100, D80, D70-Series,
D50, D40-Series, F6, F5,
F4-Series, F100, F90X/N90s*,
F90-Series/N90*,
F80-Series/N80-Series*,
F75-Series/N75-Series*,
F70-Series/N70*,
F65-Series/N65-Series*,
Pronea 600i/6i*, Pronea S
F60-Series/N60*,
F55-Series/N55-Series*,
F50-Series/N50*,
F-801s/N8008s*, F-801/N8008*,
F-601M/N6000*,
F-401x/N5005*,
F-401s/N4004s*, F-401/N4004*
* Sold exclusively in the USA.
AF: Autofocus MF: Manual focus
Fig. 1
Page 24
24
En
5. To limit the range of autofocus
(See page 20 for usable cameras.)
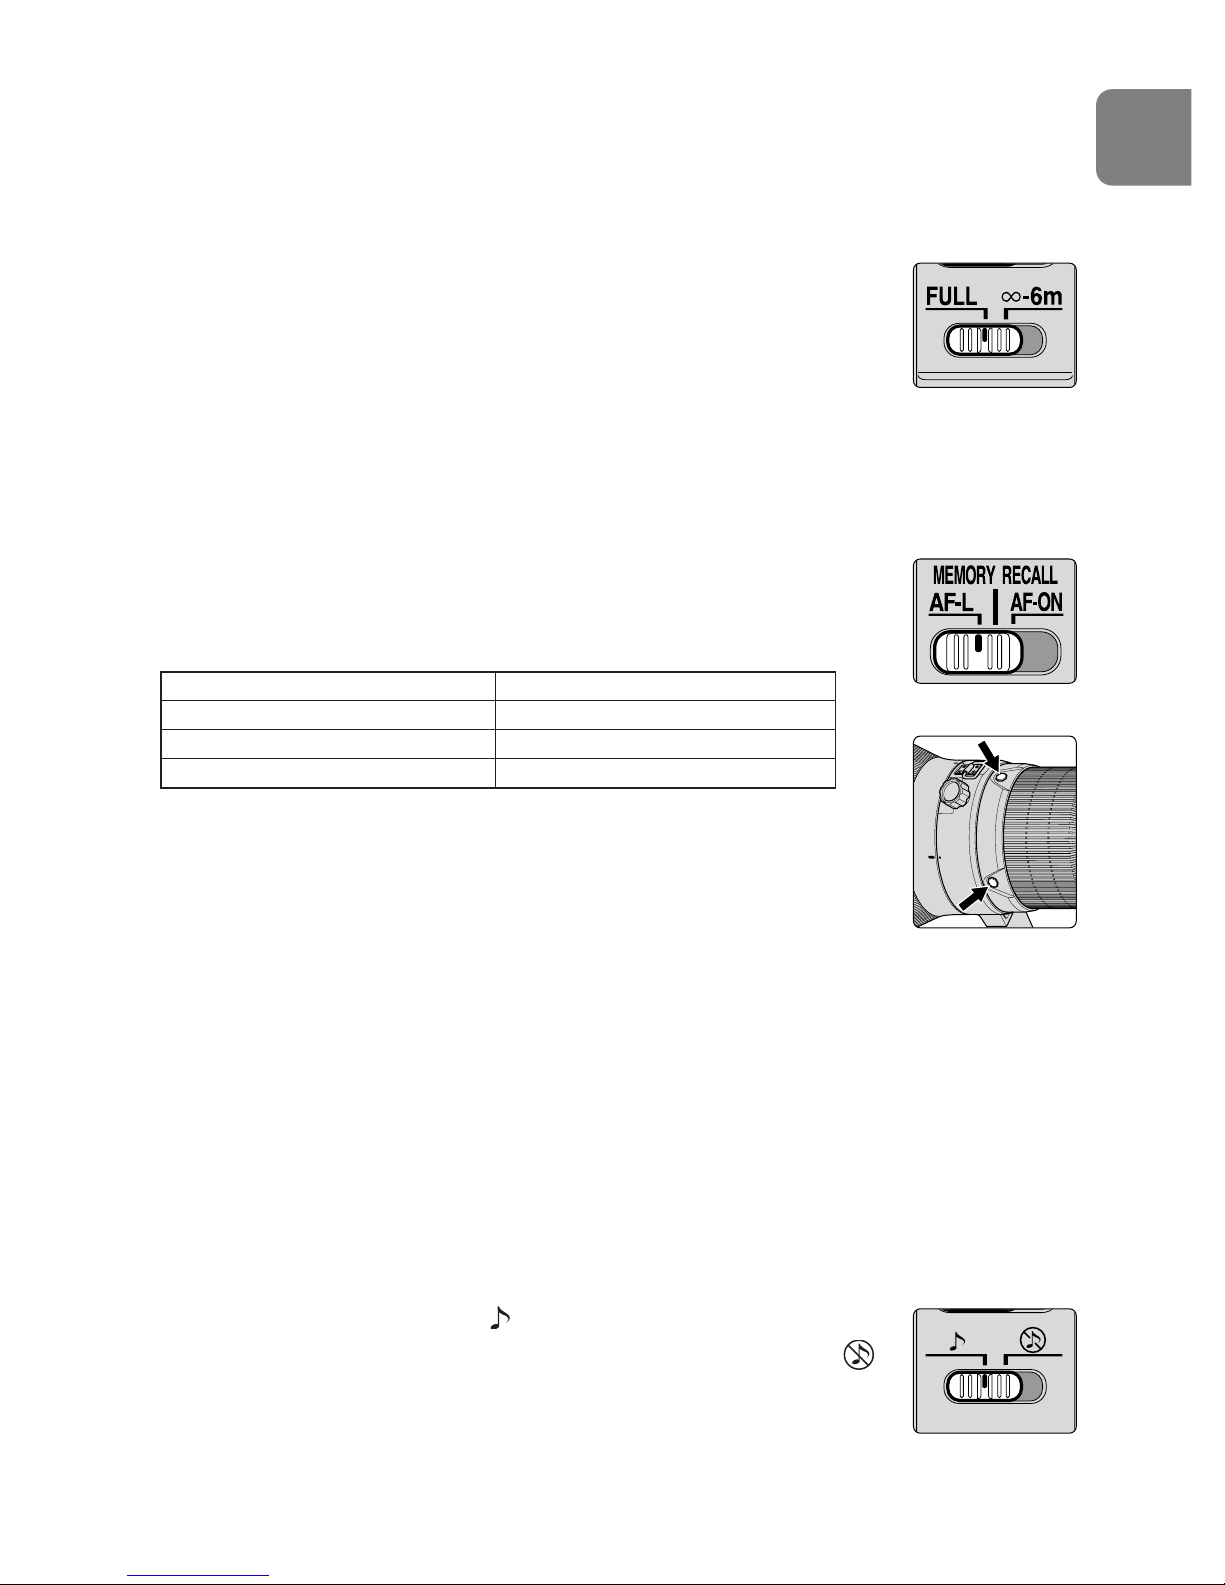
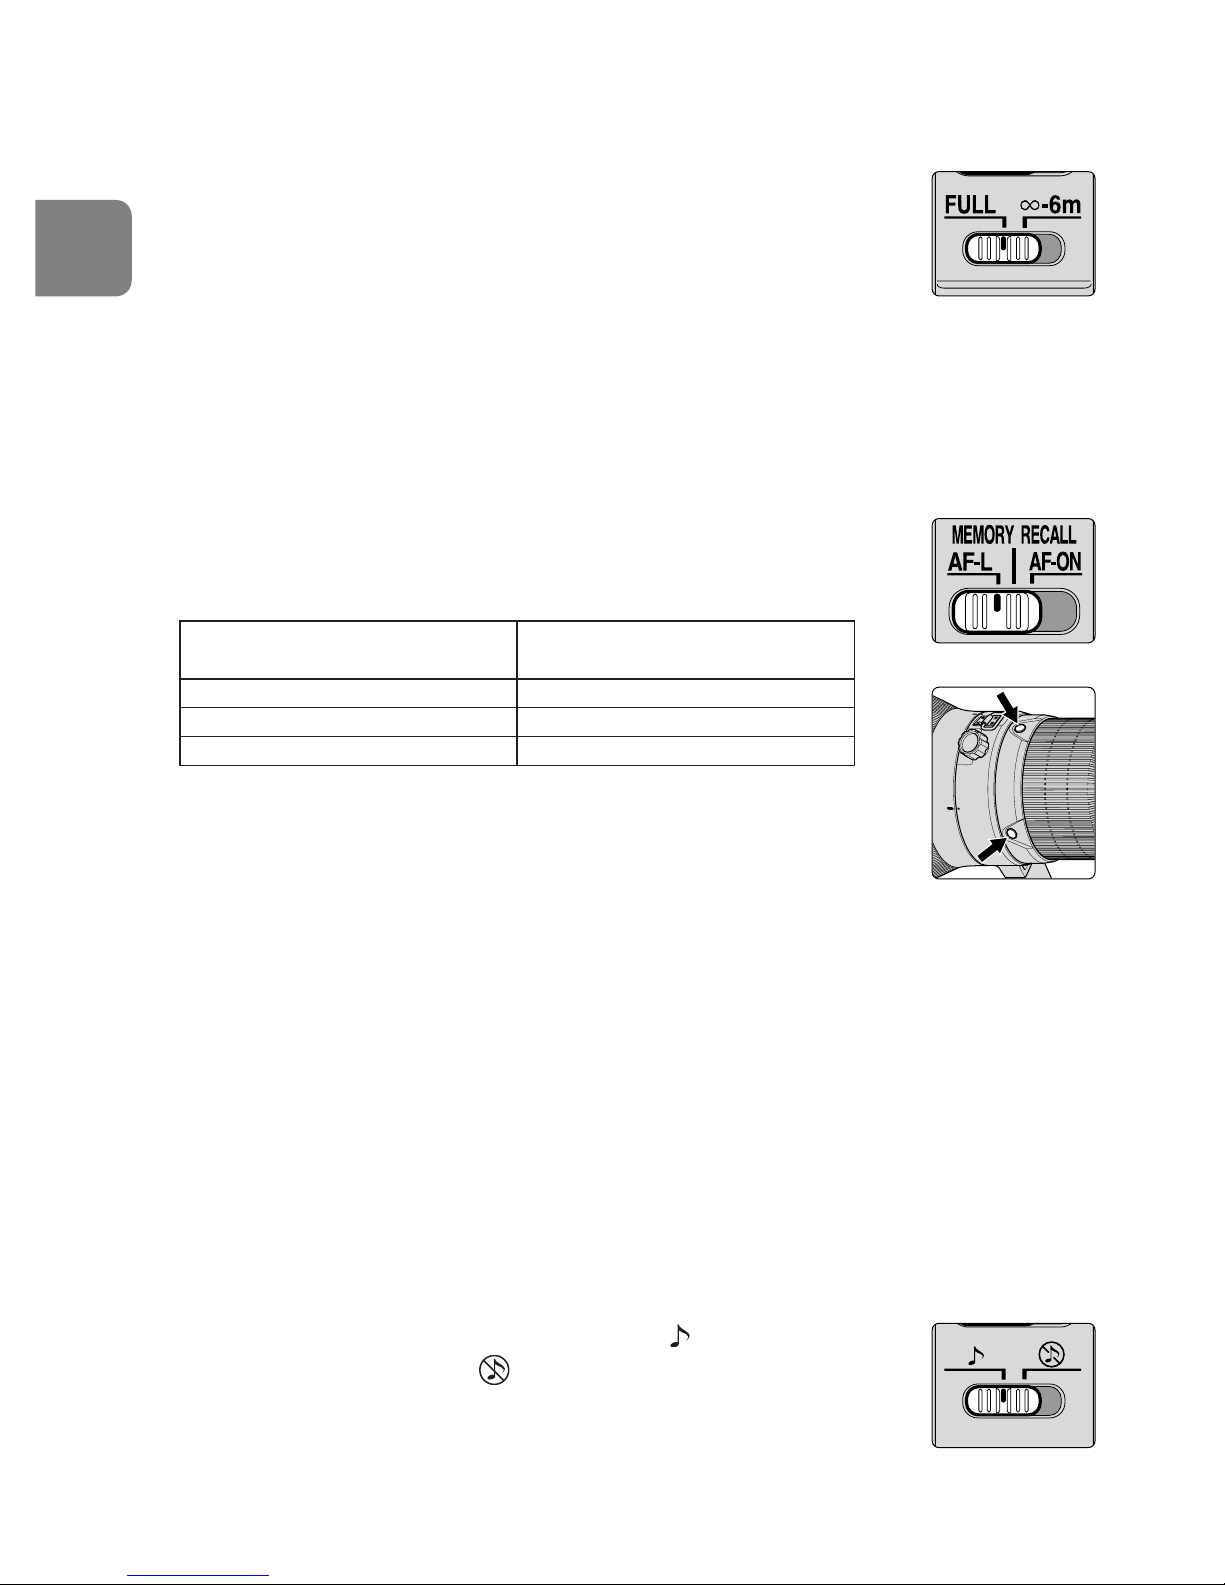
• With AF operation, if the subject is always more than 6m
(19.7 ft.) away, set the focusing limit switch (Fig. 2) to
“∞–6m” to reduce focusing time.
• If the subject is sometimes 6m (19.7 ft.) or closer, set it to
“FULL”.
• This function is only compatible with autofocus.
6. AF-L/MEMORY RECALL/AF-ON
Focus operation selection switch (AF-L/MEMORY RECALL/
AF-ON) and Focus operation button
• Depending on the position of the Focus operation selection
switch (Fig. 3), the function of the Focus operation button
(Fig. 4) varies.
• The position of the Focus operation buttons can be changed to
suit your preference. For more details on this change, contact
your nearest Nikon service center or representative office.
• Press one of four Focus operation buttons to activate each
function.
Using the Focus lock button
(See page 20 for usable cameras.)
1
Set the Focus mode switch to “A/M“ or “M/A“. (Fig. 1)
• This function is only compatible with autofocus.
2
Set the Focus operation selection switch (Fig. 3) to “AF-L“.
3
During autofocus, the focus can be locked while you are pressing the Focus
operation button. (Fig. 4)
• Focus is locked while either of these buttons is pressed.
• The AF-Lock function can be engaged on either the camera and lens.
MEMORY RECALL (See page 20 for usable cameras. Available during
autofocus and manual focus.)
• Set the sound monitor switch (Fig. 5) to “ “ to activate the
sound monitor; set it to “ “ to cancel.
• The following operation is with the sound monitor activated.
Fig. 3
Fig. 4
Position of Focus operation
selection switch
Function of Focus
operation button
AF-L Focus lock
MEMORY RECALL Memory recall
AF-ON AF start (AF-ON) on the lens
Fig. 5
Fig. 2
Page 25
25
En
1
Set the focus mode switch to “A/M“, “M/A“ or “M“. (Fig. 1)
2
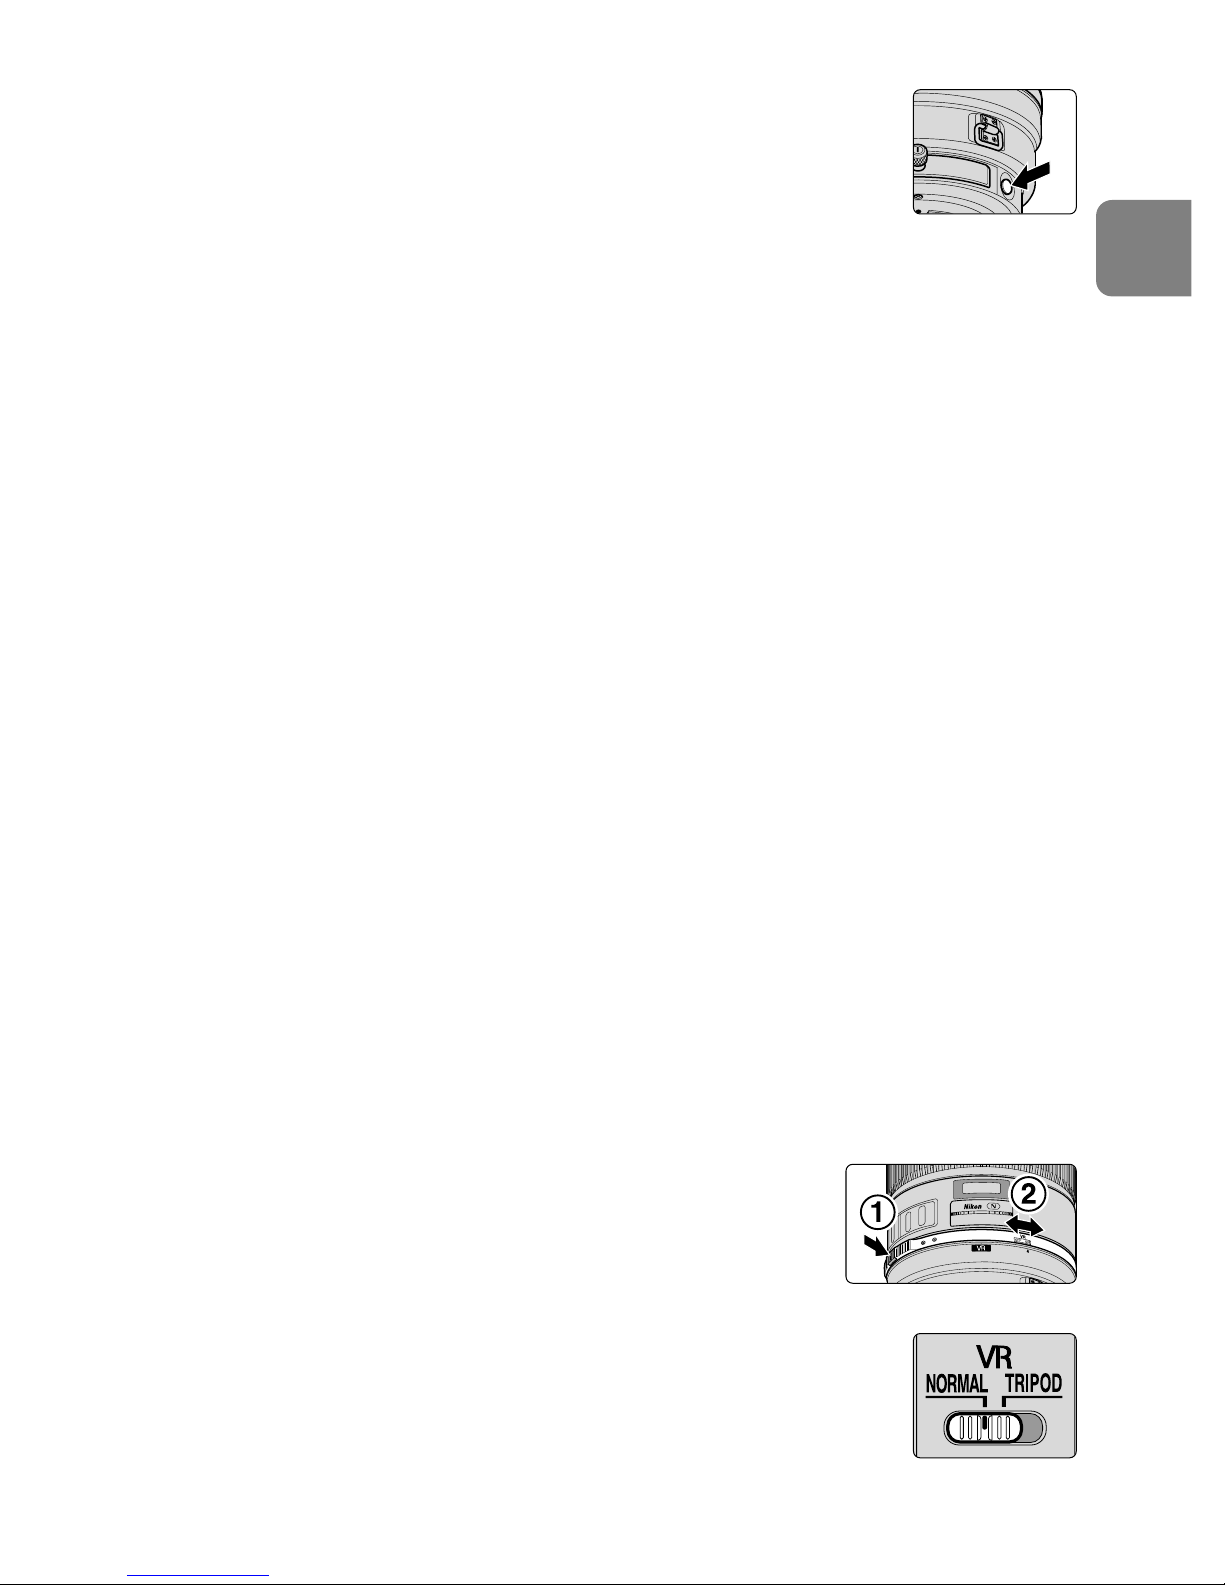
Focus on a subject that you want to memorize the focused
distance. Press the Memory Set button (Fig. 6) and a beep
sounds, indicating that the focused distance was stored in
memory.
• Memory set is possible regardless of the position of the Focus mode switch or
Focus operation selection switch.
• The focused distance is kept stored in the memory even when the camera is
turned off or the lens is detached from the camera.
Note: If the distance scale ring turns from right to left about 10 times when
setting, and at the same time one short beep and three long beeps sound,
perform Memory set again.
3
Set the Focus operation selection switch (Fig. 3) to “MEMORY RECALL“.
4
Press the Focus operation button (Fig. 4).
• While softly pressing the shutter release button, press the focus operation
button to recall the memorized focus distance.
5
Two beeps sound to indicate the focused distance was recalled. Then depress
the shutter release button all the way to take the picture.
Note: To take pictures at the memorized focused distance, fully depress the
shutter release button before removing your finger from the focus
operation button.
• In the A/M or M/A mode, the lens reverts from Memory recall to autofocus or
manual focus only when you remove your finger from the Focus operation
button and lightly depress the shutter release button.
AF-ON (See page 20 for usable cameras.)
1
Set the Focus mode switch (Fig. 1) to “A/M“ or “M/A“.
2
Set the Focus operation selection switch (Fig. 3) to “AF-ON“.
3
Press the focus operation button (Fig. 4) to take pictures.
• Autofocus is activated while you are pressing the Focus operation button.
7. Vibration reduction mode (See page 20 for usable cameras.)
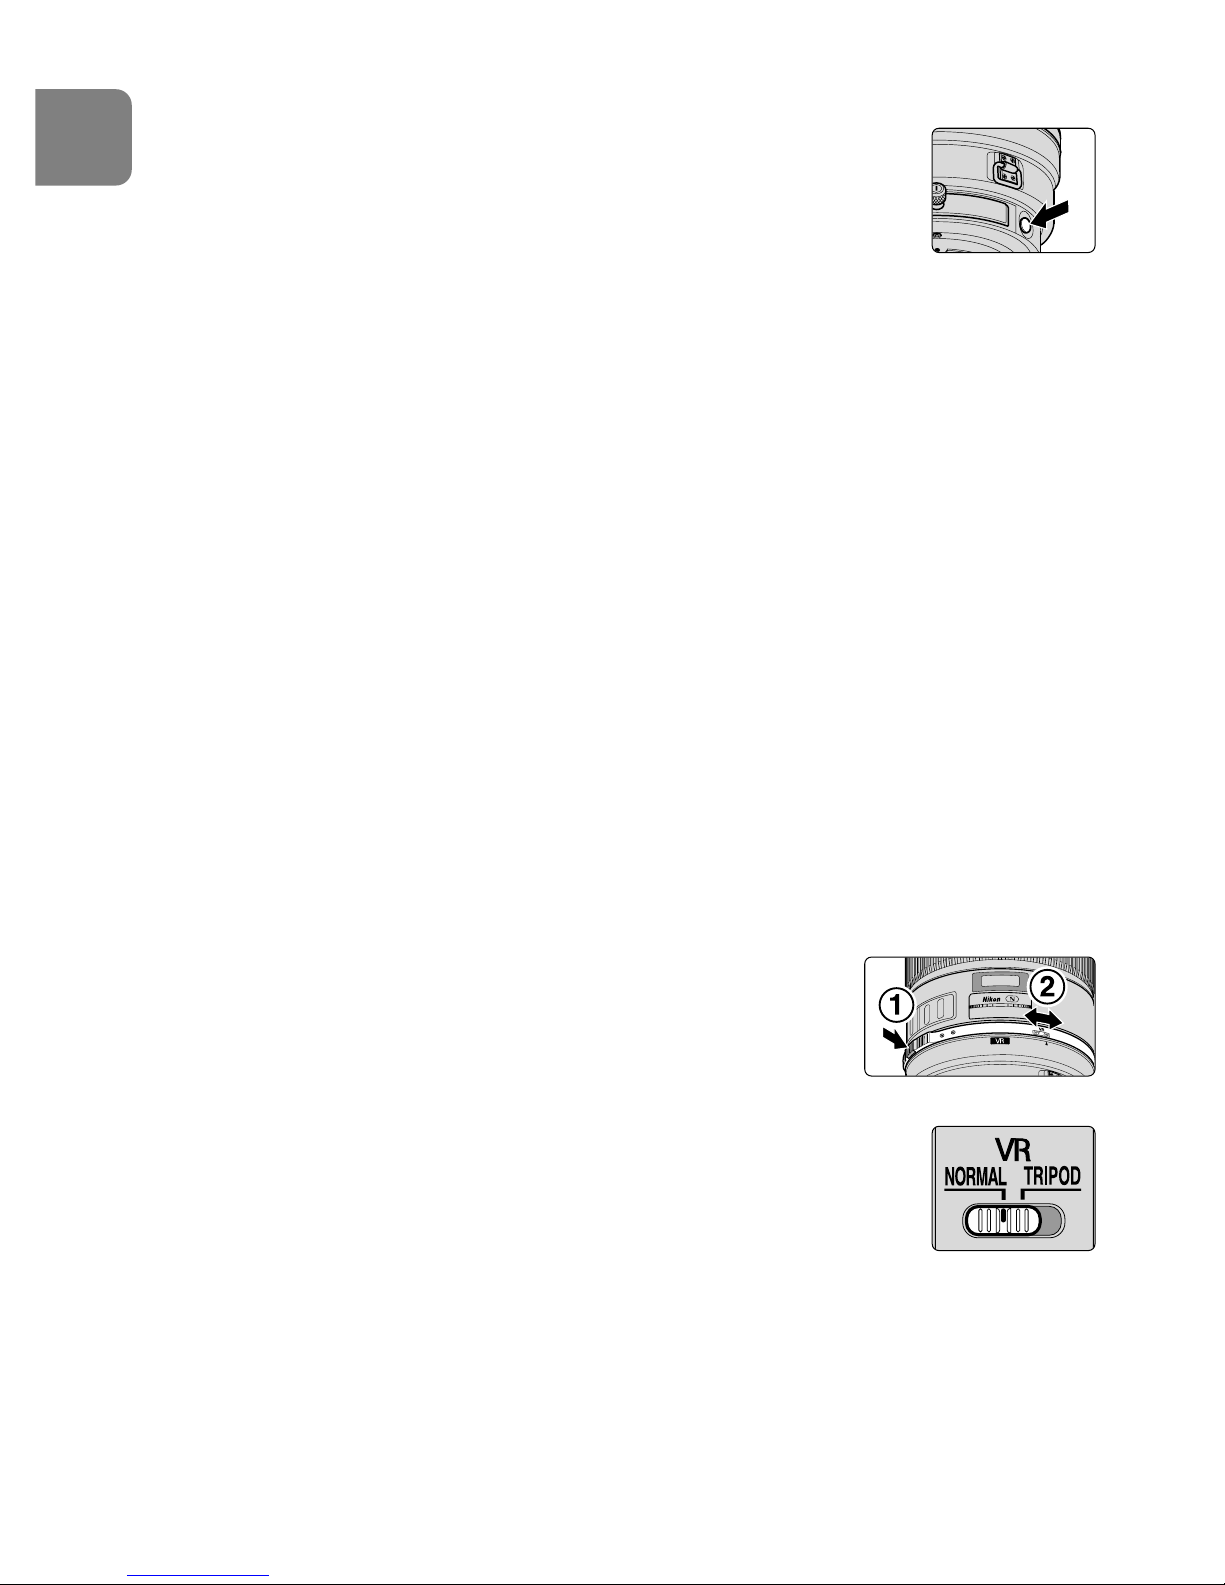
1
Set the vibration reduction ON/OFF ring switch to “ON“
2, while pressing the button on the ring switch 1.
(Fig. 7)
2
Set the vibration reduction mode switch (Fig. 8) to
“NORMAL“ or “TRIPOD“.
• Image vibration in the viewfinder can be reduced by softly
pressing the shutter release button, making auto/manual
focusing and exact framing of the subject easier.
Fig. 7
Fig. 8
Fig. 6
Page 26
26
En
Notes on using vibration reduction
• Wait until the image in the viewfinder stops vibrating before fully depressing
the shutter release button after you have lightly pressed the shutter release
button.
• Due to the characteristics of the vibration reduction mechanism, the image in
the viewfinder may become blurred after releasing the shutter.
• If you set the AF start (AF-ON) button (Fig. 4) to “ON“ on the camera or the
Focus operation button on the lens, vibration reduction will not operate.
• Set the vibration reduction mode switch to “TRIPOD“ to reduce camera shake
and image shake in the viewfinder while using a tripod. Very slight camera
shake may fail to activate the vibration reduction system. Conversely, the VR
system may cause camera shake in the lens. In this case, vibration reduction
should be turned off. When using a tripod with an untightened head or a
monopod, select NORMAL mode.
• When taking panning shots, be sure to set the vibration reduction mode
switch (Fig. 8) to “NORMAL“.
• If you move the camera in a wide arc when panning, vibration in the direction
of that movement is not affected. For example, if you pan the camera
horizontally, only vibration in the vertical direction is reduced, making smooth
pans much easier.
• Do not turn the camera power OFF or remove the lens from the camera while
the vibration reduction mode is in operation. (Otherwise, the lens may emit a
chattering noise if the camera is shaken. This is not a malfunction. Turn the
camera power ON again to correct this.)
• With F80-Series/N80-Series, F75-Series/N75-Series, F65-Series/N65-Series,
D300, D200, D100, D80, D70-Series, D50 and D40-Series cameras, vibration
reduction does not work while the built-in flash is recycling.
8. Depth of field
• Approximate depth of field can be determined by
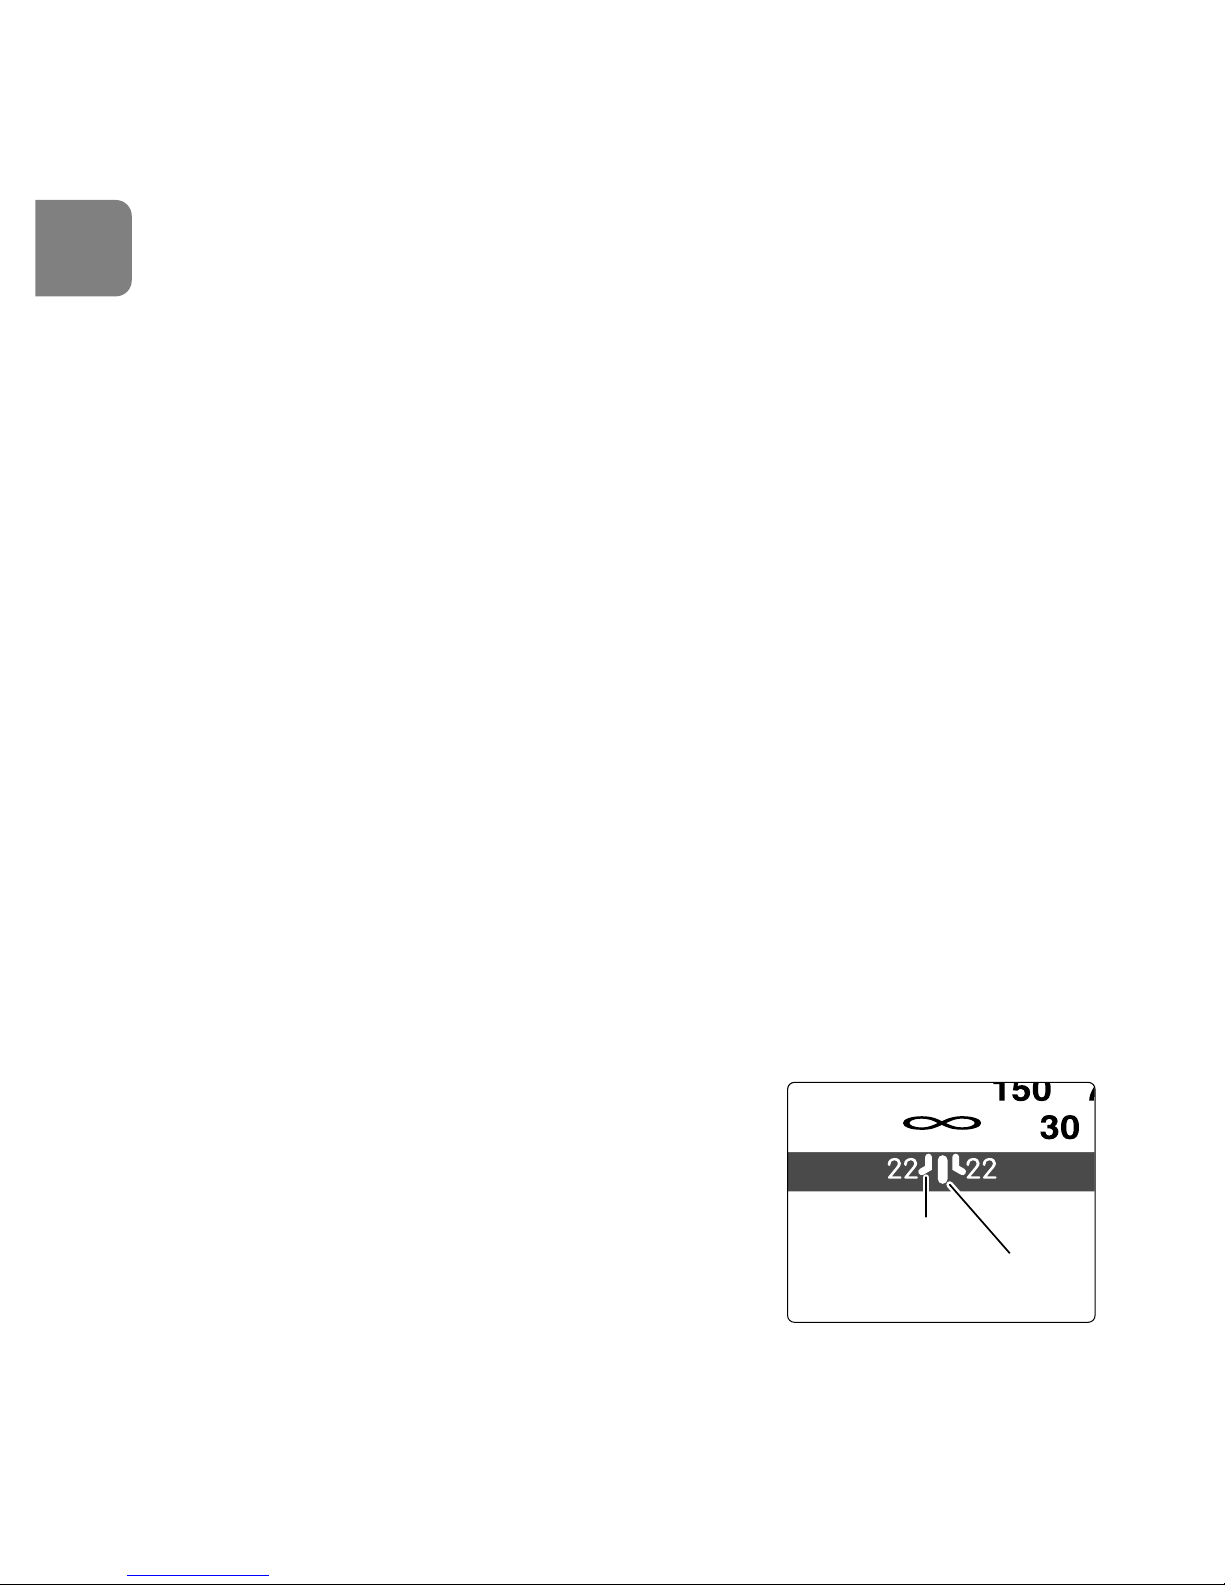
checking the depth-of-field scale. (Fig. 9)
• If your camera has a depth of field preview (stopdown) button or lever, depth of field can be
observed while looking through the camera
viewfinder.
• For more information, see p. 192.
9. Setting the aperture
• Because this lens does not have an aperture ring, you must set the aperture on
the camera.
Depth-of-field
scale
Distance index
line
Fig. 9
Page 27
27
En
10. Built-in rotating tripod collar
• When shooting vertical pictures, loosen the tripod collar lock screw by turning
it counterclockwise, rotate the lens to an appropriate position, then tighten
the screw clockwise.
• When holding the camera by its handgrip and rotating the camera with the
lens in its tripod collar, your hand may bump into the tripod, depending on
the tripod in use.
Monopod (supplied accessory)
• The tripod collar can be exchanged for a monopod collar by removing the
tripod collar lock screw.
• After changing the tripod collar, make sure the screw is fully tightened. Failure
to fully tighten the screw could lead to accidents or damage to the lens and
camera.
For details on this procedure, contact your nearest Nikon service center or
representative office.
11. Lens hood HK-33-1 and HK-33-2
Two-part lens hoods (HK-33-1 for attachment to the front of the lens and
HK-33-2 for attachment to the front of HK-33-1) are provided.
Using the HK-33-1: First, loosen the lens hood screw on the HK-33-1, slip
HK-33-1 onto the front of the lens, then tighten the screw.
Attaching the HK-33-2: Loosen the lens hood screw on the HK-33-2, slip
HK-33-2 onto the front of the HK-33-1, then tighten the screw.
Storing the lens hoods: First, reverse the HK-33-2, and slip it back onto the
HK-33-1. Then reverse the HK-33-1 with the HK-33-2 attached, and slide both
back onto the front of the lens.
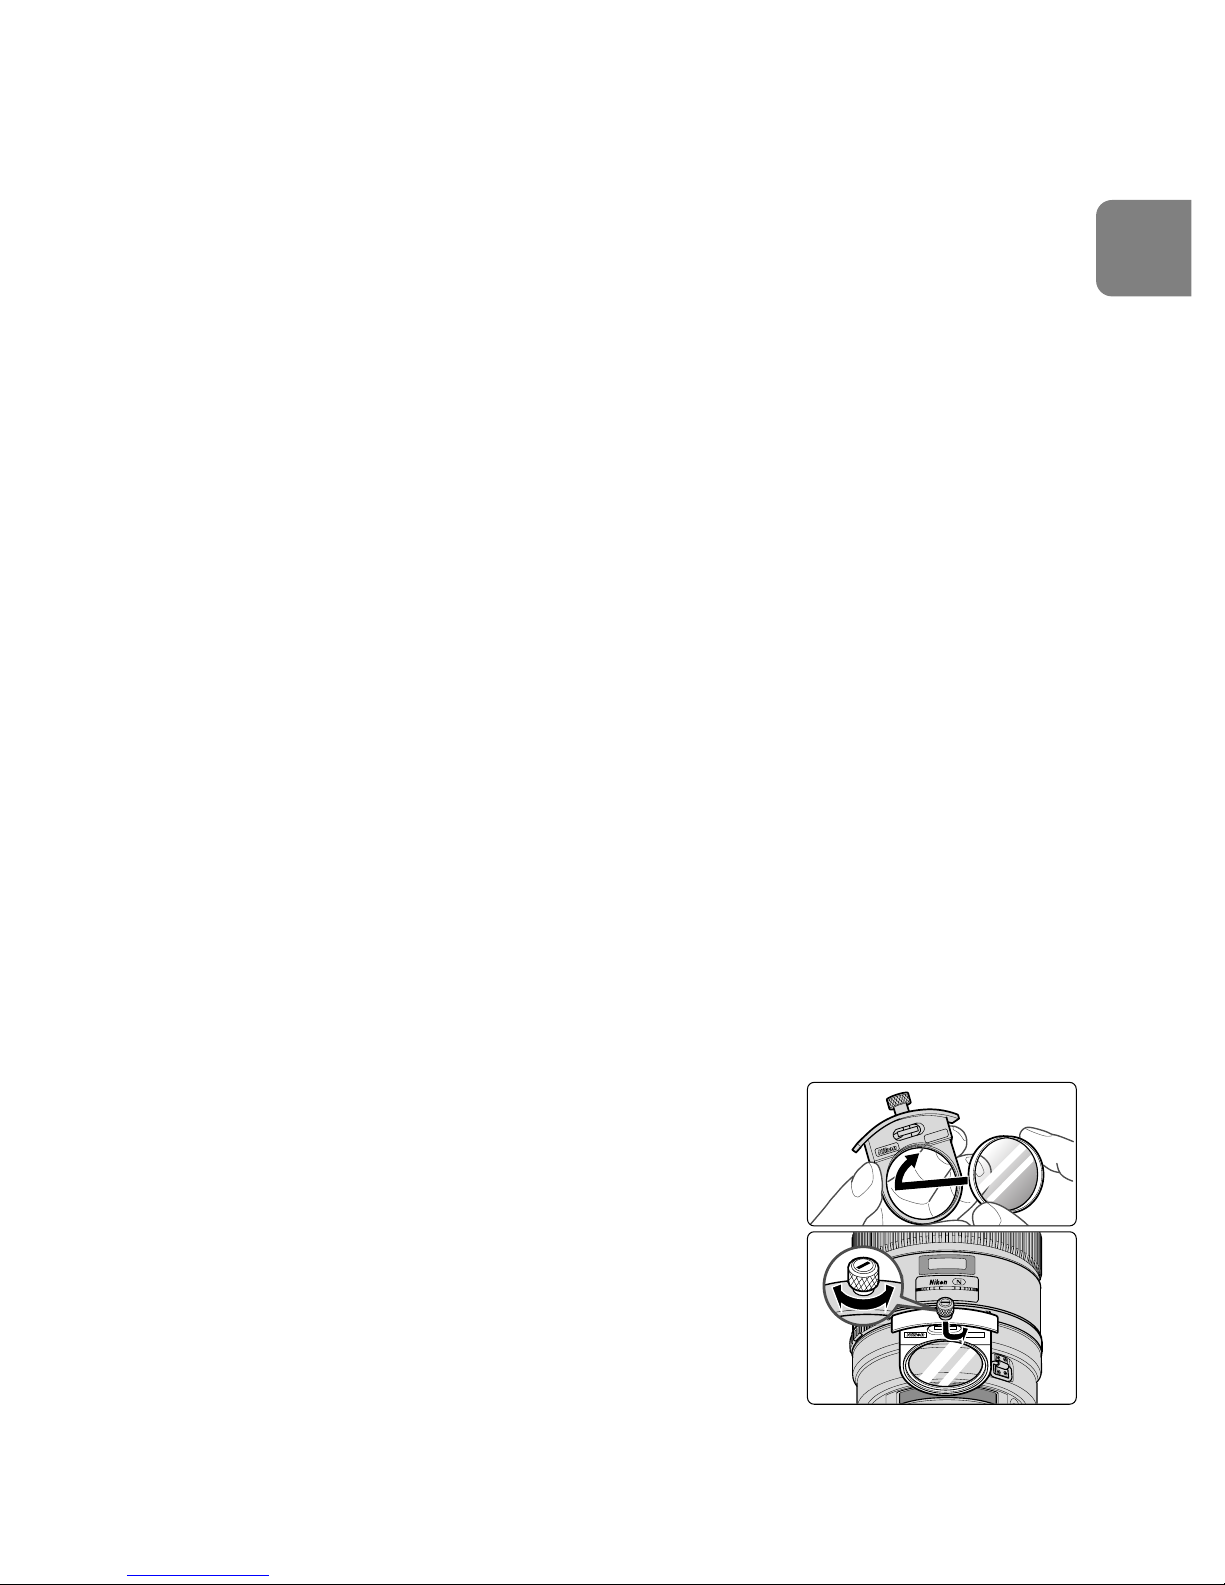
12. Slip-in filter holder
• Always use a (52mm screw-in) filter. A 52mm screwin NC filter is attached to the filter holder when
shipped from the factory.
1
Screw a filter into the side of the filter holder marked
with the words “Nikon” and “JAPAN”. (Fig. 10)
2
Press down on the slip-in filter holder knob, and turn
counterclockwise until the white line on the knob is
at a right angle to the axis of the lens.
• The slip-in filter holder can be attached either facing
lens or camera side without having any effect on your
pictures.
Fig. 10
Page 28

28
En
C-PL1L slip-in circular polarizing filter (optional)
• Blocks reflections from nonmetallic surfaces such as glass and water
• The focus point of a C-PL1L slip-in circular polarizing filter differs from that of
a 52mm screw-in filter. The distance scale is shifted from the correct position.
The closest focused distance is extended slightly.
• The memory set position may change slightly when using focus preset. Attach
the C-PL1L filter before using the memory set function.
13. Recommended focusing screens
Various interchangeable focusing screens are available for certain Nikon SLR
cameras to suit any picture-taking situation. The ones recommended for use with
this lens are:
◎
: Excellent focusing
○
: Acceptable focusing
Slight vignetting or moiré patterns appear in the viewfinder, but not on the
film.
―
: Not available.
( ): Indicates degree of exposure compensation needed (Center-Weighted
metering only). For F6 cameras, compensate by selecting “Other screen“ in
Custom Setting “b6: Screen comp.“ and setting the EV level to -2.0 to +2.0
in 0.5 EV steps. When using screens other than type B or E, “Other screen“
must be selected even when the required compensation value is “0“ (no
compensation required). For F5 cameras, compensate using Custom Setting
#18 on the camera body. For F4-Series cameras, compensate using the
Exposure Compensation Dial for the focusing screen.
See instruction manual of the camera body for more details.
Blank box means not applicable. Since type M screen can be used for both
macrophotography at a 1:1 magnification ratio and for photomicrography, it has
different applications than other screens.
Screen
Camera
F5+DP-30
◎
(+0.5)
◎―
◎―
―
―
―
―
―◎―◎
―◎―◎
G1
G2
G4G3BCE
EC-B
EC-E
FJKLMPU
F4+DP-20
F4+DA-20
F5+DA-30
A
◎◎◎
◎
◎
◎◎
◎
◎
◎
◎
◎
◎◎
―
―
◎◎
◎
○
○
○
(+0.5)
○
(–0.5)
○
(–0.5)
◎
◎◎◎
◎
◎
◎
F6
――― ― ―
―
―
―◎◎ ◎◎― ――◎ ◎
◎
◎
◎
Page 29

29
En
• For F5 cameras, only EC-B, EC-E, B, E, J, A, L focusing screens are usable in
Matrix Metering.
• When using the B and E focusing screens in cameras other than those listed
above, refer to the columns for the B and E screens.
14. Lens care
• Clean the lens surfaces with a blower brush. To remove dirt and smudges, use
a soft, clean cotton cloth or lens tissue moistened with ethanol (alcohol) or
lens cleaner. Wipe in a circular motion from center to outer edge, taking care
not to leave traces or touch other parts of the lens.
• Never use thinner or benzene to clean the lens as this might damage it, result
in a fire, or cause health problems.
• When the lens is not in use, attach the lens cap to protect the front lens
element.
• When storing the lens in its lens case, attach both front and rear caps.
• When the lens will not be used for a long time, store it in a cool, dry place to
prevent mold. Also store the lens away from direct sunlight or chemicals such
as camphor or naphthalene.
• Do not get water on the lens or drop it in water as this will cause it to rust and
malfunction.
• Reinforced plastic is used for certain parts of the lens. To avoid damage, never
leave the lens in an excessively hot place.
15. Supplied accessories
• Heavy duty case CT-404 • Slip-on front lens cap • Rear lens cap LF-1 • Lens
hood HK-33 • Dedicated filter holder* • 52mm screw-in NC filter • Strap LN-1
• Monopod collar
* If dedicated accessories are broken or missing, contact your nearest Nikon
service center or representative office as they are not available at general
shops.
16. Optional accessories
• Semi-soft case CL-L2 • 52mm screw-in filters (except circular polarizing filter II)
• Slip-in circular polarizing filter C-PL1L • AF-S Teleconverters (TC-14EII/
TC-17EII/TC-20EII)
Page 30

30
En
17. Specifications
Type of lens: G-type AF-S Nikkor lens having built-in CPU and Nikon
bayonet mount. Special vibration reduction (VR)
mechanism incorporated
Focal length: 400mm
Maximum aperture: f/2.8
Lens construction: 14 elements in 11 groups (3 ED glass and 1 Nano
Crystal Coat deposited lens elements), as well as
1 protective glass
Picture angle: 6°10’ with 35 mm (135) format Nikon film-SLR cameras
and Nikon FX format digital SLR cameras
4° with Nikon DX format digital SLR cameras;
5° with IX240 system cameras
Distance information: Output to camera body
Focusing: Nikon Internal Focusing (IF) system (utilizing an internal
Silent Wave Motor); manually via separate focus ring.
Vibration reduction: Lens-shift method using voice coil motors (VCMs)
Shooting distance scale: Graduated in meters and feet from 2.8 m (10 ft) to
infinity (∞)
Closest focusing distance:
2.9 m (9.5 ft) in AF mode, 2.8 m (9.2 ft) in MF mode
No. of diaphragm blades
: 9 pcs. (rounded)
Diaphragm: Fully automatic
Aperture scale: f/2.8—f/22
Exposure measurement: Via full-aperture method with cameras with CPU
interface system
Focusing limit switch: Provided; two ranges available: FULL (∞–2.9 m), or
∞–6m
Tripod collar: Built-in. Rotatable through 360°, lens rotating position
index at 90°. Tripod collar can be exchanged for a
monopod collar
Dimensions: Approx. 159.5 mm dia. x 368.0 mm extension from the
camera's lens mounting flange
Weight: Approx. 4,620 g (10.2 lbs)
Specifications and design are subject to change without notice.
Page 31

31
En
Page 32

32
De
Nehmen Sie das Objektiv nicht auseinander
Beim Berühren der Innenteile von Kamera oder Objektiv droht Verletzungsgefahr.
Überlassen Sie Reparaturen unbedingt ausschließlich qualifizierten Technikern.
Kommt es durch einen heftigen Stoß (z. B. Fall auf den Boden) zu einem Bruch
von Kamera oder Objektiv, so trennen Sie zunächst das Produkt vom Stromnetz
bzw. entnehmen die Batterie(n) und geben es dann an eine autorisierte NikonServicestelle zur Überprüfung ab.
Schalten Sie die Kamera bei einer Fehlfunktion sofort aus
Entnehmen Sie bei Entwicklung von Rauch oder ungewöhnlichem Geruch durch
Kamera oder Objektiv sofort die Akkus/Batterien. Gehen Sie dabei dabei
vorsichtig vor, denn es besteht Verbrennungsgefahr. Bei einem Weiterbetrieb
unter diesen Umständen droht Verletzungsgefahr. Geben Sie das Gerät nach
Entnahme der Akkus/Batterien bzw. nach Trennung vom Netzadapter an eine
autorisierte Nikon-Servicestelle zur Überprüfung ab.
Verwenden Sie Kamera oder Objektiv nicht in der Nähe von
brennbarem Gas
In der Nähe von brennbarem Gas sollten Sie niemals elektronische Geräte in
Betrieb nehmen. Es besteht Explosions- und Brandgefahr.
Schauen Sie niemals durch Objektiv oder Sucher in die Sonne
Beim Betrachten der Sonne oder anderer starker Lichtquellen durch Objektiv oder
Sucher droht eine permanente Schädigung des Sehvermögens.
Achten Sie darauf, dass Kamera und Zubehör nicht in die Hände
von Kindern gelangen
Es ist unbedingt dafür zu sorgen, dass Kleinkinder keine Batterien oder andere
kleine Teile in den Mund nehmen können.
Hinweise für sicheren Betrieb
ACHTUNG
Page 33

33
De
Beachten Sie beim Umgang mit Kamera und Objektiv unbedingt
die folgenden Vorsichtmaßnahmen:
• Halten Sie Kamera oder Objektiv stets trocken. Andernfalls droht Brand- oder
Stromschlaggefahr.
• Handhaben oder berühren Sie die Komponente keinesfalls mit nassen Händen.
Andernfalls droht Stromschlaggefahr.
• Achten Sie bei Gegenlichtaufnahmen darauf, dass sich die Sonne nicht im
Bildfeld befindet.
Das Sonnenlicht könnte in gebündelter Form in das Objektivgehäuse geleitet
werden und einen Brand verursachen. Auch wenn sich die Sonne zu nahe am
Bildfeld befindet, kann es zu einem Brand kommen.
• Bringen Sie vor einem längeren Nichtgebrauch des Objektivs den vorderen und
hinteren Deckel an und bewahren das Objektiv geschützt vor direkter
Sonnenlichteinwirkung auf. Andernfalls droht Brandgefahr wegen möglicher
Fokussierung von Sonnenlicht auf Gegenstände.
Page 34
34
De
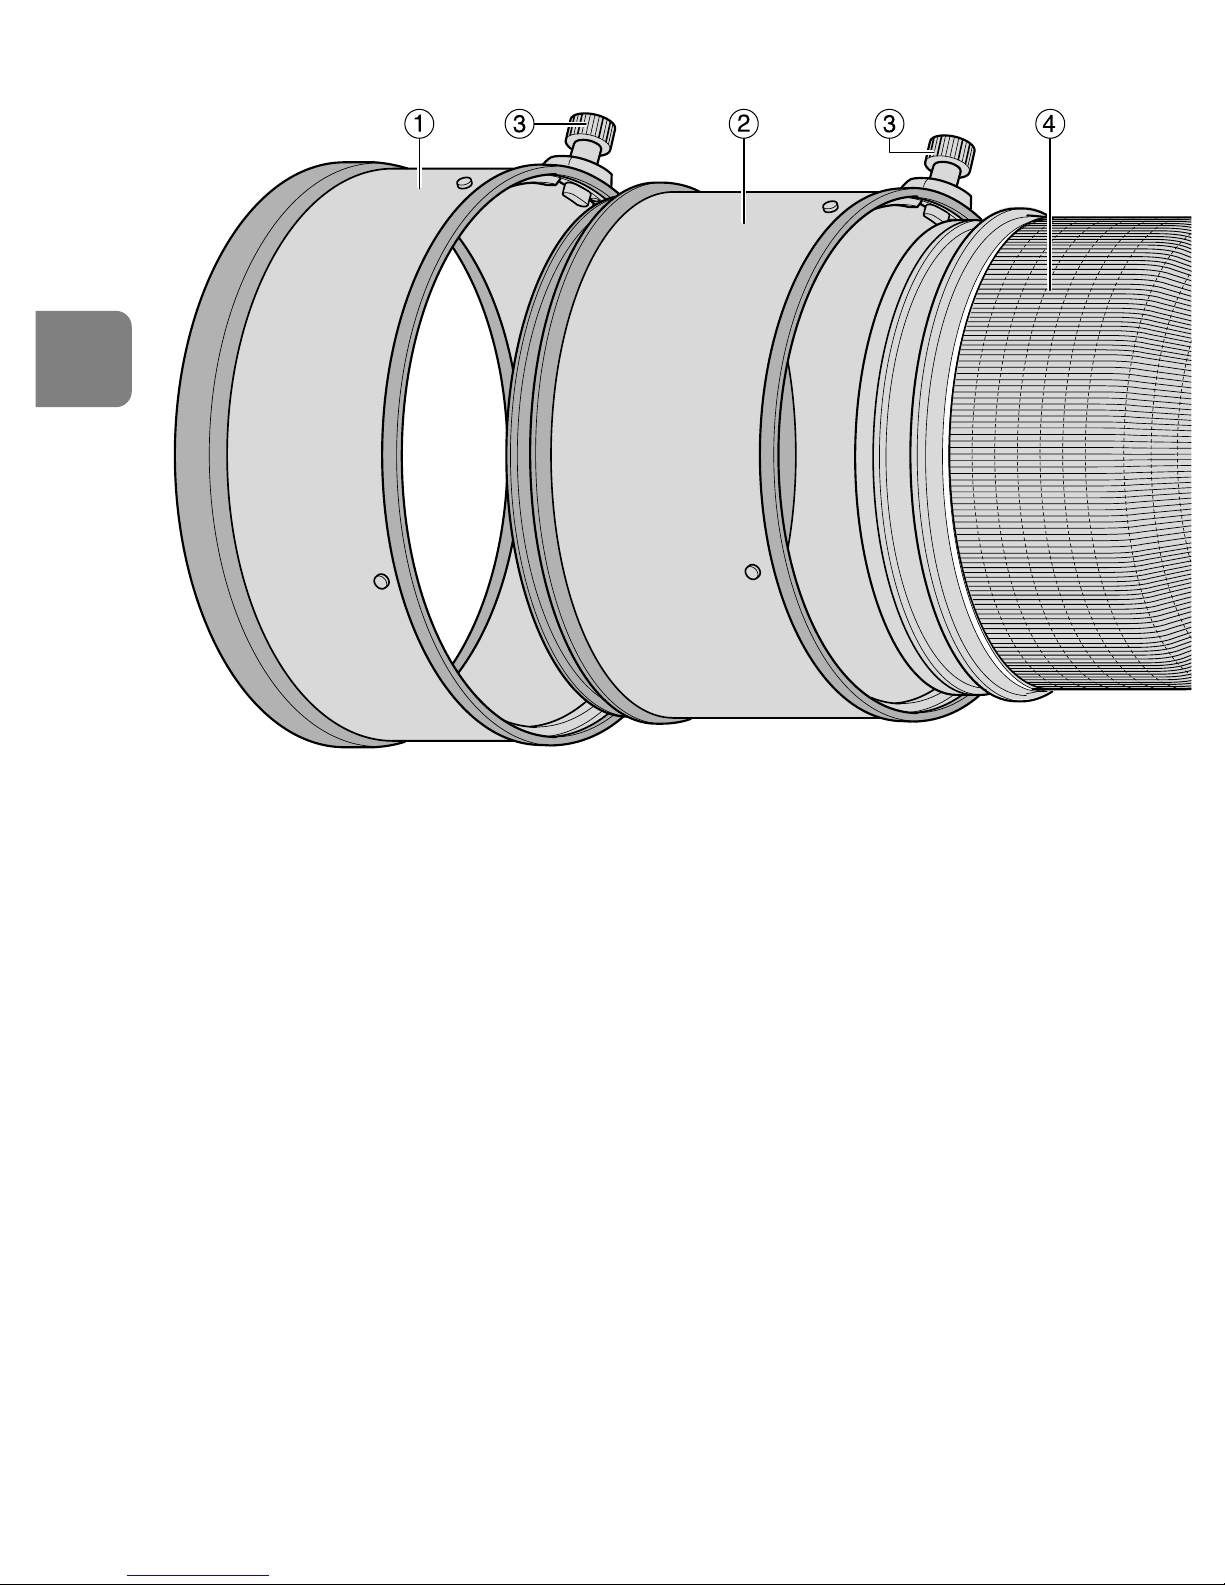
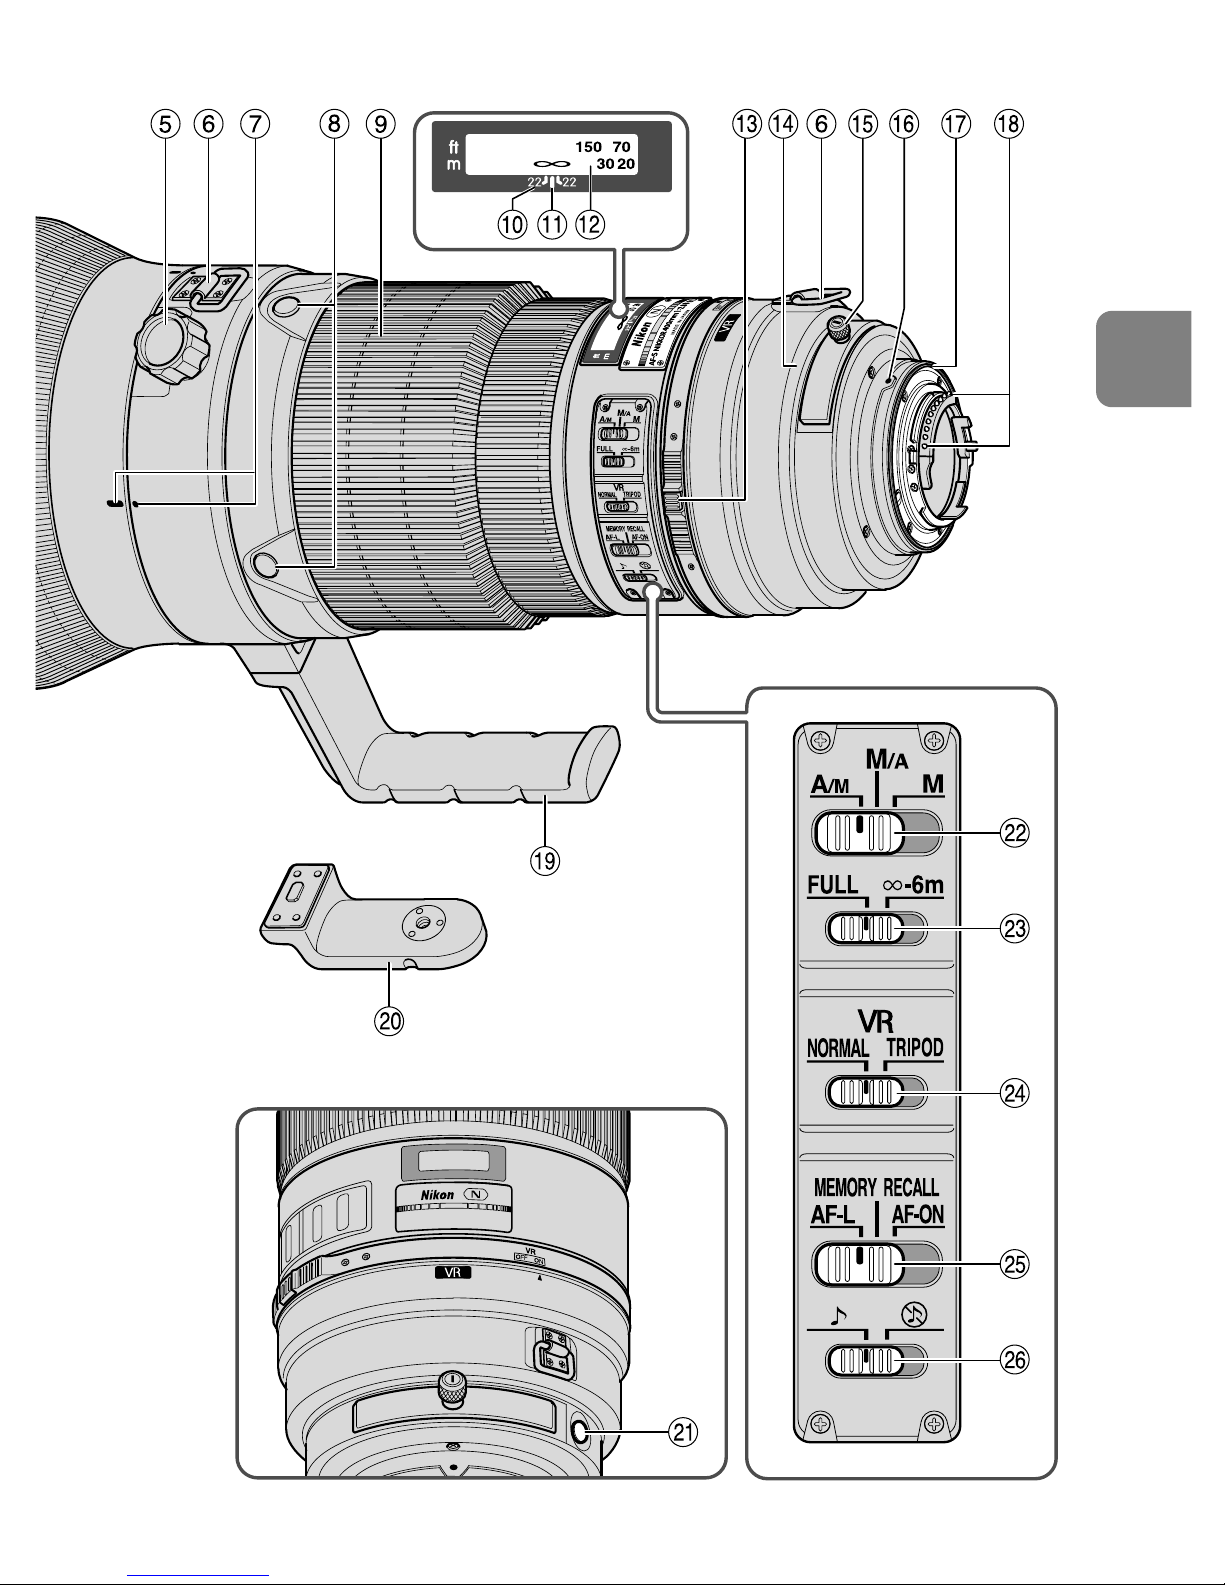
1 Gegenlichtblende HK-33-2 (S. 43)
2 Gegenlichtblende HK-33-1 (S. 43)
3 Halteschraube der Gegenlichtblende
(S. 43)
4 Gummigriff
5 Feststellschraube des Stativanschlusses
(S. 43)
6 Ösen für den Schulterriemen
7 Positionsindex für Objektivdrehung
8 Fokus-Betriebstaste (Fokus-Sperre/
MEMORY RECALL/AF Start) (S. 40)
9 Entfernungseinstellring (S. 39)
! Schärfentiefe-Skala (S. 42)
" Entfernungs Indexlinie (S. 42)
# Entfernungsskala
$ ON/OFF-Ringschalter für
Vibrationsreduktion (S. 41)
% Einsetzbarer Filterhalter (S. 43)
& Knopf für einsetzbaren Filterhalter
(S. 43)
( Objektivindex
) Gummiring der Objektivfassung
(S. 38)
~ CPU-Kontakte (S. 38)
+ Eingebauter Stativanschluß (S. 43)
, Einbeinstativanschluß (austauschbar)
(S. 43)
- Speichertaste (S. 41)
. Fokus-Modusschalter (S. 39)
/ Fokussier-Begrenzungsschalter
(S. 40)
: Bildstabilisator-Schalter (S. 41)
; Fokus-Betriebswahlschalter (AF-L/
MEMORY RECALL/AF-ON) (S. 40)
< Ton-Monitorschalter (S. 40)
1. Nomenklatur ( ): Seitennummer
Page 35
35
De
Page 36

36
De
2. Verwendbare Kameras und verfügbare Funktionen
Möglicherweise gibt es hinsichtlich der verfügbaren Funktionen Einschränkungen.
Informationen hierzu finden Sie in der Bedienungsanleitung zu Ihrer Kamera.
*1 P umfaßt AUTO (General-Purpose Program) und Vari-Program System.
*2 Manueller Betrieb (M) ist nicht möglich.
*3 Ist der Fokus-Betriebswahlschalter in Stellung AF-ON, so wird der Autofokus
aktiviert, sobald bei angetipptem Auslöser die Fokus-Betriebstaste gedrückt
wird.
*4 Drücken Sie bei angetipptem Auslöser die Speichertaste oder Fokus-
Betriebstaste.
• Wird dieses Objektiv bei Kameras verwendet, die nicht mit Vibrationsreduktion
kompatible sind, ist die Funktion Vibrationsreduktion zu deaktivieren (ON/OFFRingschalter auf OFF). Insbesondere bei der Kamera Pronea 600i wird die
Batterie u.U. schnell erschöpft, wenn dieses Schalter auf ON bleibt.
Kameras
Vibrationsreduzierung
Autofokus
Fokusverriegerung
Belichtungsfunktion
P*
1
SAM
D3, D2-Serie, D1-Serie,
D300, D200, D100, D80,
D70-Serie, D50,
D40-Series
F6, F5, F100, F80-Serie,
F75-Serie, F65-Serie
Pronea 600i,
Pronea S*2
F4-Serie, F90X, F90-Serie,
F70-Serie
F60-Serie, F55-Serie,
F50-Serie,
F-401x, F-401s, F-401
F-801s, F-801, F-601M
F3AF, F-601, F-501,
Nikon MF Kameras
(außer F-601M)
҂҂҂
*
3
҂
҂
*
3
*
4
҂҂
҂҂҂҂҂
҂҂҂҂҂
҂
҂
҂
҂
҂
҂
҂
҂
Speicheraufruf
AF-Start
am
Objektiv
Funktion
: Möglich : Möglich mit bestimmen Einschränkungen ҂: Nicht möglich
Page 37

37
De
3. Einführung
Vielen Dank für das Vertrauen in unsere Produkte, das Sie uns mit dem Kauf des
IF-Objektivs AF-S NIKKOR 400mm f/2,8G ED VR. IF erwiesen haben. Es handelt sich
um ein Hochleistungsobjektiv mit spezieller Vibrationsreduktion (VR) und schneller
interner Fokussierung (IF). Außerdem wird der Fokussiermechanismus durch einen
Silent-Wave-Motor (S) betrieben. Fokus-Voreinstellung ist ebenfalls verfügbar.
Wichtigste Ausstattungsmerkmale
Zwei AF-Betriebsarten (S. 39)
Der Autofokus kann durch Einstellen des Fokus-Modusschalters auf “A/M” bzw.
“M/A” und manuelles Fokussieren mit dem Einstellring außer Kraft gesetzt werden.
M/A: Der Autofokus wird durch manuelles Fokussieren mit dem Einstellring
außer Kraft gesetzt. Diese Betriebsart sollte für die Feinabstimmung des
Fokus verwendet werden.
A/M: Der Autofokus wird durch manuelles Fokussieren mit dem Einstellring
außer Kraft gesetzt, die Empfindlichkeit bei der Einstellringerkennung ist
jedoch wesentlich geringer als in der Betriebsart “M/A”. Verwenden Sie
diesen Modus, wenn Sie darauf achten müssen, die AF-Einstellung nicht
versehentlich durch Berühren des Einstellrings zu ändern.
Begrenzen der Autofokusreichweite (S. 40)
Die Fokussierungszeit kann durch Festlegen von Fokusgrenzen eingeschränkt werden.
Wenn sich ein Motiv beispielsweise mindestens 6 m entfernt befindet, stellen Sie den
Fokussier-Begrenzungsschalter auf “∞–6 m”.
Fokus-Betriebswahlschalter (AF-L/MEMORY RECALL/AF-ON) (S. 40)
Fokusentfernungen können während des Autofokus (AF-L) gesperrt und
gespeichert werden. Anschließend können die Einstellungen über die Taste
“MEMORY RECALL” abgerufen werden. Der Autofokus wird am Objektiv wieder
gestartet, indem der Moduswahlschalter auf “AF-ON” gestellt wird.
Bildstabilisator* (VR II) (S. 41)
NORMAL: Verringert Verwackelungsunschärfen beim Freihandbetrieb oder bei
Verwendung eines Einbeinstativs. In diesem Modus können Aufnahmen mit
um ca. 4 Stufen längeren Verschlusszeiten als bei einem Objektiv ohne
Bildstabilisator gemacht werden. Dadurch stehen mehr Verschlusszeiten zur
Verfügung, und Aufnahmen im Freihandbetrieb oder mit Einbeinstativ werden
stark vereinfacht. Auch Kameraschwenks sind möglich.
TRIPOD: Empfohlener Modus zum Verringern von Verwacklungsunschärfen bei
Verwendung eines Stativs. Mit einem Supertele-Objektiv können selbst dann
Verwacklungsunschärfen entstehen, wenn die Kamera auf einem Stativ
aufgesetzt ist. Im Modus “TRIPOD” werden Verwacklungsunschärfen bei
Aufnahmen mit Stativ verringert, besonders bei Verschlusszeiten zwischen
1/15 und 1 s. Auch verwackelte Darstellungen im Sucher werden reduziert.
* Bezogen auf Nikon-Testbedingungen. Die genauen Auswirkungen des Bildstabilisators
sind von der Einzelperson und von den Aufnahmeumständen abhängig.
Page 38
38
De
Optimale Belichtungssteuerung in Verbindung mit Nikon-Kameras mit 3D-
Matrix-Messung, weil die Aufnahmedistanz vom Objektiv an die Kamera
übertragen wird.
Drei ED-Linsenelemente (Extra-low Dispersion) sorgen für scharfe Bilder, die
praktisch frei von Farbsaumbildung sind. Neun Blendenlamellen sorgen für
eine nahezu kreisrunde Blendenöffnung, so daß außerhalb des
Schärfenbereichs vor und hinter dem Motiv liegende Elemente in
ansprechende Unschärfe getaucht werden.
Die Nano Crystal Coat-Vergütung auf bestimmten Linsenelementen ermöglicht die
Reproduktion feiner und klarer Bilder unter allen Aufnahmebedingungen, von
Außenaufnahmen bei Sonnenschein bis zu Innenaufnahmen mit Spot-Beleuchtung.
Die Objektiv-Schutzscheibe besteht nicht wie üblich aus Flachglas, sondern aus
Meniskusglas.
Mindestfokussierabstand von 2,9 m (AF) bzw. 2,8 m (MF) ist möglich.
Achtung!
• Fassen Sie die Kamera nicht an ihrem Gehäuse, wenn das Objektiv angebracht
ist, da sie sonst beschädigt werden kann. Halten Sie beim Transport unbedingt
sowohl die Kamera als auch das Objektiv.
• Bringen Sie unbedingt ein 52-mm-Einschraubfilter am einsetzbaren Filterhalter an.
• Halten Sie die CPU-Kontakte peinlich sauber, und schützen Sie sie vor Beschädigung!
• AF-I/AF-S Telekonverter TC-14E/TC-14EII/TC-17EII/TC-20E/TC-20EII können
verwendet werden.
• Bei Anbringen an Nikon Digital-SLR-Kameras (Nikon DX-Format), wie etwa der
Modelle der D2-Serie sowie Modell D50, hat das Objektiv einen Bildwinkel von
4° und eine 35-mm-Äquivalentbrennweite von ca. 600mm. (Der Bildwinkel
des Objektivs beträgt 6°10’ bei 35mm Brennweite.)
• Wenn der Gummiring der Objektivfassung beschädigt ist, bringen Sie das Objektiv
zum nächsten Nikon-Vertragshändler bzw. zu einer Nikon-Reparaturwerkstatt.
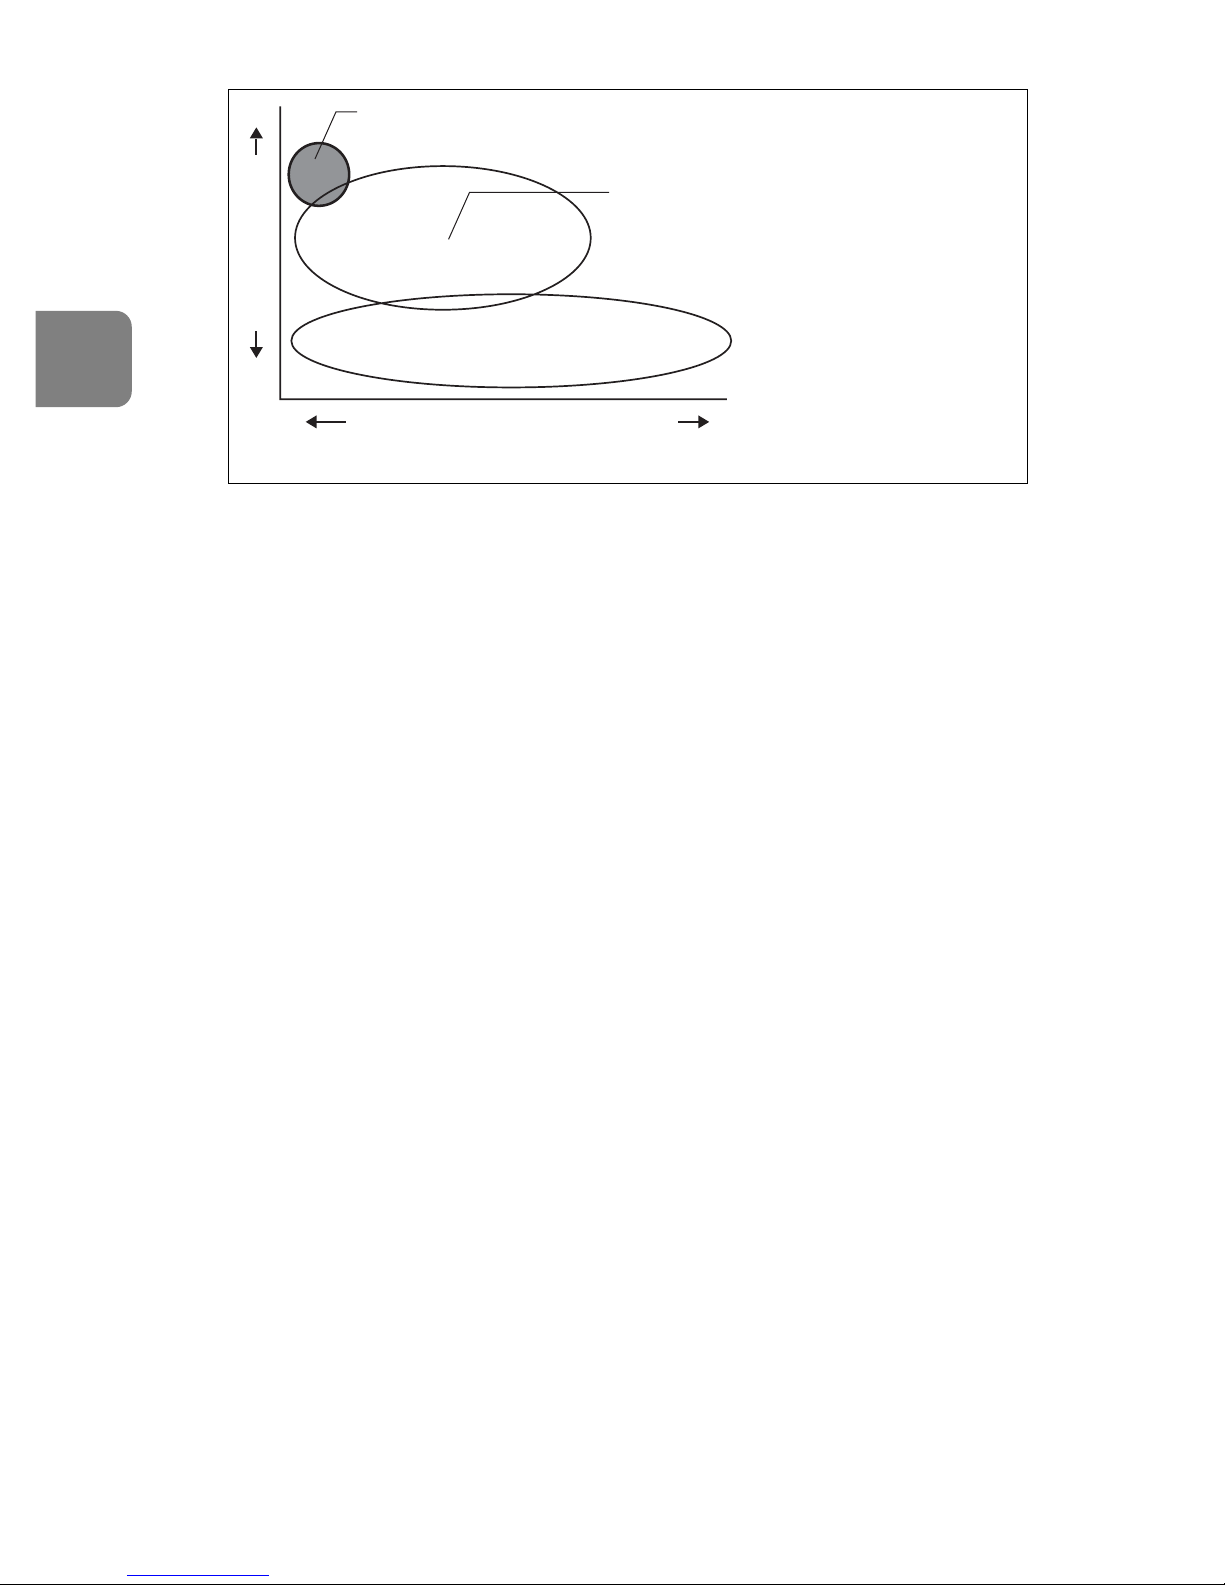
Kameraschwenks
(im Modus NORMAL)
Bildstabilisierung mit Stativ
(im Modus TRIPOD)
Stärke der Erschütterungen
Verwacklungsunschärfe bei
Freihandaufnahmen oder
Verwendung eines Einbeinstativs
(im Modus NORMAL)
Grundkonzept des Bildstabilisators
Anzahl der
Erschütterungen
Page 39
39
De
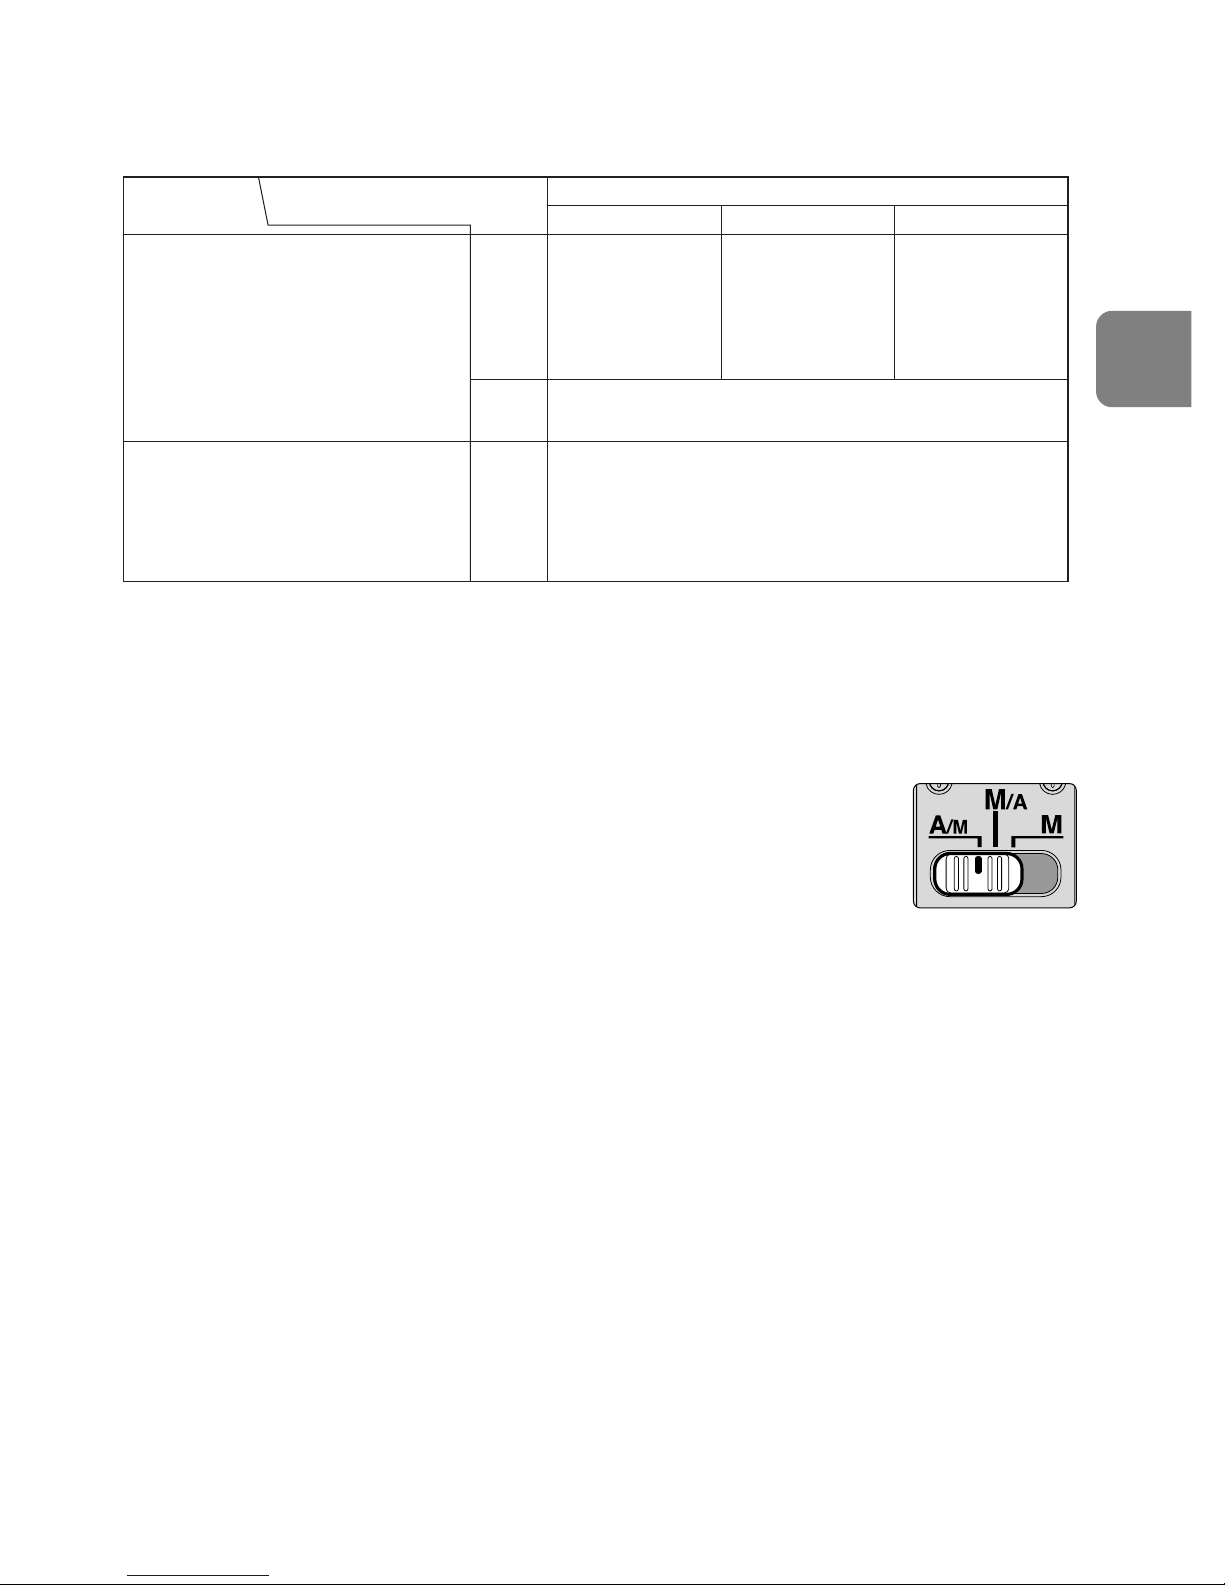
4. Fokussieren
Wählen Sie den Fokussiermodus der Kamera anhand der folgenden Tabelle:
Autofocus with manual override (S. 37)
Modus “A/M”: Autofokus mit manuellem Eingriff. AF-Prioritität
Modus “M/A”: Autofokus mit manuellem Eingriff. MF-Priorität
1
Stellen Sie den Fokus-Modusschalter auf “A/M” oder “M/A”
ein. (Abb. 1)
2
Der Autofokus lässt sich durch Drehen des Einstellrings und
gleichzeitiges Antippen des Auslösers oder der AF-Starttaste
(AF-ON) an der Kamera oder der Fokus-Betriebstaste am
Objektiv manuell übersteuern.
• Zur Deaktivierung der manuellen Übersteuerung geben Sie den Auslöser oder
die AF-Starttaste an der Kamera oder die Fokus-Betriebstaste am Objektiv frei
und tippen den Auslöser an, um wieder auf Autofokus-Modus umzuschalten.
Fokussiermodus des Objektive
Kameras
Fokussiermodus der Kamera
MM/AA/M
Manuelles
Fokussieren
(Entfernungsmessung verfügbar)
Manueller Fokus
(mit elektronischer Einstellhilfe; keine
Einstellhilfe bei F-601M)
Manuelles Fokussieren
(Entfernungsmessung verfügbar)
Autofokus mit
manuellem
Eingriff
(MF-Priorität)
Autofokus mit
manuellem
Eingriff
(AF-Priorität)
AF
(C/S)
AF
(C/S)
MF
MF
D3, D2-Serie, D1-Serie, D300,
D200, D100, D80, D70-Serie,
D50, D40-Serie, F6, F5, F4-Serie,
F100, F90X, F90-Serie, F80-Serie,
F75-Serie, F70-Serie, F65- Serie,
Pronea 600i, Pronea S
F60-Serie, F55-Serie, F50-Serie,
F-801s, F-801, F-601M, F-401x,
F-401s, F-401
AF: Autofokus MF: Manuelle Fokussierung
Abb. 1
Page 40
40
De
5. So begrenzen Sie die Autofokusreichweite
(Eine Liste der betreffenden Kameras finden Sie auf Seite 36.)
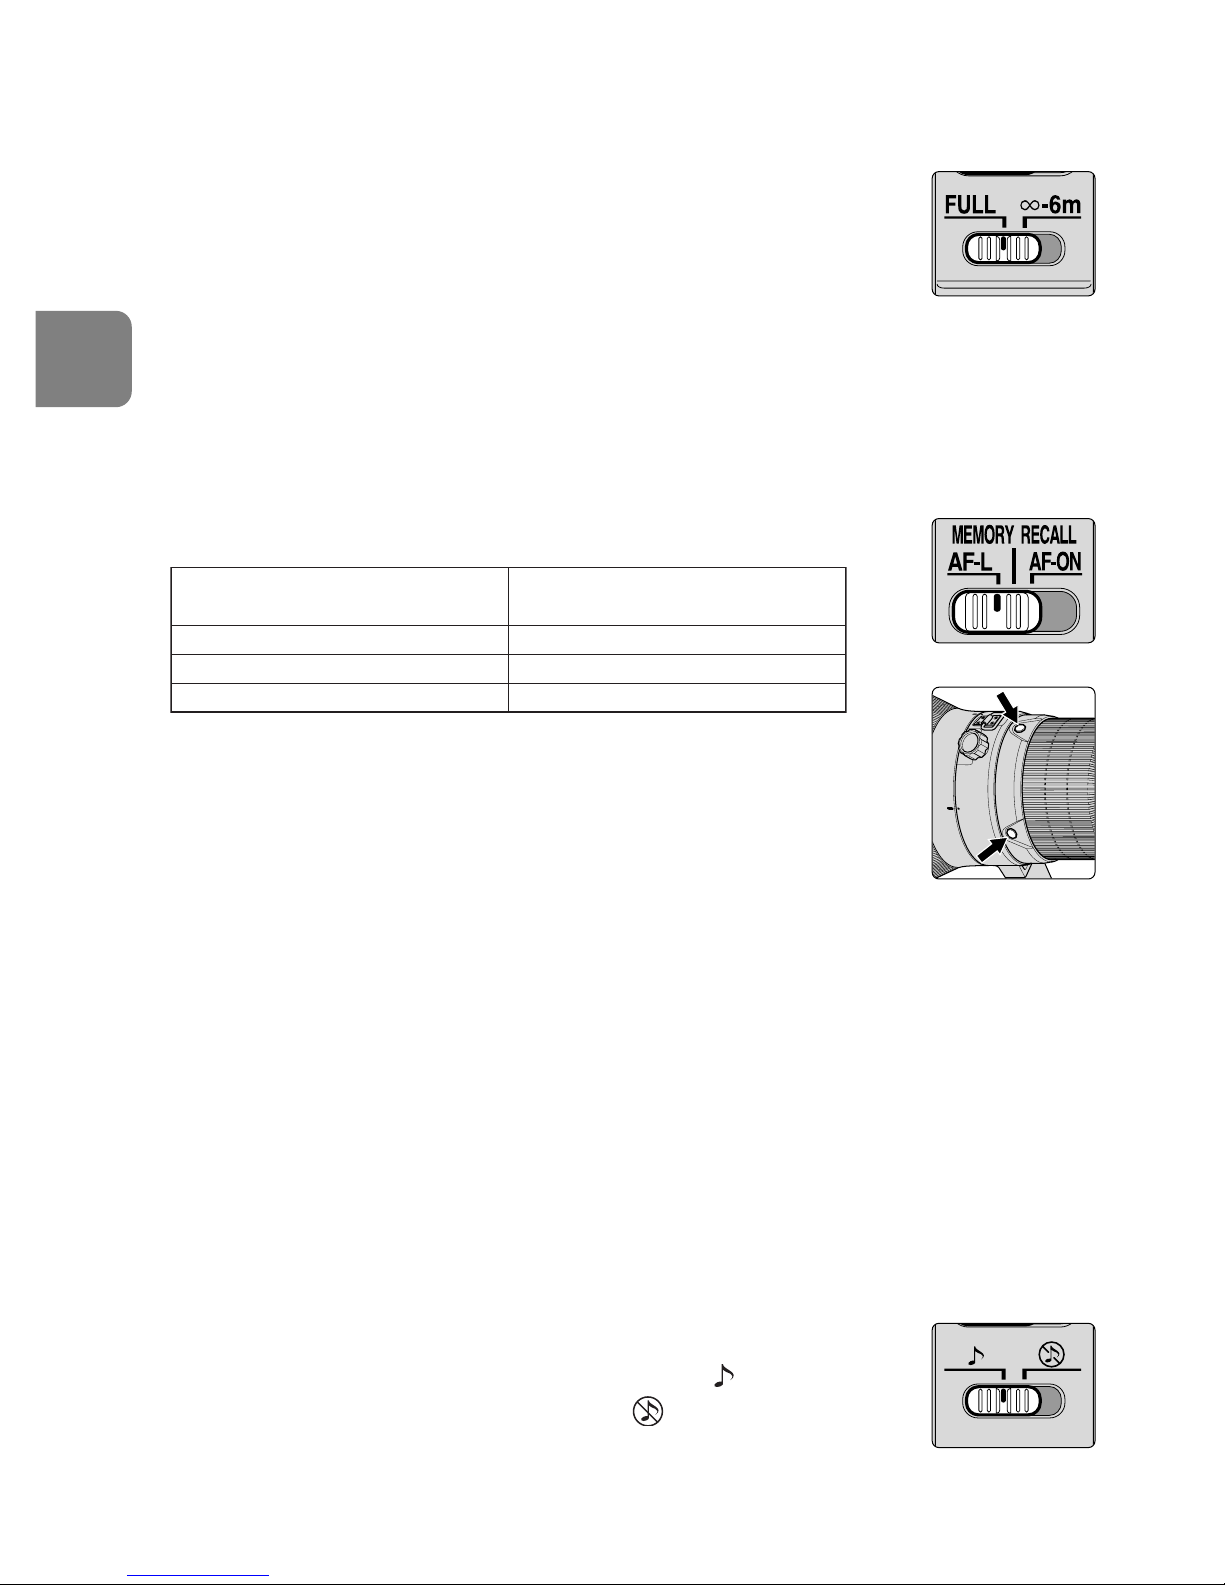
•Wird die AF-Funktion nur für Motive eingesetzt, die mindestens 6 m
entfernt sind, stellen Sie den Fokussier-Begrenzungsschalter (Abb. 2)
auf “∞–6 m”, um die Fokussierzeit zu verkürzen.
• Ist der Abstand zum Motiv u. U. 6 m oder kürzer, so wählen Sie
“FULL”.
• Diese Funktion ist nur mit dem Autofokus kompatibel.
6. AF-L/MEMORY RECALL/AF-ON
Fokus-Betriebswahlschalter (AF-L/MEMORY RECALL/AF-ON)
und Fokus-Betriebstaste
• Je nach der Position des Fokus-Betriebswahlschalters (Abb. 3)
ändert sich die Funktion der Fokus-Betriebstaste (Abb. 4):
• Die Fokus-Betriebstasten lassen sich je nach Wunsch einstellen.
Näheres hierzu erfahren Sie beim nächsten NikonKundendienstzentrum oder -Händler.
• Drücken Sie eine der vier Fokus-Betriebstasten, um die
einzelnen Funktionen zu aktivieren.
Verwenden der Fokusverriegelungstaste (eine Liste der
betreffenden Kameras finden Sie auf Seite 36)
1
Stellen Sie den Fokus-Modusschalter auf “A/M” oder “M/A” ein. (Abb. 1)
• Diese Funktion ist nur mit dem Autofokus kompatibel.
2
Stellen Sie den Fokus-Betriebswahlschalter (Abb. 3) auf “AF-L”.
3
Bei aktiviertem Autofokus lässt sich der Fokus während des Drückens der
Fokus-Betriebstaste (Abb. 4) fixieren.
• Die AF-Verriegelungsfunktion kann entweder an der Kamera oder am Objektiv
eingestellt werden.
• Durch Drücken einer dieser Tasten wird die Scharfeinstellung verriegelt.
Speicheraufruf (Eine Liste der betreffenden Kameras
finden Sie auf Seite 36. Verfügbar beim Autofokus und
beim manuellen Fokussieren.)
• Stellen Sie den Ton-Monitorschalter (Abb. 5) auf “ ”, um den TonMonitor zu aktivieren. Stellen Sie ihn, auf “ ”, um abzubrechen.
• Der folgende Ablauf gilt bei aktiviertem Ton-Monitor.
Abb. 3
Abb. 4
Position des
Fokus-Betriebswahlschalters
Funktion der
Fokus-Betriebstaste
AF-L Fokus-Sperre
MEMORY RECALL Speicheraufruf
AF-ON AF-Start (AF-ON) am Objektiv
Abb. 5
Abb. 2
Page 41
41
De
1
Stellen Sie den Fokus-Modusschalter auf “A/M”, “M/A” oder
“M” ein. (Abb. 1)
2
Stellen Sie auf ein Motiv scharf, das sich in der gewünschten Entfernung
zum Speichern befindet. Drücken Sie die Speichertaste (Abb. 6). Ein Ton
weist darauf hin, dass der Fokusabstand gespeichert wurde.
• Die Speicherung ist unabhängig von der Position des Fokus-Modusschalters
oder des Fokus-Betriebswahlschalters möglich.
• Die Fokussierabstand bleibt auch dann gespeichert, wenn die Kamera
ausgeschaltet oder das Objektiv von der Kamera abgenommen wird.
Hinweis: Wenn die Entfernungsskala sich beim Einstellen ca. 10-mal nach links
drehen lässt und gleichzeitig ein kurzer und drei lange Pieptöne
ausgegeben werden, führen Sie die Speicherung erneut durch.
3
Stellen Sie den Fokus-Betriebswahlschalter (Abb. 3) auf “MEMORY RECALL”.
4
Drücken Sie die Fokus-Betriebstaste (Abb. 4).
• Drücken Sie den Auslöser bis zum Anschlag, halten Sie ihn gedrückt, und drücken
Sie die Fokus-Betriebstaste, um den gespeicherten Fokussierabstand abzurufen.
5
Durch zwei Pieptöne wird das Abrufen des Fokussierabstands bestätigt. Drücken Sie den
anschließend Auslöser bis zum zweiten Druckpunkt, um die Aufnahme zu machen.
Hinweis: Um Bilder in der gespeicherten Entfernung aufzunehmen, drücken Sie
den Auslöser bis zum zweiten Druckpunkt, bevor Sie den Finger von
der Fokus-Betriebstaste nehmen.
• In den Modi “A/M” und “M/A” wechselt das Objektiv nur dann vom Speicherabruf
zum Autofokus oder manuellen Fokus, wenn Sie den Finger von der FokusBetriebstaste nehmen und den Auslöser bis zum ersten Druckpunkt drücken.
AF-ON (Eine Liste der betreffenden Kameras finden Sie auf Seite 36.)
1
Stellen Sie den Fokussierschalter (Abb. 1) auf “A/M” oder “M/A” ein.
2
Stellen Sie den Fokus-Betriebswahlschalter (Abb. 3) auf “AF-ON”.
3
Drücken Sie die Fokus-Betriebstaste (Abb. 4), um Bilder aufzunehmen.
• Während Sie die Fokus-Betriebstaste drücken, ist der Autofokus aktiviert.
7. Bildstabilisator-Modus (Eine Liste der betreffenden Kameras
finden Sie auf Seite 36.)
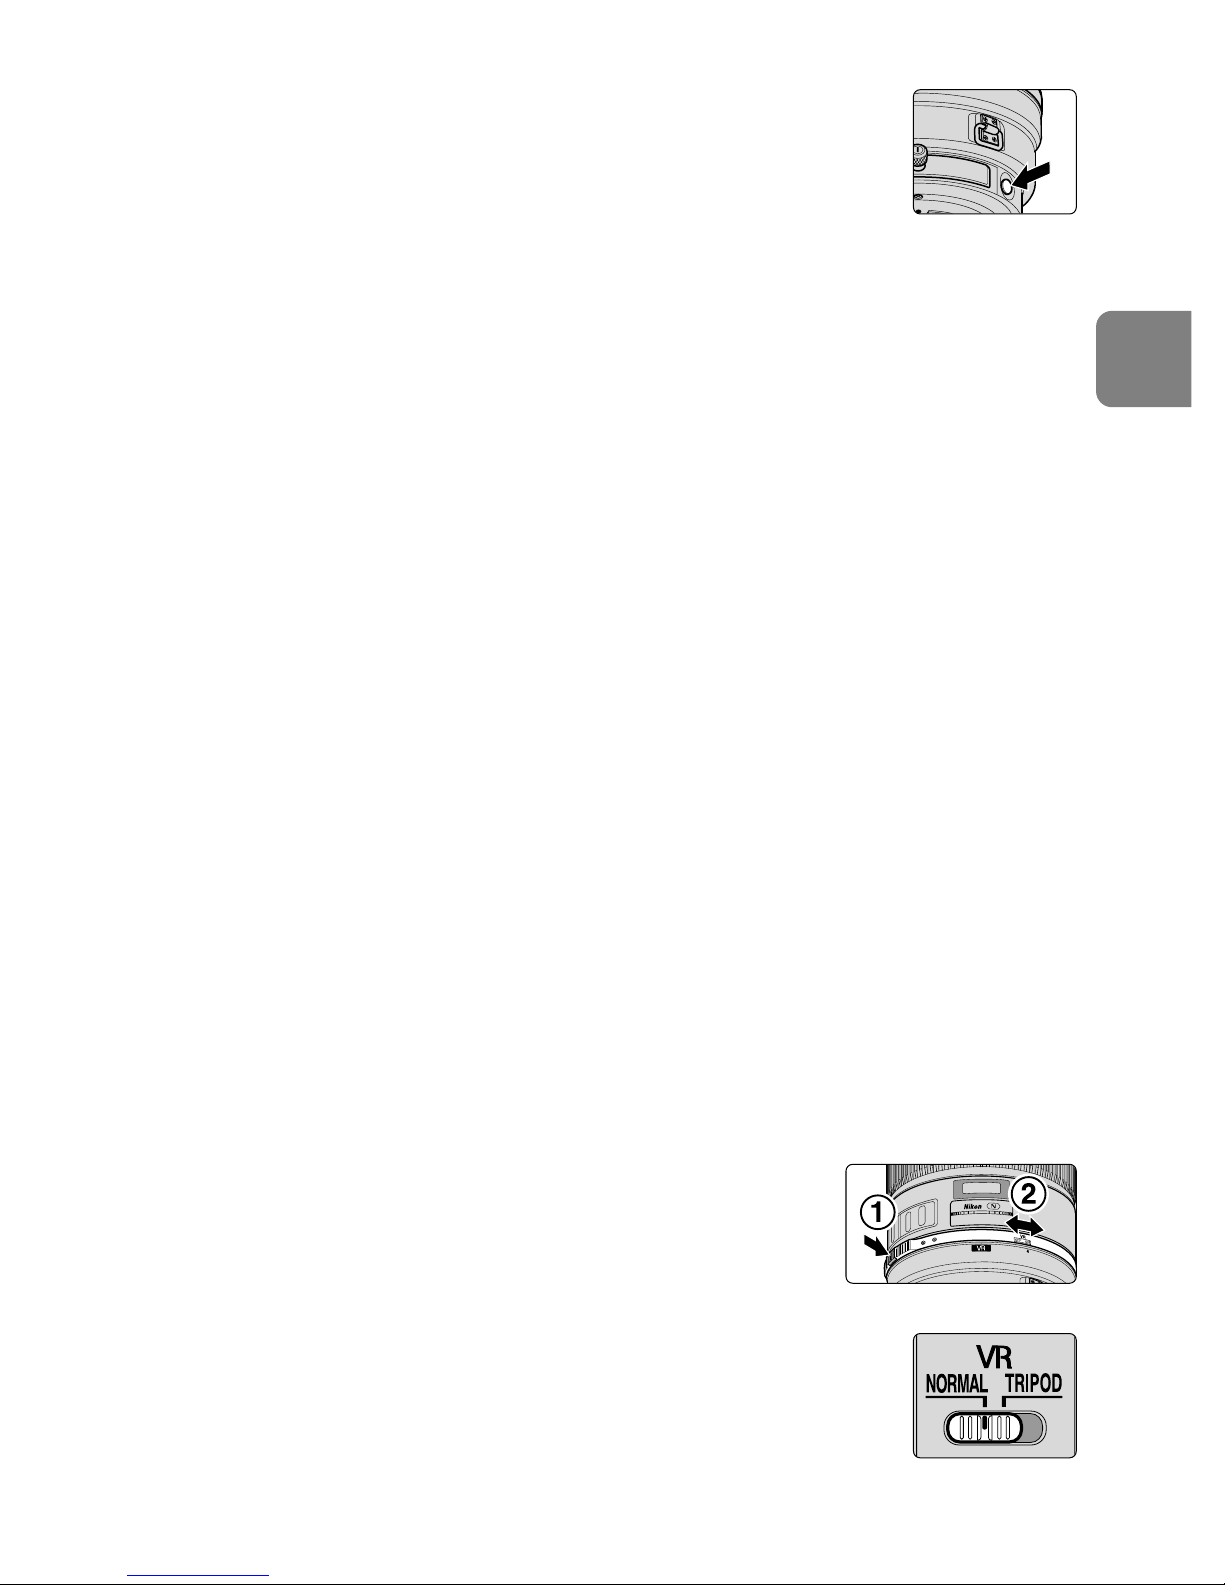
1
Stellen Sie den ON/OFF-Ringschalter auf “ON” 2, und
halten Sie gleichzeitig die Taste des Ringschalters 1
gedrückt. (Abb. 7)
2
Stellen Sie den Bildstabilisator-Schalter (Abb. 8) auf
“NORMAL” oder “TRIPOD” ein.
• Die Bildvibration im Sucher kann durch Drücken des
Auslösers bis zum ersten Druckpunkt verringert werden.
Dies vereinfacht die automatische/manuelle Fokussierung
und die genaue Motivwahl.
Abb. 7
Abb. 8
Abb. 6
Page 42
42
De
Hinweise zur Verwendung der Vibrationsreduktion
• Warten Sie, bis sich das Bild im Sucher stabilisiert hat, bevor Sie den Auslöser
nach kurzem Antippen ganz herunterdrücken.
• Aufgrund der Eigenschaften der VR-Funktion kann das Sucherbild nach dem
Auslösen unscharf erscheinen.
• Ist die AF-Starttaste (AF-ON) (Abb.4) an der Kamera oder die FokusBetriebstaste am Objektiv aktiviert, so arbeitet die Vibrationsreduktion nicht.
• Stellen Sie den Bildstabilisator-Schalter auf “TRIPOD”, um die
Verwacklungsunschärfe und die Bildverwacklung zu verringern, wenn Sie ein
Stativ verwenden. Durch sehr geringe Verwacklungsunschärfen wird das
Bildstabilisatorsystem unter Umständen nicht ausgelöst. Umgekehrt kann das VRSystem zu Verwacklungsunschärfe im Objektiv führen. In diesem Fall sollte der
Bildstabilisator deaktiviert werden. Wenn Sie ein Stativ mit nicht festgezogenem
Kopf oder ein Einbeinstativ verwenden, wählen Sie den Modus “NORMAL”.
• Bei Kameraschwenks muss der Vibrationsreduktions-Schalter (Abb. 8) auf
NORMAL gesetzt sein.
• Wenn Sie die Kamera in einem weiten Bogen bewegen (z. B. bei einem
Kameraschwenk), sind Vibrationen in die Richtung dieser Bewegung nicht
betroffen. Wenn Sie die Kamera z. B. horizontal schwenken, werden nur
vertikale Vibrationen reduziert, so dass gleichmäßige Kameraschwenks
möglich werden.
• Solange der Vibrationsreduktions-Modus eingeschaltet ist, dürfen Sie
keinesfalls die Stromversorgung der Kamera ausschalten oder das Objektiv von
der Kamera abnehmen. (Andernfalls erzeugt das Objektiv u.U. ein klapperndes
Geräusch, wenn die Kamera wackelt. Dies ist keine Fehlfunktion. Schalten Sie
die Kamera einfach wieder ein und die VR-Funktion aus.)
• Bei Kameras der F80-Serie, F75-Serie, F65-Serie, D300, D200, D100, D80,
D70-Serie, D50 und D40-Serie steht die Vibrationsreduktion nicht zur
Verfügung, während der eingebauten Blitz aufgeladen wird.
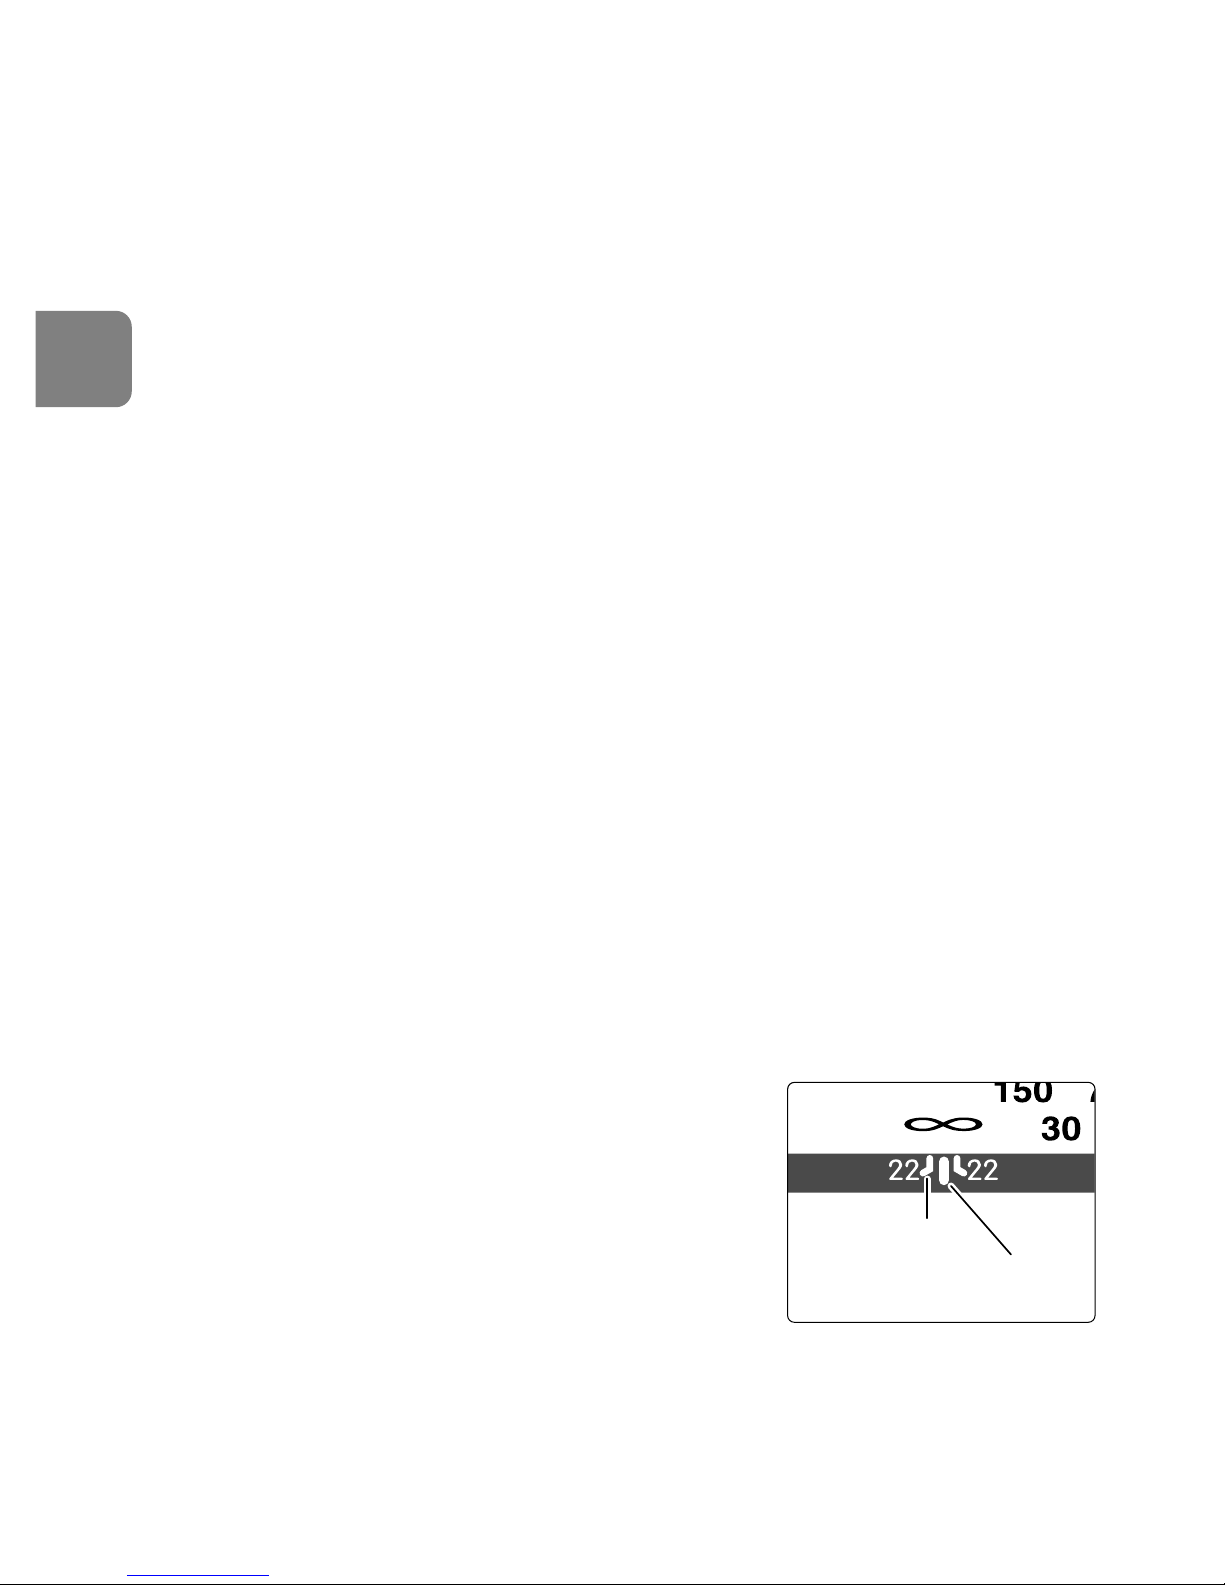
8. Schärfentiefe
• Die ungefähre Schärfentiefe kann über die
Schärfentiefeskala ermittelt werden. (Abb. 9)
• Wenn die Kamera über eine SchärfentiefeVorschau-Taste oder einen entsprechenden Hebel
verfügt (Arbeitsblende), kann die Schärfentiefe im
Sucher verfolgt werden.
• Weitere Informationen finden Sie auf Seite 192.
9. Blendeneinstellung
• Das Objektiv hat keinen Blendenring. Die Blende wird an der Kamera eingestellt.
SchärfentiefeSkala
Entfernungs
Indexlinie
Abb. 9
Page 43
43
De
10. Eingebauter Stativanschluß
• Bei der Aufnahme von Hochformatbildern lockern Sie zunächst die Feststellschraube
des Stativanschlusses durch Drehen im Gegenuhrzeigersinn. Drehen Sie dann das
Objektiv in die passende Position, und ziehen Sie die Schraube im Uhrzeigersinn an.
• Wenn Sie die Kamera am Handgriff halten und dabei in ihrer Stativmanschette
drehen, kann je nach verwendetem Stativ Ihre Hand am Stativ anschlagen.
Einbeinstativ (im Lieferumfang enthaltenes Zubehör)
• Die Stativmanschette kann gegen eine Einbeinstativmanschette ausgetauscht
werden. Dazu muss die Schraube der Stativmanschette gelöst werden.
• Achten Sie nach dem Austauschen der Stativmanschette darauf, dass die
Schraube fest angezogen ist. Andernfalls können Unfälle oder Schäden an
Objektiv und Kamera auftreten.
Ausführliche Angaben zu diesem Vorgang erhalten Sie beim zuständigen
Nikon-Kundendienst oder beim Büro Ihres Nikon-Vertreters.
11. Gegenlichtblende HK-33-1 und HK-33-2
Zweiteilige Gegenlichtblenden (HK-33-1 zum Anbringen am Objektiv und
HK-33-2 zum Anbringen an der HK-33-1) gehören zum Lieferumfang.
Gebrauch der HK-33-1:Drehen Sie zunächst die Halteschraube der
Gegenlichtblende HK-33-1 los, schieben Sie dann die HK-33-1 vor das Objektiv
und ziehen Sie dann die Schraube an.
Anbringen der HK-33-2: Drehen Sie zunächst die Halteschraube der
Gegenlichtblende HK-33-2 los, schieben Sie dann die HK-33-2 vor die HK-33-1
und ziehen Sie die Schraube an.
Aufbewahrung der Gegenlichtblenden: Drehen Sie zunächst die HK-33-2
herum und schieben Sie sie auf HK-33-1. Drehen Sie dann die HK-33-1 samt
HK-33-2 um, und schieben Sie sie vor das Objektiv.
12. Einsetzbarer Filterhalter
• Verwenden Sie ausschließlich 52 mm-Schraubfilter.
Bei der Lieferung ab Werk ist ein 52 mm-SchraubNC-Filter am Filterhalten angebracht.
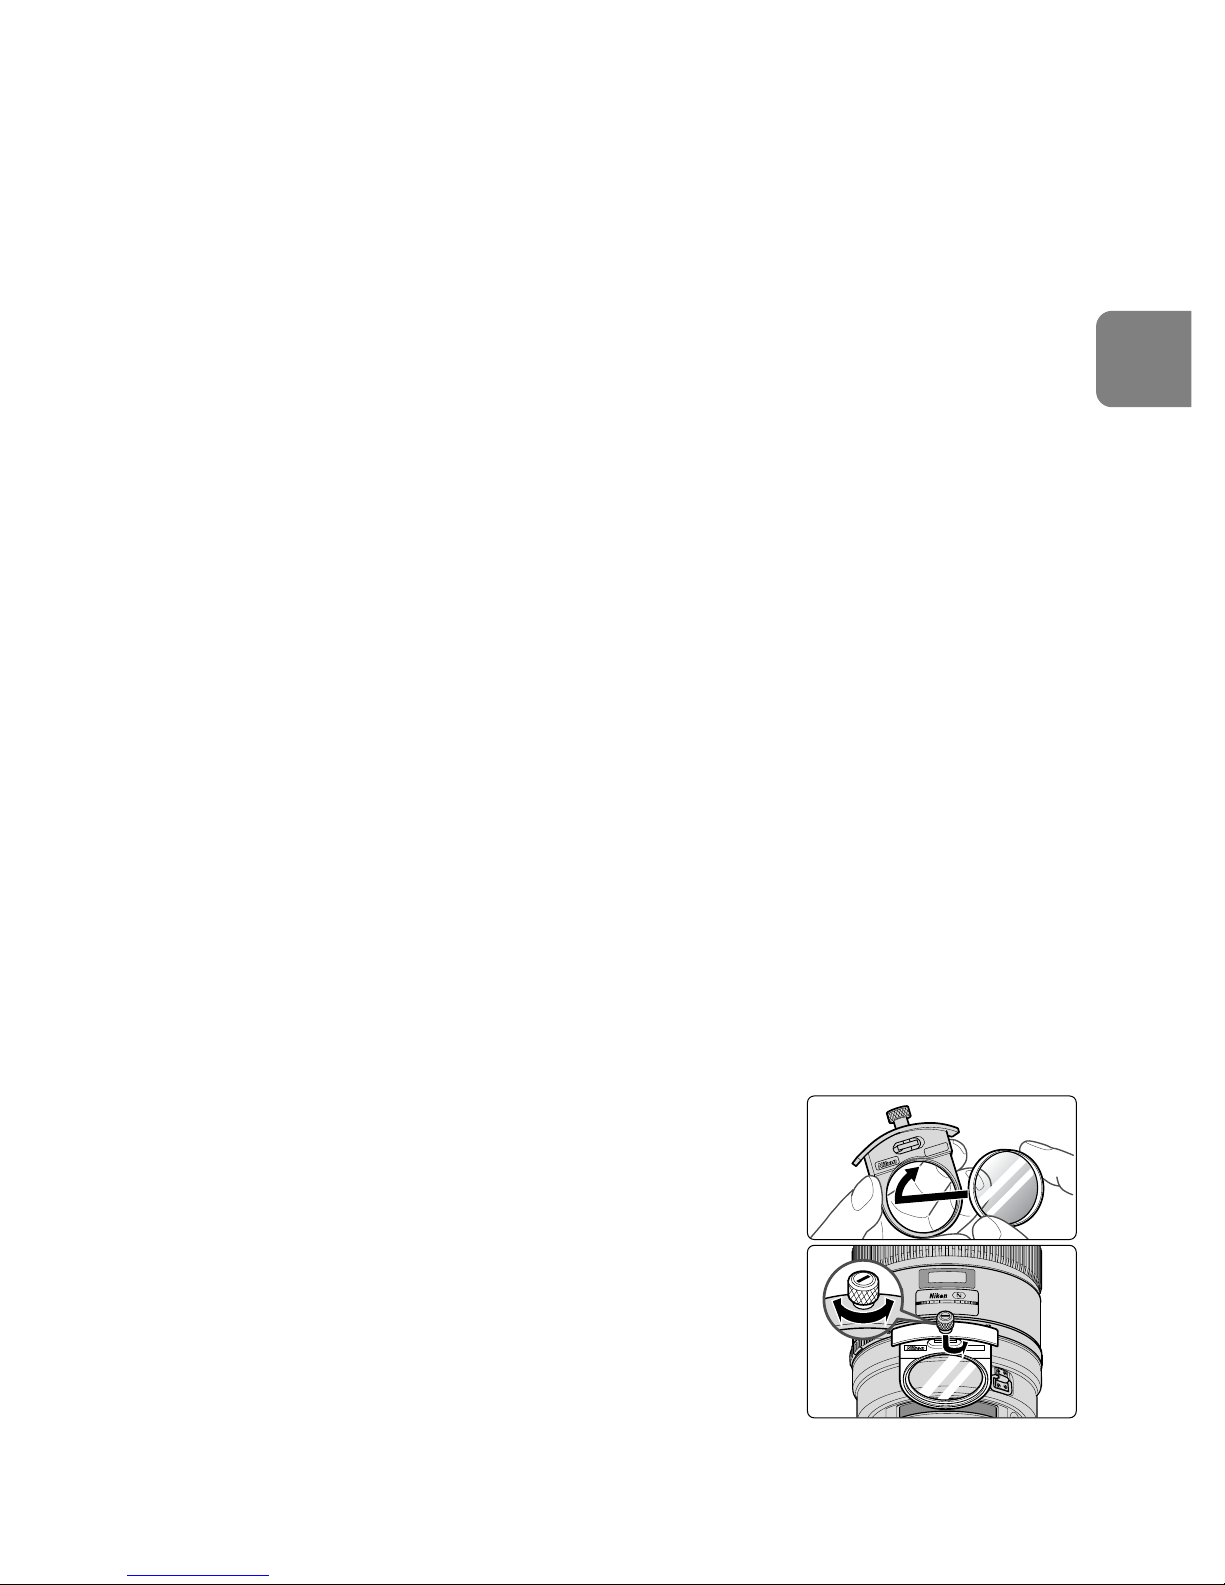
1
Schrauben Sie einen Filter an der Seite des
Filterhalters ein, auf der die Wörter “Nikon” und
“JAPAN” zu erkennen sind. (Abb. 10)
2
Drücken Sie auf den Filterhalterknopf und drehen Sie
den Halter so lange entgegen dem Uhrzeigersinn, bis
die weiße Markierungslinie am Knopf im rechten
Winkel zur Objektivachse steht.
• Die Ausrichtung des Filterhalters – entweder zum
Objektiv oder zur Kamera weisend – hat keinerlei
Einfluß auf Ihre Bilder.
Abb. 10
Page 44
44
De
Zirkular-Steckpolfilter C-PL1L (optional)
• Blockt Reflexionen von nichtmetallischen Oberflächen wie Glas oder Wasser
• Der Brennpunkt eines Zirkular-Steckpolfilters C-PL1L weicht von dem eines
52 mm-Schraubfilters ab. Die Entfernungsskala ist gegenüber der richtigen
Position verschoben. Die nächste fokussierte Abstand wird leicht vergrößert.
• Die gespeicherte Position kann bei Verwendung einer Fokusvoreinstellung
leicht abweichen. Bringen Sie den Filter C-PL1L an, bevor Sie die
Speicherabruffunktion verwenden.
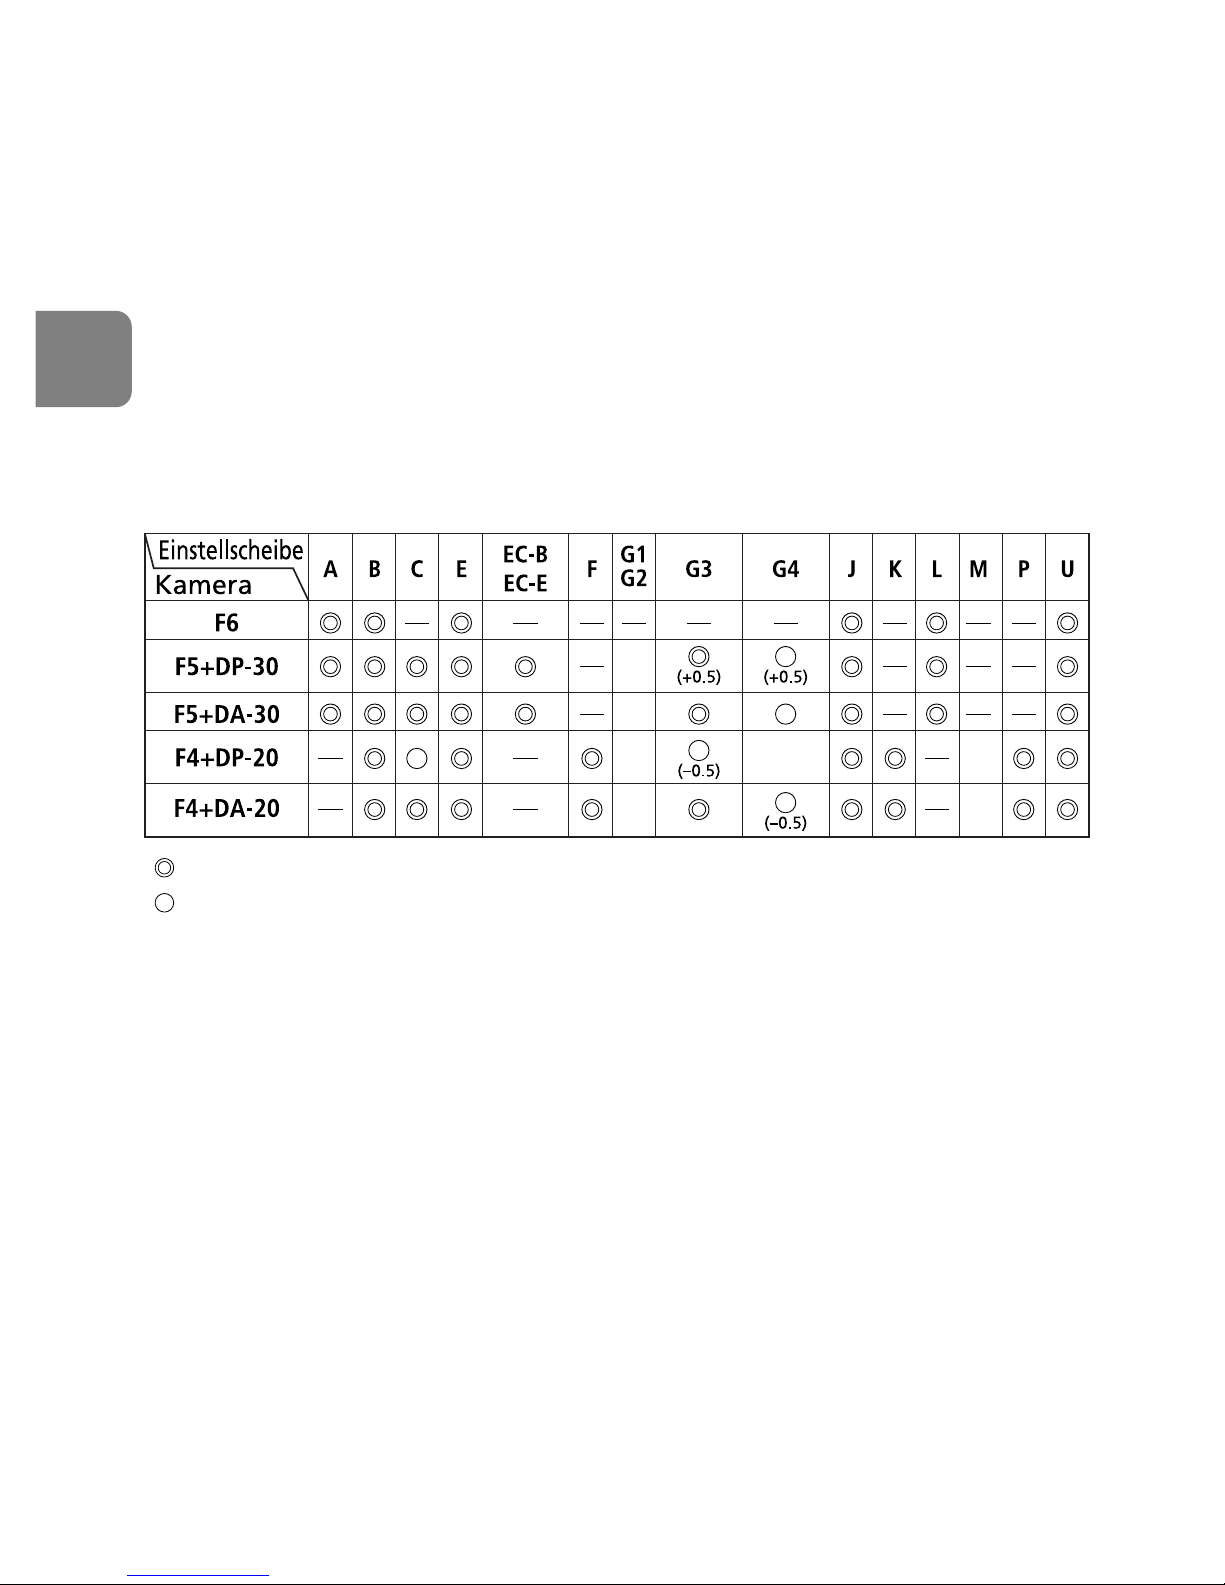
13. Empfohlene Einstellscheiben
Für bestimmte Nikon-Kameras stehen verschiedene auswechselbare
Einstellscheiben zur Verfügung, um jeder Aufnahmesituation gerecht zu werden.
Die für dieses Objektiv empfohlenen werden in der Tabelle aufgeführt.
: Hervorragende Scharfeinstellung
: Akzeptable Scharfeinstellung
Das Sucherbild vignettiert leicht. Die Aufnahme selbst bleibt hiervon unberührt.
—: Nicht möglich
( ): Zeigt den Betrag zusätzlich erforderlicher Belichtungskorrektur ( Nur
mittenbetonte Belichtungsmessung). Bei F6-Kameras korrigieren Sie durch
Wahl von "Andere” in der Individualfunktion “b6: Einstellscheibe” und
Einstellen des LW-Werts im Bereich zwischen –2,0 und +2,0 in 0,5-LW-
Schritten. Bei Gebrauch von anderen Scheiben als B oder E, ist “Andere” auch
dann zu wählen, wenn der erforderliche Korrekturwert “0” beträgt (keine
Korrektur nötig). Zur Einstellung des Korrekturwerts am F5 Kameragehäuse
dient die Individualfunktion Nr. 18. Mit den F4-Serien-Geräten durch den
Belichtung-Kompensationsanzeiger für Visiermattscheiben kompensieren.
Näheres hierzu finden Sie in der Bedienungsanleitung des Kameragehäuses.
Ein Leerfeld bedeutert: unbrauchbar. Da die Einstellscheibe M sowohl für
Maktrofotografie bis zum Abbildungsmaßstab 1:1 als auch Mikrofotografie
eingesetzt werden kann, unterscheidet sich ihr Anwendungsbereich von dem
anderer Einstellscheiben.
Page 45

45
De
• Bei F5-Kameras können die Einstellscheiben EC-B, EC-E, B, E, J, A, L nur mit
Matrixmessung verwendet werden.
• Bei Verwendung der Scheiben B und E in anderen als den obengenannten
Kameras gelten die Spalten für die Scheiben B und E.
14. Pflege des Objektivs
•
Säubern Sie Glasflächen mit einem Blasepinsel. Entfernen Sie Staub und Flecken
mit einem sauberen, weichen Baumwolltuch oder Optik-Reinigungstuch, das
Sie mit Ethanol (Alkohol) oder Optik-Reinigungsflüssigkeit anfeuchten. Wischen
Sie in kreisförmigen Bewegungen von der Mitte nach außen, ohne
Wischspuren zurückzulassen.
• Verwenden Sie niemals Verdünner oder Benzin zur Reinigung, da dieses zu
Beschädigungen führen, Gesundheitsschäden verursachen oder ein Feuer
auslösen könnte.
• Bringen Sie bei Nichtbenutzung des Objektivs den Objektivdeckel an, um die
Frontlinse zu schützen.
• Bei Aufbewahrung des Objektivs in seinem Köcher sollten beide
Objektivdeckel aufgesetzt sein.
• Bei längerer Nichtbenutzung sollte das Objektiv an einem kühlen, trockenen Ort
aufbewahrt werden. Halten Sie das Objektiv von direkter Sonneneinstrahlung
und Chemikalien wie Kampfer oder Naphthalin (Mottenmittel) fern.
• Das Objektiv ist nicht wasserdicht und kann beschädigt werden, wenn es
Nässe ausgesetzt wird.
• Einige Teile des Objektivs bestehen aus verstärktem Kunststoff. Eine Lagerung
an übermäßig heißen Orten kann zur Beschädigung führen.
15. Zubehör
• Massivkoffer CT-404 • Aufschiebbarer Objektivdeckel • Objektivrückdeckel
LF-1 • Gegenlichtblende HK-33 • Spezieller Filterhalter* • 52-mmNC-Schraubfilter • Gurt LN-1 • Einbeinstativanschluß
*Sind die speziellen Zubehörteile defekt oder nicht vorhanden, so wenden Sie
sich bitte an das nächste Nikon-Kundendienstzentrum oder - Händler, da sie im
allgemeinen Fachhandel nicht erhältlich sind.
16. Sonderzubehör
• Etui CL-L2 • 52-mm-Scharubfilter (außer Zirkularpolarisationsfilter II) • Einsetzbares
Zirkularpolarisationsfilter C-PL1L • Telekonverter AF-S (TC-14EII/TC-17EII/TC-20EII.)
Page 46

46
De
17. Technische Daten
Objektivtyp: AF-S-Zoom-Nikkor mit G-Charakteristik eingebauter
CPU und Nikon-Bajonett. Spezielle VibrationsreduktionsFunktion (VR)
Brennweite: 400mm
Maximale Blendenöffnung: f/2,8
Optischer Aufbau: 14 Elemente in 11 Linsengruppen (3 Linsenelemente aus
ED-Glas und 1 mit Nano Crystal Coat-Vergütung) sowie
1 Objektiv- Schutzscheibe
Bildwinkel: 6°10’ mit Nikon-Film-Spiegelreflexkameras im 35 mm-
Format (135) und Digital-Spiegelreflexkameras im
Nikon-FX-Format
4° mit Digital-Spiegelreflexkameras im Nikon-DX-Format
5° mit IX240-Systemkameras
Entfernungsdaten: Ausgabe an die Kamera
Fokussiersystem: Innenfokussierung nach dem Nikon-IF-System (mittels
integriertem Silent Wave-Motor); manuell über
separaten Fokussierring
Vibrationsreduktion: Linsen-Versatzverfahren mittels Schwingspulenmotoren
(VCM)
Entfernungsskala: Unterteilt in Meter und Fuß, und zwar von 2,8 m bis
unendlich (∞)
Mindestfokussierabstand: 2,9 m im AF-Modus bzw. 2,8 m im MF-Modus
Blende
: Irisblende mit 9 gerundeten Lamellen
Blendenart: Vollautomatisch
Blendenskala: f/2,8 – f/22
Belichtungsmessung: Offenblendenmessung bei Kameras mit CPU-Interface-
System
Fokussier- Vorhanden; zwei Wählbereiche: FULL (∞ – 2,9 m) oder
Begrenzungsschalter: ∞ – 6 m
Stativmanschette: Integriert. Um 360° rotierbar, Objektivrotations-
Positionsindex bei 90°. Stativmanschette kann gegen
eine Einbeinstativmanschette ausgetauscht werden.
Abmessungen: ca. 159,5 x 368,0 mm (Durchmesser x Länge bis
Flansch)
Gewicht: ca. 4.620 g
Irrtümer und Änderungen vorbehalten.
Page 47

47
De
Page 48

48
Fr
Ne démontez pas le matériel
Le fait de toucher aux pièces internes de l’appareil ou de l’objectif pourrait
entraîner des blessures. Les réparations doivent être effectuées uniquement par
des techniciens qualifiés. Si l’appareil ou l’objectif est cassé suite à une chute ou
un autre accident, apportez le produit dans un centre de service agréé Nikon
pour le faire vérifier après avoir débranché le produit et/ou retiré l'accumulateur
ou les piles.
En cas de dysfonctionnement, éteignez immédiatement
Si vous remarquez de la fumée ou une odeur inhabituelle se dégageant de
l’appareil photo ou de l’objectif, retirez immédiatement l’accumulateur ou les
piles, en prenant soin de ne pas vous brûler. Continuer d’utiliser son matériel
peut entraîner des blessures. Après avoir retiré ou débranché la source
d’alimentation, confiez votre matériel à un centre de service agréé Nikon pour le
faire vérifier.
N’utilisez pas l’appareil photo ou l’objectif en présence de gaz
inflammable
N’utilisez pas de matériel électronique en présence de gaz inflammable car cela
risque de provoquer une explosion ou un incendie.
Ne regardez pas le soleil dans l’objectif ou le viseur
Regarder le soleil ou tout autre source lumineuse violente dans l’objectif ou le
viseur peut provoquer de graves lésions oculaires irréversibles.
Tenez hors de portée des enfants
Faites extrêmement attention à ce que les enfants ne mettent pas à la bouche les
accumulateurs/piles ou d’autres petites pièces.
Remarques concernant une utilisation en toute sécurité
ATTENTION
Page 49

49
Fr
Observez les précautions suivantes lorsque vous manipulez
l’appareil et l’objectif
• Maintenez l’appareil et l’objectif au sec. Le non-respect de cette precaution
peut provoquer un incendie ou une électrocution.
• Ne manipulez pas et ne touchez pas le matériel avec les mains humides. Le
non-respect de cette précaution peut provoquer une électrocution.
• Lorsque vous photographiez à contre-jour, laissez le soleil hors du champ. Les
rayons du soleil peuvent se focaliser dans l'objectif et provoquer un incendie.
Lorsque le soleil est proche du centre de la vue, il peut également provoquer
un incendie.
• Lorsque vous n’utilisez pas l’objectif pendant une longue période, fixez les
bouchons avant et arrière et rangez l’objectif à l’abri de la lumière directe du
soleil. Le non-respect de cette précaution peut provoquer un incendie, car
l’objectif peut concentrer la lumière du soleil sur un objet.
Page 50
50
Fr
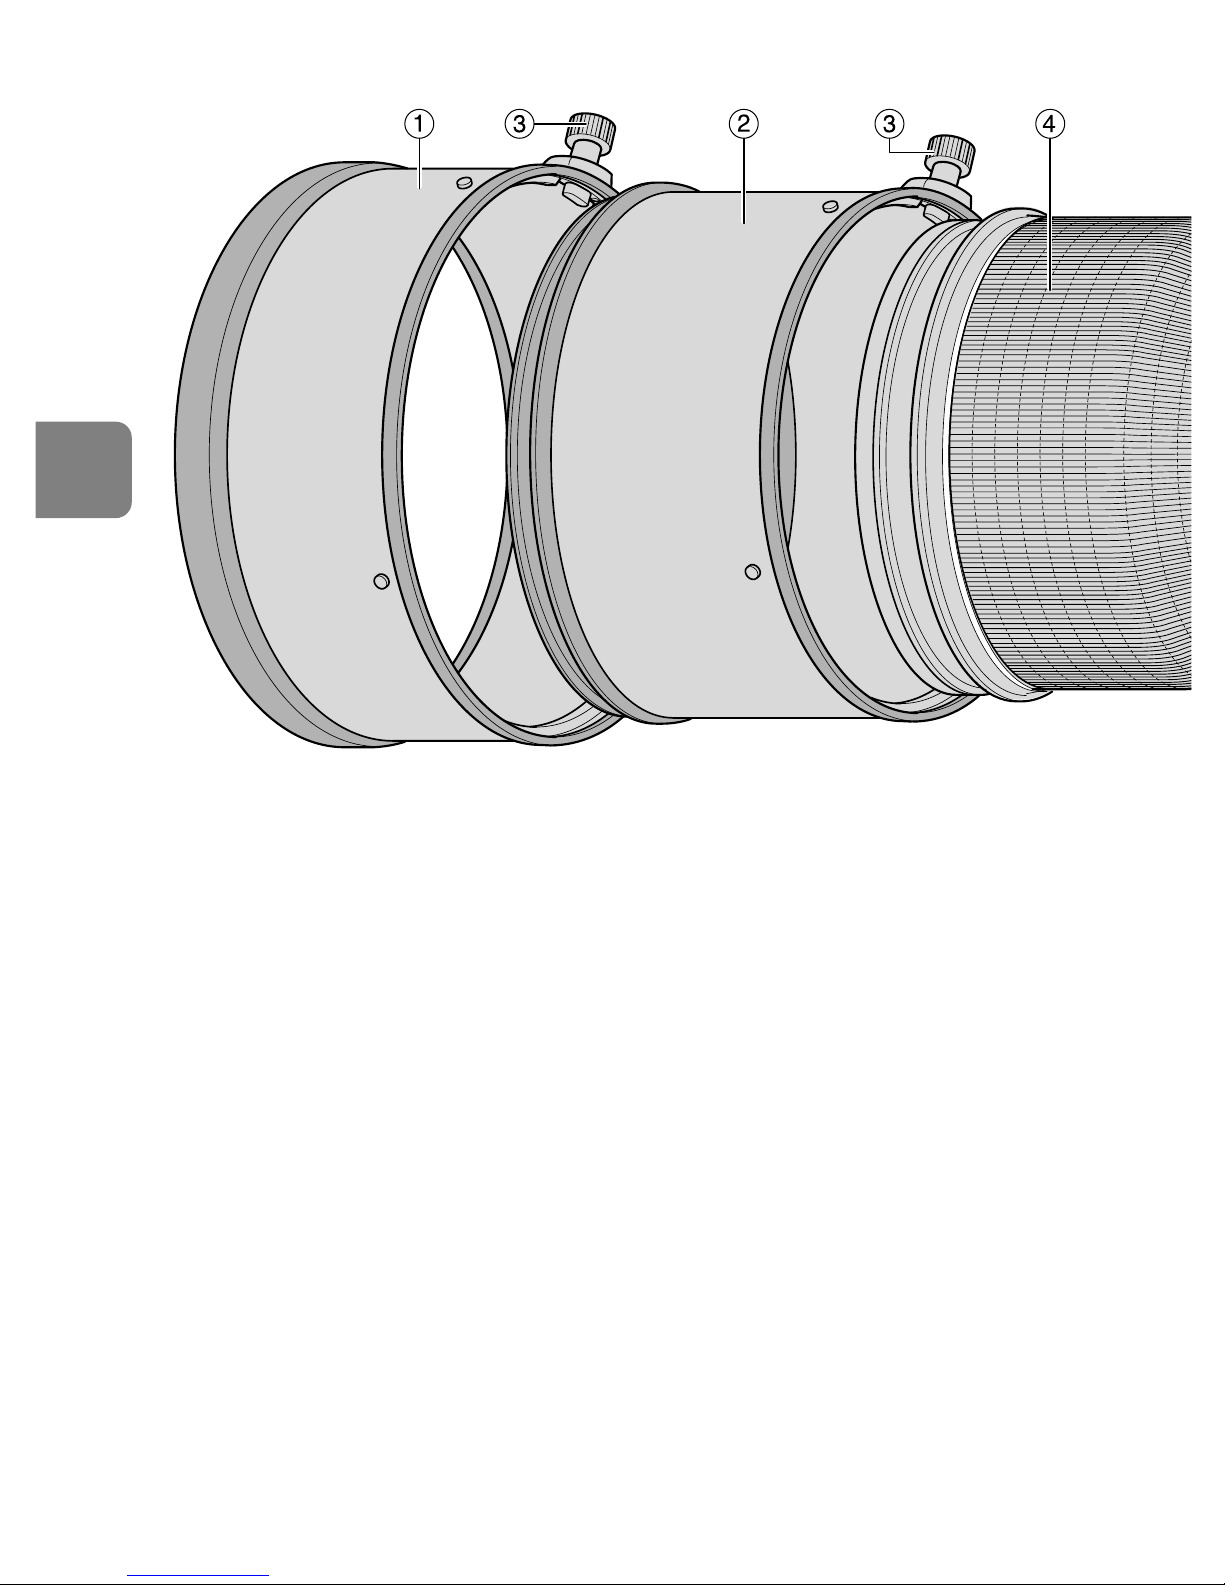
1 Parasoleil HK-33-2 (p. 59)
2 Parasoleil HK-33-1 (p. 59)
3 Vis du parasoleil (p. 59)
4 Poignée en caoutchouc
5 Vis de verrouillage de collier du
trépied (p. 59)
6 Oeilleton de bandoulière
7 Index de position de rotation de l’objectif
8 Bouton de mise au point
(Verrouillage Mise au Point/RAPPEL
MEMOIRE/Départ AF) (p. 56)
9 Bague de mise au point (p. 55)
! Échelle des profondeurs de champ (p. 58)
" Ligne de repère des distance (p. 58)
# Échelle des distances
$ Bague de commutateur ON/OFF
(MARCHE/ARRET) de la réduction de
la vibration (p. 57)
% Support de filtre à insérer (p. 59)
& Bouton du support de filtre à insérer
(p. 59)
( Repère de montage
) Joint en caoutchouc de l’objectif (p. 54)
~ Contacts électroniques (p. 54)
+ Collier de trépied rotatif intégré (p. 59)
, Collier pour monopode
(de remplacement) (p. 59)
- Bouton mémoire (p. 57)
. Commutateur de mode de mise au
point (p. 55)
/ Commutateur limiteur de mise au
point (p. 56)
: Commutateur de mode de
réduction de vibration (p. 57)
; Commutateur de sélection de mise
au point (AF-L/MEMORY RECALL/
AF-ON) (p. 56)
< Interrupteur de contrôle sonore (p. 56)
1. Nomenclature ( ): Page de référence
Page 51
51
Fr
Page 52

52
Fr
2. Appareils utilisables et fonctions disponibles
Il peut y avoir des restrictions et des limites pour les fonctions disponibles.
Consultez le manuel d’utilisation de l’appareil pour obtenir les détails.
*1 P inclut AUTO (Programme a usage général) et le système à programme variable.
*2 Manuel (M) n’est pas disponible.
*3 Quand le commutateur de sélection de mise au point est sur AF-ON,
l’autofocus commence dès que vous relâchez le bouton de mise au point
tout en relâchant légèrement le déclencheur.
*4 Relâchez le bouton mémoire ou le bouton de mise au point tout en relâchant
légèrement le déclencheur.
•
Si vous utilisez cet objectif avec des appareils photo non compatibles avec la
réduction de la vibration, mettez la bague de commutation ON/OFF
(MARCHE/ARRET) sur OFF. Avec le Pronea 600i, en particulier, la batterie peut se
vider rapidement si l’interrupteur est sur MARCHE.
Appareil
Réduction
de la
vibration
Autofocus
Verrouillage
de la mise
au point
Mode
d’exposition
P*1SAM
D3, série D2, série D1,
D300, D200, D100, D80,
série D70, D50, série D40
F6, F5, F100, série F80,
série F75, série F65
Pronea 600i, Pronea S*
2
Série F4, F90X,
série F90, série F70
Série F60, série F55,
série F50, F-401x,
F-401s, F-401
F-801s, F-801,
F-601M
F3AF, F-601, F-501,
appareils MF Nikon
(sauf F-601M)
҂҂҂
*
3
҂
҂
*
3
*
4
҂҂
҂҂҂҂҂
҂҂҂҂҂
҂
҂
҂
҂
҂
҂
҂
҂
Rappel
mémoire
Départ
AF sur
l’objectif
Fonction
: Possible : Possible, avec des restrictions limitées ҂: Impossible
Page 53

53
Fr
3. Introduction
Merci d’avoir acheté l’objectif AF-S NIKKOR 400mm f/2,8G ED VR. C'est un
objectif de haute performance possédant une réduction de la vibration spéciale
(VR) ainsi que des mécanismes de mise au point interne (IF) de grande vitesse. Il
utilise également un moteur ondulatoire silencieux (S) qui commande le
mécanisme de mise au point. Une mise au point préréglée est aussi fournie.
Caractéristiques principales
Deux modes AF (p. 55)
L'autofocus peut être débrayé en plaçant le commutateur de mode de mise en
mode “A/M” ou “M/A” et en effectuant manuellement la mise au point grâce à
la bague de mise au point.
M/A: l'autofocus peut être débrayé pour effectuer la mise au point
manuellement via la bague de mise au point. Le mode est conseillé pour
effectuer une mise au point très précise.
A/M: l'autofocus peut être débrayé pour effectuer la mise au point
manuellement via la bague de mise au point, mais la sensibilité au réglage
manuel de la bague est inférieure à celle en mode M/A. Utilisez ce mode
pour éviter de dérégler la mise au point automatique accidentellement en
touchant la bague de mise au point.
Limitation de la plage de l'autofocus (p. 56)
La vitesse de mise au point peut être accélérée en définissant des limites de plage.
Par exemple, si le sujet se trouve à au moins 6 mètres, réglez le limiteur de mise
au point sur ∞–6 m.
Commande AF-L/MEMORY RECALL/AF-ON (p. 56)
Les distances de mise au point peuvent être verrouillées et enregistrées lors de la
mise au point (AF-L) puis rappelées grâce à la commande “MEMORY RECALL”.
L'autofocus est réactivé en plaçant le commutateur sur AF-ON.
Réduction de vibration* (VR II) (p. 57)
NORMAL: permet de réduire le bougé d'appareil en prise de vue à main levée ou
au monopode. Ce mode permet de gagner environ 4 vitesses d'obturation par
rapport à un objectif non VR pour une plus grande créativité, et facilite
grandement la prise de vue à main levée ou au monopode. Il est possible de
réaliser des filés.
TRIPOD: Ce mode est recommandé pour réduire le bougé d'appareil lors de
l'utilisation d'un pied. Avec un super téléobjectif, des vibrations sont possibles, même
lorsque l'appareil photo est monté sur un pied. Le mode TRIPOD réduit le bougé
d'appareil lorsque ce dernier est monté sur un pied, particulièrement pour les vitesses
d'obturation comprises entre 1/15 s et 1 s. La visée est également stabilisée.
* Selon des tests de mesure Nikon. Les effets de la réduction de vibration varient
d'un individu à l'autre et selon les conditions de prise de vue.
Page 54
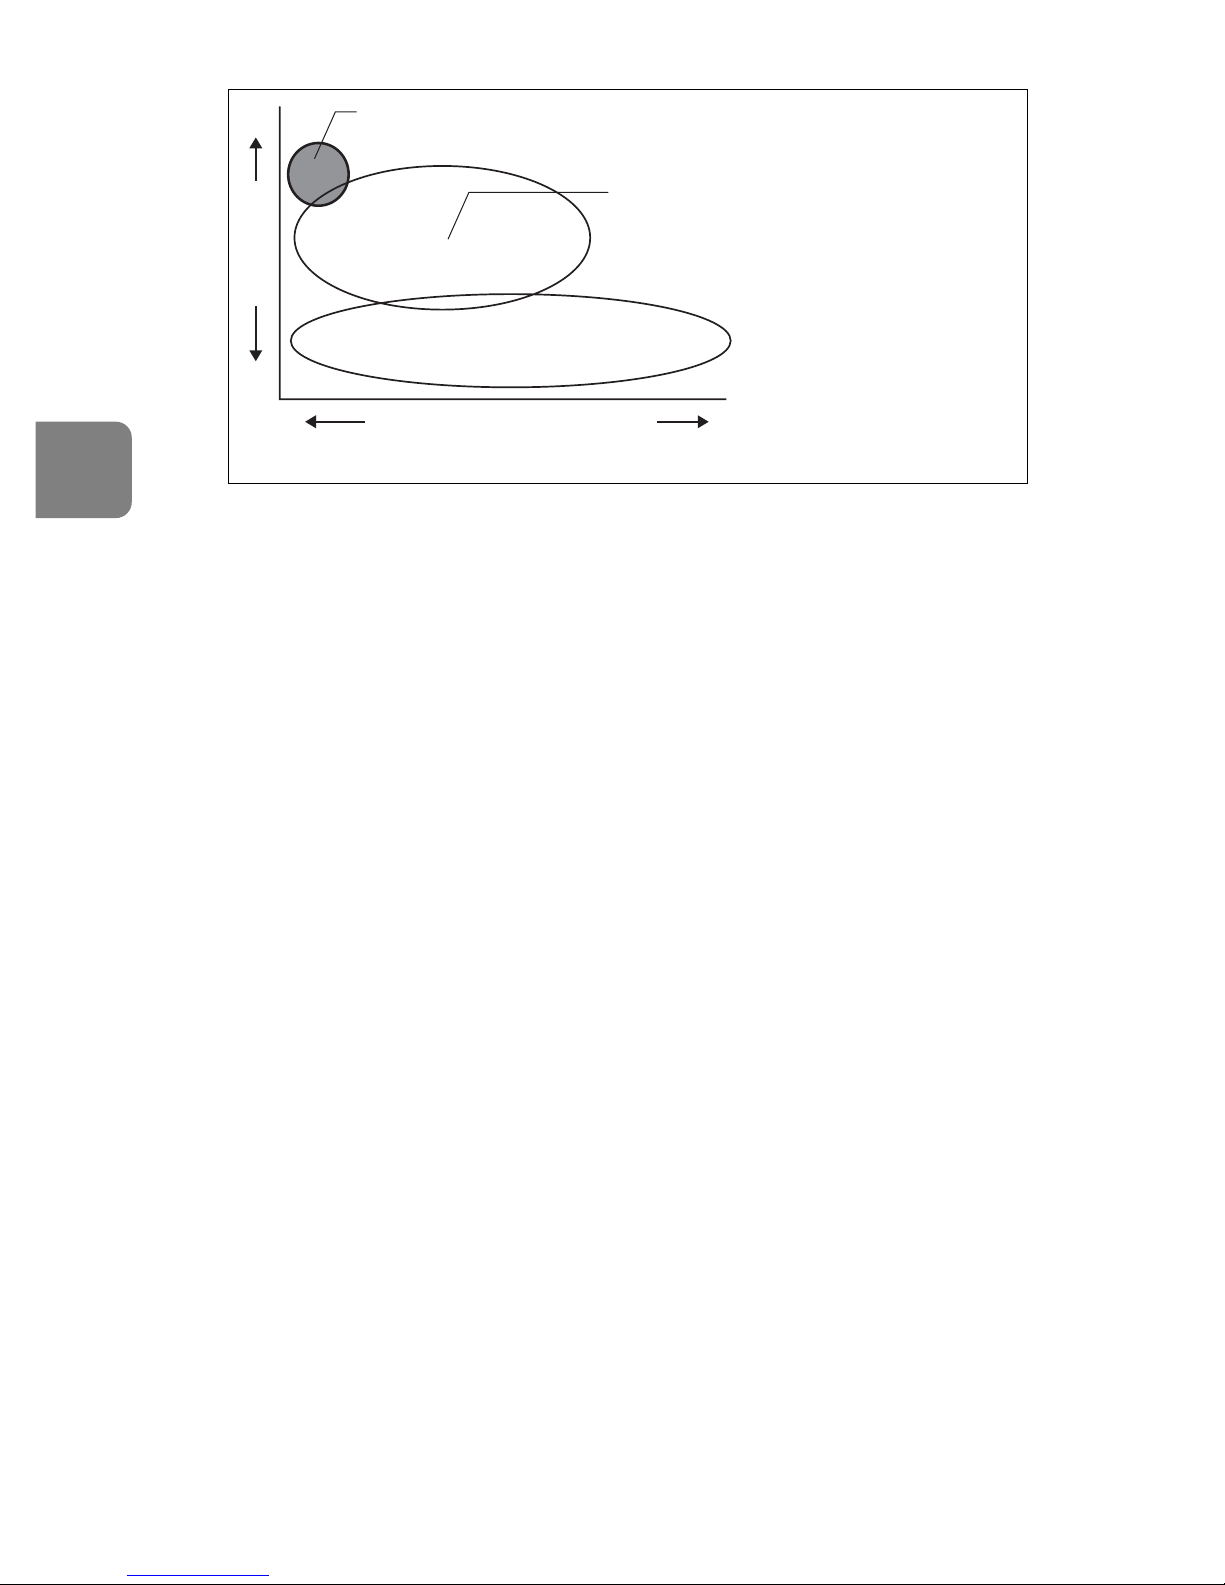
54
Fr
Un contrôle d’exposition plus prévis est possible quand cet objectif est monté
sur un appareil Nikon à mesure matricielle 3D, parce que l’information de
distance au sujet est transférée de l’objectif au boîtier.
L’utilisation de trois lentilles ED (à dispersion ultra faible) assure des images
pointues quasiment sans frange de couleur. Et l’emploi d’un diaphragme à 9
lames produisant une ouverture quasi circulaire estompe agréablement les
images floues à l’avant ou à l’arrière du sujet.
La couche de nano cristal déposée sur certaines lentilles permet de reproduire
des images fines et nettes quelles que soient les conditions de prise de vue,
des scènes d'extérieur ensoleillées à celles d'intérieur en éclairage artificiel.
Le verre ménisque, à la différence du verre plat, sert de verre de protection de l’objectif.
Les plus proches distances de mise au point de 2,9m (AF) et 2,8m (MF) sont
possibles.
Important!
• Faites attention à ne pas tenir le boîtier de l'appareil photo lorsque l'objectif
est fixé, car ceci pourrait endommager l'appareil photo. Assurez-vous se tenir à
la fois l’objectif et l’appareil lorsque vous le tenez.
• Assurez-vous de fixez un filtre au pas de 52mm sur le support de filtre à insérer.
• Veiller à ne pas salir ni endommager les contacts électroniques.
• Vous pouvez utiliser les téléconvertisseurs AF-I/AF-S TC-14E/TC-14EII/
TC-17EII/TC-20E/ TC-20EII.
• Lorsqu’il est monté sur les reflex numériques Nikon (format Nikon DX) telles les
séries D2 et D50, l'angle d'image de l'objectif devient 4° et la focale
équivalente est d’environ 600mm. (L’angle d’image de l’objectif est de 6°10’
pour une focale de 35mm.)
• Si le joint en caoutchouc de l’objectif est endommagé, rendez-vous chez votre
revendeur ou dans le centre de réparations agréé Nikon le plus proche pour
réaliser les réparations nécessaires.
Filés
(mode NORMAL)
Réduction de vibration avec un pied
(mode TRIPOD)
Amplitude des vibrations
Bougé d'appareil à main
levée ou sur monopode
(mode NORMAL)
Concept de base de la réduction de vibration
Nombre de
vibrations
Page 55
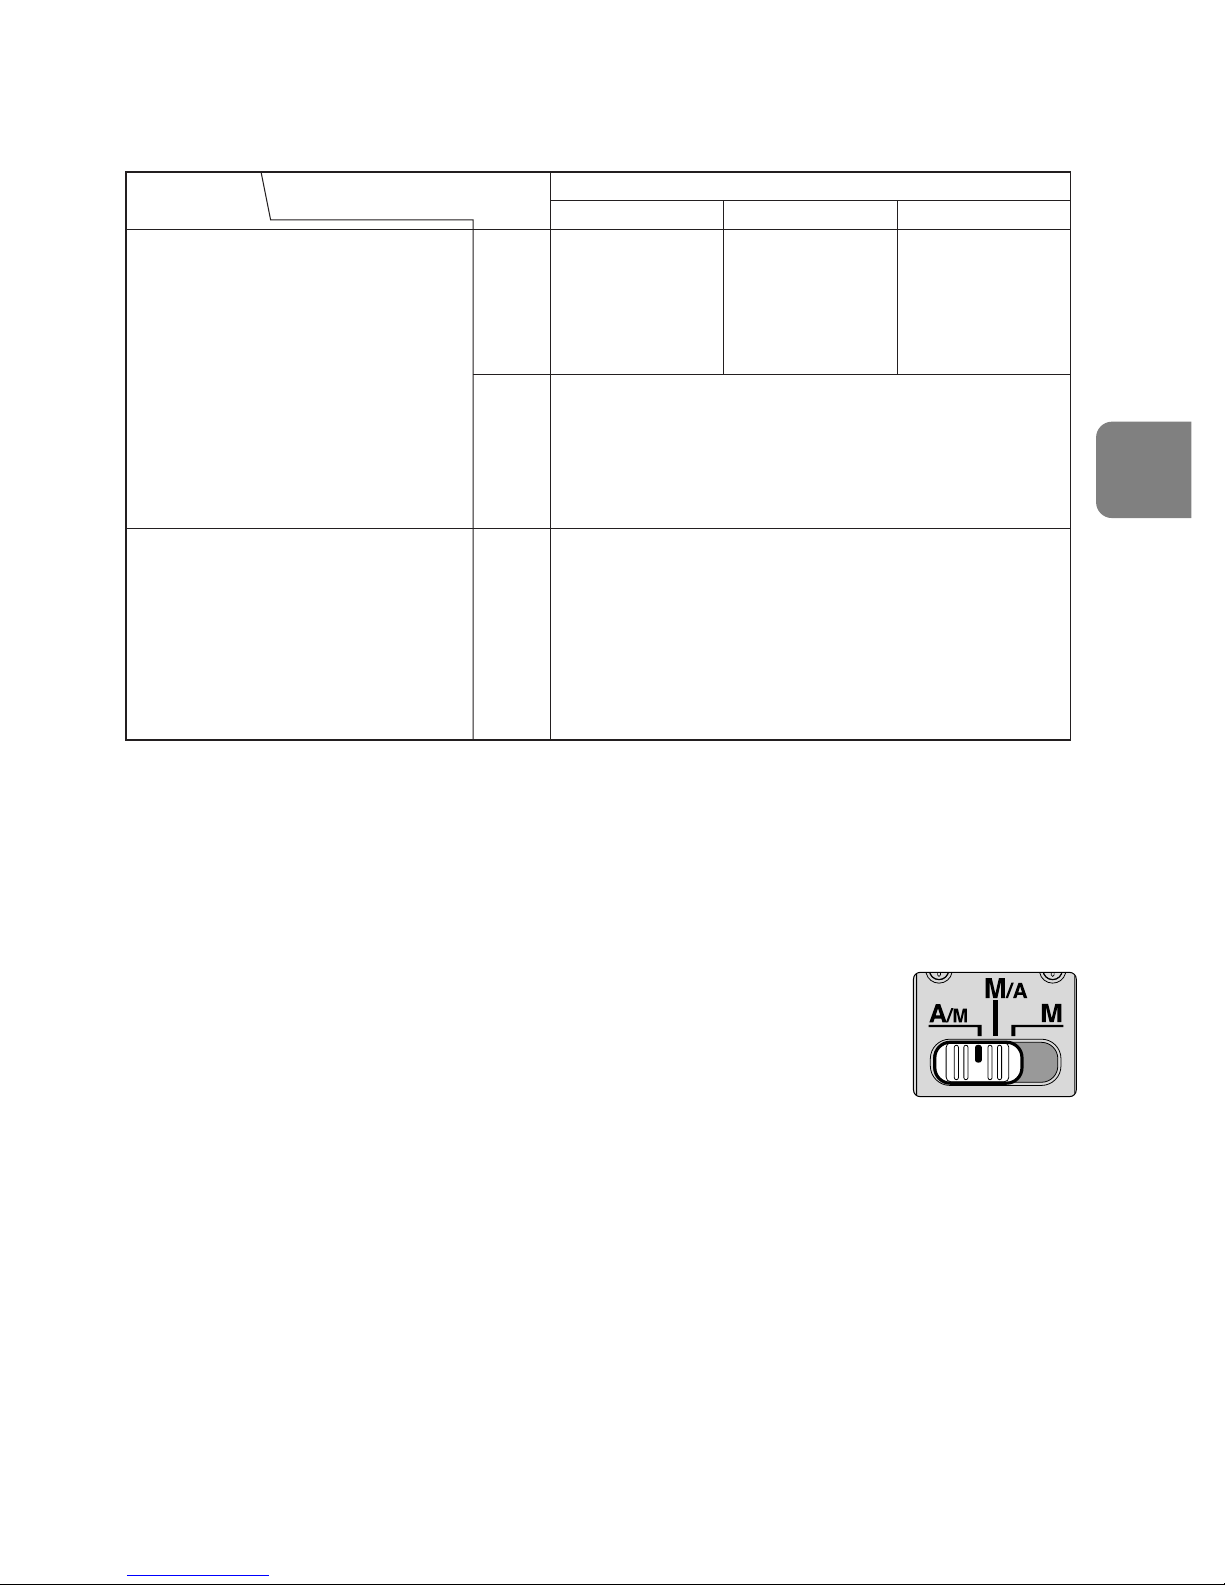
55
Fr
4. Mise au point
Réglez le sélecteur de mise au point de l’appareil conformément à ce tableau:
Autofocus avec débrayage manuel (p. 53)
Mode A/M: Autofocus avec débrayage manuel. Priorité AF
Mode M/A: Autofocus avec débrayage manuel. Priorité MF
1
Placez le commutateur de mise au point sur “A/M” ou “M/A”.
(Fig. 1)
2
Vous pouvez annuler manuellement l’autofocus en actionnant
la bague de mise au point tout en relâchant légèrement le
déclencheur ou le bouton Départ-AF (AF-MARCHE) sur
l’appareil ou le bouton de mise au point sur l'objectif.
• Pour annuler la commande de passage en mode manuel, ôtez
le doigt du déclencheur ou du bouton Départ AF (AF-MARCHE)
sur l'appareil ou du bouton de mise au point sur l'objectif, et relâchez
légèrement le déclencheur pour revenir au mode autofocus.
Mode de mise au point de l’objectif
Appareil
Mode de mise au
point de l’appareil
MM/AA/M
Mise au point
manuelle
(assistance à la
mise au point
disponible)
Mise au point manuelle
(l’assistance à la mise au point est disponible,
sauf avec le F-601M)
Mise au point manuelle
(assistance à la mise au point disponible)
Autofocus avec
débrayage
manuel
(priorité MF)
Autofocus avec
débrayage
manuel
(priorité AF)
AF
(C/S)
AF
(C/S)
MF
MF
D3, série D2, série D1, D300,
D200, D100, D80, série D70,
D50, série D40, F6, F5, série F4,
F100, F90X, série F90, série F80,
série F75, série F70, série F65,
Pronea 600i, Pronea S
Série F60, série F55, série F50,
F-801s, F-801, F-601M, F-401x,
F-401s, F-401
AF: Autofocus MF: Mise au point manuelle
Fig. 1
Page 56
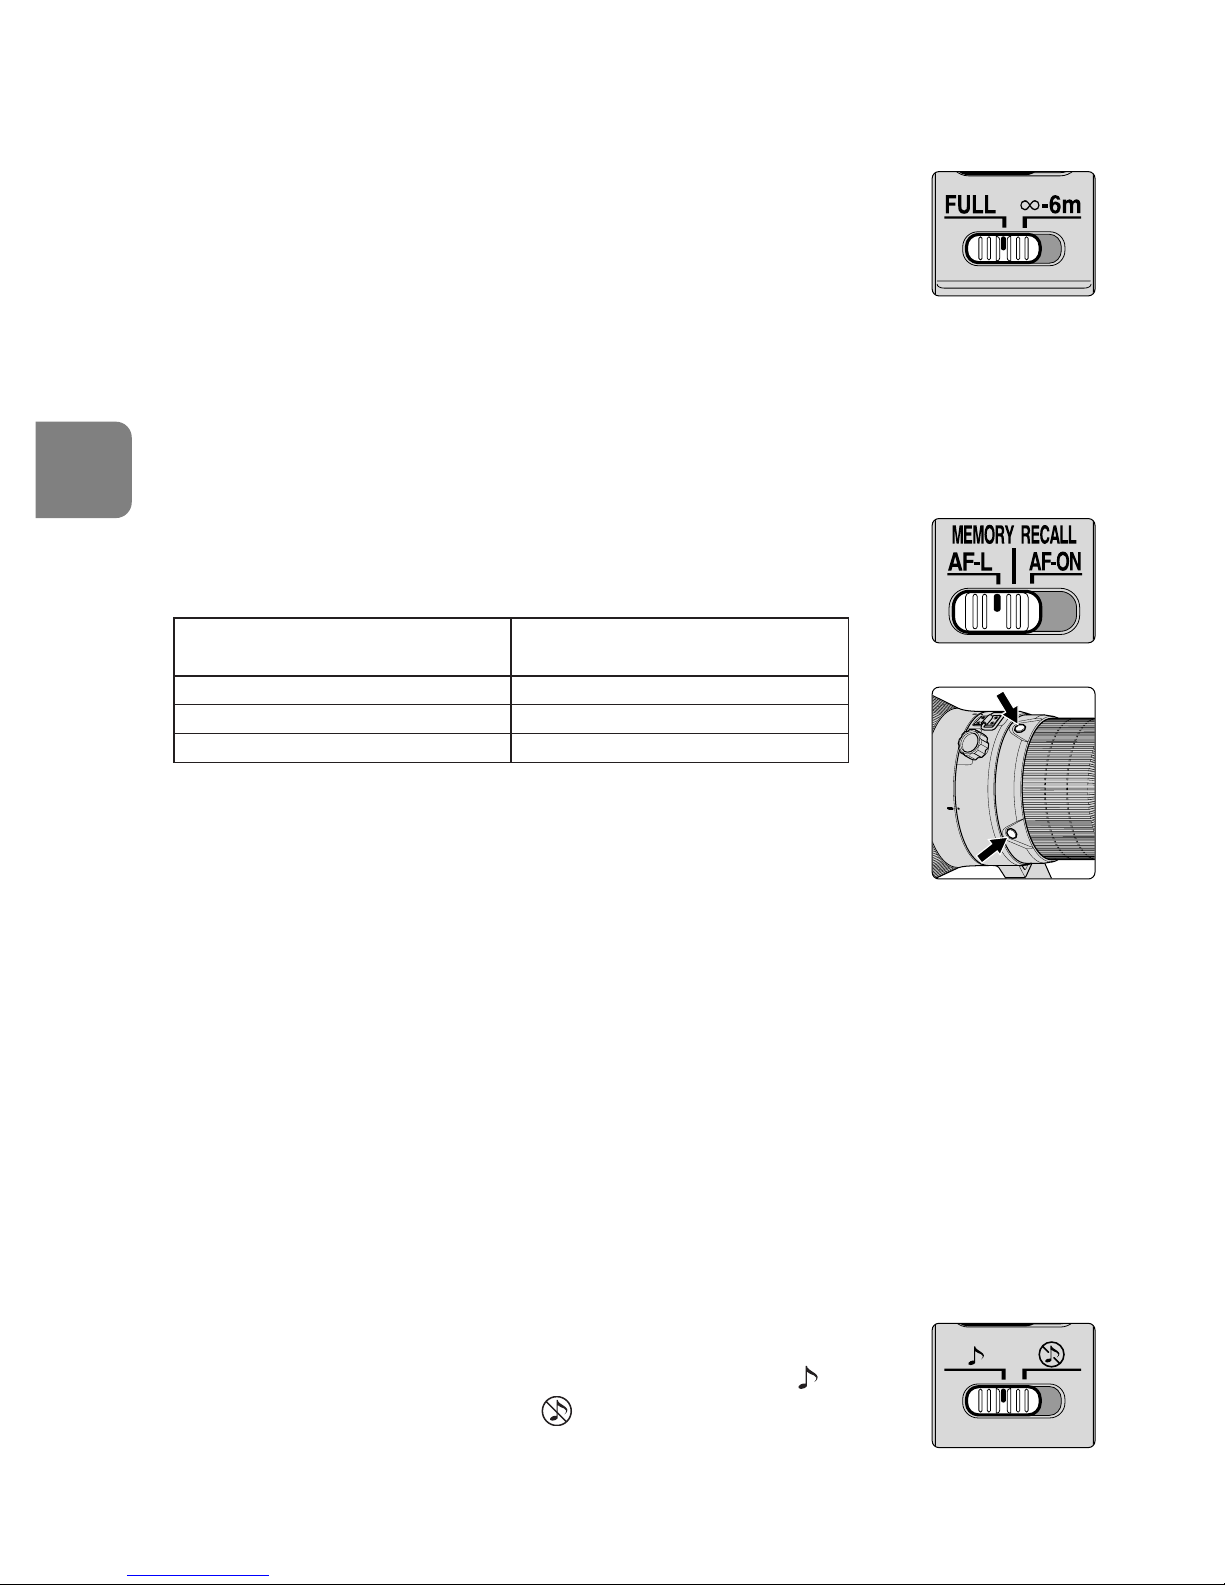
56
Fr
5. Pour limiter la plage de l'autofocus
(Voir la liste des appareils photo compatibles page 52)
• Avec le fonctionnement AF, si le sujet est toujours à plus de 6 m,
placez le commutateur limiteur de mise au point (Fig. 2) sur
“∞ – 6 m” pour réduire le délai de mise au point.
• Si le sujet est parfois à 6 m ou moins, placez-le sur “FULL“
(PLEIN).
• Cette fonction est compatible uniquement en mode autofocus.
6. AF-L/MEMORY RECALL/AF-ON
Commutateur de sélection de mise au point (AF-L/RAPPEL
MEMOIRE/ AF-MARCHE) et bouton de mise au point
• Le fonction du bouton de commande de mise au point (Fig. 3)
varie selon la position du commutateur de sélection de
commande de mise au point (Fig. 4):
• Vous pouvez changer la position des boutons de commande de
mise au point à votre guise. Pour plus de détails à ce sujet,
contactez votre plus proche concessionnaire ou représentant Nikon.
• Appuyez sur l'une des quatre commandes de mise au point pour l'activer.
Utilisation de la commande de verrouillage de la mise au point
(Voir la liste des appareils photo compatibles page 52.)
1
Placez le commutateur de mise au point sur “A/M” ou “M/A”. (Fig. 1)
• Cette fonction est compatible uniquement en mode autofocus.
2
Réglez le commutateur de sélection de mise au point (Fig. 3) sur “AF-L”.
3
Pendant l’autofocus, la mise au point peut être verrouillée pendant que vous
appuyez sur le bouton de mise au point (Fig. 4).
• La fonction de verrouillage AF peut être enclenchée sur l’appareil et sur l’objectif.
• La mise au point est verrouillée lorsque l’un de ces boutons est enfoncé.
Commande MEMORY RECALL (Voir la liste des
appareils photo compatibles page 52 Cette fonction est
disponible en mode autofocus et manuel.)
• Placez le commutateur de signal sonore (Fig. 5) sur “ ” pour
activer le signal sonore et sur “ ” pour le désactiver.
• Fonctionnement avec le signal sonore activé.
Fig. 3
Fig. 4
Position du commutateur de sélection
de commande de mise au point
Fonction du bouton de
commande de mise au point
AF-L Verrouillage de la mise au point
MEMORY RECALL Rappel mémoire
AF-ON
Départ AF (AF-MARCHE) sur l’objectif
Fig. 5
Fig. 2
Page 57
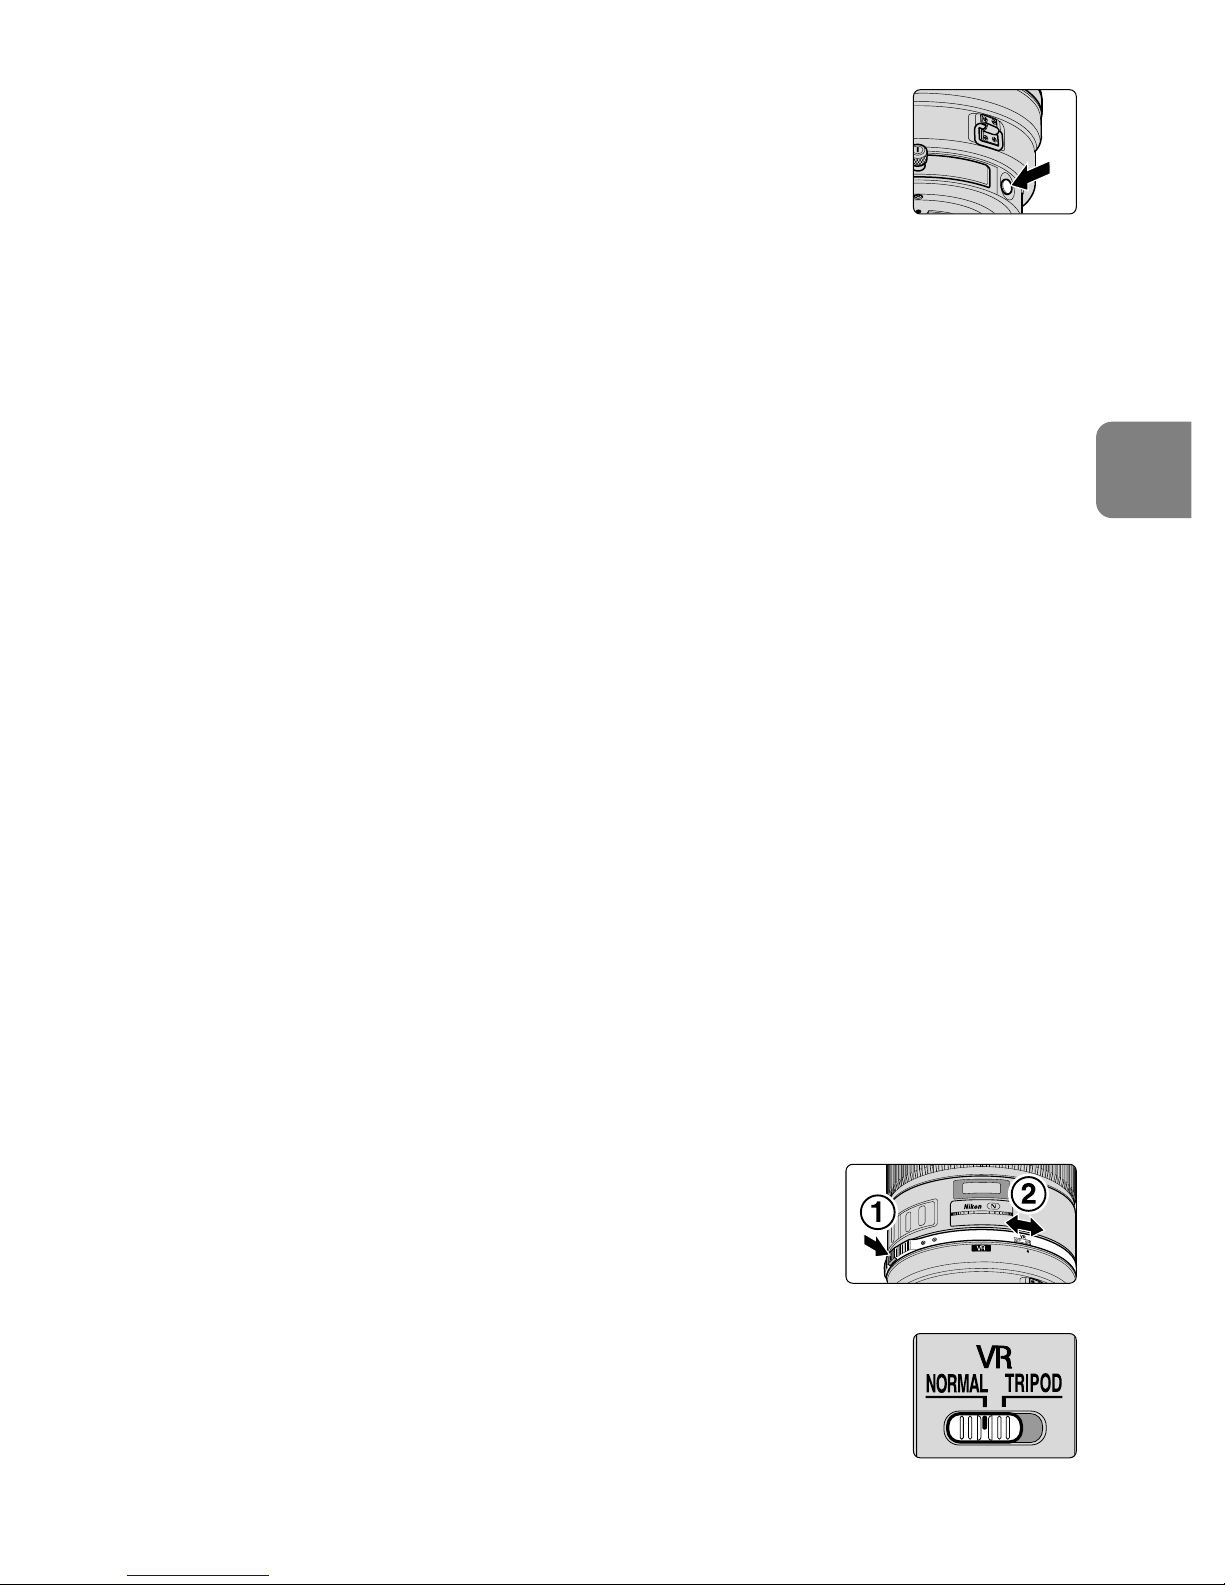
57
Fr
1
Placez le commutateur de mise au point sur “A/M”, “M/A” ou “M”. (Fig. 1)
2
Effectuez la mise au point sur le sujet dont vous souhaitez
mémoriser la distance de mise au point. Appuyez sur la
commande de mémorisation (Fig. 6). Lorsque vous entendez
un signal sonore, la mise au point est mémorisée.
• Cette fonction est disponible que le commutateur de mise au point soit en
mode autofocus ou manuel.
• La distance reste mémorisée, même lorsque l'appareil photo est mis hors
tension ou que l'objectif est retiré.
Remarque: si la bague d'échelle de distance tourne de droite à gauche environ 10 fois
pendant la mise au point et qu'en même temps un signal sonore court et
trois signaux longs retentissent, effectuez à nouveau la mémorisation.
3
Placez le commutateur de sélection de mise au point (fig. 3) sur “MEMORY RECALL”.
4
Appuyez sur la commande de mise au point (Fig. 4).
• Appuyez à mi-pression sur le déclencheur tout en appuyant sur la commande de
mise au point de l'objectif pour rappeler la distance de mise au point mémorisée.
5
Deux signaux sonores retentissent et indiquent le rappel de la distance de mise
au point. Appuyez à fond sur le déclencheur pour prendre la photo.
Remarque: pour prendre des photos à la distance de mise au point mémorisée,
appuyez à fond sur le déclencheur avant de relâcher la commande
de mise au point de l'objectif.
• En mode A/M et M/A, l'objectif repasse du mode mémorisation au mode
autofocus ou manuel seulement lorsque vous relâchez la commande de mise
au point de l'objectif et que vous appuyez à mi-course sur le déclencheur.
Commande AF-ON (Voir la liste des appareils photo compatibles page 52)
1
Placez le commutateur de mise au point (Fig. 1) sur “A/M” ou “M/A”.
2
Placez le commutateur de sélection de mise au point (Fig. 3) sur “AF-ON”.
3
Appuyez sur la commande de mise au point (Fig. 4) pour prendre des photos.
• L'autofocus est activé lorsque vous appuyez sur la commande de mise au point de l'objectif.
7. Mode de réduction de vibration (Voir la liste des appareils
photo compatibles page 52)
1
Placez le commutateur de réduction de vibration ON/OFF
sur “ON” tout en appuyant sur la commande sur la
bague 1. (Fig. 7)
2
Placez le commutateur de mode de réduction de vibration
(Fig. 8) sur “NORMAL” ou “TRIPOD”.
• Le bougé peut être réduit dans le viseur en appuyant à micourse sur le déclencheur afin de faciliter la mise au point
manuelle ou automatique, et un meilleur cadrage du sujet.
Fig. 7
Fig. 8
Fig. 6
Page 58
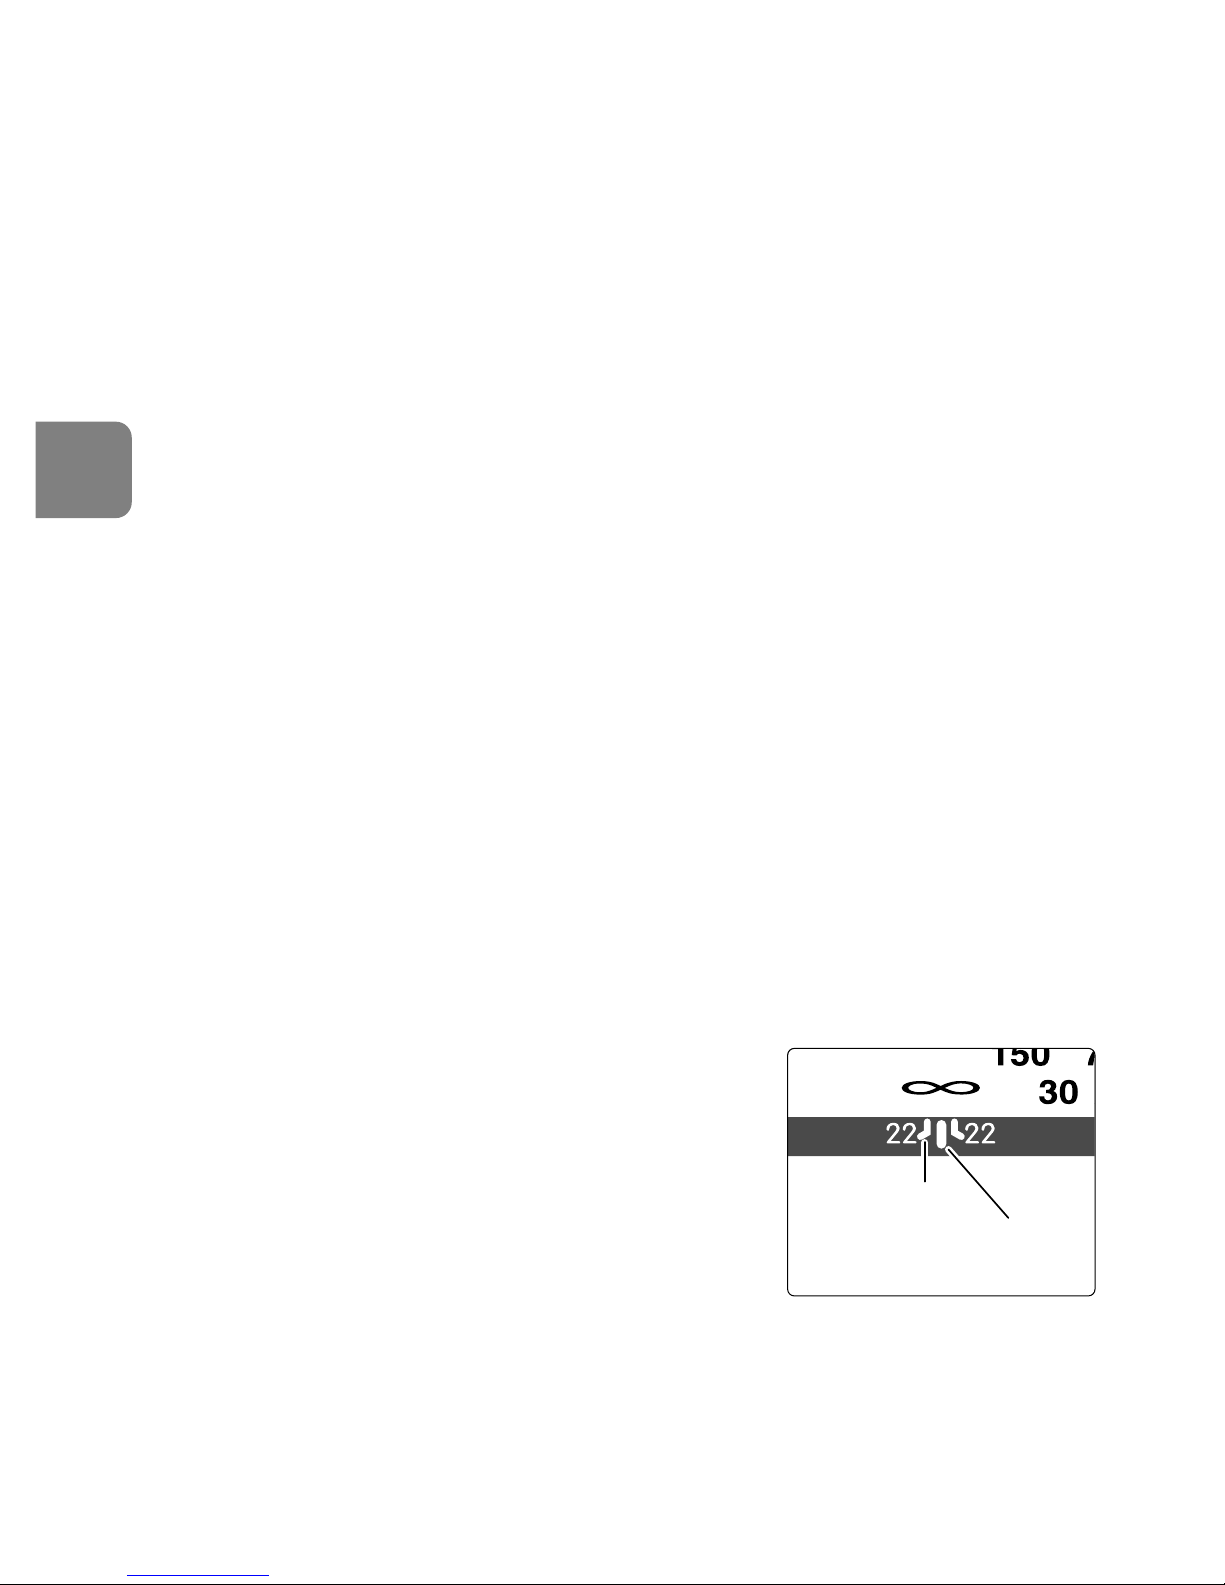
58
Fr
Remarques concernant la réduction de la vibration
• Attendez que l’image cesse de vibrer dans le viseur avant d’appuyer à fond sur
le déclencheur après l’avoir légèrement enfoncé.
• Caractéristique du mécanisme de réduction de la vibration, l’image dans le
viseur deviendra floue après le déclenchement.
•
Si vous réglez le bouton Départ AF (AF-ON) (Fig.4) sur ON sur l’appareil ou le
bouton de mise au point sur l’objectif, la stabilisation d’image ne fonctionnera pas.
• Placez le commutateur de réduction de vibration sur “TRIPOD” pour réduire le
bougé d'appareil et stabiliser la visée lors de l'utilisation d'un pied. Lorsque le bougé
est très faible, le système de réduction de vibration peut ne pas s'activer. A l'inverse,
le système VR peut provoquer un bougé d'appareil dans l'objectif. Dans ce cas, il est
conseillé de désactiver la réduction de vibration. En cas d'utilisation d'un pied dont
la tête n'est pas fixe ou un monopode, sélectionnez le mode NORMAL.
• Lorsque vous prenez des panoramiques, vérifiez que vous avez bien placé le
mode de reduction de la vibration (Fig. 8) sur NORMAL.
• Si vous déplacez l’appareil en décrivant une courbe pendant le panoramique,
la vibration dans la direction du mouvement ne sera pas affectée. Si vous
déplacez latéralement et horizontalement l’appareil, seule la vibration verticale
est réduite, ce qui facilite les panoramiques.
• Ne mettez pas l’appareil hors tension et n’ôtez pas l’objectif de l’appareil
quand le mode de réduction de la vibration est activé. (Sinon, l’objectif risque
d’émettre un claquement si l’appareil est secoué. Il ne s’agit pas d’une
anomalie. Remettez l’appareil sous tension pour éliminer ce cliquetis.)
• Avec les appareils série F80, série F75, série F65, D300, D200, D100, D80,
série D70, D50 et série D40, la réduction de la vibration ne fonctionne pas
lorsque le flash intégré se remet en place.
8. Profondeur de champ
• La profondeur de champ approximative peut être
déterminée en examinant l'échelle de profondeur
de champ. (Fig. 9)
• Si votre appareil photo est équipé d'une commande
ou d'un levier de test de profondeur de champ, celleci peut être estimée en regardant dans le viseur.
• Pour plus d'informations, consultez la page 192.
9. Réglage de l’ouverture
• Cet objectif étant dépourvu de réglage du diaphragme, l’ouverture se règle à
partir de l’appareil.
Ligne de
repère des
distance
Échelle des
profondeurs
de champ
Fig. 9
Page 59
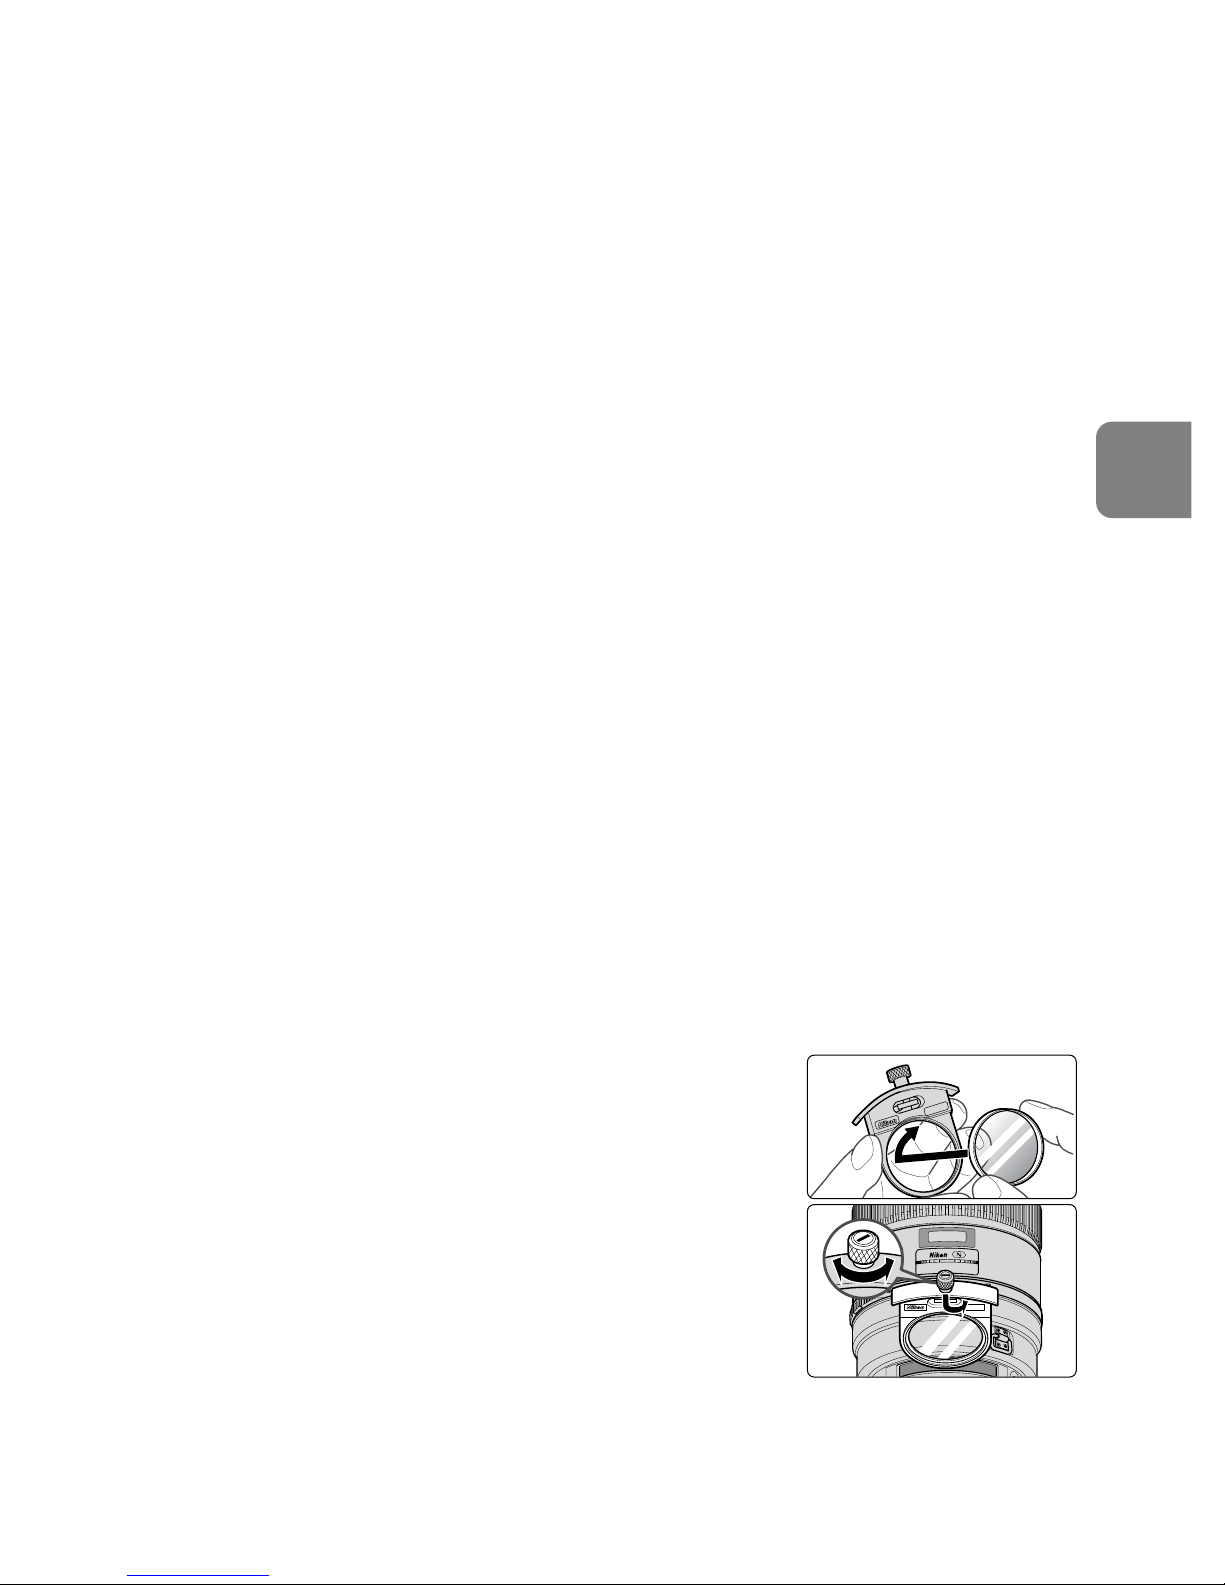
59
Fr
10. Collier de trépied rotatif intégré
•A la prise de vues à la verticale, desserrez la vis de verrouillage du collier de
trépied en la tournant dans le sens anti-horaire, tournez l’objectif à la position
appropriée, puis tournez la vis dans le sens horaire pour la serrer.
• En maintenant l’appareil par sa poignée et en le tournant avec l’objectif dans
son collier de trépied, votre main peut heurter le trépied selon le trépied utilisé.
Monopode (accessoire fourni)
• Le collier de pied peut être transformé en collier de monopode en enlevant
une vis de verrouillage.
• Après avoir changé le collier de pied, assurez-vous que la vis est parfaitement
serrée. Dans le cas contraire, l'objectif et l'appareil pourraient être
endommagés en cas de chute.
Pour plus de détails sur cette procédure, veuillez contacter votre centre de SAV
ou bureau officiel le plus proche.
11. Parasoreil HK-33-1 et HK-33-2
Un parasoreil en deux parties (HK-33-1 à fixer sur l’avant de l’objectif et HK-33-2
à fixer sur l’avant du HK-33-1) est fourni.
Emploi du HK-33-1: Desserrez d’abord la vis de parasoreil du HK-33-1, glissez
le HK-33-1 sur l’avant de l’objectif et resserrez la vis.
Fixation du HK-33-2: Desserrez d’abord la vis de parasoreil du HK-33-2, glissez
le HK-33-2 sur l’avant du HK-33-1 et resserrez la vis.
Rangement des parasoreil: Retournez d’abord le HK-33-2, puis reglissez-le sur
le HK-33-1. Puis retournez le HK-33-1 avec le HK-33-2 monté, et reglissez les
deux sur l’avant de l’objectif.
12. Porte-filtres insérable
• Utilisez toujours un filtre à vis de 52 mm. Un filtre
neutre à vis de 52 mm est inséré en usine dans le
porte-filtre.
1
Placez un filtre sur le côté du porte-filtre portant les
mentions “Nikon” et “JAPAN”. (Fig. 10)
2
Appuyez sur le bouton du support de filtre à insérer, et
tournez le dans le sens anti-horaire jusqu’à ce que la ligne
blanche sur le bouton soit à angle droit avec l’axe de
l’objectif.
• Le support de filtre à insérer peut s’attacher face à
l’objectif ou face à l’appareil sans aucun effet sur les
photos.
Fig. 10
Page 60
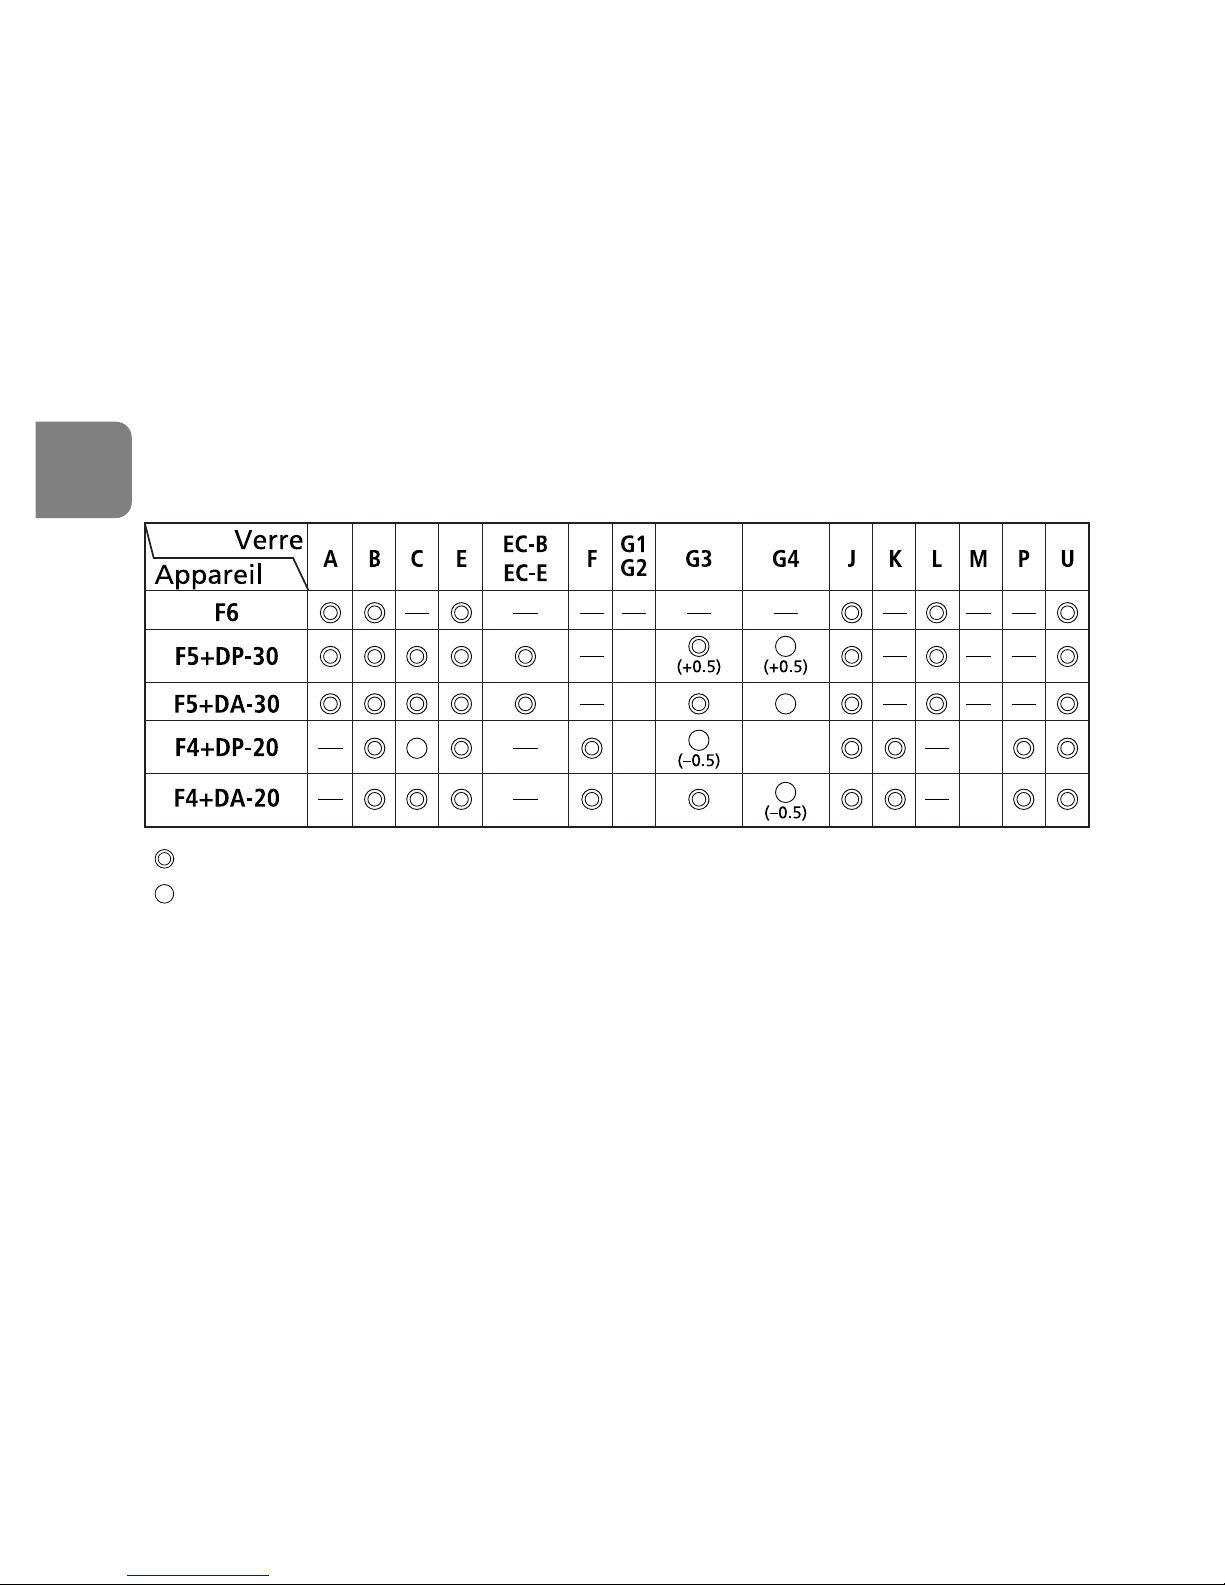
60
Fr
Filtre polarisant insérable C-PL1L (vendu séparément)
• Bloque les reflets des surfaces non métalliques, comme le verre et l'eau.
• Le point de mise au point d'un filtre polarisant circulaire insérable C-PL1L est
différent d'un filtre à vis 52 mm. L'échelle de distance est déplacée de la position
correcte. La distance minimale de mise au point est légèrement plus grande.
• La position mémorisée peut changer légèrement lors de l'utilisation de la
fonction de mémorisation de la mise au point. Insérez le filtre C-PL1L avant
d'utiliser la fonction de rappel de la mise au point.
13. Ecrans de mise au point recommandés
Divers écrans de mise au point sont disponibles pour certains appareils Nikon SLR
qui s’adaptent à toutes les conditions de prise de vues. Les écrans recommandés
avec cet objectif sont listés cidessons.:
: Mise au point excellente
: Mise au point passable
Un vignetage affecte l’image du verre. L’image sur la pellicule ne porte
cependant aucune trace de ceci.
—: Non disponible
( ): Indique la compensation de l’exposition additionnelle requise ( Mesure
pondérée centrale uniquement). Pour les appareils F6, corrigez en
sélectionnant “Activ.: autre”dans le réglage personnalisé "b6: Plage visée” et
en réglant le niveau IL de -2,0 à +2,0 par pas de 0,5 IL. Lorsque vous utilisez
des verres autres que ceux de type B ou E, il faut sélectionner “Activ.: autre”
même lorsque la valeur de correction est de “0”(pas de correction nécessaire).
Pour les appareils F5, compenser en utilisant le réglage personnalisé n° 18 sur
l’appareil. Pour les appareils de la série F4, compenser en utilisant le cadran de
compensation de l’exposition prévu pour les filtres de mise au point.
Voyez le manuel d’instructions de l’appareil photo pour plus de détails.
Un blanc indique aucune application. Du fait que le verre M peut être utilisé pour
la macrophotographie à un rapport d’agradissement 1:1 et pour la
photomicrographie, il a des applications diffèrentes de celles des autres verres.
Page 61

61
Fr
• Pour les appareils F5, seuls les verres de mise au point EC-B, EC-E, B, E, J, A, L
peuvent être utilisés avec la mesure matricielle.
• Lors de l’utilisation de verres B et E dans des appareils autres que ceux
indiqués ci-dessus, se reporter aux colonnes sur verres B et E.
14. Entretien de l’objectif
• Nettoyez la surface de l’objectif avec un pinceau soufflant. Pour enlever les
poussières ou les traces, utilisez de préférence un tissu de coton doux, ou un
tissu optique, légèrement humidifié avec de l’alcool éthylique (éthanol).
Essuyez en effectuant un mouvement circulaire en partant du centre.
• N’employez jamais de solvant ou de benzène qui pourrait endommager
l’objectif, prendre feu ou nuire à la santé.
• Lorsque l'objectif n'est pas utilisé, mettez le capuchon en place pour protéger
la lentille frontale.
• Lors du rangement de l’objectif dans son étui, pensez à remettre en place les
bouchons avant et arrière.
• En cas d’inutilisation pour une longue période, entreposez l’objectif dans un
endroit frais, sec et aéré pour éviter les moisissures. Tenez l'objectif éloigné des
sources de lumière, et des produits chimiques (camphre, naphtaline, etc.).
• Ne projetez pas de l'eau sur l'objectif et ne l'immergez pas: cela pourrait le
rouiller et provoquer des dommages irréparables.
• Divers matériaux de synthèse sont utilisés dans la fabrication. Pour éviter tout
problème, ne soumettez pas l’objectif à de fortes chaleurs.
15. Accessoires fournis
• Valise rigide CT-404 • Capuchon d’objectif avant à glisser • Bouchon arrière
LF-1 • Parasoleil HK-33 • Porte-filtre dédié* • Filtre NC à visser 52mm
• Courroie LN-1 • Collier pour monopode
*Si des accessoires dédiés sont brisés ou perdus, contactez le centre de service
après vente Nikon le plus proche ou, comme ils ne sont pas disponibles dans le
magasins généraux, le bureau du représentant.
16. Accessoires en option
• Sac semi-souple CL-L2 • 52Autres filtres vissants 52mm (sauf filtre circulaire
polarisant II) • Filtre circulaire polarisant à insérer C-PL1L • Téléconvertisseurs
AF-S (TC-14EII/TC-17EII/TC-20EII.)
Page 62

62
Fr
17. Caractéristiques
Type d’objectif: Zoom-Nikkor AF-S de type G avec processeur et
monture baïonnette Nikon. Mécanisme de réduction de
la vibration (VR) spécial intégré
Focale: 400 mm
Ouverture maximale: f/2,8
Construction optique: 14 éléments en 11 groupes (3 verres ED et 1 lentilles à
couche déposée de nano cristal), ainsi qu'un verre de
protection de l'objectif
Angle de champ: 6°10’ avec les reflex argentiques 24x36 Nikon et reflex
numériques Nikon au format FX
4° avec les reflex numériques Nikon au format DX,
5° avec les appareils photo IX240
Informations sur la A l’appareil
distance:
Mise au point: Système Internal Focusing (IF) Nikon (utilisant un moteur
à ondes silencieux interne); manuel par bague de mise
au point séparée
Réduction de la Méthode de déplacement de l’objectif en utilisant des
vibration: moteurs à bobine mobile (VCM)
Echelle des distances Graduée en mètres et pieds de 2,8 m à l’infini (∞)
de prise de vue:
Distance focale la 2,9 m en mode AF, 2,8m en mode MF
plus courte:
Nb. de lamelles du
9 (circulaires)
diaphragme:
Diaphragme: Entièrement automatique
Echelle des ouvertures: f/2,8 – f/22
Mesure de l’exposition: Via méthode pleine ouverture avec les appareils avec
système d’interface CPU
Commutateur limiteur Fourni; deux plages disponibles: FULL (∞ – 2,9 m),
de mise au point: ou ∞ – 6 m.
Collier de pied: Intégré, angle de rotation de 360°, index de position à
90°. Collier de pied remplaçable par un collier de
monopode.
Dimensions: Env. 159,5 mm diam. x 368,0 mm extension à partir de
la monture d’objectif située sur l’appareil photo
Poids: Env. 4.620 g
Les caractéristiques et les schémas sont susceptibles d’être modifiés sans préavis
ni obligation de la part du constructeur.
Page 63

63
Fr
Page 64

64
Es
No desarme el equipo
El contacto con las piezas internas de la cámara o del objetivo puede provocar
lesiones. Las reparaciones solamente deben ser ejecutadas por técnicos
cualificados. Si a causa de un golpe u otro tipo de accidente la cámara o el
objetivo se rompen y quedan abiertos, desenchufe el producto y/o retire la
batería, y a continuación lleve el producto a un centro de servicio técnico
autorizado Nikon para su revisión.
Apague inmediatamente el equipo en caso de funcionamiento
defectuoso
Si observa que sale humo o que la cámara o el objetivo desprenden un olor
extraño, retire la batería inmediatamente, con cuidado de no quemarse. Si sigue
utilizando el equipo corre el riesgo de sufrir lesiones. Después que haya retirado
o desconectado la fuente de alimentación, lleve el equipo a un centro de servicio
técnico autorizado Nikon para su revisión.
No utilice la cámara ni el objetivo en presencia de gas inflamable
No utilice equipos electrónicos en presencia de gas inflamable, ya que podría
producirse una explosión o un incendio.
No mire hacia el sol a través del objetivo ni del visor
Mirar hacia el sol u otra fuente de luz potente a través del objetivo o del visor
podría producirle daños permanentes en la vista.
Mantener fuera del alcance de los niños
Se debe tener especial cuidado en evitar que los niños se metan en la boca pilas
u otras piezas pequeñas.
Notas sobre un uso seguro
PRECAUCIÓN
Page 65

65
Es
Adopte las siguientes precauciones al manipular la cámara y el
objetivo
• Mantenga la cámara y el objetivo secos. De no hacer esto podría producirse un
incendio o una descarga eléctrica.
• No manipule ni toque la unidad con las manos húmedas. De hacer eso podría
recibir una descarga eléctrica.
• En fotografías a contraluz, procure que el sol no entre ni quede cerca del
encuadre. Podría producirse un efecto lente dentro del cuerpo del objetivo e
incendiarse éste. Esto también puede ocurrir cuando el sol queda cerca del
encuadre.
• Cuando el objetivo no vaya a utilizarse por un período de tiempo prolongado,
colóquele las tapas frontal y trasera al objetivo y guárdelo alejado de la luz solar
directa. De no hacer esto podría producirse un incendio, ya que el objetivo
pudiera enfocar la luz solar directa sobre un objeto.
Page 66
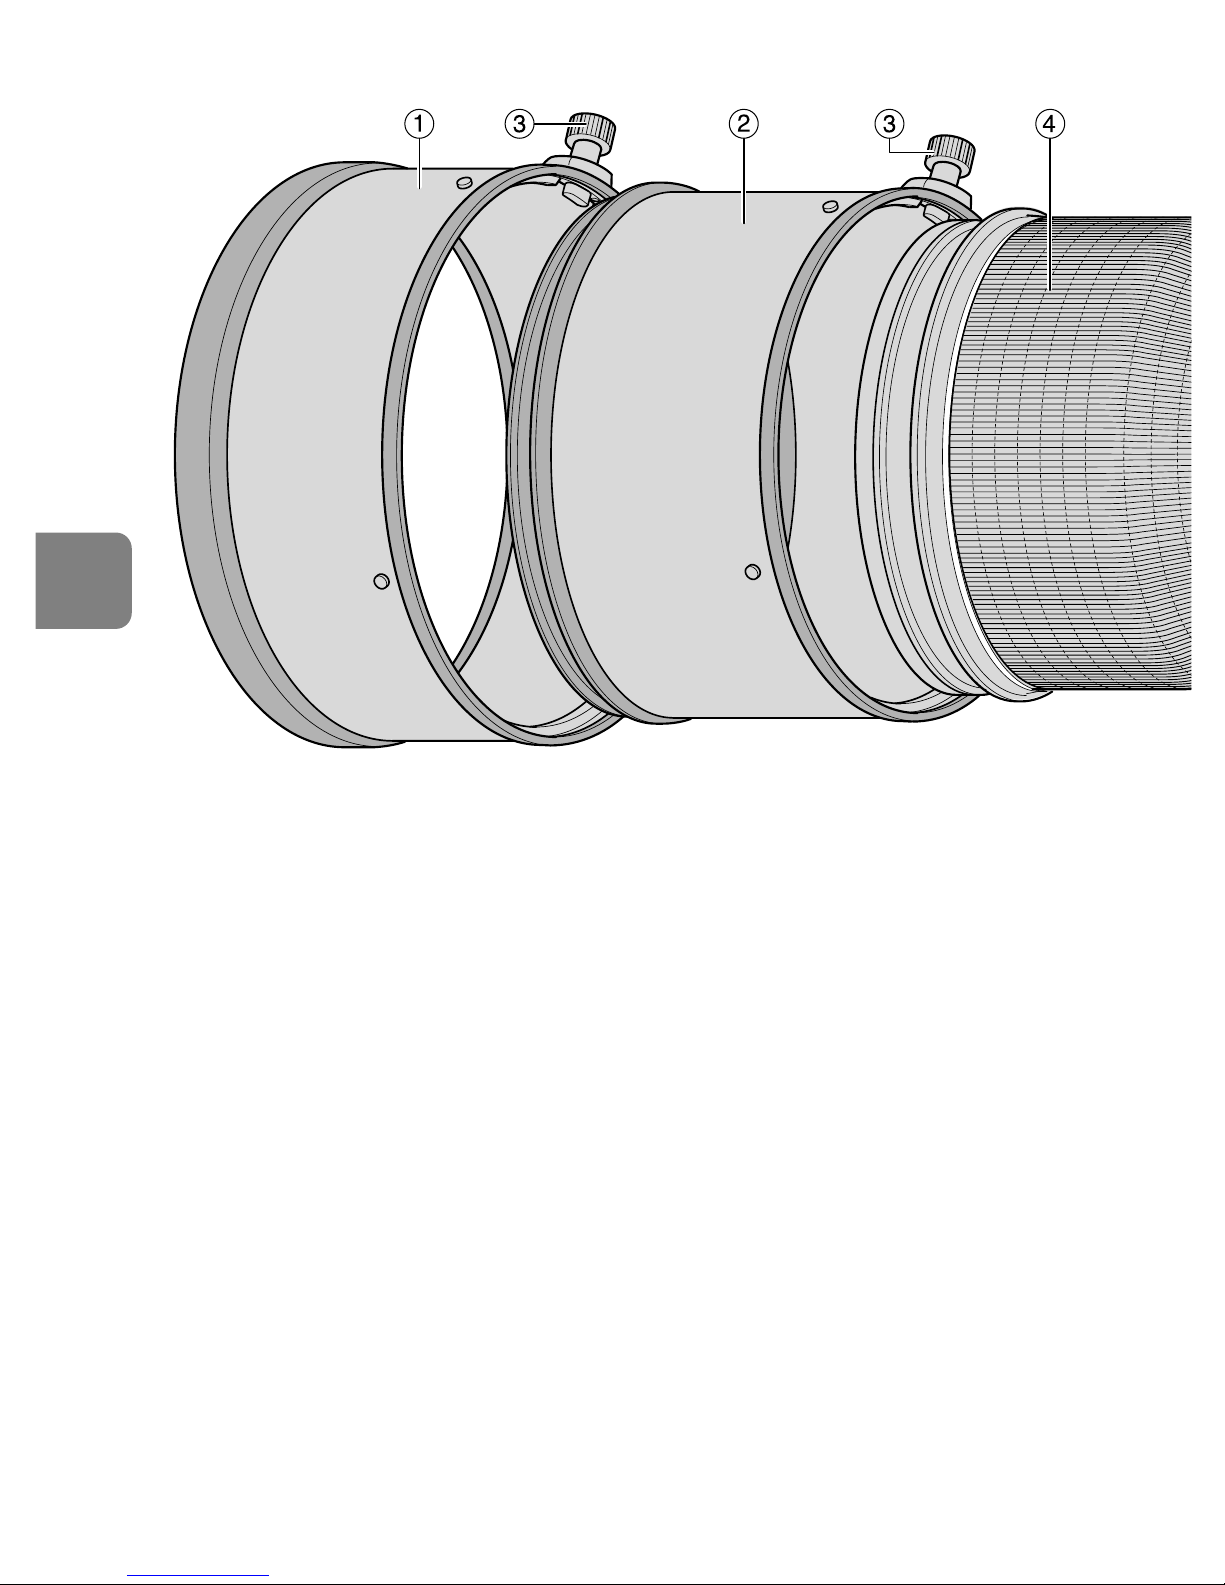
66
Es
1 Visera del objetivo HK-33-2 (p. 75)
2 Visera del objetivo HK-33-1 (p. 75)
3 Tornillo de la visera del objetivo (p. 75)
4 Empuñadura de goma
5 Tornillo de fijación del collar del
trípode (p. 75)
6 Ojillos para la correa
7 Indices de posición de rotación del
objetivo
8 Botón de enfoque (Bloqueo de
enfoque/ MEMORY RECALL/ Inicio
de enfoque automático) (p. 72)
9 Anillo de enfoque (p. 71)
! Escala de profundidad de campo (p. 74)
" Línea indicadora de distancias (p. 74)
# Escala de distancias
$ Interruptor de anillo de ON/OFF de
reducción de vibración (p. 73)
% Soporte del filtro deslizable (p. 75)
&
Perilla del soporte del filtro deslizable
(p. 75)
( Indice de monturas
) Junta de goma de montaje del
objetivo (p. 70)
~ Contactos CPU (p. 70)
+ Collar del trípode rotatorio
integrado (p. 75)
, Collar de monópode (para el
cambio) (p. 75)
- Botón Memoria (p. 73)
. Interruptor de modo de enfoque (p. 71)
/ Interruptor de límite de enfoque (p. 72)
: Interruptor de modo de reducción
de vibración (p. 73)
; Interruptor de selección de enfoque
(AF-L/MEMORY RECALL/AF-ON) (p. 72)
< Interruptor de control acústico (p. 72)
1. Nomenclatura ( ): Página de referencia
Page 67
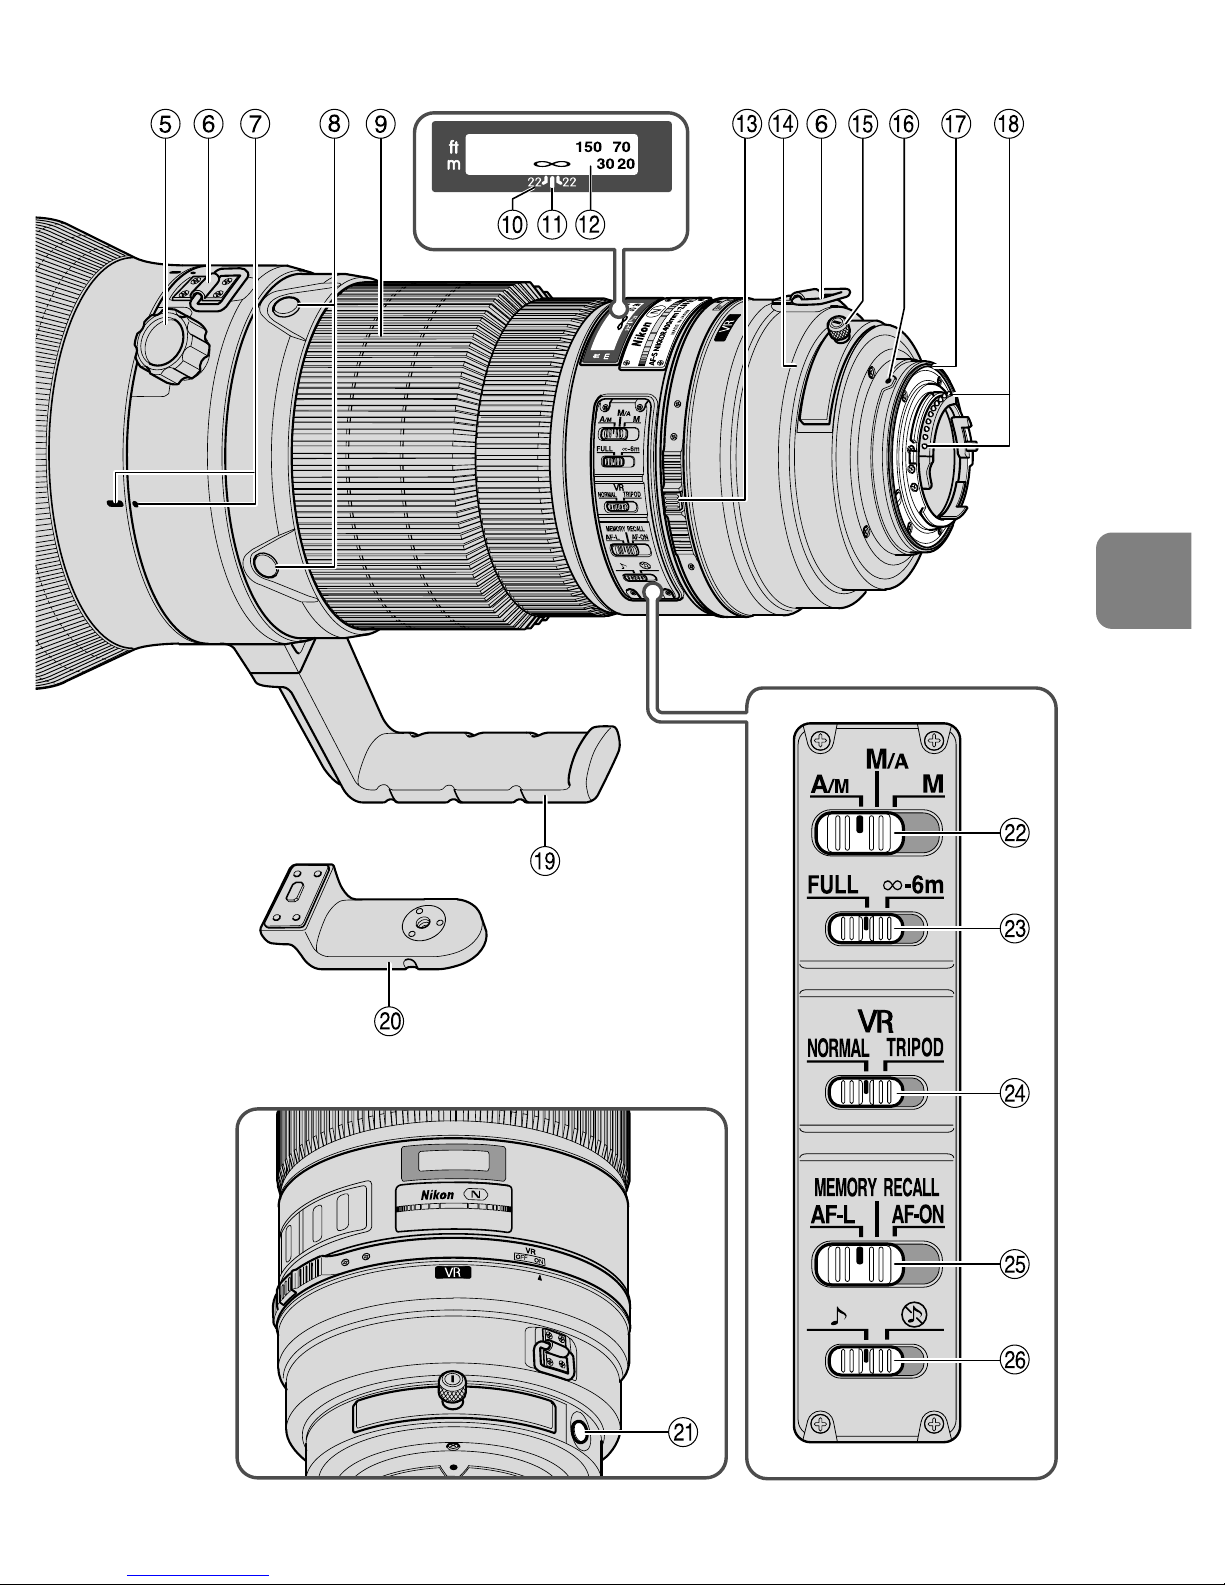
67
Es
Page 68

68
Es
2. Cámaras que puede utilizar y funciones disponibles
Puede haber algunas restricciones o limitaciones para las funciones disponibles.
Para más detalles, consulte el manual de instrucción de la cámara.
* De venta exclusiva en los EE.UU. **De venta exclusiva en los EE.UU. y Canadá.
*1 P incluye AUTO (Programa para propósitos generales) y sistema de programa variable.
*2 No puede utilizar el manual (M).
*3 Cuando el interruptor de selección de enfoque se ajusta en AF-ON, el
enfoque automático comenzará tan pronto como se presione el botón de
enfoque a la vez que se presiona ligeramente el disparador.
*4 Presione el botón Memoria o el botón de enfoque a la vez que presiona
ligeramente el disparador.
Cámaras
Reducción
de vibración
Enfoque
automático
Bloqueo
de enfoque
Modo de
exposición
P*1SAM
D3, Serie D2, Serie D1,
D300, D200, D100, D80,
Serie D70, D50,
Serie D40
F6, F5, F100,
Serie F80/Serie N80*,
Serie F75/Serie N75*,
Serie F65/Serie N65*
Pronea 600i/6i*,
Pronea S*
2
Serie F4, F90X/N90s*,
Serie F90/N90*,
Serie F70/N70*
Serie F60/N60*,
Serie F55/Serie N55*,
Serie F50/N50*,
F-401x/N5005*,
F-401s/N4004s*,
F-401/N4004*
F-801s/N8008s*,
F-801/N8008*,
F-601M/N6000*
F3AF, F-601/N6006*,
F-501/N2020**,
Nikon MF cámaras
(excepto F-601M/N6000*)
҂҂҂
*
3
҂
҂
*
3
*
4
҂҂
҂҂҂҂҂
҂҂҂҂҂
҂
҂
҂
҂
҂
҂
҂
҂
Recuperación de
memoria
Inicio de
enfoque
automático
en el objetivo
Función
: Posible : Posible, con ciertas restricciones ҂: Imposible
Page 69

69
Es
• Si se utiliza este objetivo con cámaras no compatibles con reducción de
vibración, coloque el interruptor de anillo de ON/OFF de reducción de
vibración en OFF. En especial con la cámara Pronea 600i/6i, si este interruptor
se deja en ON puede agotarse rápidamente la energía de la pila.
3. Introducción
Muchas gracias por adquirir el objetivo AF-S NIKKOR 400mm f/2,8G ED VR. Este
es un objetivo de grandes prestaciones que presenta mecanismos especiales de
Reducción de vibraciones (VR) y Enfoque interno de alta velocidad (IF). Además
para el movimiento del mecanismo de enfoque emplea un Motor de onda
silenciosa (S). También se proporciona configuración por defecto del enfoque.
Principales prestaciones
Dos modos AF (pág. 71)
El enfoque automático se puede anular poniendo el interruptor de modo de
enfoque en “A/M” o “M/A” y enfocando manualmente con el anillo de enfoque.
M/A: el enfoque automático se anula al enfocar manualmente con el anillo de
enfoque. Es el modo que se debe utilizar para enfocar con precisión.
A/M: el enfoque automático se anula y se enfoca manualmente con el anillo de
enfoque, pero la sensibilidad de detección del anillo de enfoque es inferior
a la del modo M/A. Utilice este modo para evitar que, de forma no
intencionada, el ajuste de AF se anule al mover el anillo de enfoque.
Limitación de la distancia del enfoque automático (pág. 72)
Para reducir el tiempo al enfocar se pueden establecer límites de enfoque.
Por ejemplo, si el sujeto está al menos a 6 m, ajuste el interruptor de límite de
enfoque en ∞–6 m.
AF-L/MEMORY RECALL/AF-ON (pág. 72)
Podemos bloquear y guardar las distancias de enfoque durante el enfoque
automático (AF-L) y después recuperarlas pulsando el botón “MEMORY RECALL”.
Si el interruptor se coloca en AF-ON, el objetivo reinicia el enfoque automático.
Reducción de la vibración* (VR II) (pág. 73)
NORMAL: reduce las sacudidas de la cámara en las tomas a pulso o cuando se
utiliza un monópodo. Este modo permite tomar fotografías a una velocidad
de obturación aproximadamente 4 puntos más lenta que con los objetivos sin
VR, ampliando las opciones de velocidad de obturación y facilitando las tomas
a pulso o con monópodo. También admite los barridos.
TRIPOD: es el modo recomendado para reducir las sacudidas de la cámara al utilizar
el trípode. Con un superteleobjetivo, se pueden producir sacudidas incluso con la
cámara montada en un trípode. El modo TRIPOD reduce las sacudidas de la
cámara en la fotografía con trípode, especialmente a velocidades de obturación
de entre 1/15 y 1 seg. También reduce la inestabilidad de la imagen en el visor.
* Según las condiciones de medida de Nikon. Los efectos de la reducción de la
vibración dependerán de los sujetos y de las condiciones de disparo.
Page 70
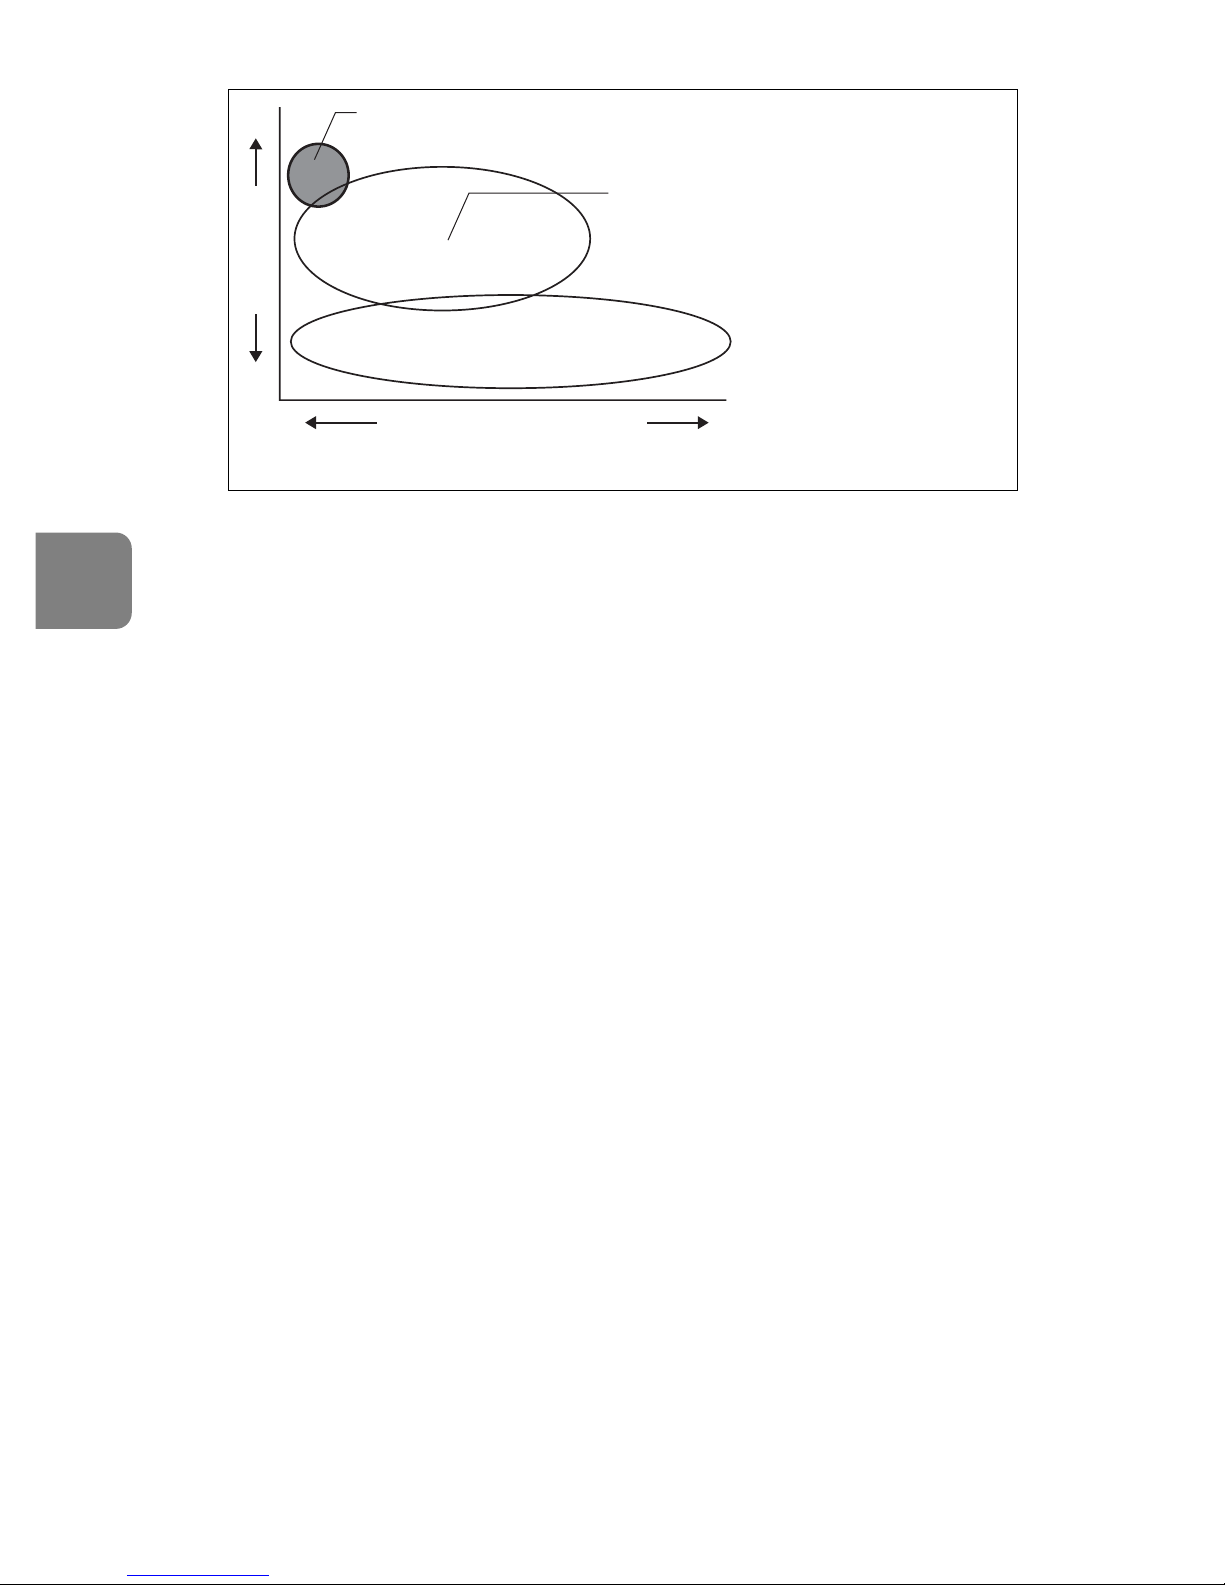
70
Es
Es posible un control de exposición más preciso cuando el objetivo está montado
en una cámara Nikon con posibilidad de medición matricial tridimensional porque
la información de distancia del sujeto se transfiere del objetivo a la cámara.
El uso de tres lentes ED (dispersión extra-baja) garantiza imágenes nítidas,
prácticamente sin mezcla de colores. Además, con el uso de un diafragma de 9 hojas
que produce una abertura casi circular, las imágenes fuera de enfoque delante o
detrás del sujeto aparecen más borrosas para crear un hermoso efecto de esfumado.
El recubrimiento nanocristalino en algunos objetivos garantiza sea posible
reproducir imágenes claras y nítidas bajo cualquier condición de fotografiado,
desde escenas en exteriores soleados hasta escenas con flash en interiores.
Para el cristal protector del objetivo se utiliza cristal con menisco, diferente del
cristal liso común.
Tiene distancias de enfoque más cercanas de 2,9 m (9,5 pies) (enfoque
automático) y 2,8 m (9,2 pies) (enfoque manual).
Importante!
• Debe tenerse cuidado de no sujetar la cámara cuando el objetivo está
acoplado, porque esto puede dañar la cámara. Al transportarla, asegúrese de
sujetar tanto la cámara como el objetivo.
• Asegúrese de acoplar un filtro enroscable de 52mm en el soporte del filtro deslizable.
• Tener cuidado de no manchar o dañar los contactos de la CPU.
• Puede utilizarse teleconvertidores AF-I/AF-S TC-14E/TC-14EII/TC-17EII/TC-20E/TC-20EII.
• Cuando se monta en las cámaras SLR digitales Nikon (formato Nikon DX), como las
de la serie D2 y la D50, el ángulo de imagen del objetivo se vuelve de 4° y su
distancia focal equivalente es de aproximadamente 600mm. (El ángulo de imagen
del objetivo es 6°10’ a una distancia focal de 35mm.)
• Si la junta de goma de montaje del objetivo se daña, asegúrese de ir a un
distribuidor autorizado Nikon o a un centro de servicio para que lo reparen.
Barridos
(en modo NORMAL)
Reducción de la vibración al utilizar el trípode
(en modo TRIPOD)
Fuerza de las vibraciones
Sacudidas de la cámara en las
tomas a pulso o al usar un
monópodo (en modo NORMAL)
Concepto básico de la reducción de la vibración
Número de
vibraciones
Page 71
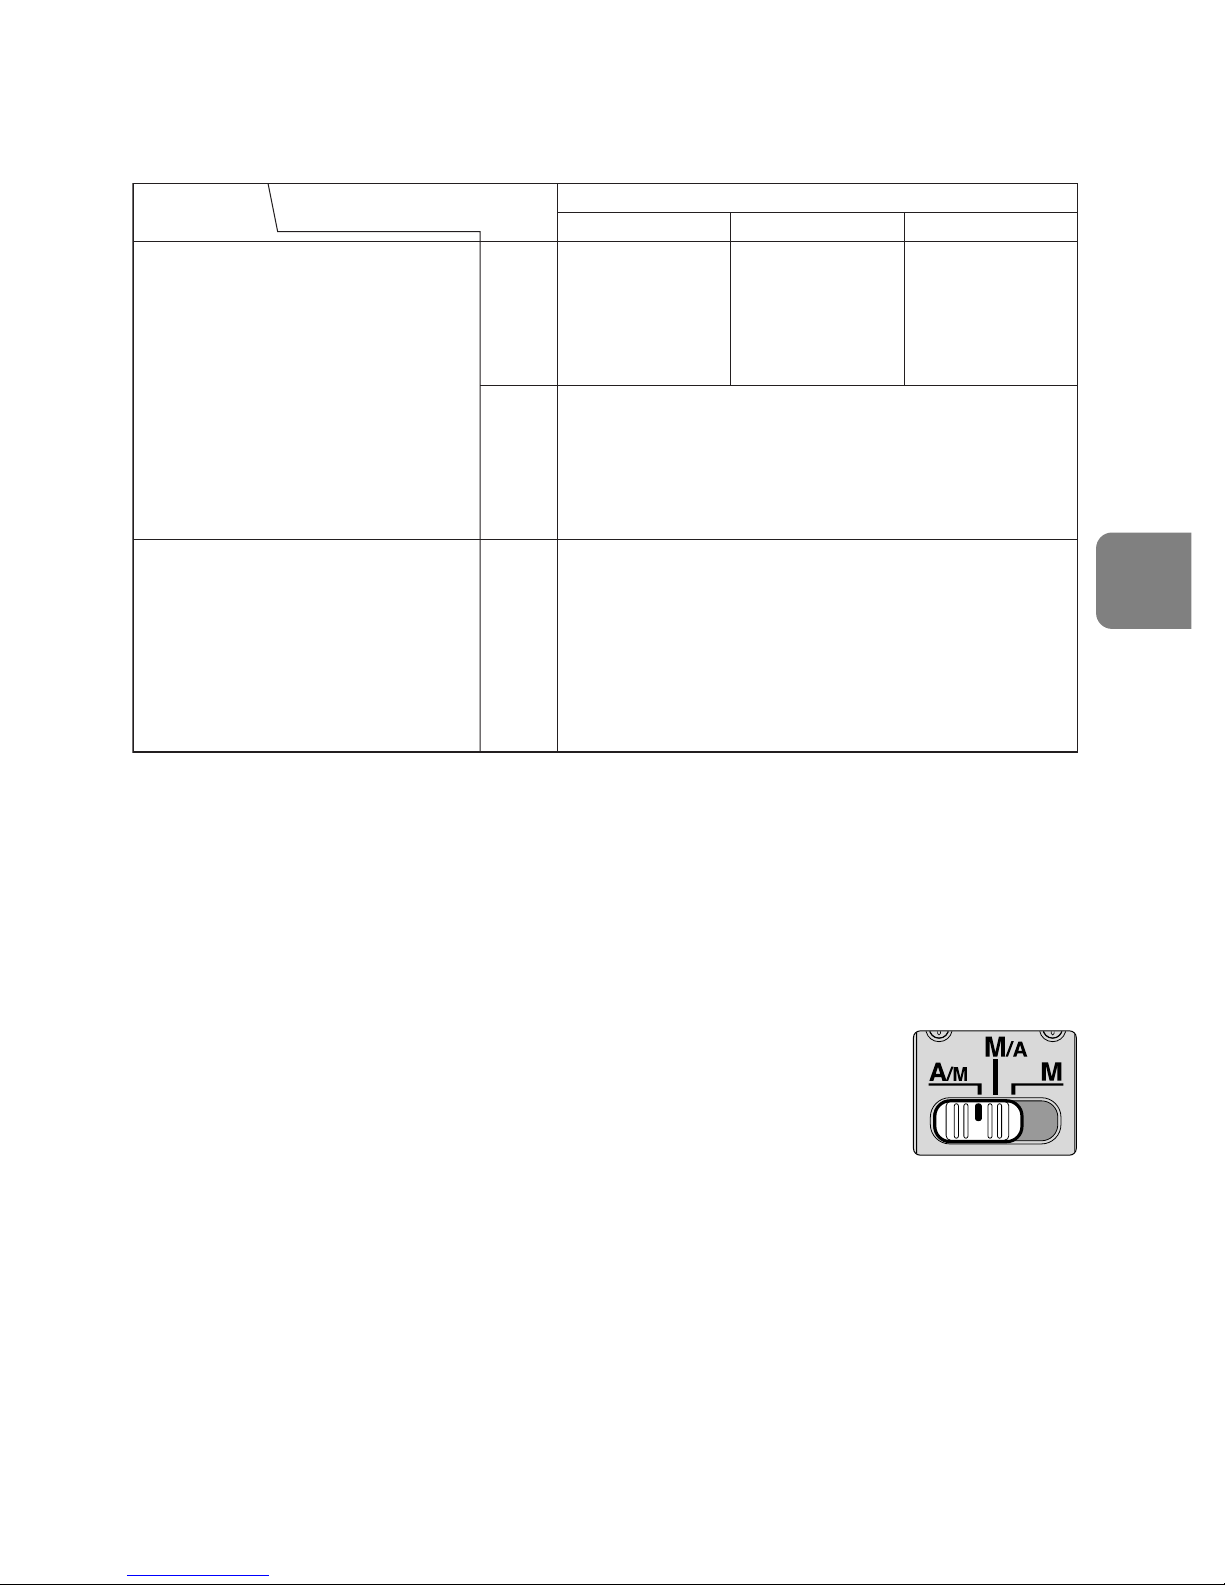
71
Es
4. Enfoque
Ajuste el selector de modo de enfoque de su cámara de acuerdo con este cuadro:
Enfoque automático con anulación manual (pág. 69)
Modo A/M: enfoque automático con anulación manual.
Prioridad al AF
Modo M/A: enfoque automático con anulación manual.
Prioridad al MF
1
Coloque el interruptor de modo de enfoque en “A/M” o
“M/A”. (Fig. 1)
2
Es posible anular manualmente el enfoque automático
manipulando el anillo de enfoque manual a la vez que se
presiona ligeramente el disparador o el botón de inicio de
enfoque automático (AF-ON) en la cámara o el botón de
enfoque en el objetivo.
• Para cancelar la anulación manual, retire el dedo del disparador o del botón de
inicio de enfoque automático en la cámara o del botón de enfoque en el
objetivo, y presione ligeramente el disparador para regresar al modo de
enfoque automático.
Modo de enfoque del objetivo
Cámaras
Modo de enfoque de la cámara
MM/AA/M
Enfoque manual
(Con ayuda de
enfoque)
MF Enfoque manual
(Con ayuda de enfoque, excepto con la
F-601M/N6000*)
Enfoque manual
(Con ayuda de enfoque)
Enfoque automático con anulación manual
(prioridad al MF)
Enfoque automático con anulación manual
(prioridad al AF)
AF
(C/S)
AF
(C/S)
MF
MF
D3, Serie D2, Serie D1, D300,
D200, D100, D80, Serie D70,
D50, Serie D40, F6, F5,
Serie F4, F100, F90X/N90s*,
Serie F90/N90*,
Serie F80/Serie N80*,
Serie F75/Serie N75*,
Serie F70/N70*,
Serie F65/Serie N65*,
Pronea 600i/6i*, Pronea S
Serie F60/N60*,
Serie F55/Serie N55*,
Serie F50/N50*,
F-801s/N8008s*, F-801/N8008*,
F-601M/N6000*,
F-401x/N5005*,
F-401s/ N4004s*, F-401/N4004*
* De venta exclusiva en los EE.UU.
AF: enfoque automático MF: enfoque manual
Fig. 1
Page 72
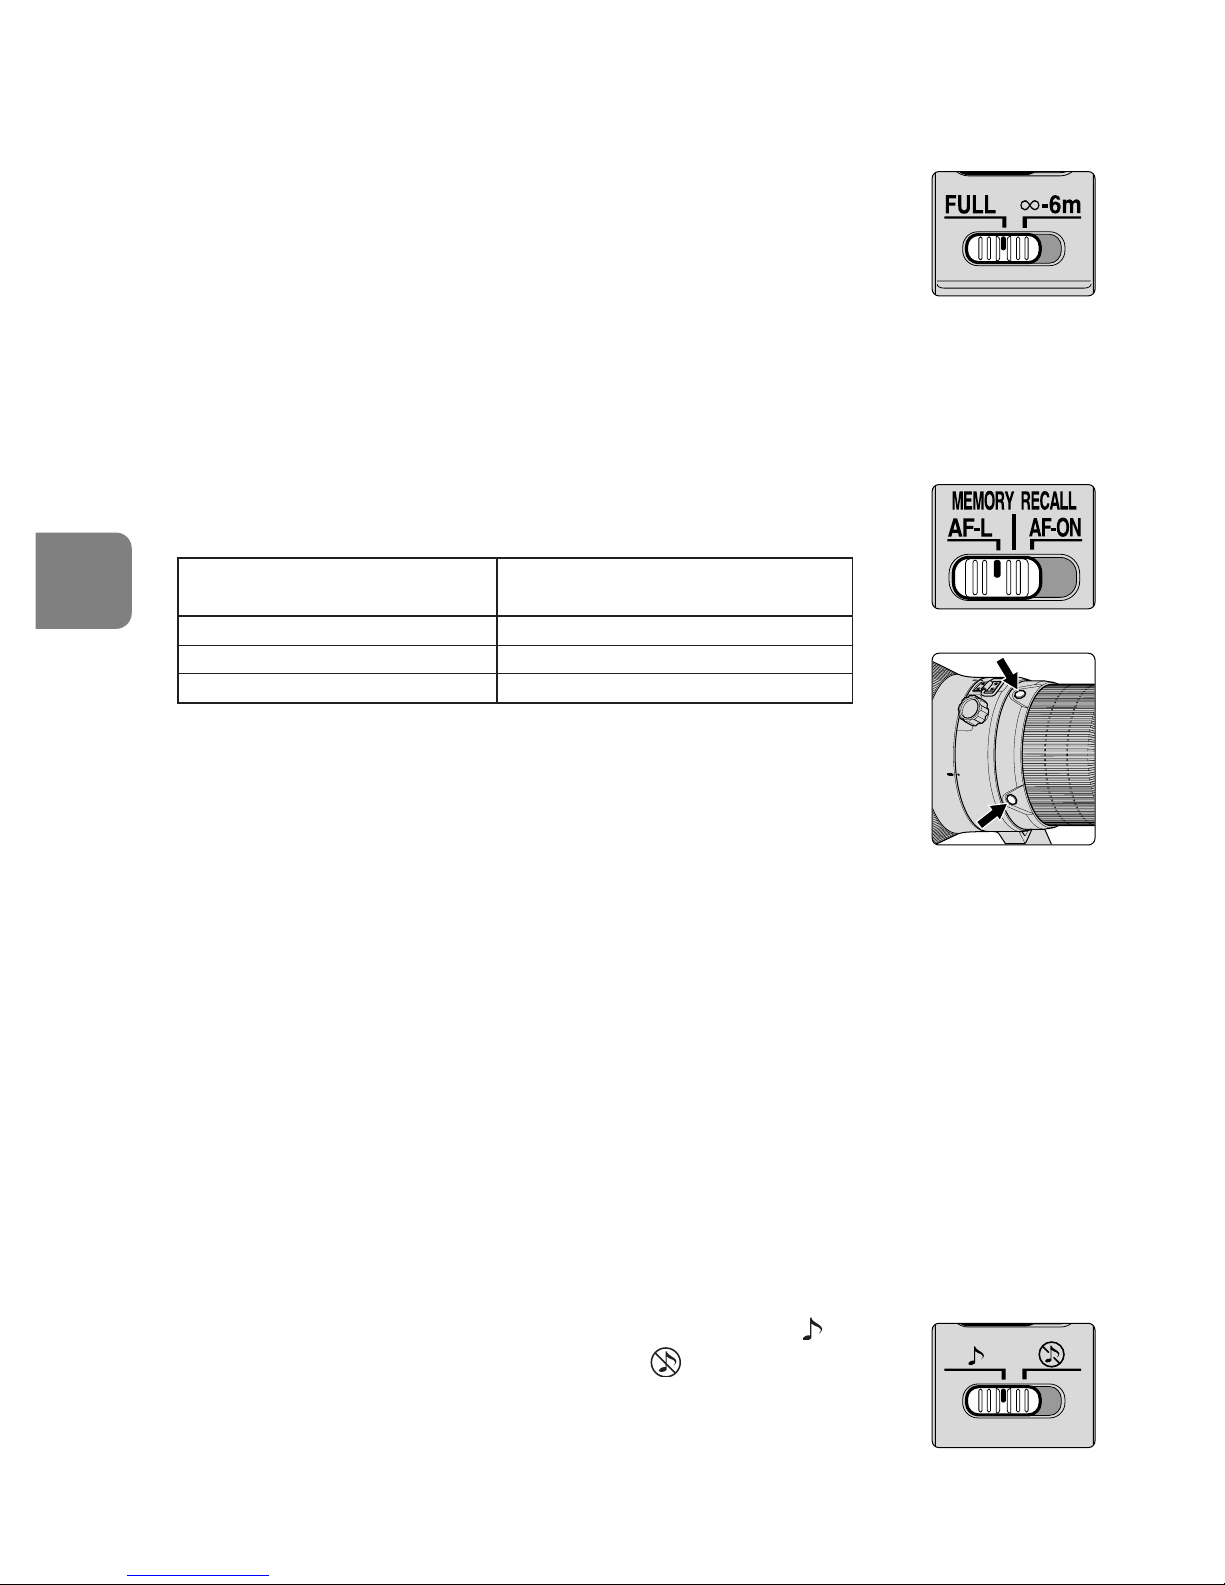
72
Es
5. Para limitar la distancia del enfoque automático
(Consulte en la página 68 las cámaras compatibles.)
• En funcionamiento AF, si el objeto está alejado siempre más de
6 m (19,7 pies), ajuste el interruptor de límite de enfoque
(Fig. 2) en “∞–6 m” para reducir el tiempo de enfoque.
• Si el objeto se encuentra a 6 m (19,7 pies) o más cerca,
ajústelo a “FULL”.
• Esta función sólo es compatible con el enfoque automático.
6. AF-L/MEMORY RECALL/AF-ON
Interruptor de selección de enfoque (AF-L/MEMORY
RECALL/AF-ON) y botón de enfoque
• La función del botón de enfoque (Fig. 3) varía según la
posición del interruptor de selección de enfoque (Fig. 4):
• Es posible cambiar la posición de los botones de enfoque
según sus preferencias. Si desea más información sobre este
cambio, contacte con el representante o centro de servicio
técnico de Nikon más cercano.
• Pulse uno de los cuatro botones de enfoque para activar cada función.
Uso del botón de bloqueo de enfoque (Consulte en la página 68
las cámaras compatibles.)
1
Coloque el interruptor de modo de enfoque en “A/M” o “M/A”. (Fig. 1)
• Esta función sólo es compatible con el enfoque automático.
2
Ajuste el interruptor de selección de enfoque (Fig. 3) a “AF-L”.
3
Es posible bloquear el enfoque durante el enfoque automático si se presiona el
botón de enfoque (Fig. 4).
• La función de bloqueo AF se puede aplicar a la cámara o al objetivo.
• El enfoque quedará bloqueado mientras cualquiera de estos botones se
mantiene pulsado.
MEMORY RECALL (Consulte en la página 68 las cámaras
compatibles. Está disponible para el enfoque automático y el
manual.)
• Coloque el interruptor de control acústico (Fig. 5) en “ ” para
activar el control acústico; colóquelo en “ ” para cancelarlo.
• Para la siguiente operación, el control acústico estará activado.
Fig. 3
Fig. 4
Posición del interruptor de
selección de enfoque
Función del botón
de enfoque
AF-L Bloqueo de enfoque
MEMORY RECALL Recuperación de memoria
AF-ON
Inicio de enfoque automático (AF-ON) en el objetivo
Fig. 5
Fig. 2
Page 73
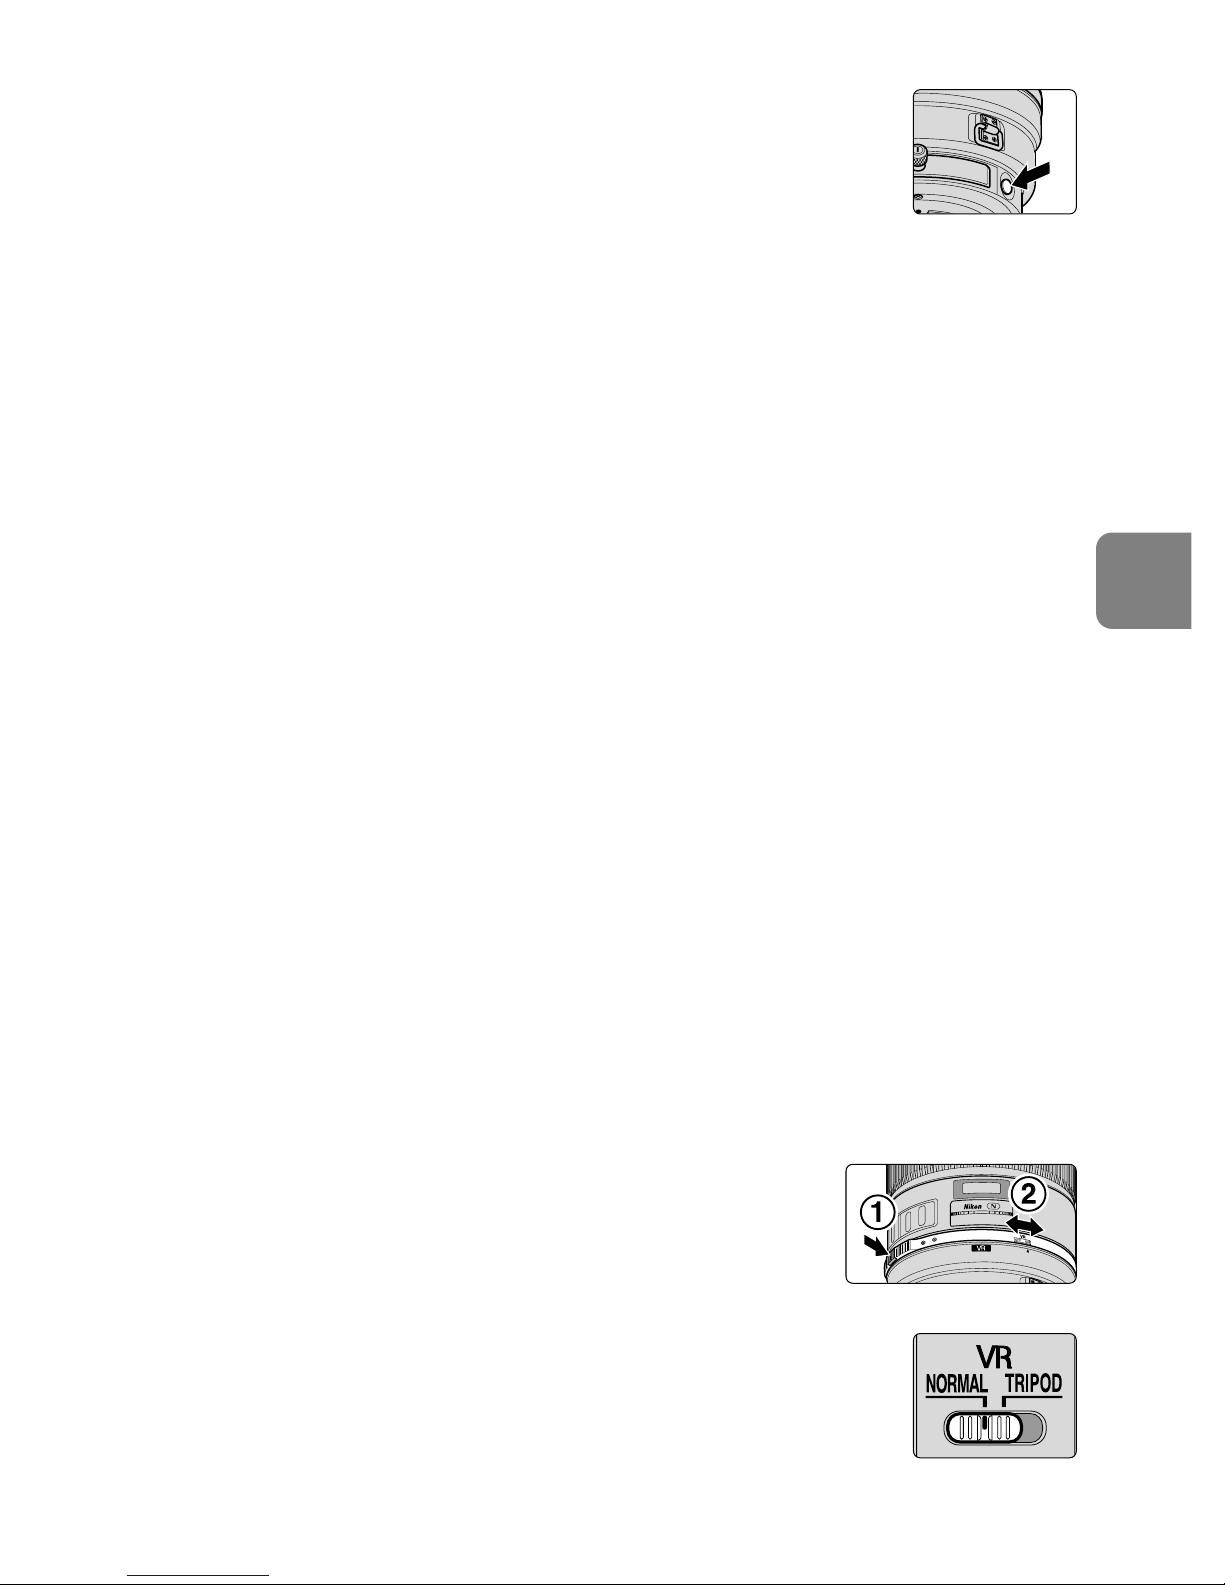
73
Es
1
Coloque el interruptor de modo de enfoque en “A/M”, “M/A”
o “M”. (Fig. 1)
2
Enfoque al sujeto para el que quiera memorizar la distancia de
enfoque. Pulse el botón Memoria (Fig. 6) y se oirá un sonido
indicando que la distancia de enfoque se ha guardado en
memoria.
• Independientemente de la posición del interruptor de modo de enfoque o del
interruptor de selección de enfoque, se puede guardar en memoria.
• La distancia de enfoque se conservará en la memoria aunque se apague la
cámara o se desmonte el objetivo.
Nota: si el anillo de escala de distancia se mueve de derecha a izquierda unas 10
veces durante la medición y, al mismo tiempo, se escucha un pitido corto y
tres largos, vuelva a guardar en memoria.
3
Coloque el interruptor de modo de enfoque (Fig. 3) en “MEMORY RECALL”.
4
Pulse el botón de enfoque (Fig. 4).
•A la vez que pulsa suavemente el disparador, pulse el botón de enfoque para
recuperar la distancia de enfoque memorizada.
5
Se escucharán dos pitidos para indicar que se ha recuperado la distancia de enfoque.
A continuación, pulse el disparador hasta el fondo para hacer la fotografía.
Nota: para hacer fotografías a la distancia de enfoque memorizada, pulse
totalmente el disparador antes de retirar el dedo del botón de enfoque.
• En el modo A/M o M/A, el objetivo sólo pasa del modo MEMORY RECALL al
enfoque automático o manual cuando se retira el dedo del botón de enfoque
y se pulsa suavemente el disparador.
AF-ON (Consulte en la página 68 las cámaras compatibles.)
1
Coloque el interruptor de modo de enfoque (Fig. 1) en “A/M” o “M/A”.
2
Coloque el interruptor de modo de enfoque (Fig. 3) en “AF-ON”.
3
Pulse el botón de enfoque (Fig. 4) para hacer fotografías.
• El enfoque automático estará activado mientras se pulse el botón de enfoque.
7. Modo Reducción de la vibración (Consulte en la página 68 las
cámaras compatibles.)
1
Coloque el interruptor del anillo ON/OFF de reducción de
la vibración en “ON” 2, mientras pulsa el botón del
interruptor del anillo 1.(Fig. 7)
2
Coloque el interruptor del modo de reducción de la
vibración (Fig. 8) en “NORMAL” o “TRIPOD”.
• La inestabilidad de la imagen en el visor se puede reducir pulsando
suavemente el disparador, para que resulte más fácil enfocar
manual o automáticamente y encuadrar con precisión el sujeto.
Fig. 7
Fig. 8
Fig. 6
Page 74
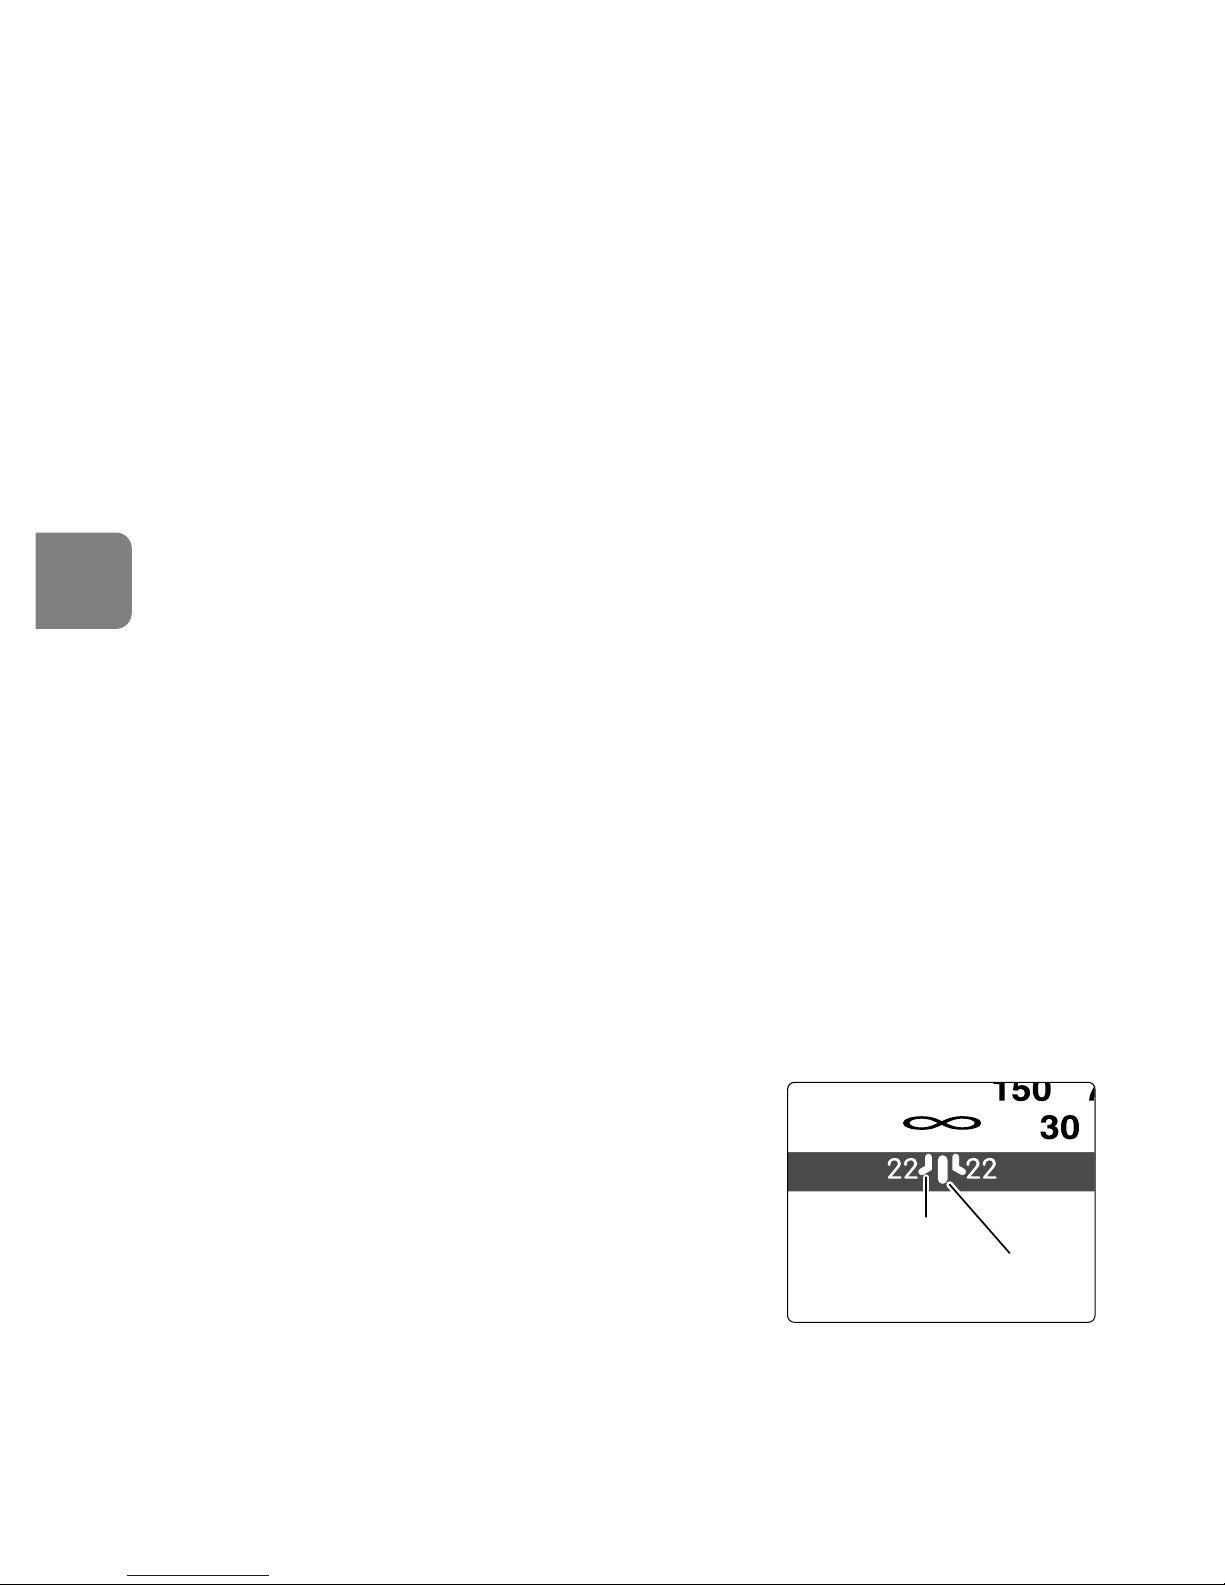
74
Es
Notas sobre el uso de la reducción de la vibración
• Espere hasta que la imagen en el visor deje de vibrar antes de presionar a
fondo el botón de liberación del obturador, habiendo presionado antes
ligeramente dicho botón.
• Es una característica del mecanismo de reducción de la vibración que se puede
borronear la imagen en el visor después de levantarse el obturador.
• Si coloca en ON el botón de inicio de enfoque automático (AF-ON) (Fig.4) de la
cámara o el botón de enfoque en el objetivo, la reducción de la vibración no
funcionará.
• Cuando utilice el trípode, coloque el interruptor del modo de reducción de la
vibración en “TRIPOD” para reducir las sacudidas de la cámara y la inestabilidad
de la imagen en el visor. Las más ligeras sacudidas de la cámara pueden impedir
que se active el sistema de reducción de la vibración. Por el contrario, el sistema
VR puede originar sacudidas de la cámara en el objetivo. En tal caso, será
necesario desactivar la reducción de la vibración. Cuando utilice un trípode con
el cabezal suelto o un monópodo, seleccione el modo NORMAL.
• Cuando tome panorámicas, asegúrese de que el interruptor de modo de
reducción de vibración (Fig. 8) está en posición NORMAL.
• Si mueve la cámara en un arco amplio como el de las panorámicas, la vibración
en la dirección de dicho movimiento no se verá afectada. Por ejemplo, si mueve
rápidamente la cámara en horizontal, únicamente se reducirá la vibración en la
dirección vertical, haciendo que la panorámica sea mucho más suave.
• No desconecte el interruptor de la cámara a OFF ni extraiga el objetivo de la cámara
mientras está funcionando el modo de reducción de la vibración. (En caso contrario,
el objetivo puede emitir un ruido vibratorio si la cámara se mueve. Esto no es una
avería. Conecte nuevamente el interruptor principal de la cámara para corregirlo.)
• Con las cámaras de la serie F80/serie N80, serie F75/serie N75, serie F65/serie
N65, D300, D200, D100, D80, serie D70, D50 y serie D40, la reducción de
vibración no funciona mientras el flash incorporado está en periodo de recarga.
8. Profundidad de campo
•
La profundidad de campo aproximada se puede determinar
comprobando la escala de profundidad de campo. (Fig. 9)
• Si la cámara dispone de una palanca o botón de
previsualización de la profundidad de campo (cierre
del diafragma), se puede comprobar la profundidad
de campo mirando por el visor de la cámara.
•
Para obtener más información, consulte la pág. 192.
9. Ajuste de abertura
• Debido a que este objetivo no tiene un anillo de aberturas, debe ajustar la
abertura en la cámara.
Línea indicadora
de distancias
Escala de
profundidad de
campo
Fig. 9
Page 75
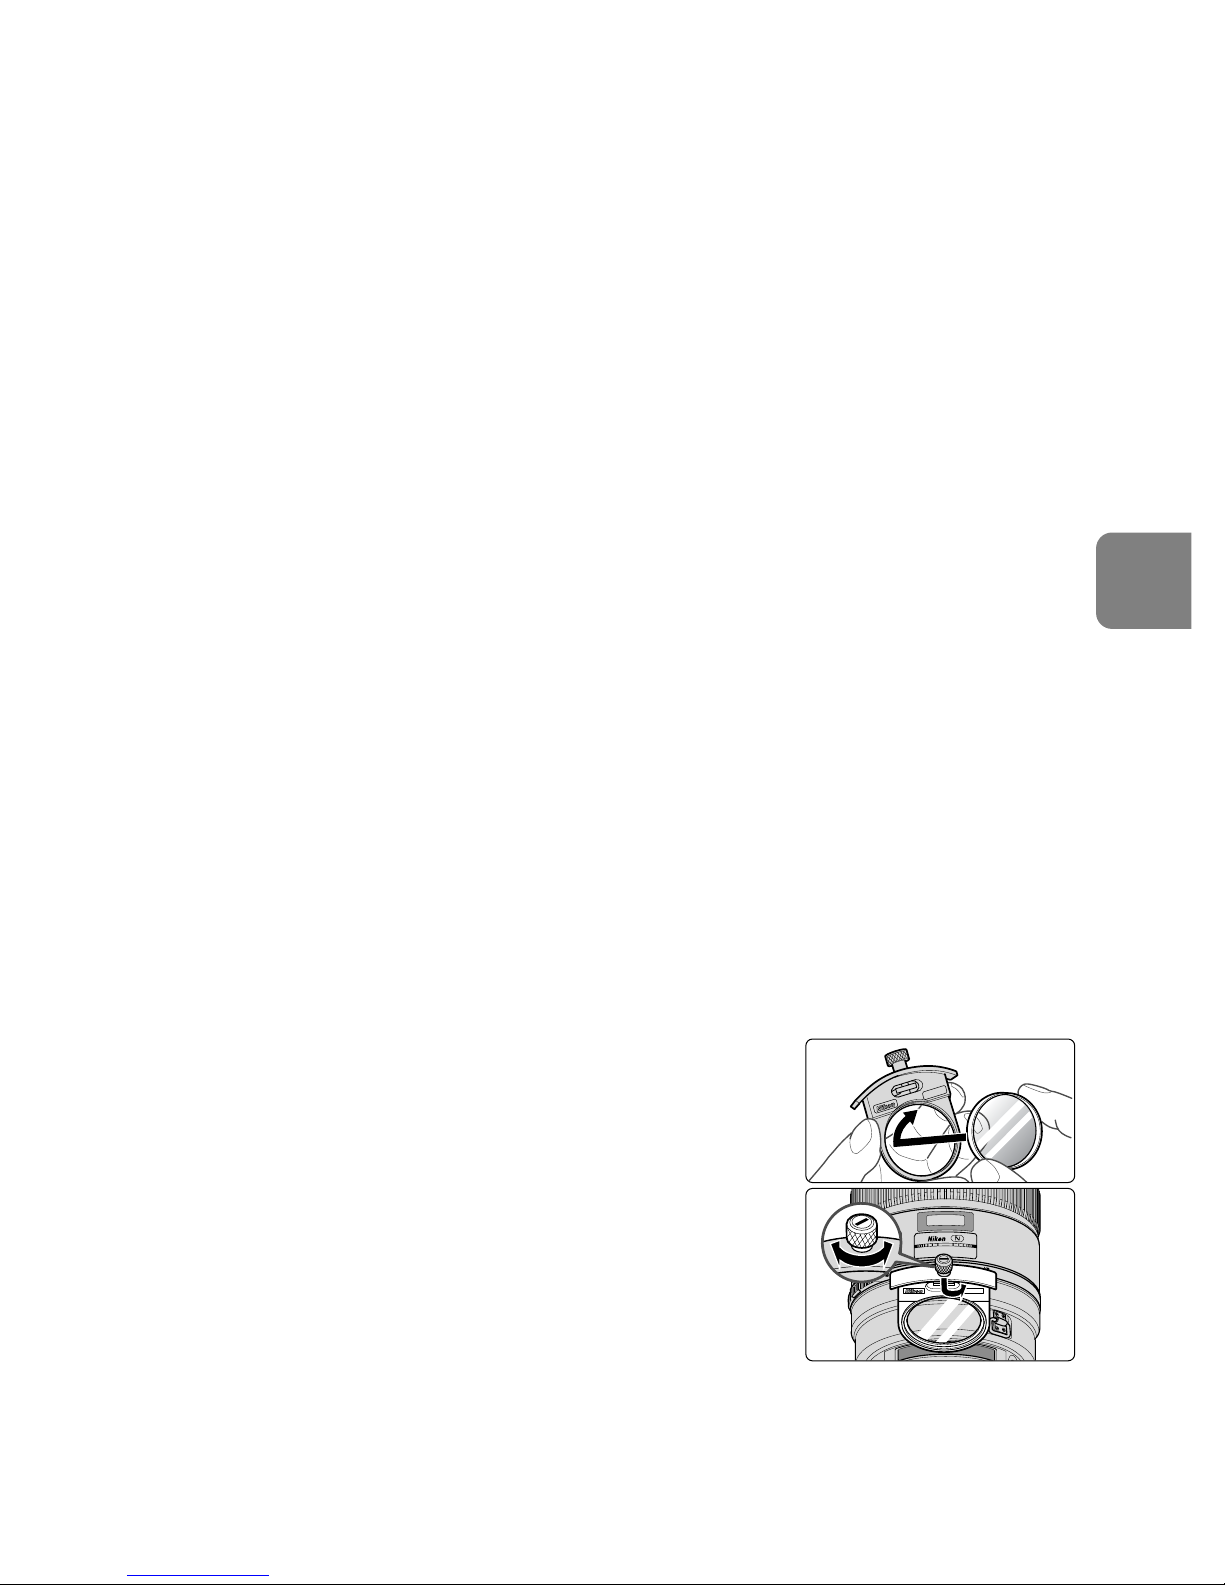
75
Es
10. Collar del trípode rotatorio integrado
• Cuando se hacen fotografías verticales, afloje el tornillo de fijación del collar
del trípode girándolo hacia la izquierda, rote el objetivo a una posición
apropiada y apriete el tornillo hacia la derecha.
• Cuando sujete la cámara por su empuñadura y rote la cámara con el objetivo
en su collar del trípode, su mano puede golpear contra el trípode según el tipo
de trípode utilizado.
Monópodo (accesorio incluido)
• El collarín para el trípode se puede cambiar por un collarín para monópodo
retirando el tornillo de bloqueo del collarín del trípode.
• Después de cambiar el collarín para el trípode, compruebe que el tornillo
queda firmemente apretado. No asegurar firmemente el tornillo podría
ocasionar accidentes o daños en el objetivo y la cámara.
Para obtener más detalles sobre este procedimiento, póngase en contacto con
el servicio técnico o con la oficina de Nikon más cercana.
11. Viseras del objetivo HK-33-1 y HK-33-2
Hay viseras de dos partes (HK-33-1 para instalar en el lado delantero del objetivo
y HK-33-2 para instalar en el lado delantero el HK-33-1).
Utilización del HK-33-1: Afloje primero el tornillo e la visera del objetivo en el
HK-33-1, deslice el HK-33-1 en el lado delantero del objetivo y apriete el tornillo.
Instalación del HK-33-2: Afloje el tornillo de la visera del objetivo en el
HK-33-2, deslice el HK-33-2 en el lado delantero del HK-33-1 y apriete el tornillo.
Almacenaje de las viseras de objetivo: Primero invierta el HK-33-2 y deslice en
la parte trasera en el HK-33-1. A continuación, invierta el HK-33-1 con el HK-33-2
instalado y deslice ambos en la parte delantera del objetivo.
12. Soporte para filtros deslizantes
• Utilice siempre un filtro (rosca de 52 mm). De fábrica,
viene montado un filtro NC de rosca de 52 mm en el
soporte para filtros.
1
Monte el filtro en la cara del soporte para filtros que
está marcada con las palabras “Nikon” y “JAPAN”.
(Fig. 10)
2
Presione la perilla del soporte del filtro y gire hacia la
izquierda hasta que la línea blanca en la perilla esté
en ángulo recto con respecto al eje del objetivo.
• El soporte del filtro puede instalarse mirando hacia el
lado del objetivo o de la cámara sin que tenga efecto
en sus imágenes.
Fig. 10
Page 76
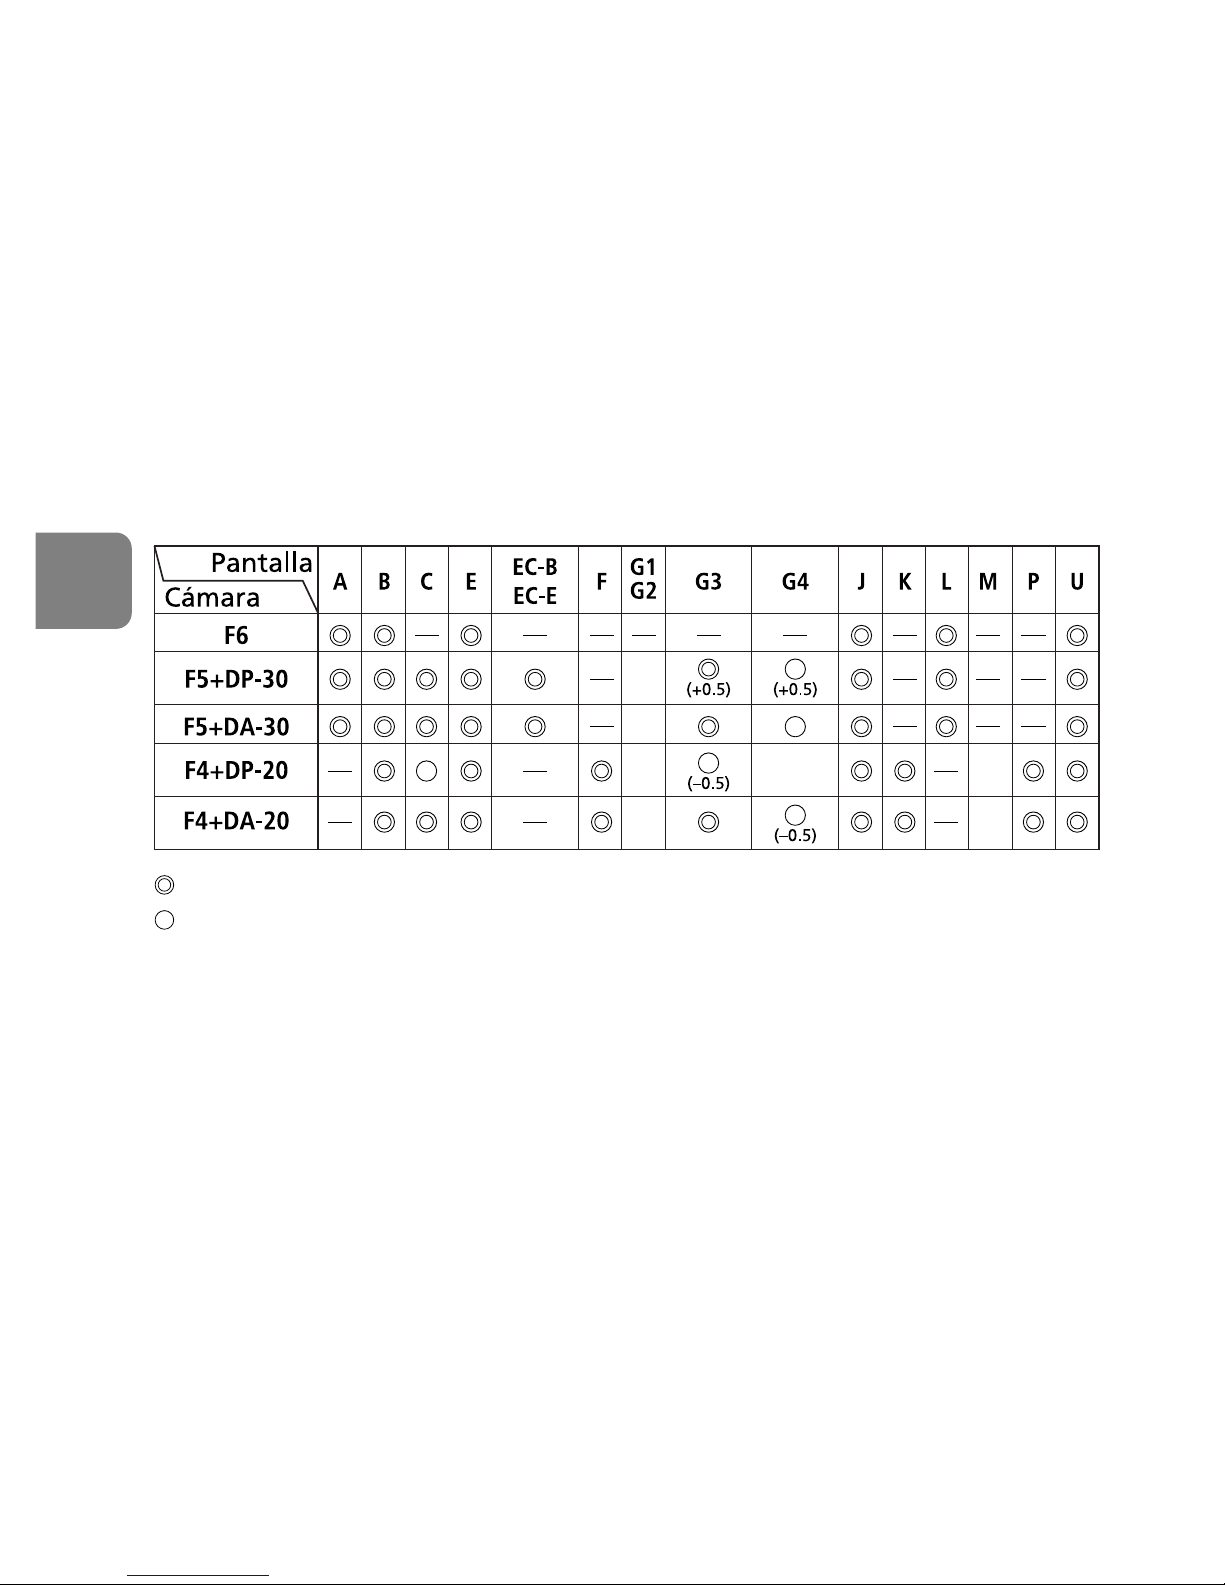
76
Es
Filtro deslizante polarizador circular C-PL1L (opcional)
• Bloquea los reflejos de las superficies no metálicas, como el cristal y el agua.
• El punto de foco de un filtro deslizante polarizador circular C-PL1L es distinto
del del filtro de rosca de 52 mm. La escala de distancias se desvía de la
posición correcta. La distancia mínima de enfoque es ligeramente mayor.
• La posición guardada en memoria puede variar un poco al utilizar la
preselección de enfoque. Antes de utilizar la función de recuperación de
memoria, coloque el filtro C-PL1L.
13. Pantallas de enfoque recomendadas
Hay diferentes pantallas de enfoque intercambiables para algunas cámaras SLR
de Nikon apropiados para cualquier situación fotográfica. Las recomendadas para
utilizar con este objetivo son las que aparecen en la lista a continuación.
: Enfoque excelente
: Enfoque aceptable
Ligero viñeteo afecta la imagen de la pantalla, pero la imagen de la película
no es afectada por esto.
—: No existe
( ): Indica la cantidad de compensación adicional necesaria (Solamente medición
ponderada central). Para cámaras F6, compense seleccionando "Otra pantalla”
en el ajuste personal del usuario “b6: Compens pantalla” y ajustando el nivel
EV a -2,0 a +2,0 en pasos de 0,5 EV. Cuando se utilice una pantalla que no sea
de tipo B o E, debe seleccionarse “Otra pantalla” incluso cuando el valor de
compensación requerido sea “0” (no se requiere compensación). Para la
cámara F5 compense usando el ajuste personal del usuario No. 18 en el cuerpo
de la cámara. Para las cámaras de la serie F4, compense usando el dial de
compensación de exposición para las pantallas de enfoque.
Para más detalles, consulte el manual de instrucciones de la cámara.
Page 77

77
Es
Los blancos significan inaplicable. Como la pantalla de tipo M se usa para
macrofotografía a una razón de aumento de 1:1 asi como para microfotografía,
su aplicación es distinta a la de las demás pantallas.
• Para las cámaras F5, únicamente pueden utilizarse pantallas de enfoque EC-B,
EC-E, B, E, J, A, L, en Medición de matriz.
• Cuando se utilicen las pantallas de enfoque B y E en cámaras distintas de las
relacionadas arriba, ver las columnas correspondientes a las pantallas B y E.
14. Forma de cuidar el objetivo
• Limpiar la superficie del objetivo con un cepillo soplador. Para eliminar la
suciedad o las huellas, utilizar un trapo de algodón suave y limpio o papel
especial para objetivos humedecido en etanol (alcohol) o limpiador de
objetivos. Limpiar describiendo un movimiento circular del centro hacia fuera,
teniendo cuidado de no dejar restos ni tocar otras partes.
• No usar en ningún caso disolvente o benceno para limpiar el objetivo ya que
podría dañarlo, provocar un incendio o causar problemas sanitarios.
• Cuando no esté usando el objetivo, coloque la tapa del objetivo para proteger
la lente frontal.
• Cuando se guarde el objetivo en su estuche, colocarle las dos tapas.
• Cuando no se vaya a utilizar el objetivo durante largo tiempo, guardarlo en un lugar
fresco y seco para evitar la formación de moho. Guardar el objetivo, además, lejos
de la luz solar directa o de productos químicos tales como alcanfor o naftalina.
• No mojar el objetivo ni dejarlo caer al agua, ya que se oxidaría y no funcionaría
bien.
• Algunas partes del objetivo son de plástico reforzado. Para evitar daños, no
dejarlo nunca en un lugar excesivamente caliente.
15. Accesorios suministrados
• Estuche reforzado CT-404 • Tapa delantera del objetivo insertable • Tapa
trasera del objetivo LF-1 • Visera del objetivo HK-33 • Soporte para filtros
dedicado* • Filtro NC enroscable 52mm • Correa LN-1 • Collar de monópode
*Si los accesorios específicos no aparecen o están rotos, contacte con el
representante o centro técnico de Nikon más cercano, porque esos accesorios
no están disponibles en tiendas generales.
Page 78

78
Es
16. Sonderzubehör
• Funda semiblanda CL-L2 • Otras filtros con rosca de 52mm (excepto filtro de
polarización circular II) • Filtro de polarización circular insertable (C-PL1L)
• Teleconvertidores AF-S (TC-14EII/TC-17EII/TC-20EII)
17. Especificaciones
Tipo de objetivo: AF-S Zoom-Nikkor tipo G con CPU incorporado y
montura de bayoneta Nikon. Mecanismo de reducción
de vibración (VR) especial incorporado
Distancia focal: 400 mm
Abertura máxima: f/2,8
Estructura del objetivo: 14 elementos en 11 grupos (3 lentes ED y 1 objetivos
con recubrimiento nanocristalino), así como 1 cristal
protector del objetivo
Ángulo de imagen: 6° 10’ para las cámaras SLR de película con formato de
35 mm (135) de Nikon y para las cámaras SLR digitales
con formato FX de Nikon
4° para las cámaras SLR digitales con formato DX de
Nikon
5° para las cámaras del sistema IX240
Información de distancia:Salida al cuerpo de la cámara
Enfoque: Sistema de enfoque interno de Nikon (IF) (con un motor
Silent Wave interno); manual por anillo de enfoque
independiente
Reducción de vibración: Método de desplazamiento del objetivo utilizando
motores de bobina de voz (VCM)
Escala de distancias de Calibrado en metros y pies desde 2,8 m (10 pie) a
la toma: infinito (∞)
Distancia de enfoque 2,9 m (9,5 pies) en modo de enfoque automático, 2,8
más cercana: m (9,2 pies) en modo de enfoque manual.
No. de láminas del
diafragma:
9 piezas (redondeadas)
Diafragma: Totalmente automático
Escala de aberturas: f/2,8 – f/22
Medición de exposición: Método de abertura total con cámaras con sistema de
interfase CPU
Page 79

79
Es
Conmutador de límite Instalado; hay dos posiciones: FULL (∞ – 2,9 m) o
de enfoque: ∞ – 6 m
Collarín para el trípode: integrado. Puede girar 360°, incluye una marca de
posición de giro del objetivo a 90°. El collarín para el
trípode se puede cambiar por un collarín para
monópodo.
Dimensiones: Aprox. 159,5mm de diám x 368,0mm desde la pestaña
de montaje
Peso: Aprox. 4.620g (10,2 libras)
Las especificaciones y los diseños están sujetos a cambio sin previo aviso ni
obligación por parte del fabricante.
Page 80

80
Se
Ta inte isär kameran eller objektivet
Du kan skada dig om du rör vid kamerans eller objektivets inre delar.
Reparationer ska endast utföras av kvalificerade tekniker. Om kameran eller
objektivet öppnar sig på grund av ett fall eller annan olyckshändelse gör du
följande: Dra ut nätkabelns kontakt ur eluttaget och/eller ta ut batteriet. Ta
sedan med produkten till en servicerepresentant för Nikon och få den undersökt.
Stäng av kameran omedelbart om det uppstår ett fel
Om kameran eller objektivet börjar ryka eller luktar konstigt ska du genast ta ur
batteriet. Var försiktig så att du inte bränner dig. Om du fortsätter att använda
kameran kan du skada dig. När du har tagit ut batteriet eller dragit ut kontakten
tar du med utrustningen till en servicerepresentant för Nikon och får den
undersökt.
Använd inte kameran eller objektivet där det finns brandfarlig gas
Om den elektroniska utrustningen används där det finns brandfarlig gas kan det
uppstå explosion eller brand.
Titta inte på solen genom objektivet eller sökaren
Om du tittar på solen eller andra starka ljuskällor genom objektivet eller sökaren
kan du få en permanent synskada.
Förvaras utom räckhåll för barn
Se till att småbarn inte stoppar batterierna eller andra smådelar i munnen.
Anmärkningar om säkerhetsåtgärder
VARNING!
Page 81

81
Se
Tänk på följande när du hanterar kameran och objektivet
• Håll kameran och objektivet torra, annars finns risk för brand eller elchock.
• Vidrör inte utrustningen med våta händer. Det medför risk för elchock.
• Se till att solen inte kommer med i bilden när du tar bilder i motljus.
Solljuset kan samlas till en punkt i kamerahuset och orsaka brand. Detta gäller
även om solen är strax utanför bilden.
• När du inte ska använda objektivet under en längre tid bör du sätta på både
det bakre och det främre objektivlocket och förvara objektivet på en plats utan
direkt solljus. Om du inte gör detta finns risk för brand, eftersom objektivet kan
koncentrera solstrålar på ett föremål.
Page 82
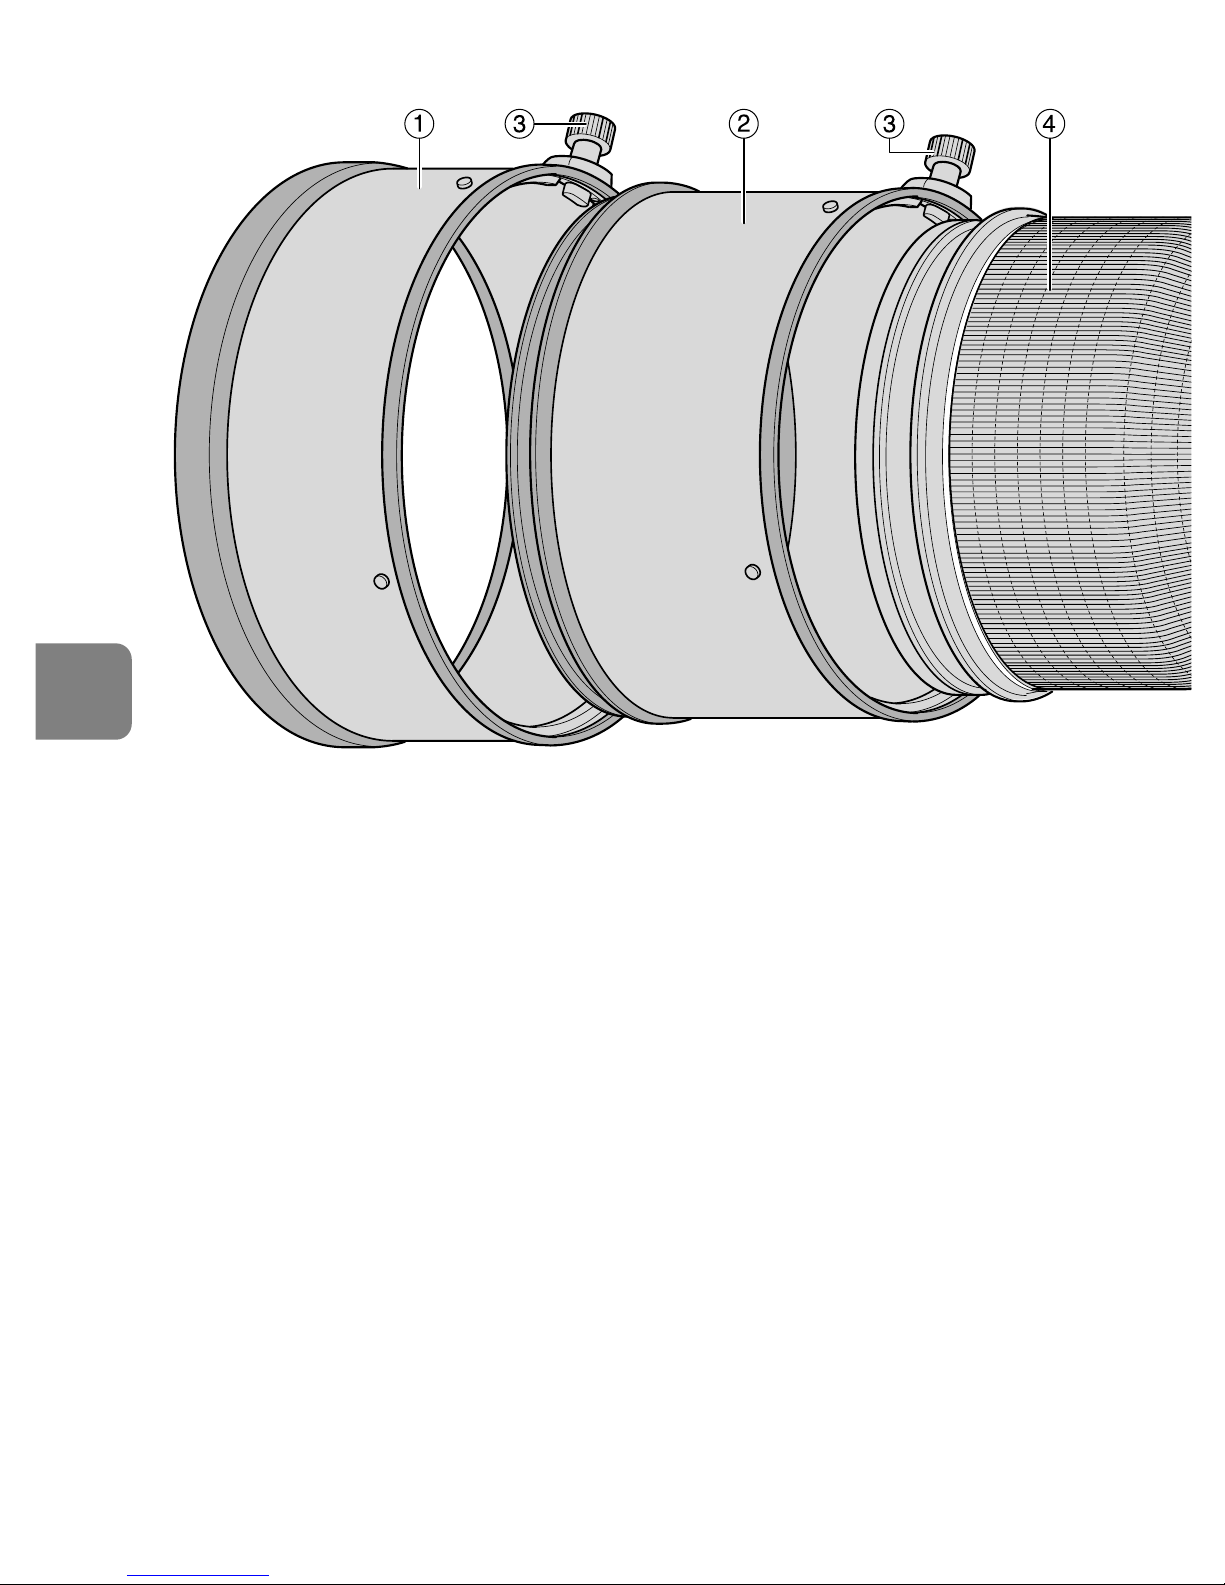
82
Se
1 Motljusskydd HK-33-2 (s. 91)
2 Motljusskydd HK-33-1 (s. 91)
3 Skruv för motljusskydd (s. 91)
4 Gummigrepp
5 Skruv för stativfästeslås (s. 91)
6 Fäste för rem
7 Markering för objektivrotationsläge
8 Knapp för fokusfunktion
(Fokuslås/MEMORY RECALL/
AF-start) (s. 88)
9 Fokusring (s. 87)
! Skärpedjupsskala (s. 90)
" Distansindikeringslinje (s. 90)
# Avståndsskala
$ Ringomkopplare för
vibrationsreducering PÅ/AV (s. 89)
% Instickshållare för filter (s. 91)
& Knapp på instickshållare för filter
(s. 91)
( Monteringsindikering
) Gummitätning för objektivfattning
(s. 86)
~ CPU-kontakter (s. 86)
+ Inbyggt roterande stativfäste (s. 91)
, Fäste för enbensstativ (utbytbart)
(p. 91)
- Minnesinställningsknapp (s. 89)
. Fokuslägesväljare (s. 87)
/ Väljare för fokuseringsgräns (s. 88)
: Väljare för vibrationsreduceringsläge
(s. 89)
; Väljare för fokusfunktion (AF-L/
MEMORY RECALL/AF-ON) (s. 88)
< Väljare för ljudmonitor (s. 88)
1. Beteckningar ( ): Referenssida
Page 83
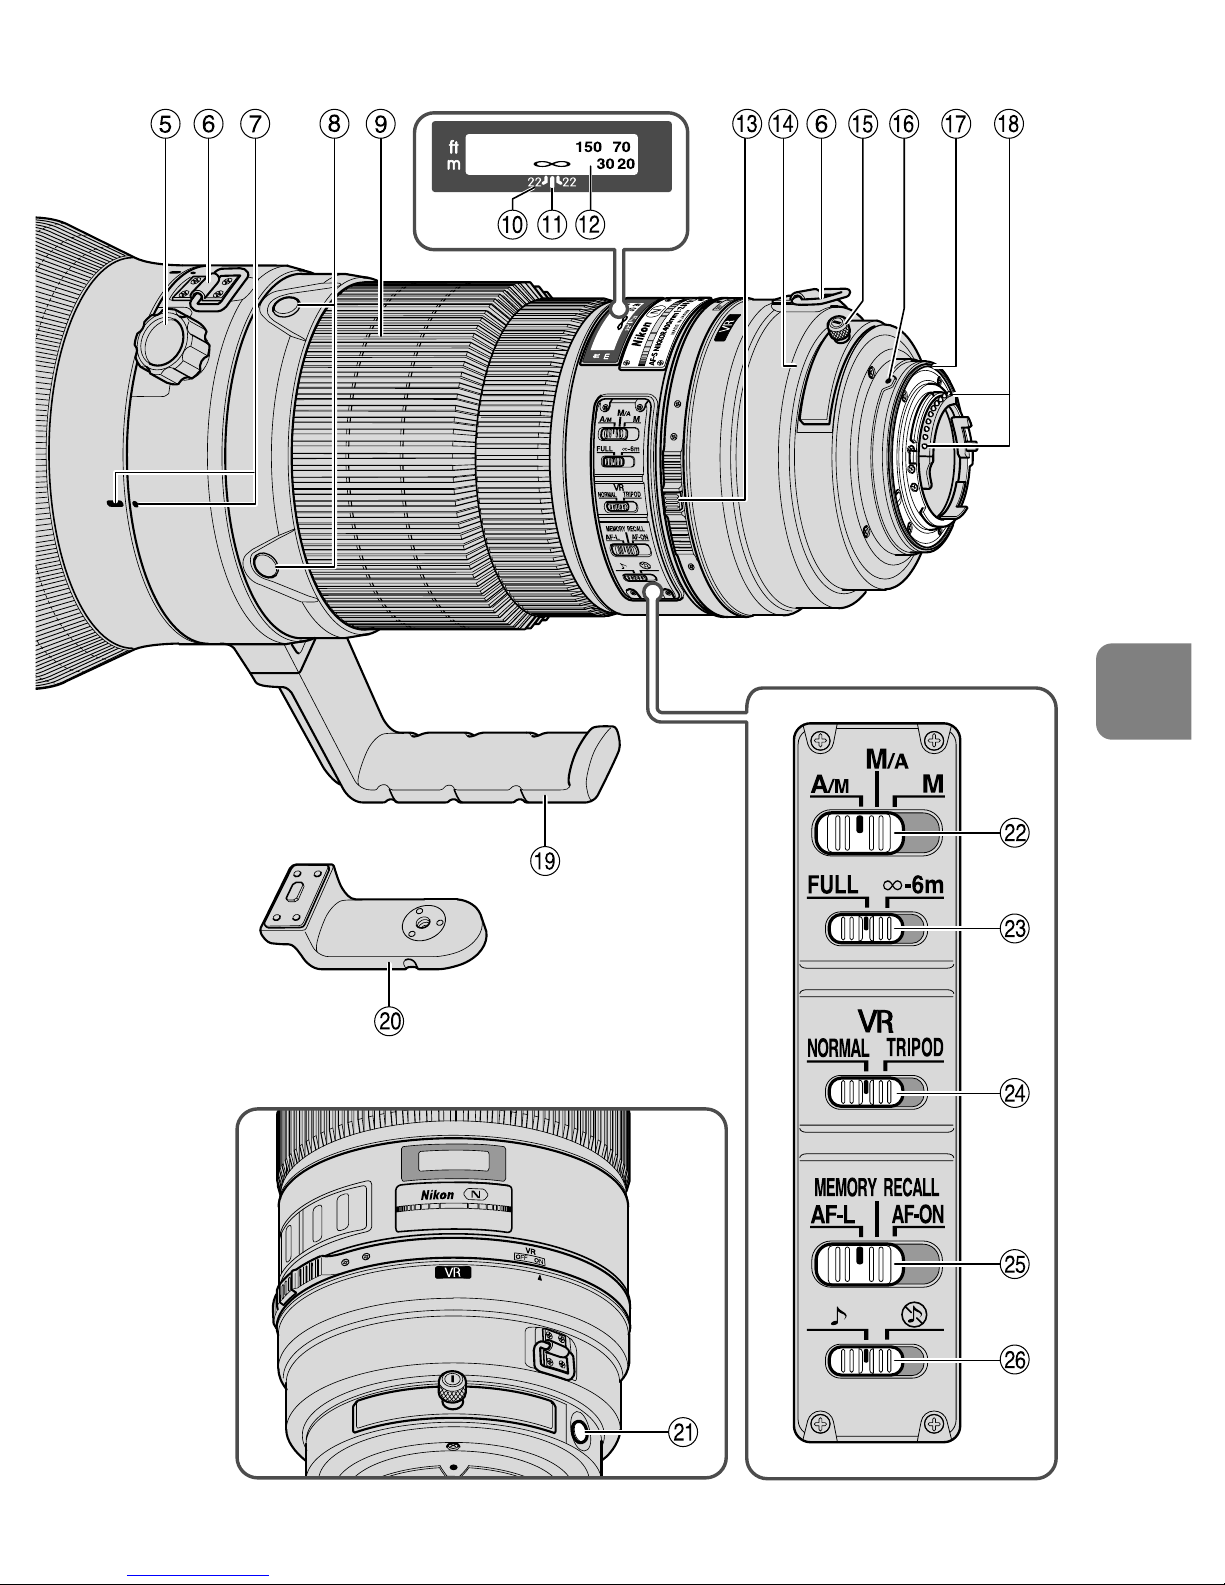
83
Se
Page 84

84
Se
2. Kameror som kan användas och tillgängliga funktioner
Det kan finnas vissa begränsningar för tillgängliga funktioner. Närmare
information finns i användarhandboken för kameran.
*1 I P ingår AUTO- (program för allmänt bruk) och Vari-Program-system
*2 Manuell (M) är inte tillgängligt.
*3 När väljaren för fokusfunktion står på AF-ON, startar autofokusering så snart
du trycker ned knappen för fokusfunktion samtidigt som du trycker ned
avtryckaren lätt.
*4 Tryck ned minnesinställningsknappen eller knappen för fokusfunktion
samtidigt som du trycker ned avtryckaren lätt.
Kameror
Vibrationsreducering
Autofokus
Fokuslås
Exponeringsläge
P*1SAM
D3, D2-serien, D1-serien,
D300, D200, D100, D80,
D70-serien, D50,
D40-serien
F6, F5, F100,
F80-serien,
F75-serien,
F65-serien
Pronea 600i,
Pronea S*
2
F4-serien, F90X,
F90-serien,
F70-serien
F60-Serien,
F55-Serien,
F50-Serien,
F-401x,
F-401s,
F-401
F-801s,
F-801,
F-601M
F3AF, F-601,
F-501,
Nikon MF-kameror
(utom F-601M)
҂҂҂
*
3
҂
҂
*
3
*
4
҂҂
҂҂҂҂҂
҂҂҂҂҂
҂
҂
҂
҂
҂
҂
҂
҂
Inställning
av sparat
avstånd
AF-start
på
objektivet
Funktion
: Möjligt : Möjligt, med vissa begränsningar ҂: Ej möjligt
Page 85

85
Se
• Om objektivet ska användas på en kamera som inte är kompatibel med
vibrationsreducering ställer du ON/OFF-ringomkopplaren för vibrationsreducering
på OFF. I synnerhet när du använder Pronea 600i/6i-kameran kan batteriet
snabbt laddas ur om denna omkopplare står kvar i läget ON.
3. Introduktion
Tack för att du valde AF-S NIKKOR 400mm f/2,8G ED VR. Detta är ett
kvalitetsobjektiv med specialmekanismer för vibrationsreducering (VR) och snabb
internfokusering (IF). Dessutom har det en ultraljudsmotor för
fokuseringsmekanismen och möjlighet till förinställning av fokus.
Viktiga egenskaper
Två AF-lägen (s. 87)
Du kan koppla ur autofokusfunktionen genom att ställa fokuslägesväljaren på
”A/M” eller ”M/A” och fokusera manuellt med fokusringen.
M/A: Du kan koppla ur autofokusfunktionen genom att fokusera manuellt med
fokusringen. Detta läge används för fininställning av skärpan.
A/M: Du kan koppla ur autofokusfunktionen genom att fokusera manuellt med
fokusringen, men fokusringens känslighet är lägre än i M/A-läget. Använd
detta läge om du vill undvika att ändra AF-inställningen genom att
oavsiktligt röra fokusringen.
Begränsa autofokusområdet (s. 88)
Du kan fokusera snabbare genom att ställa in fokuseringsgränser.
Om motivet till exempel finns minst sex meter bort ställer du in väljaren för
fokuseringsgräns på ∞–6 m.
AF-L/MEMORY RECALL/AF-ON (s. 88)
Du kan låsa och spara fokusavstånd medan du använder autofokus (AF-L) och
sedan ställa in dem genom att trycka på ”MEMORY RECALL”. Objektivets
autofokusfunktion aktiveras igen när du ställer väljaren på AF-ON.
Vibrationsreducering* (VR II) (s. 89)
NORMAL: Minskar skakningsoskärpa vid fotografering på fri hand eller med
hjälp av ett enbensstativ. I detta läge kan du ta bilder med cirka fyra stegs
längre slutartid än när du använder ett objektiv utan VR. Detta ger dig tillgång
till fler slutartidsalternativ och gör det mycket enklare att fotografera på fri
hand eller med ett enbensstativ. Du kan också panorera.
TRIPOD: Rekommenderat läge för minskning av skakningsoskärpa vid
användning av stativ. När du använder ett superteleobjektiv kan det uppstå
skakningsoskärpa trots att kameran är monterad på ett stativ. I TRIPOD-läget
minskar skakningsoskärpan när du fotograferar med stativ, i synnerhet med
slutartider mellan 1/15 och 1 sekund. Dessutom blir bilden i sökaren stabilare.
* Under de förhållanden som råder vid Nikons mätningar. Effekterna av
vibrationsreducering varierar beroende på fotograf och fotograferingsförhållanden.
Page 86
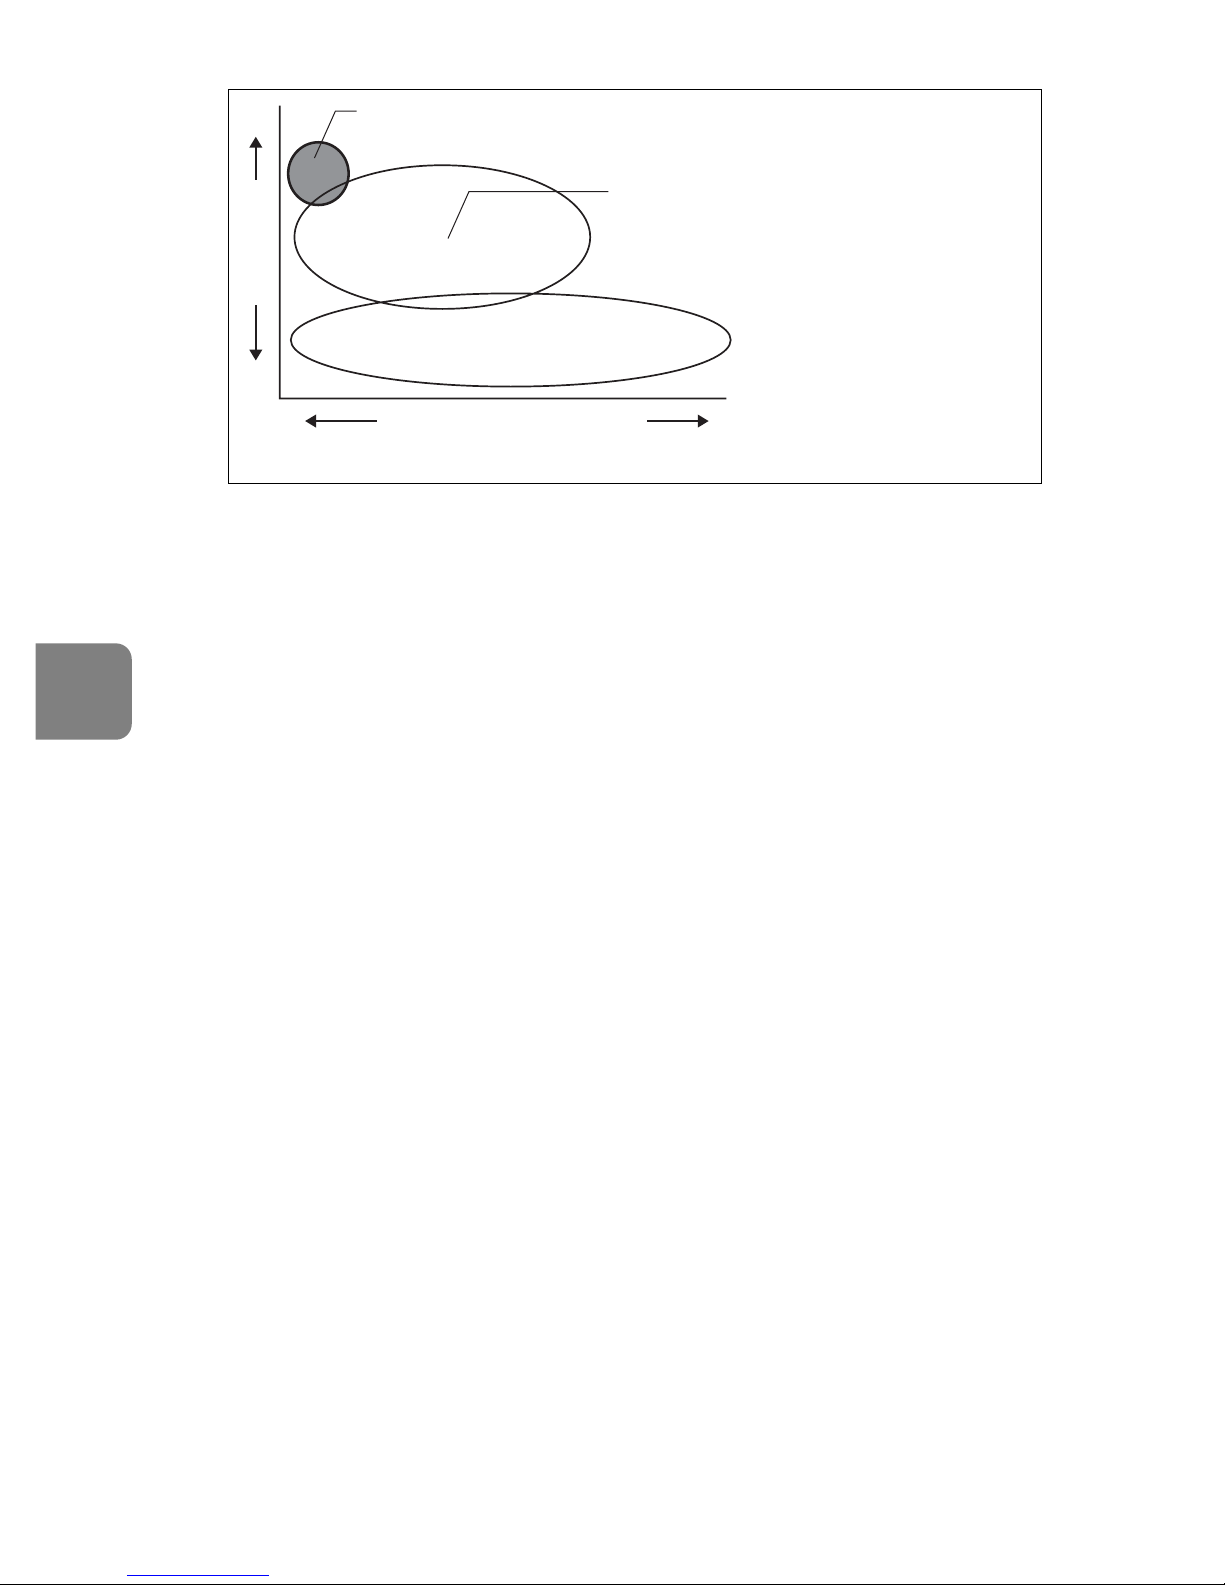
86
Se
Exponeringen kan styras mer exakt när detta objektiv är monterat på en
Nikon-kamera med 3D Matrix-mätning, eftersom information om avståndet till
motivet överförs från objektivet till kamerahuset.
Tre ED-linselement (Extra Low Dispersion, extra låg ljusspridning) ger skarpa
bilder praktiskt taget utan färgblödning mellan olika delar av bilden. Tack vare
en bländare med nio lameller som ger en nästan helt cirkelrund öppning
återges dessutom de delar av bilden som befinner sig framför eller bakom
motivet med en vacker oskärpa.
Nano Crystal-beläggningen på vissa linselement ger fina, klara bilder under alla
ljusförhållanden, från soliga utomhusmiljöer till spotlightbelysta inomhusscener.
Som skyddsglas för objektivet används en menisk i stället för ett platt glas,
som annars är vanligt.
Närgränsen är 2,9 m (AF) respektive 2,8 m (MF).
Viktigt!
• Håll inte bara i kamerahuset när objektivet är monterat, eftersom detta kan
medföra att kameran skadas. Håll i stället både i objektivet och i kameran.
• Sätt i ett 52-millimeters skruvfilter i instickshållaren för filter.
• Se till att CPU-kontakterna är rena och oskadade.
• AF-I/AF-S-telekonvertrarna TC-14E/TC-14EII/TC-17EII/TC-20E/TC-20EII kan
användas.
• När objektivet monteras på en digital SLR-kamera från Nikon (Nikon DXformat), till exempel en kamera ur D2-serien eller D50, är bildvinkeln 4° och
brännvidden (motsvarande småbildsformat) 600mm. (Objektivets bildvinkel är
6°10´ vid 35mm brännvidd.)
• Om objektivfattningens gummitätning är skadad måste du få den reparerad
hos närmaste servicerepresentant för Nikon.
Panoreringar
(i NORMAL-läge)
Vibrationsreducering när stativ
används (i TRIPOD-läge)
Vibrationernas styrka
Skakningsoskärpa vid fotografering
på fri hand eller vid användning av
enbensstativ (i NORMAL-läge)
Grundtanken bakom vibrationsreducering
Antal
vibrationer
Page 87
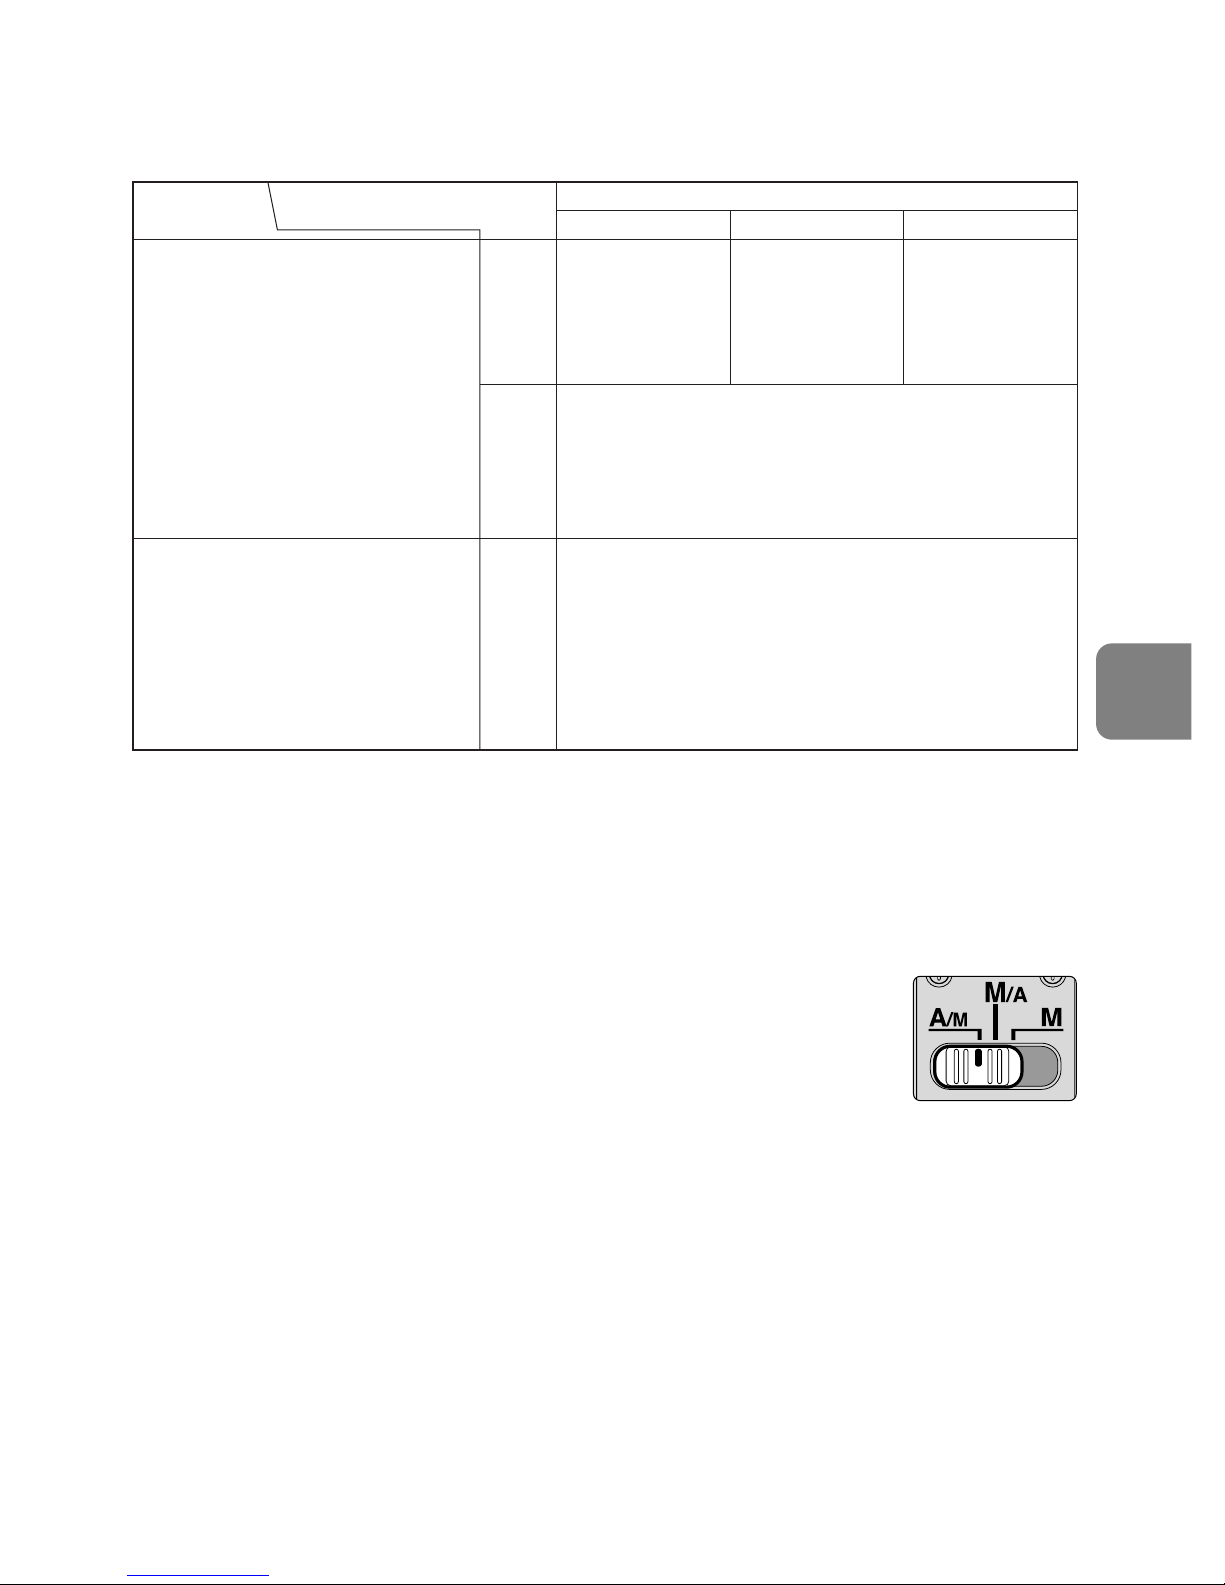
87
Se
4. Fokusering
Ställ kamerans fokuslägesväljare enligt denna tabell:
Autofokus med möjlighet till manuell fokusering (s. 85)
A/M-läge: Autofokus med möjlighet till manuell fokusering.
AF-prioritet
M/A-läge: Autofokus med möjlighet till manuell fokusering.
MF-prioritet
1
Ställ fokuslägesväljaren på ”A/M” eller ”M/A”. (Bild 1)
2
Du kan koppla ur autofokusfunktionen och fokusera manuellt
så här: vrid fokusringen samtidigt som du trycker lätt på
avtryckaren eller AF-startknappen på kameran eller på
knappen för fokusfunktion på objektivet.
• Så här återgår du till autofokusläget: Ta bort fingret från avtryckaren eller
AF-startknappen på kameran eller knappen för fokusfunktion på objektivet.
Tryck sedan lätt på avtryckaren.
Objektivets fokusläge
Kameror
Kamerans fokusläge
MM/AA/M
Manuell fokusering
(Möjlighet till
fokuseringshjälp.)
Manuell fokusering
(Möjlighet till fokuseringshjälp, utom med
F-601M.)
Manuell fokusering
(Möjlighet till fokuseringshjälp.)
Autofokus med
möjlighet till
manuell fokusering
(MF-prioritet)
Autofokus med
möjlighet till
manuell fokusering
(AF-prioritet)
AF
(C/S)
AF
(C/S)
MF
MF
D3, D2-serien, D1-serien, D300,
D200, D100, D80, D70-serien,
D50, D40-serien, F6, F5,
F4-serien, F100, F90X,
F90-serien,
F80-serien,
F75-serien,
F70-serien,
F65-serien,
Pronea 600i, Pronea S
F60-serien,
F55-serien,
F50-serien,
F-801s, F-801,
F-601M,
F-401x,
F-401s, F-401
AF: Autofokus MF: Manuell fokuserin
g
Fig. 1
Page 88
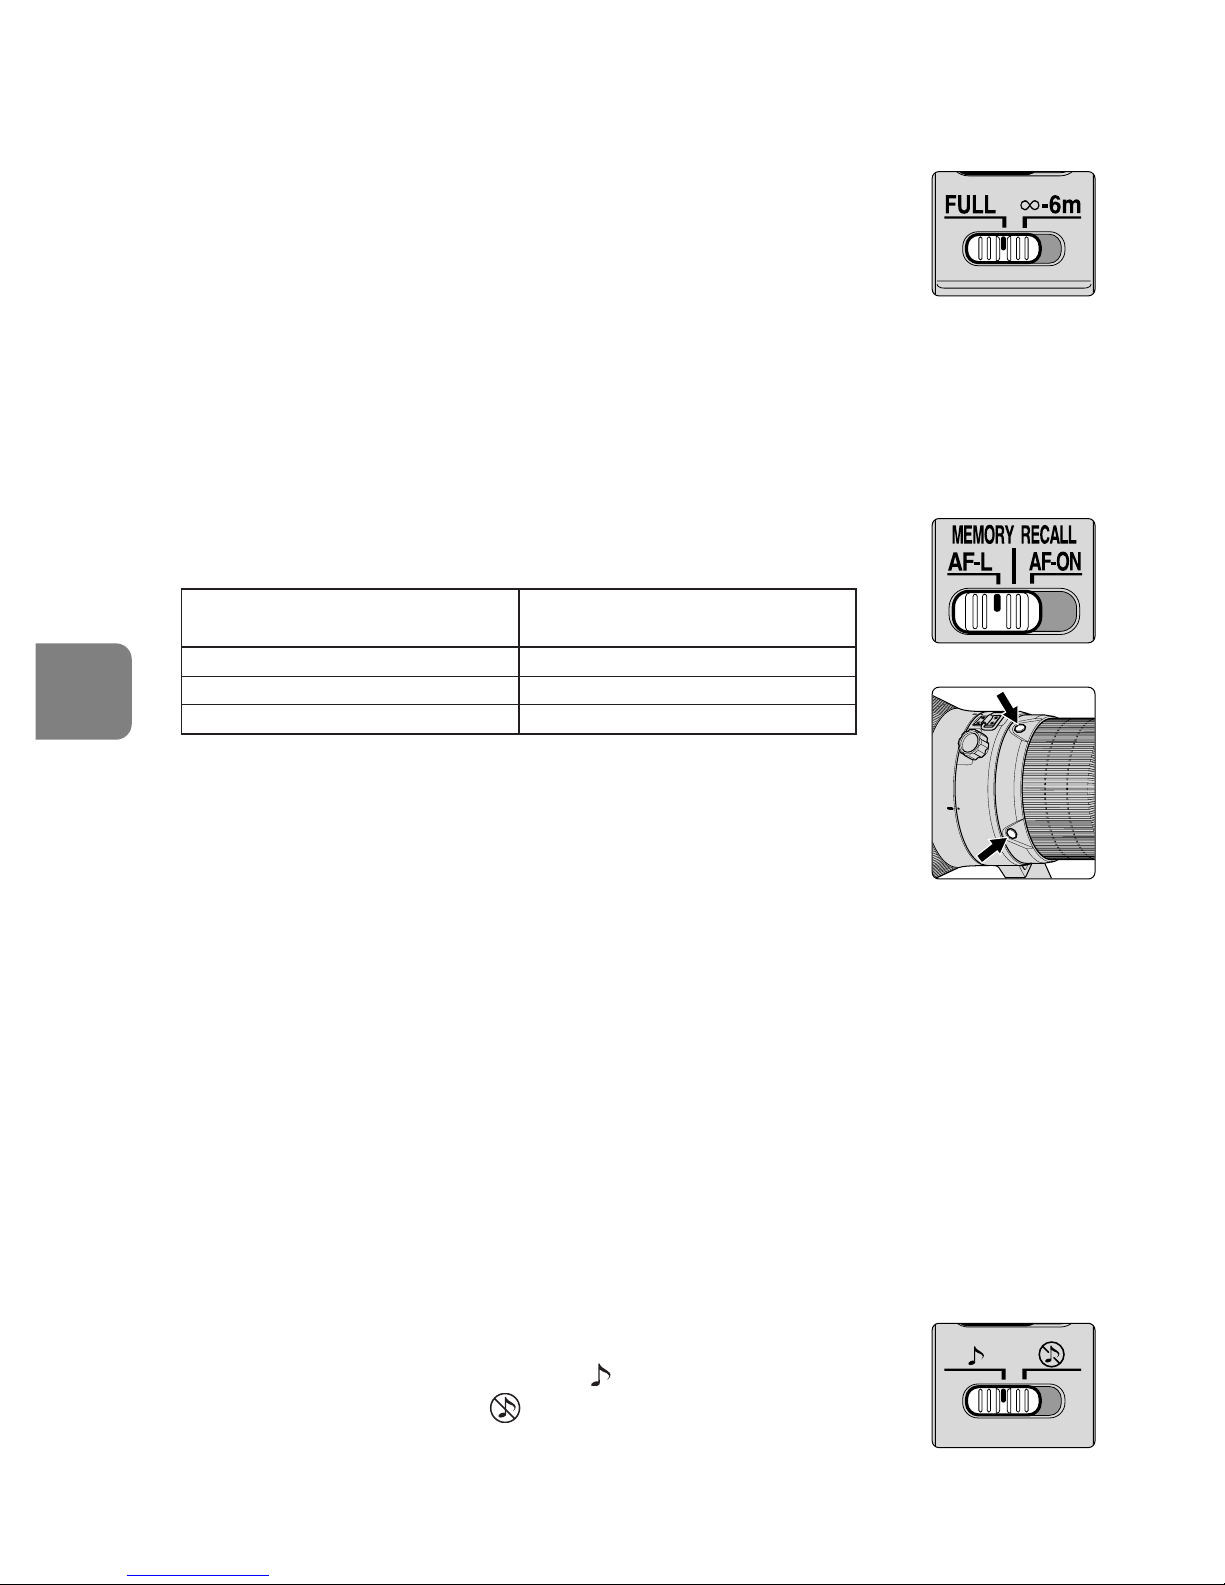
88
Se
5. Så här begränsar du autofokusområdet (På sidan 84 finns
information om vilka kameror som funktionen kan användas på.)
• Om avståndet till motivet alltid är mer än sex meter ställer du
väljaren för fokuseringsgräns (bild 2) på ”∞–6m” i AF-läge för
att minska fokuseringstiden.
• Om avståndet till motivet ibland är sex meter eller mindre
ställer du väljaren på ”FULL”.
• Denna funktion kan bara användas med autofokus.
6. AF-L/MEMORY RECALL/AF-ON
Väljare för fokusfunktion (AF-L/MEMORY RECALL/AF-ON) och
knapp för fokusfunktion
• Knappen för fokusfunktion (Bild 4) har olika funktioner
beroende på var väljaren för fokusfunktion står (Bild 3).
• Läget för knapparna för fokusfunktion kan ändras efter dina
önskemål. Kontakta närmaste Nikon-serviceverkstad eller
Nikon-representant för mer information.
• Aktivera de olika fokusfunktionerna genom att trycka på
någon av de fyra knapparna för fokusfunktion.
Fokuslåsknappen (På sidan 84 finns information om vilka kameror
som funktionen kan användas på.)
1
Ställ fokuslägesväljaren på ”A/M” eller ”M/A”. (Bild 1)
• Denna funktion kan bara användas med autofokus.
2
Ställ väljaren för fokusfunktion (Bild 3) på ”AF-L”.
3
När autofokus är aktivt kan fokus låsas medan du trycker på knappen för
fokusfunktion. (Bild 4)
• Fokus är låst medan någon av dessa knappar är nedtryckt.
• AF-låsfunktionen kan aktiveras på kameran eller objektivet.
MEMORY RECALL (På sidan 84 finns information om vilka
kameror som funktionen kan användas på. Funktionen kan
användas i autofokusläge och vid manuell fokusering.)
• Ställ ljudmonitorväljaren (Bild 5) på ” ” om du vill aktivera
ljudmonitorn. Ställ den på ” ”om du vill stänga av ljudmonitorn.
•I det följande är ljudmonitorn aktiverad.
Fig. 3
Fig. 4
Läge för väljaren för
fokusfunktion
Funktion hos knappen
för fokusfunktion
AF-L Fokuslås
MEMORY RECALL Inställning av sparat avstånd
AF-ON AF-start (AF-ON) på objektivet
Fig. 5
Fig. 2
Page 89
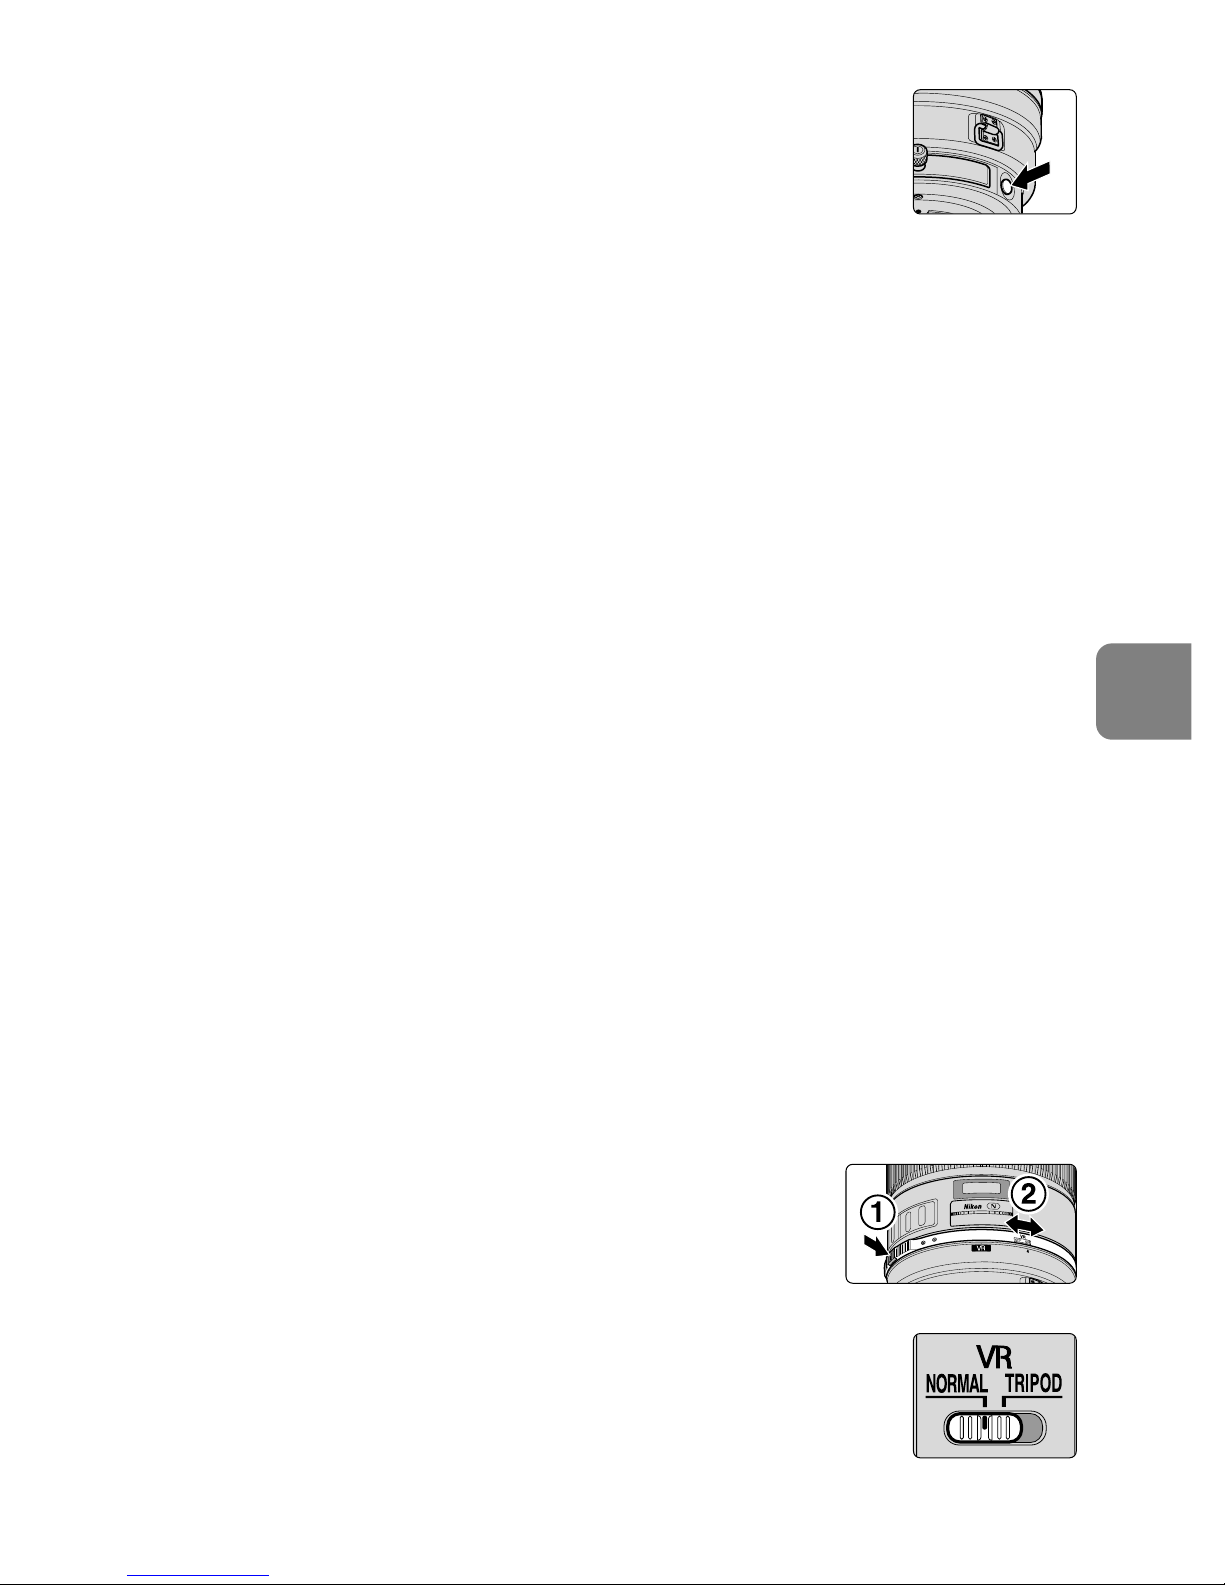
89
Se
1
Ställ fokuslägesväljaren på ”A/M”, ”M/A” eller ”M”. (Bild 1)
2
Fokusera på ett motiv. Tryck på minnesinställningsknappen
(Bild 6). Ett pipljud anger att avståndet har lagrats i minnet.
• Ett avstånd kan lagras oberoende av var fokuslägesväljaren
eller väljaren för fokusfunktion står.
• Fokusavståndet sparas i minnet även om kameran stängs av eller objektivet tas
bort från kameran.
Obs: Om ringen för avståndsskala roterar från höger till vänster cirka tio gånger
när du gör inställningen, samtidigt som det hörs ett kort och tre långa pip,
ska du utföra minnesinställningen igen.
3
Ställ väljaren för fokusfunktion (Bild 3) på ”MEMORY RECALL”.
4
Tryck på knappen för fokusfunktion (Bild 4).
• Ställ in objektivet på det sparade fokusavståndet genom att trycka på knappen
för fokusfunktion, samtidigt som du trycker lätt på avtryckaren.
5
Två pip anger att objektivet har ställts in på det sparade fokusavståndet. Ta
sedan bilden genom att trycka in avtryckaren helt.
Obs: Om du vill ta bilder på det sparade fokusavståndet trycker du ned
avtryckaren helt, innan du tar bort fingret från knappen för fokusfunktion.
•I läget A/M eller M/A återgår inte objektivet från Memory recall till autofokus
eller manuell fokusering förrän du tar bort fingret från knappen för
fokusfunktion och trycker ned avtryckaren lätt.
AF-ON (På sidan 84 finns information om vilka kameror som
funktionen kan användas på.)
1
Ställ fokuslägesväljaren (Bild 1) på ”A/M” eller ”M/A”.
2
Ställ väljaren för fokusfunktion (Bild 3) på ”AF-ON”.
3
Tryck på knappen för fokusfunktion (Bild 4) när du vill ta bilder.
• Autofokus aktiveras när du trycker på knappen för fokusfunktion.
7. Vibrationsreduceringsläge (På sidan 84 finns information om
vilka kameror som funktionen kan användas på.)
1
Ställ ringomkopplaren för vibrationsreducering ON/OFF
på ”ON” 2, samtidigt som du trycker på knappen på
ringomkopplaren 1. (Bild 7)
2
Ställ väljaren för vibrationsreduceringsläge (Bild 8) på
”NORMAL” eller ”TRIPOD”.
• Du kan minska skakningsoskärpan i sökaren genom att
trycka lätt på avtryckaren. Då kan du lättare fokusera
automatiskt och manuellt samt komponera bilden.
Fig. 7
Fig. 8
Fig. 6
Page 90
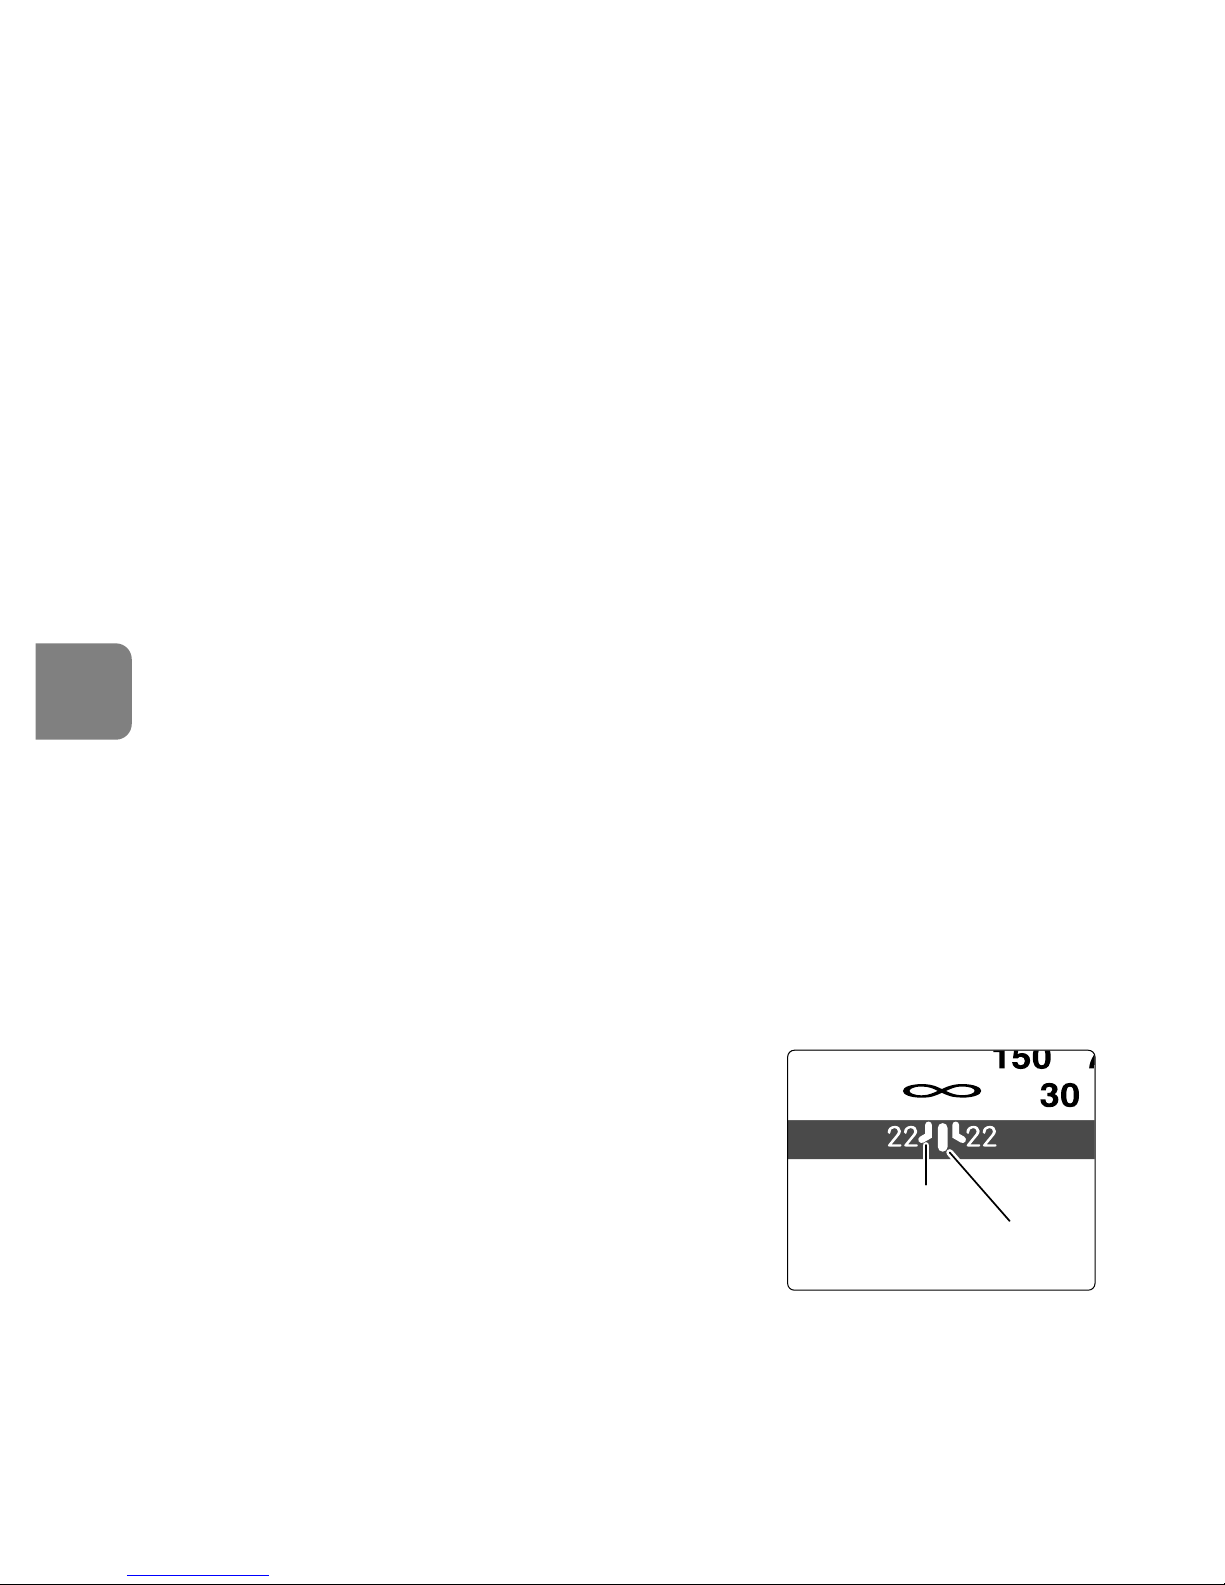
90
Se
Anmärkningar om användning av vibrationsreducering
• Vänta tills bilden i sökaren slutar vibrera, innan du trycker ned avtryckaren helt
efter att ha tryckt lätt på den.
• Vibrationsreduceringen kan medföra att bilden i sökaren blir oskarp när du har
tagit bilden.
• Om du ställer AF-startknappen (AF-ON, Bild 4) på ”ON” på kameran eller
knappen för fokusfunktion på objektivet, fungerar inte vibrationsreduceringen.
• Ställ väljaren för vibrationsreduceringsläge på ”TRIPOD” för att minska
skakningsoskärpan på bilden och i sökaren när du använder stativ.
Vibrationsreduceringssystemet aktiveras kanske inte vid mycket små
kameraskakningar. Omvänt kan VR-systemet orsaka kameraskakningar i
objektivet. I så fall bör vibrationsreduceringen stängas av. När du använder ett
stativ med ett huvud som inte är åtdraget eller ett enbensstativ ska du välja
läget NORMAL.
• När du panorerar ska du ställa väljaren för vibrationsreduceringsläge (Bild 8) i
läget ”NORMAL”.
• Om du rör kameran i en vid båge när du panorerar påverkas inte vibrationer i
denna rörelseriktning. Om du till exempel panorerar horisontellt reduceras
endast vibrationer i vertikal riktning, vilket gör det mycket lättare att
åstadkomma mjuka panoreringar.
• Stäng inte AV strömmen till kameran och ta inte bort objektivet från kameran
medan vibrationsreduceringsläget är aktivt. (Om du gör det kan det höras ett
skramlande ljud från objektivet om kameran skakas. Detta är inte ett fel.
Åtgärda tillståndet genom att sätta PÅ strömmen till kameran igen.)
•I F80-serien, F75-serien, F65-serien, D300, D200, D100, D80, D70-serien, D50
och D40-serien fungerar inte vibrationsreducering medan den inbyggda
blixten laddas upp.
8. Skärpedjup
• Du kan få en uppfattning om skärpedjupet med
hjälp av skärpedjupsskalan. (Bild 9)
• Om det finns en knapp eller spak för
skärpedjupskontroll (nedbländning) på kameran,
kan du se skärpedjupet i sökaren.
• Mer information finns på s. 192.
9. Bländarinställning
• Eftersom det inte finns någon bländarring på objektivet måste du ställa in
bländaren på kameran.
Distansindikeringslinje
Skärpedjupsskala
Fig. 9
Page 91
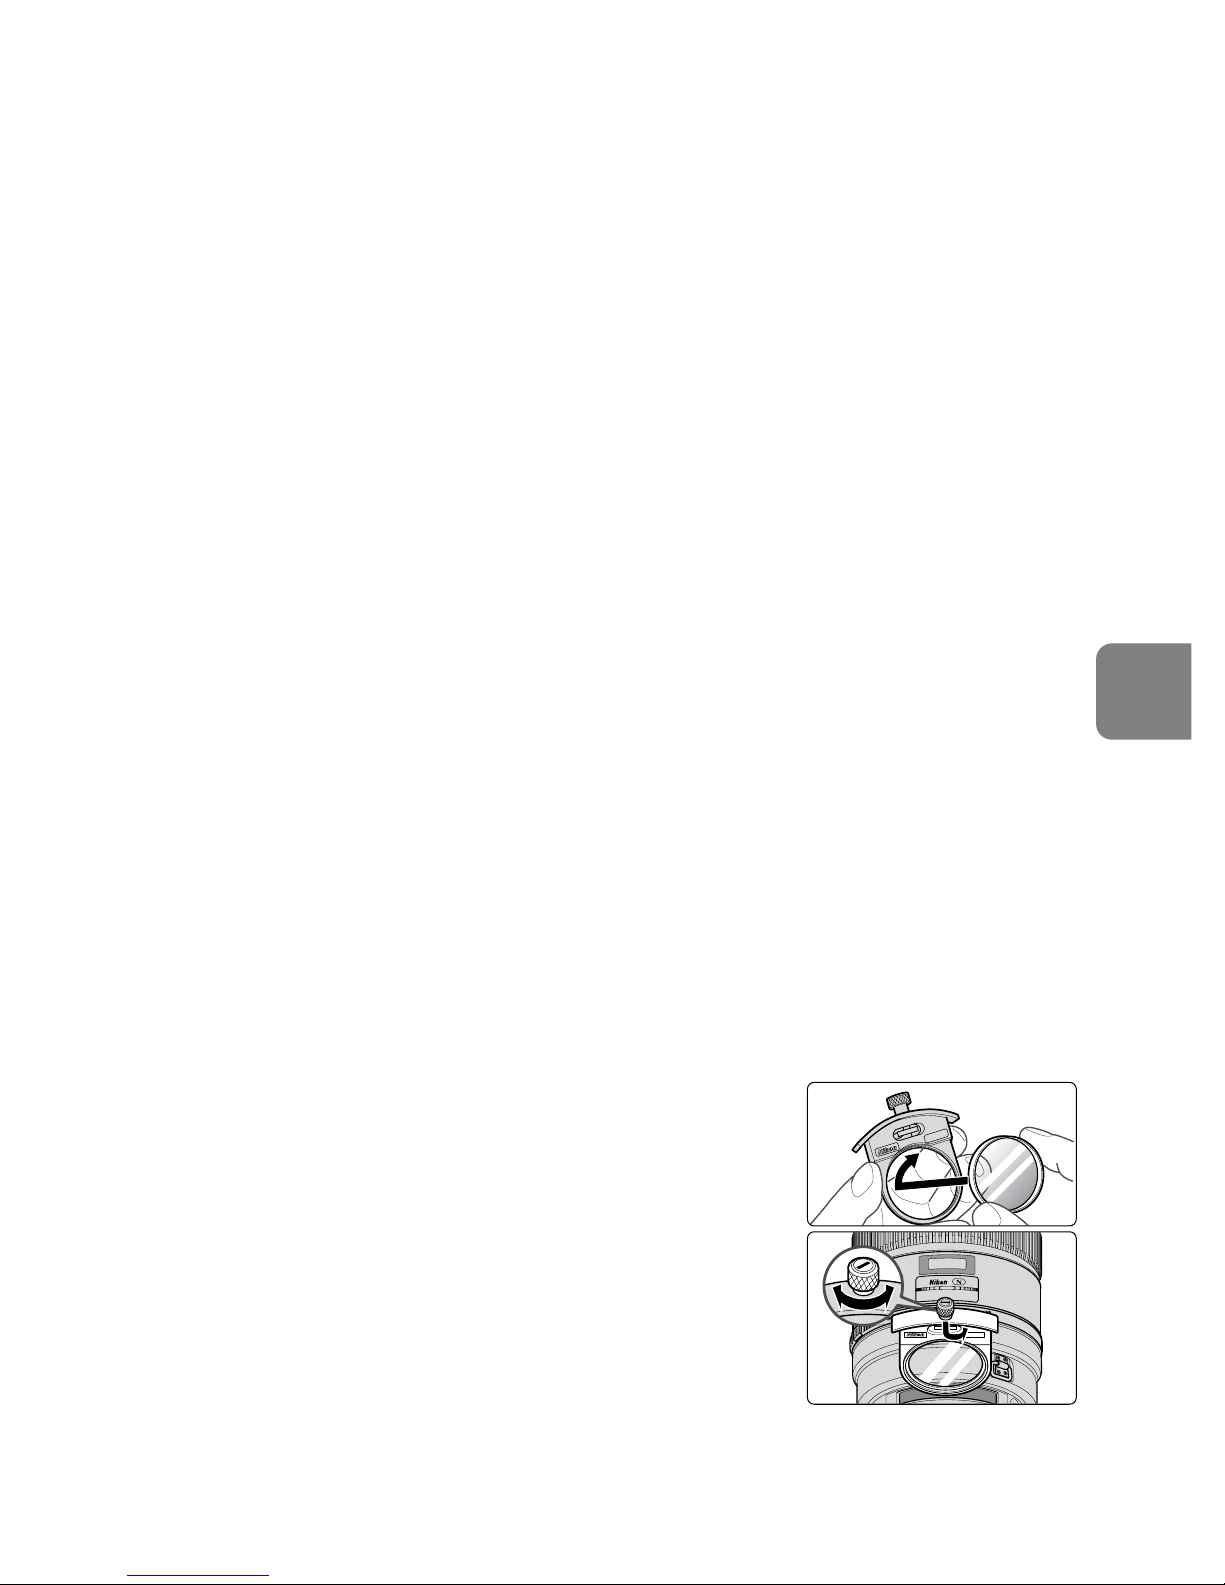
91
Se
10. Inbyggt roterande stativfäste
• När du tar bilder i stående orientering lossar du stativfästets låsskruv så här:
vrid skruven moturs, vrid objektivet till lämpligt läge och dra åt skruven
medurs.
• När du håller kameran i handgreppet och vrider kameran med objektivet i
stativfästet, kan det hända att du stöter emot stativet med handen.
Enbensstativ (tillbehör som medföljer)
• Du kan byta ut stativfästet mot ett fäste för enbensstativ genom att ta bort
stativfästets låsskruv.
• När du har bytt ut stativfästet måste du dra åt skruven så långt det går. Om du
inte gör det kan det leda till olyckshändelser eller skador på objektivet och
kameran.
Kontakta närmaste Nikon-serviceverkstad eller Nikon-representant för mer
information.
11. Motljusskydd HK-33-1 och HK-33-2
Ett tvådelat motljusskydd medföljer objektivet. Det består av HK-33-1, som
monteras på objektivets främre del, och HK-33-2, som monteras på den främre
delen av HK-33-1.
Användning av HK-33-1: Lossa skruven för motljusskydd på HK-33-1, för på
HK-33-1 på objektivets främre del och dra åt skruven.
Montering av HK-33-2: Lossa skruven för motljusskydd på HK-33-2, för på
HK-33-2 på den främre delen av HK-33-1 och dra åt skruven.
Förvaring av motljusskydden: Vänd på HK-33-2 och sätt tillbaka den på
HK-33-1. Vänd sedan på HK-33-1 med HK-33-2 monterad, och för båda delarna
tillbaka på objektivets främre del.
12. Instickshållare för filter
• Använd alltid ett (52 mm gängat) filter. Vid leverans
är ett 52 mm gängat NC-filter monterat på
filterhållaren.
1
Skruva fast ett filter på den sida av filterhållaren som
är märkt ”Nikon” och ”JAPAN”. (Bild 10)
2
Tryck ned knappen på instickshållaren för filter. Vrid
sedan moturs tills den vita linjen på knappen står i rät
vinkel mot objektivets axel.
• Instickshållaren för filter kan monteras mot
objektivsidan eller kamerasidan utan att det påverkar
bilderna.
Fig. 10
Page 92
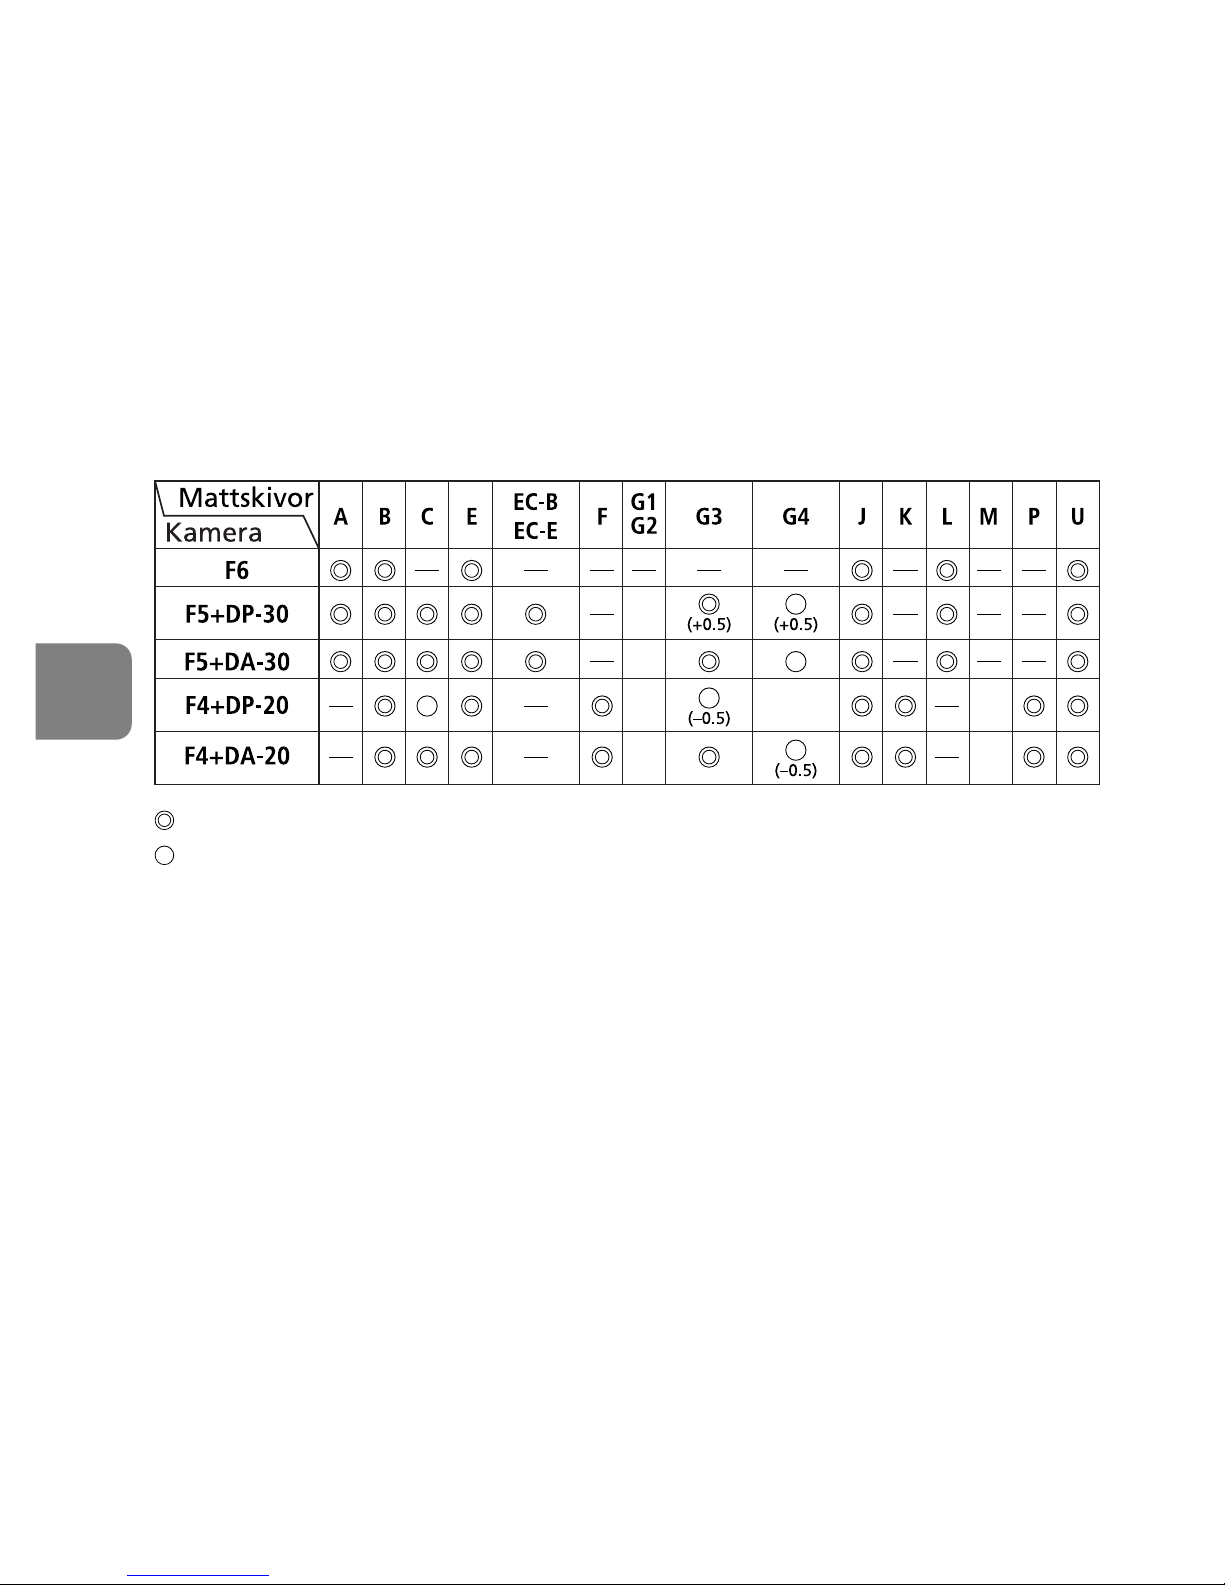
92
Se
C-PL1L runt instickspolarisationsfilter (säljs separat)
• Blockerar reflexer från icke-metalliska ytor som glas och vatten.
• Fokuspunkten för ett C-PL1L instickspolarisationsfilter skiljer sig från
fokuspunkten för ett 52 mm gängat filter. Avståndsskalan flyttas från det
korrekta läget, och närgränsen utökas något.
• Sparade avståndsinställningar kan förändras något vid användning av förinställt
fokus. Montera C-PL1L-filtret innan du använder Memory recall-funktionen.
13. Rekommenderade mattskivor
Det finns olika utbytbara mattskivor för vissa SLR-kameror från Nikon till olika
fotograferingssituationer. Till detta objektiv rekommenderas följande:
: Utmärkt fokusering
: Acceptabel fokusering
Viss vinjettering eller moirémönster i sökaren men inte på filmen.
—: Ej tillgänglig.
( ): Anger graden av exponeringskompensation som krävs (endast centrumvägd
mätning) För F6-kameror kompenserar du genom att välja ”Other screen”
(Annan skiva) i Custom setting (Anpassad inställning) ”b6: Screen comp."
(Mattskivekomp.) och ställa EV-nivån på –2,0 till +2,0 i steg om 0,5 EV. När du
använder en annan mattskiva än typ B eller E måste du välja ”Other screen”
(Annan skiva) , även om kompensationsvärdet som krävs är ”0” (ingen
kompensation krävs). På F5-kameror kompenserar du med ”Custom setting
#18” (Anpassad inställning nr 18) på kamerahuset. På kameror i F4-serien
kompenserar du med hjälp av exponeringskompensationsratten för mattskivan.
Mer information finns i användarhandboken för kamerahuset.
En tom ruta anger att alternativet inte är tillämpligt. Eftersom en skiva av typ M
kan användas både för makrofotografering med förstoringsgraden 1:1 och för
fotomikrografi, har den andra tillämpningar än övriga skivor.
Page 93

93
Se
• På F5-kameror kan bara mattskivorna EC-B, EC-E, B, E, J, A och L användas vid
matrixmätning.
• Se kolumnerna för mattskivorna B och E när du använder dessa på andra
kameror än ovanstående.
14. Skötsel av objektivet
• Rengör linsytorna med en blåsborste. Ta bort smuts med en mjuk, ren
bomullsduk eller ett linsputspapper fuktat med etanol (alkohol) eller
linsrengöringsvätska. Torka med en cirkelrörelse från mitten ut till ytterkanten,
och var noga med att inte lämna några spår eller vidröra andra delar av linsen.
• Använd aldrig thinner eller bensen för att rengöra objektivet, eftersom detta
kan ge upphov till skador på objektivet, brand eller hälsoproblem.
• Skydda frontlinsen genom att sätta på objektivlocket när objektivet inte
används.
• Sätt på både det främre och det bakre locket när objektivet förvaras i fodralet.
• Förvara objektivet svalt och torrt när det inte används under en längre tid, så
att det inte bildas mögel. Förvara också objektivet på en plats utan direkt
solljus eller kemikalier som kamfer eller naftalin.
• Se till att det inte kommer vatten på objektivet och tappa det inte i vatten,
eftersom det bildas rost som gör att objektivet inte fungerar.
•I vissa delar av objektivet används förstärkt plast, som kan skadas om
objektivet förvaras på en mycket varm plats.
15. Tillbehör som medföljer
• Hårt fodral CT-404 • Främre objektivlock som snäpps fast • Bakre objektivlock
LF-1 • Motljusskydd HK-33 • Specialfilterhållare* • 52 mm gängat NC-filter
• Rem LN-1 • Fäste för enbensstativ
*Om specialtillbehör är trasiga eller saknas kontaktar du närmaste Nikon-
serviceverkstad eller Nikon-representant, eftersom de inte är tillgängliga i
vanliga butiker.
16. Tillbehör som säljs separat
• Vadderad mjuk väska CL-L2 • 52 mm gängade filter (utom runt
polarisationsfilter II) • Runt instickspolarisationsfilter C-PL1L • AF-S-telekonvertrar
(TC-14EII/TC-17EII/TC-20EII)
Page 94

94
Se
17. Specifikationer
Objektivtyp: AF-S Nikkor-objektiv av G-typ med inbyggd CPU och
Nikon-bajonettfattning. Inbyggd specialmekanism för
vibrationsreducering (VR).
Brännvidd: 400 mm
Största bländare: f/2,8
Objektivkonstruktion: 14 element i 11 grupper (tre linselement av ED-glas och
ett med Nano Crystal-beläggning) samt ett skyddsglas
Bildvinkel: 6°10´ med Nikons SLR-kameror för film i småbildsformat
och Nikons digitala SLR-kameror med FX-format
4° med digitala SLR-kameror för Nikon DX-format
5° med IX240-systemkameror
Avståndsinformation: Överförs till kamerahus
Fokusering: Nikons internfokuseringssystem (IF, med intern
ultraljudsmotor); manuellt med separat fokusring.
Vibrationsreducering: Linsförskjutning med hjälp av VCM (voice coil motors)
Avståndsskala: Graderad i meter och fot från 2,8 m till oändlighet (∞)
Närgräns: 2,9 m i AF-läge, 2,8 m i MF-läge
Antal bländarlameller:
nio stycken (rundade)
Bländare: Helautomatisk
Bländarskala: f/2,8–f/22
Exponeringsmätning: Vid full bländaröppning med kameror med CPU-
gränssnittssystem
Väljare för Finns; två tillgängliga områden: FULL (∞–2,9 m) eller
fokuseringsgräns: ∞–6 m
Stativfäste: Inbyggt. Kan vridas 360°, objektivrotationsmarkering vid
90°. Stativfästet kan bytas ut mot ett fäste för
enbensstativ
Dimensioner: Cirka 159,5 mm diameter x 368,0 mm längd från
kamerans objektivmonteringsfläns
Vikt: Cirka 4620 g
Specifikationer och konstruktion kan förändras utan föregående meddelande.
Page 95

95
Se
Page 96

96
ç ‡Á·Ë‡ÈÚ ÛÒÚÓÈÒÚ‚Ó
иЛНУТМУ‚ВМЛВ Н ‚МЫЪВММЛП ˜‡ТЪflП ЩУЪУН‡ПВ˚ ЛОЛ У·˙ВНЪЛ‚‡ ПУКВЪ
ФЛ‚ВТЪЛ Н ФУОЫ˜ВМЛ˛ Ъ‡‚П. кВПУМЪ ‰УОКВМ ФУЛБ‚У‰ЛЪ¸Тfl ЪУО¸НУ
Н‚‡ОЛЩЛˆЛУ‚‡ММ˚ПЛ ТФВˆЛ‡ОЛТЪ‡ПЛ. З ТОЫ˜‡В ФУ‚ВК‰ВМЛfl НУФЫТ‡
ЩУЪУН‡ПВ˚ ЛОЛ У·˙ВНЪЛ‚‡ ‚ ВБЫО¸Ъ‡ЪВ Ф‡‰ВМЛfl ЛОЛ ‰Ы„У„У
ФУЛТ¯ВТЪ‚Лfl УЪНО˛˜ЛЪВ ТВЪВ‚УИ ·ОУН ФЛЪ‡МЛfl Л/ЛОЛ ЛБ‚ОВНЛЪВ
·‡Ú‡Â˛ Ë ‰ÓÒÚ‡‚¸Ú ÛÒÚÓÈÒÚ‚Ó ‰Îfl ÔÓ‚ÂÍË ‚ ·ÎËʇȯËÈ
‡‚ÚÓËÁÓ‚‡ÌÌ˚È Ò‚ËÒÌ˚È ˆÂÌÚ Nikon.
иЛ ФУfl‚ОВМЛЛ МВЛТФ‡‚МУТЪЛ МВПВ‰ОВММУ ‚˚НО˛˜ЛЪВ
ЩУЪУН‡ПВЫ
иЛ ФУfl‚ОВМЛЛ ‰˚П‡ ЛОЛ Б‡Ф‡ı‡, ЛТıУ‰fl˘В„У УЪ ЩУЪУН‡ПВ˚ ЛОЛ
У·˙ВНЪЛ‚‡, МВПВ‰ОВММУ ЛБ‚ОВНЛЪВ ·‡Ъ‡В˛; ТУ·О˛‰‡ИЪВ ПВ˚
ФВ‰УТЪУУКМУТЪЛ, ˜ЪУ·˚ МВ ФУОЫ˜ЛЪ¸ УКУ„Л. иУ‰УОКВМЛВ ‡·УЪ˚ Т
ЫТЪУИТЪ‚УП ПУКВЪ ФЛ‚ВТЪЛ Н ФУОЫ˜ВМЛ˛ Ъ‡‚П. иУТОВ ЛБ‚ОВ˜ВМЛfl
·‡Ú‡ÂË ËÎË ÓÚÍβ˜ÂÌËfl ËÒÚÓ˜ÌË͇ ÔËÚ‡ÌËfl ‰ÓÒÚ‡‚¸Ú ËÁ‰ÂÎË ‰Îfl
ÔÓ‚ÂÍË ‚ ·ÎËʇȯËÈ ‡‚ÚÓËÁÓ‚‡ÌÌ˚È Ò‚ËÒÌ˚È ˆÂÌÚ ÍÓÏÔ‡ÌËË
Nikon.
зВ ЛТФУО¸БЫИЪВ ЩУЪУН‡ПВЫ ЛОЛ У·˙ВНЪЛ‚ ‚ ФЛТЫЪТЪ‚ЛЛ
ОВ„НУ‚УТФО‡ПВМfl˛˘ЛıТfl „‡БУ‚
зВ ‡·УЪ‡ИЪВ Т ˝ОВНЪУММ˚П У·УЫ‰У‚‡МЛВП ФЛ М‡ОЛ˜ЛЛ ‚ ‚УБ‰ЫıВ
ОВ„НУ‚УТФО‡ПВМfl˛˘ЛıТfl „‡БУ‚ — ˝ЪУ ПУКВЪ ФЛ‚ВТЪЛ Н ‚Б˚‚Ы ЛОЛ
ФУК‡Ы.
ç ÒÏÓÚËÚ ̇ ÒÓÎ̈ ˜ÂÂÁ Ó·˙ÂÍÚË‚ ËÎË ‚ˉÓËÒ͇ÚÂθ
ЗБ„Оfl‰ М‡ ТУОМˆВ ЛОЛ ‰Ы„УИ flНЛИ ЛТЪУ˜МЛН Т‚ВЪ‡ ˜ВВБ У·˙ВНЪЛ‚ ЛОЛ
‚Л‰УЛТН‡ЪВО¸ ПУКВЪ ‚˚Б‚‡Ъ¸ МВУ·‡ЪЛПУВ ЫıЫ‰¯ВМЛВ БВМЛfl.
п‡МЛЪВ ЫТЪУИТЪ‚У ‚ МВ‰УТЪЫФМУП ‰Оfl ‰ВЪВИ ПВТЪВ
иЛПЛЪВ УТУ·˚В ПВ˚ ФВ‰УТЪУУКМУТЪЛ ‚У ЛБ·ВК‡МЛВ ФУФ‡‰‡МЛfl
·‡Ú‡ÂÈ Ë ‰Û„Ëı Ì·Óθ¯Ëı Ô‰ÏÂÚÓ‚ ‰ÂÚflÏ ‚ ÓÚ.
кВНУПВМ‰‡ˆЛЛ ФУ ·ВБУФ‡ТМУИ ˝НТФОЫ‡Ъ‡ˆЛЛ ЛБ‰ВОЛfl
икЦСмикЦЬСЦзаЦ
Ru
Page 97

97
ЗУ ‚ВПfl ˝НТФОЫ‡Ъ‡ˆЛЛ ЩУЪУН‡ПВ˚ ЛОЛ У·˙ВНЪЛ‚‡
ТУ·О˛‰‡ИЪВ ТОВ‰Ы˛˘ЛВ ПВ˚ ФВ‰УТЪУУКМУТЪЛ
• п‡МЛЪВ ЩУЪУН‡ПВЫ ЛОЛ У·˙ВНЪЛ‚ ‚ ТЫıУП ПВТЪВ. зВТУ·О˛‰ВМЛВ
˝ЪУ„У ЪВ·У‚‡МЛfl ПУКВЪ ФЛ‚ВТЪЛ Н ФУ‡КВМЛ˛ ˝ОВНЪЛ˜ВТНЛП ЪУНУП.
• зВ ФЛН‡Т‡ИЪВТ¸ Н ЫТЪУИТЪ‚Ы ПУН˚ПЛ ЫН‡ПЛ. зВТУ·О˛‰ВМЛВ ˝ЪУ„У
ЪВ·У‚‡МЛfl ПУКВЪ ФЛ‚ВТЪЛ Н ФУ‡КВМЛ˛ ˝ОВНЪЛ˜ВТНЛП ЪУНУП.
• иЛ Т˙ВПНВ Т ФУ‰Т‚ВЪНУИ ТБ‡‰Л МВ ‰УФЫТН‡ИЪВ ФУФ‡‰‡МЛfl ТУОМВ˜М˚ı
ОЫ˜ВИ ‚ Н‡‰.
лУОМВ˜М˚В ОЫ˜Л ПУ„ЫЪ ТЩУНЫТЛУ‚‡Ъ¸Тfl ‚ НУФЫТ У·˙ВНЪЛ‚‡ Л ТЪ‡Ъ¸
ФЛ˜ЛМУИ ФУК‡‡. дУПВ ЪУ„У, ФЛ˜ЛМУИ ФУК‡‡ ПУ„ЫЪ ТЪ‡Ъ¸
ТУОМВ˜М˚В ОЫ˜Л, ФУФ‡‰‡˛˘ЛВ М‡ НУФЫТ ‚ МВФУТВ‰ТЪ‚ВММУИ ·ОЛБУТЪЛ
УЪ ‚Л‰УЛТН‡ЪВОfl.
• ЦТОЛ У·˙ВНЪЛ‚ МВ ФО‡МЛЫВЪТfl ЛТФУО¸БУ‚‡Ъ¸ М‡ ФУЪflКВМЛЛ
‰ОЛЪВО¸МУ„У ‚ВПВМЛ, ФЛТУВ‰ЛМЛЪВ Б‡‰М˛˛ Л ФВВ‰М˛˛ Н˚¯НЛ Л
ФУПВТЪЛЪВ У·˙ВНЪЛ‚ М‡ ı‡МВМЛВ ‚ ПВТЪУ, НУЪУУВ МВ ФУ‰‚ВКВМУ
‚УБ‰ВИТЪ‚Л˛ ФflП˚ı ТУОМВ˜М˚ı ОЫ˜ВИ. иЛ МВТУ·О˛‰ВМЛЛ ˝ЪУ„У
ЪВ·У‚‡МЛfl ‚УБМЛН‡ВЪ ‚ВУflЪМУТЪ¸ ‚УБМЛНМУ‚ВМЛfl ФУК‡‡, ФУТНУО¸НЫ
У·˙ВНЪЛ‚ ПУКВЪ ЩУНЫТЛУ‚‡Ъ¸ ТУОМВ˜М˚В ОЫ˜Л М‡ УНЫК‡˛˘Лı
ФВ‰ПВЪ‡ı.
Ru
Page 98
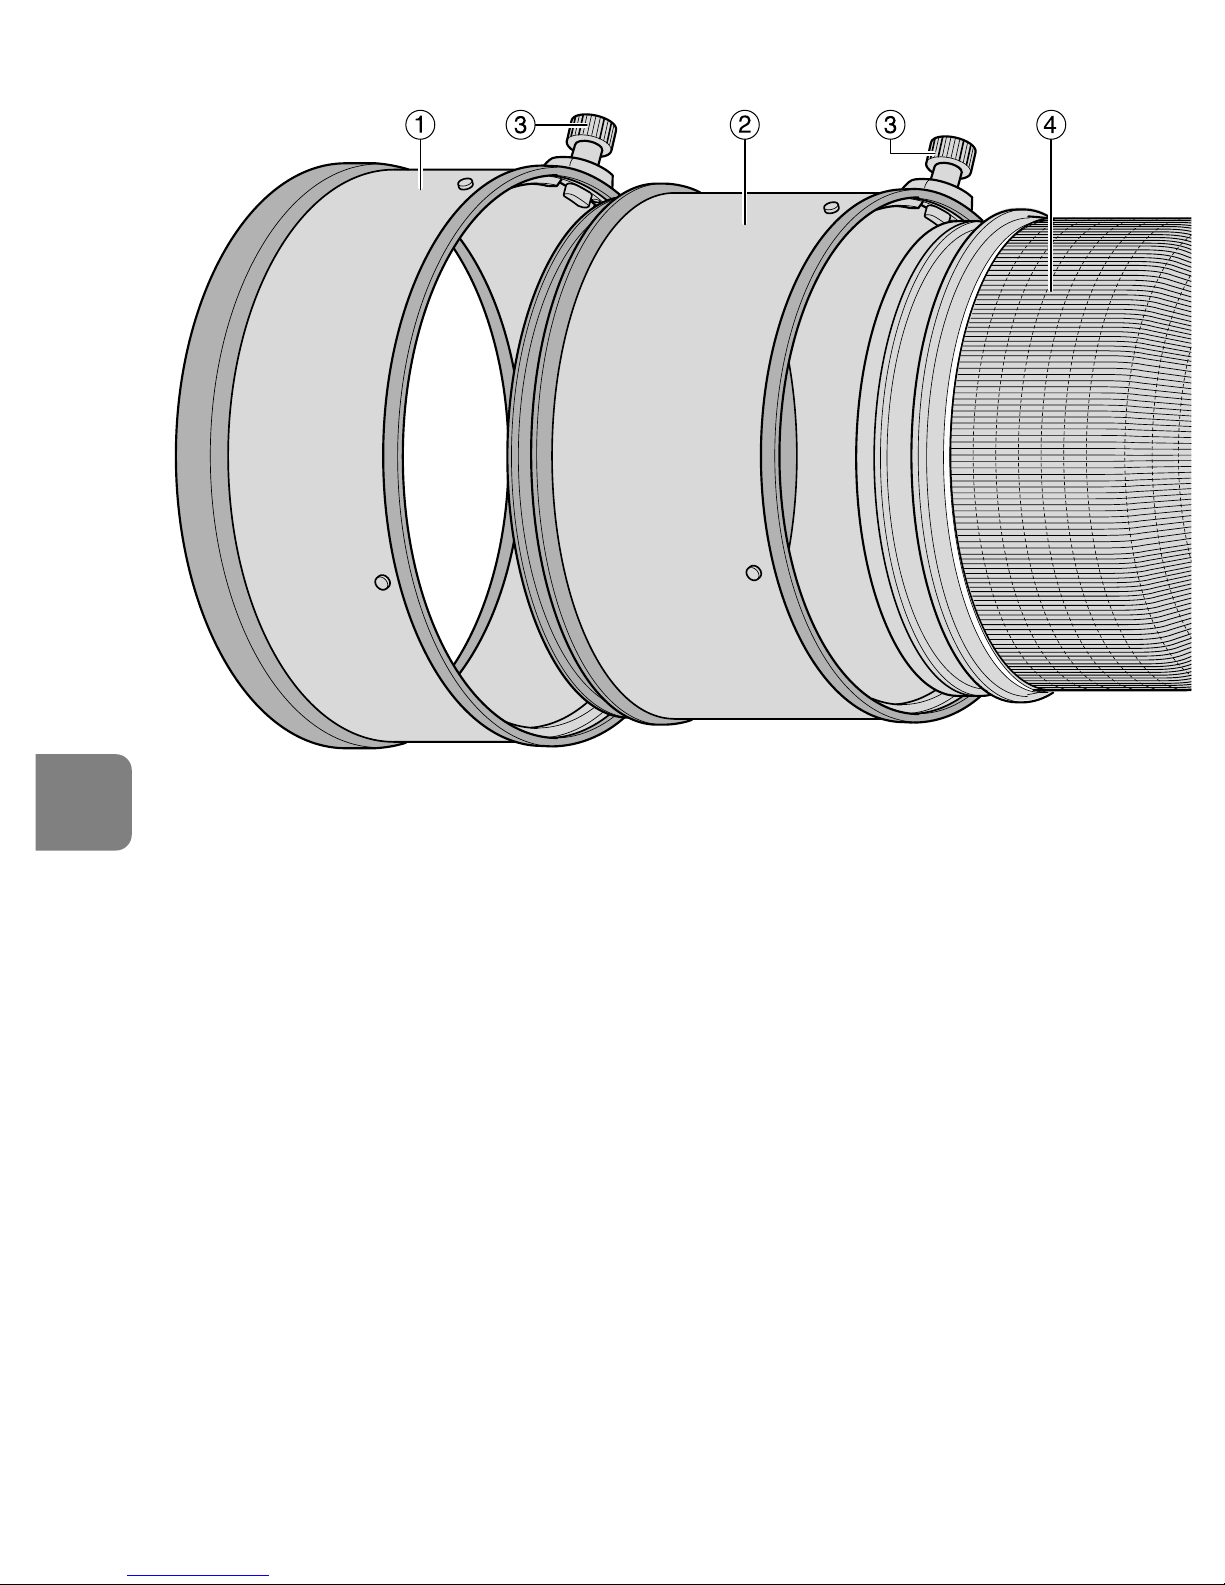
98
1
ÅÎẨ‡ Ó·˙ÂÍÚË‚‡ HK-33-2 (ÒÚ. 107)
2
ÅÎẨ‡ Ó·˙ÂÍÚË‚‡ HK-33-1 (ÒÚ. 107)
3 ÇËÌÚ ·ÎẨ˚ Ó·˙ÂÍÚË‚‡ (ÒÚ. 107)
4 кВБЛМУ‚УВ НУО¸ˆУ
5
оЛНТЛЫ˛˘ЛИ ‚ЛМЪ ФВВıУ‰МЛН‡
‰Оfl НВФОВМЛfl М‡ ¯Ъ‡ЪЛ‚В (ТЪ. 107)
6 èÓÛ¯Ë̇ ‰Îfl ÂÏÌfl
7 еВЪН‡ ФУОУКВМЛfl ФЛ ФУ‚УУЪВ
Ó·˙ÂÍÚË‚‡
8
дМУФН‡ ЫФ‡‚ОВМЛfl ЩУНЫТЛУ‚НУИ
(·ОУНЛУ‚Н‡ ЩУНЫТ‡/MEMORY
RECALL/Б‡ФЫТН AF) (ТЪ. 104)
9
оУНЫТЛУ‚У˜МУВ НУО¸ˆУ (ТЪ. 104)
!
тН‡О‡ „ОЫ·ЛМ˚ ВБНУТЪЛ (ТЪ. 106)
" ì͇Á‡ÚÂθ ‡ÒÒÚÓflÌËfl (ÒÚ. 106)
# ò͇· ‡ÒÒÚÓflÌËfl
$ äÓθˆÂ‚ÓÈ ÔÂÂÍβ˜‡ÚÂθ
ÂÊËχ ÔÓ‰‡‚ÎÂÌËfl ‚Ë·‡ˆËÈ
(ON/OFF) (ÒÚ. 105)
% З˚‰‚ЛКМУИ ‰ВК‡ЪВО¸ ЩЛО¸Ъ‡
(ÒÚ. 107)
& êÛÍÓflÚ͇ ‚˚‰‚ËÊÌÓ„Ó
‰ÂʇÚÂÎfl ÙËθڇ (ÒÚ. 107)
( ìÒÚ‡ÌӂӘ̇fl ÏÂÚ͇
) кВБЛМУ‚˚И ЫФОУЪМЛЪВО¸
НВФОВМЛfl У·˙ВНЪЛ‚‡ (ТЪ. 103)
~ äÓÌÚ‡ÍÚ˚ ÛÔ‡‚ÎÂÌËfl (ÒÚ. 102)
+
ЗТЪУВММ˚И ФУ‚УУЪМ˚И ФВВıУ‰МЛН
‰Оfl НВФОВМЛfl М‡ ¯Ъ‡ЪЛ‚В (ТЪ. 107)
, иВВıУ‰МЛН ‰Оfl НВФОВМЛfl М‡
ПУМУФУ‰В (Т˙ВПМ˚И) (ТЪ. 107)
- дМУФН‡ Memory Set (ТЪ. 105)
. иВВНО˛˜‡ЪВО¸ ВКЛПУ‚
ЩУНЫТЛУ‚НЛ (ТЪ. 103)
/
鄇МЛ˜ЛЪВО¸ ЩУНЫТЛУ‚НЛ (ТЪ. 104)
: иВВНО˛˜‡ЪВО¸ ВКЛПУ‚
ÔÓ‰‡‚ÎÂÌËfl ‚Ë·‡ˆËÈ (ÒÚ. 105)
; èÂÂÍβ˜‡ÚÂθ ‚˚·Ó‡ ÂÊËχ
ЩУНЫТЛУ‚НЛ (AF-L/MEMORY
RECALL/AF-ON) (ТЪ. 104)
< èÂÂÍβ˜‡ÚÂθ ÛÔ‡‚ÎÂÌËfl
Á‚ÛÍÓÏ (ÒÚ. 104)
1. дУПФУМВМЪ˚ ( ): ÒÔ‡‚Ә̇fl ÒÚ‡Ìˈ‡
Ru
Page 99
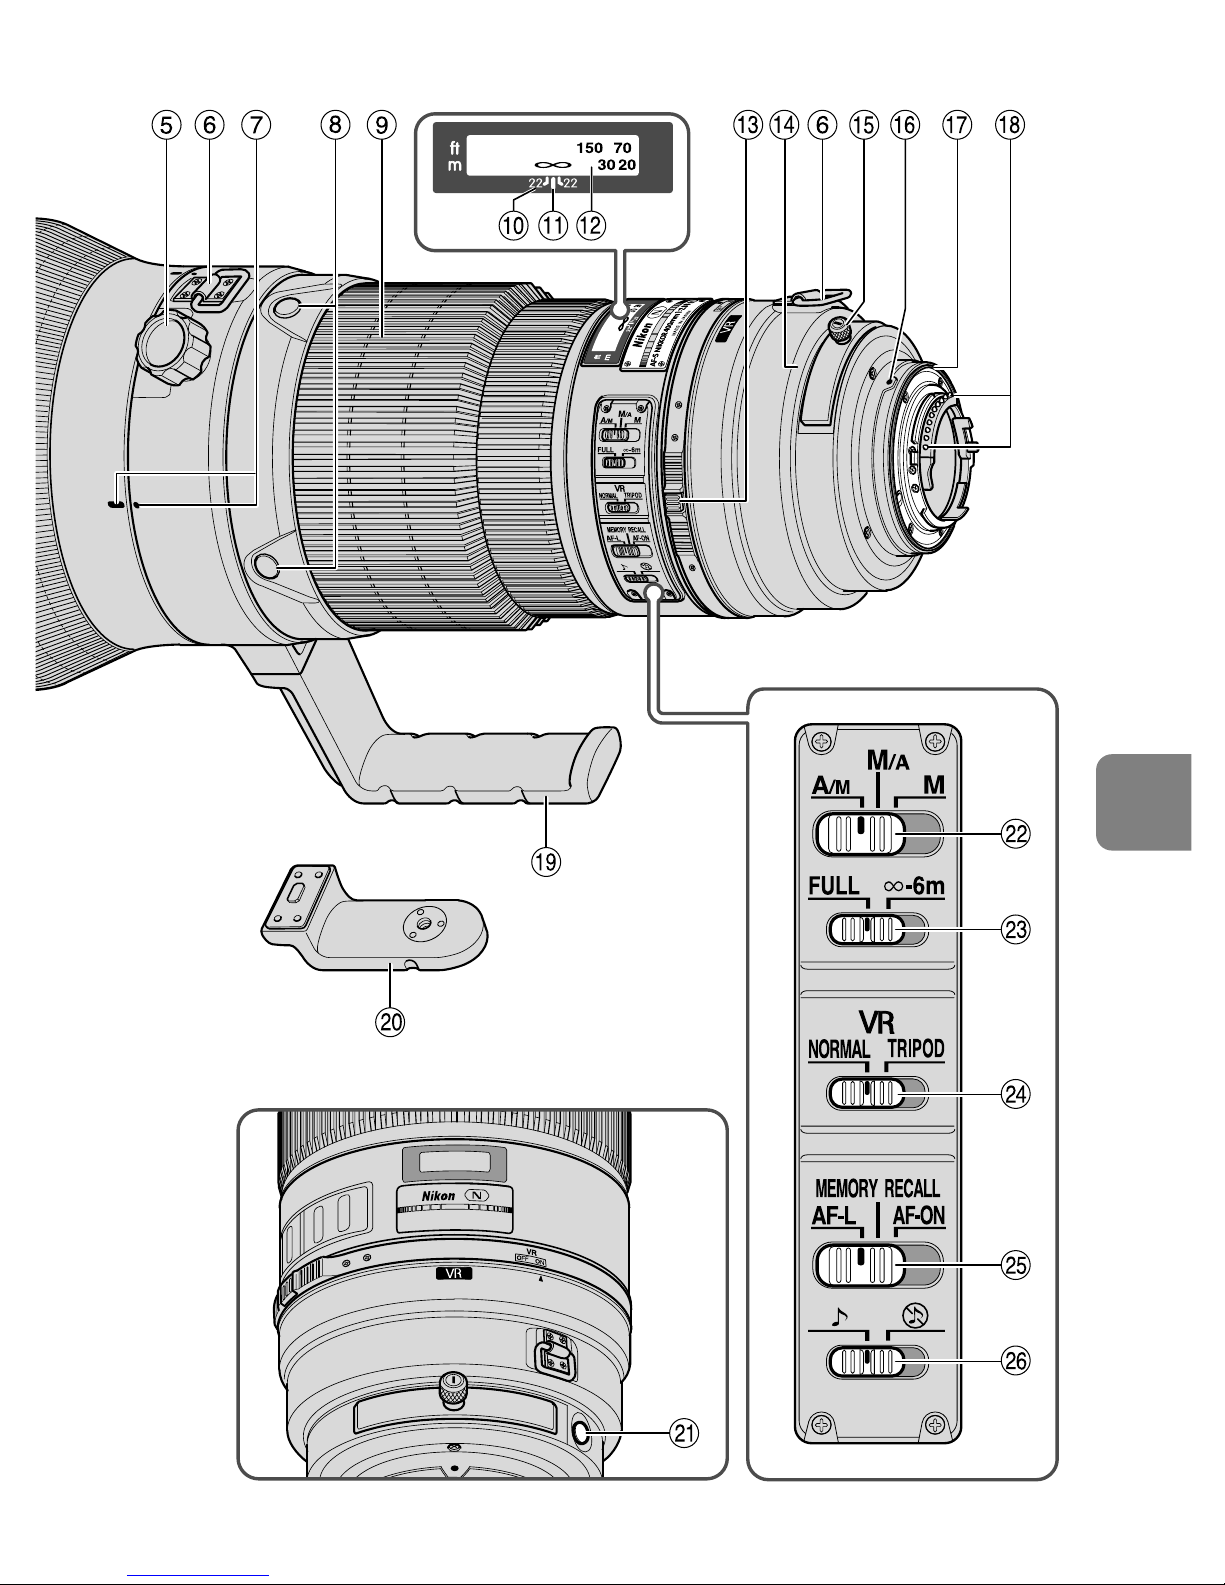
99
Ru
Page 100

100
2. лУ‚ПВТЪЛП˚В ЩУЪУН‡ПВ˚ Л ‰УТЪЫФМ˚В ЩЫМНˆЛЛ
аТФУО¸БУ‚‡МЛВ ‰УТЪЫФМ˚ı ЩЫМНˆЛИ У·˙ВНЪЛ‚‡ ПУКВЪ ·˚Ъ¸ Т‚flБ‡МУ Т
МВНУЪУ˚ПЛ У„‡МЛ˜ВМЛflПЛ. иУ‰У·М˚В Т‚В‰ВМЛfl ТП. ‚ ЫНУ‚У‰ТЪ‚В ФУ
˝НТФОЫ‡Ъ‡ˆЛЛ ЩУЪУН‡ПВ˚.
*1 кВКЛП P ‚НО˛˜‡ВЪ ‚ ТВ·fl ВКЛП AUTO (ЫМЛ‚ВТ‡О¸М‡fl ФУ„‡ПП‡)
Л ТЛТЪВПЫ Т ‚‡ЛФУ„‡ППУИ
*2 кЫ˜МУИ ВКЛП (M) МВ‰УТЪЫФВМ.
*3 ЦТОЛ ФВВНО˛˜‡ЪВО¸ ‚˚·У‡ ВКЛП‡ ЩУНЫТЛУ‚НЛ М‡ıУ‰ЛЪТfl ‚
ФУОУКВМЛЛ AF-ON, ФУˆВТТ ‡‚ЪУП‡ЪЛ˜ВТНУИ ЩУНЫТЛУ‚НЛ М‡˜МВЪТfl
Т‡БЫ КВ ФУТОВ М‡К‡ЪЛfl НМУФНЛ ЫФ‡‚ОВМЛfl ЩУНЫТЛУ‚НУИ ФЛ
У‰МУ‚ВПВММУП ФО‡‚МУП М‡К‡ЪЛЛ ТФЫТНУ‚УИ НМУФНЛ Б‡Ъ‚У‡.
*4 иО‡‚МУ М‡КЛП‡fl ТФЫТНУ‚Ы˛ НМУФНЫ Б‡Ъ‚У‡, М‡КПЛЪВ НМУФНЫ Memory
Set ЛОЛ НМУФНЫ ЫФ‡‚ОВМЛfl ЩУНЫТЛУ‚НУИ.
• ЦТОЛ ˝ЪУЪ У·˙ВНЪЛ‚ ЛТФУО¸БЫВЪТfl Т ЩУЪУН‡ПВ‡ПЛ, МВ ТУ‚ПВТЪЛП˚ПЛ
Т ТЛТЪВПУИ ФУ‰‡‚ОВМЛfl ‚Л·‡ˆЛИ, ФВВПВТЪЛЪВ НУО¸ˆВ‚УИ
ФВВНО˛˜‡ЪВО¸ ВКЛП‡ ФУ‰‡‚ОВМЛfl ‚Л·‡ˆЛИ ‚ ФУОУКВМЛВ OFF. ЦТОЛ
˝ЪУЪ ФВВНО˛˜‡ЪВО¸ М‡ıУ‰ЛЪТfl ‚ ФУОУКВМЛЛ ON, ·‡Ъ‡Вfl ЩУЪУН‡ПВ˚
ПУКВЪ У˜ВМ¸ ·˚ТЪУ ‡БflК‡Ъ¸Тfl (УТУ·ВММУ ˝ЪУ УЪМУТЛЪТfl Н
ЩУЪУН‡ПВВ Pronea 600i).
оУЪУН‡ПВ˚
иУ‰‡‚ОВМЛВ
‚Л·‡ˆЛИ
Д‚ЪУЩУНЫТ
ЕОУНЛУ‚Н‡
ЩУНЫТ‡
кВКЛП
˝НТФУБЛˆЛЛ
P*1SAM
D3, ÒÂËfl D2,
ÒÂËfl D1, D300, D200,
D100, D80,ÒÂËfl D70,
D50, ÒÂËfl D40
F6, F5, F100,
ÒÂËfl F80, ÒÂËfl F75,
ÒÂËfl F65
Pronea 600i, Pronea S*
2
ëÂËfl F4, F90X,
ÒÂËfl F90, ÒÂËfl F70
ëÂËfl F60, ÒÂËfl F55,
ÒÂËfl F50, F-401x,
F-401s, F-401
F-801s, F-801, F-601M
F3AF, F-601, F-501,
оУЪУН‡ПВ˚ Nikon MF
(Б‡ ЛТНО˛˜ВМЛВП F-601M)
҂҂҂
*
3
҂
*
3
*
4
҂҂
҂҂҂҂҂
҂҂҂҂҂
҂
҂
҂
҂
҂
҂
҂
҂
҂
Ç˚ÁÓ‚
‰‡ÌÌ˚ı
ËÁ Ô‡ÏflÚË
á‡ÔÛÒÍ
AF ̇
Ó·˙ÂÍÚË‚Â
î ÛÌ͈Ëfl
: ЗУБПУКМУ : ЗУБПУКМУ, МУ Т МВНУЪУ˚ПЛ У„‡МЛ˜ВМЛflПЛ ҂: зВ‚УБПУКМУ
Ru
 Loading...