


No reproduction in any form of this manual,
in whole or in part (except for brief quotation in
critical articles or reviews), may be made without
written authorization from NIKON CORPORATION.
AF DC-Nikkor
135mm
f/2 D
付属アクセサリー
72mmスプリング式前キャップ
裏ぶたLF-1
Standard accessories
72mm snap-on front lens cap
Rear lens cap LF-1
Accessoires standard
Bouchon avant à emboîtement 72mm
Bouchon arriére LF-1
Accesorlos estándar
Tapa frontal a presión de 72mm
Tapa trasera del objetivo LF-1
安全上のご注意
ご使用の前にこの「使用説明書」をよくお読みのうえ、十分に理解してから正しくお使いくだ
さい。お読みになった後は、お使いになる方がいつでも見られる所に必ず保管してください。
表示について
製品を安全に正しく使用していただき、あなたや他の人への危害や財産への損害を未然に防
止するために、重要な内容を記載しています。
表示と意味は次のようになっています。
この表示を無視して、誤った取り扱いをすると、人が死亡または
重傷を負う可能性が想定される内容を示しています。
この表示を無視して、誤った取り扱いをすると人が障害を負う可
能性が想定される内容および物的損害の発生が想定される内容を
示しています。
絵表示の例
記号は、注意(警告を含む)を促す内容を告げるものです。図の中や近く
△
に具体的な注意内容(左図の場合は感電注意)が描かれています。
記号は、禁止(してはいけないこと)の行為を告げるものです。図の中や
近くに具体的な禁止内容(左図の場合は分解禁止)が描かれています。
● 記号は、行為を強制すること(必ずすること)を告げるものです。図の中
や近くに具体的な強制内容(左図の場合は電池を取り出す)が描かれています。
電池を取る
すぐに修理依頼を
水かけ禁止
使用禁止
発熱、発煙、焦げ臭いなどの異常時は、速やかにカメラ
の電池を取り出すこと
そのまま使用すると火災、火傷の原因となります。
カメラの電池を取り出す際、火傷に十分注意すること。
カメラの電池を抜いて、販売店または当社サービス機関に修理
を依頼して下さい。
水につけたり水をかけたりしないこと
発火したり感電することがあります。
可燃性スプレーなどを吹き付けたり、可燃ガスの雰囲気
中で使用しないこと
爆発、火災の原因になることがあります。
使用説明書の内容が破損などによって判読できなくなったときは、
当社サービス機関に新しい使用説明書をお求めください(有償)。
FUJI BLDG., 2-3 MARUNOUCHI 3-CHOME, CHIYODA-KU,
TOKYO 100-8331, JAPAN
Printed in Japan ●
HB7L11(80)
8MNJA329-11 ▲
Serienmäßiges Zubehör
Aufsteckbarer Frontdeckel 72mmø
Hinterer Objektivdeckel LF-1
使用説明書
Instruction Manual
Bedienungsanleitung
Manuel d'utilisation
Accessori standard
Tappo anteriore da 72mm dia
Tappo posteriore LF-1
Manual de instrucciones
Manuale di istruzioni
分解禁止
接触禁止
すぐに修理依頼を
分解したり修理・改造をしないこと
感電したり、異常作動をしてケガをすることがあります。
落下などによって破損し、内部が露出したときは、露出
部に手を触れないこと
感電したり、破損部でケガをすることがあります。
カメラの電池を抜いて、販売店または当社サービス機関に修理
を依頼してください。
見ないこと
感電注意
保管注意
保管注意
レンズまたはカメラで直接太陽や強い光をみないこと
失明や視力障害になることがあります。
ぬれた手で操作しないこと
感電の原因となります。
製品および付属品は、幼児の手の届かない所に保管する
こと
ケガをする恐れがあります。。
使用しないときは、レンズにキャップをつけるか太陽光
のあたらない所に保管すること
太陽光がレンズに入射し、発火の原因となります。
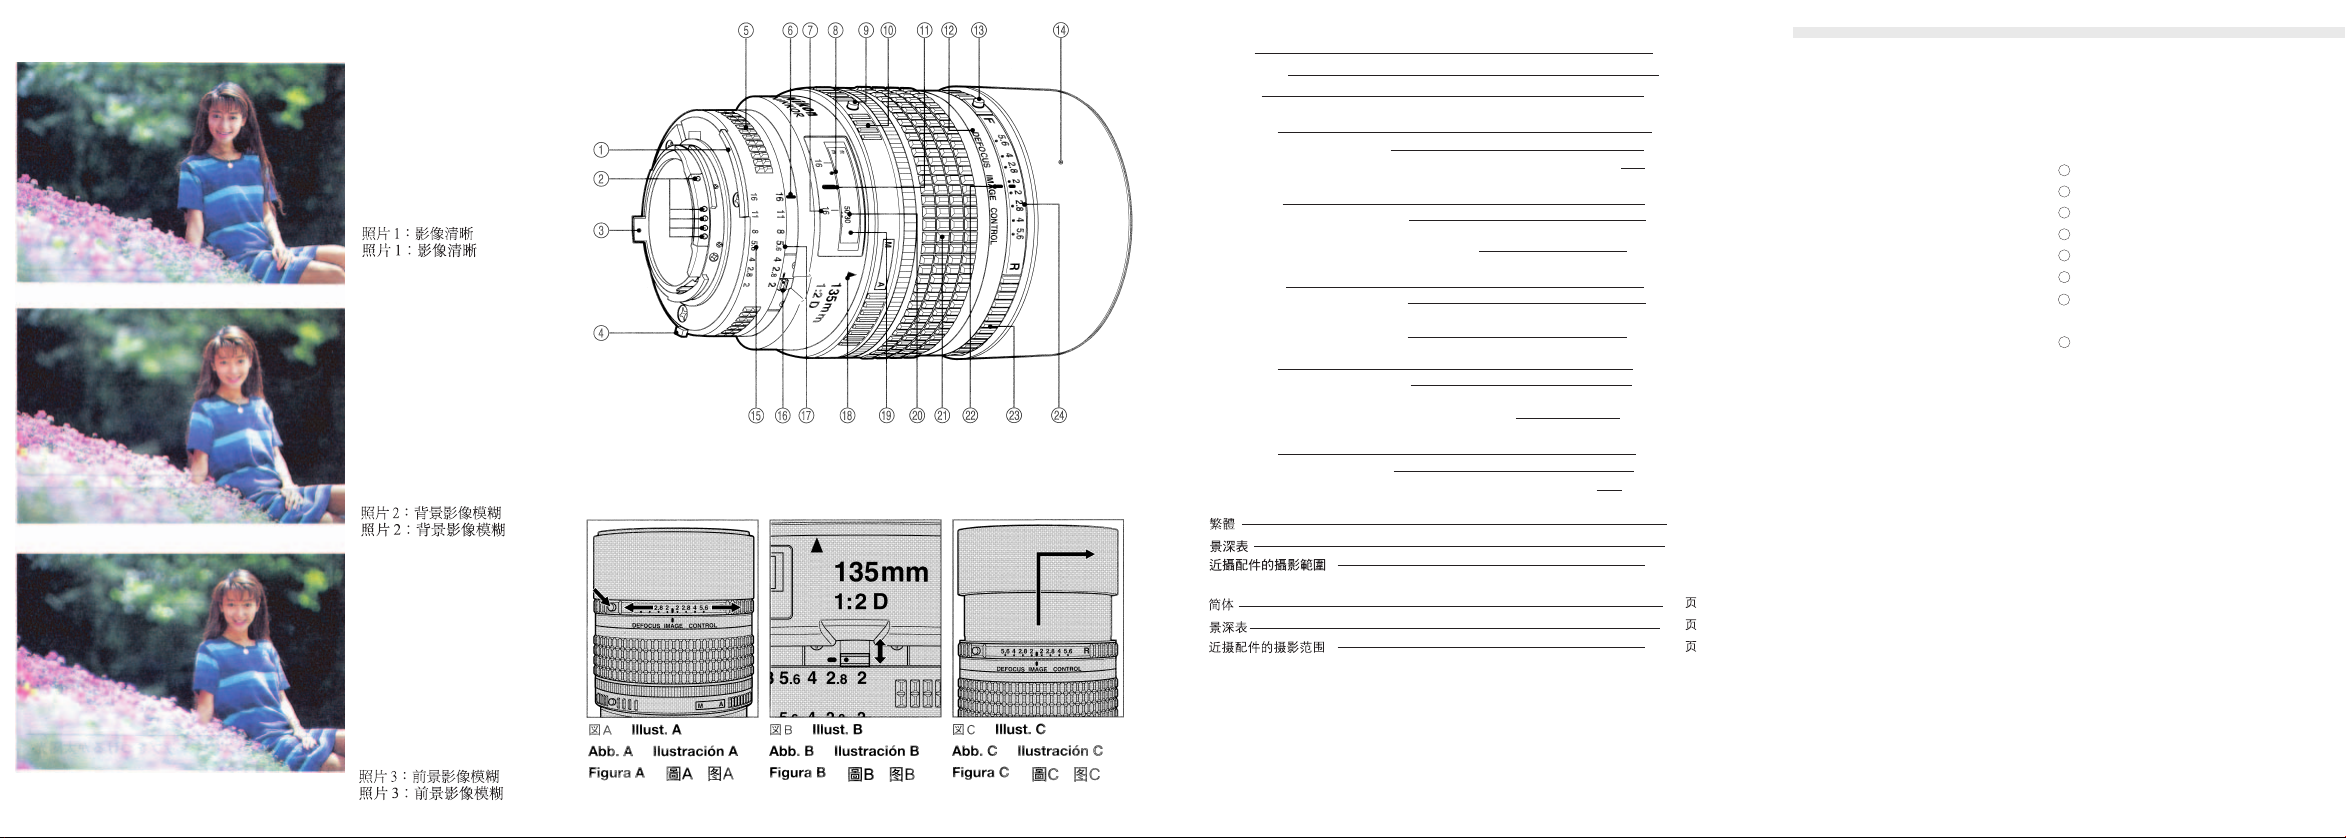
写真1:DCリングをセットして
いない状態です。
Photo 1: No image blur
Foto 1: Keine Unschärfe im
Bild
Fig. 1: Aucune image floue
Fotografia 1; No hey
borrosidad de la imagen
Foto 1: Nessuna immagine
sfocara
写真2:R(リア)側にセットし
た状態です。
Photo 2: Background
images are blurred
Poto 2; Hintergrund
unschart
Fig. 2: Les images de
l’arrière-plan sont floues
Fotografia 2: Las imágenes
en el fondo están borrosas
Foto 2: Le immagini sullo
sfondo sono sfocate
写真3:F(フロント)側にセ
ットした状態です。
Photo 3: Foreground
images are blurred
Poto 3; Vordergrund
unschart
Fig. 3: Les images de
premier-plan sont floues
Fotografia 3: Las imágenes
en el primer plano están
borrosas
Foto 3: Le immagini del
primo piano sono sfocate
日本語
被写界深度
接写表
ENGLISH
DEPTH-OF-FIELDTABLE
PHOTOGRAPHICRANGEWITHCLOSE-UPATTACHMENT
DEUTSCH
SCHÄRFENTIEFE-TABELLE
FOTOGRAFISCHEBEREICHE
MITDENNAHAUFNAHME-ZUBHÖR
FRANÇAIS
PROFONDEURDECHAMP
RAPPORTSOBTENUSENPROXIPHOTOGRAPHEET
PHOTOMACROGRAPHIE
ESPAÑOL
PROFUNDIDADDECAMPO
RANGOSFOTOGRÁFICOS
CONACCESORIOSDEACERCAMIENTO
ITALIANO
PROFUNDITÁ DI CAMPO
OTOGRAFIACONDISPOSITIVIPERRIPRESECLOSE-UP
F
7〜11頁
44頁
46-47頁
Page12
Page45
Page47
Seite16
Seite44
Seite46-47
Page21
Page44
Page46-47
Página26
Página44
Página46-47
Pagina31
Pagina44
Pagina44-47
34頁
42頁
44-45頁
37
42
44-45
各部の名称
各部の名称
①露出計連動ガイド
②CPU信号接点
③開放F値連動ガイド
④EE連動ガイド
⑤絞りリング
⑥絞り指標・着脱指標
⑦被写界深度目盛:f/16のときの被写界深
度を表します。
⑧赤外補正マーク(白色)
⑨A-M切換え解除ボタン
⑩A-M切換えリング
⑪距離目盛指標
⑫レンズ鏡筒
⑬DCリングロック解除ボタン:DCリング
をセットする際に押します。
はじめに
このたびは、ニッコールレンズをお買いあげいただきありがとうございます。
このレンズはニコンAF[オートフォーカス(ニコンF3AFは除く)]カメラと組み合わせます
と、オートフォーカス撮影が可能です。マニュアル(手動)によるピント合わせもできます。
また、被写体までの距離情報をカメラボディ側に伝達する機能を備え、3D測光機能を持っ
たカメラとの組み合わせ時により的確な露出制御を実現する3Dマルチパターン測光・3DマルチBL調光を可能とします。
このレンズの特徴として、…
‥ニコン独自のDC(Defocus-imageControk)機能により主要被写体をシャープに保ったま
ま前後のボケ味を変えることができます。
‥円形に近い形状の絞り羽根を採用しているため自然なボケ形状が得られます。
‥ピント合わせはレンズ部の後群のみを移動するリア・フォーカス方式を採用しているた
め無限遠(∞)から短い撮影距離まで良好な描写が得られます。また、ピント合わせの際に
全長が変わらないため操作性が良く、AF動作も迅速に行えます。
‥通常のポートレート撮影にも適しています。また、内蔵ねじ込み式フード等、便利さも
十分考慮されています。
⑭ねじ込み式内蔵フード:使用法は10ペー
ジをご参照ください。
⑮ファインダー内直読用絞り目盛
⑯最小絞りロックレバー
絞り目盛
17
18
A-M切換え指標
19
距離目盛窓
20
距離目盛
21
距離リング
22
DCリング指標
23
DCリング:ボケ味のコントロールに使用
します。(8ページをご参照ください。)
24
DCリング用絞り目盛:8ページをご参照
ください。
54 76
98
ピント合わせ
このレンズはA-M切り換え方式となっております。
ニコンAF(オートフォーカス)カメラとの組み合わせでオートフォーカス撮影を行う場合
は、A-M 切換え解除ボタンを押しながらA-M 切換えリングを回転し、A-M 切り換え指
標をAの位置にセットしてからご使用ください。
マニュアルでピント合わせを行う場合はA-M 切り換え解除ボタンを押しながらA-M切り換
えリングを回転させ、A-M切り換え指標をMの位置にセットしてご使用ください。
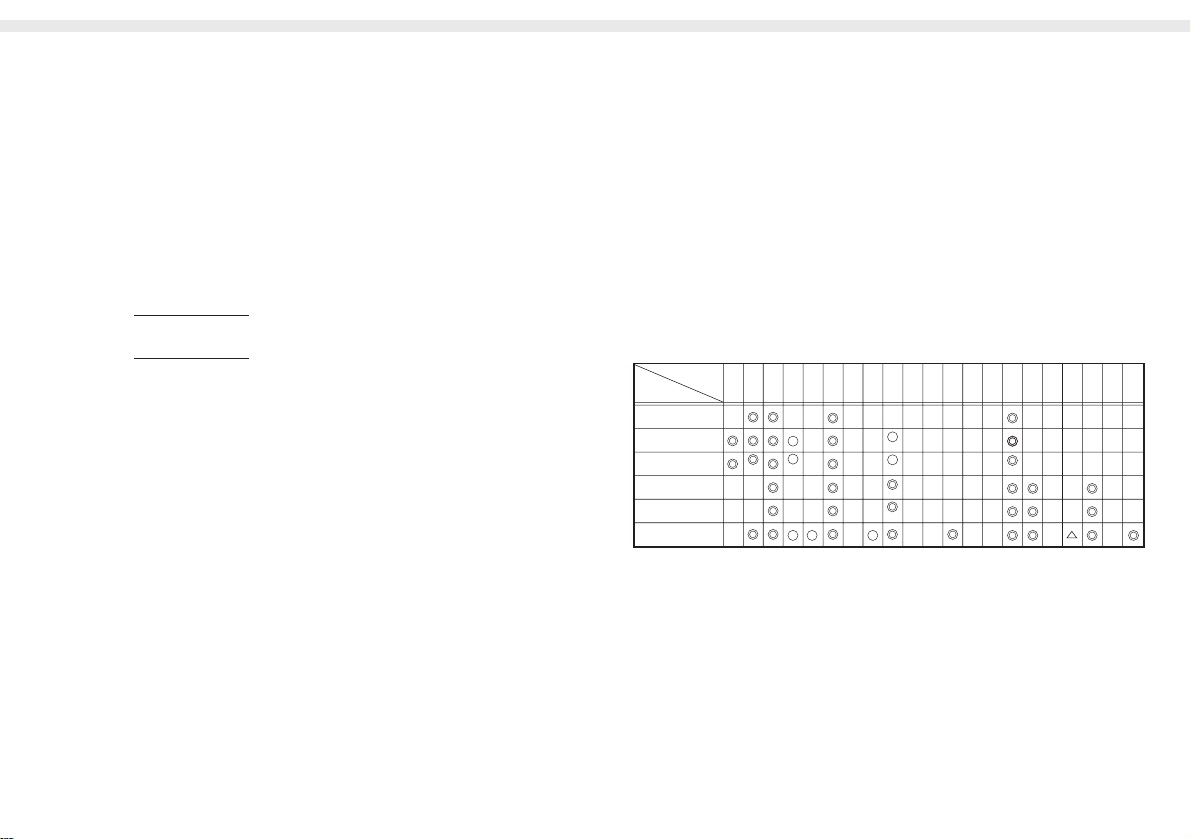
ファインダースクリーンとの組み合わせ
ニコンF6,F5,F4、F3シリーズカメラボディには多種類のファインダースクリー
ンがあります。レンズのタイプや撮影条件に合わせてご使用ください。このレ
ンズに適したファインダースクリーンは表のとおりです。(なお、ご使用に際し
ては必ず各カメラボディの使用説明書を併せてご参照ください)。
■構図の決定やピンと合わせの目的には
◎:最適です。
○:視野の一部が多少見にくくなりますが使用できます。
△:スプリットの合致像は見えますが、ピント合わせは制度上適しません。
():中央部重点測光時の補正値です。
F6カメラの場合、測光値の補正は、カメラのカスタムメニュー「b6:スクリーン補正」を「BorE
以外」にセットして行ないます。B型およびE型以外を使用する場合は、補正量が0でも、「BorE外」
にセットしてください。 F5カメラの場合は、カスタムセッティングNo.18の設定で測光値の補正
を行ないます。F4シリーズカメラの場合は、ファインダースクリーン露出補正ダイヤルを回して補
正を行います。
詳しくはカメラの使用説明書をご覧ください。
空欄:使用不適当です。
ただし、Mスクリーンの場合、撮影倍率 1/1 倍以上の近接撮影に用いられるため、この限
りではありません。
上記以外のカメラでB2/B3、E2/E3、K2/K3スクリーンをご使用の場合は、それぞれB、E、Kス
クリーンの欄をご覧ください。
カメラ
F6
F5(DP-30付き)
F5(DA-30付き)
F4(DP-20付き)
F4(DA-20付き)
F3
スクリーン
EC-B/
EC-E
A/L B C D E G1 G2 G3 G4 H1H2H3H4 JK/PM R TFU
(
+0.5
)(
+0.5
)
(
+0.5
)
(
+1.0
)
(
-1.0
)
(
-1.0
)
(
+0.5
)
注 記
・CPU 信号接点はニコン AF(オートフォーカス)カメラボディとの電気伝達を行うため
のものです。汚れたり、キズがついたりしますと、オートフォーカス作動不良の原因と
なります。特にカメラボディ着脱の際にはご注意ください。
・下記のアクセサリーは、このレンズに直接取り付けないでください。取り付けますと
CPU信号接点を破損します。
オート接写リングPK-1・PK-11、K-1リング、オートリングBR-4・BR-2・K2
(なお、PK-11
の代わりには
PK-11A、オートリングBR-4にはBR-6、BR-2にはBR-2A
をご使用ください。)
・DX-1ファインダー(ニコンF3AF用)と組み合わせてのご使用はできません。
DCリングの使用方法
被写隊に対して後方のボケ味を強調する場合は、
‥DCリングロック解除ボタンを押しながら、R(リア)側にDCリングを回転させます。
被写体に対して前方のボケ味を強調する場合は、
‥DCリングロック解除ボタンを押しながらF(フロント)側にDCリングを回転させます。
被写体をシャープに保ったまま最大にボケ味をきれいにするには、DC リングの絞り値をレ
ンズの絞り値と同じにセットします。
また、DC リングを絞り値の数値より大きな数値にセットすることによりソフトフォーカス
的な使い方もできます。(4ページの作例写真を参照ください。)
(
この場合は、オートフォーカスは使わずに、ファインダーのマット面でピントを合わせ
てください。)
●DCリングのセットはピント合わせの前に行ってください。
ピントを合わせた後、DCリングをセット(回転)させますとピントがズレてしまいます。
ズレた場合は再度ピント合わせを行ってください。(フォーカスロック中に行った場合も
ピントはズレますのでご注意ください。)
●このレンズは、DC リングの目盛を標準(F側の2とR側の2の中央)に合わせた場合に最大
の解像力を発揮します。また、DC リングを回転させることにより距離目盛とピントの
位置にズレが生じますのでご注意ください。DC 機能使用時は、距離リングが無限遠目
盛(∞)の位置を越えて回転するようになっています。なお、最短撮影距離は DC リングの
設定によっては1.1mより大きくなる場合があります。
●DC(ボケ味のコントロール)の効果は被写体の条件(被写体と背景や前景の距離との組
み合わせ等)によって異ります。
●ファインダー内ではDCの効果を確認することが困難なため、試し取りを行ってからご
自分の好みでご使用ください。

1110
最小絞りロックレバー(図B参照)
プログラム撮影時や、シャッター優先による撮影時は、絞りリングを最小絞り目盛り(オ
レンジ色)で固定しておくことができます。最小絞り目盛でロックする場合には、まずレ
ンズの絞りリングを最小絞り目盛り(16)まで回転させます。次に最小絞りロックレバーを搾
りリングの方向にスライドさせます。このとき最小絞りロックレバーの白色の指標と鏡筒
上のオレンジ色の線が合う位置まで確実にスライドさせてください。ロックを解除すると
きは、ロックするときと反対方向に止まるまで最小絞りロックレバーをスライドさせます。
内蔵フードの使い方(図C)
内蔵レンズフードを使用する場合はレンズ前方に向かって引きだし、反時計方向に止まる
まで回して固定してください。フードを収納する場合は時計方向に回して元の位置に戻し
て収納してください。
レンズ取り扱い上のご注意
●レンズの清掃は、むやみに拭かないで、ホコリを拭う程度にしてください。万一指紋が
ついたときは、柔らかい清潔な木綿の布に市販のレンズクリーナーを少量湿らせ、中心
から外側へ渦巻状に、拭きムラ、拭き残りのないよう注意して、軽く拭いてください。
●レンズ表面の汚れや傷を防ぐために、NCフィルターの使用をおすすめします。レンズ
の保護には、フードも役立ちます。
●レンズをご使用にならないときは、レンズの前後に必ず付属のレンズキャップをしてお
いてください。
●長期間レンズをお使いにならないときや保管の際は、カビまたはサビを防ぐため、高温
多湿の所や直射日光のあたる所、また、ナフタリンや樟脳のある所は避けて風通しのよ
い場所に保管してください。
●レンズを水に落したり濡らしたりすると部品がサビつくなどして故障の原因となります。
当社サービス機関に点検、修理を依頼してください。
●このレンズは、外観の一部に強化プラスチックを使用していますが、極端に温度が高く
なると変形する場合があります。ストーブの前等、高熱となる場所は避けてください。
シンナーやベンジンなどの有機溶剤をレンズ
の清浄に使用しないこと
火災や健康障害の原因となります。
製品を破損します。
使用禁止
:135mm
:1:2
:6群7枚(+保護ガラス1枚)
:18°
:∞〜1.1m、4ft.(併記)
:カメラボディへの撮影距離情報出力可能
:2〜16ファインダー内直読用絞り目盛併記
:ロックレバーによりf/16にロック可能
:自動絞り
:CPU・AI方式のカメラボディでは開放測光、従来方式のカ
メラボディでは絞り込み測光
:ニコンFマウント
:72mm(P=0.75mm)
:約79mm(最大径)×120mm(長さ:バヨネット基準面からレ
ンズ先端まで)、全長128mm
:約815g
仕様
焦点距離
最大口径比
レンズ 構成
画角
距 離目盛
距離情報
絞り目盛
最小絞りロック
絞り方式
測光方式
マウント
アタッチメントサイズ
大きさ
質 量(重さ)
別売りアクセサリー
72mmねじ込み式フィルター
ハードケース CL-38

1312
CONTROLLING DEFOCUS IMAGE–MAKING IMAGE BLUR
While pushing the DC ring lock release button, rotate the DC ring toward the R
(rear)
side to blur the
background, or toward the F (front) side to blue the
foreground (see illust. A). To effectively blur background or foreground images.
turn the DC ring so the f-number on the DC ring (aligned to the DC ring index) is
same as the aperture in use. Turning the ring beyond the aperture in use lets you
create a soft-focus effect. See photos on page 4.(In thes case, do not use the
autofocus and focus manually using the clear matte field in the viewfinder.)
• Defocus control should always be performed before focusing. If you rotate the
DC ring after focusing, or during focus lock in autofocus photography, your
subject will be out of focus.
•
With the DC ring at either the F or R side, the distance scale may not show the
correct distance.
• The effect of defocus image control depends on subject conditions such as
subject-to-background distance, subject
-to-
foreground distance, etc.
• Image blur cannot be verified through the viewfinder. To obtain the desired
effect, take a series of shots with the DC ring at various settings.
FOCUSING
This lens can be used for both autofocus and manual focus.
To select autofocus, while pressing the A-M ring lock release button, turn the AM ring so that “A” aligns with the A-M index. Also, set the camera’s focus mode
selector to autofocus position.
To select manual, turn the A-M ring so “M” aligns with the A-M index. Also, set
the camera’s focus mode selector for manual focus.
• With a Nikon autofocus camera, improperly setting the camera’s focus mode
selector and lens’ A-M ring may damage the camera body.
NOMENCLATURE
Meter coupling ridge Built-in lens hood: See page 14.
CPU contacts Aperture-direct-readout scale
Aperture indexing post Minimum aperture lock lever
EE servo coupling post Aperture scale
Aperture ring A-M index
Aperture index/Mounting index Distance scale window
Depth-of-field indicators: Show Distance scale
Depth of field at f/16. Focusing ring
Infrared compensation index DC ring index
(white dot) DC ring:Turn toward “R” side to
A-M ring lock release button blur the background or toward
A-M ring “F” side to blur foreground.See
Distance index page 13.
Lens barrel Aperture scale for image blur
DC ring lock release button:Push control:See page 13.
to turn DC ring
Thank you for purchasing the AF DC-Nikkor 135mm f/2 D lens.
Features of this lens are:
•
Nikon’s DC (Defocus image Control) enables you to defocus the background or
foreground.
•
Rounded diaphragm opening makes out-of-focus elements appear more
natural.
• Thanks to Nikon’s Rear Focusing (RF) system, the rear lens elements move inside
the lens while focusing, so there is no increase in the overall length of the lens.
This also provides quicker AF operation and improved durability.
• Built-in lens hood minimizes flare when shooting in bright sunlight.
• Distance information used for 3D Matrix Metering or the 3D Multi-Sendor Balanced
Fill-Flash will be transmitted instantly from the lens to the camera body.
Before using your new lens, read this manual carefully so you get the maximum
value from your lens now and for years to come.
Important!
• Be careful not to soil or demage the CPU contacts.
• Do not attach the following accessories directly to the lens; they could damage
the lens CPU contacts;
Auto Extension Ring PK-1, Auto Extension Ring PK-11, K1, Ring, Auto Ring
BR-4, Macro Adapter Ring BR-2 or K2 Ring.
(Use PK-11A instead of PK-11, BR-6 instead of BR-4, BR-2A instead of BR-2.)
• This lens cannot be used with AF finder DX-1(for the Nikon F3AF)
1514
RECOMMENDED FOCUSING SCREEN
Various interchangeable focusing screens are available for Nikon cameras to suit
any type os lens or picture-taking situation. Those which are recommended for use
with your lens are listed below.
For determining the frame type and focusing
F6
F5
with DP-30
F5
with DA-30
F4
with DP-20
F4
with DA-20
F3
Camera
Screen
◎=
○=
△=
()
=
I
deal
Can be used even though part of the view is a little hard to see
Split image focusing is possible. but focusing is inaccurate
Correction value for center-weighted metering
When using the F6, you can correct the exposure value by setting “b6: Screen
Conpensation” to “Except for B and E” in the Customize menu.
When using a camera model othre than B or E. set this to “Except for B and E”
regardiess of whether the correction weight is set to “0” When using the F5.set the
compensation for the exposure value in custom setting number 18. When using a
camera from the F4 series, turn the exposure adjustment diat for the finder screen to
set the compensation.
For details, reter to the instruction manual for the camera you are using.
Blank=Unsuitable
However, when using the M screen, this value is not used in order to allow you to use
a rate of 1 to 1 or higher for close-up photography.
When using a camera other than one listed above with a B2/B3, E2/E3, or K2/K3 screen
refer to the B, E, or K column respectively.
MINIMUM APERTURE LOCK
For Programmed auto or Shutter-priority auto exposure shooting. use the
minimum aperture lock lever to lock the lens aperture at f/16.
1. Turn the aperture ring so that f/16 on the aperture scale is alignae with the white
aperuture indes dot.
2. Slide the lock lever in the direction of the aperuture ring so the white dot on the
lever aligns with the orange dot (Illust. B).
To release the lock, slide the lever in reverse direction.
USING BUILT-IN LENS HOOD
Pull out the hood and turn it counterclockwise for two rotations (see Illst. C). To
store, turn the hood clodkwise and push back.
LENS CARE
• Clean lens suface with a blower brush. To remove dirt and smudges, use a
soft, clean cotton cloth or lens tissue moistened with ethanol (alcohol) or lens
cleaner. Wipe in a circular motion from center to outer edge, taking care not to
leave traces and not to touch the other lens parts.
• Never use thinner or benzine to clean the lens.
•
To protect the lens surface from dirt or damege, use of an NC filter is
recommended at all times. The lens hood also heope protect the lens.
• Cover lens with lens cap when lens is not in use.
• Attach both front and rear caps when the lens is stored separately.
• If you will not use the lens for a long time, protect it from rust and mold by
storing it in a cool, dry place. Also, do not store in direct sunlight, and keep it
away from naphthalene or camphor.
• Be careful not to get the lens wet or drop it in water. Water on the lens may
cause malfunction.
• Reinforced plastic is used on the exterior of the lens unit; to avoid damage,
take extra care to never leave the lens in an excessively hot place.
SPECIFICATIONS
Focal length:
Maximum aperture:
Lens construction:
Picture angle:
Distance scale:
Distance imformation:
Aperture scale:
Minimum aperture lock:
Diaphragm:
Focusing:
Exposure measurement:
Mount:
Attachment size:
Dimensions:
Weight:
135mm
f/2
7 elements in 6 groups (plus built-in rear glass plate
for dust protection)
18°
Graduated in meters and feet from 1.1m (4 ft.) to
infinity (∞)
Output into camera body
f/2 to f/16 on both standard and aperture-directreadout scales
Provided
Fully automatic
Nikon Rear Focusing (RF) system
Via full-aperture method for Al cameras or cameras
with CPU interface system; via stop-down method for
other cameras
Nikon bayonet mount
72mm(P=0.75mm)
Approx, 79mm dia. x 120mm extension from the
camera’s lens mounting flenge; overall length is
approx. 128mm
Approx. 815g
OPTIONAL ACCESSORIES
72mm screw – in filters
Hard lens case CL-38
EC-B/
EC-E
A/L B C D E G1 G2 G3 G4 H1H2H3H4 J K/PM R TFU
(
+0.5
)(
+0.5
)
(
+0.5
)
(
+1.0
)
(
-1.0
)
(
-1.0
)
(
+0.5
)

1716
BEZEICHNUNG DER TEILE UND BEDIENUNGSELEMENTE
Steuerkurve
CPU
-
Kontakte
Anschlag für Blendenkupplung
Kupplungsstift für automatische
Blendensteuerung
Blendenring
Blenden-/Montageindex
Schärfentiefenanzeige
(für Blende 16)
Infrarot–Kompensationsindex
(weißer Punkt)
Entriegelungstaste des A-M Ringes
A-M-Ring
Entfernungsindex
Objectivtubus
DC-Ring-Entriegelungstaste:
Drücken, damit der DC-Ring
gedreht werden kann.
Eingebaute Gegenlichtblende:Skala
Seote 19.
Skala für direkte Blendenablesung
Hebel für Verriegelung für kleinste
Blende
Blendenskala
A-M-Index
Entfernungsskalenfenster
Entfernungsskala
Einstellring
DC-Ring-index
DC-Ring: Drehen Sie diesen Ring in
Richtung “R”, um den Hintergrund,
und in Richtung “F”, um den
Vordergrund unscharf abzubilden.
Siehe Seite 17.
Blendenskala zur Steuerung der
Bildunschärfe:Siehe Seite 17.
Wir danken Ihnen für das Vertrauen, das Sie uns mit dem Kauf des AF DCNikkors 135mm f/2 D erwiesen haben.
Dieses Objektiv zeichnet sich durch die folgenden Besonderheiten aus;
•
Die Nikon Defocus Image Control (DC), eine Art “Ucschärfenstenerung”, die
eine gezielte Beeinflussung der Schärfe im Vorder-und Hintergrund gestattet.
•
Eine Kreisförmige Biendenöffnung, die entscheidend zur harmonischen
Bildstruktur im Unschärfenbereich beitâgt.
•
Nikon Innenfokussierung, die konstante Baulänge, schnelleren AF-Betrieb und
kompakte Bauweise ermöglicht.
•
Eine eingebaute Gegenlichtblende zur wirksamen Abschirmung gegen
seitliches Streulicht.
•
D-Charakteristik zur Nutzung der 3D-Matrixmessung bzw. des 3D-Multi-
Sensor-Aufhellblizes.
Bitte lesen Sie diese Anleitung vor Benutzung des Objektivs aufmerksam durch,
damit Sie mit all seinen Funktionen voll vertraut sind.
Wichtig!
•
Sorgen Sie dafür, daß die AF-Kontakte unter kainen Umstäden verschmutzen
oder beschädigt werden.
•
Setzen Sie bitte folgendes Zubehör nicht an des Objektiv an, da es die AFKontakte beschädigen könnte; Die Automatik-Zwischenringe PK-1 und PK-11, die
Zwischenringe K1 und K2, den Automatikring BR-4 und den Umkehrring BR-2.
(Verwenden Sie PK-11A statt PK-11, BR-6 statt BR-4 und BR-2A statt BR-2).
•
Dieses Objektiv kann nicht mit dem Sudner DX-1 (der Nikon F3AF) verwendet
werden.
BEEINFLUSSUNG DER VORDER- UND HINTERGRUNDUNSCHÄRFE
Drehen Sie den DC-Ring unter Druk auf seine Entriegelung in Richtung R (Rear)
zur Verstärkung der Unschärfe im Hintergrund bzw. nach F (Front) zur
Verstärkung der Unschärfe im Vordergrund (siehe Abb. A). Die Blendeneinstellung
am DC-Ring sollte jener am Blendenring entsprechen. Wird der DC-Ring über die
Arbeitsöffung hinaus gedreht, ergibt sich ein zunehmend stärkerer
Weichzeichuungseffekt. Siehe Abbildungen auf Seite 4. (Arbeiten Sie in einem
solchen Fall nicht mit Autofokus, sondern stellen von Hand mit der
Mattscheibe im Sucher schart.)
•
Die Einstellung des DC-Rings sollte grundsätzlich vor der Scharfeinstellung
erfolgen, da das Hauptobjekt sonst unschart abgebildet werden kann.
•
Solange sich der DC-Ring nicht in Nullstellung befindet, zaigt die
Entfernungsskala nicht den richtigen Aufnahmeabstand.
• Es versteht sich, daß die Beeinflussung der Unschärfe von Faktoren wie dem
Abstand zwischen Objekt und Hintergrund bzw. Vordergrund abhängt.
• Eine Beurteilung der Schärfenverschiebung im Sucher ist nicht möglich. Es
empfiehit sich, mehrere Aufnahmen mit unterschiedlicher Einstellung des DCRings zu machen.
SCHARFEINSTELLUNG
Dieses Objektiv kann mit automatischer (Autofokus) und manueller Scharfeinstellung benutzt werden.
Um auf Autofokusbetrieb zu schalten, drücken Sie die Entriegelungstaste des
A-M-Ringes und drehen diesen Ring gleichzeitig so weit, daß das “A” dem A-MIndex gegenübersteht. Stellen Sie gleichfalls den Fokussier-Betriebsartenwähler
der Kamera aut Autofokus-Position.
Für die manuelle Scharfeinstellung stellen Sie den A-M-Ring auf “M”, so daß
das “M” auf den A-M-Index ausgerichtet ist. Auch der FokussierBetriebsertenwähler der Kamera ist auf “M” zu setzen.
• Durch die nicht korrekte Einstellung des Fokussier-Betriebsartenwählers der
Kamera und des A-M-Objektivringes kann bei einer Nikon-Autofokus-Kamera
das Kameragehäuse beschädigt werden.
 Loading...