

Page 1
Nikon
NIKONOS
Speedlight
·58-104
Page 2
FOREWORD
Thank you for purchasing the
Nikonos Speedlight
Speedlight
underwater photography and can
used with the Nikonos
as the Nikonos V and Nikonos
When used with the Nikonos RS,
it will allow you to take flash pictures
at depths of
(328 feet).
is
up
S8-1 04. This
specially designed for
RS,
as well
IVA
to 100 meters
be
Page 3
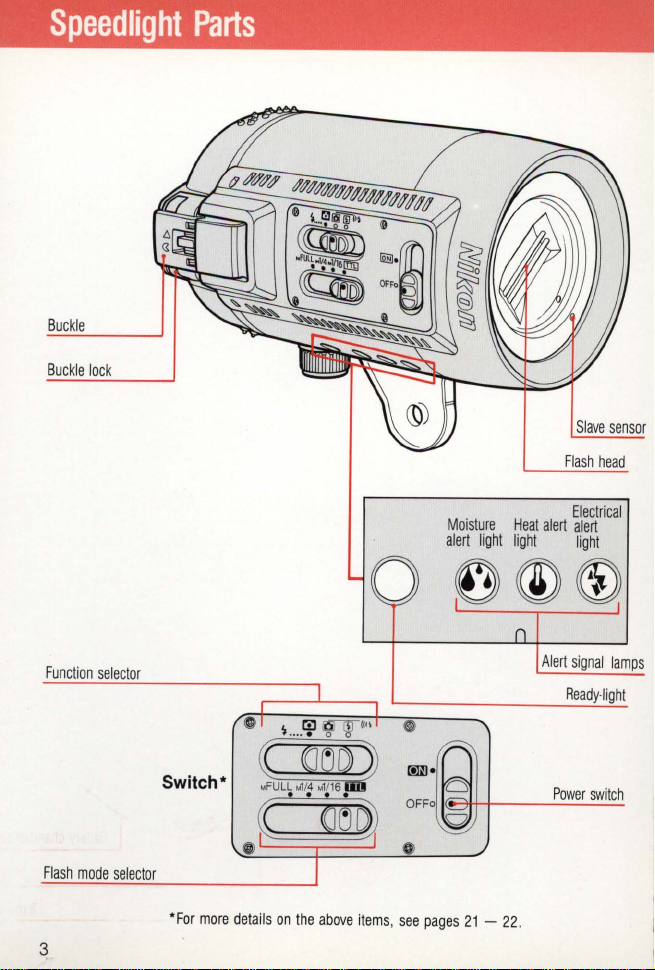
Speedlight
Buc
kle
Buc
kle
lock
Parts
Moisture
alert
light
Fun
Flash
3
ction
mode
selector
selecto
Switch·
r
'For
more
details
on
the
above
items, see
pages
21 -22
Power
switch
.
Page 4
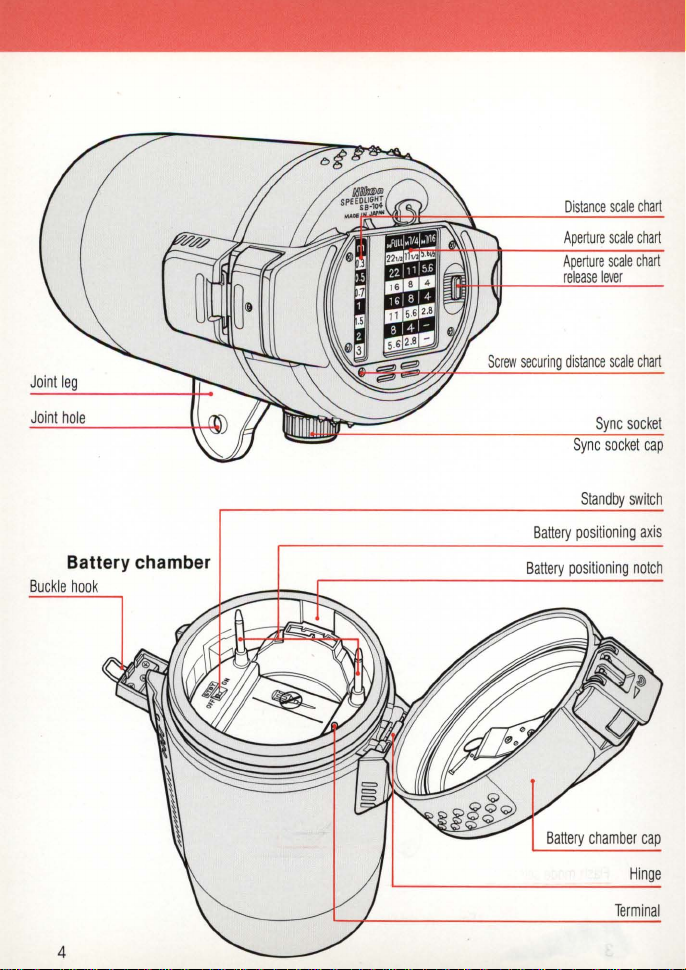
Joint leg
Joint
hole
Battery chamber
Buck
le
hook
Screw
Distance
Aperture
Aperture
release
securing
distance
Battery
Battery
scale
scale
scale
lever
scale
Sync
socket
Sync
socket
Standby
switch
positioning
positioning
chart
chart
chart
chart
cap
axis
notch
Battery
chamber
cap
Hinge
Terminal
4
Page 5
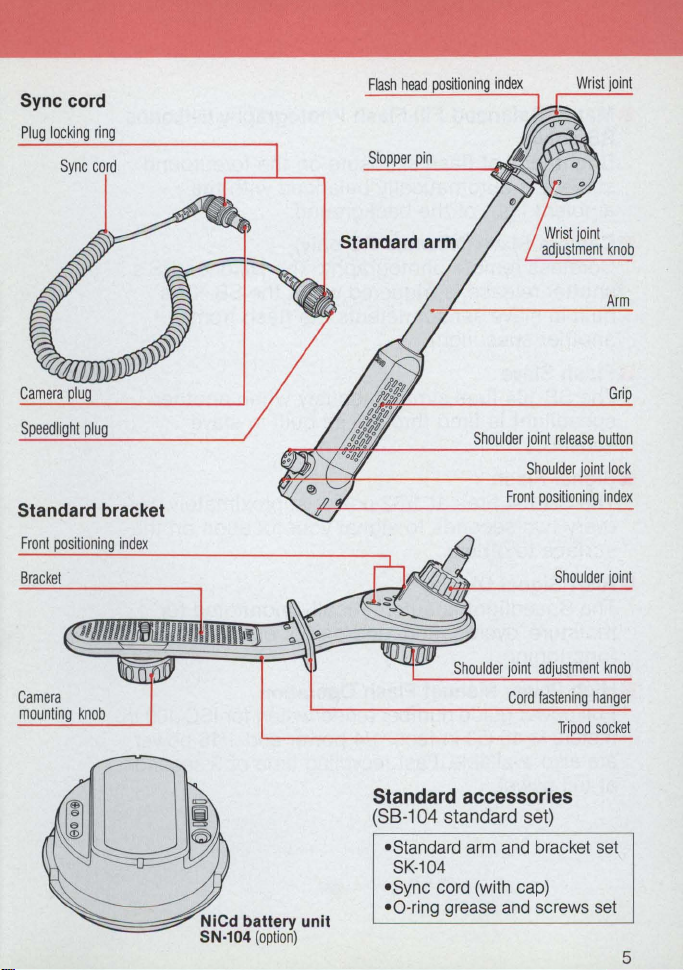
Sync cord
Plug
locking
ring
Sync
cord
Standard bracket
Front
Bracket
Flash
head
Stopper
positioning
pin
index
Shoulder
Front
Wrist
joint
release
Shoulder
positioning
Shoulder
joint
joint
Arm
Grip
button
lock
index
joint
Camera
mounting
knob
Cord
fastening
Standard
(S8-104 standard
-Standard arm and bracket set
SK
-Sync cord (with cap)
-O-ring grease and screws set
accessories
set)
-104
knob
hanger
5
Page 6
Main
Features
• Matrix
RS
Brightness
subject is automatically balanced with the
ambient light
•
Camera
Cordless remote photography. The Nikonos R8's
shutter release is triggered when the 8B·104's
built·in slave sensor detects the flash from
another speedlight.
•
Flash
The 8B·104 fires simultaneously when another
speed light is fired through its built·in slave
sensor.
•
Signal
The 8B·104 fires at 1/32 power approximately
every two seconds to signal your location on the
surface to others.
•
Alert
The 8peedlight is automatically monitored for
moisture, overheating, and proper electronic
functioning.
•
High
Full power guide number (underwater) for 180
meters is
are
at full
Balanced
Fill· Flash
Photography
(Nikonos
only)
of
flash exposure
of
Slave
(Nikonos
the background.
RS
on
the foreground
only)
Slave
Flash
Signal
Power
also available. Fast recycling time of 3 seconds
power.
Display
Manual
16
(53
in
Flash
feet).
Operation
1/4
power and
1/16
power
100
in
6
Page 7
This Instruction Manual
easy
for
the most of your Speedlight's potential.
reference.
Preparations
Taking
Basic
Taking
Details
Speedlight's
Basic
Pictures
Shooting/
Pictures
on
the
Parts
Applications
Other
Items
has
Use
this guide to
for
been
organized
learn
He
re
we
Speedlight
In
these
sections
photography
and
the
procedures
S8-104
are
This
section describes
light's various features, points to
checked,
This
section explains how
the
Speedlight's features
various results.
In
this
section,
accessaries, details
battery
and
as
follows
how
to
make
explain
with
explained.
and
how
to
get the
ready
for
taking
the
fundamentals
the
Nikonos
for
taking
pictures
the
other pertinent items.
we
describe
on
the
tips
on
S8-104
pictures.
of
RS
, V
Speed
to
to
obtain
optional
NiCd
care
flash
and
using
use
.
IV·A,
-
be
.----
~
Ir
the
.----
~
.----
'--
,....-
'--
• Important
e
Caution
+Note
Denotes
Denotes
mandatory
Denotes a useful
remembered
an
important
points
action
for
where
is
required
point
future
point.
caution
.
that
should
reference.
or
be
7
Page 8
Foreword
Speedlight
Main
About
ps
Ti
Checking
Removing
.........
Parts
Features
this
Manual
on
Speedlight
O-rings
and
. . . . . . . . . . . . . . . . . . . . . . . . . . . . . . . . . . . 6
Reseating O-rings ....
Preparations
Installing
Connecting
Function
Flash
Making
Mode
the
Battery . . . . . . . . . . . . . . . . . . . . . .
the
Settings . .....
Selector
Selector
.
.........
. . .
. . . . . . . . . . . . . . . . . . . . . . . . . . . . 7
Care ....
....
. . .
.........
for
Taking
SB-104
to
the
. . . . . . . . . . . . . . . . . . . . . . . . . . . . .
..
. ....
.................
. .... . . . . .
.. .. .. ..
Pictures
Camera
..
and
.....................
...................
.............
....
.
.....
......
. ,
......
... .. .. ...
..
14-22
. . .
2
3-5
10
11
12
15
17
21
22
8
Basic
Basic
Flash
Taking
Fbssible
and
Nikonos
Fbssible
and
Nikonos
Fbssible
and
Nikonos
Caring
for
Details
Standby
Alert
Signal
Reading
Shooting ......................
Photography
Pictures .........
Shooting
Shooting
Shooting
the
on
Switch
the
Modes
RS.
Modes
V . . . ......
IV-A
SB-104
the
. . . . . . . . . . . . . . . .
Lamps
Exposure
with
the
Nikonos
..
...
.. .. .. ..
with
the
SB-104
. . . . . . . .
with
the
SB-104
Modes
with
the
SB-104
. .
After
Use
. . . . . . .
Speed
light's
..
Calculation
Parts
Chart ...............
RS
.. . ..........
... .. .
.
....
23-27
.........
......
..........
..........
. . . . . . . . . . .
.....
....
28-35
36-44
.
24
29
31
33
34
37
39
41
Page 9
Basic
Basic Tips
Camera Slave (Cordless Remote Photography) . . _
Flash Slave . . . . . . . . . . . . . . . . . . . . . . . . . . . . . . . .
Rear-Curtain Sync Photography ... .
Using the Flash Signal Function
Applications
on
Underwater Flash Photography
...
..........
.......
...
. .....
.
...
......
......
. . .....
. . .
.. ..
. . . 45-54
. . . 46
..
48
50
52
54
Other
Optional Accessories . . . . . . . . . . . . . . . . . . . .
Details
Tips
Specifications . . . . . . . . . . . . . . . . . . . .
Items
on
on
SB-104 Care . . . . .
....
NiCd Battery Unit SN-104
.
..............
................
......
. . . . .
55-68
...
...
56
62
. 64
. 68
9
Page 10
Tips
Be
-When taking important photographs with the SB-104 or
on
Speedlight
sure
to
take
trial
using it again after a long period of disuse, be sure to take
one or more trial shots first to be sure it
Care
shots
first
. . .
is
working properly.
Have
regularly
-Because the Speedlight
Using
-Use
Do
-Since the SB-104
Nikon
spot
check
your
Speedlight
. ..
is
a precision instrument, we
recommend taking your Speedlight to a Nikon service
center once every year or two to have
to have it overhauled every three to five years.
-
We
recommend this service especially if the Speedlight
for commercial applications .
- Once water gets inside the plastic case or the battery has decayed,
be sure to have your Speedlight spot checked, or it may emit a
flammable gas.
the
Speed/ight
only Nikon products with this Speedlight, since the
SB-104 has been designed for use with specialized Nikon
camera and lens accessories. The Speedlight may become
damaged if
manufacturers.
not
not to fire the unit directly
eyes.
fire
you
attempt to use it with products of other
toward
is
safely ...
eyes
a high-power output flash unit,
at
or
it
spot checked, and
is
in
the vicinity of human
being used
be
sure
10
Page 11
Checking
•
Be
sure
This Speedlight uses O-rings to ensure that it
sealed and water-proofed. If dust or damage
the O-rings, water will leak into the Speedlight and cause
damage. It is important to check
lubricate them before use .
•
O-ring
O-rings
to
check
areas
to
the
check
O-rings
before
-
Two
sync cord
use.
all
the O-rings and
O-rings
on
·
~H.---O-ring
is
well
is
found
body, O-ring channel,
and contact area
on
on
the main
between battery
chamber cap and
main body
-Sync socket cap
O-ring, and contact area between
sync socket and
main body.
11
Page 12
Removing
and
Reseating
O-rings
Remove the
1
channels.
-Use
S8-
104
remove O-rings.
Do
not use metal items with sharp edges
that may damage the O-rings.
Check the O
2
not damaged.
- Wipe the O-rings and O-ring channels
with a clean cloth or tissue, and check
them for any damage.
-Do
not
contains lint.
-If
O·ring channels
contact a
O-r
ings from the ir
a thin plastic card, such
's exposure calcu lation chart,
-ri
ngs to
use
a cloth or tissue which
are
Nikon
service
as
be sure they
damaged, please
center.
the
Apply lubricant to the O-rings.
3
-With
your fingertip, smear a small
amount of O-ring lubricant over the entire
surface of the O-rings.
-This
makes the O-rings slip more easily
into the O-ring channels.
too much lubricant to the surface of
the O-ring
a better seal, and can cause
unwanted build-up of excess
lubrication which will attract sand
and dirt.
as
this will not help make
Do
not apply
an
- Caution
e
Feel for any damage
applying the lubricant. If damage
replace the O·ring with a new one.
e
Take
care that lint, hair, or other foreign
matter does not remain
their channels.
e Use O-ring lubricant available from Nikon.
If a lubricant made
manufacturer
affect the O-ring and result
is
by
used,
on
another
it
the O-rings while
on
may adversely
is
the O-rings or
in
water leaks.
to
are
found,
12
Page 13
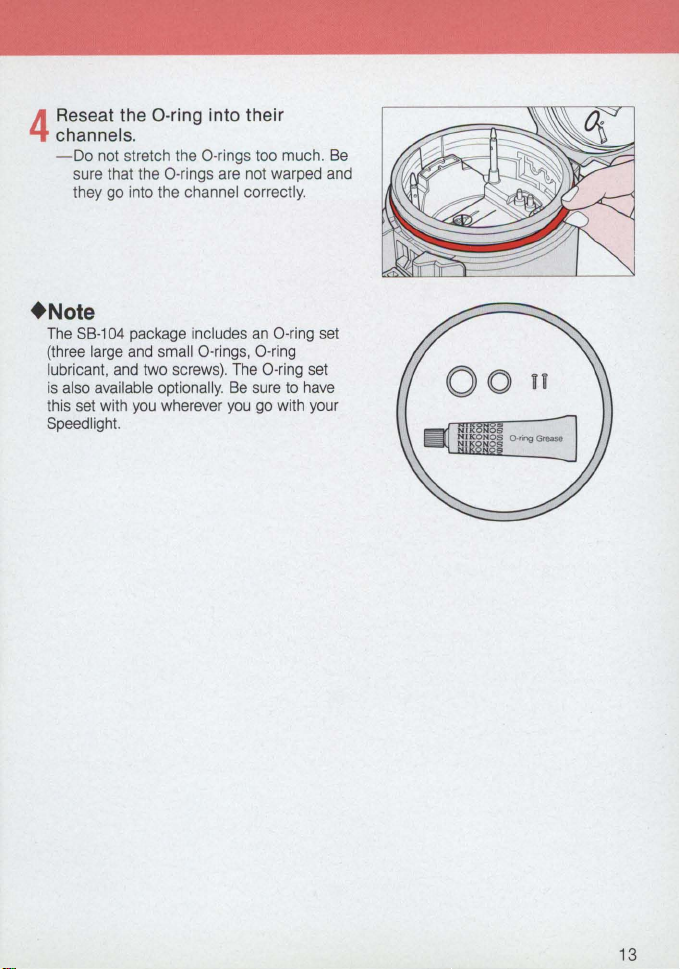
Reseat the O-
channels.
4
-Do
not stretch the O-rings too much .
sure that the O-rings are not warped and
they go into the channel correctly.
ring
into their
+Note
The 8B-104 package includes an O-ring set
(three large
lubricant, and two screws). The O-ring set
is also available optionally. Be
this set with you wherever
8peedlight.
an
d small O-rings, O-ring
you
su
re to h
go with your
Be
ave
13
Page 14
14
Page 15
• Important
. Only the NiCd battery unit
used with this Speedlight. Do not use any
other type of battery .
Be
sure to turn OFF the power of the
•
SB-104
•
• Refer to page 62 for details on the battery.
when replacing the battery .
Be
sure to recharge the
when using it for the first time or after
having stored it for three months or more.
-For
procedures
SN-104,
refer to the Instruction Manual
that came with the Quick Charger
-104
.
SH
so
Be sure al
Manual that came with the
unit.
to read the Instruction
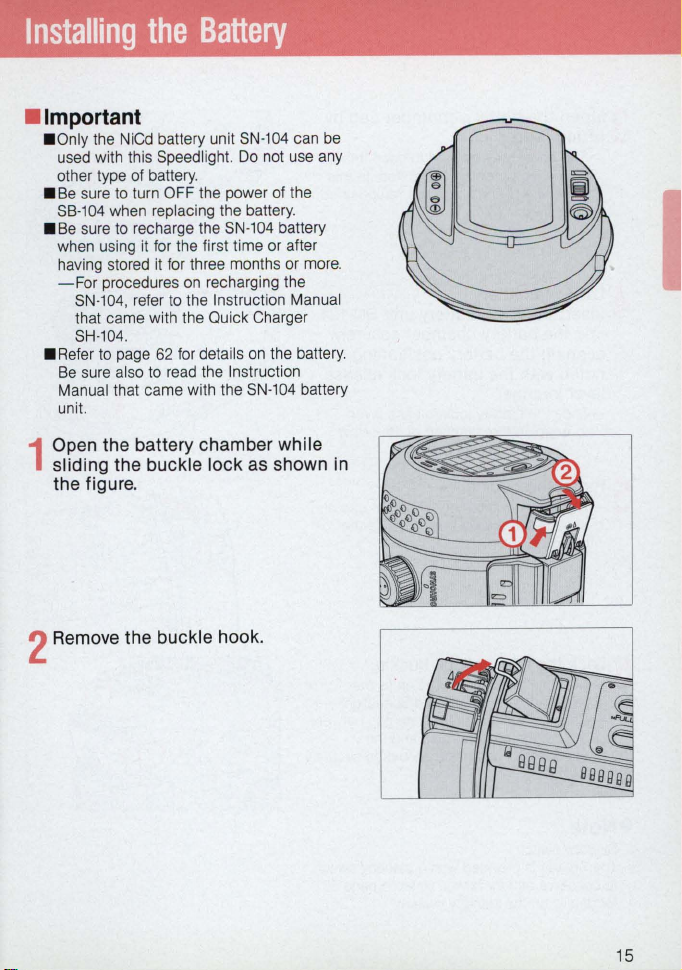
Open the battery chamber while
1
sliding the buckle lock as shown in
the figure.
SN-104
SN-104
on
recharging the
SN-104
can be
battery
2 Remove the buckle hook.
battery
15
Page 16
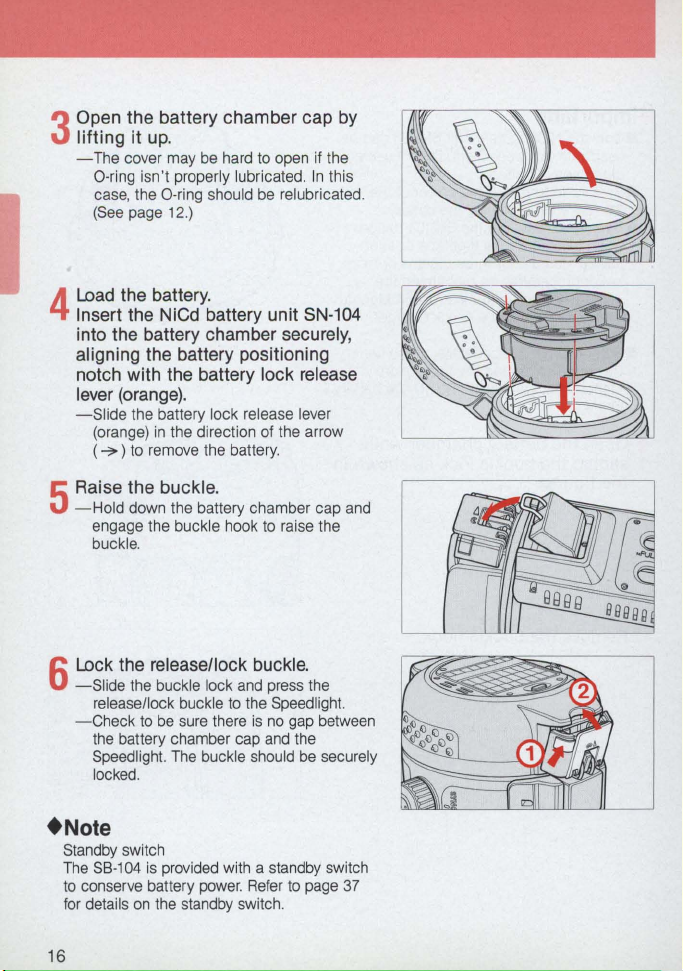
Open
the
lifting
3
-The
O·ring isn't properly lubricated.
case, the O-ring should be relubricated.
(See page
Load
4
Insert
into
aligning
notch
lever
-Slide
(orange) in the direction of the arrow
(
Raise
-Hold
5
engage the buckle hook to raise the
buckle.
Lock
6
-Slide
release/lock buckle to the Speedlight.
-Check
the battery chamber cap and the
Speedlight.
locked.
battery chamber
it
up.
cover may be hard to open if the
12
.)
the
battery.
the
NiCd
battery
the
battery
battery
chamber
positioning
the
battery
the
with
(orange).
the battery lock release lever
~
) to remove the battery.
the
buckle.
down the battery chamber cap and
the
releasellock
the buckle lock and press the
to
be sure there
The
buckle.
is
buckle should be securely
cap
unit
SN-104
securely,
lock
release
no
gap between
by
In
this
+Note
Standby switch
The
SB-104
to conserve battery
for
details
on
16
is
provided with a standby switch
power.
Refer
the standby switch.
to page
37
Page 17
Connecting
the
S8-104
to
• Important
. Be sure
• Check the a -rings and apply a small
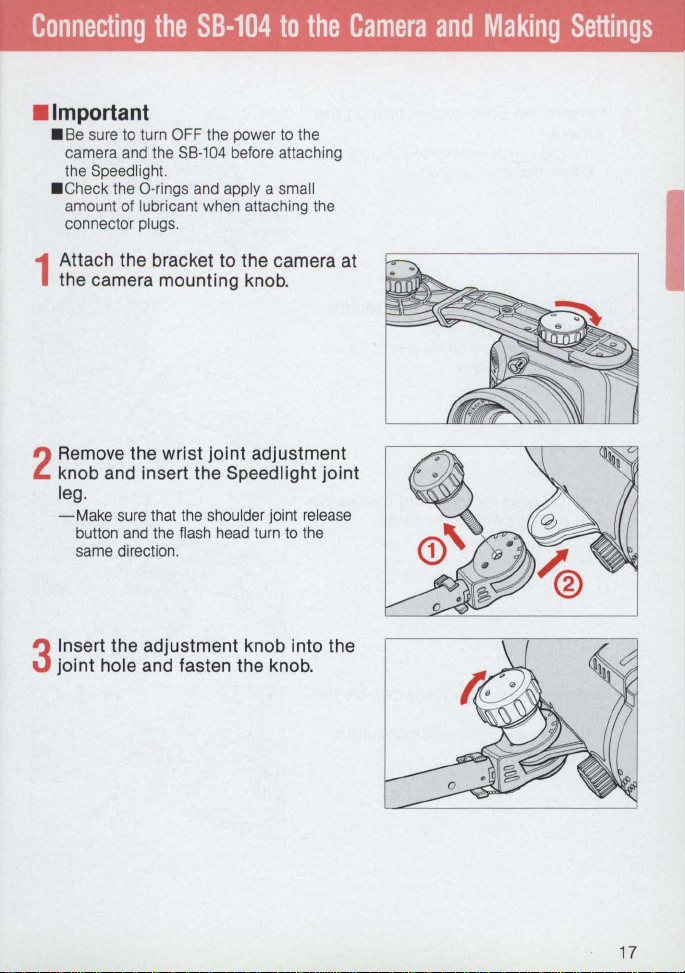
Attach the bracket to the camera at
the camera mounting knob.
1
to
camera and the 8B-104 before attaching
the 8peedlight .
amount of lubricant when attaching t
connector plugs.
turn OFF the power to the
the
Camera
he
and
Making
Settings
Remove the wrist
knob and insert the Speedlight
2
leg.
3
-Make
joint
sure th
button and the flash head turn to the
same direction.
Insert the adjustment knob into the
hole and fasten the knob.
joint
at the
shoulder joint relea
adjustment
joint
se
17
Page 18
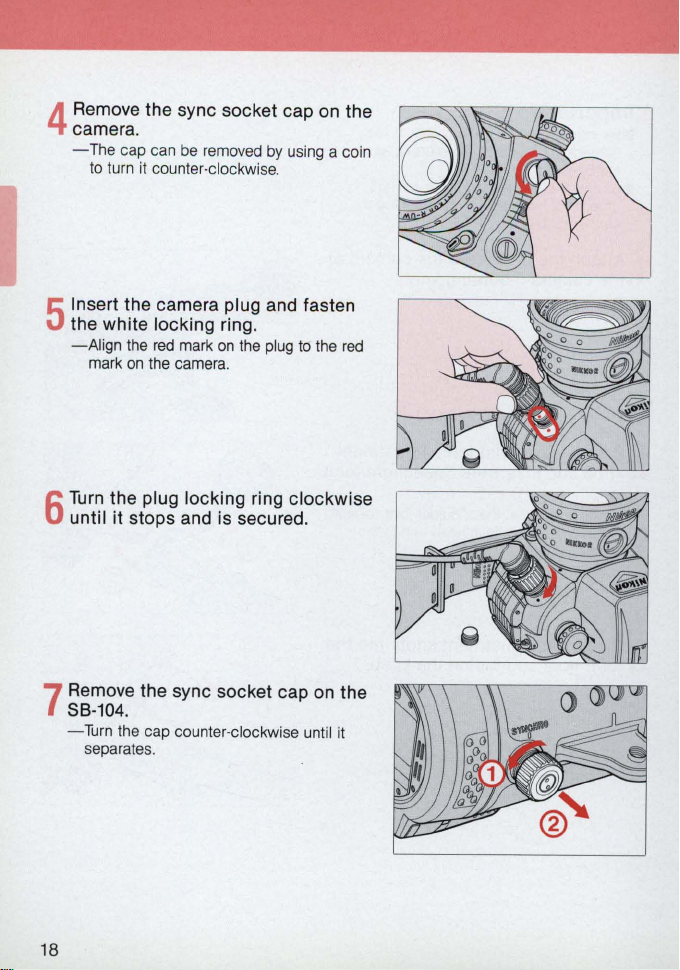
Remove the sync socket cap on the
4
camera.
-The
cap can
to
turn it counter·clockwise.
Insert the camera plug and fasten
the white locking ring.
5
- Align the
mark
Turn
6
the plug locking ring clockwise
until it stops and is secured.
red
on
the camera.
be
mark
removed
on
the
by
using a coin
plug
to
the
red
Remove the sync socket cap on the
7
S8
-104.
-
Turn
the cap counter-clockwise until it
separates.
18
Page 19
Insert
the
Speed
light
jOint
fasten
plug
ring.
on
the plug and
adjustment
in
the
direction
the
shoulder
8
9
fasten
-Align
the 88·104.
Turn
the
knob
on
of
the
the
black locking
the guide marks
shoulder
the
bracket
arrow
to
joint.
-Align
it
with the white positioning index on
the front.
Insert
the
arm
1 0
-Release
align the arm with the white positioning
index
.
the shoulder joint lock and
on
the front of the joint.
+Note
Cord
fasten
ing
This hanger secures the sync cord to the
bracket to keep it out of the way while
shooting.
attach
it
in
the illustration, then attach the sync cord
the hook.
hanger
To
use the cord fastening hanger,
to
the speedlight bracket
and
as
shown
to
19
Page 20
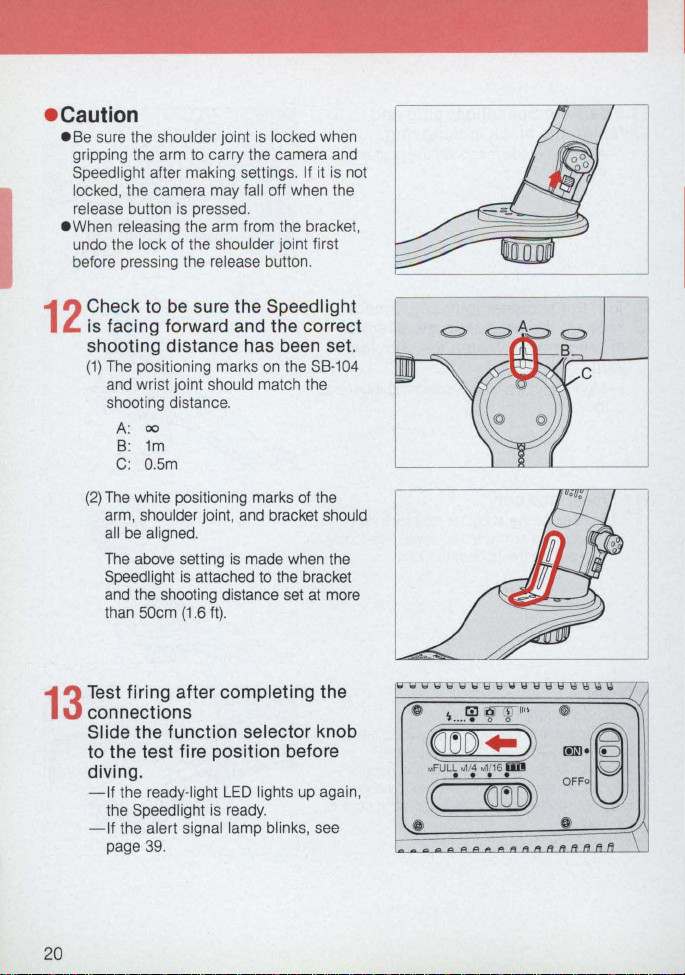
e Caution
_ Be sure the shoulder joint is locked when
gripping the arm to carry the camera and
8peedlight after making settings. If it is not
locked, the camera may fall off when the
release button is pressed.
-W
hen releasing the arm from the bracket,
undo the lock of the shoulder joint first
before pressing the release button .
Check to
is facing forward and the correct
12
shooting distance has been set.
(1)
The positioning marks on the 8B-104
and wrist joint should match the
shooting distance.
(2)
The white positioning marks of the
arm, shoulder joint, and bracket shou
all be aligned.
The above setting
Speedlight is attached to the bracket
and the shooting distance set at more
than
Test
connections
13
Slide the function selector knob
to the test fire position before
diving.
-If
the 8peedlight is ready.
-If
page 39 .
be
sure the Speed light
00
A:
B: 1m
C:
O.Sm
is
made when the
SOcm (1.6 ft).
firin.g after completing the
the ready-light LED lights up again,
the alert signal lamp blinks, see
ld
...
.............
•
•
""""",,
~
....
~
rr(U'
~
(]
~Q
..
MFULL
M1I4 M1I
16
db
. . . .
~rJ~
~
......
G
~
~
OFFo
Il
_."
..
,,'"
/
@
""""
\
20
Page 21
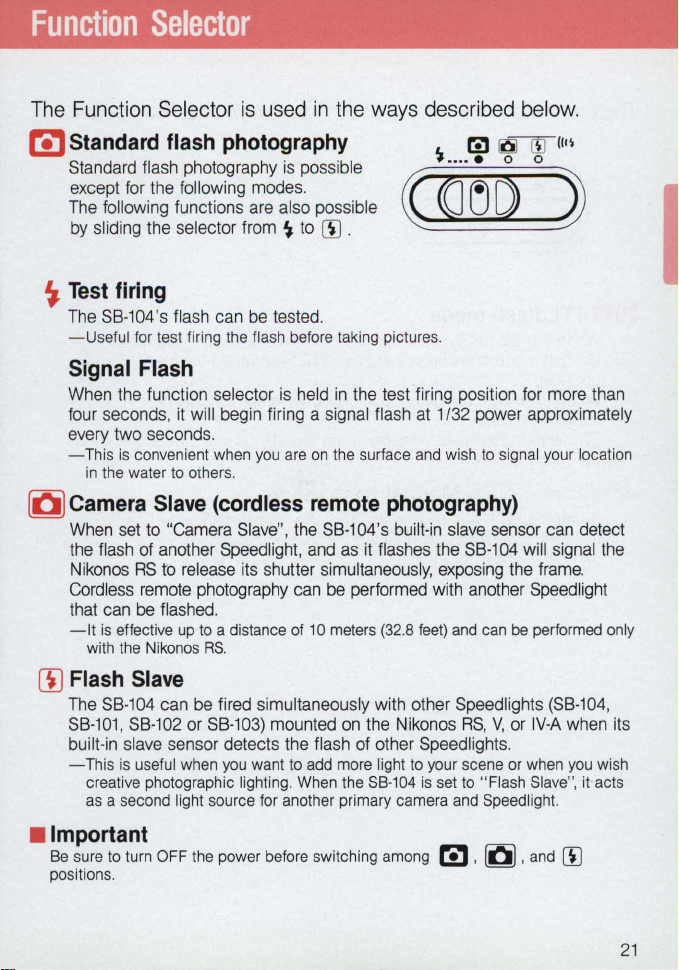
Function
Selector
The Function Selector
C!l
Standard
8tandard flash photography
except for the following modes.
The following functions are also possible
by sliding the selector from ~ to
~
Test
The 88-104's flash can be tested.
-Useful
Signal
When the function selector
four seconds, it will begin firing a signal flash at 1/32 power approximately
every two seconds.
-This
in the water to Others.
[0]
Camera
When set to "Camera 8lave", the 88-104's built-in slave sensor can detect
the flash of another 8peedlight, and
Nikonos
Cordless remote photography can
that can be flashed.
-It
is
with the Nikonos
(I)
Flash
The 88-104 can be fired simultaneously with other 8peedlights (88-104,
88-101,88-102 or 88-10
built-in slave sensor detects the flash of other 8peedlights.
-This
creative photographic lighting. When the
as
flash
firing
for test firing the flash before taking pictures.
Flash
is
convenient when you are
Slave
R8
to release its shutter simultaneously, exposing the frame.
effective
up
Slave
is useful when you want to add more light to your scene or when you wish
a second light source for another primary camera and Speedlight .
is
used
in
the ways described below.
photography
is
possible
11l
. .
is
held
in
the test firing position for more than
on
the surface and wish to signal your location
(cordless
to a distance of 10 meters (32.8
RS
.
3)
mounted
remote
photography)
as
it
flashes the 88-104 will signal the
be
performed with another 8peedlight
on
the Nikonos R8,
SB-104
L
..
~
~ W (,,~
r(
liD
(i)
~
feet)
is
[)\
'Sn
U!)
and can be performed only
V,
or
set to " Flash Slave
IV-A
J
.!)
when its
",
it acts
• Important
Be
sure to turn OFF the power before switching among
pOSitions
.
ril
,
[OJ
, and
11l
21
Page 22
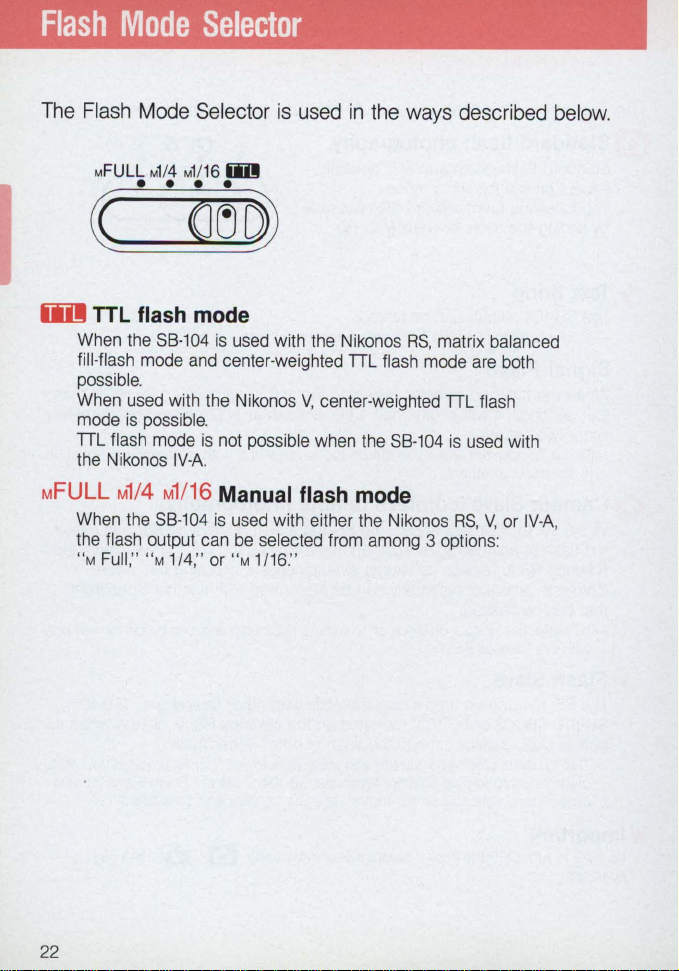
Flash
Mode
Selector
The Flash Mode Selector
MFULL
M1/4
M1I16
~
..
~6~
on
TTL flash mode
When the 88-104
fill-flash mode and center-weighted
possible.
When used with the Nikonos V, center-weighted
mode
is
possible.
TIL
flash mode
the Nikonos
MFULL
M1/4
When the 88-104
the flash output can be selected from among 3 options:
"M
Full,"
"M
is
IVA
M1/16
is
1
14
,"
or
is
is
used
in
the ways described below.
im
used with the Nikonos
not possible when the 88-
Manual flash mode
used with either the Nikonos R8, V, or
"M
1/16
."
R8,
TIL
flash mode are both
matrix balanced
TIL
flash
104
is
used with
IV-A,
22
Page 23

23
Page 24

Basic
Flash
Photography
with
the
Nikonos
RS
Flash photography with matrix balanced fill-flash operation
the Nikonos
mode to Aperture-Priority Auto Exposure
tion, the camera automatically balances the flash brightness
ground and the main subject.
Matrix Balanced Fill-Flash (Nikonos
Flash output falling
light background exposure automatically, producing more natural photographs.
The Matrix Meter reads five segments, analyzing brightness and contrast, then
determines the correct exposure. Set your preferred aperture, the camera will
automatically adjust shutter speed. The
light to provide for a precise balance with the predetermined background
exposure. As
automatically adjusts shutter speed and flash output to provide consistent
exposures.
The
1
ON
RS
you
Speedlight
.
and the
SB-104
will be explained
on
the foreground subject
change apertures for different depths of field the camera
's
standby
switch
RS
(A). In
only)
SB-104
is
in
matrix balanced fill-flash opera-
is
balanced with the ambient
is
automatically told how much
in
this section. Set exposure
OFF
combination with
in
both the back-
[
STBY
]
CiIl
ON
24
Page 25

Set the camera's sync mode to any
2
desired mode.
-When
The Speed light's function selector
is
3
The Speedlight's flash mode
4
selector
the sync mode switch is set
"Normal ", the shutter speed
between
is
controlled between 1/125 and 1 second.
set to "Standard
set
1/125 and 1
to
"Rear
is
set to
",
the shutter speed
."
TIL.
is
/30
second. When
to
controlled
is
it
o
• L..
rt'
n""
~(J~D
",FULL
101114 1011/
16
•
j)
po
:~
5 Power switch
is
ON.
~
....
rt'
•
•
fl""
~
~r:lQ
.FU
Li
011
:
.~16
((
~a[)
~"
......
~
jID
)
"''''RI'IRlilifi
•
. /
g'
l
OFFo
0
\
25
Page 26

Set the focus mode
RS
to
"
S"
6
-All
Nikon recommends using
servo autofocu
servo autofocus) mode.
or "C
focus modes can
on
the Nikonos
".
be
used. However,
"5
s)
or "C" (continuous
" (single
Set exposure mode
priority auto exposure
7
-Set
the aperture value so that the subject
distance
distance range.
is
within the flash
to
aperture-
(A).
shooting
26
Page 27

Pr
essing
the shutter release
slightly
8
Check the
r
ange
the
-If
the operation is controlled by center·
weighted
subject is taken at the correct exposure,
but if the electronic analog display
the plus side, the background exposure
will
on
sure will
no special background effects are
needed, the photograph can
is with correct exposure.
For
reset the aperture dial on the camera so
that the overexposure or underexposure
indicator goes out. Using the exposure
calculation chart (see page
the aperture value set is with
shooting distance range.
flash shooting distance
and
be
sure
the
(e
) i
n-focus indicator
the elect
ron
ic analog display appears,
TTL
flash.
be
too bright (over·exposed), or if
the minus side, the background expo·
be
too dark
matrix balanced fill·flash operation,
ready-light
In
this case, the main
(un
der·exposed). If
Shooting
If
both
9
viewfinder ready-light
S8-104
three
flash
power
-In
ready
-light blink
seconds after shooting,
has
operated
at
maximum
.
this case, either reduce the object
distance, or select a smaller f·number.
are
be
41)
in
for
button
and
lit up.
is
on
it
taken as
, be sure
the
and
about
the
is
I ..
~~~~~~h~~~:
.:.
I • A
1m
~
IG FS.~
_
~
27
Page 28

28
Page 29

The settings and shooti
ng
techniques that are possible
with the 88-104
according to the camera used. Follow the procedures below. .
-See
page
46
for basic tips
on
underwater flash photography.
vary
Possible
shooting
I
modes
Matrix balanced
fill-flash (*4)
Center-weighted
TTL
flash (*6) mode
Rear-curtain
sync
Manual (*5)
*1
Set
the
function
selector
*2When
the
sync
controlled
between
1/
125
and 1 second
*31n
manual
exposure
shutter
speed
*41n
matr
ix
balanced fill-flash
finder
goes
posure
setting
16)
so
fla
sh
and
.
out.
controlled
but with
the
that
output
the
output
the
ambient
automatically
ex
*5
When
M 1/
Manual Flash Exposure
The
SB-104
*6
Center-Weighted
The flash
measuring
background
settings
to "Standard" for
mode
is
set
1/
125
and
.)
mode, the
is
set
to
1/
2000
If
the
photograph
by
no
background exposure
flash
mode
the
actual shooting
mode
that
falls
on
distance
from
TTL
Auto Exposure (Ni
that falls
amount
on
of
light
light, which
S8·104 settings Nikonos
Standby Function Flash Sync mode
switch
ON
ON
ON
ON
to "Normal
1/
shutter
to
operation, set
center,weighted
selector
the
the
the
which
selector mode
1)
(*
Standard
Standard
Standard
Standard M 1/4
operations
" in
aperture'priority auto exposure
30
second. (When
speed
1/
250
second, it
is
taken
in
distance
foreground
Speedlight
konos
foreground
passes through
is
controlled
it
can
be
is
the
aperture dial
while
the
TTL
flash. (In
adjustment.) Refer
manual shooting
corresponds
subject
to
the
RS
& Ni
subject
manually
selector
TT
L mode
TTL
Desired Rear-curtain Desired
mode mode mode
M
Full
M 1/16
other
than
Camera
is
set
to "Rear
set
at
1/
125
automatically
electronic
is
directly
subject.
konos V on
is
automatically
the
second
so
that
analog
this
case
to "Matr
mode, select a guide
to
that
of
related
ly)
lens
and
by
the
photographers
Slave
mode
",
the
shutter
to
controlled
the
electron
display
the
main
ix
Balanced
the
exposure cal
to
the
controlled
strikes
the
RS
settings
Flash
Slave
shutter
is
controlled
second
display
t is
taken
·Fl
ash" on
(M
F
culation
power
camera
has
no
speed
Exposure
Aperturepriority
auto
Manual
Desired
.
speed
).
(When
.)
in
the view
operation
at
the
correct
page 24.
ull
, M 1/4,
chart.
setting
on
as a result
affect
on
and
aperture
(*2) mode (*3)
Desired
Desired
Desired
mode mode
and
(A), the
speed
1 s
econd, or B (bulb
at
11125
ic
analog
appears, the
subjec
Fill
number
selected
by
the
film
.
It
shutter
is
between
·
is
or
the
of
the
29
Page 30

Select a possible shooting mode,
1
and set the
Press the shutter release button
2
slightly.
Confirm the flash shooting distance
3
range and check to
ready-light and the
indicator are lit up to shoot.
-If
both viewfinder ready-light and 88-104
ready-light blink for about three seconds
after shooting, the fl
maximum power.
-In
this case, either reduce the object
distance, or select a smaller f-number.
S8-104
and the camera.
be
sure that the
(e)
in-focus
ash
has operated
at
A
I[!
SOrS.b
30
Page 31

Possible
Shooting
Modes
wHh
the
S8-104
and
Nikonos
V
I
Possible
shooting
modes
Center·weighted
TTL flash (*5)
Manual (*6) M Full
*1
In
manual
shooting
*2
Set
the
function
*31f
the
shutter
shutter
speed
specified
*41f
the
shutter
and "60" blink,
If
you
set
shutter
speed indicator
*5
It
the
usable
or
the
shutter
*6When
setting
so
that
the
speed
dial
shutter
speed dial
or "60" or
the
shutter
film
speed
the
actual
mode,
selector
is
set
is
set to
speed
.
speed dial
speed
dial
flash
mode
shooting
to
to
is
"30" blinks
blinks, or
range
is
58·104 settings Nikonos V settings
Standby Function Flash Shutter dial Aperture
switch selector mode
(*1) (*2)
ON
ON
turn
OFF
the
or
1/
1000-1/125
second
to
"A,"
select
.
to
1/
60
that a shutter
in
TTL
flash
to
"
M90
selector
in
corresponds
standby
or
second
"
or "S",
manual shooting
"Standard" for
"A"
1/
60
set
set
distance
Standard TTL
Standard M 1/4
operations
slower, the
the
mode
switch
when
other
second, it
shutter
aperture val
or
1/
30
second
speed
slower
exceeds
the
ready-light
to
that
selector
M 1/16 sec
than
ue
ISO
mode, select a guide
of
the
the
shutter
Camera
is
automatically
speed
is
so
that
select
than
the
400, the
will bli
nk
exposure
(*3)
"A".
1/1000-1/30
sec.
"A". Desired
1/1000-1/30
., "M90,
"S"
speed
dial
and
controlled
shutter
speed
value
specified
cord
is
alert
you
number (MFull
is
Flash
blinks
not
.
chart
Slave
automatically
the
aperture
one
sync
to
calculation
" value
set
to
"
M90
Slave
at
1/90
controlled
indicators
so
that
the
.
correctly
, M 1/4,
(see
value (*4)
Desired
aperture
value
aperture
"
or "8."
.
second. It
at
the
for "125
spec
ifi
ed
connected
or
M 1/
page
41)
.
the
"
,
16
)
31
Page 32

Select a possible shooting mode,
1
and set the S8·104 and the camera.
Check the flash shooting distance
range and to
2
be
sure that the ready·
light is lit up to shoot.
- If both viewfinder rea
ready-
light blink for about three seconds
after shooting, the flash h
maximum power.
-In
this case, either reduce the object
distance, or select a smaller f-number.
dy-ligh
t a
as
operated
nd 88-104
at
...
1000500
250
125
30
~
32
Page 33

S8·104 settings
Possible
shooting
modes
Manual
*1
When
setting
distance
shutter
the
exposure
the
speed
aperture
se
shooting
*21f
the
*3
Determine
from
-
Caution
If the flash mode selector
the ready-light blinks to alert you. Reset the
flash mode
Standby Function
switch
OFF Standard
flash
mode
dial
value
is
set
by
selector,
to
to
"A,"
reading
chart.
is
corresponds
calculation
lector.
selector mode dial aperture distance
select a guide
that
of
the
exposure
the
shutter
the
relationship
set to
TIL
1 Set the S8·104 and the camera.
Flash Shutter
selector
(*1)
M Full A, M
M 1/4 (1/90 value
M 1/16
number
calculation
speed
is
between
,
sec.
(M
Full
, M 1
chart
automatically
the
shooting
Nikonos IV·A settings
Lens Lens
(*2)
),
B
/4,
or
(see
page
controlled
distance
value
Desired Distance
M
1/16)
41).
at
(*3)
1
and
so
/90
scale
to subject
that
the
second.
the
guide
actual
number
Press the shutter release button
shoot.
2
to
33
Page 34

Caring
for
the
88-104
After
Use
Wash the Speedlight with fresh wate
If
the 88-104 8peedlight
having been washed after use under water
(especially
foreign matter will stick to its part
possibly causing corrosion or operation
failures. With the 8peedlight's cap closed ,
wash the 8peedlight thorough
water (do not use hot water).
8peedlight was used
muddy places, submerge it
other suitable
and
levers and knobs) to
from the gaps around these parts. It
then a good idea to rinse the 8peedlight
under running water.
Do
When washing the 8peedlight, attach t
supplied sync socket cap to prevent water
from getting into the sync socket.
Drying the Speedlight .
When drying the 8peedlight after washing,
do not subject it
direct sunlight.
area.
in
seawater), salt and other
vessel
move
all operating parts (such as
not let water get into the sockets . . .
Let
is
stored without
ly
with fresh
If
the
in
salt water or
in
a sink or
filled with fresh water,
remove
to
flames or heat. Avoid
it dry in a well-ventilated
any salt or dirt
..
r.
s,
is
he
..
34
Page 35

Be sure that all water has been removed .
Several days are required for all water to dry from below the rubber cover.
in
Keep
the surface has dried.
mind that water may still remain
..
in
hard-to-reach areas even after
Disconnect the sync cord from the
socket and attach the cap . . .
Salt and other foreign matter will remain
the sync cord and the socket if the cord
not disconnected. After washing and drying
the Speedlight, remove the plug and
remove all the salt. After that, it
idea to apply a small amount of O-ring
lubricant to the screw threads.
always to attach the socket cap to prevent
water or dirt from getting into the socket.
is
Be
on
is
a good
sure
Also dry the battery chamber . . .
After drying the main body, open the
battery chamber,
let the inside of the chamber dry
completely before closing it again.
remove the battery, and
If switch or selector movements become
rough . . .
Tiny particles of sand getting inside the
panel may affect smooth operation of the
power switch or selector.
remove the four screws (as illustrated),
open the panel, and rinse out the sand.
Reassemble the panel after letting the
inside dry completely. If a screw
use a spare screw provided.
In
this event,
is
lost,
35
Page 36

36
Page 37

Standby
Swnch
When the Speedlight
the Nikonos
turning
RS
ON
the standby switch
inside the battery chamber will help
conserve battery power.
When the Standby switch
The power of the 88-104 is turned OFF automatically when the
flash is not operated for about 80 seconds after the 88-104 's power
switch
is
-The
turned ON .
88-1
ON
flash ready
04's ready-light goes out.
the power (for about
to
fire at
is
used with
or Nikonos V,
80
seconds) about once
any
time.
OFF
is
ON .
..
The
88-104 then automatically turns
an
hour to keep the
(STBY]
CiJ
ON
When the power to the camera is turned ON (by
shutter release button slightly) , the 88-104 power
accordingly and becomes ready to fire.
-The 88-104 power
ON
then
again and becomes ready to fire as well.
is
turned
ON
when its power switch
preSSing
is
turned
is
turned OFF
the
ON
37
Page 38

When the Standby switch
When using the S8-104 with the Nikonos
power switch
flash output
being fired. The battery will thus
without the flash being fired unless the standby switch
is
turned ON, the power required for one manual full
is
consumed
in
about
is
OFF.
..
RS
or V, if the S8-104's
10
minutes without the flash
be
used up
in
about 20 hours
is
turned ON.
- Caution
e
The
standby function does not work
e
The
standby function does not work with the Nikonos
the standby switch .
in
Flash Slave mode.
IV-A.
Turn
+Note
A fully-charged, fresh NiCd battery can be used in the standby mode for
about 60 days while setting the function selector to
and about 30 days while it
at
20° C, no flashes fired).
(
If the Speedlight will not be used for a long period of time, be sure the
power switch
is
OFF before storing.
is
set to [0] (cordless remote flash) mode
~
(standard) mode,
OFF
38
Page 39

Alert
Signal
A warni
the lamps in the illustrati
blink
problem below a
procedures given to fix
Ready-light
If
flash
ready-light blinks for about th
to alert
fired
viewfinder will also blink.)
-In this event, reduce the distance between
ng
is indicated when any of
on
starts
in
g. Look up the cause of the
nd
follow the
it.
blinks.
the exposu
in
the camera and the subject, or select a
smaller f-number.
re
is
is
fired at fu
you
TTL mode.
not sufficient when the
ll
output, the 8
immediately after the flash
(The
ready-light
8-1
ree
04's
seconds
in
the
+Note
Flash power may vary due to surrounding
conditions - with unusually dark subjects,
for exam
distance settings are the same. A warning
end of the flash shooting distance range but
sti
pl
e -
eve
n though flash shooting
may thus appear if the subject
ll
within i
t.
is
at the far
is
Moisture
This alert indicator blinks when water has
entered the battery chamber. Operation of
the 88
-Bring
center
alert
light
-104
stops automatically.
the Speedlight
to
have it checked.
blinks.
to
a Nikon service
39
Page 40

Heat alert light blinks.
When the interior of the 88-104 overheats
due to successive firing of the flash or
other factors, the heat alert light blinks.
Operation of the
88-104
stops
automatically.
- The flash can
cooled down and the lamp has stopped
blinking.
be
used again after it has
Electrical alert light blinks.
If one or both flash tubes did not
electrical alert light blinks to alert you.
-Bring
the Speedlight
center
to
have it checked.
to
a Nikon service
fire,
the
+Note
Each time the flash is fi
checks
to
be
normally. If both flash tubes fires abnormally,
the Flash Abnormality lamp blinks after firing.
If the lamp blinks
has fired, one of the two flash tubes
defective.
If the shutter is released before the readylight goes
flash abnormality lamp will blink. However,
there is
sure both flash tubes have fired
on
, the flash will not fire and the
no
abnormality
red,
the SB-104
even
though the SB-104
in
this case.
is
40
Page 41

Reading
The
88-104
shooting
three
(by
film
Distance
S
scale chart
the
comes
distance
aperture
speeds)
sca
crew
securing
le - - - I
Exposure
with
one
scale
chart
scale
charts
.
H--+ltt-
distance
-
-=
s::
Calculation
flash
and
-~-
r-'r.......,.,,.-
--tI11
~~~~~~
=¥
~
'>?"
Chart
---
HlHI
f-f-
--f
-r--
~II<--
--
-IHH
Film speed
- Ap
ertu
chart
l
ever
Corr
val
ue
"M
Full",
re
release
ect
ape
at
M 1/
"M
sca
rtu
1/4"
le
16
re
",
Changing
chart
and
the
exposure
charts
Distance
The distance
(on
Use
screw
ing it,
-Do not t
Aperture
Remove
down
the
chart
Be
scale
scale
one
the
damage to the plastic.
arrow
sure
scale
side)
and
system
to
remove
tighten
the
ighten the screws too much
scale
the
aperture
the
release
and
to
insert
peel
before
the
off
matching
chart
distance
chart
is
marked
in
feet
you
prefer. Loosen
the
chart.
screws
chart
scale
lever
in
an
film
speed
protective
use.
scale
calculation
in
meters
(on
the
other
When
hold
chart
direction
being
film
reattach
it
securely
by
scale
on
to
the
aperture
side)
the
to
avoid
holding
of
used.
the
.
.
41
Page 42

Objects
closer
For
subject
(3
.3
(4
.3
The
calculation chart
estimated
estimate
shooting
directly.
In
TTL
Read
the
For
underwater
using
or
larger
correct
When
removed
Open
(f/16)
column
underwater
than
instance, if
distance
feet), the
feet)
.
distance
distances
the
distance
flash
the
flash
"M
Full" column
example,
at
ISO 1 00
(smaller
exposure
taking
from
the
aperture
than
that
on
the
they
actually
the
estimated
underwater
actual
distance
scales
on
and
lenses
underwater. When
distance,
mode
when
estimated
pictures
read
range
shooting
on
shooting a subject
film,
set
f-number)
.
the
bracket
one
(f/22)
read
left
of
the
appear
is 1 meter
the
exposure
are
the
from
distance
the
left
0.5
meter (1.6
the
aperture
to
with
the
or
more
in
the
scale
are.
camera-tois 1.33
marked
flash
the
range
of
the
get
arm
steps
"M
.
• Important
When setting aperture, check the flash
shooting distance range first.
best possible color reproduction, set the
aperture to the larger f·number if available.
To
obtain the
meters
chart
to
the
Full
you
in
scale
feet)
f/22
wider
"
by
.
------
.-f
-------------
..
:' .-..
; l
~,
I
I.
1 Size of objec t as it appears
un
derwater
2 Actual si
3 Distan
ce set on lens
4 Actual or measured distance
ze
of objec t
4
150100
oPo
___
--
3
+Note
Usable film speed range
ISO
25
to 1000 for the Nikonos
ISO
25 to 400 for the Nikonos V
42
in
TTL mode:
RS
Page 43

In
manual
The scales from the left indicate
" M 1/4," and
For
underwater
(1.6
flstop
and at
flash
"M
mode
1/16.
"
"M
example, when shooting a subject
at
an
feet) using
at
"M
"M
estimated 0.5 meter
ISO
1 00 film, the appropriate
Full"
is
f/22, at
1/16" is f/5.6 .
"M
1/4" is f/11,
• Important
In
manual mode, set the guide number (M Full,
M 1/4, or M 1/16) corresponding
value selected.
If the aperture value is set to
above example), set the flash mode selector
to
" M 1/4."
to
the aperture
f/11
(in
+Note
The exposure calculation chart is effective
only when the
standard arm with the standard bracket.
88
-104
is
mounted
on
Full,"
the
the
150100
43
Page 44

In
manual mode. you can determine the correct flstop using the following
equation:
flstop
=
__
-"g_ui_d_e_n_um_ b_er
flash-to-subject distance
See table below for the guide number at various film speed.
Guide
number
at
various film speed
Light
output
M Full 8 (26)
M 1/4 4 (13) 5.6 (18) 6 (20) 8 (26)
M 1/16
18025
2 (7) 2.8
50
11
(36) 12 (39) 16 (53)
(9)
__
Underwater shooting
64
3 (10) 4 (13) 5.6 (18) 8 (26)
100
200
22 (72)
11
(36) 16 (53)
400
32 (105)
Light On-land shooting
output
M Full 16 (52) 22 (72) 25 (82) 32 (105) 45 (148) 64 (210)
M 1/4 8 (26)
M 1/16 4 (13) 5.6 (18) 6 (20) 8 (26)
18025
50
11
64
(36) 12 (39) 16 (52)
100
200
22 (72)
11
(36) 16 (52)
400
32 (105)
_ Caution
- Guide numbers under water vary according to water conditions.
- When aiming the Speedlight diagonal
step wider (smaller f-number) than the aperture value obtained
above equation to compensate for the different angle
_ When taking photographs with the arm removed from the bracket.
Nikon recommends you to take various pictures with different
apertures by adjusting the camera-to-subject distance .
ly.
open the aperture 1/2 to 1
of
reflection.
45 (148)
22 (72)
11
90 (295)
45 (148)
22 (72)
in
the
800
(36)
800
m (ft)
1000
50 (164)
25 (82)
12 (39)
m (tt)
1000
101
(331)
50 (164)
25 (82)
• Important
If the camera-to-subject distance is actually measured underwater.
multiply the measured distance by
underwater.
For example. if the actual camera-to-subject distance is 1.33 meters
(4.3 feet). set the lens distance scale to 1 meter
"1 meter" column on the exposure calculation chart.
44
3/4 to get the estimated distance
(3
.3 feet). and read the
Page 45

45
Page 46

Basic
Tips
on
Underwater
Flash
Photography
The basic aspects of underwater flash photography will
reviewed
T
he
The primary purpose of the Speedlight underwater
the subject's colors. At a depth of three meters
subject will begin to
in
blue content. This phenomenon, known as "Selective Light Absorption
increases
ng
Usi
and create better contrast.
Try
to stay as close as possible to your subject to reduce the amount of water
between your camera and subject. This will result
photograph.
Taking
Try
to shoot at
into the picture.
In
TIL
aiming the camera at the blue background. Then set the aperture dial.
In
this condition,
blue background. The main subject can be reproduced in vivid colors by the
light from the Speedlight.
-In
obtain the correct expos
in
this sectio
Role
of the
as
you go deeper underwater and move farther from the subject.
a Speedlight effectively will restore the lost color to your photographs
photographs
an
upward angle to allow the background ambient light to enter
flash mode, select the aperture value to get the correct exposure while
you
manual flash mode, select the combination of shutter speed and aperture value
n.
Speedligh
be
absorbed
can take photographs with correct exposure and a natural
ure
t .
..
by
the water, resulting
highlighting
against the background.
the
is
to accurately reproduce
(10
feet), the
in
in
a sharp, colorful
blue
of
the
be
red
content of the
a photograph strong
,"
sea
. . .
to
46
Page 47

When
shooting
brightly
shining
fish ...
If
the Speedlight
fish from the front, correct exposure will be
hard to obtain because of the bright light
reflected from the fish.
subject, remove the arm from the bracket,
hold the Speedlight
camera as possible, and aim the
Speedlight at the subject diagonally.
is
aimed at shiny silver
To
shoot this sort of
as
far away from the
When
in
When light from the Speedlight
on
photograph turns out looking like it was
taken
the sand settles down, or
arm from the bracket and aim t
light at the subject diagonally, as far away
from the camera as possible.
sand
has
the
water . ..
particles floating
in
a snowstorm.
Illustrat
ions
Tateish
and
i,
Mar
Akira
been
stirred
in
the water, the
It
editorial supervision
ine
Art Center,
is
is
best to wait until
to
remove the
he
Co
up
reflected
Speed·
supplied
.,
Ltd
. ...
=
~~
by
!
~
~
----
---
___
~
~
-----
<..------
47
Page 48

Camera
Slave
(Cordless
Remote
Photography)
When
the
camera's shutter
activated
another
detects
built-in
simultaneously.
you
used
with
the
Nikonos
S8-104
and
releases
want
approach
.
Important
Use Speedlight S8·
flash activating unit. Camera Slave (cordless
remote photography) is possible only when
the S8·
Turn
S8-104 connected to the Nikonos
1
RS,
to
set the Flash mode to any desired
position.
-The
when the power switch
can
release
upon
from a remote
Speedlight.
the
remote
slave
sensor,
to
photograph
or
shy
104
is
used with the Nikonos RS.
OFF the power switch on the
and set the function selector
[0]
"Cordless Remote:' Then
funct ion selector does not work
The
flash
fires
the
camera's shutter
This
is
subject.
104
or S8·
the
being
location
S8-104
with
its
useful
hard-to-
102
is ON.
RS,
its
flash
when
as
the
by
'
~
\
.
~
/
\ V
\
/j
~
\
.? \ I
/
o
~.
((!]
O
FF
OI
o
I
Set the Focus mode on the Nikonos
RS
to
"P"
2
advance. Then set the Sync mode
and Exposure mode to any desired
position.
-Autofocus
Camera Slave (cordless remote
photography).
48
and set the distance in
operation
is
not possible for
Page 49

Turn
ON
3
and check to
light is lit.
The shutter is released each time
4
another speedlight fires, and the
88-104 mounted on the camera also
fires at the preset mode.
the 88-104's power switch,
be
sure that the ready-
o
~
...
FULl
~
L..rtJ
(JeJtfj)
"M4
..
e Caution
If there are other people
your Speedlight to fire also.
in
the area firing a speedlight, it may cause
+Notes
. It
is
recommended that you use a tripod for this operation unless you
have someone to assist by holding the slave
• Underwater Camera Slave (cordless remote photography) when
another speedlight (activating a shutter release operation) and the
SB-104
are facing each other is possible within a distance of
(32
.8 feet) .
• If the flash from the other speedlight (activating shutter release
operation)
not fire. Check to be sure the flash fires properly before using it .
• Battery power consumption of the
operation
With standby switch
output is consumed in approximately six hours.
With standby switch OFF: Equivalent power required for one manual
full output
is
not detected by the sensor
is
as
follows:
ON
: Equivalent power required for one manual full
is
consumed
in
approximately
SB·104
SB·104
and Nikonos
on
the SB·
104
, the SB·104 may
when set for cordless remote
10
minutes.
_
.,
oom·
i
OFFO
lJiV
nil"
",1/
16
iJ6D~
•
RS
.
10
meters
I
49
Page 50

Flash
Slave
The 8B-104 can
slave without releasing the camera's
shutter. When it senses the light
from a master flash,
neously, providing additional light for \ / /
exposing the photograph. Because
these 8peedlights are not connected / \ /
by a cord, more than two can
used to create special lighting
effects .
be
used as a flash
I . /
it
fires simulta- \ . /
be
~
\v /
\
I
II]
• Important
An
S8-
104
, S8-
101
used as a flash activati
Set the function selector
1
unit to
[IJ
-When
set the function selector switch.
the power switch.
Set the flash mode selector on the
slave unit to either
2
or
"M
1/16." (Manual)
Set the output to the desired flash
power as a fill-in light.
Determine the correct flash output
from the camera's aperture value
and the distance between the
subject and the Speedlight.
, S8-102, or
"flash slave" mode.
the power switch
ng
"M
unit.
is
Full
S8-103
on
ON,
,"
can be
the slave
you
cannot
Turn
OFF
"M
1/4,"
~
¥
./;7
o
~.Q
OFFol
50
Page 51

Turn
3
ON the power switches on
Speed
both
ready-lights are
lights
, and
li
t.
be
sure t
he
o
~·
i
OFFO
W
G>
Release t
4
-When
camera) fires, the another Speedlight
(SB·104)
he
shutter
the Speed light (connected to the
will fire simultaneously.
on
the camera.
e Caution
e
lf
there are other people
your slave unit to fire also.
e
The
slave unit normally fires only when it senses a sudden burst of
light. However, it can also fire
fluorescent light flickers when it
abnormality
in
this case.
in
the area firing a Speedlight, it may cause
in
the event a lamp such
is
turned ON. However, there
as
+Notes
+
The
slave unit fires when light from the master unit activates the slave
unit's sensor. The maximum distance under water at which the slave
unit can react to light from the master unit
feet) when the master unit
However, the slave unit may not fire if the water
strong external light.
Flash Slave will work properly.
+
The
standby function does not work
power will thus be consumed
power needed to fire the flash once
battery power will be used up
firing of the flash.
is
directly facing the slave unit's sensor.
Test
fire the Speedlights
in
about
in
about 20 hours even without a single
is
about
10
meters (32.8
is
cloudy or there
in
advance to be sure the
in
Flash Slave mode. Battery
10
minutes, the equivalent
in
manual full output.
At
a
is
no
I
is
this
rate,
51
Page 52

Rear-Curtain
When ambient light conditions are
low and you wish to produce
creative exposures by highlighting
the movement of subjects at a slow
shutter speed, you can use the
rear-curtain sync feature
R8
Nikonos
synchronize with the closing of the
shutter producing a natural stream
of light behind the subject.
• Important
Rear-curtain sync photography
with the Nikonos RS.
Before entering the water, open the
camera back , set the camera's sync
1
mode switch
arrow, and close the camera back.
. The 88-104 will then
Sync
in
the direction of the
Photography
on
the
is
possible
Turn
ON
and check to
2
isON.
-Set
-Set
desired position.
52
the
SB-104
's power switch
be
sure the ready-light
the function selector
the fl
ash
mode selector
to
"standard."
to
any
• L..
@
Ci!
ITII"
0
g·
e
OFF0
l!i2J
OJ
Page 53
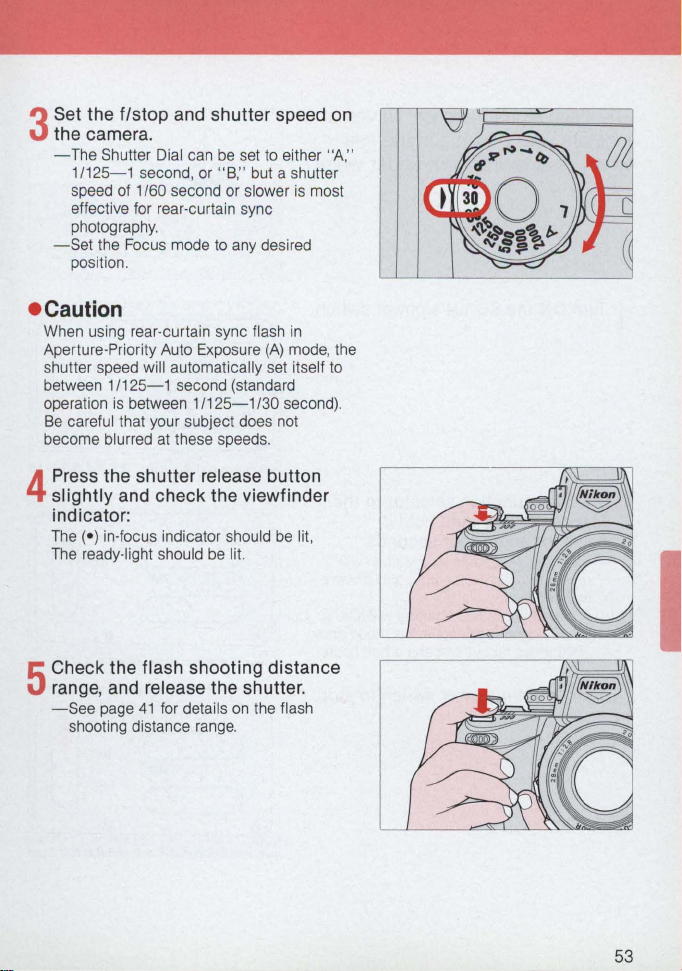
Se
t the f/stop and shutter speed on
the came r
3
-The
1/125-1
speed of 1/60 second or slower
effective for rear·curtain sync
photography.
-Set
position.
a.
Shutter Dial can
second, or "B," but a shutter
the Focus mode
be
set
to
any desired
to
e Caution
When using rear-curtain sync flash
Aperture·Priority Auto Exposure
shutter speed will automatically set itself
between
operation
Be
become blurred
1/125-1
is
careful that your subject does not
second (standard
between
at
these speeds.
1/125-1/30
Press the shutter release button
slightly and check the viewfinder
4
indicator:
The (e) in-focus indicator should
The ready-light should
Check the flash shooting distance
range, and release the shutter.
5
-See
page
41
for details
shooting distance
range.
be
lit.
on
(A)
be
the flash
either "A,"
is
most
in
mode, the
to
second).
lit,
53
Page 54

Using
The flash signal function serves to
in
dicate your pos
when resurfacing from under
1
Slide the function selector to the
2
Test
down for about four seconds.
-F
- A fullY'charged Ni
3
the
Flash
Turn
ON
the S8-
positi
on ~ and hold it
rom the second firing , the flash will
repeat firing at 1/32 output about every
two seconds.
8B·104 continue firi
3000 times (about one and a half hours).
Turn
OFF the power switch to stop.
Signal
iti
on
in the sea
104
's power switch.
Cd
battery will let the
ng
in this mode about
water.
Function
•••
w""
•
~
..
.. '"II!
(
(J~Q")
.
FULL .114 .111
~
· .
•
~
..
.. qJfff'
•
((
~a~
.
FULL .11
4
~
..
................
'"
.,
'
)
6 JIll
~~D»
.1
/16 !ID
~~~
OFFo
··
•
..
..
I'
•
))
&1
OFFo
e
"
,."
Q •
~
/
\
54
•
"""
~
•
. .,.,.""Ii""11 \
Page 55

55
Page 56

Optional
Accessories
Extension
Used
for
extending
standa
useful
effects
for
f
the
Weight:
Using
1
rd
arm (SK-104A
for
obtaining
for
distancing
rom
the
Speedlight
arm.
Approx. 332g
Approx.
Stopper
the
SK·104E
Pullout
standard arm
the wrist joint.
Arm
SK·104E
the
length
).
special
close-up
180g
pin
the stopper pin from the
photography
the
axis
(11
.7
(6.4
oz) (underwater)
Elbow
Extension
(SK-104A)
of
by
stretching
oz)
(on
joint
of
Especially
lighting
the
lens
land)
Arm
and detach
the
or
--
- El
bow
joint
knob
Insert the wrist joint (protruding
portion) into the hole
2
the notch at the
arm, and
stopper pin.
56
secure it by reinserti
by aligning it to
end
of the extension
ng
the
Page 57
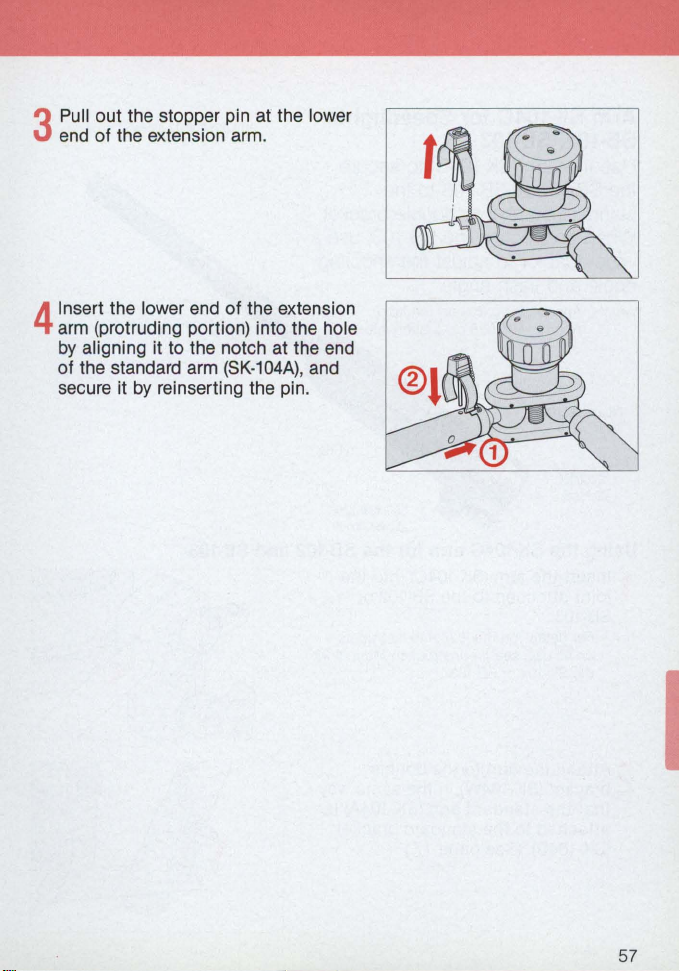
Pull out the stopper pin at the lower
3
end of the extension arm.
Insert the lower end
4
arm (protruding portion) into the hole
by aligning it to the notch at the end
of
the standard arm
secure it
by reinserting the pin.
of
the extension
(SK-104A)
, and
57
Page 58

Arm 5K·104C for 5peedlights
58·102, 58·103
Use
the
arm
(SK-104C)
the SBstandard
When
wide
angle
Weight:
Using
1
102
or
SB-103
bracket
connecting
adaptor
and
Approx. 250g (8.8 oz)
Appro
Shoulder
joint
loc
the
Insert the arm
jOint attached to the S8-102 or
S8-103.
-For
on
the 88-
flash
x.
k
SK·104C
details
its
use, see
102
to
adjust
angle
80g (2.8
(SK-104C)
on
the joint
the
or 88-
to
secure
to
the
or
double
the
bracket.
SB-103,
the
shooting
.
(on
land)
oz)
(un
derwater)
~·ShOllllr1er
release
arm
for
the
into the
and
instructions
Instruction Manual
103
.
use
joint
button
S8·102
for
a
and
Arm
positioning
S8·103
screw
Attach the arm to the double
2
bracket
that the standard arm (SK-104A) is
attached to the standard bracket
(SK-1048).
58
(SK-104W)
(See
page
in the same way
17.)
Page 59

Double
The
two
camera for
ai
med
shadowed
Using the SK·104W Double Bracket
Attach the arms to the double bracket
in the same way that the standard arm
(SK-104A)
bracket
Bracket
double
bracket
SK·104W
(8K-104W)
is
used
8peedlights -88-104, 88-102, or
enhanced
from
both
areas
Shoulder
joint
adjustment
is attached to the standard
(SK-104B). (See
flash illumination. Light
the
left
and right sides
on
the
subject
Weight: Approx. 730g (25.8
App
joint
knob
page 17.)
for
rox
+Note
When mounting the S8
(camera's shutter
remove the S8
and attach it reversely to the wrist joint
n.
agai
-104
re
-104
on the arm
lease button side),
once from the wrist joint
when
88-103 -to
to eli
close-up
. 430g
(15
.2 o
attaching
the
can
be
minate
photography
oz) (on land)
z)
(underwater)
.
59
Page 60

Double
The
for
weighted
-Manual
connected.
Sync
(black)
Sync
Double
TTL
flash
flash mode only
Sync
TTL
Cord
Cord
(matrix
flash)
is
SC·100
lets
you
use
two
Speedlights
balanced
operation
available when used with the Nikonos IV-A
fill-flash, center-
,
e Caution
e
The
combined guide number for two 8peedlights firing
direction can be calculated
Combined
where G
used.
e Attach a wide adaptor when using the
photography.
e
lf
you want to use just one of two 8peedlights attached, use the
8peedlight connected by the black cord.
- If the power switch
GN = .J(GN1
N1
and GN2 represent the guide numbers of each 8peedlight
is
turned OFF, the flash fires
flash. The camera's shutter speed cannot be switched automatically
to the sync shutter speed.
as
follows:
)' + (GN2)'
88
-102 or 88-103 for close-up
on
the 8peedlight connected by the black cord
at full
output instead of TTL automatic
in
the same
60
Page 61

NiCd
The SNbattery
S8-104
SN-104
times
at
Weigh
t:
Approx. 370g
Battery
104
designed
. A
can
manual
Unit
is a rechargeable
exclusively
fresh,
fully-charged
fire
approximately
full
(13.1
SN·104
power
oz)
NiCd
for
the
120
output.
Quick
The
Charger
SH-104
exclusively
the N iCd
unit
SN-104
Full
charging
about
two
(four
hours
Weight:
Appro
(Phot
o: US/
Canada
O·Ring
A
set
two
screws
and
of
spare
small),
for
panel.
is
used
to
recharge
battery
.
takes
hours
for
two
x.
600g
version)
Screw
O-rings
O-ring
securing
SH·104
for
one
units).
(21
.2
oz)
Set
(one
lubricant,
the
battery
large,
and
switch
unit
two
61
Page 62

Details
on
NiCd
Battery
Unit
SN-104
Generally
temperature
used
Please
speaking,
drops,
for a long
note
the
battery
and
time.
following
power
power
points
weakens
drains
when
as
off slowly
using
the
the
when
NiCd
not
battery:
Notes
eBe sure
eOvercharging or excessive running of the battery shortens overall
elf
eWhen
e Do not subject battery packs to excessive heat or throw them
e Do not disassemble, heat , short-circuit, or throw batteries into a
eTake care not to allow metal objects to come into contact with the
on
using
to
the first time or after havi
battery
when not
battery life.
the battery cannot be used for the specified length of time after
being properly charged, it
Replace it wi
under
into fi
fire,
battery's terminals, as they can cause a short and blow the fuse
inside the battery pack. There
recharge the NiCd battery unit 8N-
life.
Be
in
use to prevent battery leaks and to ensure long
th
taking photographs in the low temperatures (especially
DoC)
, use a fully-charged battery and keep it warm.
re
.
as
explosions may result.
the
NiCd
ng
sure to turn OFF the power switch of the 8B-104
is
a fresh one.
battery
104
not used it for over three months.
approaching the end of its life.
is
no way of replacing the fuse.
when using it for
62
Page 63

Tips
on
carrying
e
Be
sure
that
cannot
be
disassembled
case
whenever
e
lf
water
or
moisture
SN-104
can
battery chemicals
e
Do
not
water
may
e
lf
the
battery
gas
may
e
Keep
e
Do
not
no
carry
equipment
get
inside
Speedlight
and
store
be
produced
the
SN-104
recharge
and
storing
the
SN-104
is
not
for
repair.
not
being
used
gets
inside
longer
be
used
to
produce
or
store
the
battery
not
it
in a cool
inside
of
the
battery
pack
be
the
battery
used
place
the
reach
(speedlights, cameras,
the
will
out
while
the
SN·104
subject
.
flammable
to
shock
or
moisture,
Keep
the
SN-104
the
SN-104
's
plastic
case,
because
the
water
gases.
in
the
same
diving
and
cause
for a long
(20°C). Otherwise, flammable
battery
chamber.
of
small
is
still
warm
can
case
as
gear,
a short-circuit.
time,
children
etc). Water
remove
.
immediately
in
its
react
wet
as
it
protective
the
with
under
the
after
use
-
.
When
e
When
carefully
-Charging
recharging
recharging,
the
instruction
is
best conducted between 5°C and 35°C.
the
only
use
manual provided
SN·104
Nikon
's
battery
SH-104
.
Quick
pack ...
Charger. Read
63
Page 64

Tips
on
88-104
Care
Notes of Caution
Do
not
subject
vibrations
Strong vibrations or shock may cause
damage to delicately-adjusted parts. If
accidentally drop the Speedlight, take
a Nikon service center
damage, although no damage may be
by
found
Do
holding
When entering the water from a boat, enter
it yourself first and then have someone
hand you the camera and Speedlight from
the boat, or suspend the items
and claim them after entering the water.
Unforeseen damage may
shock of the Speedlight hitting the water
surface if you jump into the water while
holding
Do
a simple visual inspection.
not
jump
the
it.
not
subject
excessive
Do not leave the Speedlight inside
enclosed location, such
subject to sunlight and high temperatures.
Also avoid leaving it
subject to high temperatures (over 60°C).
When the interior of the S8-104 overheats,
the heat alert light blinks and operation of
the
S8-104
stops automatically.
the
or
shock.
to
into
the
Speedlight.
the
heat.
as
in
any other area
Speed
be
checked for
water
on
be
caused
Speed
a car, that
light
while
a rope
by
light
an
it
is
to
you
to
the
to
Prevent
matter
The Speedlight can be damaged if foreign matter finds its way inside the
battery chamber. Damage of this sort
64
dirt,
from
mud,
sand,
entering
dust,
the
Speed light.
water,
is
salt,
not always covered
or
other
by
the warranty.
foreign
Page 65

Take
care
not
to
splash
into
the
battery
the
N ied
batteries.
When changing batteries, be sure not to
accidentally splash water into the battery
chamber or onto the NiCd battery unit
SN-104.
away immediately. Nikon recommends
keeping the batteries
provided until they are needed.
If a lot of water enters the battery chamber,
the moisture alert light will light up and the
Speedlight will stop working. Remove the
battery from the chamber and take the
Speedlight to a Nikon service center with
the chamber's cover open .
If water has been splashed, wipe it
chamber
in
water
or
onto
the plastic case
........................................................................
If
the
Speedlight
Use a blower to remove dust first, and
then wipe the Speedlight clean with a soft,
dry cloth.
Do not use thinner, benzine, or other active
agents.
Never
disassemble
Never disassemble or remodel the Speed light
if damaged.
The Speedlight houses a high-voltage
circuitry which
Speedlight to a Nikon service center if
damaged.
is
gets
soiled.
the
Speedlight.
very dangerous.
Take
__
the
65
Page 66

Carrying
the
58·104
When transporting the
58·104 .
Do not put the 88as the NiCd battery unit 8Ncharger. Water from below the rubber parts
of the 88-104 may cause damage to these
items.
Do
..
104
into the same bag
104
or 8H-104
not subject the 5peedlight to
vibrations or shock.
When carrying the 88-104
the boat, insert the 8peedlight and other
equipment into bags to prevent them from
bumping each other, or fill the gaps with a
towel to absorb vibrations or shock .
in
the car or
in
........................................................................
Do
not carry the 5peedlight
by
the sync cord.
Do not carry the 8peedlight dangling at the
end of the sync cord.
66
Page 67

Safekeeping the S8·104
Remove
If the Speedlight will not be used for a long
time, remove the battery from
battery leaks, flammable gas may
produced inside the battery chamber
which
do not use the Speedlight and take it to a
Nikon service center.
When
Store the Speedlight
Do not leave the Speedlight inside
wet areas, or places subject to magnetism or chemicals such
naphthalene (mothballs).
Test
the
NiCd
battery.
it.
If
is
very dangerous. If that happens,
storing
fire
the
the
5peedlight
58·104 .
in
a cool, dry place to prevent mold from growing
about
the
be
..
an
enclosed location, such as humid or
once a month.
If
the Speedlight
for a long time, take it out about once a
month, insert the NiCd battery unit S
and fire the Speed light several times to
prevent the conden
Before returning it to storage, turn O
power switch while the ready-light
and remove the battery.
-8y
occasionally test firing the 88-104,
can preserve
condenser
is
being kept
se
r from weakenin
the
performance of the
for
a long peri
od
in
storage
of time.
N-104,
FF
is lit,
you
g.
the
as
camphor or
on
it.
67
Page 68

Specifications
Electronic
construction
Usable exposure mode
Gu
ide
number
Angle
of
Flash
Usable
Number
coverage
shooting distance
r
ange
film
mode
full
of
flashes
outpu
speed
(ASAIISO
TTL
(at
range
t)
Recycling time
(at
full
output
)
Water
resistance
Power
source
Power
standby swi
F
lash
mode
F
unction selecto
Ale
rt
Indicators
tch
selector
r
Exposure calculation
Flash
duration
Di
mension
(diam. x length
s
)
Weight
On land
Un
derwate
r
100
chart
Automatic
and
series
Matrix balanced fill·flash
auto
flash
"M
Full
32
(at M Full), 16
on land and
M
1/4),
1000 (covering
f/5.6
to
(underwater)
100)
in
)
ASAIISO
ASAIISO
Approx. 120
Approx
unit
SN-104)
Up
to
Nikon
Available
TTL
and
StandardlTest
Flash
Full
output/Heat alert light/Moisture alert light/
Electrical alert
Removable
distance
Appro
x.
Appro
x.
Appro
x.
Approx.
flash
head)
Approx. 1990g
Approx.
SN-104
Approx
Appro
x.
and
sync
insulated
circuitry
(Nikonos
,"
"M
10
Ws
fl22: 0.3
25-1000
25-400 (Ni
. 3
sec. (with
100m
NiCd
with
manual
slave
sca
1/1000 sec.
1/1800
1/7000
124mm
3450g (7.6
and
. -
510g
340g
cord)
RS
1/4," and
(at
M 1/
meters/160
(at M 1/16)
15mm
to
6m
in
TTL
auto
(Nikonos
(with
Nikon
(328
tt)
depth
battery unit SN·
Nikonos
(M
Full
firing/Signal flash/
light
aperture scale charts
le chart (x
sec. (a
sec.
(4.9
(4.4
Ibs.)
Ibs
sync
cord)
(-1
.1
(12
oz)
gate
bipolar transistor
(Nikonos
and
"M
1/16" settings
4), 8 (at M 1/16)
Ws
lens),
(on
flash
konos
NiCd
Nikon
RS
, M 1/4, M
1)
(at M Full)
t M
(at
M 1/16)
in.) x 222mm (8.7 in.)
(S8-104
.)
(S8·104
Ibs
(S8-104
RS
mode
RS)
0.3
only); TTL
ASA/ISO
land)
to
3m
(using
Nikonos V only); Manual
(at M Full), 40
1150 (on
land),
V)
battery
unit SN-
NiCd
battery
104
and
Nikonos
V
1/16)
Camera
(x 3),
1/4)
only)
with SK-
.) (S8-
104
only)
with SK-
104, SN·104
(IG8T)
Ws
(at
ASNISO
104)
slave/and
(main
104
,
:
100
68
Page 69

Accessories
(provided)
Standard
sync
cord
O-ring
lubricant,
arm
(SK-104A), standard
(with
cap), O-ring
and
two
set
screws)
bracket
(three
(SK-104B)
O-rings
,
,
Note: All performance data are subject to change depending
conditions .
Specifications and design are subject to change without notice.
on
environmental and chargi
ng
Page 70

No reproduction
whole or
articles or reviews), may be made without written
authorisation from NIKON CORPORATION.
in
in
any form of this manual,
part (except for brief quotation
in
in
critical
Nikon
NIKON
FUJI BLDG
CHIYODA-KU, TOKYO 100,
TEL
: 81-3-3214-5311
FA
X:
81-3-3201-5856
CORPORATION
.,
2-3,
MARUNOUCHI 3-CHOME,
TELEX
JAPAN
: NIKON J22601
9T012-C02
(S368)
Printed in_
Japan
-
Page 71

O-
ring
contact
Check
Die
auf
Seite
Die
Verbindungsstellen
Les
zones
Verifier
Las
areas
de
contacto
Compruebe
las
Correction
areas
as
shown
O-ring
contact
Berichtigung
11
gezeigten
O-Ringe
sind
gezeigten
Abbildung
Correction
de
contact
des
page
11
sont
les
zones
de
Correccion
de
junta
la
pagina
11
areas
de
contacto
on
page
11
areas
as
shown
Verbindungsstellen
nicht
zutreffend
der
O-Ringe
joints
incorrectes
contact
t6rica
son
incorrectas.
gemaB
prOfen
toriques
.
indiquees
que
como
se
_
.
se
are
incorrect.
here
_
der
der
hier
indiquees
ici.
muestran
muestra
aqui.
en
Page 72

58
- 1
041iffl
~a,ij:e.IE~~
SB-lo4~m~,lI.J:lJl'i!l:(:Jt!!l.1)
J:J
TOJJ:
5(:fjT
jE
l 'I.:L1-to
11
tJf
~I)
1 Lt.:OJ-(',
iib
cf~\3
LJ:Jr'J.>cc
O')/:7'tJ'ti~~9~lilJ
b(:,
.IE
t:llIl~)
(:-:JL'-rt,
20
(iffi<~~
::i~.>(:>1Jj
 Loading...