

Page 1
1
2
3
4
5
6
7
8
9
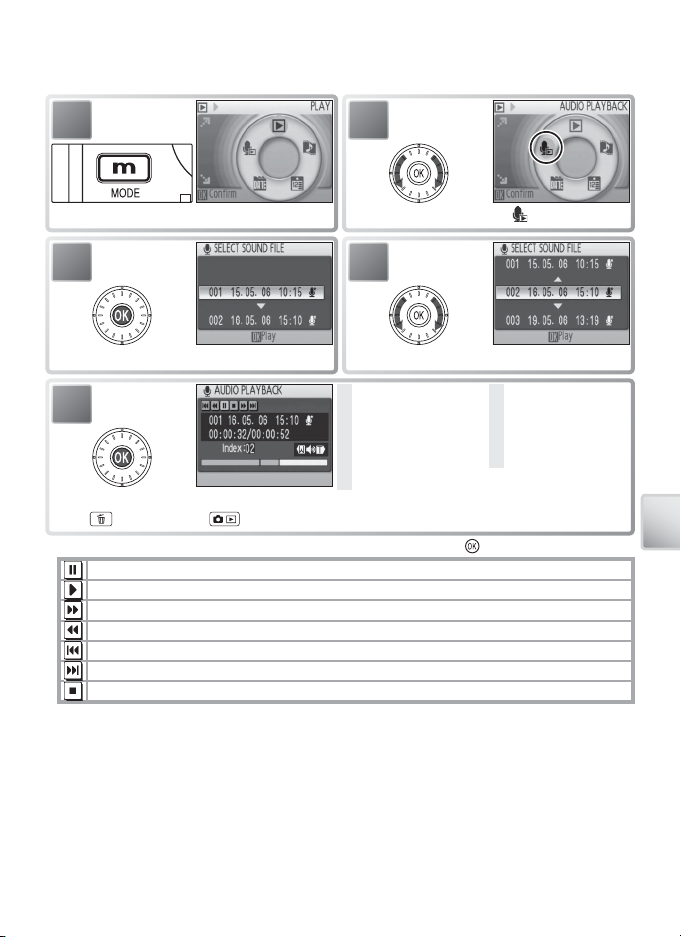
Playing Voice Recordings
To play voice recordings back, select playback mode and follow these steps.
1
Display playback mode menu.
3
Display list of voice recordings.
5
2
3
4
5
1
6
7
8
9
2
4
1 Control icons
2 File number
3 Playback time
4 Index number
5 Progress indicator
*
Highlight .
Select recording.
6 Date of recording
7 Length of recording
8 Volume
9 Index
†
Play recording. Rotate rotary multi selector to advance or rewind. To delete recording,
press button. Press to exit playback and return to recording mode.
* Press rotary multi selector left or right to highlight control, press button to select.
Pause playback.
Resume playback.
Advance recording. Playback resumes when rotary multi selector is released.
Rewind recording. Playback resumes when rotary multi selector is released.
Return to start of current index.
Skip to next index.
End playback and return to voice recording list.
† Zoom control controls volume. Select W to lower volume, T to raise volume.
Voice Recordings
41
Page 2
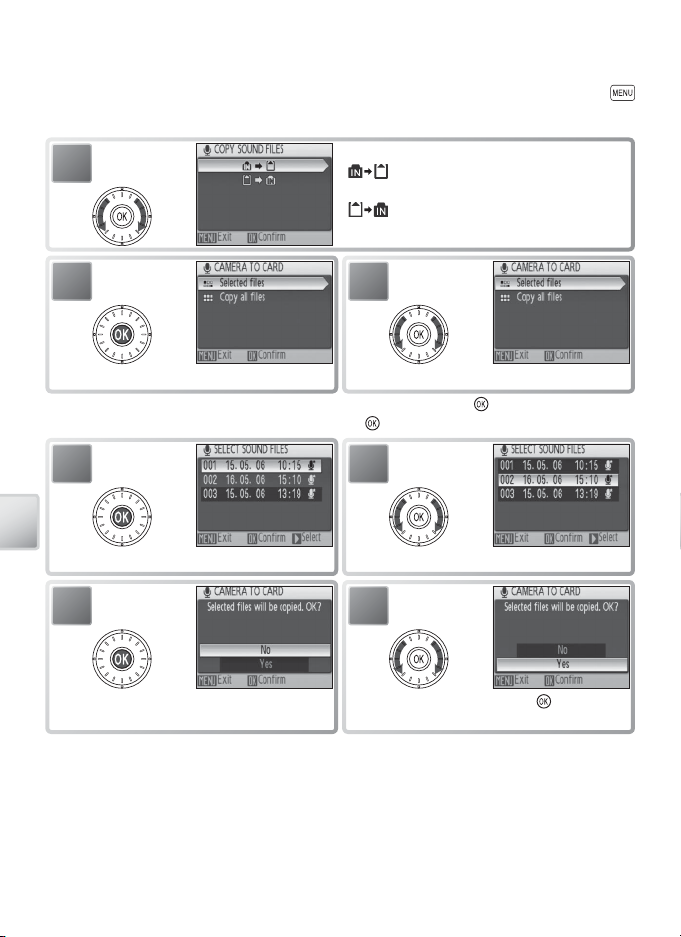
Copying Voice Recordings
To copy voice recordings between internal memory and a memory card, display
the voice recording list shown in Step 3 on the preceding page and press the
button. This option is available only when a memory card is inserted.
1
2
Display menu of copy options.
* To copy all voice recordings, highlight Copy all fi les and press button. Confi rmation
dialog will be displayed; highlight Yes and press button.
4
Voice Recordings
Display list of voice recording fi les.
6
Confi rmation dialog displayed.
Highlight option:
•
: Copy recordings from internal mem-
ory to memory card
• : Copy recordings from memory card
to internal memory
3
Highlight Selected fi les.
*
5
Highlight fi le.
7
Highlight Ye s and press button
to copy fi le.
42
Page 3
Viewing Pictures on the Camera
Erase image (s)?
Confirm
Yes
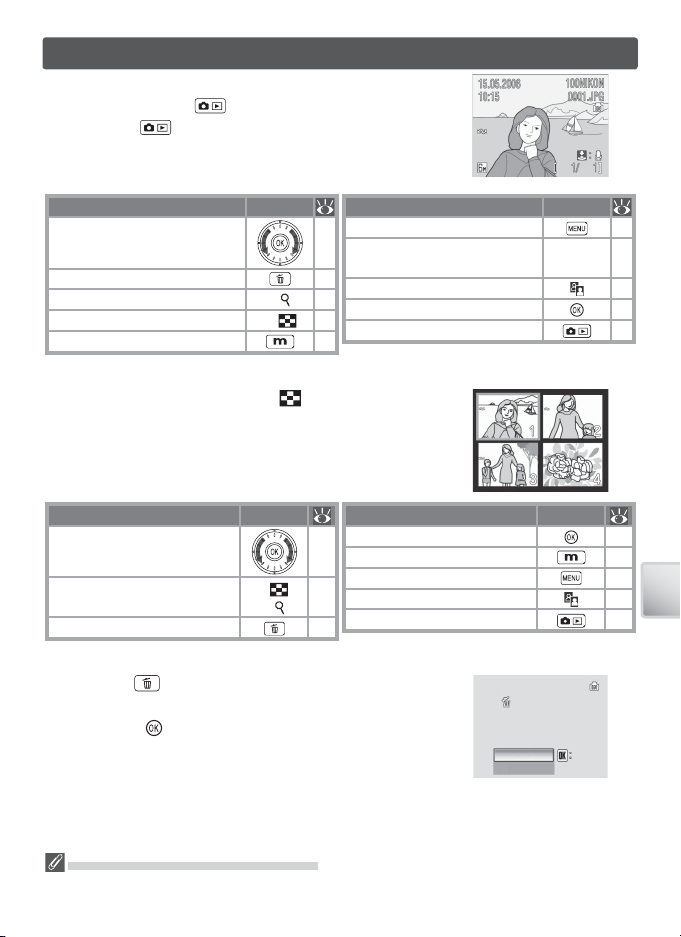
To view pictures full-frame in the monitor (full-frame
playback), press the button (if the camera is off ,
pressing the button for about a second will turn
the camera on in playback mode). The following operations can be performed:
To Pr ess
View other pictures 19
Delete picture
Zoom picture in
View thumbnails
W (
)
T (
)
View playback mode menu
View playback menu
Record/play voice memo
—
Enhance contrast
42
Movie: Play movie
—
Exit to shooting mode
5
To Pr ess
Viewing Multiple Pictures: Thumbnail Playback
Pressing the zoom control to W ( ) in full-frame playback displays pictures in “contact sheets” of four, nine,
or sixteen thumbnail images. The following operations
can be performed while thumbnails are displayed:
To Pr ess
Highlight picture 19
Change number of pictures
displayed
W (
)/
T ( )
Delete highlighted picture
Exit to full-frame playback —
View playback mode menu 5
View playback menu 67
—
Enhance contrast 43
Exit to shooting mode
—
To Pr ess
Deleting Pictures
Pressing the button in full-frame or thumbnail playback displays the dialog shown at right. Highlight Ye s
and press the button to delete the selected picture.
67
Shutter
44
button
43
37
—
—
Viewing Pictures on the Camera
Erase image (s)?
Erase image (s)?
No
Confirm
Confirm
Yes
Yes
Viewing Pictures in Internal Memory
Pictures in internal memory can only be viewed if no memory card is inserted.
43
Page 4
Tak ing a Closer Look: Playback Zoom
Save this image
as displayed?
Confirm
Yes
Scroll
Zoom
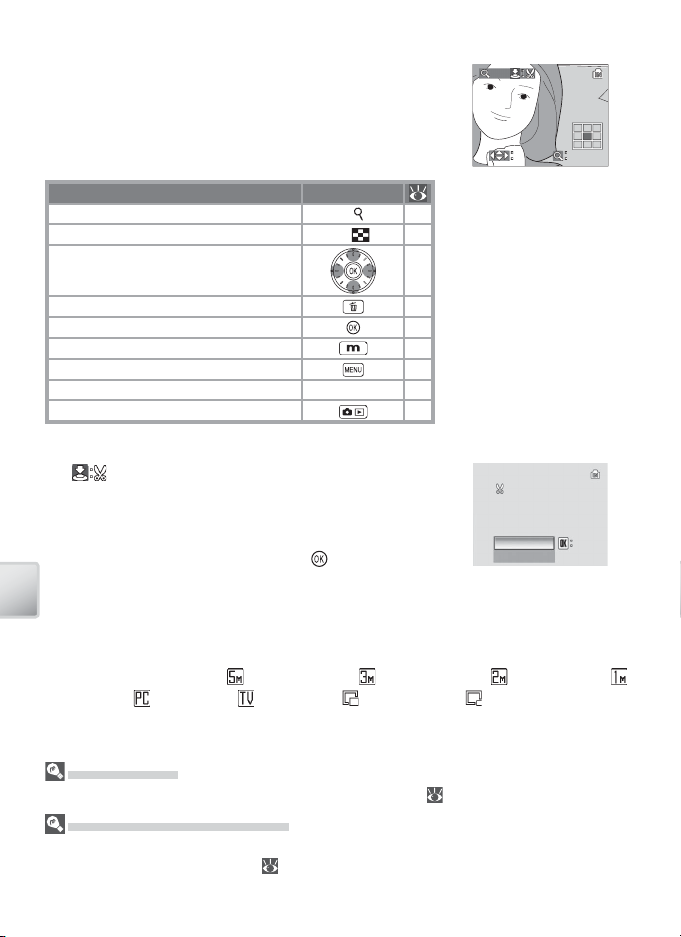
Pressing the zoom control to T during full-frame playback zooms the current picture in 3 ×, with the center
of the picture displayed in the monitor (Quick Playback
Zoom). The following operations can be performed
while pictures are zoomed in:
To Pr ess
Zoom in (maximum 10 ×) T ( )—
Zoom out
W (
View other areas of picture
Delete picture
Exit to full-frame playback 41
View mode menu 5
View playback menu
Create cropped copy (see below) Shutter button —
Exit to shooting mode
—
)
—
41
67
—
×3.0
Scroll
Scroll Zoom
Zoom
Playback zoom display.
Note that “tall” orientation
pictures are displayed in
“wide” orientation when
zoomed in. Select T once
to display picture in “wide”
orientation, again to zoom
picture in 3 ×.
Creating a Cropped Copy
If a icon is displayed in the monitor during playback zoom, the portion of the picture currently visible
in the monitor can be saved to a separate fi le. Pressing
the shutter-release button displays the dialog shown
at right; highlight Ye s and press the button to create a new picture containing only the area visible in
the monitor.
Viewing Pictures on the Camera
Cropped copies are stored as JPEG fi les with a compression ratio of 1 : 8. Depending
on the size of the original and the zoom ratio at the time the copy was created, copies will be 2,592 × 1,944 ( ), 2,048 × 1,536 ( ), 1,600 × 1,200 ( ), 1,280 × 960 ( ),
1,024 × 768 ( ), 640 × 480 ( ), 320 × 240 ( ), or 160 × 120 ( ) pixels in size.
Save this image
Save this image
as displayed?
as displayed?
No
Yes
Yes
Confirm
Confirm
Cropped Copies
See the Appendix for more information on cropped copies ( 89).
Auto Power off (Stand-by Mode)
At default settings, the monitor will turn off if no operations are performed for about a minute
during playback (stand-by mode; 75). The camera will turn off automatically if no operations are performed for another three minutes.
44
Page 5
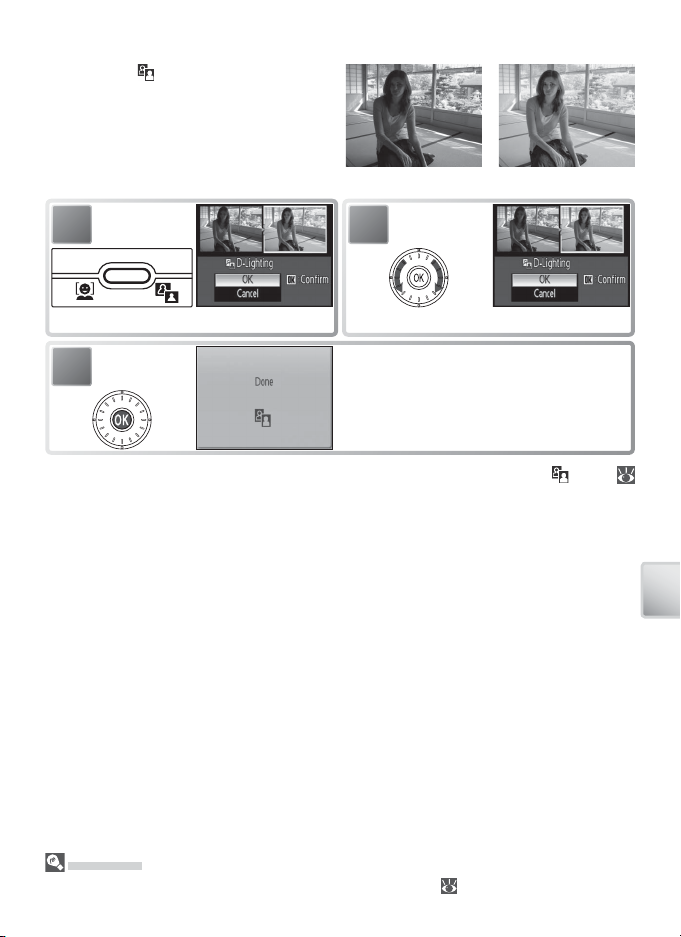
Enhancing Contrast: D-Lighting
Pressing the button during full-frame
or thumbnail playback creates a copy
of the current picture with enhanced
brightness and contrast, brightening
dark and backlit subjects.
Before After
1
Confi rmation dialog displayed.
3
During playback, copies created with D-Lighting are indicated by a icon (
6–7).
2
Highlight OK.
Create copy.
Viewing Pictures on the Camera
D-Lighting
See the Appendix for more information on D-Lighting copies ( 89).
45
Page 6
Voice Memos: Recording and Playback
Confirm
Yes
Erase image (s)?
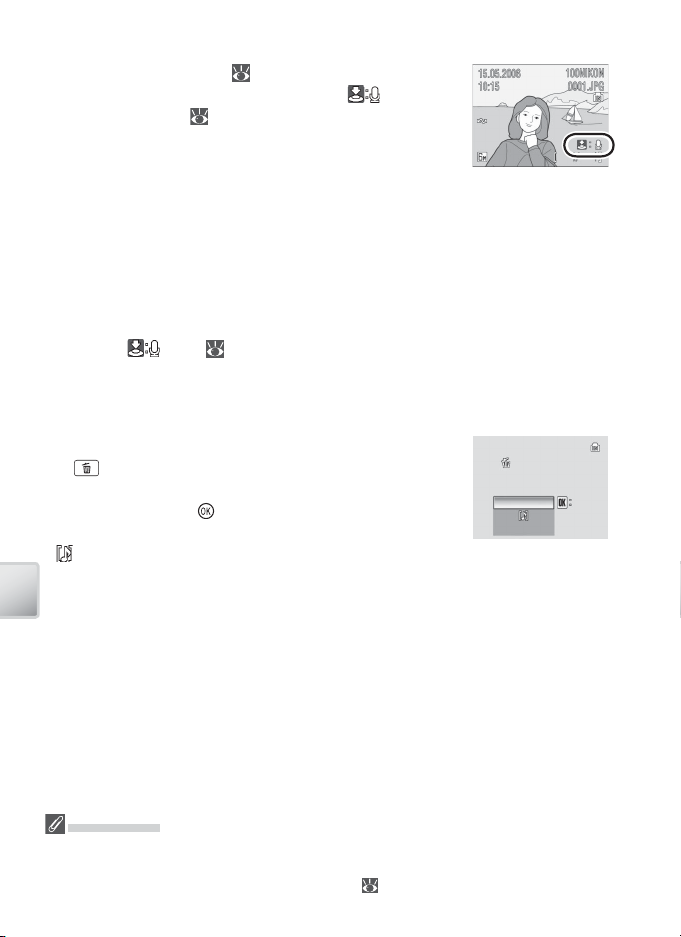
The built-in microphone ( 2) can be used to record
voice memos for pictures marked with a icon in
full-frame playback ( 41).
Recording Voice Memos
To record a voice memo, press and hold the shutter-release button. Recording
ends after about 20 seconds or when the button is released. Do not touch the microphone during recording. Note that if a voice memo already exists for the current
picture, it must be deleted before a new voice memo can be recorded.
Playing Voice Memos
During playback, pictures to which a voice memo has been appended are indicated by a
playback. Volume is controlled by the zoom control. Select W to lower volume, T
to increase.
Deleting Voice Memos
To delete the voice memo for the current picture, press
the button. The dialog shown at right will be displayed; rotate the rotary multi selector to highlight an
option and press the button to select.
• No: Exit without deleting the picture or voice memo.
• : Delete voice memo only.
• Yes : Delete both picture and voice memo.
Viewing Pictures on the Camera
icon ( 6–7). Press the shutter-release button to start and stop
Erase image (s)?
Erase image (s)?
Confirm
Confirm
No
Yes
Yes
Voice Memos
Voice memos can not be added to pictures created with other types of camera. Voice memos
recorded using other types of camera can not be played back on the COOLPIX S6. See the
Appendix for more information on voice memos ( 89).
46
Page 7
Viewing Pictures by Date
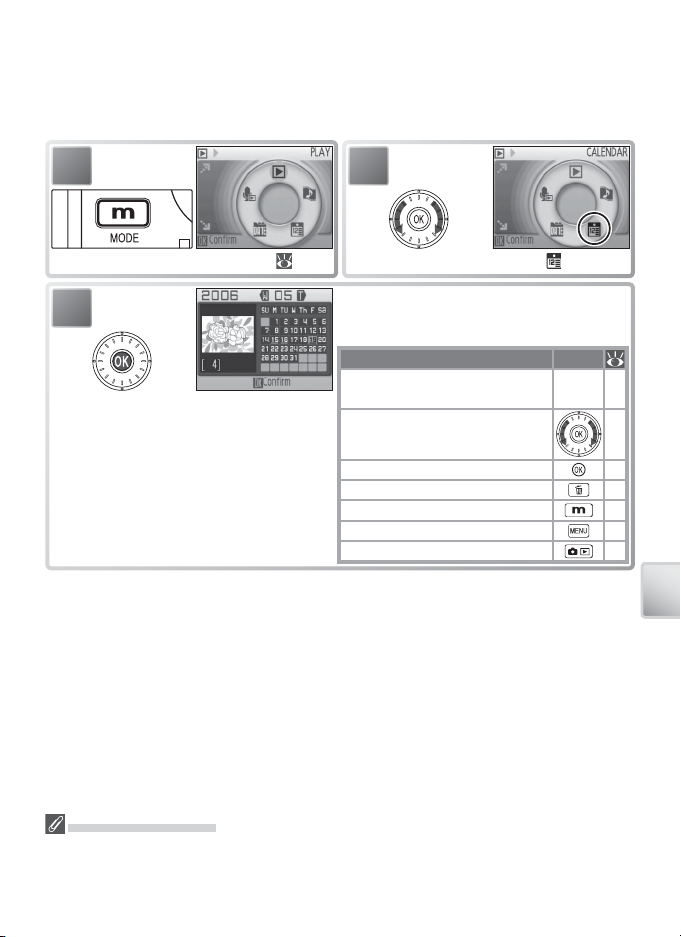
In full-frame and thumbnail playback, pictures taken on selected dates can be selected for viewing, deletion, printing, protection, and transfer.
Calendar Mode: Choose a date from a calendar.
1
Display playback mode menu ( 5).
3
2
Highlight Calendar ( ).
Dates for which pictures exist are underlined
in yellow. The following operations can be
performed:
To Press
Select month (keep control
pressed for quick scroll)
Highlight date (only if pictures
exist for more than one date)
View pictures taken on date 47
Delete all pictures taken on date 41
View playback mode menu 5
View playback menu 46
Exit to shooting mode
W/T —
—
—
Viewing Pictures on the Camera
Calendar/List by Date
The camera lists a maximum of 9,000 pictures for each date. Dates with more than 9,000
pictures are indicated by an asterisk (“*”). Pictures taken while the camera clock is not set are
not displayed.
47
Page 8
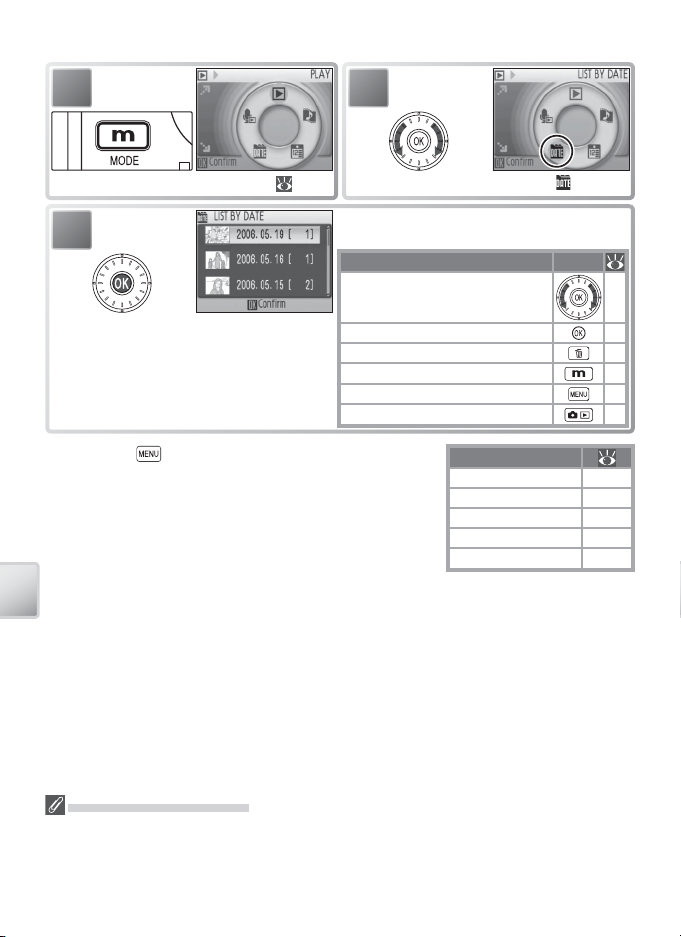
List-by-Date Mode: Choose a date from a list.
1
Display playback mode menu ( 5).
3
* Camera lists up to 30 dates. If pictures ex-
ist for more than 30 dates, all pictures recorded earlier than most recent 29 dates
will be listed together as Past pictures.
2
View dates for which pictures exist. The following operations can be performed:
Highlight date —
View pictures taken on date 47
Delete all pictures taken on date 41
View playback mode menu 5
View playback menu —
Exit to shooting mode
Pressing the button in the calendar or date list displays the options listed at right. These options apply to
all pictures taken on the currently selected date.
Viewing Pictures on the Camera
Highlight List By Date ( ).
To Press
—
Option
Print set 59
Slide show 68
Delete 68
Protect 68
Transfer marking 68
Print Set/Transfer Marking
Selecting
a confi rmation dialog. Selecting Ye s removes existing print or transfer marking from all pic-
tures in internal memory or on the memory card, ensuring that only pictures taken on the
selected date are selected for printing or transfer.
48
Print set
or Transfer marking from the menu for the calendar or date list displays
Page 9
Viewing Pictures
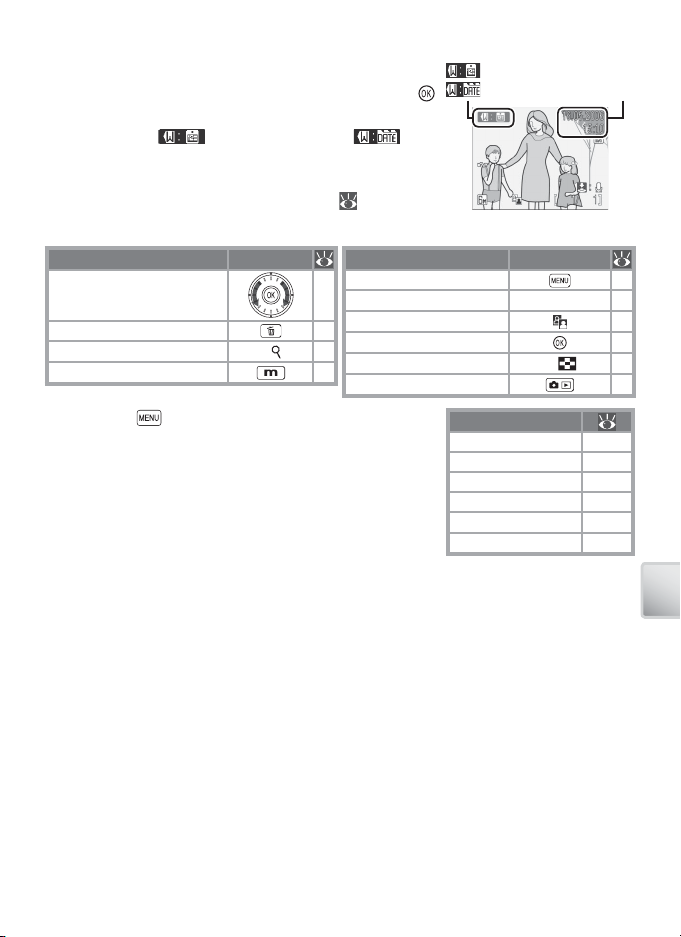
To view pictures taken on a selected date, highlight
the date in the calendar or date list and press the
button. The fi rst picture for that date will be displayed
full frame, with (calendar mode) or (listby-date mode) displayed in the top left corner, and the
date and time of recording displayed in place of the
folder name and fi le number and type (
6–7). The
following operations can be performed:
: calendar mode
: list-by-date mode
Date/
time
To Pr ess
View other pictures taken
on same date
Delete picture
Zoom picture in
View playback mode menu
Pressing the
button in full-frame playback displays
View playback menu
19
Record/play voice memo Shutter button 44
Enhance contrast
41
Movie: Play movie
42
)
T (
Return to date list
5
Exit to shooting mode
To Pr ess
the options listed at right. These options apply only
to the picture currently displayed full frame, although
other pictures taken on the same date can be selected.
W (
)
Option
Print set 59
Slide show 68
Delete 68
Protect 68
Transfer marking 68
Small pic. 69
—
43
37
—
—
Viewing Pictures on the Camera
49
Page 10
Pictmotion by muvee
Save Pictmotion?
No
Change settings
Confirm
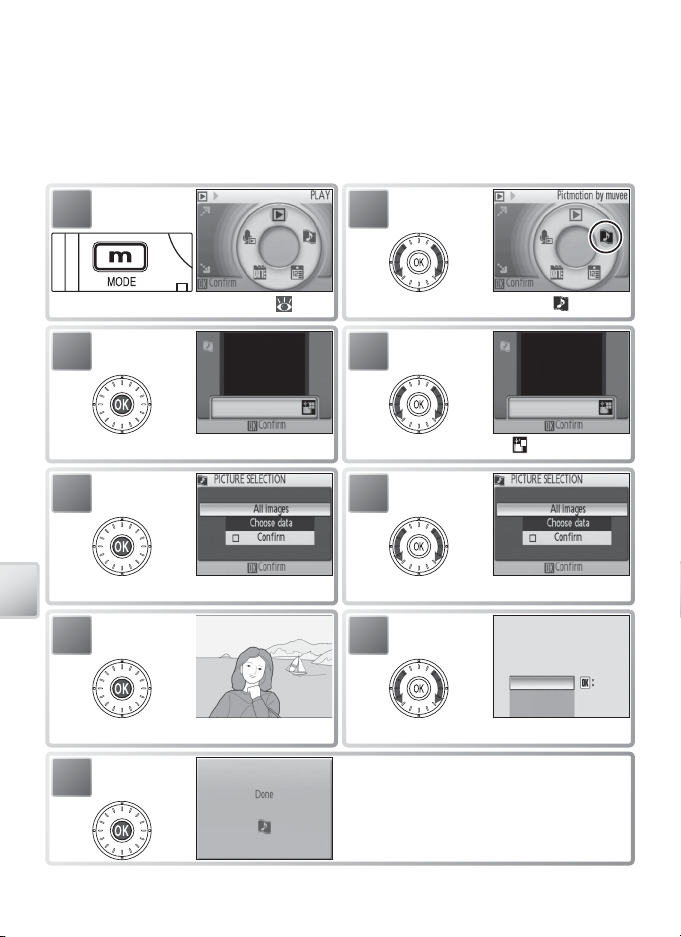
Pictmotion creates slide show movies with custom transitions and background
music. It is only available when a memory card is inserted in the camera.
Creating a Pictmotion Movie
To create a simple movie using the ten most recent pictures during full-frame or
thumbnail playback:
1
Display playback mode menu ( 5).
3
Display options.
5
Display options.
Viewing Pictures on the Camera
7
View Pictmotion.
9
2
Highlight Pictmotion ( ).
4
Highlight .
6
Highlight All images.
Save Pictmotion?
8
When dialog is displayed, highlight Yes .
Save Pictmotion and return to Step 3.
Save Pictmotion?
Yes
Change settings
Change settings
No
No
Confirm
Confirm
Pictmotion is powered by muvee Technologies.
50
 Loading...