

Page 1
En
The Nikon Guide to Digital Photography
with the
DIGITAL CAMERA
Page 2

The documentation for this product includes the manuals listed below.
Please be sure to read all instructions thoroughly to get the most from your
cam era.
Quick Start Guide
The Quick Start Guide takes you through the process of unpacking and
set ting up your Nikon digital camera, taking your fi rst photographs, and
trans fer ring them to your computer.
Guide to Digital Photography
The Guide to Digital Photography (this manual) provides complete op er at ing
in struc tions for your camera.
Reference CD
The ref er ence CD contains information on the software provided with
your camera. For information on view ing the reference CD, see the Quick
Start Guide.
CAUTION: Foreign Matter on the Low-Pass Filter
Nikon takes every possible precaution to pre vent foreign matter from com ing into
con tact with the low-pass fi lter during production and ship ping. The D70, how ev er,
is designed to be used with interchangeable lens es, and for eign matter may enter the
camera when lens es are removed or exchanged. Once inside the camera, this for eign
matter may adhere to the low-pass fi lter, where it may appear in photographs tak en
under cer tain con di tions. To prevent foreign matter from entering the camera, do not
exchange lenses in dusty environments. To pro tect the camera when no lens is in place,
be sure to replace the body cap pro vid ed with the camera, being care ful to fi rst remove
all dust and other foreign matter that may be ad her ing to the body cap.
Should foreign matter fi nd its way onto the low-pass fi lter, clean the low-pass fi lter as
instructed on pages 194–195 of this manual, or have the low-pass fi lter cleaned by
authorized Nikon ser vice per son nel. Pho to graphs affected by the presence of for eign
matter on the low-pass fi lter can be re touched us ing Nikon Capture 4 version 4.1 or
later (available separately) or the clean image options available in some third-party
im ag ing software.
Product Documentation
Page 3
…on connecting to a com put er or TV…
…on printing photos on a PictBridge printer…
How to Read This Manual
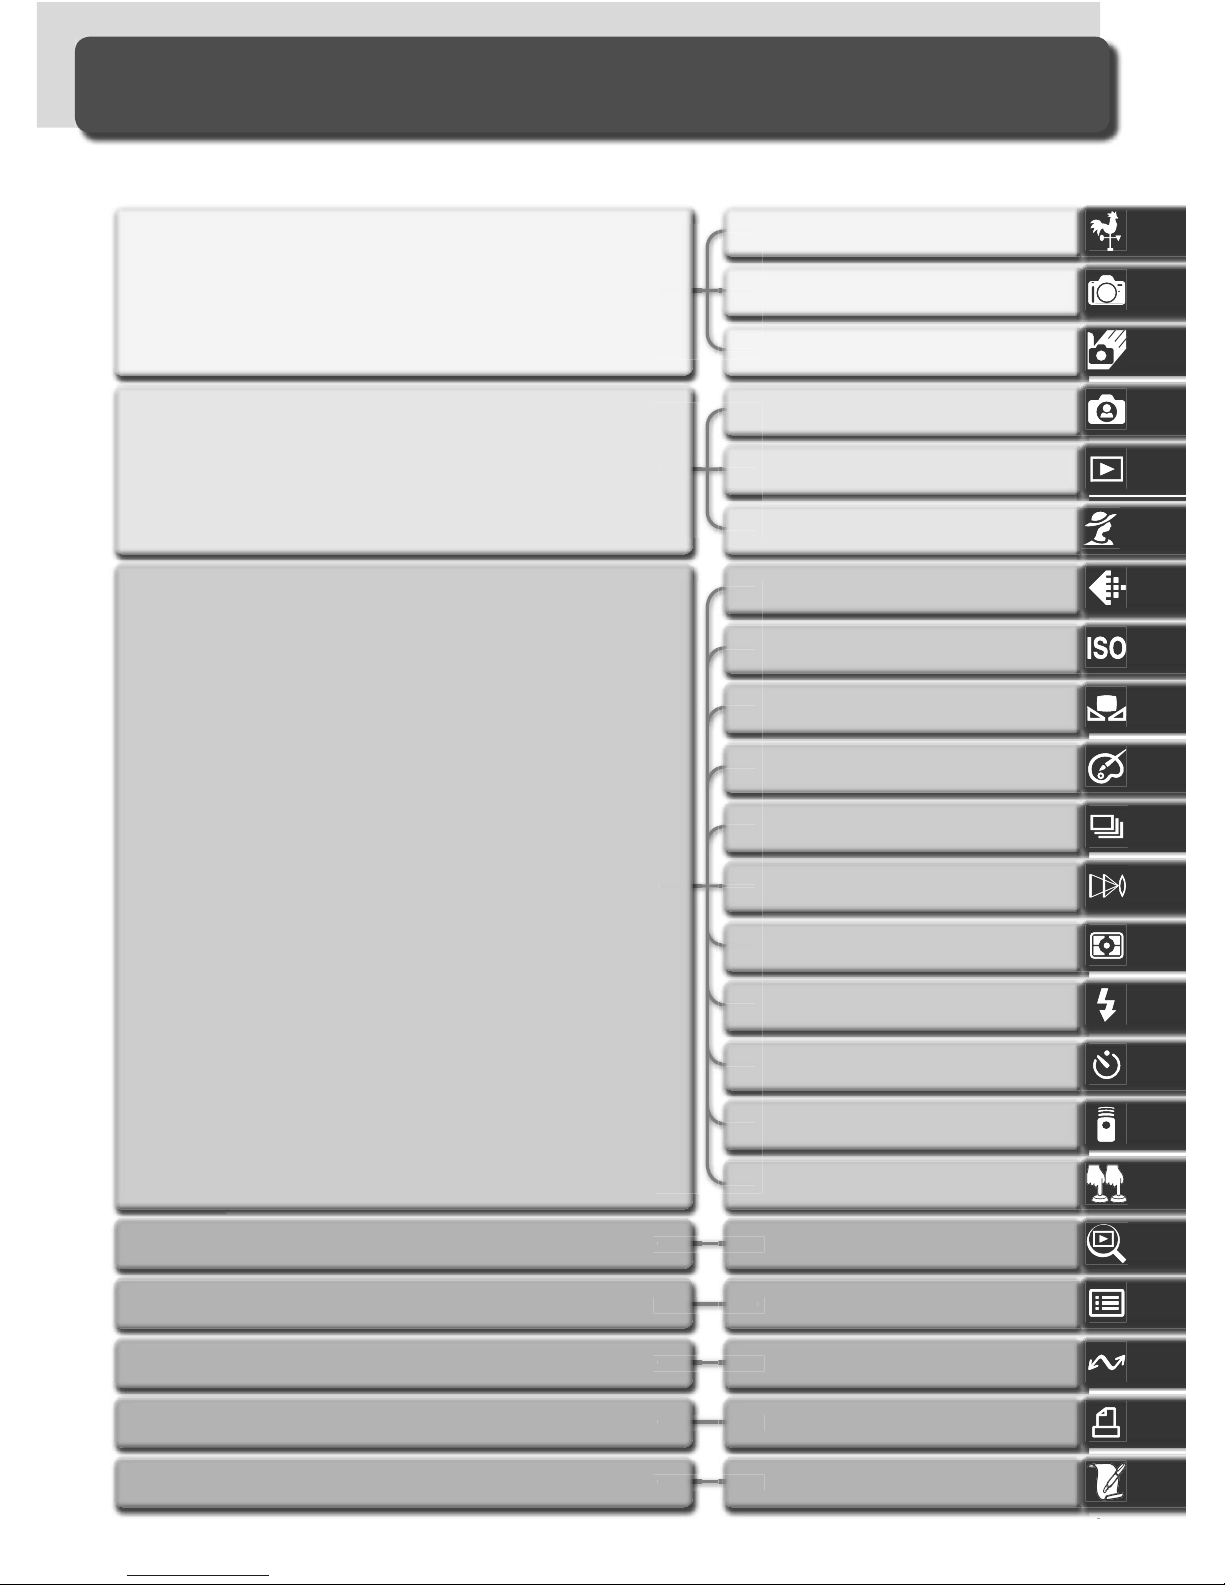
First, be aware of the warnings, cautions, and notices on pages ii–v.
…and on ac ces so ries and trou ble shoot ing.
Refer to these chapters for more on play back…
Once you have mastered the basics of dig i tal
photography, you can read these sections for
complete in for ma tion on when and how to use
camera controls.
Now you are ready to take photographs and
play them back. You can then try your hand
at creative composition as described in “Digital
Vari-Programs.”
Next, read “Overview” and “Getting to Know the
Camera” to fa mil iar ize your self with the con ven tions used in this man u al and the names of cam era
parts, then set up your cam era as de scribed in
“First Steps.”
…on cam era menus and cus tom settings… Menu Guide
More About Playback
Technical Notes
Focus
Digital Vari-Programs
Self-Timer Mode
Sensitivity (ISO Equivalency)
Using the Remote Control
Two-Button Reset
White Balance
Optimizing Images
Choosing a Shooting Mode
Basic Playback
Basic Photography
Getting to Know the Camera
First Steps
Connections
Flash Photography
Exposure
Image Quality and Size
Overview
Printing Photographs
Page 4
ii
WARNINGS
Do not look at the sun through the view-
fi nder
Viewing the sun or other strong light
source through the viewfi nder could
cause per ma nent visual im pair ment.
Turn off immediately in the event of
malfunction
Should you notice smoke or an un usu al
smell coming from the equip ment or
from the AC adapt er (avail able sep a rate ly), unplug the AC adapt er and
re move the battery im me di ate ly, taking care to avoid burns. Con tin ued
op er a tion could re sult in injury. After
re mov ing the bat tery, take the equip ment
to a Nikon-au tho rized service cen ter for
in spec tion.
Do not use in the presence of fl am-
ma ble gas
Do not use electronic equip ment in the
presence of fl ammable gas, as this could
result in ex plo sion or fi re.
Do not place strap around the neck of
an infant or child
Placing the camera strap around the
neck of an infant or child could result
in strangulation.
Do not disassemble
Touching the product’s internal parts
could result in injury. In the event of
a malfunction, the prod uct should be
re paired only by a qualifi ed tech ni cian.
Should the product break open as the
re sult of a fall or other ac ci dent, re move
the battery and/or AC adapt er and then
take the prod uct to a Nikon-au tho rized
ser vice cen ter for in spec tion.
Observe proper precautions when han-
dling batteries
Batteries may leak or explode if im prop er ly handled. Observe the fol low ing
pre cau tions when handling bat ter ies for
use in this product:
• Be sure the product is off before re plac ing the battery. If you are using an
AC adapter, be sure it is un plugged.
• Use only batteries approved for use in
this equipment. Do not mix old and new
batteries or batteries of different types.
• Do not at tempt to insert the battery
upside down or back wards.
• Do not short or disassemble the bat tery.
• Do not expose the battery to fl ame or
to excessive heat.
• Do not immerse in or expose to wa ter.
For Your Safety
To prevent damage to your Nikon product or injury to yourself or to others,
read the following safety precautions in their entirety before using this equipment. Keep these safety instructions where all those who use the product
will read them.
The consequences that could result from failure to observe the precautions
listed in this section are indicated by the following symbol:
This icon marks warnings, information that should be read before using this
Nikon product to prevent possible injury.
Page 5
iii
• Replace the terminal cover when transporting the battery. Do not transport
or store with metal objects such as
neck lac es or hair pins.
• Batteries are prone to leakage when
fully discharged. To avoid damage to
the prod uct, be sure to remove the battery when no charge re mains.
• When the battery is not in use, at tach
the terminal cover and store in a cool
place.
• Immediately after use, or when the
prod uct is used on battery power for
an ex tend ed period, the bat tery may
become hot. Before re mov ing the bat tery, turn the camera off and al low the
battery to cool.
• Discontinue use immediately should you
notice any changes in the bat tery, such
as dis col or a tion or de for ma tion.
Use appropriate cables
When connecting cables to the in put and
output jacks, use only the ca bles pro vid ed or sold by Nikon for the pur pose,
to main tain com pli ance with prod uct
reg u la tions.
Keep out of reach of children
Particular care should be tak en to pre vent
infants from putting the bat tery or other
small parts into their mouths.
Removing memory cards
Memory cards may become hot dur ing use. Observe due cau tion when
re mov ing memory cards from the
cam era.
CD-ROMs
The CD-ROMs on which the soft ware
and manuals are dis trib ut ed should not
be played back on audio CD equip ment.
Playing CD-ROMs on an audio CD play er
could cause hear ing loss or dam age the
equip ment.
Observe caution when using the fl ash
Using the fl ash close to your sub ject’s
eyes could cause tem po rary vi su al
im pair ment. Par tic u lar care should
be observed if pho to graph ing in fants,
when the fl ash should be no less than
one meter (39˝) from the sub ject.
When using the viewfi nder
When operating the diopter ad just ment
control with your eye to the viewfi nder,
care should be tak en not to put your
fi n ger in your eye ac ci den tal ly.
Avoid contact with liquid crystal
Should the monitor break, care should
be tak en to avoid injury due to bro ken
glass and to pre vent liq uid crystal from
the mon i tor touch ing the skin or en ter ing
the eyes or mouth.
Page 6
iv
Notice for customers in the U.S.A.
Federal Communications Commission (FCC) Radio Frequency Interference Statement
D70
Tested To Comply
With FCC Standards
FOR HOME OR OFFICE USE
Notices
CAUTIONS
Modifi cations
The FCC requires the user to be notifi ed
that any changes or modifi cations made to
this device that are not expressly approved
by Nikon Corporation may void the user’s
authority to operate the equipment.
Interface Cables
Use the interface cables sold or provided
by Nikon for your equipment. Using other
interface cables may exceed the limits of
Class B Part 15 of the FCC rules.
Notice for customers in the State of California
WARNING: Handling the cord on this
product will expose you to lead, a chemical
known to the State of California to cause
birth defects or other reproductive harm.
Wash hands after handling.
Nikon Inc.,
1300 Walt Whitman Road, Melville, New York
11747-3064, U.S.A. Tel.: 631-547-4200
• No part of the manuals included with
this product may be reproduced, transmitted, transcribed, stored in a retrieval
system, or translated into any language
in any form, by any means, without
Nikon’s prior written permission.
• Nikon reserves the right to change the
specifi cations of the hardware and software described in these manuals at any
time and without prior notice.
• Nikon will not be held liable for any
damages resulting from the use of this
product.
• While every effort has been made to
ensure that the information in these
manuals is accurate and complete, we
would appreciate it were you to bring
any errors or omissions to the attention
of the Nikon representative in your area
(address provided separately).
This equipment has been tested and found
to comply with the limits for a Class B digital device, pursuant to Part 15 of the FCC
rules. These limits are designed to provide
reasonable protection against harmful
interference in a residential installation.
This equipment generates, uses, and can
radiate radio frequency energy and, if not
installed and used in accordance with the
instructions, may cause harmful interference to radio communications. However,
there is no guarantee that interference
will not occur in a particular installation.
If this equipment does cause harmful interference to radio or television reception,
which can be determined by turning the
equipment off and on, the user is encouraged to try to correct the interference by
one or more of the following measures:
•
Reorient or relocate the receiving antenna.
• Increase the separation between the
equipment and receiver.
• Connect the equipment into an outlet
on a circuit different from that to which
the receiver is connected.
• Consult the dealer or an experienced
radio/television technician for help.
Page 7

v
Notice for customers in Canada
CAUTION
This class B digital apparatus meets all requirements of the Canadian Interference
Causing Equipment Regulations.
ATTENTION
Cet appareil numérique de la classe B respecte toutes les exigences du Règlement
sur le matériel brouilleur du Canada.
Notice Concerning Prohibition of Copying or Reproduction
Note that simply being in possession of material that has been digitally copied or reproduced
by means of a scanner, digital camera or other device may be punishable by law.
• Items prohibited by law from being
copied or reproduced
Do not copy or reproduce paper money,
coins, securities, government bonds, or
local government bonds, even if such
copies or reproductions are stamped
“Sample.”
The copying or reproduction of paper
money, coins, or securities which are
circulated in a foreign country is prohibited.
Unless the prior permission of the
government has been obtained, the
copying or reproduction of unused postage stamps or post cards issued by the
government is prohibited.
The copying or reproduction of stamps
issued by the government and of certifi ed documents stipulated by law is
prohibited.
• Cautions on certain copies and reproductions
The government has issued cautions on
copies or reproductions of securities issued by private companies (shares, bills,
checks, gift certifi cates, etc.), commuter
passes, or coupon tickets, except when
a minimum of necessary copies are to be
provided for business use by a company.
Also, do not copy or reproduce passports issued by the government, licenses
issued by public agencies and private
groups, ID cards, and tickets, such as
passes and meal coupons.
• Comply with copyright notices
The copying or reproduction of copyrighted creative works such as books,
music, paintings, woodcut prints, maps,
drawings, movies, and photographs is
governed by national and international
copyright laws. Do not use this product
for the purpose of making illegal copies
or to infringe copyright laws.
Trademark Information
Apple, the Apple logo, Macintosh, Mac OS, Pow er Macintosh, and PowerBook are reg is tered trade marks of Apple
Computer, Inc. Power Mac, iMac, and iBook are trade marks of Ap ple Com put er, Inc. Microsoft and Win dows are
reg is tered trade marks of Microsoft Corporation. Pentium is a trade mark of Intel Cor po ra tion. CompactFlash is a
trade mark of SanDisk Cor po ra tion. Microdrive is a registered trademark of Hitachi Global Storage Technologies in
the United States and/or other countries. Lexar Me dia is a trade mark of Lexar Me dia Cor po ra tion. PictBridge is a
trademark. All oth er trade names men tioned in this man u al or the oth er doc u men ta tion pro vid ed with your Nikon
prod uct are trade marks or reg is tered trade marks of their re spec tive holders.
Page 8

vi
Table of Contents
For Your Safety ................................................................................................ ii
Notices ............................................................................................................ iv
Introduction....................................................................................................... 1
Overview .......................................................................................................... 2
Getting to Know the Camera.......................................................................... 3
First Steps ......................................................................................................... 13
Attaching the Camera Strap............................................................................. 13
Inserting Batteries ............................................................................................ 14
Basic Setup ...................................................................................................... 16
Attaching Lenses.............................................................................................. 18
Inserting Memory Cards................................................................................... 20
Tutorial............................................................................................................... 23
Basic Photography ........................................................................................... 24
Step 1—Rotate the Mode Dial to
................................................................ 24
Step 2—Ready the Camera .............................................................................. 24
Step 3—Adjust Camera Settings ...................................................................... 26
Step 4—Frame a Photograph ........................................................................... 27
Step 5—Focus.................................................................................................. 28
Step 6—Take the Photograph .......................................................................... 30
Basic Playback .................................................................................................. 31
Digital Vari-Programs ...................................................................................... 32
Taking Photographs .......................................................................................... 35
When to Use Shooting Options........................................................................ 36
Using Camera Menus....................................................................................... 39
Image Quality and Size.................................................................................... 41
Image Quality .................................................................................................. 41
Image Size ....................................................................................................... 43
Sensitivity (ISO Equivalency)............................................................................ 46
White Balance .................................................................................................. 48
Fine-Tuning White Balance ............................................................................... 50
Preset White Balance........................................................................................ 52
Optimizing Images........................................................................................... 56
Customizing Image Enhancement Options ....................................................... 57
Choosing a Shooting Mode............................................................................. 62
Focus ................................................................................................................. 64
Focus Mode ..................................................................................................... 64
Focus Area Selection ........................................................................................ 66
Focus Lock ....................................................................................................... 70
The AF-Assist Illuminator.................................................................................. 72
Getting Good Results with Autofocus .............................................................. 73
Manual Focus .................................................................................................. 74
Page 9

vii
Exposure ........................................................................................................... 75
Metering.......................................................................................................... 75
Exposure Mode................................................................................................ 76
Autoexposure Lock .......................................................................................... 84
Exposure Compensation................................................................................... 86
Bracketing ....................................................................................................... 87
Flash Photography ........................................................................................... 94
Flash Sync Modes............................................................................................. 95
Using the Built-in Speedlight ............................................................................ 97
Self-Timer Mode............................................................................................... 105
Using a Remote Control .................................................................................. 107
Two-Button Reset............................................................................................. 111
More About Playback ....................................................................................... 113
Single-Image Playback...................................................................................... 114
Photo Information............................................................................................ 116
Viewing Multiple Images: Thumbnail Playback.................................................. 118
Taking a Closer Look: Playback Zoom ............................................................... 120
Protecting Photographs from Deletion.............................................................. 121
Deleting Individual Photographs....................................................................... 122
Menu Guide....................................................................................................... 123
The Playback Menu.......................................................................................... 124
Delete.............................................................................................................. 124
Playback Fldr.................................................................................................... 126
Rotate Tall ........................................................................................................ 126
Slide Show....................................................................................................... 127
Hide Image ...................................................................................................... 129
Print Set........................................................................................................... 130
The Shooting Menu ......................................................................................... 132
Optimize Image................................................................................................ 132
Long Exp. NR ................................................................................................... 133
Image Quality .................................................................................................. 134
Image Size ....................................................................................................... 134
White Bal......................................................................................................... 134
ISO .................................................................................................................. 134
Custom Settings ............................................................................................... 135
The Setup Menu............................................................................................... 155
Folders............................................................................................................. 156
File No. Seq...................................................................................................... 159
Format............................................................................................................. 160
CSM Menu ...................................................................................................... 161
Date ................................................................................................................ 161
Page 10

viii
LCD Brightness ................................................................................................ 161
Mirror Lock-Up................................................................................................. 162
Video Mode..................................................................................................... 162
Language......................................................................................................... 163
Image Comment.............................................................................................. 163
USB ................................................................................................................. 165
Dust Ref Photo................................................................................................. 166
Firmware Ver. ................................................................................................... 167
Image Rotation ................................................................................................ 168
Connections....................................................................................................... 169
Television Playback .......................................................................................... 170
Connecting to a Computer.............................................................................. 171
Printing Photographs........................................................................................ 175
Technical Notes.................................................................................................. 181
Camera Settings ............................................................................................... 182
Optional Accessories........................................................................................ 183
Lenses for the D70........................................................................................... 183
Optional Speedlights........................................................................................ 186
Other Accessories............................................................................................. 190
Caring for the Camera..................................................................................... 193
Troubleshooting............................................................................................... 198
Specifi cations ................................................................................................... 201
Index .................................................................................................................. 206
Page 11
1
This chapter is divided into the following sections:
Overview
Read this section for a description of how this
man u al is organized and for an ex pla na tion of the
symbols and conventions used.
Getting to Know the Camera
Bookmark this section and refer to it for information on the names and func tions of camera parts.
First Steps
This section details the steps required to ready the
camera for use: inserting the battery and memory
card, attaching a lens and cam era strap, and setting the date, time, and lan guage.
Introduction
Getting Started
Page 12
2
Introduction—Overview
This icon marks settings that can be
fi ne-tuned from the Custom Set tings menu.
This icon marks settings that can be
adjusted using camera menus.
Overview
About This Manual
Take Test Shots
Before taking pictures on important occasions (for example, at weddings or be fore
tak ing the cam era with you on a trip), take a test shot to ensure that the camera is
func tion ing normally. Nikon will not be held liable for damages or lost profi ts that may
result from product malfunction.
Life-Long Learning
As part of Nikon’s “Life-Long Learning” commitment to ongoing prod uct sup port and
ed u ca tion, con tin u al ly-updated information is avail able on-line at the following sites:
• For users in the U.S.A.: http://www.nikonusa.com/
• For users in Europe: http://www.europe-nikon.com/support
• For users in Asia, Oceania, the Middle East, and Africa: http://www.nikon-asia.com/
Visit these sites to keep up-to-date with the latest product in for ma tion, tips, an swers
to fre quent ly-asked ques tions (FAQs), and gen er al advice on digital imaging and pho tog ra phy. Ad di tion al information may be available from the Nikon rep re sen ta tive in
your area. See the URL below for contact in for ma tion:
http://nikonimaging.com/
Replacing This Manual
Should you lose this manual, replacements can be ordered, for a fee, from any au tho rized Nikon service representative.
Thank you for your purchase of a Nikon D70 single-lens refl ex (SLR) digital
camera with interchangeable lenses. This manual has been written to help
you enjoy taking pictures with your Nikon digital camera. Read this manual
thoroughly before use, and keep it handy when using the product.
To make it easier to fi nd the information you need, the following sym bols
and con ven tions are used:
This icon marks cautions, information that should be read before use
to prevent damage to the camera.
This icon marks tips, additional information that may be helpful when
using the camera.
This icon marks notes, information
that should be read before using
the camera.
This icon indicates that more information is available elsewhere in this
manual or in the Quick Start Guide.
Page 13
3
Introduction—Getting to Know the Camera
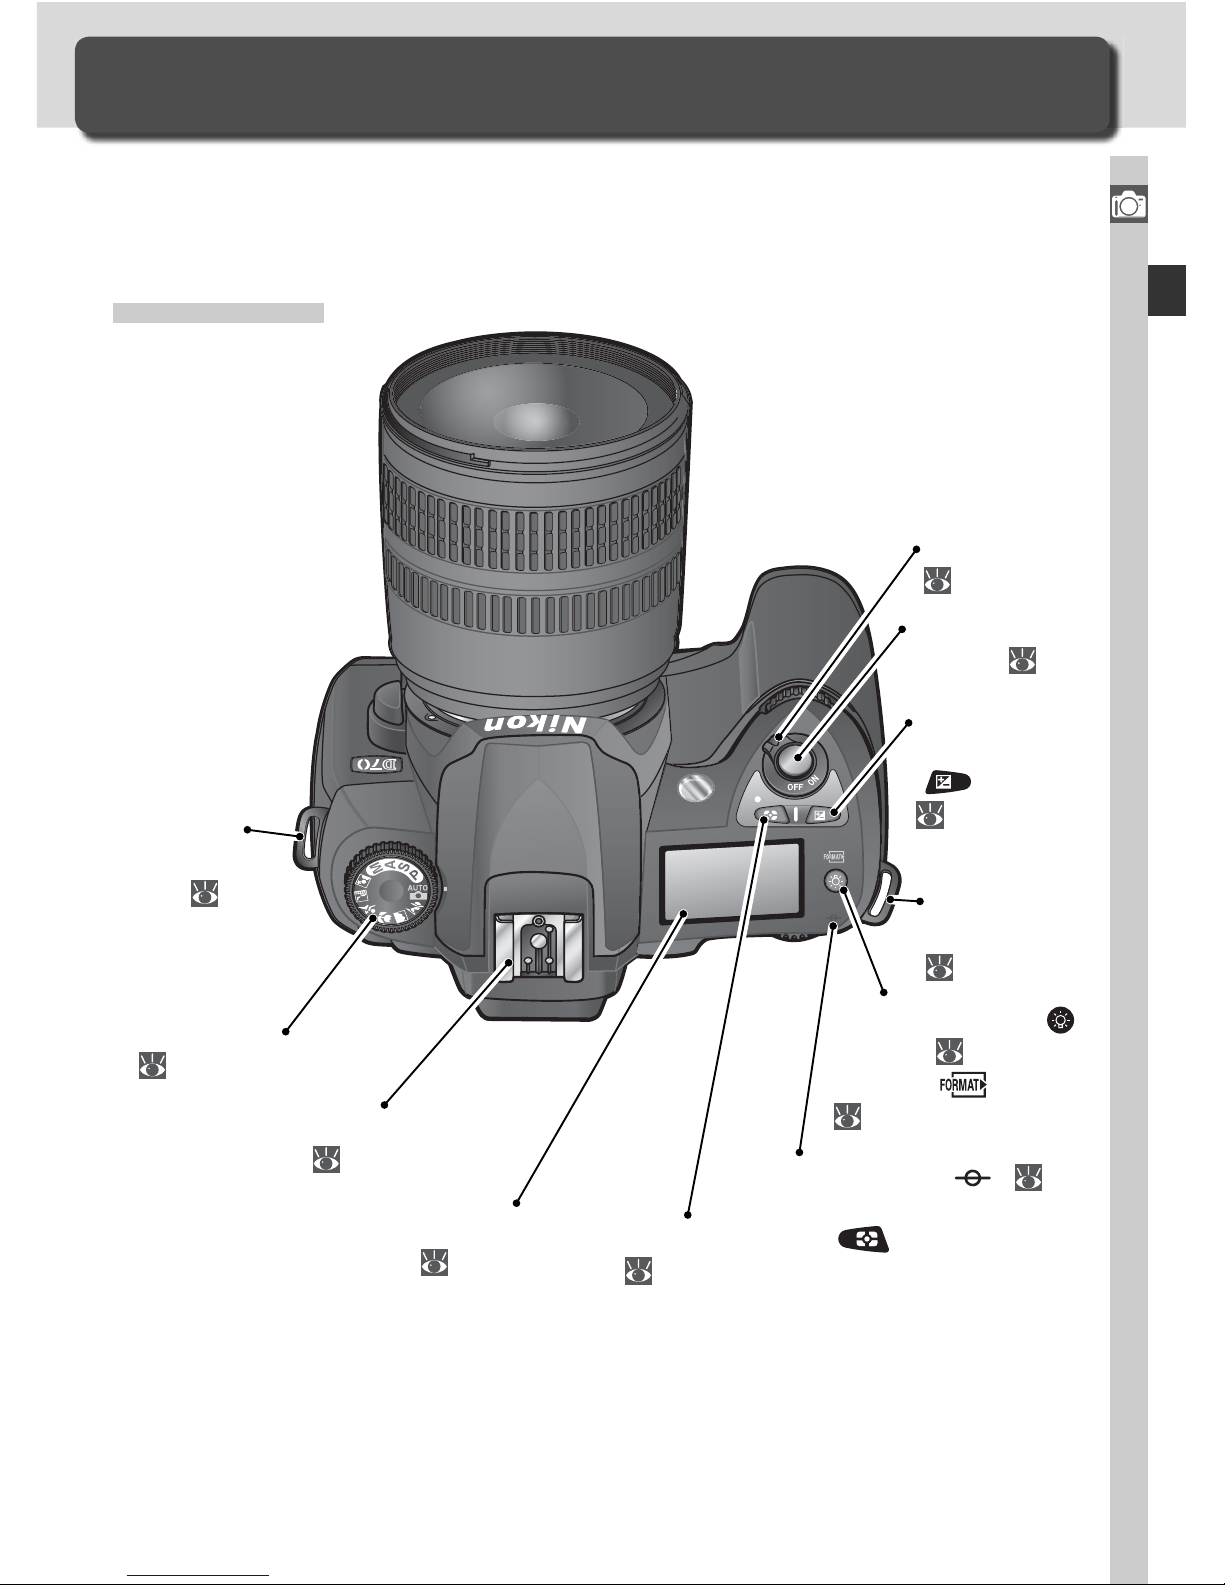
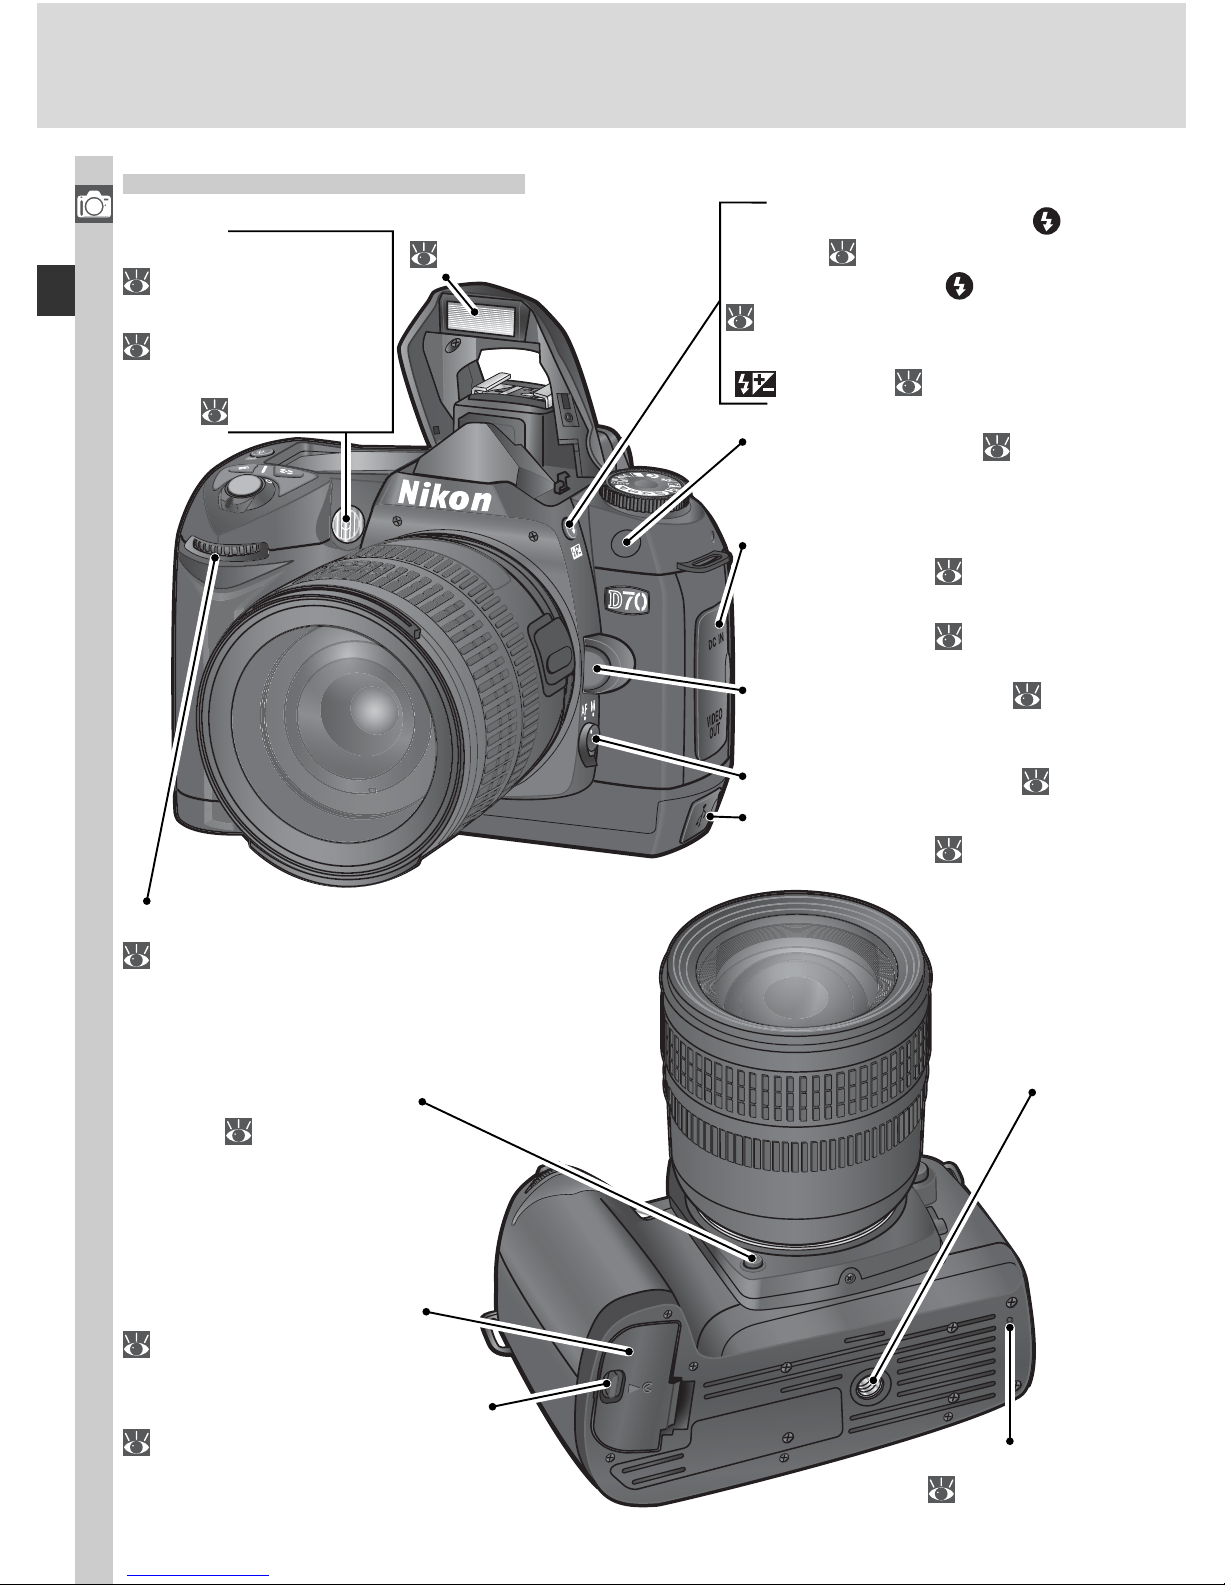
Eyelet for
camera
strap: 13
Mode dial:
10
Accessory shoe:
187
LCD illuminator ( )
button: 7
Format ( ) button:
21
Exposure
compensation
(
) button:
86
Shutter-release
button:
12
Power switch:
24
Control panel:
6
Focal plane mark (
): 74
Eyelet for
camera strap:
13
Metering mode (
) button:
75
Take a few moments to familiarize yourself with camera controls and displays. You may fi nd it helpful to bookmark this section and refer to it as you
read through the rest of the manual.
Camera Body
Getting to Know the Camera
Camera Controls and Displays
Page 14
4
Introduction—Getting to Know the Camera
Camera Body (continued)
Depth-of-fi eld preview
button:
76
Tripod
socket
Battery-chamber cover:
14
Battery-chamber cover latch:
14
Reset switch:
200
Lens release button: 19
DC-in connector
(under cover):
170
Video connector
(under cover): 170
Speedlight lock release ( )
button: 97
Flash sync mode ( ) button:
97
Flash exposure compensation
(
) button: 102
Self-timer lamp:
105, 107
AF-assist illuminator:
72
Red-eye reduction
lamp: 95
Sub-command dial:
147
Built-in Speedlight:
94
USB connector
(under cover):
171
Focus-mode selector:
64
Infrared receiver :
107
Page 15
5
Introduction—Getting to Know the Camera
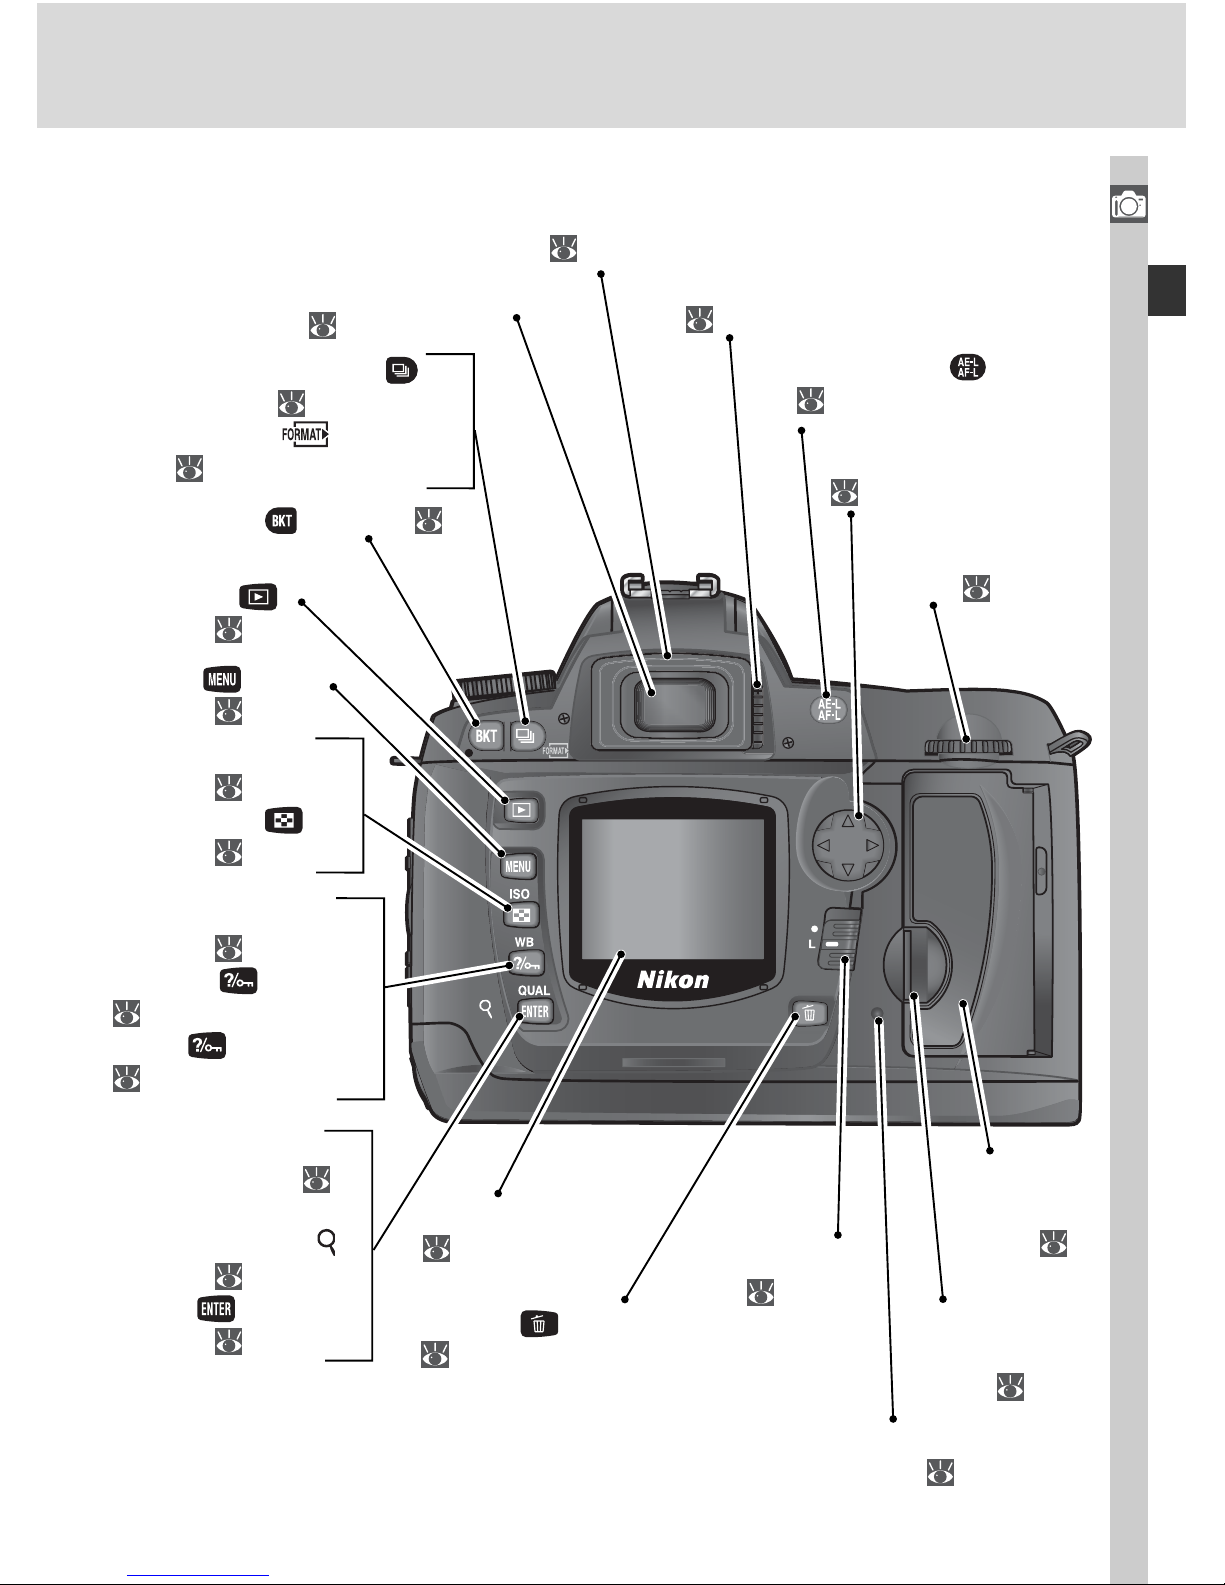
Viewfi nder eyepiece:
27
Bracketing (
) button:
87
Playback (
)
button: 114
Menu (
)
button: 39
Monitor:
13, 193
Viewfi nder eyepiece
cup:
27
Delete (
) button:
122
Focus selector
lock: 66
Memory card
slot cover
latch: 20
Multi selector:
12
Main command
dial:
147
AE / AF lock ( ) button:
84
Memory
card slot
cover:
20
Memory card access
lamp:
30
Diopter adjustment control:
27
Image quality / size
(QUAL) button:
41
Playback zoom ( )
button: 120
Enter ( )
button: 40
Sensitivity (ISO)
button:
46
Thumbnail ( )
button: 118
White balance (WB)
button:
48
Protect ( ) button:
121
Help ( ) button:
136
Shooting mode ( )
button: 62
Format ( ) button:
21
Page 16
6
Introduction—Getting to Know the Camera
Control Panel
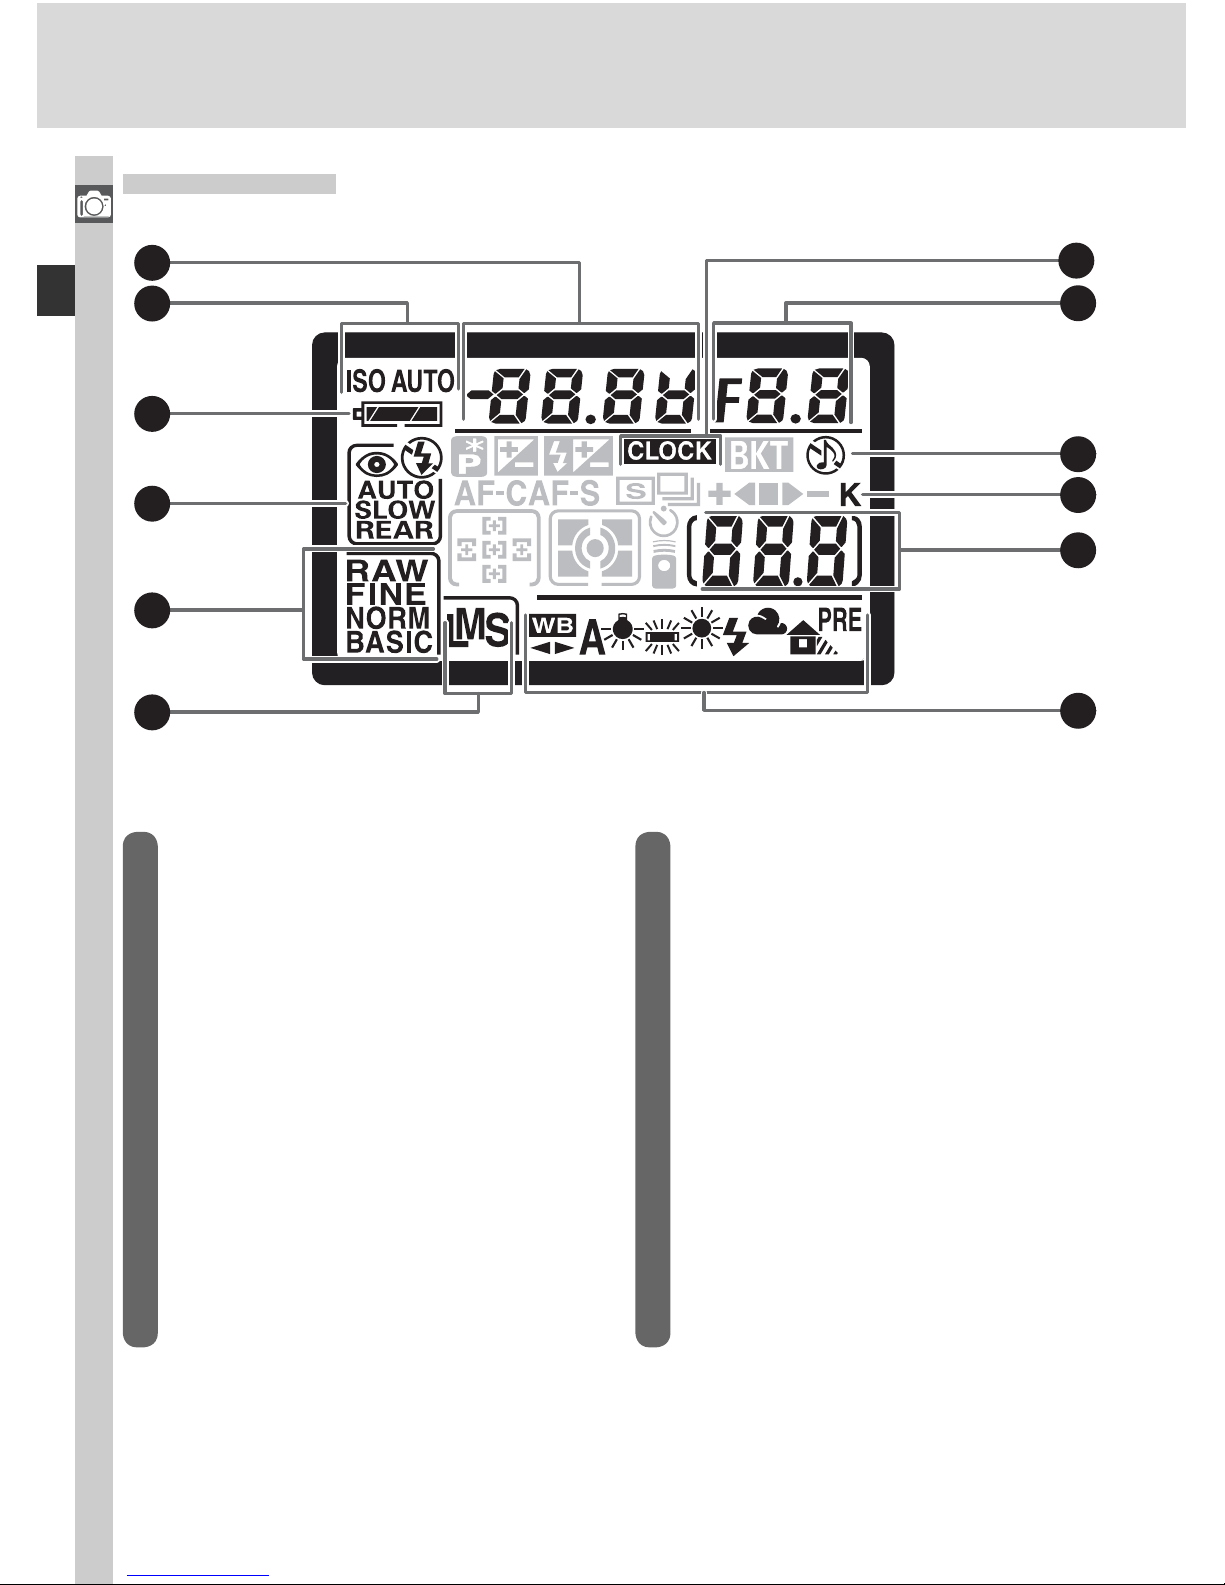
1 Shutter speed ............................... 76
Exposure compensation value ....... 86
Flash compensation value ........... 102
White balance adjustment ............ 50
Number of shots in bracketing
sequence ...................................... 87
2 Sensitivity (ISO) indicator............... 46
Auto sensitivity indicator............. 142
3 Battery indicator ........................... 24
4 Flash sync mode ........................... 95
5 Image quality................................ 41
6 Image size .................................... 43
7 White balance mode..................... 48
8 Number of exposures
remaining ..................................... 25
Number of shots remaining
before memory buffer fi lls............. 62
Preset white balance recording
indicator ....................................... 52
Remote control mode indicator... 107
9 “K” (appears when memory remains
for over 1000 exposures) .............. 45
10 “Beep” indicator ........................ 138
11 Aperture (f/-number) .................... 76
Bracketing increment.................... 87
PC mode indicator ...................... 172
12 Clock battery indicator.................. 16
1
2
3
4
5
6
7
8
11
12
10
9
Page 17
7
Introduction—Getting to Know the Camera
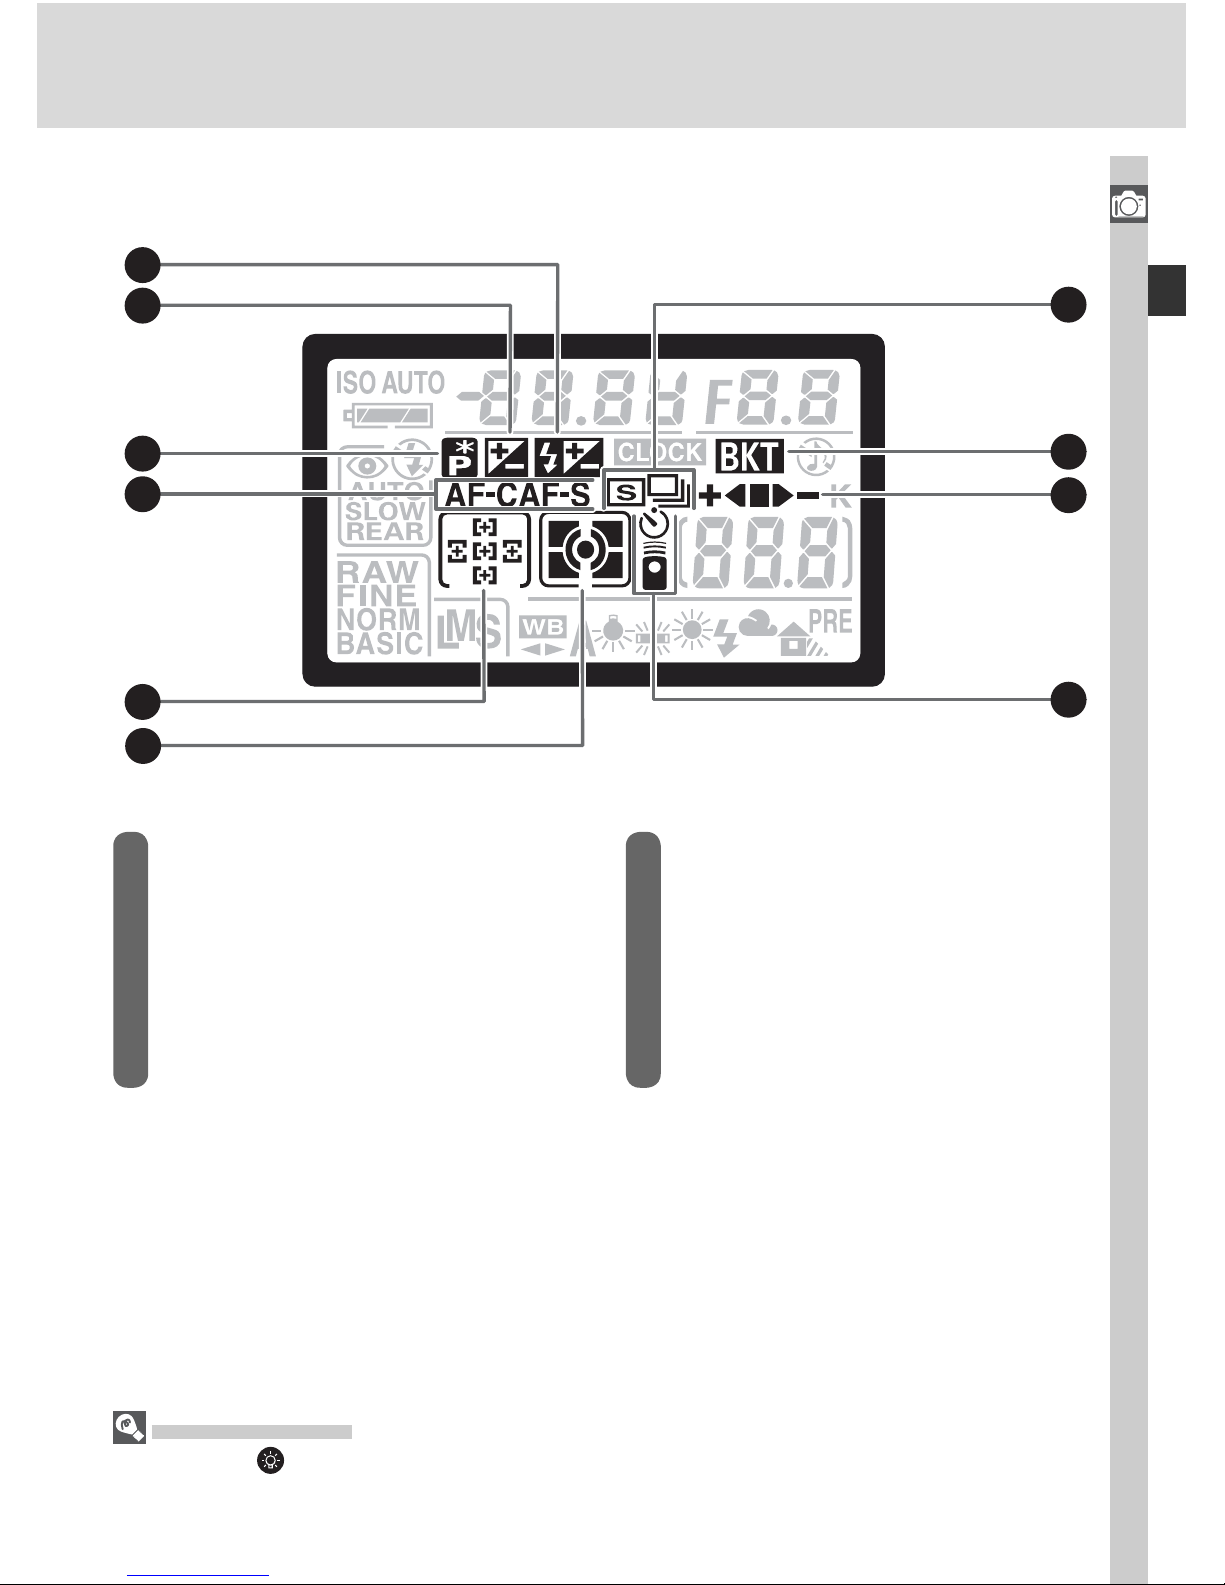
13 Flash compensation indicator...... 102
14 Exposure compensation indicator.. 86
15 Flexible program indicator............. 77
16 Autofocus mode......................... 139
17 Focus area .................................... 66
AF-area mode............................. 140
18 Metering mode............................. 75
19 Self-timer indicator ..................... 105
Remote control indicator ............ 107
20 Bracketing progress indicator........ 87
21 Bracketing indicator...................... 87
22 Shooting mode............................. 62
19
22
21
20
13
14
15
16
17
18
LCD Illuminator
Pressing the button activates the control panel backlight (LCD illuminator), allowing
the display to be read in the dark.
Page 18
8
Introduction—Getting to Know the Camera
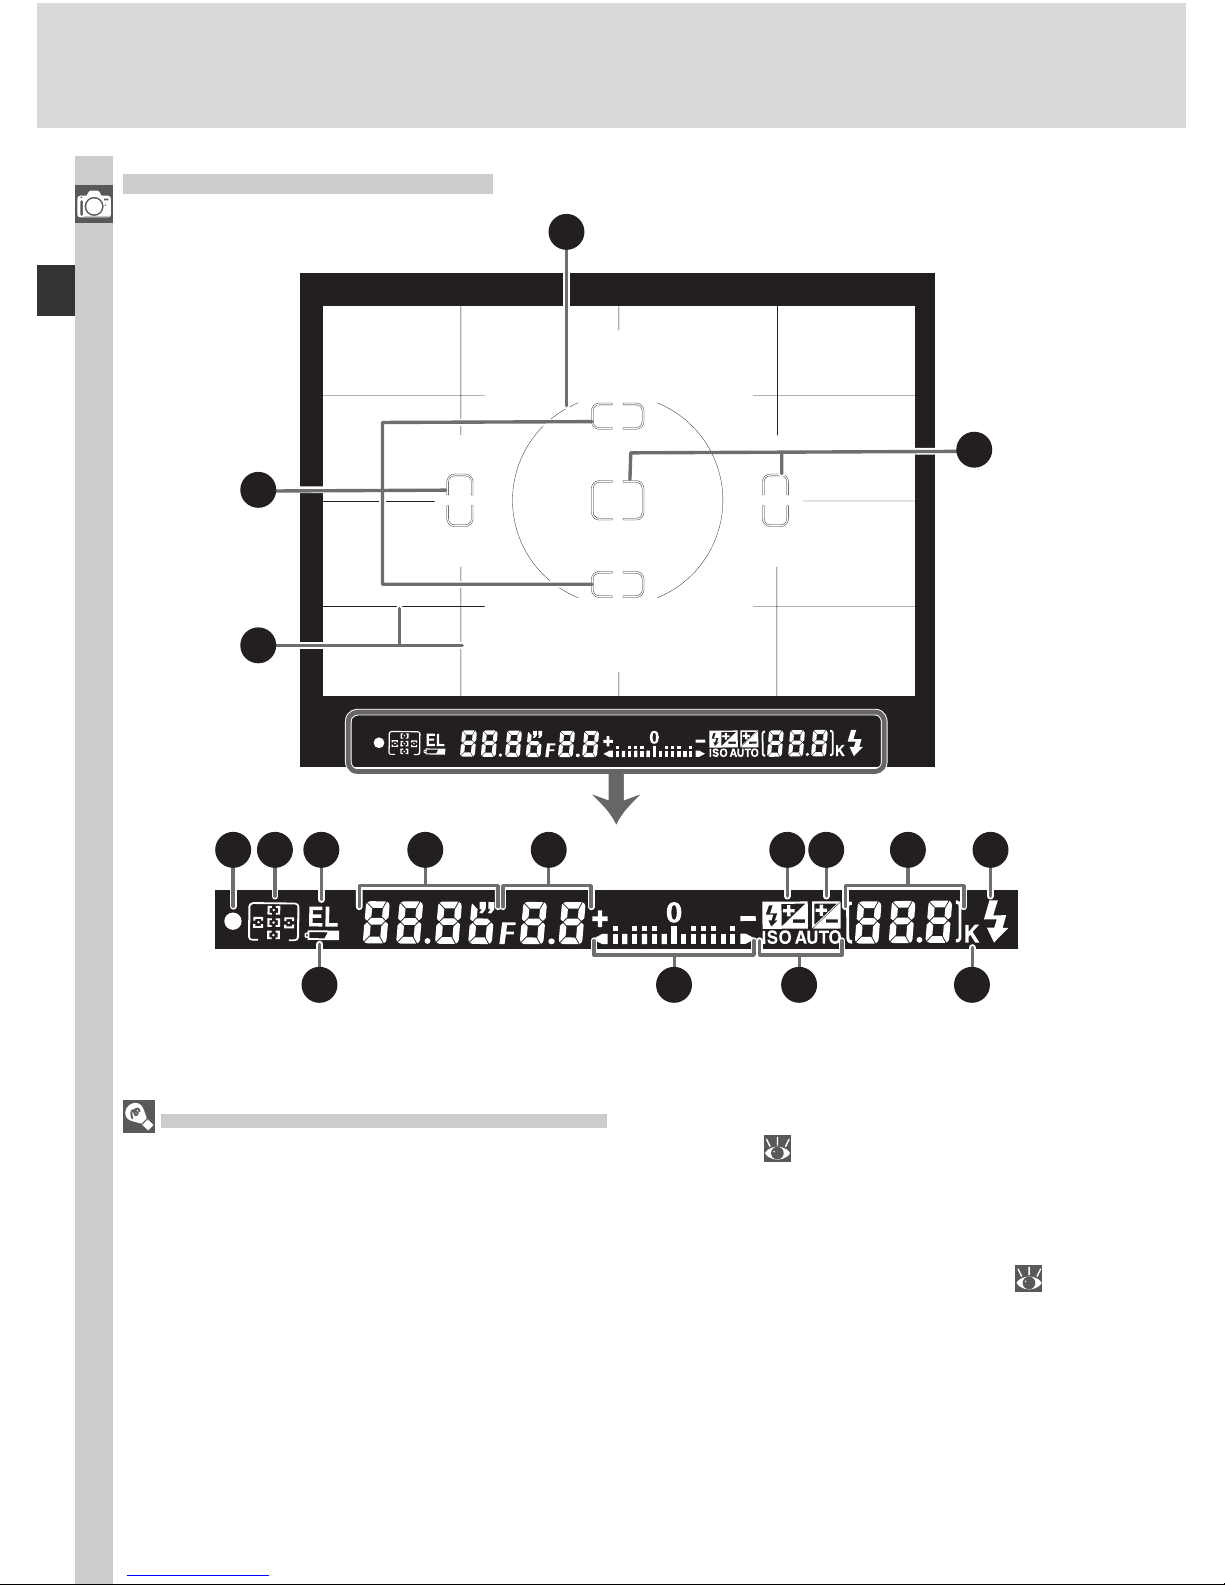
The Viewfi nder Display
Advanced Focusing Screen Display
When the background is bright, the active focus area (
66) is highlighted in black.
When the background is dark, the active focus area is highlighted briefl y in red as
needed to establish contrast with the background (“Vari-Brite” focus areas), making
it easier to identify the selected focus area. The viewfi nder is also equipped with ondemand grid lines. When On is selected for Custom Setting 8 (Grid display;
144),
a reference grid is superimposed over the display in the viewfi nder. This grid is a useful
aid when composing landscape shots or when tilting or shifting a PC Nikkor lens.
Owing to the characteristics of this type of viewfi nder display, you may notice fi ne lines
radiating outwards from the selected focus area, or that the display in the viewfi nder
turns red when the selected focus area is highlighted. These phenomena are normal
and do not indicate a malfunction.
1
2
3
2
4 5 6 7 8 9 10 11 12
13
14
15
16
Page 19
9
Introduction—Getting to Know the Camera
1 8-mm (0.31˝) reference circle for
center-weighted metering............. 75
2 Focus brackets (focus areas).......... 66
Spot metering targets ................... 75
3 Reference grid (displayed when On is
selected for Custom Setting 8).... 144
4 Focus indicator ............................. 28
5 Focus area .................................... 66
AF-area mode............................. 140
6 Autoexposure (AE) lock................. 84
FV lock indicator ......................... 103
7 Shutter speed ............................... 76
8 Aperture (f/-number) .................... 76
9 Flash compensation indicator...... 102
10 Exposure compensation indicator.. 86
11 Number of exposures
remaining ..................................... 25
Number of shots remaining
before memory buffer fi lls............. 62
Preset white balance recording
indicator ....................................... 52
Exposure compensation value ....... 86
Flash compensation value ........... 102
PC mode indicator ...................... 172
12 Flash-ready indicator..................... 97
13 Battery indicator ........................... 24
14 Electronic analog exposure
display .......................................... 82
Exposure compensation ................ 86
15 Auto sensitivity indicator ............. 142
16 “K” (appears when memory remains
for over 1000 exposures) .............. 45
The Viewfi nder Display
The focus-area and grid-line displays in the viewfi nder (advanced focusing screen display) tend to brighten at high temperatures and to darken and exhibit slower response
times at low temperatures. The other displays in the viewfi nder tend darken at high
temperatures and exhibit slower response times at low temperatures. All displays will
return to normal at room temperature.
No Battery
When the battery is totally exhausted or no battery is inserted, the display in the viewfi nder will dim. This is normal and does not indicate a malfunction. The viewfi nder
display will return to normal when a fully-charged battery is inserted.
Page 20
10
Introduction—Getting to Know the Camera
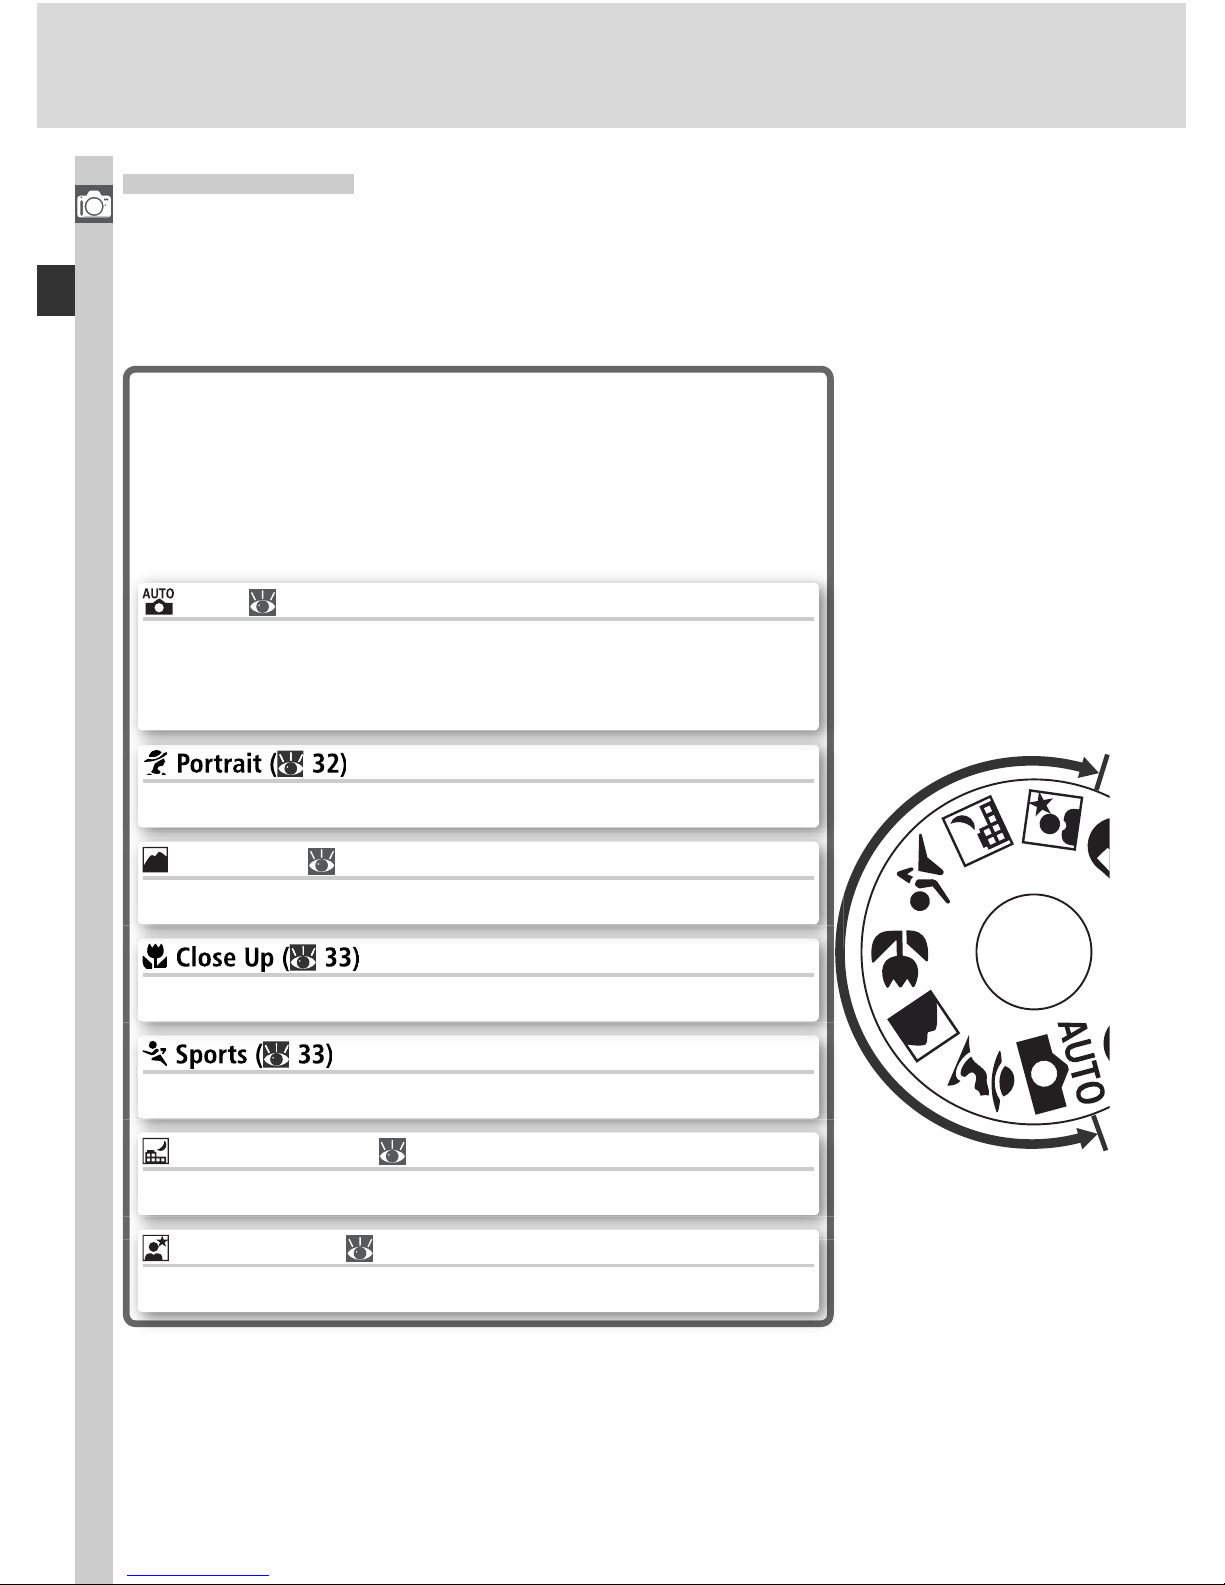
The Mode Dial
In addition to Digital Vari-Programs that allow settings to be adjusted to suit
a particular scene simply by rotating the mode dial to the appropriate mode,
the D70 is equipped with exposure modes that offer complete control over
settings.
Digital Vari-Programs
Selecting a Digital Vari-Program automatically optimizes settings to suit the selected scene, making
creative photography as simple as rotating the mode
dial.
Freeze motion in sports shots.
Take close-ups of fl owers, insects, or other small objects.
Shoot portraits with the background in soft focus.
Auto ( 32)
Use for “point-and-shoot” snapshots that leave the camera in charge of settings. Recommended for fi rst-time
users of digital SLR cameras.
Night Landscape ( 33)
Use when taking landscape shots at night.
Night Portrait ( 34)
Shoot portraits against a dimly-lit backdrop.
Landscape ( 32)
Preserve details in landscape shots.
Page 21
11
Introduction—Getting to Know the Camera
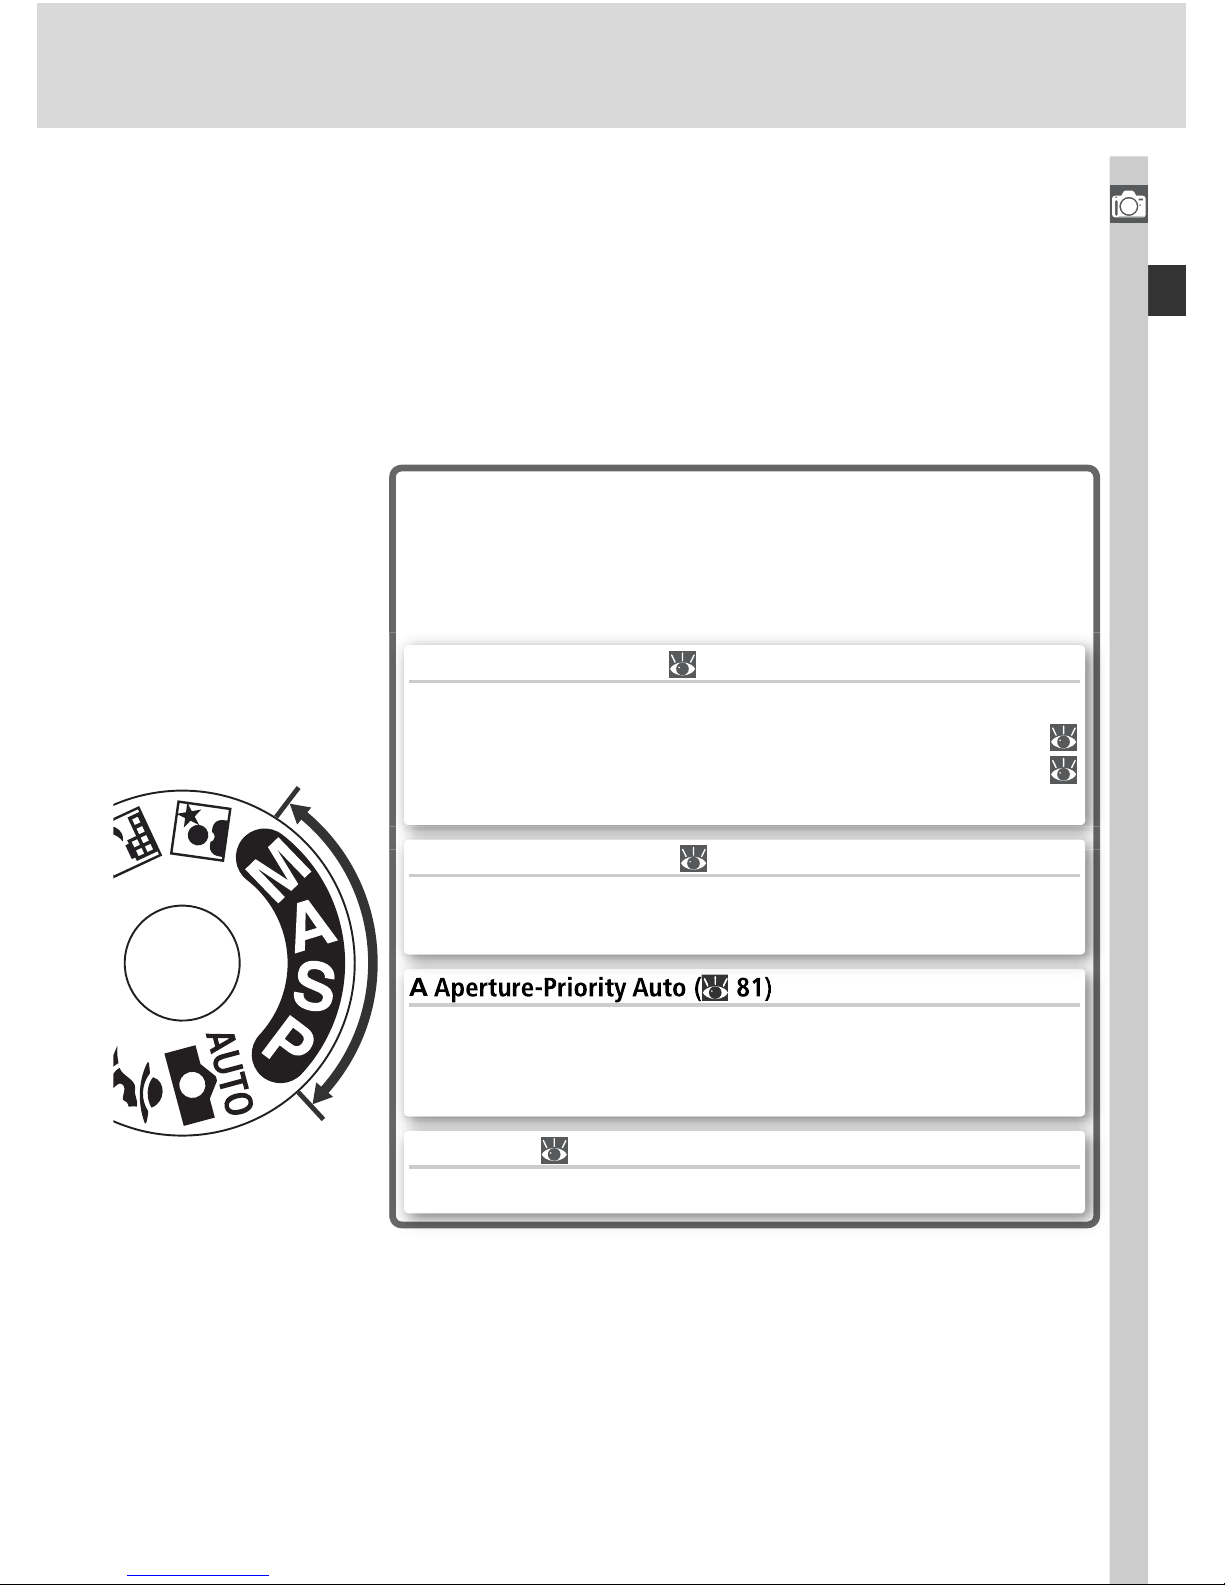
Exposure Modes
Select these modes for full control over camera settings, including shutter speed and aperture, fl ash
mode, and camera menus.
P Auto Multi Program ( 77)
Let the camera optimize exposure to suit the subject. Use
fl exible program to control shutter speed and aperture (
77), or adjust exposure with exposure compensation (
86).
Adjust aperture to soften background details, or increase
depth of fi eld to bring both the main subject and the background into focus.
S Shutter-Priority Auto ( 79)
Choose fast shutter speeds to freeze action, slow shutter
speeds to suggest motion by blurring moving objects.
M Manual ( 82)
Match shutter speed and aperture to your creative intent.
Page 22
12
Introduction—Getting to Know the Camera
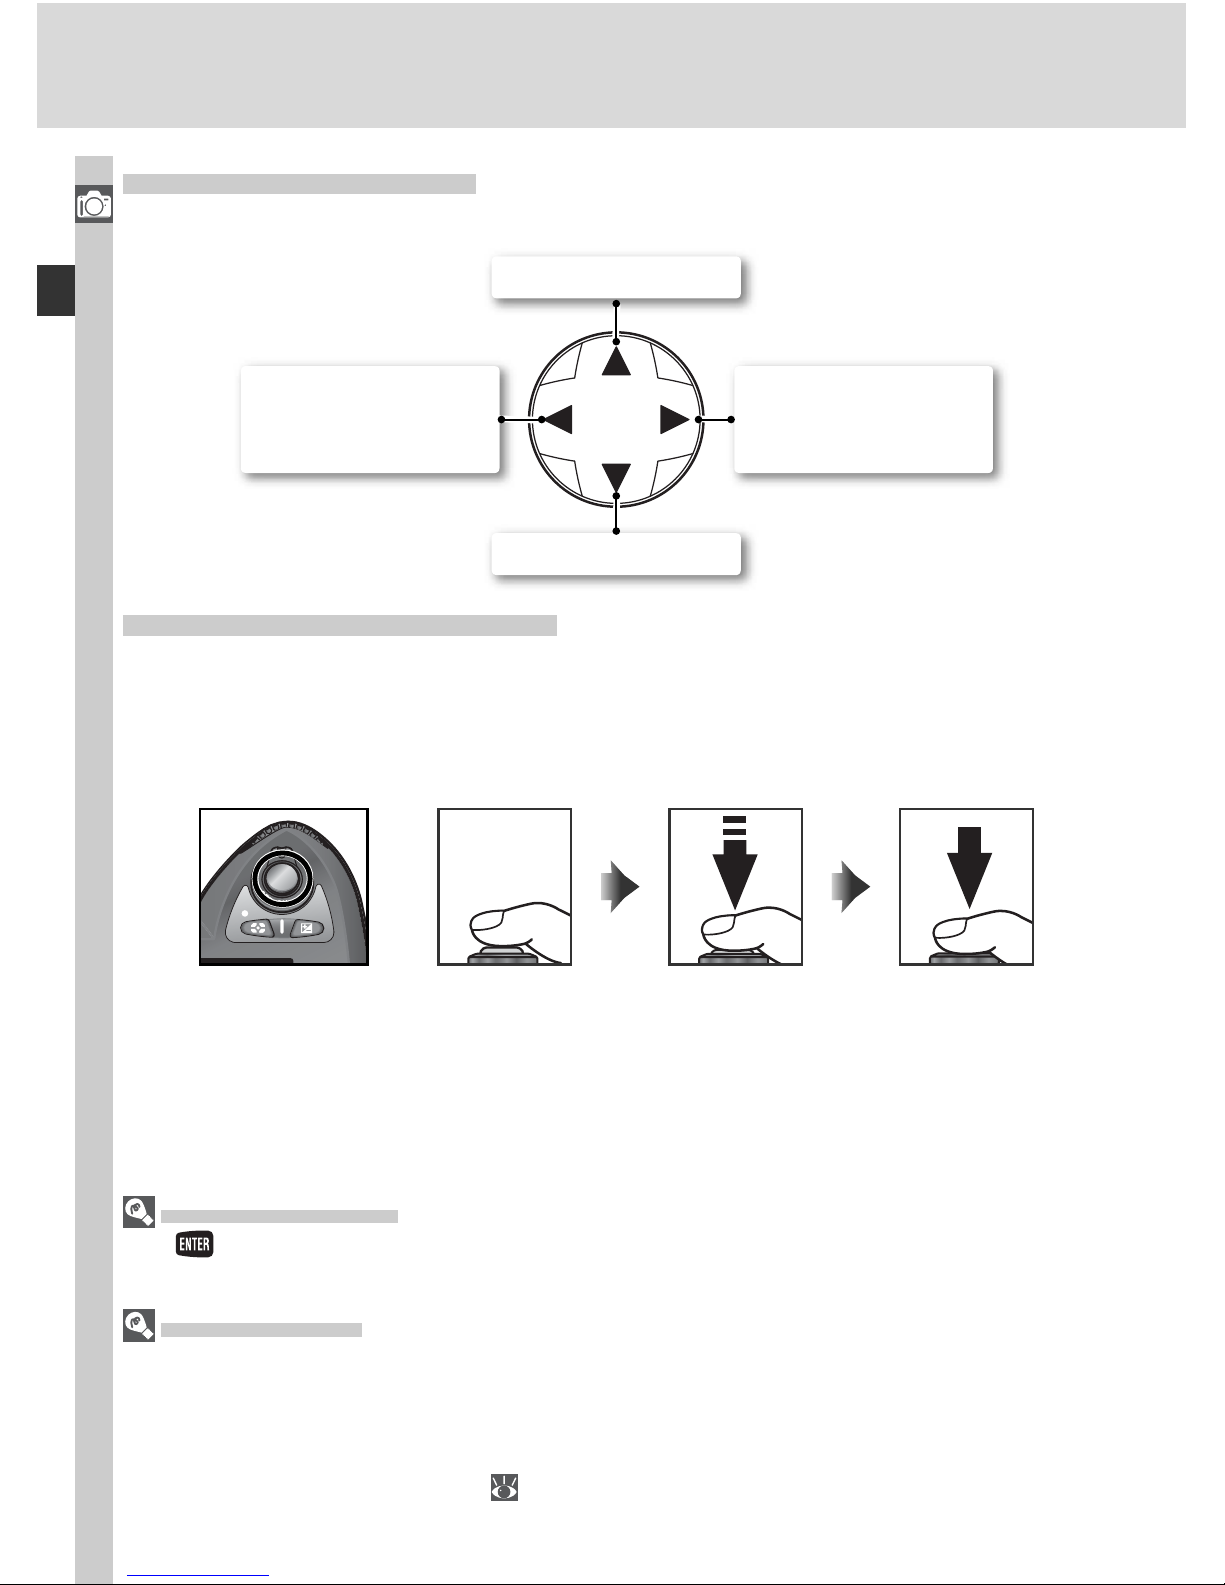
The Multi Selector
The button can also be used to select items highlighted in the camera menus.
There may be some cases in which the operations listed on this page do not apply.
Auto Meter Off
At default settings, the camera continues to meter exposure for six seconds after you
remove your fi nger from the shutter-release button. The shutter speed and aperture
indicators in the control panel and all indicators in the viewfi nder then turn off to save
power (auto meter off). The length of the auto meter off delay can be adjusted using
Custom Setting 23 (Meter-off; 153).
Navigating the Menus
The multi selector is used to navigate through the camera menus.
Cancel and return
to previous menu,
or move cursor left
Display sub-menu,
move cursor right,
or make selection.
Move cursor up
Move cursor down
The Shutter-Release Button
The camera has a two stage shutter-release button. The camera sets focus
and exposure when the button is pressed halfway. Focus and exposure will
remain locked while the shutter-release button is kept in this position. To
take the picture, press the shutter-release button the rest of the way down.
Page 23
13
Introduction—First Steps
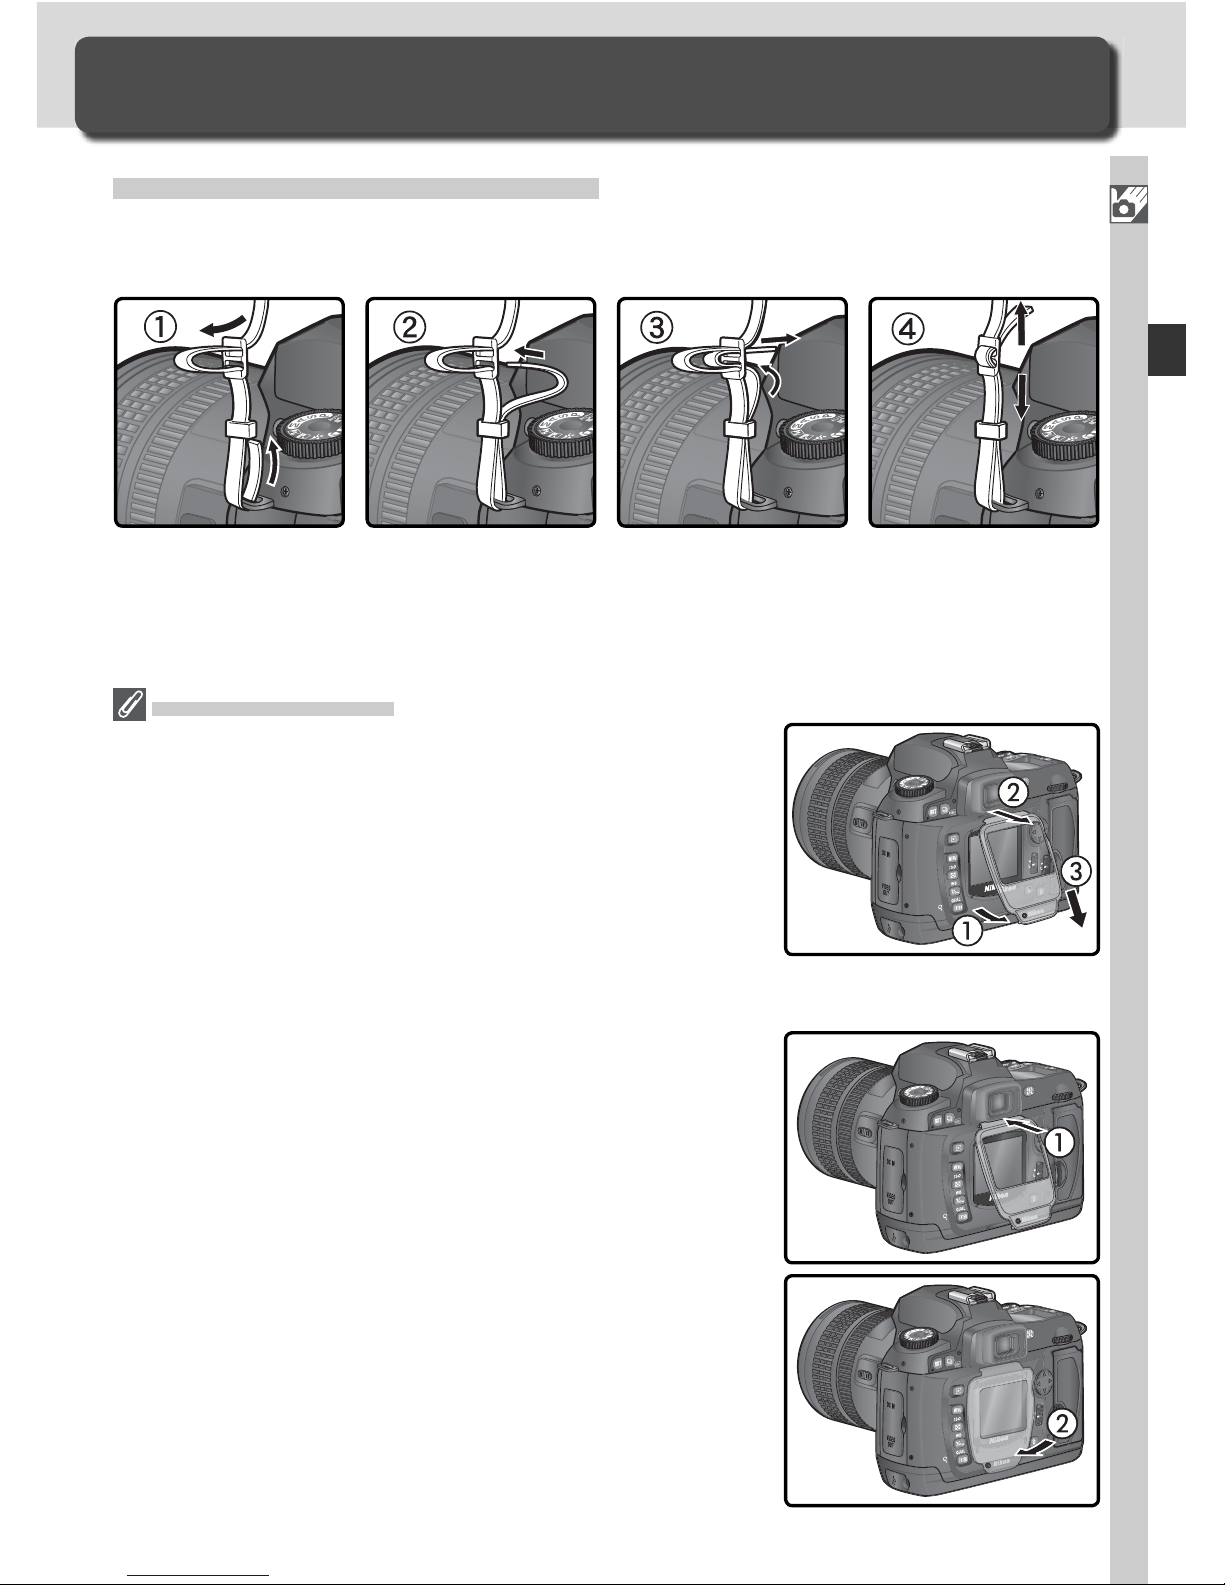
The Monitor Cover
A clear plastic cover (the BM-4 LCD monitor cover) is
pro vid ed with the cam era to keep the monitor clean,
and to pro tect the mon i tor when the camera is not
in use or when you are trans port ing the camera. To
re move the mon i tor cover, hold the cam era fi rmly and
pull the bot tom of the cover gen tly out wards as shown
at right (). Once the cover is un latched, you can move
it slightly away from the mon i tor () and then remove
it as shown ().
To replace the cover for shooting or stor age, insert the
two projections on the top of the cover into the match ing in den ta tions above the camera monitor (), then
press the bot tom of the cover un til you hear it click into
place ().
First Steps
Getting the Camera Ready for Use
Attaching the Camera Strap
Attach the camera strap securely to the two eyelets on the camera body as
shown below.
Page 24
14
Introduction—First Steps
1
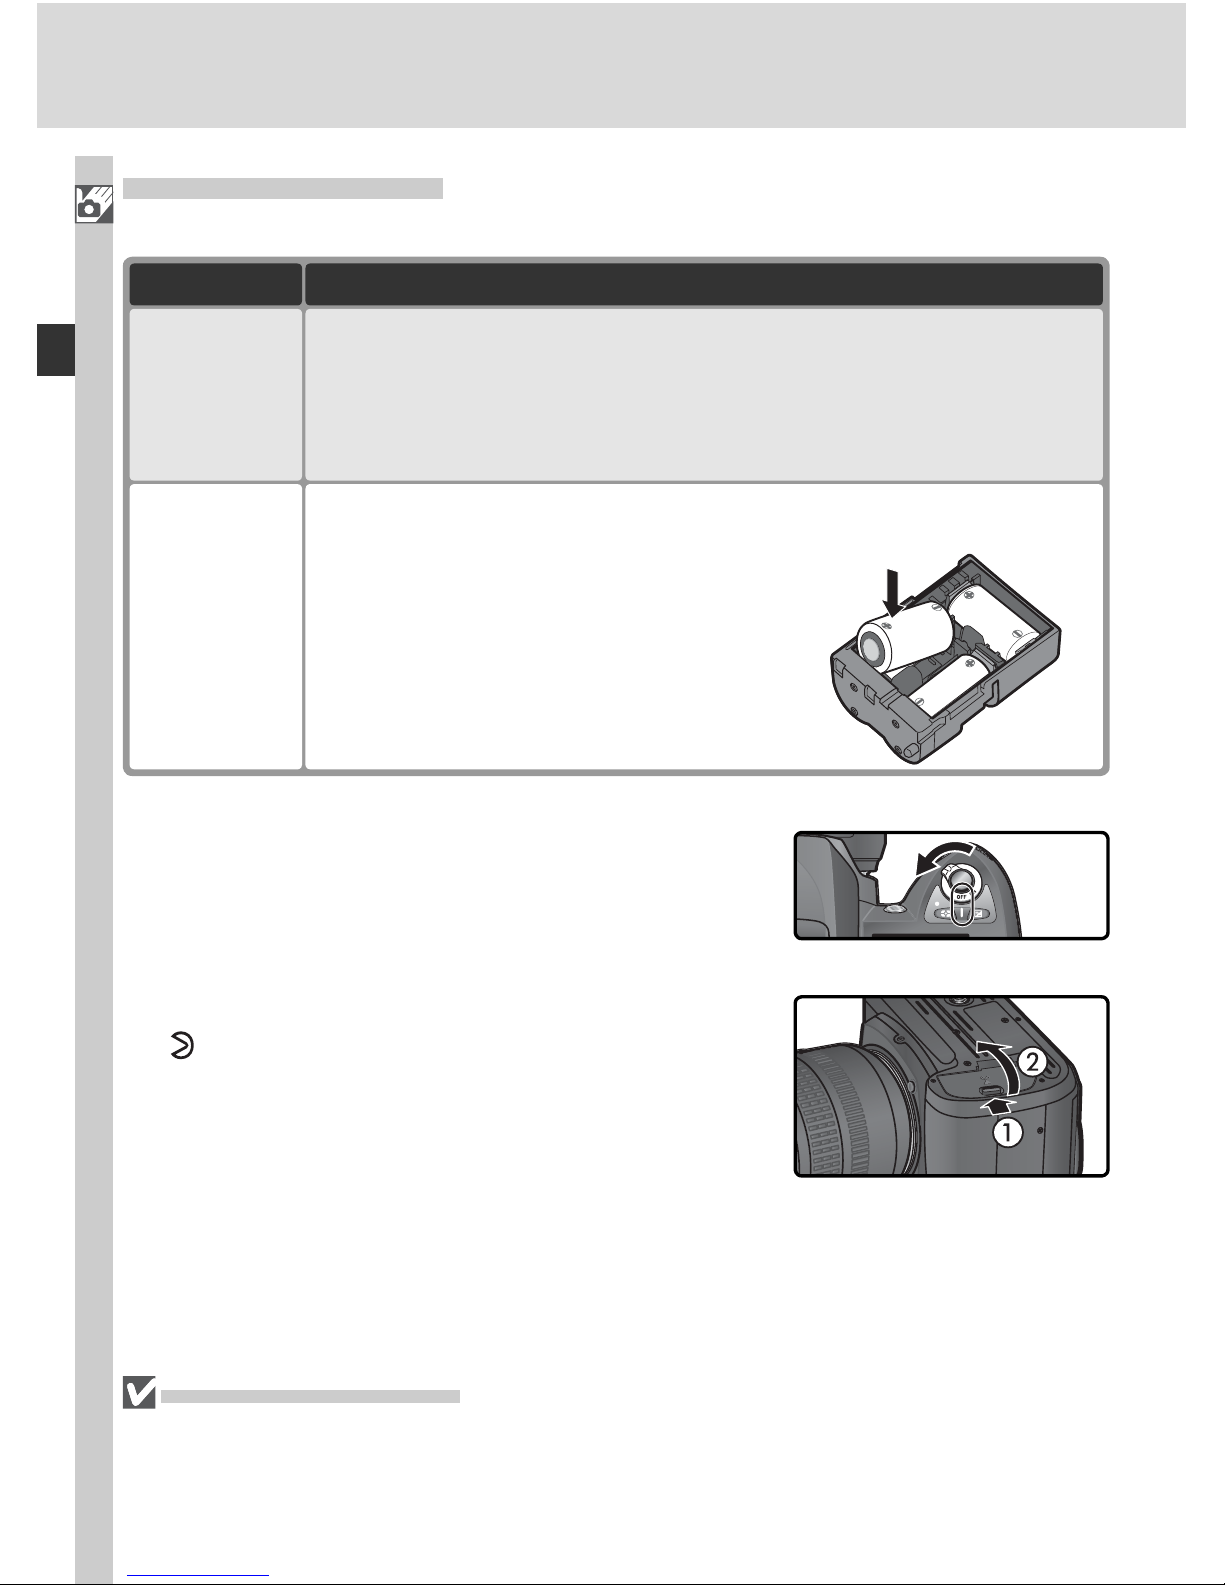
Turn the camera off
Turn the cam era off before inserting or re mov ing bat ter ies.
2
Open the bat tery-chamber cover
Slide the battery-chamber cover latch to the
position () and open the battery-chamber
cover ().
Battery Description
Rechargeable
Nikon EN-EL3
batteries (×1)
•Provided with camera.
• Can be recharged using supplied MH-18 quick charger (be sure
to charge battery before using camera for fi rst time or after long
period of disuse; see charger manual for details). About two hours
are required to recharge battery when no charge remains.
CR2 lithium
batteries (×3)
•Available at many retail outlets.
• Not rechargeable.
• Can only be used when inserted in
supplied MS-D70 battery holder. Insert batteries as shown in illustration
on battery holder.
Inserting Batteries
The D70 uses the following batteries:
Read Battery Warnings
Read and follow the warnings and cautions on pages ii–iii and 196–197 of this
manual, together with any warnings and instructions provided by the battery
manufacturer.
Page 25
15
Introduction—First Steps
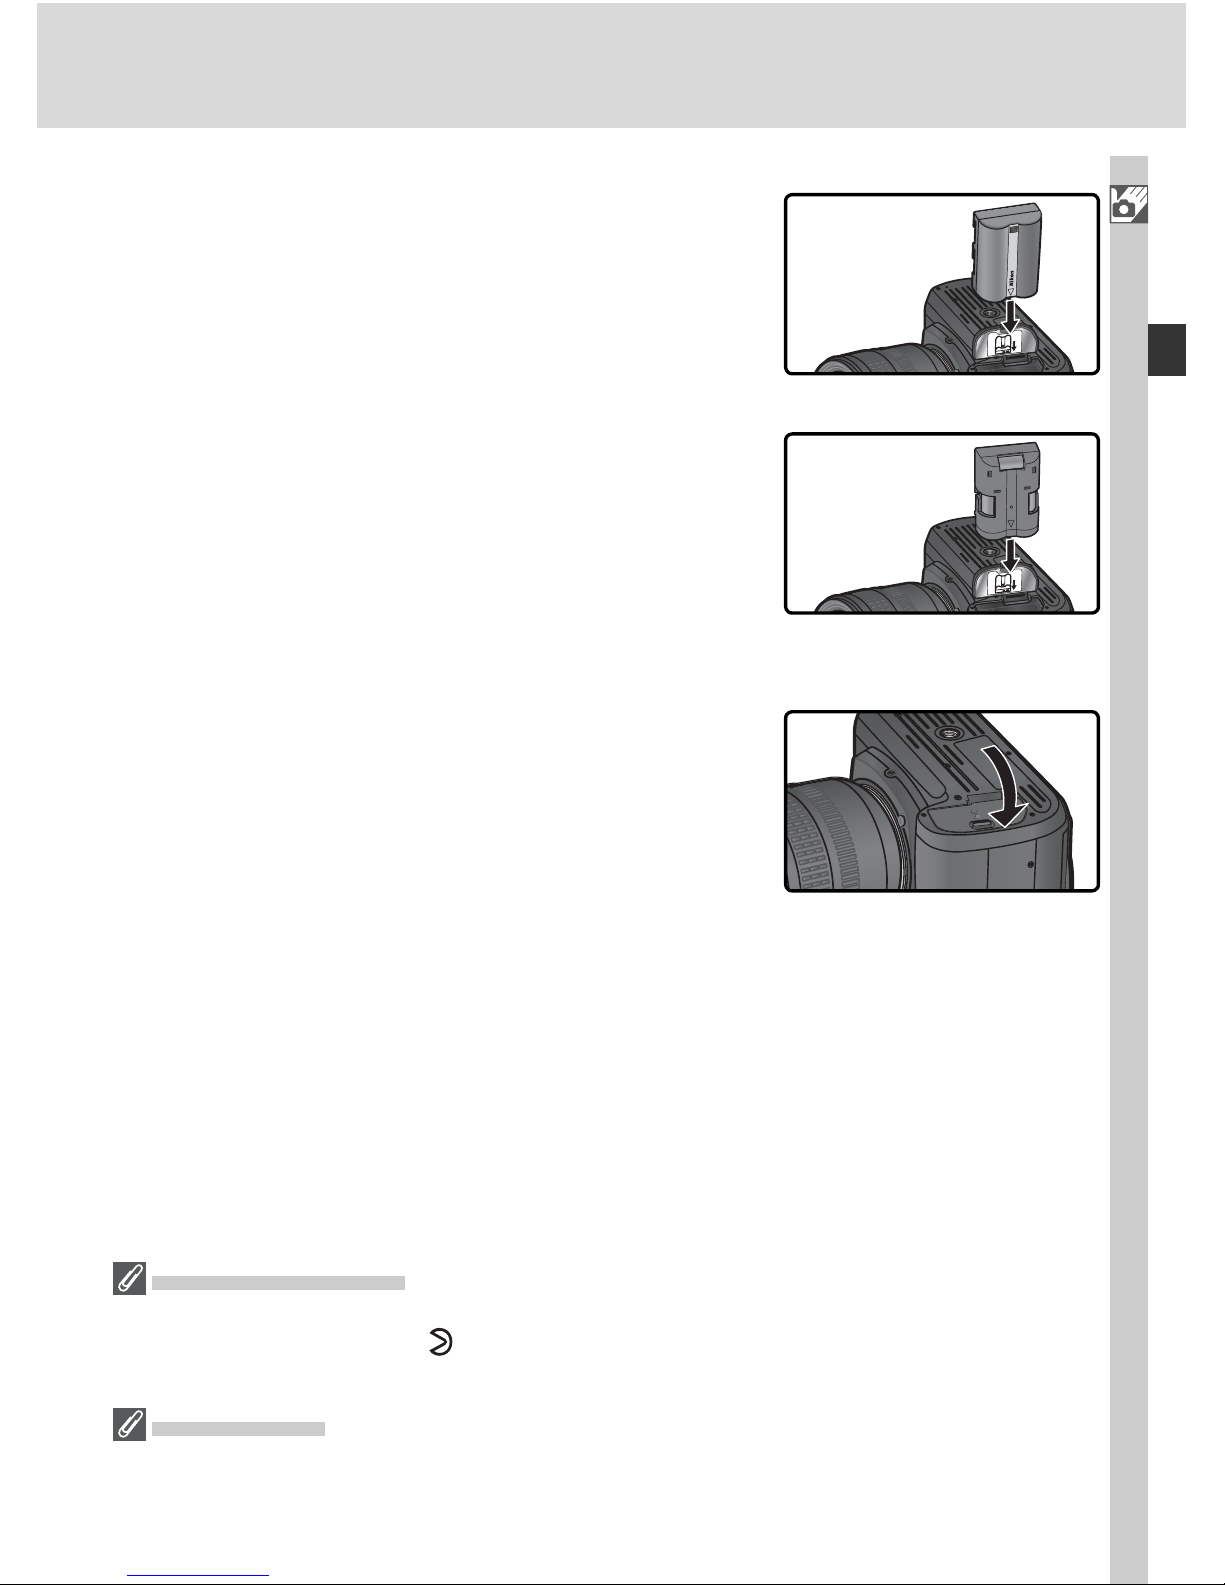
4
Latch the battery-cham ber cover
To prevent the battery from being dis lodged
during operation, be sure the cover is securely
latched.
3
In sert the bat tery or battery holder
In sert the battery or battery holder as shown
at right.
L
i
-
i
o
n
B
A
T
T
E
R
Y
P
A
C
K
EN-EL3
MS-D70
Removing Batteries
Before removing batteries, turn the camera off and slide the bat tery-chamber cover
latch to the open po si tion ( ). Replace the terminal cover when the EN-EL3 is not in
use.
CR2 Batteries
CR2 batteries are best suited for use at room temperature. At low temperatures, CR2
batteries loose much of their charge.
Page 26
16
Introduction—First Steps
Basic Setup
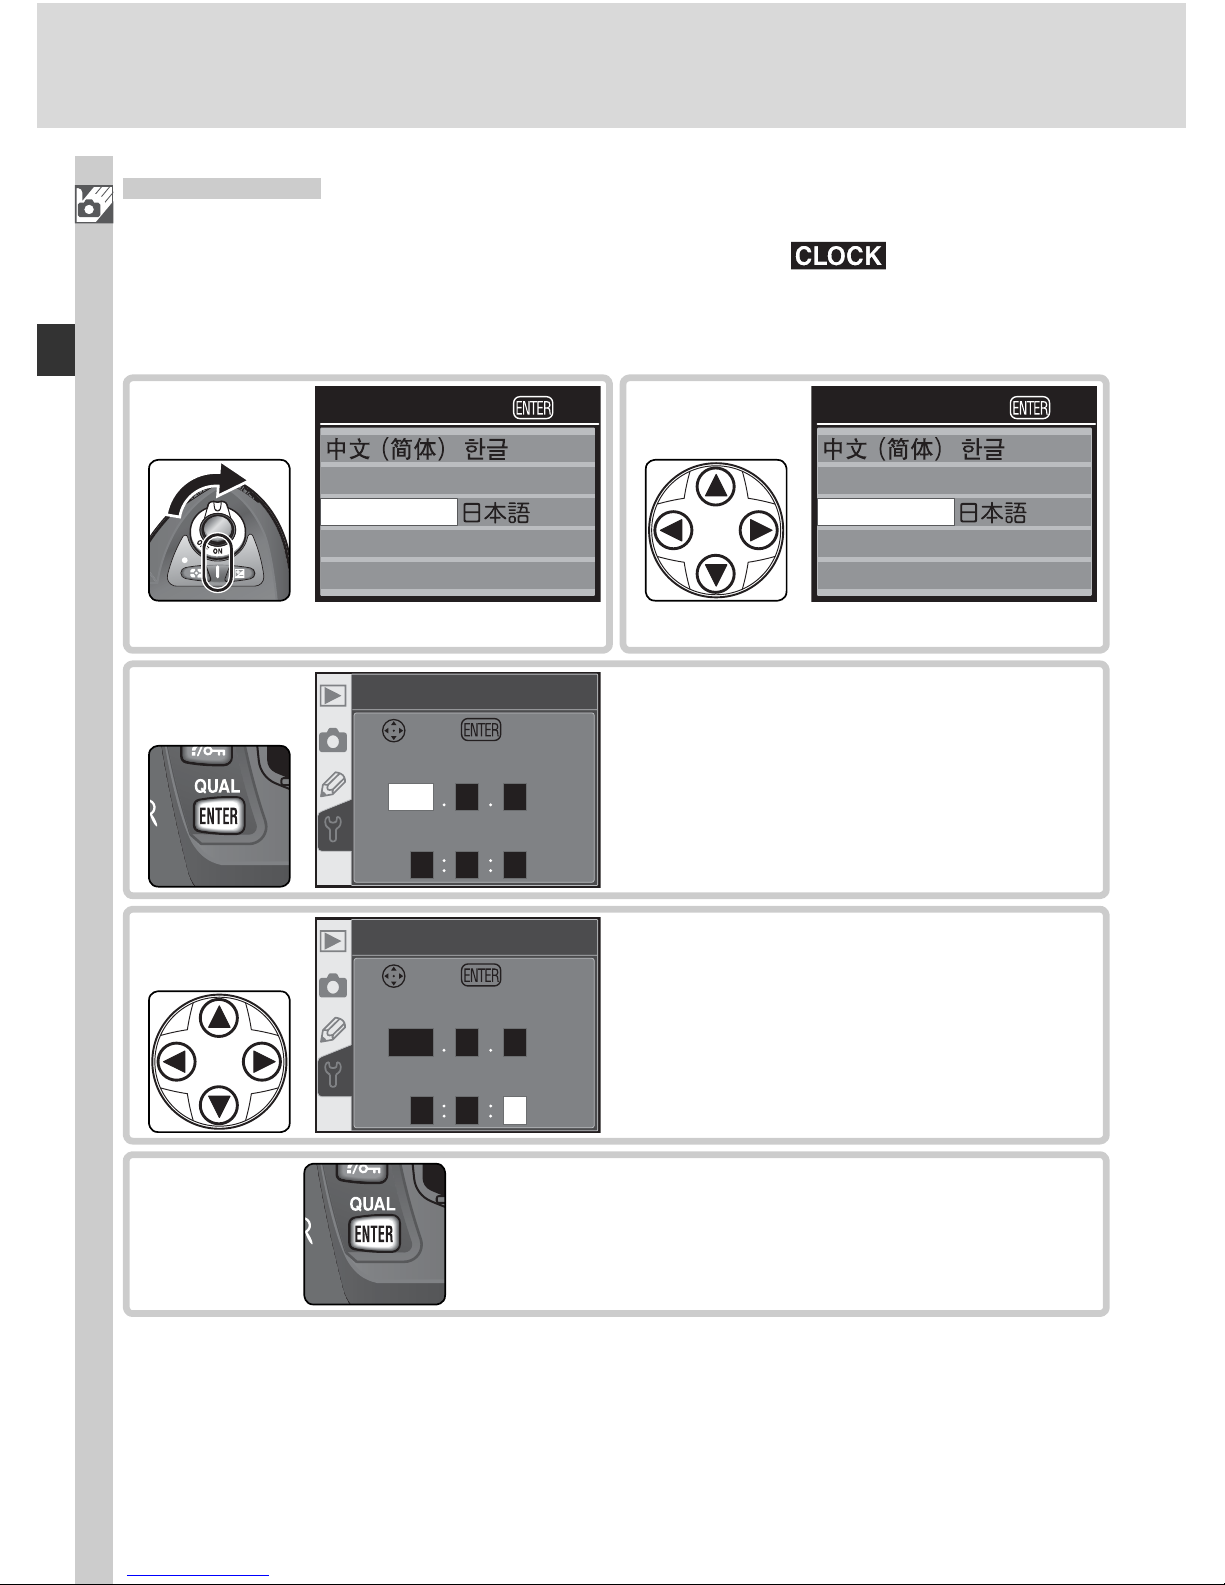
The fi rst time the camera is turned on, the language selection dialog shown
in Step 1 will be displayed in the monitor and the icon will fl ash in
the control panel. Follow the steps below to choose a language and set the
time and date.
Language selection dialog displayed.
1
Language OK
Español
Français
English
Deutsch
Nederlands
Svenska
Italiano
Select language.
2
Language OK
Español
Français
English
Deutsch
Nederlands
Svenska
Italiano
Display DATE menu.
Date
Set
YMD
HM
S
2004 01 01
00 0000
OK
3
Edit Year, Month, Day, Hour, Minute,
and Second. Press multi selector left
or right to select item, up or down to
change.
YMD
HM S
2004 01 07
45 4613
Date
Set OK
4
Exit DATE menu. Monitor turns off.
5
Page 27
17
Introduction—First Steps
Basic Setup
If the button is not pressed at the completion of basic setup, the language selection
dialog will be displayed the next time the camera is turned on. Until setup is complete,
the icon will continue to fl ash, and no photographs can be taken nor other
operations performed.
The Clock Battery
The clock-calendar is powered by an independent, rechargeable power source, which
is charged as necessary when the main batteries are installed or the camera is powered
by an optional EH-5 AC adapter. Three days of charging is suffi cient to provide about
one month of back-up power. If the icon fl ashes in the control panel, the clock
battery is exhausted and the clock has been reset to 2004.01.01 00:00:00. Set the
clock to the correct date and time as described in “The Setup Menu: Date” ( 161).
The Camera Clock
The camera clock is less accurate than most watches and household clocks. Check the
clock regularly against more accurate time pieces and reset as necessary.
Language ( 163)
To change the language in which camera menus and messages are displayed, use the
Language option in the setup menu.
Date ( 161)
Use the Date option in the setup menu to change the time and date.
Page 28
18
Introduction—First Steps
Attaching Lenses
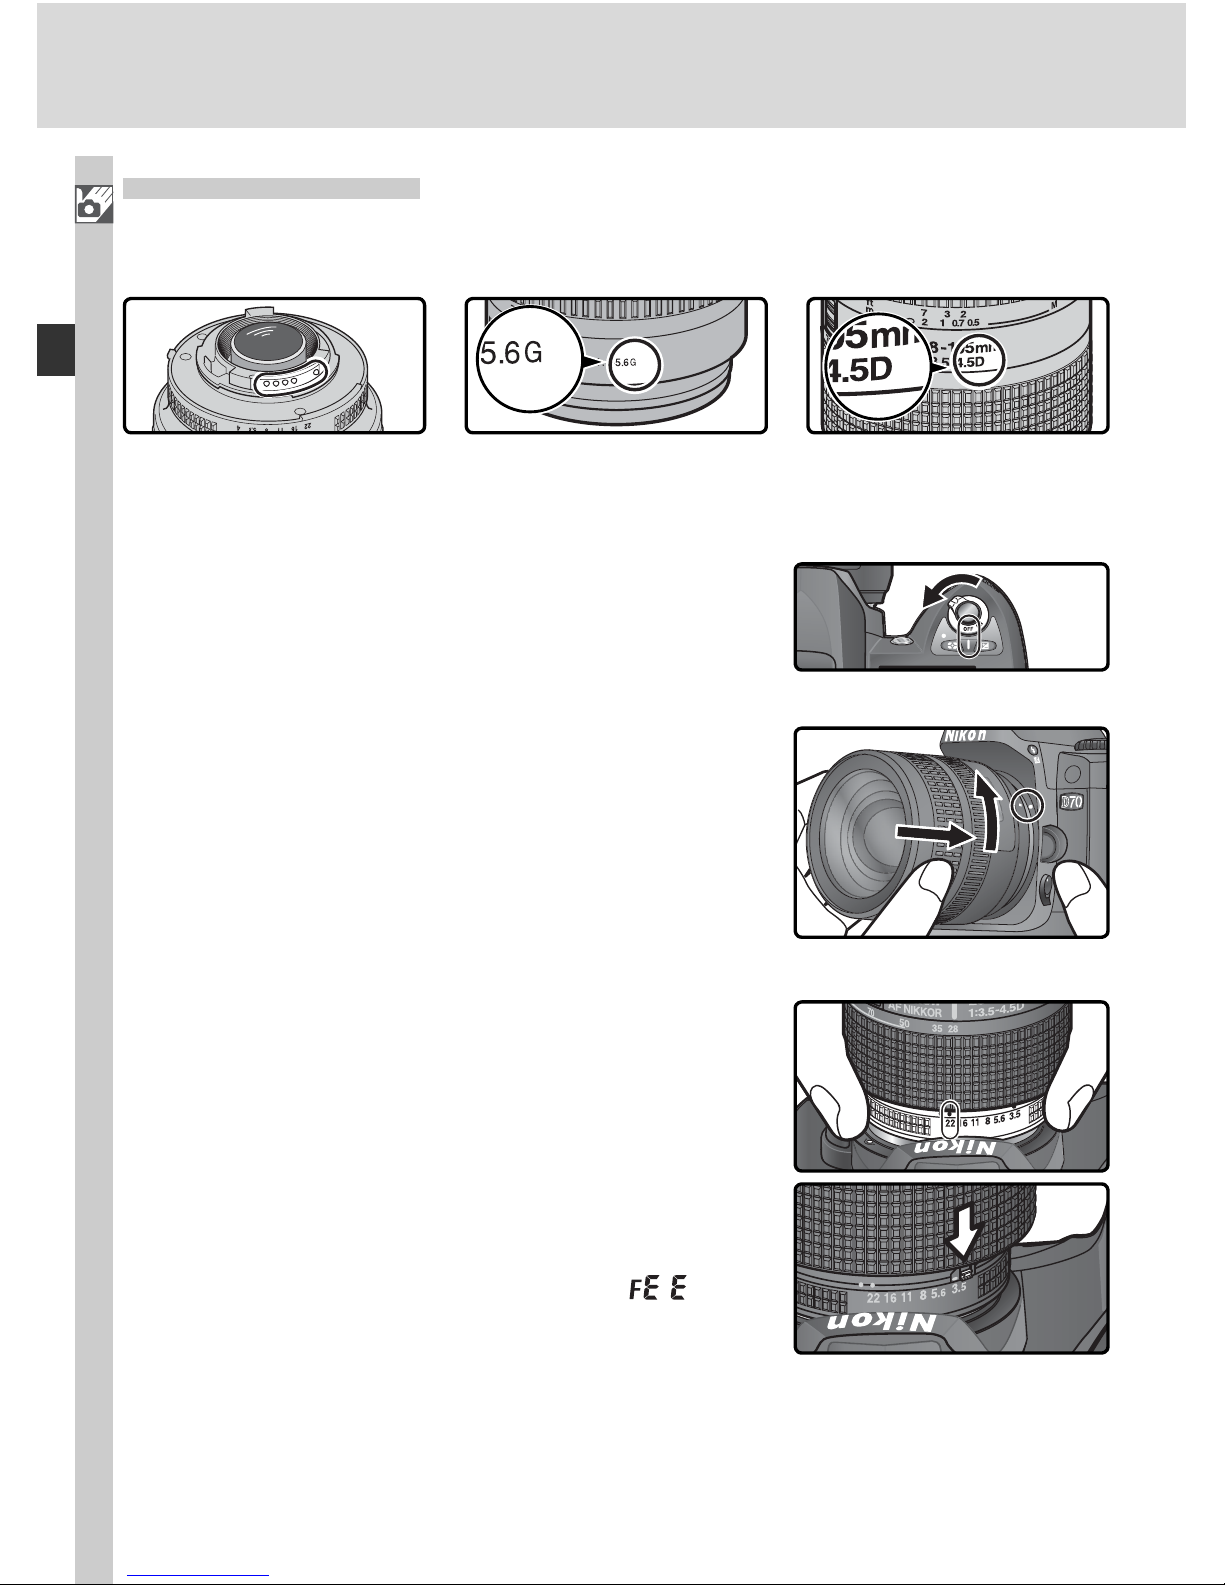
Nikon recommends using a type G or type D CPU lens to take full ad van tage
of the features the camera offers.
1
Turn the camera off
Turn the camera off before attaching or re mov ing lenses.
2
Attach a lens
Keep ing the mounting mark on the lens
aligned with the mounting mark on the cam era body, position the lens in the cam era’s
bayonet mount. Being careful not to press
the lens-release button, ro tate the lens counter-clockwise until it clicks into place.
3
Lock aperture at the minimum setting
This step is not necessary if you are using a
type G lens not equipped with an aperture
ring. If you are using a lens of another type,
lock aperture at the minimum setting (highest
f/-num ber).
If this step is omitted when attaching a CPU
lens, the ap er ture dis plays in the con trol panel
and viewfi nder will show a blinking when
the camera is turned on. Pho to graphs can not
be taken until the cam era is turned off and
ap er ture locked at the highest f/-num ber.
Type D lensType G lensCPU lenses have CPU
contacts
Page 29
19
Introduction—First Steps
Protect the Camera from Dirt and Dust
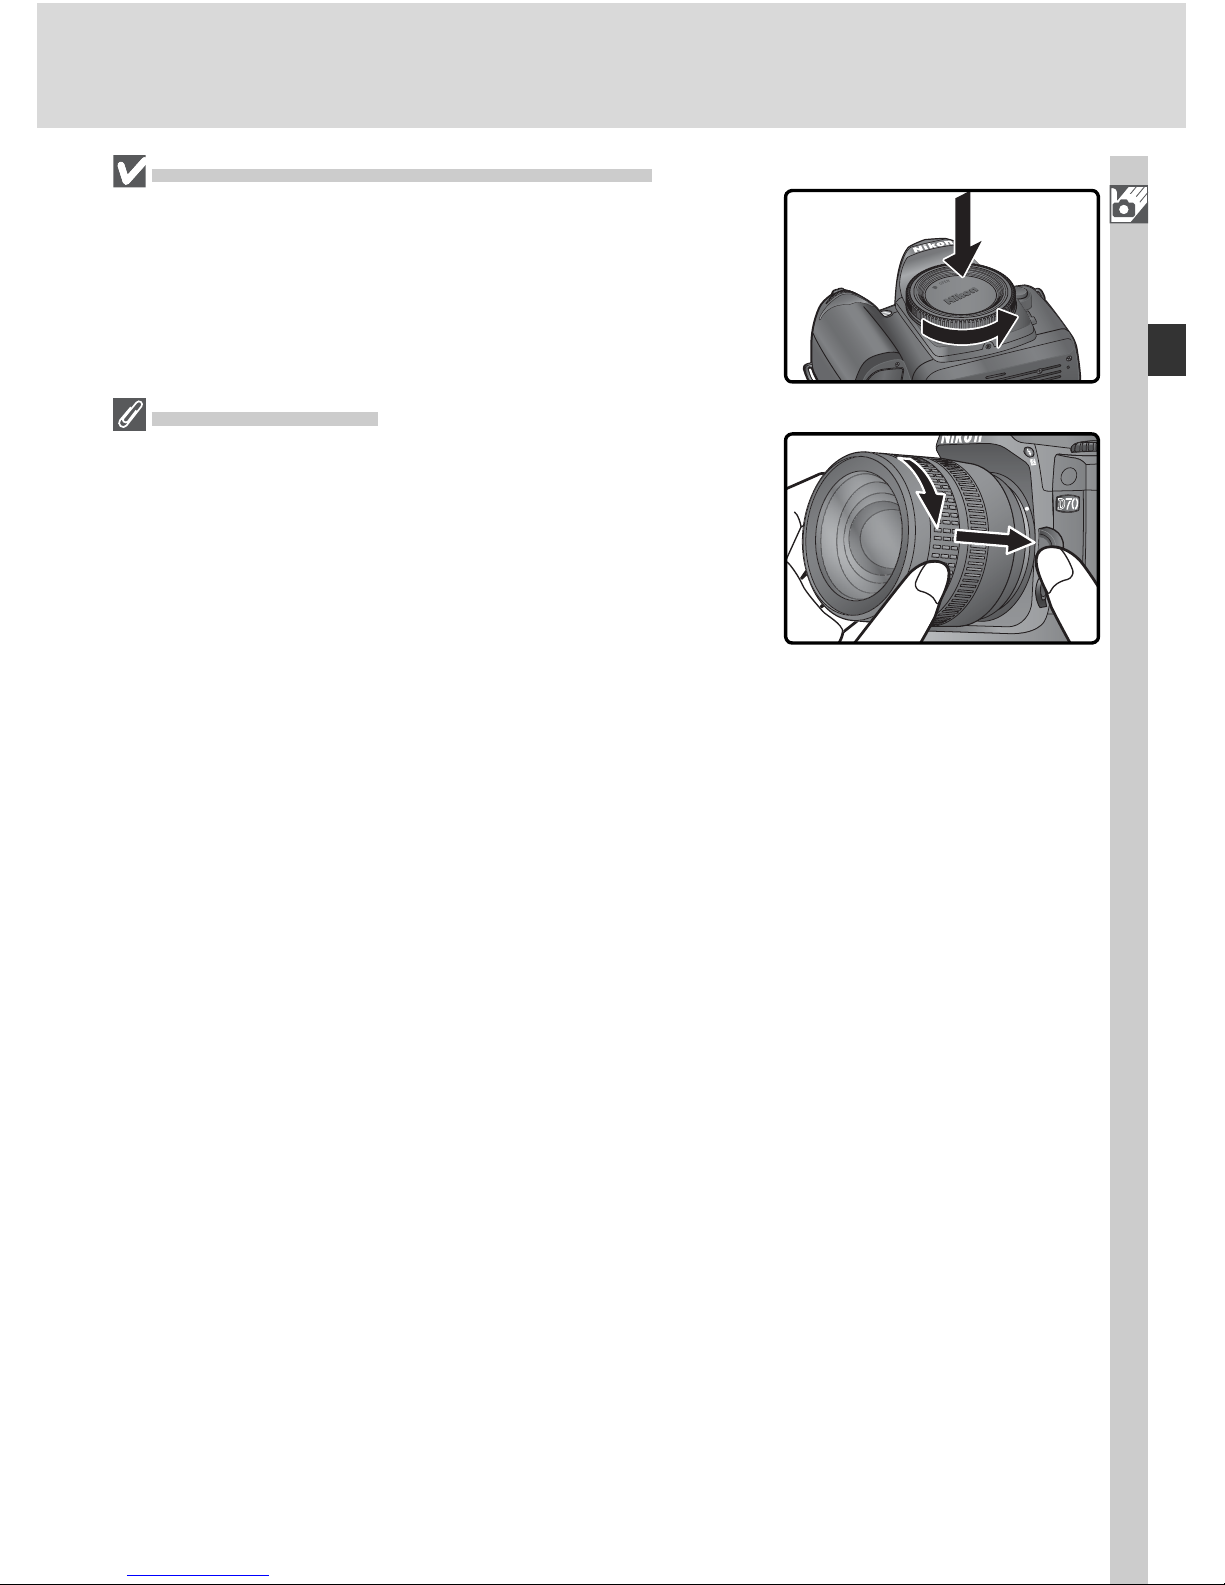
Any dust, dirt, or other foreign matter inside your
cam era could show up as specks or blotches in your
pho to graphs or the viewfi nder display. When no lens is
in place, keep the lens mount covered with the supplied
body cap. When exchanging lenses or replacing the
body cap, keep the lens mount pointed down.
Detaching Lenses
Be sure the camera is off when removing or exchanging
lenses. To remove the lens, press and hold the lens-release button while turning the lens clockwise.
Page 30
20
Introduction—First Steps
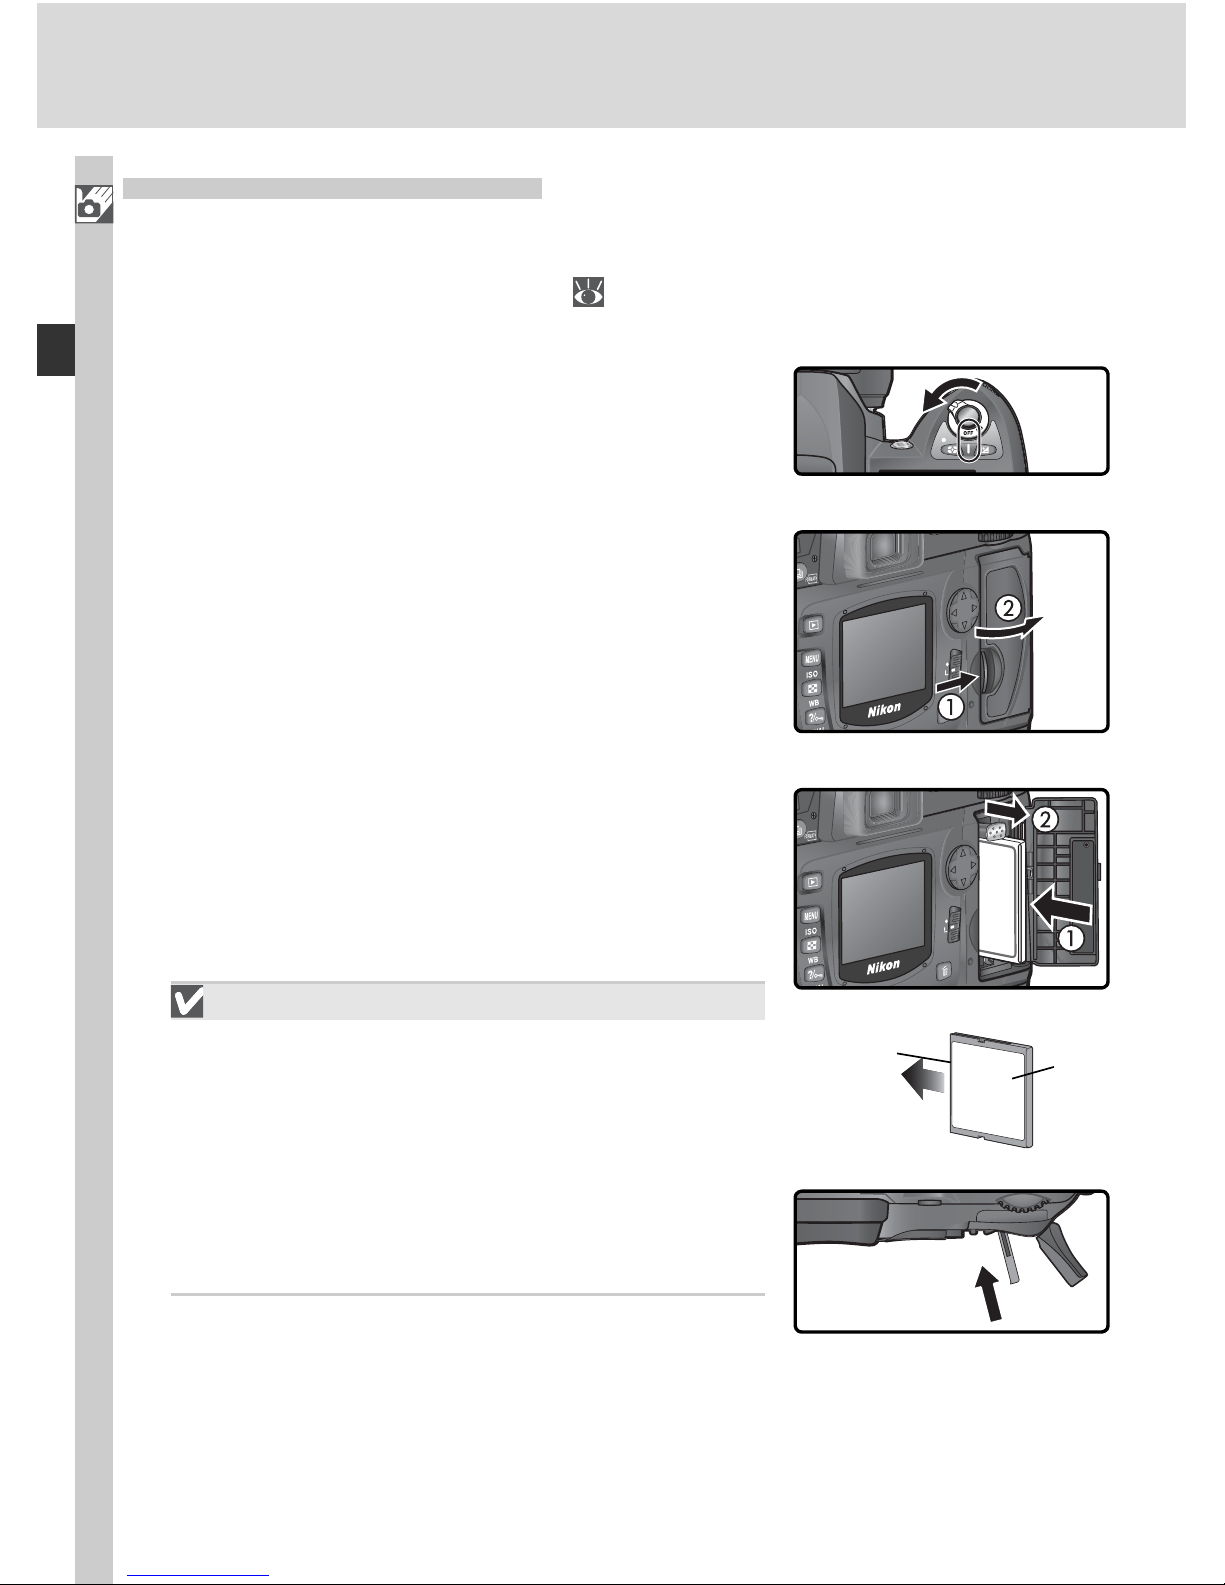
3
Insert a memory card
Insert the memory card with the rear label
toward the monitor (). When the memory
card is fully inserted, the access lamp will light
and the eject button will pop up (). Close
the card slot cover.
Inserting Memory Cards
Insert the memory card terminals fi rst. Inserting the card upside down or backwards could
damage the camera or the card. Check to be
sure that the card is in the correct orientation.
The memory card slot is on a slight angle (see
illustration at right). Match the angle of the
memory card slot when inserting cards.
2
Open the card slot cover
Open the card slot cover as shown at right.
Inserting Memory Cards
In place of fi lm, the D70 uses CompactFlash or microdrive memory cards
to store photographs. For a list of approved mem o ry cards, see “Technical
Notes: Approved Memory Cards” (
192).
1
Turn the cam era off
Turn the cam era off before inserting or re mov ing mem o ry cards.
Di rec tion of
insertion
Rear
label
Ter mi nals
Page 31
21
Introduction—First Steps
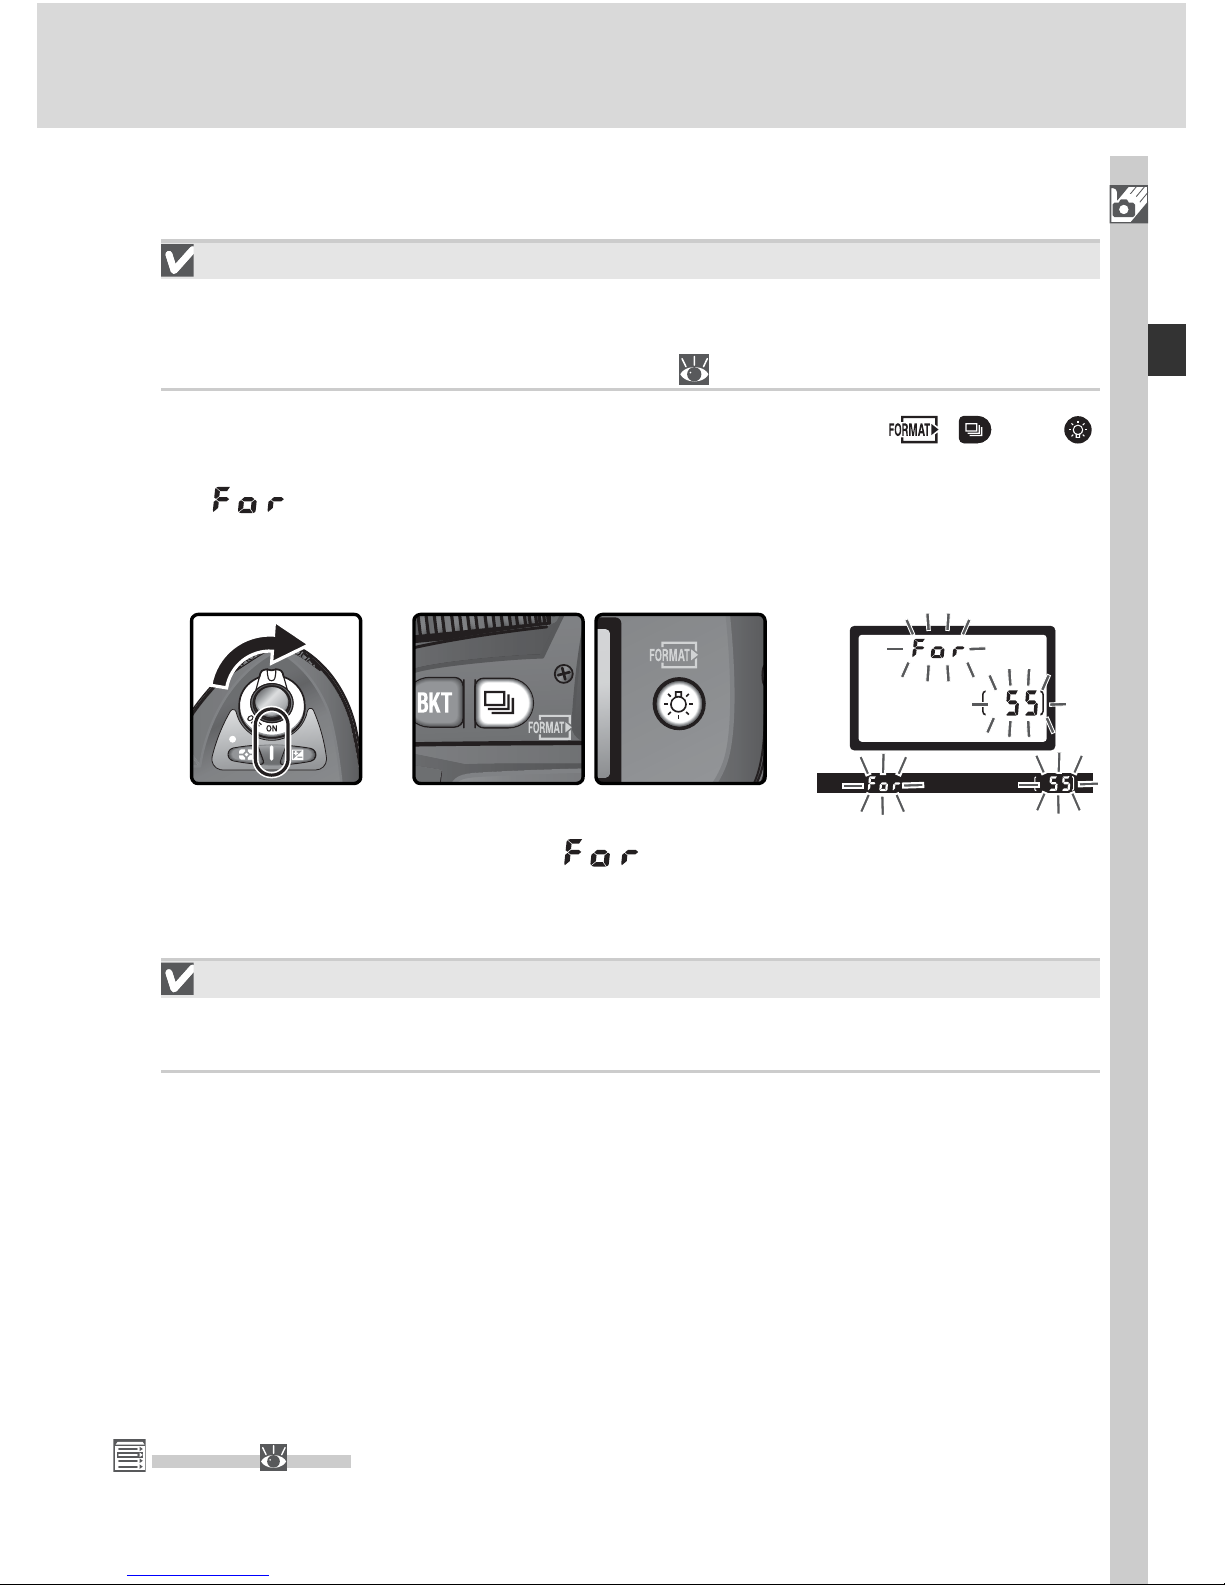
During formatting, the letters will be appear in the frame-count
dis play. When for mat ting is com plete, the frame-count display will show
the number of pho to graphs that can be re cord ed at current set tings.
During Formatting
Do not remove the card or battery or unplug the AC adapter (available sep a rate ly) during formatting.
Format ( 160)
Memory cards can also be formatted using the Format option in the setup menu.
4
Format the mem o ry card
Memory cards must be for mat ted be fore fi rst use.
Formatting Memory Cards
Formatting memory cards permanently deletes any data they may
contain. Be sure to copy any photographs and other data you wish to
keep to a com put er be fore proceeding (
171–174).
To for mat the card, turn the camera on and hold the ( and )
but tons down si mul ta neous ly for ap prox i mate ly two sec onds. A blink ing will appear in the shut ter-speed display and the frame count
will blink. Press ing both but tons to geth er a sec ond time will for mat the
mem o ry card. Press any other button to exit with out for mat ting.
Page 32
22
Introduction—First Steps
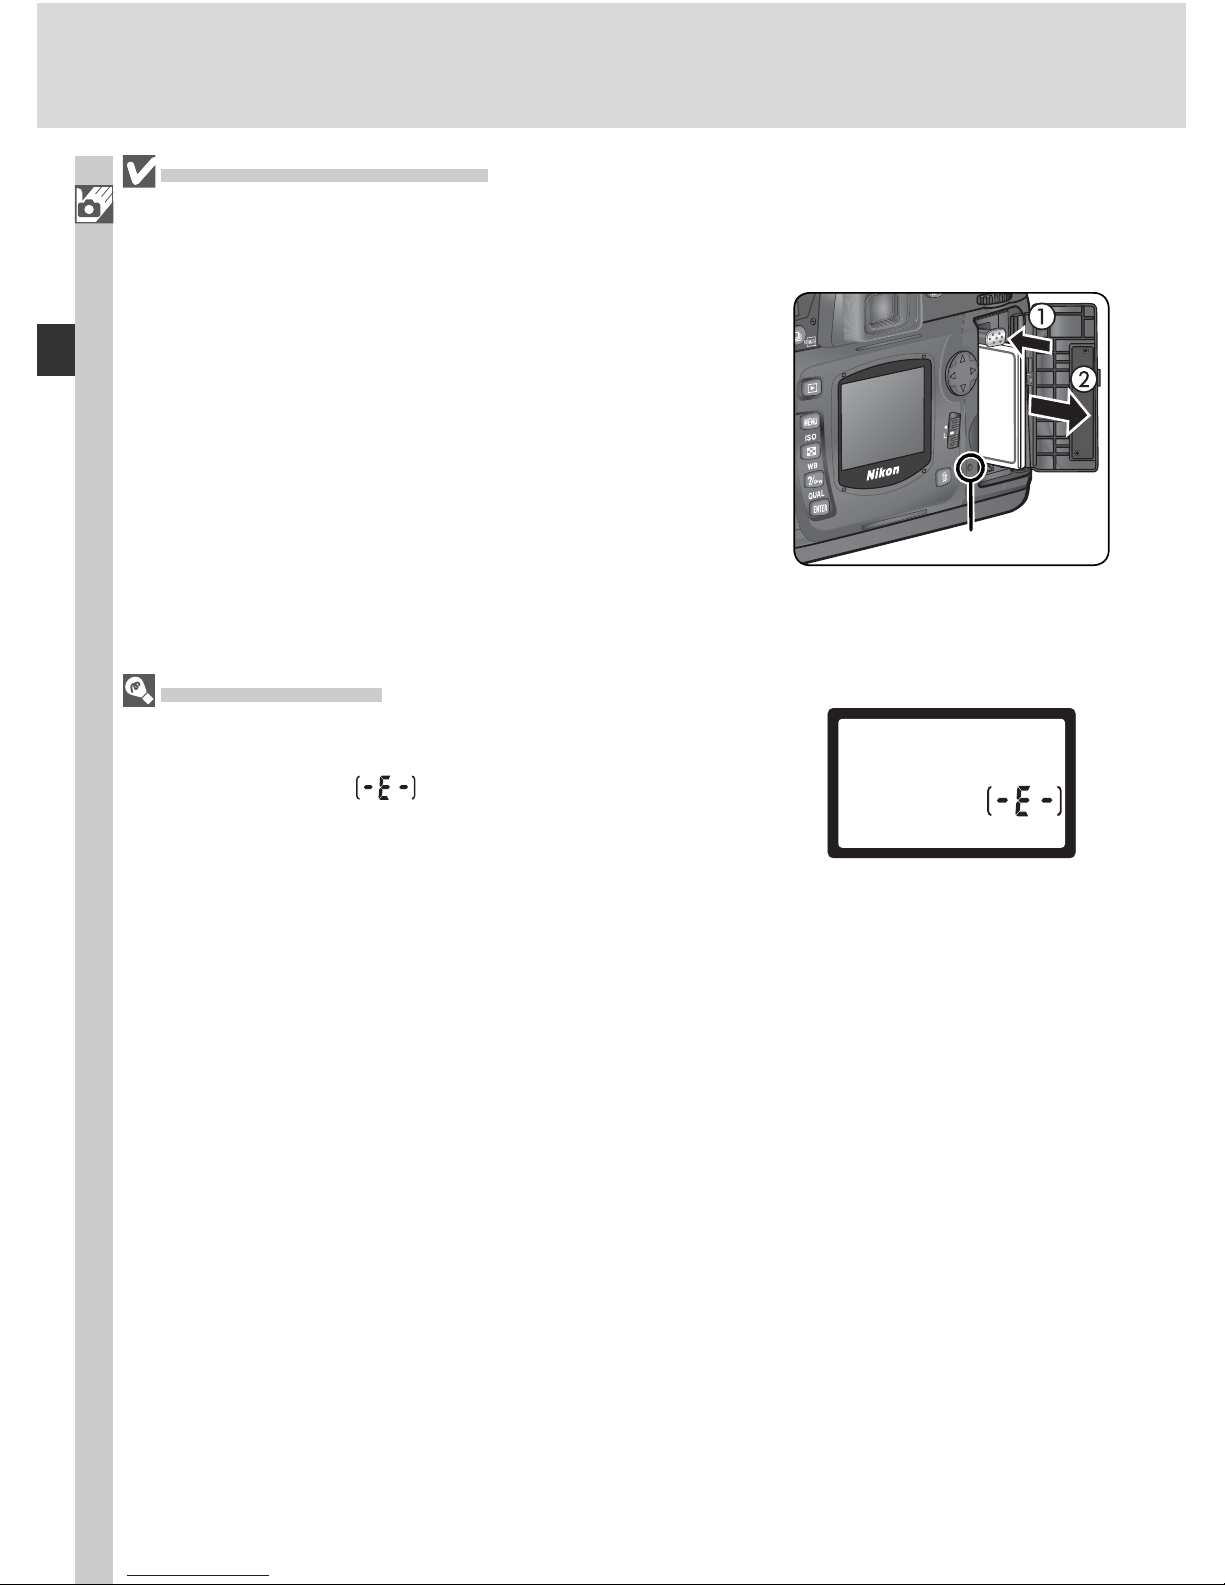
Removing Memory Cards
Memory cards can be removed without loss of data when the camera is off. Be fore
removing the mem o ry card, wait for the green card access lamp next to the card slot
cover to go out and then turn the camera off. Do NOT at tempt to remove the card
while the ac cess lamp is on. Failure to observe this
pre cau tion could re sult in loss of data or in damage to
the cam era or card. Open card slot cover and press the
eject but ton to par tial ly eject the card (). The card
can then be removed by hand (). Do not push on the
memory card while pressing the eject button. Failure
to observe this precaution could damage the memory
card.
Note that memory cards may be hot after use. Observe
due caution when removing memory cards from the
camera.
No Memory Card
If no memory card is inserted in the camera when
charged batteries are in place or the camera is pow ered
by an AC adapt er, will appear in the ex po surecount display .
Access lamp
Page 33
23
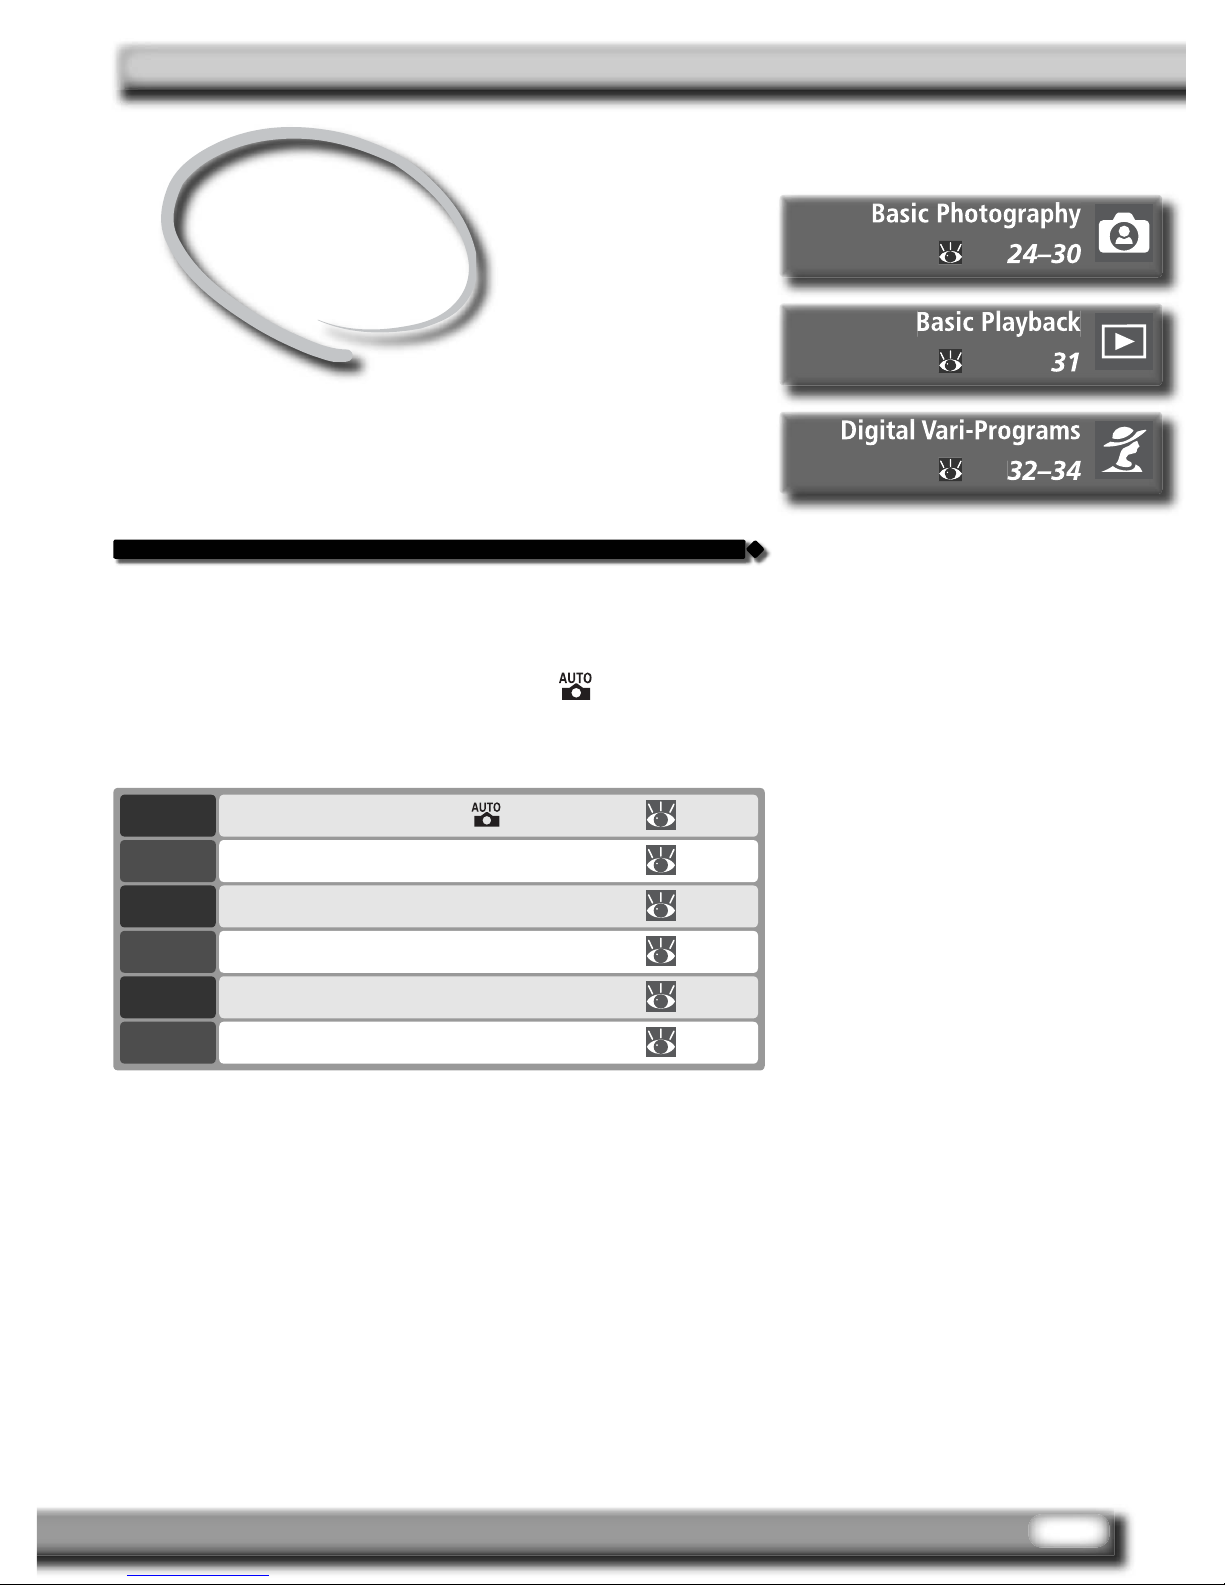
This chapter is divided into the following sections:
Basic Photography
This section details how to use the (auto) Digital
Vari-Program for “point-and-shoot” pho tog ra phy
that produces optimal re sults in most situations.
Tutorial
Basic Photography and Playback
Basic Playback
Read this section for information on viewing pho to graphs in the monitor.
Digital Vari-Programs
This section describes other Digital Vari-Programs
that leave the camera in charge of settings while
allowing you to express your creativity with a variety of subject types.
Rotate the Mode Dial to 24Step 1
Ready the Camera 24–25Step 2
Adjust Camera Settings 26Step 3
Frame the Photograph 27Step 4
Focus 28–29Step 5
Take the Photograph 30Step 6
Page 34
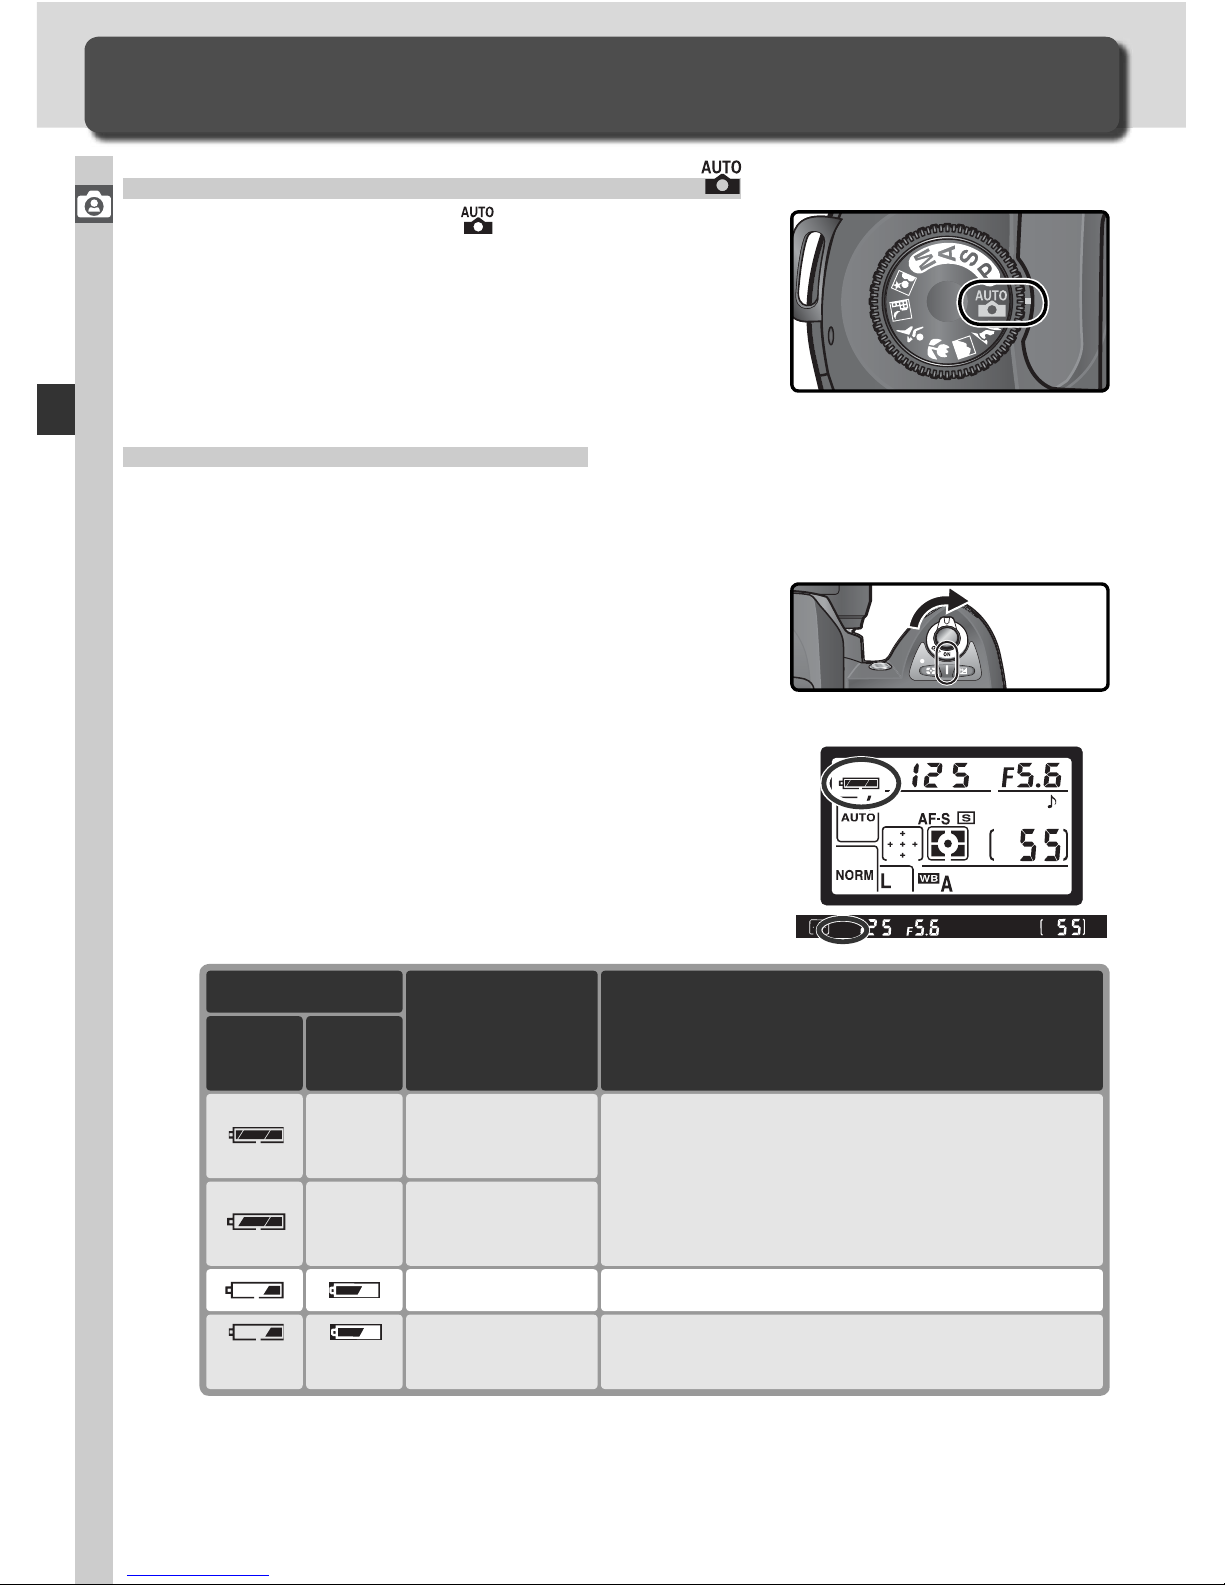
24
Tutorial—Basic Photography
2
.2 Check the battery level
Check the battery level in the viewfi nder or
control panel.
Basic Photography
Taking Your First Photographs
* No icon displayed when camera powered by optional AC adapter.
Icon
*
Control
panel
View-
fi nder
Status Notes
—
Battery fully
charged
Aperture and shut ter-speed in di ca tors in
con trol pan el and all in di ca tors in viewfi nder turn off if no op er a tions are per formed
for 6 s (auto meter off). Press shutter-re lease but ton halfway to re ac ti vate dis play.
—
Battery partially
discharged
(fl ashes) (fl ashes)
Battery
exhausted
Shutter release disabled.
Low battery Ready fully-charged spare battery.
Step 1—Rotate the Mode Dial to
Rotate the mode dial to . In this automatic,
“point-and-shoot” mode, the majority of settings are controlled by the camera in response to
shooting conditions, making it ideal for fi rst-time
users of digital SLR cameras.
Step 2—Ready the Camera
Before taking photographs, ready the camera as described below.
2
.1 Turn the cam era on
The control panel will turn on and the dis play in the viewfi nder will light.
Page 35
25
Tutorial—Basic Photography
2
Non-CPU Lenses
Digital Vari-Program modes (including mode) are available only with CPU lenses.
The shutter release is disabled when a non-CPU lens is attached. See “Optional Accessories: Lenses for the D70” ( 183).
CR2 Batteries
Depending on the type of battery and on battery use, the camera may require more
time to update the exposure-count display when CR2 batteries are used.
For information on what to do when fl ashes in the exposure-count display, see
“Troubleshooting” ( 200).
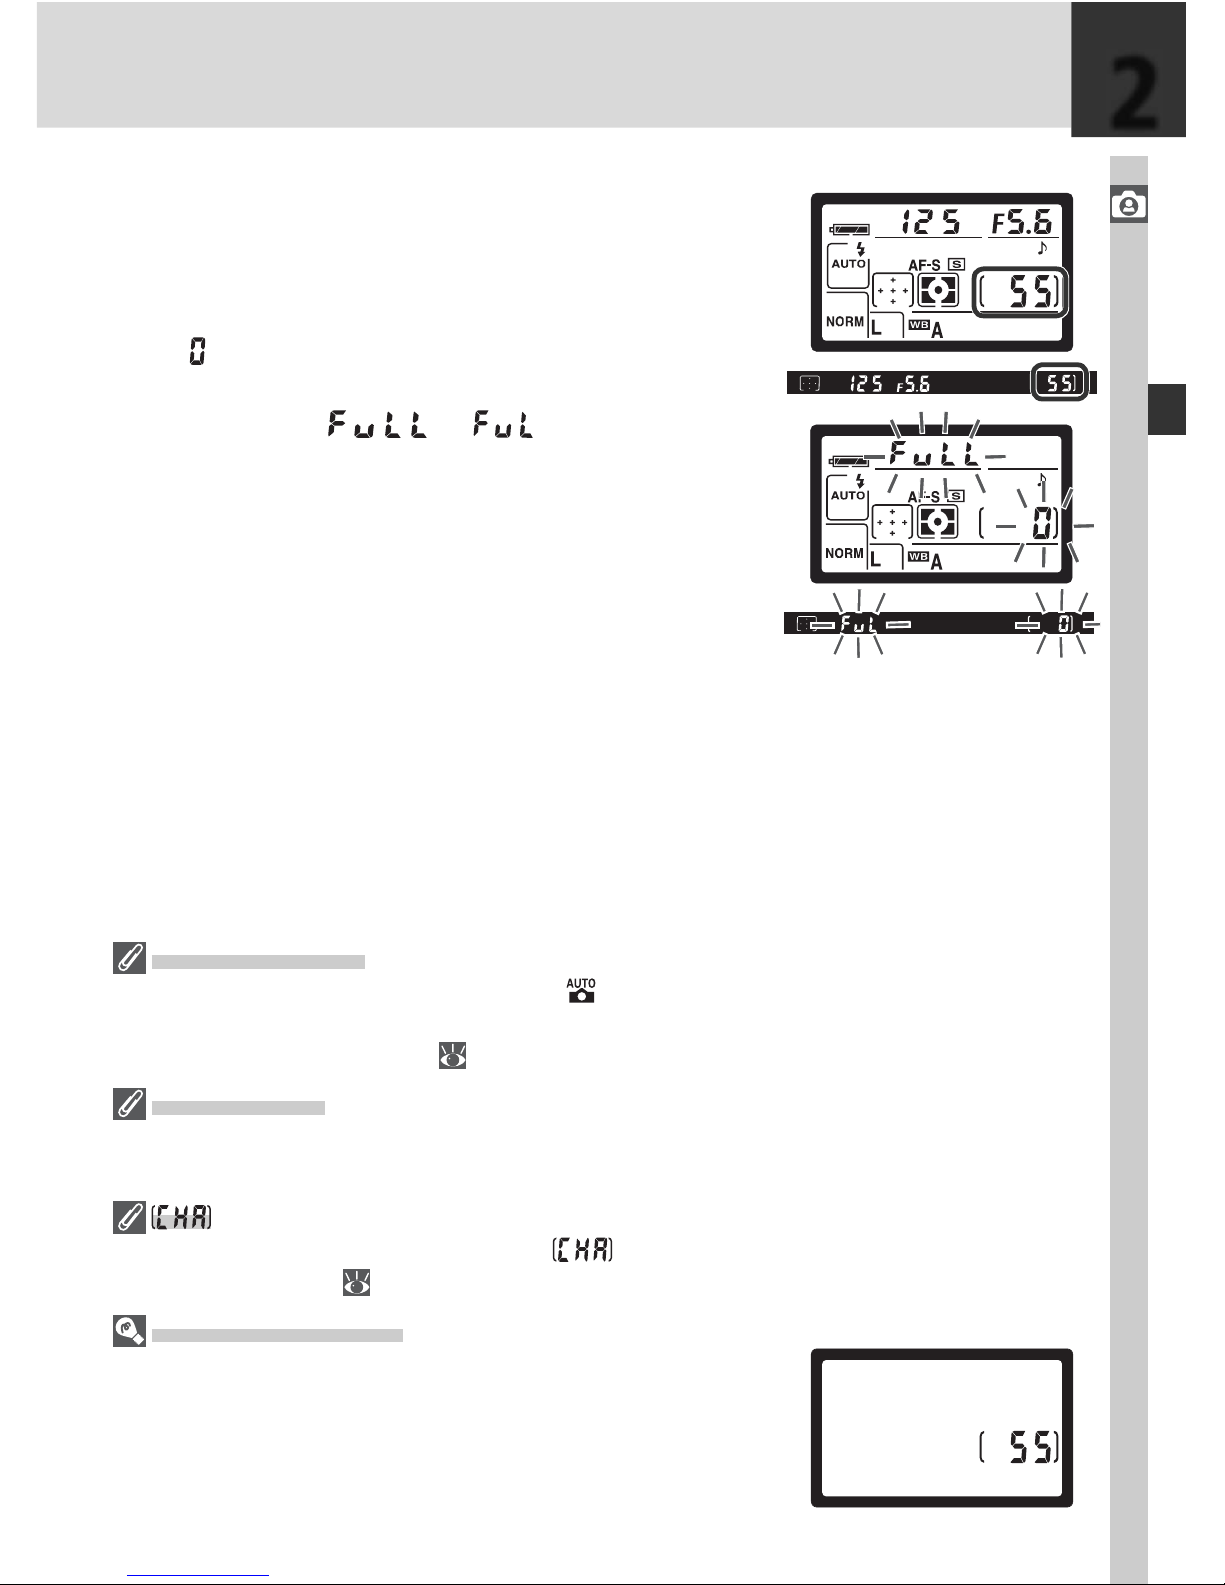
Camera Off Display
If the camera is turned off with a battery and memory
card inserted, the number of exposures remaining will
be displayed in the control panel.
2
.3 Check the num ber of exposures re main ing
The exposure-count displays in the control
pan el and viewfi nder show the num ber of
pho to graphs that can be taken at current
set tings. When this number reaches zero,
will fl ash in the exposure-count displays,
while the shutter-speed displays will show
a blinking or . No further pictures can be taken until you de lete pic tures
or in sert a new mem o ry card. You may be
able to take additional pictures at lower image qual i ty or size set tings.
Page 36
26
Tutorial—Basic Photography
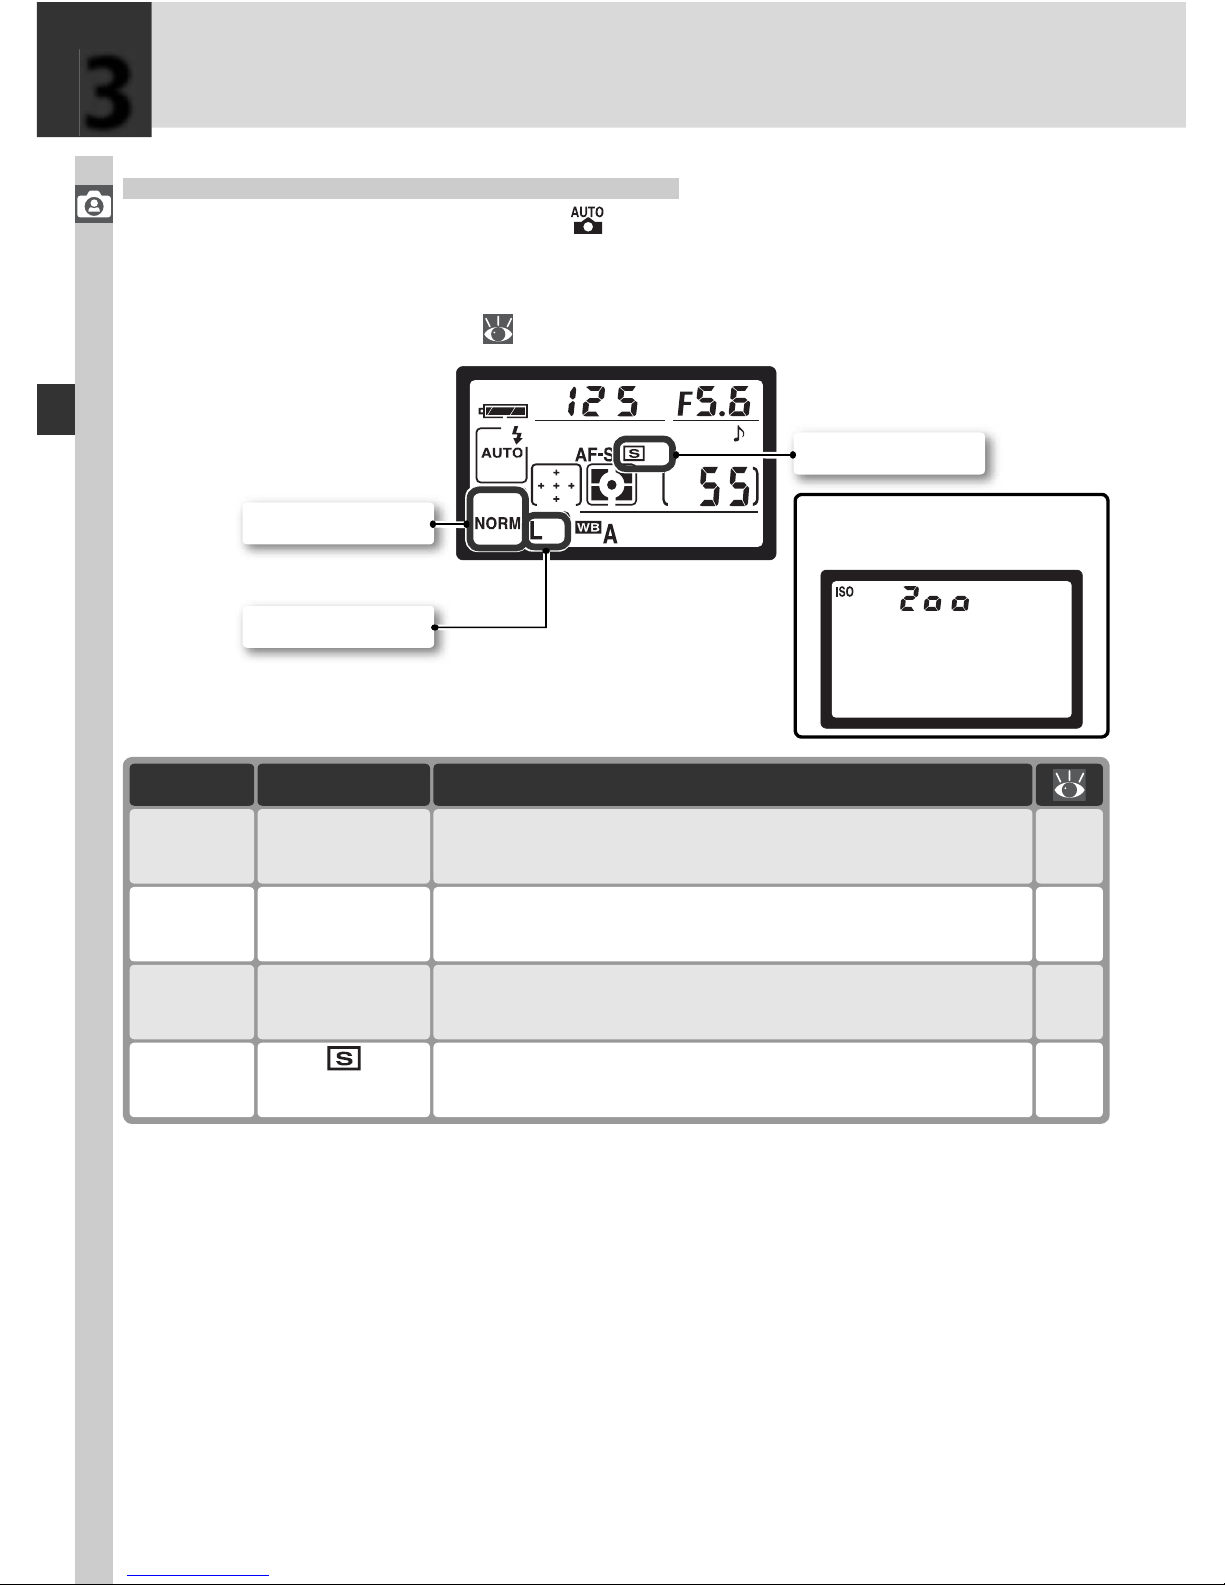
Step 3—Adjust Camera Settings
When the mode dial is rotated to , camera settings are automatically adjusted to produce optimal results in most situations. Image quality, image
size, sensitivity, and shooting mode are set to the values in the table below.
See “Taking Photographs” ( 35).
Option Default Description
Shooting
mode (Single frame)
62–
63
One photograph is taken each time shutter-releasebutton is pressed.
Sensitivity 200
46–
47
Sensitivity (dig i tal equivalent of fi lm speed) set to
value roughly equiv a lent to ISO 200.
Image
size
L
(Large)
43–
45
Images are 3,008 × 2,000 pix els in size.
Image
quality
NORM
(JPEG Normal)
41–
42
Pictures are com pressed for balance be tween im age quality and fi le size that is ideal for snap shots.
3
Shooting mode
Image quality
Image size
Sensitivity is displayed only
when ISO button is pressed.
Page 37
27
Tutorial—Basic Photography
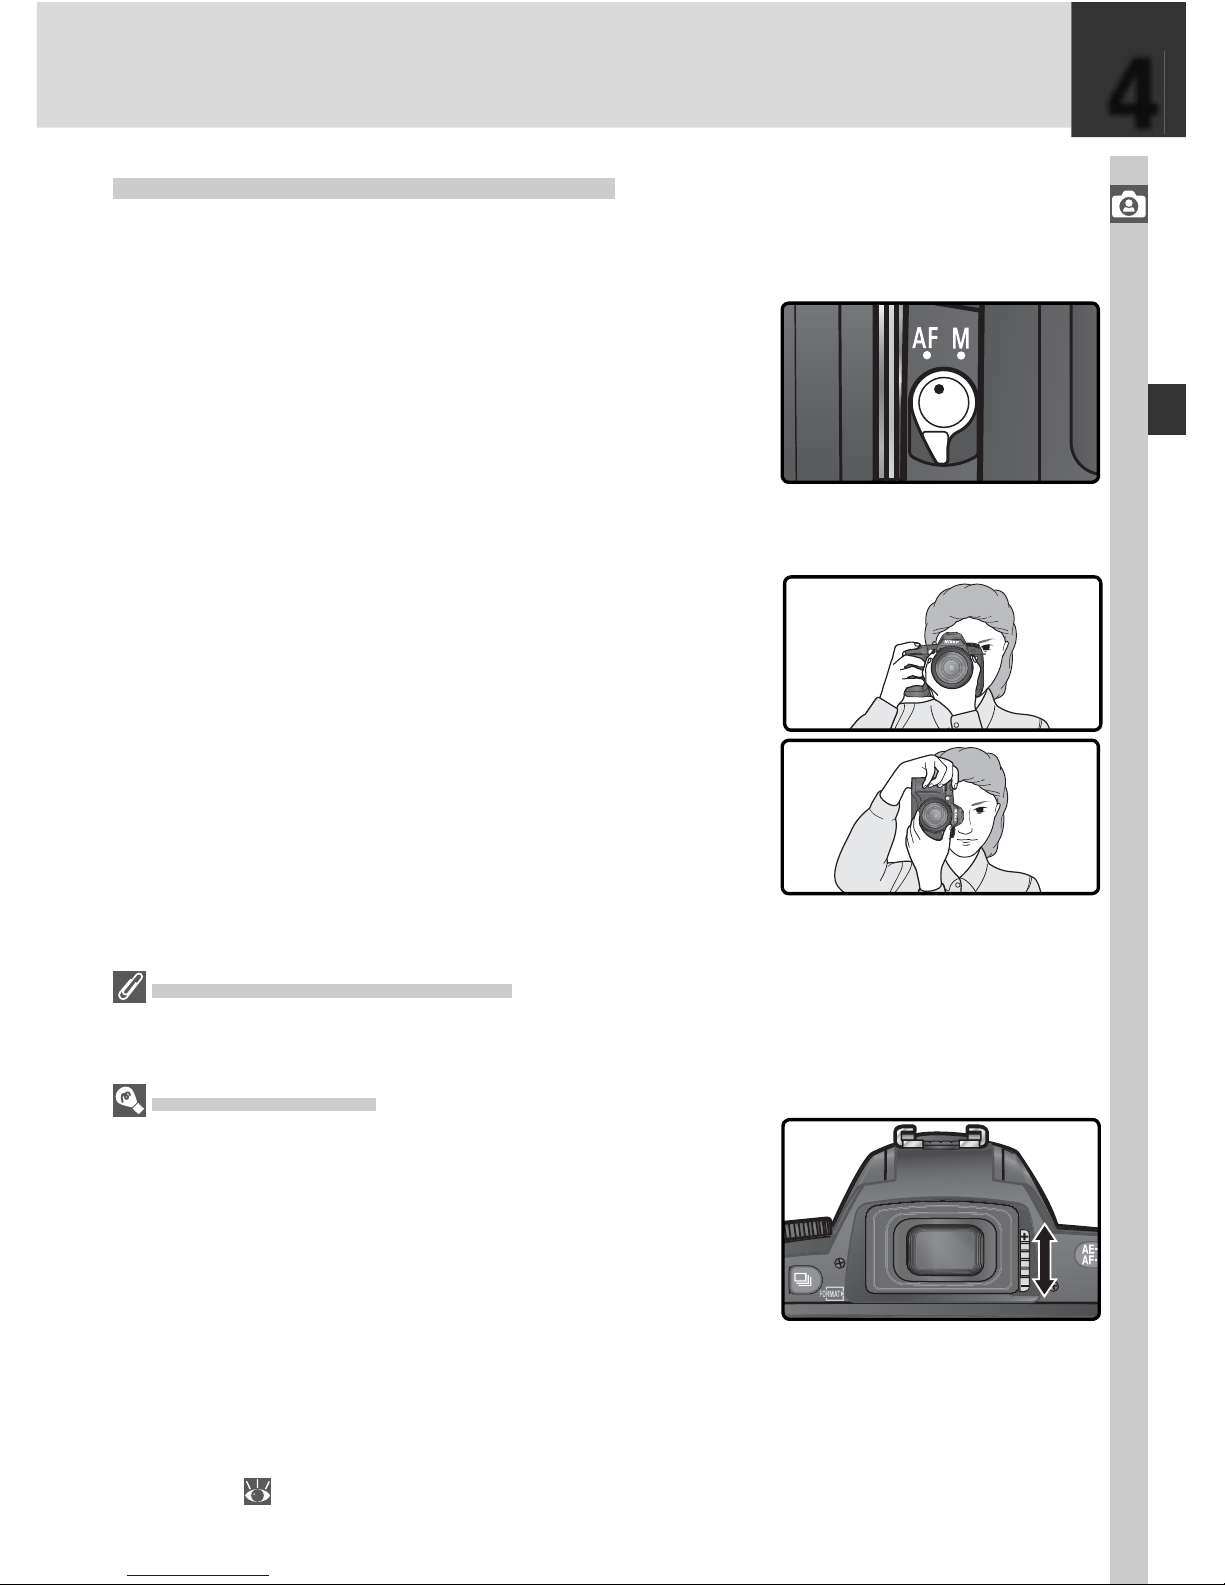
Step 4—Frame a Photograph
Choose a focus mode and frame a photograph.
4
.1 Choose autofocus
Confi rm that the focus-mode selector is
pointing to AF (autofocus). At this setting,
the camera will focus automatically when
the shutter-release button is pressed halfway. Pictures can only be taken when the
camera is in focus.
4
.2 Frame a photograph
The rec om mend ed stance for tak ing pho to graphs is with one foot a half pace in front
of the other and your upper body stable.
To prevent blurred photographs caused by
unsteady hands (camera shake), hold the
camera steadily in both hands, with your
elbows propped lightly against your torso
for support. Hold the handgrip in your
right hand and cradle the cam era body or
lens with your left.
Viewfi nder Frame Coverage
The viewfi nder shows slightly less of the image (approximately 95% both vertically and
horizontally) than appears in the fi nal photograph.
Viewfi nder Focus
The viewfi nder is equipped with diopter adjustment
to ac com mo date individual dif fer enc es in vision. To
adjust viewfi nder focus, slide the diopter adjustment
control up and down until the viewfi nder display and
focus brackets are in sharp focus. If necessary, the
rubber eyepiece cup can be removed; when the cup is
replaced, the lettered face should be down.
When operating the diopter adjustment control with your eye to the viewfi nder, be
careful not to put your fi ngers or fi ngernails in your eye.
Diopter can be adjusted in the range –1.6 m–1 to +0.5 m–1. Cor rec tive lenses (avail able
sep a rate ly; 190) allow di opt ers of –5 m–1 to +3 m–1.
4
Page 38
28
Tutorial—Basic Photography
Step 5—Focus
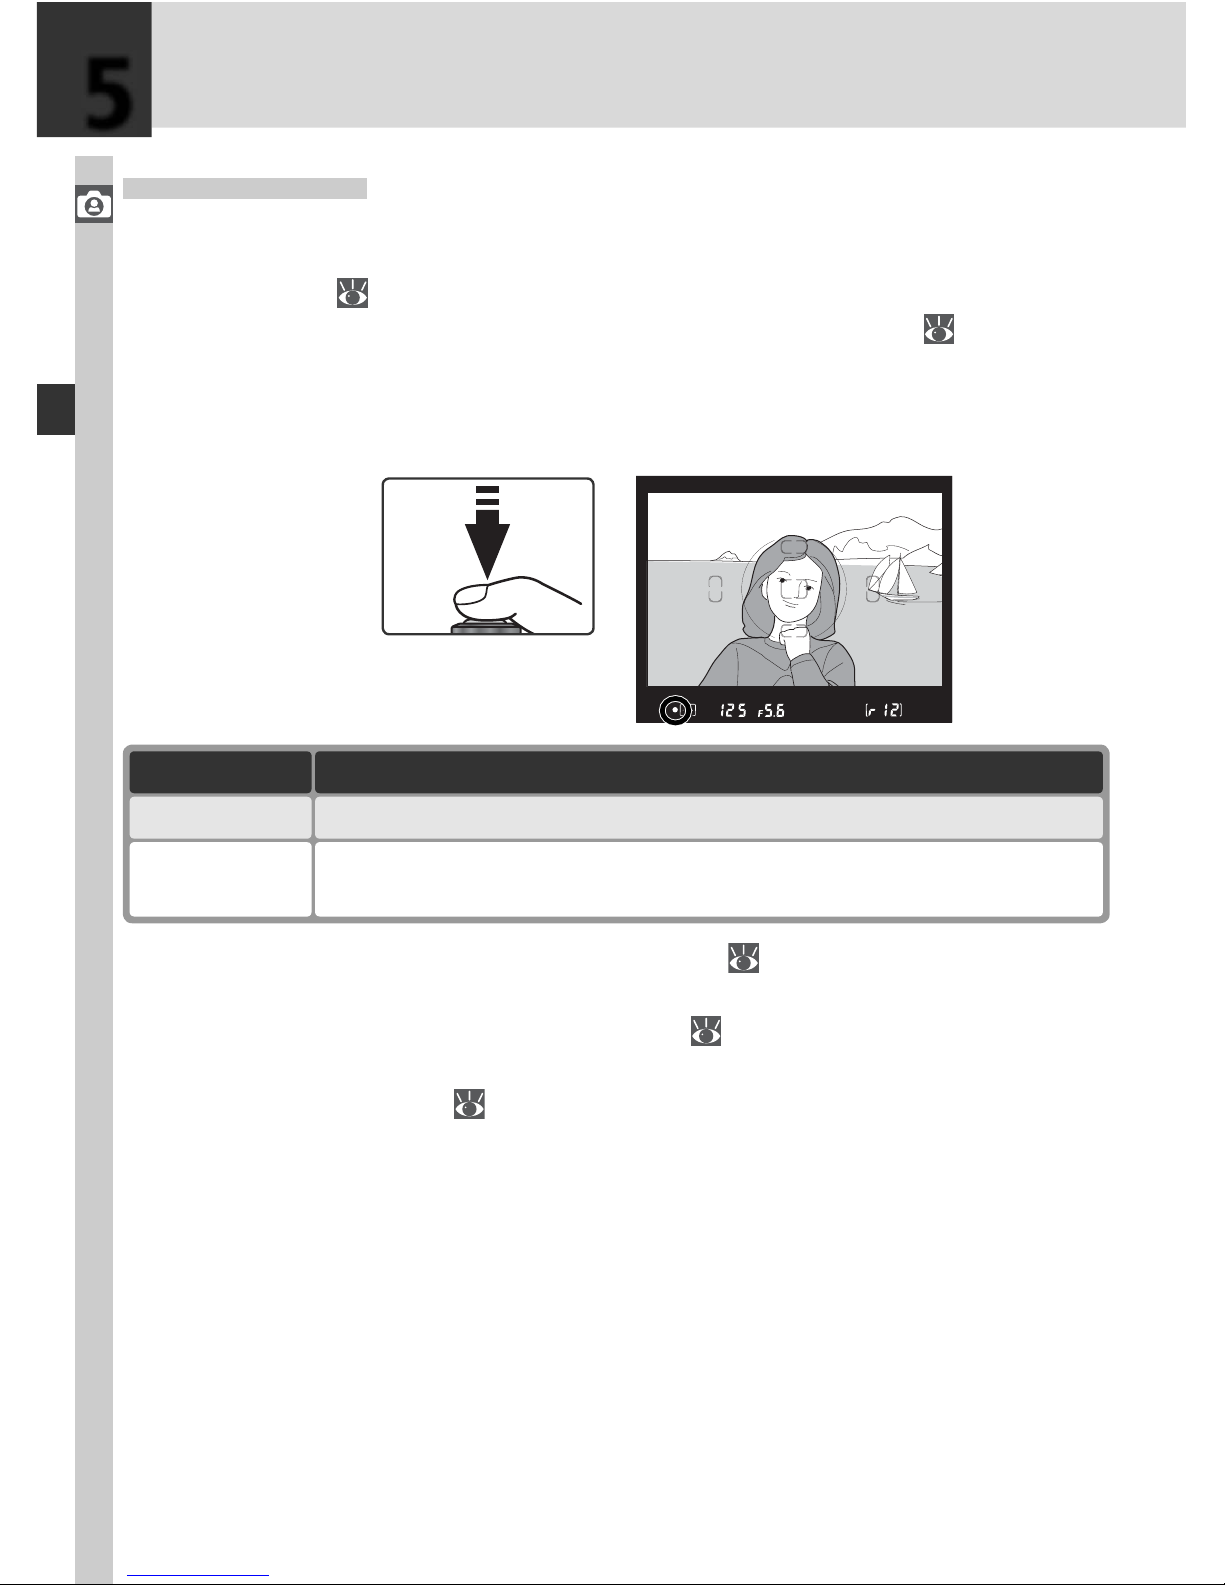
Press the shutter-release button halfway. The camera will automatically
select the focus area containing the subject closest to the camera (closest
subject priority; 140). Once the camera has focused on this subject, a
beep will sound, the selected focus area will be highlighted ( 8), and the
in-focus indicator (●) will appear in the viewfi nder (see table below). If the
subject moves out of the selected focus area before the camera has focused,
the camera will focus based on information from other focus areas.
If the subject is dark, the AF-assist illuminator (
72) will light automatically
to assist in the focus operation. To focus on a subject that does not fall in
any of the fi ve focus frames, use focus lock ( 70). For information on what
to do if the camera is unable to focus using autofocus, see “Getting Good
Results with Autofocus” ( 73).
Focus indicator Description
●
Subject in focus (beep will sound when camera has focused).
●
(fl ashes)
Camera unable to focus using autofocus.
5
Page 39
29
Tutorial—Basic Photography
In mode, the camera automatically sets shutter speed and aperture when the shutter-release
button is pressed halfway. Before shooting, check
the shut ter-speed and aperture in di ca tors in the
viewfi nder. If the photo would be overexposed
at cur rent settings,
will be displayed; use an
optional Neutral Density (ND) fi lter. If the photo
would be underexposed, the built-in Speedlight
will pop up automatically, and fi re when the photograph is taken.
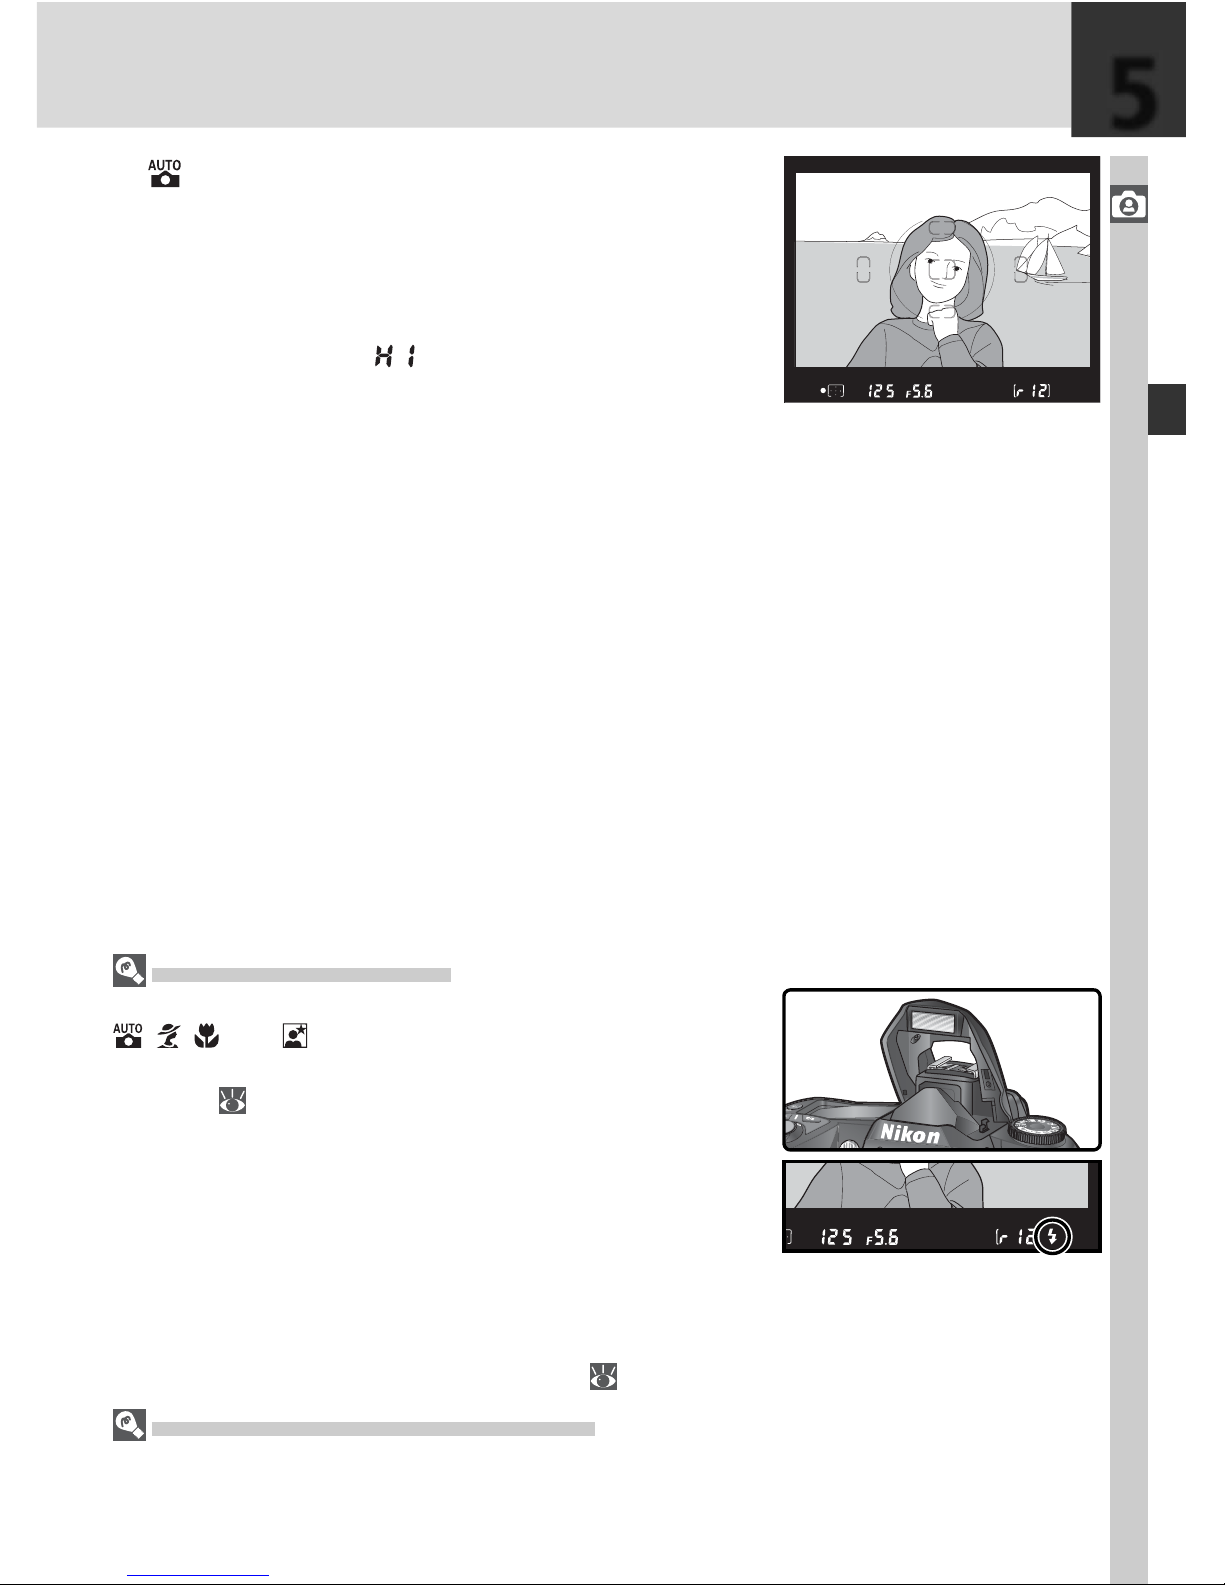
The Built-in Speedlight
If additional lighting is required for correct exposure in
, , , and modes, the built-in Speedlight will pop
up automatically when the shutter-release is pressed
halfway ( 94). When the built-in Speedlight is raised,
photographs can only be taken when the fl ash-ready
indicator is displayed. If the fl ash-ready indicator is not
displayed, remove your fi nger briefl y from the shutterrelease button and try again.
If desired, the fl ash can be turned off so that it will not
fi re even when lighting is poor. A red-eye reduction
mode is also available for reducing “red-eye” caused by
light refl ecting from the subject’s retinas ( 95).
When the Speedlight Is Not in Use
To save battery power when the Speedlight is not in use, return it to the closed position
by pressing it gently downward until the latch clicks into place.
5
Flash-ready indicator
Page 40
30
Tutorial—Basic Photography
6
Shutter Sound
The D70 is equipped with a combined electronic (CCD) and mechanical shutter. This
shutter operates on a different principle from the mechanical shutters found in fi lm
cameras. As a result, the interval between the sounds made by the shutter and mirror
will not decrease past a certain point, even at high shutter speeds.
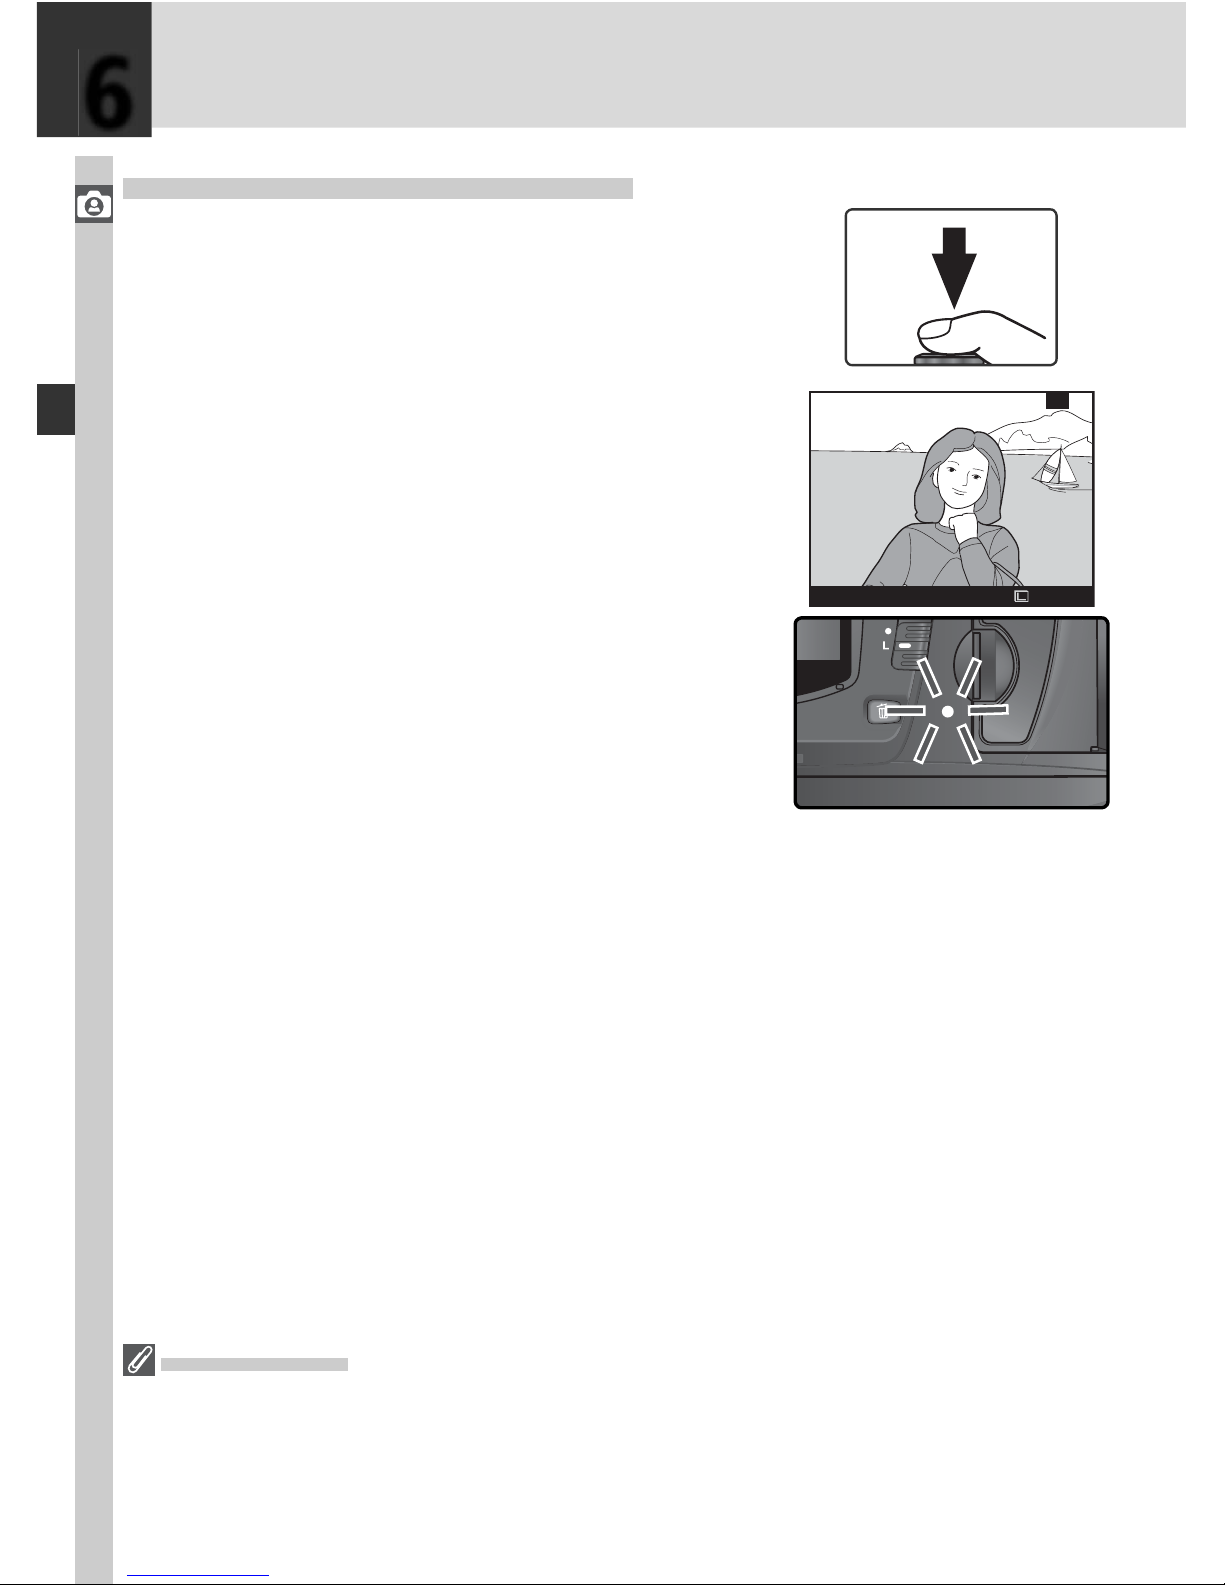
While the photograph is being recorded to the
mem o ry card after shooting, it will be displayed
in the monitor (see opposite) and the access lamp
next to the card slot cov er will light. Do not eject
the mem o ry card, turn the camera off, or
remove or dis con nect the power source until
the lamp has gone out. Re mov ing the memory
card or cutting pow er in these cir cum stanc es
could result in loss of data.
Step 6—Take the Photograph
Smoothly press the shutter-re lease button the rest
of the way down.
1/9
100 NCD70 /DSC_0001.JPG NORMAL
Page 41
31
Tutorial—Basic Playback
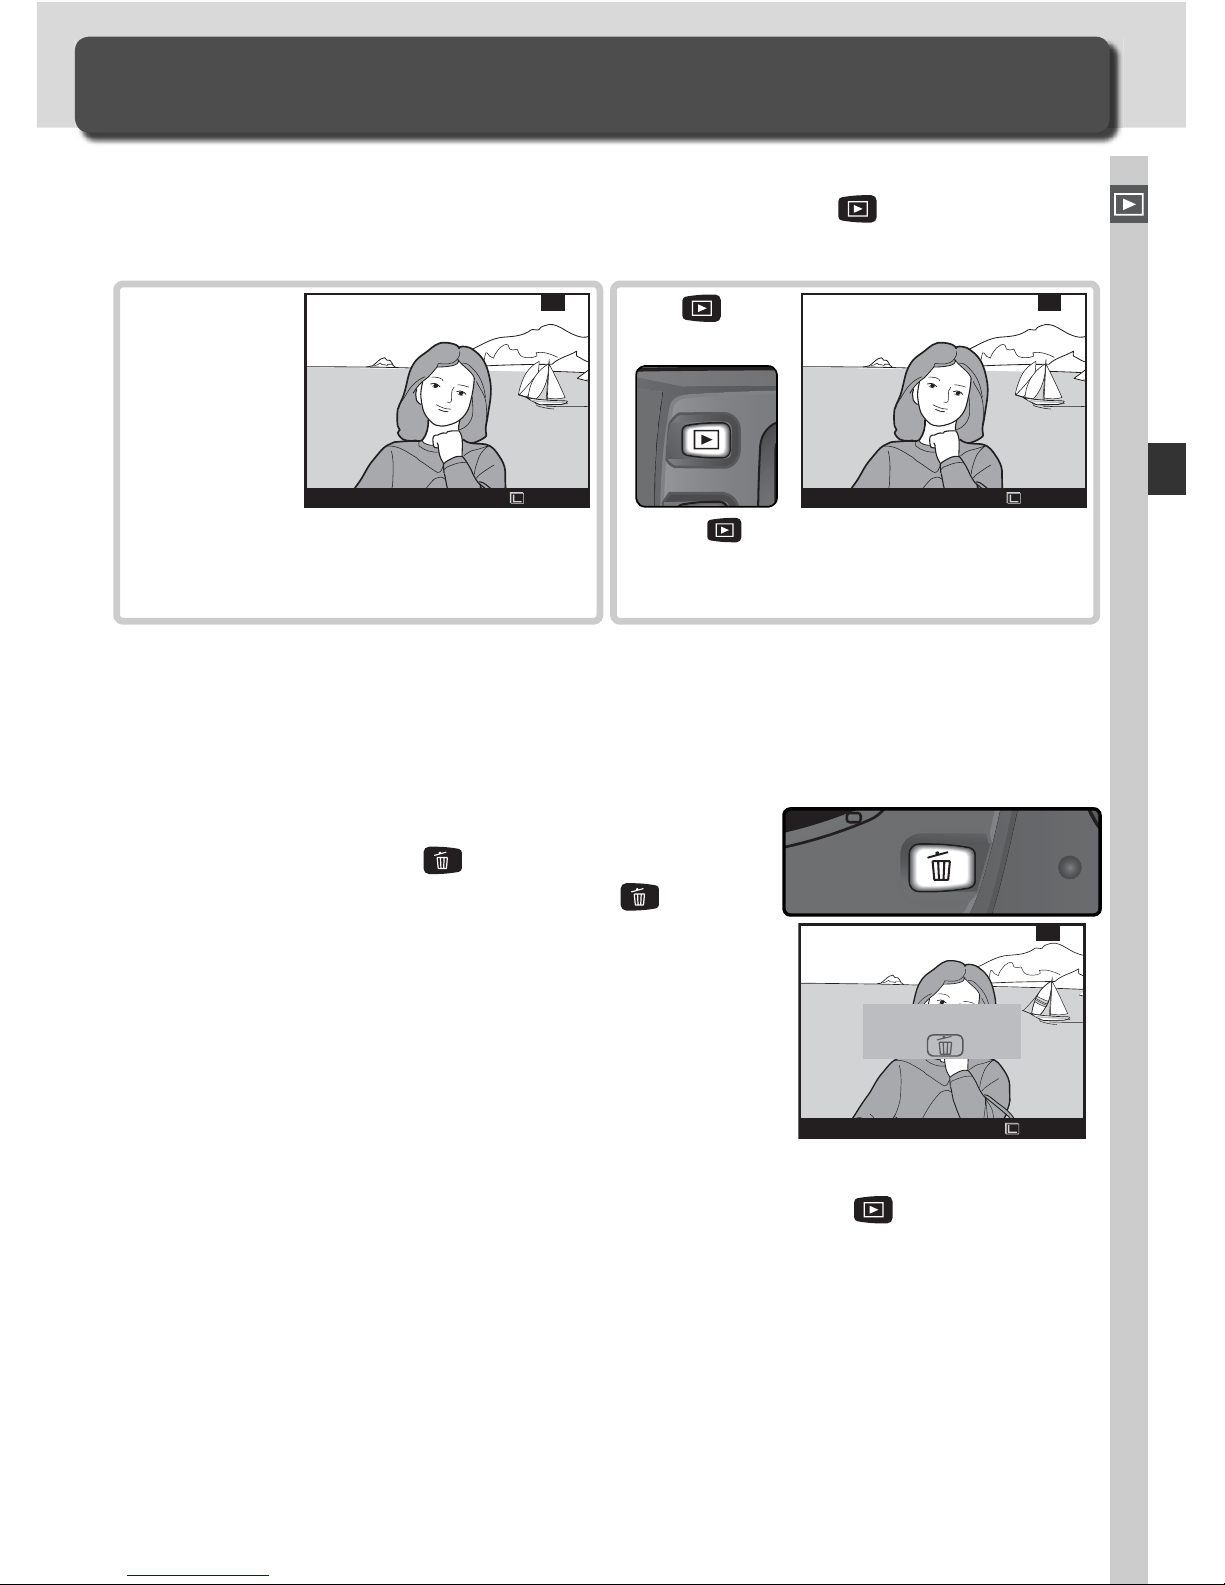
Press button at any time to dis-
play most recent photograph.
1/1
100 NCD70 /DSC_0001.JPG NORMAL
The
Button
Photographs are automatically
displayed while being recorded to
memory card.
1/1
100 NCD70 /DSC_0001.JPG NORMAL
During
Recording
Basic Playback
Viewing Photographs
Photographs are displayed automatically while being recorded to the memory card. Photographs can also be viewed by pressing the
button to display
most recent pho to graph in the mon i tor.
Press the multi selector up or down to view additional photographs. Press
the multi selector down to view photographs in the order recorded, up to
view photographs in reverse order.
Deleting Unwanted Photographs
To delete the pho to graph cur rent ly dis played in
the monitor, press the
button. A confi rmation dialog will be dis played. Press the button
again to de lete the image and re turn to play back.
Press any other button to exit without de let ing
the picture.
1/9
100 NCD70 /DSC_0001.JPG NORMAL
Delete?
Ye s
Take Additional Photographs
To end playback and return to shooting mode, press the button or press
the shutter-release but ton halfway.
Page 42
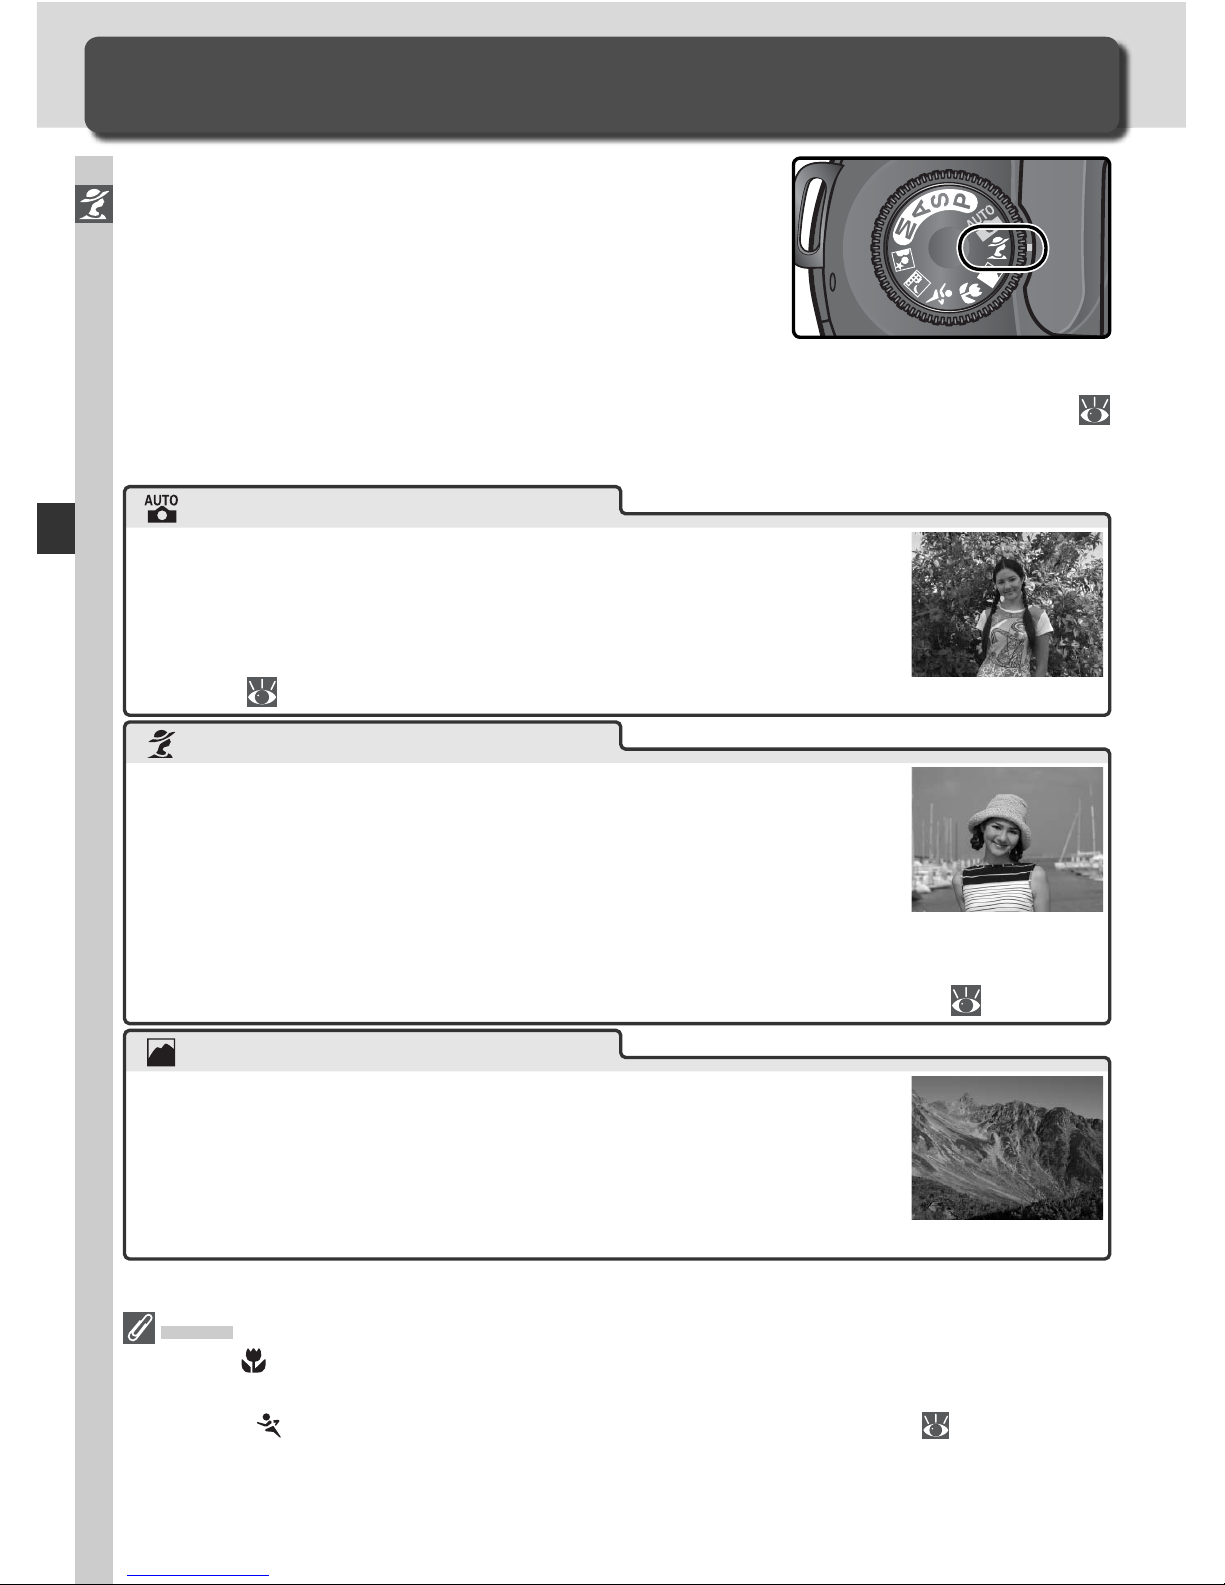
32
Tutorial—Digital Vari-Programs
Digital Vari-Programs
Creative Photography
The D70 offers a choice of seven Digital Vari-Program modes. Selecting a program automatically
optimizes settings to suit the selected scene, making creative photography as simple as rotating the
mode dial.
Digital Vari-Programs are available with CPU lenses only. When a non-CPU
lens is attached, the shutter release is disabled. See “Camera Settings” (
182) for information on the options available in Digital Vari-Program modes.
Portrait
Use for portraits. Main subject stands out clearly while
background details are softened, lending composition sense
of depth.
• Degree of softening depends on amount of light available.
Increase distance between subject and background or use
telephoto lens for best results.
• Flash set to front-curtain sync. Other modes can be selected ( 96).
Landscape
Use for vivid landscape shots that enhance outlines, colors,
and contrast in such subjects as skyscapes and forests.
• Use wide-angle lens for wider fi eld of view.
• Built-in Speedlight and AF-assist illuminator turn off automatically and will not fi re even when lighting is poor.
Auto
Use for snapshots. Camera settings are automatically adjusted according to subject and lighting, producing vivid, smooth
images with balanced saturation, color, and sharpness.
• Flash set to front-curtain sync. Other modes can be selected ( 96).
Focus
Except in mode, the camera automatically selects the focus area containing the
subject closest to the camera. Once the camera has focused on this subject, a beep
will sound ( excepted), the selected focus area will be highlighted ( 8), and focus
will lock. If the subject moves out of the selected focus area before the camera has
focused, the camera will focus based on information from other focus areas.
Page 43
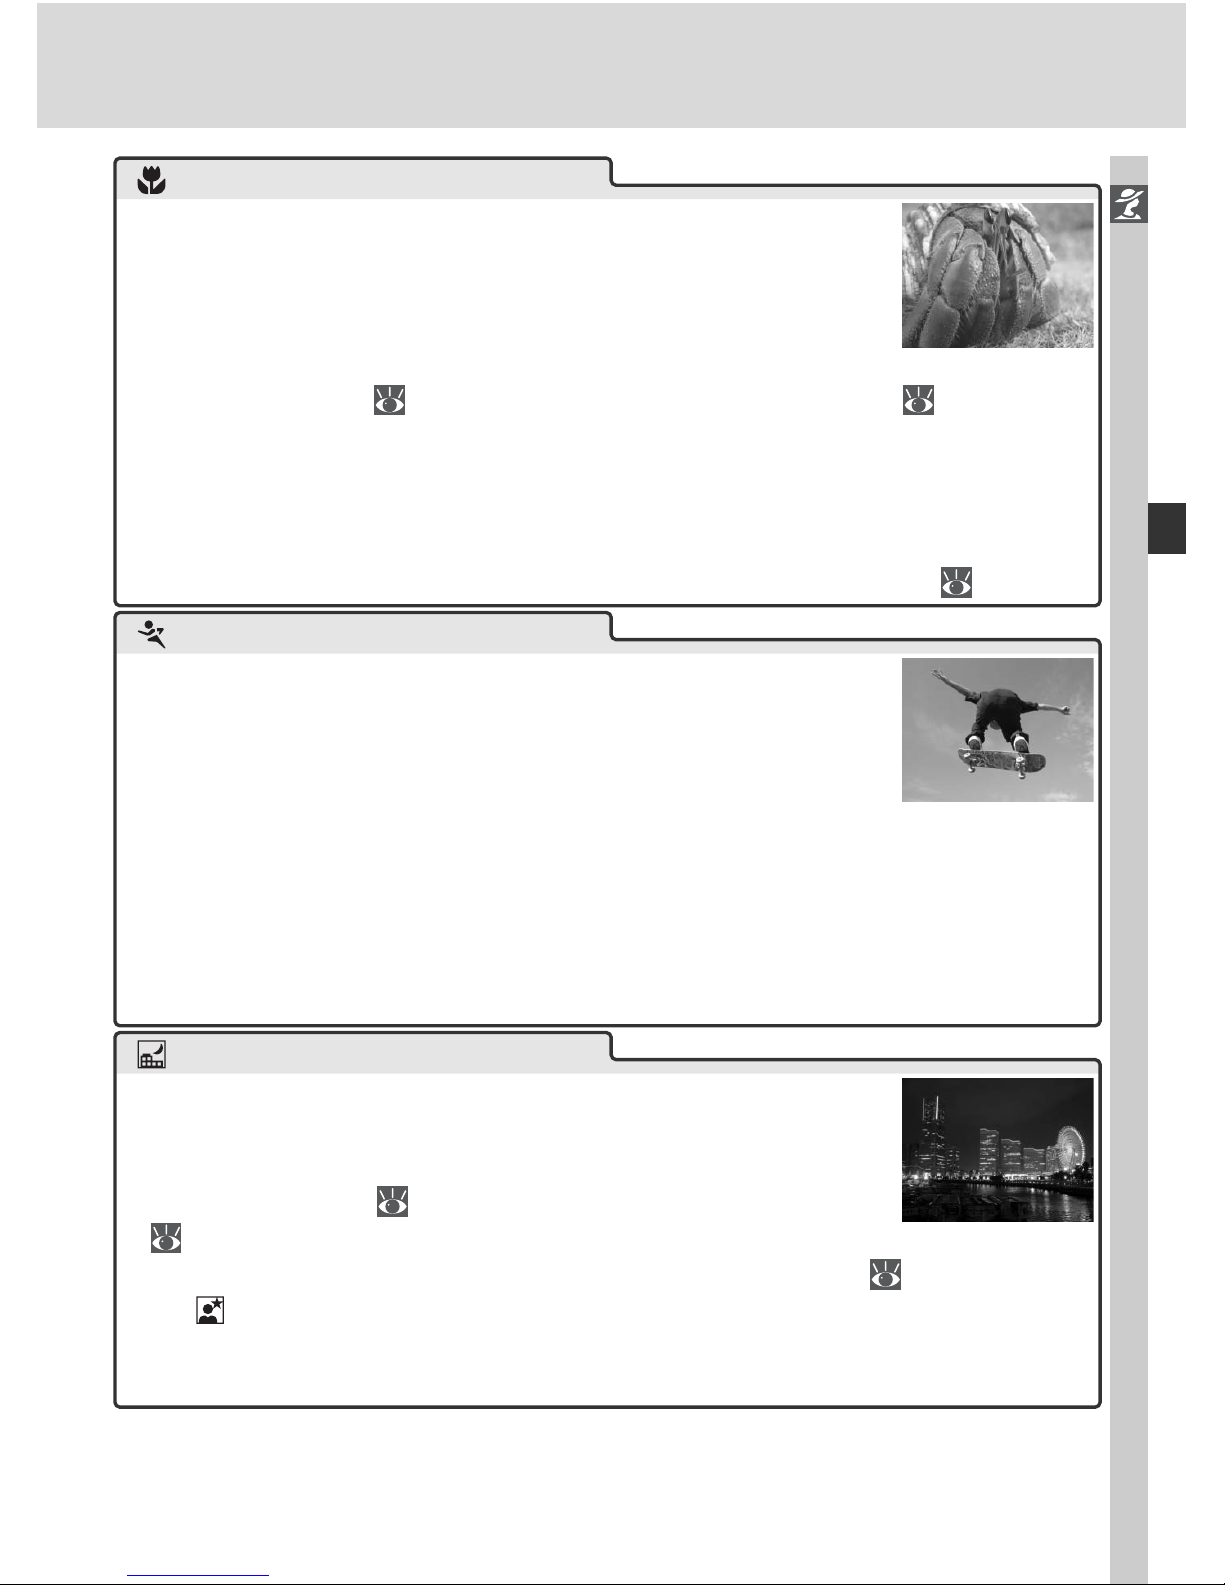
33
Tutorial—Digital Vari-Programs
Close up
Use for close-up shots of fl owers, insects, and other small
objects in which main subject stands out clearly. Reds and
greens are captured particularly vividly.
• Camera automatically selects center focus area. Focus area
selection can be changed.
• Tripod, self-timer (
105), and / or optional remote control ( 107) can be
used to prevent blurring at slow shutter speeds.
• Micro lens recommended. Effective use can be made of other lenses by
focusing at minimum focus distance. With zoom lenses, zoom in to make
subject appear larger.
• Flash set to front-curtain sync. Other modes can be selected ( 96).
Night landscape
Slow shutter speeds produce stunning night landscapes
while minimizing mottling and discoloration often seen in
low-light photographs.
• Tripod, self-timer ( 105), and / or optional remote control
( 107) can be used to prevent blurring at slow shutter speeds. At speeds
slower than 1 s, use noise reduction to reduce mottling ( 133).
• Use mode for portraits that include night scenery.
• Built-in Speedlight and AF-assist illuminator turn off automatically and will
not fi re even when lighting is poor.
Sports
High shutter speeds freeze motion for dynamic sports shots
in which main subject stands out clearly.
• Camera focus continuously while shutter-release button is
pressed halfway, following movement of subject through
focus areas. Note that shutter can be released even when camera is not
in focus; check focus indicator (●) in viewfi nder before shooting.
• Use telephoto lens for best results. Tripod recommended to prevent blurring when telephoto lens is used.
• Built-in Speedlight and AF-assist illuminator turn off automatically and will
not fi re even when lighting is poor.
Page 44
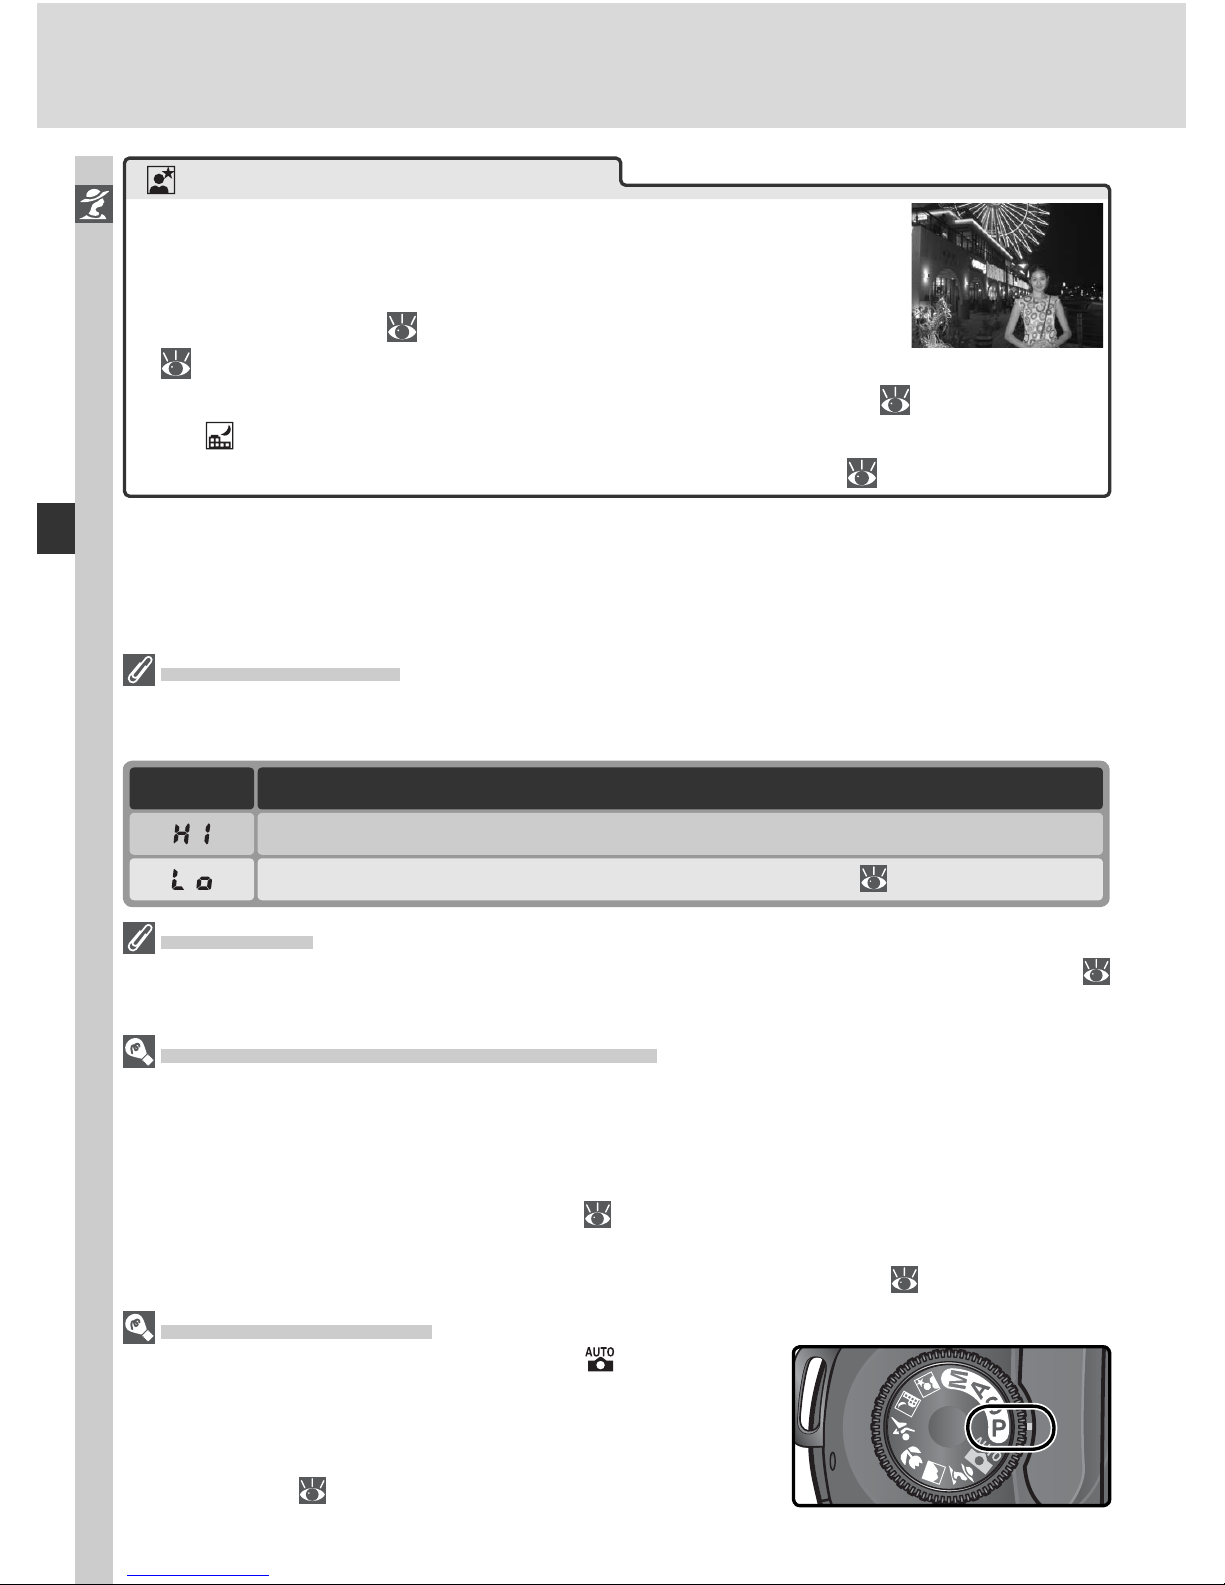
34
Tutorial—Digital Vari-Programs
Subject too dark. Raise sensitivity (ISO equiv a len cy; 46).
DescriptionIndicator
Subject too bright. Use optional Neutral Density (ND) fi lter.
Exposure Warning
If the limits of the exposure metering system are exceeded, one of the following in di ca tors will be dis played in the control panel and viewfi nder:
Color Space
Photos taken in Digital Vari-Program modes are recorded in the sRGB color space (
59).
Self-Timer and Remote Control Modes
The self-timer and remote control can be used to allow photographers to appear in
their own photographs or prevent blur caused by the camera moving when the shutter-release button is pressed. At default settings, the self-timer delays shutter release
until about ten seconds after the shutter-release button is pressed. For details, see
“Taking Photographs: The Self-Timer” ( 105). The optional ML-L3 remote control
can be used to release the shutter remotely, either instantaneously or with a two-second delay. See “Taking Photographs: Using the Remote Control” ( 107).
P, S, A, and M Modes
In addition to the settings available in mode, P, S,
A, and M modes offer control over such settings as
shutter speed and aperture, white balance, image optimization, and exposure compensation. See “Taking
Photographs” ( 35).
Night portrait
Provides natural balance between main subject and background in portraits taken under low light. Lighting for portrait subject will seem natural even when fl ash is used.
• Tripod, self-timer ( 105), and / or optional remote control
(
107) can be used to prevent blurring at slow shutter speeds. At speeds
slower than 1 s, use noise reduction to reduce mottling ( 133).
• Use mode for night shots that do not include portrait subject.
• Flash set to slow sync. Other modes can be selected ( 94).
Page 45
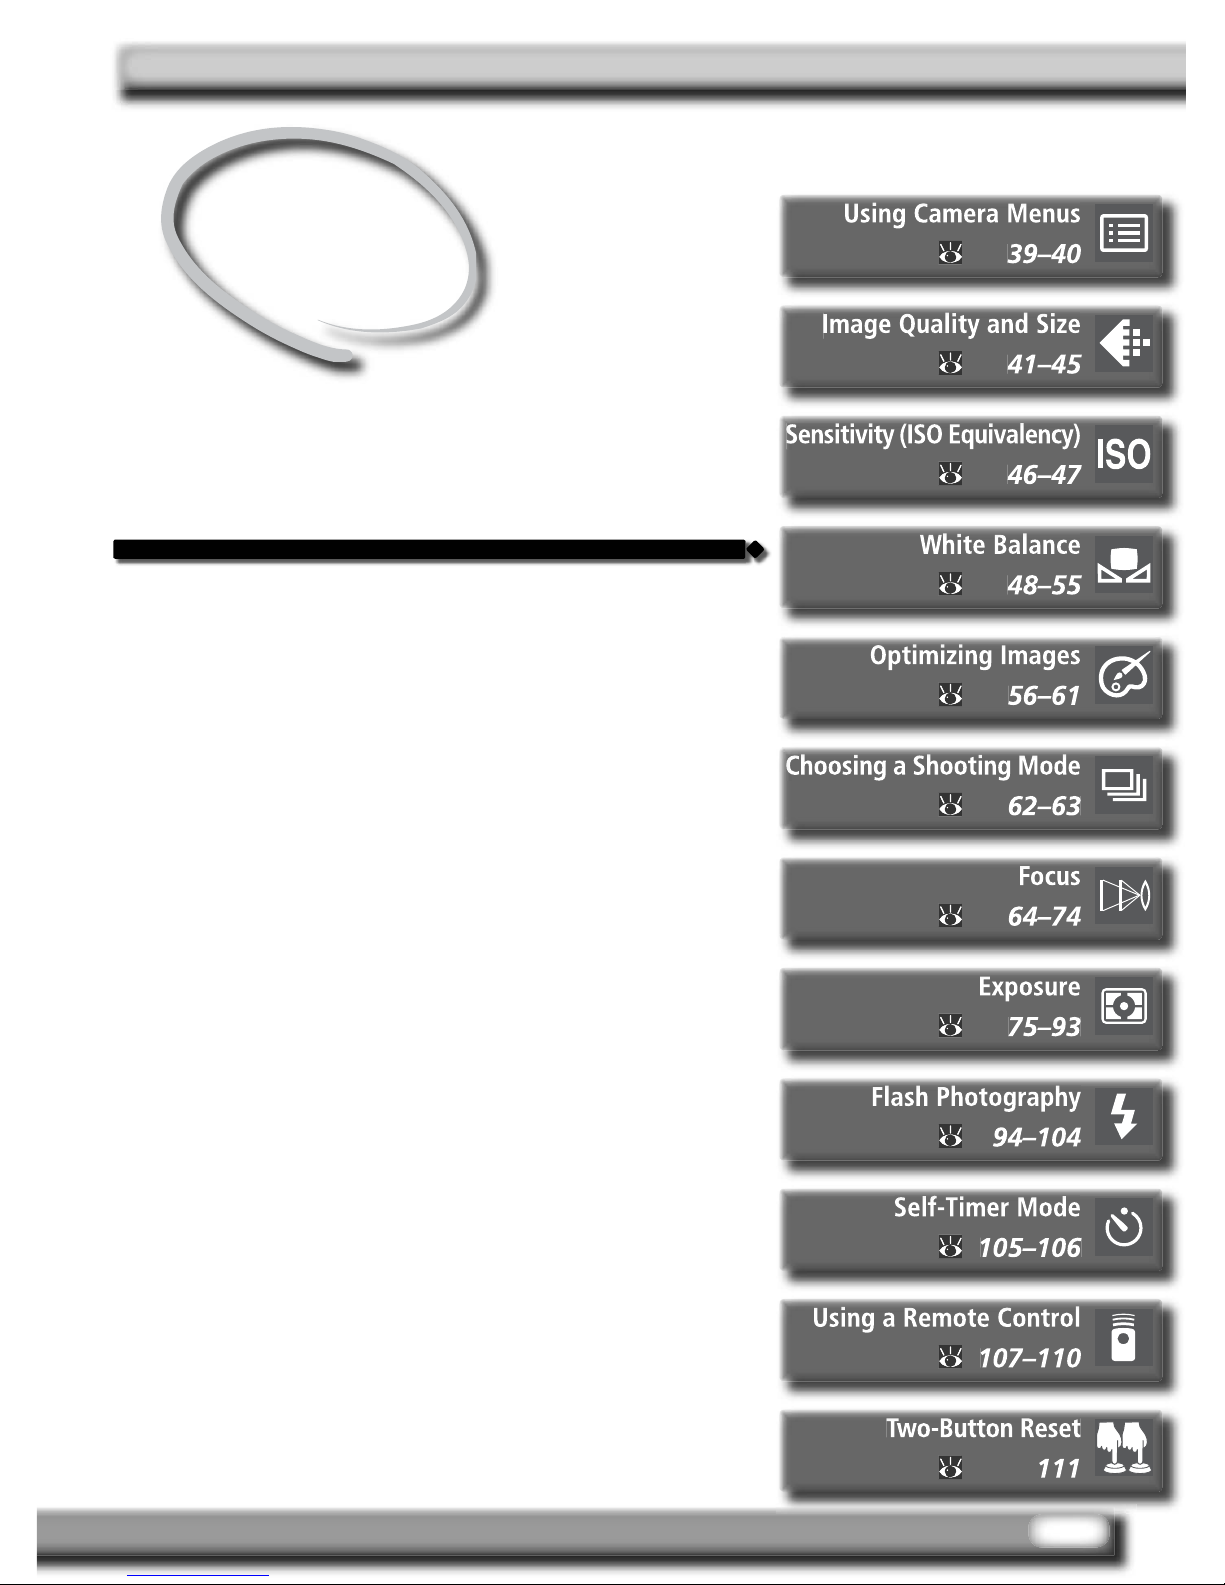
35
“Tutorial: Taking Photographs” described the basic
order of operations for taking photographs at the
most commonly-used settings. This chapter explains how and when to adjust camera set tings for
different shooting conditions.
Taking
Photographs
The Details
Page 46
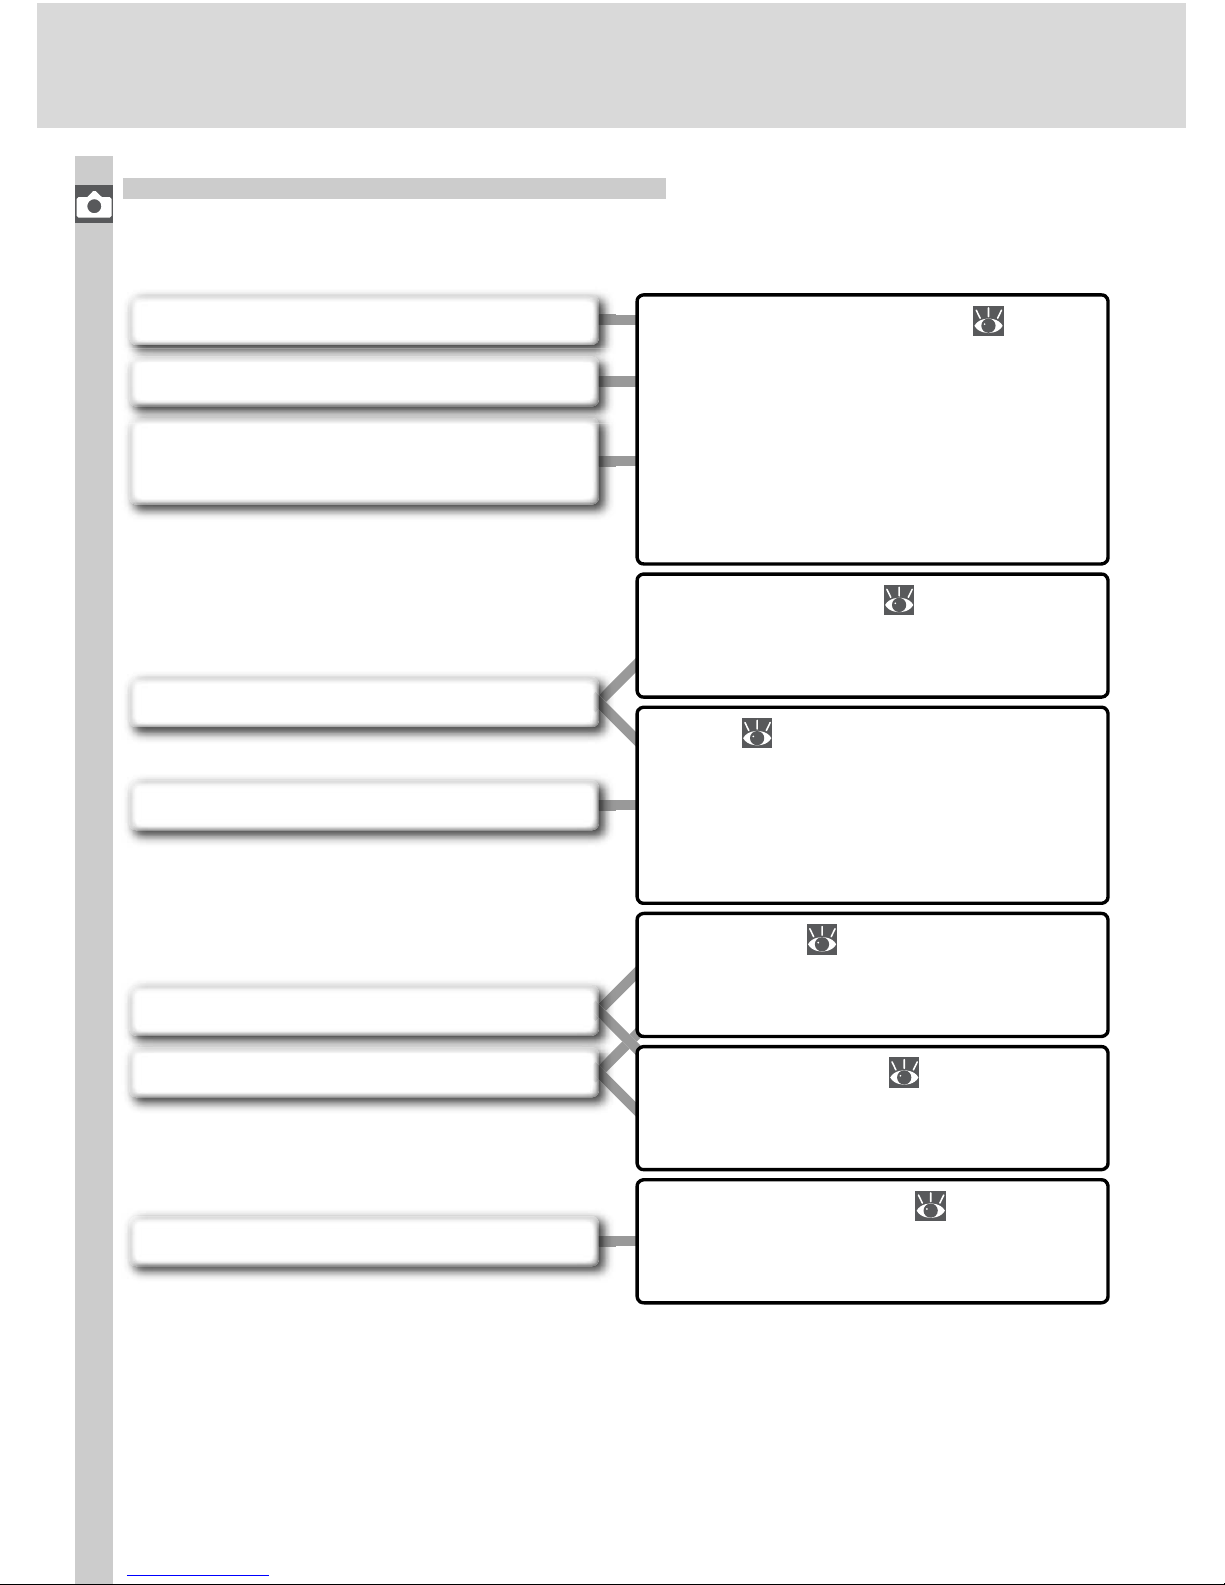
36
Taking Photographs
When to Use Shooting Options
The following fi gure illustrates when to use the shooting options described
in this chapter.
Image Quality and Size ( 41–45)
Choose high settings for quality
and size when taking photos that
will be enlarged, lower settings
when taking photos for electronic
distribution or to save space on the
memory card.
Shooting Mode ( 62–63)
Take photographs one at a time or
in a continuous burst.
Focus ( 64–74)
Give priority to accurate focus or
shutter response. Select how focus
area is chosen and whether to focus manually or automatically.
Self-Timer ( 105–106)
Delay shutter release until after the
shutter-release button is pressed.
Remote Control ( 107–110)
Use the optional remote control for
taking photos at a distance.
Two-Button Reset ( 111)
Reset shooting options to default
values.
Photos out of focus?
Photos “grainy” when enlarged?
Need to get more pictures on a
memory card?
Files too big for e-mail?
Shutter response too slow?
Want to shoot a self-portrait?
Photos blurred by camera shake?
Want to shoot at default settings?
Page 47
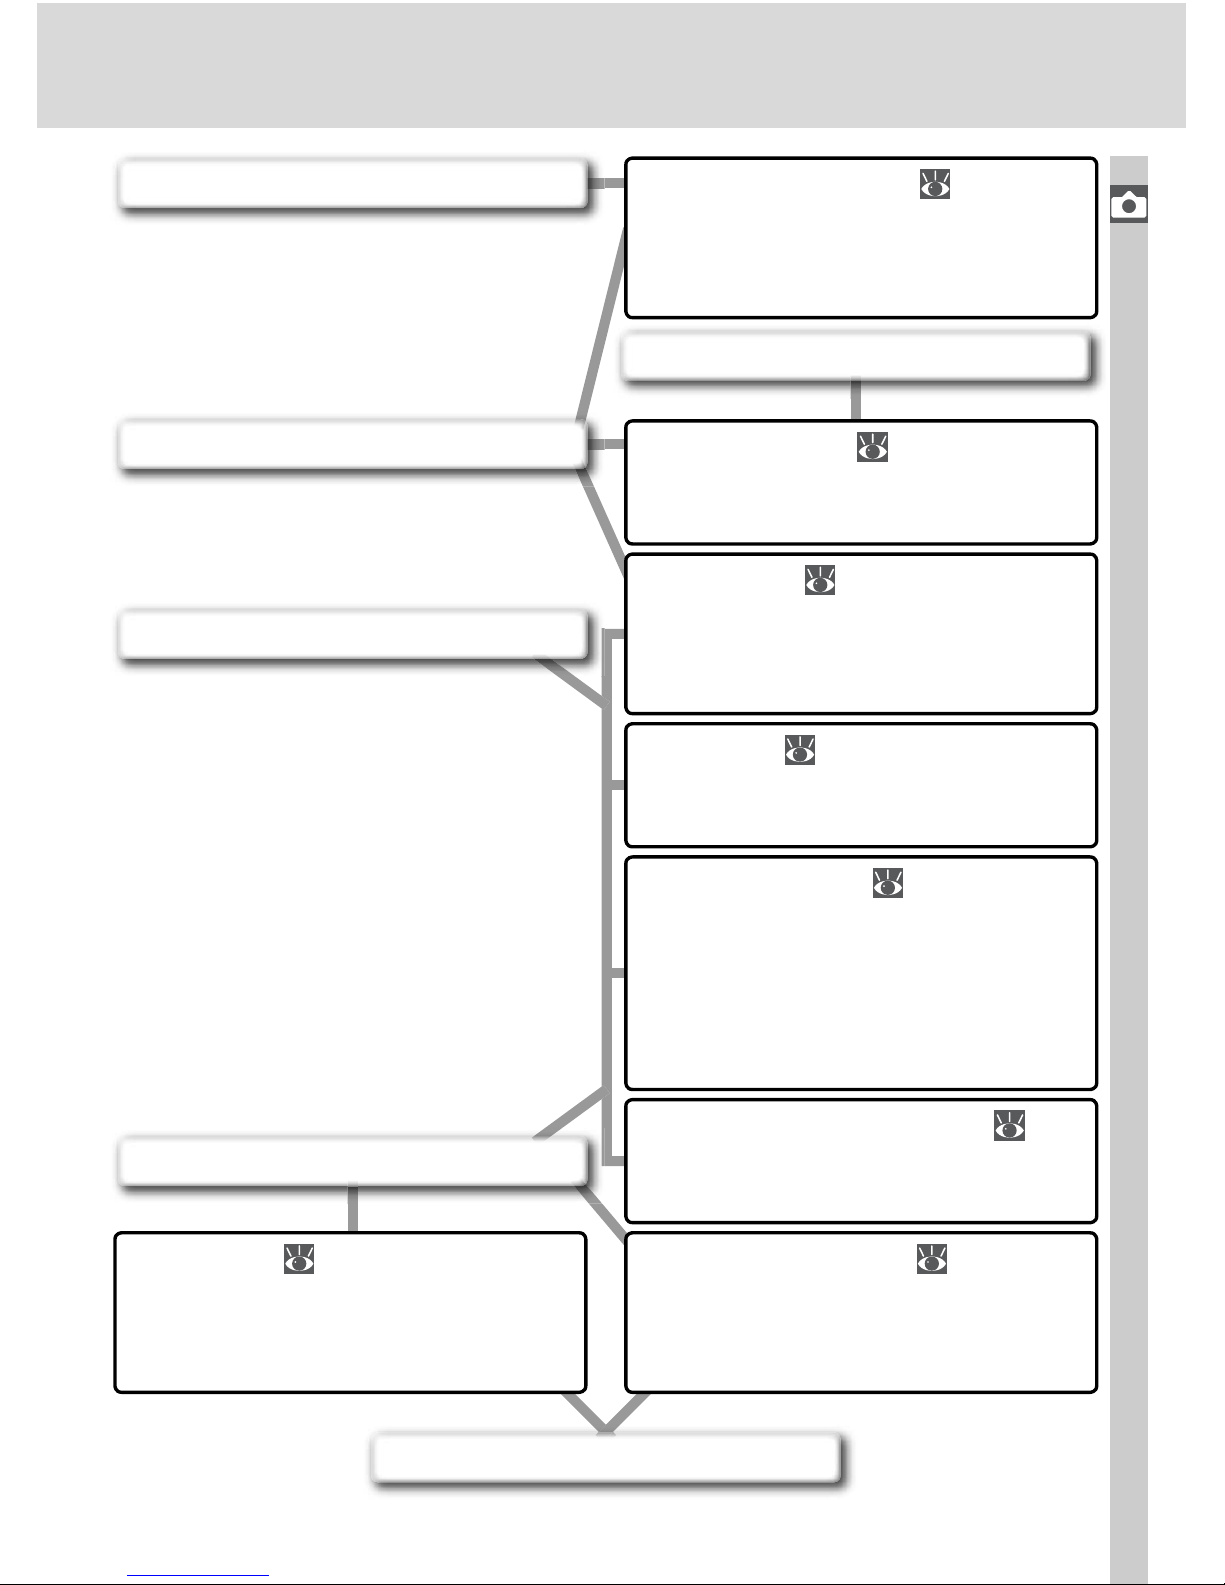
37
Taking Photographs
Flash Photography ( 94–104)
Use the built-in Speedlight for additional lighting when shooting
poorly-lit or backlit subjects.
Sensitivity ( 46–47)
Raise sensitivity to reduce the
amount of light needed to make
an exposure.
Optimizing Images ( 56–61)
Adjust sharpness, contrast, color
space, saturation, and hue to suit
your creative intent.
White Balance ( 48–55)
Match white balance to lighting for
natural coloration.
Bracketing ( 87–93)
Create multiple photographs
“bracketing” a selected exposure
value, fl ash level, or white balance.
Metering ( 75)
Choose how the camera sets exposure.
Exposure Mode ( 76–83)
Set shutter speed (how long the
CCD is exposed to light) and aperture (the size of the opening
through which light enters the
camera) for a variety of effects.
Exposure Compensation ( 86)
Adjust exposure from the value
suggested by the camera.
Photos blurred?
Subject too bright?
Subject too dark, or backlit?
Photos dull and lifeless?
Colors not natural?
Photos have a red or blue cast?
Page 48
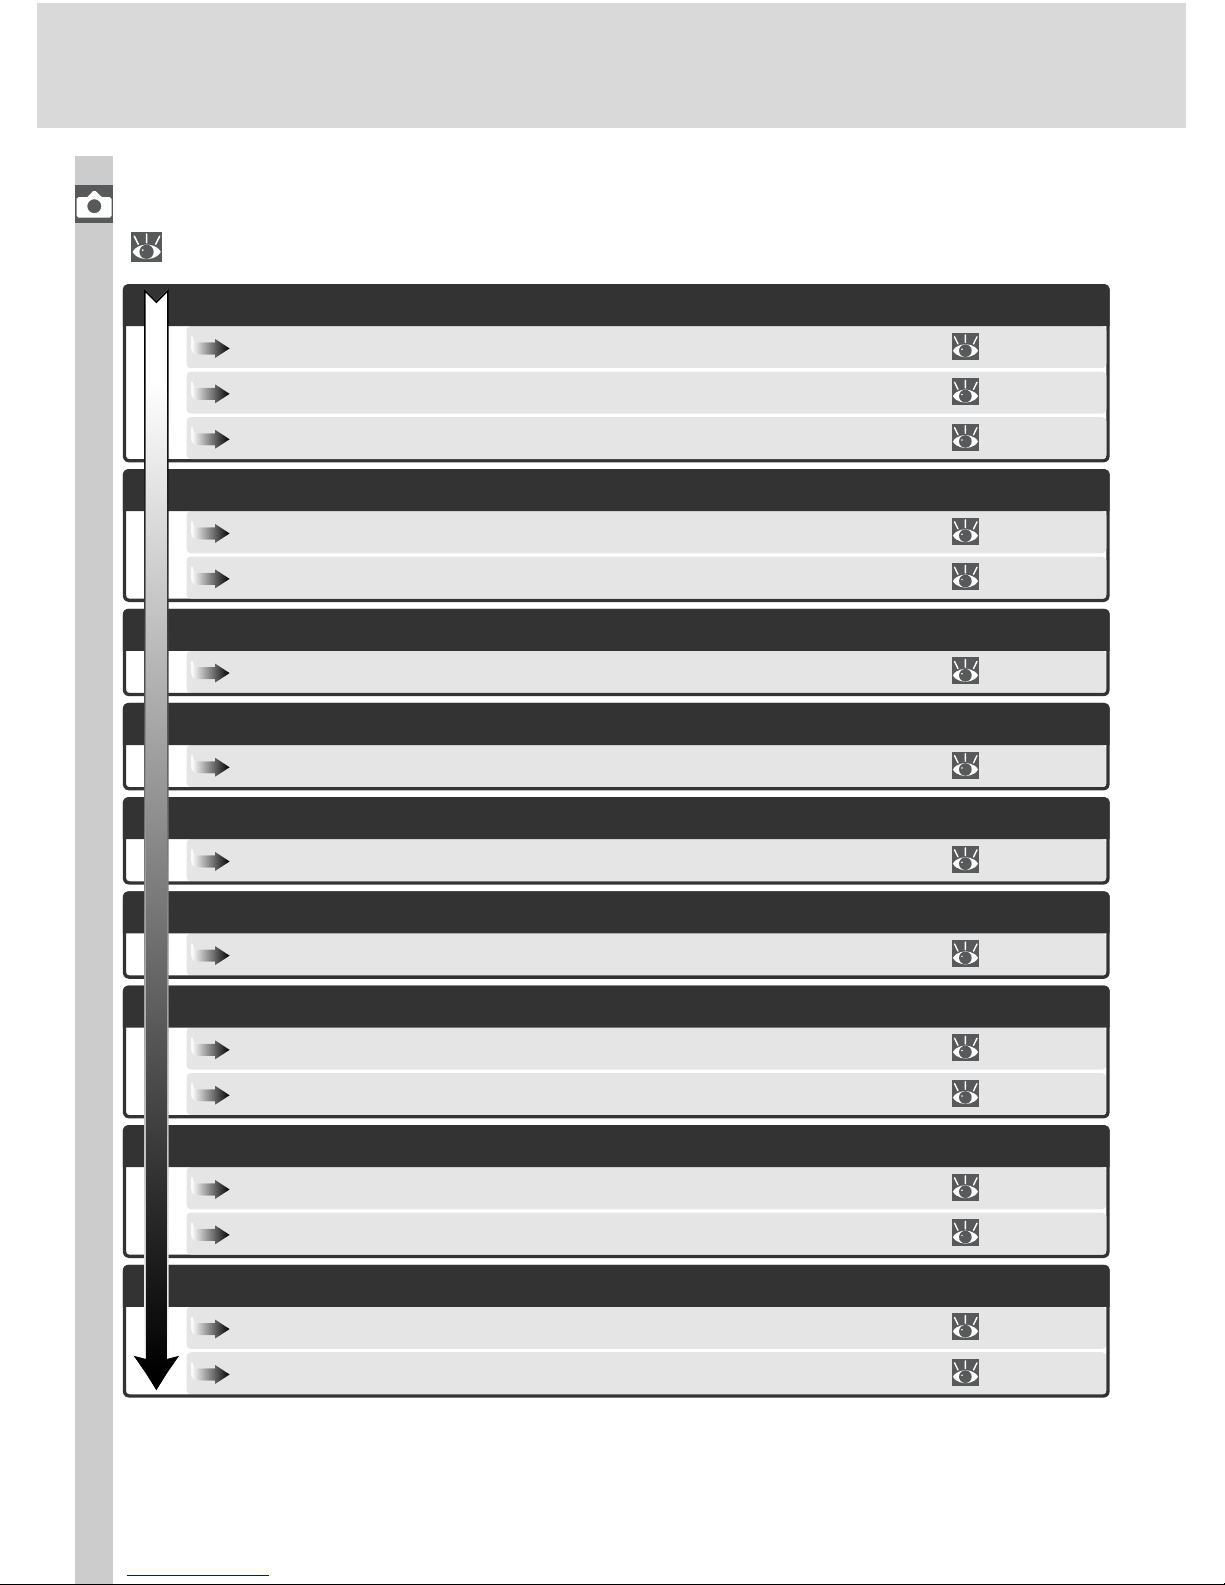
38
Taking Photographs
The Shooting Menu ...............................................................
132–134
The chart below shows the basic order for adjusting settings when taking
photographs. Before proceeding, be sure to read “Using Camera Menus”
( 39) for information on menu operations.
Image Quality and Size...........................................................
41–45
Choosing a Shooting Mode ...................................................
62–63
Focus .....................................................................................
64–74
Exposure: Metering ................................................................
75
Exposure: Exposure Mode.......................................................
76–83
Exposure: Exposure Compensation .........................................
86
Exposure: Bracketing..............................................................
87–93
How important is background lighting to the photograph?
Optimizing Images .................................................................
56–61
Sensitivity (ISO Equivalency)....................................................
46–47
White Balance........................................................................
48–55
Self-Timer Mode ....................................................................
105–106
Using a Remote Control .........................................................
107–110
Flash Photography .................................................................
94–104
Will I need a fl ash?
Is the subject very bright, very dark, or high contrast?
What is more important, shutter speed or aperture?
What is the subject, and how will I compose the photography?
Will this be a single photo, or a series of photos?
How will this photograph be used?
What lighting is available?
How do I want to control the shutter?
Optional Accessories: Optional Speedlights ............................
186–189
Page 49
39
Taking Photographs—Using Camera Menus
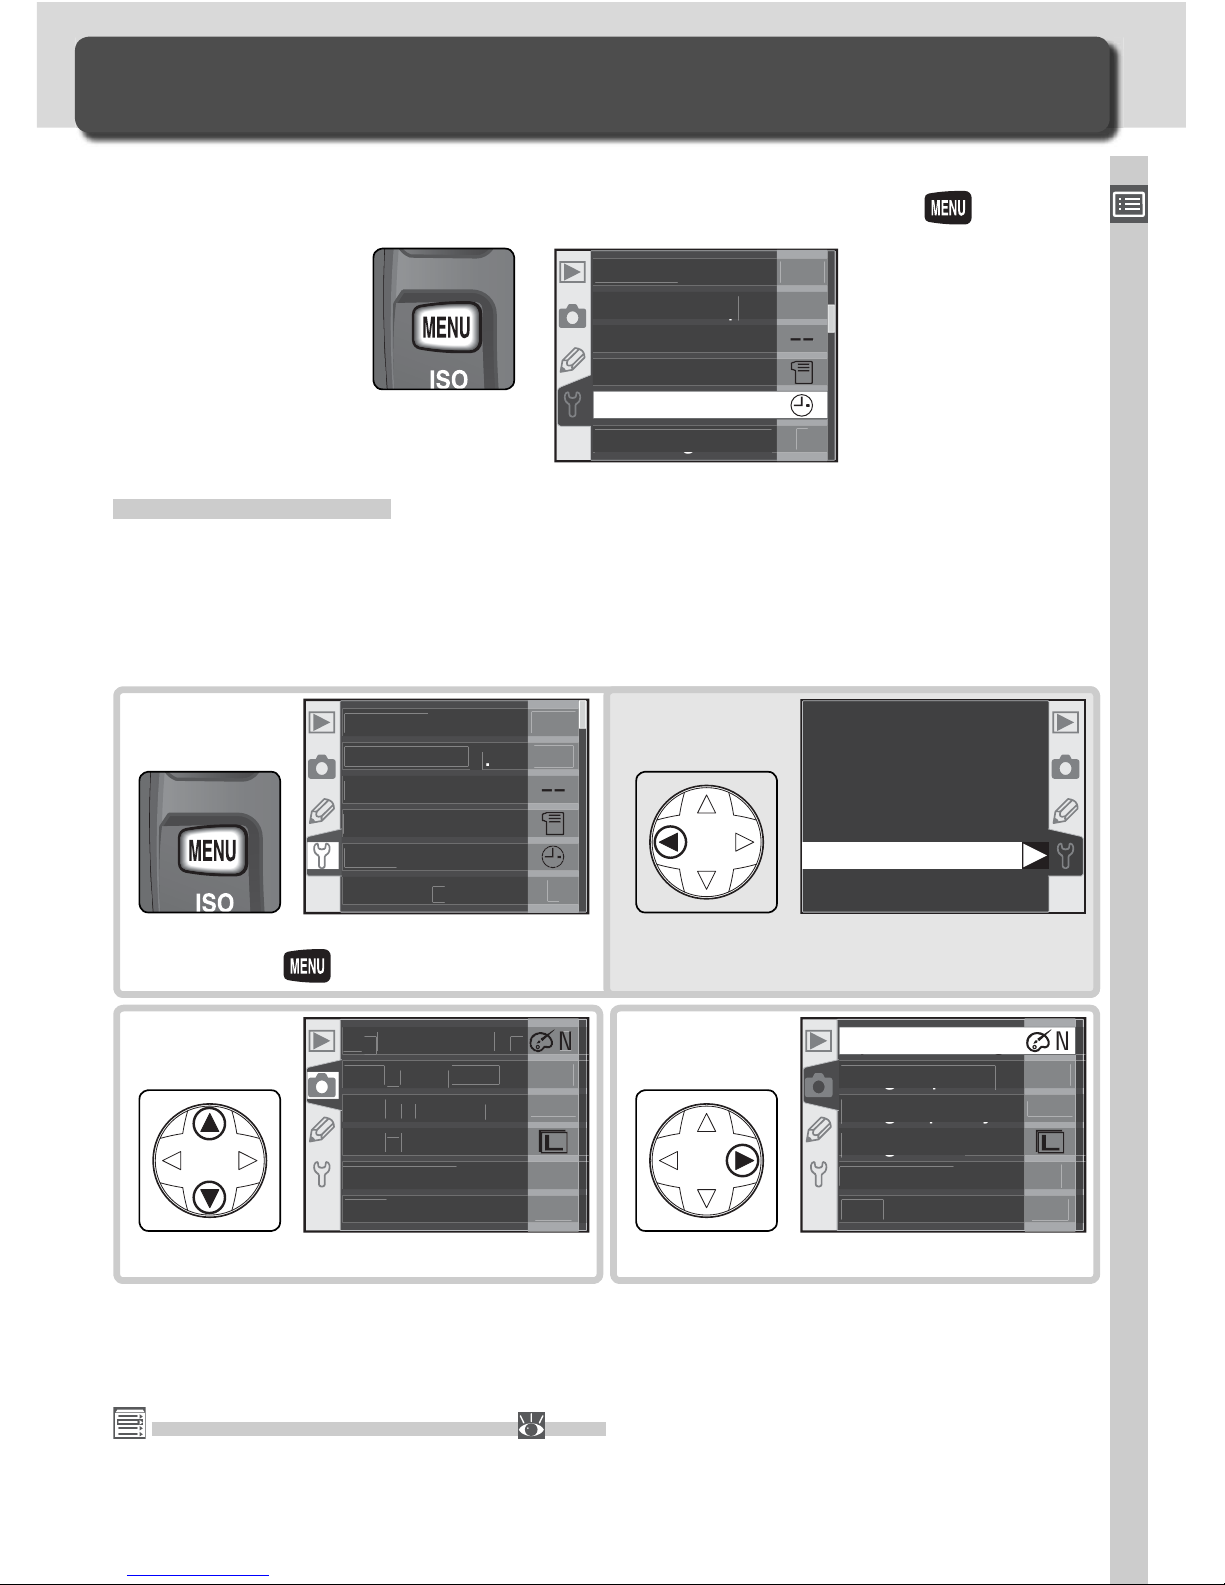
The next four sections involve settings that can be accessed via the camera
menus. To view the menus, turn the camera on and press the button.
F
F
NCD70
Folder
s
q
File No. Se
q.
Form
at
M men
u
Dat
e
g
LCD brightnes
s
Select menu.
2
00
NOR
M
F
F
timize im
a
L
on
ex
Im
alit
Im
a size
White bal
.
I
SO
2
Using Camera Menus
Basic Menu Operations
Choosing a Menu
The camera has four main menus: the playback menu, the shooting menu,
the Custom Settings menu, and the setup menu. When the menu button
is pressed, the camera displays the last menu used. To select a different
menu:
The Custom Settings Menu ( 161)
The Custom Settings menu normally lists only options R through 9; if desired, all
options can be displayed.
If menu item is highlighted, press
button.
F
F
NCD70
Folder
s
File No.
Se
Form
at
M men
u
Dat
e
LCD brihtn
ess
1
(To view menu names, press multi se-
lector left when icon is highlighted.)
PLAY
SHOOTING MENU
CSM MENU
SET UP
Position cursor in selected menu.
F
F
2
00
NOR
M
g
Optimize ima
ge
pg
gp
Long exp. N
R
gq y
Image qualit
y
g
Image siz
e
White bal
.
I
SO
3
Page 50
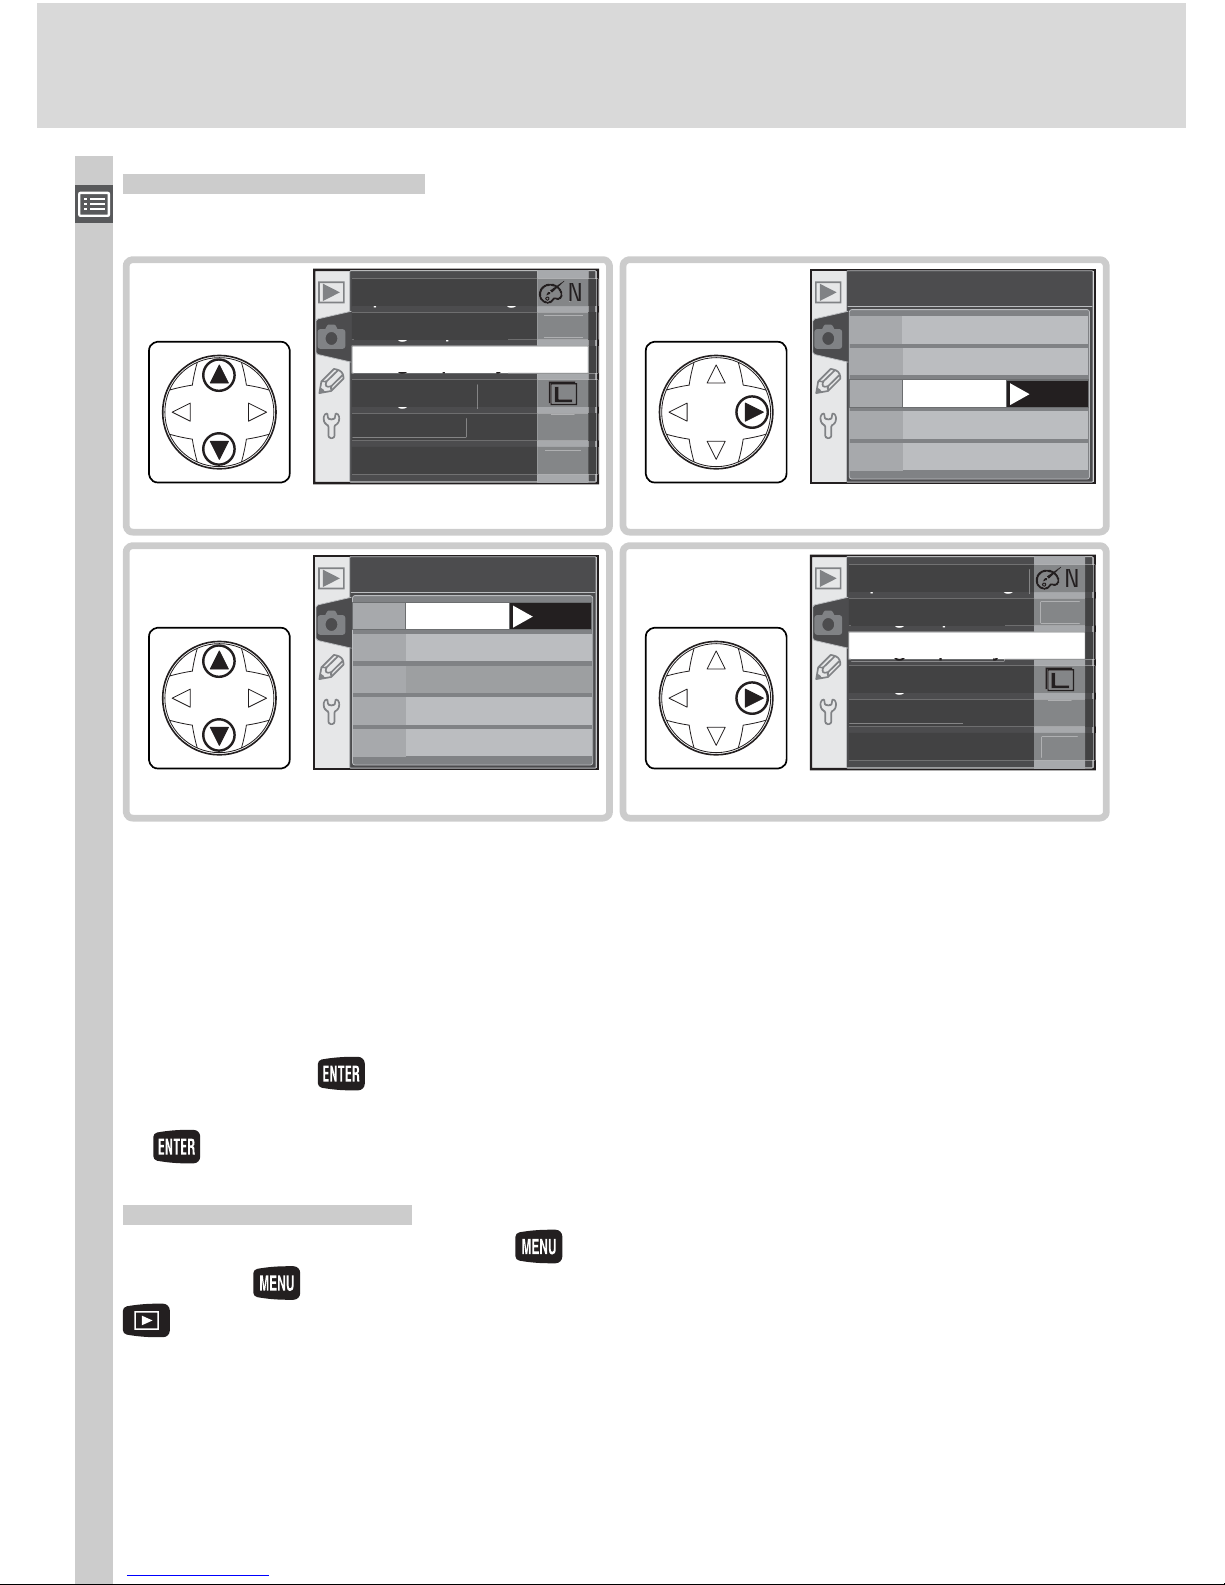
40
Taking Photographs—Using Camera Menus
• To return to the previous menu without making a selection, press the multi
se lec tor to the left.
• The selection for some options is made from a sub-menu. Repeat steps 3
and 4 to make a selection from a sub-menu.
• Some menu items may not be available in some modes, during recording,
or when no memory card is inserted in the camera.
• Pressing the button performs the same func tion as press ing the multi
selector to the right. In some cases, a selection can only be made using
button.
Exiting the Menus
To exit the menus, press the button (if a menu option is highlighted,
press the button twice). You can also exit the menus by press ing the
but ton to exit to playback mode or by turning the cam era off. To exit
the menus and fo cus the cam era for the next shot, press the shut ter-release
but ton half way.
Highlight menu item. Display options.
RAW
FINE
NORM
BASIC
RAW+B
NEF(Raw
)
JPEG Fine
JPEG Normal
JPEG Basic
NEF+JPEG Basic
Image quality
OK
2
2
00
NOR
M
F
F
pg
Optimize ima
ge
gp
Long exp. N
R
gy
Image qualit
y
gq y
g
Image siz
e
White bal
.
I
SO
1
Make selection.
2
00
F
F
pg
Optimize ima
ge
gp
Long exp. N
R
gq y
Image qualit
y
gq y
g
Image siz
e
White bal
.
I
SO
4
Highlight option.
RAW
FINE
NORM
BASIC
RAW+B
Image quality
OK
NEF(Raw
)
JPEG Fine
JPEG Normal
JPEG Basic
NEF+JPEG Basic
3
Making a Selection
To modify settings for an item in the current menu:
Page 51
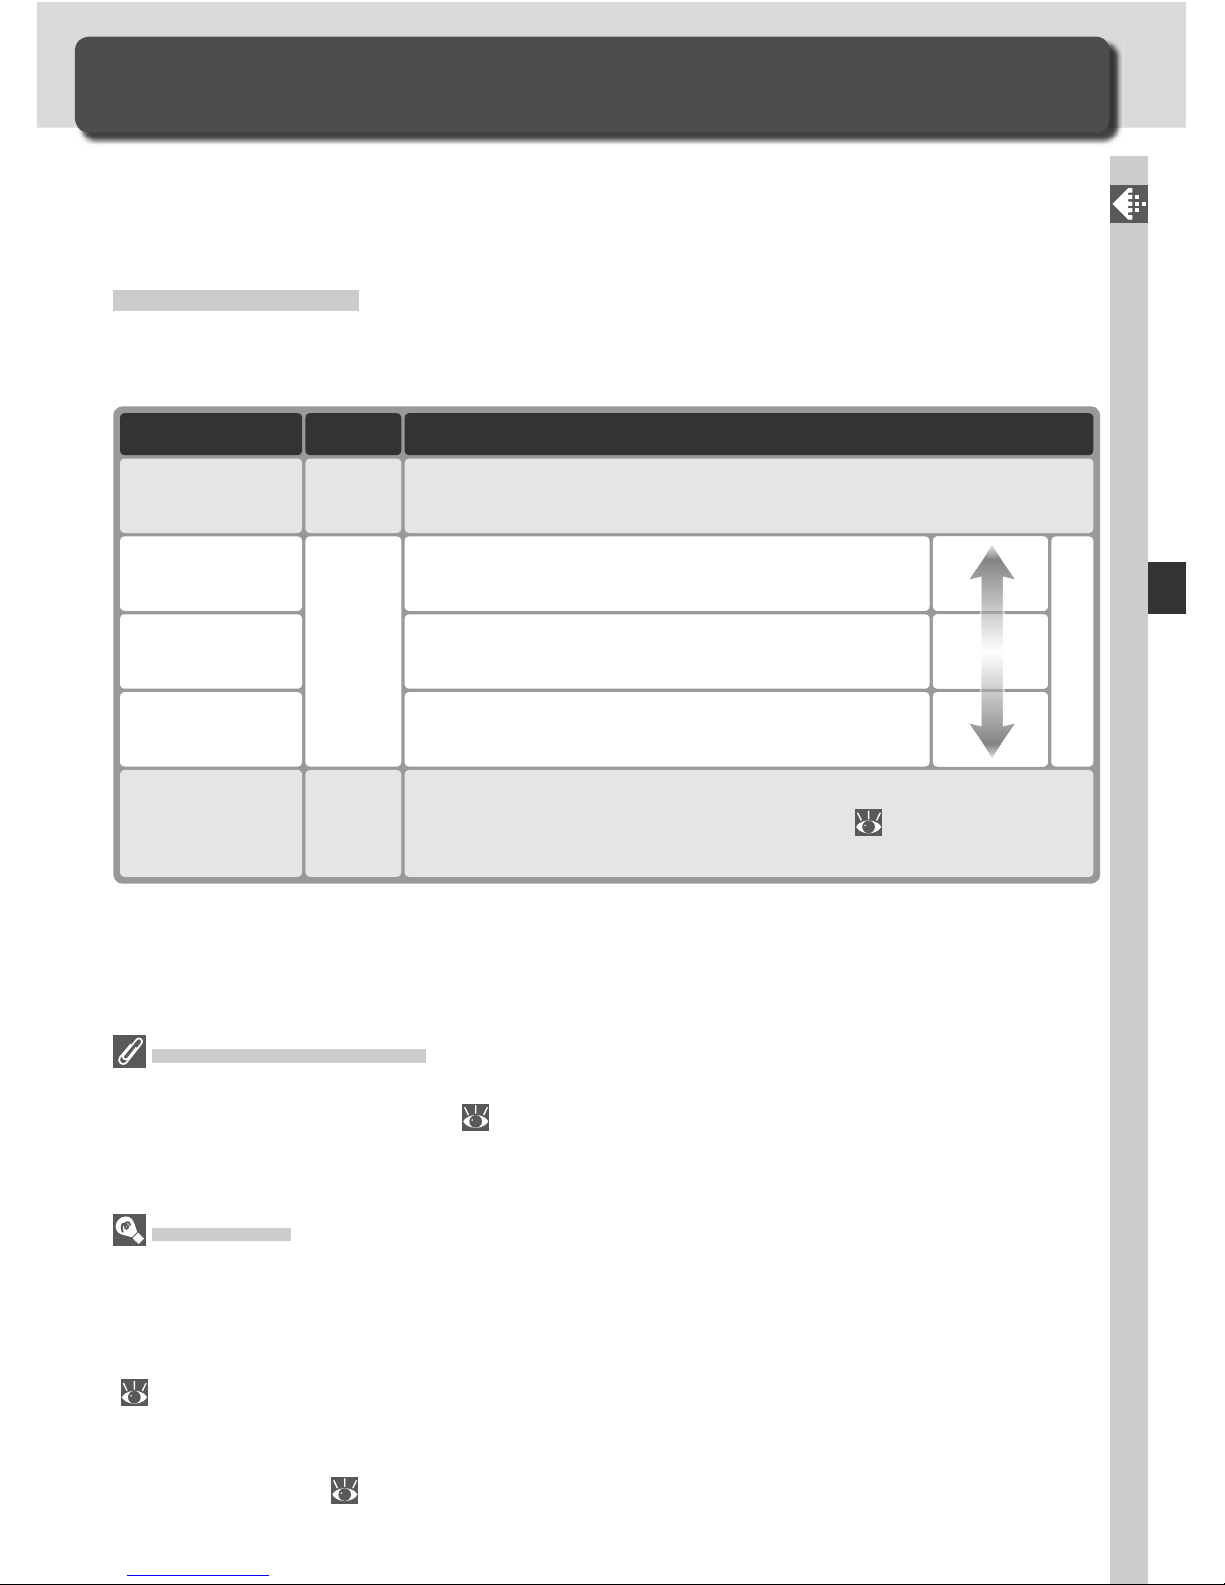
41
Taking Photographs—Image Quality and Size
Image Quality and Size
Making Effective Use of Memory
Together, image quality and size determine how much space each pho to graph occupies on the memory card.
Image Quality
The D70 supports the following image quality options (listed in descending
order by image quality and fi le size):
Option Description
NEF (Raw)
(RAW)
Raw 12-bit data from CCD are saved directly to memory
card in compressed Nikon Electronic Image Format (NEF).
JPEG Normal
(NORM)
Normal image quality, suited to most applications.
JPEG Fine
(FINE)
Fine image quality, suitable for enlargements
or high-quality prints.
JPEG Basic
(BASIC)
Basic image quality, suitable to distribution
by e-mail or use in web pages.
NEF+JPEG
Basic
(RAW BASIC)
Two images are recorded, one NEF (RAW) image and one
basic-quality JPEG image. Image size ( 43) automatically
set to L; JPEG image is 3,008 × 2,000 pixels in size.
NEF (Raw) / NEF + J PEG
NEF images can only be viewed using the software provided with the camera or Nikon
Capture 4 version 4.1 or later ( 191). When photographs taken at NEF + JPEG Basic
are viewed on the camera, only the JPEG image will be displayed. When photographs
taken at NEF + JPEG Basic are deleted, both NEF and JPEG images will be deleted.
File Names
Photographs are stored as image fi les with names of the form “DSC_nnnn.xxx,”
where nnnn is a four-digit number between 0001 and 9999 as signed automatically in
ascending order by the camera, and xxx is one of the following three letter extensions:
“NEF” for NEF images, “JPG” for JPEG im ag es, and “NDF” for Dust Off ref photos
( 166). The NEF and JPEG fi les recorded at a setting of NEF + JPEG Basic have the
same fi le names but different extensions. Images recorded at an Optimize image >
Color mode setting of II (Adobe RGB) have names that begin with an underbar, e.g.,
“_DSC0001.JPG” ( 56).
Format
NEF
JPEG
NEF+
JPEG
Compression ratio
Medium
Medium
(1 : 8)
(1 : 8)
Low
Low
(1 : 4)
(1 : 4)
High
High
(1 : 16)
(1 : 16)
Page 52
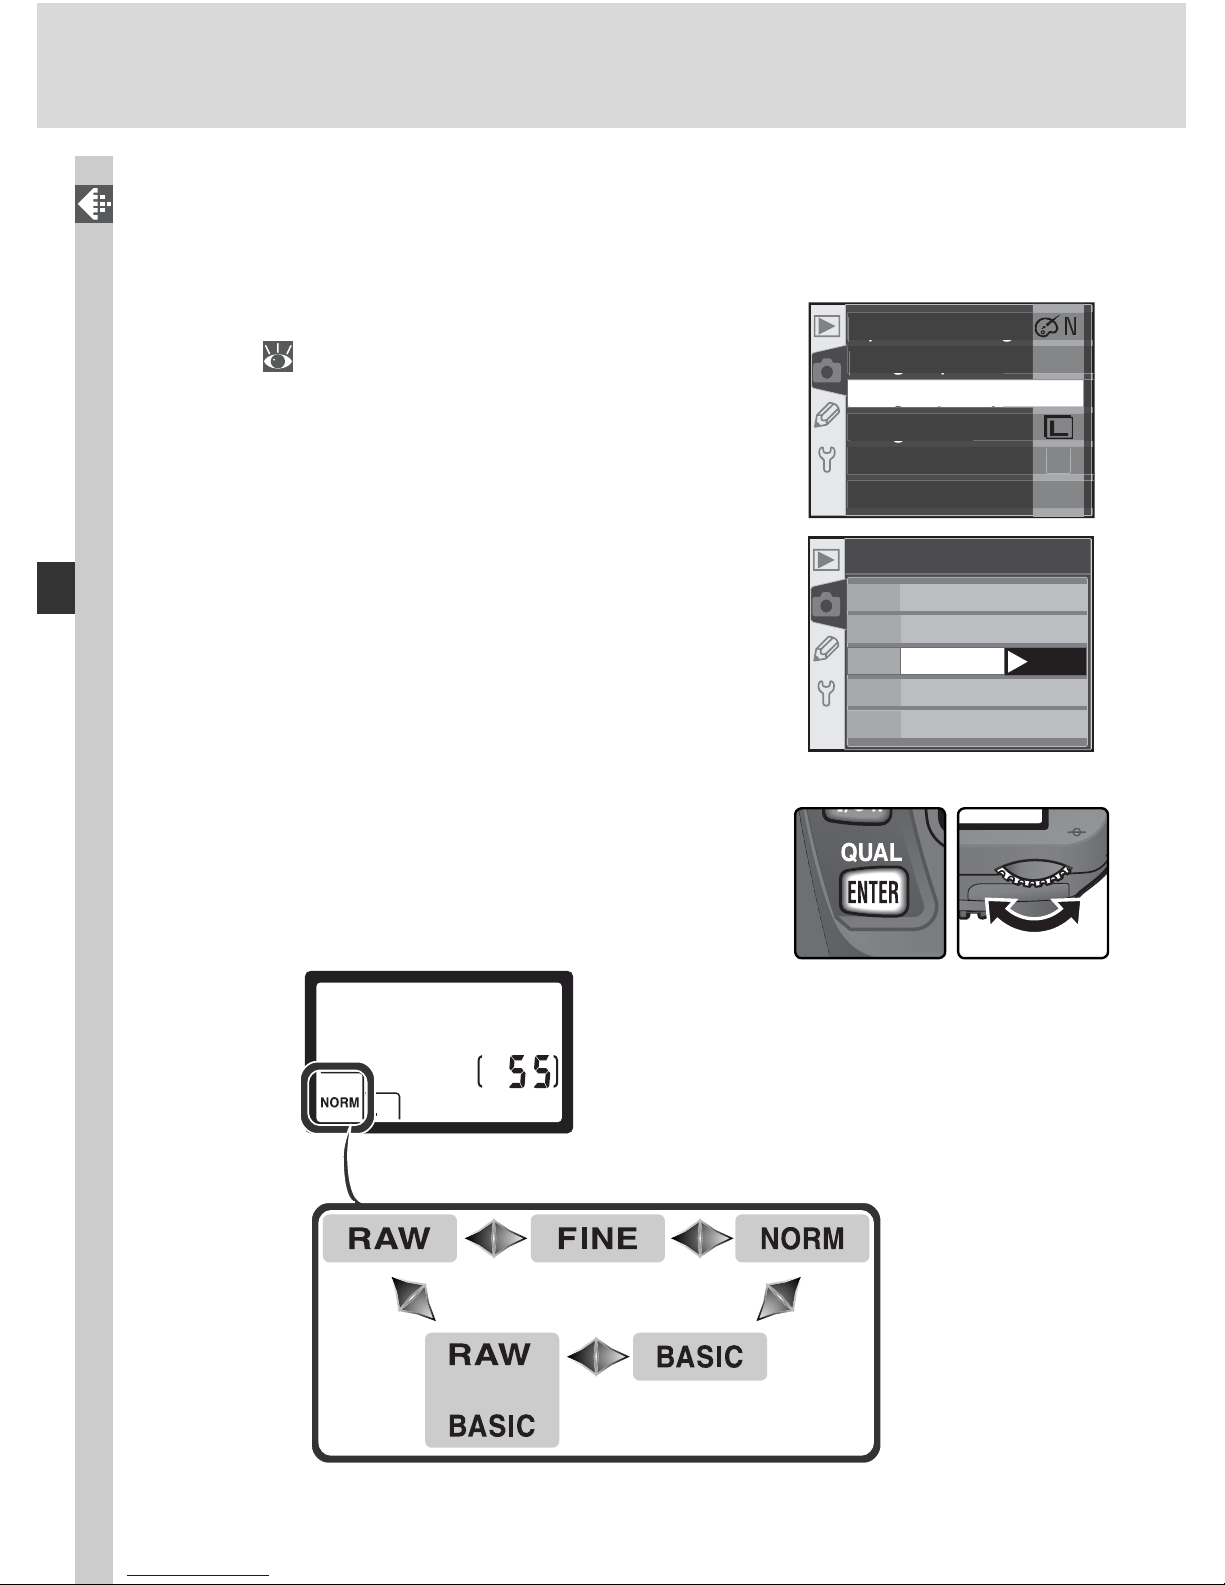
42
Taking Photographs—Image Quality and Size
Image quality can be set using the Image quality option in the shooting
menu or by pressing the QUAL button and rotating the main command dial.
The Image Quality Menu
1
Highlight Im age quality in the shooting
menu (
132) and press the multi selector to
the right.
2
00
NOR
M
F
F
pg
Optimize ima
ge
gp
Long exp. N
R
gy
Image qualit
y
gq y
g
Image siz
e
White bal
.
I
SO
2
High light the de sired op tion and press the
multi se lec tor to the right. The shooting menu
will be displayed.
RAW
FINE
NORM
BASIC
RAW+B
NEF(Raw
)
JPEG Fine
JPEG Normal
JPEG Basic
NEF+JPEG Basic
Image quality
OK
The QUAL Button
When the monitor is off, image quality can be
set by pressing the QUAL button and rotating the
main command dial. Image quality is displayed in
the control panel:
Page 53
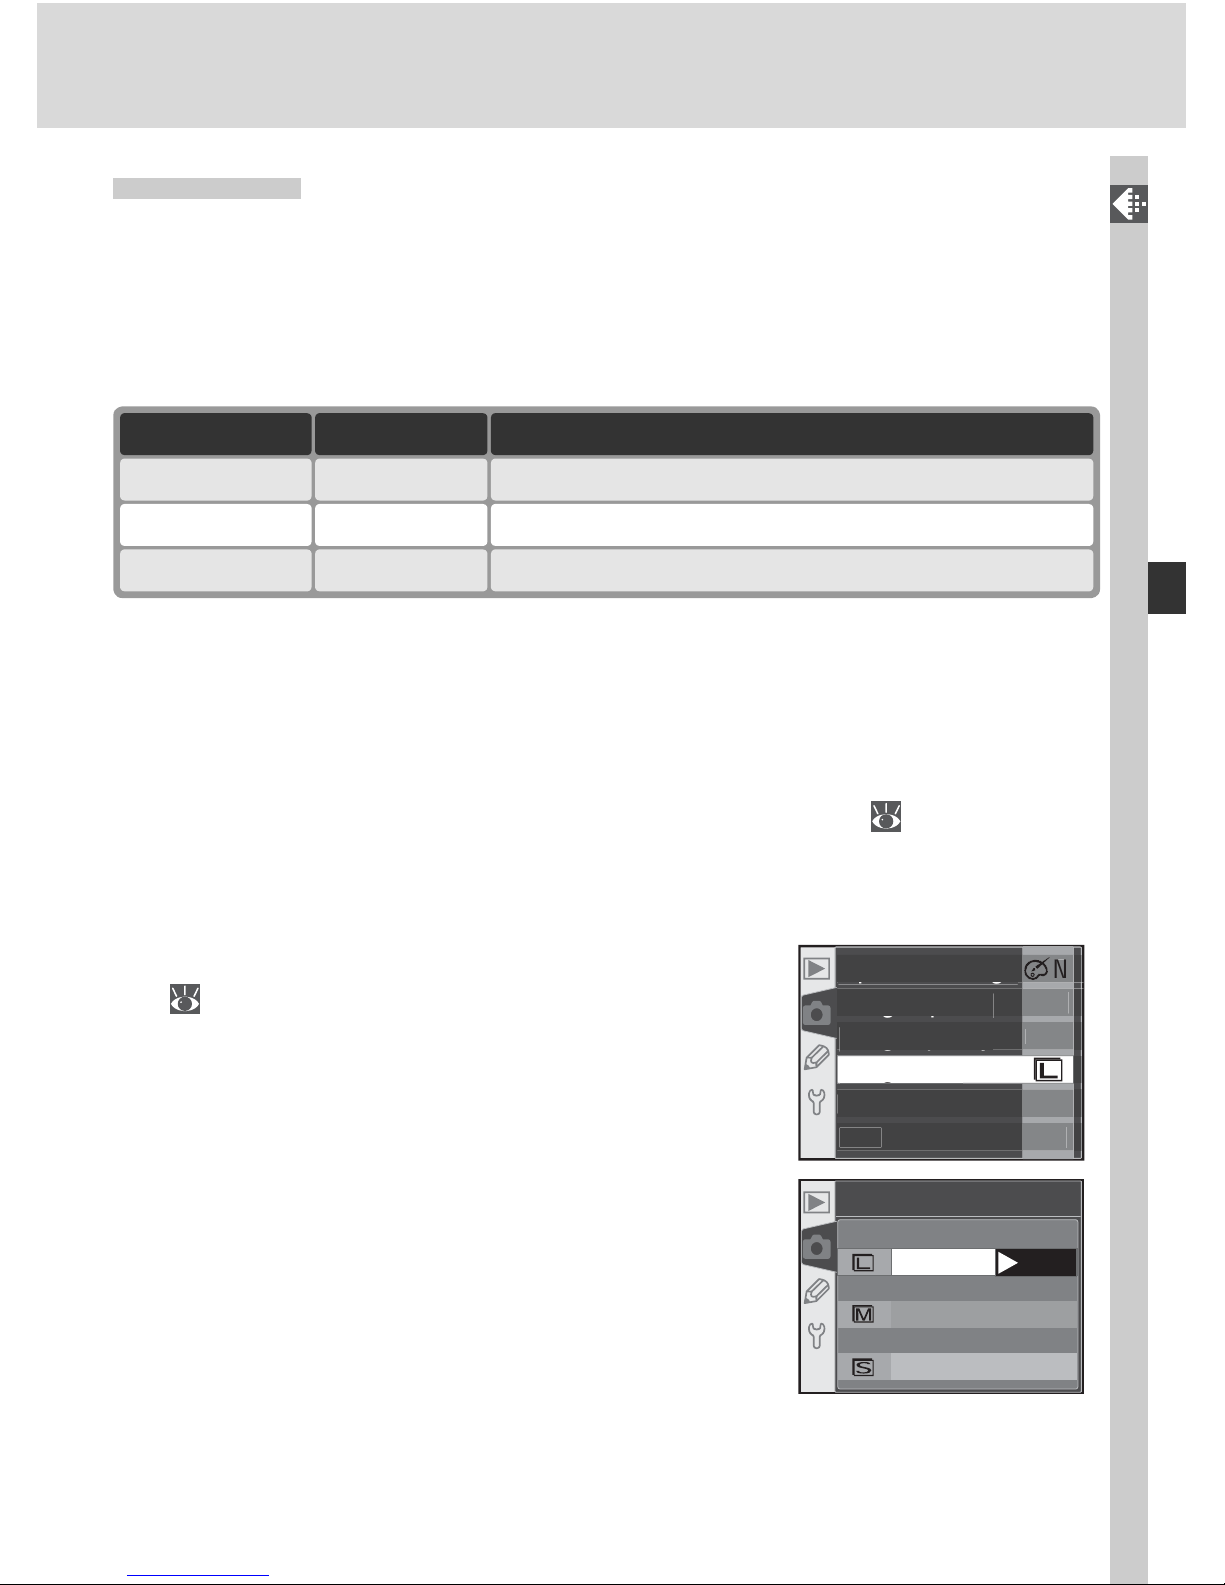
43
Taking Photographs—Image Quality and Size
Image Size
Image size is measured in pixels. Smaller sizes pro duce smaller fi les, making
them suited to dis tri bu tion via e-mail or inclusion in web pages. Con verse ly,
the larger the image, the larger the size at which it can be printed without
becoming noticeably “grainy.” Choose image size according to the space
available on the memory card and the task at hand.
Size (pixels) Size when printed at 200 dpi (approx.)
38 × 25 cm (15˝ × 10˝)
28 × 19 cm (11˝ × 7.5˝)
Option
3,008 × 2,000L (3008 × 2000)
2,240 × 1,488
M
(2240 × 1488)
19 × 13 cm (7.5˝ × 5˝)1,504 × 1,000S (1504 × 1000)
Image size can be set using the Image size option in the shooting menu
or by pressing the QUAL button and rotating the sub-command dial. Image
size can not be selected when NEF (Raw) or NEF+JPEG Basic is selected for
image quality. When opened in the software provided with the camera or in
Nikon Capture 4 version 4.1 or later, NEF im ag es are 3,008 × 2,000 pixels in
size. When NEF+JPEG Basic is selected for image quality ( 41), the size of
the JPEG image is fi xed at L (3,008 × 2,000 pixels).
The Image Size Menu
1
Highlight Im age Size in the shooting menu
( 132) and press the multi selector to the
right.
2
00
NOR
M
F
F
pg
Optimize ima
ge
gp
Long exp. N
R
gq y
Image qualit
y
g
Image siz
e
g
White bal
.
I
SO
2
High light the de sired op tion and press the
multi se lec tor to the right. The shooting menu
will be displayed.
L (3008x2000
)
M (2240
x
1488
)
S (1504
x
1000
)
Image size
OK
Page 54
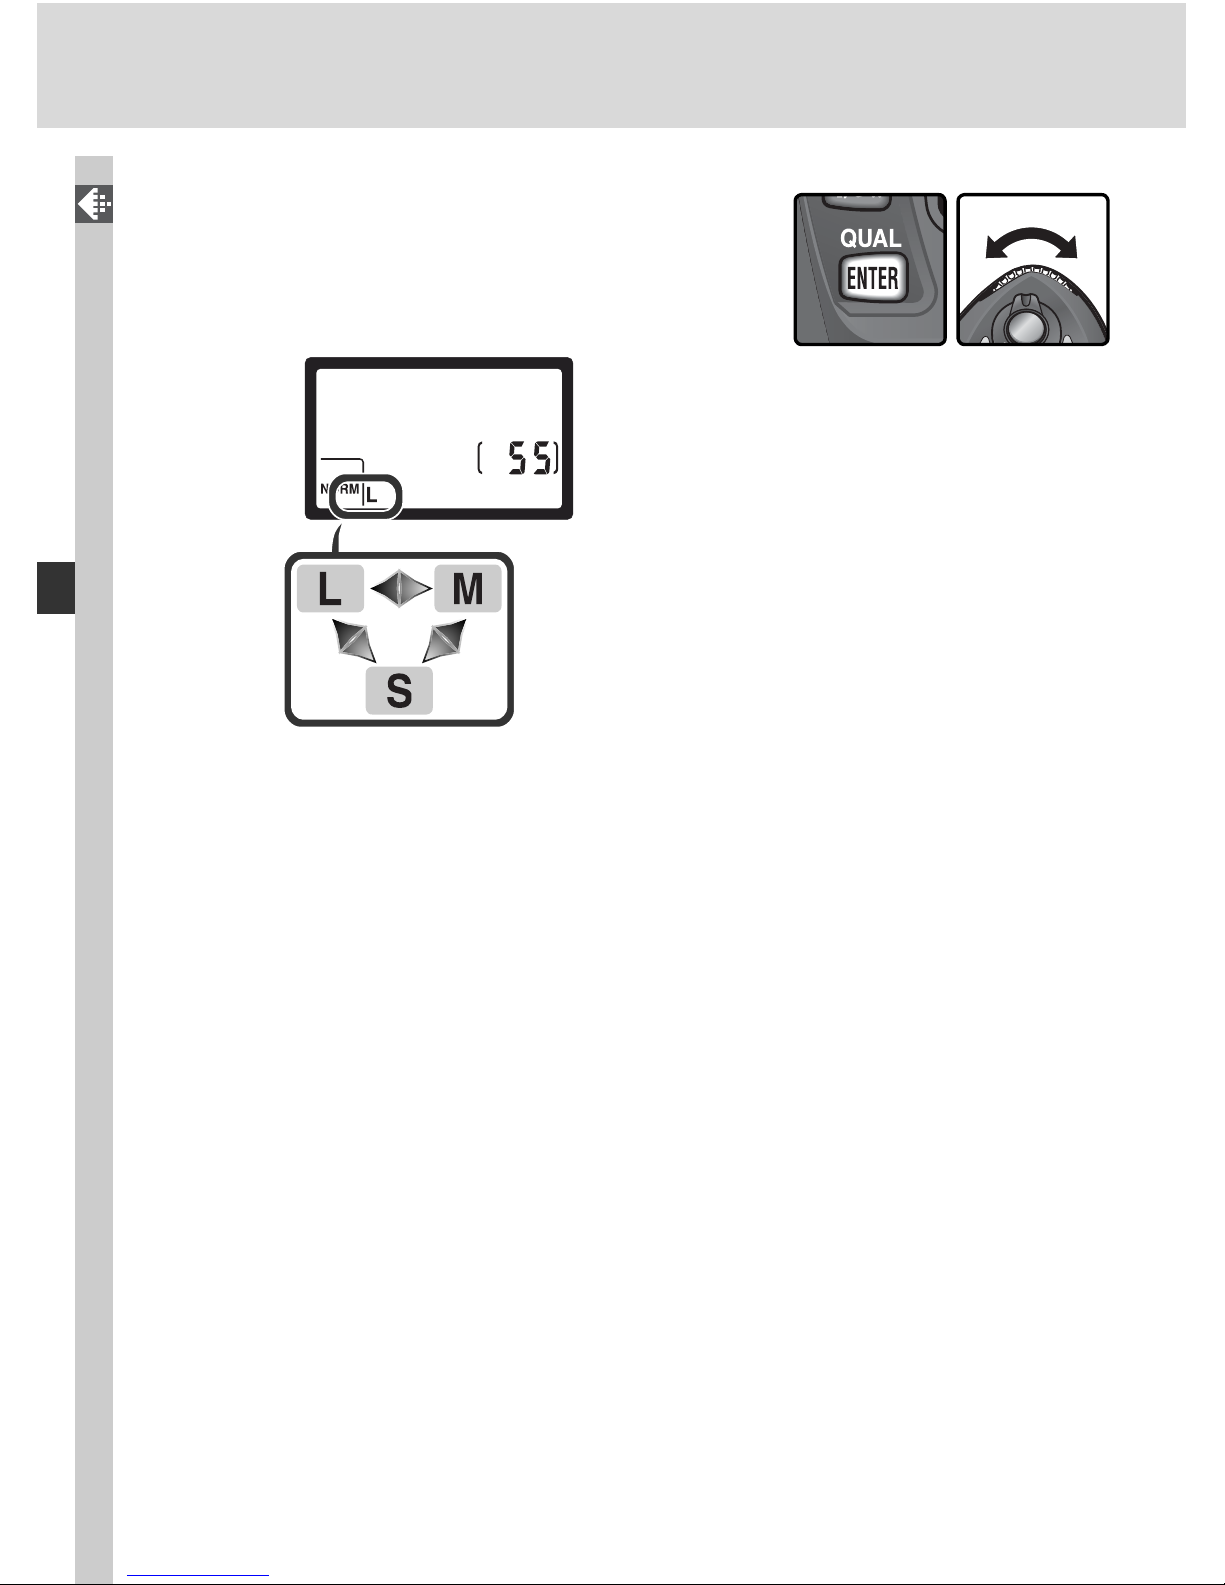
44
Taking Photographs—Image Quality and Size
The QUAL Button
When the monitor is off, image size can be set
by pressing the QUAL button and rotating the
sub-command dial. Image size is displayed in the
control panel:
Page 55
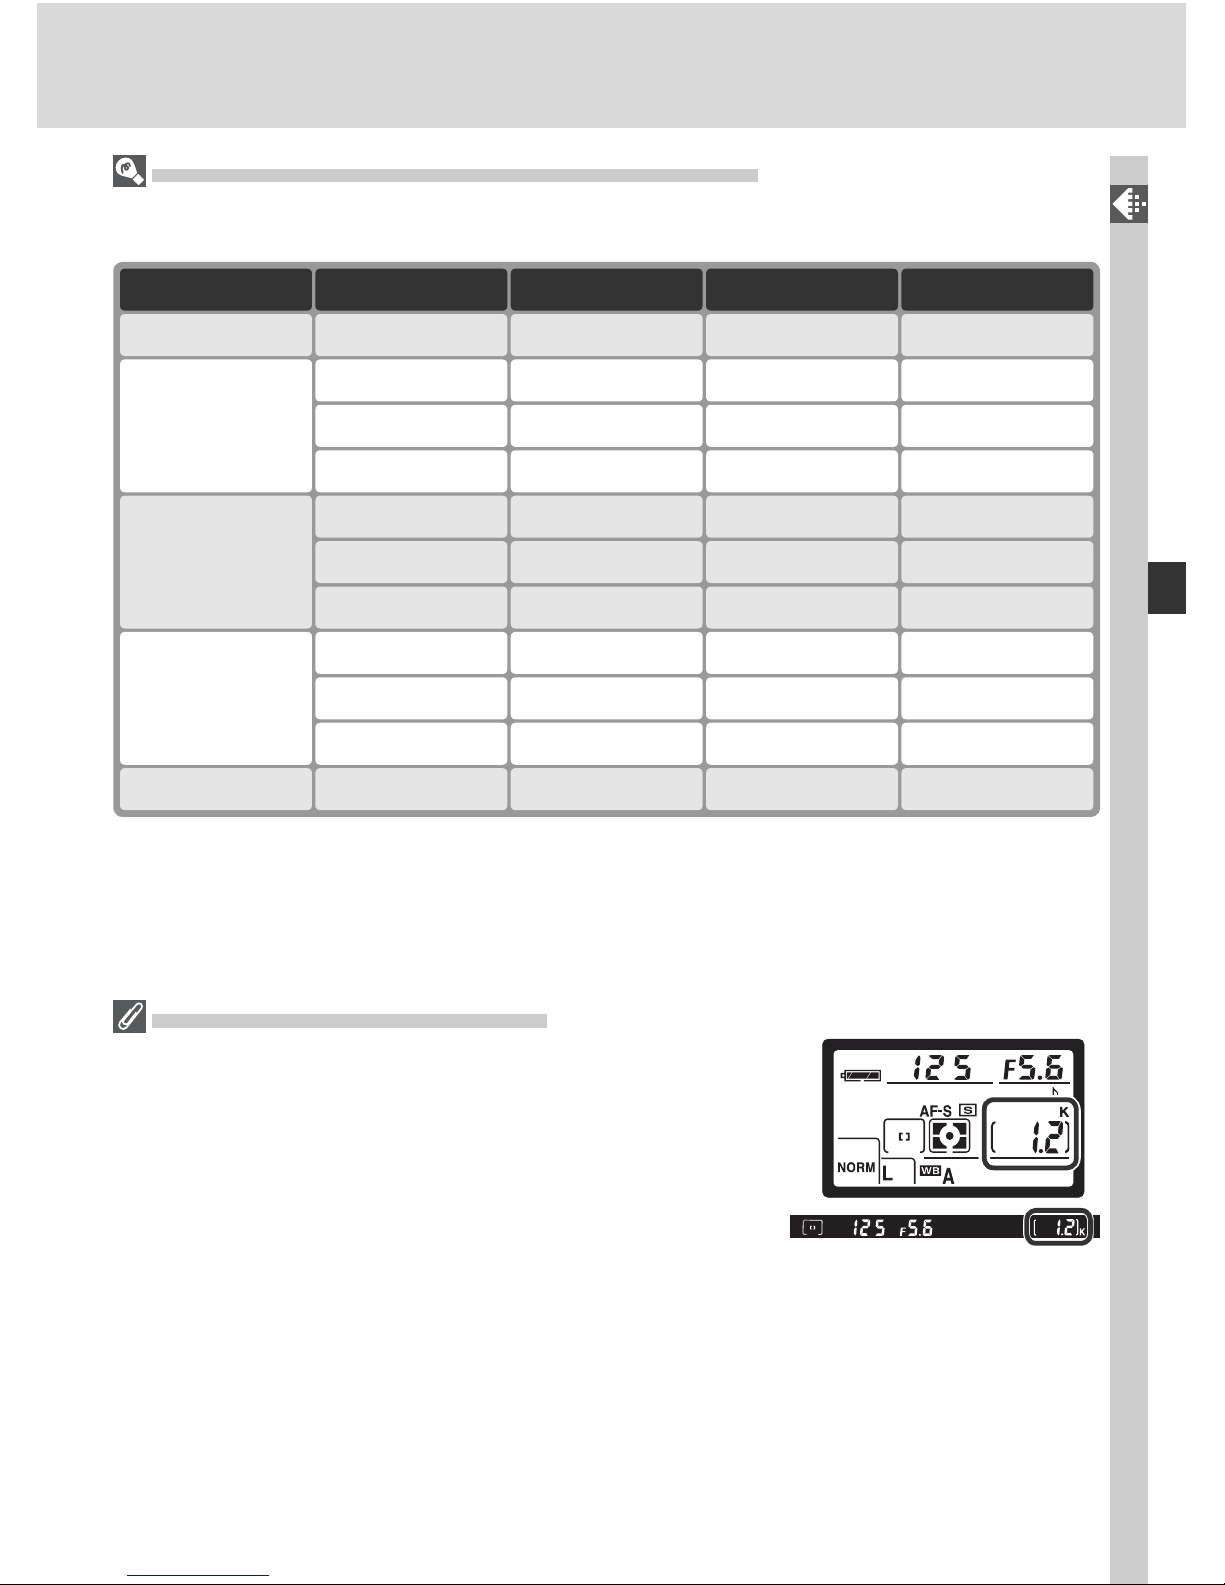
45
Taking Photographs—Image Quality and Size
Memory Card Capacity and Image Quality/Size
The following table shows the approximate number of pictures that can be stored on
a 256 MB card at different image quality and size settings.
Image quality Image size File size
*
No. of images*Buffer capacity
†
NEF (Raw) 4 235.0 MB—
JPEG Fine
9 732.9 MBL
71301.6 MBM
192790.8 MBS
JPEG Normal
121441.5 MBL
72530.8 MBM
275280.4 MBS
JPEG Basic
192790.8 MBL
74810.4 MBM
499500.2 MBS
NEF+JPEG Basic 4 215.8 MB
**
L
‡
*
All fi gures are approximate. File size of JPEG images varies with scene recorded.
†
Maximum number of frames that can be stored in memory buffer.
‡
Size of JPEG image fi xed at L. When opened in software provided with camera or in
Nikon Capture 4 version 4.1 or later, NEF im ag e is 3,008 × 2,000 pixels.
**
Total fi le size of NEF (RAW) and JPEG images.
Large-Capacity Memory Cards
When enough mem o ry re mains on the memory card to
record a thou sand or more pic tures at cur rent set tings,
the num ber of exposures re main ing will be shown in
thou sands, round ed down to the near est hun dred (e.g.,
if there is room for ap prox i mate ly 1,260 ex po sures, the
ex po sure count dis play will show 1.2 K).
Page 56
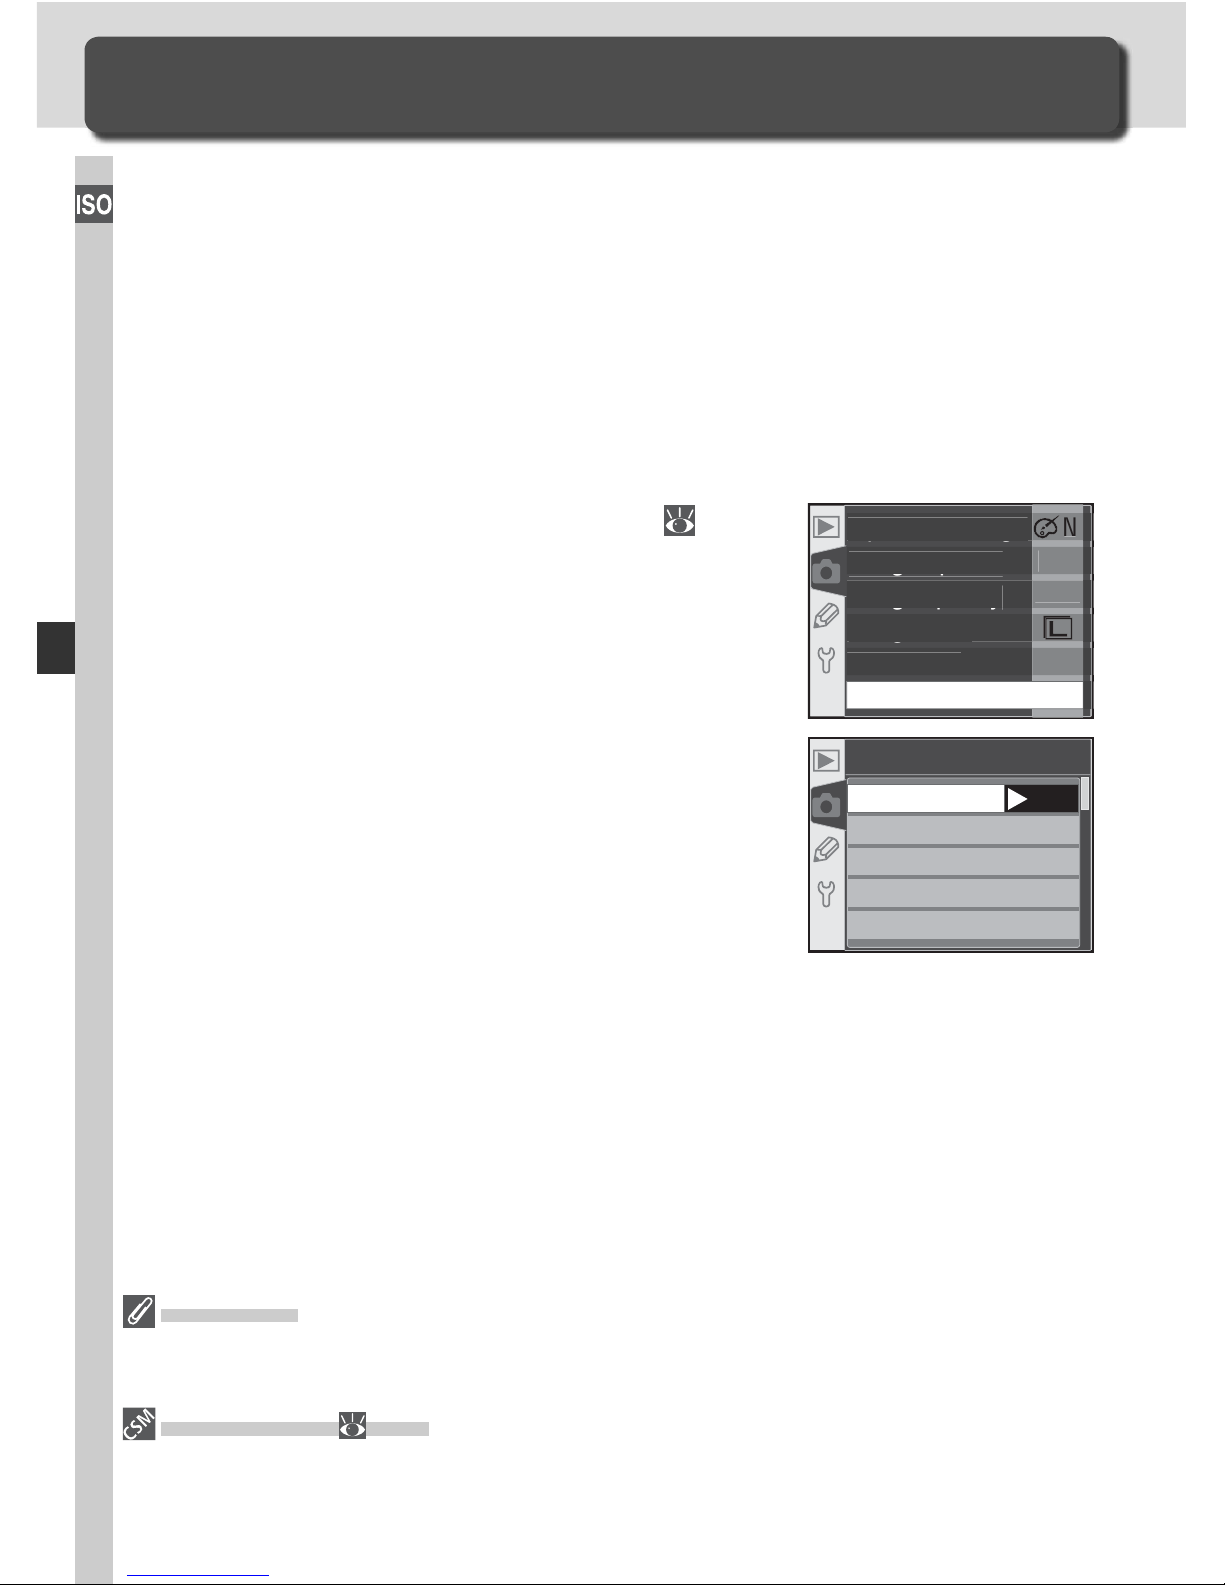
46
Taking Photographs—Sensitivity (ISO Equivalency)
“Sensitivity” is the digital equivalent of fi lm speed. The higher the sensitivity,
the less light needed to make an exposure, allowing higher shutter speeds
or smaller apertures.
Sensitivity can be set between values roughly equivalent to ISO 200 and ISO
1600 in steps equivalent to
1
/3 EV. Sensitivity can be adjusted using the ISO
option in the shooting menu or by pressing the ISO button and rotating the
main command dial.
The ISO Menu
1
Highlight ISO in the shooting menu ( 132)
and press the multi selector to the right.
Sensitivity
The higher the sensitivity, the more likely pictures are to be subject to “noise” in the
form of randomly-spaced, brightly-colored pixels.
5—ISO Auto ( 142)
When On is selected for Custom Setting 5 (ISO auto), the camera will automatically
vary sensitivity from the value selected by the user to help ensure optimum exposure.
Sensitivity (ISO Equivalency)
Reacting Faster to Light
2
00
NOR
M
F
F
pg
Optimize ima
ge
gp
Long exp. N
R
gq y
Image qualit
y
g
Image siz
e
White bal
.
I
SO
2
High light the de sired op tion and press the
multi se lec tor to the right. The shooting menu
will be displayed.
ISO
200
250
320
400
500
OK
Page 57
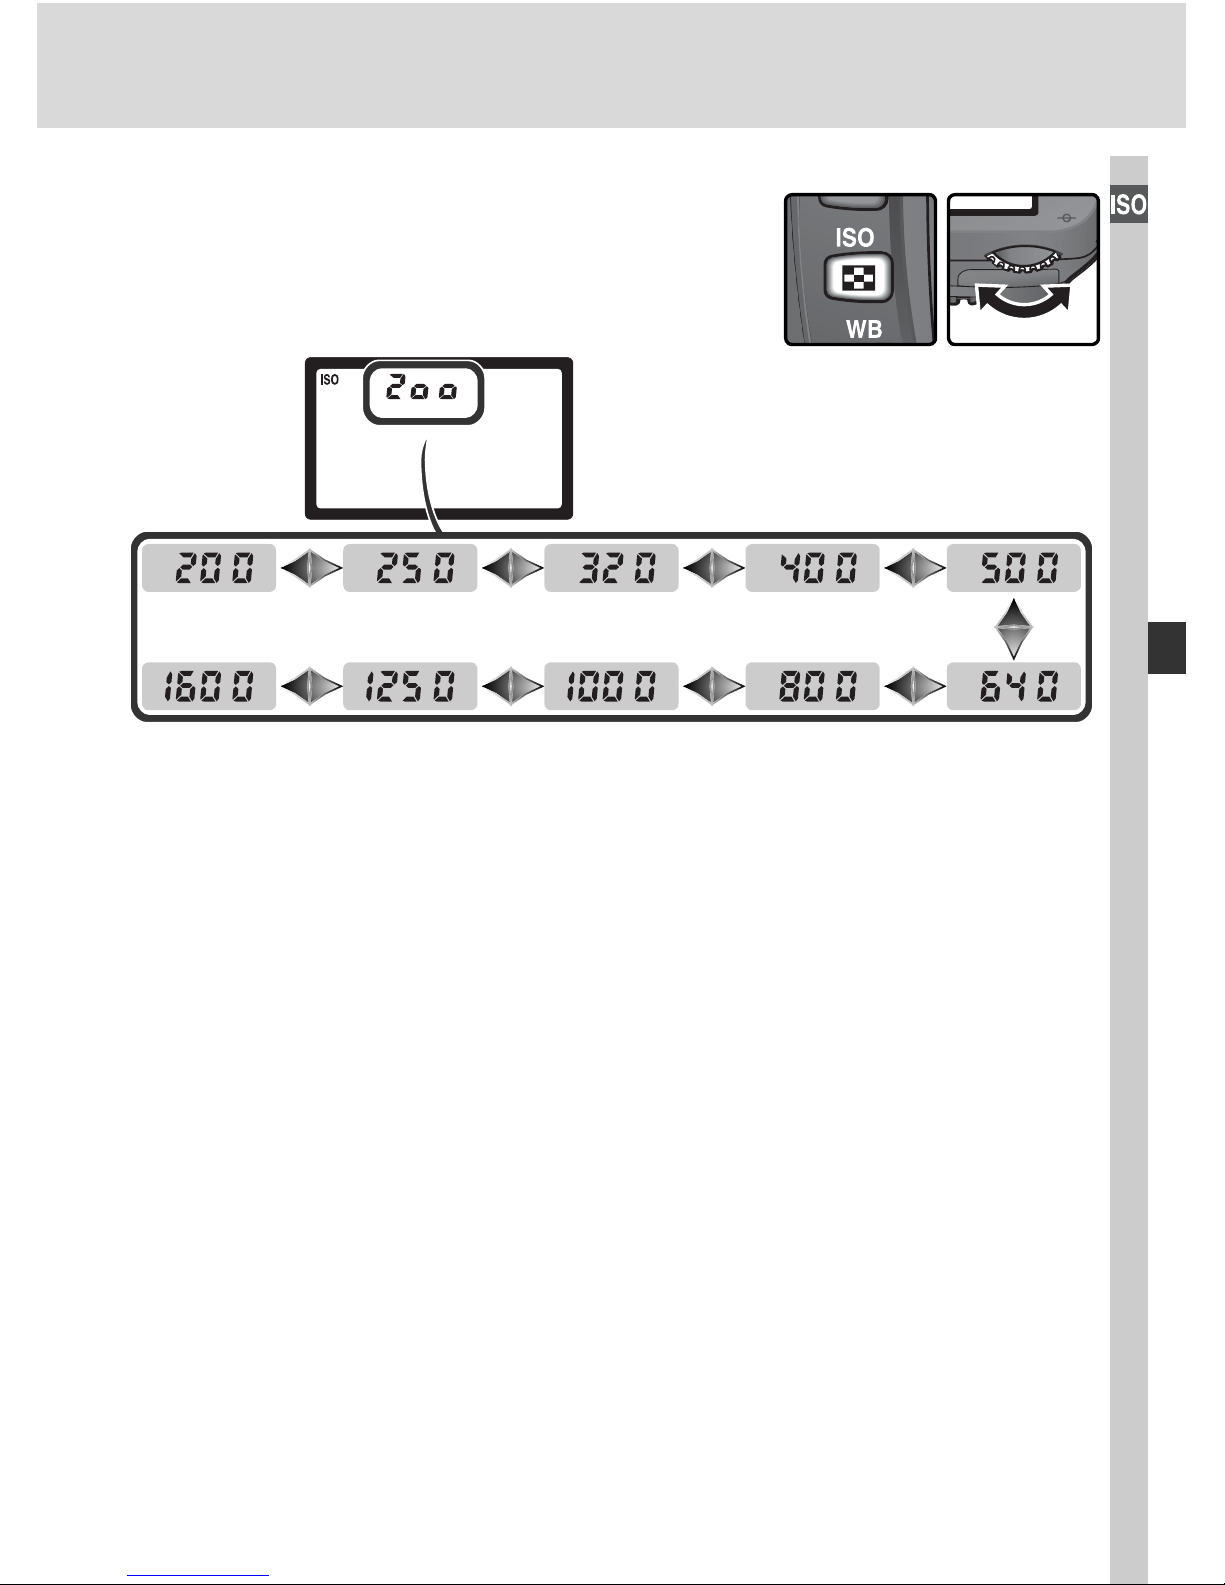
47
Taking Photographs—Sensitivity (ISO Equivalency)
The ISO Button
When the monitor is off, sensitivity can be set by
pressing the ISO button and rotating the main
command dial. Sensitivity is displayed in the
control panel:
Page 58
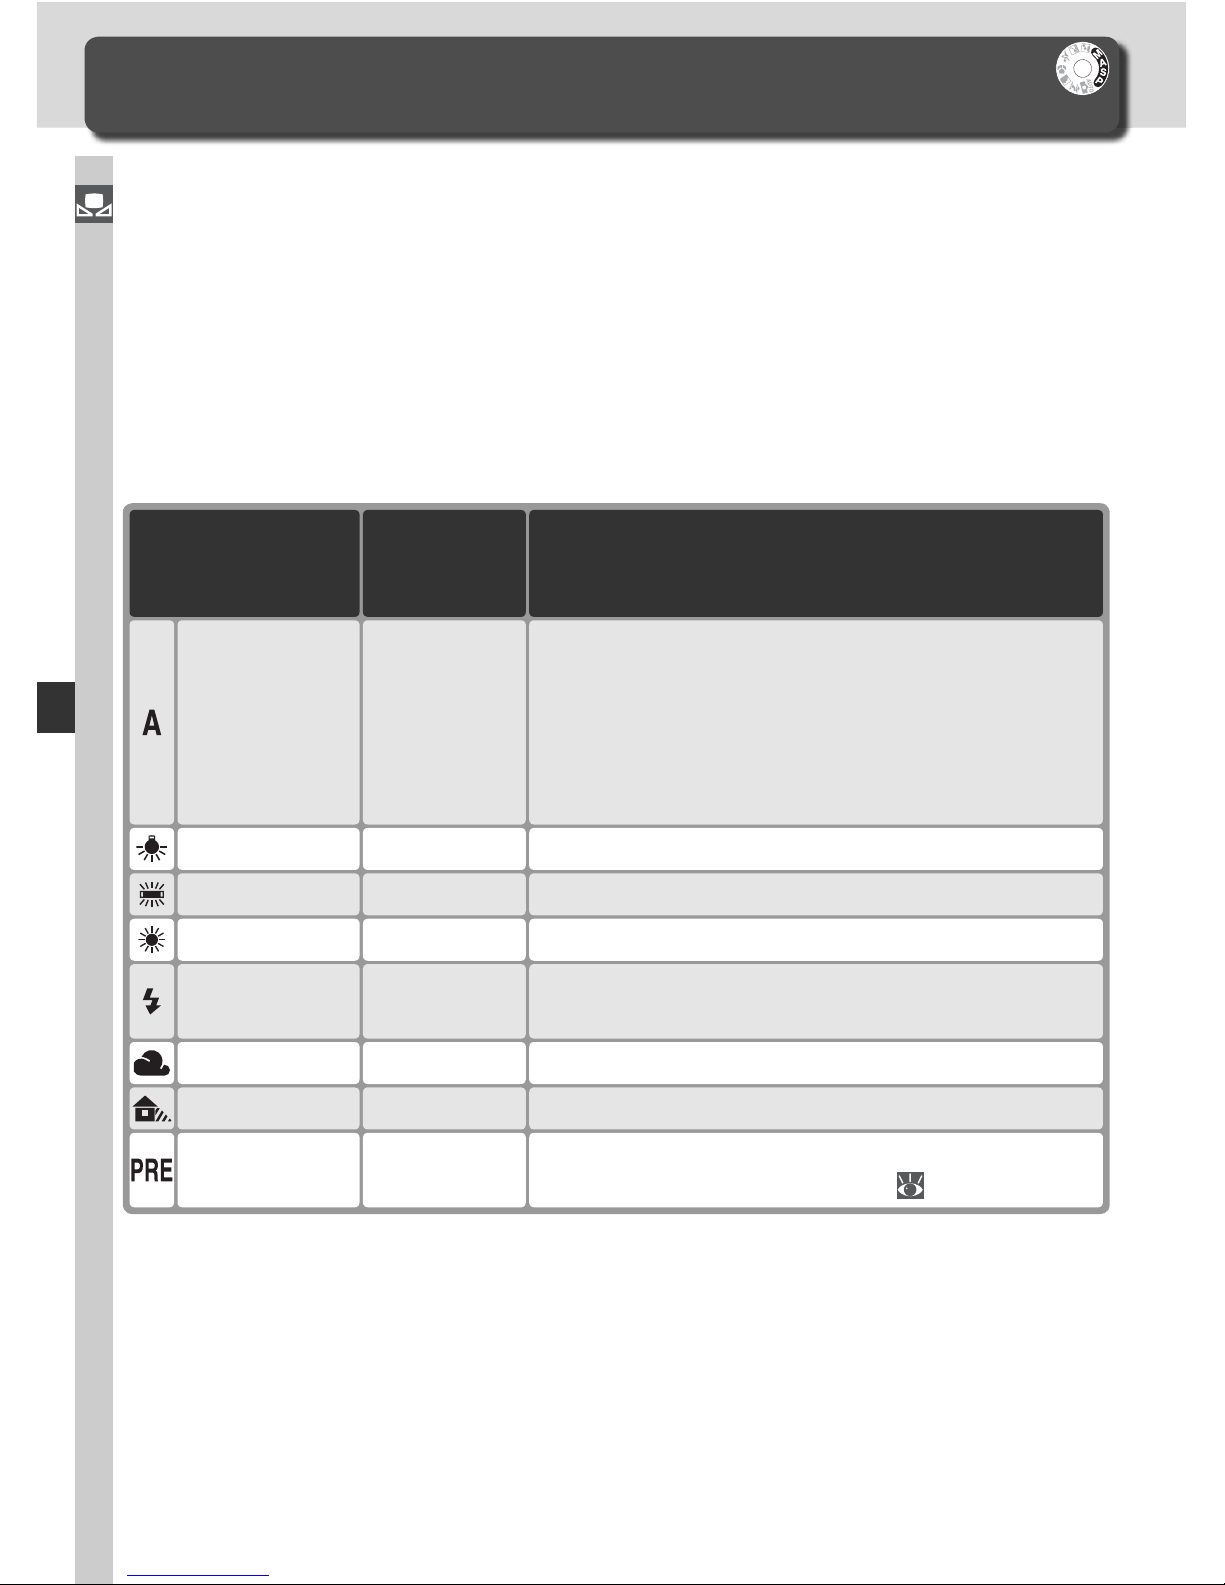
48
Taking Photographs—White Balance
White Balance
Keeping Colors True
The color of the light refl ected from an object varies with the color of the light
source. The human brain is able to adapt to changes in the color of the light
source, with the result that white objects appear white whether seen in the
shade, direct sunlight, or under incandescent lighting. Unlike the fi lm used in
fi lm cameras, dig i tal cam er as can mimic this adjustment by processing images
according to the color of the light source. This is known as “white balance.”
For natural coloration, choose a white bal ance set ting that match es the light
source before shooting. When the mode dial is set to P, S, A, or M, white
balance can be selected from the following options:
* Fine-tuning set to 0.
Auto white balance is recommended with most light sources. If the desired
results can not be achieved with auto white balance, choose an option from
the list above or use preset white balance.
Approximate
color
tem per a ture
*
White bal ance adjusted automatically based on
color temperature from 1,005-pixel RGB sensor
and CCD image sensor. For best results, use type
G or D lens. With built-in Speedlight and optional
SB-800 and 600 Speedlights, white balance refl ects conditions in effect when Speedlight fi res.
3,500–
8,000 K
Auto
Use under incandescent lighting.3,000 KIncandescent
DescriptionOption
Use under fl uorescent lighting.4,200 KFluorescent
Use with subjects lit by direct sunlight.5,200 KDir. sunlight
Use with Nikon Speedlights, including built-in
Speedlight.
5,400 KFlash
Use in daylight under overcast skies.6,000 KCloudy
Use in daylight with subjects in the shade.8,000 KShade
Use gray or white object or existing photograph
as reference for white balance ( 52).
—Preset
Page 59
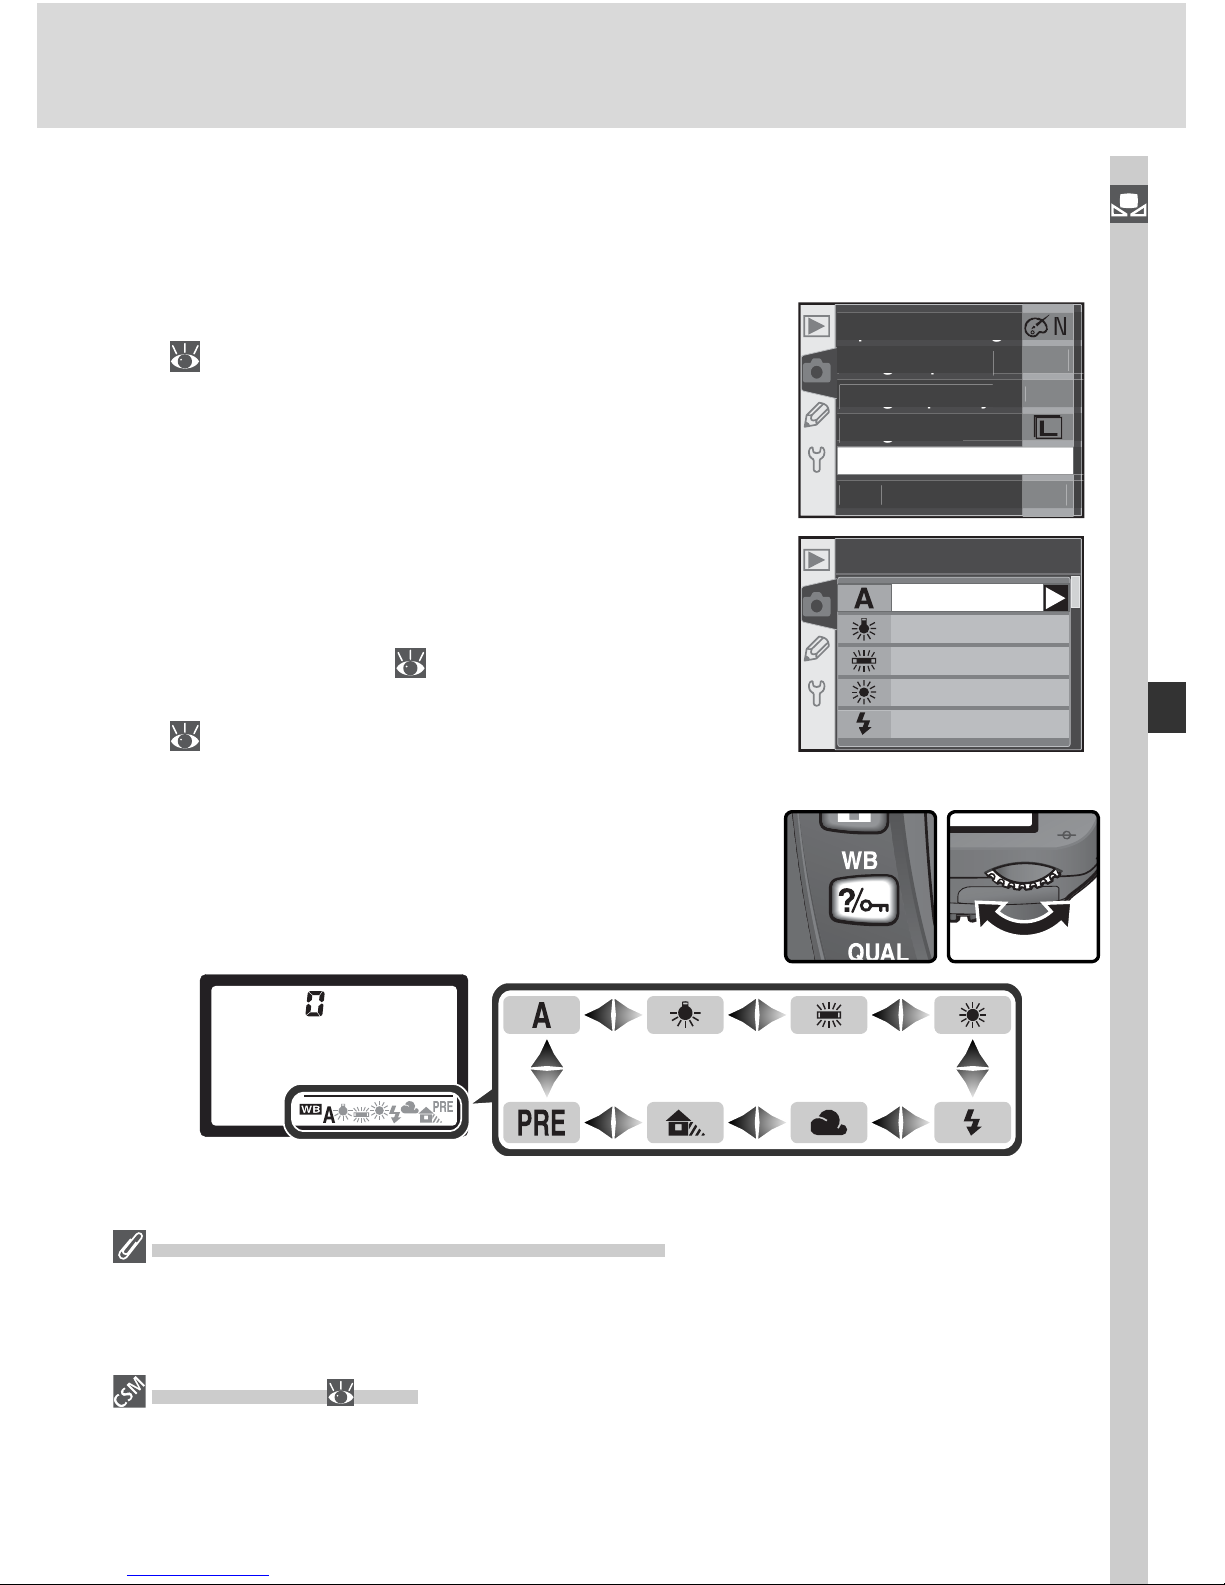
49
Taking Photographs—White Balance
White balance can be set using the White bal. option in the shooting menu
or by pressing the WB button and rotating the main command dial.
The White Balance Menu
1
Highlight White bal. in the shooting menu
( 132) and press the multi selector to the
right.
2
00
NOR
M
F
F
pg
Optimize ima
ge
gp
Long exp. N
R
gq y
Image qualit
y
g
Image siz
e
White bal
.
I
SO
2
High light the de sired op tion and press the
multi se lec tor to the right. If Preset is selected, a menu of preset white balance options
will be displayed ( 52). Otherwise a whitebalance fi ne-tuning dialog will be displayed
( 50).
The WB Button
When the monitor is off, white balance can be set
by pressing the WB button and rotating the main
command dial. White balance is displayed in the
control panel:
White bal.
Auto
Incandescent
Fluorescent
Dir. sunlight
Flash
Speedlights Connected via a Sync Cable
Auto white balance may not produce the desired results when the AS-15 accessory
shoe adapter is used to connect optional Speedlights via a sync cable. Use preset white
balance or set white balance to Flash and use fi ne tuning to adjust white balance.
12—BKT Set ( 146)
When WB bracketing is selected for Custom Setting 12 (BKT set), the camera will
create several images each time the shutter is released. White balance will be varied
with each image, “bracketing” the value currently selected for white balance.
Page 60
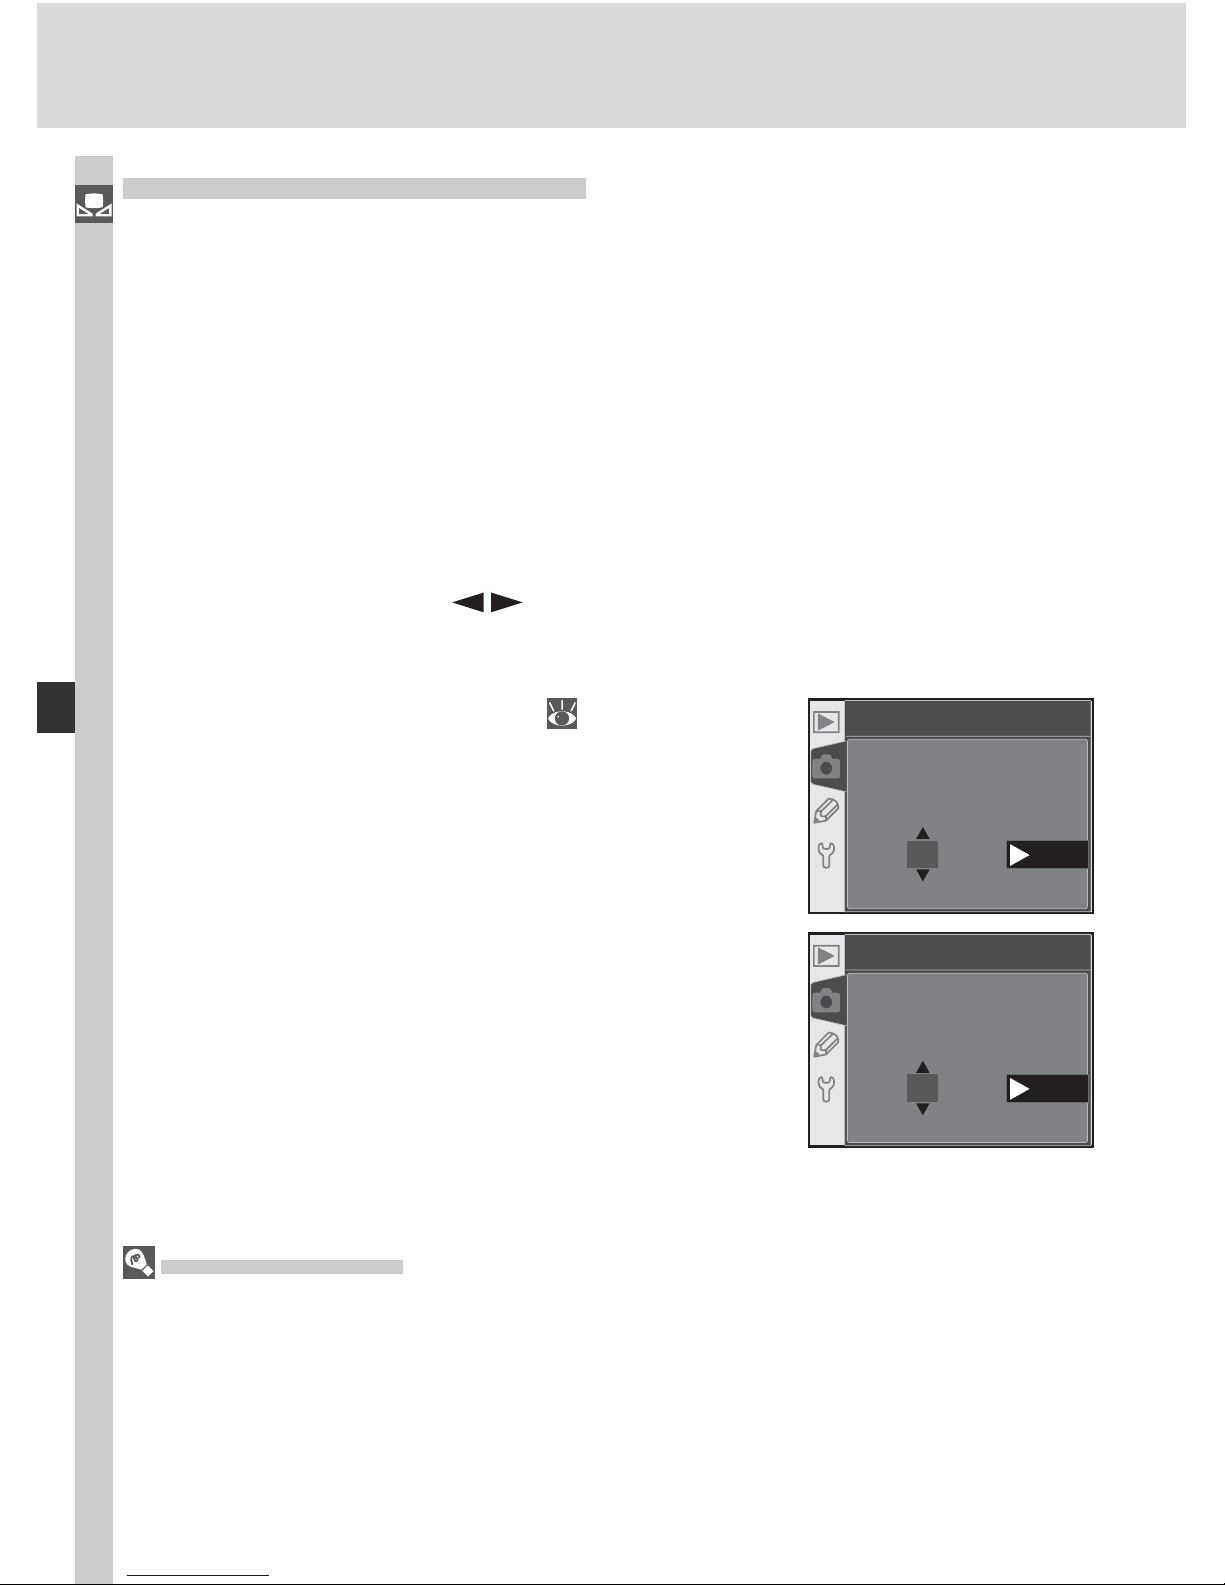
50
Taking Photographs—White Balance
Fine-Tuning White Balance
At settings other than Preset, white bal ance can be “fi ne tuned” to compensate for vari a tions in the color of the light source or to in tro duce a deliberate
“warm” or “cold” cast into an image. Higher settings can be used to lend
im ag es a blu ish tinge or to com pen sate for light sources with a yellow or red
cast, while low er ing white bal ance can make pho to graphs ap pear slight ly
more yellow or red or com pen sate for light sources with a blue cast. Adjustments can be made in the range +3 to –3 in in cre ments of one. Except in
Fluorescent mode, each in cre ment is equiv a lent to about 10 mired.
White balance is fi ne tuned using the White bal. option in the shooting
menu or by pressing the WB button and rotating the sub-command dial. At
settings other than ±0, a
icon appears in the control panel.
The White Balance Menu
1
In the white balance menu ( 49), highlight
an option other than Preset and press the
multi selector to the right.
0
White bal.
OK
Fine-tune
2
Press the multi selector up or down to choose
the desired value and press the multi selector
to the right. The shooting menu will be displayed.
White bal.
Fine-tune
OK
+
1
Color Temperature
The perceived color of a light source varies with the viewer and other conditions.
Color temperature is an objective measure of the color of a light source, defi ned with
ref er ence to the temperature to which an object would have to be heated to radiate
light in the same wavelengths. While light sources with a color temperature in the
neigh bor hood of 5,000–5,500 °K appear white, light sources with a lower color tem per a ture, such as incandescent light bulbs, appear slightly yellow or red. Light sourc es
with a higher color temperature appear tinged with blue.
Page 61
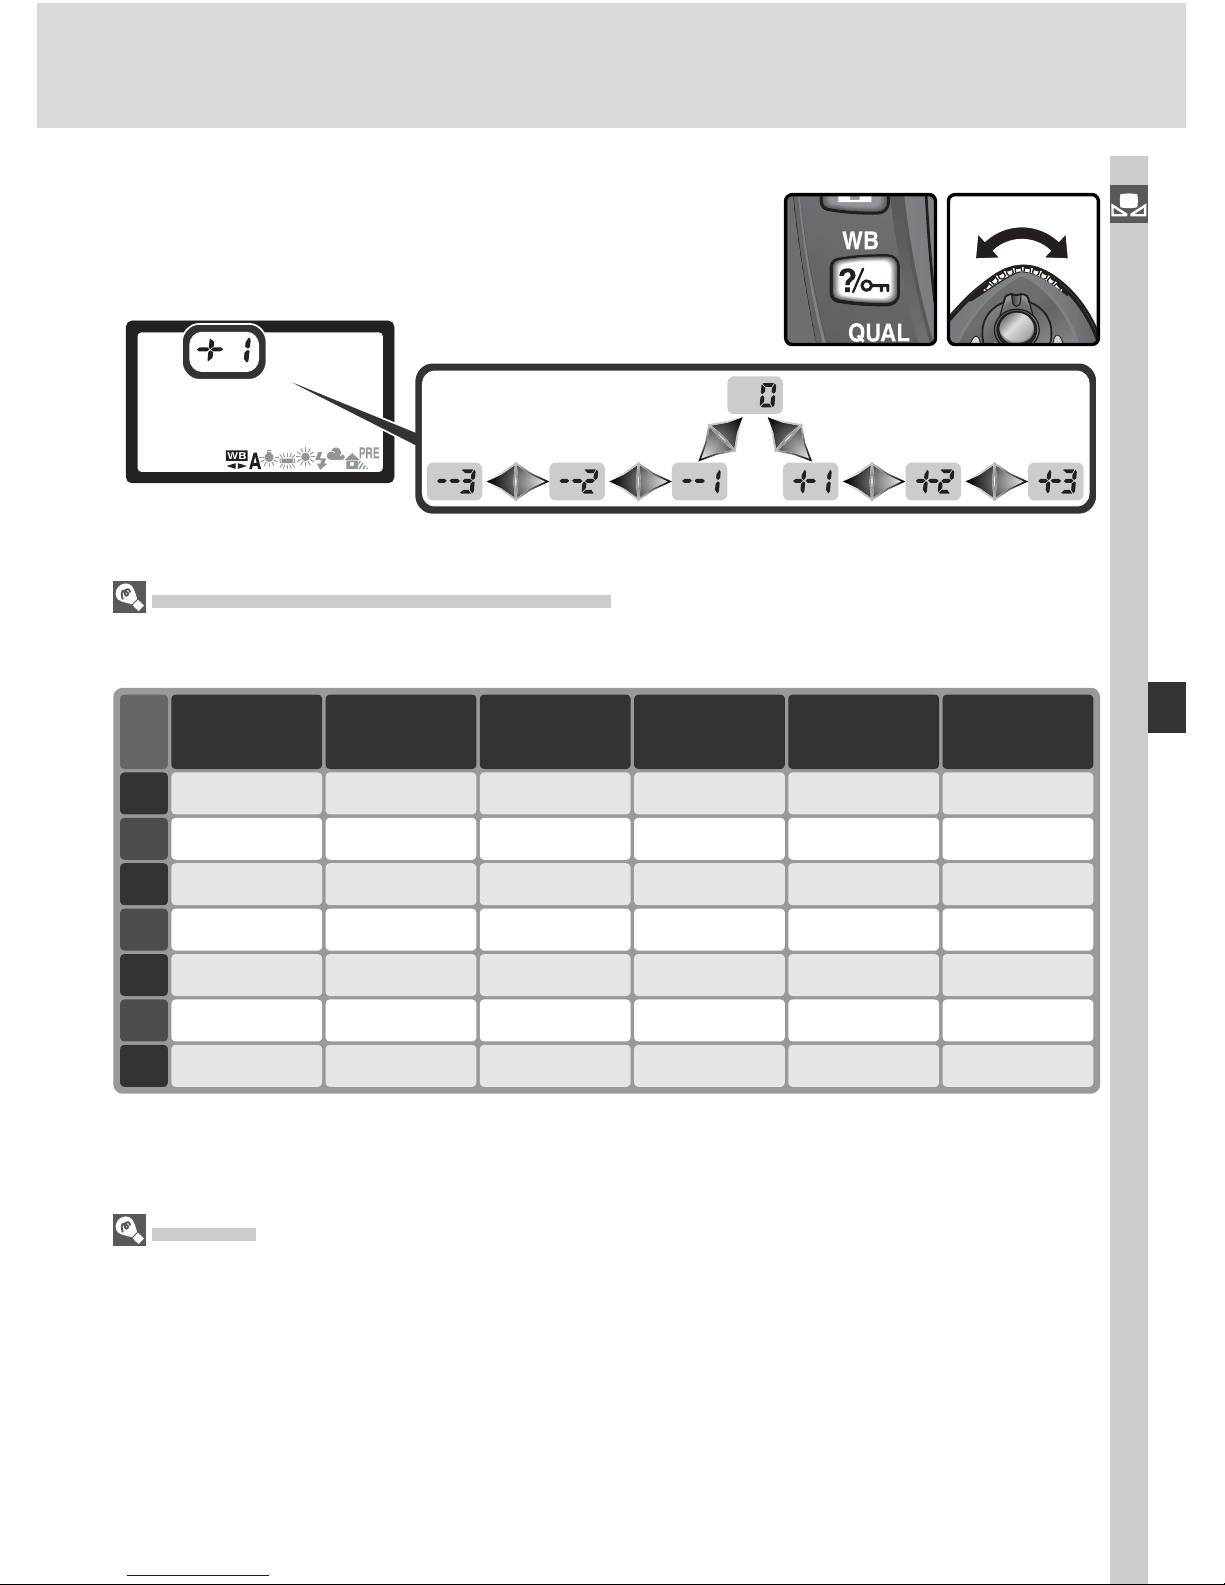
51
Taking Photographs—White Balance
The WB Button
When the monitor is off, white balance can be
fi ne tuned by pressing the WB button and rotating
the sub-command dial.
Fine-Tuning and Color Temperature
Approximate color-temperatures for settings other than A (auto) are given below (values may differ from color temperatures given by pho to color meters):
+3 2,700 K 2,700 K 4,800 K 4,800 K 5,400 K 6,700 K
Shade
(daylight)
Cloudy
(daylight)
Direct
sunlight FlashFluorescent
*
Incandescent
+2 2,800 K 3,000 K 4,900 K 5,000 K 5,600 K 7,100 K
+1 2,900 K 3,700 K 5,000 K 5,200 K 5,800 K 7,500 K
±0 3,000 K 4,200 K 5,200 K 5,400 K 6,000 K 8,000 K
–1 3,100 K 5,000 K 5,300 K 5,600 K 6,200 K 8,400 K
–2 3,200 K 6,500 K 5,400 K 5,800 K 6,400 K 8,800 K
–3 3,300 K 7,200 K 5,600 K 6,000 K 6,600 K 9,200 K
* The size of the increments for Fluorescent refl ects the wide variations in color tem-
per a ture among the many different types of fl uorescent light source, ranging from
low-tem per a ture sta di um lighting to high-temperature mer cu ry-vapor lamps.
“Mired”
Any given change in color temperature produces a greater difference in color at low
color tem per a tures than it would at higher color temperatures. For example, a change
of 100 K produces a much greater change in color at 3000 K than at 6000 K. Mired,
calculated by multiplying the inverse of the color temperature by 10 6, is a measure of
color temperature that takes such variation into account, and as such is the unit used
in color-temperature compensation fi lters. E.g.:
• 4000 K – 3000 K (a difference of 1000 K) = 83 mired
• 7000 K – 6000 K (a difference of 1000 K) = 24 mired
Page 62
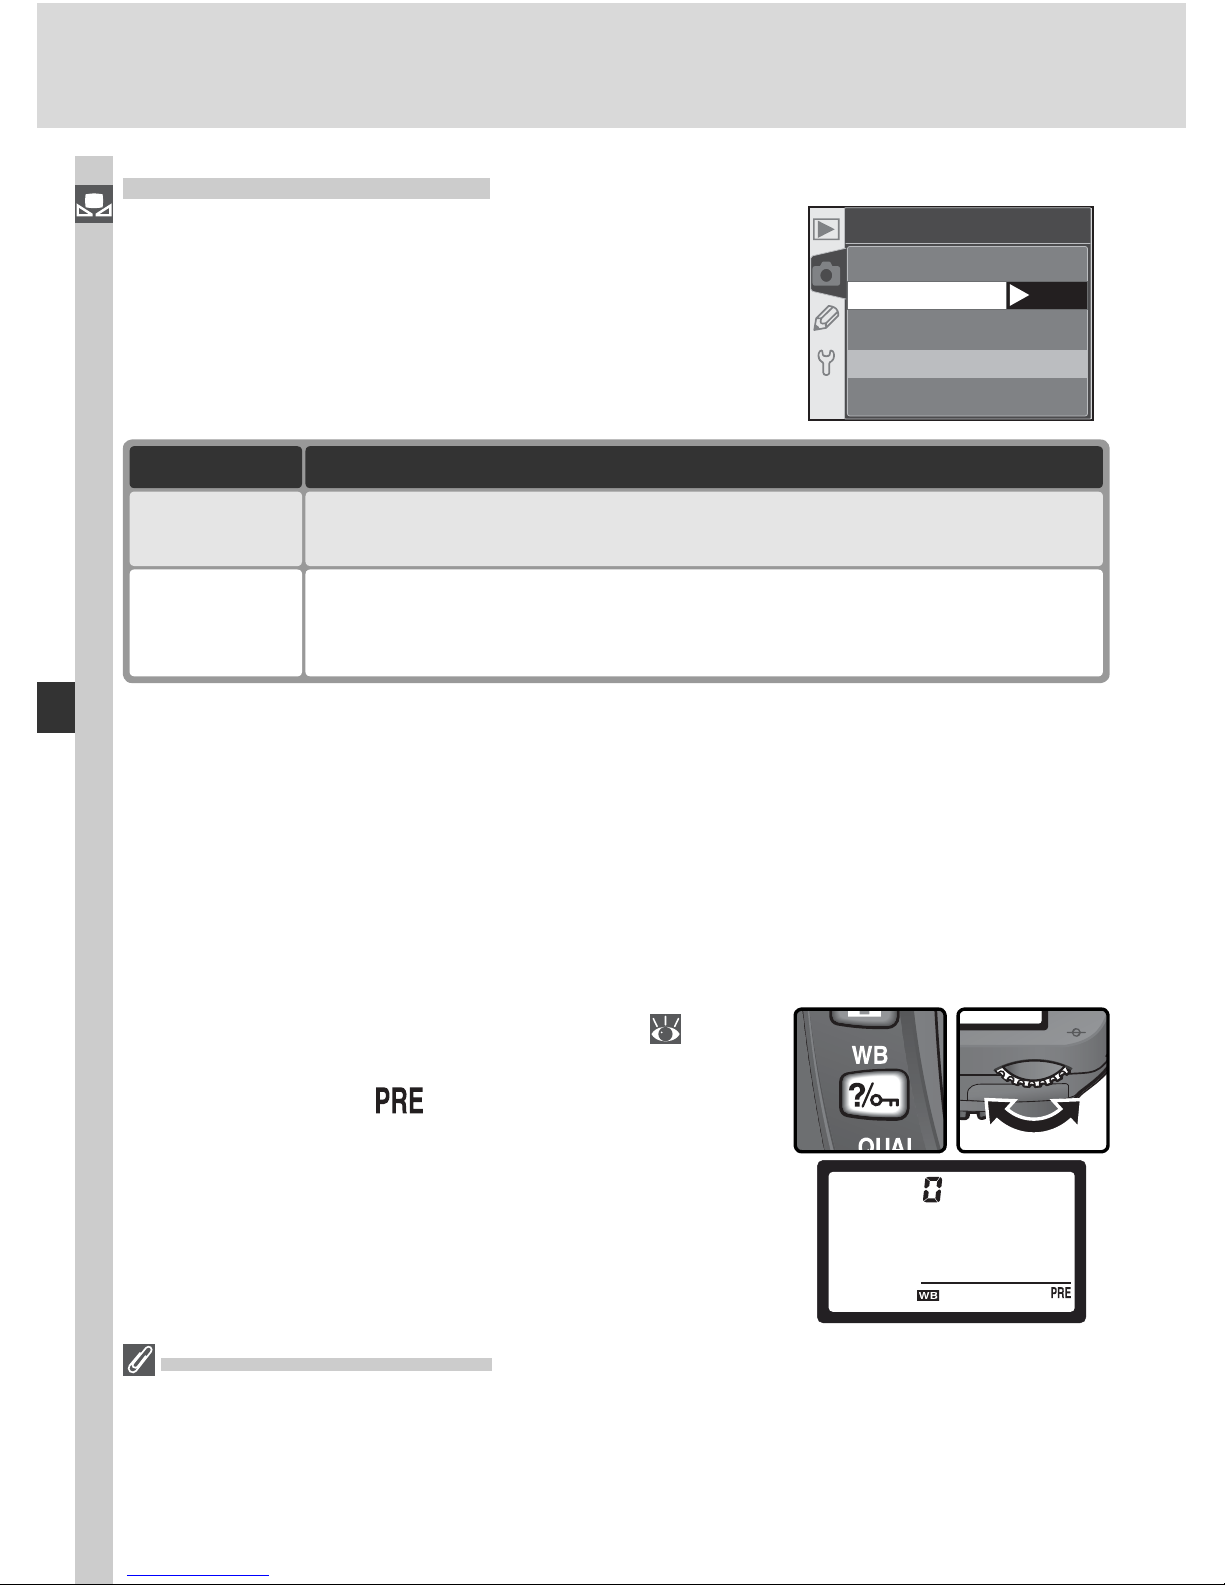
52
Taking Photographs—White Balance
Preset White Balance
Preset white balance is used to record and recall
custom white balance settings for shooting under
mixed lighting, to compensate for light sources
with a strong color cast, or to replicate the white
balance used in an existing photo. Two methods
are available for setting preset white balance:
Preset
Set
Measure
Use photo
Description
Neutral gray or white object is placed under lighting that will be used
in fi nal photograph and white balance is measured by camera.
Method
Measure
white balance
White balance value is copied from photo taken with D70 (if desired,
source picture can be RAW image modifi ed using white balance adjustment option in Nikon Capture 4 version 4.1 or later).
Copy from
existing
photograph
The camera can store only one value for preset white balance at a time; the
existing value is overwritten when a new value is measured or copied. Measuring a new value for white balance automatically sets Preset to Measure.
Measuring a Value for White Balance
1
Place a neutral gray or white object under the lighting that will be used in
the fi nal photograph. In studio settings, an 18% diffusion panel can be
used to make the reference object appear gray.
2
Select Measure in the Preset menu ( 55) or
press the WB button and rotate the main com-
mand dial until is displayed in the control
panel. White balance will be set to the last
value selected for preset white balance; if no
previous value exists, white balance will be set
to 5,200 K, equivalent to Dir. sunlight.
Measuring White Balance
Preset white balance can be measured in P, S, A, and M modes. In these modes,
exposure is automatically increased by one EV to ensure accurate results. In mode
M, optimal results can be obtained by setting exposure to ±0 EV as indicated by the
electronic analog exposure display.
Page 63
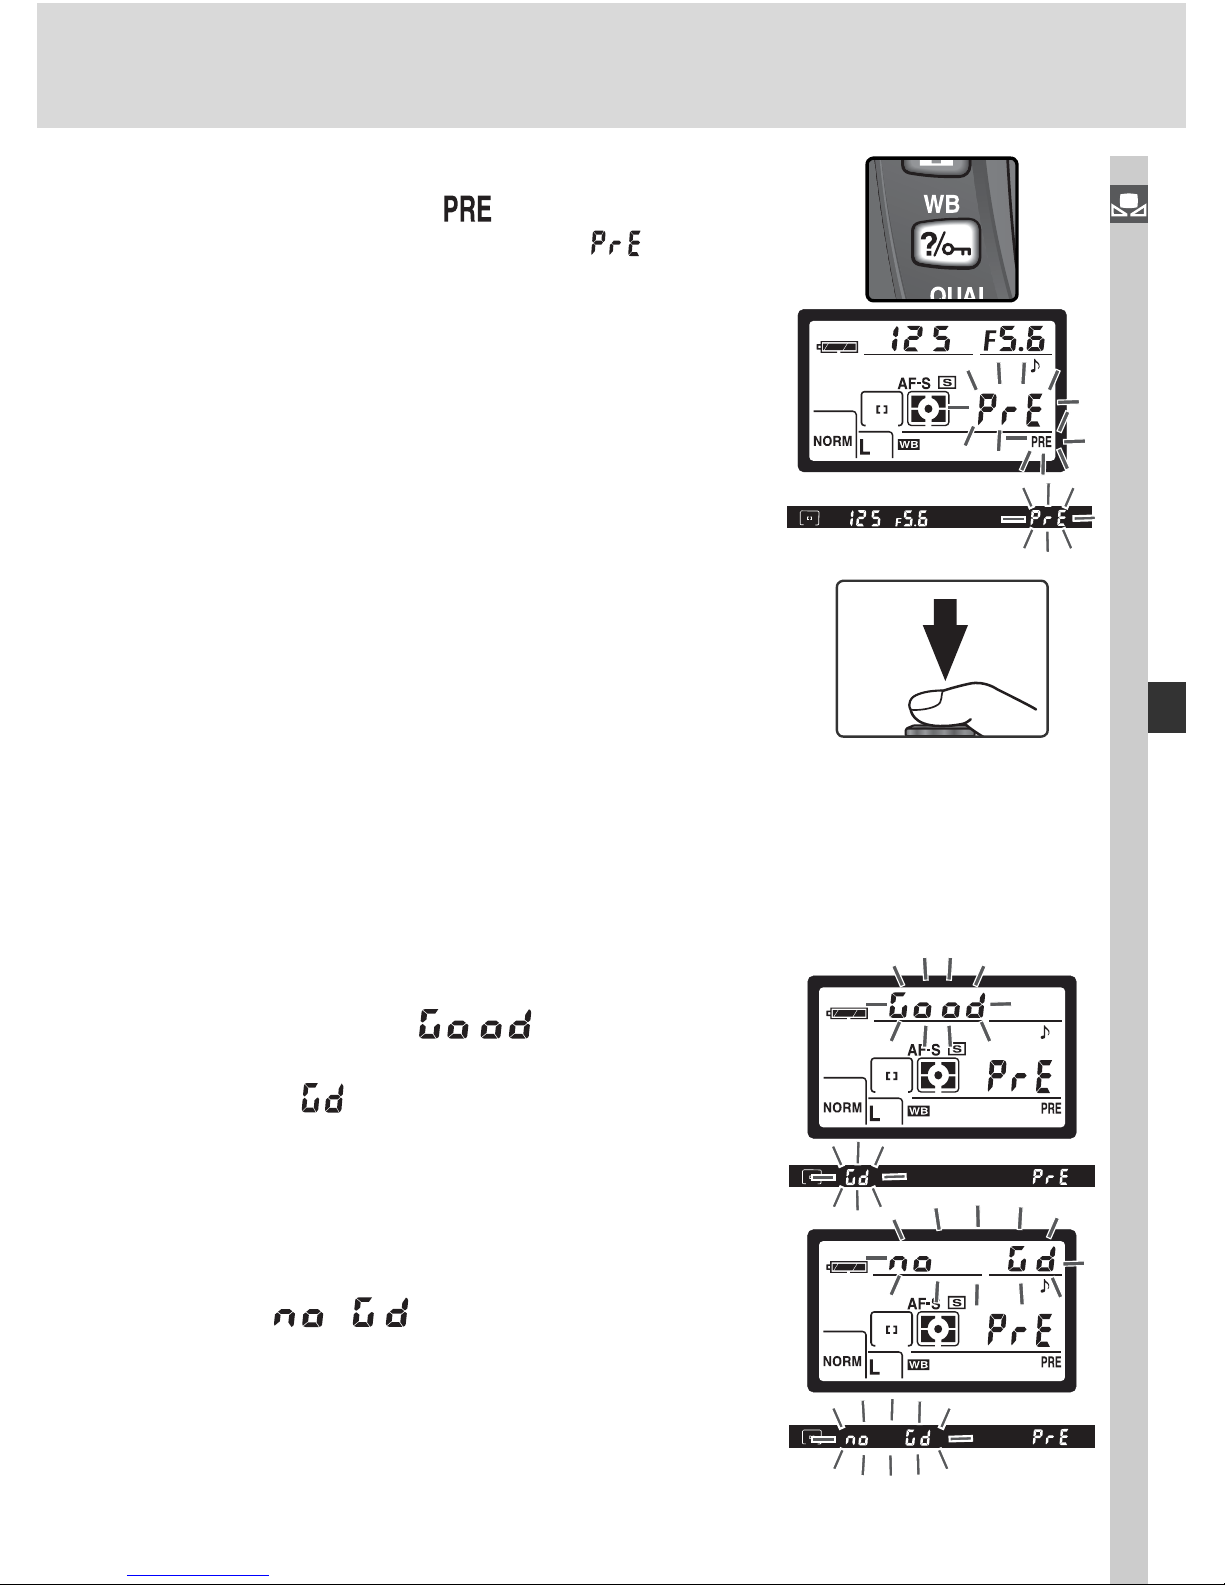
53
Taking Photographs—White Balance
3
Release the WB button briefl y and then press
the button until the icon in the control
panel starts to fl ash. A blinking will also
appear in the control panel and viewfi nder
frame-count displays.
4
Frame the reference object so that it fi lls the
viewfi nder and press the shutter-release button all the way down. The camera will measure a value for white balance and use this
value when preset white balance is selected.
No photograph will be recorded; white balance can be measured accurately even when
the camera is not in focus.
To exit without measuring a new value for white balance, press the WB
button.
5
If the camera was able to measure a value
for white balance, will fl ash in the
control panel, while the viewfi nder will show
a fl ashing . To return to shooting mode,
press the shutter-release button halfway or
wait until the exposure meters turn off.
If lighting is too dark or too bright, the camera
may be unable to measure white balance. A
fl ashing will appear in the control
panel and viewfi nder. Return to Step 4 and
measure white balance again.
Page 64
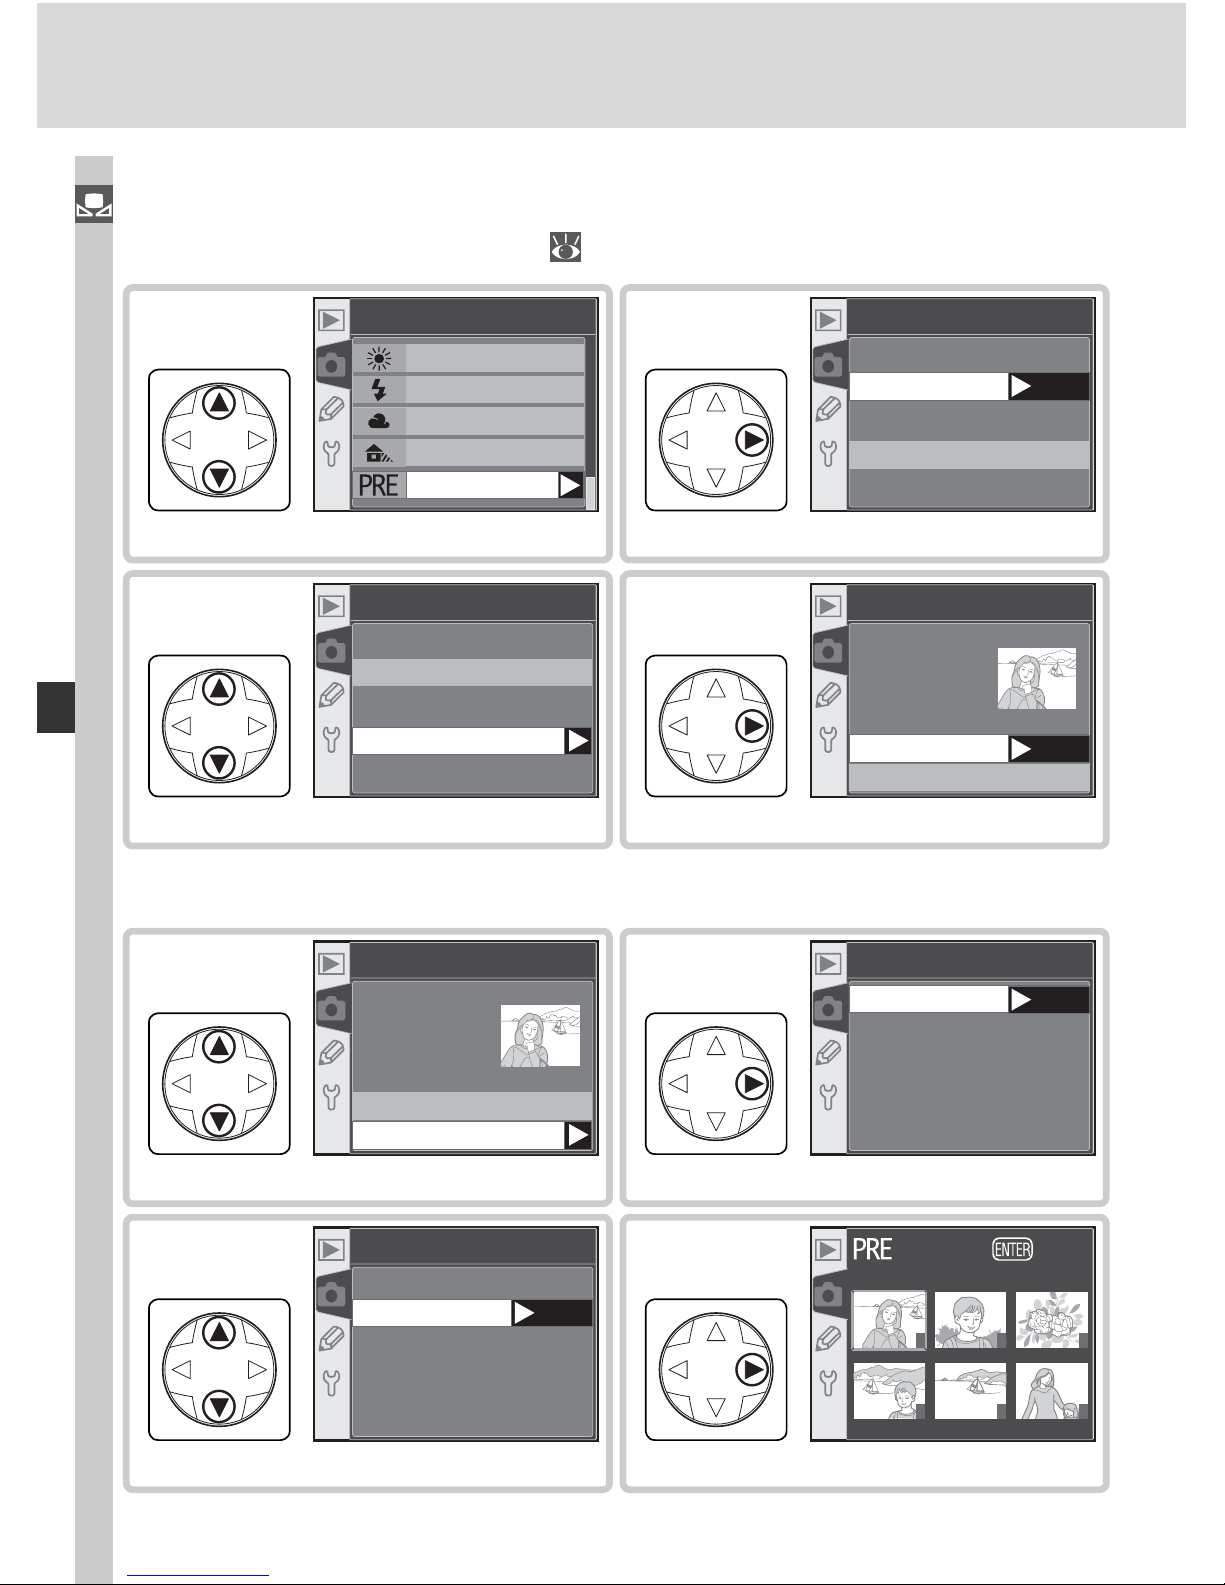
54
Taking Photographs—White Balance
Display options.
Preset
Set
Measure
Use photo
2
Highlight Preset.
White bal.
Dir. sunlight
Flash
Cloudy
Shade
Preset
1
Display current source photo.
*
This image
Select image
Preset
Set
4
Highlight Use photo.
Preset
Measure
Use photo
3
Copying White Balance from a Photograph
To copy a value for white balance from a photograph on the memory card,
display the white balance menu ( 49) and follow the steps below:
*To use white balance value for current photo, proceed to Step 11. If no photo is
displayed, preset white balance will be set to 5,200 K (Dir. sunlight).
Highlight Select image.
Preset
This image
Select image
5
Display folder list.
NCD70
NIKON
TOKYO
OK
Preset
6
Display images in selected folder.
1 2 3
4 5 6
OK
8
Highlight folder.
NCD70
NIKON
TOKYO
OK
Preset
7
Page 65
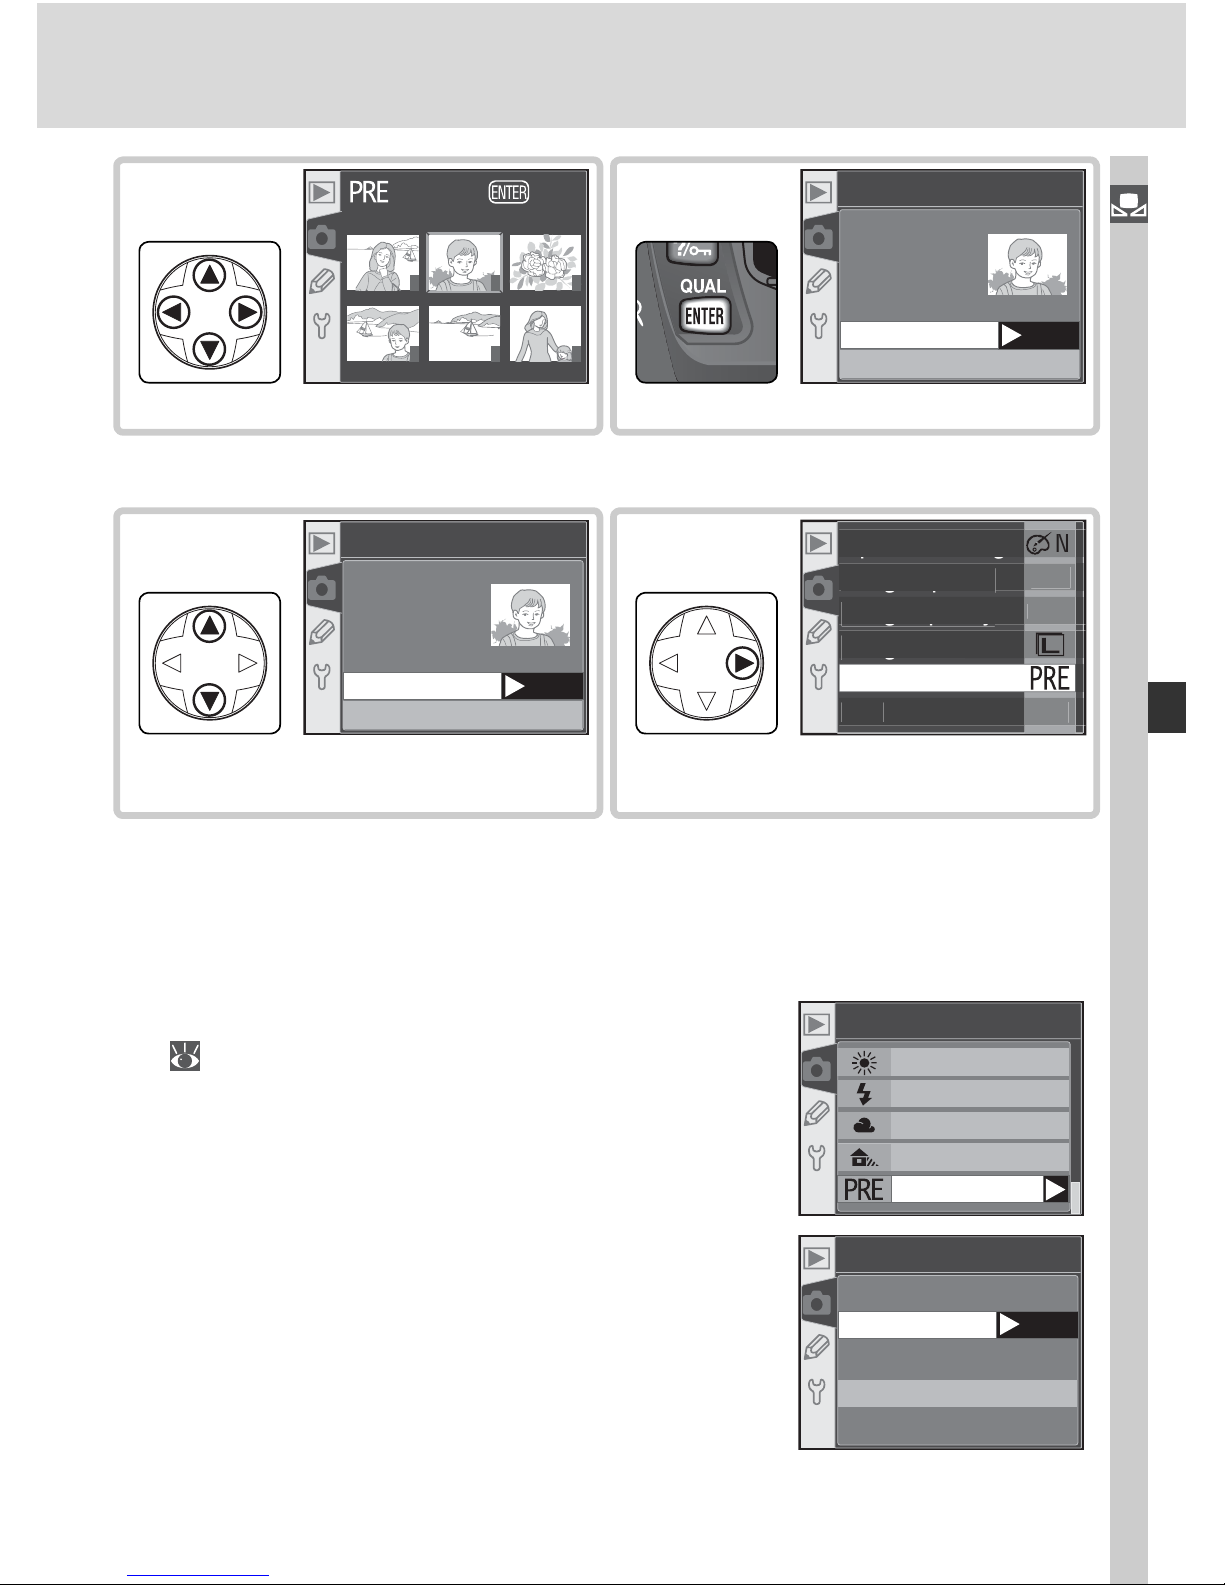
55
Taking Photographs—White Balance
† Images displayed may include those created by other cameras, but only photographs
created with D70 can be used as source for preset white balance.
Select photograph.
This image
Select image
Preset
Set
10
Highlight photograph.
†
1 2 3
4 5 6
OK
9
Highlight This image.
This image
Select image
Preset
Set
11
Set preset white balance to value for
selected photograph.
‡
2
00
NOR
M
F
F
pg
Optimize ima
ge
gp
Long exp. N
R
gq y
Image qualit
y
g
Image siz
e
White bal
.
I
SO
12
‡To select different photo, repeat steps 5–12.
Using the Current Value for Preset White Balance
To set white balance to the value currently selected for preset white balance:
1
Highlight Preset in the white balance menu
( 49) and press the multi selector to the
right.
White bal.
Dir. sunlight
Flash
Cloudy
Shade
Preset
2
High light Measure and press the multi se-
lec tor to the right to set white balance to the
current value for preset white balance and
return to the shooting menu.
Preset
Set
Measure
Use photo
Page 66
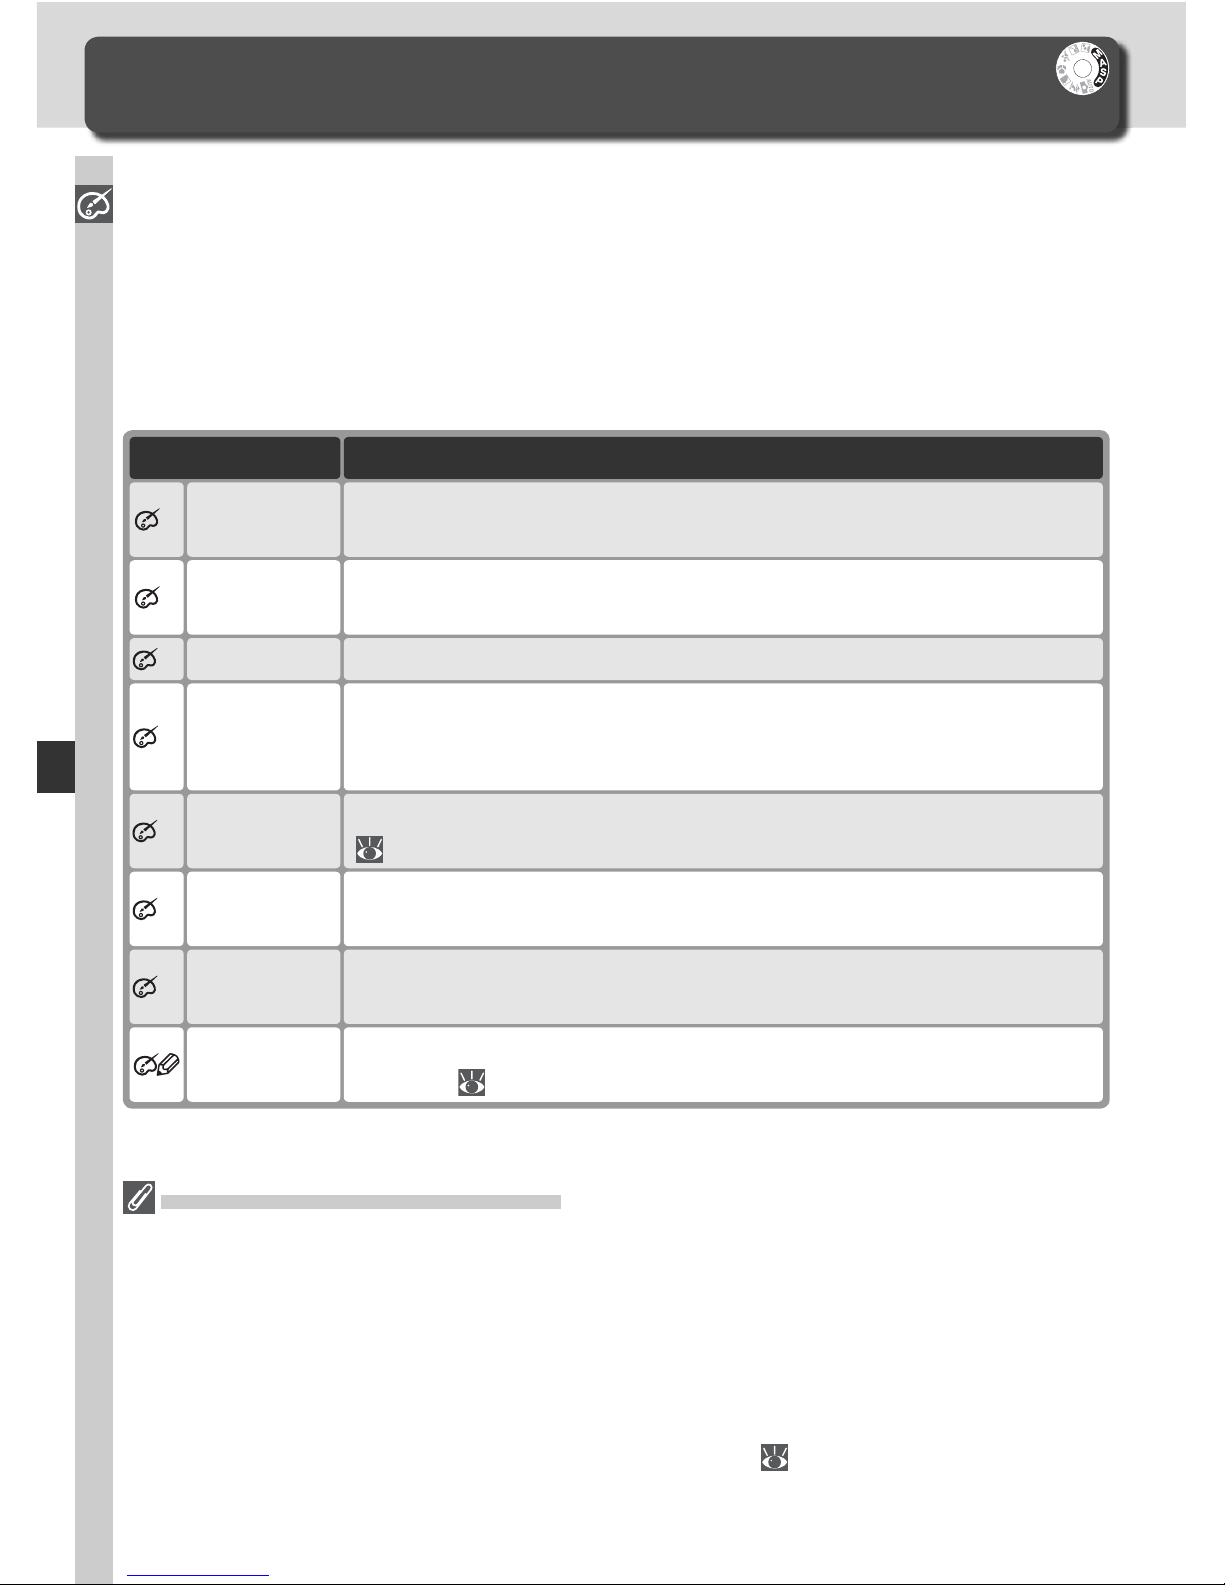
56
Taking Photographs—Optimizing Images
Optimizing Images
Image Enhancement
When a Digital Vari-Program mode is selected, the camera automatically
optimizes outlines, contrast, saturation, and hue according to the type of
scene. In P, S, A, and M modes, image enhancement options can be selected
from Normal, Vivid, Sharp, Soft, Direct Print, Portrait, or Landscape to
optimize photographs according to how the picture will be used or the type
of scene. Sharpening, contrast, color reproduction, saturation, and hue can
also be customized individually to match the user’s creative intent.
Recommended for most situations.
Normal
(default)
N
Enhances saturation, contrast, and sharpness to produce vivid images with vibrant reds, greens, and blues.
Vivid
VI
DescriptionOption
Sharpens outlines.Sharp
SH
Softens outlines. Use to ensure smooth, natural-looking fl esh
tones in portrait subjects or when taking pictures that will be
sharpened in image application.
Soft
SF
Optimizes images for printing “as is” via direct USB connection
( 175). Images will be sharp and clear even when enlarged.
Direct Print
DP
Lowers contrast and softens background details while lending
natural texture and rounded feel to skin of portrait subjects.
Portrait
PO
Enhances saturation and sharpness to produce landscapes with
vibrant greens and blues.
Landscape
LA
Customize sharpness, contrast, color reproduction, saturation,
and hue ( 57).
Custom
At Settings Other than Custom
At settings other than Custom:
• Photographs are optimized for current shooting conditions. Results will vary with ex-
posure and the position of the subject in the frame, even in scenes of the same type.
To take a series of photographs with identical image optimization, choose Custom
and adjust settings individually, being sure not to select Auto for Sharpening or
Tone comp.
• Photographs are recorded in the sRGB color space. When Custom is selected, the
color space can be chosen in the Color mode menu ( 59).
• Use a type G or D lens for best results.
Page 67
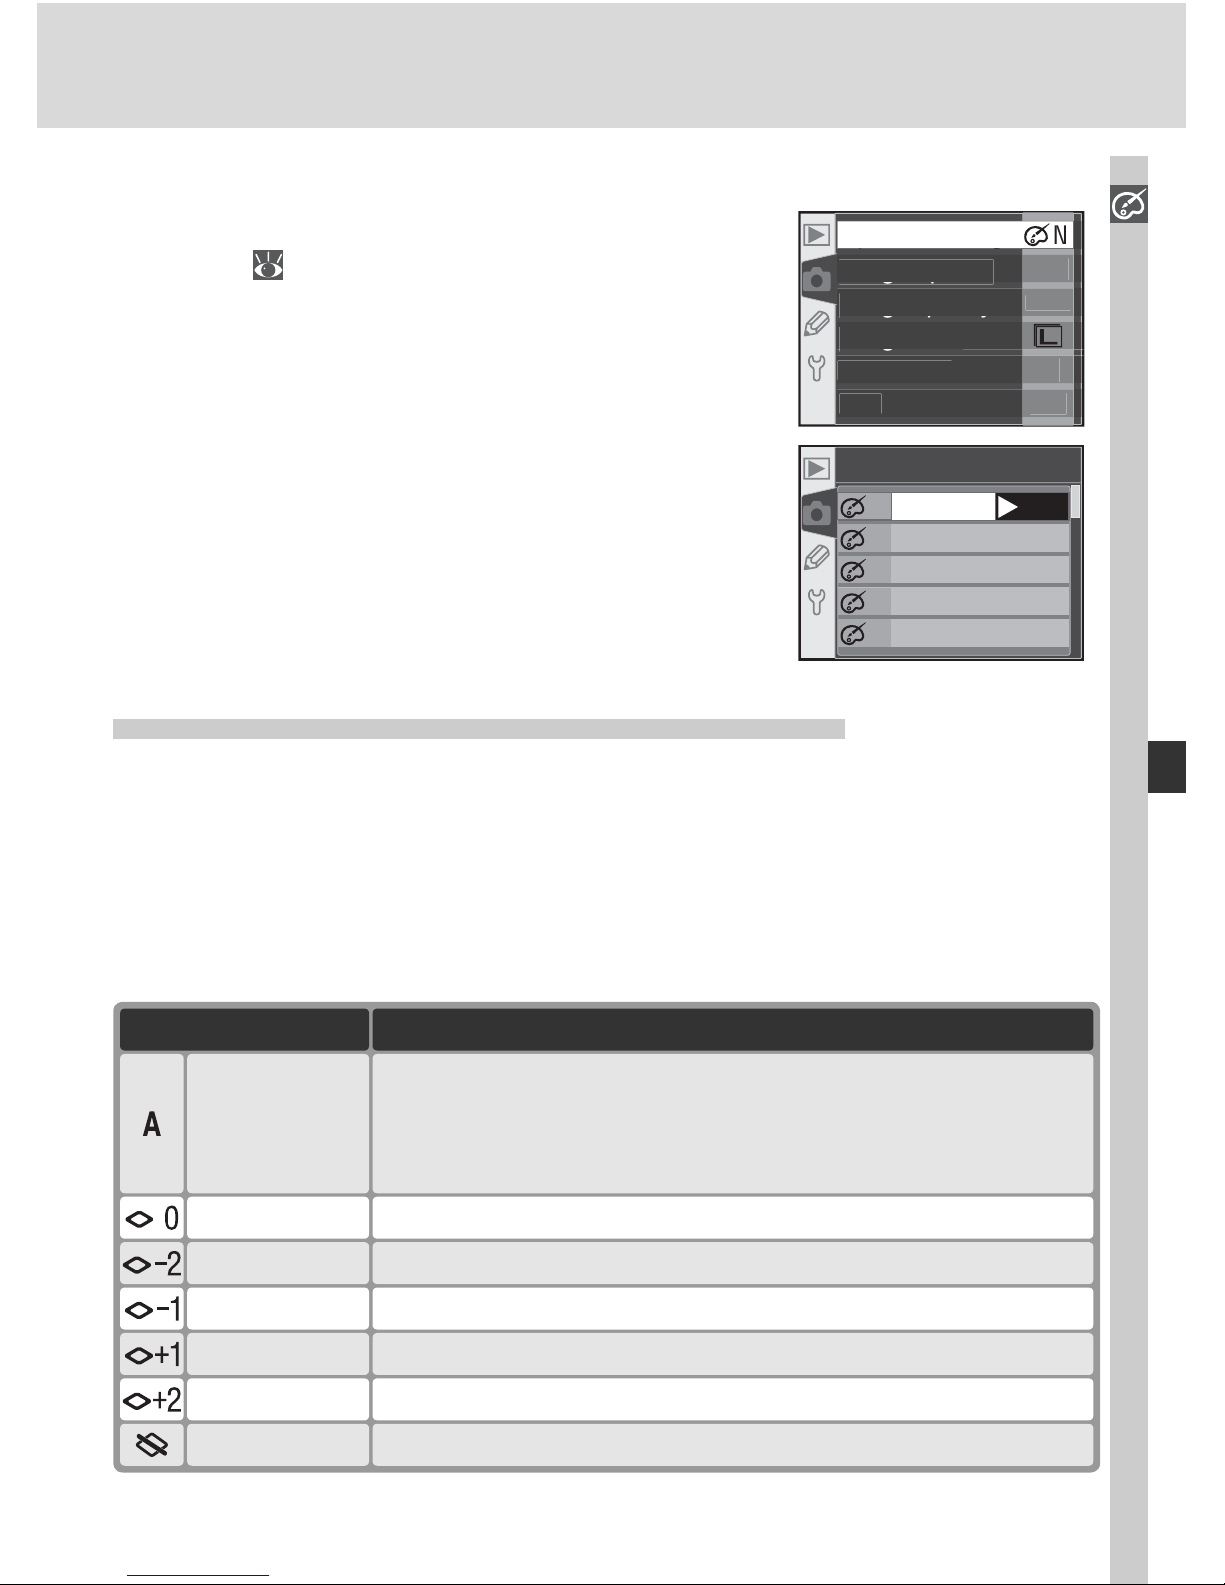
57
Taking Photographs—Optimizing Images
To select an image optimization option:
1
Highlight Optimize image in the shooting
menu (
132) and press the multi selector to
the right.
F
F
2
00
NOR
M
g
Optimize ima
ge
pg
gp
Long exp. N
R
gq y
Image qualit
y
g
Image siz
e
White bal
.
I
SO
2
High light the desired option and press the
multi se lec tor to the right. If Custom is selected, a menu of custom options will be displayed. In all other cases, the shooting menu
will be displayed.
SF
DP
SH
VI
N
Optimize image
OK
Normal
Vivid
Sharp
Soft
Direct Print
Camera automatically adjusts sharpening according to subject. Results vary from shot to shot, even in scenes of same
type; choose different setting to take multiple shots with same
sharpening. For best results, use type G or D lens.
All im ag es are sharpened by same standard amount.
Description
Images are sharpened less than standard amount.
Images are sharpened slightly less than standard amount.
Images are sharpened slightly more than standard amount.
Images are sharpened more than standard amount.
Images are not sharpened.None
High
Medium high
Medium low
Low
Option
Normal
Auto
(default)
Customizing Image Enhancement Options
Select Custom to make separate adjustments to sharpening, contrast, color
reproduction, saturation, and hue.
Making Edges More Distinct: Sharpening
During shooting, the camera processes photographs to emphasize the borders between light and dark areas, mak ing pic tures appear sharper. Sharpening can be customized using the Sharpening menu.
Page 68
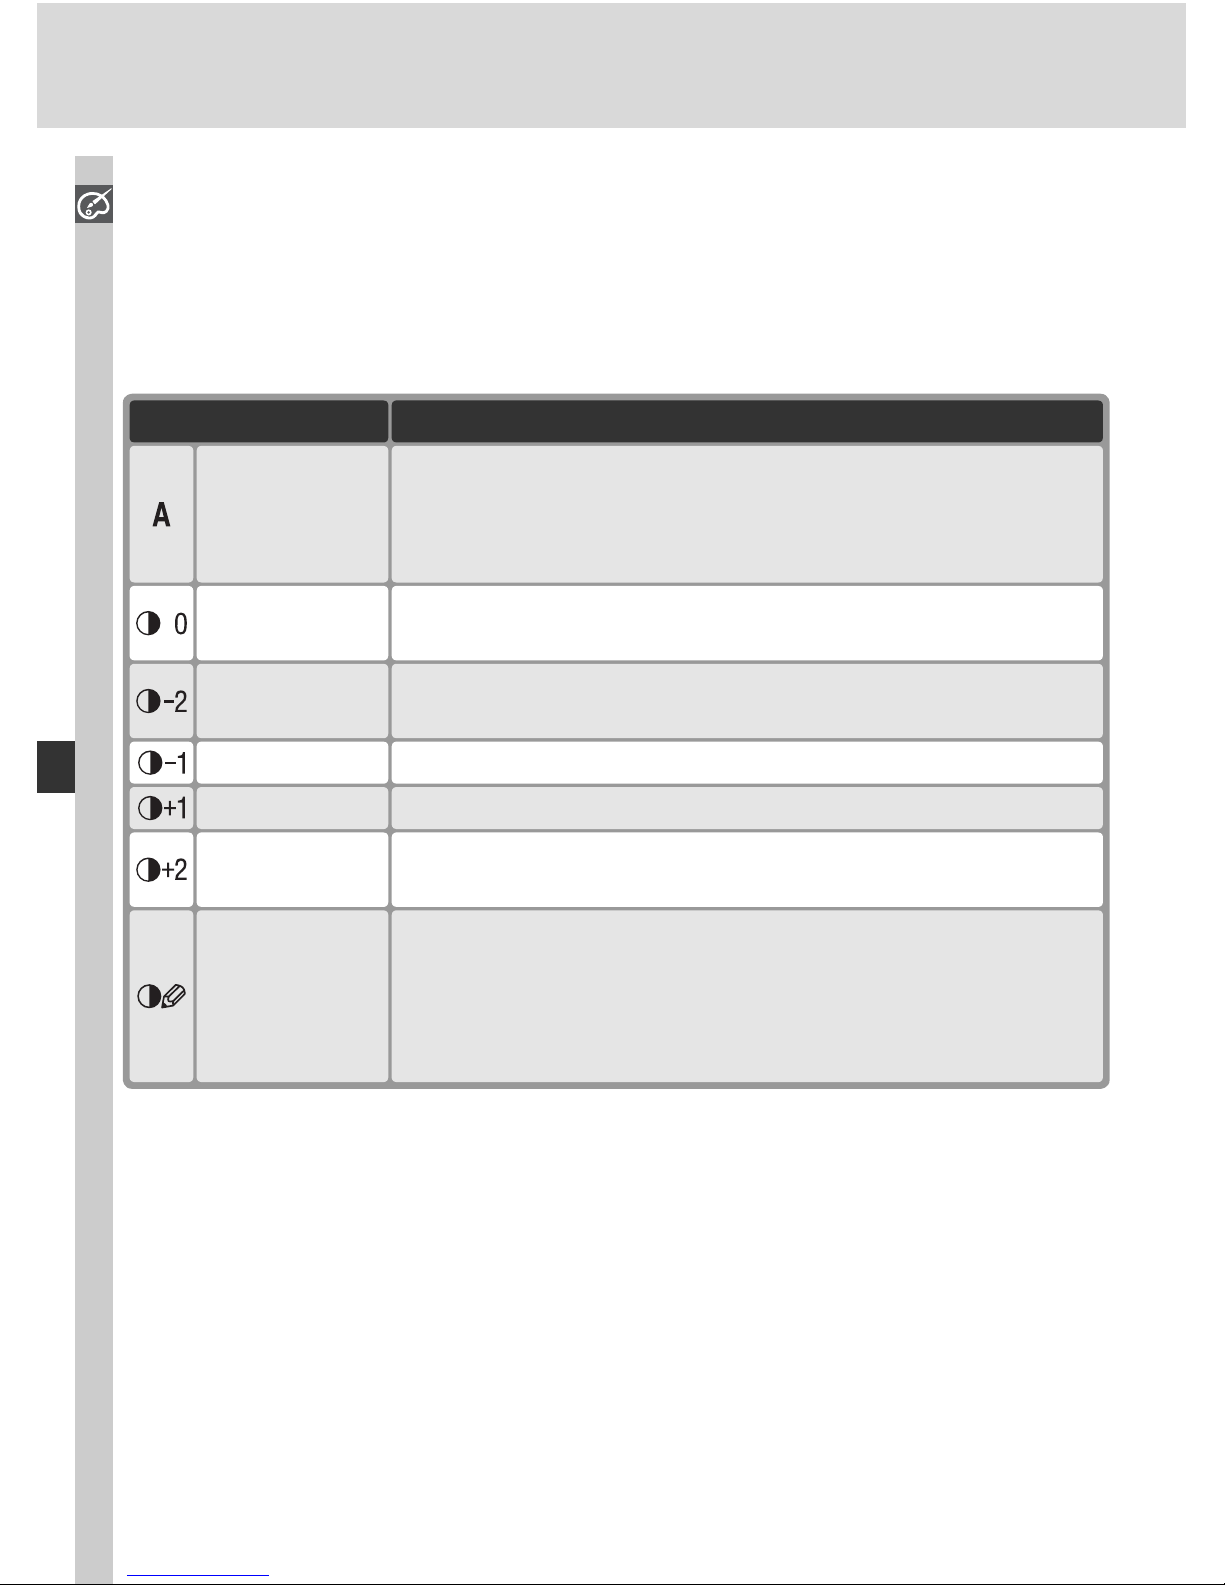
58
Taking Photographs—Optimizing Images
Adjusting Contrast: Tone Comp.
As photographs are saved to the memory card, they are processed to adjust
the distribution of tones in the image, en hanc ing con trast. Tone com pen sa tion is performed by means of tone curves that defi ne the relationship
be tween the dis tri bu tion of tones in the original image and the compensated
result. The Tone comp. menu controls the type of curve used.
Camera automatically optimizes con trast by selecting ap pro pri ate curve. Curve varies from shot to shot, even in scenes
of same type; to take multiple shots with same curve, choose
different setting. For best results, use type G or D lens.
Auto
(default)
Camera uses same standard curve for all im ag es. Suit ed to
most scenes, whether dark or bright.
Normal
DescriptionOption
Produces “softer” images. Pre vents highlights on portrait
subjects from being “washed out” in direct sunlight.
Low contrast
Slightly less contrast than Normal.Medium low
Custom curve can be created in Nikon Capture 4 version 4.1
or later (available separately)
and downloaded to camera.
Choose Custom to se lect this user-defi ned curve. If no
custom curve has been created, this op tion is equiv a lent to
Nor mal.
Custom
Preserves de tail in misty land scapes and other low-contrast
subjects.
High contrast
Slightly more contrast than Normal.Medium high
Page 69
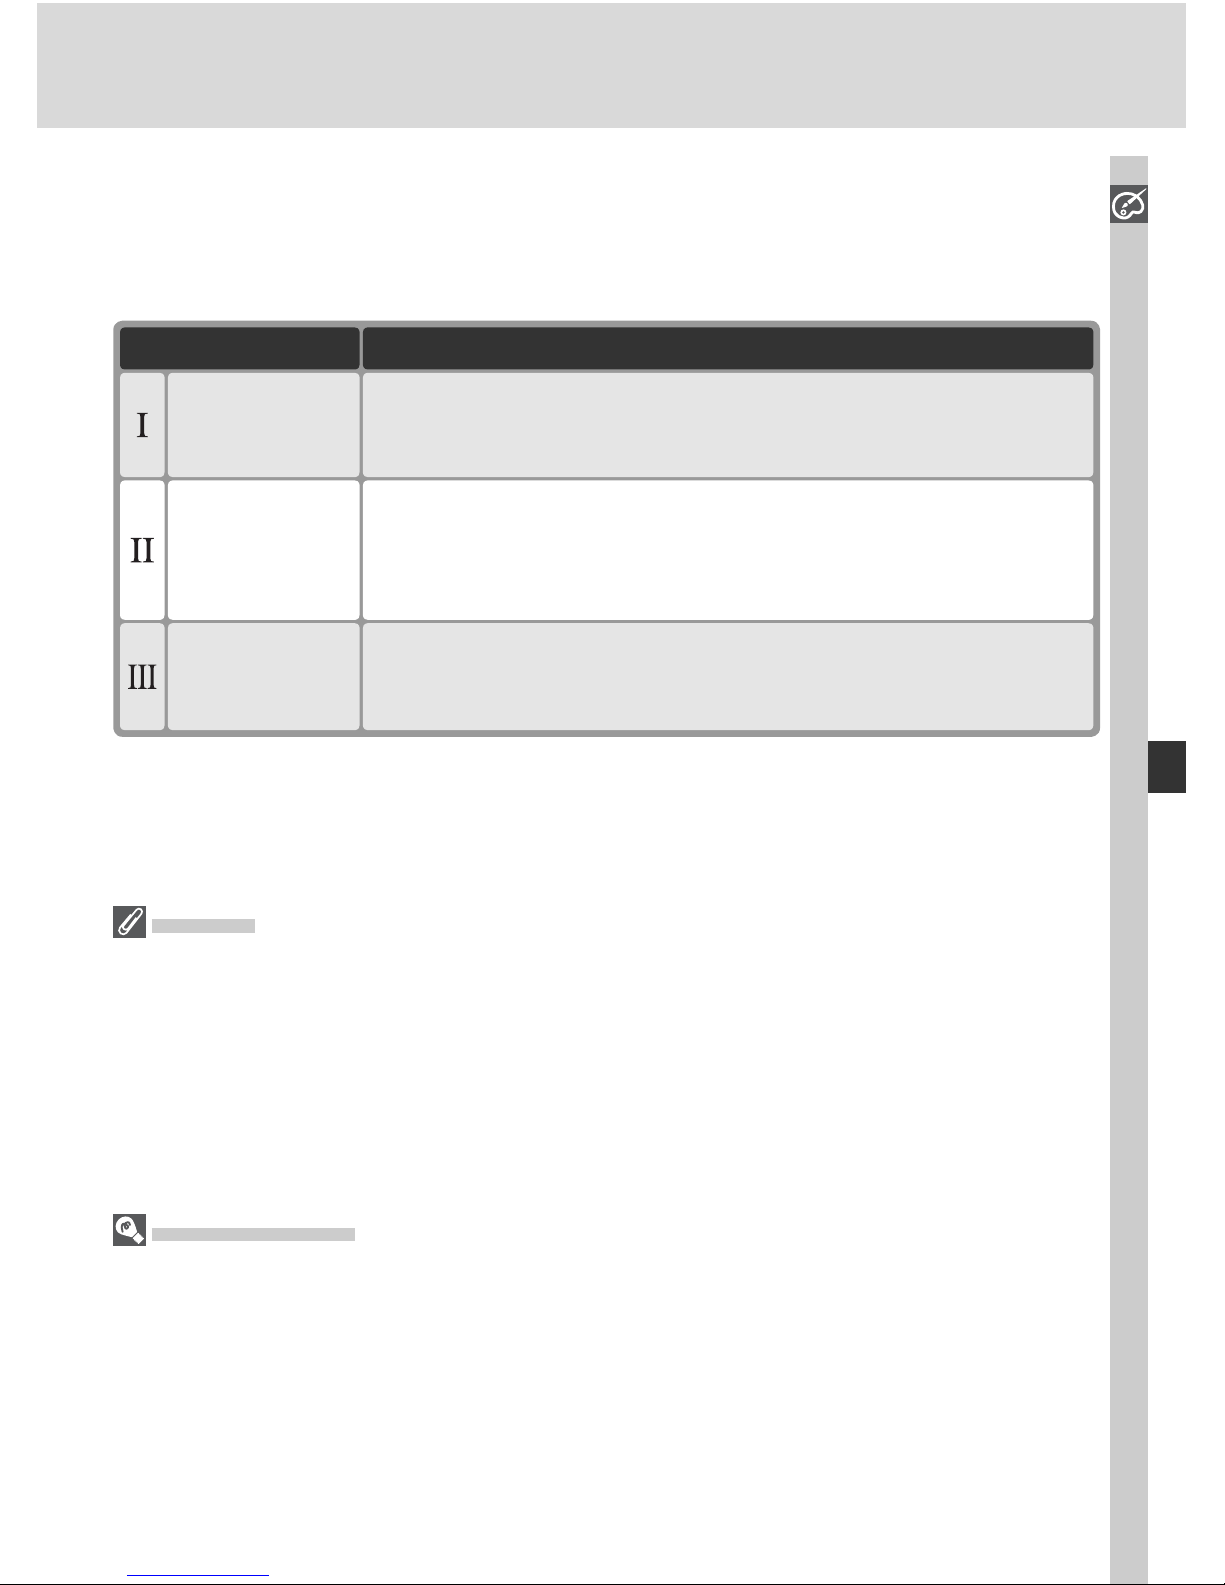
59
Taking Photographs—Optimizing Images
Suiting Colors to a Workfl ow: Color Mode
The D70 offers a choice of color modes, which determine the gamut of colors available for color reproduction. Choose a color mode according to how
pho to graphs will be pro cessed on leaving the cam era.
Choose for portrait shots that will be print ed or used “as is,”
with no fur ther modifi cation. Pho to graphs are adapted to
sRGB col or space.
Ia (sRGB)
(default)
Photographs taken at this setting are adapted to Adobe RGB
color space. This color space is capable of expressing wider
gamut of colors than sRGB, making it preferred choice for images that will be extensively processed or retouched.
II (Adobe RGB)
DescriptionOption
Choose for nature or landscape shots that will be print ed or
used “as is,” with no fur ther modifi cation. Pho to graphs are
adapt ed to sRGB col or space.
IIIa (sRGB)
Mode II
When opening photographs taken in Mode II in Adobe Photoshop or other applications that support color management, select the Adobe RGB color space. Although
the system for recording Mode II images is based on Exif and DCF, it is not in strict
conformity with these standards. Mode Ia or Mode IIIa is rec om mend ed when taking
pho to graphs that will be printed using ExifPrint, the di rect print ing op tion on some
house hold print ers, or kiosk print ing or other com mer cial print ser vic es. For information on whether your printer or print ser vice sup ports ExifPrint, refer to the documentation provided with your print er or speak to your photofi nisher.
Nikon Software
For best results when viewing photographs on a computer, use the software provided
with the camera or Nikon Capture 4 version 4.1 or later (available separately), which
make an excellent addition to any imaging workfl ow. Nikon Capture is unique in its
ability to directly edit NEF fi les without affecting the image quality of the original, and
belongs at the fi rst stage of any production workfl ow involving image editing software. When photographs created with the D70 are opened in the software provided
with the camera or Nikon Cap ture 4 version 4.1 or later, the ap pro pri ate color space
will be selected automatically.
Page 70
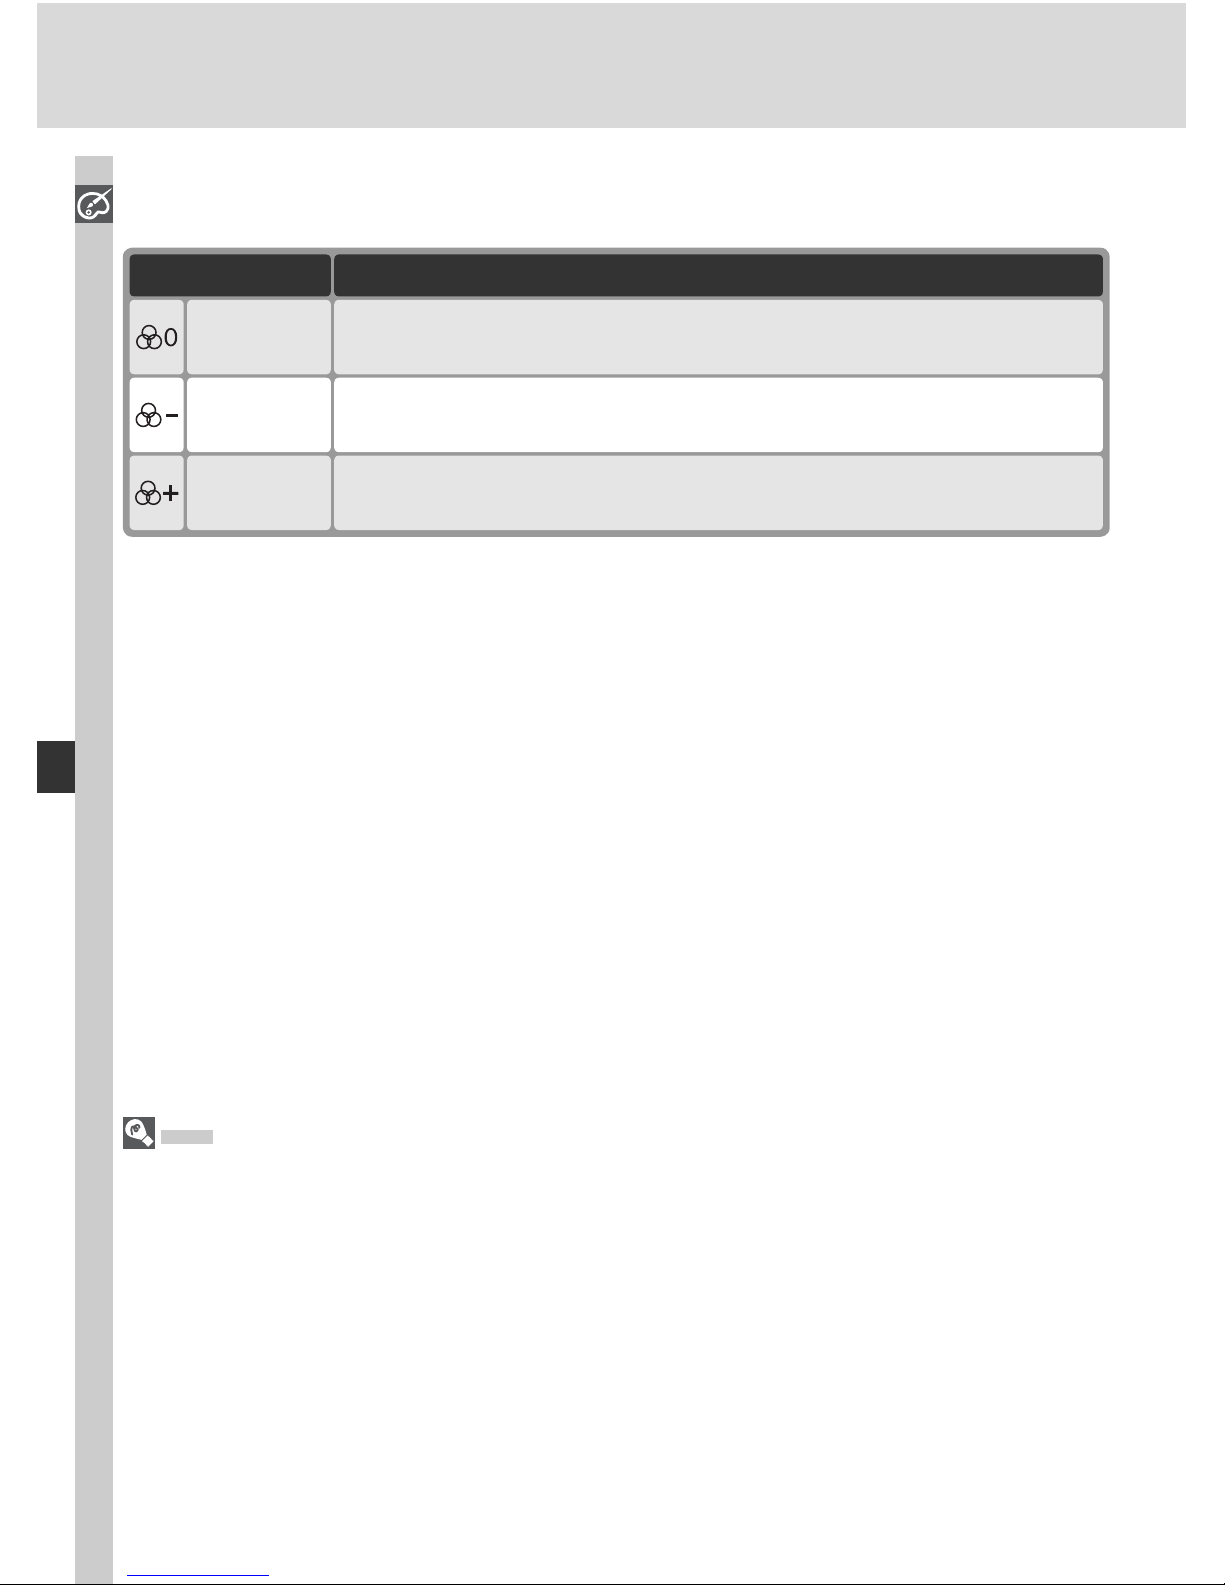
60
Taking Photographs—Optimizing Images
Controlling Color: Hue Adjustment
Hue can be adjusted in the range of about –9 ° to +9 ° in in cre ments of 3 °.
If red is taken as the start ing color, raising hue above 0 ° (the de fault set ting)
would introduce a yel low cast, mak ing col ors that would be red at a setting
of 0 ° ap pear in creas ing ly or ange. Low er ing hue be low 0 ° would in tro duce
a blue cast, mak ing col ors that would be red at a setting of 0 ° appear in creas ing ly pur ple.
Hue
The RGB color model used in digital photographs re pro duc es colors using dif fer ing
amounts of red, green, and blue light. By mixing two colors of light, a variety of
dif fer ent colors can be pro duced. For example, red combined with a small amount
of green light produces orange. If red and green are mixed in equal amounts, yellow re sults, while a smaller amount of red produces a yel low green. Mixing dif fer ent
amounts of red and blue light pro duc es col ors rang ing from a red dish purple through
pur ple to navy, while mixing different amounts of green and blue light produces col ors
rang ing from em er ald to turquoise. (Add ing a third color of light results in lighter
hues; if all three are mixed in equal amounts, the results range from white through
gray.) When this pro gres sion of hues is ar ranged in a cir cle, the re sult is known as a
color wheel.
Controlling Vividness: Saturation
Saturation controls the vividness of colors.
Normal vividness. Recommended for most situations.
Normal
(default)
Reduced vividness. Use when taking pictures that will later be
retouched by computer.
Moderate
DescriptionOption
Increased vividness. Use for vivid, photoprint effect when taking
pictures that will be printed “as is,” without further modifi cation.
Enhanced
Page 71
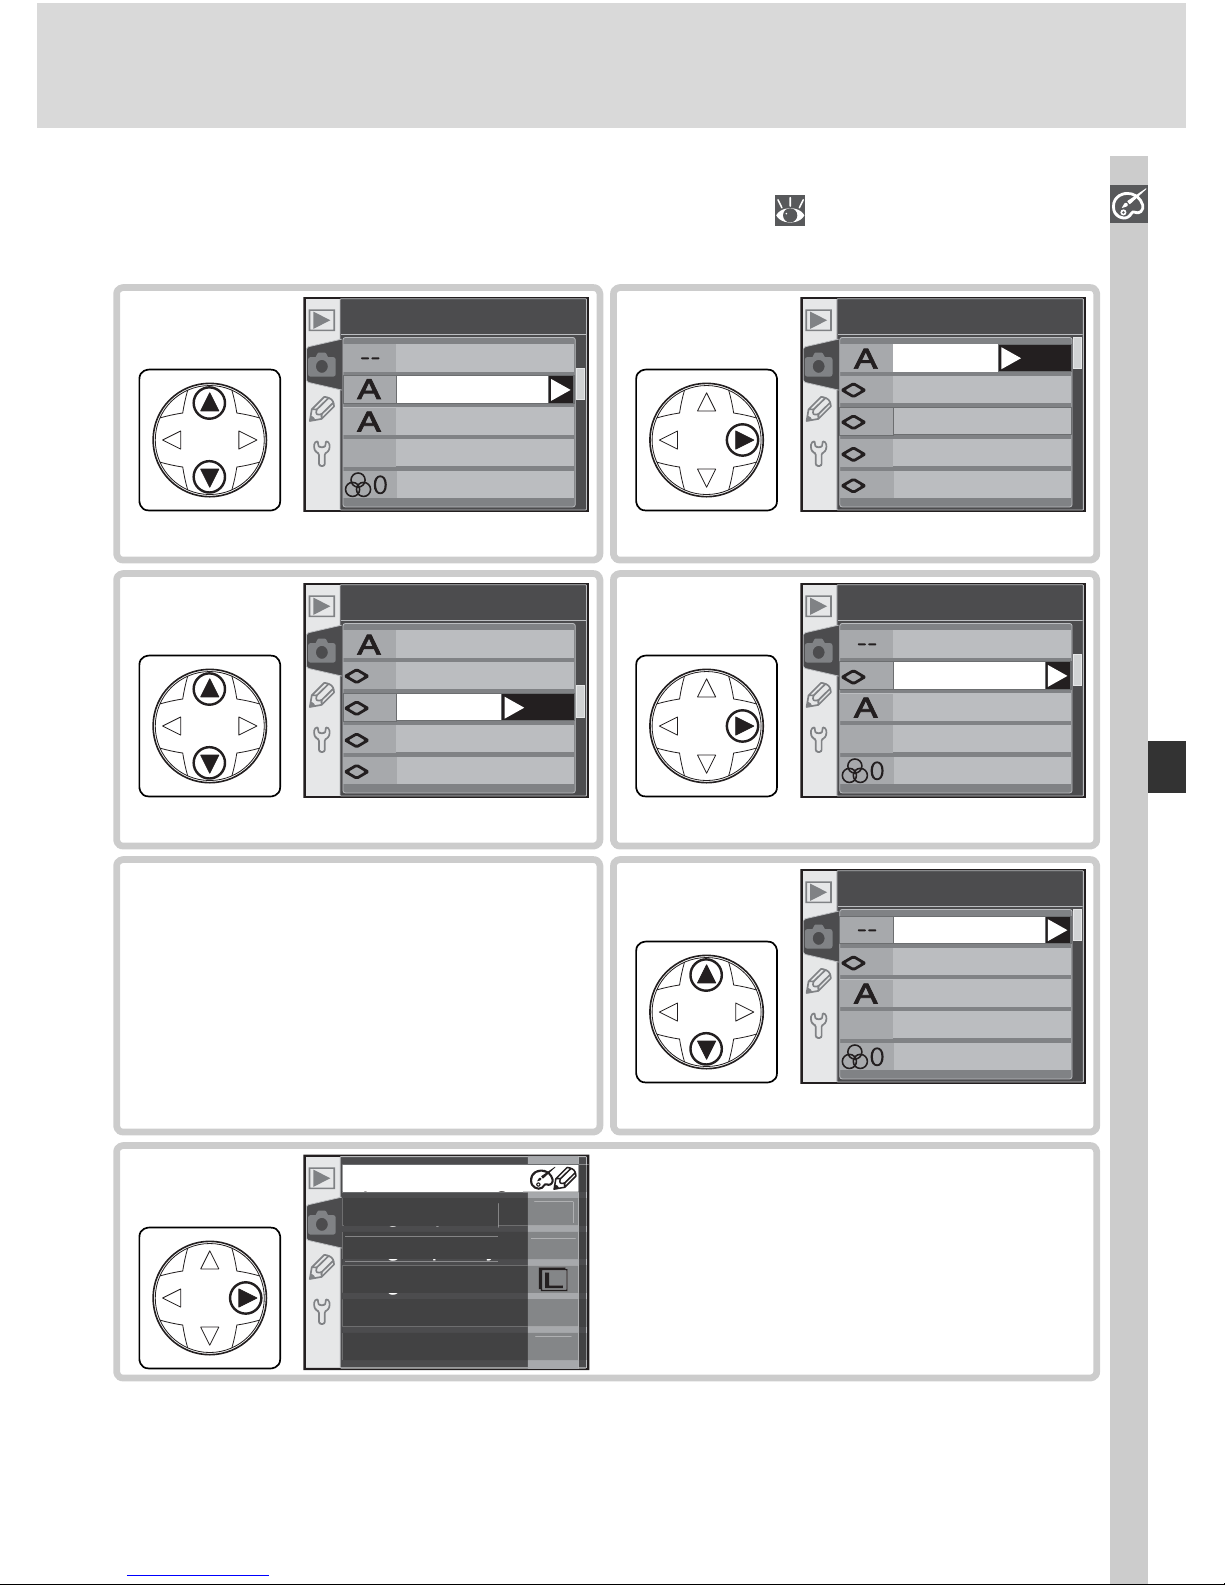
61
Taking Photographs—Optimizing Images
Highlight option.
+
1
-
1
-
2
0
Sharpening
Auto
Normal
Low
Medium low
Medium high
OK
3
Make selection.
I
-
2
Custom
Done
Sharpening
To ne comp.
Color mode
Saturation
4
Highlight optimization option.
I
Custom
Done
Sharpening
To ne comp.
Color mode
Saturation
1
Display sub-menu.
+
1
-
1
-
2
0
Sharpening
Auto
Normal
Low
Medium low
Medium high
OK
2
Choosing Custom Image Optimization Options
Choosing Custom in the Optimize image menu ( 57) displays the menu
shown in Step 1.
Repeat steps 1–4 to adjust
other options.
5
Highlight Done.
I
-
2
Custom
Done
Sharpening
To ne comp.
Color mode
Saturation
6
Return to shooting menu.
F
F
2
00
NOR
M
g
Optimize ima
ge
pg
gp
Long exp. N
R
gq y
Image qualit
y
g
Image siz
e
White bal
.
I
SO
7
Page 72
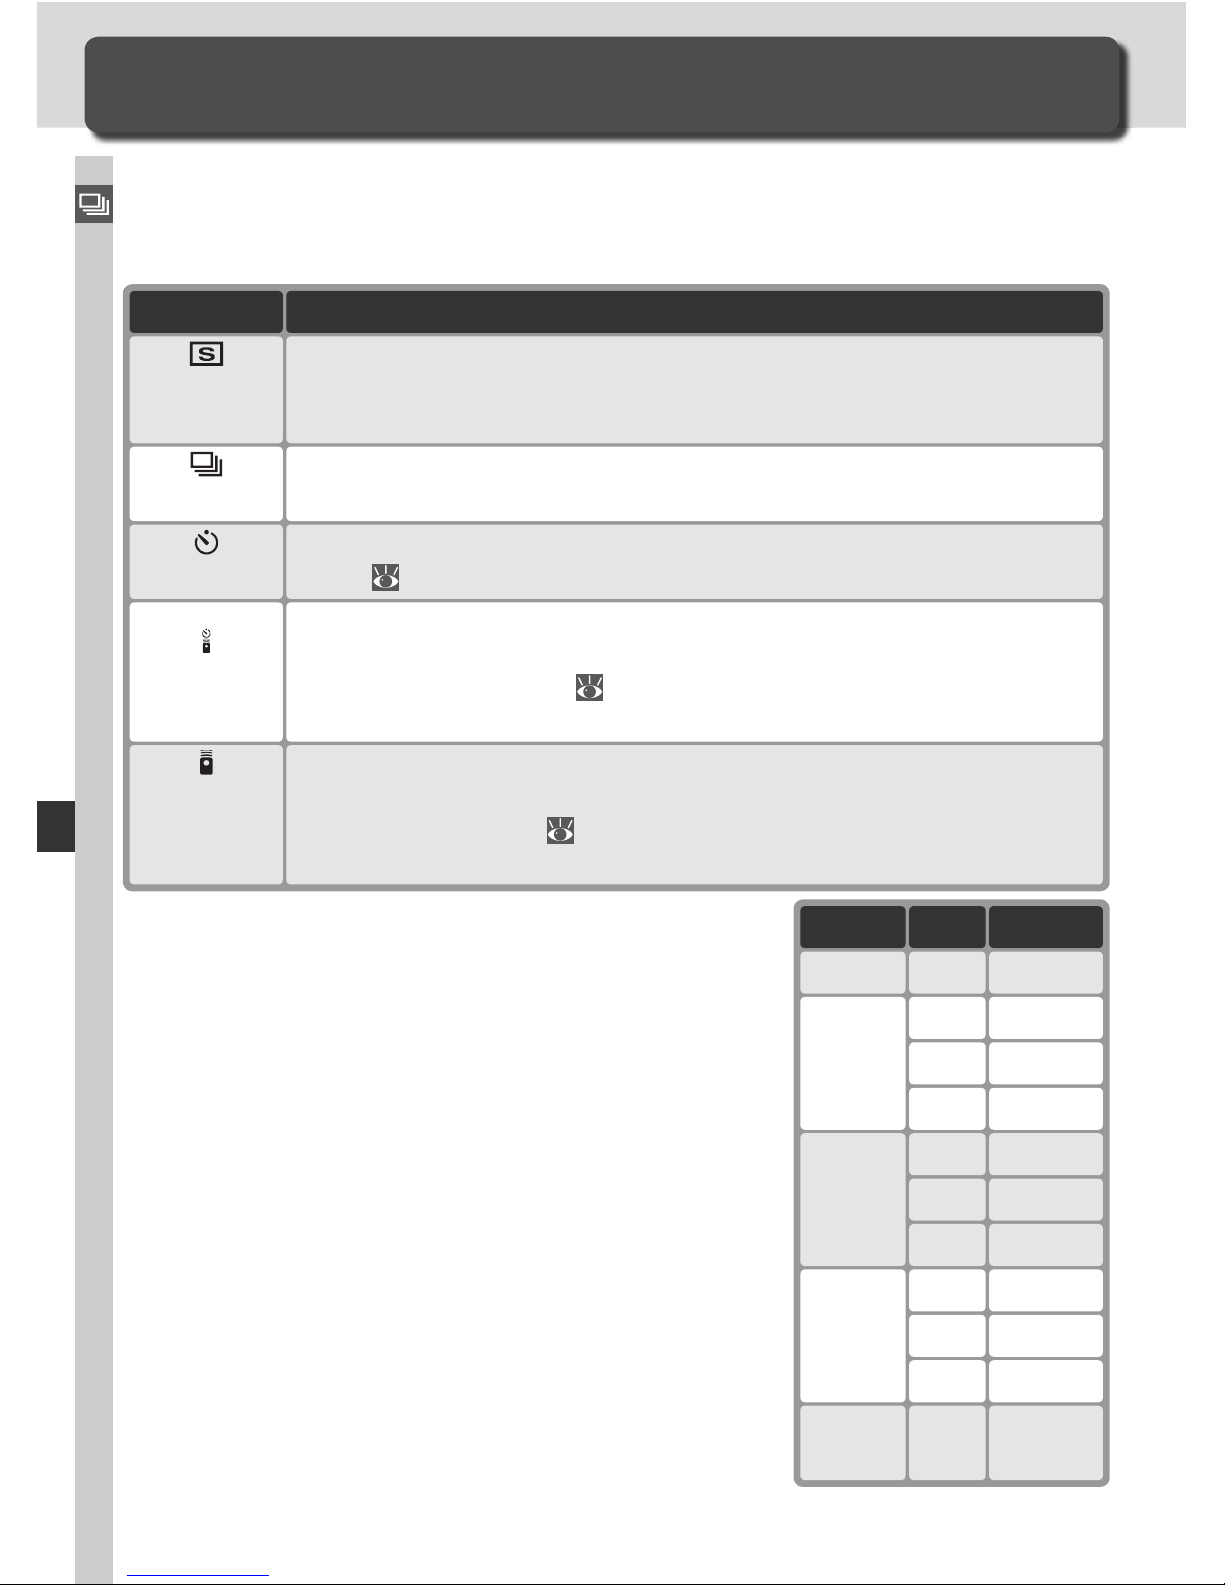
62
Taking Photographs—Choosing a Shooting Mode
Choosing a Shooting Mode
Single Frame, Continuous, Self-Timer, or Remote Control
Shooting mode determines how the camera takes pho to graphs: one at a
time, in a continuous sequence, with a timed shutter-release delay, or using
a remote control.
Camera takes one photograph each time shutter release button is
pressed. Access lamp will light while photo is recorded; next shot can
be taken immediately if enough space remains in memory buffer.
Single
frame
DescriptionMode
Shutter release controlled using optional ML-L3 remote. Camera
focuses when shutter-release button on ML-L3 is pressed; shutter is
released after 2 s delay ( 107). Gives operator time to pose when
taking self-portrait using remote control.
Delayed
remote
Shutter release controlled using optional ML-L3 remote. When shutter-release button on ML-L3 is pressed, camera releases shutter immediately after focusing ( 107). Ensures quick shutter response; can be
used to reduce blurring caused by camera shake.
Quick-
response
remote
Camera records photographs at up to about three frames per second*
while shut ter-re lease but ton is held down.Continuous
Use self-timer for self-portraits or to reduce blurring caused by camera
shake ( 105).Self-timer
*Average frame rate in mode M with manual focus,
shutter speed of ½
50 s or faster, and memory re main ing
in memory buffer. Number of pictures that can be
stored in buffer depends on options selected for image quality and size (see table at right). Additional
photographs can be taken as soon as enough memory
is available in buffer.
Note that all pictures taken in continuous mode are
recorded at the orientation for the fi rst picture in each
series, even if the camera orientation is changed during shooting. For example, if the fi rst picture is taken
with the camera in horizontal orientation, all pictures
in the series will be recorded in “wide” (landscape)
orientation, even if the camera is rotated to vertical
orientation during shooting.
Quality Size Capacity
RAW 4—
FINE
9L
7M
19S
NORM
12L
7M
27S
BASIC
19L
7M
49S
RAW
BASIC
4L
Page 73
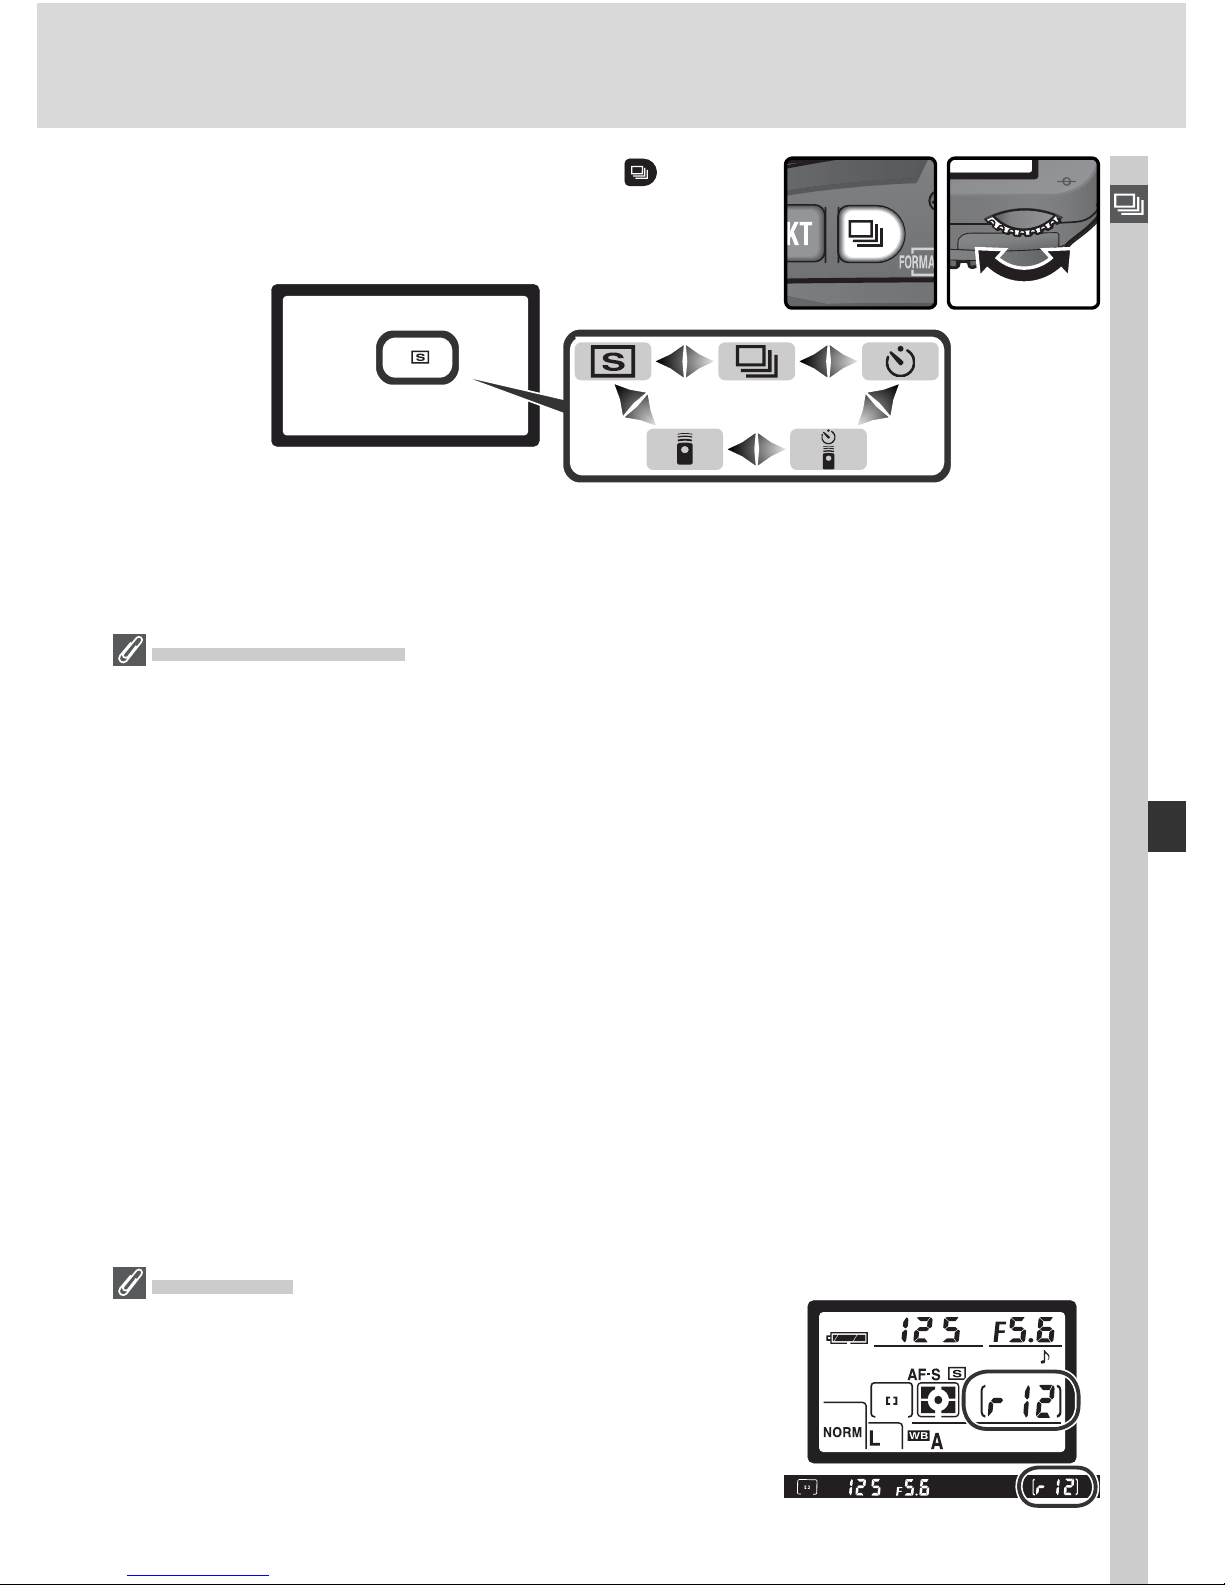
63
Taking Photographs—Choosing a Shooting Mode
The Memory Buffer
The camera is equipped with a memory buffer for tem po rary storage, allowing shooting to continue while photographs are being saved to the memory card. When the
buff er is full, the shut ter is disabled until enough data have been trans ferred to the
mem o ry card to make room for another photograph. In con tin u ous mode, shooting
will con tin ue as long as the shutter-release button is held down, al though the frame
rate will drop once the buffer has fi lled.
While photographs are being recorded to the memory card, the access lamp next to
the memory card slot will light. Depending on the number of the images in the buff er, recording may take from a few seconds to a few minutes. Do not re move the
mem o ry card or re move or dis con nect the power source until the access lamp
has gone out. If the camera is switched off while data remain in the buffer, the power
will not turn off until all images in the buffer have been recorded to the memory card.
If the battery is exhausted while images remain in the buffer, the shutter release will be
disabled and all images will be transferred to the memory card.
The approximate time required to write the entire buffer to a Lexar Media 40 × WA USB
card is given below. Write times may drop when a microdrive card is used.
• NEF (RAW): 6 s (4 frames) • JPEG Normal (size L): 9 s (12 frames)
Buffer Size
The number of im ag es that can be stored in the memory
buffer at current set tings is shown in the ex po sure-count
dis plays in the viewfi nder and con trol pan el while the
shutter-release button is pressed. Note that the actual
number of images that can be stored in the memory
buffer may vary with the type of subject.
To choose a shooting mode, press the button
and rotate the main command dial. Shooting
mode is displayed in the control panel:
Page 74
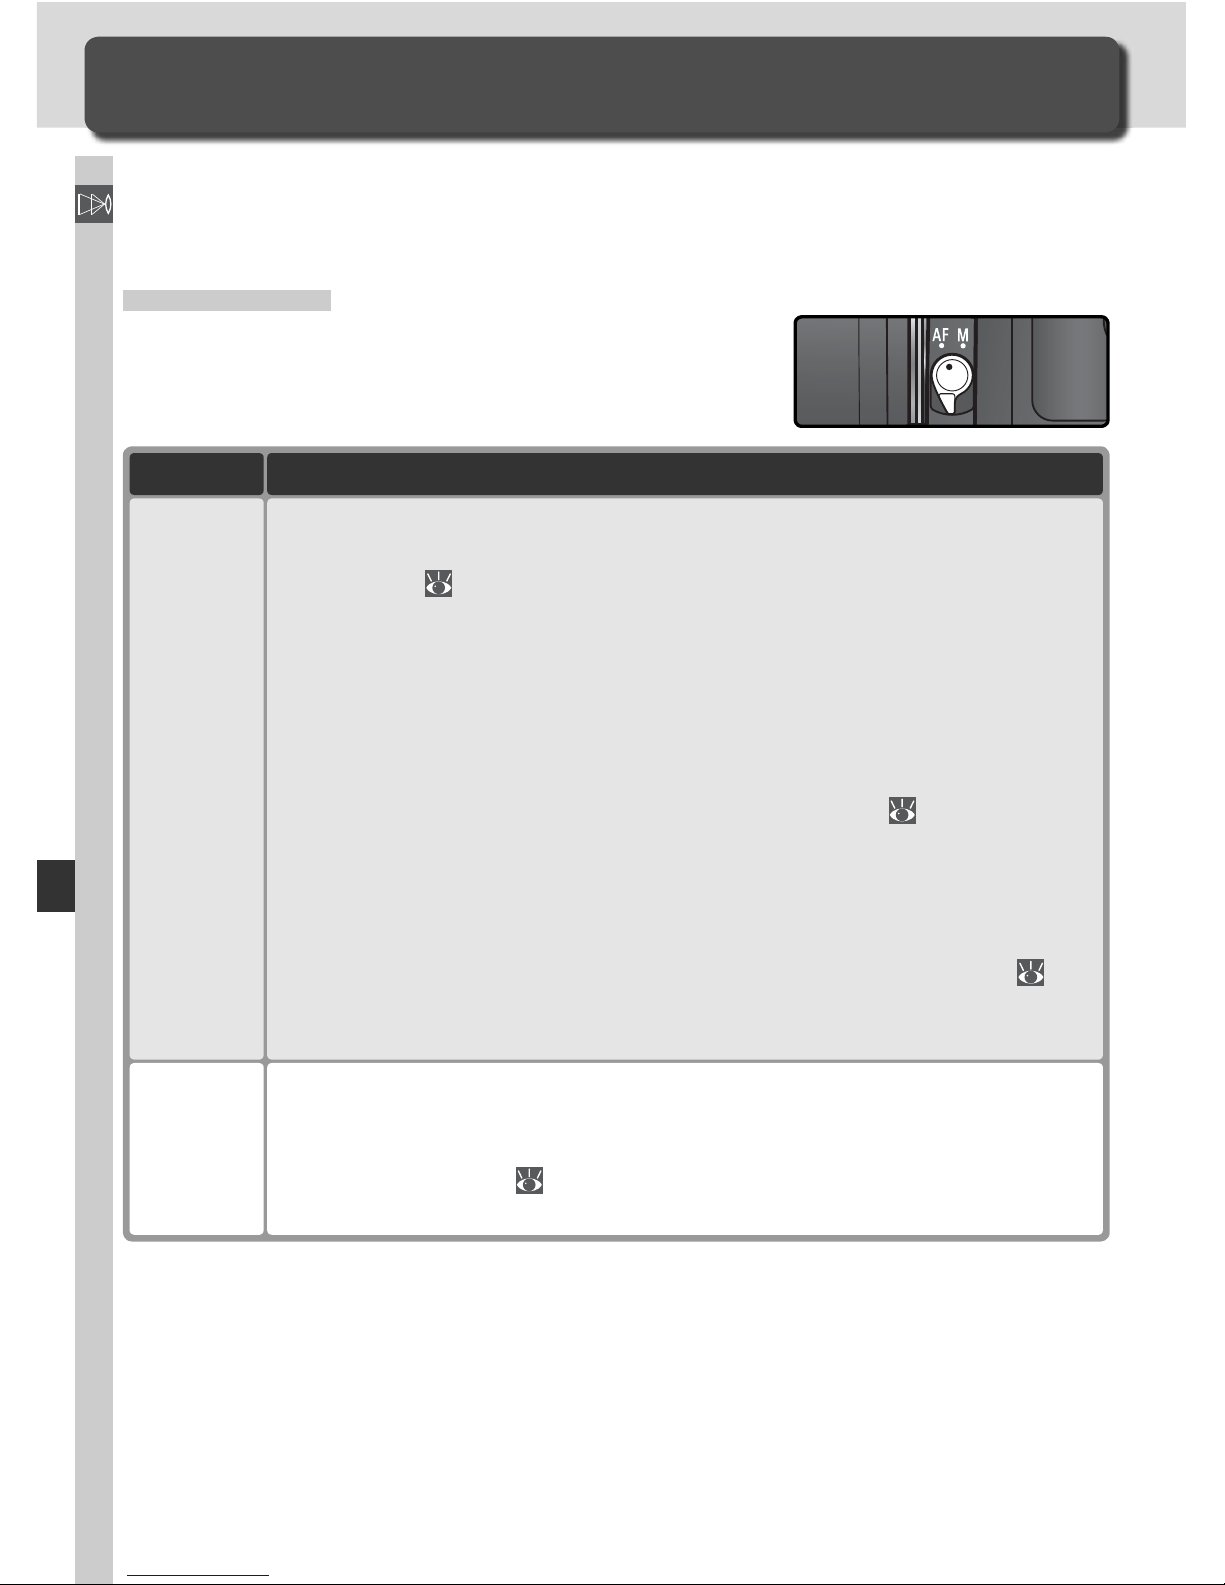
64
Taking Photographs—Focus
Focus
Controlling How the Camera Focuses
This section describes the options that control how your camera focuses:
fo cus mode, focus-area selection, and AF-area mode.
Focus Mode
Focus mode is controlled by the focus mode se lec tor on the front of the camera. Two modes are
available:
VIDEO
OUT
Camera focuses automatically when shutter-release button is pressed
half way. Operation depends on option selected for Custom Setting 2
(Autofocus; 139):
• AF-S (single-servo autofocus): When camera focuses, beep sounds
and in-focus indicator (●) appears in view fi nd er. Focus re mains locked
while shutter-release button is pressed halfway (focus lock). Shut ter
can only be re leased when in-fo cus in di ca tor is dis played (focus pri-
or i ty). If sub ject was mov ing when shutter-release button was pressed
half way, cam era will track sub ject until fo cus ing is complete and the
shut ter can be re leased (pre dic tive fo cus tracking; 65). If subject
stops mov ing before shutter is released, in-focus in di ca tor will ap pear
in viewfi nder and focus will lock at this dis tance.
• AF-C (continuous-servo autofocus): Camera focuses continuously
while shutter-release but ton is pressed halfway. If subject moves, focus will be adjusted to compensate (predictive fo cus tracking; 65).
Pho to graphs can be taken whether or not camera is in focus (release
priority).
AF
Autofocus
DescriptionOption
Camera does not focus automatically; focus must be adjusted manually
using the lens focusing ring. If max i mum aperture of lens is f/5.6 or
faster, view fi nd er fo cus in di ca tor can be used to con fi rm focus (elec-
tronic range fi nd ing; 74), but photographs can be taken at any time,
wheth er or not camera is in focus.
M
Man u al
Choosing single-servo AF ensures a sharp, focused image. Continuous-servo
AF may be a better choice with erratically-moving subjects. Man u al fo cus is
rec om mend ed when the cam era is unable to focus using autofocus.
Page 75
65
Taking Photographs—Focus
Predictive Focus Tracking
If the camera autofocus system detects that the subject is moving when the shutterrelease button is pressed halfway, it will au to mat i cal ly ini tiate pre dic tive focus track ing.
If the sub ject is mov ing toward or away from the cam era, the camera will track focus
while at tempt ing to predict where the subject will be when the shutter is re leased. In
single-servo autofocus, the camera will initiate pre dic tive focus tracking if the sub ject
was moving when the shut ter-release button was pressed halfway. Fo cus will lock
when the subject stops moving. In con tin u ous-servo AF, the camera will also initiate
predictive focus tracking if the subject starts mov ing after the shutter-re lease button is
pressed halfway. Focus will not lock when the sub ject stops moving.
Predictive focus tracking is not available in manual focus mode.
Page 76
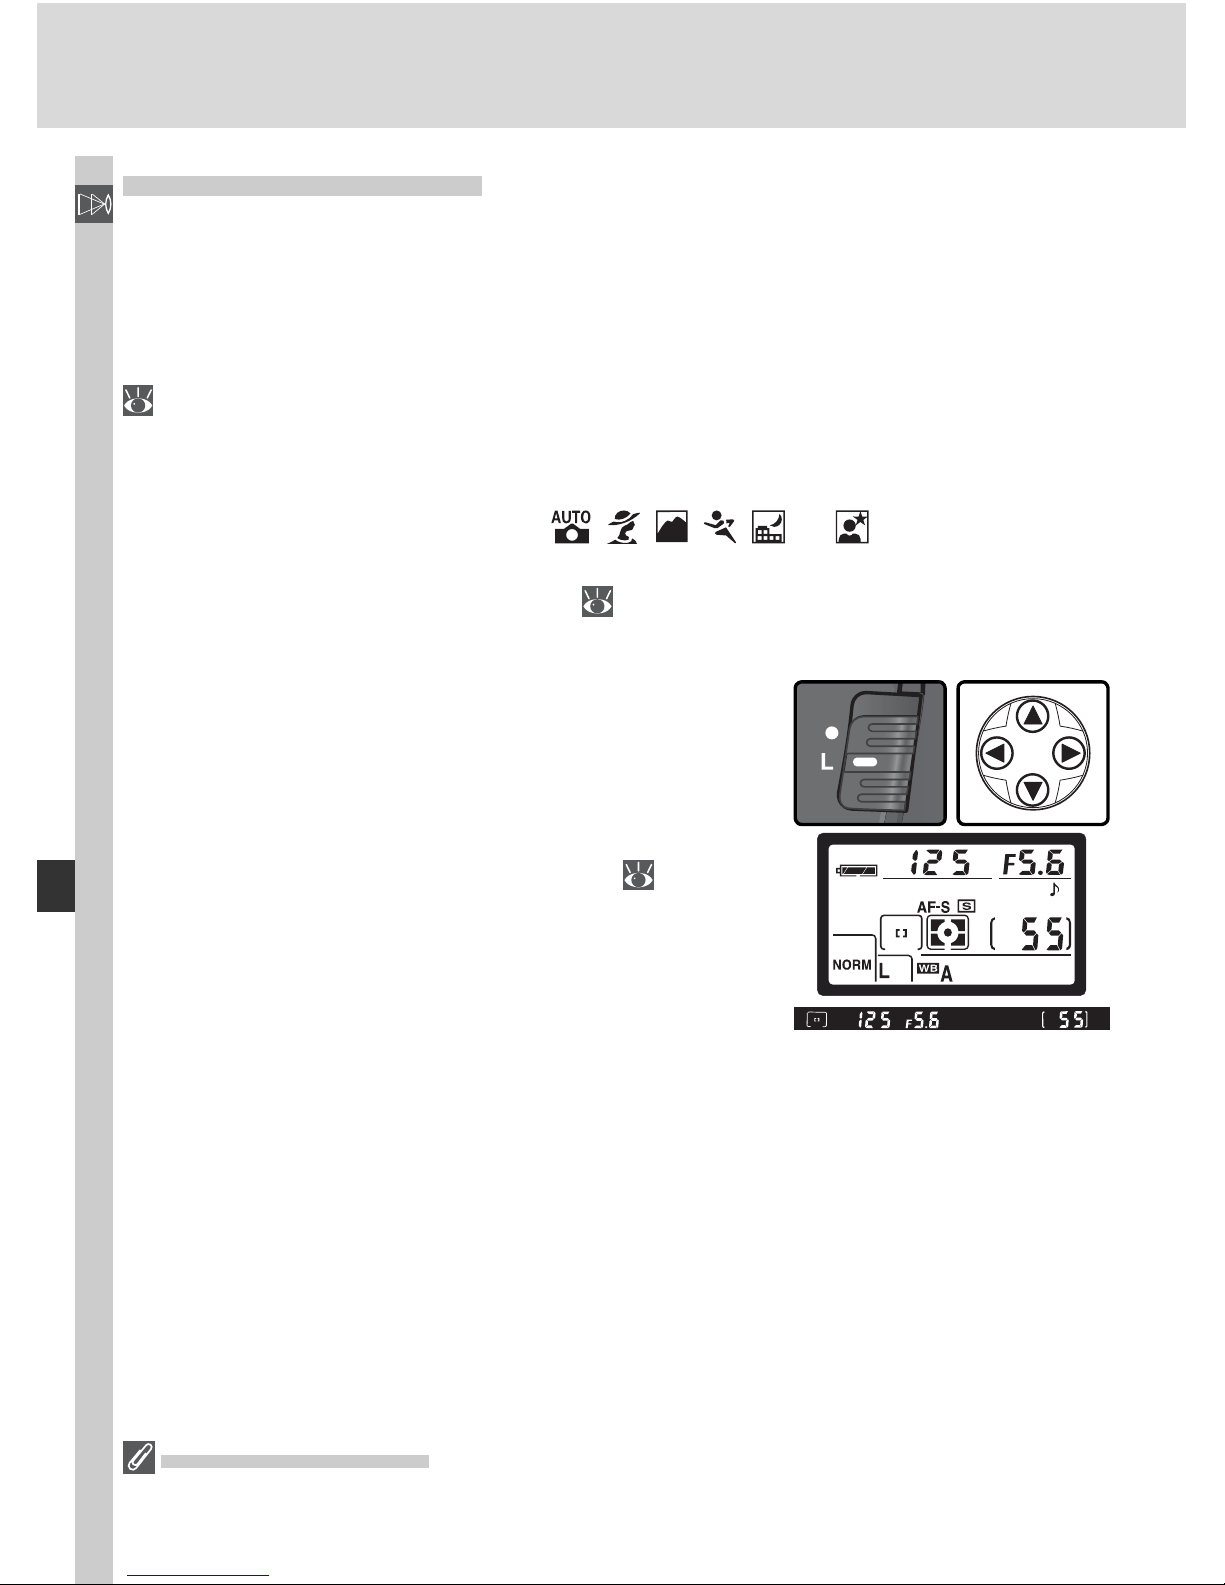
66
Taking Photographs—Focus
Focus Area Selection
The D70 offers a choice of fi ve focus areas that together cover a wide area of
the frame. The focus area can be selected manually, allowing photographs
to be com posed with the main sub ject positioned almost anywhere in the
frame, or automatically to ensure that the subject closest to the camera is
always in focus regardless of where it is the frame (closest-subject priority;
140).
Manual focus area selection is not available when closest-subject priority is
selected in autofocus mode. Closest-subject priority is automatically selected
when the mode dial is rotated to , , , , , or ; to enable manual
focus area selection in these modes, select Single area or Dynamic area for
Custom Setting 3 (AF-area mode; 140).
Manual Focus Area Selection
To select the focus area, slide the focus selector
lock to ●. The multi selector can then be used
to select the focus area. The se lect ed focus area
will be displayed in the viewfi nder, highlighted
in red if necessary to establish contrast with the
background (“Vari-Brite” focus areas; 8). The
selected focus area is also shown in the control
panel.
The focus selector lock can be set to L (lock) following selection to prevent
the se lect ed fo cus area from changing when the multi se lec tor is pressed.
Focus Area Selection
The focus area can not be changed during playback or while menus are displayed.
Page 77
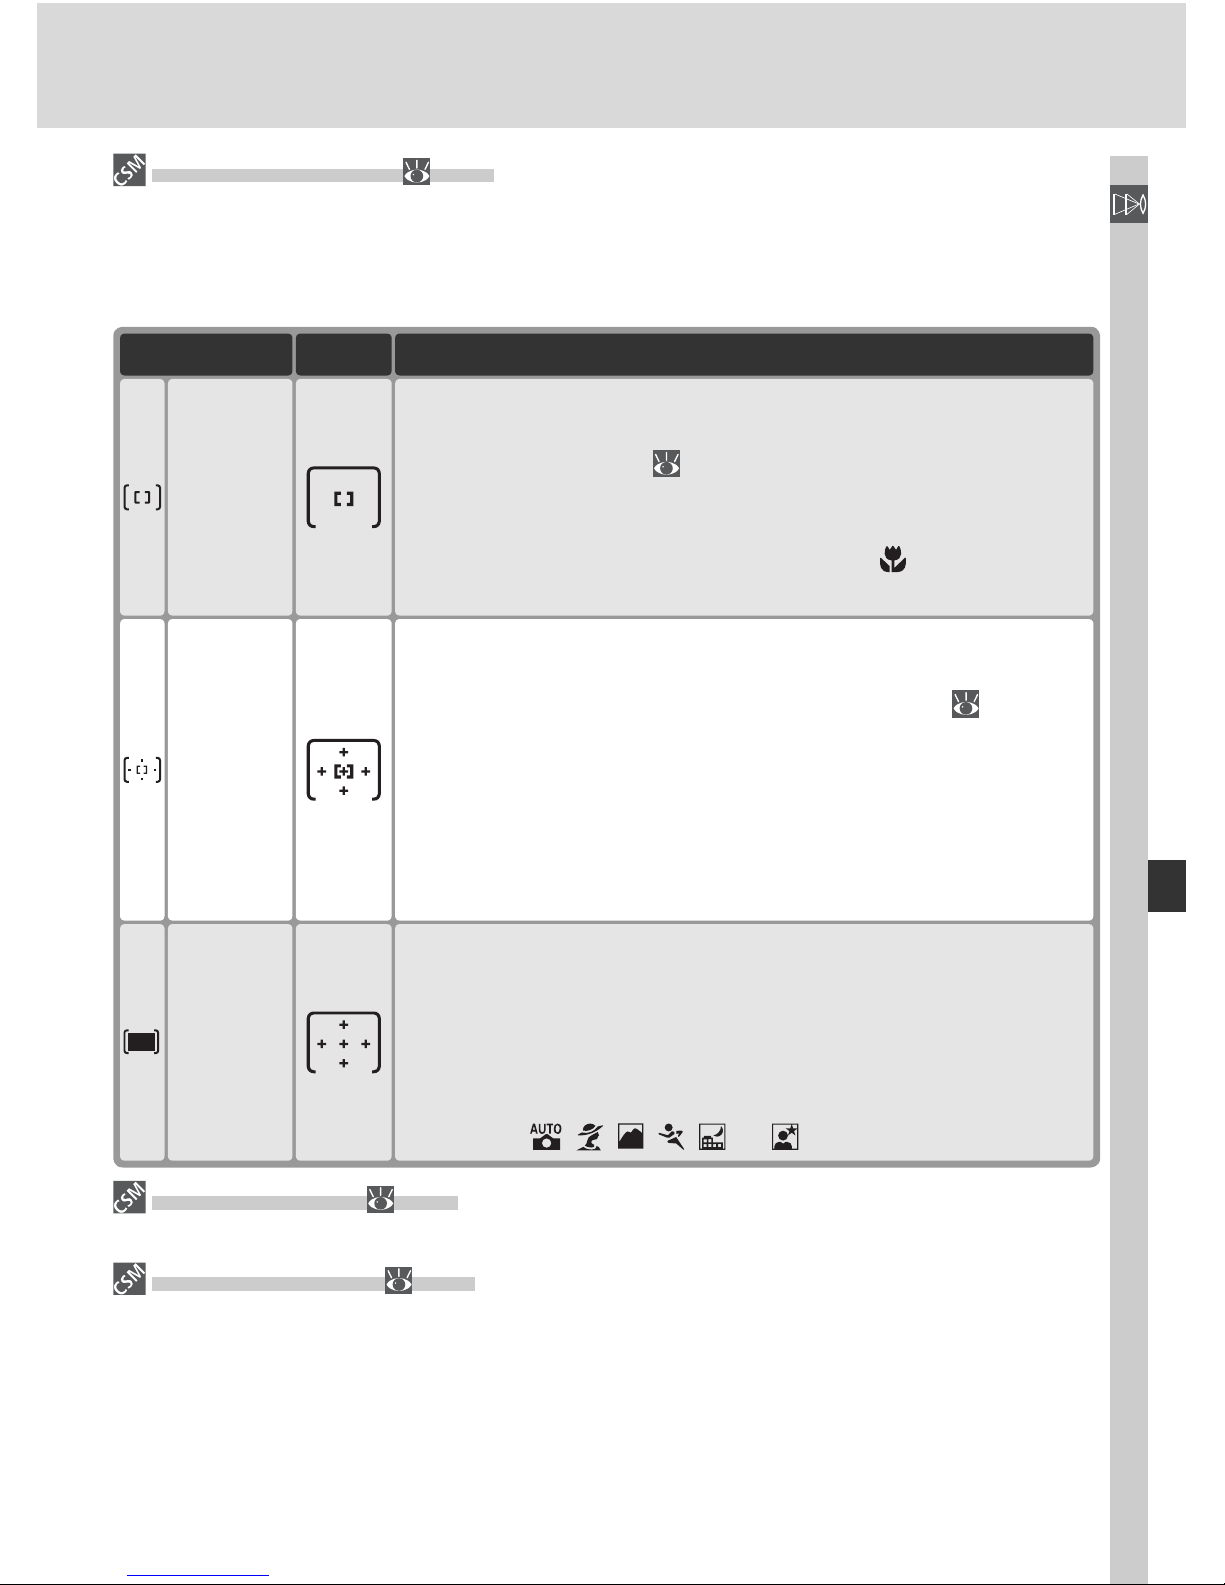
67
Taking Photographs—Focus
3—AF-Area Mode ( 140)
Custom Setting 3 (AF-area mode) de ter mines how the focus area is selected and
what hap pens if the sub ject moves out of the selected focus area while the cam era is
still fo cus ing. The current setting is indicated by the focus-area displays in the control
panel and viewfi nder.
Display DescriptionOption
User selects focus area manually; camera focuses on subject
in selected focus area only. Selected focus area is highlighted in viewfi nder ( 8) when focus area is selected and
when camera focuses. Use for relatively static com po si tions
with sub jects that will stay in selected focus area. Selected
automatically when mode dial rotated to ; default setting
for P, S, A, and M modes.
Single
area
User selects focus area manually, but camera uses information from multiple focus areas to de ter mine focus. Selected focus area is highlighted in viewfi nder ( 8) when
focus area is selected and when camera focuses. If sub ject
leaves selected focus area even briefl y, cam era will still be
able to focus based on in for ma tion from oth er focus areas
(focus-area selection does not change). Use when fol low ing
erratically moving subjects and in oth er situations in which it
is diffi cult to keep subject in se lect ed focus area.
Dynamic
area
Camera automatically selects focus area containing subject
closest to camera. Focus area can not be selected manually,
and focus area is not displayed in control panel; active focus area is highlighted in viewfi nder when camera focuses.
Prevents out-of-focus shots when photographing erratically
moving subjects. Selected automatically when mode dial is
rotated to , , , , , or .
Closest
subjct
17—Focus Area ( 148)
This option can be used to set focus area selection to “wrap around.”
18—AF Area Illm ( 149)
Depending on the option selected for Custom Setting 18 (AF area illm), the active
focus area will be highlighted briefl y in red to improve contrast as needed (“Vari-Brite”
focus areas), highlighted at all times, or never highlighted.
Page 78
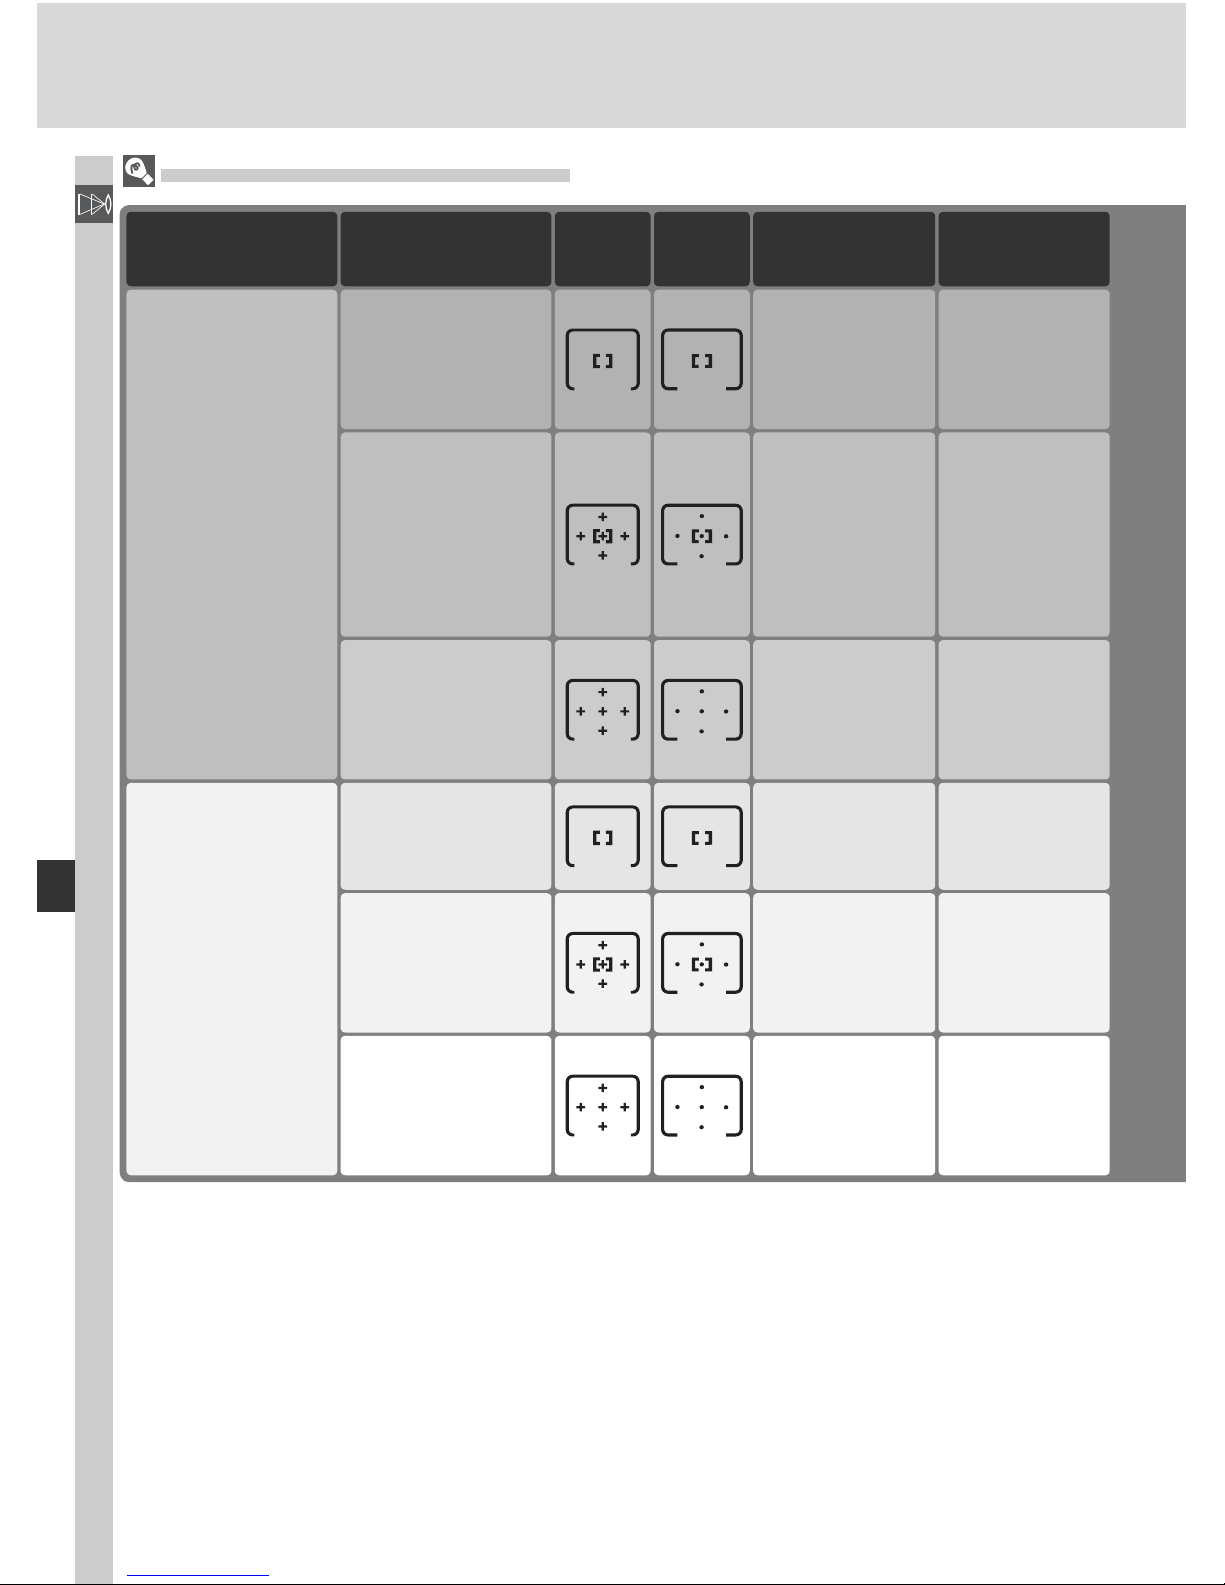
68
Taking Photographs—Focus
Focus-area
selection
Active
focus area
Custom Setting 3
(AF-area mode)
Control
panel
Summary of Autofocus Options
Custom Setting 2
(Autofocus)
AF-S
AF-C
View-
fi nder
Manual
Shown in
viewfi nder and
control panel
Single area
Manual
Shown in
viewfi nder and
control panel
Single area
Manual
Shown in
viewfi nder and
control panel
Dynamic area
AutomaticNot shown
Closest subjct
Manual
Shown in
viewfi nder and
control panel
Dynamic area
AutomaticNot shown
Closest subjct
Page 79
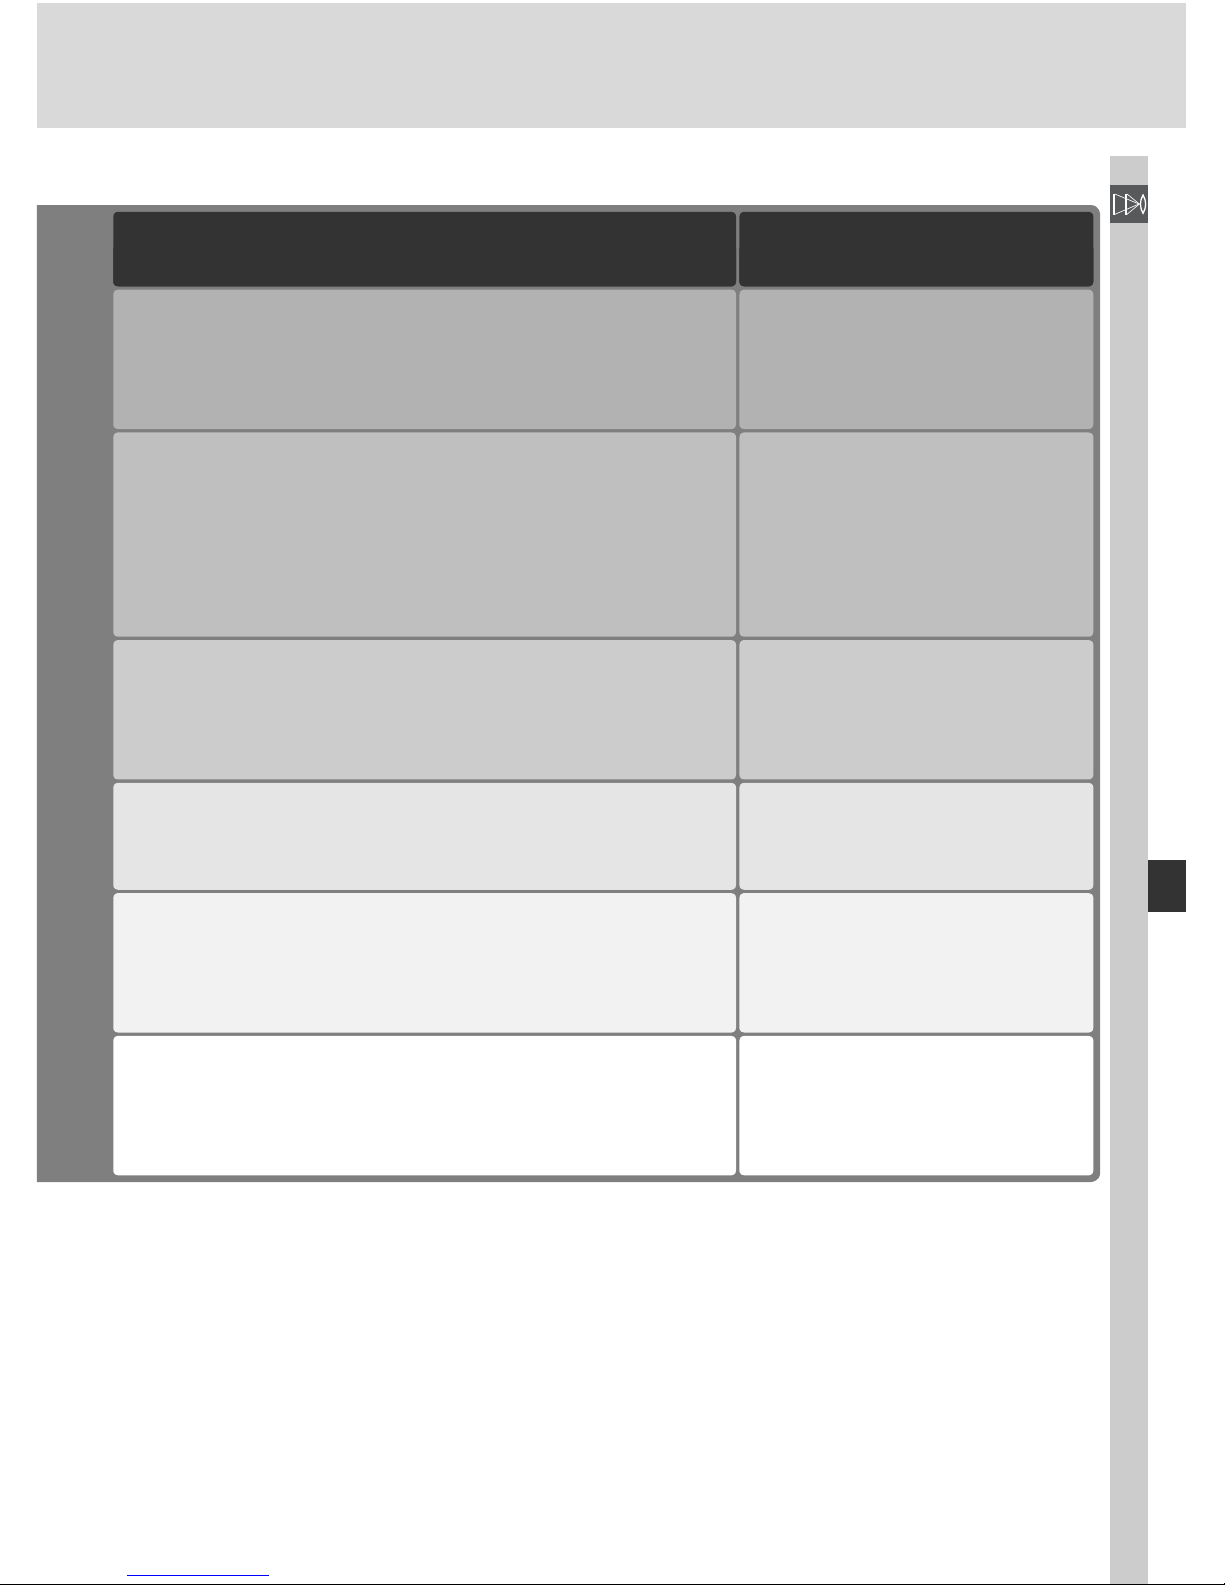
69
Taking Photographs—Focus
How it works When to use it
Camera focuses on subject in selected focus area.
Beep sounds when camera has focused. Focus will
remain locked while shutter-release button is pressed
half way.
Use with static sub jects when
time is avail able to com pose
pho to.
Camera continues to focus on subject in selected
focus area while shutter-release button is pressed
halfway.
Use with moving subjects that
can be continuously framed
in single focus area.
Camera focuses on subject in selected focus area. If
sub ject moves before cam era has focused, camera
will focus based on in for ma tion from other focus
areas. Beep sounds when camera has focused. Fo cus will remain locked while shut ter-re lease but ton is
pressed half way.
Use with relatively static sub jects when time is avail able to
com pose photo.
As above, except that camera automatically selects
focus area con tain ing sub ject closest to camera.
Beep sounds and active focus area is highlighted in
viewfi nder when camera has focused.
Use when sure that sub ject
will be clos est ob ject to cam era but un sure where it will
ap pear in fi nal com po si tion.
Camera focuses on subject in selected focus area.
While shutter-release button is pressed halfway, camera tracks sub ject as it moves from one fo cus area to
the next.
Use with subjects that are
moving unpredictably.
As above, except that camera automatically selects
focus area con tain ing sub ject closest to camera.
Active focus area is highlighted in viewfi nder when
camera has focused.
Use with erratically mov ing
sub jects when you know
sub ject will be clos est ob ject
to camera.
Page 80
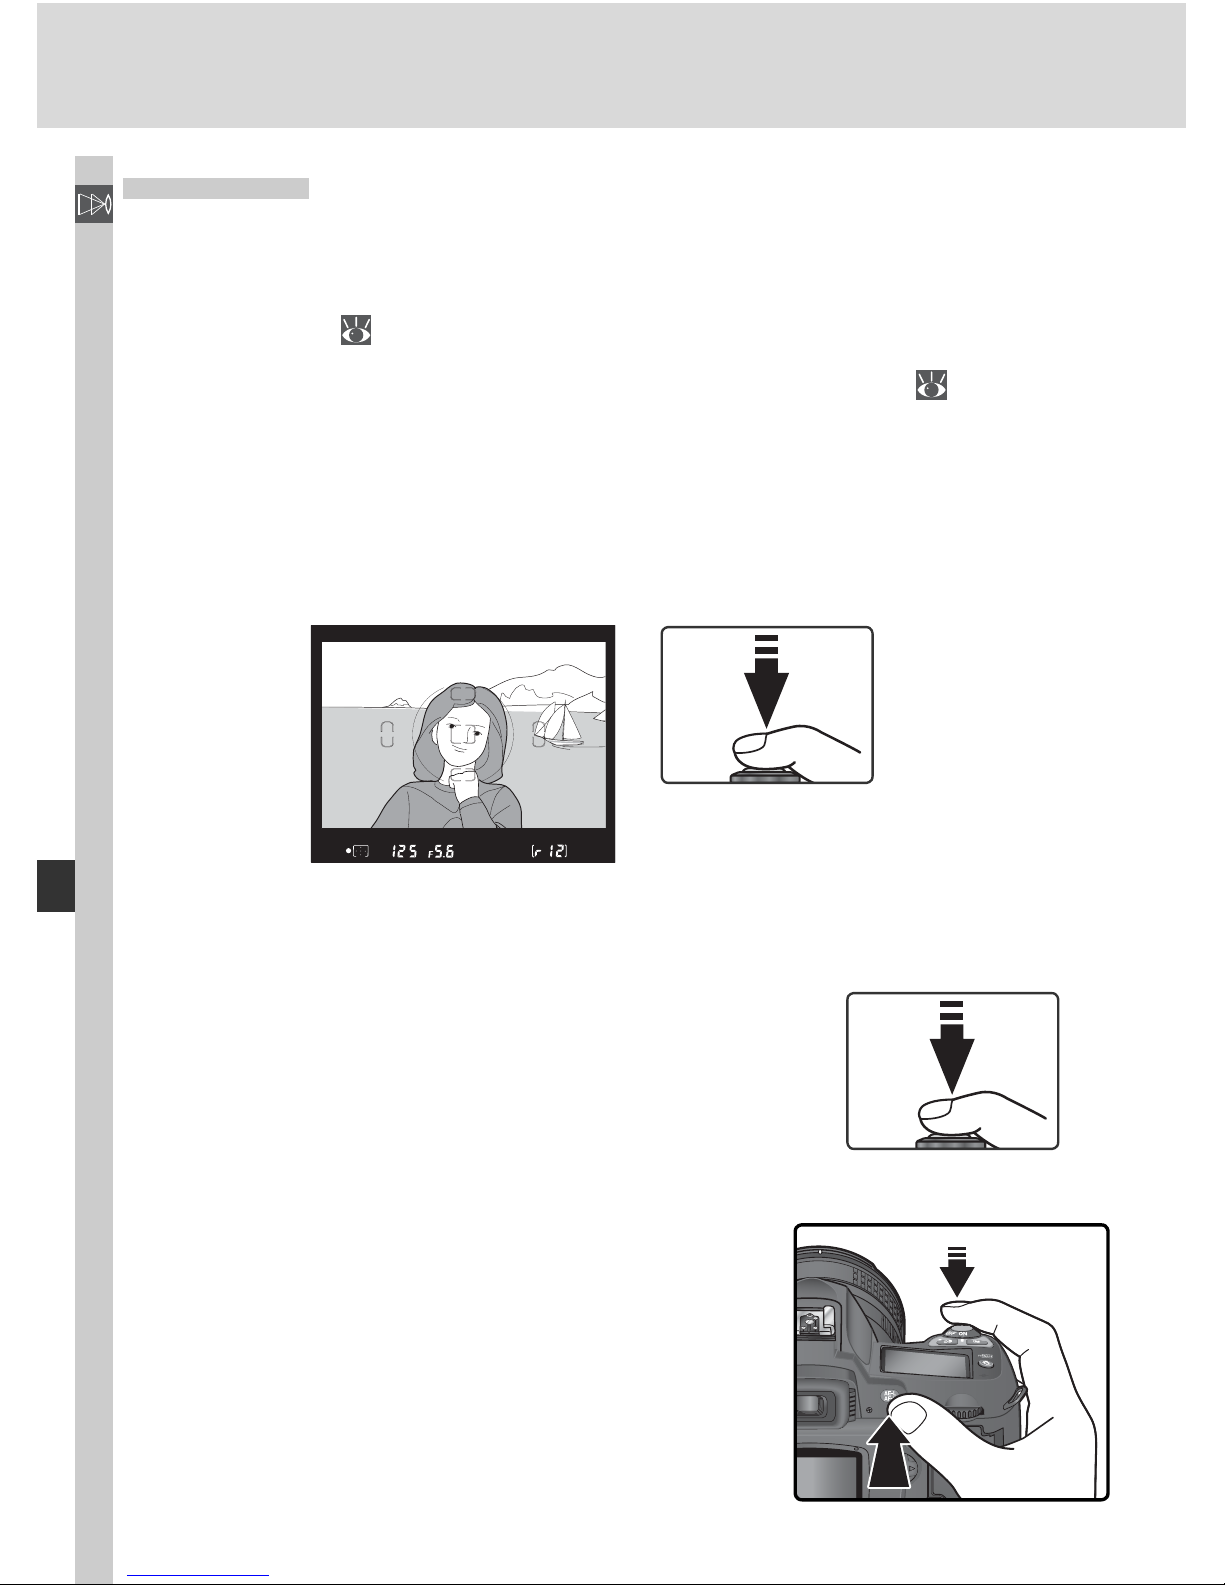
70
Taking Photographs—Focus
Focus Lock
Focus lock can be used to change the com po si tion after focusing, making it
possible to focus on a subject that will not be in one of the fi ve focus areas
in the fi nal composition. It can also be used when the autofocus system is
unable to focus ( 73).
When AF-S is selected for Custom Setting 2 (Autofocus;
139), focus
locks automatically when the in-focus indicator (●) appears in the viewfi nder.
When AF-C is selected, focus must be locked man u al ly using the AE-L/AF-L
button. To recompose a photograph using focus lock:
1
Position the subject in the selected focus area and press the shutter-re-
lease button halfway to ini tiate focus.
2
Check that the in-focus indicator (●) appears in the viewfi nder.
AF-S (Single-servo AF)
Focus will lock automatically when the info cus indicator appears, and re main locked
until you remove your fi nger from the shutterre lease button. Focus can also be locked by
pressing the AE-L/AF-L button (see below).
AF-C (Con tin u ous-servo AF)
Press the AE-L/AF-L button to lock both fo cus
and exposure. Focus will remain locked while
the AE-L/AF-L button is pressed, even if you
later remove your fi nger from the shutter-re lease button.
Page 81
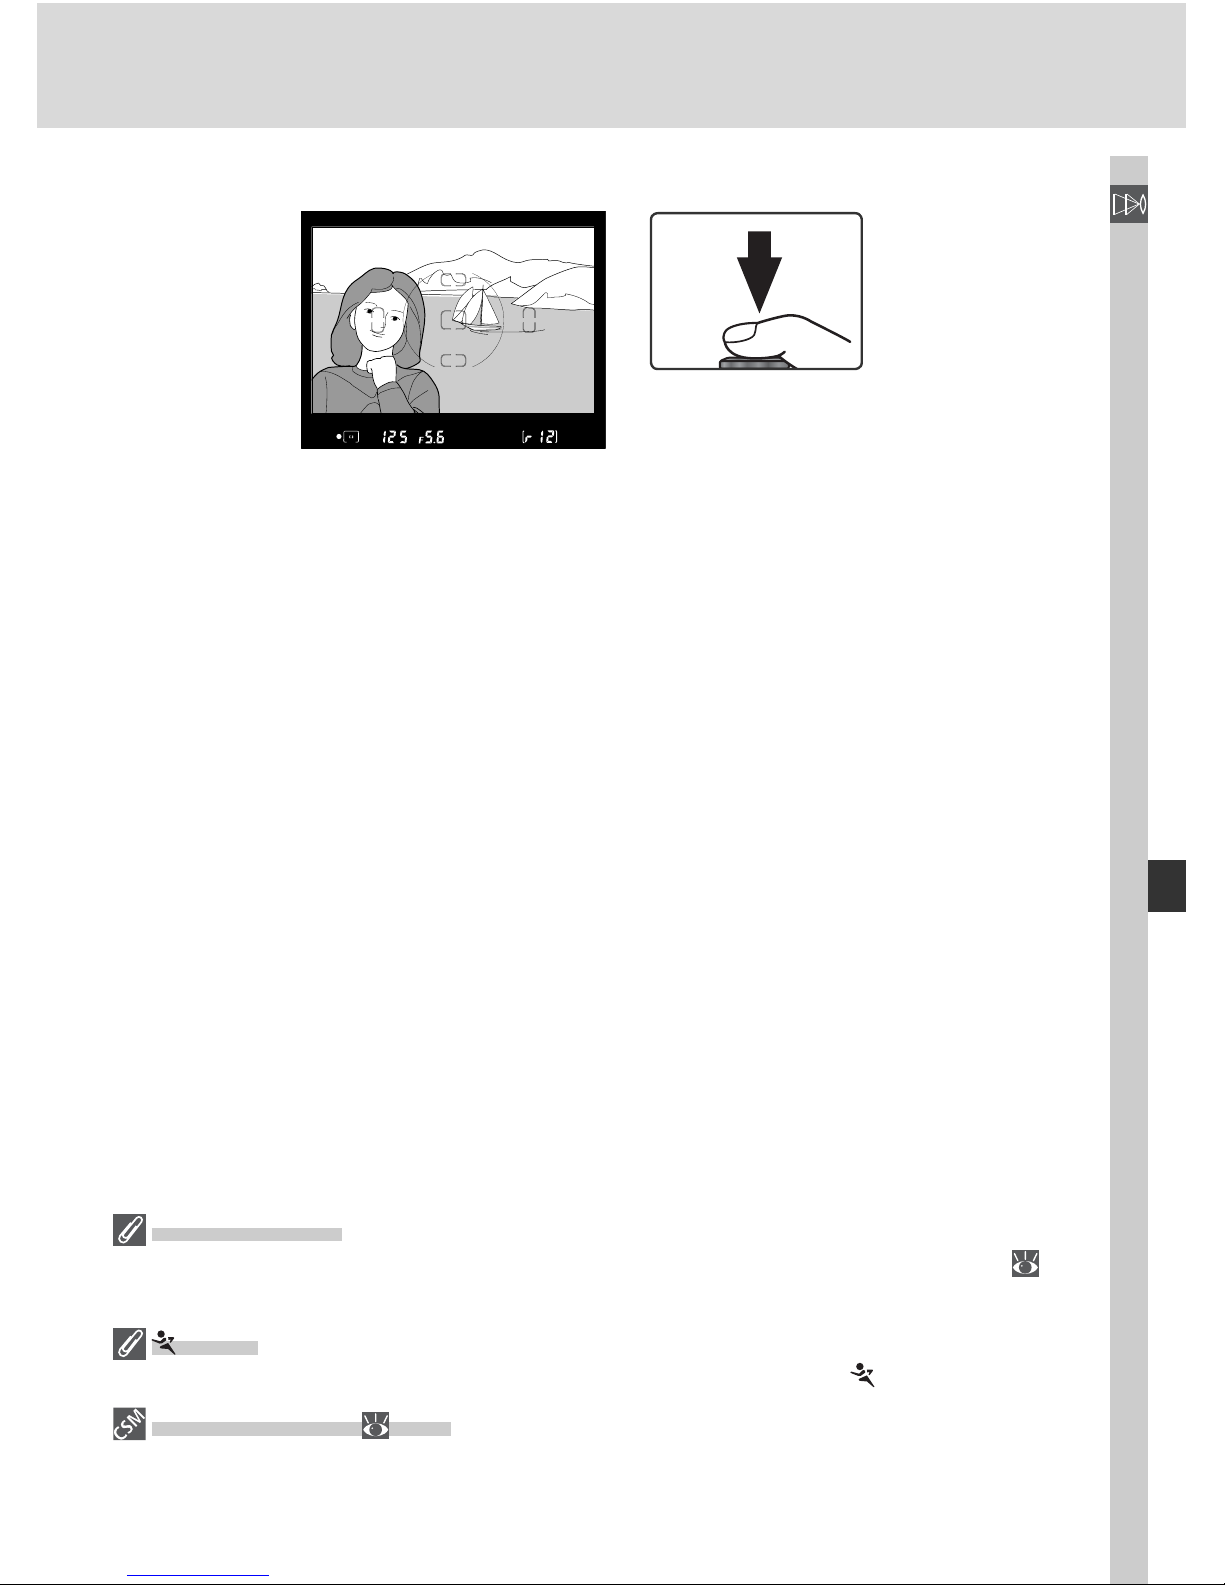
71
Taking Photographs—Focus
3
Re com pose the pho to graph and shoot.
In single-ser vo AF (AF-S), focus will remain locked be tween shots as long as
the shutter-re lease button is kept pressed half way, al low ing sev er al pho to graphs in suc ces sion to be taken at the same focus setting. Focus will also
remain locked between shots while the AE-L/AF-L button is pressed.
Do not change the distance between the camera and the subject while focus
lock is in effect. If the subject moves, focus again at the new distance.
AF-Area Mode
Select Single area or Dynamic area for Custom Setting 3 (AF-area mode; 140)
when focusing using focus lock.
Mode
AF-C is selected automatically when the mode dial is rotated to .
15—AE- L/AF-L ( 147)
This option controls whether the AE-L/AF-L button locks focus and exposure (the default setting), focus only, or exposure only.
Page 82

72
Taking Photographs—Focus
The AF-Assist Illuminator
The built-in AF assist illuminator enables the
camera to focus even when the subject is poorly
lit. To use the illuminator, AF-S must be selected
for Custom Setting 2 (Autofocus; 139), an
AF-Nikkor lens must be attached, and the center
focus area must be selected or closest subject priority in effect. If these
conditions are met and the subject is poorly lit, the illuminator will light automatically to assist the autofocus operation when the shutter-release button is
pressed halfway. The AF-assist illuminator is not available in
(Landscape),
(Sports), and (Night landscape) modes.
For the AF-assist illuminator to function correctly, the lens must have a focal
length of 24–200 mm and the subject must be in range of the illuminator.
Lens hoods should be removed. With most lenses, the illuminator has a
range of about 0.5–3 m (1´8˝–9´10˝). With the following lenses, autofocus
with AF-assist illumination is not available at ranges under 1 m (3´3˝):
• AF Micro ED 200 mm f/4
• AF-S DX ED 12–24 mm f/4
• AF-S ED 17–35 mm f/2.8
• AF ED 18–35 mm f/3.5–4.5
• AF-S DX 18–70 mm f/3.5–4.5
• AF 20–35 mm f/2.8
• AF ED 24–85 mm f/2.8–4
• AF ED 24–85 mm f/3.5–4.5
• AF-S VR ED 24–120 mm f/3.5–5.6
• AF 24–120 mm f/3.5–5.6
• AF ED 28–200 mm f/3.5–5.6
• AF Micro ED 70–180 mm f/4.5–5.6
With the following lenses, AF assist is not available at ranges under 2 m (6´7˝):
• AF-S ED 28–70 mm f/2.8 • AF-S DX ED 17–55 mm f/2.8
AF assist is not available with the following lenses:
• AF-S VR ED 70–200 mm f/2.8
• AF-S ED 80–200 mm f/2.8
• AF ED 80–200 mm f/2.8
• AF VR ED 80–400 mm f/4.5–5.6
• AF-S VR ED 200–400 mm f/4
If an optional SB-800 or SB-600 Speedlight is used, the camera AF-assist illuminator will turn off and the Speedlight illuminator will be used instead.
With other Speedlights, the camera AF assist illuminator will be used.
4—AF Assist ( 141)
This option can be used to turn the AF-assist illuminator off.
Page 83
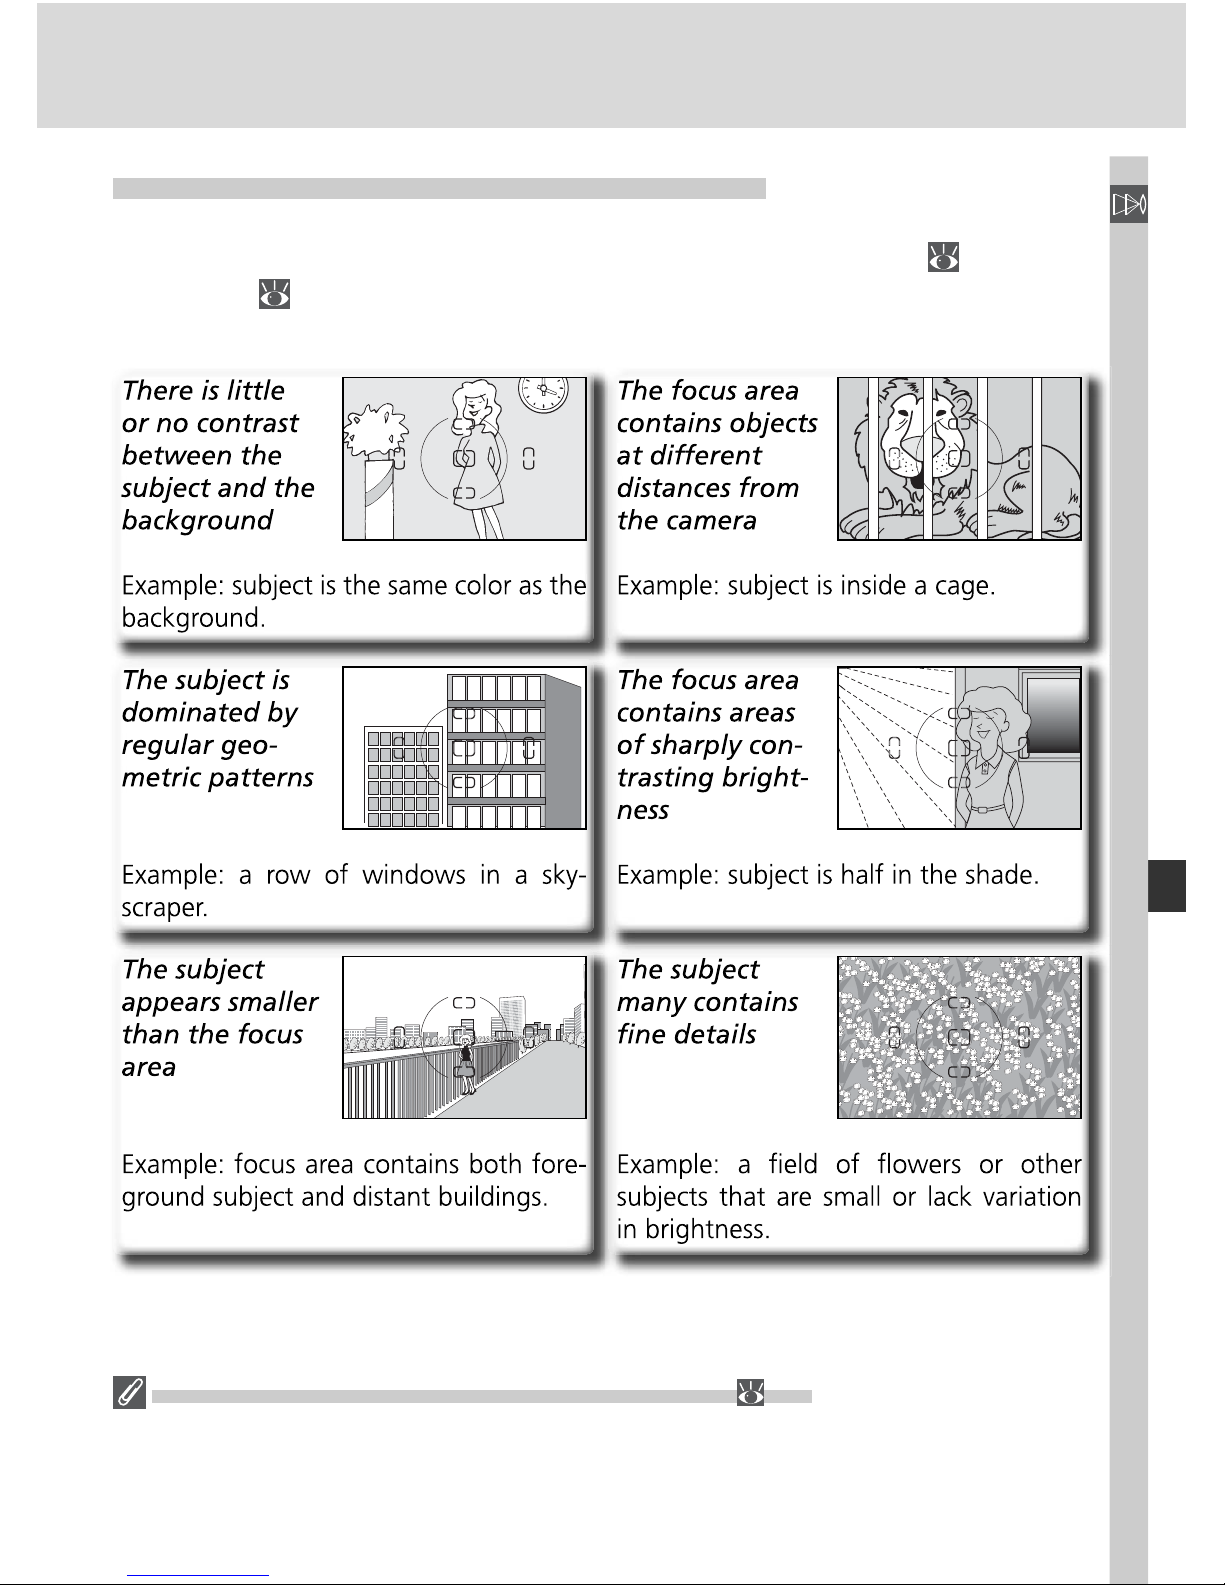
73
Taking Photographs—Focus
Getting Good Results with Autofocus
Autofocus does not perform well under the conditions listed below. If the
camera is unable to focus using autofocus, use manual focus ( 74) or use
focus lock (
70) to focus on another subject at the same distance and then
recompose the photograph.
Continuous Use of the AF-Assist Illuminator ( 72)
After the AF-assist illuminator has been used for several consecutive shots, it may turn
off briefl y to protect the lamp. The illuminator can be used again after a short pause.
Note that the illuminator may become hot with continuous use.
Page 84
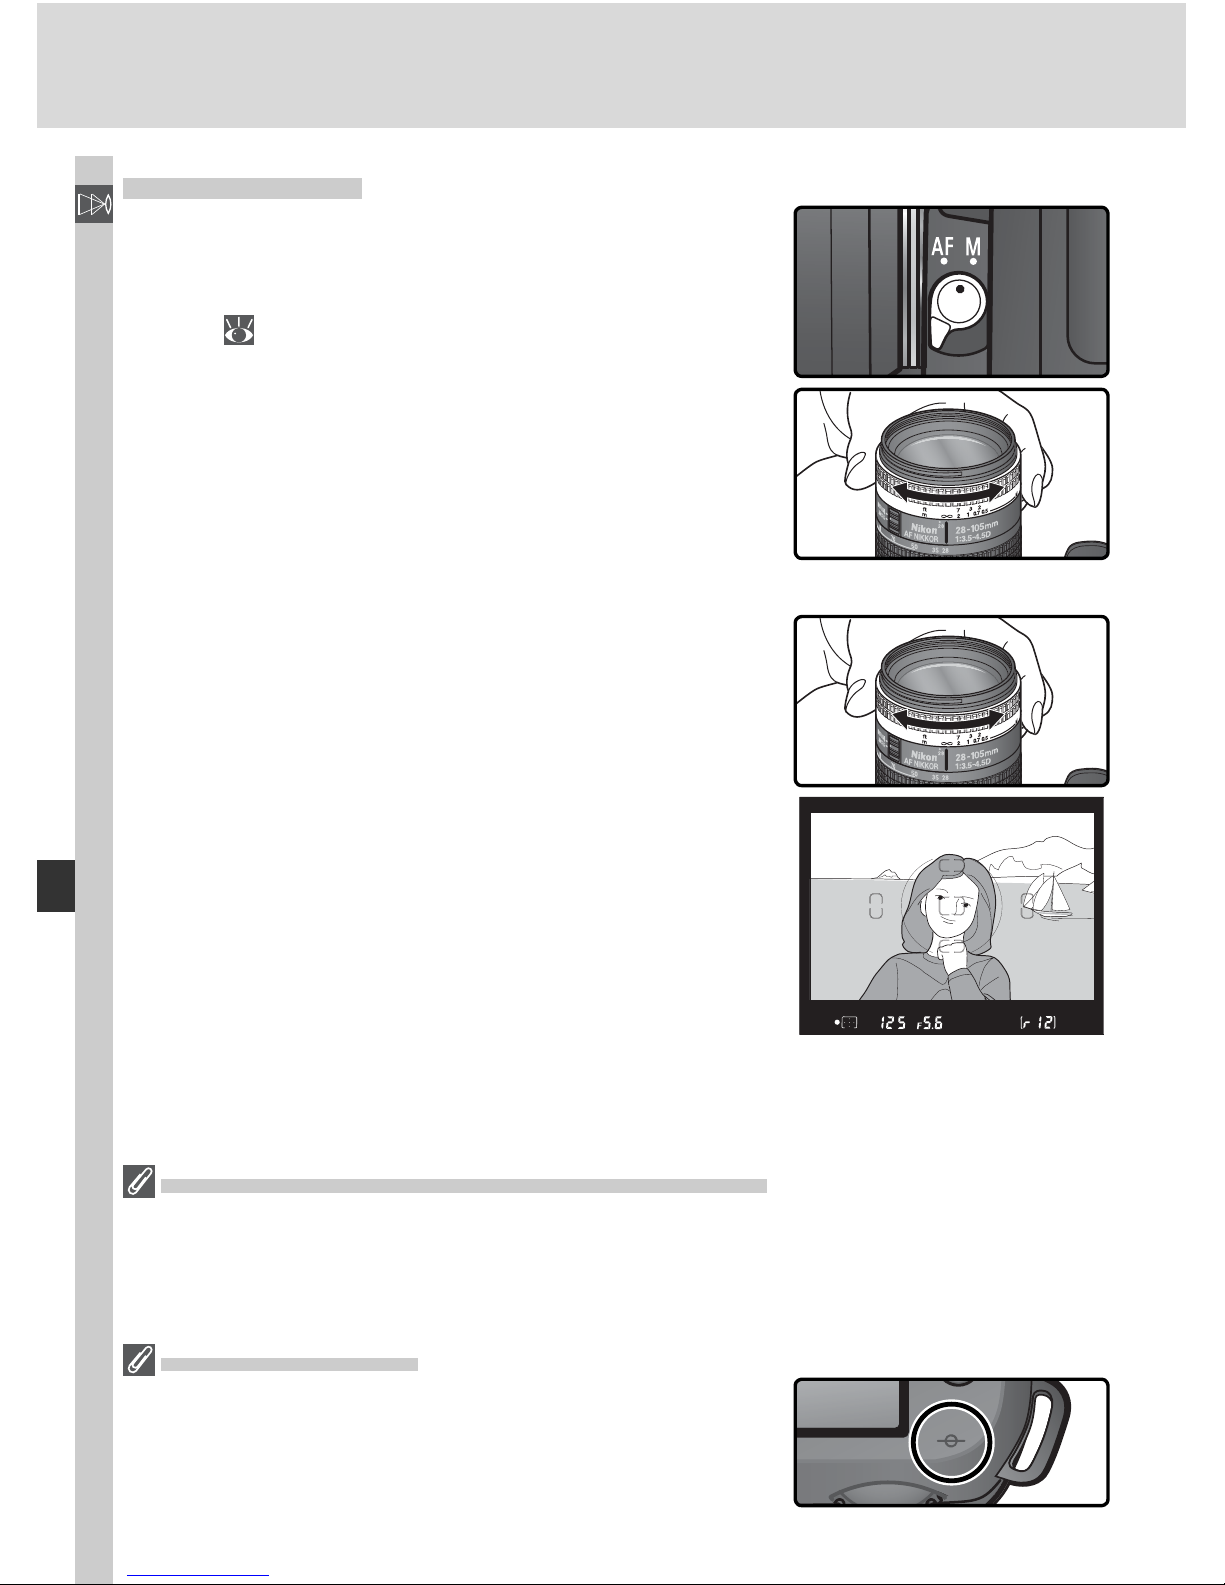
74
Taking Photographs—Focus
Manual Focus
Manual focus is available for lenses that do not
sup port autofocus (non-AF Nikkor lens es) or
when autofocus does not produce the desired
re sults ( 73). To focus manually, set the focusmode selector to M and adjust the lens focusing
ring until the image displayed on the clear matte
fi eld in the viewfi nder is in focus. Pho to graphs
can be taken at any time, even when the image
is not in focus.
The Electronic Range Finder
If the lens has a maximum aperture of f/5.6 or
faster, the viewfi nder fo cus indicator can be used
to con fi rm whether the subject in the se lect ed focus area is in focus. After positioning the sub ject
in the active focus area, press the shut ter-re lease
but ton half way and rotate the lens fo cus ing ring
un til the in-fo cus in di ca tor (●) is dis played.
V
A-M Selection/Autofocus with Manual Priority
When using a lens that offers A-M selection, select M when focusing manually. With
lenses that support M/A (autofocus with manual priority), focus can be adjusted man u al ly with the lens set to M or M/A. See the documentation provided with your lens
for details.
Focal Plane Position
To determine the distance between your subject and
the camera, measure from the focal plane mark on the
camera body. The distance between the lens mounting
fl ange and the focal plane is 46.5 mm (1.83˝).
Page 85
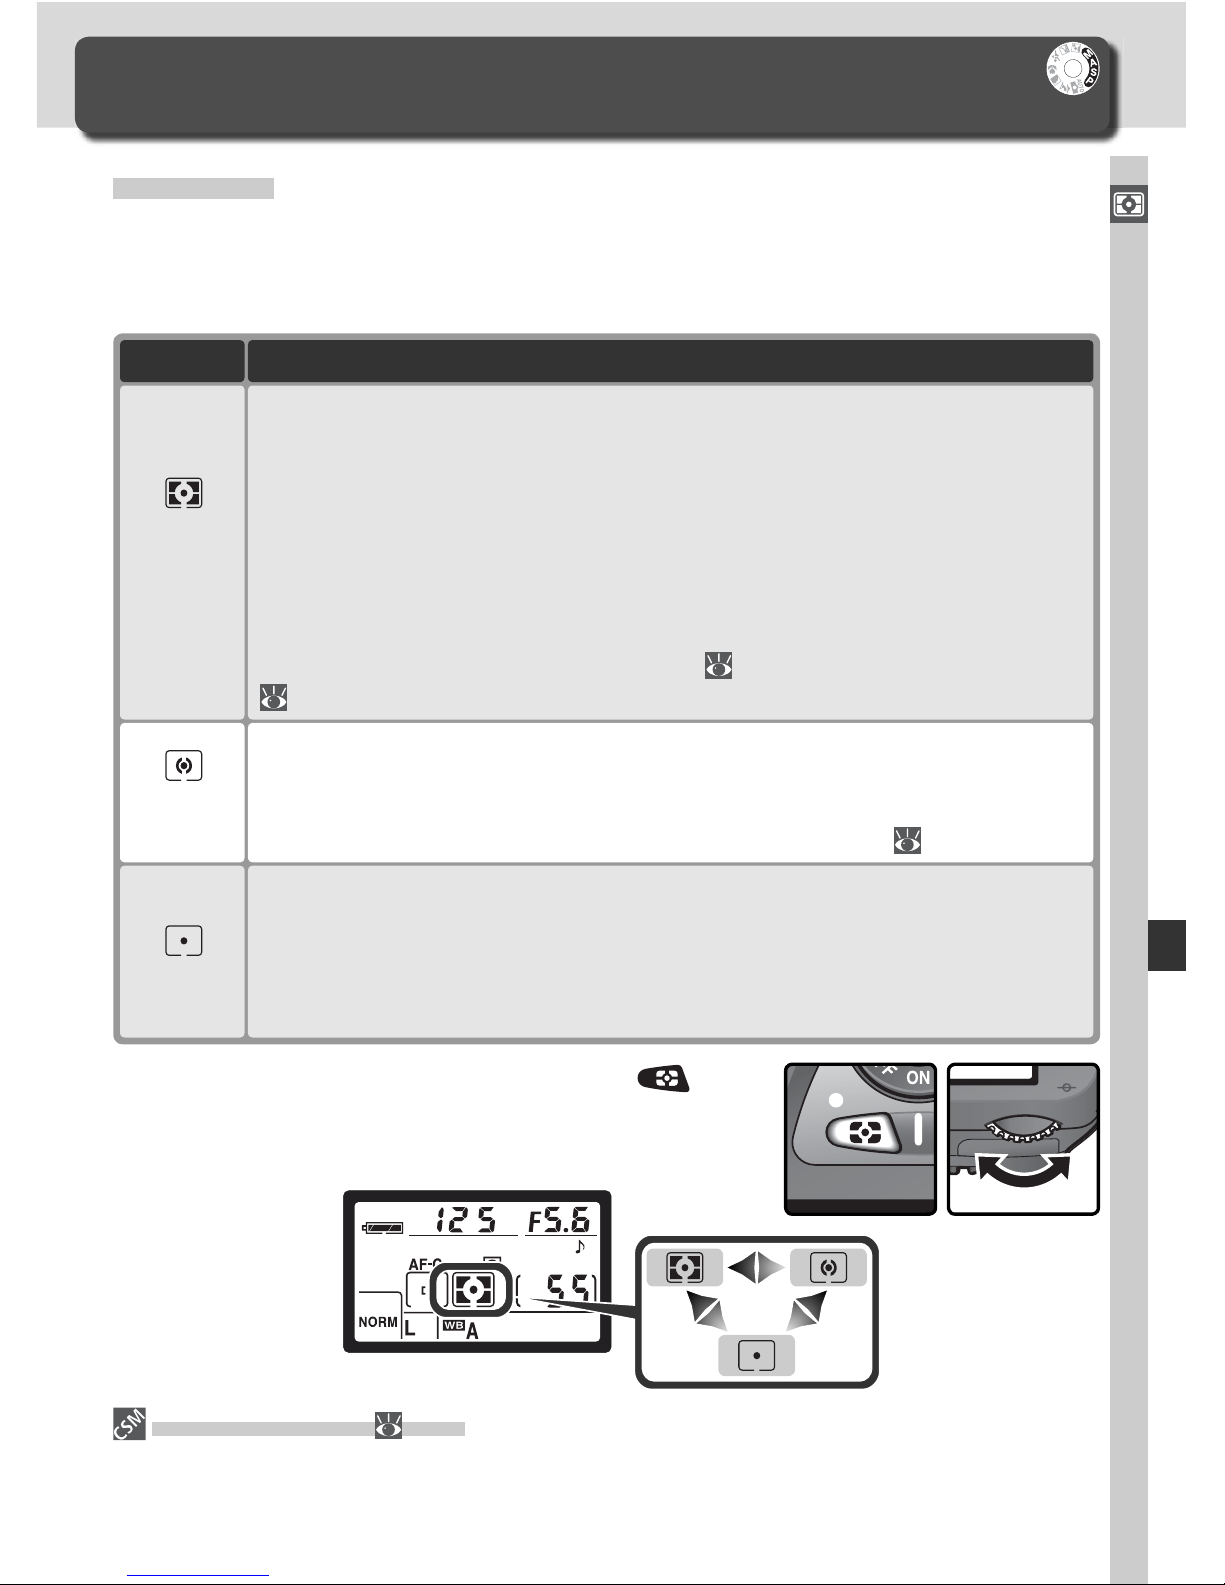
75
Taking Photographs—Exposure
Metering
In P, S, A, and M modes, the metering mode determines how the camera sets
exposure. The following options are available when a CPU lens is attached
(metering is not performed when a non-CPU lens is used).
Exposure
Controlling How the Camera Sets Exposure
Camera meters circle 2.3 mm (0.09˝) in diameter (approximately 1% of
frame). Circle is centered on current focus area, making it possible to
meter off-center subjects (if Closest subjct is selected for AF-area mode,
camera will meter center focus area). En sures that sub ject will be correctly ex posed, even when back ground is much brighter or darker.
Spot
Camera meters entire frame but assigns greatest weight to area in center
of frame 8 mm (0.31˝) in diameter, shown by corresponding 8-mm reference circle in viewfi nder. Classic meter for portraits; recommended when
using fi lters with exposure factor (fi lter factor) over 1 × ( 191).
Center-
weighted
DescriptionMethod
Metering is performed by 1,005-pixel RGB sensor, which sets exposure
based on variety of information from all areas of frame. This method is
particularly effective where frame is dominated by bright (white or yellow) or dark (black or dark green) colors, when its results approach what
is seen by human eyes. 3D color matrix metering, which uses range information from lens in adjusting exposure, is available only with type G or D
lenses. Color matrix metering, which does not include range information,
is available with other CPU lenses. Matrix metering will not produce
desired results with autoexposure lock ( 84) or exposure compensation
( 86), but is recommended in most other cases.
3D color
matrix/
Color
matrix
11—Center Wtd ( 145)
This option controls the size of the area assigned the greatest weight in centerweighted metering.
To choose a metering mode, press the button and rotate the main command dial. Metering
mode is displayed in the control panel:
Page 86
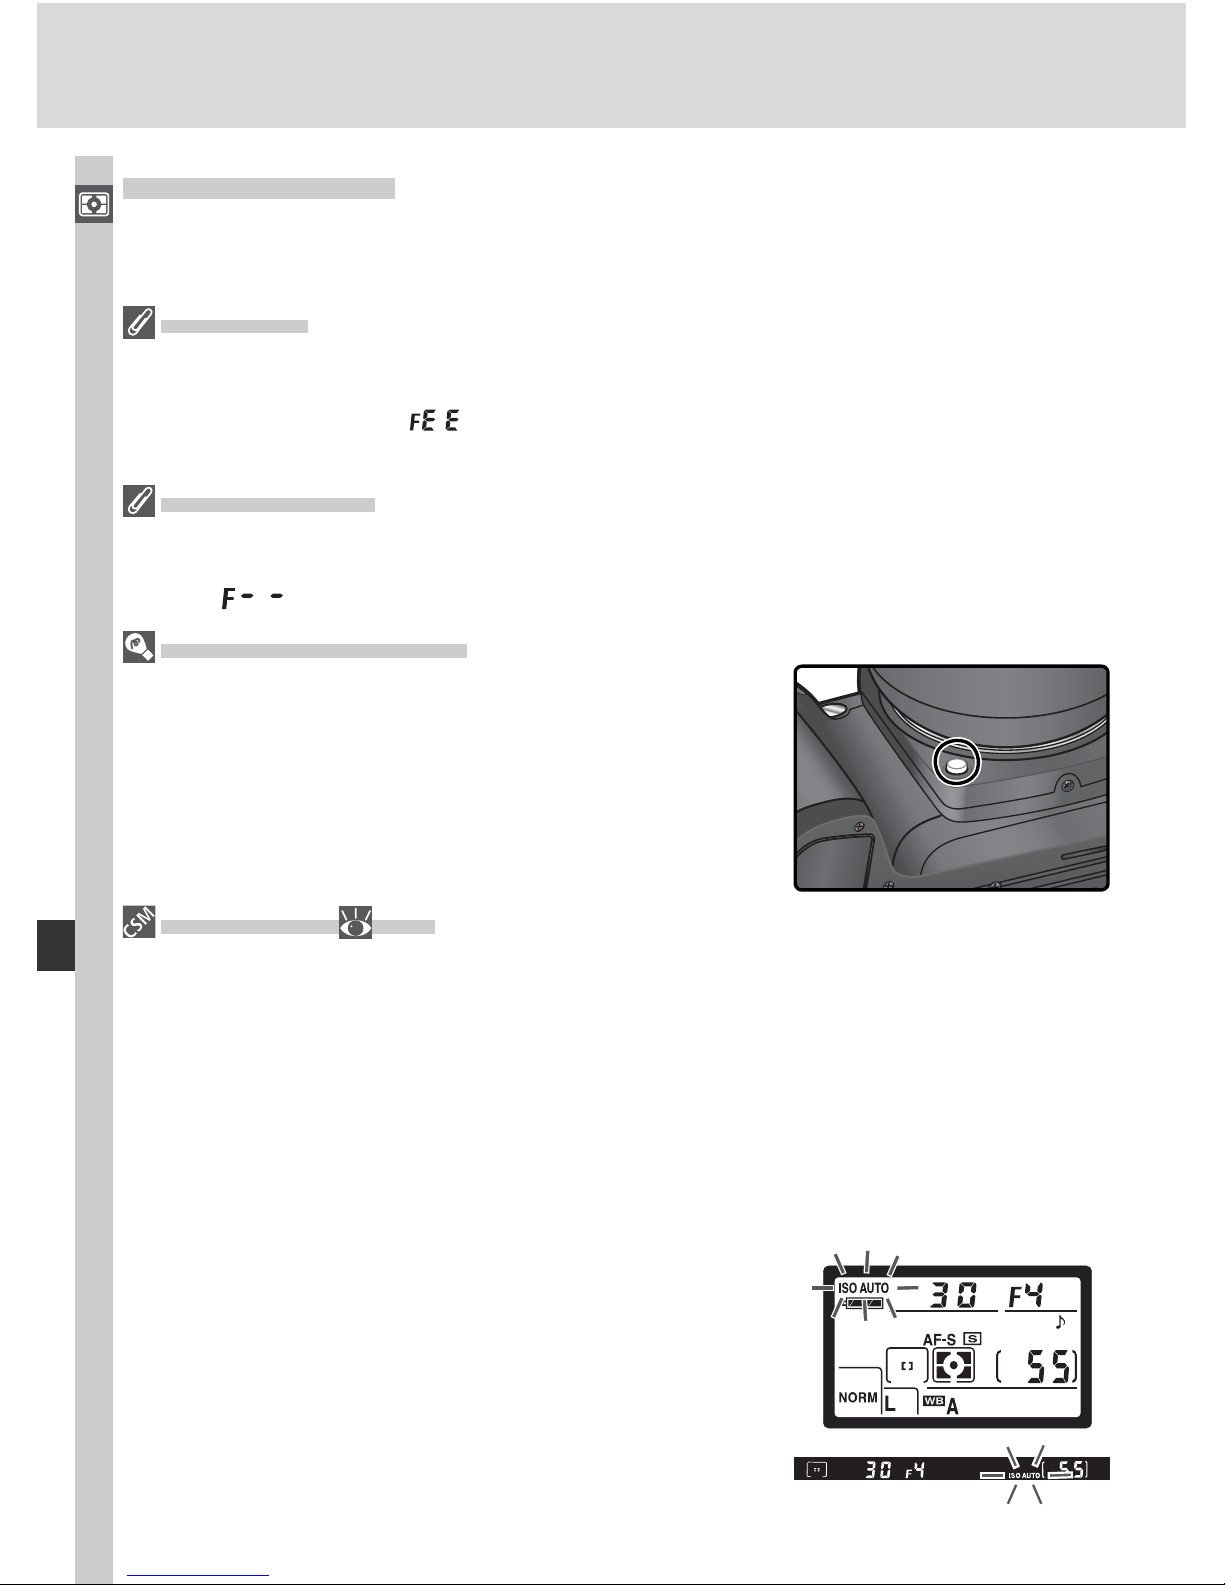
76
Taking Photographs—Exposure
Exposure Mode
When the mode dial is rotated to P, S, A, or M, the user can set shutter speed
and aperture as described on the following pages.
CPU Lenses
When using a CPU lens equipped with an aperture ring, lock the aperture ring at the
min i mum aperture (highest f/-number). At other settings, the shutter release will be
dis abled and a blinking
will appear in the aperture displays in the top control
panel and viewfi nder. Type G lenses are not equipped with an aperture ring.
Non-CPU Lenses
Non-CPU lenses can only be used in mode M, when aperture can be adjusted manually
using the lens aperture ring. In other modes, the shutter-release will be disabled and a
blinking will appear in the control panel and viewfi nder aperture displays.
Depth-of-Field Preview
To preview the effects of aperture, press and hold the
depth-of-fi eld preview button. If a CPU lens is attached,
the lens will be stopped down to the aperture value
se lect ed by the cam era (P and S modes) or the val ue
cho sen by the user (A and M modes), al low ing depth of
fi eld to be previewed in the viewfi nder (depth-of-fi eld
preview is not available with non-CPU lenses).
5—ISO Auto ( 142)
When On is selected for Custom Setting 5 (ISO auto), the camera automatically varies
sensitivity in the range 200–1600 (ISO equivalent) to help ensure optimum ex po sure
and fl ash level. In P and A modes, the camera adjusts sensitivity when the shutter
speed needed to obtain optimum exposure would be faster than
1
/
8000 s or slower than
a specifi ed value (shutter speed may drop below the specifi ed value if optimal exposure
can not be achieved at ISO 1600 equivalent). Otherwise the camera adjusts sensitivity when the limits of the camera exposure me ter ing sys tem are exceeded (mode S)
or when optimum exposure can not be achieved at the shutter-speed and aperture
selected by the user (mode M).
When sen si tiv i ty is al tered from the value se lect ed by
the user, ISO AUTO fl ashes in the control panel and
viewfi nder. In the camera photo information display for
pictures taken at altered sensitivities, the ISO value will
be displayed in red. Note that noise is more likely to ap pear in pho to graphs taken at higher sen si tiv i ties.
Page 87
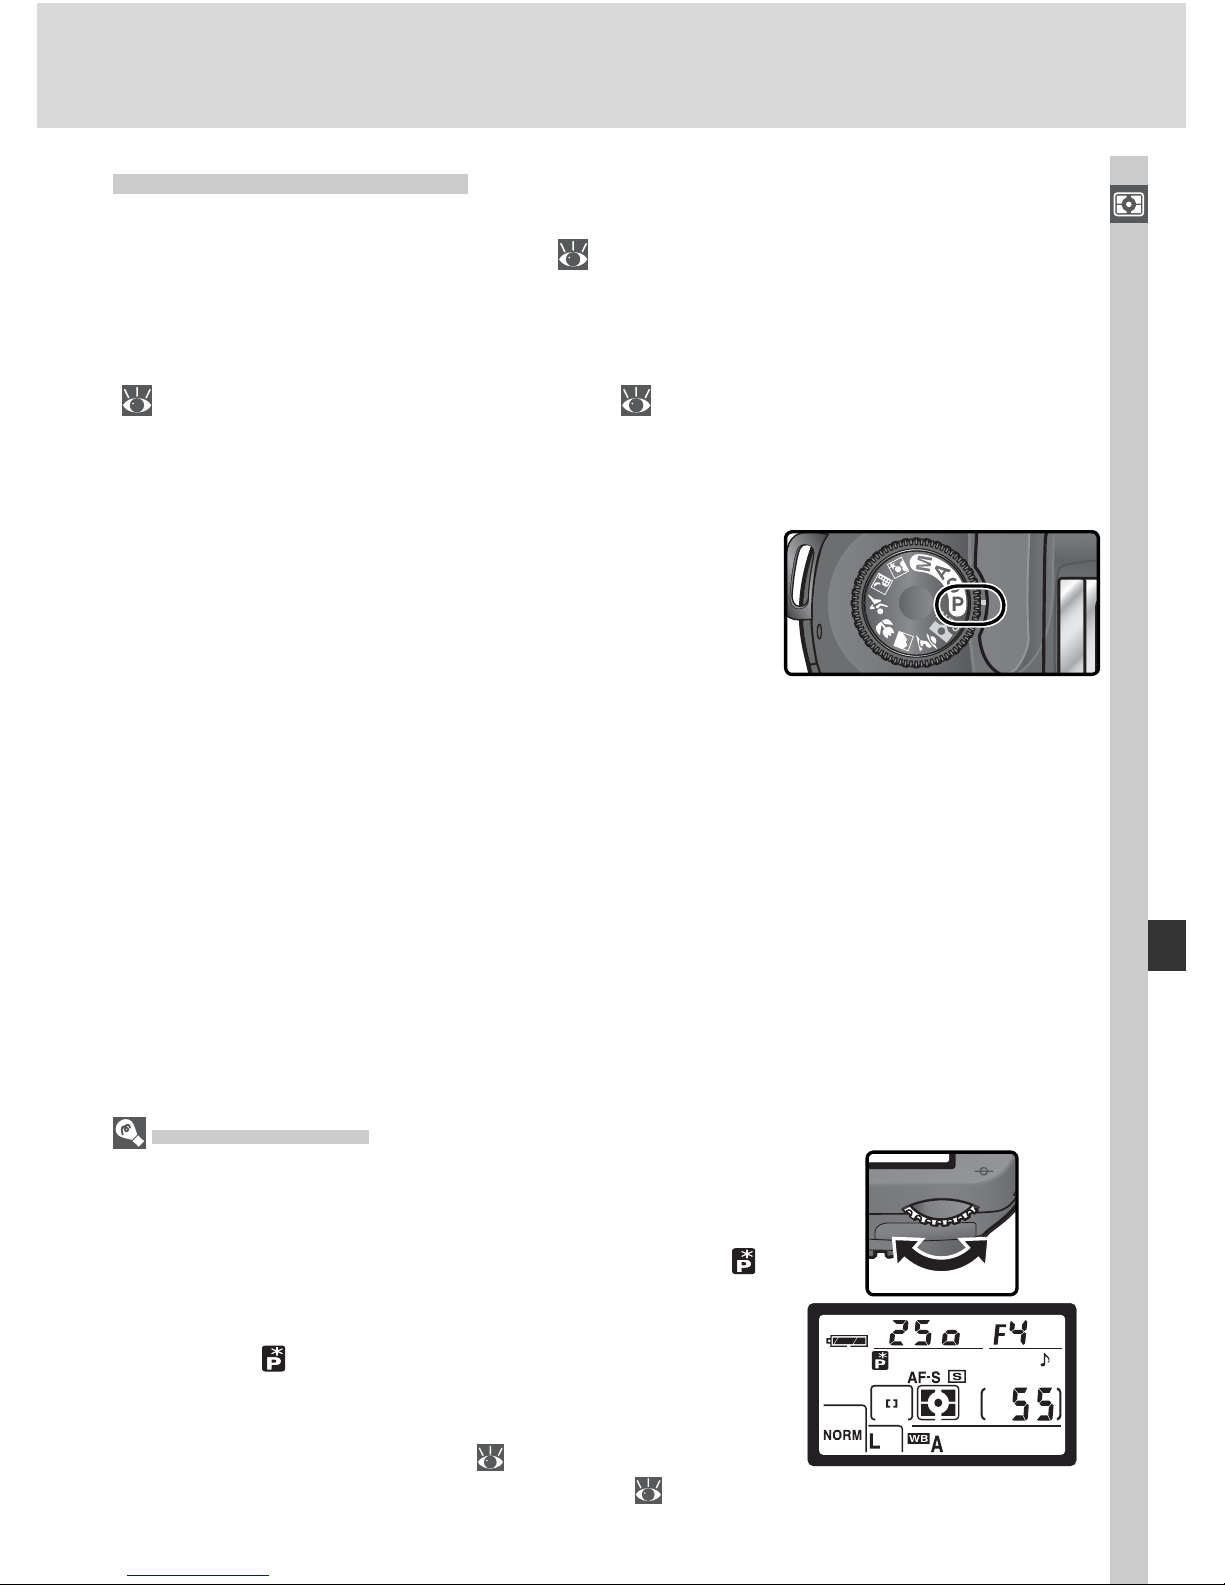
77
Taking Photographs—Exposure
P: Auto Multi Program
In this mode, the camera automatically adjusts shutter speed and aperture
ac cord ing to a built-in program ( 78) for optimal exposure in most sit u a tions. This mode is recommended for snapshots and other sit u a tions in
which you want to leave the camera in charge of shutter speed and aperture.
Ad just ments can be made using fl exible program, ex po sure com pen sa tion
(
86), and auto ex po sure bracketing ( 87). Mode P is only available with
CPU lenses.
To take photographs in auto multi program:
1
Rotate the mode dial to P.
2
Frame a photograph, focus, and shoot.
Flexible Program
In mode P, different com bi na tions of shutter speed and
ap er ture can be selected by rotating the main com mand
dial (“fl exible program”). All combinations pro duce the
same ex po sure. While fl exible program is in effect, a
icon appears in the control panel. To restore the default
shutter speed and aperture, rotate the main com mand
dial until the icon is no longer dis played. Defaults can
also be re stored by turning the cam era off, rotating the
mode dial, raising or lowering the built-in Speedlight,
per form ing a two-but ton re set ( 111), or choosing another setting for Custom Setting 9 (EV step; 144).
Page 88
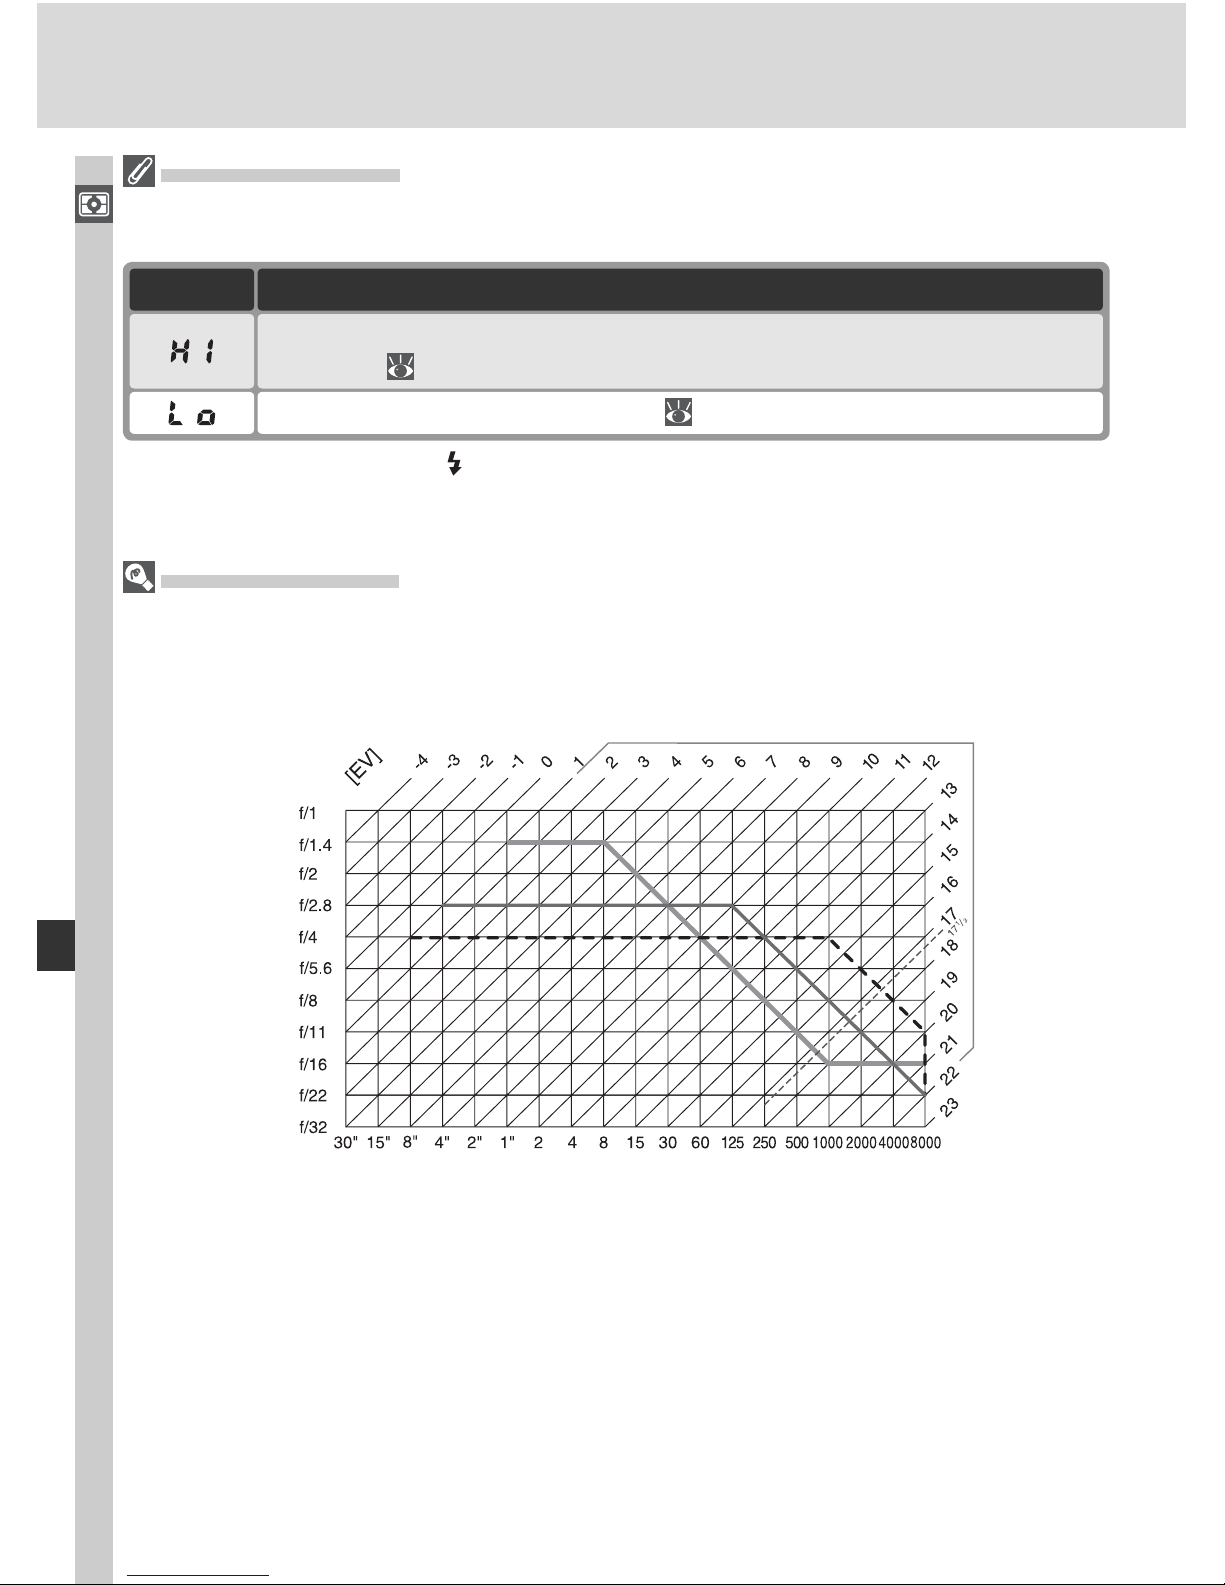
78
Taking Photographs—Exposure
If the fl ash-ready indicator ( ) blinks in the viewfi nder, the fl ash can be used for additional lighting. The fl ash-ready indicator will not be displayed if Off is selected for
Custom Setting 20 (Flash sign).
Exposure Program
The exposure program for mode P is shown in the fol low ing graph:
The maximum and minimum values for EV vary with sen si tiv i ty (ISO equivalency); the
above graph assumes a sen si tiv i ty of ISO 200 equivalent. When matrix metering is
used, values over 17
1
/
3 EV are re duced to 17
1
/
3 EV.
AF 50 mm f/1.4D
AF ED 180 mm f/2.8D
AF-S ED 300 mm f/4D
Aperture
Shutter speed
Subject too dark. Raise sensitivity ( 46).
DescriptionIndicator
Subject too bright. Use optional Neutral Density (ND) fi lter or lower
sensitivity ( 46).
Exposure Warning
If the limits of the exposure metering system are exceeded, one of the following indicators will be dis played in the control panel and viewfi nder:
Page 89
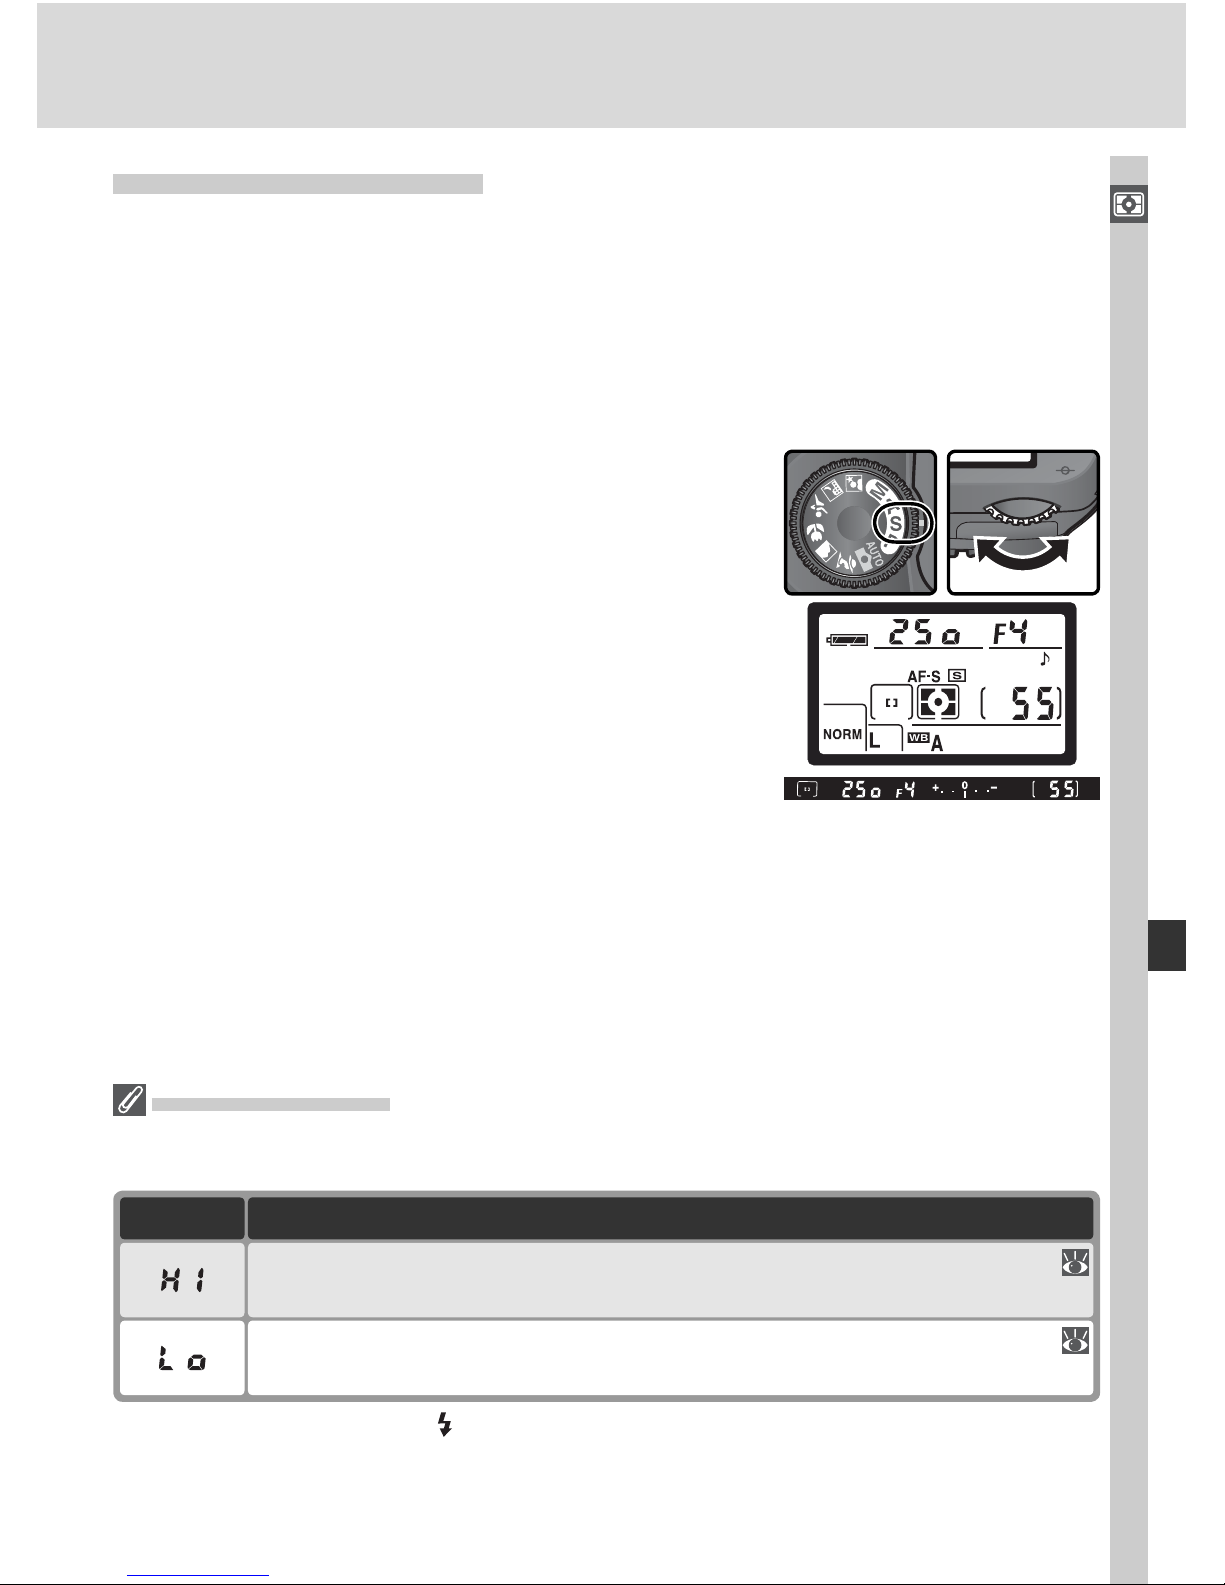
79
Taking Photographs—Exposure
S: Shutter-Priority Auto
In mode S, you choose the shutter speed while the camera au to mat i cal ly selects the aperture that will produce the optimal exposure. Shutter speed can
be set to values between 30 s and
1
/
8,000 s. Use slow shutter speeds to suggest
motion by blurring moving objects, high shutter speeds to “freeze” motion.
Mode S is only available with CPU lenses.
To take pho to graphs in shutter-pri or i ty auto:
1
Rotate the mode dial to S.
2
Rotate the main com mand dial to choose the
de sired shut ter speed.
3
Frame a photograph, focus, and shoot.
If the fl ash-ready indicator ( ) blinks in the viewfi nder, the fl ash can be used for additional lighting. The fl ash-ready indicator will not be displayed if Off is selected for
Custom Setting 20 (Flash sign).
Subject too dark. Choose slower shutter speed or higher sensitivity (
46).
DescriptionIndicator
Subject too bright. Choose faster shutter speed or lower sensitivity (
46), or use optional Neutral Density (ND) fi lter.
Exposure Warning
If the limits of the exposure metering system are exceeded, one of the following indicators will be dis played in the control panel and viewfi nder:
Page 90
80
Taking Photographs—Exposure
Changing from Mode M to Mode S
If you select a shutter speed of or (long time exposure) in mode M and
then select mode S without changing the shutter speed, the shutter-speed display will
fl ash and the shutter can not be released. Rotate the main command dial to select a
different shutter speed before shooting.
Shutter Speed and Camera Shake
To prevent blurring caused by camera shake, the shutter speed should be faster than
the inverse of the focal length of the lens, in seconds (for example, if a lens has a focal length of 300 mm, shutter speed should be faster than
1
/
300 s). Use of a tripod is
rec om mend ed when shooting at slower shutter speeds. To prevent blur, try increasing
sensitivity ( 46), using the built-in Speedlight ( 94), or attaching a VR lens.
Page 91
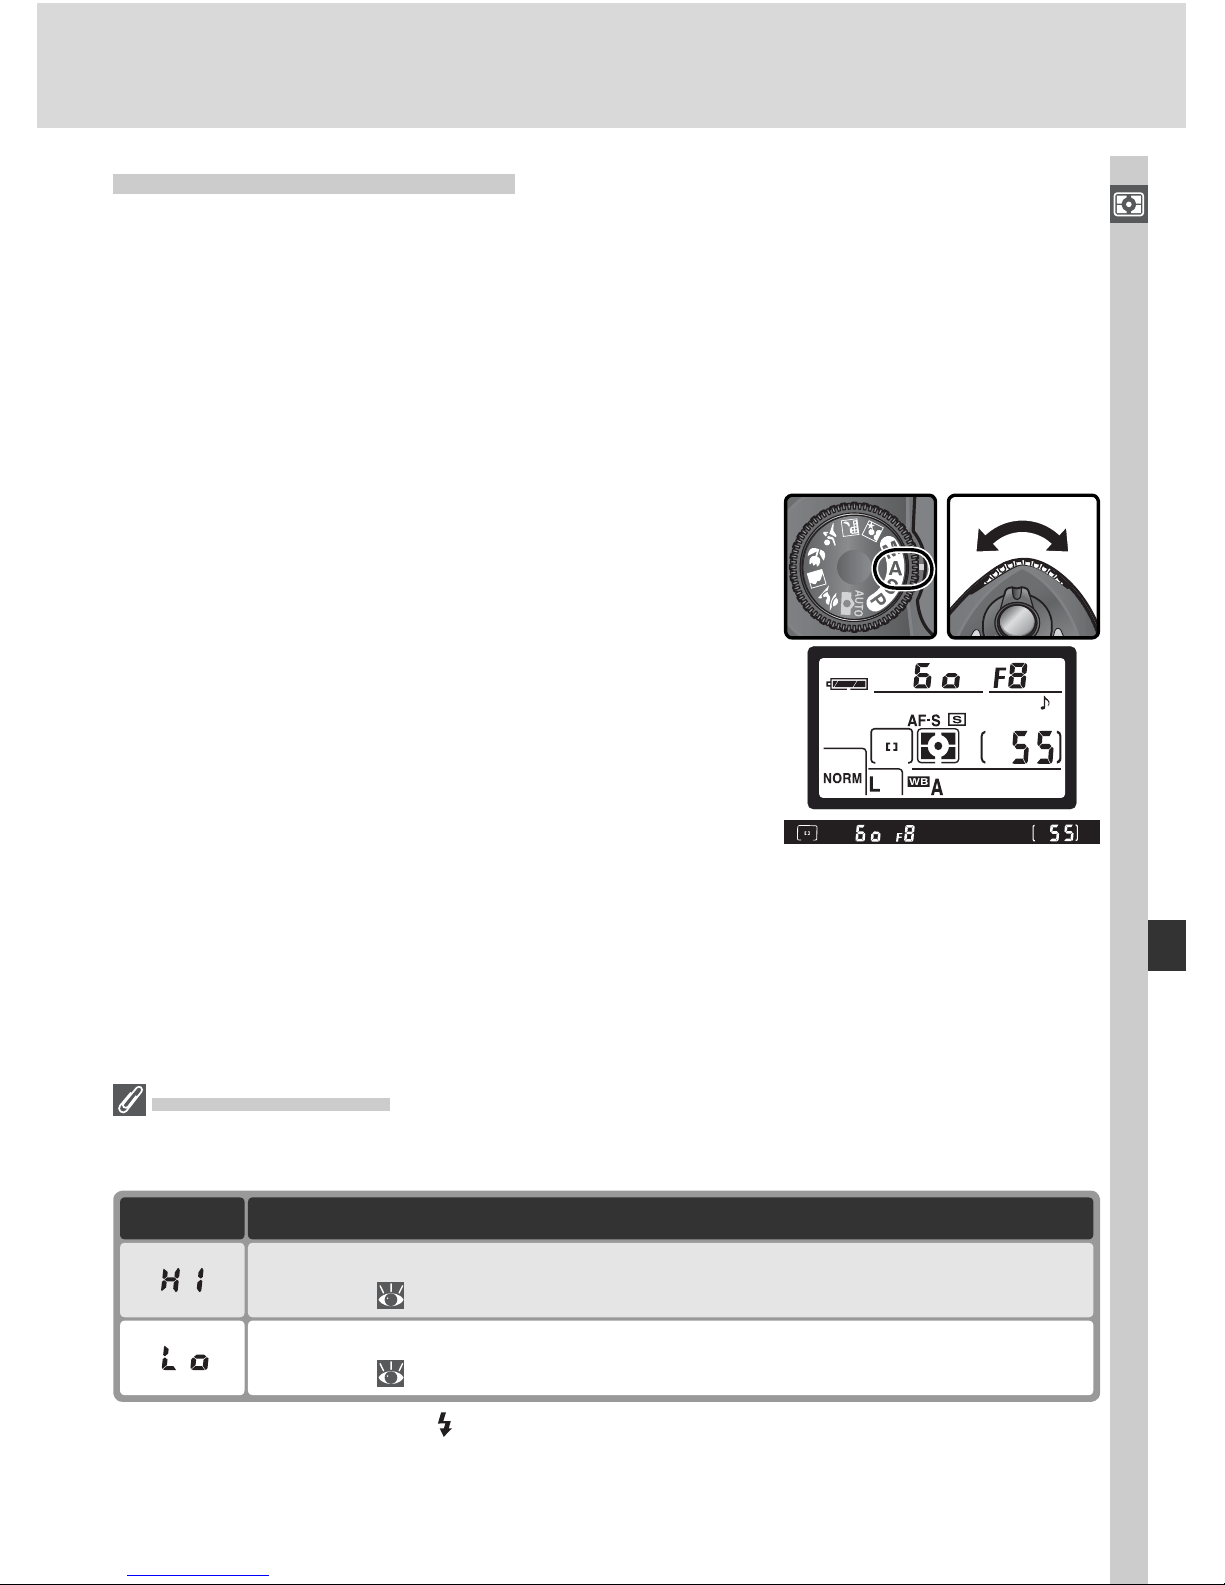
81
Taking Photographs—Exposure
A: Aperture-Priority Auto
In mode A, you choose the aperture while the camera controls shutter speed
for optimal exposure. Small apertures (high f/-numbers) increase depth of
fi eld, bringing both the main subject and back ground into focus. Large
apertures (low f/-num bers) soften background details and let more light into
the camera, increasing the range of the fl ash and making photographs less
susceptible to blurring. Mode A is only available with CPU lenses.
To take pho to graphs in aperture-pri or i ty auto:
1
Rotate the mode dial to A.
2
Rotate the sub-com mand dial to choose the
de sired aperture.
3
Frame a photograph, focus, and shoot.
If the fl ash-ready indicator ( ) blinks in the viewfi nder, the fl ash can be used for additional lighting. The fl ash-ready indicator will not be displayed if Off is selected for
Custom Setting 20 (Flash sign).
Subject too dark. Choose larger aperture (smaller f/-number) or higher
sensitivity ( 46).
DescriptionIndicator
Subject too bright. Choose smaller aperture (larger f/-number) or lower
sensitivity ( 46), or use optional Neutral Density (ND) fi lter.
Exposure Warning
If the limits of the exposure metering system are exceeded, one of the following indicators will be dis played in the control panel and viewfi nder:
Page 92
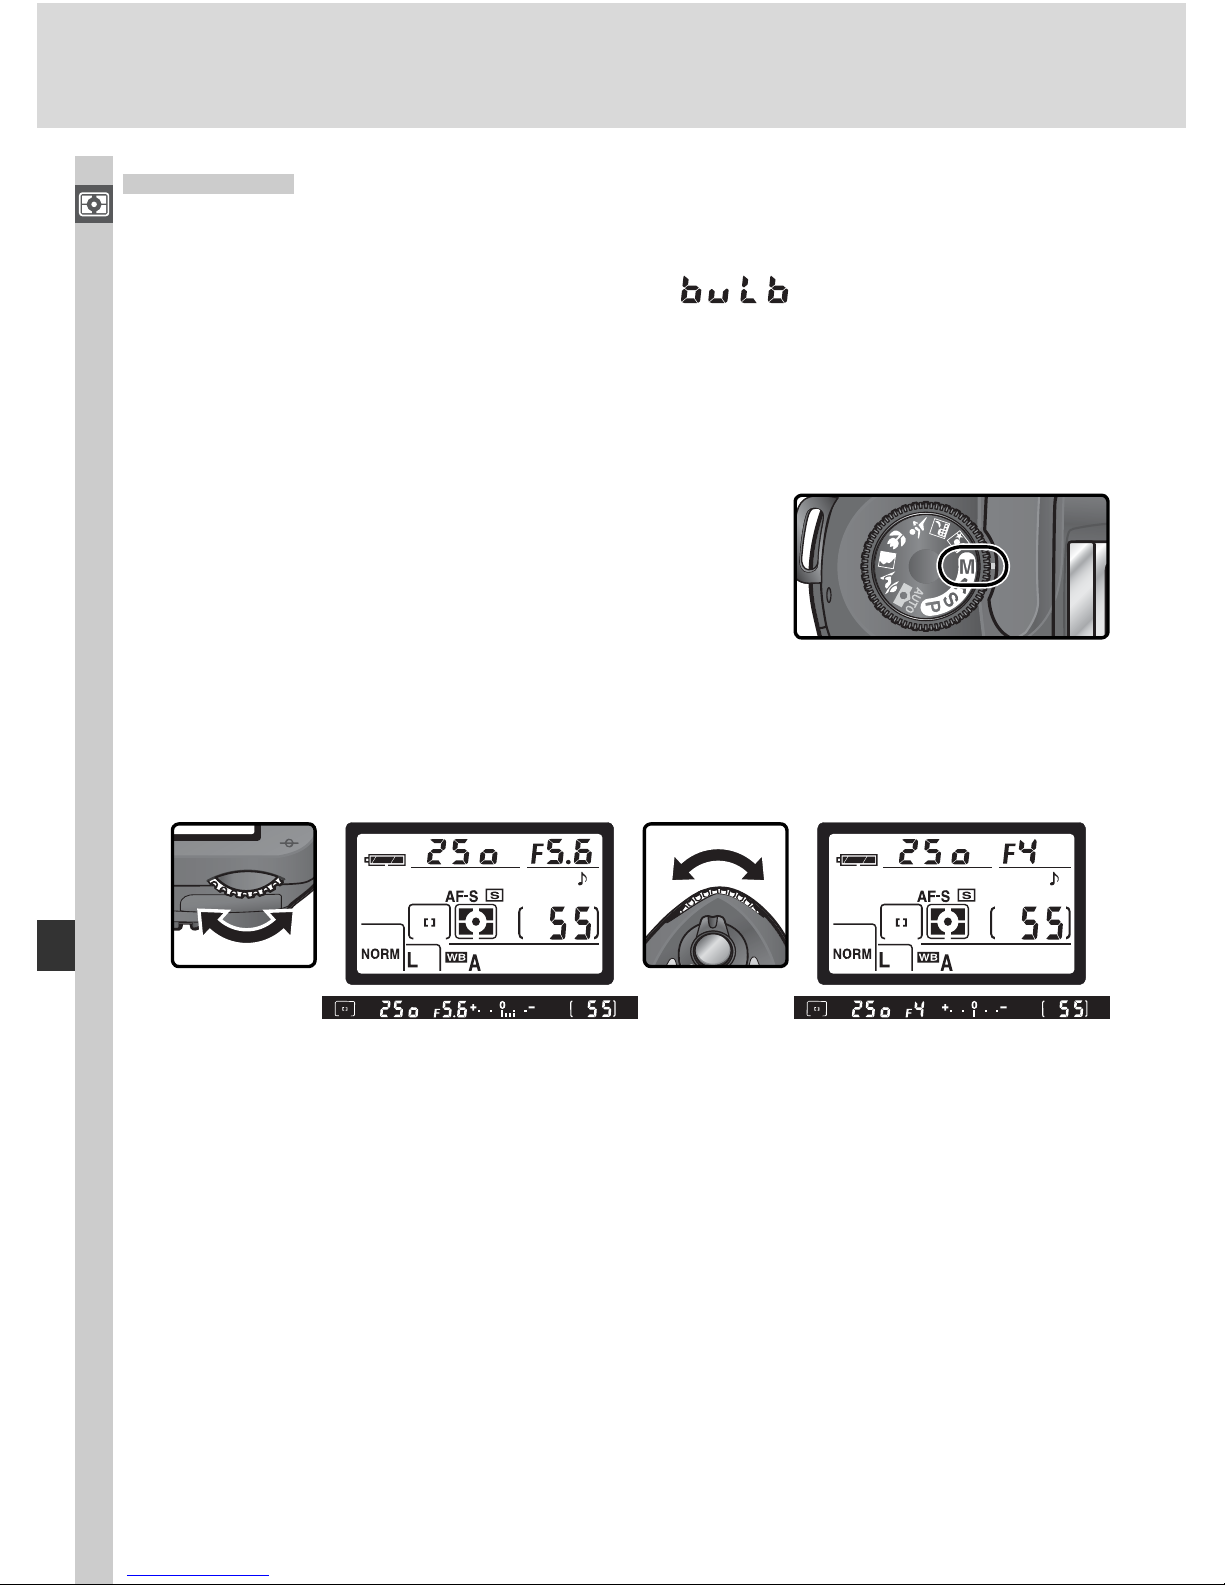
82
Taking Photographs—Exposure
M: Manual
In mode M, the user controls both shutter speed and aperture. Shut ter speed
can be set to values between 30 s and
1
/
8,000 s, or the shutter can be held
open indefi nitely for a long time-exposure ( ). Aperture can be set to
val ues between the minimum and maximum values for the lens. Using the
elec tron ic analog exposure display in the viewfi nder, you can adjust exposure
ac cord ing to shooting con di tions and the task at hand.
To take pho to graphs in manual exposure mode:
1
Rotate the mode dial to M.
2
Rotate the main com mand dial to choose a shut ter speed, and the sub-
com mand dial to set aperture. Check exposure in the electronic an a log
ex po sure display (see opposite), and con tin ue to adjust shut ter speed and
ap er ture until the de sired ex po sure is achieved.
3
Frame a photograph, focus, and shoot.
Page 93
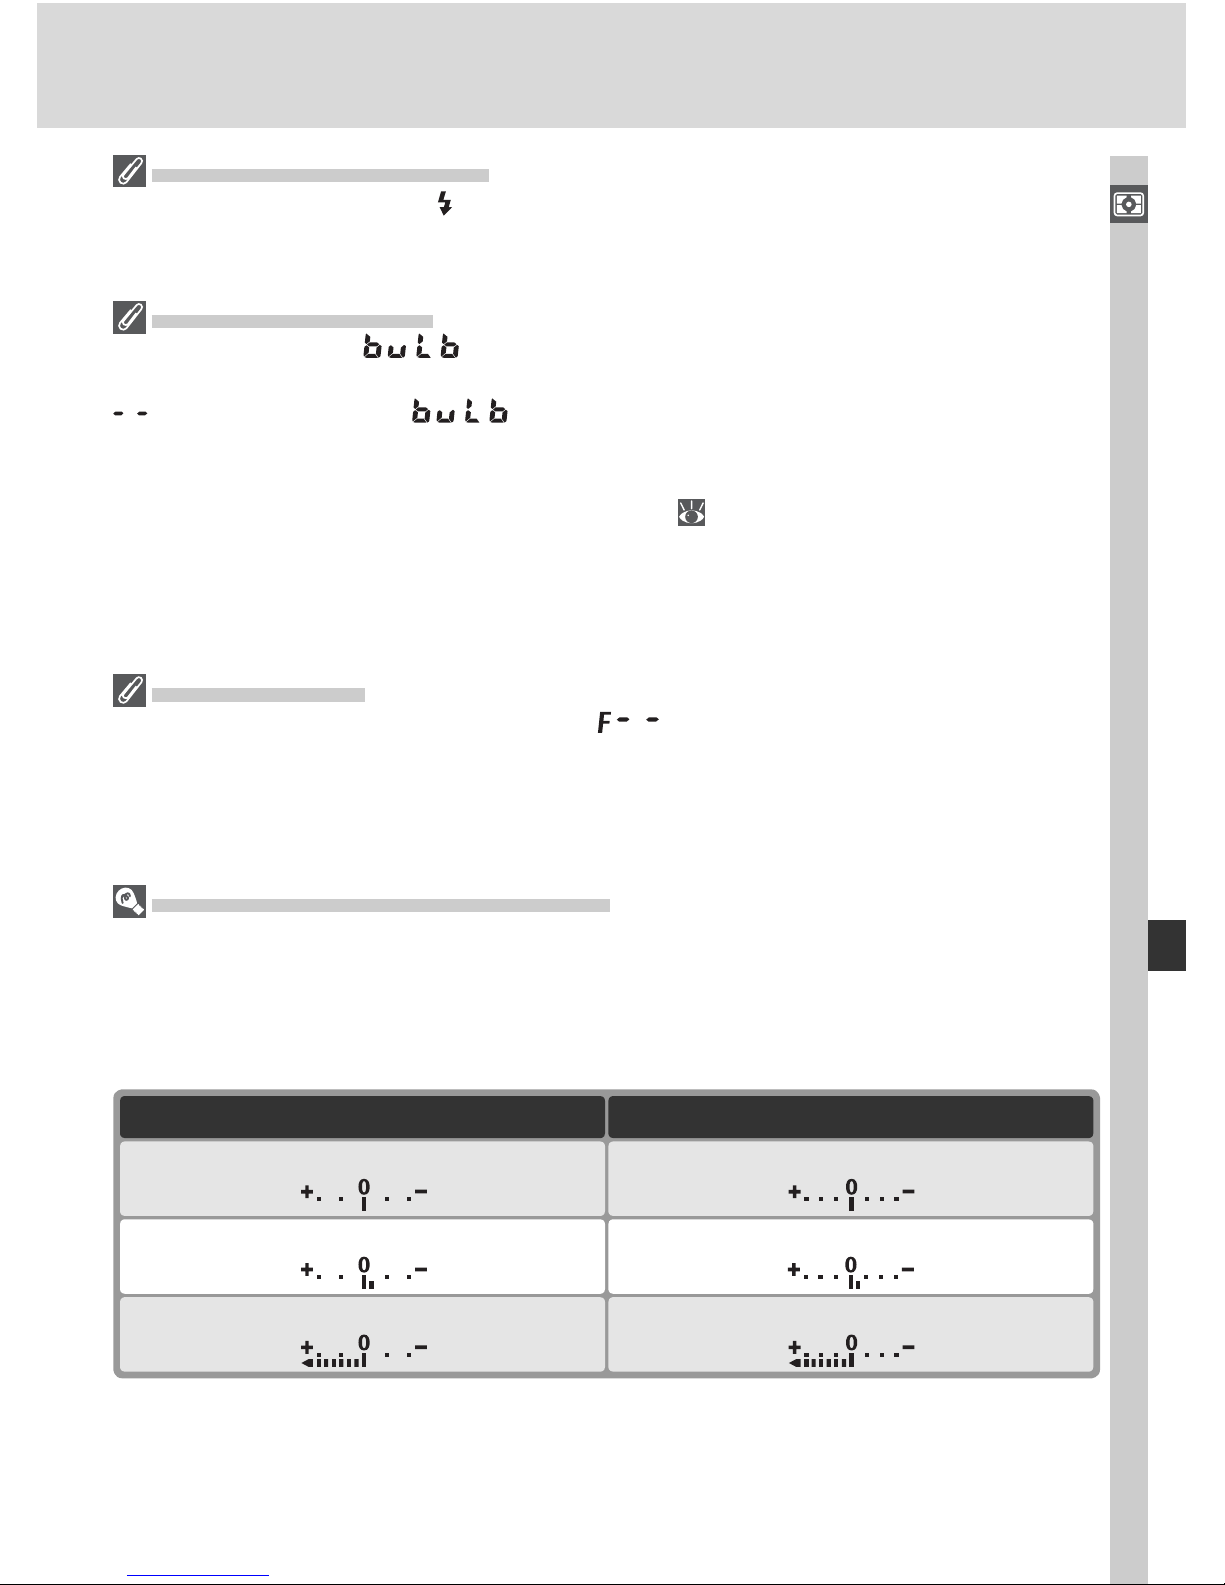
83
Taking Photographs—Exposure
The Flash-Ready Indicator
If the fl ash-ready indicator (
) blinks in the viewfi nder, the fl ash can be used for additional lighting. The fl ash-ready indicator will not be displayed if Off is selected for
Custom Setting 20 (Flash sign).
Long Time-Exposures
At a shutter speed of
, the shutter will remain open while the camera shutter-
release but ton is held down. In delayed remote and quick-response remote modes,
is displayed instead of ; the shutter opens when the shutter-release button
on the optional ML-L3 remote control is pressed (2 s after the button is pressed in delayed remote mode) and remains open until the remote-control shutter-release button
is pressed a second time (maximum 30 minutes; 107). Nikon recommends using a
fully-charged EN-EL3 battery or an optional EH-5 AC adapter to prevent loss of power
while the shutter is open. Note that if the shutter is open for more than approximately
1 s at any setting, “noise” in the form of randomly-spaced, brightly-colored pixels may
ap pear in the fi nal pho to graph.
Non-CPU Lenses
If a non-CPU lens is attached in mode M, will appear in the aperture displays in
the control panel and viewfi nder. Aperture must be adjusted manually using the lens
aperture ring, and depth-of-fi eld preview is not available. The camera exposure meter
can not be used, and exposure will not be displayed in the electronic analog exposure
display.
Electronic Analog Exposure Display
The electronic analog exposure display in the viewfi nder shows whether the photograph would be un der- or over-exposed at current settings. Depending on the option
chosen for Custom Setting 9 (EV step), the amount of un der- or over-ex po sure is
shown in increments of
1
/
3 EV or ½ EV. If the limits of the ex po sure metering system
are ex ceed ed, the display will fl ash.
“EV step” set to “1/3 step” “EV step” set to “1/2 step”
Underexposed by
1
/
3 EV Underexposed by ½ EV
Optimal exposure Optimal exposure
Overexposed by more than 2 EV Overexposed by more than 3 EV
Page 94
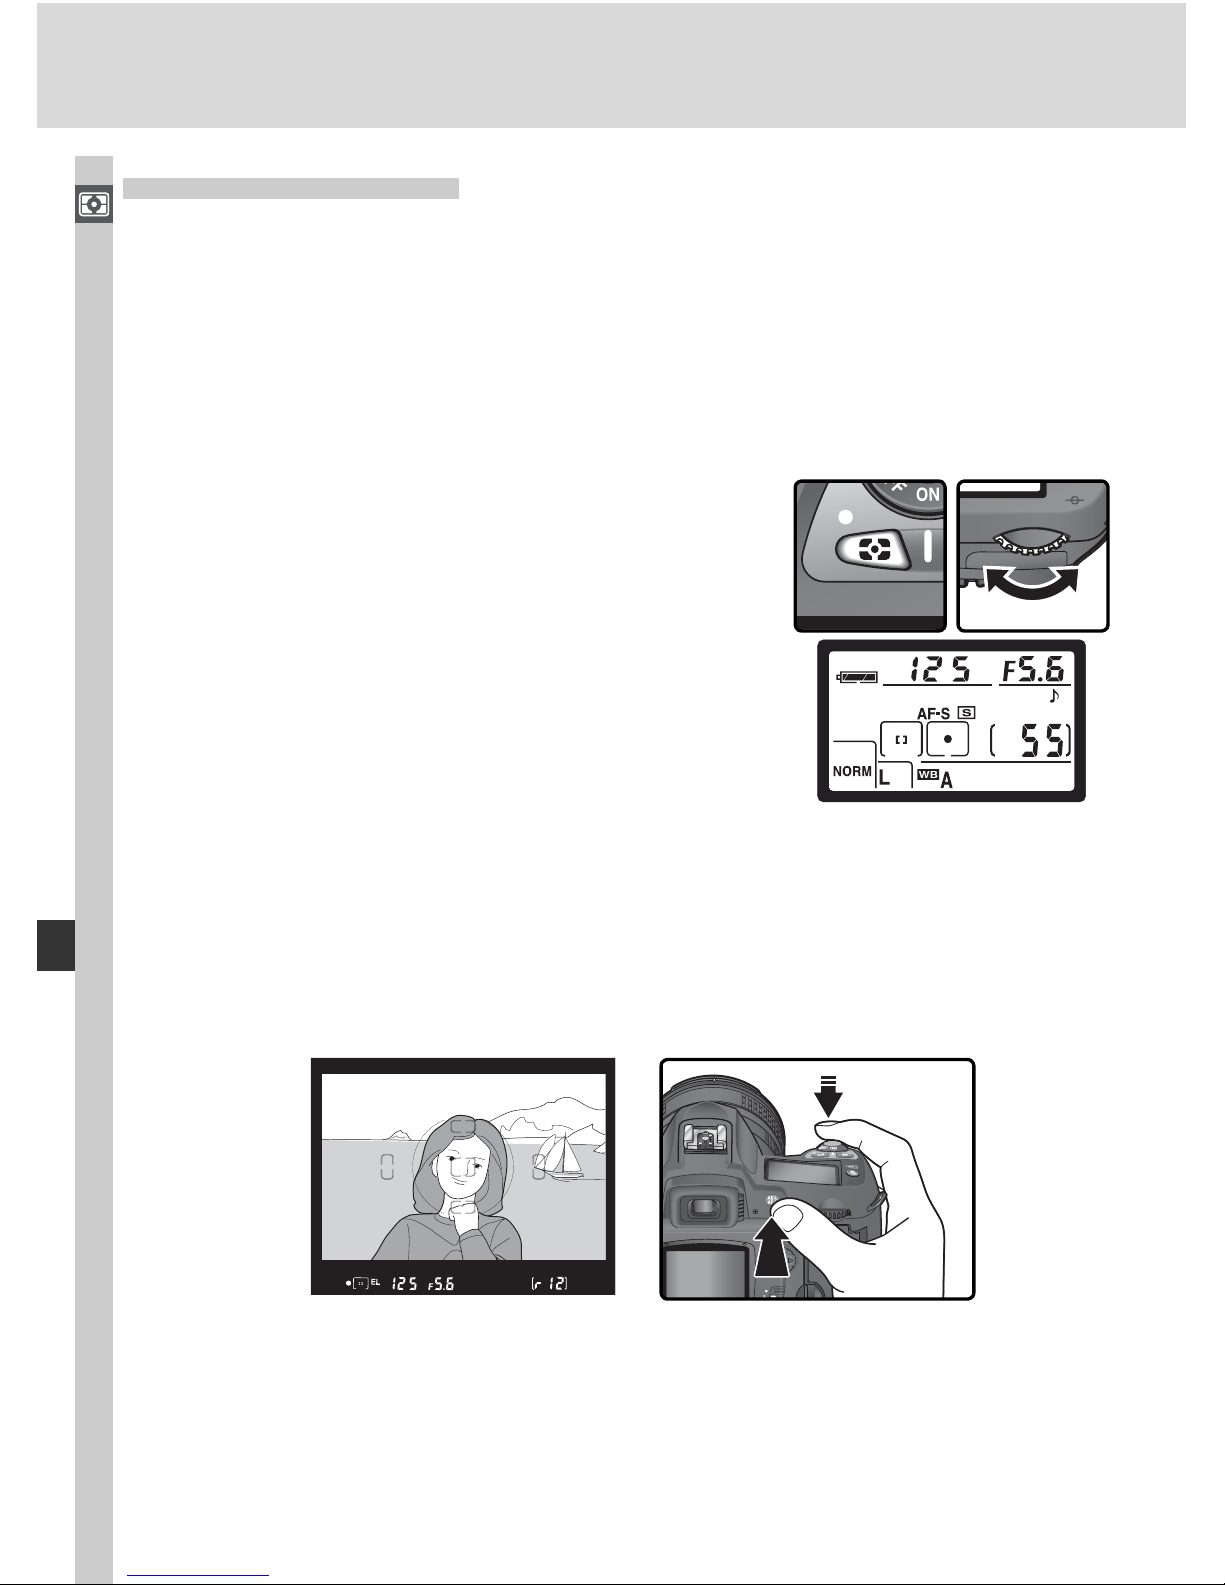
84
Taking Photographs—Exposure
Autoexposure Lock
When center-weighted metering is used, an area in the center of the frame
is assigned the greatest weight when determining exposure. Similarly, when
spot metering is used, exposure is based upon lighting conditions in the selected focus area. If the subject is not in the metered area when the picture
is taken, exposure will be based on lighting conditions in the back ground,
and the main sub ject may be under- or over-exposed. To prevent this, use
autoexposure lock:
1
Rotate the mode dial to P, S, or A and select
center-weight ed or spot metering (exposure
lock has no effect in mode M, while Digital
Vari-Program modes are not recommended as
center-weighted and spot metering can not
be selected in these modes).
While ex po sure lock is in effect, an EL in di ca tor will ap pear in the view-
fi nder.
2
Position the sub ject in the selected focus area and press the shutter-re-
lease button halfway (when using center-weighted metering, position
the subject in the center focus area). With the shut ter-release button
pressed halfway and the subject still po si tioned in the fo cus area, press
the AE-L/AF-L button to lock exposure. Confi rm that the in-focus in di ca tor (●) appears in the viewfi nder.
Page 95
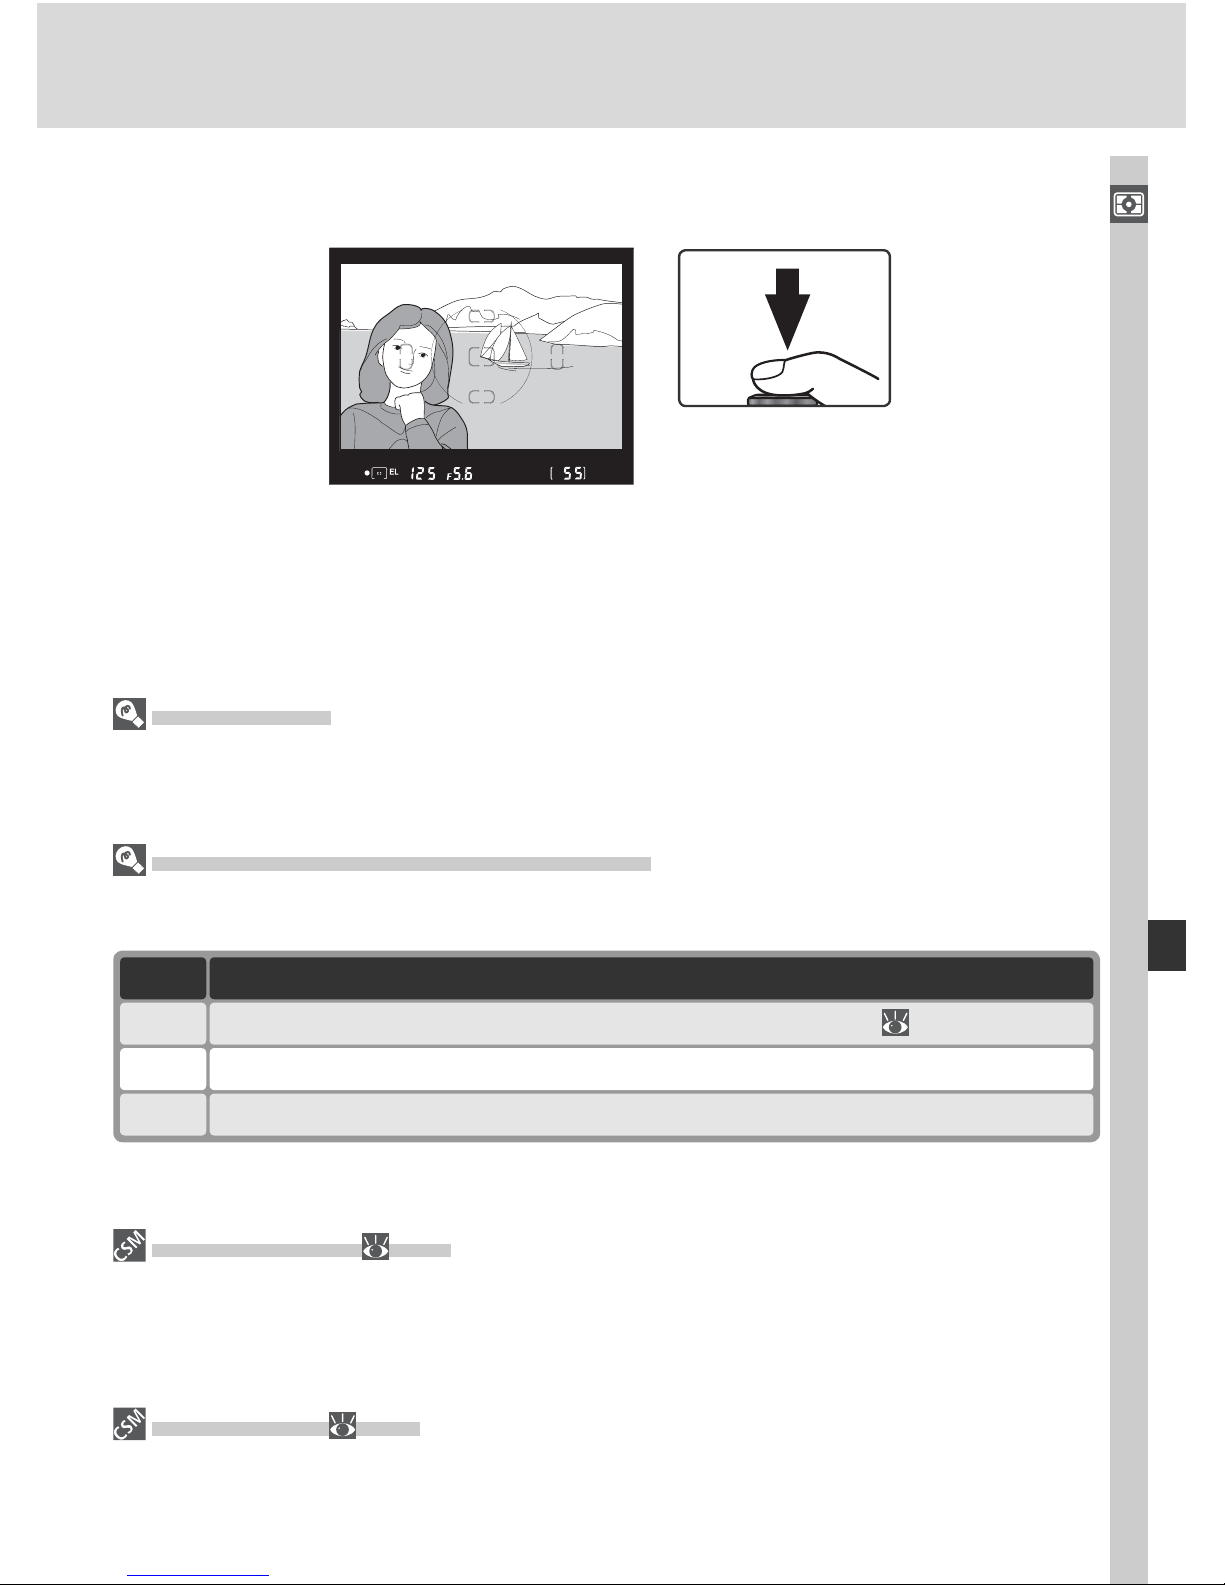
85
Taking Photographs—Exposure
3
Keeping the AE-L/AF-L but ton pressed, re com pose the pho to graph and
shoot.
Metered Area
In spot metering, exposure will be locked at the value metered in a 2.3-mm (0.09˝) circle centered on the selected focus area. In center-weighted metering, exposure will be
locked at the value metered in an 8-mm (0.31˝) circle at the center of the viewfi nder.
Adjusting Shutter Speed and Aperture
While exposure lock is in effect, the following settings can be changed without altering
the metered value for exposure:
The new values can be confi rmed in the viewfi nder and control panel. Note that the
metering method can not be changed while exposure lock is in effect.
15—AE- L/AF-L ( 147)
Depending on the option selected, the AE-L/AF-L button locks both focus and exposure
(the default setting), only focus, or only exposure. Options are available for keeping
exposure locked until the AE-L/AF-L button is pressed a second time, the shutter is
released, or exposure meters turn off.
16—AE Lock ( 148)
If +Release bttn is selected for AE Lock, exposure will lock when the shutter-release
button is pressed halfway.
Shutter speedS
SettingsMode
Shutter speed and aperture (fl exible program; 77)P
ApertureA
Page 96
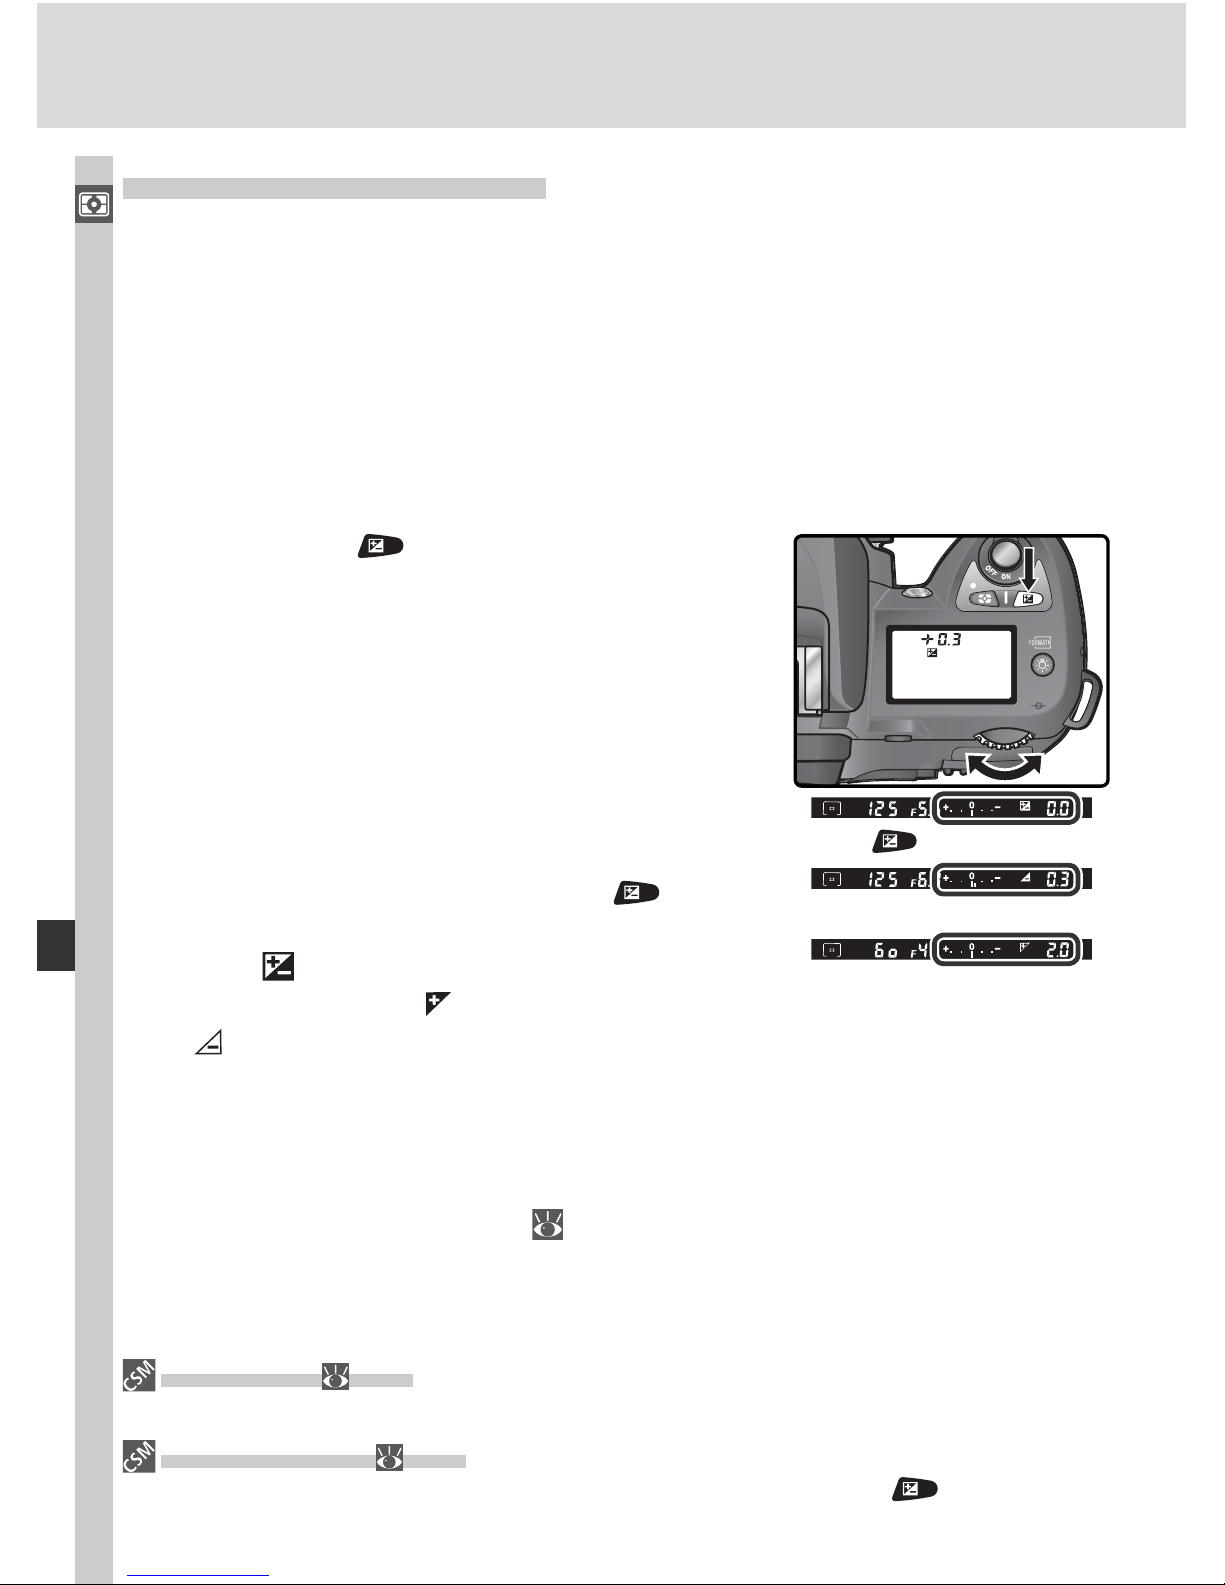
86
Taking Photographs—Exposure
Exposure Compensation
To obtain the desired results with certain subject compositions, it may be
nec es sary to use ex po sure compensation to alter exposure from the val ue
sug gest ed by the cam era. As a rule of thumb, positive compensation may
be needed when the main sub ject is dark er than the background, negative
val ues when the main sub ject is bright er than the background.
Exposure compensation is available in modes P, S, and A (in mode M, only the
exposure information in the electronic analog exposure display is affected;
shutter speed and aperture do not change).
1
Pressing the button, rotate the main
com mand dial and confi rm ex po sure com pen sa tion in the control panel or the electronic analog exposure display (the 0 in the
electronic analog exposure display will fl ash).
Ex po sure com pen sa tion can be set to val ues
be tween –5 EV (un der ex po sure) and +5 EV
(over ex po sure) in in cre ments of
1
/
3 EV.
The cur rent val ue for ex po sure com pen sa tion
can be con fi rmed by press ing the but ton.
The current value is shown in the control panel
with a icon; in the viewfi nder, positive values are shown by a icon, negative values by
a icon.
2
Frame the pho to graph, fo cus, and shoot.
Normal ex po sure can be restored by set ting ex po sure compensation to ±0 or
per form ing a two button reset ( 111). Ex po sure com pen sa tion is not reset
when the camera is turned off.
9—EV Step ( 144)
Use this option to set the increments for exposure com pen sa tion to ½ EV.
10—Exp Comp. ( 145)
If desired, exposure compensation can be set without pressing the button.
+2.0 EV
–0.3 EV
±0 EV ( button pressed)
Page 97
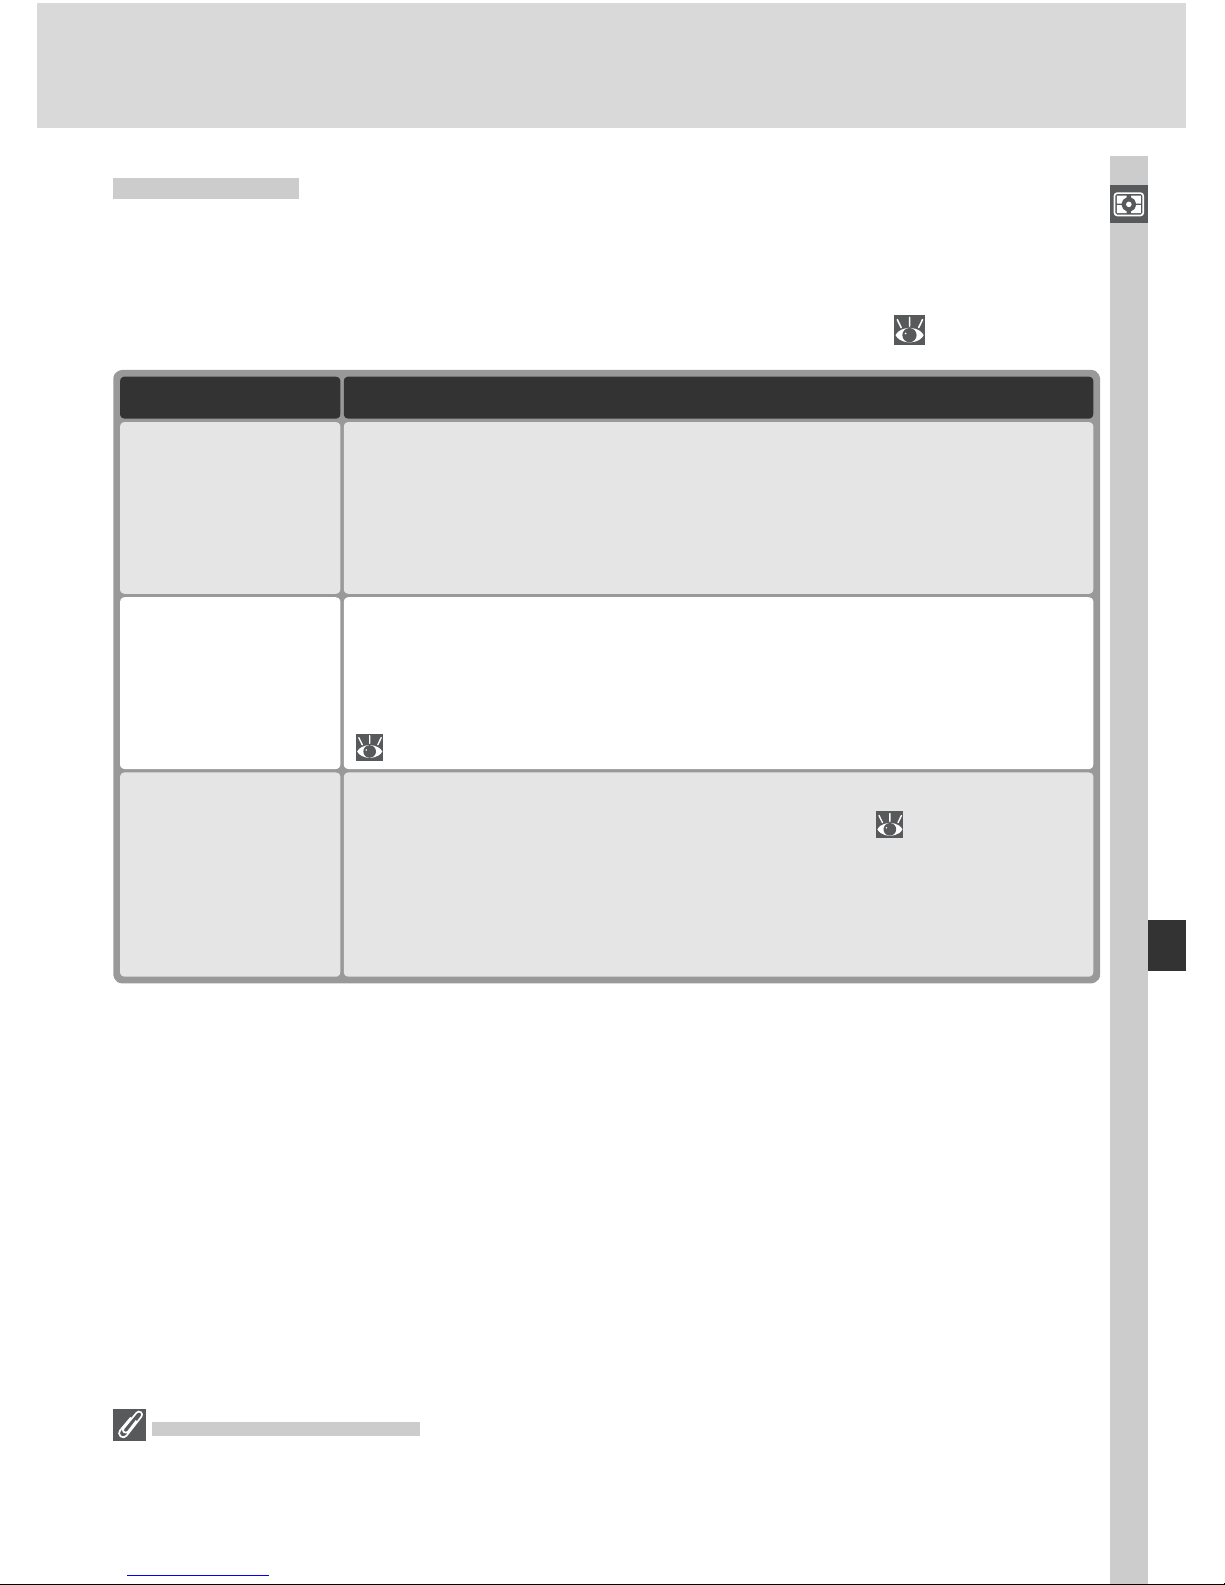
87
Taking Photographs—Exposure
Bracketing
In P, S, A, and M modes, the D70 offers three types of bracketing (bracketing is not available in Digital Vari-Program modes). The type of bracketing
performed is determined by the option selected for Custom Setting 12 (BKT
set): AE & fl ash, AE only, Flash only, or WB bracketing ( 146).
DescriptionType
With each shot, camera varies exposure by maximum of ±2 EV,
“bracketing” exposure selected with exposure compensation
(modes P, S, and A) or by user (mode M). One pho to graph is
pro duced each time shut ter is released; up to three shots are
re quired to com plete brack et ing se quence.
Exposure
bracketing
(AE & fl ash or
AE only)
Camera varies fl ash level by maximum of ±2 EV with each shot.
One pho to graph is pro duced each time shut ter is released; up
to three shots are re quired to com plete brack et ing se quence.
Available only in i-TTL and auto aperture fl ash control modes
( 150).
Flash bracketing
(AE & fl ash or
Flash only)
Cam era cre ates up to three im ag es each time shut ter is re leased,
“bracketing” current white balance setting ( 92). Only one
shot is re quired to complete bracketing sequence. Recommended when shoot ing under mixed light ing or experimenting with
different white bal ance settings. Not available at NEF (Raw) or
NEF + JPEG Basic image quality.
White balance
bracketing
(WB bracketing)
Digital Vari-Program
If a Digital Vari-Program mode is selected while bracketing is in effect, bracketing will
be suspended until P, S, A, or M mode is restored.
Page 98
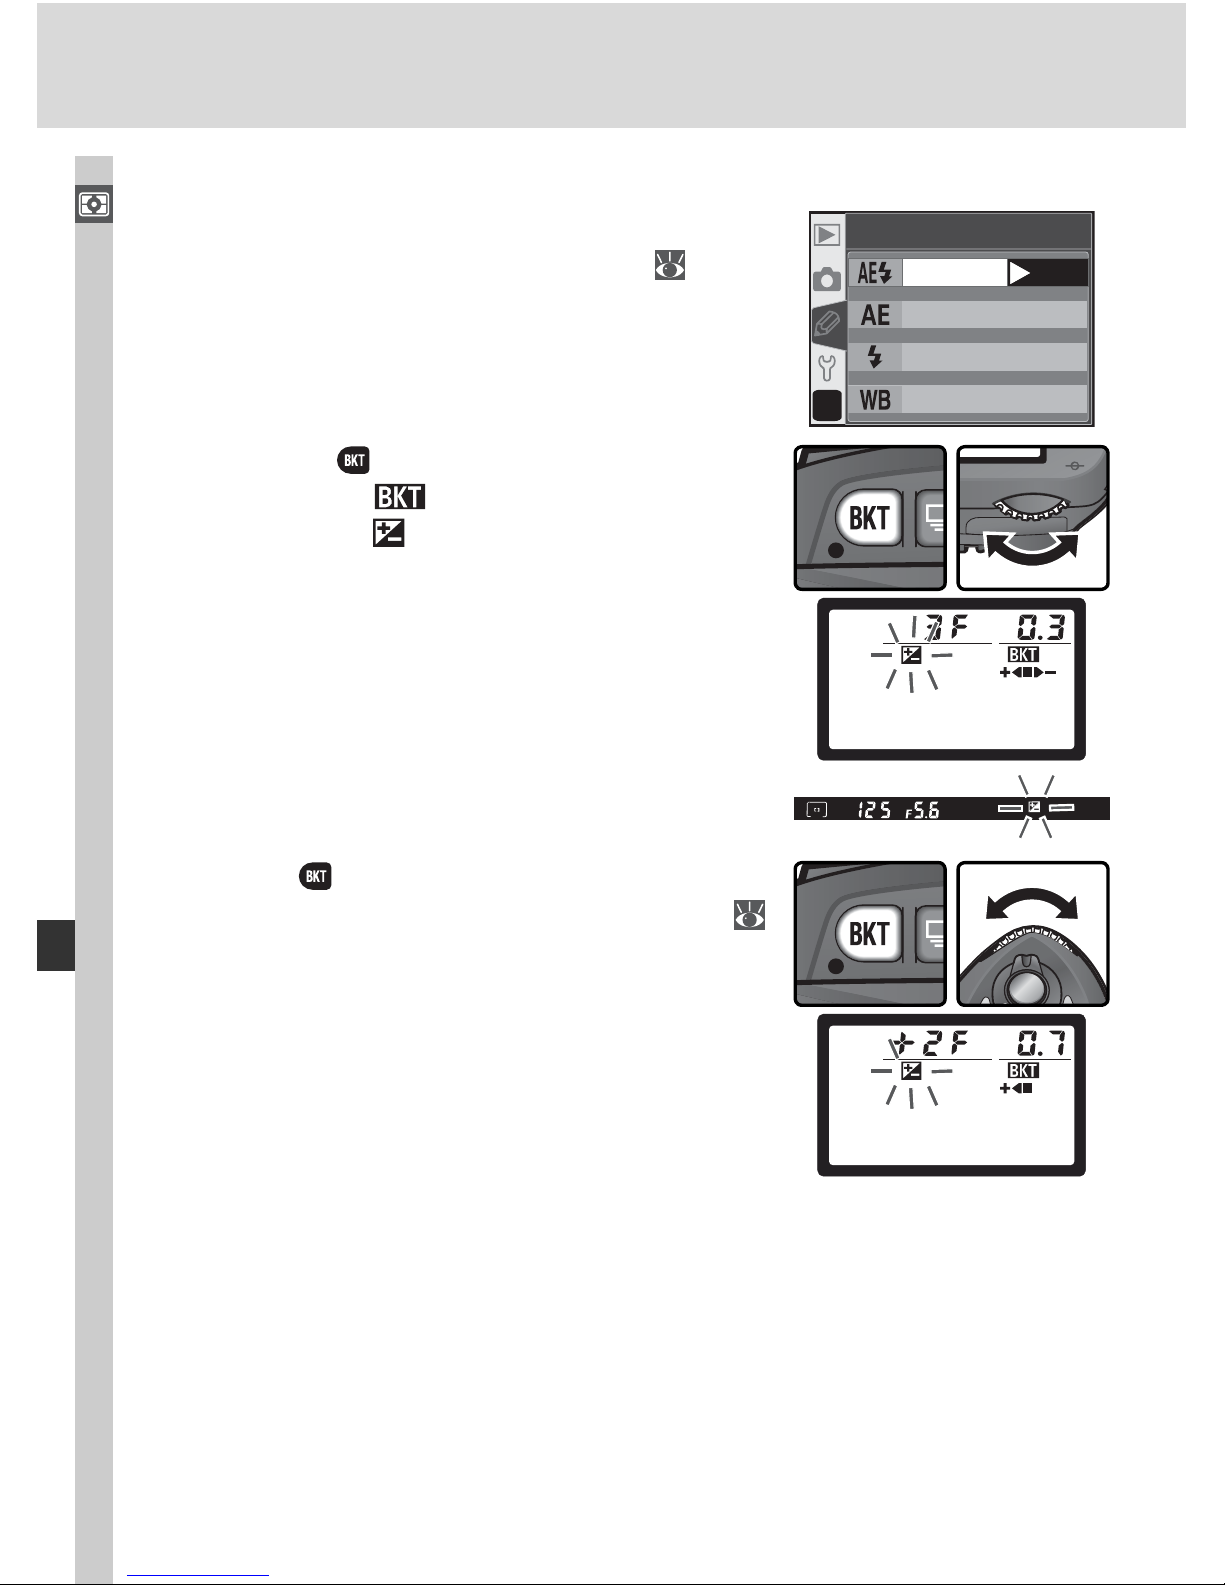
88
Taking Photographs—Exposure
Exposure and Flash Bracketing
1
Se lect the type of brack et ing to be per formed
us ing Cus tom Set ting 12 (BKT set; 146).
Choose AE & fl ash to vary both ex po sure and
fl ash level (the de fault setting), AE only to
vary only exposure, or Flash only to vary only
fl ash level.
?
WB bracketin
g
AE & flash
AE onl
y
Flash onl
y
12
BKT set
OK
2
Press ing the button, rotate the main com-
mand dial until is displayed in the control
panel and the icons in the control panel
and viewfi nder start to blink.
3
Press the button and rotate the sub-com-
mand dial to choose a bracketing program (
90–91).
Page 99
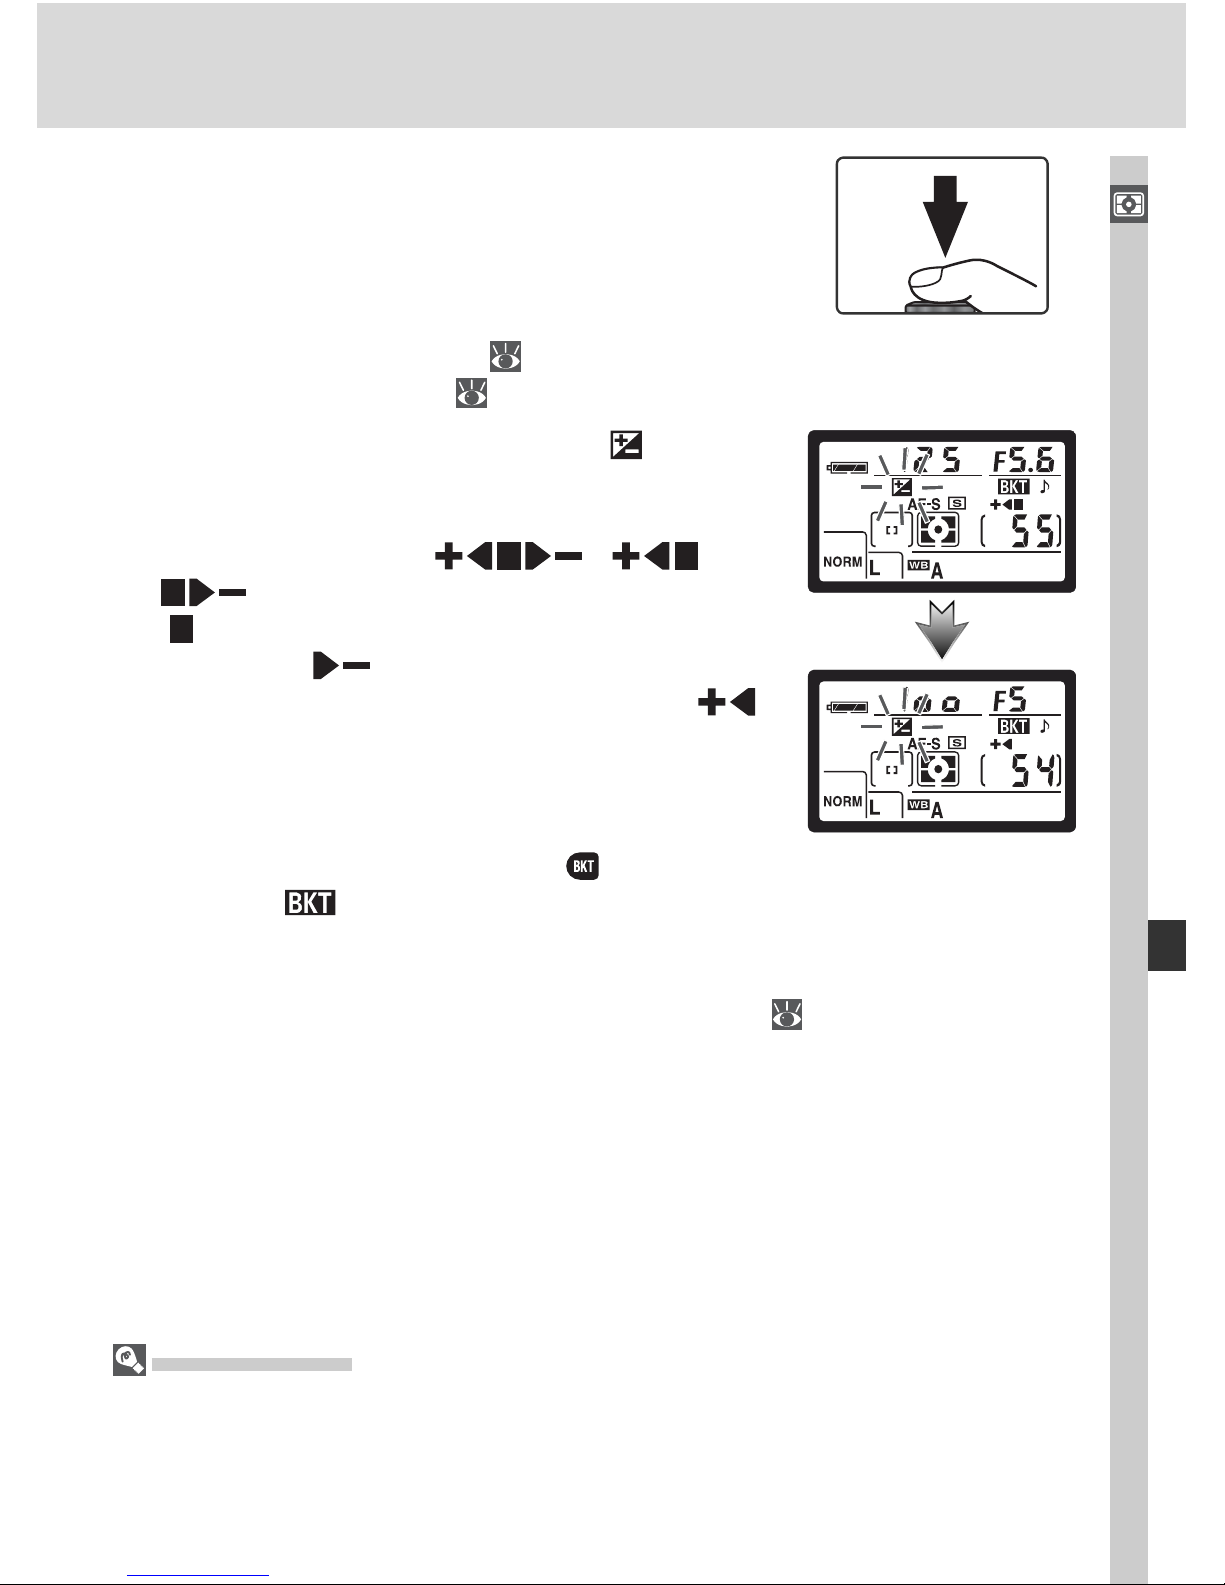
89
Taking Photographs—Exposure
4
Com pose a photograph, focus, and shoot.
The cam era will vary ex po sure and/or fl ash
level shot-by-shot according to the brack et ing
pro gram se lect ed. Mod i fi ca tions to ex po sure
and fl ash level are add ed to those made with
ex po sure com pen sa tion (
86) and fl ash ex-
posure compensation ( 102).
While bracketing is in ef fect, the icons in
the control panel and viewfi nder will fl ash. A
seg ment will dis ap pear from the bracketing
progress in di ca tor ( , , or
) af ter each shot. The middle segment
( ) disappears when the unmodifi ed shot is
taken, the segment when a shot with
negative compensation is taken, and the
segment when a shot with positive compensation is taken. Bracketing begins again when
all shots in the sequence have been taken.
To cancel bracketing, press the
button and rotate the main com mand
dial until is no longer displayed in the control panel. The program
last in effect will be restored the next time brack et ing is ac ti vat ed. Brack et ing can also be cancelled by selecting WB bracketing for Custom Setting 12 or by per form ing a two-button reset ( 111), although in this
case the bracketing program will not be restored the next time brack et ing
is activated.
Shooting Mode
In single frame, self-timer, and remote control modes, one shot will be taken each time
the shutter-release button is pressed. In continuous mode, shooting will pause af ter
the number of shots specifi ed in the bracketing pro gram have been taken. Shooting
will resume the next time the shutter-release button is pressed.
Page 100
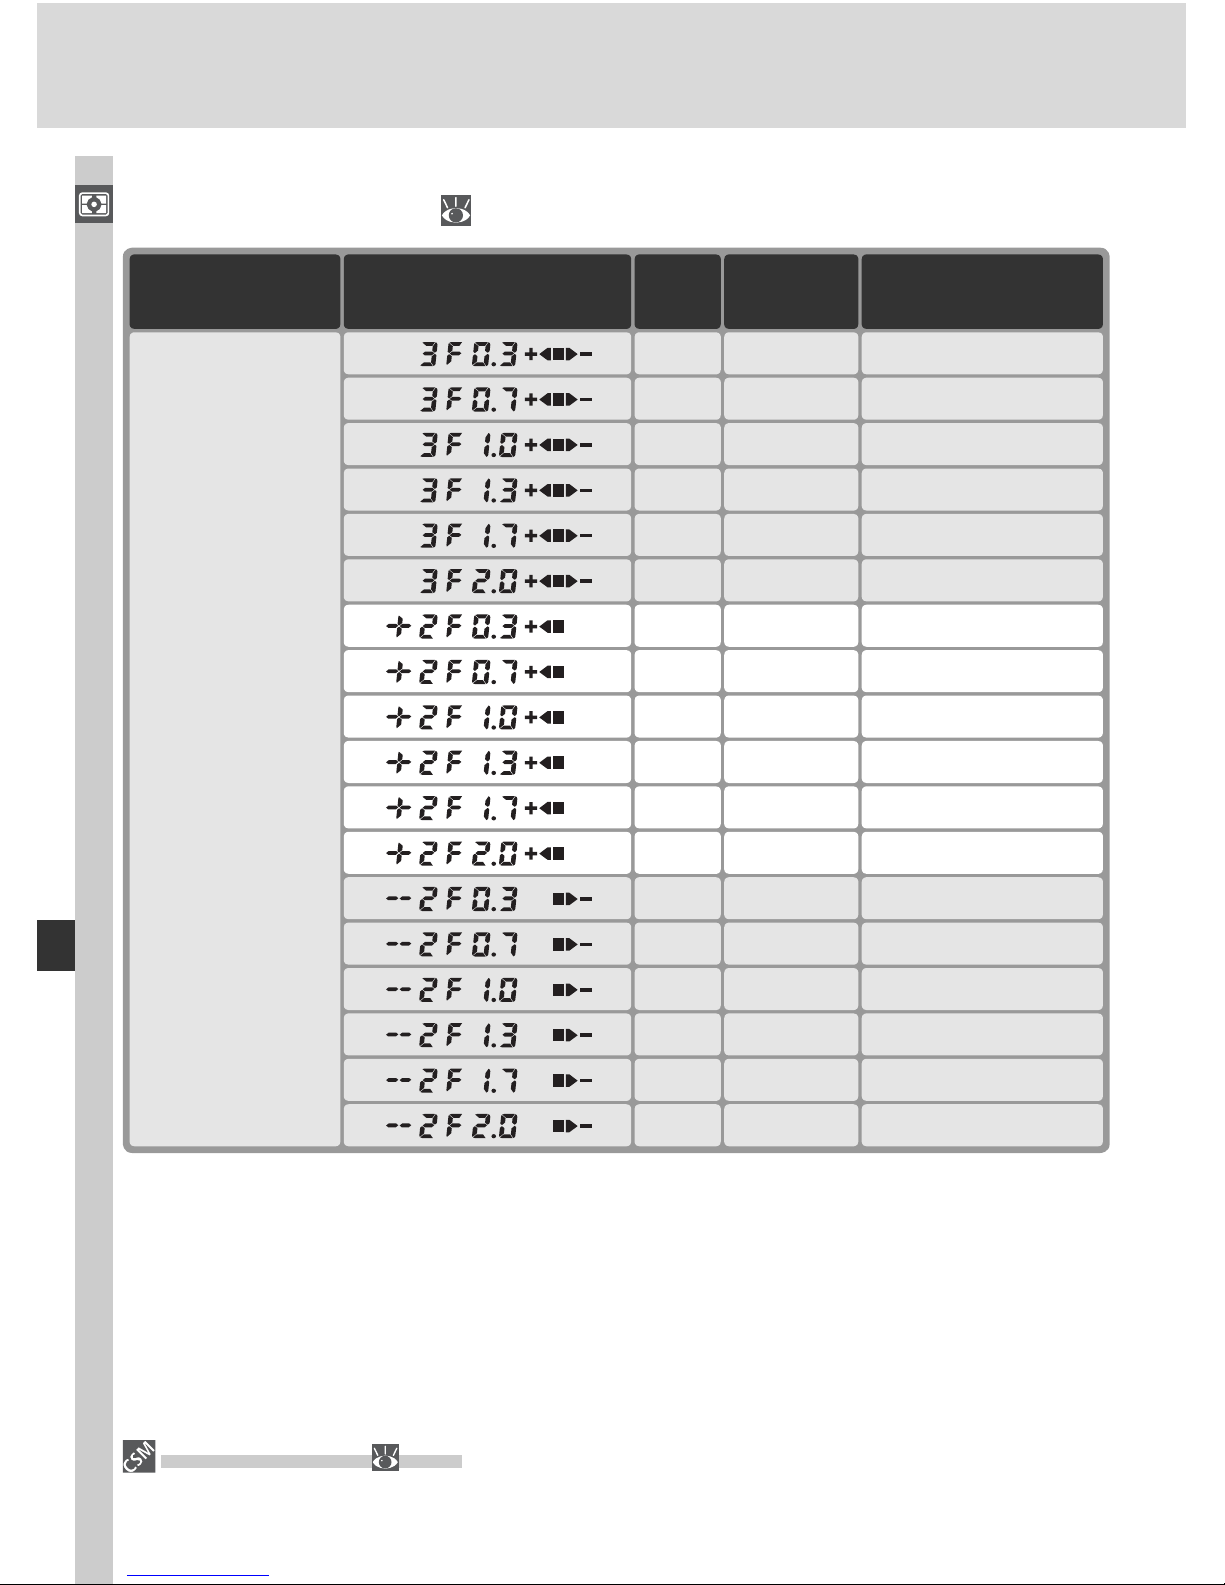
90
Taking Photographs—Exposure
The bracketing programs available depend on the option selected for Custom Setting 9 (EV step; 144).
No. of
shots
Control panel
display
Exposure
increment
3 ±
1
/
3 EV 0, –0.3, +0.3
3 ±
2
/
3 EV 0, –0.7, +0.7
Bracketing
order (EVs)
3 ±1 EV 0, –1.0, +1.0
3 ±1
1
/
3 EV 0, –1.3, +1.3
3 ±1
2
/
3 EV 0, –1.7, +1.7
3 ±2 EV 0, –2.0, +2.0
2 +
1
/
3 EV 0, +0.3
2 +
2
/
3 EV 0, +0.7
2 +1 EV 0, +1.0
2 +1
1
/
3 EV 0, +1.3
2 +1
2
/
3 EV 0, +1.7
2 +2 EV 0, +2.0
2 –
1
/
3 EV 0, –0.3
2 –
2
/
3 EV 0, –0.7
2 –1 EV 0, –1.0
2 –1
1
/
3 EV 0, –1.3
2 –1
2
/
3 EV 0, –1.7
2 –2 EV 0, –2.0
Custom Setting 9
(EV step)
1/3 step
(default)
13—BKT Order ( 146)
This option can be used to change the bracketing order.
 Loading...