

Page 1
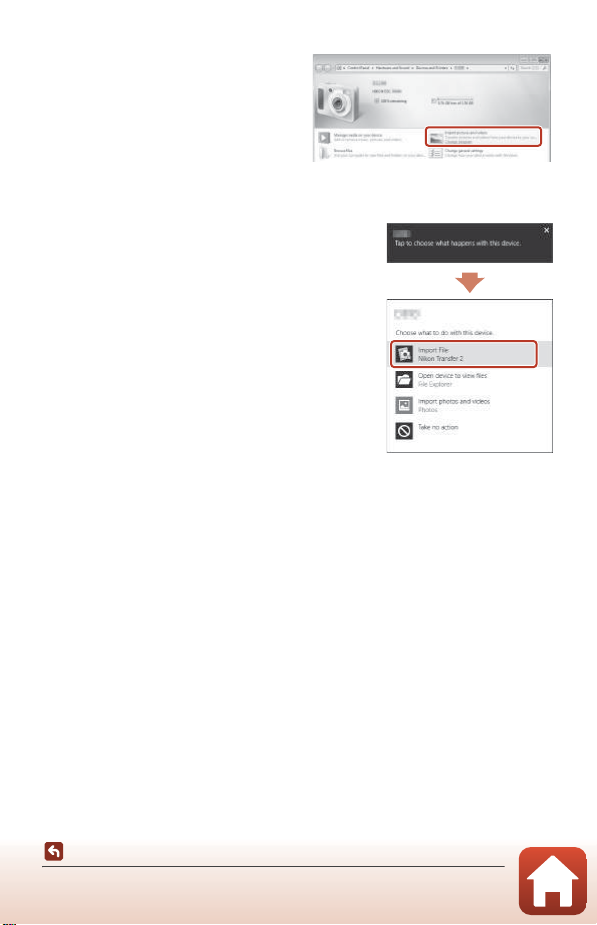
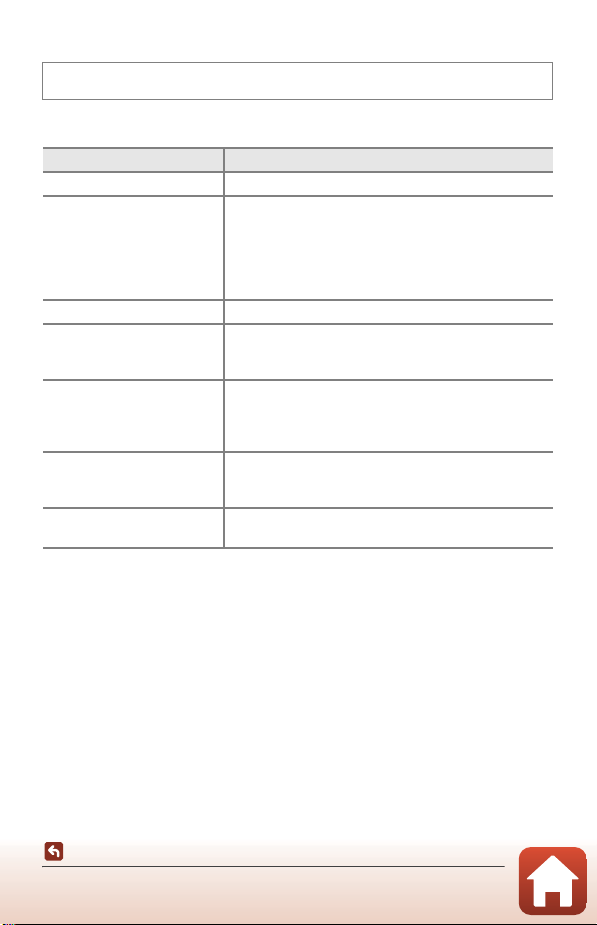
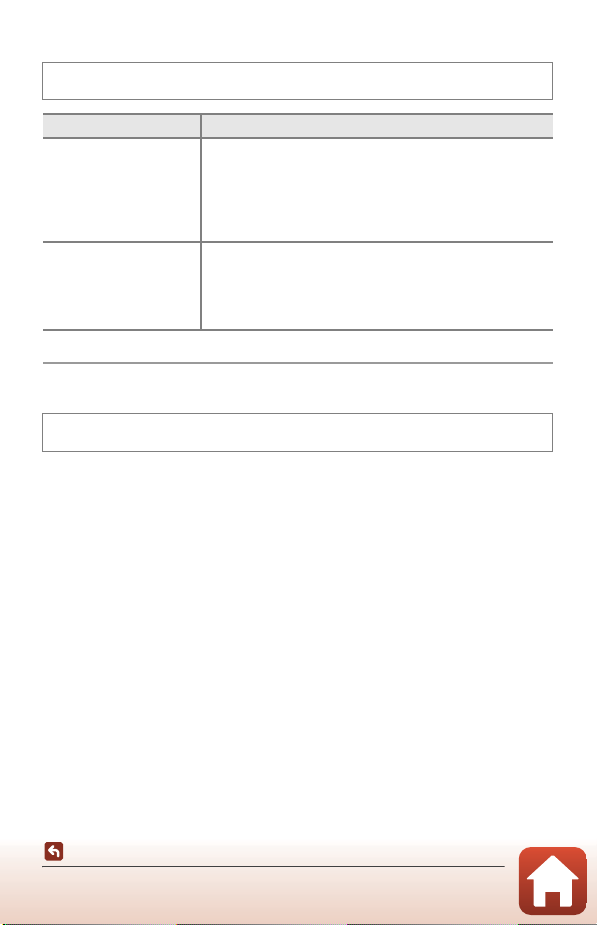
If a message is displayed prompting you to choose a program, select Nikon Transfer 2.
• When using Windows 7
If the dialog shown on the right is
displayed, follow the steps below to
select Nikon Transfer 2.
1Under Import pictures and
videos, click Change program. A
program selection dialog will be
displayed; select Nikon Transfer 2
and click OK.
2 Double-click the Nikon Transfer 2 icon.
• When using Windows 10 or Windows 8.1
If the dialog shown on the right is displayed, click
the dialog and then click Import File/Nikon
Transfer 2.
• When using OS X or macOS
If Nikon Transfer 2 does not automatically start, launch the Image Capture
application that comes bundled with Mac while the camera and your computer are
connected, and select Nikon Transfer 2 as the default application to open when the
camera is connected to your computer.
If the memory card contains a large number of images, it may take a while for Nikon
Transfer 2 to start. Wait until Nikon Transfer 2 starts.
B Notes About Connecting the USB Cable
Operation is not guaranteed if the camera is connected to the computer via a USB hub.
C Using ViewNX-i
Consult online help for more information.
117
Connecting the Camera to a TV, Printer, or Computer
Transferring Images to a Computer (ViewNX-i)
Page 2
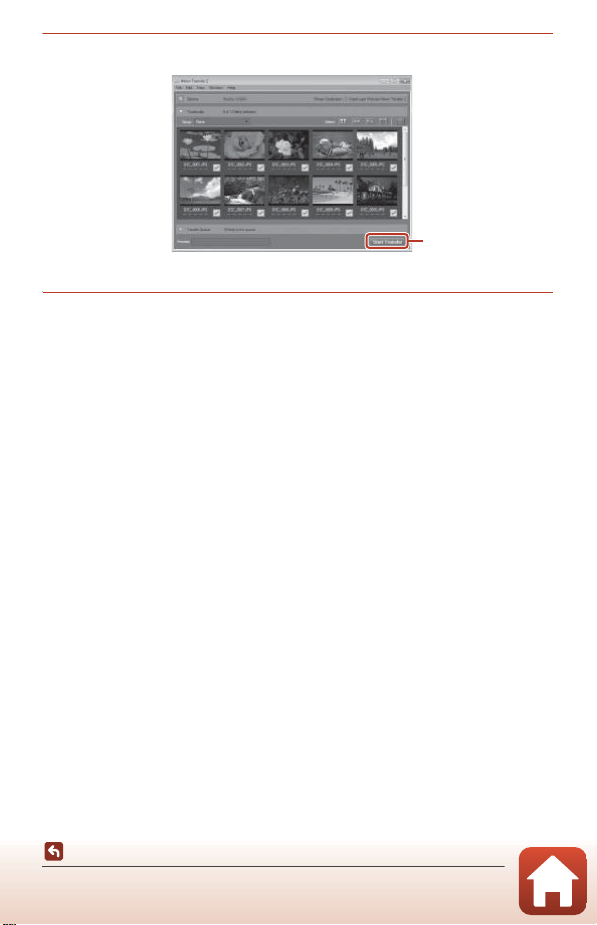
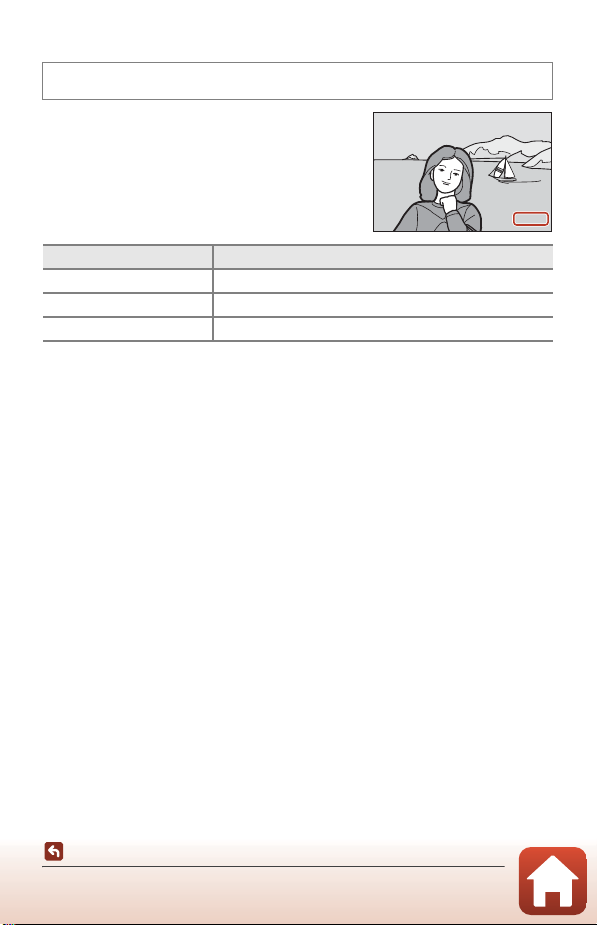
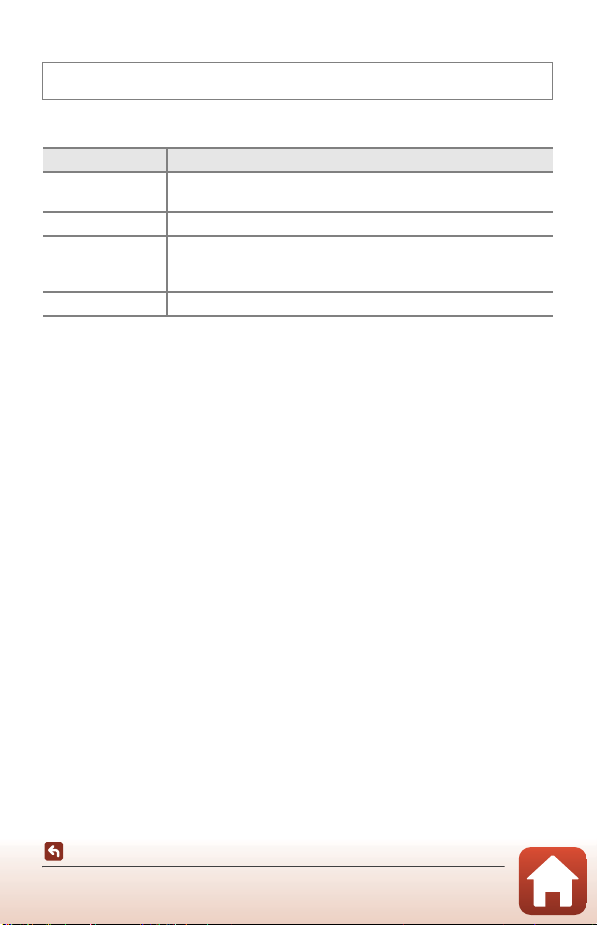
2 After Nikon Transfer 2 starts, click Start Transfer.
Start Transfer
• Image transfer begins. When image transfer is complete, ViewNX-i starts and the
transferred images are displayed.
3 Terminate the connection.
• If you are using a card reader or card slot, choose the appropriate option in the
computer operating system to eject the removable disk corresponding to the
memory card and then remove the memory card from the card reader or card slot.
• If the camera is connected to the computer, turn the camera off and disconnect the
USB cable.
C Capture NX-D
Use Nikon’s Capture NX-D software to fine-tune photos or to change settings for RAW
pictures and save them in other formats. It is available for download from the following
website:
http://downloadcenter.nikonimglib.com
118
Connecting the Camera to a TV, Printer, or Computer
Transferring Images to a Computer (ViewNX-i)
Page 3
Using the Menu
Menu Operations...............................................................................................................120
Menu Lists ............................................................................................................................123
The Shooting Menu (The Common Shooting Options) ......................................127
The Shooting Menu (A, B, C, or D Mode)..............................................................130
The Movie Menu................................................................................................................144
The Playback Menu...........................................................................................................151
The Network Menu ...........................................................................................................156
The Setup Menu.................................................................................................................159
Using the Menu
119
Page 4

Menu Operations
Image quality
Image size
Shooting menu
Menu icons
Time zone and date
Date stamp
Monitor settings
Self-timer: after release
Photo VR
EVF auto toggle
AF assist
Set up
You can set the menus listed below by pressing the d (menu) button.
• A Shooting menu
• e Movie menu
• c Playback menu
1, 2
1
3
• J Network menu
• z Setup menu
1
Press the d button when the shooting screen is displayed.
2
Menu icons and available setting options vary depending on the shooting mode.
3
Press the d button when the playback screen is displayed.
1 Press the d (menu) button.
• The menu is displayed.
2 Press the multi selector
J.
• The current menu icon is
displayed in yellow.
3 Select a menu icon and
press the k button.
• The menu options become
selectable.
Using the Menu
Menu Operations
120
Page 5
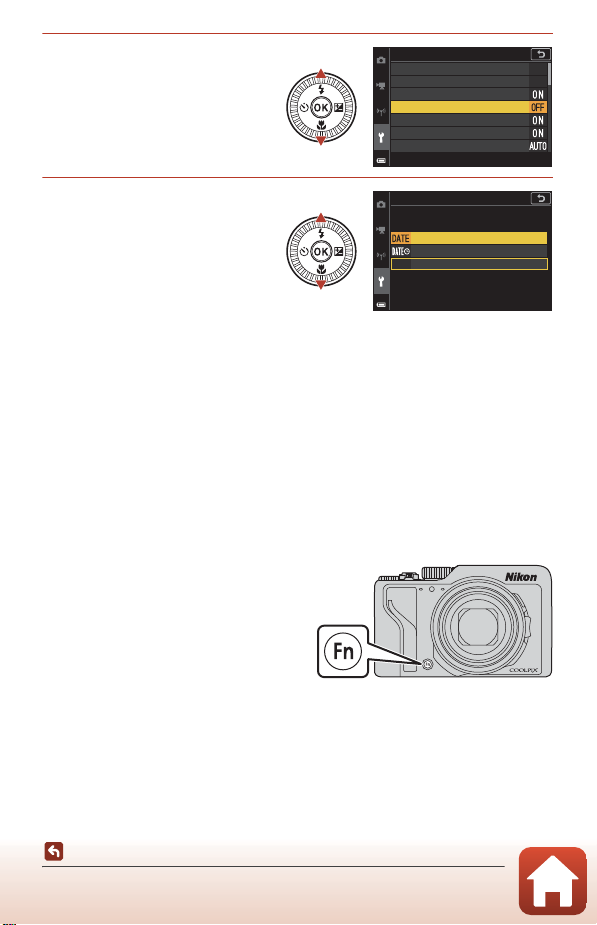
4 Select a menu option and
press the k button.
• Certain menu options cannot
be set depending on the
current shooting mode or the
state of the camera.
Time zone and date
Monitor settings
EVF auto toggle
Date stamp
Self-timer: after release
Photo VR
AF assist
Set up
5 Select a setting and press
Date stamp
the k button.
• The setting you selected is
applied.
• When you are finished using
the menu, press the d
button.
• When a menu is displayed, you
can switch to shooting mode by pressing the shutter-release button or b (e)
button.
Date
Date and time
O
C Command Dial or Multi Selector Operation When a Menu Is Displayed
When a menu or setting items are displayed, you can select a menu option also by rotating
the command dial or multi selector.
C Operating the Touch Panel on Menus
You can use the touch panel to operate menus (A7).
Using the w (Function) Button
If you press the w button in A, B, C, or
D mode, you can quickly configure the
pre-saved menu options (default setting
is Continuous). To set a different menu
option, select U Fn button and select
the desired menu option.
Using the Menu
Menu Operations
121
Page 6
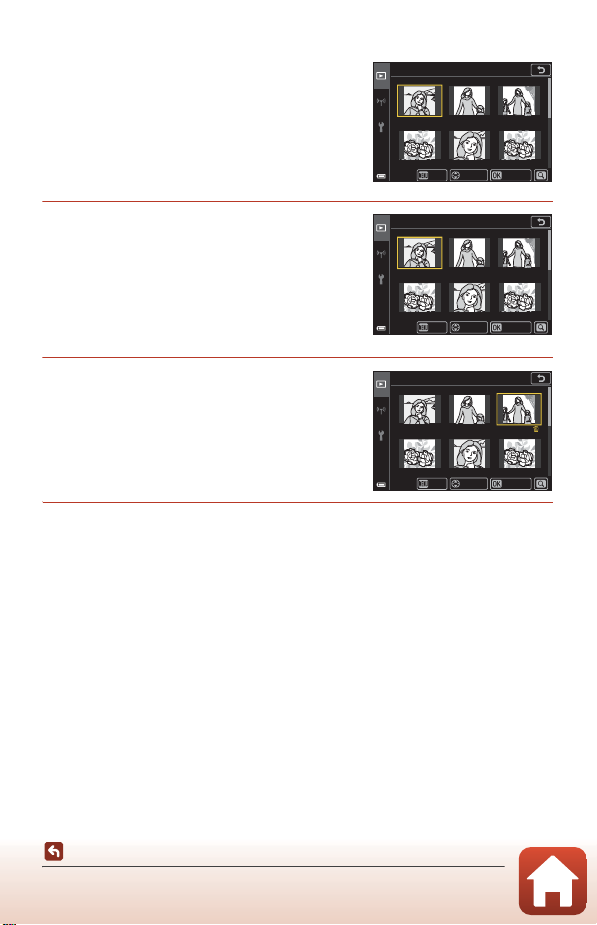
The Image Selection Screen
Erase selected images
Back
Conrm
ON/OFF
When an image selection screen such as the one
shown on the right is displayed while operating the
camera menu, follow the procedures described
below to select the images.
1 Use the multi selector JK or rotate
Erase selected images
it to select the desired image.
• Move the zoom control (A2) toward g (i) to
switch to full-frame playback, or f (h) to
switch to thumbnail playback.
• Only one image can be selected for Rotate
image.
Proceed to step 3.
2 Use HI to select ON or OFF.
• When ON is selected, an icon is displayed
under the selected image. Repeat steps 1 an d 2
to select additional images.
Back
Erase selected images
Back
3 Press the k button to apply the image selection.
• When a confirmation dialog is displayed, follow the on-screen instructions to
operate.
ON/OFF
ON/OFF
Conrm
Conrm
Using the Menu
Menu Operations
122
Page 7
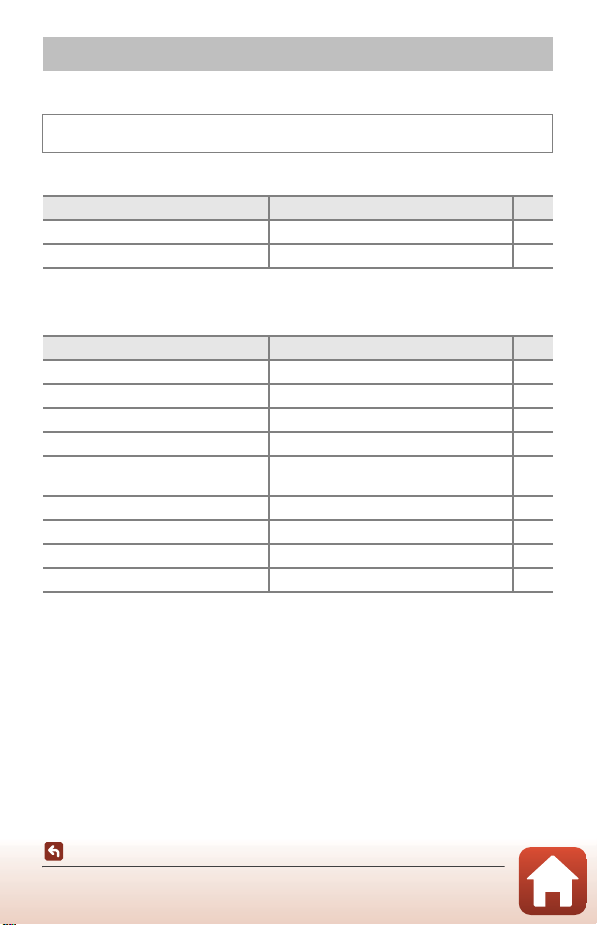
Menu Lists
The Shooting Menu
Enter shooting mode M d button
Common Options
Option Default setting A
Image quality* Normal 127
Image size* i 4608×3456 129
* Also can be set by pressing the w (function) button (A121).
For A, B, C, and D Modes
Option Default setting A
White balance*
Metering* Matrix 133
Continuous* Single 134
ISO sensitivity* Auto 137
Exposure bracketing
AF area mode* Target finding AF 139
Autofocus mode Pre-focus 142
Noise reduction filter Normal 143
M exposure preview On 143
* Also can be set by pressing the w (function) button (A121).
Auto (normal)
• Number of shots: Bracketing off
• Bracketing increment: ±0.3
130
138
Using the Menu
Menu Lists
123
Page 8
The Movie Menu
Enter shooting mode M d button M e menu icon M k button
Option Default setting A
Movie options e 1080/30p or S 1080/25p 144
Autofocus mode Single AF 148
Movie VR On (hybrid) 149
Wind noise reduction Off 150
Frame rate –150
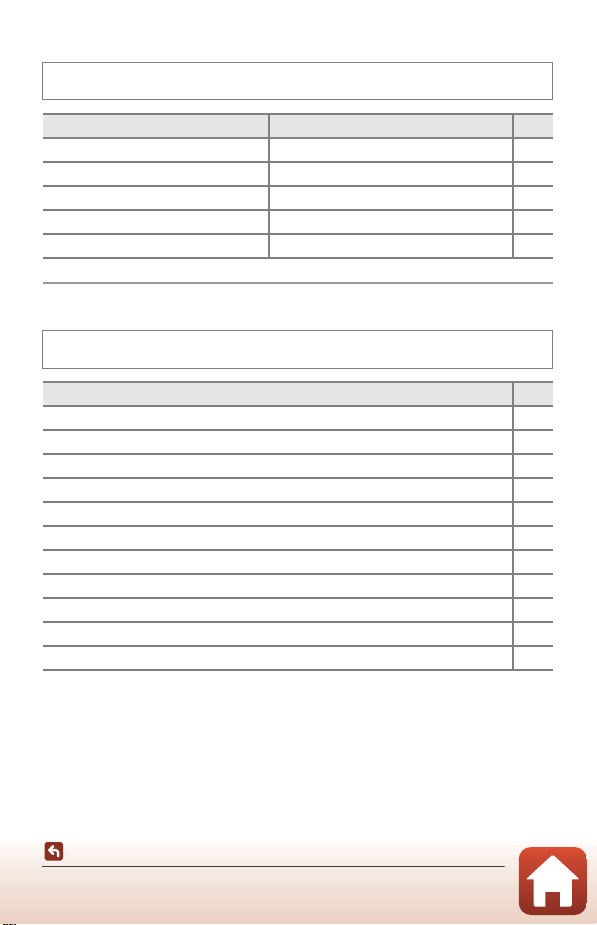
The Playback Menu
Press the c button (playback mode) M d button
Mark for upload
Quick retouch
D-Lighting
Red-eye correction
Glamour retouch
1
2
2
2
2
Filter effects 92
Slide show 152
Option A
1
Protect
Rotate image
Copy
1
1
Sequence display
1
Select an image on the image selection screen. See “The Image Selection Screen”
(A122) for more information.
2
Edited images are saved as separate files. Some images may not be edited.
124
Using the Menu
Menu Lists
151
89
89
90
90
153
153
154
155
Page 9
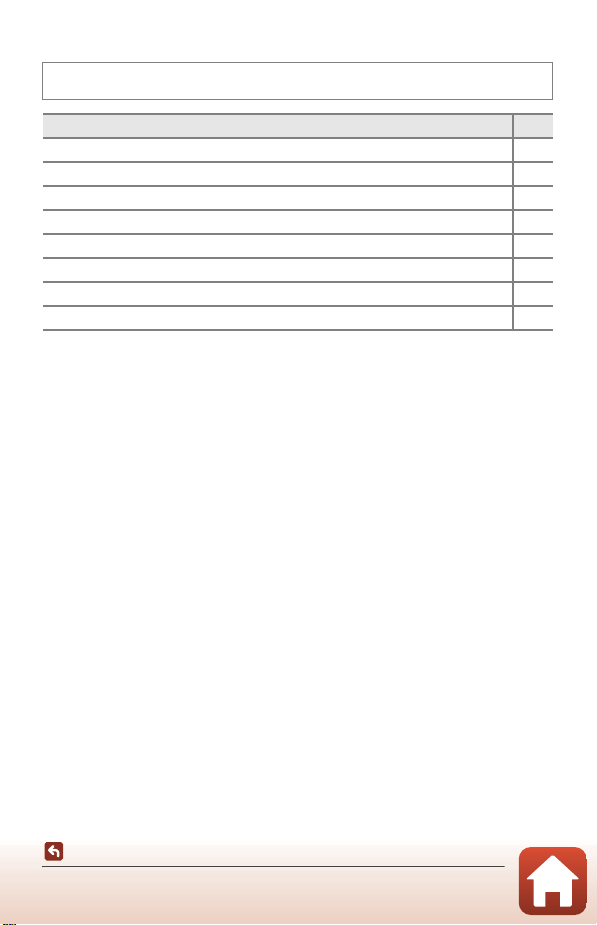
The Network Menu
Press the d button M J menu icon M k button
Option A
Airplane mode 156
Choose connection 156
Connect to smart device 156
Connection to remote 156
Send while shooting 156
Wi-Fi 157
Bluetooth 157
Restore default settings 157
Using the Menu
Menu Lists
125
Page 10
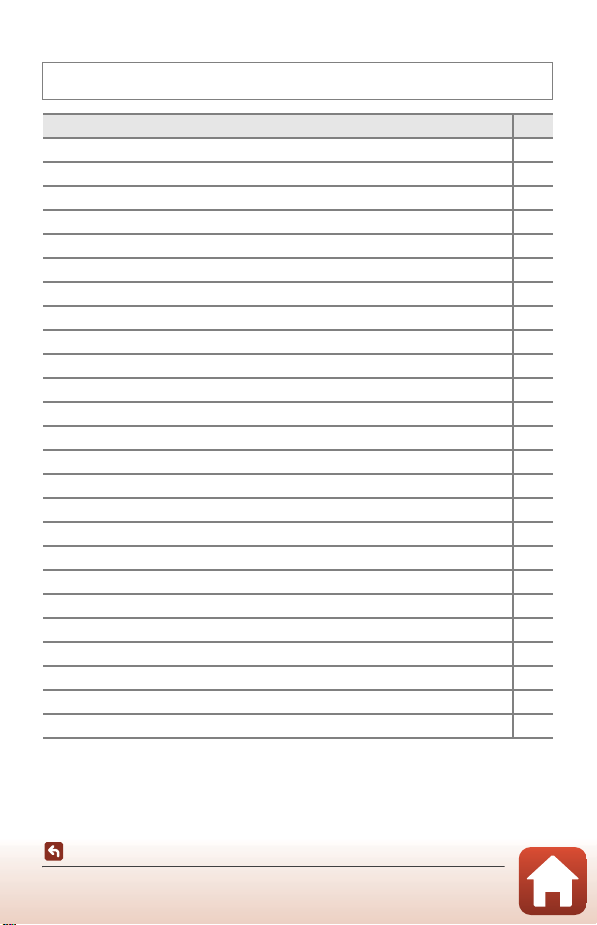
The Setup Menu
Press the d button M z menu icon M k button
Option A
Time zone and date 159
Monitor settings 161
EVF auto toggle 163
Date stamp 164
Self-timer: after release 165
Photo VR* 165
AF assist 166
Digital zoom 166
Assign side zoom control 167
AE/AF lock button 168
Sound settings 169
Auto off 169
Format card/Format memory 170
Language 171
HDMI output 171
Charge by computer 172
Image comment 173
Copyright information 174
Location data 175
Toggle Av/Tv selection 175
MF peaking 176
Reset all 176
Touch-screen controls 176
Conformity marking 177
Firmware version 177
* Also can be set by pressing the w (function) button (A121).
Using the Menu
Menu Lists
126
Page 11
The Shooting Menu (The Common Shooting
Options)
Image Quality
Enter shooting mode M d button M Image quality M k button
Set the image quality (compression ratio) used when saving images.
Lower compression ratios result in higher quality images, but the number of images
that can be saved is reduced.
The setting is also applied to other shooting modes.
Option Description
a Fine
b Normal
(default setting)
F RAW
G RAW + Fine
H RAW + Normal
B Notes About Image Quality
• Image mode cannot be set in the following shooting modes:
- Time-lapse movie and Easy panorama scene modes
-Short movie show mode
• RAW images cannot be captured in the following shooting modes:
- Scene modes
-Creative mode
-Short movie show mode
If you change the shooting mode to any of the above shooting modes when a RAW
image quality has been selected, the image quality will change to Fine or Normal.
• This function may not be available to use in combination with other functions (A80).
Finer image quality than Normal.
Compression ratio of about 1:4
Normal image quality, suitable for most applications.
Compression ratio of about 1:8
Raw data from the image sensor are saved without additional
processing. You can use a computer to change settings that were
set during shooting such as white balance and contrast.
• Image size is fixed at i 4608×3456
File format: RAW (NRW), Nikon’s own format
Two images are recorded, one RAW image and one fine-quality
JPEG image.
Two images are recorded, one RAW image and one normal-quality
JPEG image.
127
Using the Menu
The Shooting Menu (The Common Shooting Options)
Page 12

C RAW Images of This Camera
• RAW images cannot be processed on this camera.
• ViewNX-i (A116) needs to be installed on the computer to be able to view RAW images
on the computer.
• RAW images cannot be edited or printed directly. You can adjust images or process RAW
images if you transfer RAW images to a computer, and then use software such as Capture
NX-D (A118).
C Saving of RAW and JPEG Images at the Same Time
• The RAW image and the JPEG image that are saved at the same time have the same file
number but with their own extensions, “.NRW” and “.JPG” (A203).
• When playing back on the camera, only the JPEG image is displayed.
• Note that when the JPEG image is deleted, the RAW image that was saved at the same
time is also deleted.
C Number of Images That Can Be Saved
• The approximate number of images that can be saved can be checked on the screen
when shooting (A23).
• Note that due to JPEG compression, the number of images that can be saved may vary
greatly depending on the image content, even when using memory cards with the same
capacity and the same image quality and image size settings. In addition, the number of
images that can be saved may vary depending on the make of the memory card.
• If the number of exposures remaining is 10,000 or more, the number of exposures
remaining display shows “9999.”
128
Using the Menu
The Shooting Menu (The Common Shooting Options)
Page 13
Image Size
Enter shooting mode M d button M Image size M k button
Set the image size (number of pixels) used when saving JPEG images.
The larger the image size, the larger the size at which it can be printed, but the
number of images that can be saved is reduced.
The setting is also applied to other shooting modes.
Option*
i 4608×3456 (default setting) 4:3
I 3264×2448 4:3
L 2272×1704 4:3
B 1600×1200 4:3
e 4608×2592 16:9
J 4608×3072 3:2
H 3456×3456 1:1
* The numerical values indicate the number of pixels that are captured.
Example: i 4608×3456 = approx. 16 megapixels, 4608×3456 pixels
Aspect ratio (horizontal to vertical)
B Notes About Printing Images at 1:1 Aspect Ratio
Change the printer setting to “Border” when printing images at a 1:1 aspect ratio.
Some printers may not be able to print images at a 1:1 aspect ratio.
B Notes About Image Size
• Image mode cannot be set in the following shooting modes:
- Time-lapse movie and Easy panorama scene modes
-Short movie show mode
• This function may not be available to use in combination with other functions (A80).
129
Using the Menu
The Shooting Menu (The Common Shooting Options)
Page 14
The Shooting Menu (A, B, C, or D Mode)
• See “Image Quality” (A127) and “Image Size” (A129) for information about
Image quality and Image size.
White Balance (Adjusting Hue)
Rotate the mode dial to A, B, C, or D M d button M A, B, C, or D menu
icon M White balance M k button
Adjust white balance to suit the light source or weather conditions in order to make
the colors in images match what you see with your eyes.
Option Description
a Auto (normal)
(default setting)
a2 Auto (warm
lighting)
b Preset manual
c Daylight* Use under direct sunlight.
d Incandescent* Use under incandescent lighting.
e Fluorescent
f Cloudy* Use under overcast skies.
g Flash* Use with the flash.
x Choose color temp. Use to directly specify color temperature (A131).
* Fine adjustments in seven steps are available. Apply positive (+) to increase blue hue and
negative (–) to increase red hue.
White balance is automatically adjusted.
When set to Auto (warm lighting), the images are preserved
with warm colors if they are shot under an incandescent light
source. When using the flash, white balance is adjusted
according to the flash lighting condition.
Use when the desired result is not achieved with Auto
(normal), Auto (warm lighting), Incandescent, etc. (A132).
Use under most types of fluorescent lighting. Choose one of 1
(cool-white fluorescent), 2 (day white fluorescent), and 3
(daylight fluorescent).
B Notes About White Balance
• Lower the flash when white balance is set to any setting other than Auto (normal), Auto
(warm lighting), or Flash (A25).
• This function may not be available to use in combination with other functions (A80).
130
Using the Menu
The Shooting Menu (A, B, C, or D Mode)
Page 15
C Color Temperature
3000 4000 5000 6000 8000 10000
[K]
112 3 4 8 9 0a567
Red Blue
1
Sodium-vapor lamps: 2700K
2
Incandescent/
Warm-white fluorescent: 3000K
3
White fluorescent: 3700K
4
Cool-white fluorescent: 4200K
5
Day white fluorescent: 5000K
6
Direct sunlight: 5200K
7
Flash: 5400K
8
Cloudy: 6000K
9
Daylight fluorescent: 6500K
0
High temp. mercury-vapor: 7200K
a
Shade: 8000K
Color temperature is an objective measure of colors of light sources which are expressed in
the unit of absolute temperature (K: Kelvin). Light sources with lower color temperatures
appear more reddish, while light sources with higher color temperatures appear more
bluish.
Using the Menu
The Shooting Menu (A, B, C, or D Mode)
131
Page 16
Using Preset Manual
Au to ( no rm al)
Au to ( wa rm li gh ti ng )
In ca nd es ce nt
Da yl ig ht
Fl uo re sce nt
Cl ou dy
Measuring window
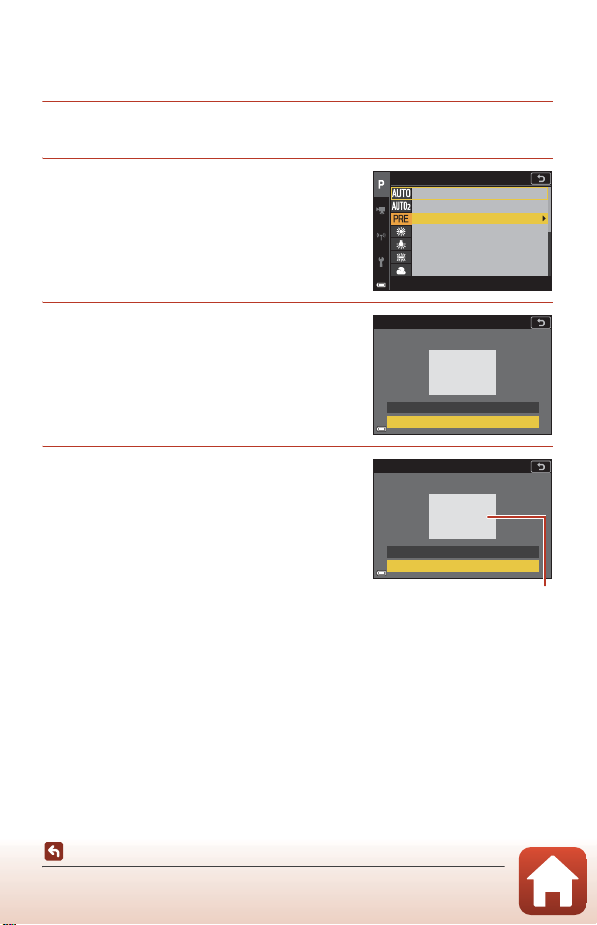
Follow the procedures described below to measure the white balance value under
the lighting used during shooting.
1 Place a white or gray reference object under the lighting that
will be used during shooting.
2 Use the multi selector HI to select
Preset manual, and press the k
button.
• The lens extends to the zoom position for
measurement.
3 Select Measure.
• To apply the last measured value, select
Cancel and press the k button.
4 Frame the white or gray reference
White balance
Auto (normal)
Auto (warm lighting)
Preset manual
Daylight
Incandescent
Fluorescent
Cloudy
Preset manual
Preset manual
Cancel
Measure
object in the measuring window, and
press the k button to measure the
value.
• The shutter is released and measurement is
complete (no image is saved).
Cancel
Measure
B Notes About Preset Manual
A white balance value for flash lighting cannot be measured with Preset manual. When
shooting using the flash, set White balance to Auto (normal), Auto (warm lighting), or
Flash.
Using the Menu
The Shooting Menu (A, B, C, or D Mode)
132
Page 17
Metering
Rotate the mode dial to A, B, C, or D M d button M A, B, C, or D menu
icon M Metering M k button
The process of measuring the brightness of the subject to determine the exposure is
known as “metering.”
Use this option to set the method of how the camera meters exposure.
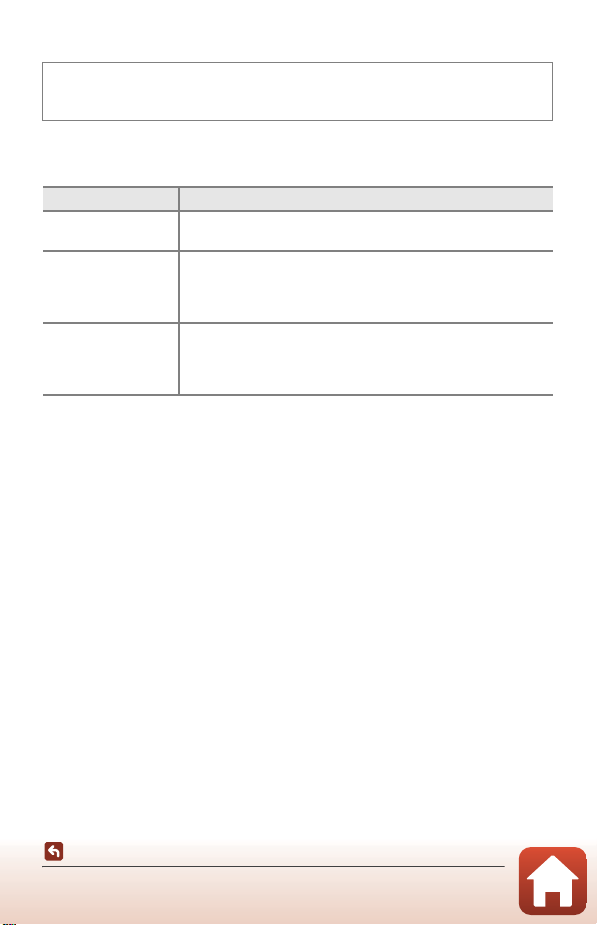
Option Description
G Matrix
(default setting)
q Center-weighted
r Spot
* To set focus and exposure for off-center subjects, change AF area mode to manual and
set the focus area to the center of the frame, and then use focus lock (A77).
The camera uses a wide area of the screen for metering.
Recommended for typical shooting.
The camera meters the entire frame but assigns greatest weight
to the subject in the center of the frame. The classic metering for
portraits; it preserves background details while letting lighting
conditions in the center of the frame determine exposure.*
The camera meters the area shown by the circle in the center of
the frame. This can be used when the subject is much lighter or
darker than the background. Ensure that the subject is within the
area shown by the circle when shooting.*
B Notes About Metering
• When digital zoom is in effect, Center-weighted or Spot is selected depending on the
zoom ratio.
• This function may not be available to use in combination with other functions (A80).
C Display on the Shooting Screen
When Center-weighted or Spot is selected, the metering range guide (A12) is displayed
(except when digital zoom is used).
Using the Menu
The Shooting Menu (A, B, C, or D Mode)
133
Page 18
Continuous Shooting
Rotate the mode dial to A, B, C, or D M d button M A, B, C, or D menu
icon M Continuous M k button
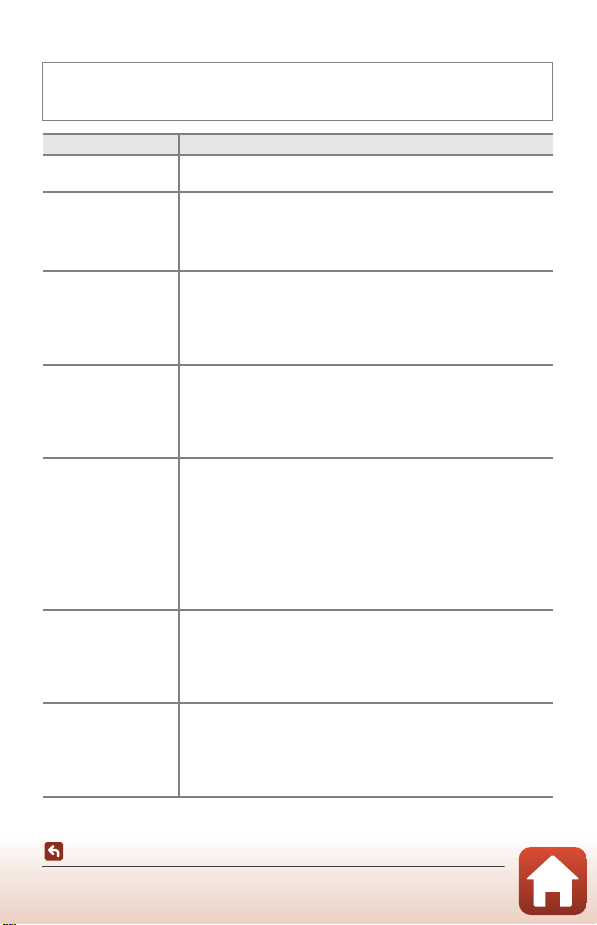
Option Description
U Single
(default setting)
k Continuous H
K Continuous M
m Continuous L
L Pre-shooting
cache
n Continuous H:
120 fps
j Continuous H:
60 fps
One image is captured each time the shutter-release button is
pressed.
While the shutter-release button is held all the way down, images
are captured continuously.
• The camera can capture up to about #10 images#
continuously at a rate of about #10 fps# (when set to Normal
(image quality) and i 4608×3456 (image size)).
While the shutter-release button is held all the way down, images
are captured continuously.
• The camera can capture up to #about 200 images# continuously
at a rate of #about 7 fps# (when set to Normal (image quality)
and i 4608×3456 (image size)). If the shutter-release button is
held all the way down further, the frame rate becomes slower.
While the shutter-release button is held all the way down, images
are captured continuously.
• The camera can capture up to about #200 images# continuously
at a rate of about #3 fps# (when set to Normal (image quality)
and i 4608×3456 (image size)). If the shutter-release button is
held all the way down further, the frame rate becomes slower.
Pre-shooting cache shooting begins when the shutter-release button
is pressed halfway. When the shutter-release button is pressed all the
way down, the camera saves the current image as well as the images
captured immediately before the button is pressed (
shooting cache makes it easy to capture perfect moments.
• The camera can capture up to about #10 images#
continuously at a rate of about #15 fps# (including a maximum
of #5 images# captured in the pre-shooting cache).
• The image quality is fixed at Normal and the image size is
fixed at i 4608×3456.
Each time the shutter-release button is pressed all the way down,
images are captured continuously at a high speed rate.
• The camera can capture up to about #60 images#
continuously at a rate of about 120 fps.
• The image quality is fixed at Normal and the image size is
fixed at B 1600×1200.
Each time the shutter-release button is pressed all the way down,
images are captured continuously at a high speed rate.
• The camera can capture up to about #60 images#
continuously at a rate of about 60 fps.
• The image quality is fixed at Normal and the image size is
fixed at B 1600×1200.
A
135). Pre-
Using the Menu
The Shooting Menu (A, B, C, or D Mode)
134
Page 19
Option Description
Press down halfway Press down all the way
Images saved before
pressing all the way
Images saved by
pressing all the way
M Intvl timer
shooting
The camera automatically captures still images continuously at
the specified interval (A136).
B Notes About Continuous Shooting
• Focus, exposure and white balance are fixed at the values determined with the first shot in
each series (except Intvl timer shooting).
• It may take some time to save the images after shooting.
• When ISO sensitivity increases, noise may appear in captured images.
• The frame rate may become slower depending on the image quality, image size, memory
card type or shooting conditions (such as when saving RAW images).
• When using Pre-shooting cache, Continuous H: 120 fps, or Continuous H: 60 fps,
banding or variance in brightness or hue may occur in images that were captured under
lighting that flashes quickly at high speeds, such as fluorescent, mercury-vapor, or
sodium-vapor lighting.
• This function may not be available to use in combination with other functions (A80).
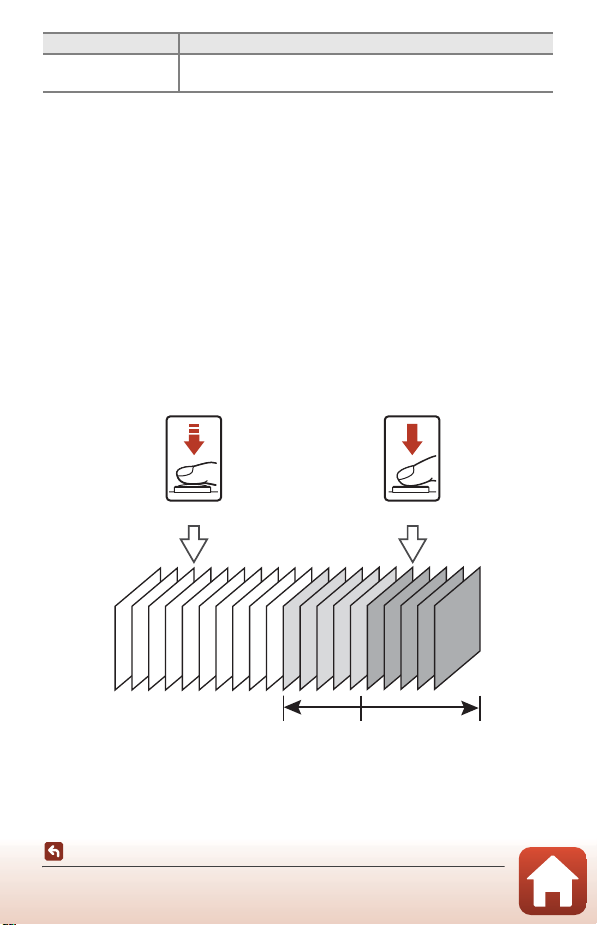
C Pre-shooting Cache
When the shutter-release button is pressed halfway or all the way down, images are saved
as described below.
• The pre-shooting cache icon (N) on the shooting screen changes to yellow while the
shutter-release button is pressed halfway.
135
Using the Menu
The Shooting Menu (A, B, C, or D Mode)
Page 20
Interval Timer Shooting
F 3. 4F3.4 5 00500
2 5m 0s25m 0s
1 /2 5 01/250
0 .00.0
1 00100
0 2m 3 0s02m30s
Rotate the mode dial to A, B, C
icon M Continuous M k button M Intvl timer shooting M k button
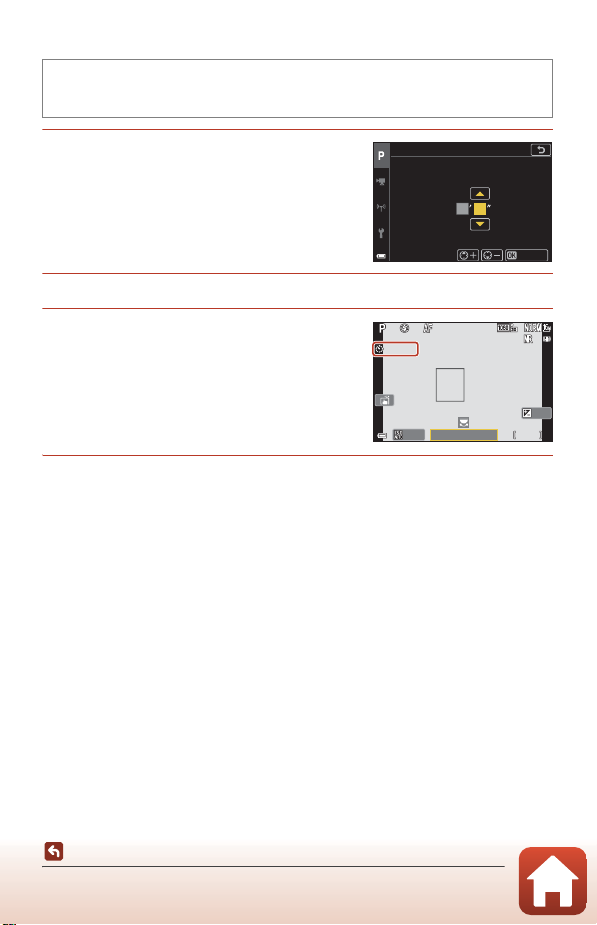
1 Set the desired interval between
each shot.
• Use JK to select an item, and use HI to set
the time.
• Press the k button when setting is complete.
, or
D M d button M A, B, C
, or
D menu
Intvl timer shooting
ms
3002
Conrm
2 Press the d (menu) button to display the shooting screen.
3 Press the shutter-release button to
shoot the first image.
• The shutter is automatically released at the
specified interval to shoot second and
subsequent images.
• The screen turns off and the power-on lamp
flashes during the intervals between shots.
4 When the desired number of images have been captured, press
the shutter-release button.
• Shooting ends.
• Shooting ends automatically in the following situations:
- When the memory card becomes full
- When the number of images captured continuously reaches 9999
B Notes About Interval Timer Shooting
• To prevent the camera from turning off unexpectedly during shooting, use a sufficiently
charged battery.
• If the EH-62F AC Adapter (available separately; A204) is used, this camera can be
powered from an electrical outlet. Do not, under any circumstances, use an AC adapter
other than the EH-62F. Failure to observe this precaution could result in overheating or
damage to the camera.
• Do not rotate the mode dial to a different setting while performing interval timer
shooting. Shooting will end.
• If the shutter speed is slow and saving an image takes time compared to the specified
interval, some of the shots during Interval timer shooting may be canceled.
Using the Menu
The Shooting Menu (A, B, C, or D Mode)
136
Page 21
ISO Sensitivity
Rotate the mode dial to A, B, C, or D M d button M A, B, C, or D menu
icon M ISO sensitivity M k button
A higher ISO sensitivity allows darker subjects to be captured. Additionally, even with
subjects of similar brightness, pictures can be taken at faster shutter speeds, and
blurring caused by camera shake and subject movement can be reduced.
• When a higher ISO sensitivity is set, images may contain noise.
Option Description
a Auto
(default setting)
I Fixed range auto
100, 200, 400, 800,
1600, 3200, 6400
Sensitivity is automatically selected from the range of ISO 100 to
1600.
The range in which the camera automatically adjusts ISO
sensitivity can be selected from ISO 100-400 or ISO 100-800.
ISO sensitivity is fixed at the specified value.
C Notes About ISO Sensitivity
• In D (manual) mode, when set to Auto, ISO 100-400, or ISO 100-800, the ISO sensitivity
is fixed at ISO 100.
• This function may not be available to use in combination with other functions (A80).
C ISO Sensitivity Display on the Shooting Screen
• When Auto or Fixed range auto is selected, the value for ISO sensitivity automatically
specified is displayed.
• You can also set this function by tapping the ISO sensitivity display on the shooting
screen.
Using the Menu
The Shooting Menu (A, B, C, or D Mode)
137
Page 22
Exposure Bracketing
Rotate the mode dial to A, B, or C M d button M A, B, or C menu icon M
Exposure bracketing M k button
The exposure (brightness) can be changed automatically during continuous shooting.
This is effective for shooting when it is difficult to adjust the picture brightness.
Option Description
Number of shots
Bracketing increment
Select Bracketing off (default setting), 3, or 5 for the number of
images to capture continuously.
Select ±0.3 (default setting), ±0.7, or ±1.0 for the step width
used in exposure compensation.
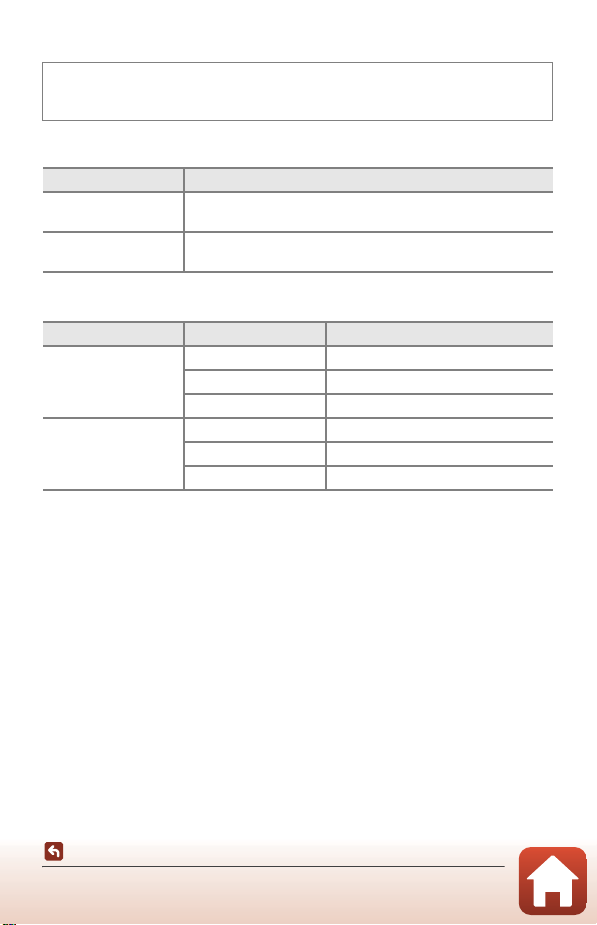
The relationships between the settings and shooting order are listed below.
Number of shots Bracketing increment Shooting order
±0.3 0, -0.3, +0.3
3
5
±0.7 0, -0.7, +0.7
±1.0 0, -1.0, +1.0
±0.3 0, -0.7, -0.3, +0.3, +0.7
±0.7 0, -1.3, -0.7, +0.7, +1.3
±1.0 0, -2.0, -1.0, +1.0, +2.0
B Notes About Exposure Bracketing
• Exposure bracketing is not available in m (manual) mode.
• When exposure compensation (A66) and ±0.3, ±0.7, or ±1.0 in Bracketing increment
are set simultaneously, the combined exposure compensation values are applied.
• This function may not be available to use in combination with other functions (A80).
Using the Menu
The Shooting Menu (A, B, C, or D Mode)
138
Page 23
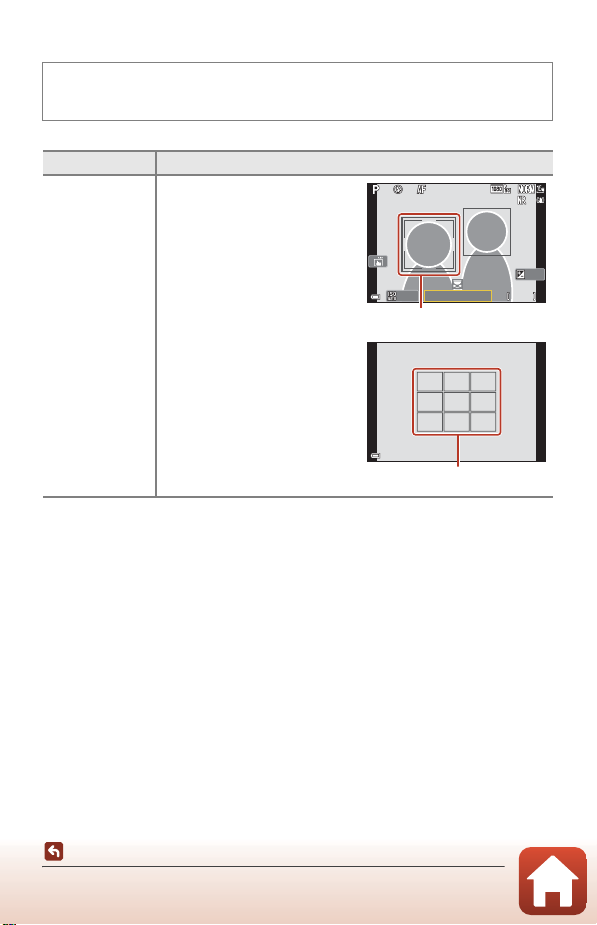
AF Area Mode
F 3. 4
5 00
2 5m 0s
1 /2 5 0
0 .0
1 00
Focus area
F 3. 4F3.41 /2 5 01/250
Focus area
Rotate the mode dial to A, B, C or D M d button M A, B, C or D menu icon
M AF area mode M k button
Set how the camera selects the focus area for autofocus.
Option Description
When the camera detects a
human face, it focuses on that
face. See “Using Face Detection”
(A75) for more information.
25m 0s
F3.4
100
1/250
500
0.0
a Face priority
When framing a composition
with no human subjects or
detected faces, the camera
automatically selects one or more
of the nine focus areas containing
the subject closest to the camera
when the shutter-release button
is pressed halfway.
Using the Menu
The Shooting Menu (A, B, C, or D Mode)
139
Page 24
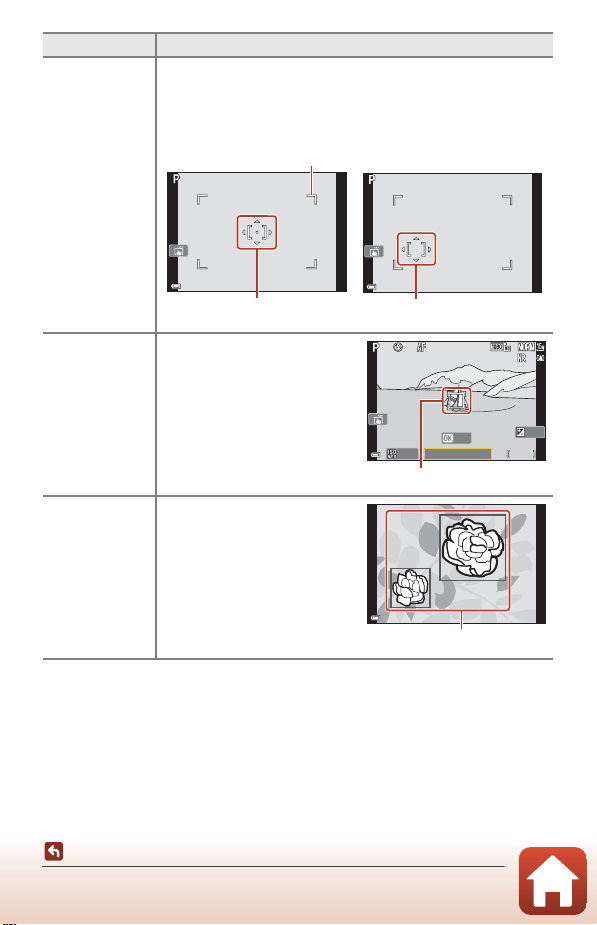
Option Description
Focus area (centered)
Scope of movable focus area
Focus area (moving)
F 3. 4
5 00
2 5m 0s
1 /2 5 0
0 .0
1 00
Focus area
F 3. 4F3.41 /2 5 01/250
Focus areas
Use the multi selector HIJK to move the focus area to where you
want to focus.
To use the multi selector to configure the flash mode or other
settings, press the k button. To return to moving the focus area,
press the k button again.
N Manual
(spot)
x Manual
(normal)
O Manual
(wide)
Use this function to take pictures
of moving subjects. Register the
subject on which the camera
s Subject
tracking
focuses. The focus area
automatically moves to track the
subject. See “Using Subject
Tracking” (A141) for more
information.
When the camera detects the
main subject, it focuses on that
subject.
M Target
finding AF
(default setting)
See “Using Target Finding AF”
(A74) for more information.
100
1/250
Exit
F3.4
0.0
25m 0s
500
B Notes About AF Area Mode
• When digital zoom is in effect, the camera focuses on the area in the center of the frame
regardless of the AF area mode setting.
• This function may not be available to use in combination with other functions (A80).
140
Using the Menu
The Shooting Menu (A, B, C, or D Mode)
Page 25
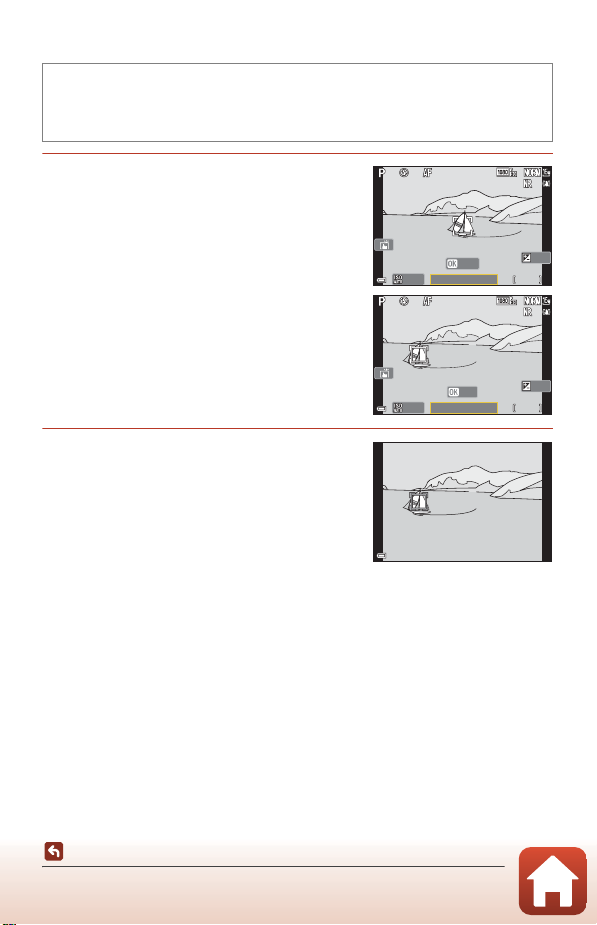
Using Subject Tracking
F 3. 4
5 00
2 5m 0s
1 /2 5 0
0 .0
1 00
F 3. 4
5 00
2 5m 0s
1 /2 5 0
0 .0
1 00
F 3. 4
1 /2 5 0
Rotate the mode dial to A, B, C or D M d button M A, B, C or D menu
icon M AF area mode M k button M s Subject tracking M k button M d
button
1 Register a subject.
• Align the subject that you want to track with
the border in the center of the frame and press
the k button.
• When the subject is registered, a yellow border
(focus area) is displayed around it and the
camera begins tracking the subject.
• If the subject cannot be registered, the border
is displayed in red. Change the composition
and try registering the subject again.
100
1/250
Start
F3.4
25m 0s
500
• To cancel subject registration, press the k
button.
• If the camera can no longer track the registered
subject, the focus area disappears. Register the
subject again.
100
1/250
Exit
F3.4
25m 0s
500
2 Press the shutter-release button all
the way to take the picture.
• If the shutter-release button is pressed while
the focus area is not displayed, the camera
focuses on the subject in the center of the
frame.
B Notes About Subject Tracking
• If you perform operations such as zooming while the camera is tracking the subject, the
registration is canceled.
• Subject tracking may not be possible in certain shooting conditions.
1/250
F3.4
0.0
0.0
Using the Menu
The Shooting Menu (A, B, C, or D Mode)
141
Page 26
Autofocus Mode
Rotate the mode dial to A, B, C or D M d button M A, B, C or D menu
icon M Autofocus mode M k button
Set how the camera focuses when shooting still images.
Option Description
A Single AF
B Full -time AF
a Pre-focus
(default setting)
The camera focuses only when the shutter-release button is
pressed halfway.
The camera always focuses even if the shutter-release button is not
pressed halfway. The sound of lens drive movement is heard while
the camera focuses.
Even if the shutter-release button is not pressed halfway, the
camera focuses when subject movement is detected or when the
composition of the framed image is significantly changed.
B Notes About Autofocus Mode
This function may not be available to use in combination with other functions (A80).
C Autofocus Mode for Short Movie Show Mode or Movie Recording
Autofocus mode for short movie show mode or movie recording can be set with
Autofocus mode (
A148) in the movie menu.
Using the Menu
The Shooting Menu (A, B, C, or D Mode)
142
Page 27
Noise Reduction Filter
Rotate the mode dial to A, B, C, or D M d button M A, B, C, or D menu
icon M Noise reduction filter M k button
Set the strength of the noise reduction function that is normally performed when
saving images.
Option Description
Q High Performs noise reduction at a level higher than the standard strength.
M Normal
(default setting)
R Low Performs noise reduction at a level lower than the standard strength.
Performs noise reduction at the standard strength.
M Exposure Preview
Rotate the mode dial to A, B, C or D M d button M A, B, C or D menu icon
M M exposure preview M k button
Set whether or not to reflect the brightness to the shooting screen when the
exposure is changed in D (manual) mode.
Option Description
On (default setting) Reflects the brightness to the shooting screen.
Off Does not reflect the brightness to the shooting screen.
Using the Menu
The Shooting Menu (A, B, C, or D Mode)
143
Page 28
The Movie Menu
Movie Options
Enter shooting mode M d button M e menu icon M Movie options M k
button
Select the desired movie option to record. Select normal speed movie options to
record at normal speed, or HS movie options (A145) to rec ord in sl ow or fast motion.
The movie options that can be selected vary depending on the Frame rate setting
(A150).
• Memory cards with an SD Speed Class rating of 6 or faster are recommended for
recording movies (A213). When Movie options is set to d 2160/30p (4K
UHD) or c 2160/25p (4K UHD), memory cards with a UHS Speed Class rating
of 3 or faster are recommended.
Normal Speed Movie Options
Option (Image size/
Frame rate, File format)
dc2160/30p (4K UHD)
2160/25p (4K UHD)
eS1080/30p
1080/25p
(default setting)
ef1080/60p
1080/50p
fV720/30p
720/25p
iX720/60p
720/50p
Image size
3840 × 2160 16:9
1920 × 1080 16:9
1920 × 1080 16:9
1280 × 720 16:9
1280 × 720 16:9
Aspect ratio
(horizontal to
vertical)
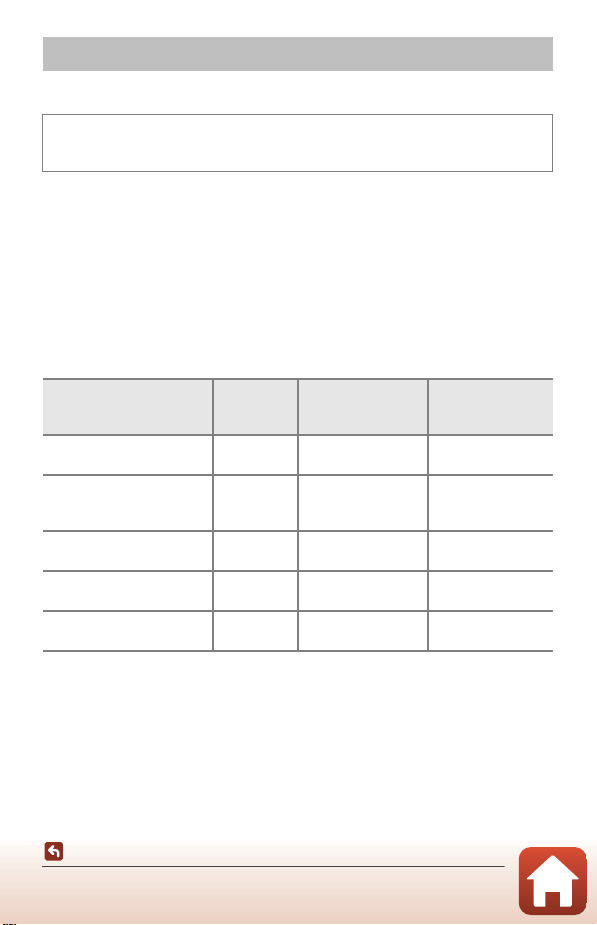
• Individual movie files cannot exceed 29 minutes in length, even when there is
sufficient free space on the memory card for longer recording. The maximum size
of a single movie file is 4 GB. If a file exceeds 4 GB even when you record for less
than 29 minutes, it is split into multiple files and cannot be played back
continuously.
• The actual remaining recording time may vary depending on the movie content,
subject movement, or type of memory card.
Max. recording time
per file
(approx.)
# min
# min
# min
# min
# min
# min
# min
# min
# min
# min
Using the Menu
The Movie Menu
144
Page 29
HS Movie Options
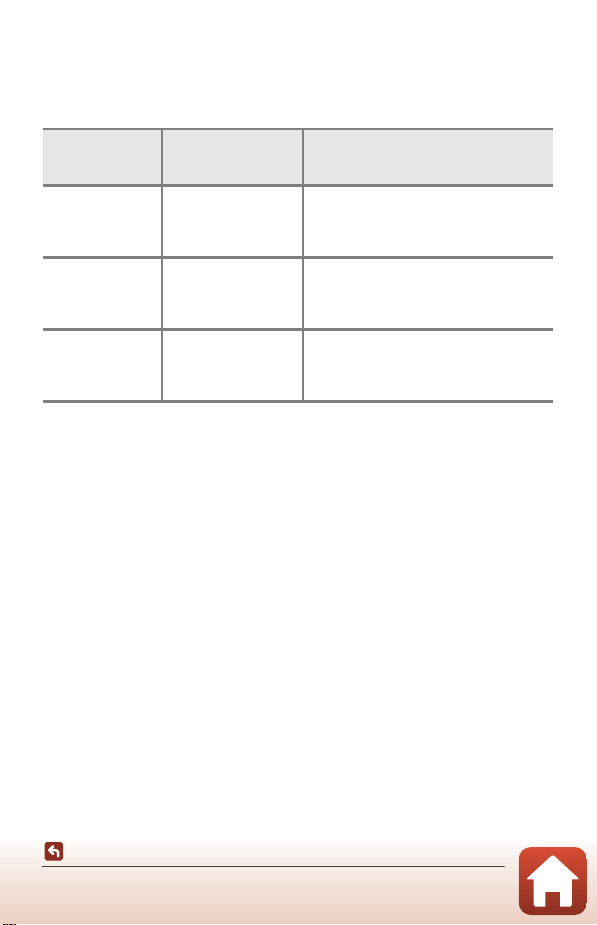
Recorded movies are played back in fast or slow motion. While recording movies, the
camera can be switched between normal speed movie recording and slow motion or
fast motion movie recording.
See “Recording Movies in Slow Motion and Fast Motion (HS Movie)” (A147).
Image size
Option
S HS 1080/4×
U HS 1080/2×
V HS 1080/0.5×
Aspect ratio
(horizontal to vertical)
1920 × 1080
16:9
1920 × 1080
16:9
1920 × 1080
16:9
Description
1/4-speed slow motion movies
• Max. recording time:
7 minutes and 15 seconds (playback
time: 29 minutes)
1/2-speed slow motion movies
• Max. recording time:
14 minutes and 30 seconds (playback
time: 29 minutes)
2× speed fast motion movies
• Max. recording time:
29 minutes (playback time: 14 minutes
and 30 seconds)
B Notes About HS Movie
• Sound is not recorded.
• Still images cannot be saved during movie recording.
• Movie recording cannot be paused.
• Zoom position, focus, exposure, and white balance are locked when movie recording
starts.
Using the Menu
The Movie Menu
145
Page 30
C Playing Back in Slow Motion and Fast Motion
Playback
time
Recording
time
10 s
10 s
Recording
time
Playback
time
40 s
10 s
Slow motion playback
Recording
time
Playback
time
10 s
5 s
Fast motion playback
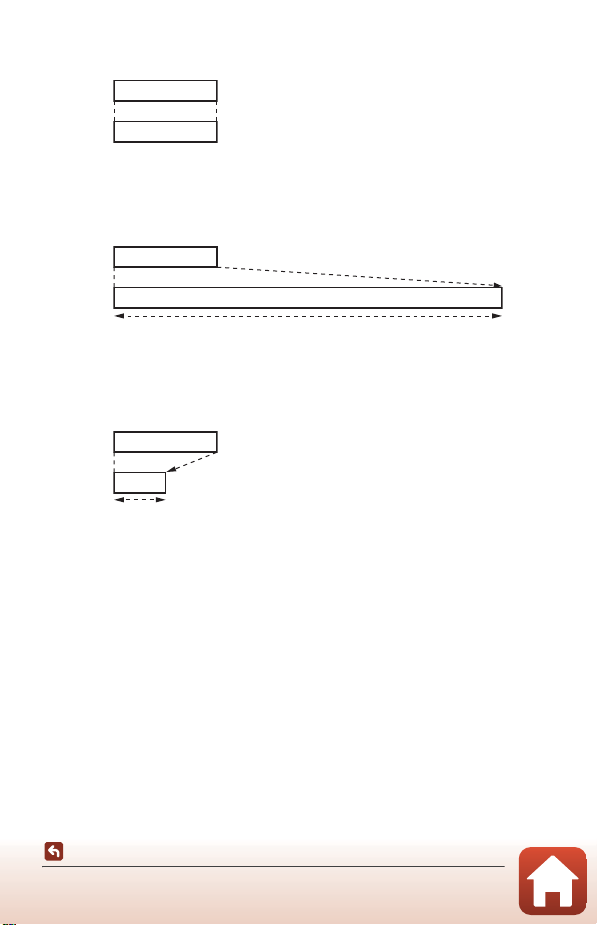
When recording at normal speed:
When recording at S HS 1080/4×:
Movies are recorded at 4× normal speed.
They are played back in slow motion at 4× slower speed.
When recording at V HS 1080/0.5×:
Movies are recorded at 1/2 normal speed.
They are played back in fast motion at 2× faster speed.
The Movie Menu
Using the Menu
146
Page 31
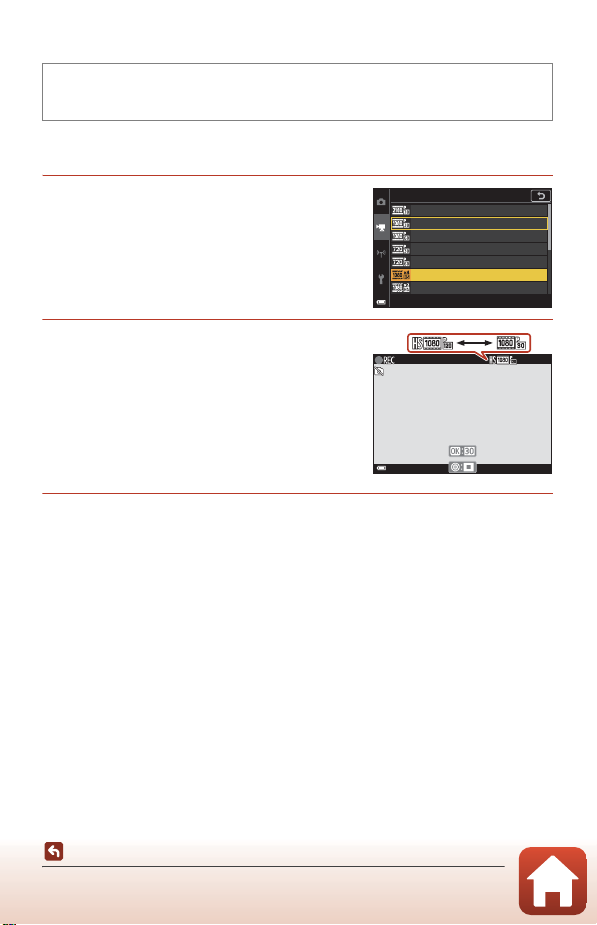
Recording Movies in Slow Motion and Fast Motion (HS Movie)
5 s
Enter shooting mode M d button M e menu icon M Movie options M
k button
Movies recorded using HS movie can be played back in slow motion at 1/4 or 1/2 of
the normal playback speed, or in fast motion at twice the normal playback speed.
1 Use the multi selector HI to select
an HS movie option (A145) and
press the k button.
• After applying the option, press the d
button to return to the shooting screen.
2 Press the b (e movie-record)
button to start recording.
• The camera starts recording an HS movie.
• The camera switches between normal speed
movie recording and HS movie recording each
time the k button is pressed.
• The movie options icon changes when
switching between HS movie recording and
normal speed movie recording.
3 Press the b (e) button to end recording.
Movie options
2160/30p
1080/30p
1080/60p
720/30p
720/60p
HS 1080/4×
HS 1080/2×
5s
Using the Menu
The Movie Menu
147
Page 32
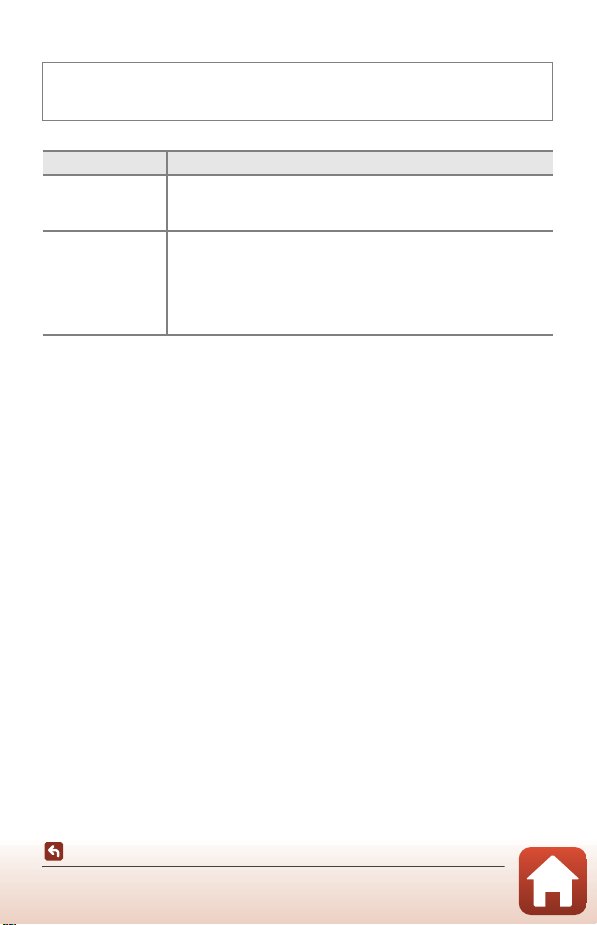
Autofocus Mode
Enter shooting mode M d button M e menu icon M Autofocus mode M k
button
Set how the camera focuses in short movie show mode or when recording movies.
Option Description
A Single AF
(default setting)
B Full-time AF
Focus is locked when movie recording starts.
Select this option when the distance between the camera and the
subject will remain fairly consistent.
The camera focuses continuously.
Select this option when the distance between the camera and
subject will change significantly during recording. The sound of the
camera focusing may be heard in the recorded movie. Use of
Single AF is recommended to prevent the sound of the camera
focusing from interfering with recording.
B Notes About Autofocus Mode
When an HS movie option is selected in Movie options, the setting is fixed at Single AF.
Using the Menu
The Movie Menu
148
Page 33
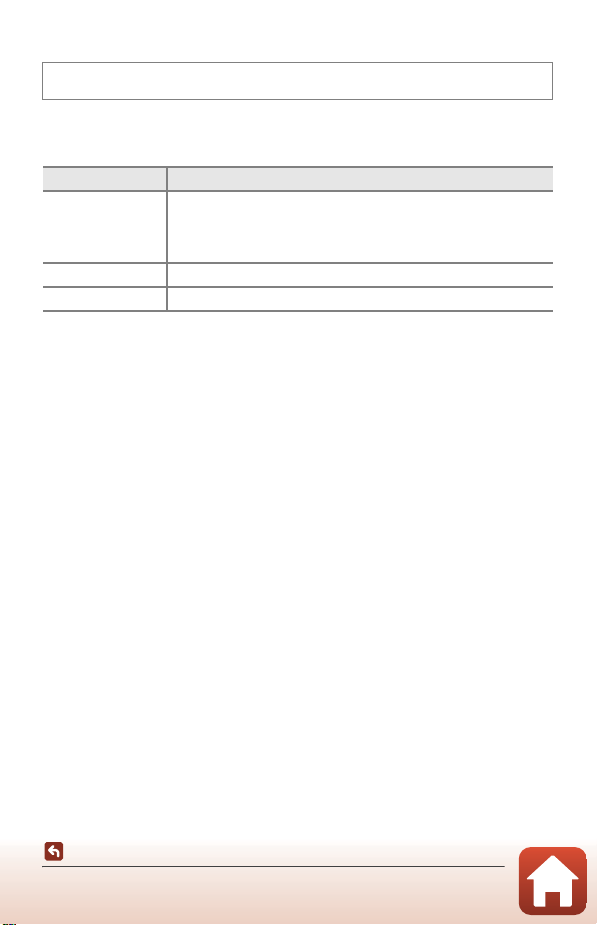
Movie VR
Enter shooting mode M d button M e menu icon M Movie VR M k button
Select the vibration reduction setting used in short movie show mode or when
recording movies.
Select Off when using a tripod to stabilize the camera during recording.
Option Description
V On (hybrid)
(default setting)
g On Performs compensation for camera shake using lens shift VR.
Off Compensation is not performed.
Performs optical compensation for camera shake using the lens
shift method. Also performs electronic VR using image processing.
The angle of view (i.e., the area seen in the frame) becomes
narrower.
B Notes About Movie VR
• When an HS movie option is selected in Movie options, the setting is fixed at Off.
• The effects of camera shake may not be completely eliminated in some situations.
Using the Menu
The Movie Menu
149
Page 34
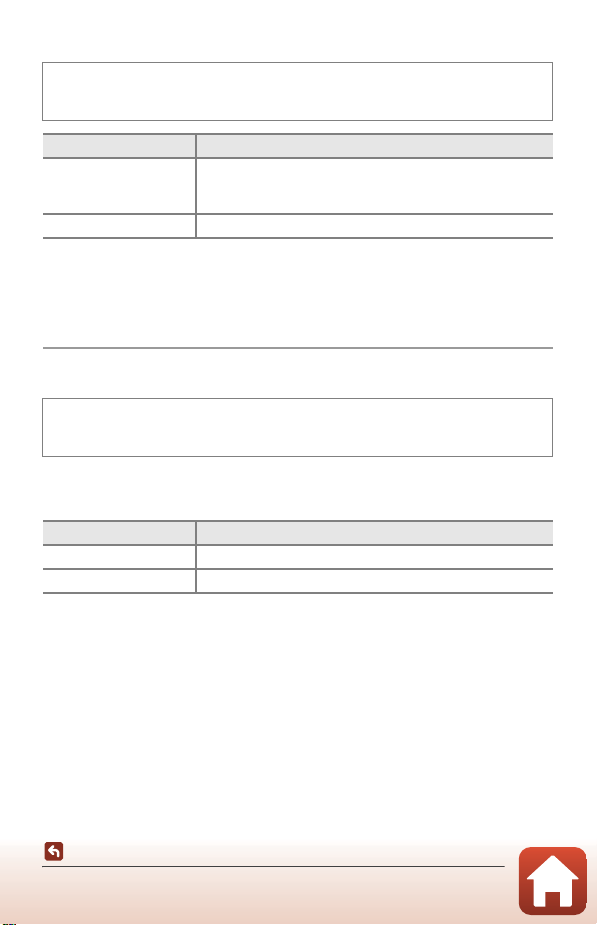
Wind Noise Reduction
Enter shooting mode M d button M e menu icon M Wind noise reduction
M k button
Option Description
Y On
Off (default setting) Wind noise reduction is disabled.
Reduces the sound that is produced when wind passes over
the microphone during movie recording. Other sounds may
become difficult to hear during playback.
B Notes About Wind Noise Reduction
When an HS movie option is selected in Movie options, the setting is fixed at Off.
Frame Rate
Enter shooting mode M d button M e menu icon M Frame rate M k
button
Select the frame rate used in time-lapse movie, short movie show mode, or when
recording movies. When the frame rate setting is switched, options that can be set in
Movie options (A144) change.
Option Description
30 fps (30p/60p) Suited for playback on a TV using the NTSC standard.
25 fps (25p/50p) Suited for playback on a TV using the PAL standard.
Using the Menu
The Movie Menu
150
Page 35
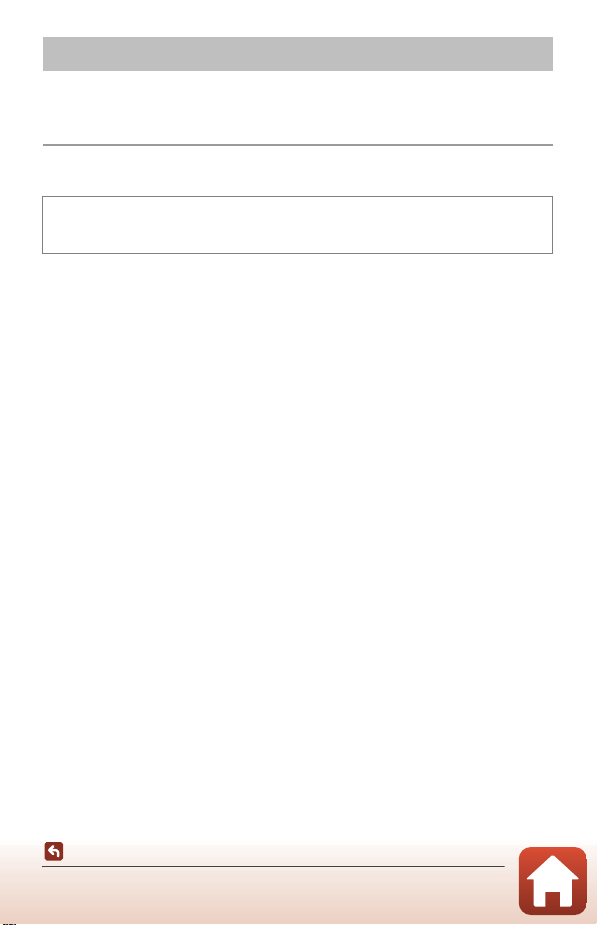
The Playback Menu
See “Editing Images (Still Images)” (A88) for information about image editing
functions.
Mark for Upload
Press the c button (playback mode) M d button M Mark for upload M k
button
Select still images in the camera and upload them to a smart device that has a wireless
connection established with the SnapBridge app.
On the image selection screen (A122), select or deselect images to upload.
• The size of images that are uploaded is restricted to 2 megapixels. To upload still
images at their original size, use Download pictures in the SnapBridge app.
• RAW images and movies cannot be selected. To upload movies to a smart device,
use Download pictures in the SnapBridge app.
• Note that when you select Reset all (A176) in the setup menu or Restore
default settings (A157) in the network menu, the Mark for upload settings that
you made are canceled.
Using the Menu
The Playback Menu
151
Page 36
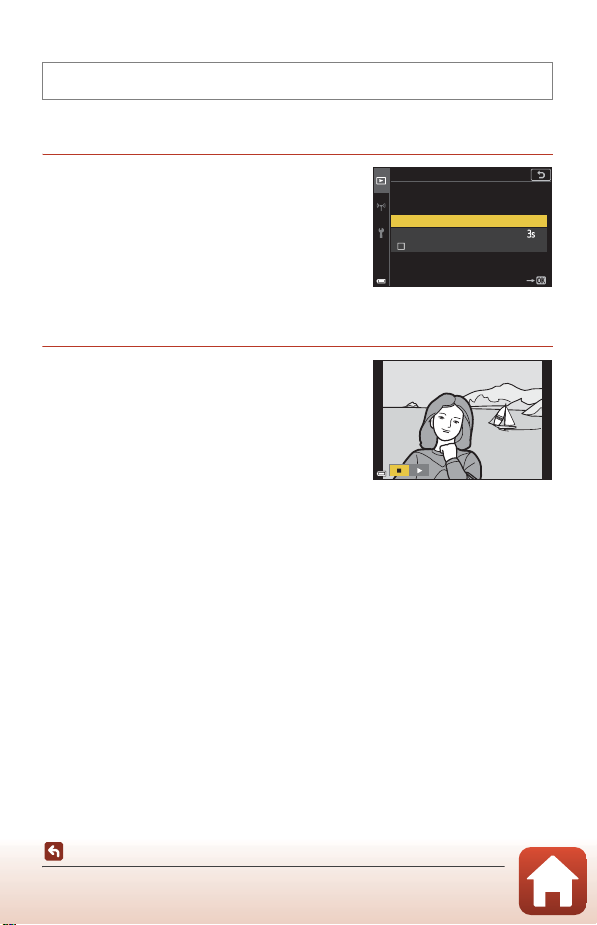
Slide Show
Press the c button (playback mode) M d button M Slide show M k button
Play back images one by one in an automated “slide show.” When movie files are
played back in the slide show, only the first frame of each movie is displayed.
1 Use the multi selector HI to select
Slide show
Start and press the k button.
• The slide show begins.
• To change the interval between images, select
Frame intvl, press the k button, and specify
the desired interval time before selecting Start.
• To repeat the slide show automatically, select
Loop and press the k button before selecting
Start.
• The maximum playback time is up to about 30 minutes even if Loop is enabled.
Start
Frame intvl
Loop
Pause
2 End or restart the slide show.
• The screen shown on the right is displayed
after the slide show ends or is paused. To exit
the show, select G and then press the k
button. To resume the slide show, select F
and then press the k button.
Operations During Playback
• Use the multi selector JK to display the previous/next image. Press and hold
down JK to rewind/fast-forward images quickly.
• Press the k button to pause or end the slide show.
Using the Menu
The Playback Menu
152
Page 37
Protect
Rotate 90 degrees
counterclockwise
Rotate 90 degrees
clockwise
Press the c button (playback mode) M d button M Protect M k button
The camera protects selected images from accidental deletion.
Select images to protect or cancel protection from the image selection screen
(A122).
Note that formatting the memory card or the camera’s internal memory permanently
deletes all data including protected files (A170).
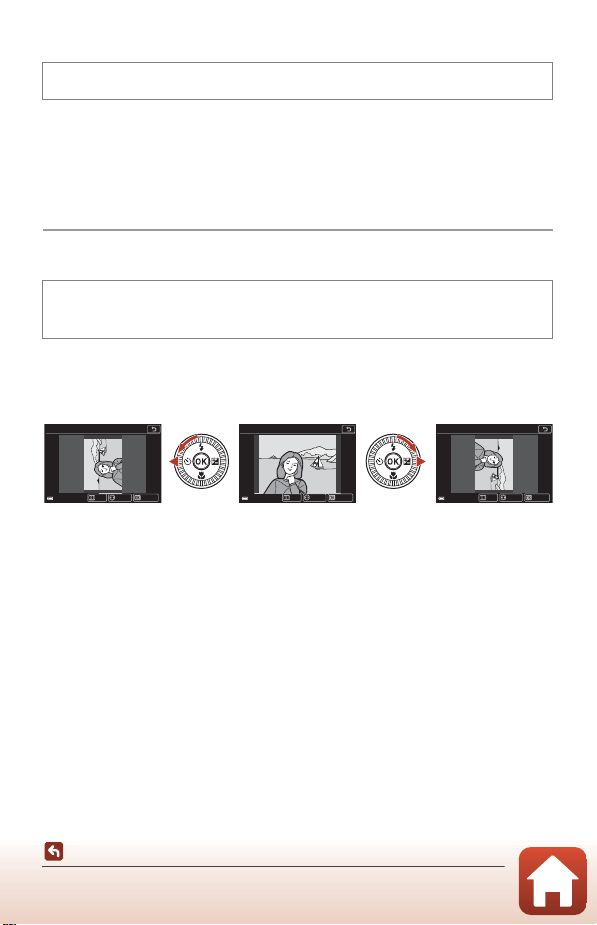
Rotate Image
Press the c button (playback mode) M d button M Rotate image M k
button
Specify the orientation in which saved still images are displayed during playback.
Select an image from the image selection screen (A122). When the rotate image
screen is displayed, use the multi selector JK or rotate it to rotate the image 90
degrees.
Rotate image
Rotate image
Rotate image
ConrmBack Rotate
ConrmBack Rotate
Press the k button to finalize display orientation, and save orientation information
with the image.
153
Using the Menu
The Playback Menu
ConrmBack Rotate
Page 38
Copy (Copy Between the Memory Card and Internal
Memory)
Press the c button (playback mode) M d button M Copy M k button
Images can be copied between a memory card and the internal memory.
• When a memory card that contains no images is inserted and the camera is switched to
playback mode, Memory contains no images. is displayed. In that case, press the d
button to select Copy.
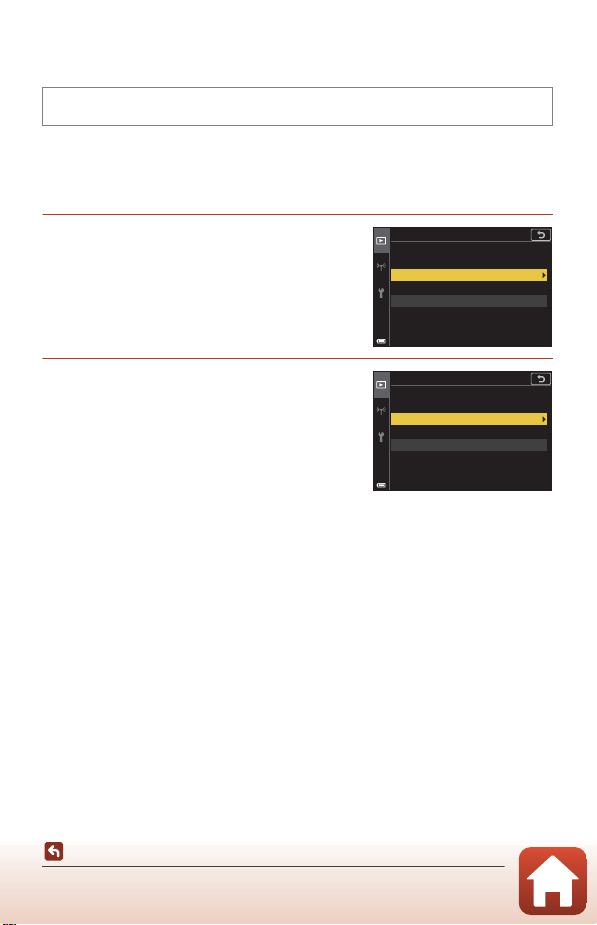
1 Use the multi selector HI to select
Copy
a destination option to which images
are copied and press the k button.
2 Select a copy option and press the k
Camera to card
Card to camera
Camera to card
button.
• When you choose Selected images, use the
image selection screen to specify images
(A122).
Selected images
All images
B Notes About Copying Images
• Only files in formats that this camera can record can be copied.
• Operation is not guaranteed with images captured with another make of camera or that
have been modified on a computer.
C Copying Images in a Sequence
• If you select a key picture of a sequence in Selected images, all images in the sequence
are copied.
• If you press the d button while images in a sequence are displayed, only the Card to
camera copy option is available. All images in the sequence are copied if you select
Current sequence.
Using the Menu
The Playback Menu
154
Page 39
Sequence Display
Press the c button (playback mode) M d button M Sequence display M
k button
Select the method used to display images in the sequence (A86).
Option Description
Q Individual pictures
C Key picture only
(default setting)
Settings are applied to all sequences, and the setting is saved in the camera’s memory
even after the camera is turned off.
Displays each image in a sequence individually.
F is displayed on the playback screen.
Displays only the key picture for images in a sequence.
Using the Menu
The Playback Menu
155
Page 40
The Network Menu
Press the d button M J menu icon M k button
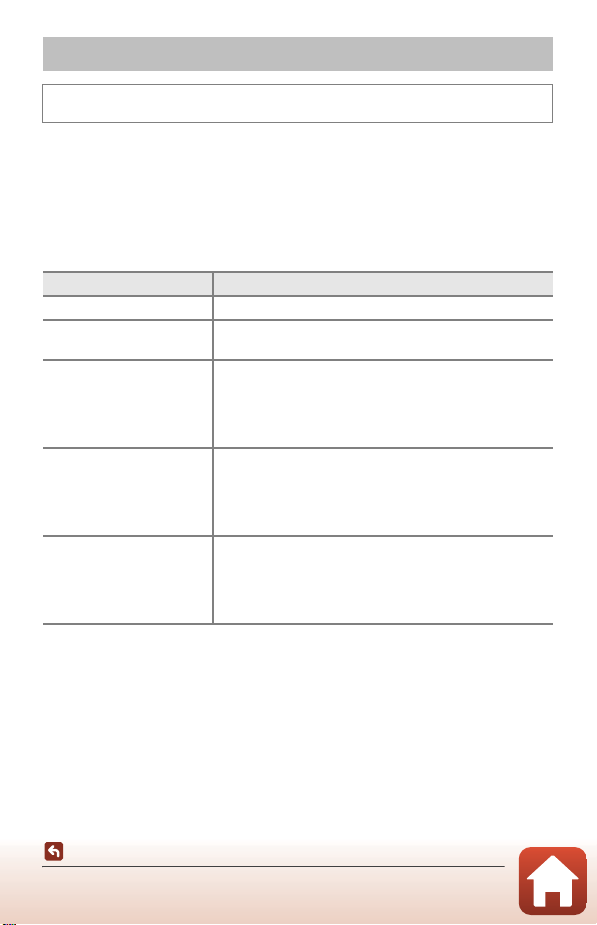
Configure the wireless network settings to connect the camera to a smart device or
the ML-L7 Remote Control (available separately).
• When you establish a wireless connection between the camera and a smart device
with the SnapBridge app installed, you can upload images captured with the
camera to the smart device or perform remote photography. See the included
“SnapBridge Connection Guide” for the connection procedure.
• Some settings cannot be changed while a wireless connection is established. To
change them, disconnect the wireless connection.
Option Description
Airplane mode Select On to turn off all wireless connections.
Choose connection
Connect to smart device
Connection to remote
Send while shooting
Select whether to connect the camera to a smart device or
the ML-L7 Remote Control (available separately).
Select when using the SnapBridge app to connect the
camera and a smart device. See the included “SnapBridge
Connection Guide” for more information.
• Select Smart device in Choose connection before
selecting this option.
Select when connecting the ML-L7 Remote Control
(available separately) with the camera. The camera waits for
the connection to be established (A207).
• Select Remote control in Choose connection before
selecting this option.
Set the conditions for automatically sending images to a
smart device.
• The size of images that are uploaded is restricted to 2
megapixels. To upload still images at their original size,
use Download pictures in the SnapBridge app.
Using the Menu
The Network Menu
156
Page 41
Option Description
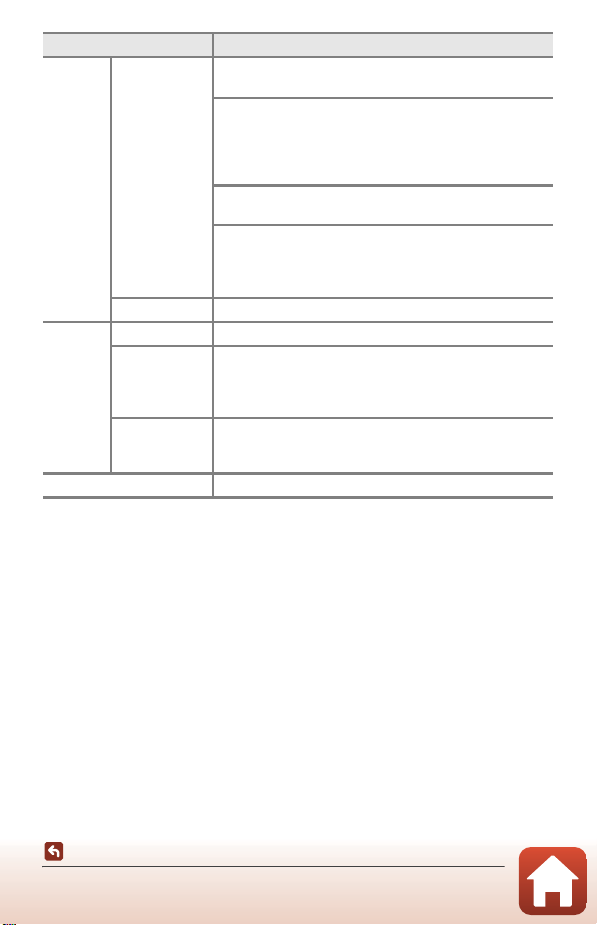
SSID*: Change the SSID. Set a 1- to 32-character
alphanumeric SSID.
Auth./encryp.: Select whether or not to encrypt the
communications between the camera and the connected
smart device.
Network
Wi-Fi
Bluetooth
Restore default settings Restore all network menu settings to their default values.
* See “Operating the Text Input Keyboard” (A158) for information on how to enter
settings
Current settings Display the current settings.
Connection Select Disable to turn off Bluetooth communication.
Paired devices
Send while off
alphanumeric characters.
Communications are not encrypted when Open is
selected.
Password*: Set the password. Set an 8- to 36-character
alphanumeric password.
Channel: Select the channel used for the Wi-Fi connection.
If the communication quality is poor or the image upload
speed is extremely slow when using a Wi-Fi connection, try
changing the channel.
Change the smart device to connect with, or delete the
connected smart device.
This camera can be paired with up to five smart devices,
but can connect to only one device at a time.
Set whether or not to allow the camera to communicate
with the smart device when the camera is off or in standby
mode (A25).
C Bluetooth Communication Indicator on the Shooting Screen
• On: The camera is connected to a smart device via Bluetooth.
• Flashing: The camera is waiting for the connection to a smart device to be reestablished. It
also flashes when Bluetooth communication is disconnected while uploading images
(A200).
Using the Menu
The Network Menu
157
Page 42
Operating the Text Input Keyboard
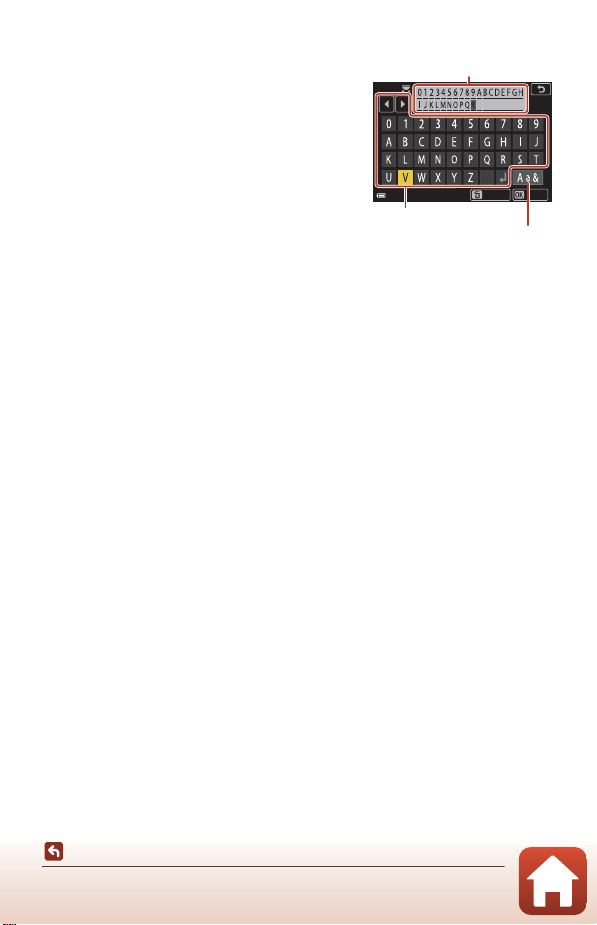
Text field
Keyboard
Change character type icon
• Use the multi selector HIJK to select
alphanumeric characters. Press the k button to
enter the selected character in the text field and
move the cursor to the next space.
• Select the change character type icon and press
the k button to change the character type.
• To move the cursor in the text field, rotate the
command dial.
• To delete characters, move the cursor to the text
field you want to delete and press the l button.
• To apply the setting, select P on the keyboard
and press the k button.
InputDelete
C Operating the Touch Panel on the Text Input Keyboard
You can input characters by tapping the text field, keyboard, or change character type icon.
Using the Menu
The Network Menu
158
Page 43
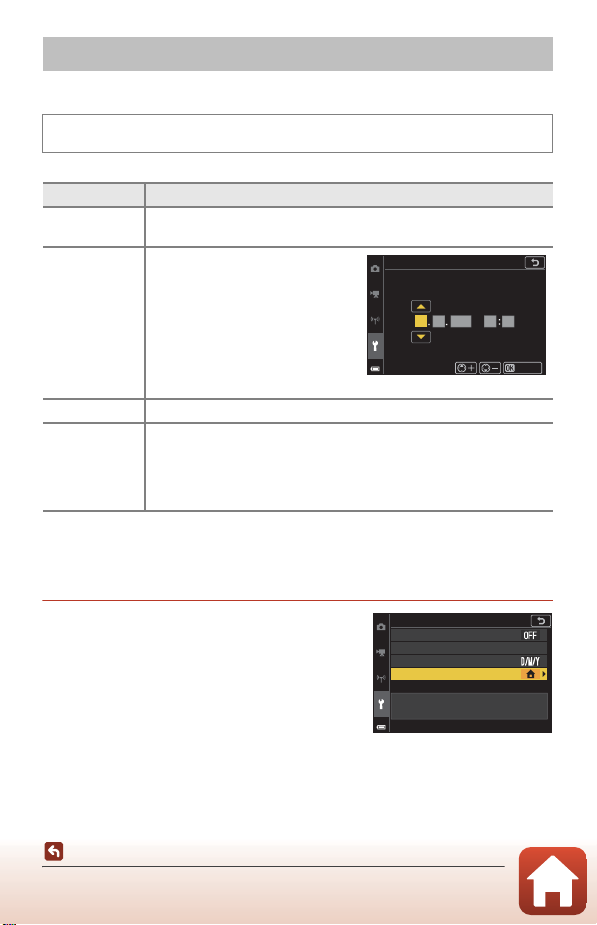
The Setup Menu
Time Zone and Date
Press the d button M z menu icon M Time zone and date M k button
Set the camera clock.
Option Description
Sync with
smart device
Date and time*
Date format Select Year/Month/Day, Month/Day/Year, or Day/Month/Year.
Time zone*
*Can be set only when Sync with smart device is set to Off.
Setting the Time Zone
Select On to synchronize the date and time setting with a smart device.
Enable the clock synchronization function of the SnapBridge app.
• Select a field: Press the multi
selector JK.
• Edit the date and time: Press
HI. Date and time can also be
changed by rotating the multi
selector or command dial.
• Apply the setting: Select the
minute field setting and press
the k button.
Set time zone and daylight saving time.
• When Travel destination (
zone (w), the time difference between the travel destin ation and the
home time zone is automatically calculated, and the date and time
are saved for the selected region.
x) is set after having set the home time
Date and time
DM Y h m
0101
2018
00 00
Conrm
1 Use the multi selector HI to select
Time zone and press the k button.
159
Using the Menu
The Setup Menu
Time zone and date
Sync with smart device
Date and time
Date format
Time zone
London, Casablanca
UTC+0
15/11/2018 15:30:00
Page 44
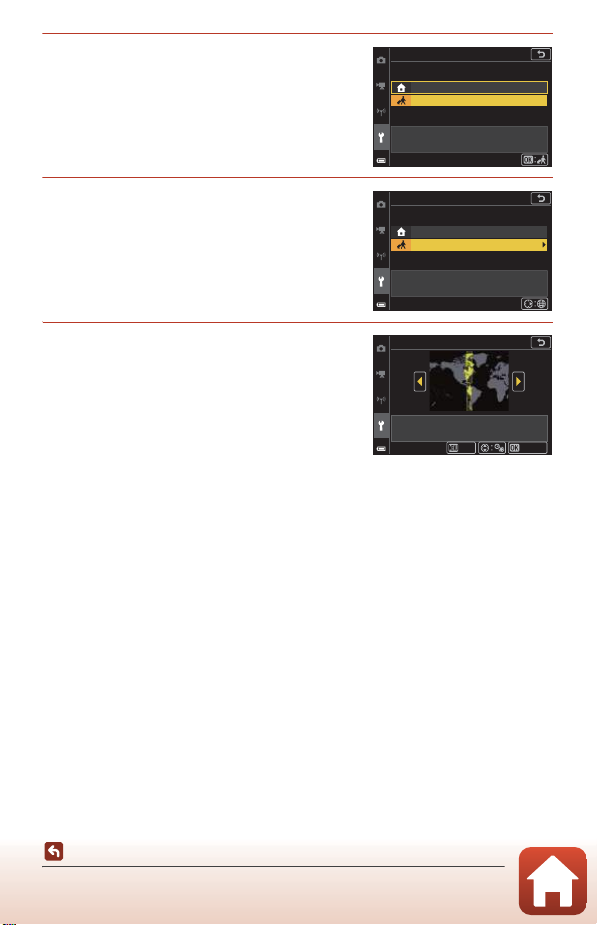
2 Select w Home time zone or x
Travel destination and press the k
button.
• The date and time displayed on the screen
changes depending on whether the home
time zone or travel destination is selected.
Time zone
Home time zone
Travel destination
London, Casablanca
UTC+0
15/11/2018 15:30:00
3 Press K.
4 Use JK to select the time zone.
• Press H to enable daylight saving time
function, and W is displayed. Press I to
disable the daylight saving time function.
• Press the k button to apply the time zone.
• If the correct time is not displayed for the home
or travel destination time zone setting, set the
appropriate time in Date and time.
Time zone
Home time zone
Travel destination
London, Casablanca
UTC+0
15/11/2018 15:30:00
Travel destination
New York, Toronto, Lima
UTC-5
15/11/2018 10:30:00
Back
Conrm
Using the Menu
The Setup Menu
160
Page 45
Monitor Settings
F 3. 4F3.4 5 00500
2 5m 0s25m 0s
1 /2 5 01/250
0 .00.0
1 00100
1 00 - 00 0 4100-0004
1 5/ 1 1/ 2 01 8 1 5 :3 015/11/2018 15:30
4 /44/4
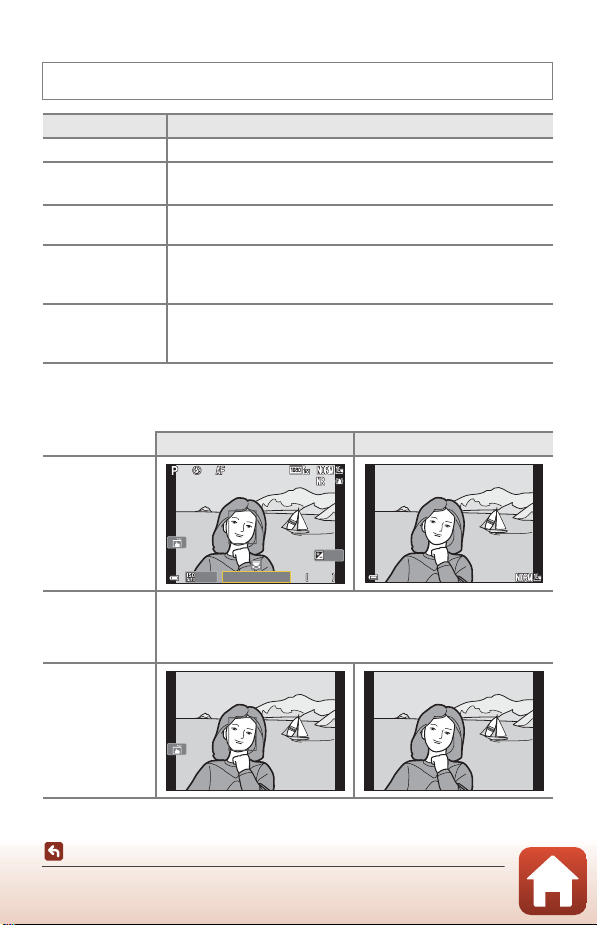
Press the d button M z menu icon M Monitor settings M k button
Option Description
Photo info Set whether or not to display information on the screen.
Monitor brightness
EVF brightness
Help display
Image review
Photo info
Show info
Auto info
(default setting)
Adjust the monitor brightness.
• Default setting: 3
Adjust the viewfinder brightness.
• Default setting: 3
The descriptions of functions are displayed while changing the
shooting mode or while the setting screen is displayed.
• Default setting: On
Set whether or not to display the captured image immed iately after
shooting.
• Default setting: On
Shooting mode Playback mode
The same information as shown in Show info is displayed, and it is
hidden as shown in Hide info if no operations are performed for a
few seconds. The information is displayed again when an operation is
performed.
Hide info
Using the Menu
The Setup Menu
161
Page 46
Framing
F 3. 4
5 00
2 5m 0s
1 /2 5 0
0 .0
1 00
1 00 - 00 0 4
1 5/ 1 1/ 2 01 8 1 5 :3 0
4 /4
F 3. 4F3.4 5 00500
2 5m 0s25m 0s
1 /2 5 01/250
0 .00.0
1 00100
1 00 - 00 0 4
1 5/ 1 1/ 2 01 8 1 5 :3 0
4 /4
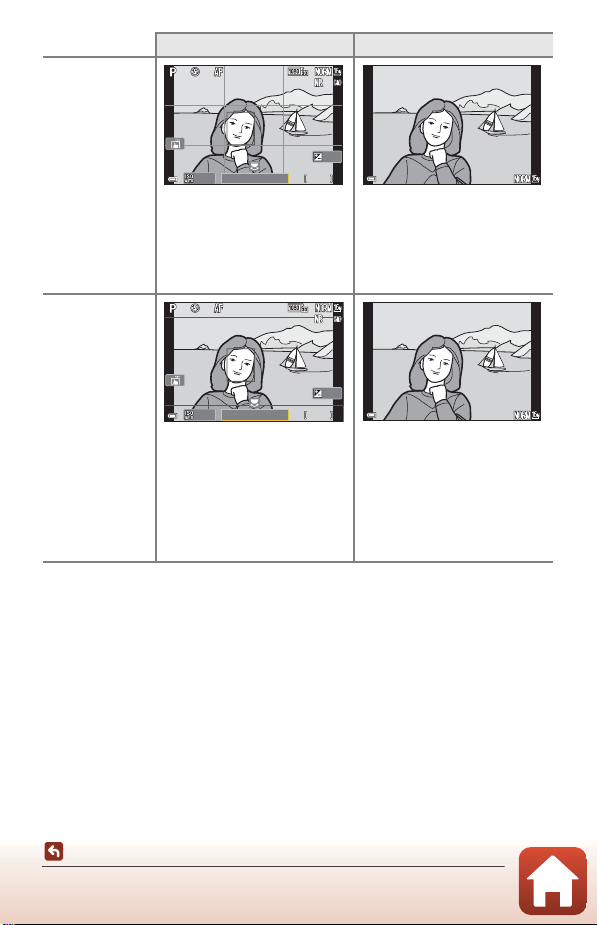
grid+auto info
Movie
frame+auto info
Shooting mode Playback mode
0.0
1/250
100
In addition to the information
shown in Auto info, a framing
grid is displayed to help frame
pictures.
The framing grid is not displayed
while recording movies.
In addition to the information
shown in Auto info, a frame is
displayed before movie
recording begins that represents
the area that will be captured
when recording movies.
The movie frame is not displayed
while recording movies.
500
25m 0s
F3.4
100-0004
15/11/2018 15:30
Same as Auto info.
100-0004
15/11/2018 15:30
Same as Auto info.
4/4
4/4
Using the Menu
The Setup Menu
162
Page 47
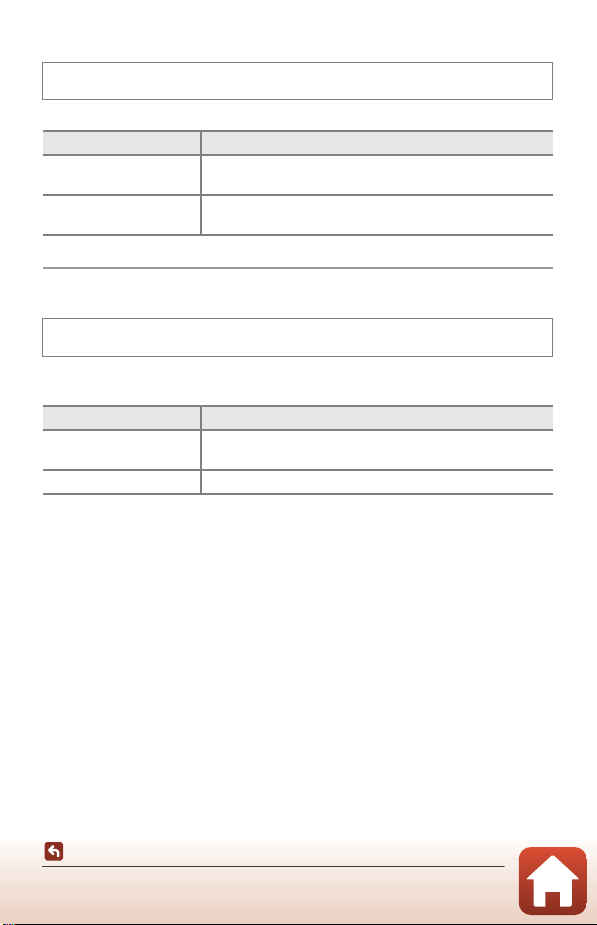
EVF Auto Toggle (Automatically Switching the Display
to the Viewfinder)
Press the d button M z menu icon M EVF auto toggle M k button
Option Description
On
(default setting)
Off
When you bring your face close to the viewfinder, the eye sensor
responds to it and the display is automatically switched from the
monitor to viewfinder.
Even when you bring your face close to the viewfinder, the display
is not switched to the viewfinder.
Using the Menu
The Setup Menu
163
Page 48
Date Stamp
15 . 11 . 20 1 8
Press the d button M z menu icon M Date stamp M k button
The shooting date and time can be stamped on
images when shooting.
15.11.2018
Option Description
W Date Date is stamped on images.
X Date and time Date and time are stamped on images.
Off (default setting) Date and time are not stamped on images.
B Notes About Date Stamp
• Stamped date and time form a permanent part of image data and cannot be deleted. The
date and time cannot be stamped on images after they have been captured.
• The date and time cannot be stamped in the following situations:
- When the scene mode is set to Night portrait (when set to Hand-held), Night
landscape (when set to Hand-held), Backlighting (when HDR is set to On), Easy
panorama, or Multiple exp. Lighten
- When Image quality (A127) is set to RAW, RAW + Fine, or RAW + Normal
- When Continuous (A134) is set to Pre-shooting cache, Continuous H: 120 fps, or
Continuous H: 60 fps
- When recording movies
- When saving still images during movie recording
- When extracting still images from a movie during movie playback
• The stamped date and time may be difficult to read when using a small image size.
Using the Menu
The Setup Menu
164
Page 49
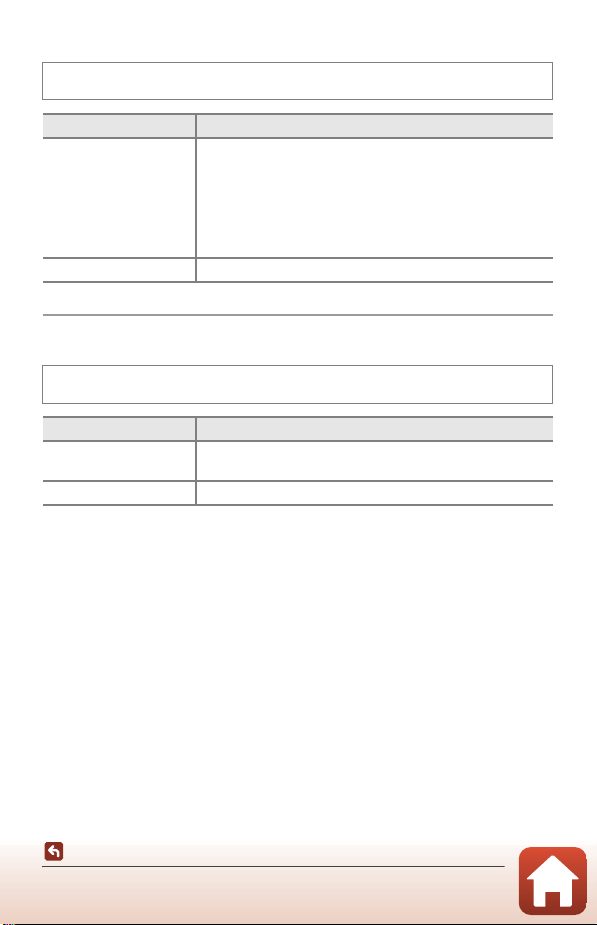
Self-timer: After Release
Press the d button M z menu icon M Self-timer: after release M k button
Set whether to cancel the self-timer after using it to shoot (A61).
Option Description
Exit self-timer mode
(default setting)
Stay in self-timer mode
The self-timer is canceled after shooting.
The self-timer photography continues after shooting.
• When the camera is turned off, self-timer is canceled.
Photo VR
Press the d button M z menu icon M Photo VR M k button
Select the vibration reduction setting used when shooting still images.
Select Off when using a tripod to stabilize the camera during shooting.
Option Description
g On
(default setting)
Off Compensation is not performed.
Performs compensation for camera shake using lens shift VR.
B Notes About Photo VR
• After turning on the camera or after switching from playback mode to shooting mode,
wait until the shooting screen is ready before taking pictures.
• Images on the screen may be displayed blurry immediately after shooting.
• Vibration reduction may be unable to completely eliminate the effects of camera shake in
some situations.
Using the Menu
The Setup Menu
165
Page 50
AF Assist
Press the d button M z menu icon M AF assist M k button
Option Description
The AF-assist illuminator automatically lights up when you
press the shutter-release button under dim lighting. The
a Auto
(default setting)
Off The AF-assist illuminator does not light.
illuminator has a range of about #5.0 m (16 ft)# at the
maximum wide-angle position and about #5.0 m (16 ft)# at
the maximum telephoto position.
• The AF-assist illuminator may not light depending on the
position of the focus area or the shooting mode.
Digital Zoom
Press the d button M z menu icon M Digital zoom M k button
Option Description
On
(default setting)
Off Digital zoom is disabled.
Digital zoom is enabled.
B Notes About Digital Zoom
• Digital zoom cannot be used in the following scene modes:
- Por trait, Night portrait, Night landscape, Backlighting (when HDR is set to On),
Easy panorama, Pet portrait, Smart portrait
• Digital zoom cannot be used in other shooting modes when using certain settings
(A82).
Using the Menu
The Setup Menu
166
Page 51
Assign Side Zoom Control
Press the d button M z menu icon M Assign side zoom control M k button
Choose the function to be performed during shooting when the side zoom control is
moved.
Option Description
Y Zoom (default setting) Adjust the zoom (A70).
When the focus mode is set to E (manual focus), use
the side zoom control to focus (A64).
E Manual focus
Z Aperture
b ISO sensitivity
1
2
3
o Exposure compensation
c White balance
5
None
1
When the focus mode is set to modes other than E, operation of the side zoom control
is disabled.
2
In shooting modes where the f-number cannot be set, operation of the side zoom control
is disabled.
3
When the ISO sensitivity cannot be set, operation of the side zoom control is disabled.
4
When the exposure compensation cannot be set, operation of the side zoom control is
disabled.
5
When the white balance cannot be set, operation of the side zoom control is disabled.
• Move the side zoom control toward g to focus on
distant subjects.
• Move the side zoom control toward f to focus on
near subjects.
Set the f-number (A53).
Display the ISO sensitivity setting screen (A137).
Move the side zoom control while the setting screen is
displayed to select an item.
Display the exposure compensation setting screen
(A66, 68).
4
Move the side zoom control while the setting screen is
displayed to select a compensation value.
Display the white balance setting screen (A130).
Move the side zoom control while the setting screen is
displayed to select an item.
The side zoom control does not operate even if it is
moved.
Using the Menu
The Setup Menu
167
Page 52
AE/AF Lock Button
Press the d button M z menu icon M AE/AF lock button M k button
Choose the function to be performed during shooting when the g (AE-L/AF-L)
button (A3) is pressed.
Option Description
a AE/AF lock
(default setting)
b AE lock only Hold down the g button to lock the exposure.
c AE lock (Hold)
d AF lock only Hold down the g button to lock the focus.
Hold down the g button to lock both the focus and exposure.
Press the g button to lock the exposure. Exposure lock is not
released even if you press the shutter-release button.
Press the g button again to release the exposure lock.
B Notes About AE/AF Lock Button
• The exposure is not locked even if you press the g button in the following shooting
modes.
- D (manual) mode
- Time-lapse movie (during Night sky (150 minutes) or Star trails (150 minutes)),
Fireworks show, or Multiple exp. Lighten scene mode
• When the focus mode (A63) is E (manual focus), the focus is not locked even if you
press the g button.
Using the Menu
The Setup Menu
168
Page 53
Sound Settings
Press the d button M z menu icon M Sound settings M k button
Option Description
When On (default setting) is selected, the camera produces
one beep when operations are performed, two beeps when
Button sound
Shutter sound
focus is acquired on the subject, and three beeps when an
error occurs. The welcome screen sound is also produced.
• Sounds are disabled when using Pet portrait scene
mode.
When On (default setting) is selected, the shutter sound is
produced when the shutter is released.
• The shutter sound is not produced when recording
movies or when using Easy panorama or Pet portrait
scene mode.
Auto Off
Press the d button M z menu icon M Auto off M k button
Set the amount of time that elapses before the camera enters standby mode (A25).
You can select 30 s, 1 min (default setting), 5 min, or 30 min.
C Setting the Auto Off Function
The time that passes before the camera enters standby mode is fixed in the following
situations:
• When a menu is displayed: 3 minutes (when auto off is set to 30 s or 1 min)
• When shooting using Pet portrait auto release: 5 minutes (when auto off is set to 30 s
or 1 min)
• When shooting using Smile timer: 5 minutes (when auto off is set to 30 s or 1 min)
• When the AC adapter is connected: 30 minutes
• When an HDMI cable is connected: 30 minutes
• When waiting for connecting with Connect to smart device: 30 minutes
Using the Menu
The Setup Menu
169
Page 54
Format Card/Format Memory
Press the d button M z menu icon M Format card/Format memory M
k button
Use this option to format a memory card or the internal memory.
Formatting the memory cards or internal memory permanently deletes all
data. Data that has been deleted cannot be recovered. Make sure to save
important images to a computer before formatting.
• You may not be able to select this setting while a wireless connection is
established.
Formatting a Memory Card
• Insert a memory card into the camera.
• Select Format card in the setup menu and then press the k button.
Formatting the Internal Memory
• Remove the memory card from the camera.
• Select Format memory in the setup menu and then press the k button.
To start formatting, select Format on the screen that is displayed and press the k
button.
• Do not turn the camera off or open the battery-chamber/memory card slot cover
during formatting.
Using the Menu
The Setup Menu
170
Page 55
Language
Press the d button M z menu icon M Language M k button
Select a language for display of camera menus and messages.
HDMI Output
Press the d button M z menu icon M HDMI output M k button
Select the image resolution when outputting through HDMI.
When Auto (default setting) is selected, 2160p, 1080p, or 720p is selected
automatically for the resolution supported by the connected TV.
Using the Menu
The Setup Menu
171
Page 56
Charge by Computer
Press the d button M z menu icon M Charge by computer M k button
Option Description
When the camera is connected to a computer that is running
a Auto
(default setting)
Off
(A110), the battery inserted into the camera is automatically
charged using power supplied by the computer.
• The power-on lamp (charge lamp) slowly flashes while the battery
is charging. When charging is complete, the power-on lamp
(charge lamp) changes from flashing to on.
The battery inserted into the camera is not charged when the camera
is connected to a computer.
B Notes About Charging with a Computer
• When connected to a computer, the camera turns on and starts charging. If the camera is
turned off, charging stops.
• About # hours and ## minutes are required to charge a fully exhausted battery. Charging
time increases when images are transferred while the battery is charging.
• The camera turns off automatically if there is no communication with the computer for 30
minutes after the battery has finished charging.
B When the Power-on Lamp (Charge Lamp) Quickly Flashes
Charging cannot be performed, possibly due to one of the reasons described below.
• The ambient temperature is not suited to charging. Charge the battery indoors with an
ambient temperature of 5°C to 35°C (41°F to 95°F).
• The USB cable is not connected correctly or the battery is faulty. Make sure that the USB
cable is connected correctly or replace the battery if necessary.
• The computer is in sleep mode and is not supplying power. Wake up the computer.
• The battery cannot be charged because the computer cannot supply power to the
camera due to the computer’s settings or its specifications.
Using the Menu
The Setup Menu
172
Page 57
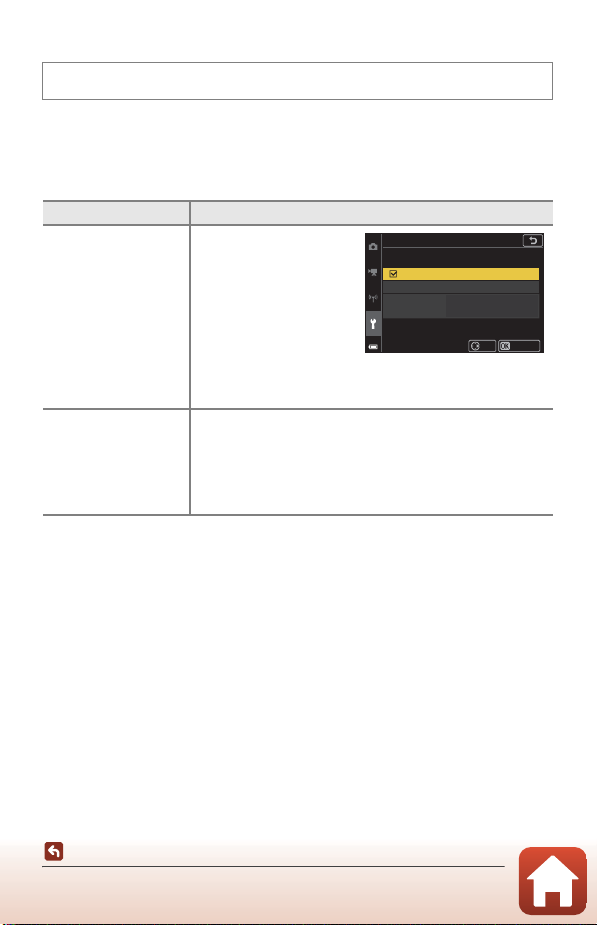
Image Comment
Press the d button M z menu icon M Image comment M k button
Attach a comment that was previously registered to images that will be captured.
You can imprint the attached comment to images that will be sent to a smart device
using the SnapBridge app. You must configure the SnapBridge app in advance. See
SnapBridge app online help for more information.
You can also check the attached comment using ViewNX-i metadata.
Option Description
Attach comment
Input comment
A comment registered
with Input comment is
attached to images.
• Select Attach
comment, press K,
and set the check box
to on (w). When you
press the k button,
the setting is enabled,
and the comment will be attached to the images captured
afterwards.
You can register a comment of up to 36 alphanumeric
characters.
• Select Input comment, press K, and the input screen is
displayed.
See “Operating the Text Input Keyboard” (A158) for
information about the input method.
Image comment
Attach comment
Input comment
XXXXXXXXXXXXXXXXXX
XXXXXXXXXXXXXXXXXX
ConrmSet
B Notes About Image Comments
Image comments cannot be attached to movies.
C Image Comments Display
Image comments are not displayed even if images are played back on the camera.
Using the Menu
The Setup Menu
173
Page 58
Copyright Information
Press the d button M z menu icon M Copyright information M k button
Attach the copyright information that was previously registered to images that will be
captured.
You can imprint the attached copyright information to images that will be sent to a
smart device using the SnapBridge app. You must configure the SnapBridge app in
advance. See SnapBridge app online help for more information.
You can also check the attached copyright information using ViewNX-i metadata.
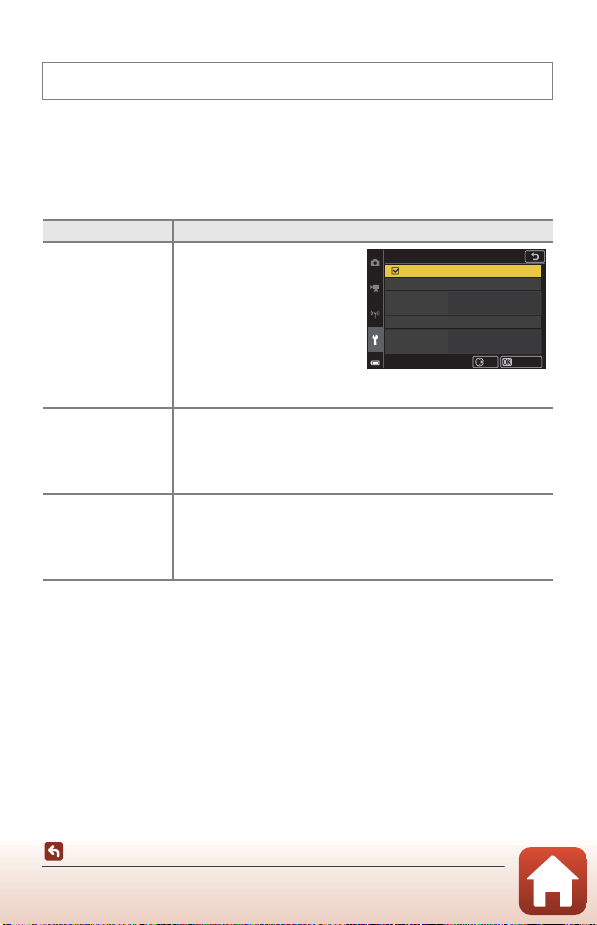
Option Description
Attach copyright
info
Artist
Copyright
Copyright information registered
with
Artist
and
Copyright
attached to images.
• Select Attach copyright
info, press K, and set the
check box to on (w).
When you press the k
button, the setting is
enabled, and the copyright
information will be attached to the images captured afterwards.
You can register an artist name of up to 36 alphanumeric
characters.
• Select Artist, press K, and the input screen is displayed. See
“Operating the Text Input Keyboard” (A158) for information
about the input method.
You can register a copyright owner name of up to 54
alphanumeric characters.
• Select Copyright, press K, and the input screen is displayed.
See “Operating the Text Input Keyboard” (A158) for
information about the input method.
is
Copyright information
Attach copyright info
Artist
XXXXXXXXXXXXXXXXXX
XXXXXXXXXXXXXXXXXX
Copyright
XXXXXXXXXXXXXXXXXX
XXXXXXXXXXXXXXXXXX
ConrmSet
B Notes About Copyright Information
• Copyright information cannot be attached to movies.
• To prevent illegal use of artist names and copyright owner names when lending or
transferring ownership of the camera, make sure to disable the Attach copyright info
setting. Also, make sure that the artist name and copyright owner name are blank.
• Nikon is not responsible for any kind of trouble or damage resulting from the use of
Copyright information.
C Copyright Information Display
• Copyright information is not displayed even if images are played back on the camera.
• If you input both Artist and Copyright, only the copyright owner name is imprinted to
images in the SnapBridge app.
Using the Menu
The Setup Menu
174
Page 59
Location Data
Press the d button M z menu icon M Location data M k button
Set whether or not to add shooting location information to the images that you take.
Option Description
Download from device
Position
Select Yes to add location information from the smart device
to the images that you take. Enable the location information
function of the SnapBridge app.
Display the obtained location information.
• The information is not updated while it is being displayed.
To update it, perform Position again.
Toggle Av/Tv Selection
Press the d button M z menu icon M Toggle Av/Tv selection M k button
Change which controls to use for setting the exposure in D mode.
Option Description
Do not toggle selection
(default setting)
Toggle selection
Use the command dial to set the shutter speed (Tv), and the
multi selector to set the f-number (Av).
Use the multi selector to set the shutter speed (Tv), and the
command dial to set the f-number (Av).
Using the Menu
The Setup Menu
175
Page 60
MF Peaking
Press the d button M z menu icon M MF peaking M k button
Option Description
On
(default setting)
Off Peaking is disabled.
When operating E (manual focus), focusing is assisted by
highlighting areas that are in focus in white on the image
displayed on the screen (A64, 65).
Reset All
Press the d button M z menu icon M Reset all M k button
When Reset is selected, the camera’s settings are restored to their default values.
• The network menu settings are also restored to their default values.
• Some settings, such as Time zone and date or Language, are not reset.
• You may not be able to select this setting while a wireless connection is
established.
C Resetting File Numbering
To reset file numbering to “0001”, delete all images saved on the memory card or in the
internal memory before selecting Reset all.
Touch-screen Controls
Press the d button M z menu icon M Touch-screen controls M k button
Set whether to enable touch controls (A7).
Default setting: Enable
176
Using the Menu
The Setup Menu
Page 61
Conformity Marking
Press the d button M z menu icon M Conformity marking M k button
View some of the conformity markings that the camera complies with.
Firmware Version
Press the d button M z menu icon M Firmware version M k button
View the current camera firmware version.
• You may not be able to select this setting while a wireless connection is
established.
Using the Menu
The Setup Menu
177
Page 62
Technical Notes
Notices...................................................................................................................................179
Notes About Wireless Communication Functions ................................................181
Caring for the Product.....................................................................................................184
The Camera.................................................................................................................184
The Battery ..................................................................................................................185
The Charging AC Adapter......................................................................................186
Memory Cards............................................................................................................187
Cleaning and Storage ......................................................................................................188
Cleaning .......................................................................................................................188
Storage .........................................................................................................................188
Error Messages ................................................................................................................... 189
Troubleshooting................................................................................................................192
File Names............................................................................................................................203
Accessories ..........................................................................................................................204
ML-L7 Remote Control............................................................................................205
Specifications......................................................................................................................209
Memory Cards That Can Be Used........................................................................213
Index ......................................................................................................................................215
Technical Notes
178
Page 63
Notices
Notices for Customers in the U.S.A.
IMPORTANT SAFETY INSTRUCTIONS SAVE THESE INSTRUCTIONS.
DANGER - TO REDUCE THE RISK OF FIRE OR ELECTRIC SHOCK, CAREFULLY
FOLLOW THESE INSTRUCTIONS
For connection to a supply not in the U.S.A., use an attachment plug adapter of the
proper configuration for the power outlet if needed.
The power supply unit is intended to be correctly orientated in a vertical or floor
mount position.
Federal Communications Commission (FCC) Radio Frequency Interference
Statement
This equipment has been tested and
found to comply with the limits for a
Class B digital device, pursuant to Part
15 of the FCC rules. These limits are
designed to provide reasonable
protection against harmful
interference in a residential installation. This equipment generates, uses, and can
radiate radio frequency energy and, if not installed and used in accordance with the
instructions, may cause harmful interference to radio communications. However,
there is no guarantee that interference will not occur in a particular installation. If this
equipment does cause harmful interference to radio or television reception, which
can be determined by turning the equipment off and on, the user is encouraged to
try to correct the interference by one or more of the following measures:
• Reorient or relocate the receiving antenna.
• Increase the separation between the equipment and receiver.
• Connect the equipment into an outlet on a circuit different from that to which the
receiver is connected.
• Consult the dealer or an experienced radio/television technician for help.
CAUTIONS
Modifications
The FCC requires the user to be notified that any changes or modifications made to
this device that are not expressly approved by Nikon Corporation may void the user’s
authority to operate the equipment.
Technical Notes
Notices
179
Page 64
Interface Cables
Use the interface cables sold or provided by Nikon for your equipment. Using other
interface cables may exceed the limits of Class B Part 15 of the FCC rules.
Notice for Customers in the State of California
WARNING
Handling the cord on this product will expose you to lead, a chemical known to the
State of California to cause birth defects or other reproductive harm.
Wash hands after handling.
Nikon Inc.,
1300 Walt Whitman Road, Melville, New York 11747-3064, U.S.A.
Tel: 631-547-4200
Notice for Customers in Canada
CAN ICES-3 B / NMB-3 B
Notices for Customers in Europe
CAUTIONS
RISK OF EXPLOSION IF BATTERY IS REPLACED BY AN INCORRECT TYPE.
DISPOSE OF USED BATTERIES ACCORDING TO THE INSTRUCTIONS.
This symbol indicates that electrical and electronic equipment is to be
collected separately.
The following apply only to users in European countries:
• This product is designated for separate collection at an appropriate
collection point. Do not dispose of as household waste.
• Separate collection and recycling helps conserve natural resources and
prevent negative consequences for human health and the environment that might
result from incorrect disposal.
• For more information, contact the retailer or the local authorities in charge of waste
management.
This symbol on the battery indicates that the battery is to be collected
separately.
The following apply only to users in European countries:
• All batteries, whether marked with this symbol or not, are designated
for separate collection at an appropriate collection point. Do not
dispose of as household waste.
• For more information, contact the retailer or the local authorities in charge of waste
management.
Technical Notes
Notices
180
Page 65
Notes About Wireless Communication
Functions
Restrictions on Wireless Devices
The wireless transceiver included in this product conforms to wireless regulations in
the country of sale and is not for use in other countries (products purchased in the EU
or EFTA can be used anywhere within the EU and EFTA). Nikon does not accept
liability for use in other countries. Users who are unsure as to the original country of
sale should consult with their local Nikon service center or Nikon-authorized service
representative. This restriction applies to wireless operation only and not to any other
use of the product.
Security
Although one of the benefits of this product is that it allows others to freely connect
for the wireless exchange of data anywhere within its range, the following may occur
if security is not enabled:
• Data theft: Malicious third-parties may intercept wireless transmissions to steal user
IDs, passwords, and other personal information.
• Unauthorized access: Unauthorized users may gain access to the network and alter
data or perform other malicious actions. Note that due to the design of wireless
networks, specialized attacks may allow unauthorized access even when security is
enabled. Nikon is not responsible for data or information leaks that may occur
during data transfer.
• Do not access networks that you are not permitted to use, even if they are
displayed on your smartphone or tablet. Doing so may be regarded as
unauthorized access. Only access networks that you are permitted to use.
Personal Information Management and Disclaimer
• User information registered and configured on the product, including wireless LAN
connection settings and other personal information, is susceptible to alteration
and loss resulting from operational error, static electricity, accident, malfunction,
repair or other handling. Always keep separate copies of important information.
Nikon is not responsible for any direct or indirect damages or lost profits resulting
from alteration or loss of content that is not attributable to Nikon.
• Before discarding this product or transferring it to another owner, perform Reset
all in the setup menu (A120) to delete all user information registered and
configured with the product, including wireless LAN connection settings and other
personal information.
• Nikon is not responsible for any damages resulting from unauthorized use of this
product by third parties in the event that the product is stolen or lost.
181
Technical Notes
Notes About Wireless Communication Functions
Page 66
Precautions when Exporting or Carrying This Product Abroad
This product is controlled by the United States Export Administration Regulations
(EAR). The permission of the United States government is not required for export to
countries other than the following, which as of this writing are subject to embargo or
special controls: Cuba, Iran, North Korea, Sudan, and Syria (list subject to change).
Notice for Customers in the U.S.A. and Canada
Federal Communications Commission (FCC) and Innovation, Science and
Economic Development Canada (ISED)
Declaration of Conformity
This device complies with part 15 of FCC Rules and Innovation, Science and
Economic Development Canada’s licence-exempt RSSs. Operation is subject to
the following two conditions: (1) this device may not cause harmful interference,
and (2) this device must accept any interference received, including interference
that may cause undesired operation.
FCC/ISED RF Exposure Statement
This transmitter must not be co-located or operated in conjunction with any other
antenna or transmitter.
The available scientific evidence does not show that any health problems are
associated with using low power wireless devices. There is no proof, however,
that
these low power wireless devices are absolutely safe. Low power Wireless
devices emit low levels of radio frequency energy (RF) in the microwave range
while being used. Whereas high levels of RF can produce health effects (by
heating tissue), exposure of low-level RF that does not produce heating effects
causes no known adverse health effects. Many studies of low-level RF exposures
have not found any biological effects. Some studies have suggested that some
biological effects might occur, but such findings have not been confirmed by
additional research.This product has been tested and found to comply with FCC/
ISED radiation exposure limits set forth for an uncontrolled environment and
meets the FCC radio frequency (RF) Exposure Guidelines and RSS-102 of the ISED
radio frequency (RF) Exposure rules.
Please refer to the SAR test report that was uploaded to FCC website.
Technical Notes
Notes About Wireless Communication Functions
182
Page 67
Notice for Customers in Europe
Declaration of Conformity (Europe)
Hereby, Nikon Corporation declares that the radio equipment type N1721 is in
compliance with Directive 2014/53/EU.
The full text of the EU declaration of conformity is available at the following internet
address: http://imaging.nikon.com/support/pdf/DoC_N1721.pdf.
• Maximum output power: ##.# dBm (EIRP)
• Operating frequency:
- Wi-Fi: 2412–2462 MHz (channels 1–11)
- Bluetooth: 2402–2480 MHz
- Bluetooth Low Energy: 2402–2480 MHz
Notice for Customers in Singapore
This device complies with radio-frequency regulations.
Complies with
IMDA Standards
DA103423
183
Technical Notes
Notes About Wireless Communication Functions
Page 68
Caring for the Product
Observe the precautions described below in addition to the warnings in “For Your
Safety” (Avi-ix) when using or storing the device.
The Camera
Do Not Apply Strong Impact to the Camera
The product may malfunction if subjected to strong shock or vibration. In addition, do not
touch or apply force to the lens or lens cover.
Keep Dry
The device will be damaged if immersed in water or subjected to high humidity.
Avoid Sudden Changes in Temperature
Sudden changes in temperature, such as when entering or leaving a heated building on a
cold day, can cause condensation to form inside the device. To prevent condensation, place
the device in a carrying case or a plastic bag before exposing it to sudden changes in
temperature.
Keep Away from Strong Magnetic Fields
Do not use or store this device in the vicinity of equipment that generates strong
electromagnetic radiation or mag netic fields. Doi ng so could result in loss of data or camera
malfunction.
Do Not Point the Lens at Strong Light Sources for Extended
Periods
Avoid pointing the lens at the sun or other strong light sources for extended periods when
using or storing the camera. Intense light may cause the image sensor to deteriorate or
produce a white blur effect in photographs.
Turn the Product Off Before Removing or Disconnecting the
Power Source or Memory Card
Do not remove the battery while the product is on, or while images are being saved or
deleted. Forcibly cutting power in these circumstances could result in loss of data or in
damage to the memory card or internal circuitry.
Technical Notes
Caring for the Product
184
Page 69

Notes About the Monitor
• Monitors (including electronic viewfinders) are constructed with extremely high precision;
at least 99.99% of pixels are effective, with no more than 0.01% being missing or defective.
Hence while these displays may contain pixels that are always lit (white, red, blue, or
green) or always off (black), this is not a malfunction and has no effect on images recorded
with the device.
• Images in the monitor may be difficult to see under bright lighting.
• Do not apply pressure to the monitor, as this could cause damage or malfunction. Should
the monitor break, care should be taken to avoid injury caused by broken glass and to
prevent the liquid crystal from the display touching the skin or entering the eyes or
mouth.
The Battery
Precautions for Use
• Note that the battery may become hot after use.
• Do not use the battery at ambient temperatures below 0°C (32°F) or above 40°C (104°F) as
this could cause damage or malfunction.
• If you notice any abnormalities such as excessive heat, smoke, or an unusual smell coming
from the battery, immediately discontinue use and consult your retailer or Nikonauthorized service representative.
• After removing the battery from the camera or optional battery charger, put the battery in
a plastic bag, etc. in order to insulate it.
Charging the Battery
Check the battery level before using the camera and replace or charge the battery if
necessary.
• Charge the battery indoors with an ambient temperature of 5°C to 35°C (41°F to 95°F)
before use.
• A high battery temperature may prevent the battery from charging properly or
completely, and may reduce battery performance. Note that the battery may become hot
after use; wait for the battery to cool before charging.
When charging the battery inserted into this camera using the Charging AC Adapter or a
computer, the battery is not charged at battery temperatures below 0°C (32°F) or above
50°C (122°F).
• Do not continue charging once the battery is fully charged as this will result in reduced
battery performance.
• The battery temperature may increase during charging. However, this is not a
malfunction.
Carrying Spare Batteries
Whenever possible, carry fully charged spare batteries when taking pictures on important
occasions.
Using the Battery When Cold
On cold days, the capacity of batteries tends to decrease. If an exhausted battery is used at a low
temperature, the camera may not turn on. Keep spare batteries in a warm place and exchange as
necessary. Once warmed, a cold battery may recover some of its charge.
Technical Notes
Caring for the Product
185
Page 70

Battery Terminals
Dirt on the battery terminals may prevent the camera from functioning. Should the battery
terminals become dirty, wipe them off with a clean, dry cloth before use.
Charging an Exhausted Battery
Turning the camera on or off while an exhausted b attery is inserted in the camera may result
in reduced battery life. Charge the exhausted battery before use.
Storing the Battery
• Always remove the battery from the camera or optional battery charger when it is not
being used. Minute amounts of current are drawn from the battery while it is in the
camera, even when not in use. This may result in excessive battery drain and complete
loss of function.
• Charging a used battery within six months is recommended. When storing the battery for
long periods, recharge it at least once every six months and use the camera until the
battery level indicator is B before returning it to storage.
• Put the battery in a plastic bag, etc. in order to insulate it and store it in a cool place. The
battery should be stored in a dry location with an ambient temperature of 15°C to 25 °C (59°F
to 77°F). Do not store the battery in hot or extremely cold locations.
Battery Life
A marked drop in the time a fully charged battery retains its charge, when used at room
temperature, indicates that the battery needs to be replaced. Purchase a new battery.
Recycling Used Batteries
Replace the battery when it no lo nger holds a charge. Used batteries are a valuable resource.
Please recycle used batteries in accordance with local regulations.
The Charging AC Adapter
• The EH-73P/EH-73PCH Charging AC Adapter is for use only with compatible devices. Do
not use with another make or model of device.
• Do not use any USB cable other than the UC-E21. Using a USB cable other than the UC-E21
could result in overheating, fire or electric shock.
• Do not, under any circumstances, use another make or model of AC adapter other than
the EH-73P/EH-73PCH Charging AC Adapter, and do not use a commercially available
USB-AC adapter or a battery charger for a mobile phone. Failure to observe this precaution
could result in overheating or in damage to the camera.
• The EH-73P /EH-73PCH is compati ble with AC 100–240 V, 50/60 Hz electrical outlets. When
using in other countries, use a plug adapter (commercially available) as necessary. For
more information about plug adapters, consult your travel agency.
Technical Notes
Caring for the Product
186
Page 71
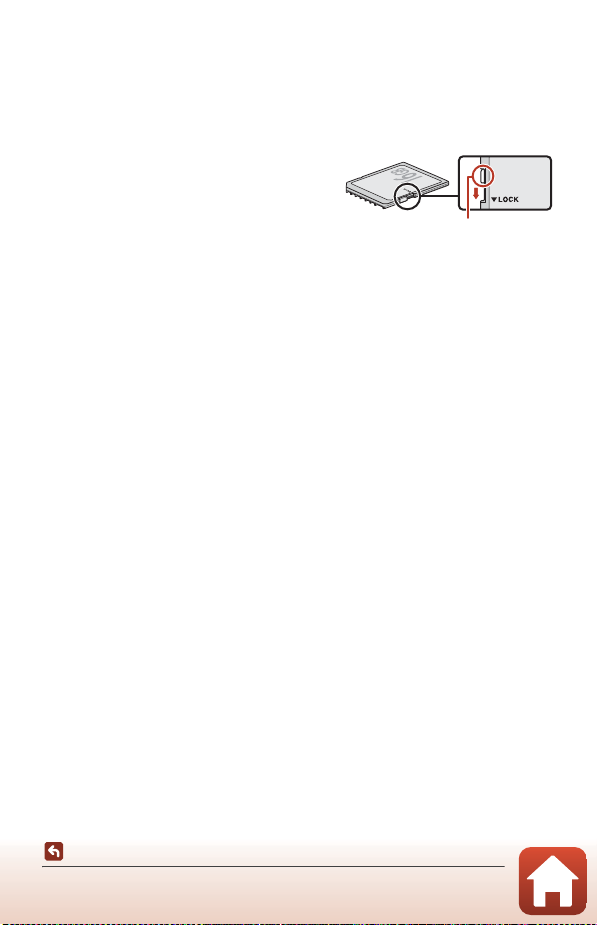
Memory Cards
Write-protect switch
Precautions for Use
• Use only Secure Digital memory cards (A213).
• Be sure to follow the precautions described in the documentation included with the
memory card.
• If the write-protect switch of the memory card is
locked, you cannot shoot, delete images, or
format the memory card.
• Do not put labels or stickers on memory cards.
Formatting
• Do not format the memory card using a computer.
• The first time you insert a memory card that has been used in another device into this
camera, be sure to format it with this camera. We recommend formatting new memory
cards with this camera before using them with this camera.
• Note that formatting a memory card permanently deletes all images and other
data on the memory card. Be sure to make copies of any images you wish to keep
before formatting the memory card.
• If the message Card is not formatted. Format card? is displayed when the camera is
turned on, the memory card must be formatted. If there is data that you do not want to
delete, select No. Copy the necessary data to a computer, etc. If you want to format the
memory card, select Yes. The confirmation dialog will be displayed. To start formatting,
press the k button.
• Do not perform the following during formatting, while data is being written to or deleted
from the memory card, or during data transfer to a computer. Failure to observe this
precaution could result in the loss of data or in damage to the camera or memory card:
- Open the battery-chamber/memory card slot cover to remove/insert the battery or
memory card.
-Turn off the camera.
- Disconnect the AC adapter.
Technical Notes
Caring for the Product
187
Page 72
Cleaning and Storage
Cleaning
Do not use alcohol, thinner, or other volatile chemicals.
Avoid touching glass parts with your fingers. Remove dust or lint with a
blower (typically a small device with a rubber bulb attached to one end that
Lens/
viewfinder
Monitor
Body
Storage
Remove the battery if the camera will not be used for an extended period. To prevent
mold or mildew, take the camera out of storage at least once a month.
Turn the camera on and release the shutter a few times before putting the camera
away again. Do not store the camera in any of the following locations:
• Places that are poorly ventilated or subject to humidity of over 60%
• Exposed to temperatures above 50°C (122°F) or below –10°C (14°F)
• Next to equipment that produces strong electromagnetic fields, such as televisions
or radios
For storing the battery, follow the precautions in “The Battery” (A185) in “Caring for
the Product” (A184).
is pumped to produce a stream of air out the other end). To remove
fingerprints or other stains that cannot be removed with a blower, wipe the
lens with a soft cloth, using a spiral motion that starts at the center of the
lens and working toward the edges. If this fails, clean the lens using a cloth
lightly dampened with commercial lens cleaner.
Remove dust or lint with a blower. To remove fingerprints and other stains,
clean the monitor with a soft, dry cloth, being careful not to apply pressure.
Use a blower to remove dust, dirt, or sand, then wipe gently with a soft, dry
cloth. After using the camera at the beach or other sandy or dusty
environment, wipe off any sand, dust, or salt with a dry cloth lightly
dampened with fresh water and dry thoroughly. Note that foreign matter
inside the camera could cause damage not covered by the warranty.
Technical Notes
Cleaning and Storage
188
Page 73
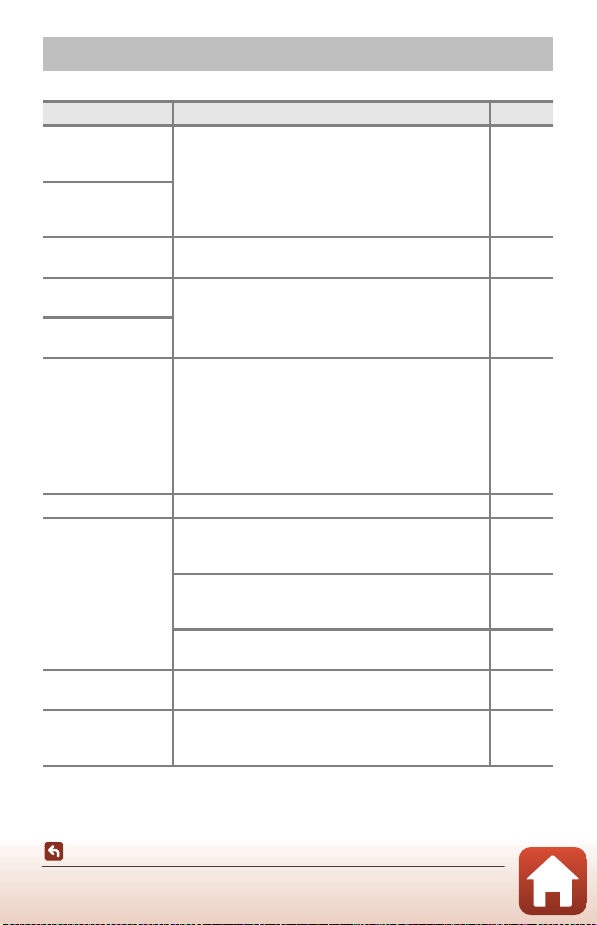
Error Messages
Refer to the table below if an error message is displayed.
Display Cause/Solution A
Battery temperature
is elevated. The
camera will turn off.
The camera will turn
off to prevent
overheating.
Memory card is write
protected.
This card cannot be
used.
This card cannot be
read.
Card is not
formatted. Format
card?
Out of memory. Delete images or insert a new memory card. 16, 28
Image cannot be
saved.
Image cannot be
modified.
Cannot record
movie.
The camera turns off automatically. Wait until the
camera or battery temperature has cooled before
resuming use.
The write-protect switch is locked. Unlock it. –
An error occurred while accessing the memory card.
• Use an approved memory card.
• Check that the terminals are clean.
• Confirm that the memory card is correctly inserted.
The memory card has not been formatted for use in
the camera.
Formatting deletes all data saved on the memory card.
If you need to keep copies of any images, make sure to
select No and save the copies to a computer or other
medium before formatting the memory card. Select
Yes and press the k button to format the memory
card.
An error occurred while saving the image.
Insert a new memory card or format the memory card
or internal memory.
The camera has run out of file numbers.
Insert a new memory card or format the memory card
or internal memory.
There is insufficient space to save the copy.
Delete images from the destination.
Check that the images can be edited. 88, 198
A time-out error occurred while saving the movie on
the memory card.
Select a memory card with a faster write speed.
–
16, 213
16, 187
16, 170
16, 170
28
98, 213
Technical Notes
Error Messages
189
Page 74
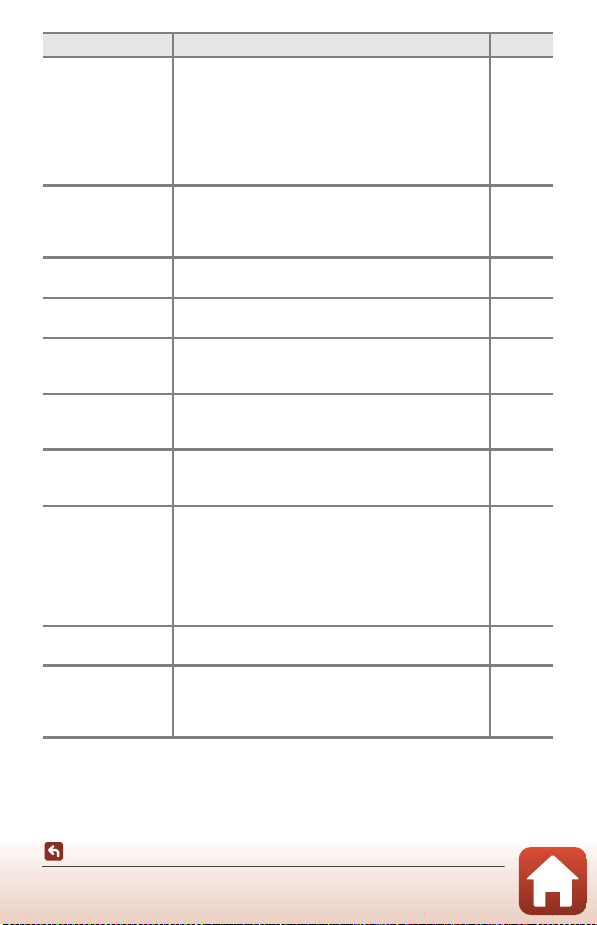
Display Cause/Solution A
There are no images in the internal memory or on the
memory card.
Memory contains no
images.
File contains no
image data.
All images are
hidden.
This image cannot be
deleted.
The flash is lowered.
Raise the flash.
No card present.
Turn the cam era off
and then on again.
Communications
error
System error
• Remove the memory card to play back images in
the internal memory.
• To copy the images saved in the camera’s internal
memory to the memory card, press the d button
to select Copy in the playback menu.
The file was not created or edited with this camera.
The file cannot be viewed on this camera.
View the file using a computer or the device used to
create or edit this file.
There are no images available for a slide show, etc. –
The image is protected.
Disable protection.
When the scene mode is Scene auto selector, you
can take a picture even if the flash is lowered but the
flash will not fire.
When the scene mode is Night portrait or
Backlighting with HDR set to Off, you must raise the
flash to take a picture.
When shooting time-lapse movies or the shooting
mode is set to short movie show mode, insert a
memory card.
An error occurred in lens operation.
Do not apply excessive force on the lens.
If you turn the camera off and then on again, lens
operation will return to normal.
If the error persists even after turning the camera off
and then on again, contact your retailer or Nikonauthorized service representative.
An error occurred while communicating with the printer.
Turn the camera off and reconnect the USB cable.
An error occurred in the camera’s internal circuitry.
Turn the camera off, remove and reinsert the battery,
and turn the camera on. If the error persists, contact
your retailer or Nikon-authorized service representative.
16
120
–
153
34
35, 37
–
–
112
192
Technical Notes
Error Messages
190
Page 75
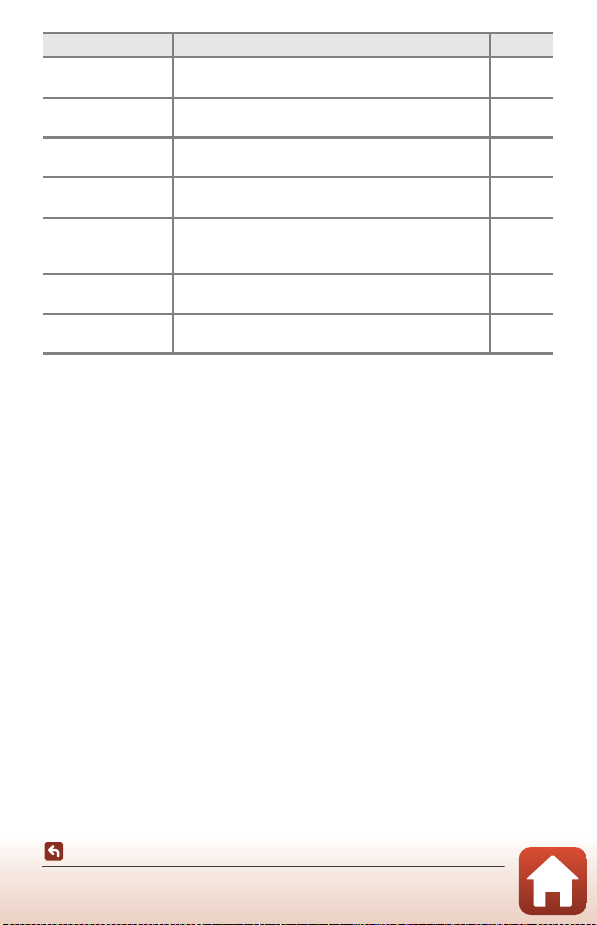
Display Cause/Solution A
Printer error: check
printer status.
Printer error: check
paper.
Printer error: paper
jam.
Printer error: out of
paper.
Printer error: check
ink.
Printer error: out of
ink.
Printer error: file
corrupt.
* See the documentation provided with your printer for further guidance and information.
After solving the problem, select Resume and press the
k button to resume printing.*
Load the specified size of paper, select Resume, and
press the k button to resume printing.*
Remove the jammed paper, select Resume, and press
the k button to resume printing.*
Load the specified size of paper, select Resume, and
press the k button to resume printing.*
There is a problem with the printer’s ink.
Check the ink, select Resume, and press the k button
to resume printing.*
Replace the ink cartridge, select Resume, and press the
k button to resume printing.*
There is a problem with the image file to be printed.
Select Cancel and press the k button to cancel printing.*
–
–
–
–
–
–
–
Technical Notes
Error Messages
191
Page 76
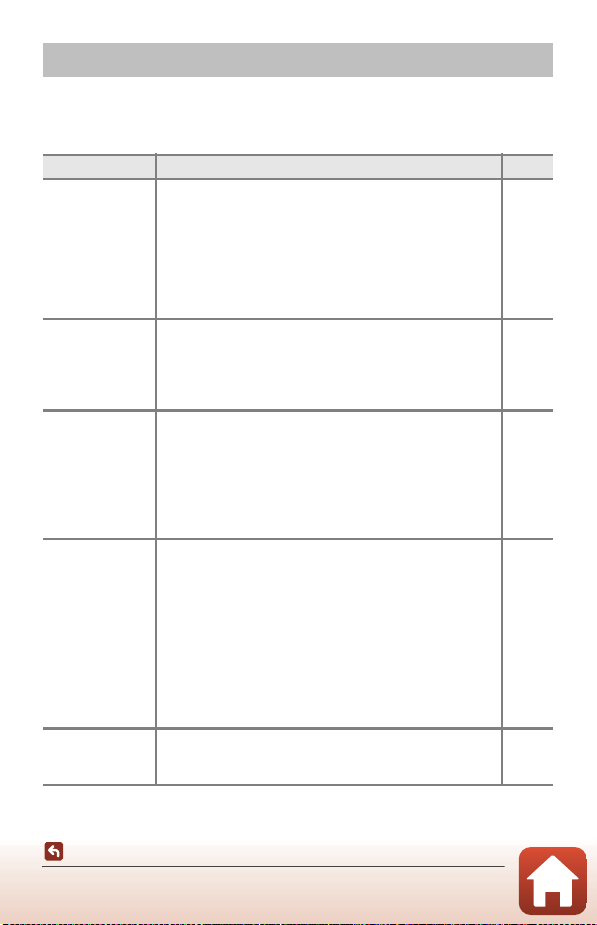
Troubleshooting
If the camera fails to function as expected, check the list of common problems below
before consulting your retailer or Nikon-authorized service representative.
Power, Display, Settings Issues
Problem Cause/Solution
• Wait for recording to end.
• If the problem persists, turn the camera off.
The camera is on
but does not
respond.
The camera
cannot be turned
on.
The camera turns
off without
warning.
The monitor or
viewfinder is
blank.
The camera
becomes hot.
If the camera does not turn off, remove and reinsert the
battery or batteries or, if you are using an AC adapter,
disconnect and reconnect the AC adapter.
Note that although any data currently being recorded will
be lost, data that have already been recorded will not be
affected by removing or disconnecting the power source.
• The battery is exhausted. 16, 17,
• The power switch is enabled a few seconds after the
battery is inserted. Wait a few seconds before pressing
the power switch.
• The camera automatically turns off to save power (auto
off function).
• The camera and battery may not work properly at low
temperatures.
• The inside of the camera has become hot. Leave the
camera off until the inside of the camera has cooled, and
then try turning it on again.
• The camera is off. 20
• The battery is exhausted. 23
• The camera automatically turns off to save power (auto
off function).
• You cannot turn on both the monitor and viewfinder at
the same time. It may take a while to switch between the
monitor and viewfinder.
• The camera is connected to a computer. –
• Interval timer shooting, or Time-lapse movie or Multiple
exp. Lighten scene mode shooting is in progress.
The camera may become hot when used for an extended
period of time to record movies or send images, or when
used in a hot environment; this is not a malfunction.
A
–
185
–
25
185
–
25
–
–
–
Technical Notes
Troubleshooting
192
Page 77
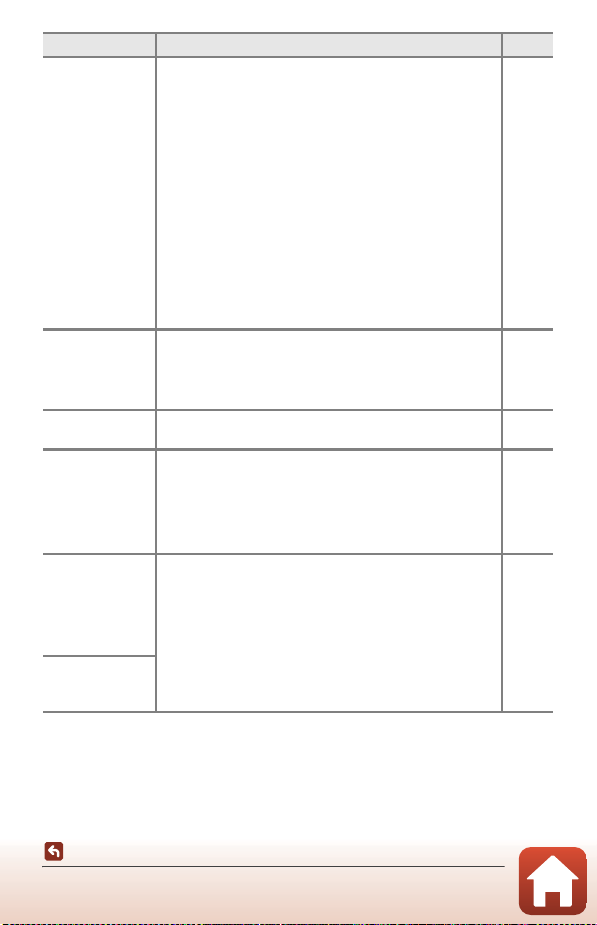
Problem Cause/Solution
• Confirm all connections. 17
• When connected to a computer, the camera may not
charge for any of the reasons described below.
- Off is selected for Charge by computer in the setup
menu.
The battery
inserted in the
camera cannot be
charged.
The monitor is
hard to see.
The viewfinder is
hard to see.
The camera does
not switch
between the
monitor and
viewfinder.
O flashes on the
screen.
Date and time of
recording are not
correct.
- Battery charging stops if the camera is turned off. –
- Battery charging is not possible if the camera’s display
language and date and time have not been set, or the
date and time were reset after the camera’s clock
battery was exhausted. Use the Charging AC Adapter to
charge the battery.
- Battery charging may stop when the computer enters
sleep mode.
- Depending on the computer specifications, settings,
and status, battery charging may not be possible.
• The surrounding area is too bright. 26
- Move to a darker place.
- Use the viewfinder.
• Adjust the screen brightness. 161
• Adjust the diopter of the viewfinder.
• Adjust the viewfinder brightness.
• The display does not switch in the following situations:
- While operating the zoom when recording movies
- During movie playback
- When editing movies
• The display may not switch while the camera is being
operated.
• If the camera clock has not been set, O flashes on the
shooting screen, and images and movies saved before
the clock is set are dated “00/00/0000 00:00” and “01/01/
2018 00:00” respectively.
Set the correct time and date for Time zone and date in
the setup menu.
The camera clock is not as accurate as ordinary watches or
•
clocks. Periodically compare the time of the camera clock
with that of a more accurate timepiece and reset as required.
A
172
20
–
–
26
161
–
11, 159
Technical Notes
Troubleshooting
193
Page 78
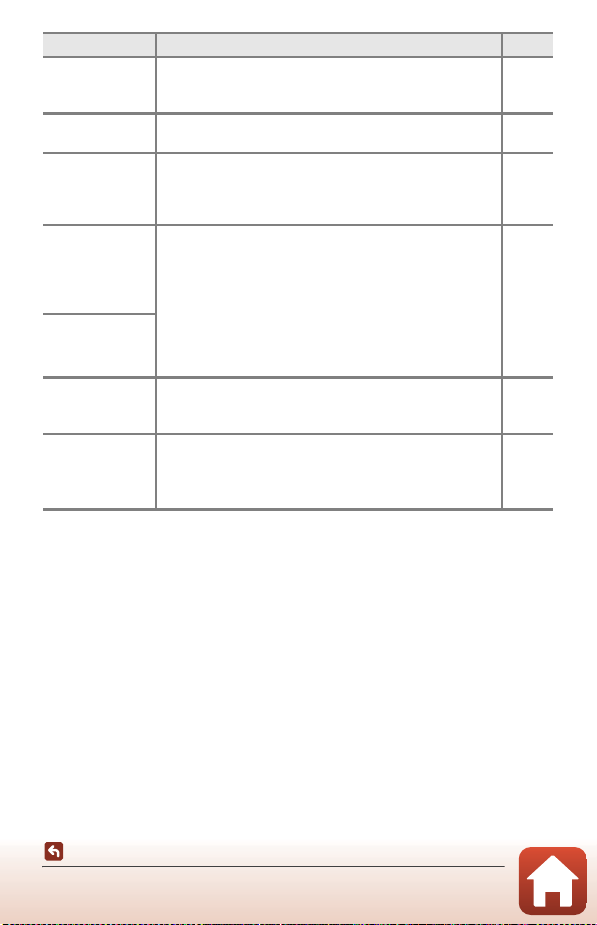
Problem Cause/Solution
No information
displayed on the
screen.
Date stamp not
available.
Date not stamped
on images even
Date stamp
when
is enabled.
Screen for setting
time zone and
date is displayed
when the camera
is turned on.
The camera
settings reset.
The camera
makes sound.
Unable to select a
menu.
Hide info is selected for Photo info in Monitor settings
in the setup menu.
Time zone and date has not been set in the setup menu. 159
• The date cannot be stamped with certain shooting
modes or when using certain settings in other functions.
• The date cannot be stamped on movies.
The clock battery is exhausted; all settings were restored to
their default values. Configure the camera settings again.
• The internal clock battery is used to power the camera
clock and to retain certain settings. Charging time of the
clock battery takes about 10 hours when you insert the
battery into the camera or connect the AC adapter
(available separately) to the camera, and the clock battery
operates for several days even after the camera battery is
removed.
Depending on the Autofocus mode setting or the
shooting mode, the camera may produce an audible
focusing sound.
• Some functions cannot be used with other menu settings. 80
• Some menus are not available while a wireless
connection is established. Disconnect the wireless
connection.
A
161
80, 164
–
31,
142,
148
–
Technical Notes
Troubleshooting
194
Page 79
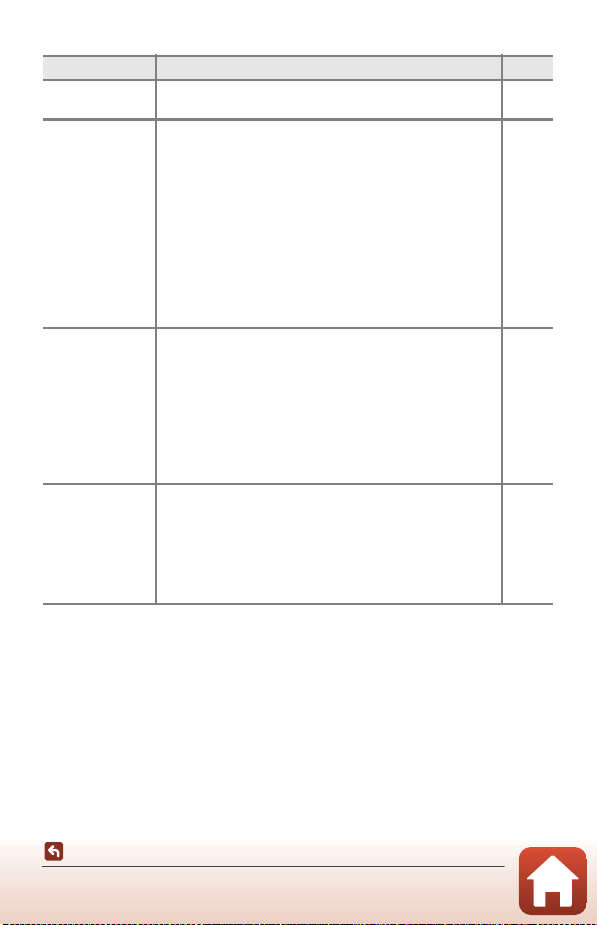
Shooting Issues
Problem Cause/Solution
Cannot switch to
shooting mode.
Cannot take
pictures or record
movies.
The camera
cannot focus.
Colored stripes
appear on the
screen when
shooting.
Disconnect the USB cable. 110
• When the camera is in playback mode, press the c
button, shutter-release button, or b(e) button.
• When menus are displayed, press the d button. 121
• The flash is charging while K is flashing. 58
• Movies cannot be recorded when the camera is
connected to the Charging AC Adapter.
• You cannot shoot while connected with an HDMI cable. 111
• Insert a memory card with sufficient free space into the
camera.
• The battery is exhausted. 16, 17,
• The subject is too close. Try shooting using the Scene
auto selector or Close-up scene mode, or the macro
close-up focus mode.
• Incorrect focus mode setting. Check or change the setting. 63
• The subject is hard to focus on. 76
• Set AF assist in the setup menu to Auto. 166
• The focus mode is set to E (manual focus). 63, 64
• Turn the camera off and then on again. –
Colored stripes may appear when shooting subjects with
repeating patterns (such as window blinds); this is not a
malfunction.
The colored stripes will not appear in captured images or
recorded movies. However, when using Continuous H:
120 fps or S HS 1080/4×, the colored stripes may be
seen in the captured images and recorded movies.
A
2, 27
18
16
185
33, 34,
36, 63
–
Technical Notes
Troubleshooting
195
Page 80
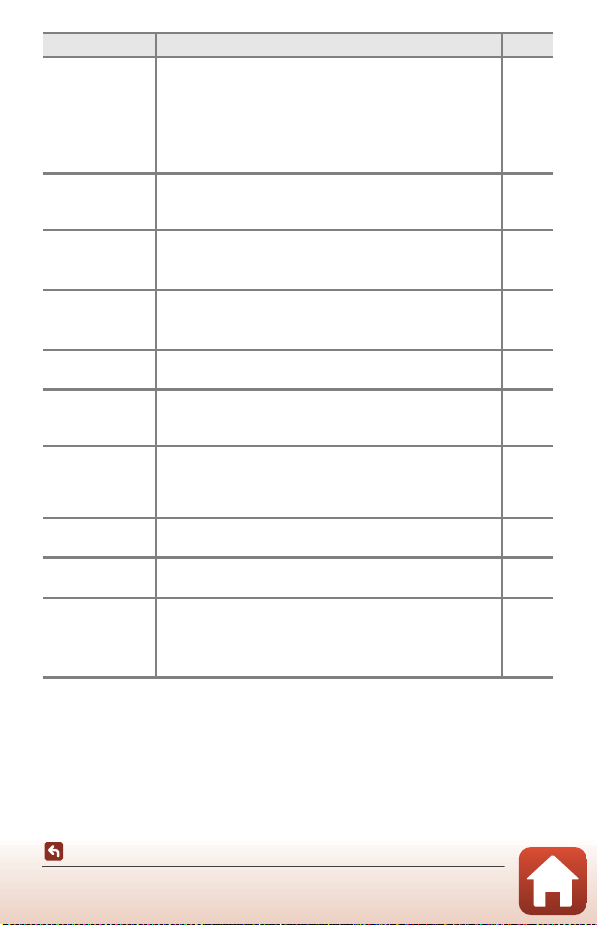
Problem Cause/Solution
• Use the flash. 58
Images are
blurred.
Bright specks
appear in images
captured with flash.
Flash does not fire.
Digital zoom
cannot be used.
Image size not
available.
No sound when
the shutter is
released.
AF-assist
illuminator does
not light.
Images appear
smeared.
Colors are
unnatural.
Randomly spaced
bright pixels
(“noise”) appear in
image.
• Increase the ISO sensitivity value. 137
• Enable Photo VR when shooting still images. Enable
Movie VR when recording movies.
• Use a tripod to stabilize the camera (using the self-timer
at the same time is more effective).
Flash is reflecting off particles in the air. Lower the flash, and
set the flash mode setting to W (off).
• The flash is lowered. 25, 58
• The flash does not fire with certain shooting modes or
when using certain settings in other functions.
• Digital zoom is set to Off in the setup menu. 166
• Digital zoom cannot be used with certain shooting
modes or when using certain settings in other functions.
Image size cannot be selected with certain shooting
modes or when using certain settings in other functions.
Off is se lected for Shutter sound in Sound settings in the
setup menu. No sound is produced with some shooting
modes or settings, even when On is selected.
Off is selected for the AF assist option in the setup menu.
AF-assist illuminator may not light depending on the
position of the focus area or the current shooting mode,
even when Auto is selected.
The lens is dirty. Clean the lens. 188
White balance or hue is not adjusted properly.
The subject is dark and the shutter speed is too slow or ISO
sensitivity is too high. Noise can be reduced by:
• Using the flash 25, 58
• Specifying a lower ISO sensitivity setting 137
A
149,
165
61
58
78, 80
82, 166
80, 129
169
166
36, 66,
130
Technical Notes
Troubleshooting
196
Page 81
Problem Cause/Solution
• The flash is lowered, or a shooting mode that restricts the
flash is selected.
• The flash window is blocked. 23
Images are too
dark
(underexposed).
Images are too
bright
(overexposed).
Unexpected
results when flash
set to V
(auto+red-eye
reduction /redeye reduction).
Skin tones are not
softened.
Saving images
takes time.
• The subject is beyond the range of the flash. 210
• Adjust exposure compensation. 66, 68
• Increase ISO sensitivity. 137
• The subject is backlit. Select Backlighting scene mode,
or raise the flash and set the flash mode to X (fill flash/
standard flash).
Adjust exposure compensation. 66, 68
Use any shooting mode other than Night portrait, and
change the flash mode to any setting other than V
(auto+red-eye reduction/red-eye reduction) and try taking
the picture again.
• Under some shooting conditions, facial skin tones may
not be softened.
• For images containing four or more faces, try using Skin
softening in Glamour retouch in the playback menu.
It may take more time to save images in the following
situations:
• When the noise reduction function is in operation, such
as when shooting in a dark environment
• When the flash mode is set to V (auto+red-eye
reduction/red-eye reduction)
• When capturing images in the following scene modes:
- Hand-held in Night portrait 35
- Hand-held in Night landscape 36
- HDR is set to On in Backlighting 37
-Easy panorama
• When Image quality is set to RAW, RAW + Fine, or
W + Norm
RA
• When the skin softening function is applied while
shooting
• When using continuous shooting mode 134
al
A
25, 58,
78
37, 58
58, 78
46
90
–
59
42
127
46
Technical Notes
Troubleshooting
197
Page 82
Problem Cause/Solution
A ring-shaped
belt or rainbowcolored stripe
appears on the
screen or images.
When shooting with backlighting or when a very strong
light source (such as sunlight) is in or out of the frame, a
ring-shaped belt or rainbow-colored stripe (ghosting) may
occur. Change the position of the light source, or frame the
picture so that the light source does not enter the frame,
and try again.
Playback Issues
Problem Cause/Solution
• This camera may not be able to play back images saved
with another make or model of digital camera.
• This camera cannot play back RAW images or movies
File cannot be
played back.
Cannot zoom in
on image.
Cannot edit
image.
Cannot rotate
image.
saved with another make or model of digital camera.
• This camera may not be able to play back data edited on
a computer.
• Files cannot be played back during interval timer
shooting.
• Playback zoom cannot be used with movies.
• This camera may not be able to zoom in on images
captured with another make or model of digital camera.
• When zooming in on a small-sized image, the
magnification rate shown on the screen may differ from
the actual magnification rate of the image.
• Some i mages cannot be edited. Images that have already
been edited may not be edited again.
• There is not enough free space on the memory card or in
the internal memory.
• This camera is unable to edit images captured with other
cameras.
• Editing functions used for images are not available for
movies.
This camera cannot rotate images captured with another
make or model of digital camera.
A
–
A
–
–
–
135
–
44, 88
–
–
–
–
Technical Notes
Troubleshooting
198
Page 83
External Device Issues
Problem Cause/Solution
• When establishing a wireless connection for the first time,
refer to the instructions in the included “SnapBridge
Connection Guide”.
• If a wireless connection is established, perform the
following operations.
-Turn the camera off and then on again.
- Restart the SnapBridge app.
- Cancel the conn ection and then establish a connection
again.
• Check the Network menu settings in the camera. 156
-Set Airplane mode to Off.
Cannot establish
a wireless
connection with a
smart device.
-Set Bluetooth M Connection to Enable.
-Set Choose connection to Smart device.
• If the camera is registered with two or more smart
devices, select the smart device you want to connect in
1
Network menu M Bluetooth M Paired devices in the
camera. If two or more cameras are registered in the
SnapBridge app, switch the connection on the app.
• Use a sufficiently charged battery. –
• Insert a memory card with sufficient free space into the
camera.
• Disconnect the HDMI cable or USB cable. 110
• Enable Bluetooth, Wi-Fi, and the location data functions
on the smart device.
• In the A tab of the SnapBridge app M Auto link
options M turn on Auto link. If it is off, Download
pictures and Remote photography can be used, but
images cannot be downloaded automatically.
A
–
–
157
16
–
–
Technical Notes
Troubleshooting
199
Page 84
Problem Cause/Solution
• Perform the operations described below when uploading
automatically.
-Set Network menu M Send while shooting M Still
images in the camera to Yes.
-In the A tab of the SnapBridge app M Auto link
Cannot upload
images to a smart
device that has a
wireless
connection
established with
the SnapBridge
1
app.
Cannot perform
remote
photography from a
smart device that
has a wireless
connection
established with the
SnapBridge app.
Cannot download
still images at the
original size in the
SnapBridge app.
Communication
quality is poor or
image upload
speed is extremely
slow when using
wireless connection
with the
SnapBridge app.
1
1
options M turn on Auto link.
-In the A tab of the SnapBridge app M Auto link
options M turn on Auto download.
-If Network menu M Bluetooth M Send while off in
the camera is set to Off, turn on the camera or change
the setting to On.
• When there is a large number of images to upload during
Bluetooth communication, communication may be
disconnected while uploading images. If you turn the
camera off and then on again, the camera is reconnected
to the smart device and image upload resumes in Send
while shooting or Mark for upload.
• You may not be able to upload images or uploading may
be canceled while the camera is being operated.
• You cannot perform remote photography when there is
no free space in the internal memory or memory card.
Delete unnecessary images or insert a memory card with
sufficient free space.
• You may not be able to perform remote photography
while the camera is being operated.
For Send while shooting and Mark for upload in the
camera, the size of images that are downloaded is restricted
to 2 megapixels. To download still images at their original
1
size, use Download pictures in the SnapBridge app.
On the camera, try changing the channel in Network
menu M Wi-Fi M Network settings.
A
156
–
–
157
–
–
–
–
–
157
Technical Notes
Troubleshooting
200
Page 85
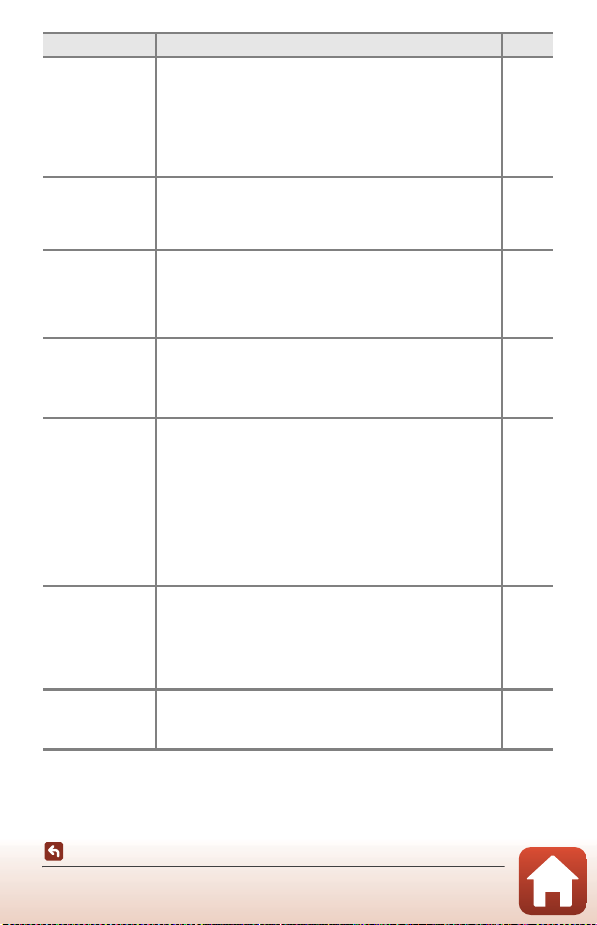
Problem Cause/Solution
• The camera is not connected to the ML-L7 Remote
The camera does
not respond
when operating
the ML-L7
Remote Control.
Cannot be paired
with the ML-L7
Remote Control.
Images saved in the
camera are not
displayed on a
connected smart
device or computer.
Images are not
displayed on TV.
Nikon Transfer 2
does not start
when the camera
is connected to a
computer.
The PictBridge
screen is not
displayed when
the camera is
connected to a
printer.
Images to be
printed are not
displayed.
Control (available separately). Press the power button on
the remote control to establish the connection. If M is not
displayed on the shooting screen, perform pairing again.
The remote control can be used only for shooting operations.
•
2
• The w1/w2 buttons on the remote control cannot be
used with this camera.
Check the Network menu settings in the camera.
• Set Choose connection to Remote control.
• Set Airplane mode to Off.
2
• Set Bluetooth M Connection to Enable.
If the number of images saved on a memory card in the
camera exceeds 10,000, images captured thereafter may not
be displayed in a connected device.
• Reduce the number of images saved on the memory
card. Copy the necessary images to a computer, etc.
• A computer or printer is connected to the camera. –
• The memory card contains no images. –
• Remove the memory card to play back images in the
internal memory.
• The camera is off. –
• The battery is exhausted. 16, 17,
• The USB cable is not correctly connected. 110,
• The camera is not recognized by the computer. –
• The computer is not set to start Nikon Transfer 2
automatically. For more information about Nikon Transfer
2, refer to help information contained in ViewNX-i.
With some PictBridge-compatible printers, the PictBridge
startup screen may not be displayed and it may be
impossible to print images when Auto is selected for
Charge by computer in the setup menu. Set Charge by
computer to Off and reconnect the camera to the printer.
• The memory card contains no images. –
• Remove the memory card to print images in the internal
memory.
A
207
205
205
156
–
16
185
116
–
120,
172
16
Technical Notes
Troubleshooting
201
Page 86
Problem Cause/Solution
The camera cannot be used to select the paper size in the
Cannot select
paper size with
the camera.
1
See the included “SnapBridge Connection Guide” and SnapBridge online help.
2
Refer to the User’s Manual provided with the ML-L7 Remote Control (available separately).
following situations, even when printing from a PictBridgecompatible printer. Use the printer to select the paper size.
• The printer does not support the paper sizes specified by
the camera.
• The printer automatically selects the paper size.
–
A
Technical Notes
Troubleshooting
202
Page 87
File Names
File name:
Images or movies are assigned file names as follows.
.JPG0001DSCN
(3)(2)(1)
Not shown on the screen of the camera.
• DSCN: Original still images, movies, still images created by the
(1) Identifier
(2) File number
(3) Extension
B Notes
When images are captured with the Image quality (A127) setting set to RAW + Fine or
RAW + Normal, the RAW and JPEG images that are saved at the same time are assigned the
same identifier and file number. The pair of images is saved in the same folder, and is
counted as one file.
C Folders for Storing Files
Still images and movies shot or recorded with this camera are saved in folders of the
memory card or internal memory.
• Sequential numbers are added to folde r names in asce nding o rder, s tartin g with “ 100” an d
ending with “999”.
• A new folder is created in the following situations:
- When the number of files in a folder reaches 999
- When a file in a folder is numbered “9999”
movie editing function
• RSCN: Cropped copies
• FSCN: Images created by an image editing function other than
crop, movies created by the movie editing function
Assigned in ascending order, starting with “0001” and ending with
“9999.”
• A new folder is created each time a series of images are captured
using interval timer shooting, and the images are saved in that
folder with file numbers starting with “0001.”
Indicates file format.
• .JPG: JPEG still images
• .NRW: RAW still images
• .MP4: Movies
Technical Notes
File Names
203
Page 88
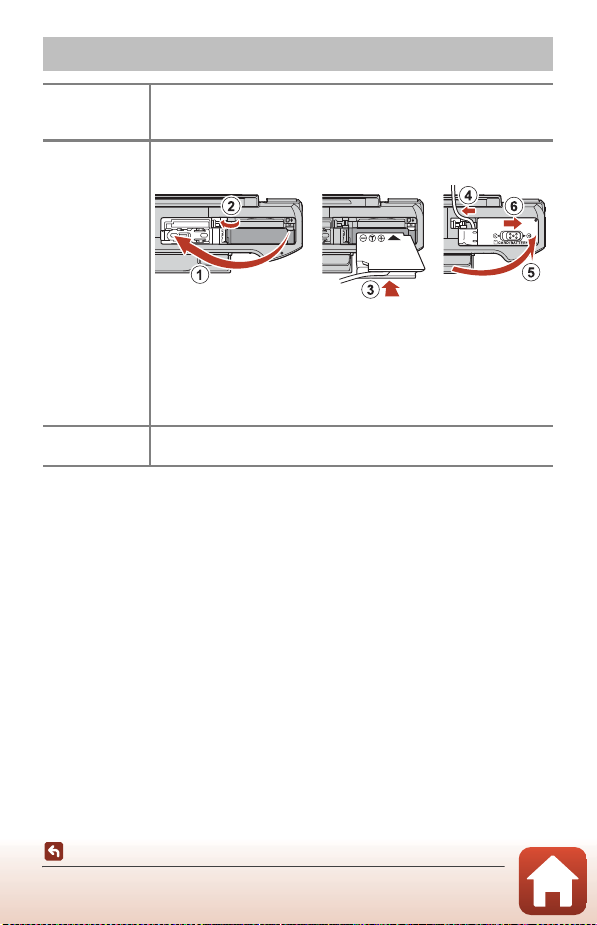
Accessories
Battery charger
AC adapter
Remote control
accessories
MH-65 Battery Charger
Charging time is about 2 hours and 30 minutes for a fully exhausted
battery.
EH-62F AC Adapter
(connect as shown)
Make sure that the power connector cable is fully inserted in the
power connector slot before inserting the AC adapter into the battery
chamber. In addition, make sure that the power connector cable is
fully inserted in the battery chamber slot before closing the batterychamber/memory card slot cover. If part of the cable protrudes from
the slots, the cover or cable may be damaged when the cover is
closed.
ML-L7 Remote Control
See “ML-L7 Remote Control” (A205) for information on how to use it.
Availability may vary with country or region.
See our website or brochures for the latest information.
Technical Notes
Accessories
204
Page 89
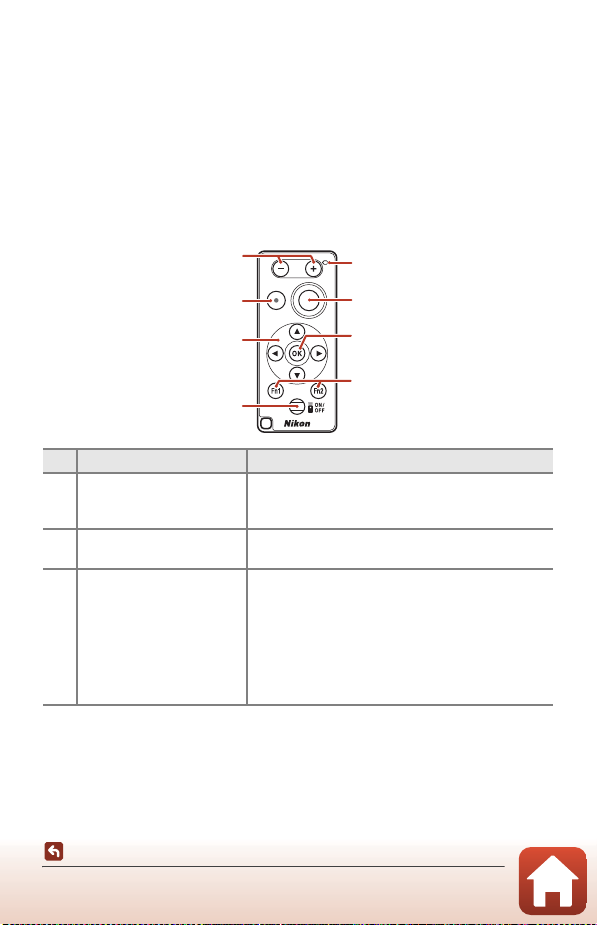
ML-L7 Remote Control
You can pair (A207) the separately available ML-L7 Remote Control with the camera,
and use it to operate the camera. The operations described in “Parts and Functions of
the Remote Control (for N1721)” (A205) can be performed when shooting
with this camera.
• The camera can only be paired with one remote control at a time. When the
camera is paired with a different remote control, only the most recent paired
remote control is enabled.
• Refer to the User’s Manual provided with the ML-L7 Remote Control.
Parts and Functions of the Remote Control (for N1721)
Control Function
1 – button/+ button
2 Movie recording button
3Multi selector
Technical Notes
Accessories
1
2
3
5
6
7
8
4
While the shooting screen is displayed, zooms out
when the – button is pressed and zooms in when
the + button is pressed.
Starts recording a movie when the button is pressed,
and stops recording when pressed again.
• Functions similarly to the multi selector on the
camera, enabling you to configure settings on the
shooting screen, such as the flash mode (A58),
self-timer (A61), focus mode (A63), creative
slider (A66), and exposure compensation
(A68).
• When using manual focus, the focus can be
adjusted with HI (A64).
205
Page 90
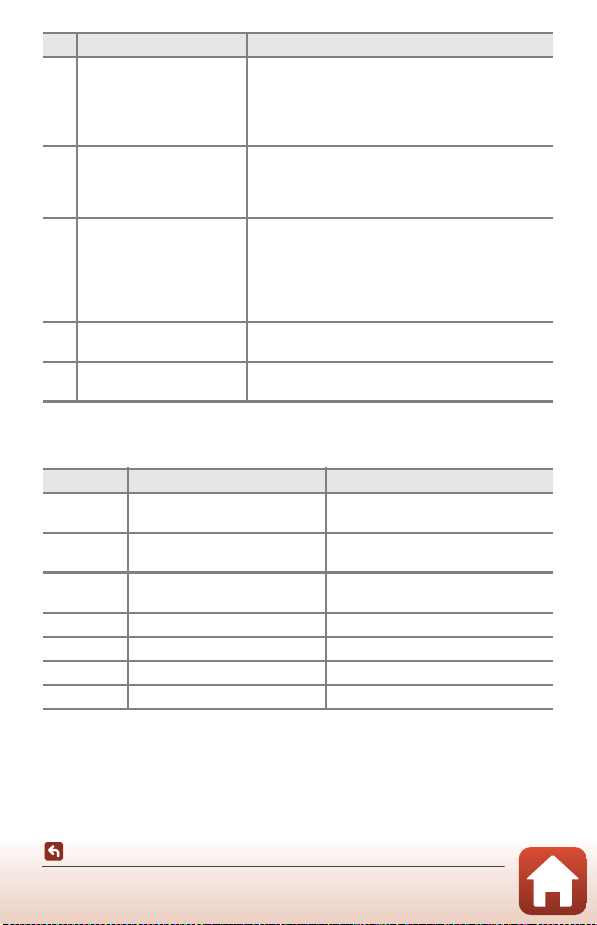
Control Function
Press the button to turn on the remote control and
4Power button
5Status lamp
6 Shutter-release button
7 k (apply selection) button
w1 (Function 1) / w2
8
(Function 2) buttons
search for a camera that has already been paired.
Press and hold the button (for at least 3 seconds) to
search for a new pairing camera. To turn off the
remote control, press the button again.
Indicates the remote control status or shooting
session status, based on the color and behavior of
the lamp. See “Status Lamp on the Remote Control
(for N1721)” (A206) for more information.
Functions similarly to the shutter-release button on
the camera.
• Half-press and press-and-hold operations are not
available.
• When using the self-timer, you can press the
button during the countdown to cancel shooting.
Applies the selected item. When adjusting manual
focus, press this button to stop focusing.
Cannot be used with this camera.
Status Lamp on the Remote Control (for N1721)
Color Status Description
Green Flashing about every second
Green
Green Flashing about every 3 seconds
Orange Flashes once Still image shooting starts.
Orange Flashes twice Still image shooting ends.
Red Flashes once Movie recording starts.
Red Flashes twice Movie recording ends.
Flashing quickly (about every 0.5
seconds)
Remote control is searching for a
camera that has already been paired.
Pairing process is being performed.
Connection is established between
remote control and camera.
Technical Notes
Accessories
206
Page 91
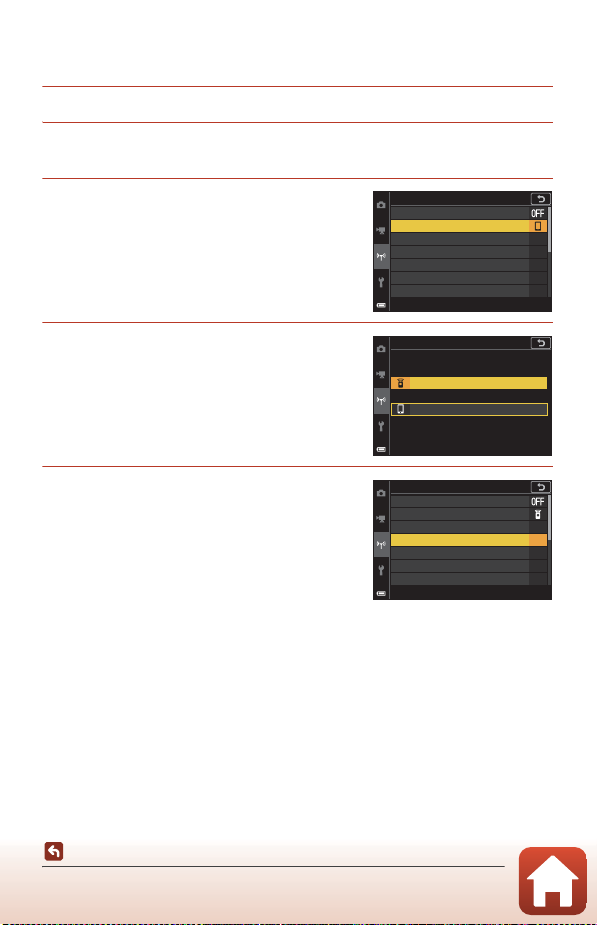
Pairing the Camera and Remote Control
Before using the remote control for the first time, it must be paired with the camera.
1 Press the d button on the camera.
2 Press the multi selector J, use HI to select the J menu icon,
and press the k button.
3 Select Choose connection, and
press the k button.
4 Select Remote control, and press
the k button.
5 Select Connection to remote, and
press the k button.
• Pairing is enabled and the camera waits for the
connection to be established.
Network menu
Airplane mode
Choose connection
Connect to smart device
Connection to remote
Send while shooting
Wi-Fi
Bluetooth
Choose connection
Remote control
Smart device
Network menu
Airplane mode
Choose connection
Connect to smart device
Connection to remote
Send while shooting
Wi-Fi
Bluetooth
Technical Notes
Accessories
207
Page 92
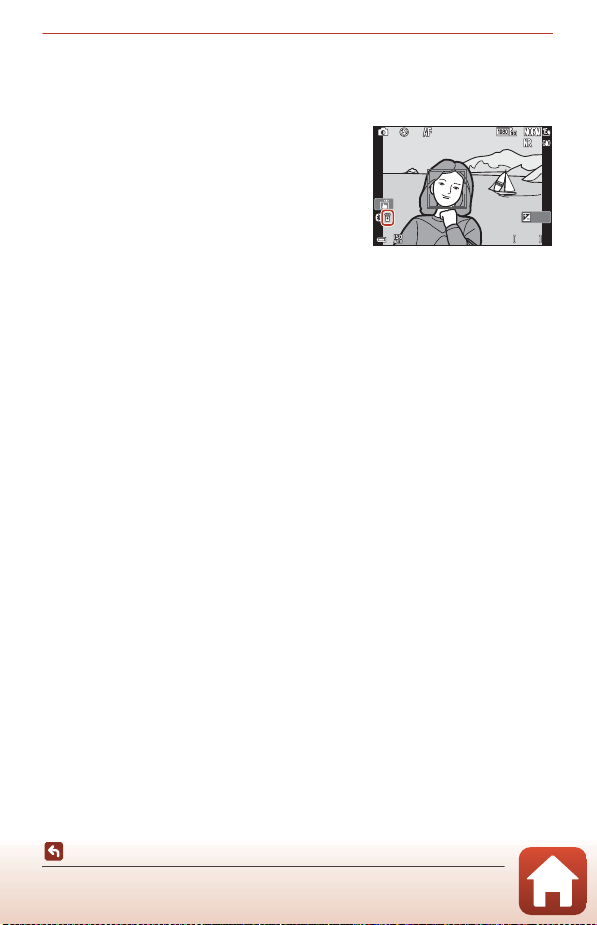
6 Press and hold (for at least 3 seconds) the power button on the
1 /2 5 01/250 F 3 .4F3.4 5 0 0500
2 5m 0s25m 0s
0 .00.0
1 00100
remote control.
• Pairing starts for the camera and remote control. During the process, the status
lamp on the remote control flashes about every 0.5 seconds.
• When pairing is complete, a connection is
established between the camera and the
remote control. When you enter shooting
mode, M is displayed on the shooting screen.
• If a pairing failure message is displayed,
perform the procedure again from step 5.
Switching the Connection to a Smart Device
• Switch the connection from Remote control to Smart device in Choose
connection in the camera network menu (A156, 207).
• When the SnapBridge app is launched on your smart device, and a connection is
established between the camera and smart device, L is displayed on the shooting
screen.
• When establishing a wireless connection with a smart device for the first time, see
the included “SnapBridge Connection Guide”.
Technical Notes
Accessories
208
Page 93
Specifications
Nikon N1721 Digital Camera
Type Compact digital camera
Number of effective
pixels
Image sensor 1/2.3-in. type CMOS; approx. 16.79 million total pixels
Lens
Focal length
f/-number f/3.4–6.9
Construction 13 elements in 11 groups (4 ED lens elements)
Digital zoom
magnification
Vibration reduction
Autofocus (AF) Contrast-detect AF
Focus range
Focus-area selection
Viewfinder
Frame coverage
(shooting mode)
Frame coverage
(playback mode)
Monitor
Frame coverage
(shooting mode)
Frame coverage
(playback mode)
16.04 million (Image processing may reduce the number of
effective pixels.)
NIKKOR lens with 35× optical zoom
4.3–151 mm (angle of view equivalent to that of 24–840 mm
lens in 35mm [135] format)
Up to 4× (angle of view equivalent to that of approx. 3360 mm lens
in 35mm [135] format)
Lens shift (still images)
Combination of lens shift and electronic VR (movies)
• [W]: Approx. 50 cm (1 ft 8 in.)–∞,
[T]: Approx. 2.0 m (6 ft 7 in.)–∞
• Macro close-up: Approx. 1 cm (0.4 in.)–∞ (wide-angle
position)
(All distances measured from center of front surface of lens)
Face priority, manual (spot), manual (normal), manual (wide),
subject tracking, target finding AF
Electronic viewfinder, 0.5 cm (0.2-in.) approx. #1170#k-dot
equivalent LCD with the diopter adjustment function
(–4 – +4 m
Approx. #98%# horizontal and vertical (compared to actual
picture)
Approx. #100%# horizontal and vertical (compared to actual
picture)
7.5 cm (3-in.), approx. #1140#k-dot, wide viewing angle TFT
LCD (touch panel) with anti-reflection coating and 5-level
brightness adjustment, tilting TFT LCD
Approx. #98%# horizontal and vertical (compared to actual
picture)
Approx. #100%# horizontal and vertical (compared to actual
picture)
-1
)
Technical Notes
Specifications
209
Page 94
Storage
Media
File system DCF and Exif 2.31 compliant
File formats
Image size
Still images
Movies
ISO sensitivity
(Standard output
sensitivity)
Exposure
Metering mode
Exposure control
Shutter Mechanical and CMOS electronic shutter
Speed
Aperture Electromagnetic 3-blade iris diaphragm
Range 7 steps of 1/3 EV (W) (C, D mode)
Self-timer
Flash
Range (approx.)
(ISO sensitivity: Auto)
Flash control TTL auto flash with monitor preflashes
Internal memory (approx. ## MB), SD/SDHC/SDXC memory
card
Still images: JPEG, RAW (NRW) (Nikon’s own format)
Movies: MP4 (Video: H.264/MPEG-4 AVC, Audio: AAC stereo)
16 M 4608×3456, 8 M 3264×2448,
4 M 2272×1704, 2 M 1600×1200,
16:9 12 M 4608×2592, 3:2 14 M 4608×3072,
1:1 3456×3456
2160/30p (4K UHD), 2160/25p (4K UHD),
1080/30p, 1080/25p, 1080/60p, 1080/50p,
720/30p, 720/25p, 720/60p, 720/50p,
HS 1080/4×, HS 1080/2×, HS 1080/0.5×
• ISO 100–1600
• ISO 3200, 6400 (available when using A, B, C, or D mode)
Matrix, center-weighted (digital zoom less than 2×), spot
(digital zoom 2× or more)
Programmed auto exposure with flexible program, shutterpriority auto, aperture-priority auto, manual, exposure
bracketing, exposure compensation (–3.0 – +3.0 EV in steps of
1/3 EV)
• 1/2000–1 s
• 1/2000–8 s (B, C, or D mode)
• 1/4000 s (maximum speed during high-speed continuous
shooting)
• 25 s (Star trails in Multiple exp. Lighten scene mode)
• 10 s, 3 s
• 5 s (self-portrait timer)
[W]: #0.5–6.0 m (1 ft 8 in.–19 ft)#
[T]: #1.5–3.0 m (5 ft–9 ft 10 in.)#
Technical Notes
Specifications
210
Page 95
Interface
Micro-USB connector (Do not use any USB cable other than
USB connector
HDMI output connector
the included UC-E21 USB Cable.), Hi-Speed USB
• Supports Direct Print (PictBridge)
HDMI micro connector (Type D)
Wi-Fi (Wireless LAN)
Standards IEEE 802.11b/g (standard wireless LAN protocol)
Operating frequency 2412–2462 MHz (channels 1-11)
Maximum output
power
#.# dBm (EIRP)
Authentication Open system, WPA2-PSK
Bluetooth
Communication
protocols
Operating frequency
Power sources
Charging time
Battery life
1
Bluetooth Specification Version 4.1
Bluetooth: ####–#### MHz
Bluetooth Low Energy: ####–#### MHz
One EN-EL12 Rechargeable Li-ion Battery (included)
EH-62F AC Adapter (available separately)
Approx. # h ## min (when using EH-73P/EH-73PCH Charging
AC Adapter and when no charge remains)
Still images Approx. ### shots when using EN-EL12
Movie recording
(actual battery life for
recording)
2
Approx. # h ## min (when using EN-EL12 in 1080/30p)
Approx. # h ## min (when using EN-EL12 in 1080/25p)
Tripod socket 1/4 (ISO 1222)
Dimensions
(W × H × D)
Approx. #114.2 × 71.7 × 40.5 mm (4.5 × 2.9 × 1.6 in.)#
(excluding projections)
Weight Approx. #315 g (11.2 oz)# (including battery and memory card)
Operating environment
Temperature 0°C–40°C (32°F–104°F)
Humidity 85% or less (no condensation)
• All measurements are performed in conformity with Camera and Imaging Products
Association (CIPA) standards or guidelines.
1
Battery life does not reflect the use of SnapBridge and may vary with the conditions of
use, including temperature, the interval between shots, and the length of time that
menus and images are displayed.
2
Individual movie files cannot exceed 29 minutes in length, even when there is sufficient free
space on the memory card for longer recording. The maximum size of a single movie file is
4 GB. If a file exceeds 4 GB even when you record for less than 29 minutes, it is split into
multiple files and cannot be played back continuously.
Technical Notes
Specifications
211
Page 96
EN-EL12 Rechargeable Li-ion Battery
Type Rechargeable lithium-ion battery
Rated capacity DC 3.7 V, 1050 mAh
Operating temperature 0°C–40°C (32°F–104°F)
Dimensions (W × H × D) Approx. 32 × 43.8 × 7.9 mm (1.3 × 1.7 × 0.3 in.)
Weight Approx. 22.5 g (0.8 oz)
EH-73P/EH-73PCH Charging AC Adapter
Rated input AC 100–240 V, 50/60 Hz, MAX 0.14 A
Rated output DC 5.0 V, 1.0 A
Operating temperature 0°C–40°C (32°F–104°F)
Approx. 55 × 22 × 54 mm (2.2 × 0.9 × 2.2 in.)
Dimensions (W × H × D)
Weight
The symbols on this product represent the following:
D AC, E DC, F Class II equipment (The construction of the product is double-insulated.)
• Nikon will not be held liable for any errors this manual may contain.
• The appearance of this product and its specifications are subject to change without
notice.
• The sample images displayed on the camera and the images and illustrations in the
manual are for illustrative purposes only.
(excluding plug adapter)
For Brazil: Approx. 55 × 67 × 59 mm
For India: Approx. 55 × 63.5 × 59 mm
Approx. 51 g (1.8 oz) (excluding plug adapter)
For Brazil: Approx. 73 g
For India: Approx. 76 g
Technical Notes
Specifications
212
Page 97
Memory Cards That Can Be Used
The camera supports SD, SDHC, and SDXC memory cards.
• The camera supports UHS-I.
• Memory cards with an SD Speed Class rating of 6 or faster are recommended for
recording movies. When Movie options is set to d 2160/30p (4K UHD) or
c 2160/25p (4K UHD), memory cards with a UHS Speed Class rating of 3 or
faster are recommended. When using a memory card with a lower Speed Class
rating, movie recording may stop unexpectedly.
• If you use a card reader, make sure that it is compatible with your memory card.
• Contact the manufacturer for information on features, operation, and limitations
on use.
Trademark Information
• Windows is either a registered trademark or trademark of Microsoft
Corporation in the United States and/or other countries.
• The Bluetooth® word mark and logos are registered trademarks owned by
Bluetooth SIG, Inc. and any use of such marks by Nikon Corporation is under
license.
• Apple®, App Store®, the Apple logos, Mac, OS X, macOS, iPhone®, iPad®, iPod
touch® and iBooks are trademarks or registered trademarks of Apple Inc., in the
U.S. and other countries.
• Android and Google Play are trademarks or registered trademarks of Google
Inc. The Android robot is reproduced or modified from work created and
shared by Google and used according to terms described in the Creative
Commons 3.0 Attribution License.
• iOS is a trademark or registered trademark of Cisco Systems, Inc., in the United
States and/or other countries and is used under license.
• Adobe, the Adobe logo, Acrobat, and Reader are either trademarks or
registered trademarks of Adobe Systems Incorporated in the United States
and/or other countries.
• SDXC, SDHC, and SD Logos are trademarks of SD-3C, LLC.
• PictBridge is a trademark.
Technical Notes
Specifications
213
Page 98
• HDMI, HDMI logo and High-Definition Multimedia Interface are trademarks or
“Made for iPod,” “Made for iPhone,” and “Made for iPad” mean that an
electronic accessory has been designed to connect specifically to iPod, iPhone,
or iPad, respectively, and has been certified by the developer to meet Apple
performance standards. Apple is not responsible for the operation of this
device or its compliance with safety and regulatory standards. Please note that
the use of this accessory with iPod, iPhone, or iPad may affect wireless
performance.
registered trademarks of HDMI Licensing, LLC.
• Wi-Fi and the Wi-Fi logo are trademarks or registered trademarks of the Wi-Fi
Alliance.
• All other trade names mentioned in this manual or the other documentation
provided with your Nikon product are the trademarks or registered trademarks
of their respective holders.
AVC Patent Portfolio License
This product is licensed under the AVC Patent Portfolio License for the personal and
non-commercial use of a consumer to (i) encode video in compliance with the AVC
standard (“AVC video”) and/or (ii) decode AVC video that was encoded by a consumer
engaged in a personal and non-commercial activity and/or was obtained from a video
provider licensed to provide AVC video. No license is granted or shall be implied for
any other use. Additional information may be obtained from MPEG LA, L.L.C.
See http://www.mpegla.com.
FreeType License (FreeType2)
Portions of this software are copyright © 2012 The FreeType Project
(http://www.freetype.org). All rights reserved.
MIT License (HarfBuzz)
Portions of this software are copyright © 2018 The HarfBuzz Project
(http://www.freedesktop.org/wiki/Software/HarfBuzz). All rights reserved.
Technical Notes
Specifications
214
Page 99

Index
Symbols
A Auto mode..................................... 31, 32
o Creative mode.......................... 31, 51
y Scene mode........................ 31, 33
C Aperture-priority auto mode
........................................................................ 31, 53
B Shutter-priority auto mode..... 31, 53
n Short movie show mode ..... 31, 103
A Programmed auto mode ......... 31, 53
D Manual mode ................................. 31, 53
c Playback mode..................................... 27
i Playback zoom ............................... 27, 84
f (Wide-angle)............................ 2, 24, 70
h Thumbnail playback ................ 27, 85
g (Telephoto) ................................. 2, 24, 70
g AE-L/AF-L button................... 3, 6, 168
q Snap-back zoom button ...... 2, 4, 71
k Apply selection button ...... 3, 5, 120
c Playback button........................ 3, 6, 27
l Delete button............................... 3,
b (e M
w Function button ..................... 2, 6, 69
K Flash pop-up control........ 3, 25, 58
d Menu button........................ 3, 6, 120
x Monitor button ........................ 3, 6, 26
o Creative slider................................ 57, 66
n Self-timer........................................... 57, 61
p Focus mode.................................... 57, 63
m Flash mode ....................................... 57, 58
o Exposure compensation
o
vie-record) button... 3, 5, 25
..................................................... 45, 57, 66, 68
A
AC adapter........................................ 110, 204
Accessories.................................................. 204
Active D-Lighting ....................................... 66
AE/AF lock button ....................... 126, 168
Technical Notes
Index
6, 28
AF area mode.......................... 69, 123, 139
AF assist .............................................. 126, 166
AF-assist illuminator...................................... 2
Airplane mode ................................ 125, 156
Aperture-priority auto mode ....... 31, 53
App.................................................................... 156
Assign side zoom control........ 126, 167
Auto flash ........................................................ 59
Auto mode .............................................. 31, 32
Auto off...................................... 25, 126, 169
Auto+red-eye reduction............... 59, 60
Autofocus............. 63, 76, 123, 142, 148
Autofocus mode.... 123, 124, 142, 148
B
Background music................................... 103
Backlighting o.................................... 33, 37
Battery ..................................................... 16, 211
Battery charger.......................................... 204
Battery level indicator............................... 23
Battery-chamber/memory card slot
cover............................................ 3, 16, 17, 110
Beach Z........................................................... 33
Blink proof....................................................... 49
Bluetooth............................................ 125, 157
Button sound.............................................. 169
C
Calendar display.......................................... 85
Capture NX-D.............................................. 118
Capturing still images while recording
movies............................................................. 100
Charge by computer.................. 126, 172
Charge lamp.............................................. 3, 17
Charging AC Adapter..................... 17, 212
Choose connection...................... 125, 156
Close-up k............................................ 33, 36
215
Page 100

Color temperature.................................... 131
Command dial ................................... 2, 6, 53
Computer............................................ 110, 116
Conformity marking .................... 126, 177
Connect to smart device.......... 125, 156
Connection to remote ............... 125, 156
Connector cover.......................... 3, 17, 110
Continuous .............................. 69, 123, 134
Copy ..................................................... 124, 154
Copyright information.............. 126, 174
Creative mode....................................... 31, 51
Creative slider....................................... 57, 66
Crop........................................................... 84, 94
D
Date and time.................................... 20, 159
Date format.......................................... 21, 159
Date stamp....................................... 126, 164
Daylight saving time ..................... 20, 160
Delete........................................................ 28, 87
Digital zoom........................... 70, 126, 166
Diopter adjustment control............ 3, 26
Direct Print.......................................... 110, 112
D-Lighting............................................ 89, 124
Dusk/dawn i .............................................. 33
E
Easy panorama p............................. 33, 42
Easy panorama playback....................... 44
Editing movies ........................................... 107
Editing still images .................................... 88
End recording............................................. 104
EVF auto toggle.............................. 126, 163
EVF brightness ............................................ 161
Exposure bracketing ................... 123, 138
Exposure compensation
..................................................... 45, 57, 66, 68
Extracting still images................ 106, 108
Eye sensor.................................................. 3, 26
Eyelet for strap ......................................... 2 , 15
F
Face detection .............................................. 75
Face priority ................................................. 139
Fast motion movies .................... 145, 147
File name ...................................................... 203
Fill flash ............................................................. 59
Filter effects......................................... 92, 124
Fireworks show m............................. 33, 37
Firmware version .......................... 126, 177
Fixed range auto....................................... 137
Flash...................................................... 2, 25, 58
Flash mode............................................. 57, 58
Flick ......................................................................... 7
Fn button......................................................... 69
F-number.......................................................... 53
Focal length................................................ 209
Focus....................... 24, 73, 139, 142, 148
Focus area............................................... 12, 24
Focus indicator ............................................. 10
Focus lock ........................................................ 77
Focus mode........................................... 57, 63
Food u...................................................... 33, 36
Format.................................................... 16, 170
Format card.............................. 16, 126, 170
Format internal memory...................... 170
Format memory ............................ 126, 170
Format memory cards.................. 16, 170
Formatting........................................... 16, 170
Foundation makeup........................ 45,
ame rate......................................... 124, 150
r
F
Full-frame playback.......... 13, 27, 84, 85
Full-time AF...................................... 142, 148
Functions that cannot be used
simultaneously............................................. 80
46
G
Glamour retouch ................... 45, 90, 124
H
HDMI cable......................................... 110, 111
Technical Notes
Index
216
 Loading...