

Page 1
!
TRIGGER-PRO User manual
Mode operation - Product information - Warning
Mode Operation
-
Turn the selector switch (located on the left side of the light) to the required mode, as indicated on the Trigger-Pro handle.
-
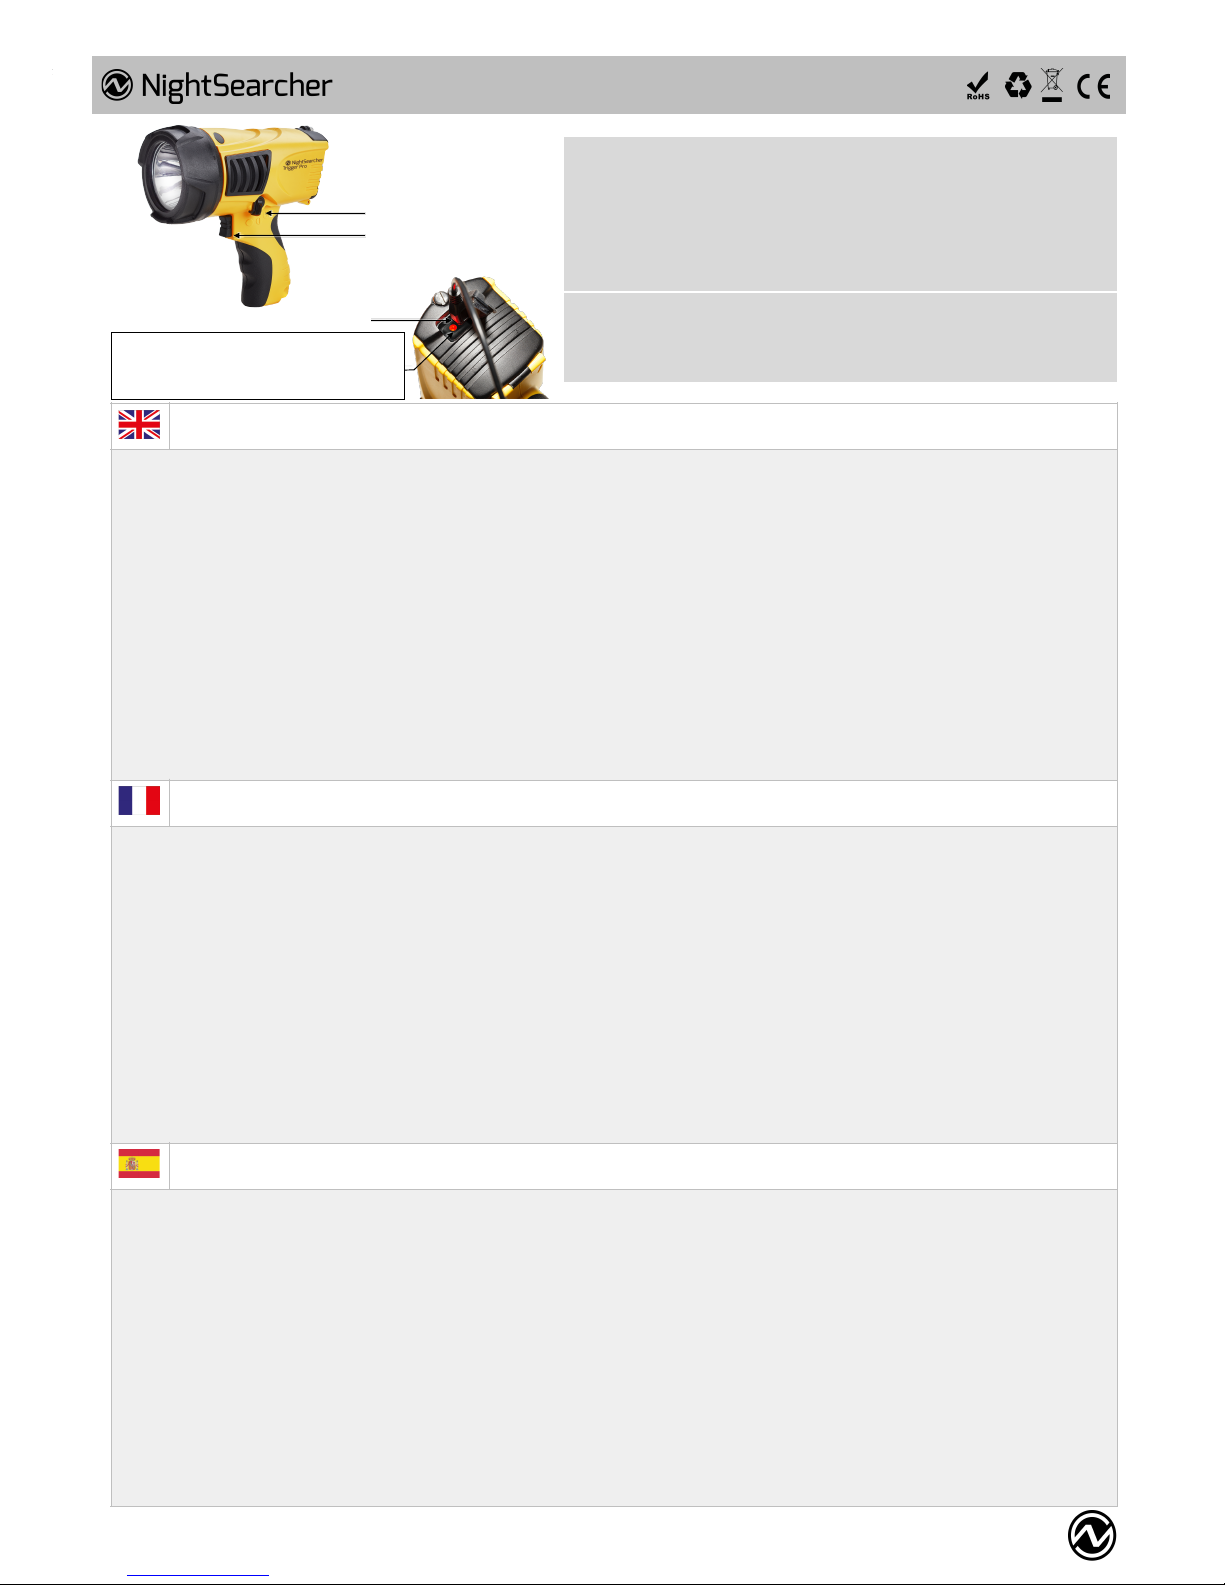
3-way selector switch to choose from HIGH, LOW and STROBE LIGHT.
-
Then use the ON/OFF trigger switch to illuminate the spotlight.
Note: The light setting can be changed while the light is ON.
Battery level indicator (shown above)
-
The battery charging indicator will turn GREEN within 100% and 45% of the battery energy level
-
The battery charging indicator will turn YELLOW within 44% and 10% of the battery energy level
-
The battery charging indicator will turn RED within 9% and 5% of the battery energy level. Please, recharge your unit when the battery level turns RED.
Battery charging
-
Remove the INPUT charging socket cover. This will reveal the micro USB INPUT socket.
-
Connect the micro USB end of the cable into the socket and connect the USB end into a standard USB power supply (phone charger / PC / laptop or similar)
-
The battery charging indicator (shown above) LED will glow red while charging. The LED will turn green when charging is complete.
-
The charging time is 5 hours from flat.
Warning
-
Do not stare into light beam
-
Before using the micro USB cable, read all instructions. Do not abuse the micro USB cable. Never carry the light by the cable or yank it to disconnect the cable from a
receptacle. Plug the micro USB cable directly into an AC or your car’s DC outlet. Do not operate with damaged micro USB cable. Replace the cable immediately if it
appears damaged. Unplug your Trigger from any power source before attempting any routine cleaning or maintenance. Do not try to repair the light or micro USB
cable yourself. Take it to a qualified service facility or return it to Nightsearcher Ltd.
To assure product safety and reliability, repairs other than battery replacement should be performed by NightSearcher Ltd. Always use NightSearcher Ltd approved
replacement parts
The operating temperature range of the light battery: Charging: 0°C to 45°C / Discharging: -10°C to 55°C
Utilisation - Information produit - Avertissement
Mode de fonctionnement
-
Tourner le sélecteur (situé sur le côté gauche du TriggerPro) pour sélectionner le mode souhaité, comme indiqué sur la poignée TriggerPro.
-
Sélecteur 3-WAY à choisir FORT, FAIBLE et Stroboscope.
-
Ensuite, utilisez l'interrupteur ON / OFF “gâchette” pour allumer et éteindre votre lampe.
Remarque: Le réglage de lumière peut être modifiée alors que la lumière est allumée.
Indicateur de niveau de batterie
-
L’indicateur de niveau de batterie devient VERT entre 100% et 45% du niveau d’énergie maximale de la batterie.
-
L'indicateur de niveau de batterie devient JAUNE entre 44% et 10% du niveau d’énergie maximale de la batterie.
-
L'indicateur de niveau de batterie devient ROUGE entre 9% et 5% du niveau d’énergie maximale de la batterie.
-
Merci de recharger votre appareil lorsque l’indicateur de niveau de la batterie ROUGE s’allume.
Batterie en charge
-
Retirez le couvercle de la prise de charge. Cela révèle la prise d'entrée micro USB.
-
Branchez l'extrémité micro USB du câble dans la prise d’entrée du TriggerPro et connectez l'extrémité USB dans une alimentation USB standard (chargeur de téléphone
/ PC / ordinateur portable ou similaire - accessoires optionnels NightSearcher disponibles)
-
La LED témoin de charge devient ROUGE pendant la charge. Le voyant devient VERT lorsque la charge est complète.
-
Le temps de charge complet est de 5 heures.
Attention
-
Ne pas diriger le faisceau de lumière vers les yeux.
-
Avant d'utiliser le câble micro USB, lire toutes les instructions. Ne pas abuser du câble micro USB. Ne pas transporter par le câble de charge ou tirer sur ce dernier
pour débrancher l’appareil. Branchez le câble USB directement dans un port USB AC ou DC. Ne pas utiliser un câble micro USB endommagé. Remplacer le câble
immédiatement si celui-ci semble endommagé. Débranchez votre Trigger de toute source d'alimentation avant tout nettoyage ou entretien de routine. Ne pas essayer
de réparer la lumière ou le câble micro USB. Prendre contact avec centre de service qualifié ou retourner à Nightsearcher Ltd si besoin.
-
Pour assurer la sécurité des produits et leur fiabilité, les réparations autres que remplacement de la batterie doivent être effectués par Nightsearcher Ltd. Toujours
utiliser pièces de rechange approuvées par Nightsearcher Ltd.
-
La gamme de température de fonctionnement de la batterie: Charge: 0 ° C à 45 ° C / décharge: -10 ° C à 55 ° C
Uso - Informacion sobre el producto - Advertencia
Modo de operación
-
Gire el interruptor (situado en la parte izquierda de TriggerPro) para seleccionar el modo deseado, como se muestra en la manija TriggerPro.
-
Selector de 3 posiciones para elegir alto, bajo y estroboscópico.-
-
A continuación, utilice el / OFF "disparador" ON para encender y apagar la lámpara.
Nota: El ajuste de la luz se puede cambiar mientras la luz está encendida.
Indicador de nivel de batería
-
El indicador de nivel de la batería VERDE entre el 100% y el 45% del nivel máximo de energía de la batería.
-
El indicador de nivel de la batería AMARILLO entre el 44% y el 10% del nivel máximo de energía de la batería.
-
El indicador de nivel de batería es ROJO entre el 9% y el 5% del nivel máximo de energía de la batería.
-
Gracias cargar su dispositivo cuando el indicador de nivel de luces de la batería ROJO.
Carga de la batería
-
Retire la cubierta de la toma de carga. Esto revela el conector micro USB de entrada.
-
Conecte el extremo micro USB del cable en la toma de la TriggerPro y conecte el extremo USB en una potencia estándar USB (cargador de teléfono / PC / portátil o
similar - accesorios opcionales disponibles Nightsearcher)
-
El indicador de carga LED se vuelve rojo durante la carga. Las luces LED verde cuando la carga está completa.
-
El tiempo de carga completa es de 5 horas.
¡Atención!
-
No dirigir el haz de luz hacia los ojos.
-
Antes de utilizar el cable micro USB, lea todas las instrucciones. No abuse del cable micro USB. No lleve la carga por el cable ni lo jale para desconectar el dispositivo.
Conecte el cable USB directamente a un puerto USB de CA o CC. No utilice un cable micro USB dañado. Reemplace el cable inmediatamente si parece estar dañado.
Gatillo desconecte todas las fuentes de energía antes de la limpieza o el mantenimiento de rutina. No intente reparar la luz o el cable micro USB. Comuníquese con su
distribuidor autorizado más cercano o regresar a Nightsearcher Ltd si es necesario.
-
Para garantizar la seguridad y fiabilidad del producto, las reparaciones, que no sea el reemplazo de la batería debe ser realizado por Nightsearcher Ltd. Piezas de
repuesto Utilice siempre aprobados Nightsearcher Ltd.
-
El rango de temperatura de funcionamiento de la batería: Carga: 0 ° C a 45 ° C / descarga: -10 ° C a 55 ° C
www.nightsearcher.co.uk
Light Source
Cree® XPL cool white LED
Light Output
1000 lumens
100 lumens
Strobe light
Running Time
3.4 hrs
15 hrs
4.5 hrs
Battery
Li-ion 3.7V 3600 mAh
Charge time
5 hours
Product Dimensions
L173 x H176 x Dia90 (mm)
Product Weight
700 grams
NS Part No
NSTRIGGER-PRO
Wrist strap, Micro USB cable, DC vehicle charger USB adaptor
Supplied with
Optional extras
CH-USB-UK
AC Mains charger USB adaptor with British plug
CH-USB-EU
AC Mains charger USB adaptor with European plug
CH-USB-USA
AC Mains charger USB adaptor with North American plug
CH-USB-AUS
AC Mains charger USB adaptor with Australian plug
Charging micro USB input
Selector switch 3-way
ON/OFF trigger switch
ON USE - Battery level indicator
Green (100 to 45%), Yellow (44 to 10%), Red (9 to 5%)
ON CHARGE - Battery charging indicator
Green (fully charged) - Red (on charge)
Page 2
Uso - Informazioni batteria - Attenzione
Modalità di funzionamento
-
Portare l'interruttore (situato sul lato sinistro della TriggerPro) per selezionare la modalità desiderata, come mostrato nella maniglia TriggerPro.
-
Selettore a 3 vie per scegliere ALTO, BASSO e Strobe.
-
Quindi utilizzare il / OFF "trigger" ON per attivare e disattivare la lampada.
Nota: L'impostazione della luce può essere cambiata mentre la luce è accesa.
Indicatore livello batteria
-
L’indicatore del livello della batteria diventa VERDE tra il 100% e il 45% del livello massimo di carica della batteria.
-
L'indicatore del livello della batteria diventa GIALLO tra il 44% e il 10% del livello massimo di carica della batteria.
-
L'indicatore del livello della batteria è ROSSO tra il 9% e il 5% del livello massimo di carica della batteria.
-
Grazie di ricaricare il dispositivo quando l'indicatore del livello della batteria luci ROSSO.
La carica della batteria
-
Togliere il coperchio dalla presa di ricarica. Questo rivela il jack di ingresso micro USB.
-
Collegare l'estremità micro USB del cavo nella presa sul TriggerPro e collegare l'estremità USB in una potenza USB standard (telefono caricabatterie / PC / notebook o
simili - accessori opzionali disponibili Nightsearcher)
-
L'indicatore di carica LED diventa rosso quando si carica. Le luci a LED verde quando la carica è completa.
-
Il tempo di ricarica completa è di 5 ore.
Attenzione
-
Non dirigere il fascio di luce verso gli occhi.
-
Prima di utilizzare il cavo micro USB, leggere tutte le istruzioni. Non abusare del cavo micro USB. Non trasportare il carico via cavo o tirare a disconnettere il
dispositivo. Collegare il cavo USB direttamente in una porta USB di CA o CC. Non utilizzare un cavo micro USB danneggiato. Sostituire il cavo immediatamente se
appare danneggiato. Trigger scollegare tutte le fonti di alimentazione prima della pulizia o manutenzione ordinaria. Non tentare di riparare la luce o il cavo micro USB.
Rivolgersi al proprio centro di assistenza qualificato più vicino o tornare Nightsearcher Ltd, se necessario.
-
Per garantire la sicurezza dei prodotti e l'affidabilità, le riparazioni, escluse la sostituzione della batteria deve essere effettuata da Nightsearcher Ltd. Parti di ricambio
Utilizzare sempre approvate Nightsearcher Ltd.La temperatura di funzionamento della batteria: Carico: 0 ° C a 45 ° C / scarico: -10 ° C a 55 ° C
Betrieb - Produktinformationen - Achtung
Mode Operation
-
Drehen Sie den Wahlschalter (befindet sich auf der linken Seite des Licht) auf den gewünschten Modus, wie auf der Trigger-Pro Handgriff angezeigt.
-
3-Wege-Wahlschalter, um von hohen, niedrigen und Blitzlicht wählen.
-
Dann nutzen Sie die ON / OFF-Triggerschalter, den Scheinwerfer beleuchten.
Hinweis: Die Lichteinstellung kann geändert werden, während das Licht eingeschaltet ist.
Batteriestandsanzeige
-
Die Akkuanzeige ist grün Im Umkreis von 100% und 45% der Batterieenergiepegel schalten
-
Die Batteriestandsanzeige Wird YELLOW Innerhalb 44% und 10% der Batterieenergiepegel schalten
-
Die Akkuanzeige leuchtet rot Innerhalb von 9% und 5% der Batterieenergieniveau zu machen. Bitte laden Sie Akkus Ebene Wenn das Gerät rot.
Batterieladung
-
Entfernen Sie die INPUT-Ladebuchse Abdeckung. Dadurch wird erkennbar, die Micro-USB-Buchse INPUT.
-
Schließen Sie den Micro-USB-Ende des Kabels in die Steckdose und schließen Sie das USB-Ende in ein Standard-USB-Netzteil (Telefonladegerät / PC / Laptop oder
ähnliches)
-
Die Ladeanzeige LED leuchtet rot während des Ladevorgangs. Die grüne LED leuchtet Beim Laden ist voll.
-
Die Ladezeit beträgt 5 Stunden von flach.
Verwarnung
-
Nicht in den Strahl blicken Licht
-
Bevor Sie das Micro-USB-Blei, lesen Sie alle Anweisungen. Missbrauchen Sie nicht die Micro-USB-Leitung. Nie das Licht tragen durch das Blei oder reißen es, die
Führung aus einem Behälter zu trennen. Stecken Sie den Micro-USB-Leitung direkt in eine AC- oder DC-Steckdose Ihres Autos. Nicht mit beschädigten Micro-USB-
Leitung zu betreiben. Ersetzen Sie die Vorlaufzeit sofort, wenn es beschädigt erscheint. Ziehen Sie von Ihrem Trigger-Netz, bevor der Reinigung oder dem Versuch der
Wartungsarbeiten. Versuchen Sie nicht, das Licht micro USB-Kabel oder selbst zu reparieren. Nehmen Sie es zu einem qualifizierten Dienstleistungs-Struktur oder
senden Sie es an den Hersteller.
-
Um zu gewährleisten, Produktsicherheit und Zuverlässigkeit, Reparaturen --other als Batteriewechsel shoulds durch durchgeführt werden. Stets einen zugelassenen
Ersatzteilen
-
Der Betriebstemperaturbereich des Licht Akku: Lade: 0 ° C bis 45 ° C / Entladung: -10 ° C bis 55 ° C
操作法-产品信息-注意
モード動作 - バッテリー情報 - 警告
模式操作
旋转选择器开关(位于光的左侧)到所需的模式,作为指关于所述触
发临柄。
3路选择开关从,低和频闪灯选择。
然后使ON / OFF触发开关,照亮了聚光灯下。
注:光设置可以在光线上更改。
电池电量指
电池电量指灯会变成绿在100%,电池的能量平的45%
电池电量指灯会变成在44%,电池的能量平的10%
电池电量指灯会变成红在9%和电池能量平的5%。请给电池充电
时的平单元变为红。
电池充电
将输充电插座盖。这将揭微型USB接输。
电缆的微型USB端连接到插座和USB端连接到标准USB电源(机充电
器/ PC /笔记本电脑或类似)
充电时,充电指灯指灯会发出红光。该绿LED点亮时充电已满。
充电时间为5时持平。
警
请勿直视光束
使微型USB导线之前,请阅读所有说明。不要滥微型USB引线。切
勿带头扛光或猛拉它从插座拔下领先。直接将微型USB线插AC或DC
电源插座你的的。不要损坏的微型USB引线运。取代铅的时间,如
果即出现损坏。清洁或尝试任何常维护之前,您触发拔下所有的电
源。不要试图修复光微型USB引线或。把它带到有资质的服务机构
或将其返还给制造商。
为了确保产品的安全性和可靠性, - 其他更换电池不宜通过进维
修。始终使批准的更换部件
光电池的作温度范围:充电:0°C45°C /放电:-10°C55°C
モード動作
トリガーProのハンドルの上にされているように、必要なモード(光の左側に位置
する)セレクタスイッチをONにします。
HIGH、LOWとストロボライトから選択する3ウェイセレクタースイッチ。
そして、スポットライトを照らすためにオン/オフトリガースイッチを使していま
す。
注:ライトがオンになっている間、光の設定を変更することができます。
バッテリー残量表
電池残量インジケータが100%とバッテリーのエネルギーレベルの45%以内に緑に
変わります
電池残量インジケータが44%と、電池のエネルギーレベルの10%以内に変わり
ます
電池残量インジケータが9%と、電池のエネルギーレベルの5%以内に変わりま
す。ユニットはになると、お使いのバッテリーレベルを充電してください。
バッテリーの充電
INPUT充電ソケットカバーを取り外します。これは、マイクロUSBソケットのを
明らかにします。
ソケットにケーブルのマイクロUSB側の端を接続し、標準のUSB電源にUSB側の端を
接続します(電話充電器/ PC /ラップトップまたは類似の)
充電中は充電インジケータLEDがく点灯します。充電がいっぱいになると緑の
LEDが点灯します。
充電時間は、フラットから5時間です。
警告の
光線を直視しないでください
マイクロUSBリードを使する前に、すべての指を読んで下さい。マイクロUSB
リードを乱しないでください。リードによって光を運ばないか、レセプタクルから
導線を切断し、それをヤンクありません。 ACまたはDCコンセントあなたのの中に
直接マイクロUSBリードを差し込みます。破損したマイクロUSBリードを操作しない
でください。それが破損している場合は、すぐにリードタイムを交換してください。
清掃または任意の定期的なメンテナンスをしようとする前に、トリガから任意の電源
プラグを抜いてください。光マイクロUSBリードや分を修復しようとしないで
ください。資格のあるサービス施設にそれを取るか、製造元に戻します。
製品の安全性と信頼性を保証するために、よりバッテリ交換shoulds - その他修理を
することによってうこと。承認された交換部品を常にを使
45°C /放電を0°C:充電:光電池の動作温度範囲-10°C、55°Cまで
GUARANTEE TERMS
NightSearcher products have been carefully tested and inspected before shipment and are guaranteed to be free from defective materials and workmanship for a period
of 12 months from the date of purchase, provided that the enclosed instructions have been followed. Should you experience problems with your NightSearcher product,
please return the item, complete with any chargers, to your place of purchase or contact NightSearcher Ltd direct. Your NightSearcher guarantee does not apply to
normal wear and tear, nor does it cover any damage caused by misuse, careless or unsafe handling, alterations, accidents or repairs attempted or made by any
personnel without prior approval from NightSearcher Ltd. Your NightSearcher guarantee is not effective unless you can provide a dated proof of purchase. Please note
that this guarantee does not affect your statutory rights. If at any time, you need to dispose of this product or parts of this product: Please note that waste electrical
products, batteries and bulbs should not be disposed of with household waste. Please recycle where facilities exist, check with your local authority for recycling advice.
NIGHTSEARCHER LIMITED - Unit 4 Applied House - Fitzherbert Spur – Portsmouth – PO6 1TT – UNITED-KINGDOM - Tel. +44 (0)23 9238 9774
www.nightsearcher.co.uk
 Loading...