

Page 1
WNVR-NC SERIES
QUICK SETUP GUIDE
Home
&
SECURITY SYSTEMS
QSG-WNVR-NC.indd 1 2018/12/24 09:46
Business
Page 2
What’s in the Box
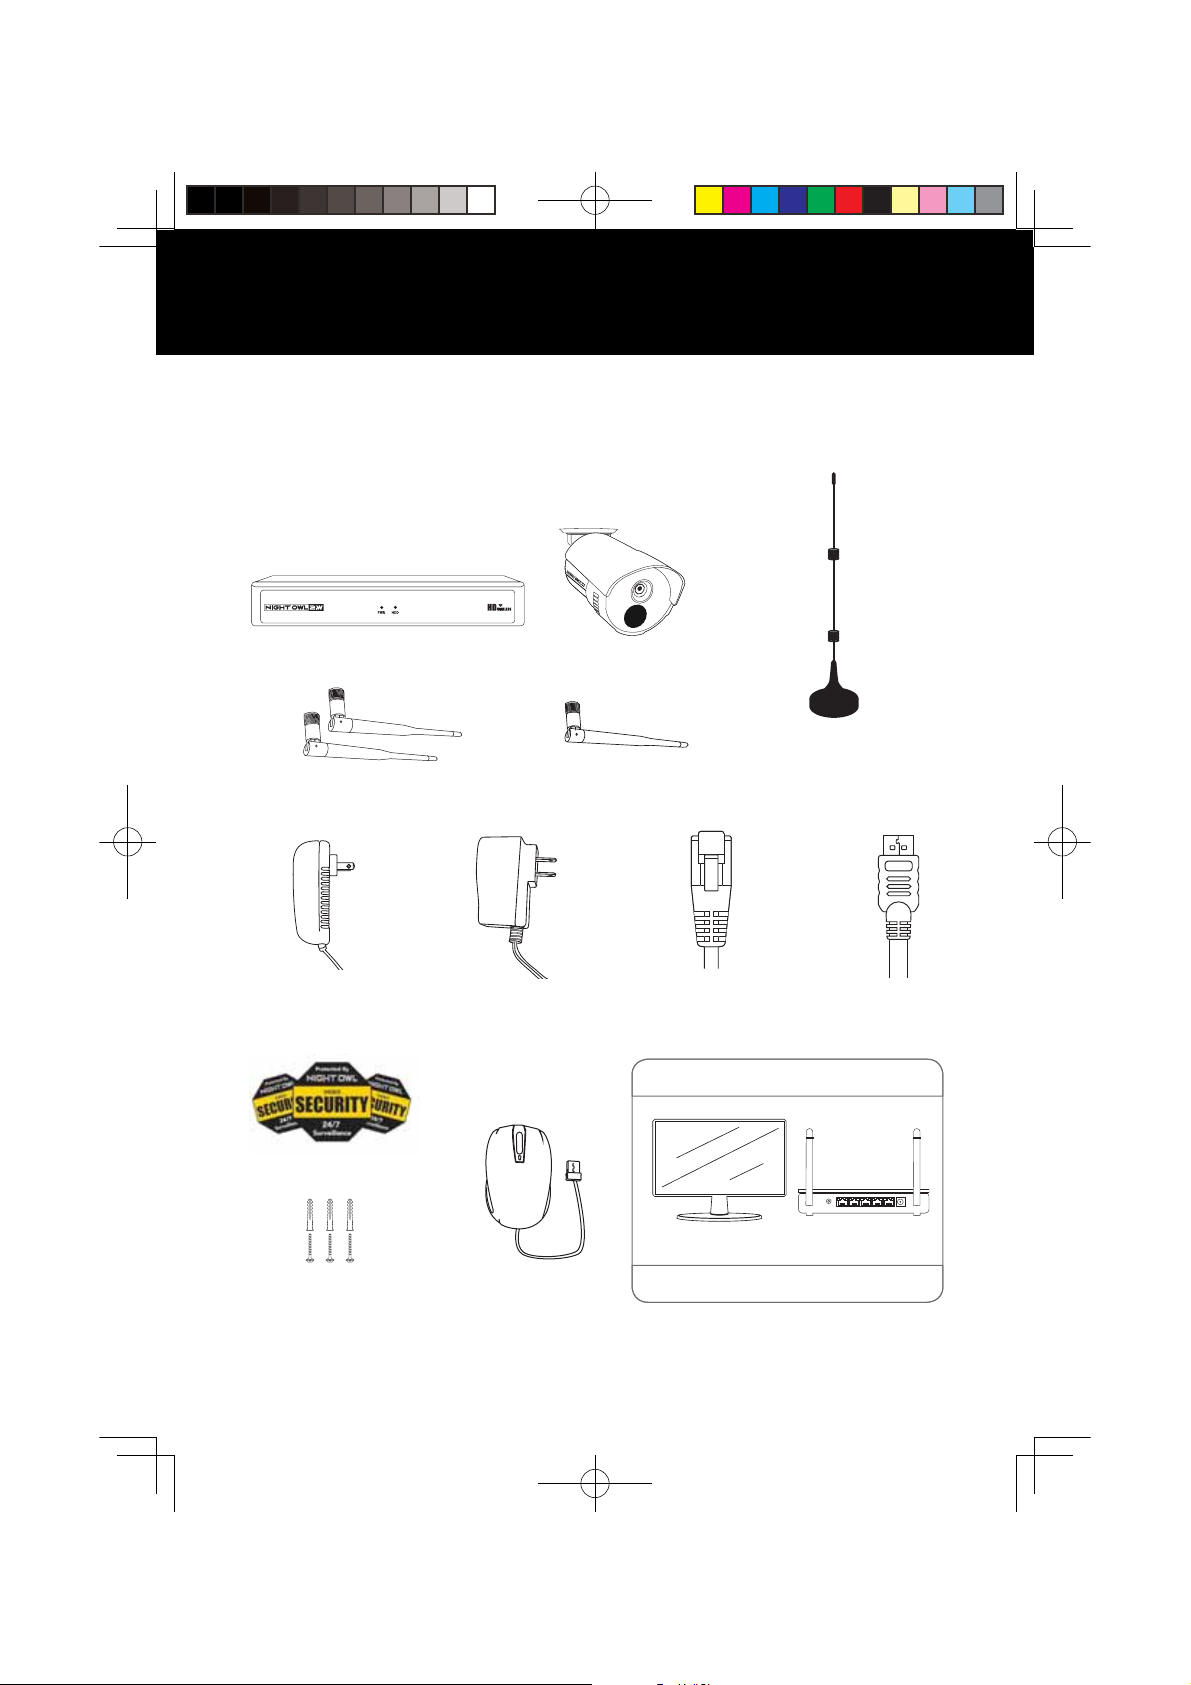
Package Contents
DISCLAIMER: The exact components of your system, images and quantities may vary
depending on your model number. While these may vary, this QSG will address the setup
ANDINITIALCONlGURATIONOFYOUR.62ANDCAMERAS
NVR (x1)
NVR Antenna (x2)
NVR Power Adapter
(x1)
Safety Stickers (x3)
Camera Antenna
(1 per camera)
9 ft. Camera Power
Adapter
(1 per camera)
Camera(s)
9 ft. Wi-Fi Extender Antenna and
Mounting Hardware
(1 for every 4 cameras)
6 ft. RJ-45 Cable
(Ethernet) (x1)
Items Not Included
Monitor Router
6 ft. HDMI
RESET
LAN1 LAN2 LAN3 LAN4 WAN
(x1)
Mounting Hardware
(3 per camera)
USB Mouse (x1)
NOTE: Monitor is required for initial setup.
IMPORTANT: For best results, use all the included Night Owl accessories. Third-party
accessories may not work properly.
1
QSG-WNVR-NC.indd 2 2018/12/24 09:47
Page 3
Product Overview
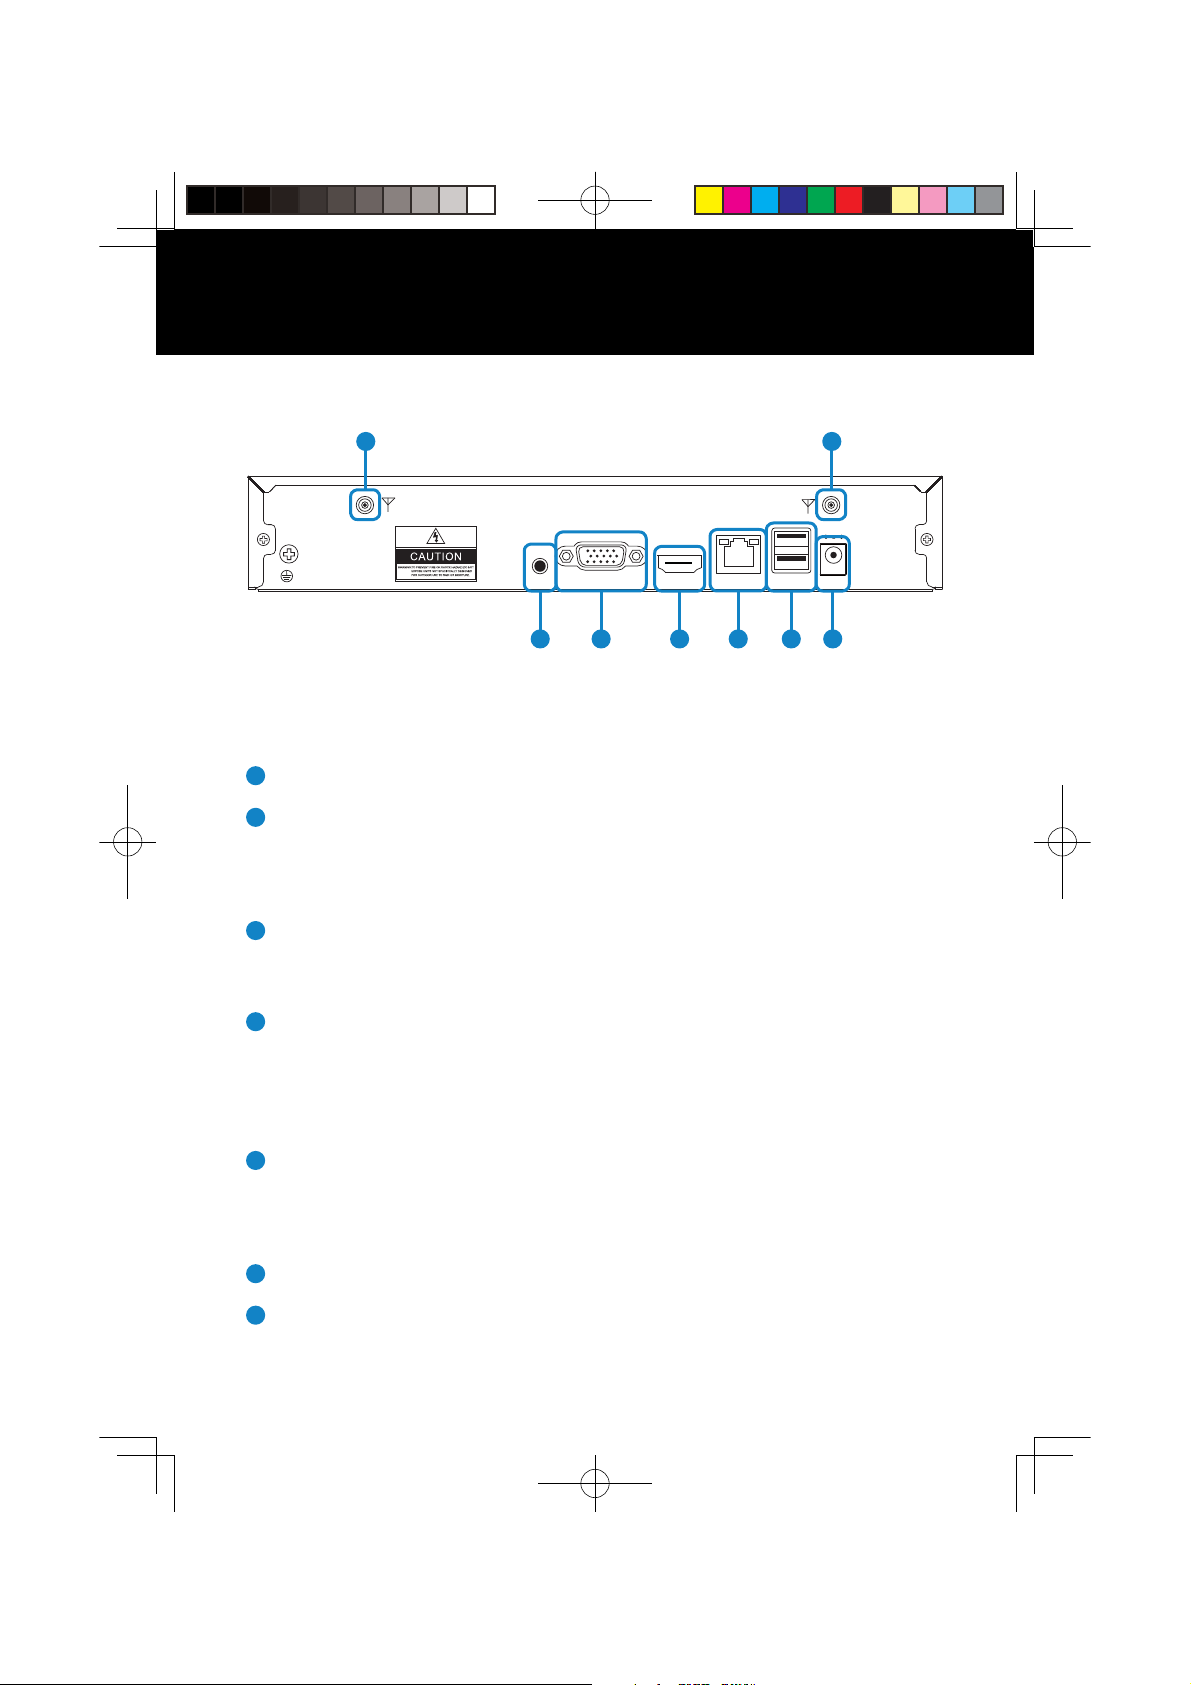
NVR Rear View
77
GROUND
AUDIO
OUTPUT
VGA
1
2 5
HDMI
LAN
43
POWER
USB
12V
6
NOTE: The maximum number of cameras you can connect to your NVR will be determined
by the number of channels.
1
Audio Output – Allows for the connection of an amplified speaker.
2
VGA Output – Allows for a video connection. If the TV/Monitor does not have
an HDMI input but does have a VGA input, connect the VGA cable from the
VGA output port on the NVR to the VGA input port on your TV/Monitor. (VGA
cable not included)
3
HDMI Output – Allows for a video connection. If the TV/Monitor has an HDMI
input, connect the HDMI cable from the HDMI output port on the NVR to the
HDMI input port on your TV/ Monitor.
4
RJ-45 (Ethernet) Port – Used to connect the NVR to your modem/router for
remote viewing. Please note your NVR comes with built-in Wi-Fi for the
cameras to transmit to the NVR. However, you will need to manually connect
the NVR to your modem/router to remotely view on a Smart Device or PC /
®
Mac
.
USB Ports – Allow for the connection of a USB mouse and/or a USB flash
5
drive. Connect the included USB mouse to assist in navigating the NVR’s
menu interface. Connect a USB flash drive to download video files from the
NVR for long term storage or sharing.
6
Power Input – Used to connect the included 12V DC power supply.
7
NVR Antenna Mount – For installation of two included NVR antennas.
2
QSG-WNVR-NC.indd 3 2018/12/24 09:47
Page 4
Positioning Your NVR and Cameras
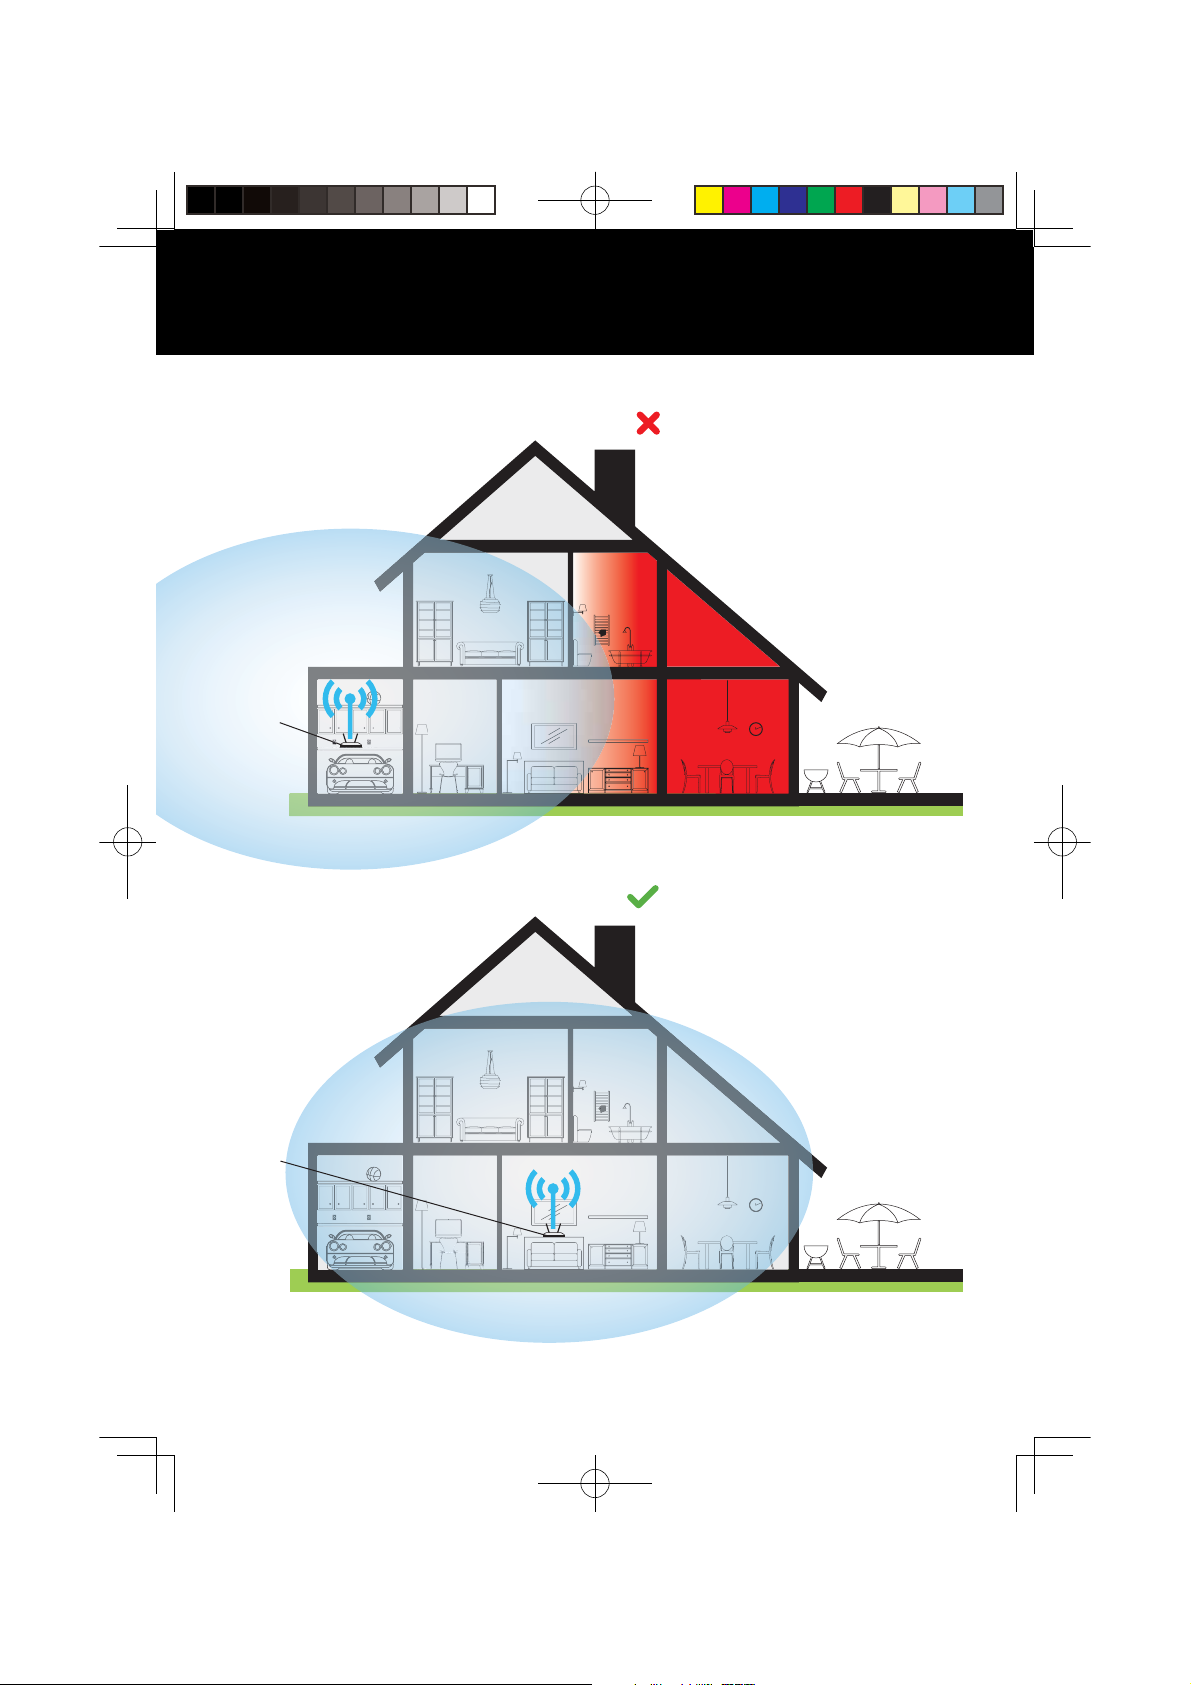
Incorrect Placement
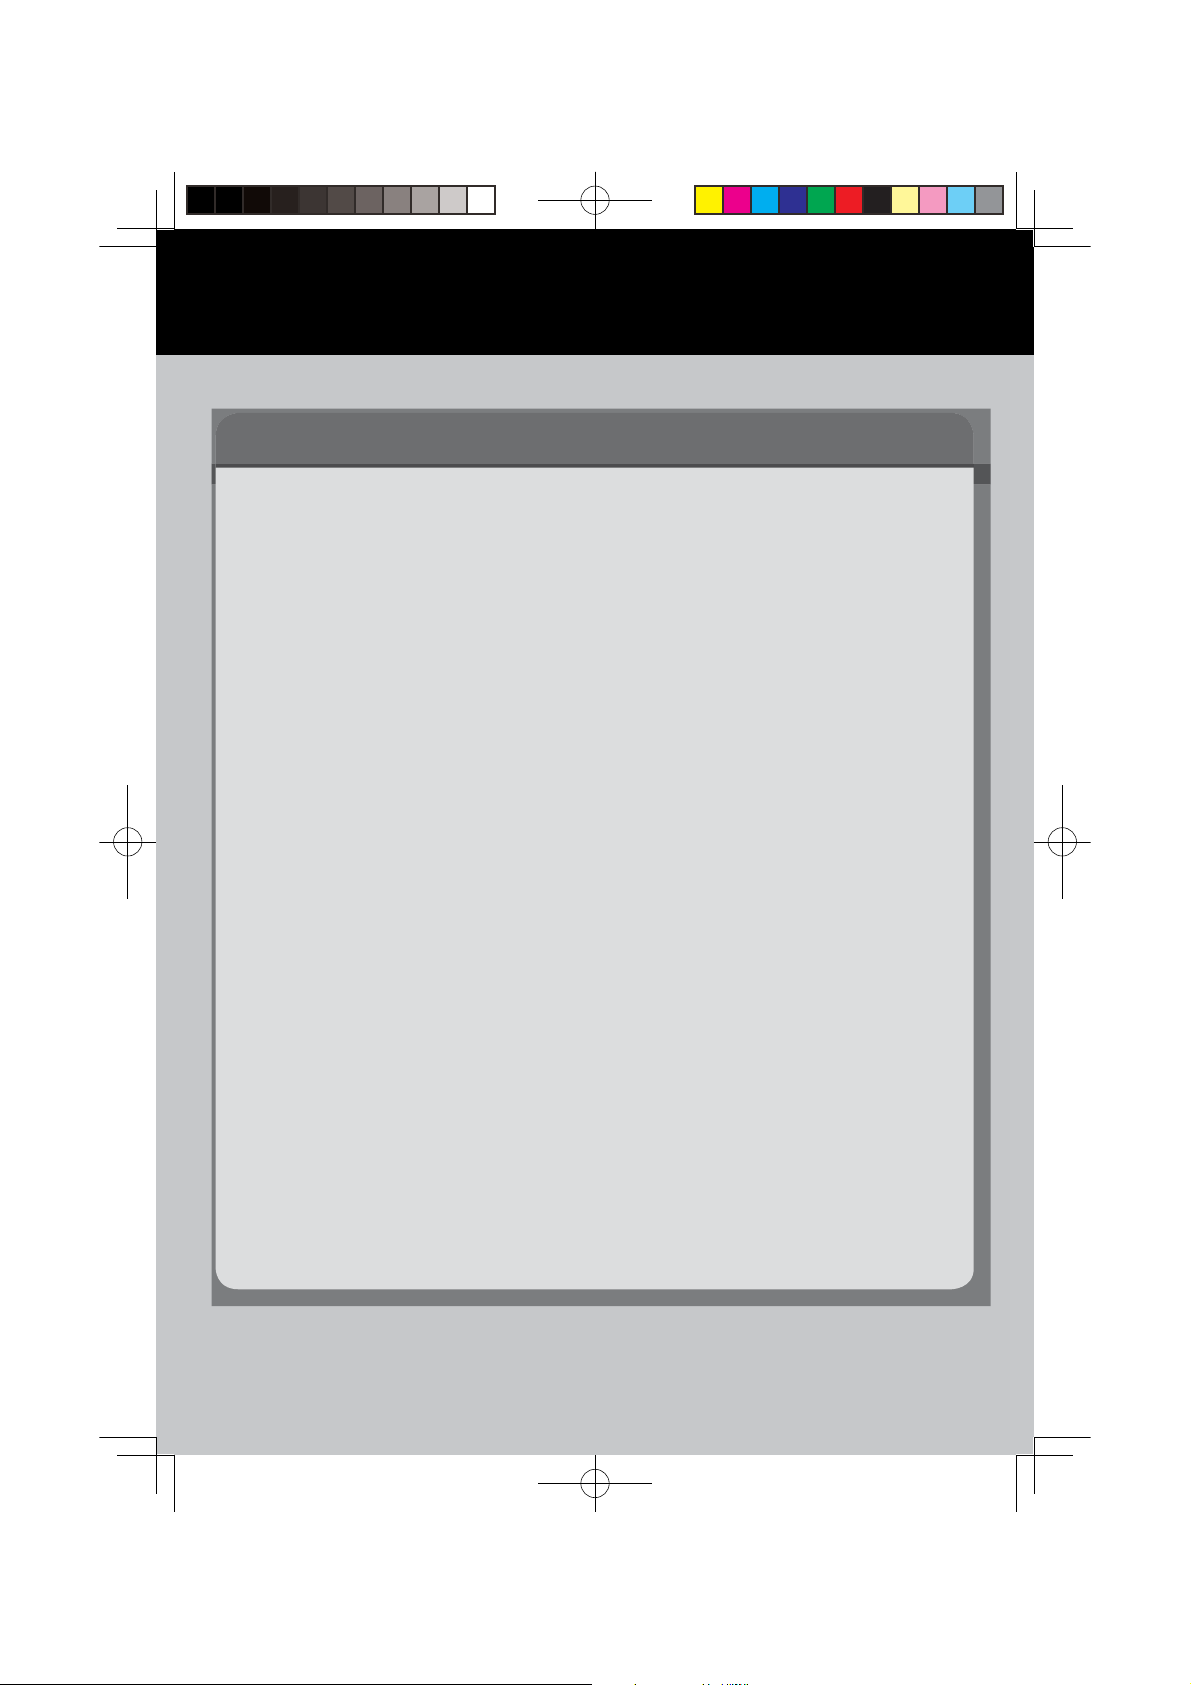
Your wireless IP cameras will reach up
to 300 ft. Therefore, proper placement
of the NVR in your home will ensure
you achieve maximum coverage.
NVR
Correct Placement
Placing the NVR centrally in your home
will help make certain that no matter
where you mount your cameras, they
will be able to wirelessly connect inside
the signal range of the WNVR.
NVR
3
QSG-WNVR-NC.indd 4 2018/12/24 09:47
Page 5
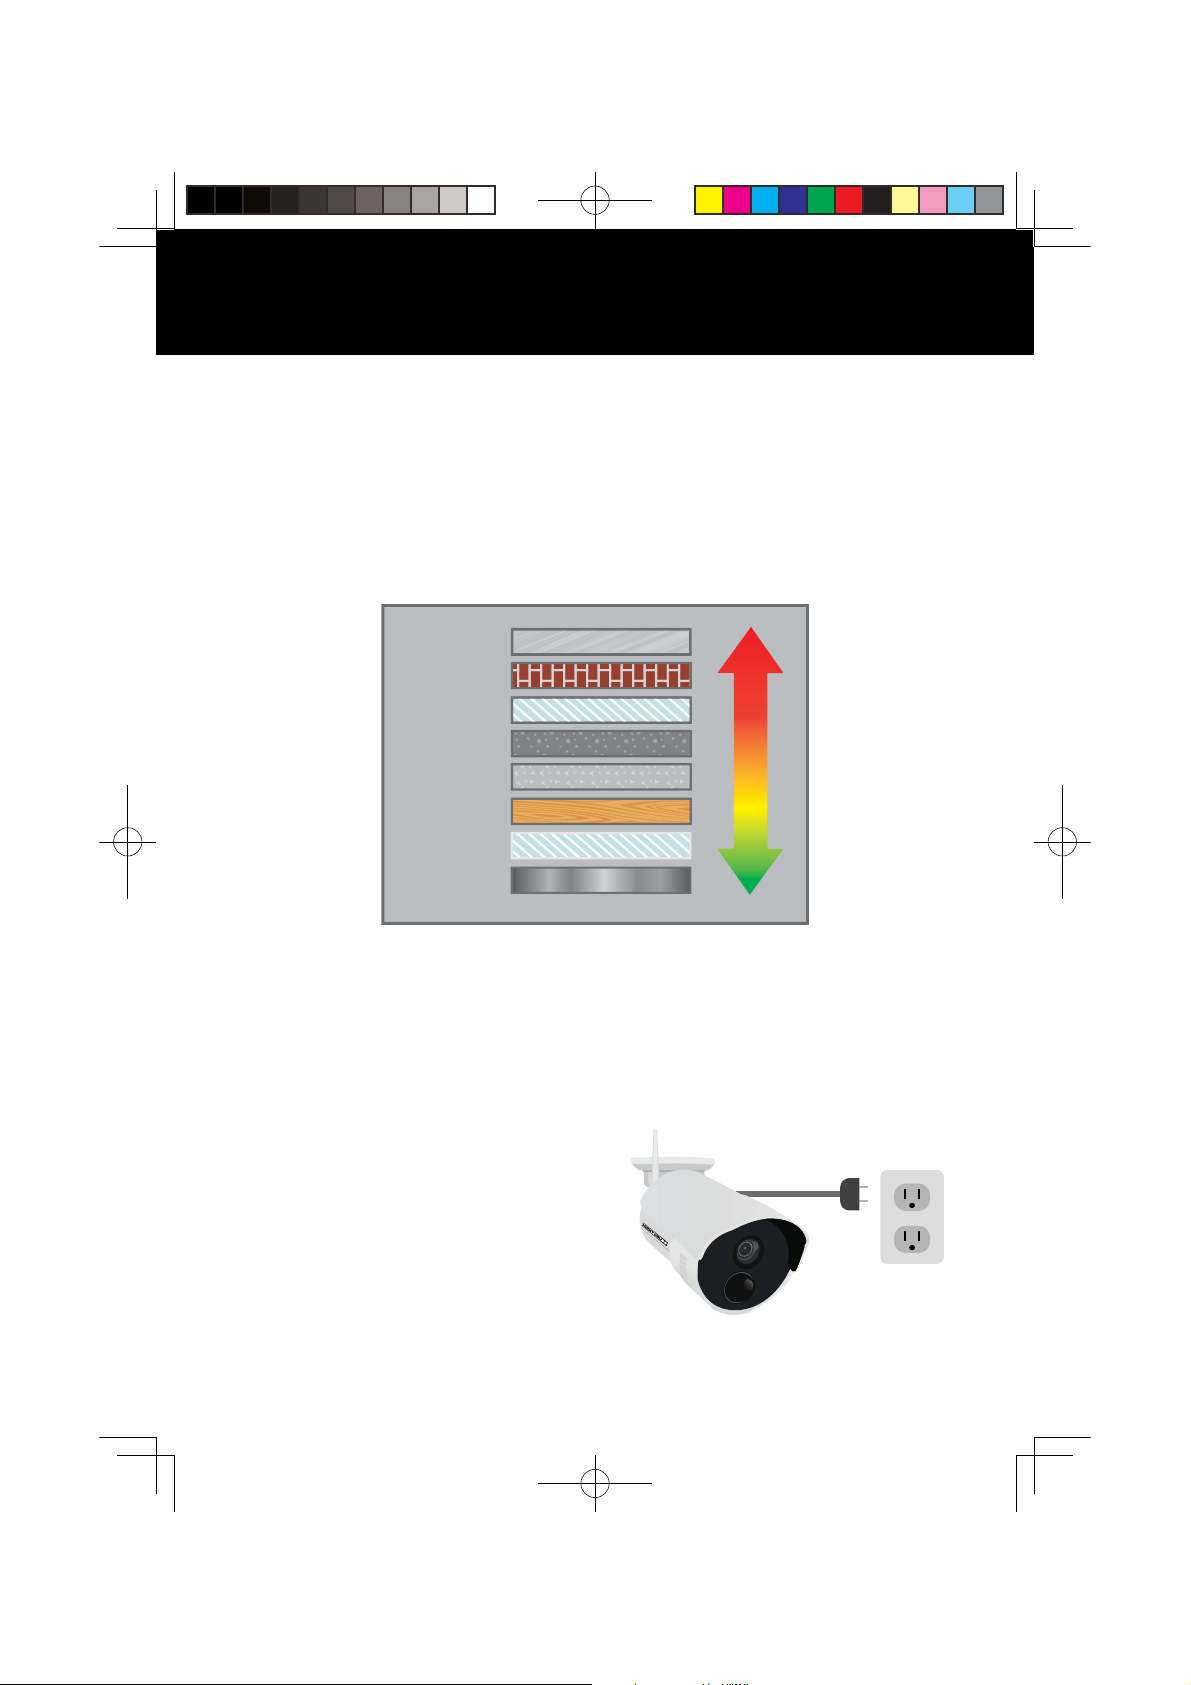
How Obstacles Affect Your Signal Strength
When your wireless signal is transmitted through various materials, such
as walls and windows, the signal strength is affected. Though the NVR and
wireless camera may be very close in proximity, you could still notice high
signal interference if the signal passes through certain obstacles. For instance,
if the signal passes through a concrete wall it will be severely weakened. Please
reference the chart below to see which obstacles highly affect your signal and
which do not.
Concrete Wall
Brick Wall
Glass with
Metal
Cinderblock
Dry Wall
Wood Door
Glass Window
Mirror
Weak
Signal
Strong
Signal
NOTE: If your setup requires the signal to be transmitted through an obstacle that severely
weakens it, you can use the 9 ft. Wi-Fi Extender Antenna included with your system. The
Extender Antenna can be used to bypass the obstacle weakening the signal. Simply replace
the white Camera Antenna with the Extender Antenna and then mount the Extender Antenna
on the opposing side of the obstacle.
Powering the NVR and Wireless Cameras
Your NVR must be powered on using
the NVR power adapter. Similarly, each
wireless camera must be powered with
a camera power adapter. Though these
cameras wirelessly transmit video to
the NVR, they are not battery powered,
and must therefore be powered via the
included adapters. Each camera within
your system will come equipped with its
own camera power adapter.
4
QSG-WNVR-NC.indd 5 2018/12/24 09:47
Page 6
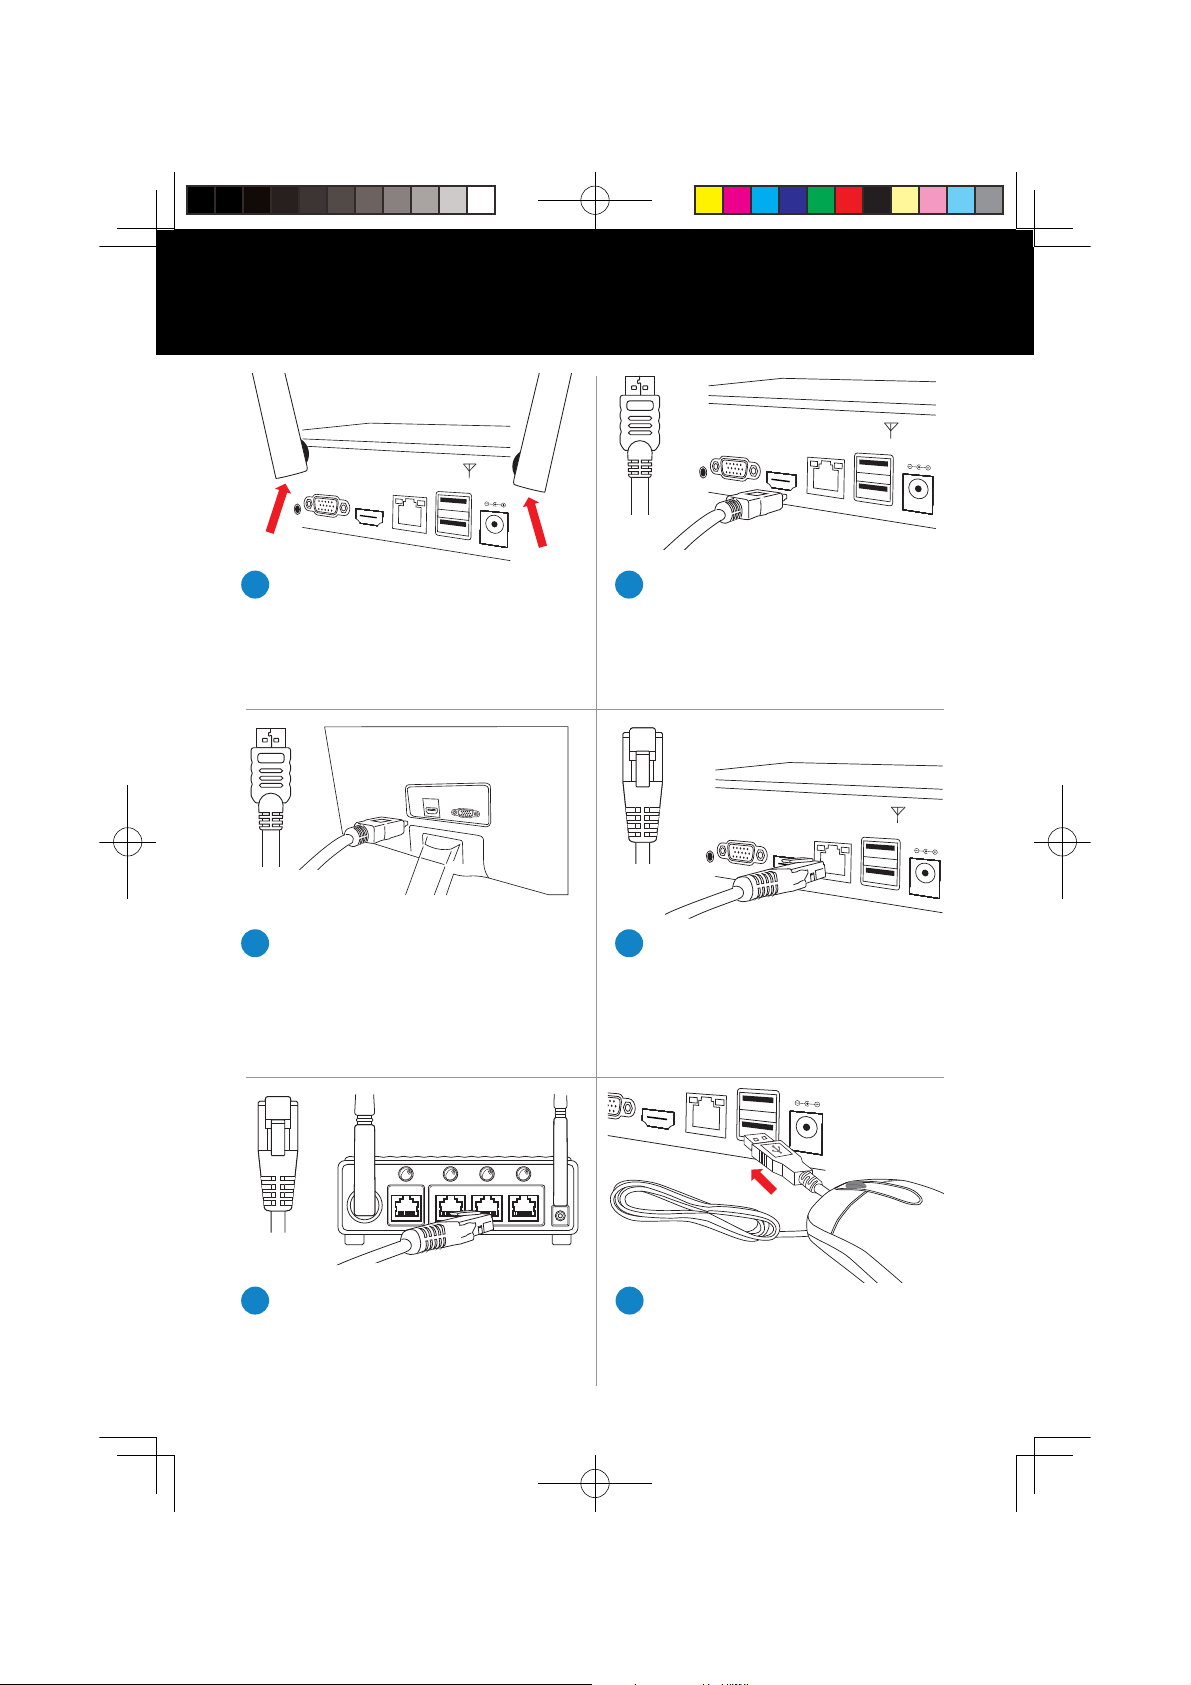
Connecting Your System
HDMI
Connect the two included antennas
1
to your NVR. This will ensure you
achieve the maximum wireless
range for transmission from your
wireless cameras.
HDMI
You may also connect using VGA (not included)
Plug the other end of the
3
HDMI cable into the back of
your TV or monitor.
NOTE: Monitor is required for initial setup.
To view cameras, TV/Monitor must be tuned
to the same Input the HDMI is plugged into.
(Router Not Included)
Plug one end of the included
2
HDMI cable into the HDMI port
on the back of the NVR.
ETHERNET
Plug one end of the included
4
Ethernet cable into the LAN port
on the back of the NVR.
ETHERNET
Plug the other end of the
5
Ethernet cable into a port on
Plug the USB mouse into the
6
USB port on the back of the NVR.
the back of your router.
5
QSG-WNVR-NC.indd 6 2018/12/24 09:47
Page 7
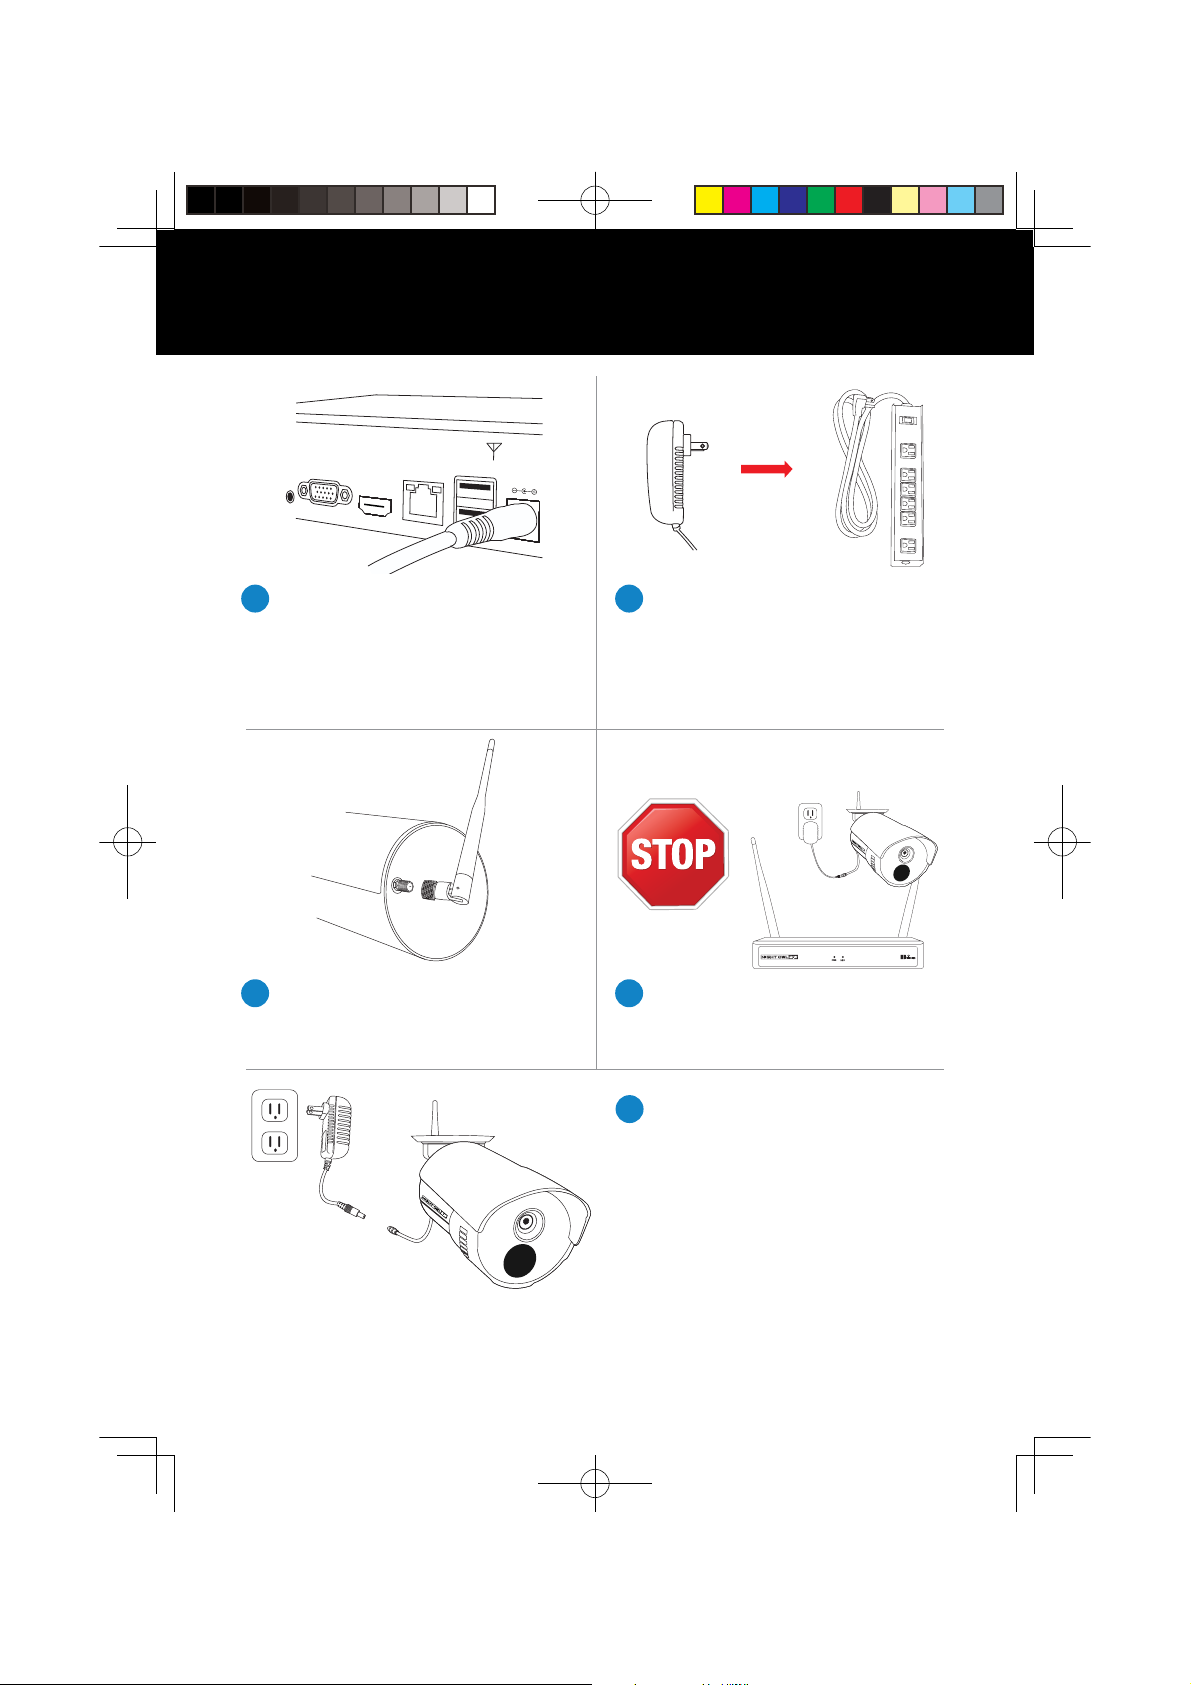
(Surge Protector
Not Included)
Connect the NVR power adapter to
7
the Power Input on the rear of the
NVR.
NOTE: Power adapters will be
as either NVR or Camera.
Connect the included camera
9
antenna to the antenna mount on
the camera.
labeled
Plug the NVR power adapter
8
into a surge protector or
Uninterruptible Power Supply
(UPS). (Surge protector and UPS
not included)
NOTE: Make sure NVR is in intended
before testing cameras.
To verify cameras are working,
10
please ensure they appear on your
TV/Monitor before mounting them.
Each camera comes equipped
11
with its own camera power
adapter. Connect the female
power cable coming from the
camera to the male power end of
the camera power adapter. Next,
plug the camera power adapter
into a wall outlet.
location
NOTE:
You should see each camera appear on your TV/Monitor. You may now proceed to
install your NVR cameras in the desired location.
6
QSG-WNVR-NC.indd 7 2018/12/24 09:47
Page 8
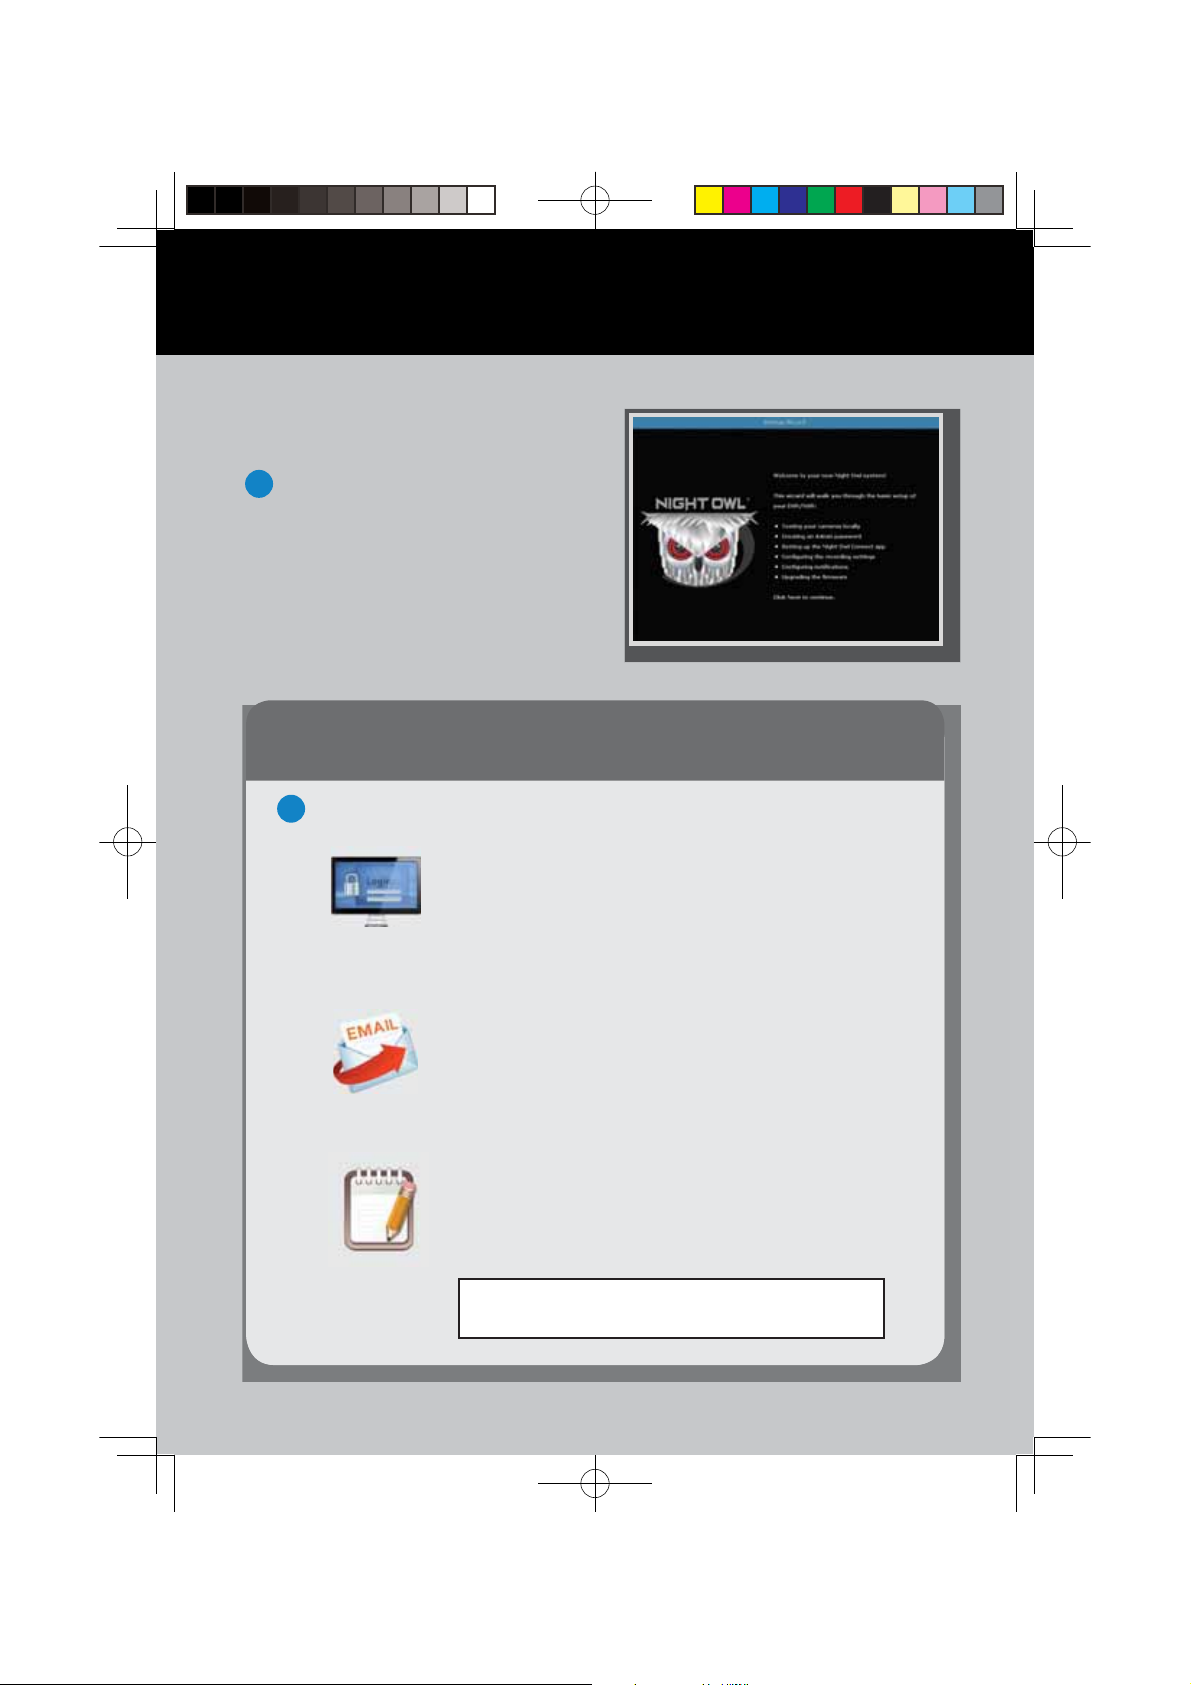
Booting Up for the First Time
Startup Wizard
When you power on the NVR
1
you will be prompted with the
following screen. Please follow
the instructions to complete the
Startup Wizard.
Important… Please Read
On the Password Creation screen, please note the following:
2
Admin Account Creation
By default, the username will be admin. It must
remain admin upon your initial account configuration.
However, you may add additional users at a later time.
NOTE: Password can be any alphanumeric combination
between 6 and 20 characters.
Recovery Email Address
Please ensure you provide a valid email address
in case your ever forget your account information.
NOTE: You MUST enter a VALID email address. If you
don’t, you will have to call Tech Support to reset your
password, and that just seems like a waste of time.
Remember Your Password
Night Owl strongly recommends writing down your
password within the Quick Setup Guide. You will need
it every time you log into your NVR and to remotely
view on a Smart Device.
Write your
password here:
7
QSG-WNVR-NC.indd 8 2018/12/24 09:47
Page 9
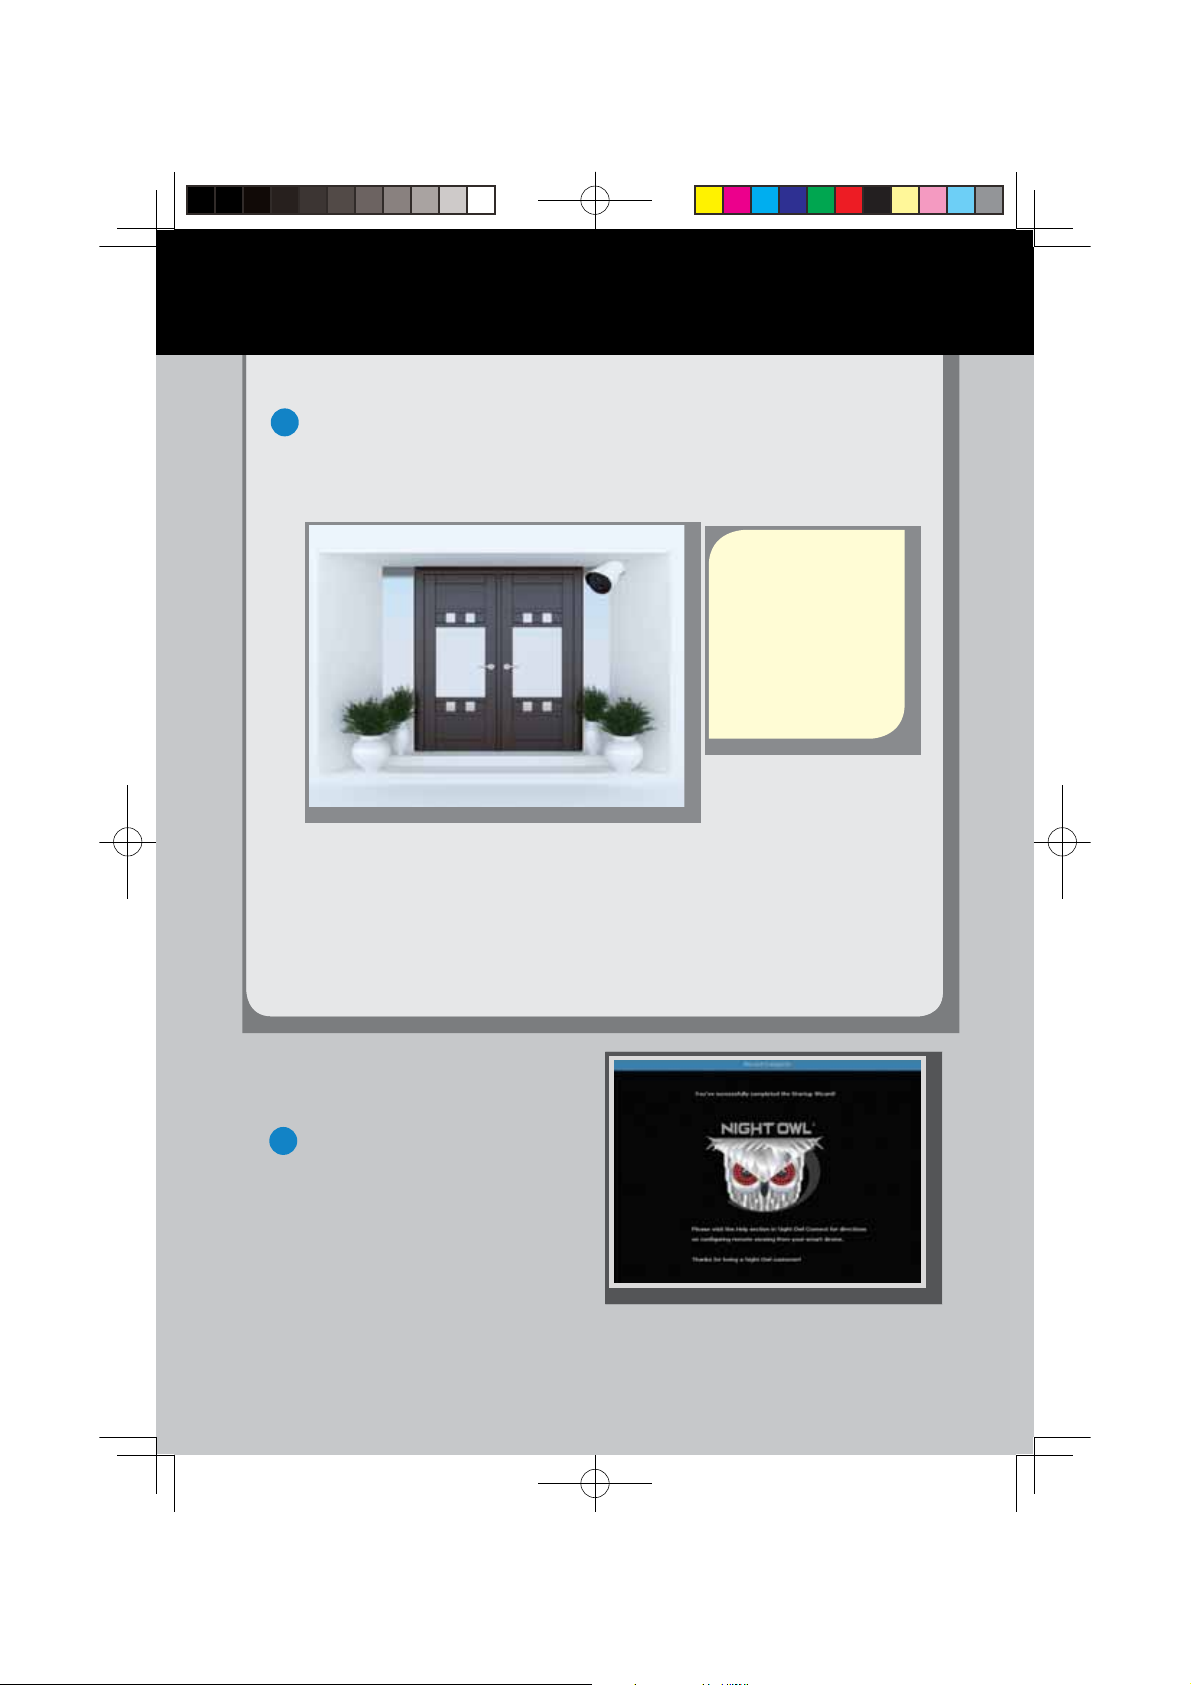
When you reach the Camera / Channel Settings screen, you will want
3
to have installed the cameras in their final position. Please make sure
you have mounted cameras at least 7ft. above the ground and angled
them slightly down.
NOTE: If your camera
has an infrared sensor,
it works best for ‘side to
side’ movement across
the camera’s field of
view as opposed to
directly to or away from
the camera.
At this stage of the Startup Wizard, you will be instructed on
adjusting the camera sensitivity and setting the Motion Detection Area.
Having your cameras in their final position will be key.
So, if you would like to detect motion for the front door to your home,
place the camera to the side of the entrance.
This is the last screen you will
4
see when you have successfully
completed the Startup Wizard.
NOTE: For additional configuration of your NVR, please refer to the owner’s manual
located on our support page at www.NightOwlSP.com.
8
QSG-WNVR-NC.indd 9 2018/12/24 09:47
Page 10
load and Install Applicati
on
Using Night Owl Connect
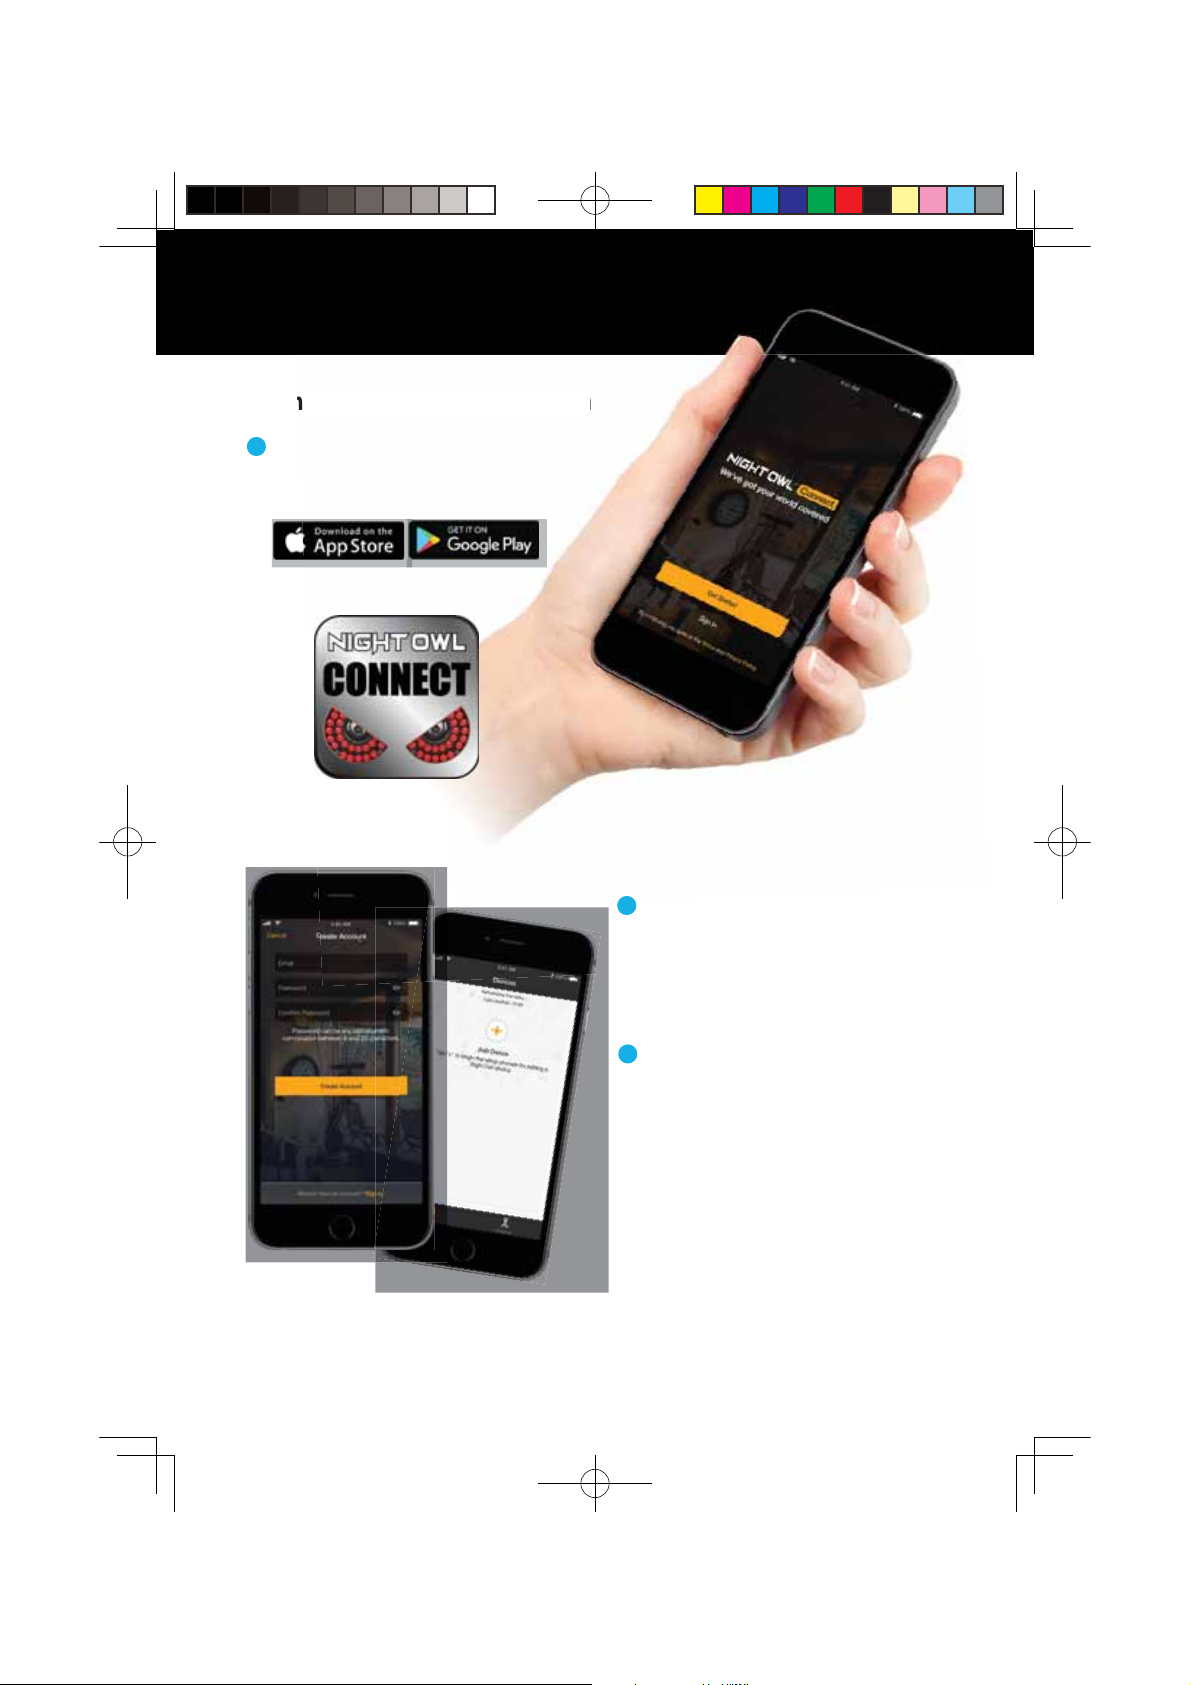
Download and Install Application
1
Download the app from the App Store
or Google Play Store and install the
application on your device.
NOTE: Setup is the same for
Smartphone and Tablet.
2
Create an account using an
email address for the username
and a password between
6–20 characters.
3
After completing the account
setup and verification process,
sign into the app and tap the
“+” symbol to add a device.
The Night Owl Application will lead you through the rest of the setup process.
9
QSG-WNVR-NC.indd 10 2018/12/24 09:47
Page 11
Connecting and Adding your Device
NOTE: When adding a new device, it may take 5–10 minutes before you begin
receiving notifications.
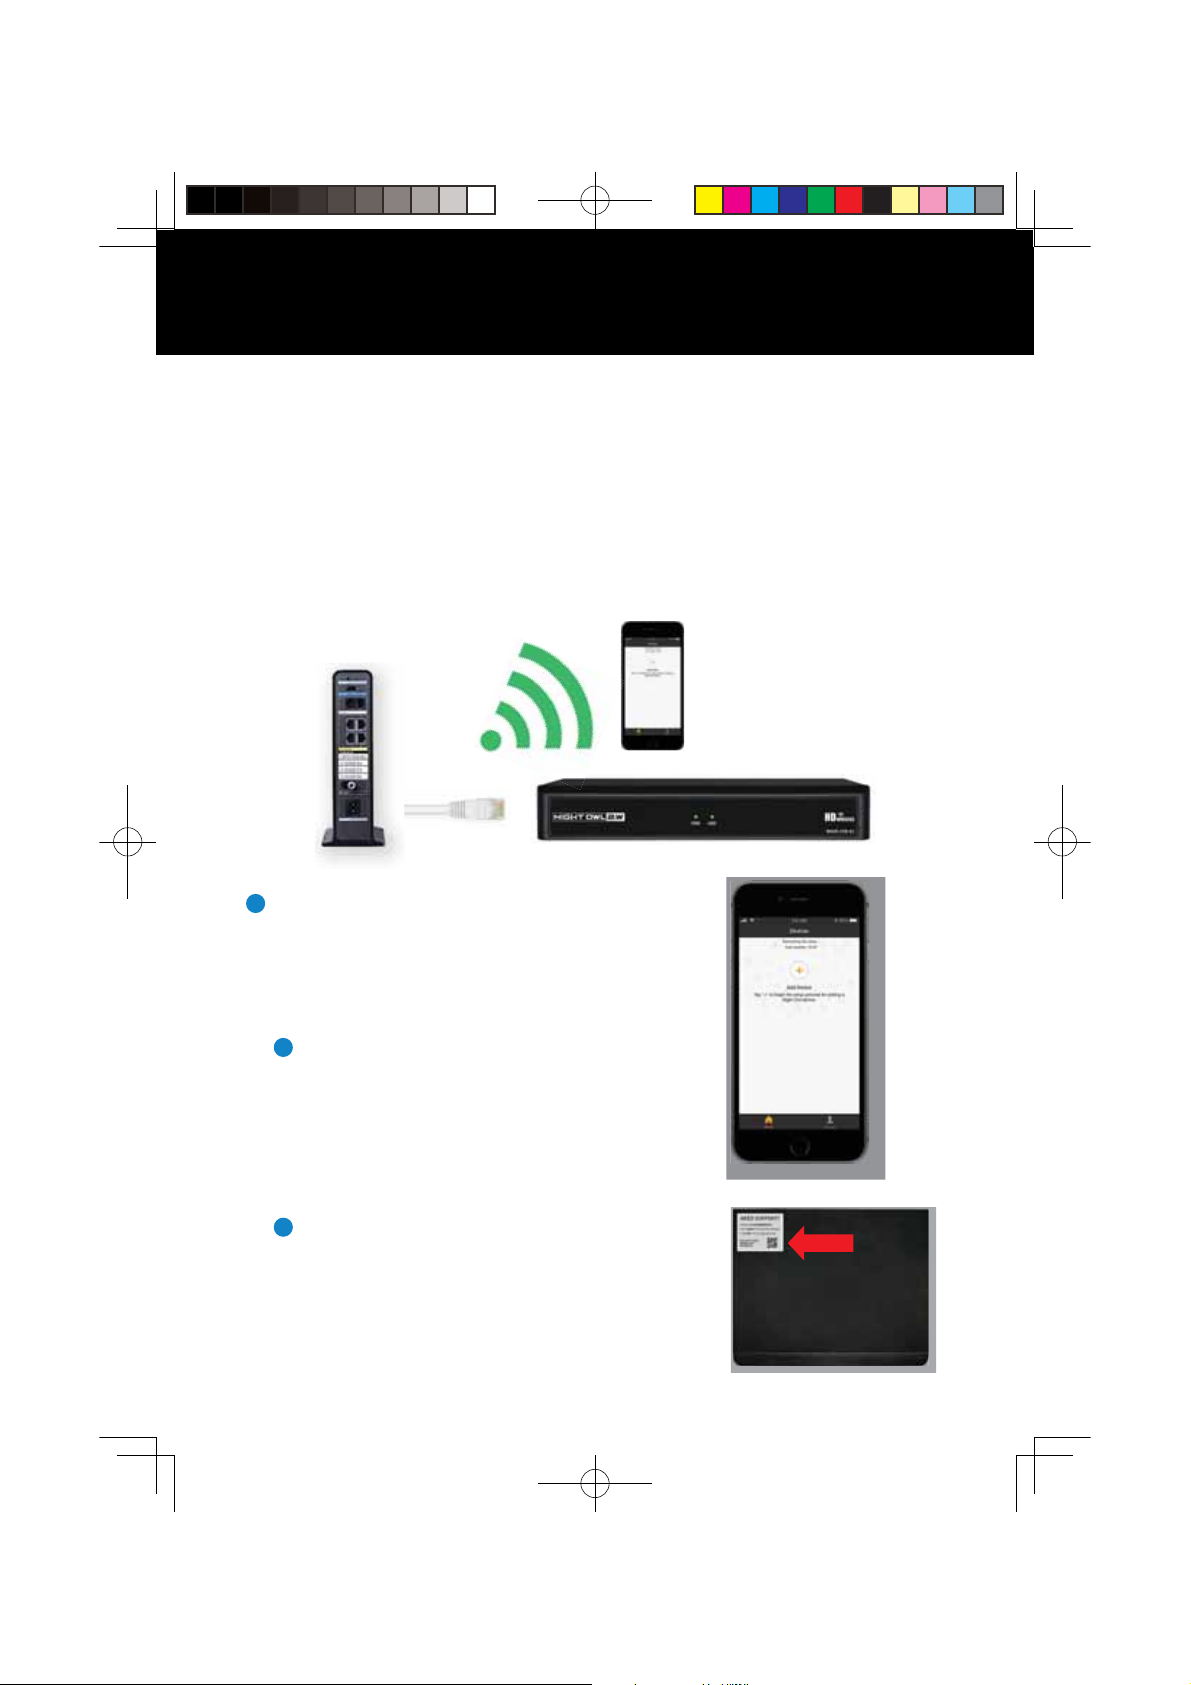
A device can be added to the Night Owl Connect App by using the application’s
Smart Auto Detection or through a QR Code Setup. With Smart Auto Detection,
your NVR will automatically be detected by the Night Owl Connect software,
making connecting easy! To use this preferred method, ensure your Smart
Device and NVR are both on the same network.
WIFI
Ethernet
Cable
4
Adding a Device
To begin adding a new device, first select
the yellow plus sign within the Device menu.
Then select your device type from the Device
list and follow the on screen instructions.
4A
Smart Auto Detection
If your NVR and Smart Device are running
Night Owl Connect on the same network,
the Smart Auto Detection will auto find your
NVR. If this method is not available, please
use the QR Code Setup from step 4B below.
4B
QR Code Setup
To use the QR Code Setup, select Setup
device by QR Code and hover your Smart
Device camera lens over the QR Code
located on the top of your NVR.
10
QSG-WNVR-NC.indd 11 2018/12/24 09:47
Page 12
1
Using Night Owl Connect
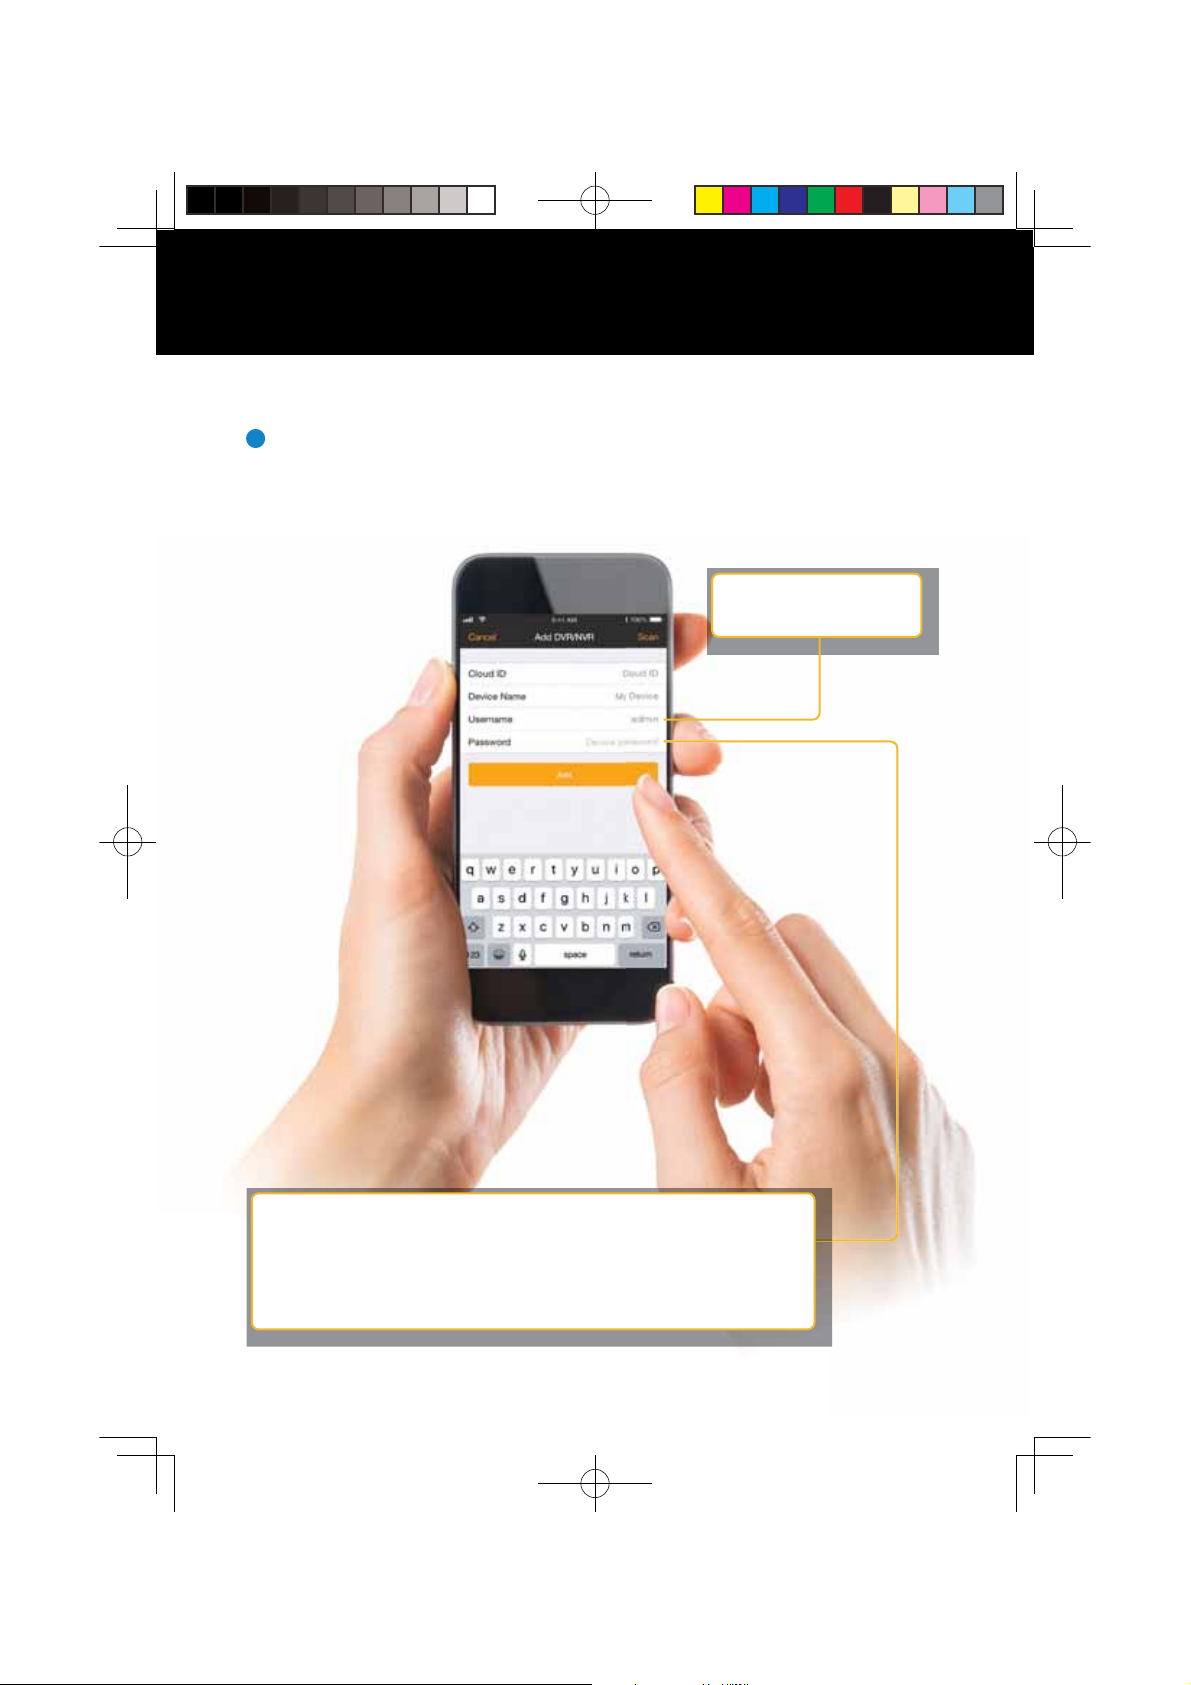
5
On the Device Login screen, enter the login information for the NVR
(Remember, the NVR login and Night Owl Connect App login are different).
The NVR username is admin by default. If you are not the admin, login with
your username credentials.
admin is case sensitive
(all lowercase).
The password will be the same password you created during the
Startup Wizard and should be stored in your QSG. NOTE: This
is the password of your NVR, NOT the password used to login
to the Night Owl Connect App. You must key the NVR password
verbatim to add it to the app.
111
QSG-WNVR-NC.indd 12 2018/12/24 09:47
Page 13
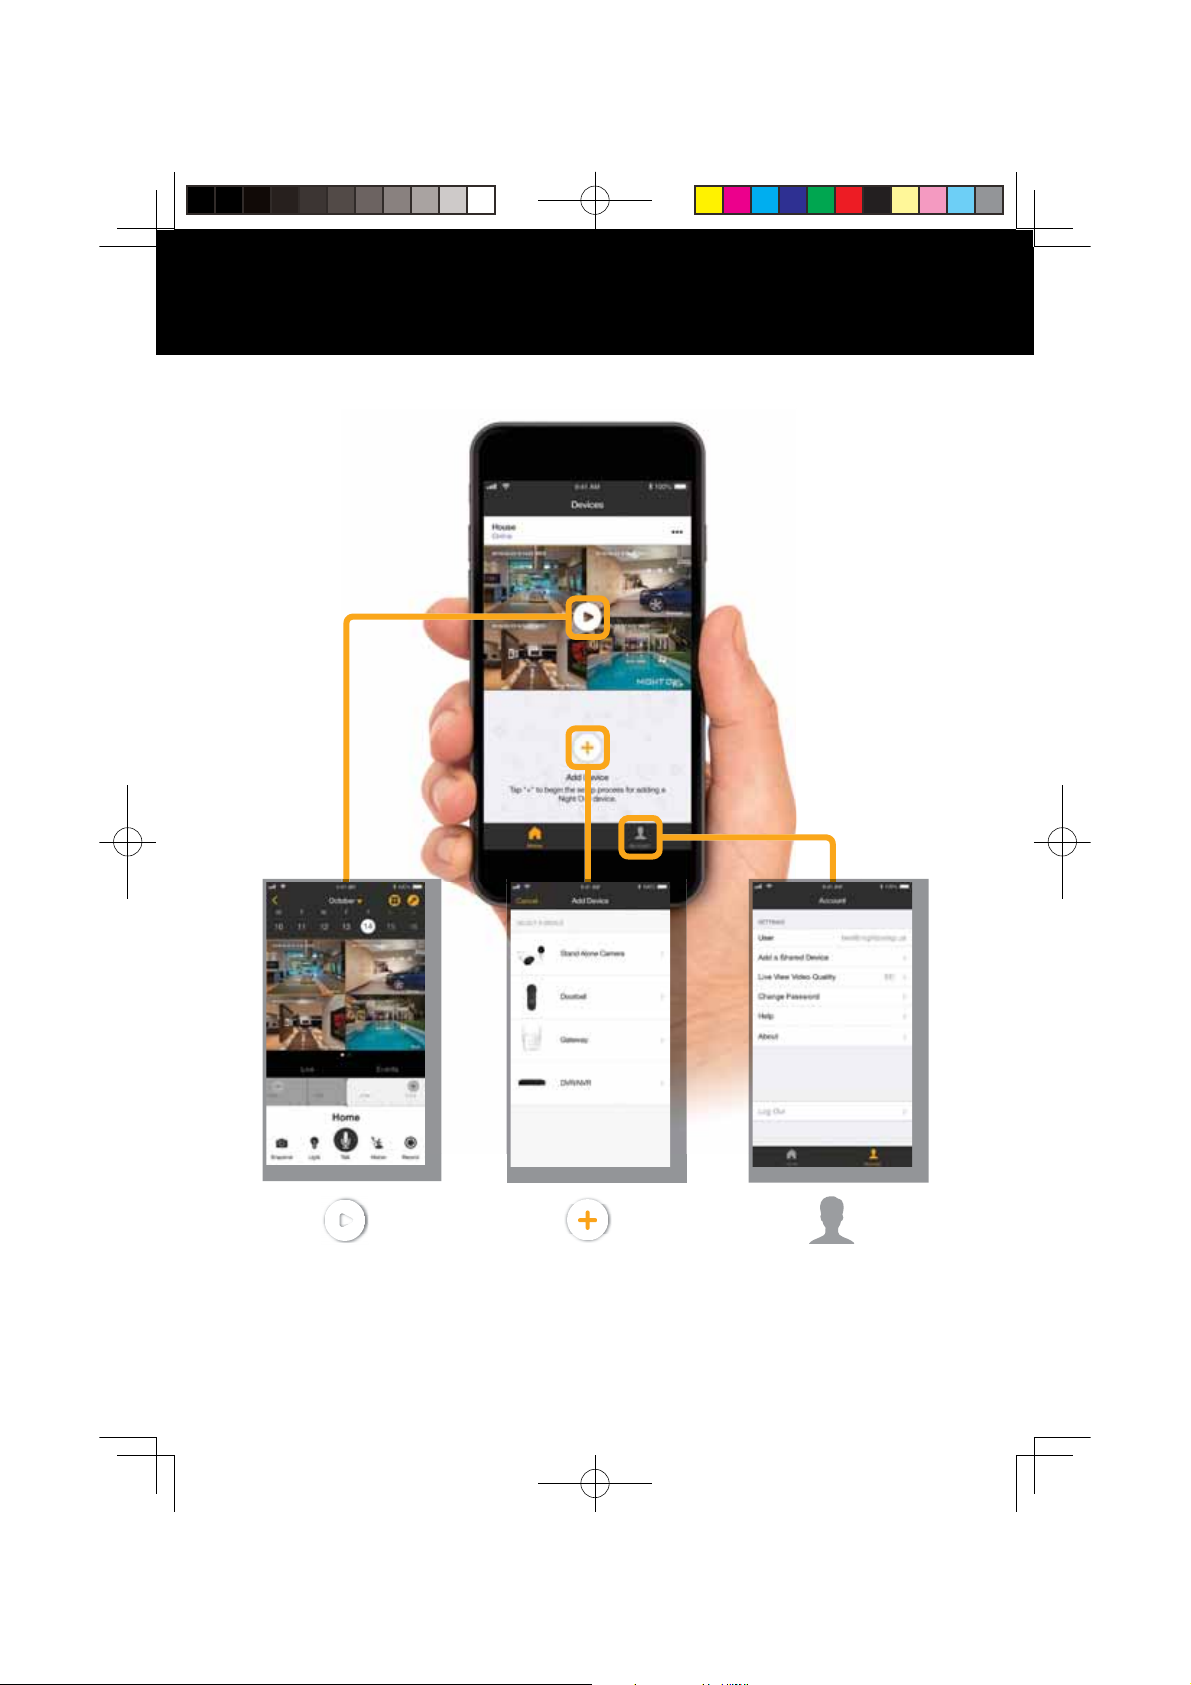
App Overview
Live View
Displays real-time
footage of your
system.
QSG-WNVR-NC.indd 13 2018/12/24 09:47
Add Device
Add connected devices
to your NVR and access
your footage.
Manage account settings,
add a shared device, and
Account
change password.
12
Page 14
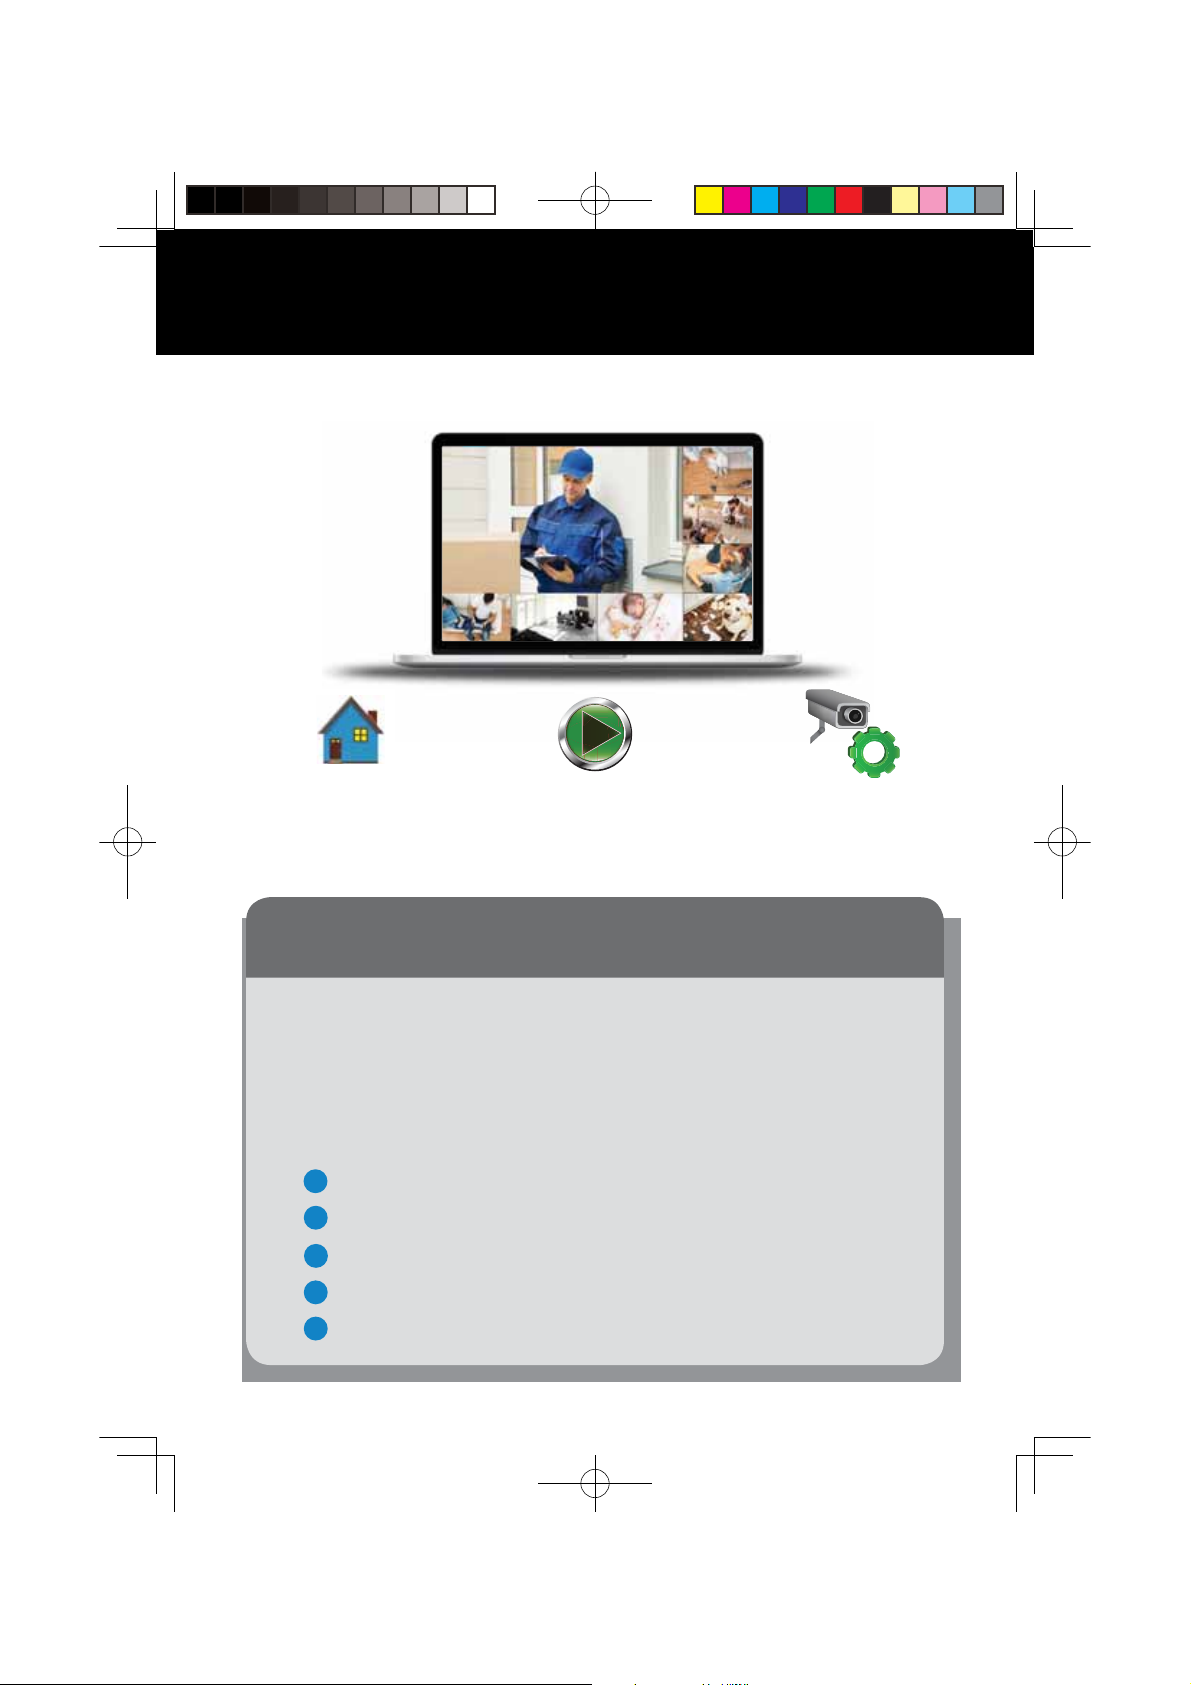
Using Night Owl Connect CMS Software
Access your NVR from any computer , anywhere!
Live View
Viewing live video, controlling
PTZ functionality and setting
image parameters.
Playback
View system recordings
and images and save them
directly to your PC or Mac®.
Device Manager
Add and configure
available NVRs and
cameras on your network.
Night Owl Connect CMS Software
The Night Owl Connect Control Management Software (CMS) allows you
to view your Night Owl Security system remotely from a PC or Mac®.
Additionally, you can playback recorded video, save video and images
directly to your PC or Mac®, configure numerous settings such as channel
names and set record preferences.
To download the CMS Software:
1
Go to www.NightOwlSP.com.
2
Click on the Support tab.
In the search bar, type “Connect CMS”.
3
Download the Night Owl Connect CMS software.
4
5
Once downloaded, select PC or Mac
®
.
13
QSG-WNVR-NC.indd 14 2018/12/24 09:47
Page 15
Pairing a Replacement Wireless Camera
By default, each camera within your NVR kit comes pre-paired to the NVR.
Additionally, your NVR has its own built-in Wi-Fi for secure, uninterrupted
video transmission and recording. Pairing allows for the wireless
transmission coming from the camera to be detected by the NVR. However,
if you have a camera that needs to be replaced while under warranty, the
replacement camera will similarly need to be paired to the NVR.
NOTE: When pairing a Night Owl add-on camera, refer to “Add-on cameras Quick Setup Guide”.
To pair a replacement camera to your NVR, please use the below steps:
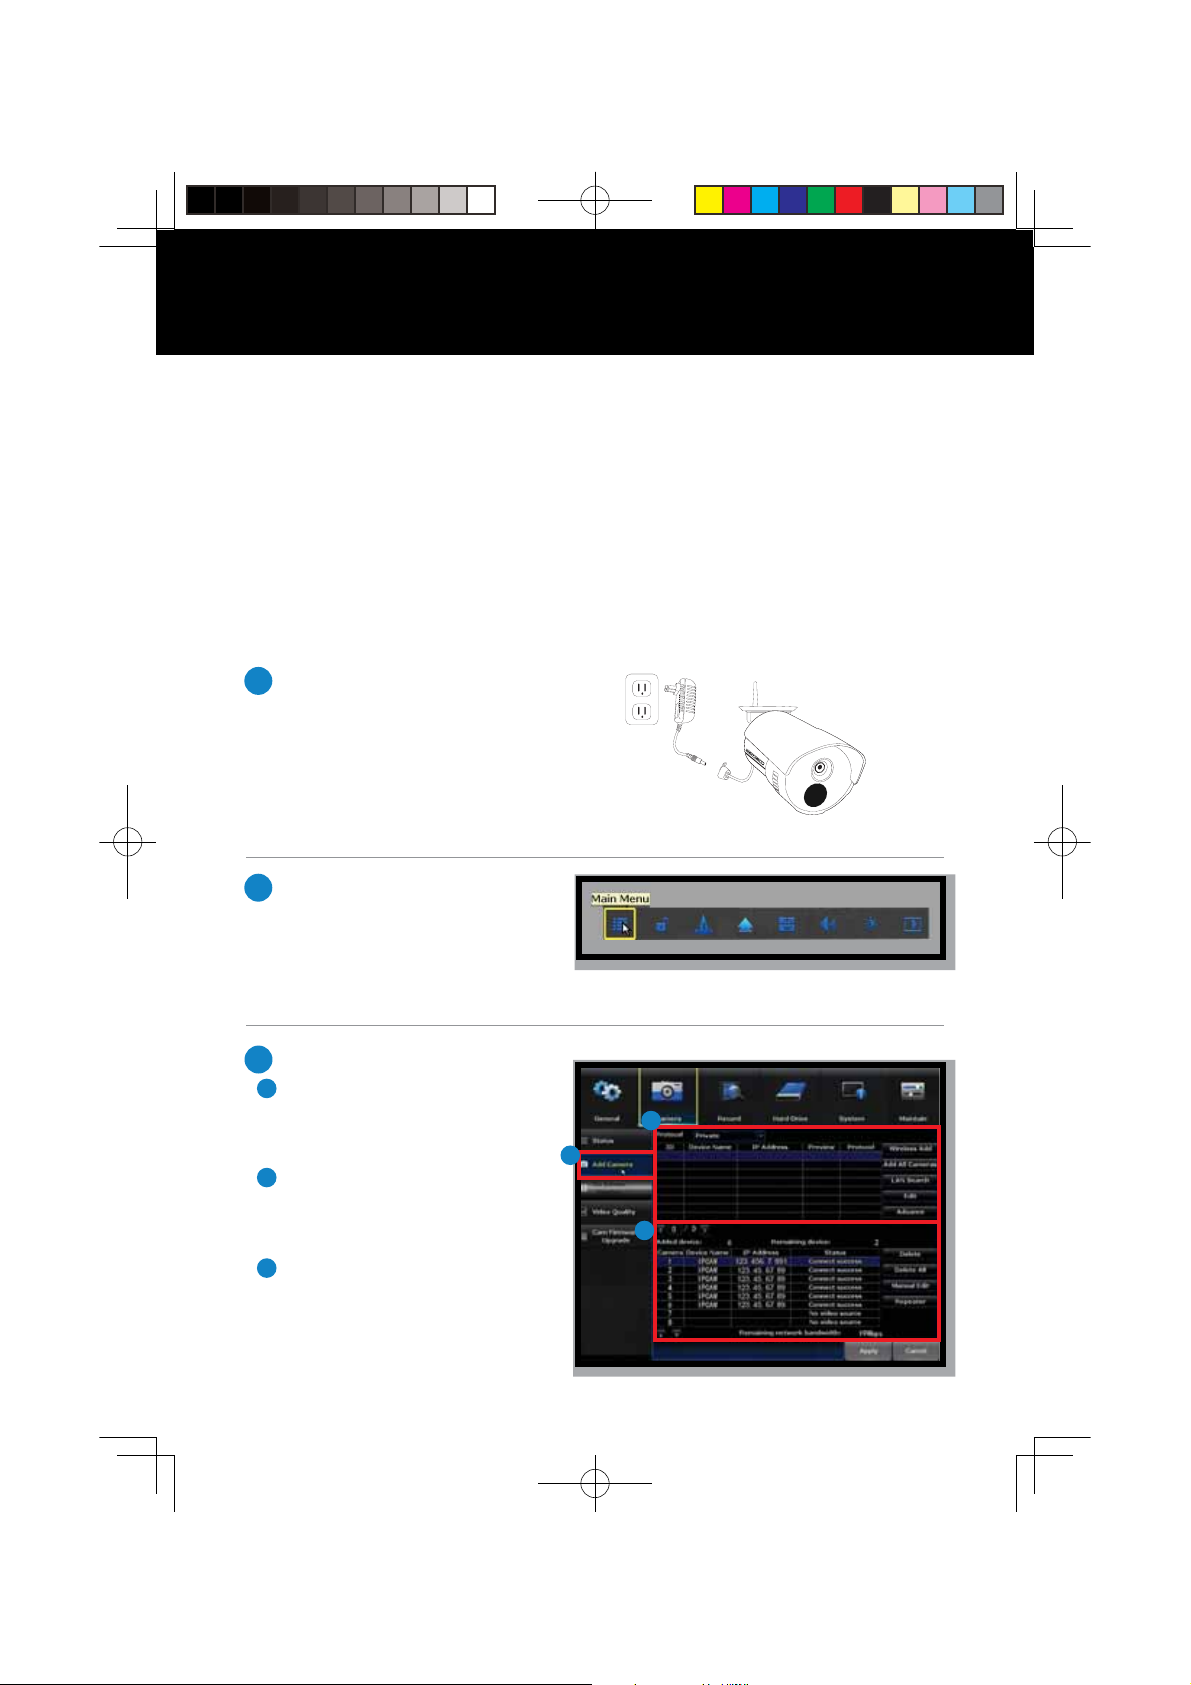
Power on the replacement
1
camera using the camera
power adapter.
NOTE: This should be done
locally at the NVR to avoid
interference.
With the NVR connected to a
2
TV/Monitor, right click on your
mouse and navigate to the Main
Menu using the options bar.
NOTE: Icons may vary depending on model number.
3
A
Go to the Camera Menu and
Select the Add Camera tab on
the left side of the menu.
B
The top portion of the screen
will list cameras that have
been found but not yet paired.
C
The bottom portion of the screen
will show all cameras that are
currently paired to the NVR.
A
B
C
14
QSG-WNVR-NC.indd 15 2018/12/24 09:47
Page 16
Pairing a Replacement Wireless Camera
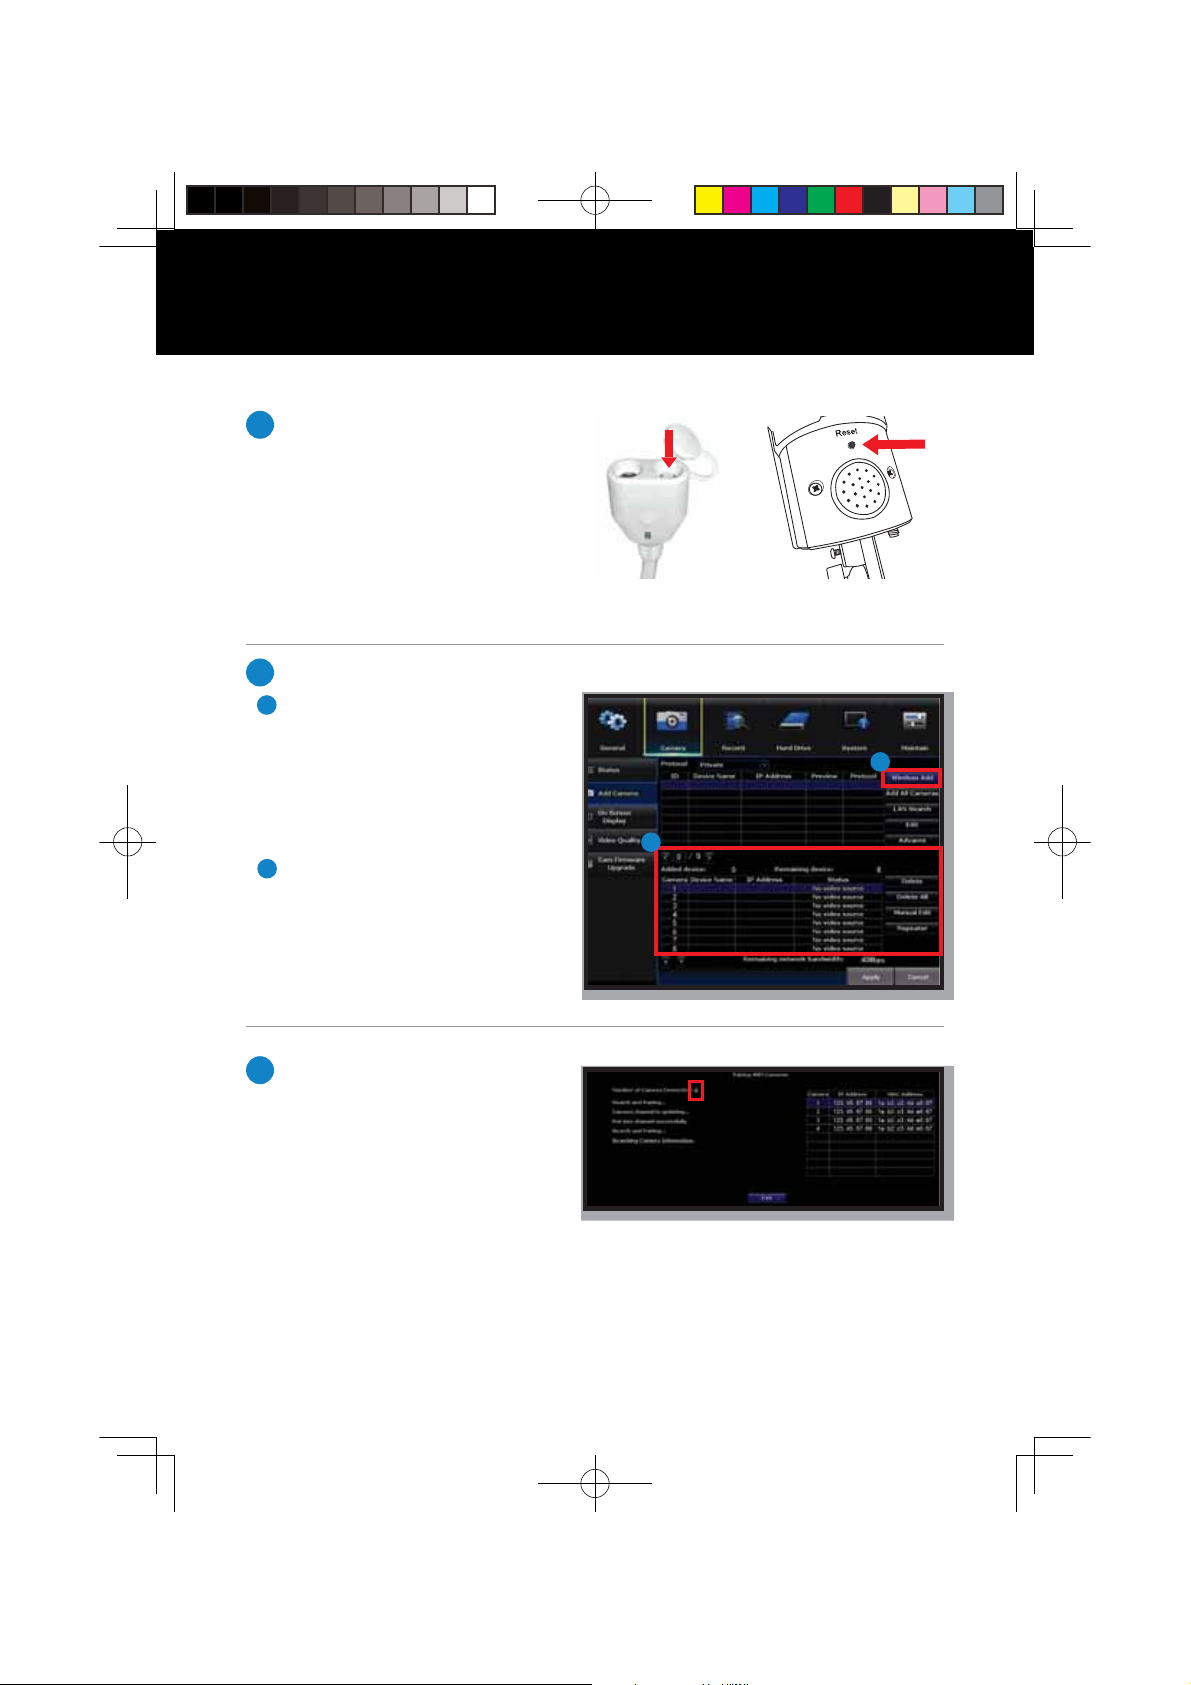
Next, you will need to reset
4
the replacement camera. To
do so, press and hold the reset
button until you hear a beep,
indicating the camera has
begun the reset process.
NOTE: The reset process may take
up to 3 minutes.
5
A
After 3 minutes have passed or
after hearing the camera beep,
click on Wireless Add located
on the Add Camera screen.
Your NVR will now search for
new cameras.
NOTE: The replacement camera
B
will not appear in the bottom
screen with all other paired
cameras until the NVR finishes the
process of finding and pairing the
new camera.
Within the Wireless Add screen,
6
the “Number of Cameras
Connected” signifies those
cameras that are already paired
to the NVR and will not
immediately reflect this
new camera.
NOTE: The Reset Button location
depends on the camera version.
A
B
NOTE: You cannot exceed the number of NVR channels you have. If you have a 4
channel system, the maximum number of cameras you can have paired is 4.
15
QSG-WNVR-NC.indd 16 2018/12/24 09:47
Page 17
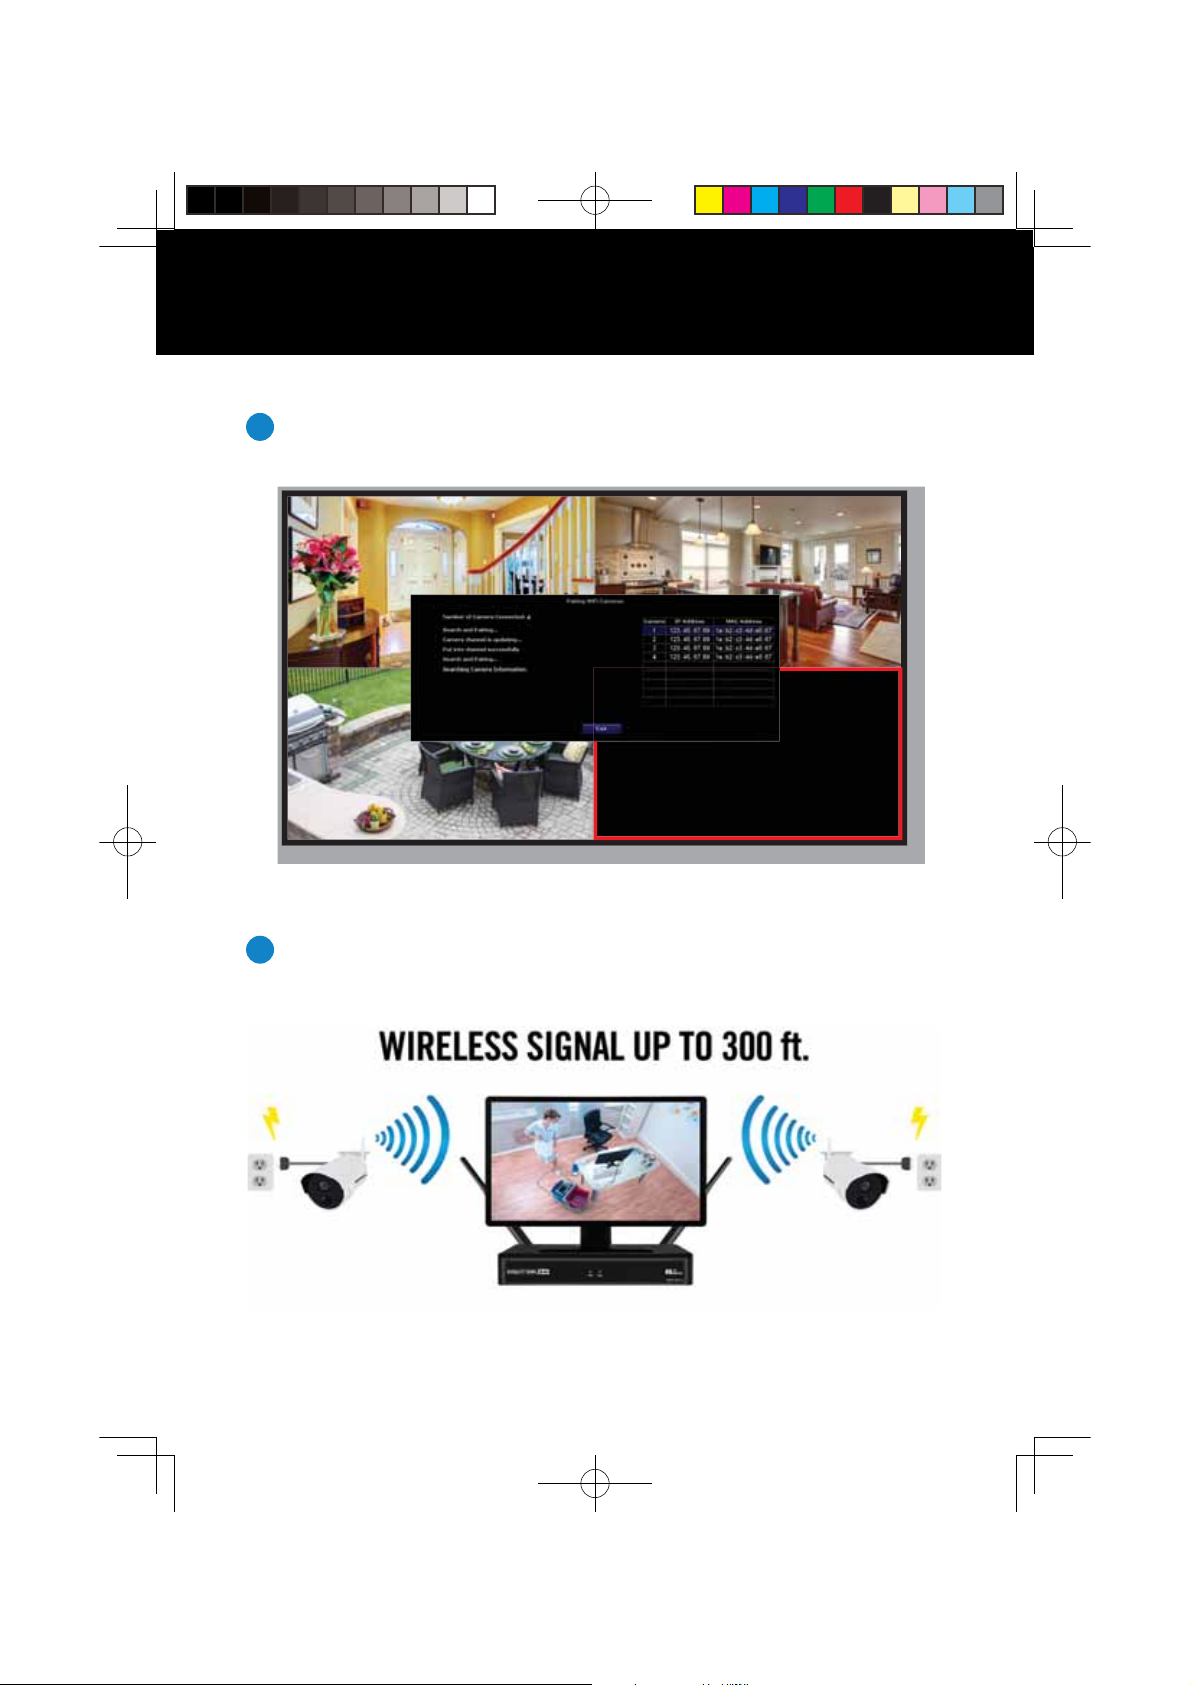
If you have not exceeded the channel limitation, the new camera will
7
appear in a vacant video field once paired.
WooHoo! Your add-on camera has now been paired to the NVR using the
8
NVR’s built in Wi-Fi.
16
QSG-WNVR-NC.indd 17 2018/12/24 09:47
Page 18
Frequently Asked Questions
FAQs
1. Does my NVR have to be connected to the Internet to work?
No, your NVR does not have to be connected to the Internet to work. You can view live feed
and recordings by connecting it to a TV/Monitor via HDMI or VGA.
2. Will I be able to view my system while away from home?
In order to view your wireless system remotely, your NVR will need to be manually
connected to a modem/router via the included Ethernet cable. You can view your system
via the FREE Night Owl Connect App by utilizing the FREE CMS software on a PC/Mac
3. How do the cameras transmit video to the NVR?
Our NVRs have built-in Wi-Fi for communicating with the cameras. Each camera comes
paired to the NVR by default, so your initial setup should be hassle free.
4. Are my cameras weatherproof?
Yes, your cameras are weatherproof and will endure minimal moisture and dirt/debris.
However, Night Owl strongly recommends placing all outdoor cameras under an eave or
awning to help shield them from overexposure to the elements, which could reduce your
camera’s lifespan.
5. Does my NVR have to be connected to a TV or monitor?
For initial setup, you will need to connect your NVR to a TV or monitor. After completing
the initial setup, your NVR does not need to be connected to a TV or monitor to view or
capture recordings. You can view your system using the Night Owl Connect CMS Software
on a PC/Mac
6. Why is the Night Owl Connect App not accepting my password?
The Night Owl apps will require two passwords to configure: one password will be used to
login to the app itself and the second will be the admin password of your NVR. In order
to add a device to the app, you will need to enter the NVR’s admin password. Please refer
to pages 7 and 11 of this QSG. Remember, when setting up your Night Owl Connect App,
you must confirm your email by clicking the “Confirm Email” link sent by Night Owl upon
initial application configuration.
7. Why can’t I connect using the Night Owl Connect App or Night Owl Connect CMS Software?
If you are having trouble connecting using our mobile app or client software, A) your Night
Owl system may not be connected to a router, B) the latest firmware or client software may
not be installed on your computer or mobile device or, C) the password may have been
entered incorrectly or, D) You may need to restart your NVR and try again.
®
or by downloading the Night Owl Connect App on your Smart Device.
®
.
17
QSG-WNVR-NC.indd 18 2018/12/24 09:47
Page 19
Notes
18
QSG-WNVR-NC.indd 19 2018/12/24 09:47
Page 20
Need Help?
CONTACT US
PHONE (English, Spanish & French)
Technical Support
1.866.390.1303
Live Chat 24/7, 365 days a year
Pre-Sales Support
1.866.979.0580
EMAIL
Sales Support
Technical Support
WEBSITE
24/7 Product Support
• How-To Videos
• Manuals
www.NightOwlSP.com
For system manuals, troubleshooting
guides, FAQs, video tutorials and more:
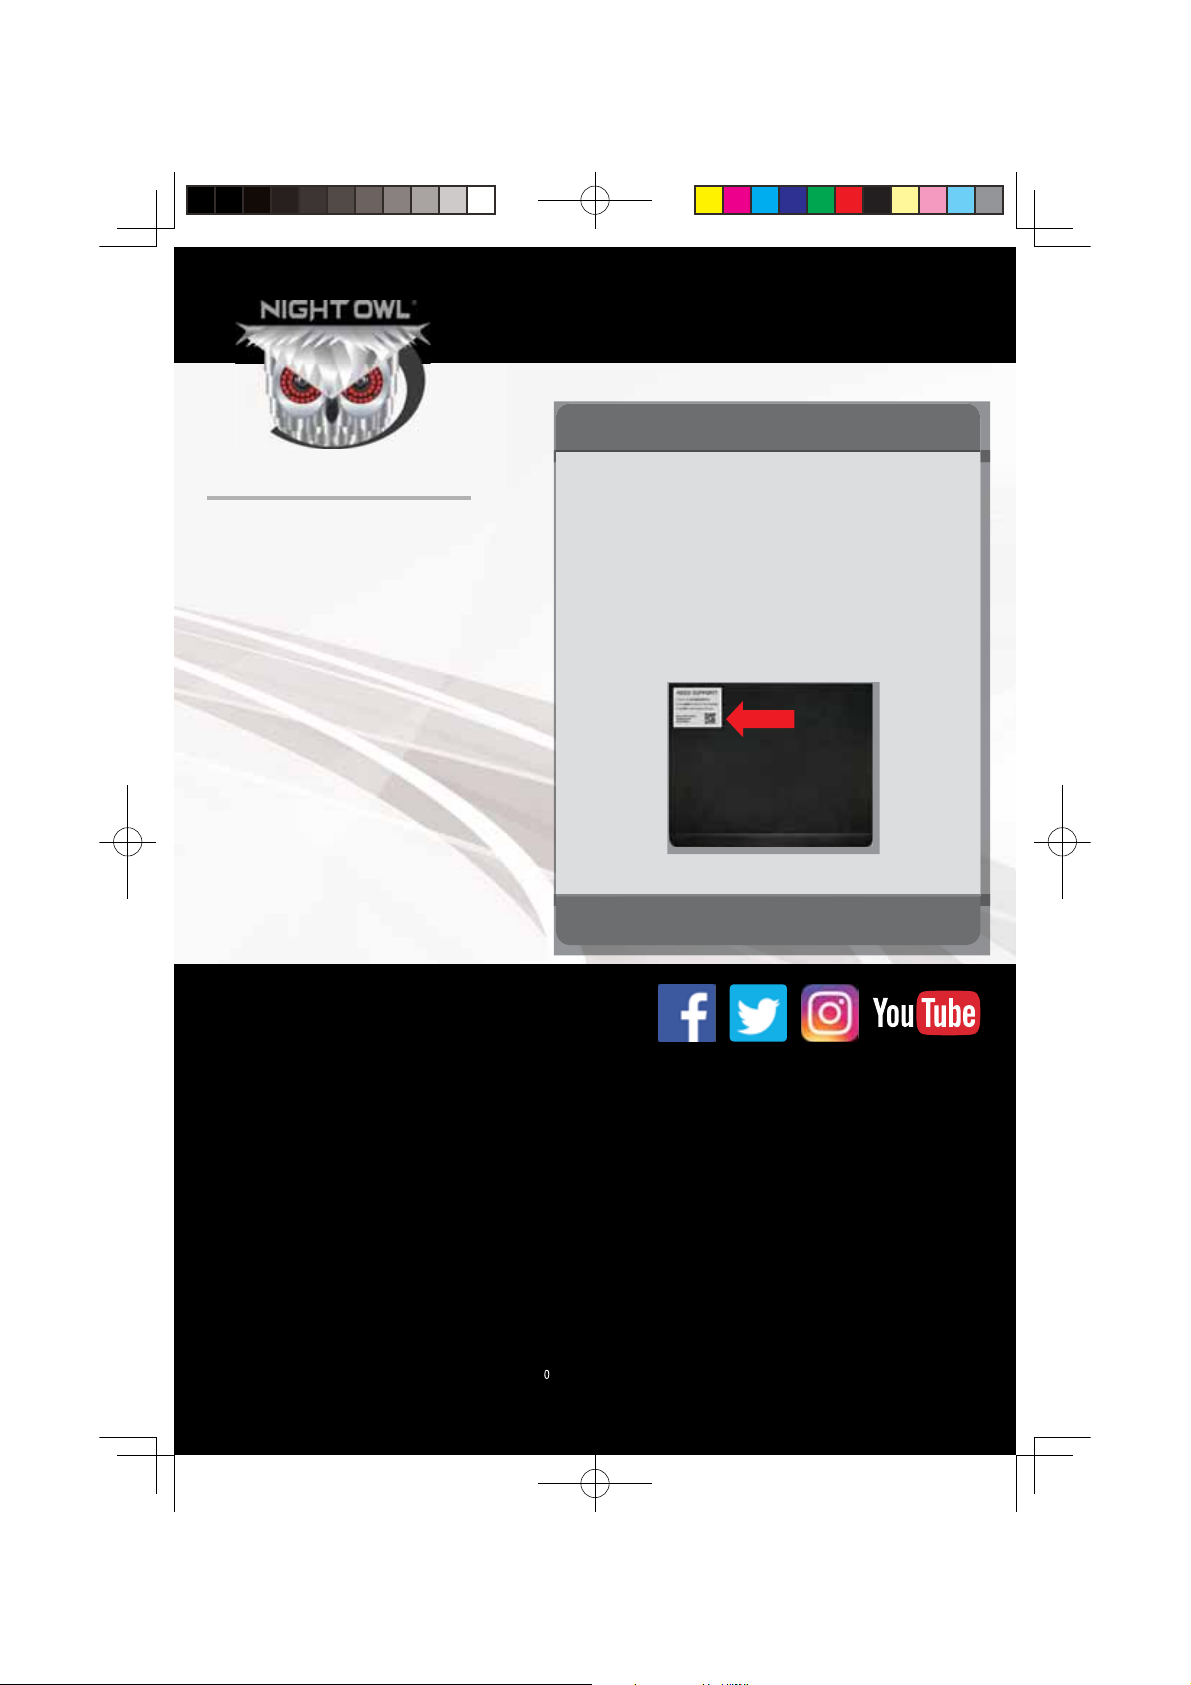
Please refer to the sticker located on top of
the device for steps on how to access your
product’s support material.
iPhone, iPad, Mac and Mac OS X are registered trademarks of Apple Inc.
Windows, Windows XP, Windows Vista, Windows 7, Windows 8 and Windows 10 are registered trademarks of Microsoft Corporation in the
United States and/or other countries.
FCC RADIATION NORM
FCC
This device complies with Part 15 of the FCC Rules. Operation is subject to the following two conditions: (1) this device may not cause harmful
interference, and (2) this device must accept any interference received, including interference that may cause undesired operation.
FCC Compliance Statement
These limits are designed to provide reasonable protection against frequency interference in residential installation. This equipment generates,
uses, and can radiate radio frequency energy, and if not installed or used in accordance with the instructions, may cause harmful interference to
radio communication. However, there is no guarantee that interference will not occur in television reception, which can be determined by turning
the equipment off and on. The user is encouraged to try and correct the interference by one or more of the following measures:
•
Reorient or relocate the receiving antenna.
•
Increase the separation between the equipment and the receiver.
•
Connect the equipment into an outlet on a circuit different from that to which the receiver is connected.
•
Consult the dealer or an experienced radio/TV technician for help.
CAUTION!
The Federal Communications Commission warns the user that changes or modifications to the unit not expressly approved by the party responsible
for compliance could void the user’s authority to operate the equipment.
This equipment should be installed and operated with a minimum distance of 200 cm between the radiator and your body.
QSG-WNVR-NC.indd 20 2018/12/24 09:47
Rev 181221
 Loading...