

Night Owl WMC User Manual

Night Owl L / TL / P / WMC Series Manual
1
Table of Contents
Chapter 1. Welcome 2
Chapter 2. Installation 4
Chapter 3. Startup Wizard 6
Chapter 4. Recording and Playback Test 12
Chapter 5. Display icon - Camera Placement and Display 14
Chapter 6.Record icon - Record Settings and Scheduling 17
Chapter 7. Search icon - Search and Playback 19
Chapter 8. Network icon - Network Settings 22
Chapter 9.System icon - System Settings 25
Chapter 10. Advanced icon and tabs 28
Appendices:
A. Navigate with Icons (map of Icons and Tabs)
Picture control and playback bar icons
B. Mouse Operation
C. Handheld Remote Control
D. Troubleshooting and Maintenance - Q&A
E. FCC Compliance
F. Features/Specs
G. Glossary

Night Owl L / TL / P / WMC Series Manual
2
CHAPTER 1 — WELCOME
Welcome to your Night Owl Security System!
This manual applies to the following model series:
L Series
TL Series
P Series
WMC Series
You Night Owl DVR can be controlled locally with a USB mouse or with the included
remote control. You can also view your system remotely via router and internet browser
with a computer or mobile device.
This manual will guide you through set up options and procedures (Chapters 1 – 4) and
direct you through each of the icon pages and setting tabs (Chapters 5-10).
Please review the safety and operating instruction before operating equipment. For
product registration, helpful user tips and tech support contact information please visit
us at - www.nightowlsp.com At the end of the manual are reference guides for system
navigation, operation, safety and maintenance.
Make sure you have all necessary components arranged near each other before you
start. While the steps are relatively simple for a basic system, please allow half an hour
or more for set up. For systems with multiple DVRs or other components allow more
time.
Package Contents
DVR:
(1) DVR (1) DVR Power Supply 12V 2A
(1) Ethernet (RJ45) Cable (1) HDMI Video Cable
(1) Remote Control (1) USB Mouse
Software CD Quick Setup Guide

Night Owl L / TL / P / WMC Series Manual
3
Camera:
Your Night Owl DVR Kit includes cameras. The number of cameras included in your kit
depends on the model you have purchased. Below is a list of models and the quantity of
the camera included:
L Series / TL Series / WMC Series DVR with 4 Cameras
(4) Cameras (1) Camera Power Supply 12V 1.0A
(1) 1-to-4 Power Splitter Cable (4) Camera (video/power) Cable (60 ft.)
(TL-44 & L-45-4511 & TL-84 & L-85-4511 )
L Series / TL Series DVR with 8 Cameras
(8) Cameras (2) Camera Power Supply 12V 1.0A
(2) 1-to-4 Power Splitter Cable (8) Camera (video/power) Cable (60 ft.)
(TL-88 & TL-168 & L-85-8511 & L-165-8511)
P Series DVR with 4 Cameras
(4) Cameras (1) Camera Power Supply 12V 1.5A
(1) 1-to-4 Power Splitter Cable (4) Camera (video/power) Cable (60 ft.)
(P-45-4624N & P-85-4624N)
P Series DVR with 6 Cameras
(6) Cameras (2) Camera Power Supply 12V 1.5A
(2) 1-to-4 Power Splitter Cable (6) Camera (video/power) Cable (60 ft.)
(P-45-6624N)
P Series / WMC Series DVR with 8 Cameras
(8) Cameras (2) Camera Power Supply 12V 1.5A
(2) 1-to-4 Power Splitter Cable (8) Camera (video/power) Cable (60 ft.)
(P-85-8624N & P-165-8624N & WMC-85-8624N & WMC-165-8624N)
You will also need:
TV or Monitor with either HDMI or VGA input
Router/Modem with two empty Ethernet cable inputs
Computer Requirements -
PC Mac OS X® 10.6 or above
IBM or Compatible Safari 5.0 and above
Windows® XP, Windows® Vista, Windows® 7 and Windows® 8
Night Owl L / TL / P / WMC Series Manual
4
CHAPTER 2—INSTALLATION
WARNING:
Do not connect power until monitor and camera connections have been made.
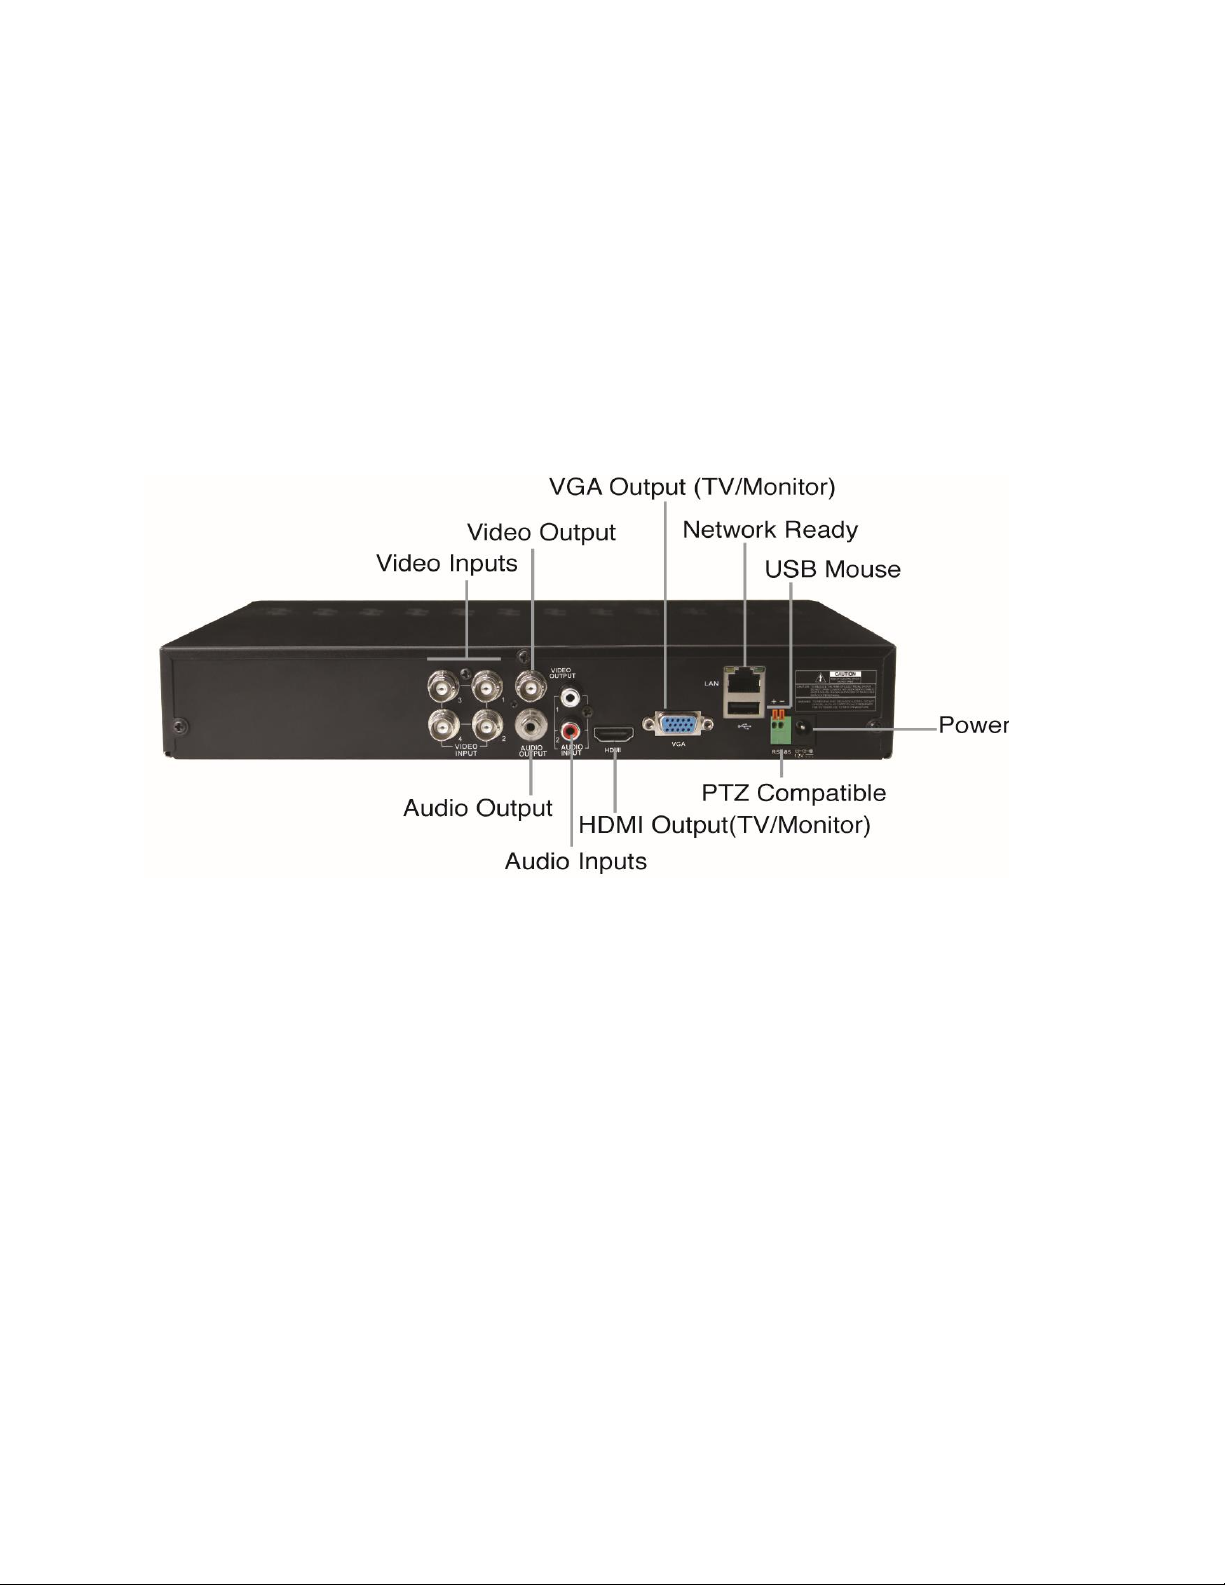
Step 1: Connecting Your Night Owl DVR to a TV or Monitor
Before connecting your DVR, check your TV or monitor to determine what type of
connection is available - VGA or HDMI. Connect TV/Monitor with either VGA or HDMI
cable to the matching connector on the DVR.
Connect the other end into the VGA/HDMI input on your TV/Monitor. VGA Cable not
included.
Step 2: Connecting the USB Mouse
Unpack the USB mouse provided and connect the cable into the USB port either on the
front or the back of the DVR. This will give you direct access to on-screen menus
required for setup.
Note: The output defaulted as HDMI/VGA, if BNC monitor connected, you will need using remote control, press ‘SEL’
key twice firstly, then press ‘0’ key to switch the output to BNC.
Step 3: Connect the Cameras to the DVR
IMPORTANT!!! Test cameras next to the DVR before placing them around your
property.
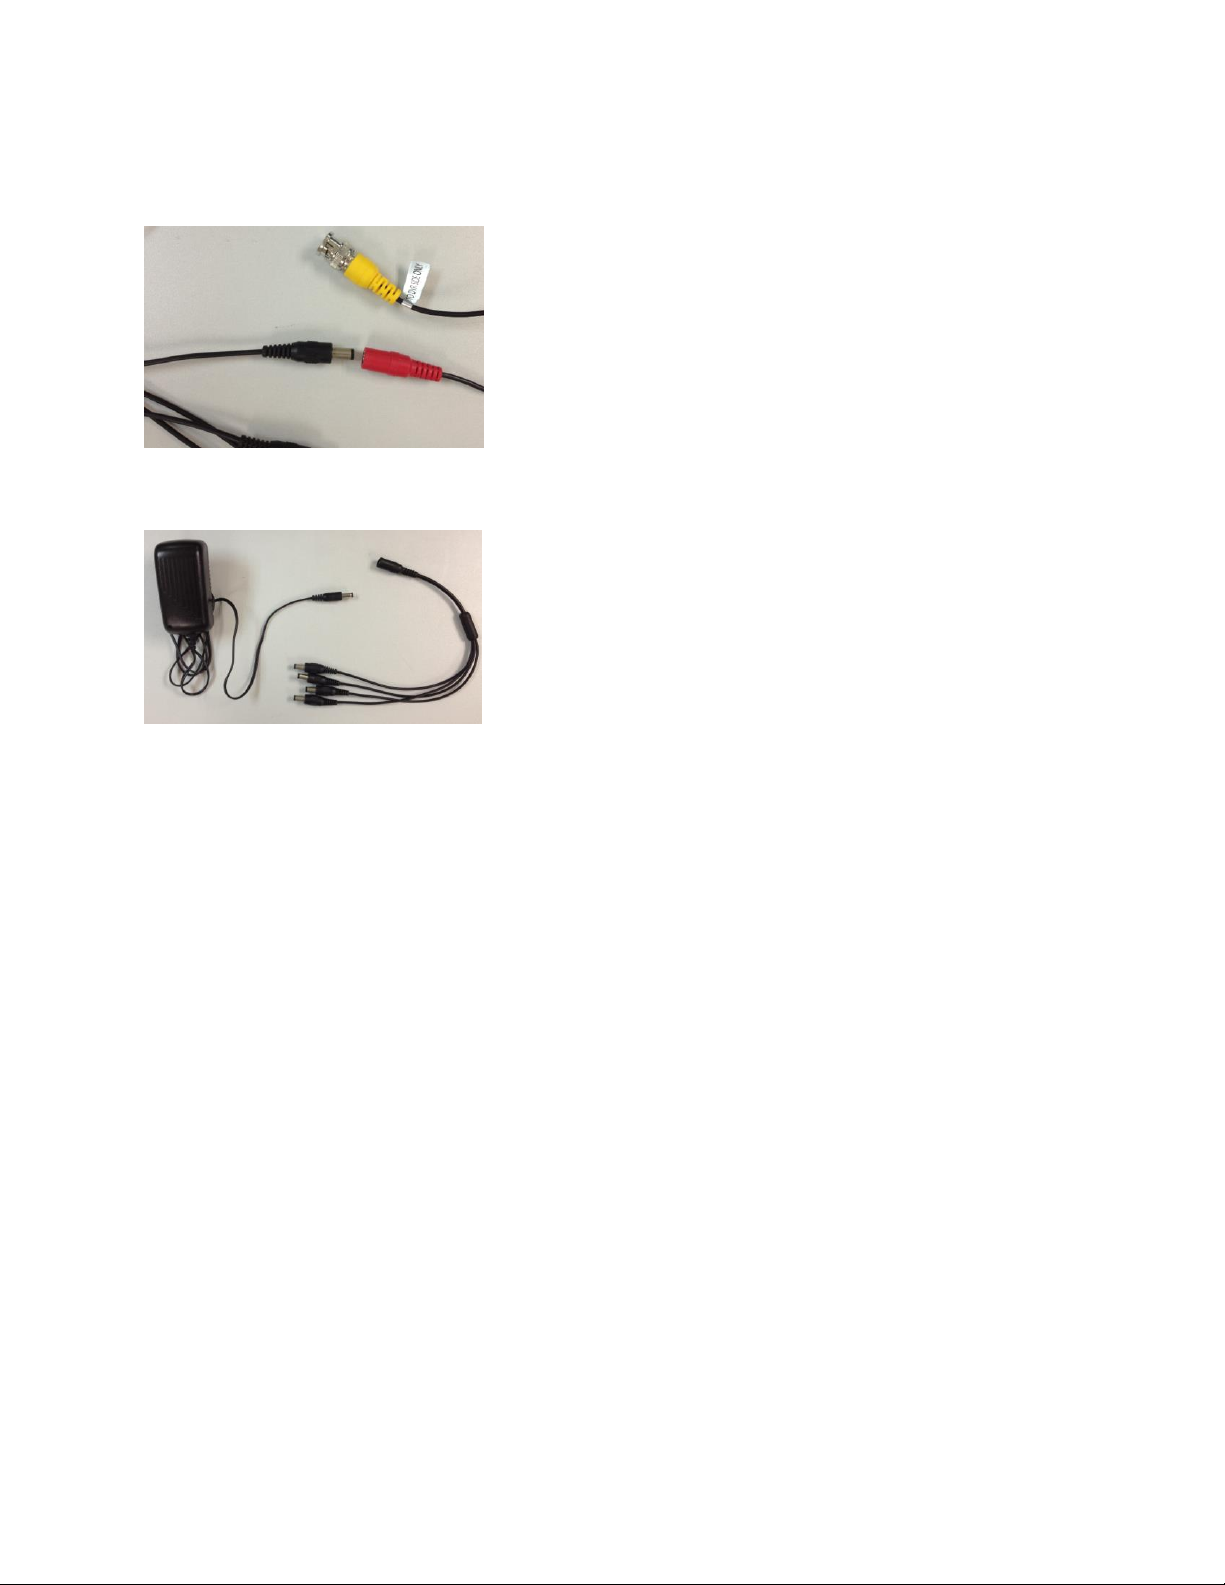
The 60’ video extension cable and the DC power are individually colored to help prevent
confusion. Connect the video (yellow BNC connector labeled “To Camera”) and power
(red male connector) cables to each camera.
Plug the other end of each the BNC cable (labeled “To DVR Only”) into the video input
ports on the back panel of the DVR.
Night Owl L / TL / P / WMC Series Manual
5
Step 4: Powering Up the Cameras, DVR, and Monitor
Cameras - Plug the other ends of the 60’ video extension cable into the four-way power
splitter
Connect the single end of the splitter to the Camera Power Supply
Plug Camera Power Supply into a wall socket or surge protector.
DVR
Plug DVR power connector into the port on back of DVR then plug the DVR Power
Supply into a wall socket or surge protector. Make sure your monitor or TV is powered
up. The Night Owl logo will appear followed the Startup Wizard or by a Live Feed. If you
don’t see a live feed for all of your cameras, check the cables and connections and try
again.
Night Owl L / TL / P / WMC Series Manual
6
CHAPTER 3—SET UP WIZARD SCREENS & ICONS
Mouse Operations
Using the mouse is the easiest way to interact with the set up screens and Live Feed
To maximize or minimize – Double click on any of the images
To access or exit Main Menu – Right click anywhere
To select Menu items – Left click on the Menu item
To exit each Menu – Right click or left click any area outside the menu
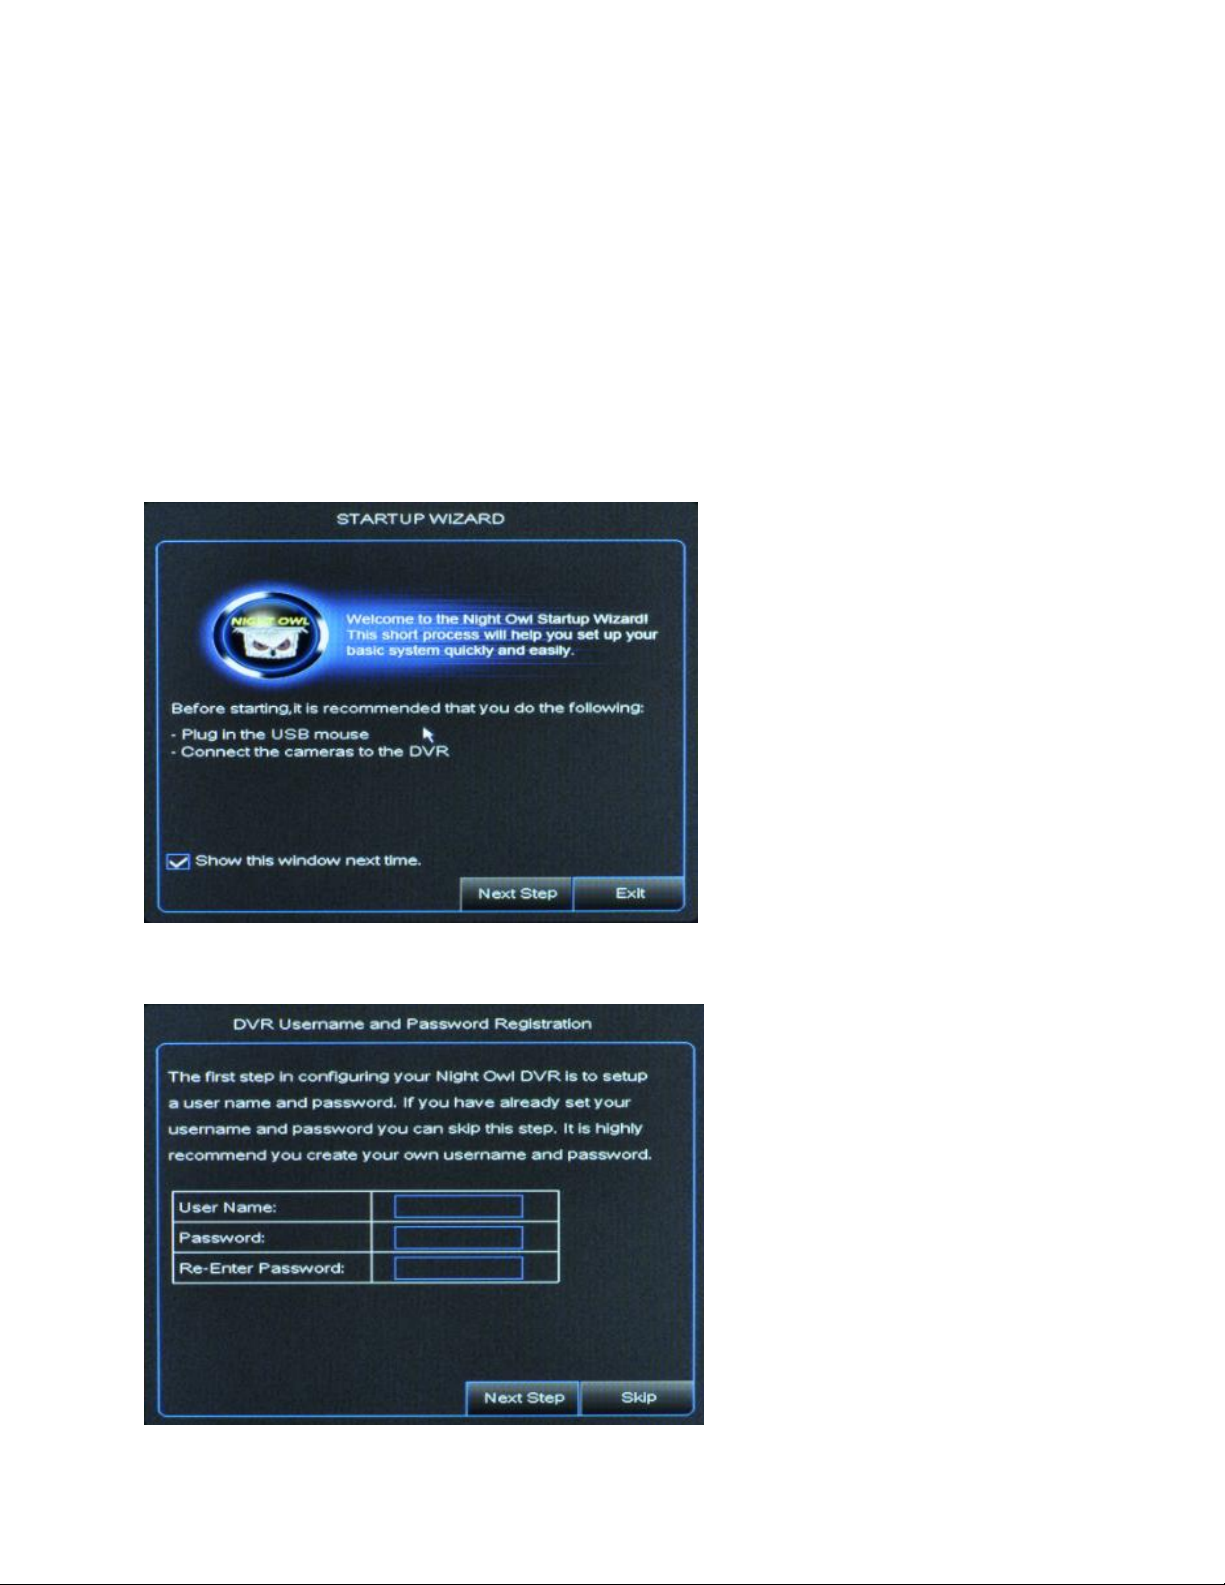
Startup Wizard Screens guide you through basic administrative choices.
Below you will find Step 1 designed for first time users and automatic setup as well
as a Step 1 for experienced users who know their configuration information.
Step1 for First Time Users/Automatic Setup:
Night Owl L / TL / P / WMC Series Manual
7
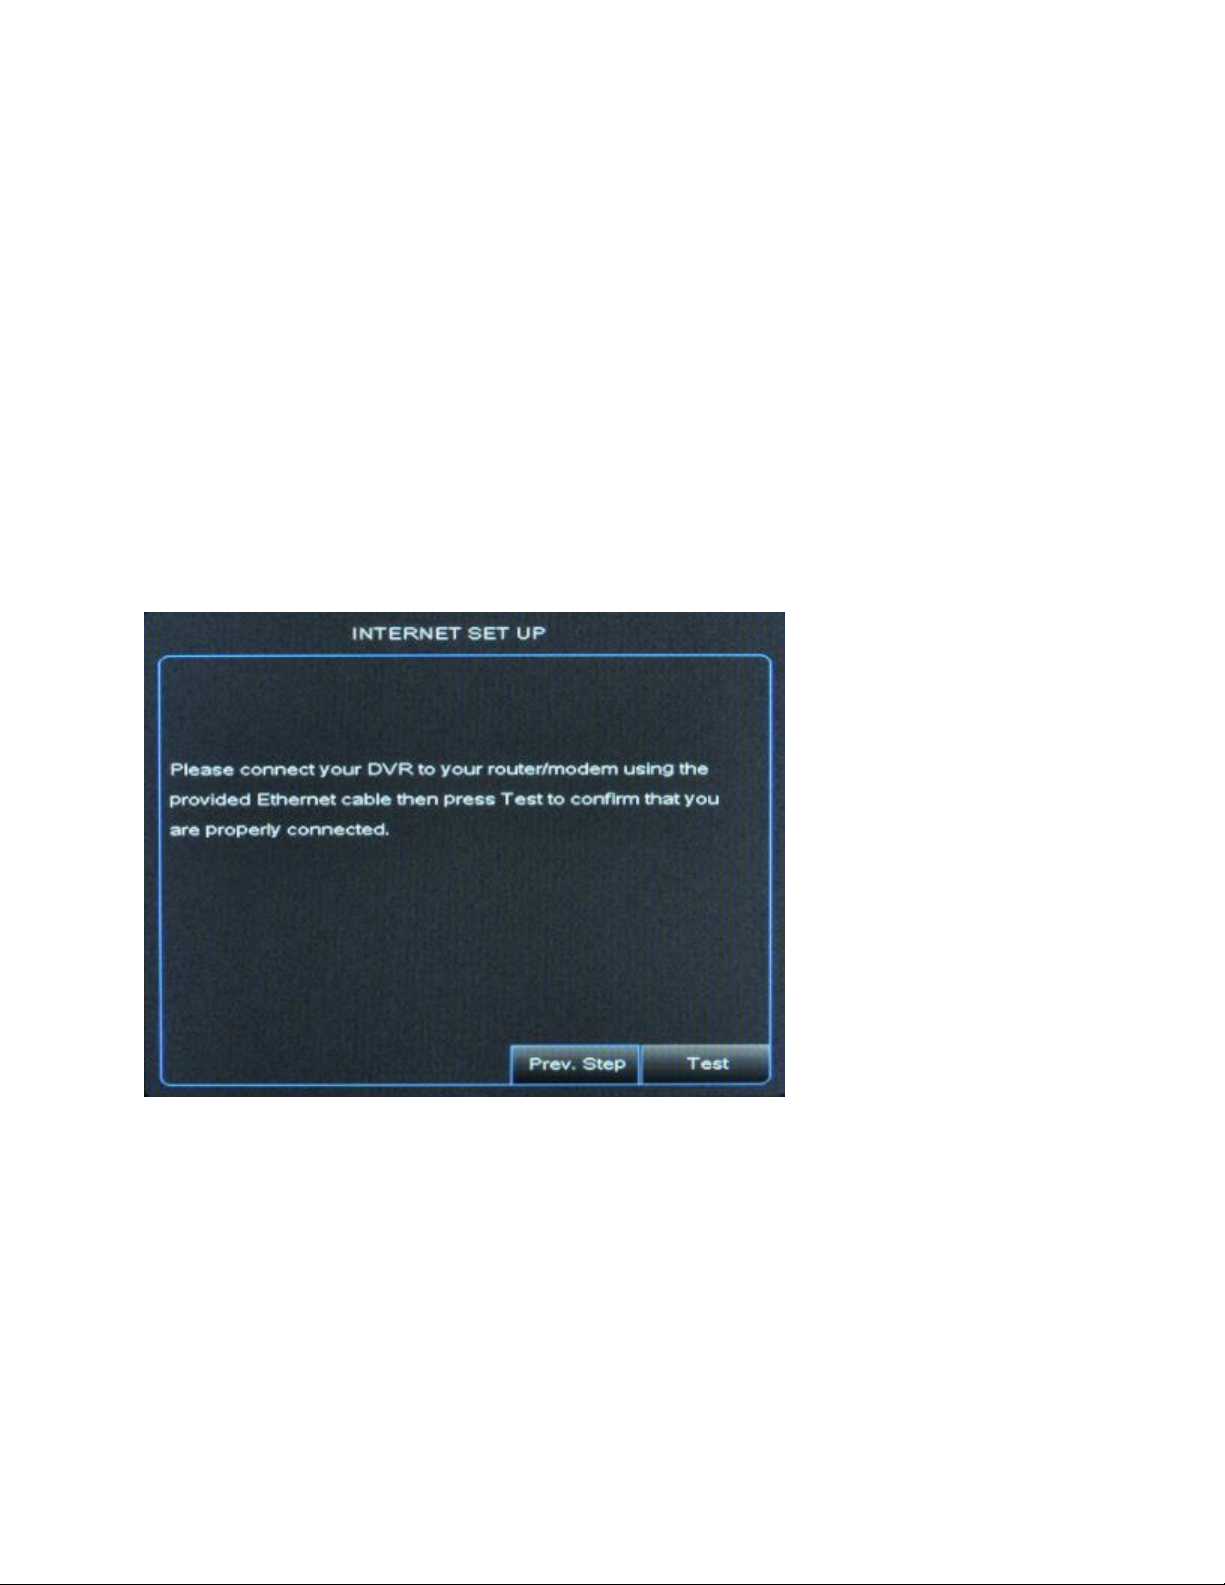
Before you start the automatic setup please ensure you have connected your
DVR to your router or modem with an Ethernet cable, and make sure that your
router/modem is connected to the internet.
A. The first step in configuring your Night Owl DVR is to setup a user name and
password. Enter your username and password in the fields shown and click [Next Step].
It is highly recommend that you setup a username and password.
B. Click [Automatic] on the Network and System Setting screen
C. Click [Test] to check your DVR to router/modem connection or [Previous] to go back
to setup choices. If you are connected to your router/modem and the router/modem is
connected to the internet you will see a screen confirming success. If there is an issue
with your connection you will see a screen displaying a connection error. If you see this
screen please check your connection of the DVR to the router/modem and your router
/modem connection to the Internet.
D. Click [Next Step] to proceed to Step 2 - Mobile Access configuration.
Alternate Step 1 for Experienced Users/Manual Setup: If you are already familiar
with the Night Owl system this is a quick way to change your Setup. The Startup Wizard
will appear every time you power up the system unless you check the option not to
show it on the [Advanced] page/[Maintain] tab.
A. The first step in configuring your Night Owl DVR is to setup a user name and
password. Enter your username and password in the fields shown and click [Next Step].
It is highly recommend that you setup a username and password. If you are returning to

Night Owl L / TL / P / WMC Series Manual
8
adjust your settings and don’t want to set a new username and password you can click
[Skip]
B. Click [Manual] on the Network and System Setting screen
C. Enter your values in the fields below to manually set up your network. If you do not
know the information, click [Prev. Step] and try Automatic configuration.
D. Once you have filled in all the fields, click [Next Step] to see next screen - System
General Configuration.
Night Owl L / TL / P / WMC Series Manual
9
E. Enter Date and Time preferences and click [Next Step] to proceed to Step 2: Mobile
access configuration.
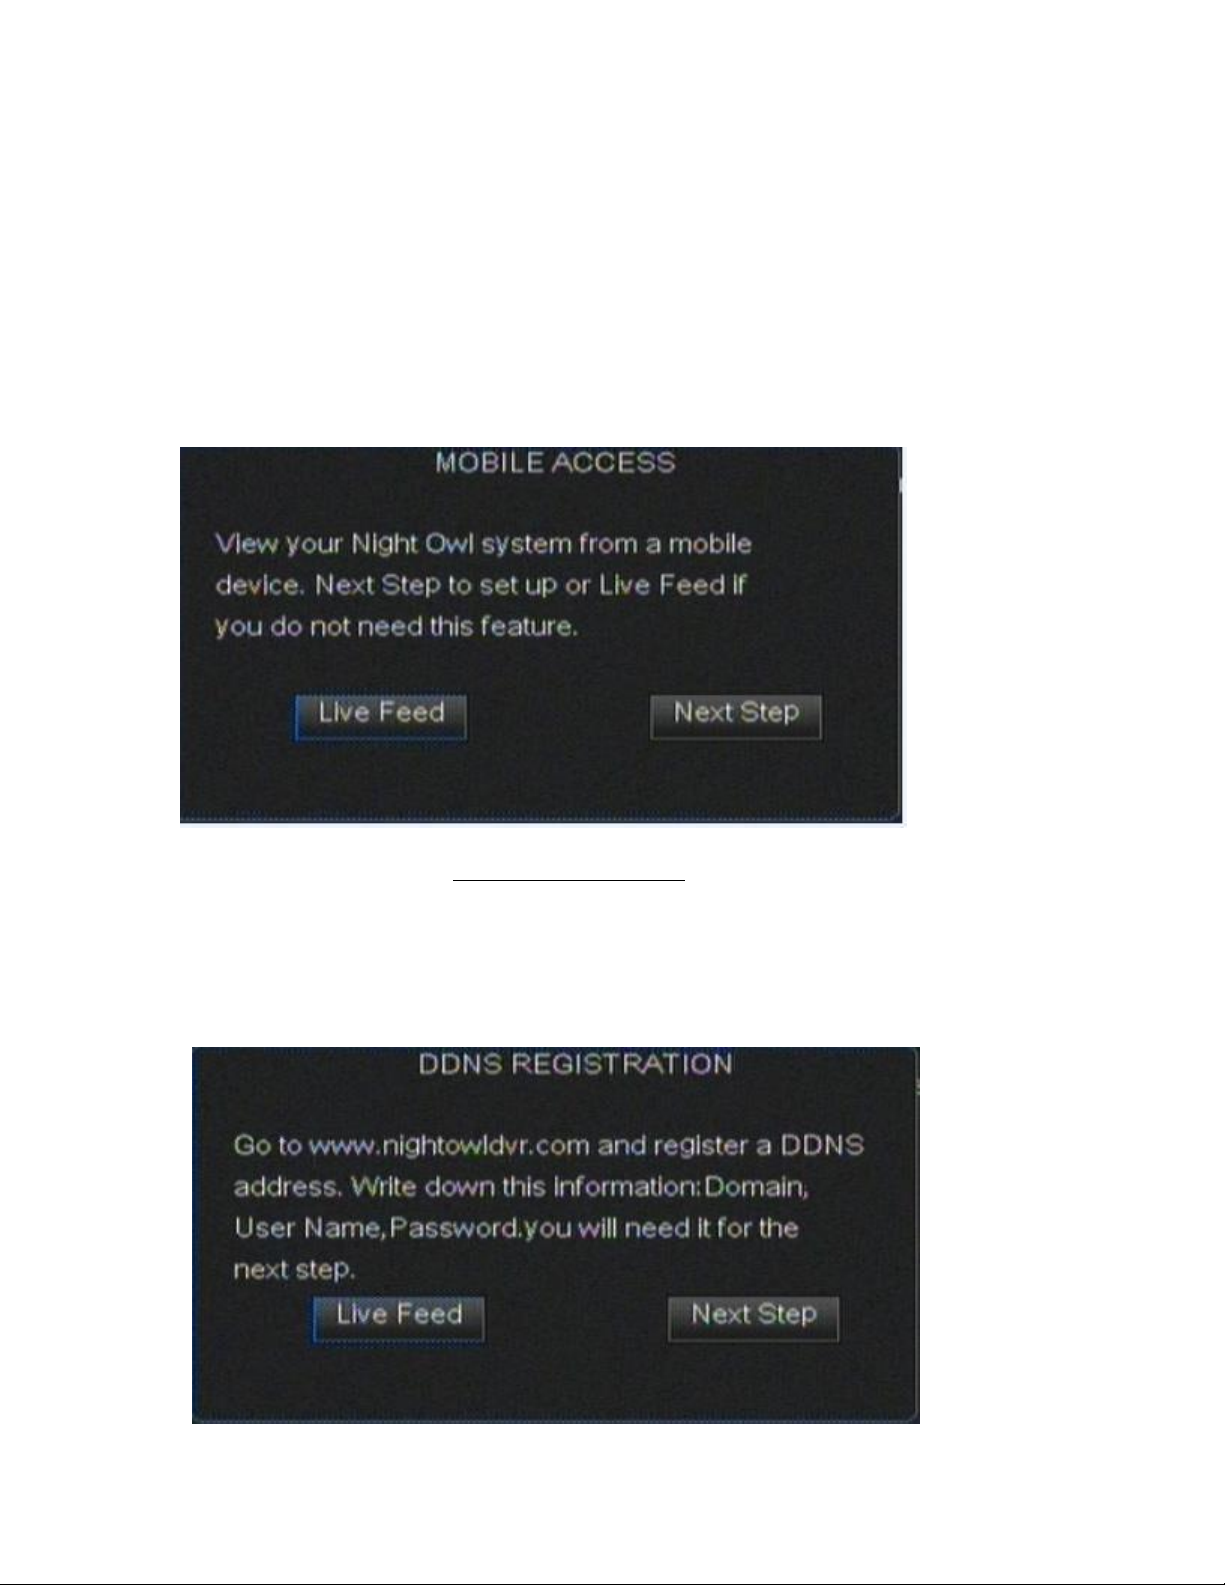
Step 2: Mobile Access Configuration – for both Automatic and Manual Setup
Use this to view your security system from outside your local network E.g. Remotely via
web browser or from mobile phone. If you do not have a need for mobile access click
[Live Feed] and you will be taken to the live display of your cameras. See Chapter 4.
A. For mobile access click [Next Step] and you will be prompted to check your Internet
connection– when confirmed proceed to B
B. DDNS registration: Go to www.nightowldvr.com on your computer or mobile phone
to get your DDNS account for mobile access. Here you will choose a domain name,
E.g. YourName.NIghtOwldvr.com. You will need to create a username and
password for Nightowldvr.com. Please take note of the Domain you create, your new
username and password you will need this in the next step. Once you have this
information click [Next Step] on the startup wizard.
Night Owl L / TL / P / WMC Series Manual
10
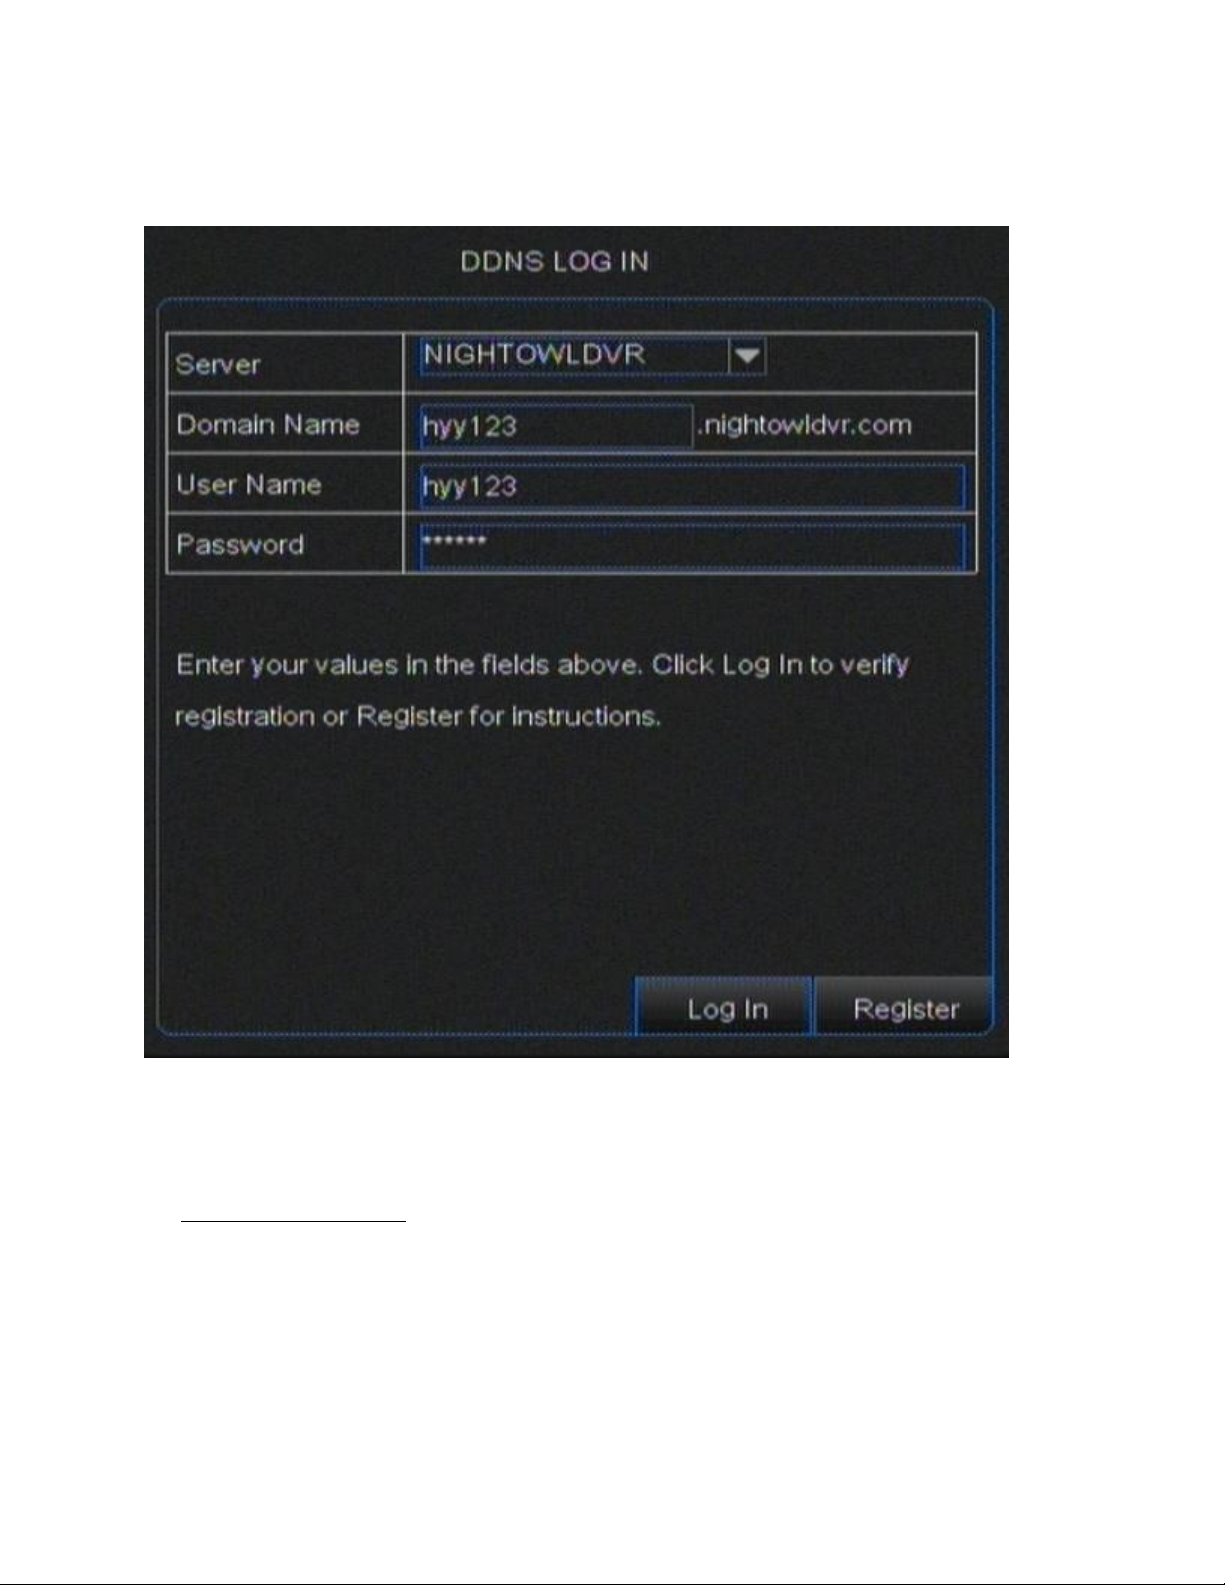
C. Enter this information into LOGIN screen
Any default admin data is not secure.
D. Click [Log In] to confirm that your account is registered and is working with your
security system. If test is okay, click [Next Step] to proceed to next step.
If test fails you will be returned to the Login screen and asked to reenter your
information. Try again. If your test fails multiple times, please contact customer support
via www.nightowlsp.com.
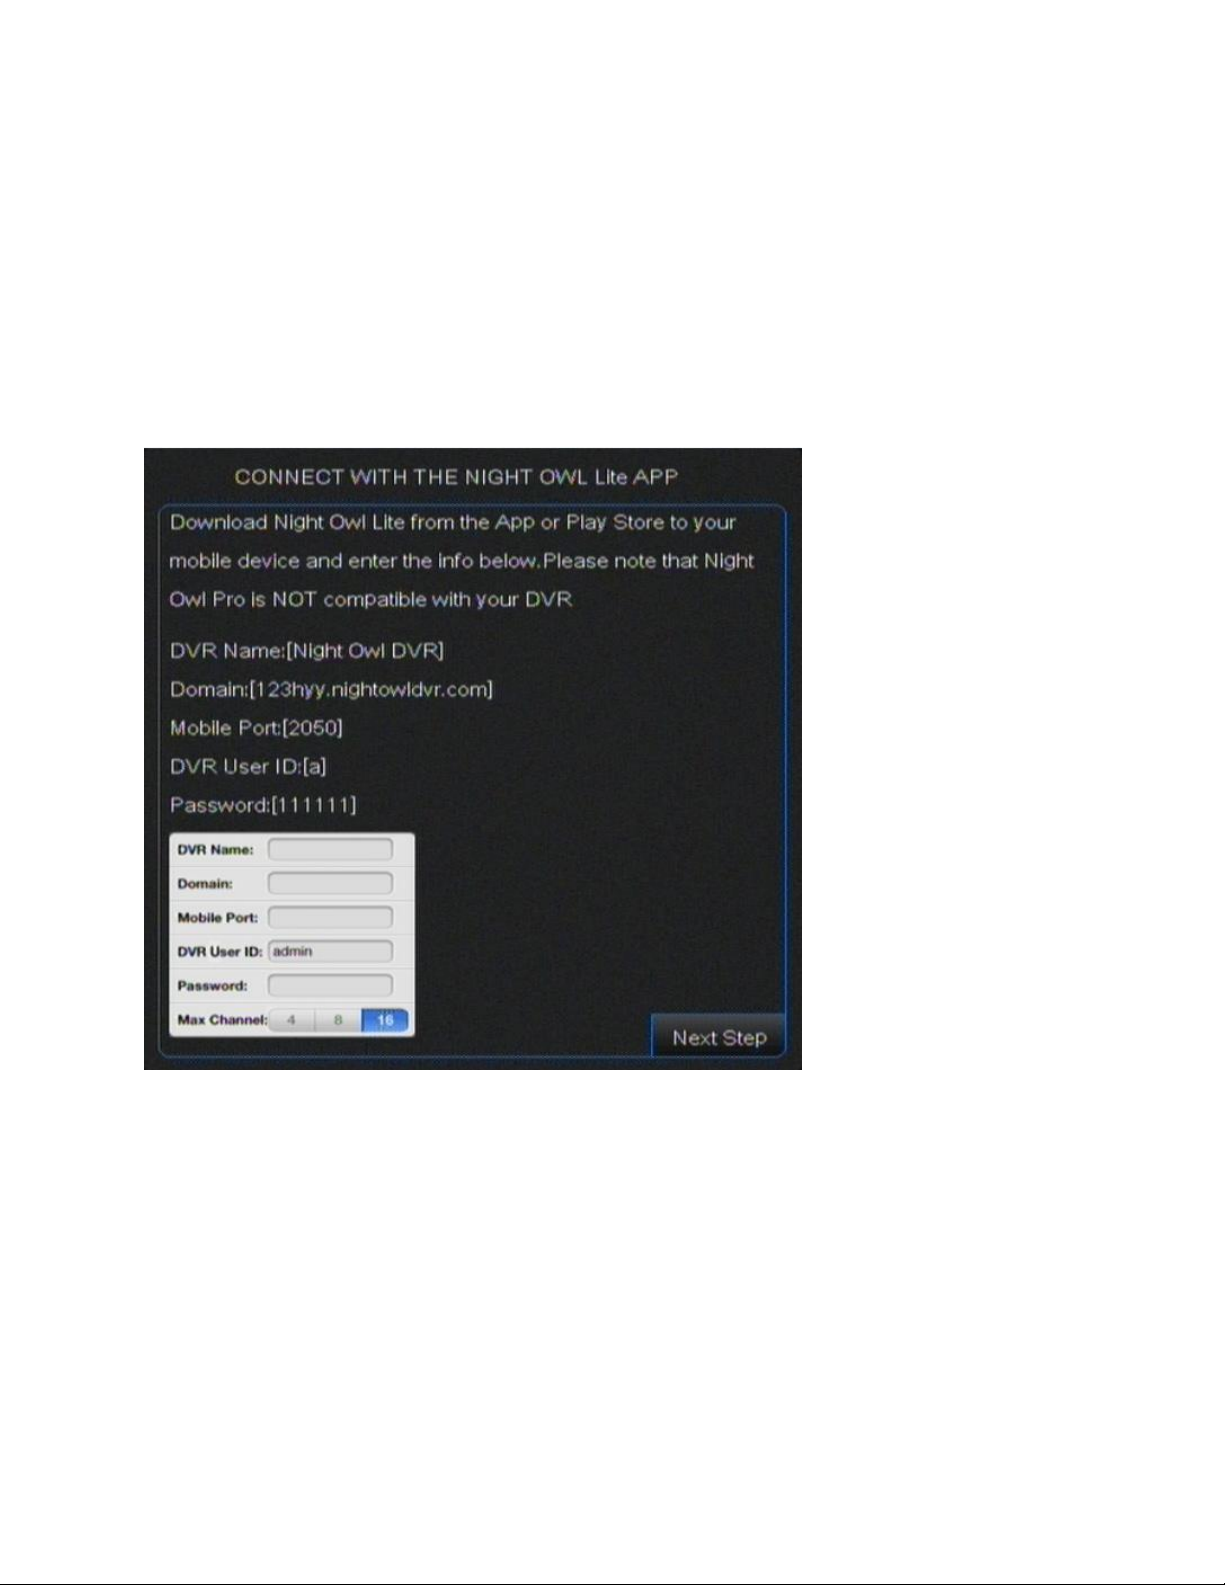
Step 3 Download and Install Night Owl Lite app –
A. Go to either the App Store or Google Play Store and download the free app – Night
Owl Lite (NOT Night Owl Pro – this program is not compatible with your system).
Night Owl L / TL / P / WMC Series Manual
11
B. On your device press [+] to add. Enter same Login information as for DVR setup
(Domain/DVR User ID/Password). Select the number of channels (CH) for your system.
C. If everything is working you can now see your security system from your mobile
device. Click [Next Step] on mobile access configuration screen.
D. Click [Live Feed] once more on the next screen and you will be taken to the live feed.
To view from your web browser with Internet Explorer (with ActiveX enabled) or Safari:
Follow step A through D as for Mobile Access
And see Network chapter 8
 Loading...